User Manual
L169 Digital Voice Recorder
Aftersale service: [email protected]
Website: https://aomago.net/
V4

Thanks for purchasing Voice Recorder from AOMAGO
1 x Voice Recorder
1 x MICRO USB Cable (for data transfer and charging)
1 x User Manual
1 year warranty and 18 months for AOMAGO VIP.
L169 Package List
We highly recommend you register at our site to receive
an extended warranty (18months), to verify the product
authentication, and to have better customer service.
Registration is free.
Register VIP: https://aomago.net/ or email
[email protected] to register VIP and receive an
extended 18 Month Product Warranty
Please feel free to contact us if you have any question
during using our product, you can contact us for a
replacement if it is a quality problem.
Write the issues with model number or amazon order ID,
so we can reply to you effectively.
1
Product Warranty
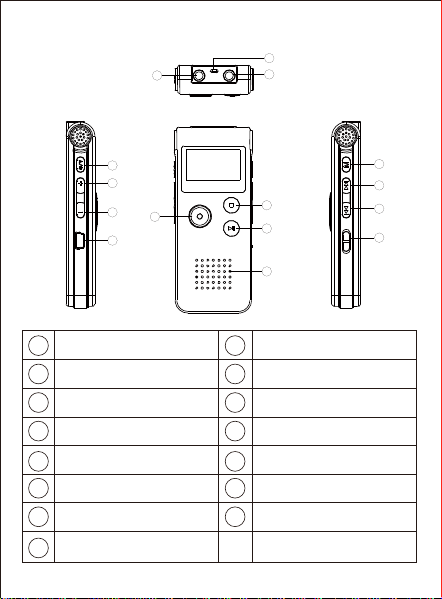
Product description of each part:
A-B
Vol+ Play/Pause
Vol- Inner microphone
USB jack Menu key
External Microphone Jack Previous
Earphone Jack Next
Hanging Hole ON/OFF
Record key
Stop key
1
5
6
7
8
9
12
13
14
15
10
11
2
1
3
4
2
3
4
5
6
7
8
9
10
11
12
13
14
15
2

The basic application method:
The basic application method
Main function section
Record play Systemg Music
In the manual, “short press”“long press” appear frequently, their
meanings as follows:
2. Long press: After pressing the button, keep it for a while , until
the screen with related contents.
1. Check the inner lithium battery enough or not.
2. Set the “ON”, after initialization, the screen with “play record
interface”
1. Short press: After pressing the button, then leave the finger
immediately.
3
Special button operation specification
Turn on the power

1. When the machine is in standby mode, set to “OFF”, then the
machine turned off;
2. When the machine is in the stop state, press the“PLAY”button for
a few seconds, the machine shutdowns after showing“Bye-Bye”,
which can only turn off the working state, can’t turn off the power. If
no use in a long period, please turn off the power “OFF”, which
could save power.
1. Start recording: In any state of power-up,Short Press “REC”
to start recording,At this point the recording indicator light is long
on,The timing number moves at the top of the screen,That
means it's in recording mode.
2. Stop Recording:Short Press“REC”or“PLAY”to pause
recording during recording,The indicator light and the timing figure
at the top of the screen flicker,Short Press“REC”or“PLAY”again
to cancel the pause recording.
3. During record, if the battery is going to use up, then it will
shutdown automatically.
※ Note: Please stop the machine by“PLAY”,then turn off the
power by “OFF”. If turn off the power directly, it will reset to defaults.
4
Turn off the power
Recording

In play mode,Short press the“VOL”key when the volume level
appears on the screen,Press the “VOL+” button to increase the
volume,Press “VOL-” to reduce the volume,The volume
indicator bar on the screen will be added or subtracted accordingly.
Once the adjustment is complete,Short Press“PLAY”to save the
exit volume adjustment mode.(A 10-second no-action will
automatically save the exit).
In the main menu interface,Long Press“UP”or“DOWN”to select
“Record”or“Music”to switch with each other,Simply press
the“MODE”button to enter the playback interface,Short Press
“PLAY”to confirm play.
In play mode,Short Press“UP”or“DOWN”to switch tracks.
In the BOOT state, simply press the“UP”or“DOWN”button to
select the“Record”or“Music”interface,
Short press
the“MODE”key to enter the play interface,Short press
the“PLAY”button to start playing,Short press play again to
pause/play.
3. Save the recording:Briefly press the“stop/return”button
while recording,The screen prompt “saved”after the display,Go
to play standby,Short press play again to play the current
recording.
5
Play/pause
Tangent curv
Music/recording mode switch
Volume Control

In play mode,Simply press the “UP”or“DOWN”keys to select the
previous file or the next file,Long Press “UP”or“DOWN”key to
play fast forward/fast back.
In play mode,Just press“DEL/A-B”one time,Set the starting
point for repeat A,Just short-press “DEL/A-B” again,Set the
end point for repeat reading B,At this point the screen shows A-B
,Press the “DEL/A-B” key again to repeat the function between
the two points of A-B,Then short press the “DEL/A-B” key will
exit the A-B repeat mode.(The default each time to read 5 times
automatically back to normal playback).
3. Abort. Delete:To abandon the deletion,You can choose “
No”to exit without deleting,Or simply press the "stop/return"
button to exit.
※Warning:The delete operation is a permanent delete,The file
will not be recovered,Please be careful about deleting files.
1. Single delete:Short Press “DEL/A-B” to enter the delete
option on the standby or pause screen,Short
Press“UP”or“DOWN” key to select(Delete one、Delete all,Exit
settings),Then simply press the “MODE” button to enter,Short
Press“UP”or“DOWN”to select “ yes ”,Then short press the
“MODE” button to confirm the deletion,Screen prompt,
“delete…”
2. Delete them all:The action is the same as a single delete.
6
UP/DOWN selection, fast forward/fast back
A-B repeat
Delete

Simply press the “ MODE ” button to enter the settings menu in the
playback state(Play mode, Repeat settings,Variable Speed
Playback,Equalizer),Short Press “UP”or“DOWN” key to
select.
1. Play mode:Short press the “MODE”button to enter the mode
selection,Then Short Press “UP”or “DOWN” to choose(
Repeat1, Repeat ALL,Shuffle),Short Press“MODE” key to
determine.
2. Repeat Settings:Short press the “MODE” button to enter the
repeat settings mode,Short Press “UP”or“DOWN” to choose(
Repeat Mode,Replay Times,Replay Interval)Short press the
“MODE” button to enter,Press the “MODE” button for confirma-
tion shortly after you have made the necessary adjustments.
3. Variable Speed Play back:Short press the “MODE”button to
enter,Short press the “VOL+”or “VOL-” button to select(- 8 to 8
adjustable),To the desired level and then short press the
“MODE” key to confirm.
4. Equalizer:Short press the “ MODE ” key to enter the sound
MODE settings,Short Press“UP”or“DOWN” key to select(off、
Rock,soft、Pop、Jazz、Classical、Techno)Short press the
“MODE” button to confirm.
In the main menu interface, simply press the “UP”or“DOWN” keys
to select system settings,Short press the “ MODE ” button to
enter the settings menu,Short Press “UP”or“DOWN” key to
select.
7
Play settings
System setup(SYS Settings)

1. Date & time Settings:Short press the “ MODE” button to enter
(Date setting,Time setting),Select the date set after a short
press the “UP”or“DOWN” key to select the year/month/day,
Press “ VOL+” or “VOL-” to adjust the number. After selecting the
time setting, simply press the "up" or "down" keys to select
hours/minutes/seconds,Press “VOL+” or “VOL-” to adjust the
number,After setting up the short press the “MODE” key to
confirm.
2. Screen saver time(Sleeper time):Short press the “ MODE ”
button to enter,Short Press “UP”or“DOWN” key to select(
Always ON,10Seconds,20Seconds,30Seconds),Then short
press the “MODE” button to confirm.
(1). Recording format:Short press the“MODE” button to enter,
Short Press“UP”or“DOWN”to select(MP3 format or WAV format
),The less time it takes), Then short press the “MODE”button to
confirm.
(3). Record Subsection:Short press the“MODE”button to enter
,Short Press “UP” or “DOWN” to select(off,30Minutes,
60Minutes,120Minutes)Then short press the“MODE”button to
(2). Set rec bit rate: Short press the“MODE” button to enter,
Short Press“UP”or“DOWN”to select(MP3 format:32kbps,
64kbps, 128kbps, 192kbps or WAV format: 512kbps,768kbps,
1024kbps, 1536kbps, 3072kbps. This parameter is the recording
sampling rate,The higher the sampling rate, the better the sound
effect,The greater the power consumption。The lower the
sampling rate, the worse the sound effect,The less time it takes),
Then short press the “MODE”button to confirm.
3. Record settings:Short press the “ MODE ” key to enter the
recording settings,Short Press “UP”or“DOWN” key to select(
Record Format,set rec bit rate,Record from,Record
Subsection,AVR mode,Monitor Setting,Rec Indicator,
Timed recording).
8

(4). Voice Control Mode(AVR Mode):Short press
the“MODE”button to enter,Short Press “ UP ” or “ DOWN ” to
select(Tar ck AVR mode,set level of AVR)Short press
the“MODE”button to enter,Set up after the re-short press
the“MODE”key confirmation.
(5). Listening switch(Monitor setting):
Short press
the“MODE”button to enter,Short Press “ UP ” or “ DOWN ” to
select( OFF、ON),Short press the “MODE” button to confirm(
When you select “ON”to record again, plug in your headphones to
hear the sound you are recording).
(6). Rec Indicator:Short press the“MODE”button to enter,Short
Press “ UP ” or “ DOWN ” to select(OFF、ON),Short press
the“MODE”button to confirm(Select“ON”when recording indicator
light indication,There is no light indication when selecting“OFF”for
recording).
(7). Timed recording:Short press the“MODE”button to enter,
Short Press “UP” or “DOWN” to select( Record on/off,Timed
Record Cycle, Start Time,end time),Short press
the“MODE”button to enter,Set up after the short press
the“MODE”key to confirm.
(8). Record source (Record from):Short press the“MODE”but-
ton to enter,Short Press “ UP ” or “ DOWN ” to select(
Microphone、line-in),Short press the“MODE”button to confirm.
confirm.
4. Language:Short press the“MODE”button to enter,Simply
Press “UP” or “DOWN” to select the language you want,Short
press the“MODE”button to confirm when finished(Available in a
variety of languages).
5. Back light Timer:Short press the “MODE” button to
enter,Short Press “UP” or “DOWN” to choose(Always on,
9

6. Brightness:Short press the “MODE”button to enter,
Press“VOL+”or“VOL-”to select the contrast brightness(00-11
optional),Short press the“MODE”button to confirm.
7. Disk Space:Short press the“MODE”button to enter,Total
machine capacity and used space can be queried,Short Press
“STOP” to return to the settings menu.
8. Software Version:Short press the“MODE”button to enter,
View local hardware and software information,Short Press “STOP”
to return to the settings menu.
9. Password Settings:Short press the “MODE”button to
enter,Short Press “ UP ” or “ DOWN ” to choose(Password
Switch,Password Set),Then short press the“MODE” button
to enter,Press“VOL+”or“VOL-”to adjust the number,Short Press
“ UP ” or “ DOWN ”to go to the next set of numbers to adjust,Set
up after the completion of short press the “MODE”key to confirm.
10. Restore Factory settings:Short press the“MODE”button to
enter,Short Press“UP” or “DOWN” to select“yes”or “no”,
Short press the “MODE”button to confirm(If you select yes, the
machine will revert to the factory state and all files will be cleared)
11. Format Device:Short press the“MODE”button to enter,
Short Press “ UP ” or “ DOWN ”to select“yes”or “no”,Short
press the “MODE” button to confirm(If you select yes, the
machine will empty all files.
1. Through the LINE-IN interface,Can Be connected (CD, MP3,
DVD mobile) and other products output audio source direct audio
LINE-IN Recording setup(You need to set the “Record from” Sub
menu to “Line-in” in the recording setting)
10
10Seconds,20Seconds,30Seconds),Short press
the“MODE”button to confirm.

2. External microphone recording: After connecting the external
microphone through the LINE-IN interface,The same way you
record with a built-in microphone.
1. Plug one end of the USB cable into the USB port,Plug in your
computer's USB port at the other end, After connecting the
computer will appear this disk symbol identification,At this point,
you can locate the disk to upload/download the file,The display
screen of the machine will also have the corresponding icon
indication. As shown in the image below:
2. Please remove the removable disk in the normal way,To
prevent data loss.
3. Connect the machine to the computer and use it as a removable
USB stick,UPLOAD/DOWNLOAD your favorite music or other
3. A recording of the
call: After connecting
the phone box through
the LINE-IN interface,
The same way you
record with a built-in
microphone.
input
11
Connect to the computer
Downloading Uploading files Connecting
1. Connect the USB cable to the charger(5V-1000MA)Ready to
charge,Battery icon shows the status of running horse when
charging,When the icon is full, it means the charge is full(The
charging time depends on the power of the charger).
2. When the machine runs out of power or not enough ,Please
charge in time,Keep the machine fully charged in all conditions,
Otherwise, it will affect the service life of the machine .
files(Copy/paste mode). Do not disconnect while data is being
transmitted,Otherwise, it could cause data loss.
12
Trouble shooting
Charging
Questions
No display
No recording
Unable to play the
audio file
The words on the
display screen are
out of orde
Whether the language
choice is correct or not
Choose the right
language
There's no audio file
Keep the volume to a
minimum
Make sure there are no
audio files
Adjust the volume
It's not on the record
Memory capacity is full
Put It on tape
Delete some files or
move them to the
peripheral equipment
Battery's low If it's on
Recharge in time
Turn on the power
Why Measures

13
No sound from
headphones or
speakers
Unable to upload/
download files properly
Check the USB cable for
damage Whether the USB
connection is normal or not
Plug check the USB
cable is not damaged
Connect USB cable
properly
Make sure your earphones
are plugged in Keep the
volume to a minimum
The play file was corrupted
Remove headphones
Adjust the volume
Check that the playback
file is intact