

Statement:
Note:
1. First, thanks for using our company's digital
products!
1. Please do not attempt to open, repair or modify
the product.
2. Please read the manual before using for the
proper use of it.
3. As for the information, please back up on your
own. Our company takes no responsibility to any
loss of data caused by abnormal operation of
software, hardware, or product repair, or battery
changing, or other accidents, also the loss
caused indirectly by these reasons. Meanwhile,
we also can’t control the possible misunderstand-
ing of the manual from the customer. Thus, our
company won’t take charge of accidental damage
caused by using this manual, also the third
party’s claim for compensation caused by using
this manual.( The product system will occur some
part of the memory, so it’s normal if there’s any
difference with the standard memory)
1

Warnings:
2. Please do not use this product in the region
with prohibited use sign of electronic products
(such as airplane, etc).
3. Please do not put in the mouth of products or
accessories.
4. Please do put the product into water or other
liquids.
5. Please do not use this product in special cold,
hot, humid or dusty environments.
1. Please do not drop the product itself or its
parts, for avoiding malfunctions.
2. Please do not keep the product under the
bright light, or heat, for extending the life span of
the product itself.
3. Please charge it sometimes if leave it unused
for a long period, to avoid losing battery function.
4. In order to expand the life span of the battery,
please don’t use it when charging.
5. Please do not force to remove or waggle up
2

and down, side to side to connect accessories
(For example: headphone, microphone, USB
connection, etc.).
6. This machine is for learning tool, our company
will out of any law responsibility caused by the
economical or commercial usage.
7. Please don’t set it under 60℃ environment
(such as: sauna room, inside the packed car), it
might reach to 80℃ inside the car.
8. Our company takes no responsibility to any
loss of data when using the product or service.
So if there is important information in the product
memory, please back up on your own.
9. Please note that this product is prohibited for
illegal use. For example: for the privacy of others
or eavesdropping.
3
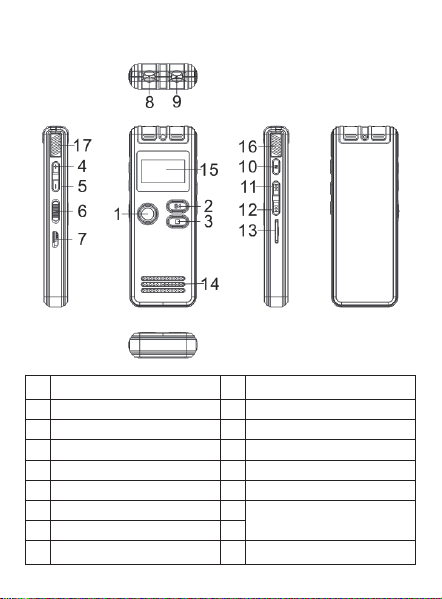
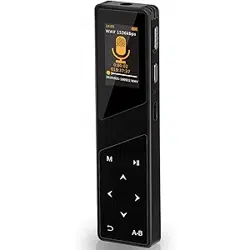
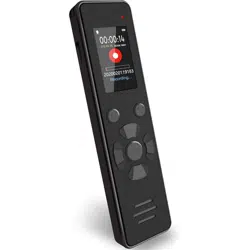
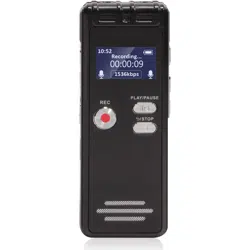
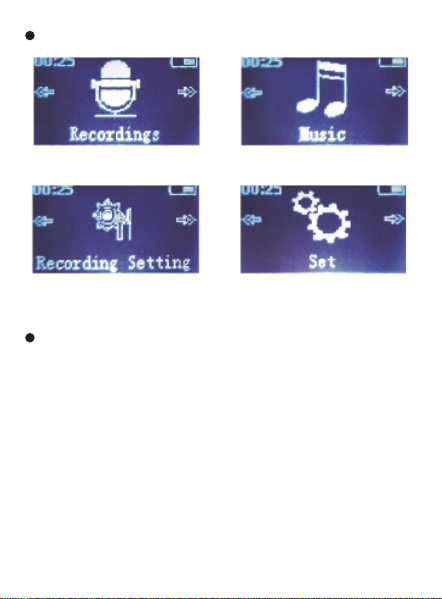
Product description of each part:
1. Recording key
PLAY/Time out
SOTP/GET BACK
VOL+
VOL-
Power switch
USB/Charging port
Earphone output
Menu key
UP/Fast-forward
DOWN/Quick replay
TF Card
Trumpets
Led display
MIC
LINE-IN
2.
3.
4.
5.
6.
7.
8.
9.
10.
11.
12.
13.
14.
15.
16.
17.
4
Main function module
The words "short press" and "long press" often
appear in this paper,The meanings are as
follows:
1. short press:Keystroke time is less than 1.2
seconds.
2. long press:Button time greater than 1.2
seconds,Until the appropriate display appears.
Special keypad instructions
Voice playback Play the music
Record setting System setup
5

Basic usage:
1. The machine power switch is pulled to the
“ON”position,Turn on the power. Turn it on,
The boot initialization icon appears on the screen
and then goes to standby,Ready when you are
(Make sure the machine is fully charged).
2. In the soft shutdown state without power off,
Long Press“PLAY”for 3 seconds,The boot
initialization icon appears on the screen and then
goes to standby,Ready when you are.
1. In the BOOT state,Pull the machine power
switch to the “OFF” position,When the
“Bye-Bye” icon is displayed on the screen, the
power is turned off.
2. In the BOOT state,Long Press“PLAY”button
for 3 seconds to turn off the computer,At this
point, the screen displays the Bye-Bye interface
and shuts down.
Roll Camera
Roll Camera
6
3. Machine default standby for a long time without
operation will automatically shutdown(Shutdown
time can be set in the system settings).The
machine also shuts down automatically when the
battery used in the machine runs out of power.
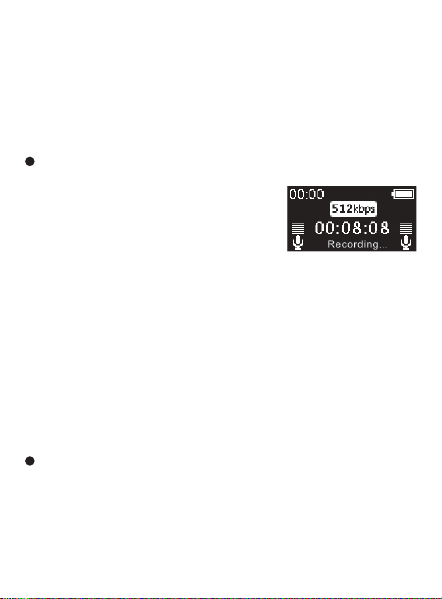
In the boot state, short press the
“REC”button to start recording,
The display will say “Record-
ing”and start recording the
time.Short press the “STOP”button to stop the
machine and save the recording,In the
meantime, the screen will show the
“saved...”.During recording, briefly press the
“PLAY”button to pause the recording,At this
point, the screen will tell you to“stop recording”,
And the recording timer is suspended。Short
Press“PLAY”again to resume recording.
In standby mode, press the“PLAY”button to start
playing,Press the “PLAY” button again briefly to
pause the playback,Short press the “STOP”but-
ton to stop playing and return to the parent menu.
Recording
Play/pause
7

Simply press the“STOP”button
to return to the main menu in the
playback state,Short press
the“UP”or“DOWN”button
to select“Music”or“Recordings”, Short
Press“PLAY”to enter,Press“PLAY”again to
confirm the play.
While it's playing,Short press the“VOL+”or
“VOL-”button to adjust the volume level,The
volume indicator bar on the display will indicate
the addition and subtraction of the volume,Once
the adjustment is complete,Then short press
the“PLAY”button to save the exit volume
adjustment mode(5 seconds if no operation will
automatically save the exit).
While it's playing,Simply
Press“UP”or“DOWN”to select the last file or the
next file to play. Long Press“UP”or“DOWN”key
to fast-forward, fast-back play.
Music/recording mode conversion
Adjust the volume
UP/DOWN selection、
Fast forward/fast back
8

While it's playing,Short press the “MENU”
button to enter,Press“UP” or “DOWN ”to
select,Repeat Setting,Short Press“PLAY”to
enter,Then press“UP”or“DOWN ”to select:
Repeat mode,Press the "play" button to set the
starting point a for repeat reading,Then short
press the “DOWN” key to set the end point B(
Press the “UP” button to cancel the B setting)
,At this point the screen display A-B between
the two points to repeat the function,Short
Press “MENU” to exit a-b repeat mode.
1. Delete single:Simply press the“MENU”
button to access the music (voice) playback
interface,Then short press“UP”or“DOWN”to
select “delete”,Short press the “PLAY”button to
enter the delete screen,Short Press
“UP”or“DOWN”to select“yes”,Then short
press“PLAY”to confirm,Single file deletion
complete.As shown in figure 1
2. Delete all:In the music (voice) main interface,
simply press the“PLAY”button to enter the play file
A-B repetition
Delete
9

list,Simply Press“UP”or“DOWN”to select delete
all,Short Press“PLAY”button to enter the delete
interface,Short Press “UP”or “DOWN”to
select“yes”,Then short press “PLAY” to confirm
,All files deleted.As shown in figure 2
3. Abort. Delete:To abandon the deletion,
Select “ No”and then press the “PLAY”button for
confirmation,You can discard the delete and go
back to the previous level,Or simply press the
“STOP” button to exit.As shown in figure 3
※Warning:“Delete all”Operation For perma-
nent deletion,The file will not be recovered,
Please be careful about deleting files!
When it turns on the main menu interface, Short
Press“UP”or“DOWN”to select the recording
settings, Short Press“PLAY”to enter,Then short
Record setting
Figure 1 Figure 2 Figure 3
10

press the“UP”or“DOWN”keys to select the items
you want to set,Press the “STOP” Key to return
to the main menu without setting.
1. Recording format:Short Press“PLAY”to
enter, Then short press“UP”or“DOWN”to select
the format you want to record,(MP3 format
and WAV format)Then Short Press“PLAY”to
enter,Short Press“UP”or“DOWN”to select
recording quality,Short Press“PLAY”to confirm
saving,Press the“STOP”Key to return to the
settings menu.
2. Recording bit rate(Description parameter):
MP3 format(Low Quality)<32kbps,64kb-
ps,128kbps,192kbps> WAV format(High Quality)
<512kbps,768kbps,1024kbps,1536kbps,3072kb-
ps>
3. Listening setup:Short Press“PLAY”to enter,
Short Press“UP”or“DOWN”to turn it on or off,
Then short press“PLAY”to confirm.Select “on”
※ The above parameters are the sampling rate
of recording,The higher the number, the higher
the degree of sound restoration(The closer we
get to the actual sound source).
11

and insert the earphone when recording to hear
the currently recorded sound(The function can
also be used for hearing aid).
4. ADC gain setting:Short Press“PLAY”to
enter, Short Press“UP” or “DOWN ”to turn it on
or off, Then short press“PLAY”to confirm.(
This function can be used in a complex recording
environment).
5. Segmented record: Short Press“PLAY”to
enter,Short Press “UP”or “DOWN”to select,
Record time segment(
OFF.30Min.60Min.90Min.120Min)Optional,
Then short press“PLAY”to confirm.
6. Recording source:Short Press“PLAY”to
enter, Short Press “UP”or“DOWN”to select,
There are (microphone, line-in) sound sources
available,Then short press“PLAY”to confirm(
The normal recording source of the machine is
the microphone channel,Use the line-in channel
if you need to input a sound source for another
device).
7. Voice Control Mode:Short Press“PLAY”to
enter, Short Press“UP”or“DOWN”to select the
12

voice switch or sensitivity adjustment(Sensitivity
doesn't kick in until the voice switch is turned on
).Sensitivity adjustment is 1-5 grade adjust-
able(The higher the level of sensitivity, the more
sensitive it is to start recording),Short
Press“PLAY”to confirm.
8. Set the time log:Short Press“PLAY”to
enter, Short Press“UP”or“DOWN”to select the
timing switch or record the cycle(Takes effect
when the record is open at set time),Set the
recording start time and end time after a short
press the“PLAY”button to confirm.
9. Recording sensitivity: Short Press“PLAY”-
to enter,Short Press“UP”or“DOWN”to select,
It's 0-7 adjustable(In the context of a complex
loop),Short Press“PLAY”to confirm.
In the main menu interface, press
the“UP”or“DOWN”keys to select the “system
settings” interface, Short Press“PLAY”to enter,
Short press the “UP”or“DOWN”keys to select
the options you want to set,You do not need to
set the “STOP” Key to return to the main menu.
System setup
13

1. Screen saver time:Short Press“PLAY”to
enter, Short Press“UP”or“DOWN”to select
screen saver time(10Min、20Min、30Min、ON
),Short Press“PLAY”to confirm.
2. Storage location:Short Press “PLAY”to
enter,Simply press the “UP”or “DOWN”keys to
select which audio files to store in local memory
or the TF extension card.
3. Language selection:Short Press“PLAY”to
enter, Simply Press“UP”or“DOWN” to select
the language you want,Short press the“PLAY”
button to confirm when the selection is complete.
(Available in multiple languages).
4. Display contrast adjustment:Short
Press“PLAY” to enter, Short Press “VOL+”or
“VOL-” to select(There are: 0-1 adjustable,
Adjust when display is not clear),Short
Press“PLAY” to confirm.
5. Shutdown setting:Short Press“PLAY”to
enter,Short Press“UP”or“DOWN” to select
shutdown time(ON、1Min、2Min、5Min、
10Min),Short Press“PLAY”to confirm.
14

6. Date and time settings:Short Press“PLAY”-
to enter, Simply press the “UP”or“DOWN” keys
to select the setting time and the setting date,
Short Press“PLAY”to enter,Short Press
“UP”or“DOWN”to select settings,Short press
the“VOL+”or“VOL-”button to adjust the number
, After setting up the short press the“PLAY”key
to confirm.
7. Information(Firmware version):Short
press the“PLAY”button to enter the local model
and software version, 5 seconds to auto return to
system menu.
8. Disk space:Short Press“PLAY”to enter,
Query the capacity and free space of the
machine, 5 seconds to auto return to system
menu.
9. Password setting:Short Press “PLAY” to
enter, Short press the “UP”or“DOWN”keys to
select the password switch or password
settings.Then Short Pres s“PLAY”to enter,
Short Press“UP”or“DOWN”to select settings,
Short Press “VOL+”or “VOL-” to adjust the
numbers.After setting up the short press
the“PLAY”key to confirm.
15

10. Go back to the factory settings: Short
Press“PLAY”to enter,Short press
the“UP”or“DOWN”keys to choose whether to
resume factory settings, Short Press“PLAY”to
confirm.
11. Format device:Short Press“PLAY”to enter
,Simply press the“UP”or“DOWN”keys to select
yes or no formatting devices,Short Press
“PLAY”to confirm. (Use with caution,The data
will be cleared after the machine is formatted).
※ This feature will revert to the factory setting,
Use with caution,The machine data will be
wiped clean.
※ Close the password enter the old password
directly after the input of “0000” short
press“PLAY”key confirmation can close the
password function. (You have already set the
password, please remember, The next time you
use it, you need to enter your password to turn it
on. If you forget your password, you can also type
“181818”and long press “MENU” to unlock it).
16

Simply press the “MENU” button to enter the
settings menu in the playback state(Play mode
,Repeat Settings、Equalizer、Variable Speed
Playback,Bookmarks),Short press
the“UP”or“DOWN” keys to select the options
you want to set.
1. Play mode(Cyclic mode):Short press
the“PLAY”button to enter play mode,Short
Press“UP”or“DOWN”to select(Repeat 1、
Repeat all,Shuffle,preview),Short
“PLAY”button to confirm.
2. Repeat Settings:Short Press“PLAY”to enter
,Short Press “UP”or“DOWN” to select(
Repeat mode,Replay Times,Replay Interval)
,Short “PLAY” button to confirm.
(1)Repeat mode(Repeat reading):There's
a description in a-b.
(2)Replay Times (The number of repetitions is)
:1-10 times optional,The default number of
times for this machine is 5,Repeat for 5 times
and then automatically switch to normal .playback.
Play settings
(Music playback and recording playback)
17

3. Sound effect settings(Equalizer):Short
Press“PLAY”to enter,Short
Press“UP”or“DOWN” to select(OFF,Rock,
soft,Pop,Jazz,Classical,Techno),Short
Press“PLAY”to confirm.
4. Variable Speed Playback:Short
Press“PLAY”to enter,Short
Press“UP”or“DOWN” to adjust,The playback
speed of “8” to “-8 ” can be adjusted,Level 0 is
normal speed,Short Press“PLAY”to confirm.
5. Bookmarks:Short Press “PLAY”to enter,
Short Press “UP”or “DOWN”to select:Add
bookmarks to bookmark your favorite music and
files, Short press play to add and return to the
play screen.
(1) Go to bookmarks:To listen to the file you
added, also select “go to bookmarks”,Short
press the“PLAY” button to enter and play the file.
(2) Remove bookmarks:If you want to delete a
bookmark,Select "remove bookmark" and then
(3)Replay Interval ( The repetition interval is)
:1-10 seconds,Time interval can be selected
as needed.
18
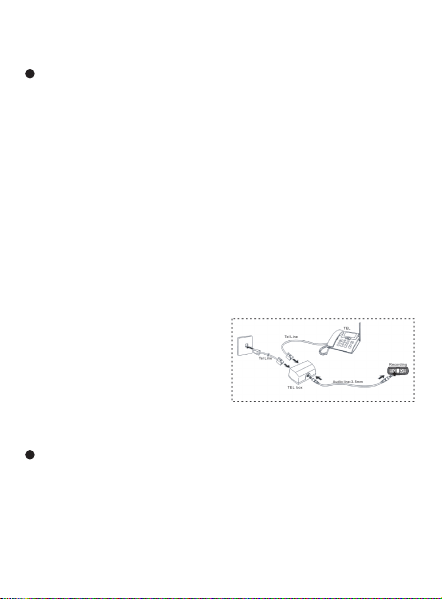
1. Through the LINE-IN Portal,Selectable audio
direct input record,Can Access (CD , recorder,
DVD, Cell phone) and other products sound
source,Press “REC”again to record.
2. External MIC recording: After connecting the
external MIC through the LINE-IN interface,
Same as built-in MIC recording.
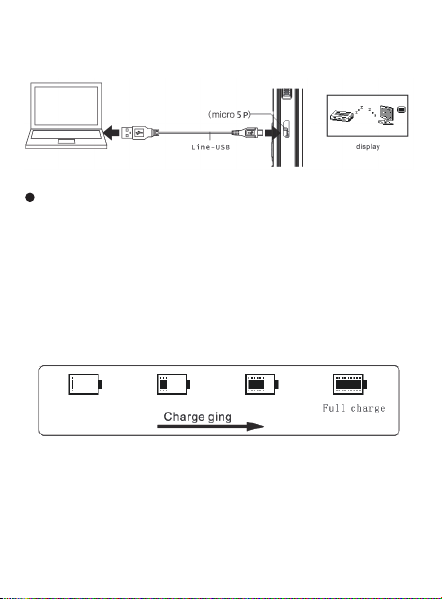
The machine is connected to the computer via a
USB cable,Available for file upload/download,
Data transfer by copy/paste(It can also be used
as a flash drive).
3. A recording of the
call: After connecting the
telephone recording
adapter through the
LINE-IN interface, Same
as built-in MIC recording.
press“PLAY”to confirm.
LINE-IN line recording setup
Connect to the computer
(Select line-in audio source input)
19
Note:Please remove the removable disk in the
normal way,To prevent data loss.
The USB interface that connects the machine to
the charger through a data cable,The charge
indicator icon appears on the screen,Battery
symbol to stop running when fully charged。(
The charging time depends on the power of the
charger,It usually fills up in about 2 hours).
※ Extend Battery Life,When the machine was
down to its last bar of electricity,Please charge
in time.
Charging
20
Troubleshooting
Problem Cause Solutions
LCD doesn’t
display
Can’t record
Low battery;
Check the power on or
off;
Not in the recording
state;
Low battery;
Memory capacity has
been raised to the limit
or full recording
Turn to recording state;
Timely charge;
Delete some files or
move them to an
external device;
Unable to open
recording file
Low battery;
No recording file;
The minimum volume;
Timely charge;
Confirm documents;
Adjust the volume;
Words on the
screen are
abnormal
The language selection
correctness
Choose correct
language
No sound from
the speaker
Confirm that there is
earphone;
The minimum volume;
Check the recording
format;
Remove the headset;
Adjust the volume;
Select the correct
recording format;
No sound from
headphones
Confirm whether the
headset is connected
properly;
The minimum volume;
The damaged audio or
MP3 files caused the
noise or no voice;
Connect the headset
properly;
Adjust the volume;
Check whether audio
or MP3 files are
damaged, make sure
the file integrity;
Low battery;
Check the power on or
off;
21

Statement: Our company won’t in charge of
data missing caused by using the machine or
repairing it. Therefore please back up on your
own if there’s important data in the machine.
Unable to
properly
upload/down-
load the audio
file
Check whether the
USB cable is damaged;
Whether USB
connection is normal;
Check whether there
are gaps in the
memory;
Ensure that no damage
of the USB connection;
Normal USB cable
connection;
Delete blank memory;
22