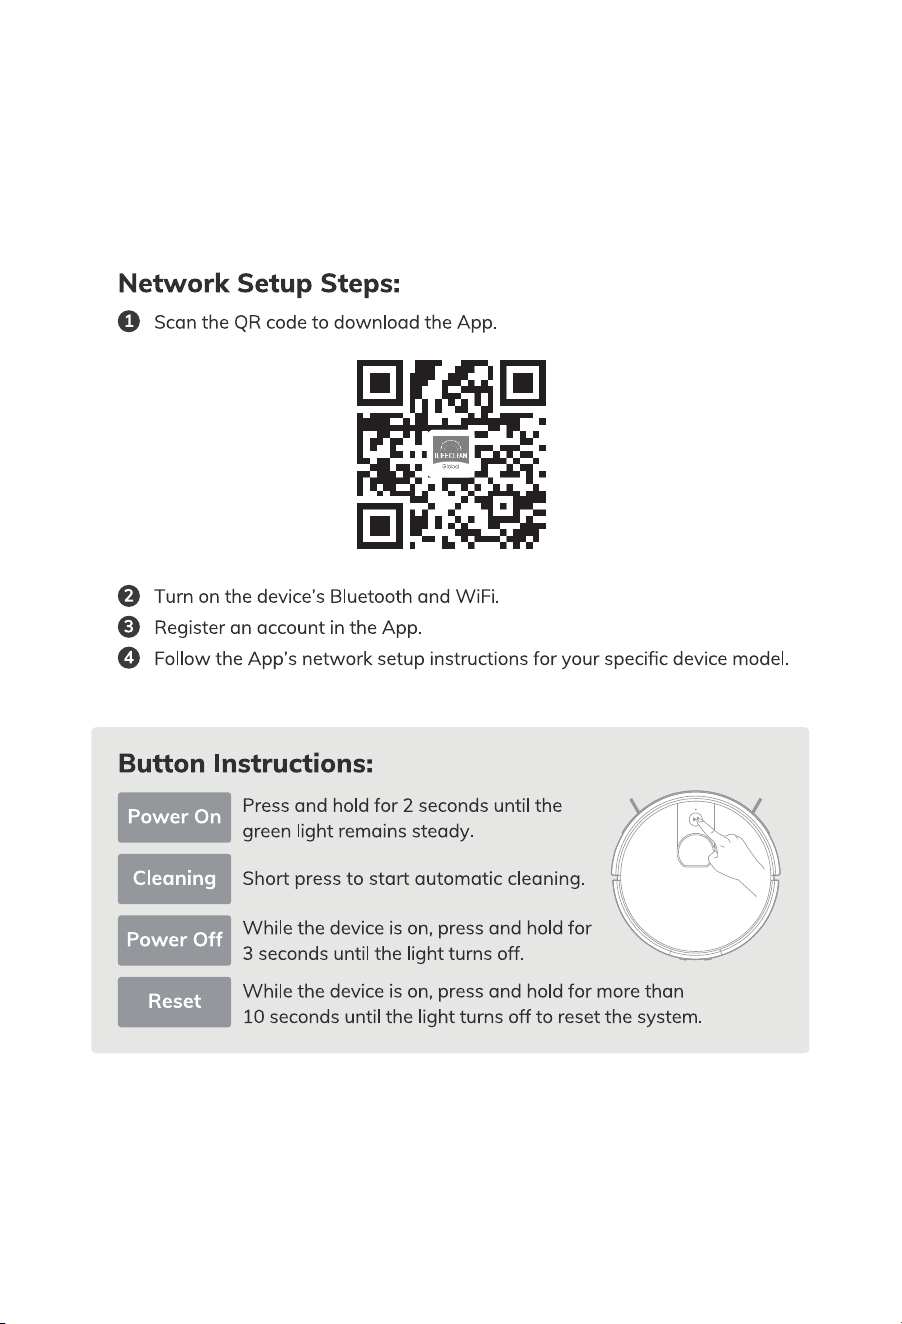
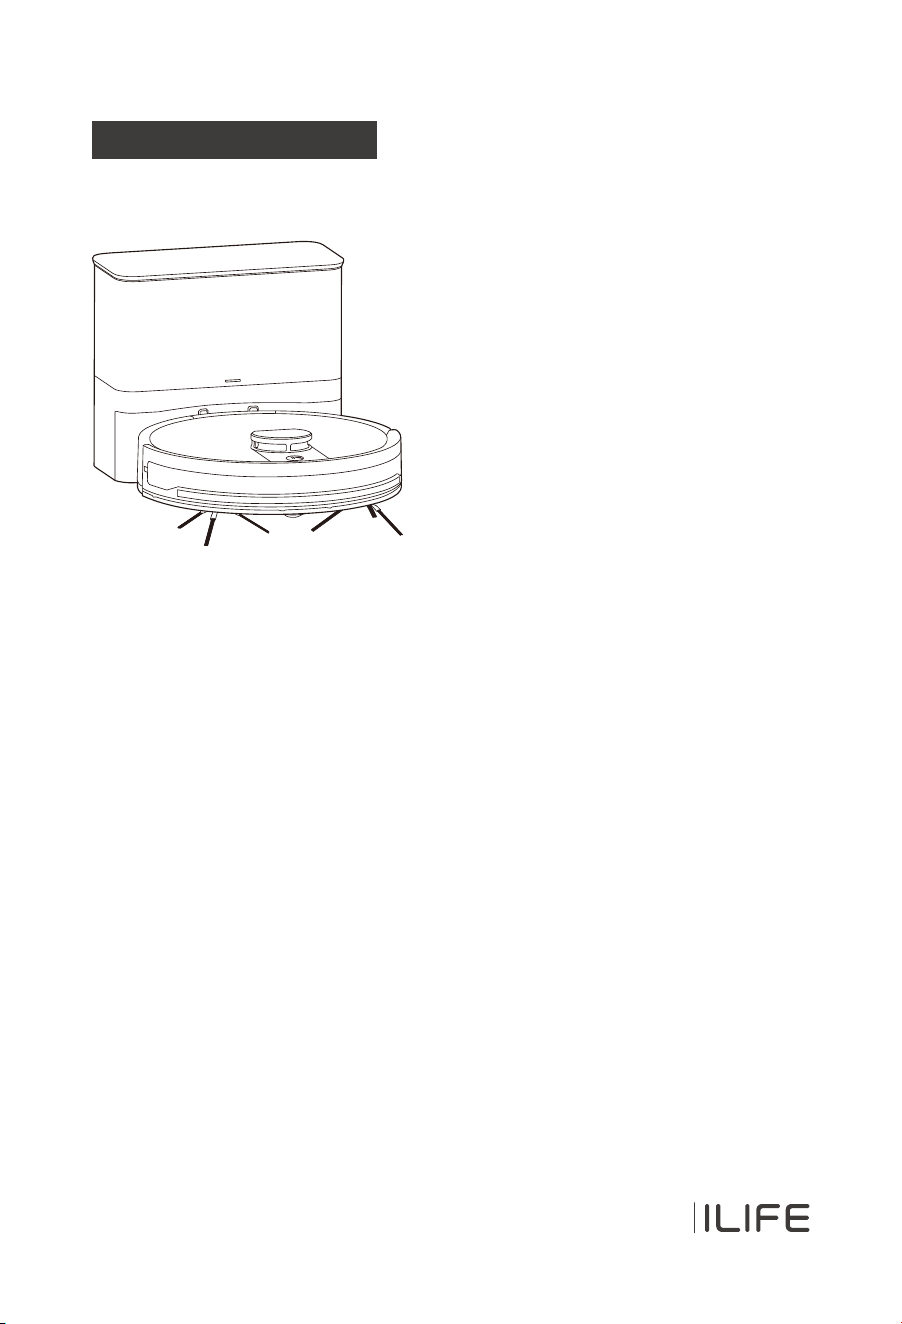
ILIFE-A12 Pro
User Manual
For more detailed information,
please visit: www.iliferobot.com
Robotic vacuum cleaner


Dear Customer,
Thank you for purchasing the ILIFE A12 Pro Robotic Vacuum Cleaner!
You've joined the millions of people cleaning with robots - the smartest
way to do it.
Please take a few moments to read through this manual and familiarize
yourself with your robot to achieve the best performance. If you encounter
any issues with your robot, feel free to contact our customer service or visit
our website at www.iliferobot.com for further assistance. Stay connected
with us on Facebook and Twitter to enjoy these exclusive benefits:
- Get tailored support for your specific robot, including answers to your
questions, maintenance tips, video demonstrations, live chat, and more.
- Receive product updates and other valuable information, be among the
first to discover new robots, exclusive discounts, and special promotions.
Connect with us now on
Facebook: https://www.facebook.com/ilifeglobal
Twitter: https://twitter.com/ilife_global
Enjoy comprehensive cleaning every day! Best regards,
ILIFE Innovation
For more detailed information, please visit: www.iliferobot.com 1
English
ILIFE Customer Service
suppor[email protected]

For more detailed information, please visit: www.iliferobot.com
Table of Contents
2
English
Safety Instructions ........................................................................................................3
Product Composition ...................................................................................................5
List of accessories ....................................................................................................................5
Host introduction ....................................................................................................................6
Robot anatomy .........................................................................................................................7
Self-empty station ...................................................................................................................8
2-in-1 dustbin and water tank ............................................................................................9
Remote control .........................................................................................................................9
Product Specifications .............................................................................................11
Product Operating ......................................................................................................12
Attentions ................................................................................................................................12
Quick guide ..............................................................................................................................14
Select cleaning modes .........................................................................................................18
Water tank operation ..........................................................................................................19
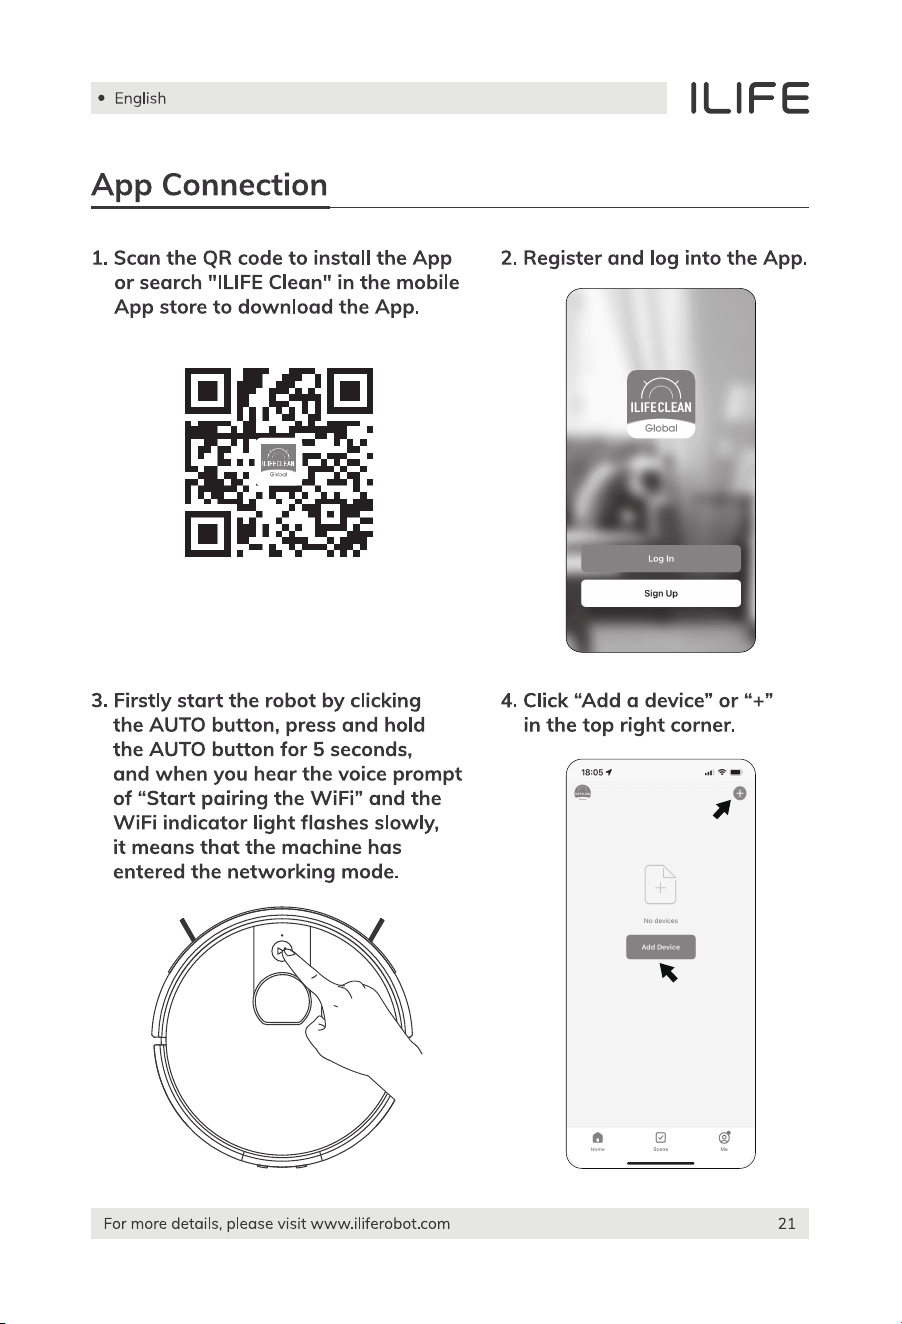
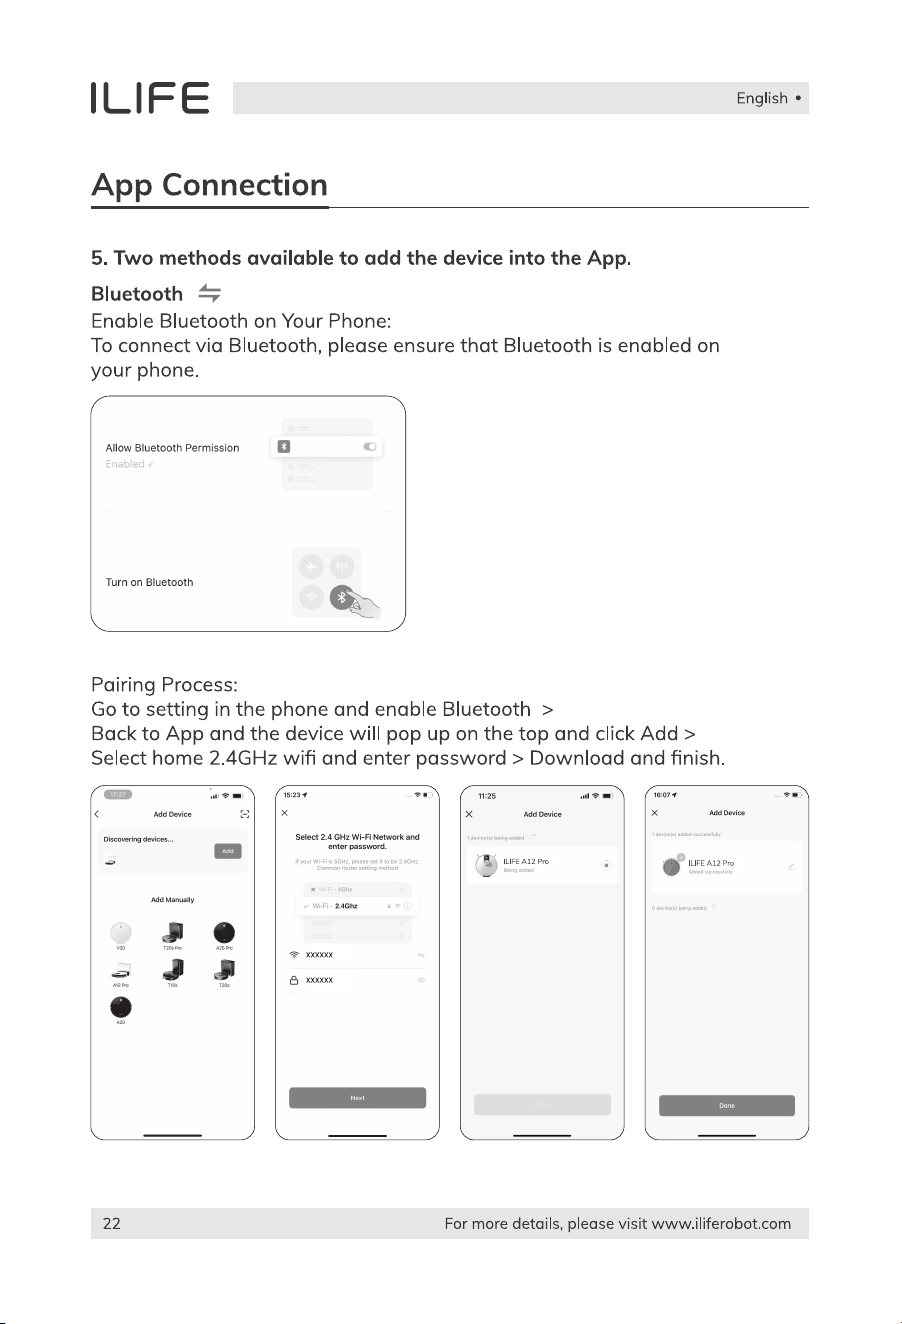
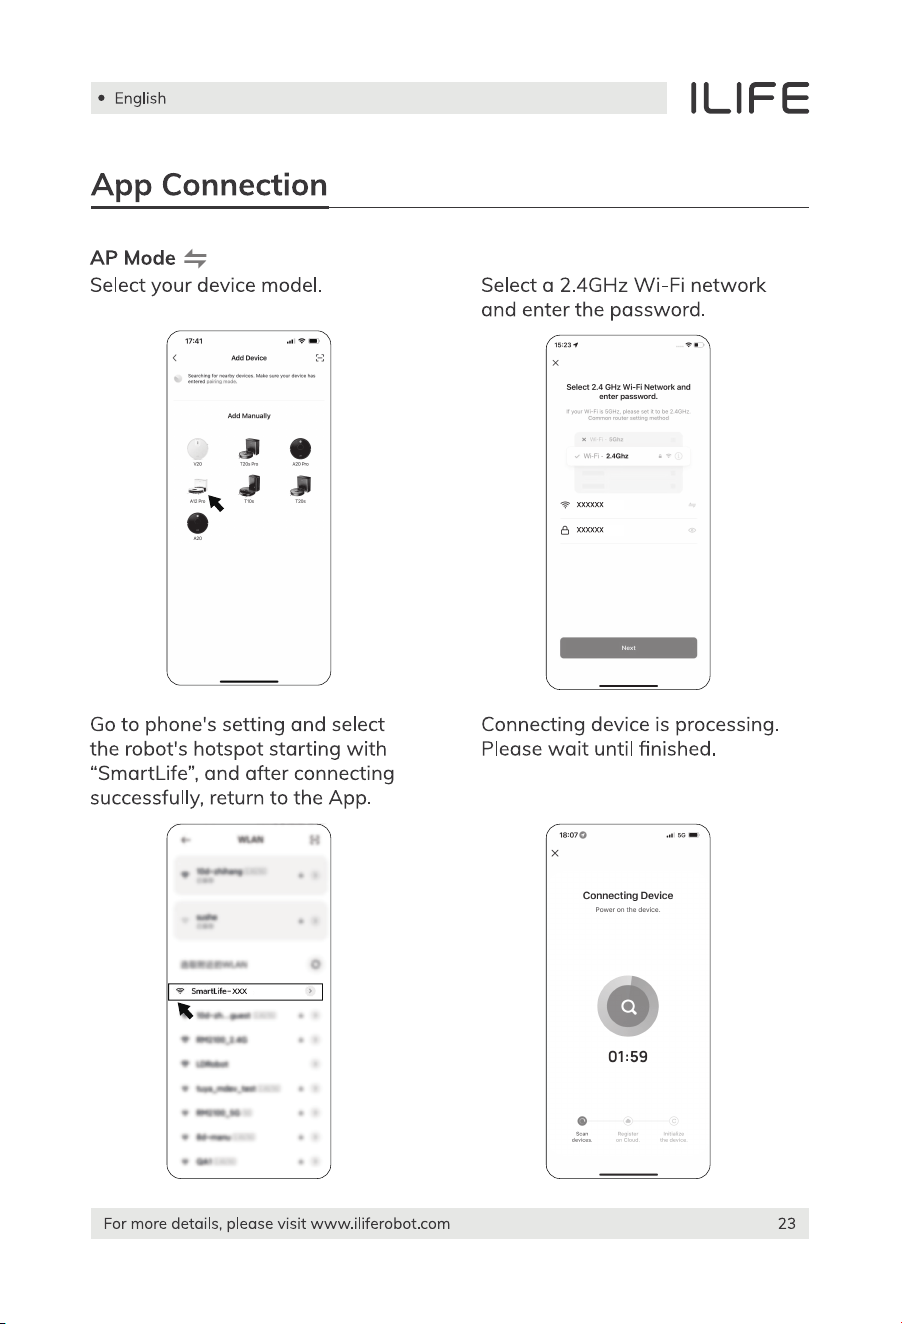
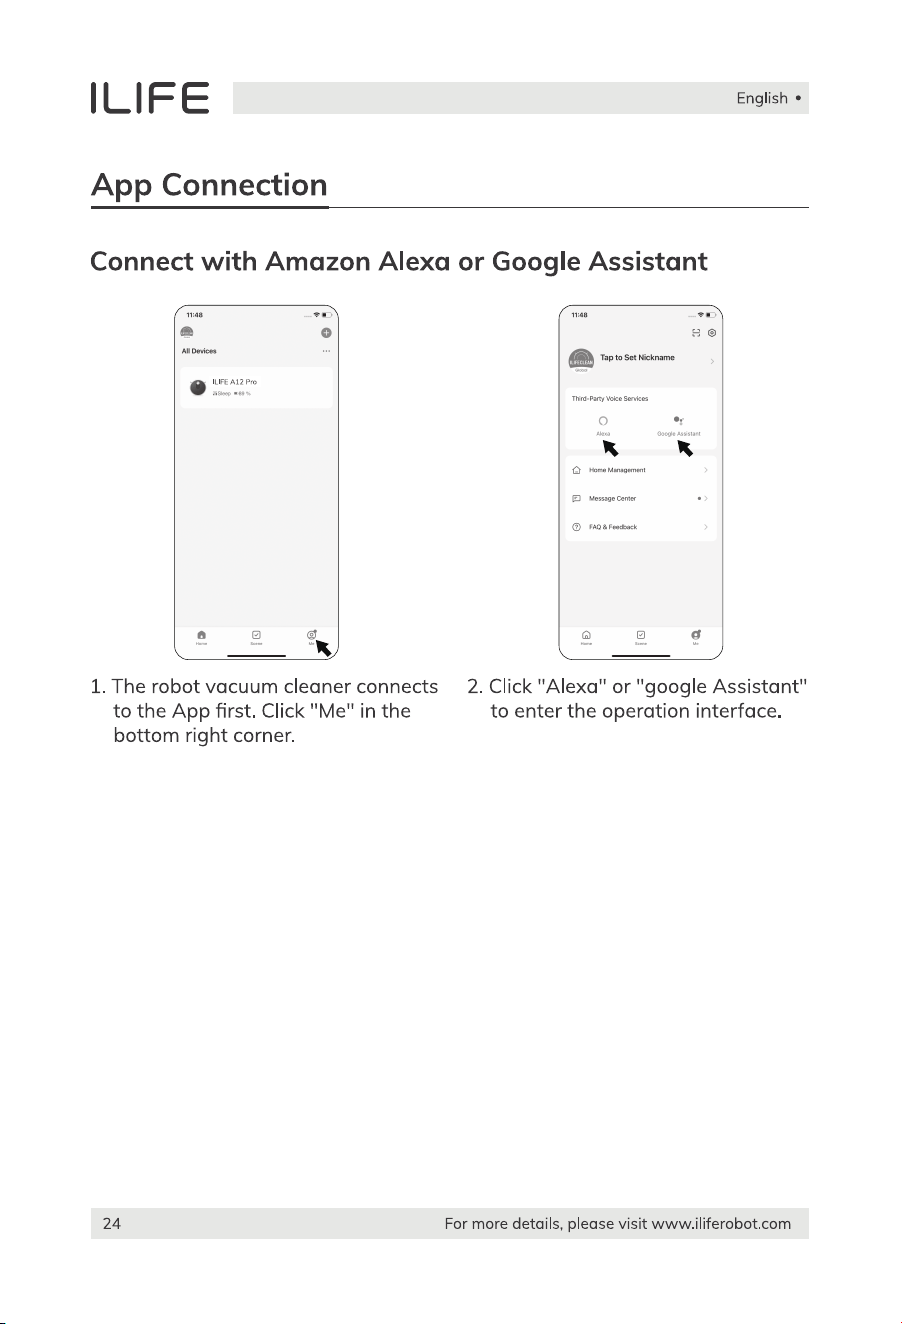
App Connection .............................................................................................................21
Maintenance ....................................................................................................................25
Clean up dustbin and filters ...............................................................................................25
Cleaning of water tank components ..............................................................................26
Replacing the dust bag .......................................................................................................27
Cleaning the dust passage ................................................................................................27
Clean up the side brushes ..................................................................................................28
Check side wheels ................................................................................................................28
Other spare parts ..................................................................................................................28
Troubleshooting ............................................................................................................30
Alert Reference
......................................................................................................................30

For more detailed information, please visit: www.iliferobot.com
Safety Instructions
3
English
1. This robot should not be used by children under 8 or people with mentally
challenged, unless they are under supervision. Do not let children sit on the
robot or use it as a toy.
2. Attend to the robot promptly if an error occurs during cleaning. Before
using the robot, remove all power cords and small objects on the floor.
Roll up carpet tassels and make sure curtains and table cloth are not in
contact with the floor.
3. If there are hanging steps or stairs, please test if the robot can detect them
before use. If not, please set up barriers to avoid falling down, and make
sure that the barriers cause no harm to people.
4. Follow the instructions in this user manual. Use factory authorized or
recommended accessories only.
5. Make sure the voltage of the charging dock is compatible with the voltage
of power supply.
6. Use the robot indoor and in a home environment only. Do not use it outdoor,
or in commercial or industrial spaces.
7. Use factory authorized adaptor and charging dock only. Do not use
non-rechargeable battery. Refer to “Product Specifications” section for
details about battery standards.
8. Do not soak the robot in water and do not rinse the robot under the faucet.
9. Do not clean the robot with dripping wet cloth.
10. Do not use the robot on floors with ponding water.
11. Do not use the robot near fire or fragile objects.
12. Do not make the cloth, humans hair, finger, or other parts of the body close
to the open or the running mechanism of the robot.
13. Do not use the robot on floors with stones or paper to avoid being stuck.
14. Do not use the robot in areas with any flammables, such as gasoline, toner
and so on. Or use the robot to clean any burning objects, like cigarettes,
ashes or matches, or anything that may cause a fire.
15. Do not use damaged charging dock.
16. Do not lift up the robot or the charging dock by the power cord, and keep
the power cords away from heat and avoid it being trapped around doors,
sharp edges or corners.
Warnings

Safety Instructions
For more detailed information, please visit: www.iliferobot.com4
English
17. Damaged power cords must be repaired by manufacturer’s repair service
or certified technicians.
18. Install dustbin and filters properly before using the robot.
19. Do not use the robot in rooms where babies are sleeping.
20. Do not use damaged power cords or charging dock to recharge the robot.
Do not use the robot if it’s damaged by falling down, or soaking in water.
21. Turn off the power switch if the robot will not be used for a long time.
22. Turn off the power switch before cleaning or maintaining the robot.
23. Unplug power cords from the charging dock before cleaning or
maintaining the robot.
24. Remove battery before discarding the robot.
25. Robot and battery are to be disposed of according to local safety
regulations.
26. Do not cremate the robot to avoid the explosion.
27. Follow the instructions in this user manual.
Manufacturer is not responsible for any damages caused by improper use.
For more detailed information, please visit: www.iliferobot.com 5
English
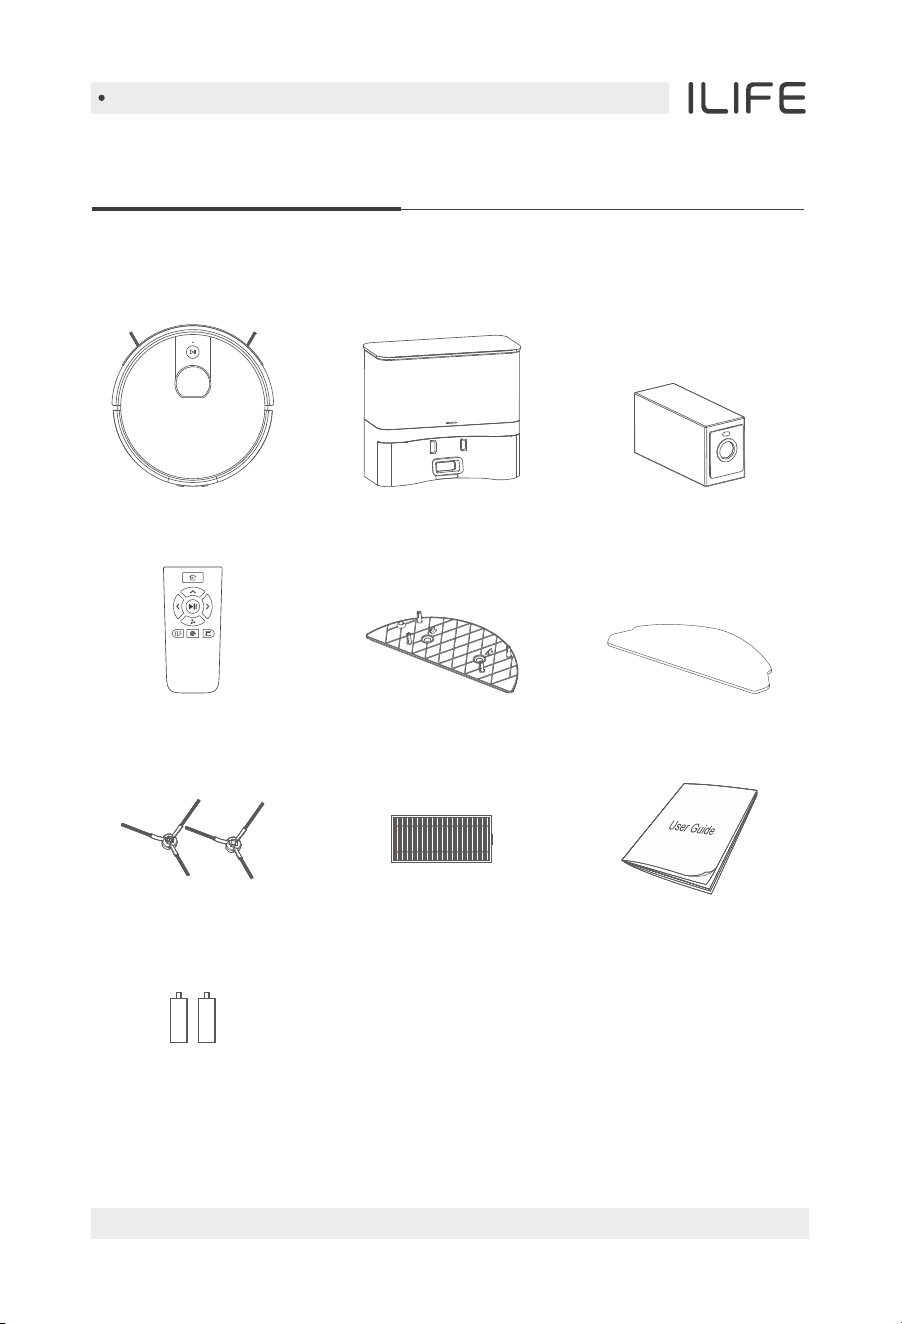
List of accessories
Product Composition
Self-empty station Dust bag X5
User manual
Main body
Mop clothMopping supportRemote Control
High performance filterExtra side brush X2
AAA Battery X2
For more details, please visit www.iliferobot.com6
English
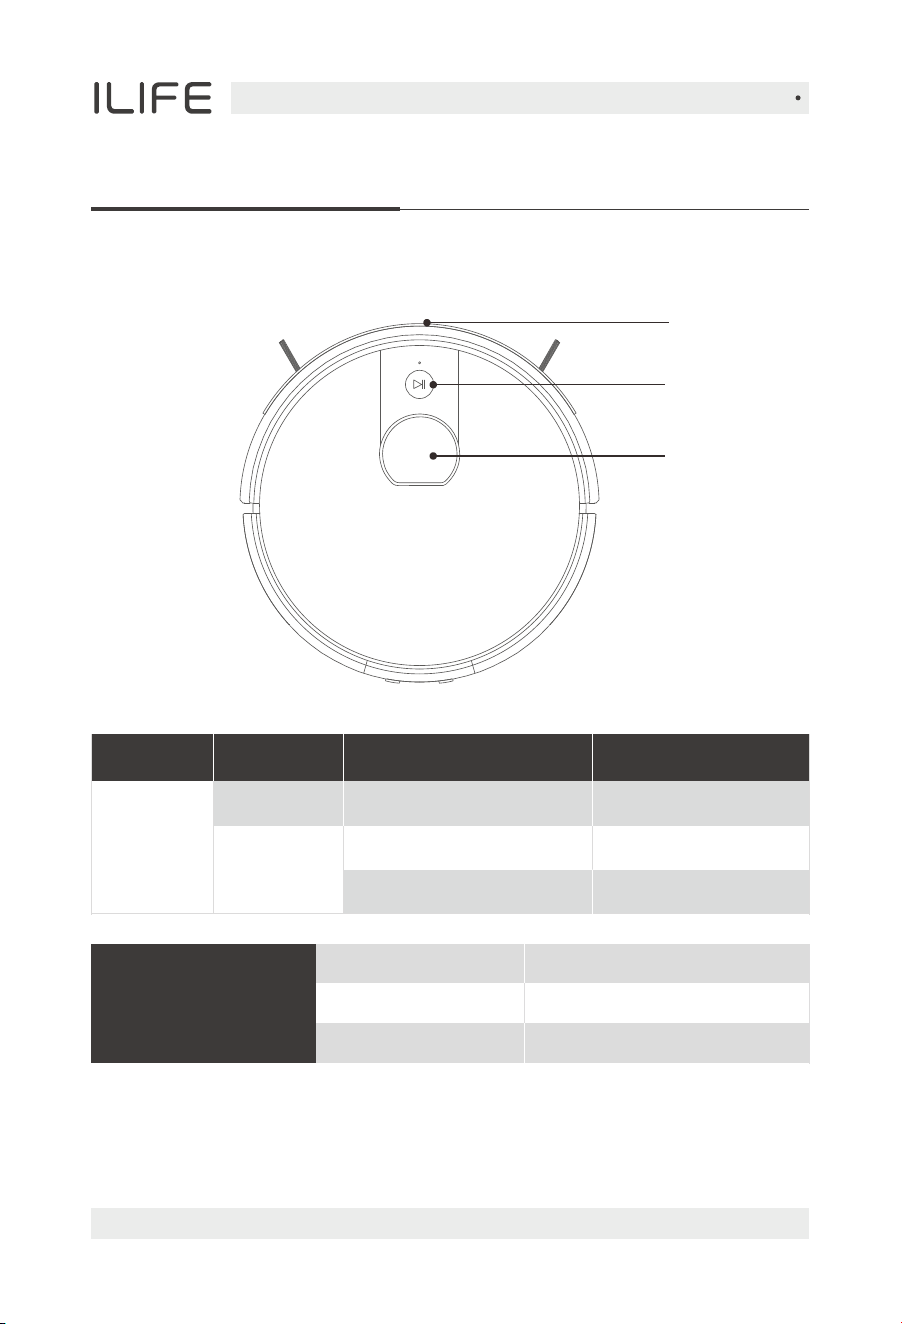
Host introduction
Product Composition
Auto Button
Button
Functional descriptionOperation
Turn off
Robot status
Turn on
Press and hold for 2 seconds
Press the button once
Press and hold for 3 seconds
Turn on the robot
Start/Stop cleaning
Turn off the robot
Green
Orange
Red
Electricity ≥12%
Electricity ≤12%
Failure or abnormality
Power indicator
Auto button
Bumper
Laser radar
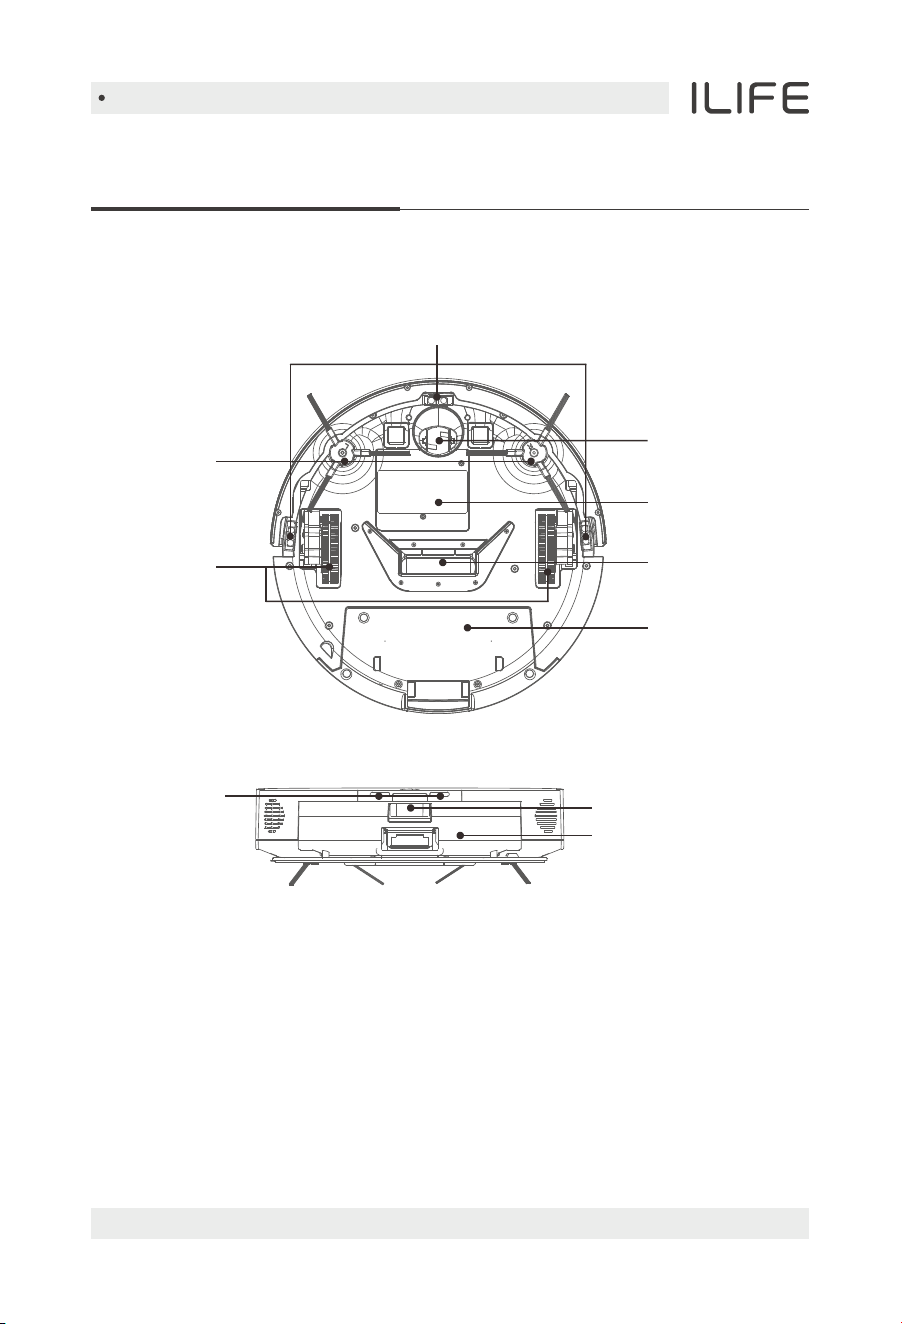
Product Composition
For more details, please visit www.iliferobot.com 7
English
Robot anatomy
Dustbin release button
2-in-1 dustbin
and water tank
Nose wheel
Battery lid
Side brushes
Side wheels
Cliff sensors
Suck passage
2-in-1 dustbin
and water tank
Charging pins
Product Composition
For more details, please visit www.iliferobot.com8
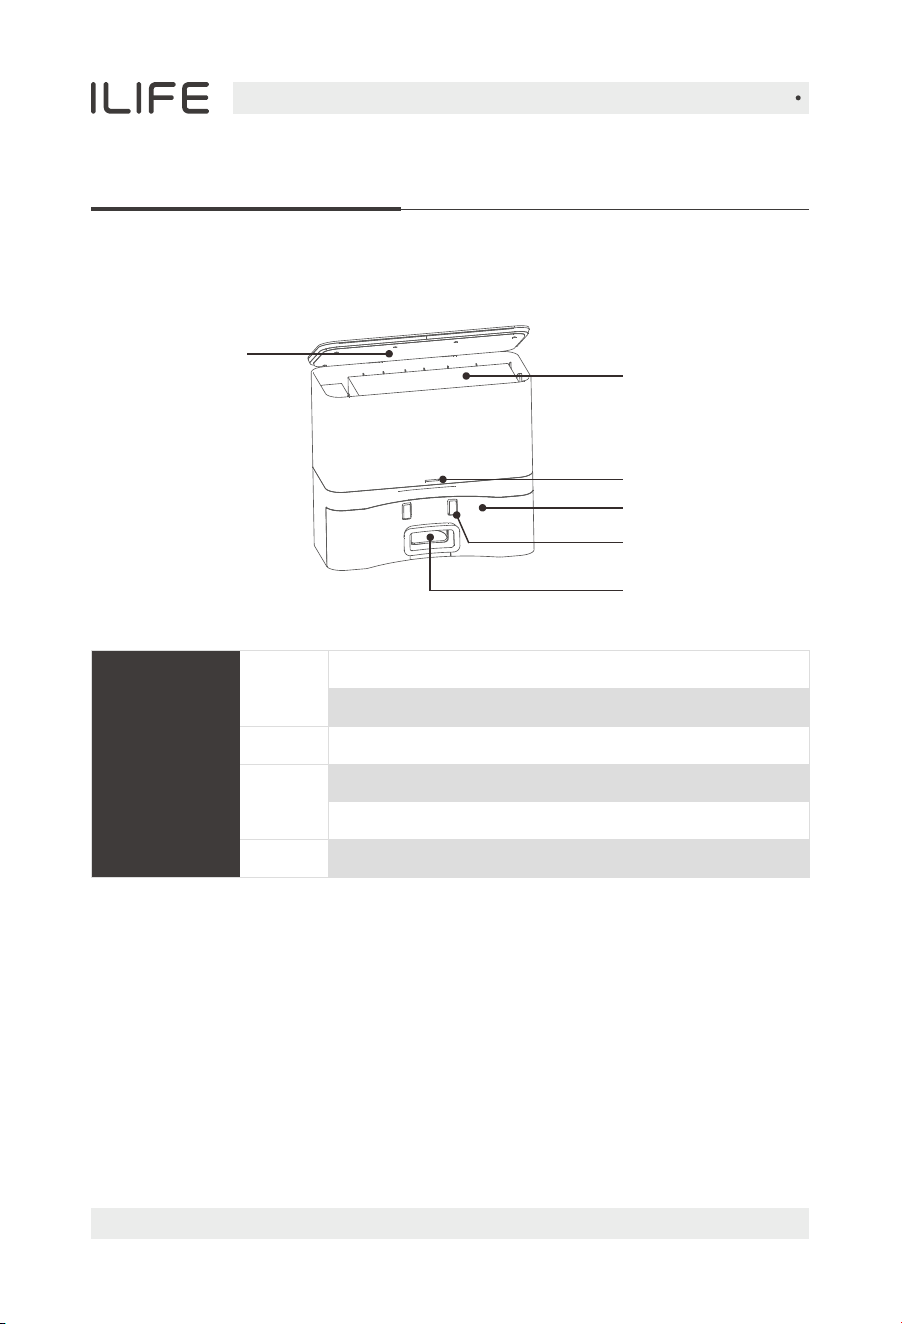
English
Dust bag
Cover
Self-empty station
Signal light
Charging pins
Infrared sensor
Dust collecting
Solid on - Robot vacuum fully charged
Breathing - Self-emptying station powered on
Flashing - Dust bag not installed
Flashing - Self-emptying station starting to collect dust
Breathing - Charging in progress
Sleep mode
Green
Orange
Red
Off
Power
indicator light
Product Composition
For more details, please visit www.iliferobot.com 9
English
Note:
When the water tank is filled with water, the robot's ability to
overcome obstacles and climb hills may be affected.
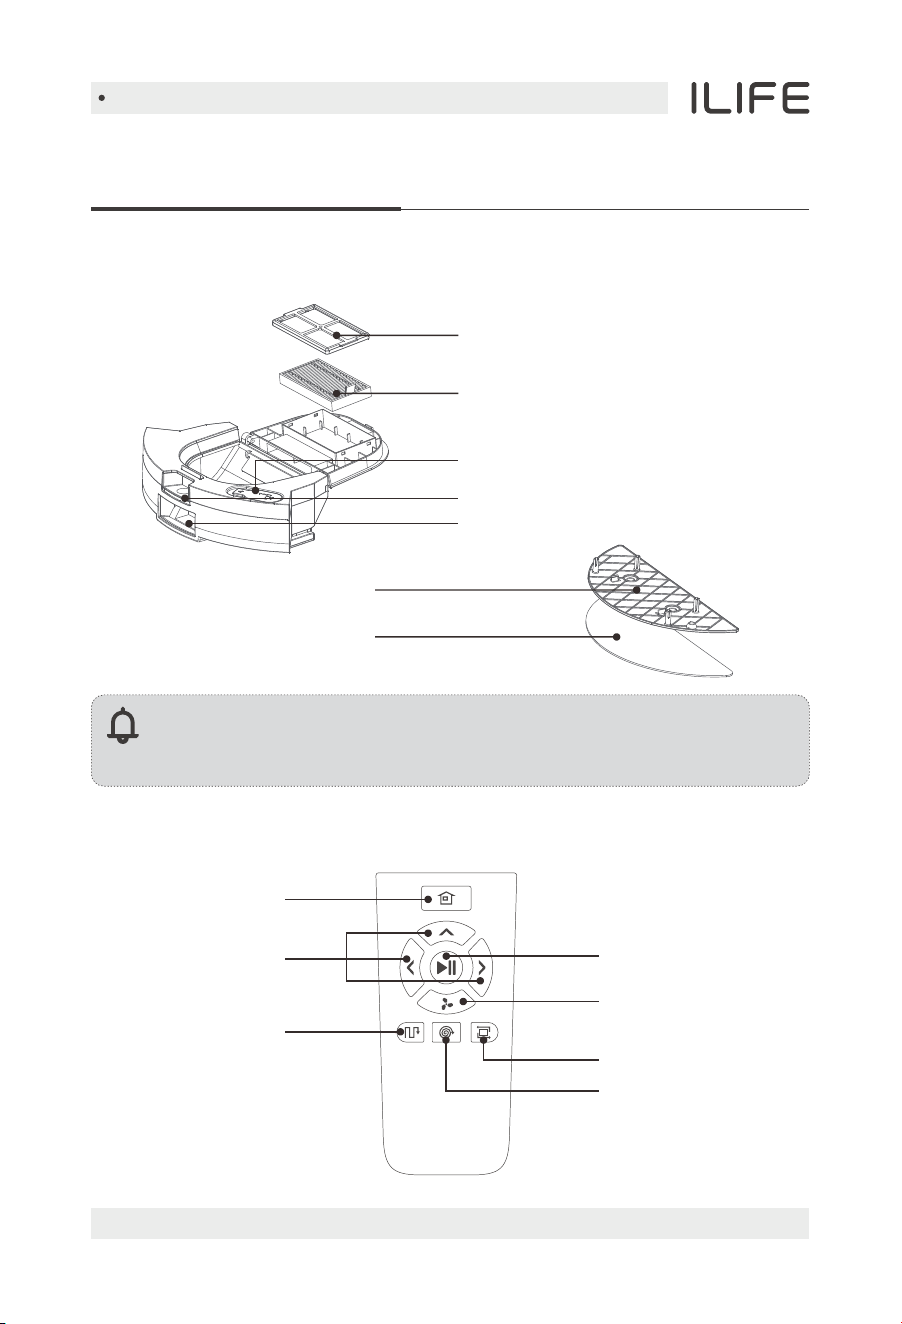
2-in-1 dustbin and water tank
Water tank plasticplug
High-efficiency filter
Primary filter
Mopping support
Mop cloth
Dustbin button
Dust ports
Remote Control
Direction
Start/Pause
Adjustable suction
Edge mode
Spot mode
Path mode
Auto charge button
Product Composition
For more details, please visit www.iliferobot.com10
English
Clean/Pause button
Direction buttons
Note: “ ” cannot be used during a cleaning cycle.
Press the button to switch the robot from sleep mode to idle mode.
1
2
Press the button when in idle mode to start cleaning.
Press the button to Pause the robot during its operation.
A. “ ” Forward
Press the button to move the robot forward.
C. “ ” Left
Press the button and the robot will turn left.
Note:
Please install two AAA/R03 batteries before using the remote control.
Please take out the batteries if the remote control won't be used for a long time.
D. “ ” Right
Press the button and the robot will turn right.
3
Auto charge button
Press the button and the robot will return to the charging dock for recharging.
Spot mode button
5
Press the button to start the spot cleaning.
Path mode
6
Press the button to start cleaning under path mode.
Edge cleaning button
4
Press the button to start border cleaning.
Press the button to switch suction in working mode.
B. “ ” Adjustable suction
MAX mode
7
During the cleaning process, if there is a lot of dust, press this button to
increase the suction power of the robot. Press it again to switch to the
max suction power, press it again to switch to the mute mode suction,
and press it again to switch back to auto mode suction.
For more details, please visit www.iliferobot.com 11
English
Product specifications
Note:
The company reserves the right of final decision on the interpretation
of these terms and conditions.
Main unit
Self-empty station
Overall dimension
Net weight
Rated Input
Rated Output
Rated power
Dust bag capacity
285x145x253mm
2.0kg
220-240V~50/60Hz
19V 0.6A
550W
2.5L
Overall dimension
Net weight
Battery type
Rated voltage
Rated power
Charging time
Capacity of dustbin
Capacity of water tank
315x315x93mm
2.4kg
Li-ion
14.4V
40W
<300mins
0.2L
0.2L
For more details, please visit www.iliferobot.com12
English
Product Operation
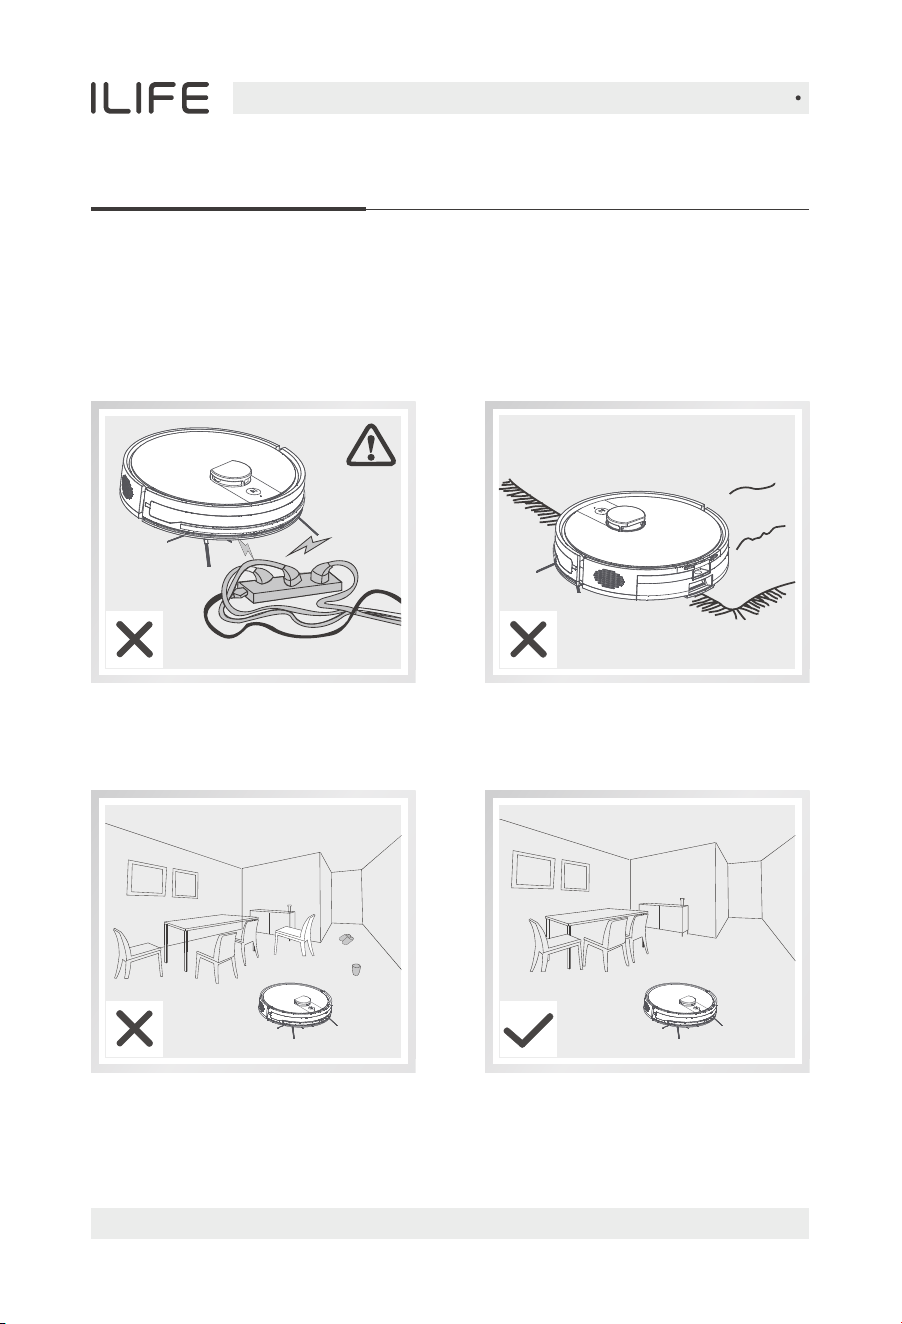
Attentions
The robot may skip over some areas due to the complexity of the home
environment. To achieve the best result, we suggest using it as daily routine
and clearing up the obstructions on the floor before starting the robot.
Please move away the power cords
and other objects that may tangle
the robot before cleaning.
To avoid being stuck during cleaning, please arrange the furniture neatly.
Please fold up the edges of the
carpets before cleaning.
For more details, please visit www.iliferobot.com 13
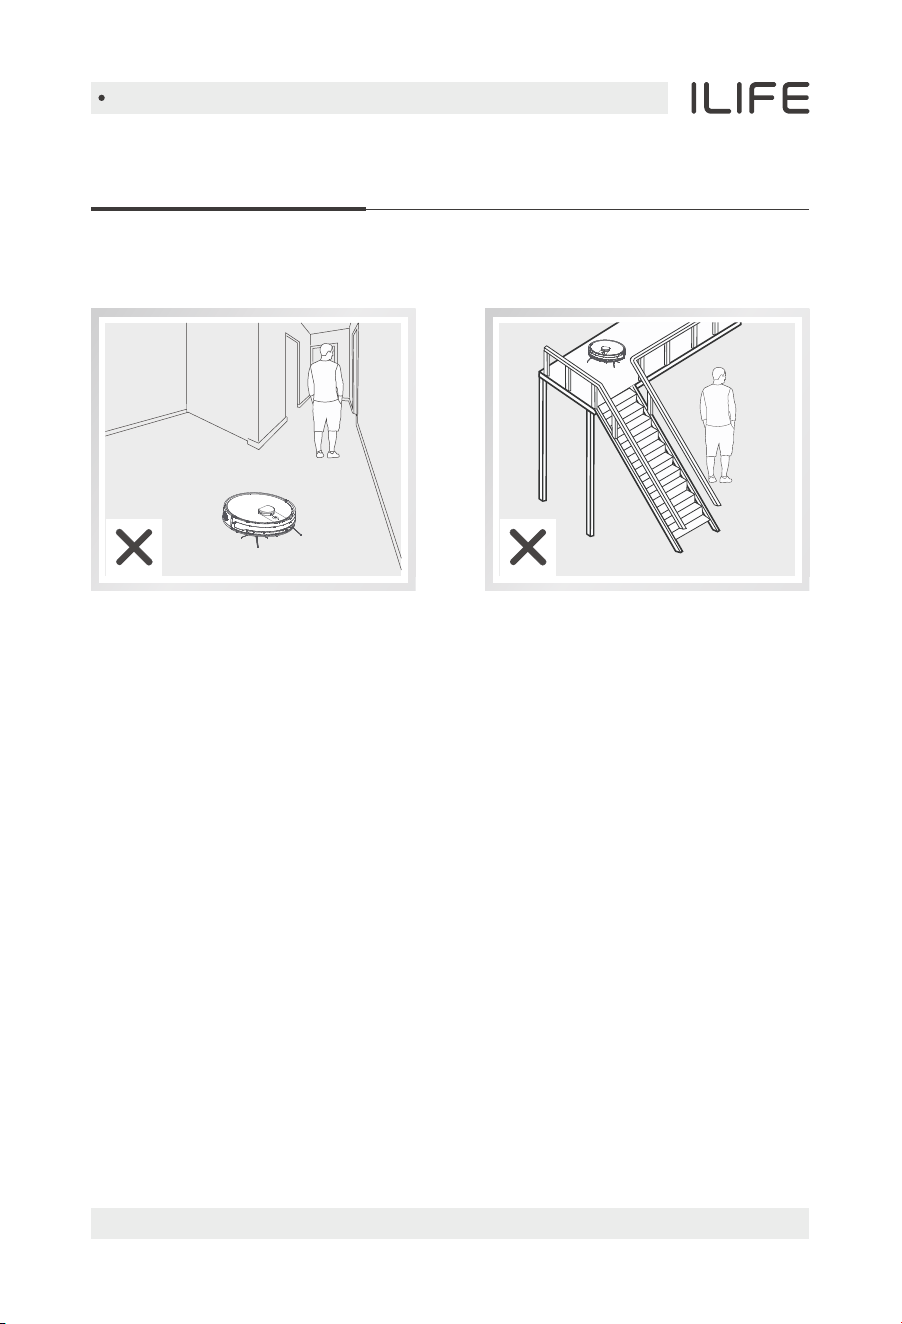
English
Product Operation
Attentions
Please do not stand at somewhere
with narrow space like the door sill
or hallway in case of blocking the
robot and skipping over some areas.
Please do not stand by downstairs
when the robot is working upstairs
in case of getting injured by any
fallen objects.
For more details, please visit www.iliferobot.com14
English
Product Operation
Quick guide
Turn on the robot
Note:
• After the robot finishes its work, please do not turn it off, and fully
recharge it for the next run.
• If the robot pauses working for more than ten minutes, it will enter
sleeping mode. If you need to wake up the robot again, you need to
press the AUTO button once.
Press and hold the AUTO button for
2 seconds to turn on, and press and
hold it for 3 seconds to turn off.
Reminder: After powering on the self-emptying station, the indicator
light will stay solid.
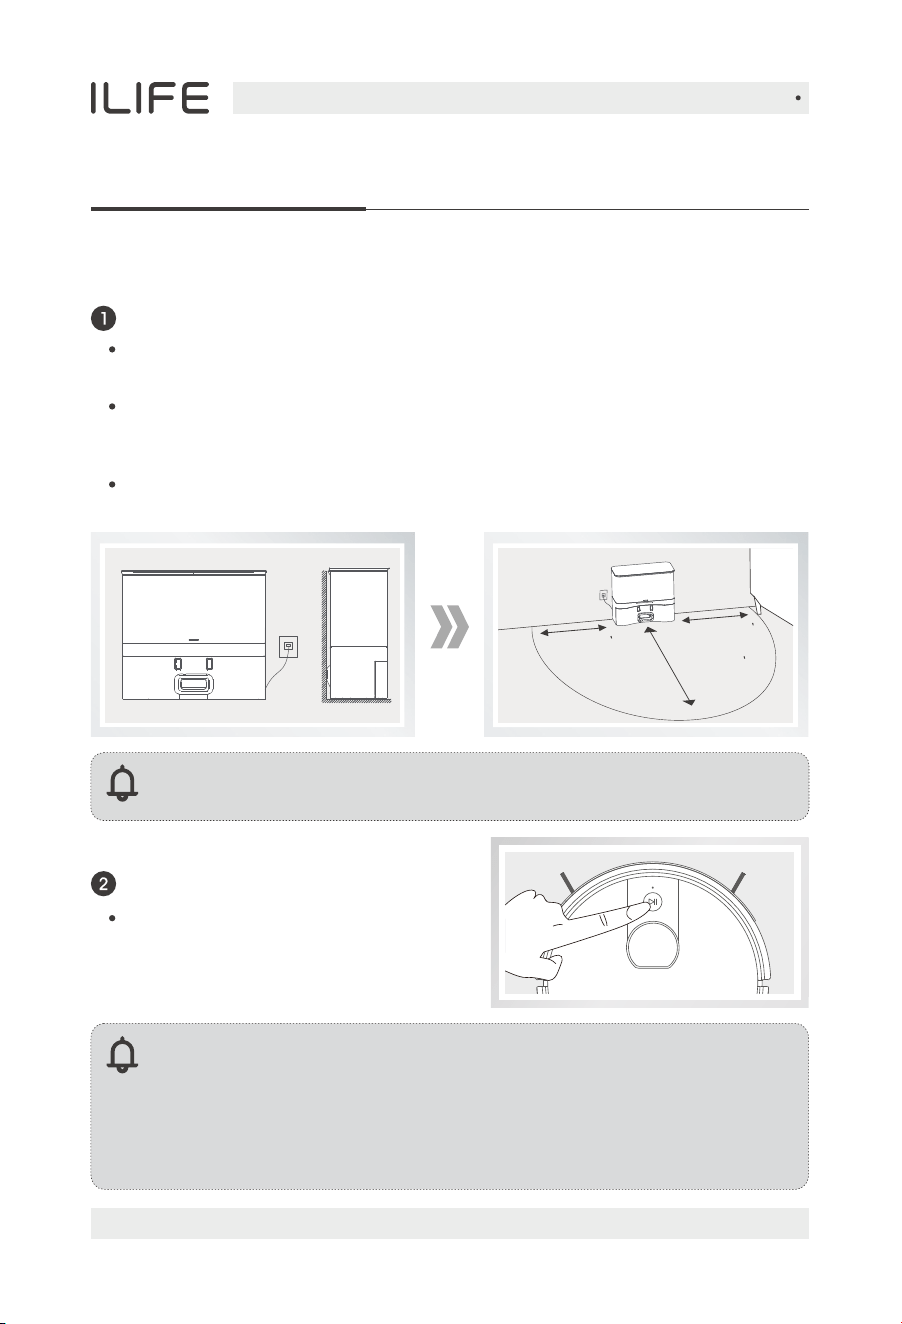
Self-emptying station installation
Place the self-emptying station on a hard surface against the wall,
plug in the power cord, and turn on the power.
Install the dust bag and close the lid. The self-emptying station indicator
light will breathe, indicating it's in standby mode.
Ensure there are no obstacles within approximately 1.5 meters in front of
and 0.5 meters above the self-emptying station's infrared signal range.
Avoid strong reflective objects like mirrors and direct sunlight.
1.5m(4.8 )
0.5m(1.6 )
0.5m(1.6 )
For more details, please visit www.iliferobot.com 15
English
Product Operation
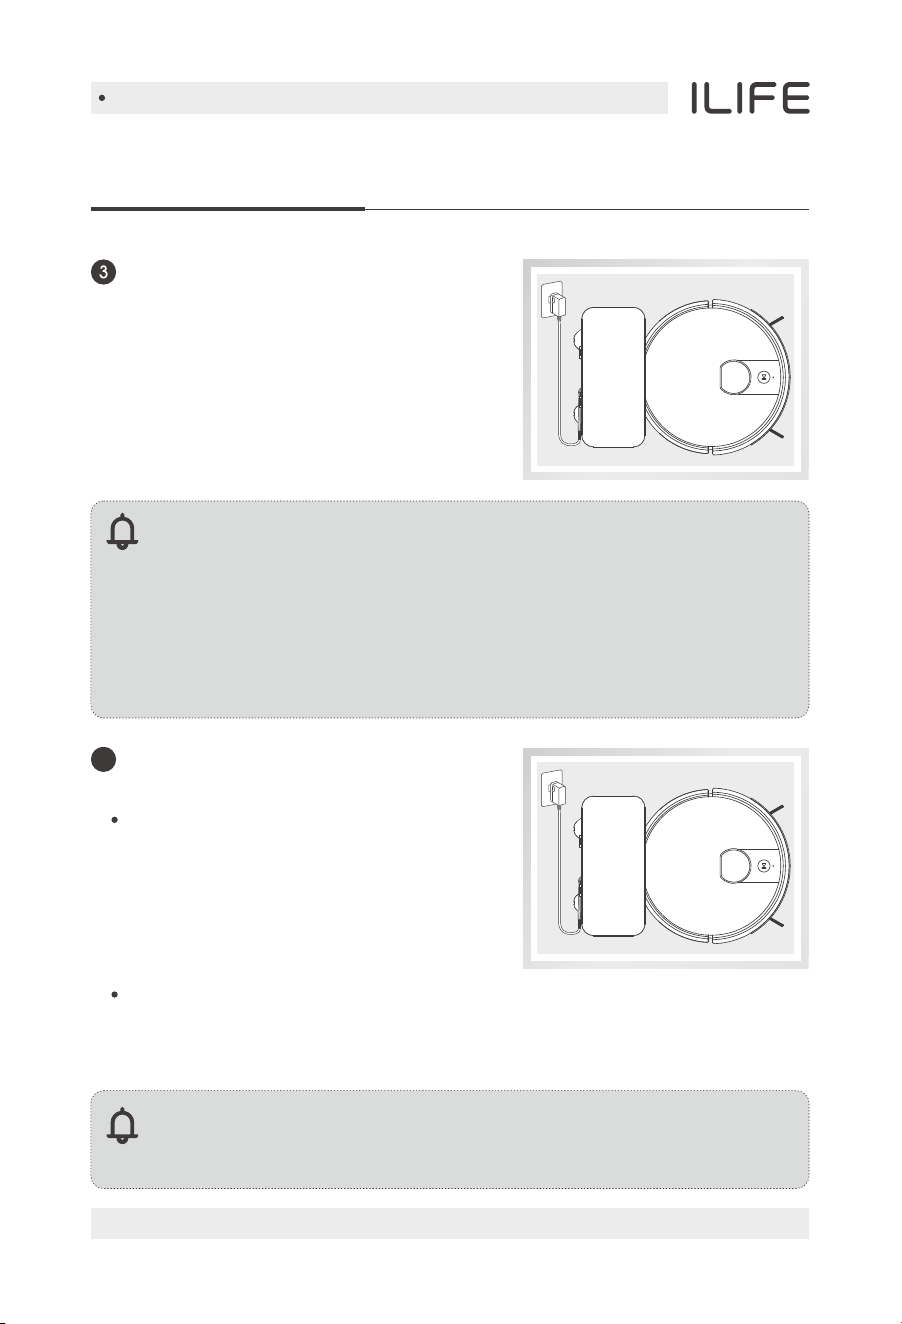
Robot charging
3. Charge for 6 hours for the first time.
When the charging contacts of the
self-emptying station come into contact
with the robot vacuum and begin
charging, wait for 3 seconds to start the
dust collection mode. The fan will run for
15 seconds, and the self-emptying station
indicator light will flash orange.
The dust collection will only occur when the robot has cleaned for more
than 5 minutes and returned to recharge. (The App can be set to schedule
a return to charge and dust collection after running the machine randomly
three times, each time for more than 5 minutes.)
Reminder:
1. Please keep the charging pins clean in daily use to ensure a
good connection.
2. For daily use, place the robot on the self-emptying station and
ensure the self-emptying station is powered on. (Placing it on the
self-emptying station will automatically turn it on.)
3. If you won't use the robot for a long time, please fully charge it,
turn off the power and keep it in a well-ventilated dry place.
Note:
If the machine has a mop bracket installed, dust collection function
will not be executed.
Automatic dust collection
by self-emptying station
4
1. Place the robot unit on the self-emptying
station, aligning it with the charging
electrodes.
2. During charging, the AUTO button will
breathe orange; after charging is complete,
all lights will turn off.
For more details, please visit www.iliferobot.com16
English
Product Operation
Before starting cleaning, you need to make sure the indicator light is
flashing and the robot is in a wake-up state. If the robot is sleeping,
please press the AUTO button once to wake up the robot.
If you want to choose other modes, please operate on the App.
The robot performs path planning autonomously during the working
process. If it is manually moved or operated by the App (except pause),
the robot will re-plan the path and may re-clean the cleaned area.
To ensure the working efficiency of the robot, please do not manipulate
the robot. (If the machine is lifted, it will alarm and stop cleaning, and you
need to press the AUTO button or operate the App to restart cleaning)
After waking up the robot, you can press the AUTO button once, and the robot
will start the automatic cleaning.
Start cleaning
5
For more details, please visit www.iliferobot.com 17
English
Product Operation
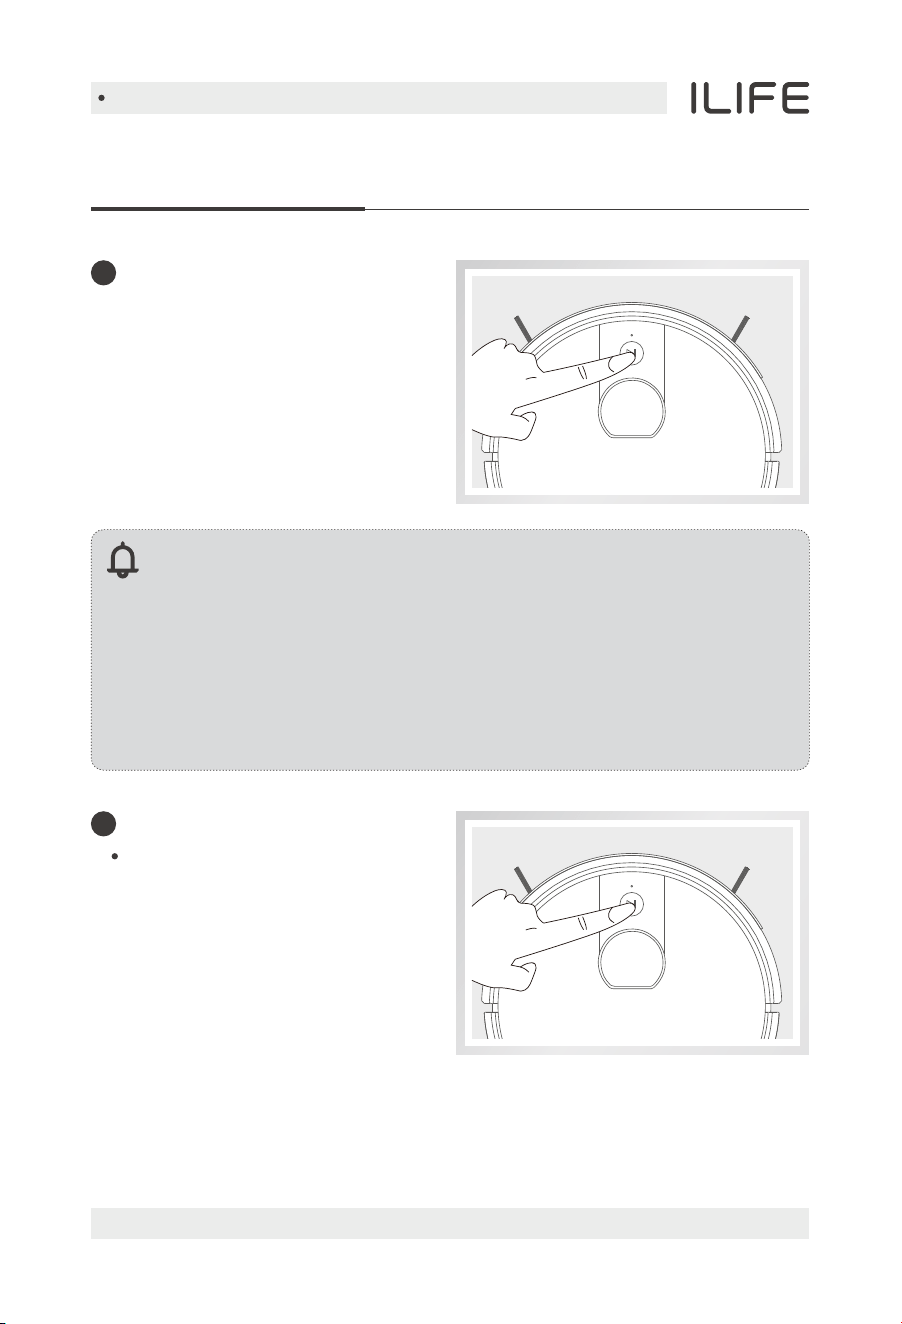
Sleep mode
The Robot will automatically
enter the Sleep Mode if no
action is taken for 10 minutes.
Reminder:
1. The Robot will automatically enter the Sleep Mode if no action is
taken for 10 minutes. If you want to start the robot again,
please press the AUTO button once to wake up the robot.
2. The robot will work out a new cleaning path, and will clean the
areas again which have been cleaned before.
Note: After the sleeping robot in pause mode is woken up again,
it needs to be restarted to start cleaning, and the robot will not
resume the last unfinished cleaning.
When the robot is working,
you can pause the robot by
pressing the robot‘s AUTO button
or the “standby” button in the App.
Pause
6
7
English
For more details, please visit www.iliferobot.com18
Product Operation
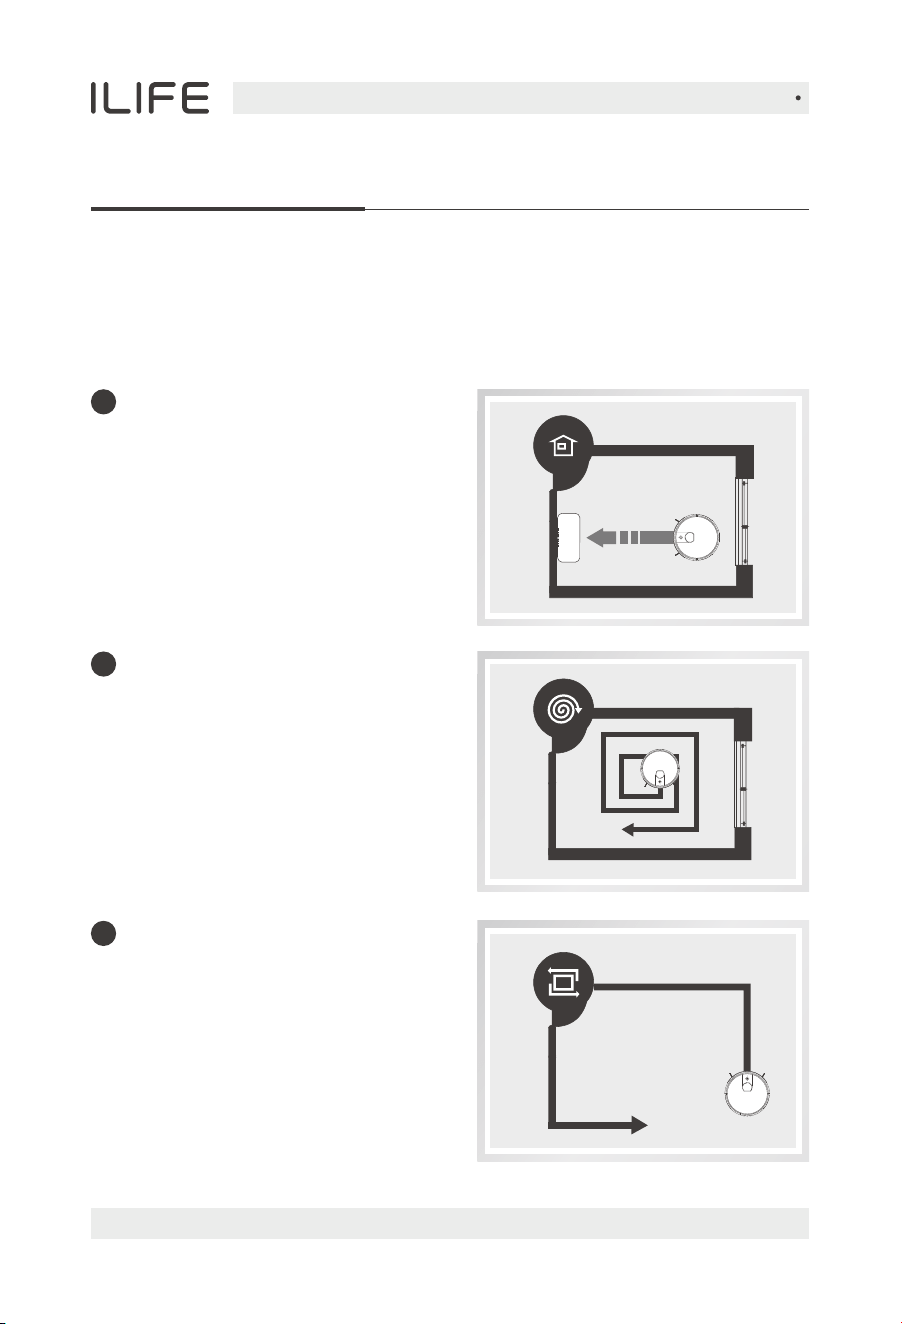
Select cleaning modes
This product can set a variety of cleaning modes through the App to adapt to
different ground conditions and achieve deep cleaning.
1
Auto charge
The robot can sense lower
power during the cleaning
process and automatically
activate Self-charge Mode and
search for the charging dock.
2
Spot mode
This mode is suitable for the
ground environment where
garbage is more concentrated.
In this mode, the robot can carry
out concentrated cleaning in a
"spiral" route in a designated area.
3
Edge Mode
This mode is mainly for cleaning
indoor corners. In this mode,
this robot can clean along the edge
of fixed objects (such as walls).
English
For more details, please visit www.iliferobot.com 19
Product Operation
Water tank operation
The water tank with a mopping cloth is installed into the device. Please kindly
add water to the water tank before mopping. It is recommended to vacuum
the floor before mopping. Fordailymaintenance,pleasecheckoutthetips
onthecorrespondingchapterinthismanual.
Note:
1. Please do not use water tank components on the carpet .
2. Please pay attention during the mopping mode, timely add water or
clean the mopping pad. The water tank needs to be removed when
adding water.
3. Be sure to remove the water tank components when charging.
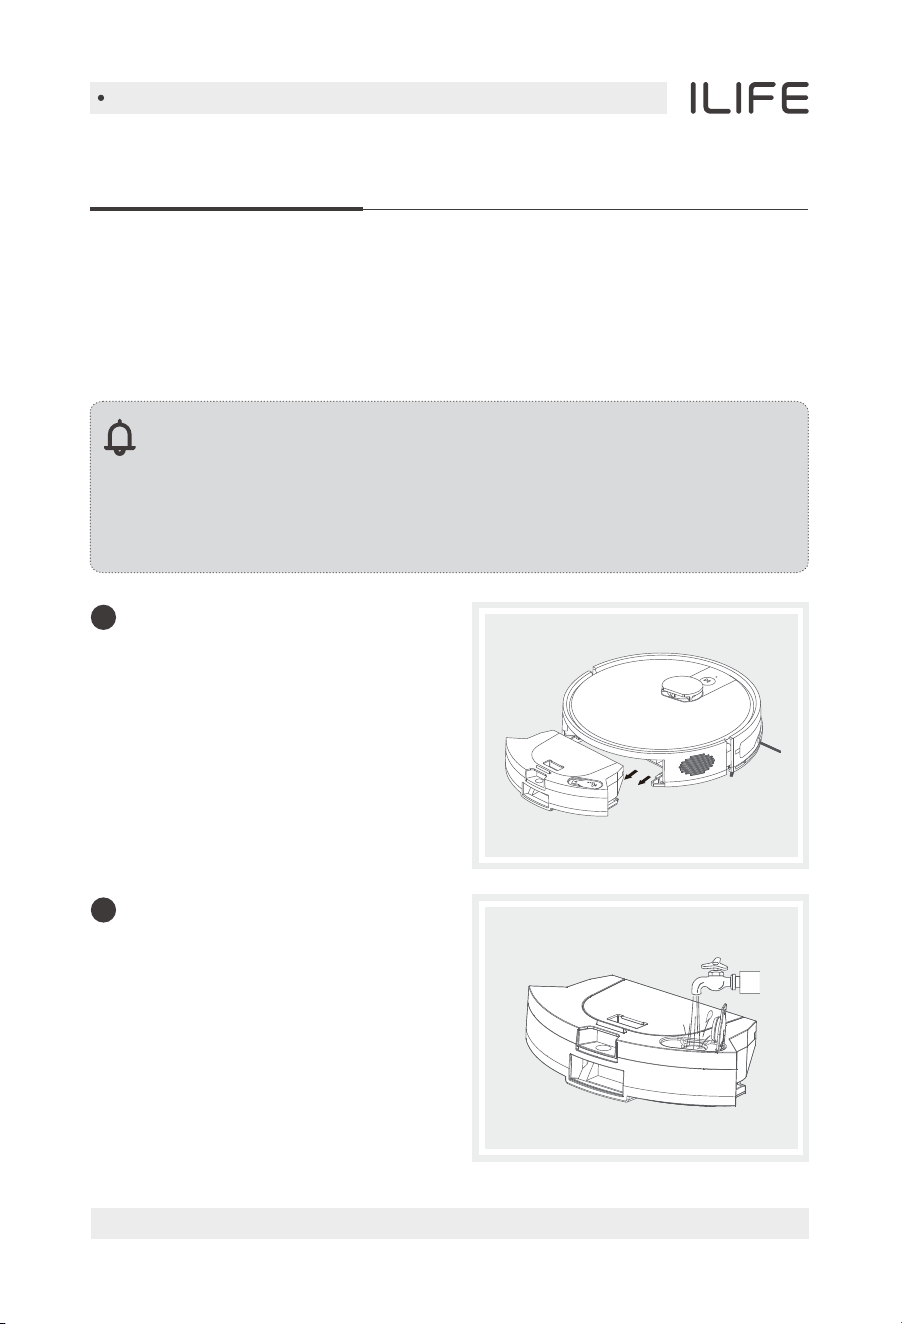
Remove the water tank
components
Slide back to remove the
water tank components.
1
Add water
Open the water injection cap and
fill it with water. Tightly close the
cap once finish water injecting.
2
English
For more details, please visit www.iliferobot.com20
Product Operation
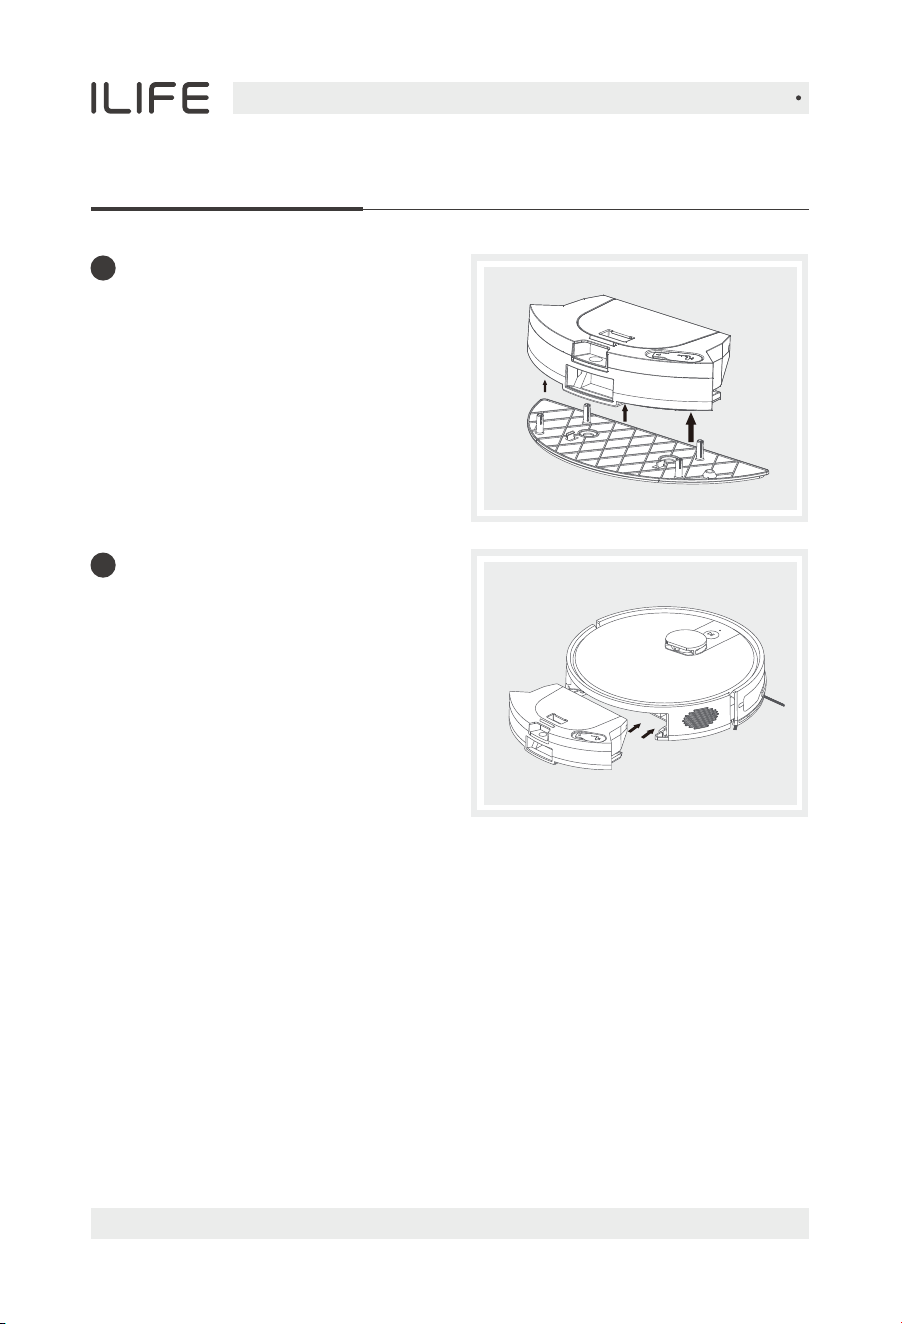
Place the mopping support
Paste a mopping support.
3
Slide it forward, align it with the clip,
and when you hear a "click" sound,
it is installed in place, and then you
can press the sweep button to
automatically execute the
corresponding mopping mode.
Install water tank components
4

English
For more details, please visit www.iliferobot.com 25
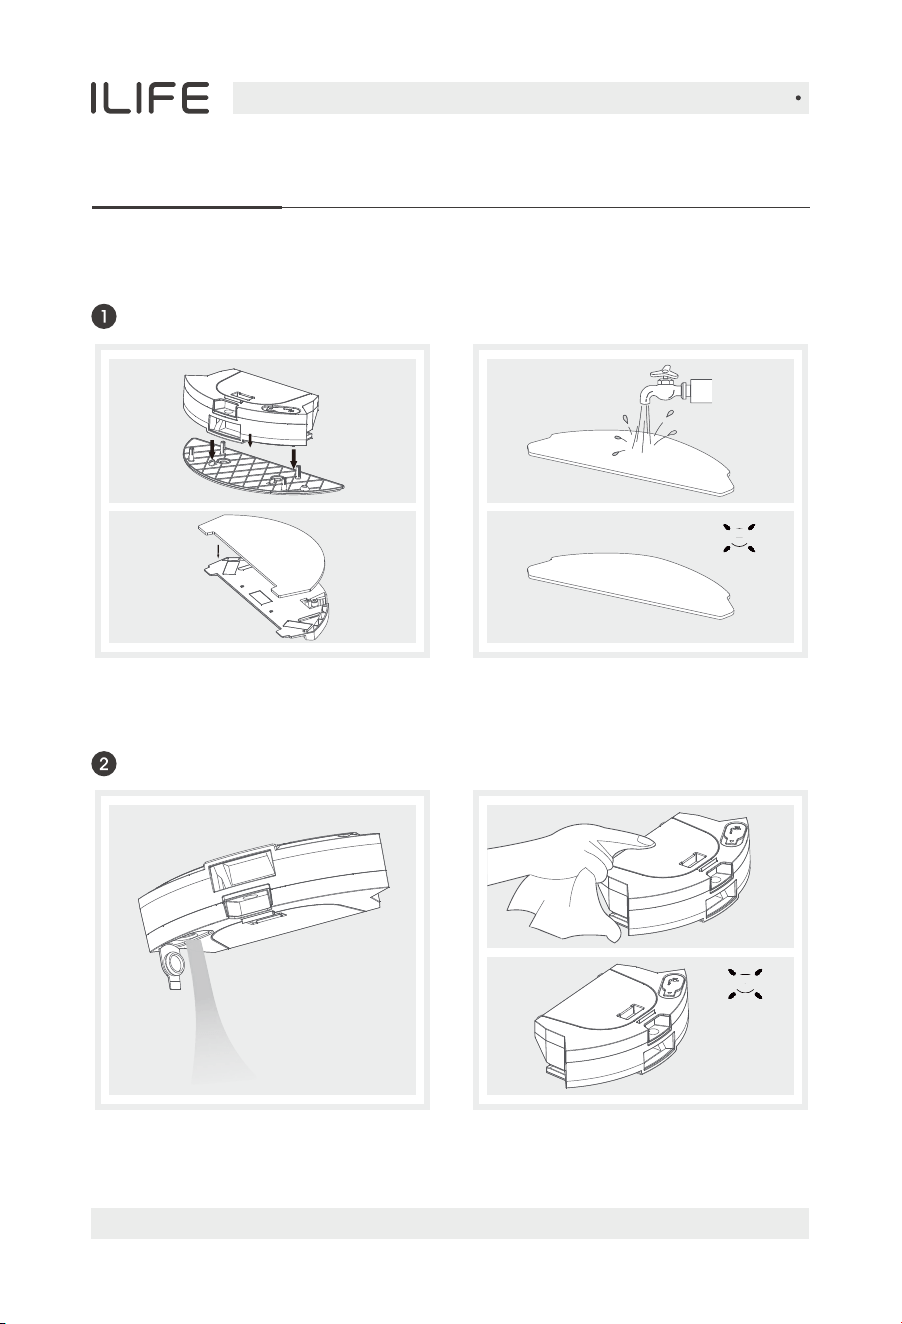
Maintenance
Clean up dustbin and filters
Please turn off the robot before cleaning any spare parts, and remember
to cut off the power.
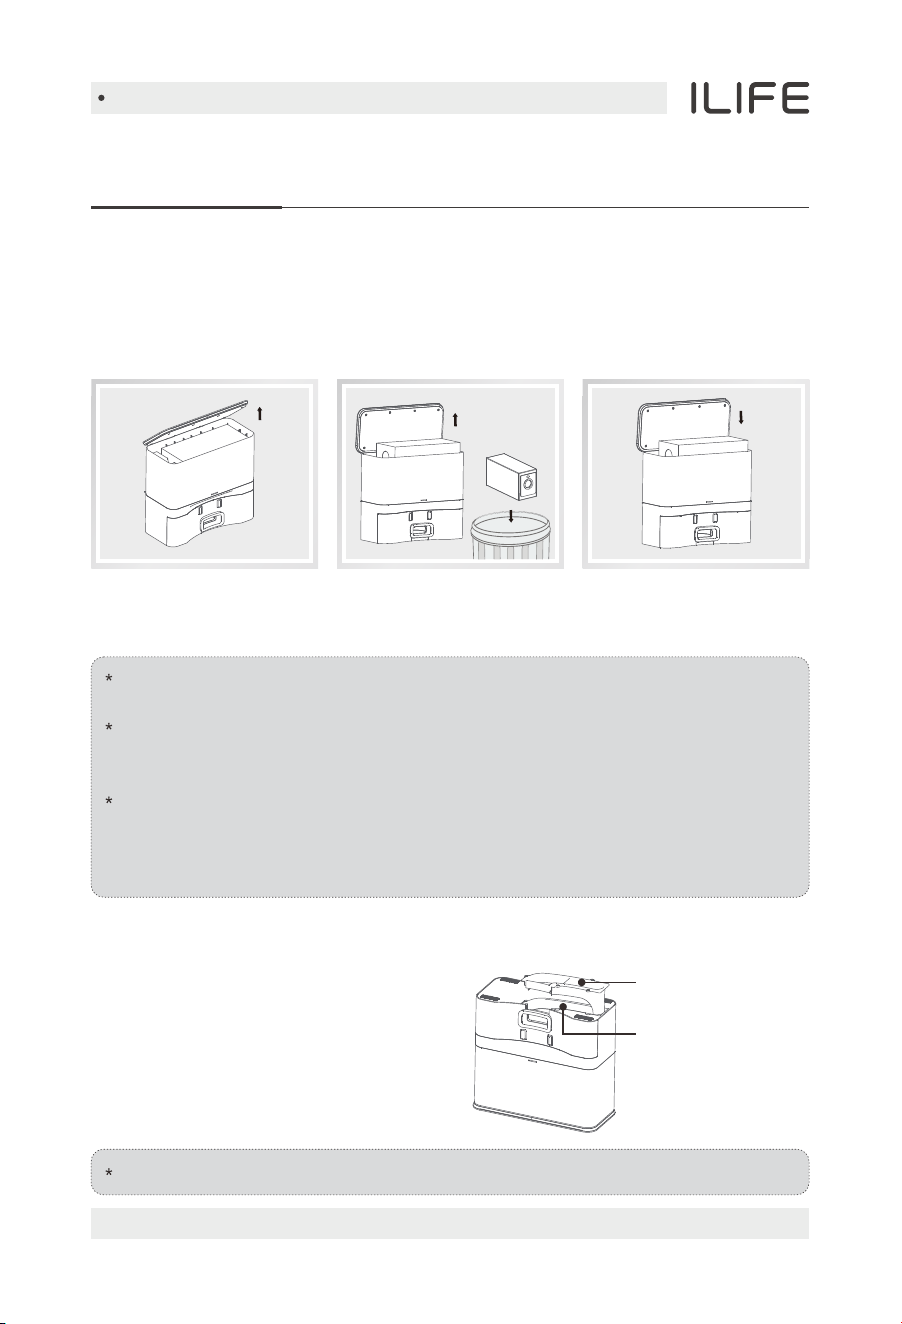
1. Open the cover, take out the
dustbin and high-performance filter,
and press the button on the dustbin
to release all dust, then wipe clean
the dustbin.
2. Take out the high-performance filter.
Slightly tap it to empty the trash in it.
English
For more details, please visit www.iliferobot.com26
Maintenance
Cleaning of water tank components
Remove: after mopping, please remove
the water tank components and the
mop cloth.
Maintenance: rinse and air dry the
mop cloth.
Remove: after mopping, remove the
mop cloth and the components, drain
the remaining water in the water tank.
Maintenance: dry the water tank by
hand and then air dry it.
Clean the mop cloth
Clean the water tank
English
For more details, please visit www.iliferobot.com 27
Maintenance
Replacing the dust bag
Open the top cover of the dust charging base, remove the dust bag, dispose of
it in the trash, take out a new dust bag, check for any damage, place it in the
dust bag slot, and cover it with the lid.
Damaged dust bags may cause damage to the self-emptying station.
Before use, check if the dust bag is intact.
Dust bags are disposable consumables with a usage cycle of about one
and a half months. Please check and replace them regularly to avoid
damage caused by prolonged use.
If dirt accumulates in the dust bag compartment of the self-emptying
station, it is recommended to clean it regularly to ensure the filter is free
of foreign objects, avoiding blockage of the fan inlet and affecting
performance.
Replace with a new
dust bag and cover the
top of the station.
Remove the dust bag
and discard it.
Open the top cover of
the base station.
Do not disassemble violently. After cleaning, reinstall it as it was.
If any foreign objects are found blocking
the passage, unplug the power plug,
turn over the self-emptying station,
and refer to the diagram below.
Use a screwdriver to remove the
transparent cover of the dust passage
and clean out the foreign objects.
Cleaning the dust passage
Transparent cover
of the dust passage
Dust passage
English
For more details, please visit www.iliferobot.com28
Maintenance
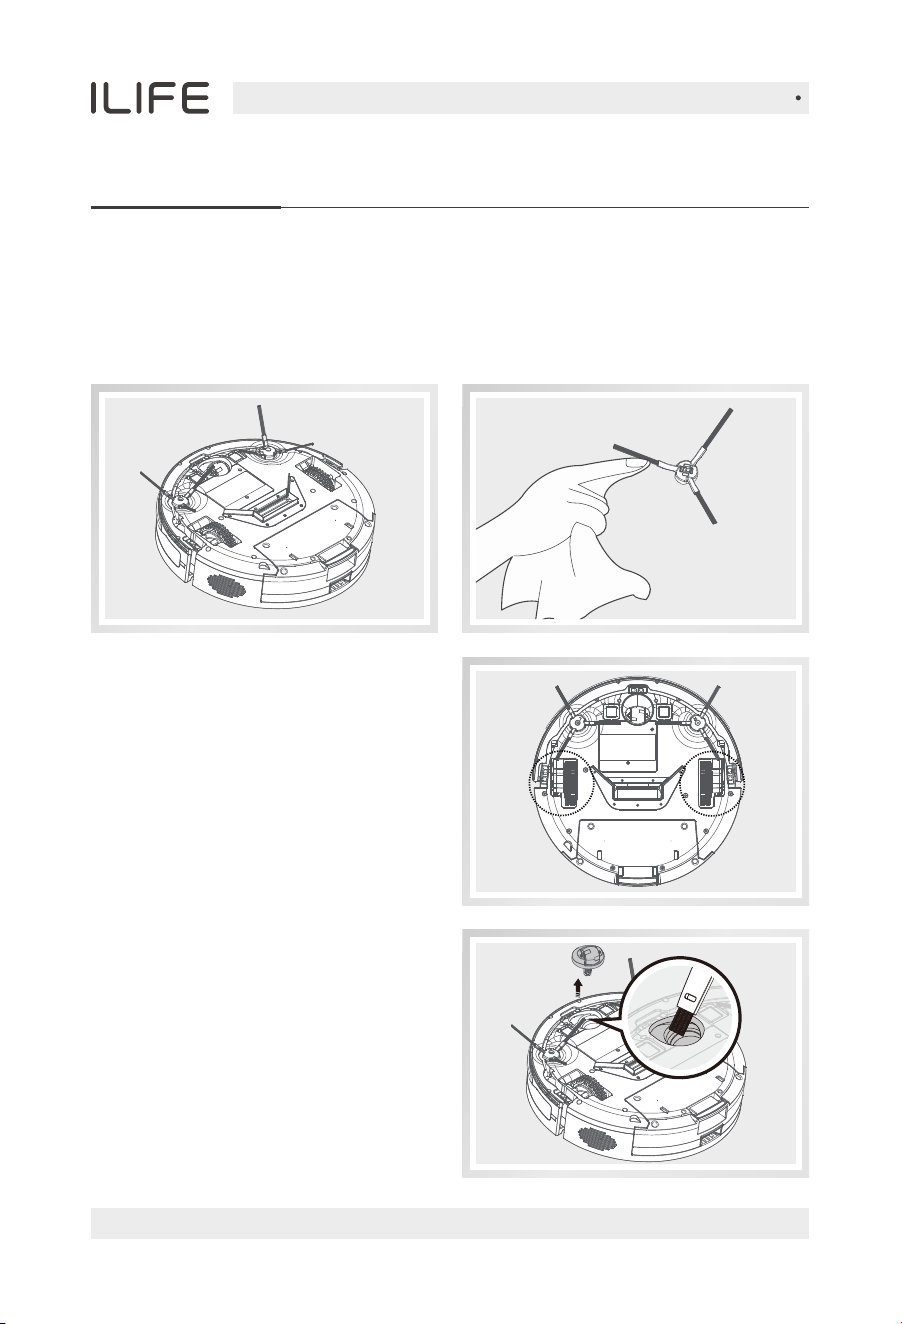
Clean up the side brushes
• Remove side brushes. Wipe clean with a clean cloth.
• When replacing the side brush, please distinguish the corresponding
installation position of the "L" "R" side brush.
Other spare parts
Please turn off the robot first,
then pull out the nose wheel vertically,
clean off the hair and foreign objects
tangled in the nose wheel, and wipe
it with a clean cleaning cloth.
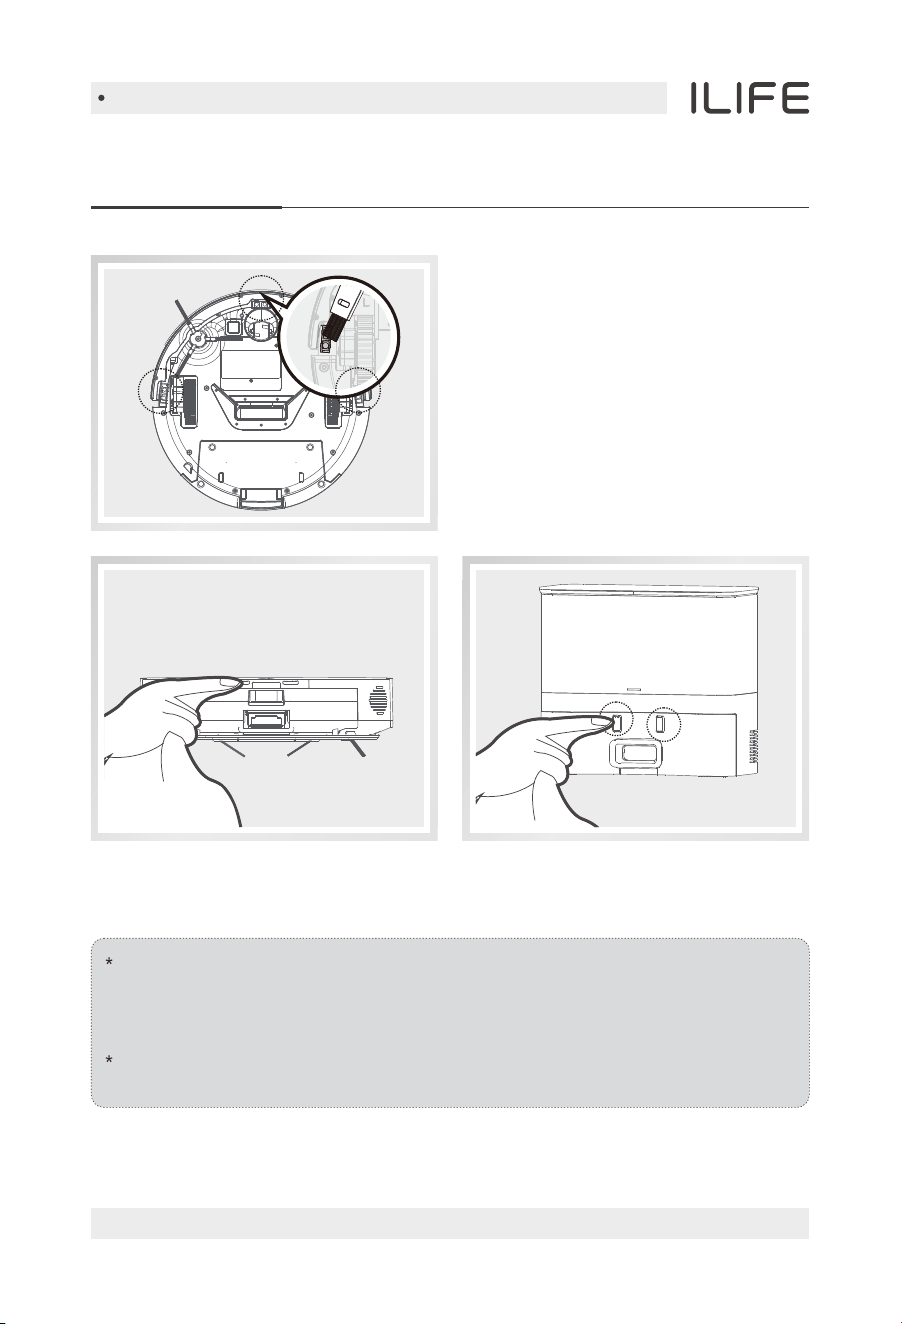
Check side wheels
When a buzzer sounds,
turn off the power, and then clear
any objects blocking the side wheels.
English
For more details, please visit www.iliferobot.com 29
Maintenance
When the battery is in the depth of discharge state or not in use for a long
time, its capacity will be reduced. In this case, we suggest you to activate
it again. Charge the robot on the charging dock for 3mins, and repeat
3 times, then fully charge the robot for 5-6hours.
The robot uses long cyclic life batteries. There is no need to replace it
frequently. Please contact our support team if necessary.
Periodically wipe the sensor with a
dry cloth to keep it clean.
Clean the charging pins on the robot and the charging dock regularly with
dry cloth.

Note:
If the solutions above don't resolve the issue, please try the following:
1. First, press and hold the AUTO button for 3 seconds to turn off
the robot , then press and hold the AUTO button for 2 seconds to
turn on the robot.
2. If restarting the robot still does not solve the problem, please send
the machine to the after-sales center for repair.
Troubleshooting
Alert Reference
In case of errors, red light stays on with voice annoucement.
No. Voice announcement What to doPossible causes
Please check the
side brushes
Remove and clean the
side brushes.
Side brush error.
Please check left wheel.
Please check right wheel.
Check and clean left
side wheel.
Check and clean right
side wheel.
Left side wheel error.
Right side wheel error.
Please check vaccum.
Please clap front bumper.
Contact Maintenance.
Tap bumper to confirm
it moves normally and is
on track.
Fan error.
Bumper error.
01
02
03
04
05
06
07
Please clean drop sensors. Check drop sensors.Drop sensors error.
Please check radar sensor.
Auto charging fail,
please put the robot back
to charging dock.
Check radar sensor,
restart the robot again.
Place the charging dock.
Radar sensors error.
Unable to explore
charging dock.
Please put robot back to
the ground.
Relocate robot to a
flat surface.
Robot is lifted up.
09
08
English
For more details, please visit www.iliferobot.com30