
A7 Jump Starter
with Air Pump
SUPERSAFE is a safety protection technology by GOOLOO
Model No.:JS-558
User Manual
6000A
160PSI
JUMP STARTER
AIR COMPRESSOR
6000A
160PSI
A7
JUMP STARTER
AIR COMPRESSOR

Charge It First !
Warning
While reviewing this manual, you can begin charging your A7 using the included USB-C
cable and a compatible wall charger.
Note: Wall charger not included.
Thank you for choosing the GOOLOO Jump Starter.
To ensure a safe and satisfying experience, please read this manual carefully before use. It
contains important safety guidelines and operating instructions.
We highly recommend keeping this manual for future reference.
This unit is designed exclusively for 12V vehicles or equipment. Using it with incompatible
battery systems can be hazardous.
Before using the jump starter, carefully review all safety information provided.
Failure to follow safety guidelines may result in:
• Damage to the unit • Electric shock • Fire or explosion
• Property damage • Personal injury
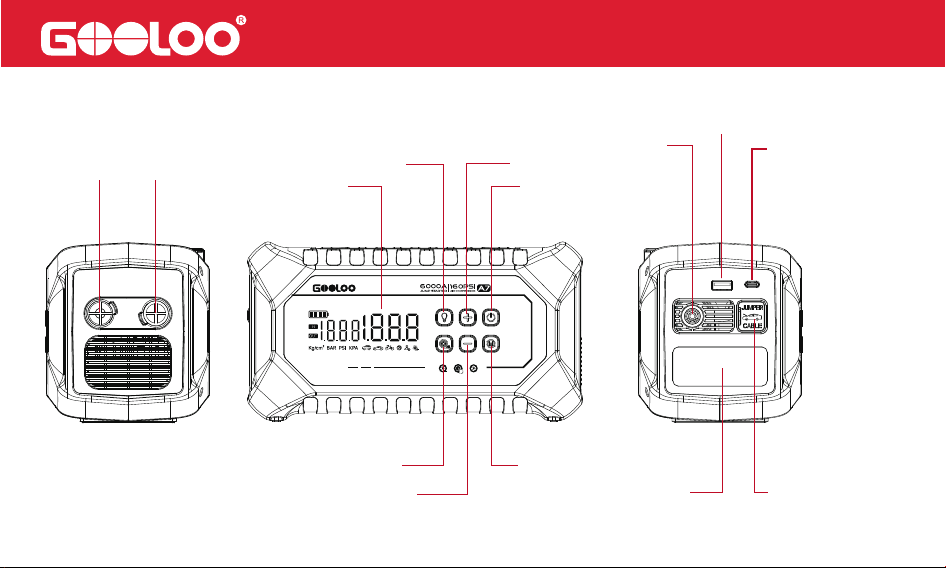
Product Parts and Functions Description
Deflate
Inflate
Led Display
Power Switch
Pressure Increase
Light Switch
Blower Function
Pressure Increase
Setting Button
Output Port
USB-C
Input/output Port
12V Jump Start
Aerated
LED Flash Light

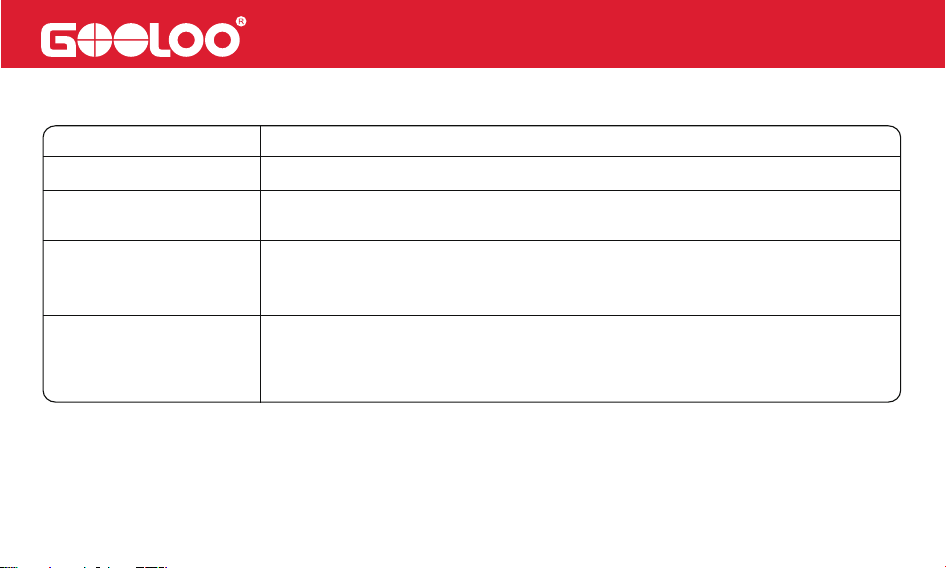
Package Content
# QuantityPart Name
Host
Air Hose
Nozzle Kits
USB-A to USB-C Cable
1
1
1
1
1
5
5
1
1
2
3
4 Blower Compression Tube
5
6
7
8
Blower Nozzles
User Manual
Smart Jumper Cable

Technical Specification
Dimension:
Weight:
Battery Capacity:
Input:
Max Inflation Pressure:
Air Flow Volume:
Full Charging Time:
Peak Current:
Operating Temperature
Output:
9.1×4.4×4.9in
3.75lb
88.8Wh
USB-C PD30W (5V/3A; 9V/3A; 12V/2.5A; 15V/2A; 20V/1.5A);
Quick charge ( 5V/3A; 9V/2A; 12V/1.5A);
12V jump starter
USB-CPD30W(5V/3A; 9V/3A; 12V/2.5A; 15V/2A; 20V/1.5A)
160PSI
Inflate/Deflate: 150L/min
About3.5hours
6000A
-20°C~60°C(-4°F~140°F)
Operation Instructions
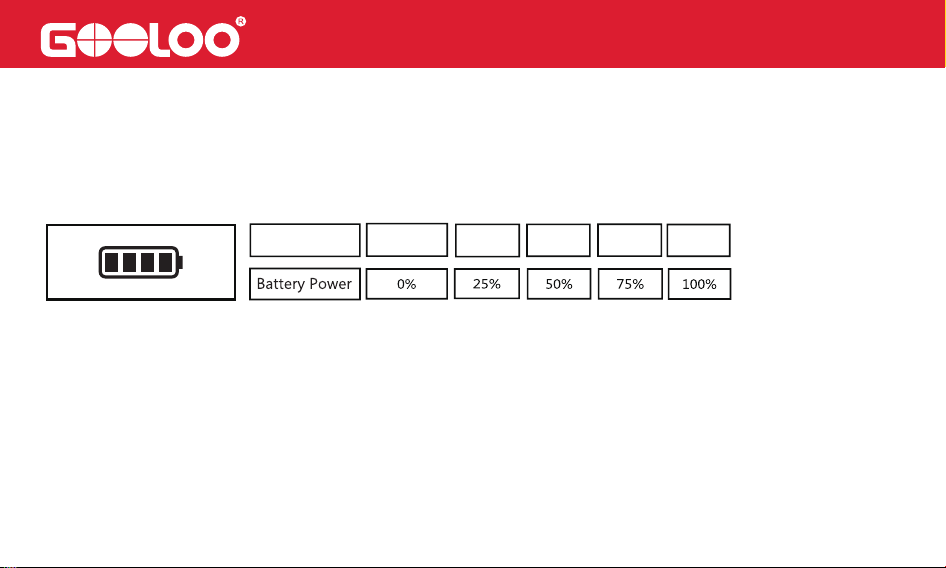
Battery Power:
1 Bar 2 Bars 3 Bars 4 Bars
0 Bar
Battery Icon
Press the Power button to check the current battery level. The number of bars on the battery
icon indicates the approximate charge percentage:
During charging, the battery icon will blink progressively, indicating the charging progress.
Once charging is complete, all four bars will be solid.
To charge the A7, use the included USB-C cable with a compatible wall charger.
Note: Wall charger is not included.
How to Charge the A7
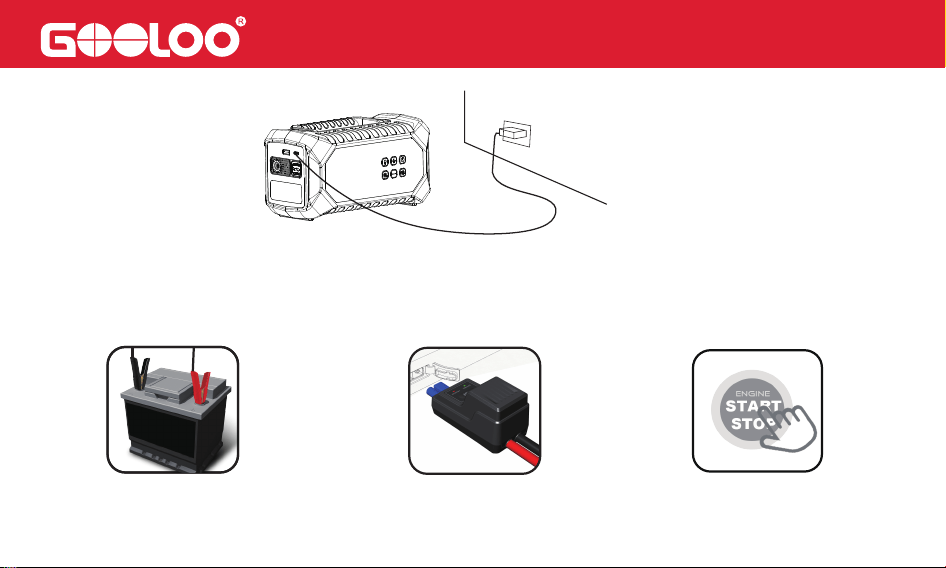
How to Start a 12V Vehicle (
Make sure the battery power≥2 bars)
Note: Please ensure the correct connection of the vehicle battery before pressing the "BOOST" button on the
jumper cable.
1. Connect the vehicle battery
2. Green LED illuminates (solid)
3. Start vehicle engine
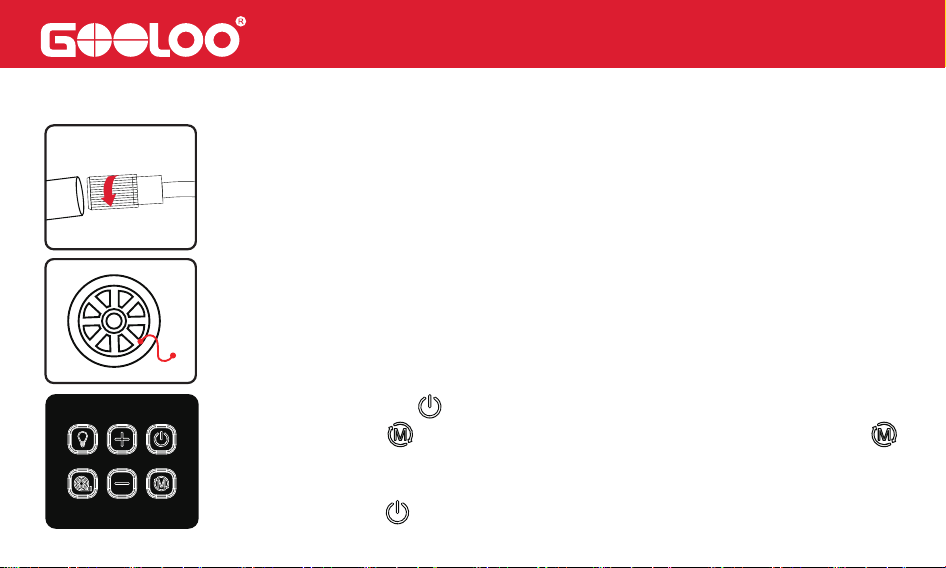
How to Inflate a Tire
1.Attach the air hose and secure it
① Press and hold the for 2 seconds to turn on the device.
2.Attach Air Hose to Tire
② Short press the to select the inflation mode, press and hold the
for 2 seconds to switch the pressure unit.
③ Use “+” and “–” buttons to set the desired pressure.
④ Short press the to start inflation.
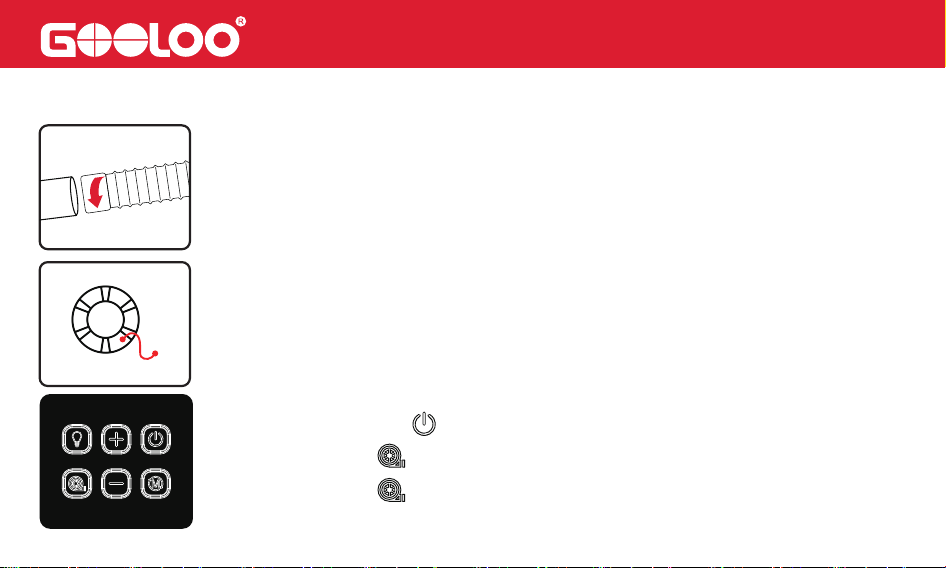
How to Use Inflate/Deflate Function
1.Attach the blower compression tube and secure it
2.Connect the blower compression tube to the inflatable/deflatable item
① Press and hold the for 2 seconds to turn on the device.
② Short press the to start inflation/deflation.
③ Short press the to stop inflation/deflation.
Green LED (solid)
Red LED
Green LED (blinking)
LED Indicator
Proper connection detected. You can start the vehicle immediately.
Reverse polarity detected. Please check that the battery clamps are
connected to the correct terminals.
Operation
Check the LED indicator on the jumper cable and follow the instructions as below:
The vehicle battery voltage is too low. Press the “BOOST” button on the
jumper cable. Once the Green LED turns solid, start the vehicle within 30
seconds.
The vehicle battery may be damaged. First, ensure the clamps are
connected correctly. Then press the “BOOST” button. When the Green
LED turns solid, start the vehicle within 30 seconds.
No Light
If you encounter any persistent issues, we recommend discontinuing the use of the
jump starter and contacting our service team directly at [email protected] (for the
US)/[email protected] (for the EU). Rest assured, we will make every effort to
resolve the problem within 24 hours.
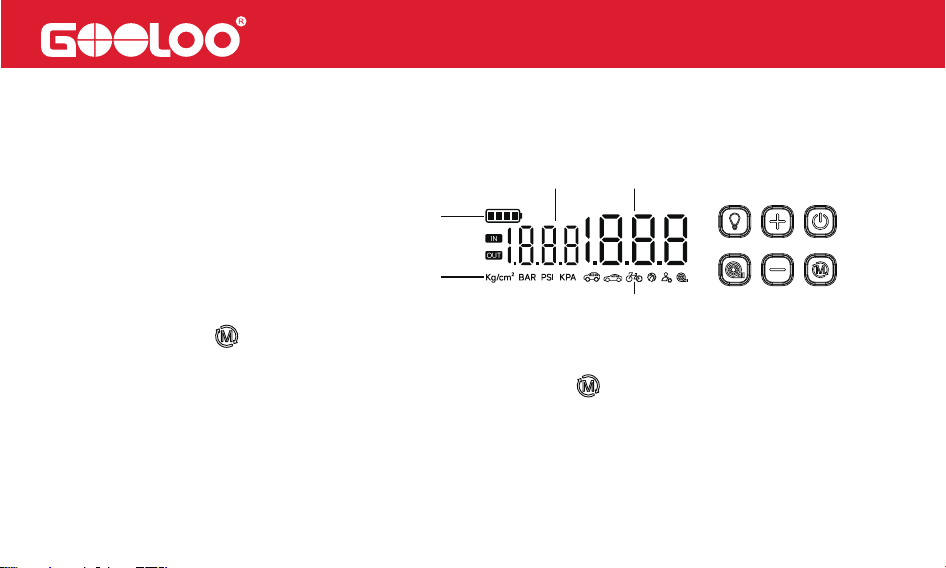
Instructions of buttons and display screen:
1. To turn the device on or off, press and hold the power button for 2 seconds.
The display screen shows:
•①: Battery level
•②: Pressure unit (BAR, PSI, or KPA)
•③: Inflation mode icon
•④: Real-time tire pressure
•⑤: Preset tire pressure
2. Press the Mode button briefly to cycle through inflation modes.The screen will toggle
between icons for SUV, Car, Bicycle, Basketball, and Free Mode.
3. To change the pressure unit, press and hold the Mode button for 2 seconds.The
screen will cycle through BAR, PSI, and KPA.Release the button to confirm your selection.
4. Press the “+” or “–” button to adjust the air pressure for the selected mode. Press and
hold to increase or decrease continuously until the desired pressure is set.
1
2
3
45
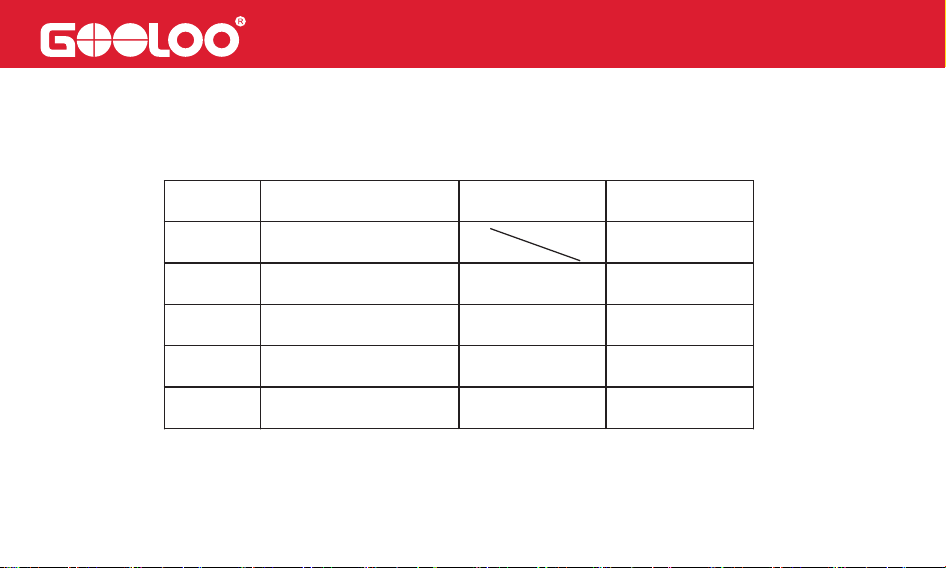
Mode
Adjustable Pressure
Range
Default
Pressure
Unit
Free Mode
Basketball
Bicycle
Car
SUV
7-160
4-16
30-145
26-43
26-50
PSI
PSI
36
PSI
44
PSI
PSI
9
32
6. During charging, the battery icon (1) will appear and flash from bottom to top, indicating the
current charging level.
7. When the battery level drops below 10%, the battery indicator will flash as a low-power
warning.
5.(1)In the selected mode, press the Power button briefly to start inflation. The pump will
automatically stop when the preset pressure is reached.
(2)In the selected mode, press the blower button briefly to start inflating or deflating.
How to Turn the LED Flashlight On/Off
How to Turn the Unit On and Off
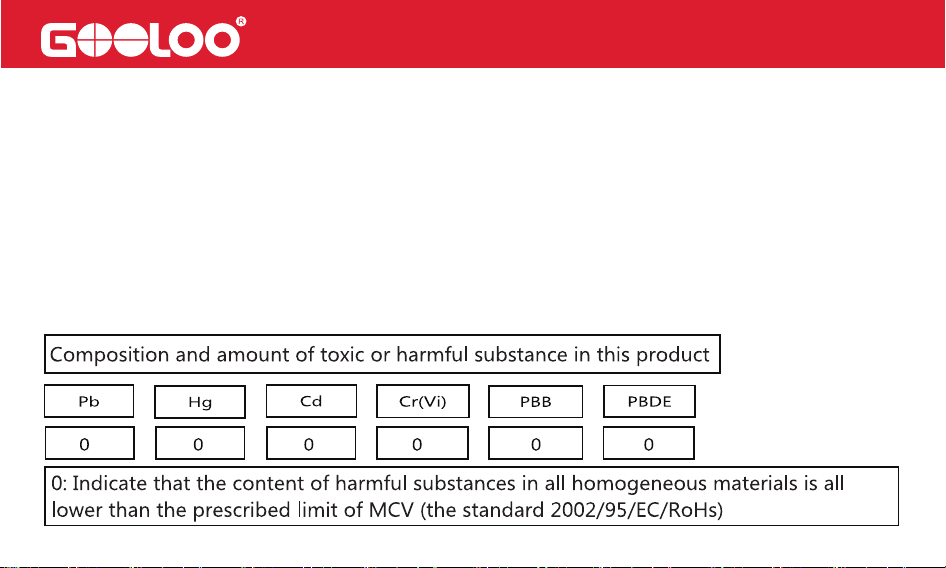
Toxic and Hazardous Substances Declaration
To activate the LED light, briefly press the lighting button. The white light will stay on continuously.
Pressing the button again will cycle through the following modes:
Burst Flash → SOS Signal → OFF
To turn the unit on, press and hold the Power button for 2 seconds.
To turn it off, press and hold the Power button again for 2 seconds.
The device will automatically power off after 90 seconds of inactivity.

FAQ
Q1: What is the operating temperature of this unit and how should it be stored?
A: This unit contains a lithium polymer battery with an operating temperature range of -20°C
to 60°C (-4°F to 140°F). If ambient temperatures exceed 60°C (140°F), internal battery
damage, swelling, or safety risks may occur. To prevent damage, avoid storing the unit in a
hot vehicle for extended periods.
Q2: How do I start a vehicle using this unit?
A: Please refer to the section “How to start a 12V vehicle” in this manual for detailed instruc-
tions.
Q3: How do I know if this unit is properly connected to the vehicle?
A: After connecting the clamps to the vehicle battery, check the LED on the jumper cable. A
solid green light means the connection is correct. A solid red light indicates reverse polarity.

Q4: What should I do if the unit doesn’t start the vehicle?
A: First, fully recharge the unit. Then reconnect the clamps and press the BOOST button. If
the green LED turns solid, attempt to start the vehicle within 30 seconds. If the issue persists,
contact us:US Support: [email protected]/EU Support: [email protected]
Please include your order ID for faster assistance.
Q5: What should I do if the unit doesn’t charge?
A: Charge the unit using a USB-C cable and a wall charger overnight. If it still doesn’t charge,
contact us at: US Support: [email protected]/ EU Support: [email protected]
Include your order ID when reaching out.
Q6: What if this unit can’t charge other devices?
A: Try using a different charging cable. If it works, the included cable may be faulty—we’ll
replace it. If the issue continues with another cable, please contact us:US Support: fiona@-
gooloo.com/EU Support: [email protected]
Be sure to include your order ID.

Q7: Can this unit charge other devices while being charged?
A: Yes.
Q8: Can this unit charge other devices while jump-starting a vehicle?
A: No.
Q9: How often should I recharge the unit?
A: We recommend recharging the unit every 3 months to maintain optimal battery health.
Q10: Why does the unit shut off in 30 seconds when charging other devices?
A: The unit requires a minimum load of 200mA. Devices like smartwatches or earbuds that
draw less current may cause the unit to shut off. If the current remains below 200mA, the
unit will automatically power off after 90 seconds.

Warning
1. Read this user manual carefully before operating the device.
2. Use caution while handling this unit. Improper use may cause injury or damage to your
vehicle or equipment.
3. Do not allow untrained individuals to operate this unit without supervision.
4. This unit is not a toy. Keep it out of reach of children.
5. This product is designed for vehicles with 12V batteries only. Do not use with non-12V
vehicles or on aircraft, ships, or other equipment.
6. Do not use the unit if any cable, clamp, or connector is damaged, or if the device appears
swollen, overheated, or leaking.
7. Do not use the unit as a car battery or a standalone battery charger.
8. Do not attempt to jump-start a vehicle while the unit is charging.
9. Only use the supplied clamps for jump-starting and a certified charger for recharging.
10. Do not allow the battery to fully discharge. Recharge every 3 months for optimal perfor-
mance.

11. Ensure the blue plug on the jumper cable is fully inserted into the output port. Loose
connections may cause melting.
12. Clean the vehicle’s battery terminals before connecting. Dirty or corroded terminals may
reduce performance.
13. Do not start the engine more than three times consecutively. Allow 2 minutes between
attempts to prevent overheating.
14. Do not reverse the clamp connection after pressing the BOOST button.
15. Only use the unit to jump-start the vehicle when its battery level exceeds 2 bars.
16. After jump-starting, wait at least 30 minutes before recharging the unit.
17. Do not submerge the unit in water.
18. Do not use the device in explosive or flammable environments (e.g., near gasoline, gas
vapors, or dust).
19. Do not disassemble or modify the unit. Repairs must be performed by qualified service
technicians.
20. Keep the unit away from fire and extreme heat.

21. Do not drop or crush the device. If damaged, have it inspected by a certified technician.
22. Do not store the device in areas where temperatures exceed 60°C / 140°F.
23. Only charge at ambient temperatures between -10°C to 45°C (14°F to 113°F).
24. Under extreme conditions, battery leakage may occur. Do not touch leaking material with
bare hands.
• If contact with skin occurs, wash the affected area with soap and water immediately. Seek
medical attention if irritation develops.
• If contact with eyes occurs, rinse thoroughly with clean water for at least 10 minutes and
seek medical attention immediately.
25. This unit contains a lithium battery. At the end of its service life or in case of leakage,
dispose of the device in accordance with local regulations.

We provide timely and effective online support for any product issues within 18 months of
purchase.
18-Month Online After-Sales Service
If you experience any product issues within 30 days of purchase, you may request a return
via Amazon for a full refund.
30-Day Money-Back Guarantee
If the product develops a manufacturing defect between 30 days and 18 months after
purchase, we will replace it with a new unit at no additional cost.
30 Days to 18 Months Replacement Guarantee
Your Warranty Includes
Disclaimer
A. To obtain warranty service, the original purchaser must provide proof of purchase (order
ID or receipt). Warranty coverage begins on the date of original purchase.

B. The warranty does not cover damage or malfunction caused by:
• Normal wear and tear
• Physical abuse or impact
• Improper installation
• Misuse or modification
• Unauthorized third-party repairs
C. GOLOOO is not liable for any accidental, indirect, or consequential damages arising from
improper use or misuse of this product.
D. All warranty claims are limited to the repair or replacement of the defective product, at the
sole discretion of GOOLOO.
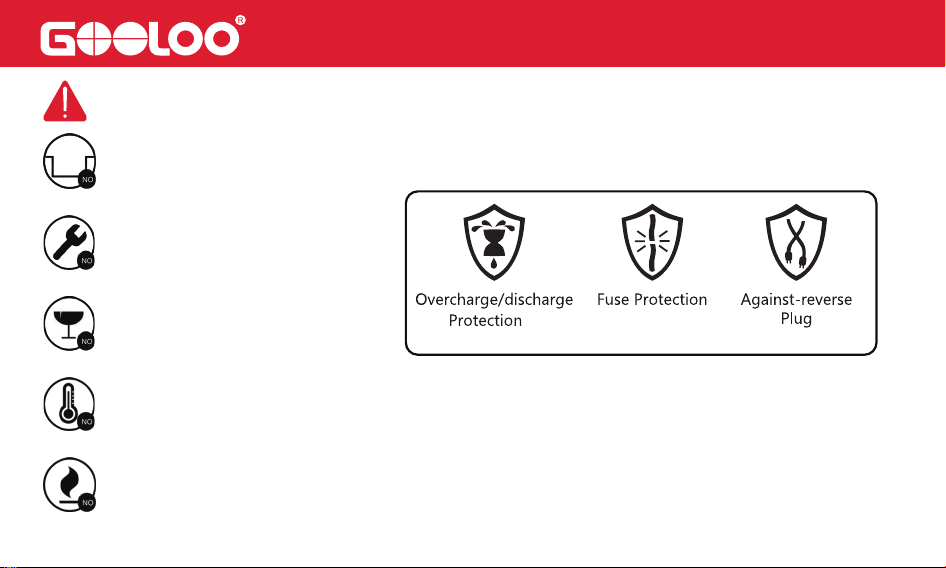
Attention
Do Not Place Near or Into Fire
Avoid Extreme Temperatures
Do Not Drop
Do Not Disassemble
Do Not Submerge In Water

Customer Service
18 Months Limited Warranty Service
Lifetime Technical Service
Feel Free to Contact Us
For FAQ and More Information
[email protected] (for the US)
[email protected] (for the EU)
www.gooloo.com
1-888-886-1805
Mon.-Fri. PST 9:00a.m.-5:00p.m.

Thank You
for Choosing Us
Made in China
