Reg No.
5904374
R
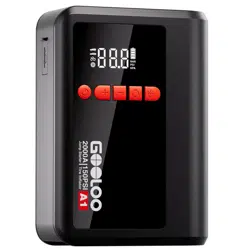
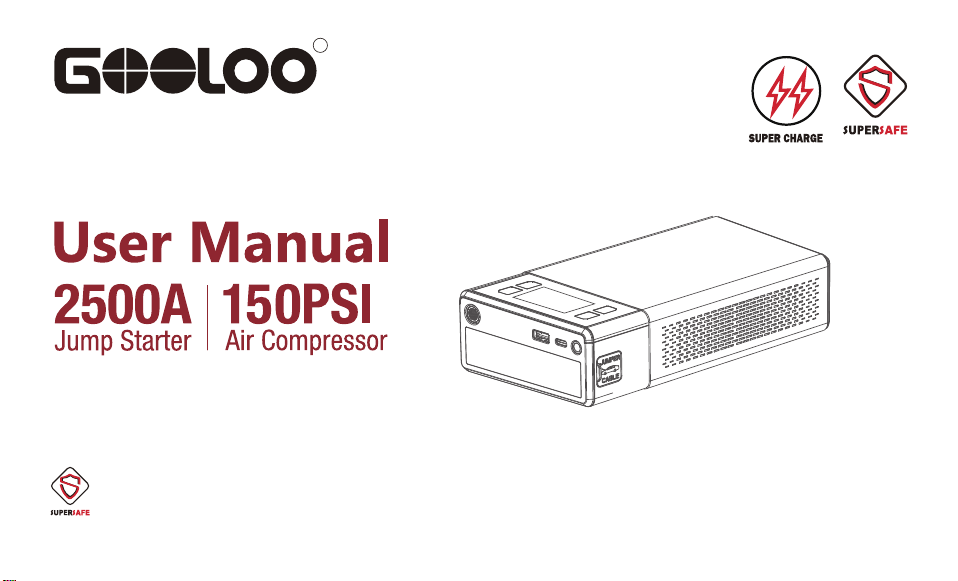
Product Name: VX1
SUPERSAFE is a safety protection technology by GOOLOO
Reg No.
5904374
Model No.: JS-211


Contents
English
Deutsch
Français
Español
Italiano
Русский
1~21
22~43
44~65
66~86
87~108
109~130

Thank you for choosing GOOLOO jump starter. To ensure a good user experience, personal
safety, and property security, please read all of the instructions carefully before using this
product, please keep this manual for reference.
Charge It First !
Warning
While reading through the manual, you can start to charge your VX1 with the wall charger
and type-c cable provided.
This unit is for vehicle (equipment) with 12V batteries. It may be dangerous if it is used with
other types of batteries. Read and understand the safety information before using the jump
starter. Failure to follow the safety information may cause damage to the jump starter, and
may also result in electric shock, explosions, fire, property damage, and personal injury.
1
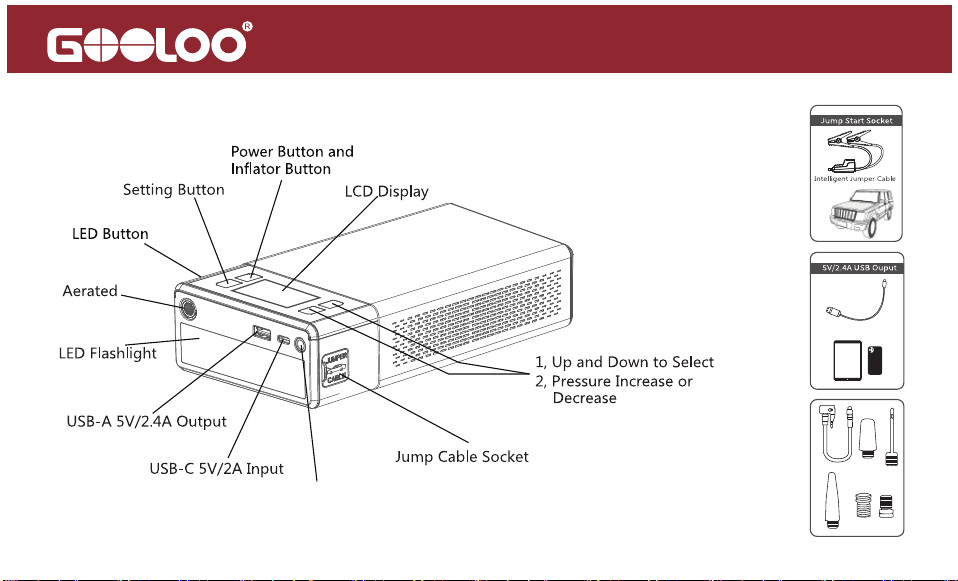
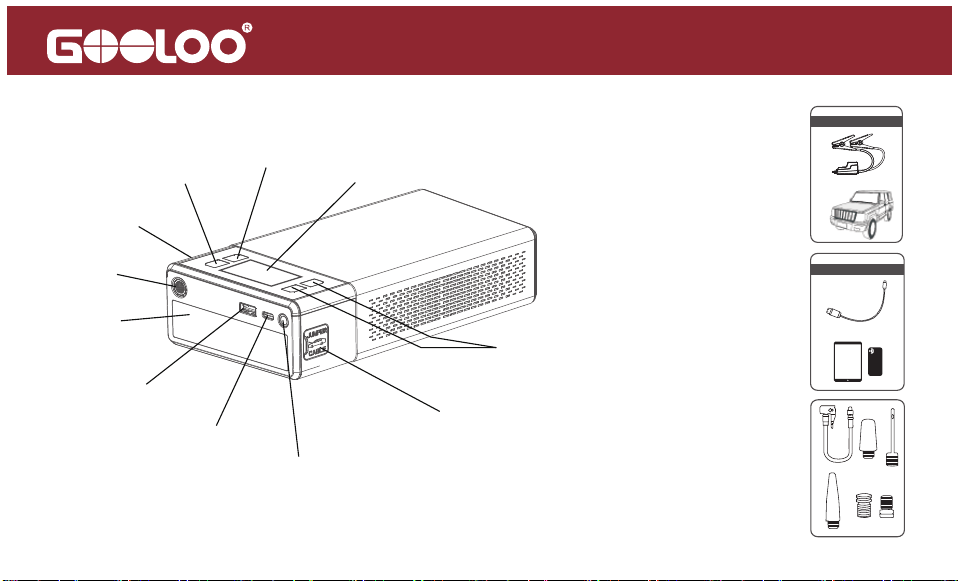
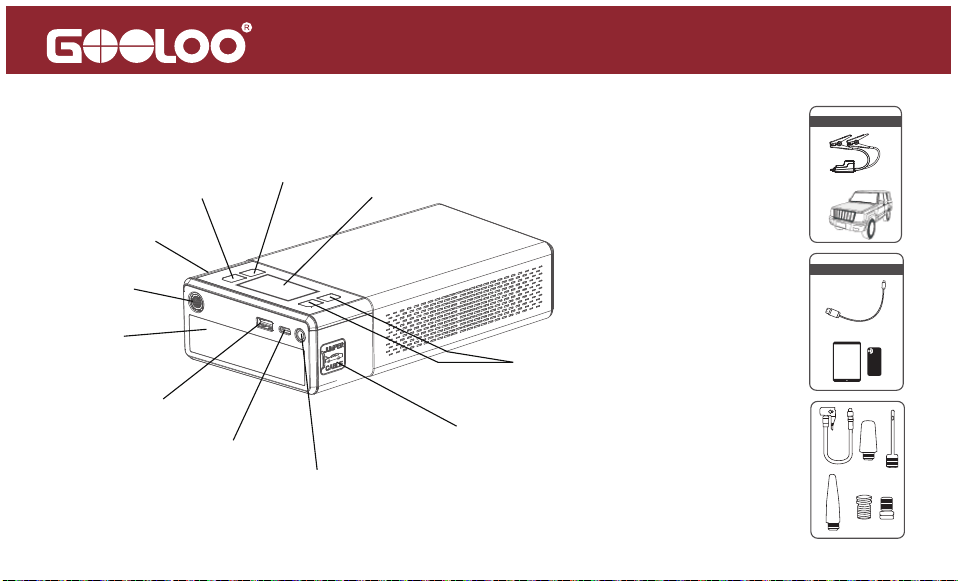
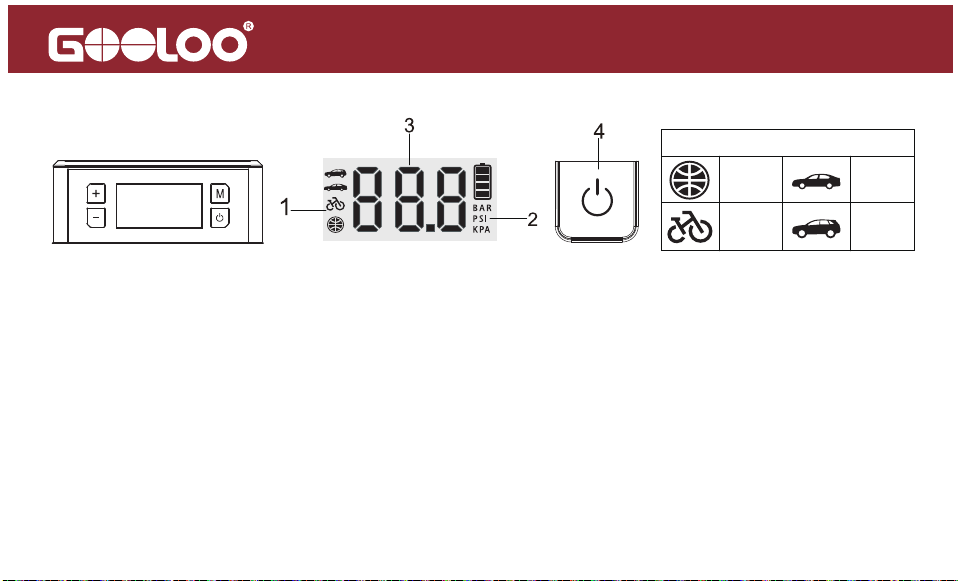
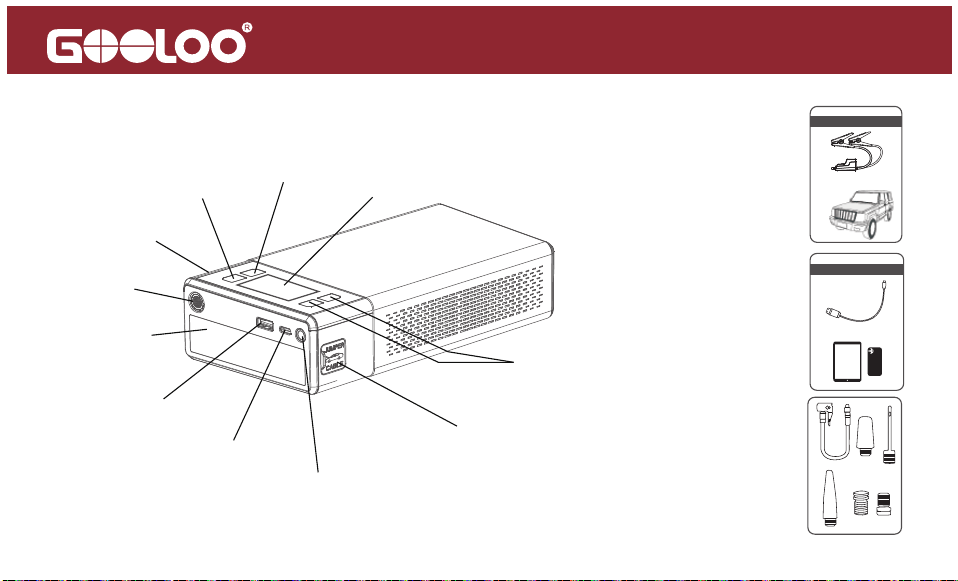
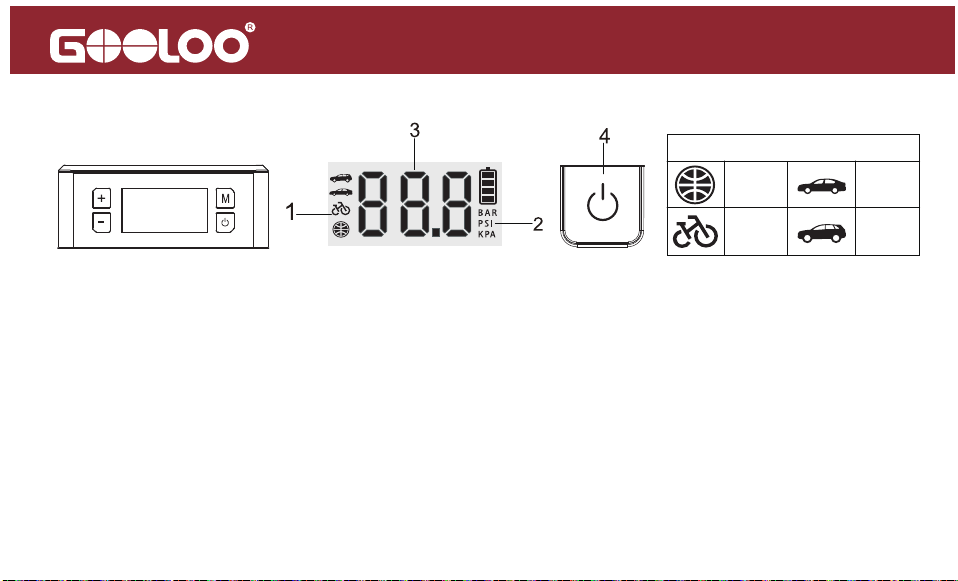
Product Parts and Functions Description
2
DC 15V/10A Output
Operation Instructions
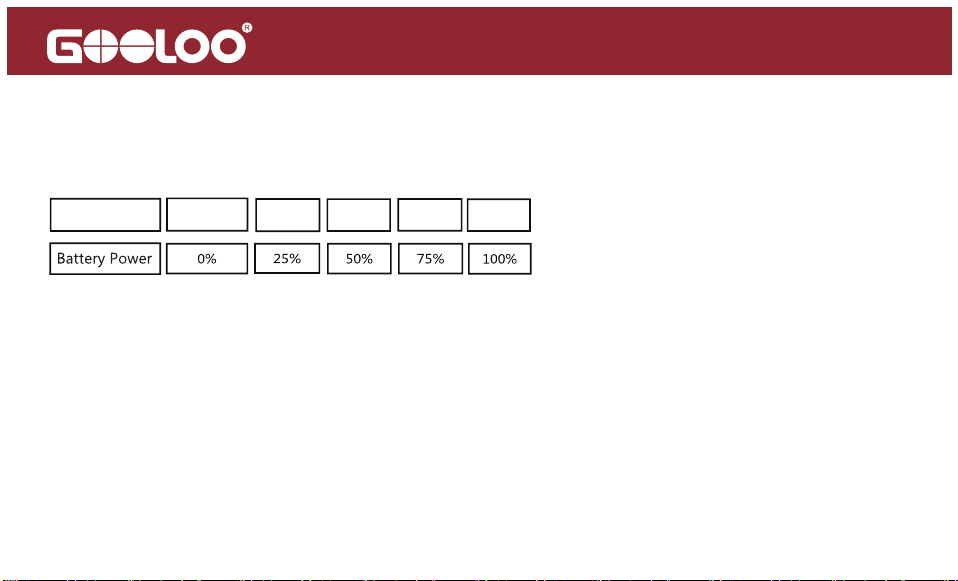
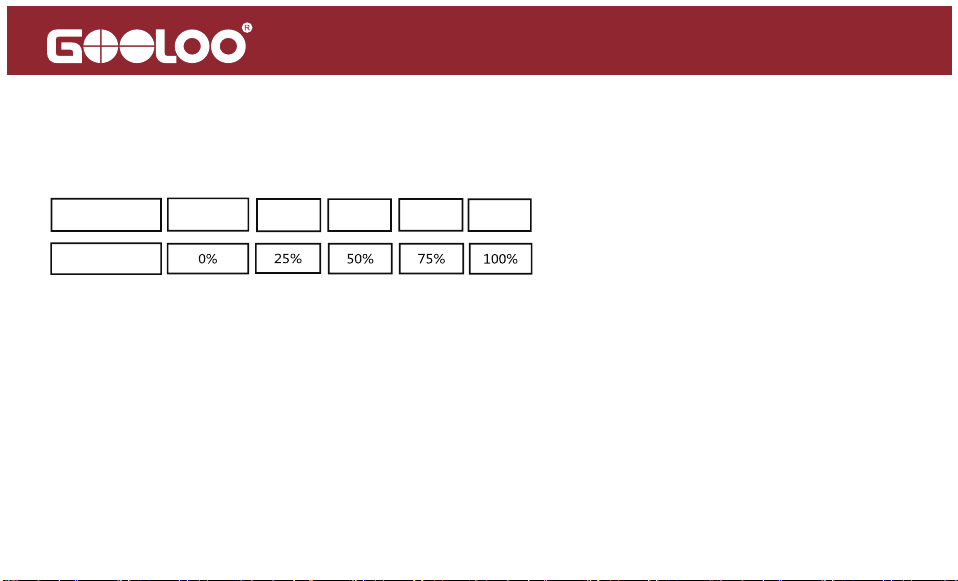
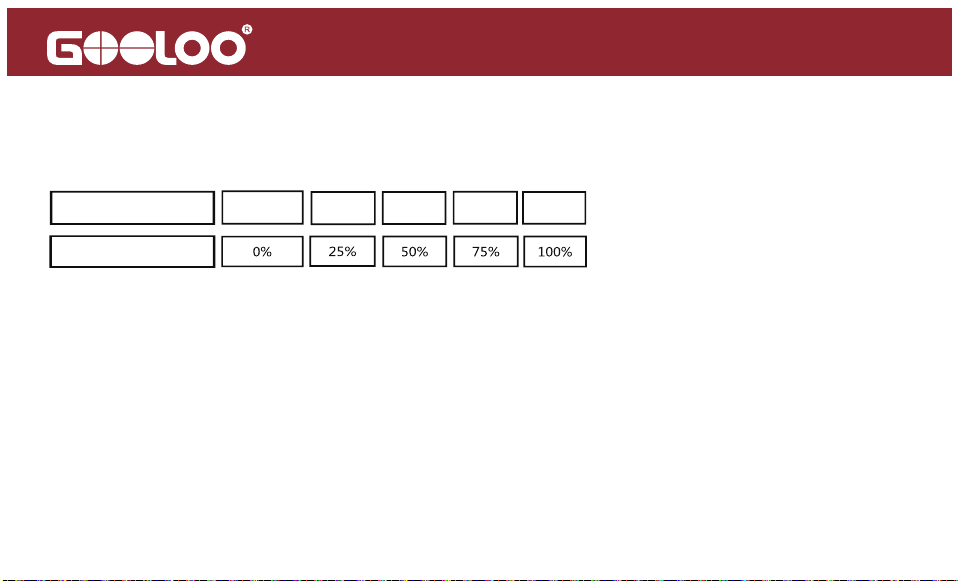
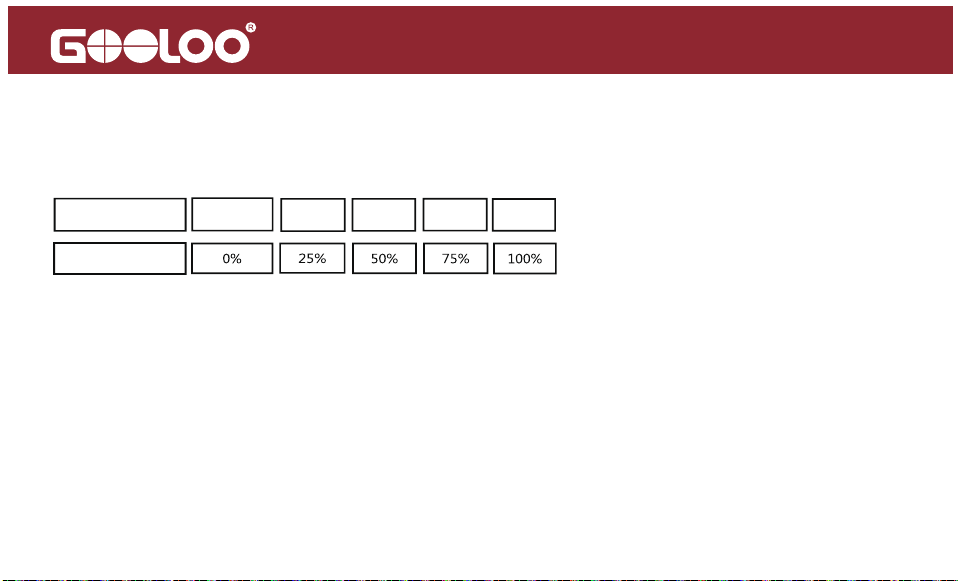
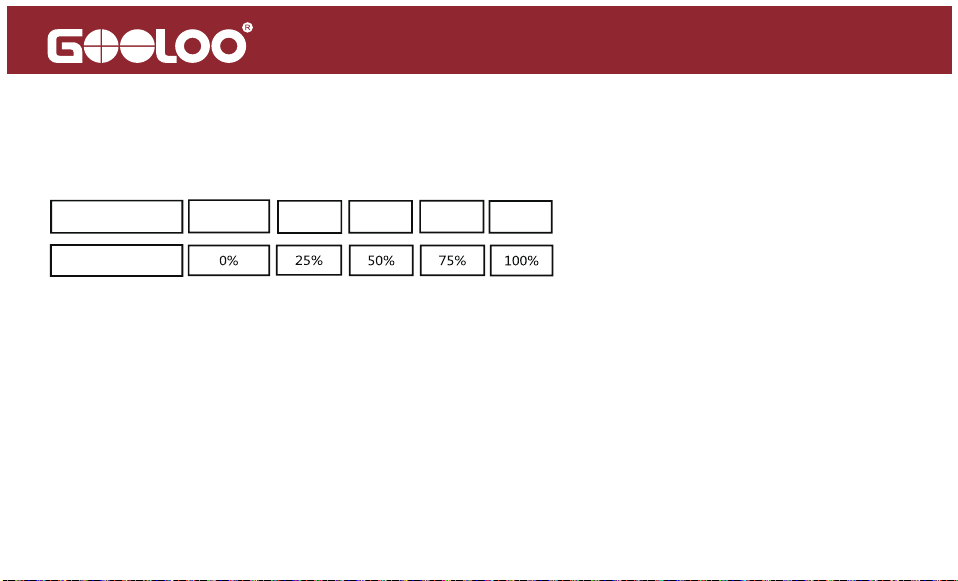
Battery Power:
1 Bar 2 Bars 3 Bars 4 Bars
0 Bar
Baery Icon
Press the power button to check the battery power:
The battery icon will blink one by one during the period of charging. Different bars of battery
icon show different battery power, the battery icon becomes 4 bars when the charging
process was finished.
3
Product Highlights:
The VX1 jump starter integrates six functions - car jump start, tire inflation, lighting, SOS
warning, device charging, and 12V accessory start - based on an upgraded 2024 design
meant to lead future market trends. This versatile battery jump starter packs multiple
capabilities into one unit.

4
Equipped with 2500A peak current, the VX1 can instantly jump start 12V vehicles (8.5 gas/6.0L
diesel engines), even in extreme temperatures up to 50 times, with over 1000 recharge cycles
in its service life. Its powerful startup performance is long-lasting and reliable.
The built-in air compressor has an LCD digital meter and tire pressure detection to automati-
cally shut off at preset PSI/BAR/KPA values. Inflating an average car tire to 20 PSI takes around
3 minutes with the 150 PSI compressor, useful for bikes, balls, and inflatables too.
The unique honeycomb heat dissipation design allows the VX1 jump starter to disperse heat
more effectively, enhancing safety performance by 30% and extending service life by 50%. Its
upgraded thermal engineering improves durability and safety.
With 10 built-in protections against issues like overcharging, overcurrent, short-circuit, reverse
polarity, and extreme temperatures, the VX1 allows easy and fast car starts in harsh -4°F to
140°F environments. Safety is the paramount priority in its design.
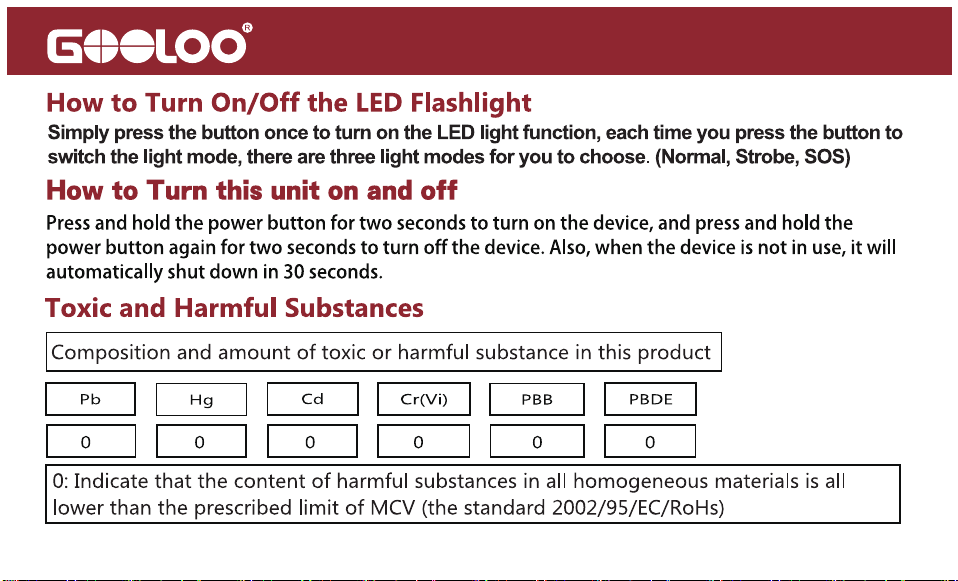
The VX1's LED lights offer Normal, Strobe, and SOS modes for emergencies, while the unit
5
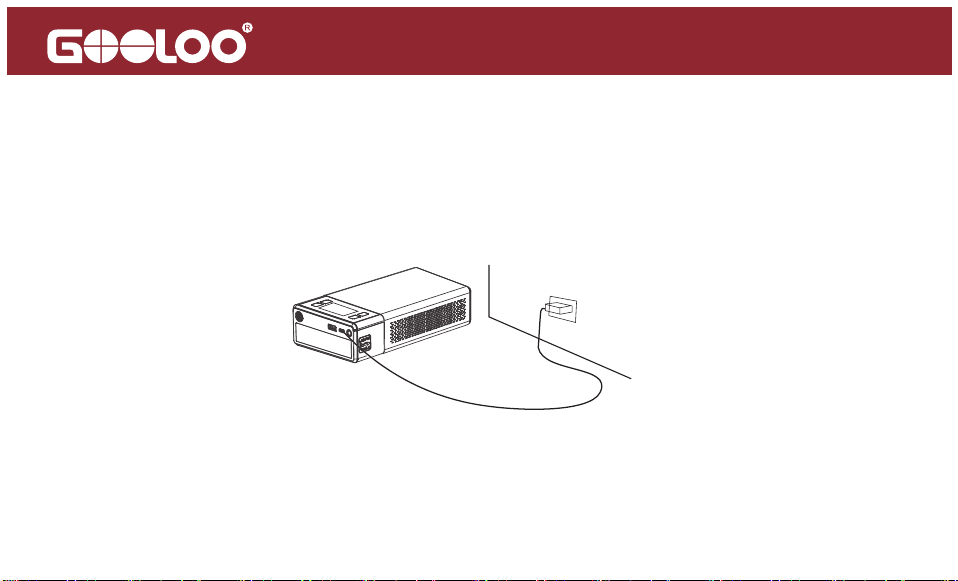
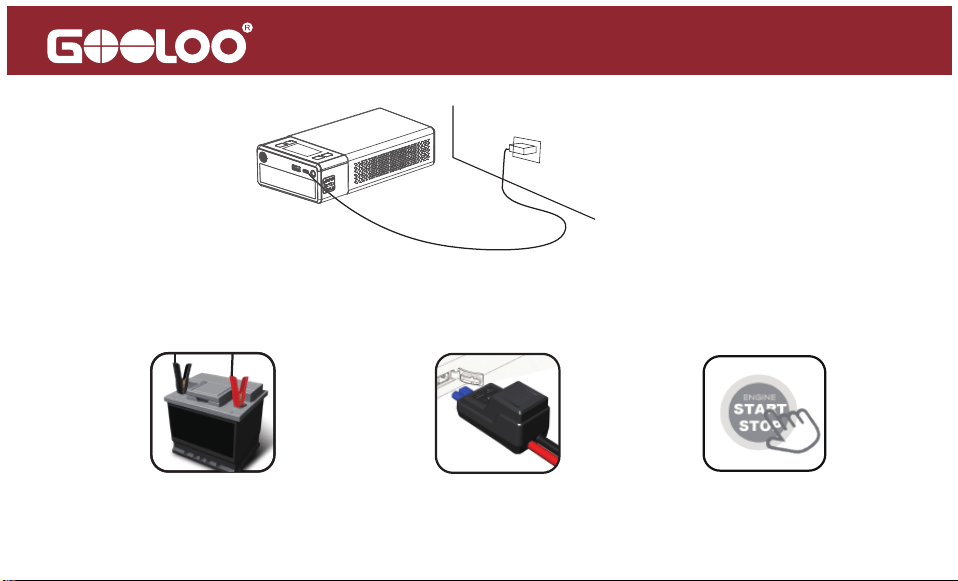
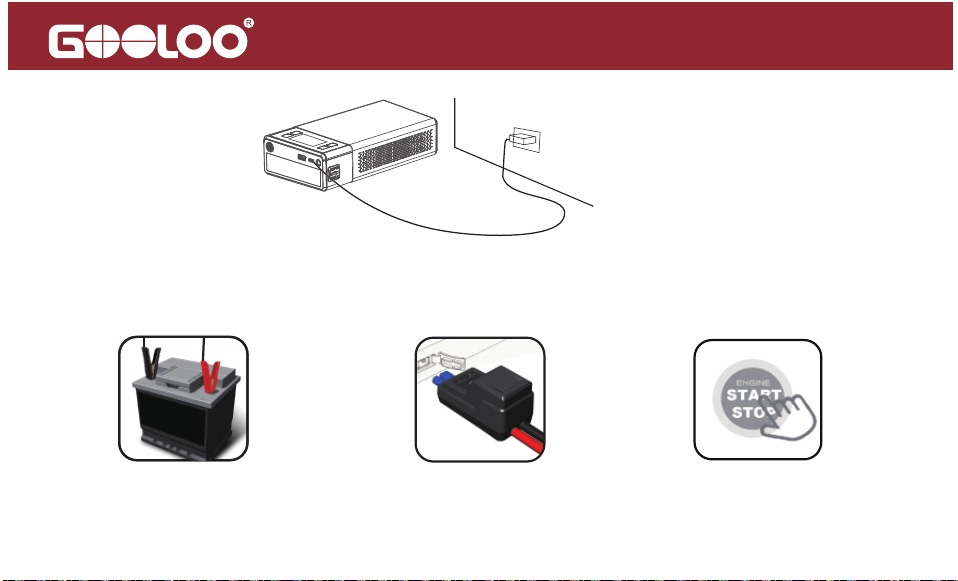
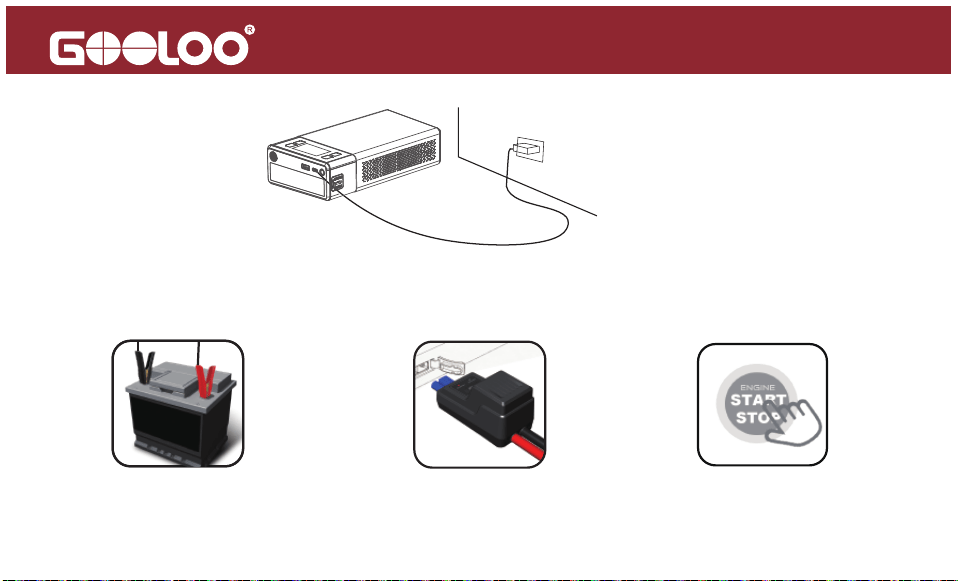
This unit can be charged with the type-c cable and wall charger(wall charger Not Included).
How to Charge the VX1
also functions as a portable power bank to charge USB devices via its port and provide 36
hours of high-brightness lighting. It combines an emergency light and mobile charging
capabilities.
6
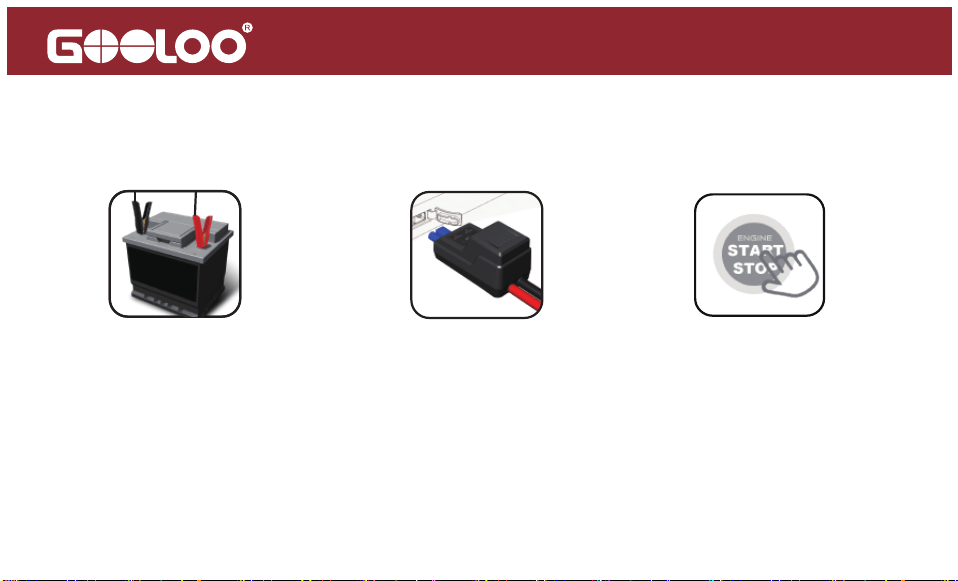
How to Start a 12V Vehicle (Make sure the battery power) ≥2 bars
Note: Do not press the “BOOST” button on the jumper cable before connecting the vehicle battery correctly.
1. Connect the vehicle battery
2. Green LED illuminates (solid)
3. Start the vehicle engine

Green LED (solid)
Red LED
Green LED (blinks)
LED Indicator
The connection is correct, you can start the vehicle directly.
Reverse connection, please correct the polarity of battery clamps.
Operation
Check the LED indicator on the jumper cable and follow the instructions as below:
If any problem persists, stop using the jump starter and contact our service team directly
at [email protected], we will do our best to solve the problem within 24 hours.
The vehicle battery voltage is too low, try to press “BOOST” button on the
jumper cable, when Green LED illuminates (solid), then start the vehicle
within 30s.
The vehicle battery may be damaged, first of all, make sure the correct
connection, try to press “BOOST” button on the jumper cable, when Green
LED illuminates (solid), then start the vehicle within 30s.
No Light
7
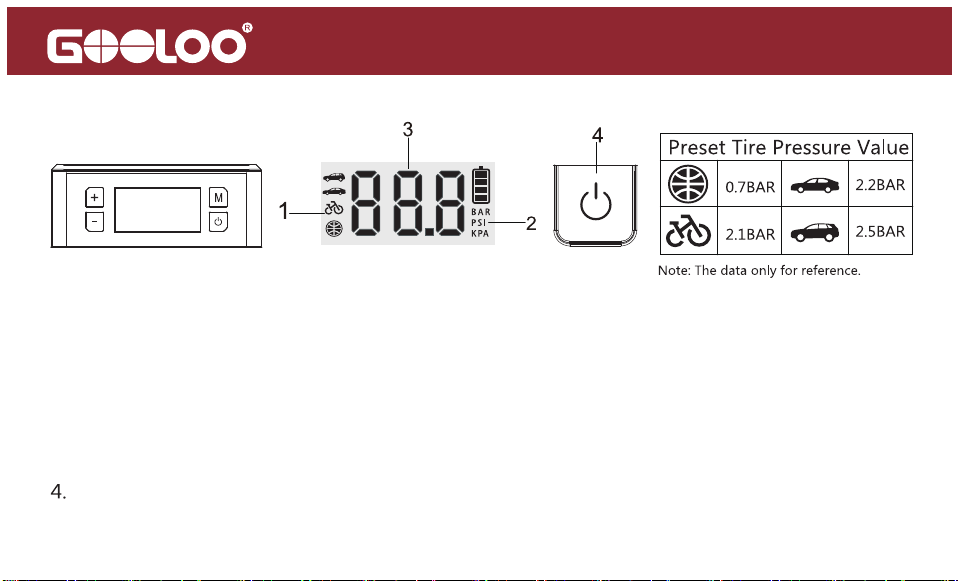
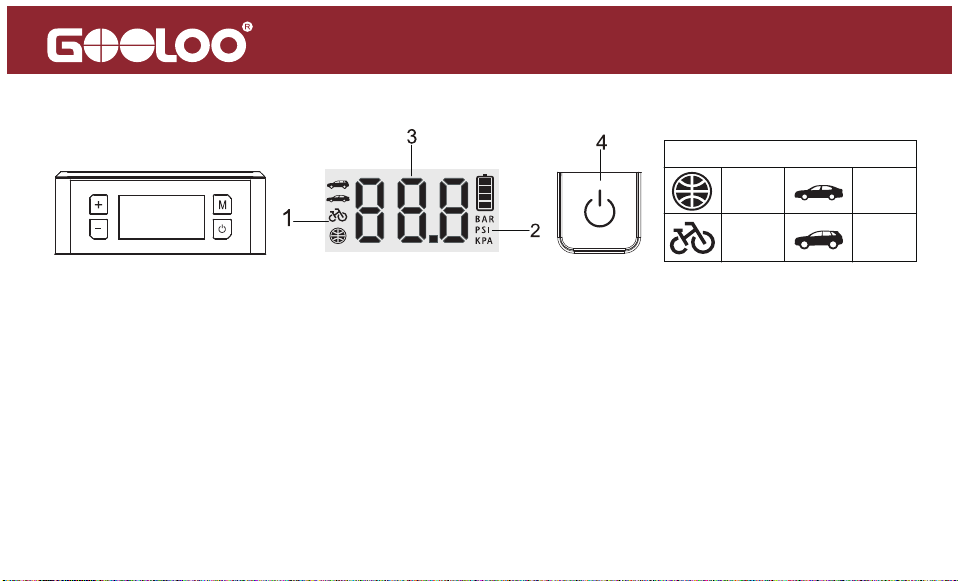
After selecting the inflating mode, the inflation function can be turned on by short pressing
the power switch key once.
Steps to Use the Air Inflator
Power on, short press the "M" key to start to set the air inator.
1. Press the "M" key once, the icon on the far left flashes, and then press the "+" or "-" keys
to switch between “basketball”, “bicycle”, “car” and “SUV” icon.
2. Press the "M" key twice, the pressure unit icon flashes, and then press the "+" or "-" keys
to switch between "BAR", "PSI", and "KPA".
3. Press the "M" key again , the current target pressure value flashes, and then press the "+"
or "-" keys to adjust the target pressure value.
8
9
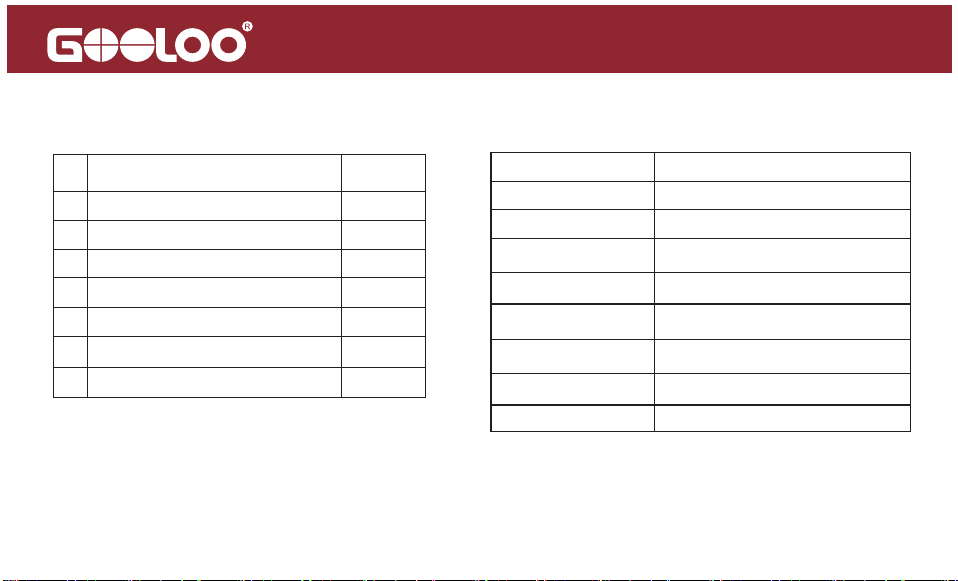
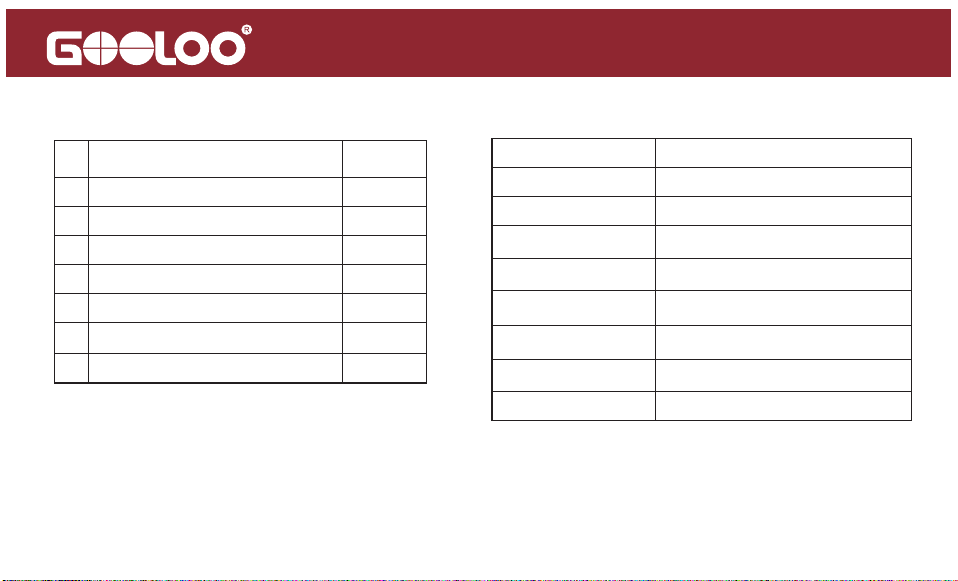
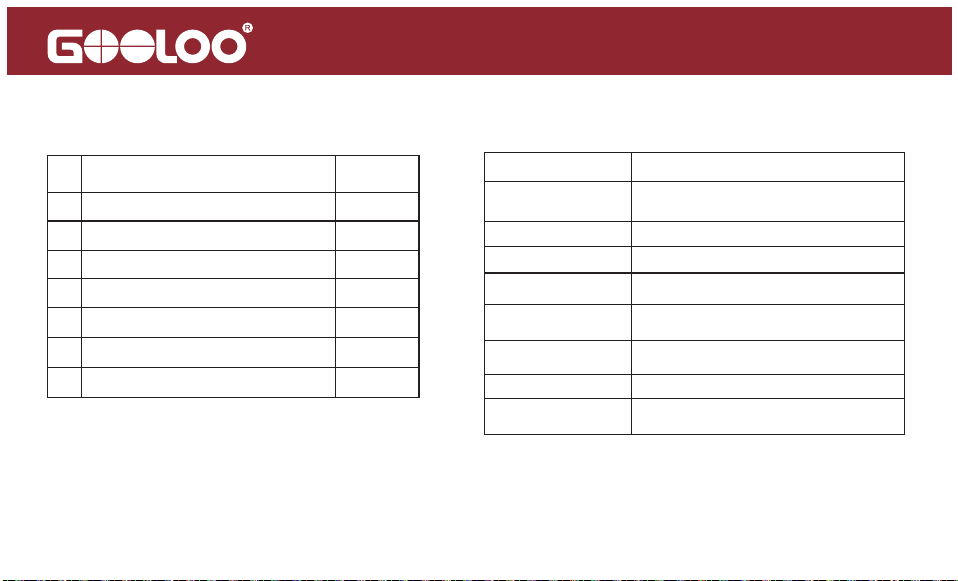
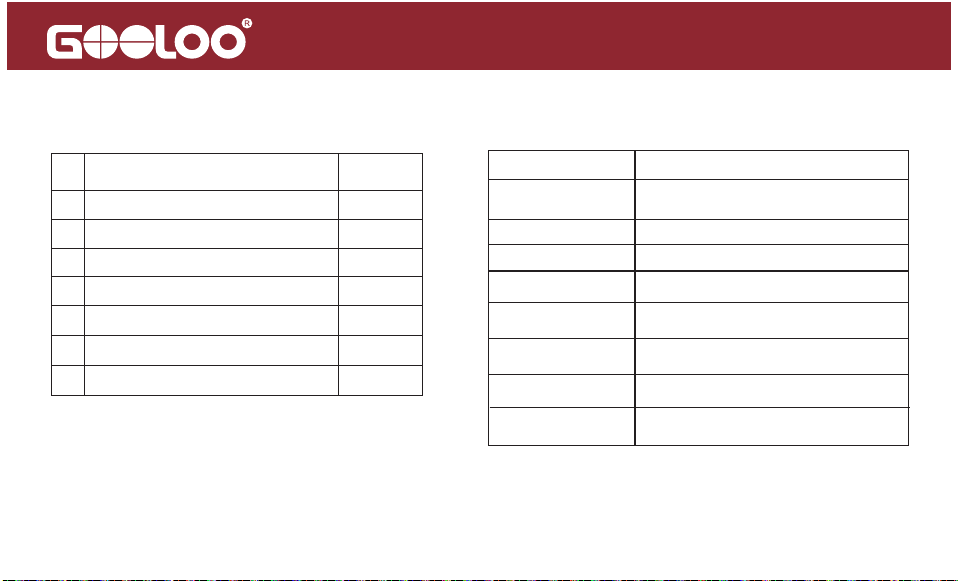
Technical SpecificationPackage Content
#
QuantityPart Name
Host
Carrying Bag
Pump Tube
Air Nozzle
USB-A to USB-C Cable
1
1
1
1
1
5
1
1
2
3
4
5
6
7
User Manual
Capacity
44.4Wh
Starting Current
Peak Current
USB-C In
USB-A Out
DC Out
400A (3s)
2500A
5V/2A
5V/2.4A
15V/10A
Operating Temp
Life time
Full Charge Time
> 1000 Cycles
-20℃~60℃ /-4℉ ~140℉
6-8 hours (5V/2A Charger)
Smart Jumper Cable
10

FAQ
11
Q1: What is the operating temperature of this unit and how to store it?
A: This unit is lithium polymer battery, operating temp is -20-60 ºC/ -4-140ºF. If the ambient
temperature is higher than 60ºC/140ºF, the internal construction of the battery cells may be
damaged, it may swell and become unsafe. So don’t store the device in vehicle which parked in
hot weather for long periods of time.
Q2: How to start a vehicle with this unit?
A: Please refer to the instructions about “How to Start a 12V Vehicle“.
Q3: How do you know if this unit is connected to the vehicle correctly?
A: With the battery clamps connected to the vehicle battery, when the LED indicator on the
jumper cable shines a steady green light, it means it's connected correctly. If red light
illuminates (solid) , it means it‘s reverse connection.
Q4: What should I do if this unit can’t start a vehicle?
A: Recharge this unit fully, and try to press the “BOOST” button on the jumper cable after
connecting the vehicle battery correctly, the LED indicator illuminates steady green light ,

then start the vehicle within 30s. If it still does not work, contact us at:
[email protected](Attach your order ID).
Q5: What should I do if this unit can’t charge up?
A: Charge it with a usb-c cable and wall charger for a full overnight period. If it still does not
work, contact us at: [email protected] ( Attach your order ID).
Q6: What should I do if this unit can’t charge other devices?
A: Try to charge the device with another charging cable, If it works, which means the charging
cable we provided is defective, we will provide you a new one; If it still does not work, please
email us at: [email protected] ( Attach your order ID).
Q7: Can this unit charge other devices while it is being charged?
A: Yes.
Q8: Can this product charge other devices while starting a vehicle?
A: No.
12

Q9: How often does this unit need to be recharged?
A: It would be best to recharge it every 3 months.
Q10: Why it shuts off in 30s when charging other devices?
A: This unit may shut off automatically when charging for the devices that need light charging
current, such as headphone, smart watch,etc since there is minimum load current limitation
(200mA) on this unit, it will be automatically off after 30s if the load current is less than 200mA.
Warning
1. Please read this user manual carefully before using this machine.
2. Please be careful when using this machine. If you do not follow the instructions, you may
injure yourself or damage the equipment or vehicle battery.
3. Do Not allow people who do not have proper knowledge or ability to operate the device
without supervision.
4. Do Not use this unit as a toy. Keep it away from children to avoid accident.
5. This unit work for vehicles (equipment) with 12V battery, doesn't for vehicles with non-12V
battery. It is forbidden to be used in other machines, such as airplanes and ships.
13

6. Do Not use this unit when any cable, clamp, or cord was damaged or when this unit was
overheated, swelled or leaking fluid.
7. Do Not use it as a vehicle battery or a battery charger.
8. Do not use the unit to start a vehicle while charging the internal battery.
9. Only use the battery clamps provided to start vehicle and the qualified charger to charge this
unit.
10. Don't over-discharge the unit (don't let the battery run out), charge it regularly, it would
be best to recharge it every 3 months.
11. Make sure the blue plug of the jumper cable is plugged fully into the battery clamps
output port, otherwise, the blue plug could be melt.
12. Make sure the battery terminals are clean before starting up, and make sure the battery
clamps are well connected. If the battery terminals on the vehicle are dirty or corroded, the
output power of the unit will decrease.
13. Please do not start the product for more than three consecutive times, as this may cause
it to overheat and damage the product. If you need to start the product multiple times, please
make sure to wait for two minutes between each start-up.
14. Do Not connect the jump starter's clamps to the battery reversely after pressing the ''BOOST''
button to avoid accident.
14

15. Use this unit to start the vehicle when the battery power is more than 2 bars.
16. Do Not recharge this product immediately after starting the vehicle, please let it cool for
30 minutes before recharging it.
17. Do Not let the product be immersed in water
18. Do not operate this product in an explosive environment, such as a place where flammable
liquid, gas or dust exists.
19. Do not modify or disassemble this machine. Only service technicians can repair this
equipment.
20. Do not expose the product to extreme heat or fire.
21. Do not drop or squeeze the device. If the device is hit hard or damaged in any other way, it
should be inspected by a qualified battery technician.22. Do not store in places where the
temperature may exceed 60ºC/140ºF.
23. Only charge at ambient temperature of -10~45ºC/14~113ºF.
24. Under extreme conditions, the battery may leak. If there is a liquid leak from the device,do
not handle it with bare hands. If there is skin contact, wash immediately with soap and water.
If the liquid accidentally touches the eyes, immediately rinse the eyes with water for at least
10 minutes and seek medical help.
15

Within 18 months, we will provide timely and effective online after- sales service after your
purchase
.
18 Months Online After- Sales Service
Within the first 30 days after your purchase, you can apply return for it through Amazon when
you have any product issue.
30 Days Money Back Guarantee
We will replace the defective unit due to manufacturing issues with a new one within 18
months.
30 Days to 18 Months
Your Warranty Includes
16
25. The device contains a lithium battery. At the end of the product's service life, or if the
device leaks liquid, dispose of the device according to local regulations.

Disclaimer
A. When the product needs to be repaired or replaced, the original purchaser should show the
original receipt (order ID), and the warranty will take effect.
B. The warranty does not cover damage or product failures caused by normal wear and tear,
physical abuse, improper installation, misuse, modification, or unauthorized third-party repairs.
C. We are not responsible for any accidental or indirect damage caused by incorrect use or
misuse of this product.
D. All warranty claims are limited to repair or replacement of the defective product and at the
sole discretion of GOOLOO.
17
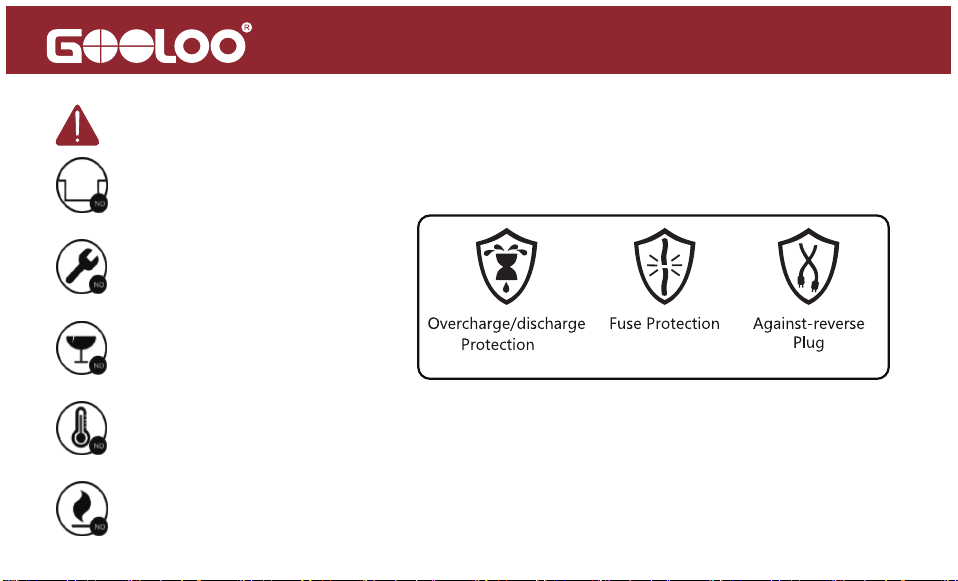
Attention
Do Not Place Near or Into Fire
Avoid Extreme Temperatures
Do Not Drop
Do Not Disassemble
Do Not Submerge In Water
18

Customer Service
18 Months Limited Warranty Service
Lifetime Technical Service
Feel Free to Contact Us
For FAQ and More Information
19

20
Thank You
for Choosing Us
Made in China
21
Manufacturer Shenzhen Carku Technology Co.,Ltd
Address
Importer
shen zhen shi lan de wo ke ji you xian gong si
Address
Guangdong, Shenzhen, Longgang, 2nd Floor, Building 12, Shenao Cultural
Industry Park, Dafapu Community, Bantian Street
Tel
UK Representative
Name and contact
+442921680945
No.103, block A, Qixing Creative factory, GaoFeng community, Dalang
street, LongHua, Shenzhen, Guangdong, China
Reg No.
5904374
R
Produkt: VX1
SUPERSAFE ist eine Sicherheitsschutztechnologie von GOOLOO
Reg No.
5904374
Benutzerhandbuch
2500A
Starthilfe
150PSI
Luftkompressor
Modell: JS-211

Vielen Dank, dass Sie sich für den Starthilfe von GOOLOO entschieden haben. Um eine gute
Benutzererfahrung, persönliche Sicherheit und den Schutz von Eigentum zu gewährleisten,
bitten wir Sie, alle Anweisungen gründlich durchzulesen, bevor Sie dieses Produkt benutzen.
Bitte bewahren Sie dieses Handbuch zwecks Bezugnahme auf.
Zuerst aufladen!
Warnung
Während Sie sich das Handbuch durchlesen, können Sie damit beginnen, Ihren VX1 mit dem
bereitgestellten Wandladegerät und dem bereitgestellten Typ-C-Kabel zu starten.
Dieses Gerät ist für ein Fahrzeug (eine Ausrüstung) mit 12V-Batterien vorgesehen. Die
Verwendung für andere Batterieraten kann sich als gefährlich herausstellen. Lesen und
verstehen Sie die Sicherheitsinformationen, bevor Sie die Starthilfe benutzen. Ein Versäumnis
bei der Einhaltung der Sicherheitsinformationen kann die Starthilfe beschädigen und
Stromschläge, Explosionen, Brände, Sachschäden und Verletzungen an Personen führen.
23
Produktteile und Funktionsbeschreibung
Ein/Aus-Taste und
Gasgenerator-Taste
Einstelltaste
LED-Taste
Belüftet
LED-Taschenlampe
USB-A 5V/2.4A-Ausgang
USB-C 5V/2A-Eingang
Starthilfekabel-Buchse
Starthilfekabel-Buchse
5V/2,4A USB-Ausgang
Intelligentes Starthilfekabel
1. Auswahl: aufwärts und abwärts
2. Druckzunahme oder -abnahme
LCD-Anzeige
24
DC 15V/10A Ausgang
Betriebsanleitung
Batterieleistung:
Wichtige Punkte
1 Balken 2 Balken 3 Balken 4 Balken
0 Balken
Baeriesymbol
Baerieleistung
Drücken Sie die Ein/Aus-Taste, um die Batterieleistung zu prüfen:
Das Batteriesymbol leuchtet während des Ladevorgangs nacheinander auf. Verschiedene Balken
des Batteriesymbols zeigen eine unterschiedliche Batterieleistung, das Batteriesymbol zeigt 4
Balken, wenn der Ladevorgang abgeschlossen ist.
Der VX1 Starthilfe-Kompressor vereint 6 Funktionen: Starthilfe, Reifenaufpumpen,
Beleuchtung, SOS-Warnlicht, Ladegerät und Startgerät für 12V-Geräte - ein Upgrade-Design für
die Zukunft.
25

Wie wird der VX1 geladen
Dieses Gerät kann mit dem Typ-C-Kabel und dem Wandladegerät (Wandladegerät nicht im
Lieferumfang enthalten) aufgeladen werden.
26
Mit 2500A Spitzenleistung startet er zuverlässig 12V-Autos (8,5L Benzin/6L Diesel), selbst bei
Extremtemperaturen bis zu 50 Mal und über 1000 Ladezyklen.
Der integrierte Luftkompressor mit LCD-Display und Reifendruckerkennung pumpt Reifen in
ca. 3 Minuten auf 20 PSI auf und ist für Fahrräder, Autos, Bälle etc. geeignet.
Honeycomb-Kühldesign erhöht die Wärmeableitung des Starthilfe-Kompressors um 30% und
verlängert die Lebensdauer um 50%.
Mit 10 Sicherheitsmerkmalen wie Überlastungs-, Kurzschluss- und Verpolungsschutz bietet der
VX1 ultimative Sicherheit und startet Autos von -20°C bis 60°C.
Die LED-Leuchte hat 3 Modi (Normal/Stroboskop/SOS), die Powerbank lädt USB-Geräte und
ermöglicht 36 Stunden Dauerlicht.
27
Wie starte ich ein 12V-Fahrzeug
(Stellen Sie sicher, dass die Batterieleistung ≧2 Balken liegt)
Hinweis: Drücken Sie nicht die „BOOST“-Taste auf dem Starthilfe-Kabel, bevor Sie die Fahrzeugbatterie korrekt
anschließen.
1. Anschluss der Fahrzeugbatterie
2. Grünes LED-Licht leuchtet
auf (durchgehend)
3. Fahrzeugmotor starten

28
Prüfen Sie die LED-Anzeige auf dem Starthilfekabel und befolgen Sie die folgenden Anweisungen:
LED grün (durchgehend)
LED rot
LED grün (blinkt)
LED-Anzeige
Die Verbindung ist korrekt, Sie können das Fahrzeug direkt starten.
Umgekehrte Verbindung, bitte korrigieren Sie die Polarität der Batterieklemmen.
Maßnahme
Wenn ein Problem weiterhin fortbesteht, stellen Sie die Nutzung der Starthilfe ein und setzen
Sie sich mit unserem Service-Team direkt über [email protected] in Verbindung. Wir
werden unser Bestes tun, um das Problem innerhalb von 24 Stunden zu beheben.
Die Fahrzeugbatteriespannung ist zu niedrig. Versuchen Sie die Taste „BOOST“
auf dem Starthilfe-Kabel zu drücken. Wenn die LED grün durchgehend
leuchtet, starten Sie das Fahrzeug innerhalb von 30 Sekunden.
Die Fahrzeugbatterie kann beschädigt sein. Vergewissern Sie sich zuerst über
den korrekten Anschluss. Versuchen Sie die Taste „BOOST“ auf dem Starthilfe-
Kabel zu drücken. Wenn die LED grün durchgehend leuchtet, starten Sie das
Fahrzeug innerhalb von 30 Sekunden.
Kein Licht
29
Schritte zur Nutzung der Pumpe
Einschalten und die „M“-Taste kurz drücken, um damit zu beginnen,
die Luftpumpe einzustellen.
Voreingestellter Reifendruckwert
Hinweis: Daten nur als Referenz.
0,7BAR 2,2BAR
2,1BAR 2,5BAR
1. Drücken Sie die „M“-Taste einmal, das Symbol ganz links leuchtet auf und drücken Sie
dann die Tasten „+“ oder „-“, um zwischen den Symbolen „Basketball“, „Fahrrad“, „Auto“ und
„SUV“ zu wechseln.
2. Drücken Sie die „M“-Taste zweimal, das Symbol für die Druckeinheit leuchtet auf und
drücken Sie dann die Tasten „+“ oder „-“, um zwischen „BAR“, „PSI“ und „KPA“ zu wechseln.
3. Drücken Sie die „M“-Taste erneut, der aktuelle Zieldruckwert blinkt und drücken Sie dann
die Tasten „+“ oder „-“, um den Zieldruckwert anzupassen.
4. Nach Auswahl des Pumpmodus, kann die Pumpfunktion eingeschaltet werden, indem der
Ein/Aus-Schalter einmal kurz gedrückt wird.
Einschalten/Ausschalten der LED-Taschenlampe
30
Drücken Sie die Taste einfach einmal, um die LED-Lichtfunktion einzuschalten. Immer dann,
wenn Sie die Taste zum Umschalten des Lichtmodus drücken, stehen drei Lichtmodi zur
Auswahl. (Normal, Strobe, SOS)
Drücken Sie die Ein/Aus-Taste und halten Sie sie für 2 Sekunden gedrückt, um das Gerät
einzuschalen. Drücken Sie die Ein/Aus-Taste und halten Sie sie erneut für 2 Sekunden, um
das Gerät auszuschalten. Wenn das Gerät nicht Verwendet wird, schaltet es sich automatisch
innerhalb von 30 Sekunden ab.
Wie halte ich diese Einheit ein und aus
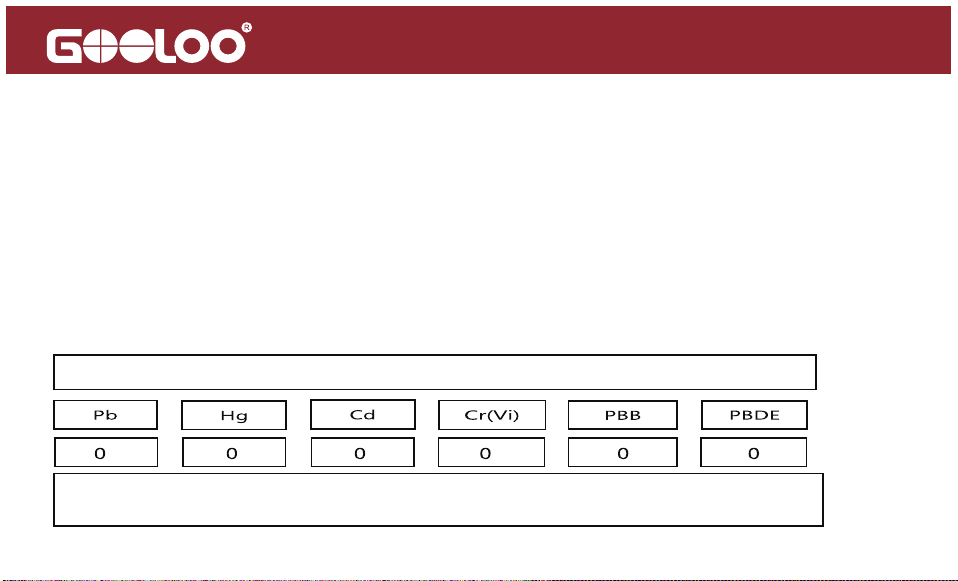
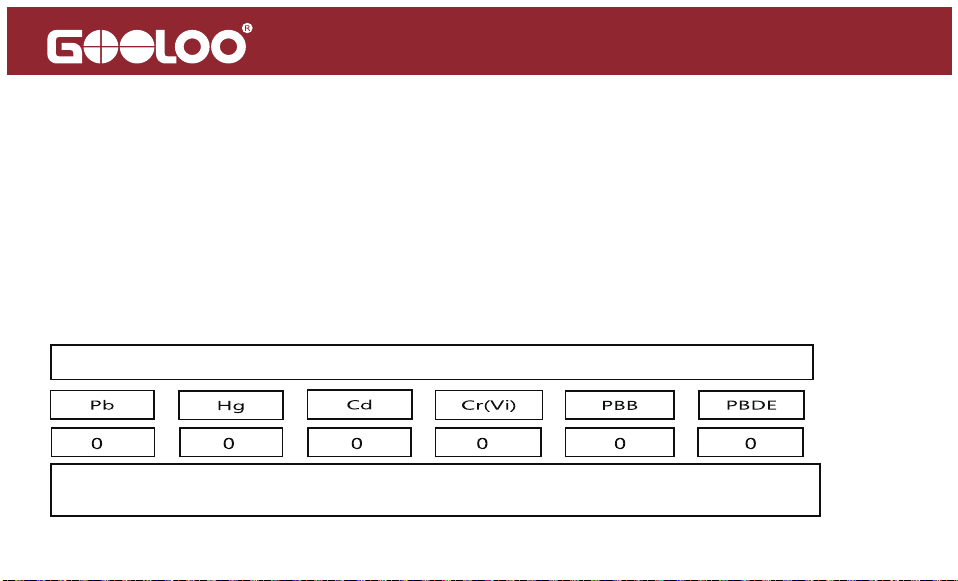
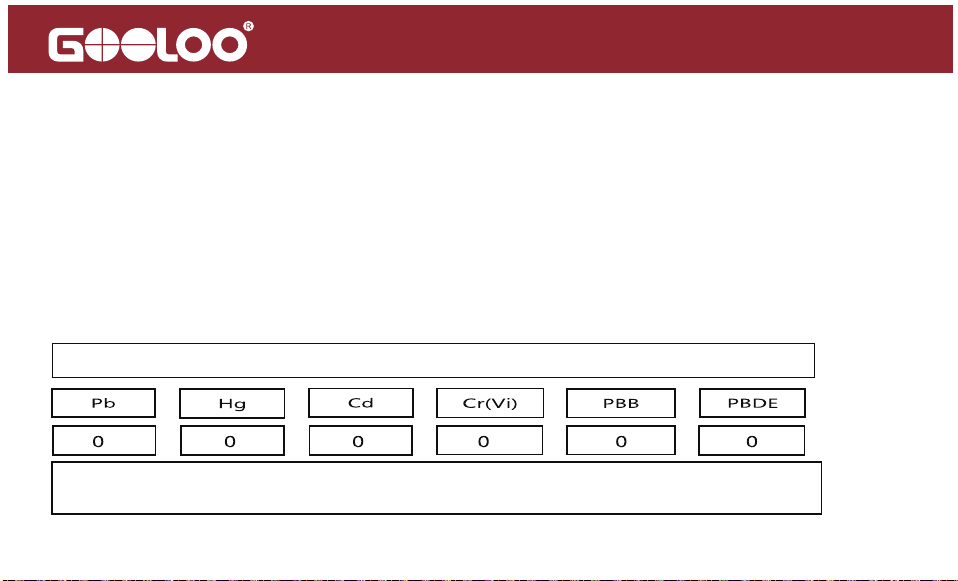
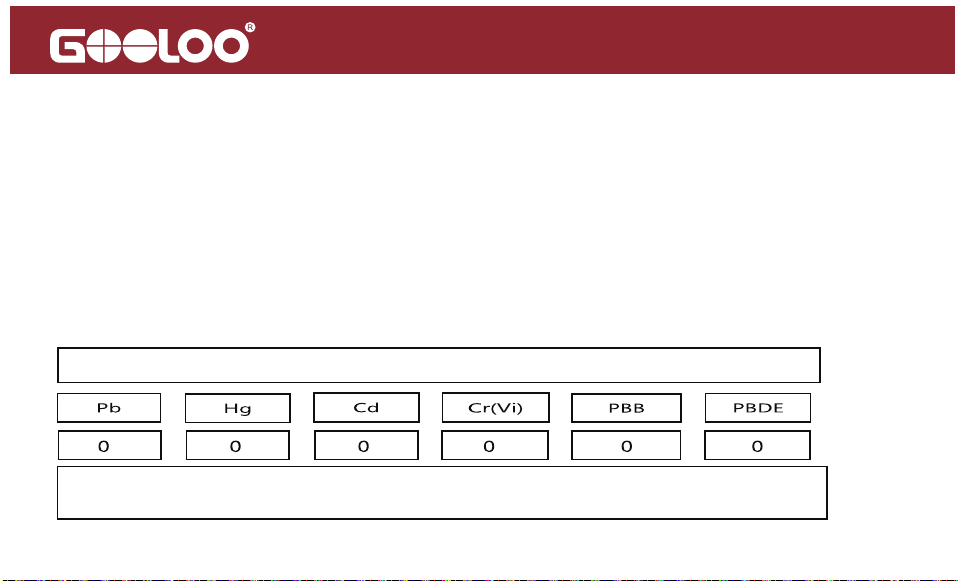
Toxische und schädliche Substanzen
Zusammensetzung und Menge an toxischen und gefährlichen Substanzen im Produkt
0: Weist darauf hin, dass die Menge an gefährlichen Substanzen in allen homogenen
Materialien geringer ist als das Vorgeschriebene Limit des MCV (Norm 2002/95/EC/RoHs)
31
Technische SpezifikationenVerpackungsinhalt
#
MengeTeilebezeichnung
Host
Tragetasche
Pumpschlauch
Luftdüse
USB-A-zu-USB-C-Kabel
1
1
1
1
1
5
1
1
2
3
4
5
6
7
Benutzerhandbuch
Kapazität
44.4Wh
400A (3s)
2500A
5V/2A
5V/2.4A
15V/10A
-20°C~60°C/-4°F~140°F
> 1000 Zyklen
6-8 Stunden (5V/2A-Ladegerät)
Startstrom
Spitzenstrom
USB-C Eingang
USB-A Ausgang
DC Ausgang
Betriebstemperatur
Lebensdauer
Gesamtladezeit
Starthilfekabel

32
FAQ
Frage 1: Welche Betriebstemperatur hat dieses Gerät und wie wird es gelagert?
A: Bei diesem Gerät handelt es sich um eine Lithium-Polymer-Batterie, die Betriebstemperatur
liegt bei -20-60℃/ -4-140℉. Wenn die Umgebungstemperatur höher ist als 60℃/140℉, kann
die Innenkonstruktion der Batteriezellen beschädigt werden, sie kann anschwellen und
unsicher werden. Lagern Sie das Gerät daher nicht in Fahrzeugen, die bei heißen
Wetterbedingungen für längere Zeit abgestellt werden.
Frage 2: Wie starte ich ein Fahrzeug mit Hilfe dieses Geräts?
A: Bitte beziehen Sie sich auf die Anweisungen über “Wie starte ich ein 12V-Fahrzeug".
Frage 3: Woher weiß ich, ob dieses Gerät korrekt an das Fahrzeug angeschlossen ist?
A: Wenn die Batterieklemmen an die Fahrzeugbatterie angeschlossen sind, leuchtet die
LED-Anzeige auf dem Starthilfekabel durchgehend grün, d. h. der Anschluss ist korrekt. Wenn
das Licht durchgehend rot leuchtet, weist dies auf eine umgekehrte Verbindung hin.

Frage 4: Was sollte ich tun, wenn dieses Gerät ein Fahrzeug nicht starten kann?
A: Laden Sie diese Einheit vollständig auf und versuchen Sie, die „BOOST“-Taste auf dem
Starthilfekabel zu drücken. Nachdem die Fahrzeugbatterie korrekt angeschlossen wurde,
leuchtet die LED-Anzeige durchgehend grün, starten Sie dann das Fahrzeug innerhalb von
30 Sekunden. Wenn es immer noch nicht funktioniert, setzen Sie sich mit uns über
[email protected] in Verbindung (Geben Sie Ihre Auftrags-ID an).
Frage 5: Was soll ich tun, wenn sich das Gerät nicht aufladen lässt?
A: Laden Sie es über eine ganze Nacht mit einem USB-C-Kabel und einem Wandladegerät.
Wenn es immer noch nicht funktioniert, setzen Sie sich mit uns über [email protected]
in Verbindung (Geben Sie Ihre Auftrags-ID an).
Frage 6: Was soll ich tun, wenn dieses Gerät andere Geräte nicht aufladen kann?
A: Versuchen Sie, das Gerät mit einem anderen Ladekabel aufzuladen. Wenn es funktioniert,
was bedeutet, dass das von uns bereitgestellte Ladekabel defekt ist, stellen wir Ihnen ein
neues zur Verfügung. Wenn es immer noch nicht funktioniert, senden Sie uns bitte eine
E-Mail an: [email protected] (Geben Sie Ihre Auftrags-ID an).
33

Frage 7: Kann dieses Gerät andere Geräte aufladen, während es geladen wird?
A: Ja.
Frage 8: Kann dieses Produkt andere Geräte aufladen, während es ein Fahrzeug
startet?
A: Nein.
Frage 9: Wie oft muss das Gerät aufgeladen werden?
A: Am besten ist es, ihn alle 3 Monate aufzuladen.
Frage 10: Warum schaltet es sich nach 30 Sekunden ab, wenn andere Geräte geladen
werden?
A. Diese Einheit schaltet sich automatisch ab, wenn Diese Einheit kann sich automatisch
ausschalten, wenn sie Geräte auflädt, die nur wenig Ladestrom benötigen, wie z. B. Kopf-
hörer, Smartwatches usw., denn es gibt eine minimale Ladestrombegrenzung (200mA) für
diese Einheit. Sie wird nach 30 Sekunden automatisch ausgeschaltet, wenn der Ladestrom
weniger als 200mA ist.
34

Warnung
1.Bitte lesen Sie dieses Benutzerhandbuch gründlich durch, bevor Sie diese Maschine verwen-
den.
2.Bitte seien Sie vorsichtig, wenn Sie diese Maschine verwenden. Wenn Sie die Anweisungen
nicht befolgen, könnten Sie sich selbst verletzen oder die Ausrüstung oder die Fahrzeugbat-
terie beschädigen.
3.Lassen Sie das Gerät nicht von Personen bedienen, die nicht über die erforderlichen Kennt-
nisse und Fähigkeiten verfügen, ohne sie zu beaufsichtigen.
4.Verwenden Sie dieses Gerät nicht wie ein Spielzeug. Halten Sie von Kindern fern, um Unfälle
zu vermeiden.
5.Dieses Gerät funktioniert für Fahrzeuge (Ausrüstung) mit einer 12V-Batterie, es funktioniert
nicht für Fahrzeuge mit Nicht-12V-Batterine. Die Verwendung mit anderen Maschinen, wie z.
B. Flugzeugen und Schiffen ist Verboten.
6.Verwenden Sie dieses Gerät nicht, wenn ein Kabel, eine Klemme oder eine Leitung
beschädigt sind oder wenn sich dieses Gerät überhitzt hat, angeschwollen ist oder Flüssigkeit
verliert.
7.Verwenden Sie es nicht als Fahrzeugbatterie oder Batterieladegerät.
35

8.Verwenden Sie dieses Gerät nicht, um ein Fahrzeug zu starten, während die interne
Batterie aufgeladen wird.
9.Verwenden Sie nur die Batterieklemmen, die mitgeliefert werden, um das Fahrzeug zu
starten und das qualifizierte Ladegerät, um diese Einheit zu laden.
10.Überladen Sie die Einheit nicht (lassen Sie die Batterie nicht leerlaufen), laden Sie
regelmäßig, es wäre am besten, alle 3 Monate aufzuladen.
11.Stellen Sie sicher, dass der blaue Stecker des Starthilfekabels vollständig in den Batter-
ieklemmenanschluss eingesteckt ist, da andernfalls der blaue Stecker schmelzen könnte.
12.Stellen Sie vor der Inbetriebnahme sicher, dass die Batterieklemmen sauber sind und
vergewissern Sie sich, dass die Batterieklemmen korrekt angeschlossen sind. Wenn die
Batterieklemmen auf dem Fahrzeug verschmutzt oder korrodiert sind, wird die Ausgang-
sleistung des Geräts abnehmen.
13."Bitte starten Sie das Produkt nicht mehr als dreimal hintereinander, da dies dazu führen
kann, dass das Produkt überhitzt und beschädigt wird. Wenn Sie das Produkt mehrmals
starten müssen, warten Sie bitte zwischen jedem Startvorgang zwei Minuten."
36

14.Schließen Sie die Klemmen der Starthilfe nicht umgekehrt an die Batterie an, nachdem
Sie die „BOOST“-Taste gedrückt haben, um einen Unfall zu vermeiden.
15.Verwenden Sie die Einheit, um das Fahrzeug zu starten, wenn die Batterieleistung bei
über 2 Balken liegt.
16.Laden Sie dieses Produkt nicht direkt nach dem Start des Fahrzeugs auf, bitte lassen Sie
es für 30 Minuten abkühlen, bevor Sie es erneut aufladen.
17.Lassen Sie das Produkt nicht in Wasser eintauchen.
18.Betreiben Sie das Produkt nicht in einer explosiven Umgebung, wie z. B. ein Ort, mit
brennbaren Flüssigkeiten, Gasen oder Staub.
19.Modifizieren Sie diese Maschine nicht und bauen Sie sie nicht auseinander. Nur
Kundendienst-Techniker können diese Ausrüstung reparieren.
20.Setzen Sie das Produkt keiner extremen Hitze oder Feuer aus.
21.Lassen Sie das Gerät nicht fallen und drücken Sie es nicht. Wenn das Gerät hart getrof-
fen wird oder auf eine andere Weise beschädigt wird, sollte es von einem qualifizierten
Batterie-Techniker in Augenschein genommen werden.
22.Lagern Sie das Gerät nicht an Orten, an denen die Temperatur 60℃/140℉ überschreit-
en kann.
37

Innerhalb von 18 Monaten nach dem Kauf bieten wir Ihnen einen pünktlichen und effektiven
Online-Kundendienst.
.
18 Monate Online-Kundendienst
Ihre Garantie umfasst
23.Laden Sie nur bei einer Umgebungstemperatur von -10~45℃/14~113℉.
24.Unter extremen Bedingungen kann die Batterie auslaufen. Wenn ein Leck am Gerät
vorliegt, fassen Sie es nicht mit blanken Händen an. Wenn es zu einem Hautkontakt
kommt, waschen Sie die Hände sofort mit Seife und Wasser ab. Wenn die Flüssigkeit
versehentlich mit den Augen in Kontakt kommt, spülen Sie Augen sofort für mindestens 10
Minuten aus und suchen Sie einen Arzt auf.
25.Das Gerät enthält eine Lithium-Batterie. Entsorgen Sie das Gerät am Ende der Lebens-
dauer des Produkts oder wenn das Gerät Flüssigkeit verliert gemäß den lokalen Bestim-
mungen.
38

Innerhalb von 30 Tagen nach Ihrem Kauf, können sie bei Problemen mit dem Produkt, eine
Amazon verlangen.
30 Tage Geld-zurück-Garantie
Wir werden das defekte Gerät aufgrund von Herstellungsproblemen innerhalb von 18
Monaten durch ein neues ersetzen.
30 Tage bis 18 Monate
Haftungsausschluss
A. Wenn das Produkt repariert oder ersetzt werden muss, sollte der ursprüngliche Käufer den
Originalbeleg (Bestellnummer) vorlegen, damit die Garantie in Kraft treten kann.
B. Die Garantie deckt keine Schäden oder Produktausfälle ab, die durch normalen verschleiß,
physischen Missbrauch, unsachgemäße Installation, Missbrauch, Modifikation oder nicht
autorisierte Reparaturen durch Dritte verursacht wurden.
C. Wir haften nicht für zufällige oder indirekte Schäden, die durch unsachgemäßen Gebrauch
oder Missbrauch dieses Produkts entstehen.
D. Alle Garantieansprüche beschränken sich auf die Reparatur oder den Ersatz des defekten
Produkts und liegen im alleinigen Ermessen von GOOLOO.
39

Achtung
Nicht in die Nähe oder ins Feuer stellen
Vermeiden Sie extreme Temperaturen
Nicht fallen lassen
Nicht auseinanderbauen
Nicht in Wasser tauchen
Überladung/Entladung
Schutz
Sicherungsschutz Gegen-Rückwärts
Stecker
40

Kundenbetreuung
18 Monate eingeschränkte Garantie
Lebenslanger technischer Service
Kontaktieren Sie uns bitte
Für FAQ und weitere Informationen
41

Danke,
dass Sie sich für
uns entschieden haben
Hergestellt in China
42
43
Hersteller
Anschrift
Importeur
Anschrift
EU-Vertreter
Name und Konta
Tel
496995179070
Shenzhen Carku Technology Co.,Ltd
shen zhen shi lan de wo ke ji you xian gong si
Guangdong, Shenzhen, Longgang, 2nd Floor, Building 12, Shenao Cultural
Industry Park, Dafapu Community, Bantian Street
No.103, block A, Qixing Creative factory, GaoFeng community, Dalang
street, LongHua, Shenzhen, Guangdong, China

Reg No.
5904374
R
Produit : VX1
SUPERSAFE est une technologie de protection de GOOLOO
Reg No.
5904374
Manuel d'utilisation
2500A
Aide au démarrage
150PSI
Compresseur d'air
Modèle : JS-211

Chargez d'abord l'appareil !
Avertissement
Tout en lisant le manuel, vous pouvez commencer à charger votre VX1 avec le chargeur mural
et le câble de type C fournis.
Merci d'avoir choisi l'aide au démarrage gooloo. Pour garantir une bonne expérience utilisateur,
la sécurité personnelle et la sécurité des biens, veuillez lire attentivement toutes les instructions
avant d'utiliser ce produit, veuillez conserver ce manuel pour référence.
Cette unité est destinée aux véhicules (équipements) équipés de piles 12V. Il peut être dangere-
ux s'il est utilisé avec d'autres types de piles. Lisez et comprenez les informations de sécurité
avant d'utiliser l'aide au démarrage. Le non-respect des consignes de sécurité peut l'endom-
mager, et peut également entraîner des chocs électriques, des explosions, des incendies, des
dommages matériels et des blessures.
45

Description des pièces et des fonctions du produit
Bouton d'alimentation et
bouton de gonflage
Bouton de réglage
Bouton LED
Aération
Lampe de
poche LED
Sortie USB-A 5V/2.4A
Entrée USB-C 5V/2A
Prise pour câble de démarrage
Prise pour câble de démarrage
Sortie USB 5 V/2,4 A
Câble de démarrage intelligent
1. Haut et bas pour sélectionner
2. Augmenter ou réduire la pression
Affichage LCD
46
Sortie DC 15V/10A
Instructions d'utilisation
Alimentation de la batterie:
Points Clés
1 barre 2 barres 3 barres 4 barres
0 barre
Icône de la baerie
Puissance de la baerie
Appuyez sur le bouton d'alimentation pour vérifier la puissance de la batterie:
L'icône de la batterie clignote une barre après l'autre pendant la période de charge. Les
différentes barres de l'icône de la batterie indiquent sa puissance ; elle atteint 4 barres lorsque
le processus de charge est terminé.
Le démarreur VX1 intègre 6 fonctions: démarrage d'urgence, gonfleur, éclairage, feu de
détresse, chargeur et démarrage d'appareils 12V - un design nouvelle génération.
Avec 2500A de courant de crête, il démarre instantanément les véhicules 12V (8,5L essence/6L
diesel), même à températures extrêmes, jusqu'à 50 fois et plus de 1000 cycles.
47

Le compresseur intégré avec écran LCD et détection de pression gonfle un pneu en 3 min à 20
PSI, convenant aux vélos, voitures, ballons, etc.
La conception en nid d'abeille améliore la dissipation thermique de 30% et la durée de vie de
50%.
Avec 10 protections contre les surcharges, courts-circuits, inversions de polarité..., le VX1 offre
une sécurité optimale et démarre entre -20°C et 60°C.
Lampe LED 3 modes (Normal/Stroboscopique/SOS), la batterie externe charge les appareils
USB et offre 36h d'éclairage.
48
Cette unité peut être chargée avec un câble de type C et un chargeur mural (chargeur mural
non inclus).
Comment charger le VX1
Comment démarrer un véhicule 12V
(assurez-vous que la puissance de la batterie est ≧2 barres)
Note : N'appuyez pas sur le bouton ‘‘BOOST’’ du câble de démarrage qu’une fois la batterie du véhicule correctement
connectée.
1. Connectez la batterie
du véhicule
2. La LED verte s'allume (fixe)
3. Démarrez le moteur
du véhicule
49

LED verte (fixe)
LED rouge
LED verte (clignote)
Indicateur LED
La connexion est correcte, vous pouvez démarrer le véhicule directement.
Connexion inversée, veuillez corriger la polarité des pinces de la batterie.
Fonctionnement
Vériez l'indicateur LED du câble de démarrage et suivez les instructions ci-dessous:
Si un problème persiste, arrêtez d'utiliser l’aide au démarrage et contactez notre équipe de
service directement à [email protected], nous ferons de notre mieux pour résoudre le
problème dans les 24 heures.
La tension de la batterie du véhicule est trop faible, essayez d'appuyer sur le
bouton "BOOST" du câble de démarrage, lorsque la LED verte s'allume (fixe),
puis démarrez le véhicule dans les 30s.
La batterie du véhicule peut être endommagée. Tout d'abord, assurez-vous que
la connexion est correcte, essayez d'appuyer sur le bouton "BOOST" du câble de
démarrage, lorsque la LED verte s'allume (fixe), puis démarrez le véhicule dans
les 30s.
Pas de lumière
50

Étapes d'utilisation du gonfleur d'air
Allumez l'appareil, appuyez brièvement sur la touche "M" pour
commencer à régler le gonfleur.
Préréglage de la pression des pneus
Note: Les données ne sont fournies
qu'à titre de référence.
0,7BAR 2,2BAR
2,1BAR 2,5BAR
1. Appuyez une fois sur la touche "M", l'icône à l'extrême gauche clignote, puis appuyez sur les
touches "+" ou "-" pour passer de l'icône "basket-ball", "vélo", "voiture" et "SUV".
2. Appuyez deux fois sur la touche "M", l'icône de l'unité de pression clignote, puis appuyez
sur les touches "+" ou "-" pour basculer entre "BAR", "PSI" et "KPA".
3. Appuyez à nouveau sur la touche "M", la valeur de pression cible actuelle clignote, puis
appuyez sur les touches "+" ou "-" pour régler la valeur de pression cible.
4. Après avoir sélectionné le mode de gonflage, la fonction de gonflage peut être activée en
appuyant brièvement une fois sur la touche d'alimentation.
51
Il suffit d'appuyer une fois sur le bouton pour allumer la fonction de lumière LED, chaque fois
que vous appuyez sur le bouton pour changer le mode de lumière ; vous avez le choix entre
trois modes de lumière : (Normal, Stroboscope, SOS)
Appuyez sur le bouton d'alimentation pendant deux secondes pour allumer l'appareil, et
appuyez à nouveau sur le bouton d'alimentation pendant deux secondes pour l’éteindre. En
outre, lorsque l'appareil n'est pas utilisé, il s'éteint automatiquement au bout de 30 secondes.
Comment allumer/éteindre la lampe de poche LED
Comment allumer et éteindre cette unité
Substances toxiques et nocives
Composition et quantité de substances toxiques ou nocives dans ce produit
0 : Indique que la teneur en substances nocives de tous les matériaux homogènes est
inférieure à la limite prescrite pour les VCM (norme 2002/95/CE/RoHs).
52
Technische SpezifikationenContenu de l'emballage
#
QuantitéNom de la pièce
Hôte
Câble de démarrage intelligent
Câble USB-A à USB-C
Sac de transport
Tube de pompe
Buse d'air
Manuel d’utilisation
1
1
1
1
1
5
1
1
2
3
4
5
6
7
Capacité
44.4 Wh
400A(3s)
2500A
5V/2A
5V/2.4A
15V/10A
-20°C~60°C/-4°F~140°F
> 1000 Cycles
6-8 heures (chargeur 5V/2A)
Courant de
démarrage
Courant de crête
Entrée USB-C
Sortie USB-A
Sortie CC
Température de
fonctionnement
Durée de vie
Temps de charge
complet
53

Questions Fréquentes
Q1 : Quelle est la température de fonctionnement de cet appareil et comment la conserver?
R : Cette unité est une batterie au lithium polymère, la température de fonctionnement est de
-20-60℃/ -4-140℉. Si la température ambiante est supérieure à 60℃/140℉, la construction
interne des cellules de la batterie peut être endommagée, elle peut gonfler et devenir
dangereuse. Ne stockez donc pas l'appareil dans un véhicule stationné pendant de longues
périodes par temps chaud.
Q2 : Comment démarrer un véhicule avec cette unité?
R : Veuillez vous référer aux instructions sur «Comment démarrer un véhicule 12V».
Q3 : Comment savoir si cette unité est correctement connectée au véhicule?
R : Lorsque les pinces de la batterie sont connectées à la batterie du véhicule, lorsque le voyant
LED du câble de démarrage s'allume en vert fixe, cela signifie que le câble est correctement
connecté. Si le voyant rouge s'allume (fixe) , cela signifie que la connexion est inversée.
54

Q4 : Que dois-je faire si cet appareil ne peut pas démarrer un véhicule?
R : Rechargez complètement cet appareil, et essayez d'appuyer sur le bouton "BOOST" du
câble de démarrage après avoir connecté correctement la batterie du véhicule, l'indicateur
LED s'allume en vert fixe, puis démarrez le véhicule dans les 30s. Si cela ne fonctionne
toujours pas, veuillez nous envoyer un e-mail à : [email protected] (joignez votre
numéro de commande)
Q5 : Que dois-je faire si l’appareil ne peut pas se recharger?
R : Chargez-le avec un câble USB-C et un chargeur mural pendant toute une nuit. Si cela ne
fonctionne toujours pas, veuillez nous envoyer un e-mail à : [email protected] (joignez
votre numéro de commande).
Q6 : Que dois-je faire si cet appareil ne peut pas charger d'autres appareils?
R : Essayez de charger l'appareil avec un autre câble de charge ; si cela fonctionne (ce qui
signifie que le câble de charge que nous avons fourni est défectueux), nous vous en
fournirons un nouveau ; si cela ne fonctionne toujours pas, veuillez nous envoyer un
e-mail à : [email protected] (joignez votre numéro de commande).
55

Q7 : Cet appareil peut-il charger d'autres appareils pendant qu'il est en charge?
R : Oui.
Q8 : Ce produit peut-il charger d'autres appareils pendant le démarrage d'un véhicule?
R : Non.
Q9 : À quelle fréquence cet appareil doit-il être rechargé?
R : Il est préférable de le recharger tous les 3 mois.
Q10 : Pourquoi l’appareil s'éteint-il au bout de 30 secondes lorsque vous chargez
d'autres appareils?
R. Cette unité peut s'éteindre automatiquement lors de la charge des appareils nécessitant
un faible courant de charge, tels que les écouteurs, les montres intelligentes, etc. Puisqu'il
existe une limitation du courant de charge minimum (200mA) sur cet appareil, il s'éteindra
automatiquement après 30s si le courant de charge est inférieur à 200mA.
56

Avertissement
1.Veuillez lire attentivement ce manuel d'utilisation avant d'utiliser cette machine.
2.Veuillez être prudent lorsque vous utilisez cette machine. En cas de non-respect des instruc-
tions, vous risquez de vous blesser ou d'endommager l'équipement ou la batterie du véhicule.
3.Ne permettez pas aux personnes n'ayant pas les connaissances ou les capacités adéquates
d'utiliser l'appareil sans supervision.
4.N'utilisez pas cet appareil comme un jouet. Gardez-le hors de portée des enfants pour éviter
tout accident.
5.Cette unité fonctionne pour les véhicules (équipements) avec une batterie de 12V, mais pas
pour les véhicules avec une batterie de moins de 12V. Il est interdit de l'utiliser dans d'autres
machines, comme les avions et les bateaux.
6.N'utilisez pas cet appareil si un câble, une pince ou un cordon a été endommagé ou si l'appa-
reil a subi une surchauffe, un gonflement ou une fuite de liquide.
7.Ne pas l'utiliser comme une batterie de véhicule ou un chargeur de batterie.
8.N'utilisez pas l'appareil pour démarrer un véhicule pendant la charge de la batterie interne.
9.Utilisez uniquement les pinces de batterie fournies pour le démarrage du véhicule et le
chargeur qualifié pour charger cette unité.
57

10.Ne déchargez pas trop l'unité (ne laissez pas la batterie se vider), chargez-la régulière-
ment, il serait préférable de la recharger tous les 3 mois.
11.Assurez-vous que la fiche bleue du câble de démarrage est branchée à fond dans le port
de sortie des pinces de la batterie, sinon la fiche bleue risque de fondre.
12.Assurez-vous que les bornes de la batterie sont propres avant de démarrer, et que les
pinces de la batterie sont bien connectées. Si les bornes de la batterie du véhicule sont
sales ou corrodées, la puissance de sortie de l'appareil diminuera.
13.Veuillez ne pas démarrer le produit plus de trois fois consécutives, car cela peut provo-
quer une surchauffe et endommager le produit. Si vous devez démarrer le produit
plusieurs fois, veuillez attendre deux minutes entre chaque démarrage.
14.Ne connectez pas les pinces du démarreur à la batterie de manière inversée après avoir
appuyé sur le bouton "BOOST" pour éviter tout accident.
15.Utilisez cette unité pour démarrer le véhicule lorsque la puissance de la batterie est
supérieure à 2 barres.
16.Ne rechargez pas ce produit immédiatement après le démarrage du véhicule, laissez-le
refroidir pendant 30 minutes avant de le recharger.
17.Ne laissez pas le produit être immergé dans l'eau.
58

18.N'utilisez pas ce produit dans un environnement explosif, tel qu'un endroit où se
trouvent des liquides, des gaz ou des poussières inflammables.
19.Ne modifiez pas et ne démontez pas cette machine. Seuls les techniciens de mainte-
nance peuvent réparer cet équipement.
20.N'exposez pas le produit à une chaleur extrême ou au feu.
21.Ne laissez pas tomber l'appareil et ne le serrez pas. Si l'appareil subit un choc violent ou
est endommagé de toute autre manière, il doit être inspecté par un technicien qualifié en
batteries.
22.Ne pas stocker dans des endroits où la température peut dépasser 60℃/140℉.
23.Chargez uniquement à une température ambiante de -10~45℃/14~113℉.
24.Dans des conditions extrêmes, la batterie peut présenter des fuites. Si l'appareil
présente une fuite de liquide, ne le manipulez pas à mains nues. En cas de contact avec la
peau, lavez-vous immédiatement à l'eau et au savon. Si le liquide entre accidentellement
en contact avec les yeux, rincez immédiatement les yeux à l'eau pendant au moins 10
minutes et consultez un médecin.
25.L'appareil contient une batterie au lithium. A la fin de la durée de vie du produit, ou en
cas de fuite de liquide, éliminez l'appareil conformément aux réglementations locales.
59

Dans les 18 mois, nous vous fournirons un service après-vente en ligne rapide et efficace
après votre achat.
.
18 mois de service après-vente en ligne
Dans les 30 premiers jours suivant votre achat, vous pouvez demander à retourner le produit
par l'intermédiaire d'Amazon en cas de problème.
Garantie de remboursement de 30 jours
Nous remplacerons l'appareil défectueux en raison de problèmes de fabrication par un
nouvel appareil dans les 18 mois.
30 jours à 18 mois
Votre garantie comprend
Clause de non-responsabilité
A. Lorsque le produit doit être réparé ou remplacé, l'acheteur d’origine doit présenter le reçu
original (identifiant de commande), et la garantie prendra effet.
60

B. La garantie ne couvre pas les dommages ou les défaillances du produit causés par une
usure normale, un abus physique, une installation incorrecte, une mauvaise utilisation, une
modification ou des réparations non autorisées par un tiers.
C. Nous ne sommes pas responsables de tout dommage accidentel ou indirect causé par une
mauvaise utilisation de ce produit.
D. Toutes les réclamations au titre de la garantie sont limitées à la réparation ou au
remplacement du produit défectueux et à la seule discrétion de GOOLOO.
61

Attention
Ne pas placer à proximité ou dans le feu
Éviter les températures extrêmes
Ne pas laisser tomber
Ne pas démonter
Ne pas immerger dans l'eau
Protection
Surcharge/décharge
Protection par fusible Contre l'inversion
de fiches
62

Service client
Service de garantie limitée de 18 mois
Service technique à vie
N'hésitez pas à nous contacter
Pour les questions fréquentes et plus d'informations
63

Merci de nous
avoir choisis
Fabriqué en Chine
64
65
Fabricant
Adresse
Importateur
Adresse de
l'importateur
Tél. 496995179070
Représentant de l'UE
Nom et coordonnées
Shenzhen Carku Technology Co.,Ltd
shen zhen shi lan de wo ke ji you xian gong si
Guangdong, Shenzhen, Longgang, 2nd Floor, Building 12, Shenao Cultural
Industry Park, Dafapu Community, Bantian Street
No.103, block A, Qixing Creative factory, GaoFeng community, Dalang
street, LongHua, Shenzhen, Guangdong, China

Reg No.
5904374
R
Producto: VX1
SUPERSAFE es una tecnología de protección de seguridad de GOOLOO
Reg No.
5904374
Manual de instrucciones
2500A
Arrancador de batería
150PSI
Compresor de aire
Modelo: JS-211

Primero cárguela!
Advertencia
Mientras lee el manual, puede comenzar a cargar su VX1 con el cargador de pared y el cable
tipo C suministrado.
Gracias por elegir el arrancador de batería de Gooloo. Para garantizar una buena experiencia,
su seguridad personal y la seguridad de su propiedad, lea atentamente todas las instrucciones
antes de usar este producto. Conserve este manual para consulta.
Esta unidad es para vehículos (equipos) con baterías de 12V. Su uso con otro tipo de baterías
puede ser peligroso. Lea y comprenda la información de seguridad antes de usar. No seguir la
información de seguridad puede dañar el arrancador y también provocar descargas eléctricas,
explosiones, incendio, daños a la propiedad zy lesiones.
67
Piezas del producto y descripción de las funciones
Tecla de encendido y
tecla de inflador
Tecla de configuración
Tecla LED
Ventilado
Linterna
de LED
USB-A Salida 5V/2.4A
USB-C Salida 5V/2A
Enchufe del cable del arrancador
Enchufe del cable de arranque
Salida USB 5V/2.4A
Cable del
arrancador inteligente
1. Para seleccionar hacia arriba o
hacia abajo
2. Para aumentar o disminuir la presión
Pantalla LCD
68
Salida DC 15V/10A
Instrucciones de funcionamiento
Carga de la batería:
1 barra 2 barras 3 barras 4 barras
0 barras
Ícono de batería
Carga de la batería
Presione la tecla de encendido para verificar la carga de la batería:
El ícono de la batería titilará barra por barra durante el período de carga. Los íconos de las
diferentes barras muestran las distintas cargas. El ícono llega a 4 barras cuando el proceso de
carga finaliza.
Puntos Clave
El arrancador VX1 integra 6 funciones: arranque de emergencia, inflador, iluminación, luz
SOS, carga de dispositivos y arranque de equipos de 12V - un diseño vanguardista.
Con 2500A de corriente pico, arranca al instante vehículos de 12V (8,5L gasolina/6L diésel),
incluso a temperaturas extremas, hasta 50 veces y más de 1000 ciclos.
69

Esta unidad se puede cargar con el cable tipo C y el cargador de pared (cargador de pared
no incluido).
Cómo cargar el VX1
70
El compresor integrado con pantalla LCD y detección de presión infla un neumático en 3 min a
20 PSI, apto para bicis, coches, pelotas, etc.
El diseño en panal mejora la disipación térmica un 30% y prolonga la vida útil un 50%.
Con 10 protecciones contra sobrecargas, cortocircuitos, polaridad inversa..., el VX1 ofrece
máxima seguridad y arranca de -20°C a 60°C.
Luz LED de 3 modos (Normal/Estroboscópica/SOS), batería portátil para cargar dispositivos
USB y 36h de iluminación.

Cómo arrancar un vehículo de 12V
(asegúrese de que la carga de la batería sea ≧2 barras)
Nota: No pulse el botón "BOOST" del cable de arranque antes de conectar correctamente la batería del vehículo.
1. Conecte la batería del vehículo.
2. Se ilumina el indicador
LED verde (sólido)
3. Ponga en marcha
el motor del vehículo
71
LED verde (sólido)
LED rojo
LED verde (titila)
Indicador LED
La conexión es correcta, puede poner en marcha el vehículo directamente.
Invierta la conexión, coloque las pinzas de la batería en la polaridad correcta.
Funcionamiento
Controle el indicador LED del cable del arrancador y siga estas instrucciones:
Si algún problema persiste, deje de usar el arrancador y comuníquese con nuestro equipo de
servicio técnico directamente en [email protected]. Haremos todo lo que esté a nuestro
alcance para resolver el problema dentro de las 24 horas.
La tensión de la batería del vehículo es muy baja. Intente presionar la tecla
"REFUERZO" del cable del arrancador; cuando se ilumine el indicador LED verde
(sólido), ponga en marcha el vehículo dentro de los 30 segundos.
Puede haber un daño en la batería del vehículo. En primer lugar, asegúrese de
que la conexión sea correcta e intente presionar la tecla "REFUERZO" del cable
del arrancador; cuando se ilumine el LED verde (sólido), ponga en marcha el
vehículo dentro de los 30 segundos.
Sin luz
72
Pasos para usar el inflador de aire
Encienda, y presione brevemente la tecla "M" para comenzar a
configurar el inflador de aire.
Valor prestablecido de presión de neumático
Nota: La información es solo para
referencia.
0,7BAR 2,2BAR
2,1BAR 2,5BAR
1. Presione la tecla "M" una vez; los íconos del extremo izquierdo titilarán. Luego, presione
las teclas "+" o "-" para alternar entre los íconos de "básquetbol", "bicicleta", "automóvil" o
"SUV".
2. Presione la tecla "M" dos veces; titilarán los íconos de la unidad de presión. Luego,
presione las teclas "+" o "-" para alternar entre "BAR", "PSI" o "KPA".
3. Vuelva a presionar la tecla "M"; titilará el valor actual de presión objetivo. Luego, presione
las teclas "+" o "-" para ajustar el valor de la presión objetivo.
4. Después de seleccionar el modo de inflado, se puede encender la función de inflado
presionando brevemente una vez la tecla de encendido.
73
Solo presione una vez la tecla para encender la función de la luz de LED. Cada vez que
presione la tecla para cambiar el modo de luz, podrá elegir entre tres modos. (Normal,
estroboscópica, SOS)
Para encender el dispositivo, presione la tecla de encendido y mantenga presionada por dos
segundos. Para apagarlo, vuelva a presionar la tecla de encendido y mantenerla presionada
otros dos segundos. Además, cuando la unidad no esté en uso, se apagará en forma
automática a los 30 segundos.
Cómo encender/apagar la linterna de LED
Cómo encender y apagar esta unidad
Sustancias tóxicas y nocivas
Composición y cantidad de sustancias tóxicas o nocivas en este producto
0: Indica que el contenido de sustancias nocivas en todos los materiales homogéneos se
encuentra por debajo del límite de MVC (Estándar 2002/95/EC/RoHs)
74
Especificaciones técnicasContenido del empaque
#
CantidadNombre de la pieza
Servidor
Cable del arrancador inteligente
Cable de USB-A a USB-C
Bolsa para transporte
Tubo de la bomba
Boquilla de aire
Manual de instrucciones
1
1
1
1
1
5
1
1
2
3
4
5
6
7
Capacidad
44.4Wh
400A (3s)
2500A
5V/2A
5V/2.4A
15V/10A
-20℃ a 60℃ /-4℉ a 140℉
> 1000 Ciclos
6 a 8 horas (Cargador de 5V/2A)
Corriente de
arranque
Corriente pico
Entrada USB-C
Salida USB-A
Salida CC
Temperatura de
funcionamiento
Vida útil
Tiempo de carga
completa
75

Preguntas frecuentes
P1: ¿Cuál es la temperatura de funcionamiento de esta unidad y cómo la almacena?
R: Esta unidad es una batería de polímero de litio; su temperatura de funcionamiento es de
-20°C a 60°C/ de -4
°F
a 140
°F
. Si la temperatura ambiente es mayor a 60℃/140℉, la
construcción interna de las celdas de la batería se puede dañar, puede hincharse y tornarse
insegura. Por lo tanto, no almacene el dispositivo en vehículos estacionados por períodos
prolongados en un clima caluroso.
P2: ¿Cómo arrancar un vehículo con esta unidad?
R: Consulte en las instrucciones "Cómo arrancar un vehículo de 12V".
P3: ¿Cómo sabemos si esta unidad está conectada correctamente al vehículo?
R: Si el indicador LED del cable del arrancador emite una luz verde estable con las pinzas de la
batería conectadas a la batería del vehículo, significa que está conectada correctamente. Si se
ilumina el indicador rojo (sólido), significa que la conexión está invertida.
76

P4: ¿Qué debería hacer si la unidad no puede arrancar un vehículo?
R: Recargue completamente la unidad e intente presionar la tecla "REFUERZO" del cable del
arrancador después de conectar correctamente a la batería del vehículo. El indicador LED se
iluminará con una luz verde estable. Luego, arranque el vehículo dentro de los 30 segundos. Si
esto no funciona, comuníquese con nosotros a: [email protected] (Adjunte el número de
identificación de su pedido).
P5: ¿Qué debería hacer si no puedo cargar la unidad?
R: Cárguela con un cable USB-C y un cargador de pared durante toda la noche. Si esto no
funciona, comuníquese con nosotros a: [email protected](Adjunte el número de
identificación de su pedido).
P6: ¿Qué debería hacer si la unidad no puede cargar otros dispositivos?
R: Intente cargar el dispositivo con otro cable de carga. Si funciona, significa que el cable de
carga que le suministramos es defectuoso. Le enviaremos uno nuevo. Si aun así sigue sin
funcionar, envíenos un correo electrónico a: [email protected] (Adjunte el número de
identificación de su pedido).
77

P7: ¿Esta unidad puede cargar otros dispositivos mientras se está cargando?
R: Sí.
P8: ¿Esta unidad puede cargar otros dispositivos mientras está arrancando un vehículo?
R: No.
P9: ¿Con qué frecuencia es necesario recargar la unidad?
R: Recomendamos recargarla cada 3 meses.
P10: ¿Por qué se apaga en 30 segundos cuando carga otros dispositivos?
A. Esta unidad se puede apagar en forma automática cuando carga dispositivos que requieren
corriente de carga baja, como auriculares, relojes inteligentes, etc., ya que cuenta con una
limitación de corriente de carga mínima (200mA). Se apagará automáticamente pasados 30
segundos si la corriente de carga es menor a 200mA.
78

Advertencia
1.Lea este manual de instrucciones detenidamente antes de usar esta máquina.
2.Tenga cuidado durante su uso. Si no sigue las instrucciones, podría lesionarse o dañar el
equipo o la batería del vehículo.
3.No permita que personas sin los conocimientos o la capacidad adecuados maneje el disposi-
tivo sin supervisión.
4.No use como juguete. Mantenga alejada de los niños para evitar accidentes.
5.Esta unidad funciona en vehículos (equipo) con batería de 12V, no así en vehículos que no
tienen una batería de 12V. Queda prohibido usar en otras máquinas como aviones y barcos.
6.No utilice esta unidad cuando alguno de los cables o pinzas estén dañados o cuando la
unidad esté recalentada, hinchada o con pérdida de fluido.
7.No use como batería del vehículo o como cargador de batería.
8.No use la unidad para arrancar el vehículo mientras la batería interna está cargando.
9.Use solo las pinzas de batería suministradas para poner en marcha el vehículo y el cargador
calificado para cargar esta unidad.
10.No sobre-descargue la unidad (no deje que se agote la batería). Cárguela con regularidad,
preferentemente cada 3 meses.
79

11.Asegúrese de que el enchufe azul del cable del arrancador esté totalmente enchufado en el
puerto de salida de las pinzas de la batería; de lo contrario, el enchufe azul podría fundirse.
12.Verifique que los terminales de la batería estén limpios antes de intentar el arranque, y
asegúrese de que las pinzas de la batería estén bien conectadas. Si los terminales de la batería
del vehículo están sucios o corroídos, la potencia de salida de la unidad se verá reducida.
13. Por favor, no inicie el producto más de tres veces consecutivas, ya que esto podría provocar
sobrecalentamiento y dañar el producto. Si necesita iniciar el producto varias veces, asegúrese
de esperar dos minutos entre cada arranque.
14.No conecte las pinzas del arrancador a la batería de manera invertida después de presionar
la tecla "REFUERZO". Evite accidentes.
15.Utilice esta unidad para poner en marcha el vehículo cuando la potencia de la batería
supere las 2 barras.
16.No recargue este producto inmediatamente después de poner en marcha el vehículo.
Espere 30 minutos a que se enfríe antes de proceder a su recarga.
17.No sumerja el producto en agua.
18.No ponga en funcionamiento el producto en ambientes explosivos, como por ejemplo, en
presencia de líquidos inflamables, gases o polvo.
80

19.No modifique ni desarme el producto. Este equipo solo puede ser reparado por personal de
servicio técnico.
20.No exponga el producto al calor extremo o al fuego.
21.No lo deje caer ni lo apriete. Si el dispositivo recibe un golpe fuerte o se daña, debe ser
inspeccionado por un técnico de baterías calificado.
22.No almacene en lugares donde la temperatura supere los 60
°C
/ 140°F.
23.Solo cargue a una temperatura ambiente de -10~45
°C
/14~113°F.
24.Bajo condiciones extremas, la batería podría tener fugas. Si sale líquido del dispositivo, no
lo manipule con las manos desprotegidas. En caso de contacto con la piel, lave con agua y
jabón de inmediato. Si el líquido por accidente entrara en sus ojos, enjuague de inmediato con
agua por al menos 10 minutos y busque ayuda médica.
25.El dispositivo contiene una batería de litio. Al final de la vida útil del producto, o si hubiera
una fuga de líquido en el dispositivo, elimínelo según las disposiciones locales.
81

Durante los18 meses siguientes a su compra, le brindaremos un servicio post-venta efectivo
y puntual.
.
18 meses de servicio post-venta en línea
Durante los primeros 30 días posteriores a su compra, puede solicitar la devolución a través
de Amazon ante cualquier problema con el producto.
Garantía de devolución del dinero a los 30 días
Reemplazaremos aquellas unidades defectuosas por temas de fabricación con una nueva
dentro de los 18 meses.
De 30 días a 18 meses
La garantía incluye
Exención de responsabilidad
A. Cuando necesite reparar o reemplazar el producto, el comprador original deberá mostrar
la factura original (identificación del pedido) para poder hacer uso de la garantía.
82

B. La garantía no cubre daños o fallas del producto causadas por el uso y desgaste normal,
abuso físico, instalación inadecuada, uso indebido, modificaciones o reparaciones realizadas
por terceros no autorizados.
C. No somos responsables por los daños accidentales o indirectos derivados del uso
incorrecto o indebido del producto.
D. Todos los reclamos relacionados con la garantía se limitan a la reparación o reemplazo
del producto defectuoso y de acuerdo al exclusivo criterio de GOOLOO.
83

Atención
No colocar cerca o en el fuego
Evitar temperaturas extremas
No dejar caer
No desarmar
No sumergir en agua
Protección ante
sobrecarga/descarga
Protección por fusible Conexión inversa
84

Servicio de atención al cliente
18 meses de servicio de garantía limitada
Servicio técnico durante toda la vida útil de la unidad
Comuníquese con nosotros
Para Preguntas frecuentes y conocer más información
85

Gracias por
elegirnos
Hecho en China
86

86
Fabricante
Dirección
Importador
Dirección
Tel 496995179070
Representante de la
UE Nombre y contacto
Shenzhen Carku Technology Co.,Ltd
shen zhen shi lan de wo ke ji you xian gong si
Guangdong, Shenzhen, Longgang, 2nd Floor, Building 12, Shenao Cultural
Industry Park, Dafapu Community, Bantian Street
No.103, block A, Qixing Creative factory, GaoFeng community, Dalang
street, LongHua, Shenzhen, Guangdong, China
Reg No.
5904374
R
Prodotto: VX1
SUPERSAFE è una tecnologia di protezione di sicurezza di GOOLOO
Reg No.
5904374
Manuale d'uso
2500A
Avviatore di emergenza
150PSI
Compressore aria
Modello: JS-211

Ricarica!
Avvertenza
Durante la lettura del manuale, puoi iniziare a caricare VX1 con il caricabatterie a parete e
un cavo tipo-c fornito.
Grazie per aver scelto l'avviatore di emergenza gooloo. Per garantire una buona esperienza
utente, sicurezza personale e protezione della proprietà, leggere attentamente tutte le istruzi-
oni prima di utilizzare questo prodotto, conservare questo manuale come riferimento.
Questa unità è per veicoli (dispositivi) con batterie da 12V. Può essere pericoloso se utilizzato
con altri tipi di batterie. Leggere e comprendere le informazioni sulla sicurezza prima di utilizza-
re l'avviatore di emergenza. Il mancato rispetto delle informazioni sulla sicurezza può causare
danni all'avviatore di emergenza e può anche provocare scosse elettriche, esplosioni, incendi,
danni alla proprietà e lesioni personali.
88
Parti del prodotto e descrizione delle funzioni
Pulsante accensone e
Pulsante gonfiatore
Pulsante di impostazione
Pulsante LED
Aerato
Torcia a LED
Uscita USB-A 5V/2.4A
Ingresso USB-C 5V/2A
Presa cavo jumper
Presa avvio jumper
Uscita USB 5V/2,4A
Cavo jumper intelligente
1. Su e Giù per selezionare
2. Aumento o diminuzione della pressione
Display LCD
89
Uscita DC 15V/10A
Istruzioni operative
Potenza batteria:
Punti Chiave
1 Bar 2 Bar 3 Bar 4 Bar
0 Bar
Icona Baeria
Potenza baeria
Premere il pulsante di accensione per controllare la carica della batteria:
L'icona della batteria lampeggerà una per una durante il periodo di ricarica. Diverse barre
dell'icona della batteria mostrano una diversa potenza della batteria, l'icona della batteria
divent 4 barre quando il processo di ricarica è terminato.
L'avviatore VX1 integra 6 funzioni:
avviamento di emergenza, gonfiaggio, illuminazione,
luce SOS, carica dispositivi e avviamento dispositivi 12V - un design all'avanguardia.
Con 2500A di corrente di spunto, avvia istantaneamente veicoli 12V (8,5L benzina/6L diesel),
90

Questa unità può essere caricata con il cavo di tipo C e il caricatore da parete (caricatore da
parete non incluso).
Come ricaricare il VX1
91
anche a temperature estreme, fino a 50 volte e oltre 1000 cicli.
Il compressore integrato con display LCD e rilevamento pressione gonfia uno pneumatico in 3
min a 20 PSI, adatto a bici, auto, palloni ecc.
Il design a nido d'ape migliora la dissipazione termica del 30% e la durata del 50%.
Con 10 protezioni contro sovraccarichi, cortocircuiti, inversione di polarità ecc., il VX1 offre
massima sicurezza e avvia da -20°C a 60°C.
Luce LED 3 modalità (Normale/Strobo/SOS), power bank per caricare dispositivi USB e 36 ore di
illuminazione.
Come avviare un veicolo a 12V
(assicurarsi che la carica della batteria sia ≧2 bar)
Nota: Non premere il pulsante "BOOST" sul cavo jumper prima di aver collegato correttamente la batteria del veicolo.
1. Collegare la batteria del veicolo
2. Il LED verde si
accende (fisso)
3. Avviare il motore del veicolo
92
LED verde (fisso)
LED rosso
LED verde (lampeggiante)
Indicatore LED
La connessione è corretta, è possibile avviare il veicolo direttamente.
Connessione inversa, correggere la polarità dei morsetti della batteria.
Operazione
Controllare l'indicatore LED sul cavo jumper e seguire le istruzioni seguenti:
Se il problema persiste, interrompere l'utilizzo dell'avviatore di emergenza e contattare
direttamente il nostro team di assistenza all'indirizzo [email protected], faremo del
nostro meglio per risolvere il problema entro 24 ore.
La tensione della batteria del veicolo è troppo bassa, provare a premere il
pulsante "BOOST" sul cavo jumper, quando il LED verde si accende (fisso),
quindi avviare il veicolo entro 30 sec.
La batteria del veicolo può essere danneggiata, innanzitutto assicurarsi che la
connessone sia corretta, provare a premere il pulsante "BOOST" sul cavo jumper,
quando il LED verde si accende (fisso), quindi avviare il veicolo entro 30 sec.
Nessuna luce
93
Passi per utilizzare il gonfiatore
Accensione, pressione breve del tasto "M" per iniziare a impostare
il gonfiatore.
Valore preimpostato della pressione dei pneumatici
Nota: I dati sono solo per riferimento.
0,7BAR 2,2BAR
2,1BAR 2,5BAR
1. Premere una volta il tasto "M", l'icona in fondo a sinistra lampeggia, e quindi premere i
tasti "+" o "-" per commutare tra le icone "basketball", "bicycle", "car" e "SUV".
2. Premere due volte il tasto "M", l'icona dell'unità di pressione lampeggia, e quindi premere
i tasti "+" o "-" per commutare tra "BAR", "PSI" e "KPA".
3. Premere nuovamente il tasto "M", il valore della pressione target corrente lampeggia, e
quindi premere i tasti "+" o "-" per regolare il valore della pressione target.
4. Dopo aver selezionato la modalità di gonfiaggio, la funzione di gonfiaggio può essere
attivata premendo brevemente una volta il tasto di accensione.
94
Premere una volta il pulsante per accendere la funzione della luce LED, ogni volta che si
preme il pulsante per commutare la modalità luce, ci sono tre modalità di luce tra cui
scegliere. (Normale, Strobo, SOS)
Premere e tenere premuto il pulsante di accensione per due secondi per accendere il
dispositivo e premere e tenere premuto nuovamente per due secondi per spegnerlo. Inoltre,
quando il dispositivo non è in uso, si spegne automaticamente dopo 30 secondi.
Come accendere/spegnere la torcia a LED
Come accendere e spegnere l'unità
Sostanze tossiche e nocive
Composizione e quantità di sostanza tossica o nociva in questo prodotto
0: Indicare che il contenuto di sostanze nocive in tutti i materiali omogenei è inferiore al
limite prescritto di MCV (la norma 2002/95/CE/RoHs)
95

Specifiche tecnicheContenido del empaque
#
QuantitàNome parte
Host
Cavo jumper smart
Cavo da USB-A a USB-C
Borsa da trasporto
Tubo pompa
Ugello aria
Manuale d'uso
1
1
1
1
1
5
1
1
2
3
4
5
6
7
Capacità
44.4Wh
400A(3s)
2500A
5V/2A
5V/2.4A
15V/10A
-20°C~ 60°C /-4°F ~140°F
> 1000 cicli
Corrente di avvio
Corrente di picco
Ingresso USB-C
Uscita USB-A
Uscita CC
Temperatura
operativa
Durata
Tempo ricarica
completa
96
6-8 ore (caricabatterie 5V/2A)

Domande Frequenti
D1: Qual è la temperatura di esercizio di questa unità e come conservarla?
R: Questa unità è una batteria ai polimeri di litio, la temperatura di esercizio è -20-60℃/
-4-140℉. Se la temperatura ambiente è superiore a 60℃/140℉, la struttura interna delle celle
della batteria potrebbe danneggiarsi, gonfiarsi e diventare pericolosa. Quindi non riporre il
dispositivo in un veicolo parcheggiato al caldo per lungo periodo di tempo.
D2: Come avviare un veicolo con questa unità?
R: Fare riferimento alle istruzioni su "Come avviare un veicolo a 12V".
D3: Come si fa a sapere se questa unità è collegata correttamente al veicolo?
R: Con i morsetti della batteria collegati alla batteria del veicolo, quando la spia LED sul cavo
jumper si accende verde fissa, significa che è collegato correttamente. Se la spia rossa si
accende (fissa) , indica connessione inversa.
97

D4: Cosa devo fare se questa unità non può avviare un veicolo?
R: Ricaricare completamente questa unità e provare a premere il pulsante "BOOST" sul cavo
jumper dopo aver collegato correttamente la batteria del veicolo, l'indicatore LED si accende
fisso verde, quindi avviare il veicolo entro 30 secondi. Se ancora non funziona, contattaci a:
[email protected] (Allegare l'ID del proprio ordine).
D5: Cosa devo fare se questa unità non riesce a caricarsi?
R: Caricalo con un cavo USB-C e un caricabatterie a parete per un'intera notte. Se ancora non
funziona, contattaci a: [email protected] (Allegare l'ID del proprio ordine).
D6: Cosa devo fare se questa unità non riesce a ricaricare altri dispositivi?
R: Provare a ricaricare il dispositivo con un altro cavo di ricarica, se funziona, significa che il cavo
di ricarica che abbiamo fornito è difettoso, te ne forniremo uno nuovo; se ancora non funziona,
inviaci un'e-mail a: [email protected] (Allegare l'ID del proprio ordine).
98

D7: Questa unità può ricaricare altri dispositivi mentre è in carica?
R: Sì.
D8: Questo prodotto può ricaricare altri dispositivi durante l'avvio di un veicolo?
R: N.
D9: Con che frequenza deve essere ricaricata questa unità?
R: Sarebbe meglio ricaricarla ogni 3 mesi.
D10: Perché si spegne dopo 30 secondi durante la ricarica di altri dispositivi?
R: Questa unità potrebbe spegnersi automaticamente durante la ricarica per i dispositivi
che necessitano di una corrente di carica leggera, come cuffie, smartwatch ecc. poiché su
questa unità è presente una limitazione minima della corrente di carico (200 mA), quindi
si spegnerà automaticamente dopo 30 sec. se la corrente di carico è inferiore a 200mA.
99

Avvertenza
1.Leggere attentamente questo manuale utente prima di utilizzare questa macchina.
2.Fare attenzione quando si utilizza questo dispositivo. Se non segui le istruzioni, potresti ferirti
o danneggiare il dispositivo o la batteria del veicolo.
3.Non consentire a persone che non hanno una conoscenza o capacità adeguate di utilizzare il
dispositivo senza supervisione.
4.Non utilizzare questa unità come un giocattolo. Tenere fuori dalla portata dei bambini per
evitare incidenti.
5.Questa unità funziona per veicoli (dispositivi) con batteria da 12V, non per veicoli con batter-
ia non da 12V. È vietato l'uso su altre macchine, come aeroplani e navi.
6.Non utilizzare questa unità se un cavo, un morsetto o un cavo è stato danneggiato o se
questa unità è stata surriscaldata, gonfiata o presenta perdite.
7.Non utilizzare come batteria per veicolo o caricabatterie.
8.Non utilizzare l'unità per avviare un veicolo durante la ricarica della batteria interna.
9.Utilizzare solo i morsetti della batteria forniti per avviare il veicolo e il caricabatterie qualifica-
to per caricare questa unità.
100

10.Non scaricare eccessivamente l'unità (non lasciare che la batteria si scarichi), caricarla rego-
larmente, preferibilmente ogni 3 mesi.
11.Assicurarsi che la spina blu del cavo jumper sia inserita completamente nella porta di uscita
dei morsetti della batteria, altrimenti la spina blu potrebbe fondersi.
12.Assicurarsi che i terminali della batteria siano puliti prima dell'avvio e assicurarsi che i
morsetti della batteria siano ben collegati. Se i terminali della batteria del veicolo sono sporchi
o corrosi, la potenza di uscita dell'unità diminuirà.
13.Si prega di non avviare il prodotto per più di tre volte consecutive, poiché ciò potrebbe
causare surriscaldamento e danneggiare il prodotto. Se è necessario avviare il prodotto più
volte, si prega di attendere due minuti tra ogni avvio.
14.Non collegare i morsetti dell'avviatore di emergenza alla batteria al contrario dopo aver
premuto il pulsante "BOOST" per evitare incidenti.
15.Utilizzare questa unità per avviare il veicolo quando la carica della batteria è superiore a 2
bar.
16.Non ricaricare questo prodotto subito dopo aver avviato il veicolo, lasciarlo raffreddare per
30 minuti prima di ricaricarlo.
17.Non lasciare il prodotto immerso in acqua.
101

18.Non utilizzare questo prodotto in un ambiente esplosivo, come luoghi in cui sono presenti
liquidi, gas o polvere infiammabili.
19.Non modificare o smontare questo dispositivo. Solo i tecnici dell'assistenza possono ripara-
re questo dispositivo.
20.Non esporre il prodotto a calore estremo o fuoco.
21.Non far cadere o schiacciare il dispositivo. Se il dispositivo viene colpito duramente o
danneggiato in qualsiasi altro modo, deve essere ispezionato da un tecnico qualificato della
batteria.
22.Non conservare in luoghi in cui la temperatura può superare i 60℃/140℉.
23.Ricaricare solo a temperatura ambiente di -10~45℃/14~113℉.
24.In condizioni estreme, la batteria potrebbe avere perdite. Se si verifica una perdita di liquido
dal dispositivo, non maneggiarlo a mani nude. In caso di contatto con la pelle, lavare immedia-
tamente con acqua e sapone. Se il liquido tocca accidentalmente gli occhi, sciacquare immedi-
atamente gli occhi con acqua per almeno 10 minuti e consultare un medico.
25.Il dispositivo contiene una batteria al litio. Al termine della vita utile del prodotto, o se il
dispositivo perde liquidi, smaltire il dispositivo secondo le disposizioni locali.
102

Per 18 mesi dall'acquisto, forniremo assistenza post-vendita online tempestivo ed efficace.
.
18 mesi di assistenza post-vendita online
Entro i primi 30 giorni dall'acquisto, puoi richiedere il reso tramite Amazon in caso di problemi
al prodotto.
Garanzia di rimborso entro 30 giorni
Nei 18 mesi sostituiremo l'unità difettosa a causa di problemi di produzione con una nuova.
Da 30 giorni a 18 mesi
La tua garanza include
Esclusione di responsabilità
A. Se il prodotto deve essere riparato o sostituito, l'acquirente originale deve mostrare la
ricevuta originale (ID ordine) e la garanzia avrà effetto.
103

B. La garanzia non copre danni o guasti del prodotto causati da normale usura, abuso,
installazione impropria, uso improprio, modifica o riparazioni non autorizzate da parte di terzi.
C. Non siamo responsabili per eventuali danni accidentali o indiretti causati da un uso
improprio o improprio di questo prodotto.
D. Tutti i reclami in garanzia sono limitati alla riparazione o sostituzione del prodotto difettoso
e ad esclusiva discrezione di GOOLOO.
104
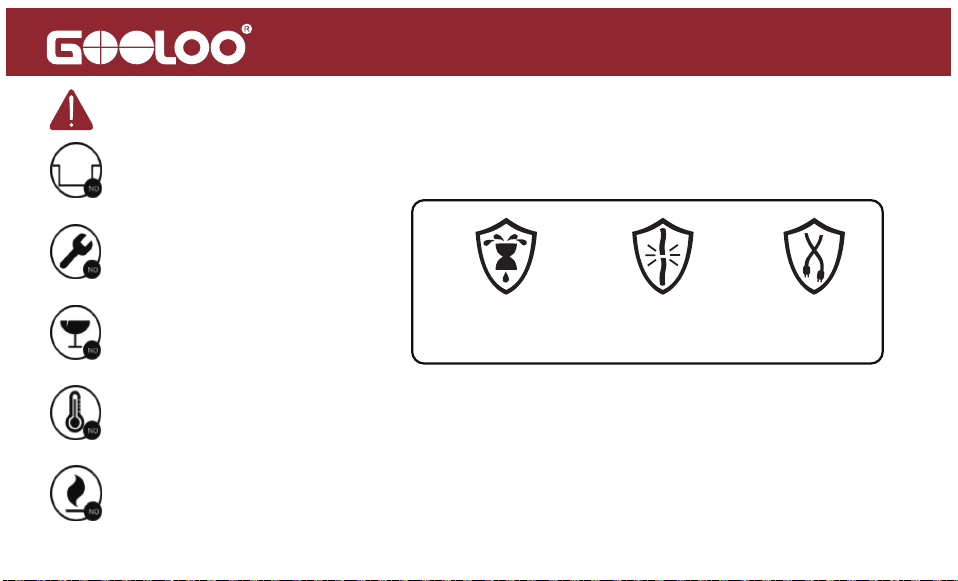
Attenzione
Non porre vicino o nel fuoco
Evitare temperature estreme
Non far cadere
Non smontare
Non immergere in acqua
Sovraccaricare/scaricare
Protezione
Protezione fusibile Contro-inversione
Spinotto
105

Assistenza Clienti
18 mesi di assistenza in garanzia limitata
Assistenza tecnica a vita
Non esitare a contattarci
Per Domande Frequenti e maggiori informazioni
106

Grazie per
averci scelto
Prodotto in Cina
107

108
Produttore
Indirizzo
Importatore
Indirizzo
Tel
496995179070
Rappresentante UE
Nome e contatto
Shenzhen Carku Technology Co.,Ltd
shen zhen shi lan de wo ke ji you xian gong si
Guangdong, Shenzhen, Longgang, 2nd Floor, Building 12, Shenao Cultural
Industry Park, Dafapu Community, Bantian Street
No.103, block A, Qixing Creative factory, GaoFeng community, Dalang
street, LongHua, Shenzhen, Guangdong, China
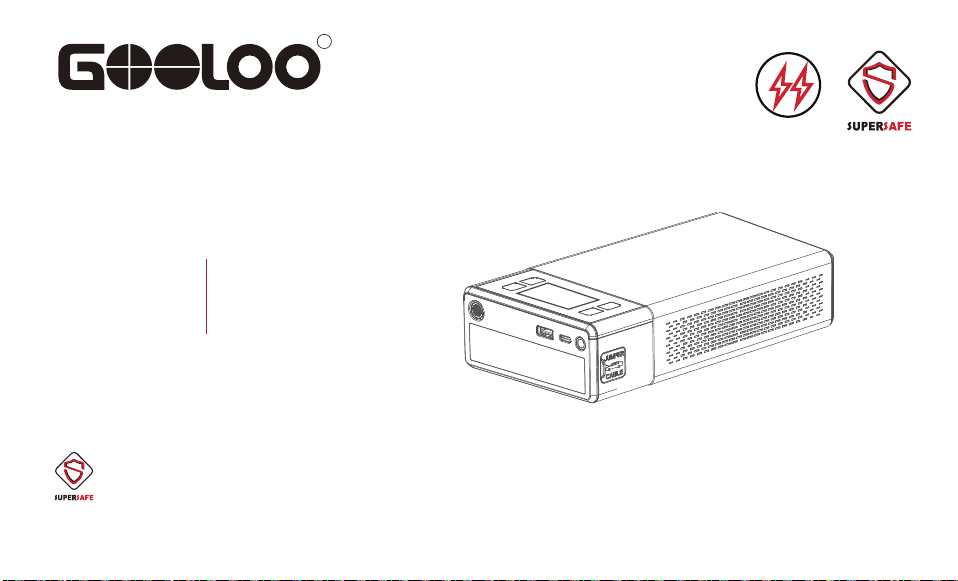
Рег. № 5904374
УСИЛЕННЫЙ
ЗАРЯД
R
Изделие: VX1
SUPERSAFE — технология обеспечения безопасности компании GOOLOO
Рег. № 5904374
Модель: JS-211
Руководство
пользователя
Пусковое
устройство
2500A
Воздушный
компрессор
150 фн/кв. дюйм

SUPERSAFE — технология обеспечения безопасности компании GOOLOO
Зарядить перед использованием!
Предупреждение
110
Благодарим Вас за выбор пускового устройства GOOLOO. Для обеспечения удобства
использования, личной безопасности и сохранности имущества, пожалуйста,
внимательно ознакомьтесь со всеми инструкциями перед использованием данного
изделия. Сохраните данное руководство в качестве справочной информации.
После прочтения руководства можно приступать к зарядке VX1 при помощи
настенного зарядного устройства и входящего в комплект поставки кабеля Type-C.
Это устройство предназначено для автомобилей (оборудования), оснащенных
аккумуляторными батареями напряжением 12 В. Его использование с аккумуляторными
батареями другого типа может представлять опасность. Внимательно ознакомьтесь с
информацией по технике безопасности перед использованием пускового устройства.
Несоблюдение указаний по технике безопасности может привести к повреждению
пускового устройства, а также к поражению электрическим током, взрыву, пожару,
повреждению имущества и травмам.
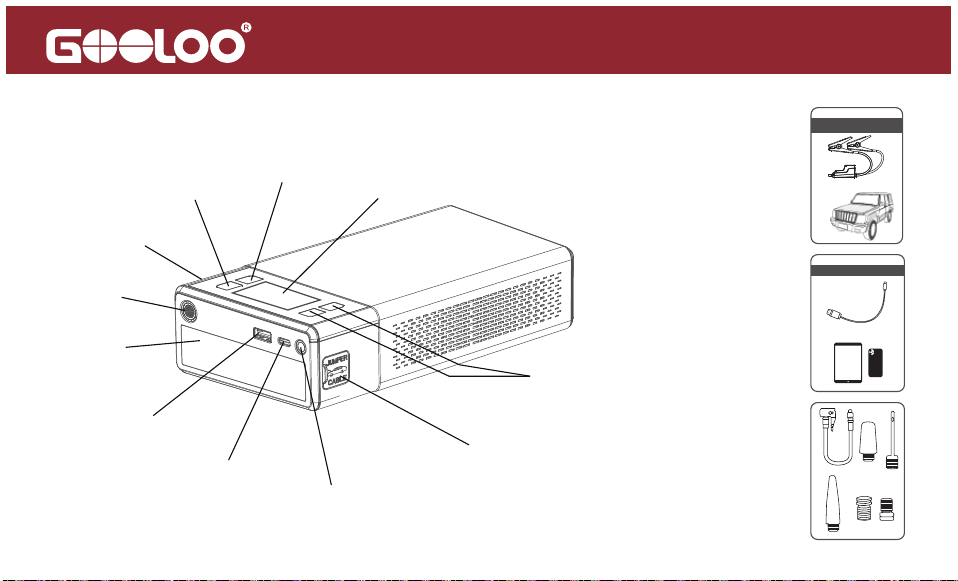
Перечень деталей и описание функций
111
Кнопка питания и кнопка
насоса для накачивания шин
1. Вверх и вниз для выбора
2. Повышение или снижение
давления
Гнездо для подключения блока
запуска от внешнего источника
Кнопка настройки
ЖК-дисплей
Кнопка включения
Выход USB-A,
5 В/2,4 А
Вход USB-C 5 В/2 А
светодиодного
фонаря
Воздух
Гнездо для подключения блока
запуска от внешнего источника
Интеллектуальный блок запуска
от внешнего источника
USB-выход, 5 В/2,4 А
Выход постоянного
тока 15 В/10 А
Инструкция по эксплуатации
Заряд аккумуляторной батареи:
Индикация заряда
аккумуляторной батареи
Нажмите кнопку питания, чтобы проверить заряд аккумуляторной батареи:
Во время зарядки индикаторы аккумуляторной батареи будут поочередно мигать.
Разное количество делений аккумуляторной батареи указывает на разный заряд
аккумуляторной батареи, а после завершения процесса зарядки будут гореть 4
деления индикатора.
Компрессор для запуска от внешнего источника VX1 сочетает в себе 6 функций:
запуск от внешнего источника, подкачка шин, освещение, сигнальная лампа SOS,
зарядное устройство и стартер для устройств на 12 В — модернизированная
конструкция для будущего.
Важные моменты
112
Заряд аккумуляторной
батареи
0 делений 1 делений 2 делений 3 делений 4 делений
0%
25%
50% 75% 100%

Данное устройство можно заряжать с помощью кабеля Type-C и настенного зарядного
устройства (настенное зарядное устройство не входит в комплект поставки).
Порядок зарядки VX1
113
Пиковая мощность 2500 А позволяет надежно запускать автомобили с напряжением 12
В (8,5 л бензина/6 л дизельного топлива) даже при экстремальных температурах (до 50
раз) и более 1000 циклов зарядки.
Встроенный воздушный компрессор с ЖК-дисплеем и датчиком давления в шинах
накачивает шины до 20 фунтов на квадратный дюйм примерно за 3 минуты и подходит
для велосипедов, автомобилей, мячей и т. д.
Сотовая конструкция охлаждения увеличивает рассеивание тепла компрессором
пускового устройства на 30 % и продлевает срок службы на 50 %.
Благодаря 10 функциям безопасности, таким как защита от перегрузки, короткого
замыкания и обратной полярности, VX1 обеспечивает максимальную безопасность и
запускает автомобили при температуре от -20°C до 60°C.
Светодиодный фонарь имеет 3 режима (обычный/стробоскоп/SOS), аккумулятор
заряжает USB-устройства и обеспечивает 36 часов непрерывного света.
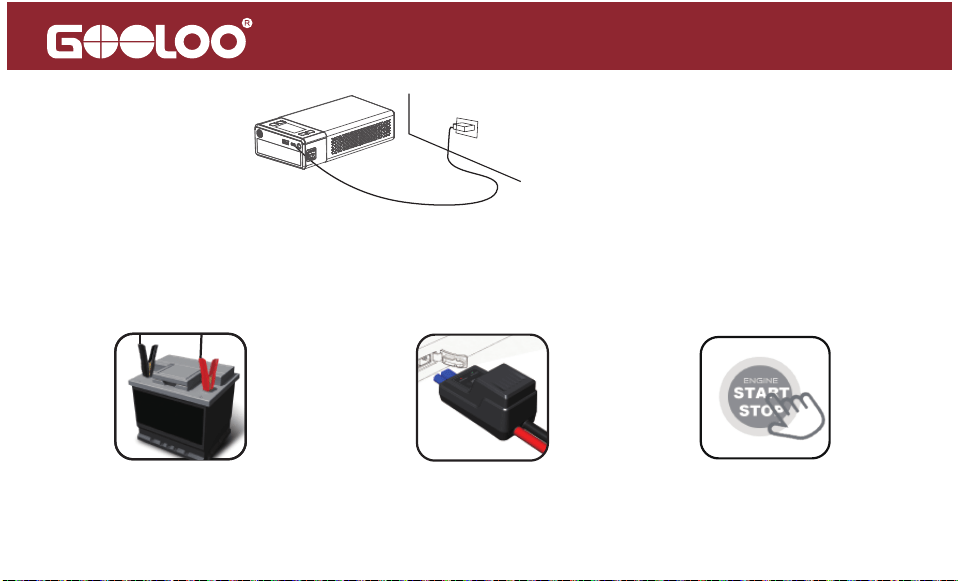
Как запустить автомобиль с аккумуляторной батареей 12 В
(убедитесь, что уровень заряда аккумуляторной батареи составляет не менее 2 делений)
Примечание: запрещается нажимать кнопку BOOST на блоке запуска от внешнего
источника до надлежащего подключения к аккумуляторной батарее автомобиля.
1. Подключите аккумуляторную
батарею автомобиля
2. Загорится (непрерывно)
зеленый светодиодный
индикатор
3. Запустите двигатель
автомобиля
114
Горит (непрерывно)
зеленый светодиодный
индикатор
Горит красный
светодиодный индикатор
Зеленый светодиодный
индикатор мигает
Светодиодный индикатор
Подключение выполнено правильно, можно сразу запускать автомобиль.
Перепутаны положительный и отрицательный выводы; выполните подключ-
ение зажимов аккумуляторной батареи с требуемой полярностью.
Слишком низкое напряжение аккумуляторной батареи автомобиля, нажмите
кнопку BOOST на блоке запуска от внешнего источника. Когда зеленый
индикатор начнет светиться (непрерывно), необходимо выполнить запуск
автомобиля течение 30 с.
Возможное повреждение аккумуляторной батареи автомобиля. Сначала
проверьте правильность подключения, затем попробуйте нажать кнопку
BOOST на блоке запуска от внешнего источника. Когда зеленый индикатор
начнет светиться (непрерывно), необходимо выполнить запуск автомобиля
течение 30 с.
Значение
Проверьте светодиодные индикаторы на блоке запуска от внешнего источника и в
ыполните действия в соответствии с приведенными ниже инструкциями:
Индикатор не горит
115
Если проблема не устранена, прекратите использовать пусковое устройство и свяжитесь
с нашей сервисной службой напрямую по электронной почте [email protected].
Мы сделаем все возможное, чтобы решить проблему в течение 24 часов.
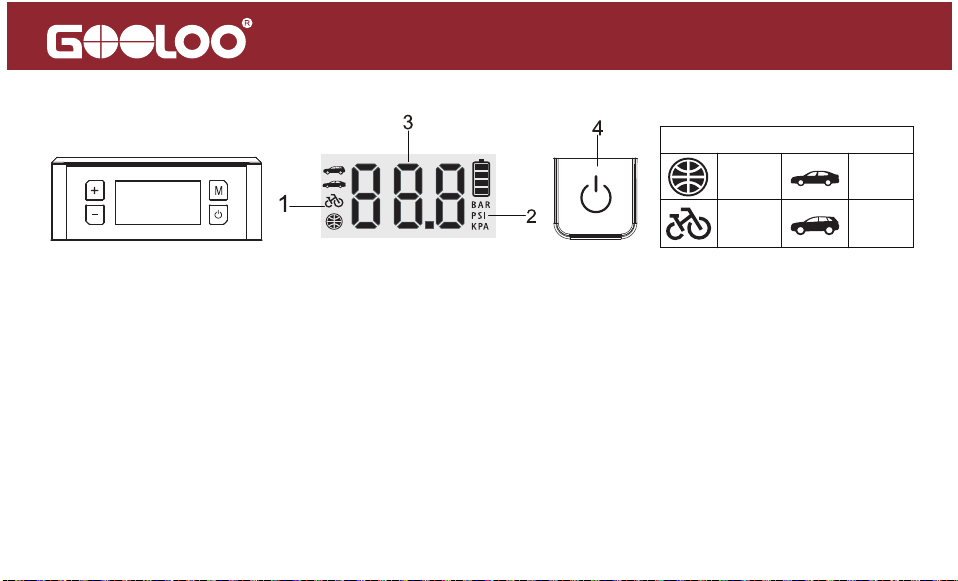
Порядок использования насоса для накачивания шин
Включите питание, кратковременно нажмите кнопку «M»,
чтобы начать настройку насоса для накачивания шин.
116
Текущее значение давления в шинах
Примечание: данные приведены только
для справки.
0,7 бар 2,2 бар
2,1 бар 2,5 бар
1. Нажмите кнопку «M» один раз, после чего начнет мигать пиктограмма слева. Затем
нажимайте кнопки «+» или «-», чтобы переключаться между пиктограммами
«Баскетбольный мяч», «Велосипед», «Автомобиль» и «Внедорожник».
2. Нажмите кнопку «M» дважды, после чего начнет мигать пиктограмма единиц
измерения давления. Затем нажимайте кнопки «+» или «-», чтобы переключаться между
«бар», «фунт/кв. дюйм» и «кПа».
3. Еще раз нажмите кнопку «M», после чего начнет мигать текущее целевое значение
давления. Затем нажимайте кнопки «+» или «-», чтобы отрегулировать целевое значение
давления.
4. После выбора режима накачивания функцию накачивания можно включать коротким
нажатием кнопки питания.
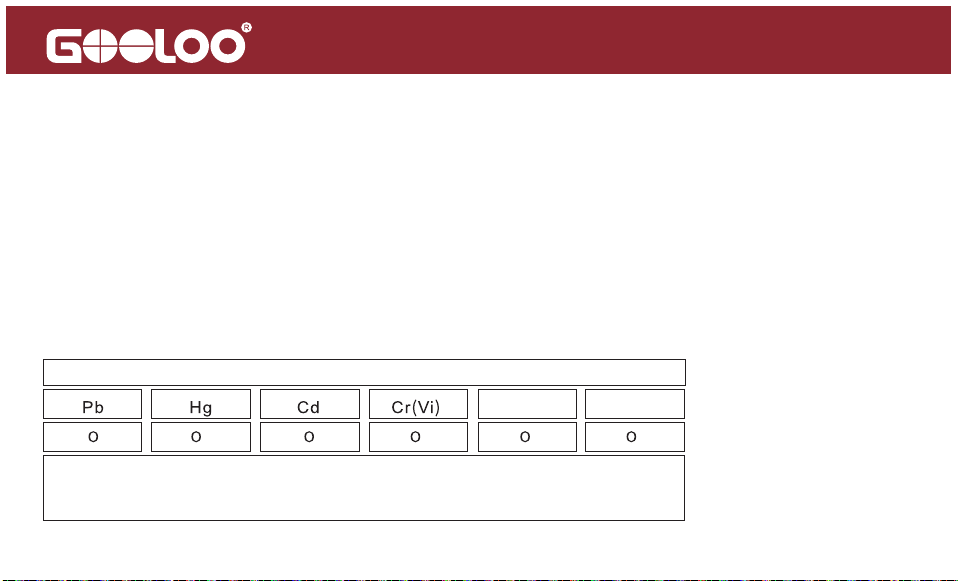
117
Порядок включения-выключения светодиодного фонаря
Просто нажмите кнопку один раз, чтобы включить функцию светодиодного фонаря. При
каждом нажатии кнопки выполняется переключение режимов работы фонаря. Для
вашего удобства предусмотрено три режима работы фонаря. («Нормальный»,
«Стробоскоп», «SOS»)
Порядок включения и выключения устройства
Нажмите и удерживайте кнопку питания в течение двух секунд, чтобы включить
устройство. Снова нажмите и удерживайте кнопку питания в течение двух секунд, чтобы
выключить устройство. Кроме того, если устройство не используется, оно автоматически
выключится через 30 секунд.
Токсичные и вредные вещества
Состав и количество токсичных или вредных веществ в данном изделии
O: указывает на то, что содержание вредных веществ во всех однородных
материалах ниже установленного предела максимальной концентрации,
определенного стандартом 2002/95/ЕС (RoHS)
ПБД ПБДЭ
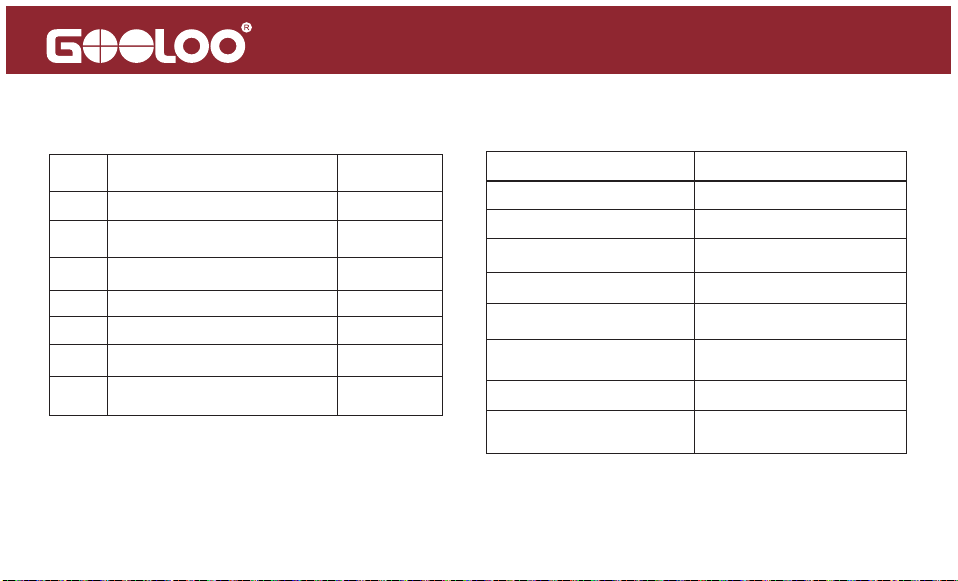
Технические характеристикиКомплектность поставки
№ п.п.
КоличествоНазвание детали
Главное устройство
Сумка для переноски
Трубка насоса
Штуцер подачи воздуха
Переходной кабель USB-A
на USB-C
1
1
1
1
1
5
1
1
2
3
4
5
6
7
Руководство пользователя
Емкость
Пусковой ток
Пиковое значение тока
Вход USB-C
Выход USB-A
Выход постоянного тока
Рабочая температура
44,4 Вт·ч
400 А (3 с)
2500 A
5 В/2 А
5 В/2,4 А
15 В/10 А
> 1000 циклов
от -20°C до 60°C
(от -4 °F до 140 °F)
6–8 ч (зарядное
устройство 5 В/2 А)
Интеллектуальный блок
запуска от внешнего источника
118
Срок службы
Время полной зарядки

Часто задаваемые вопросы
119
Вопрос № 1: Какова рабочая температура этого устройства, и как его хранить?
Ответ: В данном устройстве используется литий-полимерная аккумуляторная батарея;
рабочая температура должна быть в диапазоне от -20 ℃ до 60 ℃ (от -4 °F до 140 °F).
Если температура окружающей среды превышает 60 ℃ (140 °F), это может привести к
повреждению внутренней конструкции элементов аккумуляторной батареи, вздутию и
выходу из строя аккумуляторной батареи. Поэтому не следует в течение длительного
времени хранить устройство в припаркованном автомобиле в жаркую погоду.
Вопрос № 2: Каков порядок запуска автомобиля с помощью данного устройства?
Ответ: См. инструкции в пункте «Порядок запуска автомобиля 12 В».
Вопрос № 3: Как узнать, правильно ли подключено данное устройство к автомобилю?
Ответ: Если светодиодный индикатор на блоке запуска от внешнего источника
непрерывно светится зеленым светом, это означает, что подключение выполнено
надлежащим образом. Если (непрерывно) светится красный индикатор, это означает,
что перепутана полярность.

120
Вопрос № 3: Как узнать, правильно ли подключено данное устройство к
автомобилю?
Ответ: Если светодиодный индикатор на блоке запуска от внешнего источника непрерывно
светится зеленым светом, это означает, что подключение выполнено надлежащим
образом. Если (непрерывно) светится красный индикатор, это означает, что перепутана
полярность.
Вопрос № 4: Что делать, если невозможно запустить автомобиль с помощью
данного устройства?
Ответ: Еще раз полностью зарядите устройство, затем нажмите кнопку BOOST на блоке
запуска от внешнего источника после надлежащего подключения аккумуляторной батареи
автомобиля. Светодиодный индикатор начнет непрерывно гореть зеленым цветом, после
чего необходимо выполнить запуск автомобиля в течение 30 с. Если оно по-прежнему не
работает, напишите нам на электронный адрес: [email protected] (укажите
идентификатор вашего заказа).
Вопрос № 5: Что делать, если невозможно зарядить данное устройство?

121
Ответ: Его необходимо заряжать с помощью кабеля USB-C и настенного зарядного
устройства в течение ночи для полного заряда. Если оно по-прежнему не работает,
напишите нам на электронный адрес: [email protected] (укажите идентификатор
вашего заказа).
Вопрос № 6: Что делать, если невозможно зарядить другие устройства с помощью
данного устройства?
Ответ: Попробуйте зарядить устройство с помощью другого зарядного кабеля. Если
зарядка выполняется нормально, значит неисправен входящий в комплект поставки
зарядный кабель. В этом случае мы предоставим вам новый зарядный кабель. Если он
по-прежнему не работает, напишите нам на адрес электронной почты: support.eu@-
gooloo.com (укажите идентификатор вашего заказа).
Вопрос № 7: Можно ли с помощью этого устройства заряжать другие устройства во
время зарядки?
Ответ: Да.

Предупреждение
122
Вопрос № 8: Можно ли с помощью этого изделия заряжать другие устройства во
время запуска автомобиля?
Ответ: Нет.
Вопрос № 9: Как часто необходимо заряжать данное устройство?
Ответ: Лучше всего выполнять подзарядку один раз в 3 месяца.
Вопрос № 10: Почему устройство отключается через 30 с во время зарядки других
устройств?
Ответ. Данное устройство может автоматически отключаться при зарядке устройств,
которым требуется небольшой зарядный ток (наушники, смарт-часы и т. д.), поскольку
на этом устройстве установлено ограничение минимального тока нагрузки (200 мА).
Автоматическое отключение происходит через 30 с, если ток нагрузки менее 200 мА.
1. Перед использованием данного устройства внимательно прочитайте данное
руководство пользователя.

2. Будьте осторожны при использовании этого устройства. Несоблюдение инструкций
может привести к травмам, повреждению оборудования или аккумуляторной батареи
автомобиля.
3. Не позволяйте без присмотра использовать устройство лицам, не обладающим
необходимыми знаниями или умениями работы с устройством.
4. Запрещается использовать данного устройства в качестве игрушки. Во избежание
несчастного случая держите его подальше от детей.
5. Данное устройство допускается использовать на автомобилях (оборудовании) с
аккумуляторной батареей 12 В и запрещается использовать на автомобилях с
аккумуляторной батареей другого напряжения. Запрещается использовать в других
машинах, например, самолетах, лодках и т. д.
6. Запрещается использовать данное устройство в случае повреждения кабеля, зажима
или шнура, а также при перегреве, вздутии корпуса или утечке жидкости.
7. Запрещается использовать устройство вместо аккумуляторной батареи автомобиля
или в качестве зарядного устройства для аккумуляторной батареи автомобиля.
8. Запрещается использовать устройство для запуска автомобиля во время зарядки
внутренней аккумуляторной батареи.
9. Для зарядки данного устройства используйте только зажимы аккумуляторной батареи,
которые входят в комплект поставки, а также подходящее сертифицированное зарядное
устройство.
123

124
10. Не допускайте избыточного разряда (не допускайте полного разряда аккумуляторной
батареи), регулярно заряжайте устройство, лучше всего — один раз в 3 месяца.
11. Убедитесь, что синий штекер блока запуска от внешнего источника полностью
вставлен в гнездо зажима аккумуляторной батареи; в противном случае синий штекер
может расплавиться.
12. Перед началом работы убедитесь, что клеммы аккумуляторной батареи очищены, а
зажимы аккумуляторной батареи надежно соединены. Если клеммы аккумуляторной
батареи автомобиля загрязнены, либо на них есть следы коррозии, выходная мощность
устройства будет снижена.
13. Не используйте данное устройство для запуска более трех раз подряд, поскольку это
может привести к его перегреву и повреждению. Если вам необходимо использовать
устройство для запуска несколько раз подряд, подождите две минуты после каждого
запуска.
14. Во избежание несчастного случая не подключайте зажимы пускового устройства к
аккумуляторной батарее с обратной полярностью после нажатия кнопки BOOST.
15. Используйте данное устройство для запуска автомобиля в том случае, если индикатор
заряда аккумуляторной батареи показывает более 2 делений.
16. Запрещается заряжать изделие сразу после запуска автомобиля. Перед повторной
зарядкой следует его охлаждать в течение 30 мин.

125
17. Запрещается погружать изделие в воду.
18. Запрещается использовать изделие во взрывоопасной среде, например, в
присутствии легковоспламеняющихся жидкостей, газов или пыли.
19. Запрещается вносить изменения в конструкцию или разбирать устройство. Выполнять
ремонт данного оборудования могут только специалисты сервисной службы.
20. Не подвергайте изделие воздействию высоких температур или огня.
21. Не допускайте падения и сдавливания устройства. Если по устройству был нанесен
сильный удар, либо оно было повреждено каким-либо другим способом, его должен
осмотреть квалифицированный специалист по аккумуляторным батареям.
22. Запрещается хранить устройство в местах, где температура может превышать 60℃
(140°F).
23. Зарядку необходимо выполнять только при температуре окружающей среды от -10℃
до 45℃ (от 14 °F до 113 °F).
24. В экстремальных условиях может произойти утечка жидкости из аккумулятора. Если из
устройства вытекает жидкость, запрещается прикасаться к нему голыми руками. В случае
попадания жидкости на кожу немедленно смойте ее водой с мылом. В случае случайного
попадания жидкости в глаза следует сразу же промыть глаза водой в течение не менее 10
мин и обратитесь за медицинской помощью.
25. В данном устройстве используется литиевая аккумуляторная батарея. По окончании

126
срока службы изделия, либо в случае вытекания жидкости устройство необходимо
утилизировать в соответствии с местными правилами.\
Ваша гарантия предусматривает
●18 месяцев послепродажного обслуживания в режиме онлайн
В течение 18 месяцев мы обеспечим своевременное и эффективное послепродажное
обслуживание в режиме онлайн.
●30-дневная гарантия возврата денежных средств
При возникновении каких-либо проблем с изделием в течение первых 30 дней после
покупки вы можете продукт оформить возврат денежных средств через Amazon.
●От 30 дней до 18 месяцев
Мы заменим неисправное устройство на новое устройство в течение 18 месяцев, если
неисправность связана с дефектами производства.

127
Отказ от ответственности
A. При необходимости ремонта или замены изделия первоначальный покупатель
должен предъявить оригинальный чек (идентификатор заказа), после чего гарантия
вступит в силу.
B. Гарантия не распространяется на повреждения или неисправности изделия,
возникшие в результате нормального износа, физического воздействия, неправильной
установки, ненадлежащего использования, модификации или ремонта третьими
лицами, не имеющими соответствующих полномочий.
C. Мы не несем ответственности за любой случайный или косвенный ущерб, возникший
в результате ненадлежащего использования или неправильного применения данного
изделия.
D. Все гарантийные обязательства ограничиваются ремонтом или заменой дефектного
изделия и осуществляются исключительно по усмотрению компании GOOLOO.
128
Внимание
Запрещается размещать вблизи огня или бросать в огонь
Избегать экстремальных температур
Защита от избыточного
заряда/глубокого
разряда
Защита при
помощи плавких
предохранителей
Защита от
обратной
полярности
Не бросать
Не разбирать
Не погружать в воду

129
Служба поддержки клиентов
18-месячное ограниченное
гарантийное обслуживание
Техническая поддержка в течение всего
срока эксплуатации
Со всеми вопросами просьба обращаться
Для получения отчетов на часто задаваемые вопросы
и по поводу дополнительной информации
1-888-886-1805
С понедельника по пятницу Тихоокеанское стандартное время:
с 9:00 до 17:00
@gooloofans
@GoolooOfficial

Благодарим за
Ваш выбор
Сделано в Китае