Model# GCM3500
USER
MANUAL
Siphon Coffee
Brewer

Model: CG9129-GS
© 2016 Gourmia
www.gourmia.com
The Steelstone Group
Brooklyn, NY
All rights reserved. No portion of this manual may be reproduced by any means
whatsoever without written permission from The Steelstone Group, except for the
inclusion of quotations in a media review.
Although every precaution has been taken in the preparation of this manual, The
Steelstone Group assumes no responsibility for errors or omissions. Nor is any
liability assumed for damages resulting from the use of the information contained
herein. Although every eort has been made to ensure that the information
contained in this manual is complete and accurate, The Steelstone Group is not
engaged in rendering professional advice or services to the individual consumer;
further, The Steelstone Group shall not be held responsible for any loss or damage
allegedly arising from any information or suggestion in this manual.
Read this manual thoroughly
before using and save it for
future reference
2

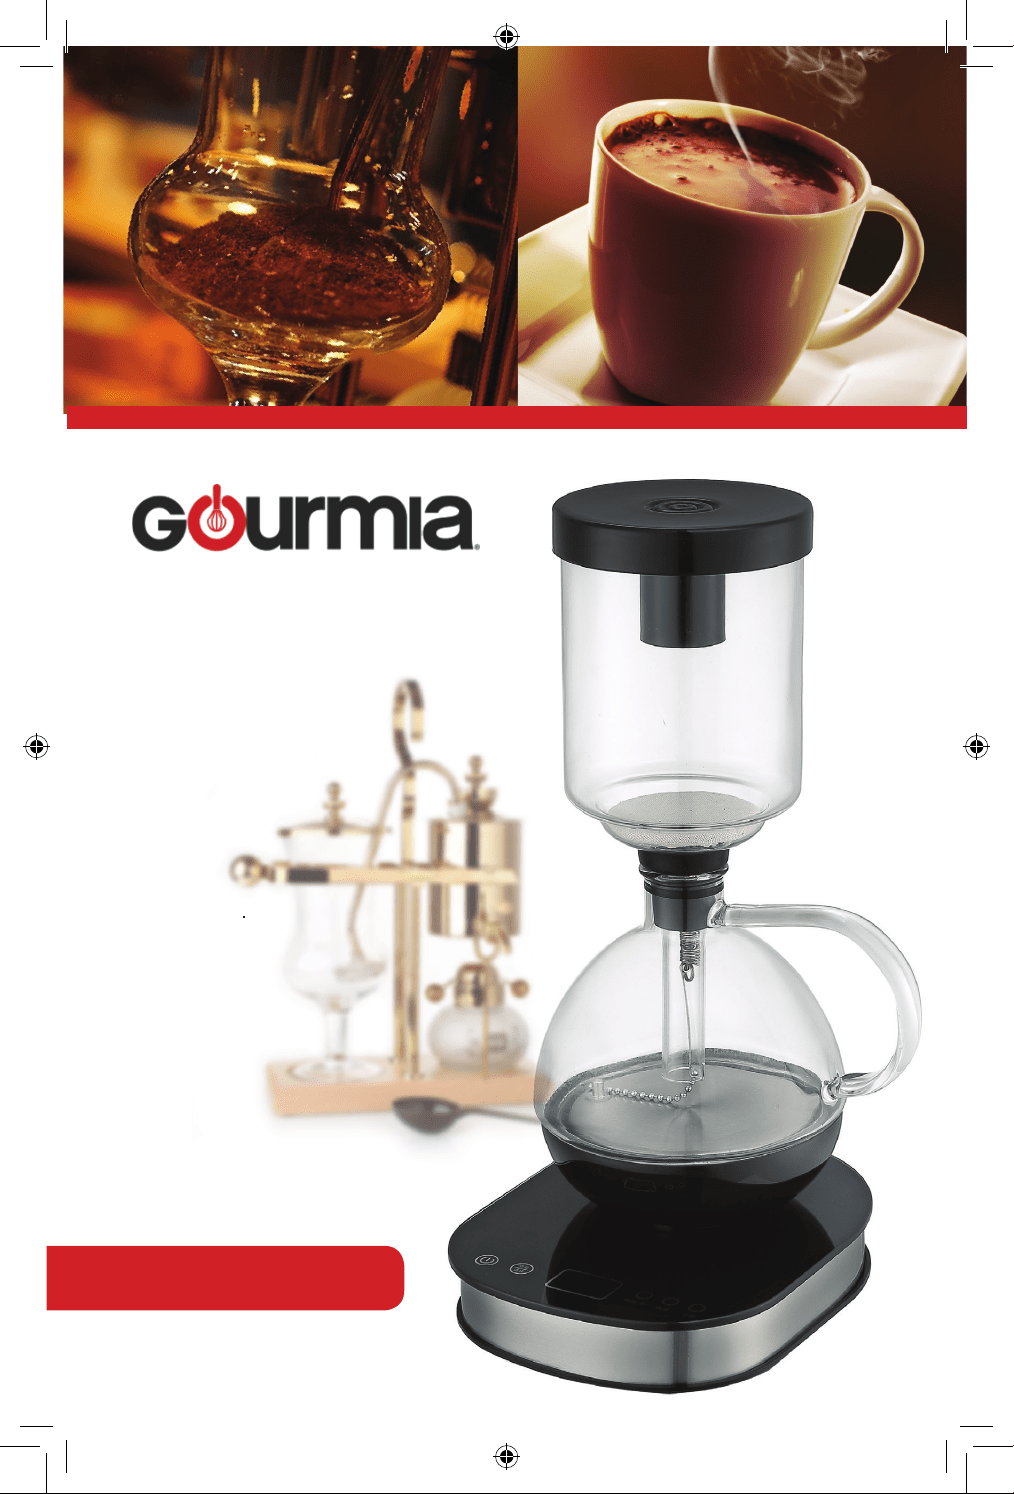
Welcome to the Exciting World of
Vacuum Coee Brewing from Gourmia
Congratulations on your purchase of the Siphon Coee Brewer from Gourmia,
exclusively designed for the discerning coee lover!
If you are one of those individuals who cherishes a velvety smooth fresh brewed
cup of coee – with that “pick-me-up” aroma when you walk into the room -
you’ve made the right choice.
With your new Gourmia Siphon Coffee Brewer, preparing fresh ground coffee,
and exceeding the expectations of your most demanding coffee connoisseurs,
is only moments away. Siphon Coffee Brewing is not just a feast for the palette
but also a delight for the eyes, as you watch the elegant and exciting process of
vacuum brewing unfold right before your eyes! We’re confident that you’ll find
your new compact Siphon Coffee Brewer easy and fun to use, with the end
results being a fresh smooth even full-bodied coffee experience that you and
your whole family are sure to love over and over again!
The pages of this manual offer full and comprehensive instructions to guide
you through the functions and features of the Gourmia Siphon Coffee Brewer.
Inside this guide you will also find information on its modes of operation,
complete step-by-step instructions for the operation, assembly, cleaning, and
maintenance of your appliance.
Please read all safety instructions thoroughly to ensure safe usage at all times.
Thank you for your purchase! We sincerely hope you will enjoy this as well as all
the many innovative products brought to you by our family at Gourmia.
3

4
IMPORTANT SAFEGUARDS
• Incorrect operation and improper use can damage the
appliance and cause injury.
• The appliance must be used only for its intended
purpose. No responsibility can be taken for any possible
damage caused by incorrect use or improper handling.
• Before plugging in the appliance, check that the cur-
rent and power match those given on the rating plate.
• Do not put the appliance or the plug in water or any
other liquid. This could cause a fatal electric shock. If the
appliance or plug should accidentally become wet,
unplug the appliance immediately and have it checked
by an electrician before using it again.
• Do not place any kind of object into the inside of the
appliance.
• Do not use the appliance with wet hands, on a damp
floor or when the appliance itself is wet.
• Do not touch the plug with wet or damp hands.
• Check the cable and the plug regularly for any possible
damage. If the supply cord is damaged, it must be
replaced by the manufacturer or its service agent or a
similarly qualified person in order to avoid the hazard.
• Do not use the appliance if it was dropped or other-
wise damaged or if the cable or plug are damaged. In
case of damage, take the appliance to an electrical repair
shop for examination and repair if necessary.
• Never attempt to open the appliance or repair the
appliance yourself. This could cause an electric shock.
• Do not allow the cable to hang over sharp edges and
keep it far away from hot objects and open flames.
• Remove the plug from the socket only by holding the
plug.
• Make sure the cable or extension cable cannot inad-
vertently be pulled or cause anyone to trip when in use.
• If an extension cord is used it must be suited to the
power consumption of the appliance, otherwise over-
heating of the extension cord or plug may occur.
• Stand the appliance on a firm, level and heatproof
surface away f
rom
open flames (e.g. gas oven) and out
of the reach of children.
• This appliance is neither suitable for commercial use
nor for use in the outdoors.
• The appliance must not be immersed in water.
• Always remove the plug from the socket when the
appliance is not in use and each time before it is cleaned.
• As long as the appliance is connected to the mains
socket, a small amount of current continue to flow to the
appliance even when it’s not in use.
• If the machine is overfilled, boiling water may spill out.
• This appliance is not intended for use by persons
(including children) with reduced physical, sensory
or mental capabilities, or lack of experience and
knowledge, unless they have been given supervision or
instruction concerning use of the appliance by a person
responsible for their safety.
Children should be supervised to ensure that they do not
play with the appliance.
SPECIAL SAFETY
INFORMATION
Use the machine only with the base supplied,
and do not use the base for any other purposes.
• Do not overll the kettle.
If you do so, there is a danger that scalding water
could boil over.
• The machine is for heating water only, and is
not to be used for any other liquid.
• CAUTION! Danger of burns! The machine
becomes very hot during use. Hold it by the handle only.
• Allow the water to cool down in a safe place out of the
reach of children and disabled people
SAFETY GUIDE

TABLE OF CONTENTS
Know Your Siphon Coee Brewer ....6
Before Using The Brewer ................ 7
Assembling Your Brewer ................8
Understanding Your Brewer ...........9
Making Your Coee ...................... 10
Cleaning And Warranty ................ 11
5
TABLE OF CONTENTS
6
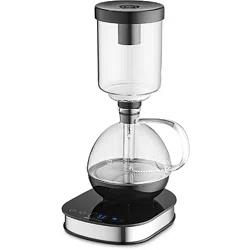
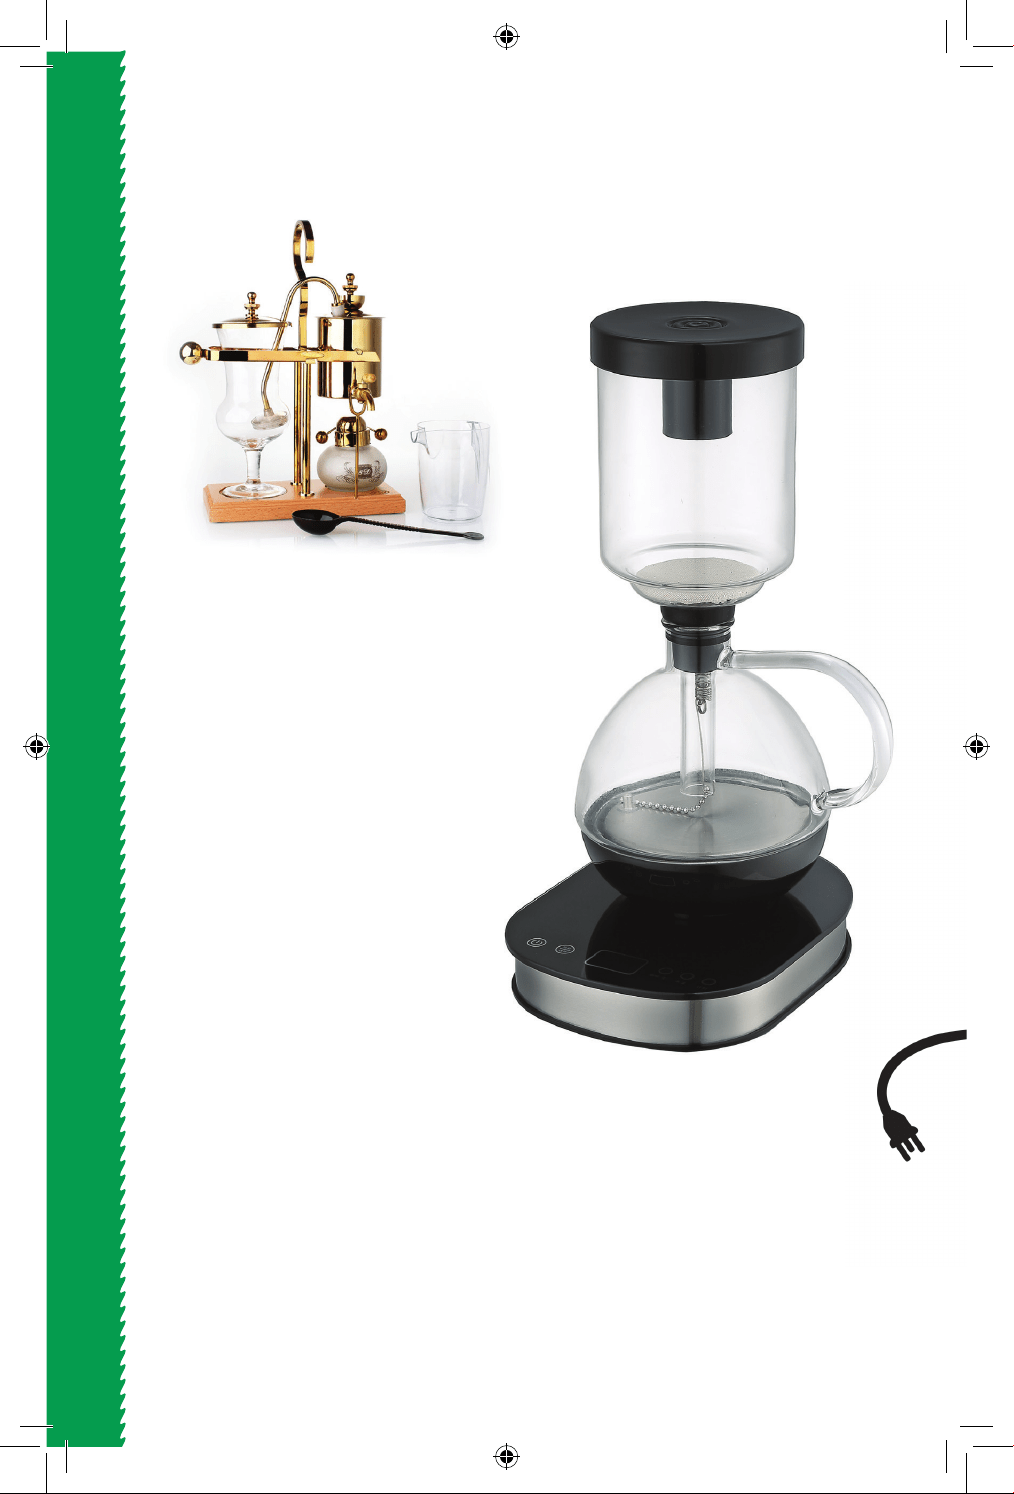
KNOW YOUR SIPHON COFFEE BREWER
KNOW YOUR SIPHON COFFEE BREWER
predecessors in a clean and practi-
cal modern design.
Simply ll the carafe with your
desired amount of water, add your
favorite ground coee into the brew
unit, and let the Gourmia Siphon
Coee Brewer do all the work!
YOUR NEW GOURMIA
SIPHON COFFEE BREWER
A NEW & SLEEK INTERPRETATION
OF AN OLD ARTFORM
A “vacuum” coee maker brews
coee using two chambers where
vapor pressure and vacuum pro-
duce coee. This type of coee
maker is also known as vac pot,
siphon or syphon coee maker,
and was invented in the 1830s.
These devices have since been
used for more than a century in
many parts of the world. While
vacuum coee makers generally
were excessively complex for ev-
eryday use, they were prized for
producing an exceptionally
clear brew, and were quite
popular until the middle of the
twentieth century.
Our new and innovative Siphon
Coee Brewer combines all the
quality and excitement of its
7
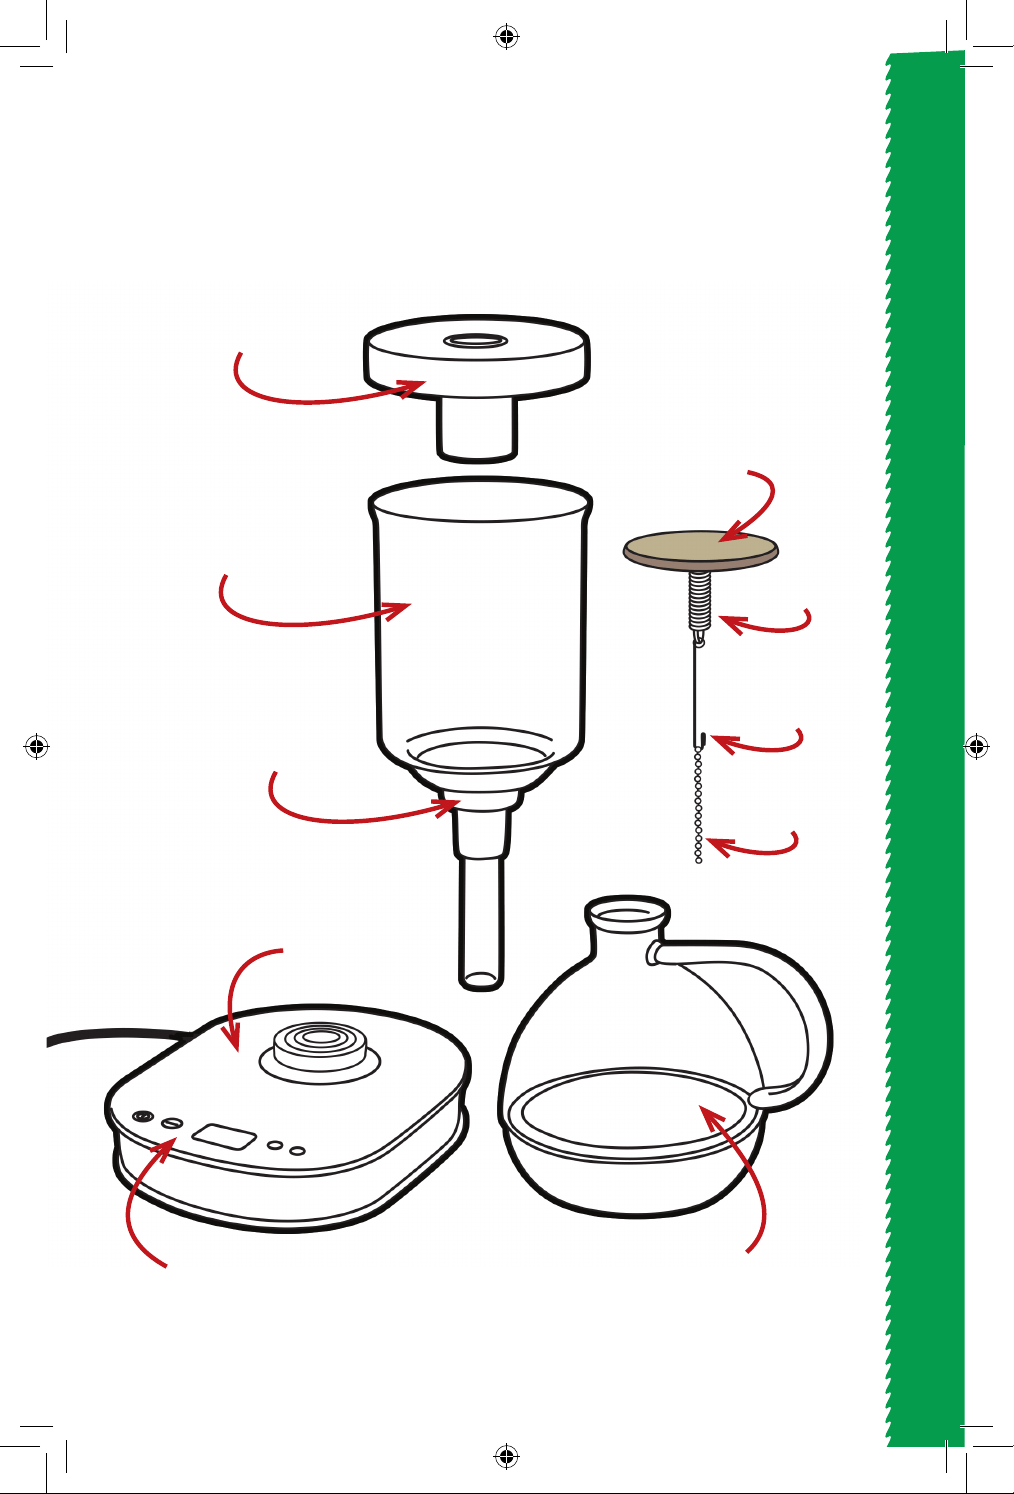
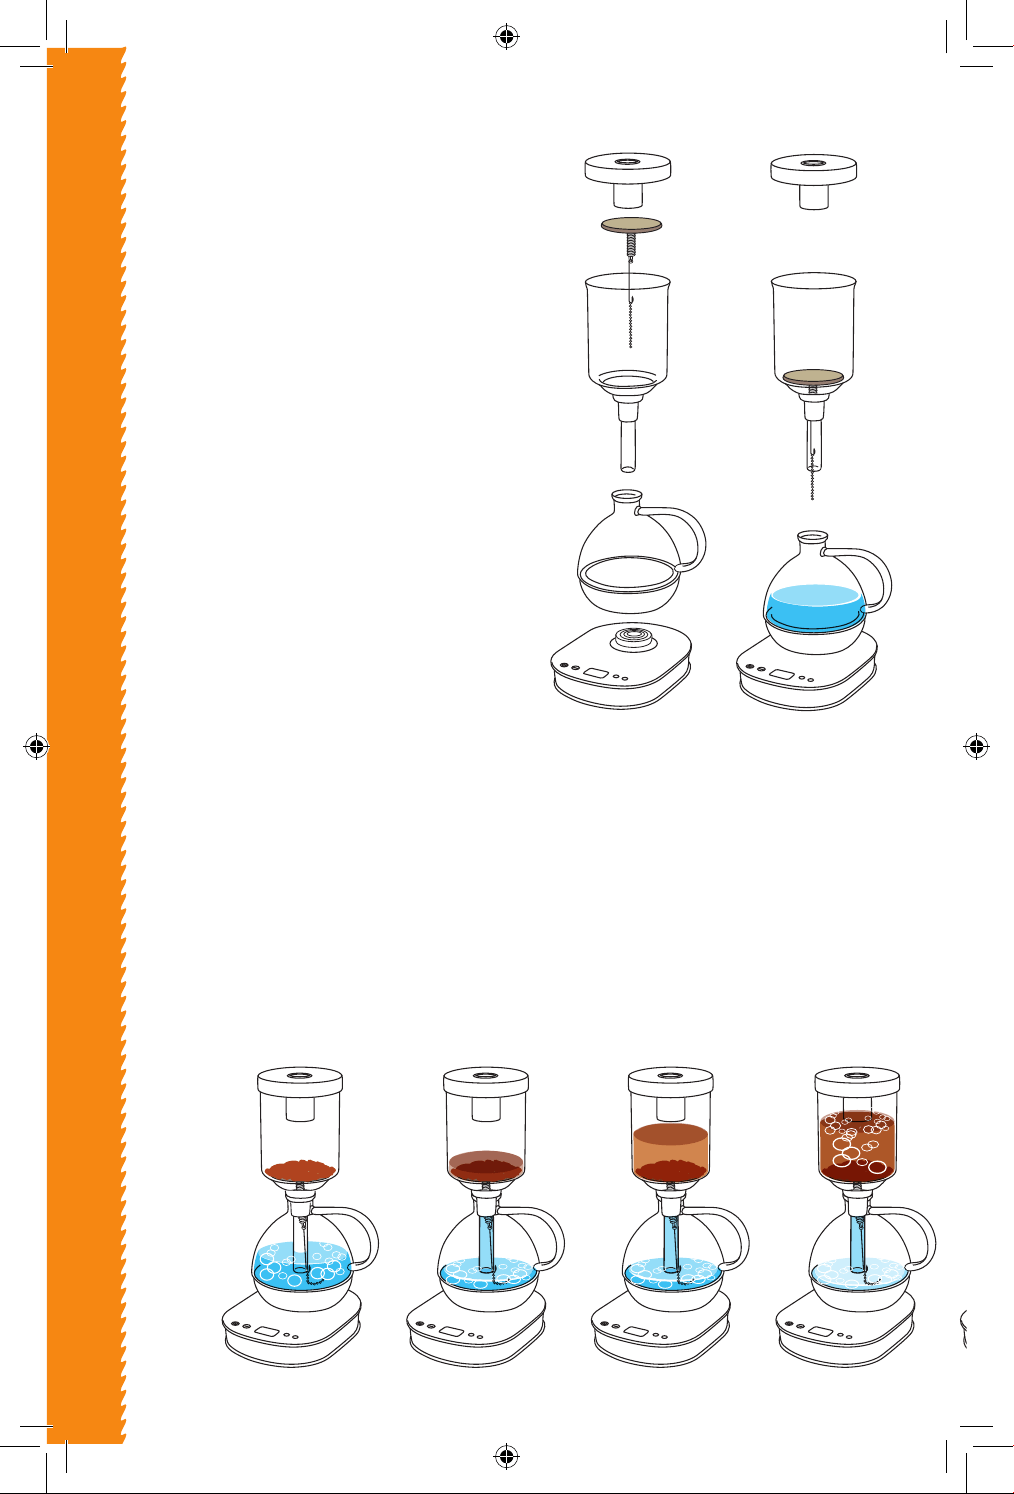
KNOW YOUR SIPHON COFFEE BREWER
Pyrex Glass
UPPER TANK
Upper Tank
COVER
Coee
FILTER
SPRING
HOOK
CHAIN
Pyrex Glass CARAFE
SEAL
Electronic
BASE
CONTROLS & DISPLAYS
KNOW YOUR SIPHON COFFEE BREWER
8
ASSEMBLING THE SIPHON COFFEE BREWER
The Gourmia Siphon Coee Brewer is a
vacuum coee maker which operates as
a siphon, where heating and cooling the
lower vessel changes the vapor pressure of
water in the lower, rst pushing the water
up into the upper tank, then allowing the
water to fall back down into the lower
vessel (carafe).
The principle of a vacuum coee maker is
to heat water in the lower vessel (A) of the
brewer until expansion forces the con-
tents through a narrow tube (B) into the
upper tank containing coee grounds
(as water temperature increases, dense
liquid water increasingly converts to
less dense water vapor gas, which takes
up more space and increases pressure);
when the water reaches and exceeds
the boiling point (so the vapor pressure
equals and then exceeds atmospheric
ASSEMBLING
THE SIPHON
COFFEE BREWER
UNDERSTANDING
THE SIPHON
COFFEE BREWING PROCESS
(A) (B) (C) (D)
(1) (2)
9
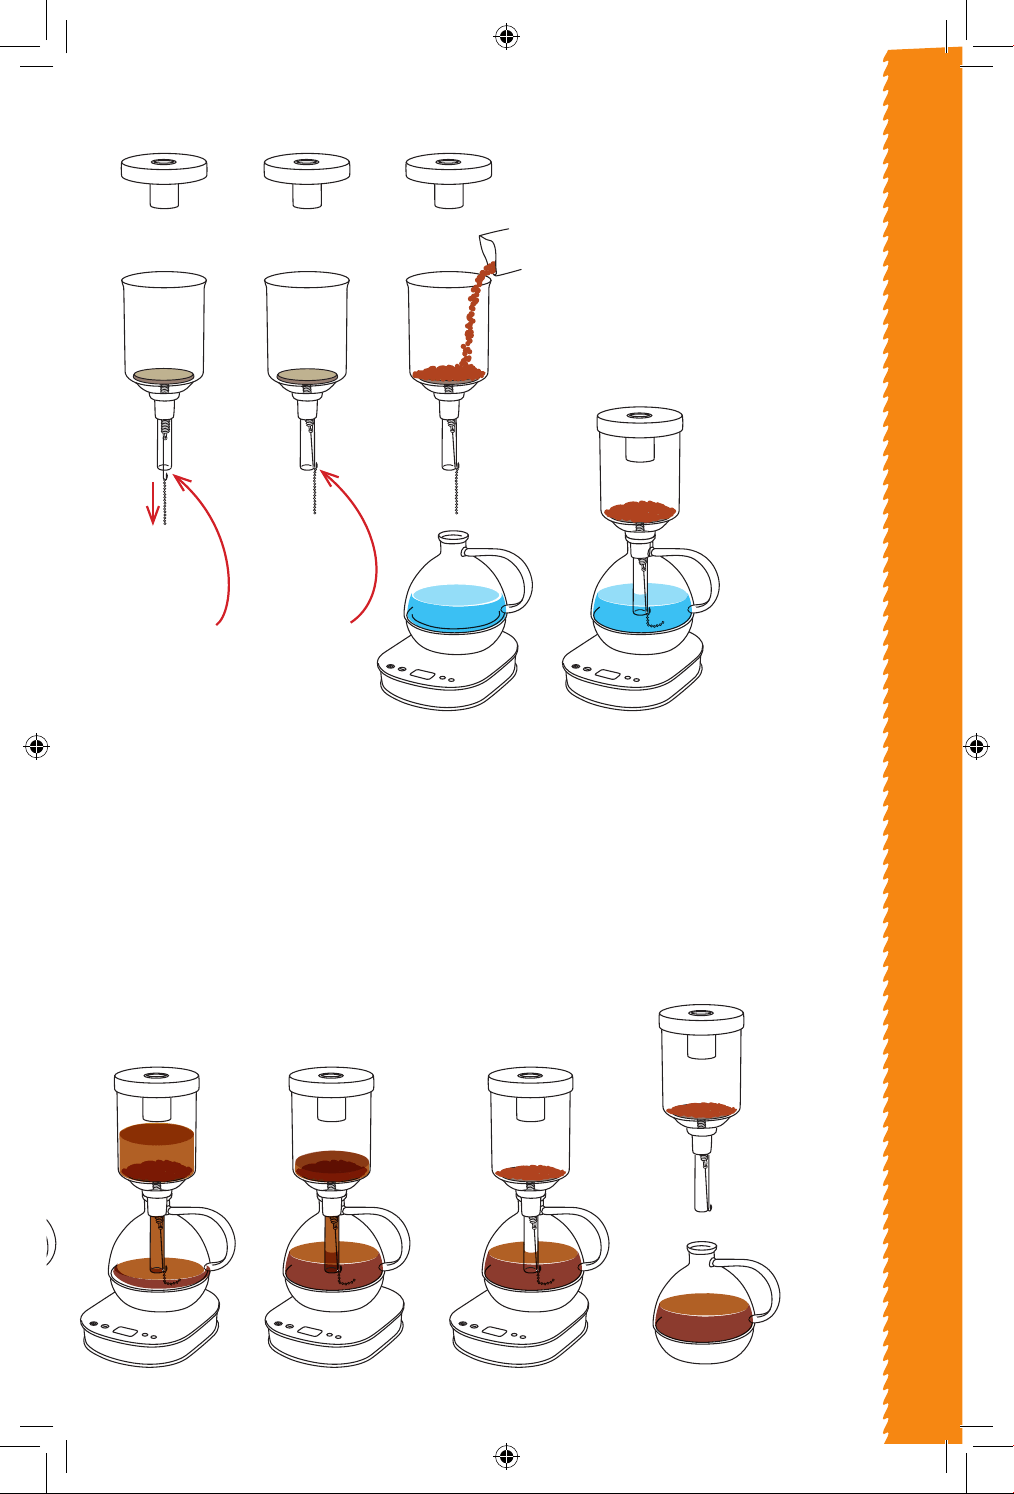
UNDERSTANDING THE SIPHON COFFEE BREWING PROCESS
pressure), the (water vapor) pressure in
the lower vessel exceeds the pressure in
the upper tank and water is pushed up
the siphon tube (C) into the upper tank.
During brewing, a small amount of water
and sucient water vapor remain in the
lower vessel (D) and are kept hot enough
so the pressure will support the column of
water in the siphon. When enough time
has elapsed that the coee has nished
brewing, (E) the heat is removed and the
pressure in the bottom vessel drops, so
the force of gravity push the water down
(F) into the lower vessel, through a strain-
er and away from the grounds, (G) ending
brewing. The upper tank is then removed
and the coee is now (H) ready to be
served from the lower chamber (carafe).
Pull the chain
downward
untill the hook
clears the rim
of the tube.
Securing the FILTER in the Tank
Allow
the hook
to lock in
over the edge
of the tube
and release
the chain.
Insert the
Upper Tank into
the opening
on top of the
Lower Chamber
(Carafe).
Make sure
the t is tight
and secure.
(E) (F) (G) (H)
(3) (4) (5) (6)

10
MAKING YOUR COFFEE
MAKING YOUR COFFEE
1. Place unit on a secure and sturdy platform. Pour water in to the Carafe and
plug unit into a power base
2. Make sure the lter is placed securly in the upper tank (see previous page).
3. Place the upper Tank onto the Carafe securely and pour in your choice of ground
coee. (See chart on opposite page for recommended amount).
4. As you plug the power base into an electrical outlet,
the LCD will begin ashing 000 several times.
5. When the ashing stops, press the power button two
times the LCD will display “00” on the left side.
The heater will begin working and LCD will display a ashing dash moving
around the display, indicating the heater is on. About
two minutes later, the water will rise up through the
siphon tube into the upper tank.
MANUAL FUNCTION MODE
6. After all of the water settles into the to
upper tank, press the function button
to choose auto function. The LCD will
display 01 and begin counting upward
as the brewing processes takes place.
7. When you feel the coffee is at its opti-
mum, press the power button to turn
off the machine. As pressure inside the
Carafe is released and the water cools
down, the coffee will spill down into
the Carafe.
8. Carefully remove the upper tank from
the Carafe by slowly twisting and
pulling the upper tank.
BEWARE: The Tank may be very
hot - use padded gloves or towel.
9. Your freshly brewed coffee is now
ready to be served. Enjoy!
AUTO FUNCTION MODE
6. After all of the water settles into the
to upper tank, press the function
button to choose auto function.
The LCD will begin to count down
from 60 (seconds) as the brewing
processes takes place..
7. At the end of 60 seconds the unit
will automatically turn o. As pres-
sure inside the Carafe is released
and the water cools down, the cof-
fee will spill down into the Carafe.
8. Carefully remove the upper tank
from the Carafe by slowly twisting
and pulling the upper tank.
BEWARE: The Tank may be very hot -
use padded gloves or towel.
9. Your freshly brewed coee is now
ready to be served. Enjoy!
POWER SELECT
AUTO MANUAL
POWER SELECT
AUTO MANUAL
POWER SELECT
AUTO MANUAL
POWER SELECT
AUTO MANUAL
POWER SELECT
AUTO MANUAL
POWER SELECT
AUTO MANUAL
POWER SELECT
AUTO MANUAL
POWER SELECT
AUTO MANUAL
POWER SELECT
AUTO MANUAL
POWER SELECT
AUTO MANUAL
POWER SELECT
AUTO MANUAL
POWER SELECT
AUTO MANUAL
POWER SELECT
AUTO MANUAL
POWER SELECT
AUTO MANUAL
POWER SELECT
AUTO MANUAL
POWER SELECT
AUTO MANUAL
POWER SELECT
AUTO MANUAL
POWER SELECT
AUTO MANUAL
POWER SELECT
AUTO MANUAL
POWER SELECT
AUTO MANUAL
POWER SELECT
AUTO MANUAL
POWER SELECT
AUTO MANUAL
POWER SELECT
AUTO MANUAL
POWER SELECT
AUTO MANUAL
POWER SELECT
AUTO MANUAL
11
CLEANING & WARRANTY
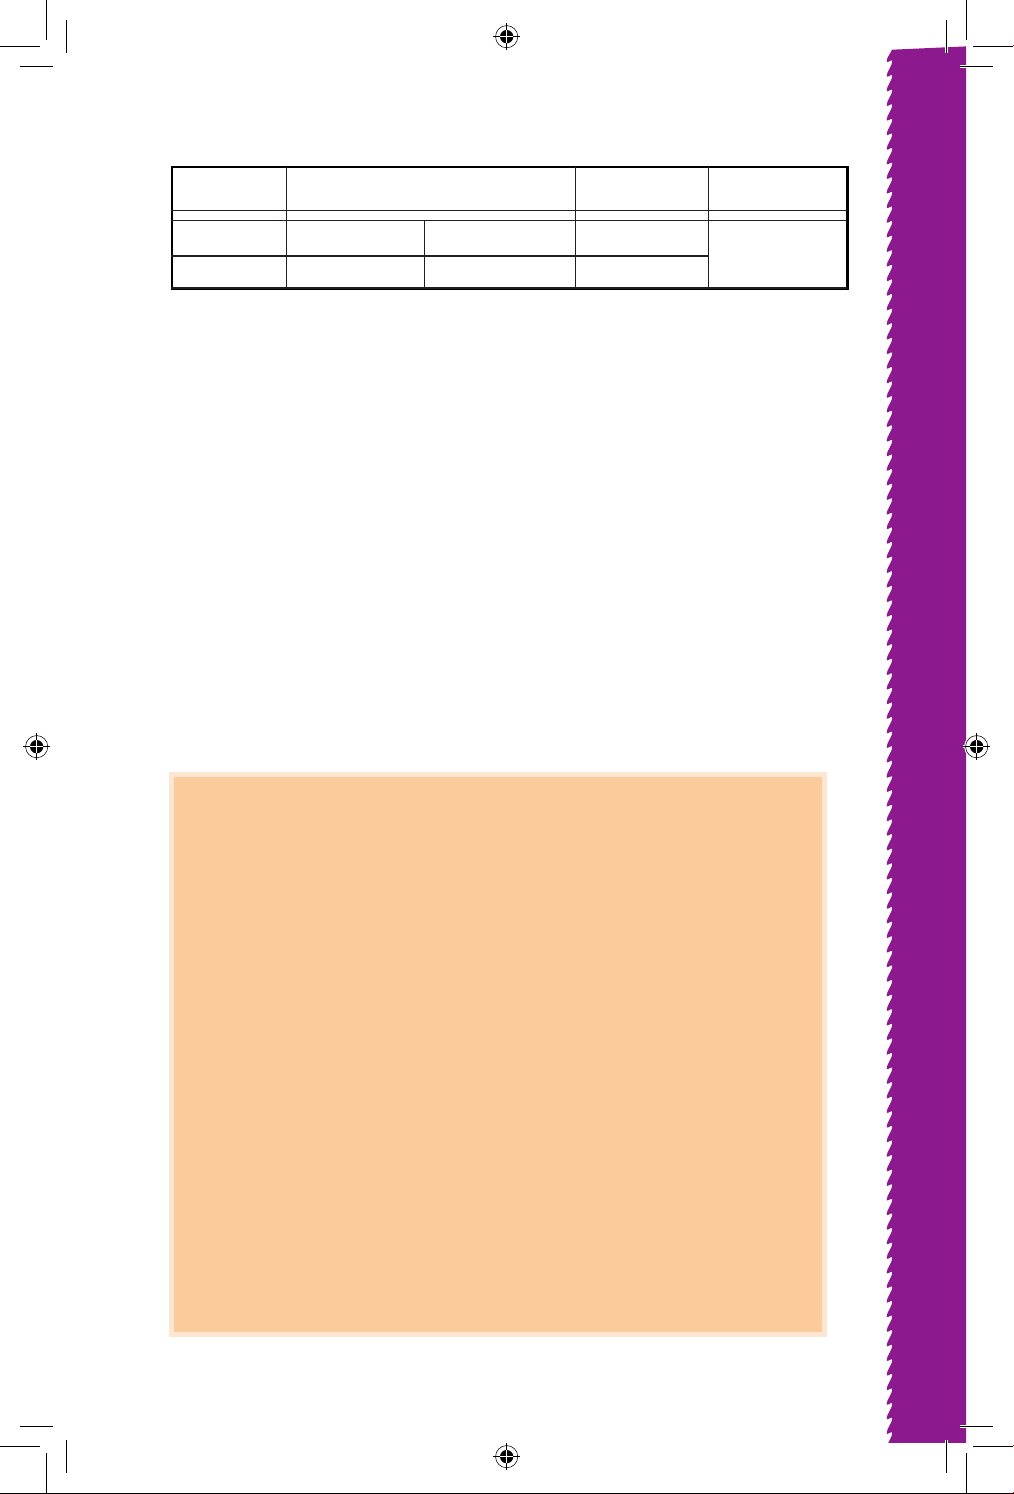
CUPS
2
3
10 OZ.
15 OZ.
295.7 grams
443.6 grams
COFFEE
18.5 grams
27.7 grams
GRIND
Medium
(recommended)
WATER
CLEANING & MAINTEN
A
NCE
• Always remove the plug from power socket before cleaning the base.
Allow the appliance to cool down completely before cleaning.
• Clean the outside of the appliance and the base with a soft damp cloth, do not
use scouring materials.
• Dry the appliance thoroughly before plugging into a power source again.
• Descale the appliance regularly. Use detergent, which can be obtained from
specialist shops, and follow the instructions given.
• To store the appliance; wind the cord in the cord compartment on the under-
side of the base.
WARRANTY & SERVICE
This Limited Warranty is for one full year from the date of
purchase. It is applicable to the original purchaser only
and is not transferable to a third party user.
Repair or replacement of defective parts is solely at the
seller’s discretion. In the event that repair isn’t possible,
the seller will replace the product/part.
If product repair/replacement won’t suce, the seller has
the option of refunding the cash value of the product or
component returned.
Product defects not covered under the Warranty provisions
include normal wear and damage incurred from use
or accidental negligence, misuse of instruction
specications or repair by unauthorized parties.
The manufacturing company is not liable for any incidental
or consequential damages incurred by such circumstances.

FOR CUSTOMER SERVICE
QUESTIONS OR COMMENTS
VISIT US @ GOURMIA.COM
OR CALL 888.552.0033
