USER
MANUAL
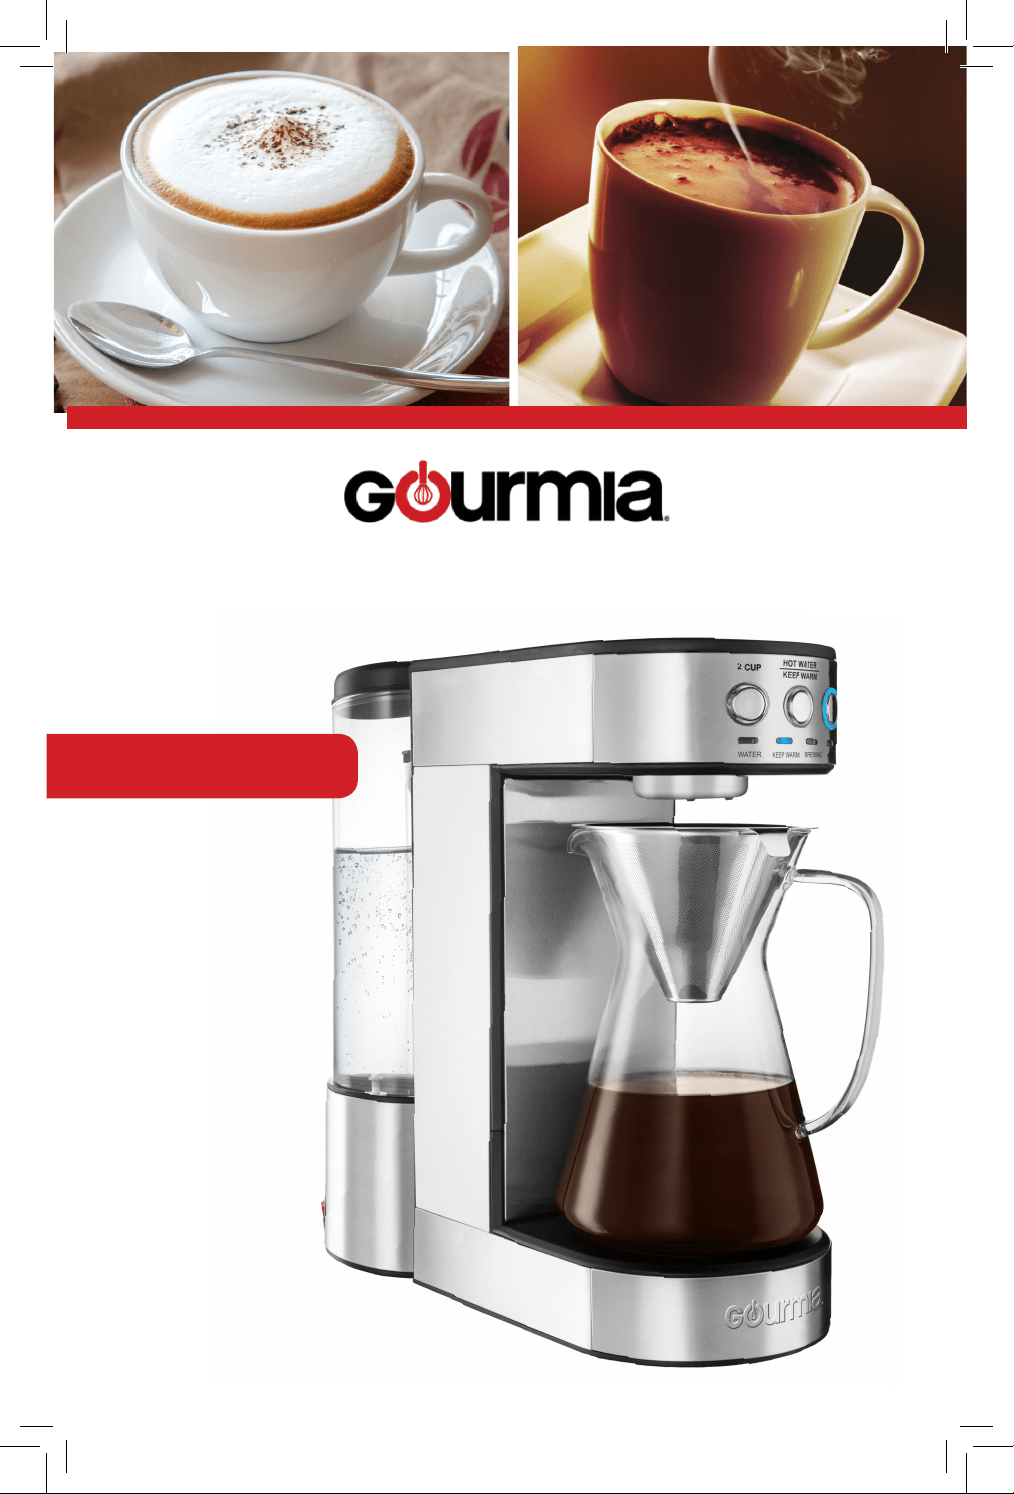
Pour Over Coffee Maker
Model# GCM-4900

Model: GCM-4900
© 2017 Gourmia
www.gourmia.com
The Steelstone Group
Brooklyn, NY
All rights reserved. No portion of this manual may be reproduced by any means
whatsoever without written permission from The Steelstone Group, except for the
inclusion of quotations in a media review.
Although every precaution has been taken in the preparation of this manual, The
Steelstone Group assumes no responsibility for errors or omissions. Nor is any
liability assumed for damages resulting from the use of the information contained
herein. Although every eort has been made to ensure that the information
contained in this manual is complete and accurate, The Steelstone Group is not
engaged in rendering professional advice or services to the individual consumer;
further, The Steelstone Group shall not be held responsible for any loss or damage
allegedly arising from any information or suggestion in this manual.
Read this manual thoroughly
before using and save it for
future reference
2
Welcome to the Practical World of
Fresh Coee from Gourmia
Congratulations on your purchase of the Pour Over Coee Maker from Gour-
mia, exclusively designed to deliver the perfect cup of coee every time! Your
mornings will become more relaxed as you watch your coee being ltered
and freshly brewed just the way you like it.
The coee maker’s unique design and brewing system contribute to the
superior avor and precise temperature of the coee.
With its thought out design and easy operation you’ll never again have to
think twice about which type of hot, fresh drink to make. This coee maker will
provide the perfect coee to kick-start your morning!
The pages of this manual oer full and comprehensive instructions to guide
you through the functions and features of the Gourmia Pour Over Coee
Maker. In this guide you will also nd complete step-by-step instructions for
the operation, assembly, and maintenance of your appliance.
Please read all safety instructions thoroughly to ensure safe usage at all times.
Thank you for your purchase! We sincerely hope you will enjoy this as well as all
the many innovative products brought to you by our family at Gourmia.
3

4
IMPORTANT SAFEGUARDS
1. Read all instructions.
2. Remove all packaging from the appliance.
3. Use handles or knobs to operate the appliance.
Do not touch surfaces; they are hot and can
cause you to burn yourself.
4. Check voltage to be sure that it indicated on the
name plate agrees with your voltage.
5. To protect against re, electrical shock or injury,
do not immerse cord, plug or main unit in water
or any other liquid.
6. Do not leave the machine unattended when in
use.
7. Keep the appliance out of reach of children and
people with limited capabilities.
8. Do not place on or near a gas or electric burner or
in a heated oven.
9. Unplug the appliance when not in use and before
cleaning.
10. Allow it to cool down completely before
assembling, disassembling and cleaning the
appliance.
11. Do not operate the appliance with a damaged
cord or plug. If the appliance malfunctions or
has been damaged in any manner, do not use it.
Return the appliance to the nearest authorized
service facility for repair.
12. Do not use any accessories or attachments that
were not provided by the manufacturer. They
may result in re or electrical shock.
13. The appliance should be placed on a at and dry
surface. Do not place the machine onthe edge of
a desk or table.
14. Do not let the cord hang over the edge of a table
or counter, or touch hot surfaces.
15. Do not touch or move the machine while in
use. Hot steam will be escaping from the steam
outlet.
16. Do not remove the lid during brewing cycles,
you can burn yourself.
17. Do not expose the appliance to extreme cold
temperatures, the residual water in the heat
pipes and pumps will become ice and damage
the machine.
18. When adding water to the water tank, do not
exceed the MAX line.
19. If you notice a defect in the machine, unplug
immediately and do not use until it is examined
by an authorized person.
20. Do not pour hot water into the water tank.
21. Do not use outdoors.
22. Do not use the appliance for other than
intended use.
SAVE THESE INSTRUCTIONS
Important Safety Instructions
TABLE OF CONTENTS
5
TABLE OF CONTENTS
Know Your Coffee Maker.....................6
Using Your Coee Maker ........................8
Why
P
our
O
ver coffee...........................11
Cleaning And Maintenance ..................12
Troubleshooting ..................................14
Warranty & Services.............................15
KNOW YOUR COFFEE MAKER
6
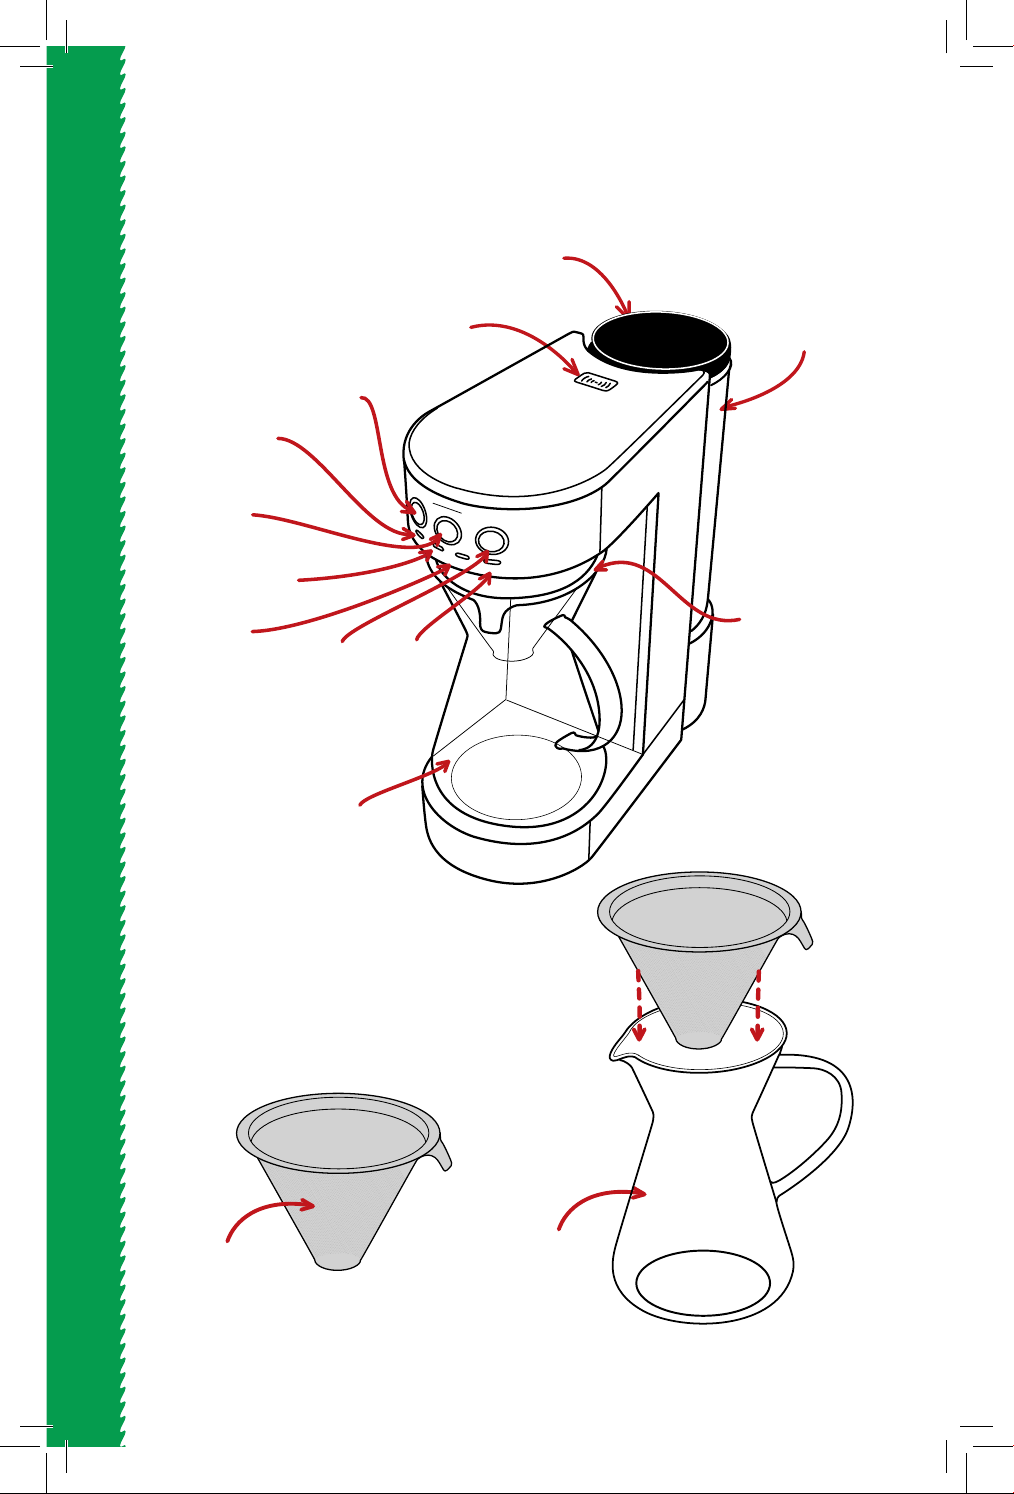
KNOW YOUR COFFEE MAKER
Water
Tank Lid
Steam
Vent
Glass
Water Tank
Glass
Carafe
Coee
Filter
HOT WATER
KEEP WARM
2 CUP
WARM
WATER
BREWING
READY
4 CUP
2 Cup
Button
Water
Indicator
Light
Hot Water/
Keep Warm
Button
Warm
Indicator
Light
Brewing
Indicator
Light
4 Cup
Button
Ready
Indicator
Light
Coee
Filter
Glass
Carafe
Water
Suction
Tube
Water
Heater
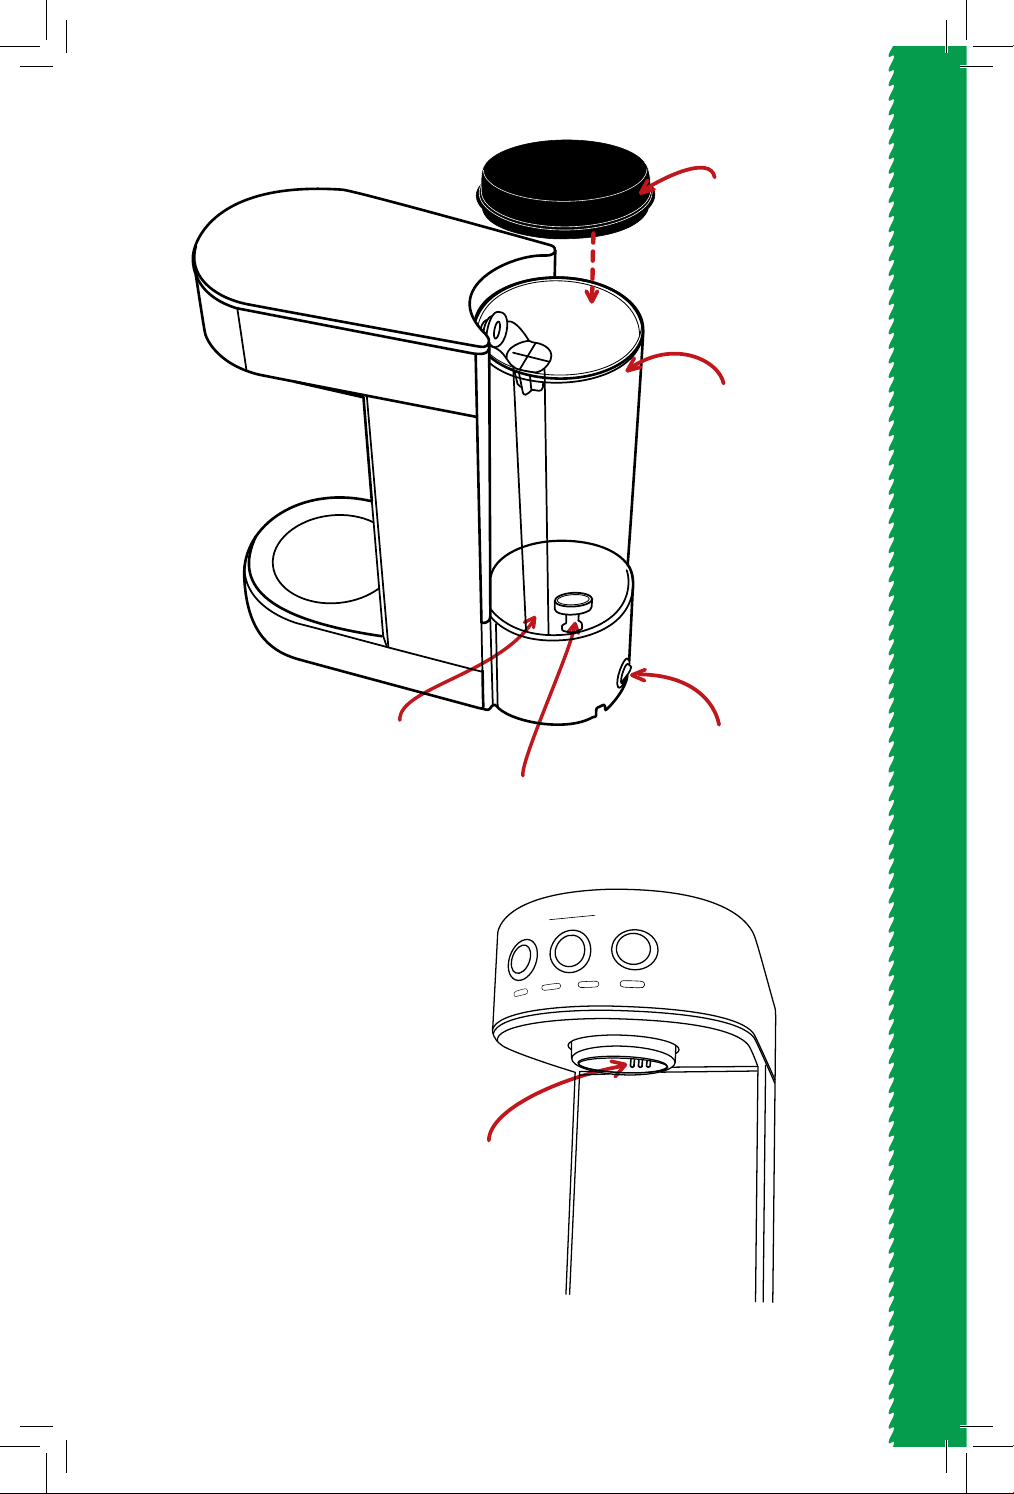
KNOW YOUR COFFEE MAKER
7
MAX
Power
Button
Water
Nozzle
Glass
Water Tank
Water
Tank Lid
Back View
Lower View
HOT WATER
KEEP WARM
BREWING
READY
WARM
WATER
2 CUP
4 CUP
8
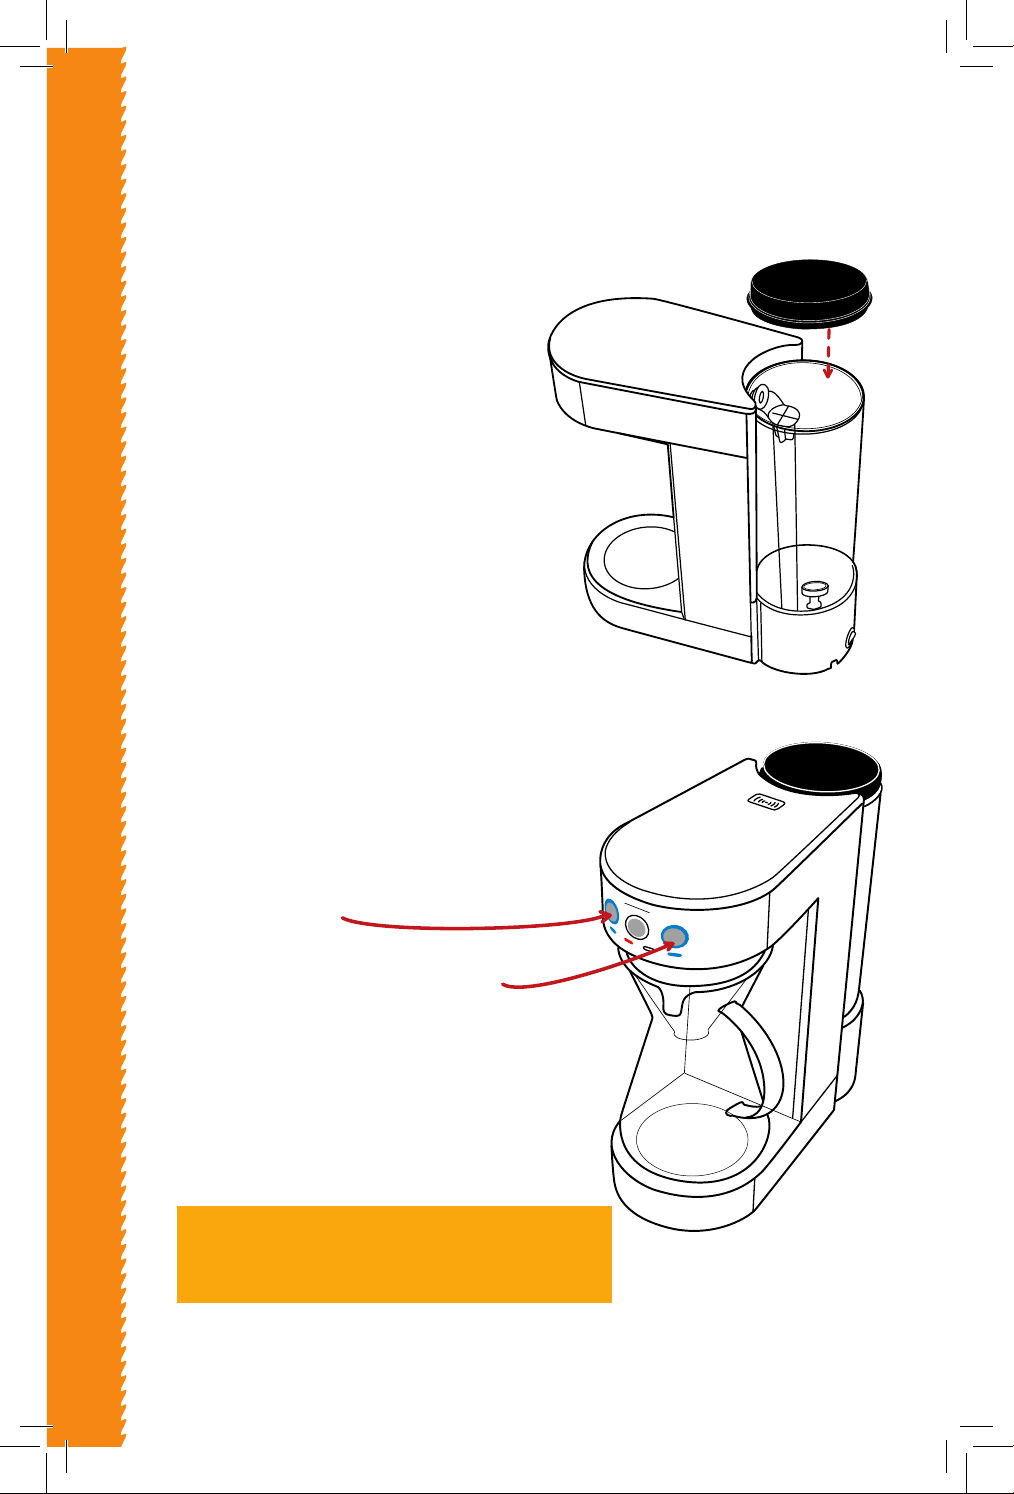
USING YOUR COFFEE MAKER
1. Remove all packaging from the machine and make sure you have
all the attachments.
2. Clean all the attachments.
3. Remove the water tank cover.
4. Using the glass carafe, ll the water tank
with desired amount of water.
Do not exceed the MAX line.
5. Place the cover on the water tank.
6. Run one cycle to boil water to ensure that
there is no residue in the machine.
Using Your Coffee Maker for the First Time
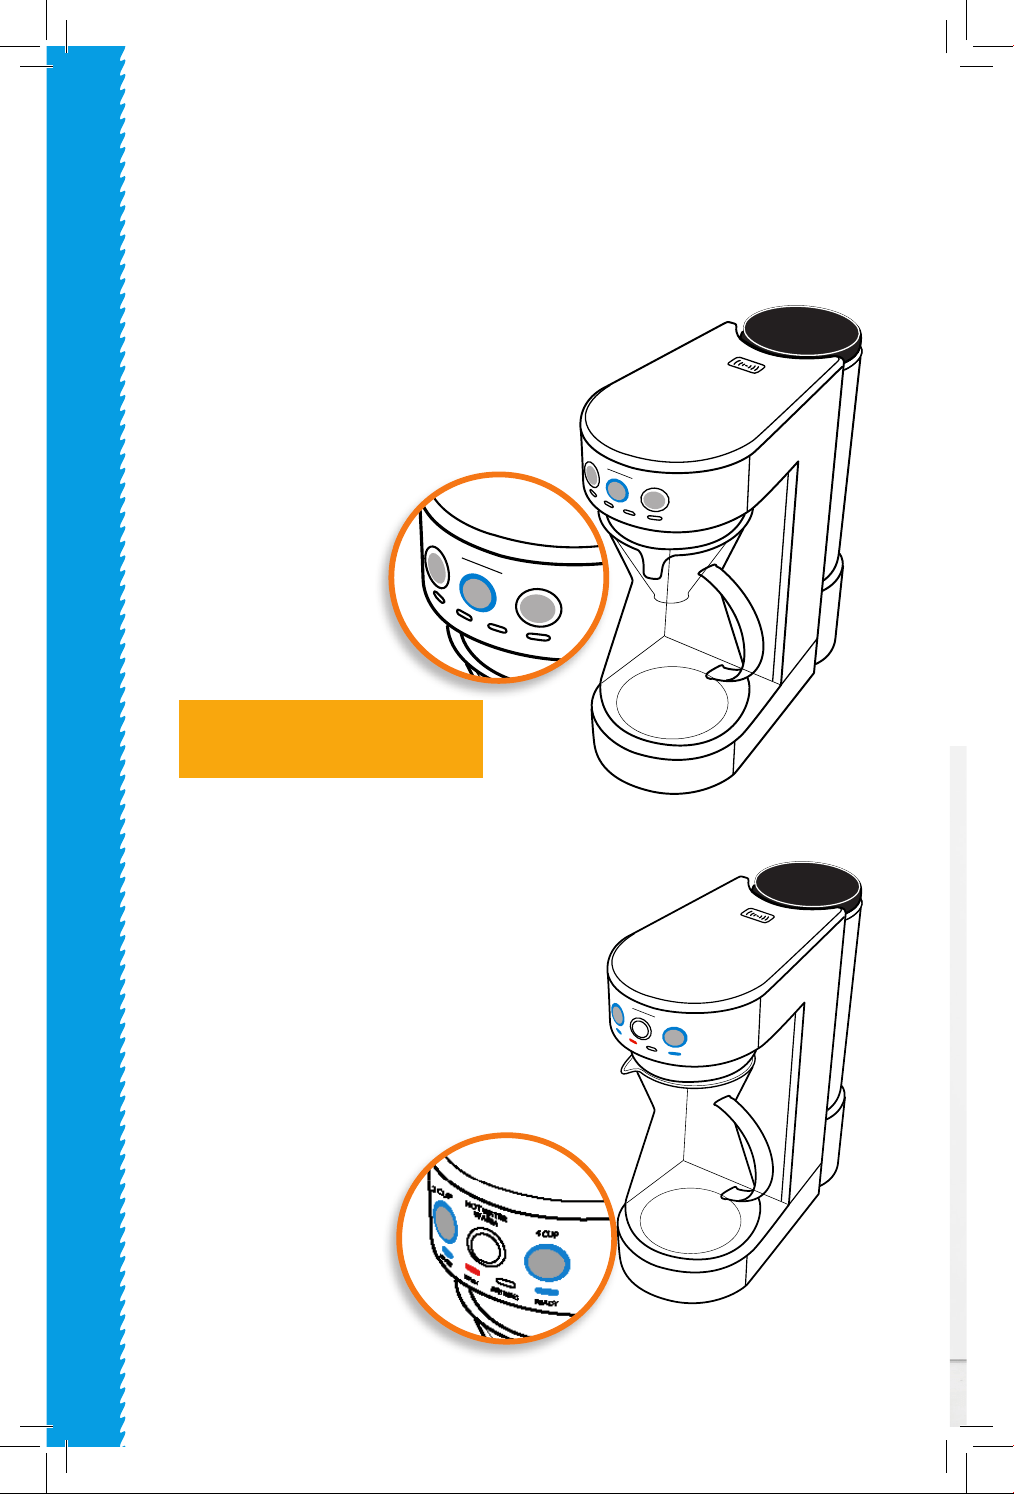
USING YOUR COFFEE MAKER
MAX
• Plug the appliance into a wall outlet.
• Flip the power switch on the back of the
machine to on.
• The 2 cup, 4 cup, and keep warm indicator
lights will turn on.
• When the coee maker is in standby mode,
the 2 cup and 4 cup indicator lights
will always be on.
• Add water to the water tank.
• The water indicator light will ash until
there is enough water in the water tank to
begin brewing.
HOT WATER
KEEP WARM
2 CUP
WARM
WATER
BREWING
READY
4 CUP
For best results run the hot water cycle a
few seconds before brewing coee.
9
USING YOUR COFFEE MAKER
USING YOUR COFFEE MAKER
• The machine will then begin to boil the water.
• The water will begin to brew into the glass carafe.
• Ten seconds before the coee is ready, the ready indicator light
will ash blue and then the light will stay on.
2 CUP
WARM
WATER
BREWING
READY
4 CUP
HOT WATER
KEEP WARM
2 CUP
WARM
WATER
BREWING
READY
4 CUP
HOT WATER
KEEP WARM
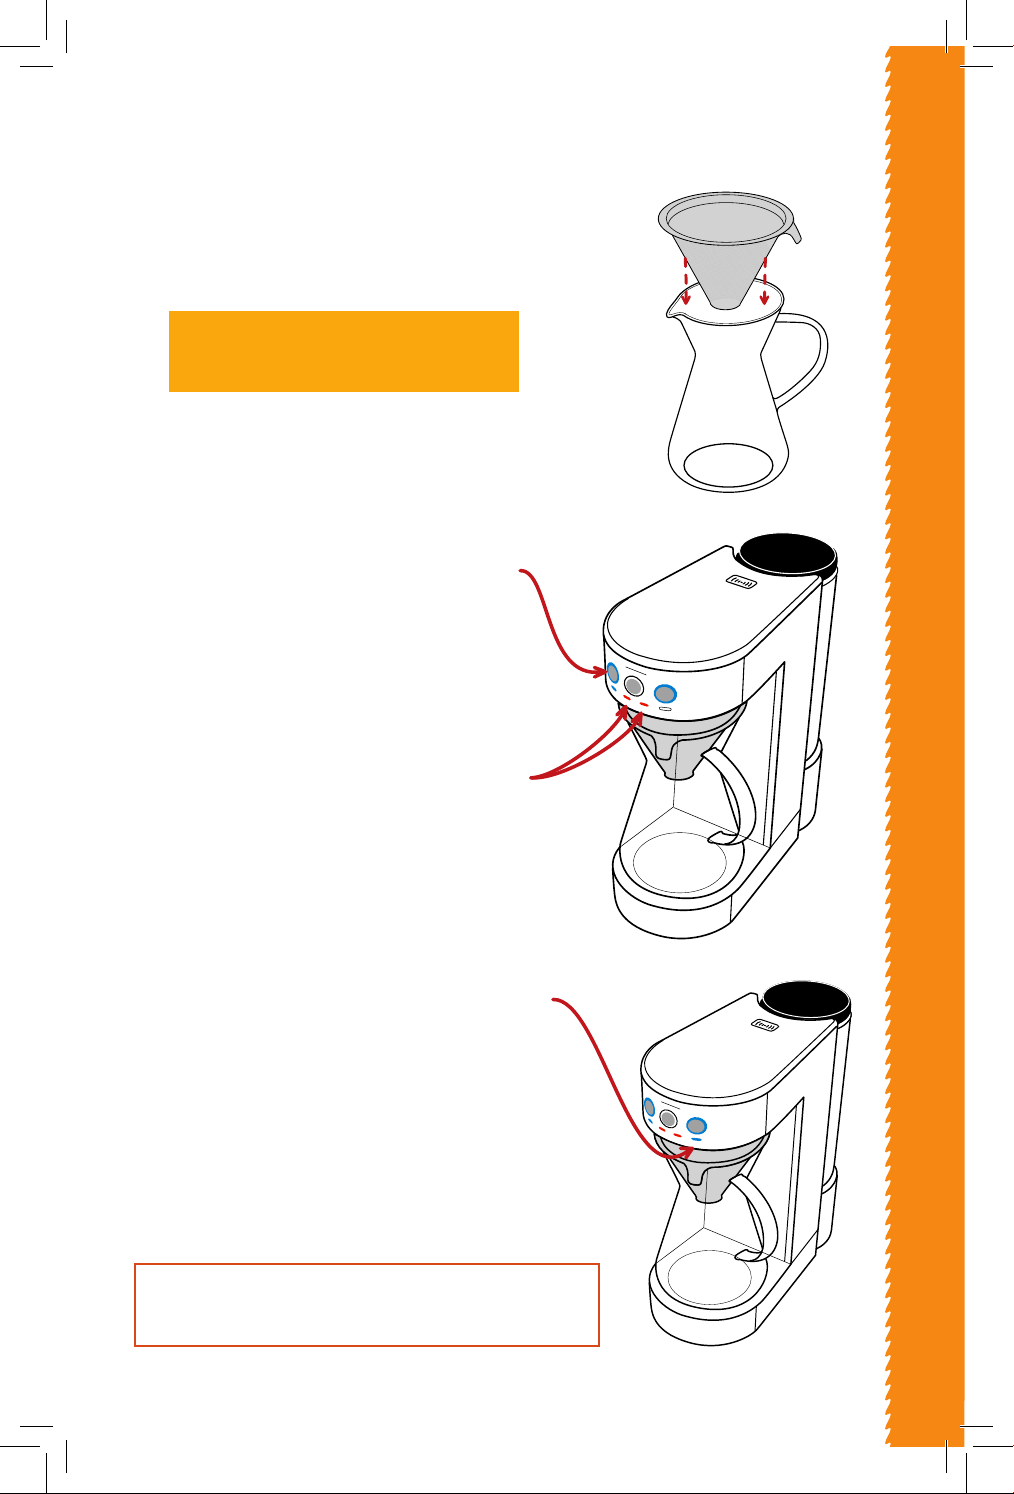
• Place the coee grinds into the lter.
• The suggested ratio of water to coee grinds is
16ml water/1g of coee grinds.
Recommended grind size
Medium/Coarse-Coarse
• Place the lter into the glass carafe.
• Place the carafe on the base of the coee maker.
• The 2 cup, 4 cup and water indicator lights
will turn blue until an option is chosen.
• Select 2 cup or 4 cup, depending on how
many cups of coee you are brewing.
• The indicator light of the option you selected
will turn on and the other light will turn o.
• The brewing and warm indicator lights will
turn red.
• The water may still drip down even once it
indicates that it is ready.
• The 2 cup or 4 cup and brewing indicator lights will
turn o.
• The coee maker will automatically go into keep
warm mode for a maximum of two hours and then
it will go back into standby mode.
To cancel the hot water/ keep warm option,
hold the 2 cup or 4 cup button for three seconds.
10
2 CUP
WARM
WATER
BREWING
READY
4 CUP
HOT WATER
KEEP WARM
USING YOUR COFFEE MAKER
TO USE KEEP WARM MODE
1. Under standby mode, place the glass carafe on the base, then press hot water/
warm button for three seconds.
2. The 2 cup or 4 cup indicator light will turn o and the keep warm
indicator light will turn on.
3. The machine will keep warm for a maximum of 2 hours.
4. The keep warm indicator light will
turn o after two hours and the
machine will go back into standby mode.
TO BOIL WATER
1. Place the glass carafe on the base.
2. Fill the water tank with desired amount of water.
3. Press the hot water/keep warm button
to begin boiling process.
4. When the water is hot it will pour downward
into the glass carafe.
CAUTION: The appliance gets very hot
when in use. Do not touch any surfaces.
2 CUP
WARM
WATER
BREWING
READY
4 CUP
HOT WATER
KEEP WARM
2 CUP
WARM
WATER
BREWING
READY
4 CUP
HOT WATER
KEEP WARM
After brewing the keep warm
stays on by default.
11
The Pour Over Coee Maker has dierent features that provide the perfect
system to brew coee.
It automatically calculates the dierent variables that are important for
brewing coee and maintains quality and consistency with each step.
The way the coee is brewed mimics the manual pour over technique which
has many benets over your standard cup of coee. The pour over method
continuously replenishes the liquid surrounding the coee grounds with
new, fresher water. The fresh water evenly wets the coee grounds and
therefore extracts more avor into the cup without the bitterness that coee
may have. The water then comes down in a pulsing water bath to ensure
steady temperature and saturation of the entire coee.
Additionally, it has a faster, more ecient brew than a standard coee maker.
The coee maker has a lter which is made of ne mesh and eliminates the
need for a paper lter and the mess that comes along with it.
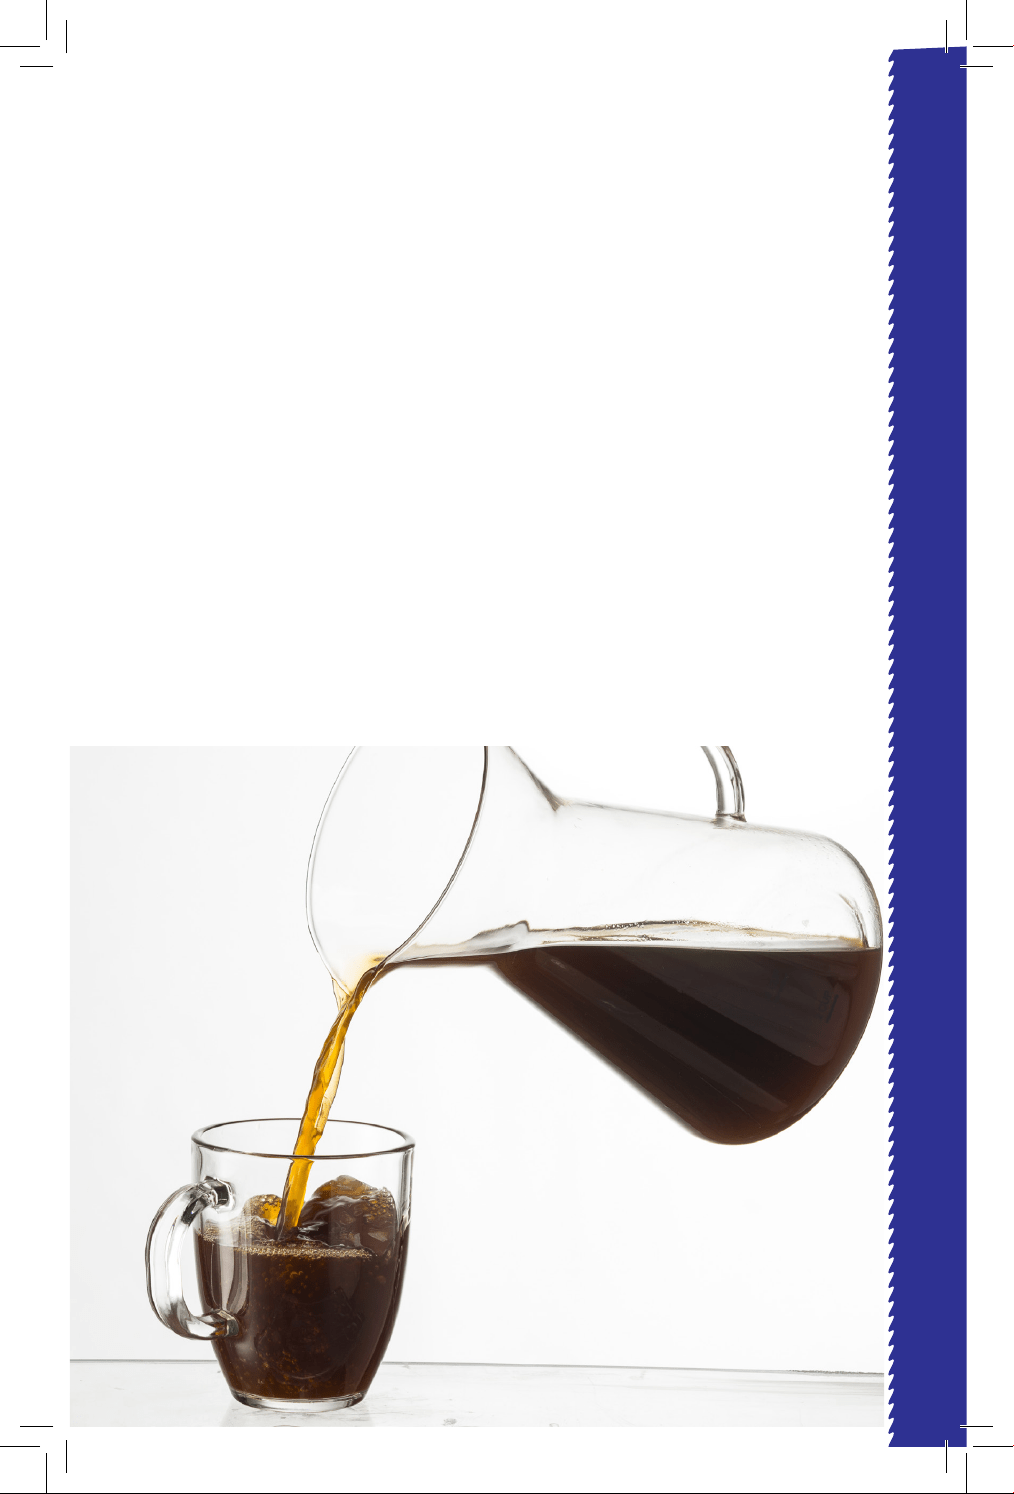
The hourglass design of the glass carafe lends to the beauty and clean appear-
ance of the machine. The carafe is made of durable glass and with its heat
resistant handle, you can bring it straight to the table to serve your coee.
WHY POUR OVER COFFEE
11
12
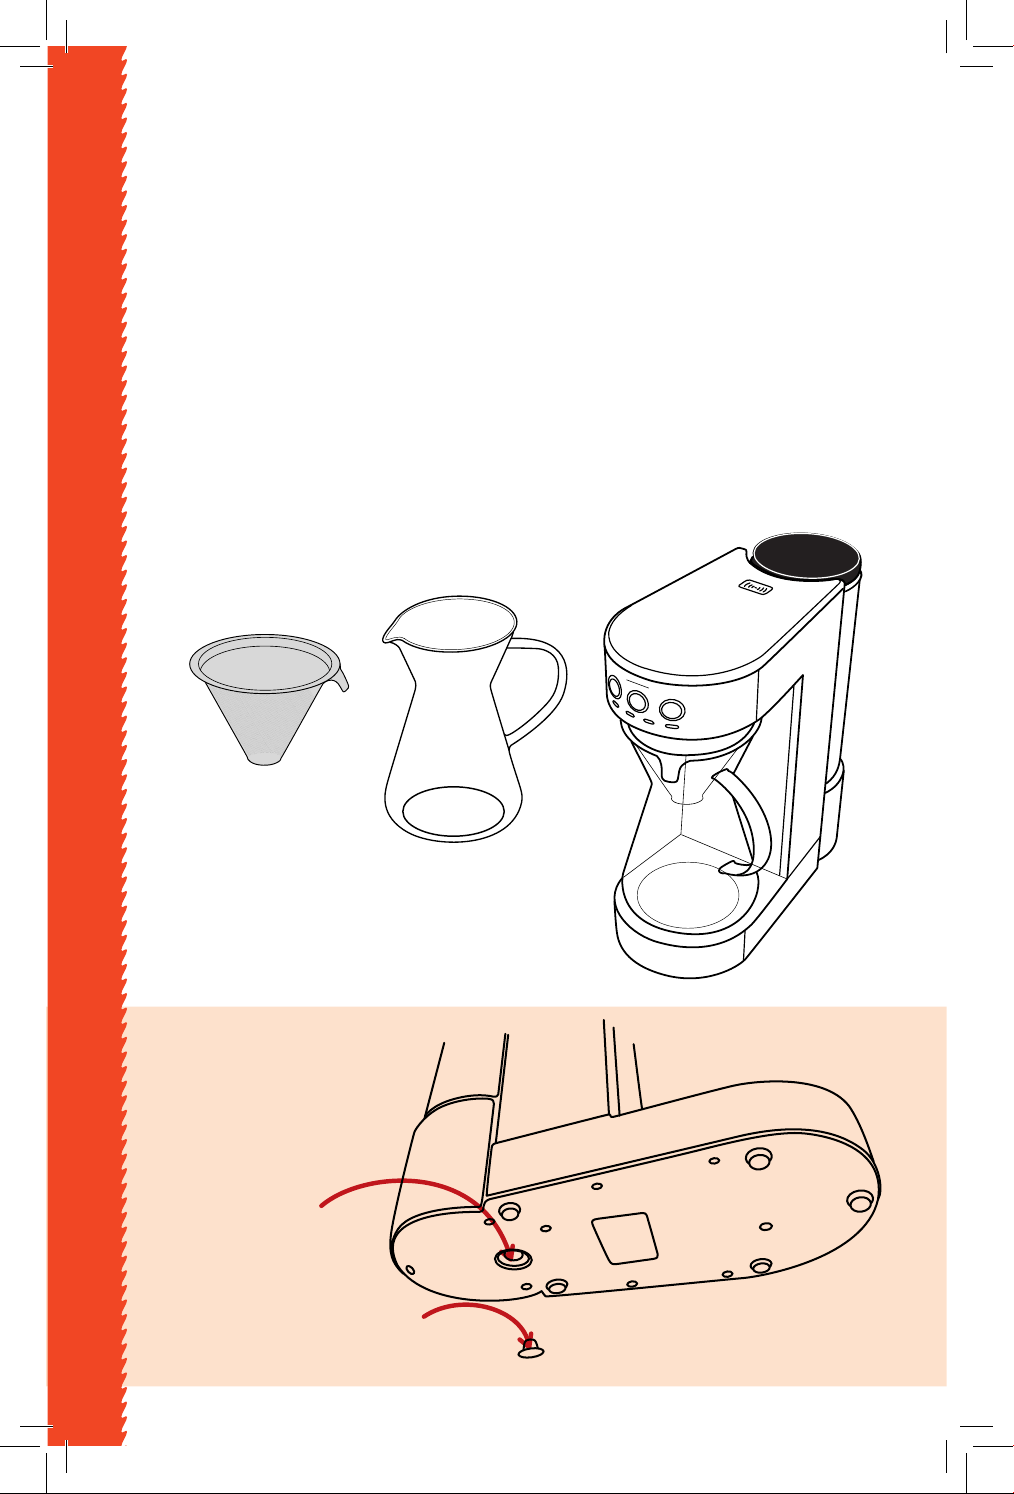
CLEANING AND MAINTENANCE
1. U
nplug the appliance and allow it to cool down completely before cleaning.
2. Clean the exterior of the appliance with a damp cloth.
3. Clean the steam outlet on top of the machine with a damp cloth to make sure
there is no residue blocking the outlet.
4. Clean all attachments and dry thoroughly.
5. Use pure water or mineral water to ensure proper cleaning.
Note: Do not clean the machine with alcohol or harsh cleaning agents.
Do not immerse the machine in water.
Draining the water out of the water tank:
HOT WATER
KEEP WARM
2 CUP
WARM
WATER
BREWING
READY
4 CUP
CLEANING AND MAINTENANCE
Bottom of Machine
Water
Drain
Stopper
13
CLEANING AND MAINTENANCE
1. Fill the water tank with water and vinegar or lemon juice till the MAX line
(about 1.8L).
The ratio of water to vinegar or lemon juice is 100:3.
2. Press 2 cup button to boil water.
3. Repeat 3 to 5 times to make sure
that the tank is clean.
CLEANING MINERAL DEPOSITS:
After using the coee maker several times, lime scale can begin to build up
inside the machine. Descale the machine every 2-3 months.
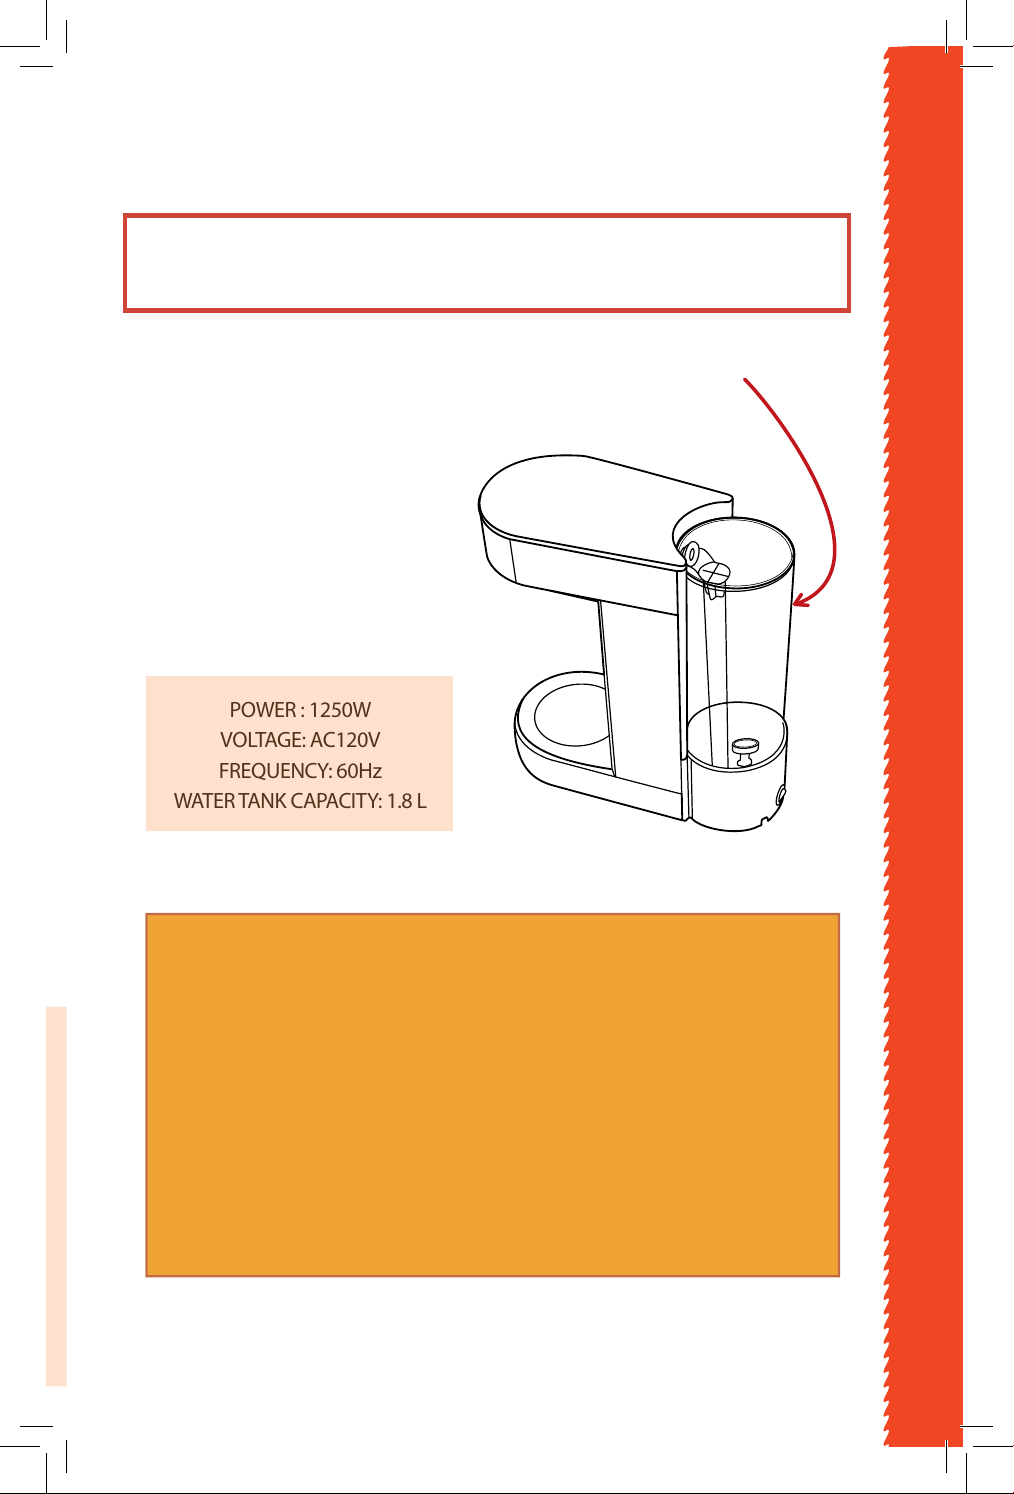
POWER : 1250W
VOLTAGE: AC120V
FREQUENCY: 60Hz
WATER TANK CAPACITY: 1.8 L
MAX
CAUTION:
• While the appliance is in use, the water is constantly boiling. Therefore,
you may hear boiling sounds coming from the machine.
• If the temperature of the water and the environment is very low when
using the machine, it will take longer for the water to boil.
• After brewing is complete, water may still drip into the glass carafe.
• There may be some water drops on top of the steam outlet, due to
steam that is being released.
• Do not remove the glass carafe from the base while machine is in use.
14
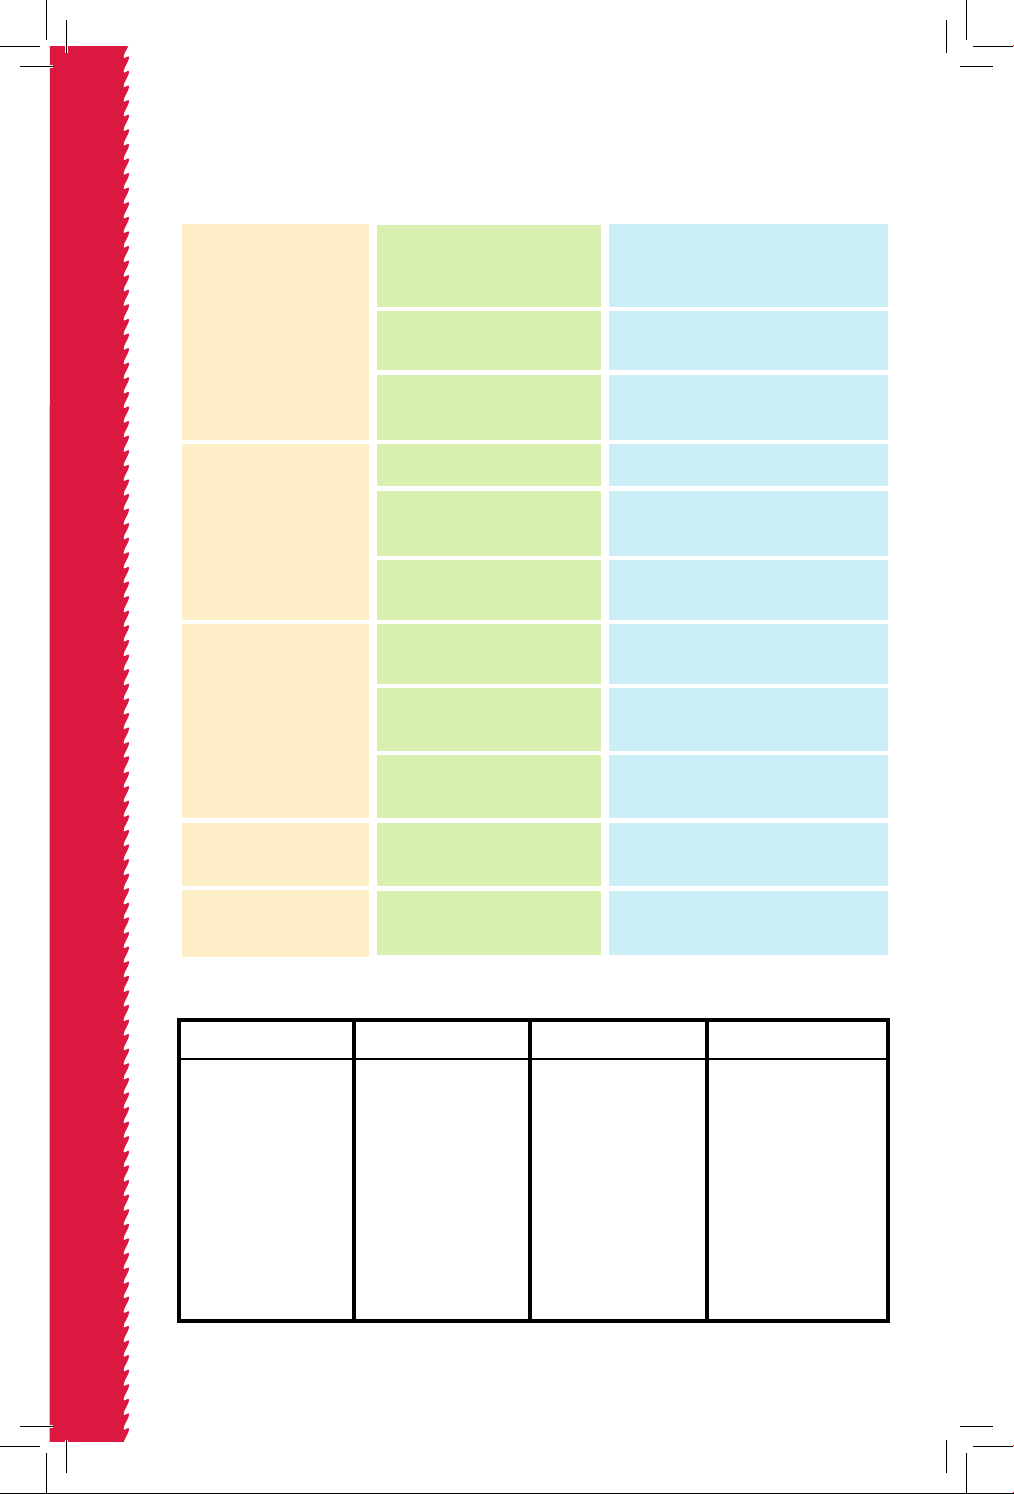
TROUBLESHOOTING
Pour water into the water tank.
Make sure the voltage and frequency is
consistent with the nameplate.
Please contact the authorized dealer.
Pour water into the water tank.
Restart the machine by turning it o and
allowing it to cool down.
Please contact the authorized dealer.
Plug the power cord into a wall outlet.
Restart the machine by turning it o and
allowing it to cool down.
Please contact the authorized dealer.
Please contact the authorized dealer.
Place the carafe on the base.
No water comes out.
Appliance is making noise.
Machine is NOT working.
Function button is not
working.
W
ater tank is empty.
The input voltage or frequency is
inconsistent with nameplate.
Machine malfunctions
Water tank is empty.
Pump not working.
Implementation of the above
operation problems still exist.
The power outlet is not plugged in.
Machine is overheating, causing the
thermostat to malfunction.
Machine malfunctions.
Indicator and button lights do not
appear.
There is no cup or carafe in place.
PROBLEM POSSIBLE CAUSE SOLUTION
TROUBLESHOOTING
WATER
Indicator light
will ash when
there is no water
or not enough
water
Indicator light
is on, and will
turn o after
2 hours.
Indicator light
is always on for
2 CUP, 4 CUP
and hot water
Indicator light
will ash for
ten seconds
before coee is
ready and will
stay on until
machine goes
into keep warm
mode.
KEEP WARM BREWING READY

15
WARRANTY & SERVICES
WARRANTY & SERVICE
This Limited Warranty is for one full year from the date
of purchase. It is applicable to the original purchaser
only and is not transferable to a third party user. Repair
or replacement of defective parts is solely at the seller’s
discretion. In the event that repair isn’t possible, the
seller will replace the product/part. If product repair/
replacement won’t suce, the seller has the option of
refunding the cash value of the product or component
returned.
Product defects not covered under the Warranty
provisions include normal wear and damage incurred
from use or accidental negligence, misuse of instruction
specications or repair by unauthorized parties.
The manufacturing company is not liable for any
incidental or consequential damages incurred by such
circumstances.

FO
R CUSTOMER SERVICE
QUESTIONS OR COMMENTS
VISIT US @ GOURMIA.COM
EMAIL I
OR CALL 888.552.0033