Bagd[efS
Read this manual
thoroughly before
using and save it for
future reference
Model: GCM3350
© 2018 Gourmia
www.gourmia.com
The 4UFFM4UPOF Group
Brooklyn, NY
All rights reserved. No portion
of this manual may be repro-
duced by any means whatsoever
without written permission from
The 4UFFM4UPOF Group, except for
the inclusion of quotations in a
media review.
Although every precaution has
been taken in the preparation
of this manual, The 4UFFM4UPOF
Group assumes no responsibility
for errors or omissions. Nor is any
liability assumed for damages
resulting from the use of the
information contained herein.
made to ensure that the infor-
mation contained in this manual
is complete and accurate, The
4UFFM4UPOF Group is not engaged
in rendering professional advice
or services to the individual
consumer; further, The 4UFFM4UPOF
Group shall not be held
responsible for any loss or
damage allegedly arising from
anyinformation or suggestion in
this manual.
FOR CUSTOMER SERVICE
QUESTIONS OR COMMENTS
VISIT US @ WWW.GOURMIA.COM
EMAILIN FO@GOURMIA.COM
OR CALL 888.552.0033

Welcome to the
Gourmia Experience
The tantalizing aroma of freshly coffee grounds is just moments away! Join us
on the journey toward the cup you’ve been craving.
The secret to pour over perfection is precision, and the Gourmia Pour Over
Pourista is designed for precision throughout every stage of the coee
brewing process. Every detail - from a nely calibrated heating system that
maintains the ideal water temperature throughout the brewing and pouring
process, the built-in scale that determines the ideal water:grinds ratio, the
perfect bloom process, and real barista pour over action – has been designed
to provide the best, most authentic pour over experience.
The Gourmia Pour Over Pourista not only automates the entire process, it also
offers a manual mode that provides the flexibility to customize the most
important settings impacting coffee flavor; heat and the grinds-to-water
ratio. With both an automatic and manual mode, you’re assured a perfect
pour over coffee.

Witnessing the Pourista in action is a work of art. Once the grinds are placed in
filter and the water reaches the ideal temperature, the bloom pour begins. Our
unique system pours the ideal amount of water in a planetary pour pattern,
ensuring that every grind absorbs just the right amount of water which
prepares the grinds to release their pure flavor. After this short pour, the
Pourista pauses for the grinds to releasF the excess carbon dioxide that occur
naturally and prevent the grounds from releasing their flavor. This process is
called the bloom.
After the short pause, the Pourista begins the brew pour. Again using the
planetary pour pattern to ensure even distribution of water across the grinds,
the Pourista pours the ideal amount of water to insure the grinds release their
full flavor and not suffer from over- or under-saturation.
The precision is built into the Gourmia Pour Over Pourista, but all you’ll notice is
a delicious cup of pour over coffee at the touch of a button.
The pages of this manual offer a comprehensive set of instructions to guide
you through the functions and features of the Gourmia Pour Over Pourista. You
will find information regarding the assembly, operation, cleaning and
maintenance of your appliance. Please read all instructions thoroughly before
the first use to ensure your safety. If you have any questions, don’t hesitate to
email (info@gourmia.com) or call us (888.552.0033).
Thank you, and welcome to the Gourmia Family!
5

1. Read all instructions.
2. Do not touch hot surfaces. Use handles or knobs.
3. Make sure that your outlet voltage corresponds to the voltage stated on
the rating label of the coffee maker.
4. To protect against fire, electric shock, and injury do not immerse cord,
plug or unit in water or other liquid.
5. Close supervision is necessary when any appliance is used by or near
children.
6. Unplug from outlet when not in use and before cleaning. Allow to cool
before putting on or taking off parts and cleaning the appliance.
7. Do not operate any appliance with a damaged cord or plug, after the
appliance malfunctions, or has been damaged in any manner. Return
appliance to an authorized service facility for examination, repair or
adjustment.
8. The use of an accessory not recommended by the appliance
manufacturer may cause injury.
9. Do not use outdoors.
10. Do not let cord hang over edge of table or counter or touch hot surfaces.
11. Do not place on or near a burner or in a heated oven.
12. Only fill the water reservoir with clean and cold water. Never fill it with
mineral water, milk or other liquids.
13. Do not let the coffee maker operate without water to avoid damaging
the heating elements.
14. Do not use appliance for other than it's intended use. This appliance
should only be used for coffee.
15. Some parts of appliance are hot when operated - do no touch.
16. Do not leave the appliance unattended while in use.
17. Always operate the appliance with cover in place.
18. To disconnect, turn off the unit then remove plug from wall outlet.
Scalding may occur if the lid is removed during the brewing cycles.
19. Cleaning and maintenance should not be done by children without
supervision.
20. The glass container is designed for use with this appliance. It must never
be used on a range top.
21. Do not set the hot glass container on a wet or cold surface
22. Do not use a cracked glass container or a container having a loose or
weakened handle.
23. Do not clean glass container with cleansers, steel wool pads, or other
abrasive material.
FOR HOUSEHOLD USE ONLY
IMPORTANT SAFEGUARDS
This appliance has a polarized plug (one blade is wider than the other). To
reduce the risk of electric shock, this plug will fit in a polarized outlet only
one way. If the plug does not fit fully in the outlet, reverse the plug. If it still
does not fit, contact a qualified electrician. Do not modify the plug in any
way.

Know Your Pourista .................................8
....................................10
........................11
................................................12
...........................................12
..........................................13
.............................13
.....................................................15
...................................1
...........................1
Setting the Clock
Weighing the Grounds
Auto Mode
Manual Mode
Program S
tart
Hot Water Dispenser
Cleaning
Trouble Shooting
Warranty and Service
Table of Contents
7
MAX
MIN
Temp
Ratio
Hot
Water
Clea
Program
Tare
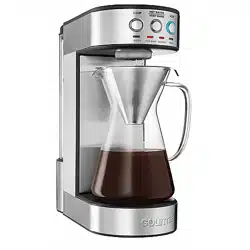
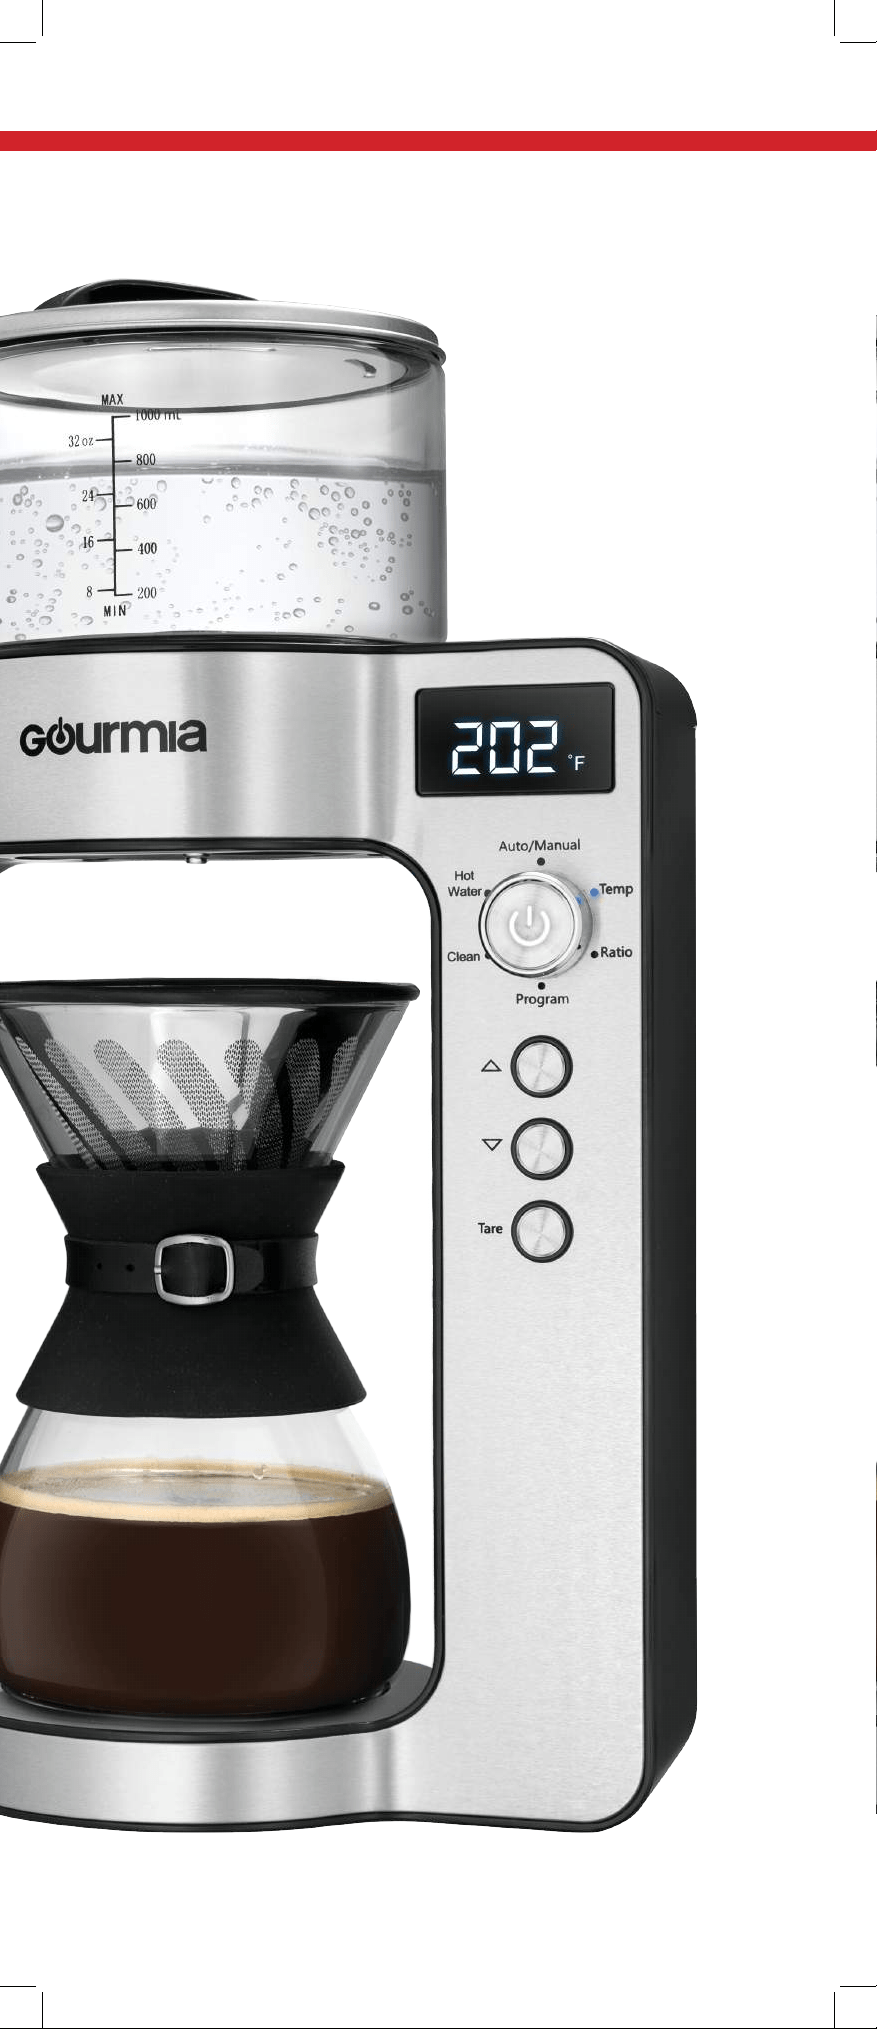
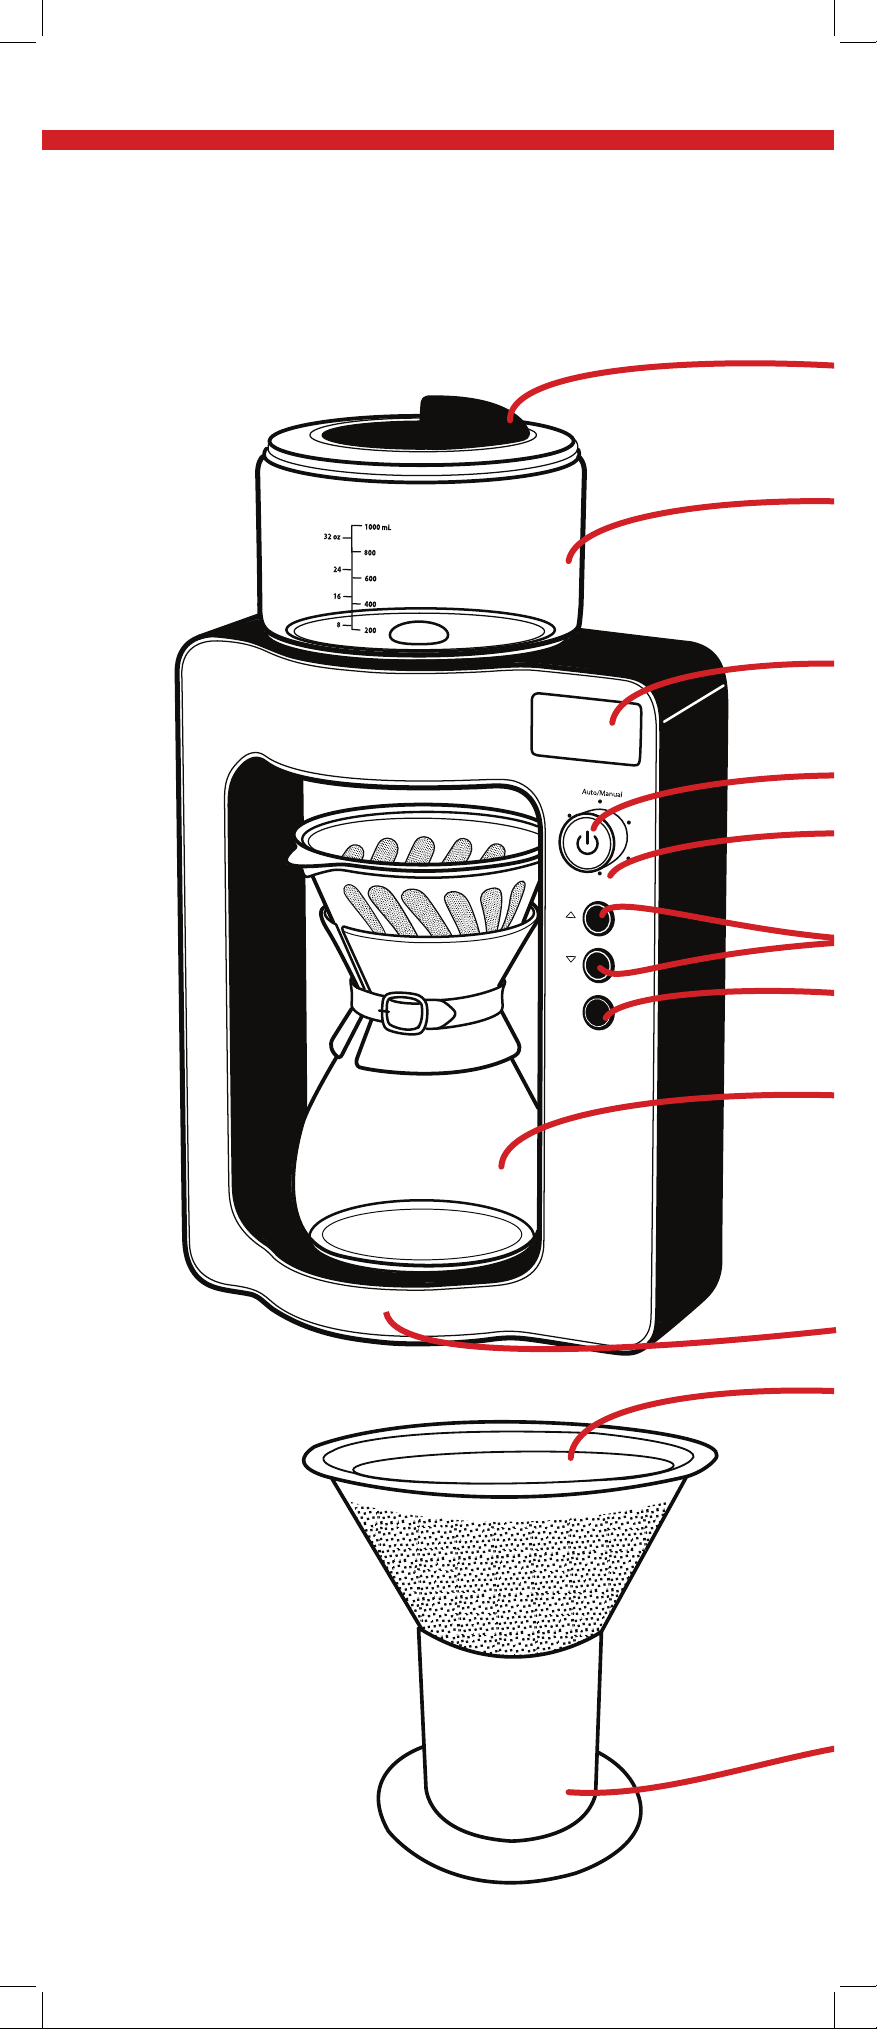
KNOW YOUR Bagd[efS
COFFEEMAK
Dial/ Power Button
Functions
Display Screen
Stainless Steel Filter
Filter Stand
Water Reservoir
Water Reservoir Lid
AKER
Built In Scale
Adjustment Buttons
Tare Button
Carafe
9

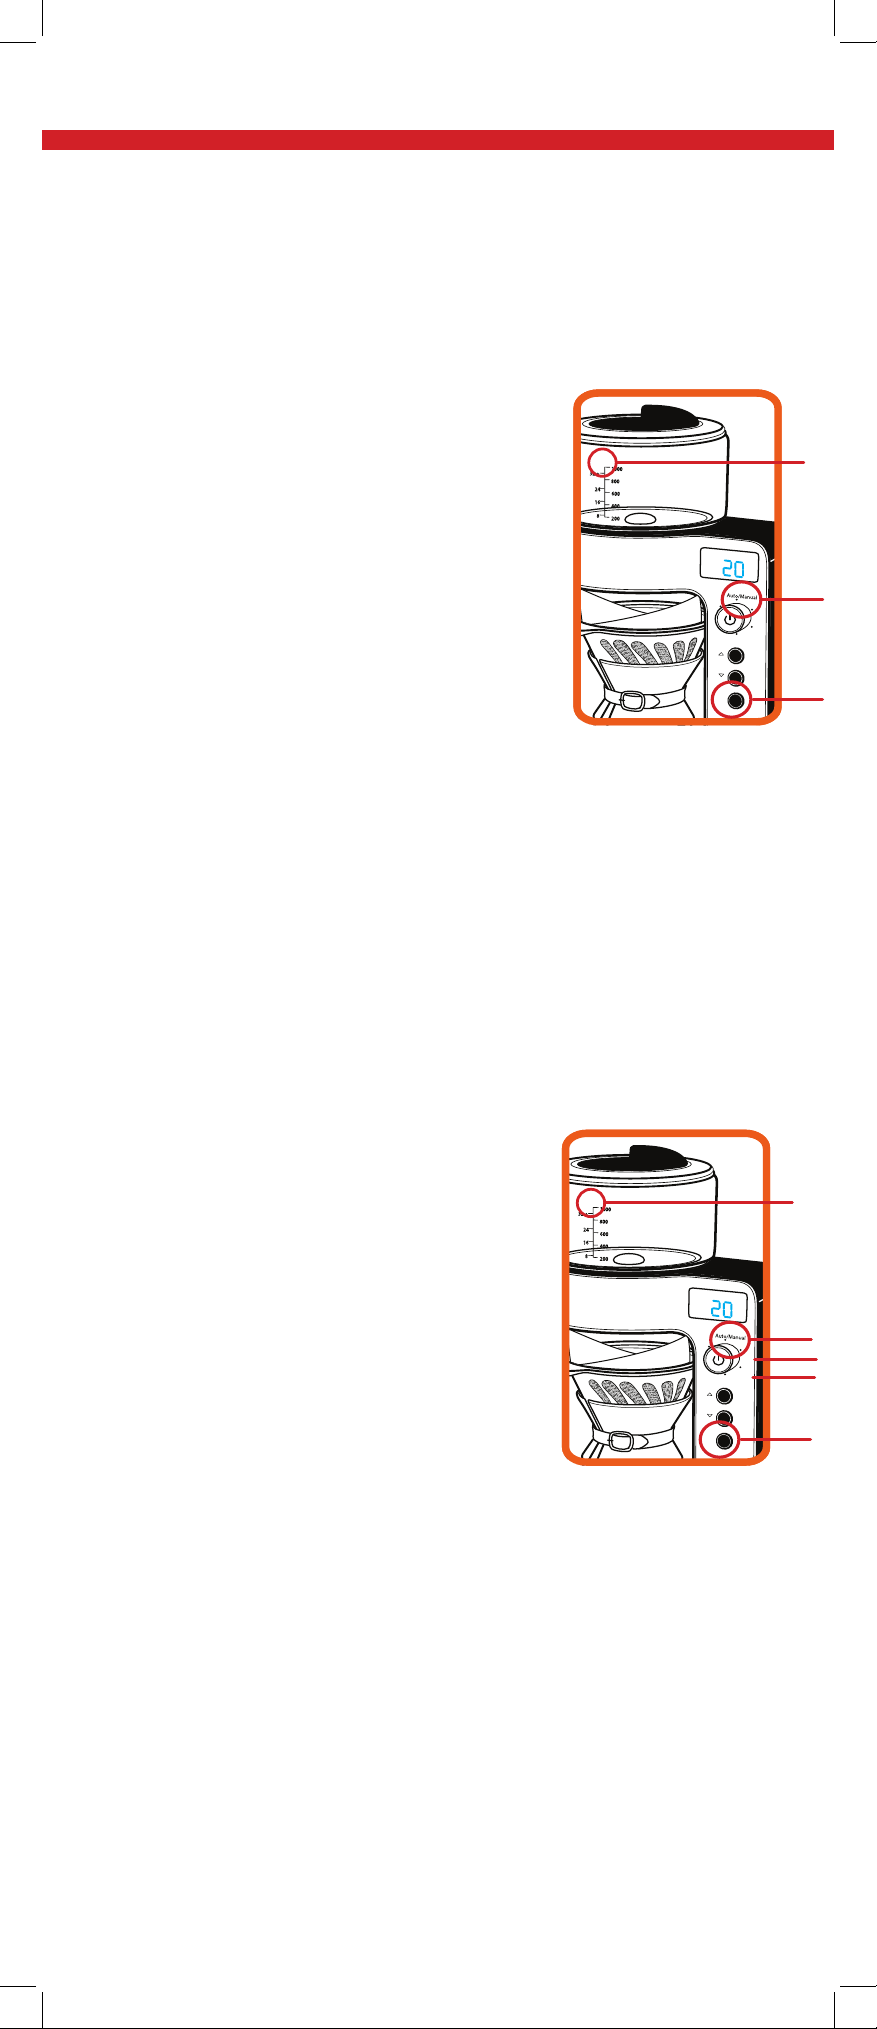
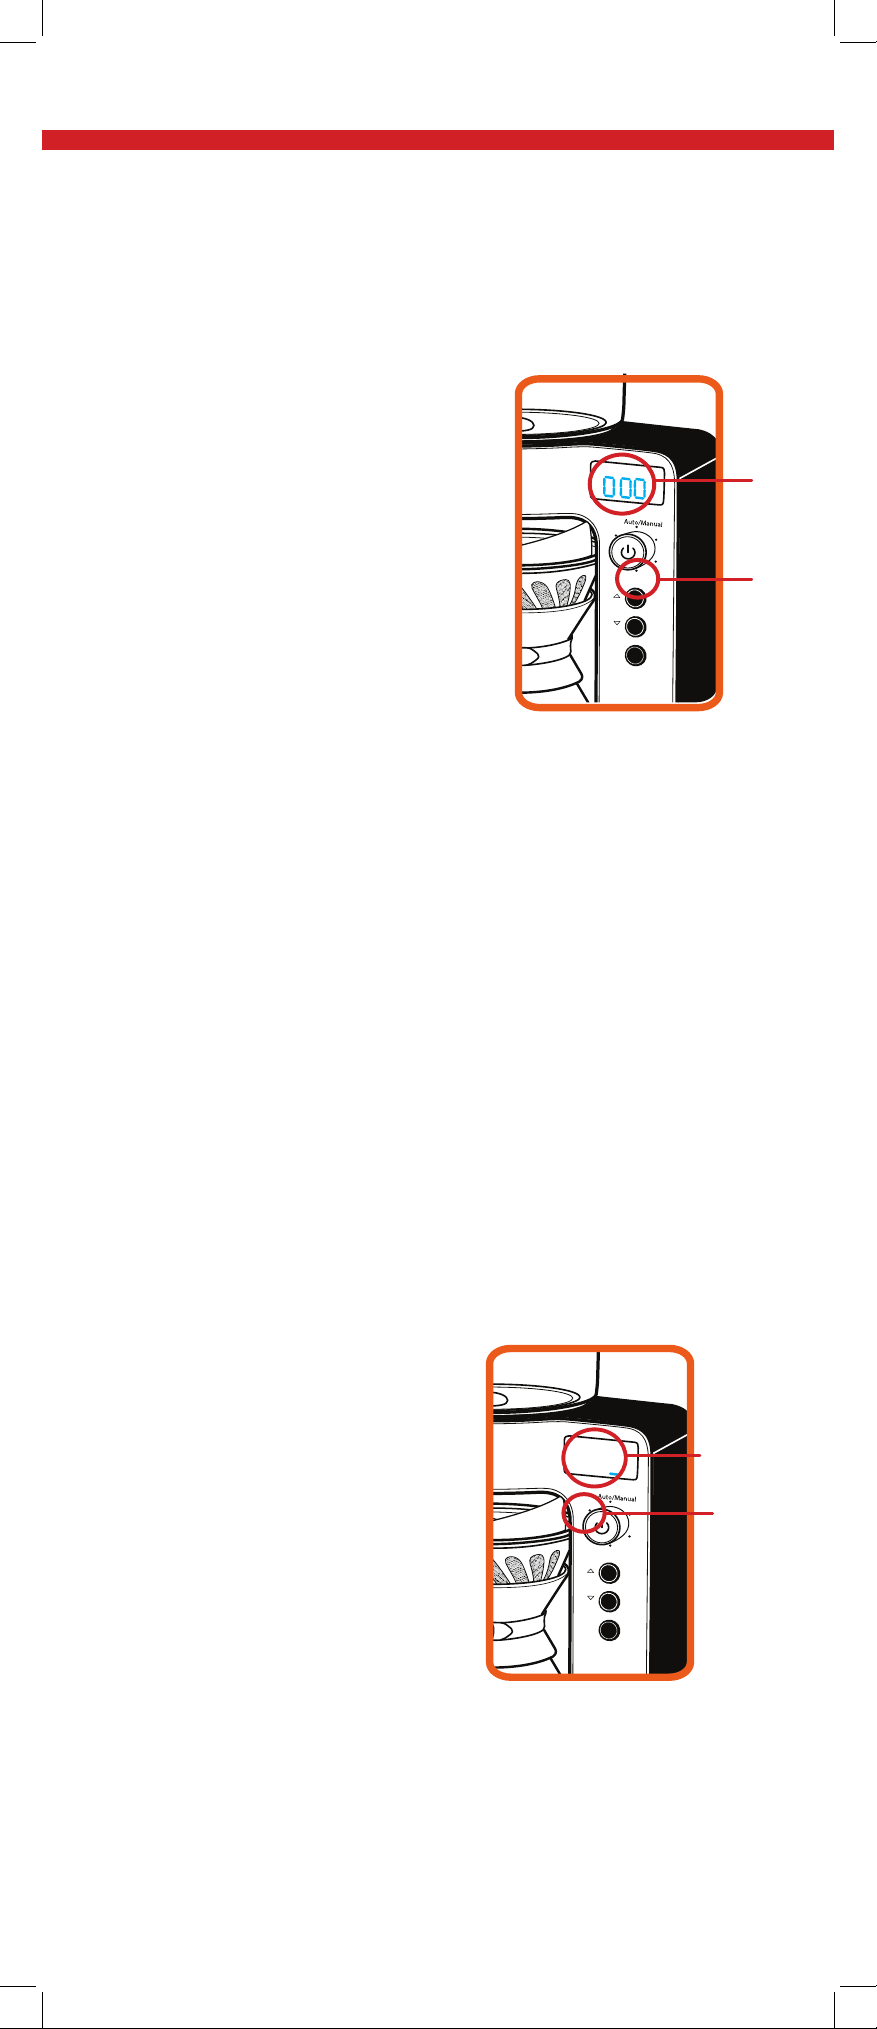
1.
Display will show 0:00.
Use UIFarrow buttons to adjust the hour. Press the Power
buttonto confirm.
Use the arrow buttons to adjust the minutes. Press the Power
button to confirm.
The clock UJNFwill now be set.
6OQMVHHJOHXJMMSFTFUUIFDMPDLUJNFUP
Note:
The Pourista
operates according to
a
24 hour clock system.
See the chart
below for reference.
12:00 am 00:00
1:00 am 1:00
2:00 am 2:00
3:00 am 3:00
4:00 am 4:00
5:00 am 5:00
6:00 am 6:00
7:00 am 7:00
8:00 am 8:00
9:00 am 9:00
10:00 am 10:00
11:00 am 11:00
12:00 pm 12:00
1:00 pm 13:00
2:00 pm 14:00
3:00 pm 15:00
4:00 pm 16:00
5:00 pm 17:00
6:00 pm 18:00
7:00 pm 19:00
8:00 pm 20:00
9:00 pm 21:00
10:00 pm 22:00
11:00 pm 23:00
Setting the Clock
0:00
Plug the Pourista into an outlet, or turn the dial to "Program"
and hold down the power button for 3 seconds.

A TRUE BARISTA spends years learning to pour the perfect pour
over – adjusting elements such as the grinds-to-water ratio, water
temperature and pour time based on a variety of factors including
where the coffee was grown, where it was roasted and your coffee
flavor preference. The Pourista was designed to give you maximum
control, if you desire, or a fully automated pour over process to give
you the cup of coffee of your dreams.
In the auto mode, once you scoop the desired amount of grinds into
the filter, the Pourista will calculate the ideal amount of water to
pour and the ideal temperature and pour speed. In the manual
mode, once you scoop the desired amount of grinds into the filter,
you can set your preferred grinds-to-water ratio and water
temperature for a truly delicious custom brew.
1/10
1/11
1/12
1/13
1/14
1/15
1/16
1/17
1/18
1/19
1/20
25g
22g
20g
19g
17.8g
16.6g
15.6g
14.7g
13.8g
13g
12.5g
100g
88g
80g
76g
71.2g
66.4g
62.4g
58.8g
55.2g
52g
50g
Ratio
1 cup
4 cup
50g
44g
40g
38g
35.6g
33.2g
31.2g
29.4g
27.6g
26g
25g
2 cup
75g
66g
60g
57g
53.4g
49.8g
46.8g
44.1g
41.4g
39g
37.5g
3 cup
Note: The machine will automatically calculate how much water to
dispense proportionate to the grounds weighed.
MA
X
mL
z
MIN
11
How Much Grounds Do I Need?
Note: Auto mode brews according to a 1/12 ratio.
1 tablespoon equals approximately 5
grams.
Weighing the Grounds
1 Fill the Water Reservoir to theMAX line.
2. Place the stainless steel on top of the carafe
(with paper filter if desired) and place the carafe
onto the base.
3. Press the "Tare" button. Display will show "0g".
4. Remove the carafe and pour desired amount
of grounds into the filter. Replace carafe on base.
5 Turn dial to “Auto/Manual” mode. Use the
arrows to select
“Manual.”
6 Turn dial to “Temp.” Use the arrows to adjust the watertemperature,
from 176˚F-208˚F.
7 Turn the EJBMUP3BUJP6TFUIFBSSPXTUPBEKVTU the water:grounds
ratio, from 1:10 - 1:20.
8. Press the Power button twice to begin brewing
"VUP.PEF
$XWKHQWLFEDULVWDTXDOLW\WHFKQLTXHat the WRXFK of a button
1. Fill the Water Reservoir to the MAX line.
2. Place the stainless steel on top of the carafe
(with paper filter if desired) and place the carafe
onto the base.
3. Press the "Tare" button. Display will show "0g".
4.
Remove the carafe and pour desired amount
of grounds into the filter. Replace carafe on base.
5. The display will now show the weight of the
grounds loaded. Add or remove grounds to your desired amount.
6. 5VSOEJBMUP"VUP.BOVBMNPEF6TFUIF
BSSPXTUPTFMFDU"VUP
7. 1SFTTUIF1PXFSCVUUPOUPCFHJOCSFXJOH
MA
X
mL
z
MIN
Temp
Ratio
Hot
Water
Clea
Program
Tare
AUTO
g
Auto
."9
.BOVBM.PEF
$XWRPDWLFSUHFLVLRQEUHZLQJZLWKFXVWRPL]DWLRQIRUHYHU\EOHQG
MA
X
mL
z
MIN
Temp
Ratio
Hot
Water
Clea
Program
Tare
AUTO
g
MA
X
mL
z
MIN
Temp
Ratio
Hot
Water
Clea
Program
Tare
AUTO
g
.BOVBM
Max ."9
MA
X
mL
z
MIN
Temp
Ratio
Hot
Water
Clea
Program
Tare
.BOVBM
g
5FNQ
3BUJP
Watch the Pourista do it's magic.
Watch the Pourista do it's magic.
Tare
Tare
Delay Start
Preset a time for DKRWIUHVKEUHZH[DFWO\ZKHQ\RXZDQWLW
MA
X
mL
z
MIN
Temp
Ratio
Hot
Water
Clea
Program
Tare
Program
Mode
Time
Display
:
MA
X
mL
z
MIN
Temp
Ratio
Hot
Water
Clea
Program
Tare
Hot Water
Mode
TemQ%JTQMBZ
'JMMUIF8BUFS3FTFSWPJSXJUI
EFTJSFEBNPVOUPGXBUFSBCPWF
UIF.*/MJOF
Rotate the dial to “Hot Water.”
Using the arrows, adjust desired
water temperature.
Press the Power button to begin
heating.
Water will dispense without
rotation until the tank is empty.
Note: Press the Power button at any time to stop dispensing.
1. Ensure the clock is set properly
(see pg 10).
2. Fill the Water Reservoir to the
MAX line.
3. For Auto Mode, follow Auto
Mode directions 2-4 on page 12.
For Manual Mode, follow Manual
Mode directions 2-7 on page 12.
4. To program the time for you coffee
to be ready , rotate the dial to1SPHSBN
5. Use the arrows to select the hour. Press the Power button
to
DPOGJSN
6. 6TFUIFBSSPXTUPTFMFDUUIFNJOVUFT1SFTTUIF1PXFS
CVUUPOUXJDFUPDPOGJSNQSPHSBNNFECSFXJOHUJNF
7. 5IFEJTQMBZXJMMOPXTIPXi1SPHwJOUIFUPQSJHIUDPSOFS
8. 5IF1PVSJTUBXJMMCSFXthe coffee XIFOyour programmed
time IBTCFFO reached.
Hot Water Dispenser
13
)
Note: The Pourista operates according to a 24 hour clock system. See
chart on page 10 for reference.


15
CLEANING
After about 200 uses, the "Clean" light will JMMVNJOBUF
We recommend de-scaling before resuming use
'JMMUIF8BUFS3FTFSWPJSXJUIDMFBOXBUFS
BOEEFTDBMJOHTPMVUJPOUPUIF."9MJOF
Rotate the dial to “Clean.”
Press the Power button.
Water will heat to 212˚F, andthen dispense.
The Pourista is now clean andready for use.
Note: Vinegar, lemon juice, citric acid, and baking soda are all great
de-scaling solutions.
TROUBLE SHOOTING
Troubleshooting:
If either the carafe or coffee grinds are not in the appliance, the
display will show “NOC”/”NULL,” and water will not dispense.
If the carafe is removed during brewing, water will stop
dispensing.
Brewing will resume if the carafe is returned within 30 seconds.
Auto Standby
After 10 minutes the display screen will turn off, and the
appliance will enter standby mode.
To exit, simply rotate the dial or press any button. The Pourista
will once again be ready for use.
CAUTION:
Do not touch the water reservoir or
carafe while in use. Allow UIFNto cool
down after brewing.
WARRANTY & SERVICE
This Limited Warranty is for one full year from the date
of purchase. It is applicable to the original purchaser
only and is not transferable to a third party user. Repair
or replacement of defective parts is solely at the seller’s
discretion. In the event that repair isn’t possible, the
seller will replace the product/part. If product repair/
refunding the cash value of the product or component
returned.
Product defects not covered under the Warranty
provisions include normal wear and damage incurred
from use or accidental negligence, misuse of instruction
The manufacturing company is not liable for any
incidental or consequential damages incurred by such
circumstances.

FOR CUSTOMER SERVICE
QUESTIONS OR COMMENTS
VISIT US @ WWW.GOURMIA.COM
EMAIL INFO@GOURMIA.COM
OR CALL 888.552.0033