Visual Performer Owner’s Manual
1
Visual Performer Owner’s Manual
• Copying of the commercially available music sequence data and/or digital audio/
graphic/video files is strictly prohibited except for your personal use.
• The software and this owner’s manual are exclusive copyrights of Yamaha Corporation.
• Copying of the software or reproduction of this manual in whole or in part by any
means is expressly forbidden without the written consent of the manufacturer.
• Yamaha makes no representations or warranties with regard to the use of the
software and documentation and cannot be held responsible for the results of
the use of this manual and the software.
• The screen displays as illustrated in this Owner’s Manual are for instructional
purposes, and may appear somewhat different from the screens which appear
on your device.
• Apple, iPod touch/iPhone/iPad are trademarks of Apple Inc., registered in the U.S.
and other countries.
• The company names and product names in this Owner’s Manual are the
trademarks or registered trademarks of their respective companies.
© 2012 Yamaha Corporation. All rights reserved.
Visual Performer Overview
The Visual Performer app allows you to create sound and video on your iPad, iPhone*, or iPod touch* using tap and swipe
gestures. What’s more, if you connect a musical instrument that supports Core MIDI, Visual Performer can also create video that
responds in real time as you play that instrument. (*: This manual contains screenshots from the iPad version.)
Main screen
Mix screen Chain screen Settings screen
Visual Performer Owner’s Manual
2
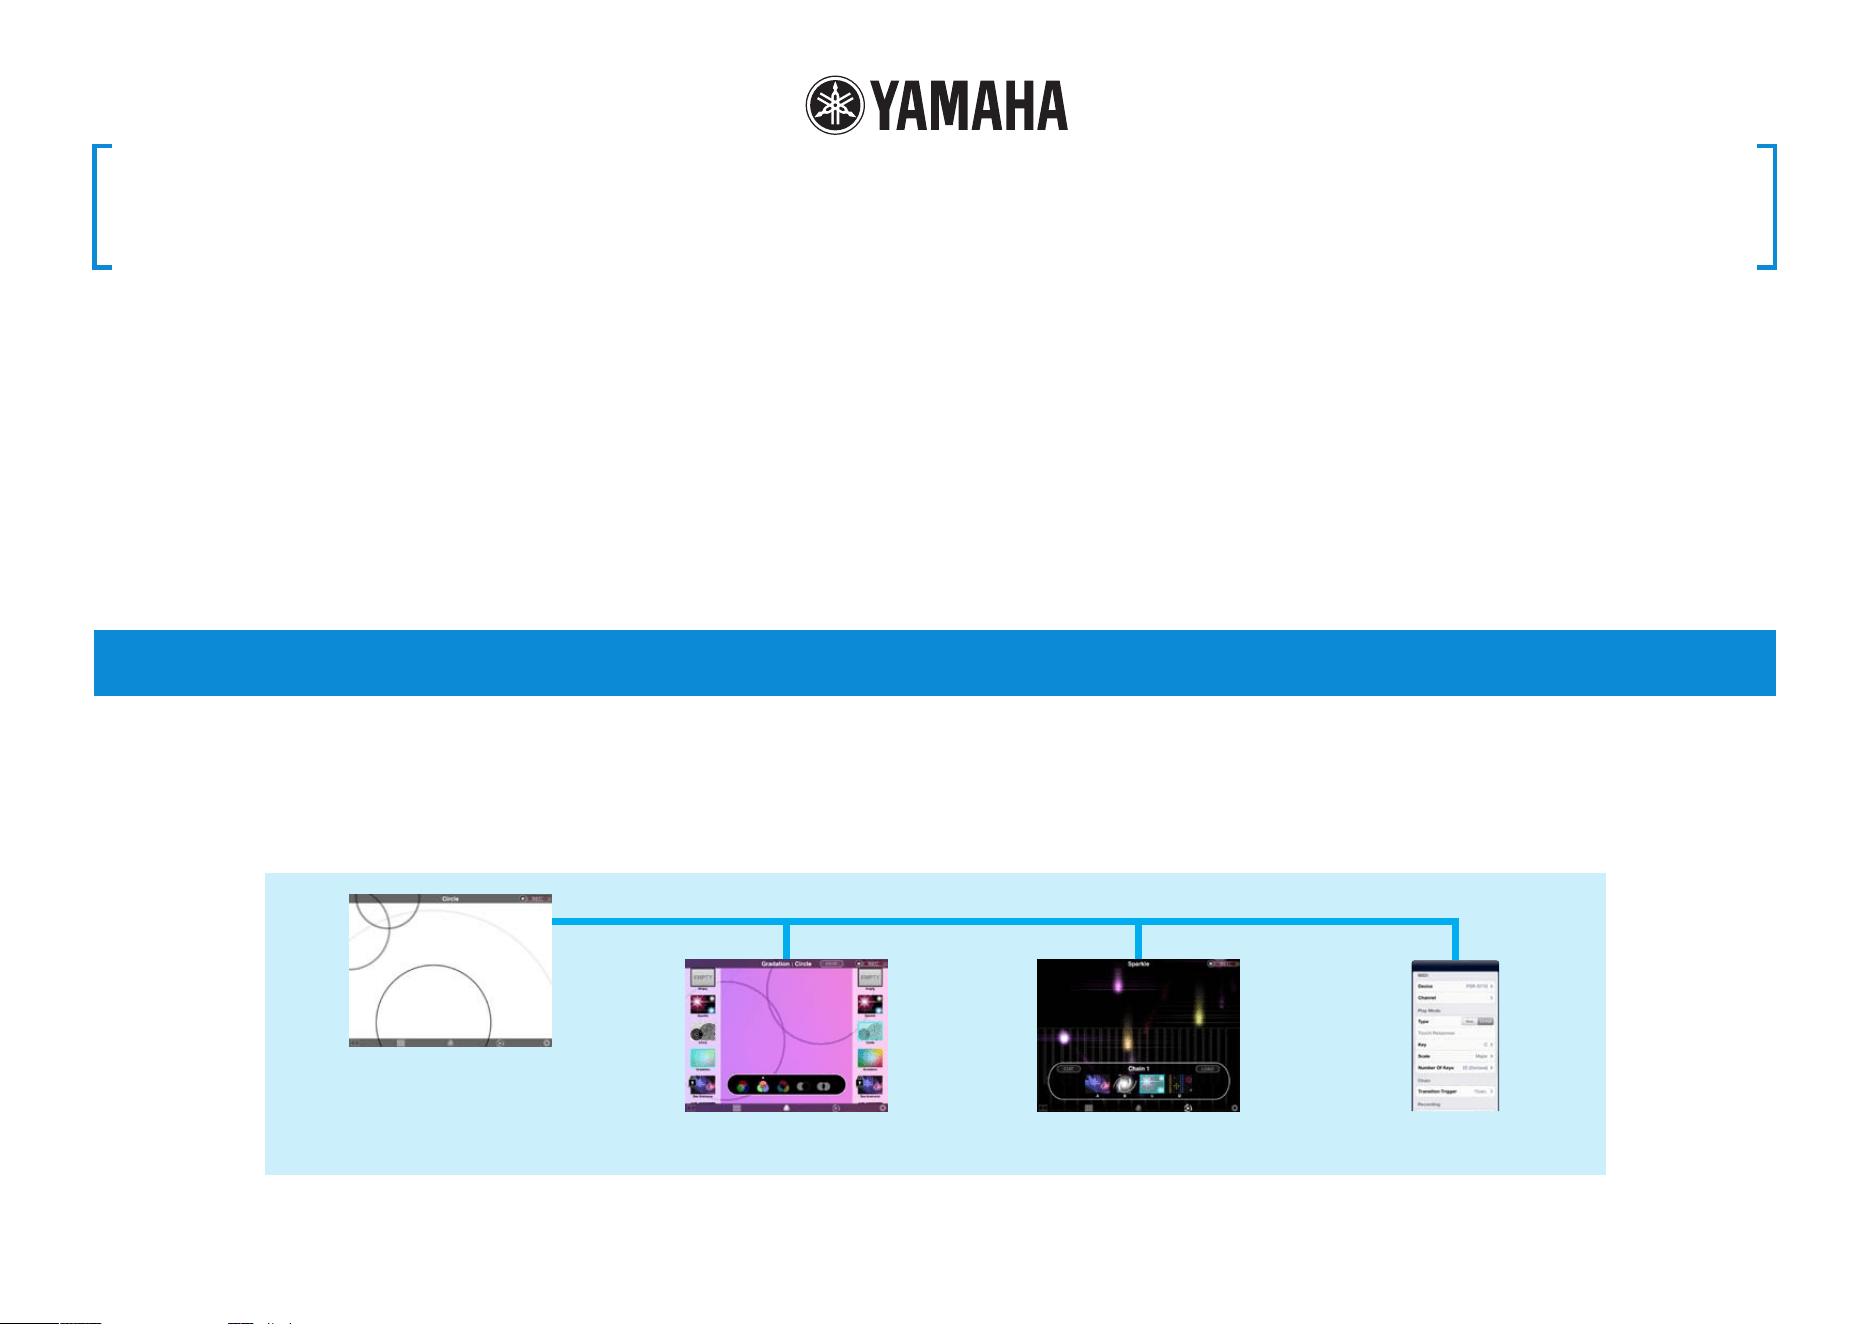
Instrument connection methods
Connection via i-MX1
Connection via
Apple iPad Camera
Connection Kit
NOTE
The iPhone and iPod touch do not
support connection via the Apple
iPad Camera Connection Kit.
Connection via
wireless LAN
NOTE
Please refer to the manual that
came with your musical instrument
in order to configure it for
connection via wireless LAN.
MIDI OUT MIDI IN
MIDI IN MIDI OUT
iPad
i-MX1
USB TO HOST
USB cable
iPad
Apple iPad
Camera
Connection Kit
iPad
MIDI musical instrument
Wireless LAN
MIDI musical instrument
MIDI musical instrument
Visual Performer Owner’s Manual
3
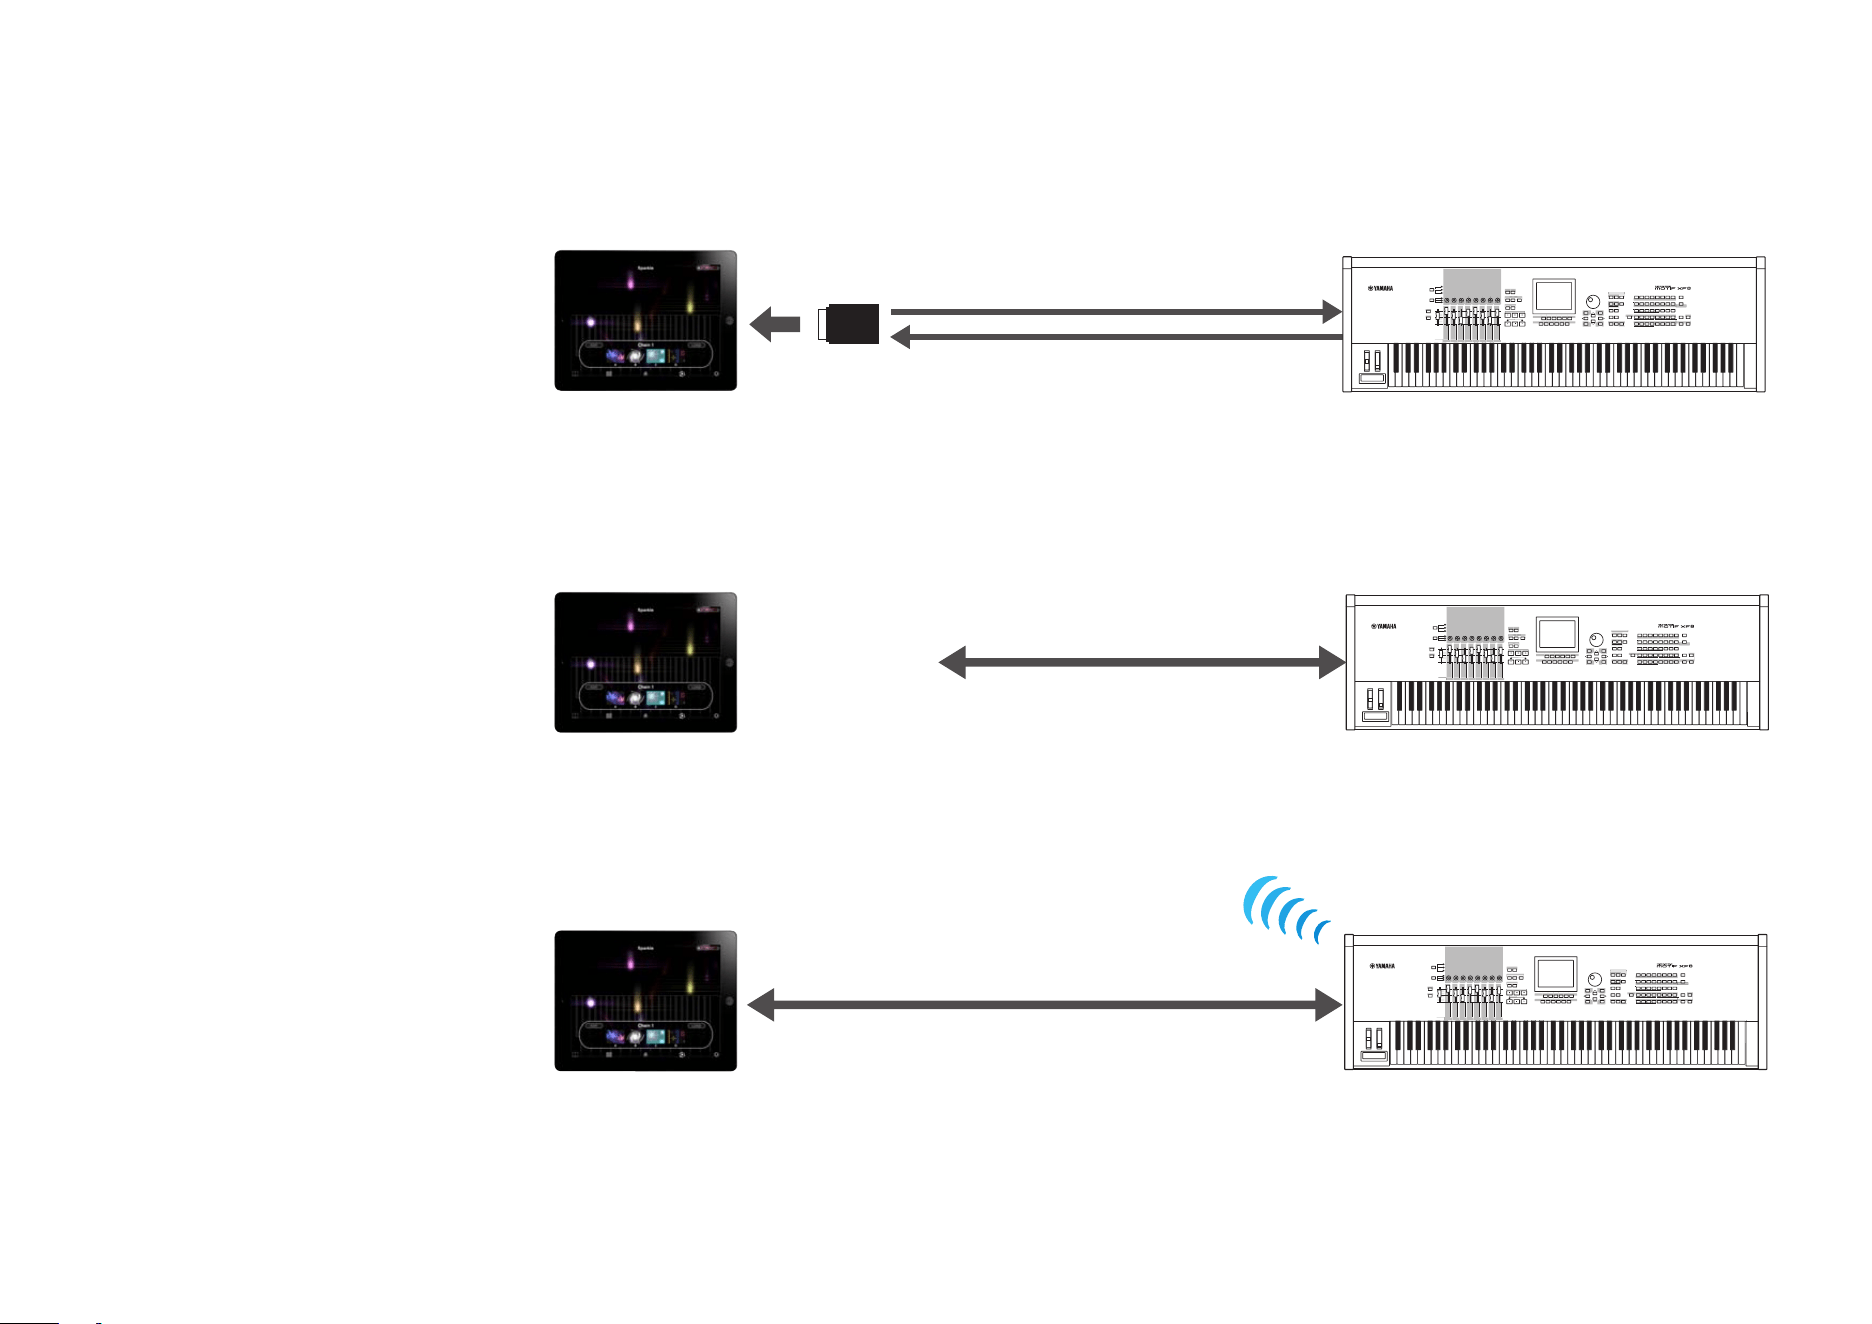
Main Screen
Current visual effect
Hide the task bar
Tap this icon to hide the task
bar and display only the
visual effects. Tap again to
restore the task bar.
Select visual effects
Tap this icon to display a list
of available visual effects.
When you select a new
visual effect, the sound will
also change.
Set your preferences
Tap this icon to open the
Settings screen.
Play with sound and
video
By tapping and swiping the
screen, you can effortlessly
create sound and visual
effects. In addition, you
can choose your preferred
playing method on the
Settings screen.
Switch visual effects while playing
a song or performing
Tap this icon to open the Chain screen.
Combine two visual effects to
create your own
Tap this icon to open the Mix screen.
Record visual effects
Drag the REC slider to the right to record
visual effects.
Visual Performer Owner’s Manual
4
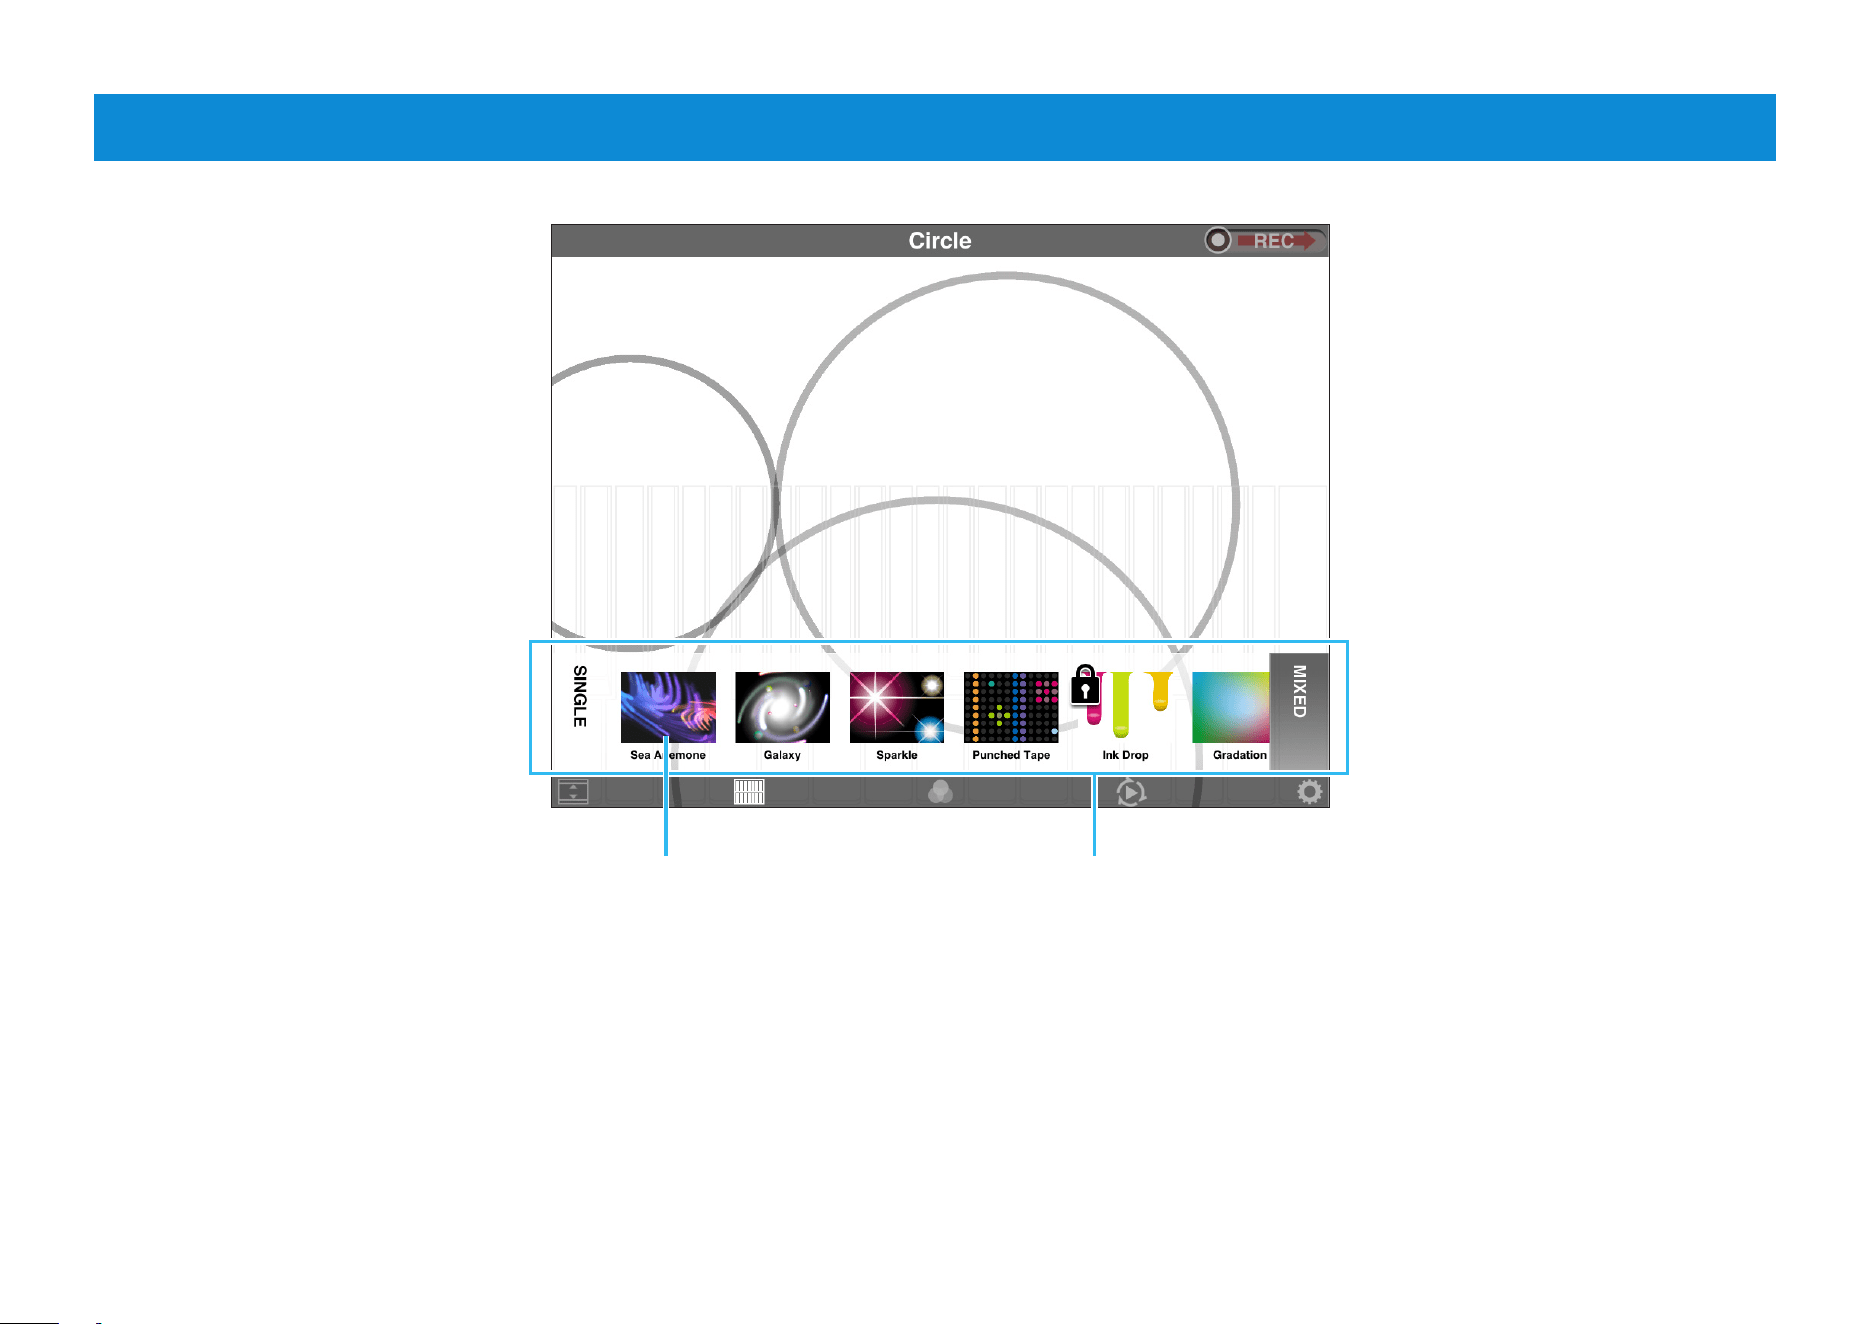
Visual Effect List
Visual effect Visual effect list
Selecting a visual effect
Flick the list left and right
and tap the visual effect you
wish to play.
SINGLE:
Tap to display the list of
standard visual effects.
MIXED:
Tap to display the list of
visual effects that you have
mixed and saved.
Deleting mixed visual effects
Touch and hold any visual effect in the Mixed list until X icons
appear. If you then tap the X icon on the visual effect you
wish to delete, a confirmation message will be displayed. Tap
[DELETE] to permanently delete the selected visual effect or
[CANCEL] to leave the list unchanged.
Rearranging visual effects in the Mixed list
Touch and hold any visual effect in the Mixed list until X
icons appear. Touch and hold the visual effect you wish to
rearrange until its icon gets bigger. You can now slide the
visual effect to a new position in the list.
Visual Performer Owner’s Manual
5
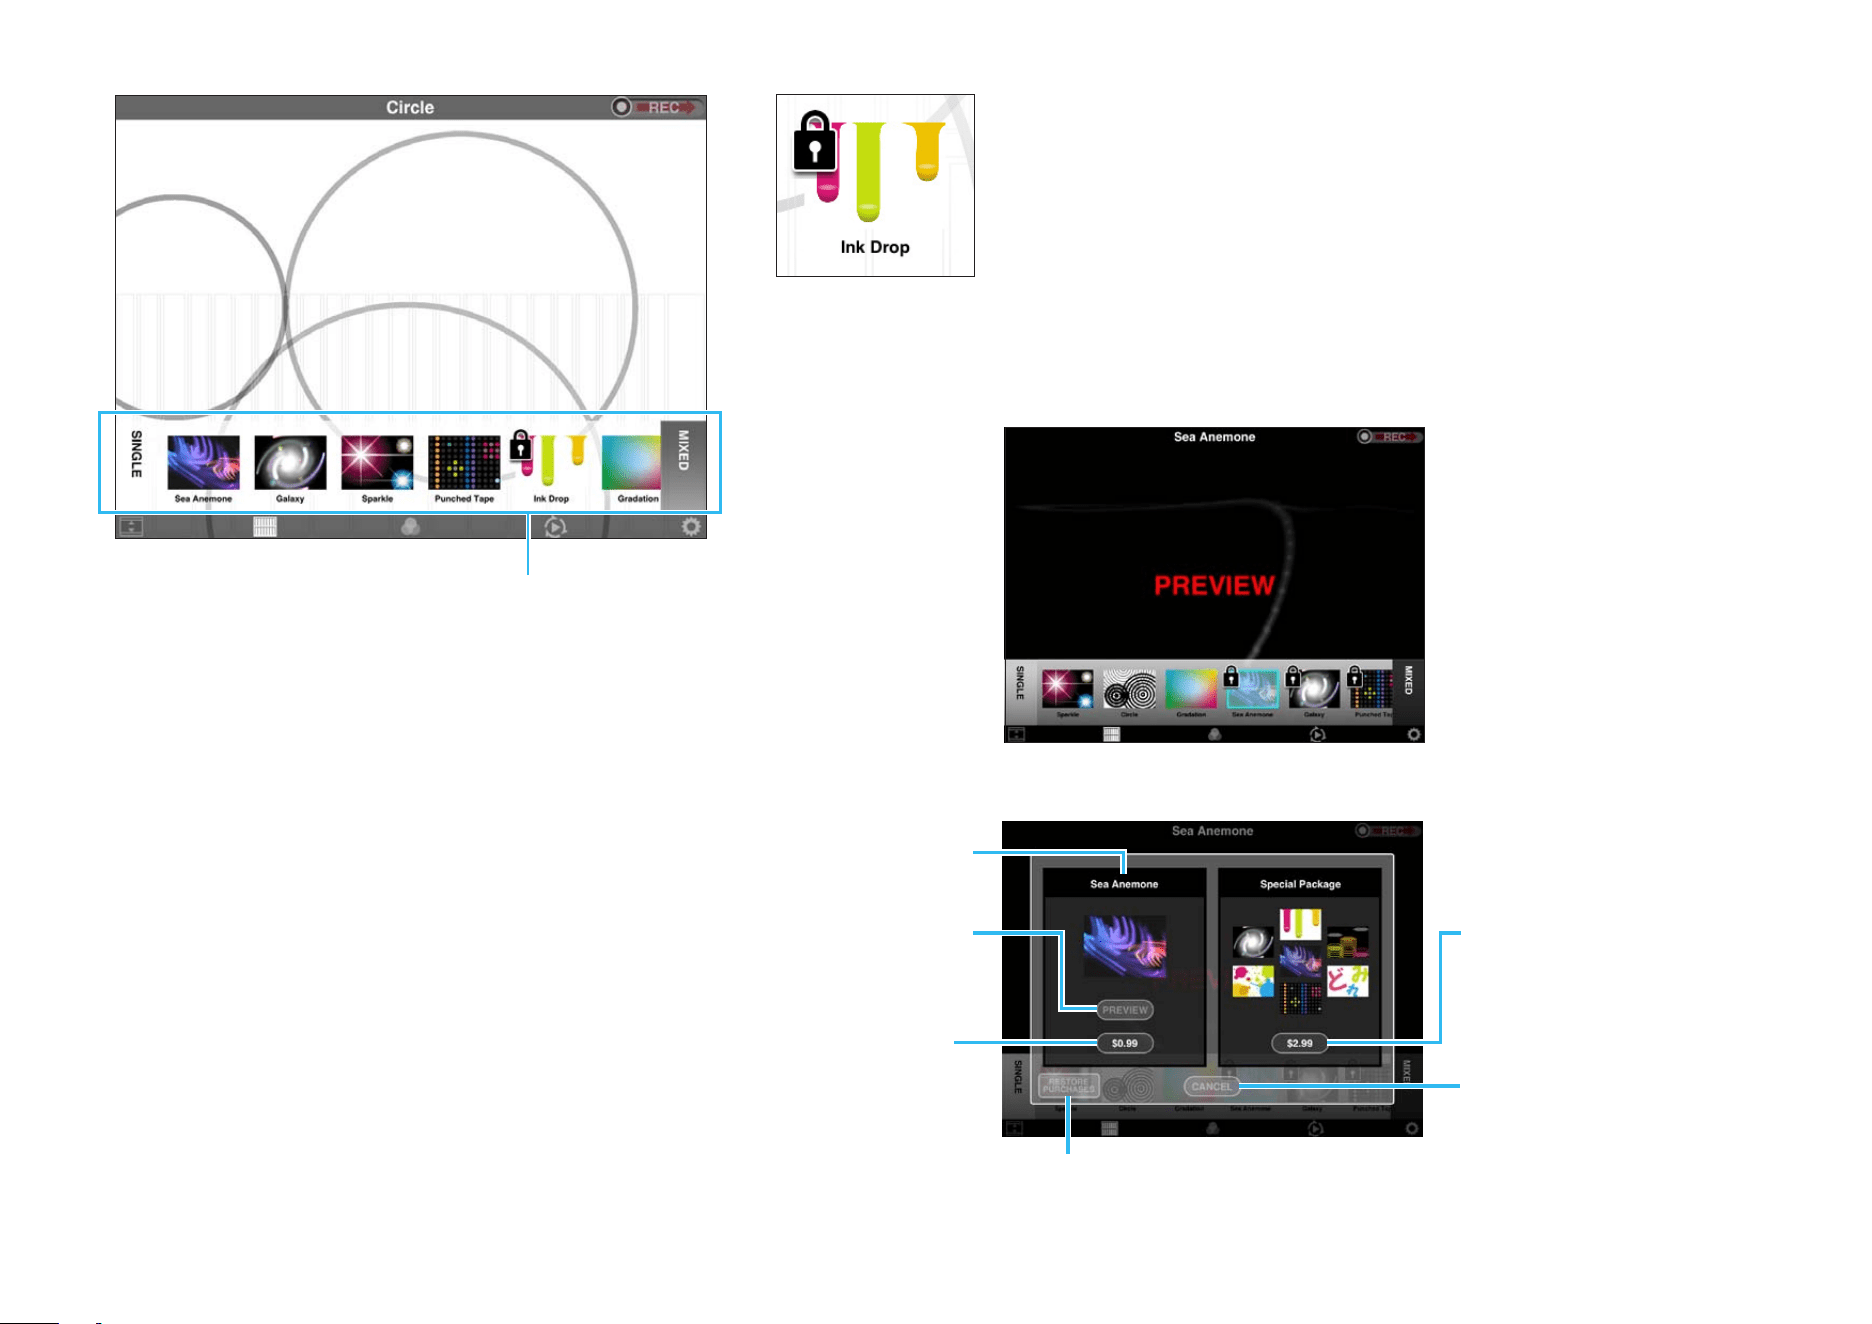
Purchasing additional visual effects
Visual effects available for purchase are displayed with a locked
icon in the visual effect list on the Main and Mix screens. If you
would like to try out one of these effects, tap its icon to open the
Preview screen. A purchase pane will be displayed after a
certain amount of time has passed on the Preview screen or if
you press the icon again while on this
screen.
Price of visual
effect. Tap to
purchase.
Special price for all visual
effects together. Tap to
purchase all effects.
Tap to close the pane.
Purchase pane
Tap to open the
Preview screen.
Name of visual
effect
Preview screen
Visual effect list
Tap to restore the previously purchased In-App Purchase(s).
Visual Performer Owner’s Manual
6
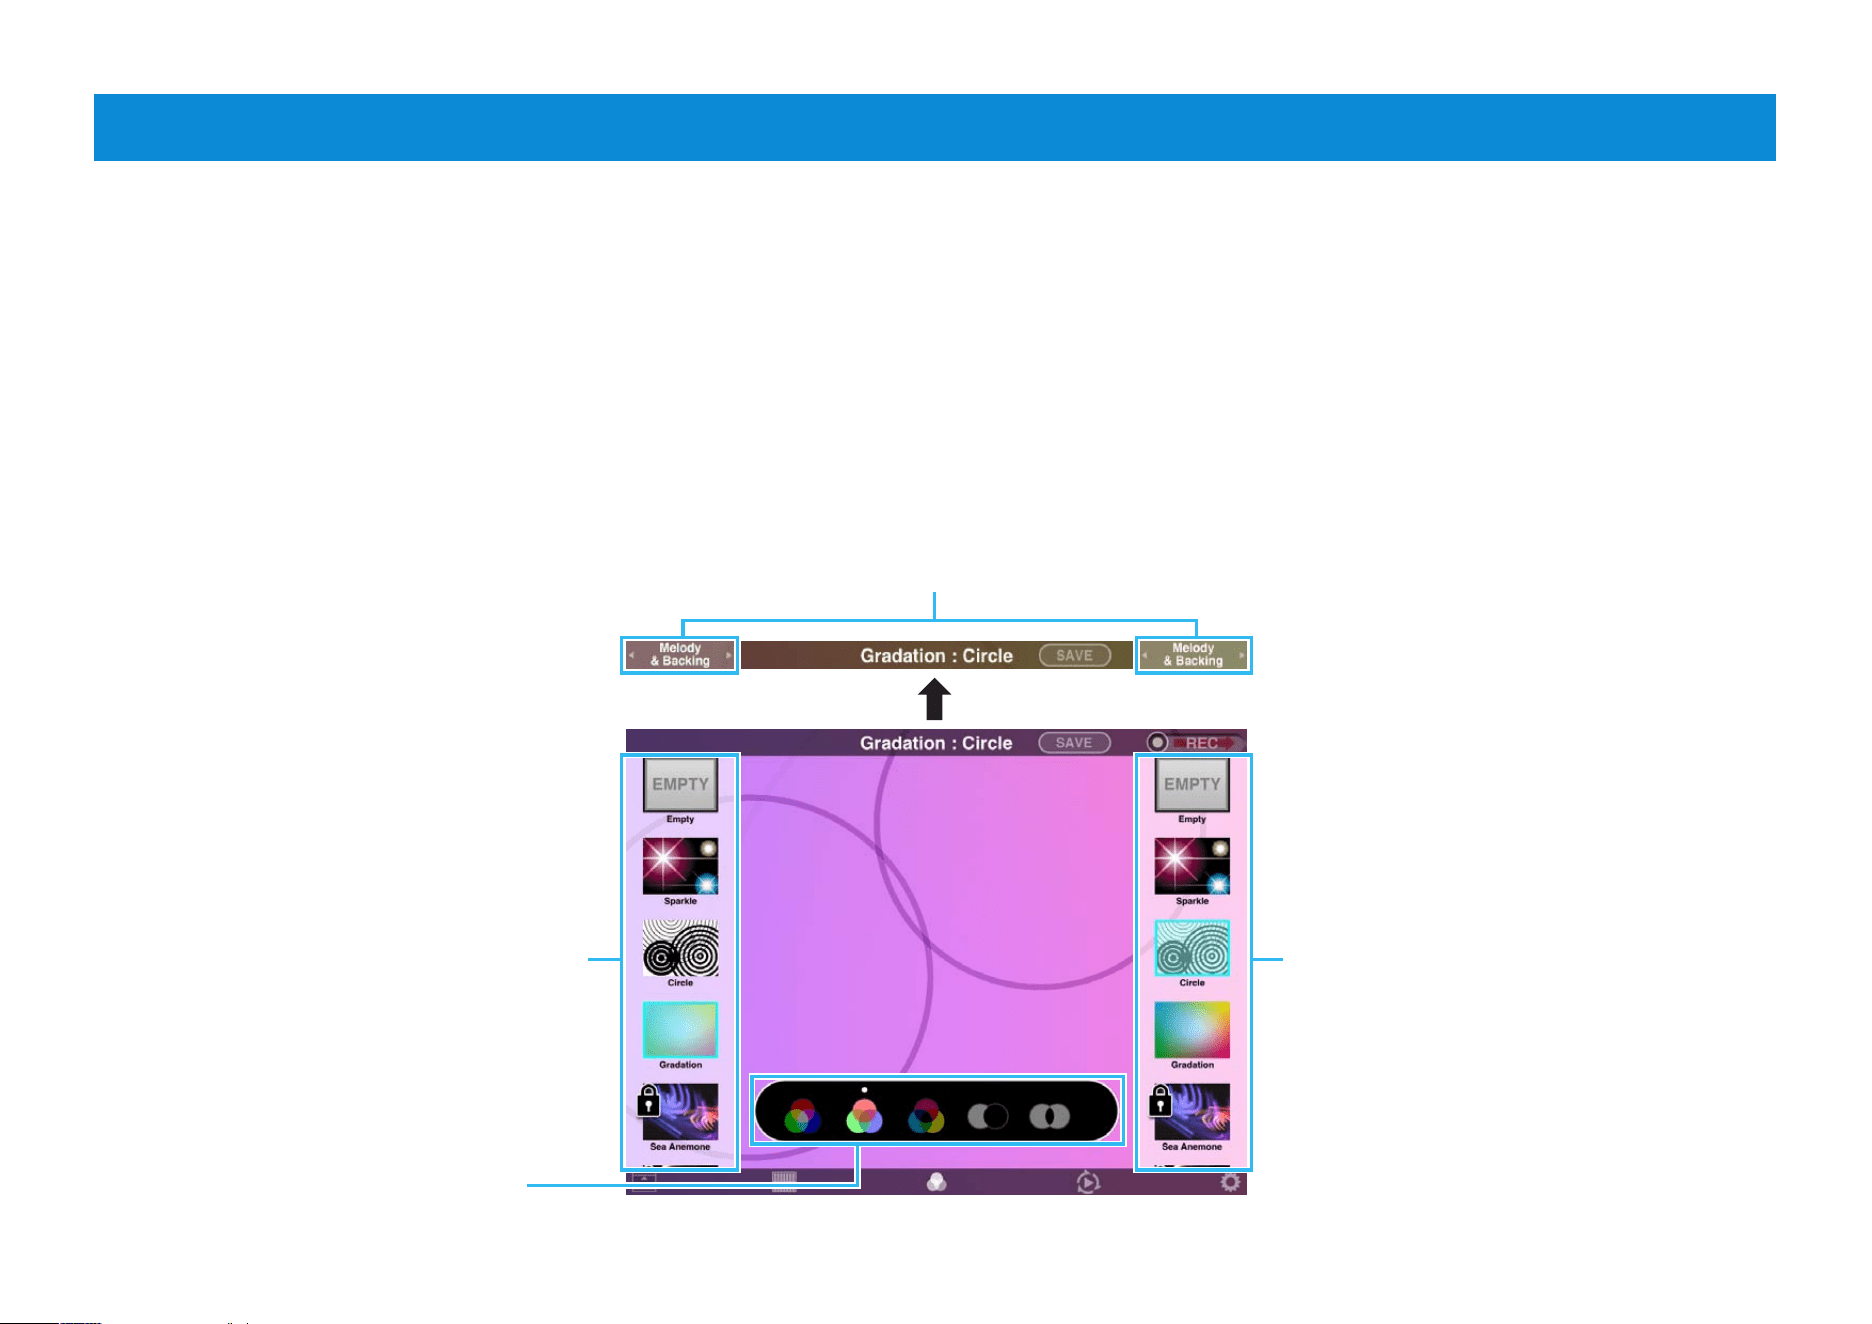
Mix Screen
The Mix screen lets you mix together two different visual effects.
Flick the list up and down and tap
the visual effect you wish to use.
Flick the list up and down and tap
the visual effect you wish to use.
The task bar changes when Visual Performer is connected to a MIDI device.
Select the method for mixing the
two selected visual effects.
Select the MIDI channels for control of the selected visual effects
If Visual Performer is connected to a MIDI device, you will be able to select MIDI channels for controlling the mixed effects. Tap
the corresponding icons in the task bar to choose one of the following.
NOTE
If no MIDI device has been connected, both visual effects will be controlled using screen gestures.
Melody:
The visual effect will respond to messages
on a MIDI channel set to Melody on the
Channel settings screen.
Backing:
The visual effect will respond to messages on
a MIDI channel set to Backing on the Channel
settings screen.
Melody & Backing:
The visual effect will respond to
messages on all MIDI channels.
Visual Performer Owner’s Manual
7
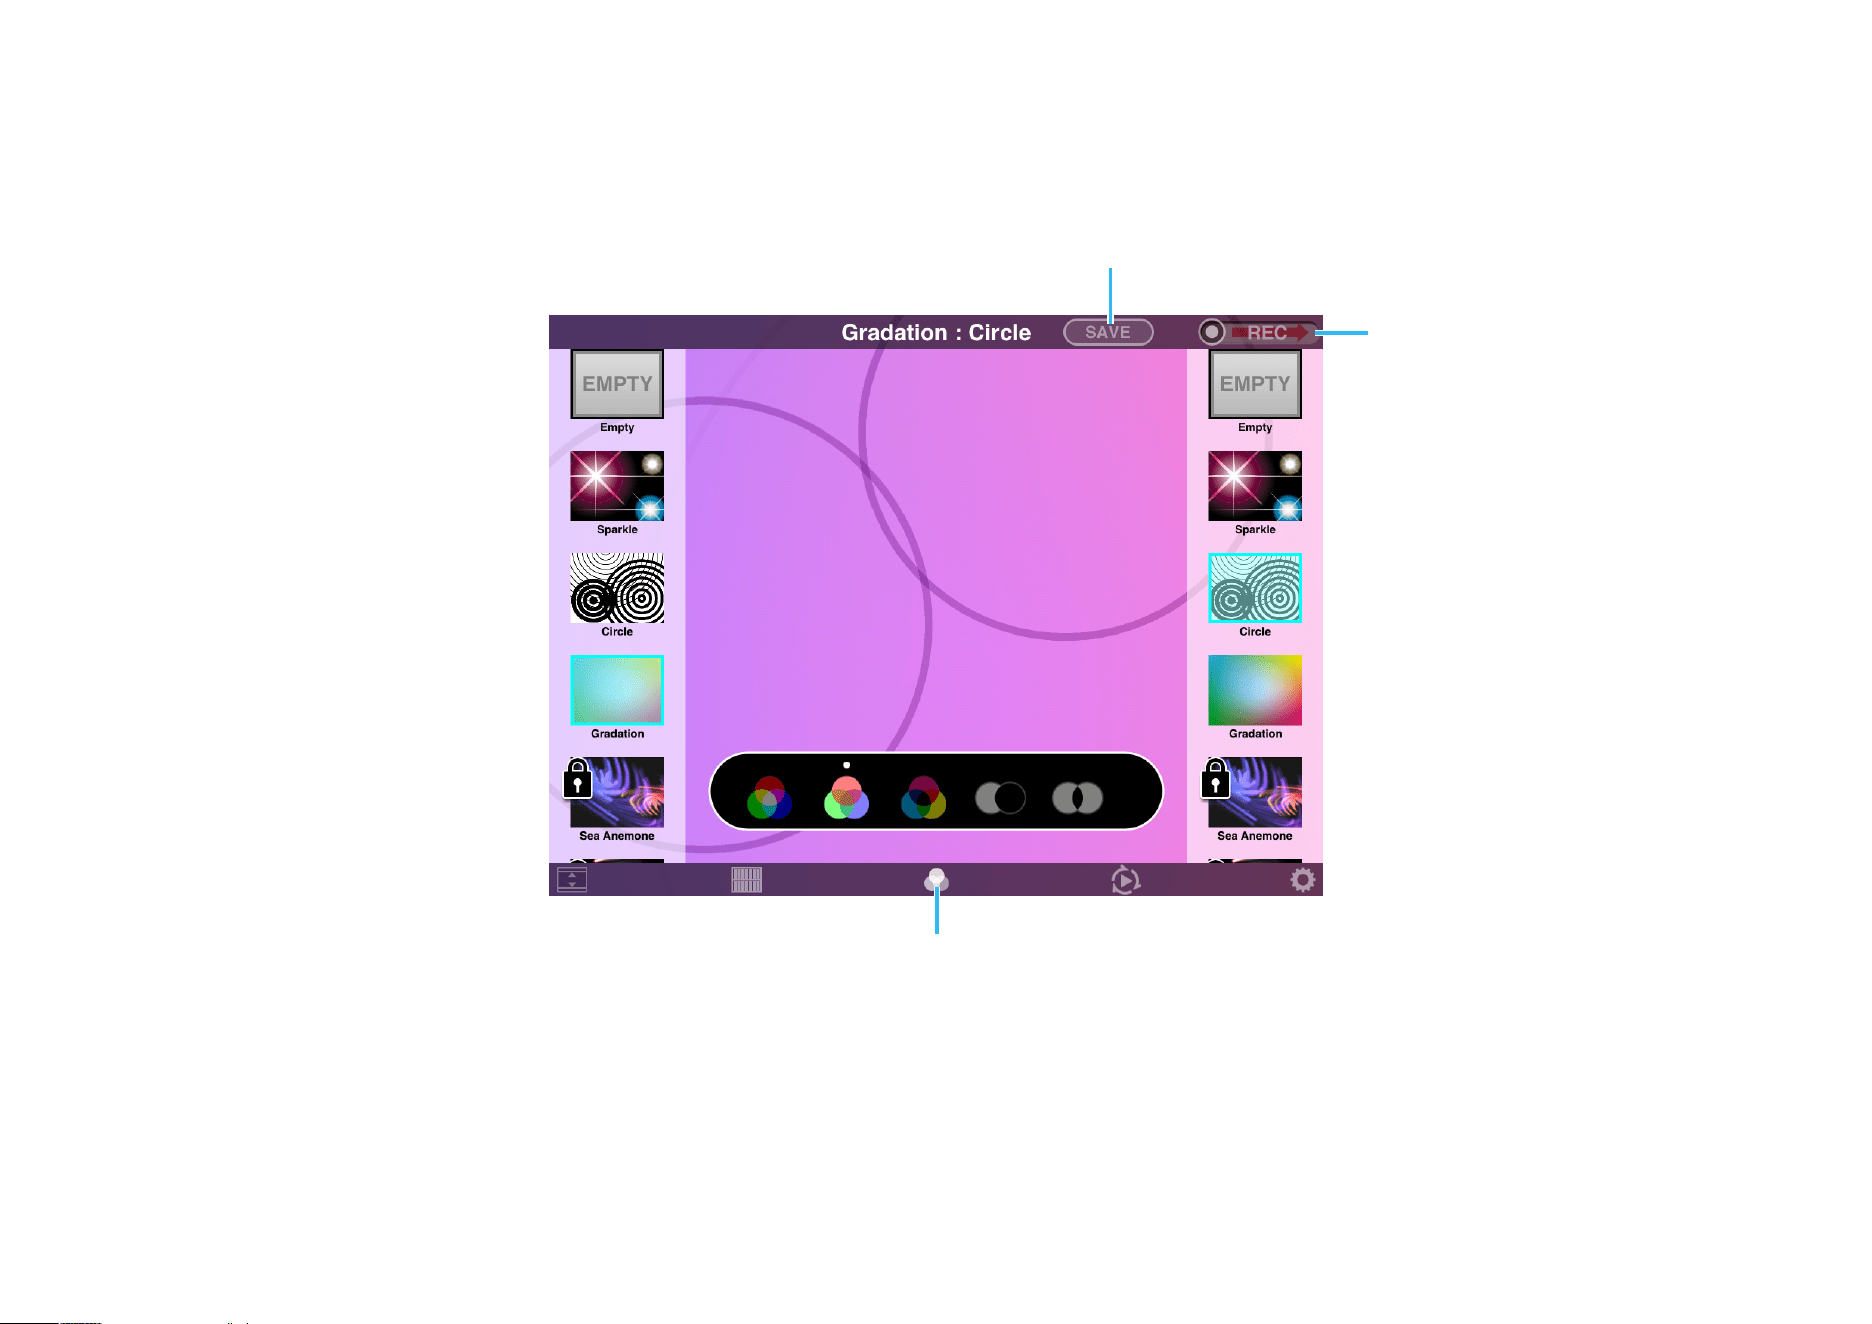
Return to the Main screen
Tap this icon to close the Mix screen
and return to the Main screen.
Recording
Drag the REC slider to the
right to record visual effects.
Visual Performer also lets
you make recordings of your
mixes.
NOTE
The REC slider is not displayed here
when an instrument is connected.
You can, however, return to the Main
screen and make a recording there.
Save your mix
When you are happy with the mix you have created, tap [SAVE]. The keyboard and
a message pane will be displayed, allowing you to enter a name for your new effect.
Enter a name and then tap [SAVE]. Alternatively, you can tap [CANCEL] to close the
pane without saving your mix.
Visual Performer Owner’s Manual
8
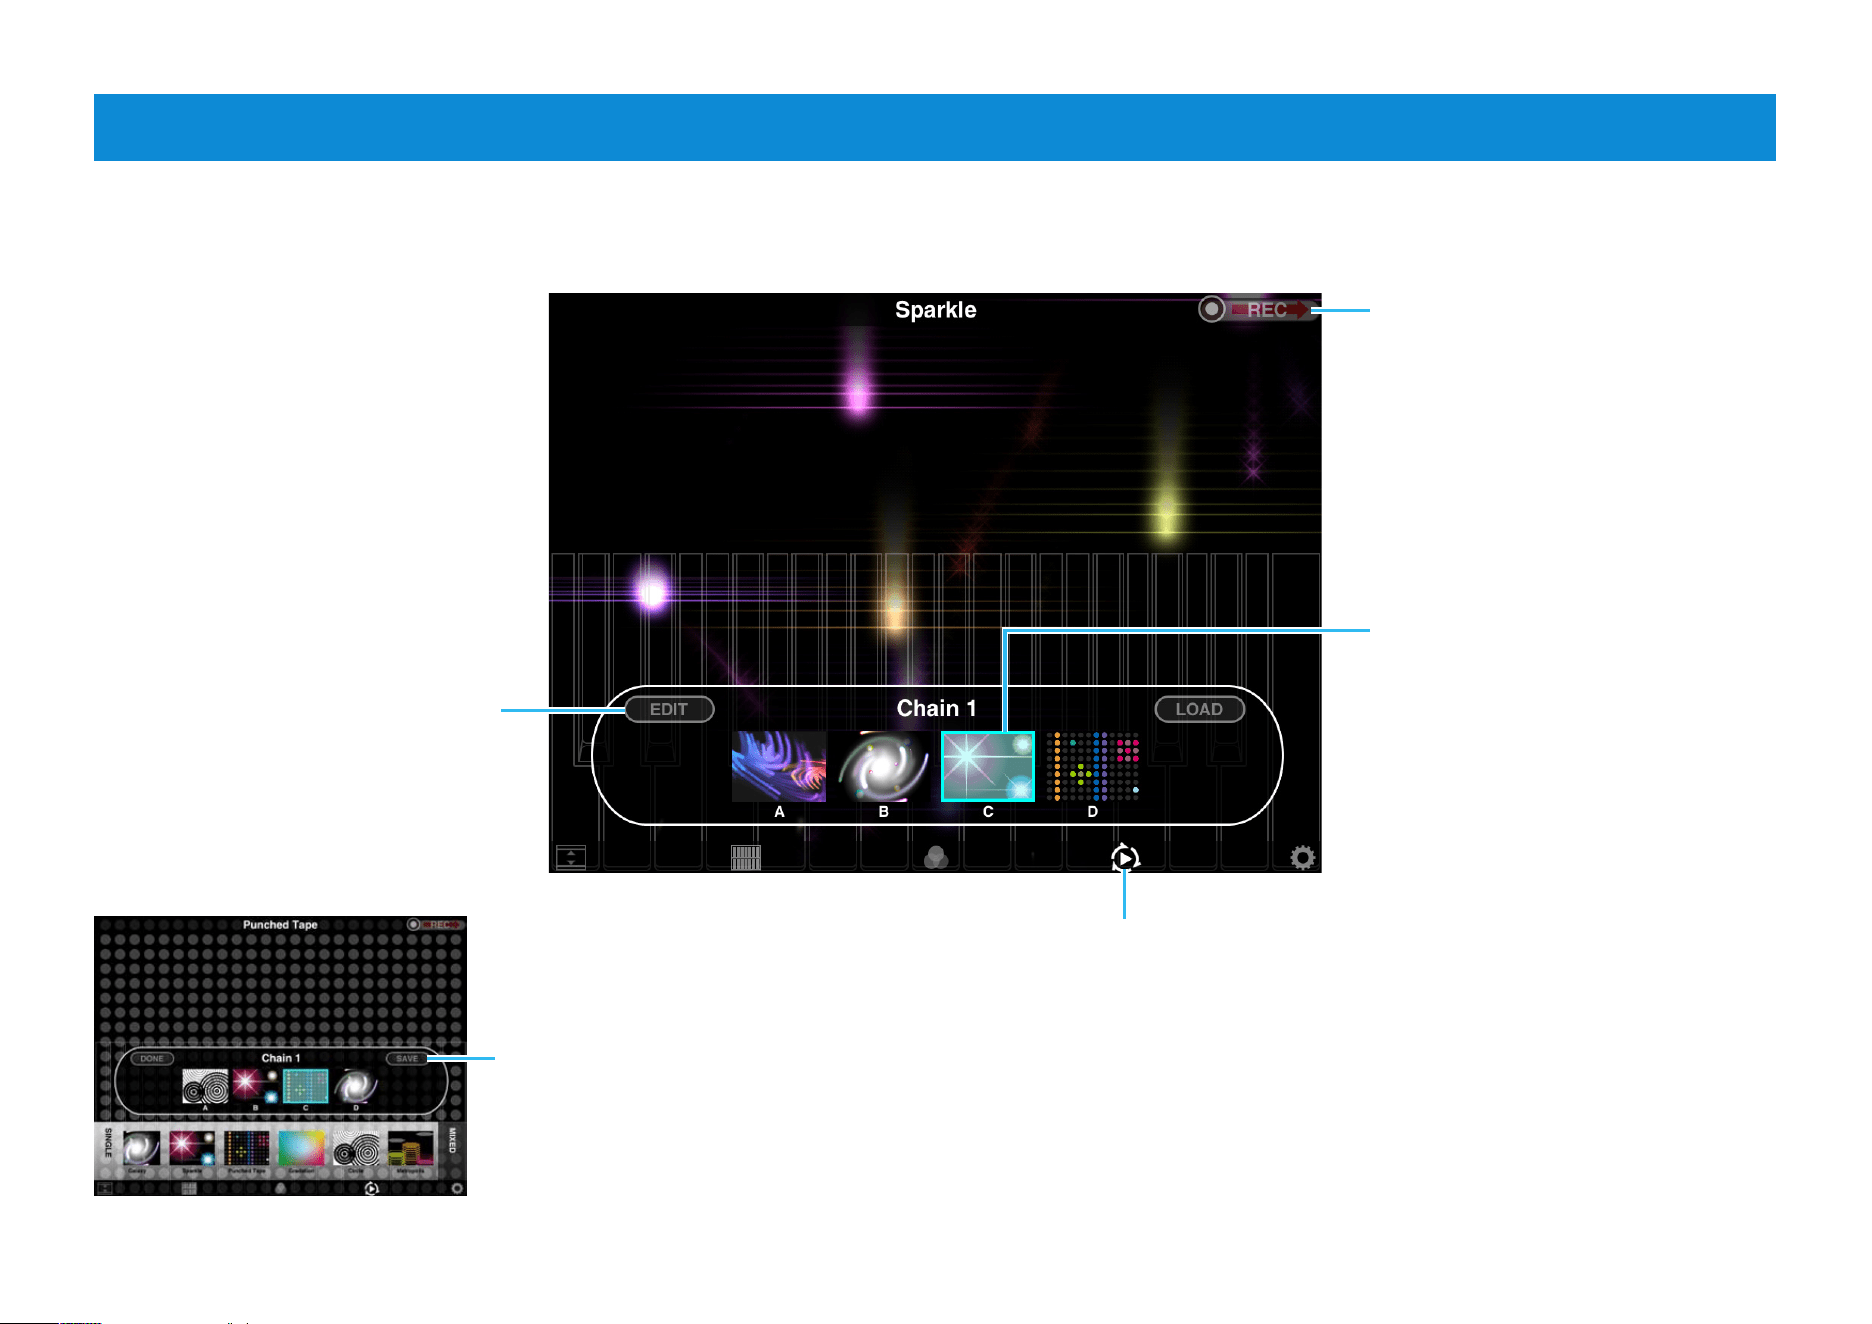
Chain Screen
On the Chain screen, you can select four visual effects to transition between as you perform. The frequency of these transitions
can be selected on the Settings screen.
Recording
Drag the REC slider to the
right to record visual effects.
Visual Performer also lets you
make recordings of chained
effects.
Return to the Main screen
Tap this icon to close the Chain screen
and return to the Main screen.
Editing a chain
You edit a chain by changing
the four visual effects that it
contains. To do so, first tap
[EDIT] to display the visual
effect list. Flick the list left and
right to find the visual effect
you want. Finally, tap one of
the slots (A to D), followed by
the visual effect you wish to
place there.
Saving a chain
When you are happy with the chain you
have created, tap [SAVE]. The keyboard
and a message pane will be displayed,
allowing you to enter a name. Enter a
suitable name and then tap [SAVE].
Alternatively, you can tap [CANCEL] to
close the pane without saving your chain.
The currently active visual
effect is highlighted as
shown. Tap a different visual
effect to transition manually.
Visual Performer Owner’s Manual
9
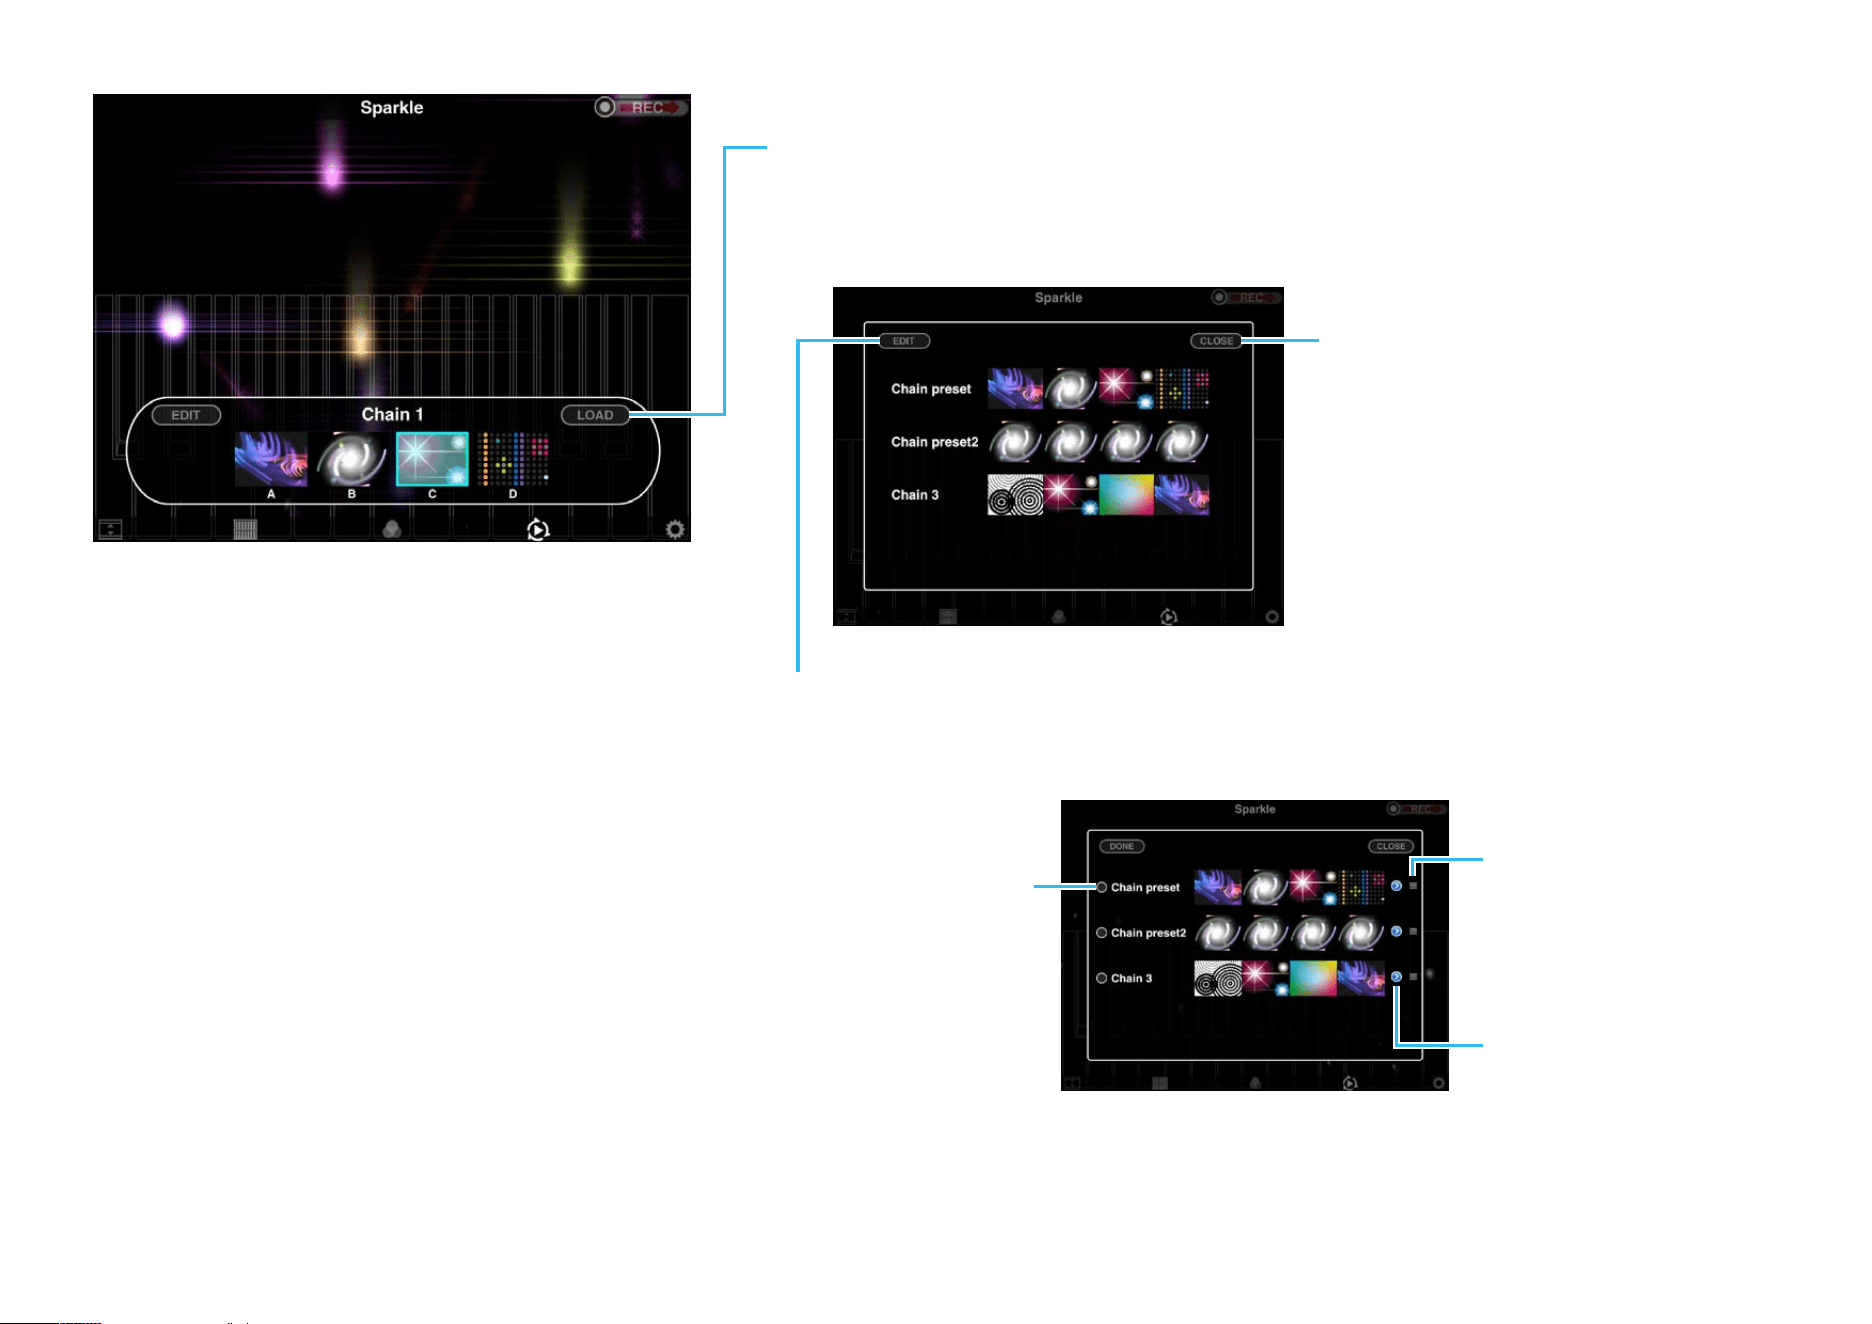
Recalling a saved chain
Tap [LOAD] to display a list of saved chains. Tap a chain to select it
and change all four visual effects on the Chain screen.
Chain list
Editing the chain list
Tap [EDIT] to delete or rename a chain or to rearrange the chain list.
Close the chain list
Renaming a chain
Tap here to display the
keyboard and change
the name of the chain.
Deleting a chain
Tap here to display
the [DELETE] icon.
Tap the icon to
delete the chain or
tap the same spot
once again to return
without deleting.
Rearranging the
chain list
You can touch here
and drag chains to
different locations in
the list.
Visual Performer Owner’s Manual
10
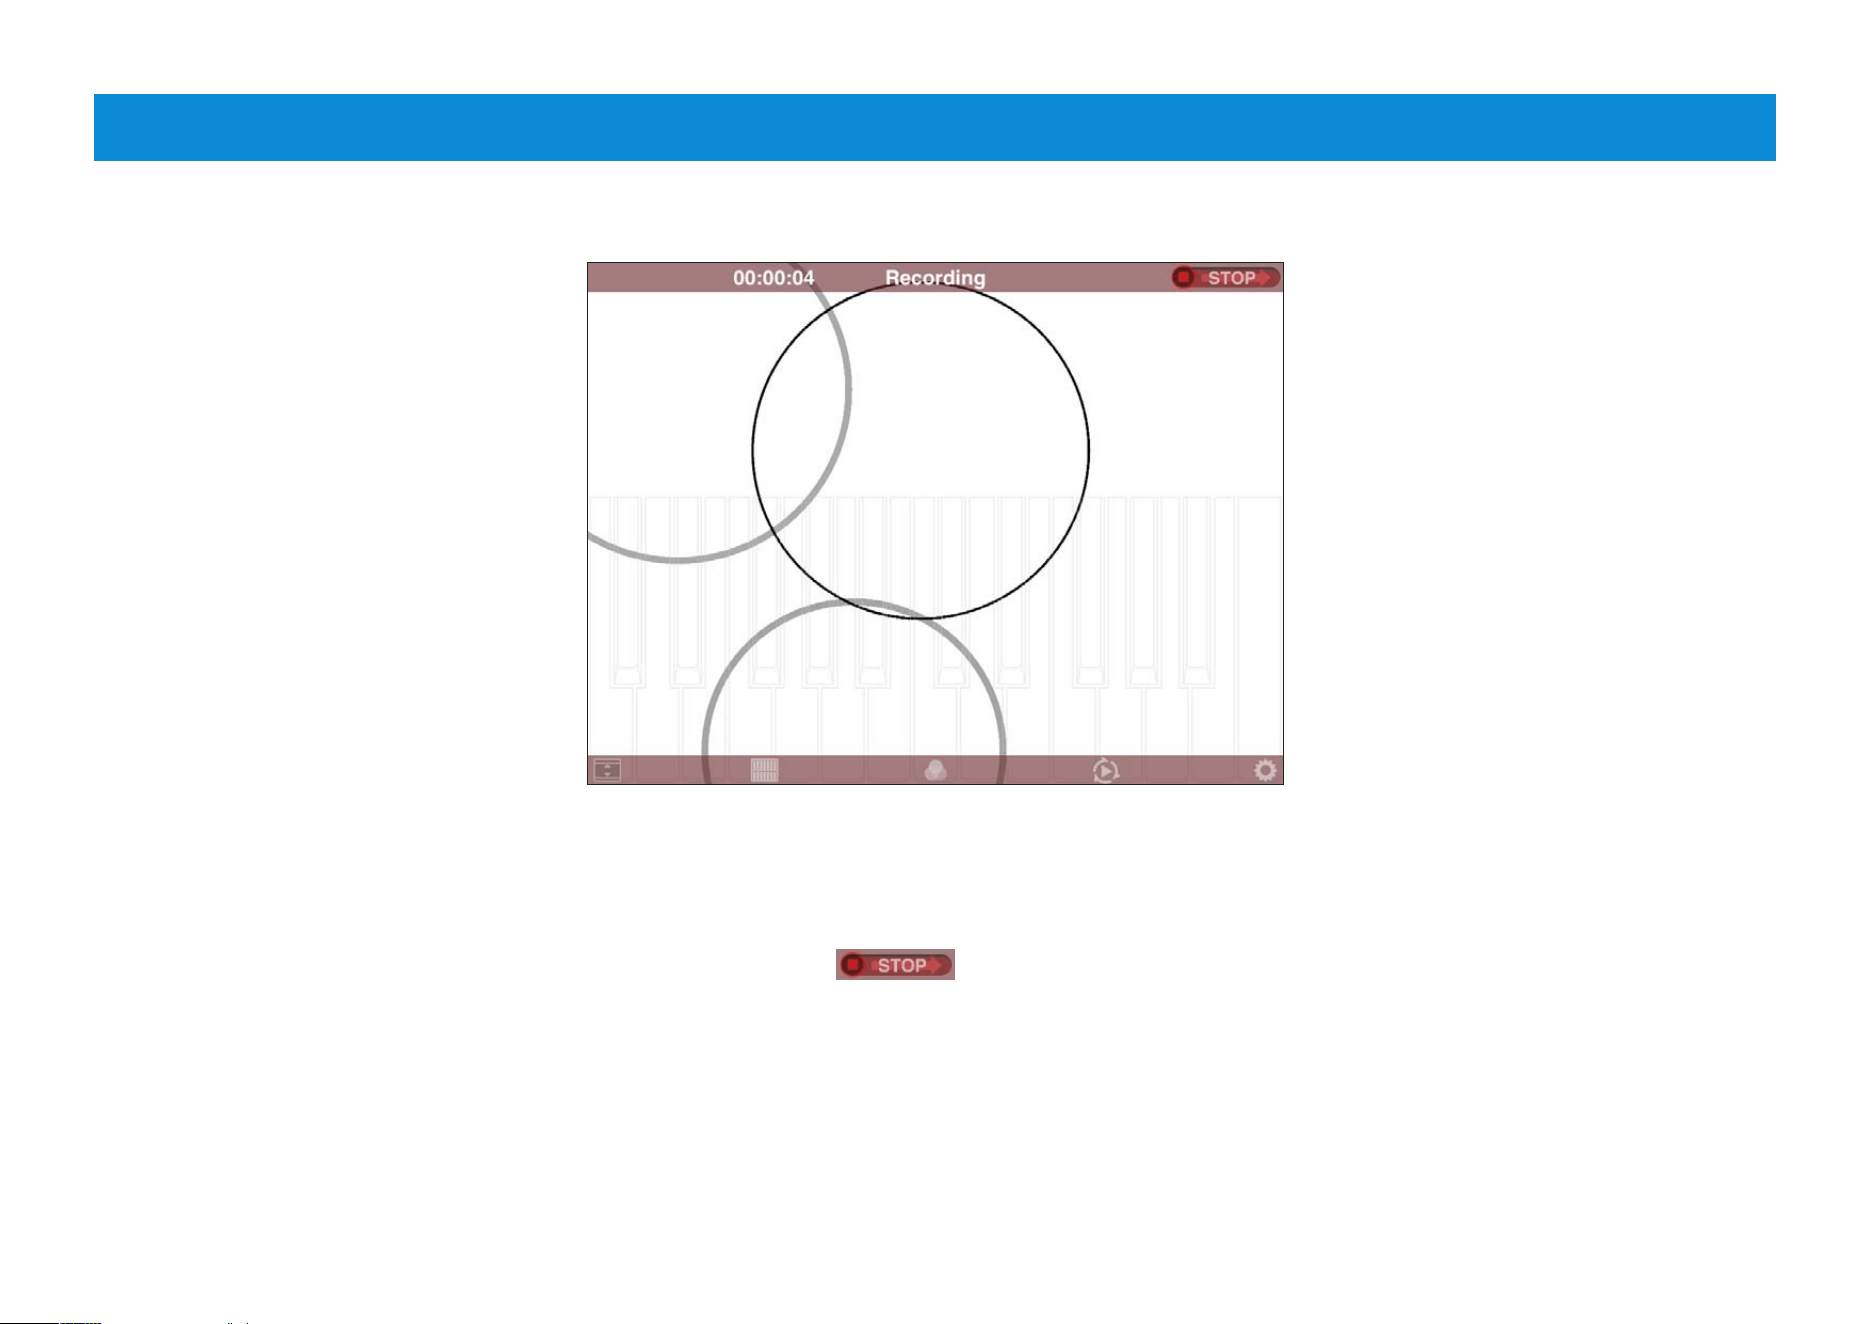
Recording
Screen display when recording
To start recording
Drag the REC slider to
the right to record visual
effects.
During recording
Visual Performer displays the recording time in
the task bar at the top of the screen. Meanwhile,
the REC slider changes to
when
recording is in
progress. During recording, you
can freely select a new visual effect, edit a mix,
or open the Chain screen.
NOTE
Recording will be stopped automatically if you press the
Home button or receive a notification.
To end recording
When you drag the REC slider to the right
once again, recording will end and a
message pane will be displayed. Tap [SAVE]
to save your recording or [CANCEL] to
discard it.
NOTE
Recorded data can be played back from your device’s
Photos app.
Visual Performer Owner’s Manual
11
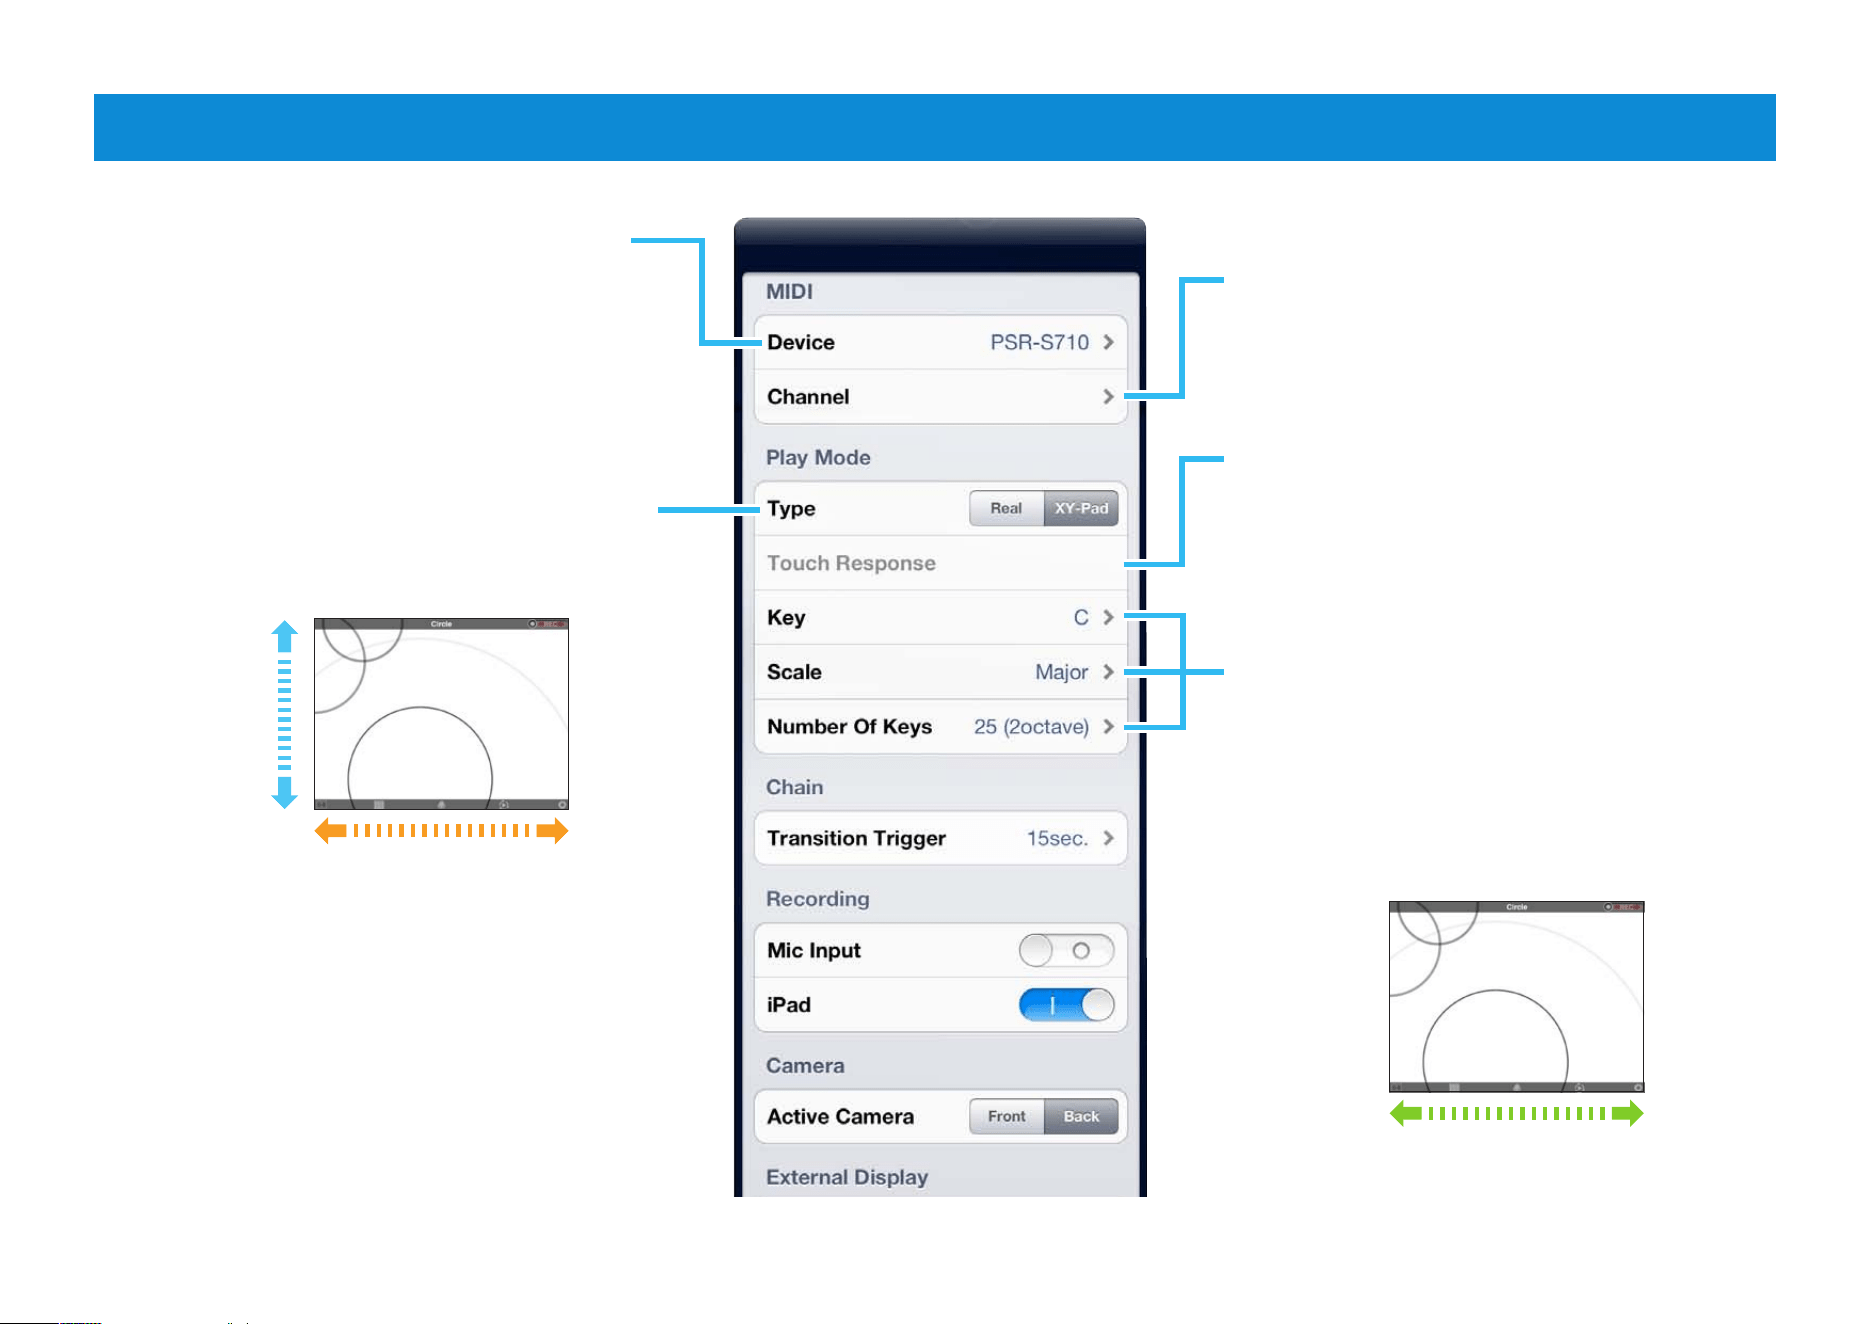
These three parameters apply when
XY-Pad has been selected for the
Type parameter. Use them to set the
musical key (such as C, C#, or D),
the type of scale, and the number of
keys covered by the screen.
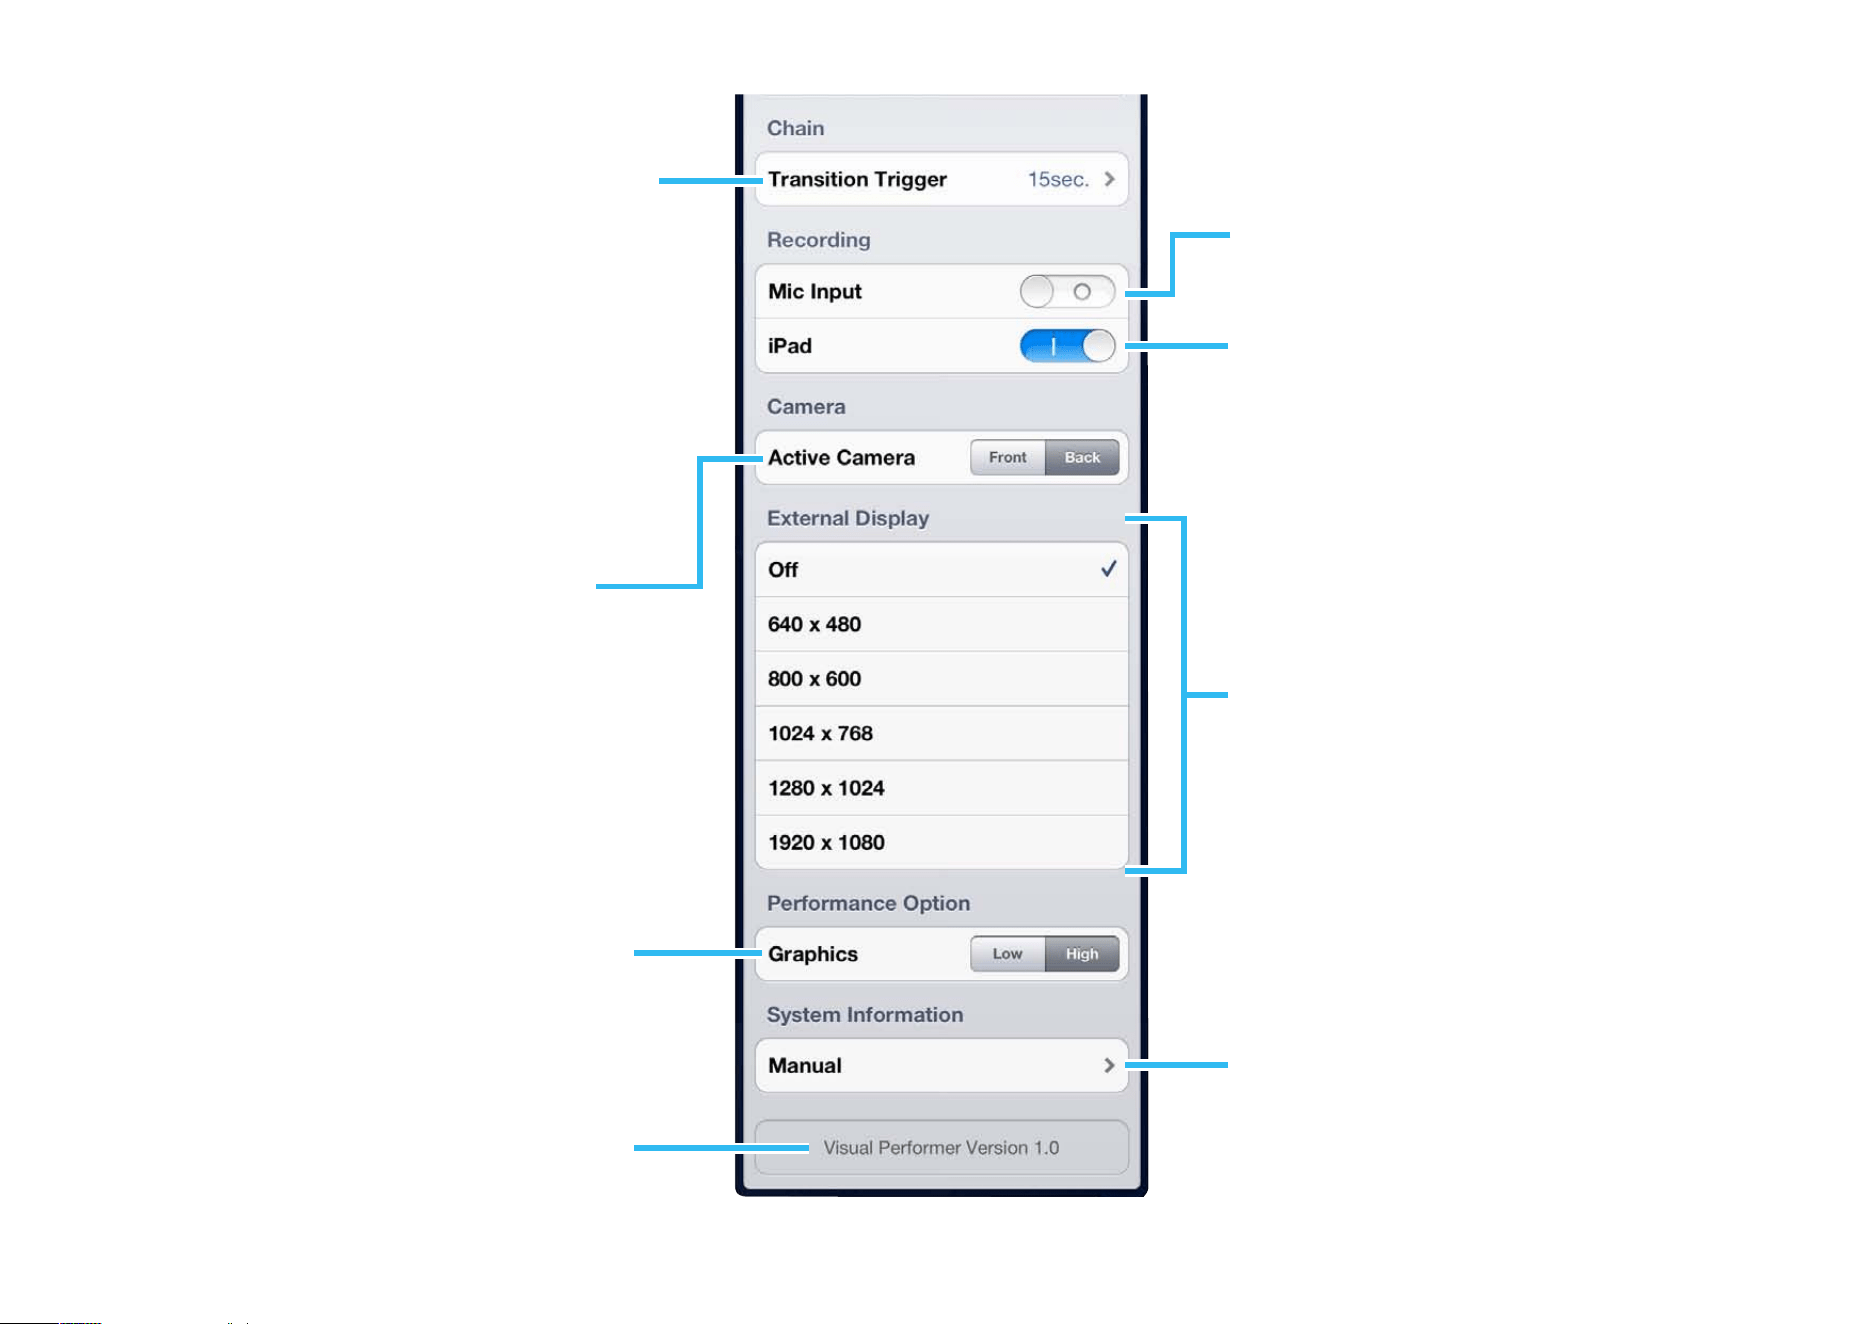
Settings Screen
The model name or port name of the
connected instrument is shown here.
Use the Channel screen to set the 16
MIDI channels to Melody or Backing.
When Touch Response is turned
on and Real has been selected for
the Type parameter, the keyboard
displayed on-screen will be touch
sensitive. In other words, the sound
and visual effects will also respond to
the strength of your playing.
Real:
With this setting, a piano-type keyboard
is shown on the Main, Mix, and Chain
screens. You can tap this keyboard to
play sounds in the same way as on a
traditional instrument.
XY-Pad:
With this setting, you can tap the right
side of the screen to produce a higher
pitched sound or the left side to produce
a lower pitched one. In addition, the top
of the screen will produce louder sounds;
the bottom, quieter ones. By swiping the
screen, therefore, you can continuously
change both sound and visual effect.
Louder
Quieter
Lower pitch
Higher pitch
Number of keys
Visual Performer Owner’s Manual
12
U.R.G., Digital Musical Instruments Division
© 2012 Yamaha Corporation
209MW-B0
This parameter sets the frequency of
visual effect transitions on the Chain
screen. Instead of a time, meanwhile,
you can also select MIDI to switch the
visual effects using MIDI signals.
F0 43 7E 00 SS 7F F7
SS 08: Transition to visual effect A
09: Transition to visual effect B
0A: Transition to visual effect C
0B: Transition to visual effect D
When on, sound captured by the
microphone will be recorded together
with the visual effects.
When on, sound produced by the
iPad will be recorded together with the
visual effects.
NOTE
This parameter is named iPhone on the iPhone
and iPod touch.
Use this parameter to select which
camera to use.
NOTE
The Active Camera parameter is shown only for
devices with two cameras.
Visual Performer lets you send your
visual effects to an external display.
Use this parameter to turn the function
on and off and to set the display
resolution.
NOTE
• The available resolution options will depend on
the type of external display being used.
• If this function is turned off while using an iPad2
or an other device which supports screen
mirroring, the menu and visual effects will
continue to be output.
This parameter specifies whether Visual
Performer should give priority to
performance or quality when creating
graphics.
NOTE
The Graphics parameter is shown only for devices
with a Retina display.
Tap here to view this manual.
The Visual Performer version is shown
here.
