User Manual
S3 Action Camera
Dual Color Screen Display
Ultra 4K Action Camera


Menu
01
04
07
09
10
12
14
18
23
31
32
38
40
45
47
49
50
Important Note
Package Contents
Button Instructions
Waterproof Case Open&Close
Battery Charging and Installation
SD Card Insertion and Formatting
Operation Instructions
Wi-Fi/Computer/TV Connecting
Setting Instructions
Remote Control Instruction
Mounting Your Camera
Lens Protection & Audio Enhancement
App Instructions
Product Specifications
Trouble Shooting/FAQ
Warranty
Contact Us


Important Note
-1-
Congratulations on purchasing one of the best action
cameras on the market! We appreciate your business
and want to earn your trust. Please refer to the notes
below and follow the instructions in this manual to
ensure that you use the action camera correctly and
have a good experience with this product.
If your camera does not seem to be functioning
properly or if you are having photo/video quality
issues, please check the Troubleshooting/FAQ section.
You also can contact our support team:
Problems are often due to something simple that was
overlooked, or require only changing one setting to
solve.
This action camera is required to use a TF high speed
card (multimedia memory card) of Class 10 or UHS.
It’s better to use UHS-3 TF card.

-2-
Memory Card Instructions
When the memory card is first used, please format it
before using if the memory card has the data or other
images that the camera can't identify.
Please turn off the camera before inserting or
removing the memory card.
If the memory card performance degradation, need
to buy a new memory card. Please know that using the
memory card multiple times will degrade its perfor-
mance. The memory card is a precision electronic
device.
Do not bend the memory card and avoid falling or
being stressed.
Do not place the memory card in a strong electric or
magnetic environment, such as near a speaker or
television receiver.
Do not use or leave the memory card in an overheat-
ed or under-cooled
environment.
Keep the memory card clean and avoid touching any
liquid. If the memory card is touching the liquid, wipe it
dry with a soft cloth.

-3-
Please note that the memory card will get hot after
prolonged use,This situation is completely normal.
When the memory card is not in use, place it in the
card sleeve.
Do not use the memory card with other digital
cameras. If you want to use a different memory card
with your camera, format it first.
Do not use a memory card formatted on another
digital video camera or card reader.
If the memory card is in one of the following
conditions, the recorded data may be damaged:
- The memory card is not used properly.
- When recording, deleting (formatting) or reading,
the power is turned off or the memory card is
removed.
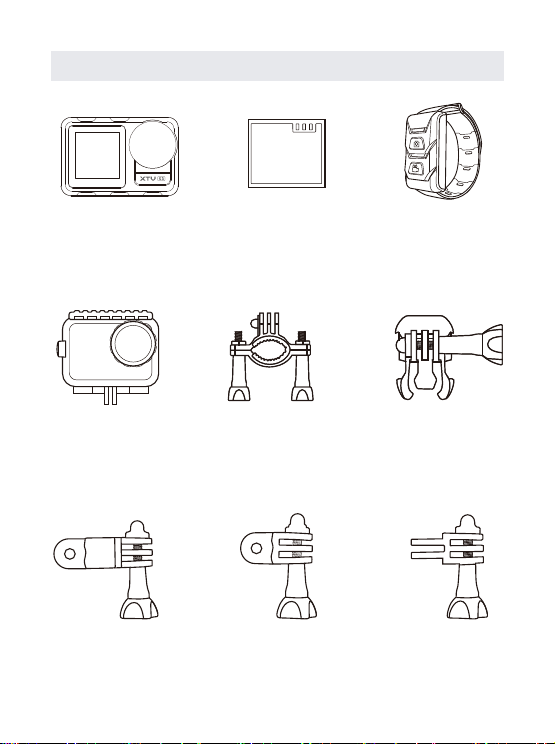
Package Contents
-4-
Action Camera Battery
Waterproof
Case
Waterproof
Case Mount
Bicycle Mount
Remote
Control Watch
Long
Thumbscrew
Short
Thumbscrew
Extension
Mount
-5-
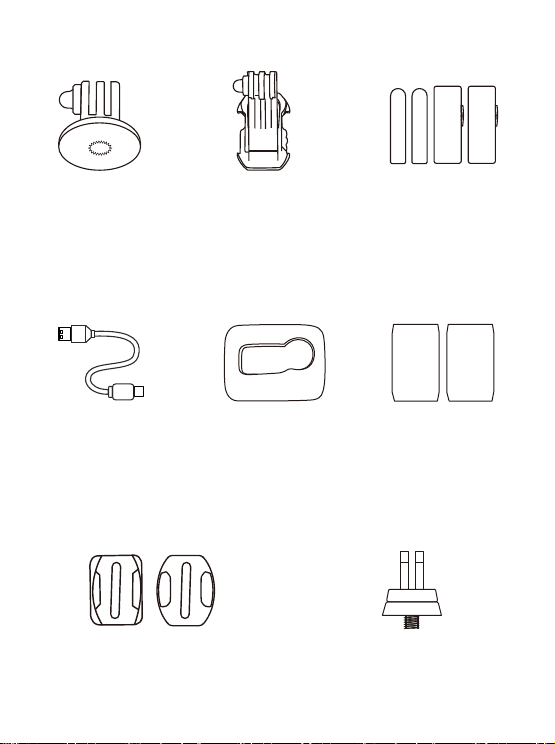
Adapter 1 J-Base Bandage
USB Cable Sponge Cover
Helmet Base
Adhesive Pads
Adapter 2
-6-
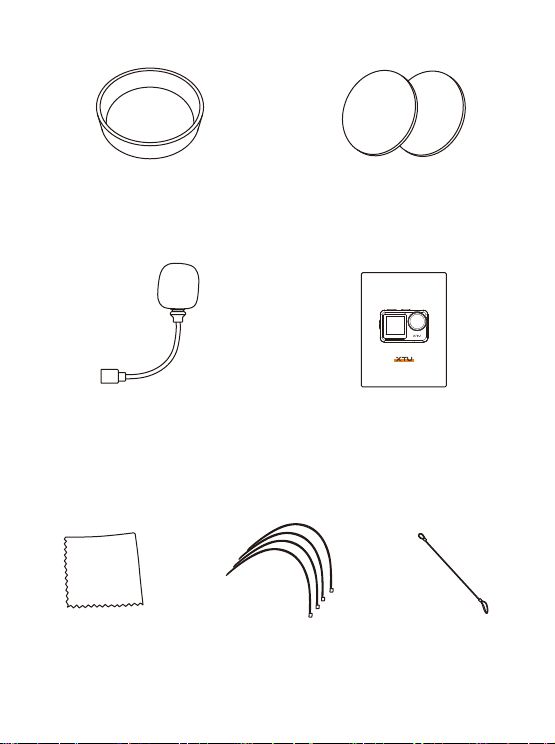
External
Microphone
Dust-proof Cover Lens Protector
User Manual
Wiping Rag
Insurance
Tether Strap
Release Buckles
User Manual
S3 Action Camera
Dual Color Screen Display
UHD 4K Action Camera

-7-
Button Instructions
7
1 2 3
4
5
6
Shutter Button
Microphone
Mode Button
Speaker
Micro HDMI Port
USB Port
Power Button
1
1
2
2
3
3
4
4
4
5
5
5
4
6
6
7
7
TIPS:
Press and hold Mode Button for 3 secs to switch between Front
Screen and Touch Screen.

-8-
11
12
15
Front Screen
Lens
Touch Screen
Charging
Status Light
Working
Status Light
Battery
Micro SD
Card Slot
1/4 Screw Hole
8
9
10
10
11
11
12
12
13
13
14
14
15
15
8 9
-9-
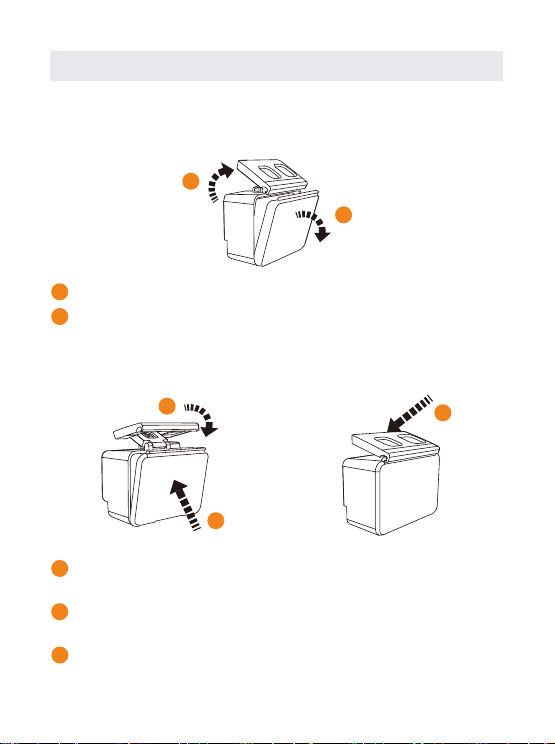
Pull up the buckle of waterproof case.
Open the back cover of the waterproof case.
A. How to open the waterproof Case correctly
B. How to close the waterproof Case correctly
Compress the back cover of the waterproof case as
arrow 1 shows;
Please pull down the buckle, and connect it to the back
cover as arrow 2 shows.
Pull down the buckle of the waterproof case as arrow 3
shows.
Waterproof Case Open & Close
1
1
1
1
2
2
2
3
3
2
-10-
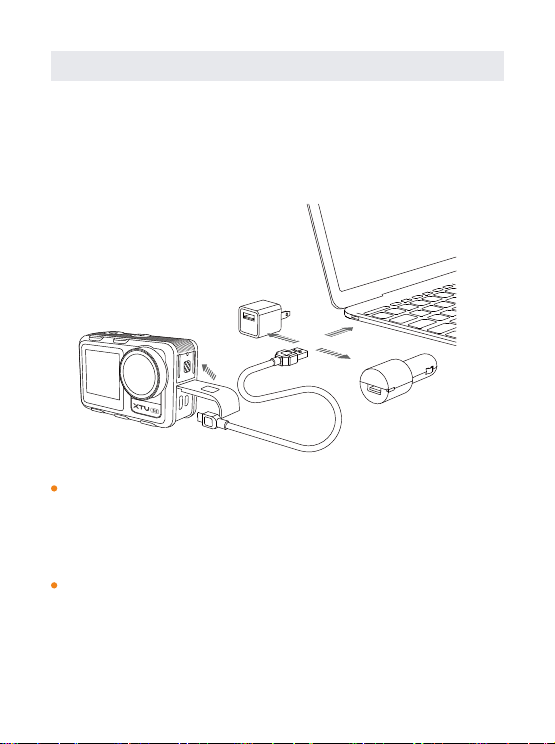
The battery and the camera are packaged separately, so
please make sure that the battery is charged with power,
inserted into the camera before turning the camera on.
A. Battery Charging
Connect the charger with USB cable, you can charge it
with power plug or computer. Charging with computer
may be slower than with a power adapter due to lower
power output of computer USB ports.
When the camera is charging, the red light will appear.
It will disappear if the battery is fully charged.
Battery Charging and Installation
TIPS:
Normal full charging time is about 3 hours. Do not
overcharge the battery.
-11-
TIPS:
Please note the direction of the battery and
battery cover.
B. Battery Installation
1. Hold down the Latch Release button on the battery
door, then slide the door open.
2. Insert the battery, then pull down the door and slide it
close.
-12-
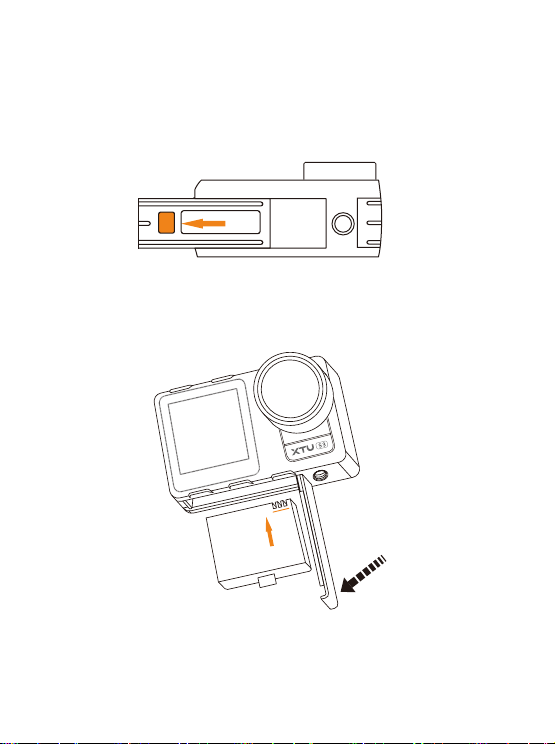
A. SD Card Insertion and Out
Find the Micro SD card slot in the camera, and insert
the card into the camera as the direction mark shows
and push inside.
SD card out: Press down the SD card until you’ve heard
a insertion sound; Then the SD card will pop out along
with a pop sound.
SD Card Insertion and Formatting
-13-
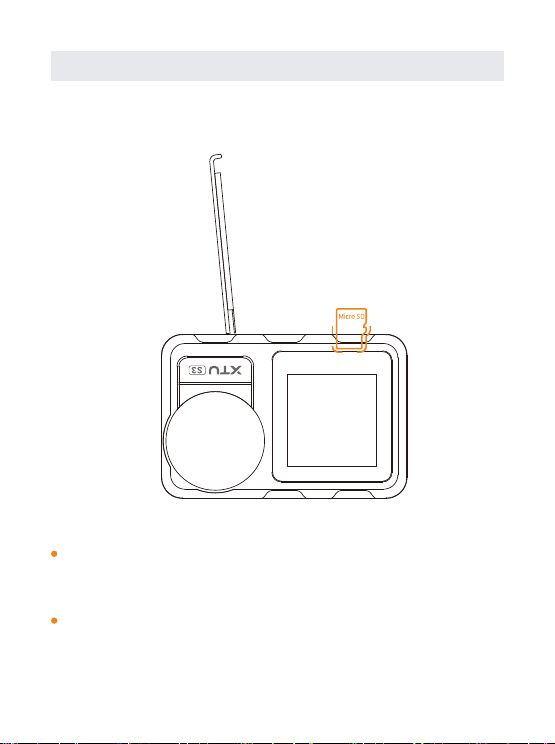
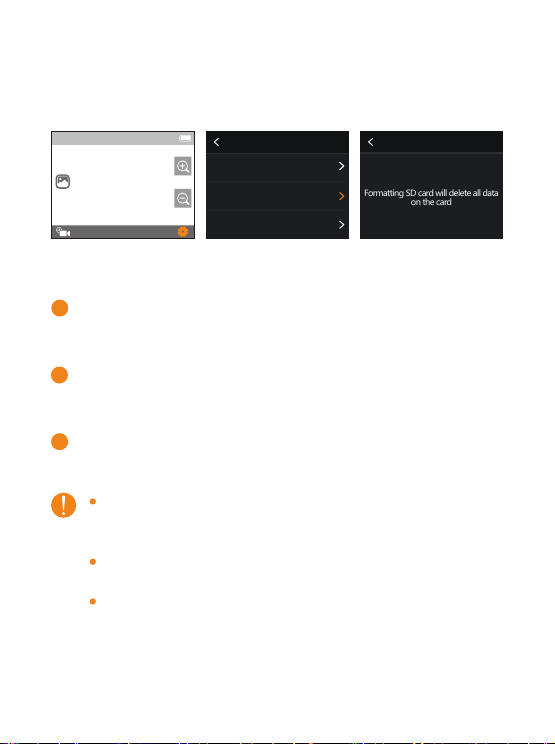
B. SD Card Formatting
Insert the SD card in the state of turning off and
then turn on the camera
Tap Settings mark and swipe down to find the
setting Format SD
Tap it and Confirm to complete the format.
The camera supports Class 10 UHS-U3 or above,
64GB to 256GB, please ensure the quality of SD
card.
You must format the SD card on the camera before
using.
If your SD card isn't compatible with the camera, it
will pop up “SD Card Unavailable, Please Format”
when you turn on the camera. It will also pop up
“Please Format SD Card” when you press any
button.
settings
Voice Control
Format SD
Factory Reset
4K60
00:01:03/00:07:01
Format SD Confirm
Format SD at once
Formatting SD card will delete all data
on the card
1
2
3
-14-
Operation Instructions
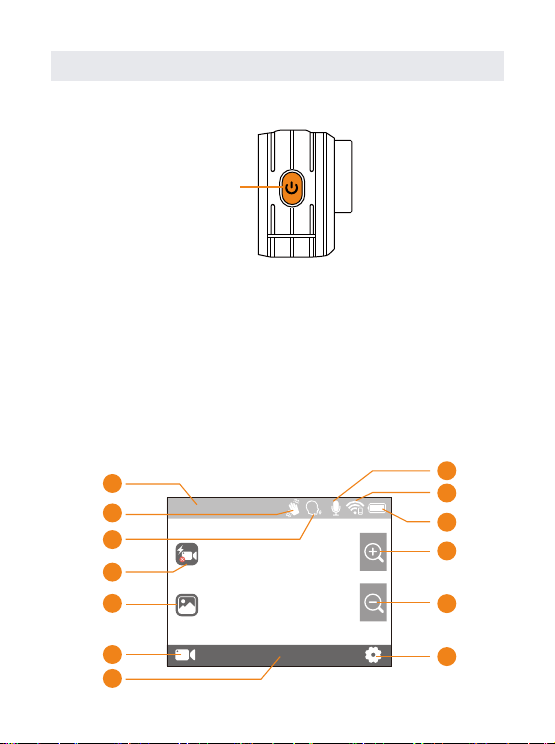
Turn ON/OFF
Main Interface Instruction
Power Button
Extended press「Power Button」:Turn on the camera.
Extended press「Power Button」:Turn off the camera.
This screen gives you total access to your camera’s
settings and provides information about your camera.
The settings shown vary by mode.
00:00:00/00:07:01
4K30
9
10
11
12
13
1
2
3
4
5
6
8
7
-15-
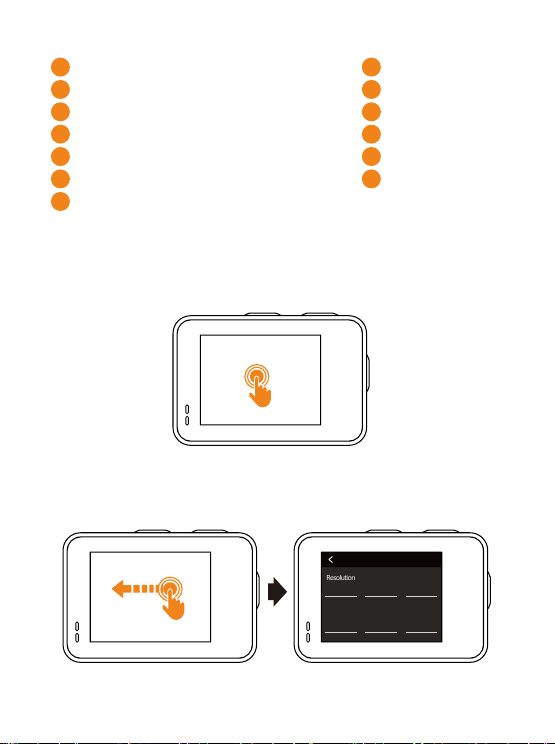
Using the Touch Screen
RecordingTime/PhotosRemaining
Anti-shakeOn
Voice Control On
Exit Quick Video
Video/PhotoFile
CurrentMode
CurrentModeSettings
MicrophoneOn
WiFi Signal
BatteryStatu
Zoom
Zoom Out
System Settings
Tap:
Selects an item, turns a setting on or off.
Swipe Left:
Enter current mode settings.
Norml Video
Resolution
4K30
Video Segme
Auto
Audio
ON
VideoEncode
H.265
LCD
ON
Gyro Stabilize
SUPER DIS
10
11
12
13
1
2
3
4
5
6
7
9
8
-16-
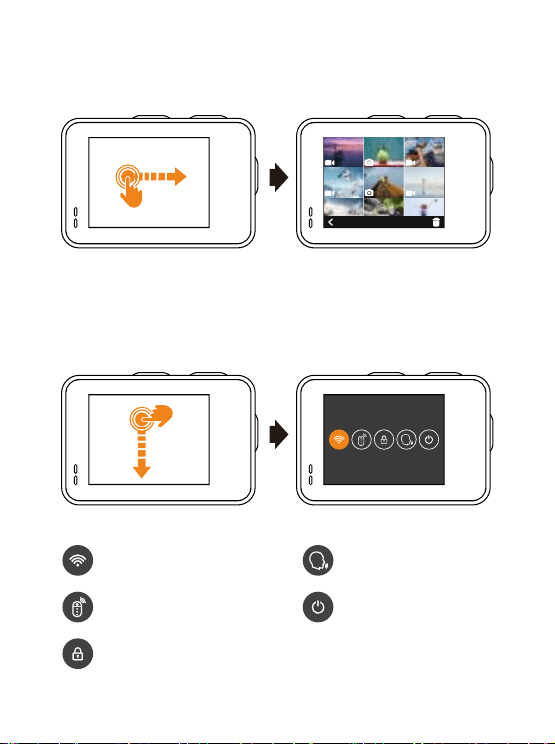
Swipe Right:
See all video/photo files.
Swipe Down:
Turn on/off the Wi-Fi/Remote Control/
Voice Control/Camera Power, or Lock the Screen.
Lock the Screen
Wi-Fi On/Off
Remote Control On/Off
Voice Control On/Off
Power Off
-17-
Wi-Fi/Computer / TV Connecting
Connect to the Wi-Fi
The Wi-Fi Application allows you to control your camera
remotely on a smartphone or tablet. You can view the
video or pictures on your phone, and download the
recordings. The connecting steps are as following:
Wi-Fi CONNECTION
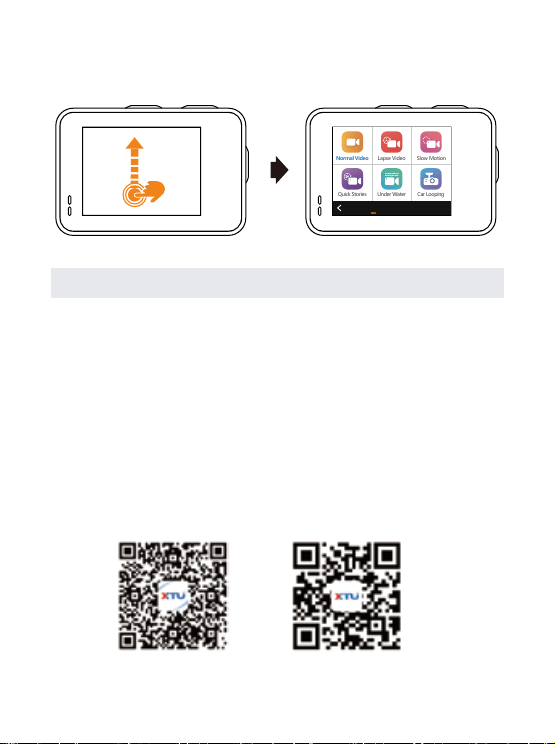
Swipe Up: Choose a video/photo mode from the list.
Step 1:
Download the XTU GO app in Google Play or
Apple App Store on your smart phone or tablet.
Normal Video
Quick Stories Under Water Car Looping
Lapse Video Slow Motion
Photo
Vedio
iOSAndroid

-18-
TIPS:
The camera can only connect to one device at a time.
The Wi-Fi connection is a little bit power-consuming, so
please avoidconnecting Wi-Fi when the battery power is
low.
The original Wi-Fi
password is 12345678
. If you want
to change it, go into
Settings - WiFi - WiFi Password
to
set a new password.
When the WiFi is connected, some functions and settings
on the camera are temporarily unavailable.
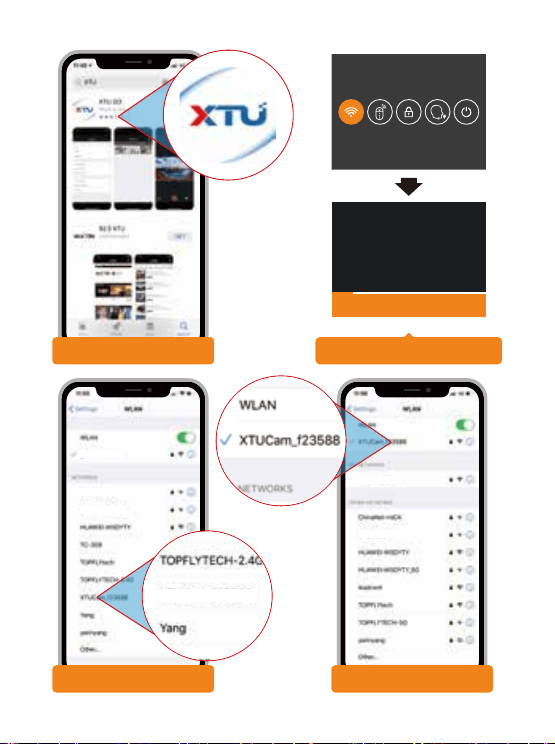
Step 2:
Swipe down on the screen with your finger after
powering the camera on to find the Wi-Fi mark. Choose it
and it will show the Wi-Fi name and password.
Step 3:
Find and connect the Wi-Fi in the Wi-Fi list on
your phone with the Wi-Fi name and password displayed
on the camera.
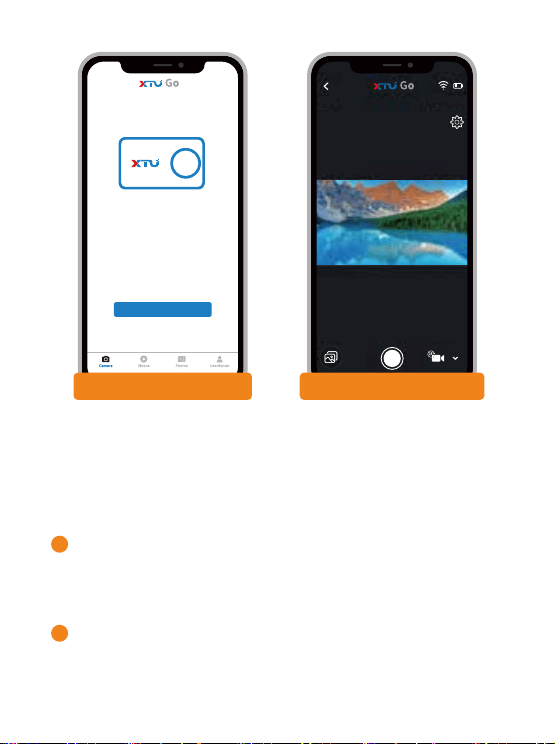
Step 4:
Open the XTU GO app on your smart phone or
tablet after the Wi-Fi is connected, you’ ll find the
camera is controlled by your phone.
Following are the available functions and settings:
1. Swipe down on touch screen to access Shortcut menu.
2. Swipe up on touch screen or press Power Button to switch
capturing modes.
3. Press Mode Button to access current mode settings.
4. Press Shutter Button to take a photo or record video.
-19-
Wi-Fi Information
Wi-Fi SSID:XTUCam_f23588
Password:12345678
WiFi opened,please cannect XTUGO
Step1
1.Download XTU GO App
3.Find and Connect Wi-Fi
2. Get Wi-Fi Information
XTUCam_f23588
4.Wi-Fi Connected
TOPFLYtech
Yang
Yang
leadcent
leadcent
SD: 0.0G/29.7G
20M
-20-
Videos Photos UserSenter
Welcome to Use
XTU camerra
Enter Camera
Camera
5.Open XTU GO App 6.Controlled by Smartphone
The XTU GO App is compatible with smart phone and
tablet listed below:
For Apple IOS
IOS 8.0 system or above devices, compatible with
iPhone and iPad
For Android
Android 5.0 system or above devices
1
2

-21-
Computer Connecting
There are three options when you use the included
micro-USB cable to connect to a computer: MSDC, PC
CAM and Charging mode. The camera can't capture
photos or videos as an action camera while it is connec-
ed to the computer.
MSDC
Access to the files stored in camera’s micro SD card to
copy or view them on a computer. Connect the camera
to the computer with the included USB cable, you will
find the video and photo files on your computer.
(Please keep the camera on, the camera will be turned
off if you have turned on the setting Auto Power Off.)
PC CAM
Connect the camera to the computer with the included
USB cable, it will pop up "Short Press OK Key switch to
PC Camera”. Press the Shutter Button once, the camera
will be switched to PC Camera mode.
(When the action camera is used as a webcam, it only
supports video but no audio.)
Charging mode
The included USB cable can be used as a charging
cable. It is recommended to use a charger adapter if you
want the camera fully charged faster.

-22-
TV Connecting
With HDMI output, you can display the movies and
images recorded by this camera on large screens of TV,
projector, etc. But the action camera can't capture
photos or videos while it is HDMI outputting.
Turn off the camera.
Connect the camera and TV with a commercially
available Micro HDMI cable (NOT INCLUDED).
Turn on the camera and turn on the HDMI setting on
the device which you intended to input.
TIPS:
The HDMI input device should support 1080P.
When outputting HDMI, the display of the camera
turns black. The screen is displayed on the HDMI input
device, but the operation is operated with the camera.
The camera is in capturing mode at first, press Shutter
Button or swipe right on touch screen to view all the
video/photo files.
Press Mode Button or swipe left and right on touch
screen to switch between different photos and videos.
Press Shutter Button to choose a photo/video or play
a video.
Press Power Button to turn back to the previous
interface.
1
2
3
-23-
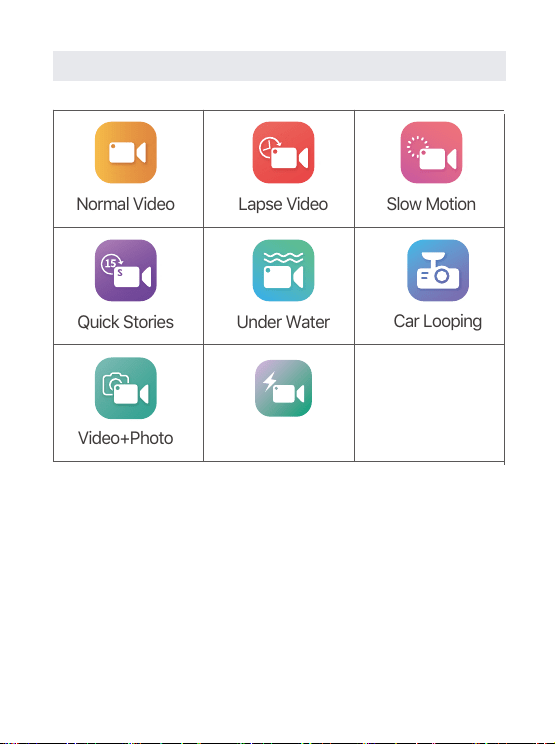
setting Instructions
Car Looping
Video+Photo Quick Video
Normal Video Lapse Video Slow Motion
Quick Stories Under Water
A. Video Settings
Shutter
Auto, 1/30Sec,1/60Sec, 1/120Sec, 1/240Sec,
1/500Sec, 1/1000Sec
Audio
On / OFF
Choose On to record audio in your video. The default
setting is On.
Compression
Standard / High

-24-
Resolution
4K 30FPS;2.7K 30FPS; 1440P /60/30FPS ;1080P
90/60/30FPS;
720P 120/60/30FPS
Time Lapse
0.5Sec, 1Sec, 2Sec, 5Sec, 10Sec, 30Sec, 60Sec
When you turn on Lapse Video mode, the video
recorded will be compressed according to the time
interval you set. Use this chart to determine the length of
your videos. For example,recording for 10 minutes with a
0.5 Sec interval will give you 20 seconds of time lapse
video in any 60 FPS video mode.Recording for 30
minutes will give you 1 minute of video in any 60 FPS
video mode.
video length
interval recording
0.5sec
1 sec
2 sec
5 sec
10 sec
30 sec
60 sec
10 min
10 min
20 min
100 min
100 min
4 h
4 h
30 FPS
40 sec
20 sec
20 sec
40 sec
30 sec
16 sec
8sec
60 FPS
20 sec
10 sec
10 sec
20 sec
10 sec
8 sec
4 sec

-25-
Loop Time
1Min / 3Min / 5Min / 10Min
When you turn on Car Looping mode, the video
recorded will be segmented at the time you set.
Video Segment
Auto / 1Min / 3Min / 5Min / 10Min
When you turn on Normal Video mode, the video
recorded will be divided into several videos according to
the time length you set. For example, you record a video
for 3 minutes, it will be divided into three 1-minute
videos when the setting 1Min is on.
Video Duration
15Sec/20Sec/25Sec/30Sec
When you turn on Quick Stories mode, the camera will
record a short video according to the time length you
set.
VedioEncode
H.264 / H.265
Quick Video
When you select the quick video mode, you need to turn
off the camera normally to save this function, the camera
will start recording next time power. Recording in quick
video mode, press the shutter button, the camera will
end the recording and turn off the camera.
If you want to exit the quick video mode, you just need to
click the exit button on the screen, and the camera will
return to the normal recording mode.
-26-
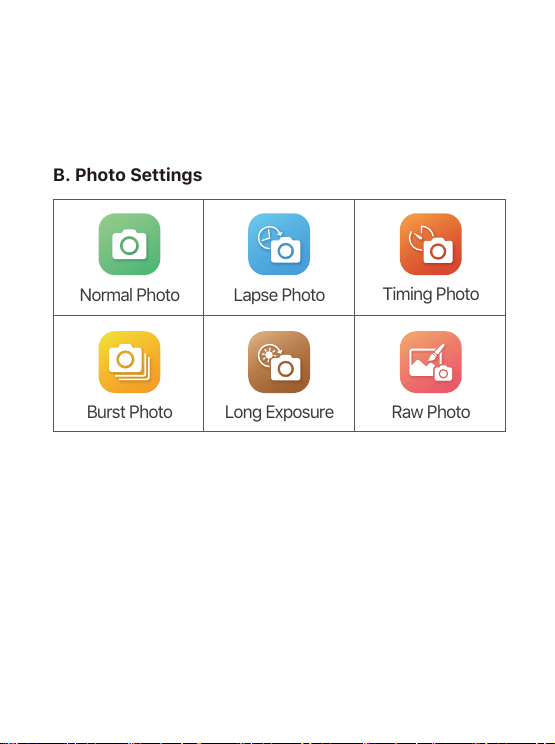
B. Photo Settings
Normal Photo Lapse Photo
Timing Photo
Burst Photo
Long Exposure
Raw Photo
Resolution
20MP/16MP/12MP/8MP/5MP/3MP
Self-Timer
3 Sec/5 Sec/10 Sec/30 Sec
After you press Shutter Button, the camera will take a
photo in the time length you set.
Shutter
Auto/1Sec/2Sec/5Sec/10Sec/20Sec/30Sec
Water Area
Seawater/Freshwater
When you turn on Under Water mode, you can change
this setting according to the water area you are in.

-27-
C. General Settings (Video & Photo)
Time Lapse
1 Sec/2 Sec/5 Sec/10 Sec/30 Sec/60 Sec
After you press Shutter Button, the camera will take
photos at every 1 Sec/2 Sec/5 Sec/10 Sec/30 Sec/60 Sec
till you press the Shutter Button again.
Burst Number
3 Photos/5 Photos/10 Photos/15 Photos
Capture fast-action scenes with one of these
high-speed settings. 10/15 photos in 1,2, or 3 seconds. 5
photos in 1 second. 3 photos in 1 second.
Exposure
-2/-1.5/-1/-0.5/0/+0.5/+1/+1.5/+2
Adjust the exposure value when shooting, to make the
brightness of the photo more realistic. Higher values
result in brighter images.
Meter Mode
Center Metering/Average Metering/Spot Metering
LDC
ON/OFF
Correct the distortion when the photo is taken.

-28-
AWB
Auto/Daylight/Cloudy/Tungsten/FLUOR-L/FLUOR-H
By adjusting this setting, the camera can correct the color
of photos taken under different lighting conditions.
ISO
Auto / ISO100 / ISO200 / ISO400 / ISO800 / ISO1600
ISO refers to the light sensitivity of either the film or
imaging sensor. Beyond simply changing the exposure,
ISO also affects image quality. A higher ISO typically
translates to a noisy or “grainy” image.
Sharpness
High/Medium/Low
Sharpness controls the quality of details captured in your
video footage or photos.
Filter
Normal/BW/Colorful/Brown/Warm/Cold
By adjusting this setting, you will get the desired photo
effect when the photo is taken.
Gyro Stabilize
OFF/SUPER DIS
Turn on Gyro EIS ON/OFF the Anti-shake, Enhance the
Anti-shake.
When you are in dim light, it is recommended to turn off
the Anti-shake for better-capturing quality.

-29-
Auto Power Off
The camera will be turned off in the time you set if there
isn't any operation.
Language
Change the language.
Video Format
Change the video format.
Frequency
Change to power frequency.
Date Stamp
If you turn it on, there will be a date stamp on the lower
right corner of the photos or videos. Please turn it off if you
don’t want the stamp.
Grid
Turn on/off the reference grid lines on the screen.
D. System Settings
Wi-Fi
Turn on/off the WiFi, Check WiFi name and password.
Auto Dormant
The camera will dormant in the time you set if there isn't
any operation.
Scene Mode
Auto/Personage/Scenery/Defog
Choose a suitable mode according to the scene you are in.

-30-
Cap Tone
Turn on / off the tone of pressing the shutter button to take a
photo.
Key Tone
Turn on /off the tone of pressing any button or tapping
the screen.
Brand Stamp
If you turn it on, there will be a brand stamp on the lower
left corner of the photos or videos. Please turn it off if you
don’t want the stamp.
Power Tone
Turn on / off the tone of turning on /off the camera.
Remote Control
Turn ON / OFF the Remote Control, Convenient to use
remote control wireless control.
FD Control
Turn ON FD Control, the camera recognizes up to max 10
faces, and will draw a face frame on the screen, the
software will follow FD control to realize face metering and
beautify the face.
Date Time
Adjust the time and date.
Voice Control
Turn on/off the Voice Control, Check the list of Voice
Commands.
Command List: Record Video, Close Recorder, Screen
ON, Screen Off, Open WiFi, Close WiFi, Take Photo
-31-
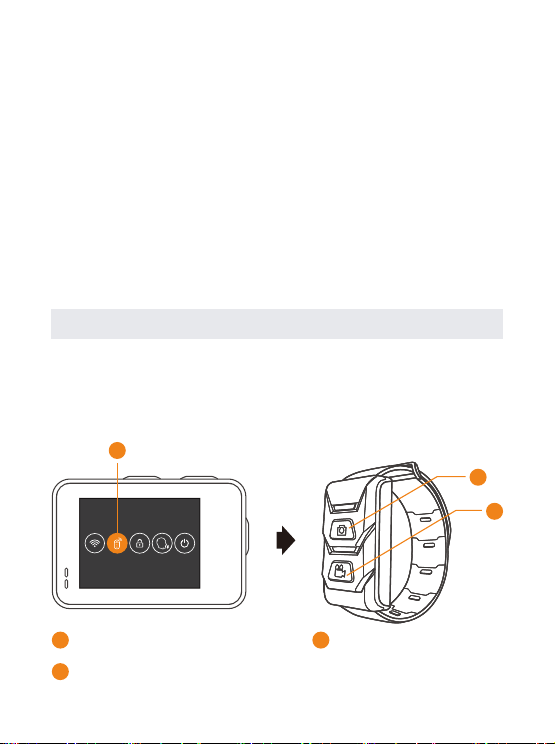
Remote Control Instruction
Swipe down on the screen with your finger after powering
the camera on to find the Remote Control setting. Choose it
and camera is connected to Remote Control Watch.
1
3
2
2
1
Remote Control Setting
Press to take a photo
3
Press to record video
Inversion Mode
Turn on to change the up and down direction of the
content displayed on the screen.
Format SD
Format your SD card to delete all data on the card.
Factory Reset
This will restore all of your camera’s original settings, clear
all device connections.
Information
Know about the information of the camera.
-32-
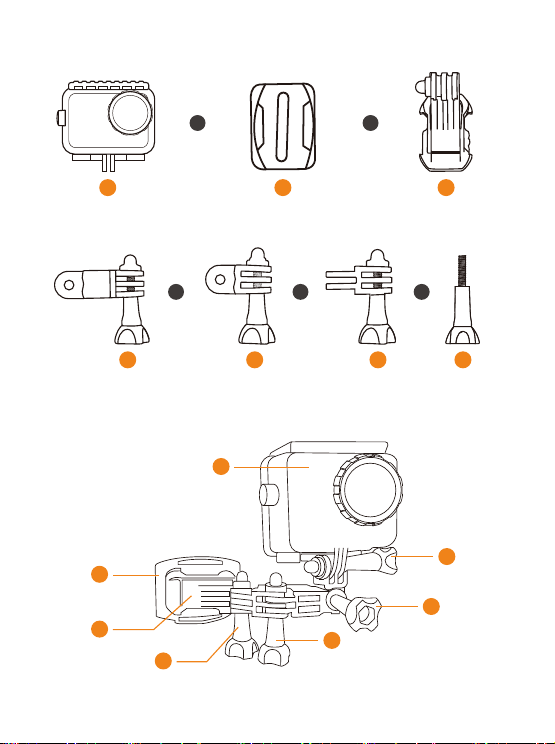
Mounting Your Camera
1
1
3
3
4
4
2
2
J-Base
Waterproof
Case
Helmet
Base
Long
Screw
Use the Waterproof Case to attach your camera to mounts.
Method A:
+ + +
Step 1:
Interlock the mounting fingers on the Waterproof
Case with the mounting fingers on the J-Base, and then
secure them with a screw.
Step 2:
Slide the Helmet Base into the J-Base bottom until
it clicks into place.
Step 3:
Stick the Adhesive Pads on the bottom of the
Helmet Base. Find a suitable position and fix the camera on
the helmet.
-33-
Waterproof
Case
Helmet
Base
1
1
3
3
2
2
+ +
Method B:
Waterproof
Case Mount
Step 1:
Interlock the mounting fingers on the Waterproof
Case with the mounting fingers on the Waterproof Case
Mount, and then secure them with a screw.
Step 2:
Slide the Helmet Base into the Waterproof Case
Mount bottom until it clicks into place.
Step 3:
Stick the Adhesive Pads on the bottom of the
Helmet Base. Find a suitable position and fix the camera on
the helmet.
-34-
3
3
J-Base
Helmet
Base
7
7
Long
Screw
2
2
Waterproof
Case
1
1
6
6
5
5
4
4
+
+
+
+
+
Method C:
Long
Thumbscrew
Short
Thumbscrew
Extension
Mount
-35-
4
4
Long
Screw
Waterproof
Case
1
1
2
2
3
3
+
++
Short
Thumbscrew
Step 1:
Interlock the mounting fingers between Water-
proof Case, J-Base, Extension Mount, Long Thumbscrew,
Short Thumbscrew, and then secure them with screws.
Step 2:
Slide the Helmet Base into the Waterproof Case
Mount bottom until it clicks into place.
Step 3:
Stick the Adhesive Pads on the bottom of the
Helmet Base. Find a suitable position and fix the camera on
the helmet.
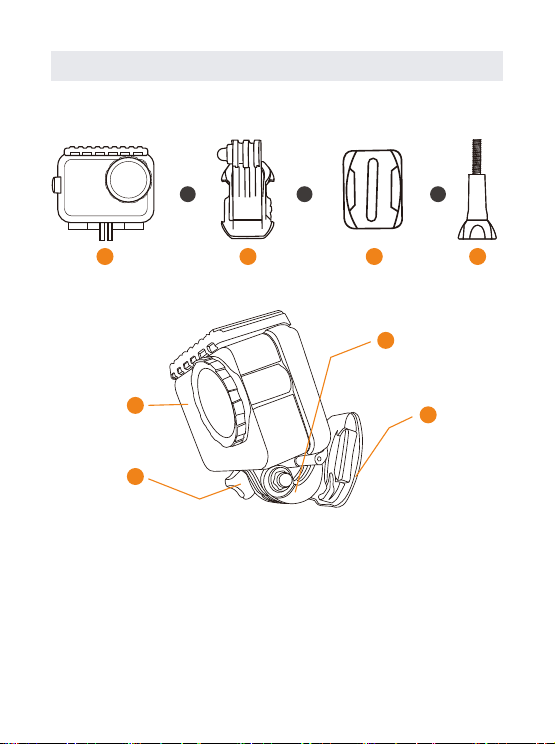
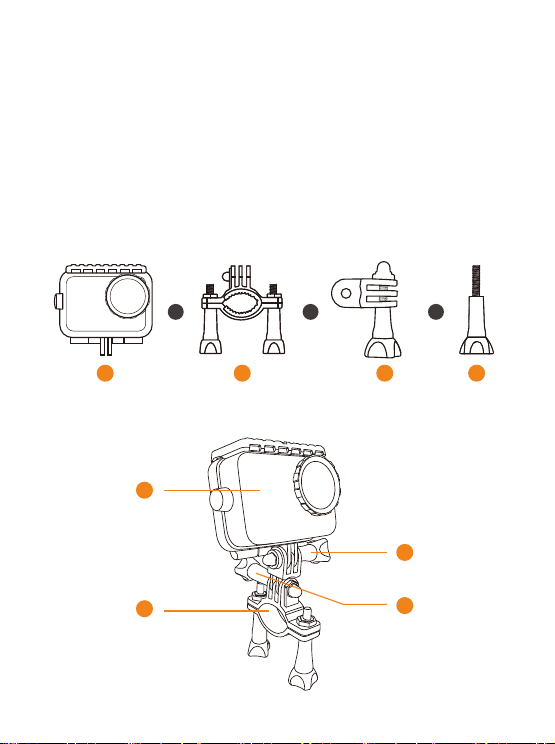
Method D:
Bicycle
Mount
-36-
2
Step 1:
Interlock the mounting fingers between Water-
proof Case, Bicycle Mount, Short Thumbscrew, and then
secure them with screws.
Step 2:
Find a suitable position and fix the camera on the
bicycle.
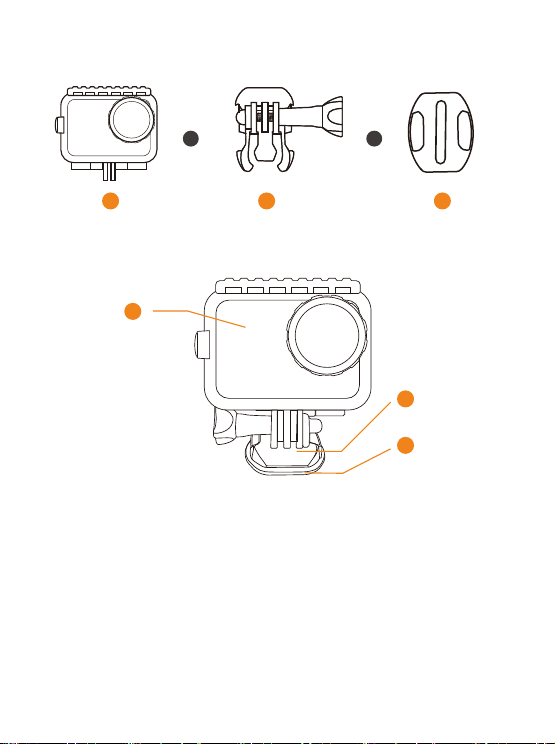
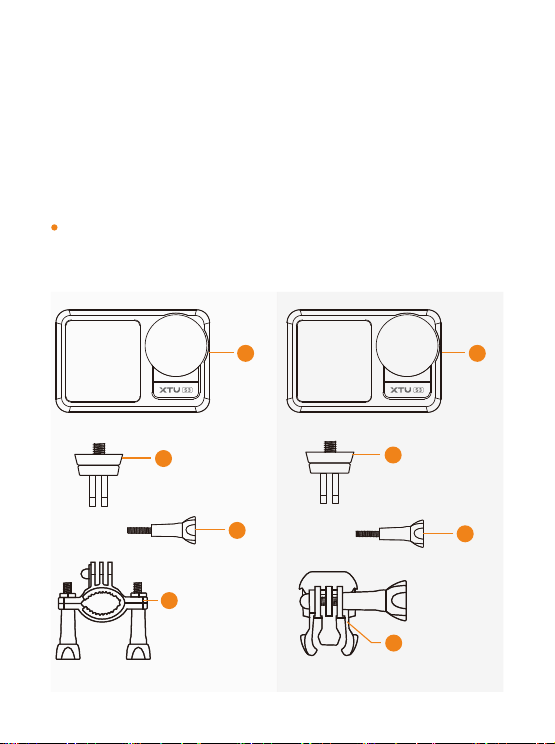
TIPS:
If you don’t like to mount the camera with the Waterproof
Case, you can use the Adapter 2 to mount the camera
directly.
2
1 1
3
4
5
3
Action
Camera
Action
Camera
Adapter 2
Adapter 2
Long
Screw
Long
Screw
Bicycle
Mount
Waterproof
Case Mount
-37-
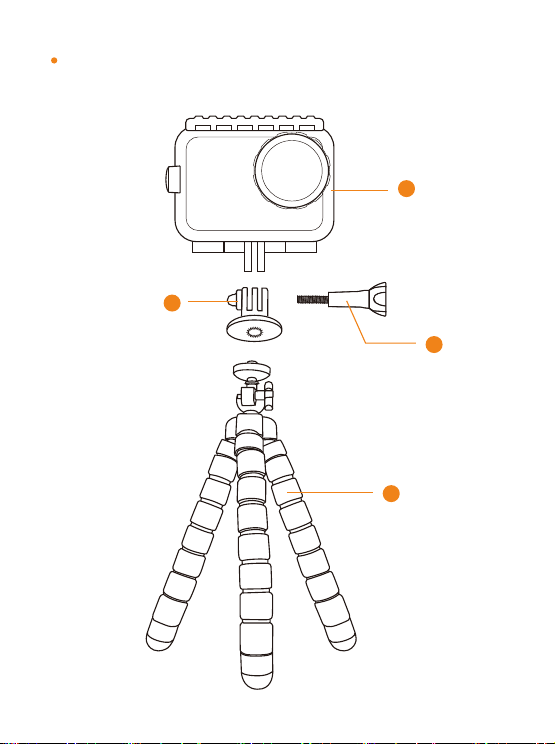
If you want to mount your camera on the tripod with the
Waterproof Case, you can use the Adapter 1 to make it.
2
1
3
4
Waterproof
Case
Long
Screw
Adapter 1
Tripod
(not included)
-38-
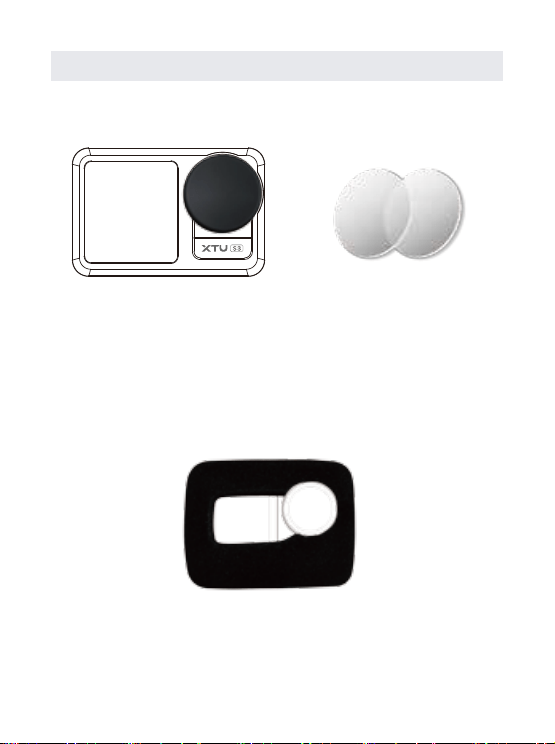
Lens Protection & Audio Enhancement
Dust-proof Cover & Lens Protector
The lens cover is made from extremely tough strengthened
glass, but it can still be scratched or cracked. The
Dust-proof Cover and Lens Protector can be used to
protect it from damage.
Sponge Cover
When you are doing high-speed sports or in windy
conditions, wearing Sponge Cover can reduce wind noise
and enhance audio capture performance.
-39-
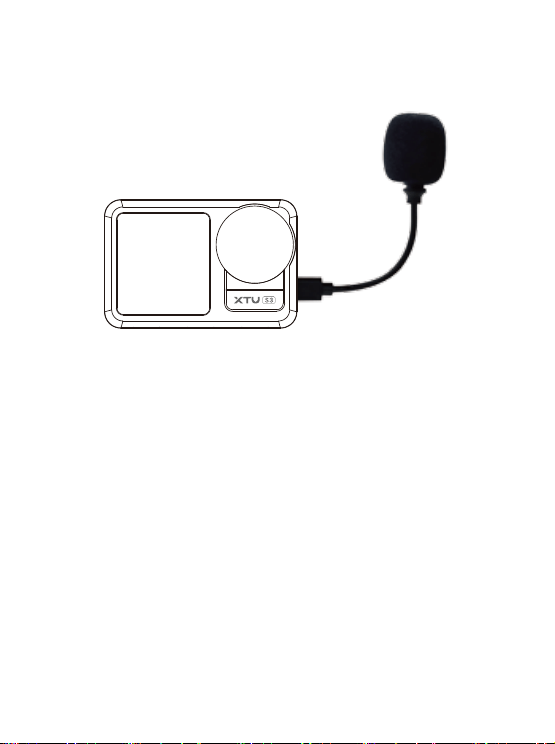
External Microphone
If you are in a noisy environment, you can use the External
Microphone to reduce noise and enhance the audio in your
videos.
-40-
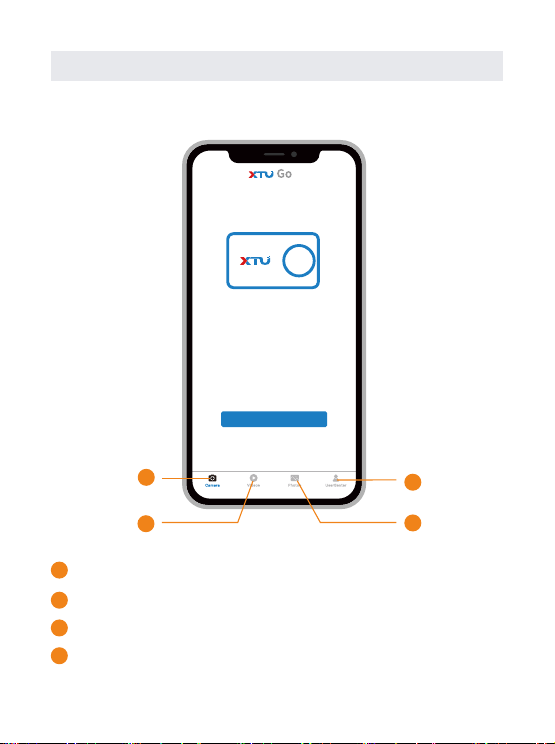
App Instructions
Videos Photos UserSenter
Welcome to Use
XTU camerra
Enter Camera
Camera
1
1
3
4
2
2
Home Page
Enter to control the camera by smart phone
View the videos downloaded from the camera
3
View the photos downloaded from the camera
4
Share photos/videos to social Apps, Help Center, App
Settings
SD: 0.0G/29.7G
20M
-41-
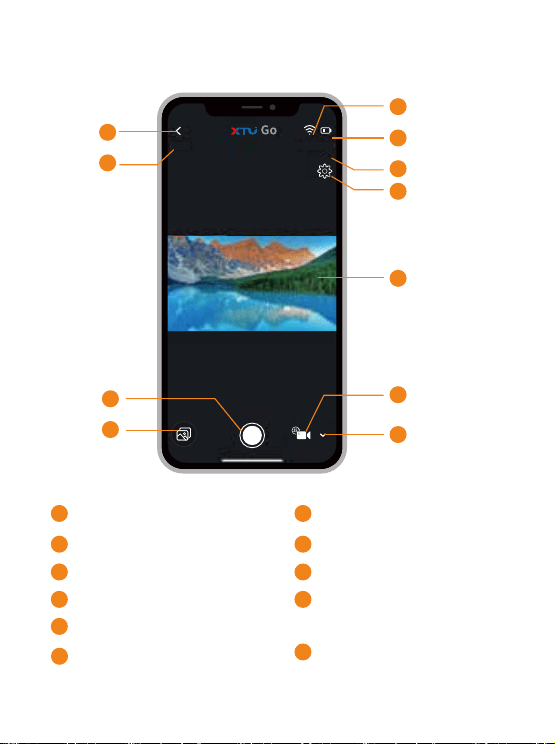
Enter Camera
Back to homepage
9
8
1
1
Photo/Video resolution
2
WiFi signal
3
Camera battery status
4
Memory card status
5
Current mode settings
/System settings
6
Sync with camera screen
7
Shutter button
8
View device files
9
Switch capturing mode
10
Photo/Video capturing
status
11
10
11
3
4
5
6
2
7
-42-
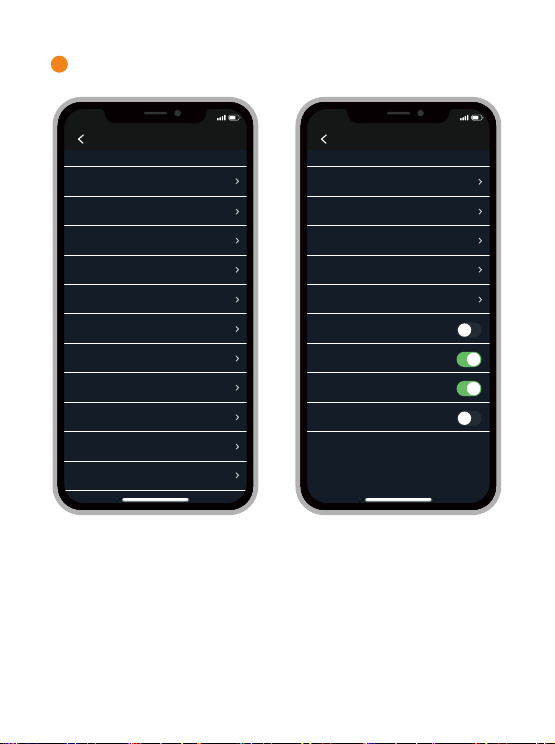
Current mode settings/System settings
6
10:12
Normal Photo
Device Settings
Resolution 12M
ON
Average Metering
0
Auto
Auto
Personage
Medium
NormalFilter
Sharpness
Scene Mode
AWB
ISO
Shutter
Exposure
Meter Mode
LDC
6400
10:12
Device Settings
30Swc
3Min
English
NTSC
50HZ
Key Tone
Brand Stamp
Date Stamp
Inversion Mode
Frequency
Video Format
Language
Auto Power Off
Auto Dormant
Wi-Fi
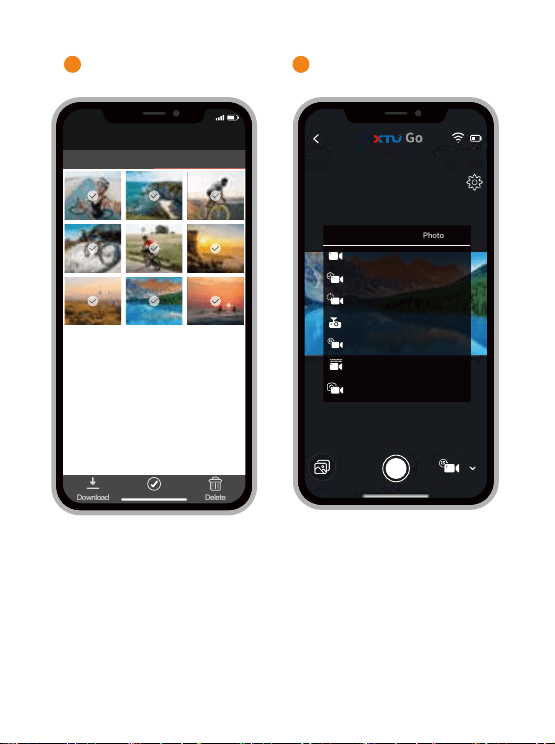
10:12
Selected0
Device File
Cancel
Video Clip
Download
Select All
Delete
Image
-43-
View device files
9
Switch capturing mode
10
SD: 0.0G/29.7G
20M
Video
Photo
Normal Video
Timelapse Video
Slow Motion
Car Looping
Quick Stories
Under Water
Video and Photo
-44-
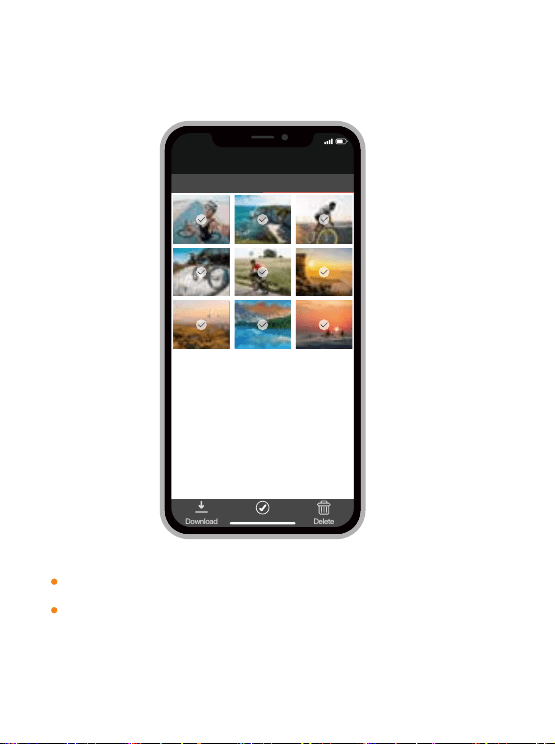
Download Photos/Videos from Action
Camera to Your Phone
Enter Camera and view device files.
Select the desired photos/videos and tap "Download",
the files will be saved to your phone.
10:12
Selected0
Device File
Cancel
Video Clip
Download
Select All
Delete
Image
-45-
Product Specifications
Model
Sensor
Lens
Photo Resolution
Image Format
Ports Micro USB / Micro HDMI
S3
SONY CMOS
160° Wide Angle Lens (Adjustable)
20MP/16MP/12MP/8MP/5M
Audio Format
Anti Shake Mode
AAC
SuperSmooth2.0
Android / iOS supported
(25~50 FT), 2.4Ghz
Dual-core Arm A7@900Mhz
Wi-Fi Connection
CPU
Video FPS
4K 30FPS
2.7K 30FPS
1440P /60/30FPS
1080P 90/60/30FPS
720P 120/60/30FPS
Video Format
MP4/H.265、H.264
Display
Dimension
2.0 Inch LCD (Rear Screen)
1.4 Inch LCD (Front Screen)
JPG / RAW

-46-
Charging Time About 3 hours (5V/2A)
Battery
3.7V/1350mAh
Rechargeable Li-ion Battery
Operating
Temperature
0 ℃ ~ 50 ℃
Waterproof
Depth
About 5M/16.4FT (Without Waterproof Case)
30M/98.4FT (With Waterproof Case)
Class U1-U3
(Support up to 256GB Memory Card)
Mirco SD Card

-47-
Trouble Shooting/FAQ
Q1: Which type of memory card can be supported by this
camera?
A1: This camera can support a Class 10 UHS-3 memory
card or above (TF Card), 256GB is the maximum size that
can be supported. It’s recommended to use SAMSUNG and
Sandisk A2 TF card.
Q2: Although you have already inserted the SD card, the
screen prompts “Please insert SD card” .
A2: You need to check whether the SD card is formatted on
the camera in the first instance. If the problem still cannot
be solved, the file system on the SD card may have become
corrupted. Please try changing the SD card to a new UHS-3
SD card with capacity 64-256GB.
Q3: Why the recorded files have not been saved?
A3: You need to make sure the camera is recording and the
SD card is in the correct format for normal recording or
replaced by other SD card that meets the requirements.
Q4: Why I can not operate or turn on the camera
normally?
A4: First ensure that the battery can be charged, whether
fully charged or replaced the backup battery, and then boot
up the operation.

-48-
Q5: The action camera feels hot during using, is it
normal?
A5: Because this machine is a fully sealed 4K/30fps action
camera, it will have a certain amount of heat during use. The
lens ring is made from metal which is easier to dissipate
heat, so it is the hottest part. It is normal that the camera will
reach 70 Celsius after long-time 4K video recording. The
camera will be turned off automatically for safety when the
machine exceeds 95 Celsius.
Q6: Sound quality is poor or there is no sound on
playback.
A6: First make sure the device is not in the waterproof case,
because the waterproof case is designed to create an air
tight-sealed environment around the device in order to
prevent water ingress. It will reduce the sound that can be
picked up by the microphone.
Secondly, ensure the Audio setting has not been turned off.
Q7: Where can I get a replacement if accidentally
damaged an accessory during use?
A7: Don't worry, you can contact our official customer
service team via email ([email protected]) . We will
send you the replacement parts.
Q8: Is the remote control waterproof?
A8: The remote control is not completely waterproof, so it
should not be fully immersed in water. If the remote control
encounters with splashing water, please wipe it clean and
dry in time.

-49-
Warranty
All XTU products come with a limited warranty of 12
months from the date of purchase. We have a profes-
sional customer service team for supporting you as soon
as we can.
If you have any questions or confusion about our product
or the warranty, please feel free to contact us via email.
We will endeavor to respond to you within 24 hours and
will do our best to help you solve the problem until you
are satisfied.
Q9: Can the front and rear screens be turned on at the
same time? If not, how to switch the screen?
A9: The front and rear screens can't be turned on at the
same time,
you can hold Mode Button for 3 secs to switch between
front screen and rear screen, but you can't switch it when
recording.