
VERSION: 1.0
USER MANUAL
SLUSHIFY F1 SLUSHIE MACHINE
ISM2021

Contents
03
04
08
08
09
10
12
14
14
14
16
17
19
20
23
25
25
26
Introduction
Warnings
Specifications
Package Includes
Diagram
Installation
Button Functions
Instructions
Before Use
Sugar Guidelines
Alcohol Guidelines
Using the Machine
Cleaning & Maintenance
Disassembly & Cleaning
Troubleshooting/FAQ
Recycling
Warranty Period
Contact Us
The Slushie Machine is specially designed to make frozen drinks. The
device is capable of stirring sugary beverages, including soft drinks,
fruit juices, milkshakes, coffee, or low-alcohol wine, into frozen
drinks. It is commonly used in the kitchen, living room, bar, party,
and other scenes. Read and follow the instructions below before
operating this machine. We hope you enjoy your HiCOZY Slushify F1
Slushie Machine!
Thank you again for choosing HiCOZY. If you have any questions or
concerns regarding your product, please contact us at 1-866-444-2699
Introduction
Warning: Risk of fire/flammable materials.
Please thoroughly read and understand this manual before using the
product; keep it for future reference.
EN > 03

Warnings
Before use, always ensure that the power source’s voltage range
matches the one specified on the machine’s nameplate, the power cord
plug matches the socket, and that the socket is properly grounded.
Do not use this product if the power cord or socket is damaged, or
if any other electrical components are faulty.
Do not use an extension cord to connect this product to an exten-
sion cord.
Do not pour liquid and turn on the Power Button without properly
installing the vessel assembly and inserting the auger.
Do not place this product upside down or tilt it over 45°.
Do not repair or disassemble this product by yourself.
Do not expose the power cord plug or air outlet to water. Never
immerse the machine in water or other liquids, doing so may cause
an electric shock.
Always keep your hands dry when plugging in or operating the product.
Disconnect the power plug when the product is not in use or while
cleaning. To prevent injury or damage, please hold the plug rather
than the cord when unplugging.
Keep the product away from ovens, electric stoves, and other heat
sources to prevent accidents.
For effective heat dissipation, ensure the product is kept at least 3in
away from other items.
Use only recommended or specified accessories, do not use this
machine for purposes other than those specified.
EN > 04

Before starting the machine, ensure the vessel only contains the
beverage and no other foreign matter.
To prevent accidents, avoid disassembling the vessel while the machine
is running.
Limit the frequency of starting the product to at least 5-minute
intervals. Excessive restarting will damage the compressor.
This product is intended for home or indoor use only and should not
be operated outdoors.
For consistent operation and results, maintain an ambient room
temperature between 41°F-90°F (5℃ and 32℃.)
Never insert metal sheets or other conductive materials into the
machine. Doing so may cause a fire or short circuit.
Only clean the product with non-chemical solutions and avoid using
hard tools. The host unit should never come into contact with water.
Do not pour dangerous or hazardous liquids into the vessel.
Keep the vessel’s top cover closed as much as possible during use and
storage; this reduces the likelihood of harmful contamination.
It is normal for the auger to make a slight noise when it contacts the
evaporator at startup if the machine is not full.
This machine should not be operated by individuals (including children)
with poor physical strength, reduced mental faculties, or lack of experi-
ence and knowledge unless they are under appropriate supervision
or instruction.
If the evaporator freezes or the auger makes unusual noises, turn off the
machine and adjust the amount of sugar or alcohol in the beverages.
EN > 05

Donotaddicecubesorsolidingredientslikenuts,candies,and
dicedfruits.Freshjuiceneedstobefilteredbeforeaddingtoavoid
shortcircuits.
Do not add hot ingredients to the unit. Ensure that the temperature of
any liquid added to the vessel is between 32°F-86°F (0°C and 30°C).
All inputs must contain a minimum of 6% sugar. Otherwise, it may
prevent proper formation. This guideline does not apply to low-calorie,
sugar-free, or diet drinks.
Allalcoholicinputsmustcontainbetween3%and16%alcohol.
Alcoholcontentoutsideofthisrangemaypreventproperfreezing.
Do not add water directly to the unit to make a slushie, as this can
cause the evaporator to freeze.
Please carefully monitor the water level line when adding beverages.
If the level is below the minimum, the machine will not be able to
produce frozen drinks. However, if it exceeds the maximum level,
the frozen drinks may overflow.
To speed up the process of making frozen drinks, we recommend
using cold beverages (cool them in the refrigerator in advance, but
do not freeze them).
Do not knock the surface or edge of the vessel when removing the
frozen drinks. Doing so may damage the vessel.
Keep hair and clothes away from the machine when loading, unload-
ing and operating.
Do not attempt to speed up the defrosting process using other
machines or methods.
EN > 06
Allinputsmustcontainaminimumof6%sugar.Other-
wise,itmaypreventproperformation.Thisguidelinedoes
notapplytolow-calorie,sugar-free,ordietdrinks.
Allalcoholicinputsmustcontainbetween3%and16%
alcohol.Alcoholcontentoutsideofthisrangemayprevent
properfreezing.
Do not add water directly to the unit to make a slushie, as
this can cause the evaporator to freeze.
Do not add hot ingredients to the unit. Ensure that the
temperature of any liquid added to the vessel is between
32°F-86°F (0°C and 30°C).
To ensure stable compressor operation, keep the product
standing for 4 hours before use if it has been overturned or
tilted.
Donotaddicecubesorsolidingredientslikenuts,candies,
and diced fruits. Fresh juice needs to be filtered before
addingtoavoidshortcircuits.
Tips & Tricks
SUGAR
EN > 07

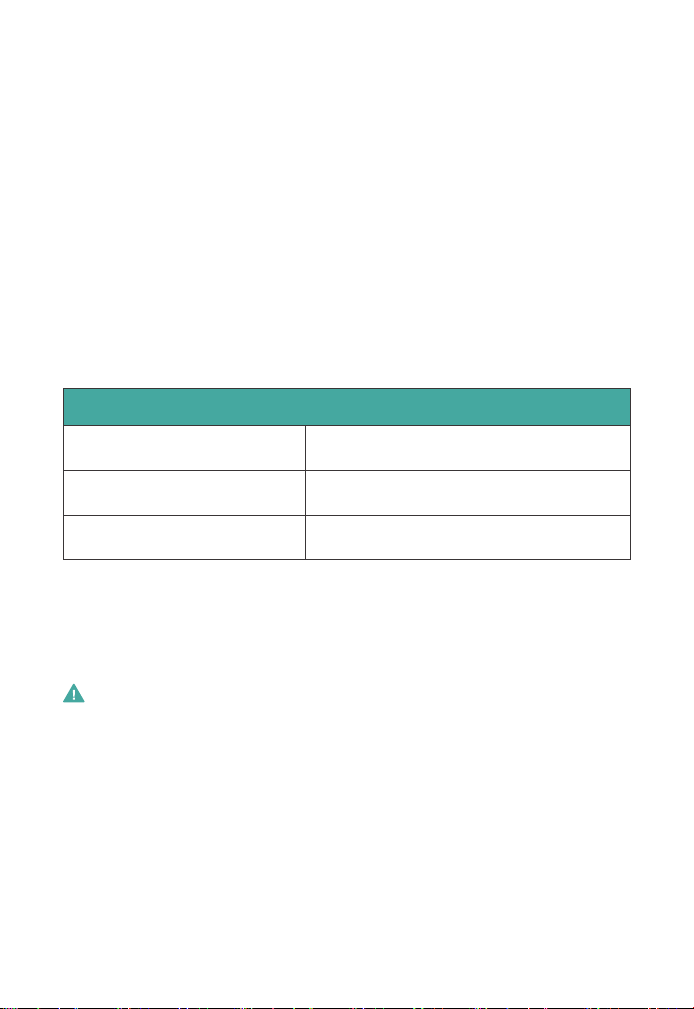
Specifications
Product Name
Model
Duration of Manufacturing
Capacity
Working Voltage
Power
Weight
Dimension
Refrigerant/
Refrigerant Amount
Frozen Drink Maker
ISM2021
15 ~ 60mins
48oz
AC 110 ~ 120V/60Hz/2.4A (US/CA/MX)
AC 220 ~ 240V/50Hz/1.4A (UK/AE)
200W (US/CA/MX)
220W (UK/AE)
23.1lb(10.5kg)(US/CA/MX)
23.8lb(10.8kg)(UK/AE)
16.9 (L) × 6.9 (W) × 17.6 (H) in
(429 × 175 × 446mm)
R290/0.74oz (21g) (US/CA/MX)
R290/0.8oz (23g) (UK/AE)
Package Includes
Slushie Machine
Handle
Drip Tray
× 1
× 1
× 1
× 1
× 1
× 1
User Manual
After-Sales Card
Guidebook
EN > 08

Diagram
1
2
9
1211
10
5
8
6
7
4
3
Note: Minimum Input = 2 cups (16oz) Maximum Input = 6 cups (48oz)
4
1
2
3
Handle
Vessel
Pour Spout
Top Cover
Control Panel
Cooling Vent
Evaporator
Vessel Lock
10
11
12
5
Auger
Water Pan
Drip Tray Lid
Drip Tray
6
7
8
9
EN > 09
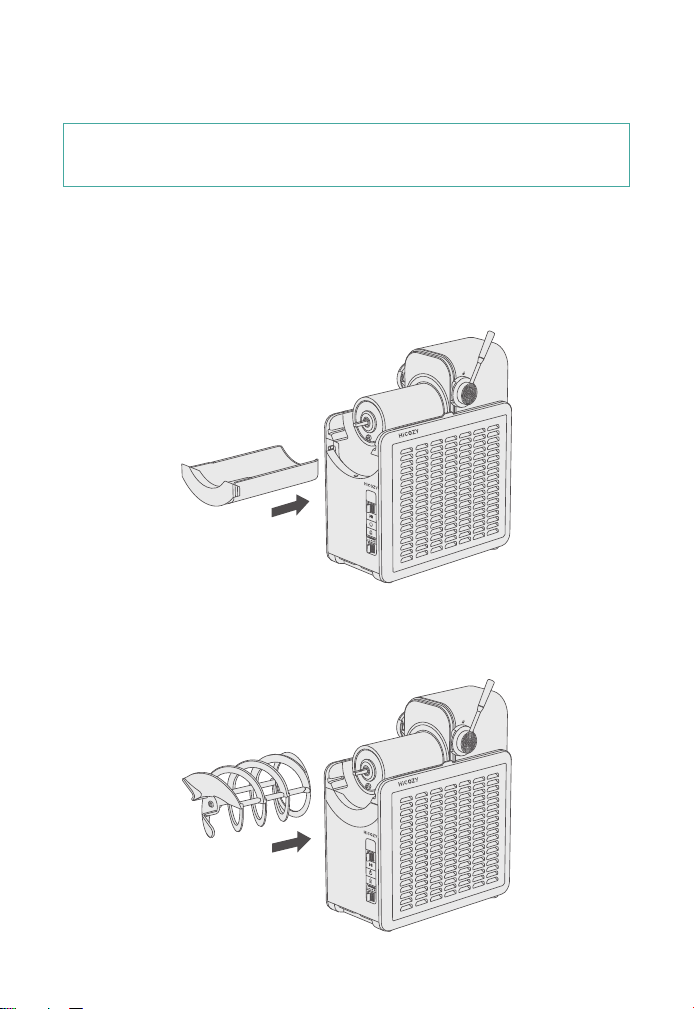
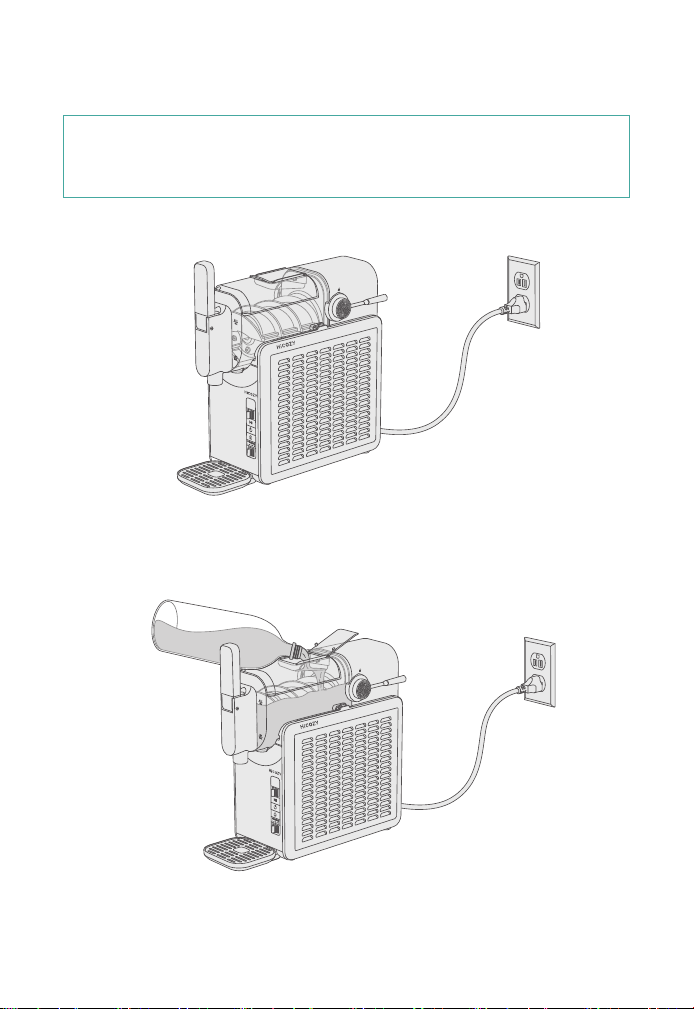
Installation
1. Ensure all parts are fully cleaned and the slushie machine is level on
a flat, solid surface.
2. Slide the water pan into the guide track and install it under the
evaporator.
3. Install the auger and ensure it is properly aligned with its designated
hole during installation.
Note: To ensure stable compressor operation, keep the product
standing for 4 hours before use if it has been overturned or tilted.
EN > 10
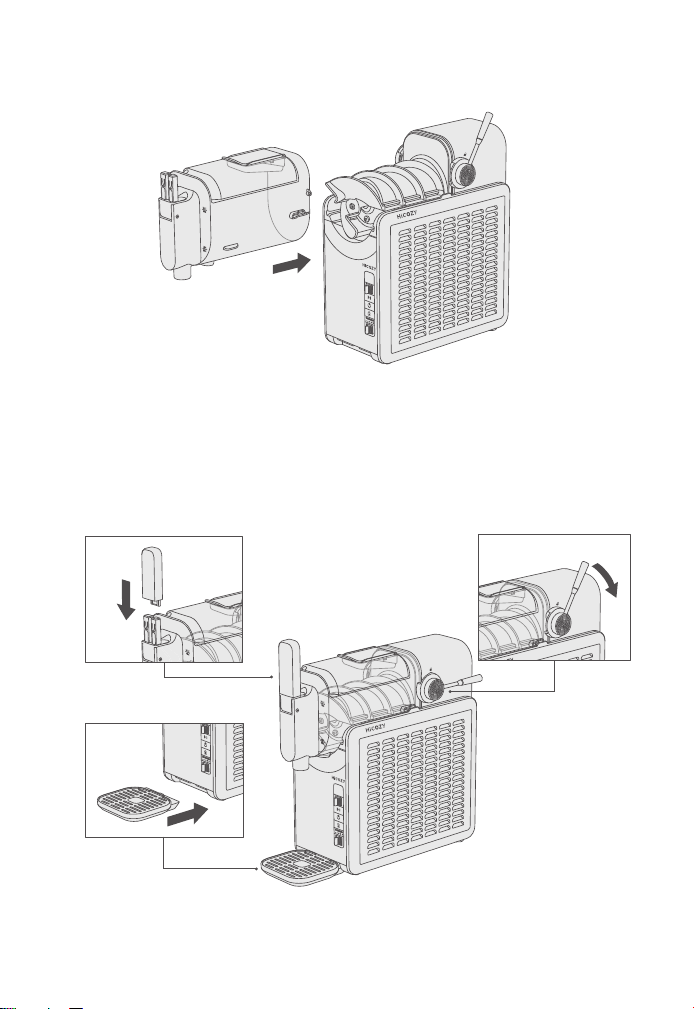
4. Install the vessel by inserting it between the water pan and the auger.
5. Press the handle down to install it, and then place the drip tray at
the base below the control panel.
6. Pull down the vessel lock; ensure it is securely locked before operating.
EN > 11
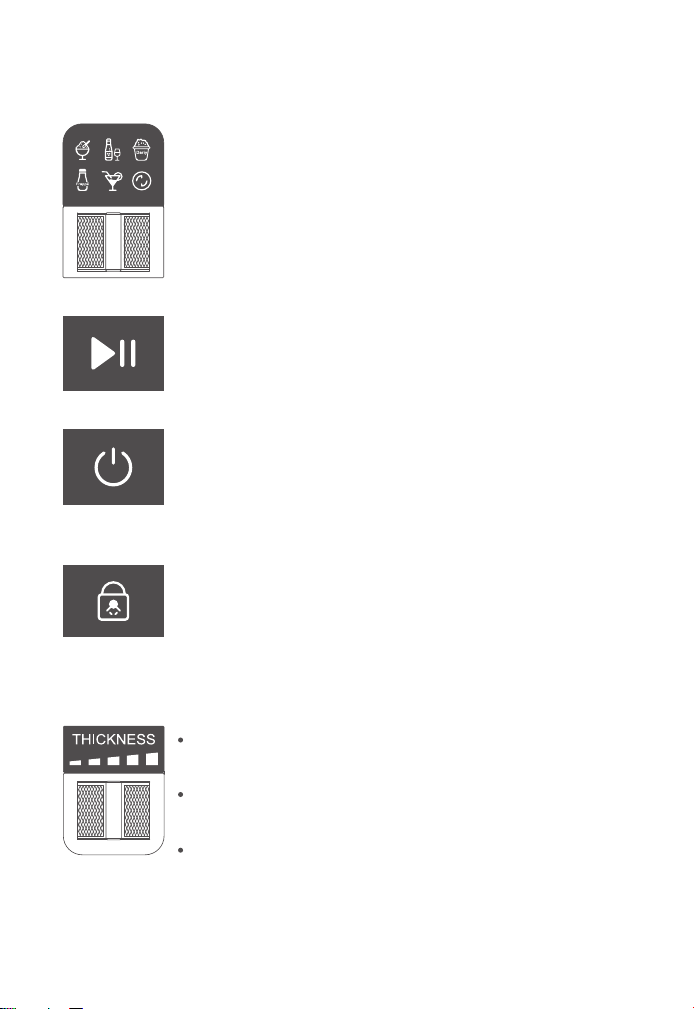
Mode Button
By toggling it to the left or right, the corresponding mode icon
will blink.
Start/Pause Button
Press this button to start making slushies. Press it again to pause
the slushie-making process.
Power Button
Press the Power Button to turn on the power. Press it again to
turn off the power.
Child Lock
Whentheunitisonfor10seconds,thechildlockfunctionwill
activateautomaticallyandallbuttonswillbeinoperable.
Todisablethechildlock,pressandholdtheChildLockButton
for2seconds;thiswillrestorethebuttons’regularfunctionality.
Button Functions
Thickness Switch
To adjust the thickness of your frozen drinks, toggle the switch
right or left to choose between 5 thickness level settings.
Moving from left to right increases the thickness and changes
the taste of the frozen drinks.
The memory function will automatically set the thickness setting
to the level you chose last time.
EN > 12
Clean
The machine is in
the third
thickness level by
default. During
use, you can
adjust the
thickness of the
frozen drinks or
the proportion of
sugar and alcohol
as needed,
thereby achieving
or obtaining the
perfect frozen
drinks.
After the cleaning
mode is activated,
the machine will
automatically clean
for 4 minutes and
then stop.
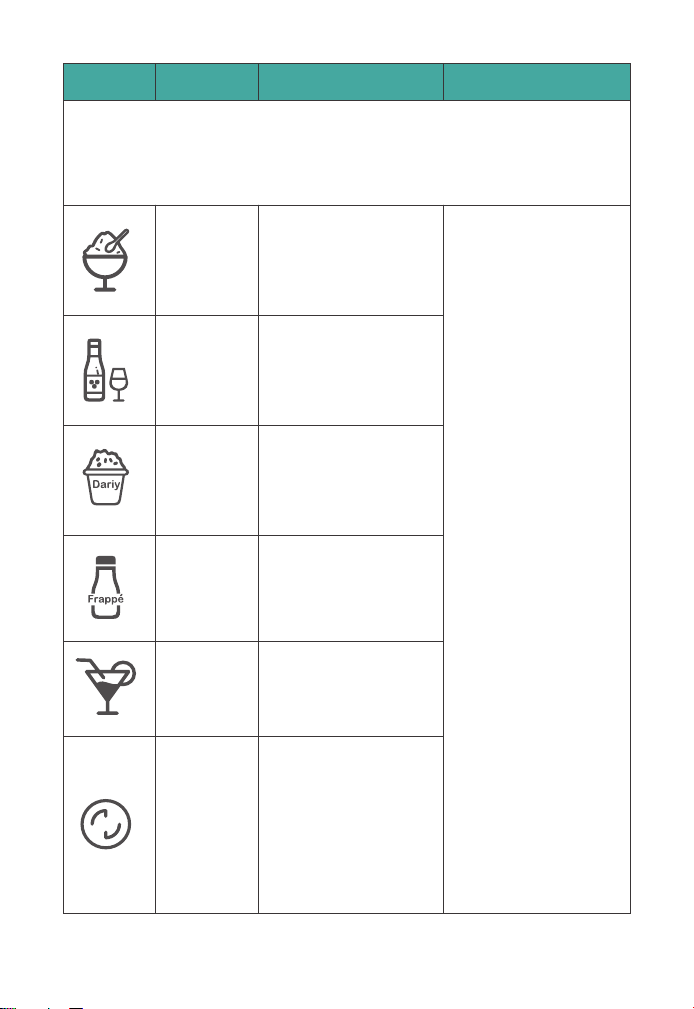
Coffee
Slushie
Store-Bought or
Handcrafted
Coffee
Regular
Slushie
Regular
Sugar-Sweetened
Beverages
Cocktail
Slushie
Beverages with
Alcoholic Content
Wine
Slushie
Beverages with
Wine or Sparkling
Wine
Milk
Slushie
Dairy-and
Cream-Based
Beverages
Icon Model Design for Preset
There are 6 mode icons in total. When selecting and making
slushies, the icon will flash. When the slushie is done, the icon
will stay illuminated.
EN > 13

Instructions
Before Use
To ensure stable compressor operation, keep the product standing
for 4 hours before use if it has been overturned or tilted.
Ensure the power supply voltage range matches the value on the
nameplate specification.
Keep the slushie machine on a flat surface to ensure stable compres-
sor operation.
DO not add ice cubes or solid ingredients like nuts, candies, and
diced fruits. Fresh juice needs to be filtered before adding.
Do not add hot ingredients to the unit. Ensure that the temperature of
any liquid added to the vessel is between 32°F-86°F (0°C and 30°C).
Do not add water directly to the unit to make a slushie, as this can
cause the evaporator to freeze.
Ensure that the vessel lock is locked by referring to the “Installation”
section for assembly instructions.
Sugar Guidelines
All inputs must contain a minimum of 6% sugar. Otherwise, it may prevent
proper formation. If a drink does not meet the minimum sugar require-
ment, you can add one of the following ingredients to increase the sugar
level: white sugar, coconut sugar, honey, maple syrup, agave nectar, white
syrup, chocolate syrup, or caramel sauce. Stir the additional sugar into the
base ingredients before pouring the mixture into the vessel.
You can refer to the beverage/liquid nutrition label to ensure that the
sugar content meets the following recommended minimums.
EN > 14
16oz (470ml)
48oz (1400ml)
28g
85g
Low-Sugar Alert: Frozen Evaporator
1. Do not add water directly to the unit to make a slushie, as this can
cause the evaporator to freeze.
2. Sugar-free alternatives or artificial sweeteners with low sugar content
may not produce frozen drinks directly.
3. If the evaporator starts to freeze, you can try lowering the thickness
level. If you set it to the lowest level and the issue persists, you will
need to add extra sugar to the already poured liquid to meet the
required sugar content.
Note: Do not turn on the vessel lock.
EXAMPLE: Cola
Serving Size
Serving Size
% Daily Valve
Amount Per Serving
Not a significant source of saturated fat,
trans gar,cholesterol,dietary fiber
vitamin D, calcium, iron and potassium.
Calories
Tolat Fat 0%0g
Protein 0g
45mg
39g
140
1 Can
Nutrition Facts
Serving Size Minimum Total Sugar Amount
Troubleshooting Tips
Sodium
Total Carbohydrate
Total Sugars 39g
Total Sugars
39g meets the minimum
sugar content requirements
2%
14%
78%Includes 39g added Sugars
1can=12oz
EN > 15
Alcohol Guidelines
When using the Wine & Cocktail Mode preset, all pre-made inputs
(such as wine, beer, etc.) must contain between 3% and 16% alcohol.
Alcohol content outside of this range may prevent proper freezing.
If the alcohol content of a drink exceeds 16%, you can dilute it by
adding one of the following ingredients: juice, soda, tonic water, water,
non-alcoholic mixed drinks, coffee, or tea.
To make frozen cocktails, refer to the chart below to see the maximum
allowable content of hard alcohol or spirits (such as vodka, tequila,
etc.) per total recipe size.
The above chart is a guide for adding hard alcohol or spirits (35% +
ABV). For instructions on adding wine, beer, soda, or pre-made
cocktails, please refer to guidebook page 21 for details.
3 cups (24oz) ½ cups (4oz)
4 ½ cups (36oz) ¾ cups (6oz)
6 cups (48oz) 1 cups (8oz)
Total Recipe Size Maximum Alcohol Amount
High-alcohol alert: The mixture remains in a liquid state and cannot
solidify.
If the machine fails to make the frozen drink, you can try increasing
the thickness level. If you set it to the highest level and the issue
persists, you may need to add extra diluted liquids to the already
poured liquid to meet the required alcohol content.
Note: Do not turn on the vessel lock.
Troubleshooting Tips
EN > 16
Using the Machine
1. Connect the power supply, pull down the vessel lock.
2. Open the top cover of the vessel and slowly pour beverages into the
vessel without exceeding the maximum water level.
3. Close the top cover of the vessel.
Note: Minimum input = 2 cups (16 oz) Maximum input = 6 cups (48 oz)
Clean the vessle, auger, and evaporator properly before use. Do not wash
or submerge the unit directly into water.
EN > 17
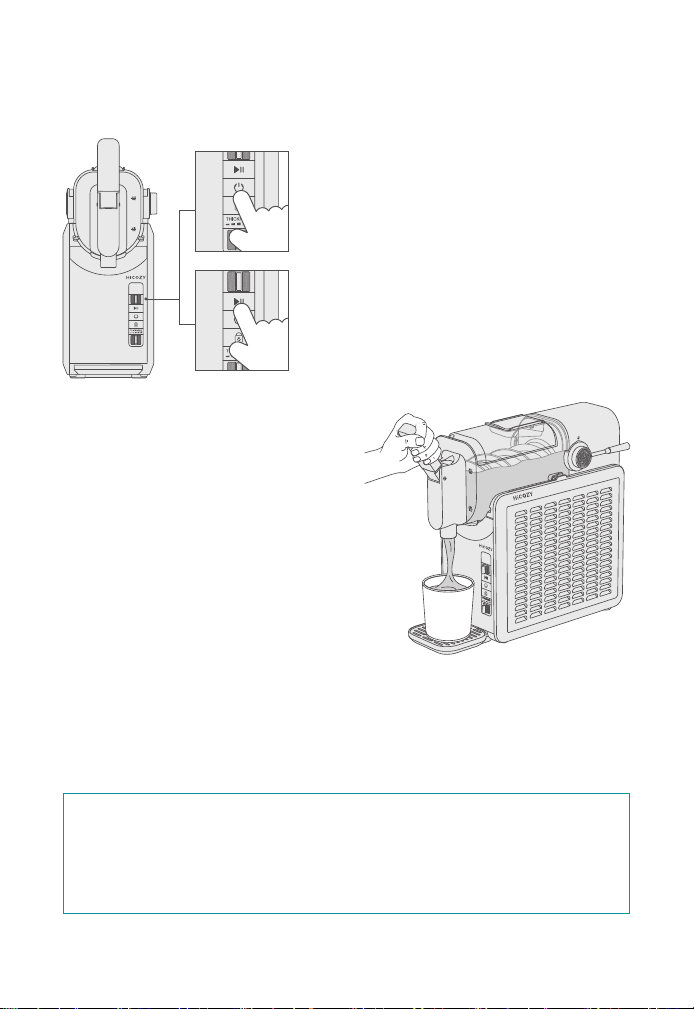
4. Press the Power Button to turn on the machine. The mode icon will
flash, allowing you to select the desired mode.
5. Press the Start Button and wait
until the frozen drink is ready.
The machine will have audible
alerts when it’s done.
You can add ingredients, adjust the thickness, and change the mode as needed
while making frozen drinks to achieve your desired results. Make sure to disable
the child lock function. Do not turn on the vessel lock.
6. Place a cup under the pour
spout, then pull the handle
to enjoy your frozen drink.
Return the handle to its orig-
inal position to stop the flow.
7. Clean the machine immediately after dispensing the frozen drink to
make cleaning easier. (For detailed cleaning instructions, refer to
the “Cleaning & Maintenance” section of this manual.)
Tips:
EN > 18
1. Make sure the machine is not in any slushie making-mode before
adding water.
2. Before activating the cleaning function, please pour fresh water into
the vessel until it reaches the maximum water level.
3. Select the Cleaning Mode and start it to clean the machine.The
default cleaning time is 4 minutes.
4. After the cleaning, press the handle to empty the water from the
vessel.
5. During the cleaning process, you can press the Pause Button to stop
the cleaning.
If the vessel remains dirty after the initial cleaning, repeat the steps
outlined above.
The water temperature should not exceed 122°F (50°C).
During the cleaning process, you can press the Pause Button to
stop the cleaning.
Please refer to the next page for detailed instructions on cleaning parts
after using the Cleaning Mode.
Notes
Cleaning & Maintenance
Using the Cleaning Mode
To maintain the fresh taste of frozen drinks and the cleanliness of the
maker, HiCOZY recommends using the cleaning function 1 or 2 times
after each use.
EN > 19
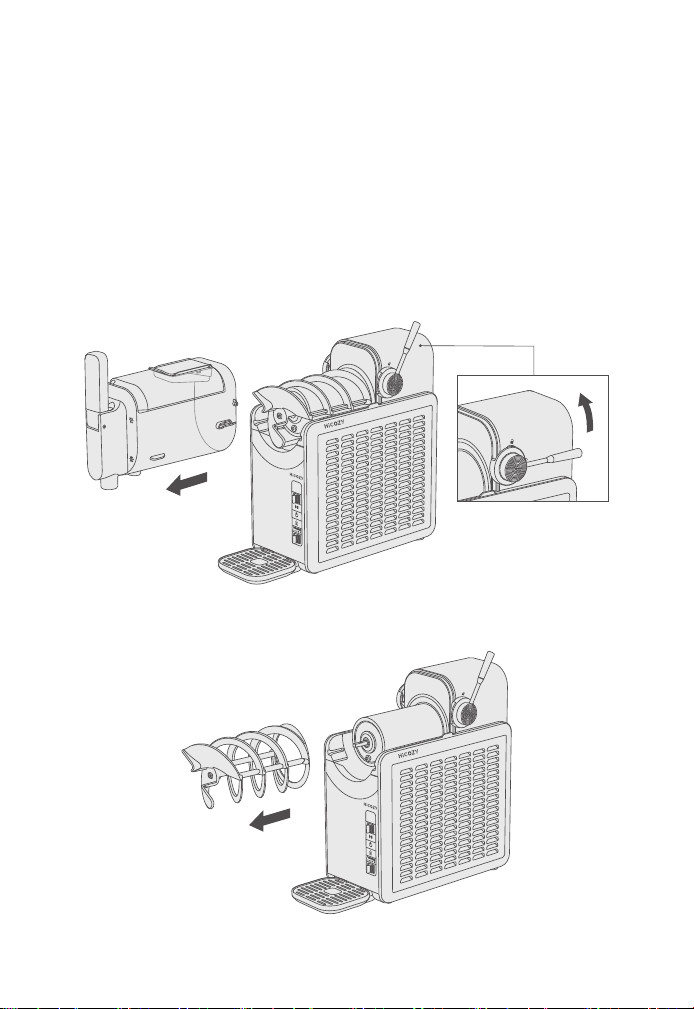
Disassembly & Cleaning
Warning: ALWAYS ensure the machine is unplugged before attempting
to clean any part of it.
For the best results, start by using the cleaning mode before disas-
sembling and cleaning all parts.
1.
Unplug the power supply, toggle the vessel lock to the unlocked
position, and remove the vessel.
2. Remove the auger.
EN > 20
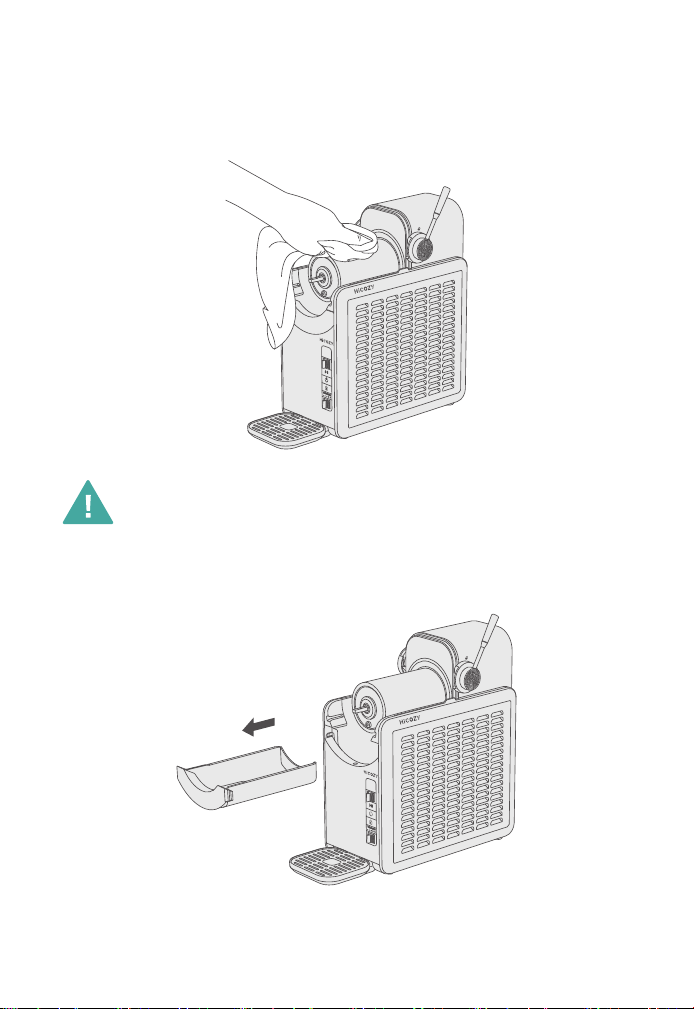
When cleaning the evaporator, do not remove the water pan,
as water may enter the machine.
3. Scrub the evaporator and its sealing ring with a clean, soft towel. Do
not disassemble or pull on the seal ring, as this may cause deforma-
tion and lead to water leakage.
4. Pull out the water pan and pour out the liquid inside.
EN > 21
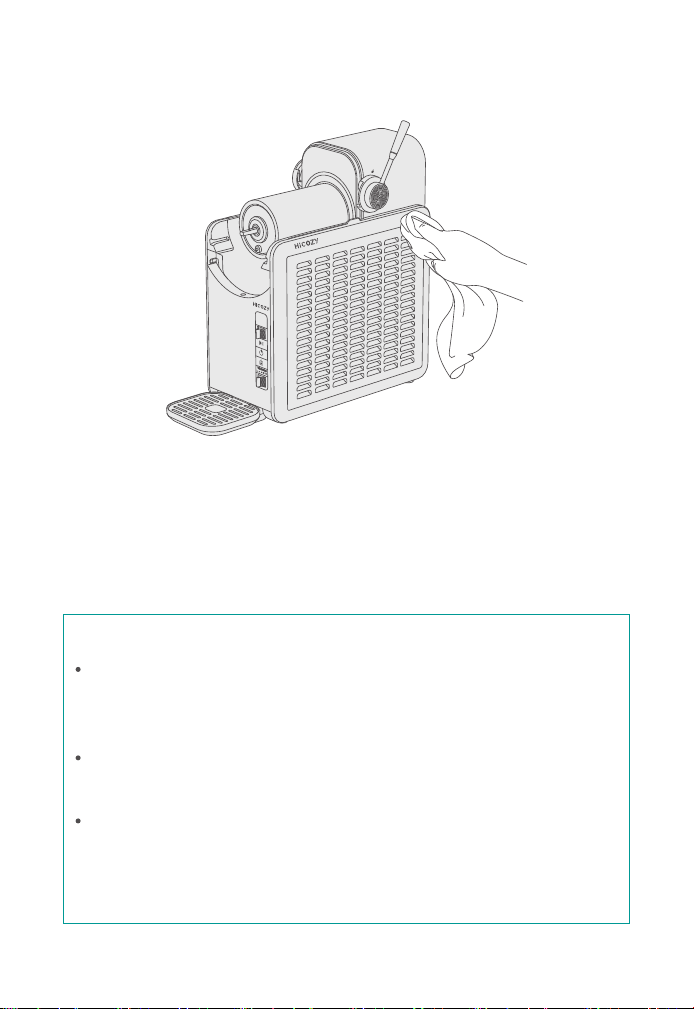
5. Wipe down the area underneath the evaporator with a sanitized or
warm, damp cloth.
6. Remove the drip tray as needed.
7. After disassembling the parts, you can either rinse them directly
under a tap or place them in a container for soaking and cleaning.
8.
Once the cleaned parts are air-dried or dried with a towel, reinstall
them in the machine.
Use a soft brush and detergent to clean stubborn stains and
grease that are difficult to remove. Please make sure to thoroughly
rinse off any residues.
Clean the vessel assembly, water pan, and auger promptly after
use to avoid unpleasant odors.
Do not scrub the unit with abrasive tools such as a high-strength
cleaning ball. Do not rinse the evaporator or the unit body directly
with water, as this may cause water ingress and potential damage
to the unit.
Note
EN > 22

Troubleshooting/FAQ
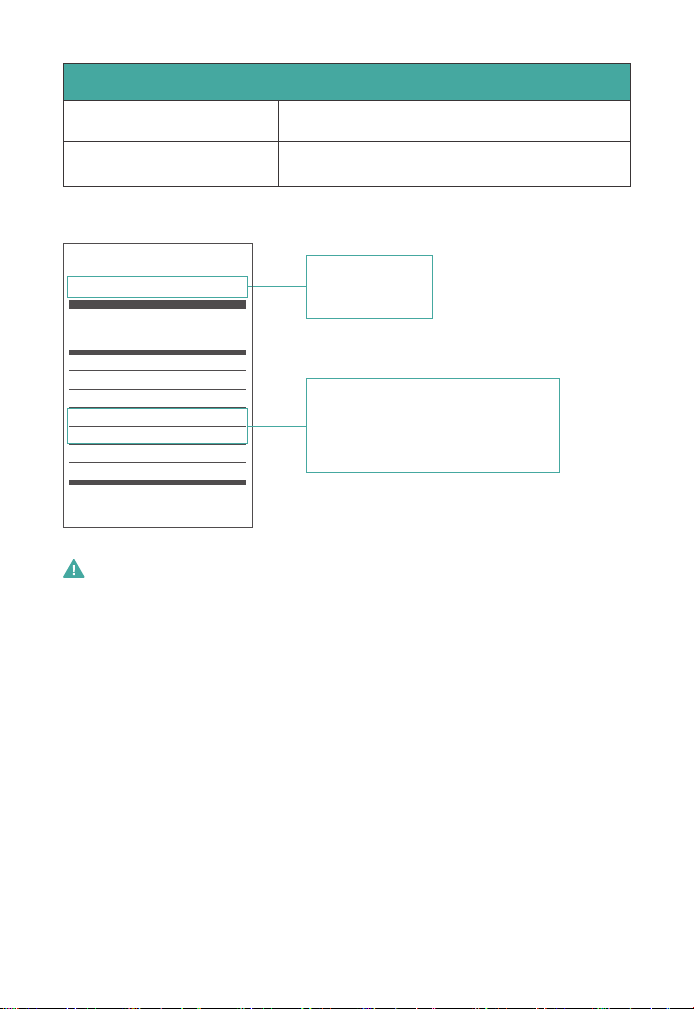
Troubleshooting Display Icons Flashing
This manual provides solutions to common problems, enabling you to
troubleshoot and resolve some common faults on your own. If the issues
persist after trying these solutions, please feel free to contact our
customer service team at 1-866-444-2699, or at [email protected].
Display shows fully illuminated flashing icons: Check the vessel
assembly to ensure that the vessel switch is properly installed and
locked.
Display flashes with 1 indicator of the thickness bar lit: The sensor
may be short-circuited. Please contact HiCOZY customer support.
Display flashes with 2 indicators of the thickness bar lit: The sensor
may be open circuited. Please contact customer service.
Display flashes with 3 indicators of the thickness bar lit: The motor
may be blocked. Please contact customer service.
The Auger Makes Unusual Sounds
If you use materials with low sugar content or set the temperature
too low, the evaporator may freeze, resulting in harder frozen drinks
and unusual sounds. Try adding sugar or switching to drinks with a
higher sugar content.
Check whether the auger is properly assembled and free of defor-
mation. If any issues are found, assemble the auger correctly.
If the auger is deformed, please contact HiCOZY customer support.
WARNING: Turn off the power and unplug the unit before troubleshoot-
ing to reduce the risk of electric shock and unintended operation.
EN > 23

The Evaporator is Not Functioning
Check whether the power plug is properly connected to the power
supply.
Check whether both the fan and compressor start. If not, please
contact customer support.
Check whether there is sufficient cooling space around the machine
(greater than 3in).
Pour Spout Leakage
Check whether the pour spout seal ring is damaged.
Check whether the handle is closed.
It is normal that a small amount of condensate water drips from the
exterior of the pour spout.
Auger is Unable to Run
Check whether the auger is properly assembled.
Check the vessel for any caked residue from the beverage. If residue is
present, melt it before restarting the machine.
The Frozen Drinks are Unable to be Shaped
If the frozen drinks are still too soft to be shaped after 60 minutes,
you can toggle the Thickness Button to increase the thickness.
Check whether the added beverages contain less than 6% sugar or
have an alcohol content either higher than 16% or less than 3%.
Beverages that do not meet these criteria cannot be shaped.
EN > 24

This product contains a refrigerant that must be removed before
disposal, as required by Federal Law. Please ensure the product is
disposed of in accordance with local regulations.
Recycling
Warranty Period
If the slushie machine malfunctions due to a defect in material or
workmanship during the 1-year limited warranty, HiCOZY will, at its
sole discretion, either replace your product with a new one or issue a
refund of the purchase price.
The warranty service shall not cover the following:
Service trips to your home.
Improper maintenance.
Replacement of house fuses or resetting of circuit breakers.
Incidental or consequential damage resulting from possible defects
in the appliance.
Labor and other charges related to the installation and/or removal
of the product.
Any damage due to private disassembly.
Each HiCOZY Slushie Machine is guaranteed to be free from defects
in materials and workmanship. This warranty does not cover damage
resulting from neglect, misuse, contamination, alteration, accident, or
abnormal operating or handling conditions. It only applies to the original
purchaser and is non-transferable.
1-year warranty and free returns within 30 days for any reason
from HiCOZY.
EN > 25

Thank You for Your Purchase!
HiCOZY is always looking forward to providing our customers
with excellent products and customer services.
For any questions or concerns, please contact us.
We are glad to help you!
Get in Touch
Visit Our Website at hicozy.com
Or Find Us on Facebook: facebook.com/HiCOZY.community
Scan the code for online help, tips and
tricks, FAQs, and how-to videos.
Call us: 1-866-444-2699
Mon to Fri, 9:00am to 5:00pm, PT
E-Mail: [email protected]
Online
EN > 26

Questions or Problems?
Call Us: 1-866-444-2699,
Mon to Fri, 9:00am to 5:00pm, PST
E-Mail: [email protected]
