VERSION: 1.0
USER MANUAL
6QT DIGITAL AIR FRYER
AF600


Contents
ENGLISH 04-29
Introduction
Warning
Package Includes
Diagram
First-Time Setup
Instructions
Maintenance
Troubleshooting/FAQ
Specifications
Recycling
Warranty Period
04
05
12
13
19
21
26
27
28
29
29
Introducción
Advertencias
El paquete incluye
Diagrama
Antes de usarla por primera vez
Instrucciones
Mantenimiento
Solución de problemas/Preguntas frecuentes
Características técnicas
Reciclaje
Período de garantía
31
32
39
40
46
48
53
55
56
57
57
ESPAÑOL 31-57

Dear HiCOZY user:
Thank you for purchasing the HiCOZY 6QT Digital Air Fryer.
Please fully read and understand this manual before using this product
and keep this manual for future reference.
If you have any questions about or issues with your new product,
please email us via [email protected].
Join the HiCOZY Community on Facebook. facebook.com/groups/…….
Explore Our Recipe Gallery www.hicozy.com/recipes
Introduction
Please fully read and follow this manual before using this product;
keep this manual for future reference.
EN > 04
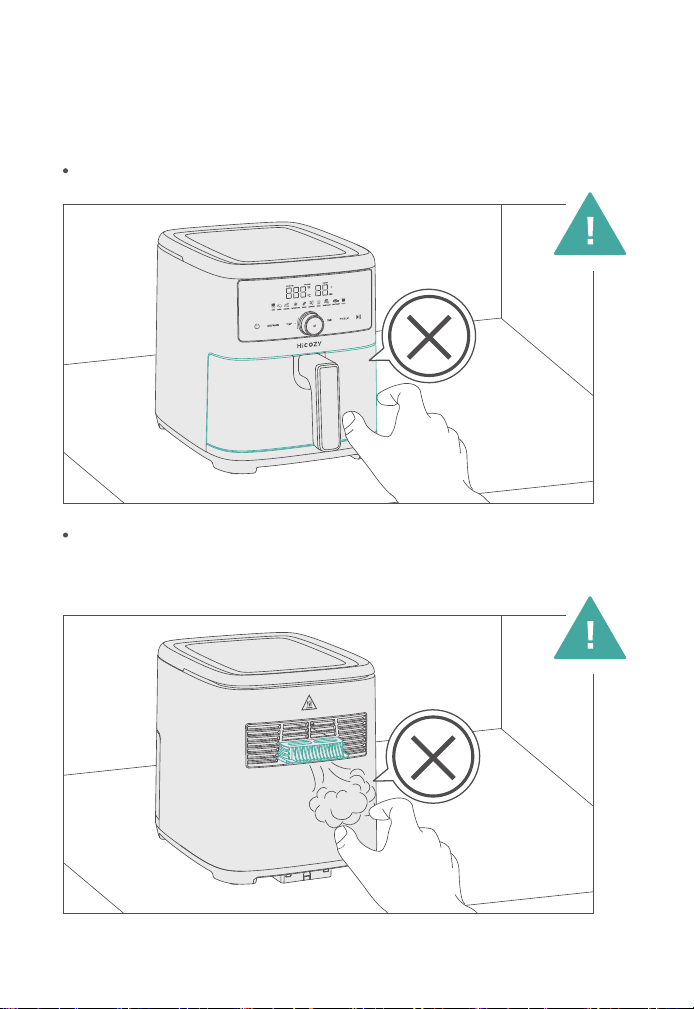
Warning
Important Safeguards
Do not touch hot surfaces. Use the handle while the air fryer is on.
Do not block any of the ventilation openings. Hot steam releases
through them while the air fryer is on. Keep your hands and face
clear of openings.
EN > 05

Read all instructions.
Do not touch hot surfaces. Use handles or knobs. When interacting
with hot surfaces, always use oven mitts or potholders.
To protect against electric shock, never immerse the cord, plugs, or
appliance in water or other liquid.
Children should be supervised to ensure that they do not play with
the appliance.
Firmly insert the crisper plate into the basket to prevent it from
falling out.
When handling hot food, always carefully remove it with oven mitts
or silicone-tipped utensils.
When using electrical appliances, basic precautions should always be
followed, including the following:
General Safety
Caution: The hot crisper plate may fall out when turning the basket over.
Note:
1
1
2
2
EN > 06

This appliance may only be used and cleaned by children age 8 and
older or by persons with reduced physical, sensory, or mental capabilities,
or lack of experience and knowledge, ONLY IF they have been given
supervision or instruction concerning the use of the appliance by a
person responsible for their safety.
Unplug from the outlet when not in use and before cleaning. Allow
the appliance to cool before removing or installing any of its parts,
and before cleaning the appliance.
Do not operate any appliance with a damaged cord or plug, or after
the appliance malfunctions, or if it has been damaged in any manner.
Bring it to a qualified technician for examination, repair, or adjustment.
Note: Do NOT attempt to repair the unit yourself. This will void the
warranty.
The use of accessory attachments is not recommended; using them
may cause injuries.
Do not use outdoors.
Do not let the cord hang over the edge of tables or counters, do not
allow it to touch hot surfaces.
Do not place it on or near gas/electric burners or heated ovens.
Extreme caution must be used when moving appliances containing
hot oil or other hot liquids.
To disconnect, pull the active basket out of the air fryer body and
remove the plug from the wall outlet.
Do not use this appliance for anything other than its intended use.
When using the crisping tray, make sure it is properly inserted into
the air fryer basket before cooking.
Always make sure any active fryer basket is fully inserted and locked
into the front of the air fryer before operation.
EN > 07

Make sure the crisping tray is in place before adding food to it.
Oversized foods or metal utensils must not be inserted in the air
fryer, they may cause a fire or electric shock.
A fire may occur if the air fryer is covered in or touching flammable
materials, including curtains, draperies, walls, etc. while in operation.
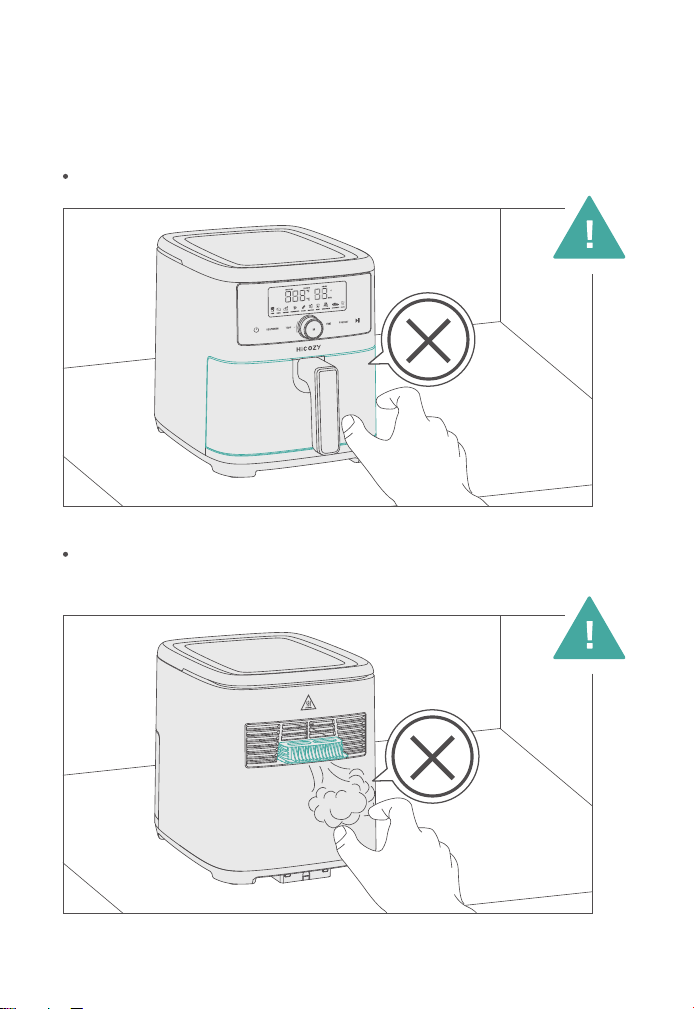
Do not store any item on top of the appliance while in operation.
Do not clean with metal scouring pads. Pieces can break off the pad
and contact the air fryer’s electrical parts, increasing the risk of an
electric shock.
Extreme caution should be exercised when using containers made
of metal or glass.
Do not store any materials, other than manufacturer-recommended
accessories, in this air fryer when not in use.
Do not place any of the following materials in the air fryer: paper,
cardboard, plastic, etc.
Do not cover the crumb tray or any part of the air fryer with metal
foil. This will cause the oven to overheat.
Press the On/Off icon once, at any time during the cooking process,
to shut down the unit. The display and running light will turn off
within 20 seconds. The fan will continue running for approximately
20 seconds to cool down the air fryer.
Caution:
The air fryer will not operate unless the basket is fully closed.
After hot air frying, roasting, broiling, baking, grilling, or reheating the
basket, accessories (if used) and cooked food will be very hot.
Extreme caution must be used when handling these items.
EN > 08
Additional Safeguards
All users of this appliance must read and understand this instruction
manual before operating or cleaning this appliance.
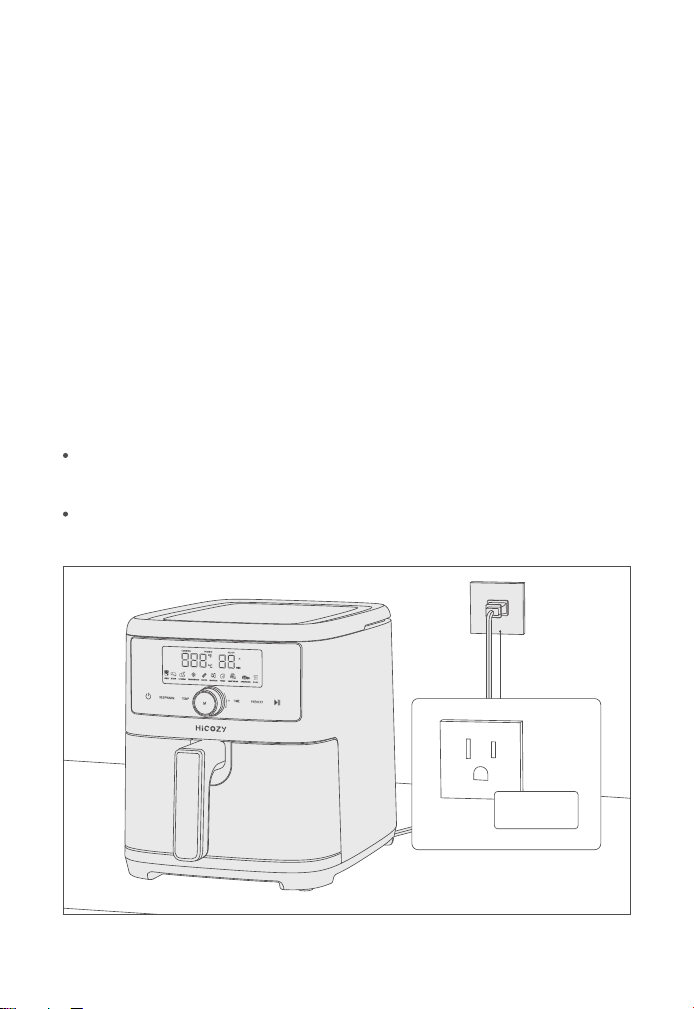
The cord to this appliance should only be plugged into a 120V AC
electrical outlet.
Caution, hot surfaces: his appliance generates heat and may release
steam during use. Proper precautions must be taken to prevent the risk
of burns, fires, or other injuries to people or property damage.
Caution: This appliance is hot during operation and retains heat for some
time after turning off. Always use oven mitts when handling hot materials
and allow the metal parts to cool before cleaning. Do not place
anything on top of the appliance while it is operating or while it is hot.
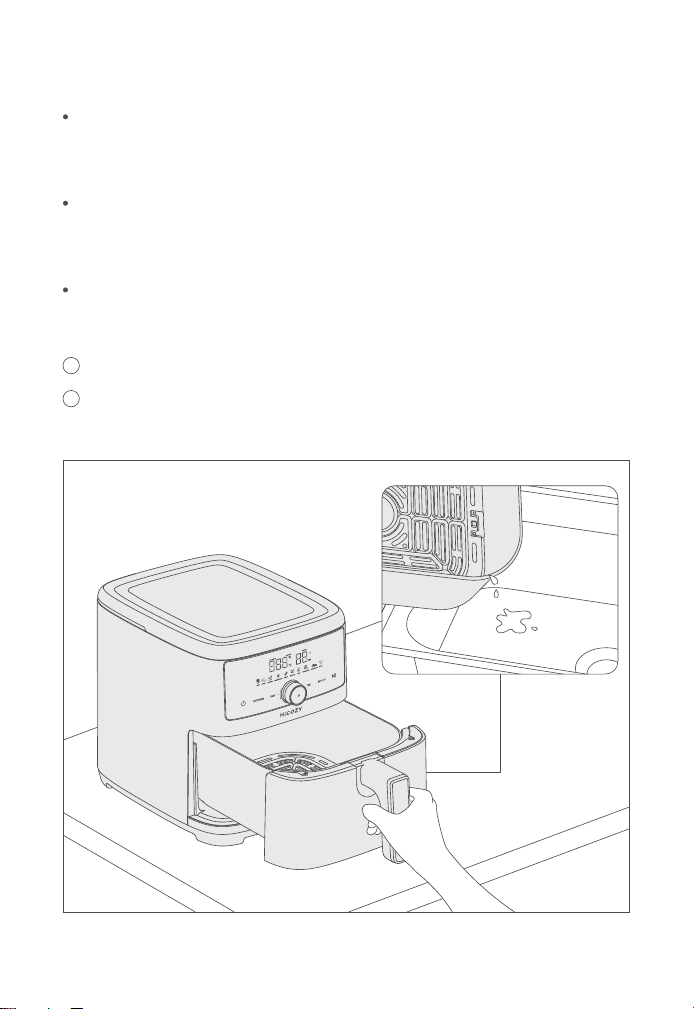
Caution: Please ensure the pot and grill/pizza/crisping tray is empty
and clean every time before preheating starts. Otherwise, the high
temperatures (over 400℉) will produce a lot of smoke.
120V
EN > 09

Warning:
Under or overfilling the air fryer basket may damage the air fryer
and could result in serious personal injury.
This air fryer should not be used to boil water.
This air fryer should never be used to deep fry foods.
If this appliance begins to malfunction during use, turn off the device
and pull any active fryer basket out of the body. Remove the plug
from the wall outlet. Please contact HiCOZY customer support and
do not attempt to use or repair the malfunctioning air fryer.
Do not immerse the power cord in any liquid. If the power cord is
damaged, it must be replaced.
To reduce the risk of electric shocks and choking, keep the cord out
of reach of children and infants.
Always use and store the air fryer on a flat, stable, heat-resistant
work area.
Do not obstruct the air outlet or air inlets on the back and sides of
the air fryer, with any objects. Avoid releasing steam from the air
outlet during cooking.
Keep the appliance at least 4 inches away from walls and other
objects during operation.
Always use the fryer basket handles to remove the fryer basket.
Never move the air fryer while it is hot or while it contains hot food.
Always allow it to sufficiently cool before attempting to move it.
Electric Power
If the electrical circuit is overloaded with other appliances, your appliance
may not operate properly. It should be operated on a separate electrical
circuit from other appliances.
EN > 10
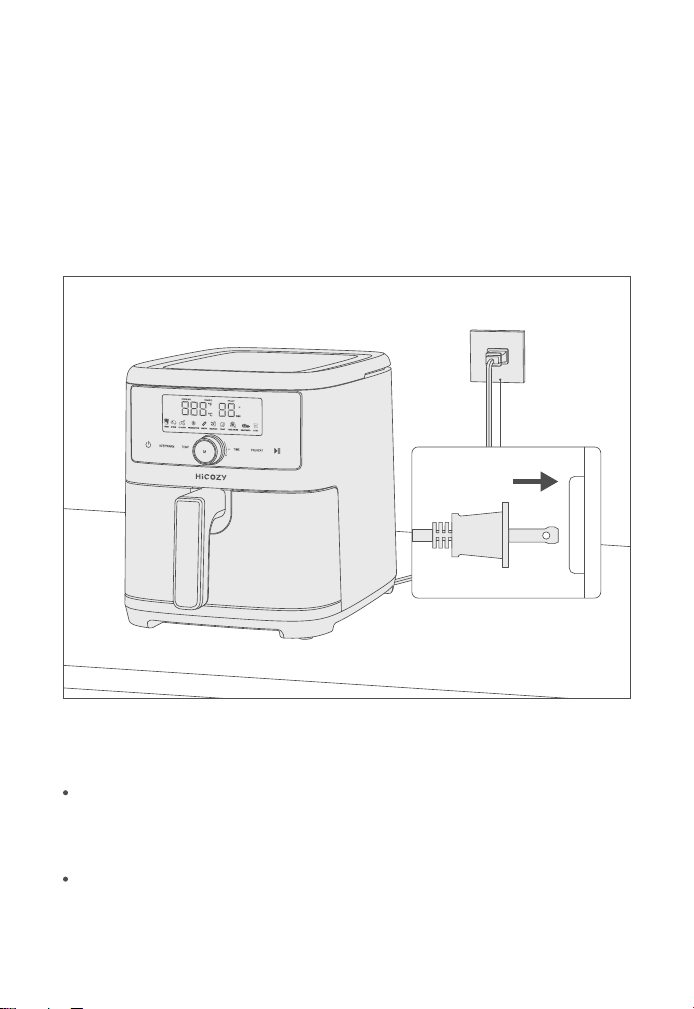
Notes on the Plug
This appliance has a polarized plug (one blade is wider than the other).
To reduce the risk of electric shock, this plug will fit in a polarized
outlet only one way. If the plug does not fit fully into the outlet, reverse
the plug. If it still does not fit, contact a qualified electrician. Do not
modify the plug in any way.
Notes on the Cord
A short power-supply cord (or detachable power-supply cord) is
provided to reduce the tangling and tripping hazards of a longer cord.
Longer detachable power-supply cords or extension cords are available
and may be used when proper care and precautions are taken.
EN > 11

Plasticizer Warning
To prevent plasticizers from migrating from the finish of the countertop
or tabletop or other furniture, place Non-Plastic coasters or place mats
between the appliance and the finish of the countertop or tabletop.
Failure to do so may cause the finish to darken, causing permanent
blemishes and stains to appear.
If a long detachable power-supply cord or extension cord is used:
The marked electrical rating of the cord or extension cord should
be at least as great as the electrical rating of the appliance.
The longer cord should be arranged so that it does not drape
over the countertop or tabletop where it can be pulled on by
children or accidentally tripped over.
1
2
Package Includes
When you receive this product, please ensure the package
includes the product and all its accessories. If you encounter
any quality issues or missing items, please contact our customer
support team.
6 Quart Air Fryer
Crisper Plate
User Manual
User Guide
x 1
x 1
x 1
x 1
EN > 12
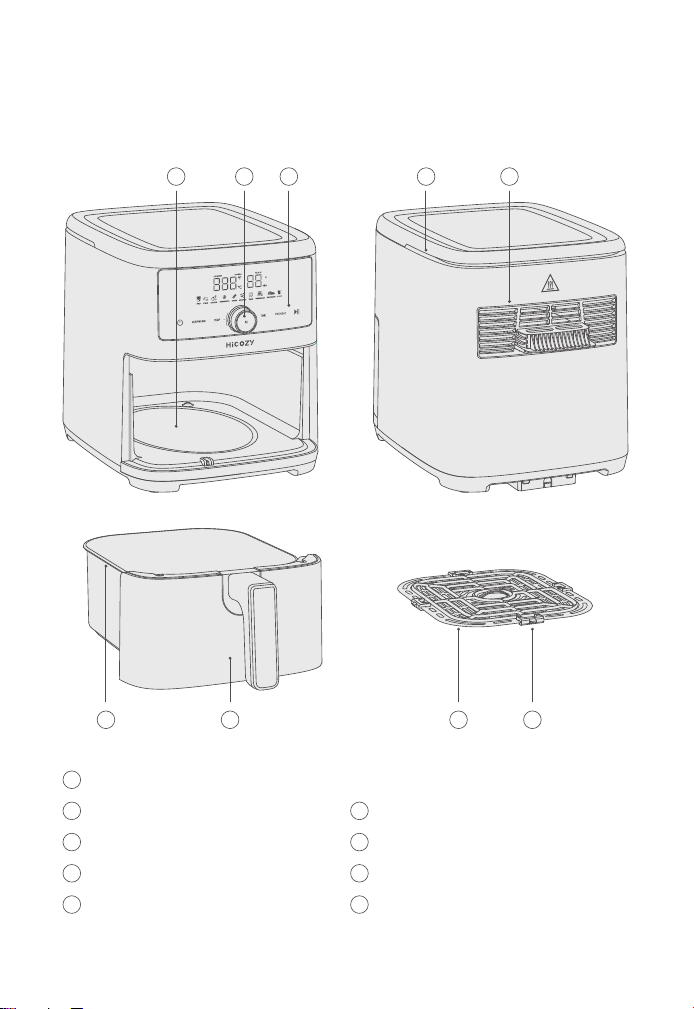
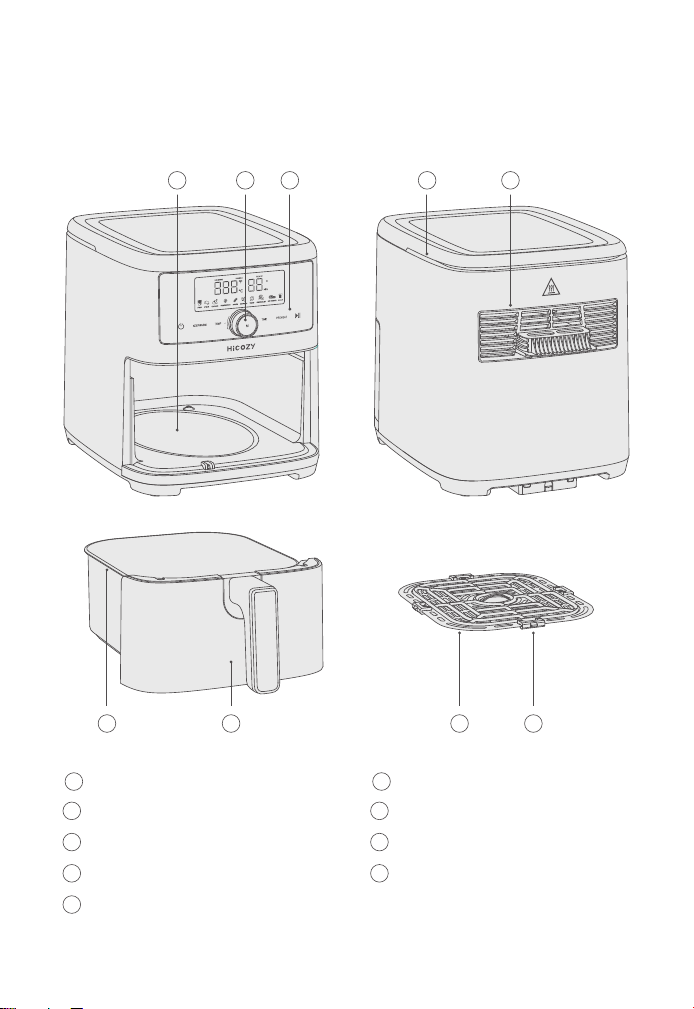
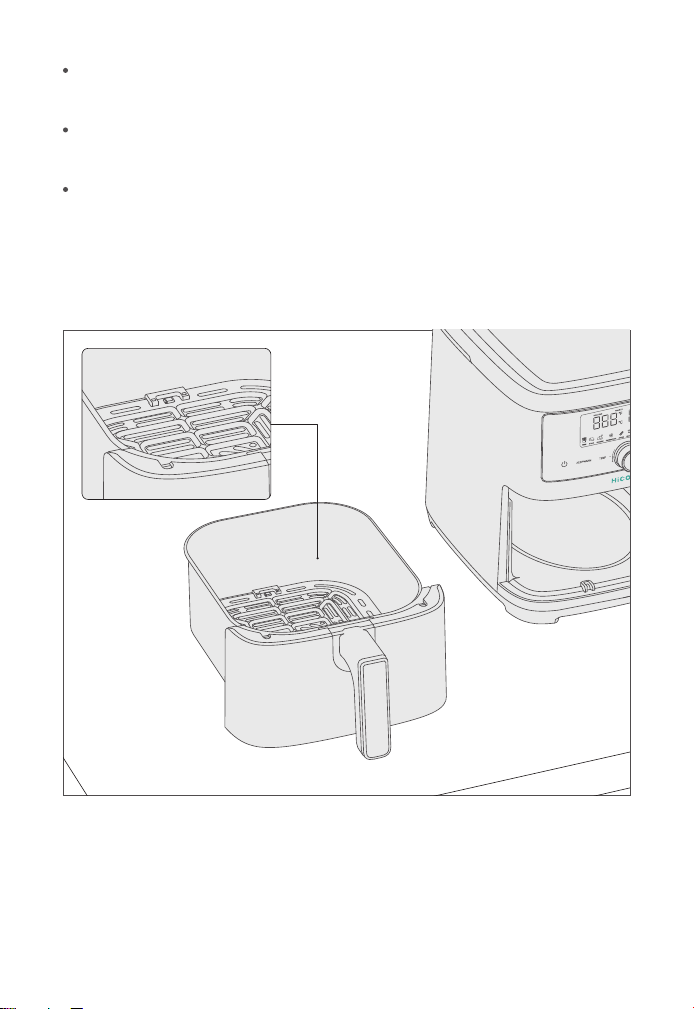
Diagram
Getting to Know Your Air Fryer
Opening
Control Knob
1
2
Touchscreen Controls
3
Air Inlet
4
Air Outlet (Not Shown)
5
Non-Stick Basket
6
Removable Basket with Handle
7
Silicon Pad for Crisper Tray
8
Non-Stick Crisper Tray
9
1
3
2
4 5
6
7
8 9
EN > 13
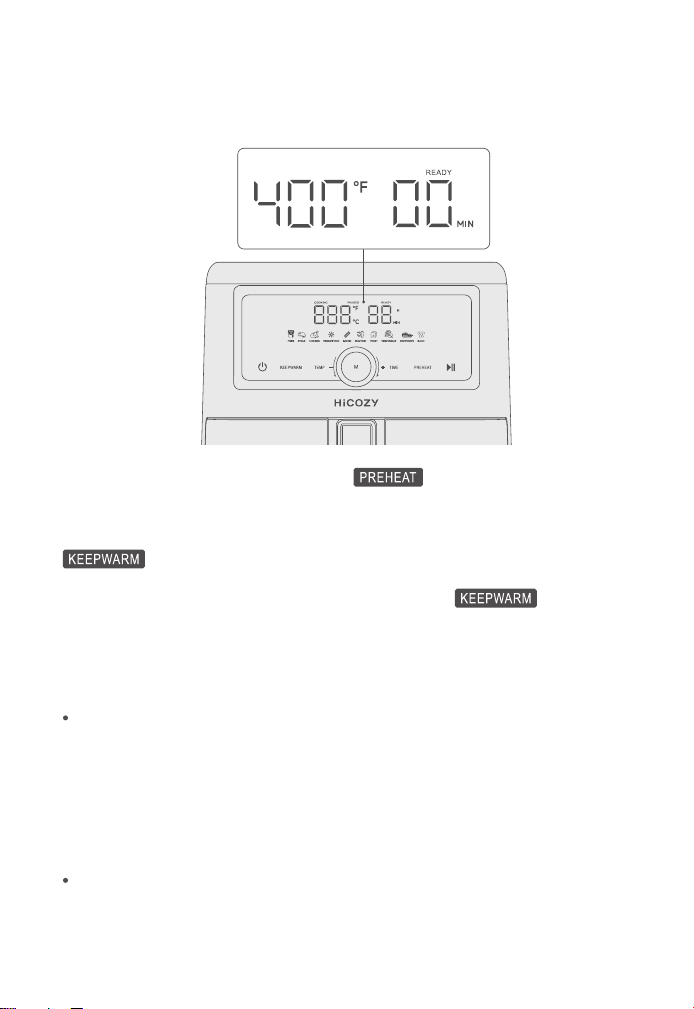
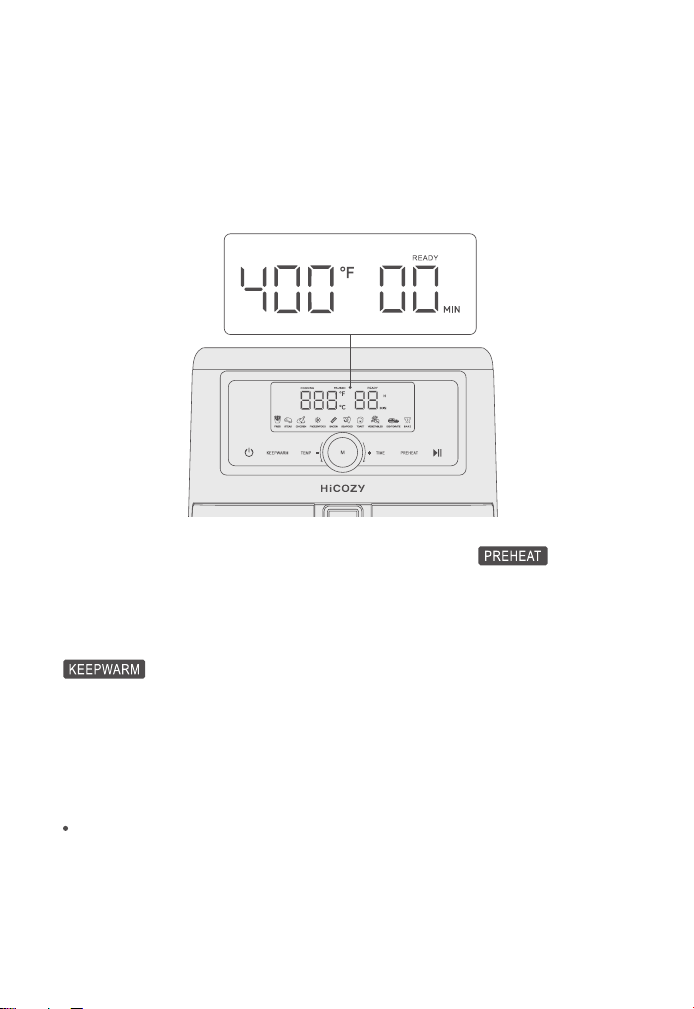
On/Off
When the air fryer is plugged in, the control panel will illuminate for 1
second. Then, it will darken and a tone will sound. The On/Off icon
will illuminate and then slowly pulse on and off.
When the On/Off icon is pressed, a tone will sound, and the icon
will turn blue. The control panel will illuminate and display “380℉”
and “15Min”.
While the air fryer is in operation, press the On/Off icon to turn it
off. The unit will enter standby mode.
Touchscreen Controls
Knob for Temp/Time Adjustment
Temp
Time
On/Off
Keep Warm
Start/Pause
Temperature
Food Presets
Time Control
Preheat
10
10
11
11
12
12
13
13
14
14
15
15
16
16
17
17
18
18
19
19
EN > 14
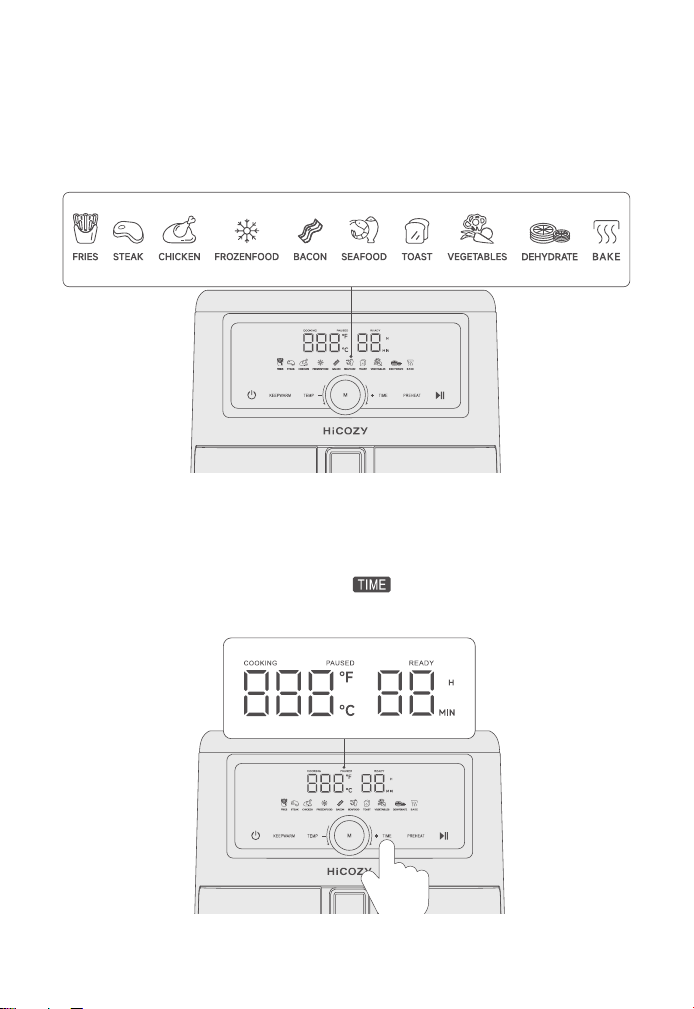
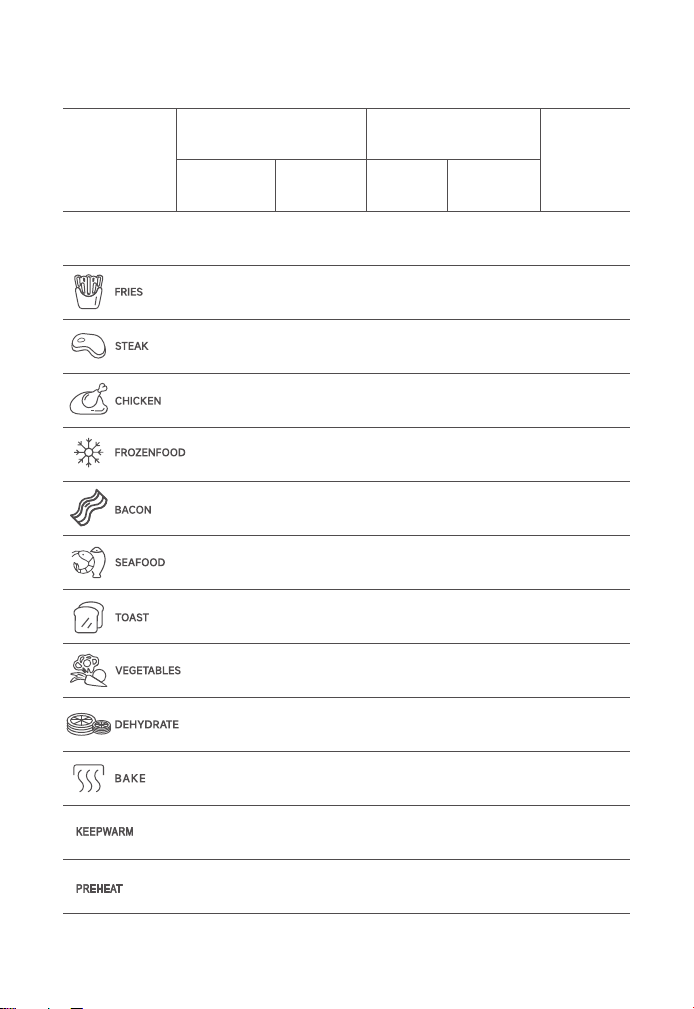
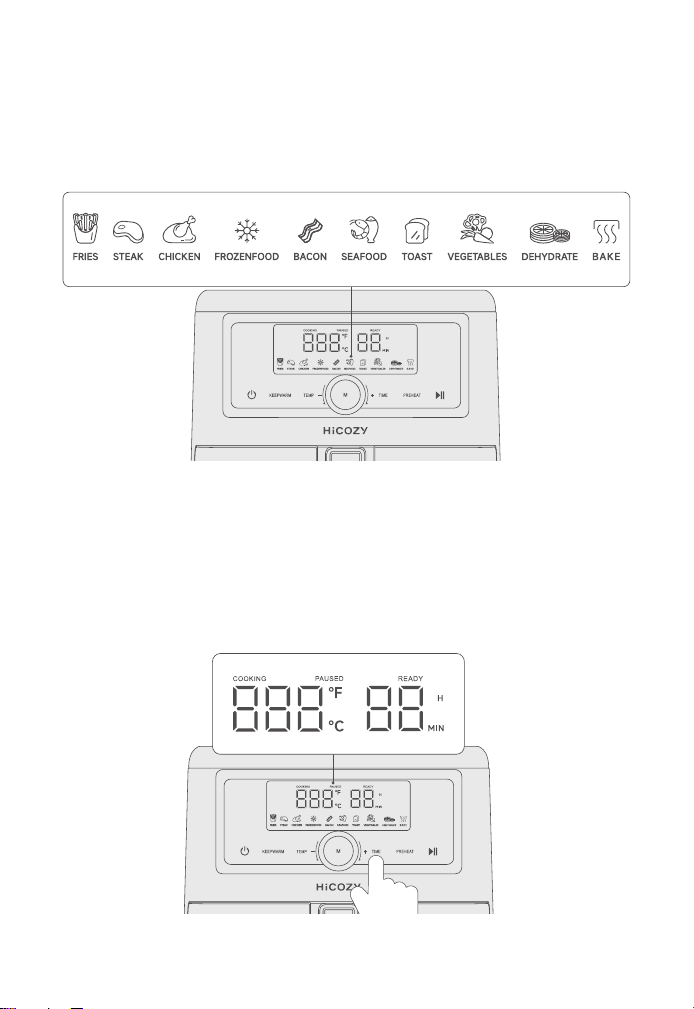
Food Presets
10 presets to choose from: Fries, Steak, Chicken, Frozen Food, Bacon,
Seafood, Toast, Vegetables, Dehydrate, Bake. Users can choose the
desired food type by rotating the knob.
Digital Display
This display will keep track of the temperature and remaining cooking
time. Press the Temp Control icon and hold it for 3 seconds to
change the temperature unit from Fahrenheit to Celsius and vice versa.
EN > 15
Adjustable Control (Temperature and Timer)
Press the Temp Control icon to enter temperature adjustment
and press the Time Control icon to enter time adjustment.
Rotate the knob left and right to increase or decrease the cooking
temperature and time.
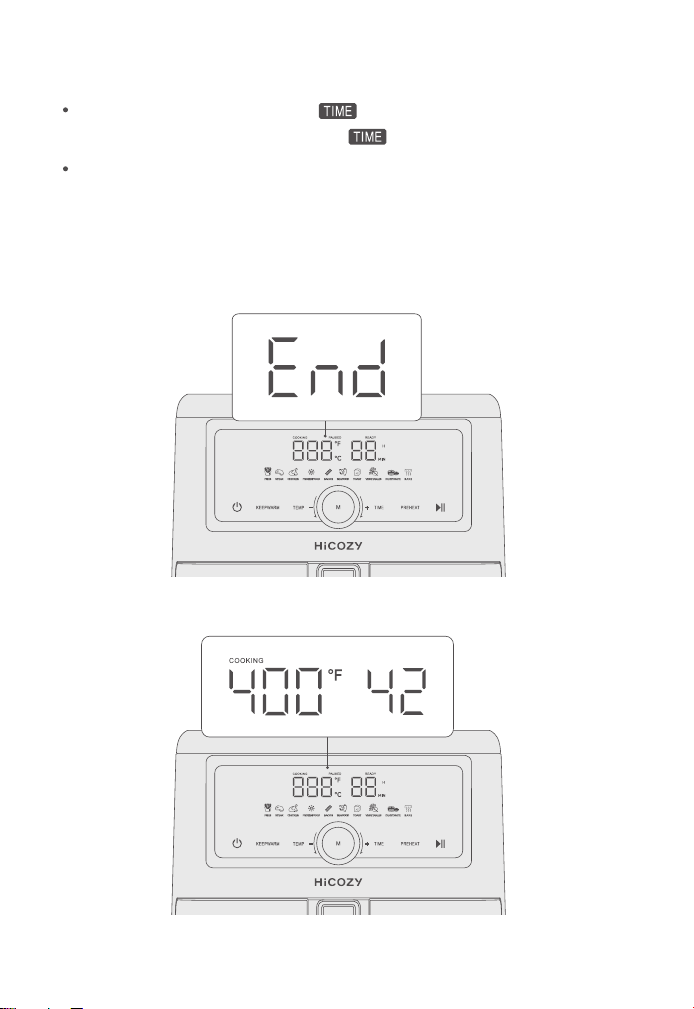
Digital Messages
The cooking process is complete
Cooking in progress
EN > 16
Pre-Programmed Temps & Times Chart (Manual Operation)
Preset Menu
Default
Temperature (℉)
Default Range Default Range
380 190 ~ 400 1 ~ 6015 YES
380 190 ~ 400 1 ~ 6025 YES
400 190 ~ 400 1 ~ 606 YES
380 190 ~ 400 1 ~ 6023 YES
380 190 ~ 400 1 ~ 608 YES
320 190 ~ 400 1 ~ 608 YES
350 190 ~ 400 1 ~ 608 YES
320 190 ~ 400 1 ~ 605 YES
320 190 ~ 400 1 ~ 608 YES
140 100 ~ 180 30min ~ 24h6h NO
300 190 ~ 400 1 ~ 60
/ /
/
35 NO
140 ~ 170 1h
400 190 ~ 400 1 ~ 605
Time (Min/h)
Shake
Reminder
170
EN > 17

Important:
When using the Preheat function, reduce the final cooking time by
3 minutes to avoid overcooking.
Depending on the thickness and/or density of foods, it may be
necessary to use a meat thermometer to check the cooking progress
after the preset time has elapsed. If more time is needed, cook at
short time intervals until food is at the appropriate temperature.
Shake Reminder
During cooking, take the basket out of the air fryer and shake, mix, or
flip the food as necessary.
How to shake
1
2
1
2
To shake food: For safety purposes, always hold the basket handle
just above a heat-resistant surface. Then, gently shake the basket.
If the basket is too heavy to shake:
When it’s time to shake/flip the food, the Shake Reminder will alert
you with 4 audible beeps. The beeping will stop whenever the basket
is removed. The default Temp/Time icon will blink 3 times on the
display.
If you do not want to shake the food, just ignore the beeps and wait
for the cooking to be done.
If the basket is too heavy to shake and there are hot liquids present:
Note: Do not use this method if there is a risk of hot liquids splashing.
Place the basket on a heat-resistant holder or surface.
Carefully shake the basket.
Place the basket on a heat-resistant holder or surface.
Use tongs to mix or flip the food.
EN > 18
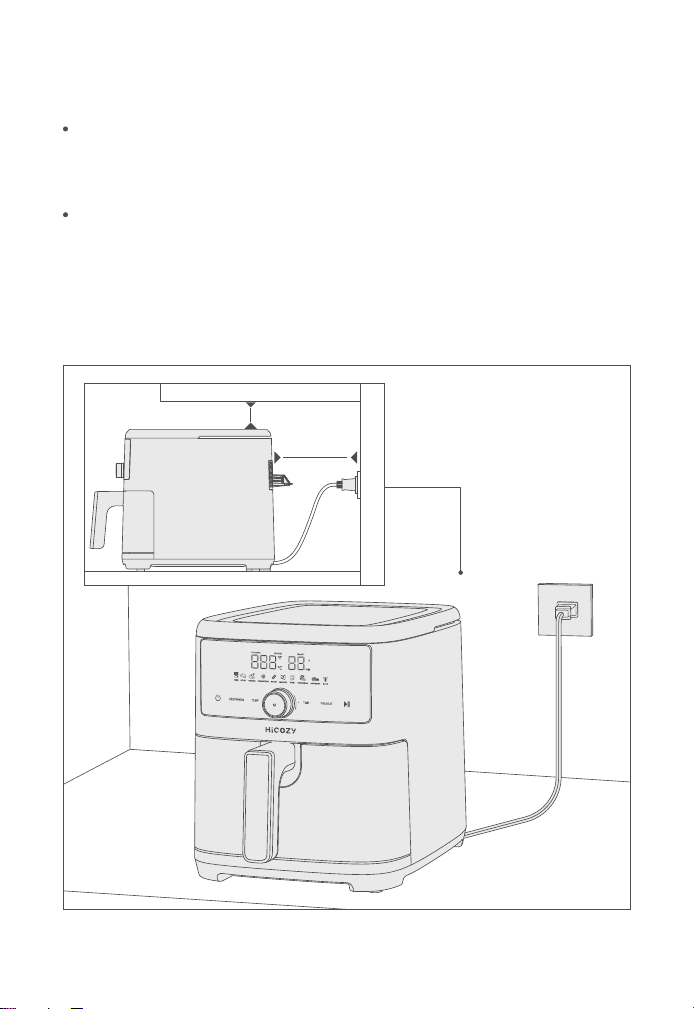
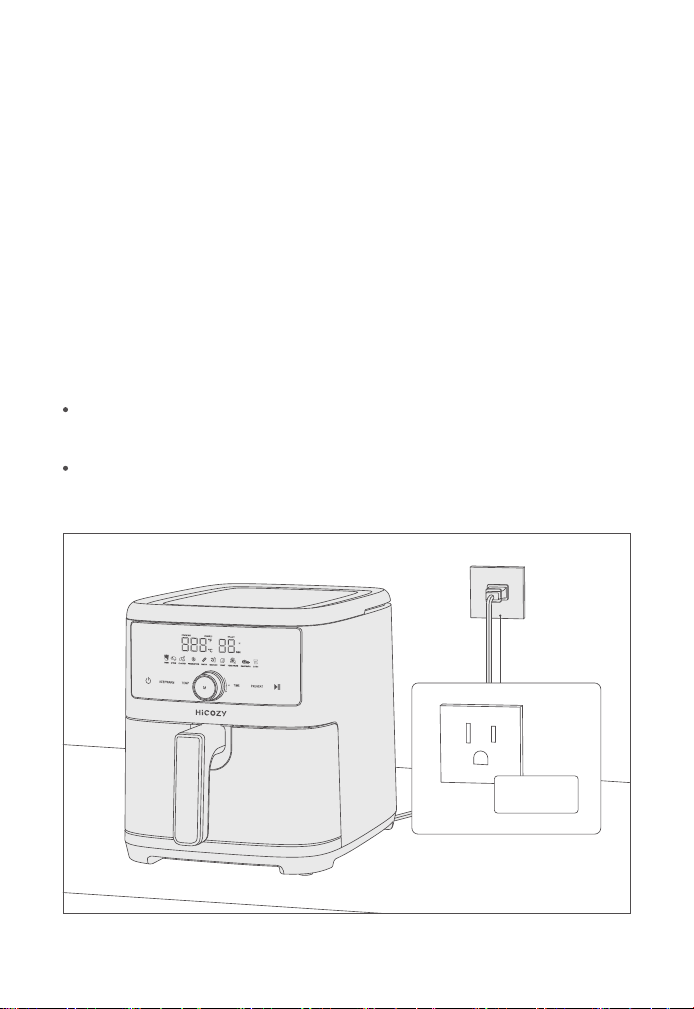
First-Time Setup
Remove all packing material and labels from the inside and outside
of the air fryer. Check that there is no packaging underneath or
around the frying basket.
Place the air fryer on a stable, level, heat-resistant surface. Keep away
from areas that can be damaged by steam (such as walls or cupboards).
Note: Leave at least 5 inches (13cm) of space behind and above the air
fryer. [Figure 1.1] Leave enough room in front of the air fryer to remove
the basket.
5in/
13cm
5in/13cm
EN > 19
Thoroughly wash the basket and crisper plate with either a dishwasher
or a non-abrasive sponge.
DO NOT immerse the air fryer body in water. Wipe the air fryer body
with a damp cloth. Dry all parts thoroughly.
To ensure the crisping tray fits snugly into the frying basket, 4
rubber tips are attached to the sides of the tray. Before using, check
to make sure all 4 rubber tips are in place. If they become separated
from the tray, simply slide them onto the tabs as shown in Figure 1.2
Note: During first use, the air fryer may emit a slight odor. This is
normal and will not affect the flavor or cooking performance.
EN > 20

Instructions
Important! The maximum food capacity recommended for this air
frying basket is 3.3lbs or 3 ~ 4 cups, depending on the exact contents.
The air frying basket will accommodate up to a 7-inch round and
2-inch-deep baking sheet or pie pan.
Warning! This air fryer should not be used to boil water.
Warning! This air fryer should never be used to deep fry foods.
Operating Instructions
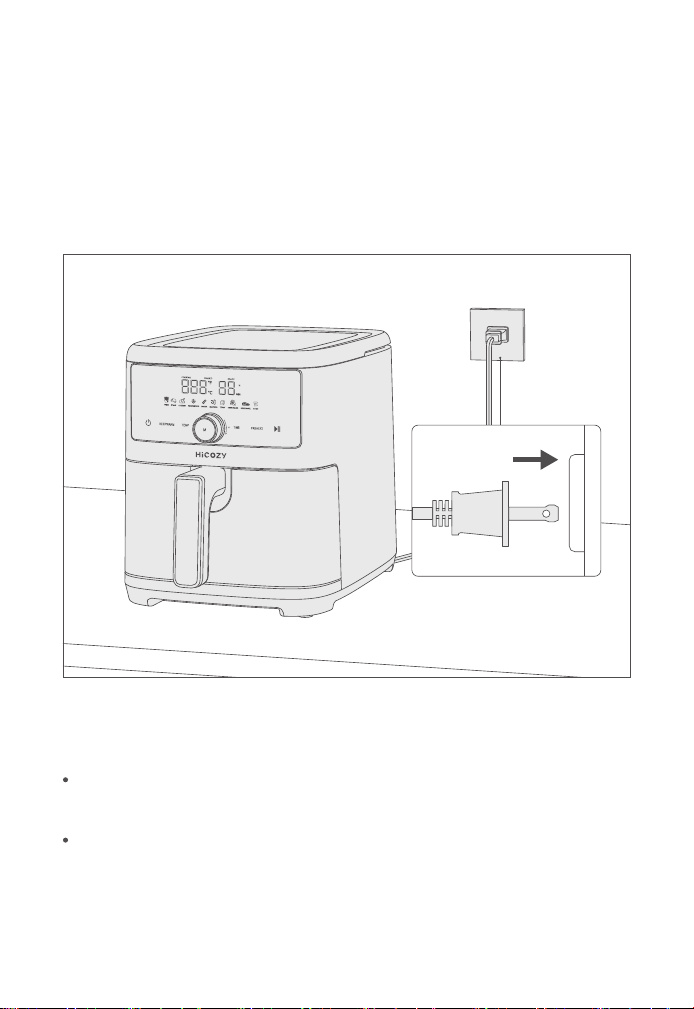
Place the air fryer on a flat, heat-resistant work area, close to an
electrical outlet.
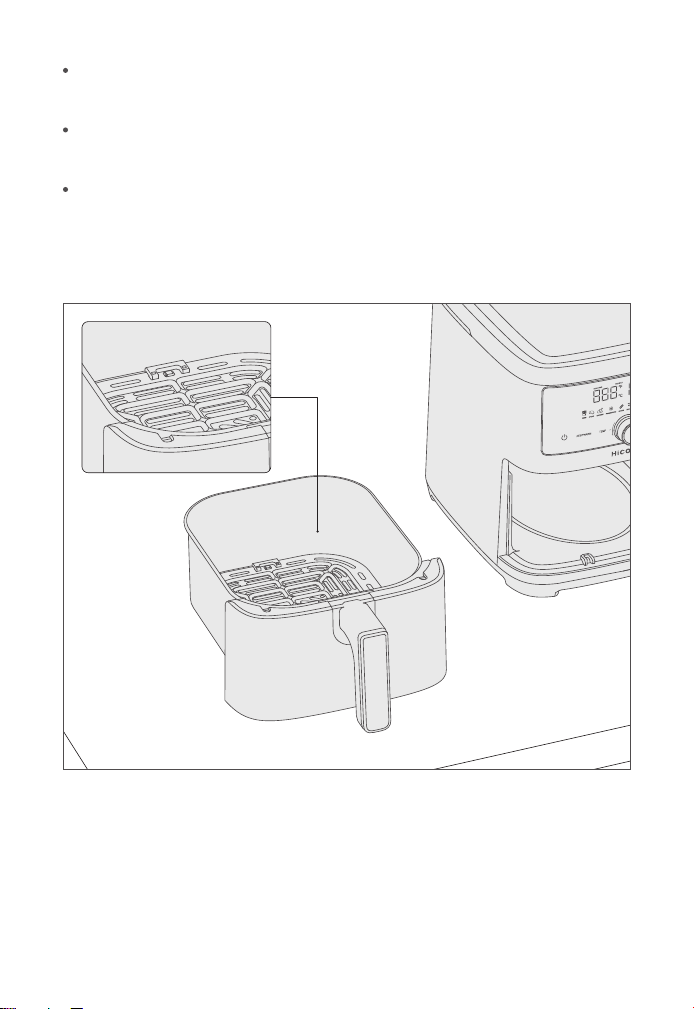
Firmly grasp the frying basket handle to open the frying basket.
Then, remove it from the machine and place on a flat, clean surface.
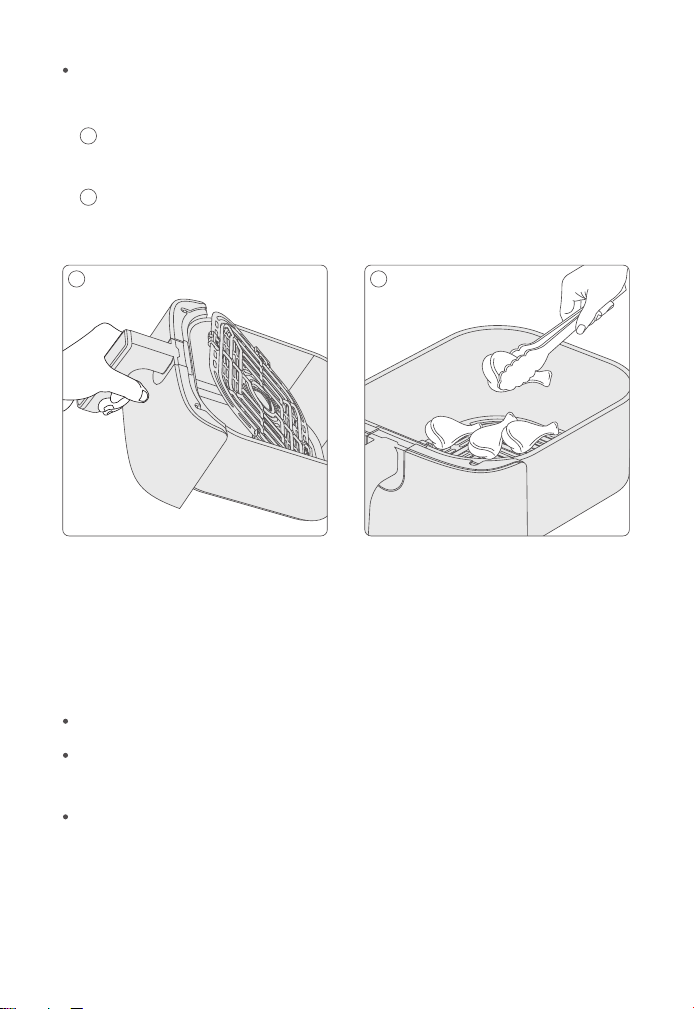
Place the crisping tray into the base of the frying basket.
Insert the assembled frying basket into the front of the air fryer.
Always make sure the frying basket is fully closed.
Plug the cord into a wall outlet. An audible beep will sound and a
red On/Off icon will appear on a black background.
To begin, press the white Start/Pause icon .
The touchscreen control panel time will count down, and the
Start/Pause icon will turn blue.
The default Time and Temp is 15:00 minutes 380℉, these numbers
will appear on the digital display.
1.
2.
3.
4.
5.
6.
7.
8.
EN > 21

To use the food presets, simply rotate the knob to choose the desired
food icon.
When the desired food option icon is illuminated, press the Start icon
to turn the air fryer on.
To adjust the air frying time during operation, press Temp or Time
Control to enter adjustment. Then, rotate the knob to increase or
decrease the control panel to advance or decrease time in 1-minute
increments up to 60 minutes. Use the temperature adjustment on
the left side of the control panel to adjust the temperature in 10-de-
gree increments from 190℉ to 400℉.
Note: The quantity, density, and weight of the food will alter the total
cooking time necessary. Remember, frying smaller batches will result
in shorter cooking times and higher food quality.
Important: Always check food halfway through the cooking time to
determine the final cook time and temperature.
Save time and make perfect air frying effortlessly.
If a recipe calls for a preheated oven, or when cooking meats or proteins
that benefit from a hot initial sear, use this function. Insert the empty
air frying basket into the body of the air fryer.
1.
Press the Start icon to begin.
The default set is 5:00 minutes at 400℉. These numbers will show
on the digital display. When the air fryer begins preheating, the display
will show a countdown and “Cooking”.
1.
2.
2.
3.
12 Food Menu Presets (Fries | Steak | Chicken | Frozen
Food | Bacon | Seafood | Toast | Vegetables | Dehydrate |
Bake | Keep warm | Preheat)
Easy-Assist Functions
Preheat
EN > 22
Please consult the Air Frying Chart and/or follow package directions for
suggested time and temperature.
Important! When using the Preheat function, reduce the final
cooking recipe or preset time by 3 minutes to avoid overcooking.
When the unit is on, press the Keep Warm icon to enter or
exit this mode. The icon will turn blue while the function is active. The
panel will display the default time and temperature. You can adjust the
temperature/time by knob.
Note: Once the air fryer starts cooking, the Keep Warm function and
Preheat mode both become unusable.
Press the On/Off icon at any time to turn off the air fryer.
When 3 beeps sound, the control panel will display “400℉ 00Min”
and “Ready” illuminated. Place food into the frying basket and program
the air fryer. Then, air fry to perfection.
3.
Keep Warm
Air Frying Techniques
EN > 23

Always pat food dry before cooking to encourage browning and avoid
excess smoke.
To ensure even cooking/browning, ALWAYS open the basket halfway
through the cook time and check, turn, or shake foods in the frying
basket. Some recipes may call for brush or spray oil halfway through
cooking. Adjust time and temperature if needed.
Allow cooked foods to rest for 5 to 10 minutes. Remove the frying basket
from the machine and place on a flat, heat-resistant surface.
Shake air-fried foods out onto the serving area. Promptly return the
frying basket to the body and lock it into place. Continue air frying subse-
quent batches, if desired.
To avoid excess smoke, when cooking naturally high-fat foods, such as
bacon, chicken wings, or sausages, it may be necessary to empty fat
from the frying basket between batches.
For crispier results, air fry small batches of freshly-breaded foods. Create
more surface area by cutting food into smaller pieces. Press breading
onto food to help it adhere. Refrigerate breaded foods for at least 30
minutes before frying.
Arrange breaded food in the frying basket so that food is not touching to
allow airflow on all surfaces.
Spray oils work best. Oil is distributed evenly, and less oil is needed.
Canola, olive, avocado, coconut, grapeseed, peanut, or vegetable oil
work well.
Unplug the air fryer when not in use.
Caution:
Always use oven mitts when handling the hot air fryer basket.
Hot oil can collect at the base of the basket. To avoid the risk of burns
or personal injury, and to stop oil from contaminating air-fried foods.
NEVER turn the basket upside down.
1
2
EN > 24
Where microwave ovens often produce hot, mushy results and toaster
ovens take forever, air convection frying assures reasonably fast, crispy,
and delicious results!
As a rule, depending on the food and amount to be cooked, suggested
cook times may have to be reduced slightly. Always check food halfway
through the cooking time to determine the final cook time and temperature.
Always check cooking progress after time has expired.
Make sure the basket is resting on a flat surface.
Watch for hot oil or fat collected in the basket. To avoid splashing, drain
any oil present before replacing the basket.
1
2
Caution: The hot crisper plate may fall out when turning the basket over.
Notes on Air Frying Pre-Packaged Frozen Foods
EN > 25

This appliance requires little maintenance. It contains no user-service-
able parts. Any servicing requiring disassembly other than cleaning
must be performed by a qualified appliance repair technician.
Note:
Warning! Allow the air fryer to cool fully before cleaning.
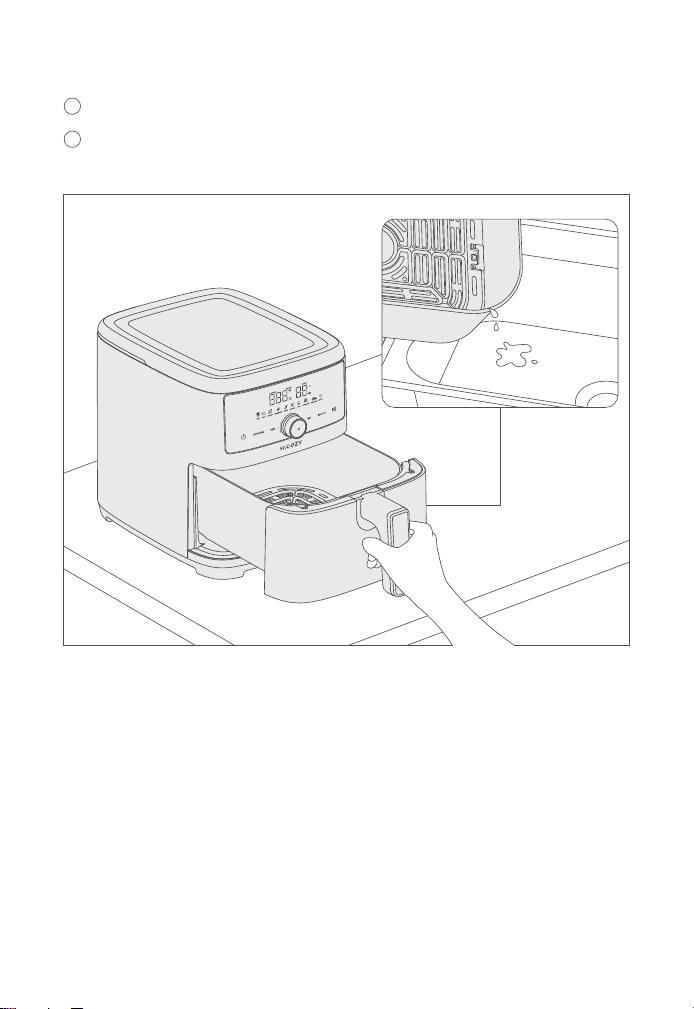
Unplug the air fryer and remove the frying basket. Make sure the
frying basket and crisping tray have cooled completely before clean-
ing them. Use the center hole of the crisping tray to lift the crisping
tray up and out of the frying basket.
Wash the frying basket and crisping tray in hot soapy water. Do not
use metal kitchen utensils, abrasive cleansers, or other cleaning
products that damage the nonstick coating.
The frying basket and crisping tray are dishwasher safe. For best
results, place in the top rack of your dishwasher to clean.
Wipe the air fryer body with a soft, non-abrasive damp cloth to clean.
The basket and crisper plate have a nonstick coating. Avoid using
metal utensils and abrasive cleaning materials.
There may be water spots on the basket window after washing. This is
normal. Run the air fryer for 15 minutes to completely dry the basket.
Make sure the air fryer is unplugged and all parts are clean and dry
before storing.
Never store the air fryer while it is hot or wet.
Lock and store the frying basket inside the air fryer’s body.
Store the air fryer in its box or in another clean, dry place.
Maintenance
Care and Cleaning
Storing
EN > 26

Troubleshooting/FAQ
Make sure the air fryer is plugged in.
Push the basket securely into the air fryer.
The air fryer will not turn on.
Place smaller batches of food items into the basket. If the basket is
overstuffed, then the food will be undercooked.
Increase cooking temperature or time.
Food is not completely cooked.
Make sure the basket is not overfilled with food.
Basket will not slide into the air fryer securely.
The air fryer may produce some white smoke or steam when you
use it for the first time or during cooking. This is normal.
Make sure the basket and the inside of the air fryer are cleaned
properly and not greasy.
Cooking greasy foods will cause oil to collect beneath the crisper
plate. This oil will produce white smoke, and the basket may be hotter
than usual. This is normal and should not affect cooking. Handle the
basket with care.
White smoke or steam is coming out of the air fryer.
Immediately unplug your air fryer. Dark smoke means that food is burning
or there is a circuit problem. Wait for smoke to clear before pulling the
basket out. If the cause was not burnt food, contact customer support.
Dark smoke is coming out of the air fryer.
EN > 27

Specifications
Model
Power Supply
Rated Power
Capacity
Temperature Range
Time Range
Dimensions (including handle)
Weight
AF600
120V AC, 60Hz
1500W
6QT/5.7L (serves 3 ~ 5 people)
100 ~ 400°F (40 ~ 204°C)
1Min ~ 24hrs
10 x 11.5 x 16.5in
(420 x 260 x 294mm)
9.3lb(4.5kg)
Any air fryer may have a plastic smell from the manufacturing process.
This is normal. Follow the instructions for a test run to get rid of the
plastic smell. If a plastic smell is still present, contact HiCOZY custom-
er support.
The air fryer has a plastic smell.
There is an open circuit in the temperature monitor. Contact HiCOZY
customer support.
Display shows error code “E01”
There is a short circuit in the temperature monitor. Contact HiCOZY
customer support.
Display shows error code “E02”
EN > 28

Recycling
You may dispose of the product when its service life has ended, please
recycle the recyclable parts according to local guidelines.
Warranty Period
1-Year Limited Warranty from HiCOZY
This warranty does not apply:
Each HiCOZY 6QT Digital Air Fryer will be free from defects in material
and workmanship. This warranty does not cover damage from neglect,
misuse, contamination, alteration, accident, or abnormal conditions of
operation or handling. This warranty covers the original purchaser only
and is not transferable.
HiCOZY always wants to provide our customers with excellent products
and customer service.
Questions or concerns? We’re happy to help!
Please contact us via [email protected].
If the product has been modified from its original condition;
If the product has not been used in accordance with directions and
instructions in the user manual.
To damages or defects caused by accident, abuse, misuse, or improper
or inadequate maintenance.
To damages or defects caused by service or repair of the product
performed by an unauthorized service provider or by anyone other
than HiCOZY.
To damages or defects occurring during commercial use, rental use,
or any use for which the product is not intended.
To damages or defects exceeding the cost of the product.
EN > 29

HiCOZY Corporation
HQ Add.: Room 2208, China Resources Building - MIXC, Jiulongpo District,
Chongqing, China
US Office: 7423 Doig Dr, Garden Grove, CA 92841 United States
Email: [email protected]
Toll-Free: 1-866-444-2699
Support Hours: Mon-Fri, 9:00 am ~ 5:00 pm PST/PDT
Please have your invoice and order ID ready before contacting
customer support.
EN > 30

Estimado usuario de HiCOZY:
Gracias por comprar la Freidora de Aire Digital HiCOZY 6QT.
Por favor, lea y comprenda completamente este manual antes de utilizar
este producto y guárdelo para futuras consultas.
Si tiene alguna pregunta o problema con su nuevo producto, envíenos
un correo electrónico a [email protected].
Únase a la Comunidad HiCOZY en Facebook. facebook.com/grupos/.......
Explore nuestra galería de recetas www.hicozy.com/recipes
Introducción
Please fully read and follow this manual before using this product;
keep this manual for future reference.
ES > 31
Advertencia
Medidas de seguridad importantes
Do not touch hot surfaces. Use handle.
Do not block any ventilation openings. Hot steam is released through
openings. Keep your hands and face clear of openings.
ES > 32
Lea todas las instrucciones.
No toque las superficies calientes. Utilice asas o tiradores. Cuando interactúe
con superficies calientes, utilice siempre manoplas o agarradoras.
Para protegerse contra descargas eléctricas, nunca sumerja el cable,
los enchufes o el aparato en agua u otro líquido.
Firmly insert the crisper plate into the basket to reduce the chance
of it falling out.
Always carefully remove hot food, removed them by using oven
mitts or silicone-tipped tongs/utensils.
Al utilizar aparatos eléctricos, deben seguirse siempre unas precauciones
básicas, entre las que se incluyen las siguientes:
Medidas de seguridad importantes
CAUTION: The hot crisper plate may fall out when turning the basket over.
Note:
1
2
1
2
ES > 33

Este aparato sólo puede ser utilizado y limpiado por niños a partir
de 8 años o por personas con capacidades físicas, sensoriales o mentales
reducidas, o con falta de experiencia y conocimientos, SÓLO SI han
recibido supervisión o instrucciones relativas al uso del aparato por
parte de una persona responsable de su seguridad.
Los niños deben ser supervisados para garantizar que no jueguen
con el aparato.
Desenchúfelo de la toma de corriente cuando no lo utilice y antes de
limpiarlo. Deje que el aparato se enfríe antes de desmontar o instalar
cualquiera de sus piezas, y antes de limpiarlo.
No utilice el aparato si el cable o el enchufe están dañados, si funciona
mal o si ha sufrido algún tipo de daño. Llévelo a un técnico cualifica-
do para que lo examine, repare o ajuste.
Nota: NO intente reparar la unidad usted mismo. Esto anulará la garantía.
No se recomienda el uso de accesorios; su uso puede causar lesiones.
No lo utilice al aire libre.
No deje que el cable cuelgue del borde de mesas o mostradores, no
permita que toque superficies calientes.
No lo coloque sobre o cerca de quemadores de gas/eléctricos u
hornos calientes.
Extreme las precauciones al mover aparatos que contengan aceite
caliente u otros líquidos calientes.
Para apagar el aparato, saque la cesta del cuerpo de la freidora de
aire y desconecte el enchufe de la toma de corriente.
No utilice este aparato para otro uso que no sea el previsto.
Cuando utilice la bandeja antiadherente, asegúrese de que está
correctamente insertada en la cesta de la freidora de aire antes de cocinar.
Asegúrese de que la bandeja antiadherente está en su sitio antes de
añadir alimentos en ella.
ES > 34

Asegúrese siempre de que la cesta de freír esté completamente
insertada y bloqueada en la parte frontal de la freidora de aire antes
de su funcionamiento.
Los alimentos de gran tamaño o los utensilios metálicos no deben
introducirse en la freidora de aire, pueden provocar un incendio o
una descarga eléctrica.
Puede producirse un incendio si la freidora de aire está cubierta o
en contacto con materiales inflamables, incluyendo cortinas, estores,
paredes, etc. mientras está en funcionamiento. No coloque ningún
objeto encima del aparato mientras esté en funcionamiento.
No limpie con estropajos metálicos. Pueden desprenderse trozos del
estropajo y entrar en contacto con las piezas eléctricas de la freido-
ra de aire, aumentando el riesgo de descarga eléctrica.
Extreme las precauciones cuando utilice recipientes de metal o vidrio.
No guarde ningún material, que no sean accesorios recomendados
por el fabricante, en esta freidora de aire cuando no esté en uso.
No coloque ninguno de los siguientes materiales en la freidora de
aire: papel, cartón, plástico, etc.
No cubra la bandeja recogemigas ni ninguna otra parte de la freido-
ra con papel metálico. Esto hará que el horno se sobrecaliente.
Pulse el icono de Encendido/Apagado una vez, en cualquier momento
durante el proceso de cocinado, para apagar la unidad. La pantalla
y la luz de funcionamiento se apagarán en 20 segundos. El ventila-
dor continuará funcionando durante aproximadamente 20 segundos
para enfriar la freidora de aire.
Precaución:
La freidora de aire no funcionará a menos que la cesta esté comple-
tamente cerrada.
Después de freír con aire caliente, asar, hornear o recalentar, la cesta,
los accesorios (si se utilizan) y los alimentos cocinados estarán muy
calientes. Extreme las precauciones al manipular estos objetos.
ES > 35
Medidas de seguridad adicionales
Todos los usuarios de este aparato deben leer y comprender este
manual de instrucciones antes de operar o limpiar este aparato.
El cable de este electrodoméstico sólo debe enchufarse a una toma
eléctrica de 120 V CA.
Precaución, superficies calientes: Este aparato genera calor y puede
liberar vapor durante su uso. Deben tomarse las precauciones adecuadas
para evitar el riesgo de quemaduras, incendios u otros daños personales
o materiales.
Precaución: Este aparato se calienta durante el funcionamiento y conserva
el calor durante algún tiempo después de apagarlo. Utilice siempre guantes
de cocina cuando manipule materiales calientes y deje enfriar las piezas
metálicas antes de limpiarlas. No coloque nada encima del aparato
mientras esté funcionando o mientras esté caliente.
Precaución: Por favor, asegúrese de que la cesta y la parrilla/pizza/bandeja para
freír están vacías y limpias siempre antes de comenzar el precalentamiento. De
lo contrario, las altas temperaturas (más de 200°C) producirán mucho humo.
120V
ES > 36

Advertencia:
El llenado insuficiente o excesivo de la cesta de la freidora de aire puede
dañar la freidora de aire y podría provocar lesiones personales graves.
Esta freidora de aire no debe utilizarse para hervir agua.
Esta freidora de aire no debe utilizarse nunca para freír en aceite
alimentos.
Si este aparato empieza a funcionar mal durante su uso, apáguelo y
saque del cuerpo la cesta de freír que estén en uso. Retire el enchufe de
la toma de corriente. Póngase en contacto con el servicio de atención al
cliente de HiCOZY y no intente utilizar ni reparar la freidora de aire averiada.
No sumerja el cable de alimentación en ningún líquido. Si el cable de
alimentación está dañado, debe ser reemplazado.
Para reducir el riesgo de descargas eléctricas y asfixia, mantenga el
cable fuera del alcance de niños y bebés.
Utilice y mantenga siempre la freidora de aire sobre una superficie de
trabajo plana, estable y resistente al calor.
No obstruya la salida de aire ni las entradas de aire situadas en la parte
posterior y en los laterales de la freidora de aire con ningún objeto.
Evite que salga vapor por la salida de aire durante el cocinado.
Mantenga el aparato a una distancia mínima de 10 cm de paredes y
otros objetos durante su funcionamiento.
Utilice siempre las asas de la cesta de la freidora para extraerla.
Nunca mueva la freidora mientras esté caliente o contenga alimentos
calientes. Deje siempre que se enfríe lo suficiente antes de intentar moverla.
Alimentación eléctrica
Si el circuito eléctrico está sobrecargado con otros aparatos, es posible
que su aparato no funcione correctamente. Debe funcionar en un circuito
eléctrico separado de otros aparatos.
ES > 37
Notas sobre el enchufe
Este aparato tiene un enchufe polarizado (una clavija es más ancha
que la otra). Para reducir el riesgo de descarga eléctrica, este enchufe
sólo encaja en una toma polarizada. Si el enchufe no encaja completa-
mente en la toma de corriente, inviértalo. Si sigue sin encajar, póngase
en contacto con un electricista cualificado. No modifique el enchufe
de ninguna manera.
Notas sobre el cable
Se suministra un cable de alimentación corto (o cable de alimentación
desmontable) para reducir los riesgos de enredos y tropiezos de un
cable más largo.
Existen cables de alimentación desmontables o alargadores más largos
que pueden utilizarse siempre que se tomen las precauciones adecuadas.
ES > 38

Advertencia sobre superficies plásticas
Para evitar que los superficies plásticas de encimera, mesa u otros
muebles alteren su acabado, coloque posavasos o salvamanteles no
plásticos entre el aparato y el acabado de la encimera o tablero de la
mesa. De lo contrario, el acabado podría oscurecerse y aparecer
manchas permanentes.
Si se utiliza un cable de alimentación desmontable largo o un alargador:
La capacidad eléctrica marcada del cable o alargador debe ser al
menos tan alta como la capacidad eléctrica del aparato.
Si el aparato es del tipo con toma de tierra, el alargador debe ser
un cable de 3 hilos con toma de tierra.
El cable prolongador debe colocarse de forma que no quede
tendido sobre la encimera o la mesa, donde los niños puedan
tirar de él o tropezar accidentalmente.
1
2
3
El paquete incluye
Cuando reciba este producto, asegúrese de que el paquete
incluye el producto y todos sus accesorios. Si tiene algún problema
de calidad o le faltan elementos, póngase en contacto con nuestro
equipo de atención al cliente.
Freidora de 5.7 litros
Plato antiadherente
Manual de Usuario
Guía del usuario
x 1
x 1
x 1
x 1
ES > 39
Diagrama
Conozca su freidora de aire
Apertura
Mando de control
1
2
Controles de pantalla táctil
3
Entrada de aire
4
Salida de aire (no se muestra)
5
Cesta antiadherente
6
Cesta extraíble con asa
7
Almohadilla de silicona para
bandeja antiadherente
8
Bandeja antiadherente
9
1 32 4 5
6
7
8 9
ES > 40
Encendido/Apagado
Cuando la freidora de aire esté enchufada, el panel de control se iluminará
durante 1 segundo. A continuación, se oscurecerá y sonará un tono. El
icono de Encendido/Apagado se iluminará y luego se encenderá y
apagará lentamente.
Cuando se pulse el icono de Encendido/Apagado , sonará un tono
y el icono se volverá azul. El panel de control se iluminará y mostrará
"380℉" (190°C) y "15Min".
Mientras la freidora de aire está en funcionamiento, pulse el icono de
Encendido/Apagado para apagarla. La unidad entrará en modo de espera.
Controles de pantalla táctil
Botón de ajuste de temperatura/tiempo
Control de temperatura
Tiempo
Encendido/Apagado
Mantener caliente
Inicio/Pausa
Temperatura
Preajustes de menú/alimento
Control de tiempo
Precalentar
10
10
11
11
12
12
13
13
14
14
15
15
16
16
17
17
18
18
19
19
ES > 41
Preajustes menú/alimento
10 preajustes para elegir: Patatas fritas, Bistec, Pollo, Congelados, Tocino,
Marisco, Tostadas, Verduras, Deshidratar, Hornear. Los usuarios pueden
elegir el tipo de alimento deseado girando el mando.
Pantalla digital
Esta pantalla mantendrá un registro de la temperatura y el tiempo de
cocinado restante. Pulse el icono Temp Control y manténgalo pulsado
durante 3 segundos para cambiar la unidad de temperatura de Fahrenheit
a Celsius y viceversa.
ES > 42

Control ajustable (temperatura y temporizador)
Pulse el icono Control de Temp. para establecer en el ajuste de
temperatura y pulse el icono Control Tiempo para establecer en el
ajuste de tiempo.
Gire el mando a izquierda y derecha para aumentar o disminuir la
temperatura y el tiempo de cocinado.
Digital Messages
Cooking function has ended
In cooking
ES > 43
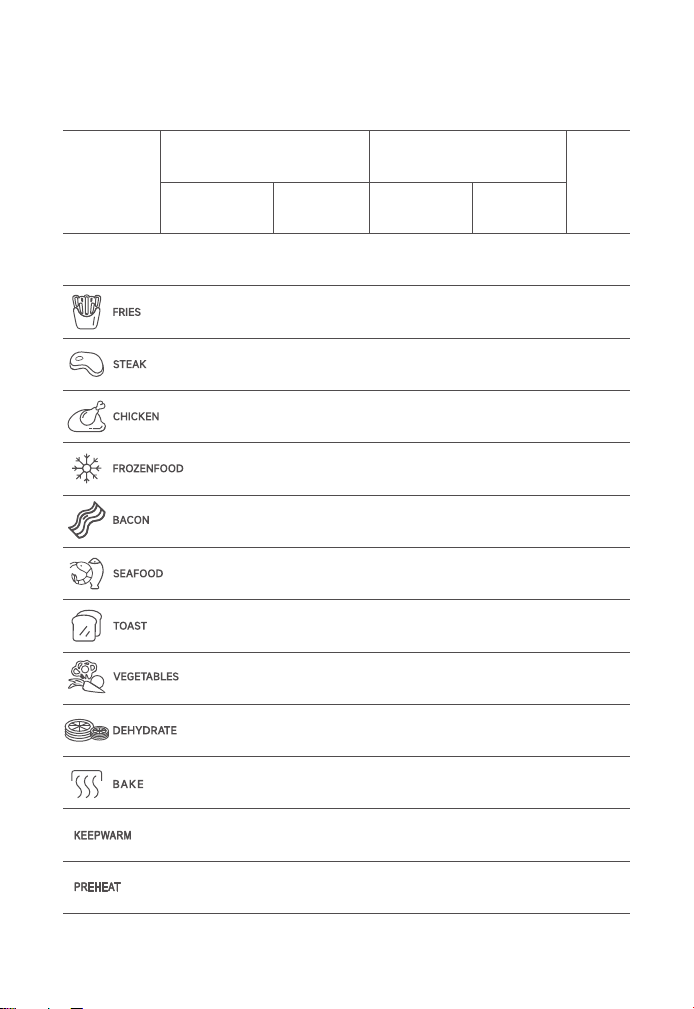
Tabla de tiempos y temperaturas preprogramados
(Funcionamiento manual)
Menú
Preajustes
Predeter-
minado
Temperatura (°C)
Predeter-
minado
Rango
Predeter-
minado
Rango
190 88 ~ 205 1 ~ 6015 SI
190 88 ~ 205 1 ~ 6025 SI
205 88 ~ 205 1 ~ 606 SI
190 88 ~ 205 1 ~ 6023 SI
190 88 ~ 205 1 ~ 608 SI
160 188 ~ 205 1 ~ 608 SI
176 88 ~ 205 1 ~ 608 SI
160 88 ~ 205 1 ~ 605 SI
160 88 ~ 205 1 ~ 608 SI
60 38 ~ 82 30min ~ 24h6h NO
150 88 ~ 205 1 ~ 6035 NO
75 60 ~ 75 1h
205 88 ~ 205 1 ~ 605
Tiempo (Min/h)
Agitar
/ /
/
ES > 44

Importante:
Cuando utilice la función Precalentar, reduzca el tiempo final de cocinado
en 3 minutos para evitar un cocinado excesivo.
Dependiendo del grosor y/o densidad de los alimentos, puede ser
necesario utilizar un termómetro para carne para comprobar el progreso
del cocinado una vez transcurrido el tiempo preestablecido. Si se
necesita más tiempo, cocine a intervalos cortos de tiempo hasta que
los alimentos estén a la temperatura adecuada.
Shake Reminder
During cooking, take the basket out of the air fryer and shake, mix, or
flip the food.
The Shake Reminder will alert you with 4 beeps, and default TEMP/TIME
will blink 3 times on the display.
How To Shake
1
2
1
2
To shake food: Hold the basket handle just above a heat-resistant
surface for safety purposes. Shake the basket.
If the basket is too heavy to shake:
If you do not remove the baskets after rounds 4 beeps, and keeping
the cooking.
The Shake Reminder will go away once you take out the basket.
If the basket is too heavy to shake and there are hot liquids present:
Note: Do not use this method if there is a risk of hot liquids splashing.
Place the basket on a heat-resistant holder or surface.
Carefully shake the basket.
Place the basket on a heat-resistant holder or surface.
Use tongs to mix or flip the food.
ES > 45

Antes de usarlo por primera vez
Retire todo el material de embalaje y las etiquetas del interior y el
exterior de la freidora de aire. Compruebe que no haya ningún embalaje
debajo o alrededor de la cesta de freír.
Su freidora de aire se envía con la cesta de freír bloqueada dentro
del cuerpo de la freidora de aire. Agarre firmemente el asa de la
cesta de freír para abrirla y colóquela sobre una superficie de trabajo
plana y limpia.
Note: Leave 5 inches / 13 cm of space behind and above the air fryer.
Leave enough room in front of the air fryer to remove the basket.
5in/
13cm
5in/13cm
ES > 46
Lave la cesta de freír y la bandeja antiadherente en agua caliente y
jabonosa.
NO sumerja el cuerpo de la freidora en agua. Limpie el cuerpo de la
freidora de aire con un paño húmedo. Seque bien todas las piezas.
Para asegurarse de que la bandeja de fritura encaja perfectamente en
el cajón de la cesta de fritura, 4 salientes de goma se encuentran en los
laterales de la bandeja. Antes de usarla, compruebe que los 4 salientes
de goma están en su sitio. Si se separan de la bandeja, simplemente
deslícelos sobre las lengüetas como se muestra en la figura 2.
Nota: Durante el primer uso, la freidora de aire puede emitir un ligero
olor. Esto es normal y no afectará al sabor ni al rendimiento del
cocinado.
ES > 47

Instrucciones
¡Importante! La capacidad máxima de alimentos recomendada para
esta cesta de freír es de 1,5 kilos o 3 ~ 4 tazas, dependiendo del
contenido exacto. La cesta de fritura de aire acomodará hasta una
bandeja para hornear redonda de 18 cm. y 5 cm. de profundidad o un
molde para tartas.
¡Advertencia! Esta freidora de aire no debe utilizarse para hervir agua.
¡Advertencia! Esta freidora de aire no debe utilizarse nunca para freír
con aceite los alimento.
Instrucciones de uso
Coloque la freidora de aire sobre una superficie de trabajo plana y
resistente al calor, cerca de una toma de corriente.
Sujete firmemente el asa de la cesta de freír para abrirla. A continuación,
sáquela de la máquina y colóquela sobre una superficie plana y limpia.
Coloque la bandeja antiadherente en la base de la cesta para freír.
Inserte la cesta de freír con la bandeja ensamblada en la parte delantera
de la freidora de aire. Asegúrese siempre de la cesta de freír está
completamente cerrada.
Enchufe el cable a una toma de corriente. Sonará un pitido y apare-
cerá un icono rojo de Encendido/Apagado sobre un fondo negro.
Para comenzar, pulse el icono blanco de Inicio/Pausa .
El tiempo del panel de control de la pantalla táctil se pondrá en
cuenta atrás y el icono de Inicio/Pausa se volverá azul.
El Tiempo y Temperatura por defecto es de 15:00 minutos y 190°C,
estos números aparecerán en la pantalla digital.
1.
2.
3.
4.
5.
6.
7.
8.
ES > 48

Para utilizar los preajustes de comida, basta con girar el mando para
elegir el icono del alimento deseado.
Cuando se ilumine el icono de la opción de alimento deseado, pulse
el icono de Inicio para encender la freidora de aire.
Para ajustar el tiempo de fritura al aire durante el funcionamiento,
pulse Temp. o Control de Tiempo para establecer el ajuste. Luego, gire
la perilla para subir o bajar el panel de control y así incrementar o
disminuir el tiempo en incrementos de 1 minuto hasta 60 minutos.
Use el ajuste de temperatura en el lado izquierdo del panel de control
para ajustar la temperatura en incrementos de 10 grados desde 88°C
hasta 205°C, y en incrementos de 5 grados desde 38°C hasta 88°C.
Nota: La cantidad, la densidad y el peso de los alimentos modificarán el
tiempo total de cocinado necesario. Recuerde que freír lotes más pequeños
reducirá el tiempo de cocinado y mejorará la calidad de los alimentos.
Importante: Compruebe siempre los alimentos a mitad del tiempo de
cocinado para determinar el tiempo de cocinado y la temperatura finales.
Ahorre tiempo y consiga una fritura al aire perfecta sin esfuerzo.
Si una receta requiere un precalentamiento de horno, o cuando cocine
carnes o proteínas que se benefician de un sellado inicial caliente,
utilice esta función. Introduzca la cesta vacía en el cuerpo de la
freidora.
1.
Pulse el icono Inicio para comenzar.1.
2.
3.
12 menús de alimento preestablecidos (Patatas Fritas |
Bistec | Pollo | Alimento Congelado | Tocino | Mariscos |
Tostadas | Verduras | Deshidratar | Hornear | Mantener
caliente | Precalentar)
Funciones de asistencia sencilla
Precalentar
ES > 49
El ajuste predeterminado es de 5:00 minutos a 205°C. Estos números
se mostrarán en la pantalla digital. Cuando la freidora de aire comience
a precalentarse, la pantalla mostrará una cuenta atrás y "Cocinando".
Cuando suenen 3 pitidos, el panel de control mostrará "00" y "Listo"
iluminado. Coloque los alimentos en la cesta de fritura y programe
la freidora de aire. A continuación, fría al aire a la perfección.
2.
3.
¡Importante! Cuando utilice la función Precalentar , reduzca
el tiempo de cocinado la receta o el tiempo preestablecido en 3 minutos
para evitar un cocinado excesivo.
When the unit is on, press the Keep Warm icon to enter or exit this
mode. The icon will turn blue while the function is active. The panel
will display the default time and temperature. You can adjust the
temperature/time by knob.
Note: Once the air fryer starts cooking, the Keep Warm function and
Preheat mode both become unusable.
Press the On/Off icon at any time to turn off the air fryer.
Mantener caliente
ES > 50

Consulte la Tabla de freír al aire y/o siga las instrucciones del paquete
para conocer el tiempo y la temperatura sugeridos.
Seque siempre los alimentos con palmaditas antes de cocinarlos para
favorecer el dorado y evitar el exceso de humo.
Para garantizar una cocinado y un dorado uniformes, abra SIEMPRE
la cesta a mitad del tiempo de cocinado y compruebe, voltee o agite
los alimentos en la cesta de freír. Algunas recetas pueden requerir un
cepillado o rociado de aceite a mitad de cocinado. Ajuste el tiempo
y la temperatura si es necesario.
Técnicas de fritura al aire
Precaución:
Utilice siempre guantes de cocina cuando manipule la cesta de la
freidora de aire caliente.
Asegúrese de que la cesta está en posición de bloqueo cuando agite
alimentos en la freidora de aire. Para evitar daños a personas o bienes
personales, no presione el Botón de Liberación de la Cesta mientras
agita la cesta para freír.
El aceite caliente puede acumularse en la base de la cesta. Para evitar
el riesgo de quemaduras o lesiones personales, y para evitar que el
aceite contamine los alimentos fritos al aire, desbloquee y retire
siempre la cesta de freír antes de vaciarla. NUNCA voltee la cesta de
freír estando encajada.
Deje reposar los alimentos cocinados de 5 a 10 minutos. Retire la
cesta de freír de la máquina y colóquela sobre una superficie plana
y resistente al calor.
Sacuda los alimentos fritos sobre el area de servir. Vuelva a colocar
inmediatamente la cesta de freír y bloquéela en su sitio. Continúe
friendo al aire tandas posteriores, si lo desea.
ES > 51

Para evitar el exceso de humo, cuando cocine alimentos ricos en
grasa en su estado natural, como tocino, alitas de pollo o salchichas,
puede ser necesario vaciar la grasa del cajón de la cesta de freír
entre tanda y tanda.
Para obtener resultados más crujientes, fría al aire pequeñas tandas
de alimentos recién empanados. Cree más superficie cortando los
alimentos en trozos más pequeños. Aplaste el empanado de los
alimentos para facilitar su adherencia. Refrigere los alimentos empanados
durante al menos 30 minutos antes de freírlos.
Disponga los alimentos empanados en la cesta de freír de forma que
los alimentos no se toquen para permitir el flujo de aire en todas las
superficies.
Los aceites en spray funcionan bien. El aceite se distribuye uniformemente
y se necesita menos aceite. El aceite de canola, oliva, aguacate,
coco, semilla de uva, cacahuete o vegetal funcionan muy bien.
Desenchufe la freidora cuando no la utilice.
Mientras que los hornos microondas a menudo producen resultados
calientes y pastosos y los hornos tostadores tardan una eternidad,
¡la fritura por convección de aire asegura resultados razonablemente
rápidos, crujientes y deliciosos!
Como regla general, dependiendo del alimento y de la cantidad a
cocinar, los tiempos de cocinado sugeridos pueden tener que
reducirse ligeramente. Compruebe siempre los alimentos a mitad
del tiempo de cocinado para determinar el tiempo de cocinado y la
temperatura finales.
Compruebe siempre el progreso del cocinado una vez completado
el tiempo.
Freír alimentos congelados preenvasados
ES > 52
Make sure the basket is resting on a flat surface.
Watch for hot oil or fat collected in the basket. To avoid splashing, drain
oil before replacing the basket.
1
2
CAUTION: The hot crisper plate may fall out when turning the basket over.
Este aparato requiere poco mantenimiento. No contiene piezas que el
usuario pueda reparar. Cualquier reparación que requiera un desmontaje
distinto a la limpieza debe ser realizada por un técnico cualificado.
Mantenimiento
ES > 53

Note:
¡Advertencia! Deje que la freidora de aire se enfríe completamente
antes de limpiarla.
Desenchufe la freidora de aire y retire la cesta de freír. Asegúrese
de que la cesta de freír y la bandeja antiadherente se han enfriado
completamente antes de limpiarlas. Utilice el orificio central de la
bandeja antiadherente para levantarla y sacarla de la cesta de freír.
Lave la cesta y la bandeja con agua caliente y jabón. No utilice
utensilios de cocina metálicos, limpiadores abrasivos u otros
productos de limpieza que dañen el revestimiento antiadherente.
La cesta y la bandeja son aptos para el lavavajillas. Para obtener
mejores resultados, colóquelas en la rejilla superior de su lavavajillas
para limpiarlas.
Limpie el cuerpo de la freidora de aire con un paño suave, no
abrasivo y húmedo.
The basket and crisper plate have a nonstick coating. Avoid using
metal utensils and abrasive cleaning materials.
There may be water spots on the basket window after washing. This is
normal. Run the air fryer for 15 minutes to completely dry the basket.
Asegúrese de que la freidora de aire esté desenchufada y de que
todas las piezas estén limpias y secas antes de guardarla.
Nunca guarde la freidora de aire mientras esté caliente o húmeda.
Encaje la cesta de freír y guárdela dentro del cuerpo de la freidora
de aire.
Guarde la freidora de aire en su caja o en otro lugar limpio y seco.
Cuidado y limpieza
Almacenamiento
ES > 54

Solución de problemas/Preguntas frecuentes
Asegúrese de que la freidora está enchufada.
Empuje la cesta en la freidora.
La freidora de aire no se enciende.
Coloque tandas más pequeñas de alimentos en la cesta. Si la cesta
está demasiado llena, los alimentos estarán poco hechos.
Aumente la temperatura o el tiempo de cocinado.
Los alimentos no están completamente cocinados.
Asegúrese de que la cesta no está demasiado llena de alimentos.
La cesta no se desliza con seguridad en la freidora de aire.
La freidora de aire puede producir algo de humo blanco o vapor cuando
la utilice por primera vez o durante el cocinado. Esto es normal.
Asegúrese de que la cesta y el interior de la freidora de aire están
bien limpios y no tienen grasa.
Si cocina alimentos grasientos, se acumulará aceite debajo de la
bandeja antiadherente. Este aceite producirá humo blanco y la cesta
puede estar más caliente de lo normal. Esto es normal y no debería
afectar al cocinado. Manipule la cesta con cuidado.
Sale humo blanco o vapor de la freidora de aire.
Cualquier freidora de aire puede tener olor a plástico debido al proce-
so de fabricación. Esto es normal. Siga las instrucciones de prueba
para eliminar el olor a plástico. Si el olor a plástico persiste, póngase
en contacto con el servicio de atención al cliente de HiCOZY.
La freidora tiene olor a plástico.
ES > 55

Desenchufe inmediatamente la freidora de aire. El humo oscuro significa
que los alimentos se están quemando o que hay un problema en el
circuito. Espere a que se disipe el humo antes de sacar la cesta. Si la
causa no es alimento quemado, póngase en contacto con el servicio
de atención al cliente.
Sale humo oscuro de la freidora de aire.
Características técnicas
Modelo
Fuente de alimentación
Potencia nominal
Capacidad
Rango de temperatura
Dimensiones (incluyendo asa)
Peso
AF600
120V CA, 60Hz
1500W
6QT/5.7L (para 3 ~ 5 personas)
100 ~ 400°F (40 ~ 204°C)
420 x 260 x 294mm
4.5kg
Hay un circuito abierto en el monitor de temperatura. Póngase en
contacto con el servicio de atención al cliente de HiCOZY.
La pantalla muestra el código de error "E01"
Hay un cortocircuito en el monitor de temperatura. Póngase en
contacto con el servicio de atención al cliente de HiCOZY.
La pantalla muestra el código de error "E02"
ES > 56

Reciclaje
Puede desechar el producto cuando haya finalizado su vida útil; recicle
las piezas reciclables de acuerdo con las directrices locales.
Período de garantía
Garantía limitada de 1 año de HiCOZY
Esta garantía no se aplica:
Cada Freidora de Aire Digital HiCOZY está libre de defectos en materi-
ales y mano de obra. Esta garantía no cubre daños por negligencia,
mal uso, contaminación, alteración, accidente o condiciones anormales
de operación o manejo. Esta garantía cubre únicamente al comprador
original y no es transferible.
HiCOZY siempre quiere proporcionar a nuestros clientes excelentes
productos y servicio al cliente.
¿Preguntas o dudas? ¡Estaremos encantados de ayudarle!
Póngase en contacto con nosotros a través de [email protected].
Si el producto ha sido modificado de su estado original;
Si el producto no se ha utilizado de acuerdo con las indicaciones e
instrucciones del manual de usuario.
A los daños o defectos causados por accidente, abuso, uso indebido
o mantenimiento incorrecto o inadecuado.
A los daños o defectos causados por el servicio o reparación del
producto realizado por un proveedor de servicios no autorizado o
por cualquier persona ajena a HiCOZY.
A los daños o defectos que se produzcan durante el uso comercial,
el alquiler o cualquier uso para el que el producto no esté destinado.
Por daños o defectos que superen el coste del producto.
ES > 57

Corporación HiCOZY
Sede Add.: Habitación 2208, Edificio de Recursos de China - MIXC,
Distrito de Jiulongpo, Chongqing, China
Correo electrónico: [email protected]
Teléfono gratuito: 1-866-444-2699
Horario de atención al público: Lun-Vie, 9:00 am ~ 5:00 pm PST/PDT
Tenga a mano la factura y el número de pedido antes de ponerse en
contacto con el servicio de atención al cliente.
ES > 58