VERSION: 1.0
USER MANUAL
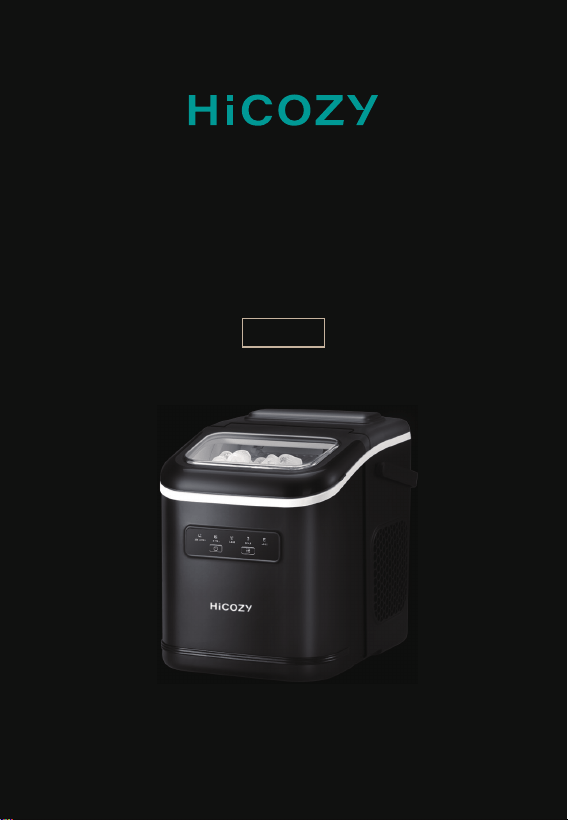
ICE MAKER
HIM-D4

Contents
Introduction
Warnings
Package Includes
Diagram
Specifications
Installation
Button Functions
Instructions
Maintenance
Troubleshooting/FAQ
Recycling
Warranty Period
03
04
05
06
07
08
08
10
14
15
15
16

Introduction
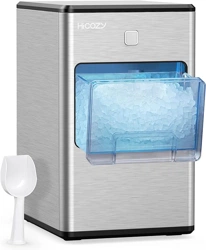
This product is designed to make bullet-shaped ice suitable for
cooling, preserving, and refreshing food and drinks. It’s great for
use in kitchens, living rooms, parties, and more.
To get the best performance from your new bullet ice maker,
please carefully read and follow all the instructions in this manual
before use. We hope you enjoy your new HiCOZY ice maker!
Thank you again for choosing HiCOZY. Questions or concerns?
You are welcome to contact us via [email protected].
Please fully read and understand this manual before using and
keep this manual for future reference.
Warning:Riskoffire/flammablematerials.
EN > 03

Warnings
HiCOZY recommends using chilled water for faster ice production.
Before using, ensure the power outlet’s voltage corresponds to the
value shown on the appliance nameplate. The wrong voltage will
damage the product.
The product should always be grounded correctly. Only use a
grounded power strip with a power rating greater than 1000W.
Leave at least 4 inches (10.2cm) of clearance on all sides of
the ice maker for proper ventilation.
Do not attempt to disassemble, repair, modify, or replace any
part of this product.
Before using the ice maker for the first time, or after
moving it, please place the ice maker on a level surface
and wait for 6 hours.
After 6 hours in the proper position, the ice maker can be
used normally.
Before operation, we recommend cleaning the ice maker as
outlined in the “Maintenance” section on page 16 of this manual.
Do not turn the ice maker upside down, this may cause the
compressor and/or refrigeration system to malfunction.
Only use this product with potable water, failure to do so is
hazardous to users’ health.
Do not use hot water in this product. Always use water that is
under 86°F (30℃).
EN > 04

Package Includes
Do not immerse any part of the product into water, or touch
the plug with wet hands.
To avoid frostbite, do not touch the ice-making part while in use.
Do not use this product in outdoor, hot, or corrosive environments.
Always use this product on a dry, even, and stable surface.
The incline angle of the ice maker cabinet should not exceed
45° during transportation or use.
Do not allow children, or persons who lack the necessary
experience and knowledge, to use the product.
When not in use, please drain the water tank and dry the
product with a clean towel. Then, store it in a dry and
well-ventilated place.
Ice Maker
Ice Scoop
User Manual
Warranty Card
× 1
× 1
× 1
× 1
EN > 05
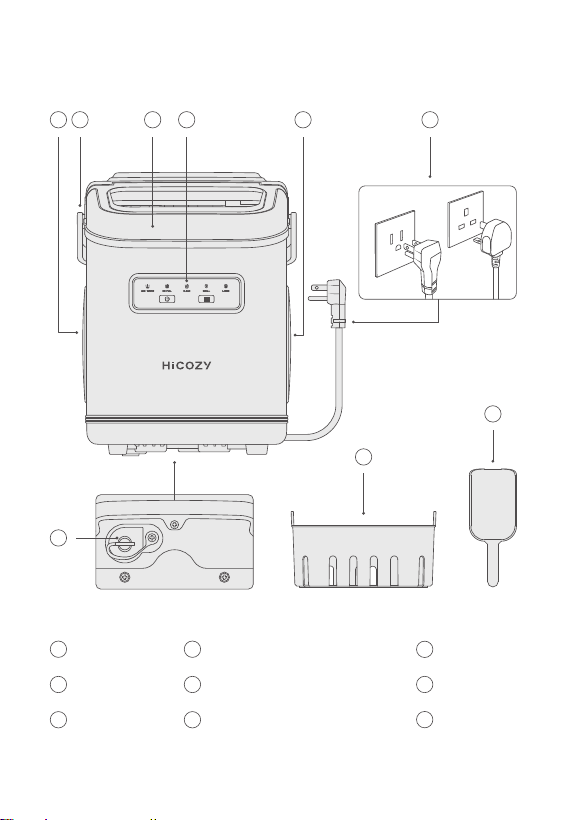
Diagram
1
Air Inlet
2
Handle
3
Lid
4
Control Panel
5
Heat Dissipation Vent
6
Power Cord
9
Ice Scoop
8
Ice Basket
7
Drain Plug
1 2 3 4 5 6
9
7
8
or
EN > 06
Ice-Making Time
Ice Basket Capacity
Water Tank Capacity
Working Voltage
Power
Weight
Dimensions
Refrigerant/
Refrigerant Amount
6 ~ 10 Minutes
1.3lbs (600g)
47.3oz (1400mL)
AC 115V 60Hz 1.5A (US/CA/MX)
AC 220 ~ 240V 50Hz 0.8A (UK/AE)
110W
13lbs ± 5% (5.9kg ± 5%)
8.7 L × 11.4 W × 11.6in H (22 × 29 × 29.5cm)
R600a/0.6oz (17g) (US/CA/MX)
R600a/0.5oz (15g) (UK/AE)
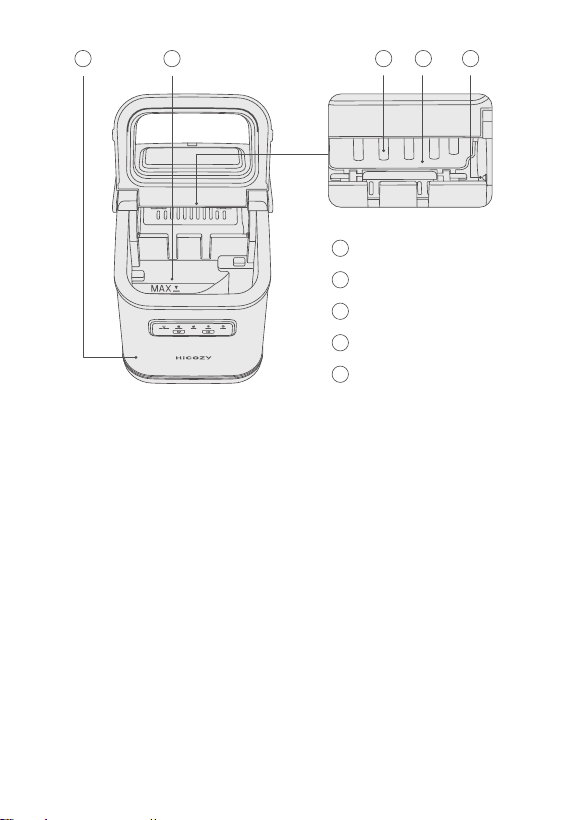
Specifications
1
Max Water Level
2
Infrared Sensor
3
Ice-Making Box
4
Ice-Making Part
5
Water Tank
1 2 3 4 5
EN > 07

Button Functions
Button & Indicator Instructions
Press to start making ice, press again to cancel.
Power Button
Mode Button
Mode function:
Press to switch between large ice or small ice modes.
Cleaning function:
Press and hold for 3 seconds to turn on the cleaning function.
Press again to turn it off.
1. Open the package and take out all the accessories.
2. Place the ice maker vertically on an even surface.
3. Use a clean towel to wipe the water tank, ice basket, and ice scoop.
4. Keep the ice maker upright for 6 hours before using it for the
first time.
Installation
EN > 08
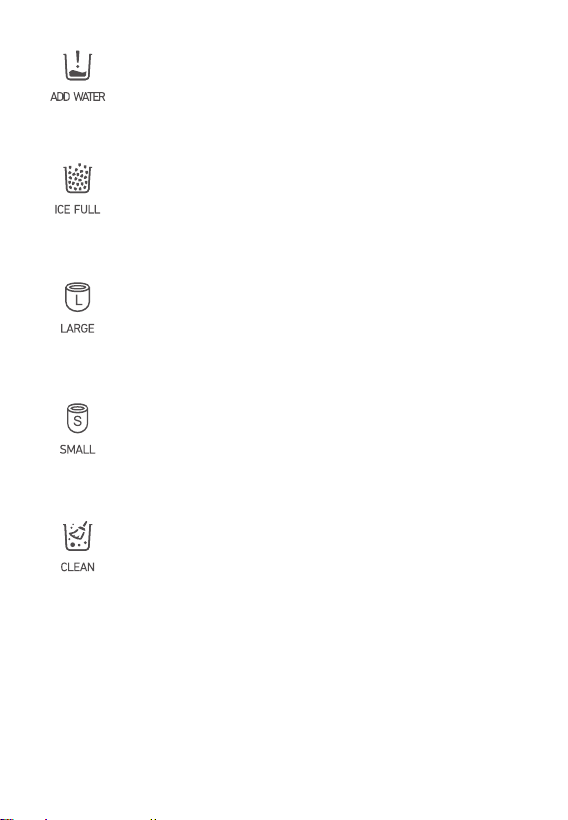
Water shortage
This indicator illuminates when the water level is low.
Full ice basket
This indicator illuminates when the ice basket is full.
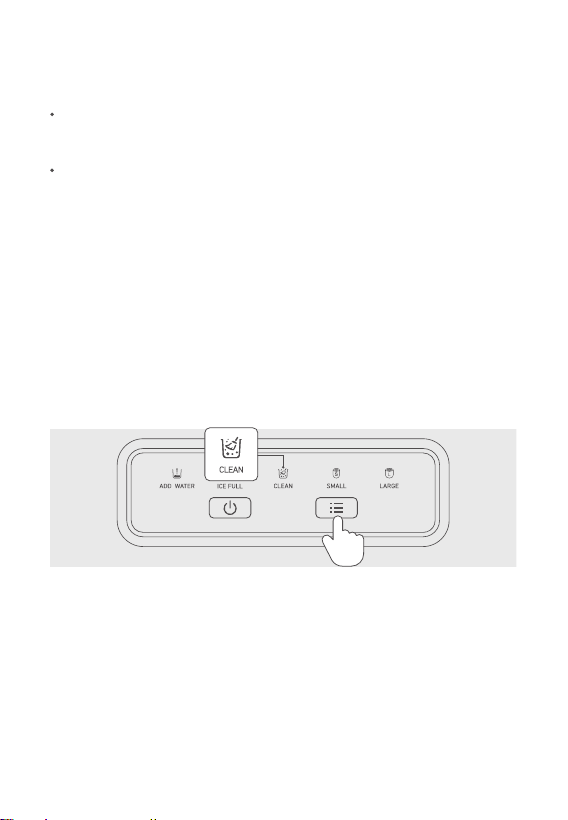
Cleaning mode
Indicates that the machine is currently in its self-cleaning function.
After starting the cleaning mode, the indicator will stay illuminated.
Small ice mode
This indicator will stay illuminated when choosing the small ice mode.
Large ice mode
This indicator will stay illuminated when choosing the large ice mode.
EN > 09
1. Place the ice maker upright for more than 6 hours before using
it for the first time.
2.
Ensure the drain hole is blocked by the drain plug.
Instructions
Add Water
EN > 10
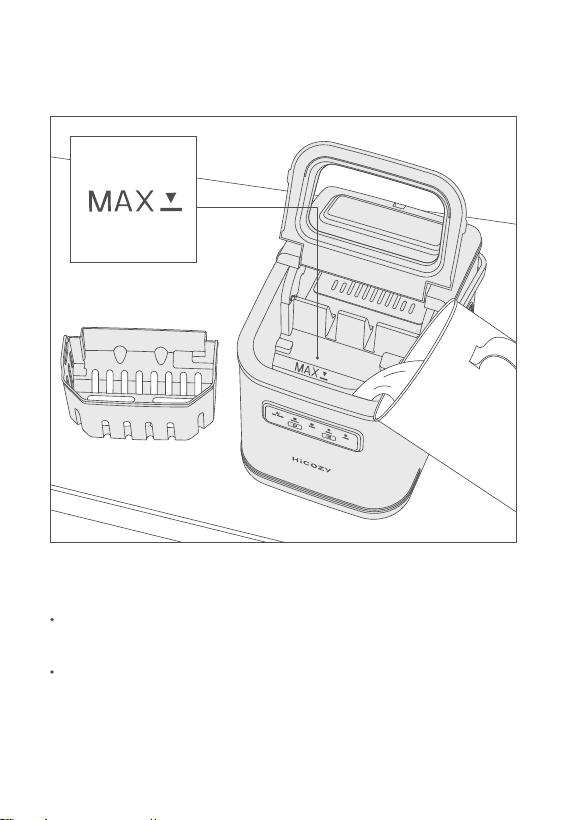
3. Slowly pour 47.3oz (1400mL) of potable water into the ice basket.
Note: Do not exceed the “MAX” water level indicator.
Check that the power outlet’s voltage corresponds to the value
shown on the appliance nameplate.
After plugging in, all the indicators will flash for 1 second and
then turn off.
Plug In
Note: Do not use wet hands to plug in the machine. Keep the plug dry.
EN > 11
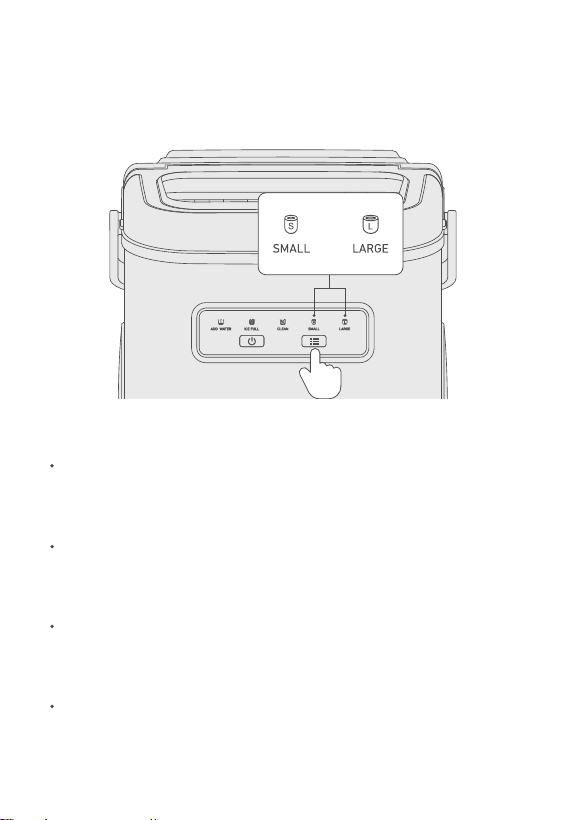
1. Press the Power Button to turn on the product.
2. Press the Mode Button to choose the desired ice size.
Start Ice-Making
If the product has been idle for a long time or if using it for the
first use, please refer to the “Maintenance” section on page 16
to clean it.
It takes approximately 6 ~ 10 minutes to make ice. The duration
may fluctuate based on the ice size, ambient temperature, and
water temperature.
The ice may come out small in the beginning because the
interior cooling pipes have not completely cooled yet. This is
normal and will resolve after a few minutes.
The ice maker stops making ice after the ice basket is full and
will resume making ice once the basket is no longer full.
Note
or
EN > 12
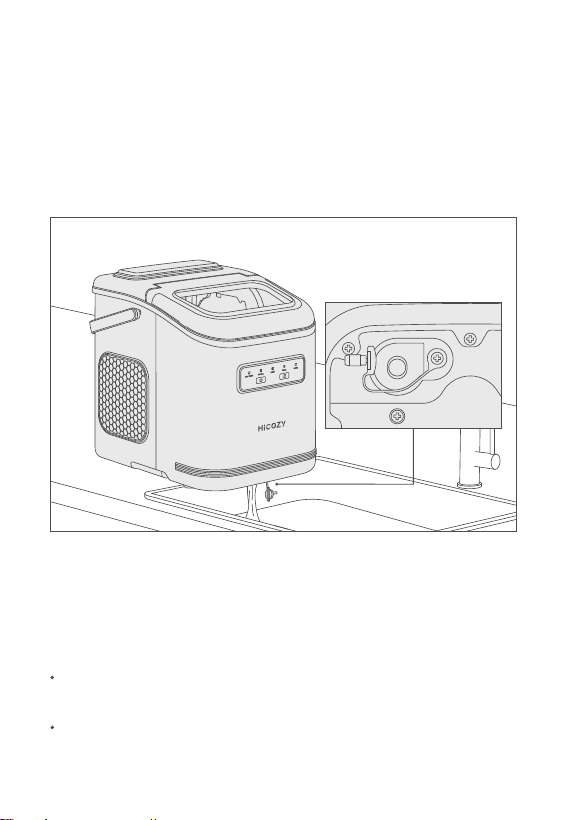
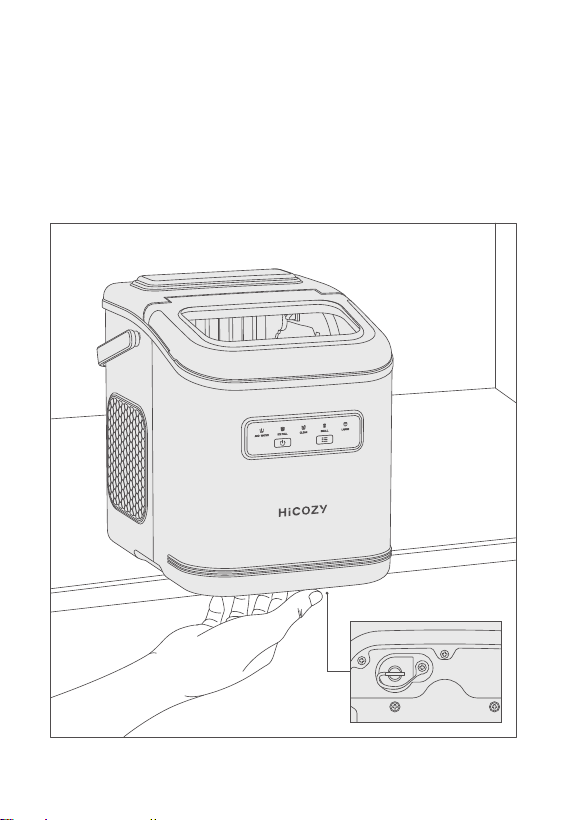
1. Disconnect the power plug before draining.
2.
Carefully move the ice maker to an area appropriate to drain
water, such as a sink.(Note: Move it evenly to avoid dropping.)
3.
Remove the drain plug and ensure the residual water flows
into the sink.
4.
After the water tank is empty, securely plug in the drain plug.
Use a clean towel to wipe up the residual water.
5. Put the ice maker back.
6. Drain out water in the following situations:
Always use fresh potable water to make ice, excess water
should be drained after every use.
When the product will be, or has been, idle for a long time.
Drain Water
EN > 13
Maintenance
To keep your ice tasting fresh and your ice maker clean, we
recommend cleaning your ice maker at least once per week.
Pull out the ice basket, and add some citric acid and water to
the water tank. Then, put the ice basket back.
1. Press and hold the Mode Button for 3 seconds, the cleaning
indicator will illuminate and the self-cleaning process will begin.
After 5 minutes, it will stop cleaning. The Power Button can be
pressed to manually stop the cleaning at any time. The ice
maker must be on standby mode (not making ice) for the cleaning
function to be activated.
2. Disconnect the drain plug after the cleaning has stopped. After
it drains, tightly plug the drain plug back in.
3. Add some fresh potable water to clean the product, activate the
cleaning mode, and repeat these steps 2 ~ 4 times to ensure
there is no residual cleaner in the machine.
Note: To avoid safety hazards, keep the interior components dry.
Do not use solvents or chemicals to clean the plastic parts.
Note: Do not use organic solvents, boiled water, strong acids, or
bases for cleaning.
EN > 14

Troubleshooting/FAQ
Recycling
Check if the product is powered correctly.
Check if the water tank has sufficient water.
Check if the compressor works.
The Ice Maker Does Not Work
Do not exceed the MAX water level when adding water.
Check if the drain plug is tightly plugged.
The Ice Maker Leaks
Check if the water tank’s filter is blocked.
Check if the compressor works.
With Sufficient Water, the Product Does Not Produce Ice
The infrared sensor is blocked by ice, remove excess ice.
This product contains a refrigerant, which under Federal Law
must be removed prior to product disposal. Legally dispose of the
product according to the local regulations.
The Full Ice Indicator Illuminates While the Ice Basket is Not Full
EN > 15

Warranty Period
What HiCOZY Will Not Cover
Service trips to your home.
Improper maintenance.
Replacement house fuses or resetting of circuit breakers.
Incidental or consequential damage caused by possible defects
with this appliance.
Labor and other charges to install and/or remove the product.
Each HiCOZY Ice Maker will be free from defects in material and
craft. This warranty does not cover damage from neglect,
misuse, contamination, alteration, accident, or abnormal condi-
tions of operation or handling. This warranty covers the original
purchaser only and is not transferable.
HiCOZY always wants to provide our customers with excellent
products and customer service.
Questions or concerns? You are welcome to contact us via
1-Year Limited Warranty from HiCOZY
If the ice maker fails due to a defect in materials or workmanship,
during the limited one-year warranty. HiCOZY will either replace
your product with a new or re-manufactured product or refund
the purchase price of the product at HiCOZY’s sole discretion.
EN > 16