FROZEN DRINK MAKER
MODEL: ISM2021
USER MANUAL
Before operating the appliance, please read this manual and all the
safety instructions thoroughly and retain it for future reference.
Manufacturer: shenzhenfuduosishangmaoyouxiangongsi
Address: LongGangQuBuJiJieDaoLuoGangSheQuJinLongLu89Hao
HaiXuanGuangChang4Zuo1403 SHENZHEN GUANGDONG 518000
Facebook Page: http://www.facebook.com/foherehome
Email: Grindigodream@163.com
Web: www.fohere.com
MADE IN CHINA
CUSTOMER SERVICE DEPARTMENT
Thank you for supporting our brand. If you have any questions, please
choose the way you prefer to contact the service team, the service team
will get back to you within 24 hours on the business day.
1. Official E-mail Address: [email protected]
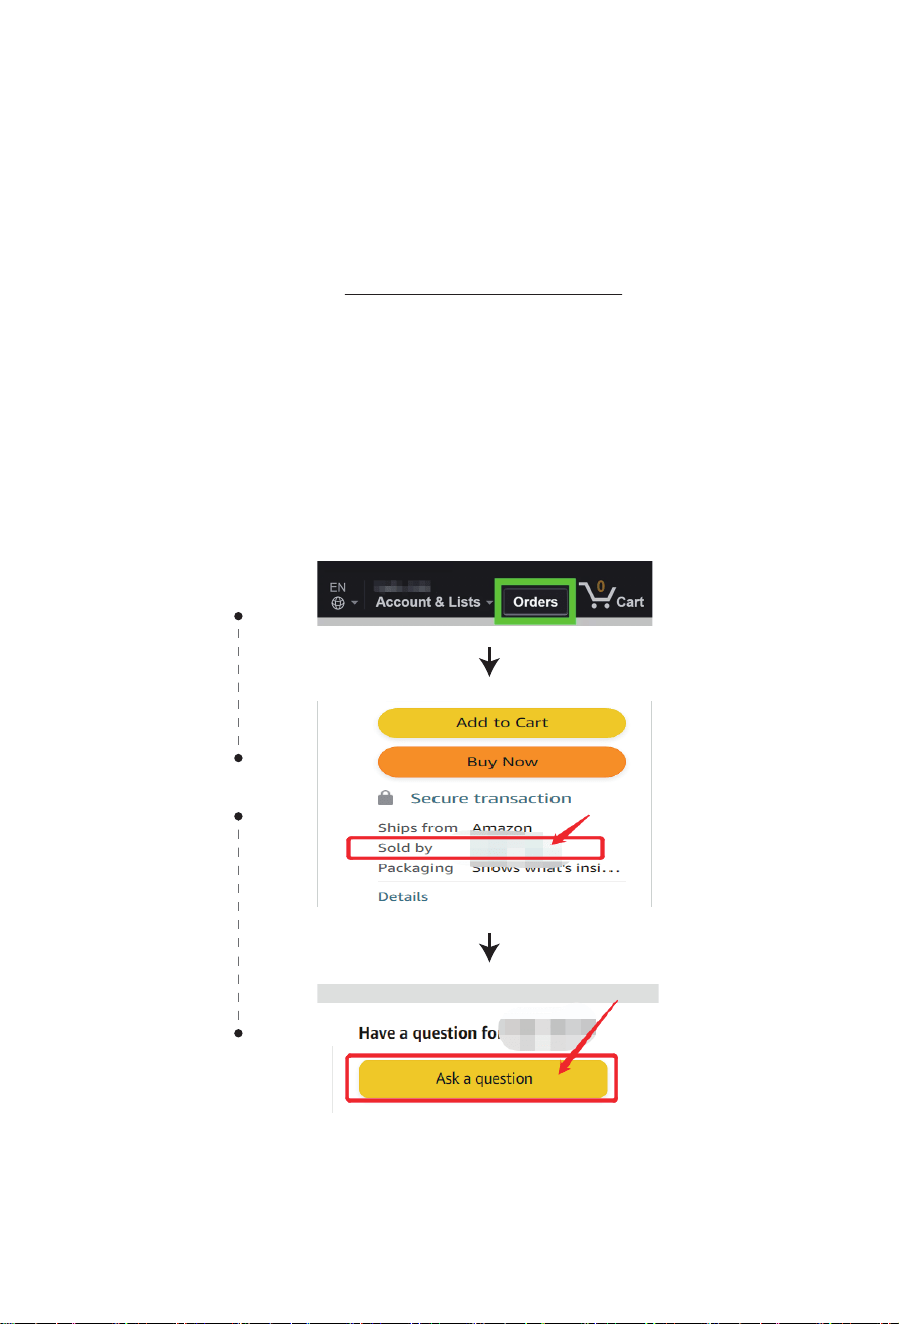
2. Log in Amazon Account - Follow the steps to contact.
① Click “Orders” - Go to the specific product page
② Click the name of the seller(after "sold by")
③ Click “Ask a question”-
Steps figure below:
①
②
③
Store

TABLE OF CONTENTS
01
04
04
05
07
09
10
12
13
13
IMPORTANT SAFEGUARDS
When using an electrical appliance, basic safety
precautions should always be followed to reduce the risk of
fire, electric shock, and/or injury, including the following:
1.Read all instructions before using.
2.Remove all packing material and carefully check your frozen drink maker
to ensure it is in good condition and that there is no damage to the frozen
drink maker or power cord and plug.
3.If the supply cord is damaged, it must be replaced by the manufacturer
or its service agent or a similarly qualified person in order to avoid a
hazard.
4.This appliance is not intended for use by persons (including children) with
reduced physical, sensory or mental capabilities, or lack of experience
and knowledge, unless they have been given supervision or instruction
concerning use of the appliance by a person responsible for their safety.
Children should be supervised to ensure that they do not play with the
appliance. This appliance can be used by children aged from 8 years
and above and persons with reduced physical, sensory or mental capa-
bilities or lack of experience and knowledge if they have been given
supervision or instruction concerning use of the appliance in a safe way
and understand the hazards involved. Children shall not play with the
appliance. Cleaning and user maintenance shall not be made by
children without supervision.
5.This appliance is intended to be used in household and similar applica-
tions such as
– Sta kitchen areas in shops, oces and other working environments;
– Farm houses and by clients in hotels, motels and other residential type
environments;
– Bed and breakfast type environments.
6.WARNING: Do not store explosive substances such as aerosol cans with
a flammable propellant in this appliance.
– WARNING: Keep ventilation openings, in the appliance enclosure or in
the built-in structure, clear of obstruction.
– WARNING: Do not damage the refrigerant circuit.
Important Safeguards
Specifications
Feature
Product Instruction
Operation Instruction
Protection Function
Cleaning
Maintenance
Trouble Shooting
Correct Disposal of This Product
01
– WARNING: When positioning the appliance, ensure the supply cord is
not trapped or damaged.
– WARNING: Do not locate multiple portable socket-outlets or portable
power supplies at the rear of the appliance.
– WARNING: When disposing of the appliance, do so only at an autho-
rized waste disposal centre. Do not expose to flame.
– WARNING: fill with potable ingredients only.
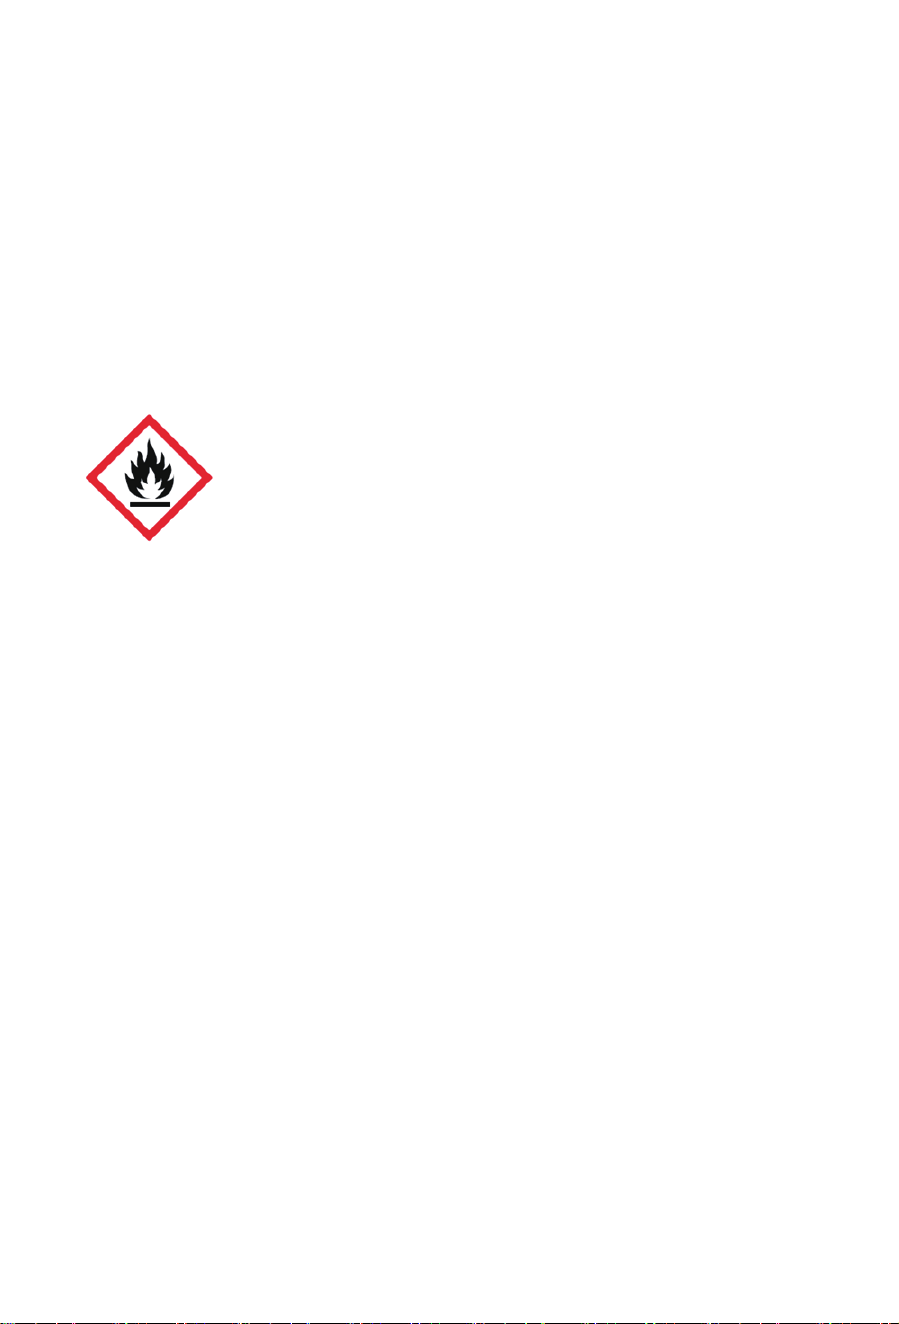
7. The refrigerant (R290) is flammable.
Caution: risk of fire / Flammable materials
The refrigerant isobutene (R290) is contained within the
refrigerant circuit of the appliance, a natural gas with a
high level of environmental compatibility, which is never-
theless flammable. During transportation and installation
of the appliance, ensure that none of the components of
the refrigerant circuit becomes damaged.
If the refrigerant circuit should be damaged:
• Avoid opening flames and sources of ignition.
• Thoroughly ventilate the room in which the appliance is situated.
8.Before using the frozen drink maker for the first time, please wait 2 hours
after positioning it.
9.Ensure the voltage is compliant with the voltage range stated on the
rating label, and ensure the earthing of the socket is in good condition.
10.Do not upend this product or incline it over a 45° angle.
11.To protect against risk of electric shock, do not pour water on cord,
plug and ventilation, immerse the appliance in water or any other
liquid.
12.Unplug the appliance after using or before cleaning.
13.Keep the appliance 8cm from other objects to ensure the good heat
releasing.
14.Do not use the accessories which are not recommended by Manufac-
turer.
15.Do not use the appliance close by flames, hot plates or stoves.
16.Do not switch on the power button frequently (ensure 5min. interval at
least) to avoid the damage of compressor.
17.Do not use outdoors.
18.Never clean with scouring powders or hard implements.
19.Please keep the instruction manual.
20.To avoid contamination of food, please respect the following instructions:
– Clean regularly surfaces that can come in contact with food and accessi-
ble systems.
– If the refrigerating appliance is left empty for long periods, switch o,
defrost, clean, dry, and leave the door open to prevent mould developing
within the appliance.
21.Regarding the information pertaining to the use of the appliance, please
refer to the paragraphs below.
22.Component parts shall be replaced with like components and that
servicing shall be done by factory authorized service personnel, so as to
minimize the risk of possible ignition due to incorrect parts or improper
service.
23.When service personnel during service operations, if it is possible to touch
the motor metal enclosure/electrical control box cover, please power o
for service operations.
24.Do not put your fingers into the discharge opening as this may cause
danger.
SPECIFICATIONS
ISM2021
2L/68oz (usable capacity: 1.42L/48oz)
AC 120V/60Hz
200 W
I
N/SN
10.4 kg
11.7 kg
429×175×446mm
451×232×460mm
Model Number:
Eective volume:
Voltage:
Power Consumption:
Protection against electric shock:
Climate Type:
N.W:
G.W:
Max overall dimensions (L*W*H):
Packing Dimensions (L*W*H):
02 03

– WARNING: When positioning the appliance, ensure the supply cord is
not trapped or damaged.
– WARNING: Do not locate multiple portable socket-outlets or portable
power supplies at the rear of the appliance.
– WARNING: When disposing of the appliance, do so only at an autho-
rized waste disposal centre. Do not expose to flame.
– WARNING: fill with potable ingredients only.
7. The refrigerant (R290) is flammable.
Caution: risk of fire / Flammable materials
The refrigerant isobutene (R290) is contained within the
refrigerant circuit of the appliance, a natural gas with a
high level of environmental compatibility, which is never-
theless flammable. During transportation and installation
of the appliance, ensure that none of the components of
the refrigerant circuit becomes damaged.
If the refrigerant circuit should be damaged:
• Avoid opening flames and sources of ignition.
• Thoroughly ventilate the room in which the appliance is situated.
8.Before using the frozen drink maker for the first time, please wait 2 hours
after positioning it.
9.Ensure the voltage is compliant with the voltage range stated on the
rating label, and ensure the earthing of the socket is in good condition.
10.Do not upend this product or incline it over a 45° angle.
11.To protect against risk of electric shock, do not pour water on cord,
plug and ventilation, immerse the appliance in water or any other
liquid.
12.Unplug the appliance after using or before cleaning.
13.Keep the appliance 8cm from other objects to ensure the good heat
releasing.
14.Do not use the accessories which are not recommended by Manufac-
turer.
15.Do not use the appliance close by flames, hot plates or stoves.
16.Do not switch on the power button frequently (ensure 5min. interval at
least) to avoid the damage of compressor.
17.Do not use outdoors.
18.Never clean with scouring powders or hard implements.
19.Please keep the instruction manual.
20.To avoid contamination of food, please respect the following instructions:
– Clean regularly surfaces that can come in contact with food and accessi-
ble systems.
– If the refrigerating appliance is left empty for long periods, switch o,
defrost, clean, dry, and leave the door open to prevent mould developing
within the appliance.
21.Regarding the information pertaining to the use of the appliance, please
refer to the paragraphs below.
22.Component parts shall be replaced with like components and that
servicing shall be done by factory authorized service personnel, so as to
minimize the risk of possible ignition due to incorrect parts or improper
service.
23.When service personnel during service operations, if it is possible to touch
the motor metal enclosure/electrical control box cover, please power o
for service operations.
24.Do not put your fingers into the discharge opening as this may cause
danger.
SPECIFICATIONS
ISM2021
2L/68oz (usable capacity: 1.42L/48oz)
AC 120V/60Hz
200 W
I
N/SN
10.4 kg
11.7 kg
429×175×446mm
451×232×460mm
Model Number:
Eective volume:
Voltage:
Power Consumption:
Protection against electric shock:
Climate Type:
N.W:
G.W:
Max overall dimensions (L*W*H):
Packing Dimensions (L*W*H):
02 03
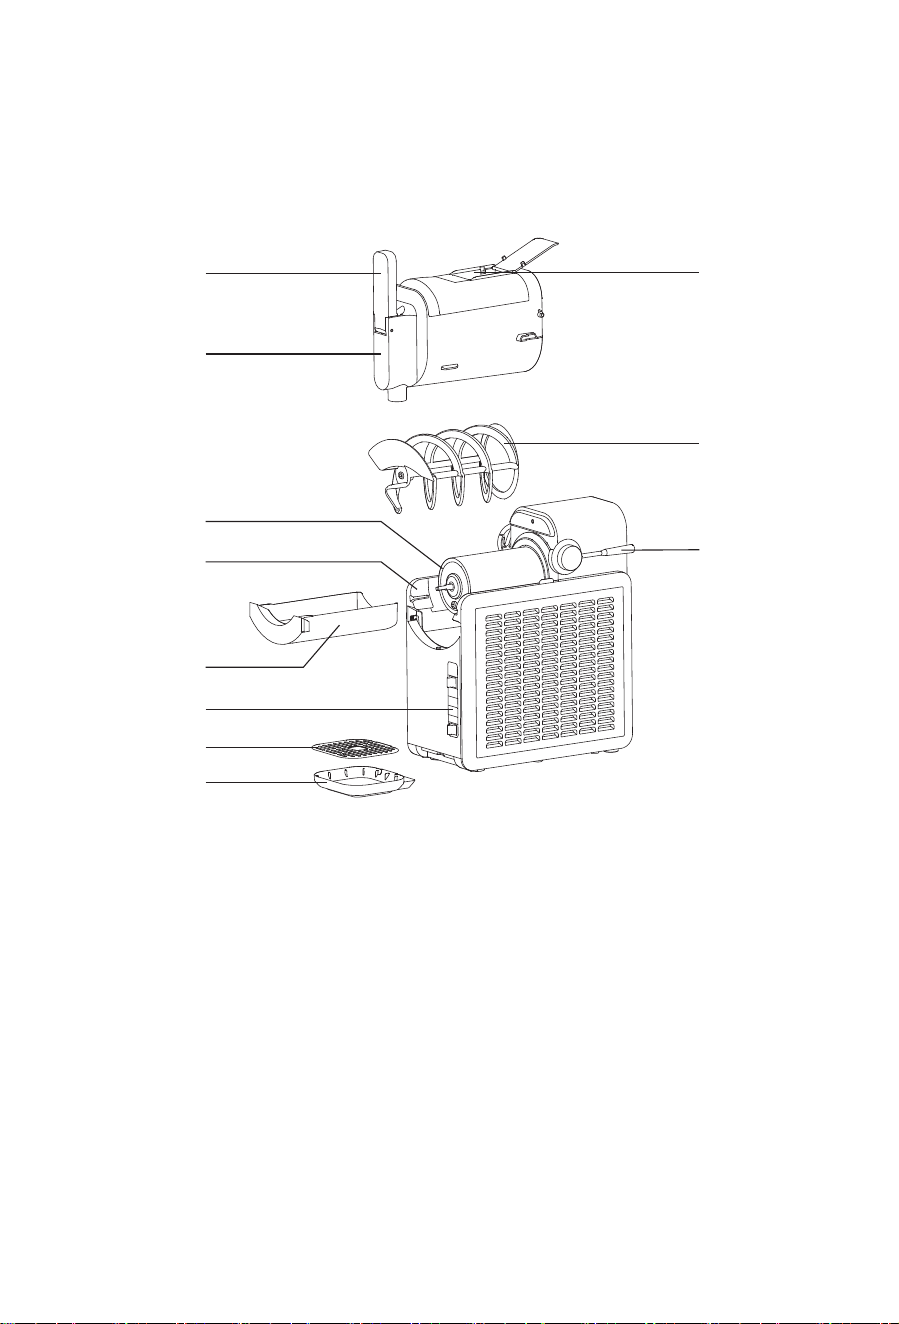
PRODUCT INSTRUCTION
1
2
3
4
6
5
7
8
1. Handle
2. Transparent Vessel with
Anti-Drip Pour Spout
3. Evaporator
4. Motor Base
5. Condensation Tray
6. Control panel
7. Decorative plate
8. Water tray
9. Easy-Fill Port & Cover
10. Auger
11. Vessel Lock
1) Structure
9
10
11
(RECIPE NOT SLUSHING?
If your recipe has not
reached the desired
texture after 60 minutes,
increase the thickness one
level. Wait 10-15 minutes
to test the recipe. If the
texture still isn't what you
desire, increase thickness
by one level again.
Repeat until desired
texture is achieved.)
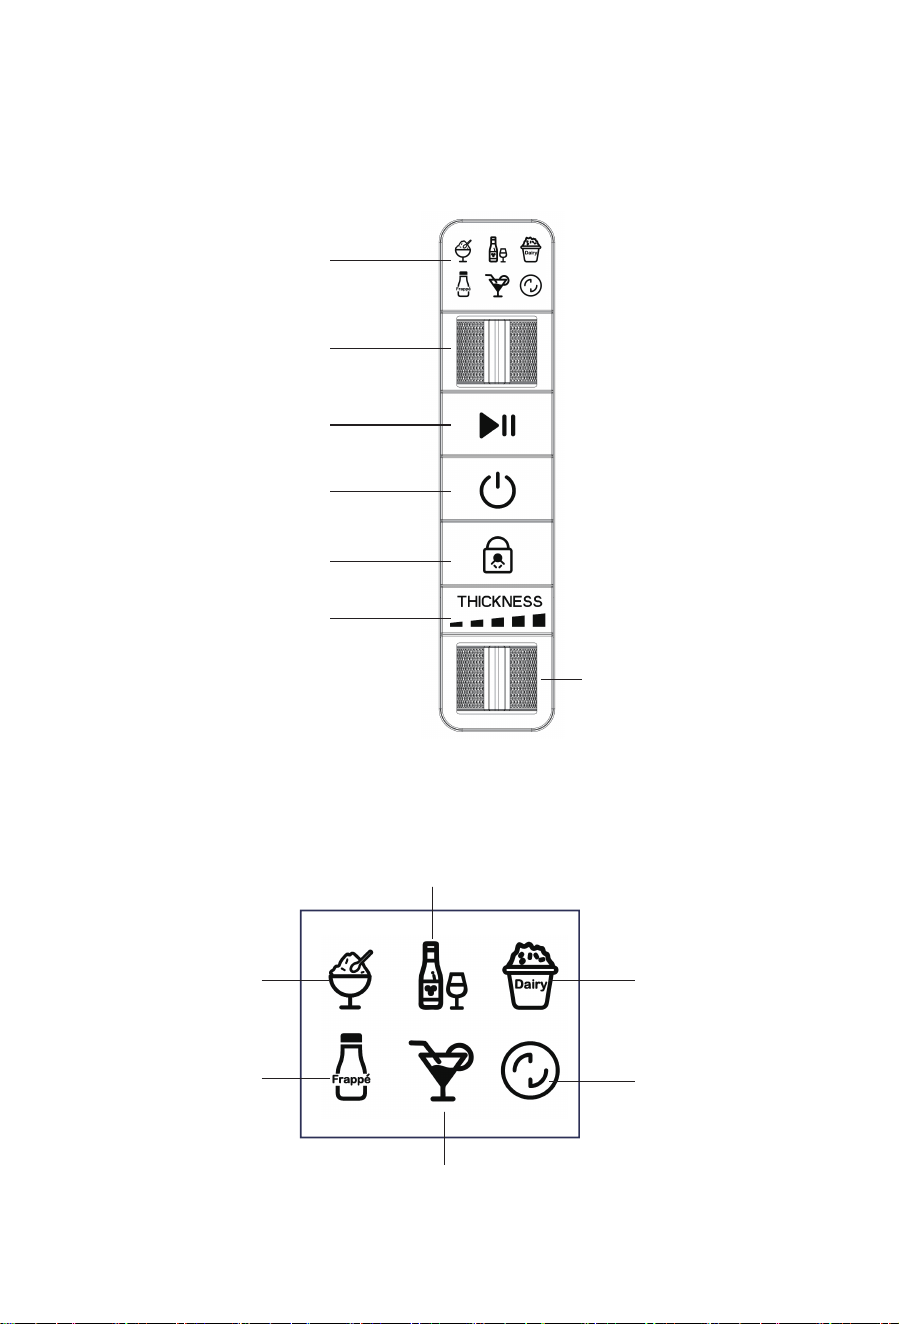
2) Control panel
3) Function
Preset Indicator
Red wine smoothies
Cocktail smoothies
Preset Selector
Start/Pause
Power
Child lock
Smoothie thickness
adjustment
Thickness Adjustor
Coee
smoothies
Cleaning
Milkshake
smoothies
Smoothies
04 05
PRODUCT INSTRUCTION
1
2
3
4
6
5
7
8
1. Handle
2. Transparent Vessel with
Anti-Drip Pour Spout
3. Evaporator
4. Motor Base
5. Condensation Tray
6. Control panel
7. Decorative plate
8. Water tray
9. Easy-Fill Port & Cover
10. Auger
11. Vessel Lock
1) Structure
9
10
11
(RECIPE NOT SLUSHING?
If your recipe has not
reached the desired
texture after 60 minutes,
increase the thickness one
level. Wait 10-15 minutes
to test the recipe. If the
texture still isn't what you
desire, increase thickness
by one level again.
Repeat until desired
texture is achieved.)
2) Control panel
3) Function
Preset Indicator
Red wine smoothies
Cocktail smoothies
Preset Selector
Start/Pause
Power
Child lock
Smoothie thickness
adjustment
Thickness Adjustor
Coee
smoothies
Cleaning
Milkshake
smoothies
Smoothies
04 05
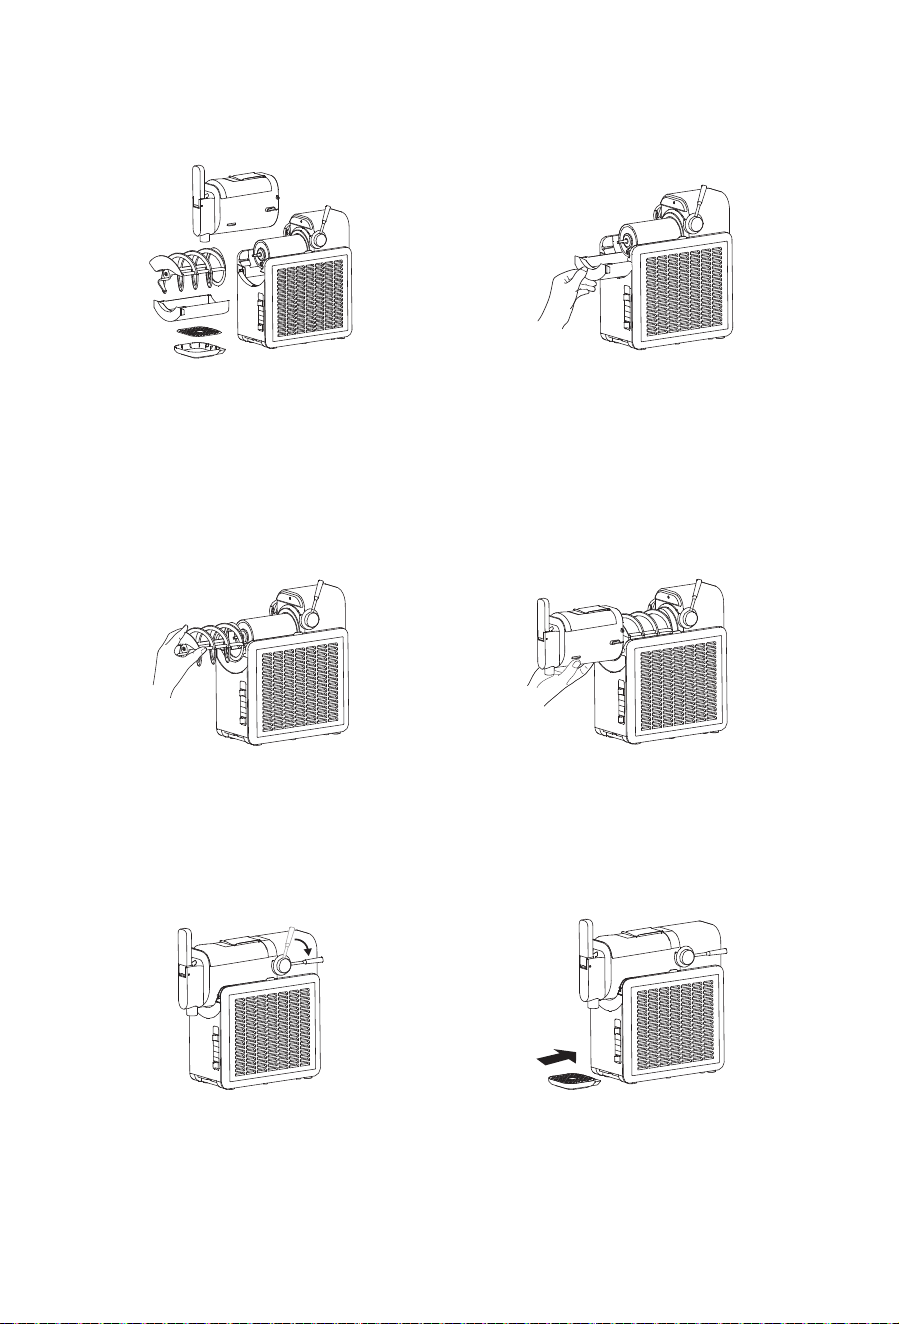
OPERATION INSTRUCTION
1. Keep unit upright for at least
2 hours before first use. Ensure
all parts are fully cleaned and
the motor base is level on a
flat, solid surface.
2. Install the condensation tray
by sliding it into the rail grooves
under the evaporator.
3. Position the auger by sliding
it over the evaporator until it
securely fits onto the pin.
4. With the vessel lock raised,
slide the vessel over the auger
and evaporator.
5. Lock the vessel in place by
pushing the vessel lock back to
seal it.
6. Insert the drip tray in front of
the motor base until it clicks
into place.
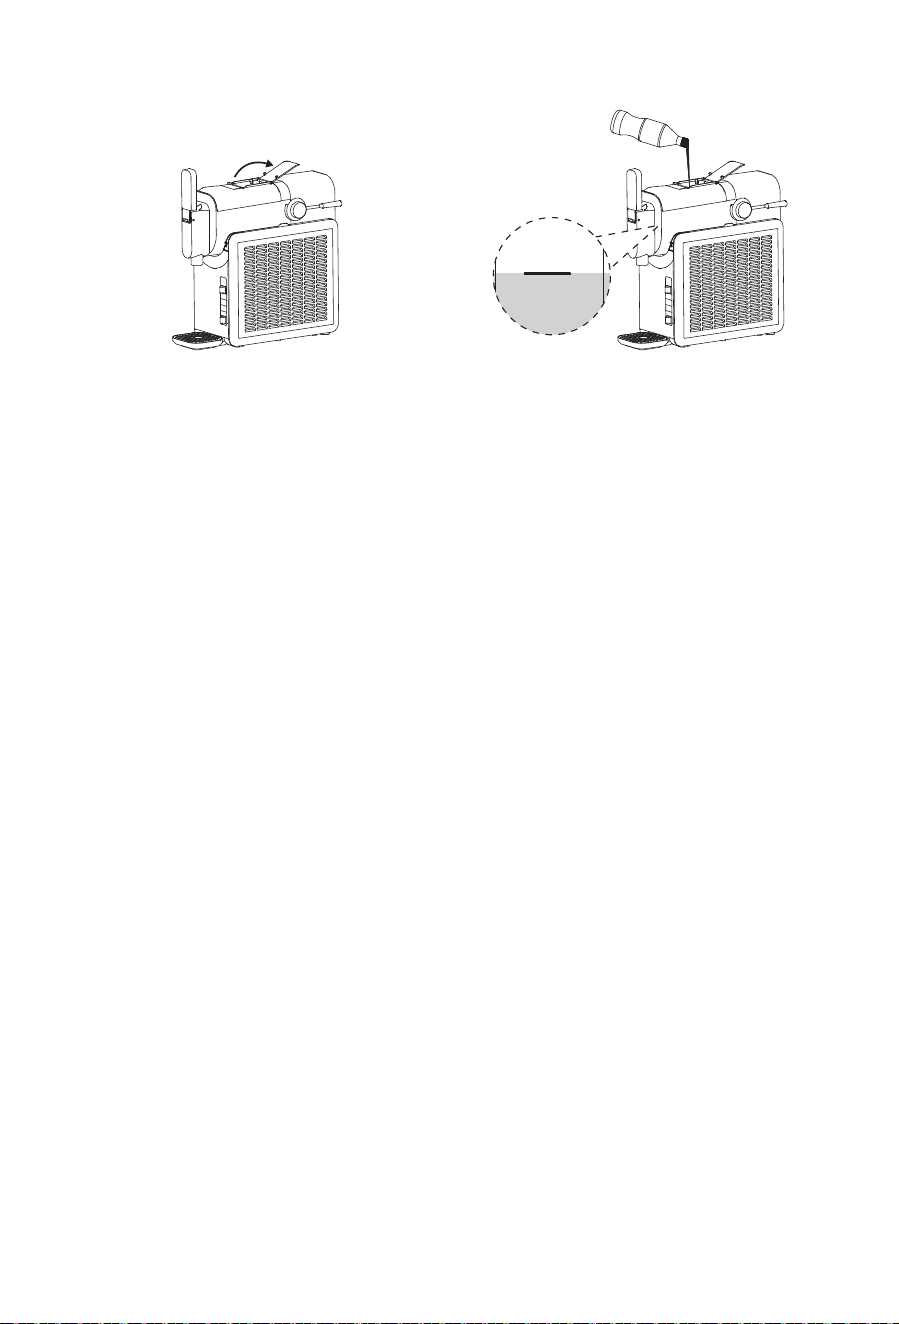
7. Plug in the unit. Open the
cover on the top of the vessel.
8. Add liquid(s) through the
easy-fill port and close the
cover(Make sure the liquid
volume is between 12oz and
48oz). Press the power button to
turn on the unit. Choose your
desired preset. The preset will
start at the default/optimal
thickness. If desired, adjust
thickness for your perfect frozen
drink texture.
MAX
48OZ
MIN
16OZ
NOTE:
1. Stopping the unit also stops the auger and cooling process. You will
need to keep the unit running to dispense contents.
2. Once the frozen drink reaches the desired temperature, the unit will
beep three times. The unit will continue running to keep your frozen drink
at the ideal temperature and be ready to dispense.
3. Creating drinks can take up to 15-60 minutes depending on ingredients,
volume, and starting temperature.
06 07
OPERATION INSTRUCTION
1. Keep unit upright for at least
2 hours before first use. Ensure
all parts are fully cleaned and
the motor base is level on a
flat, solid surface.
2. Install the condensation tray
by sliding it into the rail grooves
under the evaporator.
3. Position the auger by sliding
it over the evaporator until it
securely fits onto the pin.
4. With the vessel lock raised,
slide the vessel over the auger
and evaporator.
5. Lock the vessel in place by
pushing the vessel lock back to
seal it.
6. Insert the drip tray in front of
the motor base until it clicks
into place.
7. Plug in the unit. Open the
cover on the top of the vessel.
8. Add liquid(s) through the
easy-fill port and close the
cover(Make sure the liquid
volume is between 12oz and
48oz). Press the power button to
turn on the unit. Choose your
desired preset. The preset will
start at the default/optimal
thickness. If desired, adjust
thickness for your perfect frozen
drink texture.
MAX
48OZ
MIN
16OZ
NOTE:
1. Stopping the unit also stops the auger and cooling process. You will
need to keep the unit running to dispense contents.
2. Once the frozen drink reaches the desired temperature, the unit will
beep three times. The unit will continue running to keep your frozen drink
at the ideal temperature and be ready to dispense.
3. Creating drinks can take up to 15-60 minutes depending on ingredients,
volume, and starting temperature.
06 07

PROTECTION FUNCTION
a. Motor Protection Function: To prevent the stirring motor from stalling as
the smoothie thickens, the PCB continuously monitors the motor. If the
motor encounters excessive resistance, it will automatically stop to
protect its lifespan.
b. Compressor Protection Function: To avoid frequent compressor restarts,
the compressor has a protection period of about 3 minutes if it is turned
on again within 3 minutes. If the power cord is unplugged for 20 seconds
and then plugged back in, the machine will restart without delay.
c. Vessel Falling O Protection Device: To prevent the compressor and
stirring motor from operating abnormally or causing injury if the vessel is
removed or falls o, the vessel is equipped with a contact switch. If the
vessel is removed or falls o, the machine will not start, and the mode
display light will flash to indicate this condition.
TIPS:
1. To avoid increased mixing load and overflow from ingredient expansion,
do not exceed the maximum capacity water level (48 oz). For optimal
dispensing performance, fill the unit to the maximum fill line (48 oz).
2. For accurate temperature control and normal operation, ingredients
should be added to exceed the minimum capacity water level (12 oz).
3. The time required for the machine to complete its work varies due to
factors such as environmental temperature, initial ingredient tempera-
ture, sugar content, and softness adjustment.
4. The sugar content of the ingredient mixture must be greater than 4%.
Using ingredients with less than this may cause the evaporator to freeze,
the stirring blades to scratch, and potential damage to the machine.
When selecting the “Cocktail Smoothies” or “Red Wine Smoothies”
preset, all pre-made ingredients (e.g., wine, beer, and cocktails) must
have an alcohol content ranging from 2.8% to 16%.
5. Pre-freezing is not required. However, for the best results, chill the
liquids before adding them to the unit.
6. When using natural fruit juices, it is recommended to filter them to
prevent pulp from blocking the spout.
7. Condensation on the outer wall of the charging barrel is normal in wet
weather or during extended operation.
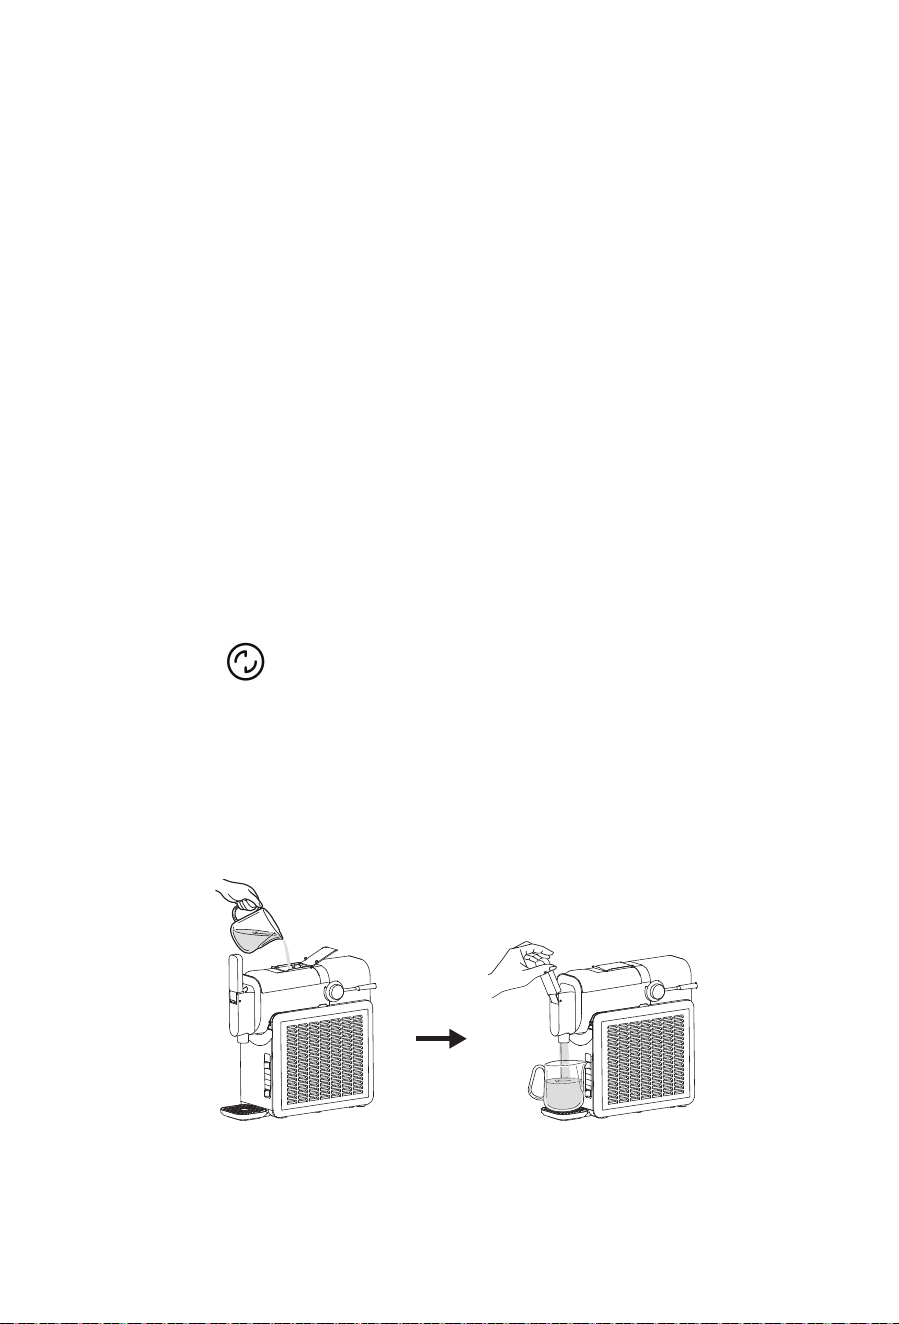
CLEANING
NOTE: For best results, use the Rinse cycle before disassembling and
cleaning all parts:
A. Dispense any remaining frozen drink.
B. Stop the current preset.
C. Choose the mode. Add warm water up to the vessel's max fill
line(48 oz).
D. Slowly dispense the water from the unit after 2 minutes (Note: This water
will dispense quickly. Ensure you use a large cup or bowl to capture it).
E. Press the power button to turn o the unit(Note: If needed, repeat until
frozen drink is rinsed o the evaporator).
8. DO NOT add hot ingredients, ice, or solid items such as fruit, ice cream,
or frozen fruit.
9. For the frostiest results, chill the serving glasses before dispensing your
slushie creations.
1. RINSE
08 09
PROTECTION FUNCTION
a. Motor Protection Function: To prevent the stirring motor from stalling as
the smoothie thickens, the PCB continuously monitors the motor. If the
motor encounters excessive resistance, it will automatically stop to
protect its lifespan.
b. Compressor Protection Function: To avoid frequent compressor restarts,
the compressor has a protection period of about 3 minutes if it is turned
on again within 3 minutes. If the power cord is unplugged for 20 seconds
and then plugged back in, the machine will restart without delay.
c. Vessel Falling O Protection Device: To prevent the compressor and
stirring motor from operating abnormally or causing injury if the vessel is
removed or falls o, the vessel is equipped with a contact switch. If the
vessel is removed or falls o, the machine will not start, and the mode
display light will flash to indicate this condition.
TIPS:
1. To avoid increased mixing load and overflow from ingredient expansion,
do not exceed the maximum capacity water level (48 oz). For optimal
dispensing performance, fill the unit to the maximum fill line (48 oz).
2. For accurate temperature control and normal operation, ingredients
should be added to exceed the minimum capacity water level (12 oz).
3. The time required for the machine to complete its work varies due to
factors such as environmental temperature, initial ingredient tempera-
ture, sugar content, and softness adjustment.
4. The sugar content of the ingredient mixture must be greater than 4%.
Using ingredients with less than this may cause the evaporator to freeze,
the stirring blades to scratch, and potential damage to the machine.
When selecting the “Cocktail Smoothies” or “Red Wine Smoothies”
preset, all pre-made ingredients (e.g., wine, beer, and cocktails) must
have an alcohol content ranging from 2.8% to 16%.
5. Pre-freezing is not required. However, for the best results, chill the
liquids before adding them to the unit.
6. When using natural fruit juices, it is recommended to filter them to
prevent pulp from blocking the spout.
7. Condensation on the outer wall of the charging barrel is normal in wet
weather or during extended operation.
CLEANING
NOTE: For best results, use the Rinse cycle before disassembling and
cleaning all parts:
A. Dispense any remaining frozen drink.
B. Stop the current preset.
C. Choose the mode. Add warm water up to the vessel's max fill
line(48 oz).
D. Slowly dispense the water from the unit after 2 minutes (Note: This water
will dispense quickly. Ensure you use a large cup or bowl to capture it).
E. Press the power button to turn o the unit(Note: If needed, repeat until
frozen drink is rinsed o the evaporator).
8. DO NOT add hot ingredients, ice, or solid items such as fruit, ice cream,
or frozen fruit.
9. For the frostiest results, chill the serving glasses before dispensing your
slushie creations.
1. RINSE
08 09
CORRECT DISPOSAL OF
THIS PRODUCT
This marking indicates that this product should not be
disposed with other household wastes throughout the EU.
To prevent possible harm to the environment or human
health from uncontrolled waste disposal, recycle it
responsibly to promote the sustainable reuse of material
resources. To return your used device, please use the
return and collection systems or contact the retailer
where the product was purchased. They can take this
product for environmental safe recycling.
Problem Reason analysis Resolutions
Inspect the vessel to make
sure it is installed correctly
and lock the vessel.
Poor contact between
the charging drum
assembly and the micro
switch;
The display
icons are all
illuminated and
flashing.
Add 1-2 tablespoons of
flavored syrup, juice,
sugar, date sugar, coconut
sugar, maple syrup,
agave, simple syrup, or
honey per serving. Mix the
additional sugar with the
base before pouring it into
the unit.
The low sugar content of
the ingredients used can
cause the evaporator to
freeze, or the setting
thickness may be too
high, resulting in a
smoothie that is too
hard.
The auger
crackled
Properly assemble the
auger. Contact our service
department if it's
deformed.
Check whether the
auger is improperly
assembled or
deformed.
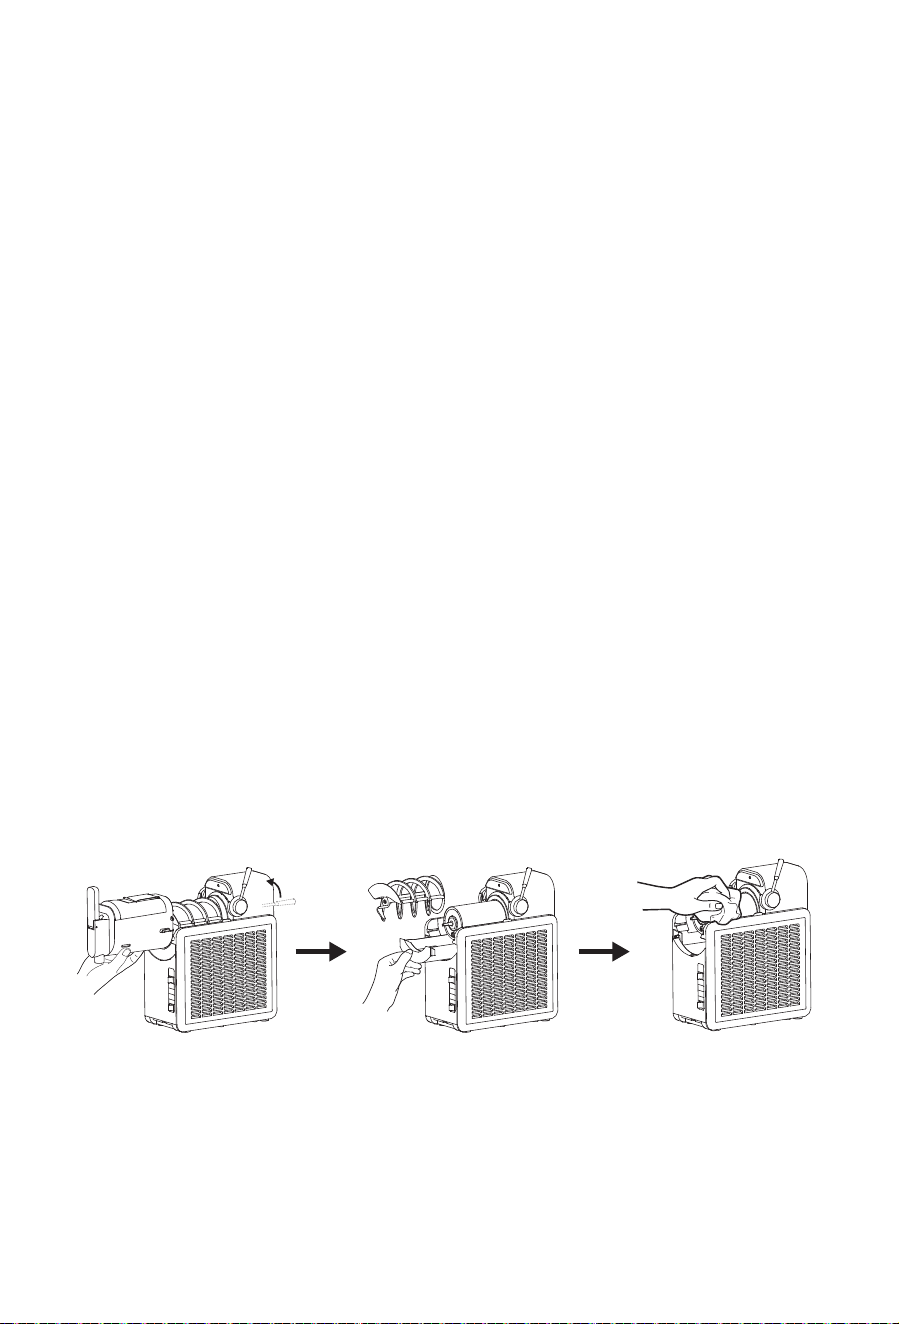
TROUBLE SHOOTING
NOTE: All parts, except the motor base and evaporator, are bottom-rack
dishwasher safe, and should NOT be cleaned with a heated dry cycle. The
plug must be removed before disassembly to avoid electric shock. Do not
pour water on the cord, plug, or ventilation, or immerse the motor base in
water or any other liquid.
A. Unlock the vessel by raising the vessel lock and remove the vessel by
gently pulling it o the unit. Ensure the vessel is tipped downward to
prevent any remaining liquid from spilling out the back. Set the vessel
aside.
B. Slide the auger o the evaporator and set it aside.
C. Wipe down the evaporator with a sanitized or warm, damp cloth.
D. Gently slide the condensation tray out of the unit, as there may be
residual liquid in it. Set the tray aside.
E. Wipe down the area underneath the evaporator with a sanitized or
warm, damp cloth.
F. If necessary, remove the drip tray and/or spout shroud.
G. Hand-wash all parts in warm, soapy water or use a dishwasher.
H. Wipe down the motor base and evaporator with a sanitized or warm,
damp cloth.
I. Allow all parts to dry thoroughly before reassembling and/or storing the
unit.
2. DISASSEMBLE & CLEAN
10 11
CORRECT DISPOSAL OF
THIS PRODUCT
This marking indicates that this product should not be
disposed with other household wastes throughout the EU.
To prevent possible harm to the environment or human
health from uncontrolled waste disposal, recycle it
responsibly to promote the sustainable reuse of material
resources. To return your used device, please use the
return and collection systems or contact the retailer
where the product was purchased. They can take this
product for environmental safe recycling.
Problem Reason analysis Resolutions
Inspect the vessel to make
sure it is installed correctly
and lock the vessel.
Poor contact between
the charging drum
assembly and the micro
switch;
The display
icons are all
illuminated and
flashing.
Add 1-2 tablespoons of
flavored syrup, juice,
sugar, date sugar, coconut
sugar, maple syrup,
agave, simple syrup, or
honey per serving. Mix the
additional sugar with the
base before pouring it into
the unit.
The low sugar content of
the ingredients used can
cause the evaporator to
freeze, or the setting
thickness may be too
high, resulting in a
smoothie that is too
hard.
The auger
crackled
Properly assemble the
auger. Contact our service
department if it's
deformed.
Check whether the
auger is improperly
assembled or
deformed.
TROUBLE SHOOTING
NOTE: All parts, except the motor base and evaporator, are bottom-rack
dishwasher safe, and should NOT be cleaned with a heated dry cycle. The
plug must be removed before disassembly to avoid electric shock. Do not
pour water on the cord, plug, or ventilation, or immerse the motor base in
water or any other liquid.
A. Unlock the vessel by raising the vessel lock and remove the vessel by
gently pulling it o the unit. Ensure the vessel is tipped downward to
prevent any remaining liquid from spilling out the back. Set the vessel
aside.
B. Slide the auger o the evaporator and set it aside.
C. Wipe down the evaporator with a sanitized or warm, damp cloth.
D. Gently slide the condensation tray out of the unit, as there may be
residual liquid in it. Set the tray aside.
E. Wipe down the area underneath the evaporator with a sanitized or
warm, damp cloth.
F. If necessary, remove the drip tray and/or spout shroud.
G. Hand-wash all parts in warm, soapy water or use a dishwasher.
H. Wipe down the motor base and evaporator with a sanitized or warm,
damp cloth.
I. Allow all parts to dry thoroughly before reassembling and/or storing the
unit.
2. DISASSEMBLE & CLEAN
10 11

FROZEN DRINK MAKER
MODEL: ISM2021
USER MANUAL
Before operating the appliance, please read this manual and all the
safety instructions thoroughly and retain it for future reference.
Manufacturer: shenzhenfuduosishangmaoyouxiangongsi
Address: LongGangQuBuJiJieDaoLuoGangSheQuJinLongLu89Hao
HaiXuanGuangChang4Zuo1403 SHENZHEN GUANGDONG 518000
Facebook Page: http://www.facebook.com/foherehome
Email: Grindigodr[email protected]om
Web: www.fohere.com
MADE IN CHINA