Important!
Disconnect power to surrounding appliances before preparing cavity.
Recommended to allow the vertical removal of the refrigerator bins.
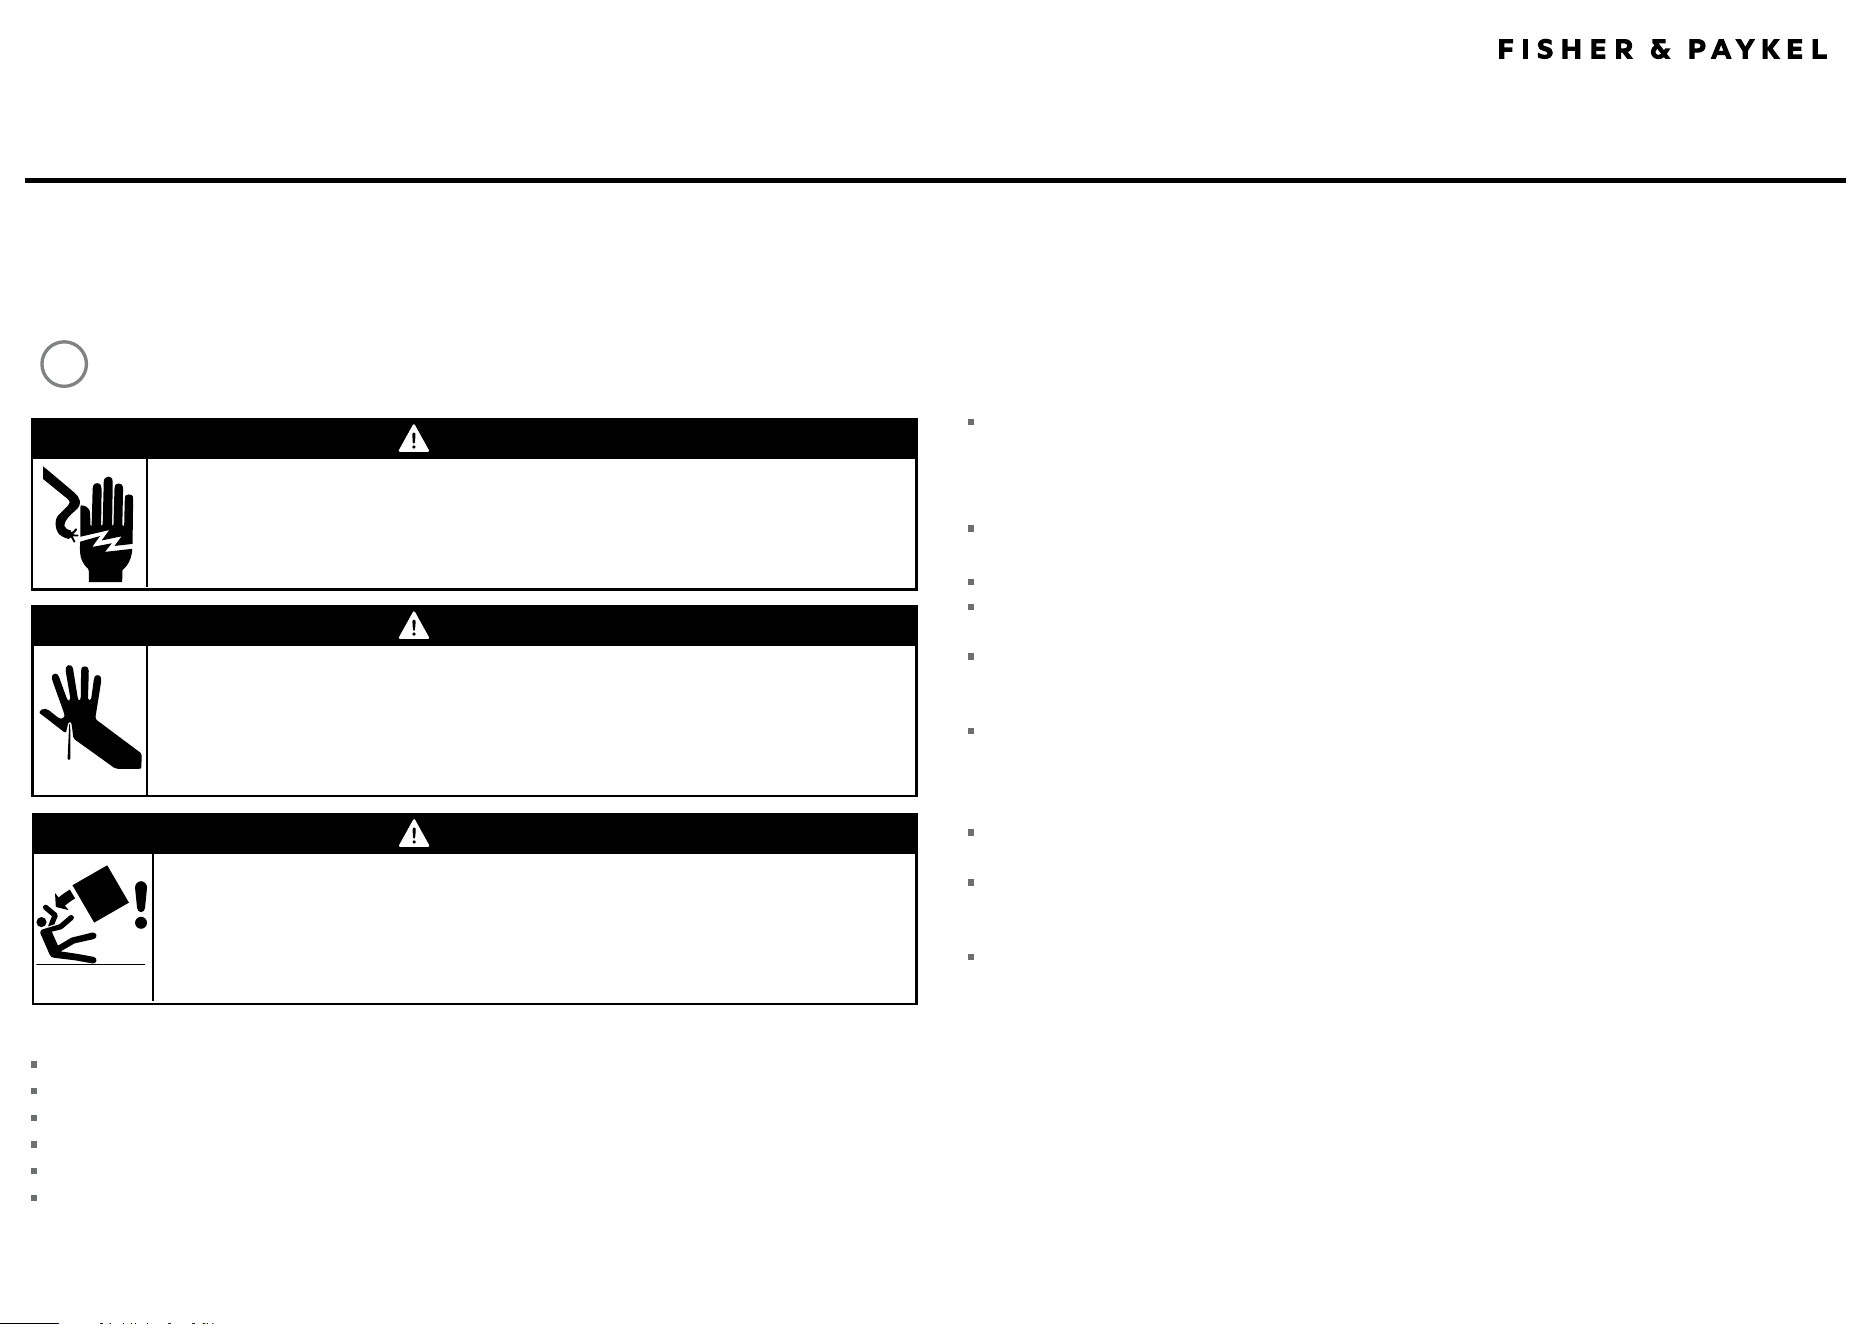
WARNING!
Electrical shock hazard
Disconnect product from main power supply before installing appliance.
Failure to do so may result in electrical shock or death
Important safety precautions!
Installation of the CoolDrawer™ requires competent mechanical and electrical skills.
Be sure to leave these Instructions with the Customer.
Installation must comply with your local building and electricity regulations.
At the completion of the CoolDrawer™ installation, the Installer must perform the Final Checklist.
Remove all packaging materials supplied with the CoolDrawer™.
The CoolDrawer™ is manufactured for indoor use only.
Important!
SAVE THESE INSTRUCTIONS
The models shown in this document may not be available in all markets and are subject to change at any time. For current details about model and specification availability in your country, please go to our website
fisherpaykel.com or contact your local Fisher & Paykel dealer.
SAFETY AND WARNINGS
WARNING!
Cut hazard
Take care - panel edges are sharp.
Failure to use caution could result in injury or cuts.
1
The CoolDrawer™ MUST be installed to allow for future removal from the enclosure if service is required.
Do not seal the CoolDrawer™ into the cabinetry with silicone or glue. Doing so will make future servicing
difficult. Fisher & Paykel will not be liable for any costs associated with removing or replacing a sealed-in
product, nor for repairing any damage that may be incurred by doing this.
Care should be taken when the appliance is installed or removed to reduce the likelihood of damage to the
power supply cord.
Failure to install the CoolDrawer™ correctly will invalidate any warranty or liability claims.
If the power supply cord is damaged, it must be replaced. Parts are available from your Authorised
Fisher & Paykel dealer.
This appliance is not intended for use by persons (including children) with reduced physical, sensory or
mental capacities, or lack of experience and knowledge unless they are supervised or given instruction
concerning use of the appliance.
Cabinetry must be sufficiently robust to support a combined product and food load of 220 lb (100 kg).
Bearers may be required to support the internal shelf.
Before you install the CoolDrawer™, please ensure that
The switched power outlet must be outside the refrigerator drawer cavity so that it is accessible after
installation.
The switched power outlet must be located outside the cavity, within 55” (1400 mm) from the
CoolDrawer™ cavity if situated on the left-hand side of the cavity and within 33
½
” (850 mm) if situated on
the right-hand side of the cavity.
The services hole in the refrigerator cavity needs to be large enough for the power supply plug to fit
through.
PARTS SUPPLIED
4
5
CAVITY PREPARATION
WARNING!
Tipping hazard
Do not operate this apppliance until it has been securely anchored inside the
cabinetry. The cabinet must be securely anchored to the floor.
Failure to use caution could result in injury or cuts.
Installation
trims (2)
Installation brackets
(left-hand and right-
hand side) (2)
Outlet duct (1)Trim brackets (4) Drawer Panel
attachment
hooks (3)
Power
cord (1)
Note: Services can be located
either side of CoolDrawer™.
Benchtop
Panel
Phillips
5/8” (
16 mm
)
wood screw (6)
Pan Head
5/8”
(16 mm)
screw (12)
Pan Head
5/8” (
16 mm)
screw (2)
Phillips
5/8”
(16 mm )
wood
screws (6)
2
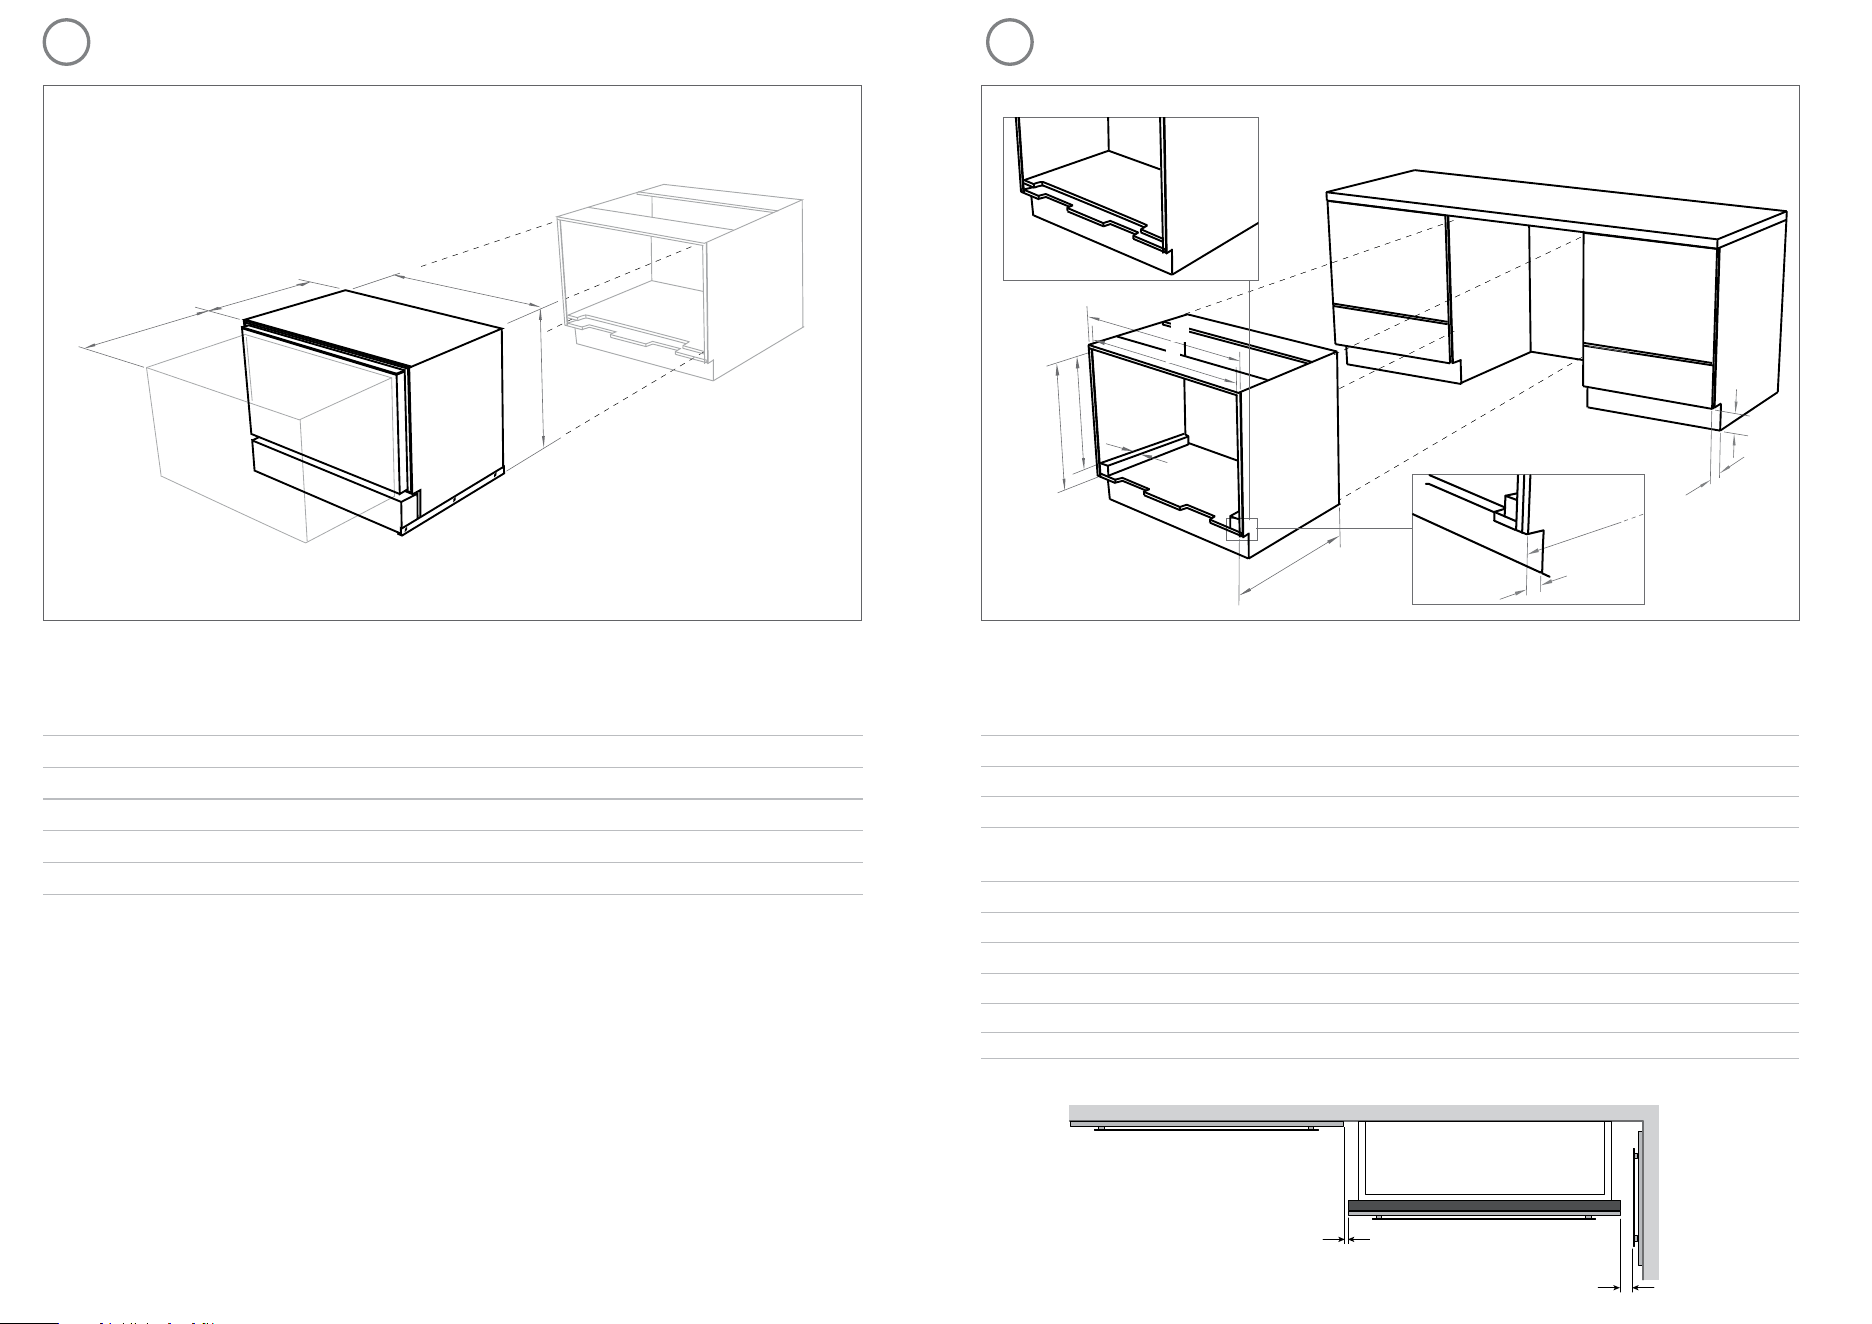
PRODUCT DIMENSIONS
Product dimensions (inches [mm])
CoolDrawer™
RB36S
RB90S
A
overall height of product (inc. installation brackets) 25 3/16” (640)
B
overall width of product 33 11/16” (855)
C
overall depth of product (excl. drawer panel; inc. power cord) 21 15/16” (557)
D
depth of drawer (open) (excl. handle) 20 ½” (520)
Installation diagrams for illustration purposes only
A
D
H
Cabinetry dimensions (inches [mm])
CoolDrawer™
RB36S
RB90S
A
overall width of cabinetry frame 35 1/2” (900)
B
minimum inside width of cabinetry frame 34” (864)
C
internal height of cabinetry to top of spacer block 25 3/8” (644)
D
internal height of cabinetry*
(to allow for product and outlet duct height)
min. 26 1/4” (665)
max. 30 1/16” (764)
E
minimum height of toe kick 3” (75)
F
minimum depth** of toe kick 1 5/8” (40)
G
minimum distance from front of cabinetry to rear wall 22 1/16” (560)
H
width of spacer blocks 1 15/16” (50)
*Minimum internal height of cabinetry can be 25 3/8” (644 mm) if outlet duct is not used.
**All depth measurements are taken from the front face of the cabinetry frame (not drawer panel)
Minimum clearances (inches [mm])
½” (13 mm)
1/16” (2 mm)
E
B
C
D
G
F
F
C
G
6
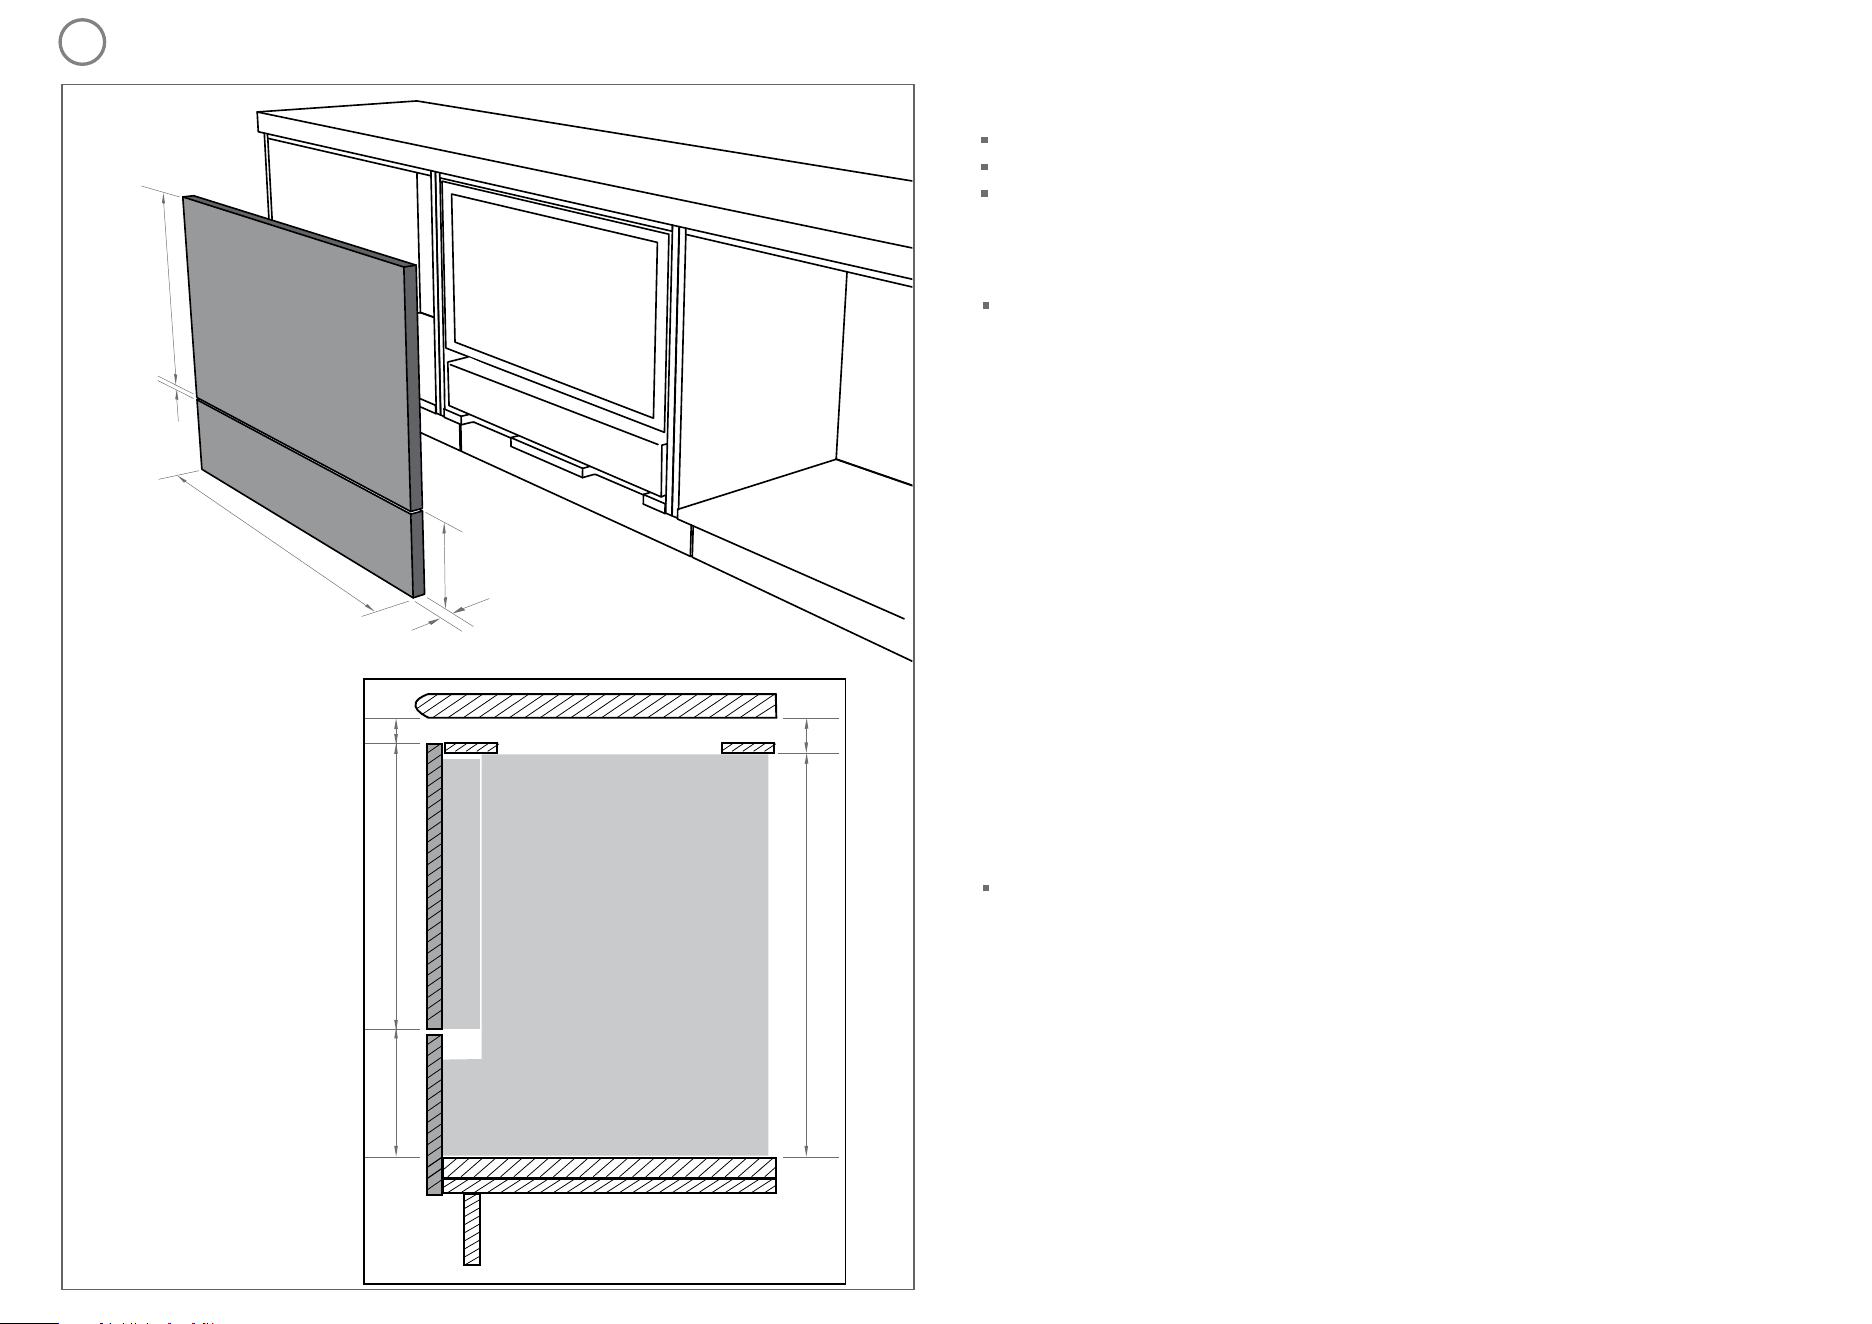
INTEGRATED PANEL PREPARATION
A
B
3
CABINETRY DIMENSIONS
An internal shelf can be used as an alternative to spacer blocks to
position the product at the correct height. In this case additional
cutouts will be required. Refer to Step 7.
Installation diagrams for illustration purposes only
Drawer Panel
5/8
-
3/16” (
16-20 mm)
False Panel
35
1/4”
(896 mm)
height of False Panel
3/16” (
4 mm)
D
height of
Drawer
Panel
Benchtop
Drawer panel
False panel
A
D
E
C
B
Integrated Panel material
5/8
-
13/16” (
16 - 20 mm) panel thickness (
¾” [
18 mm] recommended).
Maximum weight of 15.5 lb (7 kg).
Adequately sealed to withstand moisture (122
O
F/50
O
C @ 80% RH).
Height of Drawer Panel
The following information is required to correctly define your drawer panel height:
Dimension Data Source
A Clearance between top of Drawer panel and underside Your kitchen designer
of benchtop
B Height between underside of cabinetry ceiling Your kitchen designer
and underside of benchtop
C Internal height of cabinetry to top of spacer block 25
3/8
” (644 mm)
D Drawer panel height Calculated from A, B, C & E
E Bottom face of Drawer panel to top of spacer block Your kitchen designer
(to ensure that bottom cover of product is not exposed) (Min. 6
1/16
” [154 mm])
(Max. 7
¼
” [184 mm])
To calculate D complete the following equation:
D = C + B - A - E
i.e. For the F&P prefinished panel:
18
¾
” (476 mm) = 25
3/8
” (644 mm) +
11/16
” (18 mm) -
1/16
” (2 mm) - 7
¼
” (184 mm)
Height of the False Panel
Determine the height of the false panel according to your individual kitchen cabinetry
requirements maintaining a
3/16
” (4 mm) gap between panels.
F&P prefinish panel width is 35
¼
” (896 mm) assuming a
1/16
” (2 mm) clearance either side of panel
height (D) is 18
¾
” (476 mm).
Note B must be min.
5/8
” (16 mm) to ensure adequate clearance to benchtop.
SIDE VIEW
max.
33 1/2
” (850 mm)
min. 21” (535 mm)
min. 5” (130 mm)
min. 21”
(535 mm)
min.
5” (
130 mm)
min. ø
1 15/16” (
50 mm)
max.
¾”
20 mm
Shows cutout if cabinetry depth at
minimum
21 5/8”
(
550 mm)
Installation diagrams for illustration purposes only
COOLDRAWER™ MULTI-TEMPERATURE DRAWER
INSTALLATION INSTRUCTIONS
RB36S & RB90S models
FRAMELESS CABINETRY
Important!
Disconnect power to surrounding appliances before preparing cavity.
Recommended to allow the vertical removal of the refrigerator bins.
WARNING!
Electrical shock hazard
Disconnect product from main power supply before installing appliance.
Failure to do so may result in electrical shock or death
Important safety precautions!
Installation of the CoolDrawer™ requires competent mechanical and electrical skills.
Be sure to leave these Instructions with the Customer.
Installation must comply with your local building and electricity regulations.
At the completion of the CoolDrawer™ installation, the Installer must perform the Final Checklist.
Remove all packaging materials supplied with the CoolDrawer™.
The CoolDrawer™ is manufactured for indoor use only.
Important!
SAVE THESE INSTRUCTIONS
The models shown in this document may not be available in all markets and are subject to change at any time. For current details about model and specification availability in your country, please go to our website
fisherpaykel.com or contact your local Fisher & Paykel dealer.
SAFETY AND WARNINGS
WARNING!
Cut hazard
Take care - panel edges are sharp.
Failure to use caution could result in injury or cuts.
1
The CoolDrawer™ MUST be installed to allow for future removal from the enclosure if service is required.
Do not seal the CoolDrawer™ into the cabinetry with silicone or glue. Doing so will make future servicing
difficult. Fisher & Paykel will not be liable for any costs associated with removing or replacing a sealed-in
product, nor for repairing any damage that may be incurred by doing this.
Care should be taken when the appliance is installed or removed to reduce the likelihood of damage to the
power supply cord.
Failure to install the CoolDrawer™ correctly will invalidate any warranty or liability claims.
If the power supply cord is damaged, it must be replaced. Parts are available from your Authorised
Fisher & Paykel dealer.
This appliance is not intended for use by persons (including children) with reduced physical, sensory or
mental capacities, or lack of experience and knowledge unless they are supervised or given instruction
concerning use of the appliance.
Cabinetry must be sufficiently robust to support a combined product and food load of 220 lb (100 kg).
Bearers may be required to support the internal shelf.
Before you install the CoolDrawer™, please ensure that
The switched power outlet must be outside the refrigerator drawer cavity so that it is accessible after
installation.
The switched power outlet must be located outside the cavity, within 55” (1400 mm) from the
CoolDrawer™ cavity if situated on the left-hand side of the cavity and within 33
½
” (850 mm) if situated on
the right-hand side of the cavity.
The services hole in the refrigerator cavity needs to be large enough for the power supply plug to fit
through.
PARTS SUPPLIED
4
5
CAVITY PREPARATION
WARNING!
Tipping hazard
Do not operate this apppliance until it has been securely anchored inside the
cabinetry. The cabinet must be securely anchored to the floor.
Failure to use caution could result in injury or cuts.
Installation
trims (2)
Installation brackets
(left-hand and right-
hand side) (2)
Outlet duct (1)Trim brackets (4) Drawer Panel
attachment
hooks (3)
Power
cord (1)
Note: Services can be located
either side of CoolDrawer™.
Benchtop
Panel
Phillips
5/8” (
16 mm
)
wood screw (6)
Pan Head
5/8”
(16 mm)
screw (12)
Pan Head
5/8” (
16 mm)
screw (2)
Phillips
5/8”
(16 mm )
wood
screws (6)
2
PRODUCT DIMENSIONS
Product dimensions (inches [mm])
CoolDrawer™
RB36S
RB90S
A
overall height of product (inc. installation brackets) 25 3/16” (640)
B
overall width of product 33 11/16” (855)
C
overall depth of product (excl. drawer panel; inc. power cord) 21 15/16” (557)
D
depth of drawer (open) (excl. handle) 20 ½” (520)
Installation diagrams for illustration purposes only
A
D
H
Cabinetry dimensions (inches [mm])
CoolDrawer™
RB36S
RB90S
A
overall width of cabinetry frame 35 1/2” (900)
B
minimum inside width of cabinetry frame 34” (864)
C
internal height of cabinetry to top of spacer block 25 3/8” (644)
D
internal height of cabinetry*
(to allow for product and outlet duct height)
min. 26 1/4” (665)
max. 30 1/16” (764)
E
minimum height of toe kick 3” (75)
F
minimum depth** of toe kick 1 5/8” (40)
G
minimum distance from front of cabinetry to rear wall 22 1/16” (560)
H
width of spacer blocks 1 15/16” (50)
*Minimum internal height of cabinetry can be 25 3/8” (644 mm) if outlet duct is not used.
**All depth measurements are taken from the front face of the cabinetry frame (not drawer panel)
Minimum clearances (inches [mm])
½” (13 mm)
1/16” (2 mm)
E
B
C
D
G
F
F
C
G
6
INTEGRATED PANEL PREPARATION
A
B
3
CABINETRY DIMENSIONS
An internal shelf can be used as an alternative to spacer blocks to
position the product at the correct height. In this case additional
cutouts will be required. Refer to Step 7.
Installation diagrams for illustration purposes only
Drawer Panel
5/8
-
3/16” (
16-20 mm)
False Panel
35
1/4”
(896 mm)
height of False Panel
3/16” (
4 mm)
D
height of
Drawer
Panel
Benchtop
Drawer panel
False panel
A
D
E
C
B
Integrated Panel material
5/8
-
13/16” (
16 - 20 mm) panel thickness (
¾” [
18 mm] recommended).
Maximum weight of 15.5 lb (7 kg).
Adequately sealed to withstand moisture (122
O
F/50
O
C @ 80% RH).
Height of Drawer Panel
The following information is required to correctly define your drawer panel height:
Dimension Data Source
A Clearance between top of Drawer panel and underside Your kitchen designer
of benchtop
B Height between underside of cabinetry ceiling Your kitchen designer
and underside of benchtop
C Internal height of cabinetry to top of spacer block 25
3/8
” (644 mm)
D Drawer panel height Calculated from A, B, C & E
E Bottom face of Drawer panel to top of spacer block Your kitchen designer
(to ensure that bottom cover of product is not exposed) (Min. 6
1/16
” [154 mm])
(Max. 7
¼
” [184 mm])
To calculate D complete the following equation:
D = C + B - A - E
i.e. For the F&P prefinished panel:
18
¾
” (476 mm) = 25
3/8
” (644 mm) +
11/16
” (18 mm) -
1/16
” (2 mm) - 7
¼
” (184 mm)
Height of the False Panel
Determine the height of the false panel according to your individual kitchen cabinetry
requirements maintaining a
3/16
” (4 mm) gap between panels.
F&P prefinish panel width is 35
¼
” (896 mm) assuming a
1/16
” (2 mm) clearance either side of panel
height (D) is 18
¾
” (476 mm).
Note B must be min.
5/8
” (16 mm) to ensure adequate clearance to benchtop.
SIDE VIEW
max.
33 1/2
” (850 mm)
min. 21” (535 mm)
min. 5” (130 mm)
min. 21”
(535 mm)
min.
5” (
130 mm)
min. ø
1 15/16” (
50 mm)
max.
¾”
20 mm
Shows cutout if cabinetry depth at
minimum
21 5/8”
(
550 mm)
Installation diagrams for illustration purposes only
COOLDRAWER™ MULTI-TEMPERATURE DRAWER
INSTALLATION INSTRUCTIONS
RB36S & RB90S models
FRAMELESS CABINETRY

Important!
Disconnect power to surrounding appliances before preparing cavity.
Recommended to allow the vertical removal of the refrigerator bins.
WARNING!
Electrical shock hazard
Disconnect product from main power supply before installing appliance.
Failure to do so may result in electrical shock or death
Important safety precautions!
Installation of the CoolDrawer™ requires competent mechanical and electrical skills.
Be sure to leave these Instructions with the Customer.
Installation must comply with your local building and electricity regulations.
At the completion of the CoolDrawer™ installation, the Installer must perform the Final Checklist.
Remove all packaging materials supplied with the CoolDrawer™.
The CoolDrawer™ is manufactured for indoor use only.
Important!
SAVE THESE INSTRUCTIONS
The models shown in this document may not be available in all markets and are subject to change at any time. For current details about model and specification availability in your country, please go to our website
fisherpaykel.com or contact your local Fisher & Paykel dealer.
SAFETY AND WARNINGS
WARNING!
Cut hazard
Take care - panel edges are sharp.
Failure to use caution could result in injury or cuts.
1
The CoolDrawer™ MUST be installed to allow for future removal from the enclosure if service is required.
Do not seal the CoolDrawer™ into the cabinetry with silicone or glue. Doing so will make future servicing
difficult. Fisher & Paykel will not be liable for any costs associated with removing or replacing a sealed-in
product, nor for repairing any damage that may be incurred by doing this.
Care should be taken when the appliance is installed or removed to reduce the likelihood of damage to the
power supply cord.
Failure to install the CoolDrawer™ correctly will invalidate any warranty or liability claims.
If the power supply cord is damaged, it must be replaced. Parts are available from your Authorised
Fisher & Paykel dealer.
This appliance is not intended for use by persons (including children) with reduced physical, sensory or
mental capacities, or lack of experience and knowledge unless they are supervised or given instruction
concerning use of the appliance.
Cabinetry must be sufficiently robust to support a combined product and food load of 220 lb (100 kg).
Bearers may be required to support the internal shelf.
Before you install the CoolDrawer™, please ensure that
The switched power outlet must be outside the refrigerator drawer cavity so that it is accessible after
installation.
The switched power outlet must be located outside the cavity, within 55” (1400 mm) from the
CoolDrawer™ cavity if situated on the left-hand side of the cavity and within 33
½
” (850 mm) if situated on
the right-hand side of the cavity.
The services hole in the refrigerator cavity needs to be large enough for the power supply plug to fit
through.
PARTS SUPPLIED
4
5
CAVITY PREPARATION
WARNING!
Tipping hazard
Do not operate this apppliance until it has been securely anchored inside the
cabinetry. The cabinet must be securely anchored to the floor.
Failure to use caution could result in injury or cuts.
Installation
trims (2)
Installation brackets
(left-hand and right-
hand side) (2)
Outlet duct (1)Trim brackets (4) Drawer Panel
attachment
hooks (3)
Power
cord (1)
Note: Services can be located
either side of CoolDrawer™.
Benchtop
Panel
Phillips
5/8” (
16 mm
)
wood screw (6)
Pan Head
5/8”
(16 mm)
screw (12)
Pan Head
5/8” (
16 mm)
screw (2)
Phillips
5/8”
(16 mm )
wood
screws (6)
2
PRODUCT DIMENSIONS
Product dimensions (inches [mm])
CoolDrawer™
RB36S
RB90S
A
overall height of product (inc. installation brackets) 25 3/16” (640)
B
overall width of product 33 11/16” (855)
C
overall depth of product (excl. drawer panel; inc. power cord) 21 15/16” (557)
D
depth of drawer (open) (excl. handle) 20 ½” (520)
Installation diagrams for illustration purposes only
A
D
H
Cabinetry dimensions (inches [mm])
CoolDrawer™
RB36S
RB90S
A
overall width of cabinetry frame 35 1/2” (900)
B
minimum inside width of cabinetry frame 34” (864)
C
internal height of cabinetry to top of spacer block 25 3/8” (644)
D
internal height of cabinetry*
(to allow for product and outlet duct height)
min. 26 1/4” (665)
max. 30 1/16” (764)
E
minimum height of toe kick 3” (75)
F
minimum depth** of toe kick 1 5/8” (40)
G
minimum distance from front of cabinetry to rear wall 22 1/16” (560)
H
width of spacer blocks 1 15/16” (50)
*Minimum internal height of cabinetry can be 25 3/8” (644 mm) if outlet duct is not used.
**All depth measurements are taken from the front face of the cabinetry frame (not drawer panel)
Minimum clearances (inches [mm])
½” (13 mm)
1/16” (2 mm)
E
B
C
D
G
F
F
C
G
6
INTEGRATED PANEL PREPARATION
A
B
3
CABINETRY DIMENSIONS
An internal shelf can be used as an alternative to spacer blocks to
position the product at the correct height. In this case additional
cutouts will be required. Refer to Step 7.
Installation diagrams for illustration purposes only
Drawer Panel
5/8
-
3/16” (
16-20 mm)
False Panel
35
1/4”
(896 mm)
height of False Panel
3/16” (
4 mm)
D
height of
Drawer
Panel
Benchtop
Drawer panel
False panel
A
D
E
C
B
Integrated Panel material
5/8
-
13/16” (
16 - 20 mm) panel thickness (
¾” [
18 mm] recommended).
Maximum weight of 15.5 lb (7 kg).
Adequately sealed to withstand moisture (122
O
F/50
O
C @ 80% RH).
Height of Drawer Panel
The following information is required to correctly define your drawer panel height:
Dimension Data Source
A Clearance between top of Drawer panel and underside Your kitchen designer
of benchtop
B Height between underside of cabinetry ceiling Your kitchen designer
and underside of benchtop
C Internal height of cabinetry to top of spacer block 25
3/8
” (644 mm)
D Drawer panel height Calculated from A, B, C & E
E Bottom face of Drawer panel to top of spacer block Your kitchen designer
(to ensure that bottom cover of product is not exposed) (Min. 6
1/16
” [154 mm])
(Max. 7
¼
” [184 mm])
To calculate D complete the following equation:
D = C + B - A - E
i.e. For the F&P prefinished panel:
18
¾
” (476 mm) = 25
3/8
” (644 mm) +
11/16
” (18 mm) -
1/16
” (2 mm) - 7
¼
” (184 mm)
Height of the False Panel
Determine the height of the false panel according to your individual kitchen cabinetry
requirements maintaining a
3/16
” (4 mm) gap between panels.
F&P prefinish panel width is 35
¼
” (896 mm) assuming a
1/16
” (2 mm) clearance either side of panel
height (D) is 18
¾
” (476 mm).
Note B must be min.
5/8
” (16 mm) to ensure adequate clearance to benchtop.
SIDE VIEW
max.
33 1/2
” (850 mm)
min. 21” (535 mm)
min. 5” (130 mm)
min. 21”
(535 mm)
min.
5” (
130 mm)
min. ø
1 15/16” (
50 mm)
max.
¾”
20 mm
Shows cutout if cabinetry depth at
minimum
21 5/8”
(
550 mm)
Installation diagrams for illustration purposes only
COOLDRAWER™ MULTI-TEMPERATURE DRAWER
INSTALLATION INSTRUCTIONS
RB36S & RB90S models
FRAMELESS CABINETRY
Important!
Disconnect power to surrounding appliances before preparing cavity.
Recommended to allow the vertical removal of the refrigerator bins.
WARNING!
Electrical shock hazard
Disconnect product from main power supply before installing appliance.
Failure to do so may result in electrical shock or death
Important safety precautions!
Installation of the CoolDrawer™ requires competent mechanical and electrical skills.
Be sure to leave these Instructions with the Customer.
Installation must comply with your local building and electricity regulations.
At the completion of the CoolDrawer™ installation, the Installer must perform the Final Checklist.
Remove all packaging materials supplied with the CoolDrawer™.
The CoolDrawer™ is manufactured for indoor use only.
Important!
SAVE THESE INSTRUCTIONS
The models shown in this document may not be available in all markets and are subject to change at any time. For current details about model and specification availability in your country, please go to our website
fisherpaykel.com or contact your local Fisher & Paykel dealer.
SAFETY AND WARNINGS
WARNING!
Cut hazard
Take care - panel edges are sharp.
Failure to use caution could result in injury or cuts.
1
The CoolDrawer™ MUST be installed to allow for future removal from the enclosure if service is required.
Do not seal the CoolDrawer™ into the cabinetry with silicone or glue. Doing so will make future servicing
difficult. Fisher & Paykel will not be liable for any costs associated with removing or replacing a sealed-in
product, nor for repairing any damage that may be incurred by doing this.
Care should be taken when the appliance is installed or removed to reduce the likelihood of damage to the
power supply cord.
Failure to install the CoolDrawer™ correctly will invalidate any warranty or liability claims.
If the power supply cord is damaged, it must be replaced. Parts are available from your Authorised
Fisher & Paykel dealer.
This appliance is not intended for use by persons (including children) with reduced physical, sensory or
mental capacities, or lack of experience and knowledge unless they are supervised or given instruction
concerning use of the appliance.
Cabinetry must be sufficiently robust to support a combined product and food load of 220 lb (100 kg).
Bearers may be required to support the internal shelf.
Before you install the CoolDrawer™, please ensure that
The switched power outlet must be outside the refrigerator drawer cavity so that it is accessible after
installation.
The switched power outlet must be located outside the cavity, within 55” (1400 mm) from the
CoolDrawer™ cavity if situated on the left-hand side of the cavity and within 33
½
” (850 mm) if situated on
the right-hand side of the cavity.
The services hole in the refrigerator cavity needs to be large enough for the power supply plug to fit
through.
PARTS SUPPLIED
4
5
CAVITY PREPARATION
WARNING!
Tipping hazard
Do not operate this apppliance until it has been securely anchored inside the
cabinetry. The cabinet must be securely anchored to the floor.
Failure to use caution could result in injury or cuts.
Installation
trims (2)
Installation brackets
(left-hand and right-
hand side) (2)
Outlet duct (1)Trim brackets (4) Drawer Panel
attachment
hooks (3)
Power
cord (1)
Note: Services can be located
either side of CoolDrawer™.
Benchtop
Panel
Phillips
5/8” (
16 mm
)
wood screw (6)
Pan Head
5/8”
(16 mm)
screw (12)
Pan Head
5/8” (
16 mm)
screw (2)
Phillips
5/8”
(16 mm )
wood
screws (6)
2
PRODUCT DIMENSIONS
Product dimensions (inches [mm])
CoolDrawer™
RB36S
RB90S
A
overall height of product (inc. installation brackets) 25 3/16” (640)
B
overall width of product 33 11/16” (855)
C
overall depth of product (excl. drawer panel; inc. power cord) 21 15/16” (557)
D
depth of drawer (open) (excl. handle) 20 ½” (520)
Installation diagrams for illustration purposes only
A
D
H
Cabinetry dimensions (inches [mm])
CoolDrawer™
RB36S
RB90S
A
overall width of cabinetry frame 35 1/2” (900)
B
minimum inside width of cabinetry frame 34” (864)
C
internal height of cabinetry to top of spacer block 25 3/8” (644)
D
internal height of cabinetry*
(to allow for product and outlet duct height)
min. 26 1/4” (665)
max. 30 1/16” (764)
E
minimum height of toe kick 3” (75)
F
minimum depth** of toe kick 1 5/8” (40)
G
minimum distance from front of cabinetry to rear wall 22 1/16” (560)
H
width of spacer blocks 1 15/16” (50)
*Minimum internal height of cabinetry can be 25 3/8” (644 mm) if outlet duct is not used.
**All depth measurements are taken from the front face of the cabinetry frame (not drawer panel)
Minimum clearances (inches [mm])
½” (13 mm)
1/16” (2 mm)
E
B
C
D
G
F
F
C
G
6
INTEGRATED PANEL PREPARATION
A
B
3
CABINETRY DIMENSIONS
An internal shelf can be used as an alternative to spacer blocks to
position the product at the correct height. In this case additional
cutouts will be required. Refer to Step 7.
Installation diagrams for illustration purposes only
Drawer Panel
5/8
-
3/16” (
16-20 mm)
False Panel
35
1/4”
(896 mm)
height of False Panel
3/16” (
4 mm)
D
height of
Drawer
Panel
Benchtop
Drawer panel
False panel
A
D
E
C
B
Integrated Panel material
5/8
-
13/16” (
16 - 20 mm) panel thickness (
¾” [
18 mm] recommended).
Maximum weight of 15.5 lb (7 kg).
Adequately sealed to withstand moisture (122
O
F/50
O
C @ 80% RH).
Height of Drawer Panel
The following information is required to correctly define your drawer panel height:
Dimension Data Source
A Clearance between top of Drawer panel and underside Your kitchen designer
of benchtop
B Height between underside of cabinetry ceiling Your kitchen designer
and underside of benchtop
C Internal height of cabinetry to top of spacer block 25
3/8
” (644 mm)
D Drawer panel height Calculated from A, B, C & E
E Bottom face of Drawer panel to top of spacer block Your kitchen designer
(to ensure that bottom cover of product is not exposed) (Min. 6
1/16
” [154 mm])
(Max. 7
¼
” [184 mm])
To calculate D complete the following equation:
D = C + B - A - E
i.e. For the F&P prefinished panel:
18
¾
” (476 mm) = 25
3/8
” (644 mm) +
11/16
” (18 mm) -
1/16
” (2 mm) - 7
¼
” (184 mm)
Height of the False Panel
Determine the height of the false panel according to your individual kitchen cabinetry
requirements maintaining a
3/16
” (4 mm) gap between panels.
F&P prefinish panel width is 35
¼
” (896 mm) assuming a
1/16
” (2 mm) clearance either side of panel
height (D) is 18
¾
” (476 mm).
Note B must be min.
5/8
” (16 mm) to ensure adequate clearance to benchtop.
SIDE VIEW
max.
33 1/2
” (850 mm)
min. 21” (535 mm)
min. 5” (130 mm)
min. 21”
(535 mm)
min.
5” (
130 mm)
min. ø
1 15/16” (
50 mm)
max.
¾”
20 mm
Shows cutout if cabinetry depth at
minimum
21 5/8”
(
550 mm)
Installation diagrams for illustration purposes only
COOLDRAWER™ MULTI-TEMPERATURE DRAWER
INSTALLATION INSTRUCTIONS
RB36S & RB90S models
FRAMELESS CABINETRY
3
1
2
1⁄16”
(2 mm)
1
2
1
2
2
3
3 4 521
6 7
2
1
1
2 2
1
3
3 3
30 /”
(764 mm)*
1 /”
(50 mm)
11 /”
(281 mm)
3”
(76 mm)
2
3
4
1
/” (2 mm) /” (2 mm)
2
1
/” (9 mm)
x 3
35 ¼” (896 mm)
X
8
max. ø /”
(16 mm)
4” (102 mm)
8 ½”
(215 mm)
8 ½”
(215 mm)
1
/
”
(40 mm)
1”
(25 mm)
max. 33 /” (862 mm)
min. 33 /” (860 mm)
1 /”
(46 mm)
12 ¼” (311 mm) 12 ¼” (311 mm)
16 /” (414 mm)
/”
(18 mm)
/“
(2.5 mm)
/” (5 mm)
/
-
/
”
(16 - 20 mm)
/”
(1 mm)
fisherpaykel.com 840510C FRAMELESS CABINETRY 07.18
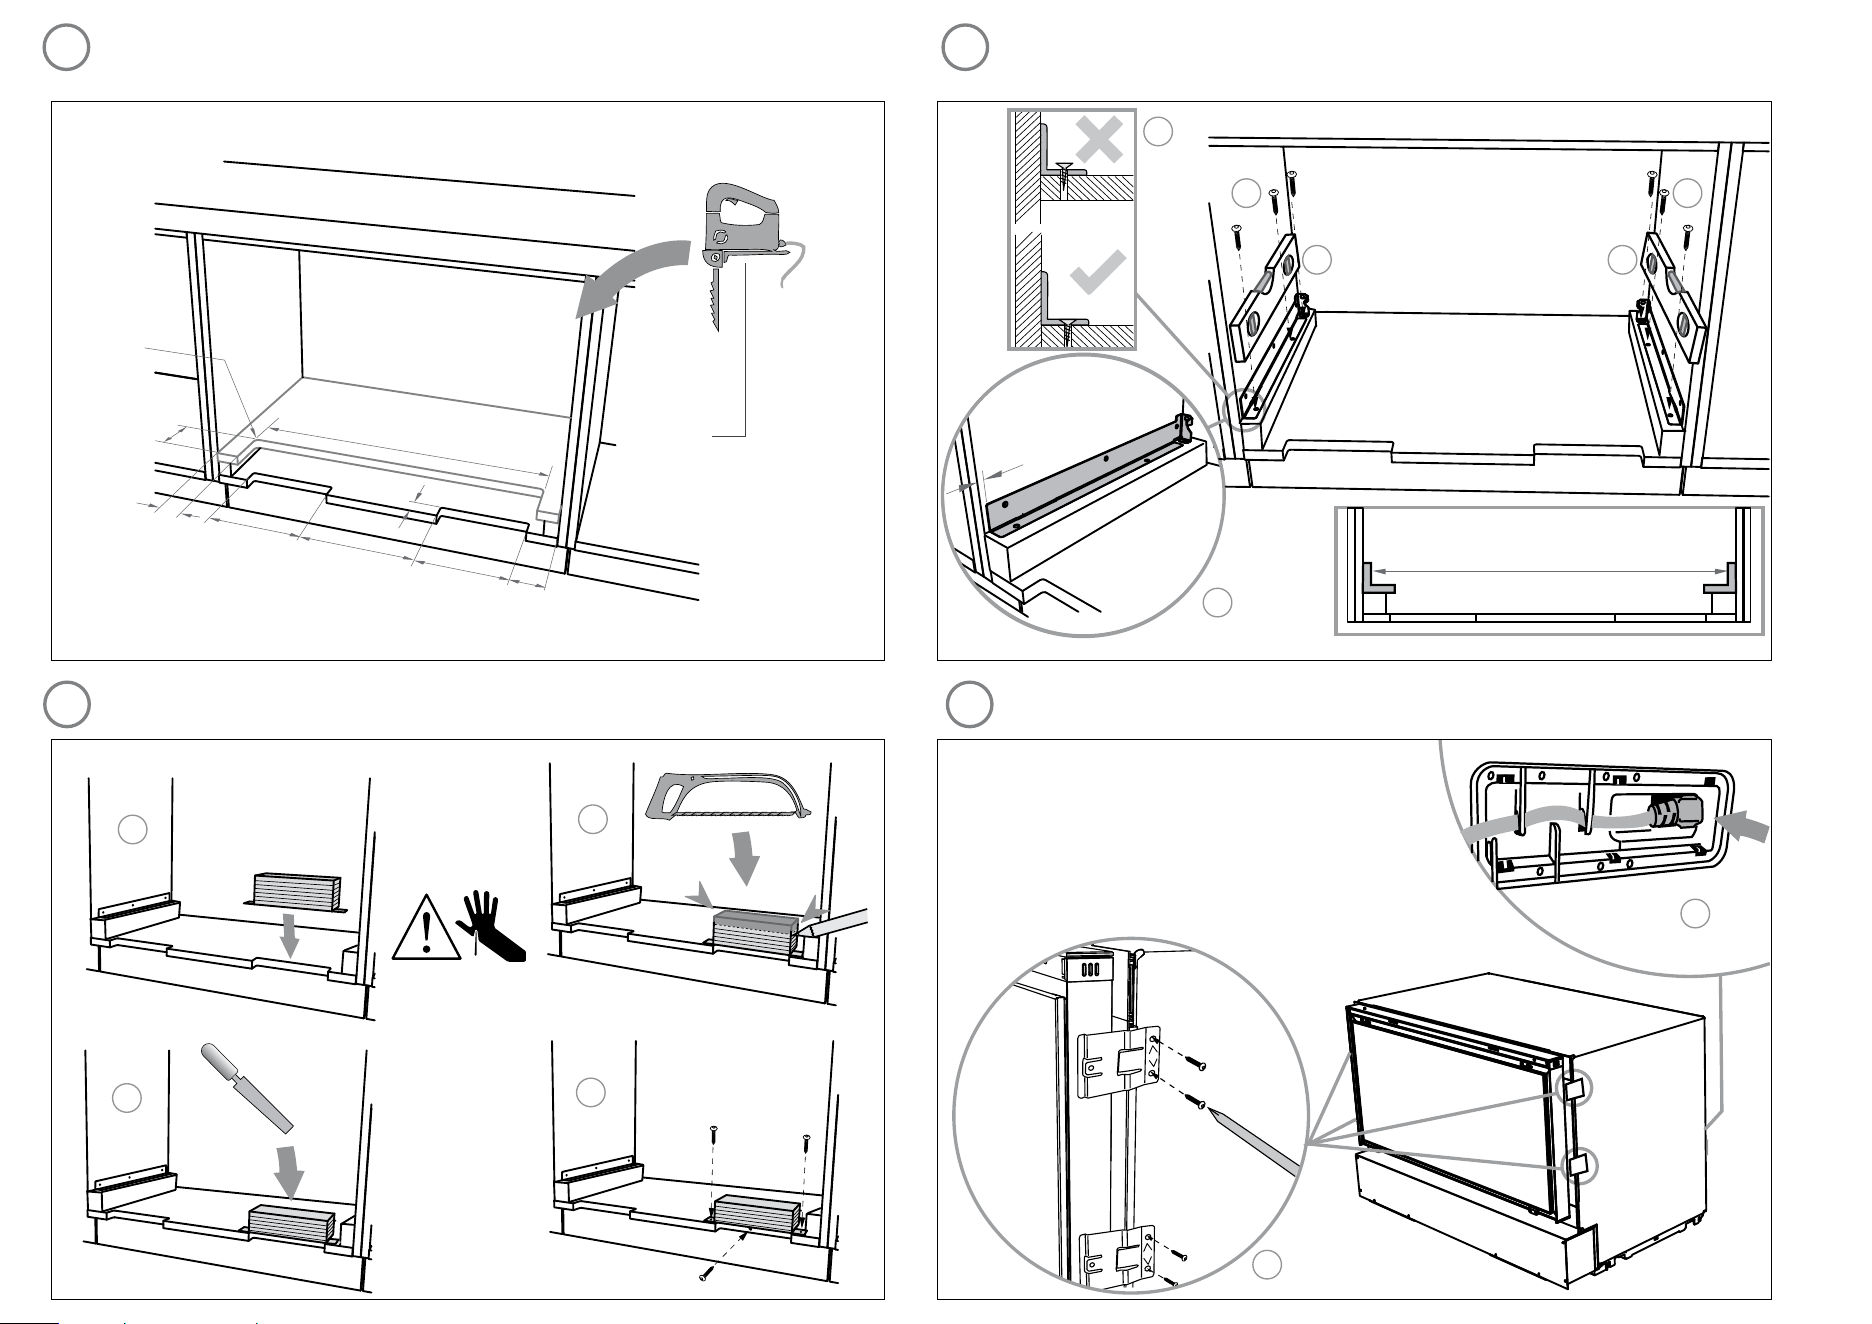
Important!
Ensure a minimum of 3 screws
per side are used. The rear screws
must always be used. Horizontal
fixing is also optional.
If the cabinetry does not already have cutouts, ensure the modifications below are made.
Important!
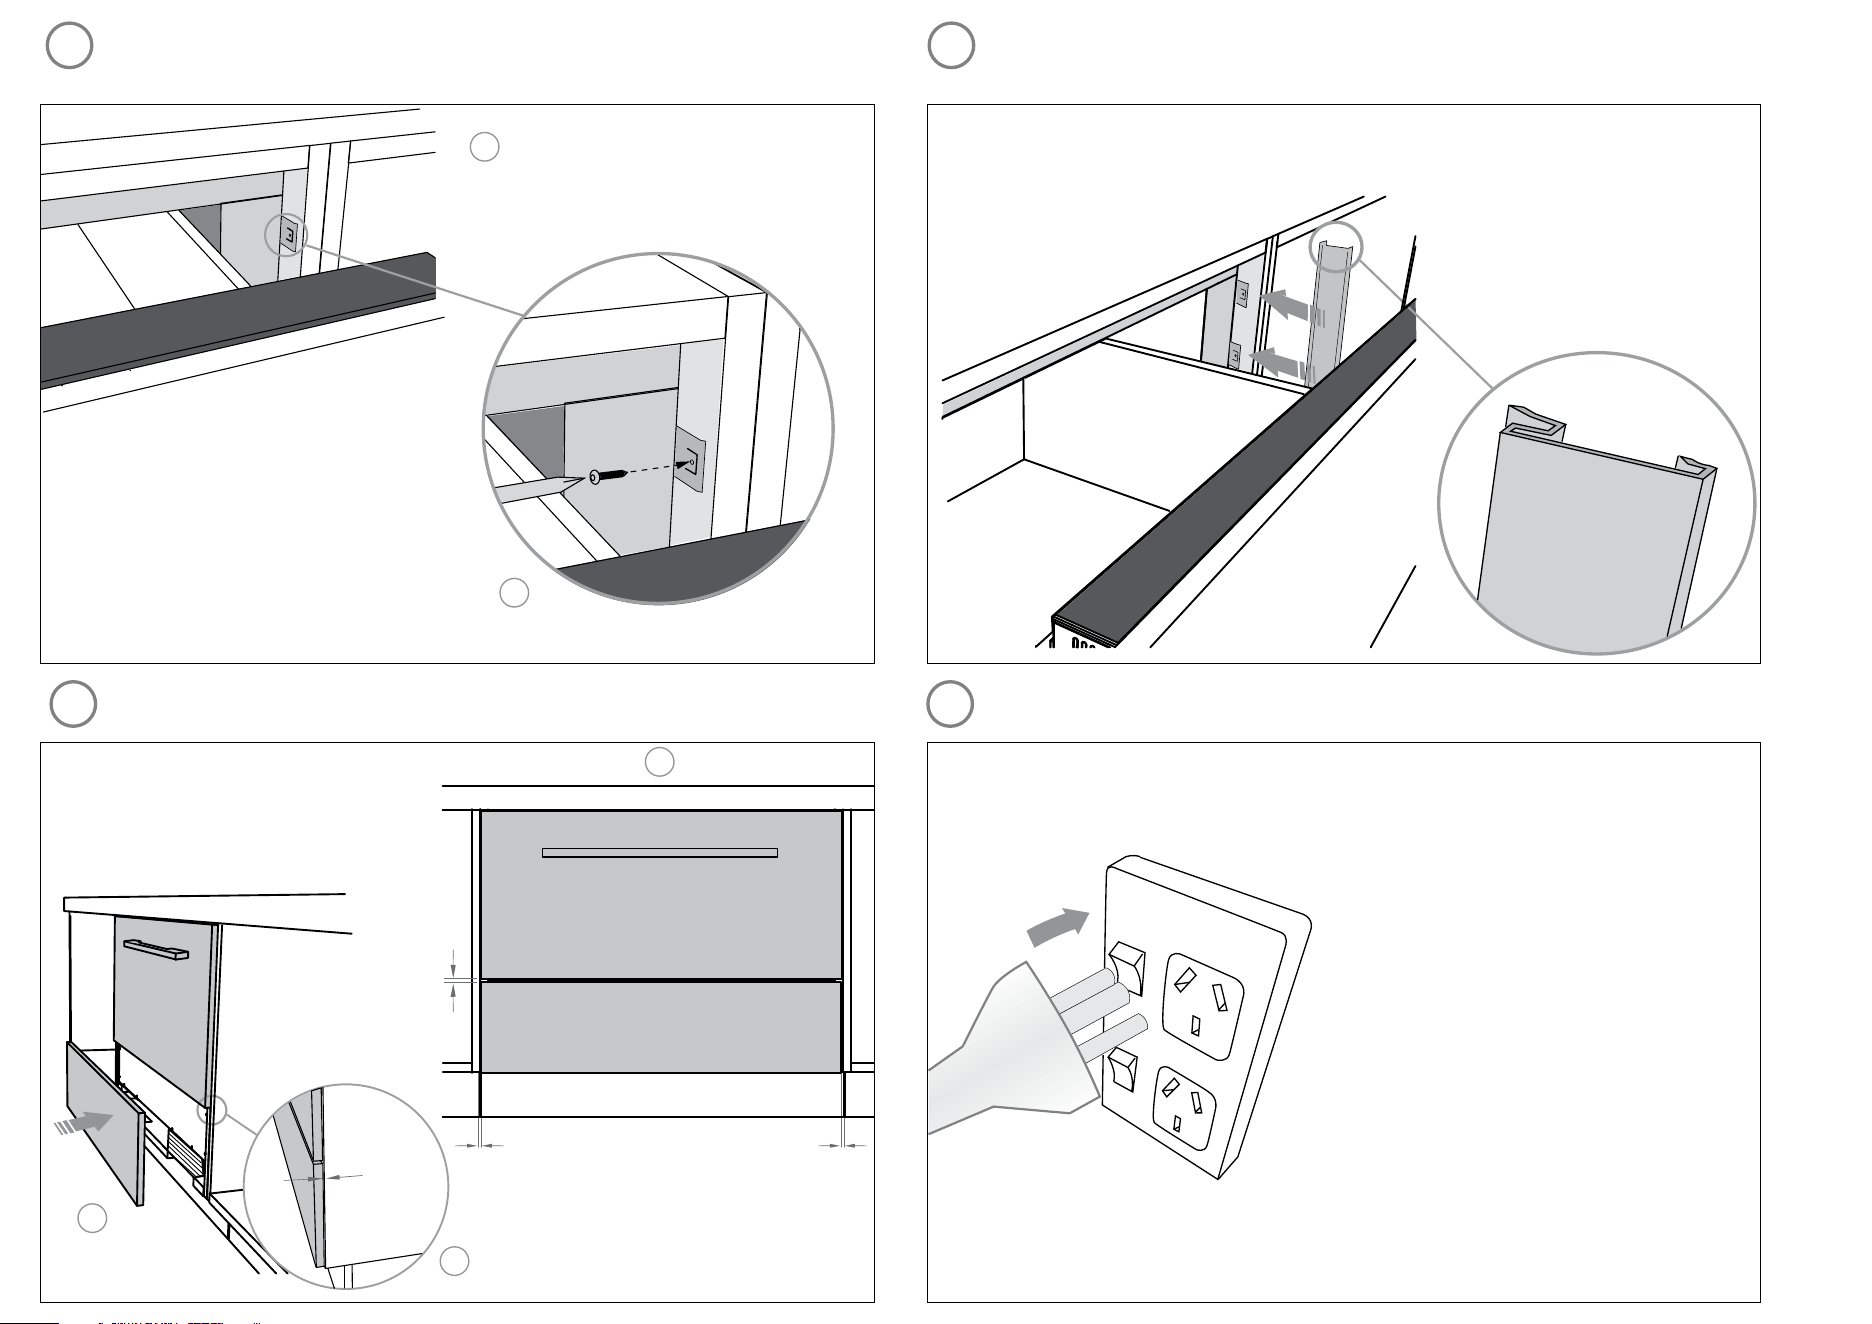
Ensure the power cord is clipped in place.
Important!
Ensure you check basic operation and perform
the final checklist.
Attach the false panel securely
as recommended by the cabinet
maker.
Important!
The false panel needs to be removable for
servicing.
Secure using vertical
or horizontal fixing
CREATE CUTOUTS IN FRAME
7
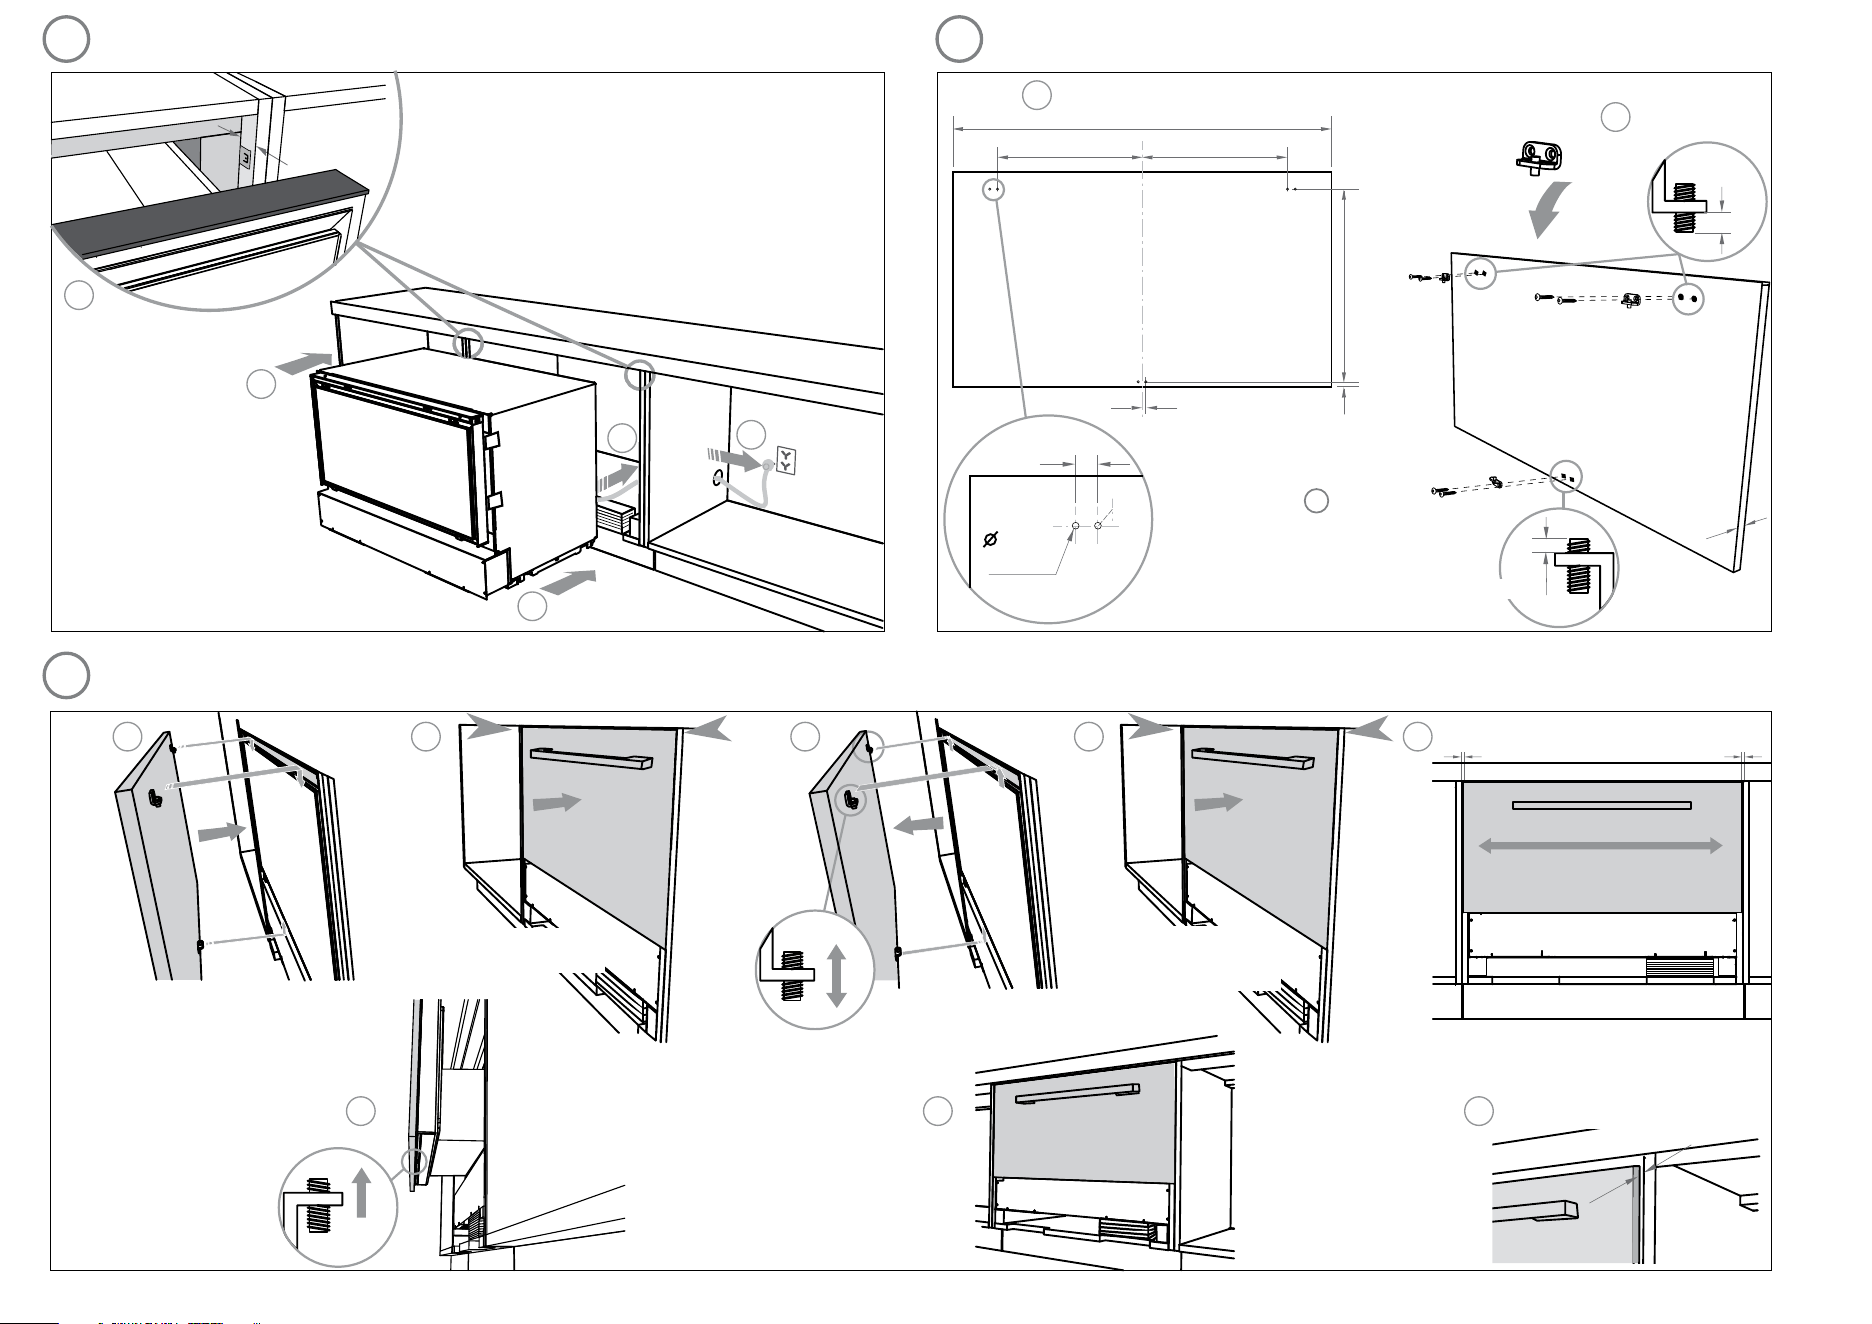
LOCATE & SECURE INSTALL BRACKETS
8
Important!
Cut outlet duct to be flush
with top of spacer blocks.
9
ATTACH OUTLET VENT DUCT
10
ATTACH POWER CORD & TRIM BRACKETS
Important!
Note correct orientation of bracket.
14
SECURE PRODUCT TO CABINETRY
15
ATTACH TRIMS TO SIDES OF CABINETRY
16
ATTACH FALSE PANEL
17
CHECK OPERATION
Open drawer and secure product
to cabinetry using four Trim
brackets and screws.
18
FINAL CHECKLIST
TO BE COMPLETED BY THE INSTALLER
Has all packaging been removed from the appliance?
Is the appliance securely fastened to the cabinetry?
Does the drawer slide freely and close properly?
Has the outlet duct been installed correctly?
Is the appliance level?
Are the panels securely attached?
Have the panels been properly aligned for correct operation and
appearance? Are all clearances even?
Is there clearance between drawer and cabinetry frame?
Has the power cord been plugged into a properly earthed 3-prong outlet,
which has been installed in accordance with all applicable electrical codes?
OPERATION:
Is the control panel lit?
Can you hear the compressor motor running?
When a hand is placed near the toe kick, can airflow be felt under front
right-hand side of appliance?
Have you demonstrated the basic operation to the customer?
Installer’s name:
Installer’s signature:
Installation company:
Date of installation:
LEAVE THESE INSTRUCTIONS WITH THE CUSTOMER
*
Only with cabinetry with internal shelf
13
ATTACH DRAWER PANEL TO FRONT OF DRAWER
Important!
Do not screw in trim
brackets at this stage.
Hook drawer panel onto
drawer front channel
Close the drawer and
check vertical clearances
Remove the panel and
adjust the TOP
attachment hooks
as necesary
Replace panel on
drawer and confirm
vertical clearances
Slide panel to achieve
horizontal clearances
Open drawer and clamp
panel onto drawer by
tightening the BOTTOM
attachment hook
Close the drawer and ensure it is flush
with adjacent cabinetry. If not, the
product may have to be pulled back
or forward.
Important!
Be careful not to damage power
supply cord when pushing
product into cavity.
Attach handle as necessary.
Ensur
e all screws are flush
with panel surface.
X = 7
5/8
” (194 mm) – E,
where E is Bottom face
of Drawer Panel to top of
spacer block, see .
6
Ensure there is clearance
between panel and cabinetry
when drawer is fully closed
3
1
2
1⁄16”
(2 mm)
1
2
1
2
2
3
3 4 521
6 7
2
1
1
2 2
1
3
3 3
30 /”
(764 mm)*
1 /”
(50 mm)
11 /”
(281 mm)
3”
(76 mm)
2
3
4
1
/” (2 mm) /” (2 mm)
2
1
/” (9 mm)
x 3
35 ¼” (896 mm)
X
8
max. ø /”
(16 mm)
4” (102 mm)
8 ½”
(215 mm)
8 ½”
(215 mm)
1
/
”
(40 mm)
1”
(25 mm)
max. 33 /” (862 mm)
min. 33 /” (860 mm)
1 /”
(46 mm)
12 ¼” (311 mm) 12 ¼” (311 mm)
16 /” (414 mm)
/”
(18 mm)
/“
(2.5 mm)
/” (5 mm)
/
-
/
”
(16 - 20 mm)
/”
(1 mm)
fisherpaykel.com 840510C FRAMELESS CABINETRY 07.18
Important!
Ensure a minimum of 3 screws
per side are used. The rear screws
must always be used. Horizontal
fixing is also optional.
If the cabinetry does not already have cutouts, ensure the modifications below are made.
Important!
Ensure the power cord is clipped in place.
Important!
Ensure you check basic operation and perform
the final checklist.
Attach the false panel securely
as recommended by the cabinet
maker.
Important!
The false panel needs to be removable for
servicing.
Secure using vertical
or horizontal fixing
CREATE CUTOUTS IN FRAME
7
LOCATE & SECURE INSTALL BRACKETS
8
Important!
Cut outlet duct to be flush
with top of spacer blocks.
9
ATTACH OUTLET VENT DUCT
10
ATTACH POWER CORD & TRIM BRACKETS
Important!
Note correct orientation of bracket.
14
SECURE PRODUCT TO CABINETRY
15
ATTACH TRIMS TO SIDES OF CABINETRY
16
ATTACH FALSE PANEL
17
CHECK OPERATION
Open drawer and secure product
to cabinetry using four Trim
brackets and screws.
18
FINAL CHECKLIST
TO BE COMPLETED BY THE INSTALLER
Has all packaging been removed from the appliance?
Is the appliance securely fastened to the cabinetry?
Does the drawer slide freely and close properly?
Has the outlet duct been installed correctly?
Is the appliance level?
Are the panels securely attached?
Have the panels been properly aligned for correct operation and
appearance? Are all clearances even?
Is there clearance between drawer and cabinetry frame?
Has the power cord been plugged into a properly earthed 3-prong outlet,
which has been installed in accordance with all applicable electrical codes?
OPERATION:
Is the control panel lit?
Can you hear the compressor motor running?
When a hand is placed near the toe kick, can airflow be felt under front
right-hand side of appliance?
Have you demonstrated the basic operation to the customer?
Installer’s name:
Installer’s signature:
Installation company:
Date of installation:
LEAVE THESE INSTRUCTIONS WITH THE CUSTOMER
*
Only with cabinetry with internal shelf
13
ATTACH DRAWER PANEL TO FRONT OF DRAWER
Important!
Do not screw in trim
brackets at this stage.
Hook drawer panel onto
drawer front channel
Close the drawer and
check vertical clearances
Remove the panel and
adjust the TOP
attachment hooks
as necesary
Replace panel on
drawer and confirm
vertical clearances
Slide panel to achieve
horizontal clearances
Open drawer and clamp
panel onto drawer by
tightening the BOTTOM
attachment hook
Close the drawer and ensure it is flush
with adjacent cabinetry. If not, the
product may have to be pulled back
or forward.
Important!
Be careful not to damage power
supply cord when pushing
product into cavity.
11
MOVE PRODUCT INTO CAVITY
12
FIT DRAWER PANEL ATTACHMENT HOOKS
Attach handle as necessary.
Ensure all screws are flush
with panel surface.
X = 7
5/8
” (194 mm) – E,
where E is Bottom face
of Drawer Panel to top of
spacer block, see .
6
Ensure there is clearance
between panel and cabinetry
when drawer is fully closed

3
1
2
1⁄16”
(2 mm)
1
2
1
2
2
3
3 4 521
6 7
2
1
1
2 2
1
3
3 3
30 /”
(764 mm)*
1 /”
(50 mm)
11 /”
(281 mm)
3”
(76 mm)
2
3
4
1
/” (2 mm) /” (2 mm)
2
1
/” (9 mm)
x 3
35 ¼” (896 mm)
X
8
max. ø /”
(16 mm)
4” (102 mm)
8 ½”
(215 mm)
8 ½”
(215 mm)
1
/
”
(40 mm)
1”
(25 mm)
max. 33 /” (862 mm)
min. 33 /” (860 mm)
1 /”
(46 mm)
12 ¼” (311 mm) 12 ¼” (311 mm)
16 /” (414 mm)
/”
(18 mm)
/“
(2.5 mm)
/” (5 mm)
/
-
/
”
(16 - 20 mm)
/”
(1 mm)
fisherpaykel.com 840510C FRAMELESS CABINETRY 07.18
Important!
Ensure a minimum of 3 screws
per side are used. The rear screws
must always be used. Horizontal
fixing is also optional.
If the cabinetry does not already have cutouts, ensure the modifications below are made.
Important!
Ensure the power cord is clipped in place.
Important!
Ensure you check basic operation and perform
the final checklist.
Attach the false panel securely
as recommended by the cabinet
maker.
Important!
The false panel needs to be removable for
servicing.
Secure using vertical
or horizontal fixing
CREATE CUTOUTS IN FRAME
7
LOCATE & SECURE INSTALL BRACKETS
8
Important!
Cut outlet duct to be flush
with top of spacer blocks.
9
ATTACH OUTLET VENT DUCT
10
ATTACH POWER CORD & TRIM BRACKETS
Important!
Note correct orientation of bracket.
14
SECURE PRODUCT TO CABINETRY
15
ATTACH TRIMS TO SIDES OF CABINETRY
16
ATTACH FALSE PANEL
17
CHECK OPERATION
Open drawer and secure product
to cabinetry using four Trim
brackets and screws.
18
FINAL CHECKLIST
TO BE COMPLETED BY THE INSTALLER
Has all packaging been removed from the appliance?
Is the appliance securely fastened to the cabinetry?
Does the drawer slide freely and close properly?
Has the outlet duct been installed correctly?
Is the appliance level?
Are the panels securely attached?
Have the panels been properly aligned for correct operation and
appearance? Are all clearances even?
Is there clearance between drawer and cabinetry frame?
Has the power cord been plugged into a properly earthed 3-prong outlet,
which has been installed in accordance with all applicable electrical codes?
OPERATION:
Is the control panel lit?
Can you hear the compressor motor running?
When a hand is placed near the toe kick, can airflow be felt under front
right-hand side of appliance?
Have you demonstrated the basic operation to the customer?
Installer’s name:
Installer’s signature:
Installation company:
Date of installation:
LEAVE THESE INSTRUCTIONS WITH THE CUSTOMER
*
Only with cabinetry with internal shelf
13
ATTACH DRAWER PANEL TO FRONT OF DRAWER
Important!
Do not screw in trim
brackets at this stage.
Hook drawer panel onto
drawer front channel
Close the drawer and
check vertical clearances
Remove the panel and
adjust the TOP
attachment hooks
as necesary
Replace panel on
drawer and confirm
vertical clearances
Slide panel to achieve
horizontal clearances
Open drawer and clamp
panel onto drawer by
tightening the BOTTOM
attachment hook
Close the drawer and ensure it is flush
with adjacent cabinetry. If not, the
product may have to be pulled back
or forward.
Important!
Be careful not to damage power
supply cord when pushing
product into cavity.
11
MOVE PRODUCT INTO CAVITY
12
FIT DRAWER PANEL ATTACHMENT HOOKS
Attach handle as necessary.
Ensure all screws are flush
with panel surface.
X = 7
5/8
” (194 mm) – E,
where E is Bottom face
of Drawer Panel to top of
spacer block, see .
6
Ensure there is clearance
between panel and cabinetry
when drawer is fully closed
