◆ The unit p icture on the user manual ju st for reference,pls sub ject to t he real items.
USER MANUAL
PORTABLE PLAYER & LCD TELEVISION
PLEA SE READ THIS USER MANUAL CAREFULLY BEFO RE ATTEMPT TO USE THE UNIT!
Dear customer,
Thanks for choosing and buying our portable player & TFT television. Please read
this user manual carefully before you use it, it can tell you how to use it and make you
operate it more expediently.
1. Please read the user manual carefully before opening the package of this unit, and
should comply with all practice manuals and cautions.
2. For the risk of high voltage, do not repai
r it by yourself. All service and adjustments
only to qualified service personnel.
3. The adaptor must consist with the category of tags and the special power.
The using method please refer to the power user manual.
4. The unit should be used with the corresponding power, pleas check silk-screen on the
back of the unit.
5. Do not place the unit near sofa or window curtain or explore to sunshine or wetly
place, and avoid dropping or striking.
6. Pick off the jack from the power jack when clean it. Do not use the thinner or other
chemical detergents. Use soft cloth to wipe.
7.Long time do not use the uni
t or use it in thunder rainy weather, please pick off the jack
from the power jack.
Cautions
MODEL:SC-2812
Remote Operation on :ATSC
SUB: To display or hide the subtitle;
SEARCH: Panel auto search button.
MENU: Menu key;
EPG: Shows EPG Guide;
CH-\
CH+:Channel changing or direction button;
\ :Volume changing or direction button;
Enter: Confirm;
Return: To return to sub menu or quit setup;
DASH: revepresentati “.”, Use with numeric keys, such as “2.0”;
CC: Closed Caption;
Fav: Favorite channel;
Info: Program’s info;
Audio: to change audio channel;
/ :video rewind / video fast forward.
ZOOM:image zoom in
DEL:delete files
2. Operation Instruction on ATSC
5
A.Press Menu in to Sytem Setup.
B.Press direction keys to select each Setions.
C.Press /ENTER go to sub menu and select items of menu.
D.Choose the item and press ENTER to confirm, System will adjust.
E.Press MENU you can return to upper menu.
F.Press RETURN to Exit setup.
3. System menu setup adjustings.
*SELECT INPUT SOURCE
1)
Press " INPUT” to show input source list.
2)
Press"
▼/▲
" to select and ENTER to confirm.
3)
The TV will go to the state you select.
OK
Input Source
(1).
CHANNEL MENU
Operation on search program:
1)Select to mode.ATSC
2)Press MENU button, select Auto search/ Manual Search/ Manual Search to ATSC AV
Search Program .
3) Select Auto Search, select Search Type, have to choose. Then ATSC
select the country you live in, press OK to start Auto search.
ATSC
Watch Digital TV Channels
AV
Connect an Audio/Video Input Device
HD-IN
Connect HD input Device
PC-RGB
Connect to a PC computer via VGA
DMP
Connect a Digital Media Player
Basic Operation of Remote Control
Remote control panel and instruction:
1. Remote operation on the
state:ATSC/AV/HD-IN/PC-RGB/DMP
POWER: Pr ess t he bu tto n to tu rn off t he te lev isi on di spl ay; Press it again to turn
on. Pleas e tur n the m ain p owe r swi tch o ff whe n the t ele vision is not to use for a
long peri od.
MUTE(mu te bu tto n): P res s thi s but ton t o mut e sou nd. P res s aga in or press the
volume in cre ase o r ecr eas e but ton s to re sum e nor mal o per ati on.
VOL+、VOL- : Pre ss VOL + but ton t o inc rea se th e tel evi sio n voice volume.
Press VOL- b utt on to d ecr eas e the t ele vis ion v olu me.
RETURN: P res s the b utt on to r etu rn to t he pr evi ous m enu d isp lay.
INPUT: P res s the b utton to change the state among differ ent s tat e.
CH+ 、CH- : Press CH+ b utt on to i ncr eas e the c han nel n umb er.
Press CH- butt on to d ecr eas e the c han nel n umb er.
, , , :Direct ion b utt on.
MENU: men u but ton .
4
1) Aim the remote control at the receiver
infrared on the television when in use.
2)Avoid pressing, dropping, moistening
or disassembling of the remote control.
Notes:
3)Avoid pressing buttons continuously
and quickly. Interval between two
operations must be at least 2 seconds.
DISPLAY
INPUT
VOL- VOL+
MENU RETURN
PLAY STOP
ENTER
SUB SEARCH
Rep eat
1 2
3
4
5
9
FAV
6
0
AUD IO
7
INF O
8
EPG
CH+
CH-
DAS H
ZOOM DEL
KR-59
CC
DISPLAY
INPUT
VOL- VOL+
MENU RETURN
PLAY STOP
ENTER
SUB
SEARCH
Repeat
1 2
3
4
5
9
FAV
6
0
AUDIO
7
INFO
8
EPG
CH+
CH-
DASH
ZOOM DEL
KR-59
CC
6-9m
Remote Ba tte rie s:
Seven car ton e nvi ron men tal
protect ion b att ery.
Remark:
The above picture is only for reference, Different unit may have different jack position.Due to the
constant improvement of our products ,the unit may be caused some change for the unit face.We will
not give prior advice.Please connect the unit accoriding the real printing of the jack.
2)Button panel instruction
MENU setup/Return button
Volume decreasing switch
Volume increasing switch
Channel decreasing switch
Channel increasing switch
Signal switch, press the button to switch state.ATSC/AV/HD-IN/PC-RGB/DMP
Enter button.
/Direction left
Buttons printing
Keys function instructions
The above description is only for reference.There may be different quantity and position for the buttons among
different models.please operate the unit according to the real printing of the keys.
2
/Direction right
/Direction down
/Direction up
MENU
ENTER
TV/AV
1
7
9
5
3
6
8
VOL-
VOL+
CH-
CH+
2
4
Connect the adapter with jack "DC-12V"
beside the device, it is charging when the
red charging light flashes constantly.
Charging procedure will be finished when
the red charging light stops flashing.
Charging Procedure
Antenna Procedure
Connect external antenna or cable signals and
radio input jack of the display with 75Ω coaxial
cable,Press the INPUT button,ATSC signal is
connected when the screen shows ATSC.
If you use it for watching TV for the first fime
please scarch automatically channels.
(See page4-5)
Power Selection and Caution
Ac adapter
Use 100V-240V AC power with AC adapter(please refer to the instruction table of
adapter) to supplied power.
Car charger
Use car adapter (adapting negative grounding) to supply for the unit(Just the
Automobile adapter with 12V power output is fit for this unit).
1
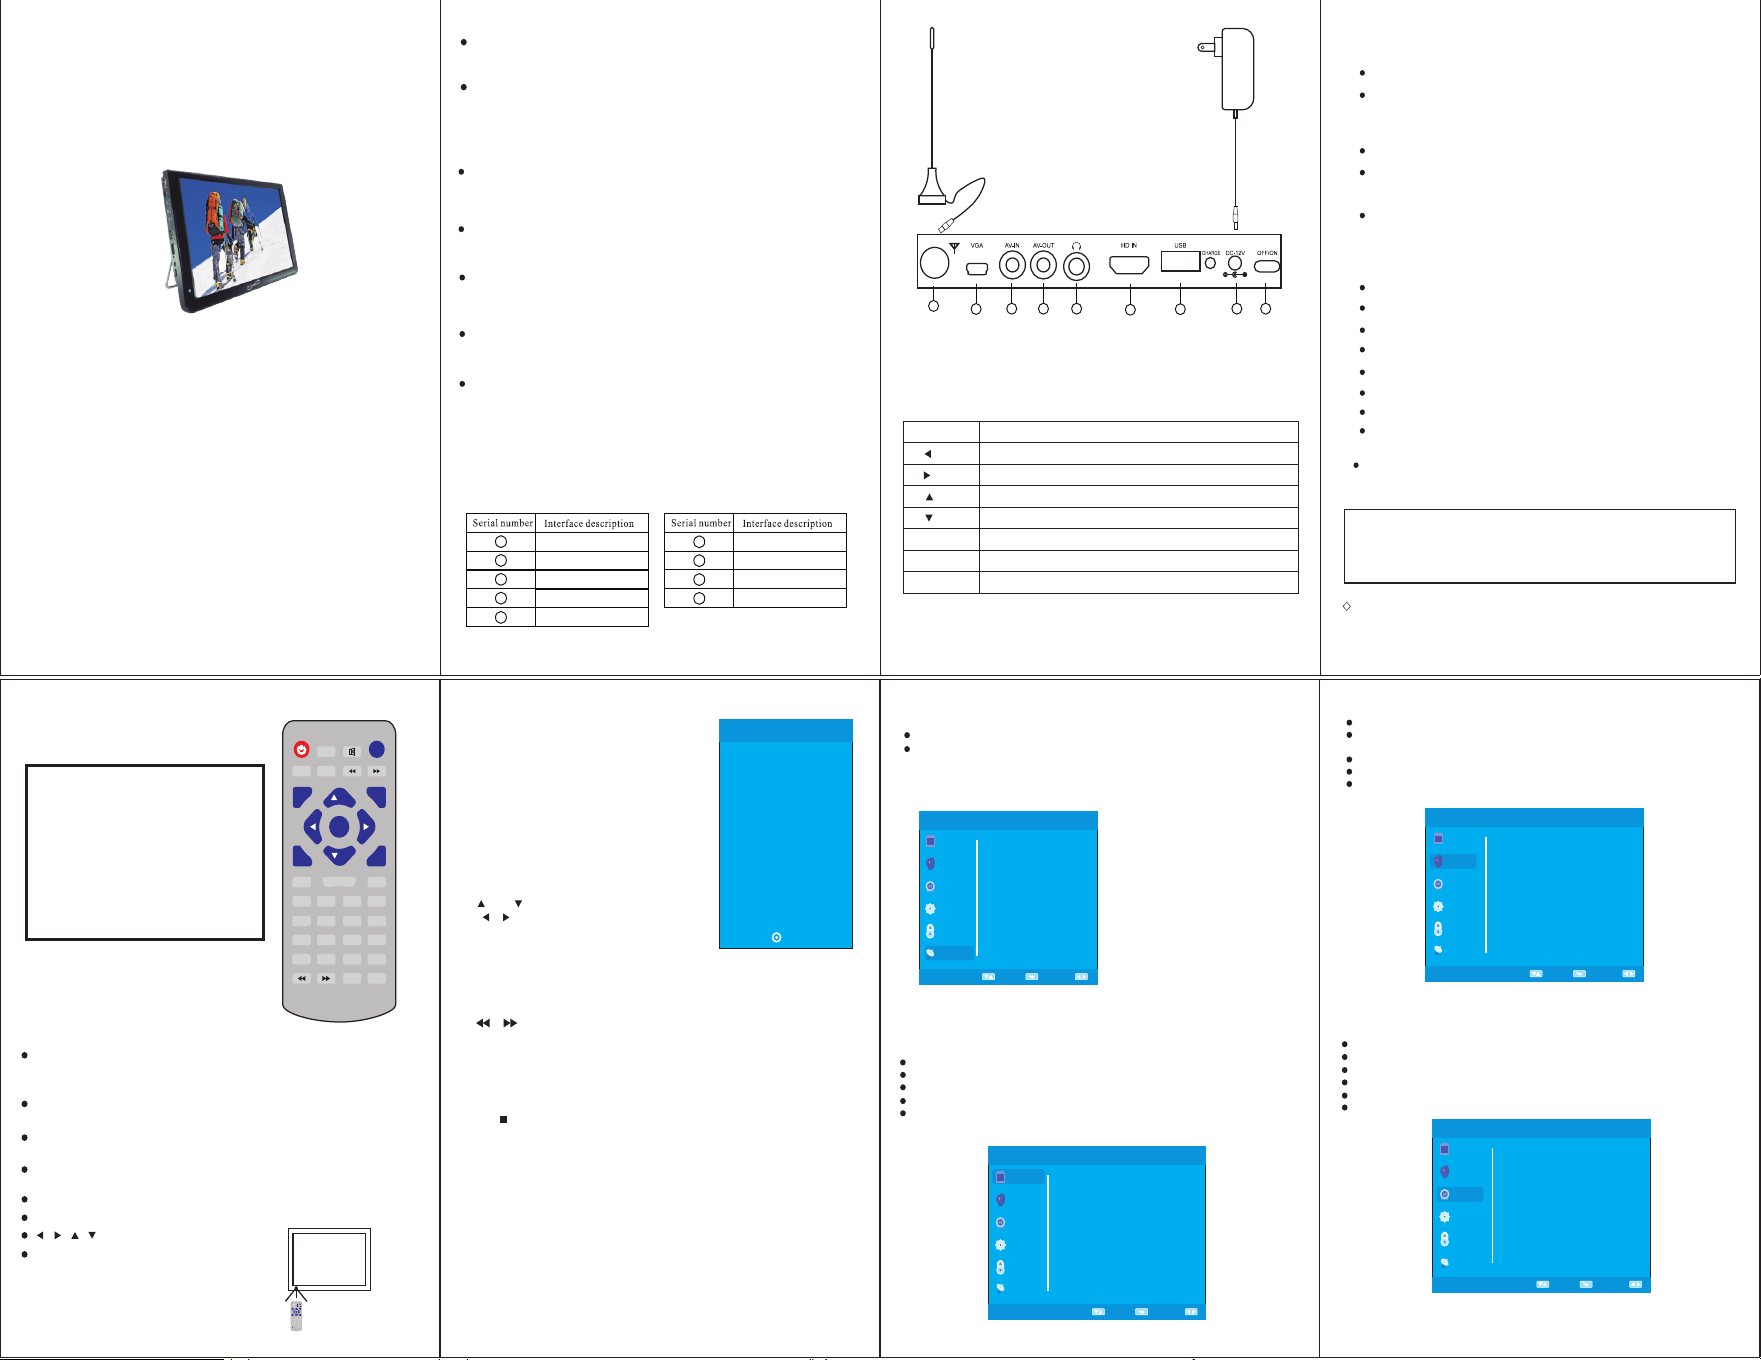
Jacks Description and operation Instruction for pressing buttons
1)Interface show and description
Antenna jack
USB
Power switch
AV IN
HD-IN jack
Power input jack
Earphone jack
1
2
3
4
5
6
7
AV OUT
VGA jack
8
9
External signal input /output function
Receiving TV ProgramsATSC
Connect external antenna or cable signals and radio input jack of the display with 75
Ω coaxial cable,
Press the INPUT button, signal is connected when the screen shows .If you use it for ATSC ATSC
watching TV for the first fime please scarch automatically channels.(See page4-5)
AV Signal Input&Output
AV line and panel AV Input jack or Output jack connected with other AV output jack or AV
input , then press the INPUT button, AV signal is connected when the screen show AV.
USB/SD Card
Put the USB/TF card into the machine,choose the USB/Card mode to play the contents
in them.
VGA
Video Graphics Array is a graphics standard for personal computers and associated
connector.
HD IN
Connect the HD-line with the machine,it will get HD input for playing video.
(Kindly remind: Please check the relative interface)
Specifications
Product: LED color television
Display component: color TFT-LED
With the purpose of further development and better service, the company has the
right to update and improve the machine structure and inferior parameters.
Further information will not be provided!
NOTE
Audio output: 2W(Max)
Screen dimensions: 12.1 inches
Power: DC12V
Speaker: two φ32mm roundness-type speakers
Power consumption: around 18W
Weight: around 0.8 Kg
External dimension: 300*200*27 mm
Receivable channels:
ATSC (50MHz~866MHz)
Connectors: Antenna jack; AV input jack;
Power input jack; earphone jack;
USB jack; Power on/off
No more further notice on technic changing .All the words and pictures printed on the boxes
just for reference, please refer to the real items.
Accessories:
1)A/C adapter; 2)AV line; 3)remote control; 4)Antenna; 5)User manual.
3
The device has to be charged for about 4 hours.
The device can last about 3 hours at least.
7
Press MENU to display the main menu, and press"
▼/
▲"to select the Sound Menu.
Sound Mode: Standard/Music/Movie/Sports/Personal.When Sound Mode is turned
to USER , then user can adjust Treble Bass.
Balance: Adjust the level of sound coning from the left and right speakers.
Auto Volume: When set on, quick volume change will be smoothed.
Surround Sound:
SURROUND /OFF
(3)SOUND MENU
Press MENU to display the main menu, and press"
▼/▲
" to select the Time Menu.
Clock: Adjust time in clock section:Date/Month/Year/Hour/Minute.
Off Time: Select the time when the TV will count 60 secs to turn off the power.
On Time: Select the time in how many minutes the TV will Power off (Sleep).
Sleep timer:240/180/120/90/60/30/20/10 mins
Auto Sleep: off/5Hours/4Hours/3Hours.
(4)TIME MENU
PICTURE
SOUND
TIME
OPTION
LOCK
Select
Menu
Adjust
Auto Volume
off
Surround Sound
off
Balance
0
Sound Mode Standard
PICTURE
SOUND
TIME
OPTION
LOCK
Clock
off Time
On Time
Sleep Timer
Auto Sync
Select
Menu
Adjust
off
off
off
off
Treble 50
Bass
50
CHANNEL
CHANNEL
Time Zone
Atlantic
4) After Auto Scan press CH+/CH- to chose the program as you like.
Channel Edit: Set channel infos.
Signal Information: Check TV signal infomations.
(2) PICTURE MENU
Press MENU to display the main menu, and press"
▼/▲
"to select the Picture Menu.
Picture Mode: Personal/Dynamic/Standard/Mild
Color Temperature: Personal/cold/Normal/Warm
Noise Reduction: Low/Middle/High/Off
PICTURE
SOUND
TIME
OPTION
LOCK
Screen
Select
Menu
Adjust
Aspect Ratio
16:9
Noise Reduction
Middle
6
Attention: if words in gray state, means it can not be adjust in current state, pls turn to
exact state to adjust.
Color Temperature
Medium
Picture Mode Standard
Contrast 50
Brightness 50
Color 50
Sharpness 50
Tint 50
CHANNEL
PICTURE
SOUND
TIME
OPTION
LOCK
Air / Cable
Auto Scan
Fav orite
Show / Hide
DTV Signal
Select
Menu
Adjust
CHANNEL
Air
How to run auto channel
scan procedure:
1) Press button “MENU”
2) Select “CHANNEL”
then get into Air/Cable
3) Press button “◀”or “▶”
to select Air mode or Cable mode.
4) After decision, press button
“▼ CH- ” to select Auto Scan
5) At Last, press button “Enter”,
the device will start to run auto
channel scan procedure.
Screen:This function can be operated when the TV is under PC-RGB ,
which is used to adjust the screen.
9
The color of the icon means whether your TV has detected a USB memory or not.
Yellow: Yes; Gray: No;
Press" / " to select Photo/Music/Movie/Text icon and ENTER to enter the
USB memory for details.
4.(Multimedia) state.
Chose C, then press " ENTER" to submenu.
Press " INPUT” to show input source list, then press"
▼/▲
" to select and ENTER to
confirm, then it will show multimdedia state.
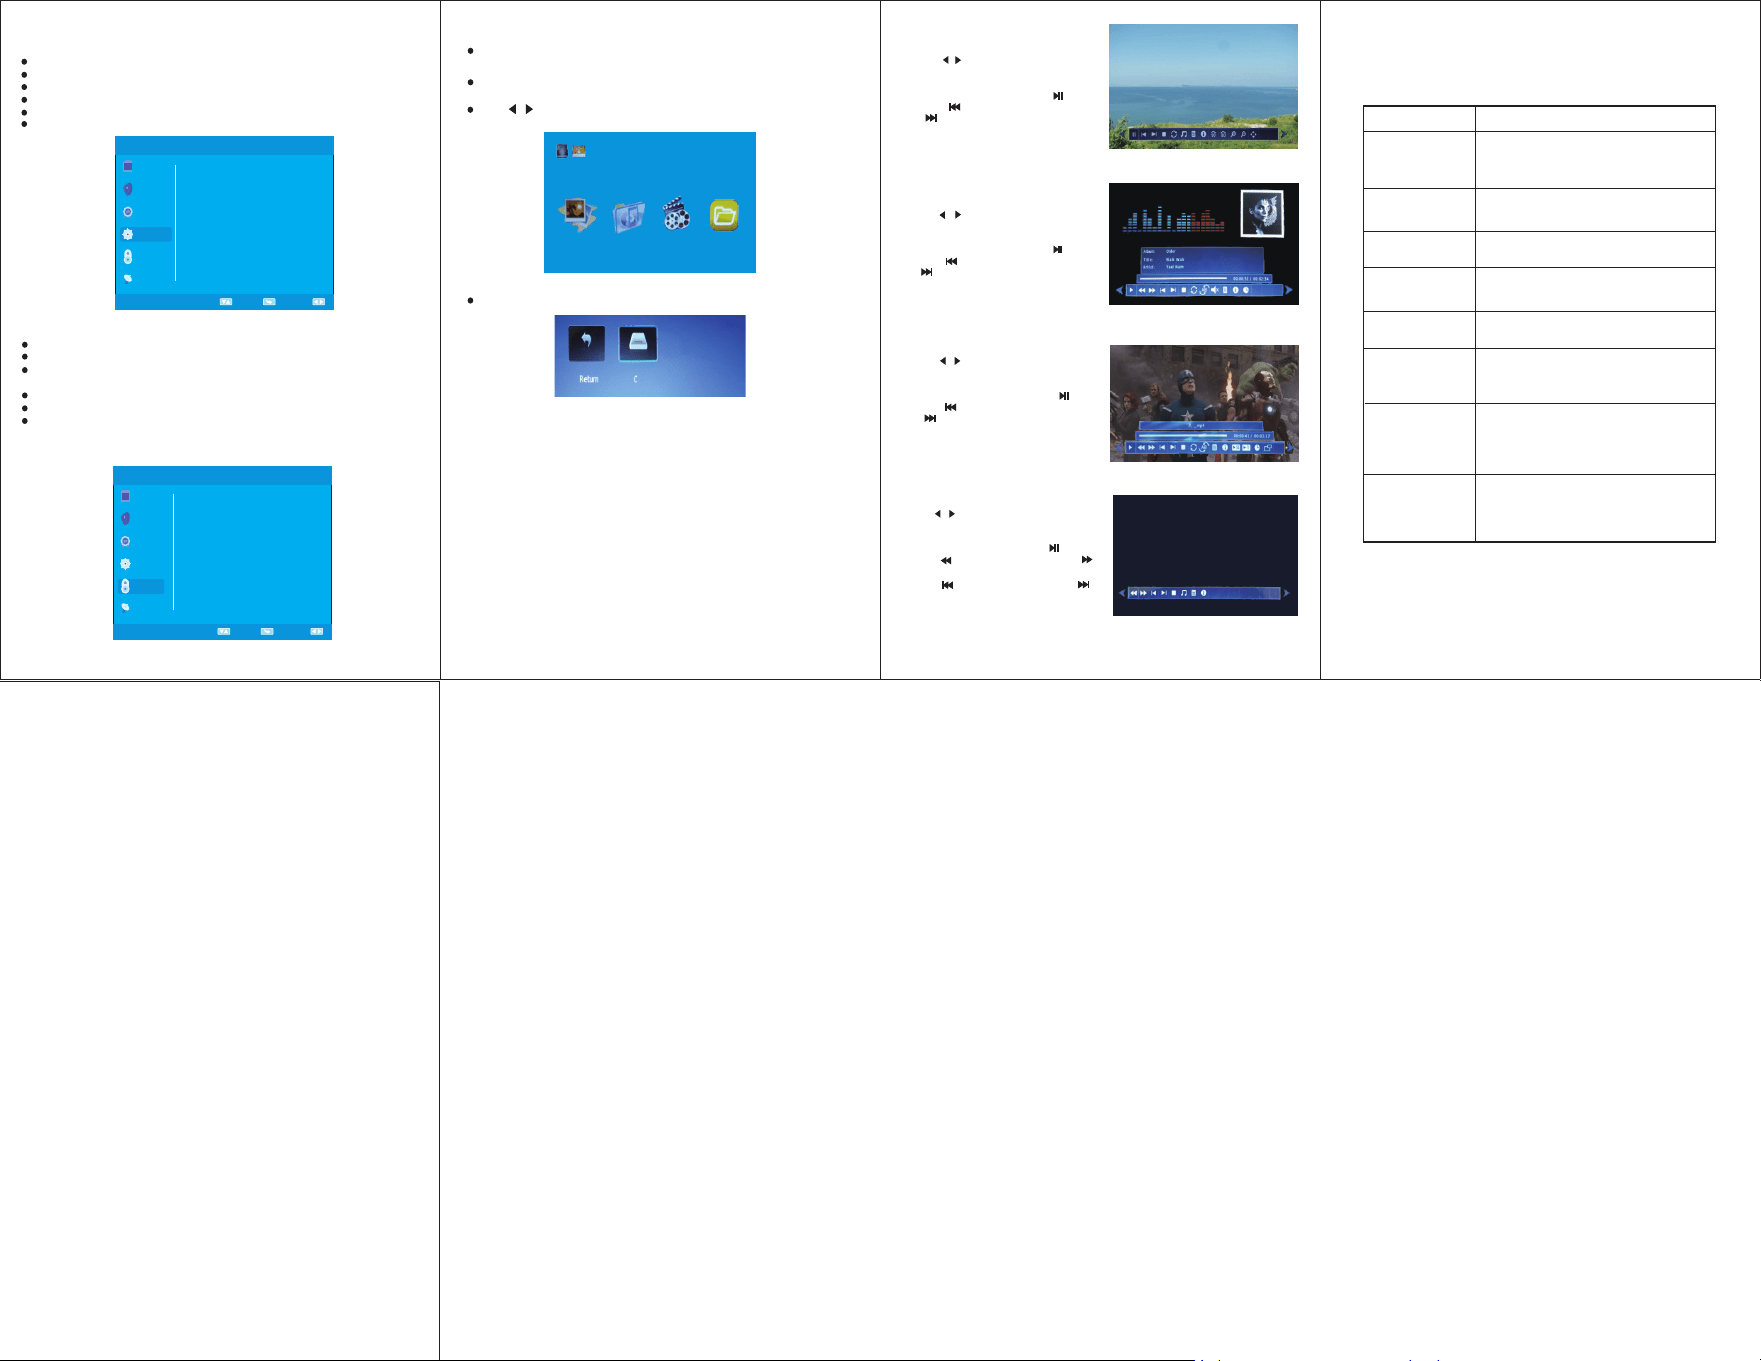
PHOTO MUSIC MOVIE
TEXT
USB2.0
10
1) Insert the USB device into the USB jack.
2)Press" / " to chose MOVIE ,press " ENTER"
to submenu.
4) Chose the movie you like ,press " " to play,
press " "to play the last the chapter, press
" "to play the next chapter.
3) Chose C, then press "ENTER" to submenu.
1) Insert the USB device into the USB jack.
2)Press" / " to chose PHOTO ,press "ENTER"
to submenu.
4) Chose the photo you like ,press" "to play,
press " "to play the last the photo, press
" "to play the next p
hoto.
3) Chose C, then press "ENTER" to submenu.
5)Press" return" to quit.
1) Insert the USB device into the USB jack.
2)Press" / " to chose MUSIC ,press " ENTER"
to submenu.
4) Chose the music you like ,press" "to play,
press " "to play the last
MUSIC
, press
" "to play the next
MUSIC.
3) Chose C, then press "ENTER" to submenu
1) Insert the USB device into the USB jack,
2)Press" / " to chose TEXT ,press " ENTER"
to submenu.
4) Chose the TXT you like ,press" "to play,
press " "to play the last page, press " "
to play the next page.
3) Chose C, then press "ENTER" to submenu.
5)Press" return" to quit.
5)Press" return" to quit.
6)Press" return" to quit
5
)press " " to play the last text, press " "to
play the next text.
(1) PHOTO PLAY
(2)
MUSIC
PLAY
(3)
MOVIE
PLAY
(4) TEXT PLAY
.
Pause
Play
Play
Prev Page
XXXXXXXXXXXXXXXXXXXXXXXXXXXXXXXXXXXXXXXXXXXXXXXXXXXX
XXXXXXXXXXXXXXXXXXXXXXXXXXXXXXXXXXXXXXXXX
XXXXXXXXXXXXXX
8
(5) OPTION MENU
Press MENU to display the main menu , and press"▼/▲" to select the OPTION menu.
OSD Language: Set the OSD display language.
Audio Language: Set the audio lanuage.
Subtitle Lanuage: Set the subtitle Language.
Restore Default: can restore all settings to default state.
(6) LOCK MENU
Press MENU to display the main menu , and press"▼/▲" to select the LOCK menu.
Beofor go to setup, press default password( 0000) to enter setup
Lock System: Enter password can lock important setup of the system, such as
program search, restore default, need to enter password before setup system.
Cancel LOCK by set it Off.
Set password:You can set new password after inputting old password.
Block Channel: Set channels which want to be blocked.
US:The TV should be under ATSC mode , then use
r can lock any channel.
Canada:The TV should be under ATSC mode , then user can lock any channel.
PICTURE
SOUND
TIME
OPTION
LOCK
Select
Menu
Adjust
Setup Wizard
Closed Caption
OSD Language English
PICTURE
SOUND
TIME
OPTION
LOCK
Lock System
Select
Menu
Adjust
Restore Factory Default
Setup Wizard: User can use this function to customize the ways of channels
searching.
CHANNEL
CHANNEL
off
MTS Stereo
Audio Languages
English
Set Password
US
Canada
RRT Setting
Reset RRT
Unrated
off
Before Request for Repair Service
The following phenomena do not indicate that the display is faulty. Before request for
the repair service, please follow the listed methods o check it.
Do not play USB
Affirm USB if put on the jack according to
right way.
Affirm memory format is right.
Phenomenon
Reason
No picture and
sound
Vague picture or
unstable picture
Duplicated pictures
TV no picture
No sound
Snowflake
interference
No color
Whether color is adjusted correctly.
Whether color system is set correctly.
Poor signal.
Whether color eliminatio
n function is on.
Affected by electric wave interference
from vehicle motors, trains, high-voltage
power wires or neon lights.
Reflective signals from nearby buildings
or high reflective signals are picked up.
Whether the antenna is correctly adjusted.
The grounding signal is too weak.
Whether audio volume is off or audio
system is improperly set.
Whether channel is selected correctly.
Staying in multimedia state, change to TV state.
Uncertified power is being used.
Power switch is off or the display is off by
remote control.
11
Warranty:
12
Supersonic Inc.("Supersonic") warrants this product to the original
purchaser ONLY, to be free from defects in materials and workmanship
under normal use, for ninety (90) DAYS from the date of original purchase.
Proof of purchase (receipt) required.
Please visit http://www.supersonicinc.com/warranty
for additional information.
