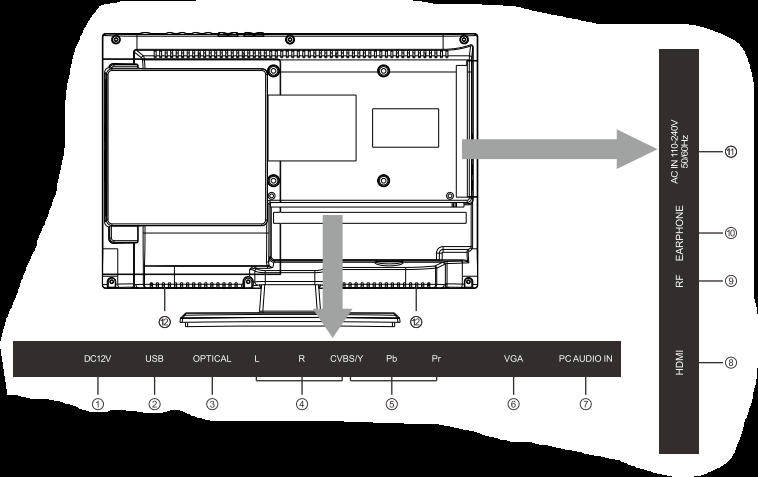
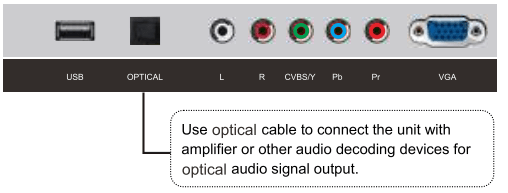
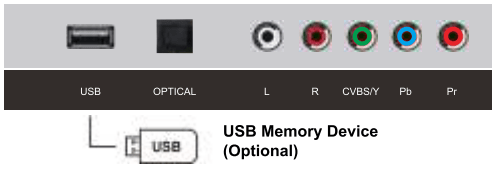
USB: Connect a USB device here to play its media files.
OPTICAL: Digital audio out.
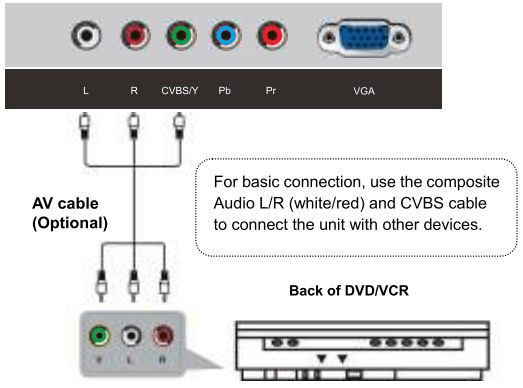
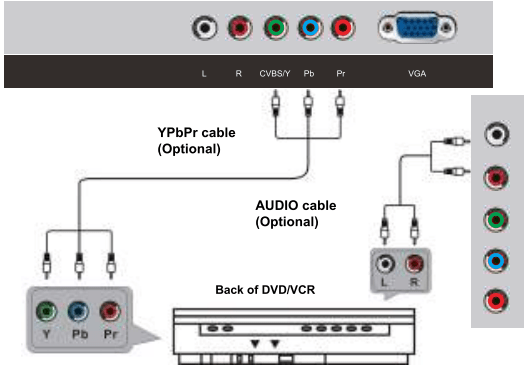
AV INPUT: External AV signal input and relevant right/left sound channel .
YPbPr: Connect to the composite terminal of your DVDA/CR.
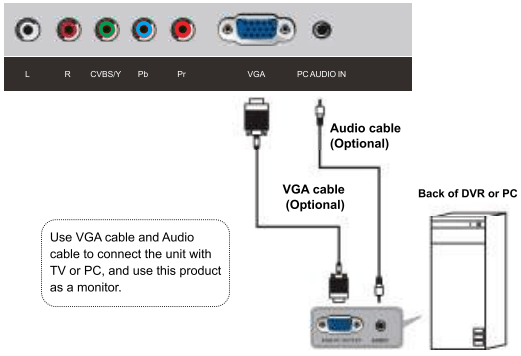
VGA: PC analog signal input.
PC AUDIO INPUT: Audio input when VGA input in use.
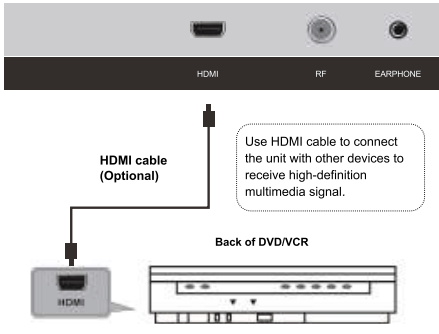
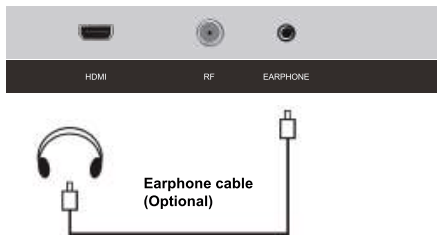
HDMI: Digital signal input from HDMI video connector.
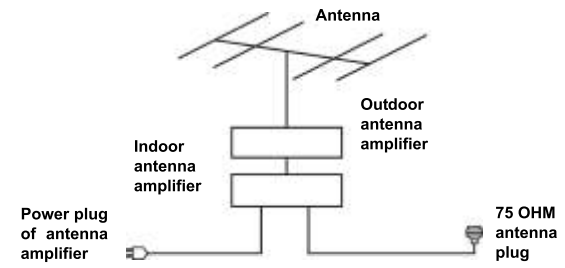
RF: Connect the antennal/cadle TV input(75A/HF/UHF).
EARPHONE: When earphones are plugged in, speakers are disabled.
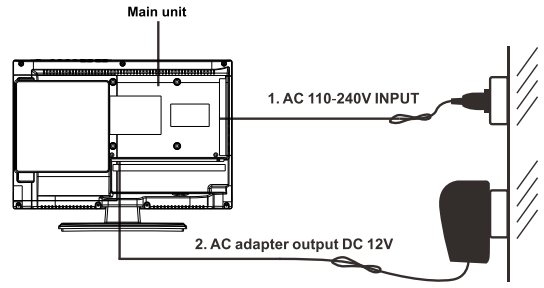
AC IN 110-240V 50/60Hz: AC power input.
Built-in speakers.
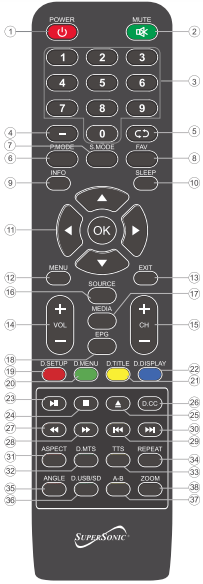
REMOTE CONTROL
REMOTE CONTROL PREPARATION
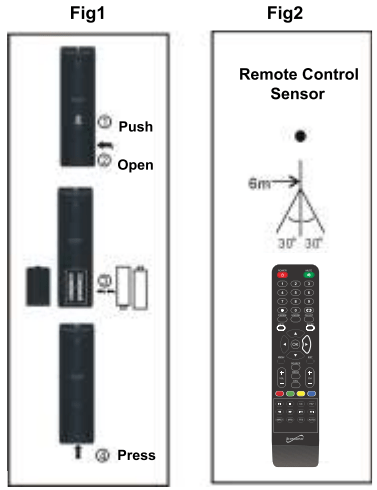
BATTERY INSTALLATION
Install the batteries as the following pictures. Be sure + and - terminals are positioned as Indicated In the battery compartment (Flg1).
SERVICE LIFE OF BATTERIES
The batteries normally last for one year although this depends on how often the remote control is used.
If the remote control fails to work even when it is operated near the player, replace the batteries.
Use two size AAA dry batteries._
NOTE:
Do not drop, step on or otherwise impact the remote control. This may damage the parts or lead to malfunction.
If the remote control is not going to be used for a long time, remove the batteries.
REMOTE CONTROL OPERATION
Point the remote control from no more than about 6m from the remote control sensor and within about 60° of the front of the player(Fig2).
NOTES:
The operating distance may vary according to the brightness of the room.
Do not point bright light at remote control sensor.
Do not place objects between the Remote control and the remote control sensor.
Do not use this remote control while simultaneously operating the remote control of any other equipments.
BASIC CONNECTION
Ensure all the cables are disconnected from the main unit before connecting to power source.
Read through the instructions before connecting other equipments.
AC 110-240V 50/60HZ & DC 12V COMPATIBILITY
CONNECT EXTERNAL ANTENNA TO UNIT
Install external antenna into antenna jack for best picture.
COMPOSITE AV CONNECTION
YPbPr CONNECTION
HDMI CONNECTION
PC/VGA CONNECTION
OPTICAL OUT CONNECTION
EARPHONE CONNECTION
CONNECTING TO USB MEMORY DEVICE
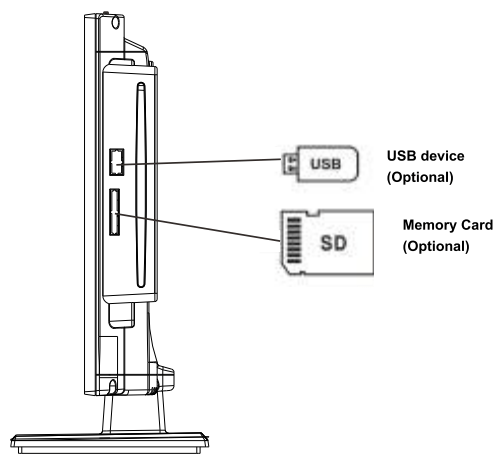
USB AND CARD CONNECTION (DVD)
Insert a USB or SD/MMC/MS memory device for multimedia files playback.
BASIC OPERATIONS
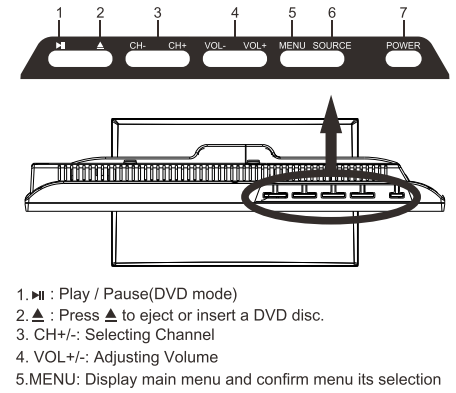
Press POWER button on the unit or remote control to power ON the unit (indicator will glow blue); press it again to power OFF (standby mode) the unit (indicator will glow red).
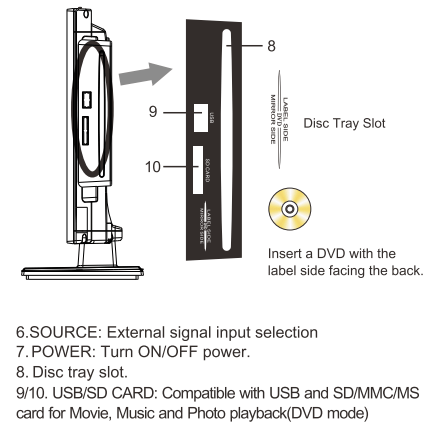
Compatible with DVD
Press SOURCE button on the unit or remote control to set the unit in DVD mode.
Basic play
a) Make sure the disc compartment has no disc. Place a disc into the disc compartment. Hold the disc without touching either of its surfaces, position it with the readable (mirror) side facing towards you, then the disc will automatically enter into the disc compartment; or you can press button on the unit or remote control to enter the disc into the disc compartment. b) Once the disc is in the disc compartment, the player starts to read the disc immediately. c) When a menu screen appears on the unit, press the navigation buttons or press the number buttons to select preferred track number, then press ENTER button to confirm. d) To stop playing and return to the menu screen, press TITLE or DVD/MENU button.
Stopping play
Press (STOP) button to stop playing.
NOTE: When player is stopped, the player records the point where STOP was pressed (RESUME function). Press (PLAY) button again, playback will resume from this point. When the tray is taken out or (STOP) is pressed again, the RESUME function will be cleared.
Skipping ahead or backward Skipping ahead
During playback, press button to skip the next chapter (DVD) or a track (Video CD/CD).
Skipping backward
During playing, press button to skip the previous chapter (DVD) or track (Video CD/CD).
Fast forward/Fast backward
During playback, press button or button to fast forward/backward.
Press (PLAY) button to resume normal play.
Pause/play
During playback, press button to pause playing, press it again to resume normal playback.
Compatible with Video CD with playback control
a) When playing VCD 2.0 with PBC, the player will show the VCD version.
b) Press DVD/MENU button on remote control repeatedly to set PBC ON or OFF. c) Press numeric buttons to select corresponding track. Example: Track 9, press 0 and 9, several seconds later, it will automatically switch to track 9. Track 15, press and 5, several seconds later, it will automatically switch to track 15. d) Press button or button, the player will play the next or previous track.
Compatible with USB playback a) Insert USB memory device containing the tiles in music, picture or movie format to be played.
b) Press SOUND (MEDIA) button to switch the unit in USB reader mode. c) After several seconds, all the folders in the USB will display on monitor screen.
d) Select a folder you want to play using the navigation buttons and press the ENTER button to confirm.
e) The files in this folder are displayed and select the desired file by navigation buttons, then press the ENTER button to start to play.
f) In file selecting page, press or button to turn the current menu page to the next or previous menu page.
g) Press CC (REPEAT) button to select repeat playing mode.
- SHUFFLE: all the files will be randomly sorted and played by the order.
- RANDOM: randomly select any file to play.
- SINGLE: play one file only.
- REPEAT ONE: repeat one file.
- REPEAT FOLDER: all the files in the folder will be played repeatedly.
- FOLDER: all the files in the folder will be played.
NOTE: The USB slot of this unit can not connect to removable tray.
GOTO
Press GREEN (GOTO) button continuously to select the item you want to set and enter a time number, chapter number, track number, etc. Accordingly, the disc will be played from the selected point.
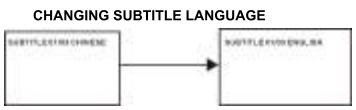
Change subtitle language (compatible with DVD only)
It is possible to change the subtitle language to a different language from the one selected at the initial settings. (This operation works only with discs on which multiple subtitle languages are recorded)
1. Press SUBTITLE button during play, the screen will display the current language.
2. Press SUBTITLE button again to change language or turn off.
NOTE: When no subtitles are recorded, press this button will not work.
Changing audio soundtrack language (compatible with DVD/VCD/CD disc)
It is possible to change the audio soundtrack language to a different language from the one selected at the initial settings (This operation works only with discs on which multiple audio soundtrack languages are recorded).
Press MTS/AUDIO (LANGUAGE) button while playing DVD disc the screen will display the number of current soundtrack languages, pressing the button again will change the language.
Pressing MTS/AUDIO (LANGUAGE) button while playing VCD/CD disc will change audio output mode: LEFT MONO, RIGHT MONO, MIX-MONO and STEREO soundtrack.
NOTE: When no soundtrack languages are recorded, pressing this button will not work. When the power is turned on or the disc is removed, the language heard is the one selected at the initial settings.
SETUP WIZARD
Connect RF cable to your TV Aerial socket.
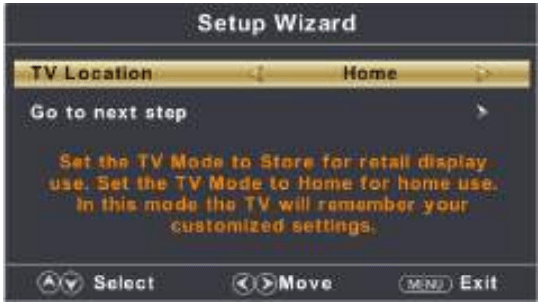
TV LOCATION
Set the TV Mode to Home or Retail display use.
Press ◄ / ► button to select (Home / Store).
Press ▼ / ▲ button to select and press ENTER/ ► button to enter the sub-menu.
Note: This page is only enable when you have Energy Star request.
SELECT LANGUAGE
Press ◄ I ► button to select the language to be used for menus and message. Press ▼ / ▲ button to select and press ENTER/►button to enter the sub-menu.
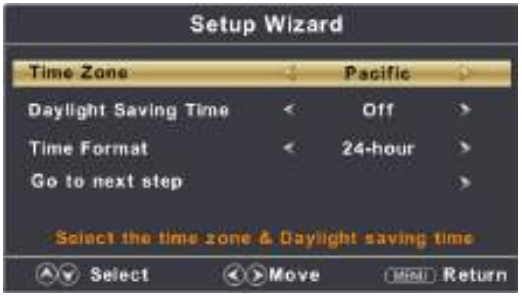
SELECT TIME
Press ▼ / ▲ button to select the time zone, daylight saving time and time format you want.
Press ◄ / ► button on the remote control to adjust.
Press ▼ / ▲ button on the remote control to select and press ENTER/►button to enter the sub-menu.
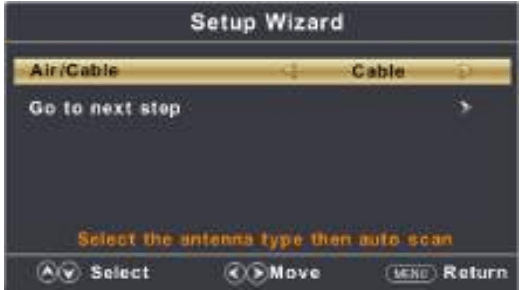
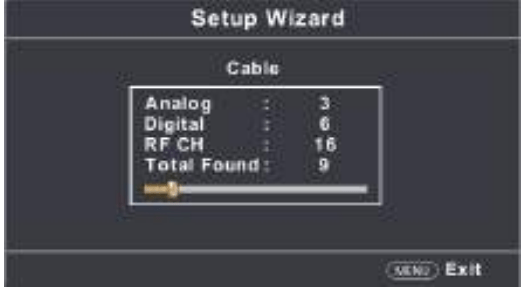
AUTO SCAN
Press ◄ / ► button to select the antenna type.
Press ▼ / ▲ button to select and press ENTER/► button to start auto scan.
SELECT INPUT SOURCE
If you have your TV connected with a Cable box or Satellite Receiver box or any other Video Input source you don’t need to run a channel scan, please follow the procedure below;
1. Power on TV and press “SOURCE” botton on TV Remote.
2. Press UP/DOWN navigation button on TV Remote to select AV or HDMI input source and press OK button to enter it.
MAIN MENU
Press MENU to display the main menu or return to the previous menu or close the main menu. Press ◄ /► to highlight the desired menu icon, and press OK to select.
If no buttons are pressed, the menu will close automatically after about 10 seconds.
MAIN MENU OPERATION
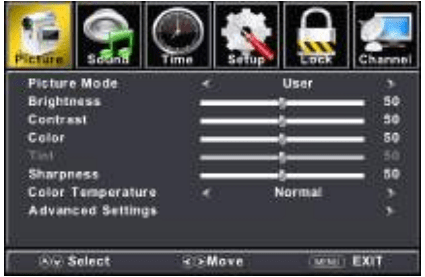
PICTURE MENU
Press MENU to enter the main menu,Press ◄ / ► button to select. Press OK / ▼ to enter.
Press MENU again to exit or back to parent menu.
Press ▼/▲ button to select among Picture Mode /Brightness/ Contrast / Color / Tint / Sharpness / Color Temperature/Advanced Settings.
Q: how do you remove dvd Disc no eject button can be found Reply
Q: My supersonic tv will not stay on anymore and it is fairly new. When it is on the power screen name shows up then it shuts off, I don't want to get another one because this one was a gift . What to do Reply
Q: How to add channels and to retrieve lost channels? Reply
 button on the unit or remote control to enter the disc into the disc compartment.
 (STOP) button to stop playing.
 (PLAY) button again, playback will resume from this point. When the tray is taken out or
  button to skip the next chapter (DVD) or a track (Video CD/CD).
 button to skip the previous chapter (DVD) or track (Video CD/CD).
 button or
  button to fast forward/backward.
 (PLAY) button to resume normal play.
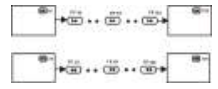
 button or
  button, the player will play the next or previous track.