K9 PROJECTOR
USER MANUAL

EN
DE
FR
ES
IT
JP
English
Deutsch
Français
Español
Italiano
日本語
P01-31
P32-64
P65-97
P98-130
P131-163
P164-195
Language

TABLE OF CONTENTS
WIMIUS LIFETIME PROFESSIONAL SUPPORT - - - - - - - - - - - - - - - - - - - 1
TIPS - - - - - - - - - - - - - - - - - - - - - - - - - - - - - - - - - - 2
PACKAGE LIST - - - - - - - - - - - - - - - - - - - - - - - - - - - - - - 3
PROJECTOR SPECIFICATIONS - - - - - - - - - - - - - - - - - - - - - - - - 4
PROJECTOR OVERVIEW - - - - - - - - - - - - - - - - - - - - - - - - - - 5
REMOTE CONTROL - - - - - - - - - - - - - - - - - - - - - - - - - - - - 7
INSTALLATION - - - - - - - - - - - - - - - - - - - - - - - - - - - - - - 8
STARTING PROJECTOR- - - - - - - - - - - - - - - - - - - - - - - - - - - 11
PROJECTION IMAGE SETTINGS - - - - - - - - - - - - - - - - - - - - - - - 12
PROJECTOR SMART SETTINGS- - - - - - - - - - - - - - - - - - - - - - - -16
OTHER BASIC PROJECTION SETTINGS - - - - - - - - - - - - - - - - - - - - -23
SIGNAL LINES CONNECTION- - - - - - - - - - - - - - - - - - - - - - - - -27
FAQ & WARRANTY - - - - - - - - - - - - - - - - - - - - - - - - - - - -30

EN1
Dear customer,
Thank you very much for supporting WIMIUS!
Please read this manual carefully before using the projector. If you have any questions, please send your
order number and problem (For example: US + K9 + Problem) to
. We will provide
a quick solution within 24 hours.
In fact, many problems can be easily solved through settings, such as no signal, no sound, Bluetooth
connection failure, WiFi connection failure, intermittent animation, etc. We promise that all projectors are
100% carefully inspected and packed before shipping.
If you have any questions, please contact us to solve the problem. And give us a chance to improve. We
promise to provide you with a satisfactory solution.
We are committed to providing excellent support
24H/7D
to ensure your satisfaction as our valued
customer.
Thank you for your understanding!
Sincerely
WIMIUS SUPPORT TEAM
WIMIUS LIFETIME PROFESSIONAL SUPPORT

EN 2
1. Do not place the projector in a room that is too hot or too cold, because high temperature or low
temperature will affect the performance of the projector. shorten the service life of the equipment. The
working environment is preferably 5°C~35°C.
2. Equipped with a ventilation device to ensure the stable operation of the projector. Do not cover the vents
with cloths, blankets, or other items. Do not insert objects of any kind into the slots of the projector, as this
may cause a short circuit or electric shock and damage the device.
3. The projector should be strictly protected from strong impact, extrusion and vibration. don't try to keep
moving Strong shocks, squeezes and vibrations. Do not try to move and internal circuit failure.
4. As the core component of the projector, the lens is directly related to the clarity and effect of the picture.
Excessive Wiping dust off the lens can affect image quality. Dirty lenses should be wiped with a soft
cotton cloth on the surface of the glass lens. Do not use hard cloths or abrasives.
5. Please control the ambient lighting in the room to enhance the visibility of the projected image. Dimming
the lights or using curtains can help reduce glare and improve image quality.
6. If you have any questions, please do not worry, please contact
via email.
TIPS
EN3
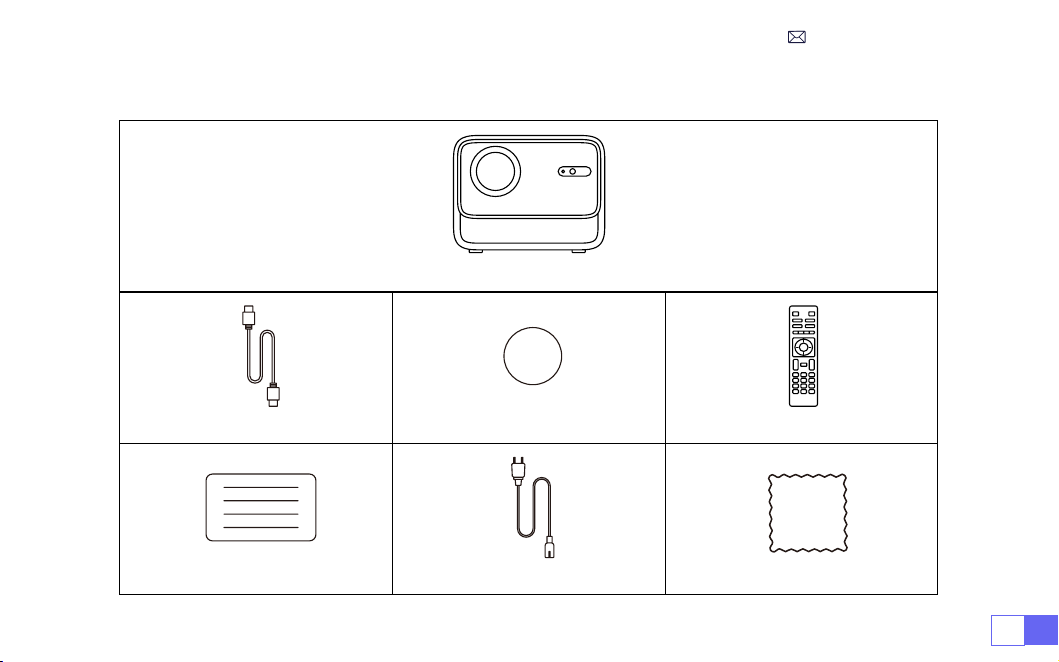
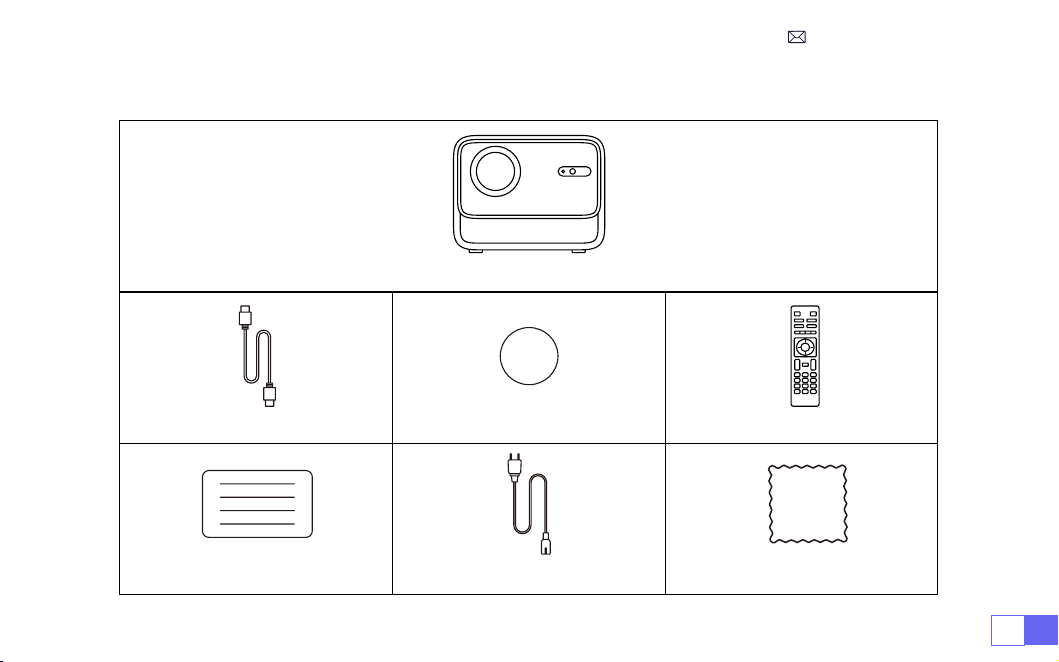
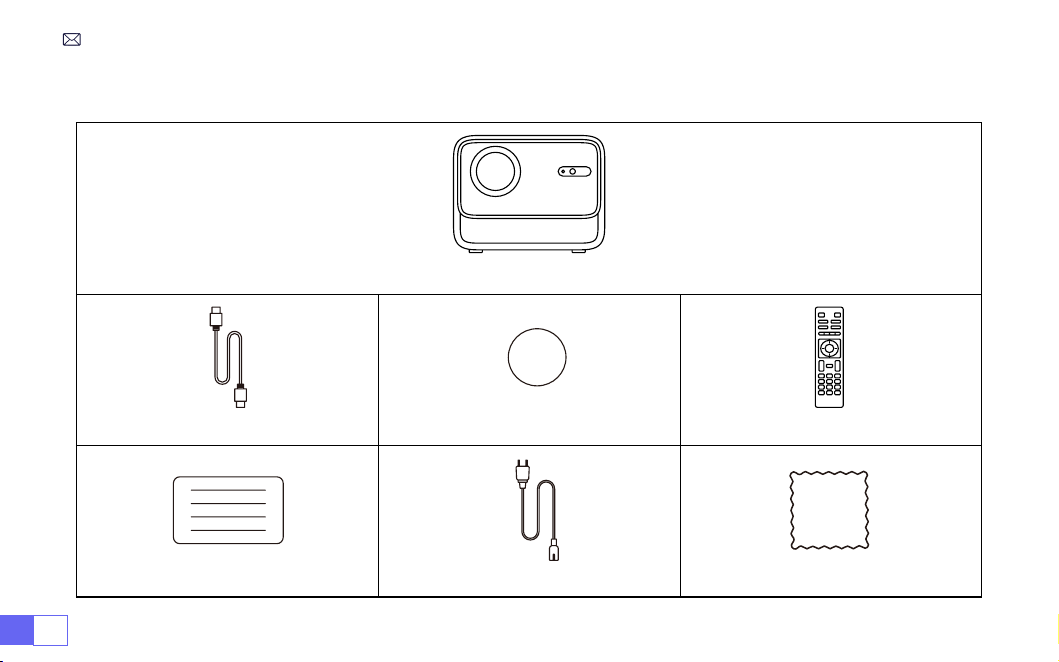
WiMiUS K9 Projector*1
HDMI Cable*1 Lens Cap*1 Remote Control*1
User Manual*1 Power Cable*1 Cleaning Cloth*1
PACKAGE LIST
EN 4
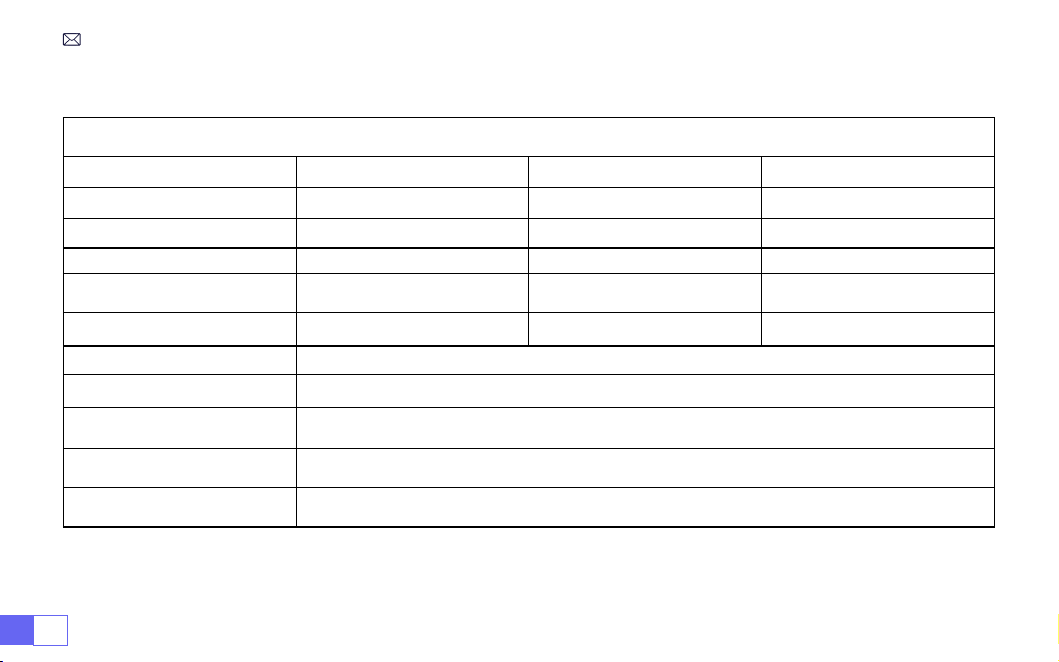
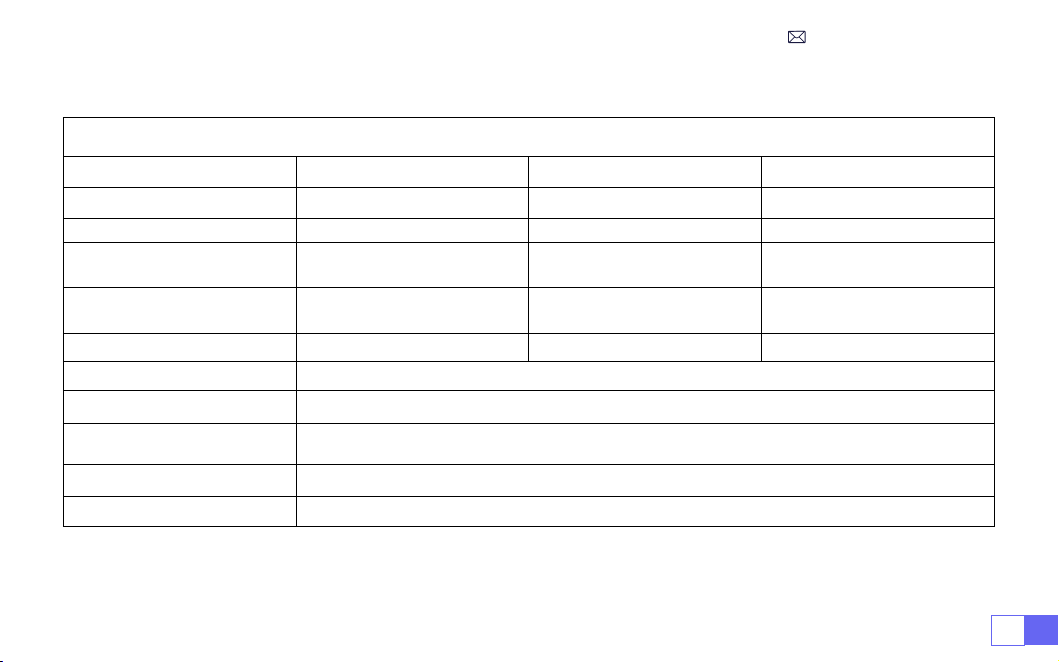
PROJECTOR SPECIFICATIONS
Model No. K9
Native Resolution
1920*1080P
Aspect Ratio
16:9/4:3/Auto
Display Tech
LCD
Light Source
LED
Weight
5.07 Lb
Size
8.26*7.09*6.34Inch
Refresh Rate
60 Hz
Power Voltage
AC100-240V~50/60Hz 1A
Focus
Auto + Electric +Manual
Keystone
Auto + Electric + Manual
Output Port
3.5mm Audio Output
Input Port
HDMI*2/USB*2/RJ45
Operation Mode
Remote Control/Button
Installation Type
Front/Rear on Desk, Front/ Rear on Ceiling
Video Format
MP4/MPG/AVI/MPEG-4/TS/MOV/M4V/MKV/FLV/DAT/3GP
(Support for video codecs
may vary depending on circumstances, contact us for additional support)
Audio Format
MP3/WMA/M4A/MP2/AAC/OGG/WAV/FLAC
(Dolby SUPPORT)
Image Format
JPG/JEPG/BMP/PNG
Note:
Manufactured under license from Dolby Laboratories. Dolby, Dolby Audio, and the double-D symbol
are trademarks of Dolby Laboratories Licensing Corporation.

EN5
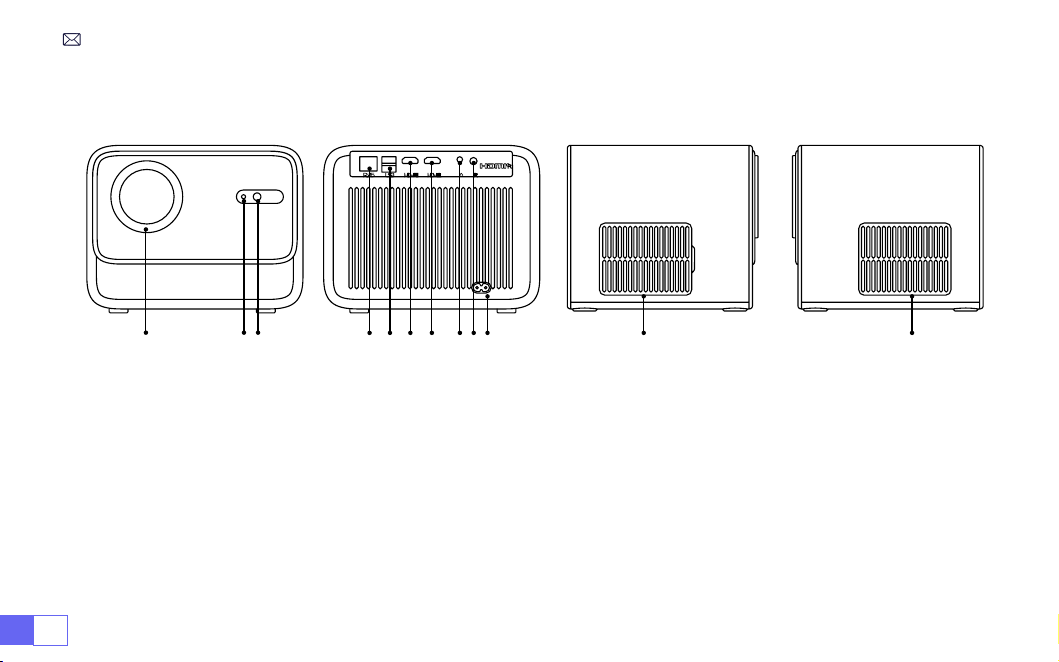
PROJECTOR OVERVIEW
1 2 3
4 5 6 7 8910
11 12
1. Lens
2. Infrared Signal Receiver
3. Autofocus Signal
4. Wired Network Port
5. USB Port *2
6. HDMI1 Port
7. HDMI2 Port
8. Headphone Jack
9. Infrared Signal Receiver
10. Power Input
11. Detachable Dust-Proof Net
12. Air Outlet

EN 6
13 14 15 16
13. Power Button
14. Bracket Screw Holes (1/4 Inch,Support
Hoisting)
15. Height Adjustment Machine Feet
16. Bottom Labeling
EN7
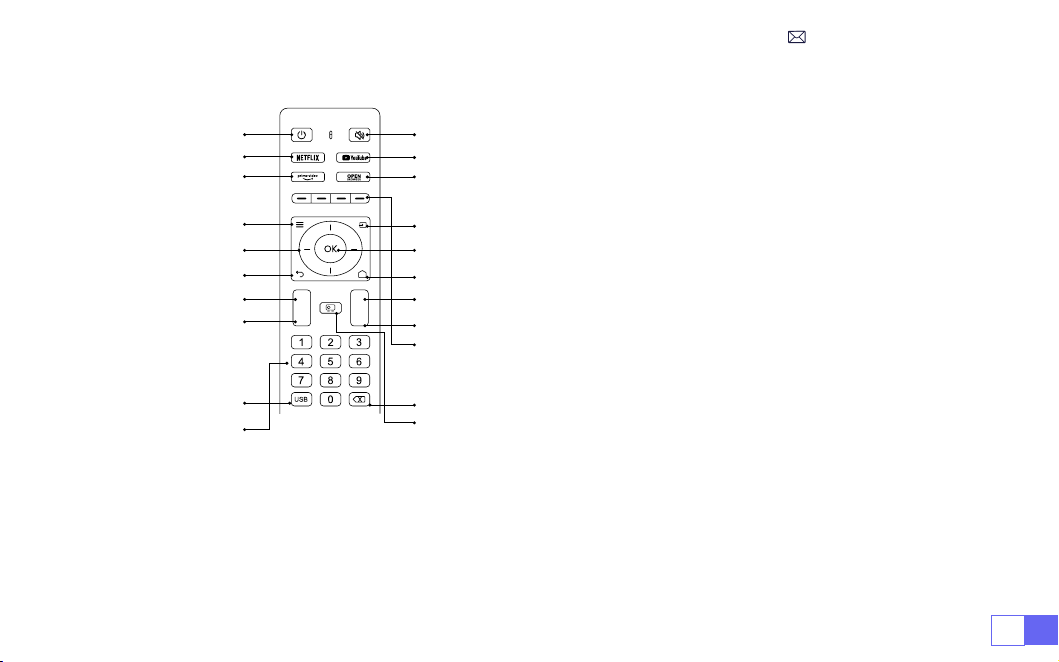
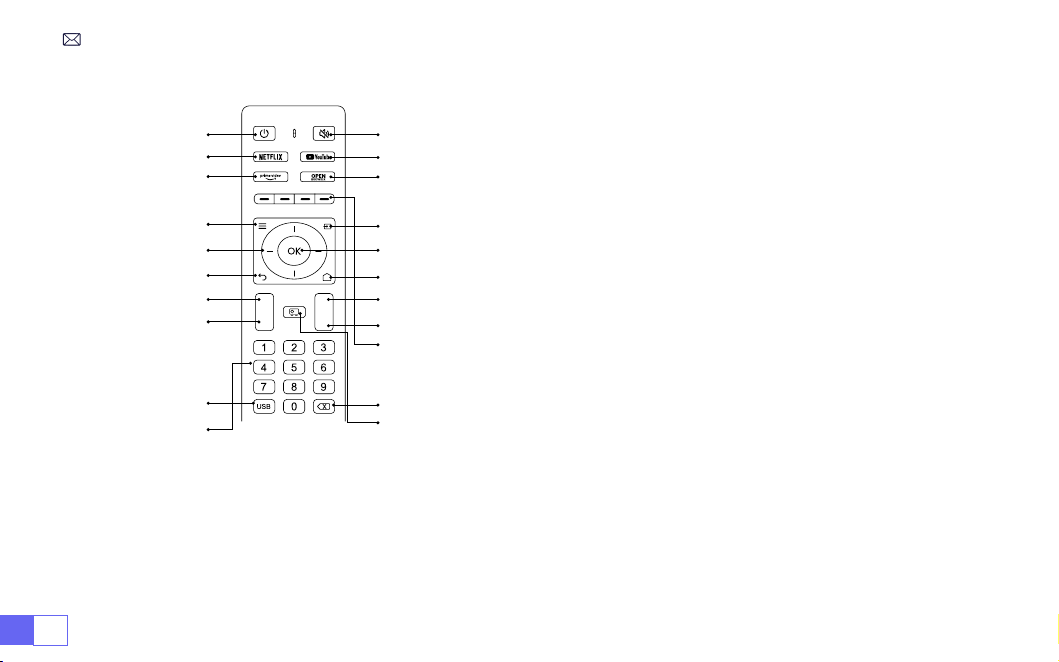
REMOTE CONTROL
1 2
4
6
8
10
12
15
16
17
19
20
3
5
7
9
11
13
14
21
18
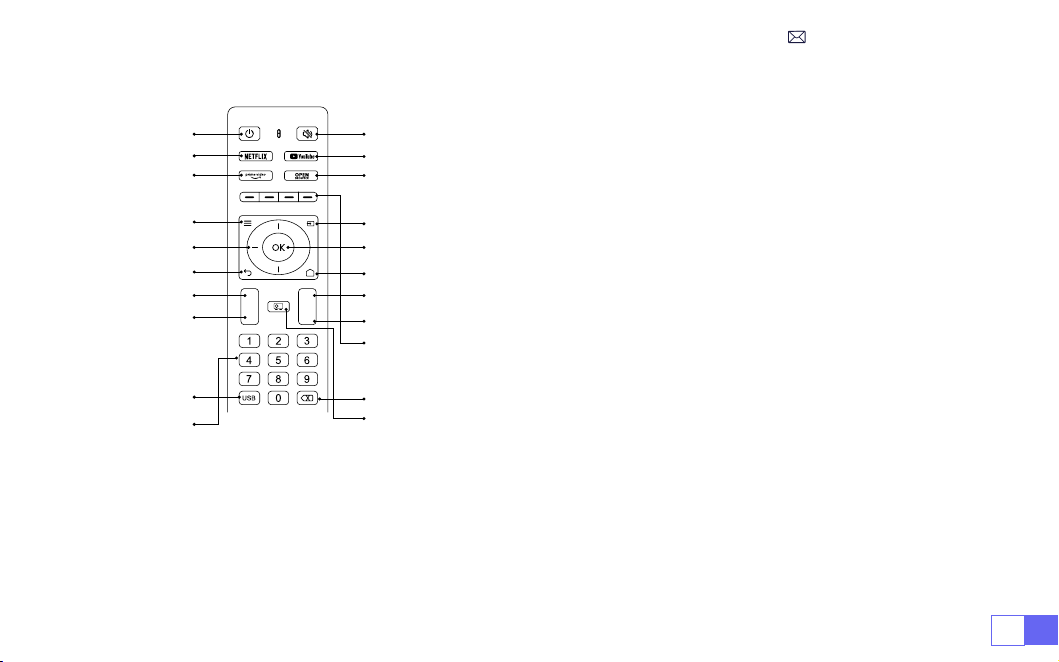
1. Power
2. Mute
3. NETFLIX
4. YouTube
5. Prime Video
6. Open BROWSER
7. Menu
8. Source
9. Arrow keys
10. Conrmation key
11. Back
12. Homepape
13. Volume +
14. Volume -
15. Focus+
16. Focus-
17. Red/Green/Yellow/Blue keys
18. USB
19. Backspace
20.Projection mode
21.Number
Note:
1. Install 2 pieces of AAA batteries (
NOT INCLUDED
) into the remote before using it. Do not combine new
batteries with old ones in the remote controller, which can cause operation failure due to insufcient
power supply.
2. When using the remote controller, please make sure that the signal transmitter of the remote controller
aims at the infrared signal receiver of the projector.
+
-
F+
F-
EN 8
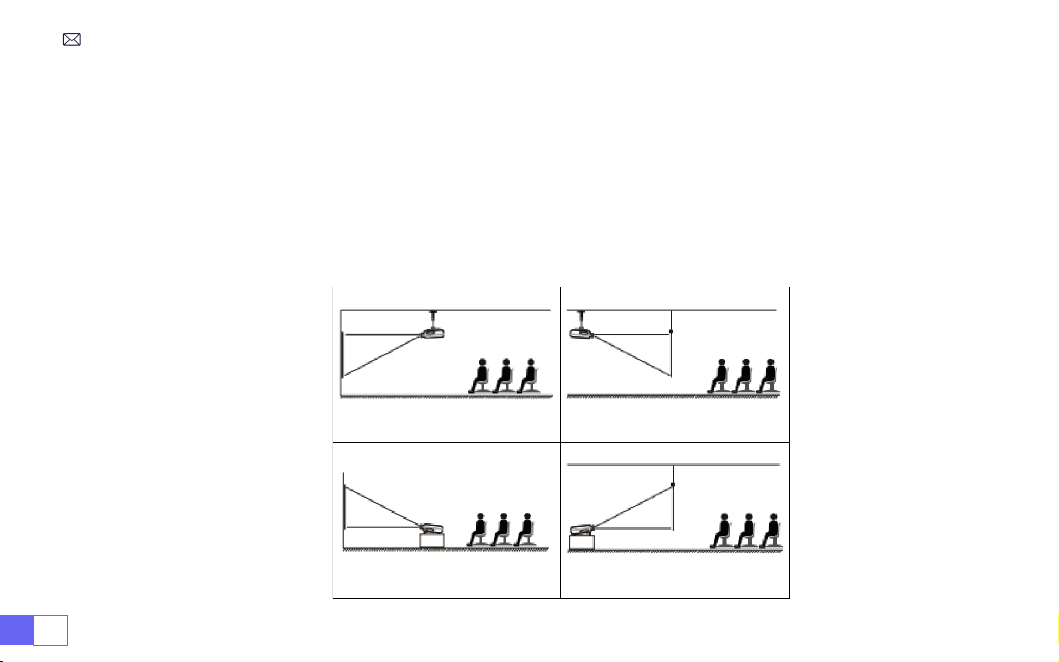
1. Front projection Ceiling mount 2. Rear projection Ceiling mount
3. Front projection Desk mount 4. Rear projection Desk mount
INSTALLATION
The projector can be hanged on the ceiling with special hanger frame, and placed on the stable desk to
project the image according to the operating environment and requirements. In addition, the projector can
be installed with the following methods:
1.Installation Method
3. If you are not using the remote controller for an extended period, please take out batteries to prevent
battery leakage.
EN9
Keep the projector at a height where its lens is axial symmetry to the screen. If this is not possible, use the
keystone correction function to adjust the projection image.
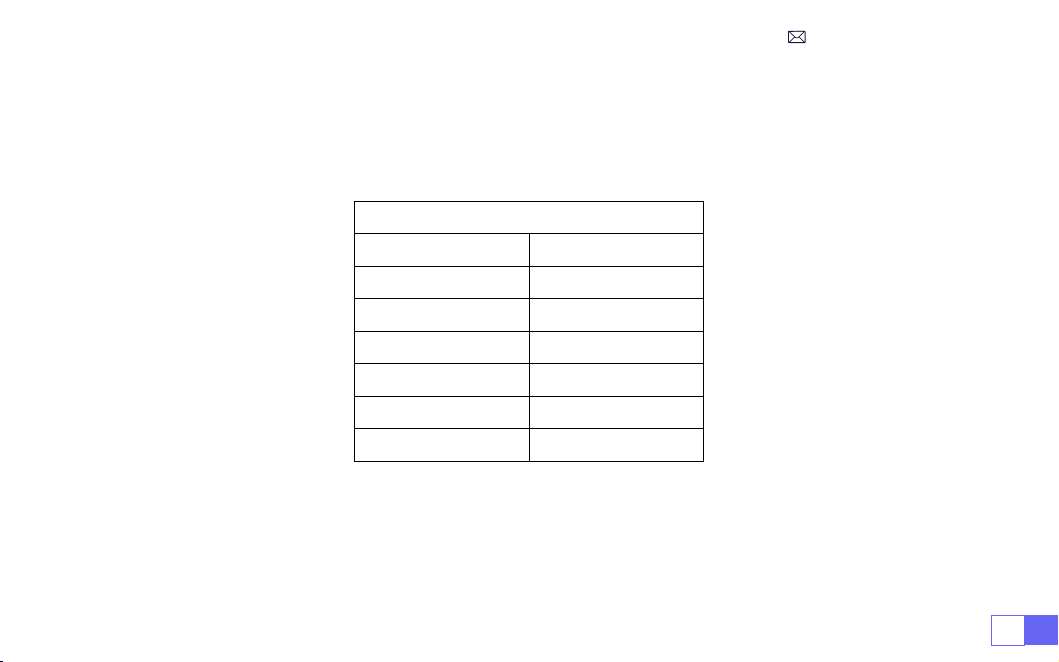
2.Projection Distance and Size
Aspect Ratio: 16:9
Distance (ft.) Screen Size
4.8 50"
5.7 60"
7.6 80"
9.5 100"
11.5 120"
14.4 150"
* Recommended Projection Distance is about
5.7-8ft
.
* Image Size Depends on the Distance Between the Projector and the Screen, the above Estimates may
have a 3% Deviation. Different Settings Result in Different Distances.
* The Projection Effect is better in a Dark Environment.
EN 10
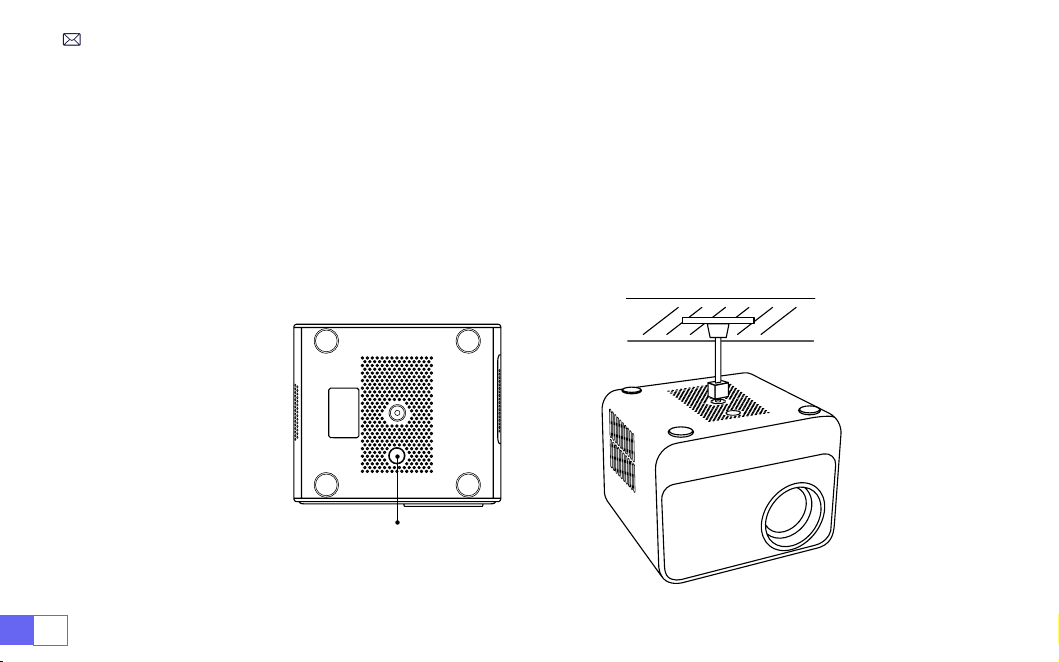
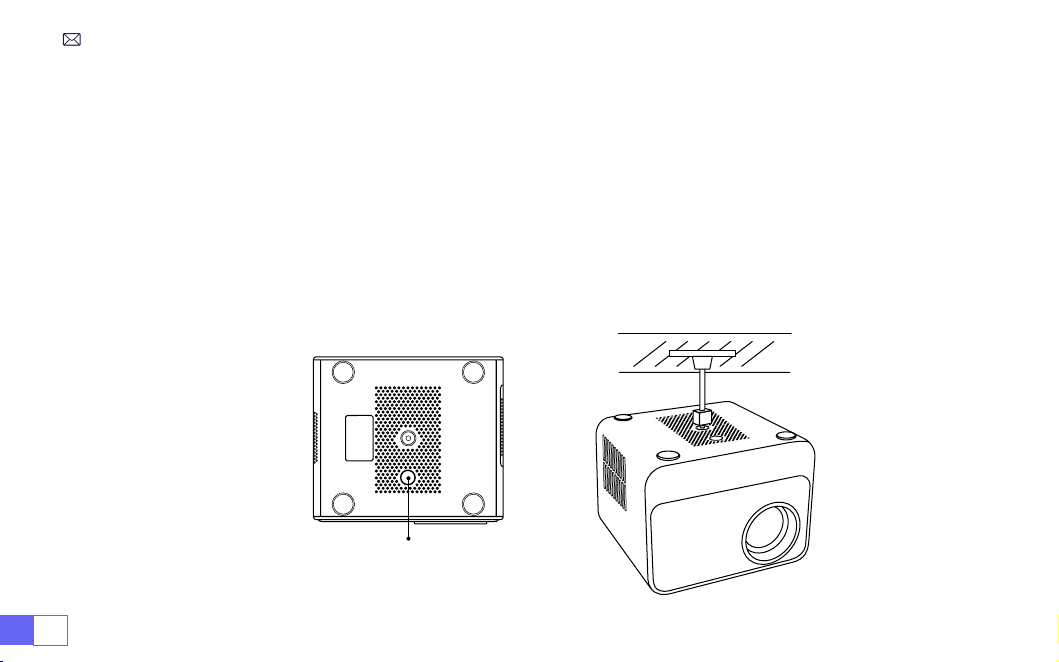
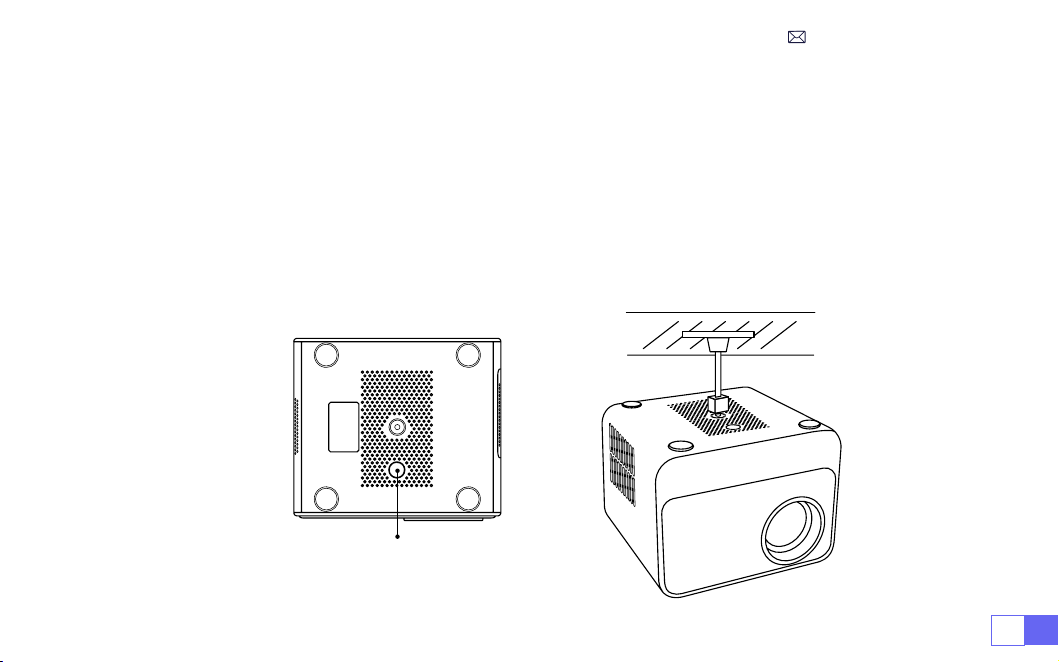
3.Install on the Ceiling
Keep the projector vertical and towards the mid of the projector screen, and keep the projection image at
on the screen.
1. To adjust the tilt base, unscrew the support rod at the bottom of the projector, see the below picture.
2. For the Ceiling mount, there is 1 hole at the bottom of the projector Please turn the projector upside down,
then you can nd the ceiling mount holes as shown in the picture below.
NOTE: The hanging bracket or ceiling mount stand is not packaged.
(
ALSO NOT SUPPORT 4-Legged
Hoisting
)
Height Adjustment Machine Feet

EN11
STARTING PROJECTOR
1. Remove the lens cap, connect the projector to the power supply via the power cord, then press the
power button, it starts to work. (Light changes from red to blue)
2. Use the
Automatic or Electronic Keystone Correction/Focus Function
of the projector to obtain a
rectangular and clear image;
3. Adjust the focus buttons
"F+" and "F-"
on the projector remote control to get the best image
performance; (If it is still blurry, please try to adjust the projection distance.)
4. Connect external devices (Smartphone(Android), Fire Stick, TV box, DVD player, PC, etc. to the projector
at the corresponding position, and be sure to select the corresponding signal source. **If you do not
select the correct source, the projector will will not be able to detect the signal)
5. Select " "and then go to the menu and select
[ Setup ]
to enter
[ OSD Language ]
to set your preferred
language.
A. Connect the power cord:
After powering on, the indicator light will ash red 8 times. During the self-test
of the machine, you need to wait patiently and then press the power button to turn it on.
B. Power on:
The blue indicator light is always on, indicating the power on working status.
C. Power off:
The red indicator light is always on, indicating the shutdown state.
D. Standby:
Pink indicator light, in the process of standby (5s), please do not press the power button
repeatedly.
Indicator Light Description
EN 12
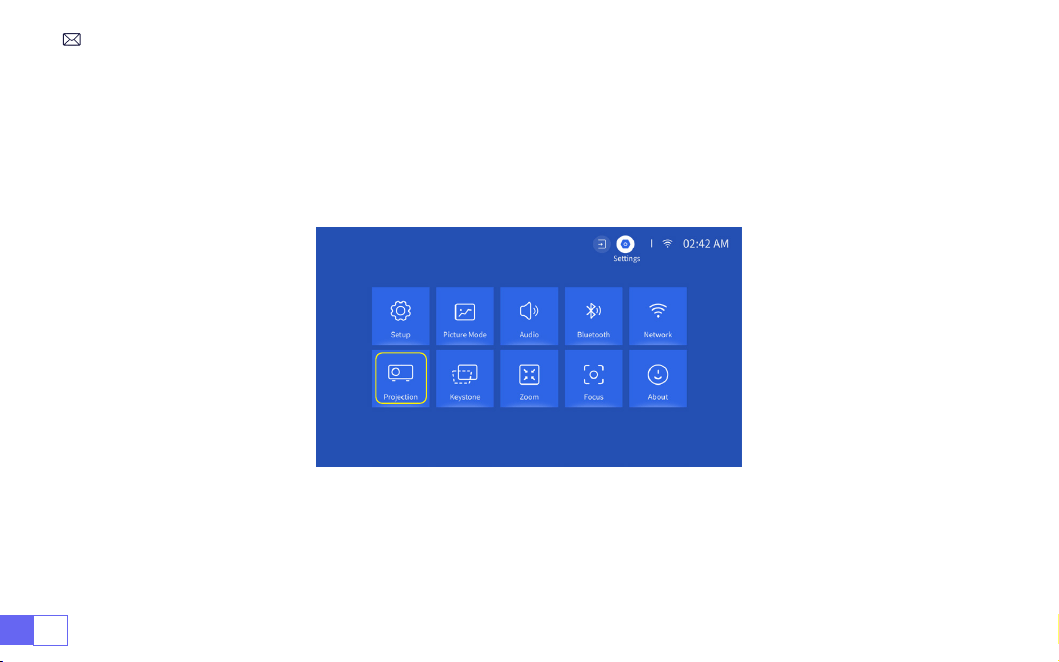
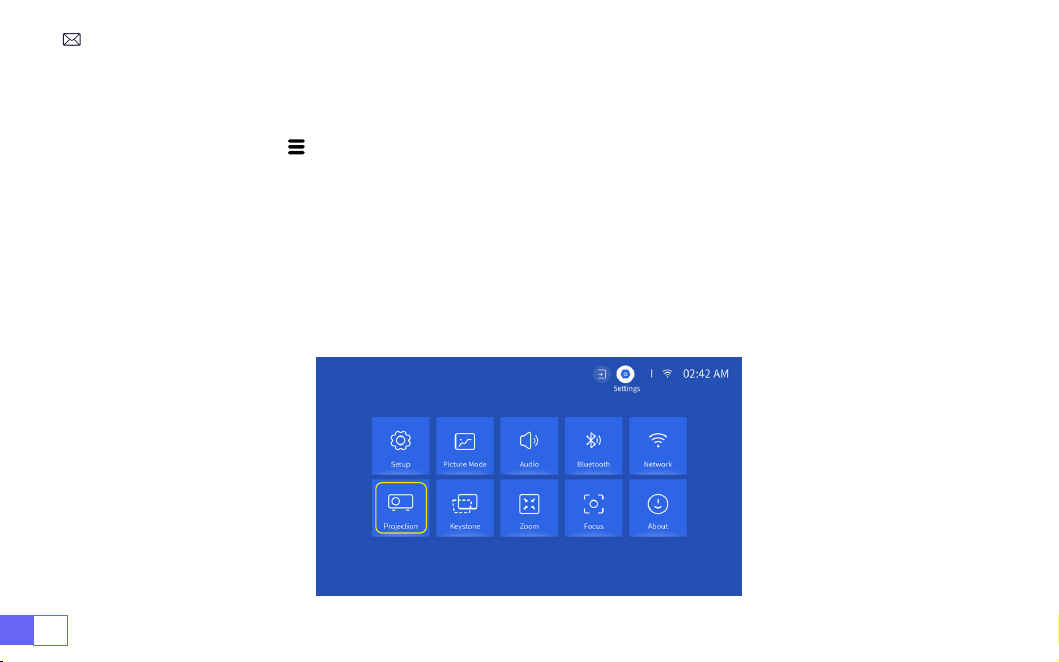
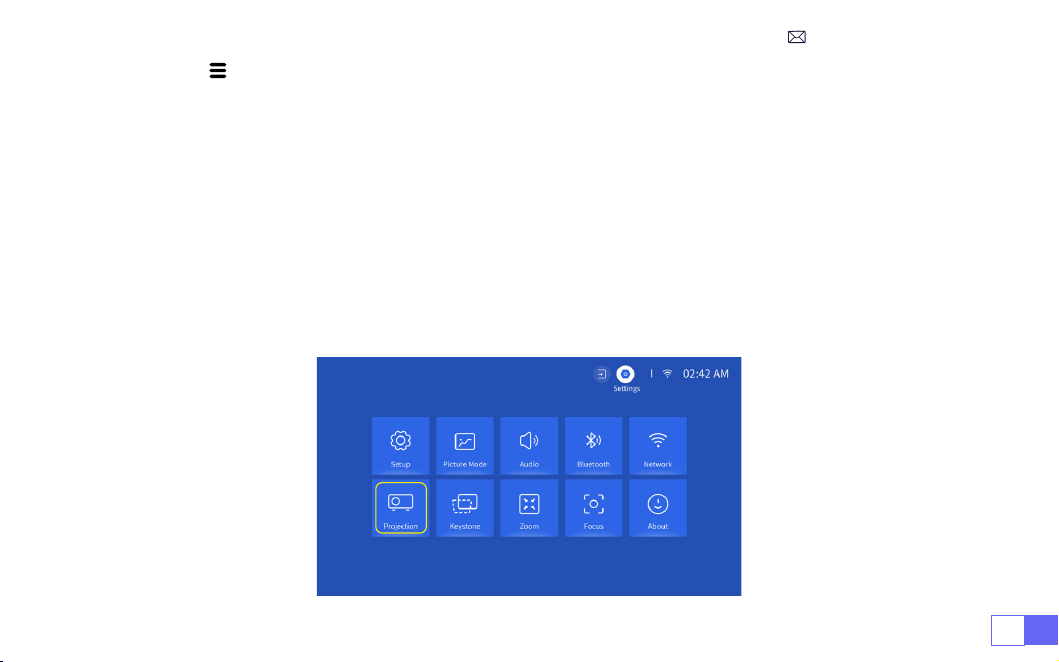
PROJECTION IMAGE SETTINGS
Select the [ Settings ] menu -- Select the [ Projection ] Option -- Select your Install Mode, Press the arrow
key to select and press “OK” to conrm the projection position.
1.Projection Mode

EN13
2.Manual Keystone Correction
2.1 Four-Point Keystone
Select the [
Settings
] menu -- Select the [
Keystone
] Option, Then select the [
Four Point Correction
],
Just click “OK” button to pick the point you want to adjust at rst, and then press the button "
▶
" or "
▼
" to
set the value(Vertical 0~100) needed as shown below.
Reset:
Press " ", and the image will restore to the original keystone correction settings.
EN 14
2.2 Vertical Keystone
Select the [
Settings
] menu -- Select the [
Keystone
] Option, Then select the [
Vertical Keystone
] option
to adjust the screen vertically
±30°
with the arrow keys until the guides are adjusted to a rectangle.
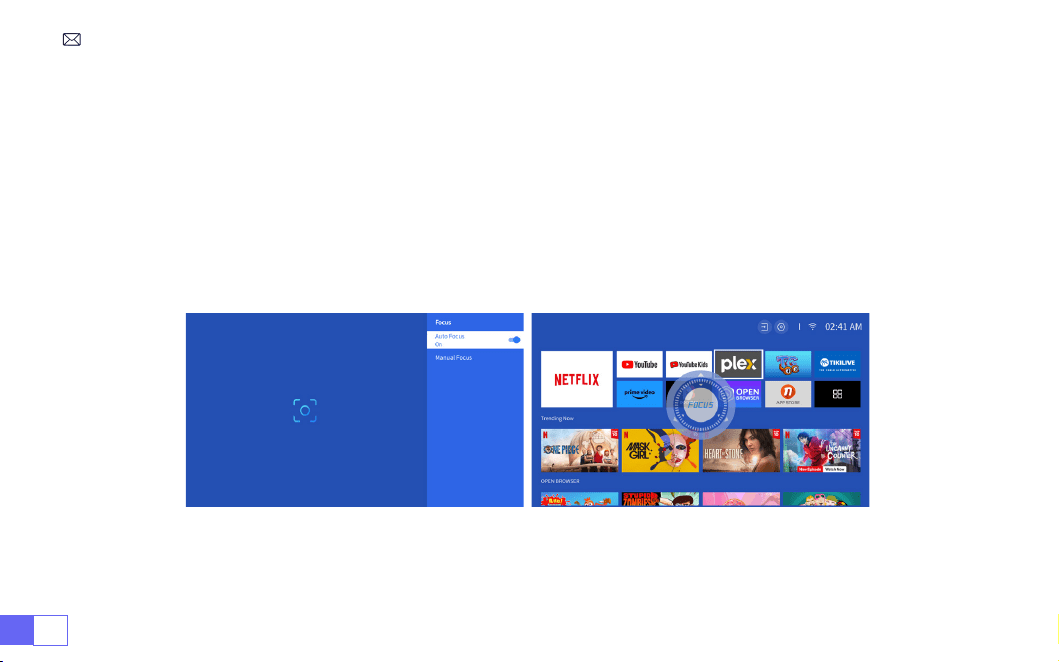
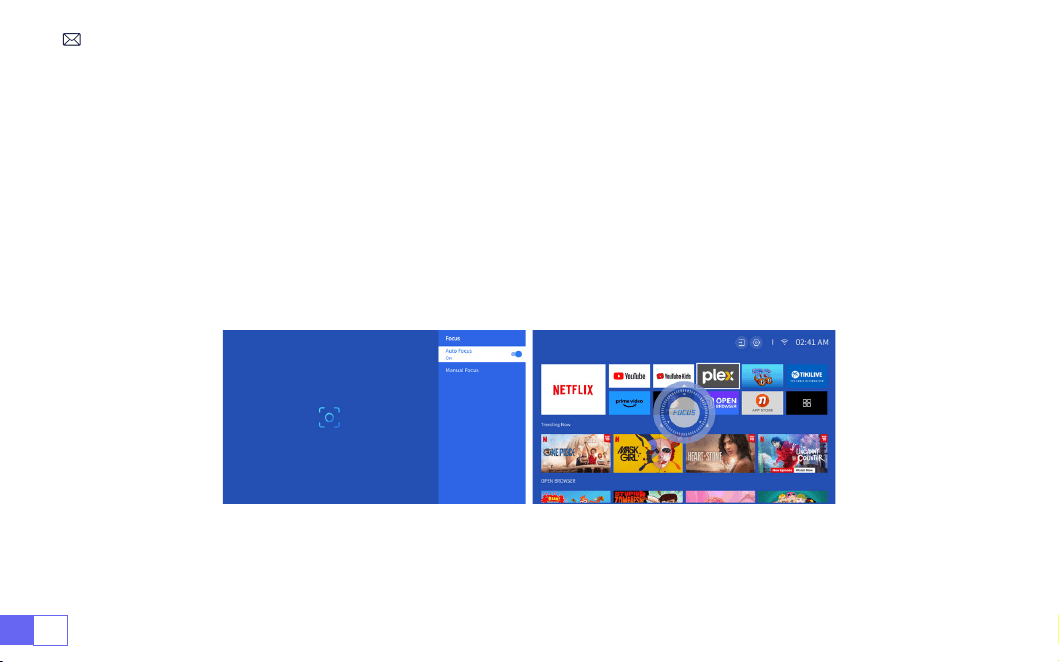
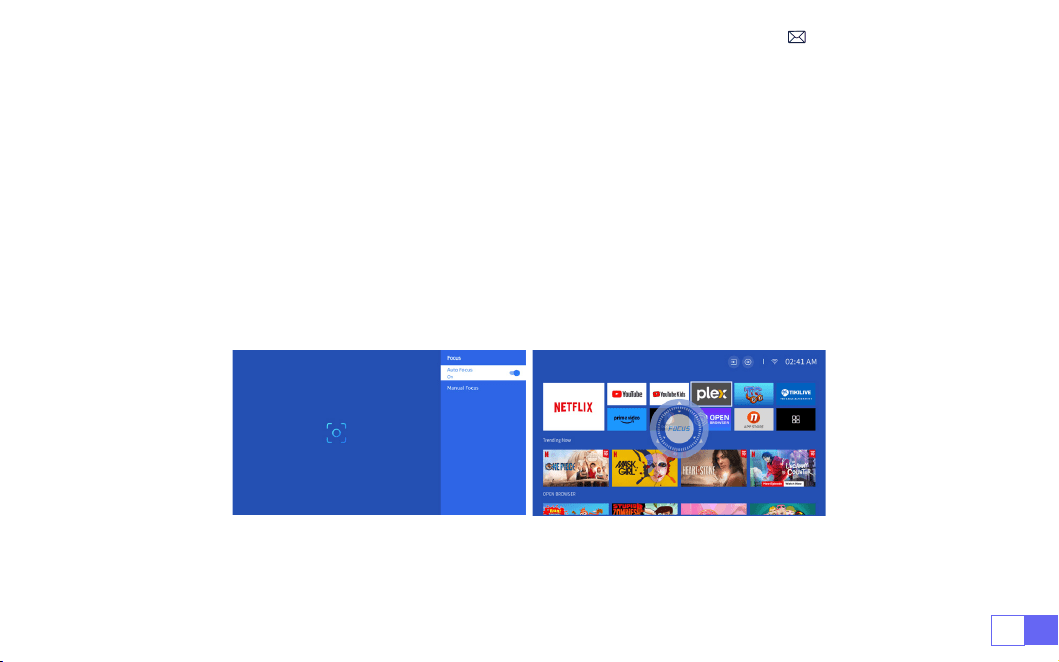
Please place the projector horizontally face to the wall first, Select the [
Settings
] menu --Select the
[
Keystone
] or [
Focus
] Option- Turn on the [
Auto Correction
] or [
Auto Focus
] option, then it will
automatically focus the picture based on the projection distance from the screen and adjust the picture to
a rectangle when you change the projection angle.
3.Auto Keystone Correction and Focus
If the picture is blurry, press repeatedly the focus button
''F+'' ''F-''
on the remote control to adjust the lens
focus, until the picture is clear.
(
**There is no need to press the OK button after the screen is clear
)
EN15
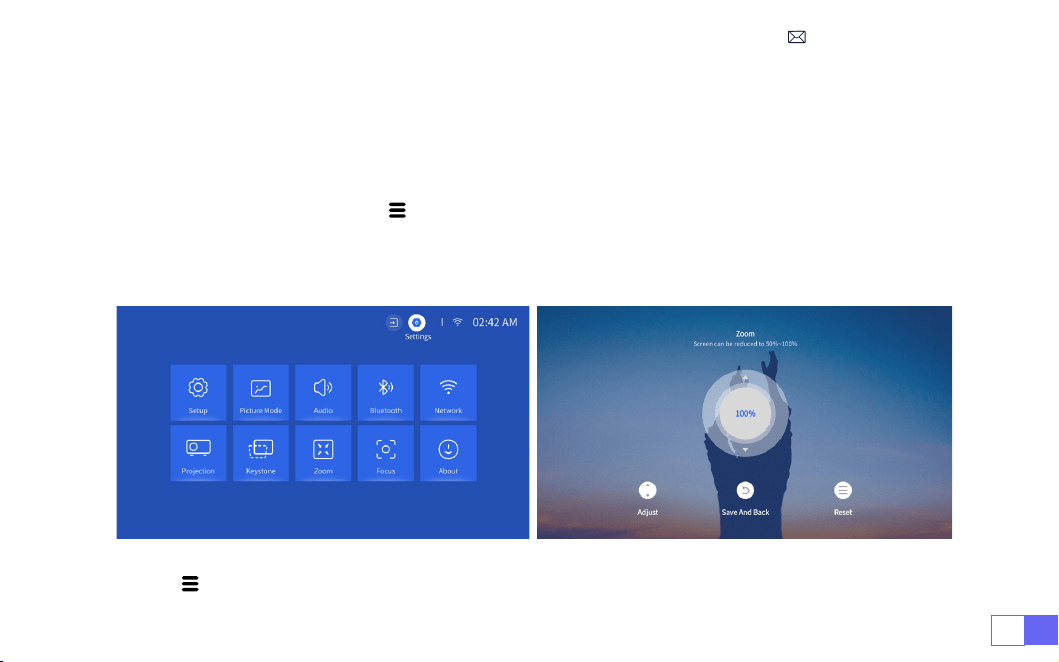
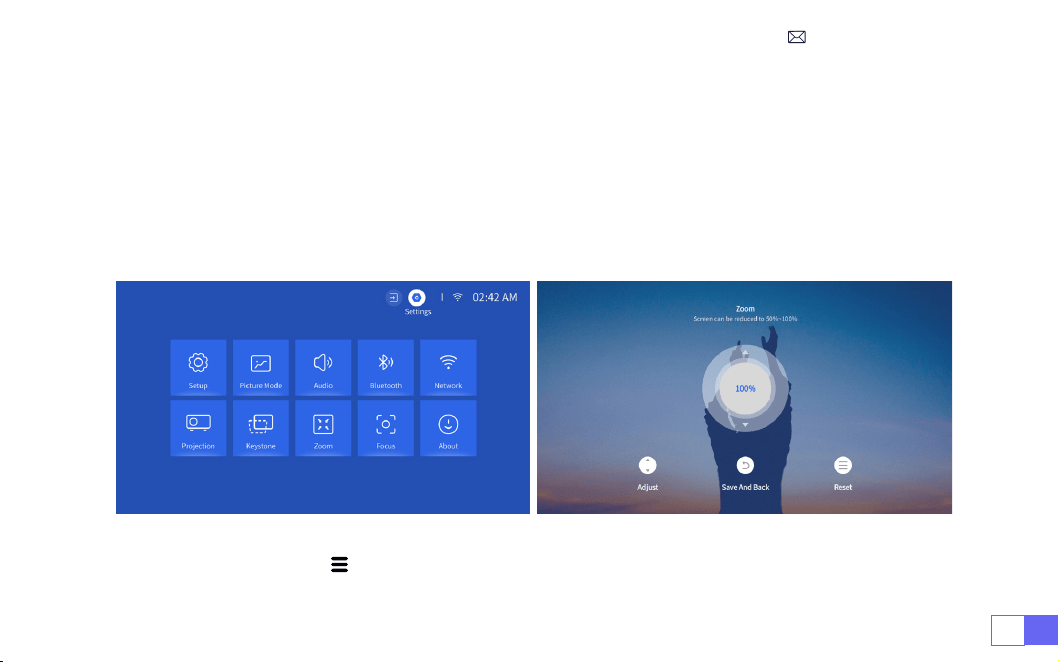
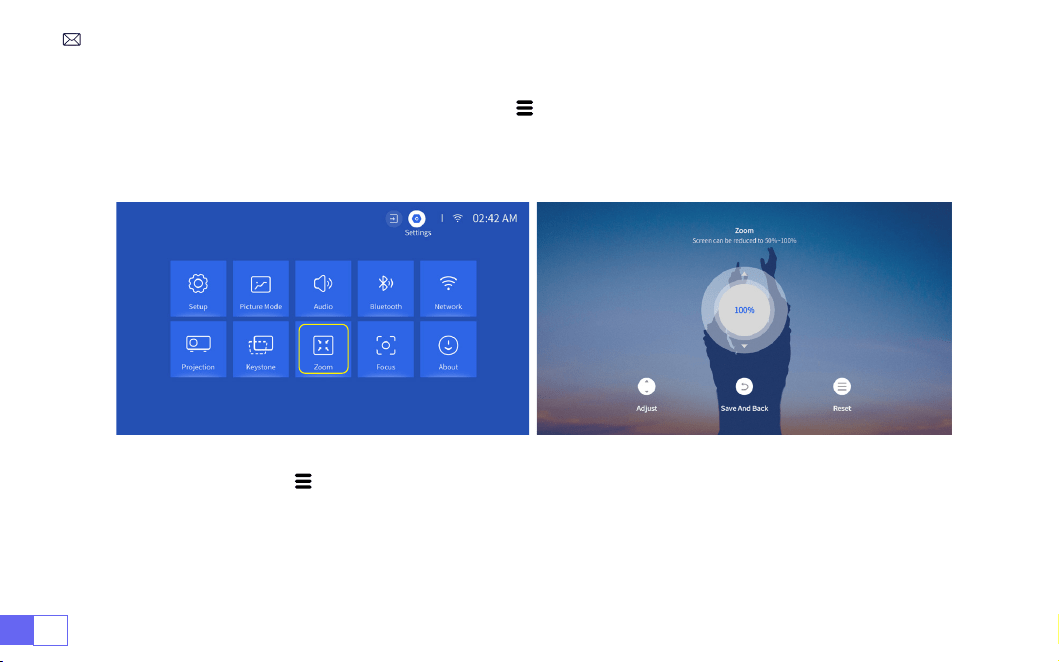
Go to the home page -- Select the" "menu -- Select the [ Settings ]-- Select the [ Zoom ] option, the
projection screen can be zoomed 50%~100%. Press the button "
↑
↓
" to set the value needed as shown
below.
Reset:
Press " ", and the image will restore to the original zoom correction settings.
4.Zoom Setting
Note:
The side projection angle of the projector should not exceed 20°. Also, there should be no obstacles
in front of the projector. Otherwise the automatic keystone correction function may not work.
EN 16
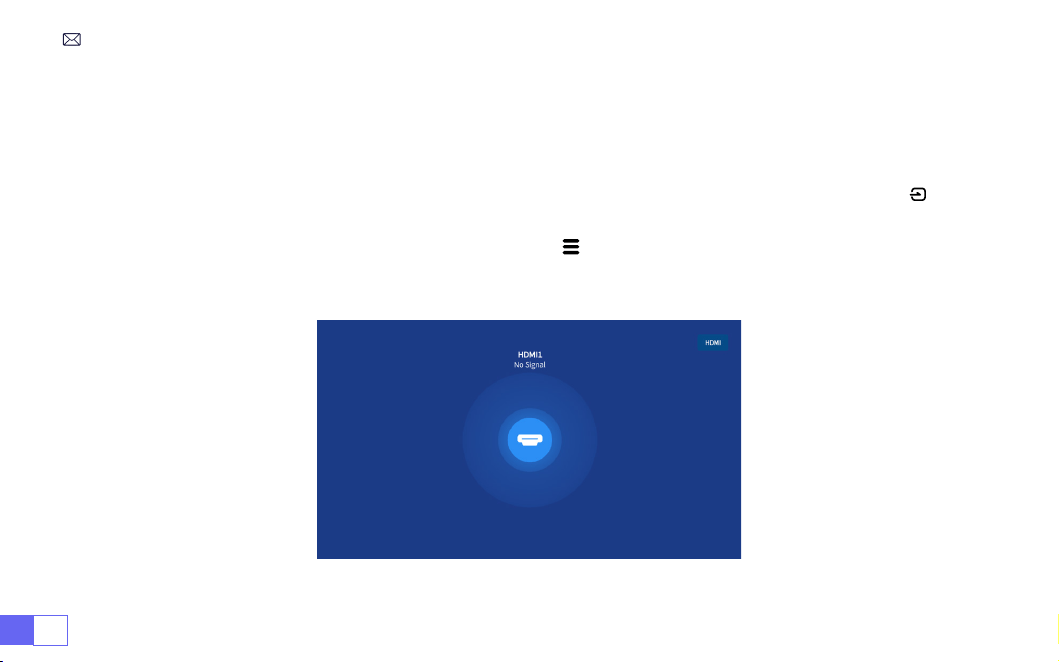
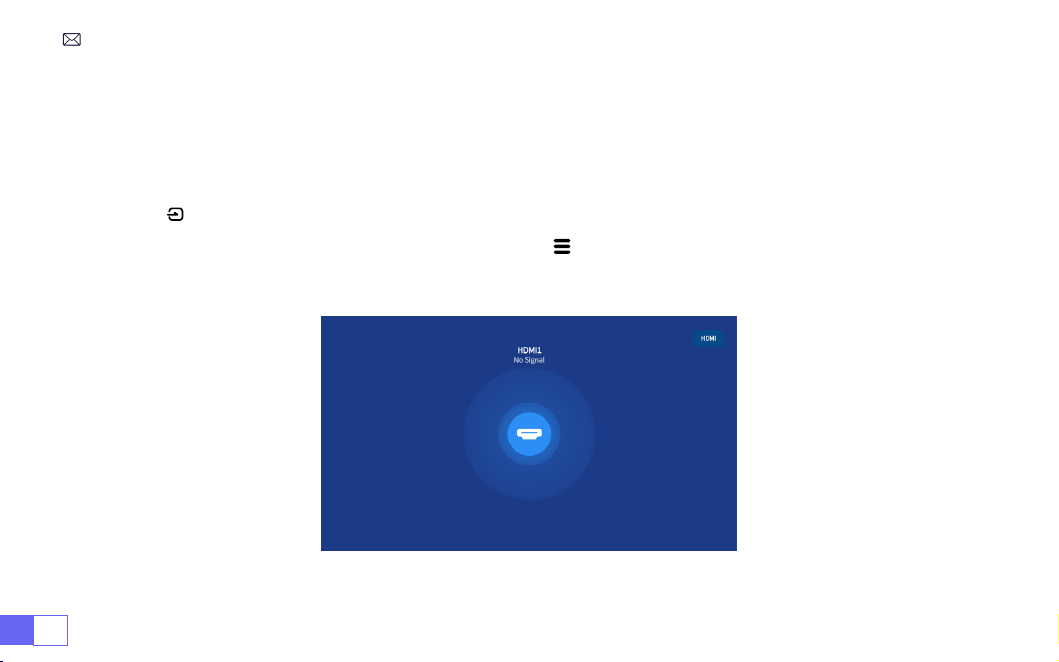
PROJECTOR SMART SETTINGS
Select the desired input signal source (HDMI1/HDMI2) on the home page, or you can press the “ ” button
on the remote control to select the corresponding signal source.
When playing a video, you can press the menu button " " , then select [
Picture Mode
]. You can freely
adjust the brightness and contrast of the image and other functions.
1.Select The Signal Source
1.1 Select The HDMI Input Signal Source
EN17
For USB devices, no need to choose the signal source. The machine will detect them automatically.
Press the “ ” button and Select the [
USB input signal source
] on the home page:
Warm Tips:
If the projector cannot recognize the USB disk, please refer to the following methods to
solve the problem.
Please conrm whether your USB disk meets the following formats.
1. FAT32: 8G/16G/32G 2. NTFS: 64G
1.2 Select The USB Input Signal Source

EN 18
If it is not, please format the USB disk. Before you format the USB disk, if you have anything on your USB disk,
make sure to backup everything. After these steps, everything will be lost forever.
If the problem is still not solved, please send your problem to this email:
1. The uency of screen mirroring with a wireless connection will be affected by the network environment. A
bandwidth of 100Mbit or more is recommended when using screen mirroring.
2. Make sure your mobile device is close to the projector when using a wireless connection. A distance of
3.28ft. is recommended.
3. Some Android devices may not support screen mirroring due to the compatibility.
Select the [
Settings
] icon in the upper right corner of the main interface, and then press the "OK" key on
the remote control to enter the settings interface and select "
Network Settings
".
Attention:
Your device and the projector should be in the same Home WiFi.
1. Choose your Home WiFi to connect and enter the right password,then click "OK", please wait 3 seconds to
establish the connection.
2. When using ios device for the first time, you need to download in the Main Interface
(Path: Main
2.Connecting with Smart devices
Warming Tips
WiFi Settings
For iOS System
EN19
Interface My Applications- APP assistant - ScrennShare - Click OK- App download complete,
Please power off and restart - Find ScreenShare in My Applications)
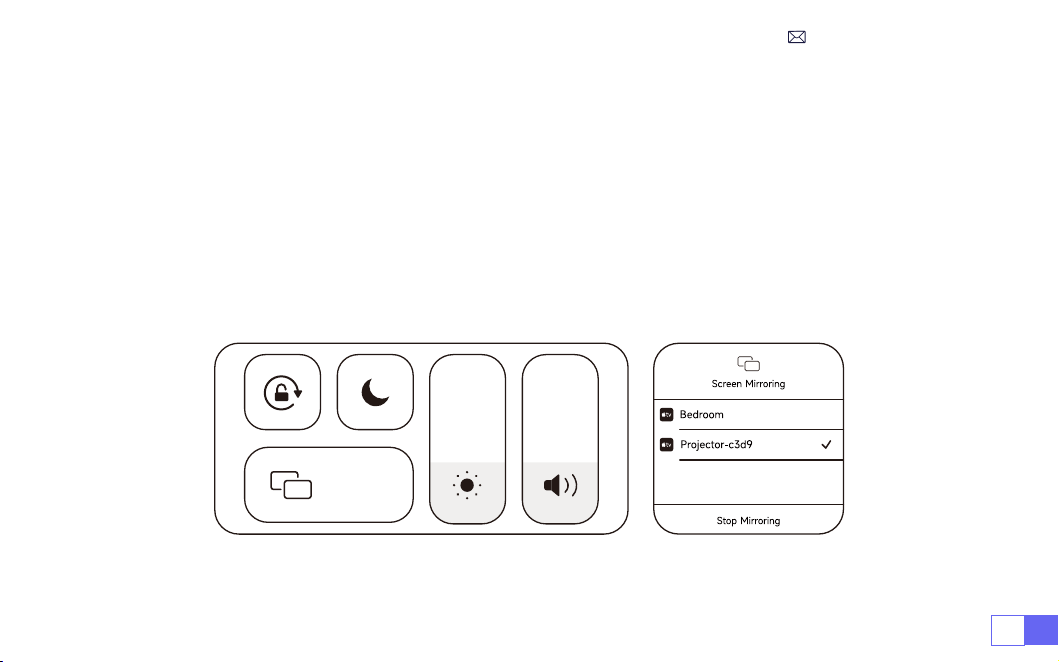
3. Turn on the WiFi setting of iOS device,then connect in the same Home WiFi.
4.Then click “Airplay" on the smartphone.
5.Select "Projector-c3d9" from the search results to connect.
NOTE: Due to the upgrading of the WiMiUS K9 smart projector itself: Screen mirroring for iOS, Android, and
Windows, and no longer need the iOS Screen Cast Device for screen mirroring (the package does not
include an iOS Screen Cast Device)
If you encounter any problems, please contact us in time:
Screen
Mirroring
EN 20
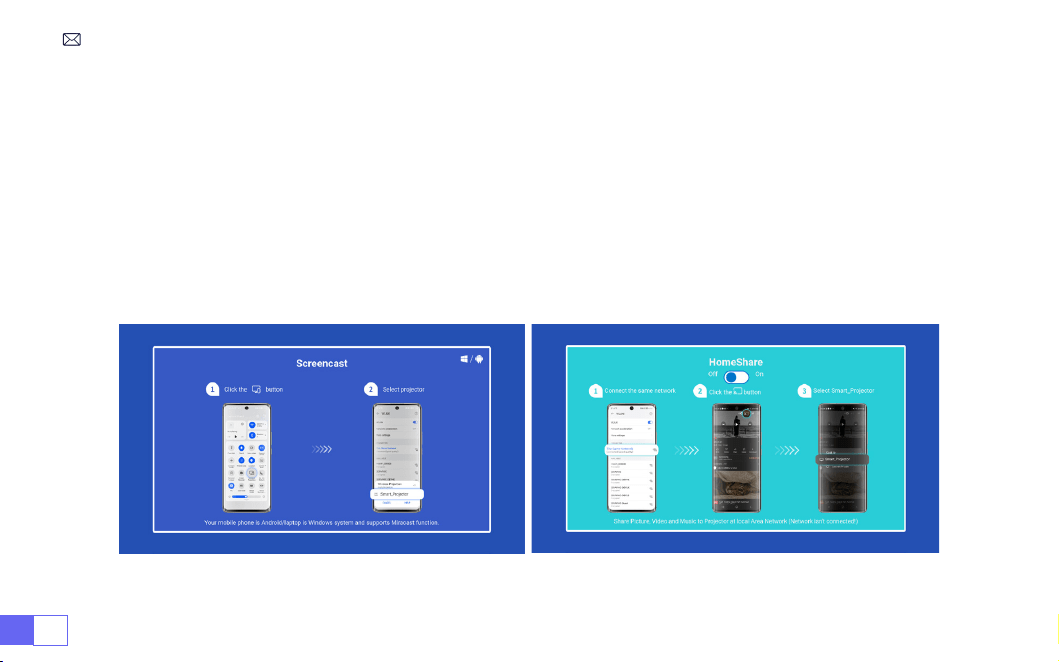
To activate this function, your android device must support Multi-Screen/Wireless Display. The name of
“Multi-Screen” may vary depending on various brands of Android devices.
Setting with mobile internet
1. Turn on the projector, and select “Screencast” as the Input Source.
2. Turn on the “Multi-Screen/Wireless Display” of your Android device.
3. Select “WiMiUS-K9 Projector/Smart Projector”from the search results to connect.
4. Succeed.
For Android System

EN21
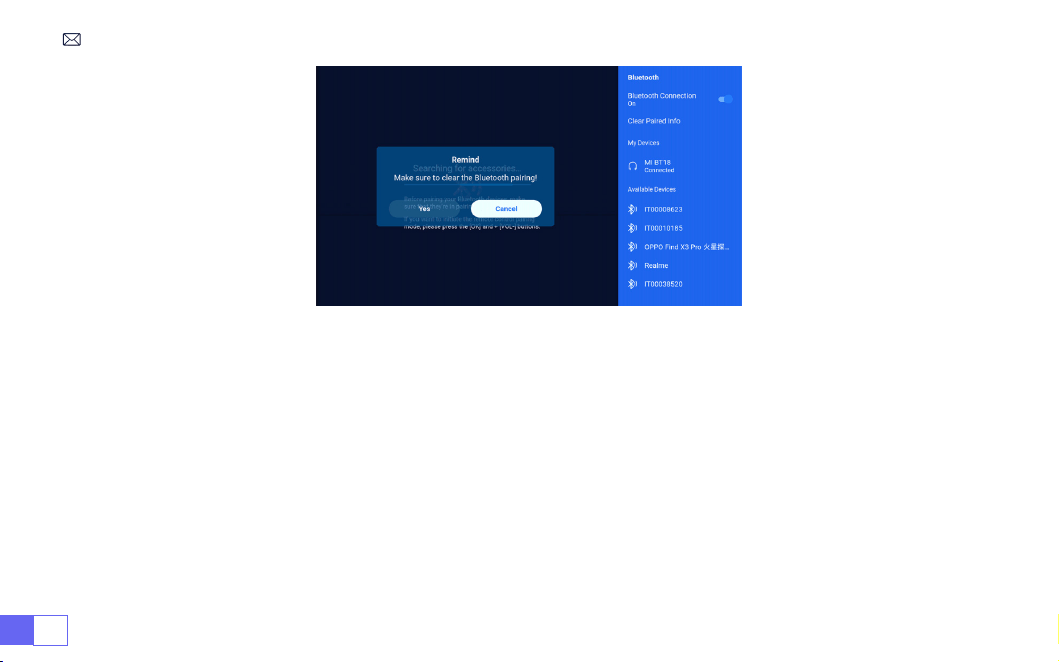
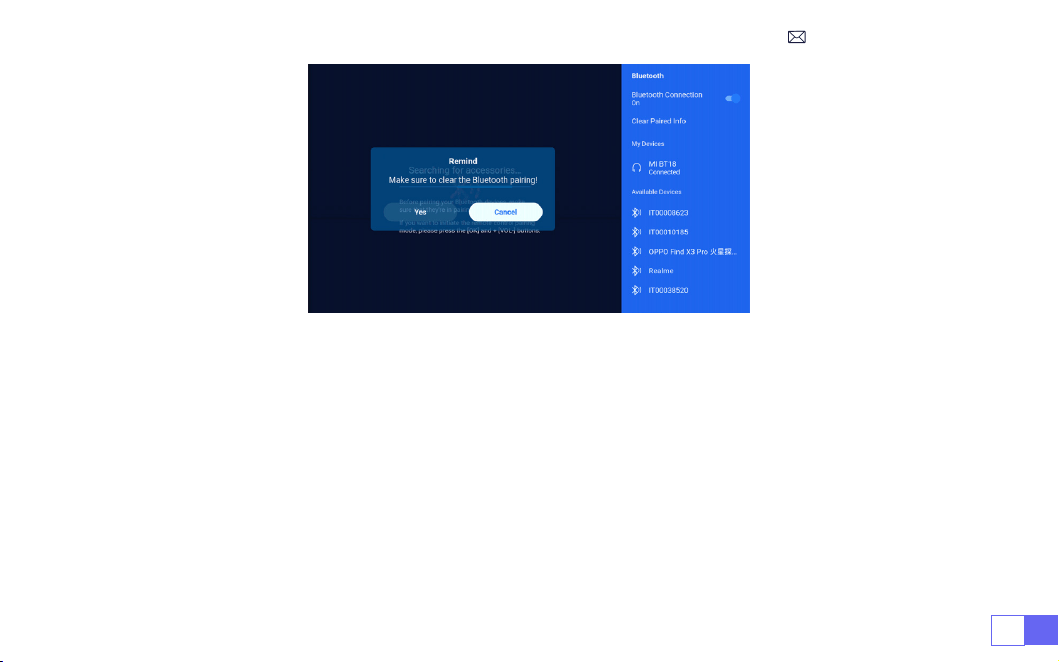
1. Turn on your Bluetooth Speaker.
2. Turn on the [
Bluetooth Settings
] of your projector.
3. Seclect your Bluetooth speaker to connect.
4. Succeed.
Note:
1. This step is only applicable to connecting the Bluetooth speaker but not to mobile phone Bluetooth.
2. The K9 projector is compatible with most Bluetooth headsets, Bluetooth speakers and Airpods, but not
the Bluetooth keyboards.
3. If you have any questions, please feel free to email WiMiUS via:
3.Bluetooth Settings
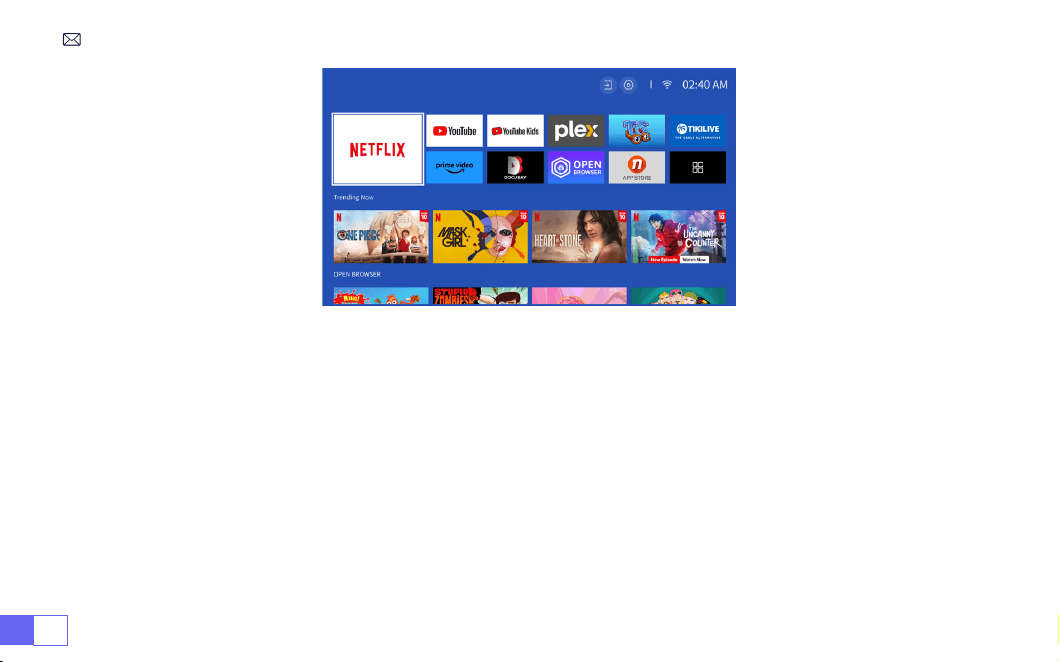
EN 22
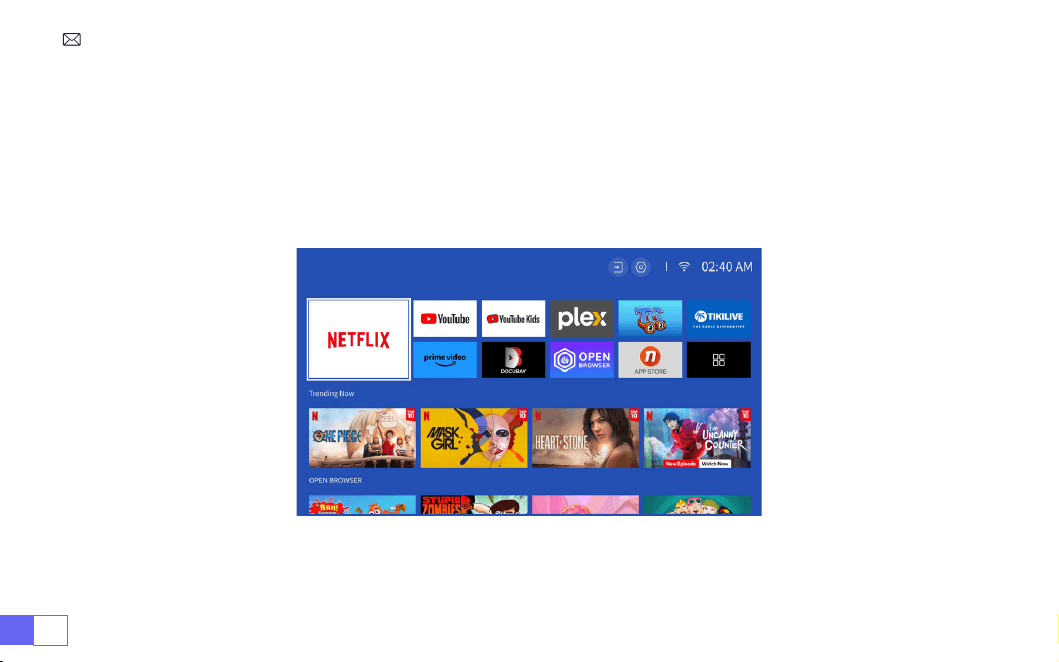
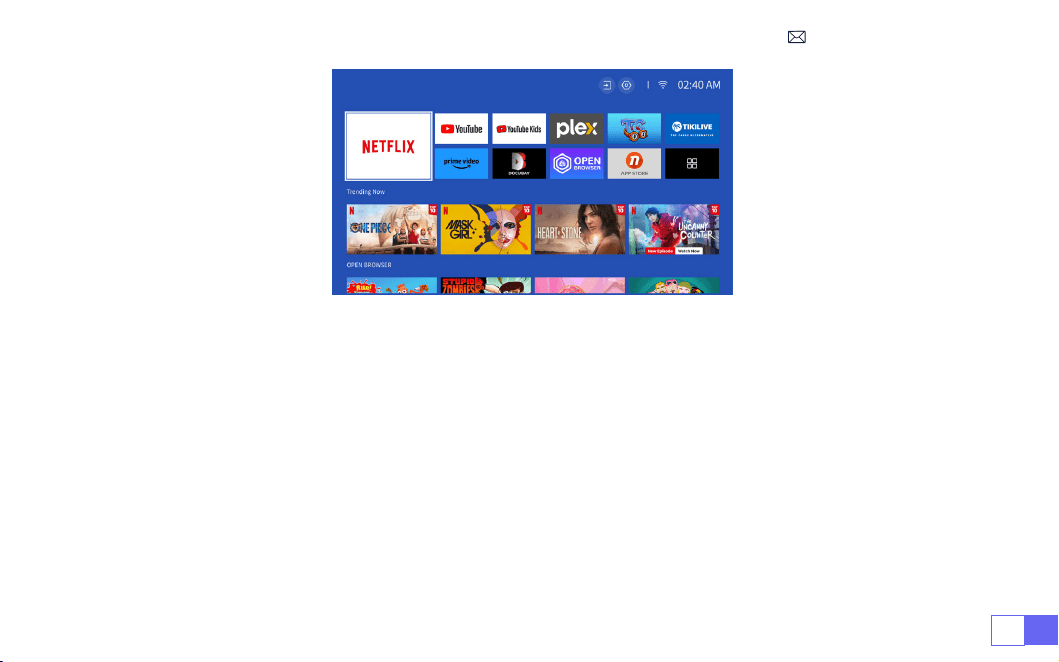
Netix Ofcially-Licensed
- The K9 projector has a built-in Smart Netix OS System, so you can choose
your favorite APP and video at will, and you can enjoy a large number of wonderful lm and television works
without using an additional Fire TV stick.
At the same time, this page is the Main Interface of the projector.
4.Built-in Smart OS System
EN23
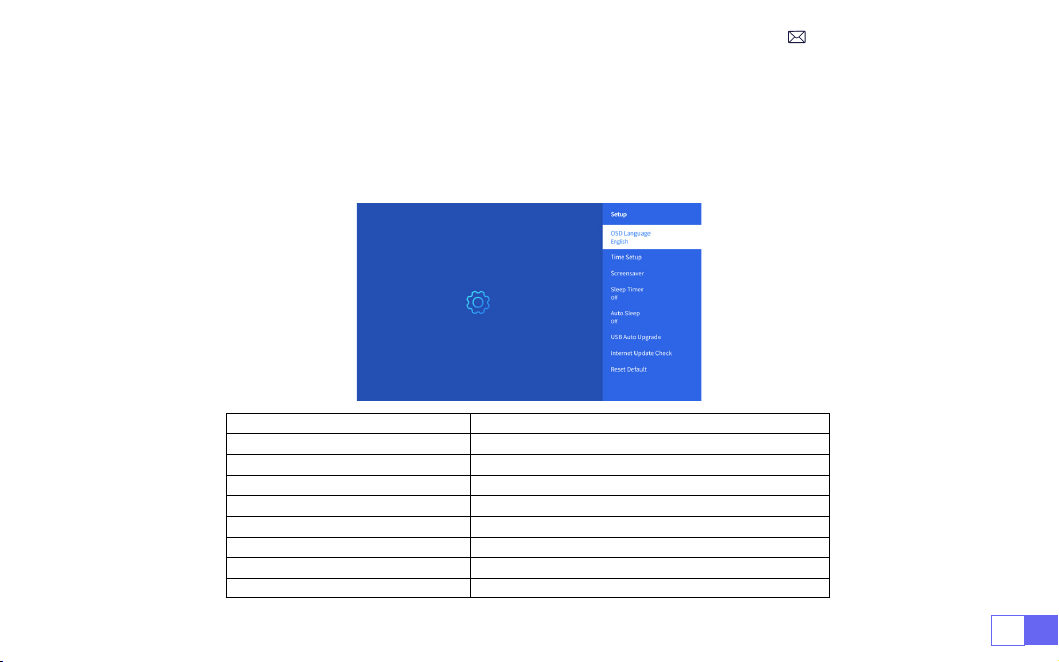
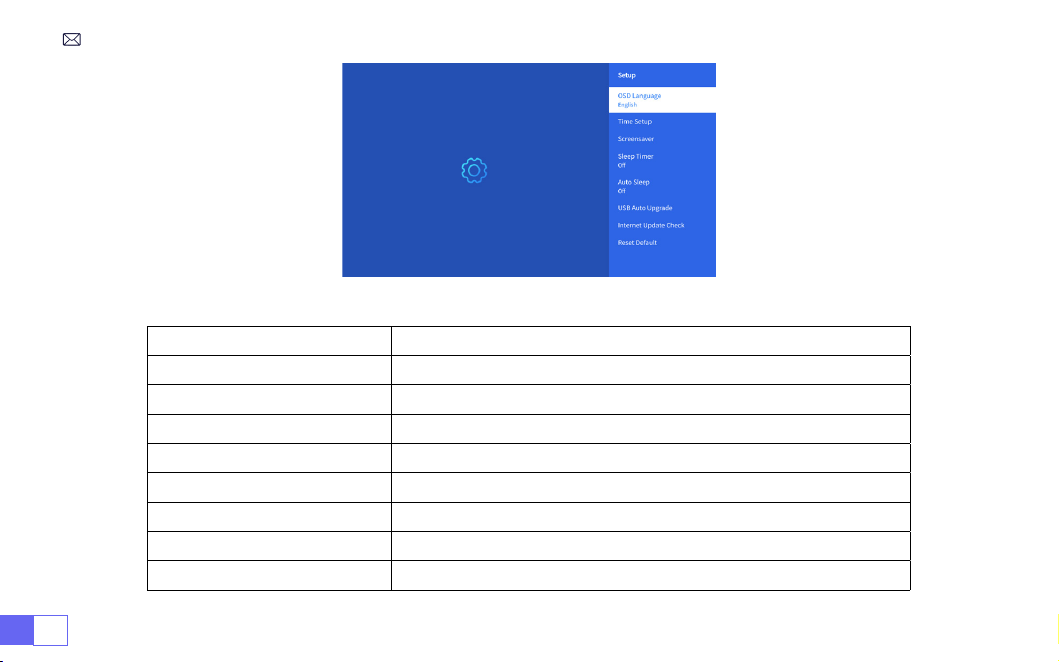
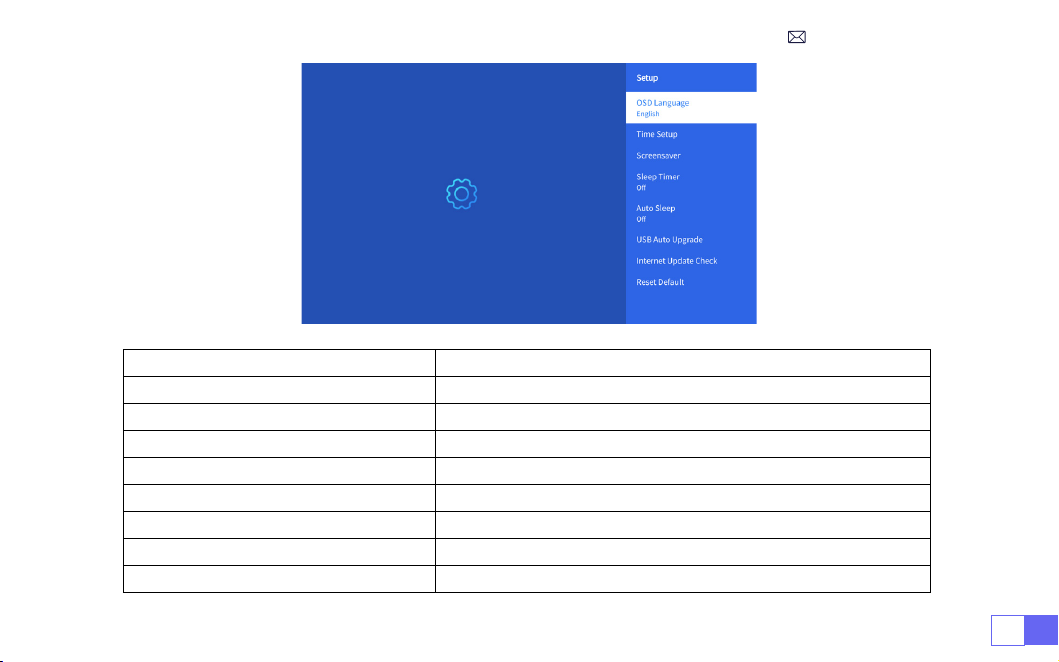
OTHER BASIC PROJECTION SETTINGS
Go to
home page
-- Select [
Setting
] -- Select the [
Setup
] .Use the arrow keys on the remote control to
switch the menu, press the “OK” to conrm and set.
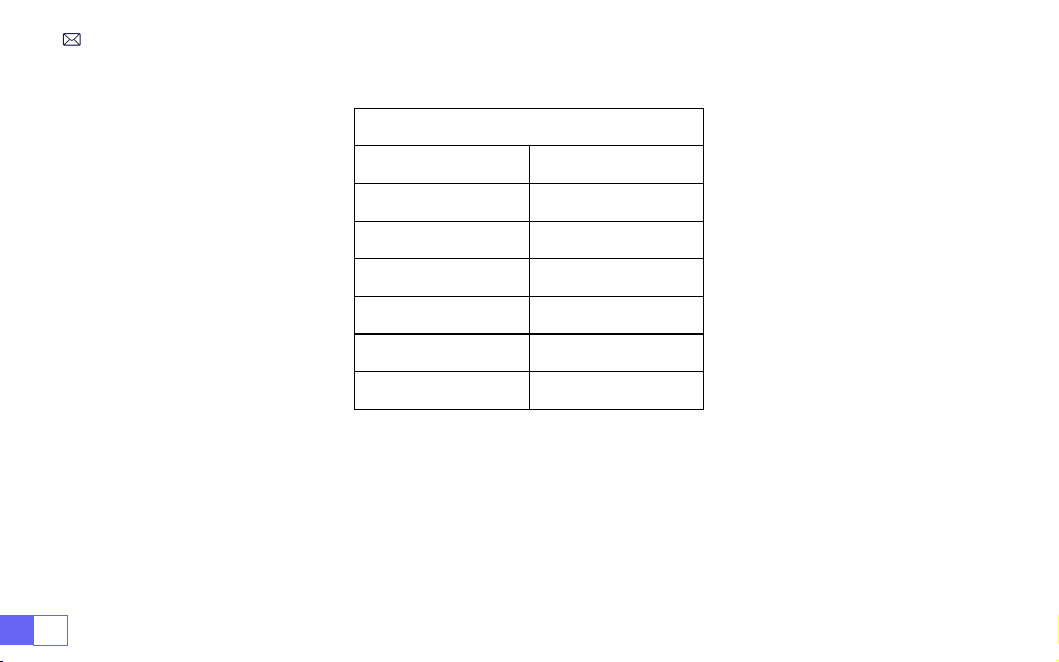
1.Option Menu
Menu Content
OSD Language English/France/Italian/Japanese etc
Time Setup Set Local Time
Screensaver Turn on/off screen saver
Sleep Timer On/Off: Set the sleep time from 10 - 120 minutes
Auto Sleep On/Off: Set the time from 30minutes - 8Hours
USB Auto Upgrade Local Update
Internet Update Check Check Internet Environment
Reset Default Restore Factory Default
EN 24
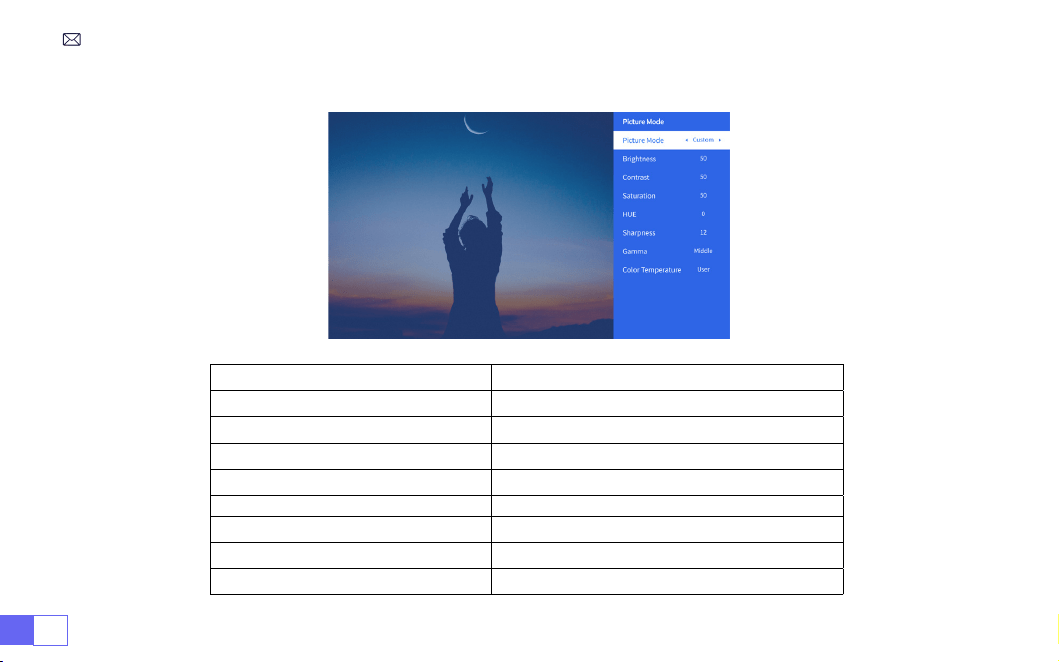
2.Picture Mode Menu
Menu Content
Picture Mode Select the Picture Mode
Brightness Set the Screen Brightness Value
Contrast Set the Screen Contrast Value
Saturation Set the Screen Saturation Color
Hue Set the Screen Hue Color
Sharpness Set the Screen Sharpness Value
Gamma Correct the Gamma Value
Color Temperature User/Cool/Standard/Warm
EN25
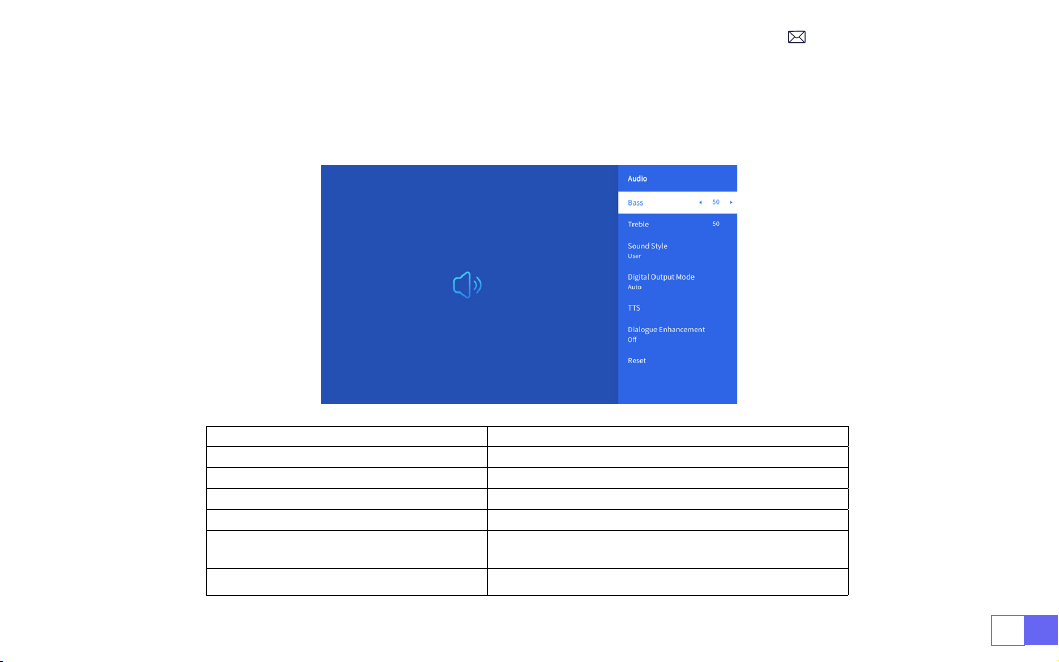
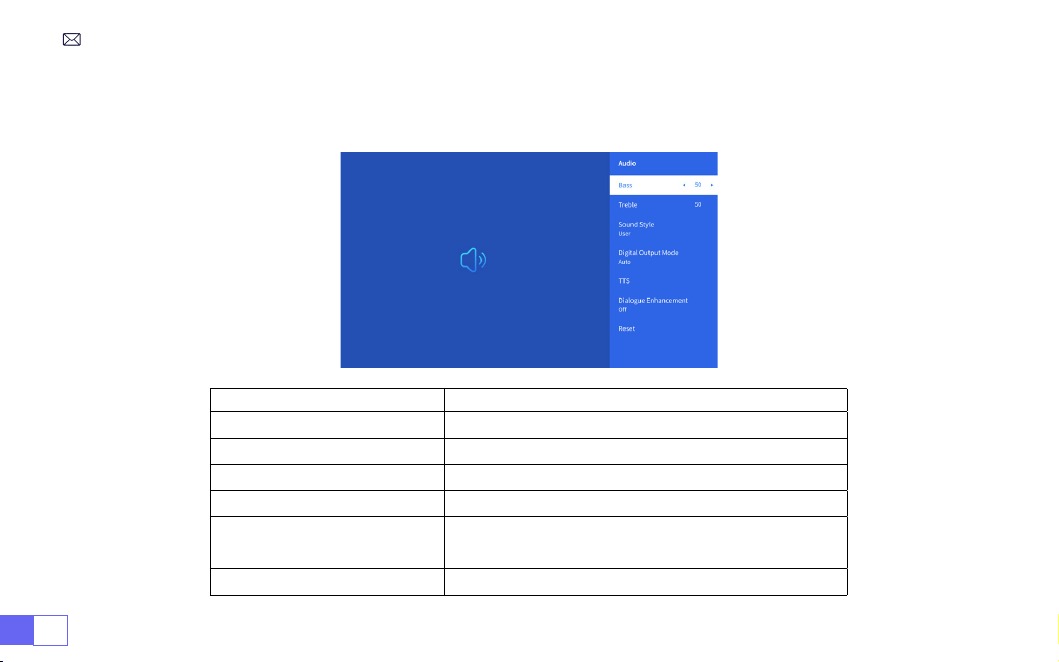
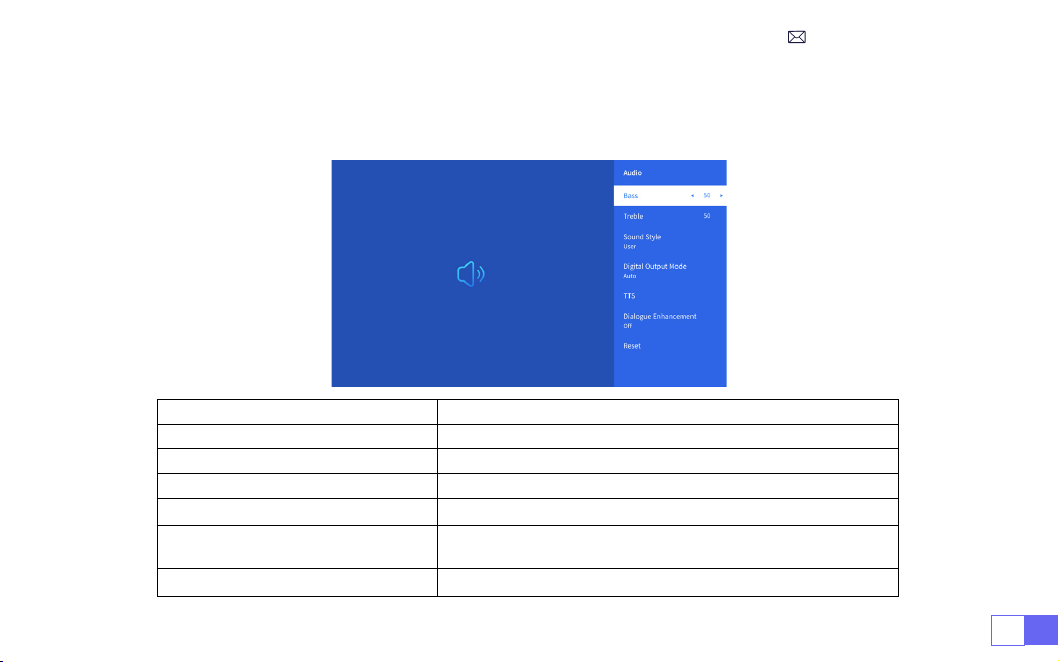
Go to
home page
-- Select [
Setting
] -- Select the [
Audio
] .Use the arrow keys on the remote control to
switch the menu, press the “OK” to conrm and set.
3.Audio Menu
Menu Content
Bass/Treble Set Preferred Values
Sound Style User/Standard/Movie/Music/Sports/Vivid
Digital Output Mode Auto/Manual
TTS Voice Broadcast Function
Dialogue Enhancement
On/Off: Conversation enhancement function, voice
broadcast function for special people
Reset Restore Default

EN 26
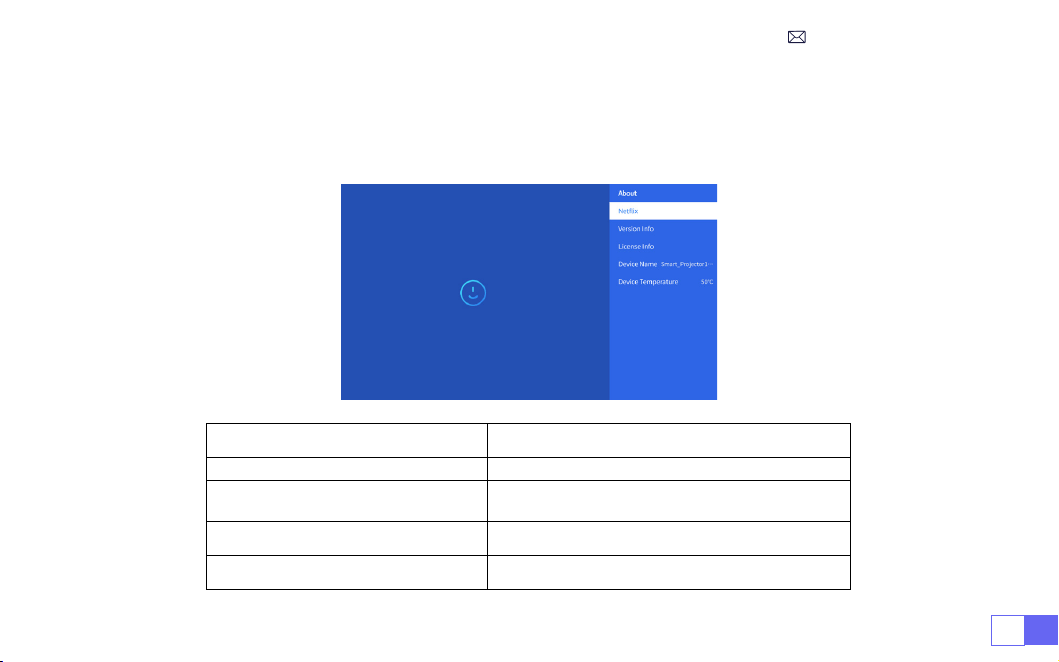
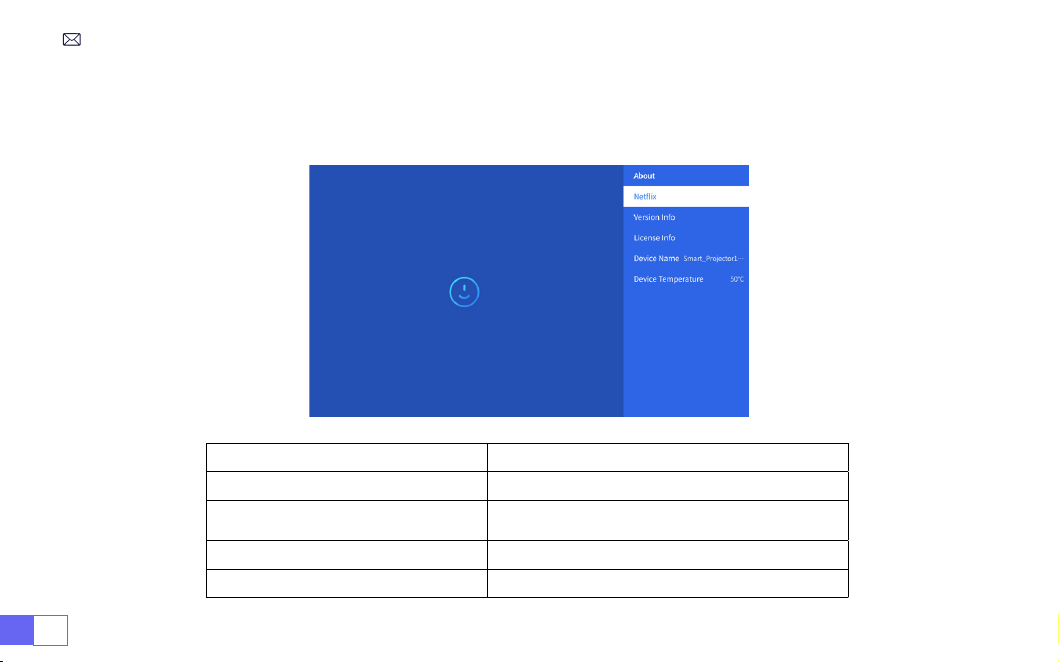
Go to
home page
-- Select [
Setting
] -- Select the [
About
] .Use the arrow keys on the remote control to
switch the menu, press the “OK” to conrm and set.
4.About
(
System Info
)
Menu Content
Netix Netix Ofcially-Licensed
Version/License Info View the Latest Version/License Information
Device Name Projector Model Name
Device Temperature 50
℃

EN27
WiMiUS K9 projector has 6 interfaces, HDMI ports*2/USB ports*2/3.5mm headphone output/RJ45
Please select the correct connecting port to connect your device (PC, Phone, DVD Player, Sound bar, USB,
PS4,etc.)
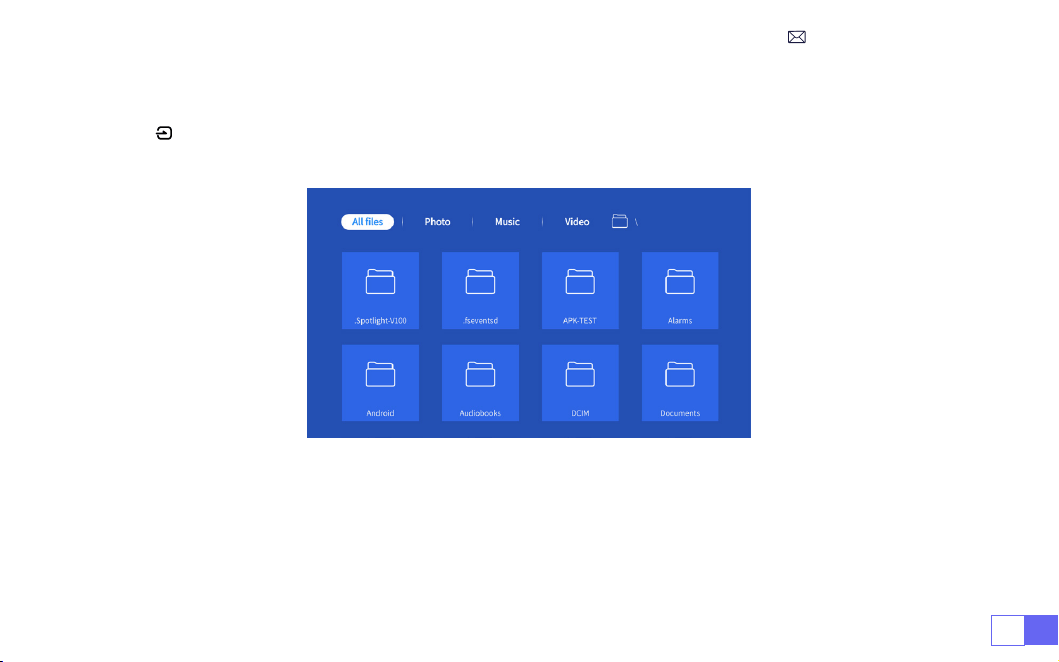
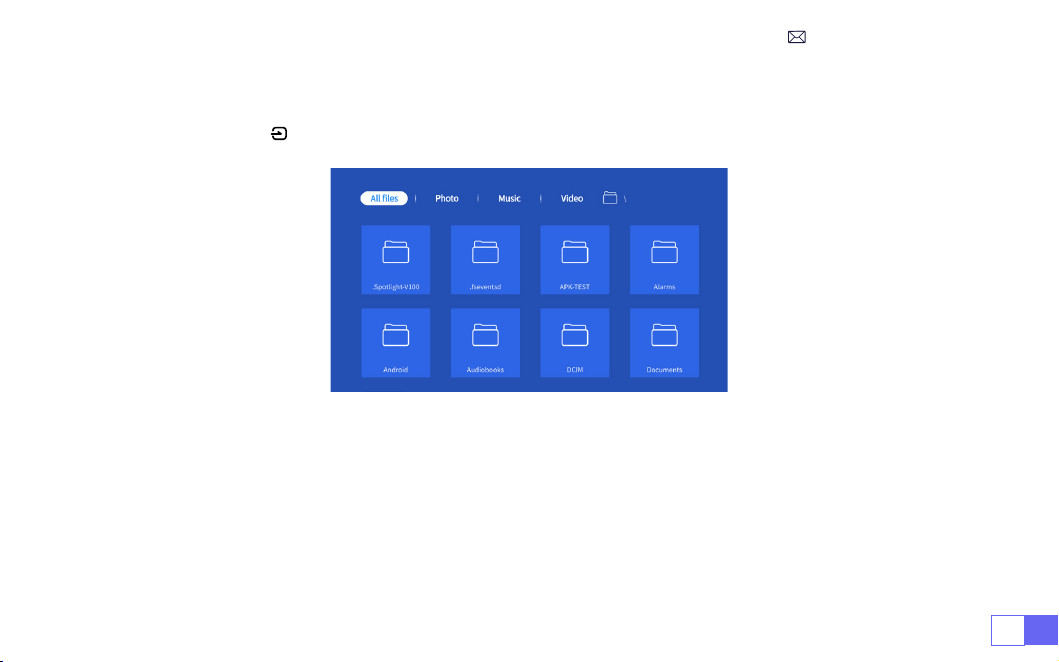
Select the USB signal source, the machine will detect them automatically.
• Select the required category “photos” “music” or “video” in the main interface, and press the “OK” key on the
remote control to enter the corresponding category.
• According to the programs to choose :“photos” “music” or “video”.
• Choose the le you want to play, and press the key “OK” to play or pause the le. (You cannot enter the
required category without connecting a USB disk.)
Note: For the “Ofce Suite” option, PPT/TXT les cannot be played or presented normally.
1. Connect to the computer and K9 projector with the HDMI cable (Included).
2. Select the HDMI source to project any les on your computer;
3. On your laptop, hold down the key “Win+P” board keys to change your display mode.
1.USB Multimedia Connecting
2.Connecting with PC
SIGNAL LINES CONNECTION
EN 28
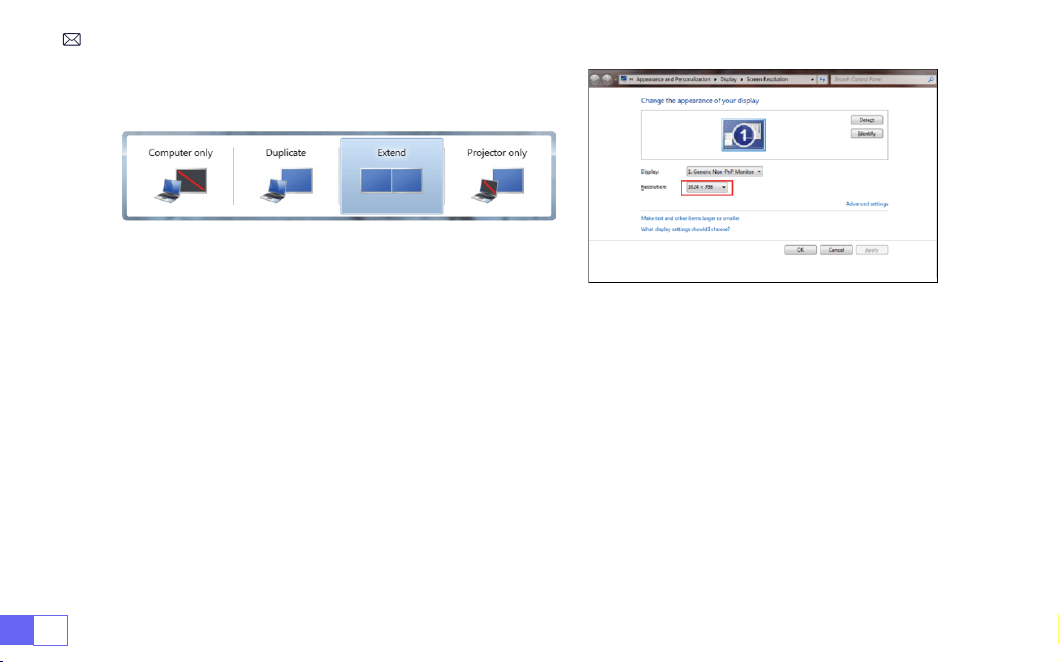
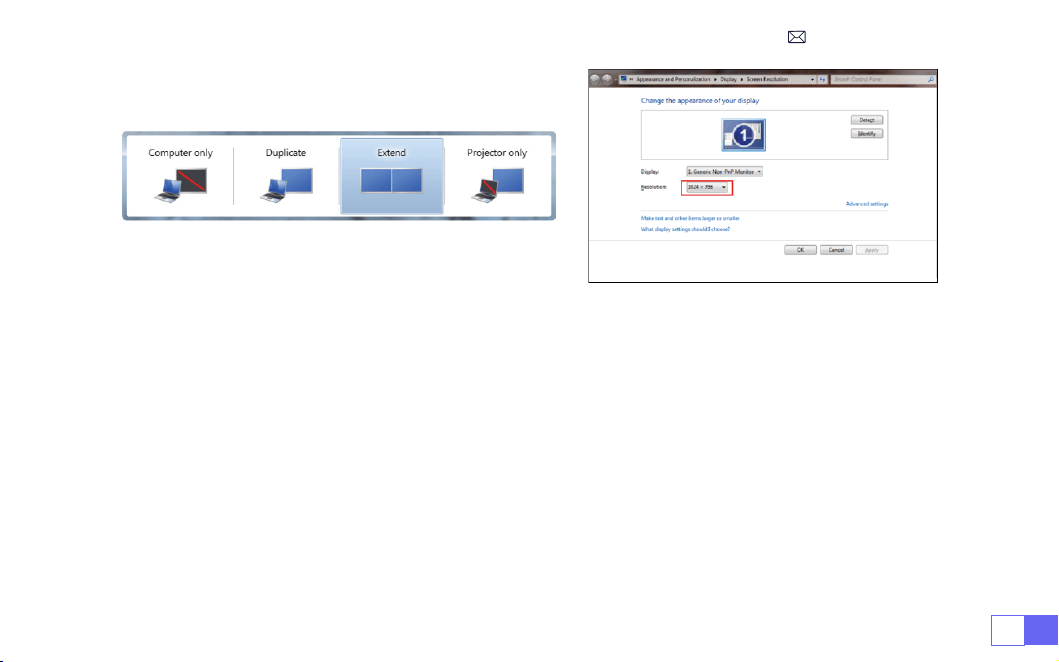
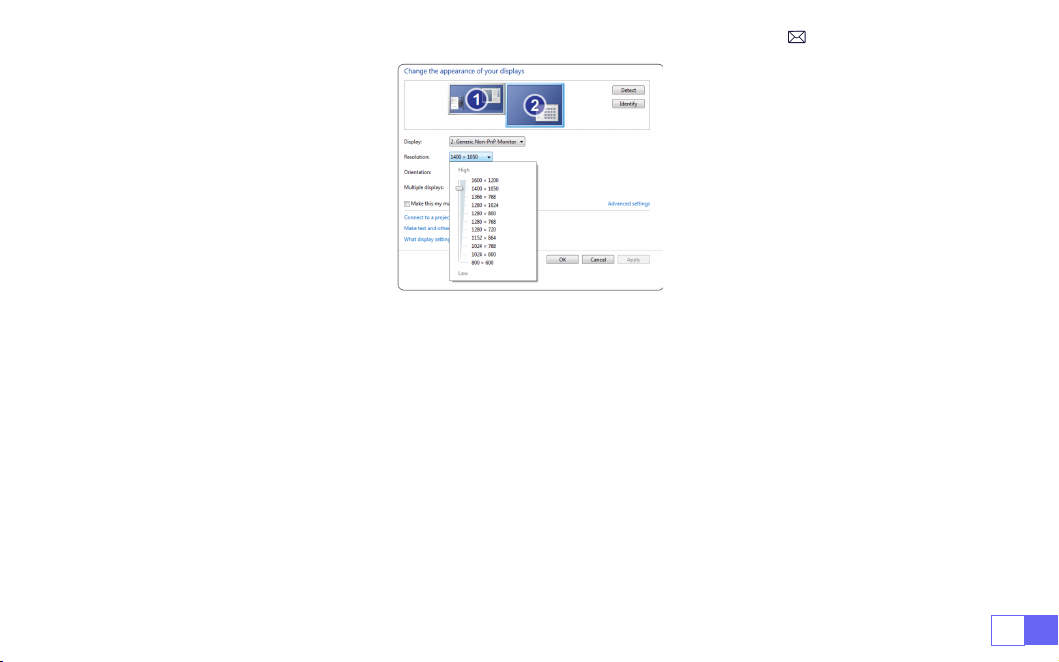
Computer only:
it is the default option – only displays on the main monitor.
Duplicate:
makes all the monitors display the same thing duplicating the desktop on each monitor.
Extend:
makes all your monitors act like one big monitor extending the desktop across all of them.
Projector only:
Displays only on the secondary monitor like a projector.
To change the screen resolution in Projector Only mode, follow these steps:
Step:
Start > Control Panel > Appearance and Personalization > Adjust Screen Resolution

EN29
• Choose the media signal channel :“HDMI”
• Use a Type-C to HDMI adapter to connect your MacBook, or a Mini Display to HDMI adapter to connect
with your MacBook Air (adapter not included).Connecting with MacBook or Mac Book Air. (
Adapter NOT
INCLUDED
)
• Choose the media signal channel :“HDMI”
• Use HDMI cable to connect to XBOX/PS5
• Succeed
3.Connecting with MacBook or MacBook Air
4.Connecting with XBOX/PS5

EN 30
• Select “HDMI” mode for connection
• Enter Menu key
• Change the PC mode from [On] to [Off] to avoid the risk of white pixel edges in the image.
5.Connecting with DVD
FAQ
&
WARRANTY
Thank you for selecting the WiMiUS K9 projector. We provide 3-year warranty for K9 projector. If you have
any questions, please feel free to contact us via
.
We have compiled some frequently asked questions and their corresponding answers to assist you better.
Q1:
The WiFi connection is unstable. How can I resolve this issue?
To address WiFi connectivity issues, rst, ensure that your home network is functioning well. Additionally,
keep the distance between your phone and the projector within 1 meter. If the problem persists, please
reach out to us at
for further assistance.
Q2:
The remote control and projector cannot communicate.
1. Is the power switch above the projector on or off?
2. The remote control battery is exhausted?
3. There are obstacles between the remote control and the infrared signal.

EN31
Q5:
Not compatible with your Bluetooth speaker?
1. The projector may not compatible with some versions Bluetooth speakers of JBL.
2. Contact our after-sales email at
immediately and tell us the brand and model
of your Bluetooth speaker.
Q4:
Auto-off after working for a while.
1. The projector ventilation is blocked or the voltage is not stable.
2. Send a video to
to check for you.
Q3:
What is the Linux system? Can I watch more popular movies and TV shows?
1. The Linux system is ofcially authorized by Netix. The projector comes pre-loaded with content from
Netix, YouTube, Prime Video, etc.
2. Please nd more apps to download in Main Interface My Applications (More Apps Path: Main Interface
My Applications- APP assistant )

DE 32
INHALT
WIMIUS7/24PROFESSIONELLERSUPPORT - - - - - - - - - - - - - - - - - - 33
Hinweis - - - - - - - - - - - - - - - - - - - - - - - - - - - - - - - 34
PACKAGE LIST - - - - - - - - - - - - - - - - - - - - - - - - - - - - - 35
PROJEKTORSPEZIFIKATIONEN - - - - - - - - - - - - - - - - - - - - - - - 36
Produktübersicht - - - - - - - - - - - - - - - - - - - - - - - - - - - 37
Fernbedienung - - - - - - - - - - - - - - - - - - - - - - - - - - - - 39
INSTALLATION - - - - - - - - - - - - - - - - - - - - - - - - - - - - - 40
INBETRIEBNAHME DES PROJEKTORS - - - - - - - - - - - - - - - - - - - - 43
BILDEINSTELLUNG - - - - - - - - - - - - - - - - - - - - - - - - - - - - 44
EINRICHTEN DES PROJEKTORS- - - - - - - - - - - - - - - - - - - - - - - 48
Andere Verbindungen - - - - - - - - - - - - - - - - - - - - - - - - - 55
ANSCHLUSS DER SIGNALLEITUNGEN - - - - - - - - - - - - - - - - - - - - 60
GARANTIE - - - - - - - - - - - - - - - - - - - - - - - - - - - - - - - 63
FAQ - - - - - - - - - - - - - - - - - - - - - - - - - - - - - - - - - 63

DE33
LieberKunde,
vielenDank,dassSieWiMiUSunterstützen!
BittelesenSiediesesHandbuchgründlichdurch,bevorSiedenProjektorverwenden.WennSieirgendwelc
heProblemehaben,sendenSieeineE-MailmitIhrerBestellnummerunddemProblem(ZumBeispiel:DE+
K9+KeinTon)an
support01@wimius.com.
Wirwerdeninnerhalbvon24StundeneineschnelleLösungan
bieten.
EigentlichkönnenvieleProblemeeinfachdurchdieEinstellunggelöstwerden,wiez.B.keinSignal,keinTon,
Bluetooth-Verbindungfehlgeschlagen,WiFi-Verbindungfehlgeschlagen,dunkleFlecken,abgehackte Anima
tionusw.Wirversprechen,dassalleProjektorenvordemVersand100%sorgfältiggeprüftundverpacktwurd
en.
WennSieirgendwelcheFragenhaben,könntenSieunsbittekontaktieren,damitdasProblemgelöstwerde
nkann.UndgebenSieunsdieMöglichkeit,unszuverbessern.Wirgarantieren,dasswirIhneneinezufrieden
stellendeLösunganbietenwerden.
VielenDankfürIhrVerständnis!
WiMiUSServiceTeam
WIMIUS7/24PROFESSIONELLERSUPPORT

DE 34
1. StellenSiedenProjektornichtineinemzuwarmenoderzukaltenRaumauf,dadiehoheTemperaturode
rdieniedrigeTemperaturdieLebensdauerdesGerätsverkürzenwird.DieArbeitsumgebungwürde5
℃
~3
5
℃
bessersein.
2. DieBelüftungistfürdenProjektorausgestattet,umstabilzuarbeiten.BedeckenSiedieBelüftungnichtm
itTüchern,DeckenoderanderenDingen.SteckenSiekeineGegenständeindenSchlitzdesProjektors,da
dieszueinemKurzschlussodereinemelektrischenSchlagführenundIhrGerätbeschädigenkann.
3. DerProjektormussstrengvorstarkenStößen,StößenundVibrationengeschütztwerden.VersuchenSieni
cht,denProjektorzubewegenundstarkenStößen,ExtrusionenundVibrationenauszusetzen.VersuchenS
ienicht,denProjektorzubewegenunddieinterneSchaltungzubeschädigen.
4. DieLinsealsKernkomponentedesProjektorsstehtindirektemZusammenhangmitderBildschärfeundd
emBildeffekt.ÜbermäßigerStaubaufihrbeeinträchtigtdieBildqualität.DieverschmutzteLinsesolltemit
einemweichenBaumwolltuchfürdieGlaslinsenoberächeabgewischtwerden.HarteTücheroderScheu
ermitteldürfennichtverwendetwerden.
5. Bitte verwenden Sie den Beamer im halbdunklen Raum. Das Dimmen des Lichts oder die Verwendung
von Vorhängen kann dazu beitragen, Blendeffekte zu reduzieren und die Bildqualität zu verbessern.
6. Wenn Sie Fragen haben, machen Sie sich bitte keine Sorgen, wenden Sie sich bitte per E-Mail an
Hinweis
DE35
WiMiUS K9 Beamer*1
HDMI-Kabel*1 Objektivdeckel*1 Fernbedienung*1
Benutzerhandbuch*1 Netzkabel*1 Reinigungstuch*1
PACKAGE LIST
DE 36
PROJEKTORSPEZIFIKATIONEN
Modell Nr.: K9
Native Auösung
1920*1080P
Seitenverhältnis
16:9/4:3/Auto
Display-Technologie
LCD
Lichtquelle
LED
Produktgröße
8.26*7.09*6.34Inch
Produktgewicht
2.3KG
Aktualisierungsrate
60 Hz
Netzspannung
AC100-240V~50/60Hz 1A
Keystone Korrektur
Auto + elektrisch+manuell
Fokus
Auto + elektrisch+manuell
Ausgangsanschluss
3.5mm audio out
Eingabeschnittstelle
HDMI*2/USB*2/RJ45
Betriebsmodus
Fernbedienung/Taste
Installationstyp
Vorne/hinten auf dem Schreibtisch, vorne/hinten an der Decke
Videodatei
MP4/MPG/AVI/MPEG-4/TS/MOV/M4V/MKV/FLV/DAT/3GP
Bilddatei
JPG/JEPG/BMP/PNG
Audiodatei
MP3/WMA/M4A/MP2/AAC/OGG/WAV/FLAC
(Dolby-Unterstützung)
Hinweis:
Hergestellt unter Lizenz von Dolby Laboratories. Dolby, Dolby Audio und das Doppel-D-Symbol sind
Marken der Dolby Laboratories Licensing Corporation.

DE37
PRODUKTÜBERSICHT
1 2 3
4 5 6 7 8910
11 12
1. Objektiv
2. Infrarot-Signalempfänger
3. Autofokus-Signal
4. RJ45 Netzwerkanschluss
5. USB Anschluss *2
6. HDMI1 Anschluss
7. HDMI2 Anschluss
8. 3.5mm Audioausgang
9. Infrarot-Signalempfänger
10. Steckdose
11. Staubnetz
12. Luftauslass

DE 38
13 14 15 16
13. Ein-/Aus-Taste
14. Schraubenlöcher für die Halterung (1/4 Zoll, Stützhebevorrichtung)
15. Höhenverstellung der Maschinenfüße
16. Produktetikett
DE39
FERNBEDIENUNG
1 2
4
6
8
10
12
15
16
17
19
20
3
5
7
9
11
13
14
21
18
1. Ein-/Aus-Taste
2. Stumm
3. NETFLIX
4. YouTube
5. Prime Video
6. Öffnen Sie den Browser
7. Menü
8. Signalquelle
9. Pfeiltasten
10. Bestätigungstaste
11. Zurück
12. Homepape
13. Lautstärke +
14. Lautstärke -
15. Fokussierung +
16. Fokussierung -
17. Rot/Grün/Gelb/Blaue Tasten
18. USB
19. Rücktaste
20. Projektionsmodus
21. Nummer
Hinweis:
1. Legen Sie 2 Stück AAA-Batterien
(
nicht im Lieferumfang enthalten
)
in die Fernbedienung ein, bevor
Sie sie verwenden. Kombinieren Sie keine neuen Batterien mit alten in der Fernbedienung, da dies zu
Betriebsstörungen aufgrund unzureichender Stromversorgung führen kann.
2. Wenn Sie die Fernbedienung verwenden, achten Sie bitte darauf, dass der Signalsender der
Fernbedienung auf das Infrarotsignal des Projektors zielt.
+
-
F+
F-

DE 40
1.Frontprojektion-Deckenhalterung 2.Rückprojektions-Deckenhalterung
3.Frontprojektion-Tischhalterung 4.Rückprojektions-Tischhalterung
INSTALLATION
Der Projektor kann mit einem speziellen Aufhängerahmen an der Decke aufgehängt und auf einen stabilen
Tisch gestellt werden, um das Bild je nach Betriebsumgebung und Anforderungen zu projizieren. Darüber
hinaus kann der Projektor mit folgenden Methoden installiert werden:
1.Installationsmethode
3. Wenn Sie die Fernbedienung über einen längeren Zeitraum nicht benutzen. Bitte nehmen Sie die Batterien
heraus, um ein Auslaufen zu verhindern.

DE41
2.Projektionsabstand und größe
Bildseitenverhältnis: 16:9
Distanz (ft.) Bildschirmgröße
4.8 50”
5.7 60”
7.6 80”
9.5 100”
11.5 120’’
14.4 150’’
* Die Bildgröße hängt von der Entfernung zwischen Projektor und Leinwand ab. Es kann 3 % Messdifferenz
zwischen den oben aufgeführten Daten geben.
* Der empfohlene Projektionsabstand beträgt 2,5-3 m.
* Die Klarheit der projizierten Bilder wird durch eine angenehme Dunkelheit verbessert.
Halten Sie den Projektor in einer Höhe, in der sein Objektiv axialsymmetrisch zur Leinwand ist. Wenn dies
nicht möglich ist, verwenden Sie die Trapezkorrekturfunktion, um das Projektionsbild einzustellen.
DE 42
3.Installation an der Decke
Halten Sie den Projektor vertikal und in Richtung der Mitte der Projektionsäche, damit das Projektionsbild
ach auf der Leinwand bleibt.
1. Um die Neigungsbasis einzustellen, schrauben Sie die Haltestange an der Unterseite des Projektors ab,
siehe Abbildung unten.
2. Für die Deckenmontage gibt es 1 Loch an der Unterseite des Projektors. Bitte drehen Sie den Projektor
dann um Sie nden die Deckenbefestigungslöcher wie im Bild unten gezeigt.
HINWEIS:
Die Hängehalterung oder der Deckenständer sind nicht im Lieferumfang enthalten.
(UNTERSTÜTZT
AUCH NICHT das Heben auf vier Beinen.)
Stützfüße zur Höhenverstellung

DE43
INBETRIEBNAHME DES PROJEKTORS
Verwenden Sie diesen Projektor für eine bessere Wiedergabe, während Sie den Vorhang zuziehen oder in
einem dunklen Raum.
1. Entfernen Sie die Objektivkappe, verbinden Sie den Projektor mit dem Strom über das Netzkabel, drücken
Sie die Einschalttaste auf der Fernbedienung oder dem Projektor, es beginnt zu arbeiten.
2. Verwenden Sie die automatische oder elektronische Trapezkorrektur/Fokus-Funktion des Projektors, um
ein rechteckiges und klares Bild zu erhalten.
3. Passen Sie die Fokustaste „F+“ „F-“ am Projektor oder an der Fernbedienung an, um die beste Bildleistung
zu erzielen; (Wenn es immer noch verschwommen ist, versuchen Sie bitte, den Projektionsabstand
anzupassen.)
A. Schließen Sie das Netzkabel an:
Nach dem Anschließen des Netzkabels blinkt die Kontrollleuchte 8
Mal rot. Das Gerät befindet sich im Selbsttest. Bitte warten Sie geduldig und drücken Sie dann den
Netzschalter, um es einzuschalten.
B. Eingeschaltet:
Die blaue Kontrollleuchte leuchtet und zeigt an, dass sich die Maschine im Betriebszustand
bendet.
C. Herunterfahren:
Die rote Kontrollleuchte leuchtet und zeigt an, dass sich die Maschine im
heruntergefahrenen Zustand bendet.
D. Tandby:
Die rosa Kontrollleuchte leuchtet. Im Standby-Modus (5 Sekunden) drücken Sie bitte nicht
wiederholt die Ein-/Aus-Taste.
Beschreibung der Anzeigeleuchte
DE 44
BILDEINSTELLUNG
Wählen Sie das Menü [ Projektionsbildeinstellungen ] -- Wählen Sie die [ Projektionseinstellungsoption ] --
Wählen Sie den [Installationsmodus], drücken Sie zur Auswahl die Pfeiltaste und drücken Sie „OK“, um die
Projektionsposition zu bestätigen.
1.Projektionsmodus
4. Schließen Sie das externe Gerät (Smartphone, iPad, Fire TV Stick, TV-Box, DVD-Player, Computer usw.) an
die entsprechenden Schnittstellen des Projektors an, achten Sie bitte darauf, die entsprechende Quelle
auszuwählen. Wenn Sie nicht die richtige Quelle auswählen, kann der Projektor das Signal nicht erkennen.
5. Wählen Sie das Menü " " , geben Sie die [ OSD Sprache] ein, dann können Sie Ihre bevorzugte Sprache
einstellen.

DE45
2.Manuelle Trapezkorrektur
2.1 4P Keystone-Korrektur
Wählen Sie das Menü [Einstellungen]--Wählen Sie die Option [Trapezkorrektur]--Wählen Sie die Option [
FourPoint Keystone ] aus. Klicken Sie einfach auf die Schaltäche „OK ", um den Punkt auszuwählen, den Sie
zuerst anpassen möchten, und drücken Sie dann die Taste „
▶
"oder „
▼
", um den Wert einzustellen (Wert
0~100) wie unten gezeigt erforderlich.
Zurücksetzen:
Drücken Sie '' '', das Bild wird auf die ursprünglichen Trapezkorrektureinstellungen
zurückgesetzt.
DE 46
2.2. Vertikale Trapezkorrektur
Wählen Sie das Menü [Einstellungen]--Wählen Sie die Option [Trapezkorrektur]--Wählen Sie die Option
[ Vertikale Trapezkorrektur ] aus, um den Bildschirm vertikal ±30° mit den Pfeiltasten einzustellen, bis die
Hilfslinien auf ein Rechteck eingestellt sind.
Bitte platzieren Sie den Projektor zuerst horizontal mit dem Gesicht zur Wand. Wählen Sie das Menü
[Einstellungen] – Wählen Sie [Trapezkorrektur] oder [Fokus]-Option– schalten Sie die Option [automatische
Korrektur] oder [Autofokus] ein, dann wird das Bild automatisch basierend auf dem Projektionsabstand von
der Leinwand fokussiert und stellen Sie das Bild auf ein Rechteck ein, wenn Sie den Projektionswinkel ändern.
3.Autofokus und Trapezkorrektur
Wenn das Bild verschwommen ist, drücken Sie wiederholt die Fokustaste ''F+'' ''F-'' auf der Fernbedienung, um
den Objektivfokus einzustellen, tippen Sie auf oder drücken Sie lange auf die Einstelltaste, bis das Bild klar ist
(Es ist nicht erforderlich drücken Sie die OK-Taste, nachdem der Bildschirm leer ist).
DE47
Gehen Sie zur Startseite -- Wählen Sie das Menü -- Wählen Sie die [ Einstellungen] -- Wählen Sie die Option [
Zoom ], der Projektionsbildschirm kann um 50 % bis 100 % gezoomt werden. Drücken Sie die Taste „
↑
↓
",
um den erforderlichen Wert wie unten gezeigt einzustellen.
Zurücksetzen:
Drücken Sie " " und das Bild wird auf die ursprüngliche Trapezkorrektureinstellung
zurückgesetzt.
4.Digitalzoom
Hinweis:
Der seitliche Projektionswinkel des Projektors sollte 20° nicht überschreiten. Außerdem
sollten sich vor dem Projektor keine Hindernisse befinden. Andernfalls funktioniert die automatische
Trapezkorrekturfunktion möglicherweise nicht.
DE 48
EINRICHTEN DES PROJEKTORS
Wählen Sie auf der Startseite die gewünschte Eingangssignalquelle (HDMI1/HDMI2) aus oder drücken Sie
die Taste „ " " auf der Startseite Fernbedienung, um die entsprechende Signalquelle auszuwählen.
Beim Abspielen eines Videos können Sie die Menütaste „" " drücken und dann [Bildmodus] auswählen. Sie
können die frei einstellen Helligkeit und Kontrast des Bildes und andere Funktionen.
1.Auswahl der Eingangssignalquelle
1.1 Wählen Sie die HDMI-Eingangssignalquelle
DE49
Bei USB-Geräten muss die Signalquelle nicht ausgewählt werden. Das Gerät erkennt sie automatisch.
Drücken Sie die Taste „ " " und wählen Sie auf der Startseite die Option [USB-Eingangssignalquelle].
Warme Tipps:
Wenn der Projektor die USB-Festplatte nicht erkennt, wenden Sie sich bitte an die folgenden
Methoden, um das Problem zu beheben Problem.
Bitte bestätigen Sie, ob Ihr USB-Datenträger den folgenden Formaten entspricht.
1. FAT32: 8G/16G/32G 2. NTFS: 64G
1.2 Wählen Sie die USB-Eingangssignalquelle
Ist dies nicht der Fall, formatieren Sie bitte den USB-Datenträger. Bevor Sie den USB-Datenträger formatie-
ren, sollten Sie sicherstellen, dass sich noch etwas auf dem USB-Datenträger bendet Sichern Sie unbedingt

DE 50
1. Das Funktionieren der Bildschirmspiegelung bei einer drahtlosen Verbindung wird durch die Netzwerku-
mgebung beeinusst. Für die Bildschirmspiegelung wird eine Bandbreite von 100 Mbit oder mehr empfo-
hlen.
2. Stellen Sie sicher, dass sich Ihr mobiles Gerät in der Nähe des Projektors bendet, wenn Sie eine drahtlose
Verbindung verwenden. Es wird ein Abstand von 1 Meter empfohlen.
3. Einige Android-Geräte unterstützen aus Kompatibilitätsgründen möglicherweise keine Bildschirmspiegel-
ung.
Wählen Sie das Symbol [Einstellungen] in der oberen rechten Ecke der Hauptschnittstelle und drücken Sie
dann drücken Sie die "OK"-Taste auf der Fernbedienung, um die Einstellungsseite zu öffnen und wählen Sie
"WiFi-Einstellung".
Hinweis:
Aufgrund der offiziellen Netflix-Autorisierung lässt Netflix+ NICHT zu, dass IOS gleichzeitig
vorhanden ist, also der K9-Projektor unterstützt derzeit keine IOS-Bildschirmfreigabe. Wir haben einen.
2.Verbindung mit Intelligente Geräte
Hinweis
WiFi-Einstellungen
alles. Nach diesen Schritten wird alles für immer verloren sein.
Wenn das Problem immer noch nicht gelöst ist, senden Sie Ihr Problem bitte an folgende E-Mail:

DE51
Achtung:
Ihr Gerät und der Projektor sollten sich im selben Heim-WLAN benden.
1. Wählen Sie Ihr Heim-WLAN aus, mit dem Sie eine Verbindung herstellen möchten, und geben Sie das
Recht ein Geben Sie Ihr Passwort ein und klicken Sie dann auf „OK“. Bitte warten Sie 3 Sekunden, um die
Verbindung herzustellen.
2. Wenn Sie das iOS-Gerät zum ersten Mal verwenden, müssen Sie es in der Hauptschnittstelle
herunterladen (Pfad: Hauptschnittstelle „Meine Anwendungen“ – APP-Assistent – ScrennShare – Klicken
Sie auf „OK“ – App-Download abgeschlossen, bitte ausschalten und neu starten – Finden Sie ScreenShare
in „Meine Anwendungen“) )
3. Schalten Sie die WLAN-Einstellung des iOS-Geräts ein und stellen Sie dann eine Verbindung zum gleichen
Heim-WLAN her.
4. Klicken Sie anschließend auf dem Smartphone auf „Airplay“.
5. Wählen Sie „Projector-c3d9“ aus den Suchergebnissen aus, um eine Verbindung herzustellen.
HINWEIS:
Aufgrund der Aktualisierung des WiMiUS K9 Smart-Projektors selbst: Bildschirmspiegelung für
iOS, Android und Windows, und das iOS-Screencast-Gerät ist nicht mehr für die Bildschirmspiegelung
erforderlich (das Paket enthält kein iOS-Screencast-Gerät).
Sollten Sie auf Probleme stoßen, kontaktieren Sie uns bitte rechtzeitig:
Für iOS-System

DE 52
Um diese Funktion zu aktivieren, muss Ihr Android-Gerät Multi-Screen/Wireless Display unterstützen. Der
Name "Multi-Screen" kann je nach Marke des Android-Geräts variieren.
Einstellung mit mobilem Internet
1. Schalten Sie den Projektor ein und wählen Sie „Screencast“ als Eingangsquelle.
2. Schalten Sie „Multi-Screen/Wireless Display“ Ihres Android-Geräts ein.
3. Wählen Sie „WiMiUS-K9-Projektor/Smart-Projektor“ aus den Suchergebnissen aus, um eine Verbindung
herzustellen.
4. Erfolg haben.
Für Android System(Miracast)
Screen
Mirroring

DE53
1. Schalten Sie Ihren Bluetooth-Lautsprecher ein.
2. Schalten Sie die [ Bluetooth-Einstellungen] Ihres Projektors ein und wählen Sie [ Zubehör hinzufügen] .
3. Wählen Sie Ihren Bluetooth-Lautsprecher zum Verbinden aus.
4. Erfolgreich.
Hinweis:
1. Der K9 Beamer ist kompatibel mit Bluetooth-Headsets, Bluetooth-Lautsprechern und Airpods, aber nicht
mit Bluetooth-Tastaturen oder Bluetooth-Telefonen.
2. Der K9 Beamer ist mit den meisten Bluetooth-Headsets, Bluetooth-Lautsprechern und Airpods
kompatibel, jedoch nicht mit den Bluetooth-Tastaturen.
3. Wenn Sie eine Frage haben, bitte zögern Sie nicht, WiMiUS per E-Mail über:
3.Bluetooth-Einstellungen
DE 54
Ofziell lizenziert von Netix – Der K9-Projektor verfügt über ein integriertes Smart-Netix-Betriebssystem,
sodass Sie Ihren Favoriten auswählen können APP und Video nach Belieben, und Sie können eine große
Anzahl wunderbarer Film- und Fernsehwerke genießen, ohne eine zu verwenden zusätzlicher Fire TV Stick.
Gleichzeitig ist diese Seite die Hauptschnittstelle des Projektors.
4.Integriertes Smart-OS-System
DE55
ANDERE VERBINDUNGEN
Gehen Sie zur Startseite – Wählen Sie [Einstellung] – Wählen Sie [Setup]. Verwenden Sie zum Umschalten
die Pfeiltasten auf der Fernbedienung Um das Menü aufzurufen, drücken Sie zur Bestätigung und Einstellung
„OK“.
1.Optionsmenü
DE 56
Menü Inhalt
OSD-Sprache Englisch/Frankreich/Italienisch/Japanisch usw
Zeiteinstellung Stellen Sie die Ortszeit ein
Bildschirmschoner Bildschirmschoner ein-/ausschalten
Sleep-Timer Ein/Aus: Stellen Sie die Schlafzeit zwischen 10 und 120 Minuten ein
Automatischer Schlaf Ein/Aus: Stellen Sie die Zeit zwischen 30 Minuten und 8 Stunden ein
USB-Auto-Upgrade Lokales Update
Internet-Update-Prüfung Überprüfen Sie die Internetumgebung
Standard zurücksetzen Werkseinstellungen wiederherstellen

DE57
2.Bildmodus-Menü
Menü Inhalt
Bildmodus
Benutzer/Standard/Anschaulich/Sport/Film/Spiel/
Energiesparen
Helligkeit Stellen Sie den Bildschirmhelligkeitswert ein
Kontrast Stellen Sie den Bildschirmkontrastwert ein
Sättigung Stellen Sie die Bildschirmsättigungsfarbe ein
Farbton Stellen Sie die Bildschirmfarbe ein
Schärfe Stellen Sie den Wert für die Bildschirmschärfe ein
Gamma Korrigieren Sie den Gammawert
Farbtemperatur Benutzer/Kühl/Standard/Warm
DE 58
Zur Startseite gehen – [Einstellung] auswählen – [Audio] auswählen. Zum Umschalten die Pfeiltasten auf
der Fernbedienung verwenden Um das Menü aufzurufen, drücken Sie zur Bestätigung und Einstellung "OK".
3.Audio-Menü
Menü Inhalt
Bass/ Hochtöne Legen Sie bevorzugte Werte fest
Klangstil Benutzer/Standard/Film/Musik/Sport/Vivid
Digitaler Ausgabemodus Automatisch/manuell
TTS Sprachübertragungsfunktion
Dialogverbesserung
Ein/Aus: Sprachübertragungsfunktion zur
Konversationsverbesserung für besondere Personen
Zurücksetzen Standard wiederherstellen
DE59
Gehen Sie zur Startseite – Wählen Sie [Einstellung] – Wählen Sie [Info]. Verwenden Sie zum Umschalten die
Pfeiltasten auf der Fernbedienung Um das Menü aufzurufen, drücken Sie zur Bestätigung und Einstellung
"OK".
4.Über (Systeminformationen)
Menü Inhalt
Netix Netix ofziell lizenziert
Versions-/Lizenzinformationen
Sehen Sie sich die neuesten Versions-/
Lizenzinformationen an
Gerätename K9-Projektor
Gerätetemperatur 50
℃

DE 60
Der WiMiUS K9-Projektor verfügt über 6 Schnittstellen, HDMI-Anschlüsse*2/USB-Anschlüsse*2/3,5-mm-
Kopfhörerausgang/RJ45 Bitte wählen Sie den richtigen Anschluss zum Anschließen Ihres Geräts (PC,
Telefon, DVD-Player, Soundbar, USB, PS4 usw.)
Bei USB-Geräten muss die Signalquelle nicht ausgewählt werden. Das Gerät erkennt sie automatisch.
• Wählen Sie die gewünschte Kategorie „Film "Musik" "Foto" oder „Ofce Suite ,in der Hauptschnittstelle und
drücken Sie die "OK"-Taste auf der Fernbedienung, um die entsprechende Kategorie aufzurufen.
• Entsprechend den Programmen zur Auswahl: Fotos"Musik" Film "oder Ofce Suite".
• Wählen Sie die Datei, die Sie abspielen möchten, drücken Sie die Taste "OK", um die Datei abzuspielen oder
anzuhalten. (Sie können die erforderliche Kategorie nicht eingeben, ohne ein USB-Laufwerk anzuschließen.)
Hinweis: Bei der Option "Ofce Suite" können PPT/TXT-Dateien nicht normal abgespielt oder dargestellt
werden.
1. Verbinden Sie den Laptop und den K9-Projektor mit dem HDMI-Kabel (im Lieferumfang enthalten).
2. Wählen Sie die HDMI-Quelle aus, um Dateien auf Ihrem Laptop zu projizieren.
3. Halten Sie auf Ihrem Laptop die Tasten "Win+P" gedrückt, um den Anzeigemodus zu ändern.
1.Anschluss an USB-Datenträger
2.Verbindung mit PC
ANSCHLUSS DER SIGNALLEITUNGEN
DE61
Nur Computer:
Dies ist die Standardoption – wird nur auf dem Hauptmonitor angezeigt.
Duplizieren:
Alle Monitore zeigen dasselbe an, indem der Desktop auf jedem Monitor dupliziert wird.
Erweitern:
Alle Ihre Monitore wirken wie ein großer Monitor und erweitern den Desktop über alle Monitore.
Nur Projektor:
Wird wie ein Projektor nur auf dem sekundären Monitor angezeigt.
Gehen Sie wie folgt vor, um die Bildschirmauösung im Nur-Projektor-Modus zu ändern.
Schritt: Start > Systemsteuerung > Darstellung und Personalisierung > Bildschirmauösung anpassen.

DE 62
• Wählen Sie den Mediensignalkanal: "HDMI".
• Verwenden Sie einen Typ-C-auf-HDMI-Adapter, um Ihr MacBook anzuschließen, oder einen Mini-Display-
auf-HDMI-Adapter, um Ihr MacBook Air anzuschließen (Adapter nicht enthalten).
• Wählen Sie den Mediensignalkanal: "HDMI".
• Verwenden Sie ein HDMI-Kabel, um eine Verbindung zur XBOX/PS4 herzustellen.
• Gelingen.
3.Verbindung mit MacBook oder Mac Book Air
4.Verbindung mit XBOX/PS4

DE63
GARANTIE
FAQ
Vielen Dank für Ihren Kauf und Ihre Unterstützung! Wir bieten 3 Jahre Garantie für den P64 Beamer. Wenn
Sie irgendwelche Fragen haben, kontaktieren Sie uns bitte über
Q1:
Die WiFi-Verbindung ist nicht stabil?
1. Bitte überprüfen Sie, ob das Netzwerk Ihres Telefons gut ist.
2. Halten Sie den Abstand zwischen Ihrem Telefon und dem Projektor innerhalb von 1 Meter.
Q2:
Die Fernbedienung kommuniziert nicht mit dem Projektor.
1. Ist der Netzschalter auf der Rückseite des Projektors ein- oder ausgeschaltet?
2. Die Batterien der Fernbedienung sind verbraucht?
3. Etwas behindert das Signal zwischen der Fernbedienung und dem IR
• Wählen Sie für die Verbindung den Modus „HDMI“.
• Geben Sie die Menütaste ein
• Ändern Sie den PC-MODUS von „EIN“ auf „AUS“, um zu verhindern, dass weiße Ränder im Bild sichtbar sind.
5.Mit DVD verbinden

DE 64
Q3:
Was ist das Linux-System? Kann ich weitere beliebte Filme und Fernsehsendungen ansehen?
1. Das Linux-System ist offiziell von Netflix autorisiert. Auf dem Beamer sind Inhalte von Netflix, YouTube,
Prime Video usw. vorinstalliert.
2. Weitere Apps zum Herunterladen nden Sie unter „Meine Anwendungen“ auf der Hauptoberäche(Weitere
Apps-Pfad: Hauptoberäche „Meine Anwendungen“ – APP-Assistent)
Q5:
Nicht kompatibel mit Ihrem Bluetooth-Lautsprecher?
1. Der Projektor ist möglicherweise nicht mit einigen Versionen der Bluetooth-Lautsprecher von JBL
kompatibel.
2. Wenden Sie sich sofort an unseren Kundendienst unter
und teilen Sie uns die
Marke und das Modell Ihres Bluetooth-Lautsprechers mit.
Q4:
Automatische Abschaltung nach längerer Arbeit.
1. Die Belüftung des Projektors ist blockiert oder die Spannung ist nicht stabil.
2. Senden Sie ein Video an
um es für Sie zu überprüfen.
4. Starkes Licht auf IR direkt.

TABLE DES MATIÈRES
Assistance professionnelle à vie WIMIUS - - - - - - - - - - - - - - - - - - 66
CONSEILS:- - - - - - - - - - - - - - - - - - - - - - - - - - - - - - - 67
Accessoires - - - - - - - - - - - - - - - - - - - - - - - - - - - - - - 68
SPÉCIFICATIONS DU PROJECTEUR - - - - - - - - - - - - - - - - - - - - - 69
APERÇU DU PROJECTEUR - - - - - - - - - - - - - - - - - - - - - - - - 70
TÉLÉCOMMANDE - - - - - - - - - - - - - - - - - - - - - - - - - - - - 72
INSTALLATION - - - - - - - - - - - - - - - - - - - - - - - - - - - - - 73
DÉMARRAGE DU PROJECTEUR - - - - - - - - - - - - - - - - - - - - - - - 76
PARAMÈTRES DE L'IMAGE DE PROJECTION - - - - - - - - - - - - - - - - - - 77
PROJECTEUR DE SÉANCES INTELLIGENTES - - - - - - - - - - - - - - - - - - 81
AUTRES PARAMÈTRES DE PROJECTION DE BASE- - - - - - - - - - - - - - - - 88
CONNEXION DES LIGNES DE SIGNAL - - - - - - - - - - - - - - - - - - - - 93
FAQ & GARANTIE - - - - - - - - - - - - - - - - - - - - - - - - - - - - 96

FR 66
Cher client,
Merci pour choisir WIMIUS!
Veuillez lire attentivement ce manuel avant d'utiliser le projecteur. Si vous avez des questions, veuillez envoyer
votre numéro de commande et votre problème (
par exemple: FR + K9 + Problème
) à
.
Nous vous fournirons une solution rapide dans les 24 heures.
En fait, de nombreux problèmes peuvent être facilement résolus grâce à des paramètres, tels que l'absence
de signal, l'absence de son, l'échec de la connexion Bluetooth, l'échec de la connexion WiFi, l'animation
intermittente, etc. Nous promettons que tous les projecteurs sont soigneusement inspectés et emballés à
100 % avant l'expédition.
Si vous avez des questions, veuillez nous contacter pour résoudre le problème. Et donnez-nous une chance
de nous améliorer. Nous nous engageons à vous fournir une solution satisfaisante.
Nous nous engageons à fournir un excellent support
24h/7j
pour garantir votre satisfaction en tant que
client précieux.
Merci pour votre compréhension!
Sincèrement
L'ÉQUIPE DE SOUTIEN WIMIUS
ASSISTANCE PROFESSIONNELLE À VIE WIMIUS

FR67
1. Ne placez pas le projecteur dans une pièce trop chaude ou trop froide, car une température élevée
ou basse affectera les performances du projecteur. raccourcir la durée de vie de l'équipement.
L'environnement de travail est de préférence compris entre 5°C et 35°C.
2. Équipé d'un dispositif de ventilation pour assurer le fonctionnement stable du projecteur. Ne couvrez
pas les bouches d'aération avec des chiffons, des couvertures ou d'autres objets. N'insérez aucun objet
d'aucune sorte dans les fentes du projecteur, car cela pourrait provoquer un court-circuit ou un choc
électrique et endommager l'appareil.
3. Le projecteur doit être strictement protégé contre les chocs violents, l'extrusion et les vibrations. n'essayez
pas de continuer à bouger. Chocs, pressions et vibrations violents. N'essayez pas de bouger et de panne
du circuit interne.
4. En tant que composant principal du projecteur, l'objectif est directement lié à la clarté et à l'effet de
l'image. Un essuyage excessif de la poussière sur l’objectif peut affecter la qualité de l’image. Les lentilles
sales doivent être essuyées avec un chiffon en coton doux sur la surface de la lentille en verre. N'utilisez
pas de chiffons durs ou d'abrasifs.
5. Veuillez contrôler l'éclairage ambiant dans la pièce pour améliorer la visibilité de l'image projetée.
Réduire l'éclairage ou utiliser des rideaux peut contribuer à réduire l'éblouissement et à améliorer la
qualité de l'image.
6. Si vous avez des questions, ne vous inquiétez pas, veuillez nous contacter via
.
CONSEILS:
FR 68
Projecteur WiMiUS K9 * 1
Câble HDMI*1 Capuchon d'objectif * 1 Télécommande * 1
Manuel d'utilisation*1 Câble d'alimentation * 1 Chiffon de nettoyage * 1
ACCESSOIRES
FR69
SPÉCIFICATIONS DU PROJECTEUR
Numéro de Modèle: K9
Résolution Native
1920*1080P
Rapport d'aspect
16:9/4:3/Auto
Technologie d'afchage
LCD
Source de lumière
LED
Poids
2.3kg
Taille
21*18.2*16.1cm
Taux de
rafraîchissement
60Hz
Tension d'Alimentation
AC100-240V~50/60Hz 1A
Focus
Auto + Électrique +
Manuel
Keystone
Auto + Électrique +
Manuel
Port de sortie
Sortie audio 3,5 mm
Port d'entrée
HDMI*2/USB*2/RJ45
Mode de fonctionnement
Télécommande/Bouton
Type d'Installation
Avant/Arrière sur bureau, Avant/Arrière au plafond
Format Vidéo
MP4/MPG/AVI/MPEG-4/TS/MOV/M4V/MKV/FLV/DAT/3GP
(Support for video codecs
may vary depending on circumstances, contact us for additional support)
Format Audio
MP3/WMA/M4A/MP2/AAC/OGG/WAV/FLAC
(Dolby SUPPORT)
Format d'Image
JPG/JEPG/BMP/PNG
Remarque:
Fabriqué sous licence de Dolby Laboratories. Dolby, Dolby Audio et le symbole double D sont
des marques commerciales de Dolby Laboratories Licensing Corporation.
FR 70
APERÇU DU PROJECTEUR
1 2 3
4 5 6 7 8910
11 12
1. Objectif
2. Récepteur de signal infrarouge
3. Signal de mise au point automatique
4. Port réseau laire
5. Port USB *2
6. Port HDMI1
7. Port HDMI2
8. Prise casque
9. Récepteur de signal infrarouge
10. Entrée d'alimentation
11. Filet anti-poussière amovible
12. Sortie d'air

FR71
13 14 15 16
13. Bouton d'alimentation
14. Trous de vis de support (1/4 pouces, levage de support)
15. Pieds de machine de réglage de la hauteur
16. Étiquetage inférieur
FR 72
TÉLÉCOMMANDE
1 2
4
6
8
10
12
15
16
17
19
20
3
5
7
9
11
13
14
21
18
1. Puissance
2. Muet
3. NETFLIX
4. YouTube
5. Vidéo principale
6. Ouvrez le NAVIGATEUR
7. Menu
8. Source
9. Touches échées
10. Clé de conrmation
11. Retour
12. Page d'accueil
13. Volume +
14. Volume -
15. Focus+
16. Focus-
17. Touches rouge/vert/jaune/
bleu
18. USB
19. Retour arrière
20. Mode de projection
21. Numéro
Note:
1. Installez 2 piles AAA (NON INCLUSES) dans la télécommande avant de l'utiliser. Ne combinez pas de piles neuves
avec des piles anciennes dans la télécommande, car cela pourrait entraîner un dysfonctionnement dû à
une alimentation électrique insufsante.
2. Lorsque vous utilisez la télécommande, assurez-vous que l'émetteur de signal de la télécommande vise
le récepteur de signal infrarouge du projecteur.
3. Si vous n'utilisez pas la télécommande pendant une période prolongée, veuillez retirer les piles pour éviter
toute fuite.
+
-
F+
F-

FR73
1. Support de plafond pour
projection frontale
2. Support de plafond pour
rétroprojection
3. Support de bureau pour
projection frontale
4. Support de bureau pour
rétroprojection
INSTALLATION
Le projecteur peut être accroché au plafond avec un cadre de suspension spécial et placé sur le bureau
stable pour projeter l'image en fonction de l'environnement d'exploitation et des exigences. De plus, le
projecteur peut être installé avec les méthodes suivantes:
Gardez le projecteur à une hauteur où son objectif est à symétrie axiale par rapport à l'écran. Si cela n'est
pas possible, utilisez la fonction de correction trapézoïdale pour ajuster l'image de projection.
1.Méthode d'Installation
FR 74
2.Distance et Taille de Projection
Format d'image: 16:9
Distance(ft.) Taille de l'écran
4.8 50"
5.7 60"
7.6 80"
9.5 100"
11.5 120"
14.4 150"
* La distance de projection recommandée est d'environ
2-3m.
* La taille de l'image dépend de la distance entre le projecteur et l'écran, les estimations ci-dessus peuvent
présenter un écart de 3%. Différents paramètres entraînent des distances différentes.
* L'effet de projection est meilleur dans un environnement sombre.
FR75
3. Installer au plafond
Gardez le projecteur vertical et vers le milieu de l'écran du projecteur, et gardez l'image projetée à plat sur
l'écran.
1. Pour régler la base inclinable, dévissez la tige de support au bas du projecteur, voir l'image ci-dessous.
2. Pour le montage au plafond, il y a un trou au bas du projecteur. Veuillez retourner le projecteur, vous
pourrez alors trouver les trous de montage au plafond comme indiqué dans l'image ci-dessous.
REMARQUE: Le support de suspension ou le support de montage au plafond n'est pas emballé.
(NE
SUPPORTE PAS ÉGALEMENT le levage à 4 pieds)
Pieds De Machine à Réglage En Hauteur

FR 76
DÉMARRAGE DU PROJECTEUR
1. Retirez le capuchon de l'objectif, connectez le projecteur à l'alimentation via le cordon d'alimentation, puis
appuyez sur le bouton d'alimentation, il commence à fonctionner. (La lumière passe du rouge au bleu)
2. Utilisez la fonction de correction/mise au point automatique ou électronique du projecteur pour obtenir
une image rectangulaire et claire.
3. Ajustez les boutons de mise au point " F+ " et " F- " sur la télécommande du projecteur pour
obtenir les meilleures performances d'image.
(
S'il est toujours ou, essayez d'ajuster la distance de
projection
)
4. Connectez des appareils externes (smartphone Android), Fire Stick, TV Box, lecteur DVD, PC, etc.
au projecteur à la position correspondante et assurez-vous de sélectionner la source de signal
correspondante. **Si vous ne sélectionnez pas le source correcte, le projecteur ne pourra pas détecter le
signal)
A. Branchez:
Le voyant de mise sous tension (branchement) clignote en rouge 8 fois. Pendant le
processus d'auto-vérication de la machine, vous devez attendre patiemment, puis appuyer sur le bouton
d'alimentation pour l'allumer.
B. Mise sous tension:
Le voyant bleu est toujours allumé, indiquant l'état de fonctionnement sous tension.
C. Arrêt:
Le voyant rouge est toujours allumé, indiquant l'état d'arrêt.
D. Veille:
Voyant rose, en cours de veille (5 s), veuillez ne pas appuyer à plusieurs reprises sur le bouton
d'alimentation.
Description Du Voyant Du Projecteur
FR77
PARAMÈTRES DE L'IMAGE DE PROJECTION
Sélectionnez le menu [ Paramètres ] -- Sélectionnez l'option [ Projection ] -- Sélectionnez votre mode
d'installation, appuyez sur la touche fléchée pour sélectionner et appuyez sur « OK » pour confirmer la
position de projection.
1.Mode de Projection
5. Sélectionnez " " puis allez dans le menu et sélectionnez [ Conguration ] pour entrer [ Langue OSD ]
pour dénir votre langue préférée.

FR 78
2.Correction Trapézoïdale Manuelle
2.1 Correction Trapézoïdale à Quatre Points
Sélectionnez le menu [ Paramètres ] - Sélectionnez l'option [ Keystone ], puis sélectionnez la [ Correction
en quatre points ], cliquez simplement sur le bouton " OK " pour choisir le point que vous souhaitez ajuster
dans un premier temps, puis appuyez sur le bouton "
▶
" ou "
▼
" pour dénir la valeur (verticale 0 ~ 100)
nécessaire comme indiqué ci-dessous.
Réinitialiser:
Appuyez sur " " et l'image sera restaurée aux paramètres de correction trapézoïdale d'origine.
FR79
2.2 Correction Trapézoïdale Verticale
Sélectionnez le menu [ Paramètres ] - Sélectionnez l'option [ Keystone ], puis sélectionnez l'option [ Vertical
Keystone ] pour ajuster l'écran verticalement ±30° avec les touches échées jusqu'à ce que les guides
soient ajustés sur un rectangle.
Veuillez d'abord placer le projecteur horizontalement face au mur, sélectionnez le menu [Paramètres] -
Sélectionnez l'option [Keystone] ou [Mise au point] - Activez l'option [Correction automatique] ou [Mise
au point automatique], la mise au point automatique se fera automatiquement. image en fonction de la
distance de projection par rapport à l'écran et ajustez l'image sur un rectangle lorsque vous modiez l'angle
de projection.
3.Correction Trapézoïdale Et Mise Au Point Automatique
Remarque:
L'angle de projection latérale du projecteur ne doit pas dépasser 20°. De plus, il ne doit y avoir
aucun obstacle devant le projecteur. Sinon, la fonction de correction trapézoïdale automatique risque de
ne pas fonctionner.
FR 80
Allez à la page d'accueil -- Sélectionnez le menu " " -- Sélectionnez les [ Paramètres ] -- Sélectionnez
l'option [ Zoom ], l'écran de projection peut être zoomé de 50% à 100%. Appuyez sur le bouton "
↑ ↓
" pour
dénir la valeur nécessaire comme indiqué ci-dessous.
Réinitialiser:
Appuyez sur " " et l'image sera restaurée aux paramètres de correction trapézoïdale d'origine.
4.Réglage Du Zoom
FR81
PROJECTEUR DE SÉANCES INTELLIGENTES
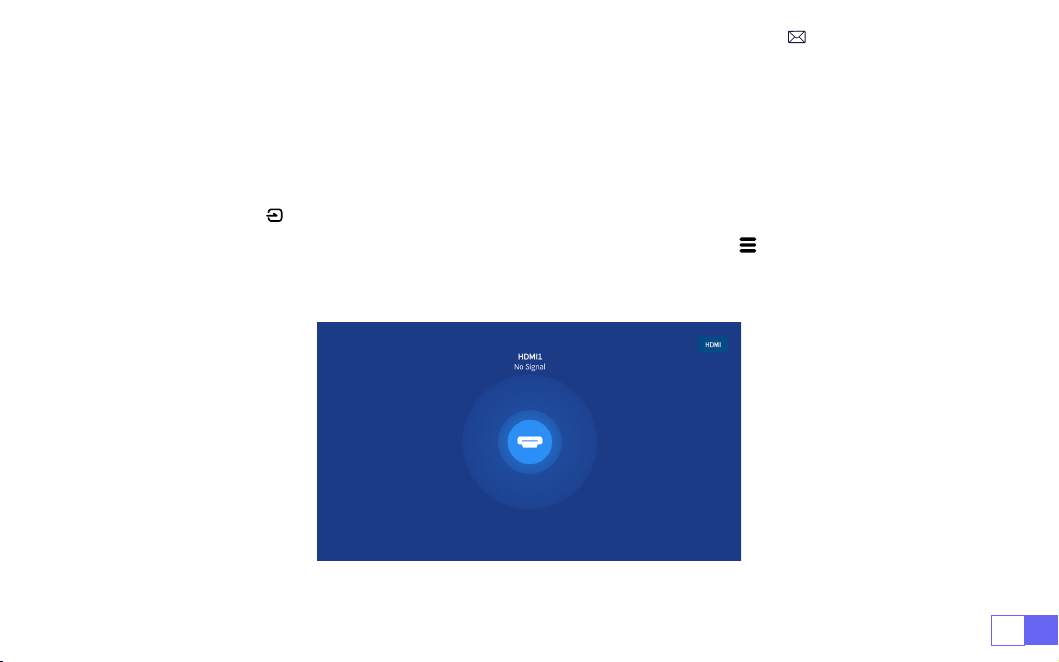
Sélectionnez la source de signal d'entrée souhaitée (HDMI1/HDMI2) sur la page d'accueil, ou vous pouvez
appuyer sur le bouton " " de la télécommande pour sélectionner la source de signal correspondante.
Lors de la lecture d'une vidéo, vous pouvez appuyer sur le bouton de menu " " , puis sélectionner [ Mode
Image ]. Vous pouvez régler librement la luminosité et le contraste de l'image et d'autres fonctions.
1.Sélectionnez la Source du Signal
1.1 Sélectionnez la source du signal d'entrée HDMI
FR 82
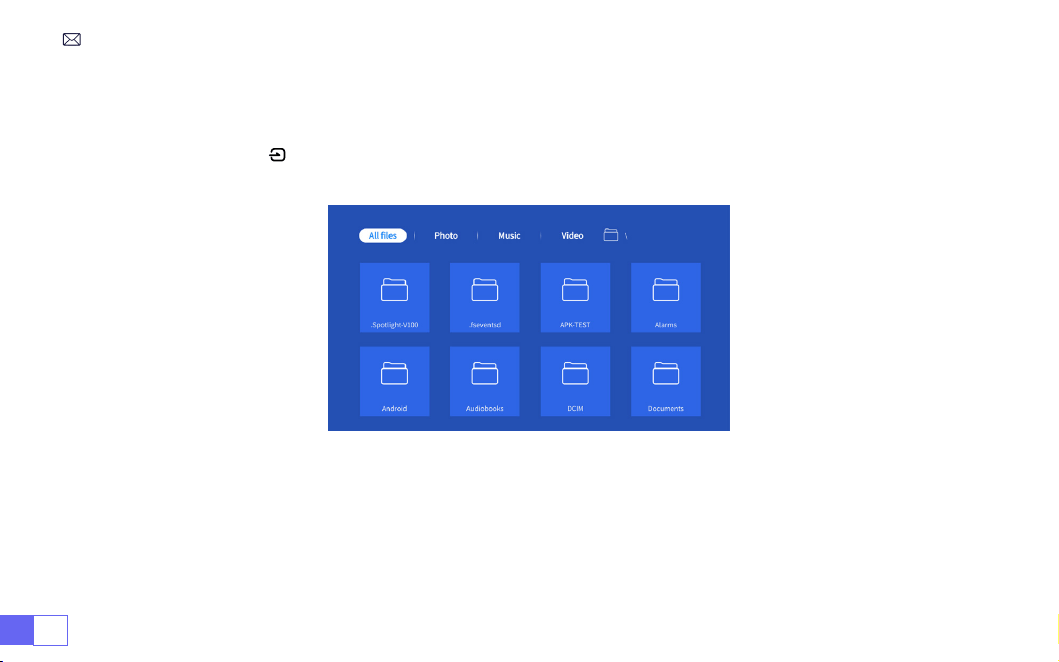
Pour les appareils USB, pas besoin de choisir la source du signal. La machine les détectera
automatiquement.
Appuyez sur le bouton " " et sélectionnez la [Source du signal d'entrée USB] sur la page d'accueil:
Conseils:
Si le projecteur ne reconnaît pas le disque USB, veuillez vous référer aux méthodes suivantes pour
résoudre le problème.
Veuillez conrmer si votre disque USB répond aux formats suivants.
1. FAT32: 8G/16G/32G 2. NTFS: 64G
1.2 Sélectionnez la source du signal d'entrée USB

FR83
Si ce n'est pas le cas, veuillez formater le disque USB. Avant de formater le disque USB, si vous avez quelque
chose sur votre disque USB, assurez-vous de tout sauvegarder. Après ces étapes, tout sera perdu à jamais.
Si le problème n'est toujours pas résolu, veuillez envoyer votre problème à cet e-mail:
1. La uidité de la mise en miroir d'écran avec une connexion sans l sera affectée par l'environnement
réseau. Une bande passante de 100 Mbits ou plus est recommandée lors de l'utilisation de la mise en
miroir d'écran.
2. Assurez-vous que votre appareil mobile est proche du projecteur lorsque vous utilisez une connexion
sans l. Une distance de 2-3m. est recommandé.
3. Certains appareils Android peuvent ne pas prendre en charge la mise en miroir d'écran en raison de la
compatibilité.
Sélectionnez l'icône [ Paramètres ] dans le coin supérieur droit de l'interface principale, puis appuyez sur la
touche " OK " de la télécommande pour accéder à l'interface des paramètres et sélectionnez " Paramètres
Réseau ".
2.Connexion avec Des Appareils Intelligents
Conseils:
Paramètres WiFi
Attention:
Votre appareil et le projecteur doivent être dans le même réseau Wi-Fi domestique.
Pour le Système iOS
FR 84
1. Choisissez votre WiFi domestique pour vous connecter et entrez le bon mot de passe, puis cliquez sur "OK ",
veuillez attendre 3 secondes pour établir la connexion.
2. Lorsque vous utilisez un appareil iOS pour la première fois, vous devez télécharger dans l'interface
principale (Chemin
:
Interface principale Mes applications - Assistant APP -
ScrennShare
- Cliquez sur
OK - Téléchargement de l'application terminé, veuillez éteindre et redémarrer - Trouver ScreenShare
dans Mes applications )
3. Activez le paramètre WiFi de l'appareil iOS, puis connectez-vous au même WiFi domestique.
4. Cliquez ensuite sur "Airplay" sur le smartphone.
5. Sélectionnez " Projecteur-c3d9 " dans les résultats de la recherche pour vous connecter.
REMARQUE
: En raison de la mise à niveau du projecteur intelligent WiMiUS K9 lui-même: Mise en miroir
d'écran pour iOS, Android et Windows, et n'a plus besoin du périphérique iOS Screen Cast pour la mise en
miroir d'écran (le package n'inclut pas de périphérique iOS Screen Cast).Si vous rencontrez des problèmes,
veuillez nous contacter à temps:
Screen
Mirroring
FR85
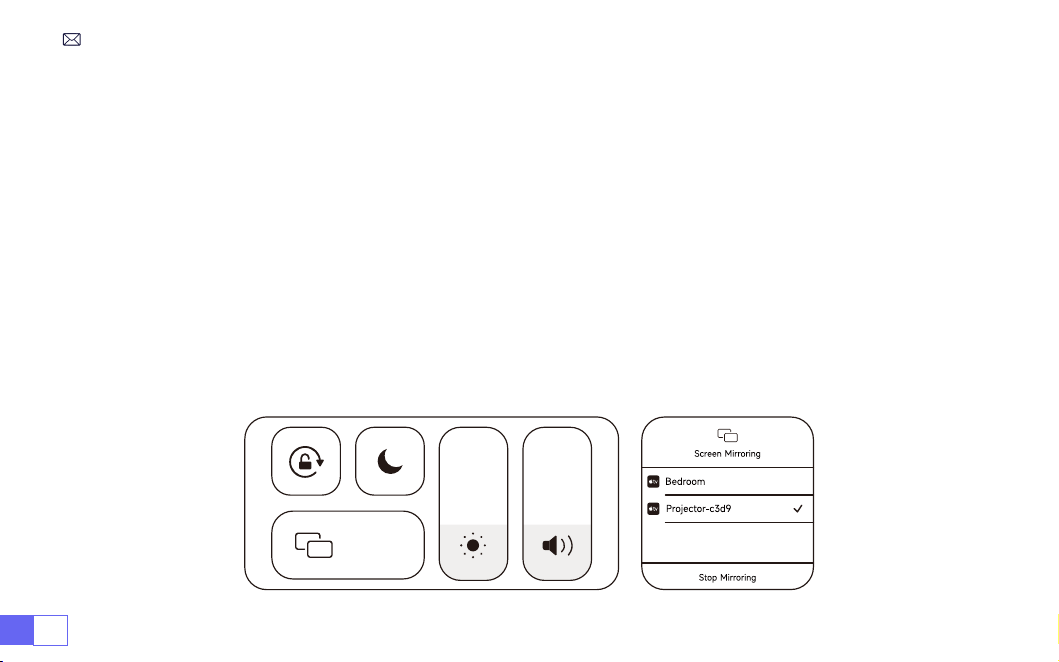
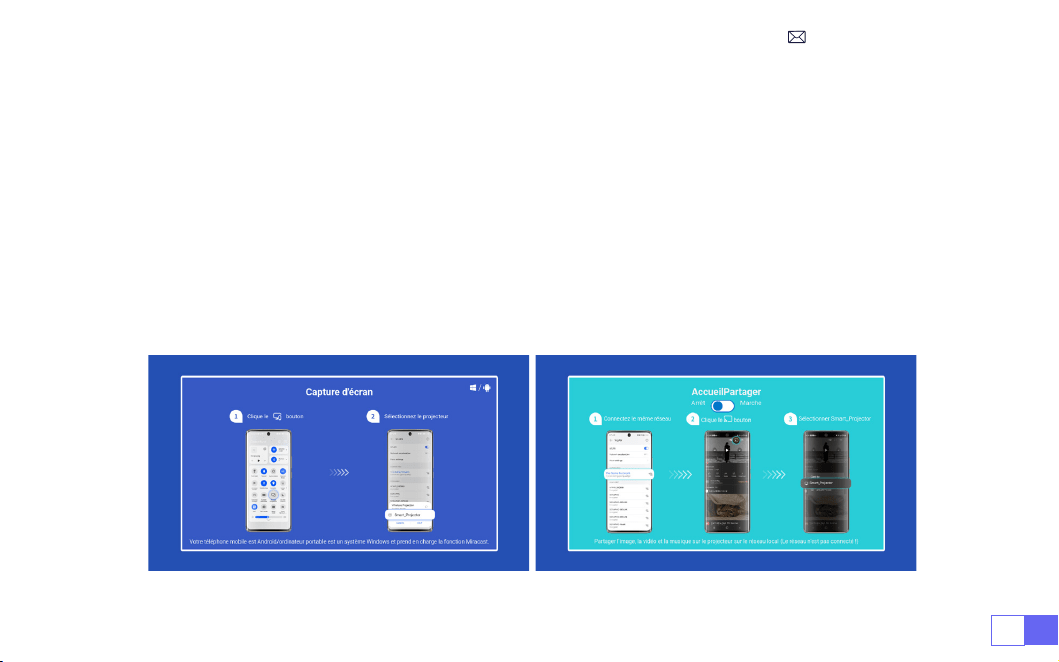
Pour activer cette fonction, votre appareil Android doit prendre en charge l'afchage multi-écrans/sans l.
Le nom "Multi-écran" peut varier en fonction des différentes marques d'appareils Android.
Conguration avec Internet mobile
1. Allumez le projecteur et sélectionnez " Screencast " comme source d'entrée.
2. Activez "Afchage multi-écran/sans l" de votre appareil Android.
3. Sélectionnez "
WiMiUS-K9 Projector/Smart Projector
" dans les résultats de la recherche pour vous
connecter.
4. Réussir.
Pour Système Android

FR 86
1. Allumez votre haut-parleur Bluetooth.
2. Activez les [Paramètres Bluetooth] de votre projecteur.
3. Sélectionnez votre haut-parleur Bluetooth pour vous connecter.
4. Réussir.
Note:
1. Cette étape s’applique uniquement à la connexion du haut-parleur Bluetooth, mais pas au Bluetooth du
téléphone mobile.
2. Le projecteur K9 est compatible avec la plupart des casques Bluetooth, haut-parleurs Bluetooth et
Airpods, mais pas avec les claviers Bluetooth.
3. Si vous avez des questions, n'hésitez pas à envoyer un e-mail à WiMiUS via:
3.Paramètres Bluetooth
FR87
Licence Ofcielle Netix - Le projecteur K9 dispose d'un système d'exploitation Smart Netix intégré, vous
pouvez donc choisir votre application et votre vidéo préférées à volonté, et vous pouvez profiter d'un
grand nombre de merveilleuses œuvres cinématographiques et télévisées sans utiliser de clé Fire TV
supplémentaire. .
En même temps, cette page constitue l'Interface Principale du projecteur.
4.Système Smart OS Intégré
FR 88
AUTRES PARAMÈTRES DE PROJECTION DE BASE
Allez à la page d'accueil -- Sélectionnez [ Paramètres ] -- Sélectionnez [ Configuration ] . Utilisez les
touches échées de la télécommande pour changer de menu, appuyez sur « OK » pour conrmer et régler.
1.Menu d'Options
FR89
Menu Contenu
Langue OSD Anglais/France/italien/japonais etc.
Conguration de l'heure Dénir l'heure locale
Économiseur d'écran Activer/désactiver l'économiseur d'écran
Minuterie de mise en veille On/Off: Réglez le temps de sommeil de 10 à 120 minutes
Veille Auto On/Off: Réglez l'heure de 30minutes à 8heures
Mise à niveau Auto USB Mise à jour locale
Vérication des mises à jour Internet Vérier l'environnement Internet
Réinitialiser par défaut Restaurer les paramètres d'usine

FR 90
2.Menu Mode Image
Menu Contenu
Mode Image Anglais/France/italien/japonais etc.
Luminosité Set the Screen Brightness Value
Contraste Dénir la valeur du contraste de l'écran
Saturation Dénir la couleur de saturation de l'écran
Teinte Dénir la couleur de la teinte de l'écran
Netteté Dénir la valeur de netteté de l'écran
Gamma Corrigez la valeur gamma
Température de couleur Utilisateur/Froid/Standard/Chaud
FR91
Allez à la page d'accueil -- Sélectionnez [ Paramètres ] -- Sélectionnez [ Audio ]. Utilisez les touches
échées de la télécommande pour changer de menu, appuyez sur « OK » pour conrmer et régler.
3.Menu Audio
Menu Contenu
Graves/Aigus Dénir les valeurs préférées
Style de son Utilisateur/Standard/Film/Musique/Sports/Vif
Sortie numérique Auto/Manuel
TTS Fonction de diffusion vocale
Amélioration des dialogues
On/Off: Fonction d'amélioration de la conversation, fonction
de diffusion vocale pour les personnes spéciales
Réinitialiser Restaurer par défaut
FR 92
Allez à la page d'accueil -- Sélectionnez [ Paramètres ] -- Sélectionnez [ À propos ] . Utilisez les touches
échées de la télécommande pour changer de menu, appuyez sur « OK » pour conrmer et régler.
4.À Propos (Information Système)
Menu Contenu
Netix Licence ofcielle Netix
Informations sur la version/licence
Afcher les dernières informations sur la
version/licence
Nom de l'appareil Nom du modèle du projecteur
Température de l'appareil
50℃

FR93
Le projecteur WiMiUS K9 dispose de 6 interfaces, ports HDMI*2/ports USB*2/sortie casque 3,5 mm/RJ45
Veuillez sélectionner le bon port de connexion pour connecter votre appareil (PC, téléphone, lecteur DVD,
barre de son, USB, PS4, etc.)
Sélectionnez la source du signal USB, la machine les détectera automatiquement.
• Sélectionnez la catégorie souhaitée " photos ", " musique " ou " vidéo " dans l'interface principale, et
appuyez sur la touche " OK " de la télécommande pour accéder à la catégorie correspondante.
• Selon les programmes choisir : " photos " " musique " ou " vidéo ".
• Choisissez le chier que vous souhaitez lire et appuyez sur la touche " OK " pour lire ou mettre en pause le
chier. (Vous ne pouvez pas accéder à la catégorie requise sans connecter un disque USB.)
Remarque: Pour l'option " Suite Office ", les fichiers PPT/TXT ne peuvent pas être lus ou présentés
normalement.
1. Connectez-vous à l'ordinateur et au projecteur K9 avec le câble HDMI (inclus).
2. Sélectionnez la source HDMI pour projeter tous les chiers sur votre ordinateur.
3. Sur votre ordinateur portable, maintenez enfoncées les touches du tableau " Win+P " pour changer votre
mode d'afchage.
1. Connexion multimédia USB
2.Connexion au PC
CONNEXION DES LIGNES DE SIGNAL

FR 94
Ordinateur uniquement:
c'est l'option par défaut – s'afche uniquement sur le moniteur principal.
Dupliquer:
fait en sorte que tous les moniteurs affichent la même chose en dupliquant le bureau sur
chaque moniteur.
Étendre:
fait en sorte que tous vos moniteurs agissent comme un seul grand moniteur étendant le bureau
sur chacun d'eux.
Projecteur uniquement:
s'afche uniquement sur le moniteur secondaire comme un projecteur.
Pour modier la résolution de l'écran en mode Projecteur uniquement, procédez comme suit.
Étape:
Démarrer > Panneau de conguration > Apparence et personnalisation > Ajuster la résolution de
l'écran
FR95
• Choisissez le canal du signal multimédia:"HDMI"
• Utilisez un adaptateur Type-C vers HDMI pour connecter votre MacBook, ou un adaptateur Mini Display
vers HDMI pour vous connecter à votre MacBook Air (adaptateur non inclus). Connexion avec MacBook ou
Mac Book Air. (Adaptateur NON INCLUS)
• Choisissez le canal du signal multimédia:"HDMI"
•Utilisez un câble HDMI pour vous connecter à la XBOX/PS4.
• Réussir
3.Connexion avec MacBook ou MacBook Air
4.Connexion avec XBOX/PS4

FR 96
• Sélectionnez le mode " HDMI " pour la connexion
• Entrer la touche de Menu
• Changez le Mode PC de [ON] à [OFF] pour éviter le risque de bords de pixels blancs dans l'image.
5.Connexion avec un DVD
FAQ
&
GARANTIE
Merci d'avoir choisi le projecteur WiMiUS K9. Nous offrons une garantie de 3 ans pour le projecteur K9. Si
vous avez des questions, n'hésitez pas à nous contacter via
Nous avons compilé quelques questions fréquemment posées et leurs réponses correspondantes pour
mieux vous aider.
Q1:
La connexion WiFi est instable. Comment puis-je résoudre ce problème?
Pour résoudre les problèmes de connectivité WiFi, assurez-vous d’abord que votre réseau domestique
fonctionne bien. De plus, gardez la distance entre votre téléphone et le projecteur à moins d’un mètre. Si le
problème persiste, veuillez nous contacter à
pour obtenir de l'aide.
Q2:
La télécommande et le projecteur ne peuvent pas communiquer.
1. L'interrupteur d'alimentation au-dessus du projecteur est-il allumé ou éteint ?
2. La pile de la télécommande est épuisée ?

FR97
Q5:
Non compatible avec votre haut-parleur Bluetooth ?
1. Le projecteur peut ne pas être compatible avec certaines versions de haut-parleurs Bluetooth de JBL.
2. Contactez immédiatement notre e-mail après-vente à
et indiquez-nous la
marque et le modèle de votre enceinte Bluetooth.
Q4:
Arrêt automatique après avoir travaillé pendant un certain temps.
1. La ventilation du projecteur est bloquée ou la tension n’est pas stable.
2. Envoyez une vidéo à
pour vérier pour vous.
Q3:
Qu'est-ce que le système Linux ? Puis-je regarder des lms et des émissions de télévision plus populaires?
1. Le système Linux est ofciellement autorisé par Netix. Le projecteur est livré préchargé avec du contenu
de Netix, YouTube, Prime Video, etc.
2. Veuillez trouver plus d'applications à télécharger dans l'interface principale Mes applications.(Chemin
plus d'applications: Interface Principale Mes Applications - Assistant APP)
3. Il y a des obstacles entre la télécommande et le signal infrarouge.

TABLA DE CONTENIDO
Soporte profesional de por vida de WIMIUS- - - - - - - - - - - - - - - - - -99
CONSEJOS - - - - - - - - - - - - - - - - - - - - - - - - - - - - - - 100
LISTA DE PAQUETES - - - - - - - - - - - - - - - - - - - - - - - - - - - -101
ESPECIFICACIONES DEL PROYECTOR - - - - - - - - - - - - - - - - - - - - 102
DESCRIPCIÓN GENERAL DEL PROYECTOR - - - - - - - - - - - - - - - - - - 103
MANDO A DISTANCIA - - - - - - - - - - - - - - - - - - - - - - - - - - 105
INSTALACIÓN - - - - - - - - - - - - - - - - - - - - - - - - - - - - - 106
PROYECTOR INICIAL - - - - - - - - - - - - - - - - - - - - - - - - - - - 109
AJUSTES DE IMAGEN DE PROYECCIÓN - - - - - - - - - - - - - - - - - - - -110
AJUSTES INTELIGENTES DEL PROYECTOR- - - - - - - - - - - - - - - - - - - -114
OTRAS CONFIGURACIONES BÁSICAS DE PROYECCIÓN - - - - - - - - - - - - - -121
CONEXIÓN DE LÍNEAS DE SEÑAL - - - - - - - - - - - - - - - - - - - - - - 126
Preguntas Frecuentes y Garantía - - - - - - - - - - - - - - - - - - - - - 129

ES99
Estimado cliente,
¡Muchas gracias por apoyar a WIMIUS!
Lea atentamente este manual antes de utilizar el proyector. Si tiene alguna pregunta, envíe su número de
pedido y problema (
por ejemplo: ES + K9 + Problema
) a
Le proporcionaremos
una solución rápida en 24 horas.
De hecho, muchos problemas se pueden resolver fácilmente mediante la conguración, como falta de
señal, falta de sonido, falla de la conexión Bluetooth, falla de la conexión WiFi, animación intermitente, etc.
Prometemos que todos los proyectores son 100% inspeccionados y embalados cuidadosamente antes del
envío.
Si tiene alguna pregunta, comuníquese con nosotros para resolver el problema. Y danos la oportunidad de
mejorar. Nos comprometemos a brindarle una solución satisfactoria.
Estamos comprometidos a brindar un excelente soporte las 24 horas del día, los 7 días de la semana para
garantizar su satisfacción como nuestro valiOSo cliente.
¡Gracias por su comprensión!
Atentamente
EQUIPO DE APOYO DE WIMIUS
SOPORTE PROFESIONAL DE POR VIDA DE WIMIUS

ES 100
1. No coloque el proyector en una habitación demasiado caliente o demasiado fría, ya que una
temperatura alta o baja afectará el rendimiento del proyector. acortar la vida útil del equipo. El
ambiente de trabajo es preferiblemente de 5 °C a 35 °C.
2. Equipado con un dispositivo de ventilación para garantizar el funcionamiento estable del proyector. No
cubra las rejillas de ventilación con paños, mantas u otros artículos. No inserte objetos de ningún tipo en
las ranuras del proyector, ya que esto puede provocar un cortocircuito o una descarga eléctrica y dañar
el dispositivo.
3. El proyector debe estar estrictamente protegido contra fuertes impactos, extrusiones y vibraciones. No
intentes seguir moviéndote. Fuertes golpes, apretones y vibraciones. No intente moverse y falla el circuito
interno.
4. Como componente central del proyector, la lente está directamente relacionada con la claridad y el
efecto de la imagen. Limpiar excesivamente el polvo de la lente puede afectar la calidad de la imagen.
Las lentes sucias se deben limpiar con un paño de algodón suave en la supercie de la lente de vidrio.
No utilice paños duros ni abrasivos.
5. Controle la iluminación ambiental de la habitación para mejorar la visibilidad de la imagen proyectada.
Atenuar las luces o utilizar cortinas puede ayudar a reducir el deslumbramiento y mejorar la calidad de
la imagen.
6. Cualquier duda, por favor contacta a nuestro correo electrónico para ayudarte pronto:
support01@
wimius.com
CONSEJOS
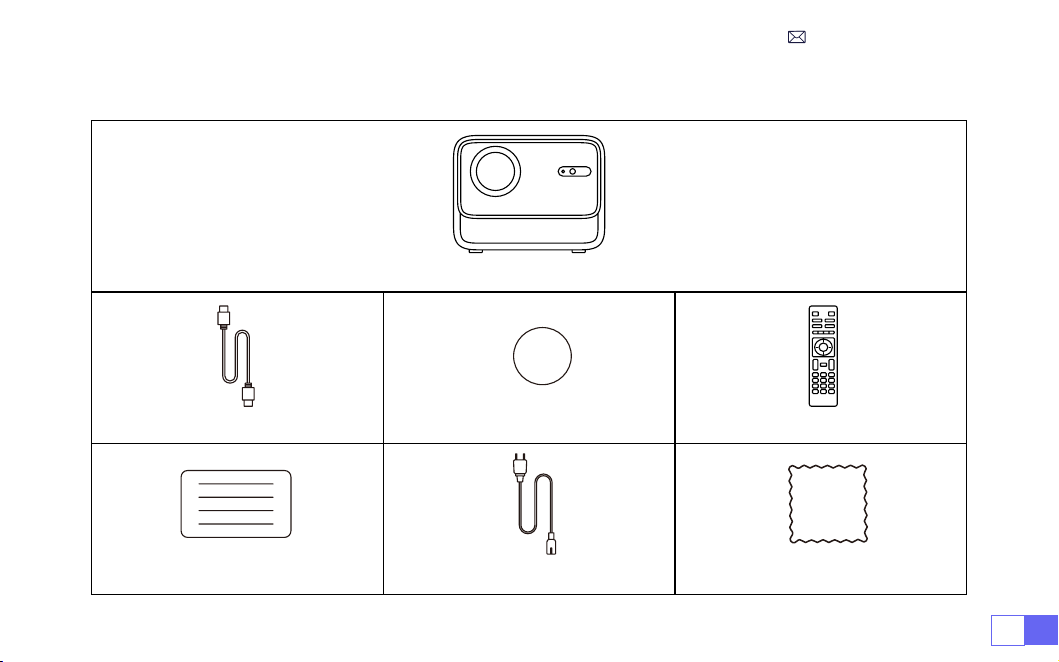
ES101
LISTA DE PAQUETES
Proyector WiMiUS K9*1
Cable HDMI*1 Tapa de lente * 1 Control remoto*1
Manual de usuario*1 Cable de alimentación*1 Paño de limpieza*1
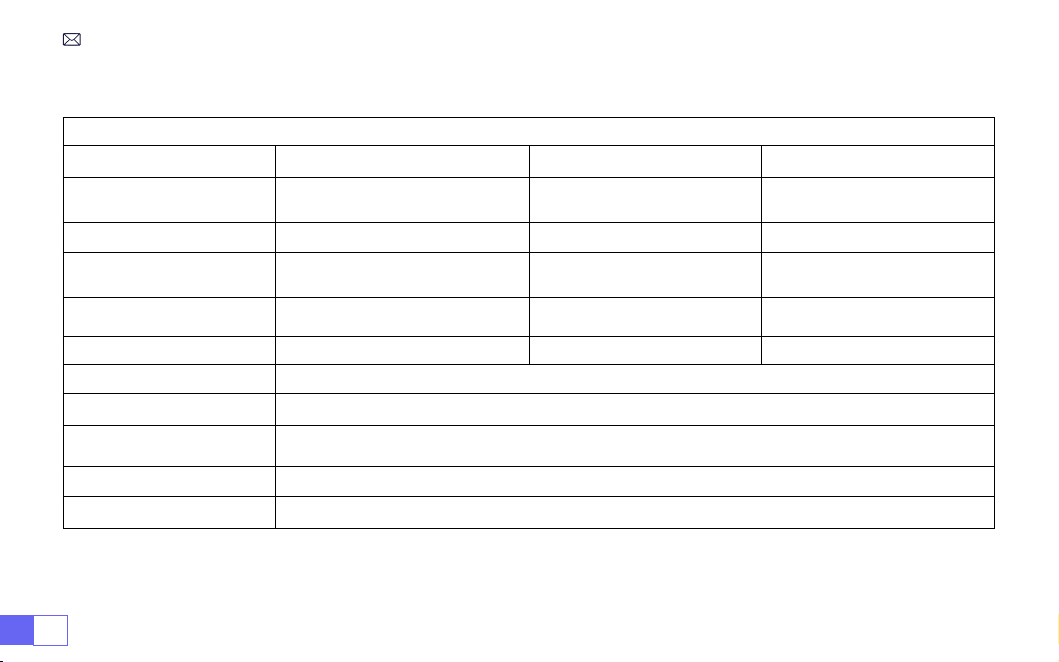
ES 102
ESPECIFICACIONES DEL PROYECTOR
Modelo: K9
Resolucion nativa
1920*1080P
Relación de aspecto
16:9/4:3/Auto
Tecnología de
visualización
LCD
Fuente de luz
LED
Peso
2.3kg
Tamaño
21*18.2*16.1cm
Frecuencia de
actualización
60Hz
Voltaje de potencia
AC100-240V~50/60Hz 1A
Enfocar
Auto + Eléctrico + Manual
Piedra clave
Auto + Eléctrico + Manual
Puerto de salida
Salida de audio de 3,5 mm
Puerto de entrada
HDMI*2/USB*2/RJ45
Modo de operación
Control remoto/botón
Tipo de instalación
Delantero / trasero en el escritorio, delantero / trasero en el techo
Formato de video
MP4/MPG/AVI/MPEG-4/TS/MOV/M4V/MKV/FLV/DAT/3GP
(La compatibilidad con
códecs de vídeo puede variar según las circunstancias; contáctenos para obtener asistencia adicional)
Formato de audio
MP3/WMA/M4A/MP2/AAC/OGG/WAV/FLAC
(SOPORTE Dolby)
Formato de imagen
JPG/JEPG/BMP/PNG
Nota:
Fabricado bajo licencia de Dolby Laboratories. Dolby, Dolby Audio y el símbolo de la doble D son
marcas comerciales de Dolby Laboratories Licensing Corporation.
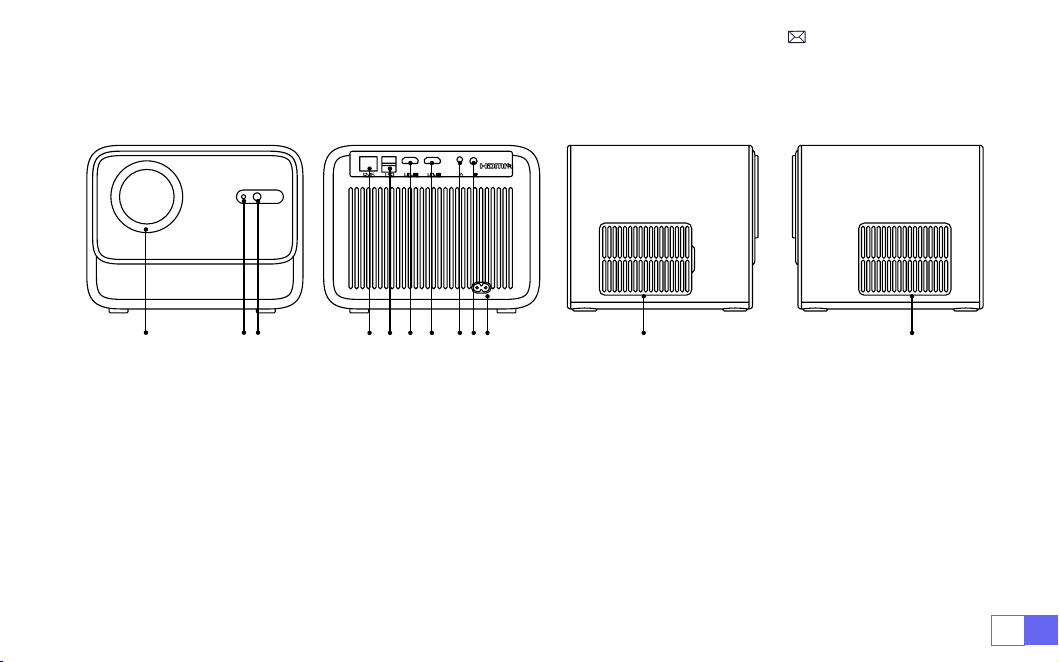
ES103
DESCRIPCIÓN GENERAL DEL PROYECTOR
1 2 3
4 5 6 7 8910
11 12
1. Lente
2. Receptor de señal infrarroja
3. Señal de enfoque automático
4. Puerto de red cableado
5. Puerto USB *2
6. Puerto HDMI1
7. Puerto HDMI2
8. Toma de auriculares
9. Receptor de señal infrarroja
10. Entrada de alimentación
11. Red desmontable a prueba de polvo
12. Salida de aire

ES 104
13 14 15 16
13. Botón de encendido
14. OriciOS para tornillos del soporte (1/4 de pulgada, elevación de soporte)
15. Pies de la máquina de ajuste de altura
16. Etiquetado inferior
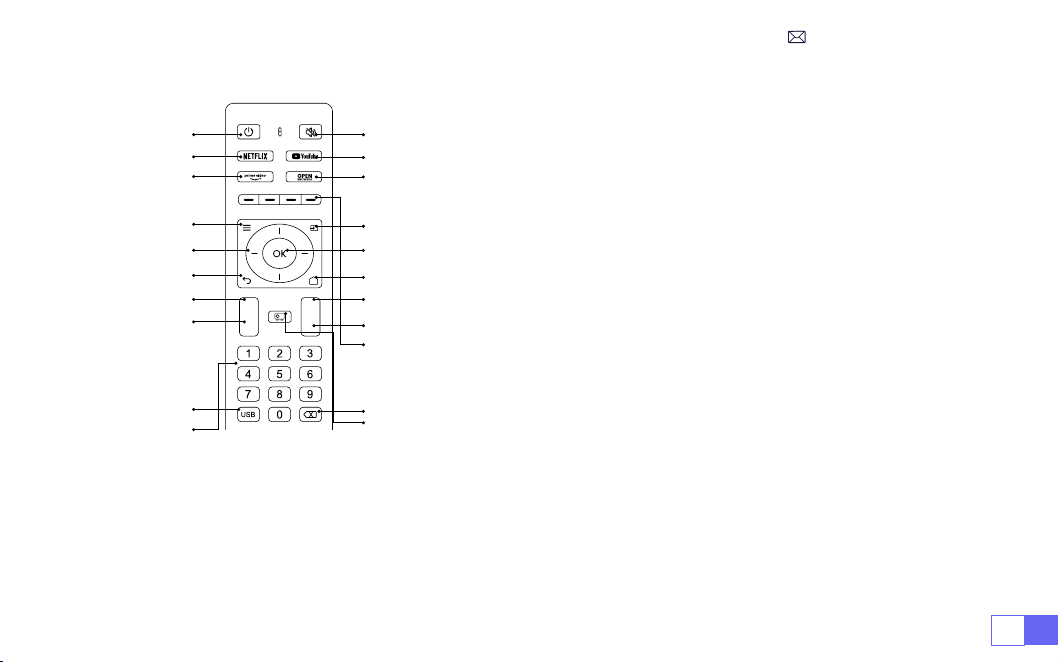
ES105
+
-
F+
F-
MANDO A DISTANCIA
1 2
4
6
8
10
12
15
16
17
19
20
3
5
7
9
11
13
14
21
18
1. Fuerza
2. Mudo
3. NETFLIX
4. YouTube
5. Vídeo principal
6. Abra el NAVEGADOR
7. Menú
8. Fuente
9. Teclas de echa
10. Clave de conrmación
11. Atrás
12. Inicio
13. Volumen +
14. Volumen -
15. Enfocar+
16. Enfocar-
17. Teclas roja/verde/amarilla/azul
18. USB
19. Retroceso
20. Modo de proyección
21. Número
Nota:
1. Instale 2 pilas AAA (NO INCLUIDAS) en el control remoto antes de usarlo. No combine pilas nuevas con pilas viejas en el
control remoto, ya que puede provocar fallos de funcionamiento debido a un suministro de energía insuciente.
2. Cuando utilice el control remoto, asegúrese de que el transmisor de señal del control remoto apunte al receptor de
señal infrarroja del proyector.
3. Si no va a utilizar el control remoto durante un período prolongado, retire las baterías para evitar fugas.

ES 106
1. Montaje en techo para proyección
frontal
2. Montaje en techo con proyección
trasera
3. Soporte de escritorio para
proyección frontal
4. Soporte de escritorio para
proyección trasera
INSTALACIÓN
El proyector se puede colgar en el techo con un marco colgante especial y colocar sobre el escritorio
estable para proyectar la imagen de acuerdo con el entorno operativo y los requisitos. Además, el
proyector se puede instalar con los siguientes métodos:
Mantenga el proyector a una altura en la que su lente tenga simetría axial con respecto a la pantalla. Si
esto no es posible, utilice la función de corrección trapezoidal para ajustar la imagen de proyección.
1.Método De Instalación
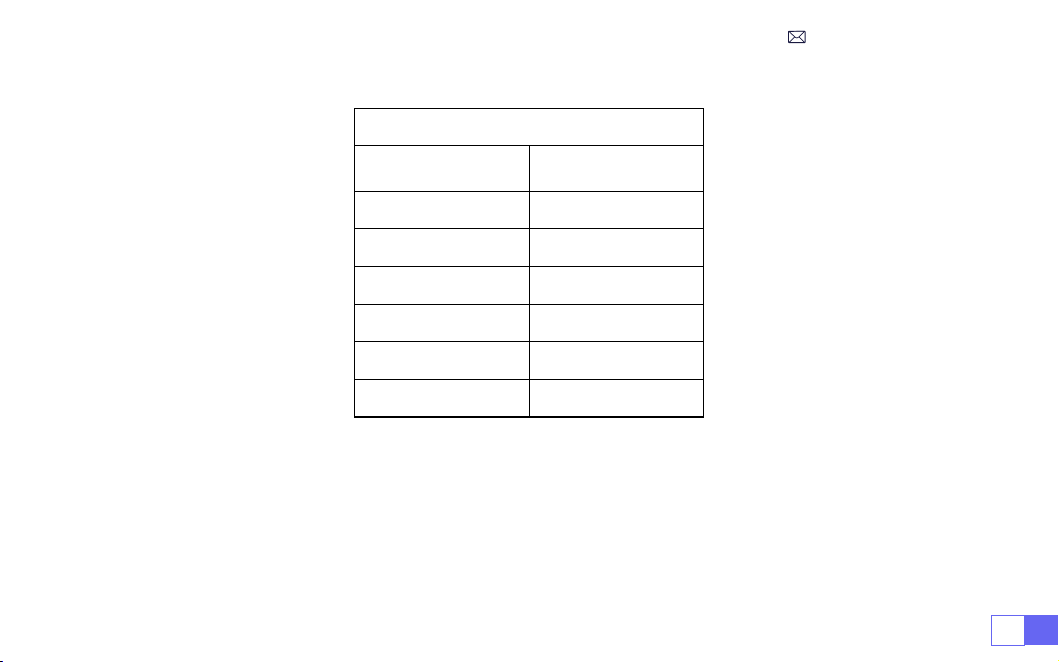
ES107
2.Distancia y Tamaño De Proyección
Relación de aspecto: 16:9
Distancia (ft.)
Tamaño de
pantalla
4.8 50"
5.7 60"
7.6 80"
9.5 100"
11.5 120"
14.4 150"
* La distancia de proyección recomendada es de aproximadamente
2-3m.
* El tamaño de la imagen depende de la distancia entre el proyector y la pantalla; las estimaciones
anteriores pueden tener una desviación del 3%. Diferentes conguraciones dan como resultado diferentes
distancias.
* El efecto de proyección es mejor en un ambiente oscuro.

ES 108
3.Instalar En El Techo
Mantenga el proyector vertical y hacia el centro de la pantalla del proyector y mantenga la imagen de
proyección plana en la pantalla.
1. Para ajustar la base inclinable, desenrosque la varilla de soporte en la parte inferior del proyector,
consulte la imagen a continuación.
2. Para el soporte de techo, hay 1 oricio en la parte inferior del proyector. Voltee el proyector, luego podrá
encontrar los oriciOS de montaje de techo como se muestra en la siguiente imagen.
NOTA:
El soporte para colgar o el soporte para montaje en techo no están empaquetados.
(Tampoco
admite elevación de 4 patas)
Pies de la máquina de ajuste de altura

ES109
PROYECTOR INICIAL
1. Retire la tapa de la lente, conecte el proyector a la fuente de alimentación mediante el cable de alime-
ntación, luego presione el botón de encendido y comenzará a funcionar. (La luz cambia de rojo a azul)
2. Utilice la función de enfoque/corrección trapezoidal automática o electrónica del proyector para obte-
ner una imagen rectangular y clara.
3. Ajuste los botones de enfoque "F+" y "F-" en el control remoto del proyector para obtener el mejor
rendimiento de imagen; (Si todavía está borroso, intente ajustar la distancia de proyección).
4. Conecte dispositivos externos (teléfono inteligente (Android), Fire Stick, TV Box, reproductor de DVD,
PC, etc. al proyector en la posición correspondiente y asegúrese de seleccionar la fuente de señal
correspondiente. **Si no selecciona la fuente correcta , el proyector no podrá detectar la señal)
5. Seleccione " "y luego vaya al menú y seleccione [Configuración] para ingresar a [Idioma OSD] y
congurar su idioma preferido.
A. Conecte la alimentación:
La luz de encendido (enchufe) parpadea en rojo 8 veces. Durante el proceso
de autocomprobación de la máquina, debe esperar pacientemente y luego presionar el botón de enc-
endido para encenderla.
B. Encendido:
La luz indicadora azul siempre está encendida, indicando el estado de funcionamiento.
C. Apagado:
La luz roja siempre está encendida, indicando el estado de apagado.
D. Suspender:
Luz rosa, actualmente en suspensión (5 s), no presione el botón de encendido repetidamente.
Descripción De La Luz Del Proyector

ES 110
AJUSTES DE IMAGEN DE PROYECCIÓN
Seleccione el menú [Configuración] - Seleccione la opción [Proyección] - Seleccione su modo de
instalación, presione la tecla de flecha para seleccionar y presione “OK” para confirmar la posición de
proyección.
1.Modo De Proyección
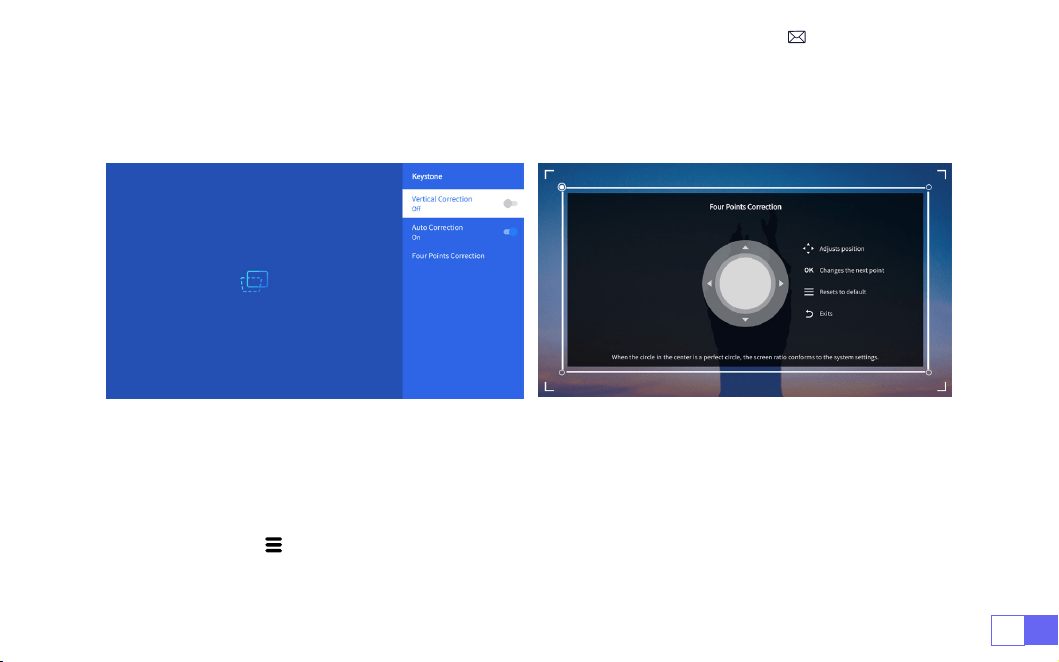
ES111
2.Corrección Trapezoidal Manual
2.1 Corrección Trapezoidal De Cuatro Puntos
Seleccione el menú [Conguración] - Seleccione la opción [Keystone], luego seleccione [Corrección de
cuatro puntos], simplemente haga clic en el botón “Aceptar” para elegir el punto que desea ajustar al
principio y luego presione el botón "
▶
" o "
▼
" para establecer el valor (Vertical 0~100) necesario como se
muestra a continuación.
Restablecer:
Presione " " y la imagen se restaurará a la conguración de corrección trapezoidal original.
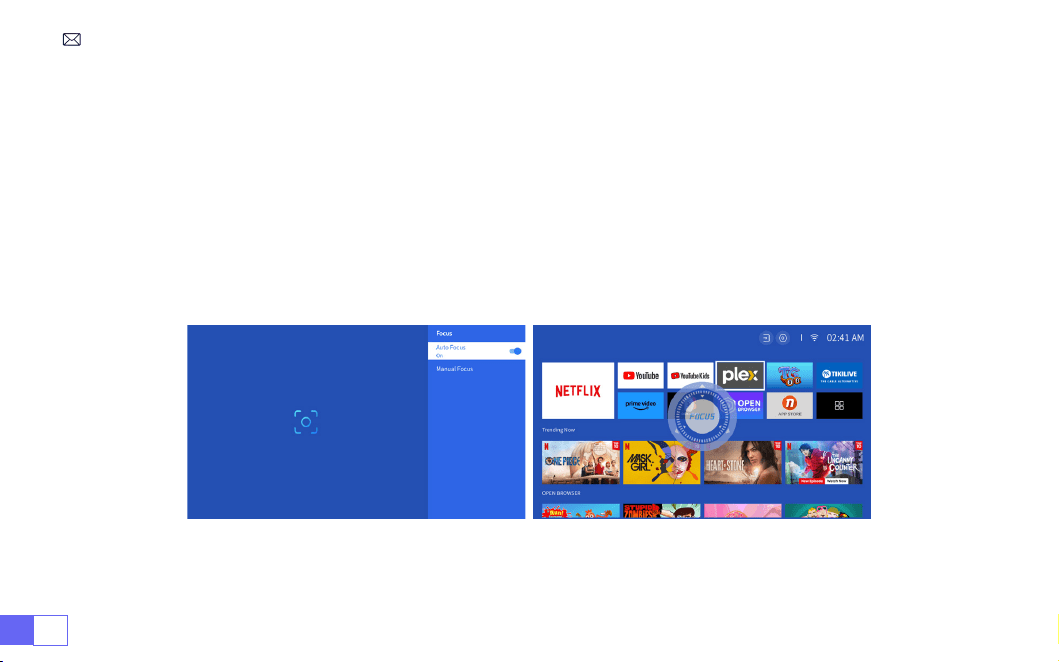
ES 112
2.2 Corrección Trapezoidal Vertical
Seleccione el menú [Conguración] - Seleccione la opción [Keystone], luego seleccione la opción [Keystone
vertical] para ajustar la pantalla verticalmente ±30° con las teclas de flecha hasta que las guías se
ajusten a un rectángulo.
Primero coloque el proyector horizontalmente frente a la pared, seleccione el menú [Configuración] -
Seleccione la opción [Keystone] o [Enfoque] - Active la opción [Corrección automática] o [Enfoque
automático], luego enfocará automáticamente el imagen según la distancia de proyección desde la
pantalla y ajuste la imagen a un rectángulo cuando cambie el ángulo de proyección.
3.Corrección Trapezoidal y Enfoque Automática
Si la imagen está borrosa, presione repetidamente el botón de enfoque ''F+'' ''F-'' en el control remoto para
ajustar el enfoque de la lente, hasta que la imagen esté clara. (**No es necesario presionar el botón OK
después de que la pantalla esté clara)
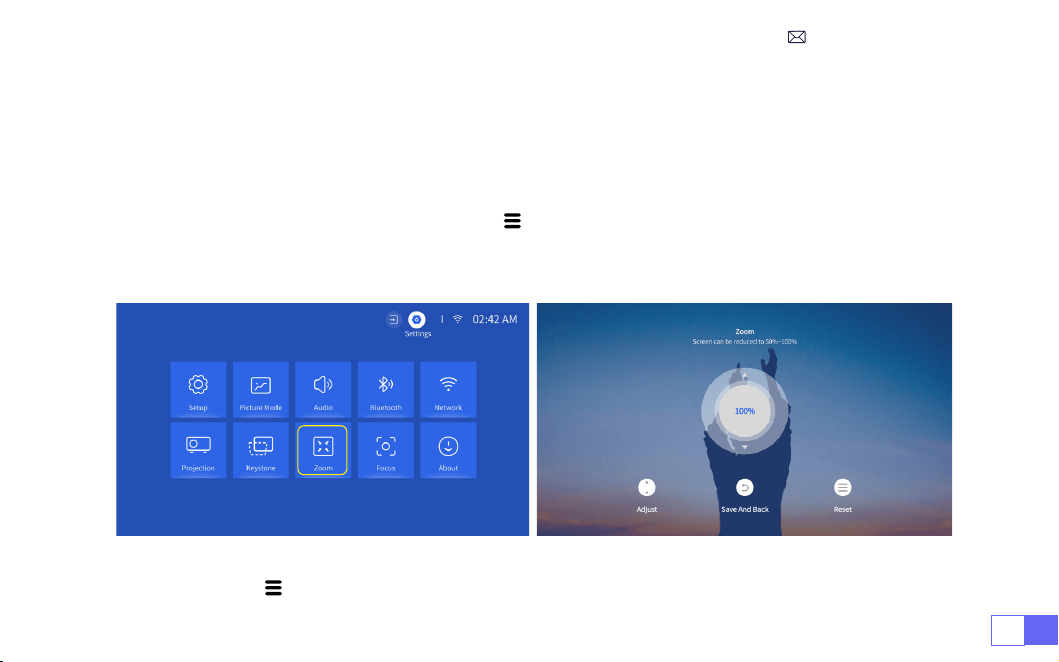
ES113
Vaya a la página de inicio - Seleccione el menú " " - Seleccione [Conguración] - Seleccione la opción
[Zoom], la pantalla de proyección se puede ampliar entre un 50% y un 100%. Presione el botón "
↑ ↓
" para
congurar el valor necesario como se muestra a continuación.
Restablecer:
Presione " " y la imagen se restaurará a la conguración de corrección trapezoidal original.
4.Conguración De Zoom
Nota:
El ángulo de proyección lateral del proyector no debe exceder los 20°. Además, no debe haber
obstáculos delante del proyector. De lo contrario, es posible que la función de corrección trapezoidal
automática no funcione.
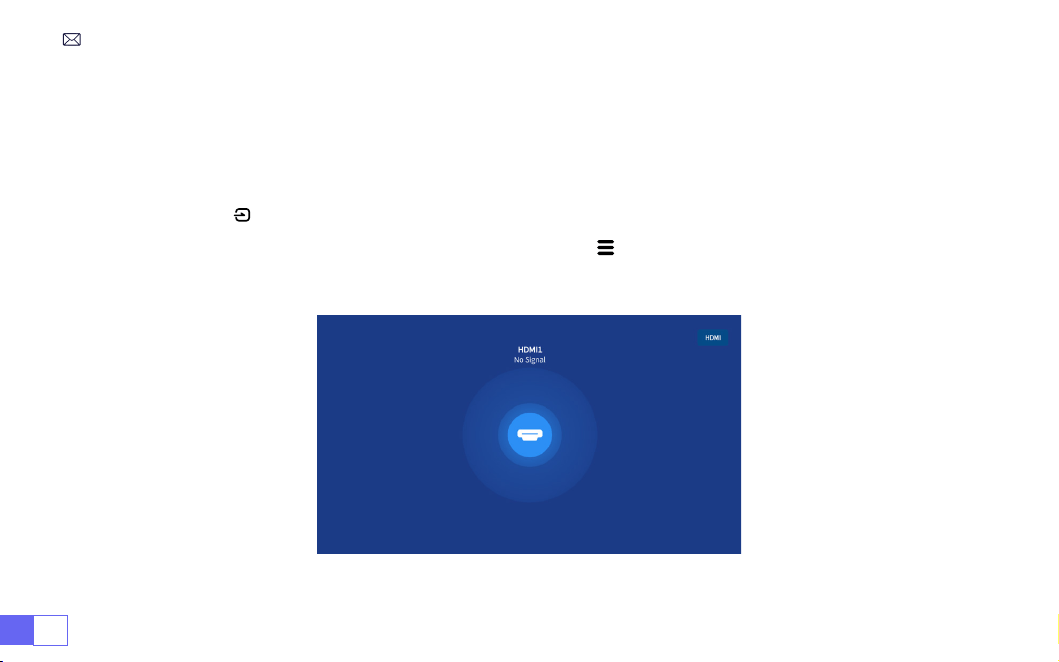
ES 114
AJUSTES INTELIGENTES DEL PROYECTOR
Seleccione la fuente de señal de entrada deseada (HDMI1/HDMI2) en la página de inicio, o puede
presionar el botón " " en el control remoto para seleccionar la fuente de señal correspondiente.
Al reproducir un vídeo, puede presionar el botón de menú " " y luego seleccionar [ Modo de imagen ].
Puedes ajustar libremente el brillo y el contraste de la imagen y otras funciones.
1.Seleccione La Fuente De Señal
1.1 Seleccione La Fuente De Señal De Entrada HDMI

ES115
Para dispositivos USB, no es necesario elegir la fuente de señal. La máquina los detectará automáticamente.
Presione el botón " " y seleccione [Fuente de señal de entrada USB] en la página de inicio:
Consejos: Si el proyector no puede reconocer el disco USB, consulte los siguientes métodos para
resolver el problema.
Conrme si su disco USB cumple con los siguientes formatos.
1. FAT32: 8G/16G/32G 2. NTFS: 64G
1.2 Seleccione La Fuente De Señal De Entrada USB

ES 116
Si no es así, formatee el disco USB. Antes de formatear el disco USB, si tiene algo en su disco USB, asegúrese
de hacer una copia de seguridad de todo. Después de estos pasos, todo se perderá para siempre.
Si el problema aún no se resuelve, envíe su problema a este correo electrónico:
1. La uidez de la duplicación de pantalla con una conexión inalámbrica se verá afectada por el entorno
de red. Se recomienda un ancho de banda de 100 Mbit o más cuando se utiliza la duplicación de
pantalla.
2. Asegúrese de que su dispositivo móvil esté cerca del proyector cuando utilice una conexión inalámbrica.
Una distancia de 2-3m. es recomendado.
3. Es posible que algunos dispositivos Android no admitan la duplicación de pantalla debido a la
compatibilidad.
Seleccione el icono [Conguración] en la esquina superior derecha de la interfaz principal y luego presione
la tecla " OK " en el control remoto para ingresar a la interfaz de conguración y seleccione " Conguración
de red ".
2.Conexión Con Dispositivos Inteligentes
Consejos Para Calentarse
Conguración WiFi
Atención:
Su dispositivo y el proyector deben estar en el mismo WiFi doméstico.
Para sistema iOS
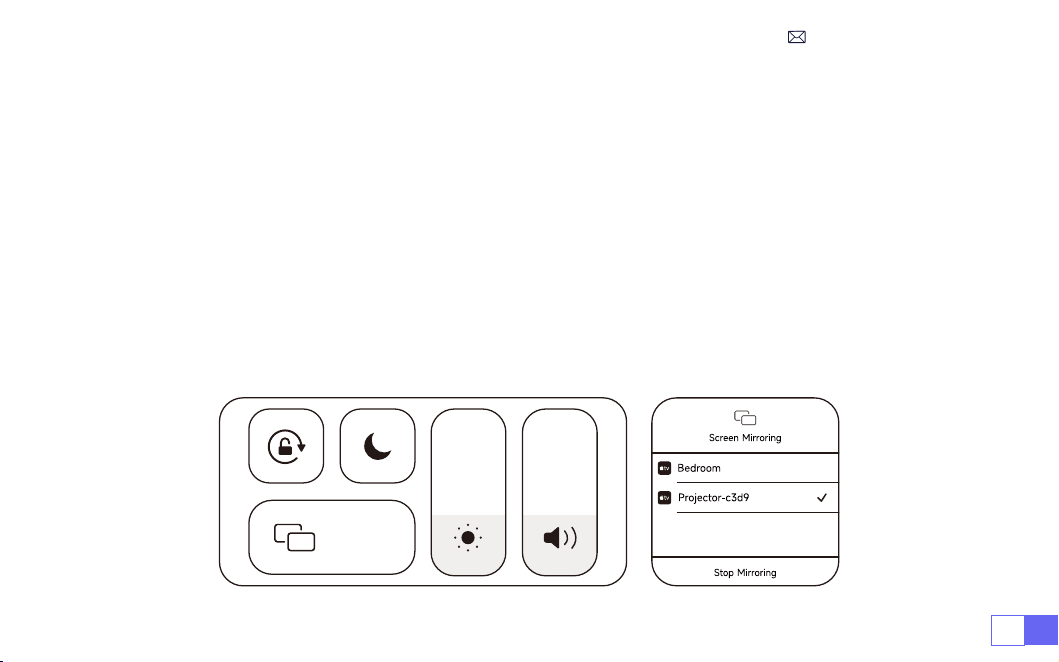
ES117
1. Elige tu WiFi en casa para conectarte e ingresa el derecho contraseña, luego haga clic en "Aceptar",
espere 3 segundos para establecer la conexión.
2. Cuando utilice un dispositivo ios por primera vez, deberá descargarlo en la interfaz principal (Ruta:
Interfaz principal Mis aplicaciones - Asistente de aplicaciones - ScrennShare - Haga clic en Aceptar -
Descarga de la aplicación completa, apague y reinicie - Busque ScreenShare en Mi Aplicaciones)
3. Active la conguración WiFi del dispositivo iOS y luego conéctese al mismo WiFi doméstico.
4. Luego haga clic en "Airplay" en el teléfono inteligente.
5. Seleccione "Projector-c3d9" de los resultados de la búsqueda para conectarse.
NOTA:
Debido a la actualización del proyector inteligente WiMiUS K9: duplicación de pantalla para iOS,
Android y Windows, y ya no necesita el dispositivo iOS Screen Cast para duplicar la pantalla (el paquete
no incluye un dispositivo iOS Screen Cast)
Si tiene algún problema, contáctenos a tiempo:
Screen
Mirroring
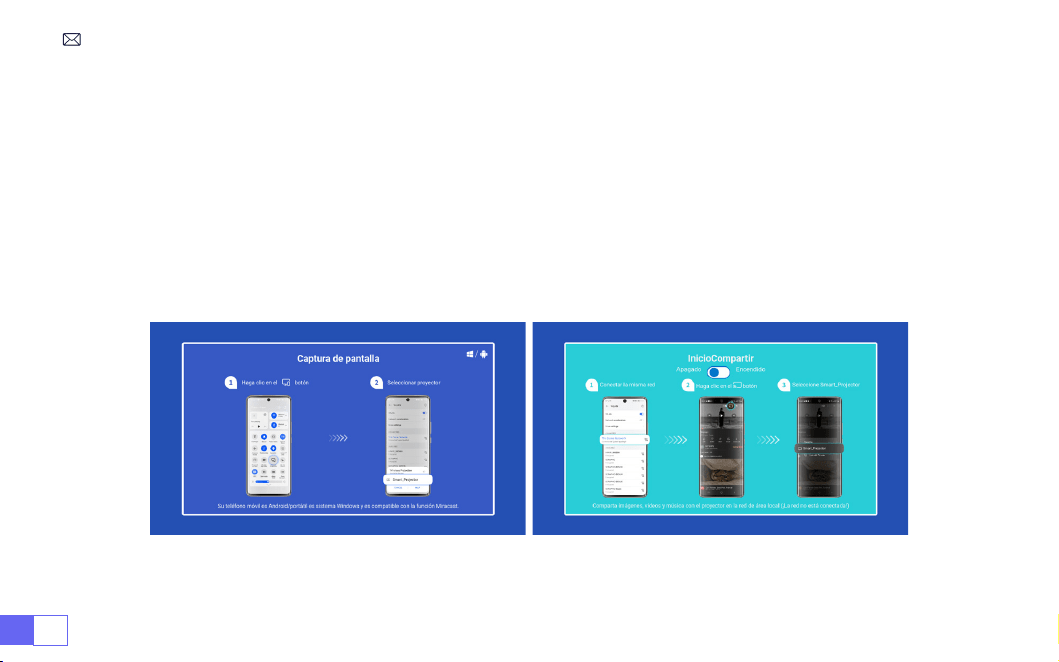
ES 118
Para activar esta función, su dispositivo Android debe admitir pantalla múltiple/pantalla inalámbrica. El
nombre de “Multipantalla” puede variar según las distintas marcas de dispositivos Android.
Conguración con internet móvil
1. Encienda el proyector y seleccione “Screencast” como fuente de entrada.
2. Active la “Pantalla múltiple/Pantalla inalámbrica” de su dispositivo Android.
3. Seleccione "
WiMiUS-K9 Projector/Smart Projector
" de los resultados de la búsqueda para conectarse.
4. Tener éxito.
Para Sistema Android

ES119
1. Encienda su altavoz Bluetooth.
2. Encienda la [Conguración de Bluetooth] de su proyector.
3. Seleccione su altavoz Bluetooth para conectarse.
4. Tener éxito.
Nota:
1. Este paso solo se aplica a la conexión del altavoz Bluetooth, pero no al Bluetooth del teléfono móvil.
2. El proyector K9 es compatible con la mayoría de los auriculares Bluetooth, parlantes Bluetooth y Airpods,
pero no con los teclados Bluetooth.
3. Si tiene alguna pregunta, no dude en enviar un correo electrónico a WiMiUS a través de:
support01@
wimius.com.
3.Conguración Bluetooth
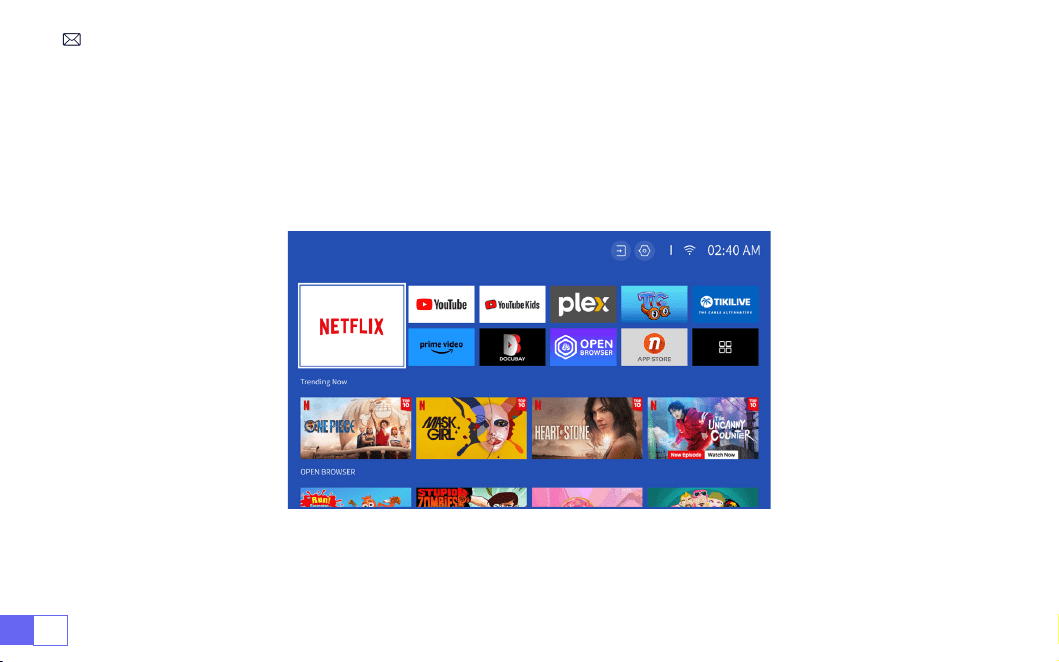
ES 120
Licencia ocial de Netix:
el proyector K9 tiene un sistema operativo inteligente Netix incorporado, por
lo que puede elegir su aplicación y video favoritos a voluntad, y puede disfrutar de una gran cantidad de
maravillosas obras de cine y televisión sin usar un dispositivo Fire TV adicional.
Al mismo tiempo, esta página es la interfaz principal del proyector.
4.Sistema Operativo Inteligente Integrado
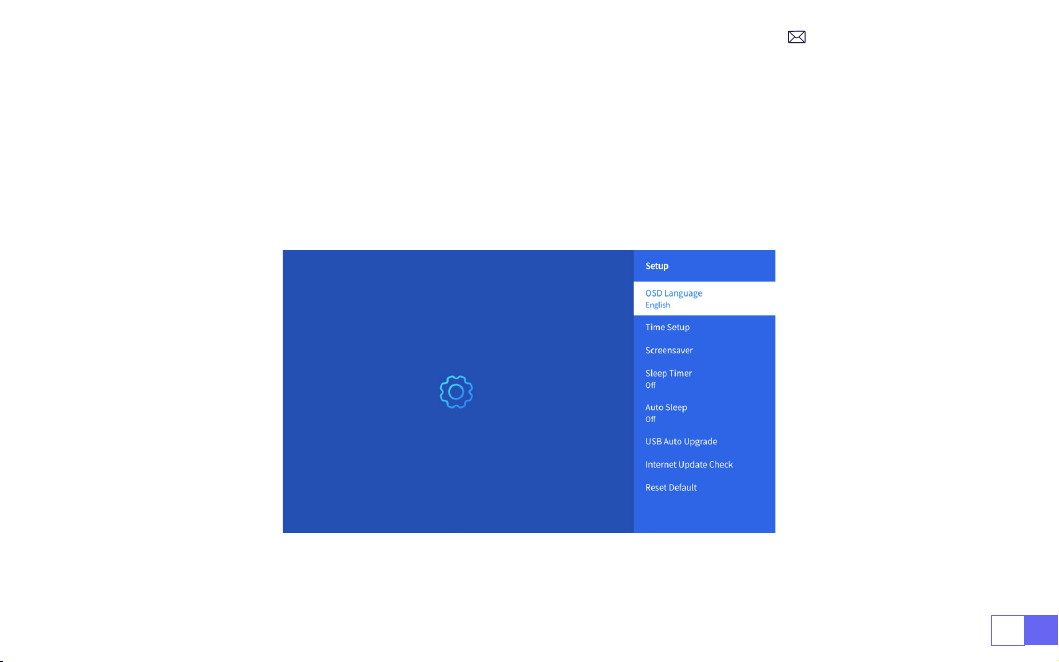
ES121
OTRAS CONFIGURACIONES BÁSICAS DE PROYECCIÓN
Vaya a la página de inicio - Seleccione [Conguración] - Seleccione [Conguración]. Utilice las teclas de
echa del control remoto para cambiar el menú, presione "OK" para conrmar y congurar.
1.Menú De Opciones

ES 122
Menú Contenido
Idioma OSD Inglés/Francia/italiano/japonés, etc.
Conguración de hora Establecer hora local
Protector de pantalla Activar/desactivar el protector de pantalla
Tiempo de dormir Encendido/Apagado: establece el tiempo de sueño entre 10 y 120 minutos.
Reposo automático Encendido/apagado: establezca el tiempo entre 30 minutos y 8 horas
Actualización automática USB Actualización local
Comprobación de actualización de Internet Comprobar entorno de Internet
Restablecer valor predeterminado Restaurar los valores predeterminados de fábrica
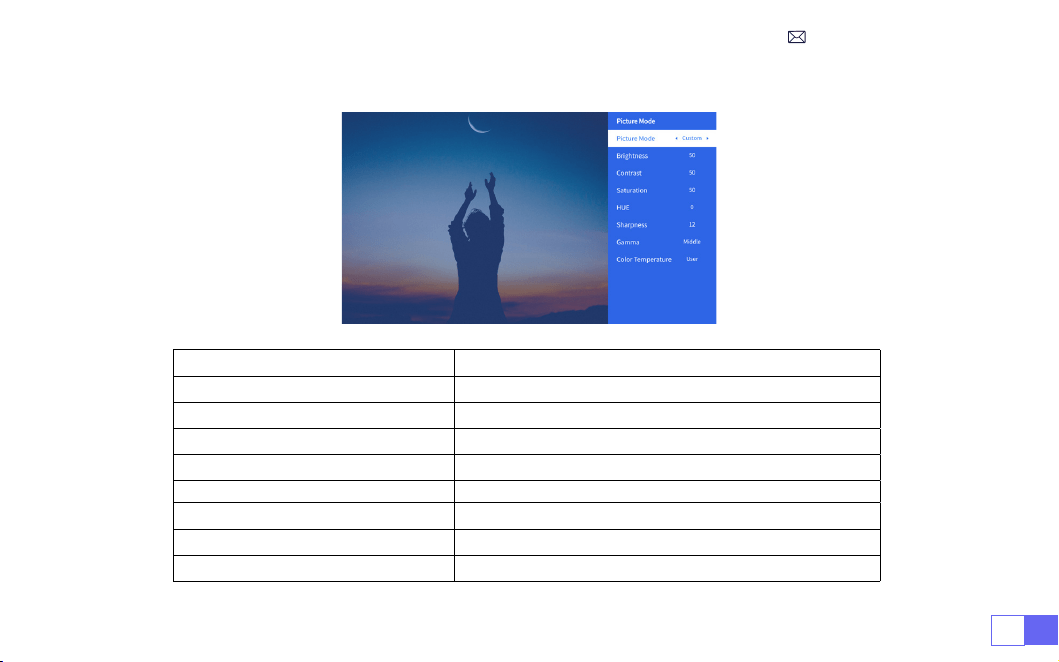
ES123
2.Menú De Modo De Imagen
Menú Contenido
Modo de imagen Inglés/Francia/italiano/japonés, etc.
Brillo Establecer el valor de brillo de la pantalla
Contraste Establecer el valor de contraste de la pantalla
Saturación Establecer el color de saturación de la pantalla
Matiz Establecer el color del tono de la pantalla
Nitidez Establecer el valor de nitidez de la pantalla
Gama Corregir el valor gamma
Temperatura del color Usuario/Frío/Estándar/Cálido
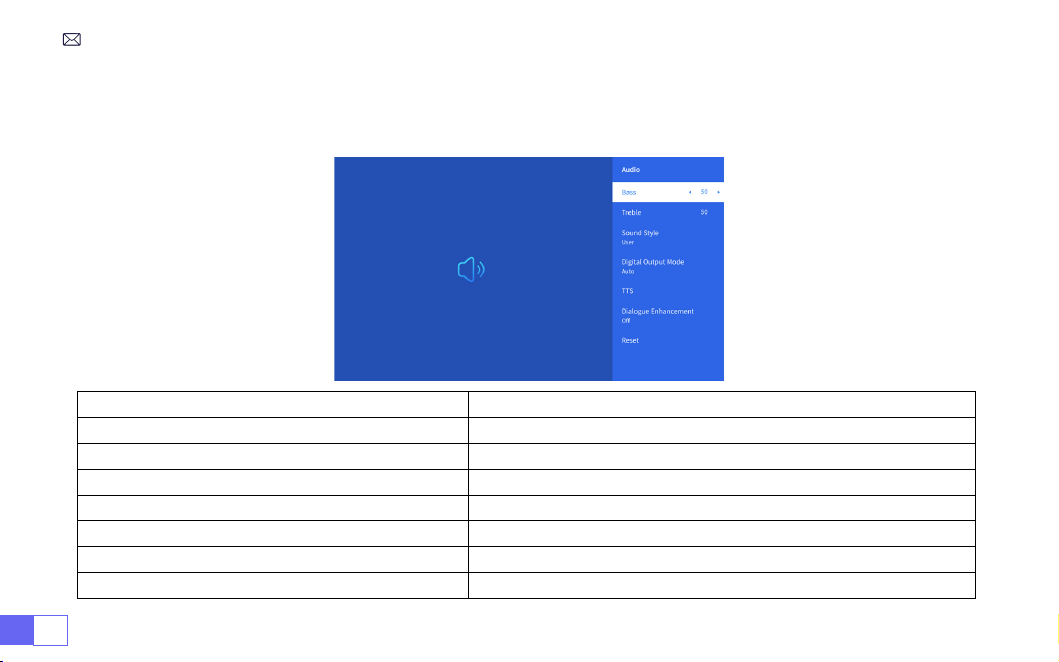
ES 124
Vaya a la página de inicio - Seleccione [Conguración] - Seleccione [Audio]. Utilice las teclas de echa
del control remoto para cambiar el menú, presione "OK" para conrmar y congurar.
3.Menú Audio
Menú Contenido
Graves agudos Establecer valores preferidos
Estilo de sonido Usuario/Estándar/Película/Música/Deportes/Vívido
Modo de salida digital Manual de auto
TTS Función de transmisión de voz
Mejora del diálogo Activado/Desactivado: función de mejora de la conversación, voz
función de transmisión para personas especiales Restore Default
Reiniciar Restaurar valor predeterminado
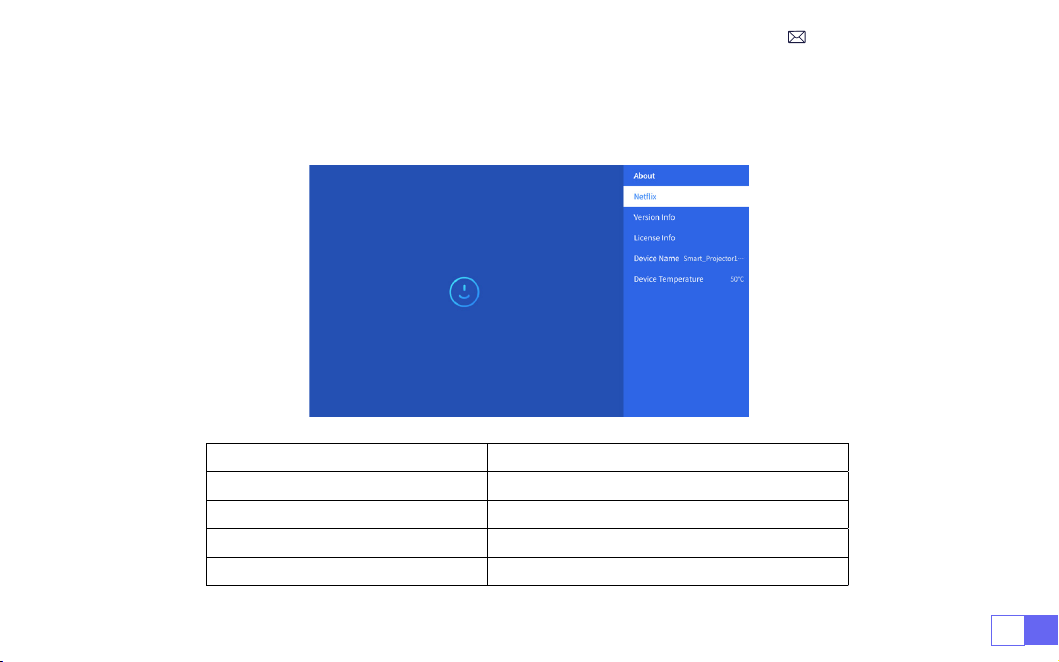
ES125
Vaya a la página de inicio - Seleccione [Conguración] - Seleccione [Acerca de]. Utilice las teclas de
echa del control remoto para cambiar el menú, presione "OK" para conrmar y congurar.
4.Acerca De (Información Del Sistema)
Menú Contenido
Netix Licencia ocial de Netix
Información de versión/licencia Ver la última versión/información de licencia
Nombre del dispositivo Nombre del modelo del proyector
Temperatura del dispositivo
50 ℃

ES 126
El proyector WiMiUS K9 tiene 6 interfaces, puertos HDMI*2/puertos USB*2/salida de auriculares de 3,5 mm/
RJ45 Seleccione el puerto de conexión correcto para conectar su dispositivo (PC, teléfono, reproductor de
DVD, barra de sonido, USB, PS4, etc.)
Seleccione la fuente de señal USB, la máquina las detectará automáticamente.
• Seleccione la categoría requerida “fotos”, “música” o “video” en la interfaz principal y presione la tecla “OK”
en el control remoto para ingresar a la categoría correspondiente.
• Según los programas a elegir: “fotos” “música” o “video”.
• Elija el archivo que desea reproducir y presione la tecla “OK” para reproducir o pausar el archivo. (No puede
ingresar a la categoría requerida sin conectar un disco USB).
Nota: Para la opción “Ofce Suite”, los archivos PPT/TXT no se pueden reproducir ni presentar normalmente.
1. Conéctese a la computadora y al proyector K9 con el cable HDMI (incluido).
2. Seleccione la fuente HDMI para proyectar cualquier archivo en su computadora;
3. En su computadora portátil, mantenga presionadas las teclas del tablero "Win + P" para cambiar el
modo de visualización.
1.Conexión Multimedia USB
2.Conexión con PC
CONEXIÓN DE LÍNEAS DE SEÑAL

ES127
Solo computadora:
es la opción predeterminada, solo se muestra en el monitor principal.
Duplicar:
hace que todos los monitores muestren lo mismo duplicando el escritorio en cada monitor.
Extender:
hace que todos sus monitores actúen como un monitor grande extendiendo el escritorio a todos
ellos.
Solo proyector:
se muestra solo en el monitor secundario como un proyector.
Para cambiar la resolución de la pantalla en el modo Solo proyector, siga estos pasos:
Paso:
Inicio > Panel de control > Apariencia y personalización > Ajustar resolución de pantalla
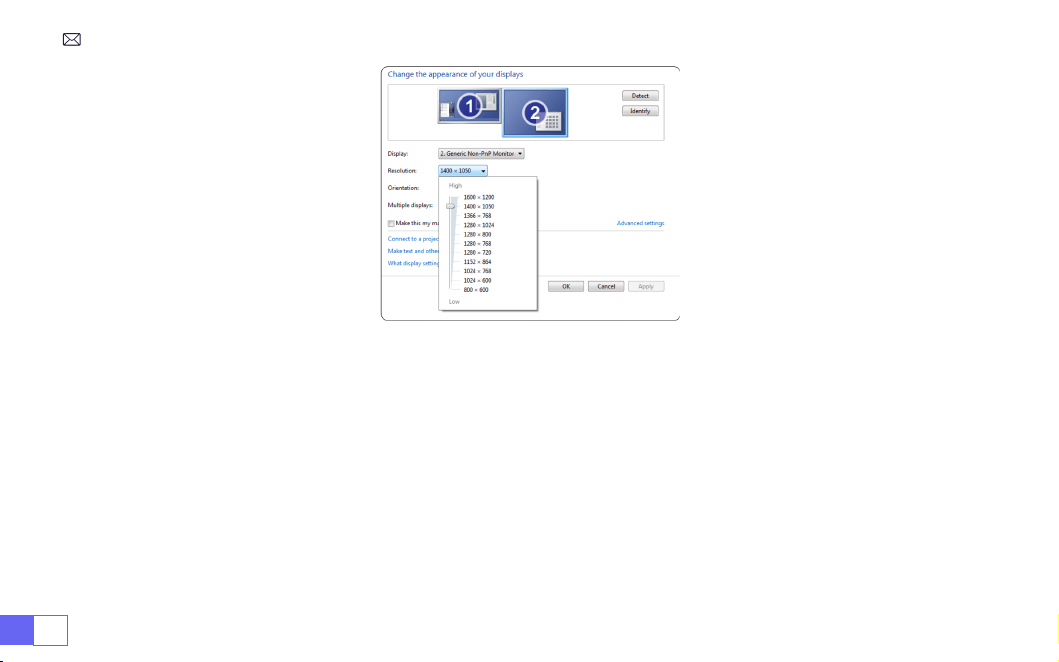
ES 128
• Elija el canal de señal multimedia: " HDM "
• Utilice un adaptador Type-C a HDMI para conectar su MacBook, o un adaptador Mini Display a HDMI para
conectar con su MacBook Air (adaptador no incluido). Conexión con MacBook o Mac Book Air.
(Adaptador
NO INCLUIDO)
• Elija el canal de señal multimedia: " HDMI "
• Utilice un cable HDMI para conectarse a XBOX/PS4
• Tener éxito
3.Conexión con MacBook o MacBook Air
4.Conexión con XBOX/PS4

ES129
Preguntas Frecuentes y Garantía
Gracias por seleccionar el proyector WiMiUS K9. Ofrecemos 3 años de garantía para el proyector K9. Si
tiene alguna pregunta, no dude en contactarnos a través de
.
Hemos recopilado algunas preguntas frecuentes y sus correspondientes respuestas para ayudarle mejor.
P1:
La conexión WiFi es inestable. ¿Cómo puedo resolver este problema?
Para solucionar los problemas de conectividad WiFi, primero asegúrese de que su red doméstica esté
funcionando bien. Además, mantenga la distancia entre su teléfono y el proyector dentro de 1 metro. Si el
problema persiste, comuníquese con nosotros en
para obtener más ayuda.
P2:
El control remoto y el proyector no pueden comunicarse.
1. ¿Está encendido o apagado el interruptor de encendido encima del proyector?
2. ¿La batería del control remoto está agotada?
• Seleccione el modo “HDMI” para la conexión
• Ingresar tecla de Menú
• Cambie el Modo de PC de [ON] a [OFF] para evitar el riesgo de que aparezcan bordes de píxeles blancos
en la imagen.
5.Conexión con DVD

ES 130
P3:
¿Qué es el sistema Linux? ¿Puedo ver películas y programas de televisión más populares?
1. El sistema Linux está autorizado ocialmente por Netix. El proyector viene precargado con contenido de
Netix, YouTube, Prime Video, etc.
2. Encuentre más aplicaciones para descargar en la interfaz principal Mis aplicaciones(Ruta de más
aplicaciones: Interfaz principal Mis aplicaciones - Asistente de aplicaciones)
P5:
¿No es compatible con su altavoz Bluetooth?
1. Es posible que el proyector no sea compatible con algunas versiones de altavoces Bluetooth de JBL.
2. Póngase en contacto con nuestro correo electrónico de posventa en
inmediatamente e indíquenos la marca y modelo de su altavoz Bluetooth.
P4:
Apagado automático después de trabajar por un tiempo.
1. La ventilación del proyector está bloqueada o el voltaje no es estable.
2. Envíe un vídeo a
para comprobarlo.
3. Hay obstáculos entre el control remoto y la señal infrarroja.

SOMMARIO
Supporto professionale a vita WIMIUS - - - - - - - - - - - - - - - - - - - 132
SUGGERIMENTI: - - - - - - - - - - - - - - - - - - - - - - - - - - - - 133
ELENCO PACCHETTI - - - - - - - - - - - - - - - - - - - - - - - - - - - 134
SPECIFICHE DEL PROIETTORE - - - - - - - - - - - - - - - - - - - - - - - 135
PANORAMICA DEL PROIETTORE - - - - - - - - - - - - - - - - - - - - - - 136
TELECOMANDO- - - - - - - - - - - - - - - - - - - - - - - - - - - - - 138
INSTALLAZIONE- - - - - - - - - - - - - - - - - - - - - - - - - - - - - 139
AVVIO DEL PROIETTORE - - - - - - - - - - - - - - - - - - - - - - - - - 142
IMPOSTAZIONI DELL'IMMAGINE DI PROIEZIONE - - - - - - - - - - - - - - - - 143
PROIETTORE IMPOSTAZIONI INTELLIGENTI - - - - - - - - - - - - - - - - - - 147
ALTRE IMPOSTAZIONI DI PROIEZIONE DI BASE - - - - - - - - - - - - - - - - - 154
COLLEGAMENTO LINEE DI SEGNALE - - - - - - - - - - - - - - - - - - - - - 159
FAQ E GARANZIA - - - - - - - - - - - - - - - - - - - - - - - - - - - - 162

IT 132
Gentile cliente,
grazie mille per aver supportato WIMIUS!
Si prega di leggere attentamente questo manuale prima di utilizzare il proiettore. Se hai domande, invia il
tuo numero d’ordine e problema (ad esempio: IT + K9 + Problema) a
. Forniremo
un rapido soluzione entro 24 ore.
In effetti, molti problemi possono essere facilmente risolti tramite le impostazioni, ad esempio assenza
di segnale, assenza di audio, errore di connessione Bluetooth, errore di connessione WiFi, animazione
intermittente, ecc. Promettiamo che tutti i proiettori saranno ispezionati e imballato attentamente al 100%
prima della spedizione.
In caso di domande, contattaci per risolvere il problema. E dacci la possibilità di migliorare. Lo promettiamo
di fornirti una soluzione soddisfacente.
Ci impegniamo a fornire un eccellente supporto 24 ore su 24, 7 giorni su 7 per garantire la vostra
soddisfazione come nostro stimato cliente.
Grazie per la vostra comprensione!
Cordiali saluti
TEAM DI SUPPORTO WIMIUS
SUPPORTO PROFESSIONALE A VITA WIMIUS

IT133
1. Non posizionare il proiettore in una stanza troppo calda o troppo fredda, poiché temperature elevate o
basse inuenzeranno le prestazioni del proiettore e ridurranno la durata dell'apparecchiatura. L'ambiente
di lavoro è preferibilmente 5°C~35°C.
2. Il dispositivo di ventilazione è attrezzato per garantire il funzionamento stabile del proiettore. Non
coprire le prese d'aria con panni, coperte o altri oggetti. Non inserire oggetti di alcun tipo nelle fessure
del proiettore, poiché ciò potrebbe causare un cortocircuito o una scossa elettrica e danneggiare il
dispositivo.
3. Il proiettore deve essere rigorosamente protetto da forti impatti, estrusione e vibrazioni. Non provare a
scuoterlo, schiacciarlo o vibrarlo con forza. Non tentare di spostare o danneggiare i circuiti interni.
4. Essendo il componente principale del proiettore, l'obiettivo è direttamente correlato alla chiarezza e
all'effetto dell'immagine. L'eccessiva rimozione della polvere dall'obiettivo può compromettere la qualità
dell'immagine. Le lenti sporche devono essere pulite con un panno di cotone morbido sulla supercie
della lente di vetro. Non utilizzare panni duri o abrasivi.
5. Controllare l'illuminazione ambientale nella stanza per migliorare la visibilità dell'immagine proiettata.
Abbassare le luci o usare le tende può aiutare a ridurre l'abbagliamento e migliorare la qualità
dell'immagine.
6. In caso di domande, non preoccuparti, contatta
via e-mail.
SUGGERIMENTI:
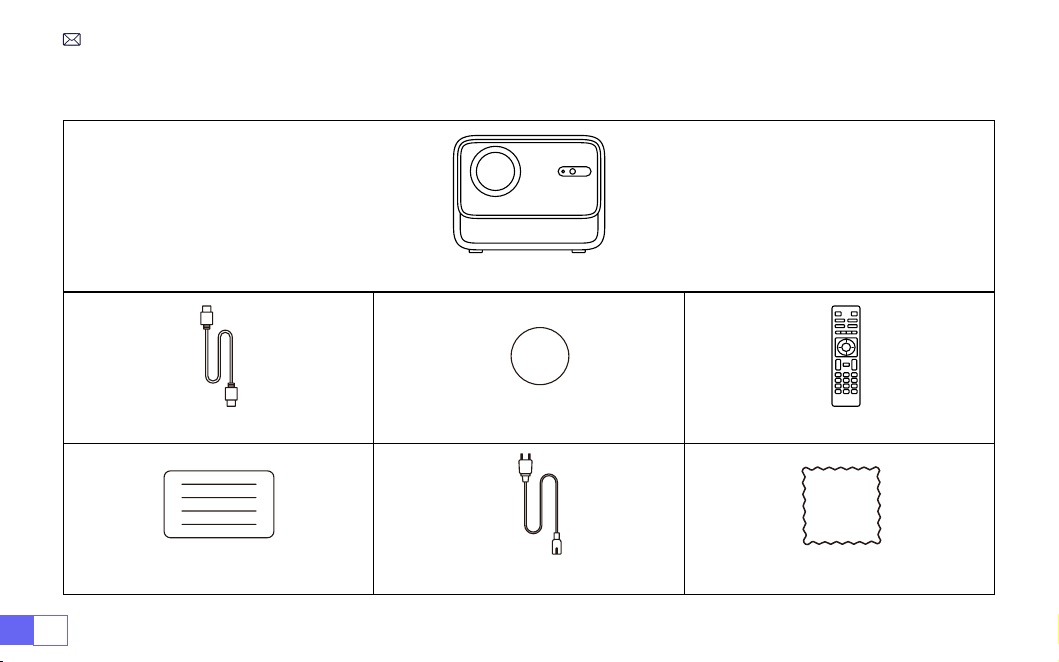
IT 134
WiMiUS K9 Proiettore *1
Cavo HDMI *1 Copriobiettivo *1 Telecomando *1
Manuale dell'utente *1 Cavo di alimentazione *1 Panno per la pulizia *1
ELENCO PACCHETTI
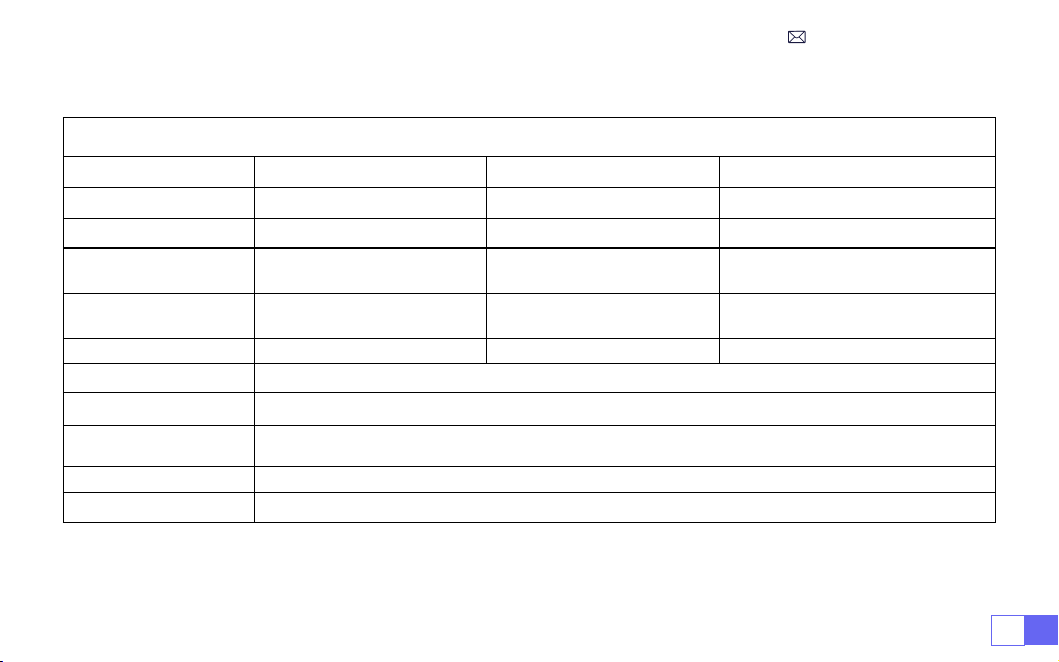
IT135
SPECIFICHE DEL PROIETTORE
Modello n. K9
Risoluzione
Nativa 1920*1080P
Proporzioni
16:9/4:3/Auto
Display Tech
LCD
Sorgente luminosa
LED
Peso
5,07 libbre
Dimensioni
8,26 x 7,09 x 6,34 pollici
Frequenza di
aggiornamento
60 Hz
Tensione di
alimentazione
CA 100-240 V~50/60 Hz 1 A
Messa a fuoco
Auto + Elettrica +
Manuale
Keystone
Auto + Elettrica + Manuale
Porta di uscita
Uscita audio da 3,5 mm
Porta di ingresso
HDMI*2/USB*2/RJ45
Modalità operativa
Telecomando/Pulsante
Tipo di installazione
Frontale/Posteriore su scrivania, Frontale/Posteriore su softto
Formato video
MP4/MPG/AVI/MPEG-4/TS/MOV/M4V/MKV/FLV/DAT/3GP
(il supporto per i codec video
potrebbe variare a seconda delle circostanze, contattaci per ulteriore supporto)
Formato audio
MP3/WMA/M4A/MP2/AAC/OGG/WAV/FLAC
(SUPPORTA Dolby)
Formato immagine
JPG/JEPG/BMP/PNG
Nota:
prodotto su licenza di Dolby Laboratories. Dolby, Dolby Audio e il simbolo della doppia D sono marchi
di fabbrica di Dolby Laboratories Licensing Corporation.

IT 136
PANORAMICA DEL PROIETTORE
1 2 3
4 5 6 7 8910
11 12
1. Obiettivo
2. Ricevitore di segnali a infrarossi
3. Segnale di messa a fuoco automatica
4. Porta di rete cablata
5. Porta USB *2
6. Porta HDMI1
7. Porta HDMI2
8. Presa per cufe
9. Ricevitore di segnali a infrarossi
10. Ingresso alimentazione
11. Rete antipolvere staccabile
12. Uscita dell'aria
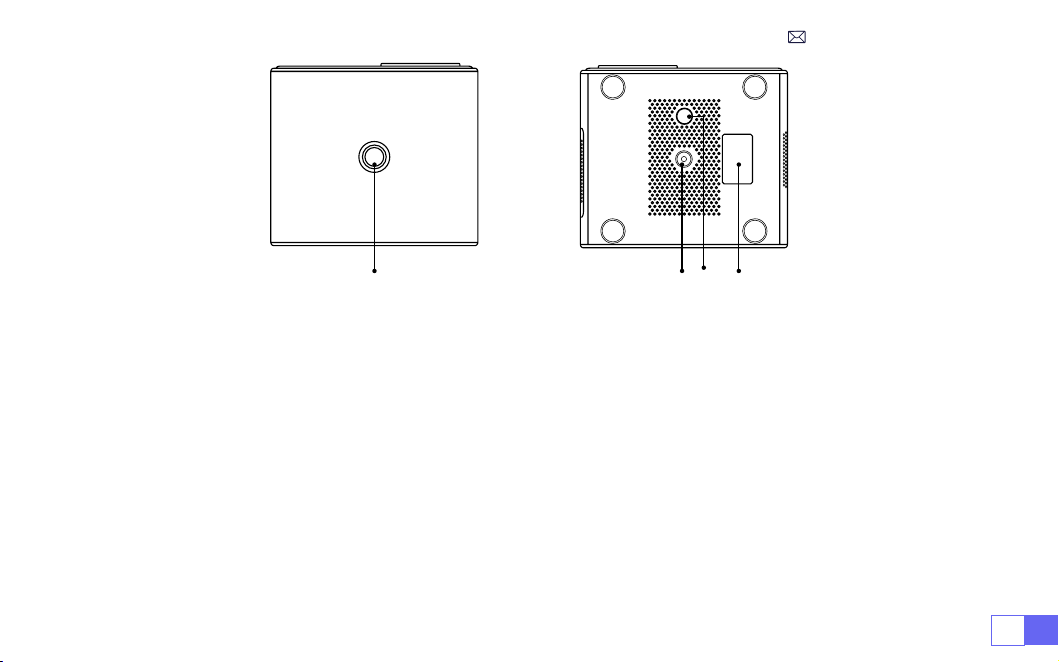
IT137
13 14 15 16
13. Tasto di accensione
14. Fori per viti della staffa (1/4 di pollice, supporto di sollevamento)
15. Piedino della macchina per la regolazione dell'altezza
16. Etichetta inferiore
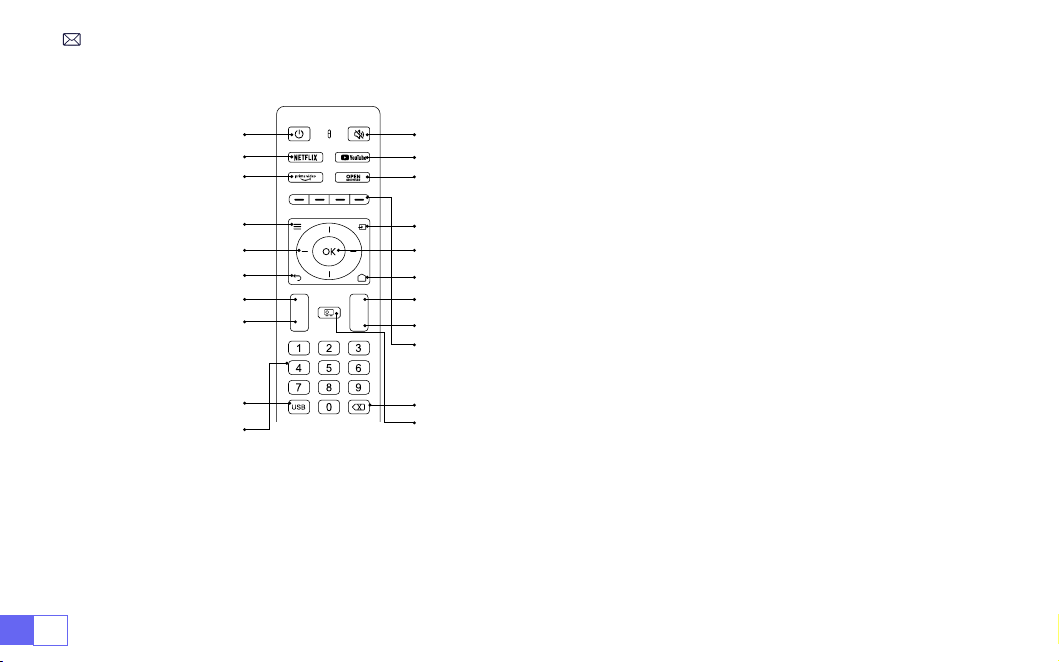
IT 138
+
-
F+
F-
TELECOMANDO
1 2
4
6
8
10
12
15
16
17
19
20
3
5
7
9
11
13
14
21
18
1. Potenza
2. Disattiva audio
3. NETFLIX
4. YouTube
5. Prime Video
6. Apri BROWSER
7. Menù
8. Fonte
9. Tasti freccia
10. Tasto di conferma
11. Indietro
12. Homepage
13. Volume +
14. Volume -
15. Messa a fuoco+
16. Messa a fuoco-
17. Tasti Rosso/Verde/Giallo/
Blu
18. USB
19. Backspace
20. Modalità di proiezione
21. Numero
Nota:
1. Installare 2 batterie AAA (NON INCLUSE) nel telecomando prima di utilizzarlo. Non combinare batterie nuove con quelli
vecchi nel telecomando, che possono causare guasti di funzionamento a causa di un'alimentazione insufciente.
2. Quando si utilizza il telecomando, assicurarsi che il trasmettitore del segnale del telecomando sia rivolto verso il
ricevitore del segnale a infrarossi del proiettore.
3. Se non si utilizza il telecomando per un lungo periodo, estrarre le batterie per evitare perdite di liquido.
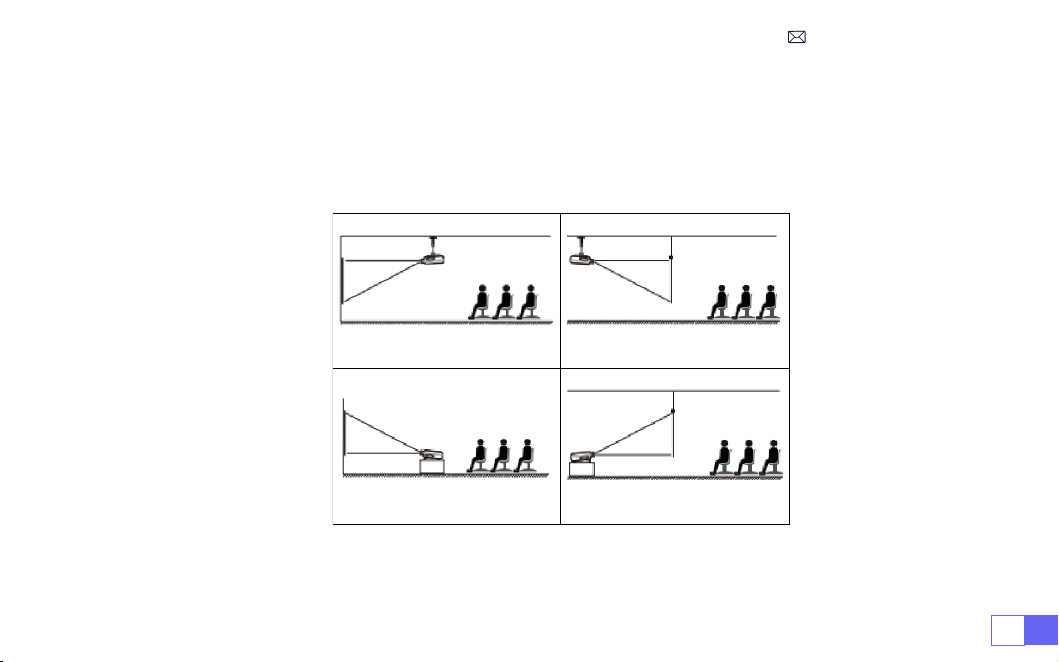
IT139
1. Frontale a softto 2. Posteriore a softto
3. Fronte sulla scrivania 4. Retro sulla scrivania
INSTALLAZIONE
Il proiettore può essere appeso al soffitto con uno speciale telaio di sospensione e posizionato sulla
scrivania stabile per proiettare l'immagine in base all'ambiente operativo e ai requisiti. Inoltre, il proiettore
può essere installato con i seguenti metodi:
Mantenere il proiettore ad un'altezza in cui la lente sia simmetrica assialmente rispetto allo schermo. Se ciò
non è possibile, utilizzare la funzione di correzione trapezoidale per regolare l'immagine di proiezione.
1.Metodo di installazione
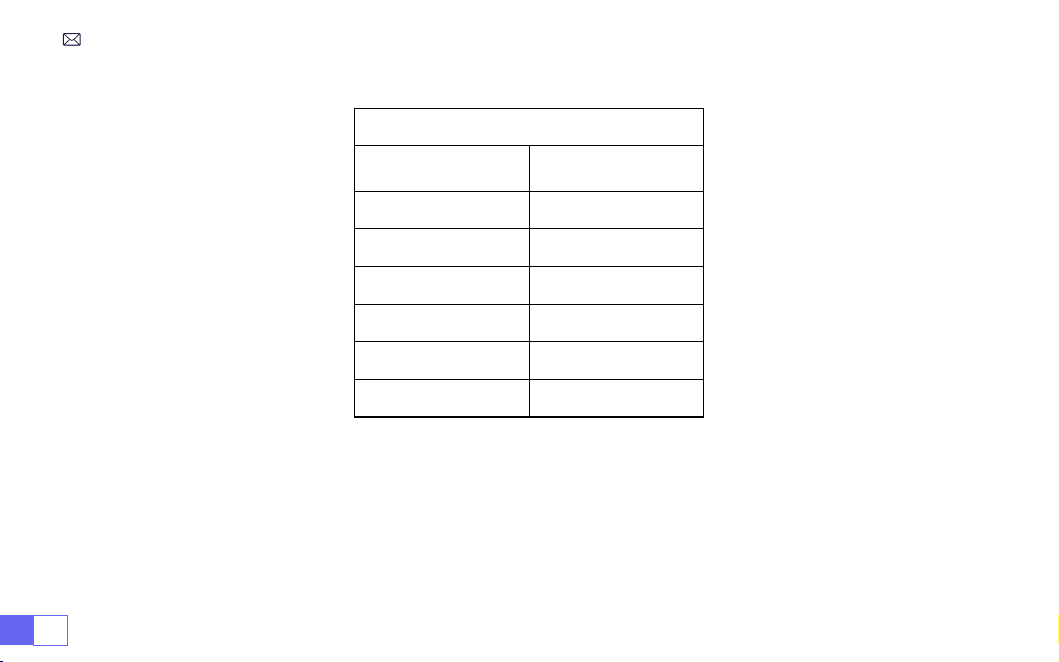
IT 140
2. Distanza e dimensioni di proiezione
Proporzioni: 16:9
Distanza (piedi)
Dimensioni dello
schermo
4,8 50"
5,7 60"
7,6 80"
9,5 100"
11,5 120"
14,4 150"
* La distanza di proiezione consigliata è di circa 5,7-8 piedi.
* La dimensione dell'immagine dipende dalla distanza tra il proiettore e lo schermo, le stime sopra riportate
potrebbero avere una deviazione del 3%. Impostazioni diverse comportano distanze diverse.
* L'effetto di proiezione è migliore in un ambiente buio.

IT141
3.Installare sul softto
Mantenere il proiettore verticale e verso il centro dello schermo proiettato e mantenere l'immagine di
proiezione piatta sul schermo.
1. Per regolare la base inclinabile, svitare l'asta di supporto nella parte inferiore del proiettore, vedere
l'immagine sotto.
2. Per il montaggio a softto, è presente un foro nella parte inferiore del proiettore. Capovolgere il proiettore,
quindi puoi trovare i fori per il montaggio a softto come mostrato nell'immagine qui sotto.
NOTA:
la staffa di sospensione o il supporto per montaggio a softto non sono imballati. (NON SUPPORTA
ANCHE il sollevamento a 4 gambe)
Piedino della Macchina per la Regolazione dell'Altezza

IT 142
AVVIO DEL PROIETTORE
1. Rimuovere il copriobiettivo, collegare il proiettore all'alimentazione tramite il cavo di alimentazione, quindi
premere il pulsante di accensione, inizia a funzionare (La luce cambia da rossa a blu).
2. Utilizzare la funzione di correzione trapezoidale/messa a fuoco automatica o elettronica del proiettore
per ottenere un rettangolo e un'immagine chiara;
3. Regolare i pulsanti di messa a fuoco "F+" e "F-" sul telecomando del proiettore per ottenere la migliore
resa dell'immagine; (Se è ancora sfocato, prova a regolare la distanza di proiezione.)
4. Collegare i dispositivi esterni (Smartphone (Android), Fire Stick, TV box, lettore DVD, PC, ecc. al proiettore
in posizione corrispondente e assicurarsi di selezionare la sorgente del segnale corrispondente. **Se non
selezioni quello corretto sorgente, il proiettore non sarà in grado di rilevare il segnale).
5. Selezionare " " quindi andare al menu e selezionare [ Congurazione ] per accedere a [ Lingua OSD ]
per impostare la lingua preferita.
A. Collegare l'alimentazione:
l'indicatore luminoso lampeggia in rosso 8 volte quando l'alimentazione è
accesa. Durante l'autotest della macchina, è necessario attendere pazientemente e quindi premere il
pulsante di accensione per accenderla.
B. Accensione:
la spia blu è sempre accesa ed è nello stato di accensione.
C. Spegnimento:
la spia rossa è sempre accesa ed è nello stato di spegnimento.
D. Standby:
Indicatore luminoso rosa, in fase di standby (5 secondi), non premere ripetutamente il pulsa-
nte di accensione.
Descrizione dell'Indicatore Luminoso
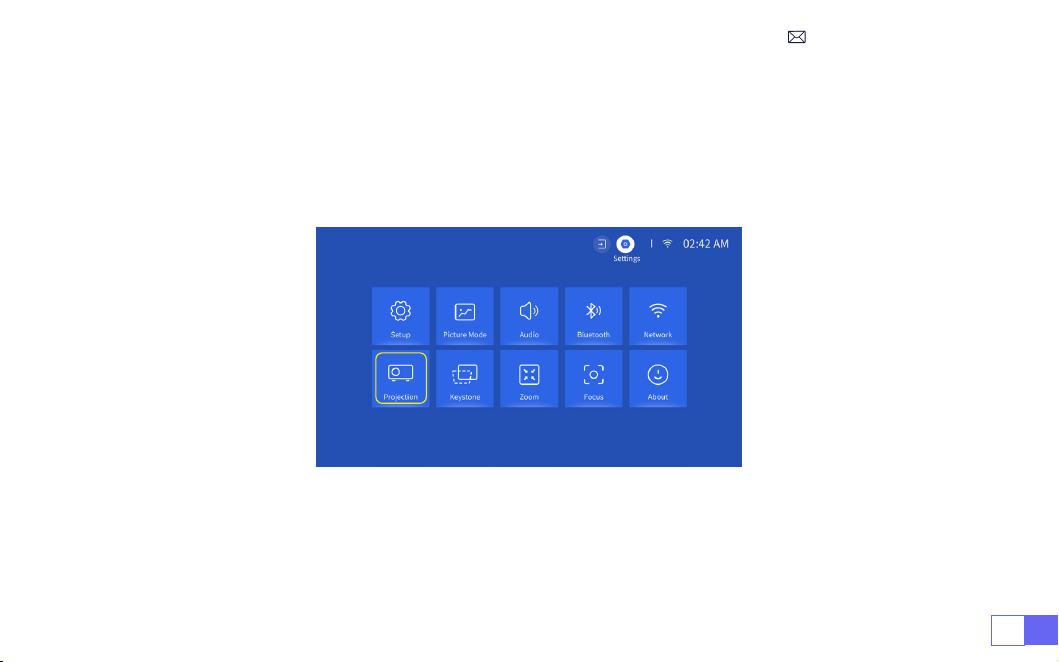
IT143
IMPOSTAZIONI DELL'IMMAGINE DI PROIEZIONE
Seleziona il menu [Impostazioni] -- Seleziona l'opzione [Proiezione] -- Seleziona la modalità di installazione,
premi il tasto freccia per selezionare e premere “OK” per confermare la posizione di proiezione.
1.Modalità di proiezione
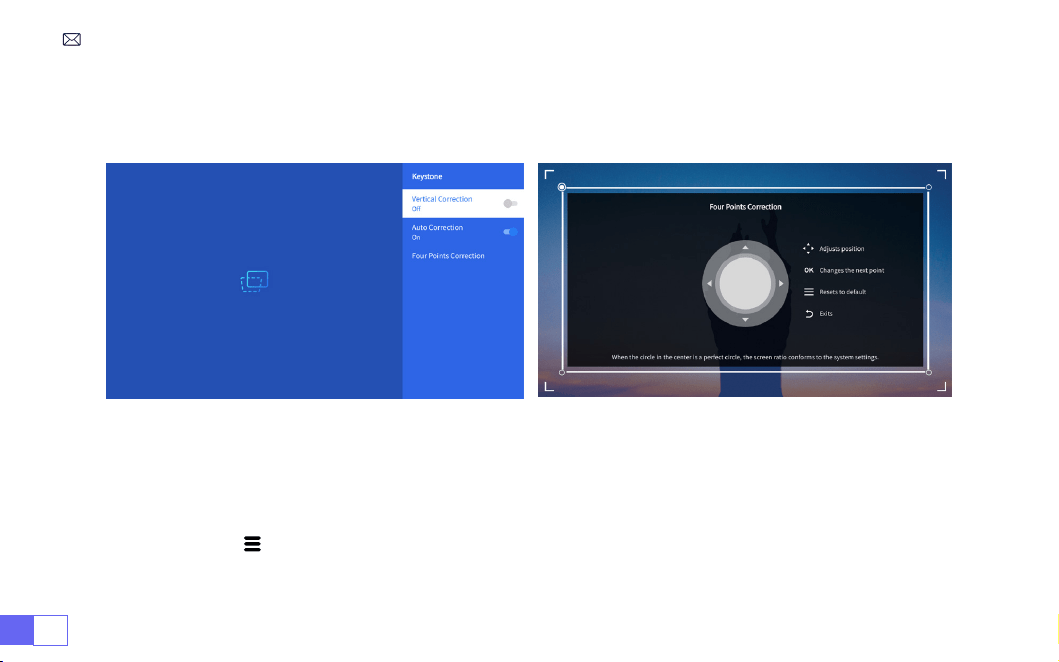
IT 144
2.Correzione trapezoidale manuale
2.1 Correzione Trapezoidale a Quattro Punti
Selezionare il menu [Impostazioni] -- Selezionare l'opzione [Keystone], quindi selezionare [Correzione a
quattro punti], fare clic sul pulsante "OK" per scegliere inizialmente il punto che si desidera regolare, quindi
premere il pulsante "
▶
" o "
▼
" per impostare il valore (Verticale 0~100) necessario come mostrato di
seguito.
Ripristina:
premere " " e l'immagine verrà ripristinata alle impostazioni originali di correzione trapezoidale.
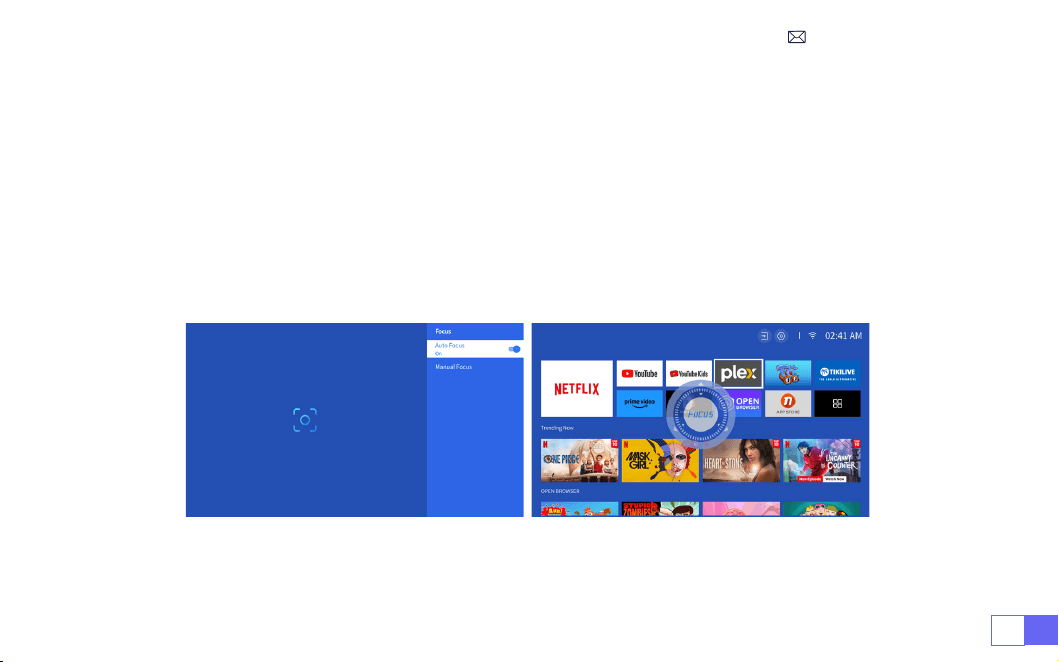
IT145
Selezionare il menu [ Impostazioni ] -- Selezionare l'opzione [ Keystone ], quindi selezionare l'opzione [
Keystone verticale ] per regolare lo schermo verticalmente di ±30° con i tasti freccia nché le guide non
vengono adattate a un rettangolo.
Posizionare prima il proiettore orizzontalmente rivolto verso la parete. Selezionare il menu [Impostazioni]
--Selezionare l'opzione [Keystone] o [Messa a fuoco] - Attivare l'opzione [Correzione automatica] o
[Messa a fuoco automatica], quindi metterà a fuoco automaticamente l'immagine in base alla distanza di
proiezione dallo schermo e regolerà l'immagine su un rettangolo quando si modica l'angolo di proiezione.
3.Correzione Trapezoidale Automatica e Messa a Fuoco
Se l'immagine è sfocata, premere ripetutamente il pulsante di messa a fuoco '' F+ '' '' F- '' sul telecomando
per regolare la messa a fuoco dell'obiettivo, finché l'immagine non risulta nitida. (**Non è necessario
premere il pulsante OK dopo che la messa a fuoco è stata cancellata)
2.2 Correzione Trapezoidale Verticale
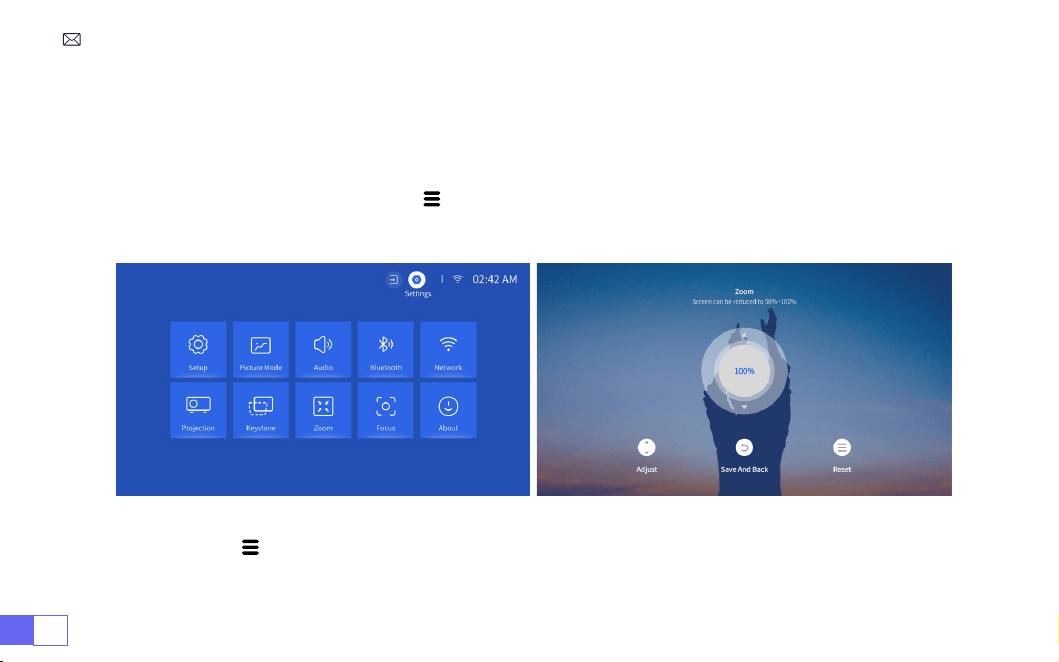
IT 146
Vai alla home page -- Seleziona il menu " " -- Seleziona [ Impostazioni ] -- Seleziona l'opzione [ Zoom ], lo
schermo di proiezione può essere ingrandito del 50%~100%. Premere il pulsante "
↑ ↓
" per impostare il valore
necessario come mostrato di seguito.
Ripristina:
Premere "
" e l'immagine verrà ripristinata alle impostazioni originali di zoom.
4.Impostazione dello Zoom
Nota:
L'angolo di proiezione laterale del proiettore non deve superare i 20°. Inoltre, non dovrebbero esserci
ostacoli davanti al proiettore. Altrimenti la funzione di correzione trapezoidale automatica potrebbe non
funzionare.

IT147
PROIETTORE IMPOSTAZIONI INTELLIGENTI
Selezionare la sorgente del segnale di ingresso desiderata (HDMI1/HDMI2) sulla home page oppure
premere il pulsante " " sul telecomando per selezionare la sorgente del segnale corrispondente.
Durante la riproduzione di un video, è possibile premere il pulsante del menu " ", quindi selezionare [Modalità
immagine]. È possibile regolare liberamente la luminosità e il contrasto dell'immagine e altre funzioni.
1.Selezionare La Sorgente Del Segnale
1.1 Selezionare La Sorgente Del Segnale Di Ingresso HDMI
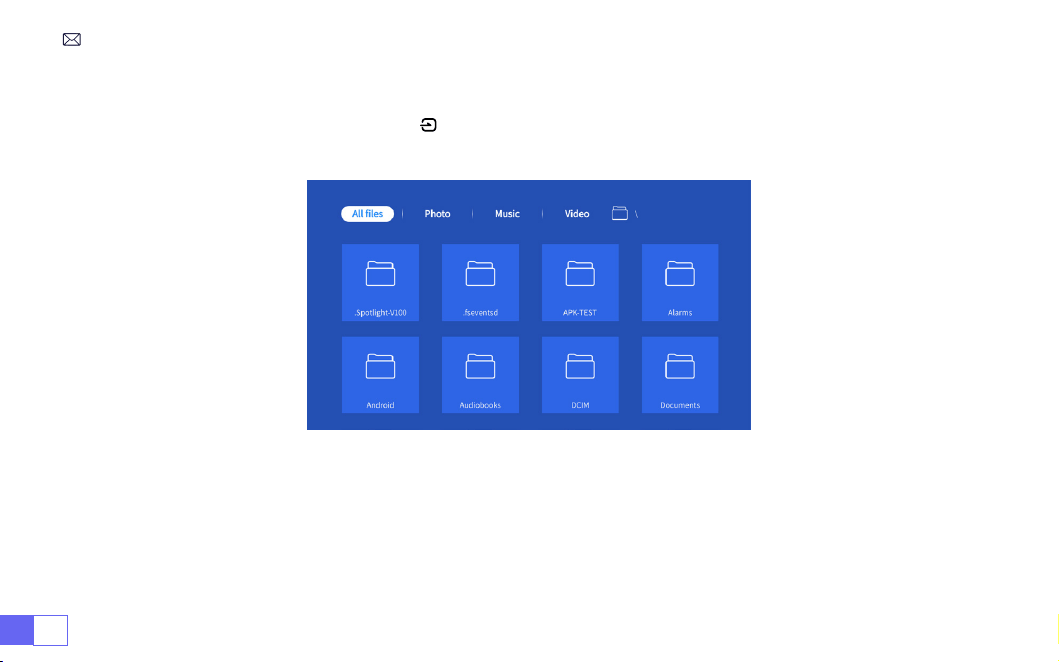
IT 148
Per i dispositivi USB non è necessario scegliere la sorgente del segnale. La macchina li rileverà
automaticamente. Premere il pulsante " " e selezionare [Sorgente segnale di ingresso USB] sulla home
page:
Suggerimenti caldi:
se il proiettore non riesce a riconoscere il disco USB, fare riferimento ai seguenti metodi
per risolvere il problema.
Conferma se il tuo disco USB soddisfa i seguenti formati.
1. FAT32: 8G/16G/32G 2. NTFS: 64G
1.2 Selezionare La Sorgente Del Segnale Di Ingresso USB

IT149
In caso contrario, formattare la chiavetta USB. Prima di formattare il disco USB, se hai qualcosa sulla
chiavetta USB, assicurati di eseguire il backup di tutto. Dopo questi passaggi, tutto andrà perduto per
sempre.
Se il problema persiste, invia il problema a questa email:
1. La uidità del mirroring dello schermo con una connessione wireless sarà inuenzata dall'ambiente di
rete. Si consiglia una larghezza di banda di 100 Mbit o più quando si utilizza il mirroring dello schermo.
2. Assicurati che il tuo dispositivo mobile sia vicino al proiettore quando usi una connessione wireless. Una
distanza di 3,28 piedi è raccomandata.
3. Alcuni dispositivi Android potrebbero non supportare il mirroring dello schermo a causa della
compatibilità.
Selezionare l'icona [Impostazioni] nell'angolo in alto a destra dell'interfaccia principale, quindi premere il tasto
" OK " sul telecomando per accedere all'interfaccia delle impostazioni e selezionare " Impostazioni di rete ".
2.Connessione Con Dispositivi Intelligenti
Consigli gentili
Impostazioni Wi-Fi
Attenzione:
il dispositivo e il proiettore devono trovarsi nella stessa rete WiFi domestica.
1. Scegli il tuo WiFi domestico per connetterti e inseriscilo a destra password, quindi fare clic su "OK", attendere 3
secondi per stabilire la connessione.
Per il sistema iOS
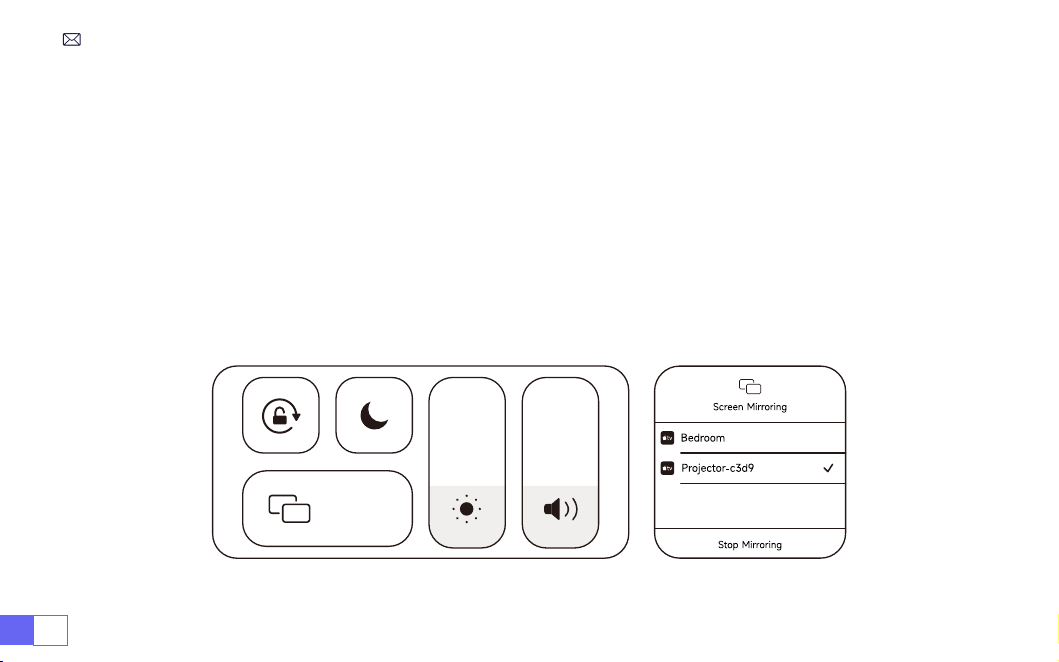
IT 150
2. Quando si utilizza il dispositivo ios per la prima volta, è necessario scaricarlo nell'interfaccia principale
(percorso: interfaccia principale Le mie applicazioni - Assistente APP - ScrennShare - Fare clic su OK -
Download dell'app completato, spegnere e riavviare - Trova ScreenShare in Le mie applicazioni )
3. Attiva l'impostazione WiFi del dispositivo iOS, quindi connettiti allo stesso WiFi domestico.
4. Quindi fare clic su "Airplay" sullo smartphone.
5. Seleziona "Projector-c3d9" dai risultati della ricerca per connetterti.
NOTA:
A causa dell'aggiornamento del proiettore intelligente WiMiUS K9 stesso: mirroring dello schermo per
iOS, Android e Windows e non è più necessario il dispositivo iOS Screen Cast per il mirroring dello schermo (il
pacchetto non include un dispositivo iOS Screen Cast)
In caso di problemi, contattaci in tempo:
Screen
Mirroring
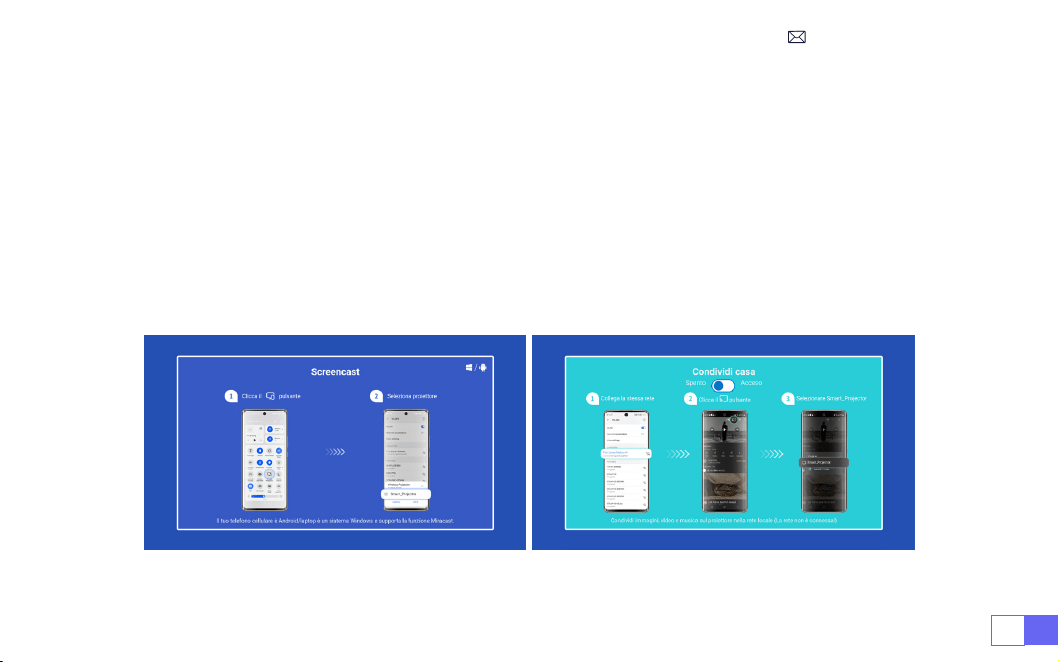
IT151
Per attivare questa funzione, il tuo dispositivo Android deve supportare la visualizzazione multischermo/
wireless. Il nome "Multi-Screen" può variare a seconda delle varie marche di dispositivi Android.
1. Impostazione con Internet mobile
2. Accendere il proiettore e selezionare "Screencast" come sorgente di ingresso.
3. Attiva il "Display multischermo/wireless" del tuo dispositivo Android.
4. Selezionare "WiMiUS-K9 Projector/Smart Projector" dai risultati della ricerca per connettersi.
5. Successo.
Per il sistema Android
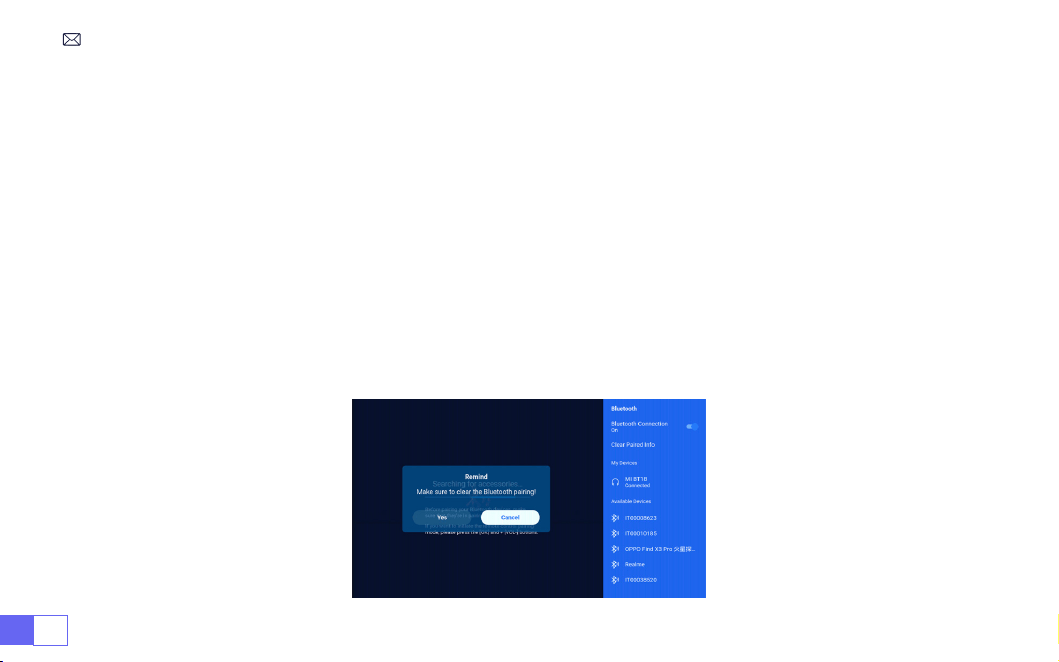
IT 152
1. Accendi l'altoparlante Bluetooth.
2. Attivare le [Impostazioni Bluetooth] del proiettore.
3. Seleziona l'altoparlante Bluetooth per connetterti.
4. Successo.
Nota:
1. Questo passaggio è applicabile solo al collegamento dell'altoparlante/ delle cufe Bluetooth ma non al
Bluetooth del telefono/PC.
2. Il proiettore K9 è compatibile con la maggior parte degli auricolari Bluetooth, altoparlanti Bluetooth e
Airpod, ma non con le tastiere Bluetooth.
3. In caso di domande, non esitate a inviare un'e-mail a WiMiUS tramite:
3.Impostazioni Bluetooth

IT153
Licenza ufficiale Netflix: il proiettore K9 è dotato di un sistema Smart Netflix OS integrato, quindi puoi
scegliere la tua APP e i tuoi video preferiti a piacimento e puoi goderti un gran numero di meravigliosi lm e
lavori televisivi senza utilizzare una Firestick TV aggiuntiva .
Allo stesso tempo, questa pagina è l'interfaccia principale del proiettore.
4.Sistema Operativo Intelligente Integrato
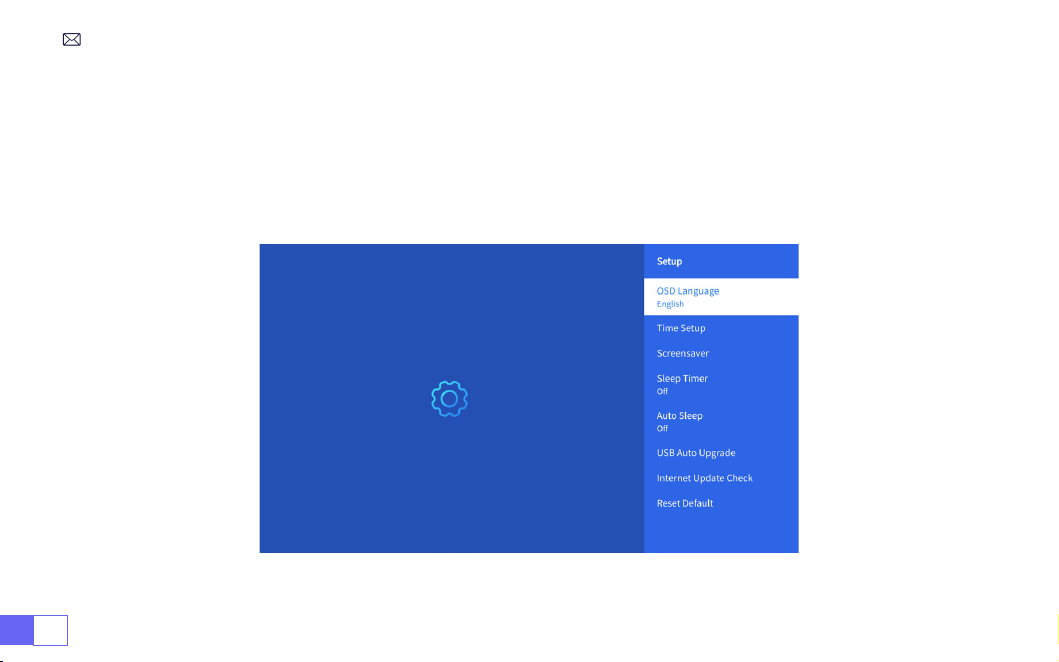
IT 154
ALTRE IMPOSTAZIONI DI PROIEZIONE DI BASE
Andare alla home page -- Selezionare [Impostazioni] -- Selezionare [Configurazione]. Utilizzare i tasti
freccia sul telecomando per cambiare menu, premere "OK" per confermare e impostare.
1.Menù Opzioni

IT155
Menu Contenuto
Lingua OSD Inglese/Francia/Italiano/Giapponese ecc.
Impostazione dell'ora Imposta l'ora locale
Salvaschermo Attiva/disattiva il salvaschermo
Sveglia On/Off: imposta il tempo di spegnimento da 10 a 120 minuti
Sospensione automatica On/Off: imposta l'ora da 30 minuti a 8 ore
Aggiornamento automatico USB Aggiornamento locale
Controllo degli aggiornamenti Internet Controlla l'ambiente Internet
Ripristina predenito Ripristina le impostazioni di fabbrica

IT 156
2.Menu Modalità Immagine
Menu Contenuto
Modalità immagine Scegli la modalità immagine desiderata
Luminosità Imposta il valore della luminosità dello schermo
Contrasto Imposta il valore del contrasto dello schermo
Saturazione Imposta il colore della saturazione dello schermo
Tonalità Imposta il colore della tonalità dello schermo
Nitidezza Imposta il valore di nitidezza dello schermo
Gamma Correggere il valore gamma
Temperatura di colore Utente/Freddo/Standard/Caldo
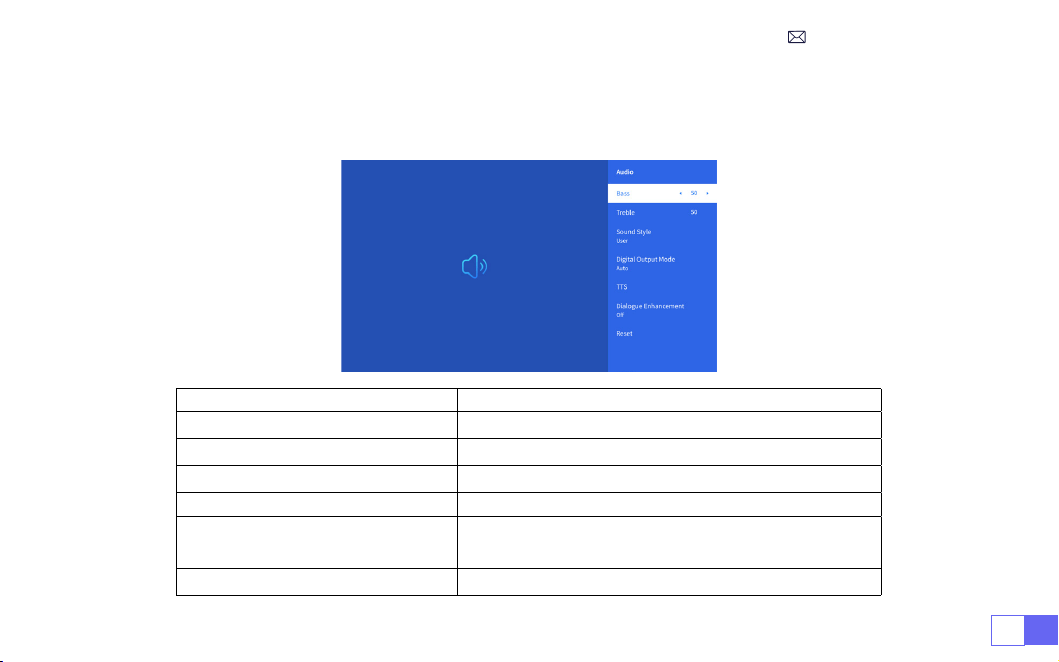
IT157
Vai alla home page -- Seleziona [Impostazioni] -- Seleziona [Audio]. Utilizzare i tasti freccia sul
telecomando per cambiare menu, premere "OK" per confermare e impostare.
3.Menù Audio
Menu Contenuto
Bassi/Alti Imposta i valori preferiti
Stile audio Utente/Standard/Film/Musica/Sport/Vivido
Modalità di uscita digitale Automatico/Manuale
TTS Funzione di trasmissione vocale
Miglioramento del dialogo
On/Off: funzione di miglioramento della conversazione,
funzione di trasmissione vocale per persone speciali
Ripristina Ripristino predenito
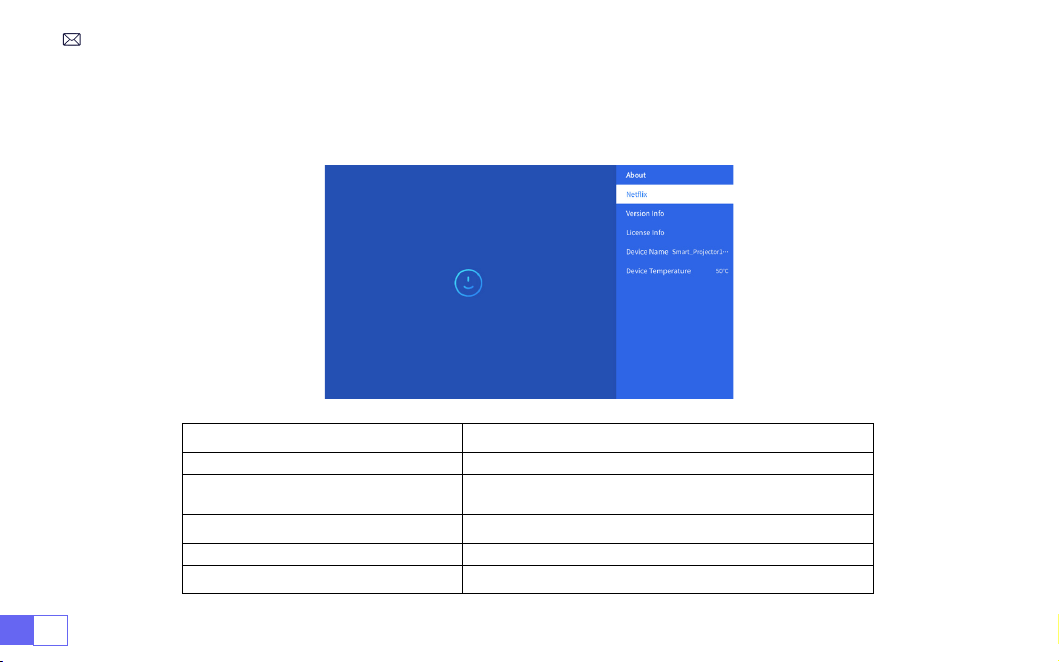
IT 158
Vai alla home page -- Seleziona [Impostazioni] -- Seleziona [About]. Utilizzare i tasti freccia sul
telecomando per cambiare menu, premere "OK" per confermare e impostare.
4. Informazioni (Informazioni sul Sistema)
Menu Contenuto
Netix Licenza ufciale Netix
Informazioni sulla versione/licenza
Visualizza le informazioni sulla versione/licenza più
recenti
Modalità di uscita digitale Automatico/Manuale
Nome del dispositivo
Nome del modello del proiettore
Temperatura del dispositivo
La temperatura attuale della macchina

IT159
Il proiettore WiMiUS K9 ha 6 interfacce, porte HDMI*2/porte USB*2/uscita cufe da 3,5 mm/RJ45
Seleziona la porta di connessione corretta per collegare il tuo dispositivo (PC, telefono, lettore DVD,
soundbar, USB, PS4, ecc.)
Seleziona la sorgente del segnale USB, la macchina li rileverà automaticamente.
• Selezionare la categoria richiesta “foto” “musica” o “video” nell'interfaccia principale e premere il tasto “OK”
sul telecomando per accedere alla categoria corrispondente.
• A seconda dei programmi scegliere: “foto” “musica” o “video”.
• Scegliere il le che si desidera riprodurre e premere il tasto "OK" per riprodurre o mettere in pausa il le. (Non
è possibile accedere alla categoria richiesta senza collegare una chiavetta USB.)
Nota:
per l'opzione “Ofce Suite”, i le PPT/TXT non possono essere riprodotti o presentati normalmente.
1. Collegare al computer e al proiettore K9 con il cavo HDMI (incluso).
2. Seleziona la sorgente HDMI per proiettare qualsiasi le sul tuo computer;
3. Sul tuo laptop, tieni premuti i tasti della scheda "Win+P" per modicare la modalità di visualizzazione.
1.Connessione multimediale USB
2.Connessione al PC
COLLEGAMENTO LINEE DI SEGNALE

IT 160
Solo computer:
è l'opzione predenita: viene visualizzata solo sul monitor principale.
Duplica:
fa sì che tutti i monitor visualizzino la stessa cosa duplicando il desktop su ciascun monitor.
Estendi:
fa sì che tutti i tuoi monitor si comportino come un grande monitor estendendo il desktop su tutti
loro.
Solo proiettore: viene visualizzato solo sul monitor secondario come un proiettore.
Per modicare la risoluzione dello schermo in modalità "Solo proiettore", attenersi alla seguente procedura:
Passaggio:
Start > Pannello di controllo > Aspetto e personalizzazione > Regola risoluzione dello
schermo

IT161
• Scegli il canale del segnale multimediale: "HDMI"
• Utilizza un adattatore da tipo C a HDMI per collegare il tuo MacBook o un adattatore da Mini Display a
HDMI per connetterti al tuo MacBook Air (
adattatore non incluso
)
• Scegli il canale del segnale multimediale: "HDMI"
• Utilizzare il cavo HDMI per connettersi a XBOX/PS4
• Successo
3.Connessione con MacBook o MacBook Air
4.Connessione con XBOX/PS4

IT 162
• Selezionare la modalità “HDMI” per la connessione
• Fare clic sul pulsante del "Menu"
• Cambia la MODALITÀ PC da [ON] a [OFF] per evitare il problema dei bordi bianchi causati dalla perdita di pixel.
5.Collegamento con il DVD
FAQ E GARANZIA
Grazie per aver scelto il proiettore WiMiUS K9. Forniamo una garanzia di 3 anni per il proiettore K9. Se ne hai
qualsiasi domanda, non esitare a contattarci tramite
.
Abbiamo raccolto alcune domande frequenti e le relative risposte per assisterti meglio.
Q1:
La connessione WiFi è instabile. Come posso risolvere questo problema?
Per risolvere i problemi di connettività WiFi, assicurati innanzitutto che la tua rete domestica funzioni bene.
Inoltre, mantieni la distanza tra il telefono e il proiettore entro 1 metro. Se il problema persiste, contattaci
all'indirizzo
per ulteriore assistenza.
Q2:
Il telecomando e il proiettore non riescono a comunicare.
1. L'interruttore di alimentazione sopra il proiettore è acceso o spento?
2. La batteria del telecomando è scarica?

IT163
Q5:
Non compatibile con il mio altoparlante Bluetooth?
1. Il proiettore potrebbe non essere compatibile con alcune versioni di altoparlanti Bluetooth di JBL.
2. Contatta immediatamente la nostra e-mail post-vendita all'indirizzo
e
comunicaci la marca e il modello del tuo altoparlante Bluetooth.
Q4:
Spegnimento automatico dopo aver lavorato per un po'.
1. La ventilazione del proiettore è bloccata o la tensione non è stabile.
2. Invia un video a
e controlleremo il problema per te.
Q3:
Cos'è il sistema Linux? Posso guardare lm e programmi TV più popolari?
1. Il sistema Linux è ufcialmente autorizzato da Netix. Il proiettore viene fornito precaricato con contenuti
di Netix, YouTube, Prime Video, ecc.
2. Trova altre app da scaricare nell'interfaccia principale Le mie applicazioni(Percorso altre app: Interfaccia
principale Le mie applicazioni - Assistente APP).
3. C'è un ostacolo tra il telecomando e la nestra di ricezione del segnale IR del proiettore?

目次
WiMiUS
よ即時りなサポート
- - - - - - - - - - - - - - - - - - - - - - - - 165
ご注意事項
: - - - - - - - - - - - - - - - - - - - - - - - - - - - - - - 166
パッケージリスト
- - - - - - - - - - - - - - - - - - - - - - - - - - - - 167
製品仕様
- - - - - - - - - - - - - - - - - - - - - - - - - - - - - - - 168
製品概要
- - - - - - - - - - - - - - - - - - - - - - - - - - - - - - - 169
リモコン
- - - - - - - - - - - - - - - - - - - - - - - - - - - - - - - 171
インストール
- - - - - - - - - - - - - - - - - - - - - - - - - - - - - - 172
プロジェクターの起動
- - - - - - - - - - - - - - - - - - - - - - - - - - 175
投影画像の設定
- - - - - - - - - - - - - - - - - - - - - - - - - - - - - 176
プロジェクターの設定
- - - - - - - - - - - - - - - - - - - - - - - - - - 180
他のプロジェクターの設定
- - - - - - - - - - - - - - - - - - - - - - - - 187
信号線接続
- - - - - - - - - - - - - - - - - - - - - - - - - - - - - - - 191
FAQ
と保証
- - - - - - - - - - - - - - - - - - - - - - - - - - - - - - 194

JP165
お客様
平素より格別のご愛顧を賜わり厚くお礼申し上げます。
プロジェクターを使用する前に、この取り扱い説明書をよくお読みください。問題がある場合はご注文番号と問題を
き、即時対応させて頂きます。
信号がない、音が出ない、Bluetooth 接続できない、WiFi 接続できない、黒点、途切れなど多くの問題は設定の仕方
で解決できるので、お困りの際はご連絡下さいませ。すべてのプロジェクターは、出荷前に 100%慎重に検品され、
パッケージされていることを保証します。
また、お買い上げいただいた商品について何かご不満な点やご使用方法について不明なことがございましたらご遠慮
なくお申し付けください。必ずご満足まで対応させていただきますのでぜひ改善チャンスをくださるようにお願いし
ます。
WiMiUS サービスチーム
WiMiUS よ即時りなサポート

JP 166
1. 高温または低温はプロジェクターの性能に影響を与えるため、プロジェクターを熱すぎたり寒すぎたりする部屋に
置かないでください。作業環境は 5℃
〜
35℃で良いです。
2.プロジェクターが安定して動作するために換気装置が搭載されています。通気孔は内部の温度上昇を防ぐためのも
のです。物を置いたり立てかけたりして通気孔をふさがないでください。ショートや感電の原因となり、プロジェ
クターを損傷する可能性があるため、プロジェクターのスロットにいかなる種類の物も挿入しないでください。
3.プロジェクターは、強い衝撃、押し出し、振動から厳重に保護する必要があります。強い衝撃、圧迫、振動。内部
回路の故障の原因となります。
4.プロジェクターの核心部品であるレンズは、画像の鮮明度と効果に直接関係します。レンズのほこりを拭きすぎる
と、画質に影響を与えることがあります。汚れたレンズは柔らかい綿布で拭いてください。硬い布や研磨剤は使用
しないでください。
5.投影画像の視認性を高めるために、部屋の周囲の照明を調節してください。照明を暗くしたり照明を暗くしたり、
カーテンを使用したりすることで、まぶしさを抑え、画質を向上させることができます。
6.ご不明な点がございましたら、[email protected]までご連絡ください。
ご注意事項 :
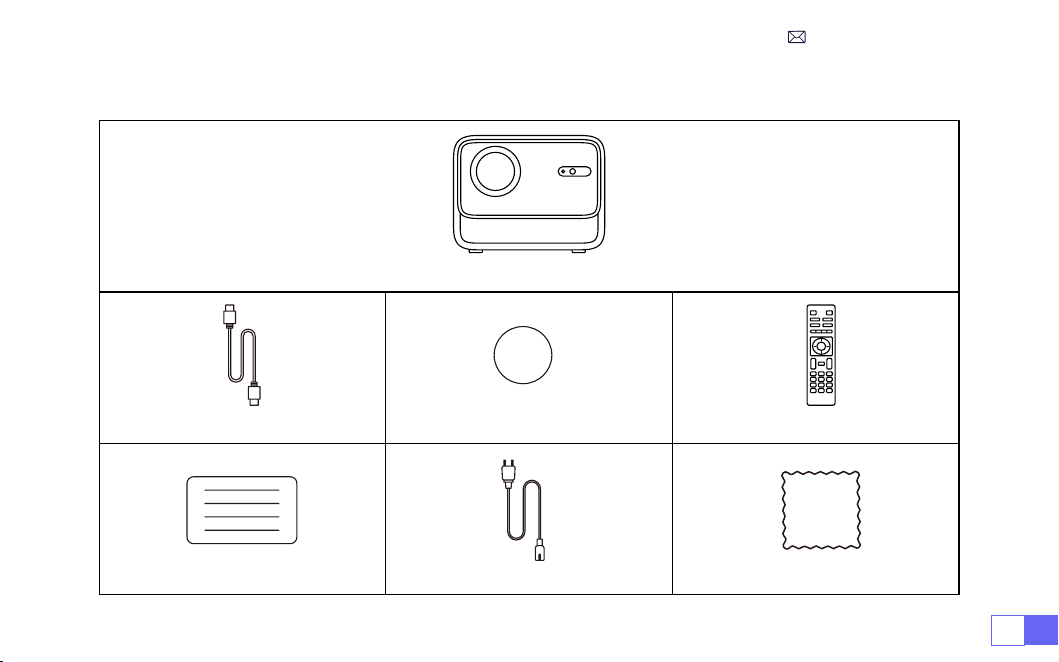
JP167
WiMiUSK9プロジェクター本体 *1
HDMIケーブル *1 レンズキャップ *1 リモコン *1
ユーザーマニュアル *1 電源ケーブル *1 クリーニング布 *1
パッケージリスト
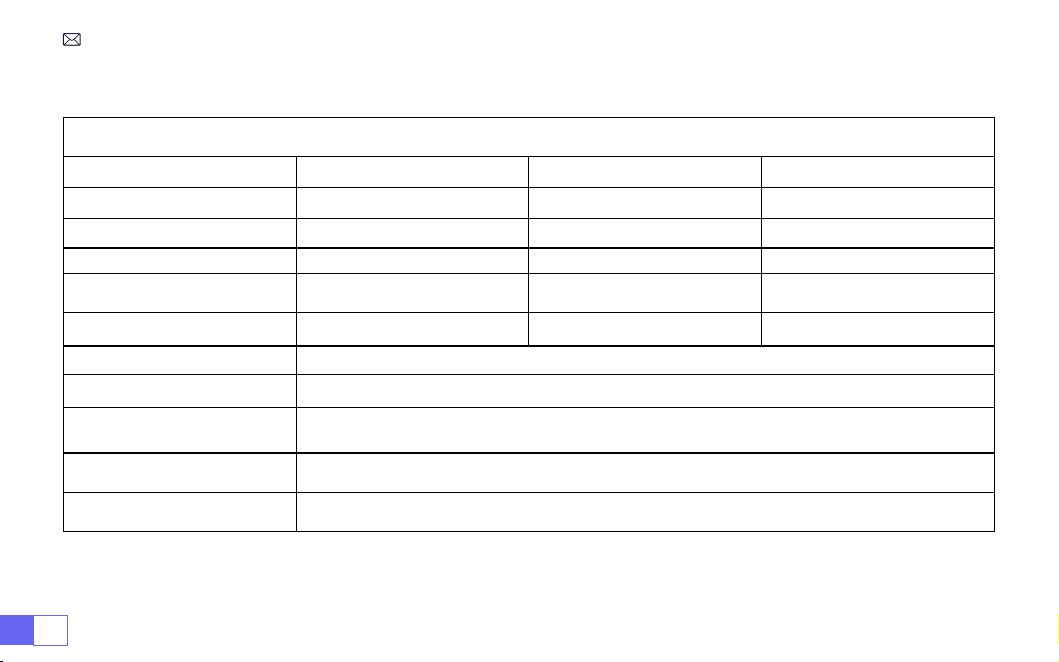
JP 168
製品仕様
Model No. K9
ネイティブ解像度 1920x1080P アスペクト 16:9/4:3/ オート
イメージングシステム LCD 光源 LED
重量 2.29kg サイズ 20.9*18.0*16.1cm
リフレッシュレート 60Hz 電源 AC100-240V~50/60Hz1A
フォーカス オート +電動 +手動 台形補正 オート +電動 +手動
出力端子 3.5mm 音声端子 入力端子 HDMI*2/USB*2/RJ45
操作モード リモコン / ボタン
インストール方式 机の前 / 後、天井の前 / 後
ビデオファイル
MP4/MPG/AVI/MPEG-4/TS/MOV/M4V/MKV/FLV/DAT/3GP( ビデオコーデックのサポー
ト状況により異なりますので、追加サポートについてはお問い合わせください。)
オディオファイル MP3/WMA/M4A/MP2/AAC/OGG/WAV/FLAC(Dolbyサポート )
写真ファイル JPG/JEPG/BMP/PNG
ご注意:ドルビーラボラトリーズのライセンスに基づき製造されています。Dolby、DolbyAudio、ダブル D のシンボ
ルは DolbyLaboratoriesLicensingCorporation の商標です。

JP169
製品概要
1 2 3
4 5 6 7 8910
11 12
1. レンズ
2.赤外線信号受信部
3.オートフォーカス信号
4.有線ネットワークポート
5.USB 端子 *2
6.HDMI1 端子
7. HDMI2 端子
8.3.5mm音声端子
9. 赤外線信号受信部
10.電源コネクタ
11.着脱式防塵ネット
12.排気口


JP171
リモコン
1 2
4
6
8
10
12
15
16
17
19
20
3
5
7
9
11
13
14
21
18
1. 電源ボタン
2.消音
3.NETFLIX
4.YouTube
5.PrimeVideo
6.ブラウザを開く
7. メニュー
8.ソース
9. 矢印キー
10.確認キー
11.戻る
12.ホームページ
13.音声+
14.音声-
15.フォーカス+
16.フォーカス-
17.赤 / 緑 / 黄 / 青キー
18.USB
19.バックスペース
20.投影モード
21.数字キー
ご注意:
1. リモコンを使用する前に、単 4 形乾電池(別売)を 2 本入れてください。新しい電池と古い電池を一緒にリモコン
に入れないでください。電源不足による動作不良の原因となります。
2.リモコンを使用する際、リモコンの信号送信部がプロジェクターの赤外線信号受信部に向けていることを確認して
ください。
3.リモコンを長期間使用しない場合は、電池の液漏れを防ぐために、電池を取り出してください。
+
-
F+
F-
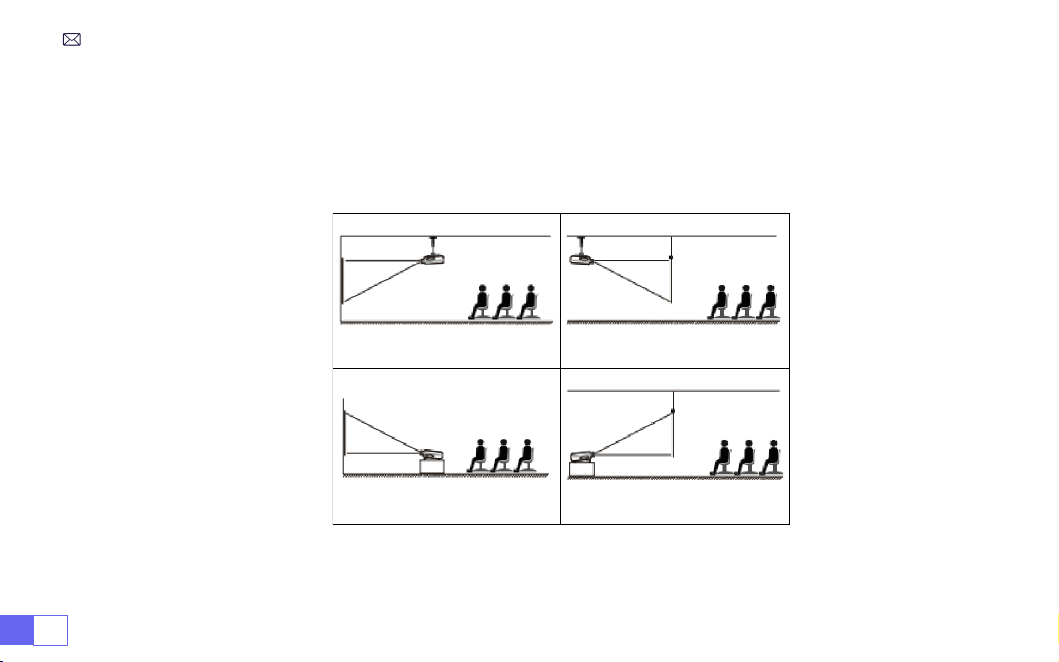
JP 172
1. 天吊りで正面投影 2. 天吊りで背面投影
3. テーブル置きで正面投影 4. テーブル置きで背面投影
インストール
K9 プロジェクターは、天吊り用の金具で天吊りができ、安定した机の上に置いても投影できます。ご使用環境によっ
て下記の 4 つの投影方式があります。
レンズがスクリーンに対して軸対称になる高さにプロジェクターを使用してください。無理な場合は台形補正機能を
使用して投影画像を調整してください。
1. 投影方式
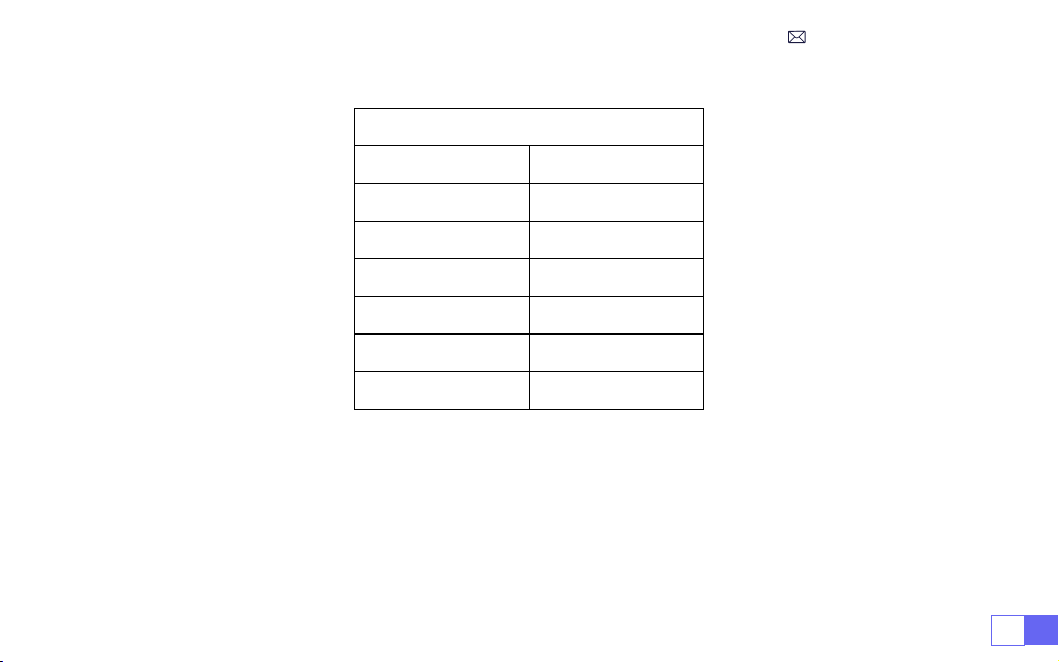
JP173
2. 投影距離と投影サイズ
アスペクト比 :16:9
投射距離 画面サイズ
1.5m 50”
1.8m 60”
2.3m 80”
3m 100”
3.5m 120’’
4.4m 150’’
* 最適な投射距離:2.0-3m。
* 上の表の画面サイズに参照して ±3%を考慮してください。
* 投影効果は暗い環境でより良くなります。
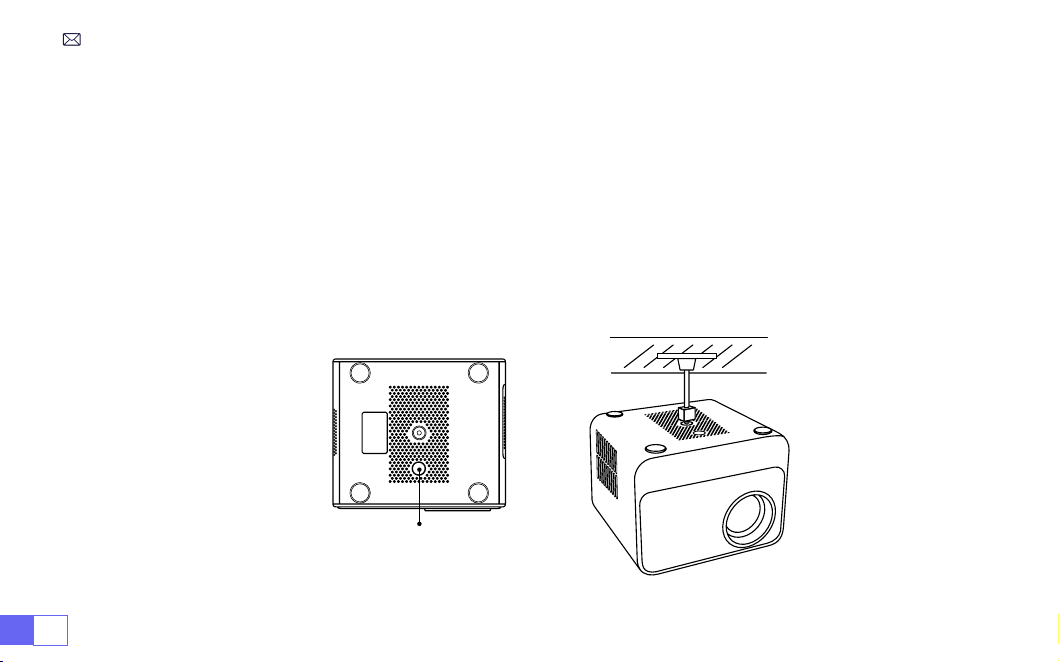
JP 174
3. 天井取り付け
プロジェクターを垂直にして、スクリーン画面の中央に向けて、投影画像を平らに保つ必要があります。
1. 本機の傾斜角度ベースを調整するには、プロジェクター底面の高さ調整フィートを外して、より良い投影角度が得
られます。以下を参照してください。
2.パッケージには用意してあるネジでプロジェクターの底部のネジ穴に取り付けて、より良い投影角度が得られます。
以下を参照してください。
3.天吊りの場合はプロジェクターの底部に
1
つの穴があります。プロジェクターを逆さまにして、穴を見つけること
ができます。以下を参照してください。
ご注意:吊り下げ金具や天井マウントスタンドは同梱されていません。(4 本足吊りには対応しておりません。)
高さ調整フィート

JP175
プロジェクターの起動
1. レンズキャップを取り外し、電源ケーブルを接続し、電源ボタンを押すと製品を起動できます。( ライトが赤から
青に変わります)
2.プロジェクターの自動または電動台形補正 / フォーカス機能を使用し、長方形で鮮明な画像を取得します。
3.最高な画像を得るには、プロジェクターリモコンのフォーカスボタン ''F+''''F-'' を調整してください。(それでも
ぼやける場合は投影距離を調整してみてください)
4.外部機器(スマホ(Android)、FireStick、TV ボックス、DVD プレーヤー、コンピューターなど)をプロジェク
ターと接続する場合は対応する信号源を選択してください。正しい信号源を選択しない場合は投影できないことを
ご了承ください。
5."" を選択し、メニューから [設定] を選択して、[言語] に入り、ご自由に言語を設定できます。
A. 電源オン:電源オン(電源オン)赤い表示灯が 8 回点滅し、マシンが自動テストの過程にある、辛抱強く待つ必要
があり、その後、マシンのスイッチをオンにキーを押します。
B. スイッチオン:青いインジケータランプが長い明るいですが、スイッチオンの作業状態に属しています。
C. シャットダウン:赤い表示灯が長く点灯し、運転停止状態に属します。
D. 待機 : ピンクの表示灯は待機(5s)の過程において、電源ボタンを繰り返し押さないで下さい。
指示ランプの説明

JP 176
投影画像の設定
[設定]メニューを選択--[投影設定] オプションを選択--[インストールモード]を選択し、矢印キーを押して選
択し、「OK」を押して投影位置を確認します。
1. 投影方式

JP177
2. 手動台形補正
2.1 4 点台形補正
[設定]メニューを選択--[台形補正] オプションを選択--[4 点台形補正]を選択して、"OK"ボタンをクリックし
て、調整したいポイントを選び、"
▶
"または"
▼
"ボタンを押して数値(垂直方向 0-100)を調整してください。
以下を参照してください。
リセット:"" を押すと、画面が元の台形補正の設定に戻ります。
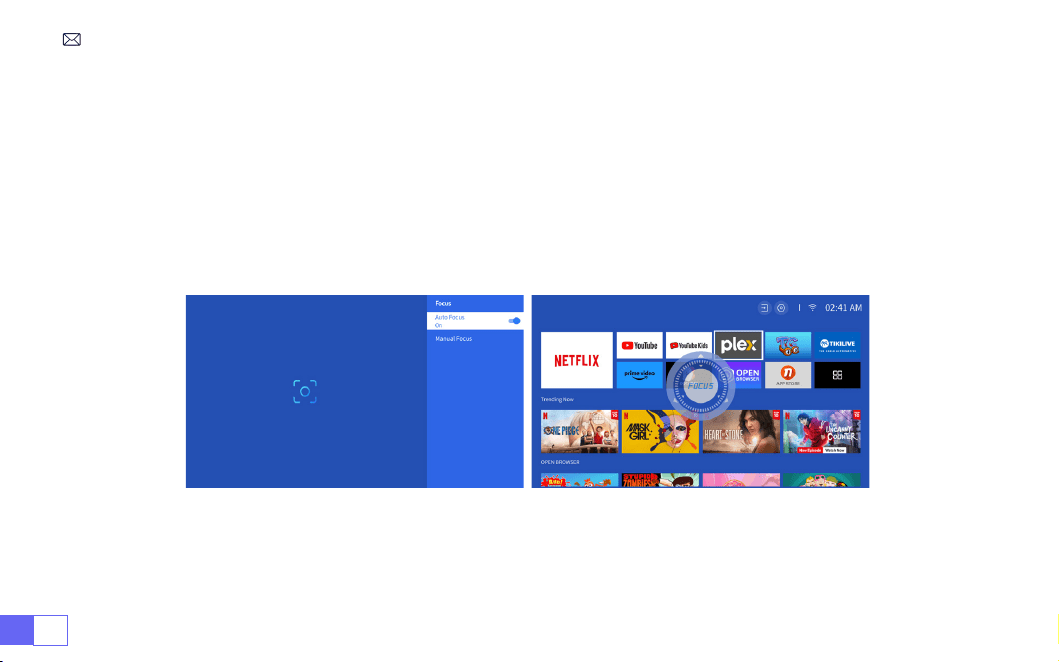
JP 178
2.2 垂直方向の台形補正
[設定]メニューを選択--[台形補正] オプションを選択--[垂直方向の台形補正] を選択し、長方形に調整される
まで、矢印キーでスクリーンを垂直(±30°)に調整します。
プロジェクターを壁に水平に設置し、[設定]メニューを選択--[台形補正]または[フォーカス]オプションをを
選択--[全方位自動補正]または[自動フォーカス]オプションをオンにすると、スクリーンからの投影距離に基づ
いて自動的に画像の焦点を合わせ、投影角度を変更すると画像を長方形に調整することができます。
3. 自動台形補正とフォーカス
画像がぼやけている場合は、リモコンのフォーカスボタン「F+」「F-」を繰り返し押してレンズの焦点を調整し、画
像が鮮明になるまで調整ボタンをタップまたは長押しします(画面が鮮明になった後は OK ボタンを押す必要はあり
ません)。
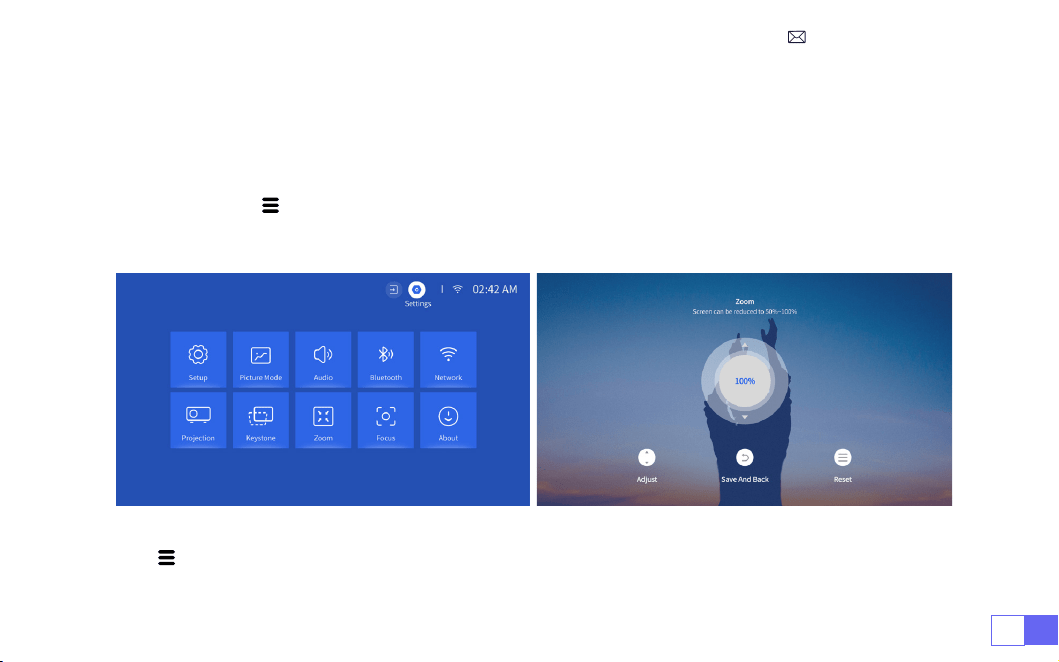
JP179
ホームページに移動--"" メニューに入り--[設定]を選択し、[ ズーム ] をを選択し、投影画面が 50%~100% 拡
大されます。ボタン "↑↓" を押して、数値を調整できます。以下を参照してください。
リセット:"" を押すと、画像は元のズーム設定に戻ります。
4. ズーム設定
注:プロジェクターの側面投影角度は 20°を超えないようにしてください。また、プロジェクターの前に障害物がな
いようにしてください。そうしないと、自動台形補正機能が働かないことがあります。
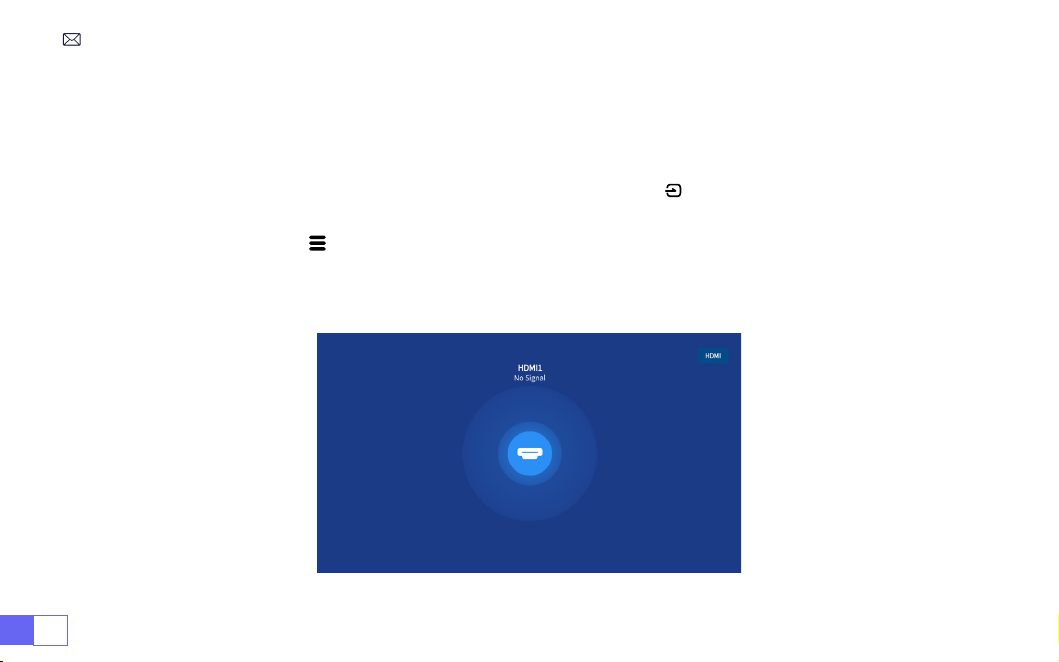
JP 180
プロジェクターの設定
ホームページの入力信号源(HDMI1/HDMI2/AV)を選択するか、リモコンの "" ボタンを押して、対応する信号源を選
択することができます。
動画再生中にメニューボタン "" を押し、[写真モード] を選択します。映像の明るさやコントラストなどを自由に
調整できます。
1. 入力信号源を選択
1.1 HDMI 入力信号源の選択
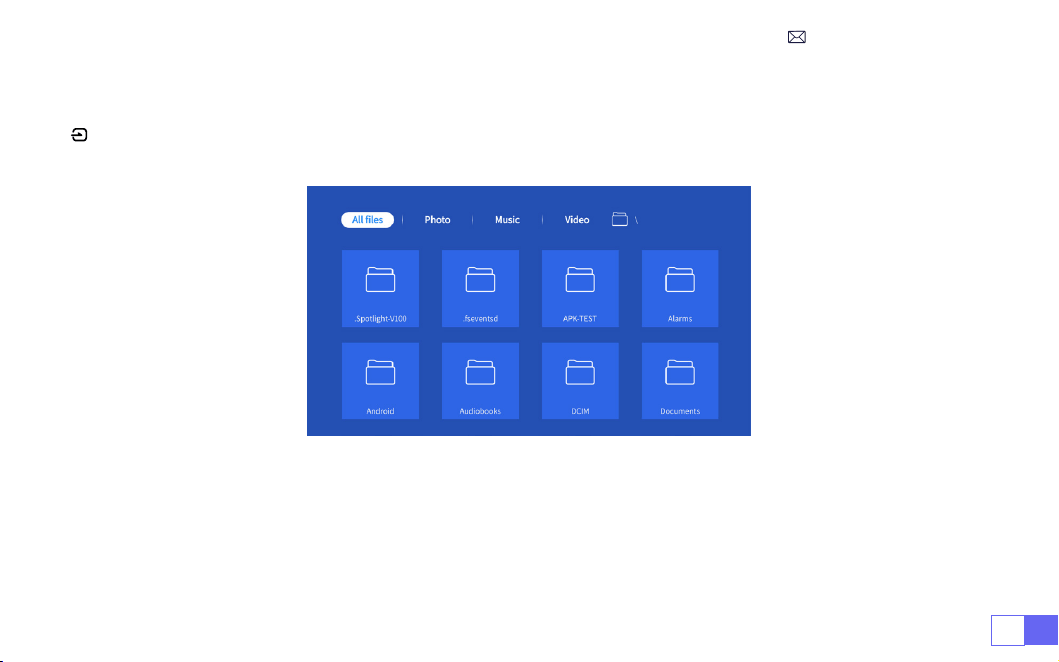
JP181
USB メモリーの場合は、信号源を選択する必要はなく、製品が自動的に検出します。
"" ボタンを押し、ホーム画面で[USB入力信号源]を選択します:
ご注意:プロジェクターが USB メモリーを認識できない場合は、以下の方法で問題を解決してください。
お手持ちの USB メモリーが以下の形式を満たしているかご確認ください。
1.fat32:8g/16g/32g2.ntfs:64g
1.2 USB 入力信号源の選択

JP 182
そうでない場合は、USB メモリーをフォーマットしてください。USB メモリをフォーマットする前に、USB メモリ
にコンテンツがある場合は、必ずすべてをバックアップしてください。
これらの手順を完了すると、すべてのコンテンツは永久に失われます。
それでも問題が解決しない場合は、ご遠慮なく [email protected] へお問い合わせください!
1. ワイヤレスで画面ミラーリングするとき、ネットワークは画像の順調性に影響を与えますから 100Mbps 以上のネ
ットワークはお勧めです。
2.ワイヤレスで画面ミラーリングするときは、デバイスをプロジェクターの近くに置いてください。1 メートル以内
の距離はお勧めです。
3.Android 端末によっては、互換性の問題でスクリーンミラーリングに対応していない場合があります。
メインインターフェイスの右上隅にある[設定]アイコンを選択し、リモコンの「OK」キーを押して設定インターフ
ェイスに入り、「ネットワーク設定」を選択します。
注意 : デバイスとプロジェクターは同じホーム WiFi である必要があります。
1. 接続するホーム
WiFi
を選択し、正しいパスワードを入力します。パスワードを入力し、"OK" をクリックしてくだ
さい。
2. スマートデバイスとの接続
ご注意
WiFi 設定
iOS システム用
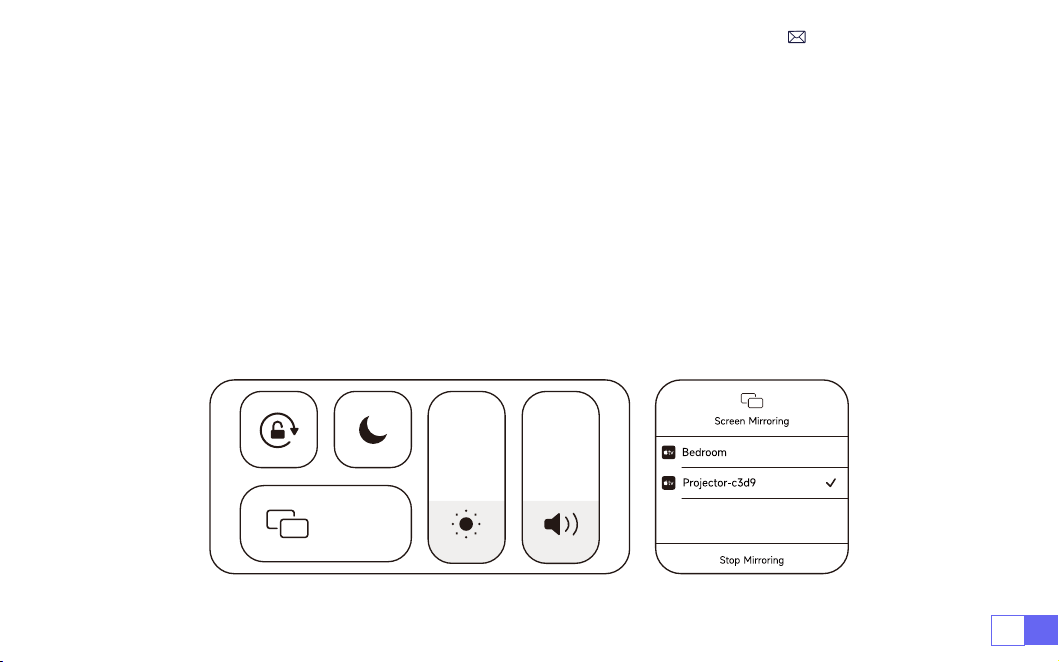
JP183
2.初めて
ios
デバイスを使用する場合、メインインターフェイスでダウンロードする必要があります(パス:
メイン
インターフェイス
マイアプリケーション
-APP
アシスタント
-ScrennShare-OK
をクリック
-
アプリのダウンロ
ードが完了したら、電源を切って再起動してください
-
マイアプリケーションで
ScreenShare
を見つけてくださ
い。)
3. iOS
デバイスの
WiFi
設定をオンにして、同じホーム
WiFi
に接続します。
4.スマートフォンの
"Airplay "
をクリックしてください。
5.検索結果から
"Projector-c3d9 "
を選択して接続します。
注:
WiMiUS K9
スマートプロジェクター本体のアップグレードのため:
iOS
、
Android
、
Windows
のスクリーンミ
ラーリングに対応し、スクリーンミラーリング用の
iOS
スクリーンキャストデバイスが不要になりました(パッケー
ジには
iOS
スクリーンキャストデバイスは含まれていません)。
何か問題がある場合は遠慮なく [email protected] へお問い合わせください!
Screen
Mirroring
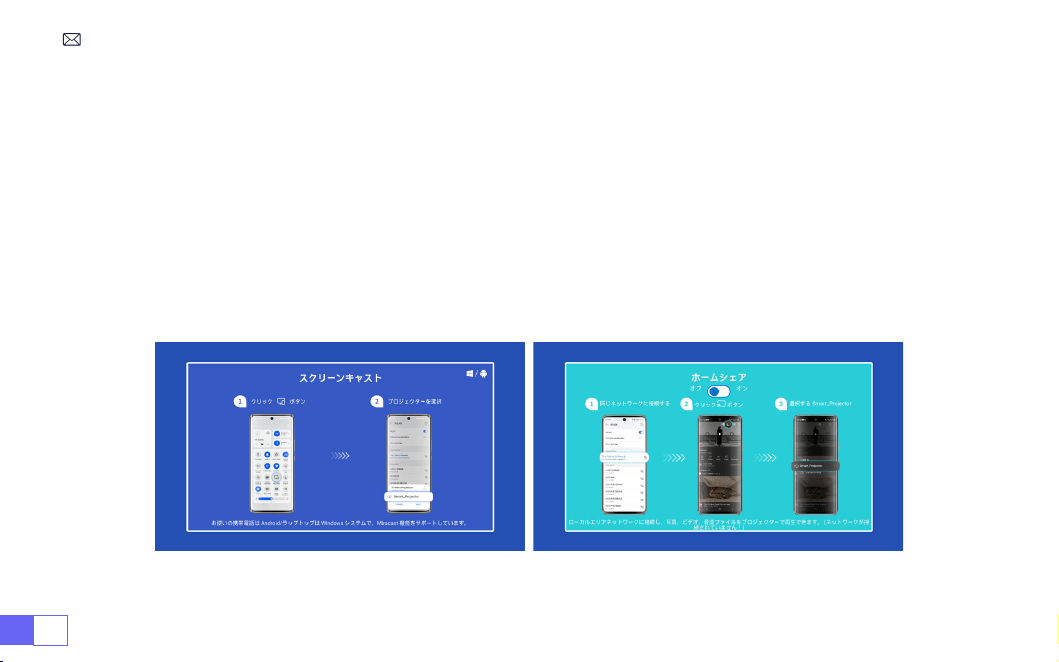
JP 184
この機能を有効にするには、お使いの Android デバイスがマルチスクリーン / ワイヤレスディスプレイに対応してい
る必要があります。マルチスクリーン" の名称は、Android デバイのブランドによって異なる場合があります。
モバイルインターネットとの設定
1. プロジェクターを起動し、入力ソースとして "Screencast" を選択します。
2.Android デバイスの「マルチスクリーン / ワイヤレスディスプレイ」を ON にします。
3.検索結果から"WiMiUS-K9Projector" を選択して接続します。
4.接続完了。
Android デバイスの場合 (Miracast)
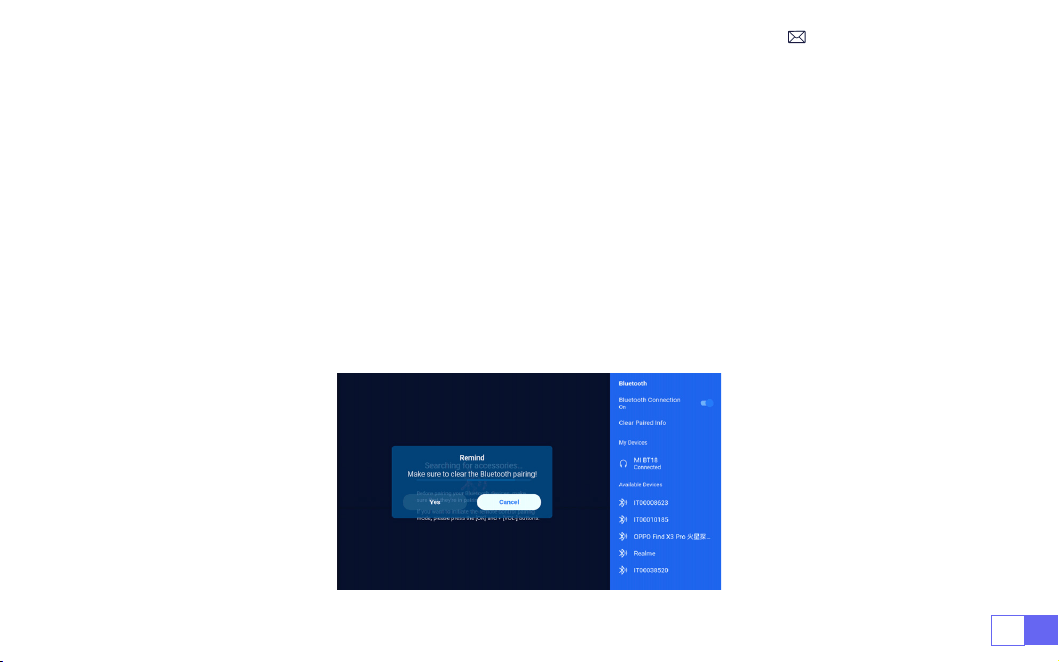
JP185
1. Bluetooth スピーカーの電源を ON にします。
2.プロジェクターの [Bluetooth 設定] をオンにします。
3.接続する Bluetooth スピーカーを選択します。
4.接続完了。
ご注意:
1. この手順は、Bluetooth スピーカーにのみ適用され、携帯電話の Bluetooth には適用されません。
2.K9 プロジェクターは、ほとんどの Bluetooth ヘッドセット、Bluetooth スピーカー、Airpods と互換性がありますが、
Bluetooth キーボードは互換性がありません。
3.何か問題がある場合は遠慮なく [email protected] へお問い合わせください!
3.Bluetooth 設定
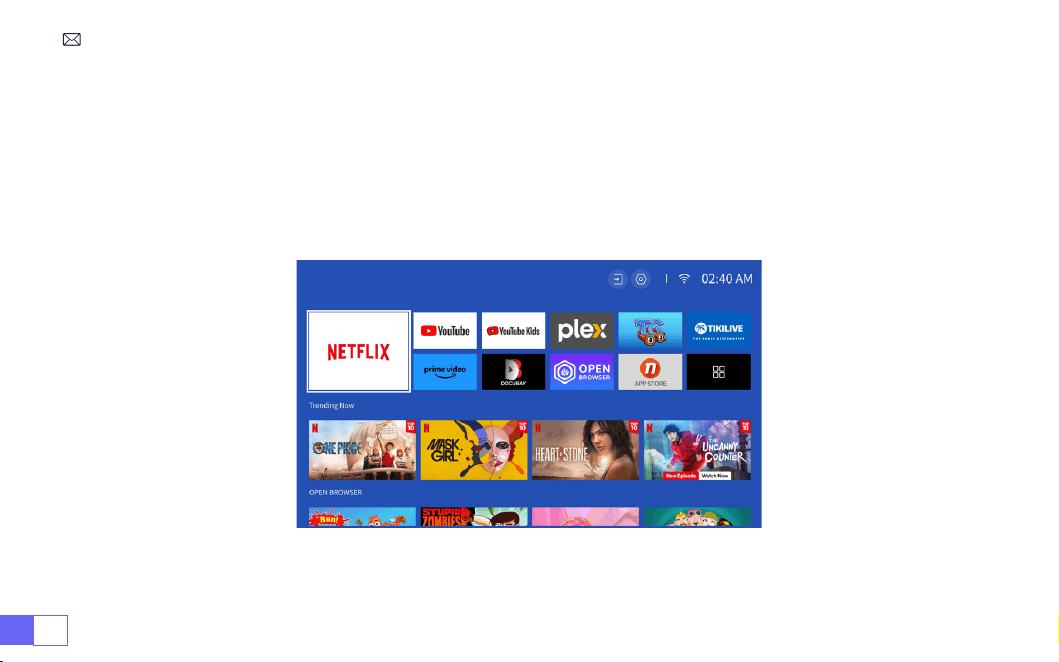
JP 186
Netflix 公式ライセンス-K9 プロジェクターはスマートNetflixOSシステムを内蔵しており、お好きな APP やビデオ
を自由に選択でき、FireTV スティックを追加することなく、数多くの素晴らしい映画やテレビ作品を楽しむことが
できます。
同時に、このページはプロジェクターのメインインターフェイスです。
4. スマート OS システム内蔵
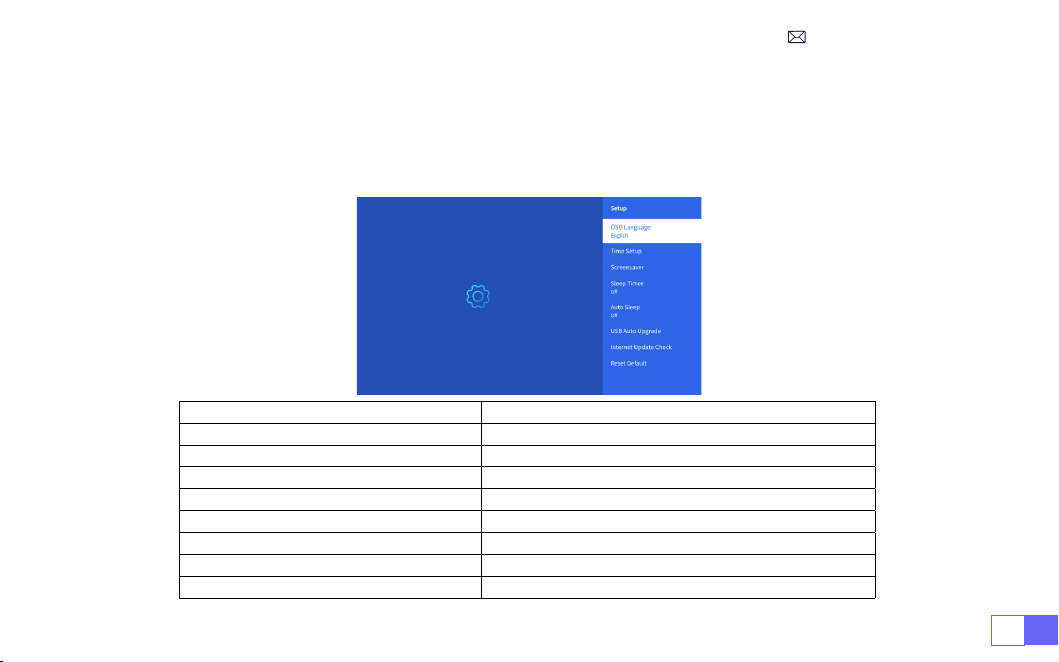
JP187
他のプロジェクターの設定
ホームページに移動--[設定]を選択し、リモコンの矢印キーでメニューを切り替え、「OK」を押して確定し、設
定します。
1. オプションメニュー
メニュー コンテンツ
言語設定 English/France/Italian/Japanese など
時刻設定 現地時間の設定
スクリーンセーバー スクリーンセーバーのオン / オフ
スリープタイマー オン / オフ:スリープ時間を 10 ~ 120 分の間で設定
オートスリープ オン / オフ:30 分
~
8 時間の間で時間を設定
USB オートアップグレード 現地最新情報
インターネットアップデートチェック インターネット環境のチェック
デフォルトのリセット 工場出荷時のデフォルトに戻す
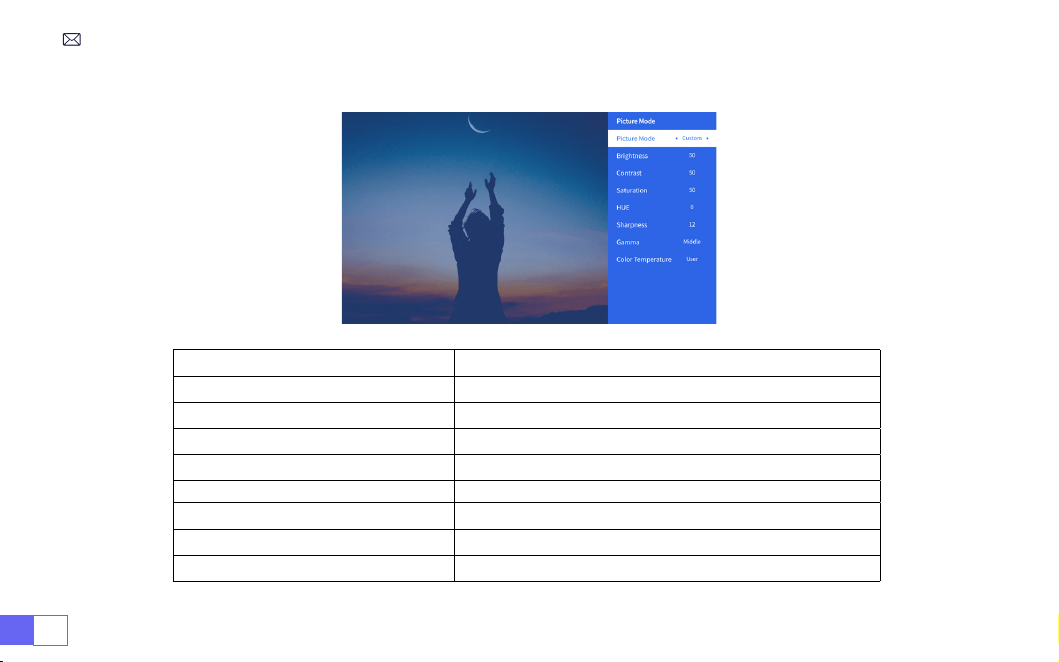
JP 188
2. 写真モードメニュー
メニュー コンテンツ
写真モード 写真モードを選択
明るさ 画面の明るさを設定
コントラスト 画面のコントラスト値を設定
彩度 画面の彩度を設定
色合い 画面の色合いを設定
シャープネス 画面のシャープネス値を設定
ガンマ ガンマ値を補正
色温 ユーザー/クール/標準/ウォーム
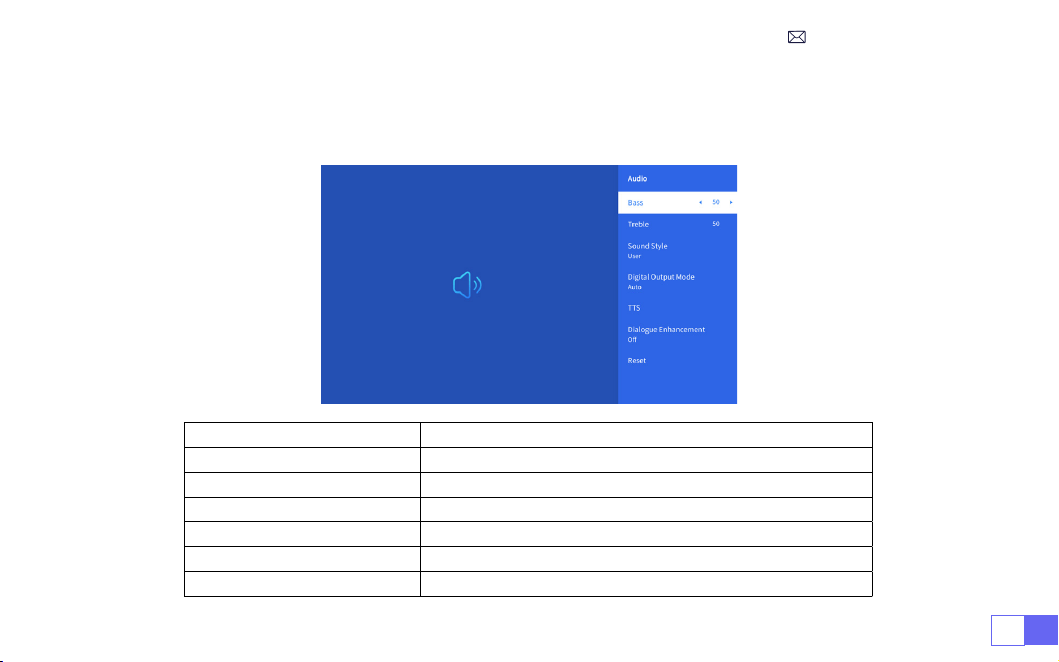
JP189
ホームページへ移動--[設定]を選択--[音声]を選択し、リモコンの矢印キーでメニューを切り替え、「OK」を
押して確定し、設定します。
3. オーディオメニュー
メニュー コンテンツ
低音 / 高音 優先値の設定
サウンドスタイル ユーザー / 標準 / 映画 / 音楽 / スポーツ / ビビッド
デジタル出力モード 自動 / 手動
TTS 音声放送機能
ダイアログ強化 オン/オフ:会話強化機能、特別な人のための音声放送機能
リセット デフォルトに戻す

JP 190
ホームページへ移動--[設定]を選択--[情報]を選択し、リモコンの矢印キーでメニューを切り替えます、「OK」
を押して確定し、設定します。
4. 情報(システム情報)
メニュー コンテンツ
Netflix Netflix 公式ライセンス
バージョン / ライセンス情報 最新バージョン / ライセンス情報の表示
デバイス名 プロジェクター型番
デバイス温度 50℃

JP191
WiMiUSK9 プロジェクターは HDMI 端子 *2、USB 端子 *2、3.5mm 音声端子、RJ45 という 6 つの端子を備えている。
対応する端子にデバイス(PC、スマホ、DVD プレーヤー、サウンドバー、USB、PS4 など)を接続する必要があります。
USB 信号源選択し、製品が自動的に検出します。
1. メインインタフェースで「写真」「音楽」または「ビデオ」を選択し、リモコンの「OK」キーを押して、対応する
カテゴリに入ります。
2. プログラムによって、" 写真 "、" 音楽" または" ビデオ" を選択します。
3. 再生したいファイルを選択し、"OK" キーを押してファイルを再生または一時停止します。(USB ディスクが接続さ
れていないと、希望のカテゴリーを入力することはできません )。
ご注意:「OfficeSuite」オプションでは、PPT/TXT ファイルは正常に再生または表示できません。
1. K9 プロジェクターと PC を HDMI ケーブルで接続します。
2.HDMI 信号源を選択し、コンピュータ上のファイルを投影します。
3.ノートパソコンで"Win+P" ボードキーを押しながら、ディスプレイモードを変更します。
1.USB マルチメディア接続
2.PC との接続
信号線接続

JP 192
コンピュータのみ:デフォルトのオプションで、メインモニターにのみ表示します。
複製:すべてのモニターに同じものを表示し、各モニターにデスクトップを複製します。
拡張:すべてのモニターを 1 つの大きなモニターのように動作させ、デスクトップをすべてのモニターに拡張します。
プロジェクターのみ:プロジェクタのようにセカンダリモニタにのみ表示します。
プロジェクターのみモードで画面解像度を変更するには、以下の手順に従います:
ステップ:スタート > コントロールパネル > 外観と個人設定 > 画面解像度の調整
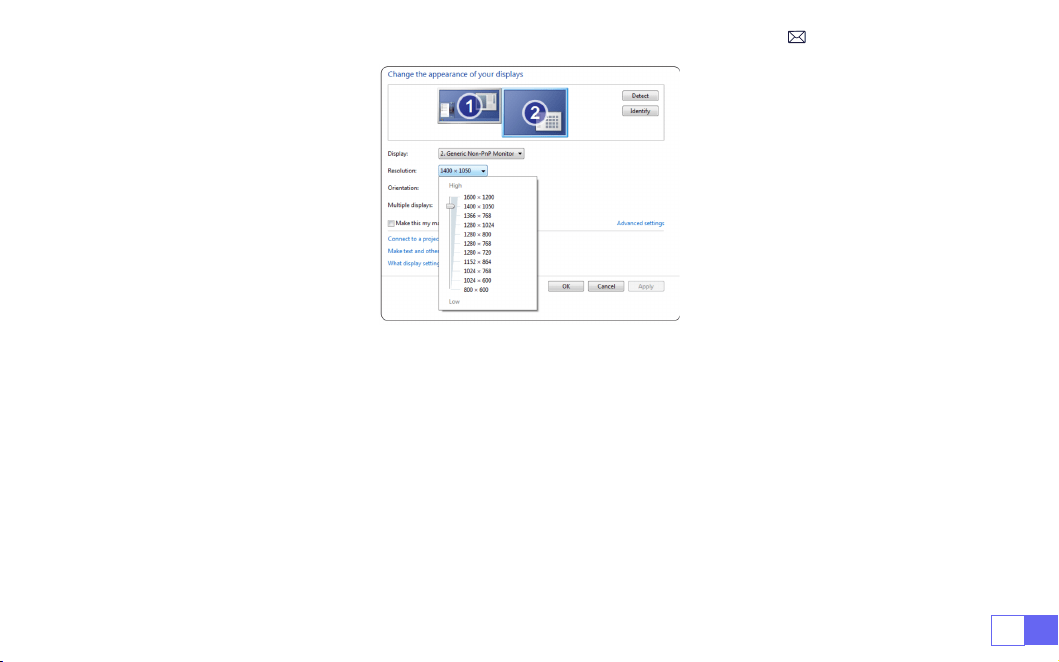
JP193
• メディア信号のチャンネルを選択:"HDMI"
•MacBook との接続には Type-CtoHDMI アダプター、MacBookAir との接続には MiniDisplaytoHDMI アダプタ
ーを使用します(アダプターは付属していません)。
• メディア信号チャネルを選択してください:"HDMI"
•XBOX/PS4に接続する HDMIケーブルを使用します。
• 接続完了。
3.MacBook や MacBook Air との接続
4.XBOX/PS4 との接続

JP 194
FAQ と保証
この度は WiMiUSK9 プロジェクターをお買い上げいただき誠にありがとうございます。弊社は K9 プロジェクターに
3 年間の保証を提供しております。ご不明な点がございましたら[email protected]までお気軽にお問い合わ
せください。
よくあるご質問とその回答をまとめました。
Q1:WiFi 接続が安定しない
1. お手元の携帯のネットワークが良いかどうかご確認ください。
2.携帯とプロジェクターの距離を 1 メートル以内にします。
3.それでも問題が解決しない場合は[email protected]までご連絡ください。
Q2:リモコンがプロジェクターと通信していません。
1. プロジェクターの電源スイッチがオンまたはオフになっていますか?
2.リモコンの電池が切れましたか?
•HDMI" モードを選択します。
•メニューキーを入力します。
•PCモードを【オン】から【オフ】に変更することで、画像に白い部分が生じる恐れがあります。
5.DVD との接続

JP195
Q3:Linux システムとは何ですか?もっと人気の映画やテレビ番組を見ることはできますか?
1. Linux システムは Netflix の公認システムです。Netflix、YouTube、PrimeVideo などのコンテンツがプリインスト
ールされています。
2.その他のアプリはメインインターフェイスのマイアプリからダウンロードしてください。( その他のアプリのパス:
メインインターフェイスマイアプリケーション -APP アシスタント)
Q5:Bluetooth スピーカーと接続できません。
1. プロジェクターは JBL の一部のバージョンの Bluetooth スピーカーと互換性がない場合があります。
2.すぐに [email protected] に連絡してください。
Q4:しばらく起動した後の自動オフ
1. プロジェクターの換気口が遮断されている。
2.電圧が安定していません。
に動画を送って確認してください。
3.リモートと IR 間の信号を妨害しましたか

FCC Statement
FCC STATEMENT :
This device complies with Part 15 of the FCC Rules. Operation is subject to the following two conditions:
(1)This device may not cause harmful interference, and
(2)This device must accept any interference received, including interference that may cause undesired
operation.
Warning: Changes or modications not expressly approved by the party responsible for compliance could
void the user's authority to operate the equipment.
NOTE: This equipment has been tested and found to comply with the limits for a Class B digital device,
pursuant to Part 15 of the FCC Rules. These limits are designed to provide reasonable protection against
harmful interference in a residential installation. This equipment generates uses and can radiate radio
frequency energy and, if not installed and used in accordance with the instructions, may cause harmful
interference to radio communications. However, there is no guarantee that interference will not occur in a
particular installation. If this equipment does cause harmful interference to radio or television reception,
which can be determined by turning the equipment off and on, the user is encouraged to try to correct the
interference by one or more of the following measures:
Reorient or relocate the receiving antenna.
Increase the separation between the equipment and receiver.
Connect the equipment into an outlet on a circuit different from that to which the receiver is connected.
Consult the dealer or an experienced radio/TV technician for help.

FCC Radiation Exposure Statement:
This equipment complies with FCC radiation exposure limits set forth for an uncontrolled environment. This
equipment should be installed and operated with minimum distance 20cm between the radiator & your
body.
This device contains licence-exempt transmitter(s)/receiver(s) that comply withInnovation, Science
and Economic DevelopmentCanada’s licence-exempt RSS(s). Operation is subject to the following two
conditions:
(1) This device may not cause interference.
(2) This device must accept any interference, including interference that may cause undesired operation
of the device.
L’émetteur/récepteur exempt de licence contenu dans le présent appareil est conforme aux CNR
d’Innovation, Sciences et Développement économique Canada applicables aux appareils radio exempts
de licence. L’exploitation est autorisée aux deux conditions suivantes :
(1) L' appareil ne doit pas produire de brouillage;
(2) L' appareil doit accepter tout brouillage radioélectrique subi, même si le brouillage est susceptible d' en
compromettre le fonctionnement.
This equipment complies with IC exposure limits set forth for an uncontrolled environment. This equipment
shall be installed and operated with minimum distance 20cm between the radiator & body.

Correct Disposal of this product
This marking indicates that this product should not be disposed with other household wastes
throughout the EU. To prevent possible harm to the environment or human health from
uncontrolled waste disposal, recycle it responsibly to promote the sustainable reuse of material
resources. To return your used device, please use the return and collection systems or contact
the retailer where the product was purchased. They can take this product for environmental safe
recycling.

We (Manufacturer is responsible for this declaration)
Ekoo Electronic Co.,Ltd.
(Company name)
B09,block B,f2,bldg.b,runfeng Pioneer Park,no.973, minzhi Avenue, Minzhi St., Longhua, Shenzhen, CN
(Company address)
declare under our sole responsibility that the product
Trade name: WIMIUS
Equipment: Entertainment Projector
Model No. : K9
to which this declaration relates is in conformity with the essential requirement set out in the Council
Directive on the Approximation of the laws of the Member States relating to RED Directive(2014/53/EU) &
RoHS(2011/65/EU) product is responsible to afx CE marking, the following standards were applied:
EN 62368-1:2014+A11:2017
EN IEC 62311:2020
ETSI EN 301 489-1 V2.2.3(2019-11)
ETSI EN 301 489-17 V3.2.4(2020-09)
EN 55032:2015
Declaration of Conformity

EN 55035:2017
EN 61000-3-2:2019
EN 61000-3-3:2013+A1:2019
ETSI EN 300 328 V2.2.2(2019-07)IEC62321-3-1:2013
IEC62321-4:2013
IEC62321-5:2013
IEC62321-6:2015
IEC62321-7-1:2015
IEC62321-7-2:2017
IEC62321-8:2017
Full Name: George.wang Position: Approbation Manager
Signature: George.wang Place/Date: Shenzhen,China/Oct.27-2021

