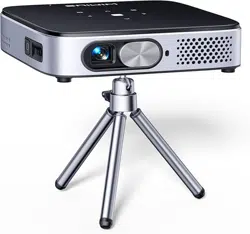

S27 PROJECTOR
USER MANUAL

EN
DE
FR
ES
IT
JP
English
Deutsch
Français
Español
Italiano
日本語
P02-30
P31-59
P60-88
P89-117
P118-146
P147-174

Scan the official QR code to register your 3-year warranty

EN 2
Table of Contents
WIMIUS 7D/24H PROFESSIONAL SUPPORT - - - - - - - - - - - - - - - 4
TIPS - - - - - - - - - - - - - - - - - - - - - - - - - - - - - 5
PACKAGE LIST - - - - - - - - - - - - - - - - - - - - - - - - - 6
PROJECTOR SPECIFICATIONS - - - - - - - - - - - - - - - - - - - 7
PROJECTOR OVERVIEW - - - - - - - - - - - - - - - - - - - - - - 8
REMOTE CONTROL- - - - - - - - - - - - - - - - - - - - - - - - 9
INSTALLATION - - - - - - - - - - - - - - - - - - - - - - - - - 10
1.Installation Method- - - - - - - - - - - - - - - - - - - - - - - - - 10
2.Projection Distance and Size- - - - - - - - - - - - - - - - - - - - - 11
STARTING PROJECTOR - - - - - - - - - - - - - - - - - - - - - - 12
IMAGE FOCUS ADJUSTMENT - - - - - - - - - - - - - - - - - - - - 12
SETTING UP THE PROJECTOR- - - - - - - - - - - - - - - - - - - - 13
1.WiFi Setting- - - - - - - - - - - - - - - - - - - - - - - - - - - - 13

EN3
2.Wireless Connection - - - - - - - - - - - - - - - - - - - - - - - - 14
3.Wired Screen- - - - - - - - - - - - - - - - - - - - - - - - - - - 16
4.Bluetooth - - - - - - - - - - - - - - - - - - - - - - - - - - - - 17
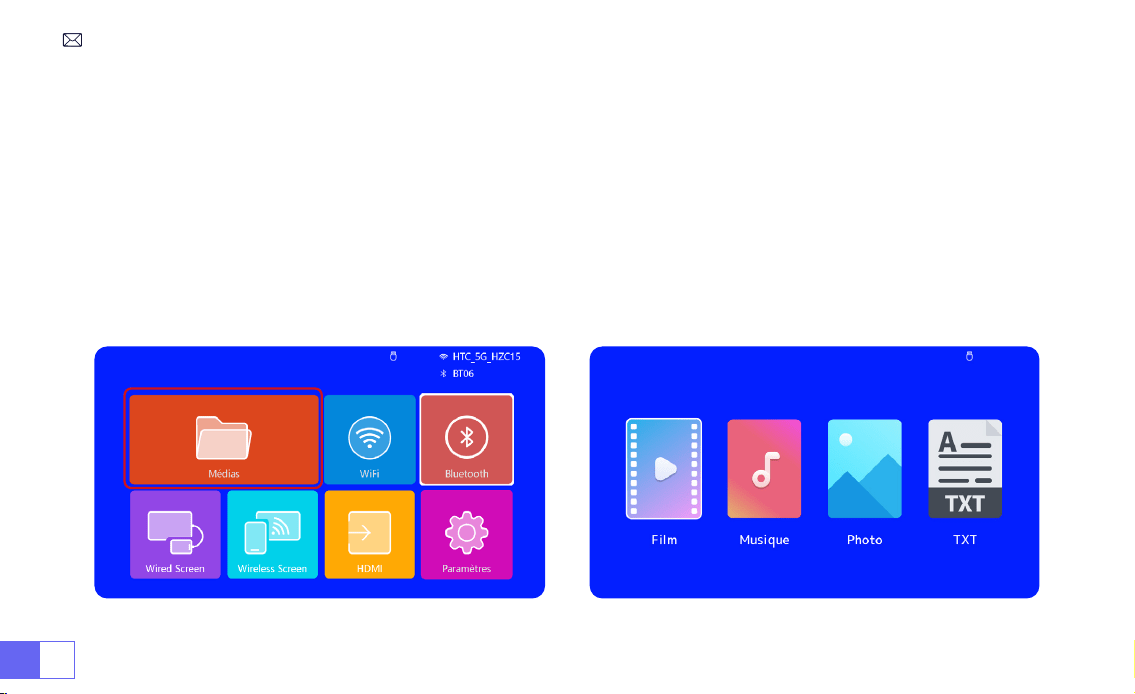
5.Multimedia Play- - - - - - - - - - - - - - - - - - - - - - - - - - 18
PROJECTOR SETTING- - - - - - - - - - - - - - - - - - - - - - - 21
1.Picture settings - - - - - - - - - - - - - - - - - - - - - - - - - - 21
2.System settings- - - - - - - - - - - - - - - - - - - - - - - - - - 23
3.Keystone - - - - - - - - - - - - - - - - - - - - - - - - - - - - 24
SIGNAL LINES CONNECTION - - - - - - - - - - - - - - - - - - - - 25
1.Connect via USB Disk - - - - - - - - - - - - - - - - - - - - - - - - 25
2.Connect to Devices via HDMI Port - - - - - - - - - - - - - - - - - - 25
3.Connect to Speaker - - - - - - - - - - - - - - - - - - - - - - - - 26
4.Connect to DVD Player - - - - - - - - - - - - - - - - - - - - - - - 26
5.Connect to Computer - - - - - - - - - - - - - - - - - - - - - - - 27
FAQ - - - - - - - - - - - - - - - - - - - - - - - - - - - - - 29

EN 4
WIMIUS 7D/24H PROFESSIONAL SUPPORT
Dear valued customer,
Thank you very much for supporting WiMiUS!
Before you begin using the projector, we kindly ask you to carefully read through this manual. If you have
any issues, please include the following details in your email: country code, order number, model, and a brief
description of the problem (For example US+000-0000000-0000000+S27+No sound) to
.
Rest assured, our team will promptly respond within 24 hours with a fast and effective solution.
It's essential to mention that many common problems can be easily resolved through simple adjustments, such
as issues with signal, sound, Bluetooth or WiFi connections, dark spots, or choppy animations. To ensure utmost
satisfaction, we want to assure you that all our projectors undergo a rigorous 100% quality check and thorough
packaging before shipping.
If you have any questions, please contact us so that the problem can be solved. And give us an opportunity to
improve. We are committed to providing you with a satisfactory solution for any challenges you may encounter.
Best regards,
WiMiUS Service Team

EN5
TIPS
Temperature Considerations:
To ensure the longevity of your projector, avoid placing it in environments that are excessively warm or
cold. Extreme temperatures can shorten the device's lifespan. For optimal performance, maintain a working
environment between 5°C and 35°C.
Dealing with Black Spots on Projection Screen:
Gently tap the projector or blow air inside with a hairdryer. Carefully open the side dust cleaning port of the
projector. Wipe the inner screen with a clean cotton swab, if necessary, dip it in alcohol for better cleaning.
Exercise caution to avoid causing any damage. For more help, email us at
Proper Ventilation:
The projector is equipped with a ventilation system to ensure stable operation. Avoid covering the vents with
cloth, blankets, or any other materials. Furthermore, refrain from inserting objects into the projector's slits, as this
may lead to short circuits or electric shocks, potentially causing damage to your device.
Protection from Impact and Vibration:
Handle your projector with care, protecting it from strong impacts, extrusions, and vibrations. Avoid moving the
projector if it is experiencing internal circuit faults.
Lens Maintenance:
The projector lens is a crucial component directly impacting picture denition and quality. Ensure to keep the lens
clean from excessive dust. When cleaning, use a soft cotton cloth suitable for glass lenses. Avoid using hard cloth
or abrasives, as they can damage the lens surface.

EN 6
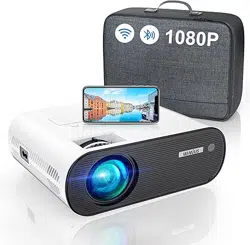
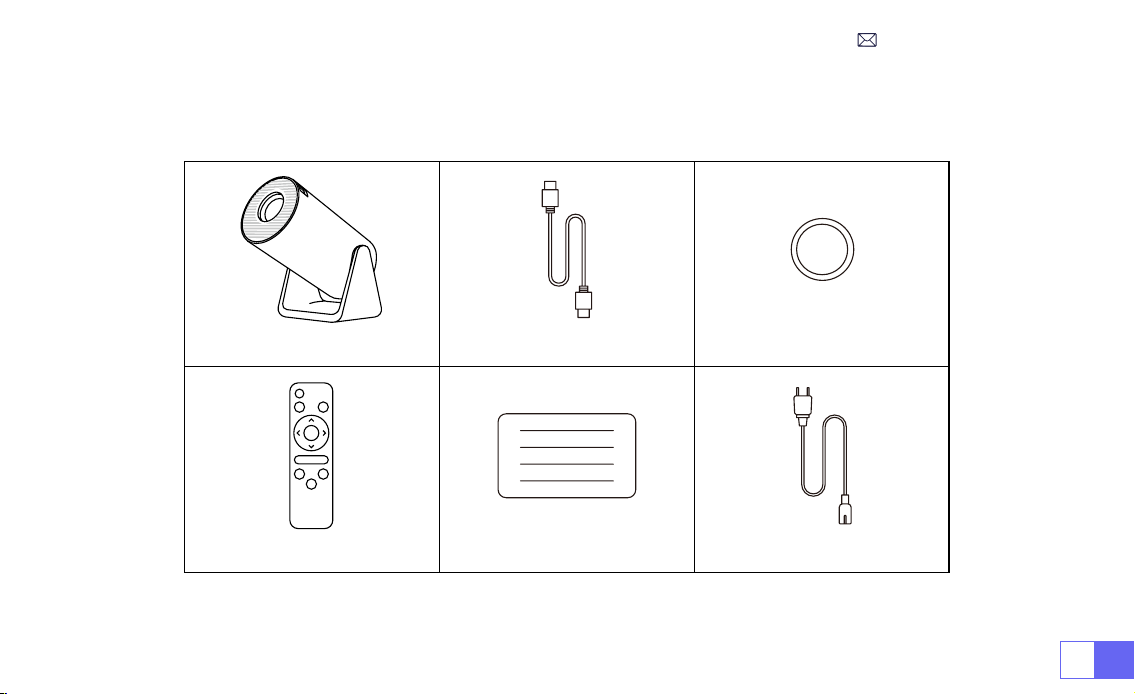
PACKAGE LIST
WiMiUS S27 Projector*1 HDMI Cable*1 Lens Cover*1
Remote Control*1 User Manual*1 Power Cable*1
EN7
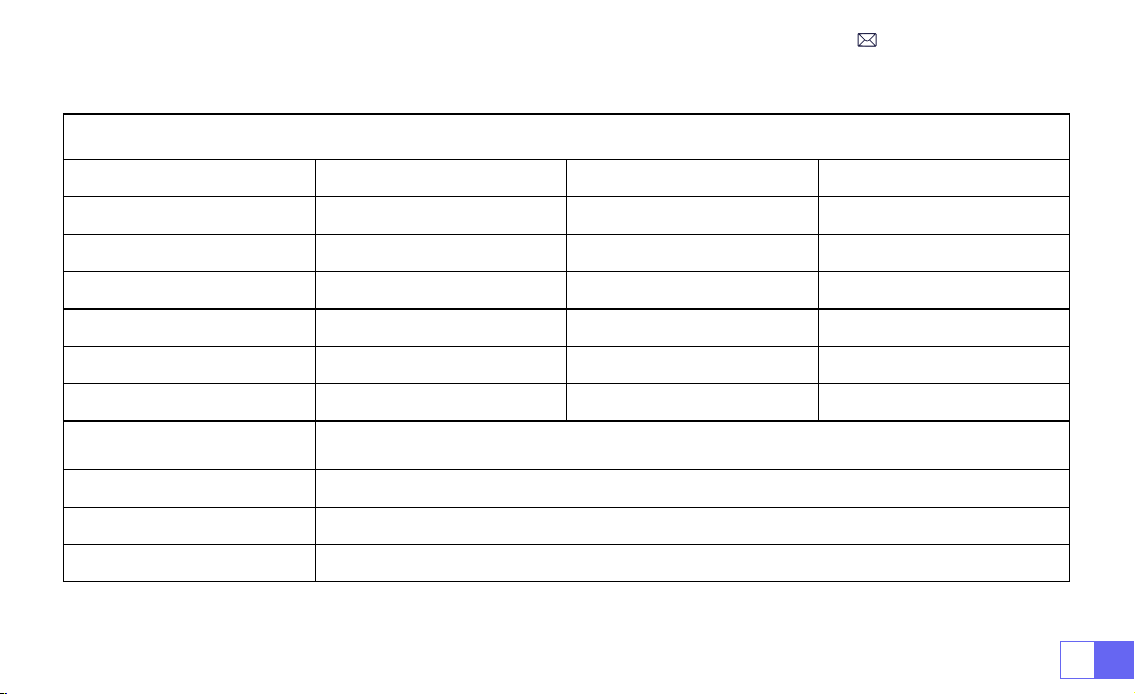
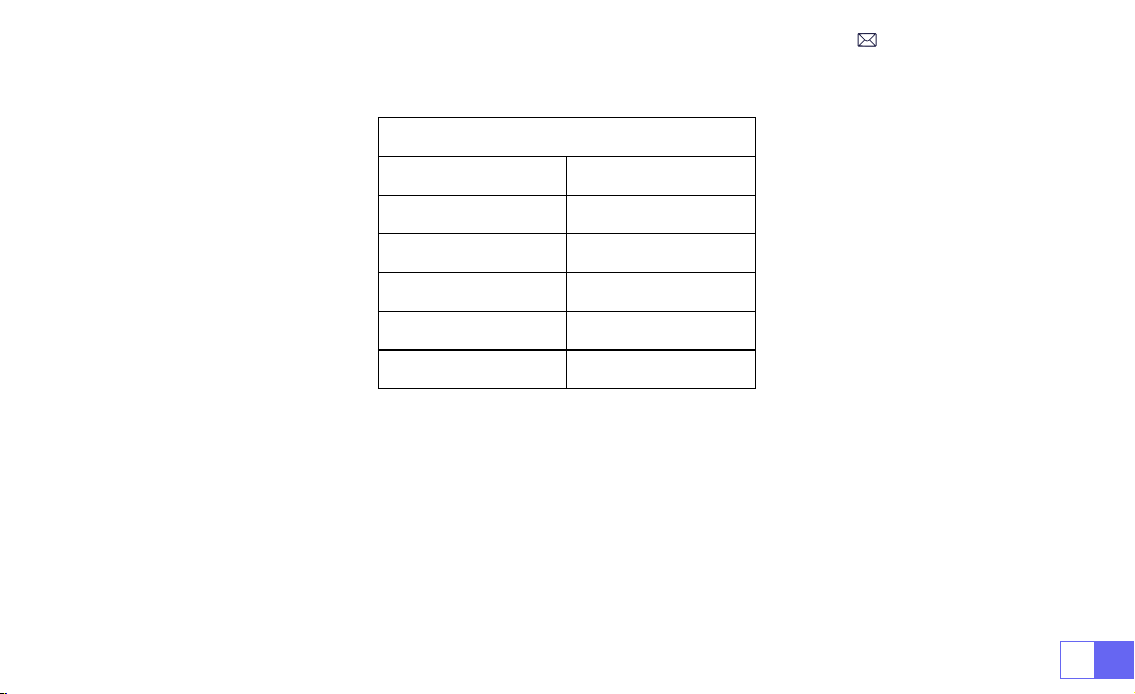
Model No.: S27
Display Technology
LCD
Light Source
LED
Product Size
8.11*3.62*4.63 inches
Product Weight
0.586kg
Refresh Rate
60Hz
Power Voltage
AC100-240V
Native Resolution
1280*720P
Max Supported Resolution
1920*1080P decoding
Keystone Correction
Auto/Manual
Focus
Manual
Operation Mode
Remote Control
Aspect Ratio
4:3/16:9
Output Port
3.5mm Audio Output
Input Port
HDMI*1/USB*1
Video Format
MP4/MPG/AVI/MPEG-4/TS/MOV/M4V/MKV/FLV/DAT/3GP (Support for video codecs may vary
depending on circumstances, contact us for additional support )
Audio Format
MP3/WMA/AAC/AMR/APE/FLAC/MP2 (Dolby audio codecs are not supported)
Image Format
JPEG/BMP/PNG/GIF
Document Format
TXT
PROJECTOR SPECIFICATIONS

EN 8
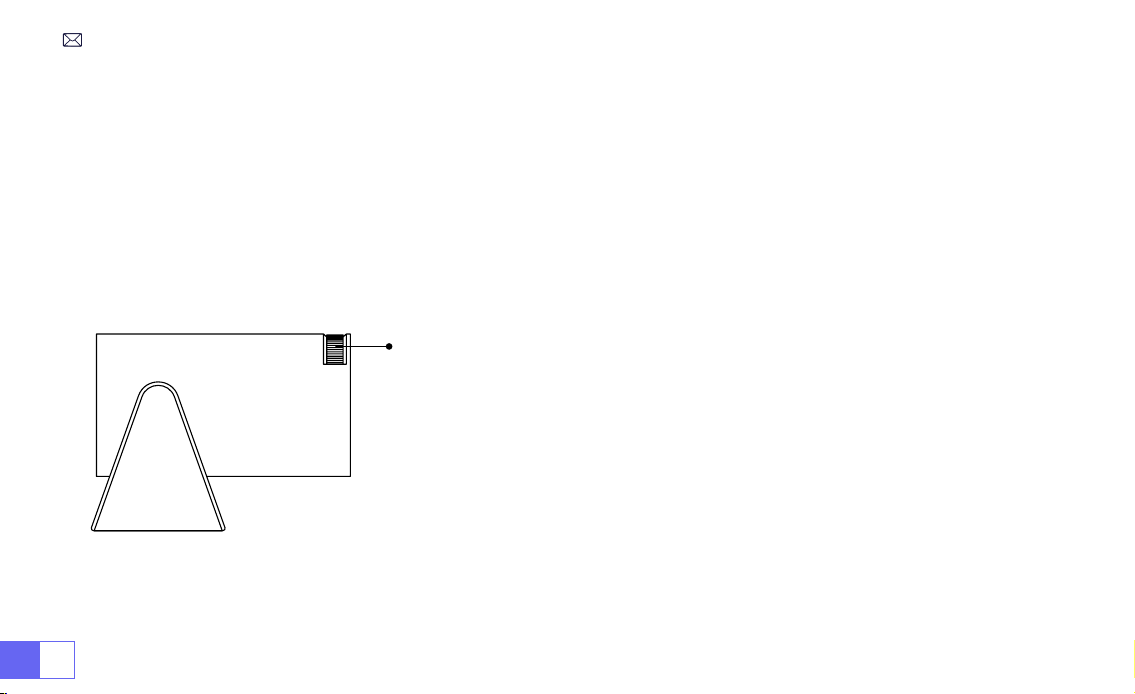
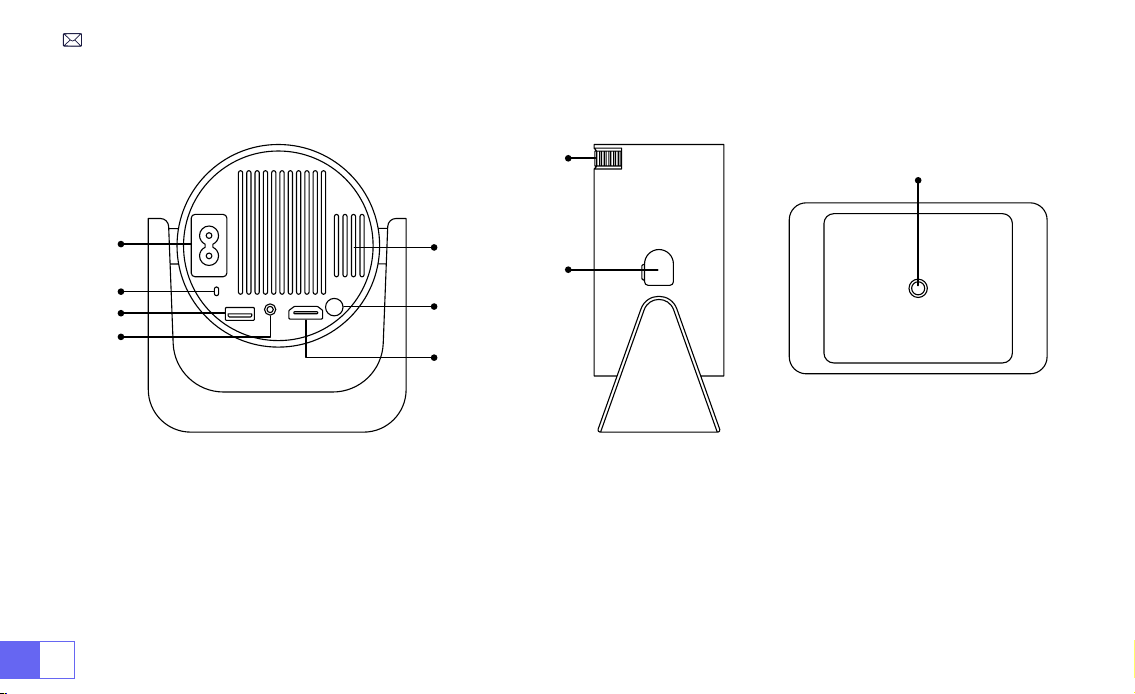
PROJECTOR OVERVIEW
①
Power Input
②
Infrared Signal Receiver
③
USB Port
④
3.5mm Audio Outport
⑤
Vent
⑥
Power Button
⑦
HDMI Port
⑧
Manual Focus ±
⑨
Dust Cleaning Port
⑩
1/4" Mounting Hole
➀
➁
➂
➃
➄
➅
➆
⑨
⑩
➇

EN9
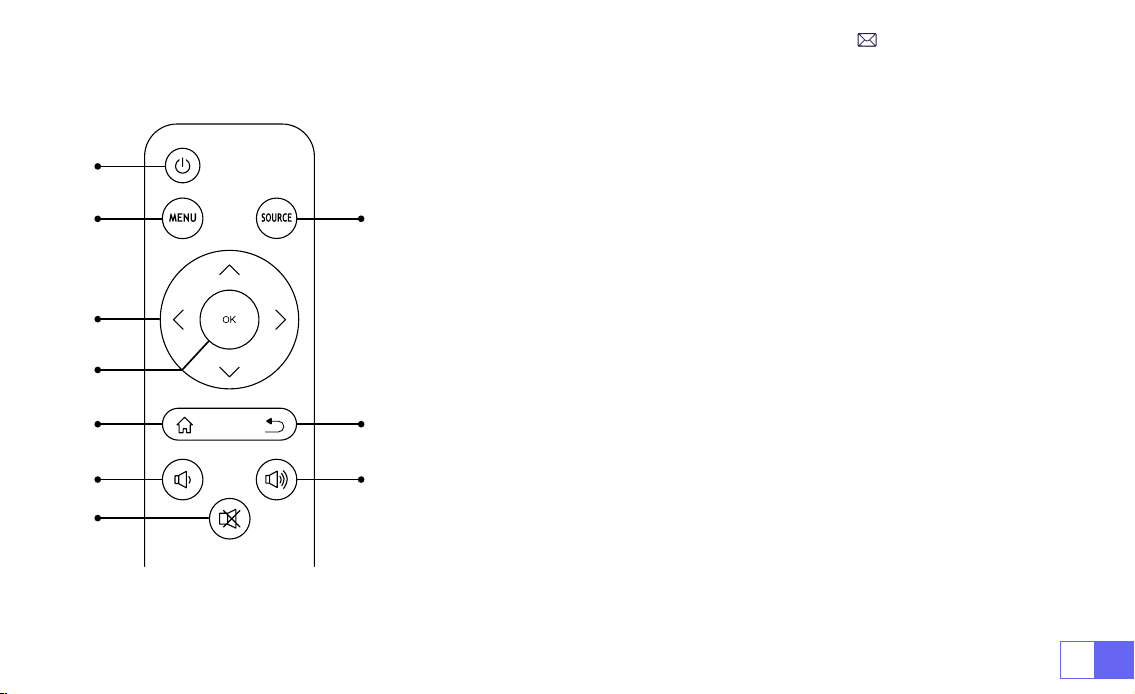
REMOTE CONTROL
➀
➁
➂
➃
➄
➅
⑧
⑩
➆
➈
①
Power on/off
②
Menu
③
Input Signal Source
④
Arrow Key
⑤
Conrm Key
Note:
1.Install 2 pieces of AAA batteries (not included) into the remote before
using it, do not combine new batteries with old ones in the remote
control, which can cause operation failure due to insufficient power
supply.
2.When using the remote control, ensure that you aim the signal
transmitter of the remote control at the infrared signal receiver on the
projector, or simply face the projection screen while operating it.
3.When you are not using the remote control for a long period. Please
take out the batteries to prevent them from leakage.
⑥
Homepape
⑦
Back
⑧
Volume -
⑨
Volume +
⑩
Mute
EN 10
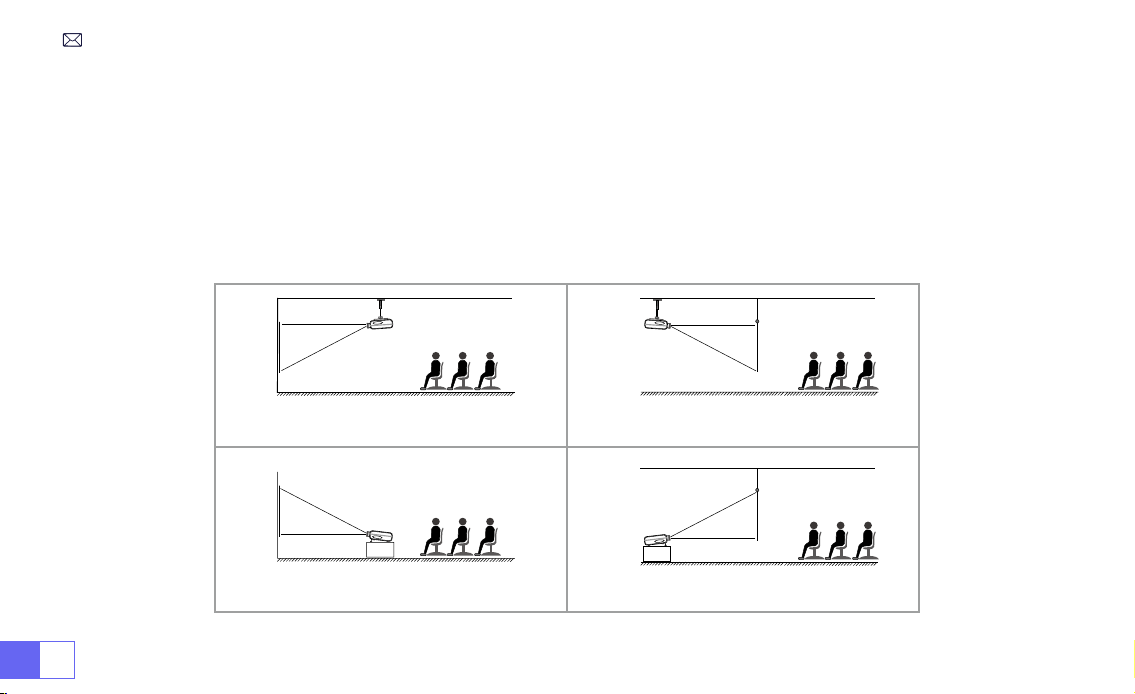
1. The projector can be placed on the stable desk or mounted on the ceiling to project the image according to the
operating environment and requirements.
2. Keep the projector at a height where its lens is axial symmetry to the screen. If this is not possible, use the
keystone correction function to adjust the projection image.
INSTALLATION
1.Installation Method
Front Projection Table Mount
Front Projection Ceiling Mount
Rear Projection Table Mount
Rear Projection Ceiling Mount
EN11
2.Projection Distance and Size
Aspect Ratio: 16:9
Distance Screen Size
1.1m 40’’
2.2m 80’’
3.3m 120’’
4.1m 150’’
5.4m 200’’
*The image size of the projection depends on the distance between the projector and the screen. There might be a
slight 3% variation in measurements among the data listed above.
*The recommended projection distance is 2-3m.
*A darker ambient environment will enhance the clarity of the projected images.
EN 12
STARTING PROJECTOR
IMAGE FOCUS ADJUSTMENT
Turn on the projector:
Connect to the power cable, when the red indicator light is on, press the power key on the
remote control or power button on the panel to start the projector, the indicator turns from the red to blue, the
projector is on.
Turn off the projector:
Press the power key on the remote control or power button on the panel to turn off the
projector, the indicator turns from the blue to red, the projector is in shut down.
Place the projector lens perpendicularly to the projection screen or curtain
wall, and adjust the focus adjustment roller until the image is clear.
Note:
If it is still blurry, please try to adjust the projection distance and
projector placement.
Manual focus

EN13
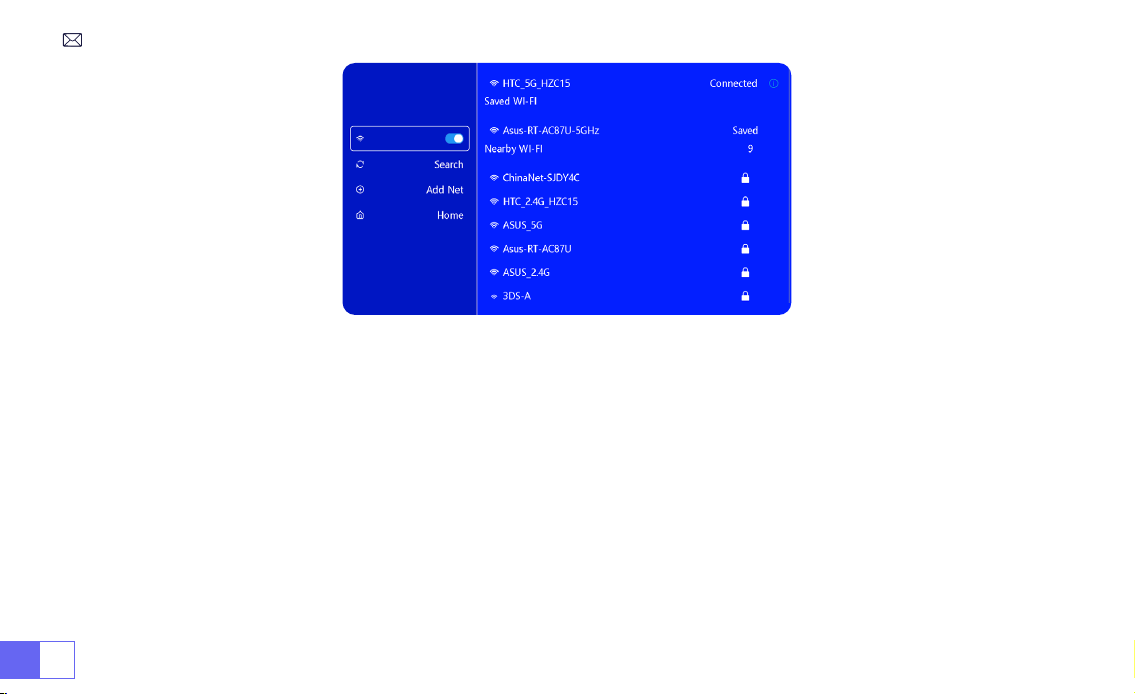
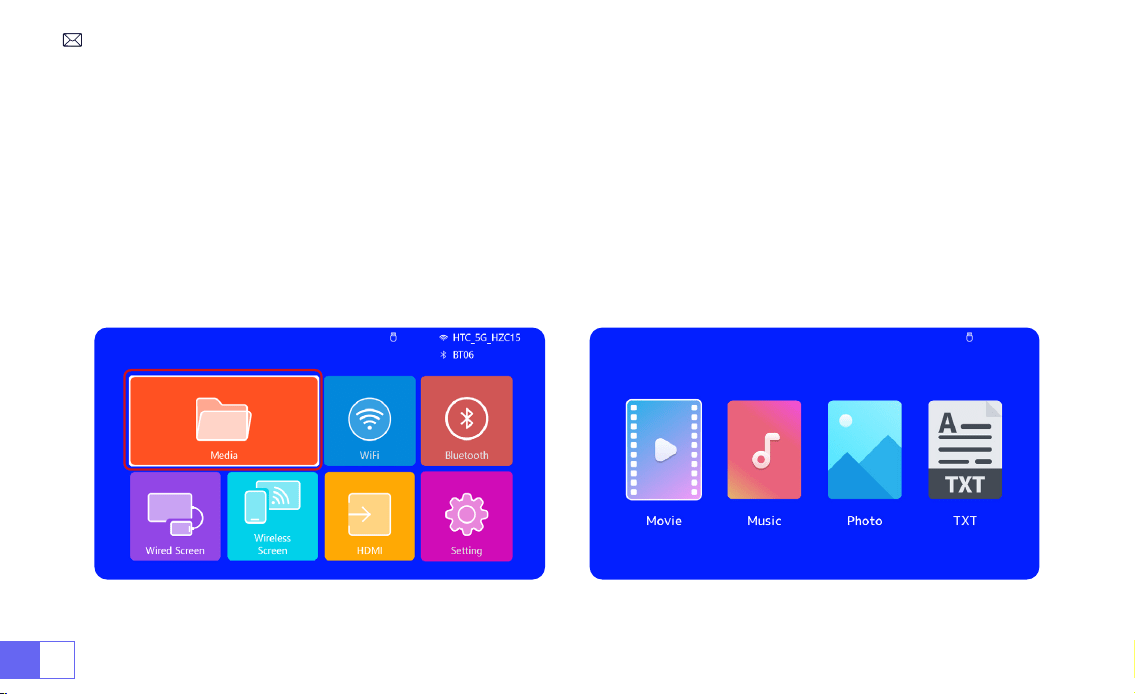
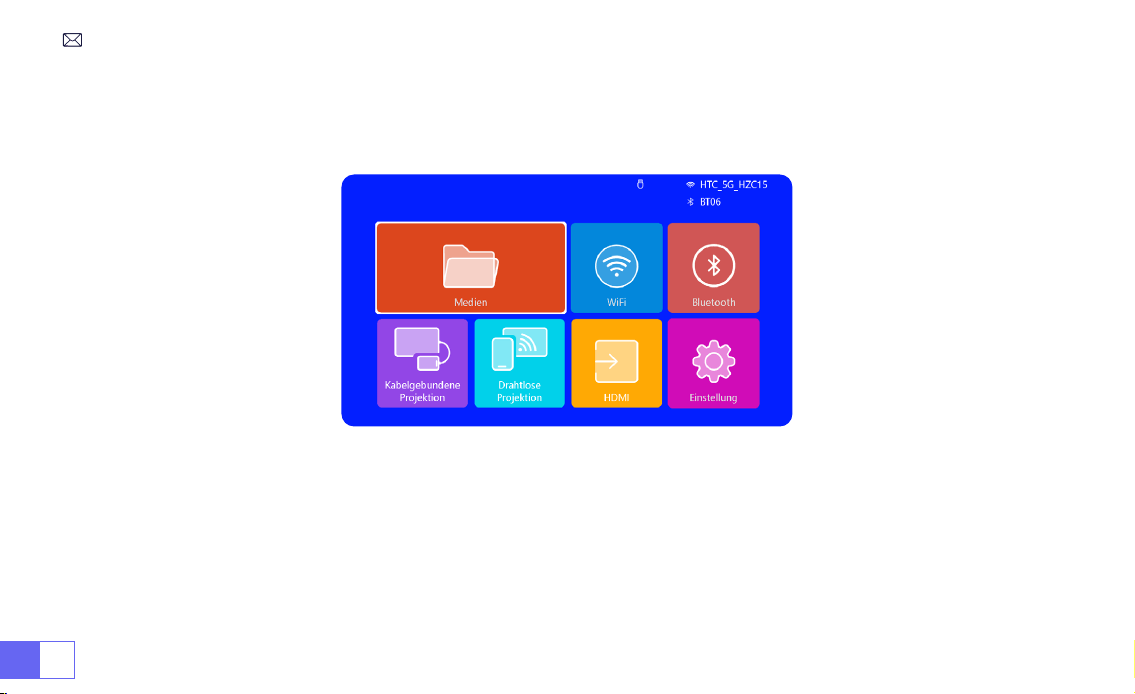
SETTING UP THE PROJECTOR
The projector's home page is as follow.
1.WiFi Setting
1. The fluency of screen mirroring with a wireless connection will be affected by the network environment. A
bandwidth of 100Mbit or more is recommended when using screen mirroring.
2. Make sure your mobile device is close to the projector when using wireless connection. A distance within 1 meter is
recommended.
3. Some mobile devices may not support screen mirroring due to the compatibility.
EN 14
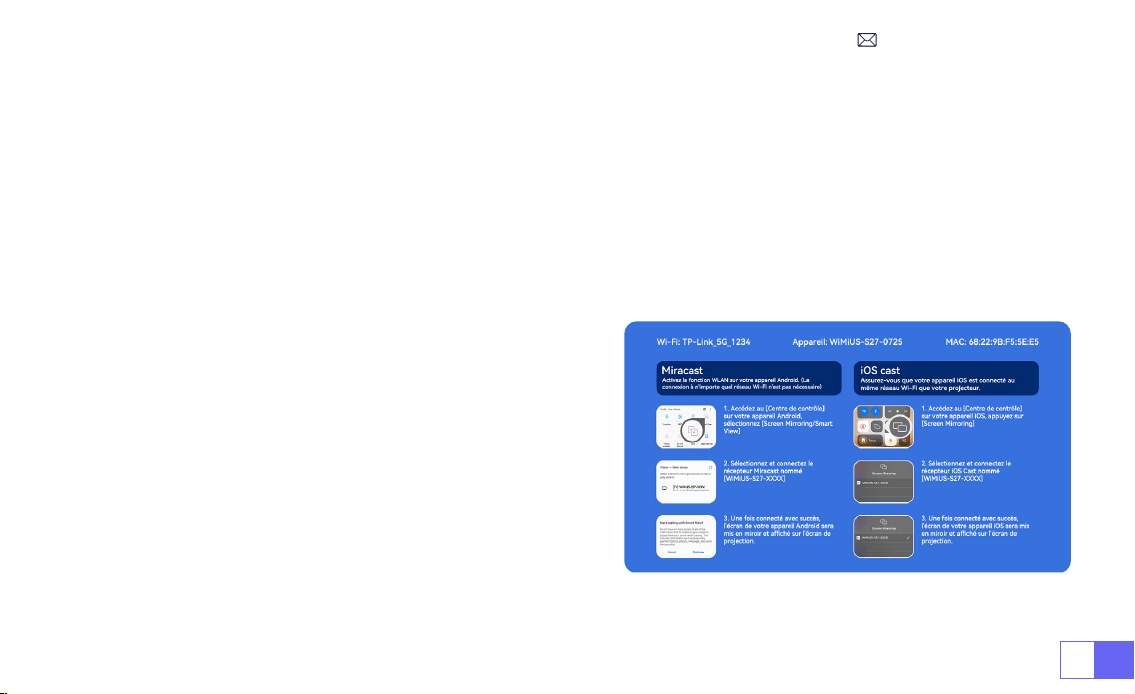
2.Wireless Connection
2.1 For iOS Cast (Airplay)
Attention:
Ensure that your iOS device is connected to the same Wi-Fi network as your projector.
1.Connect the S27 projector to your WiFi network
2.Back to home page-- Select [ Wireless screen ] menu -- Stay on this interface
3.Access the [ Control Center ] on your iOS device -- Select the [ Screen Mirroring ] function -- Select and connect
the iOS Cast receiver named [ WiMiUS-S27-XXXX ] -- iOS device screen will be mirrored and displayed on the
projection screen.
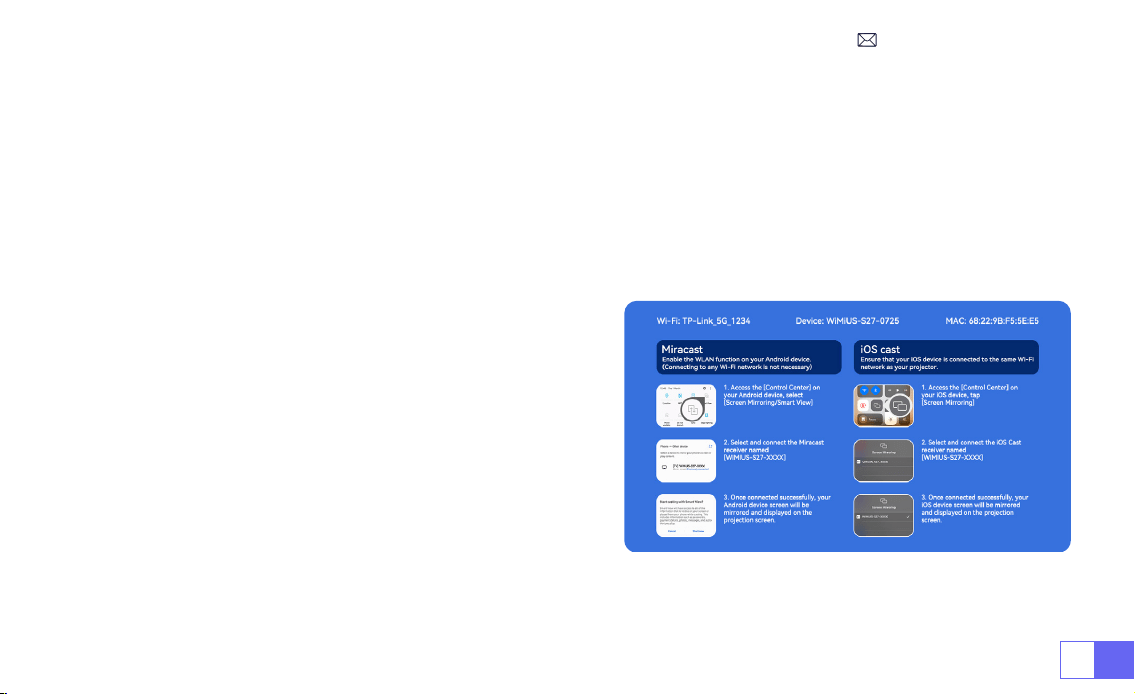
EN15
2.2 For Android System (Miracast)
Screen Mirroring Methods:
Android devices from different brands may use various terms and methods to enable
screen mirroring. To nd the exact steps for your device, please refer to your device's manual. Common terms for
screen mirroring include Multi-screen, Wireless Display, WLAN Display, Screen Mirroring, and Smart View.
Device Compatibility:
Please note that not all Android phones support the screen mirroring function. Before
attempting to use screen mirroring, ensure that your Android device supports this feature. You can check your
device's manual or look for the screen mirroring option in the settings to verify compatibility.
1.Make sure to enable the WLAN function on your Android
device. (Connecting to any Wi-Fi network is not necessary.)
2.Back to home page-- Select [ Wireless screen ] menu --
Stay on this interface
3.Access the [ Control Center ] on your Android device,
select [ Screen Mirroring/ Smart View ]
4.Select and connect the Miracast receiver named [
WiMiUS-S27-XXXX ]
5.Once connected successfully, your Android device screen
will be mirrored and displayed on the projection screen.
EN 16
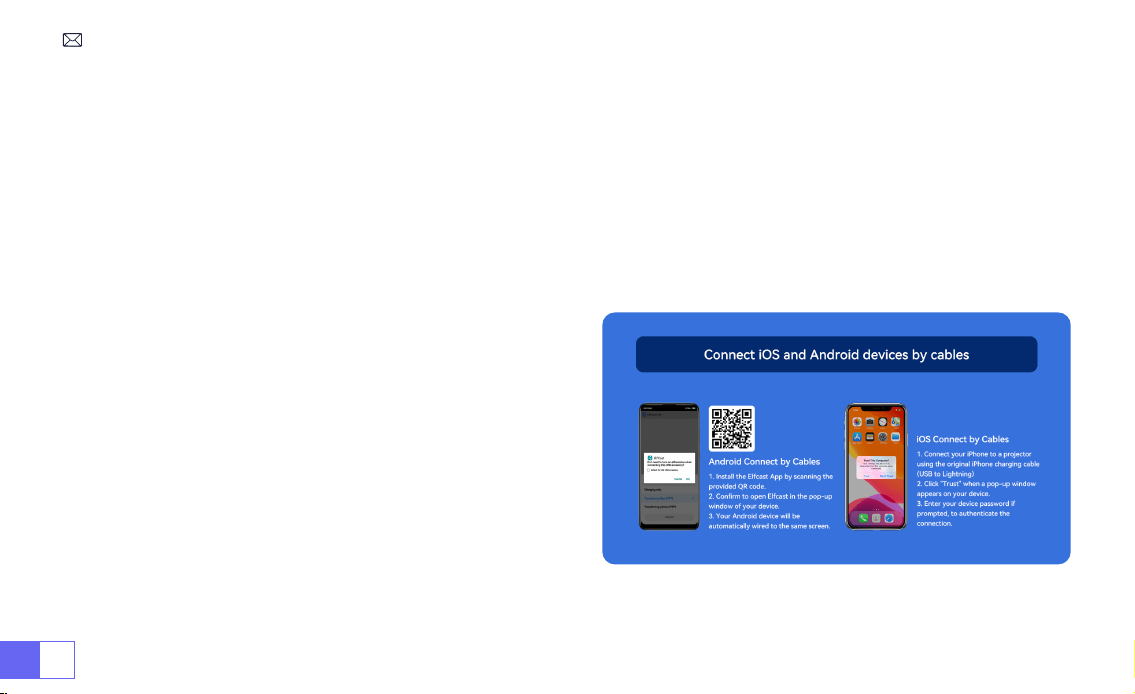
1.Install the Elfcast App rst by scanning the provided QR code.
2.Conrm to open Elfcast in the pop-up window of your device.
3.Enter your device password if prompted, to authenticate the connection.
4.Your Android device will be automatically wired to the same screen.
1.Connect your iPhone to a projector using the original
iPhone charging cable (USB to Lightning)
2.Click "Trust" when a pop-up window appears on your
device.
3.Enter your device password if prompted, to authenticate
the connection.
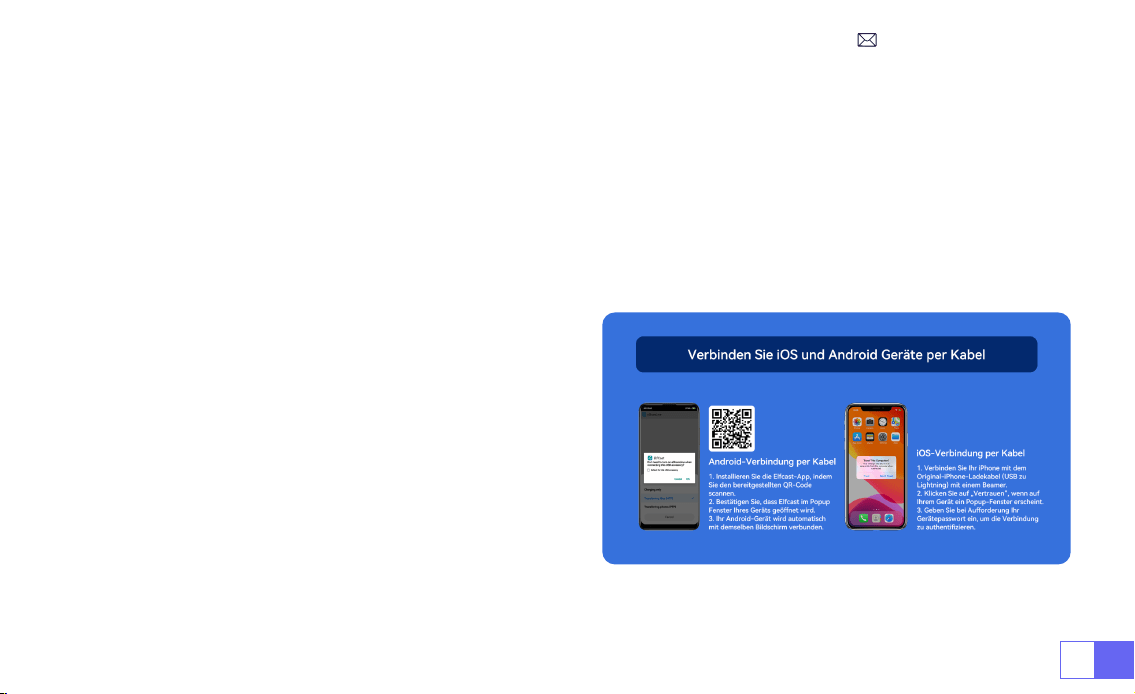
3.Wired Screen
3.1 Android Connect by Cables
3.2 iOS Connect by Cables

EN17
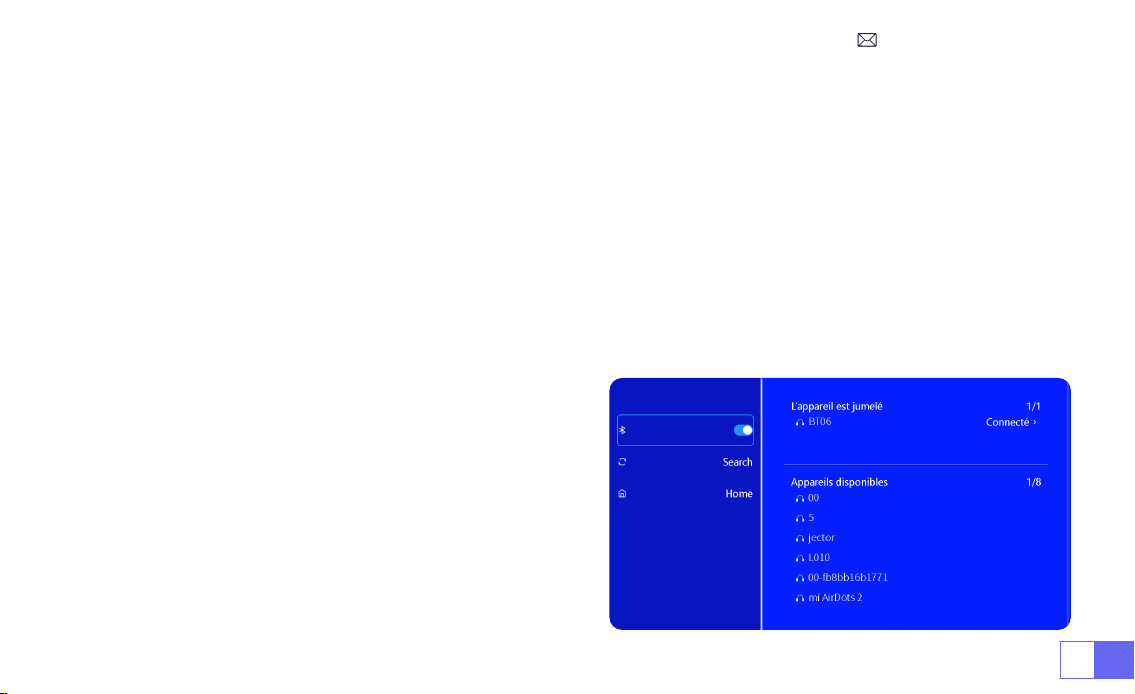
1.Turn on your Bluetooth Speaker.
2.Turn on the [Bluetooth] of your projector and select your Bluetooth speaker to connect.
Note:
1)The S27 projector is compatible with most Bluetooth headsets, Bluetooth speakers, and Airpods. However, please
note that it is not compatible with Bluetooth keyboards or Bluetooth phones.
2)If you encounter no sound while playing videos, we recommend checking the Dolby sound settings on your
connected devices. Turning off Dolby sound can ensure
better audio compatibility with the projector.
3)Some Bluetooth speakers may experience a significant
reduction in volume when connected to the projector. To
address this issue, try increasing the volume on all relevant
devices to achieve the desired sound level.
4)If you have any questions or need further assistance,
please don't hesitate to contact WiMiUS support via email
at
.
4.Bluetooth
Connect Bluetooth Speakers
EN 18
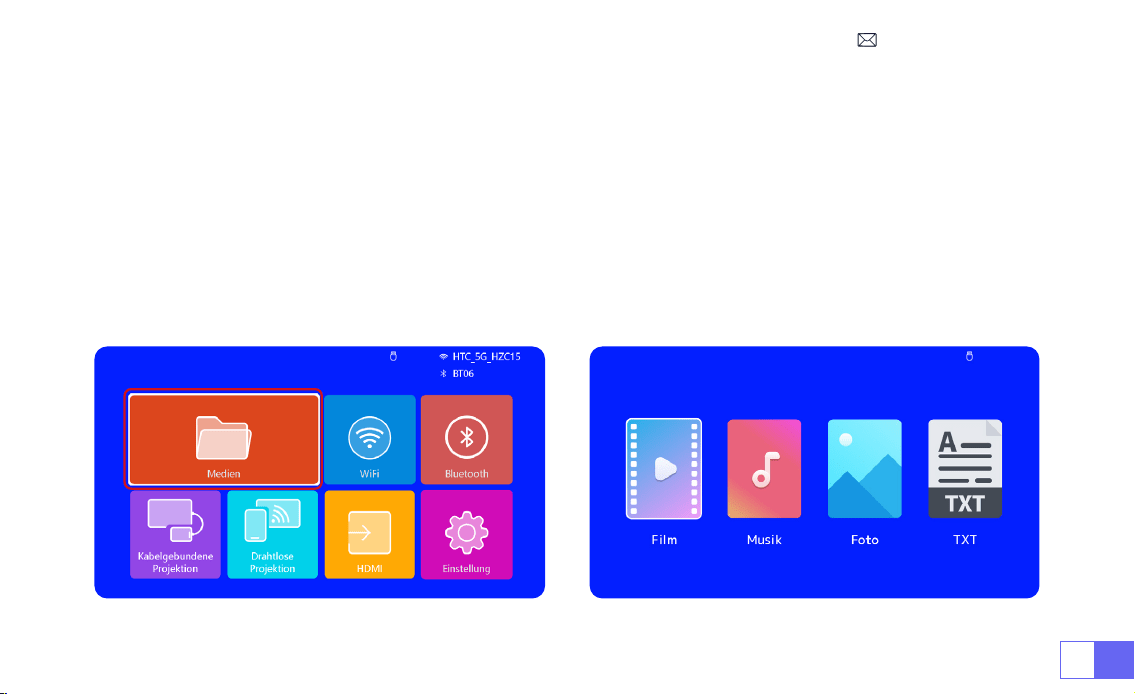
1)Insert the USB ash disk into the USB port of the projector.
2)Select “Media” and the press the "OK" key to enter
3)Depending on the le type, select the option [Movie/Music/Photo/Book]
4)Select the desired le and then press the [OK] button to play it.
5)Click “MENU” button on the remote while playing video to adjust the picture settings directly.
5.Multimedia Play
5.1 USB Disk Input Mode
EN19
Warm Tips:
If your projector cannot recognize the USB disk, please follow the methods below to resolve the issue.
Please ensure that your USB disk meets the following formats:
FAT32: 8GB/16GB/32GB
NTFS: 64GB-2TB
If it doesn't meet these criteria, you will need to change a supported format USB disk.
If the problem persists, please send a detailed description of your issue to the following email address:
support01@
wimius.com
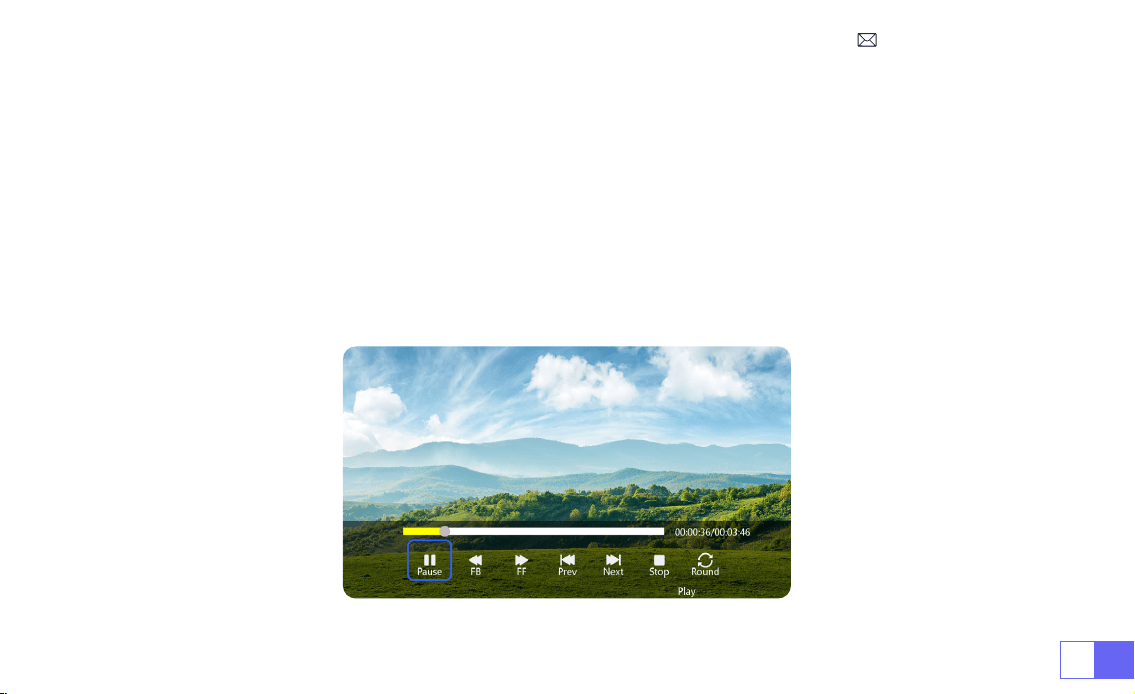
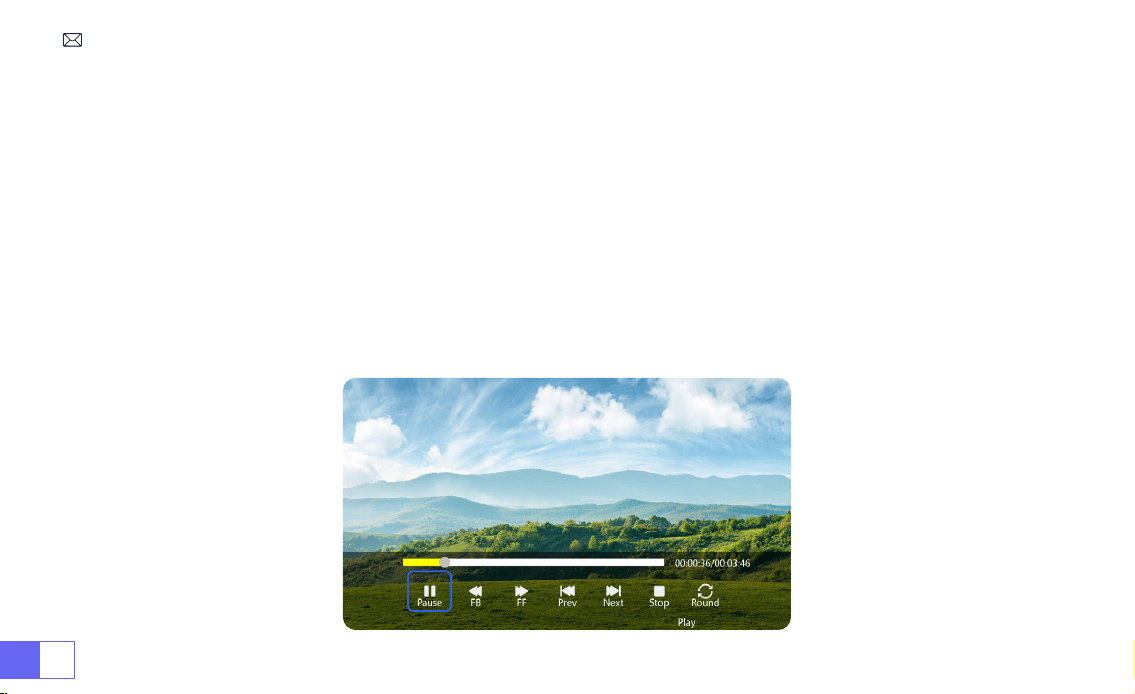
5.2 Video Play Interface

EN 20
Manual Function
FB Long press to Fast Backward the video
FF Long press to Fast Forward the video
Prev Switch to the previous video
Next Switch to the next video
Stop Stop playing and exit
Round List cycle or single cycle
Info Video details
List Select all playlists in the current folder
16:9 Aspect Ratio: Auto/4:3/16:9

EN21
PROJECTOR SETTING
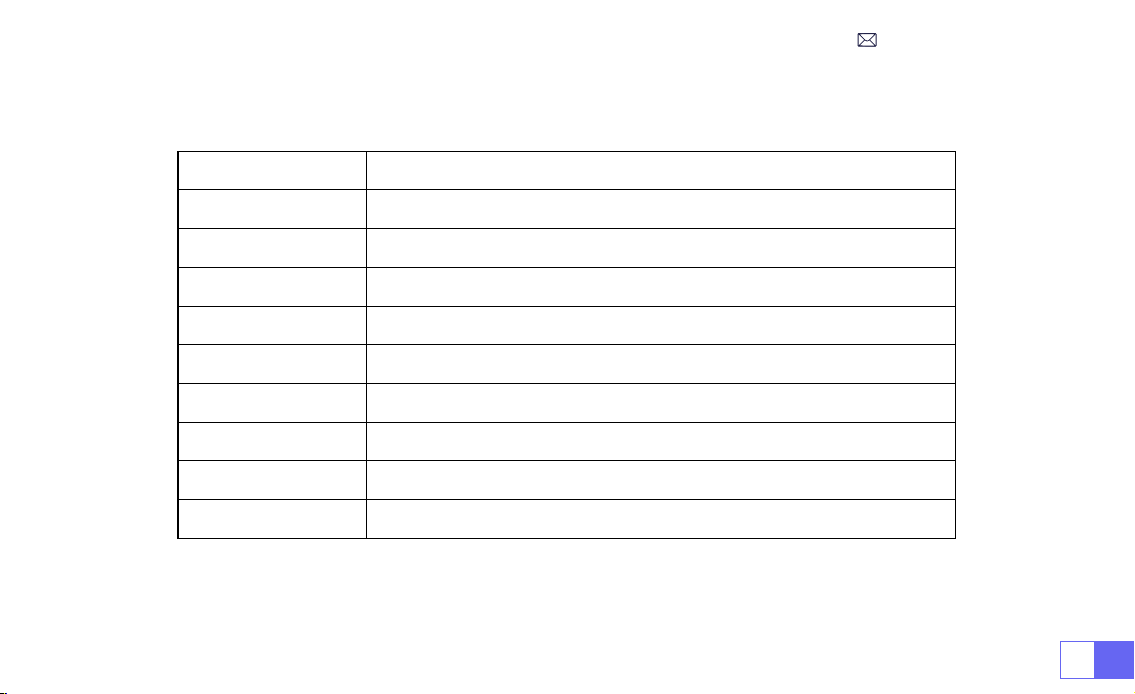
1.Picture settings
Menu Content Function
Image Mode Standard/Dynamic/Mild/User
Adjust the contrast / brightness / color /
sharpness
Color
Temperature
Cold/Standard/Warm Adjust the color temperature
Aspect Ratio 4:3/16:9 Adjust the screen aspect ratio
Zoom 100%-85% Reduce the image size

EN23
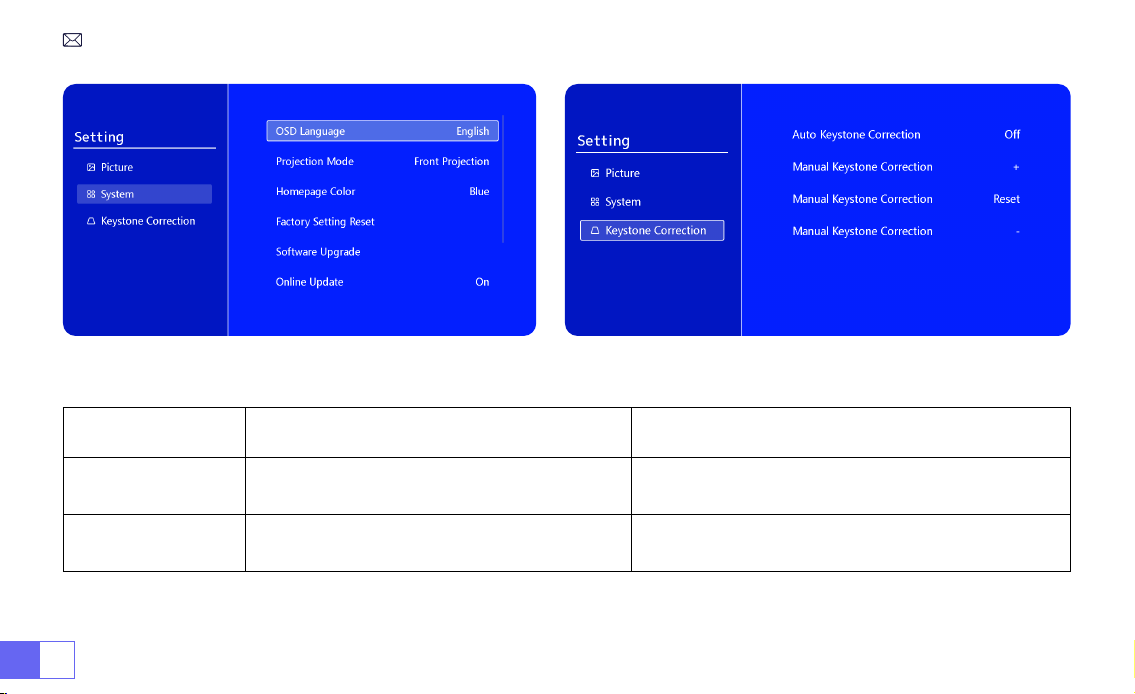
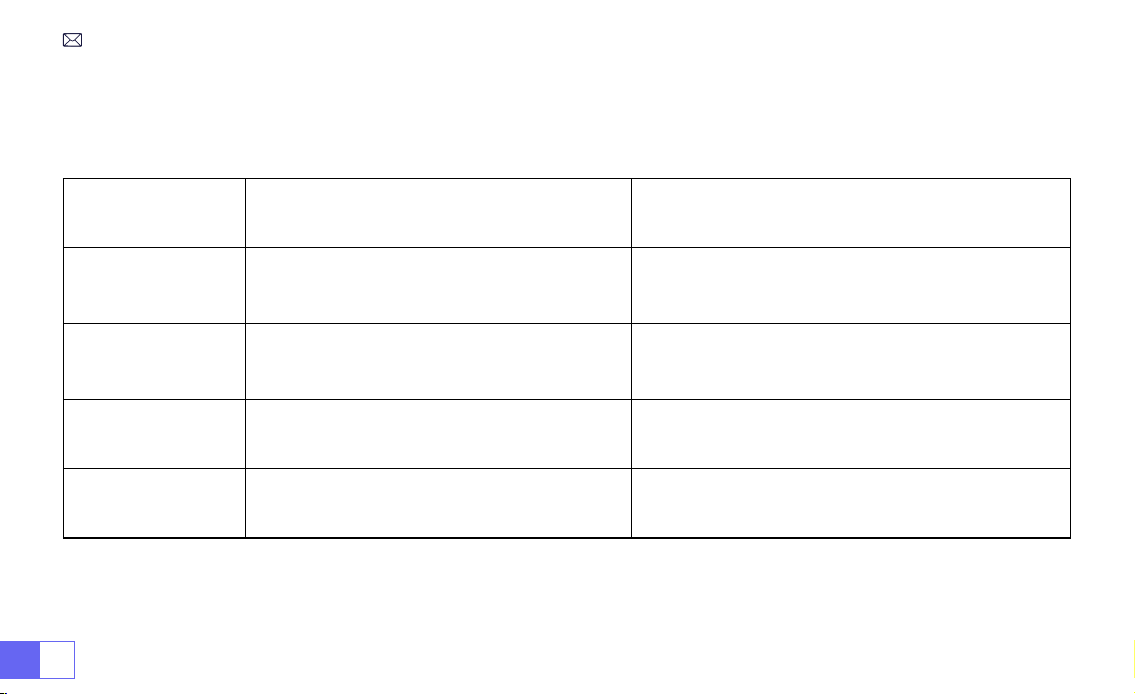
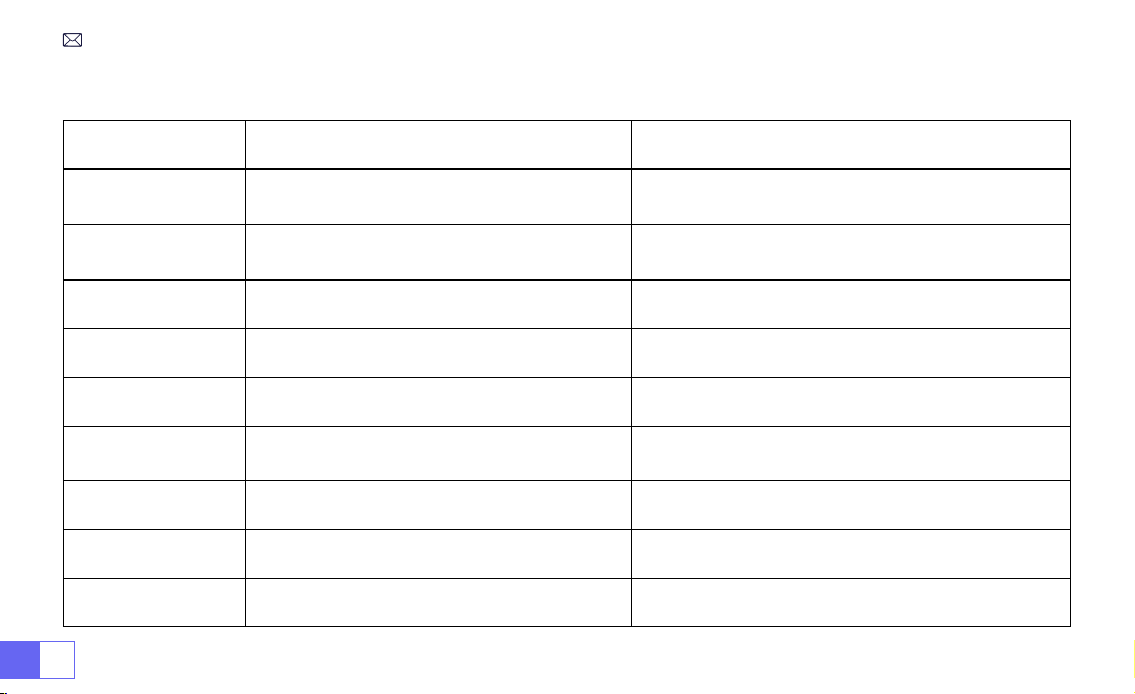
2.System settings
Menu Content Function
OSD Language
English/Français/Italian/Espanol/
Deutsche/
日本語
Choose a language
Projection Mode
Front/Back on Ceiling, Front/Back on
Table
Flip the projection image direction
Homepage Color Blue/Dark blue/Grey Change the homepage color
Factory Reset Reset Restore factory default settings
Software Upgrade Local update(USB) Update the software via local le
Online Update Online update(OTA)
Update the software via online
Note: Please DO NOT unplug the projector during the updating
process.
Auto Sleep Off/10m/20m/30m/60m/90m/120m/180m Set the sleep time
OSD Timer Off/5s/10s/15s/20s/25s/30s Set the time to return the homepage
Version Info Software version Software version
EN 24
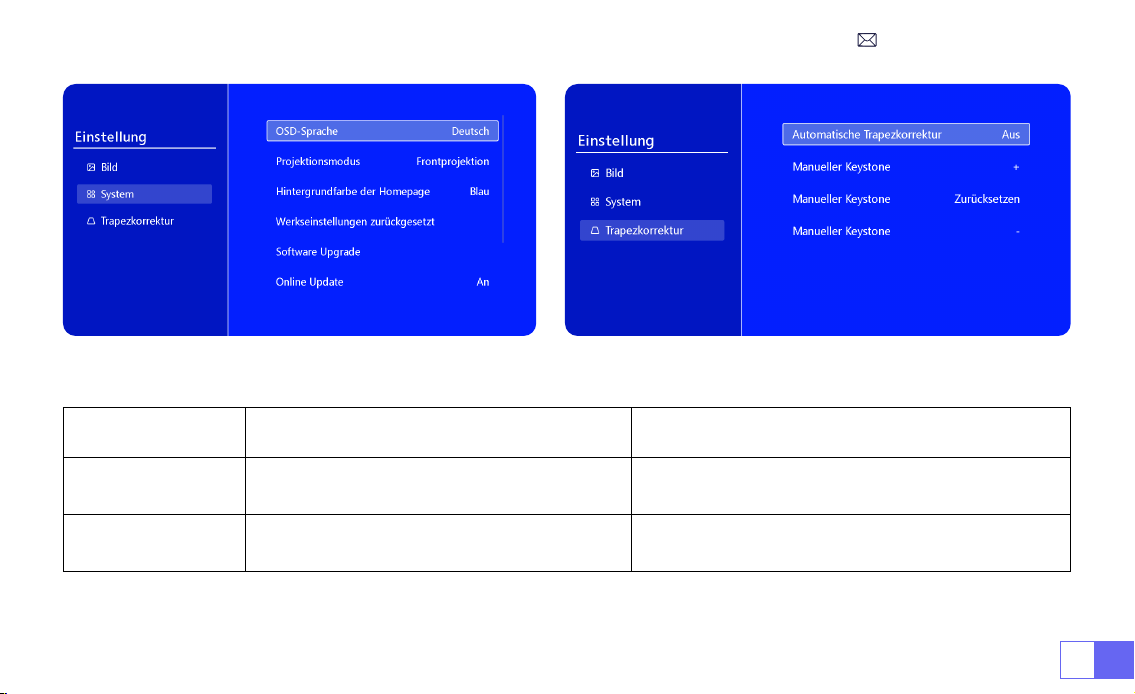
Menu Content Function
Auto Keystone
On/off
Adjust the screen angle vertically aumatically
±30°
Manual Keystone +/-/Reset Adjust the screen angle vertically manually
3.Keystone

EN25
SIGNAL LINES CONNECTION
WiMiUS S27 projector has 3 interfaces, HDMI port*1/USB port*1/3.5mm
headphone output*1. Please select the correct connecting port to
connect your device (PC, Phone, DVD Player, USB, PS4,etc.)
1)Insert the USB ash disk into the USB port of the projector.
2)Select “Media” and the press the "OK" key to enter.
3)Depending on the le type, select the option [Movie/Music/Photo/
Book]
4)Select the desired le and then press the [OK] button to play it.
1)Connect your Fire TV stick ( or PC, XBOX, PS4 etc.) to the HDMI port
of the projector.
2)Enter the home page to select the corresponding HDMI as the
signal source.
1.Connect via USB Disk
2.Connect to Devices via HDMI Port

EN 26
• Use the 3.5mm audio cable to connect with speaker.
• Turn on the projector and the speaker(choose AUX mode).
1)Turn on your DVD player and the projector.
2)Connect to the DVD Player and the projector with the HDMI cable.
3)Enter the home page to select the corresponding HDMI as the signal source.
Note:
When the projector is connected to the DVD player via the HDMI cable, if there is no sound, it may be that the
output signal of the HDMI port of the DVD player is not compatible with HDCP, please try to connect your speaker.
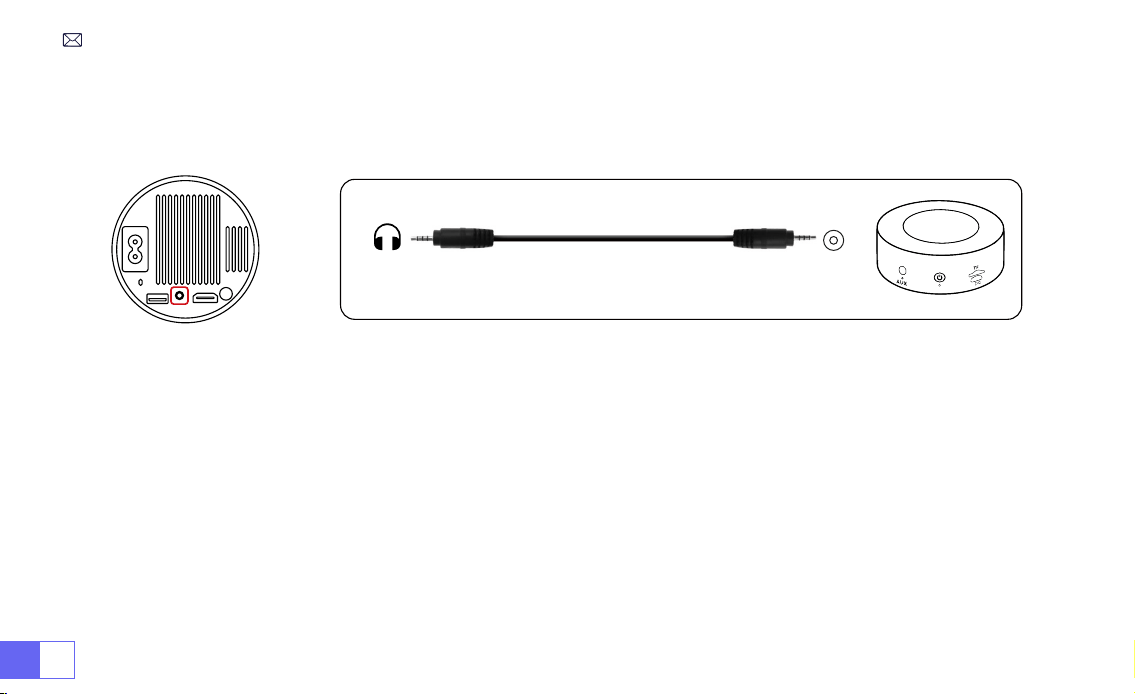
3.Connect to Speaker
4.Connect to DVD Player
Audio
out
AUX
port
EN27
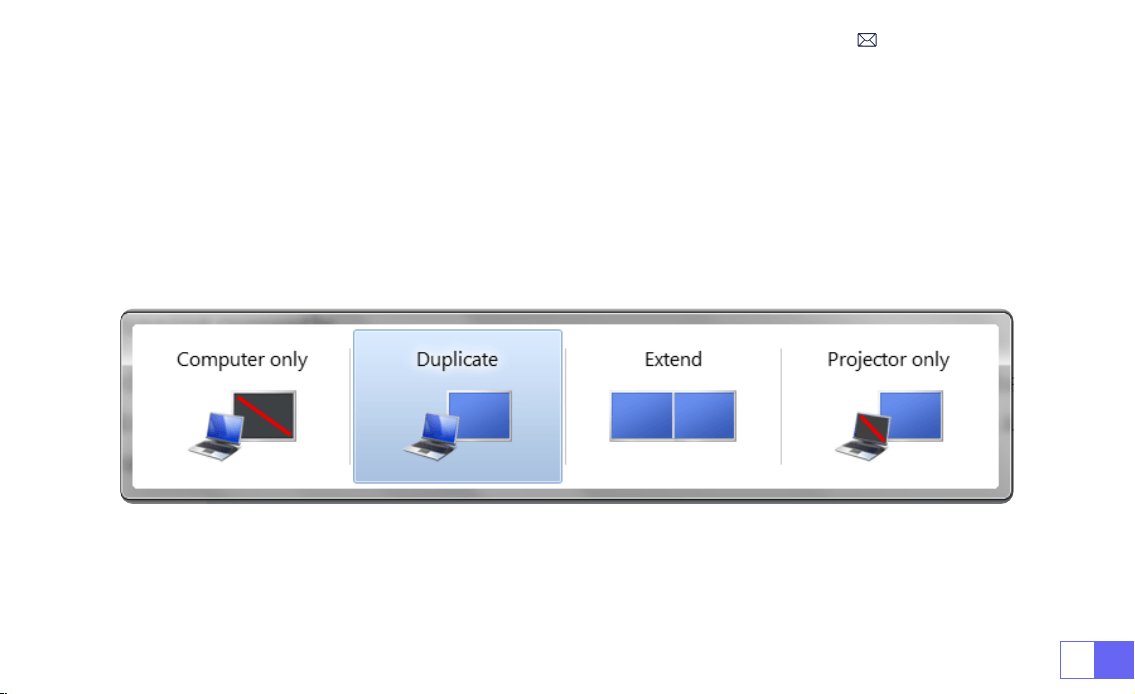
1)Connect to the computer and S27 projector with the HDMI cable.
2)Select the HDMI source to project any les on your computer;
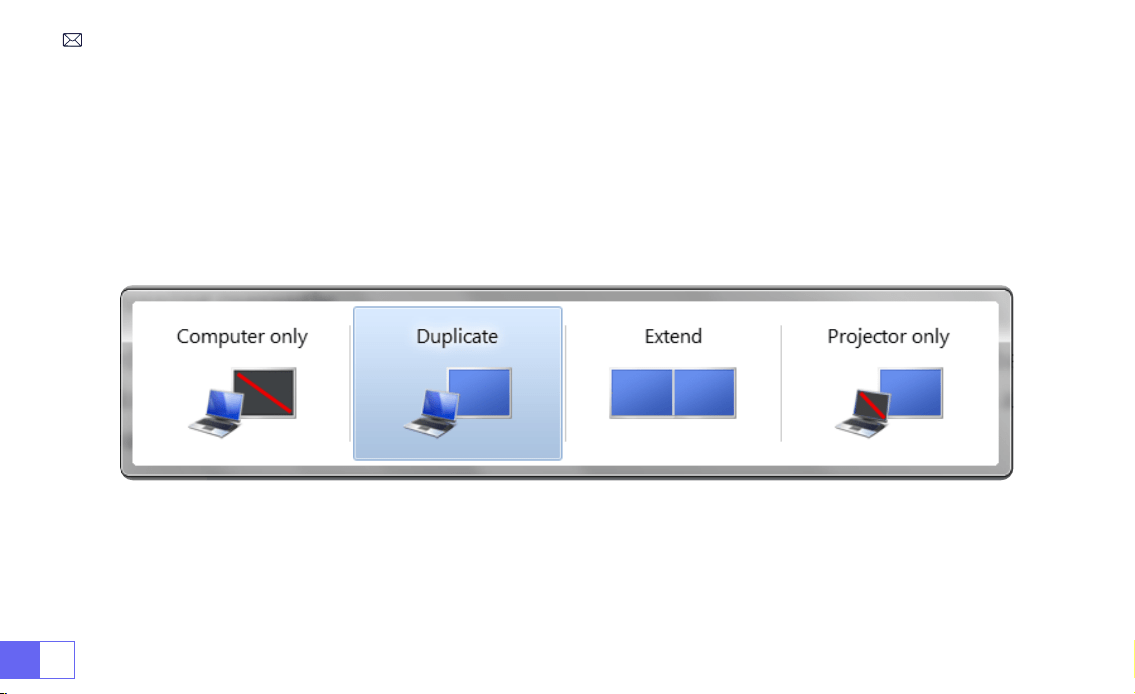
3)On your laptop, hold down the key “Win+P” board keys to change your display mode.
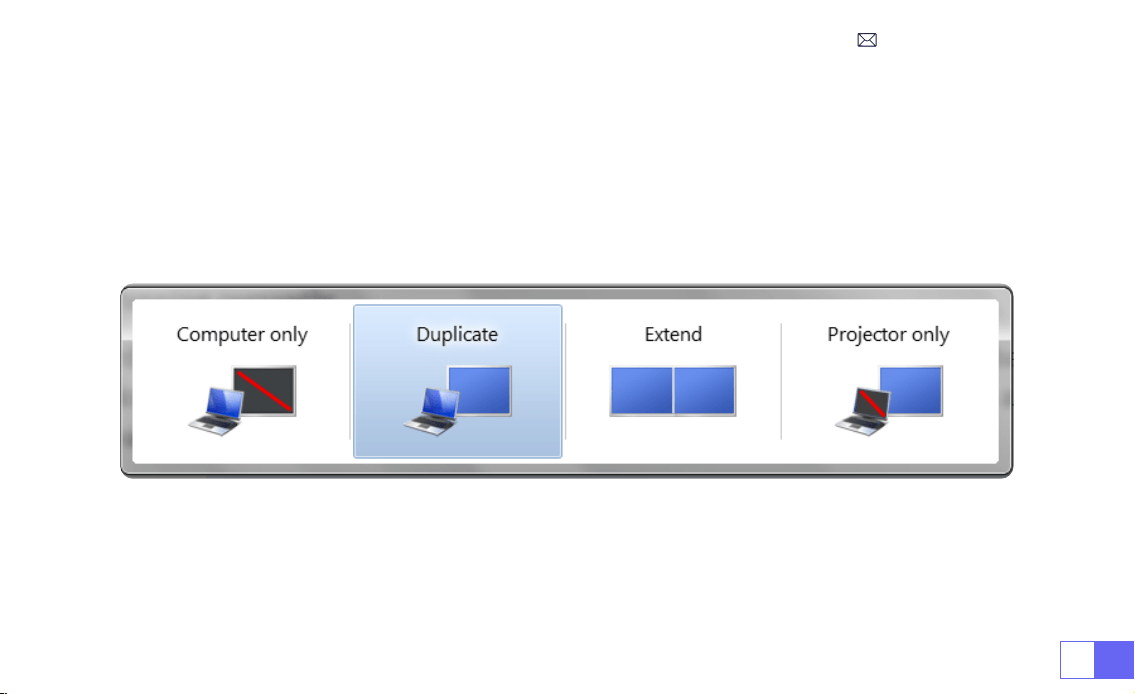
1)
Computer only:
This is the default option and will display the screen only on the main monitor.
2)
Duplicate:
To duplicate your desktop on all connected monitors.
3)
Extend:
To extend your desktop across multiple monitors.
4)
Projector only:
Use the secondary monitor (projector) only and keep the main monitor off
NOTE:
For MacBook, Use a Type-C to HDMI adapter to connect your MacBook, or a Mini Display to HDMI adapter to
connect with your MacBook Air (adapter not included).
5.Connect to Computer
EN 28
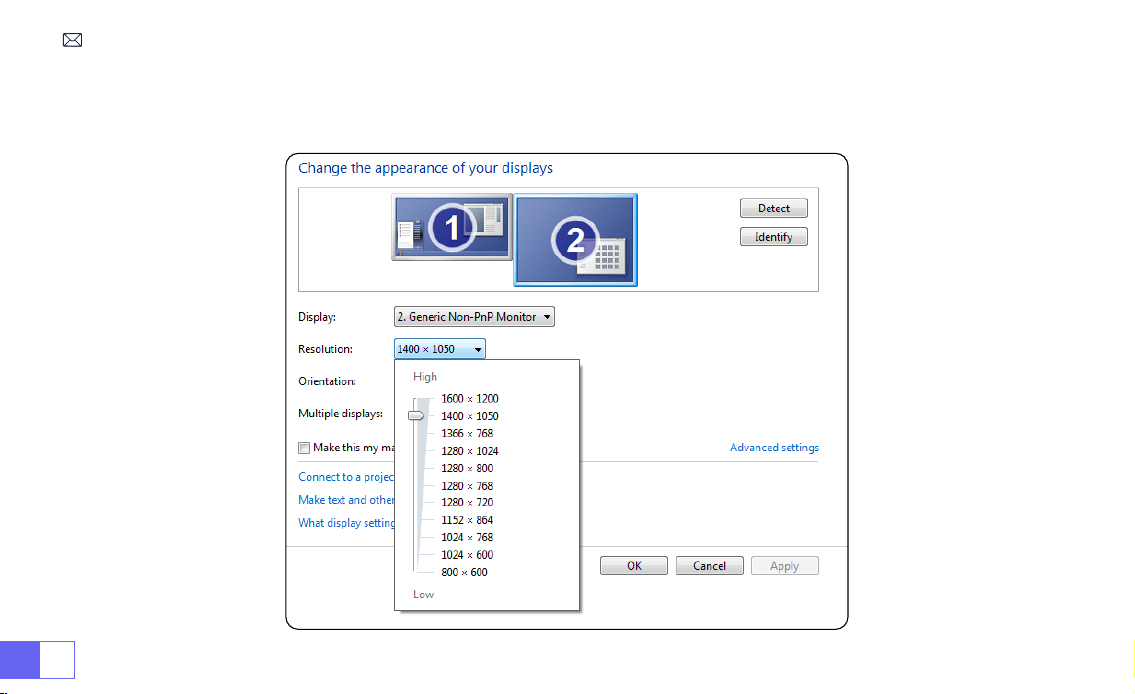
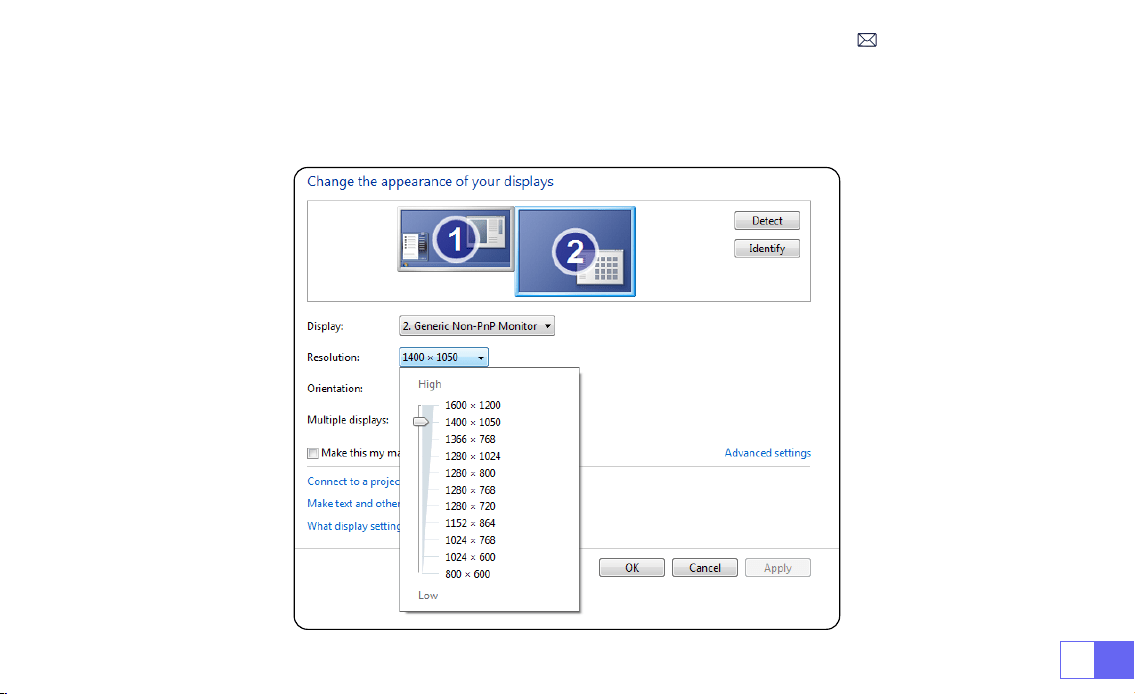
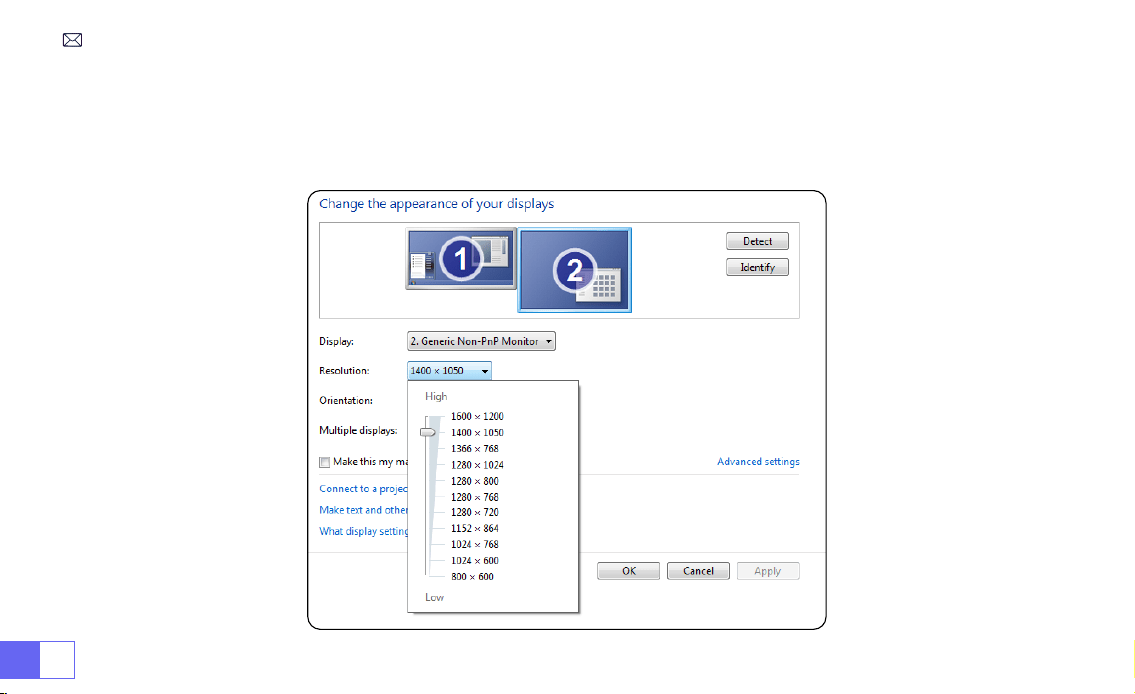
To change the screen resolution in Projector Only mode, follow these steps:
Step: Start > Control Panel > Appearance and Personalization > Adjust Screen Resolution

EN29
FAQ
Thank you for selecting the
WiMiUS S27 projector
. We have compiled some frequently asked questions and their
corresponding answers to assist you better:
Q1: There is
a black spot
on the projected image. How can I remove it?
A: Gently tap the projector or blow air inside with a hairdryer. Carefully open the side dust cleaning port of the
projector. Wipe the inner screen with a clean cotton swab, if necessary, dip it in alcohol for better cleaning.
Exercise caution to avoid causing any damage. For more help, email us at
Q2: The screen
mirroring or WiFi
connection is unstable. How can I resolve this issue?
A: Screen mirroring requires a strong wireless WiFi signal, ensure that your home network is functioning well. The
video resolution will dynamically adjust based on the strength of your Wi-Fi signal. Additionally, activate your
phone’s hotspot and connect to S27 to identify if the issue is with the home network. If the problem persists, please
reach out to us at
for further assistance.
Q3: When screen mirroring, the projector cannot play
Netix, Youtube, Hulu, or Disney videos, etc
. Why?
A: Due to copyright restrictions, most projectors do not support wireless mirroring of streaming services such as
Netix, Hulu, and Disney. To enjoy these services, we recommend using a TV Stick (not included) along with our
projector.
Q4: Why the screen is
upside down
and how can I adjust the
projected image
?
A: Please go to the Setting-->Projection Mode-->to flip the image direction. Place the projector lens
perpendicularly to the projection screen or curtain wall. Adjust the focus using the focus adjustment roller until
the image becomes clear. For picture rectangle adjustments, access the picture image settings and enable the

EN 30
auto keystone correction or manual keystone functions.
Q5: The projector displays the picture but has
no sound
. What could be the reason?
A: 1)The projector does not support Dolby sound, DTS, 5.1-channel, HDMI CEC, ARC. Make sure to turn off any Dolby
settings on your connected devices.
2) Verify that both the projector's volume and the volume on any external devices or Bluetooth speakers are set to
an adequate level.
3) Try playing different videos using other speakers. Certain versions of Bluetooth speakers may not work well with
the projector.
If you encounter any issues, kindly provide the following details in your email: country code, order number,
model, and a brief description of the problem (e.g., US+000-0000000-0000000+S27+No sound) and email us at
. Rest assured, our dedicated team will respond promptly within 24 hours with a fast and
effective solution to address your concerns.

DE31
INHALTSVERZEICHNIS
WIMIUS 7D/24H PROFESSIONELLER SUPPORT- - - - - - - - - - - - - - 33
TIPPS - - - - - - - - - - - - - - - - - - - - - - - - - - - - - 34
PAKETLISTE- - - - - - - - - - - - - - - - - - - - - - - - - - - 35
PROJEKTORSPEZIFIKATIONEN - - - - - - - - - - - - - - - - - - - - 36
PROJEKTORÜBERSICHT - - - - - - - - - - - - - - - - - - - - - - 37
FERNBEDIENUNG - - - - - - - - - - - - - - - - - - - - - - - - 38
INSTALLATION - - - - - - - - - - - - - - - - - - - - - - - - - 39
1.Installationsmethode - - - - - - - - - - - - - - - - - - - - - - - - 39
2.Projektionsabstand undgröße - - - - - - - - - - - - - - - - - - - - 40
INBETRIEBNAHME DES BEAMERS - - - - - - - - - - - - - - - - - - - 41
BILDEINSTELLUNG - - - - - - - - - - - - - - - - - - - - - - - - 41
EINRICHTEN DES BEAMERS - - - - - - - - - - - - - - - - - - - - - 42
1.WiFi-Einstellung - - - - - - - - - - - - - - - - - - - - - - - - - - 42

DE 32
2.Drahtlose Verbindung - - - - - - - - - - - - - - - - - - - - - - - 43
3.Kabelgebundener Bildschirm - - - - - - - - - - - - - - - - - - - - 45
4.Bluetooth - - - - - - - - - - - - - - - - - - - - - - - - - - - - 46
5.Multimedia-Wiedergabe - - - - - - - - - - - - - - - - - - - - - - 47
BeamerEINSTELLUNG- - - - - - - - - - - - - - - - - - - - - - - 50
1.Bildeinstellungen - - - - - - - - - - - - - - - - - - - - - - - - - 50
2.Systemeinstellungen- - - - - - - - - - - - - - - - - - - - - - - - 52
3.Trapezkorrektur - - - - - - - - - - - - - - - - - - - - - - - - - - 53
ANSCHLUSS DER SIGNALLEITUNGEN - - - - - - - - - - - - - - - - - 54
1.Anschluss über USB-Diskette- - - - - - - - - - - - - - - - - - - - - 54
2.Anschluss an Geräte über HDMI-Anschluss- - - - - - - - - - - - - - - 54
3.Anschluss an Lautsprecher - - - - - - - - - - - - - - - - - - - - - 55
4.Anschluss an DVD-Player- - - - - - - - - - - - - - - - - - - - - - 55
5.Anschluss an Computer - - - - - - - - - - - - - - - - - - - - - - 56
FAQ - - - - - - - - - - - - - - - - - - - - - - - - - - - - - 58

DE33
WIMIUS 7D/24H PROFESSIONELLER SUPPORT
Lieber Kunde,
vielen Dank, dass Sie WiMiUS unterstützen!
Bevor Sie den Beamer in Betrieb nehmen, bitten wir Sie, dieses Handbuch sorgfältig durchzulesen. Sollten Sie
Probleme haben, fügen Sie bitte die folgenden Details in Ihre E-Mail ein: Ländercode, Bestellnummer, Modell und eine
kurze Beschreibung des Problems (z. B. DE+000-0000000-0000000+S27+Kein Ton) an
. Sie
können sicher sein, dass unser Team innerhalb von 24 Stunden mit einer schnellen und effektiven Lösung reagieren
wird.
Es ist wichtig zu erwähnen, dass viele häuge Probleme durch einfache Anpassungen behoben werden können, z.
B. Probleme mit dem Signal, dem Ton, der Bluetooth- oder WiFi-Verbindung, dunklen Flecken oder abgehackten
Animationen. Um höchste Zufriedenheit zu gewährleisten, möchten wir Ihnen versichern, dass alle unsere
Beameren vor dem Versand einer strengen 100%igen Qualitätskontrolle und einer sorgfältigen Verpackung
unterzogen werden.
Wenn Sie Fragen haben, kontaktieren Sie uns bitte, damit das Problem gelöst werden kann. Und geben Sie uns die
Möglichkeit, uns zu verbessern. Wir sind bestrebt, Ihnen eine zufriedenstellende Lösung für alle Herausforderungen
zu bieten, auf die Sie stoßen könnten.
Mit freundlichen Grüßen,
WiMiUS Service Team

DE 34
TIPPS
Überlegungen zur Temperatur:
Um die Langlebigkeit Ihres Beamers zu gewährleisten, sollten Sie ihn nicht in übermäßig warmen oder kalten
Umgebungen aufstellen. Extreme Temperaturen können die Lebensdauer des Geräts verkürzen. Für eine optimale
Leistung sollten Sie eine Arbeitsumgebung zwischen 5°C und 35°C beibehalten.
Umgang mit schwarzen Flecken auf der Projektionsäche:
Klopfen Sie vorsichtig auf den Beamer oder blasen Sie mit einem Haartrockner Luft hinein. Öffnen Sie vorsichtig die
seitliche Staubreinigungsöffnung des Beamer. Wischen Sie das Innensieb mit einem sauberen Wattestäbchen ab
und tauchen Sie es bei Bedarf zur besseren Reinigung in Alkohol. Seien Sie vorsichtig, um Schäden zu vermeiden.
Für weitere Hilfe senden Sie uns eine E-Mail an
Richtige Belüftung:
Der Beamer ist mit einem Belüftungssystem ausgestattet, um einen stabilen Betrieb zu gewährleisten. Vermeiden
Sie es, die Lüftungsöffnungen mit Tüchern, Decken oder anderen Materialien abzudecken. Stecken Sie außerdem
keine Gegenstände in die Schlitze des Beamers, da dies zu Kurzschlüssen oder Stromschlägen führen kann, die Ihr
Gerät beschädigen könnten.
Schutz vor Stößen und Vibrationen:
Gehen Sie vorsichtig mit Ihrem Beamer um und schützen Sie ihn vor starken Stößen, Erschütterungen und
Vibrationen. Vermeiden Sie es, den Beamer zu bewegen, wenn er interne Schaltkreisfehler aufweist.
Wartung des Objektivs:
Das Objektiv des Beamers ist eine entscheidende Komponente, die sich direkt auf die Bildschärfe und qualität
auswirkt. Achten Sie darauf, dass das Objektiv frei von übermäßigem Staub ist. Verwenden Sie für die Reinigung
ein weiches Baumwolltuch, das für Glaslinsen geeignet ist. Vermeiden Sie die Verwendung von harten Tüchern
oder Scheuermitteln, da diese die Linsenoberäche beschädigen können.

DE35
PAKETLISTE
WiMiUS S27 Beamer*1 HDMI-Kabel*1 Objektivabdeckung*1
Fernbedienung*1 Benutzerhandbuch*1 Netzkabel*1

DE 36
Modell Nr.: S27
Anzeigetechnik
LCD
Lichtquelle
LED
Produktgröße
81.1X36.2X46.3 inch
Produktgewicht
0.586kg
Aktualisierungsrate
60HZ
Stromspannung
AC100-240V
Native Auösung
1280*720P
Max. unterstützte Auösung
1920*1080P Dekodierung
Trapezkorrektur
Automatisch/Manuell
Fokus
Manuell
Betriebsmodus
Fernbedienung
Bildseitenverhältnis
4:3/16:9
Ausgangsanschluss
3,5 mm Audioausgang
Eingangsanschluss
HDMI*1/USB*1
Videoformat
MP4/MPG/AVI/MPEG-4/TS/MOV/M4V/MKV/FLV/DAT/3GP (Die Unterstützung für Videocodecs
kann je nach den Umständen variieren)
Audioformat
MP3/WMA/AAC/AMR/APE/FLAC/MP2 (Dolby-Audiocodecs werden nicht unterstützt)
Bildformat
JPEG/BMP/PNG/GIF
Dokumentformat
TXT
PROJEKTORSPEZIFIKATIONEN

DE37
PROJEKTORÜBERSICHT
①
Stromeingang
②
Infrarot-Signalempfänger
③
USB-Anschluss
④
3,5-mm-Audio-Ausgang
⑤
Belüftung
⑥
Power-Taste
⑦
HDMI-Anschluss
⑧
Manueller Fokus ±
⑨
Staubreinigung Hafen
⑩
1/4" Montageloch
➀
➁
➂
➃
➄
➅
➆
⑨
⑩
➇

DE 38
FERNBEDIENUNG
➀
➁
➂
➃
➄
➅
⑧
⑩
➆
➈
①
Ein-/Ausschalten
②
Menü
③
Eingangssignalquelle
④
Pfeiltaste
⑤
Pause-Taste
Hinweis:
1. Legen Sie 2 AAA-Batterien (nicht im Lieferumfang enthalten) in
die Fernbedienung ein, bevor Sie sie benutzen. Kombinieren Sie keine
neuen Batterien mit alten Batterien in der Fernbedienung, da dies zu
Betriebsstörungen aufgrund unzureichender Stromversorgung führen
kann.
2. Achten Sie bei der Verwendung der Fernbedienung darauf, dass Sie
den Signalsender der Fernbedienung auf den Infrarotempfänger des
Beamers richten, oder richten Sie die Fernbedienung einfach auf die
Projektionsäche, während Sie sie bedienen.
3. Wenn Sie die Fernbedienung über einen längeren Zeitraum nicht
benutzen. Bitte nehmen Sie die Batterien heraus, um ein Auslaufen zu
verhindern.
⑥
Startseite
⑦
Zurück
⑧
Volumen -
⑨
Volumen +
⑩
Stumm

DE39
1. Der Beamer kann auf dem stabilen Schreibtisch platziert oder an der Decke montiert werden, um das Bild je nach
Betriebsumgebung und Anforderungen zu projizieren.
2. Stellen Sie den Beamer in einer Höhe auf, in der sein Objektiv axialsymmetrisch zur Leinwand ist. Wenn dies nicht
möglich ist, verwenden Sie die Trapezkorrekturfunktion, um das Projektionsbild anzupassen.
INSTALLATION
1.Installationsmethode
Frontprojektions-Tischhalterung
Deckenhalterung für Frontprojektion
Rückprojektions-Tischhalterung
Deckenhalterung für Rückprojektion

DE 40
2.Projektionsabstand undgröße
Bildseitenverhältnis: 16:9
Distanz Bildschirmgröße
1.1m 40’’
2.2m 80’’
3.3m 120’’
4.1m 150’’
5.4m 200’’
*Die Bildgröße hängt von der Entfernung zwischen Beamer und Leinwand ab. Es kann 3 % Messdifferenz zwischen
den oben aufgeführten Daten geben.
*Der empfohlene Projektionsabstand beträgt 2,5-3 m.
*Die Klarheit der projizierten Bilder wird durch eine angenehme Dunkelheit verbessert.

DE41
INBETRIEBNAHME DES BEAMERS
BILDEINSTELLUNG
Schalten Sie den Beamer ein:
Schließen Sie das Netzkabel an, wenn die rote Anzeige leuchtet, drücken Sie die
Power-Taste auf der Fernbedienung oder die Power-Taste auf dem Bedienfeld, um den Beamer einzuschalten, die
Anzeige wechselt von rot auf blau, der Beamer ist eingeschaltet.
Schalten Sie den Beamer aus:
Drücken Sie die Netztaste auf der Fernbedienung oder die Netztaste auf dem
Bedienfeld, um den Beamer auszuschalten, die Anzeige wechselt von blau auf rot, der Beamer ist ausgeschaltet.
Richten Sie das Objektiv des Beamers senkrecht auf die Projektionsfläche
oder die Vorhangwand und stellen Sie die Schärfeeinstellrolle ein, bis das Bild
klar ist.
Hinweis:
Wenn das Bild immer noch unscharf ist, versuchen Sie bitte, den
Projektionsabstand und die Position des Beamers anzupassen.
Manuell Fokus
DE 42
EINRICHTEN DES BEAMERS
Die Startseite des Beamers sieht wie folgt aus.
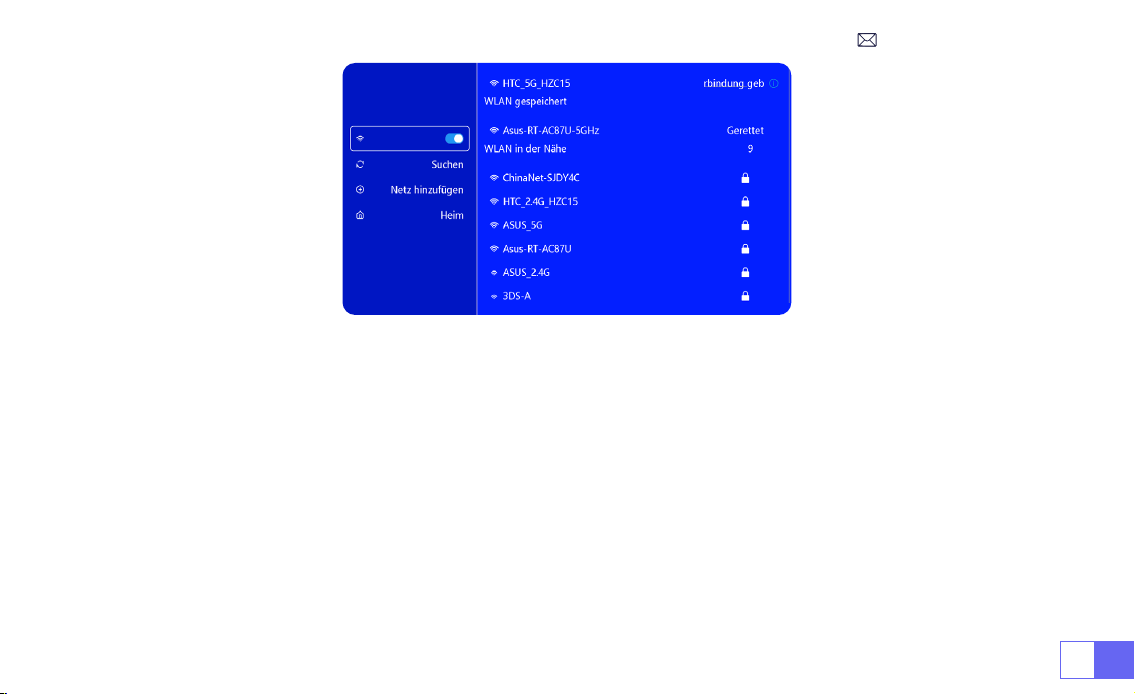
1.WiFi-Einstellung
1. Das Funktionieren der Bildschirmspiegelung bei einer drahtlosen Verbindung wird durch die Netzwerkumgebung
beeinusst. Für die Bildschirmspiegelung wird eine Bandbreite von 100 Mbit oder mehr empfohlen.
2. Stellen Sie sicher, dass sich Ihr mobiles Gerät in der Nähe des Beamers befindet, wenn Sie eine drahtlose
Verbindung verwenden. Es wird ein Abstand von 1 Meter empfohlen.
3. Einige mobile Geräte unterstützen aufgrund der Kompatibilität möglicherweise keine Bildschirmspiegelung.
DE43
2.Drahtlose Verbindung
2.1 Für iOS Cast (Airplay)
Achtung:
Stellen Sie sicher, dass Ihr iOS-Gerät mit demselben Wi-Fi-Netzwerk verbunden ist wie Ihr Beamer.
1. Verbinden Sie den S27 Beamer mit Ihrem WiFi-Netzwerk
2. Zurück zur Startseite - Wählen Sie das Menü [ Drahtloser Bildschirm ] - Bleiben Sie auf dieser Schnittstelle
3. Rufen Sie das [ Control Center ] auf Ihrem iOS-Gerät auf -- Wählen Sie die Funktion [ Airplay ] -- Wählen Sie den
iOS Cast-Empfänger mit dem Namen [ WiMiUS-S27-XXXX ] aus und schließen Sie ihn an -- Der Bildschirm des iOS-
Geräts wird gespiegelt und auf der Projektionsäche angezeigt.

DE 44
2.2 Für Android System (Miracast)
Methoden zur Bildschirmspiegelung:
Android-Geräte verschiedener Marken verwenden möglicherweise
verschiedene Begriffe und Methoden, um die Bildschirmspiegelung zu aktivieren. Um die genauen Schritte für Ihr
Gerät zu nden, lesen Sie bitte das Handbuch Ihres Geräts. Gängige Bezeichnungen für die Bildschirmspiegelung
sind Multi-Screen, Wireless Display, WLAN Display, Screen Mirroring und Smart View.
Gerätekompatibilität:
Bitte beachten Sie, dass nicht alle Android-Handys die Funktion der Bildschirmspiegelung
unterstützen. Vergewissern Sie sich vor der Verwendung der Bildschirmspiegelung, dass Ihr Android-Gerät diese
Funktion unterstützt. Sie können im Handbuch Ihres Geräts nachsehen oder in den Einstellungen nach der Option für
die Bildschirmspiegelung suchen, um die Kompatibilität zu überprüfen.
1. Stellen Sie sicher, dass die WLAN-Funktion auf Ihrem
Android-Gerät aktiviert ist. (Eine Verbindung mit einem Wi-
Fi-Netzwerk ist nicht erforderlich.)
2. Zurück zur Startseite - Wählen Sie das Menü [ Drahtloser
Bildschirm ] - Bleiben Sie auf dieser Schnittstelle
3. Rufen Sie das [ Control Center ] auf Ihrem Android-Gerät
auf und wählen Sie [ Screen Mirroring/ Smart View ].
4. Wählen Sie den Miracast-Empfänger mit dem Namen [
WiMiUS-S27-XXXX ] aus und verbinden Sie ihn.
5. Sobald die Verbindung erfolgreich hergestellt wurde, wird
der Bildschirm Ihres Android-Geräts gespiegelt und auf der
Projektionsäche angezeigt.
DE45
1. Installieren Sie zuerst die Elfcast App, indem Sie den mitgelieferten QR-Code scannen.
2. Bestätigen Sie das Öffnen von Elfcast im Pop-up-Fenster Ihres Geräts.
3. Geben Sie Ihr Gerätepasswort ein, wenn Sie dazu aufgefordert werden, um die Verbindung zu authentizieren.
4. Ihr Android-Gerät wird automatisch mit demselben Bildschirm verbunden.
1. Schließen Sie Ihr iPhone mit dem Original-iPhone-
Ladekabel (USB auf Lightning) an einen Beamer an.
2. Klicken Sie auf "Vertrauen", wenn ein Pop-up-Fenster auf
Ihrem Gerät erscheint.
3. Geben Sie Ihr Gerätepasswort ein, wenn Sie
dazu aufgefordert werden, um die Verbindung zu
authentizieren.
3.Kabelgebundener Bildschirm
3.1 Android-Verbindung über Kabel
3.2 iOS-Verbindung über Kabel
DE 46
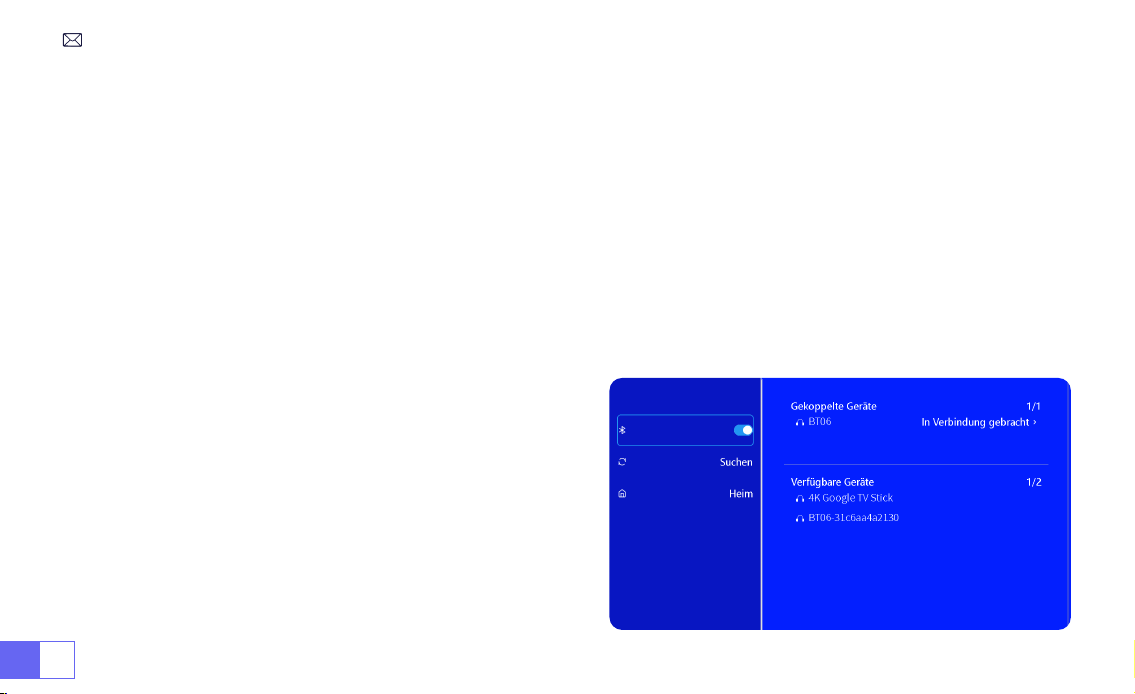
1. Schalten Sie Ihren Bluetooth-Lautsprecher ein.
2. Schalten Sie [Bluetooth] an Ihrem Beamer ein und wählen Sie Ihren Bluetooth-Lautsprecher für die Verbindung
aus.
Hinweis:
1) Der S27-Beamer ist mit den meisten Bluetooth-Headsets, Bluetooth-Lautsprechern und Airpods kompatibel. Bitte
beachten Sie jedoch, dass er nicht mit Bluetooth-Tastaturen oder Bluetooth-Telefonen kompatibel ist.
2) Wenn Sie bei der Wiedergabe von Videos keinen Ton hören, empfehlen wir Ihnen, die Dolby-Sound-Einstellungen
auf Ihren angeschlossenen Geräten zu überprüfen. Das
Ausschalten von Dolby-Sound kann eine bessere Audio-
Kompatibilität mit dem Beamer gewährleisten.
3) Bei einigen Bluetooth-Lautsprechern kann es zu einer
deutlichen Verringerung der Lautstärke kommen, wenn sie
mit dem Beamer verbunden sind. Um dieses Problem zu
beheben, versuchen Sie, die Lautstärke an allen relevanten
Geräten zu erhöhen, um den gewünschten Tonpegel zu
erreichen.
4) Wenn Sie Fragen haben oder weitere Unterstützung
benötigen, zögern Sie bitte nicht, den WiMiUS-Support per
E-Mail zu kontaktieren unter
.
4.Bluetooth
Bluetooth-Lautsprecher anschließen
DE47
1)Stecken Sie den USB-Flash-Datenträger in den USB-Anschluss des Beamers.
2)Wählen Sie "Medien" und drücken Sie die "OK"-Taste, um den Vorgang zu starten.
3)Wählen Sie, je nach Dateityp, die Option [Film/Musik/Foto/Buch].
4)Wählen Sie die gewünschte Datei und drücken Sie dann die Taste [OK], um sie abzuspielen.
5)Klicken Sie während der Videowiedergabe auf die Taste "MENU" auf der Fernbedienung, um die Bildeinstellungen
direkt anzupassen.
5.Multimedia-Wiedergabe
5.1 USB-Datenträger-Eingabemodus
DE 48
Warme Tipps:
Wenn Ihr Beamer den USB-Datenträger nicht erkennt, befolgen Sie bitte die folgenden Methoden, um
das Problem zu lösen.
Bitte stellen Sie sicher, dass Ihr USB-Datenträger die folgenden Formate aufweist:
FAT32: 8GB/16GB/32GB
NTFS: 64GB-2TB
Wenn sie diese Kriterien nicht erfüllt, müssen Sie eine USB-Festplatte mit unterstütztem Format verwenden.
Wenn das Problem weiterhin besteht, senden Sie bitte eine detaillierte Beschreibung Ihres Problems an die folgende
E-Mail-Adresse:
5.2 Video-Wiedergabe-Schnittstelle
DE49
Menü Funktion
FB Langes Drücken für schnellen Rücklauf des Videos
FF Langes Drücken zum Vorspulen des Videos
Prev Wechseln Sie zum vorherigen Video
Next Wechseln Sie zum nächsten Video
Stop Hören Sie auf zu spielen und beenden Sie den Vorgang
Round Listenzyklus oder Einzelzyklus
Info Videodetails
List Wählen Sie alle Wiedergabelisten im aktuellen Ordner aus
16:9 Seitenverhältnis: Auto/4:3/16:9
DE 50
BeamerEINSTELLUNG
1.Bildeinstellungen
Menü Inhalt Funktionen
Bildmodus Standard/Dynamisch/Mild/Benutzer
Einstellen von Kontrast / Helligkeit / Farbe /
Schärfe
Farbtemperatur Cold/Standard/Warm Einstellen der Farbtemperatur
Bildseitenverhältnis 4:3/16:9 Einstellen des Bildseitenverhältnisses
Zoom 100%-85% Verkleinern der Bildgröße
DE 52
2.Systemeinstellungen
Menü Inhalt Funktionen
OSD Sprachen
English/Français/Italian/Espanol/Deutsche/
日
本語
Wählen Sie eine Sprache aus
Projektionsmodus
Vorderseite/Rückseite an der Decke,
Vorderseite/Rückseite am Tisch
Drehen Sie die Richtung des Projektionsbildes
Farbe der Homepage Blau/Dunkelblau/Grau Ändern Sie die Farbe der Homepage
Werkseinstellung Zurücksetzen Werkseinstellungen wiederherstellen
Software Update Lokale Aktualisierung (USB) Aktualisierung der Software über eine lokale Datei
Online Update Online Update (OTA)
Aktualisieren Sie die Software online
Tipps: Bitte trennen Sie den Beamer während des
Aktualisierungsvorgangs NICHT vom Stromnetz.
Automatischer
Ruhezustand
Off/10m/20m/30m/60m/90m/120m/180m Einstellen der Schlafzeit
OSD-Zeitschaltuhr Aus/5s/10s/15s/20s/25s/30s Legen Sie die Zeit für die Rückkehr zur Homepage fest
Informationen zur
Version
Softwareversion Softwareversion
DE53
Menü Inhalt Funktionen
Automatische
Trapezkorrektur
Ein/Aus
Vertikale Einstellung des Bildschirmwinkels um
±30°
Manuelle
Trapezkorrektur
+/-/Zurücksetzen
Manuelle Einstellung des vertikalen
Bildschirmwinkels
3.Trapezkorrektur

DE 54
ANSCHLUSS DER SIGNALLEITUNGEN
Der WiMiUS S27 Beamer verfügt über 3 Schnittstellen, HDMI-
Anschluss*1/USB-Anschluss*1/3,5mm Kopfhörerausgang*1. Bitte
wählen Sie den richtigen Anschluss, um Ihr Gerät anzuschließen (PC,
Telefon, DVD-Player, USB, PS4, etc.)
1)Stecken Sie den USB-Flash-Datenträger in den USB-Anschluss des
Beamers.
2)Wählen Sie "Medien" und drücken Sie zum Aufrufen die Taste "OK".
3)Wählen Sie je nach Dateityp die Option [Film/Musik/Foto/Buch].
4)Wählen Sie die gewünschte Datei und drücken Sie dann die Taste
[OK], um sie abzuspielen.
1)Schließen Sie Ihren Fire TV Stick (oder PC, XBOX, PS4 usw.) an den
HDMI-Anschluss des Beamers an.
2)Rufen Sie die Startseite auf, um den entsprechenden HDMI-
Anschluss als Signalquelle auszuwählen.
1.Anschluss über USB-Diskette
2.Anschluss an Geräte über HDMI-Anschluss

DE55
- Verwenden Sie das 3,5-mm-Audiokabel für die Verbindung mit dem Lautsprecher.
- Schalten Sie den Beamer und den Lautsprecher ein (wählen Sie den AUX-Modus).
1) Schalten Sie Ihren DVD-Player und den Beamer ein.
2)Verbinden Sie den DVD-Player und den Beamer mit dem HDMI-Kabel.
3)Rufen Sie die Startseite auf, um den entsprechenden HDMI-Anschluss als Signalquelle auszuwählen.
Hinweis:
Wenn der Beamer über das HDMI-Kabel an den DVD-Player angeschlossen ist und kein Ton zu hören
ist, kann es sein, dass das Ausgangssignal des HDMI-Anschlusses des DVD-Players nicht HDCP-kompatibel ist;
versuchen Sie dann, Ihren Lautsprecher anzuschließen.
3.Anschluss an Lautsprecher
4.Anschluss an DVD-Player
Audio
out
AUX
port
DE 56
1) Verbinden Sie den Computer und den S27-Beamer mit dem HDMI-Kabel.
2)Wählen Sie die HDMI-Quelle, um Dateien auf Ihrem Computer zu projizieren;
3)Halten Sie auf Ihrem Laptop die Tasten "Win+P" gedrückt, um den Anzeigemodus zu ändern.
1)
Nur Computer:
Dies ist die Standardoption, bei der der Bildschirm nur auf dem Hauptmonitor angezeigt wird.
2)
Duplizieren:
Der Desktop wird auf allen angeschlossenen Monitoren dupliziert.
3)
Erweitern:
Zum Erweitern Ihres Desktops auf mehrere Monitore.
4)
Nur Beamer:
Verwenden Sie nur den zweiten Monitor (Beamer) und schalten Sie den Hauptmonitor aus.
Hinweis:
Für MacBook: Verwenden Sie einen Typ-C-auf-HDMI-Adapter, um Ihr MacBook anzuschließen, oder einen
Mini-Display-auf-HDMI-Adapter, um Ihr MacBook Air anzuschließen (Adapter nicht enthalten).
5.Anschluss an Computer
DE57
Gehen Sie wie folgt vor, um die Bildschirmauösung im Modus "Nur Beamer" zu ändern:
Schritt: Start > Systemsteuerung > Darstellung und Personalisierung > Bildschirmauösung anpassen

DE 58
FAQ
Vielen Dank, dass Sie sich für einen WiMiUS S27 Beamer entschieden haben. Im Folgenden nden Sie einige häug
gestellte Fragen und Antworten, die Hoffnung wird nützlich sein.
Q1: Auf dem projizierten Bild ist ein
Schwarzer Fleck
. Wie kann ich es entfernen?
A: Klopfen Sie vorsichtig auf den Beamer oder blasen Sie mit einem Haartrockner Luft hinein. Öffnen Sie vorsichtig
die seitliche Staubreinigungsöffnung des Beamer. Wischen Sie das Innensieb mit einem sauberen Wattestäbchen
ab und tauchen Sie es bei Bedarf zur besseren Reinigung in Alkohol. Seien Sie vorsichtig, um Schäden zu
vermeiden. Für weitere Hilfe senden Sie uns eine E-Mail an
Q2: Die
WiFi Verbindung ist nicht stabil
. Wie man es löst?
A: Bitte überprüfen Sie zuerst, ob Ihr Heimnetzwerk gut ist, und stellen Sie dann den Abstand zwischen Telefon und
Beamer auf höchstens 1 Meter ein. Wenn es immer noch nicht funktioniert, senden Sie uns bitte eine E-Mail an
.
Q3: Bei der Bildschirmspiegelung kann der Beamer keine
Netflix-, Youtube-, Hulu- oder Disney-Videos usw
.
abspielen. Warum?
A: Aufgrund von Urheberrechtsbeschränkungen unterstützen die meisten Projektoren keine drahtlose Spiegelung
von Streaming-Diensten wie Netflix, Hulu und Disney. Um diese Dienste nutzen zu können, empfehlen wir die
Verwendung eines TV-Sticks (nicht im Lieferumfang enthalten) zusammen mit unserem Beamer.
Q4: Warum steht die Leinwand auf dem Kopf und wie kann ich das projizierte Bild anpassen?
A: Bitte gehen Sie zu Einstellungen-->Projektionsmodus-->um die Bildrichtung umzukehren. Platzieren Sie
das Projektorobjektiv senkrecht zur Projektionswand oder Vorhangwand. Passen Sie den Fokus mit der

DE59
Fokuseinstellrolle an, bis das Bild klar wird. Zur Anpassung des Bildrechtecks rufen Sie die Bildeinstellungen auf
und aktivieren Sie die automatische Trapezkorrektur oder die manuelle Trapezkorrektur.
Q5: Der Beamer zeigt das Bild an, hat aber keinen Ton. Was könnte der Grund sein?
A: 1) Der Beamer unterstützt keinen Dolby-Sound, DTS, 5.1-Kanal, HDMI CEC, ARC. Stellen Sie sicher, dass Sie alle
Dolby-Einstellungen auf Ihren angeschlossenen Geräten deaktivieren.
2) Stellen Sie sicher, dass sowohl die Lautstärke des Beamer als auch die Lautstärke aller externen Geräte oder
Bluetooth-Lautsprecher auf einen angemessenen Wert eingestellt ist.
Wenn Sie weitere Fragen zum Beamer haben, können Sie uns jederzeit eine E-Mail an
mit Ihrem Ländercode + S27+ Problem senden (Beispiel: DE + S27 Beamer + kein Ton).

FR 60
TABLE DES MATIÈRES
ASSISTANCE PROFESSIONNELLE WIMIUS 7J/24H - - - - - - - - - - - - 62
CONSEILS - - - - - - - - - - - - - - - - - - - - - - - - - - - 63
LISTE DES FORFAITS - - - - - - - - - - - - - - - - - - - - - - - 64
SPÉCIFICATIONS DU PROJECTEUR - - - - - - - - - - - - - - - - - - 65
APERÇU DU PROJECTEUR - - - - - - - - - - - - - - - - - - - - - 66
TÉLÉCOMMANDE - - - - - - - - - - - - - - - - - - - - - - - - 67
INSTALLATION - - - - - - - - - - - - - - - - - - - - - - - - - 68
1.Méthode d'Installation - - - - - - - - - - - - - - - - - - - - - - - 68
2.Distance Et Taille De Projection- - - - - - - - - - - - - - - - - - - - 69
DÉMARRER LE PROJECTEUR - - - - - - - - - - - - - - - - - - - - 70
RÉGLAGE DE LA MISE AU POINT DE L'IMAGE - - - - - - - - - - - - - - 70
CONFIGURATION DU PROJECTEUR - - - - - - - - - - - - - - - - - 71
1.Paramètre WiFi - - - - - - - - - - - - - - - - - - - - - - - - - - 71

FR61
2.Connexion Sans Fil - - - - - - - - - - - - - - - - - - - - - - - - 72
3.Écran Filaire - - - - - - - - - - - - - - - - - - - - - - - - - - - 74
4.Bluetooth - - - - - - - - - - - - - - - - - - - - - - - - - - - - 75
5.Lecture Multimédia - - - - - - - - - - - - - - - - - - - - - - - - 76
RÉGLAGE DU PROJECTEUR - - - - - - - - - - - - - - - - - - - - 79
1.Paramètres d'Image - - - - - - - - - - - - - - - - - - - - - - - - 79
2.Paramètres Système- - - - - - - - - - - - - - - - - - - - - - - - 81
3.Keystone - - - - - - - - - - - - - - - - - - - - - - - - - - - - 82
CONNEXION DES LIGNES DE SIGNAL - - - - - - - - - - - - - - - - - 83
1.Connexion Avec Disque USB - - - - - - - - - - - - - - - - - - - - - 83
2.Connexion Avec Appareils Via Port HDMI - - - - - - - - - - - - - - - - 83
3.Connexion Avec Haut-Parleur - - - - - - - - - - - - - - - - - - - - 84
4.Connexion Avec Lecteur DVD - - - - - - - - - - - - - - - - - - - - 84
5.Connexion Avec l'Ordinateur - - - - - - - - - - - - - - - - - - - - 85
FAQ - - - - - - - - - - - - - - - - - - - - - - - - - - - - - 87

FR 62
ASSISTANCE PROFESSIONNELLE WIMIUS 7J/24H
Très cher client,
Merci beaucoup de soutenir WiMiUS!
Avant de commencer à utiliser le projecteur, nous vous prions de lire attentivement ce manuel. Si vous rencontrez
des problèmes, veuillez inclure les détails suivants dans votre e-mail : code pays, numéro de commande, modèle
et une brève description du problème
(par exemple FR+ID de commande 000-0000000-0000000+S27+Pas de
son)
à
. Soyez assuré que notre équipe répondra rapidement dans les 24 heures avec
une solution rapide et efcace.
Il est essentiel de mentionner que de nombreux problèmes courants peuvent être facilement résolus grâce à
de simples ajustements, tels que des problèmes de signal, de son, de connexions Bluetooth ou WiFi, des points
sombres ou des animations saccadées. Pour assurer la plus grande satisfaction, nous voulons vous assurer que
tous nos projecteurs subissent un contrôle de qualité rigoureux à 100% et un emballage complet avant l'expédition.
Si vous avez des questions, veuillez nous contacter afin que le problème puisse être résolu. Et donnez-nous
l'occasion de nous améliorer. Nous nous engageons à vous fournir une solution satisfaisante pour tous les dés
que vous pourriez rencontrer.
Cordialement,
Équipe de Service WiMiUS

FR63
CONSEILS
Considérations De Température:
Pour assurer la longévité de votre projecteur, évitez de le placer dans des environnements excessivement chauds
ou froids. Les températures extrêmes peuvent raccourcir la durée de vie de l'appareil. Pour des performances
optimales, maintenez un environnement de travail entre 5°C et 35°C.
Gérer les points noirs sur l'écran de projection:
Tapotez doucement le projecteur ou soufez de l'air à l'intérieur avec un sèche-cheveux. Ouvrez soigneusement
le port latéral de nettoyage de la poussière du projecteur. Essuyez l'écran intérieur avec un coton-tige propre,
si nécessaire, trempez-le dans de l'alcool pour un meilleur nettoyage. Soyez prudent pour éviter de causer des
dommages. Pour plus d'aide, envoyez-nous un e-mail à
.
Aération Adéquate:
Le projecteur est équipé d'un système de ventilation pour assurer un fonctionnement stable. Évitez de couvrir
les évents avec des tissus, des couvertures ou tout autre matériau. De plus, évitez d'insérer des objets dans les
fentes du projecteur, car cela pourrait entraîner des courts-circuits ou des décharges électriques, susceptibles
d'endommager votre appareil.
Protection Contre Les Chocs Et Les Vibrations:
Manipulez votre projecteur avec soin, en le protégeant des chocs violents, des extrusions et des vibrations. Évitez
de déplacer le projecteur s'il rencontre des défauts de circuit interne.
Entretien Des Lentilles:
L'objectif du projecteur est un composant crucial qui a un impact direct sur la dénition et la qualité de l'image.
Assurez-vous de garder l'objectif propre de la poussière excessive. Lors du nettoyage, utilisez un chiffon doux en
coton adapté aux lentilles en verre. Évitez d'utiliser des chiffons durs ou des abrasifs, car ils peuvent endommager
la surface de la lentille.

FR 64
LISTE DES FORFAITS
Projecteur WiMiUS S27 * 1 Câble HDMI * 1 Couvercle d'objectif * 1
Télécommande * 1 Manuel d'utilisation * 1 Câble d'alimentation * 1

FR65
Numéro de Modèle: S27
Technologie d'afchage
LCD
Source de lumière
LED
Taille du produit
8.11X3.62X4.63 inch
Poids du produit
0.586kg
Fréquence de
rafraîchissement
60HZ
Tension d'alimentation
AC100-240V
Résolution Native
1280*720P
Résolution Maximale
1920*1080P decoding
Correction Trapézoïdale
Auto/Manuel
Mise Au Point
Manuel
Mode d'Operation
Télécommande
Ratio d'Aspect
4:3/16:9
Port de Sortie
Sortie audio 3,5mm
Port d'Entrée
HDMI*1/USB*1
Format Vidéo
MP4/MPG/AVI/MPEG-4/TS/MOV/M4V/MKV/FLV/DAT/3GP
(La prise en charge des codecs vidéo
peut varier selon les circonstances, contactez notre SAV pour une assistance supplémentaire)
Format Audio
MP3/WMA/ACC/AMR/APE/FLAC/MP2
(Les codecs audio Dolby ne sont pas pris en charge)
Format d'image
JPEG/BMP/PNG/GIF
Format des documents
TXT
SPÉCIFICATIONS DU PROJECTEUR
FR 66
APERÇU DU PROJECTEUR
①
Entrée de puissance
②
Récepteur de signal infrarouge
③
Port USB
④
Sortie audio 3,5mm
⑤
Évent
⑥
Bouton d'alimentation
⑦
Port HDMI
⑧
Mise au point manuelle ±
⑨
Port de dépoussiérage
⑩
Trou de Montage 1/4"
➀
➁
➂
➃
➄
➅
➆
⑨
⑩
➇
FR67
TÉLÉCOMMANDE
➀
➁
➂
➃
➄
➅
⑧
⑩
➆
➈
①
Puissance on/off
②
Menu
③
Source du signal d'entrée
④
Touche échée
⑤
OK
Note:
1. Installez 2 piles AAA (non incluses) dans la télécommande avant de
l'utiliser, ne combinez pas de nouvelles piles avec des anciennes dans
la télécommande, ce qui peut entraîner une panne de fonctionnement
en raison d'une alimentation électrique insufsante.
2. Lorsque vous utilisez la télécommande, assurez-vous que vous
dirigez l'émetteur de signal de la télécommande vers le récepteur de
signal infrarouge sur le projecteur, ou faites simplement face à l'écran
de projection tout en l'utilisant.
3. Lorsque vous n'utilisez pas la télécommande pendant une longue
période. Veuillez retirer les piles pour éviter qu'elles ne fuient.
⑥
Page d'accueil
⑦
Retourner
⑧
Volume -
⑨
Volume +
⑩
Muet

FR 68
1. Le projecteur peut être placé sur le bureau stable ou monté au plafond pour projeter l'image en fonction de
l'environnement d'exploitation et des exigences.
2. Maintenez le projecteur à une hauteur où son objectif est à symétrie axiale par rapport à l'écran. Si ce n'est pas
possible, utilisez la fonction de correction trapézoïdale pour ajuster l'image projetée.
INSTALLATION
1.Méthode d'Installation
Support De Table De Projection Avant
Support de Plafond Pour Projection Frontale
Support De Table De Projection Arrière
Support de Plafond Pour Rétroprojection

FR69
2.Distance Et Taille De Projection
Ratio d'aspect: 16:9
Distance Taille de l'image
1.1m 40’’
2.2m 80’’
3.3m 120’’
4.1m 150’’
5.4m 200’’
Note:
*La taille de l'image de la projection dépend de la distance entre le projecteur et l'écran. Il peut y avoir une légère
variation de dans les mesures parmi les données énumérées ci-dessus.
*La distance de projection recommandée est de 2-3 m.
*Un environnement ambiant plus sombre améliorera la clarté des images projetées.

FR 70
DÉMARRER LE PROJECTEUR
RÉGLAGE DE LA MISE AU POINT DE L'IMAGE
Allumez le projecteur:
Connectez le câble d'alimentation, lorsque le voyant rouge est allumé, appuyez sur la touche
d'alimentation de la télécommande ou sur le bouton d'alimentation du panneau pour démarrer le projecteur,
l'indicateur passe du rouge au bleu, le projecteur est allumé.
Éteignez le projecteur:
Appuyez sur la touche d'alimentation de la télécommande ou sur le bouton d'alimentation
du panneau pour éteindre le projecteur, l'indicateur passe du bleu au rouge, le projecteur est éteint.
Placez l'objectif du projecteur perpendiculairement à l'écran de projection ou
au mur-rideau et réglez le rouleau de réglage de la mise au point jusqu'à ce
que l'image soit claire.
Remarque:
Si c'est encore ou, essayez d'ajuster la distance de projection et
le placement du projecteur.
Mise au point manuelle

FR71
CONFIGURATION DU PROJECTEUR
La page d'accueil du projecteur est la suivante.
1.Paramètre WiFi
1. La uidité de la duplication d'écran avec une connexion sans l sera affectée par l'environnement réseau. Une
bande passante de 100 Mbit ou plus est recommandée lors de l'utilisation de la duplication d'écran.
2. Assurez-vous que votre appareil mobile est proche du projecteur lors de l'utilisation de la connexion sans l. Une
distance inférieure à 1 mètre est recommandée.
3. Certains appareils mobiles peuvent ne pas prendre en charge la duplication d'écran en raison de la compatibilité.

FR 72
2.Connexion Sans Fil
2.1 Pour iOS Cast (Airplay)
Attention:
Assurez-vous que votre appareil iOS est connecté au même réseau WiFi que votre projecteur.
1.Connectez le projecteur S27 à votre réseau WiFi
2.Retour à la page d'accueil -- Sélectionnez le menu
[Wireless Screen]
-- Restez sur cette interface
3. Accédez au [Centre de contrôle ] sur votre appareil iOS -- Sélectionnez la fonction [ Screen Mirroring ] --
Sélectionnez et connectez le récepteur iOS Cast nommé
[ WiMiUS-S27-Projector ]
-- L'écran de l'appareil iOS sera
mis en miroir et afché sur l'écran de projection.
FR73
2.2 Pour Système Android(Miracast)
Méthodes De Mise En Miroir d'Écran:
Les appareils Android de différentes marques peuvent utiliser divers termes
et méthodes pour activer la mise en miroir d'écran. Pour trouver les étapes exactes pour votre appareil, veuillez
vous référer au manuel de votre appareil. Les termes courants pour la mise en miroir d'écran incluent multi-écran,
afchage sans l, afchage WLAN, mise en miroir d'écran et Smart View.
Compatibilité De l'Appareil:
Veuillez noter que tous les téléphones Android ne prennent pas en charge la fonction
de mise en miroir de l'écran. Avant d'essayer d'utiliser la duplication d'écran, assurez-vous que votre appareil
Android prend en charge cette fonctionnalité. Vous pouvez consulter le manuel de votre appareil ou rechercher
l'option de mise en miroir d'écran dans les paramètres pour vérier la compatibilité.
1.Assurez-vous d'activer la fonction WLAN sur votre appareil
Android. (Il n'est pas nécessaire de se connecter à un
réseau Wi-Fi.)
2.Retour à la page d'accueil -- Sélectionnez le menu
[Wireless Screen]
-- Restez sur cette interface
3. Accédez au [ Centre de contrôle ] sur votre appareil
Android, sélectionnez [ Screen Mirroring/ Smart View ]
4.Sélectionnez et connectez le récepteur Miracast nommé
[WiMiUS-S27-Projector]
5. Une fois connecté avec succès, l'écran de votre appareil
Android sera mis en miroir et affiché sur l'écran de
projection.

FR 74
1. Installez d'abord l'application Elfcast en scannant le code QR fourni.
2.Conrmez pour ouvrir Elfcast dans la fenêtre contextuelle de votre appareil.
3.Saisissez le mot de passe de votre appareil si vous y êtes invité, pour authentier la connexion.
4.Votre appareil Android sera automatiquement connecté au même écran.
1.Connectez votre iPhone à un projecteur à l'aide du câble
de chargement iPhone d'origine (USB vers Lightning)
2.Cliquez sur «
Faire Confiance
» lorsqu'une fenêtre
contextuelle apparaît sur votre appareil.
3.Saisissez le mot de passe de votre appareil si vous y
êtes invité, pour authentier la connexion.
3.Écran Filaire
3.1 Connexion Android Par Câbles
3.2 Connexion iOS Par Câbles
FR75
1. Allumez votre haut-parleur Bluetooth.
2. Allumez le [Bluetooth] de votre projecteur et sélectionnez votre haut-parleur Bluetooth pour vous connecter.
Note:
1) Le projecteur S27 est compatible avec la plupart des casques Bluetooth, haut-parleurs Bluetooth et Airpods.
Cependant, veuillez noter qu'il n'est pas compatible avec les claviers Bluetooth ou les téléphones Bluetooth.
2)
Si vous ne rencontrez aucun son lors de la lecture de vidéos, nous vous recommandons de vérier les
paramètres de son Dolby sur vos appareils connectés.
La désactivation du son Dolby peut assurer une
meilleure compatibilité audio avec le projecteur.
3)Certaines enceintes Bluetooth peuvent subir une
réduction significative du volume lorsqu'elles sont
connectées au projecteur. Pour résoudre ce problème,
essayez d'augmenter le volume sur tous les appareils
concernés pour atteindre le niveau sonore souhaité.
4)Si vous avez des questions ou avez besoin d'aide
supplémentaire, n'hésitez pas à contacter le support WiMiUS
par e-mail à
.
4.Bluetooth
Connectez Des Haut-Parleurs Bluetooth
FR 76
1) Insérez le disque ash USB dans le port USB du projecteur.
2)Sélectionnez «Média» et appuyez sur la touche «OK» pour entrer
3) Selon le type de chier, sélectionnez l'option [Film/Musique/Photo/TXT]
4)Sélectionnez le chier souhaité, puis appuyez sur le bouton [OK] pour le lire.
5)Cliquez sur le bouton "MENU" de la télécommande pendant la lecture de la vidéo pour régler directement les
paramètres de l'image.
5.Lecture Multimédia
5.1 Mode d'Entrée De Disque USB

FR77
Conseils:
Si votre projecteur ne peut pas reconnaître le disque USB, veuillez suivre les méthodes ci-dessous pour
résoudre le problème.
Veuillez vous assurer que votre disque USB respecte les formats suivants:
FAT32: 8GB/16GB/32GB
NTFS: 64GB-2TB
S'il ne répond pas à ces critères, vous devrez changer un disque USB au format pris en charge.
Si le problème persiste, veuillez envoyer une description détaillée de votre problème à l'adresse e-mail suivante:
5.2 Interface De Lecture Vidéo

FR 78
Manuel Fonction
FB Appuyez longuement pour reculer rapidement la vidéo
FF Appuyez longuement pour faire avancer rapidement la vidéo
Précédent Passer à la vidéo précédente
Next Passer à la vidéo suivante
Stop Arrêtez de jouer et quittez
Round Cycle de liste ou cycle unique
Info Détails de la vidéo
List Sélectionner toutes les listes de lecture dans le dossier actuel
16:9 Rapport d'aspect: Auto/4:3/16:9

FR79
RÉGLAGE DU PROJECTEUR
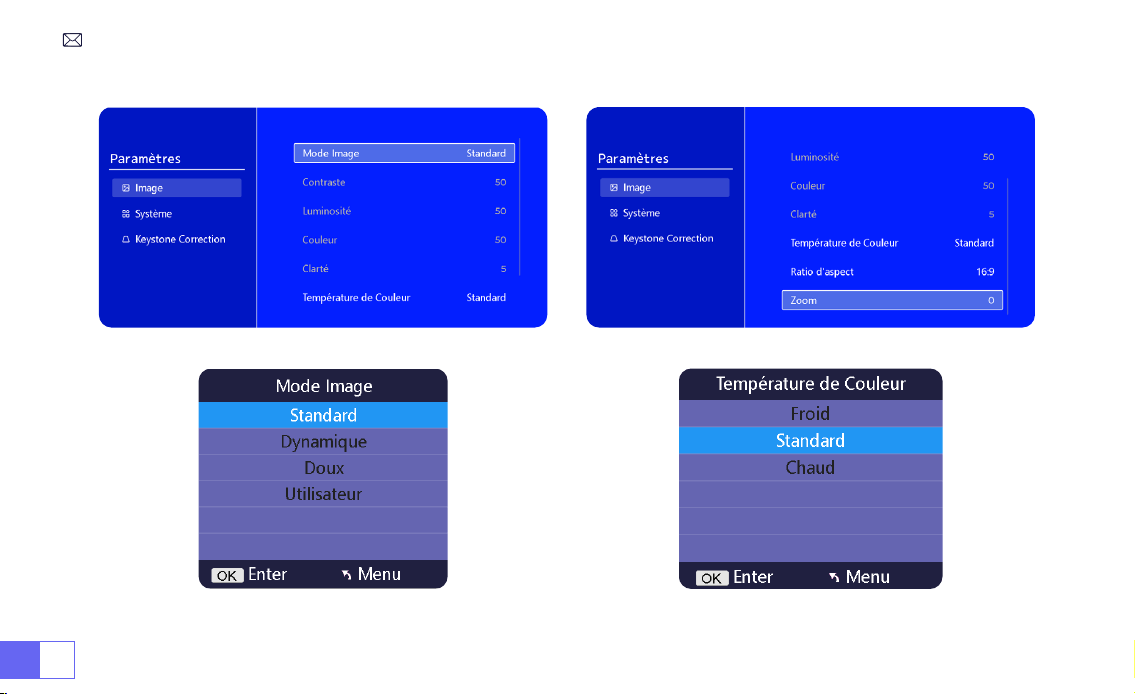
1.Paramètres d'Image
Menu Contenu Fonction
Mode Image Standard/Dynamique/Doux/Utilisateur
Ajuster le contraste/la luminosité/la couleur/la
netteté
Température de
Couleur
Froid/Normal/Chaud Ajuster la température de couleur
Ratio d'Aspect 4:3/16:9 Ajuster le format de l'écran
Zoom 100%-85% Réduire la taille de l'image
FR81
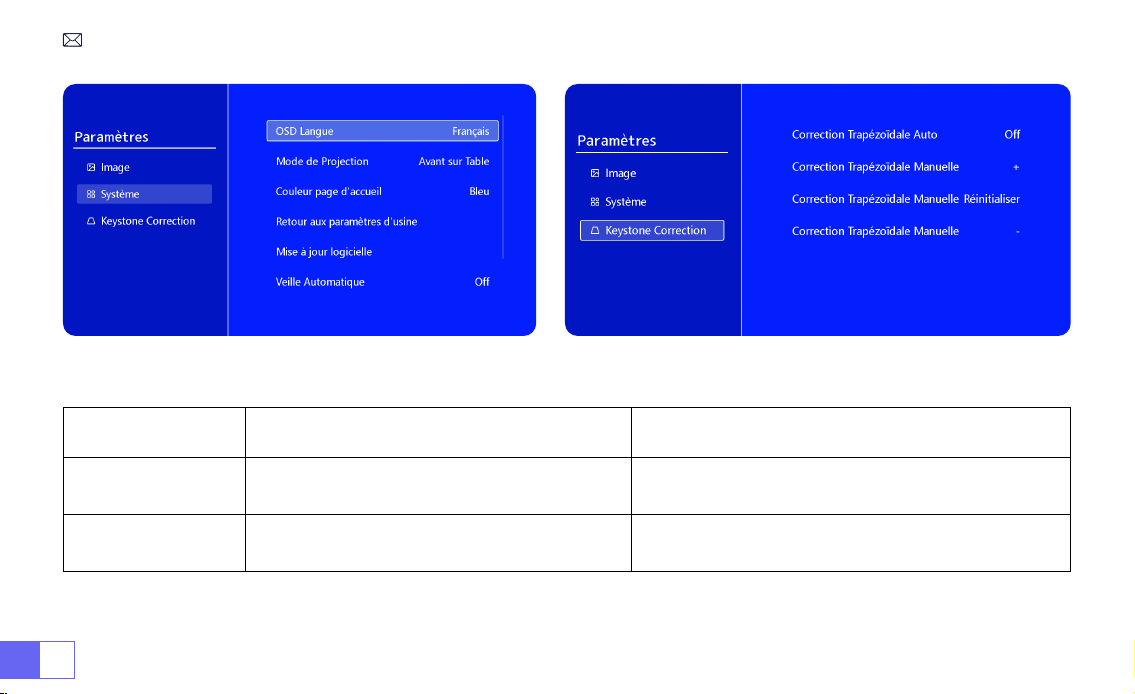
2.Paramètres Système
Menu Contenu Fonction
Langue OSD
English/Français/Italian/Espanol/Deutsche/
Japanese
Choisissez une langue
Mode de Projection
Avant/Arrière au Plafond, Avant/Arrière sur
Table
Inverser la direction de l'image projetée
Couleur de la page
d'accueil
Bleu/Bleu foncé/Gris Changer la couleur de la page d'accueil
Retour aux
paramètres d'usine
Réinitialiser Restaurer les paramètres d'usine par défaut
Mise à jour logicielle Mise à jour locale (USB) Mettre à jour le logiciel via un chier local ou en ligne
Mise à jour en ligne Mise à jour OTA (en ligne)
Mettre à jour le logiciel en ligne
Remarque: Veuillez NE PAS débrancher le projecteur pendant le
processus de mise à jour.
Veille Auto Off/10m/20m/30m/60m/90m/120m/180m Dénir le temps de sommeil
Minuterie OSD Arrêt/5s/10s/15s/20s/25s/30s Dénir l'heure de retour à la page d'accueil
Info sur la version Version de logiciel Version de logiciel
FR 82
Menu Contenu Fonction
Keystone Auto
On/off
Ajustez automatiquement l'angle de l'écran
verticalement ± 30 °
Keystone Manuel +/-/Réinitialiser
Ajustez manuellement l'angle de l'écran
verticalement
3.Keystone

FR83
CONNEXION DES LIGNES DE SIGNAL
Le projecteur WiMiUS S27 dispose de 3 interfaces, port HDMI* 1/port
USB* 1/sortie casque 3,5 mm* 1. Veuillez sélectionner le bon port de
connexion pour connecter votre appareil (PC, téléphone, lecteur
DVD, USB, PS4, etc.)
1) Insérez le disque ash USB dans le port USB du projecteur.
2) Sélectionnez "Médias" et appuyez sur la touche "OK" pour entrer.
3) Selon le type de fichier, sélectionnez l'option [Film/Musique/
Photo/TXT]
4)Sélectionnez le chier souhaité, puis appuyez sur le bouton [OK]
pour le lire.
1) Connectez votre clé Fire TV (ou PC, XBOX, PS4, etc.) au port HDMI
du projecteur.
2) Accédez à la page d'accueil pour sélectionner le HDMI
correspondant comme source de signal.
1.Connexion Avec Disque USB
2.Connexion Avec Appareils Via Port HDMI
FR 84
• Utilisez le câble audio 3,5 mm pour vous connecter au haut-parleur.
• Allumez le projecteur et le haut-parleur (choisissez le mode AUX).
1) Allumez votre lecteur DVD et le projecteur.
2) Connectez-vous au lecteur DVD et au projecteur avec le câble HDMI.
3) Accédez à la page d'accueil pour sélectionner le HDMI correspondant comme source de signal.
Remarque:
Lorsque le projecteur est connecté au lecteur DVD via le câble HDMI, s'il n'y a pas de son, il se peut que
le signal de sortie du port HDMI du lecteur DVD ne soit pas compatible avec HDCP, veuillez essayer de connecter
votre haut-parleur.
3.Connexion Avec Haut-Parleur
4.Connexion Avec Lecteur DVD
Audio
out
AUX
port
FR85
1) Connectez-vous à l'ordinateur et au projecteur S27 avec le câble HDMI.
2) Sélectionnez la source HDMI pour projeter n'importe quel chier sur votre ordinateur;
3) Sur votre ordinateur portable, maintenez enfoncées les touches de la carte "Win + P" pour changer votre mode
d'afchage.
1)
Ordinateur uniquement:
Il s'agit de l'option par défaut et n'afchera l'écran que sur le moniteur principal.
2)
Dupliquer:
Pour dupliquer votre bureau sur tous les moniteurs connectés.
3)
Étendre:
Pour étendre votre bureau sur plusieurs moniteurs.
REMARQUE:
Pour MacBook, utilisez un adaptateur Type-C vers HDMI pour connecter votre MacBook ou un
adaptateur Mini Display vers HDMI pour vous connecter à votre MacBook Air (adaptateur non inclus).
5.Connexion Avec l'Ordinateur
FR 86
4)
Projecteur uniquement:
Utilisez uniquement le moniteur secondaire (projecteur) et éteignez le moniteur principal.
Pour modier la résolution de l'écran en mode Projecteur uniquement, procédez comme suit:
Étape: Démarrer> Panneau de conguration> Apparence et personnalisation> Ajuster la résolution de l'écran

FR87
FAQ
Merci d'avoir choisi le projecteur
WiMiUS S27
. Nous avons compilé quelques questions fréquemment posées et
leurs réponses correspondantes pour mieux vous aider :
Q1 : Il y a un
point noir sur l'image
projetée. Comment puis-je l'effacer ?
R: Tapotez doucement le projecteur ou soufflez de l'air à l'intérieur avec un sèche-cheveux. Ouvrez
soigneusement le port latéral de nettoyage de la poussière du projecteur. Essuyez l'écran intérieur avec un coton-
tige propre, si nécessaire, trempez-le dans de l'alcool pour un meilleur nettoyage. Soyez prudent pour éviter de
causer des dommages. Pour plus d'aide, envoyez-nous un e-mail à
.
Q2:La mise en miroir de l'écran ou la connexion
WiFi est instable
. Comment puis-je résoudre ce problème?
R: La mise en miroir d'écran nécessite un signal WiFi sans l puissant, assurez-vous que votre réseau domestique
fonctionne bien. La résolution vidéo s'ajustera dynamiquement en fonction de la force de votre signal Wi-Fi. De
plus, activez le point d'accès de votre téléphone et connectez-vous au S27 pour identier si le problème vient du
réseau domestique. Si le problème persiste, veuillez nous contacter à
pour obtenir de
l'aide.
Q3: Lors de la mise en miroir de l'écran, le projecteur
ne peut pas lire les vidéos Netix, Youtube, Hulu ou Disney
,
etc. Pourquoi?
R : En raison de restrictions de droits d'auteur, la plupart des projecteurs ne prennent pas en charge la mise en
miroir sans l des services de streaming tels que Netix, Hulu et Disney. Pour proter de ces services,
nous vous
recommandons de le connecter avec un TV Stick (non inclus)
.
Q4 : Pourquoi
l'image est-il à l'envers
et comment puis-je ajuster l'image projetée ?

FR 88
R: Veuillez accéder à Paramètres -->
Mode de projection --> pour inverser la direction de l'image
. Placez
l'objectif du projecteur perpendiculairement à l'écran de projection ou au mur-rideau. Ajustez la mise au point
à l'aide de la molette de réglage de la mise au point jusqu'à ce que l'image devienne claire. Pour les réglages
du rectangle d'image, accédez aux paramètres d'image et activez la correction automatique du trapèze ou les
fonctions de trapèze manuel.
Q5 : Le projecteur afche
l'image mais n'émet aucun son
. Quelle pourrait être la raison?
R : 1) Le projecteur
ne prend pas en charge le son Dolby
, DTS, 5.1 canaux, HDMI CEC, ARC. Assurez-vous de
désactiver tous les paramètres Dolby sur vos appareils connectés.
2) Vériez que le volume du projecteur et celui de tous les appareils externes ou haut-parleurs Bluetooth sont
réglés à un niveau adéquat.
3) Essayez de lire différentes vidéos en utilisant d'autres haut-parleurs. Certaines versions de haut-parleurs
Bluetooth peuvent ne pas fonctionner correctement avec le projecteur.
Si vous rencontrez des problèmes, veuillez fournir les détails suivants dans votre e-mail: code du pays, numéro
de commande, modèle et une brève description du problème (par exemple, FR+ID de commande+S27+Pas de
son) et envoyez-nous un e-mail à
. Rassurez-vous, notre équipe dédiée vous répondra
rapidement dans les 24 heures avec une solution rapide et efcace pour répondre à vos préoccupations.

ES89
TABLA DE CONTENIDO
SOPORTE PROFESIONAL WIMIUS 7D/24H - - - - - - - - - - - - - - - 91
CONSEJOS - - - - - - - - - - - - - - - - - - - - - - - - - - 92
LISTA DE PAQUETES - - - - - - - - - - - - - - - - - - - - - - - 93
ESPECIFICACIONES DEL PROYECTOR - - - - - - - - - - - - - - - - - 94
DESCRIPCIÓN GENERAL DEL PROYECTOR - - - - - - - - - - - - - - - 95
MANDO A DISTANCIA - - - - - - - - - - - - - - - - - - - - - - 96
INSTALACIÓN- - - - - - - - - - - - - - - - - - - - - - - - - - 97
1.Método de Instalación - - - - - - - - - - - - - - - - - - - - - - - 97
2.Distancia y Tamaño de Proyección - - - - - - - - - - - - - - - - - - 98
PROYECTOR DE INICIO - - - - - - - - - - - - - - - - - - - - - - 99
AJUSTE DEL ENFOQUE DE LA IMAGEN- - - - - - - - - - - - - - - - - 99
CONFIGURACIÓN DEL PROYECTOR - - - - - - - - - - - - - - - - - 100
1.Conguración WiFi- - - - - - - - - - - - - - - - - - - - - - - - - 100

ES 90
2.Conexión Inalámbrica - - - - - - - - - - - - - - - - - - - - - - - 101
3.Pantalla Con Cable - - - - - - - - - - - - - - - - - - - - - - - - 103
4.Bluetooth - - - - - - - - - - - - - - - - - - - - - - - - - - - - 104
5.Reproducción Multimedia- - - - - - - - - - - - - - - - - - - - - - 105
CONFIGURACIÓN DEL PROYECTOR - - - - - - - - - - - - - - - - - 108
1.Conguración de imagen - - - - - - - - - - - - - - - - - - - - - - 108
2.Conguración Del Sistema - - - - - - - - - - - - - - - - - - - - - 110
3.Keystone - - - - - - - - - - - - - - - - - - - - - - - - - - - - 111
CONEXIÓN DE LÍNEAS DE SEÑAL- - - - - - - - - - - - - - - - - - - 112
1.Conectar A Través De Disco USB - - - - - - - - - - - - - - - - - - - 112
2.Conéctese A Dispositivos A Través Del Puerto HDMI - - - - - - - - - - - 112
3.Conectar Al Altavoz - - - - - - - - - - - - - - - - - - - - - - - - 113
4.Conectar Al Reproductor de DVD- - - - - - - - - - - - - - - - - - - 113
5.Conectar A La Computadora - - - - - - - - - - - - - - - - - - - - 114
Preguntas Más Frecuentes - - - - - - - - - - - - - - - - - - - - 116

ES91
SOPORTE PROFESIONAL WIMIUS 7D/24H
Querido cliente valioso,
¡Muchas gracias por apoyar a WiMiUS!
Antes de comenzar a utilizar el proyector, le rogamos que lea detenidamente este manual. Si tiene algún
problema, incluya los siguientes detalles en su correo electrónico: código de país, número de pedido, modelo y
una breve descripción del problema (por ejemplo, ES+000-0000000-0000000+S27+Sin sonido) a
support01@
wimius.com
. Tenga la seguridad de que nuestro equipo responderá de inmediato dentro de las 24 horas con
una solución rápida y efectiva.
Es esencial mencionar que muchos problemas comunes se pueden resolver fácilmente mediante ajustes
simples, como problemas con la señal, el sonido, las conexiones Bluetooth o WiFi, los puntos oscuros o las
animaciones entrecortadas. Para garantizar la máxima satisfacción, queremos asegurarle que todos nuestros
proyectores se someten a un riguroso control de calidad al 100 % y a un embalaje minucioso antes del envío.
Si tiene alguna pregunta, comuníquese con nosotros para que podamos resolver el problema. Y danos la
oportunidad de mejorar. Estamos comprometidos a brindarle una solución satisfactoria para cualquier desafío
que pueda encontrar.
Saludo,
Equipo de servicio de WiMiUS

ES 92
CONSEJOS
Consideraciones de Temperatura:
Para garantizar la longevidad de su proyector, evite colocarlo en ambientes excesivamente cálidos o fríos. Las
temperaturas extremas pueden acortar la vida útil del dispositivo. Para un rendimiento óptimo, mantenga un
entorno de trabajo entre 5°C y 35°C.
Tratar los puntos negros en la pantalla de proyección:
Golpee suavemente el proyector o sople aire en el interior con un secador de pelo. Abra con cuidado el puerto
lateral de limpieza de polvo del proyector. Limpie la pantalla interior con un bastoncillo de algodón limpio; si es
necesario, sumérjalo en alcohol para una mejor limpieza. Tenga cuidado para evitar causar daños. Para obtener
más ayuda, envíenos un correo electrónico a
Ventilación Adecuada:
El proyector está equipado con un sistema de ventilación para garantizar un funcionamiento estable. Evite
cubrir las rejillas de ventilación con telas, mantas o cualquier otro material. Además, evite insertar objetos en las
ranuras del proyector, ya que esto puede provocar cortocircuitos o descargas eléctricas, lo que podría causar
daños a su dispositivo.
Protección Contra Impactos y Vibraciones:
Maneje su proyector con cuidado, protegiéndolo de fuertes impactos, extrusiones y vibraciones. Evite mover el
proyector si experimenta fallas en el circuito interno.
Mantenimiento de Lentes:
La lente del proyector es un componente crucial que afecta directamente la denición y la calidad de la imagen.
Asegúrese de mantener la lente limpia del exceso de polvo. Al limpiar, use un paño de algodón suave adecuado
para lentes de vidrio. Evite el uso de paños duros o abrasivos, ya que pueden dañar la supercie de la lente.
ES93
LISTA DE PAQUETES
Proyector WiMiUS S27 * 1 Cable HDMI * 1 Cubierta de Lente * 1
Mando a Distancia * 1 Manual de Usuario * 1 Cable de Alimentación * 1

ES 94
Número de Modelo: S27
Tecnología de Visualización
LCD
Fuente de Luz
LED
Tamaño del Producto
8.11X3.62X4.63 inch
Peso del Producto
0.586kg
Frecuencia de Actualización
60HZ
Voltaje de Alimentación
AC100-240V
Resolucion Nativa
1280*720P
Resolución Máxima Admitida
Decodicación 1920*1080P
Corrección Trapezoidal
Auto/Manual
Enfocar
Manual
Modo de Operación
Control Remoto
Relación de Aspecto
4:3/16:9
Puerto de Salida
Salida de Audio de 3,5 mm
Puerto de Entrada
HDMI*1/USB*1
Formato de Video
MP4/MPG/AVI/MPEG-4/TS/MOV/M4V/MKV/FLV/DAT/3GP (La compatibilidad con los códecs de
video puede variar según las circunstancias)
Formato de Audio
MP3/WMA/ACC/AMR/APE/FLAC/MP2 (Los códecs de audio Dolby no son compatibles)
Formato de Imagen
JPEG/BMP/PNG/GIF
Formato del Documento
TXT
ESPECIFICACIONES DEL PROYECTOR

ES95
DESCRIPCIÓN GENERAL DEL PROYECTOR
①
Entrada de Alimentación
②
Receptor de Señal Infrarroja
③
Puerto USB
④
Salida de Audio de 3,5 mm
⑤
Respiradero
⑥
Botón de Encendido
⑦
Puerto HDMI
⑧
Enfoque Manual ±
⑨
Puerto de limpieza de polvo
⑩
Oricio de montaje de 1/4"
➀
➁
➂
➃
➄
➅
➆
⑨
⑩
➇

ES 96
MANDO A DISTANCIA
➀
➁
➂
➃
➄
➅
⑧
⑩
➆
➈
①
Encendido / Apagado
②
Menú
③
Fuente de Señal de Entrada
④
Tecla de Flecha
⑤
Conrmar Clave
Nota:
1.Instale 2 piezas de baterías AAA (no incluidas) en el control remoto
antes de usarlo, no combine baterías nuevas con las viejas en el
control remoto, lo que puede causar fallas en la operación debido a
una fuente de alimentación insuciente.
2.Cuando use el control remoto, asegúrese de apuntar el transmisor de
señal del control remoto al receptor de señal infrarroja del proyector, o
simplemente mire hacia la pantalla de proyección mientras lo opera.
3.Cuando no utilice el mando a distancia durante un período
prolongado. Saque las pilas para evitar que se derramen.
⑥
Inicio
⑦
Atrás
⑧
Volumen -
⑨
Volumen +
⑩
Silenciar

ES97
1. El proyector puede colocarse sobre un escritorio estable o montarse en el techo para proyectar la imagen según
el entorno operativo y los requisitos.
2. Mantenga el proyector a una altura donde su lente tenga simetría axial con respecto a la pantalla. Si esto no es
posible, utilice la función de corrección trapezoidal para ajustar la imagen de proyección.
INSTALACIÓN
1.Método de Instalación
Soporte de Mesa de Proyección Frontal
Montaje en techo para proyección frontal
Soporte de Mesa de Proyección Trasera
Montaje en techo para proyección trasera

ES 98
2.Distancia y Tamaño de Proyección
Relación de Aspecto: 16:9
Distancia Tamaño de Pantalla
1.1m 40’’
2.2m 80’’
3.3m 120’’
4.1m 150’’
5.4m 200’’
*El tamaño de la imagen de la proyección depende de la distancia entre el proyector y la pantalla. Puede haber
una ligera variación del 3% en las medidas entre los datos enumerados anteriormente.
*La distancia de proyección recomendada es de 2-3 m.
*Un entorno ambiental más oscuro mejorará la claridad de las imágenes proyectadas.

ES99
PROYECTOR DE INICIO
AJUSTE DEL ENFOQUE DE LA IMAGEN
Enciende el proyector:
Conéctese al cable de alimentación, cuando la luz indicadora roja esté encendida, presione
la tecla de encendido en el control remoto o el botón de encendido en el panel para encender el proyector, el
indicador cambia de rojo a azul, el proyector está encendido.
Apague el proyector:
Presione la tecla de encendido en el control remoto o el botón de encendido en el panel
para apagar el proyector, el indicador cambia de azul a rojo, el proyector está apagado.
Coloque la lente del proyector de forma perpendicular a la pantalla de
proyección o al muro cortina y ajuste el rodillo de ajuste de enfoque hasta
que la imagen sea clara.
Nota:
Si todavía está borroso, intente ajustar la distancia de proyección y la
ubicación del proyector.
Enfoque manual
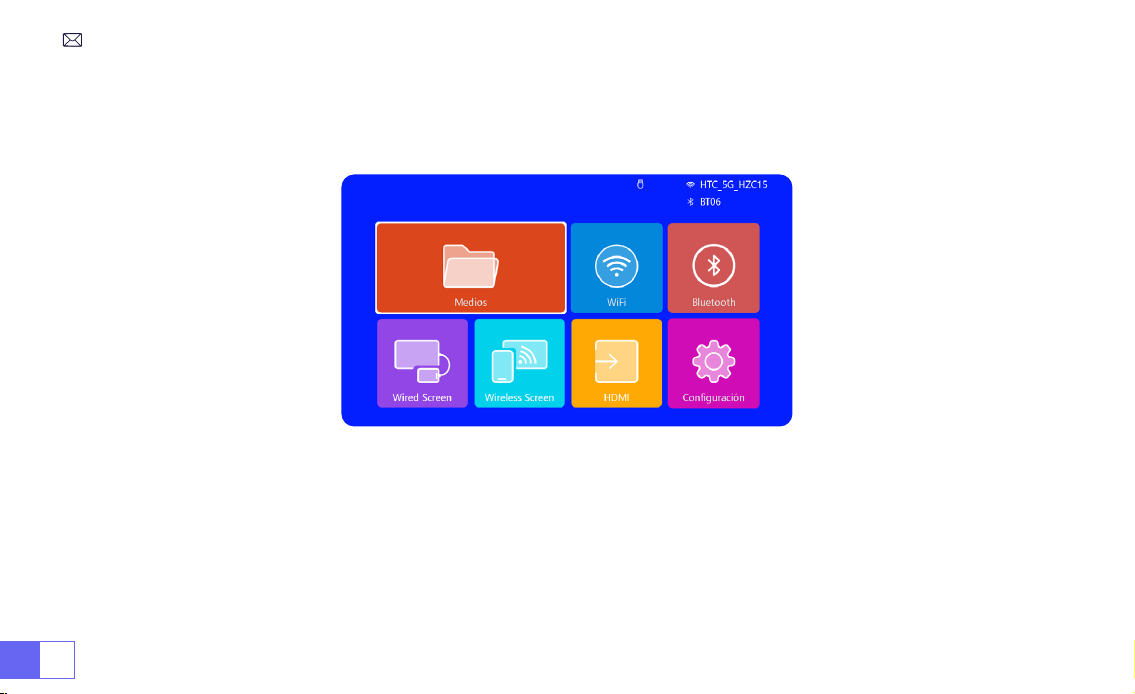
ES 100
CONFIGURACIÓN DEL PROYECTOR
La página de inicio del proyector es la siguiente.
1.Conguración WiFi
1. La uidez de la duplicación de pantalla con una conexión inalámbrica se verá afectada por el entorno de la red.
Se recomienda un ancho de banda de 100 Mbit o más cuando se utiliza la duplicación de pantalla.
2. Asegúrese de que su dispositivo móvil esté cerca del proyector cuando utilice una conexión inalámbrica. Se
recomienda una distancia de 1 metro.
3. Es posible que algunos dispositivos móviles no admitan la duplicación de pantalla debido a la compatibilidad.

ES101
2.Conexión Inalámbrica
2.1 Para iOS Cast (Airplay)
Atención:
Asegúrese de que su dispositivo iOS esté conectado a la misma red Wi-Fi que su proyector.
1.Conecta el proyector S27 a tu red WiFi
2.Volver a la página de inicio: seleccione el menú [Pantalla inalámbrica]: permanezca en esta interfaz
Acceda al [Centro de Control] en su dispositivo iOS -- Seleccione la función [Duplicación de Pantalla] --
Seleccione y conecte el receptor iOS Cast llamado [ WiMiUS-S27-Projector ] -- La pantalla del dispositivo iOS se
reejará y se mostrará en la pantalla de proyección.
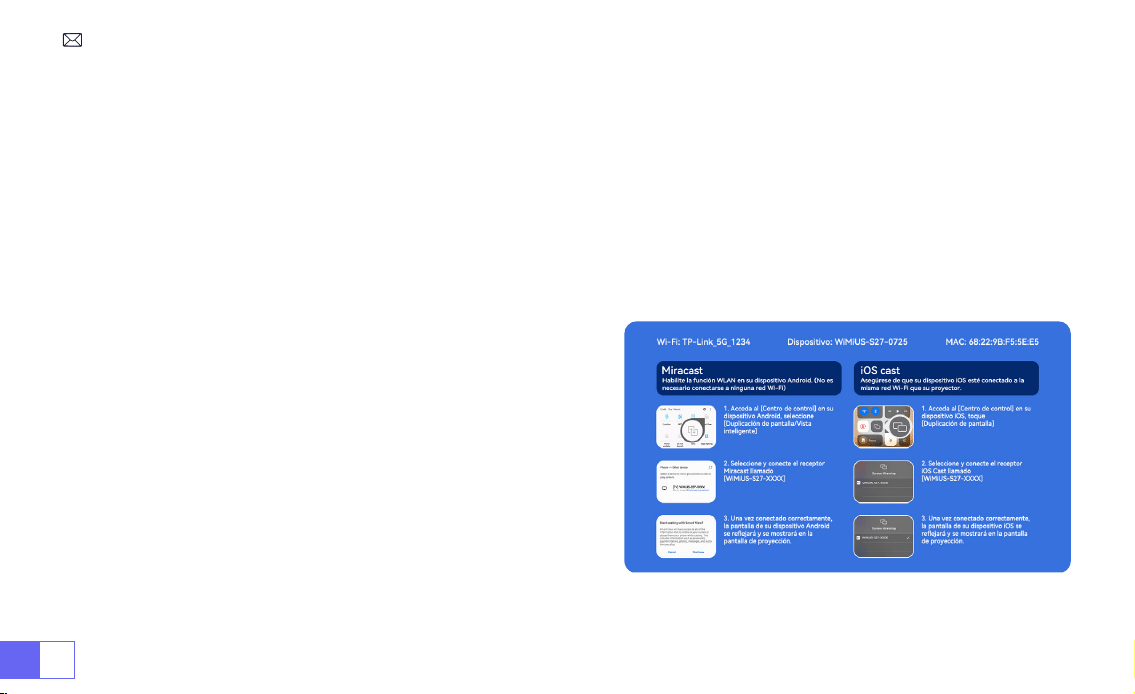
ES 102
2.2 Para Sistema Android (Miracast)
Métodos de Duplicación de Pantalla:
Los dispositivos Android de diferentes marcas pueden usar varios términos
y métodos para habilitar la duplicación de pantalla. Para encontrar los pasos exactos para su dispositivo, consulte
el manual de su dispositivo. Los términos comunes para la duplicación de pantalla incluyen Pantalla múltiple,
Pantalla inalámbrica, Pantalla WLAN, Duplicación de pantalla y Vista inteligente.
Compatibilidad del Dispositivo:
Tenga en cuenta que no todos los teléfonos Android admiten la función de
duplicación de pantalla. Antes de intentar usar la duplicación de pantalla, asegúrese de que su dispositivo Android
sea compatible con esta función. Puede consultar el manual de su dispositivo o buscar la opción de duplicación de
pantalla en la conguración para vericar la compatibilidad.
1.Asegúrese de habilitar la función WLAN en su dispositivo
Android. (No es necesario conectarse a ninguna red WiFi.)
2.Volver a la página de inicio-- Seleccione el menú
[Wireless Screen]
-- Permanecer en esta interfaz
3.Acceda al [Centro de Control] en su dispositivo Android,
seleccione [Duplicación de Pantalla/Vista Inteligente]
4.Seleccione y conecte el receptor Miracast llamado
[
WiMiUS-S27-Projector ]
5.Una vez conectado correctamente, la pantalla de su
dispositivo Android se reejará y se mostrará en la pantalla
de proyección.
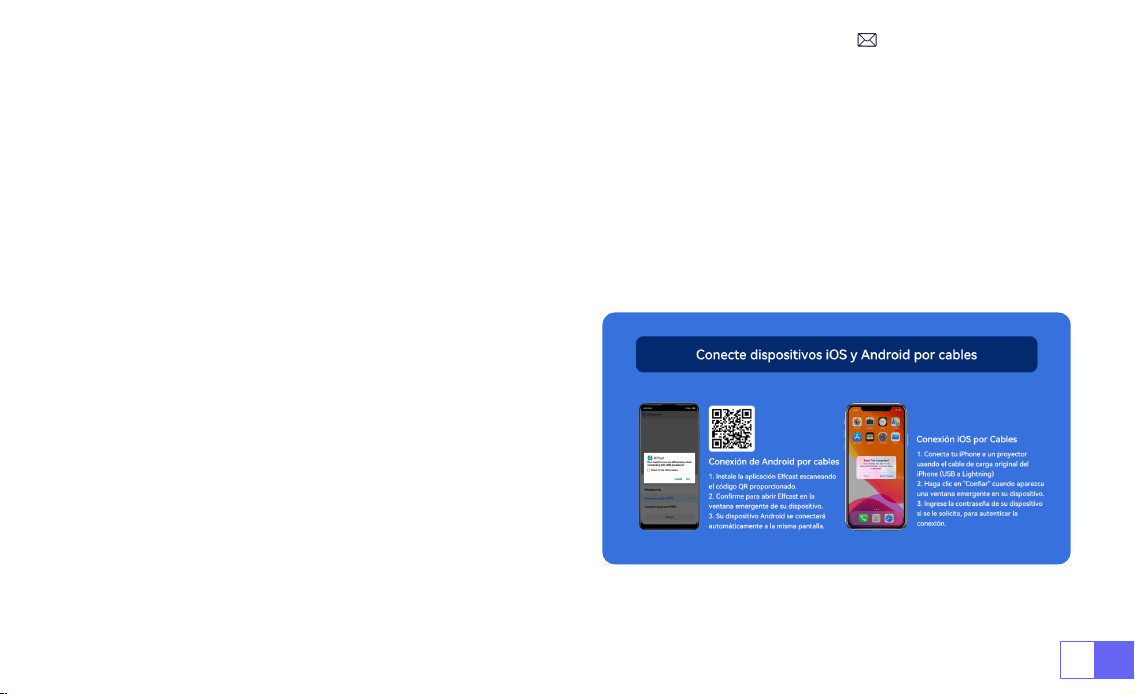
ES103
1.Instale primero la aplicación Elfcast escaneando el código QR proporcionado.
2.Conrme para abrir Elfcast en la ventana emergente de su dispositivo.
3.Ingrese la contraseña de su dispositivo si se le solicita, para autenticar la conexión.
4.Su dispositivo Android se conectará automáticamente a la misma pantalla.
1.Conecte su iPhone a un proyector usando el cable de
carga original del iPhone (USB a Lightning)
2.Haga clic en
"Conar"
cuando aparezca una ventana
emergente en su dispositivo.
3.Ingrese la contraseña de su dispositivo si se le solicita,
para autenticar la conexión.
3.Pantalla Con Cable
3.1 Conexión de Android Por Cables
3.2 Conexión de iOS Por Cables
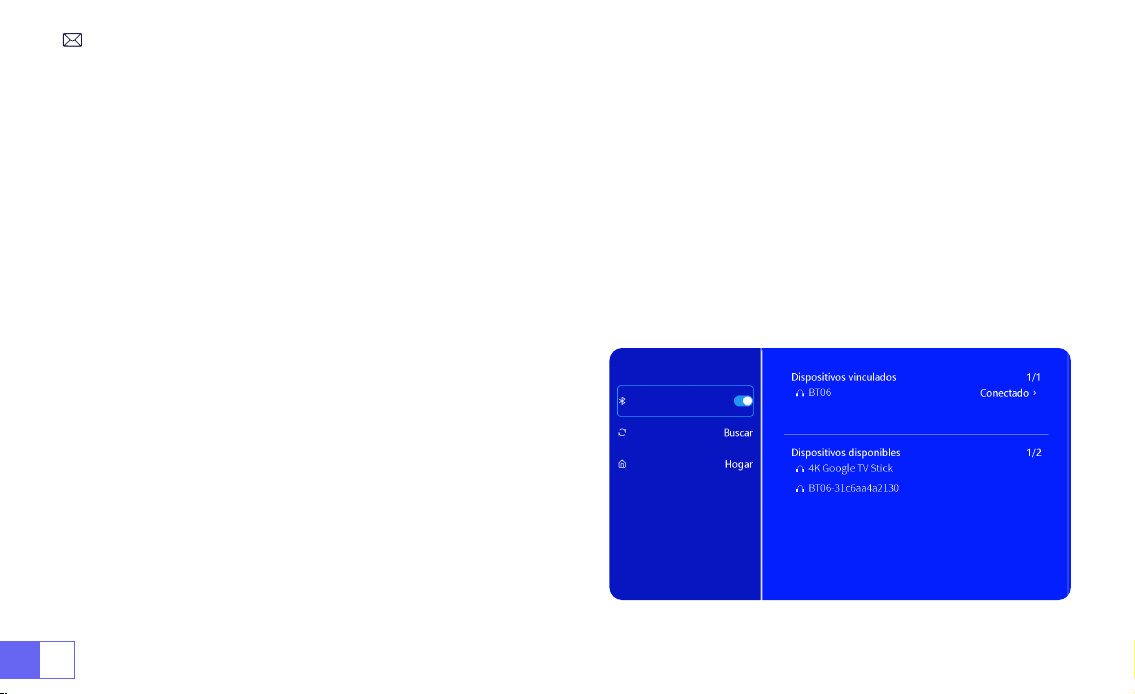
ES 104
1.Encienda su altavoz Bluetooth.
2.Encienda el [Bluetooth] de su proyector y seleccione su altavoz Bluetooth para conectarse.
Nota:
1)El proyector S27 es compatible con la mayoría de los auriculares Bluetooth, altavoces Bluetooth y Airpods. Sin
embargo, tenga en cuenta que no es compatible con teclados Bluetooth o teléfonos Bluetooth.
2)Si no encuentra sonido mientras reproduce videos, le recomendamos vericar la conguración de sonido Dolby
en sus dispositivos conectados. Desactivar el sonido Dolby
puede garantizar una mejor compatibilidad de audio con
el proyector.
3)Algunos altavoces Bluetooth pueden experimentar una
reducción signicativa en el volumen cuando se conectan
al proyector. Para solucionar este problema, intente
aumentar el volumen en todos los dispositivos relevantes
para lograr el nivel de sonido deseado.
4)Si tiene alguna pregunta o necesita más ayuda, no
dude en comunicarse con el soporte de WiMiUS por correo
electrónico a
.
4.Bluetooth
Conectar Altavoces Bluetooth

ES105
1)Inserte el disco ash USB en el puerto USB del proyector.
2)Seleccione "Medios" y presione la tecla "OK" para ingresar
3)Según el tipo de archivo, seleccione la opción [Película/Música/Foto/TXT]
4)Seleccione el archivo deseado y luego presione el botón [OK] para reproducirlo.
5)Haga clic en el botón "MENÚ" en el control remoto mientras reproduce un video para ajustar la conguración de
la imagen directamente.
5.Reproducción Multimedia
5.1 Modo de Entrada de Disco USB

ES 106
Consejos Cálidos:
Si su proyector no puede reconocer el disco USB, siga los métodos a continuación para resolver
el problema.
Asegúrese de que su disco USB cumpla con los siguientes formatos:
FAT32: 8GB/16GB/32GB
NTFS: 64GB-2TB
Si no cumple con estos criterios, deberá cambiar un disco USB de formato compatible.
Si el problema persiste, envíe una descripción detallada de su problema a la siguiente dirección de correo
electrónico:
5.2 Interfaz de Reproducción de Vídeo
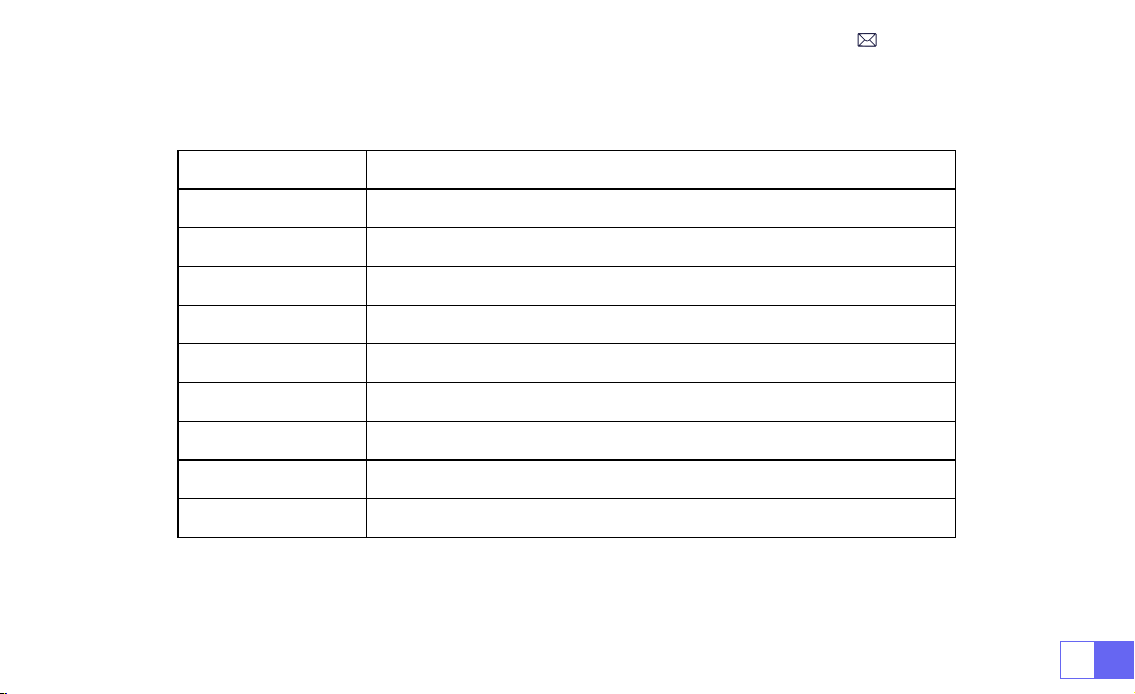
ES107
Manual Función
FB Mantenga presionado para retroceder rápidamente el video
FF Mantenga presionado para avanzar rápidamente el video
Anterior Cambiar al video anterior
Próximo Cambiar al siguiente vídeo
Detener Deja de jugar y sal
Redondo Ciclo de lista o ciclo único
Información Detalles del vídeo
Lista Seleccionar todas las listas de reproducción en la carpeta actual
16:9 Relación de Aspecto: Automático/4:3/16:9

ES 108
CONFIGURACIÓN DEL PROYECTOR
1.Conguración de imagen
Menú Contenido Función
Modo de Imagen Estándar/Dinámica/Leve/Usuario Ajuste el contraste / brillo / color / nitidez
Temperatura del
Color
Frío/Estándar/Caliente Ajustar la temperatura de color
Relación de
Aspecto
4:3/16:9 Ajustar la relación de aspecto de la pantalla
Zoom 100%-85% Reducir el tamaño de la imagen

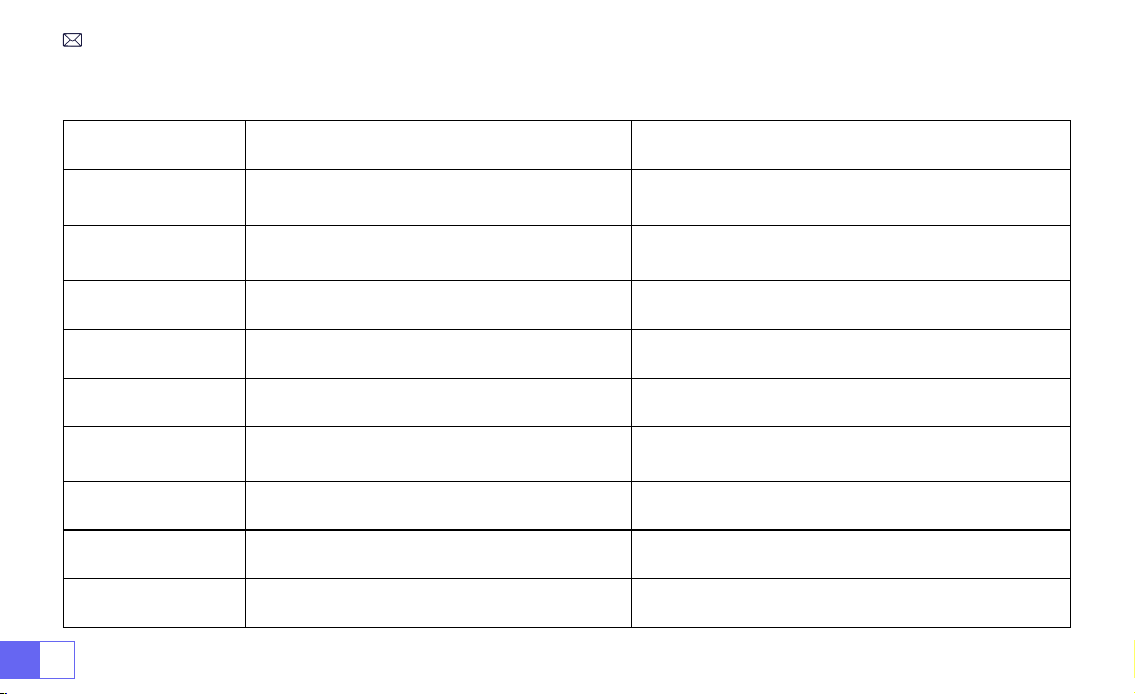
ES 110
2.Conguración Del Sistema
Menú Contenido Función
Idioma OSD
Inglés/Français/Italiano/Español/Deutsche/
Japonés
Elige un idioma
Modo de Proyección
Frente/Reverso En El Techo, Frente/Reverso En
La Mesa
Voltear la dirección de la imagen de proyección
Color de La Página
de Inicio
Azul/Azul oscuro/Gris Cambiar el color de la página de inicio
Restablecimiento de
Fábrica
Reiniciar Restaurar la conguración predeterminada de fábrica
Actualización de
Software
Actualización local (USB)
Actualice el software a través de un archivo local o en
línea
Actualización en
línea
Actualización OTA (en línea)
Actualice el software a través de en línea
Nota: NO desenchufe el proyector durante el proceso de
actualización.
Suspensión
Automática
Off/10m/20m/30m/60m/90m/120m/180m Establecer el tiempo de sueño
Temporizador OSD Apagado/5s/10s/15s/20s/25s/30s Establecer el tiempo para volver a la página de inicio
Información de La
Versión
Versión del software Versión del software
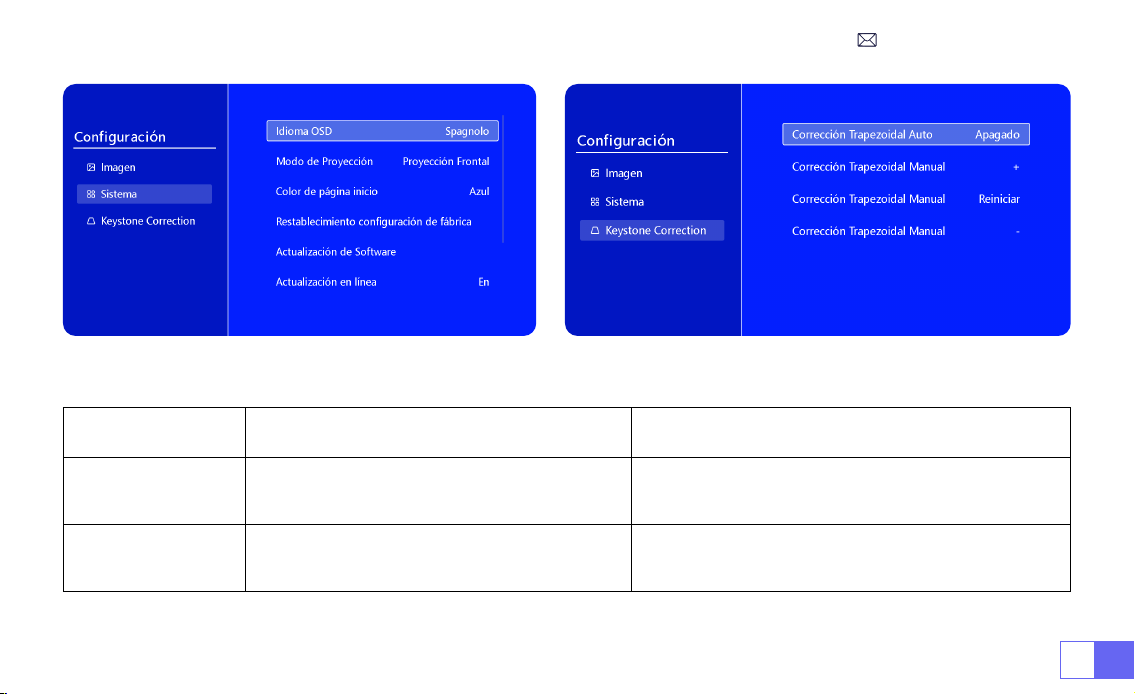
ES111
Menú Contenido Función
Corrección
Trapezoidal
Automática
Encendido/Apagado
Ajuste el ángulo de la pantalla verticalmente
automáticamente ± 30 °
Corrección
Trapezoidal
Manual
+/-/Reiniciar
Ajuste el ángulo de la pantalla verticalmente
manualmente
3.Keystone

ES 112
CONEXIÓN DE LÍNEAS DE SEÑAL
El proyector WiMiUS S27 tiene 3 interfaces, puerto HDMI*1/puerto
USB*1/salida de auriculares de 3,5 mm*1. Seleccione el puerto
de conexión correcto para conectar su dispositivo (PC, teléfono,
reproductor de DVD, USB, PS4, etc.)
1)Inserte el disco ash USB en el puerto USB del proyector.
2)Seleccione "Medios" y presione la tecla "OK" para ingresar.
3)Según el tipo de archivo, seleccione la opción [Película/Música/
Foto/TXT]
4)Seleccione el archivo deseado y luego presione el botón [OK]
para reproducirlo.
1)Conecte su dispositivo Fire TV (o PC, XBOX, PS4, etc.) al puerto
HDMI del proyector.
2)Ingrese a la página de inicio para seleccionar el HDMI
correspondiente como fuente de señal.
1.Conectar A Través De Disco USB
2.Conéctese A Dispositivos A Través Del Puerto HDMI

ES113
• Utilice el cable de audio de 3,5 mm para conectar con el altavoz.
• Encienda el proyector y el altavoz (elija el modo AUX).
1)Encienda su reproductor de DVD y el proyector.
2)Conéctese al reproductor de DVD y al proyector con el cable HDMI.
3)Ingrese a la página de inicio para seleccionar el HDMI correspondiente como fuente de señal.
Nota:
Cuando el proyector está conectado al reproductor de DVD a través del cable HDMI, si no hay sonido, es
posible que la señal de salida del puerto HDMI del reproductor de DVD no sea compatible con HDCP, intente
conectar su altavoz.
3.Conectar Al Altavoz
4.Conectar Al Reproductor de DVD
Audio
out
AUX
port
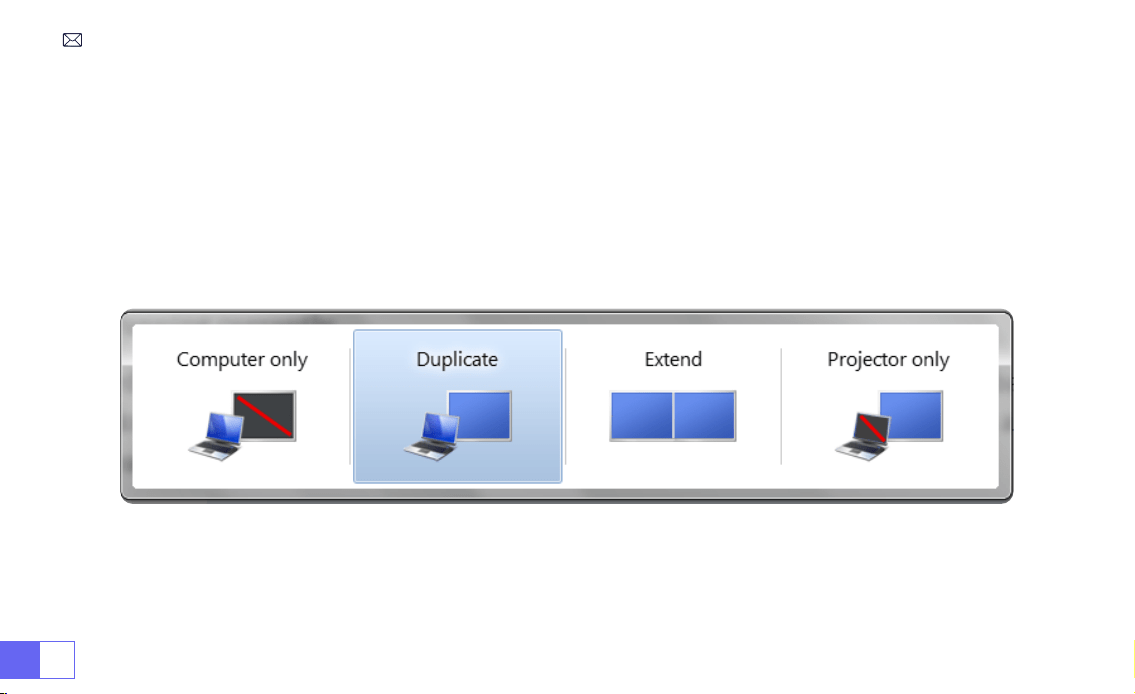
ES 114
1)Conéctese a la computadora y al proyector S27 con el cable HDMI.
2)Seleccione la fuente HDMI para proyectar cualquier archivo en su computadora;
3)En su computadora portátil, mantenga presionada la tecla "Win + P" de la placa para cambiar el modo de
visualización.
1)
Solo computadora:
Esta es la opción predeterminada y mostrará la pantalla solo en el monitor principal.
2)
Copiar:
Para duplicar su escritorio en todos los monitores conectados.
3)
Extender:
Para extender su escritorio a través de múltiples monitores.
NOTA:
Para MacBook, utilice un adaptador de tipo C a HDMI para conectar su MacBook o un adaptador Mini Display
a HDMI para conectar su MacBook Air (adaptador no incluido).
5.Conectar A La Computadora
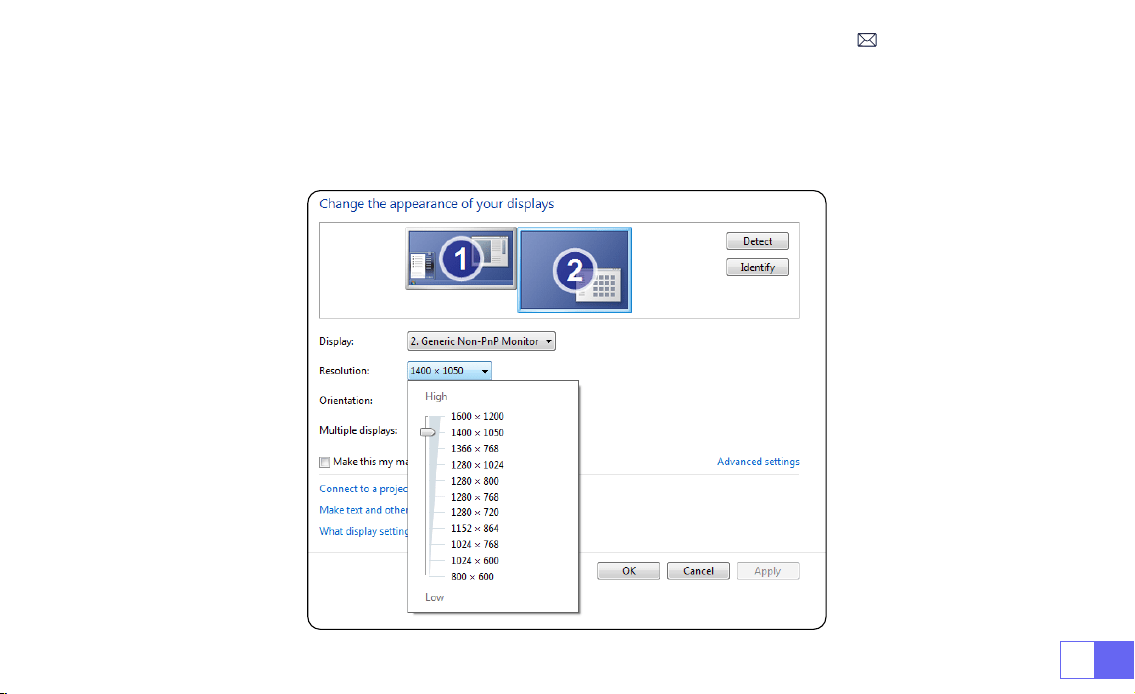
ES115
4)
Solo proyector:
Use solo el monitor secundario (proyector) y mantenga el monitor principal apagado
Para cambiar la resolución de la pantalla en el modo Solo proyector, siga estos pasos:
Paso:
Inicio > Panel de Control > Apariencia y Personalización > Ajustar Resolución de Pantalla

ES 116
Preguntas Más Frecuentes
Gracias por elegir el proyector
WiMiUS S27
. Hemos recopilado algunas preguntas frecuentes y sus
correspondientes respuestas para ayudarte mejor:
P1: Hay un
punto negro
en la imagen proyectada. ¿Como puedo quitarlo?
R: Golpee suavemente el proyector o sople aire en el interior con un secador de pelo. Abra con cuidado el puerto
lateral de limpieza de polvo del proyector. Limpie la pantalla interior con un bastoncillo de algodón limpio; si es
necesario, sumérjalo en alcohol para una mejor limpieza. Tenga cuidado para evitar causar daños. Para obtener
más ayuda, envíenos un correo electrónico a
P2: La
duplicación de pantalla
o la conexión
WiFi
son inestables. ¿Cómo puedo resolver este problema?
R: La duplicación de pantalla requiere una señal WiFi inalámbrica potente; asegúrese de que su red doméstica
funcione bien. La resolución del video se ajustará dinámicamente según la intensidad de su señal Wi-Fi. Además,
active el punto de acceso de su teléfono y conéctese al S27 para identificar si el problema está en la red
doméstica. Si el problema persiste, comuníquese con nosotros en
para obtener más
ayuda.
P3: Al duplicar la pantalla, el proyector no puede reproducir vídeos de
Netix, Youtube, Hulu o Disney
, etc. ¿Por
qué?
R: Debido a restricciones de derechos de autor, la mayoría de los proyectores no admiten la duplicación
inalámbrica de servicios de transmisión como Netflix, Hulu y Disney. Para disfrutar de estos servicios,
recomendamos utilizar un TV Stick (no incluido) junto con nuestro proyector.
P4: ¿Por qué la pantalla está
al revés
y cómo puedo ajustar la
imagen proyectada
?

ES117
R: Vaya a Conguración --> Modo de proyección --> para invertir la dirección de la imagen. Coloque la lente
del proyector perpendicularmente a la pantalla de proyección o al muro cortina. Ajuste el enfoque utilizando
el rodillo de ajuste de enfoque hasta que la imagen se vuelva clara. Para realizar ajustes del rectángulo de la
imagen, acceda a la conguración de la imagen y habilite la corrección trapezoidal automática o las funciones
trapezoidales manuales.
P5: El proyector muestra la imagen pero
no tiene sonido
. ¿Cuál podría ser la razón?
R: 1) El proyector no admite sonido Dolby, DTS, 5.1 canales, HDMI CEC, ARC. Asegúrese de desactivar cualquier
conguración de Dolby en sus dispositivos conectados.
2) Verique que tanto el volumen del proyector como el volumen de cualquier dispositivo externo o parlante
Bluetooth estén congurados en un nivel adecuado.
3) Intente reproducir diferentes videos usando otros parlantes. Es posible que algunas versiones de altavoces
Bluetooth no funcionen bien con el proyector.
Si tiene algún problema, proporcione los siguientes detalles en su correo electrónico: código de país, número
de pedido, modelo y una breve descripción del problema (por ejemplo, ES+000-0000000-0000000+S27+Sin
sonido) y envíenos un correo electrónico a
. Tenga la seguridad de que nuestro equipo
dedicado responderá rápidamente dentro de las 24 horas con una solución rápida y efectiva para abordar sus
inquietudes.

IT 118
SOMMARIO
WIMIUS ASSISTENZA PROFESSIONALE 7D/24H - - - - - - - - - - - - - 120
SUGGERIMENTI - - - - - - - - - - - - - - - - - - - - - - - - - 121
ELENCO DEI PACCHETTI- - - - - - - - - - - - - - - - - - - - - - 122
SPECIFICHE DEL PROIETTORE - - - - - - - - - - - - - - - - - - - - 123
PANORAMICA DEL PROIETTORE - - - - - - - - - - - - - - - - - - - 124
TELECOMANDO - - - - - - - - - - - - - - - - - - - - - - - - - 125
INSTALLAZIONE - - - - - - - - - - - - - - - - - - - - - - - - - 126
1.Metodo di installazione - - - - - - - - - - - - - - - - - - - - - - - 126
2.Distanza di proiezione e dimensioni - - - - - - - - - - - - - - - - - - 127
PROIETTORE DI INIZIO- - - - - - - - - - - - - - - - - - - - - - - 128
REGOLAZIONE FUOCO IMMAGINE - - - - - - - - - - - - - - - - - - 128
IMPOSTAZIONE DEL PROIETTORE - - - - - - - - - - - - - - - - - - 129
1.Impostazioni WiFi - - - - - - - - - - - - - - - - - - - - - - - - - 129

IT119
2.Connessione senza li - - - - - - - - - - - - - - - - - - - - - - - 130
3.Schermo Cablato - - - - - - - - - - - - - - - - - - - - - - - - - 132
4.Bluetooth - - - - - - - - - - - - - - - - - - - - - - - - - - - - 133
5.Riproduzione multimediale - - - - - - - - - - - - - - - - - - - - - 134
REGOLAZIONE PROIETTORE - - - - - - - - - - - - - - - - - - - - 137
1.Impostazioni dell'immagine - - - - - - - - - - - - - - - - - - - - - 137
2.Impostazioni di sistema - - - - - - - - - - - - - - - - - - - - - - 139
3.Chiave di volta - - - - - - - - - - - - - - - - - - - - - - - - - - 140
CONNESSIONE LINEE DI SEGNALE - - - - - - - - - - - - - - - - - - 141
1.Connessione tramite disco USB - - - - - - - - - - - - - - - - - - - 141
2.Connessione ai dispositivi tramite porta HDMI- - - - - - - - - - - - - - 141
3.Connetti all'altoparlante - - - - - - - - - - - - - - - - - - - - - - 142
4.Collegati al lettore DVD- - - - - - - - - - - - - - - - - - - - - - - 142
5.Connetti al computer - - - - - - - - - - - - - - - - - - - - - - - 143
FAQ - - - - - - - - - - - - - - - - - - - - - - - - - - - - - 145

IT 120
WIMIUS ASSISTENZA PROFESSIONALE 7D/24H
Gentile cliente,
Grazie mille per aver supportato WiMiUS!
Prima di iniziare ad utilizzare il proiettore, vi preghiamo di leggere attentamente questo manuale. In caso di
problemi, includi i seguenti dettagli nella tua e-mail: prefisso internazionale, numero d'ordine, modello e una
breve descrizione del problema (ad esempio IT+000-0000000-0000000+S27+Nessun suono) a
support01@
wimius.com
State tranquilli, il nostro team risponderà prontamente entro 24 ore con una soluzione rapida ed
efcace.
È essenziale menzionare che molti problemi comuni possono essere facilmente risolti attraverso semplici
regolazioni, come problemi con segnale, audio, connessioni Bluetooth o WiFi, punti oscuri o animazioni
discontinue. Per garantire la massima soddisfazione, vogliamo assicurarti che tutti i nostri proiettori sono
sottoposti a un rigoroso controllo di qualità al 100% e a un accurato imballaggio prima della spedizione.
In caso di domande, ti preghiamo di contattarci in modo che il problema possa essere risolto. E dacci l'opportunità
di migliorare. Ci impegniamo a fornirti una soluzione soddisfacente per qualsiasi sda tu possa incontrare.
Distinti saluti,
Team di assistenza WiMiUS

IT121
SUGGERIMENTI
Considerazioni sulla temperatura:
Per garantire la longevità del proiettore, evitare di collocarlo in ambienti eccessivamente caldi o freddi. Le
temperature estreme possono ridurre la durata del dispositivo. Per prestazioni ottimali, mantenere un ambiente
di lavoro tra 5°C e 35°C.
Gestione dei Punti Neri sullo Schermo di Proiezione:
Picchiettare delicatamente il proiettore o soffiare aria all'interno con un asciugacapelli. Aprire con attenzione
la porta laterale per la pulizia della polvere del proiettore. Pulisci lo schermo interno con un batuffolo di cotone
pulito, se necessario immergilo nell'alcool per una migliore pulizia. Prestare attenzione per evitare di causare
danni. Per ulteriore assistenza, inviaci un'e-mail a
Ventilazione adeguata:
Il proiettore è dotato di un sistema di ventilazione per garantire un funzionamento stabile. Evitare di coprire le
prese d'aria con panni, coperte o qualsiasi altro materiale. Inoltre, evitare di inserire oggetti nelle fessure del
proiettore, in quanto ciò potrebbe causare cortocircuiti o scosse elettriche, causando potenzialmente danni al
dispositivo.
Protezione da urti e vibrazioni:
Maneggiare il proiettore con cura, proteggendolo da forti urti, estrusioni e vibrazioni. Evitare di spostare il
proiettore se presenta guasti al circuito interno.
Manutenzione delle lenti:
L'obiettivo del proiettore è un componente cruciale che influisce direttamente sulla definizione e sulla qualità
dell'immagine. Assicurarsi di mantenere l'obiettivo pulito da polvere eccessiva. Per la pulizia utilizzare un panno di
cotone morbido adatto alle lenti in vetro. Evitare l'uso di panni duri o abrasivi, in quanto possono danneggiare la
supercie dell'obiettivo.
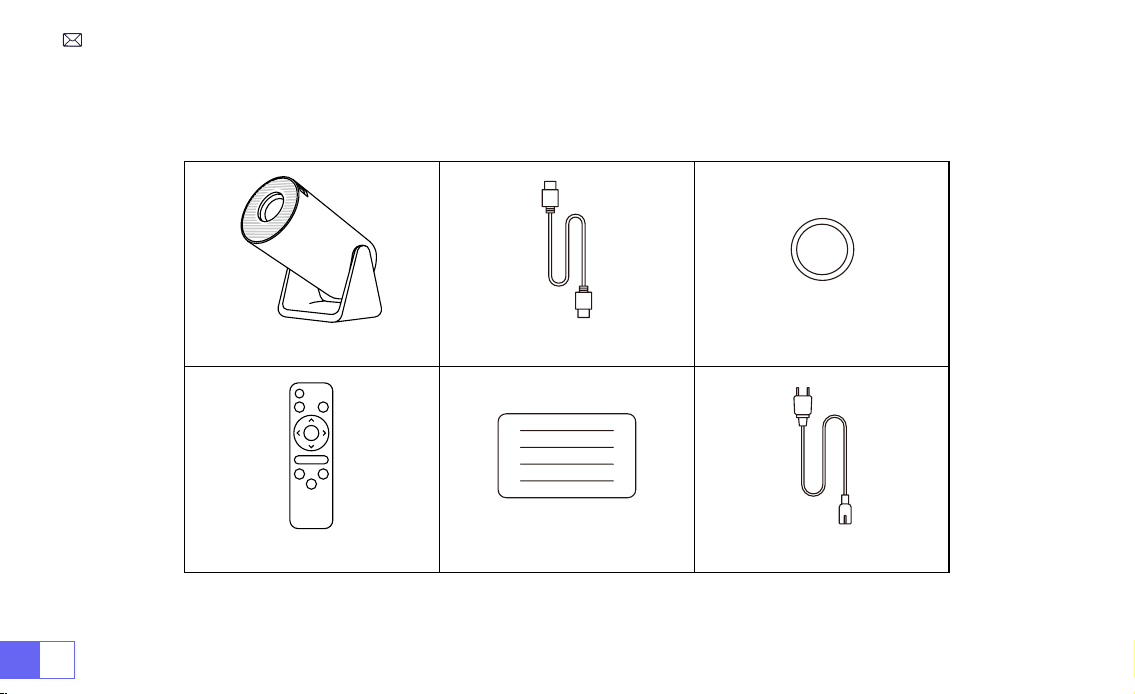
IT 122
ELENCO DEI PACCHETTI
Proiettore WiMiUS S27*1 Cavo HDMI*1 Copriobiettivo*1
Telecomando*1 Manuale dell'utente*1 Cavo di alimentazione*1

IT123
Modello n.: S27
Tecnologia di visualizzazione
LCD
Sorgente di Luce
LED
Taglia del prodotto
8.11X3.62X4.63 inch
Peso del prodotto
0.586kg
Frequenza di aggiornamento
60HZ
Tensione di potenza
AC100-240V
Risoluzione nativa
1280*720P
Risoluzione massima
supportata
Decodica 1920*1080P
Correzione Trapezoidale
Automatico/manuale
Messa a fuoco
Manuale
Modalità di Funzionamento
Telecomando
Aspect Ratio
4:3/16:9
Porta di uscita
Uscita audio da 3,5 mm
Porta d'ingresso
HDMI*1/USB*1
Formato Video
MP4/MPG/AVI/MPEG-4/TS/MOV/M4V/MKV/FLV/DAT/3GP (Il supporto per i codec video può
variare a seconda delle circostanze, contattaci per ulteriore supporto)
Formato dell'audio
MP3/WMA/AAC/AMR/APE/FLAC/MP2 (I codec audio Dolby non sono supportati)
Formato immagine
JPEG/BMP/PNG/GIF
Formato documento
TXT
SPECIFICHE DEL PROIETTORE

IT 124
PANORAMICA DEL PROIETTORE
①
Ingresso alimentazione
②
Ricevitore di segnali a infrarossi
③
Porta USB
④
Uscita audio da 3,5 mm
⑤
Sfogo
⑥
Pulsante di accensione
⑦
Porta HDMI
⑧
Messa a fuoco manuale ±
⑨
Porta per la Pulizia della Polvere
⑩
Foro di ontaggio da 1/4"
➀
➁
➂
➃
➄
➅
➆
⑨
⑩
➇

IT125
TELECOMANDO
➀
➁
➂
➃
➄
➅
⑧
⑩
➆
➈
①
Accensione/spegnimento
②
Menù
③
Sorgente del segnale di ingresso
④
Tasto freccia
⑤
Conferma chiave
Nota:
1. Installare 2 batterie AAA (non incluse) nel telecomando prima
di utilizzarlo, non combinare batterie nuove con quelle vecchie nel
telecomando, che possono causare problemi di funzionamento a
causa di un'alimentazione insufciente.
2.Quando si utilizza il telecomando, assicurarsi di puntare il
trasmettitore del segnale del telecomando verso il ricevitore del
segnale a infrarossi del proiettore o semplicemente di essere rivolti
verso lo schermo di proiezione mentre lo si utilizza.
3. Quando non si utilizza il telecomando per un lungo periodo. Si prega
di estrarre le batterie per evitare perdite.
⑥
Homepape
⑦
Indietro
⑧
Volume -
⑨
Volume +
⑩
Muto

IT 126
1. Il proiettore può essere posizionato sulla scrivania stabile o montato sul softto per proiettare l'immagine in base
all'ambiente operativo e ai requisiti.
2. Mantenere il proiettore ad un'altezza in cui l'obiettivo sia simmetrico rispetto allo schermo. Se ciò non è possibile,
utilizzare la funzione di correzione trapezoidale per regolare l'immagine di proiezione.
INSTALLAZIONE
1.Metodo di installazione
Supporto da tavolo per proiezione frontale
Supporto per softto per proiezione frontale
Supporto da tavolo per retroproiezione
Supporto da softto per proiezione posteriore
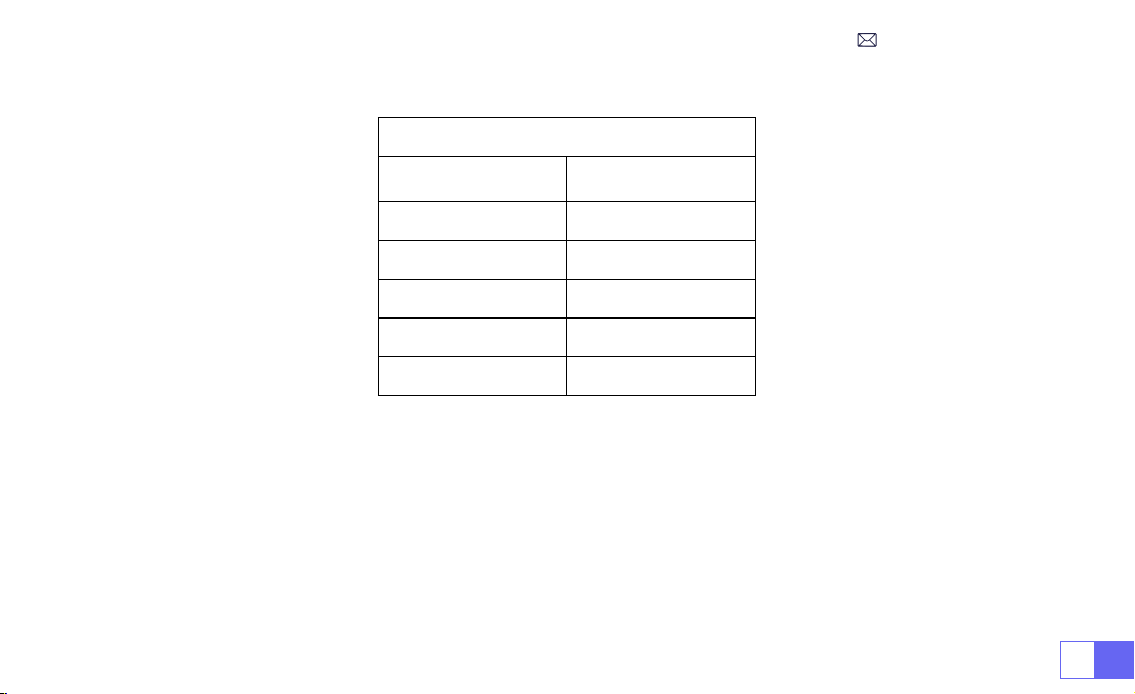
IT127
2.Distanza di proiezione e dimensioni
Proporzioni: 16:9
Distanza
Dimensione dello
schermo
1.1m 40’’
2.2m 80’’
3.3m 120’’
4.1m 150’’
5.4m 200’’
*La dimensione dell'immagine della proiezione dipende dalla distanza tra il proiettore e lo schermo. Potrebbe esserci
una leggera variazione del 3% nelle misurazioni tra i dati sopra elencati.
*La distanza di proiezione consigliata è di 2-3 m.
*Un ambiente più scuro migliorerà la nitidezza delle immagini proiettate.

IT 128
PROIETTORE DI INIZIO
REGOLAZIONE FUOCO IMMAGINE
Accendere il proiettore:
collegare al cavo di alimentazione, quando la spia rossa è accesa, premere il tasto di
accensione sul telecomando o il pulsante di accensione sul pannello per avviare il proiettore, l'indicatore passa dal
rosso al blu, il proiettore è SU.
Spegnere il proiettore:
premere il tasto di accensione sul telecomando o il pulsante di accensione sul pannello per
spegnere il proiettore, l'indicatore passa dal blu al rosso, il proiettore è spento.
Posizionare l'obiettivo del proiettore perpendicolarmente allo schermo di
proiezione o alla facciata continua e regolare il rullo di regolazione della
messa a fuoco nché l'immagine non è nitida.
Nota:
se è ancora sfocato, provare a regolare la distanza di proiezione e il
posizionamento del proiettore.
Messa a fuoco manuale
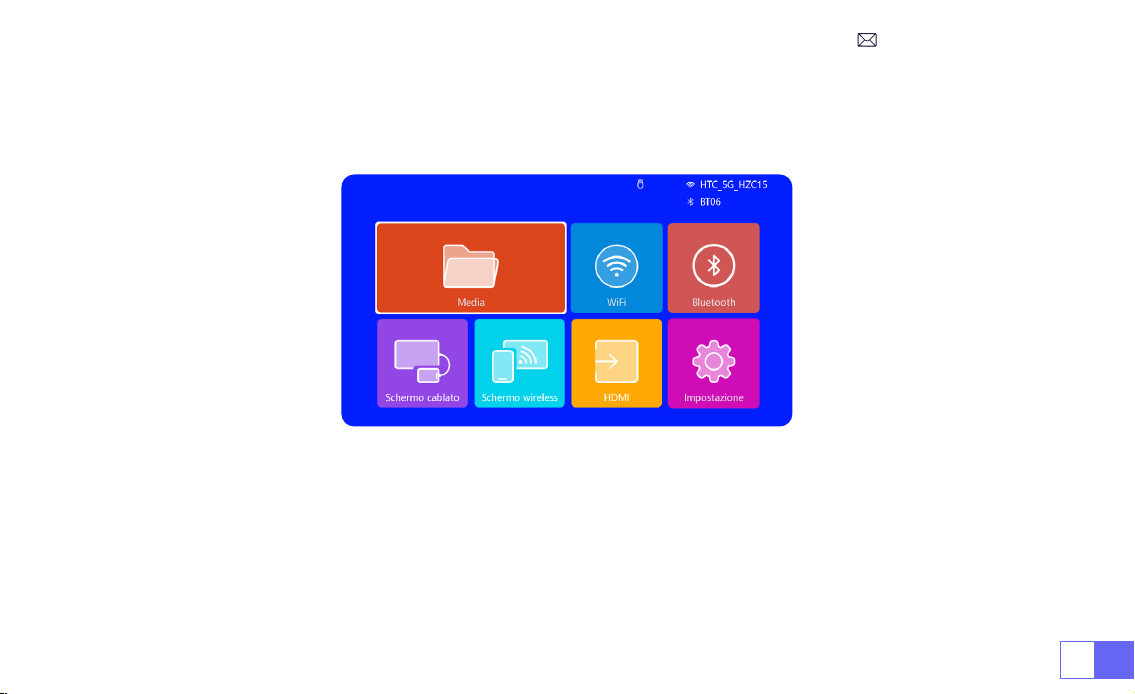
IT129
IMPOSTAZIONE DEL PROIETTORE
La home page del proiettore è la seguente.
1.Impostazioni WiFi
1. La fluidità del mirroring dello schermo con una connessione wireless sarà influenzata dall'ambiente di rete. Si
consiglia una larghezza di banda di almeno 100 Mbit quando si utilizza il mirroring dello schermo.
2. Assicurarsi che il dispositivo mobile sia vicino al proiettore quando si utilizza la connessione wireless. Si consiglia
una distanza entro 1 metro.
3. Alcuni dispositivi mobili potrebbero non supportare il mirroring dello schermo a causa della compatibilità.

IT 130
2.Connessione senza li
2.1 Per iOS Trasmetti (Airplay)
Attenzione:
assicurarsi che il dispositivo iOS sia connesso alla stessa rete Wi-Fi del proiettore.
1.Collegare il proiettore S27 alla rete Wi-Fi.
2.Torna alla home page: seleziona il menu [Schermo wireless] e resta su questa interfaccia.
3.Accedi al [ Centro di controllo ] sul tuo dispositivo iOS -- Seleziona la funzione [ Screen Mirroring ] -- Seleziona e
connetti il ricevitore Cast iOS denominato [ WiMiUS-S27-XXXX ] -- Lo schermo del dispositivo iOS verrà rispecchiato
e visualizzato sul schermo di proiezione.

IT131
2.2 Per sistema Android (Miracast)
Metodi di mirroring dello schermo:
i dispositivi Android di marche diverse possono utilizzare vari termini e metodi
per abilitare il mirroring dello schermo. Per trovare i passaggi esatti per il tuo dispositivo, fai riferimento al manuale
del tuo dispositivo. I termini comuni per il mirroring dello schermo includono Multi-schermo, Wireless Display, WLAN
Display, Screen Mirroring e Smart View.
Compatibilità del dispositivo:
tieni presente che non tutti i telefoni Android supportano la funzione di mirroring
dello schermo. Prima di tentare di utilizzare il mirroring dello schermo, assicurati che il tuo dispositivo Android
supporti questa funzione. Puoi controllare il manuale del tuo dispositivo o cercare l'opzione di mirroring dello
schermo nelle impostazioni per vericare la compatibilità.
1.Assicurati di abilitare la funzione WLAN sul tuo dispositivo
Android. (La connessione a qualsiasi rete Wi-Fi non è
necessaria).
2.Torna alla home page: seleziona il menu [Schermo
wireless] e resta su questa interfaccia.
3.Accedi al [ Centro di controllo ] sul tuo dispositivo Android,
seleziona [ Screen Mirroring/ Smart View ].
4.Selezionare e collegare il ricevitore Miracast denominato
[WiMiUS-S27-XXXX].
5. Una volta connesso correttamente, lo schermo del tuo
dispositivo Android verrà rispecchiato e visualizzato sullo
schermo di proiezione.
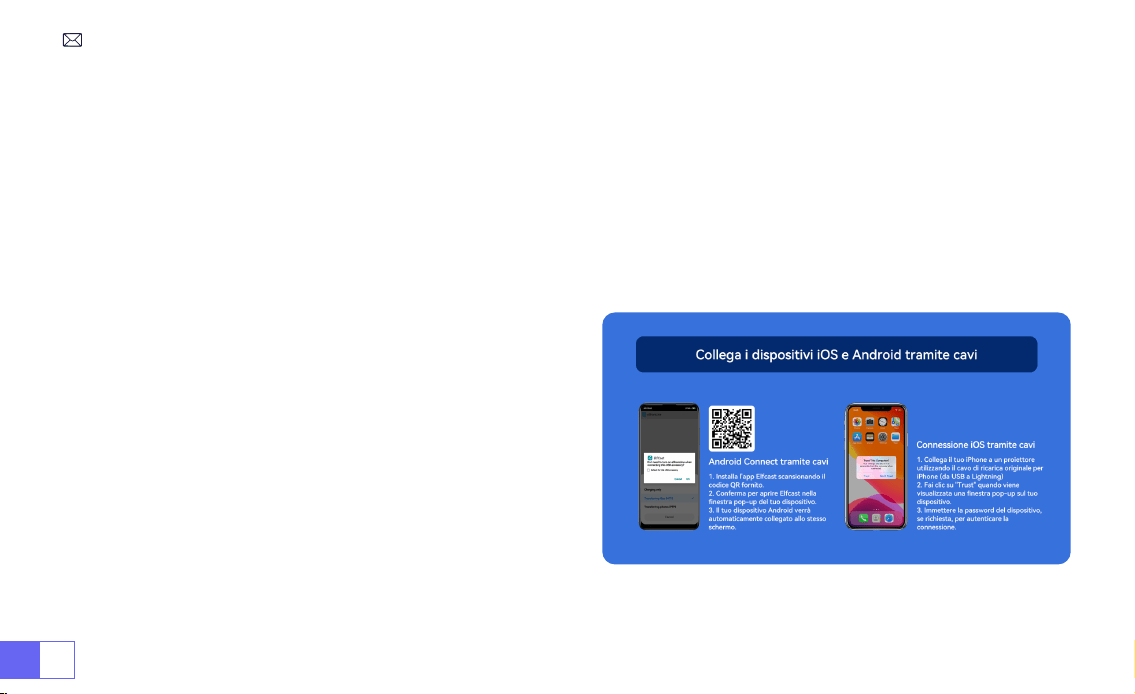
IT 132
1.Installa prima l'app Elfcast scansionando il codice QR fornito.
2.Conferma di aprire Elfcast nella nestra pop-up del tuo dispositivo.
3.Inserire la password del dispositivo, se richiesta, per autenticare la connessione.
4.Il tuo dispositivo Android verrà automaticamente collegato allo stesso schermo.
1. Collega il tuo iPhone a un proiettore utilizzando il cavo di
ricarica originale per iPhone (da USB a Lightning).
2.Fai clic su "Trust" quando viene visualizzata una nestra
pop-up sul tuo dispositivo.
3.Inserire la password del dispositivo, se richiesta, per
autenticare la connessione.
3.Schermo Cablato
3.1 Connessione Android tramite cavi
3.2 iOS Connect tramite cavi
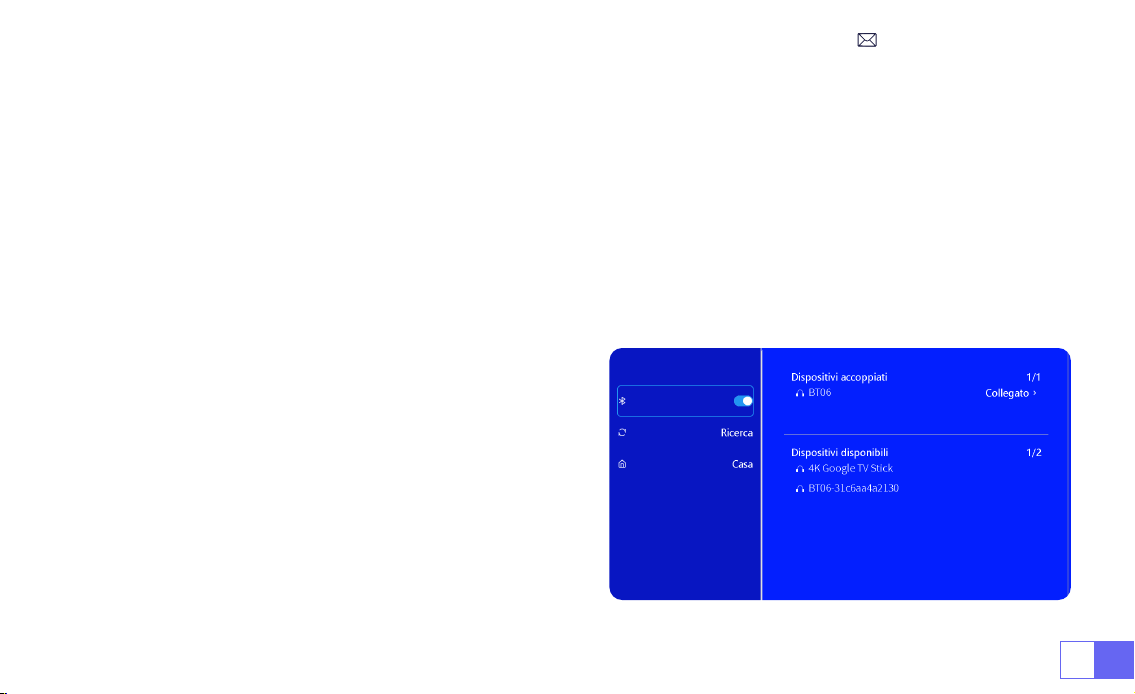
IT133
1.Accendere l'altoparlante Bluetooth.
2.Accendere il [Bluetooth] del proiettore e selezionare l'altoparlante Bluetooth da connettere.
Nota:
1) Il proiettore S27 è compatibile con la maggior parte delle cufe Bluetooth, degli altoparlanti Bluetooth e degli
Airpod. Tuttavia, tieni presente che non è compatibile con tastiere Bluetooth o telefoni Bluetooth.
2) Se non si sente alcun suono durante la riproduzione di video, si consiglia di controllare le impostazioni audio
Dolby sui dispositivi collegati. La disattivazione del suono
Dolby può garantire una migliore compatibilità audio con il
proiettore.
3)Alcuni altoparlanti Bluetooth potrebbero subire una
significativa riduzione del volume quando sono collegati
al proiettore. Per risolvere questo problema, prova ad
aumentare il volume su tutti i dispositivi interessati per
ottenere il livello sonoro desiderato.
4) Se hai domande o hai bisogno di ulteriore assistenza,
non esitare a contattare l'assistenza WiMiUS via e-mail
all'indirizzo
.
4.Bluetooth
Collega gli altoparlanti Bluetooth
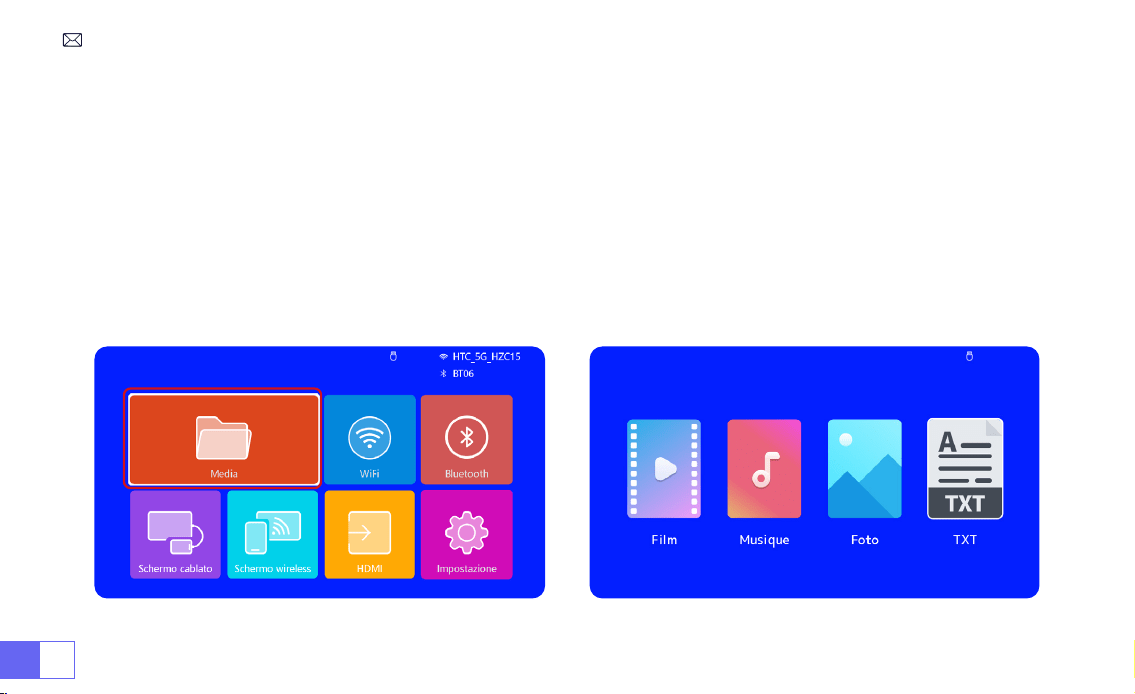
IT 134
1)Inserire il disco ash USB nella porta USB del proiettore.
2)Selezionare "Media" e premere il tasto "OK" per accedere.
3)A seconda del tipo di le, selezionare l'opzione [Film/Musica/Foto/Libro].
4)Selezionare il le desiderato e quindi premere il pulsante [OK] per riprodurlo.
5)Fare clic sul pulsante "MENU" sul telecomando durante la riproduzione del video per regolare direttamente le
impostazioni dell'immagine.
5.Riproduzione multimediale
5.1 Modalità di input del disco USB
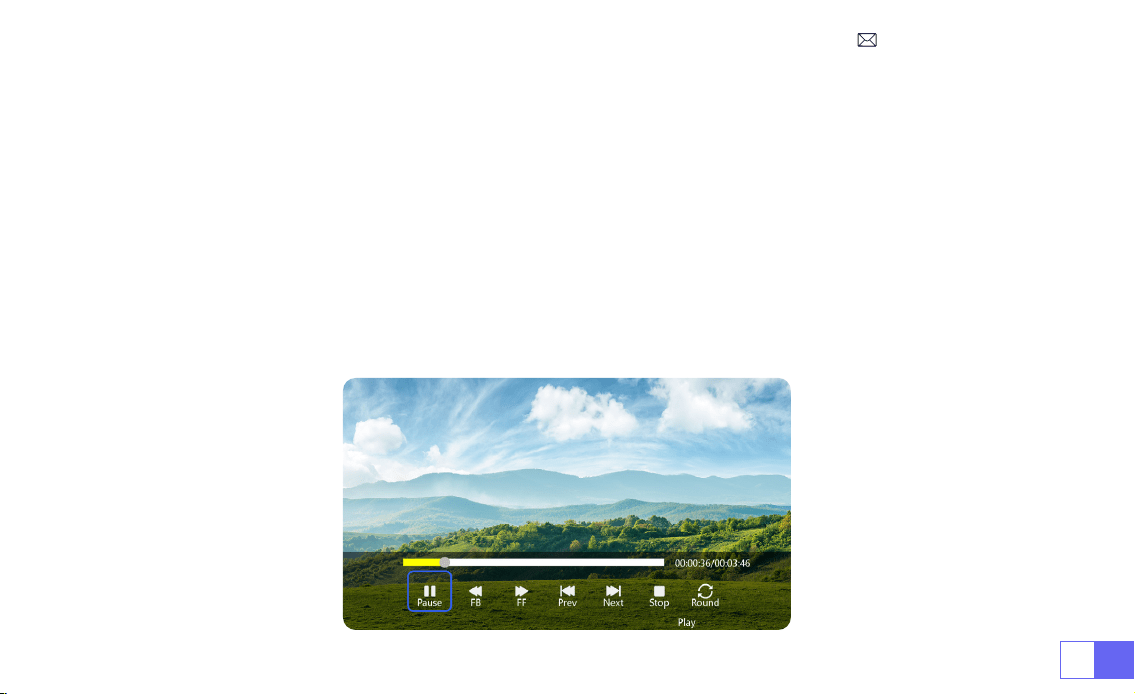
IT135
Suggerimenti caldi:
se il proiettore non è in grado di riconoscere il disco USB, seguire i metodi seguenti per risolvere
il problema.
Assicurati che il tuo disco USB soddis i seguenti formati:
FAT32: 8 GB/16 GB/32 GB
NTFS: 64GB-2TB
Se non soddisfa questi criteri, sarà necessario modicare un disco USB di formato supportato.
Se il problema persiste, invia una descrizione dettagliata del problema al seguente indirizzo email:
support01@
wimius.com
5.2 Interfaccia di riproduzione video
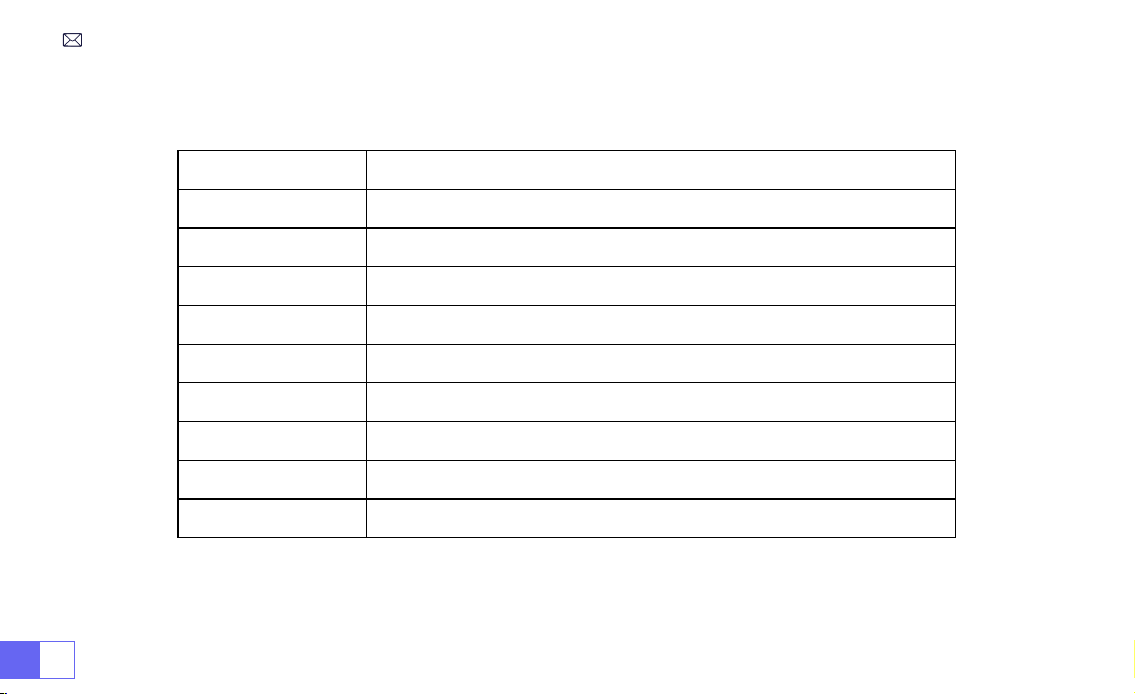
IT 136
Manuale Funzione
FB Premere a lungo per riavvolgere rapidamente il video
FF Premere a lungo per mandare avanti velocemente il video
Prec Passa al video precedente
Prossimo Passa al video successivo
Stop Smetti di giocare ed esci
Ciclo Round List o ciclo singolo
Informazioni Video dettagli
Elenco Seleziona tutte le playlist nella cartella corrente
16:9 Automatico/4:3/16:9
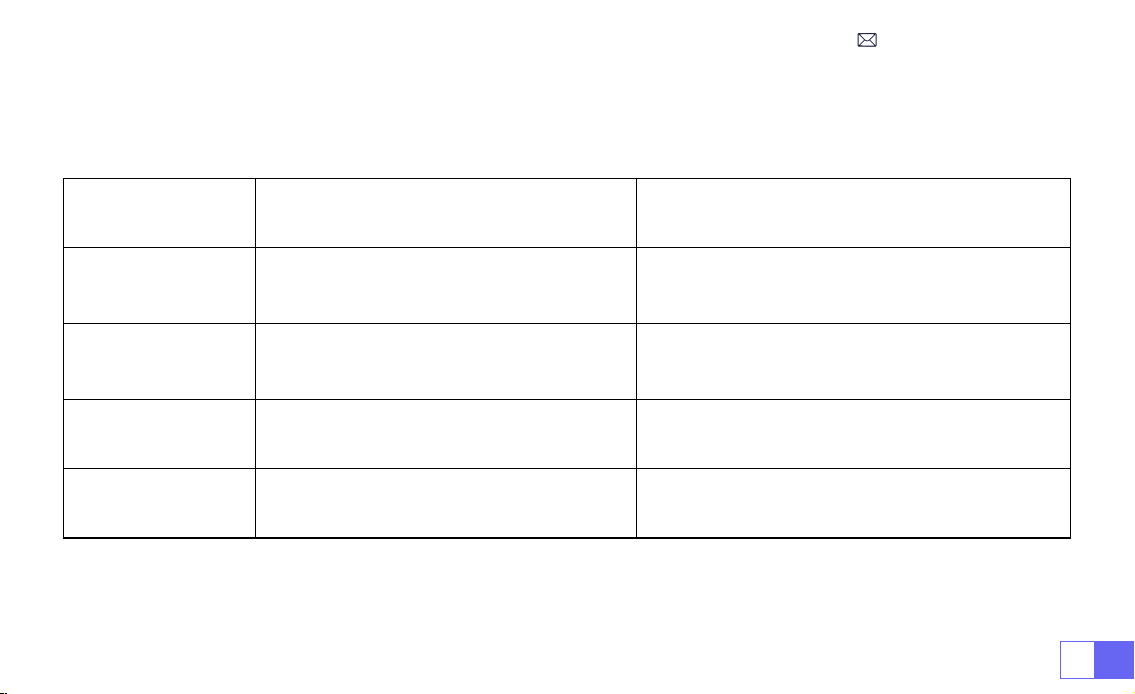
IT137
REGOLAZIONE PROIETTORE
1.Impostazioni dell'immagine
Menù Contenuto Funzione
ModalitàImmagine Standard/dinamico/lieve/utente Regola contrasto/luminosità/colore/nitidezza
Temperatura di
colore
Freddo/Standard/Caldo Regola la temperatura del colore
Rapporto d'aspetto 4:3/16:9 Regola le proporzioni dello schermo
Zoom 100%-85% Riduci la dimensione dell'immagine
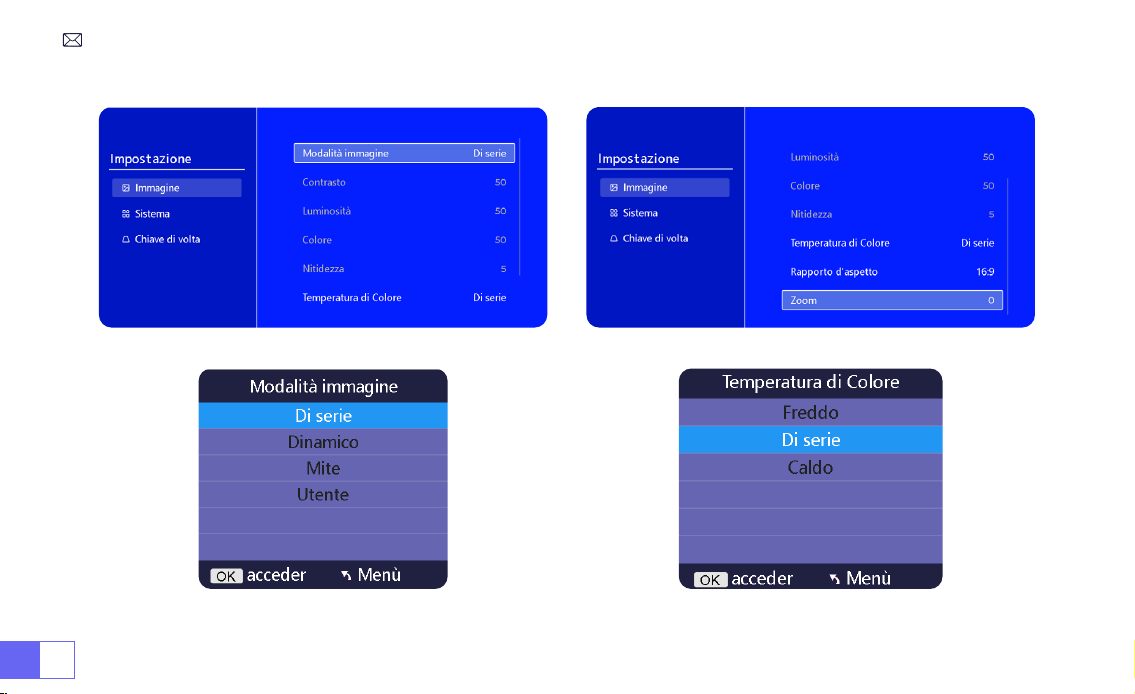
IT139
2.Impostazioni di sistema
Menù Contenuto Funzione
Lingua dell'OSD
English/Français/Italian/Espanol/Deutsche/ 日本語
Scegli una lingua
Modalità Proiezione Fronte/Retro sul softto, Fronte/Retro sul tavolo Capovolgere la direzione dell'immagine di proiezione
Colore della home
page
Blu/Blu scuro/Grigio Cambia il colore della home page
Reset di fabbrica Reset Ripristina le impostazioni predenite di fabbrica
Aggiornamento
software
Aggiornamento locale (USB) Aggiorna il software tramite le locale
Aggiornamento in
linea
Aggiornamento online (OTA)
Aggiorna il software tramite le locale
Nota: NON scollegare il proiettore durante il processo di
aggiornamento.
Dormire
automaticamente
Off/10m/20m/30m/60m/90m/120m/180m Imposta il tempo di sonno
Timer dell'OSD Off/5s/10s/15s/20s/25s/30s Imposta l'ora per tornare alla home page
Info versione Versione software Versione software
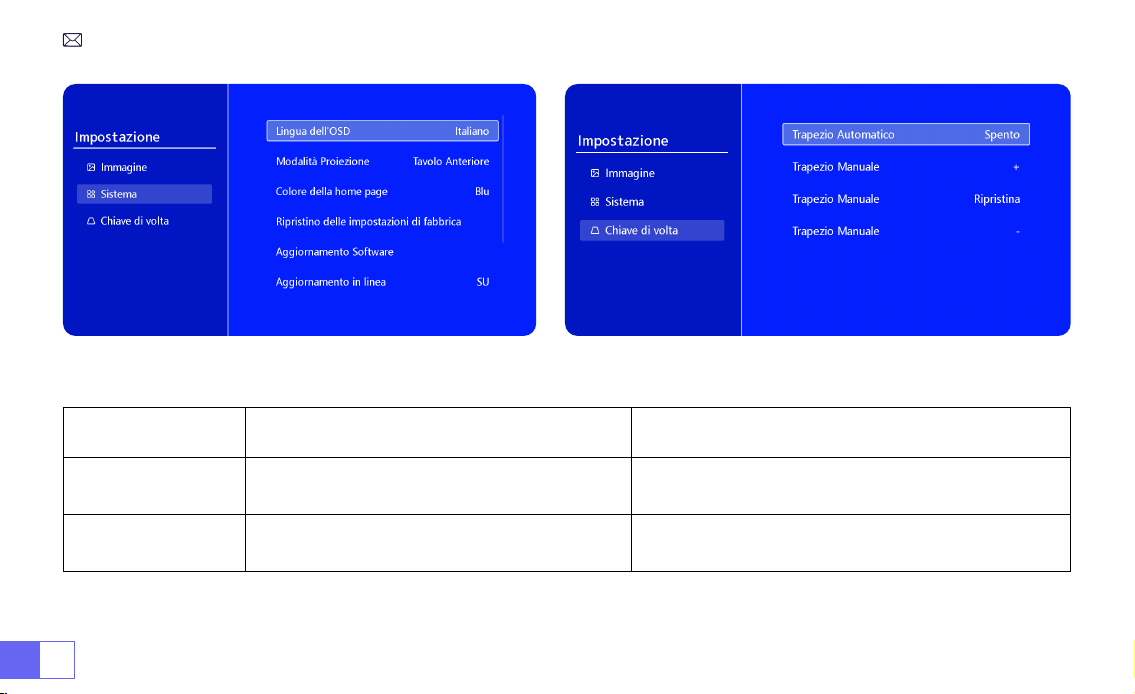
IT 140
Menù Contenuto Funzione
Trapezio
automatico
On/off
Regolare l'angolo dello schermo verticalmente
automaticamente ±30°
Trapezio manuale +/-/Reset
Regola manualmente l'angolazione dello
schermo verticalmente
3.Chiave di volta
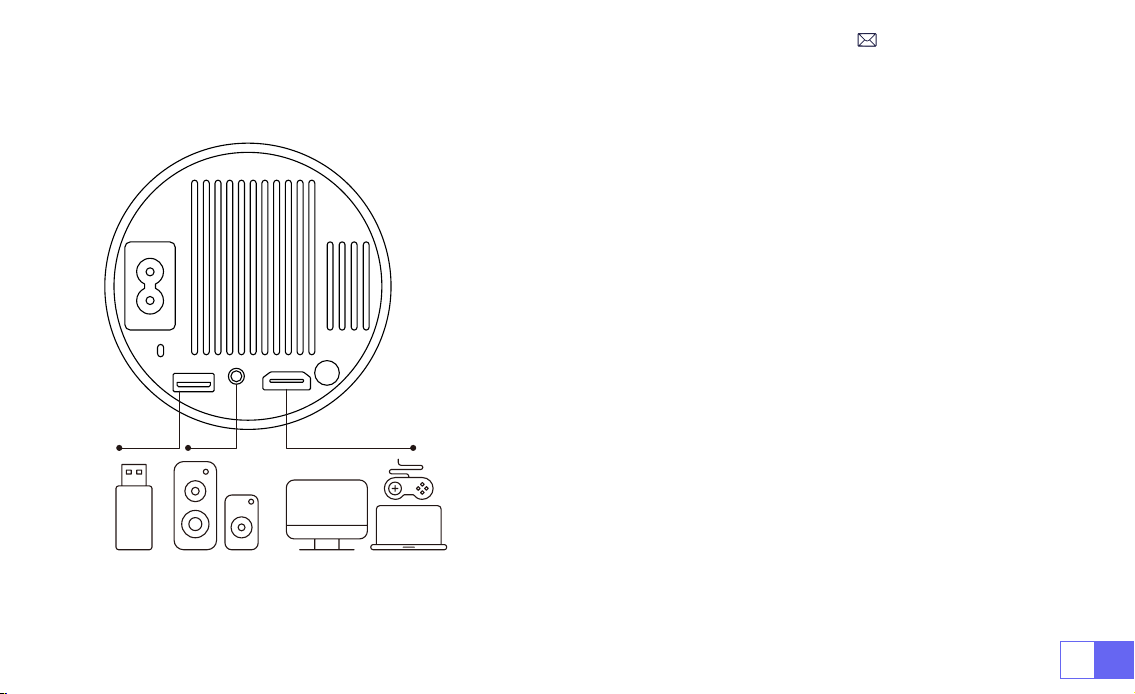
IT141
CONNESSIONE LINEE DI SEGNALE
Il proiettore WiMiUS S27 ha 3 interfacce, porta HDMI*1/porta USB*1/
uscita cuffie da 3,5 mm*1. Selezionare la porta di connessione
corretta per collegare il dispositivo (PC, telefono, lettore DVD, USB,
PS4, ecc.)
1)Inserire il disco ash USB nella porta USB del proiettore.
2) Selezionare "Media" e premere il tasto "OK" per accedere.
3) A seconda del tipo di file, selezionare l'opzione [Film/Musica/
Foto/Libro].
4)Selezionare il le desiderato e quindi premere il pulsante [OK] per
riprodurlo.
1)Collega la tua chiavetta Fire TV (o PC, XBOX, PS4 ecc.) alla porta
HDMI del proiettore.
2)Accedere alla home page per selezionare l'HDMI corrispondente
come sorgente del segnale.
1.Connessione tramite disco USB
2.Connessione ai dispositivi tramite porta HDMI

IT 142
• Utilizzare il cavo audio da 3,5 mm per il collegamento con l'altoparlante.
• Accendere il proiettore e l'altoparlante (scegliere la modalità AUX).
1)Accendi il lettore DVD e il proiettore.
2)Collegare il lettore DVD e il proiettore con il cavo HDMI.
3) Accedere alla home page per selezionare l'HDMI corrispondente come sorgente del segnale.
Nota:
quando il proiettore è collegato al lettore DVD tramite il cavo HDMI, se non viene emesso alcun suono, è
possibile che il segnale di uscita della porta HDMI del lettore DVD non sia compatibile con HDCP, provare a collegare
l'altoparlante.
3.Connetti all'altoparlante
4.Collegati al lettore DVD
Audio
out
AUX
port
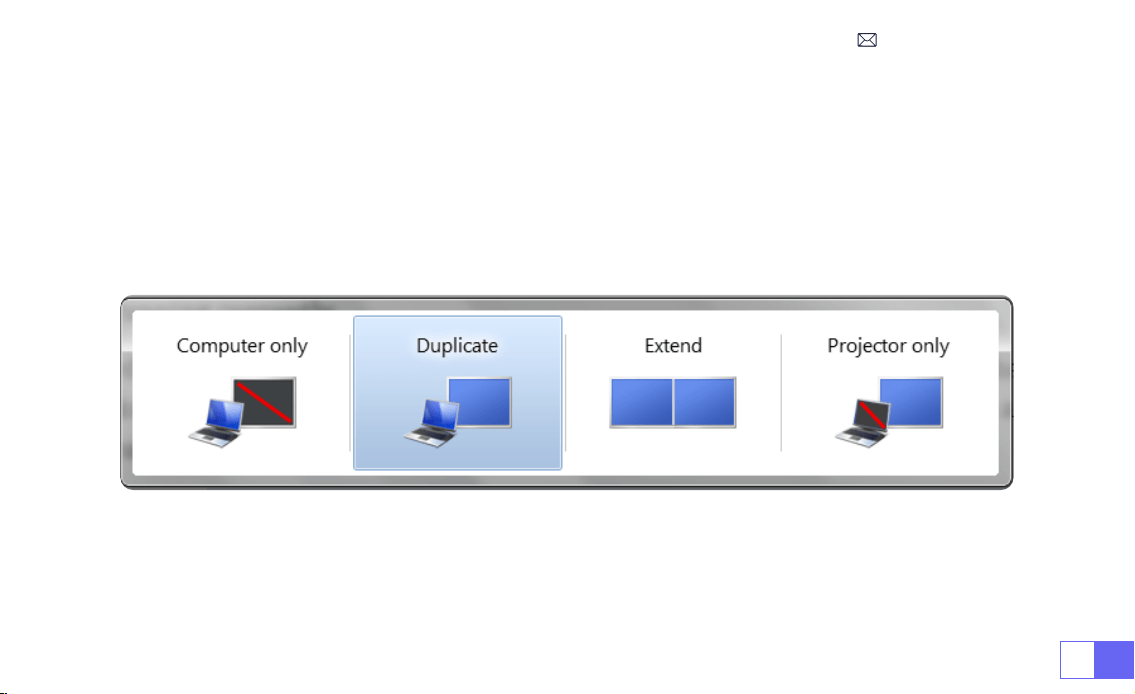
IT143
1)Collegare al computer e al proiettore S27 con il cavo HDMI.
2) Seleziona la sorgente HDMI per proiettare qualsiasi le sul tuo computer;
Sul tuo laptop, tieni premuti i tasti della scheda "Win + P" per cambiare la modalità di visualizzazione.
NOTA:
Per MacBook, usa un adattatore da Type-C a HDMI per collegare il tuo MacBook o un adattatore da Mini
Display a HDMI per connetterti con il tuo MacBook Air (adattatore non incluso).
1)
Solo computer:
questa è l'opzione predenita e visualizzerà lo schermo solo sul monitor principale.
2)
Duplica:
per duplicare il desktop su tutti i monitor collegati.
3)
Estendi:
per estendere il desktop su più monitor.
4)
Solo proiettore:
utilizzare solo il monitor secondario (proiettore) e tenere spento il monitor principale.
5.Connetti al computer
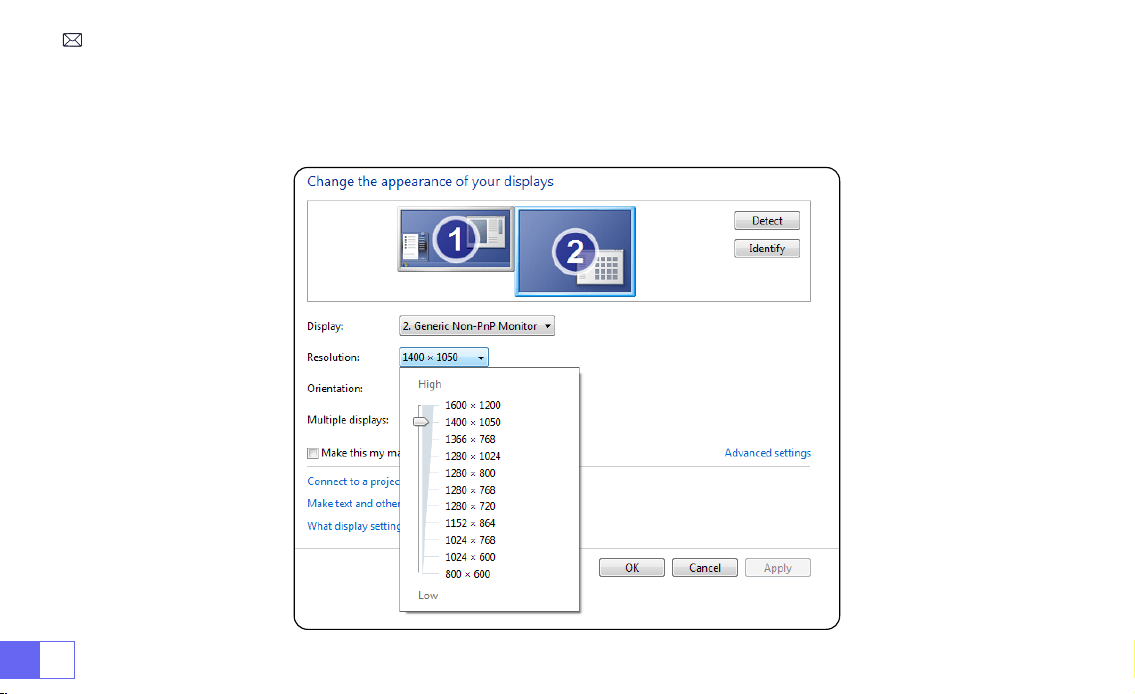
IT 144
Per modicare la risoluzione dello schermo in modalità Solo proiettore, attenersi alla seguente procedura:
Passaggio:
Start > Pannello di controllo > Aspetto e personalizzazione > Regola la risoluzione dello schermo.

IT145
FAQ
Grazie per aver scelto il proiettore WiMiUS S27. Abbiamo raccolto alcune domande frequenti e le relative risposte
per assisterti meglio:
D1: La connessione
WiFi
non è stabile. come risolverlo?
R: Vericare prima se la rete WiFi è buona, quindi impostare la distanza tra telefono e proiettore entro 1 metro. Se il
problema persiste, inviaci un'e-mail all'indirizzo [email protected].
D2: C'è una
macchia nera
sull'immagine proiettata. Come posso rimuoverlo?
R: Picchiettare delicatamente il proiettore o sofare aria all'interno con un asciugacapelli. Aprire con attenzione
la porta laterale per la pulizia della polvere del proiettore. Pulisci lo schermo interno con un batuffolo di cotone
pulito, se necessario immergilo nell'alcool per una migliore pulizia. Prestare attenzione per evitare di causare
danni. Per ulteriore assistenza, inviaci un'e-mail a
.
D3: Il proiettore
visualizza l'immagine ma non ha audio
. Quale potrebbe essere il motivo?
R: 1) Il proiettore non supporta il suono Dolby, DTS, 5.1 canali, HDMI CEC, ARC o altri effetti sonori Dolby. Assicurati di
disattivare tutte le impostazioni Dolby sui dispositivi collegati.
2) Vericare che sia il volume del proiettore che il volume di eventuali dispositivi esterni o altoparlanti Bluetooth
siano impostati su un livello adeguato.
3) Prova a riprodurre video diversi utilizzando altri altoparlanti. Alcune versioni di altoparlanti Bluetooth potrebbero
non funzionare correttamente con il proiettore.
D4: Non può riprodurre video
Netix, Hulu e Disney
quando è connesso allo smartphone. Come mai?
R: A causa delle restrizioni sul copyright, i servizi di streaming come Netix, Hulu, Disney e YouTube richiedono

IT 146
l'inserimento di una chiavetta TV (non inclusa) nel nostro proiettore per una corretta riproduzione.
D5: Non viene
emesso alcun suono
durante la connessione con gli altoparlanti Bluetooth. Come sistemarlo?
R: La funzioneBluetooth del proiettore è una nuova tecnologia. Può essere collegato solo a determinati
tipi di altoparlanti Bluetooth. Per favore dicci la marca e il nome del modello dell'altoparlante bluetooth, lo
controlleremo prima dalla nostra parte.
D6: Come regolare
l'immagine proiettata
?
R: Posizionare l'obiettivo del proiettore perpendicolarmente allo schermo di proiezione o alla facciata continua.
Regolare la messa a fuoco utilizzando il rullo di regolazione della messa a fuoco nché l'immagine non diventa
nitida. Per le regolazioni del rettangolo dell'immagine, accedere alle impostazioni dell'immagine dell'immagine
e abilitare la correzione automatica della distorsione trapezoidale o le funzioni manuali della distorsione
trapezoidale.
Se hai altre domande sul proiettore, puoi sempre inviarci un'e-mail all'indirizzo
con il
codice del tuo paese + modello S27 + problema (Esempio: IT + proiettore S27 + nessun suono).

JP147
目次
WiMiUS より即時なサ术ート 149
ご注意事項 150
パッケージリスト 151
製品仕様 152
部品仕様 153
リモコン 154
インストール 155
1. 投影方式 155
2. 投影距離と投影サイズ 156
プロジェクターの起動 157
画像フォーカス調整 157
プロジェクター設定 158
1.WiFi 設定 158

JP 148
2. 無線接続 159
3. 有線スクリーン 161
4.Bluetooth 162
5. マルチメディア・プレー 163
プロジェクター設定 166
1. 画像設定 166
2. システム設定 168
3. 台形 169
信号線の接続 170
1.USB 接続 170
2.HDMI 接続 170
3. スピーカー / サウンドバーとの接続 171
4.DVD プレ—ャーとの接続 171
5.PC との接続 172
FAQ 174

JP149
WiMiUS より即時なサ术ート
お客様
平素より格別のご愛顧を賜わり厚くお礼申し上げます。
プロジェクタ一を使用する前に、この取り扱い説明書をよくお読みください。問題がある場合は注文番号と問題を
までメ—ルを送信してください。万が一故障や問題等がありましたら弊社にご連絡いただき、即時
対応させて頂きます。
信号がない、音が出ない、Bluetooth 接続できない、WiFi 接続できない、黒点、途切れなど多くの問題は設定の仕方で解決で
きるので、お困りの際はご連絡下さいませ。すべてのプロジェクターは、出荷前に 100% 慎重に検品され、パッケージされてい
ることを保証します。
また、お買い上げいただい商品について何かご不满な点やご使用方法について不明なことがございましたらご遠慮なくお申し
付けください。必ずご満足まで対応させていただきますのでぜひ改善チャンスをくださるようにお願いします。
WiMiUS サ—ビスチ一ム

JP 150
ご注意事項
温度に関する注意事項:
プロジェクターの寿命を保つために、過度に暑いまたは寒い環境に設置しないでください。極端な温度はデバイスの寿命を短
くする可能性があります。最適なパフォーマンスを得るためには、5℃から 35℃の作業環境を維持してください。
プロジェクター画面の黒点に対応する:
プロジェクターを軽くたたくか、ドライヤーで内部に風を当てます。プロジェクターの側面ほこりクリーニングポートを注意深
く開けます。きれいな綿棒で内側スクリーンを拭きます。必要であれば、アルコールに浸すとよりきれいになります。損傷を与
えないように注意してください。詳細については、[email protected]om までメールでお問い合わせください。
適切な換気:
プロジェクターが安定して動作するために放熱装置が搭載されています。通気孔は内部の温度上昇を防ぐためのものです。物を
置いたり立てかけたりして通気孔をふさがないでください。内部の温度が上昇し、故障の原因となります。
衝撃や振動からの保護:
強い衝撃、圧迫、振動からプロジェクターを慎重に取り扱ってください。内部回路の故障が発生している場合は、プロジェク
ターを移動しないでください。
レンズのメンテナンス:
プロジェクターレンズは画像の定義と品質に直接影響する重要なコンポーネントです。過度な埃からレンズを清掃するように
してください。清掃時には、ガラスレンズ用の柔らかい綿布を使用してください。ハードクロスや研磨剤を使用しないでくだ
さい。レンズ表面を傷つける可能性があります。

JP151
パッケージリスト
WiMiUS S27 プロジェクター本体 *1
HDMI ケーブル *1 レンズキャップ *1
リモコン *1 ユーザーマニュアル *1 電源ケーブル *1
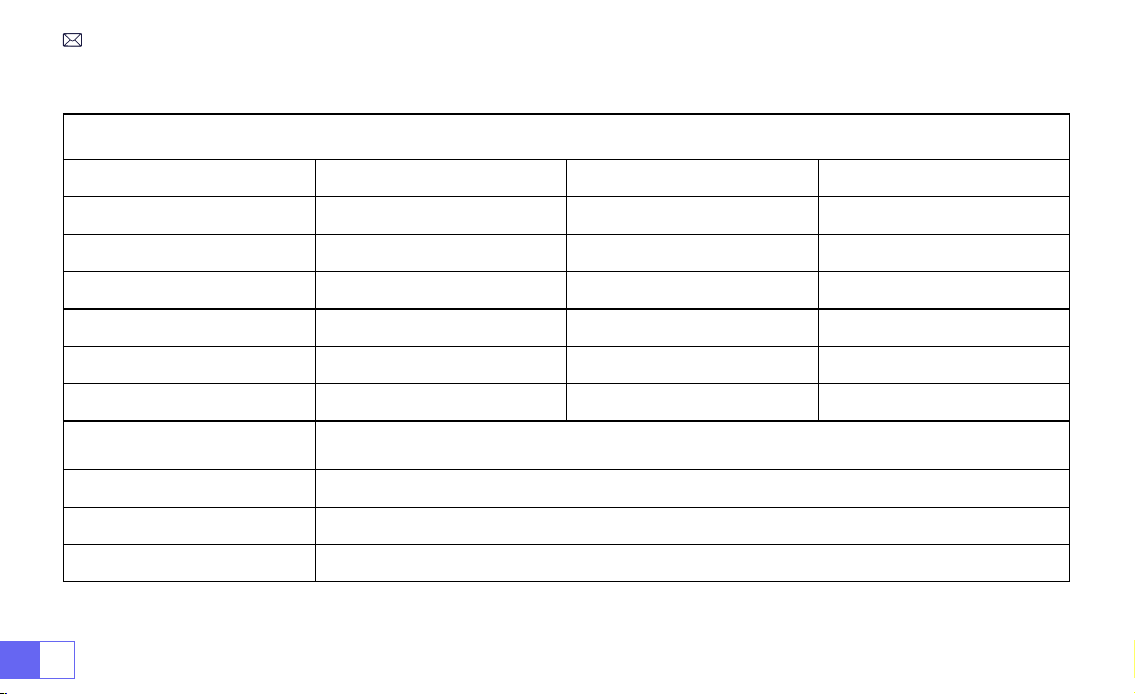
JP 152
Model No.: S27
ディスプレイ技術 LCD 光源 LED
サイズ 8.11X3.62X4.63 インチ 重量 0.586kg
リフレッシュ率 60HZ 電源 AC100240V
ネイティブ解像度 1280*720P 最高対応解像度 1920*1080P
インストール方式 机の前 / 後 アスペクト 4:3/16:9
台形補正 フォーカス / 手動 フォーカス 手動
出力端子 3.5mm 音声端子 入力端子 HDMI*1/USB*1
ビデオファイル
MP4/MPG/AVI/MPEG4/TS/MOV/M4V/MKV/FLV/DAT/3GP ( ビデオコーデックのサポートはケースによって異
なります。)
オディオファイル MP3/WMA/AAC/AMR/APE/FLAC/MP2 ( ドルビーオーディオコーデックには対応していません。)
写真ファイル JPEG/BMP/PNG/GIF
文書形式 TXT
製品仕様
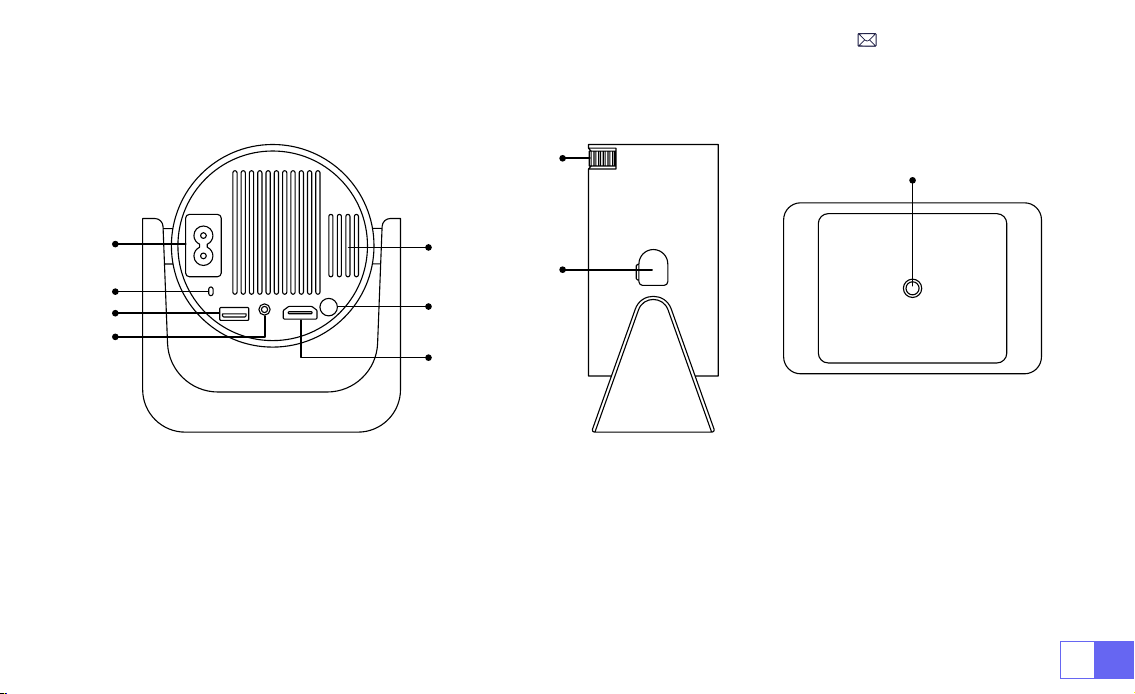
JP153
部品仕様
➀
➁
➂
➃
➄
➅
➆
①
電源入力
②
赤外線信号受信機
③
USB 端子
④
3.5mm 音声端子
⑤
排気口
⑥
電源ボタン
⑦
HDMI 端子
⑧
マニュアルフォーカス ±
⑨
ホコリ除去ポート
⑩
1/4" 取り付け穴
⑨
⑩
➇
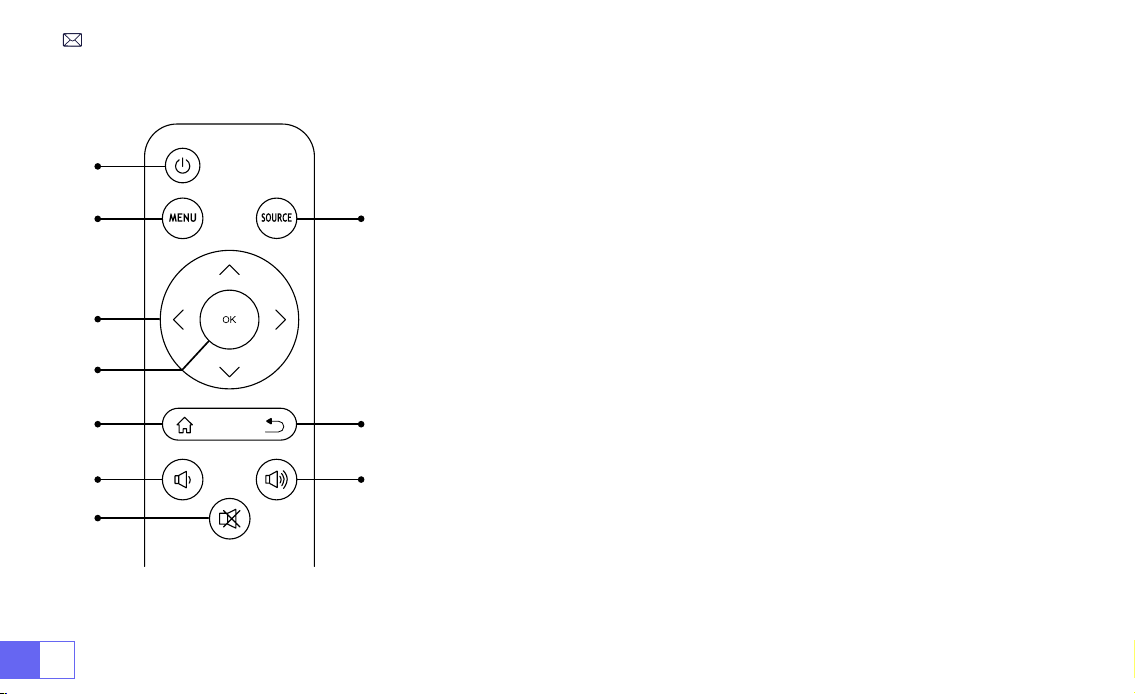
JP 154
リモコン
➀
➁
➂
➃
➄
➅
⑧
⑩
➆
➈
①
電源ボタン
②
メニュー
③
入力信号源
④
矢印キー
⑤
停止
ご注意 :
1.バッテリーは同梱されていません。2*AAAバッテリーが必要です。(別途購入)
2. リモコンを使用しながら、赤外線信号受信部に向ける必要です。
2. 液もれの原因にもなるので長期間使用しない場合は電池を取り出しておい
てください。
⑥
ホーム
⑦
戻り
⑧
音声
⑨
音声 +
⑩
消音

JP155
1. プロジェクターは、安定した机の上に置いたり、天井に取り付けたりして、使用環境や要求に応じて画像を投影することが
できます。
2. プロジェクターのレンズがスクリーン軸に対して対称になる高さに設置してください。 これが不可能な場合は、台形補正機
能を使用して投写画像を調整してください。
インストール
1. 投影方式
テーブル置きと正面投影
前面投影天井取付
テーブル置きと背面投影
背面投影天井取付

JP 156
2. 投影距離と投影サイズ
アスペクト比 :16:9
投射距離 画面サイズ
1.1m
40''
2.2m
80''
3.3m
120''
4.1m
150''
5.4m
200''
* 投影の画像サイズはプロジェクターとスクリーンの距離に依存します。上の表の画面サイズに参照して ±3%を考慮してくだ
さい
* 推奨投影距離は 2 ~ 3m です。
* 周囲環境を暗くすると、投影画像の鮮明度が向上します。
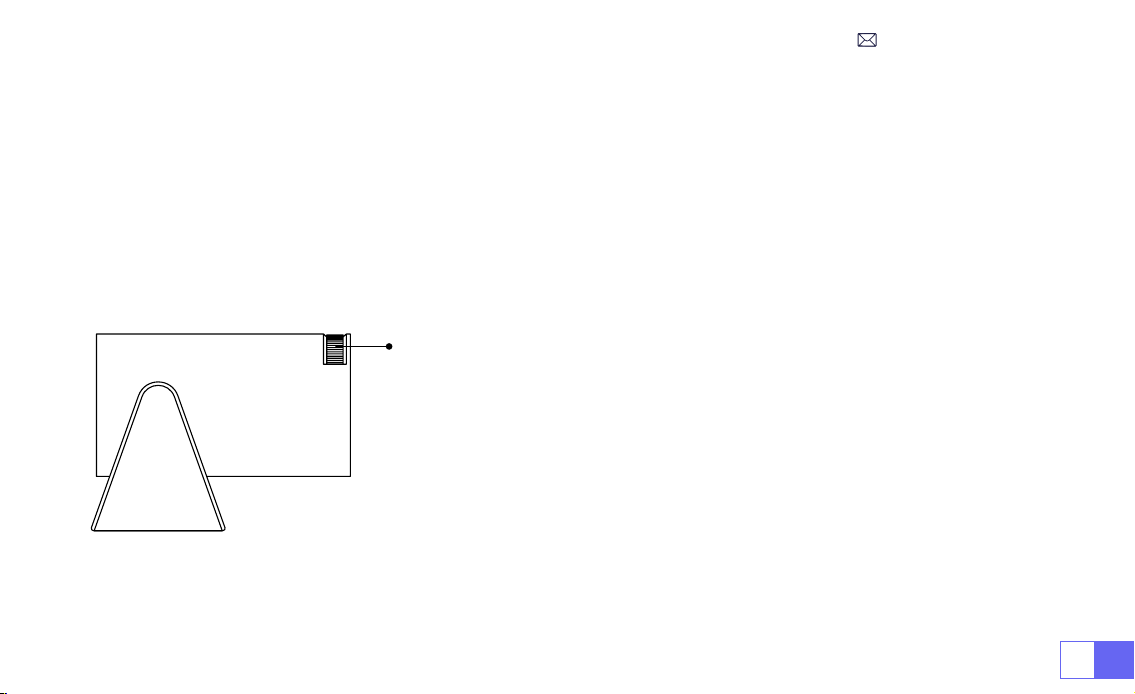
JP157
プロジェクターの起動
画像フォーカス調整
投影機の起動:電源ケーブルを接続し、赤色のインジケーターランプが点灯したら、リモコンの電源ボタンまたはパネルの電
源ボタンを押してプロジェクターを起動します。ランプが赤色から青色に変わり、プロジェクターが起動します。
投影機のシャットダウン:リモコンの電源ボタンまたはパネルの電源ボタンを押して、プロジェクターをシャットダウンします。
ランプが青色から赤色に変わり、プロジェクターがオフになります。
プロジェクターのレンズを投写スクリーンまたは壁に対して垂直に持ち、画像が鮮
明になるまでフォーカス調整リングを調整します。
注:それでもぼやける場合は、投写距離やプロジェクターの位置を調節してみてく
ださい。
手動フォーカス

JP 158
プロジェクター設定
プロジェクターのホームページは以下の通り。
1.WiFi 設定
1. 無線接続での画面ミラーリングの流暢さは、ネットワーク環境に影響されます。スクリーンミラーリングを使用する場合は、
100Mbit 以上の帯域幅を推奨します。
2. 無線接続を使用する場合、モバイルデバイスがプロジェクターの近くにあることを確認してください。1m 以内の距離を推奨
します。
3. モバイルデバイスによっては、互換性によりスクリーンミラーリングをサポートしない場合があります。
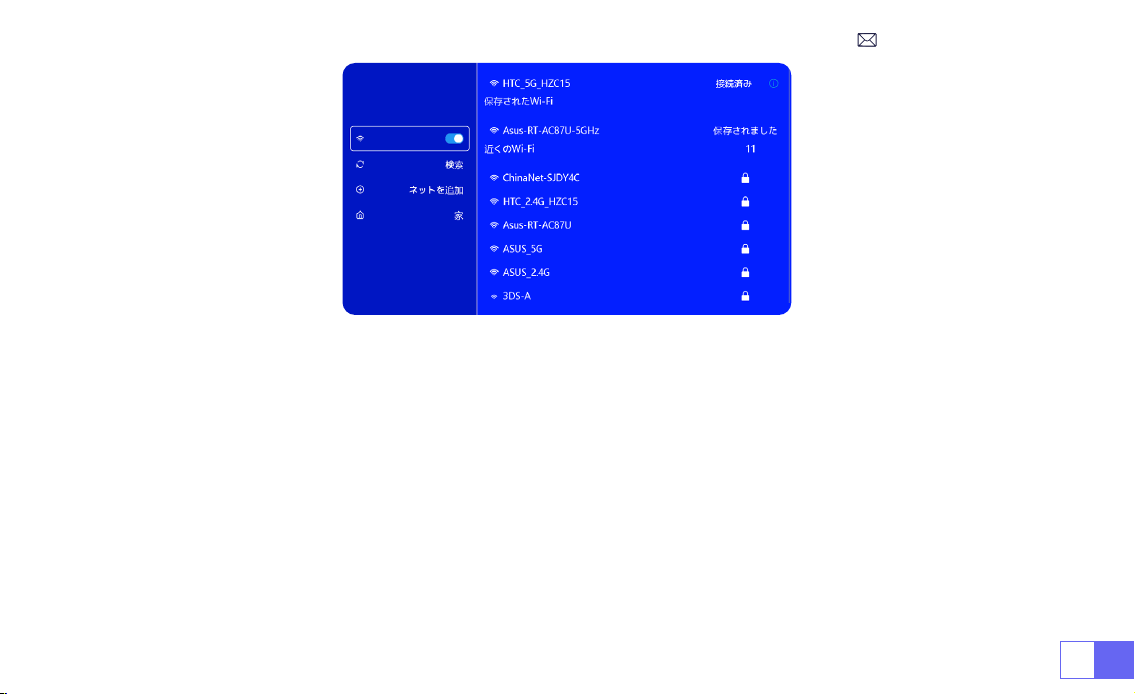
JP159
2. 無線接続
2.1 iOS デバイスの場合 (Airplay)
ご注意:お使いのデバイスとプロジェクターが同じホーム WiFi 内にある必要があります。
1、S27 プロジェクターを WiFi ネットワークに接続してください。
2、プロジェクターでホームページに戻る [ 無線スクリーン ] メニューを選択する このインターフェイスに留まること。
3、iOS デバイスで [ コントロールセンター ] にアクセスする [ 画面のミラーリング ] 機能を選択する [WiMiUSS27 プロジ
ェクター ] という iOS キャストレシーバーを選択して接続する iOS デバイスの画面がミラーリングされ、投影スクリーンに表
示されます。

JP 160
2.2 Android デバイスの場合 (Miracast)
画面ミラーリングの方法:異なるブランドの Android デバイスでは、画面ミラーリングを有効にするために様々な用語や方法
が使用される場合があります。ご使用のデバイスの正確な手順については、デバイスのマニュアルを参照してください。画面ミ
ラーリングの一般的な用語には、マルチスクリーン、ワイヤレスディスプレイ、WLAN ディスプレイ、画面ミラーリング、スマ
ート・ビューなどがあります。
デバイスの互換性:すべての Android 電話が画面ミラーリング機能をサポートしているわけではないことに注意してください。
画面ミラーリングを使用する前に、Android デバイスがこの機能をサポートしているかどうかを確認してください。デバイスの
マニュアルを確認するか、設定で画面ミラーリングオプションを検索して互換性を確認できます。
1.Android デバイスで WLAN 機能が有効になっていることを確認
してください。(WiFi ネットワークに接続する必要はありません。)
2. ホームページに戻る [ 無線スクリーン ] メニューを選択する
このインターフェースに留まること。
3.Android デバイスで [ コントロールセンター ] にアクセスし、[ 画
面のミラーリング / スマート・ビュー ] を選択します。
4.[WiMiUSS27 プロジェクター ] というミラキャストレシーバー
を選択して接続します。
5. 接続が成功すると、Android デバイスの画面がミラーリングさ
れ、投影スクリーンに表示されます。
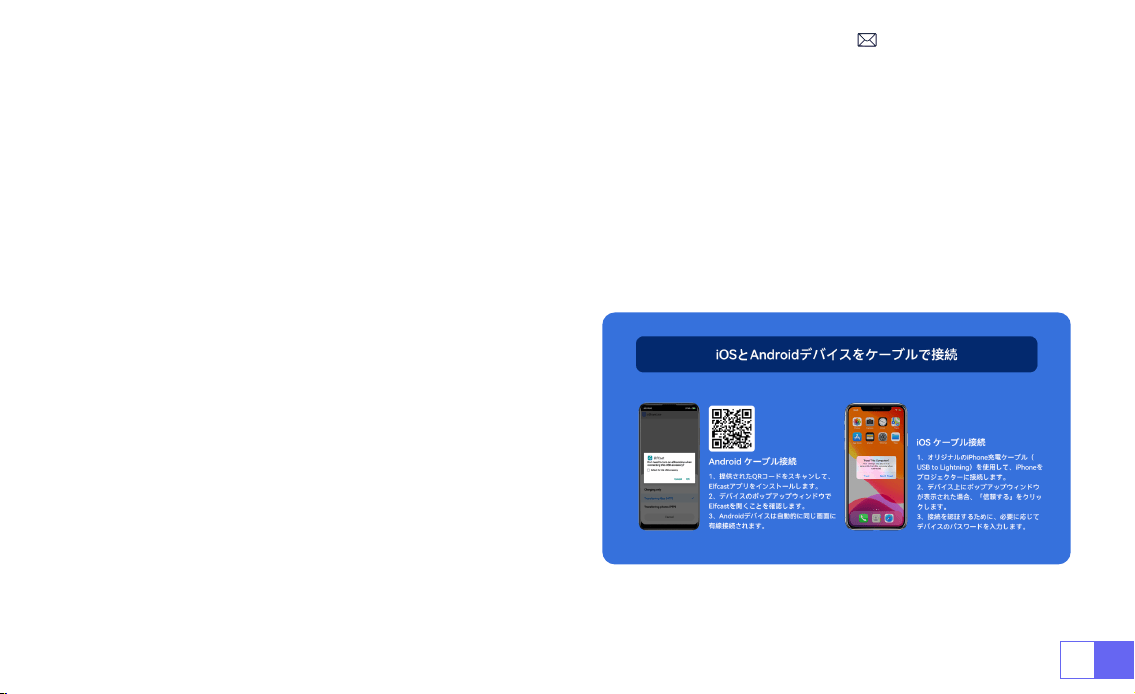
JP161
1. 提供された QR コードをスキャンして Elfcast アプリをインストールします。
2. お使いのデバイスのポップアップウィンドウで Elfcast を開くことを確認します。
3. 指示に従ってデバイスのパスワードを入力して接続を確認してください。
4. お使いの Android デバイスが自動的に同じ画面に配線されます。
1.iPhone 純正の充電ケーブルを使って iPhone をプロジェクタ
ーに接続します。
2. お使いのデバイスに表示されるウィンドウで " 信頼 " をクリ
ックします。
3. 指示に従ってデバイスのパスワードを入力して接続を確認し
てください。
3. 有線スクリーン
3.1 Android デバイスをケーブルで接続
3.2 iOS デバイスをケーブルで接続
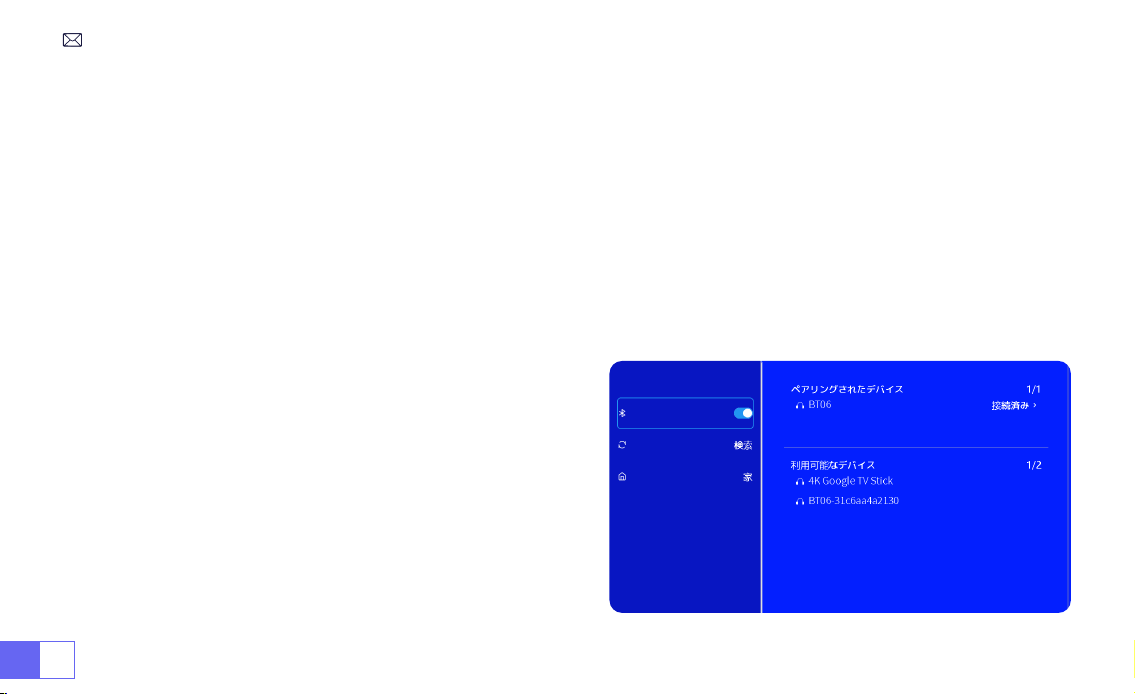
JP 162
1.Bluetooth スピーカーの電源を ON にします。
2. プロジェクターの [Bluetooth] をオンにし、Bluetooth スピーカーを選択して接続します。
ご注意:
1) S27 プロジェクターは、ほとんどの Bluetooth ヘッドセット、Bluetooth スピーカー、Airpods と互換性があり
ますが、Bluetooth キーボードは互換性がありません。
2) ビデオ再生中に音が出ない場合は、接続機器のドルビーサウン
ド設定を確認することをお勧めします。ドルビーサウンドをオフ
にすると、プロジェクターとの音声互換性が向上します。
3) Bluetooth スピーカーの中には、プロジェクターに接続すると
音量が著しく低下するものがあります。この問題に対処するには、
関連するすべてのデバイスの音量を上げて、希望のサウンドレベ
ルになるようにしてください。
お問い合わせください!
4.Bluetooth
Bluetooth スピーカーの接続

JP163
1) USB メモリーをプロジェクターの USB ポートに挿入します。
2)「メディア」を選択し、「OK」キーを押して入りなさい。
3) ファイルの種類によって、[ 動画 / 音楽 / 写真 / 書籍 ] を選択します。
4) 希望のファイルを選択し、[OK] ボタンを押して再生する。
5) ビデオ再生中にリモコンの "MENU " ボタンをクリックすると、画像設定を直接調整することができます。
5. マルチメディア・プレー
5.1 USB 入力モード

JP 164
ご注意 : プロジェクターが USB メモリーを認識できない場合は、以下の方法で問題を解決してください。
USB メモリーが以下のフォーマットを満たしていることをご確認ください:
FAT32: 8GB/16GB/32GB
NTFS: 64GB2TB
これらの条件を満たさない場合は、サポートされているフォーマットの USB メモリーに変更する必要があります。
問題が解決しない場合は、問題の詳細を以下のメールアドレスにお送りください: [email protected]om
5.2 動画再生インターフェース
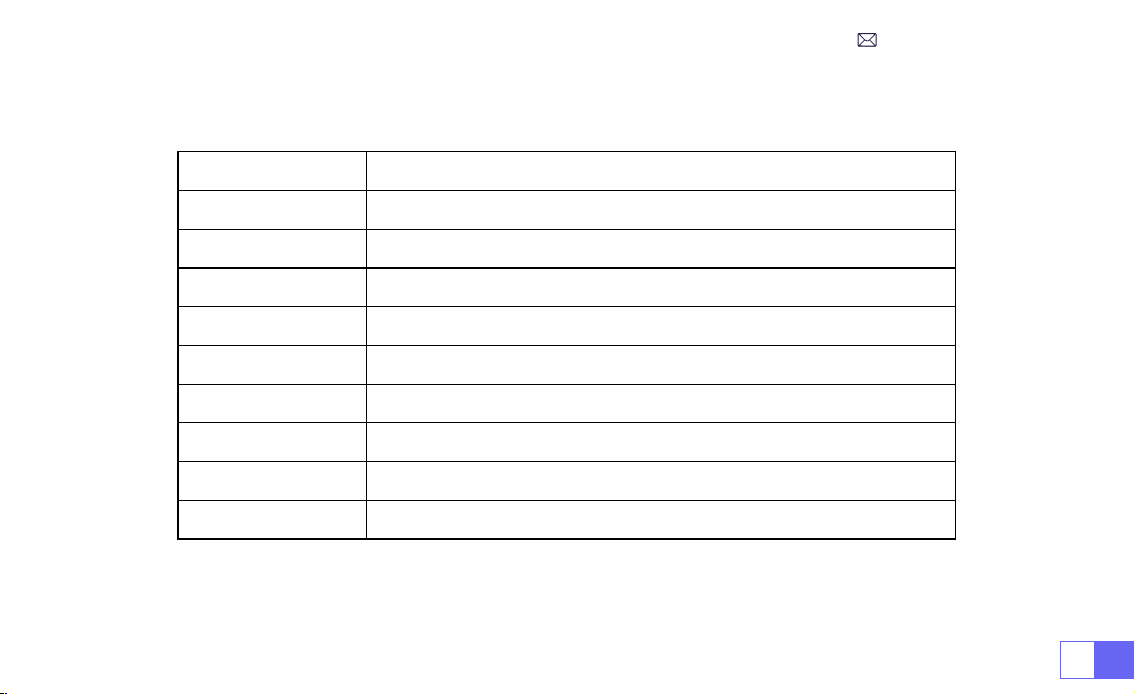
JP165
マニュアル 作用
FB 長押しで動画を早戻し
FF 長押しで動画を早送り
Prev 前の動画に切り替える
Next 次の動画に切り替える
Stop 再生を停止する
Round リストループまたはシングルループ
Info 動画詳細
List 現在のフォルダ内のすべての再生リストを選択する
16:9 アスペクト比 : オート /4:3/16:9

JP 166
プロジェクター設定
1. 画像設定
メニュー 内容 作用
画像モード 標準/動态/軽度/ユーザー コントラスト/輝度/色/鮮明度の調整
色温度 冷たい / 標準 / 暖かい 色温度の調整
アスペクト比 4:3/16:9 画面のアスペクト比の調整
ズーム 100%85% 画像サイズを縮小する
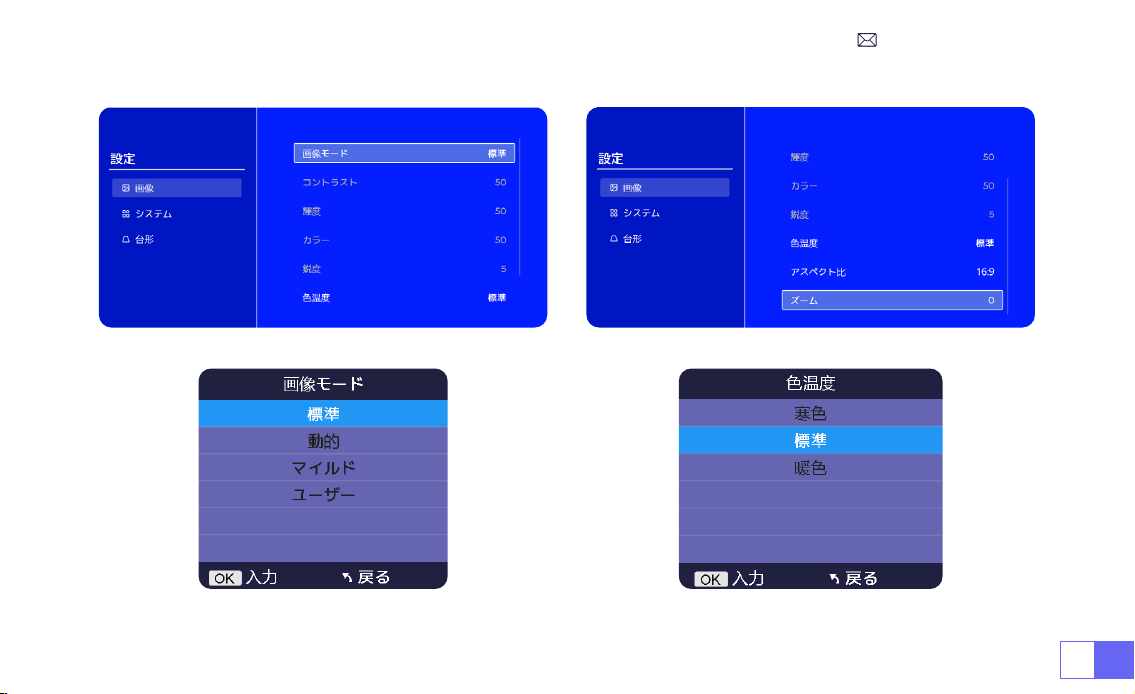
JP 168
2. システム設定
メニュー 内容 作用
OSD 言語
English/Français/Italian/Espanol/Deutsche/ 日
本語
言語を選択する
投影モード 前置 / 机の後ろに置く / 天井に前置 / 後置 投影画像の方向を反転させる
背景色 青/紺/グレー ホームページの色を変更する
工場出荷時のリセッ
ト
リセット Restore factory default settings
アップグレード 地元更新 (USB)/OTA 更新 ( オンライン )
地元のファイルを介してソフトウェアを更新する /
オンライン更新
オンライン更新 オンライン更新(OTA)
オンラインでソフトウェアを更新する
注:アップデート中はプロジェクターの電源を抜かないでください。
オートスリープ O/10m/20m/30m/60m/90m/120m/180m 睡眠時間を設定する
OSD タイマー O/5s/10s/15s/20s/25s/30s ホームページを返す時間を設定する
バージョン情報 ソフトウェア・バージョン ソフトウェア・バージョン
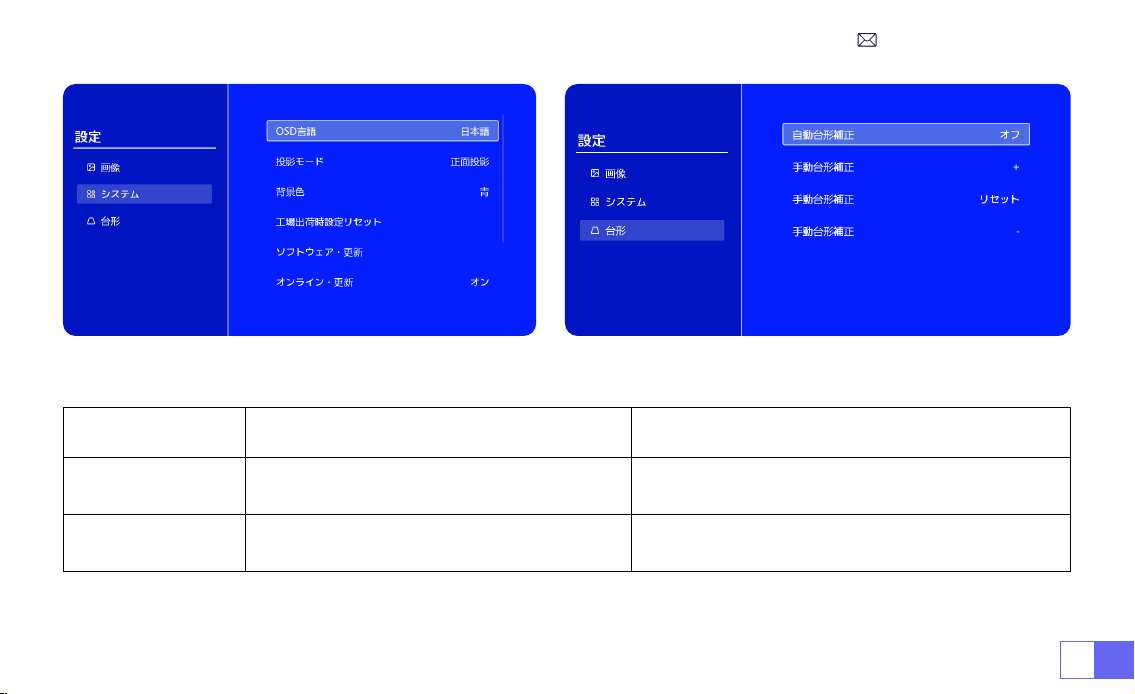
JP169
メニュー 内容 作用
自動台形
On/off
スクリーンの角度を垂直方向に ±30°調整する。
手動台形 +/-/リセット 手動で画面の角度を垂直に調整する
3. 台形
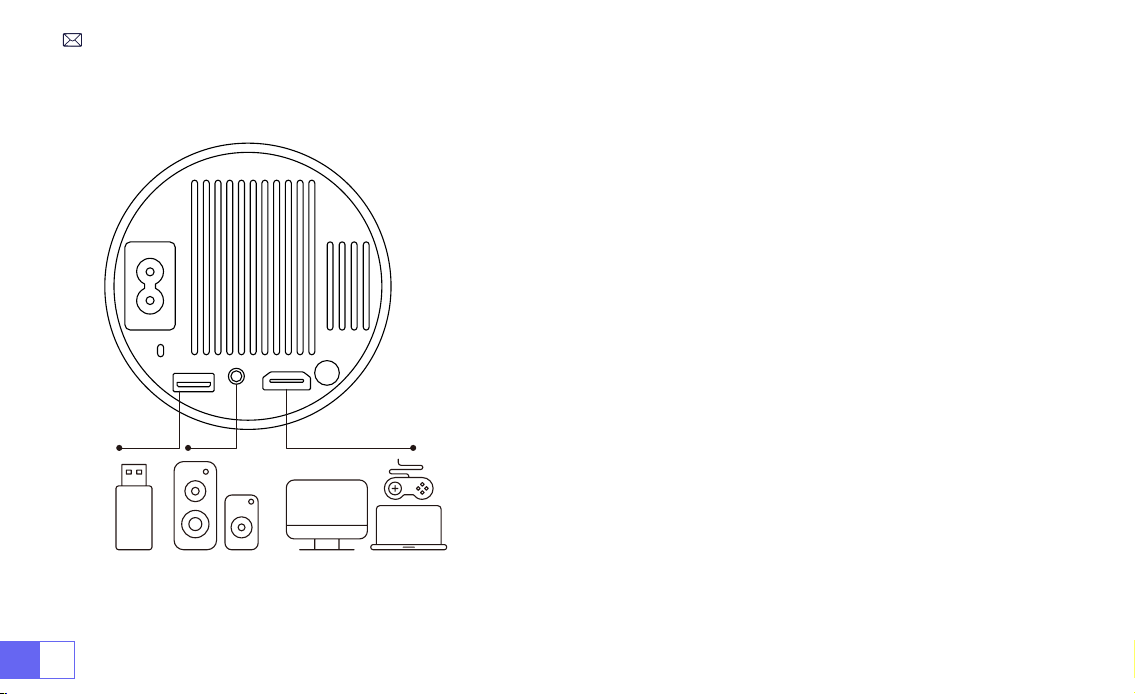
JP 170
信号線の接続
WiMiUS s27 プロジェクターは、HDMI ポート *1/USB ポート *1/3.5mm ヘ
ッドフォン出力 *1 の 3 つのインターフェースを備えています。お使いのデ
バイス(PC、電話、DVD プレーヤー、USB、PS4 など)を接続するために、
正しい接続ポートを選択してください。
1) USB メモリーを USB 入力端子のいずれかに差し込む。
2)「メディア」を選択し、「OK」キーを押して入る。
3) ファイルの種類によって , [ ビデオ / 音楽 / 画像 / オフィス ] オプション
を選択する。
4) USB メモリーのファイルを選択し、[OK] ボタンを押して再生する。
1) Fire TV スティック(または PC、XBOX、PS4 など)をプロジェクターの
HDMI ポートに接続します。
2) ホームページに入り、対応する HDMI を信号ソースとして選択します。
1.USB 接続
2.HDMI 接続
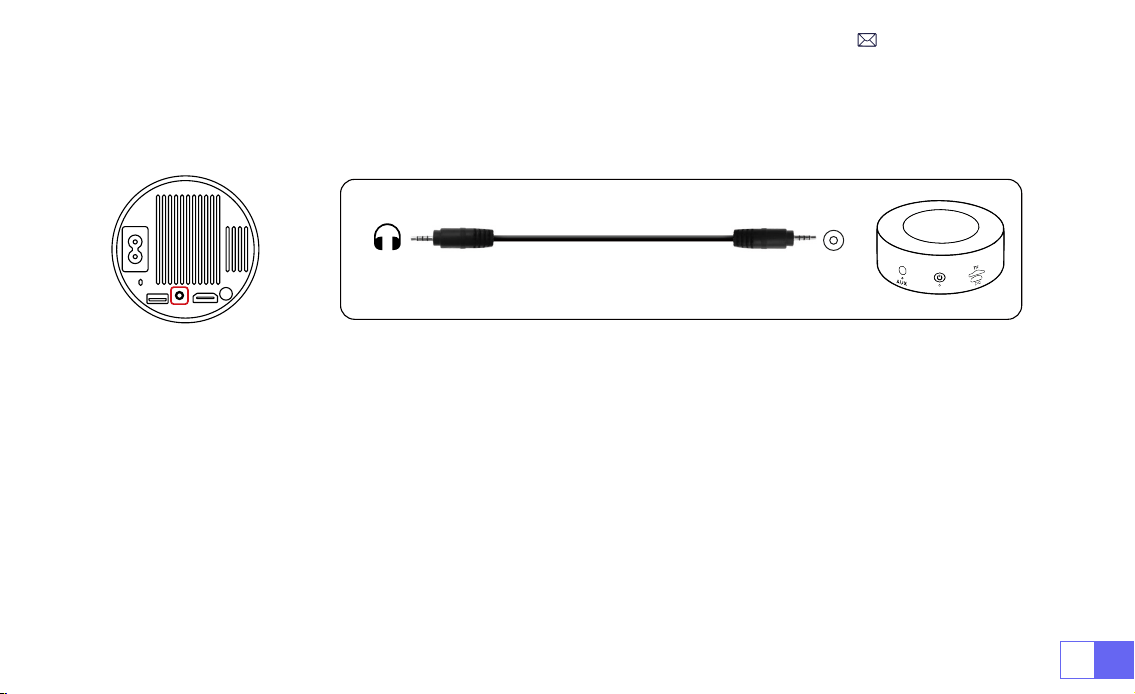
JP171
プロジェクターに付属の 3.5mm オーディオケーブルを使用して、サウンドバーと接続します。
プロジェクターとサウンドバー(AUX モードを選択)をオンにします。
1) DVD プレーヤーとプロジェクターの電源をオンにます。
2) パッケージの 3in1AV ケーブルで、DVD プレーヤーの RCA ケーブルに接続ます。
3) 黒いコネクターをプロジェクターの AV 端子に接続し、ホームページに入り、[AV] 信号源を選択してください。
注:プロジェクターと DVD プレーヤーを HDMI ケーブルで接続した場合、音が出ない場合は、DVD プレーヤーの HDMI ポート
の出力信号が HDCP に対応していない可能性がありますので、スピーカーを接続してみてください。
3. スピーカー / サウンドバーとの接続
4.DVD プレ—ャーとの接続
Audio
out
AUX
port
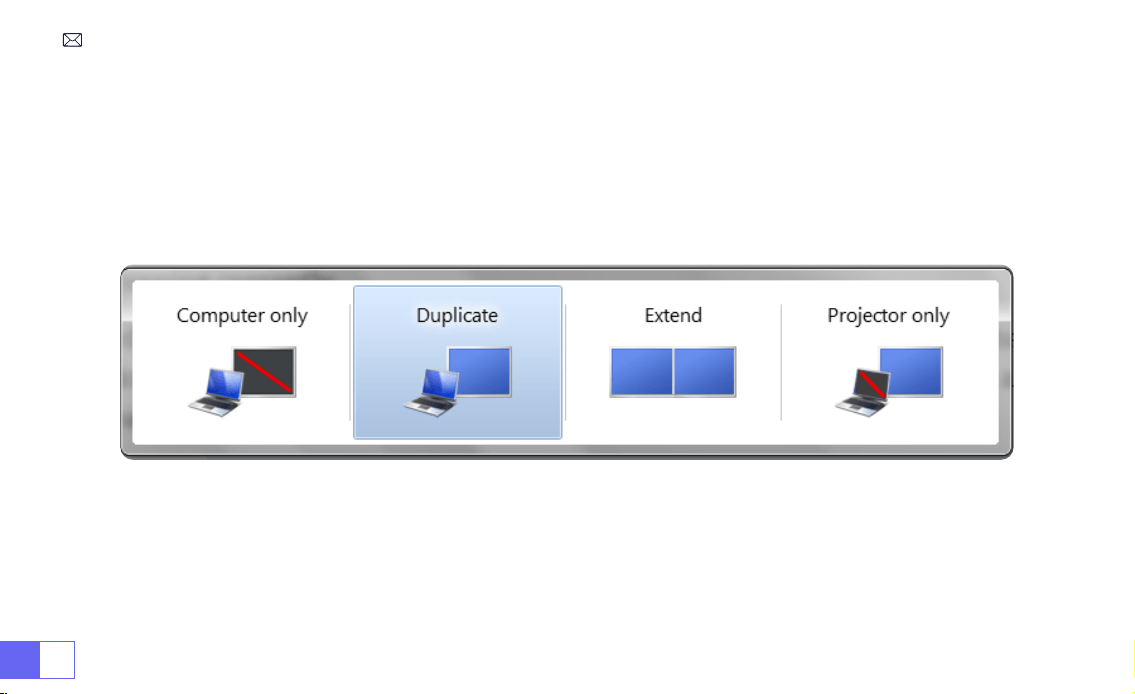
JP 172
1) HDMI ケーブル(付属)でパソコンと s27 プロジェクタを接続します。
2) HDMI ソースを選択すると、パソコン上の任意のファイルを投影することができます。
3) ノートパソコンで、「Win+P」ボードキーを押したままにします。
ご注意:Macbook と接続する場合は、外部 HDMI タイプ C ケーブルが必要です。
1)Computer only: フォルトのオプションです。メインモニタにのみ表示されます。
2)Duplicate: すべてのモニタに同じものを表示させ、各モニタのデストップを複製します。
3)Extend: すべてのモニタを1つの大きなモニタのように機能させ、デスクトップをそれらすべてに拡張します。
4)Projector only: プロジェクターのようにセカンダりモニタにのみ表示せれます。
5.PC との接続
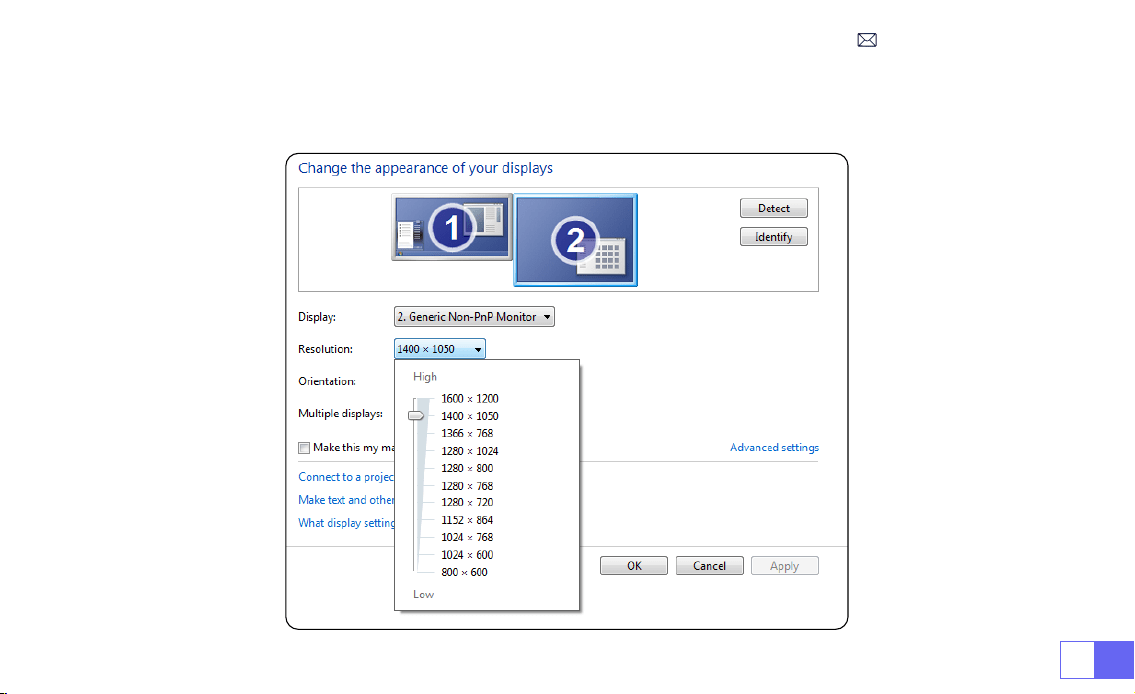

JP 174
FAQ
WiMiUS s27 プロジェクターをご利用いただき、ありがとうございます。以下はいくつかの Q&A です。ご参考になれば幸いです。
Q1: 投影映像に黒い点があります。どうすれば取れますか?
A: プロジェクターを軽くたたくか、ドライヤーで内部に風を送ってください。プロジェクターの側面ほこりクリーニングポートを注意深く開けて
ください。きれいな綿棒でスクリーンの内側を拭いてください。必要であれば、アルコールに浸すとよりきれいになります。損傷を与えないよう
に注意してください。詳しくは、[email protected] までメールでお問い合わせください。
Q2: 画面ミラーリングまたは WiFi 接続が不安定です。どうすれば解決できますか?
A: 画面ミラーリングには強力なワイヤレス WiFi 信号が必要です。ビデオ解像度は、WiFi 信号の強度に基づいて動的に調整されます。さらに、携
帯電話のホットスポットを有効にして S27 に接続し、問題がホームネットワークにあるかどうかを確認してください。それでも問題が解決しな
い場合は、[email protected]om までお問い合わせください。
Q3: スクリーンミラーリングの際、プロジェクターで Netix、Youtube、Hulu、Disney などのビデオを再生できません。なぜですか?
A: 著作権の制限により、ほとんどのプロジェクターは Netix、Hulu、Disney などのストリーミングサービスのワイヤレスミラーリングをサポー
トしていません。これらのサービスを楽しむには、プロジェクターと一緒に TV Stick(別売)を使用することをお勧めします。
Q4: スクリーンが上下逆なのはなぜですか?
A: 設定→投影モード→画像の向きを反転してください。プロジェクターのレンズをプロジェクションスクリーンまたはスクリーンに対して垂直に
置いてください。フォーカス調整ローラーを使用して、画像が鮮明になるまでフォーカスを調整します。画像の矩形を調整するには、画像設定に
アクセスし、自動台形補正または手動台形補正機能を有効にします。
Q5: プロジェクターに画像が表示されますが、音が出ません。何が原因でしょうか?
A: 1) プロジェクターはドルビーサウンド、DTS、5.1 チャンネル、HDMI CEC、ARC をサポートしていません。接続機器のドルビー設定をオフに
してください。
2) プロジェクターの音量と外部機器または Bluetooth スピーカーの音量が適切なレベルに設定されていることを確認してください。
3) 他のスピーカーで別のビデオを再生してみてください。Bluetooth スピーカーのバージョンによっては、プロジェクターとうまく動作しない場
合があります。
でご連絡ください。

FCC Statement
FCC STATEMENT :
This device complies with Part 15 of the FCC Rules. Operation is subject to the following two conditions:
(1)This device may not cause harmful interference, and
(2)This device must accept any interference received, including interference that may cause undesired operation.
Warning: Changes or modications not expressly approved by the party responsible for compliance could void the
user's authority to operate the equipment.
NOTE: This equipment has been tested and found to comply with the limits for a Class B digital device, pursuant to
Part 15 of the FCC Rules. These limits are designed to provide reasonable protection against harmful interference in
a residential installation. This equipment generates uses and can radiate radio frequency energy and, if not installed
and used in accordance with the instructions, may cause harmful interference to radio communications. However,
there is no guarantee that interference will not occur in a particular installation. If this equipment does cause
harmful interference to radio or television reception, which can be determined by turning the equipment off and on,
the user is encouraged to try to correct the interference by one or more of the following measures:
Reorient or relocate the receiving antenna.
Increase the separation between the equipment and receiver.
Connect the equipment into an outlet on a circuit different from that to which the receiver is connected.
Consult the dealer or an experienced radio/TV technician for help.

FCC Radiation Exposure Statement:
This equipment complies with FCC radiation exposure limits set forth for an uncontrolled environment. This
equipment should be installed and operated with minimum distance 20cm between the radiator & your body.
This device contains licence-exempt transmitter(s)/receiver(s) that comply withInnovation, Science and Economic
DevelopmentCanada’s licence-exempt RSS(s). Operation is subject to the following two conditions:
(1) This device may not cause interference.
(2) This device must accept any interference, including interference that may cause undesired operation of the
device.
L’émetteur/récepteur exempt de licence contenu dans le présent appareil est conforme aux CNR d’Innovation,
Sciences et Développement économique Canada applicables aux appareils radio exempts de licence. L’exploitation
est autorisée aux deux conditions suivantes :
(1) L' appareil ne doit pas produire de brouillage;
(2) L' appareil doit accepter tout brouillage radioélectrique subi, même si le brouillage est susceptible d' en
compromettre le fonctionnement.
This equipment complies with IC exposure limits set forth for an uncontrolled environment. This equipment shall be
installed and operated with minimum distance 20cm between the radiator & body.

Correct Disposal of this product
This marking indicates that this product should not be disposed with other household wastes throughout
the EU. To prevent possible harm to the environment or human health from uncontrolled waste disposal,
recycle it responsibly to promote the sustainable reuse of material resources. To return your used device,
please use the return and collection systems or contact the retailer where the product was purchased.
They can take this product for environmental safe recycling.
Declaration of Conformity
We (Manufacturer is responsible for this declaration)
YABER TECHNOLOGIES CO., LIMITED
(Company name)
Room 406, 4 Floor, B Building, BanTian International Center, HuanCheng South Road, BanTian Street, LongGang
District, Shenzhen
(Company address)
declare under our sole responsibility that the product
Trade name: WIMIUS
Equipment: Entertainment Projector
Model No. : S27
Declaration of Conformity

to which this declaration relates is in conformity with the essential requirement set out in the Council Directive on the
Approximation of the laws of the Member States relating to RED Directive(2014/53/EU) & RoHS(2011/65/EU) product
is responsible to afx CE marking, the following standards were applied:
EN 62368-1:2014+A11:2017
EN IEC 62311:2020
ETSI EN 301 489-1 V2.2.3(2019-11)
ETSI EN 301 489-17 V3.2.4(2020-09)
EN 55032:2015
EN 55035:2017
EN 61000-3-2:2019
EN 61000-3-3:2013+A1:2019
ETSI EN 300 328 V2.2.2(2019-07)IEC62321-3-1:2013
IEC62321-4:2013
IEC62321-5:2013
IEC62321-6:2015
IEC62321-7-1:2015
IEC62321-7-2:2017
IEC62321-8:2017
Full Name: George.wang Position: Approbation Manager
Signature: Place/Date: Shenzhen,China/Jul.10-2023