P64 PROJECTOR
USER MANUAL


EN
DE
FR
ES
IT
JP
English
Deutsch
Français
Español
Italiano
日本語
P02-31
P32-61
P62-91
P92-121
P122-151
P152-181

EN
2
Table of Contents
WiMiUS 7D/24H Professional Support- - - - - - - - - - - - - - - - 2
TIPS - - - - - - - - - - - - - - - - - - - - - - - - - - - - - 3
PACKAGE LIST - - - - - - - - - - - - - - - - - - - - - - - - - 4
PROJECTOR SPECIFICATIONS - - - - - - - - - - - - - - - - - - - 5
PRODUCT STRUCTURE - - - - - - - - - - - - - - - - - - - - - - 6
Remote Control - - - - - - - - - - - - - - - - - - - - - - - - 7
INSTALLATION - - - - - - - - - - - - - - - - - - - - - - - - - 8
STARTING PROJECTOR - - - - - - - - - - - - - - - - - - - - - - 11
PROJECTION IMAGE SETTINGS - - - - - - - - - - - - - - - - - - - 12
SETTING UP THE PROJECTOR - - - - - - - - - - - - - - - - - - - 16
SIGNAL LINES CONNECTION - - - - - - - - - - - - - - - - - - - - 22
MAIN MENU FUNCTION - - - - - - - - - - - - - - - - - - - - - - 25
FAQ - - - - - - - - - - - - - - - - - - - - - - - - - - - - - 29

EN
3
Dear customer,
Thank you very much for supporting WiMiUS!
Please read this manual thoroughly before using the projector. If you have any issues, email your country code,
order number and the problem (For Exemple: US+P64+No Voice) to
. We will provide a
fast solution within 24 hours.
Actually, many problems can be easily solved by setting, such as no signal, no sound, Bluetooth connection failed,
WiFi connection failed, dark spots, choppy animation etc. We promise all the projectors have been 100% carefully
checked and packaged before shipping.
If you have any questions, could you please contact us so that the problem can be solved. And give us an
opportunity to improve. We guarantee we will provide you with a satisfactory solution.
Thanks for your understanding!
WiMiUS Service Team
WiMiUS 7D/24H Professional Support

EN
4
1.Do not place the projector in too warm or too cold a room, because the high temperature or low temperature will
shorten the lifespan of the device. The working environment would be 5°C~35°C better.
2.If there are black spots on the projection screen, please don't worry, please contact
via
email, and we can send you a video about how to remove the dust.
3.The ventilation is equipped for the projector to work stably. Don't cover the vent with cloth, blanket or other things.
Don't insert anything into the slit of the projector, or it may produce a short circuit or an electric shock to your device
and cause damage.
4.The projector shall be strictly protected from strong impact, extrusion and vibration. Do not try to move and on
strong impact, extrusion and vibration. Do not try to move and the internal circuit faults.
5.Lens, as the core component of the projector, is directly related to the picture denition and effect. The excessive
dust thereon will affect image quality. The dirty lens shall be wiped with a soft cotton cloth for the glass lens surface.
Hard cloth or abrasives shall not be used.
TIPS:

EN
5
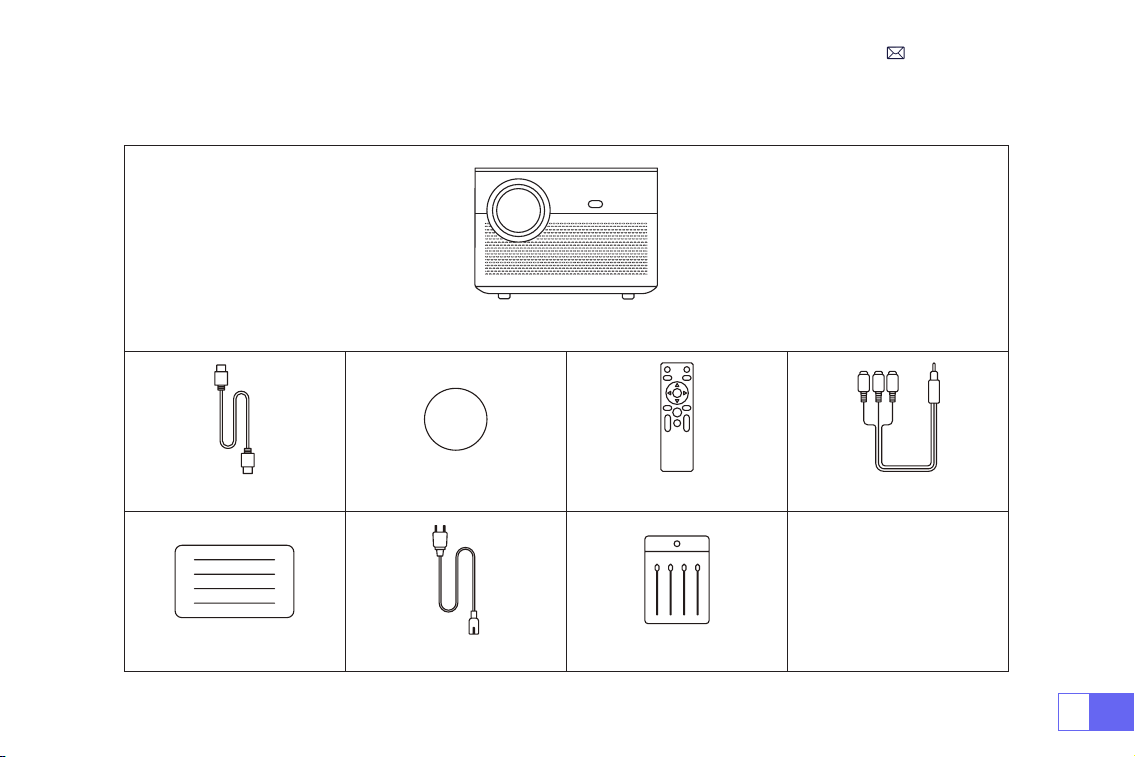
WiMiUS P64 Projector*1
HDMI Cable*1 Lens Cap*1 Remote Control*1 3-in-1 AV Cable*1
User Manual*1 Power Cable*1 Cleaning Swab*1
PACKAGE LIST
EN
6
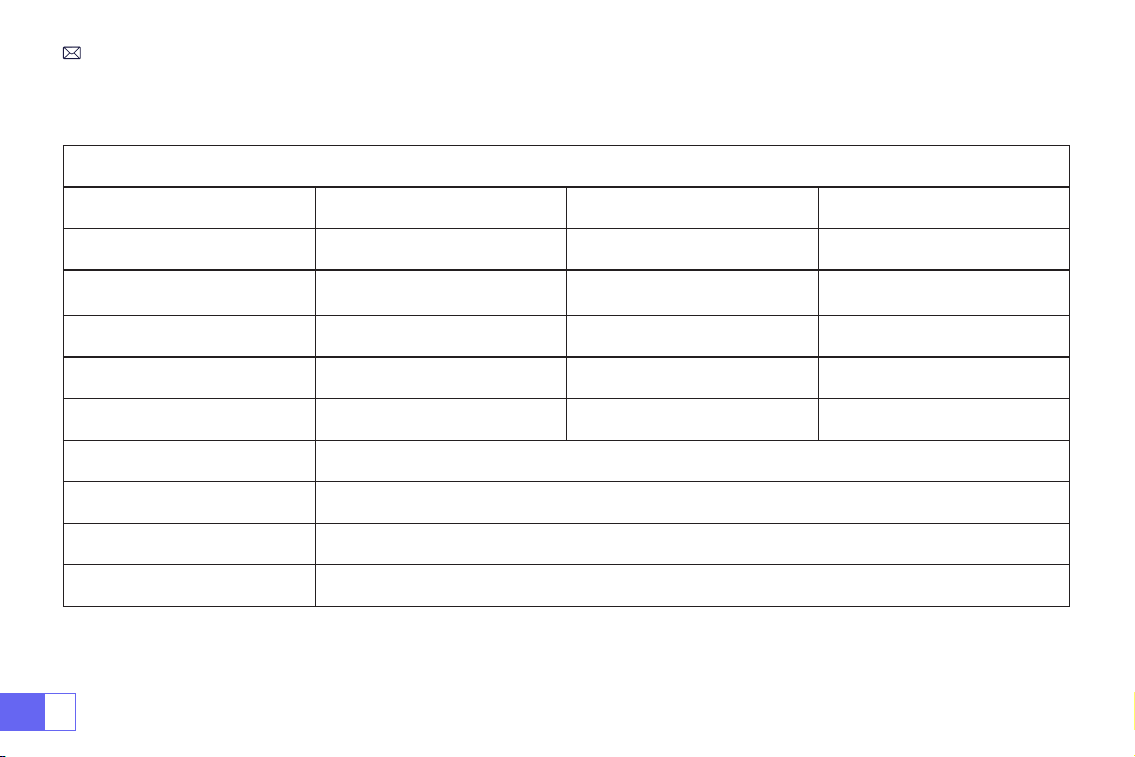
PROJECTOR SPECIFICATIONS
Model No.: P64
Display Technology
LCD
Light Source
LED
Native Resolution
1920x1080P
Zoom Function
50%-100%
Installation Type
Front/Rear on Desk, Front/
Rear on Ceiling
Aspect Ratio
16: 9/4: 3/Auto
Projection Distance
1.5-6m
Power Voltage
AC100-240V
Product Size
197*227*163mm
Product Weight
2.7kg
Keystone Correction
Auto + Electric
Focus
Auto + Electric
Input Interface
HDMI*2/USB*2/AV/3.5mm audio out
VideoFormat
H.264/H.265/MP4/AVI/WMV/MKV/FLV
Audio Format
MP3/WAV/MAK
Image Format
JPG/PNG/BMP/JPEG

EN
7
PRODUCT STRUCTURE
1.Power
2. Arrow Keys
3. Conrm
4. Back
5. Manual Focus +
6. Manual Focus -
7/8. USB Ports
9/10. HDMI Ports
11. AV Ports
12. 3.5mm Headphone jack
13. Infrared signal receiving window
14. Anti-Dust Mesh
(Regular Cleaning Recommended)
1 2 3 4 5 6
7 8 9 10 11 12
13

EN
8
9
8
11
12
13
10
1
2
3
4
6
7
14
5
Remote Control
1. Power
2. Home
3. Arrow keys
4. Menu
5. Pause the tape
6. Volume +
7. Volume -
8. Mute
9. Setting
10. Conrmation key
11. Back
12. Focus +
13. Focus -
14. Source
Note:
1. Install 2 pieces of AAA batteries(not included) into the remote before using it, do not combine new batteries with
old ones in the remote control, which can cause operation failure due to insufcient power supply.
2. When using the remote control, please make sure that the signal transmitter of the remote control aims at the
infrared signal of the projector.
3. When you are not using the remote control for a long period. Please take out the batteries to prevent them from
leakage.

EN
9
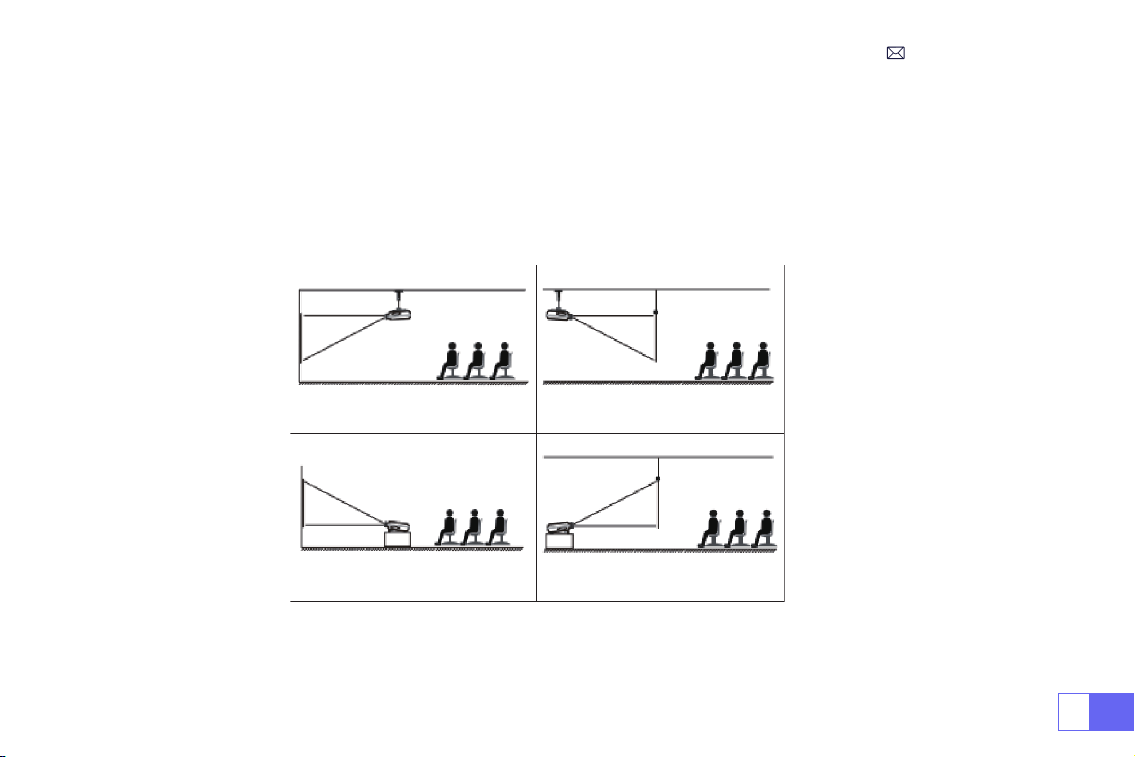
1. Front projection Ceiling mount 2. Rear projection Ceiling mount
3. Front projection Desk mount 4. Rear projection Desk mount
INSTALLATION
The projector can be hanged on the ceiling with special hanger frame, and placed on the stable desk to project the
image according to the operating environment and requirements. In addition, the projector can be installed with the
following methods:
Keep the projector at a height where its lens is axial symmetry to the screen. If this is not possible, use the keystone
correction function to adjust the projection image.
1.Installation Method

EN
10
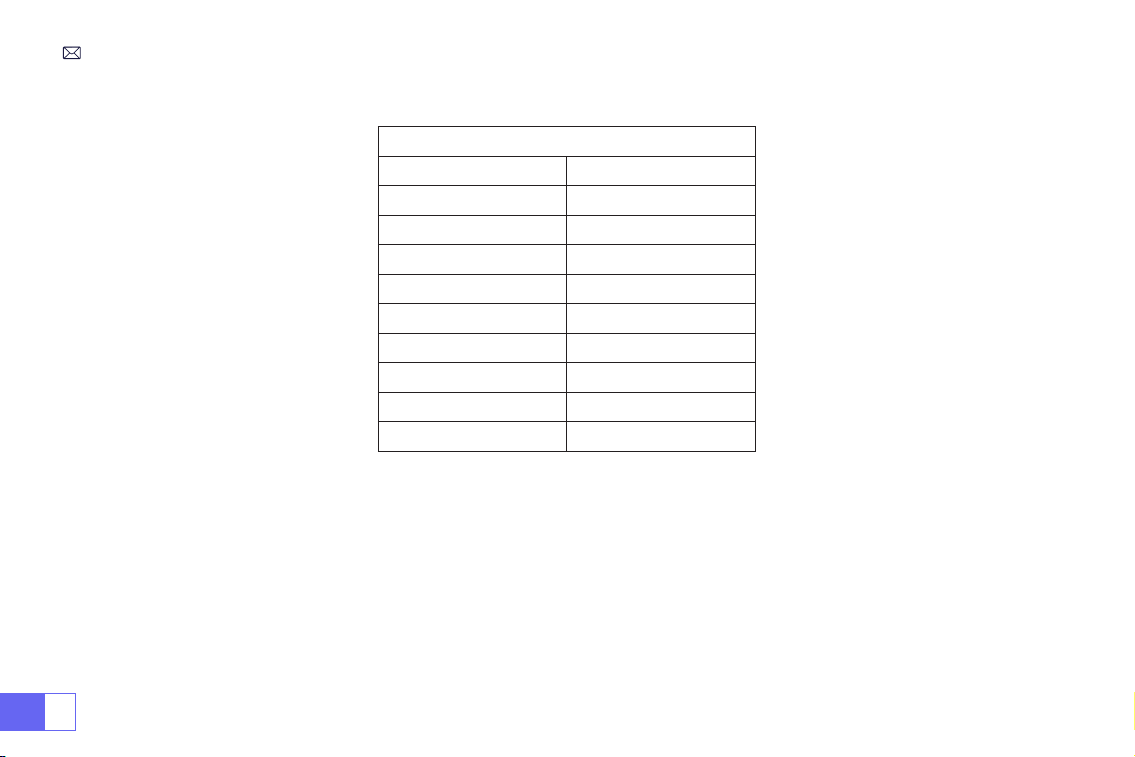
2.Projection Distance and Size
Aspect Ratio: 16:9
Distance Screen Size
1.6m 49”
2m 60”
2.5m 75”
3m 93”
3.5m 109’’
4m 125’’
4.5m 141’’
5m 157’’
6m 300’’
*The image size depends on the distance between projector and screen. there may be 3% measure difference
among above listed data.
*The recommended projection distance is 2.5-3m.
*Ambient darkness will improve the clarity of the projected images.

EN
11
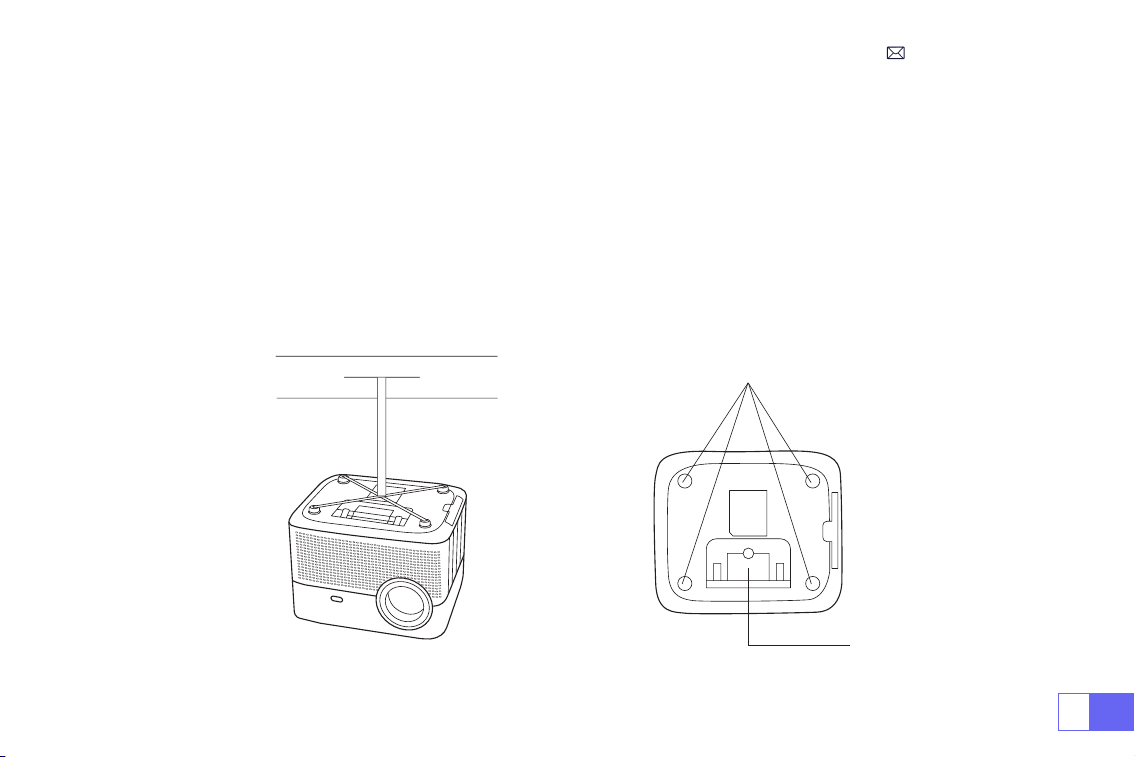
3.Install on the Ceiling
Keep the projector vertical and towards the mid of the projector screen, and keep the projection image at on the
screen.
1. To adjust the tilt base, unscrew the support rod at the bottom of the projector, see the below picture.
2. For the Ceiling mount, there are 4 holes at the bottom of the projector
(M4*10mm)
. Please slowly unscrew the 4
black rubbers, and then you can nd the holes for the ceiling mount, see the below picture.
NOTE: The hanging bracket or ceiling mount stand is not packaged.
Screw holes
Bottom support bracket

EN
12
STARTING PROJECTOR
1)Remove the lens cap, connect the projector to the power through the power supply cable, and press the power
key on the remote or projector, it starts working.;
2)Use the
Automatic or Electronic keystone/ focus function
of the projector to get a rectangle and clear image;
3)Adjust the focus button''F+'' ''F-'' on the projector or the remote to get the best image performance; (If it is still
blurry, please try to adjust the projection distance.)
4)Connect the external device (Smartphone, iPad, Fire Stick, TV box, DVD player, PC, etc.in the corresponding
interfaces of the projector, please be sure to select the corresponding source. If you do not select the correct source,
the projector will not be able to detect the signal)
5)Select the " " menu,enter the [ Language Settings], and then you can set your preferred language.

EN
13
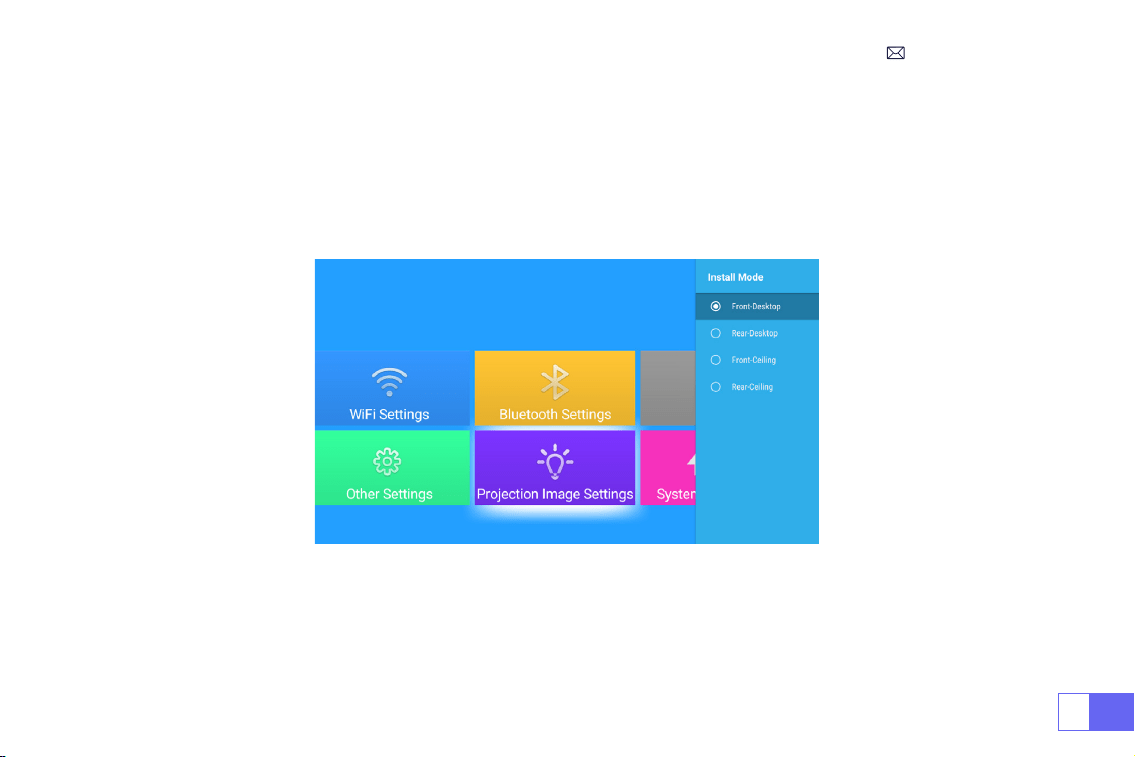
PROJECTION IMAGE SETTINGS
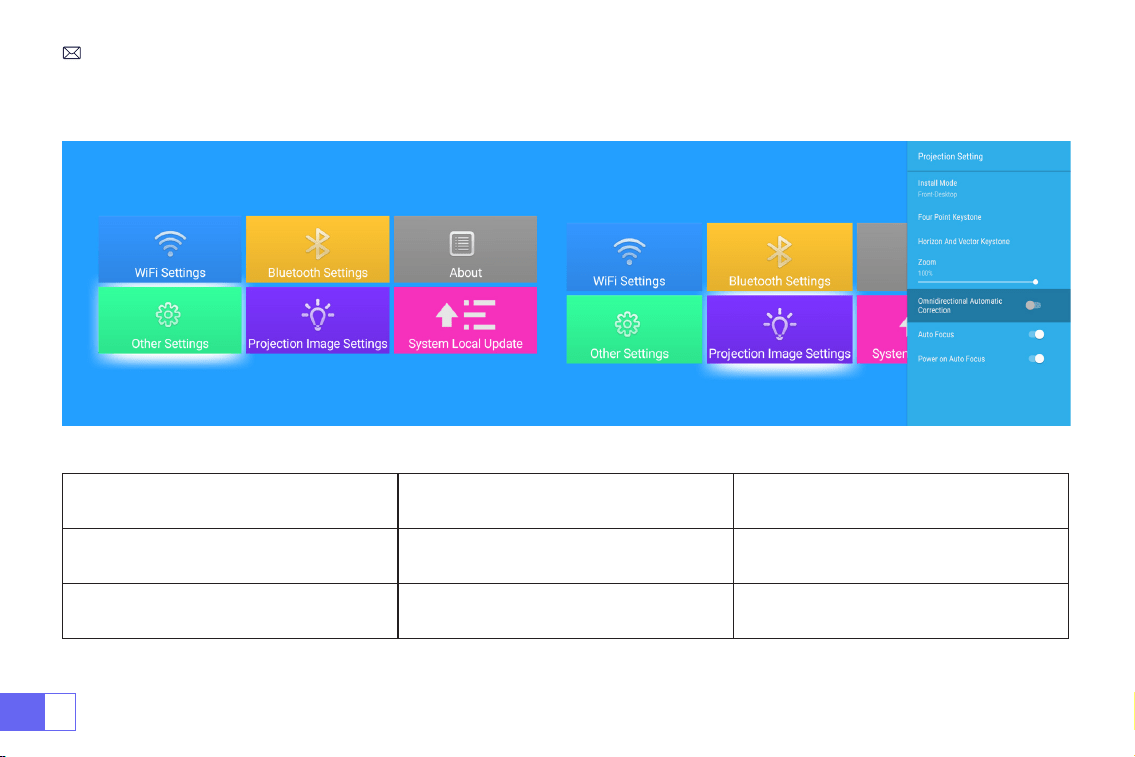
Select the [ Projection Image Settings ] menu -- Select the [ Projection Setting Option ] -- Select the
[Install Mode]
,
Press the arrow key to select and press “OK” to conrm the projection position.
1.Projection Mode

EN
14
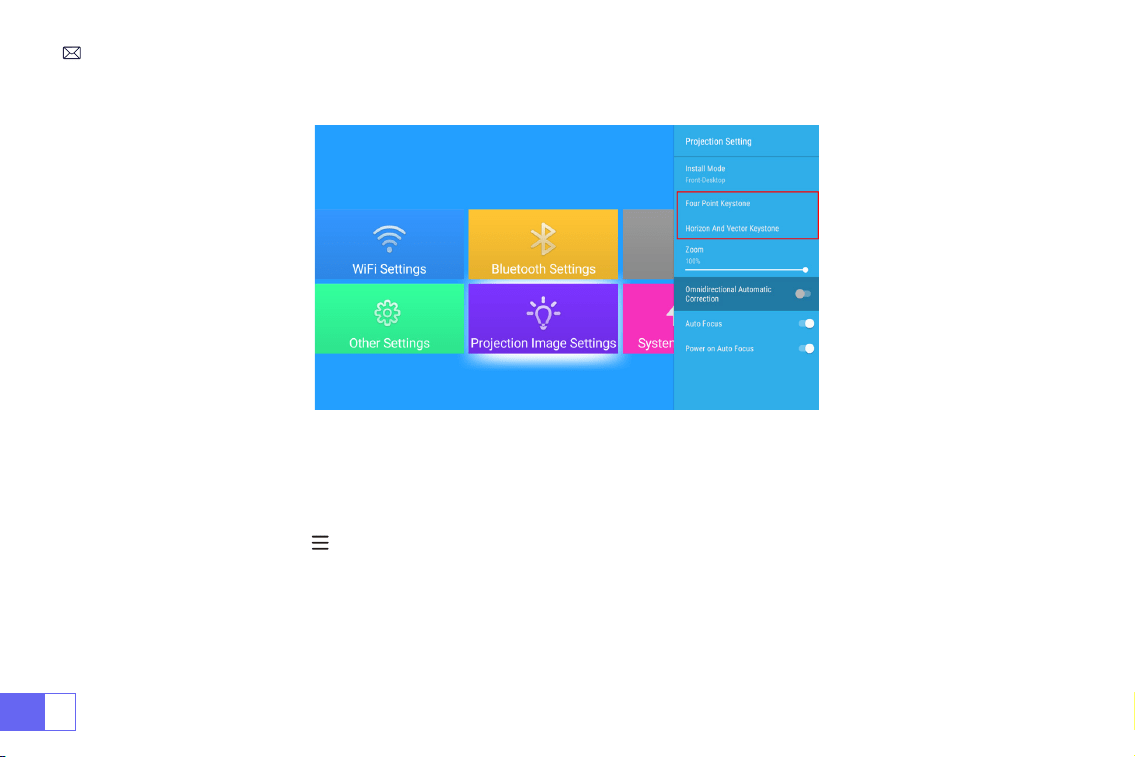
2.Manual Keystone Correction
2.1 Four-Point Keystone
Select the [ Projection Image Settings ] menu -- Select the [ FourPoint Keystone ] Option, Just click “OK” button to
pick the point you want to adjust at rst, and then press the button "
▶
" or "
▼
" to set the value(Horizontal and
Vertical 0~100) needed as shown below.
Reset: Press " ", and the image will restore to the original keystone correction settings.

EN
15
2.2 Horizontal and Vertical Keystone
Select the [ Projection Image Settings ] menu -- Select the
Horizontal or Vertical Keystone
Option to adjust the
screen horizontally or vertically
±30°
with the arrow keys until the guides are adjusted to a rectangle.
Please place the projector horizontally face to the wall rst, Select the [ Projection Image Settings ] menu -- turn on
the
[ Omnidirectional Automatic Correction ] or [ Auto Focus ]
option, then it will automatically focus the picture
based on the projection distance from the screen and adjust the picture to a rectangle when you change the
projection angle.
If the picture is blurry, press repeatedly the focus button ''F+'' ''F-'' on the remote control to adjust the lens focus,
tap or long-press the adjustment button until the picture is clear(There is no need to press the OK button after the
screen is clear).
3.Auto Keystone Correction and Focus

EN
16
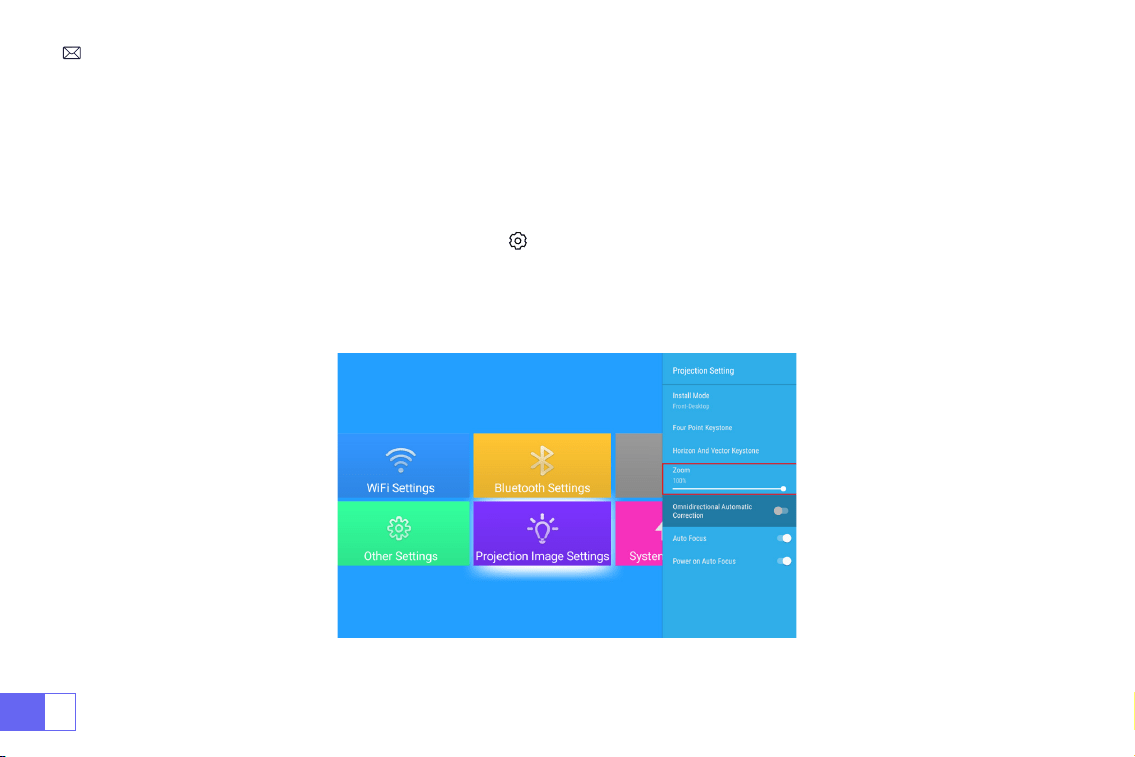
Go to the home page -- Select the [ ] menu -- Select the [ Projection Image Settings ]-- Select the [ Zoom ]
option, the projection screen can be zoomed 50%~100%. Press the button "
◀ ▶
" to set the value needed as shown
below.
4.Zoom Setting
Note: The side projection angle of the projector should not exceed 20°, otherwise the automatic keystone
correction function may not work.

EN
17
SETTING UP THE PROJECTOR
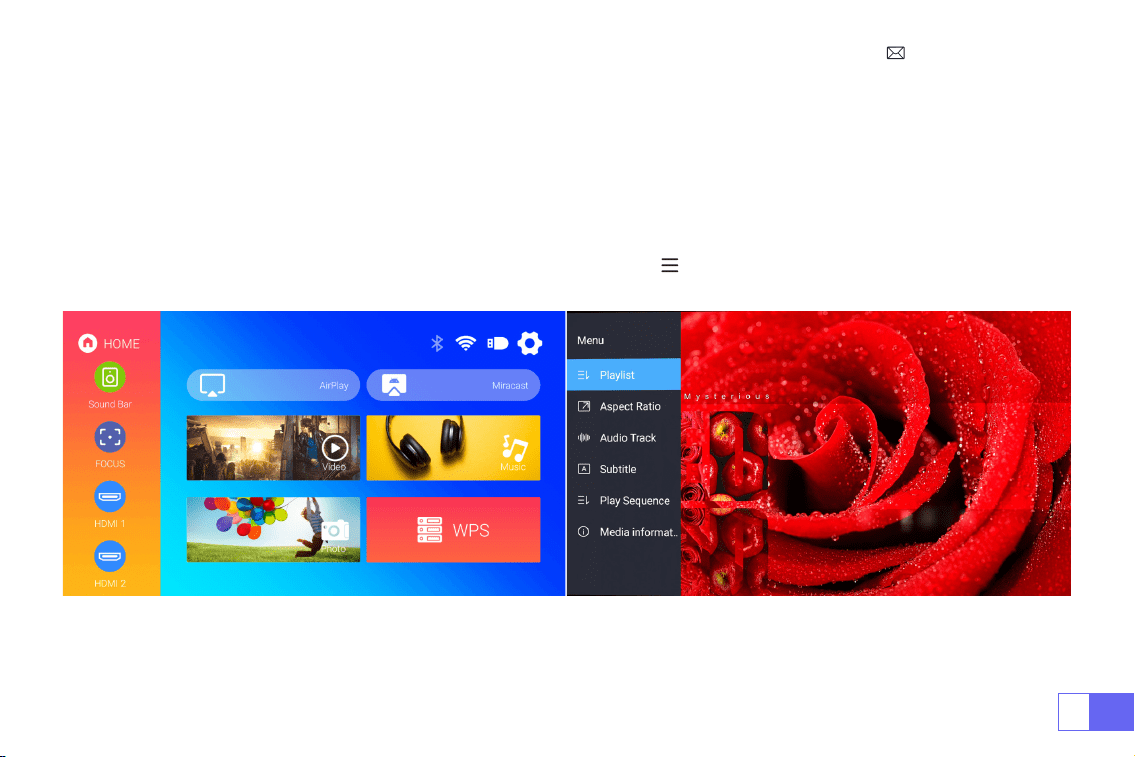
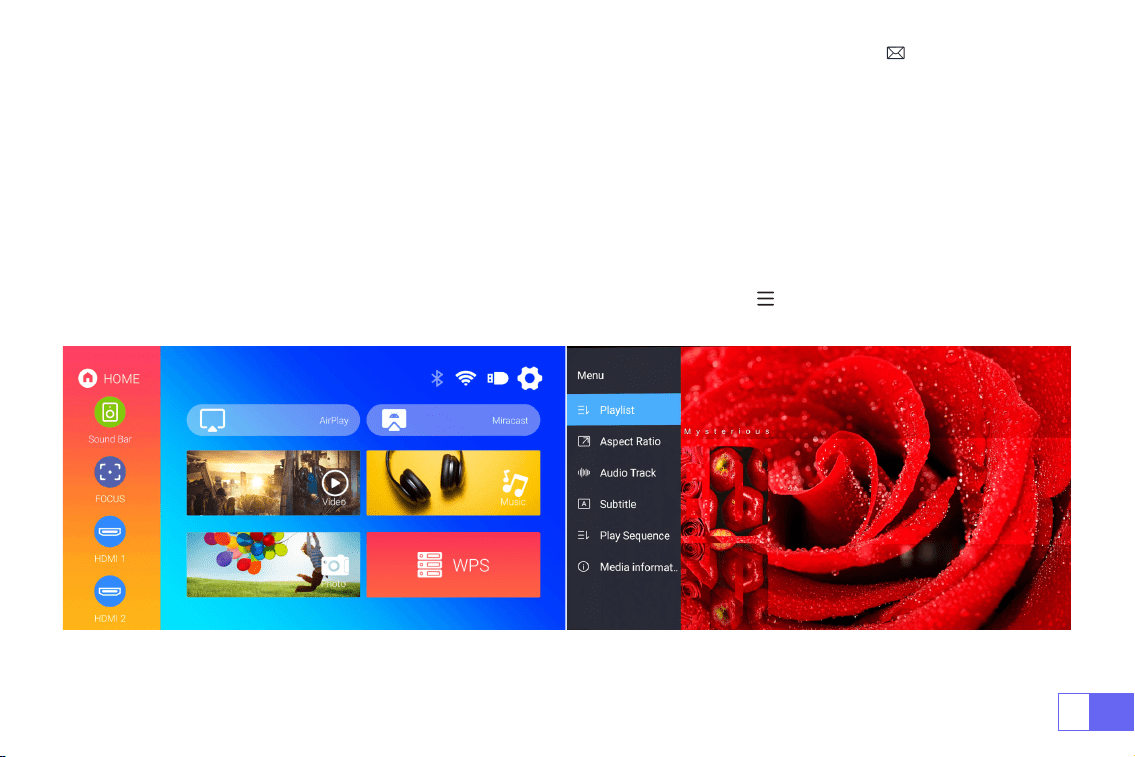
Select the desired input signal source (HDMI1/HDMI2/AV) on the home page, or you can press the “S” button on the
remote control to select the corresponding signal source, For USB devices, no need to choose the signal source. The
machine will detect them automatically.
When playing a video, you can press the menu button " " , then set the aspect ratio of the image and other
playback modes.
1.Select The Input Signal Source
EN
18
Warming Tips:
1. The fluency of screen mirroring with a wireless connection will be affected by the network environment. A
bandwidth of 100Mbit or more is recommended when using screen mirroring.
2. Make sure your mobile device is close to the projector when using a wireless connection. A distance of 1 meter is
recommended.
3. Some Android devices may not support screen mirroring due to the compatibility.
4. Any questions, please feel free to email WiMiUS via
.
2.Connecting with Smartphones and iPad
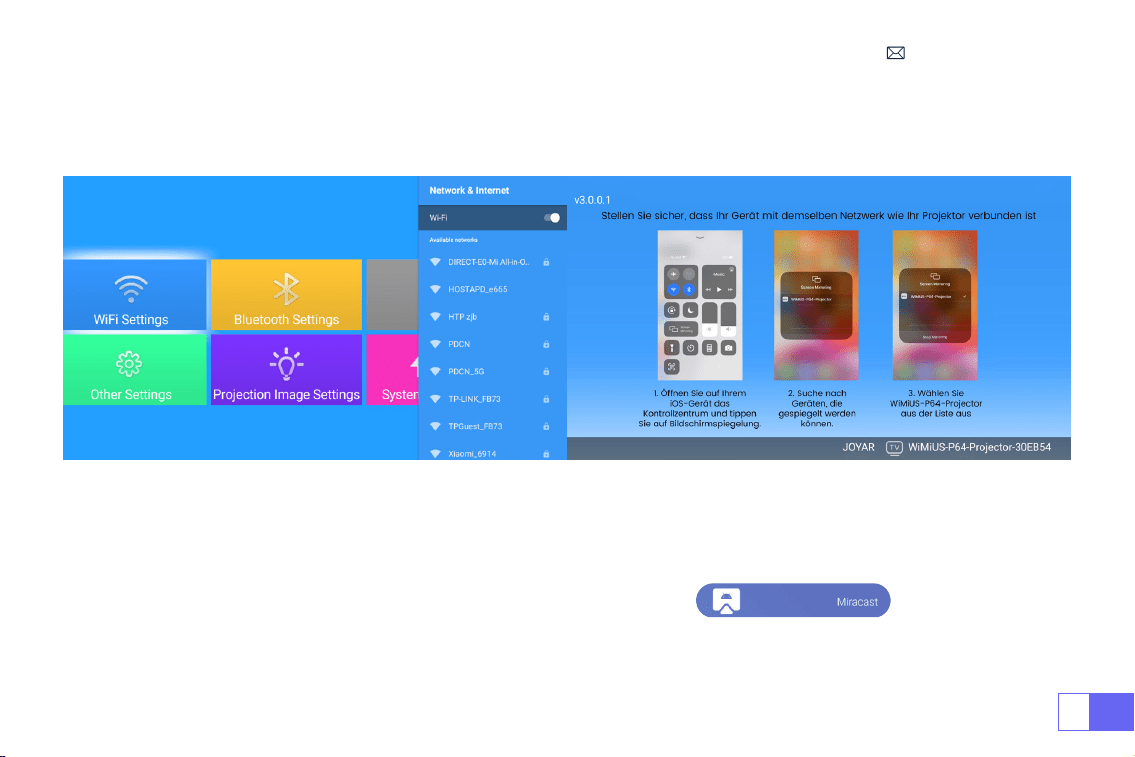
WiFi Settings
2.1 For IOS System (Airplay)
Select the settings icon in the upper right corner of the main interface, and then press the "OK" key on the remote
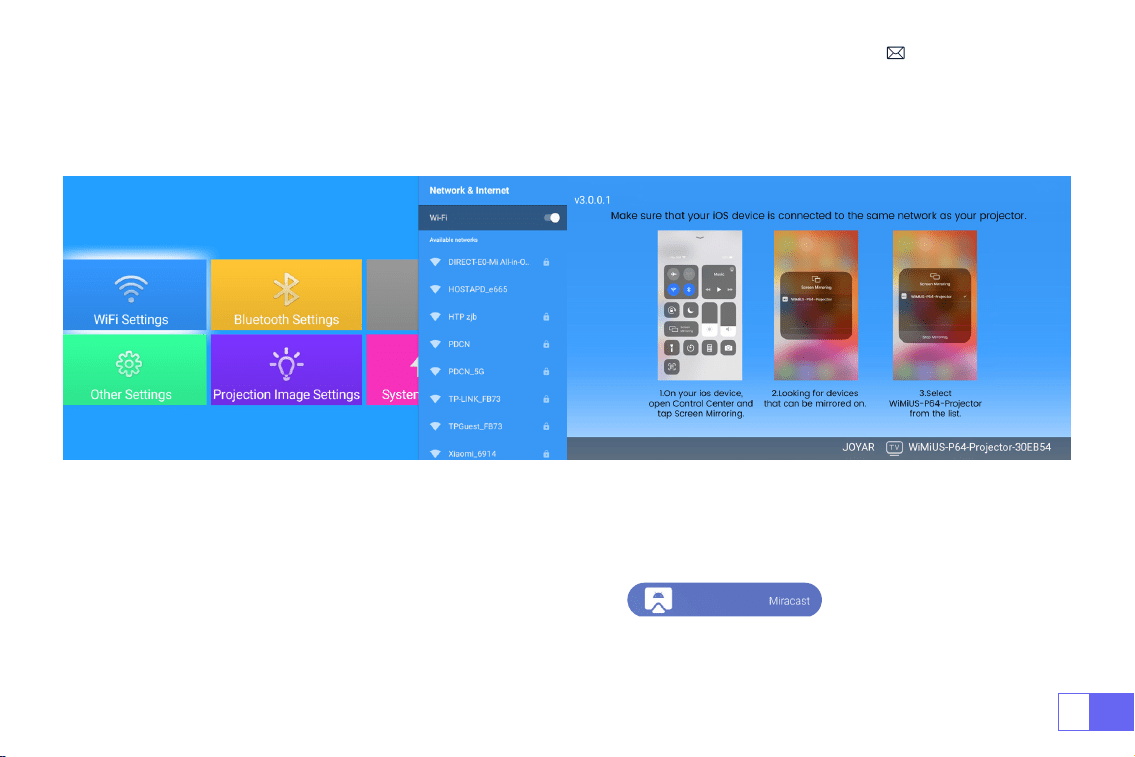
control to enter the settings interface and select "WiFi Settings".
Setting with Home Wi-Fi
Attention: Your device and the projector should be in the same Home WiFi.
1.Turn on the WiFi Setting of the projector.
2.Choose your Home WiFi to connect and enter the right password, then click “Done”to Connect, please wait 3-5
seconds to establish the connection. Once connected, it will remember the password of the connected WiFi.
3.Turn on the WiFi setting of your iOS mobile device, then connect it to the same Home WiFi as the projector.
4.Then click “Airplay” as the Input Source of your projector.
EN
19
5.Swipe up the screen of your iOS mobile device and tap “Screen Mirroring” to search for the projector, then
select“WiMiUS-P64 Projector”from the searching results to connect.
6.Succeed.
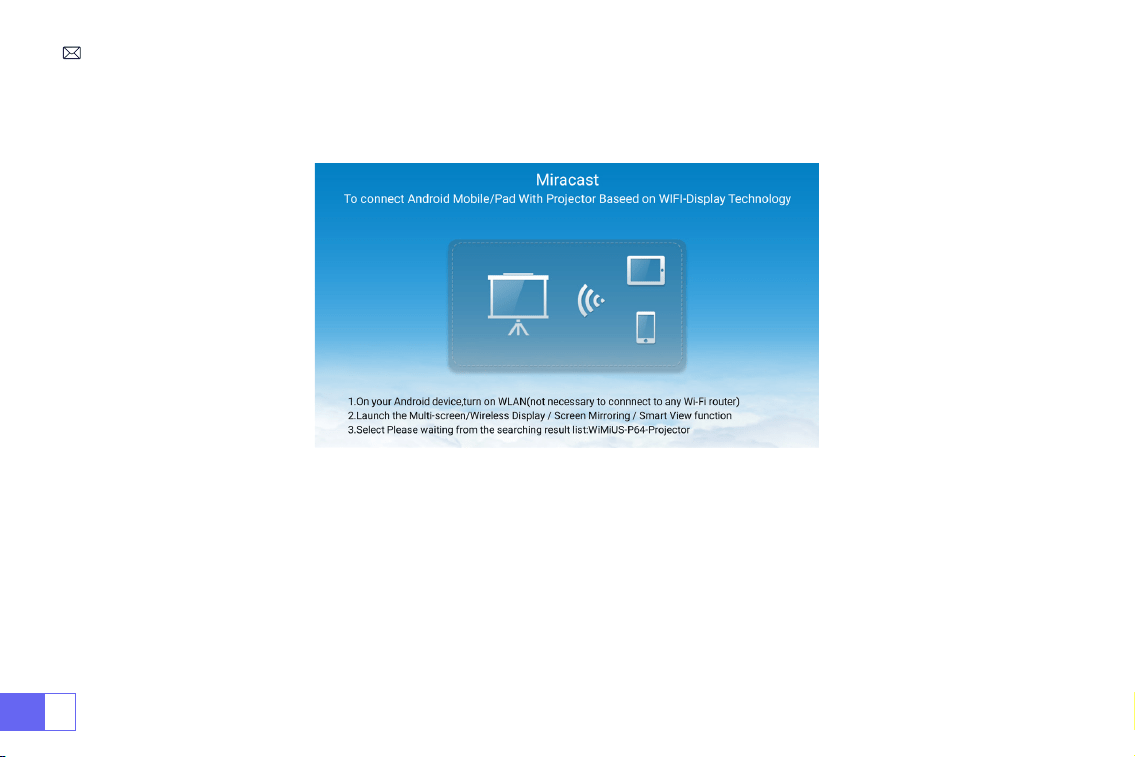
2.2 For Android System(Miracast)
To activate this function, your android device must support Multi-Screen/Wireless Display. The name of “Multi-Screen”
may vary depending on various brands of Android devices.
Setting with mobile internet
1.Turn on the projector, and select “Miracast” as the Input Source.
2.Turn on the “Multi-Screen/Wireless Display” of your Android device.
3.Select “WiMiUS-P64 Projector”from the search results to connect.
EN
20
4.Succeed.
Notes: If you want to connect it to your home wi, just repeat the steps of the IOS system and select Miracast.

EN
21
1.Turn on your Bluetooth Speaker.
2.Turn on the
[ Bluetooth Settings]
of your projector and select
[ add accessory]
.
3.Seclect your Bluetooth speaker to connect.
4.Succeed.
Note:
1. This step is only applicable to connecting the Bluetooth speaker but not to mobile phone Bluetooth.
2.The P64 projector is compatible with most Bluetooth headsets, Bluetooth speakers and Airpods, but not the
Bluetooth keyboards.
3.If you have any questions, please feel free to email WiMiUS via:
.
3.Bluetooth Settings
3.1 Connect Bluetooth Speakers
Dell

EN
22
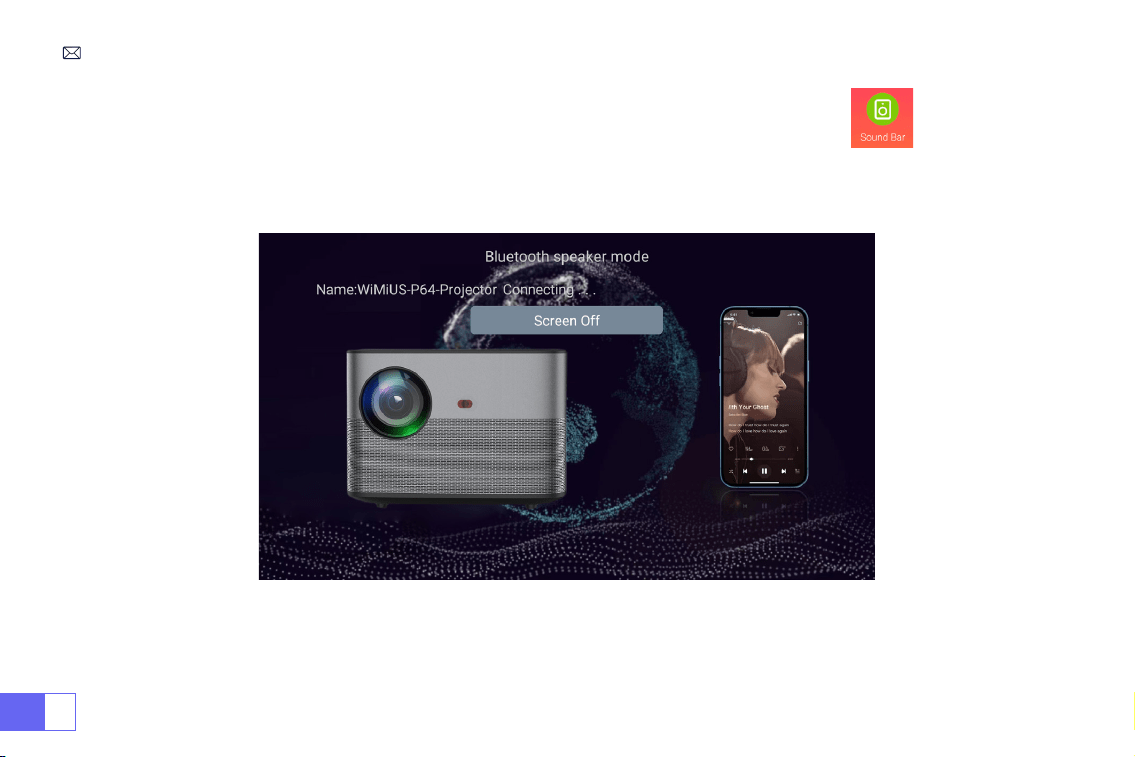
1.Enter the Soundbar option in the main interface, the following interface will be displayed.
2.Turn on the Bluetooth of your phone and connect the Bluetooth of the projector named “WiMiUS-P64 Projector ”.
3.Then the projector can play mobile phone music.
3.2 Connect Phone Bluetooth

EN
23
SIGNAL LINES CONNECTION
WiMiUS P64 projector has 6 interfaces, HDMI ports*2/USB ports*2/3.5mm headphone output/AV output. Please
select the correct connecting port to
connect your device (PC, Phone, DVD Player, Sound bar, USB, PS4,etc.)
For the USB devices, no need to choose the signal source. The machine will detect them automatically.
• Select the required category “movie”, "music", "photo" or "Ofce Suite" in the main interface, and press the “OK”key on
the remote control to enter the corresponding category.
• According to the programs to choose :“photos” “music” “movie” or “Ofce Suite”.
• Choose the le you want to play, and press the key “OK” to play or pause the le. (You cannot enter the required
category without connecting a USB disk.)
Note: For the “Ofce Suite” option, you can play, and demo PPT les.
• Connect the projector to the PC by HDMI cable.
• Choose the media signal channel : “HDMI”
1.USB Multimedia Connecting
2.Connecting with PC
EN
24
Choose the media signal channel :“HDMI”
• Use a Type-C to HDMI adapter to connect your MacBook, or a Mini Display to HDMI adapter to connect with your
MacBook Air (adapter not included).
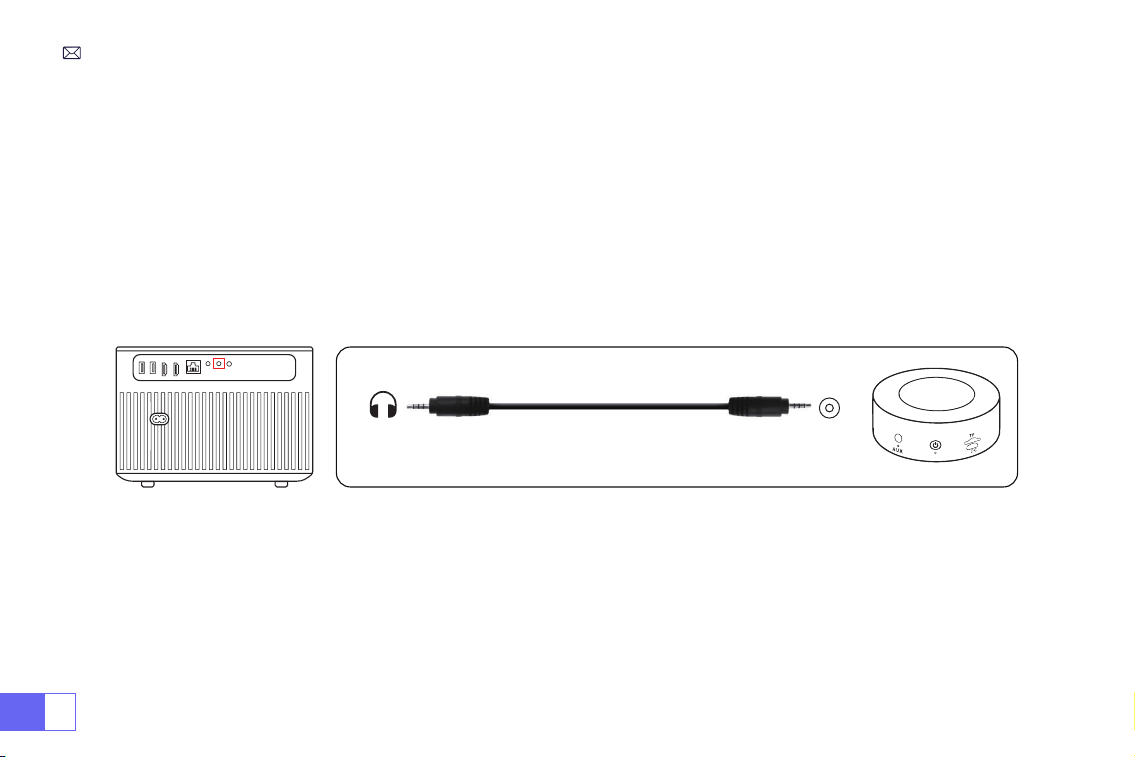
• Use the 3.5mm audio cable coming with the projector to connect with the sound bar.
• Turn on the projector and the sound bar(choose AUX mode).
• More details, please contact the seller at
.
Use the 3-in -1 AV cable in the package
• Turn on your DVD player and the projector;
• Connect the colourful female connectors to your DVD player's RCA cable with the 3-in-1 AV cable in the package;
• Connect the black connector to the AV port of the projector, and enter the home page to select [ AV ] as the
signal source.
3.Connecting with MacBook or Mac Book Air
4.Connecting with the Sound bar
5.Connecting with DVD
Audio
out
AUX
port

EN
25
Or connect to the DVD Player with the HDMI cable in the package.
Video
Left
AV port
Right
Plug the TV stick into the HDMI port of the projector.
• Choose the media signal channel :“HDMI”
•
P.S.: It only supports a 1080P TV sticks, not a 4K TV sticks.
• Choose the media signal channel :“HDMI”
• Use HDMI cable to connect to XBOX/PS4
6.Connecting with re TV Stick
7.Connecting with XBOX/PS4

EN
26
MAIN MENU FUNCTION
1.Projection Image Setting
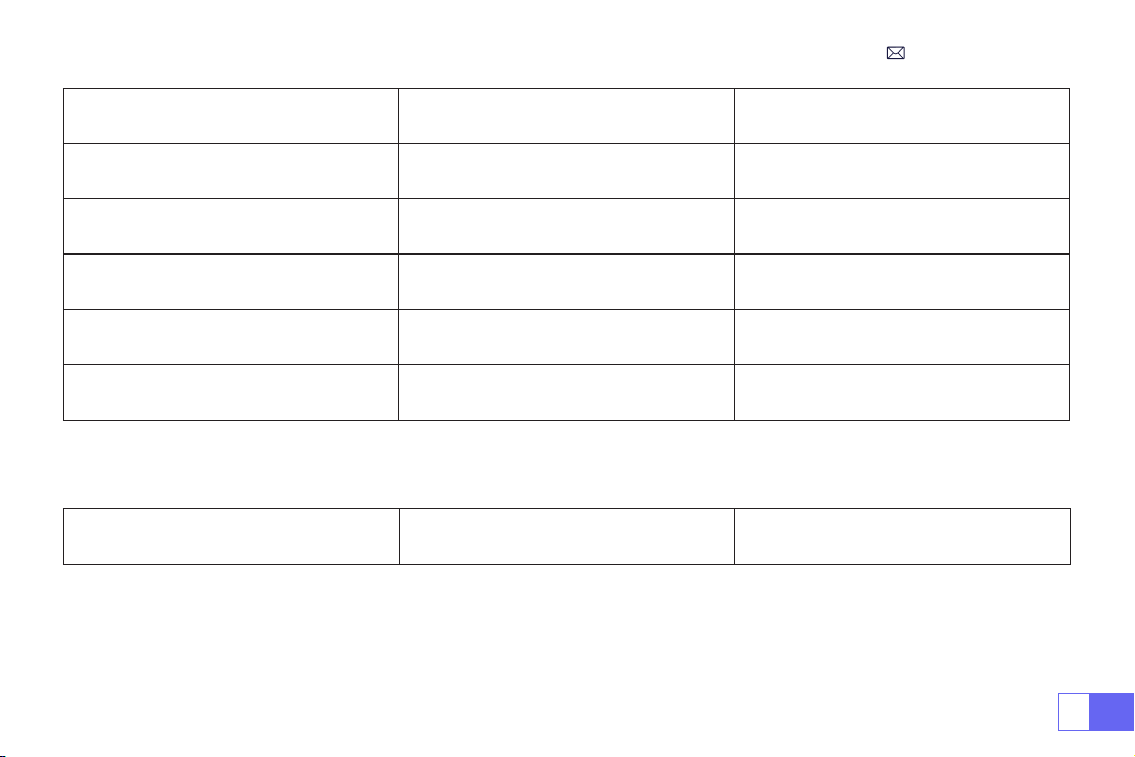
Projection Image Settings Menu included Function
Install Mode
Front-Desktop / Rear-Desktop / Front-
Ceiling / Rear-Ceiling
Choose the projection methods,ip the
image
FourPoint Keystone 4-point Keystone correction
Adjust the four points to make the
projected image a rectangle: Value 0-100

EN
27
2.System Local Update
System Local Update Local Update(USB) Update ofine
Projection Image Settings Menu included Function
Horizontal And Vertical Keystone Horizontal/Vertical Keystone/Reset
Adjust Horizontal And Vertical Keystone:
±30°
Zoom
Reduce Display 100%-50%
Reduce the size of image size
Omnidirectional Automatic Correction Horizontal/ Vertical Automatic Correction On/Off
Auto Focus Auto Focus On/Off
Power on Auto Focus On/Off On/Off

EN
28
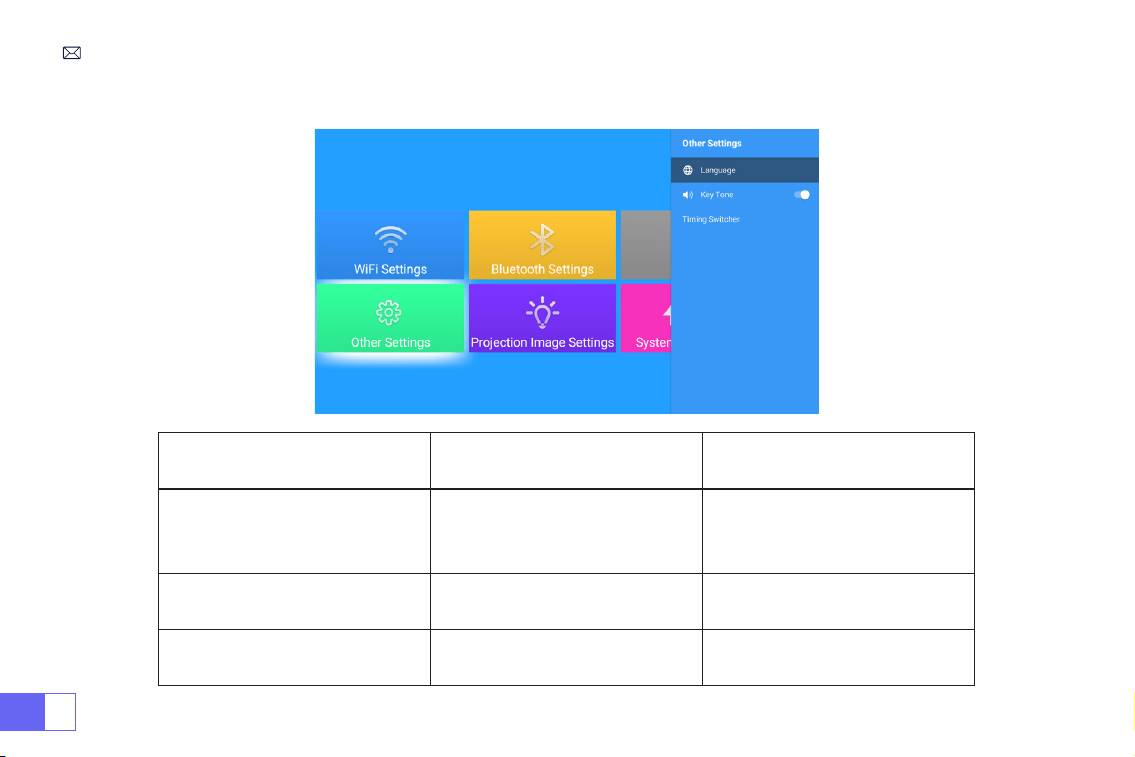
3.Other Settings
Other Settings Menu included Function
Language Settings
English, French, German, Italian,
Spanish, Japanese.20 several
languages
Choose a language
Key Tone On/Off Adjust the key sound
Timing Switcher
Off//30min/60min/90min/120mi
n/150min/180min/210m/240m
Set the sleep time of the projector

EN
29
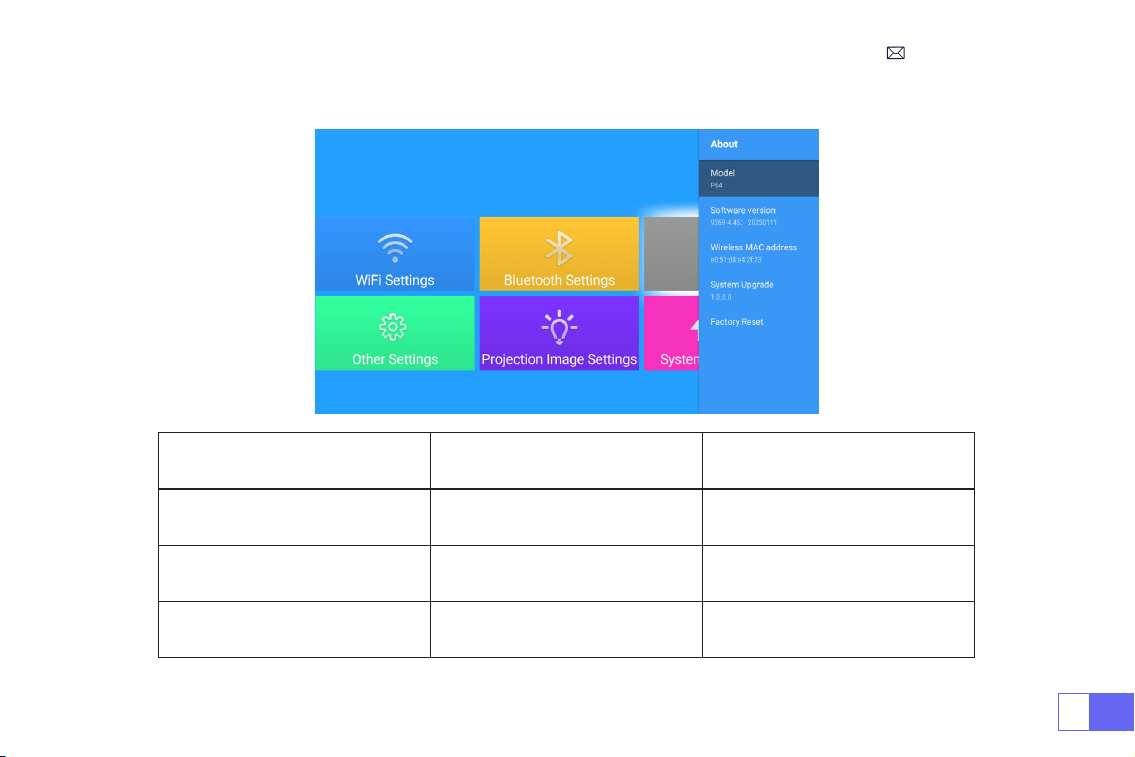
4.About
About Menu included Function
Software Version Product version Product version
System Upgrade Update the system Update Online
Factory Reset Reset
Restore all settings to their factory
settings

EN
30
FAQ
1. The remote control does not communicate with the projector.
1) The power switch at the back of the projector is turned on or off?
2) The remote control's batteries are depleted?
3) Something obstructing the signal between the remote and IR
2. No image on the screen.
1) Is the channel set up correct?
2) Is there an input signal ?
3) Is the input cable plugged well ?
4) Under PC mode, is the refresh rate > 75KHz ?
4.Picture right, no sound.
1)Input cables connected right?
2)Volume at min or on Mute.
3)Trun off the AC3/Dolby sound and set it to stereo sound.
3. Blue screen,no picture,no sound.
Input cables are connected right?

EN
31
6.Can’t play video in App Netix, Hulu, Prime
Those APPs are limited with HDCP. This model doesn’t support this function. So it can’t support these APPs.
7. Can't nd devices when connected with hard drive or ash drive.
Check if the device is broken.
8. Auto-off after working for a while
1) The projector ventilation is blocked or the voltage is not stable.
2) Send a video to
to check for you.
9.Not compatible with your bluetooth speaker?
1)The projector may not compatible with some versions bluetooth speakers of JBL.
2)Contact our after-sales email at
immediately and tell us the brand and model of your
bluetooth speaker.
10.WiFi connection is not stable?
1)Please check whether the network of your phone is well.
2)Make the distance between the phone and the projector within 1 meter.
5.Can't play the movies.
1)The format of the video is right?
2)Files are broken?
3)Device is broken?

DE
32
INHALT
WiMiUS7/24ProfessionellerSupport - - - - - - - - - - - - - - - - 32
TIPPS- - - - - - - - - - - - - - - - - - - - - - - - - - - - - 33
VERPACKUNGSLISTE - - - - - - - - - - - - - - - - - - - - - - - 34
PROJEKTORSPEZIFIKATIONEN - - - - - - - - - - - - - - - - - - - 35
Produktübersicht - - - - - - - - - - - - - - - - - - - - - - - 36
Fernbedienung - - - - - - - - - - - - - - - - - - - - - - - - 37
INSTALLATION - - - - - - - - - - - - - - - - - - - - - - - - - 38
INBETRIEBNAHME DES PROJEKTORS - - - - - - - - - - - - - - - - - 41
BILDEINSTELLUNG - - - - - - - - - - - - - - - - - - - - - - - - 42
EINRICHTEN DES PROJEKTORS - - - - - - - - - - - - - - - - - - - 46
Andere Verbindungen- - - - - - - - - - - - - - - - - - - - - - 52
Hauptmenüfunktion - - - - - - - - - - - - - - - - - - - - - - 55
GARANTIE - - - - - - - - - - - - - - - - - - - - - - - - - - - 59
FAQ - - - - - - - - - - - - - - - - - - - - - - - - - - - - - 59

DE
33
LieberKunde,
vielenDank,dassSieWiMiUSunterstützen!
BittelesenSiediesesHandbuchgründlichdurch,bevorSiedenProjektorverwenden.WennSieirgendwelcheProble
mehaben,sendenSieeineE-MailmitIhrerBestellnummerunddemProblem(ZumBeispiel:DE+P64+KeinTon)an
.Wirwerdeninnerhalbvon24StundeneineschnelleLösunganbieten.
EigentlichkönnenvieleProblemeeinfachdurchdieEinstellunggelöstwerden,wiez.B.keinSignal,keinTon,Bluetooth-
Verbindungfehlgeschlagen,WiFi-Verbindungfehlgeschlagen,dunkleFlecken,abgehackteAnimationusw.Wirverspr
echen,dassalleProjektorenvordemVersand100%sorgfältiggeprüftundverpacktwurden.
WennSieirgendwelcheFragenhaben,könntenSieunsbittekontaktieren,damitdasProblemgelöstwerdenkann.Un
dgebenSieunsdieMöglichkeit,unszuverbessern.Wirgarantieren,dasswirIhneneinezufriedenstellendeLösunga
nbietenwerden.
VielenDankfürIhrVerständnis!
WiMiUSServiceTeam
WiMiUS7/24ProfessionellerSupport

DE
34
1.StellenSiedenProjektornichtineinemzuwarmenoderzukaltenRaumauf,dadiehoheTemperaturoderdienied
rigeTemperaturdieLebensdauerdesGerätsverkürzenwird.DieArbeitsumgebungwürde5°C~35°Cbessersein.
2.WennesschwarzeFleckenaufderProjektionsächegibt,machenSiesichbittekeineSorgen,kontaktierenSiebitt
e
perE-Mail,wirkönnenIhneneinVideoschicken,wiemandenStaubentfernt.
3.DieBelüftungistfürdenProjektorausgestattet,umstabilzuarbeiten.BedeckenSiedieBelüftungnichtmitTüchern
,DeckenoderanderenDingen.SteckenSiekeineGegenständeindenSchlitzdesProjektors,dadieszueinemKurzsc
hlussodereinemelektrischenSchlagführenundIhrGerätbeschädigenkann.
4.DerProjektormussstrengvorstarkenStößen,StößenundVibrationengeschütztwerden.VersuchenSienicht,den
ProjektorzubewegenundstarkenStößen,ExtrusionenundVibrationenauszusetzen.VersuchenSienicht,denProjekt
orzubewegenunddieinterneSchaltungzubeschädigen.
5.DieLinsealsKernkomponentedesProjektorsstehtindirektemZusammenhangmitderBildschärfeunddemBilde
ffekt.ÜbermäßigerStaubaufihrbeeinträchtigtdieBildqualität.DieverschmutzteLinsesolltemiteinemweichenBau
mwolltuchfürdieGlaslinsenoberächeabgewischtwerden.HarteTücheroderScheuermitteldürfennichtverwende
twerden.
TIPPS:

DE
35
WiMiUS P64 Beamer*1
HDMI-Kabel*1 Objektivdeckel*1 Fernbedienung*1 3-in-1 AV Kabel*1
Benutzerhandbuch*1 Netzkabel*1 Reinigungstupfer*1
VERPACKUNGSLISTE

DE
36
PROJEKTORSPEZIFIKATIONEN
Modell Nr.: P64
Display-Technologie
LCD
Lichtquelle
LED
Native Auösung
1920x1080P
Zoomfunktion
50%-100%
Installationstyp
Vorne/hinten auf dem
Schreibtisch, vorne/hinten
an der Decke
Bildseitenverhältnis
16:9/4:3/Auto
Projektionsabstand
1.5-6m
Netzspannung
AC100-240V
Produktgröße
197*227*163mm
Produktgewicht
2.7kg
Keystone Korrektur
Auto + elektrisch
Fokus
Auto + elektrisch
Eingabeschnittstelle
HDMI*2/USB*2/AV/3.5mm audio out
Videodatei
H.264/H.265/MP4/AVI/WMV/MKV/FLV
Bilddatei
MP3/WAV/MAK
Audiodatei
JPG/PNG/BMP/JPEG

DE
37
Produktübersicht
1.Ein/Aus-Taste
2.Pfeiltasten
3.Bestätigungstaste
4.zurück
5.Manueller Fokus +
6.Manueller Fokus -
7/8. USB Anschluss
9/10. HDMI Anschluss
11. AV-Anschluss
12. 3.5mm Audioausgang
13. IR Empfänger
1 2 3 4 5 6
14. Anti-Staub-Netz
(Regelmäßige Reinigung empfohlen)
7 8 9 10 11 12
13

DE
38
9
8
11
12
13
10
1
2
3
4
6
7
14
5
Fernbedienung
1. Leistung
2. Home
3. Pfeiltasten
4. Menü
5. Wiedergabe pausieren
6. Lautstärke +
7. Lautstärke -
8. Stumm
9. Einstellung
10. Bestätigungstaste
11. Rückgabetaste
12. Manuelle Fokussierung +
13. Manuelle Fokussierung -
14. Signalquelle
Hinweis:
1. Legen Sie 2 Stück AAA-Batterien (nicht im Lieferumfang enthalten) in die Fernbedienung ein, bevor Sie sie
verwenden. Kombinieren Sie keine neuen Batterien mit alten in der Fernbedienung, da dies zu Betriebsstörungen
aufgrund unzureichender Stromversorgung führen kann.
2. Wenn Sie die Fernbedienung verwenden, achten Sie bitte darauf, dass der Signalsender der Fernbedienung auf
das Infrarotsignal des Projektors zielt.
3. Wenn Sie die Fernbedienung über einen längeren Zeitraum nicht benutzen. Bitte nehmen Sie die Batterien heraus,
um ein Auslaufen zu verhindern.

DE
39
1.Frontprojektion-Deckenhalterung 2.Rückprojektions-Deckenhalterung
3.Frontprojektion-Tischhalterung 4.Rückprojektions-Tischhalterung
INSTALLATION
Der Projektor kann mit einem speziellen Aufhängerahmen an der Decke aufgehängt und auf einen stabilen Tisch
gestellt werden, um das Bild je nach Betriebsumgebung und Anforderungen zu projizieren. Darüber hinaus kann der
Projektor mit folgenden Methoden installiert werden:
Halten Sie den Projektor in einer Höhe, in der sein Objektiv axialsymmetrisch zur Leinwand ist. Wenn dies nicht
möglich ist, verwenden Sie die Trapezkorrekturfunktion, um das Projektionsbild einzustellen.
1.Installationsmethode

DE
40
2.Projektionsabstand und größe
Bildseitenverhältnis: 16:9
Distanz Bildschirmgröße
1.6m 49”
2m 60”
2.5m 75”
3m 93”
3.5m 109’’
4m 125’’
4.5m 141’’
5m 157’’
6m 300’’
*Die Bildgröße hängt von der Entfernung zwischen Projektor und Leinwand ab. Es kann 3 % Messdifferenz zwischen
den oben aufgeführten Daten geben.
*Der empfohlene Projektionsabstand beträgt 2,5-3 m.
*Die Klarheit der projizierten Bilder wird durch eine angenehme Dunkelheit verbessert.

DE
41
3.Installation an der Decke
Halten Sie den Projektor vertikal und in Richtung der Mitte der Projektionsäche, damit das Projektionsbild ach auf
der Leinwand bleibt.
1. Zum Einstellen des Neigungswinkels bendet sich die Stützplatte an der Unterseite des Projektors, siehe Abbildung
unten.
2.Für die Deckenmontage benden sich 4 Löcher an der Unterseite des Projektors
(M4*10mm)
. Bitte schrauben Sie
die 4 schwarzen Gummis langsam ab, dann können Sie die Löcher für die Deckenmontage nden, siehe Abbildung
unten.
HINWEIS:
Die Aufhängevorrichtung oder der Deckenständer sind nicht im Lieferumfang enthalten.
Screw holes
Tretlager

DE
42
INBETRIEBNAHME DES PROJEKTORS
Verwenden Sie diesen Projektor für eine bessere Wiedergabe, während Sie den Vorhang zuziehen oder in einem
dunklen Raum.
1) Entfernen Sie die Objektivkappe, verbinden Sie den Projektor mit dem Strom über das Netzkabel, drücken Sie die
Einschalttaste auf der Fernbedienung oder dem Projektor, es beginnt zu arbeiten.;
2) Verwenden Sie die automatische oder elektronische Trapezkorrektur/Fokus-Funktion des Projektors, um ein
rechteckiges und klares Bild zu erhalten;
3) Passen Sie die Fokustaste „F+“ „F-“ am Projektor oder an der Fernbedienung an, um die beste Bildleistung zu
erzielen; (Wenn es immer noch verschwommen ist, versuchen Sie bitte, den Projektionsabstand anzupassen.)
4)Schließen Sie das externe Gerät (Smartphone, iPad, Fire TV, TV-Box, DVD-Player, Computer usw.) an die
entsprechenden Schnittstellen des Projektors an, achten Sie bitte darauf, die entsprechende Quelle auszuwählen.
Wenn Sie nicht die richtige Quelle auswählen, kann der Projektor das Signal nicht erkennen;
5)Wählen Sie das Menü " " , geben Sie die [ Sprache] ein, dann können Sie Ihre bevorzugte Sprache einstellen.

DE
43
BILDEINSTELLUNG
Wählen Sie das Menü [ Projektionsbildeinstellungen ] -- Wählen Sie die [ Projektionseinstellungsoption ] -- Wählen
Sie den [Installationsmodus], drücken Sie zur Auswahl die Pfeiltaste und drücken Sie „OK“, um die Projektionsposition
zu bestätigen.
1.Projektionsmodus
DE
44
2.Manuelle Trapezkorrektur
2.1 4P Keystone-Korrektur
Wählen Sie das Menü [ Projektionsbildeinstellungen ] -- Wählen Sie die Option [ FourPoint Keystone ] aus. Klicken
Sie einfach auf die Schaltäche "OK", um den Punkt auszuwählen, den Sie zuerst anpassen möchten, und drücken Sie
dann die Taste "
▶
" oder "
▼
", um den Wert einzustellen (Wert 0~100) wie unten gezeigt erforderlich.
Zurücksetzen:
Drücken Sie '' '', das Bild wird auf die ursprünglichen Trapezkorrektureinstellungen zurückgesetzt.

DE
45
2.2 Horizontale und vertikale Trapezkorrektur
Wählen Sie das Menü [ Projektionsbildeinstellungen ] -- Wählen Sie die horizontale oder vertikale Keystone-Option,
um den Bildschirm horizontal oder vertikal ±30° mit den Pfeiltasten einzustellen, bis die Hilfslinien auf ein Rechteck
eingestellt sind.
Bitte platzieren Sie den Projektor zuerst horizontal mit dem Gesicht zur Wand. Wählen Sie das Menü
[Projektionsbildeinstellungen] – schalten Sie die Option [Omnidirektionale automatische Korrektur] oder [Autofokus]
ein, dann wird das Bild automatisch basierend auf dem Projektionsabstand von der Leinwand fokussiert und stellen
Sie das Bild auf ein Rechteck ein, wenn Sie den Projektionswinkel ändern.
Wenn das Bild verschwommen ist, drücken Sie wiederholt die Fokustaste ''F+'' ''F-'' auf der Fernbedienung, um den
Objektivfokus einzustellen, tippen Sie auf oder drücken Sie lange auf die Einstelltaste, bis das Bild klar ist (Es ist nicht
erforderlich drücken Sie die OK-Taste, nachdem der Bildschirm leer ist).
3.Autofokus und Trapezkorrektur
DE
46
Hinweis:
Der seitliche Projektionswinkel des Projektors sollte 20° nicht überschreiten, da sonst die automatische
Trapezkorrekturfunktion möglicherweise nicht funktioniert.
Gehen Sie zur Startseite -- Wählen Sie das Menü [ ] -- Wählen Sie die [ Projektionsbildeinstellungen ] -- Wählen
Sie die Option [ Zoom ], der Projektionsbildschirm kann um 50 % bis 100 % gezoomt werden. Drücken Sie die Taste "
◀
▶
", um den erforderlichen Wert wie unten gezeigt einzustellen.
(Hinweis: Der Zoomwert wird durch den Wert der Vierpunkt-Trapezkorrektur beeinusst.)
4.Digitalzoom
DE
47
EINRICHTEN DES PROJEKTORS
Wählen Sie die gewünschte Eingangssignalquelle (HDMI1/HDMI2/AV) auf der Startseite aus, oder drücken Sie die
Taste “S” auf der Fernbedienung, um die entsprechende Signalquelle auszuwählen. Bei USB-Geräten muss die
Signalquelle nicht ausgewählt werden . Das Gerät erkennt sie automatisch.
Wenn Sie ein Video abspielen, können Sie auf die Schaltäche “ ” klicken und dann auf Einstellungen oder
andere Optionen klicken, um den Rhythmus und den Wiedergabemodus festzulegen.
1.Auswahl der Eingangssignalquelle

DE
48
Hinweis:
1. Das Funktionieren der Bildschirmspiegelung bei einer drahtlosen Verbindung wird durch die Netzwerkumgebung
beeinusst. Für die Bildschirmspiegelung wird eine Bandbreite von 100 Mbit oder mehr empfohlen.
2. Stellen Sie sicher, dass sich Ihr mobiles Gerät in der Nähe des Projektors befindet, wenn Sie eine drahtlose
Verbindung verwenden. Es wird ein Abstand von 1 Meter empfohlen.
3. Einige Android-Geräte unterstützen aufgrund der Kompatibilität möglicherweise keine Bildschirmspiegelung.
4. Bei Fragen senden Sie bitte eine E-Mail an WiMiUS über
.
2.Verbindung mit Smartphones und iPad
Verwendung der WiFi-Einstellungen
2.1 Für IOS-System (Airplay)
Wählen Sie das Einstellungssymbol in der oberen rechten Ecke der Hauptschnittstelle und drücken Sie dann drücken
Sie die "OK"-Taste auf der Fernbedienung, um die Einstellungsseite zu öffnen und wählen Sie "WiFi-Einstellung".
Einstellung mit Home Wi-Fi
Achtung: Ihr Gerät und der Projektor sollten sich im selben Home WiFi benden.
1. Schalten Sie die WiFi-Einstellung des Projektors ein.
2. Wählen Sie Ihr Heim-WiFi zum Verbinden und geben Sie das richtige Passwort ein, dann klicken Sie auf "Done" zum
Verbinden, bitte warten Sie 3-5 Sekunden, um die Verbindung herzustellen. Sobald die Verbindung hergestellt ist,
merkt sich der Projektor das Passwort des verbundenen WiFi.
3. Schalten Sie die WiFi-Einstellung Ihres iOS-Geräts ein und verbinden Sie es mit demselben Heim-WiFi wie den
Projektor.
4. Klicken Sie dann auf "Airplay" als Eingangsquelle Ihres Projektors.
DE
49
5. Wischen Sie auf dem Bildschirm Ihres iOS-Mobilgeräts nach oben und tippen Sie auf "Airplay", um nach dem
Projektor zu suchen, und wählen Sie dann "WiMiUS P64 Projector" aus den Suchergebnissen aus, um eine Verbindung
herzustellen.
6. Erfolgreich.
2.2 Für Android System(Miracast)
Um diese Funktion zu aktivieren, muss Ihr Android-Gerät Multi-Screen/Wireless Display unterstützen. Der Name
"Multi-Screen" kann je nach Marke des Android-Geräts variieren.
Einstellung mit mobilem Internet
1.Schalten Sie den Projektor ein, wählen Sie "Miracast" als Eingangsquelle.
2.Schalten Sie das "Multi-Screen/Wireless Display" Ihres Android-Geräts ein.
3.Wählen Sie "WiMiUS P64 Projector" aus den Suchergebnissen aus, um eine Verbindung herzustellen..

DE
50
4.Erfolgreich.
Hinweise:
Wenn Sie es mit Ihrem Heim-WLAN verbinden möchten, wiederholen Sie einfach die Schritte des IOS-
Systems und wählen Sie Miracast.

DE
51
1.Schalten Sie Ihren Bluetooth-Lautsprecher ein.
2.Schalten Sie die [ Bluetooth-Einstellungen] Ihres Projektors ein und wählen Sie [ Zubehör hinzufügen] .
3.Wählen Sie Ihren Bluetooth-Lautsprecher zum Verbinden aus.
4.Erfolgreich.
Hinweis:
1.Der P64 Beamer ist kompatibel mit Bluetooth-Headsets, Bluetooth-Lautsprechern und Airpods, aber nicht mit
Bluetooth-Tastaturen oder Bluetooth-Telefonen.
2.Der P64-Projektor ist mit den meisten Bluetooth-Headsets, Bluetooth-Lautsprechern und Airpods kompatibel,
jedoch nicht mit den Bluetooth-Tastaturen.
3.Wenn Sie eine Frage haben, bitte zögern Sie nicht, WiMiUS per E-Mail über:
.
3.Bluetooth-Einstellungen
3.1 Verbindung mit Bluetooth Lautsprecher
Dell
DE
52
1.Geben Sie die Option Soundbar in der Hauptschnittstelle ein, die folgende Schnittstelle wird angezeigt:
2. Schalten Sie das Bluetooth Ihres Telefons ein und verbinden Sie das Bluetooth des Projektors mit dem Namen
“WiMiUS-P64 Projector”.
3.Dann kann der Projektor Handymusik abspielen.
3.2 Verbinden Sie das Telefon über Bluetooth

DE
53
Andere Verbindungen
Der WiMiUS P64 Projektor verfügt über 6 Schnittstellen, HDMI-Anschlüsse*2/USB-Anschlüsse*2/3,5-mm-
Kopfhörerausgang/AV-Ausgang. Bitte wählen Sie den richtigen Anschlussport aus
Schließen Sie Ihr Gerät an (PC, Telefon, DVD-Player, Soundbar, USB, PS4 usw.)
Bei USB-Geräten muss die Signalquelle nicht ausgewählt werden. Das Gerät erkennt sie automatisch.
• Wählen Sie die gewünschte Kategorie "Film", "Musik", "Foto" oder "Ofce Suite" in der Hauptschnittstelle und drücken
Sie die "OK"-Taste auf der Fernbedienung, um die entsprechende Kategorie aufzurufen.
• Entsprechend den Programmen zur Auswahl: "Fotos", "Musik", "Film" oder "Ofce Suite".
• Wählen Sie die Datei, die Sie abspielen möchten, drücken Sie die Taste "OK", um die Datei abzuspielen oder
anzuhalten. (Sie können die erforderliche Kategorie nicht eingeben, ohne ein USB-Laufwerk anzuschließen.)
Hinweis: Für die Option „Ofce Suite“ können Sie Demo-PPT-Dateien abspielen.
•Verbinden Sie den Projektor über ein HDMI-Kabel mit dem PC.
•Wählen Sie den Mediensignalkanal: "HDMI".
1.Anschluss an USB-Datenträger
2.Verbindung mit PC

DE
54
• Wählen Sie den Mediensignalkanal: "HDMI".
• Verwenden Sie einen Typ-C-auf-HDMI-Adapter, um Ihr MacBook anzuschließen, oder einen Mini-Display-auf-
HDMI-Adapter, um Ihr MacBook Air anzuschließen (Adapter nicht enthalten).
• Verwenden Sie das mit dem Projektor gelieferte AV-Kabel, um eine Verbindung mit der Soundbar herzustellen.
• Schalten Sie den Projektor und die Soundbar ein.
• Weitere Informationen erhalten Sie vom Verkäufer unter
.
Verwenden Sie das 3-in-1-AV-Kabel im Lieferumfang
• Schalten Sie Ihren DVD-Player und den Projektor ein;
• Verbinden Sie die farbigen Buchsen mit dem RCA-Kabel Ihres DVD-Players mit dem 3-in-1-AV-Kabel im
Lieferumfang;
• Schließen Sie den schwarzen Stecker an den AV-Anschluss des Projektors an, rufen Sie die Startseite auf, um [ AV ]
als Signalquelle auszuwählen.
3.Verbindung mit MacBook oder Mac Book Air
4.Verbindung mit Soundbar
5.Connecting with DVD
Audio
out
AUX
port

DE
55
Or connect to the DVD Player with the HDMI cable in the package.
Video
Left
AV port
Right
• Stecken Sie den TV-Stick in den HDMI-Anschluss des Projektors.
• Wählen Sie den Mediensignalkanal: „HDMI“
Hinweis:
Es unterstützt nur 1080P-TV-Sticks, nicht 4K-TV-Sticks.
• Wählen Sie den Mediensignalkanal: „HDMI“
• Verwenden Sie ein HDMI-Kabel zum Anschluss an XBOX/PS4
6.Verbinden mit Fire TV Stick
7.Verbindung mit XBOX/PS4
DE
56
Hauptmenüfunktion
1.Projektorbild-Einstellung
Menü Menü enthalten Funktion
Bildmodus
Benutzer/Standard/Anschaulich/Sport/
Film/Spiel/Energiesparen
So passen Sie die "Helligkeit/Kontrast/
Sättigung/Schärfe" des Bildes an
Vierpunkt-Schlüsselstein 4-Punkt-Keystone-Korrektur
Passen Sie die vier Punkte an, um das
projizierte Bild zu einem Rechteck zu
machen: Wert 0-100

DE
57
2.Lokales System-Update
Lokales System-Update Update (USB) Ofine aktualisieren
Menü Menü enthalten Funktion
Horizontaler und vertikaler Keystone
Horizontale/vertikale Trapezkorrektur/
Zurücksetzen
Passen Sie die horizontale und vertikale
Trapezkorrektur ±30°
Zoom-Funktion Anzeige reduzieren 100%-50% Reduzieren Sie die Bildgröße
Omnidirektionale automatische Korrektur
Horizontale/vertikale automatische
Korrektur
Ein/Aus
Autofokus Autofokus Ein/Aus
Autofokus einschalten Ein/Aus Ein/Aus

DE
58
3.Andere Einstellungen
Andere Einstellungen Menü inklusive Funktion
Spracheinstellungen
Englisch, Französisch, Deutsch,
Italienisch, Spanisch, Japanisch.20
verschiedene Sprachen
Wählen Sie eine Sprache
Tastenton Ein/Aus Stellen Sie den Tastenton ein
Timer-Einstellung
Aus/30min/60min/90min/120min
/150min/180min/210m/240m
Stellen Sie die Ruhezeit des
Projektors ein

DE
59
4.Über den Projektor
Über den Projektor Menü inklusive Funktion
Softwareversion Produktversion Produktversion
System Verbesserung Aktualisieren Sie das System Online aktualisieren
Werkseinstellungen zurückgesetzt Zurücksetzen
Setzen Sie alle Einstellungen auf
die ursprünglichen Einstellungen
zurück

DE
60
FAQ
GARANTIE
1.Die Fernbedienung kommuniziert nicht mit dem Projektor.
1) Ist der Netzschalter auf der Rückseite des Projektors ein- oder ausgeschaltet?
2) Die Batterien der Fernbedienung sind verbraucht?
3) Etwas behindert das Signal zwischen der Fernbedienung und dem IR
4) Starkes Licht auf IR direkt.
Vielen Dank für Ihren Kauf und Ihre Unterstützung! Wir bieten 3 Jahre Garantie für den P64 Beamer. Wenn Sie
irgendwelche Fragen haben, kontaktieren Sie uns bitte über
2.Kein Bild auf der Leinwand.
1) Ist die Kanaleinstellung korrekt?
2) Liegt ein Eingangssignal vor ?
3) Ist das Eingangskabel gut eingesteckt ?
4) Ist im PC-Modus die Bildwiederholfrequenz > 75KHz ?
4.Bild richtig, kein Ton.
1)Eingangskabel richtig angeschlossen?
2)Lautstärke auf Minimum oder auf Mute.
3)Schalten Sie den AC3/Dolby-Ton aus und stellen Sie ihn auf Stereo-Ton ein.
3. Blauer Bildschirm, kein Bild, kein Ton.
Sind die Eingangskabel richtig angeschlossen?

DE
61
6.kann kein Video in der App Netix, Hulu, Prime abspielen.
1)Diese APPs sind mit HDCP eingeschränkt. Dieses Modell unterstützt diese Funktion nicht. Daher kann es
diese APPs nicht unterstützen.
7. Das Gerät kann nicht gefunden werden, wenn es mit einer Festplatte oder einem USB-Stick verbunden ist.
1)Prüfen Sie, ob das Gerät defekt ist.
8. Automatische Abschaltung nach längerer Arbeit
1) Die Belüftung des Projektors ist blockiert oder die Spannung ist nicht stabil.
2) Senden Sie ein Video an
, um es für Sie zu überprüfen.
9.Nicht kompatibel mit Ihrem Bluetooth-Lautsprecher?
1) Der Projektor ist möglicherweise nicht mit einigen Versionen der Bluetooth-Lautsprecher von JBL kompatibel.
2) Wenden Sie sich sofort an unseren Kundendienst unter
und teilen Sie uns die Marke
und das Modell Ihres Bluetooth-Lautsprechers mit.
10. Die WiFi-Verbindung ist nicht stabil?
1) Bitte überprüfen Sie, ob das Netzwerk Ihres Telefons gut ist.
2) Stellen Sie sicher, dass der Abstand zwischen Telefon und Projektor nicht größer
5. kann die Filme nicht abspielen.
1) Ist das Format des Videos richtig?
2) Dateien sind defekt?
3) Gerät ist defekt?

FR
62
CONTENU
Assistance Professionnelle WiMiUS 7J/24H - - - - - - - - - - - - - 62
CONSEILS - - - - - - - - - - - - - - - - - - - - - - - - - - - 63
LISTE DES FORFAITS - - - - - - - - - - - - - - - - - - - - - - - 64
SPÉCIFICATIONS DU PROJECTEUR - - - - - - - - - - - - - - - - - 65
STRUCTURE DU PRODUIT - - - - - - - - - - - - - - - - - - - - - 66
TÉLÉCOMMANDE - - - - - - - - - - - - - - - - - - - - - - - - 67
INSTALLATION - - - - - - - - - - - - - - - - - - - - - - - - - 68
DÉMARRAGE DU PROJECTEUR - - - - - - - - - - - - - - - - - - - 71
RÉGLAGES DE L'IMAGE DE PROJECTION - - - - - - - - - - - - - - - 72
MISE EN PLACE DU PROJECTEUR - - - - - - - - - - - - - - - - - - 76
CONNEXION DES LIGNES DE SIGNAL - - - - - - - - - - - - - - - - - 82
FONCTION MENU PRINCIPAL - - - - - - - - - - - - - - - - - - - - 85
FAQ - - - - - - - - - - - - - - - - - - - - - - - - - - - - - 89

FR
63
Cher client,
Merci beaucoup de soutenir WiMiUS!
Veuillez lire attentivement ce manuel avant d'utiliser le projecteur. Si vous rencontrez des problèmes, envoyez votre
numéro de commande et le problème (Par exemple: FR+P64+Pas de son) à
. Nous vous
fournirons une solution rapide dans les 24 heures.
En fait, de nombreux problèmes peuvent être facilement résolus en réglant, tels qu'aucun signal, aucun son, échec
de la connexion Bluetooth, échec de la connexion WiFi, taches sombres, animation saccadée, etc. Nous promettons
que tous les projecteurs ont été soigneusement vériés et emballés à 100% avant expédition.
Si vous avez des questions, pourriez-vous s'il vous plaît nous contacter afin que le problème puisse être résolu.
Et donnez-nous l'opportunité de nous améliorer. Nous garantissons que nous vous fournirons une solution
satisfaisante.
Merci pour votre compréhension.
Équipe de Service WiMiUS
Assistance Professionnelle WiMiUS 7J/24H

FR
64
1. Ne placez pas le projecteur dans une pièce trop chaude ou trop froide, car la température élevée ou basse
réduira la durée de vie de l'appareil.
2. S'il y a des points noirs sur l'écran de projection, ne vous inquiétez pas, veuillez contacter
par e-mail, nous pouvons vous envoyer une vidéo sur la façon d'éliminer la poussière.
3. La ventilation est équipée pour que le projecteur fonctionne de manière stable. Ne couvrez pas l'évent avec un
chiffon, une couverture ou d'autres objets. N'insérez rien dans la fente du projecteur, car cela pourrait produire un
court-circuit ou un choc électrique. à votre appareil et causer des dommages.
4.Le projecteur doit être strictement protégé contre les chocs violents, l'extrusion et les vibrations.N'essayez pas de
bouger et des chocs, extrusions et vibrations forts.N'essayez pas de bouger et des défauts du circuit interne.
5.L'objectif, en tant que composant principal du projecteur, est directement lié à la dénition et à l'effet de l'image.
La poussière excessive sur celui-ci affectera la qualité de l'image. L'objectif sale doit être essuyé avec un chiffon en
coton doux pour la surface de la lentille en verre. Chiffon dur ou les abrasifs ne doivent pas être utilisés.
CONSEILS:

FR
65
Projecteur WiMiUS P64 * 1
Câble HDMI * 1 Couvercle d'objectif * 1 Télécommande * 1 Câble AV 3-en-1 * 1
Manuel d'utilisation * 1 Câble d'alimentation * 1
Coton-Tige de
nettoyage * 1
LISTE DES FORFAITS

FR
66
SPÉCIFICATIONS DU PROJECTEUR
Numéro de modèle: P64
Technologie d'afchage
LCD
Source de lumière
LED
Résolution Native
1920x1080P
Fonction Zoom
50%-100%
Type d'installation
Avant / Arrière sur le
bureau, Avant / arrière au
plafond
Ratio d'aspect
16:9/4:3/Auto
Distance de Projection
1.5-6m
Tension d'alimentation
AC100-240V
Taille du produit
197*227*163mm
Poids du produit
2.7kg
Correction trapézoïdale
Auto + Électrique
Mise au Point
Auto + Électrique
Interface d'entrée
HDMI*2/USB*2/AV/3.5mm audio out
Fichier vidéo
H.264/H.265/MP4/AVI/WMV/MKV/FLV
Fichier audio
MP3/WAV/MAK
Fichier image
JPG/PNG/BMP/JPEG

FR
67
STRUCTURE DU PRODUIT
1.Puissance
2. Touches échées
3. Conrmez
4. Retour
5. Mise au point manuelle +
6. Mise au point manuelle -
7/8. Ports USB
9/10.Ports HDMI
11. Port AV
12. Prise casque 3,5mm
13. IR
1 2 3 4 5 6
14. Filet anti-poussière
(Nettoyage régulier recommandé)
7 8 9 10 11 12
13

FR
68
9
8
11
12
13
10
1
2
3
4
6
7
14
5
TÉLÉCOMMANDE
1. Puissance
2. HOME
3. Bouton èche
4. Menu
5. Pause/Lecture
6. VOL+
7. VOL-
8. Muet
9. Paramètres
10. OK
11. Retour
12. Mise au point +
13. Mise au point -
14. Source
Note:
1. Installez 2 piles AAA (non incluses) dans la télécommande avant de l'utiliser, ne combinez pas de nouvelles piles
avec des anciennes dans la télécommande, ce qui peut entraîner une défaillance du fonctionnement en raison d'une
alimentation électrique insufsante.
2. Lorsque vous utilisez la télécommande, assurez-vous que l'émetteur de signal de la télécommande vise le signal
infrarouge du projecteur.
3. Lorsque vous n'utilisez pas la télécommande pendant une longue période. Veuillez retirer les piles pour éviter
qu'elles ne fuient.
FR
69
1.Projection Avant montage au plafond 2.Projection Arrière montage au plafond
3.Projection Avant sur le bureau 4.Projection Arrière sur le bureau
INSTALLATION
Le projecteur peut être suspendu au plafond avec un cadre de suspension spécial et placé sur le bureau stable
pour projeter l'image en fonction de l'environnement d'exploitation et des exigences. De plus, le projecteur peut être
installé avec les méthodes suivantes:
Maintenez le projecteur à une hauteur où son objectif est symétrique axialement par rapport à l'écran. Si cela n'est
pas possible, utilisez la fonction de correction trapézoïdale pour ajuster l'image de projection.
1.Méthode d'Installation
FR
70
2.Distance et Taille de Projection
Ratio d'aspect: 16:9
Distance Taille de l'écran
1.6m 49”
2m 60”
2.5m 75”
3m 93”
3.5m 109’’
4m 125’’
4.5m 141’’
5m 157’’
6m 300’’
*La taille de l'image dépend de la distance entre le projecteur et l'écran. il peut y avoir une différence de mesure de 3%
entre les données énumérées ci-dessus.
*La distance de projection recommandée est de 2,5 à 3 m.
*L'obscurité ambiante améliore la clarté des images projetées.

FR
71
3.Installer au Plafond
Gardez le projecteur vertical et vers le milieu de l'écran du projecteur, gardez l'image de projection à plat sur l'écran.
1)Pour régler l'angle d'inclinaison, veuillez ajuster la tige de support au bas du projecteur, voir l'image ci-dessous.
2)Pour le montage au plafond, il y a 4 trous au bas du projecteur (M4 * 10mm).Veuillez dévisser lentement les 4
caoutchoucs noirs, puis vous pouvez trouver les trous pour le montage au plafond, voir l'image ci-dessous.
REMARQUE: Le support de plafond n'est pas emballé.
Screw holes
Support réglable

FR
72
DÉMARRAGE DU PROJECTEUR
Pour obtenir un meilleur visionnage, veuillez utiliser ce projecteur tout en tirant le rideau ou dans une pièce sombre.
1) Retirez le capuchon de l'objectif, connectez le projecteur à l'alimentation via le câble d'alimentation, appuyez sur
la touche d'alimentation de la télécommande ou du projecteur, cela commence à fonctionner.;
2) Utilisez la fonction trapézoïdale/mise au point automatique ou électronique du projecteur pour obtenir un
rectangle et une image claire;
3) Ajustez le bouton de mise au point ''F+'' ''F-'' sur le projecteur ou la télécommande pour obtenir les
meilleures performances d'image; (S'il est toujours ou, essayez d'ajuster la distance de projection.)
4) Connectez le dispositif externe (Smartphone, iPad, Fire Stick, boîtier TV, lecteur DVD, PC, etc. dans les interfaces
correspondantes du projecteur, assurez-vous de sélectionner la source correspondante. Si vous ne sélectionnez pas
la bonne source, le projecteur ne pourra pas détecter le signal)
5)Sélectionnez le menu " ", entrez dans [Paramètres de langue], puis vous pouvez dénir votre langue préférée.
FR
73
RÉGLAGES DE L'IMAGE DE PROJECTION
Sélectionnez le menu [Paramètres] -- Sélectionnez [Paramètres de l'image de projection] -- Sélectionnez le
[Mode
d'installation]
, appuyez sur la touche échée pour sélectionner et appuyez sur "OK" pour conrmer la position de
projection.
1.Mode de Projection

FR
74
2.Correction Trapézoïdale Manuelle
2.1 Correction Trapézoïdale à 4-Points
Sélectionnez le menu [Paramètres de l'image de projection] --Sélectionnez l'option
[Correction Trapézoïdale à
4-Points]
, Cliquez simplement sur le bouton "OK" pour sélectionner le point que vous souhaitez régler en premier,
puis appuyez sur le bouton "
▶
" ou "
▼
" pour dénir
la valeur ( 0 à 100 )
nécessaire comme indiqué ci-dessous.
Réinitialiser: Appuyez sur '' '', l'image restaurera les paramètres de correction trapézoïdale d'origine.

FR
75
2.2 Correction Trapézoïdale Horizontale et Verticale
Sélectionnez le menu [Paramètres de l'image de projection] --Sélectionnez l'option
Trapèze horizontal ou vertical
pour ajuster l'écran horizontalement ou verticalement
±30°
avec les touches échées jusqu'à ce que les guides
soient ajustés sur un rectangle.
Veuillez d'abord placer le projecteur horizontalement face au mur, Sélectionnez le menu [Paramètres de l'image de
projection] - activez l'option [Correction automatique omnidirectionnelle] ou [Mise au point automatique], puis il
fera automatiquement la mise au point de l'image en fonction de la distance de projection de l'écran et ajustera
l'image à un rectangle lorsque vous changez l'angle de projection.
Si l'image est floue, veuillez appuyez plusieurs fois sur le bouton de mise au point ''F +'' ''F-'' de la
télécommande pour régler la mise au point de l'objectif, appuyez ou appuyez longuement sur le bouton de
réglage jusqu'à ce que l'image soit claire (Pas besoin d'appuyer sur le bouton “OK” une fois l'image claire).
3.Correction Trapézoïdale et Mise Au Point Automatique

FR
76
Remarque : L'angle de projection latérale du projecteur ne doit pas dépasser 20°, sinon la fonction de
correction trapézoïdale automatique risque de ne pas fonctionner.
Allez à la page d'accueil -- Sélectionnez le menu [ ] -- Sélectionnez l'option [ Paramètres de l'image de projection
] -- Sélectionnez l'option [ Zoom ], l'écran de projection peut être zoomé de 100% à 50%. Appuyez sur le bouton "
◀
▶
" pour régler la valeur nécessaire comme indiqué ci-dessous.
4.Réglage du Zoom
FR
77
MISE EN PLACE DU PROJECTEUR
Sélectionnez la source de signal d'entrée souhaitée (HDMI1/HDMI2/AV) sur la page d'accueil, ou vous pouvez
appuyer sur le bouton "S" de la télécommande pour sélectionner la source de signal correspondante.
Pour les dispositifs USB, pas besoin de choisir la source de signal. La machine les détectera
automatiquement.
Lors de la lecture d'une vidéo, vous pouvez appuyer sur le bouton de menu " ", puis dénir le rapport d'aspect
de l'image et d'autres modes de lecture.
1.Sélectionnez La Source Du Signal d'Entrée

FR
78
Conseils:
1. La uidité de la mise en miroir d'écran avec une connexion sans l sera affectée par l'environnement réseau. Une
bande passante de 100Mbit ou plus est recommandée lors de l'utilisation de la mise en miroir d'écran.
2. Assurez-vous que votre appareil mobile est proche du projecteur lorsque vous utilisez une connexion sans l. Une
distance inférieure à 1 mètre est recommandée. Certains appareils mobiles peuvent ne pas prendre en charge la
mise en miroir d'écran en raison de la compatibilité.
3. Pour toute question, n'hésitez pas à envoyer un e-mail à WiMiUS via
.
2.Connexion avec Smartphones et iPad
Réglage WiFi
2.1 Pour le Système iOS (Airplay)
Sélectionnez l'icône des paramètres dans le coin supérieur droit de l'interface principale, puis appuyez sur la touche
"OK" de la télécommande pour accéder à l'interface des paramètres et sélectionnez "Réglage WiFi".
Réglage avec Wi-Fi domestique
Attention : Votre appareil et le projecteur doivent être dans le même WiFi domestique.
1.Activez le réglage WiFi du projecteur.
2. Choisissez votre Wi-Fi domestique pour vous connecter et entrez le bon mot de passe, puis cliquez sur "Terminé"
pour vous connecter, veuillez attendre 3 à 5 secondes pour établir la connexion. Une fois connecté, il se souviendra
du mot de passe du WiFi connecté.
3.Activez le paramètre Wi-Fi de votre appareil mobile iOS, puis connectez-le au même Wi-Fi domestique que le
projecteur.
4..Ensuite, cliquez sur“Airplay” comme source d'entrée de votre projecteur.

FR
79
5. Balayez vers le haut l'écran de votre appareil mobile iOS et appuyez sur « Screen Mirroring » pour rechercher le
projecteur, puis sélectionnez « WiMiUS-P64 Projector » dans les résultats de la recherche pour vous connecter.
6.Réussir.
2.2 Pour le Système Android(Miracast)
Pour activer cette fonction, votre appareil Android doit prendre en charge l'afchage multi-écran/sans l. Le nom
de "Multi-Screen" peut varier selon les différentes marques d'appareils Android.
Réglage avec Internet mobile
1.Allumez le projecteur, sélectionnez “Miracast” comme la source d'entrée.
2. Allumez le "Multi-Screen/Wireless Display" de votre appareil Android.
3. Sélectionnez "Projecteur WiMiUS-P64" dans les résultats de la recherche pour vous connecter.

FR
80
4.Réussir.
Remarques:
Si vous souhaitez le connecter à votre réseau Wi-Fi domestique, répétez simplement les étapes du
système iOS et sélectionnez “Miracast”.

FR
81
1. Allumez votre haut-parleur Bluetooth.
2.Activez les [Réglage Bluetooth] de votre projecteur et sélectionnez [Ajouter un accessoire].
3. Sélectionnez votre haut-parleur Bluetooth pour le connecter.
4.Réussir.
Note:
1.Cette étape s'applique uniquement à la connexion du haut-parleur Bluetooth, mais pas au Bluetooth du
téléphone portable.
2.Le projecteur P64 est compatible avec la plupart des casques Bluetooth, haut-parleurs Bluetooth et Airpods, mais
pas avec les claviers Bluetooth.
3.Si vous avez des questions, n'hésitez pas à envoyer un e-mail à WiMiUS via:
.
3.Réglage Bluetooth
3.1 Connectez les haut-parleurs Bluetooth
Dell

FR
82
1.Entrez l'option Soundbar dans l'interface principale, l'interface suivante s'afchera:
2.Allumez le Bluetooth de votre téléphone et connectez le Bluetooth du projecteur nommé “WiMiUS-P64 Projector ”,
3.Ensuite, le projecteur peut jouer de la musique de téléphone.
3.2 Connectez le Bluetooth du Téléphone

FR
83
CONNEXION DES LIGNES DE SIGNAL
Le projecteur WiMiUS P64 dispose de 6 interfaces, ports HDMI*2/ports USB*2/sortie audio 3,5 mm/sortie AV. Veuillez
sélectionner le bon port de connexion pour connecter votre appareil (PC, téléphone, lecteur DVD, barre de son, USB,
PS4, etc.)
Pour les dispositifs USB, pas besoin de choisir la source du signal. La machine les détectera automatiquement.
• Sélectionnez la catégorie requise « lm », « musique », « photo » ou « Suite Ofce » dans l'interface principale, et
appuyez sur la touche « OK » de la télécommande pour entrer dans la catégorie correspondante.
• Selon les programmes à choisir : « photos » « musique » « lm » ou « Suite Ofce ».
• Choisissez le chier que vous souhaitez lire, appuyez sur la touche « OK » pour lire ou mettre en pause le chier. (Vous
ne pouvez pas accéder à la catégorie requise sans connecter un disque USB.)
Remarque: Pour l'option "Suite Ofce", vous pouvez lire des chiers PPT de démonstration.
• Connectez le projecteur au PC avec un câble HDMI.
• Choisissez le canal du signal multimédia: "HDMI"
1.Connexion multimédia USB
2.Connexion avec PC

FR
84
• Choisissez le canal du signal multimédia: "HDMI"
• Utilisez un adaptateur Type-C vers HDMI pour connecter votre MacBook ou un adaptateur Mini Display vers HDMI
pour connecter votre MacBook Air (adaptateur non inclus).
• Utilisez le câble audio 3,5 mm fourni avec le projecteur pour vous connecter à la barre de son.
• Allumez le projecteur et la barre de son (choisissez le mode AUX).
• Plus de détails, veuillez contacter le vendeur à
.
• Utilisez le câble AV 3-en-1 dans l'emballage
• Allumez votre lecteur DVD et le projecteur ;
• Connectez les connecteurs femelles colorés au câble RCA de votre lecteur DVD avec le câble AV 3 en 1 dans
l'emballage ;
• Connectez le connecteur noir au port AV du projecteur, accédez à la page d'accueil pour sélectionner [ AV ]
comme source de signal.
3.Connexion avec MacBook or Mac Book Air
4.Connexion avec la barre de son
5.Connexion avec DVD
Audio
out
AUX
port

FR
85
Or connect to the DVD Player with the HDMI cable in the package.
Video
Left
AV port
Right
• Branchez la clé TV dans le port HDMI du projecteur.
• Choisissez le canal du signal multimédia: "HDMI"
•
P.S:
il ne prend en charge que la clé TV 1080P, pas la clé TV 4K.
• Choisissez le canal du signal multimédia: "HDMI"
• Utilisez un câble HDMI pour vous connecter à XBOX/PS4
6.Connexion avec Fire TV Stick
7.Connexion avec XBOX/PS4

FR
86
FONCTION MENU PRINCIPAL
1.Réglage de l'Image de Projection
Réglage de l'Image de Projection Menu inclus Fonction
Mode d'installation
Bureau avant / Bureau arrière / Plafond
avant / Plafond arrière
Choisissez les méthodes de projection,
retournez l'image
Correction trapézoïdale à quatre points Correction trapézoïdale à 4 points
Ajustez les quatre points pour faire de
l'image projetée un rectangle: Valeur 0-100
FR
87
2.Mise à jour locale du système
Mise à jour locale du système Mise à jour locale(USB) Mettre à jour hors ligne
Réglage de l'Image de Projection Menu inclus Fonction
Correction horizontale et verticale Trapèze horizontal/vertical/réinitialisation
Ajuster la distorsion trapézoïdale
horizontale et verticale: ±30°
Zoom Réduire l'afchage de 100% à 50% Réduire la taille de l'image
Correction automatique omnidirectionnelle
Correction automatique horizontale/
verticale
On/Off
Mise au point Auto Mise au point automatique On/Off
Allumer la mise au point automatique On/Off On/Off
FR
88
3.Autres paramètres
Autres paramètres Menu inclus Fonction
Paramètres de langue
Paramètres de langue
anglais, français, allemand, italien,
espagnol, japonais.20 plusieurs
langues
Choisissez une langue
Tonalité On/Off Ajuster le son des touches
Commutateur de temps
Off//30min/60min/90min/120mi
n/150min/180min/210m/240m
Régler le temps de veille du
projecteur
FR
89
4.À propos
À propos Menu inclus Fonction
Version de logiciel Version de produit Version de produit
Mise à niveau du systèm Mettre à jour le système Mettre à jour en ligne
Retour aux paramètres d'usine Réinitialiser
Restaurer tous les paramètres à
leurs paramètres d'usine

FR
90
FAQ
1. La télécommande ne communique pas avec le projecteur.
1) L'interrupteur d'alimentation à l'arrière du projecteur est allumé ou éteint?
2) Les piles de la télécommande sont épuisées ?
3) Quelque chose obstruant le signal entre la télécommande et l'IR
4) Lumière forte sur IR directement.
2. Aucune image à l'écran.
1) La conguration des canaux est-elle correcte?
2) Y a-t-il un signal d'entrée ?
3) Le câble d'entrée est-il bien branché ?
4) En mode PC, le taux de rafraîchissement est-il > 75KHz ?
4.
Image correcte, pas de son.
1) Les câbles d'entrée sont-ils correctement connectés?
2) Volume au min ou sur Muet.
3) Éteignez le son AC3/Dolby et réglez-le sur le son stéréo.
3. Écran bleu, pas d'image, pas de son.
Les câbles d'entrée sont bien connectés?

FR
91
6. Impossible de lire la vidéo dans App Netix, Hulu, Prime
Ces applications sont limitées avec HDCP. Ce modèle ne prend pas en charge cette fonction. Il ne peut donc
pas prendre en charge ces applications.
7. Impossible de trouver des appareils lorsqu'ils sont connectés à un disque dur ou à un lecteur ash.
Vériez si l'appareil est cassé.
8. Arrêt automatique après avoir fonctionné pendant un certain temps.
1) La ventilation du projecteur est bloquée ou la tension n'est pas stable.
2) Envoyez une vidéo à
pour vérier pour vous.
9.Non compatible avec votre haut-parleur Bluetooth?
1) Le projecteur peut ne pas être compatible avec certaines versions de haut-parleur Bluetooth de JBL.
2) Contactez immédiatement notre e-mail après-vente à
et indiquez-nous la marque
et le modèle de votre haut-parleur Bluetooth.
10.La connexion WiFi n'est pas stable?
1) Veuillez vérier si le réseau de votre téléphone fonctionne bien.
2) Faites la distance entre le téléphone et le projecteur à moins de 1 mètre.
5. Impossible de lire les lms.
1) Le format de la vidéo est-il correct?
2) Les chiers sont cassés?
3) L'appareil est cassé?

ES
92
CONTENIDO
Soporte Profesional WiMiUS 24H/7D - - - - - - - - - - - - - - - - 92
CONSEJOS - - - - - - - - - - - - - - - - - - - - - - - - - - 93
LISTA DE PAQUETES - - - - - - - - - - - - - - - - - - - - - - - 94
ESPECIFICACIONES DEL PROYECTOR - - - - - - - - - - - - - - - - 95
ESTRUCTURA DEL PRODUCTO - - - - - - - - - - - - - - - - - - - 96
MANDO A DISTANCIA - - - - - - - - - - - - - - - - - - - - - - 97
INSTALACIÓN - - - - - - - - - - - - - - - - - - - - - - - - - 98
ENCENDIDO DEL PROYECTOR - - - - - - - - - - - - - - - - - - - 101
AJUSTES DE IMAGEN DE PROYECCIÓN - - - - - - - - - - - - - - - - 102
CONFIGURACIÓN DEL PROYECTOR - - - - - - - - - - - - - - - - - 106
CONEXIÓN DE LÍNEAS DE SEÑAL - - - - - - - - - - - - - - - - - - 112
FUNCIÓN DEL MENÚ PRINCIPAL- - - - - - - - - - - - - - - - - - - 115
Preguntas Más Frecuentes - - - - - - - - - - - - - - - - - - - - 119

ES
93
Estimado cliente,
¡Muchas gracias por apoyar a WiMiUS!
Lea este manual detenidamente antes de utilizar el proyector. Si tiene algún problema, envíe un correo electrónico
con su número de pedido y el problema(Por ejemplo: ES + P64 + Sin sonido) a
. Le
daremos una rápida solución en menos de 24 horas.
En realidad, muchos problemas se pueden resolver fácilmente mediante la conguración, como la falta de señal,
falta de sonido, fallo de la conexión bluetooth, fallo en la conexión WiFi, puntos negros, animación entrecortada, etc.
Aseguramos que todos los proyectores han sido cuidadosamente revisados y empaquetados al 100% antes del
envío.
Si tiene alguna pregunta, póngase en contacto con nosotros para que podamos solucionar el problema. Y denos la
oportunidad de mejorar. Le garantizamos que le proporcionaremos una solución satisfactoria.
¡Gracias por su comprensión!
Equipo de servicio de WiMiUS
Soporte Profesional WiMiUS 24H/7D

ES
94
1. No coloque el proyector en una habitación demasiado cálida o demasiado fría, ya que la temperatura alta o baja
acortará la vida útil del dispositivo. El entorno de trabajo debe ser entre 5°C~ 35°C
2. Si hay puntos negros en la pantalla de proyección, no se preocupe, comuníquese con
por correo electrónico, podemos enviarle un video sobre cómo eliminar el polvo.
3. La ventilación está equipada para que el proyector funcione de manera estable. No cubra la ventilación con tela,
mantas u otras cosas. No inserte nada en la ranura del proyector, ya que podría producir un cortocircuito o una
descarga eléctrica en su dispositivo y causar daños.
4. El proyector estará estrictamente protegido contra fuertes impactos, extrusión y vibración. No intente arreglarlo si
el circuito interno falla.
5. La lente, como componente central del proyector, está directamente relacionada con la denición y el efecto de
la imagen. El exceso de polvo afectará a la calidad de la imagen. La lente sucia debe limpiarse con un paño de
algodón suave para la supercie de cristal de la lente. No se deben utilizar telas duras ni abrasivos.
CONSEJOS:
ES
95
Proyector WiMiUS P64 * 1
Cable HDMI * 1 Cubierta de lente * 1 Mando a distancia * 1 Cable AV 3-en-1 * 1
Manual de usuario * 1
Cable de alimentación * 1
Hisopo de limpieza * 1
LISTA DE PAQUETES

ES
96
ESPECIFICACIONES DEL PROYECTOR
Número de modelo: P64
Tecnología de pantalla
LCD
Fuente de luz
LED
Resolución nativa
1920x1080P
Función zoom
50%-100%
Tipo de instalación
Frontal / trasera en el
escritorio, Frontal / trasera
en el techo
Relación de aspecto
16:9/4:3/Auto
Distancia de proyección
1.5-6m
Voltaje
AC100-240V
Tamaño del producto
197*227*163mm
Peso del producto
2.7kg
Corrección trapezoidal
Automático + Eléctrico
Enfocar
Automático + Eléctrico
Interfaz de entrada
HDMI*2/USB*2/AV/3.5mm audio out
Archivo de vídeo
H.264/H.265/MP4/AVI/WMV/MKV/FLV
Archivo de audio
MP3/WAV/MAK
Archivo de imagen
JPG/PNG/BMP/JPEG

ES
97
ESTRUCTURA DEL PRODUCTO
1. Poder
2. Teclas de echa
3. Conrmar
4. Regreso
5. Enfoque manual +
6. Enfoque manual -
7/8. Puertos USB
9/10.Puertos HDMI
11. Puerto AV
12. Toma de auriculares de 3,5mm
13. IR
1 2 3 4 5 6
14. Malla antipolvo
(Limpieza regular recomendada)
7 8 9 10 11 12
13

ES
98
9
8
11
12
13
10
1
2
3
4
6
7
14
5
MANDO A DISTANCIA
1. Potencia
2. HOME
3. Botón de echa
4. Menú
5. Pausar/Reproducir
6. VOL+
7. VOL-
8. Silenciar
9. Conguraciones
10. OK
11. Devolver
12. Enfocar +
13. Enfocar -
14. Fuente
Nota:
1. Instale 2 pilas AAA (no incluidas) en el mando a distancia antes de usarlo, no combine baterías nuevas con
viejas en el mando, ya que pueden causar fallos en el funcionamiento debido a una fuente de alimentación
insuciente.
2. Cuando utilice el mando, asegúrese de que el transmisor de señal apunte a la señal infrarroja del proyector.
3. Cuando no utilice el mando a distancia durante un período prolongado. Saque las baterías para evitar fugas.

ES
99
1.Proyección antes del montaje en el techo 2. Soporte de techo de proyección trasera
3. Proyección frontal en escritorio 4.Proyección trasera en el escritorio
INSTALACIÓN
El proyector se puede colgar en el techo con un marco especial para colgar y colocarlo en un escritorio estable
para proyectar la imagen de acuerdo con el entorno operativo y los requisitos. Además, el proyector se puede
instalar con los siguientes métodos:
Mantenga el proyector a una altura donde su lente tenga simetría axial con la pantalla. Si esto no es posible, utilice
la función de corrección trapezoidal para ajustar la imagen proyectada.
1.Método de Instalación

ES
100
2.Distancia y Tamaño De Proyección
Relación de aspecto: 16:9
Distancia Tamaño de Pantalla
1.6m 49”
2m 60”
2.5m 75”
3m 93”
3.5m 109’’
4m 125’’
4.5m 141’’
5m 157’’
6m 300’’
*El tamaño de la imagen depende de la distancia entre el proyector y la pantalla. puede haber una diferencia de
medición del 3% entre los datos enumerados anteriormente.
*La distancia de proyección recomendada es de 2,5 a 3 m.
*La oscuridad ambiental mejora la claridad de las imágenes proyectadas.
ES
101
3.Instalar en el techo
Mantenga el proyector vertical y hacia el centro de la pantalla del proyector, mantenga la imagen de proyección
plana en la pantalla.
1) Para ajustar el ángulo de inclinación,ajuste la barra de soporte en la parte inferior del proyector, vea la imagen a
continuación.
2) Para el montaje en el techo, hay 4 orificios en la parte inferior del proyector
(M4*10 mm)
. Desatornille las
4 gomas negras lentamente, luego podrá encontrar los orificios para el montaje en el techo, vea la imagen a
continuación.
NOTA: El soporte de techo no está empaquetado.
Screw holes
Soporte ajustable

ES
102
ENCENDIDO DEL PROYECTOR
Para una mejor visualización, utilice este proyector mientras corre la cortina o en una habitación oscura.
1) Retire la tapa de la lente, conecte el proyector a la corriente a través del cable de alimentación, presione la tecla
de encendido en el control remoto o el proyector, comienza a funcionar;
2) Utilice la función de
distorsión trapezoidal/enfoque automático o electrónico
del proyector para obtener una
imagen rectangular y clara;
3) Ajuste el botón de
enfoque ''F+'' ''F-''
en el proyector o en el control remoto para obtener el mejor rendimiento
de imagen; (Si todavía está borroso, intente ajustar la distancia de proyección).
4) Conecte el dispositivo externo (teléfono inteligente, iPad, Fire Stick, caja de TV, reproductor de DVD, PC, etc. a las
interfaces correspondientes del proyector, asegúrese de seleccionar la fuente correspondiente. Si no selecciona la
fuente correcta, el proyector no podrá detectar la señal)
5) Seleccione el menú " ", ingrese [Conguración de idioma], luego puede congurar su idioma preferido.

ES
103
AJUSTES DE IMAGEN DE PROYECCIÓN
Seleccione el menú [Configuración] -- Seleccione [Configuración de imagen de proyección] -- Seleccione
[Modo de instalación], presione la tecla de echa para seleccionar y presione "OK" para conrmar la posición de
proyección.
1.Modo de Proyección

ES
104
2.Corrección Trapezoidal Manual
2.1 Corrección Trapezoidal de 4-Puntos
Seleccione el menú [Conguración de imagen de proyección] -- Seleccione la opción [Corrección trapezoidal de
4 puntos], simplemente haga clic en el botón "Aceptar" para seleccionar el punto que desea ajustar primero, luego
presione el botón "
▶
" o "
▼
" para establecer
el valor (0 a 100)
necesarios como se muestra a continuación.
Restablecer: Presione '' '', la imagen restaurará la conguración de corrección trapezoidal original.

ES
105
2.2 Corrección Trapezoidal Horizontal y Vertical
Seleccione el menú [Conguración de la imagen de proyección] -- seleccione la opción
Trapezoide horizontal
o vertical
para ajustar la pantalla horizontal o verticalmente
±30°
con las teclas de echa hasta que las guías se
ajusten a un rectángulo.
Coloque el proyector horizontalmente frente a la pared primero, seleccione el menú [Conguración de imagen de
proyección] - habilite la opción [Corrección omnidireccional automática] o [Enfoque automático], luego enfocará
automáticamente la imagen de acuerdo con la distancia de proyección desde la pantalla y se ajustará la imagen
a un rectángulo cuando cambia el ángulo de proyección.
Si la imagen está borrosa, presione el botón de enfoque ''F+'' ''F-'' en el control remoto repetidamente para
ajustar el enfoque de la lente, presione o mantenga presionado el botón de ajuste hasta que la imagen sea
clara (No es necesario presionar el botón "OK" una vez que la imagen es clara).
3.Corrección Trapezoidal y Enfoque Automático

ES
106
Nota: El ángulo de proyección lateral del proyector no debe exceder los 20°; de lo contrario, es posible que la
función de corrección trapezoidal automática no funcione.
Vaya a la página de inicio -- Seleccione el menú [ ] -- -- Seleccione la opción [ Ajustes de imagen de
proyección ] -- Seleccione la opción [ Zoom ], la pantalla de proyección se puede ampliar del 100% al 50%.
Presione el botón "
◀ ▶
" para ajustar el valor necesario como se muestra a continuación.
4.Ajuste de Zoom

ES
107
CONFIGURACIÓN DEL PROYECTOR
Seleccione la fuente de señal de entrada deseada (HDMI1/HDMI2/AV) en la página de inicio, o puede presionar el
botón "S" en el control remoto para seleccionar la fuente de señal correspondiente.
Para dispositivos USB, no es necesario elegir la fuente de la señal. La máquina los detectará
automáticamente.
Al reproducir un video, puede presionar el botón de menú " " y luego congurar la relación de aspecto de
la imagen y otros modos de reproducción.
1.Seleccione La Fuente De La Señal De Entrada

ES
108
Conseils:
1. La uidez de la duplicación de pantalla a través de una conexión inalámbrica se verá afectada por el entorno
de la red. Se recomienda un ancho de banda de 100 Mbit o más cuando se utiliza la duplicación de pantalla.
2. Asegúrese de que su dispositivo móvil esté cerca del proyector cuando utilice una conexión inalámbrica. Se
recomienda una distancia de menos de 1 metro.
3. Es posible que algunos dispositivos móviles no admitan la duplicación de pantalla debido a la compatibilidad.
4. Cualquier pregunta, no dude en enviar un correo electrónico a WiMiUS a través de
.
2.Conexión con Smartphones y iPads
Conguración WiFi
2.1 Para el Sistema iOS (Airplay)
Seleccione el ícono de conguración en la esquina superior derecha de la interfaz principal, luego presione la tecla
"OK" en el control remoto para ingresar a la interfaz de conguración y seleccione "Conguración WiFi".
Conguración con Wi-Fi doméstico
Atención: su dispositivo y el proyector deben estar en el mismo WiFi doméstico.
1. Habilite la conguración WiFi del proyector.
2. Elija el WiFi de su hogar para conectarse e ingrese la contraseña correcta, luego haga clic en "Listo" para
conectarse, espere de 3 a 5 segundos para establecer la conexión. Una vez conectado, recordará la contraseña
del WiFi conectado.
3. Habilite la conguración de Wi-Fi de su dispositivo móvil iOS, luego conéctelo al mismo Wi-Fi doméstico que el
proyector.
4.. Luego haga clic en "Airplay" como fuente de entrada de su proyector.
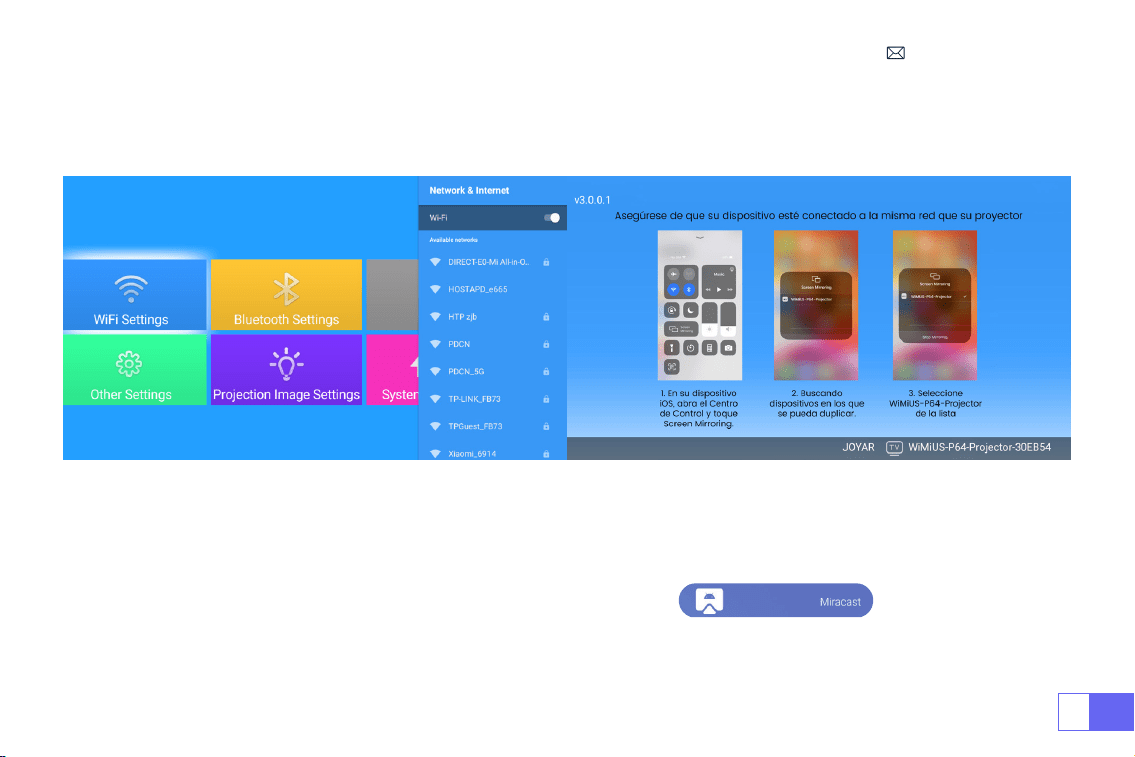
ES
109
5. Deslice hacia arriba en la pantalla de su dispositivo móvil iOS y toque
"Duplicación de pantalla"
para buscar el
proyector, luego seleccione
"WiMiUS-P64 Projector"
de los resultados de búsqueda para conectarse.
6.Tener éxito.
2.2 Para el Sistema Android(Miracast)
Para habilitar esta función, su dispositivo Android debe ser compatible con pantallas múltiples/pantallas
inalámbricas. El nombre de "Multi-Screen" puede variar entre diferentes marcas de dispositivos Android.
Conguración con internet móvil
Encienda el proyector, seleccione “Miracast” como fuente de entrada.
2. Encienda la "Pantalla multipantalla/inalámbrica" de su dispositivo Android.
3. Seleccione "Proyector WiMiUS-P64" de los resultados de búsqueda para conectarse.

ES
110
4. Tener éxito.
Notas: si desea conectarlo a la red Wi-Fi de su hogar, simplemente repita los pasos para el sistema iOS y
seleccione "Miracast".

ES
111
1. Encienda su altavoz Bluetooth.
2. Habilite la [Conguración de Bluetooth] de su proyector y seleccione [Agregar accesorio].
3. Seleccione su altavoz Bluetooth para conectarlo.
4. Tener éxito.
Nota:
1. Este paso solo se aplica a la conexión del altavoz Bluetooth, no al Bluetooth del teléfono móvil.
2. El proyector P64 es compatible con la mayoría de los auriculares Bluetooth, altavoces Bluetooth y Airpods, pero
no con teclados Bluetooth.
3. Si tiene alguna pregunta, no dude en enviar un correo electrónico a WiMiUS a través de:
.
3.Conguración de Bluetooth
3.1 Conectar Altavoces Bluetooth
Dell
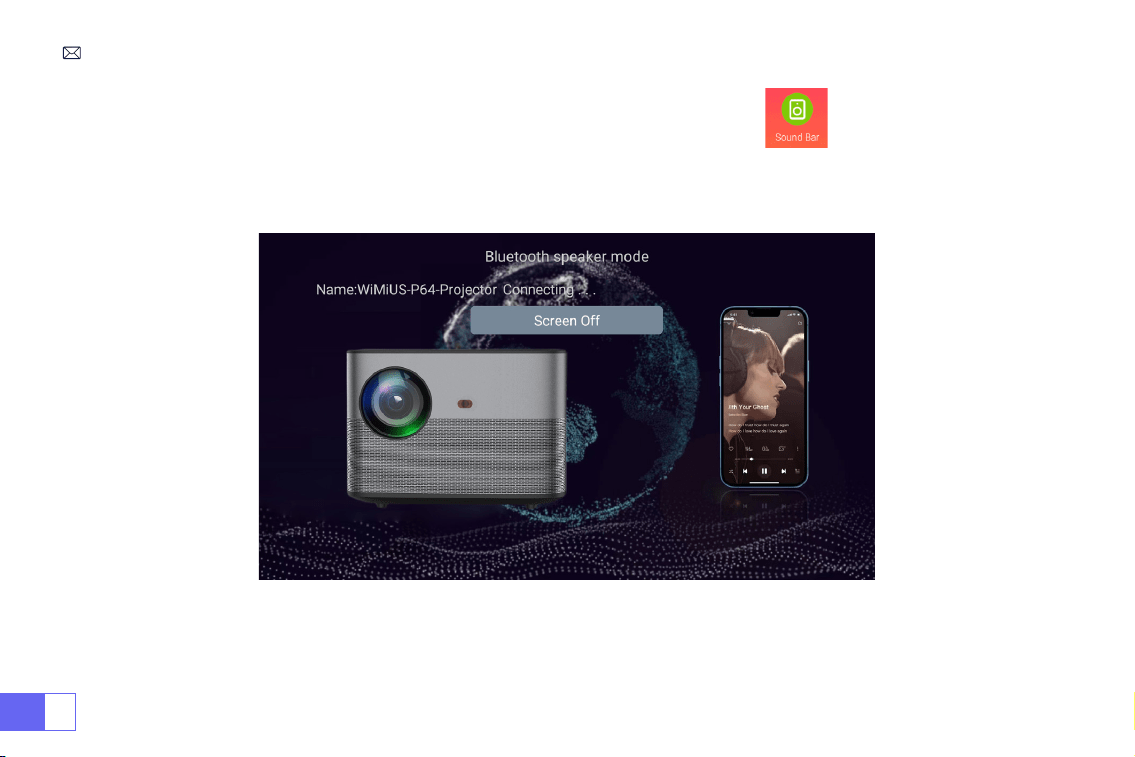
ES
112
1..Ingrese a la opción Soundbar en la interfaz principal, verá la siguiente interfaz:
2. Encienda el bluetooth de su teléfono y conecte el bluetooth del proyector llamado
"WiMiUS-P64 Projector"
,
3. Luego, el proyector puede reproducir música del teléfono.
3.2 Conectar teléfono Bluetooth

ES
113
CONEXIÓN DE LÍNEAS DE SEÑAL
El proyector WiMiUS P64 tiene 6 interfaces, puertos HDMI*2/puertos USB*2/salida de audio de 3,5 mm/salida AV.
Seleccione el puerto de conexión correcto para conectar su dispositivo (PC, teléfono, reproductor de DVD, barra de
sonido, USB, PS4, etc.)
Para dispositivos USB, no es necesario elegir la fuente de la señal. La máquina los detectará automáticamente.
• Seleccione la categoría requerida "Película", "Música", "Foto" o "Suite de ocina" en la interfaz principal y presione la
tecla "OK" en el control remoto para ingresar a la categoría correspondiente.
• Según los programas a elegir: “fotos” “música” “película” o “Ofce Suite”.
•Elija el archivo que desea reproducir, presione la tecla "OK" para reproducir o pausar el archivo. (No puede acceder
a la categoría requerida sin conectar un disco USB).
Nota: Para la opción "Ofce Suite", puede reproducir archivos PPT de demostración.
• Conecte el proyector a la PC con un cable HDMI.
• Elija el canal de señal multimedia: "HDMI"
1.Conexión multimedia USB
2.Conexión con PC

ES
114
• Elija el canal de señal multimedia: "HDMI"
• Utilice un adaptador de tipo C a HDMI para conectar su MacBook o un adaptador Mini Display a HDMI para
conectar su MacBook Air (adaptador no incluido).
• Utilice el cable de audio de 3,5 mm suministrado con el proyector para conectarlo a la barra de sonido.
• Encienda el proyector y la barra de sonido (elija el modo AUX).
• Más detalles, póngase en contacto con el vendedor en
.
• Use el cable AV 3 en 1 en el paquete
• Encienda su reproductor de DVD y el proyector;
• Conecte los conectores hembra de colores al cable RCA de su reproductor de DVD con el cable AV 3 en 1 en el
paquete;
• Conecte el conector negro al puerto AV del proyector, acceda a la página de inicio para seleccionar [ AV ] como
fuente de señal.
3.Conexión con MacBook or Mac Book Air
4.Conexión con la barra de sonido
5.Conexión con DVD
Audio
out
AUX
port

ES
115
Or connect to the DVD Player with the HDMI cable in the package.
Video
Left
AV port
Right
• Enchufe el dispositivo de TV en el puerto HDMI del proyector.
• Elija el canal de señal multimedia: "HDMI"
•
P.D: Solo es compatible con 1080P TV Stick, no con 4K TV Stick.
• Elija el canal de la señal multimedia: "HDMI"
• Use un cable HDMI para conectarse a XBOX/PS4
6.Conexión con Fire TV Stick
7.Conexión con XBOX/PS4

ES
116
FUNCIÓN DEL MENÚ PRINCIPAL
1.Ajuste De La Imagen De Proyección
Ajuste de la imagen de proyección Menú incluido Función
Modo de instalación
Escritorio frontal / Escritorio posterior /
Techo frontal / Techo posterior
Elija métodos de proyección, voltee la
imagen
Corrección trapezoidal de cuatro puntos Corrección trapezoidal de 4 puntos
Ajuste los cuatro puntos para convertir
la imagen proyectada en un rectángulo:
Valor 0-100

ES
117
2.Actualización local del sistema
Actualización local del sistema Actualización local (USB) Actualizar sin conexión
Ajuste de la imagen de proyección Menú incluido Función
Corrección horizontal y vertical
Corrección trapezoidal horizontal/vertical/
restablecer
Ajuste la distorsión trapezoidal horizontal y
vertical: ±30°
Zoom Reducir la visualización del 100% al 50% Reducir el tamaño de la imagen
Corrección automática omnidireccional Corrección horizontal/vertical automática On/Off
Enfoque Auto Enfoque automático On/Off
Activar el enfoque automático On/Off On/Off
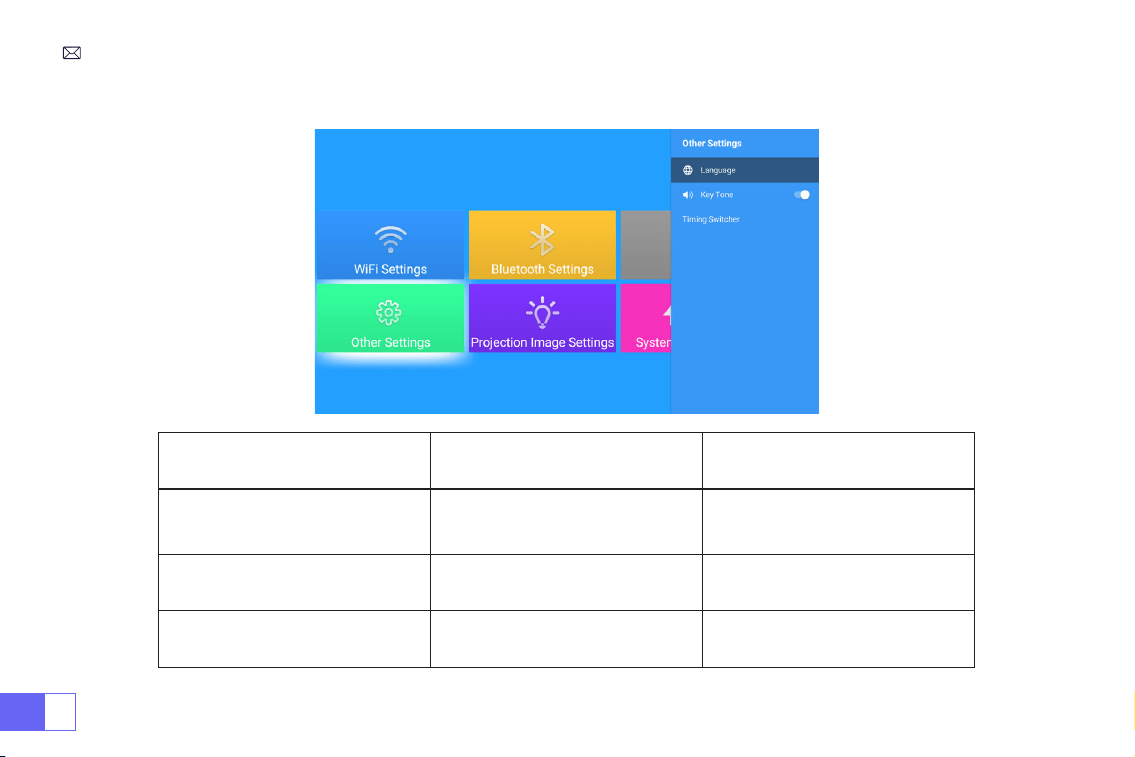
ES
118
3.Otros Parámetros
Otros parámetros Menú incluido Función
Conguraciones de idioma
inglés, francés, alemán, italiano,
Español, Japonés. 20 varios
idiomas
Elige un idioma
Tono de tecla On/Off Ajustar el sonido de las teclas
Conmutador de tiempo
Off//30min/60min/90min/120mi
n/150min/180min/210m/240m
Establecer el tiempo de
suspensión del proyector

ES
119
4.Acerca de
Acerca de Menú incluido Función
Versión del software Version del product Version del product
Actualización de sistema Actualizar el sistema Actualizar en línea
Restablecimiento de fábrica Reiniciar
Restaurar todas las
conguraciones a sus valores de
fábrica

ES
120
Preguntas Más Frecuentes
1. El control remoto no se comunica con el proyector.
1) ¿El interruptor de encendido en la parte posterior del proyector está encendido o apagado?
2) ¿Están agotadas las pilas del mando a distancia?
3) Algo que obstruye la señal entre el control remoto y el IR
4) Luz fuerte en IR directamente.
2. El control remoto no se comunica con el proyector.
1) ¿El interruptor de encendido en la parte posterior del proyector está encendido o apagado?
2) ¿Están agotadas las pilas del mando a distancia?
3) Algo que obstruye la señal entre el control remoto y el IR
4) Luz fuerte en IR directamente.
4. Buena imagen, sin sonido.
1) ¿Están bien conectados los cables de entrada?
2) Volumen al mínimo o Silencio.
3) Apague el sonido AC3/Dolby y congúrelo en sonido estéreo.
3. Pantalla azul, sin imagen, sin sonido.
¿Están bien conectados los cables de entrada?

ES
121
6. No se puede reproducir video en la aplicación Netix, Hulu, Prime
Estas aplicaciones están limitadas con HDCP. Este modelo no admite esta función. Por lo tanto, no puede
admitir estas aplicaciones.
7. No se pueden encontrar dispositivos cuando se conectan a un disco duro o una unidad ash.
Compruebe si el dispositivo está roto.
8. Apagado automático después de trabajar durante un período de tiempo.
1) La ventilación del proyector está bloqueada o el voltaje no es estable.
2) Envíe un video a
para vericarlo.
9. ¿No es compatible con su altavoz Bluetooth?
1) Es posible que el proyector no sea compatible con algunas versiones del altavoz Bluetooth de JBL.
2) Comuníquese de inmediato con nuestro correo electrónico de posventa en
e
infórmenos la marca y el modelo de su altavoz Bluetooth.
10.¿La conexión WiFi no es estable?
1) Verique si la red de su teléfono funciona bien.
2) Haga que la distancia entre el teléfono y el proyector sea de 1 metro.
5. No se pueden reproducir películas.
1) ¿Es correcto el formato de video?
2) ¿Los archivos están rotos?
3) ¿El dispositivo está roto?

IT
122
CONTENUTI
Supporto Professionale WiMiUS 7D/24H - - - - - - - - - - - - - - 122
SUGGERIMENTI - - - - - - - - - - - - - - - - - - - - - - - - - 123
ELENCO DEL PACCHETTO - - - - - - - - - - - - - - - - - - - - - 124
SPECIFICHE DEL PROIETTORE- - - - - - - - - - - - - - - - - - - - 125
STRUTTURA DEL PROIETTORE - - - - - - - - - - - - - - - - - - - 126
Controllo Remoto - - - - - - - - - - - - - - - - - - - - - - - 127
INSTALLAZIONE - - - - - - - - - - - - - - - - - - - - - - - - - 128
AVVIO DEL PROIETTORE - - - - - - - - - - - - - - - - - - - - - 131
IMPOSTAZIONI DELL'IMMAGINE DI PROIEZIONE - - - - - - - - - - - - - 132
CONFIGURAZIONE DEL PROIETTORE - - - - - - - - - - - - - - - - - 136
COLLEGAMENTO DI INTERFACCE DI SEGNALE - - - - - - - - - - - - - 142
FUNZIONE DI MENU PRINCIPALE - - - - - - - - - - - - - - - - - - 145
GARANZIA- - - - - - - - - - - - - - - - - - - - - - - - - - - 149
FAQ - - - - - - - - - - - - - - - - - - - - - - - - - - - - - 149

IT
123
Gentile cliente,
grazie mille per il supporto per WiMiUS!
Si prega di leggere attentamente questo manuale prima di utilizzare il proiettore. In caso di problemi, inviaci
un'e-mail con il codice del paese, il numero d'ordine e il problema
(Per esempio: IT+P64+nessun suono)
a
. Forniremo una soluzione veloce entro 24 ore.
In realtà, molti problemi possono essere facilmente risolti con le giuste impostazioni, come nessun segnale, nessun
suono, connessione bluetooth non riuscita, connessione WiFi non riuscita, macchie scure, animazione mosso ecc.
Promettiamo tutti i proiettori sono stati controllati e confezionati con cura al 100% prima della spedizione.
Se avete domande, vi preghiamo di contattarci in modo che il problema può essere risolto il prima possibile e darci
l'opportunità di migliorare. Garantiamo che vi forniremo una soluzione soddisfacente.
Grazie per la comprensione!
Team di Assistenza WiMiUS
Supporto Professionale WiMiUS 7D/24H

IT
124
1. Non posizionare il proiettore in una stanza troppo calda o troppo fredda, perché la temperatura elevata o la bassa
temperatura ridurrà la durata del dispositivo. La temperatura nell'ambiente di lavoro è preferibilmente 5°C~35°C.
2. Se ci sono punti neri sullo schermo di proiezione, non preoccupatevi, vi preghiamo di contattare
support01@
wimius.com
via email, vi inviamo un video su come rimuovere la polvere.
3. Il dispositivo di ventilazione consente al proiettore di funzionare stabilmente. Non coprire le prese d'aria con
panno, coperte o altro. Non inserire nulla nelle fessure del proiettore o potrebbe causare un cortocircuito o una
scossa elettrica al dispositivo e causare danni.
4. Il proiettore deve essere rigorosamente protetto da forti urti, estrusione e vibrazioni intense.
5. Come parte centrale del proiettore, l'obiettivo è direttamente correlato alla denizione e all'effetto dello schermo.
La polvere eccessiva sopra può inuenzare la qualità dell'immagine. Pulire la supercie della lente di vetro sporco
con un panno di cotone morbido. Non possono essere utilizzati tessuti duri o abrasivi.
SUGGERIMENTI

IT
125
Proiettore di WiMiUS P64 * 1
Cavo HDMI * 1 Copriobiettivo * 1 Telecomando * 1 Cavo AV 3 in 1 * 1
Manuale Utente * 1
Cavo di Alimentazione * 1
Tampone di Pulizia * 1
ELENCO DEL PACCHETTO

IT
126
SPECIFICHE DEL PROIETTORE
Model No.: P64
Tecnologia del Display
LCD
Sorgente Luminosa
LED
Resoluzione Nativa
1920x1080P
Funzione Zoom
50%-100%
Tipo di Installazione
Anteriore/Posteriore sul
Tavolo, Anteriore/Posteriore
sul Softto
Proporzioni
16: 9/4: 3/Auto
Distanza di Proiezione
1,5-6m
Tensione di Potenza
AC100-240V
Dimensione del Prodotto
197*227*163mm
Peso del Prodotto
2,7kg
Correzione Trapezoidale
Auto + Elettrico
Messa a Fuoco
Auto + Elettrico
Interfaccia di Ingresso
HDMI*2/USB*2/AV/Uscita Audio da 3,5 mm
Formato Video Supportato
AVI, MP4, MKV, FLV, WMV, MOV, RMVB, MPEG1, MPEG2, MPEG-4, H.264, XVID, H.263
Formato Audio Supportato
AAC, MP2, MP3, PCM, FLAC, WMA
Formato Immagine
Supportato
JPG/PNG/BMP/JPEG
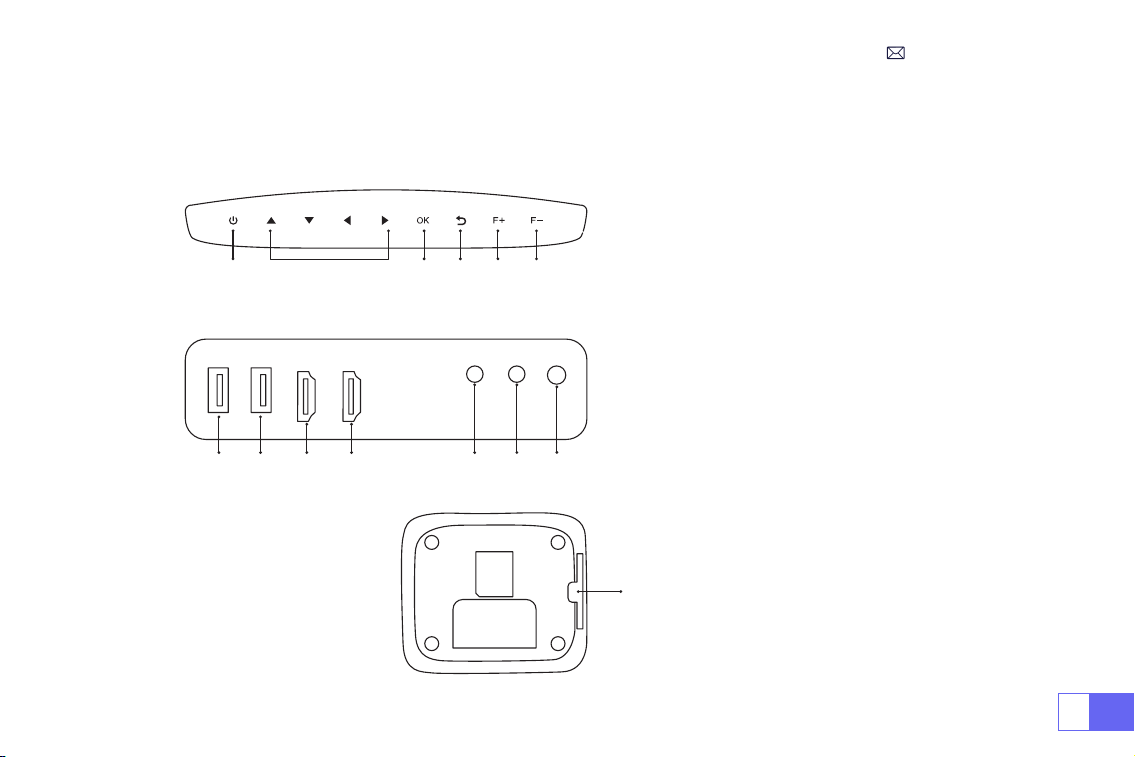
IT
127
STRUTTURA DEL PROIETTORE
1. Potenza
2. Tasti Freccia
3. Conferma
4. Indietro
5. Messa a Fuoco Manuale +
6. Messa a Fuoco Manuale -
7/8. Porte USB
9/10. Porte HDMI
11. Porta AV
12. 3,5 mm Jack per Cufe
13. Finestra di ricezione del segnale a
infrarossi
1 2 3 4 5 6
14. Filtro Antipolvere
(Si consiglia una pulizia regolare)
7 8 9 10 11 12
13

IT
128
9
8
11
12
13
10
1
2
3
4
6
7
14
5
Controllo Remoto
1. Potenza
2. Homepape
3. Tasti Freccia
4. Menù
5. Tasto di Pausa
6. Volume +
7. Volume -
8. Mute
9. Impostazione
10. Conferma
11. Ritorno
12. Messa a Fuoco +
13. Messa a Fuoco -
14. Sorgente
Nota:
1. Installare 2 pezzi di batterie AAA (non incluse) nel telecomando prima di utilizzarlo, non combinare nuove batterie
con quelle vecchie nel telecomando, che possono causare problemi di funzionamento a causa dell'alimentazione
insufciente.
2. Quando si utilizza il telecomando, assicurarsi che il trasmettitore di segnale del telecomando miri al segnale
infrarosso del proiettore.
3. Quando non si utilizza il telecomando per un lungo periodo. Togliere le batterie per evitare perdite.

IT
129
1. Proiezione frontale Montaggio a softto 2. Retroproiezione Montaggio a softto
3. Proiezione frontale Montaggio da tavolo 4. Retroproiezione Montaggio da tavolo
INSTALLAZIONE
Il proiettore può essere appeso al softto con una staffa speciale e posizionato su un tavolo stabile, proiettando
immagini in base all'ambiente operativo e alle esigenze. Inoltre, il proiettore può essere installato nei seguenti modi:
Mantenere il proiettore ad un'altezza in cui l'obiettivo è simmetria assiale allo schermo. Se ciò non fosse possibile,
utilizzare la funzione di correzione keystone per regolare l'immagine di proiezione.
1. Metodo di Installazione

IT
130
2. Distanza e Dimensione della Proiezione
Rapporto di Aspetto: 16:9
Distanza Dimensione dello Schermo
1,6m 49”
2m 60”
2,5m 75”
3m 93”
3,5m 109’’
4m 125’’
4,5m 141’’
5m 157’’
6m 300’’
*La dimensione dell'immagine dipende dalla distanza tra il proiettore e lo schermo. Ci può essere una differenza di
misura del 3% tra i dati sopra elencati.
*La distanza di proiezione raccomandata è 2,5-3m.
*L'oscurità ambientale migliorerà la chiarezza delle immagini proiettate.

IT
131
3. Montaggio a Softto
Mantenere l'obiettivo del proiettore verticale e verso la metà dello schermo del proiettore, mantenere l'immagine di
proiezione piatta sullo schermo.
1. Per regolare l'altezza di inclinazione del proiettore, la piastra della staffa nella parte inferiore del proiettore può
essere aperta verso l'esterno.
2. Per montaggio a soffitto, ci sono 4 fori nella parte inferiore del proiettore
(M4*10mm)
. Si prega di svitare
lentamente le 4 gomme nere, quindi è possibile trovare i fori per il montaggio a softto, vedi la gura seguente.
NOTA: La staffa di montaggio non è inclusa nel pacchetto.
Fori per le viti
Piastrina di supporto

IT
132
AVVIO DEL PROIETTORE
Per ottenere una visione migliore, si prega di utilizzare questo proiettore mentre si chiude la tenda o in una stanza
buia.
1) Rimuovere il copriobiettivo, collegare il proiettore all’elettricità con il cavo di alimentazione, premere il tasto di
accensione sul telecomando o sul proiettore, inizia a lavorare;
2) Utilizzare la funzione di keystone/messa a fuoco automatica o elettronica del proiettore per ottenere un
rettangolo e un'immagine chiara;
3) Regolare il tasto di messa a fuoco "F+'' 'F-'' sul proiettore o sul telecomando per ottenere le migliori prestazioni
dell'immagine (se è ancora sfocata, provare a regolare la distanza di proiezione);
4) Collegare il dispositivo esterno (come smartphone, iPad, re TV stick, TV box, lettore DVD, PC, ecc. nelle interfacce
corrispondenti del proiettore. Assicurati di selezionare la sorgente corrispondente. Se non selezioni la sorgente
corretta, il proiettore non sarà in grado di rilevare il segnale);
5) Selezionare la " " nel menu, immettere le [Impostazioni Lingua], quindi è possibile impostare la lingua preferita.

IT
133
IMPOSTAZIONI DELL'IMMAGINE DI PROIEZIONE
Selezionare [Impostazioni Immagine di Proiezione] dal menu -- Selezionare l'opzione [Impostazione di Proiezione]
-- Selezionare
[Modalità Installazione]
, premere il tasto freccia per selezionare e premere "OK" per confermare la
posizione di proiezione.
1. Modalità di Proiezione

IT
134
2. Keystone Correzione Manuale
2.1 Keystone a Quattro-Punti
Selezionare [Impostazioni Immagine di Proiezione] dal menu -- Selezionare l'opzione
[Keystone a Quattro-Punti]
,
basta fare clic sul pulsante "OK" per selezionare il punto che si desidera regolare in un primo momento, quindi
premere il pulsante "
▶
" o "
▼
" per impostare il valore (valore 0~100) necessario come mostrato di seguito.
Ripristino: Premere '' '', l'immagine ripristinerà le impostazioni di correzione keystone originali.
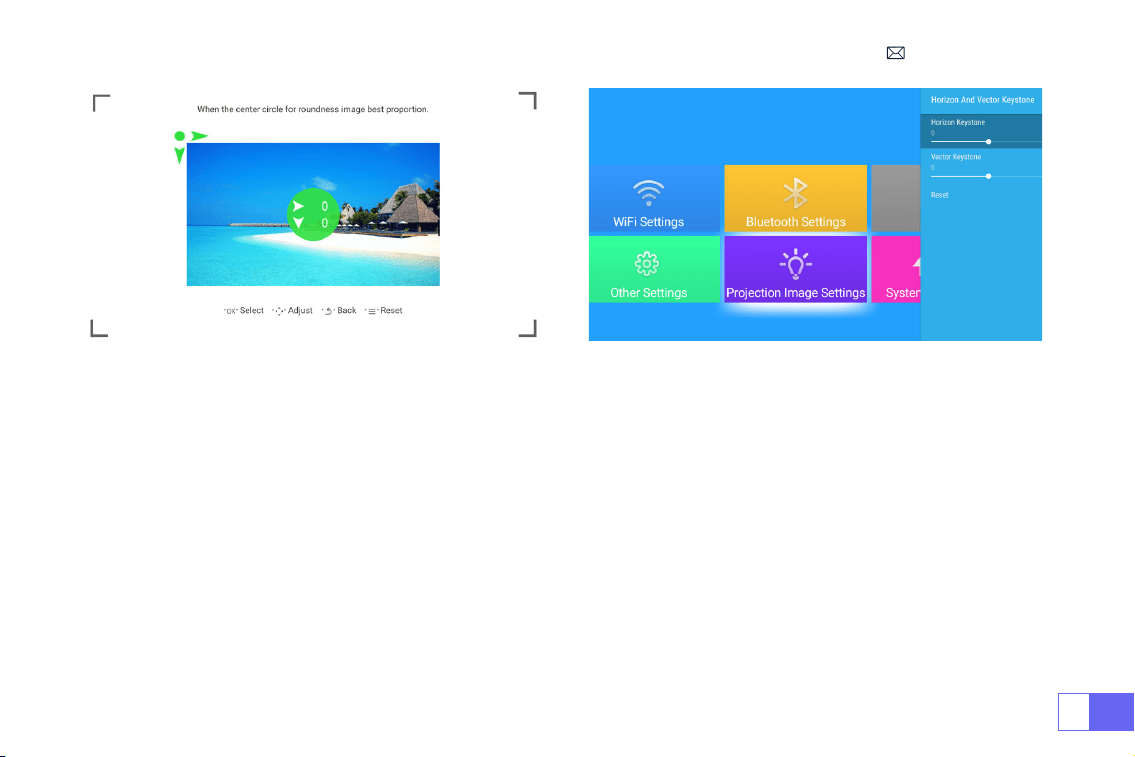
IT
135
2.2 Keystone Orizzontale e Verticale
Selezionare [Impostazioni Immagine di Proiezione] dal menu -- Selezionare l'opzione
[Keystone Orizzontale o
Verticale]
per regolare lo schermo orizzontalmente o verticalmente ±30° con i tasti freccia nché l’immagine non
venga regolata su un rettangolo.
Si prega di posizionare il proiettore orizzontalmente faccia a parete prima, selezionare l’opzione [Impostazioni
Immagine di Proiezione] dal menu -- accendere l’opzione
[Correzione Automatica Omnidirezionale] o [ Auto
Focus ]
, quindi si concentrerà automaticamente l'immagine in base alla distanza di proiezione dallo schermo e
regolare l'immagine a un rettangolo quando si cambia l'angolo di proiezione.
Se l'immagine è sfocata, premere ripetutamente il pulsante di messa a fuoco “F+” “F-” sul telecomando per regolare
la messa a fuoco dell'obiettivo, toccare o premere a lungo il pulsante di regolazione no a quando l'immagine è
chiara
(non è necessario premere il pulsante OK dopo che lo schermo è chiaro)
.
3. Auto Keystone Correzione e Messa a Fuoco

IT
136
Nota: L'angolo di proiezione laterale del proiettore non dovrebbe eccedere 20°, altrimenti la funzione automatica di
correzione keystone potrebbe non funzionare.
Vai alla home page -- Seleziona [ ] dal menu -- Seleziona l'opzione [Impostazioni Immagine di Proiezione]--
Seleziona [Zoom], lo schermo di proiezione può scalare dal 50% al 100%. Premere il pulsante "
◀ ▶
" per impostare il
valore necessario come mostrato di seguito.
4. Impostazione dello Zoom

IT
137
CONFIGURAZIONE DEL PROIETTORE
Selezionare la sorgente del segnale di ingresso desiderato (HDMI1/ HDMI2/ AV) sulla home-page, oppure è possibile
premere il pulsante "S" sul telecomando per selezionare la sorgente del segnale corrispondente.
Per i dispositivi
USB, non è necessario scegliere la sorgente del segnale. La macchina li rileverà automaticamente.
Durante la riproduzione di un video, è possibile premere il pulsante menu " ", quindi impostare le
proporzioni dell'immagine e altre modalità di riproduzione.
1. Selezionare la Sorgente del Segnale di Ingresso

IT
138
Consigli Caldi:
1. La fluidità del mirroring dello schermo con connessione wireless sarà influenzata dall'ambiente di rete. Una
larghezza di banda di 100Mbit o più è consigliabile quando si utilizza il mirroring dello schermo.
2. Assicurarsi che il dispositivo mobile sia vicino al proiettore quando si utilizza la connessione wireless. Si consiglia
una distanza entro 1 metro.
3. Alcuni dispositivi Android potrebbero non supportare il mirroring dello schermo a causa della compatibilità.
4. Qualsiasi domanda, non esitate a e-mail WiMiUS via
.
2. Collegamento con Smartphone e iPad
WiFi Impostazioni
2.1 Per il Sistema iOS(Airplay)
Selezionare l'icona delle impostazioni nell'angolo in alto a destra della pagina principale, quindi premere il tasto "OK"
sul telecomando per accedere all'interfaccia delle impostazioni e selezionare "Impostazioni WiFi".
Impostazione con Home Wi-Fi
Attenzione: Il dispositivo e il proiettore dovrebbero essere nella stessa WiFi di casa.
1. Accendere l’Impostazione WiFi del proiettore.
2. Scegliere il tuo Home WiFi per connetterti e inserire la password giusta, quindi fare clic su "Fatto" per connetterti,
attendi 3-5 secondi per stabilire la connessione. Una volta connesso, il proiettore ricorderà la password del WiFi
collegato.
3. Quindi fare clic su "Airplay" sulla homepage come sorgente di ingresso del proiettore.
4. Attivare l'impostazione Wi-Fi del dispositivo mobile iOS, quindi collegarlo allo stesso WiFi a cui è collegato il
proiettore.
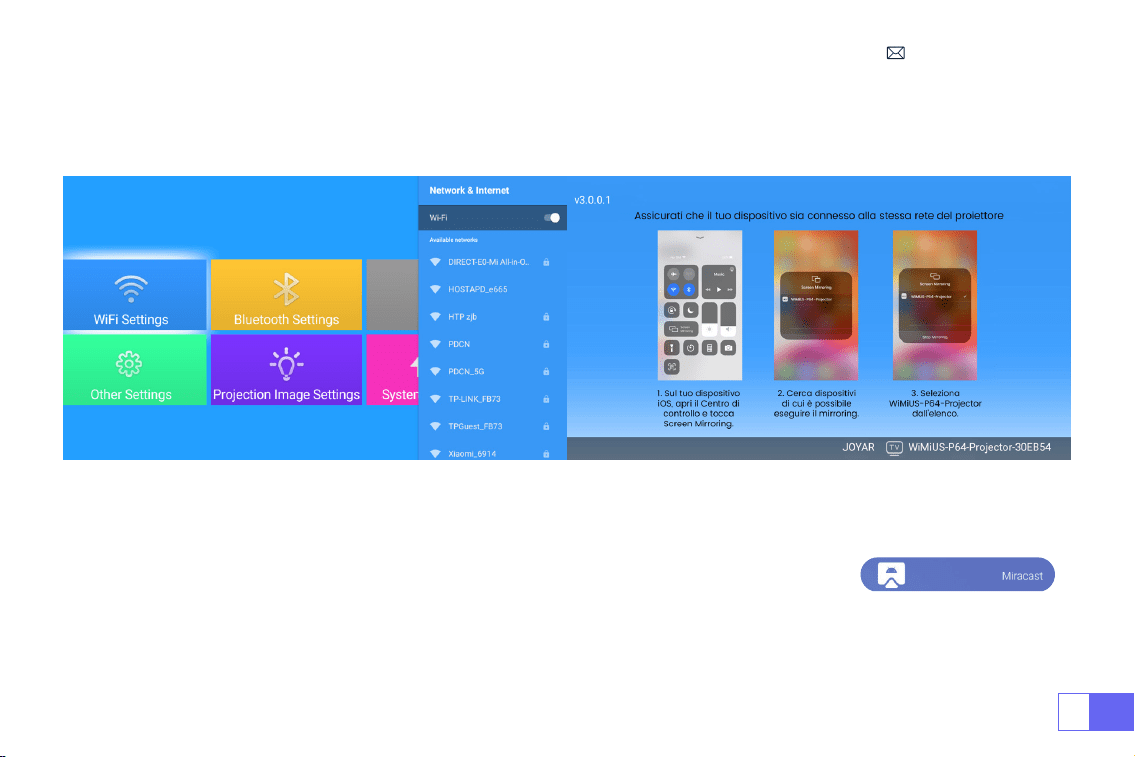
IT
139
5. Scorrere verso l'alto lo schermo del dispositivo mobile iOS e toccare "Screen Mirroring" per cercare il proiettore,
quindi selezionare "WiMiUS-P64 Projector" dai risultati della ricerca per la connessione.
6. Riuscito.
2.2 Per il Sistema Android (Miracast)
Per attivare questa funzione, il dispositivo Android deve supportare multi-schermo/ Wireless Display. Nome di "multi-
schermo" può variare a seconda delle varie marche di dispositivi Android.
1. Accendere il proiettore, selezionare "Miracast" sulla homepage come sorgente di ingresso.
2. Accendere il
"Multi-schermo/Wireless Display"
del vostro dispositivo Android.
3. Selezionare
"WiMiUS-P64 Proiettore"
dai risultati della ricerca per connettersi.
4. Riuscito.

IT
140
Note: Se si desidera collegarlo al vostro wifi di casa, basta ripetere i passaggi del sistema iOS e selezionare
Miracast.
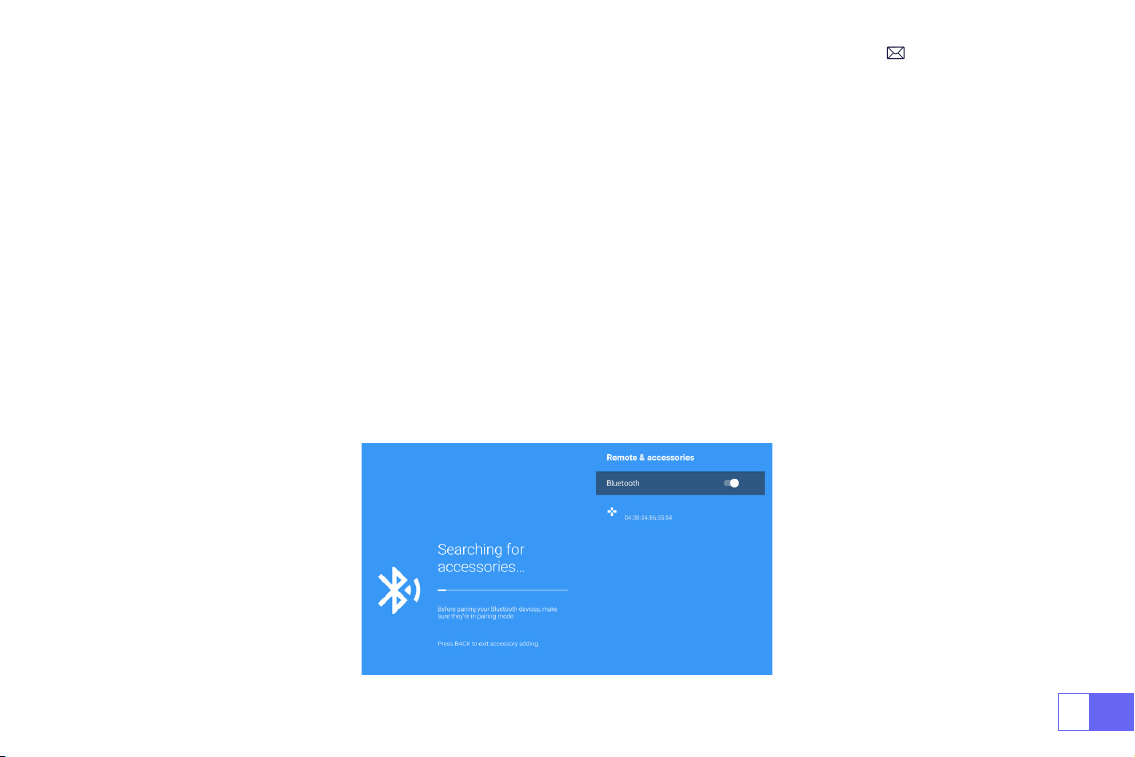
IT
141
1. Accendere l'altoparlante Bluetooth.
2. Attivare le
[Impostazioni Bluetooth]
del proiettore e selezionare
[Aggiunge accessorio]
.
3. Seclect il vostro altoparlante Bluetooth da collegare.
4. Riuscito.
Nota:
1. Questo passaggio è applicabile solo per collegare l'altoparlante Bluetooth ma non il bluetooth del telefono.
2. Il proiettore P64 è compatibile con la maggior parte degli auricolari Bluetooth, degli altoparlanti Bluetooth e degli
Airpods, ma non con le tastiere Bluetooth.
3. In caso di domande, non esitate a inviare un'e-mail a WiMiUS all'indirizzo:
.
3. Impostazione Bluetooth
3.1 Collegare gli Altoparlanti Bluetooth
Dell
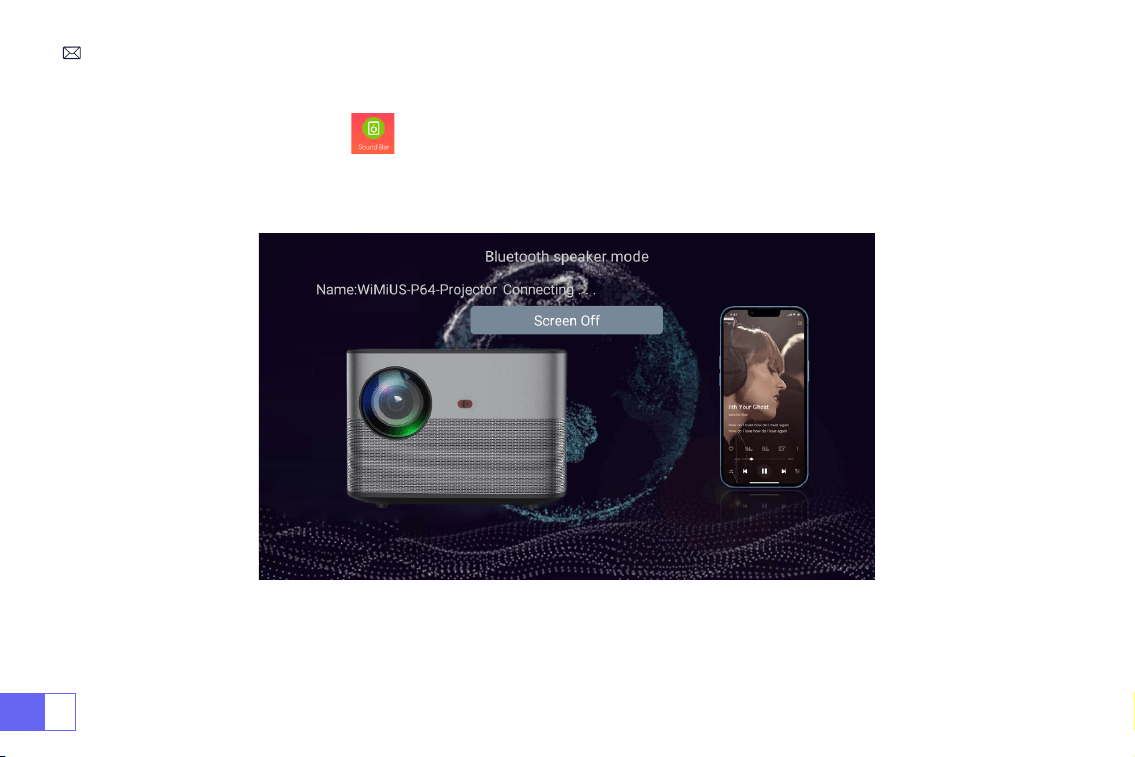
IT
142
1. Immettere l'opzione
Soundbar
nell'interfaccia principale, verrà visualizzata la seguente interfaccia;
2. Accendere il Bluetooth del telefono e collegare il Bluetooth del proiettore denominato
"WiMiUS-P64 Proiettore"
;
3. Quindi il proiettore può riprodurre la musica del cellulare.
3.2 Collegare il Bluetooth del Telefono

IT
143
COLLEGAMENTO DI INTERFACCE DI SEGNALE
Il proiettore WiMiUS P64 ha 6 interfacce, porte HDMI*2/USB*2/3,5mm uscita cufe/porta AV. Selezionare la porta di
collegamento corretta a collegare il dispositivo (PC, telefono, lettore DVD, sound bar, USB, PS4, ecc.)
Per i dispositivi USB, non è necessario scegliere la sorgente del segnale. La macchina li rileverà automaticamente.
•Selezionare la categoria richiesta "lm", "musica", "foto" o "Ofce Suite" nella pagina principale e premere il tasto "OK"
sul telecomando per accedere alla categoria corrispondente.
• Secondo i programmi di scegliere: "foto" "musica" "lm" o "Ofce Suite".
• Scegliere il le che si desidera riprodurre, premere il tasto "OK" per riprodurre o mettere in pausa il le. (Non è
possibile immettere la categoria richiesta senza collegare una chiavetta USB.)
Nota: per l'opzione "Ofce Suite", è possibile riprodurre le PPT.
• Collegare il proiettore al PC tramite cavo HDMI.
• Scegliere il canale del segnale multimediale: "HDMI"
1. USB Collegamento Multimediale
2. Collegamento con il PC

IT
144
• Utilizzare un adattatore da Type-C a HDMI per collegare il MacBook, o un adattatore da Mini Display a HDMI per
connettersi al MacBook Air (adattatore non incluso).
• Scegliere il canale del segnale multimediale: "HDMI" .
• Utilizzare il cavo audio da 3,5 mm con il proiettore per connettersi alla soundbar.
• Accendere il proiettore e la soundbar (scegliere la modalità AUX).
• Maggiori dettagli, si prega di contattare il venditore a
.
• Utilizzare il cavo AV 3-in -1 nel pacchetto;
• Accendere il lettore DVD e il proiettore;
• Collegare i connettori femmina colorati al cavo RCA del lettore DVD con il cavo AV 3-in-1 nel pacchetto;
• Collegare il connettore nero alla porta AV del proiettore, accedere alla home page per selezionare [ AV ] come
sorgente del segnale.
3. Collegamento con MacBook o Mac Book Air
4. Collegamento con la Sound Bar
5. Collegamento con DVD
Audio
out
AUX
port

IT
145
Or connect to the DVD Player with the HDMI cable in the package.
Video
Left
AV port
Right
• Collega la TV stick alla porta HDMI del proiettore.
• Scegliere il canale del segnale multimediale: "HDMI".
Nota: supporta solo 1080P TV stick, non 4K TV stick.
• Scegliere il canale del segnale multimediale: "HDMI".
• Utilizzare il cavo HDMI per collegare XBOX/ PS4.
6. Collegamento con Fire TV Stick
7. Connessione con XBOX/PS4

IT
146
FUNZIONE DI MENU PRINCIPALE
1. Impostazione dell'Immagine di Proiezione
Impostazione dell'Immagine di
Proiezione
Opzioni Incluse Funzione
Modalità di Installazione
Frontale-Tavolo/ Posteriore-Tavolo/
Frontale-Softto/ Posteriore-Softto
Scegliere i metodi di proiezione,
capovolgere l'immagine
Keystone a Quattro-Punti Correzione Keystone a 4 punti
Regolare i quattro punti per rendere
l'immagine proiettata un rettangolo: Valore
0-100

IT
147
2. Aggiornamento Locale del Sistema
Aggiornamento Locale del Sistema Aggiornamento Locale (USB) Aggiornamento ofine
Impostazione dell'Immagine di
Proiezione
Opzioni Incluse Funzione
Keystone Orizzontale e Verticale Keystone Orizzontale/Verticale/Reset
Regolare orizzontale e verticale Keystone:
Valore ±30°
Zoom Ridurre il Display dal 100% al 50% Ridurre la dimensione dell'immagine
Correzione Automatica Omnidirezionale
Correzione Automatica Orizzontale/
Verticale
On/Off
Auto Focus Messa a Fuoco Automatica On/Off
Accensione su Auto Focus On/Off On/Off

IT
148
3. Altre Impostazioni
Altre Impostazioni Opzioni Incluse Funzione
Impostazioni della Lingua
inglese, francese, tedesco, italiano,
spagnolo, giapponese.
20 diverse lingue
Sceglie una lingua
Tono dei Tasti On/Off Regola il suono dei tasti
Timing Switcher
Off//30min/60min/90min/120mi
n/150min/180min/210min/240min
Impostare il tempo di
spegnimento del proiettore

IT
149
4. About
About Opzioni Incluse Funzione
Versione Software Versione del prodotto Versione del prodotto
Aggiornamento del Sistema Aggiornare il sistema Aggiornamento Online
Ripristino delle Impostazioni di
Fabbrica
Ripristino
Ripristina tutte le impostazioni alle
impostazioni di fabbrica

IT
150
FAQ
GARANZIA
1. Il telecomando non comunica con il proiettore.
1) L'interruttore di alimentazione sul retro del proiettore è acceso o spento?
2) Le batterie del telecomando sono scariche?
3) Qualcosa che ostruisce il segnale tra il telecomando e IR?
4) Forte luce su IR direttamente.
Grazie mille per il vostro acquisto e supporto! Forniamo 3 anni di garanzia per il proiettore P64. Il primo anno per la sostituzione gratuita, i
prossimi due anni per la riparazione gratuita. Se avete domande, non esitate a contattarci via
2. Nessuna immagine sullo schermo.
1) La congurazione dei canali è corretta?
2) C'è un segnale di ingresso?
3) Il cavo di ingresso è collegato bene?
4) In modalità PC, la frequenza di aggiornamento è > 75KHz?
4. L’immagine è normale, ma non c'è suono.
1) Il cavo di ingresso si collega correttamente?
2) Volume al minimo o muto?
3) Disattiva il suono AC3/Dolby e impostarlo sul suono stereo.
3. Schermo blu, nessuna immagine, nessun suono.
Il cavo di ingresso si collega correttamente?

IT
151
6. Impossibile riprodurre video in App Netix, Hulu, Prime.
Queste App sono limitate con HDCP. Il proiettore non supporta questa funzione. Quindi non può supportare
queste App.
7. Non è possibile trovare i dispositivi quando è collegato con disco rigido o unità ash.
Controlla se il dispositivo è rotto e verica se si tratta di un formato U-disk supportato.
8. Si spegne automaticamente dopo aver lavorato per un po'.
1) La ventilazione del proiettore è bloccata o la tensione non è stabile.
2) Inviaci un video a
e verichiamo per voi.
9. Non è compatibile con l'altoparlante bluetooth?
1) Il proiettore potrebbe non essere compatibile con alcuni altoparlanti bluetooth versione di JBL.
2) Contatta immediatamente il nostro email post-vendita a
e inviaci la marca ed il
modello dell’altoparlante di Bluetooth.
10. La connessione WiFi non è stabile?
1) Si prega di vericare se la rete del telefono è bene.
2) Rendi la distanza del telefono e del proiettore entro 1 metro.
5. Il lm non poteva essere riprodotto.
1)Il formato del video è giusto?
2) I le sono rotti?
3) Il dispositivo è rotto?

JP
152
WiMiUS より即時なサポート 152
ご注意事項 153
パッケージリスト 154
製品仕様 155
部品仕様 156
リモコン 157
製品仕様 158
プロジェクターの起動 161
投影画像の設定 162
プロジェクター設定 166
信号線接続 172
メインメニュー機能 175
保証書·FAQ 179
目次

JP
153
お客様
平素より格別のご愛顧を賜わり厚くお礼申し上げます。
プロジェクターを使用する前に、この取り扱い説明書をよくお読みください。 問題がある場合はご注文番号と問題を
時対応させて頂きます。
信号がない、音が出ない、Bluetooth 接続できない、WiFi 接続できない、黒点、途切れなど多くの問題は設定の仕方で解決で
きるので、お困りの際はご連絡下さいませ。すべてのプロジェクターは、出荷前に 100%慎重に検品され、パッケージされて
いることを保証します。
また、お買い上げいただいた商品について何かご不満な点やご使用方法について不明なことがございましたらご遠慮なくお申
し付けください。必ずご満足まで対応させていただきますのでぜひ改善チャンスをくださるようにお願いします。
WiMiUS サービスチーム
WiMiUS より即時なサポート

JP
154
1. 高温または低温ではデバイスの寿命が短くなるため、プロジェクターを熱すぎたり寒すぎたりする部屋に置かないでくださ
い。作業環境は 5℃ ~35℃で良いであります。
こりを取り除く方法についてのビデオをお送りします。
3. プロジェクターが安定して動作するために放熱装置が搭載されています。通気孔は内部の温度上昇を防ぐためのものです。
物を置いたり立てかけたりして通気孔をふさがないでください。内部の温度が上昇し、故障の原因となります。
4. 本機内部には、危険な高電圧があり、安全のためプロジェクターのキャビネットを外したり、あけたりしないでください。
または本機を改造したり、自分で修理しないでください。乱用、誤用、改造、変更、不当使用、破壊行為、過失、不適切な組
み立ての場合は、製品保証は無効になります。
5. お手入れの際に安全のため電源ケーブルをコンセントから抜いてください。濡れた雑巾で本機の表面を拭きます。刺激性の
ある化学洗浄剤で製品を掃除しないでください。感電·損傷の原因となります。
ご注意事項 :
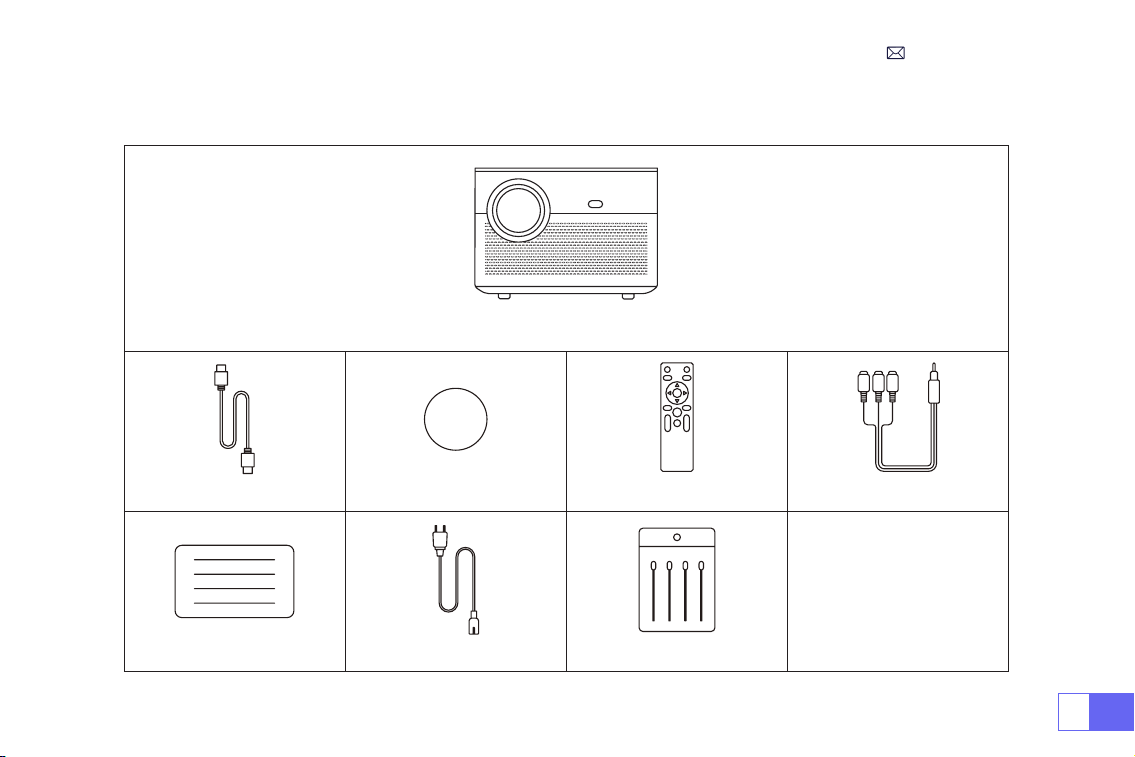
JP
155
WiMiUS P64 プロジェクター本体 * 1
HDMI ケーブル * 1 レンズキャップ * 1 リモコン * 1 3-in-1 AV ケーブル * 1
ユーザーマニュアル * 1 電源ケーブル * 1 クリーニングスワブ * 1
パッケージリスト

JP
156
製品仕様
モデル番号 .: P64
イメージングシステム LCD 光源 LED
ネイティブ解像度 1920x1080P ズーム 50%-100%
インストール方式 机の前 / 後、天井の前 / 後 アスペクト 16: 9/4: 3/ オート
投影距離 1.5-6m 電源 AC100-240V
サイズ 197*227*163mm 重量 2.7kg
台形補正 Auto + Electric フォーカス オート + 電動
入力端子 HDMI*2/USB*2/AV/3.5mm audio out
ビデオファイル H.264/H.265/MP4/AVI/WMV/MKV/FLV
オディオファイル MP3/WAV/MAK
写真ファイル JPG/PNG/BMP/JPEG

JP
157
部品仕様
1. 電源ボタン
2. 矢印キー
3. OK ボタン
4. 戻りボタン
5. マニュアルフォーカス +
6. マニュアルフォーカス -
7/8. USB 端子
9/10. HDMI 端子
11. AV 端
12. 3.5mm 音声端子
13. IR
14. 防塵メッシュ
定期的なクリーニングをお勧めます
1 2 3 4 5 6
7 8 9 10 11 12
13
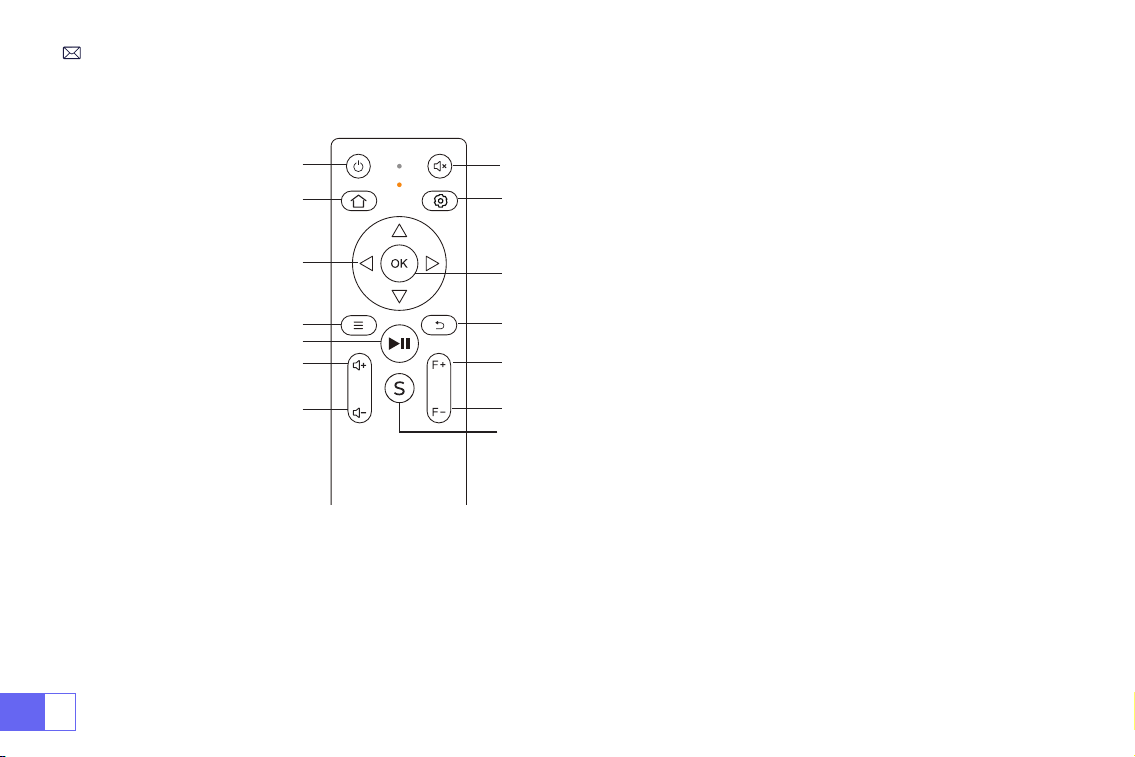
JP
158
9
8
11
12
13
10
1
2
3
4
6
7
14
5
リモコン
ご注意 :
1)バッテリーは同梱されていません。2*AAA バッテリーが必要です。(別途購入)
2)リモコンを使用しながら、赤外線信号受信部に向ける必要です。
3)液もれの原因にもなるので長期間使用しない場合は電池を取り出しておいてください。
1.
電源ボタン
2.
ホーム
3.
矢印キー
4.
メニュー
5.
停止
6.
音声 +
7.
音声 -
8.
消音
9.
設置
10.
OK ボタン
11.
戻り
12.
フォーカス +
13.
フォーカス -
14.
信号源

JP
159
1. 天吊りと正面投影 2. 天吊りと背面投影
3. テーブル置きと正面投影 4. テーブル置きと背面投影
製品仕様
P64 プロジェクターは、天吊り用の金具で天吊りができ、ご使用環境やご要望に応じた机の上に置いて投影できます。プロジ
ェクターは以下の方法で設置することができます。
レンズがスクリーンに対して軸対称になる高さにプロジェクターを使用してください。 無理な場合は台形補正機能を使用して
投影画像を調整してください。
1. 投影方式

JP
160
2. 投影距離と投影サイズ
アスペクト比 : 16:9
投射距離 画面サイズ
1.6m 49”
2m 60”
2.5m 75”
3m 93”
3.5m 109’’
4m 125’’
4.5m 141’’
5m 157’’
6m 300’’
* 上の表の画面サイズに参照して ±3%を考慮してください。
* 最適な投射距離: 2.5-3m。
* 最小距離または最大距離を超えると、画像がぼやける可能性があります。
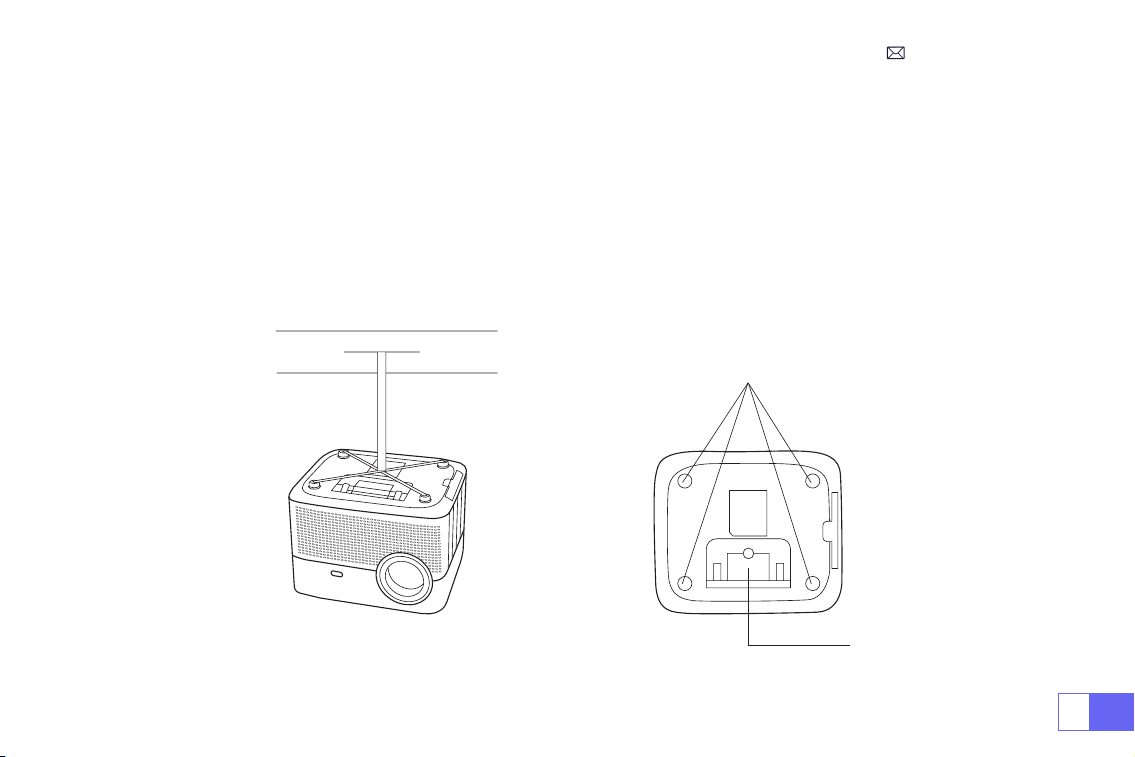
JP
161
3. 天井取り付け
プロジェクターを垂直にして、スクリーン画面の中央に向けて、投影画像を平らに保つ必要があります。
1. チルトベースを調整するには、プロジェクター下部のサポートプレートを開きます。以下を参照してください。
2. 天吊りの場合はプロジェクターの底に 4 つの穴があります(M4*10mm)。以下を参照してください。
ご注意:吊り下げ金具や天吊りスタンドはパッケージされていません。
天吊り用の穴
サポートプレート

JP
162
プロジェクターの起動
より良い視聴を得るために、カーテンを引いている間、または暗い部屋でこのプロジェクターを使用してください。
1)レンズキャップを取り外し、電源ケーブルを接続し、リモコンまたはプロジェクターの電源ボタンを押すと、製品を起動で
きます。
2) プロジェクターの自動または電動台形補正 / フォーカス機能を使用し、長方形と綺麗な画像を取得します。
3) 最高な画像を得るには、プロジェクターまたはリモコンのフォーカスボタン ''F+'' ''F-'' を調整してください。(それでもぼや
ける場合は投影距離を調整してみてください)
4) 外部機器(スマホ、iPad、 Fire TV、TV ボックス、DVD プレーヤー、コンピューターなど)をプロジェクターと接続する場
合は対応する信号源を選択してください。正しい信号源を選択しない場合は投影できないことをご了承ください。
5)「 」メニューを選択し、[ 言語 ] を入力すると、ご自由に言語を設定できる。

JP
163
投影画像の設定
[ 投影画像の設定 ] メニューを選択 -- [ 投影設定オプション ] を選択 -- [ 取り付けモード ] を選択し、矢印キーを押して選択
し、「OK」を押して投影位置を確認します。
1. 投影方式

JP
164
2. 手動台形補正
2.1 4 点台形補正
[ 投影画像の設定 ] メニューを選択、[ 4 点台形補正 ] を選択して、" OK " ボタンをクリックして、調整したいポイントを選び、
"
▶
" または " ▼ " ボタンを押して数値(0-100)を調整してください。以下を参照してください。
リセット : '' '' を押すと、画面が元の台形補正の設定に戻ります。

JP
165
2.2 水平、垂直方向の台形補正
[ 投影画像の設定 ] メニューを選択する -- 水平、垂直方向の台形補正を選択し、長方形に調整されるまで、矢印キーでスクリ
ーンを水平または垂直(±30°)に調整します。
プロジェクターを壁に水平に設置し、[ 投影画像設定 ] メニューを選択し、[ 全方位自動補正 ] または [ 自動フォーカス ] オプ
ションをオンにすると、スクリーンからの投影距離に基づいて自動的に画像の焦点を合わせ、投影角度を変更すると画像を長
方形に調整することができます。
画像がぼやけている場合は、リモコンのフォーカスボタン「F+」「F-」を繰り返し押してレンズの焦点を調整し、画像が鮮明
になるまで調整ボタンをタップまたは長押しします(画面が鮮明になった後は OK ボタンを押す必要はありません)。
ご注意:プロジェクターの側面投影角度が 20°を超えないようにしないと、自動台形補正機能が働かない場合があります。
3. 自動台形補正とフォーカス

JP
166
ホームページに移動 -- [ ] メニューに入り -- [- 投影画像の設定 ] を選択し、[ ズーム ] をを選択し、投影画面が 50%~100%
拡大されます。ボタン "
◀ ▶
" を押して、数値を調整できます。以下を参照してください。
4. ズーム設定
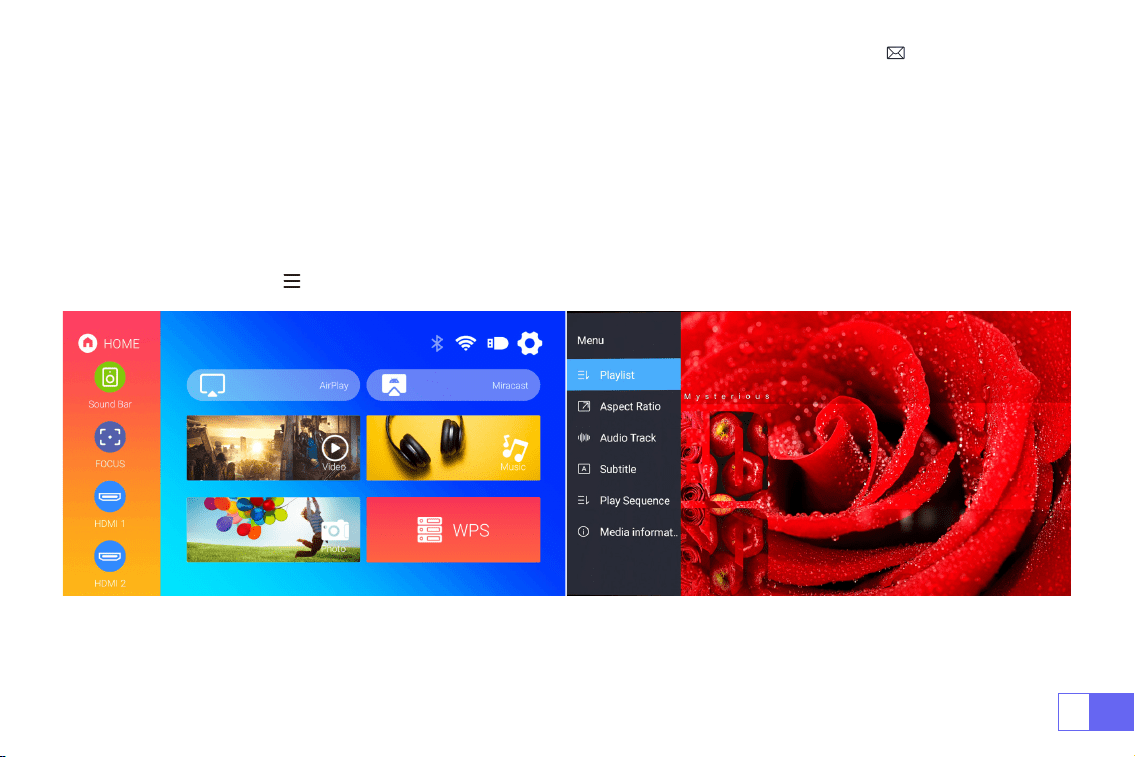
JP
167
プロジェクター設定
ホームページの入力信号源 (HDMI1/HDMI2/AV) を選択するか、リモコンの「S」ボタンを押して、対応する信号源を選択するこ
とができます。
USB デバイスの場合は、信号源を選択する必要はなく、製品が自動的に検出します。
ビデオを再生するとき、「 」ボタンを押して、画像の縦横比やその他の再生モードを設定できます。
1. 入力信号源を選択
JP
168
ご注意:
①ワイヤレスで画面ミラーリングするとき、ネットワークは画像の順調性に影響を与えますから 100Mbps 以上のネットワーク
はお勧めです。
②ワイヤレスで画面ミラーリングするときは、デバイスをプロジェクターの近くに置いてください。 1 メートル以内の距離は
お勧めです。
③あるスマホは互換性がないため、ミラーリングに対応していない場合があります。
④何か問題がある場合は遠慮なく [email protected] へお問い合わせください!
2. スマートフォン、iPad との接続
WiFi 設定
2.1.iOS デバイスの場合 (Airplay)
メインインターフェイスの右上にある設定アイコンを選択し、リモコンの「OK」ボタンを押して設定インターフェイスに入り、
「WiFi 設定」を選択します。
Home Wi-Fi で設定する
ご注意:お使いのデバイスとプロジェクターが同じホーム WiFi 内にある必要があります。
1. プロジェクターの WiFi 設定を ON にします。
2. 接続するホーム WiFi を選択し、正しいパスワードを入力し、" 成功 " をクリックして接続し、接続を確立するために 3~5 秒
お待ちください。一度接続すると、接続した WiFi のパスワードが記憶されます。
3.iOS モバイルデバイスの WiFi 設定をオンにし、プロジェクターと同じホーム WiFi に接続します。
4. 入力信号源として "Airplay " をクリックしてください。
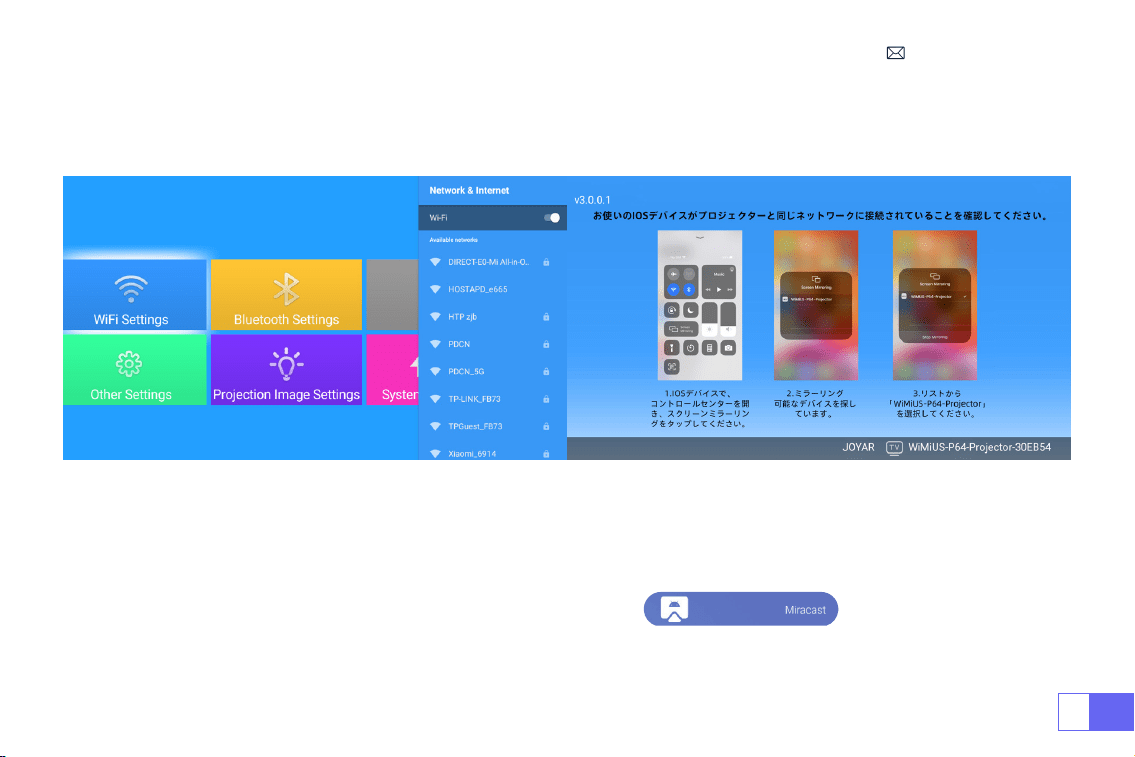
JP
169
5.iOS モバイル端末の画面を上にスワイプし、" スクリーンミラーリング " をタップしてプロジェクターを検索し、検索結果か
ら "WiMiUS-P64 Projector " を選択して接続します。
6. 接続完了。
2.2 Android デバイスの場合 (Miracast)
この機能を有効にするには、お使いの Android デバイスがマルチスクリーン / ワイヤレスディスプレイに対応している必要が
あります。マルチスクリーンの名称は、Android デバイのブランドによって異なる場合があります。
モバイルインターネットとの設定
1. プロジェクターを起動し、入力信号源として“Miracast” を選択します。
2.Android デバイスの「マルチスクリーン / ワイヤレスディスプレイ」を ON にします。
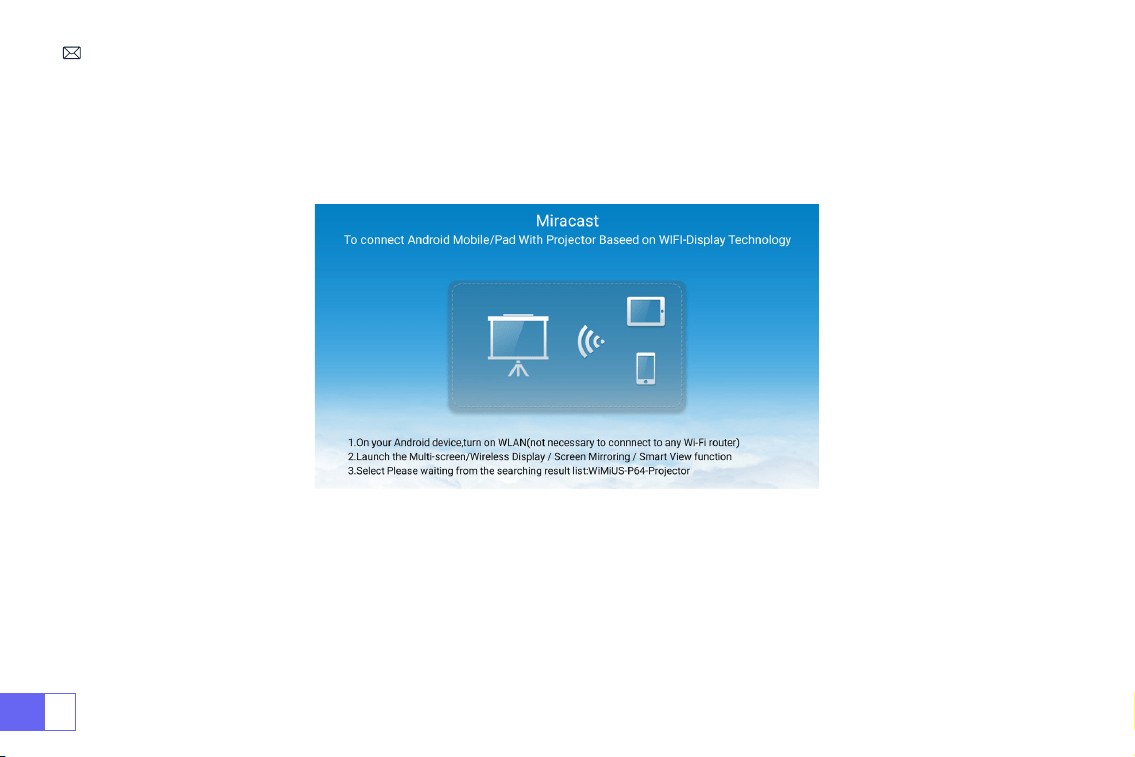
JP
170
3. 検索結果から "WiMiUS-P64 Projector " を選択して接続します。
4. 接続完了。
ご注意:自宅の無線 LAN に接続する場合は、IOS 系の手順を繰り返し、Miracast を選択するだけです。

JP
171
1.Bluetooth スピーカーの電源を ON にします。
2. プロジェクターの [ Bluetooth 設定 ] をオンにして、[ アクセサリーの追加 ] を選択します。
3. 接続する Bluetooth スピーカーを選択します。
4. 接続完了。
ご注意:
1. この手順は、Bluetooth スピーカーにのみ適用され、携帯電話の Bluetooth には適用されません。
2.P64 プロジェクターは、ほとんどの Bluetooth ヘッドセット、Bluetooth スピーカー、Airpods と互換性がありますが、
Bluetooth キーボードは互換性がありません。
3.Bluetooth 設定
3.1 Bluetooth スピーカーの接続
Dell
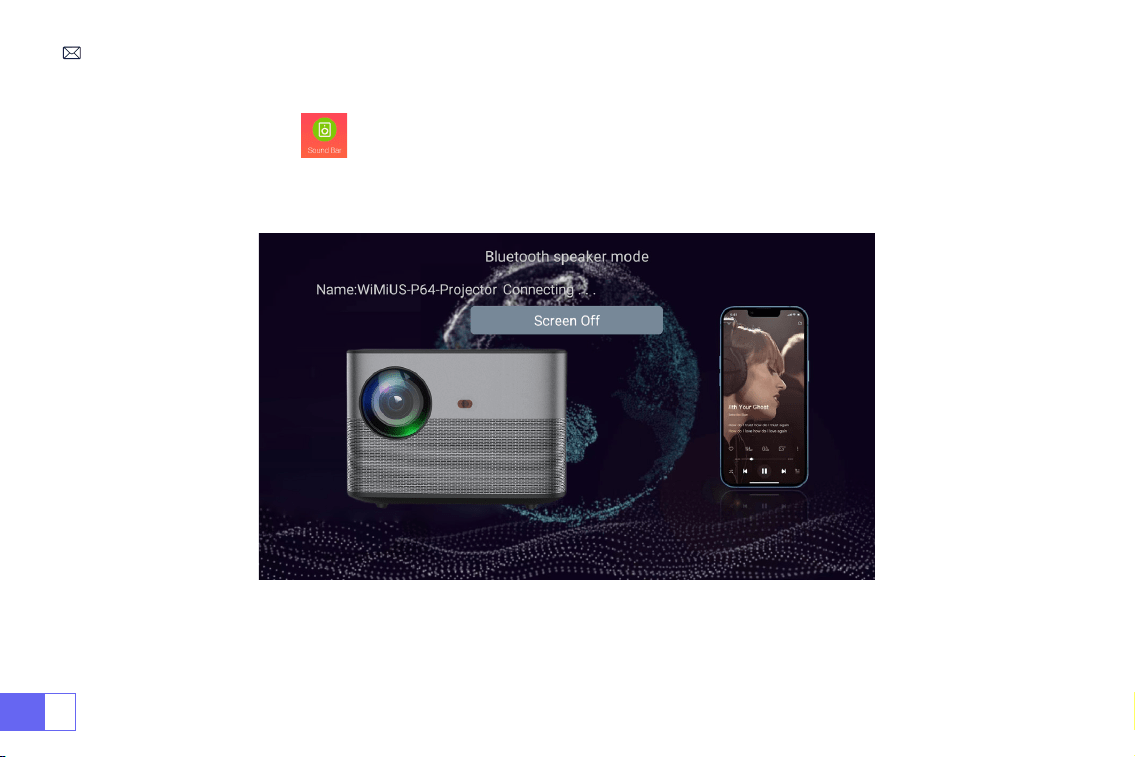
JP
172
1. メイン画面でサウンドバー に入り、以下の画面が表示されます。
2. スマホ Bluetooth をオンにして、プロジェクター "WiMiUS-P64 Projector " の Bluetooth に接続します。
3. プロジェクターはスマホの音楽を再生することができます。
3.2 スマホ Bluetooth を接続する

JP
173
信号線接続
WiMiUS P64 プロジェクターは HDMI 端子 * 2 、USB 端子 * 2 、3.5mm 音声端子、 AV 端子という 6 つの端子を備えている。
対応する端子にデバイス(PC、スマホ、DVD プレーヤー、サウンドバー、USB、PS4 など)を接続する必要があります。
USB デバイスの場合は、信号源を選択する必要はなく、製品が自動的に検出します。
1)USB メモリーを USB 入力端子のいずれかに差し込む。
2)ホームページに直接に入り、[ ビデオ / 音楽 / 画像 / オフィス ] オプションを選択する。
3)USB メモリーのファイルを選択し、[OK] ボタンを押して再生する。
- メインインターフェイスで「映画」、「音楽」、「写真」または「Office Suite」を選択し、リモコンの「OK」びボタンを押
して、対応するカテゴリに入る。
- 「写真 / 音楽 / 映画 /Office Suite」オプションを選択する。
- 再生したいファイルを選択し、再生したいファイルを選択し、リモコンの " OK " ボタンを押してファイルを再生する
ご注意:"Office Suite " では、PPT ファイルの再生、デモが可能です。
- プロジェクターと PC を HDMI ケーブルで接続します。
- メディア信号チャンネルを選択する:"HDMI"
1.USB 接続
2.PC との接続

JP
174
メディア信号のチャンネルを選択 : "HDMI"
- MacBook との接続には Type-C to HDMI アダプター、MacBook Air との接続には Mini Display to HDMI アダプターを使用し
ます(アダプターは付属していません)。
- プロジェクターに付属の 3.5mm オーディオケーブルを使用して、サウンドバーと接続します。
- プロジェクターとサウンドバー(AUX モードを選択)をオンにします。
何か問題がある場合は遠慮なく [email protected] へお問い合わせください!
パッケージに含まれる 3-in-1 AV ケーブルを使用します。
- DVD プレーヤーとプロジェクターの電源をオンにます。
- パッケージの 3-in-1 AV ケーブルで、DVD プレーヤーの RCA ケーブルに接続ます。
- 黒いコネクターをプロジェクターの AV 端子に接続し、ホームページに入り 、[AV] 信号源を選択してください。
3.MacBook や Mac Book Air との接続
4. スピーカー / サウンドバーとの接続
5.DVD プレーヤーとの接続
Audio
out
AUX
port
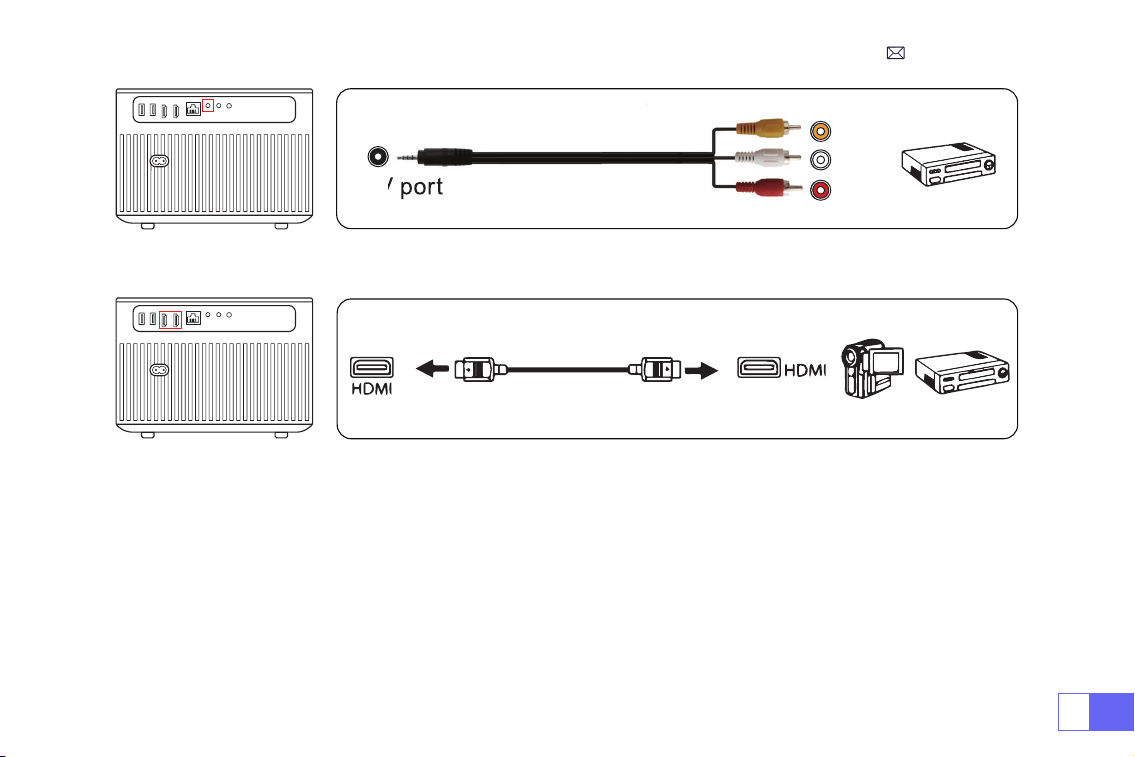
JP
175
または、同梱の HDMI ケーブルで DVD プレーヤーに接続します。
Video
Left
AV port
Right
プロジェクターの HDMI ポートに TV スティックを接続します。
- メディア信号チャンネルを選択してください:"HDMI"
- ご注意:1080P の TV スティックにのみ対応し、4K の TV スティックには対応していません。
- メディア信号チャネルを選択してください:"HDMI"
- XBOX/PS4 に接続する HDMI ケーブルを使用します。
6.Fire TV Stick との接続
7.XBOX/PS4 との接続

JP
176
メインメニュー機能
1. 画像設定
画像設定 メニュー 機能
インストール方式 机の前 / 後、天井の前 / 後 投影方法の選択、画像の反転
台形補正 4 点台形補正
投影画像が矩形になるように 4 点を調整しま
す。調整範囲:0-100

JP
177
2. システムローカルアップデート
システムローカルアップグレード ローカルアップデート (USB) オフラインでアップグレード
画像設定 メニュー 機能
水平 / 垂直方向台形補正 水平 / 垂直補正 / リセット
水平および垂直方向のキーストーンを調整しま
す。調整範囲:±30°
ズーム 画面を 100%-50% 縮小 画像サイズを小さくする
全方位自動補正 水平 / 垂直自動補正 On/Off
オートフォーカス オートフォーカス On/Off
パワーオンオートフォーカス On/Off On/Off

JP
178
3. 他の設定
他の設定 メニュー 機能
言語設定
English, French, German, Italian,
Spanish, Japanese.20 several
languages 対応する言語を選択する
対応する言語を選択する
キートーン On/Off キー音の調整
タイミングスイッチャー
Off//30min/60min/90min/120min/15
0min/180min/210m/240m
プロジェクターのスリープ時間を設
定する

JP
179
4. 情報
情報 メニュー 機能
ソフトウェアバージョン 製品バージョン 製品バージョン
システムアップグレード システムのアップグレード オフラインでアップグレード
工場出荷時の初期化 リセット
すべての設定を工場出荷時の状態に
戻す

JP
180
保証書·FAQ
1. リモコンがプロジェクターと通信していません。
1)プロジェクターの電源スイッチがオンまたはオフになっていますか?
2)リモコンの電池が切れましたか?
3)リモートと IR 間の信号を妨害しましたか
4)強光が IR を照らします
2. 画像が表示されません。
1)信号源の選択は正しいですか?
2)入力デバイスはありますか?
3)入力ケーブルがしっかり接続されていますか?
4)PC モードでは、リフレッシュレートは 75KHz を超えていますか?
4. 画像はありますが、音はありません。
1) 入力ケーブルは正しく接続されていますか?
2) ボリュームを最小にするか、ミュートにしてください。
3)AC3/ ドルビーサウンドを切り、ステレオサウンドに設定してください。
3. ブルースクリーン、画像なし、音なし。
入力ケーブルは正しく接続されていますか?

JP
181
6.App Netflix、Hulu、Prime で動画を再生できません
これらのアプリは HDCP で制限されるため、再生できないですが、fire TV stick で無事に再生できます。
7. USB メモリーまたは外部デバイスに接続しているときにデバイスが見つかりません。
デバイスが壊れていないか確認してください。
8. しばらく起動した後の自動オフ
1)プロジェクターの換気口が遮断されている。
2)電圧が安定していません。
3) [email protected] に動画を送って確認してください。
9.Bluetooth スピーカーと接続できません。
1)プロジェクターは JBL の一部のバージョンの Bluetooth スピーカーと互換性がない場合があります。
2)すぐに [email protected] に連絡してください。
10.WiFi 接続が安定しない
1)お手元の携帯のネットワークが良いかどうかご確認ください。
2)携帯とプロジェクターの距離を 1 メートル以内にします。
5. 映画を再生できません。
1)ビデオのフォーマットは正しいですか?
2)ファイルが壊れていますか?
3)デバイスが壊れていますか?

FCC Statement
FCC STATEMENT :
This device complies with Part 15 of the FCC Rules. Operation is subject to the following two conditions:
(1)This device may not cause harmful interference, and
(2)This device must accept any interference received, including interference that may cause undesired operation.
Warning: Changes or modications not expressly approved by the party responsible for compliance could void the
user's authority to operate the equipment.
NOTE: This equipment has been tested and found to comply with the limits for a Class B digital device, pursuant to
Part 15 of the FCC Rules. These limits are designed to provide reasonable protection against harmful interference in
a residential installation. This equipment generates uses and can radiate radio frequency energy and, if not installed
and used in accordance with the instructions, may cause harmful interference to radio communications. However,
there is no guarantee that interference will not occur in a particular installation. If this equipment does cause
harmful interference to radio or television reception, which can be determined by turning the equipment off and on,
the user is encouraged to try to correct the interference by one or more of the following measures:
Reorient or relocate the receiving antenna.
Increase the separation between the equipment and receiver.
Connect the equipment into an outlet on a circuit different from that to which the receiver is connected.
Consult the dealer or an experienced radio/TV technician for help.

FCC Radiation Exposure Statement:
This equipment complies with FCC radiation exposure limits set forth for an uncontrolled environment. This
equipment should be installed and operated with minimum distance 20cm between the radiator & your body.
This device contains licence-exempt transmitter(s)/receiver(s) that comply withInnovation, Science and Economic
DevelopmentCanada’s licence-exempt RSS(s). Operation is subject to the following two conditions:
(1) This device may not cause interference.
(2) This device must accept any interference, including interference that may cause undesired operation of the
device.
L’émetteur/récepteur exempt de licence contenu dans le présent appareil est conforme aux CNR d’Innovation,
Sciences et Développement économique Canada applicables aux appareils radio exempts de licence. L’exploitation
est autorisée aux deux conditions suivantes :
(1) L' appareil ne doit pas produire de brouillage;
(2) L' appareil doit accepter tout brouillage radioélectrique subi, même si le brouillage est susceptible d' en
compromettre le fonctionnement.
This equipment complies with IC exposure limits set forth for an uncontrolled environment. This equipment shall be
installed and operated with minimum distance 20cm between the radiator & body.

Correct Disposal of this product
This marking indicates that this product should not be disposed with other household wastes throughout
the EU. To prevent possible harm to the environment or human health from uncontrolled waste disposal,
recycle it responsibly to promote the sustainable reuse of material resources. To return your used device,
please use the return and collection systems or contact the retailer where the product was purchased.
They can take this product for environmental safe recycling.

We (Manufacturer is responsible for this declaration)
Ekoo Electronic Co.,Ltd.
(Company name)
B09,block B,f2,bldg.b,runfeng Pioneer Park,no.973, minzhi Avenue, Minzhi St., Longhua, Shenzhen, CN
(Company address)
declare under our sole responsibility that the product
Trade name: WIMIUS
Equipment: Entertainment Projector
Model No. : P64
to which this declaration relates is in conformity with the essential requirement set out in the Council
Directive on the Approximation of the laws of the Member States relating to RED Directive(2014/53/EU) &
RoHS(2011/65/EU) product is responsible to afx CE marking, the following standards were applied:
EN 62368-1:2014+A11:2017
EN IEC 62311:2020
ETSI EN 301 489-1 V2.2.3(2019-11)
ETSI EN 301 489-17 V3.2.4(2020-09)
EN 55032:2015
EN 55035:2017
EN 61000-3-2:2019
Declaration of Conformity

EN 61000-3-3:2013+A1:2019
ETSI EN 300 328 V2.2.2(2019-07)IEC62321-3-1:2013
IEC62321-4:2013
IEC62321-5:2013
IEC62321-6:2015
IEC62321-7-1:2015
IEC62321-7-2:2017
IEC62321-8:2017
Full Name: George.wang Position: Approbation Manager
Signature: George.wang Place/Date: Shenzhen,China/Oct.27-2021