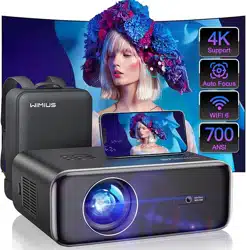

P62 PROJECTOR
USER MANUAL

EN
DE
FR
IT
ES
JP
English
Deutsch
Français
Italiano
Español
日本語
P01-26
P27-52
P53-78
P79-104
P105-130
P131-157

EN
1
Table of Contents
Safety Precautions
Accessories
Product Overview
Remote Control and Spec
Projection Size Chart
Operating Instructions
Connecting with Smartphones and iPad
Connecting with Bluetooth Speaker
Other Connections
Main Menu Function
FAQ and Contact
02
03
05
08
09
1 0
1 4
1 6
1 7
20
25

EN
2
Thank you for your purchase with WiMiUS P62 video projector. Please read this manual carefully before using the
projector.
If you have questions about the projector, please contact us at
We sincerely hope this projector can make your life more colorful.
High brightness lamp! Don't look straight into the lens when the projector is on.
1. Clean
When clean this projector, please pull out the power cable. Use a wet cloth to clean, don’t use any detergent that
may damage the unit.
2. Accessory
Please use our recommended accessory. Or it will damage the projector.
3. Correct environment
Do not place the projector in a wet environment, like damp basement or near the swimming pool, etc.
4. Ventilation
The ventilation is equipped for the projector to work stably. Do not put anything around the vents. Or it will cause the
projector heating up. To ensure the stability of heat dissipation, please open the height bracket in the bottom of the
projector before starting.
Warnings
Safety Precautions

EN
3
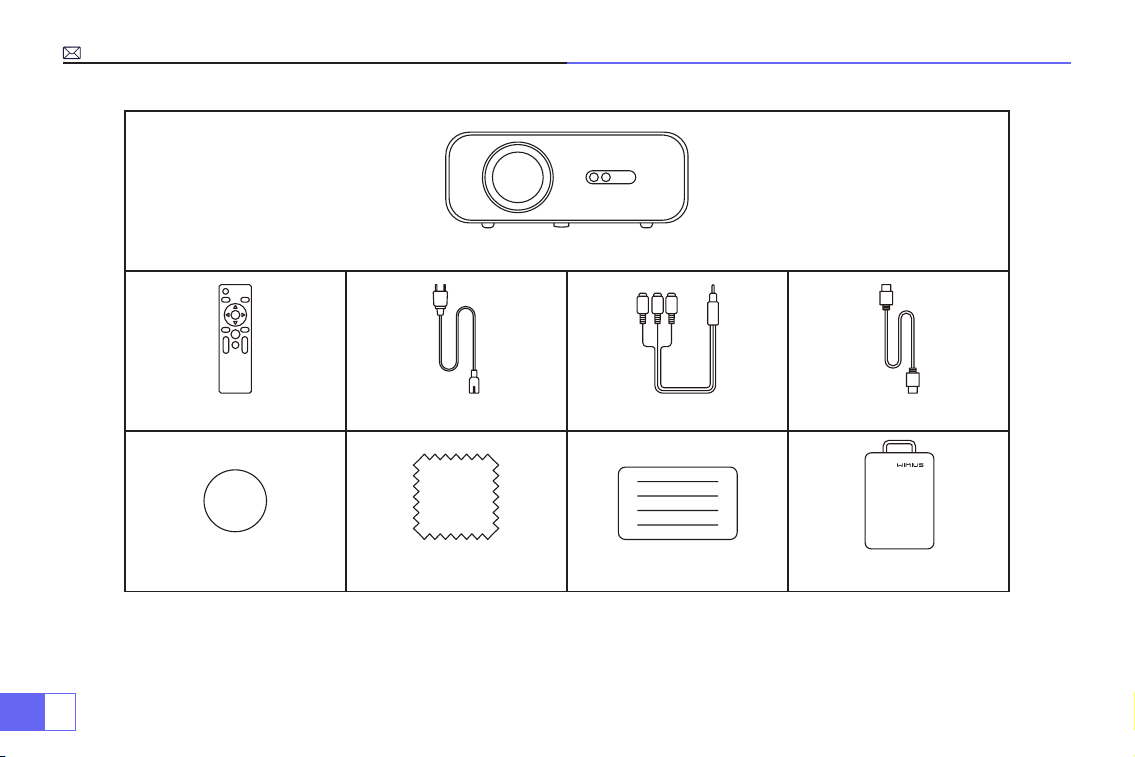
• Projector x 1
• Projector Case x 1
• Remote Control x 1
• Power Cable x 1
• AV Cable x 1
Accessories
5. Power
Please make sure the power is within the required power range.
6. Thunder
For thunder day, please unplug the power cable from the projector.
7. Repair
Due to high voltage inside, please do not open or try to repair the projector by yourself. Please ask a professional
technician to repair the projector.
8. Keep away from heat device
Please make sure the projector is far away from any heat devices which will damage the projector.
• HDMI Cable x 1
• Lens Cover x 1
• Cleaning Kit x 1
• User Manual x 1
EN
4
Projector x 1
Remote Control x 1 Power Cable x 1 AV Cable x 1 HDMI Cable x 1
Lens Cover x 1 Cleaning Kit x 1 User Manual x 1 Projector Bag x 1

EN
5
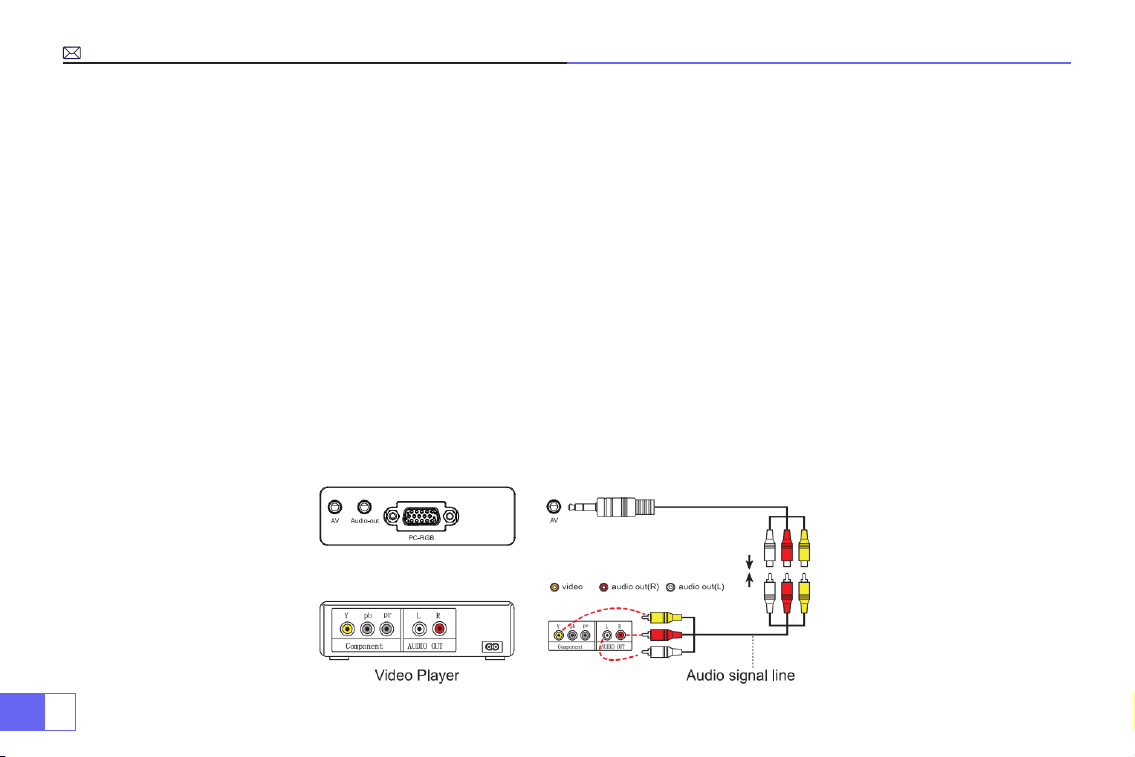
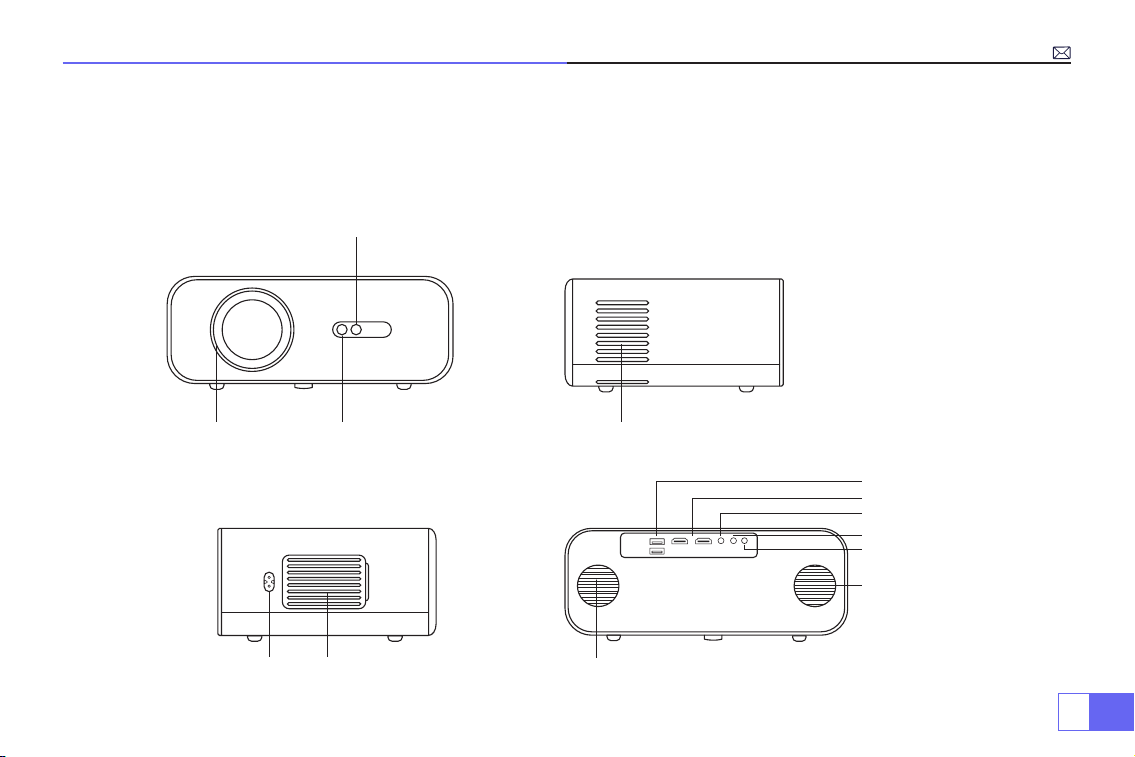
Product Overview
Projector can input high-denition video signal and composite video signal, and support stereo audio signal input
and output. Please refer to the following gure to connect the projector and other audio equipment according to
your own needs.
4. Air outlet
5. 6.Power socket Air inlet
1. 2.
3.
Focus Lens IR receiver
Auto Focus
signal window
7.
8.
9.
10.
1 1.
12.
13.
Speaker (left)
USB ports
HDMI ports
AV port
3.5mm audio output
IR receiver
Speaker (right)

EN
6
1.
2.
3.
4.
5.
6.
7.
8.
9.
10.
1 1.
Signal source
Up
Return
Left
Right
Down
Power Button
OK
Level-stand adjustment (to adjust
projection angle)
Projector mount holes (M5*12mm)
Bottom case (open to clean the internal
screen)
Note:
For Ceiling mount, please slowly remove the 4 black rubbers, then you can nd the holes for ceiling mount.
The screw size is M5*12mm.

EN
7
How to clean the Black Spots?
Open the dusting mouth cover rotation with a screwdriver.
Method 1 Method 2
Use the cold wind to blow the dusting mouth.Extert yourself to ap the body of projector.

EN
8
1.
10.
12.
13.
14.
1 1.
2.
3.
4.
5.
7.
8.
9.
6.
Remote Control
1.Signal indicator light
2.Power
3.Signal source
4.Arrow keys
5.Menu
6.Auto focus and keystone correction
7.Volume +
8.Volume -
9.Mute
10. Homepage
11. Conrm key
12. Return key
13. Manual focusing +
14. Manual focusing -
Note:
Batteries are not supplied in the package, you must purchase two additional AAA batteries by yourself.
To avoid battery leakage corrosion, please take the batteries out if not use it for a long time.

EN
9
Specications
Model No.: P62
Imaging System
LCD
Power
AC100-240V/50-60Hz
Light Source
LED
Dimension
25.7*20*10.3CM
Color
16.8M Full Color
Resolution
Native 1920*1080 Full HD
Projection Distance
1.5-7m
Input Interface
HDMI*2/VGA/AV/ USB*2
Projection Size
50-300”
Zoom Function
100%-50%
Aspect Ratio
16:9 /4:3/Auto
Output Interface
AUDIO OUT
Keystone Correction
Auto/Manual
Focus
Auto/Manual
Projection Size Chart
Distance Screen Size Distance Screen Size
1.5m 35’’ 3.9m 120’’
1.7m 50’’ 5.5m 180’’
2.4m 72’’ 7.0m 300’’
3.3m 100’’
Please refer to the following table to adjust your picture
size and distance.
Optimum projection distance: 3m
Please allow ± 3% to the image sizes in the table above.
If the distance is less than min data and more than
max data, the image could be blurry.

EN
10
Operating Instructions
1.Getting Started
2.Focus and Auto Keystone Correction
• To get a better watching, please use this projector while drawing the curtain or in a dark room.
• Please use the projector carefully, dropping or crashing may damage parts or result in blurred images and
abnormal displaying.
• Remove the lens cap, connect the projector with the power through power supply cable, it starts work.
• Then boot screen appears, like the picture.
(1)Auto Focus and Keystone Correction.
Please place the projector horizontally face to wall rst, turn on and then it will automatically focus the picture based
on the projection distance from the screen and adjust the picture to a rectangle. Or press " "Auto focus and
keystone correction key directly.

EN
11
If the picture is blurry, press the focus button ''F+'' ''F-'' on the remote control to adjust the lens focus, tap or long
press the adjustment button until the picture is clear.
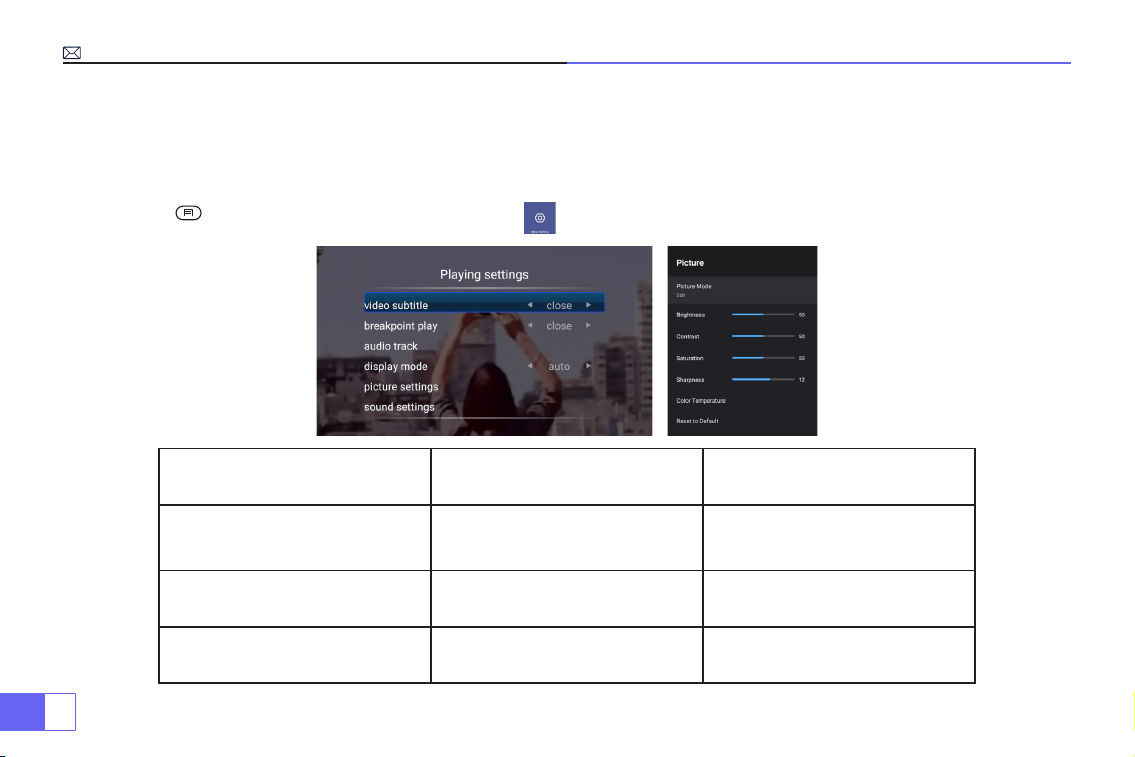
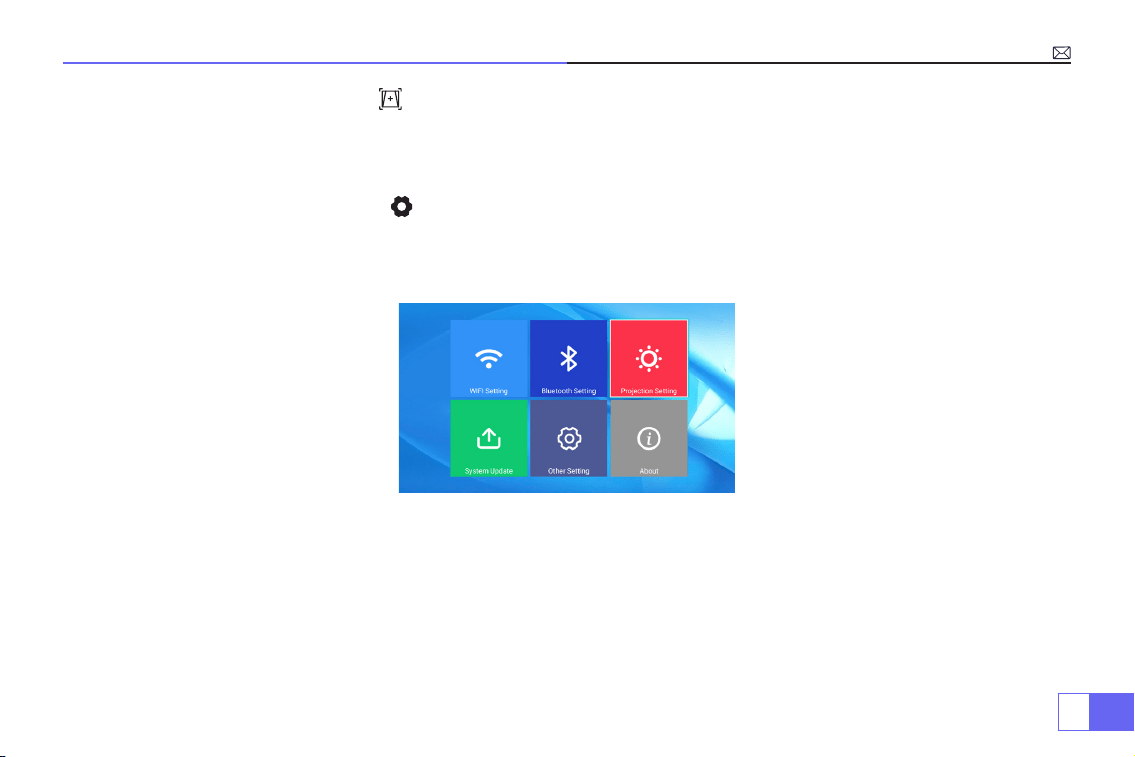
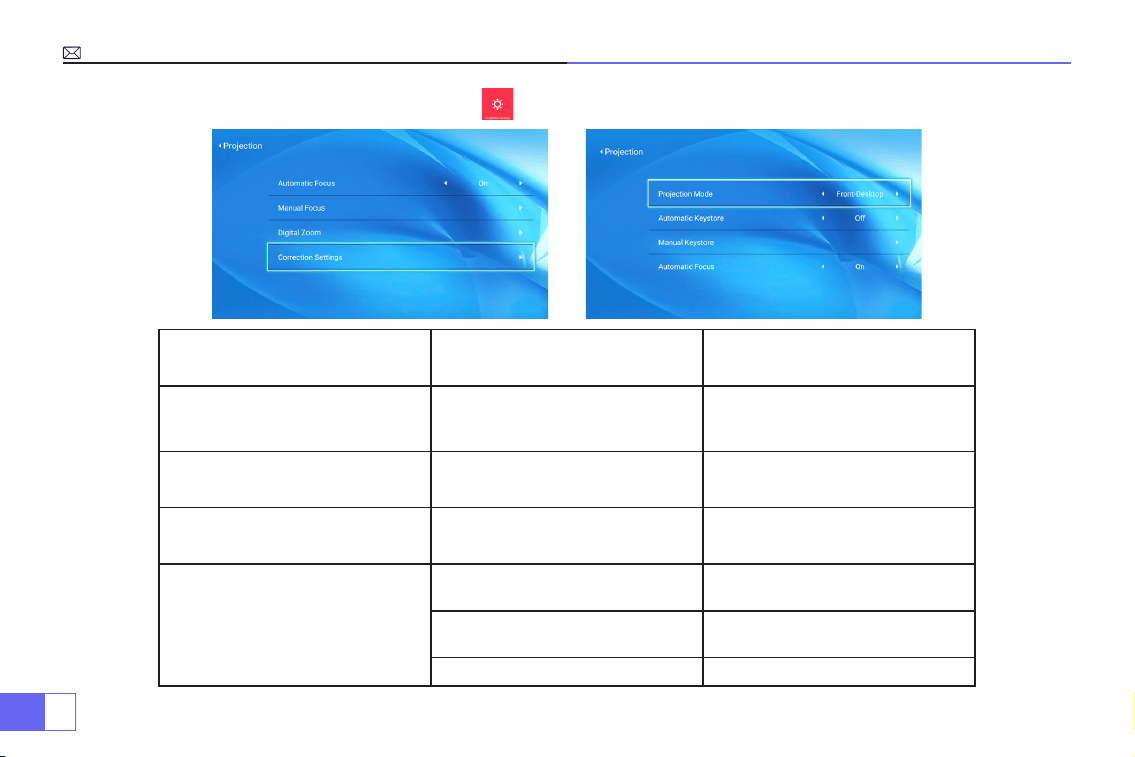
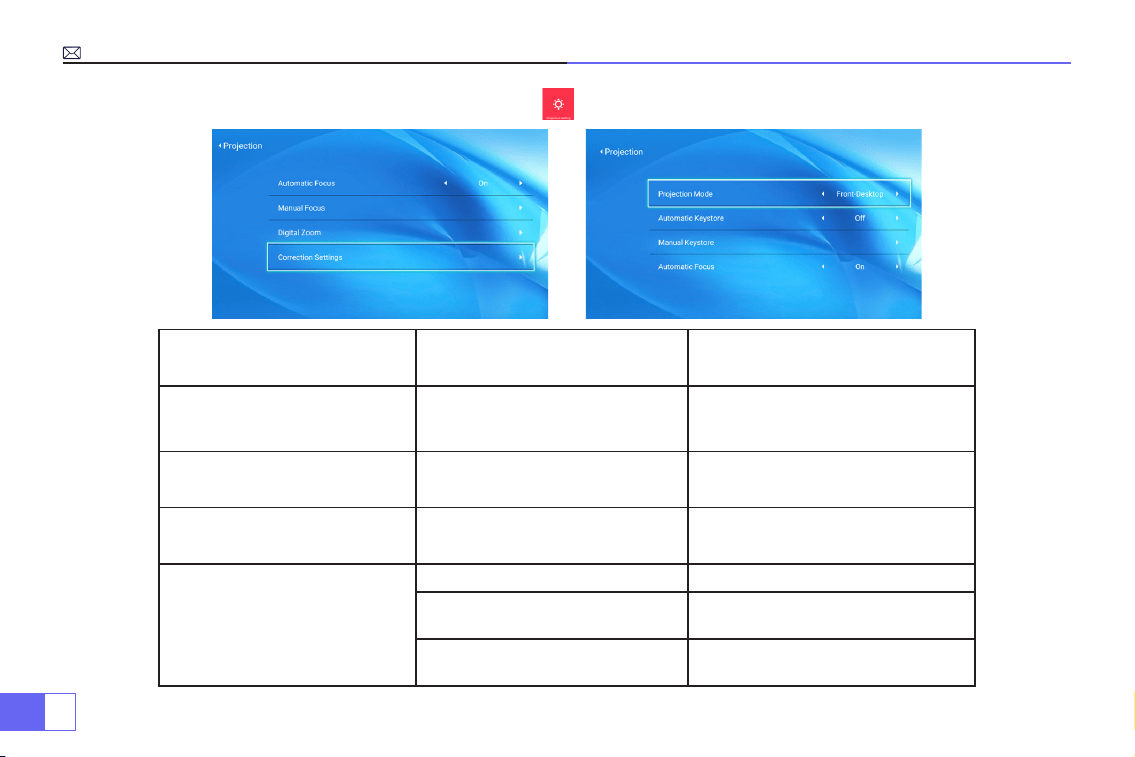
(2)How to Use Projection Settings
Select the settings icon in the upper right corner of the main interface, and then press the "OK" key on the remote
control to enter the settings interface and select "Projection Image Setting". After entering the interface, select the
mode you want in the projection settings, then adjust the keystone as you want.
• Manual Keystone
After going into"Manual Keystone",you can set “4-point Keystone”as your need: Horizontal Value ±96, Vertical Value
from±54
Just click “OK” button to pick the point you want adjust at rst, and then press the button "
▶
" or "
▼
" to set the value
needed as shown below.

EN
12
• Digital Zoom
With the zoom value at 100%-50%, Just click “OK” button enter,and then press the button "
▲
" or "
▼
" to set the value
needed as shown below.(Note: The zoom value will be affected by the value of four-point keystone correction)
• Correction setting
Trapezoidal Correction Reset: Press ''OK'',the image will restore to the original keystone correction settings.

EN
13
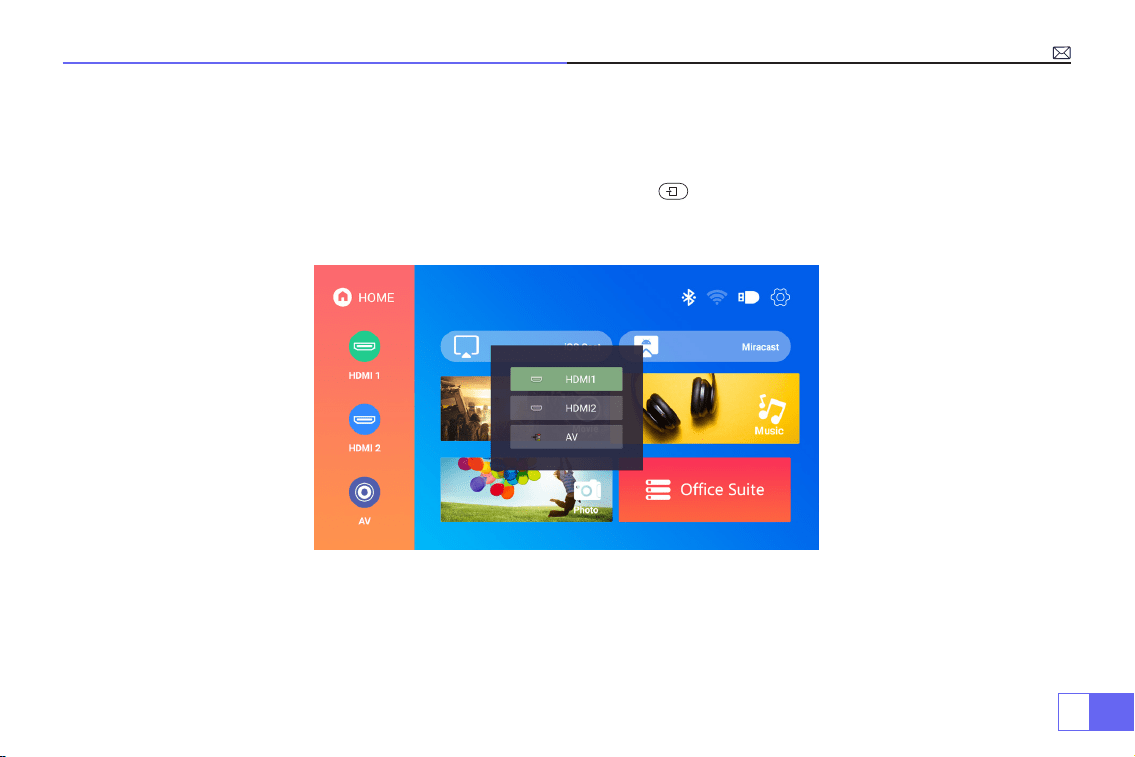
3.Connect input devices and then choose signal source button to choose
corresponding signal source ( HDMI1, HDMI2, AV,etc)
For the USB devices, no need to choose the signal source. The machine will detect them
automatically.
Just operate through the remote control: Press “ ” and then press "
▶ ▶
" or "
▲ ▼
" to choose the corresponding
signal input channel, then press "OK’’ to conrm.

EN
14
Connecting with Smartphones and iPad
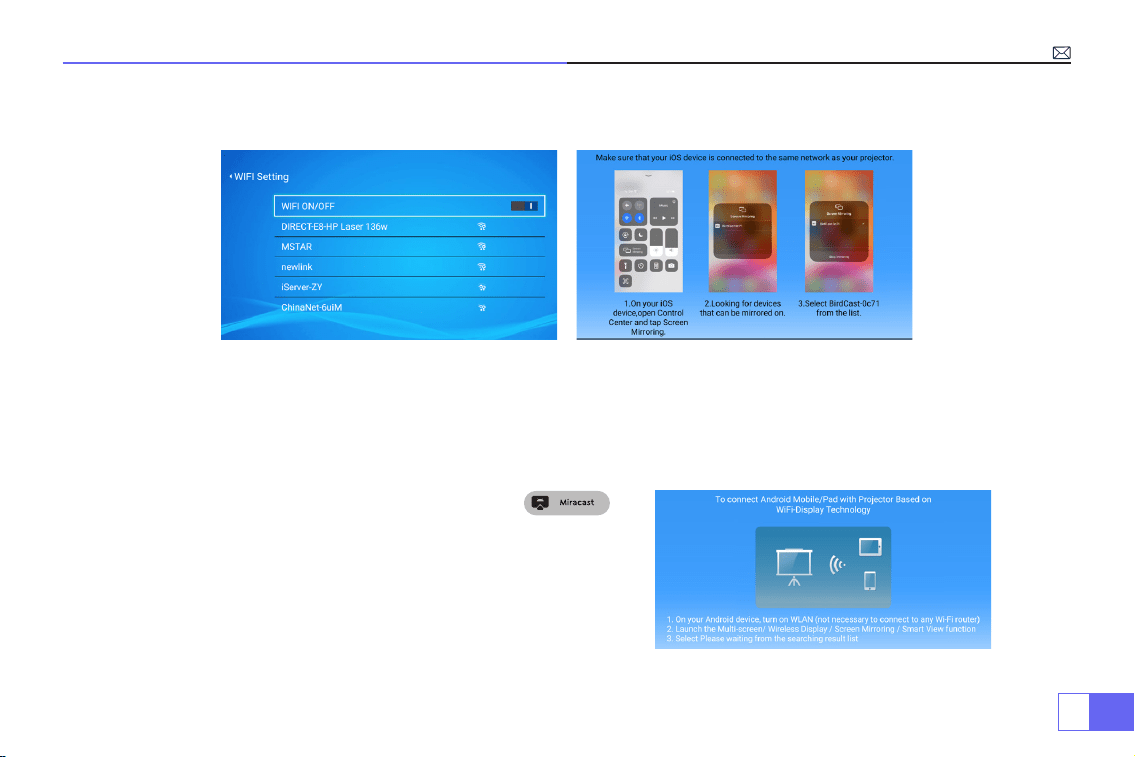
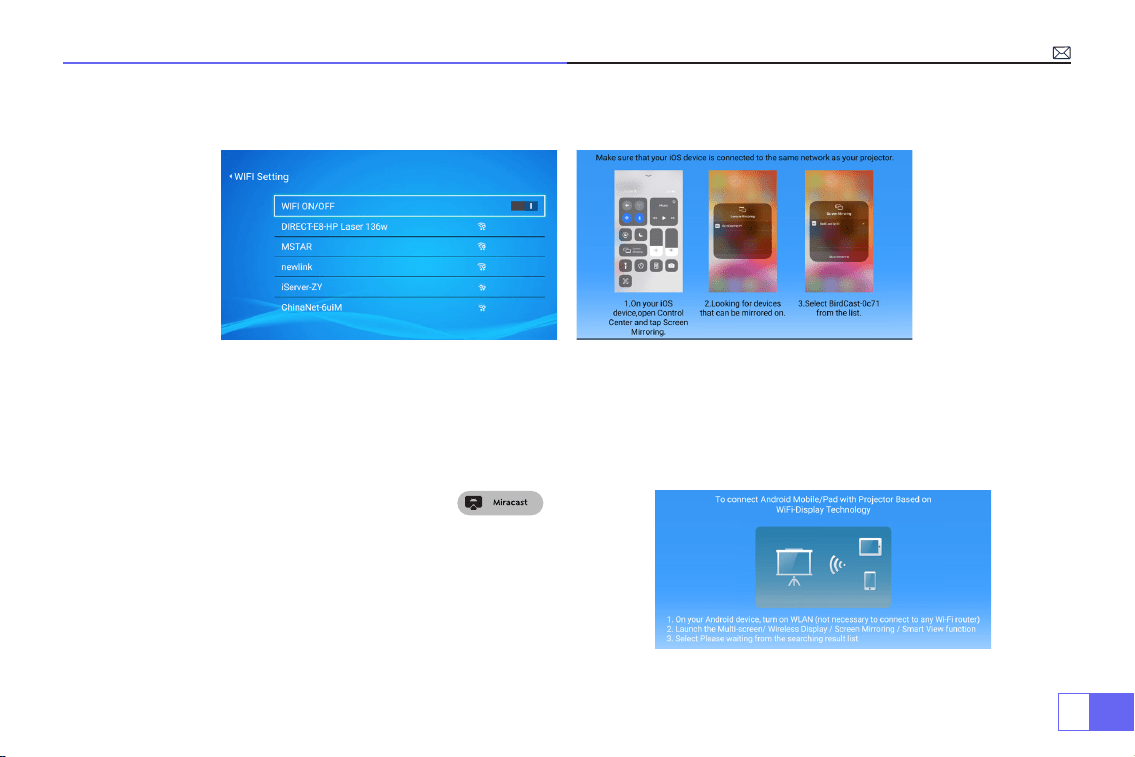
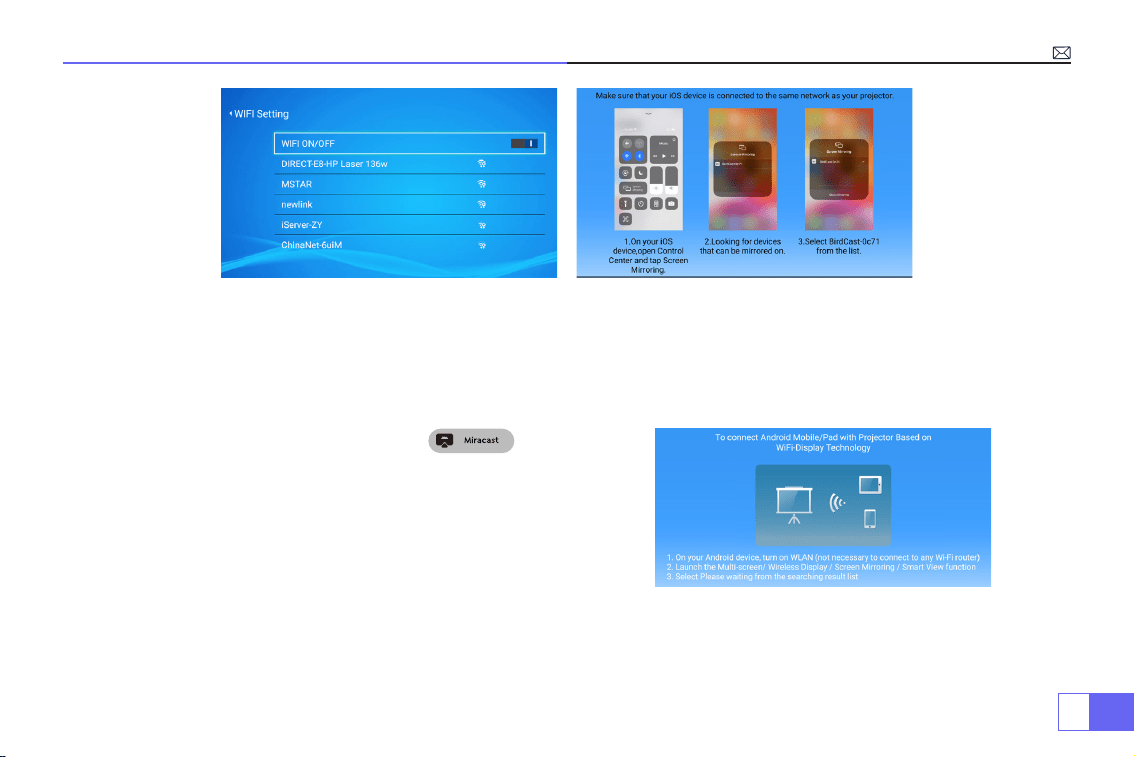
How to Use WiFi Settings
For IOS System
Note:
This projector support only Wireless Connection, wired connection is not possible.
PS: The fluency of screen mirroring with wireless connection will be affected by the network environment. A
bandwidth of 100Mbit or more is recommended when using screen mirroring. Make sure your mobile device is
closed to the projector when using wireless connection. A distance within 1 meter is recommended.
Select the settings icon in the upper right corner of the main interface, and then press the "OK" key on the remote
control to enter the settings interface and select "WiFi Setting".
Setting with Home Wi-Fi
Attention:
Your device and the projector should be in the same Home WiFi.
1.Turn on the WiFi Setting of projector.
2.Choose your Home WiFi to connect and enter the right password, then click
“Done”
to Connect, please wait 3-5
seconds to establish the connection. Once connected, it will remember the password of the connected WiFi.
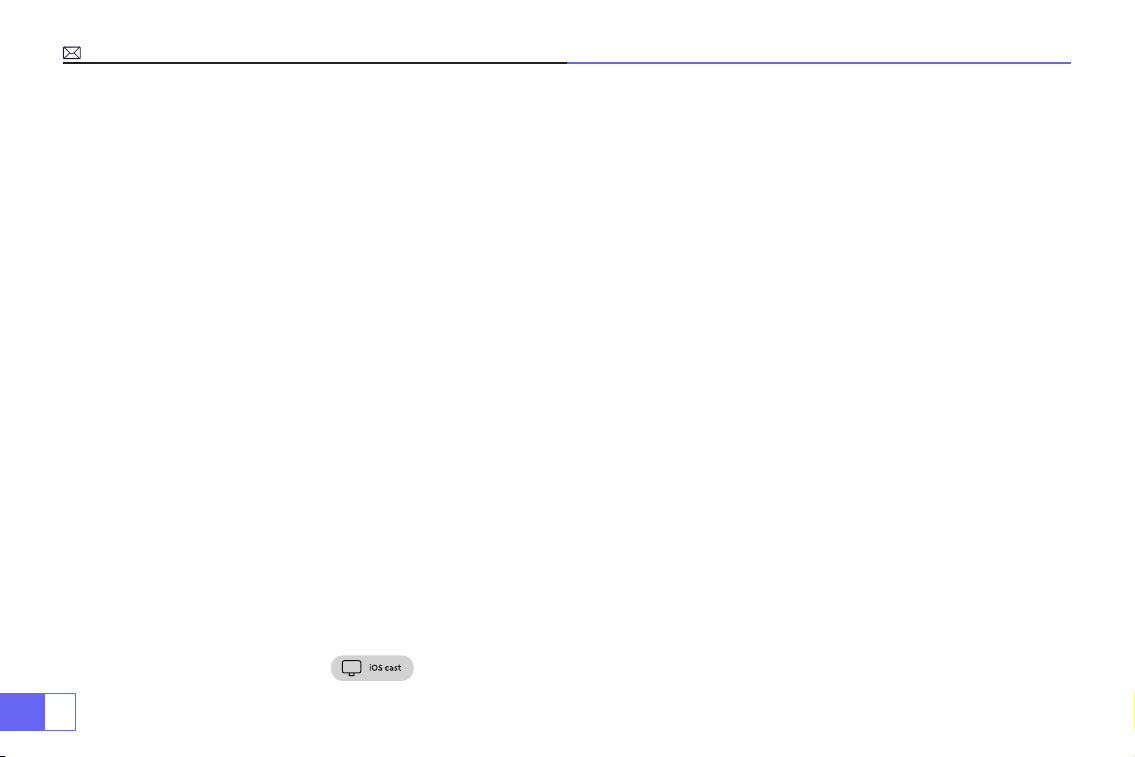
3.Turn on the WiFi setting of your iOS device, then connect it the same Home WiFi as the projector.
4.Then click “iOS Cast” as the Input Source of your projector.
5.Swipe up the screen of your iOS mobile device and tap
“Airplay”
to search for the projector, then select
“WiMiUS-
P62Projector”
from the searching results to connect.
6.Succeed.

EN
15
For Android System
To activate this function, your android device must support Multi-Screen/Wireless Display. Name of “Multi-Screen”
may vary depending on various brands of Android devices.
1.Turn on the projector, select “Miracast” as the Input Source.
2.Turn on the
“Multi-Screen/Wireless Display”
of your Android device.
3.Select
“WiMiUS-P62Projector”
from the searching results to connect.
4.Succeed.
Method 1: Setting with mobile internet

EN
16
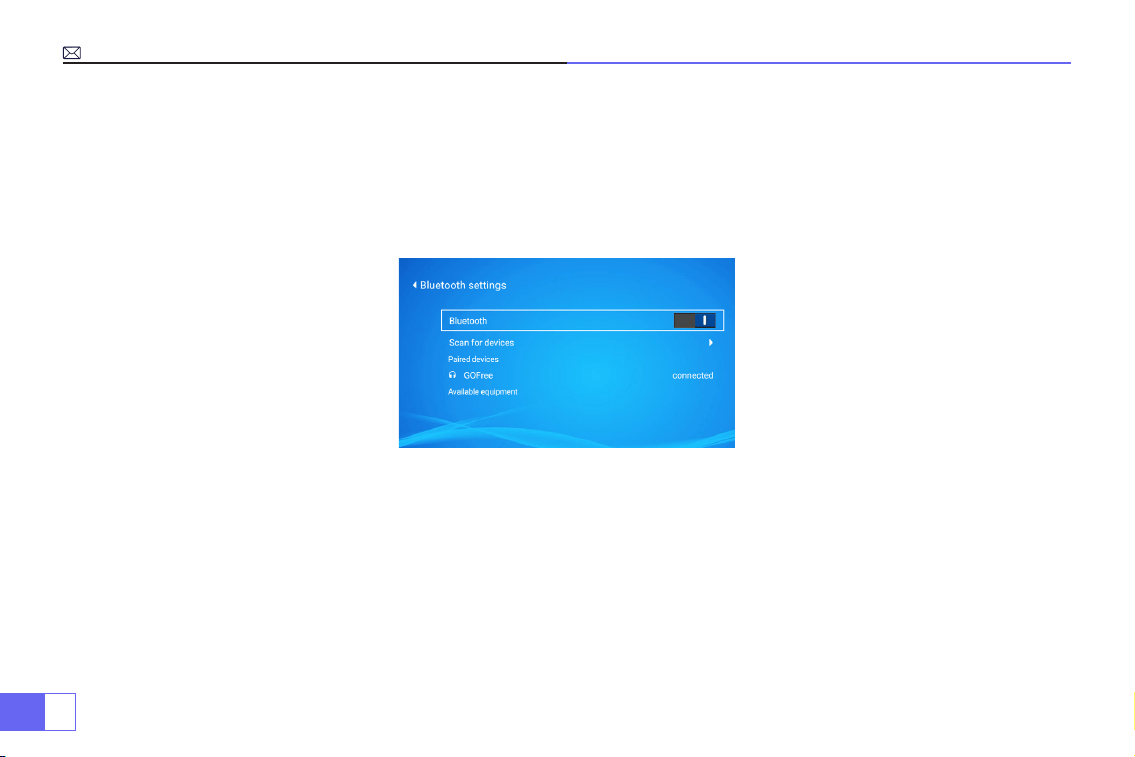
Connecting with Bluetooth Speaker
1.Turn on your Bluetooth Speaker.
2.Turn on the Bluetooth Setting of your projector.
3.Seclect your Bluetooth speaker to connect.
4.Succeed.
Compatible with Bluetooth speakers, Bluetooth Headphones, iPhone Airpods,Bluetooth Earbuds,Bluetooth Earphones.

EN
17
Other Connections
Supported multimedia playback formats
• Connect projector with PC by HDMI cable.
• Choose the media signal channel :“HDMI”
For the USB devices, no need to choose the signal source. The machine will detect them automatically.
• Select the required category “movie”, "music", "photo" or "Ofce Suite" in the main interface, and press the “OK”key on
the remote control to enter the corresponding category.
• According to the programs to choose :“photos” “music” “movie” or
“Ofce Suite”
.
• Choose the file you want to play, press the key “OK” to play or pause the file. (You cannot enter the required
category without connecting a USB disk.)
• Note:
For the “Ofce Suite” option, you can play, demo PPT les.
1.Connecting with PC
2.USB Multimedia Connecting
Picture Format
JPG、PNG、BMP、JPEG
Audio Format
MP3、AAC、WAV、WMA、M4A、OGG、FLAC
Video Format
MP4、MKV、WMV、3GP、MPG、TP、TS、F4V、DAT、FLV、TRP
File Format
TXT、EXCEL、WORD、PPTX

EN
18
• Choose the media signal channel :“HDMI”
• Use a Type-C to HDMI adapter to connect your MacBook, or a Mini Display to HDMI adapter to connect with your
MacBook Air (adapter not included).
• Use the 3.5mm audio cable coming with the projector to connect with sound bar.
• Turn on the projector and the sound bar, select [ AV ] as the signal source
• More details, please contact seller at
.
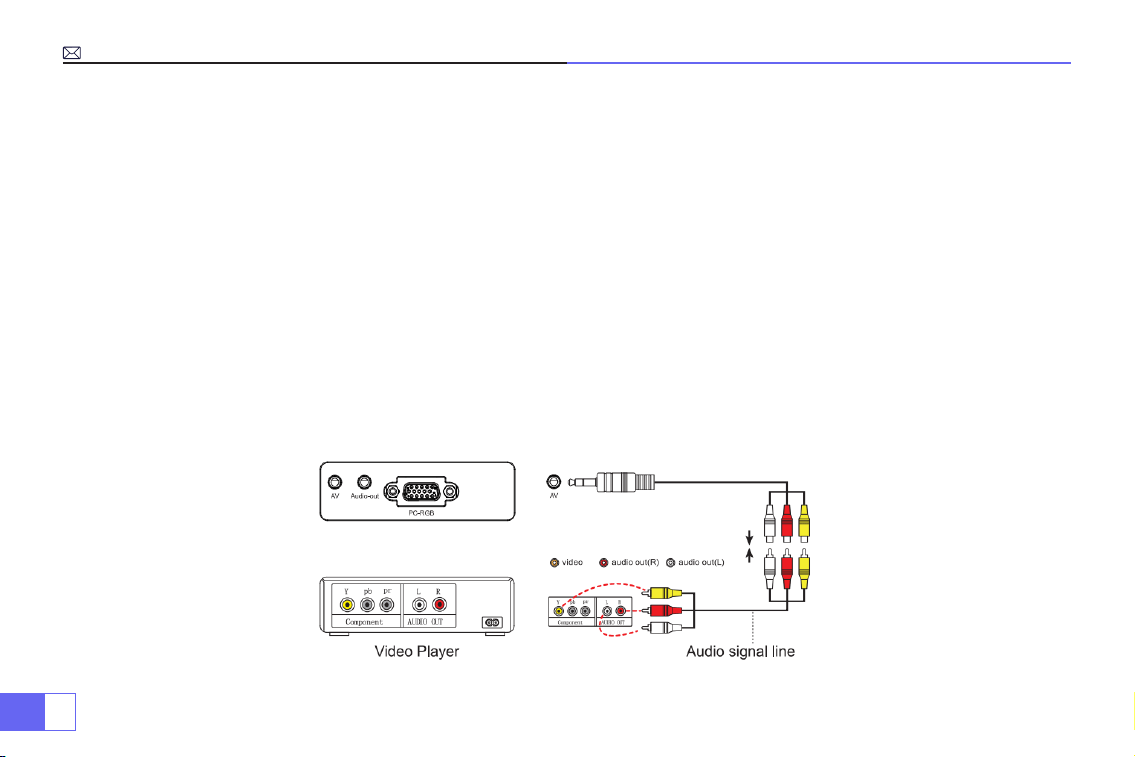
• Use the 3-in-1 AV cable, connect the colorful female connectors to your DVD player's RCA cable.
• Connect the black connector to the AV port of the projector, enter the home page to select [ AV ] as the signal
source.
3.Connecting with MacBook or Mac Book Air
4.Connecting with Sound bar
5.Connecting with DVD

EN
19
• Plug the TV stick into HDMI port of the projector.
• Choose the media signal channel :“HDMI”
• P.S:
It only supports 1080P TV stick, not 4K TV stick.
• Choose the media signal channel :“HDMI”
• Use HDMI cable connect to XBOX/PS4
6.Connecting with re TV Stick
7.Connecting with XBOX/PS4

EN
20
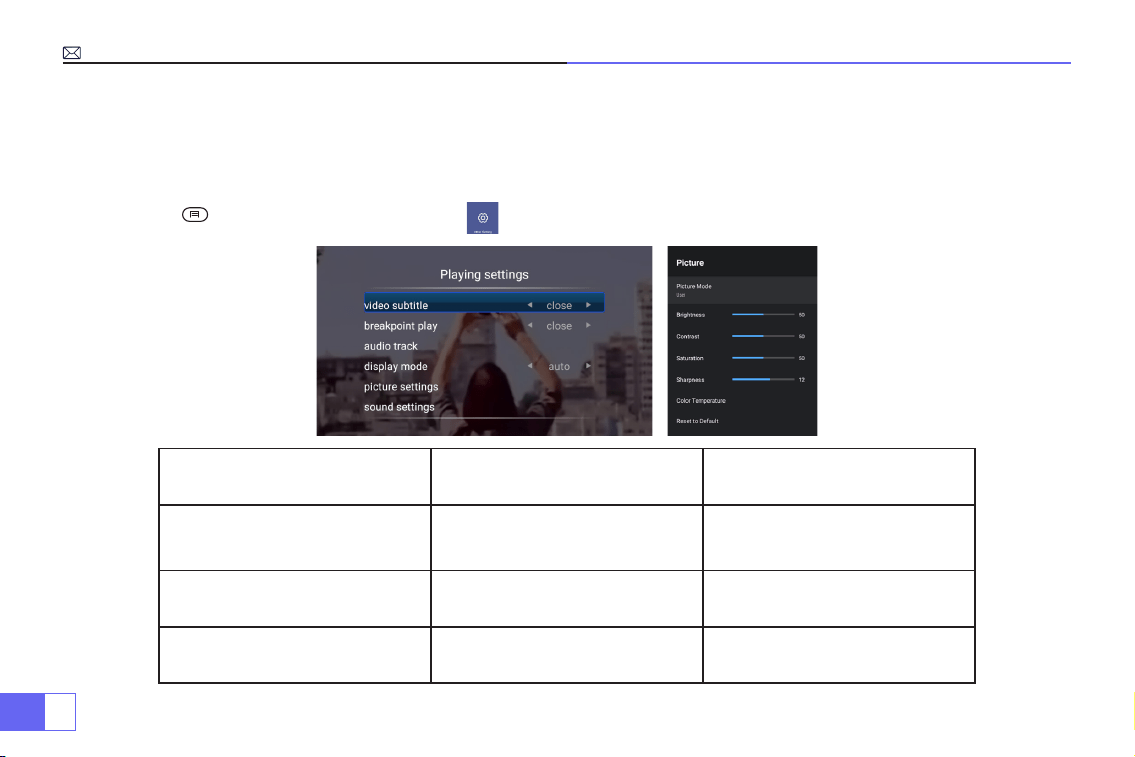
Main Menu Function
1.Picture Mode
Only when you play the video, you can set the “Picture Mode”.
Press “ ” and then select the setting on the remote control to make some personal settings.
Menu Menu included Function
Picture Mode
User/Standard/Vivid/Sport/
Movie/Game/Energy Saving
To adjust the “Brightness/
Contrast/Saturation/Sharpness”
of the image
Color Temperature User/Cool/Standard/Warm To adjust Red/Blue/Green gain
Display Mode 16:9/4:3/Auto/Full To adjust Aspect ratio

EN
21
2.Sound Mode
Only when you play the video, you can set the “Sound Mode”.
Sound Mode Menu included Function
Sound Mode
User/Standard/Vivid/Sport/
Movie/Music/News
Adjust the mode of sound
Equalizer Detail 120/500/1.5K/5K/10K Hz Adjust the tone

EN
22
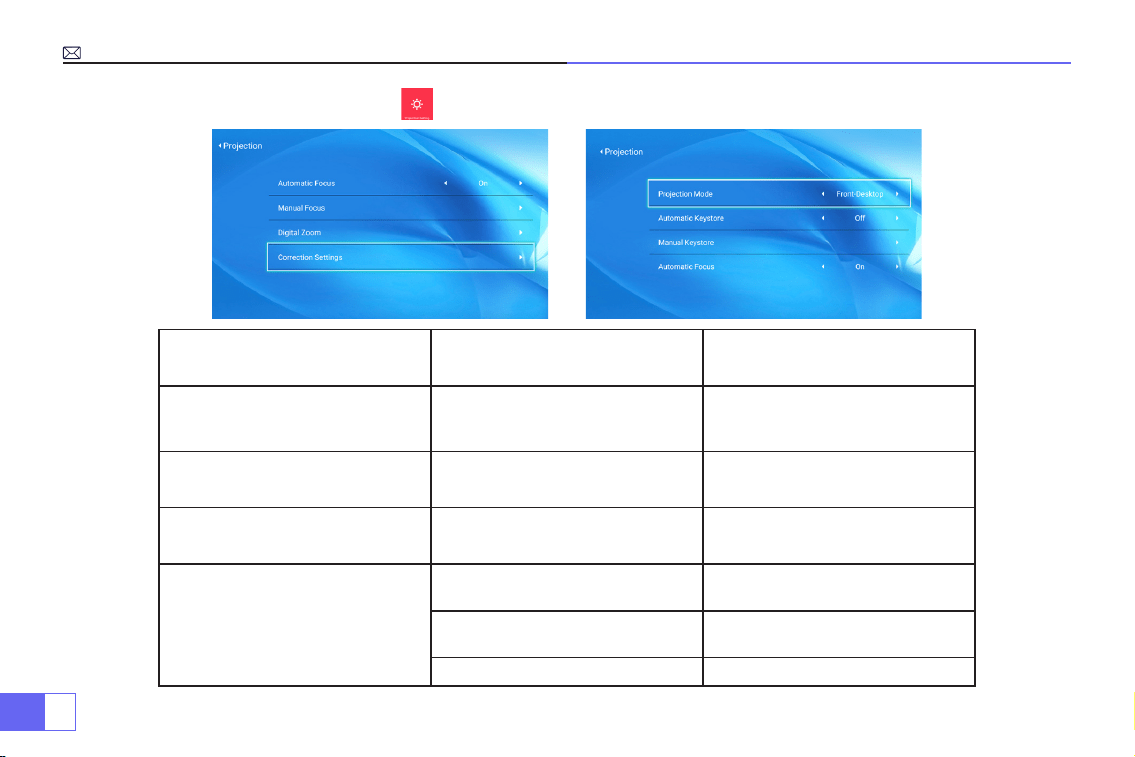
3.Projection Image Setting
Projection Menu included Function
Projection Mode
Front-Desktop / Rear-Desktop /
Front-Ceiling / Rear-Ceiling
Choose the projection
methods,ip the image
Manual Keystone 4-point Keystone correction
Adjust 4 conners of the projection
image
Digital Zoom Reduce Display 100%-50% Reduce the size of image size
Correction Setting
Trapezoidal Correction Reset Auto trapezoidal correction
Power onAuto Keystone correction On/off
Power on Auto Focus On/off

EN
23
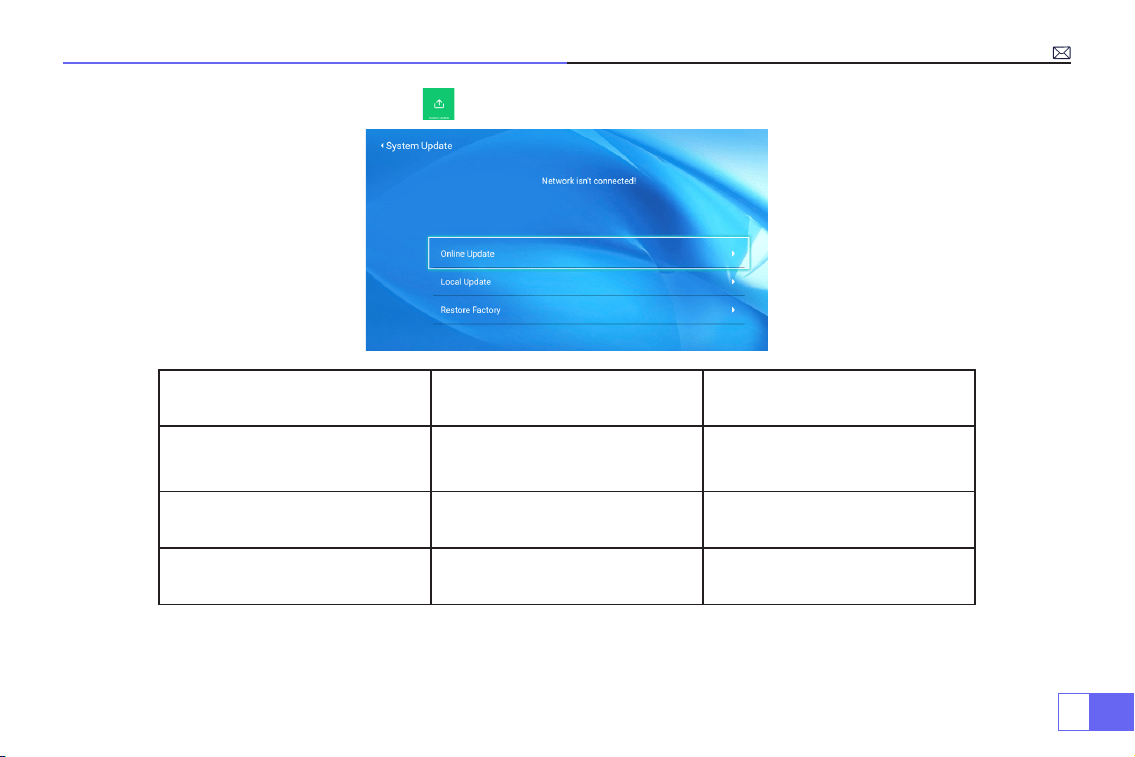
4.System Update
System Update Menu included Function
Picture Mode
User/Standard/Vivid/Sport/
Movie/Game/Energy Saving
To adjust the “Brightness/
Contrast/Saturation/Sharpness”
of the image
Color Temperature User/Cool/Standard/Warm To adjust Red/Blue/Green gain
Display Mode 16:9/4:3/Auto/Full To adjust Aspect ratio

EN
24
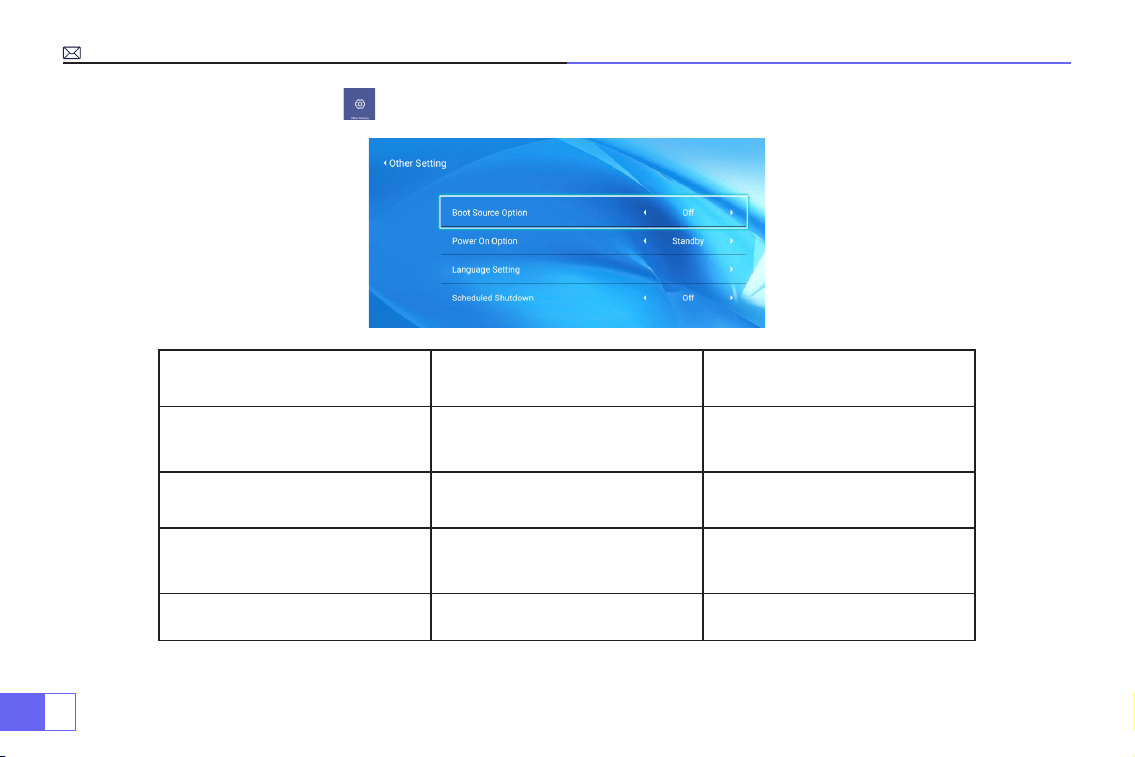
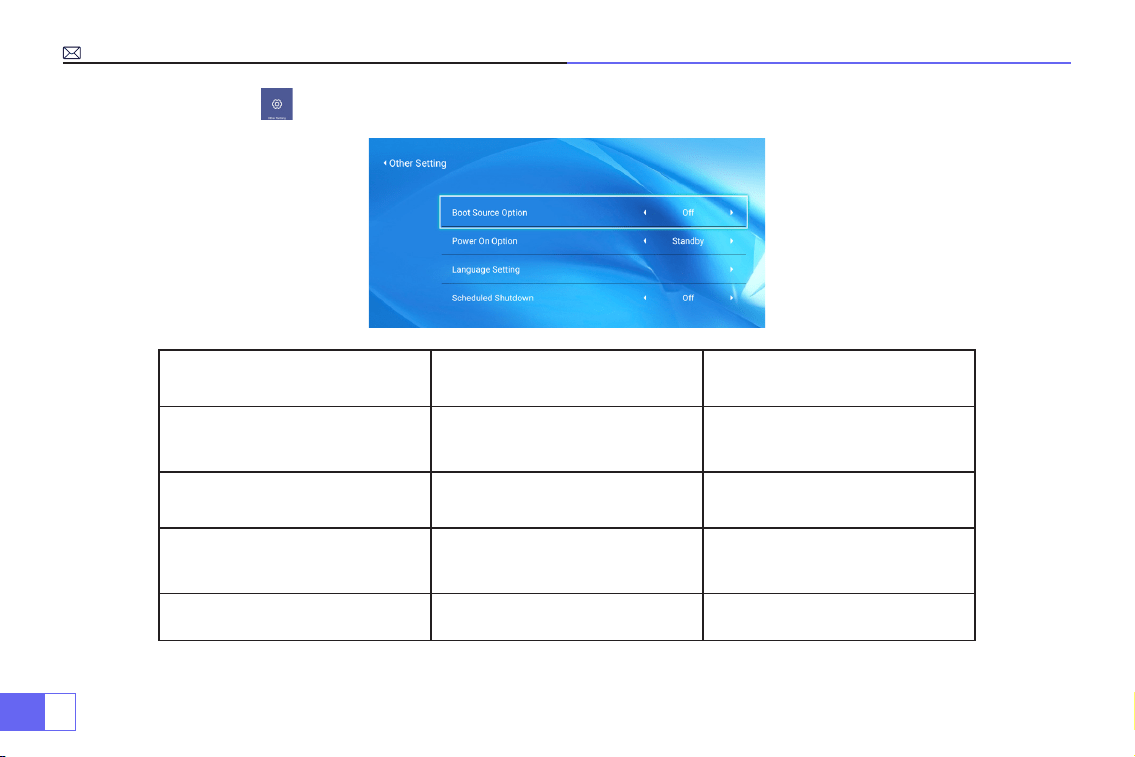
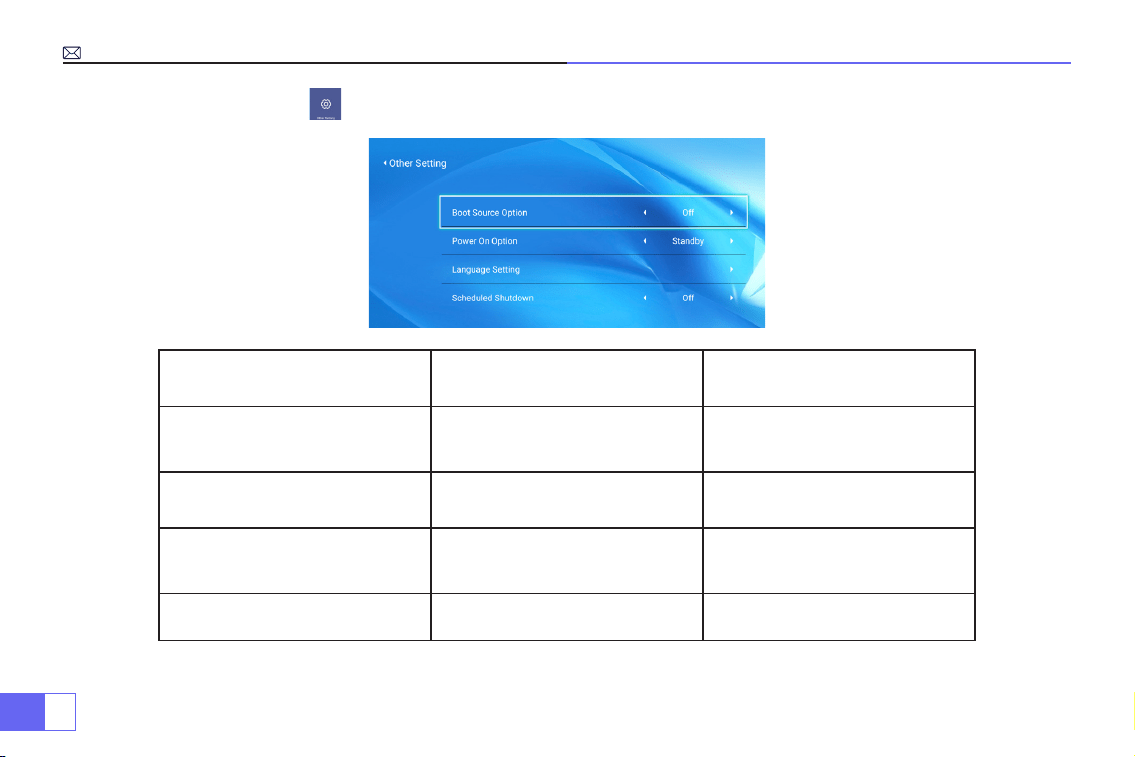
5.Other Setting
Other Setting Menu included Function
Boot Source Option HDMI 1/HDMI2/AV/OFF Default signal source of Power on
Power On Option Direct/Standby Choose the mode of Power On
Language Setting
English, French, German, Italian,
Spanish, Japanese.20 several
languages
Choose a language
Scheduled Shutdown
OFF/10min/20min/30min/60min/
120min
Set the sleep time of the projector
EN
25
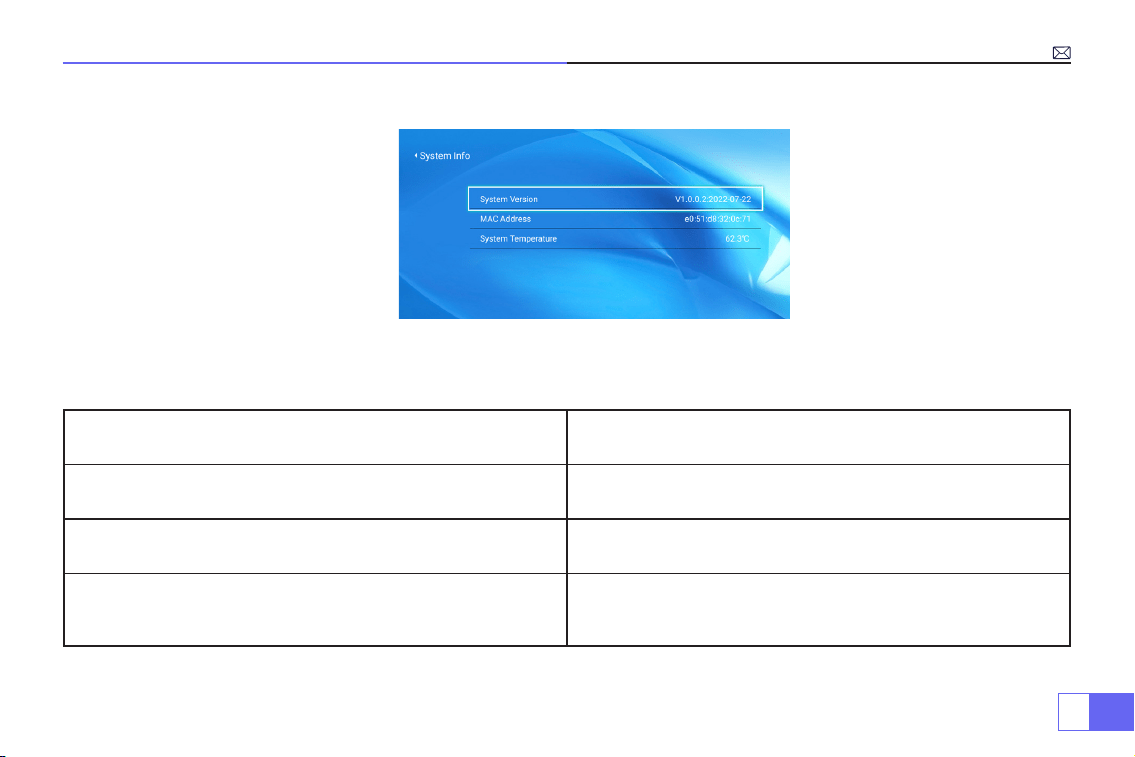
6.About(System Info)
FAQ
Questions Solutions
Can’t play video in App Netix, Hulu
Those APPs are limited with HDCP. This model doesn’t support
this function. So it can’t support these APPs.
Indicator light is off when plug into power supply
1 )The power cable not connected well.
2)The power button on the back of the projector is off.
Press the power button on the remote control and the projector
does not turn on
1 )The remote control's batteries are depleted.
2)Something obstructing the signal between the remote and IR.
3) Strong light on IR directly.
EN
26
Contact us:
Questions Solutions
Picture right, no sound
1 ) Input cables connected right?
2) Volume at minimum or on Mute?
3) Turn off the dolby of the input devices.
It will shut off automatically after turn on for a while
1 ) Is there a barrier around the ventilation?
2) Low voltage or big voltageuctuations.
3) Check the over-heat protection system.
Can't find devices when connected with hard drive or flash
drive?
1 ) Re-plug the device.
2) Check if the device is broken.
Can't play the movies
1 ) The format of the video is right?
2) Files are broken?
3) Device is broken?
Not compatible with your bluetooth speaker?
1 )The projector may not compatible with some version
bluetooth speaker of JBL.
2)Contact our after-sales service
immediately and tell us the version of your bluetooth speaker.
Black spot on the picture Contact seller for a video to remove them.
Email:
Website: www.wimius.com
DE
27
Inhaltsübersicht
Sicherheitshinweise
Zubehör
Produktübersicht
Fernbedienung und Spezikationen
Projektionsgrößentabelle
Bedienungsanleitung
Verbindung mit Smartphones und iPad
Verbindung mit Bluetooth Lautsprecher
Andere Verbindungen
Hauptmenüfunktion
FAQ und Kontakt
28
29
3 1
34
35
36
40
42
43
46
5 1

DE
28
Vielen Dank für Ihren Kauf des WiMiUS P62 Videoprojektors. Bitte lesen Sie dieses Handbuch sorgfältig durch, bevor
Sie den Projektor benutzen.
Wenn Sie Fragen zum Projektor haben, kontaktieren Sie uns bitte unter :
Wir hoffen aufrichtig, dass dieser Projektor Ihr Leben bunter machen kann.
Lampe mit hoher Helligkeit! Schauen Sie nicht direkt in die Linse, wenn der Projektor eingeschaltet ist.
1. Reinigen
Wenn Sie diesen Projektor reinigen, ziehen Sie bitte das Netzkabel ab. Verwenden Sie zur Reinigung ein feuchtes Tuch
und keine Reinigungsmittel, die das Gerät beschädigen könnten.
2. Zubehör
Bitte verwenden Sie das von uns empfohlene Zubehör. Andernfalls wird der Projektor beschädigt.
3. Richtige Umgebung
Stellen Sie den Projektor nicht in einer feuchten Umgebung auf, wie z. B. in einem feuchten Keller oder in der Nähe
eines Schwimmbeckens usw.
4. Belüftung
Die Belüftung ist für einen stabilen Betrieb des Projektors erforderlich. Stellen Sie keine Gegenstände in der Nähe
der Lüftungsöffnungen ab. Andernfalls kann sich der Projektor aufheizen. Um die Stabilität der Wärmeableitung zu
Warnungen
Sicherheitshinweise

DE
29
• Projektor x 1
• Projektorgehäuse x 1
• Fernbedienung x 1
• Netzkabel x 1
• AV-Kabel x 1
Zubehör
• HDMI-Kabel x 1
• Objektivabdeckung x 1
• Reinigungskit x 1
• Benutzerhandbuch x 1
gewährleisten, öffnen Sie bitte vor der Inbetriebnahme die Höhenhalterung an der Unterseite des Projektors.
5. Stromversorgung
Vergewissern Sie sich, dass die Leistung innerhalb des erforderlichen Leistungsbereichs liegt.
6. Gewitter
An Gewittertagen ziehen Sie bitte das Netzkabel vom Projektor ab.
7. Reparatur
Öffnen Sie den Projektor nicht selbst und versuchen Sie nicht, ihn zu reparieren, da er unter Hochspannung steht.
Bitten Sie einen professionellen Techniker, den Projektor zu reparieren.
8. Von Wärmegeräten fernhalten
Achten Sie darauf, dass der Projektor nicht in der Nähe von Wärmegeräten steht, die den Projektor beschädigen
könnten.

DE
30
Projektor x 1
Fernbedienung x 1 Netzkabel x 1 AV-Kabel x 1 HDMI-Kabel x 1
Objektivabdeckung x1 Reinigungskit x 1 Benutzerhandbuch x 1 Projektortasche x 1

DE
31
Produktübersicht
Der Projektor kann High-Denition-Videosignale und Composite-Videosignale eingeben und unterstützt den Eingang
und Ausgang von Stereo-Audiosignalen. Bitte beachten Sie die folgende Abbildung, um den Projektor und andere
Audiogeräte nach Ihren eigenen Bedürfnissen anzuschließen.
4. Luftauslass
5. 6.Steckdose Lufteinlass
1. 2.
3.
Fokussierlinse IR-Empfänger
Autofokus-
Signalfenster
7.
8.
9.
10.
1 1.
12.
13.
Lautsprecher (links)
USB 1&2-Anschluss
HDMI 1&2-Anschluss
AV-Anschluss
3.5mm Audioausgang
IR-Empfänger
Lautsprecher (rechts)

DE
32
1.
2.
3.
4.
5.
6.
7.
8.
9.
10.
1 1.
Signalquelle
Oben
Zurück
Links
Rechts
Ein/Aus-Taste
Unten
OK
Höhenverstellung (zum Anpassen des
Projektionswinkels)
unteres Gehäuse (zum Reinigen internes
Bildschirms öffnen)
Projektorbefestigungslöcher (M5*12mm)
Hinweis:
Bitte beachten Sie das Aussehen des Produkts, diese Abbildung dient nur als Referenz.
DE
33
Wie werden die schwarzen Flecken gereinigt?
Öffnen Sie die Drehung der Staubmundabdeckung mit einem Schraubendreher
Methode 1 Methode 2
Klappen Sie das Gehäuse des Projektors auf. Verwenden Sie den kalten Wind, um den staubenden
Mund zu blasen.

DE
34
1.
10.
12.
13.
14.
1 1.
2.
3.
4.
5.
7.
8.
9.
6.
Fernbedienung
1.Signalkontrollleuchte
2.Leistung
3.Signalquelle
4.Pfeiltasten
5.Menü
6.Autofokus und Trapezkorrektur
7.Lautstärke +
8.Lautstärke -
9.Stumm
10. Startseite
11. Bestätigungstaste
12. Rückgabetaste
13. Manuelle Fokussierung +
14.Manuelle Fokussierung -
Hinweis:
Batterien sind nicht im Lieferumfang enthalten, Sie müssen zwei zusätzliche AAA-Batterien selbst kaufen.
Um Korrosion durch auslaufende Batterien zu vermeiden, nehmen Sie bitte die Batterien heraus, wenn Sie sie lange
Zeit nicht benutzen.
DE
35
Spezikationen
Modell-Nr.: P62
Bildgebendes System
LCD
Leistung
AC100-240V/50-60Hz
Lichtquelle
LED
Maß
25.7*20*10.3CM
Farbe
16.8M Vollfarbe
Auösung
Natives 1920*1080 Full HD
Projektionsabstand
1.5-7m
Eingangsschnittstelle
HDMI*2/VGA/AV/ USB*2
Projektionsgröße
50-300”
Zoomfunktion
100%-50%
Bildseitenverhältnis
16:9 /4:3/ automatisch
Ausgangsschnittstelle
AUDIO-AUSGANG
Trapezkorrektur
automatisch
Fokus
automatisch
Projektionsgrößentabelle
Distance Screen Size Distance Screen Size
1.5m 35’’ 3.9m 120’’
1.7m 50’’ 5.5m 180’’
2.4m 72’’ 7.0m 300’’
3.3m 100’’
Bitte entnehmen Sie der folgenden Tabelle, wie Sie die
Bildgröße und den Abstand einstellen.
Optimaler Projektionsabstand: 3m
Bitte erlauben Sie ± 3% zu den Bildgrößen in der obigen
Tabelle. Wenn der Abstand kleiner ist als min data und
mehr als max data, könnte das Bild unscharf sein.
DE
36
Bedienungsanleitung
1.Erste Schritte
2.Fokus und automatische Trapezfehlerkorrektur
• Verwenden Sie den Projektor bei zugezogenem Vorhang oder in einem dunklen Raum, um ein besseres Bild zu
erhalten.
• Gehen Sie vorsichtig mit dem Projektor um. Wenn er herunterfällt oder abstürzt, können Teile beschädigt werden
oder zu unscharfen Bildern und abnormaler Anzeige führen.
• Nehmen Sie die Objektivkappe ab, schließen Sie den Projektor über das Netzkabel an den Strom an, und er beginnt
zu arbeiten.
• Dann erscheint der Startbildschirm, wie auf dem Bild zu sehen.
(1)Autofokus und Trapezkorrektur.
Bitte stellen Sie den Projektor zunächst waagerecht zur Wand auf, schalten Sie ihn ein, und dann wird das Bild
automatisch auf der Grundlage des Projektionsabstands zur Leinwand fokussiert und auf ein Rechteck eingestellt.

DE
37
Oder drücken Sie die Taste " " Autofokus und Trapezfehlerkorrektur direkt.
Wenn das Bild unscharf ist, drücken Sie die Fokustaste ''F+'' ''F-'' auf der Fernbedienung, um die Schärfe des Objektivs
einzustellen, tippen Sie auf oder drücken Sie lange auf die Einstelltaste, bis das Bild klar ist.
(2)Verwendung der Projektionseinstellungen
Wählen Sie das Einstellungssymbol in der oberen rechten Ecke der Hauptschnittstelle, und dann drücken Sie
die Taste "OK" auf der Fernbedienung, um die Einstellungsoberfläche aufzurufen und "Projektionsbildeinstellung"
auszuwählen. Wählen Sie nach dem Aufrufen der Schnittstelle den gewünschten Modus in den
Projektionseinstellungen aus und passen Sie dann die Trapezverzerrung wie gewünscht an.
• Manuelle Trapezkorrektur
Nachdem Sie auf "Manuelle Trapezkorrektur" gegangen sind, können Sie "4-Punkt-Trapezkorrektur" nach Bedarf
einstellen: Horizontaler Wert ±96, vertikaler Wert von±54.
Klicken Sie einfach auf die Schaltfläche "OK", um den Punkt auszuwählen, den Sie zuerst einstellen möchten, und
drücken Sie dann die Schaltäche "
▶
" or "
▼
"um den erforderlichen Wert wie unten gezeigt einzustellen.

DE
38
• Digitalzoom
Mit dem Zoom-Wert bei 100%-50%, klicken Sie einfach auf "OK" Taste eingeben, und drücken Sie dann die Taste "
▲
"
or "
▼
" um den erforderlichen Wert wie unten gezeigt einzustellen.(Hinweis: Der Zoomwert wird durch den Wert der
Vierpunkt-Trapezkorrektur beeinusst)
• Einstellung der Korrekturen
Trapezfehlerkorrektur zurücksetzen: Drücken Sie ''OK'', das Bild wird auf die ursprünglichen Trapezkorrektur-
Einstellungen zurückgesetzt.
DE
39
3.Schließen Sie die Eingangsgeräte an und wählen Sie dann mit der Taste
"Signalquelle" die entsprechende Signalquelle aus (HDMI1, HDMI2, AV, usw.)
Bei USB-Geräten müssen Sie die Signalquelle nicht auswählen. Das Gerät erkennt sie automatisch.
Die Bedienung erfolgt einfach über die Fernbedienung: Drücken Sie “ ” und dann drücken Sie "
▶ ▶
" oder "
▲ ▼
"
um den entsprechenden Signaleingangskanal auszuwählen, und drücken Sie dann zur Bestätigung "OK".
DE
40
Verbindung mit Smartphones und iPad
Verwendung der WiFi-Einstellungen
Für IOS-System
Hinweis:
Dieser Projektor unterstützt nur drahtlose Verbindungen, eine kabelgebundene Verbindung ist
nicht möglich.
Hinweis: Das Funktionieren der Bildschirmspiegelung bei einer drahtlosen Verbindung wird durch die
Netzwerkumgebung beeinusst. Für die Bildschirmspiegelung wird eine Bandbreite von 100 Mbit oder
mehr empfohlen. Stellen Sie sicher, dass sich Ihr mobiles Gerät in der Nähe des Projektors befindet,
wenn Sie eine drahtlose Verbindung verwenden. Es wird ein Abstand von 1 Meter empfohlen.
Wählen Sie das Einstellungssymbol in der oberen rechten Ecke der Hauptschnittstelle und drücken Sie dann drücken
Sie die "OK"-Taste auf der Fernbedienung, um die Einstellungsseite zu öffnen und wählen Sie "WiFi-Einstellung".
Einstellung mit Home Wi-Fi
Achtung:
Ihr Gerät und der Projektor sollten sich im selben Home WiFi benden.
1. Schalten Sie die WiFi-Einstellung des Projektors ein.
2. Wählen Sie Ihr Heim-WiFi zum Verbinden und geben Sie das richtige Passwort ein, dann klicken Sie auf "Done" zum
Verbinden, bitte warten Sie 3-5 Sekunden, um die Verbindung herzustellen. Sobald die Verbindung hergestellt ist,
merkt sich der Projektor das Passwort des verbundenen WiFi.
3. Schalten Sie die WiFi-Einstellung Ihres iOS-Geräts ein und verbinden Sie es mit demselben Heim-WiFi wie den
Projektor.
4. Dann drücken Sie “IOS Cast” als Eingangsquelle für Ihren Projektor.
DE
41
Für Android-System
Um diese Funktion zu aktivieren, muss Ihr Android-Gerät Multi-Screen/Wireless Display unterstützen. Der Name
"Multi-Screen" kann je nach Marke des Android-Geräts variieren.
1.Schalten Sie den Projektor ein, wählen Sie "Miracast"
als Eingangsquelle.
2.Schalten Sie das "Multi-Screen/Wireless Display" Ihres
Android-Geräts ein.
3.Wählen Sie "WiMiUS-P62Projector" aus den Suchergebnissen
aus, um eine Verbindung herzustellen..
4.Erfolgreich.
Methode 1: Einstellung mit mobilem Internet
5. Wischen Sie auf dem Bildschirm Ihres iOS-Mobilgeräts nach oben und tippen Sie auf "Airplay", um nach dem
Projektor zu suchen, und wählen Sie dann "WiMiUS-P62Projector" aus den Suchergebnissen aus, um eine Verbindung
herzustellen.
6. Erfolgreich.

DE
42
Verbindung mit Bluetooth Lautsprecher
1.Schalten Sie Ihren Bluetooth-Lautsprecher ein.
2.Schalten Sie die Bluetooth-Einstellungen Ihres Projektors ein.
3.Wählen Sie Ihren Bluetooth-Lautsprecher zum Verbinden aus.
4.Erfolgreich.
Kompatibel mit Bluetooth Lautsprechern, Bluetooth Kopfhörern, iPhone Airpods, Bluetooth Kopfhörern, Bluetooth
Ohrhörern.

DE
43
Andere Verbindungen
Unterstützte Wiedergabeformate für Multimedia
• Verbinden Sie den Projektor über ein HDMI-Kabel mit dem PC.
• Wählen Sie den Mediensignalkanal: "HDMI".
Bei USB-Geräten muss die Signalquelle nicht ausgewählt werden. Das Gerät erkennt sie automatisch.
• Wählen Sie die gewünschte Kategorie "Film", "Musik", "Foto" oder "Office Suite" in der Hauptoberfläche aus, und
drücken Sie die "OK"-Taste auf der Fernbedienung, um die entsprechende Kategorie aufzurufen.
• Wählen Sie je nach Programm: "Fotos", "Musik", "Film" oder "Ofce Suite".
• Wählen Sie die Datei, die Sie abspielen möchten, und drücken Sie die Taste "OK", um die Datei abzuspielen oder
anzuhalten. (Ohne Anschluss eines USB-Datenträgers können Sie die gewünschte Kategorie nicht eingeben).
• Hinweis:
Bei der Option "Ofce Suite" können Sie Demo-PPT-Dateien abspielen.
1.Verbindung mit PC
2.USB Multimedia Anschluss
Bildformat
JPG、PNG、BMP、JPEG
Audioformat
MP3、AAC、WAV、WMA、M4A、OGG、FLAC
Videoformat
MP4、MKV、WMV、3GP、MPG、TP、TS、F4V、DAT、FLV、TRP
Dateiformat
TXT、EXCEL、WORD、PPTX
DE
44
• Wählen Sie den Mediensignalkanal: "HDMI".
• Verwenden Sie einen Typ-C-auf-HDMI-Adapter, um Ihr MacBook anzuschließen, oder einen Mini-Display-auf-
HDMI-Adapter, um Ihr MacBook Air anzuschließen (Adapter nicht enthalten).
• Verwenden Sie das mit dem Projektor gelieferte 3,5-mm-Audiokabel, um eine Verbindung mit der Soundbar
herzustellen.
• Schalten Sie den Projektor und die Soundbar ein, wählen Sie [ AV ] als Signalquelle
• Weitere Informationen erhalten Sie vom Verkäufer unter
.
• Verwenden Sie das 3-in-1-AV-Kabel, verbinden Sie die farbigen Buchsen mit dem RCA-Kabel Ihres DVD-Players
• Schließen Sie den schwarzen Stecker an den AV-Anschluss des Projektors an und betreten Sie das Haus Seite, um
[ AV ] als Signalquelle auszuwählen.
3.Verbindung mit MacBook oder Mac Book Air
4.Verbindung mit Soundbar
5.Verbindung mit DVD

DE
45
• Schließen Sie den TV-Stick an den HDMI-Anschluss des Projektors an.
• Wählen Sie den Mediensignalkanal: "HDMI".
• P.S:
Er unterstützt nur 1080P TV-Stick, nicht 4K TV-Stick.
• Wählen Sie den Mediensignal-Kanal: "HDMI".
• Verwenden Sie ein HDMI-Kabel zum Anschluss an XBOX/PS4
6.Verbindung mit re TV Stick
7.Verbindung mit XBOX/PS4
DE
46
Hauptmenüfunktion
1.Bildmodus
Nur wenn Sie das Video abspielen, können Sie den "Bildmodus" einstellen.
Drücken Sie " " und wählen Sie dann die Einstellung auf der Fernbedienung, um einige persönliche Einstellungen
vorzunehmen.
Hinweis:
Wenn das Menüsymbol
grau ist, bedeutet dies, dass diese
Option nicht einstellbar ist.
Menü Menü enthalten Funktion
Bildmodus
Benutzer/Standard/Anschaulich/
Sport/Film/Spiel/Energiesparen
So passen Sie die "Helligkeit/
Kontrast/Sättigung/Schärfe" des
Bildes an
Farbtemperatur Benutzer/Kühl/Standard/Warm
Einstellen der Rot/Blau/Grün-
Verstärkung
Anzeigemodus 16:9/4:3/Automatik/Vollbild Einstellen des Seitenverhältnisses

DE
47
2.Tonmodus
Nur wenn Sie das Video abspielen, können Sie den "Tonmodus" einstellen.
Tonmodus Menü enthalten Funktion
Tonmodus
Benutzer/Standard/Vivid/Sport/
Film/Musik/Nachrichten
Einstellen des Tonmodus
Equalizer-Detail 120/500/1.5K/5K/10K Hz Einstellen des Tons
DE
48
3.Projektionsbildeinstellung
Projektion Menü enthalten Funktion
Projektionsmodus
Tischplatte vorne / Tischplatte
hinten / Decke vorne / Decke
hinten
Wählen Sie die
Projektionsmethoden, spiegeln Sie
das Bild
Manuelle Trapezkorrektur 4-Punkt Trapezkorrektur
Einstellen von 4 Konturen des
Projektionsbildes
Digitalzoom Verkleinern der Anzeige 100%-50% Verkleinern der Bildgröße
Einstellung der Korrektur
Trapezkorrektur Zurücksetzen
Automatische
Trapezfehlerkorrektur
Einschalten der automatischen
Trapezkorrektur
Ein/Aus
Einschalten des Autofokus Ein/Aus
DE
49
4.Aktualisierung des Systems
Aktualisierung des Systems Menü enthalten Funktion
Online-Aktualisierung Online-Aktualisierung
To adjust the “Brightness/
Contrast/Saturation/Sharpness”
of the image
Lokale Aktualisierung
Aktualisierung über Software-
Datei
To adjust Red/Blue/Green gain
Wiederherstellung der Fabrik Zurücksetzen
Alle Einstellungen auf die
Werkseinstellungen zurücksetzen
DE
50
5.Andere Einstellungen
Andere Einstellungen Menü enthalten Funktion
Boot-Quelle-Option HDMI1/HDMI2/AV/OFF
Standardsignalquelle für
Einschalten
Einschaltoption Direkt/Bereitschaftsdienst Wählen Sie den Einschaltmodus
Spracheinstellung
Englisch, Französisch, Deutsch,
Italienisch, Spanisch, Japanisch.20
verschiedene Sprachen
Wählen Sie eine Sprache
Geplante Abschaltung
Aus/10min/20min/30min/60min/
120min
Einstellung der Ruhezeit des
Projektors

DE
51
6.Über (Systeminformationen)
FAQ und Kontakt
Fragen Lösungen
Kann kein Video in der App Netix, Hulu abspielen
Diese APPs sind durch HDCP eingeschränkt. Dieses Modell
unterstützt diese Funktion nicht. Daher kann es diese APPs nicht
unterstützen.
Anzeigelampe ist aus, wenn der Stecker in die Steckdose
gesteckt wird
1)Das Netzkabel ist nicht richtig angeschlossen.
Die Netztaste auf der Rückseite des Projektors ist ausgeschaltet.
Drücken Sie die Einschalttaste auf der Fernbedienung und der
Projektor lässt sich nicht einschalten
1) Die Batterien der Fernbedienung sind verbraucht.
2) Etwas behindert das Signal zwischen der Fernbedienung und
dem IR.
3) Starkes Licht direkt auf den IR-Empfänger.
DE
52
Contact us:
Fragen Lösungen
Bild rechts, kein Ton
1) Sind die Eingangskabel richtig angeschlossen?
2) Lautstärke auf Minimum oder auf Stumm?
3) Schalten Sie die Dolby-Funktion der Eingangsgeräte aus.
Es schaltet sich automatisch aus, nachdem es eine Zeit lang
eingeschaltet war.
1) Gibt es eine Barriere um die Lüftung?
2) Niedrige Spannung oder starke Spannungsschwankungen.
3) Überprüfen Sie das Überhitzungsschutzsystem.
Geräte können nicht gefunden werden, wenn sie mit einer
Festplatte oder einem Flash-Laufwerk verbunden sind?
1) Stecken Sie das Gerät wieder ein.
2) Prüfen Sie, ob das Gerät defekt ist.
Filme können nicht abgespielt werden
1) Ist das Format des Videos richtig?
2) Sind die Dateien defekt?
3) Ist das Gerät defekt?
Nicht kompatibel mit Ihrem Bluetooth Lautsprecher?
1)Der Projektor ist möglicherweise nicht mit einigen Bluetooth-
Lautsprecherversionen von JBL kompatibel.
2)Kontaktieren Sie sofort unseren Kundendienst
support01@
wimius.com
und teilen Sie uns die Version Ihres Bluetooth-
Lautsprechers mit.
Schwarzer Fleck auf dem Bild Kontaktieren Sie den Verkäufer für ein Video, um sie zu entfernen.
Email:
Website: www.wimius.com
FR
53
Catalogue
Avertissements et Précautions De Sécurité
Accessoires
Structure du Projecteurs et Installation
Télécommande et Caractéristiques
Tableau des Tailles de Projection
Instructions d'Opération
Connexion Avec Smartphones et iPad
Connexion Avec Haut-Parleur Bluetooth
Autres Connexions
Fonction du Menu Principal
FAQ Et Contacts
54
55
57
60
6 1
62
66
68
69
72
77

FR
54
Merci d'avoir acheté notre vidéoprojecteur WiMiUS P62.
Veuillez lire attentivement ce manuel avant d'utiliser le projecteur.
Si vous avez des questions sur le projecteur, veuillez nous contacter à
Nous espérons sincèrement que ce vidéoprojecteur pourra rendre votre vie plus colorée.
Très haute luminosité de la lampe! S'il vous plaît ne regardez pas directement dans la lampe.
1. Nettoyage
Lorsque vous nettoyez le vidéo projecteur, s'il vous plaît retirer le câble de charge. Utiliser un tissu mouillé pour
nettoyer, n'utiliser pas de détergent ou tout autre substances corrosives, car il y a un risque d'endommager le
système.
2. Accessoires
Veillez à toujours utiliser nos accessoires fournies avec le projecteur (cables et autres). Ou il y a des risques pour le
projecteur.
3. Environnement recommandé
Ne placer pas le projecteur dans un environnement humide comme un sous-sol ou proche d'une piscine, etc.
4. La ventilation
La ventilation équipée sur le projecteur permet de le faire fonctionner de manière
Avertissements
Précautions de sécurité

FR
55
• Projecteur x 1
• Télécommande x 1
• Câble d'alimentation x 1
• Câble AV x 1
• Câble HDMI x 1
Accessoires
• Couvercle d'objectif x 1
• Trousse de nettoyage x 1
• Mode d’emploi x 1
• Étui du projecteur x 1
stable. Ne rien mettre devant les sorties d'aération. Sinon cela provoquera la surchauffe du projecteur.
5. La batterie
S'il vous plaît assurer vous que la batterie est bien sur secteur an que tout fonctionne.
6. Orage
Par temps orageux, lorsqu'il y a du tonnerre, s'il vous plaît débrancher le câble d'alimentation du projecteur.
7. Réparation
À cause de la haute tension intérieure, vous êtes prié de ne pas ouvrir ou essayer de réparer le projecteur par vous-
même. S'il vous plaît demander à un professionnel, à technicien de réparer le projecteur.
8. Garder loin des appareil à haute température
S'il vous plaît assurer vous que le projecteur est loin de toute chaleur qui peut l'abîmer.

FR
56
Projecteur x 1
Télécommande x 1
Câble
d'alimentation x 1 Câble AV x 1 Câble HDMI x 1
Couvercle
d'objectif x 1
Trousse
de nettoyage x 1 Mode d’emploi x 1 Étui du projecteur x 1
FR
57
Structure du Projecteur
Le projecteur peut entrer un signal vidéo haute dénition et un signal vidéo composite, et prendre en charge l'entrée
et la sortie du signal audio stéréo. Veuillez vous référer à la gure suivante pour connecter le projecteur et d'autres
équipements audio en fonction de vos propres besoins.
4. Sortie d'air
5. 6.Alimentation Sortie d'air
1. 2.
3.
Obejectif Récepteur IR
Fenêtre de signal de
mise au point Auto
7.
8.
9.
10.
1 1.
12.
13.
Haut-parleur (gauche)
Ports USB
Ports HDMI
Port AV
Sortie audio 3.5 mm
Récepteur IR
Haut-parleur (droit)

FR
58
1.
2.
3.
4.
5.
6.
7.
8.
9.
10.
1 1.
Source de signal
Haut
Retour
Gauche
Droit
Bouton d'alimentation
Bas
OK
Réglage du support de niveau (pour
régler l'angle de projection)
Trous de montage du projecteur
(M5*12mm)
Boîtier inférieur (ouvert pour nettoyer
l'écran interne)
Remarque:
Pour le montage au plafond, veuillez retirer lentement les 4 caoutchoucs noirs, puis vous pouvez trouver
les trous pour le montage au plafond. La taille de la vis est M5 * 12 mm.
Installation

FR
59
Comment nettoyer les points noirs?
Ouvrez la rotation du couvercle de la bouche de dépoussiérage avec un tournevis
Méthode 1 Méthode 2
Utilisez le vent froid pour soufer la bouche de
dépoussiérage.
Efforcez-vous de rabattre le corps du projecteur.

FR
60
1.
10.
12.
13.
14.
1 1.
2.
3.
4.
5.
7.
8.
9.
6.
Télécommande
1.Indicateur de signal
2.Alimentation
3.Source de signal
4.Touches échées
5.Menu
6.Mise au point et Correction trapézoïdale Auto
7.Volume +
8.Volume -
9.Muet
10. Page d'accueil
11. OK
12. Retour
13. Mise au point manuelle +
14. Mise au point manuelle -
Remarque:
Les piles ne sont pas fournies dans l'emballage, vous devez acheter vous-même deux piles AAA
supplémentaires. Pour éviter la corrosion par fuite de batterie, veuillez retirer les piles si vous ne les utilisez pas
pendant une longue période.

FR
61
Caractéristiques
Modèle.: P62
Système d'imagerie
LCD
Puissance
AC100-240V/50-60Hz
Source de lumière
LED
Dimension
25.7*20*10.3CM
Couleur
16.8M Full Color
Résolution
Full HD 1920*1080P Natif
Distance de Projection
1.5-7m
Interface d'entrée
HDMI*2/VGA/AV/ USB*2
Taille de Projection
50-300”
Fonction Zoom
100%-50%
Ratio d'Aspect
16:9 /4:3/ Auto
Interface de Sortie
SORTIE AUDIO
CorrectionTrapézoïdale
Auto
Mise au Point
Auto
Tableau des Tailles de Projection
Distance Taille de l'écran Distance Taille de l'écran
1.5m 35’’ 3.9m 120’’
1.7m 50’’ 5.5m 180’’
2.4m 72’’ 7.0m 300’’
3.3m 100’’
Veuillez vous référer au tableau suivant pour régler la
taille et la distance de votre image.
Distance de projection optimale : 3m
Veuillez allouer ± 3% aux tailles d'image dans le tableau
ci-dessus. Si la distance est inférieure aux données
minimales et supérieure aux données maximales,
l'image peut être oue.

FR
62
Instructions d'Opération
1.Démarrer
2.Mise Au Point Et Correction Trapézoïdale Automatique
• Pour obtenir un meilleur visionnage, veuillez utiliser ce projecteur tout en tirant le rideau ou dans une pièce sombre.
• Veuillez utiliser le projecteur avec précaution, une chute ou un choc peut endommager des pièces ou entraîner
des images oues et un afchage anormal.
• Retirez le capuchon de l'objectif, connectez le projecteur à l'alimentation via le câble d'alimentation, il commence à
fonctionner.
• Ensuite, l'écran de démarrage apparaît, comme sur l'image.
(1)Mise Au Point Et Correction Trapézoïdale Automatique
Veuillez d'abord placer le projecteur horizontalement face au mur, allumez-le, puis il fera automatiquement la
mise au point de l'image en fonction de la distance de projection de l'écran et ajustera l'image à un rectangle. Ou
FR
63
appuyez directement sur le bouton " " de Mise au point automatique et correction trapézoïdale.
Si l'image est oue, appuyez sur le bouton de mise au point ''F+'' ''F-'' de la télécommande pour régler la mise au
point de l'objectif, appuyez ou appuyez longuement sur le bouton de réglage jusqu'à ce que l'image soit claire.
(2)Comment Utiliser les Paramètres de Projection
Sélectionnez l'icône des paramètres dans le coin supérieur droit de l'interface principale, puis appuyez sur la
touche "OK" de la télécommande pour accéder à l'interface des paramètres et sélectionnez "Projection Image
Setting". Après être entré dans l'interface, sélectionnez le mode souhaité dans les paramètres de projection, puis
ajustez la distorsion trapézoïdale comme vous le souhaitez.
• Correction Trapézoïdale Manuelle
Après être entré dans
"Correction trapézoïdale manuelle"
, vous pouvez dénir
"Keystone à 4-points"
selon vos
besoins:
valeur horizontale ±96, valeur verticale de ±54
Cliquez simplement sur le bouton "OK" pour sélectionner le point que vous souhaitez régler en premier, puis appuyez
sur le bouton "
▶
" ou "
▼
" pour dénir la valeur nécessaire comme indiqué ci-dessous.

FR
64
• Zoom Digital
Avec la valeur de zoom à 100%-50%, cliquez simplement sur le bouton "OK", puis appuyez sur le bouton "
▲
" ou "
▼
"
pour dénir la valeur nécessaire comme indiqué ci-dessous. (Remarque: la valeur de zoom sera affectée par la
valeur de la correction trapézoïdale à quatre points)
• Paramètres de Correction
Réinitialisation de la correction trapézoïdale:
appuyez sur ''OK '', l'image restaurera les paramètres de correction
trapézoïdale d'origine.

FR
65
3.Connectez les dispositifs d'entrée, puis choisissez le bouton de source de signal
pour choisir la source de signal correspondante (HDMI1, HDMI2, AV, etc.)
Pour les appareils USB, pas besoin de choisir la source du signal. La machine les détectera
automatiquement.
Utilisez simplement la télécommande: appuyez sur " " puis appuyez sur "
▶ ▶
" ou "
▲ ▼
" pour choisir le canal
d'entrée de signal correspondant, puis appuyez sur «OK» pour conrmer.
FR
66
Connexion avec Smartphones et iPad
Comment utiliser les paramètres Wi-Fi
Pour le Système iOS
Remarque:
Ce projecteur ne prend en charge que la connexion sans l, la connexion laire n'est pas
possible.
P.S: La uidité de la mise en miroir d'écran avec une connexion sans l sera affectée par l'environnement
réseau. Une bande passante de 100 Mbit ou plus est recommandée lors de l'utilisation de la duplication
d'écran. Assurez-vous que votre appareil mobile est proche du projecteur lorsque vous utilisez une
connexion sans l. Une distance inférieure à 1 mètre est recommandée.
Sélectionnez l'icône des paramètres dans le coin supérieur droit de l'interface principale, puis appuyez sur la touche
"OK" de la télécommande pour accéder à l'interface des paramètres et sélectionnez"Paramètre Wi-Fi".
Réglage avec Wi-Fi domestique
Attention:
Votre appareil et le projecteur doivent être dans le même WiFi domestique.
1.Activez le réglage WiFi du projecteur.
2. Choisissez votre Wi-Fi domestique pour vous connecter et entrez le bon mot de passe, puis cliquez sur "Terminé"
pour vous connecter, veuillez patienter 3 à 5 secondes pour établir la connexion. Une fois connecté, il se souviendra
du mot de passe du WiFi connecté.
3. Activez le paramètre Wi-Fi de votre appareil iOS, puis connectez-le au même Wi-Fi domestique que le projecteur
4.Ensuite, cliquez sur "IOS Cast" comme source d'entrée de votre projecteur.
FR
67
Pour le Système Android
Pour activer cette fonction, votre appareil Android doit prendre en charge l'afchage multi-écran/sans l. Le nom
de "Multi-Screen" peut varier selon les différentes marques d'appareils Android.
1.Allumez le projecteur, sélectionnez “Miracast” comme
source d'entrée.
2.Allumez le "Multi-Screen/Wireless Display" de votre appareil
Android.
3.Sélectionnez "WiMiUS-P62Projector" dans les résultats de la
recherche pour vous connecter.
4.Réussir.
Méthode 1: Conguration avec Internet mobile
5.Balayez vers le haut l'écran de votre appareil mobile iOS et appuyez sur "Airplay" pour rechercher le projecteur,
puis sélectionnez "WiMiUS-P62Projector" dans les résultats de la recherche pour vous connecter.
6.Réussir.

FR
68
Connexion avec le haut-parleur Bluetooth
1. Allumez votre haut-parleur Bluetooth.
2.Activez le paramètre Bluetooth de votre projecteur.
3. Sélectionnez votre haut-parleur Bluetooth pour vous connecter.
4.Réussir.
Compatible avec les haut-parleurs Bluetooth, les écouteurs Bluetooth, les Airpods.
Remarque: Le projecteur ne prend pas en charge certains types de haut-parleur bluetooth.

FR
69
Autres connexions
Formats de lecture multimédia pris en charge
• Connectez le projecteur au PC via un câble HDMI.
• Choisissez le canal du signal multimédia: "HDMI"
Pour les dispositifs USB, pas besoin de choisir la source du signal. La machine les détectera automatiquement.
• Sélectionnez la catégorie requise «lm», «musique», «photo» ou «Suite Ofce» dans l'interface principale, puis
appuyez sur la touche «OK» de la télécommande pour entrer dans la catégorie correspondante.
• Selon les programmes au choix : « photos » « musique » « lm » ou « Suite Ofce ».
• Choisissez le chier que vous souhaitez lire, appuyez sur la touche "OK" pour lire ou mettre en pause le chier. (Vous
ne pouvez pas accéder à la catégorie requise sans connecter un disque USB.)
• Remarque:
Pour l'option "Suite Ofce", vous pouvez lire des chiers PPT.
1.Connexion avec PC
2.Connexion multimédia USB
Format d'image
JPG、PNG、BMP、JPEG
Format Audio
MP3、AAC、WAV、WMA、M4A、OGG、FLAC
Format Vidéo
MP4、MKV、WMV、3GP、MPG、TP、TS、F4V、DAT、FLV、TRP
Format de chier
TXT、EXCEL、WORD、PPTX
FR
70
• Choisissez le canal du signal multimédia: "HDMI"
• Utilisez un adaptateur Type-C vers HDMI pour connecter votre MacBook ou un adaptateur Mini Display vers HDMI
pour vous connecter à votre MacBook Air (adaptateur non inclus).
• Utilisez le câble aux 3,5mm pour connecter la barre de son.
• Allumez le projecteur et la barre de son.
• Plus de détails, veuillez contacter le vendeur à
.
• Utilisez le câble AV 3 en 1, connectez les connecteurs femelles colorés au câble RCA de votre lecteur DVD.
• Connectez le connecteur noir au port AV du projecteur, accédez à la page d'accueil pour sélectionner [ AV ]
comme source de signal.
3.Connexion avec MacBook ou Mac Book Air
4.Connectez avec la barre de son
5.Connectez avec DVD

FR
71
• Branchez la TV Stick dans le port HDMI du projecteur.
• Choisissez le canal du signal multimédia: "HDMI"
• P.S :
Il ne prend en charge que la TV Stick 1080P, pas la TV Stick 4K.
• Choisissez le canal du signal multimédia: "HDMI"
• Utilisez un câble HDMI pour vous connecter à XBOX/PS4
6.Connexion avec Fire TV Stick
7.Connexion avec XBOX/PS4
FR
72
Fonction du Menu Principal
1.Mode de L’ Image
Ce n'est que lorsque vous lisez la vidéo que vous pouvez dénir le "Mode Image".
Appuyez sur " " puis sélectionnez le réglage sur la télécommande pour effectuer des réglages personnels.
Menu Menu inclus Fonction
Mode image
Utilisateur/Standard/Vif/Sport/
Film/Jeu/Économie d'énergie
Pour régler la "Luminosité/
Contraste/Saturation/Netteté" de
l'image
Température de couleur Utilisateur/Froid/Standard/Chaud
Pour régler le gain Rouge/Bleu/
Vert
Mode d'afchage 16:9/4:3/Auto/Full Pour régler le format d'image
Remarque:
Si l'icône du menu est
grise, cela signie que cette option
n'est pas réglable.

FR
73
2.Mode du Son
Ce n'est que lorsque vous lisez la vidéo que vous pouvez dénir le "Mode Son".
Mode du Son Menu inclus Fonction
Mode du Son
Utilisateur/Standard/Vif/Sport/
Film/Musique/Actualités
Ajuster le mode de son
Détail de l'égaliseur 120/500/1.5K/5K/10K Hz Ajuster le ton
FR
74
3.Réglage De l'Image de Projection
Projection Menu inclus Fonction
Mode de Projection
Bureau avant / Bureau arrière /
Plafond avant / Plafond arrière
Choisissez les méthodes de
projection, retournez l'image
Keystone Manuelle
Correction trapézoïdale à
4-points
Ajustez 4 coins de l'image de
projection
Zoom Digital Réduire l'afchage de 100% à 50% Réduire la taille de l'image
Paramètres de Correction
Réinitialisation de correction
trapézoïdale
Correction trapézoïdale Auto
Allumer la correction trapézoïdale
Auto
On/off
Allumer la mise au point Auto On/off

FR
75
4.Mise à jour du système
Mise à jour du système Menu inclus Fonction
Mise à jour en ligne Mise à jour en ligne Mettre à jour le système en ligne
Mise à jour locale Mise à jour via le chier logiciel Mettre à jour hors ligne
Restaurer l'usine Réinitialiser
Restaurer tous les paramètres à
leurs paramètres d'usine
FR
76
5.Autre Réglage
Autre Réglage Menu inclus Fonction
Option de source de démarrage HDMI1/HDMI2/AV/OFF
Source de signal par défaut de la
mise sous tension
Option de mise sous tension Direct/Veille
Choisissez le mode de mise sous
tension
Paramètres de langue
Anglais, français, allemand, italien,
espagnol, japonais.20 plusieurs
langues
Choisissez une langue
Arrêt programmé
OFF/10min/20min/30min/60min/
120min
Réglez le temps de veille du
projecteurr

FR
77
6.À propos (Information système)
FAQ Et Contacts
Questions Solutions
Vous ne pouvez pas lire des vidéos depuis des App Netix, Hulu,
lorsque il est connecté à un smartphone?
En raison des limites HDCP, il ne peut pas prendre en charge ces
applications via smartphone directement,vous devez connecter
un re stick.
Le voyant est éteint lorsqu'il est branché sur l'alimentation
1)Le câble d'alimentation n'est pas bien connecté.
2)Le bouton d'alimentation à l'arrière du projecteur est éteint.
Appuyez sur le bouton d'alimentation de la télécommande et le
projecteur ne s'allume pas
1) Les piles de la télécommande sont in installés ou épuisées?
2) Quelque chose obstrue le signal entre la télécommande et IR.
3) Lumière forte sur IR directement.
FR
78
Contactez-nous immédiatement:
Questions Solutions
Image correcte, mais pas de son?
1) Les câbles d'entrée sont-ils bien connectés?
2) Volume au minimum ou en muet.
3) Désactivez le dolby des dispositifs d'entrée.
Il s'éteint automatiquement après avoir été allumé pendant un
moment.
1) Y a-t-il une barrière autour de la ventilation?
2) Basse tension ou grandes uctuations de tension.
3) vériez si vous réglez le temps de sommeil pour le projecteur?
Si non, veuillez le restaurer le réglage d'usine et recommencer.
Impossible de trouver des appareils lorsqu'il est connecté avec
un disque dur ou un lecteur ash?
1) Rebranchez l'appareil.
2) Vériez si l'appareil est cassé.
Impossible de lire le lm?
1) Le format de la vidéo est-il correct?
2) Les chiers sont cassés?
3) L'appareil est en panne?
Non compatible avec votre enceinte Bluetooth ?
1)Le projecteur peut ne pas être compatible avec certaines
versions de haut-parleur Bluetooth de JBL.
2)Contactez immédiatement notre service après-vente
et indiquez-nous la version de votre
enceinte bluetooth.
Point noir sur l’image
Contactez le vendeur au
pour une
vidéo pour les effacer.
Email:
Website: www.wimius.com
IT
79
Sommario
Misure di Sicurezza
Accessori
Panoramica del Prodotto
Telecomando e spec
Tabella Delle Dimensioni di Proiezione
Istruzioni per l'uso
Connessione con Smartphone e iPad
Collegamento con Altoparlante Bluetooth
Altre Connessioni
Funzione del Menu Principale
Domande Frequenti e Contatti
80
8 1
83
86
87
88
92
94
95
98
103

IT
80
Grazie per aver acquistato il videoproiettore WiMiUS P62. Si prega di leggere attentamente questo manuale prima di
utilizzare il proiettore.
In caso di domande sul proiettore, contattaci all'indirizzo
Speriamo sinceramente che questo proiettore possa rendere la tua vita più colorata.
Lampada ad alta luminosità! Non guardare direttamente nell'obiettivo quando il proiettore è acceso.
1. Pulisci
Quando si pulisce questo proiettore, estrarre il cavo di alimentazione. Utilizzare un panno umido per pulire, non
utilizzare alcun detersivo potrebbe danneggiare l'unità.
2. Accessorio
Si prega di utilizzare il nostro accessorio consigliato. Oppure danneggerà il proiettore.
3. Ambiente corretto
Non posizionare il proiettore in un ambiente umido, come scantinati umidi o vicino alla piscina, ecc.
4. Ventilazione
La ventilazione è predisposta per il funzionamento stabile del proiettore. Non mettere nulla intorno alle prese d'aria.
O causerà il proiettore in fase di riscaldamento. Per garantire la stabilità della dissipazione del calore, aprire la staffa
di altezza nella parte inferiore del proiettore prima di iniziare
Avvertenze
Misure di Sicurezza

IT
81
• Proiettore x 1
• Custodia per proiettore x 1
• Telecomando x 1
• Cavo di alimentazione x 1
• Cavo AV x 1
Accessori
• Cavo HDMI x 1
• Copriobiettivo x 1
• Kit di pulizia x 1
• Manuale dell'utente x 1
5. Potenza
Assicurati che la potenza rientri nella gamma di potenza richiesta.
6. Tuono
Per il giorno del tuono, scollegare il cavo di alimentazione dal proiettore.
7. Riparazione
A causa dell'alta tensione all'interno, non aprire o tentare di riparare il proiettore da soli. Si prega di chiedere a un
professionista tecnico per riparare il proiettore.
8. Tenere lontano dal dispositivo di calore
Assicurarsi che il proiettore sia lontano da qualsiasi dispositivo di riscaldamento che danneggerà il proiettore.

IT
82
Proiettore x 1
Telecomando x 1
Cavo di
alimentazione x 1 Cavo AV x 1 Cavo HDMI x 1
Copriobiettivo x 1 Kit di pulizia x 1 Manuale dell'utente x 1 Borsa per proiettore x 1

IT
83
Panoramica del Prodotto
Il proiettore può immettere un segnale video ad alta definizione e un segnale video composito e supportare
l'ingresso del segnale audio stereo e uscita. Fare riferimento alla gura seguente per collegare il proiettore e altre
apparecchiature audio in base a le tue stesse esigenze.
4. Uscita dell'aria
5. 6.Presa di
corrente
Presa d'aria
1. 2.
3.
Obiettivo di
messa a fuoco
Ricevitore IR
Finestra del segnale di
messa a fuoco automatica
7.
8.
9.
10.
1 1.
12.
13.
Altoparlante (a sinistra)
Porta USB 1&2
Porta HDMI 1&2
Porta AV
Uscita audio da 3.5 mm
Ricevitore IR
Altoparlante (a destra)

IT
84
1.
2.
3.
4.
5.
6.
7.
8.
9.
10.
1 1.
Sorgente del segnale
Su
Ritorno
Rimanenti
Giusto
Pulsante di accensione
Giù
OK
Regolazione del supporto livellato (per
regolare l'angolo di proiezione)
Fondello (aperto per pulire lo schermo
interno)
Fori di montaggio del proiettore (M5 * 12
mm)
Nota:
per il montaggio a softto, rimuovere lentamente le 4 gomme nere, quindi puoi trovare i fori per il montaggio
a softto. La dimensione della vite è M5 * 12 mm.

IT
85
Come pulire i punti neri?
Aprire la rata della copertura della bocca di spolvero con un cacciavite.
Metodo 1 Metodo 2
Usa il vento freddo per sofare la bocca spolverata.Sforzati di sbattere il corpo del proiettore.

IT
86
1.
10.
12.
13.
14.
1 1.
2.
3.
4.
5.
7.
8.
9.
6.
Telecomando
1. Spia di segnalazione
2. Potenza
3. Sorgente del segnale
4. Tasti freccia
5.Menu
6. Messa a fuoco automatica e correzione
trapezoidale
7.Volume +
8.Volume -
9.Muto
10. Pagina iniziale
11. Conferma chiave
12. Chiave di ritorno
13. Messa a fuoco manuale +
14. Messa a fuoco manuale -
Nota:
le batterie non sono fornite nella confezione, è necessario acquistare da soli due batterie AAA aggiuntive.
Per evitare la corrosione delle perdite della batteria, rimuovere le batterie se non le si usa per molto tempo.
IT
87
Speciche
Model No.: P62
Sistema di imaging
LCD
Potenza
AC100-240V/50-60Hz
Fonte di luce
LED
Dimensione
25.7*20*10.3CM
Colore
16.8M Full Color
Risoluzione
Nativo 1920*1080 Full HD
Distanza di Proiezione
1.5-7m
Interfaccia di Iingresso
HDMI*2/VGA/AV/ USB*2
Dimensioni di Proiezione
50-300”
Funzione Zoom
100%-50%
Proporzioni
16:9 /4:3/ Auto
Interfaccia di Uscita
AUDIO OUT
Correzione Trapezoidale
Auto
Messa a Fuoco
Auto
Tabella delle dimensioni di proiezione
Distanza
Dimensione
dello Schermo
Distance
Dimensione
dello Schermo
1.5m 35’’ 3.9m 120’’
1.7m 50’’ 5.5m 180’’
2.4m 72’’ 7.0m 300’’
3.3m 100’’
Fare riferimento alla tabella seguente per regolare le
dimensioni e la distanza dell'immagine.
Distanza di proiezione ottimale: 3 m
Si prega di consentire ± 3% alle dimensioni
dell'immagine nella tabella sopra. Se la distanza è
inferiore a dati minimi e dati superiori a quelli massimi,
l'immagine potrebbe essere sfocata.

IT
88
Istruzioni per l'uso
1.Per iniziare
2. Messa a fuoco e correzione trapezoidale automatica
• Per ottenere una visione migliore, utilizzare questo proiettore mentre si tende la tenda o in una stanza buia.
• Si prega di utilizzare il proiettore con attenzione, la caduta o l'urto potrebbe danneggiare le parti o causare
immagini sfocate e una visualizzazione anormale.
• Rimuovere il copriobiettivo, collegare il proiettore all'alimentazione tramite il cavo di alimentazione, inizia a
funzionare.
• Quindi viene visualizzata la schermata di avvio, come nell'immagine.
(1) Messa a fuoco automatica e correzione trapezoidale.
Posizionare prima il proiettore orizzontalmente di fronte al muro, accenderlo e quindi mettere a fuoco
automaticamente l'immagine in base sulla distanza di proiezione dallo schermo e regolare l'immagine su un

IT
89
rettangolo. Oppure premere " "Messa a fuoco automatica e chiave di correzione trapezoidale direttamente.
Se l'immagine è sfocata, premere il pulsante di messa a fuoco ''F+'' ''F-'' sul telecomando per regolare la messa a
fuoco dell'obiettivo, toccare o premere a lungo premere il pulsante di regolazione nché l'immagine non è nitida.
(2) Come utilizzare le impostazioni di proiezione
Seleziona l'icona delle impostazioni nell'angolo in alto a destra dell'interfaccia principale, quindi premere il tasto
"OK" sul telecomando per accedere all'interfaccia delle impostazioni e selezionare "Impostazione immagine di
proiezione". Dopo essere entrati nell'interfaccia, selezionare il modalità desiderata nelle impostazioni di proiezione,
quindi regolare la distorsione trapezoidale come desiderato.
• Trapezio manuale
Dopo essere entrati in "Trapezio manuale", puoi impostare "Trapezio a 4 punti" in base alle tue esigenze: valore
orizzontale ±96, valore verticale da ±54
Basta fare clic sul pulsante "OK" per selezionare il punto che si desidera regolare all'inizio, quindi premere il pulsante
"
▶
" "
▼
" per impostare il valore necessario come mostrato di seguito.

IT
90
• Zoom digitale
Con il valore dello zoom al 100%-50%, basta fare clic sul pulsante "OK" per entrare, quindi premere il pulsante"
▲
" "
▼
" per impostare il valore necessario come mostrato di seguito. (Nota: il valore dello zoom sarà inuenzato dal valore
della correzione trapezoidale a quattro punti)
• Impostazione della correzione
Ripristino correzione trapezoidale: premere "OK", l'immagine verrà ripristinata alle impostazioni di correzione
trapezoidale originali.

IT
91
3.Collegare i dispositivi di input e quindi scegliere il pulsante della sorgente del
segnale da scegliere sorgente del segnale corrispondente (HDMI1, HDMI2, AV, ecc.)
Per i dispositivi USB, non è necessario scegliere la sorgente del segnale. La macchina li rileverà
automaticamente.
Basta operare tramite il telecomando: premere " " e quindi premere "
▶ ▶
" "
▲ ▼
" per scegliere il corrispondente
canale di ingresso del segnale, quindi premere "OK'' per confermare.
IT
92
Connessione con Smartphone e iPad
Come utilizzare le impostazioni Wi-Fi
Per il sistema IOS
Nota:
Questo proiettore supporta solo la connessione wireless, la connessione cablata non è possibile.
PS: la uidità del mirroring dello schermo con la connessione wireless sarà inuenzata dall'ambiente
di rete. UN si consiglia una larghezza di banda di 100 Mbit o più quando si utilizza il mirroring dello
schermo. Assicurati che il tuo dispositivo mobile lo sia chiuso al proiettore quando si utilizza la
connessione wireless. Si consiglia una distanza entro 1 metro.
Selezionare l'icona delle impostazioni nell'angolo in alto a destra dell'interfaccia principale, quindi premere il tasto
"OK" sul telecomando controllo per accedere all'interfaccia delle impostazioni e selezionare "Impostazioni WiFi".
Impostazione con Wi-Fi domestico
Attenzione:
il dispositivo e il proiettore devono trovarsi nella stessa rete Wi-Fi domestica.
1.Attivare l'impostazione Wi-Fi del proiettore.
2.Scegli il tuo Wi-Fi di casa per connetterti e inserisci la password corretta, quindi fai clic su "Fatto" per Connetti,
attendi 3-5 secondi per stabilire la connessione. Una volta connesso, ricorderà la password del WiFi connesso.
3.Attiva l'impostazione Wi-Fi del tuo dispositivo iOS, quindi collegalo allo stesso Wi-Fi domestico del proiettore.
4. Quindi fare clic su "iOS Cast" come sorgente di ingresso del proiettore.
5.Scorri verso l'alto lo schermo del tuo dispositivo mobile iOS e tocca "Airplay" per cercare il proiettore, quindi
seleziona "WiMiUS P62Projector" dai risultati della ricerca per connetterti.
6. Riuscire.
IT
93
Per sistema Android
Per attivare questa funzione, il tuo dispositivo Android deve supportare Multi-Screen/Wireless Display. Nome di
"Multischermo" può variare a seconda delle varie marche di dispositivi Android.
1.Accendi il proiettore, seleziona “Miracast” come
sorgente di ingresso.
2.Accendi il "Display multischermo/Wireless" del tuo dispositivo
Android.
3.Selezionare "WiMiUS-P62Projector" dai risultati della ricerca per
connettersi.
4. Riuscire.
Metodo 1: impostazione con Internet mobile
IT
94
Collegamento con altoparlante Bluetooth
1.Accendi l'altoparlante Bluetooth.
2.Attivare l'impostazione Bluetooth del proiettore.
3.Seleziona il tuo altoparlante Bluetooth da connettere.
4.Successo.
Compatibile con altoparlanti Bluetooth, cufe Bluetooth, iPhone Airpods, auricolari Bluetooth, auricolari Bluetooth.

IT
95
Altre connessioni
Formati di riproduzione multimediali supportati
• Collegare il proiettore al PC tramite cavo HDMI.
• Scegli il canale del segnale multimediale: “HDMI”
Per i dispositivi USB, non è necessario scegliere la sorgente del segnale. La macchina li rileverà automaticamente.
• Selezionare la categoria richiesta “lm”, “musica”, “foto” o “Ofce Suite” nell'interfaccia principale e premere il tasto “OK”
su telecomando per entrare nella categoria corrispondente.
• A seconda dei programmi da scegliere: “foto” “musica” “lm” o “Ofce Suite”.
• Scegliere il le che si desidera riprodurre, premere il tasto “OK” per riprodurre o mettere in pausa il le. (Non è
possibile inserire il richiesto categoria senza collegare un disco USB.)
• Nota:
per l'opzione "Ofce Suite", è possibile riprodurre le PPT dimostrativi.
1.Collegamento con il PC
2.Collegamento multimediale USB
Formato immagine
JPG、PNG、BMP、JPEG
Formato audio
MP3、AAC、WAV、WMA、M4A、OGG、FLAC
Formato video
MP4、MKV、WMV、3GP、MPG、TP、TS、F4V、DAT、FLV、TRP
Formato del le
TXT、EXCEL、WORD、PPTX

IT
96
• Scegli il canale del segnale multimediale: “HDMI”
• Usa un adattatore da Tipo C a HDMI per collegare il tuo MacBook, o un adattatore da Mini Display a HDMI per
connetterti con il tuo MacBook Air (adattatore non incluso).
• Utilizzare il cavo audio da 3,5 mm in dotazione con il proiettore per collegare la soundbar.
• Accendere il proiettore e la soundbar, selezionare [ AV ] come sorgente del segnale
• Maggiori dettagli, si prega di contattare il venditore all'indirizzo
.
• Utilizzare il cavo AV 3 in 1, collegare i connettori femmina colorati al cavo RCA del lettore DVD.
• Collegare il connettore nero alla porta AV del proiettore, accedere alla home page per selezionare [ AV ] come
segnale fonte.
3.Collegamento con MacBook o Mac Book Air
4.Connessione con la soundbar
5.Collegamento con DVD

IT
97
• Collegare la chiavetta TV alla porta HDMI del proiettore.
• Scegli il canale del segnale multimediale: “HDMI”
• PS:
supporta solo stick TV 1080P, non stick TV 4K.
• Scegli il canale del segnale multimediale: “HDMI”
• Utilizzare un cavo HDMI per collegarsi a XBOX/PS4
6.Connessione con Fire TV Stick
7.Connessione con XBOX/PS4

IT
98
Funzione del Menu Principale
1.Modalità immagine
Solo quando riproduci il video, puoi impostare la "Modalità immagine".
Premere “ ” e quindi selezionare l'impostazione sul telecomando per effettuare alcune impostazioni personali
Menù Menù incluso Funzione
Modalità immagine
Utente/Standard/Vivido/Sport/
Film/Gioco/Risparmio energetico
Per regolare la “Luminosità/
Contrasto/Saturazione/Nitidezza”
dell'immagine
Temperatura di colore Utente/Freddo/Standard/Caldo
Per regolare il guadagno rosso/
blu/verde
Modalità display 16:9/4:3/Auto/Full Per regolare le proporzioni

IT
99
2.Modalità audio
Solo quando riproduci il video, puoi impostare la "Modalità audio".
Modalità audio Menù incluso Funzione
Modalità audio
User/Standard/Vivid/Sport/
Movie/Music/News
Regola la modalità del suono
Dettaglio equalizzatore 120/500/1.5K/5K/10K Hz Regola il tono
IT
100
3.Impostazione immagine di proiezione
Proiezione Menù incluso Funzione
Modalità di proiezione
Front-Desktop / Rear-Desktop /
Front-Ceiling / Rear-Ceiling
Scegli i metodi di proiezione,
capovolgi l'immagine
Chiave di volta manuale 4-point Keystone correction
Regolare 4 connettori dell'immagine
di proiezione
Zoom digitale Reduce Display 100%-50% Riduci le dimensioni dell'immagine
Impostazione di correzione
Trapezoidal Correction Reset Correzione trapezoidale automatica
Accendere la correzione
trapezoidale automatica
On/off
Accendere la messa a fuoco
automatica
On/off

IT
101
4.Aggiornamento del sistema
Aggiornamento del sistema Menù incluso Funzione
Aggiornamento in linea Aggiornamento in linea Aggiorna il sistema in linea
Aggiornamento locale
Aggiornamento tramite le
software
Aggiorna ofine
Ripristina fabbrica Ripristina
Ripristina tutte le impostazioni alle
impostazioni di fabbrica
IT
102
5.Altre impostazioni
Altre impostazioni Menù incluso Funzione
Opzione sorgente di avvio HDMI1/HDMI2/AV/OFF
Sorgente del segnale predenita
di accensione
Opzione di accensione Diretto/In attesa Scegli la modalità di accensione
Impostazione della lingua
Inglese, francese, tedesco, italiano,
spagnolo, giapponese.20 diverse
lingue
Scegli una lingua
Spegnimento programmato
OFF/10min/20min/30min/60min/
120min
Impostare il tempo di sospensione
del proiettore

IT
103
6.Informazioni su (Informazioni di sistema)
FAQ
Domande Soluzioni
Impossibile riprodurre video nell'app Netix, Hulu
Tali APP sono limitate con HDCP. Questo modello non supporta
questa funzione. Quindi non può supportare queste APP.
La spia è spenta quando si collega alla presa di corrente
1)Il cavo di alimentazione non è collegato bene.
2)Il pulsante di alimentazione sul retro del proiettore è spento.
Premere il pulsante di alimentazione sul telecomando e il
proiettore non si accende
1)Le batterie del telecomando sono scariche.
2)Qualcosa che ostruisce il segnale tra il telecomando e l'IR.
3)Forte luce su IR direttamente.

IT
104
Contattaci:
Domande Soluzioni
Immagine a destra, nessun suono
1) Cavi di ingresso collegati giusto?
2) Volume al minimo o su Muto?
3) Spegnere il dolby dei dispositivi di input.
Si spegnerà automaticamente dopo l'accensione per un po'
1) C'è una barriera intorno alla ventilazione?
2) Fluttuazioni di bassa o grande tensione.
3) Controllare il sistema di protezione contro il surriscaldamento.
Non riesci a trovare i dispositivi quando sono collegati con un
disco rigido o un'unità ash?
1) Ricollegare il dispositivo.
2) Vericare se il dispositivo è rotto.
Impossibile riprodurre il lm?
1) Il formato del video è giusto?
2) I le sono rotti?
3) Il dispositivo è rotto?
Non è compatibile con il tuo altoparlante Bluetooth?
1) Il proiettore potrebbe non essere compatibile con alcune
versioni di altoparlanti Bluetooth di JBL.
2) Contatta immediatamente il nostro servizio post-vendita
e comunicaci la versione del tuo
altoparlante bluetooth.
Macchia nera sull'immagine Contatta il venditore per un video per rimuoverli.
Email:
Website: www.wimius.com

ES
105
Catálogo
Precauciones y Advertencias de Seguridad
Accesorios
Estructura del Proyector y Instalación
Mando a distancia y Especicaciones
Tabla de Tamaños de Proyección
Instrucciones de Operación
Conexión con Teléfonos Inteligentes y iPad
Conexión con Altavoz Bluetooth
Otras Conexiones
Función Del Menú Principal
Preguntas Frecuentes y Contactos
106
107
109
112
113
114
118
120
121
124
129

ES
106
Gracias por comprar nuestro proyector WiMiUS P62.
Lea atentamente este manual antes de utilizar el proyector.
Si tiene alguna pregunta sobre el proyector, póngase en contacto con nosotros en
Esperamos sinceramente que este proyector pueda hacer su vida más colorida.
Brillo de lámpara muy alto! Por favor, no mire directamente a la lámpara.
1. Limpieza
Cuando limpie el proyector, retire el cable de carga. Use un paño húmedo para limpiar, no use detergente ni
ninguna otra sustancia corrosiva, ya que existe el riesgo de dañar el sistema.
2. Accesorios
Asegúrese de utilizar siempre nuestros accesorios suministrados con el proyector (cables y otros). O hay riesgos
para el proyector.
3. Entorno recomendado
No coloque el proyector en un ambiente húmedo como un sótano o cerca de una piscina, etc.
4. Ventilación
La ventilación provista en el proyector le permite operar sin problemas.
rme. No coloque nada delante de las salidas de ventilación. De lo contrario, hará que el proyector se sobrecaliente.
Advertencias
Precauciones de seguridad

ES
107
• Proyector x 1
• Mando a distancia x 1
• Cable de alimentación x 1
• Cable AV x 1
• Cable HDMI x 1
Accesorios
5. Batería
Asegúrese de que la batería esté enchufada para que todo funcione.
6. Tormenta
En clima tormentoso, cuando haya truenos, desenchufe el cable de alimentación del proyector.
7. Reparación
Debido al alto voltaje en el interior, no abra ni intente reparar el proyector usted mismo. Pida a un técnico
profesional que repare el proyector.
8. Mantener alejado del dispositivo de alta temperatura
Asegúrese de que el proyector esté alejado de fuentes de calor que puedan dañarlo.
• Cubierta de lente x 1
• Equipo de limpieza x 1
• Manual de usuario x 1
• Caso del proyector x 1

ES
108
Proyector x 1
Mando a distancia x 1
Cable de
alimentación x 1 Cable AV x 1 Cable HDMI x 1
Cubierta de lente x 1 Equipo de limpieza x 1 Manual de usuario x 1 Caso del proyector x 1

ES
109
Estructura del Proyector
El proyector puede ingresar señales de video de alta denición y señales de video compuestas, y admite entrada
y salida de señales de audio estéreo. Consulte la siguiente gura para conectar el proyector y otros equipos de
audio según sus propias necesidades.
4. Salida de aire
5. 6.Alimentación Salida de aire
1. 2.
3.
Lente Receptor IR
Ventana de señal de
enfoque automático
7.
8.
9.
10.
1 1.
12.
13.
Altavoz (izquierda)
Puertos USB
Puertos HDMI
Puerto AV
Salida de audio de 3.5 mm
Receptor IR
Altavoz (derecha)
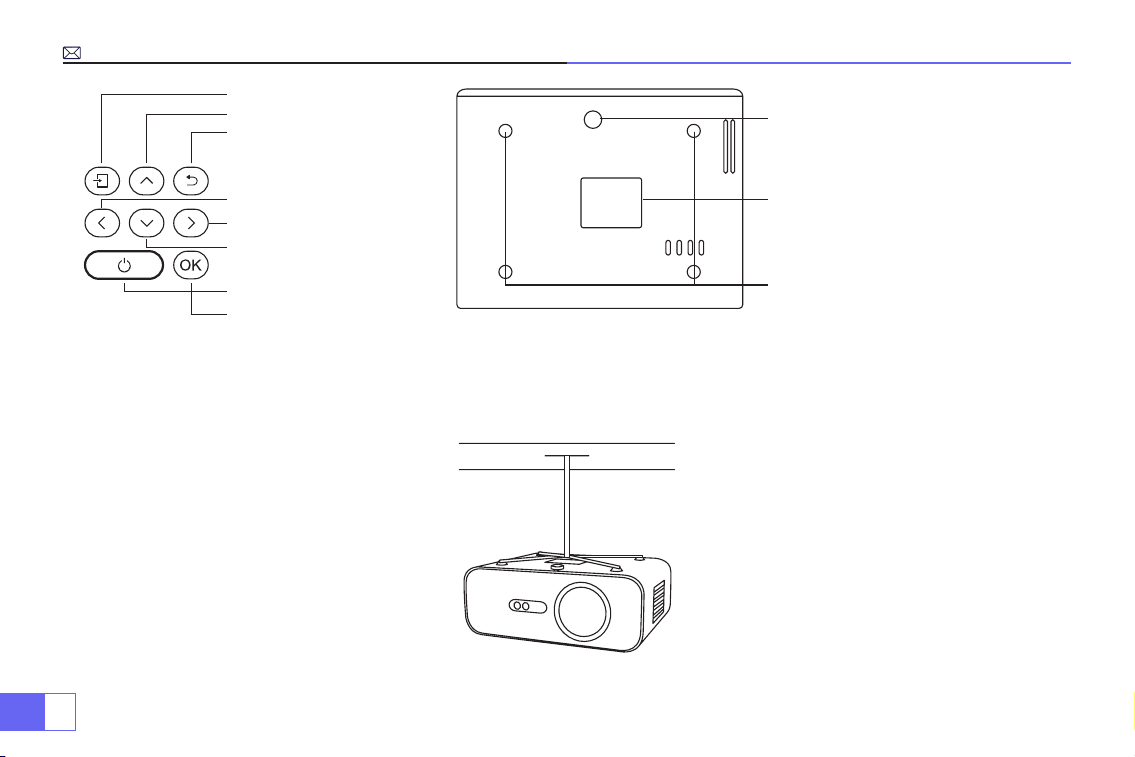
ES
110
1.
2.
3.
4.
5.
6.
7.
8.
9.
10.
1 1.
Fuente de señal
Arriba
Atrás
Izquierda
Derecha
Baja
Botón de encendido
Aceptar
Ajuste del soporte de nivel (para ajustar
el ángulo de proyección)
Agujeros de montaje del proyector
(M5*12mm)
Caja inferior (ábrala para limpiar la
pantalla interna)
Nota:
Para el montaje en el techo, retire lentamente las 4 gomas negras, luego podrá encontrar los oricios para el
montaje en el techo. El tamaño del tornillo es
M5*12mm
.
Instalación

ES
111
¿Cómo limpiar los Puntos Negros?
Abra la rotación de la cubierta de la boca de polvo con un destornillador
Método 1 Método 2
Usa el viento frío para soplar la boca de polvo.Esfuércese por aletear el cuerpo del proyector.

ES
112
1.
10.
12.
13.
14.
1 1.
2.
3.
4.
5.
7.
8.
9.
6.
Mando a distancia
1. Indicador de señal
2. Encendido
3.Fuente de señal
4. Teclas de echa
5.Menú
6. Enfoque y corrección trapezoidal automático
7. Volumen +
8. Volumen -
9. Silencio
10. Página de inicio
11. Aceptar
12.Retorno
13. Enfoque manual +
14. Enfoque manual -
Nota:
Las baterías no están incluidas en el paquete, debe comprar dos baterías AAA adicionales por su cuenta.
Para evitar la corrosión por fugas de la batería, saque las baterías si no las usa durante mucho tiempo.
ES
113
Especicaciones
Modelo.: P62
Sistema de imagen
LCD
Potencia
AC100-240V/50-60Hz
Fuente de luz
LED
Dimensión
25.7*20*10.3CM
Color
16.8M Full Color
Resolución
Full HD 1920*1080P Nativo
Distancia de Proyección
1.5-7m
Interfaz de entrada
HDMI*2/VGA/AV/ USB*2
Tamaño de Proyección
50-300”
Función Zoom
100%-50%
Aspect Ratio
16:9 /4:3/Auto
Interfaz de Salida
SALIDA DE AUDIO
Corrección Trapezoidal
Auto
Enfoque
Auto
Tabla de Tamaño de Proyección
Distancia
Tamaño de
pantalla
Distancia
Tamaño de
pantalla
1.5m 35’’ 3.9m 120’’
1.7m 50’’ 5.5m 180’’
2.4m 72’’ 7.0m 300’’
3.3m 100’’
Consulte la siguiente tabla para ajustar el tamaño y la
distancia de su imagen.
Distancia de proyección óptima: 3m
Por favor permita ±3% a los tamaños de imagen en la
tabla de arriba. Si la distancia es menor que los datos
mínimos y mayor que los datos máximos, la imagen
puede verse borrosa.
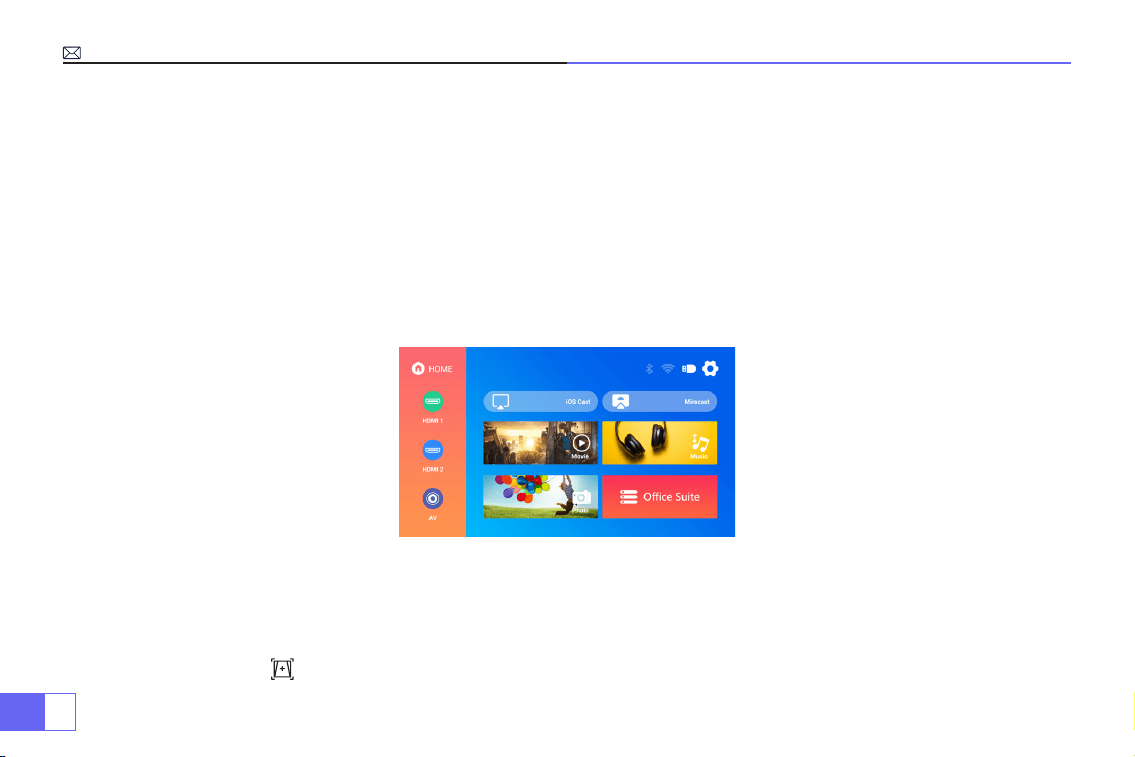
ES
114
Instrucciones de Operación
1.Inicio
2.Enfoque y Corrección Trapezoidal Automático
• Para una mejor visualización, utilice este proyector mientras corre la cortina o en una habitación oscura.
• Utilice el proyector con cuidado, las caídas o los golpes pueden dañar las piezas o causar imágenes borrosas y
una visualización anormal.
• Retire la tapa de la lente, conecte el proyector a la alimentación a través del cable de alimentación y comenzará
a funcionar.
• Luego aparece la pantalla de inicio, como muestra la imagen.
(1) Enfoque y Corrección Trapezoidal Automático
Primero coloque el proyector horizontalmente frente a la pared, enciéndalo, luego enfocará automáticamente la
imagen de acuerdo con la distancia de proyección de la pantalla y ajustará la imagen a un rectángulo. O presione
directamente el botón " " de enfoque y corrección trapezoidal automático.
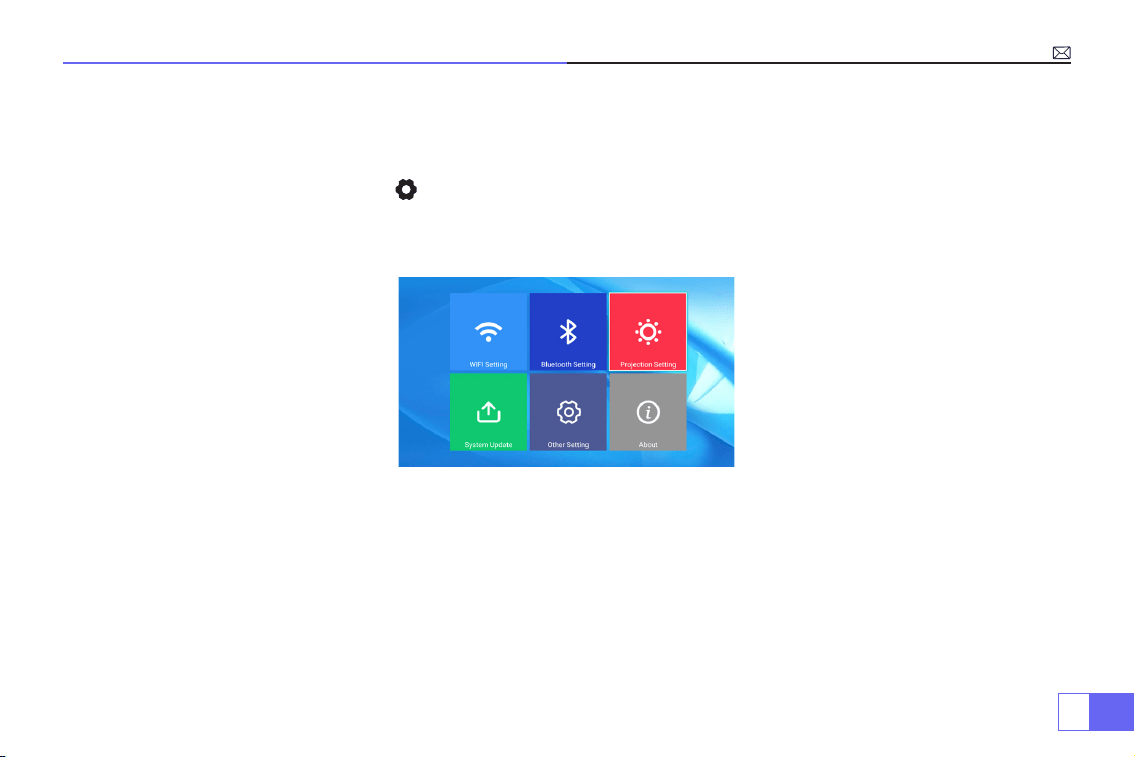
ES
115
Si la imagen está borrosa, presione el botón de enfoque ''F+'' ''F-'' en el control remoto para ajustar el enfoque de la
lente, presione o mantenga presionado el botón de ajuste hasta que la imagen sea clara.
(2)Cómo Usar La Conguración De Proyección
Seleccione el ícono de conguración en la esquina superior derecha de la interfaz principal, luego presione la
tecla "OK" en el control remoto para ingresar a la interfaz de conguración y seleccione "Conguración de imagen
de proyección". Después de ingresar a la interfaz, seleccione el modo deseado en la conguración de proyección,
luego ajuste la distorsión trapezoidal como desee.
• Corrección Trapezoidal Manual
Después de ingresar "Corrección trapezoidal manual", puede configurar
"Corrección trapezoidal de 4-Puntos"
según lo necesite: valor horizontal ±96, valor vertical ±54.
Simplemente haga clic en el botón "OK" para seleccionar el punto que desea ajustar primero, luego presione el
botón "
▶
" "
▼
" para establecer el valor necesario como se muestra a continuación.
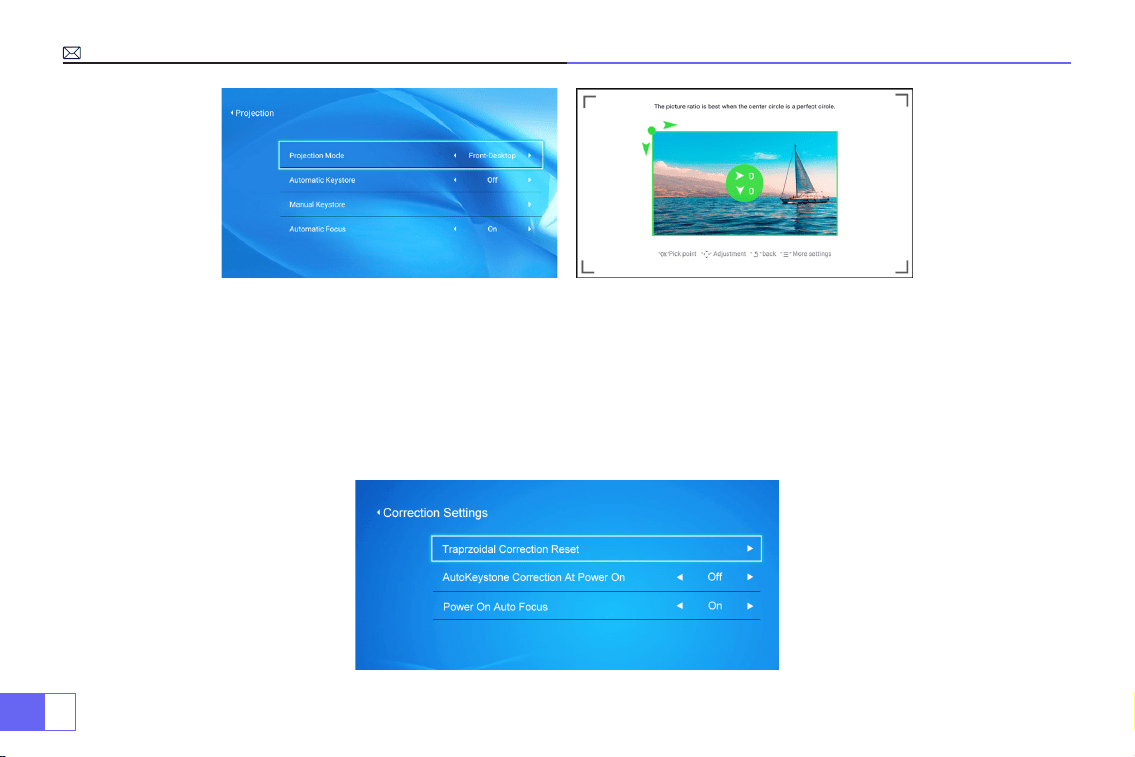
ES
116
• Zoom Digital
Con el valor de zoom en 100%-50%, simplemente haga clic en el botón "OK", luego presione el botón "
▲
" "
▼
" para
establecer el valor necesario como se muestra a continuación. (Nota: el valor del zoom se verá afectado por el
valor de corrección trapezoidal de cuatro puntos)
• Ajustes de Corrección
Restablecimiento de la corrección trapezoidal
: presione ''OK'', la imagen restaurará la conguración original de
corrección trapezoidal.

ES
117
Conecte los dispositivos de entrada, luego elija el botón de fuente de señal para
elegir la fuente de señal correspondiente (HDMI1, HDMI2, AV, etc.)
Para dispositivos USB, no es necesario elegir la fuente de la señal. La máquina los detectará
automáticamente.
Simplemente use el control remoto: presione " " uego presione "
▶ ▶
" "
▲ ▼
" para elegir el canal de entrada de
señal correspondiente, luego presione "OK" para conrmar.

ES
118
Conexión con Smartphones y iPads
Cómo usar la conguración de Wi-Fi
Para Sistema iOS
Nota:
Este proyector solo admite conexión inalámbrica, la conexión por cable no es posible.
P.D: La uidez de la duplicación de pantalla a través de una conexión inalámbrica se verá afectada
por el entorno de la red. Se recomienda un ancho de banda de 100 Mbit o más cuando se utiliza la
duplicación de pantalla. Asegúrese de que su dispositivo móvil esté cerca del proyector cuando utilice
una conexión inalámbrica. Se recomienda una distancia de menos de 1 metro.
Seleccione el ícono de conguración en la esquina superior derecha de la interfaz principal, luego presione la tecla
"OK" en el control remoto para ingresar a la interfaz de conguración y seleccione "Conguración WiFi".
Conguración con Wi-Fi doméstico
Atención:
Su dispositivo y el proyector deben estar en el mismo WiFi doméstico.
1. Habilite la conguración WiFi del proyector.
2. Elija el WiFi de su hogar para conectarse e ingrese la contraseña correcta, luego haga clic en "Listo" para
conectarse, espere de 3 a 5 segundos para establecer la conexión. Una vez conectado, recordará la contraseña
del WiFi conectado.
3. Habilite la conguración Wi-Fi de su dispositivo iOS, luego conéctelo al mismo Wi-Fi doméstico que el proyector.
4. Luego haga clic en "IOS Cast" como fuente de entrada de su proyector.
5. Deslice hacia arriba la pantalla de su dispositivo móvil iOS y toque "Airplay" para buscar el proyector, luego
seleccione
"WiMiUS-P62Projector”
de los resultados de búsqueda para conectarse.
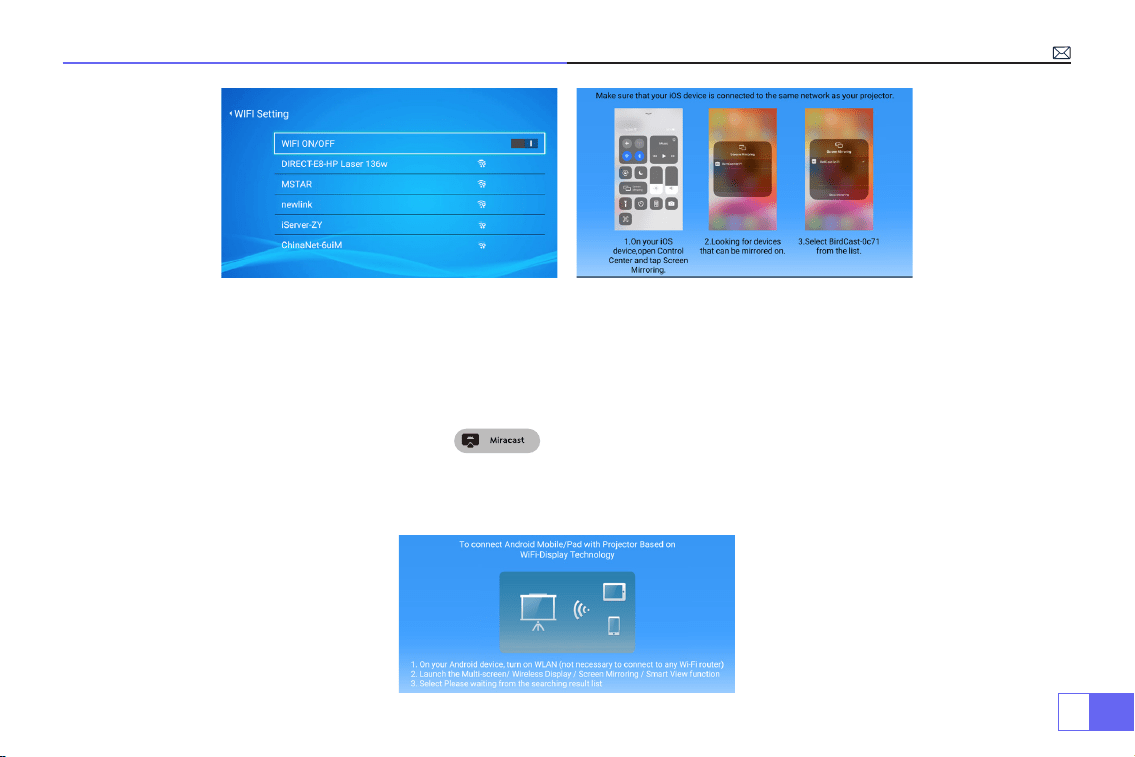
ES
119
Para el Sistema Android
Para habilitar esta función, su dispositivo Android debe ser compatible con pantallas múltiples/pantallas
inalámbricas. El nombre de "Multi-Screen" puede variar entre diferentes marcas de dispositivos Android.
1.Encienda el proyector, seleccione “Miracast” como fuente de entrada.
2.Encienda la "pantalla multipantalla/inalámbrica" de su dispositivo Android.
3.Seleccione "WiMiUS-P62Projector” de los resultados de búsqueda para conectarse.
4.Éxito.
Método 1: Conguración con Internet móvil
6. Éxito.

ES
120
Conexión con el altavoz Bluetooth
1. Encienda su altavoz Bluetooth.
2. Habilite la conguración de Bluetooth de su proyector.
3. Seleccione su altavoz Bluetooth para conectarse.
4. Éxito.
Compatible con altavoces Bluetooth, auriculares Bluetooth, Airpods.
Nota:
El proyector no es compatible con algunos tipos de altavoces bluetooth.
ES
121
Otras Conexiones
Formatos de reproducción multimedia admitidos
• Conecte el proyector a la PC a través de un cable HDMI.
• Elija el canal de señal multimedia: "HDMI"
Para dispositivos USB, no es necesario elegir la fuente de la señal. La máquina los detectará automáticamente.
• Seleccione la categoría requerida "Película", "Música", "Foto" o "Suite de oficina" en la interfaz principal, luego
presione la tecla "OK" en el control remoto para ingresar a la categoría correspondiente.
• Dependiendo de los programas a elegir: "fotos" "música" "película" o "Ofce Suite".
• Elija el archivo que desea reproducir, presione la tecla "OK" para reproducir o pausar el archivo. (No puede
acceder a la categoría requerida sin conectar un disco USB).
Nota:
Para la opción "Ofce Suite", puede leer archivos PPT.
1.Conexión con PC
2.Conexión multimedia USB
Formato de imagen
JPG、PNG、BMP、JPEG
Formato de audio
MP3、AAC、WAV、WMA、M4A、OGG、FLAC
Formato de vídeo
MP4、MKV、WMV、3GP、MPG、TP、TS、F4V、DAT、FLV、TRP
Formato de archivo
TXT、EXCEL、WORD、PPTX
ES
122
• Elija el canal de señal multimedia: "HDMI"
• Utilice un adaptador de tipo C a HDMI para conectar su MacBook o un adaptador Mini Display a HDMI para
conectar su MacBook Air (adaptador no incluido).
• Utilice el cable auxiliar de 3,5 mm para conectar la barra de sonido.
• Encienda el proyector y la barra de sonido.
• Para obtener más información, póngase en contacto con el vendedor en
.
• Use el cable AV 3 en 1, conecte los coloridos conectores hembra al cable RCA de su reproductor de DVD.
• Conecte el conector negro al puerto AV del proyector, acceda a la página de inicio para seleccionar [ AV ] como
fuente de señal.
3.Conexión con MacBook o Mac Book Air
4.Conectar con la barra de sonido
5.Conectar con DVD

ES
123
• Conecte el TV Stick al puerto HDMI del proyector.
• Elija el canal de señal multimedia: "HDMI"
• P.D:
solo es compatible con 1080P TV Stick, no con 4K TV Stick.
• Elija el canal de señal multimedia: "HDMI"
• Use un cable HDMI para conectarse a XBOX/PS4
6.Conexión con Fire TV Stick
7.Conexión con XBOX/PS4

ES
124
Función Del Menú Principal
1.Modo de Imagen
Solo cuando reproduce el video puede congurar el "Modo de imagen".
Presione " " y luego seleccione la conguración en el control remoto para realizar conguraciones personales.
Menú Menú incluido Función
Modo de imagen
Usuario/Estándar/Vívido/
Deporte/Película/Juego/Ahorro
de energía
Para ajustar el "Brillo/Contraste/
Saturación/Nitidez" de la imagen
Temperatura del color Usuario/Frío/Estándar/Caliente
Para ajustar la ganancia de rojo/
azul/verde
Modo de visualización 16:9/4:3/Auto/Full
Para ajustar la relación de
aspecto
Nota:
Si el ícono del menú está
gris, esta opción no es ajustable.

ES
125
2.Modo de Sonido
Solo cuando reproduce el video puede congurar el "Modo de Sonido".
Modo de Sonido Menú incluido Función
Modo de Sonido
Usuario/Estándar/Vívido/
Deporte/Película/Música/Noticias
Ajustar el modo de sonido
Detalle del ecualizador 120/500/1.5K/5K/10K Hz Ajustar el tono

ES
126
3.Ajuste De La Imagen De Proyección
Proyección Menú incluido Función
Modo de Proyección
Escritorio frontal / Escritorio
posterior / Techo frontal / Techo
posterior
Elija métodos de proyección,
voltee la imagen
Corrección trapezoidal manual
Corrección trapezoidal de
4-puntos
Ajuste 4 esquinas de la imagen
de proyección
Zoom Digital
Reducir la visualización del 100 %
al 50 %
Reducir el tamaño de la imagen
Ajustes de Corrección
Restablecimiento de la corrección
trapezoidal
Corrección trapezoidal
automática
Activar la corrección trapezoidal
automática
On/off
Activar enfoque automático On/off
ES
127
4.Actualizacion del Sistema
Actualizacion del sistema Menú incluido Función
Actualización en línea Actualización en línea Sistema de actualización en línea
Actualización local
Actualización mediante archivo
de software
Actualizar sin conexión
Restaurar fábrica Reiniciar
Restaurar todas las
conguraciones a sus valores de
fábrica

ES
128
5.Otro Ajuste
Otro Ajuste Menú incluido Función
Opción de fuente de arranque HDMI 1/HDMI2/AV/OFF
Fuente de señal predeterminada
de encendido
Opción de encendido Directo/En espera Elija el modo de encendido
Ajustes de idioma
Inglés, francés, alemán, italiano,
español, japonés. 20 idiomas
múltiples
Elige un idioma
Apagado programado
OFF/10min/20min/30min/60min/
120min
Congurar el tiempo de espera
del proyector

ES
129
6.Acerca de (Información del sistema)
Preguntas Frecuentes y Contactos
Preguntas Soluciones
¿No puede reproducir videos de las aplicaciones Netflix, Hulu,
cuando está conectado a un teléfono?
Debido a las limitaciones de HDCP, no puede admitir estas
aplicaciones a través de un teléfono inteligente directamente,
debe conectar una re stick.
La luz indicadora está apagada cuando se conecta a la fuente
de alimentación
1) El cable de alimentación no está bien conectado.
2)El botón de encendido en la parte posterior del proyector está
apagado.
Presione el botón de encendido en el control remoto y el
proyector no se enciende
1) ¿Las baterías del control remoto no están instaladas o están
agotadas?
2) Algo obstruye la señal entre el control remoto y el IR.
3) Luz fuerte en IR directamente.
ES
130
Contáctenos inmediatamente:
Preguntas Soluciones
Buena imagen, pero sin sonido?
1)¿Están bien conectados los cables de entrada?
2) Bajar volumen o silenciar.
3) Deshabilite los dispositivos de entrada Dolby.
Se apaga automáticamente después de estar encendido por
un tiempo.
1) ¿Hay una barrera alrededor de la ventilación?
2) Bajo voltaje o grandes uctuaciones de voltaje.
3) Verique si conguró el tiempo de reposo para el proyector.
De lo contrario, restáurelo a la configuración de fábrica y
comience de nuevo.
¿No puede encontrar dispositivos cuando está conectado con
un disco duro o una unidad ash?
1) Vuelva a enchufar el dispositivo.
2) Compruebe si el dispositivo está roto.
¿No puedes reproducir la película?
1) ¿Es correcto el formato del video?
2) ¿Los archivos están rotos?
3) ¿El dispositivo está roto?
¿No es compatible con su altavoz Bluetooth?
1)1) Es posible que el proyector no sea compatible con algunas
versiones del altavoz Bluetooth JBL.
2)Contacta inmediatamente con nuestro servicio postventa
e indícanos la versión de tu altavoz
bluetooth.
Punto negro en la imagen
Comuníquese con el vendedor a
para
ver un video para eliminarlos.
Email:
Website: www.wimius.com

JP
131
カタログ
警告およびご注意
付属品
製品仕様
リモコンと仕様書
投影サイズとインストール
設定手順
スマホや iPad との接続
Bluetooth スピーカーとの接続
他の機器との接続
メニュー
FAQ
132
134
135
138
139
140
144
146
147
150
155

JP
132
WiMiUS P62 プロジェクターをお買い上げいただき誠にありがとうございます。本機を安全に正しく使用していただくため、
ご使用の前にこの取扱説明書をよくお読みください。
取扱説明書は、いつでも見られる所に大切に保存してください。万一ご使用中にわからないことや故障ではないかと思ったと
きにお読みください。
弊社製品に関してご不明な点やご質問、ご要望などございましたら、メール([email protected])にてお気軽にお問
い合わせください。
注意:本書は、弊社のプロジェクターについての共通の取扱説明書です。製品の仕様変更により、実際の製品と若干異なる場
合があるかもしれません。WiMiUS P62 を主にして説明しますが、仕様変更がある場合は、実際の製品仕様が優先されます。
1. 動作中は強い光が投写されているので、プロジェクターのレンズをのぞかないでください。特にお子様にはご注意ください。
2. 投写画面を綺麗にするため、使用前に手動で台形補正とフォーカス調整を行うことが必要です。
3. 本機内部には、危険な高電圧が存在するので、安全のためプロジェクターのキャビネットを外したり、あけたりしないでく
ださい。または本機を改造したり、自分で修理しないでください。
1. お手入れ
お手入れの際に安全のため電源ケーブルをコンセントから抜いてください。濡れた雑巾で本機の表面を拭きます。刺激性のあ
る化学洗浄剤で製品を掃除しないでください。感電·損傷の原因となります。
2. 付属品
警告
ご注意

JP
133
専用な付属品を使用してください。本機に添付している電源コードは本機専用です。
3. 使用環境
不安な場所と湿気やほこりの多い場所では使用しないでください。暖房の近くなど高温の場所にも使用しないでください。感
電·火災の原因となります。
4. 放熱
プロジェクターが安定して動作するために放熱装置が搭載されています。通気孔は内部の温度上昇を防ぐためのものです。物
を置いたり立てかけたりして通気孔をふさがないでください。内部の温度が上昇し、故障の原因となります。
5. パワー
電圧が許容範囲内であることを確認してください。安全のために、接地された電源電圧に適合した電源コードを使用してくだ
さい。
6. 雷の日
雷が鳴る場合は、電源ケーブルをコンセントから抜いてください。感電·火災の原因となります。
7. 修理
本機内部には、危険な高電圧があり、安全のためプロジェクターのキャビネットを外したり、あけたりしないでください。ま
たは本機を改造したり、自分で修理しないでください。乱用、誤用、改造、変更、不当使用、破壊行為、過失、不適切な組み
立ての場合は、製品保証は無効になります。
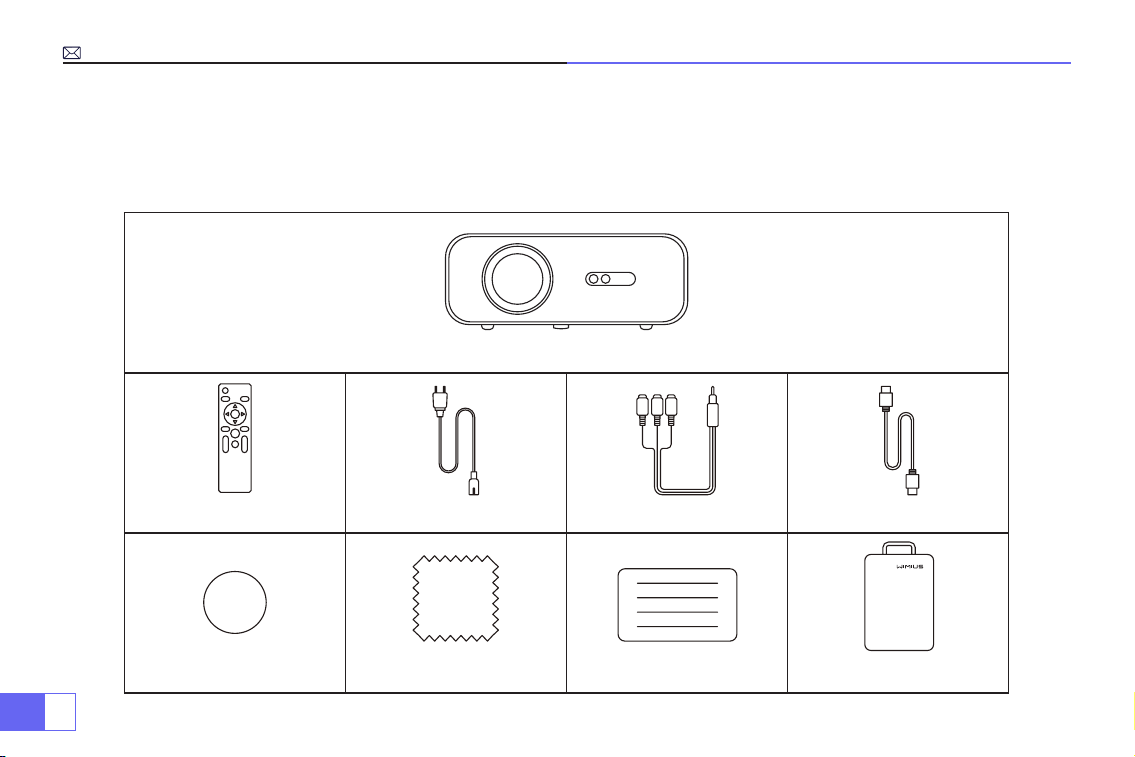
JP
134
プロジェクター 本体 * 1
リモコン * 1 電源ケーブル * 1 3in1 AV ケーブル * 1 HDMI ケーブル * 1
レンズカバー * 1 拭き布 * 1 取り扱い説明書 * 1 収納バッグ * 1
· プロジェクター 本体 * 1
· 収納バッグ * 1
· リモコン * 1
付属品
· 電源ケーブル * 1
· 3in1 AV ケーブル * 1
· HDMI ケーブル * 1
· レンズカバー * 1
· 拭き布 * 1
· 取り扱い説明書 * 1
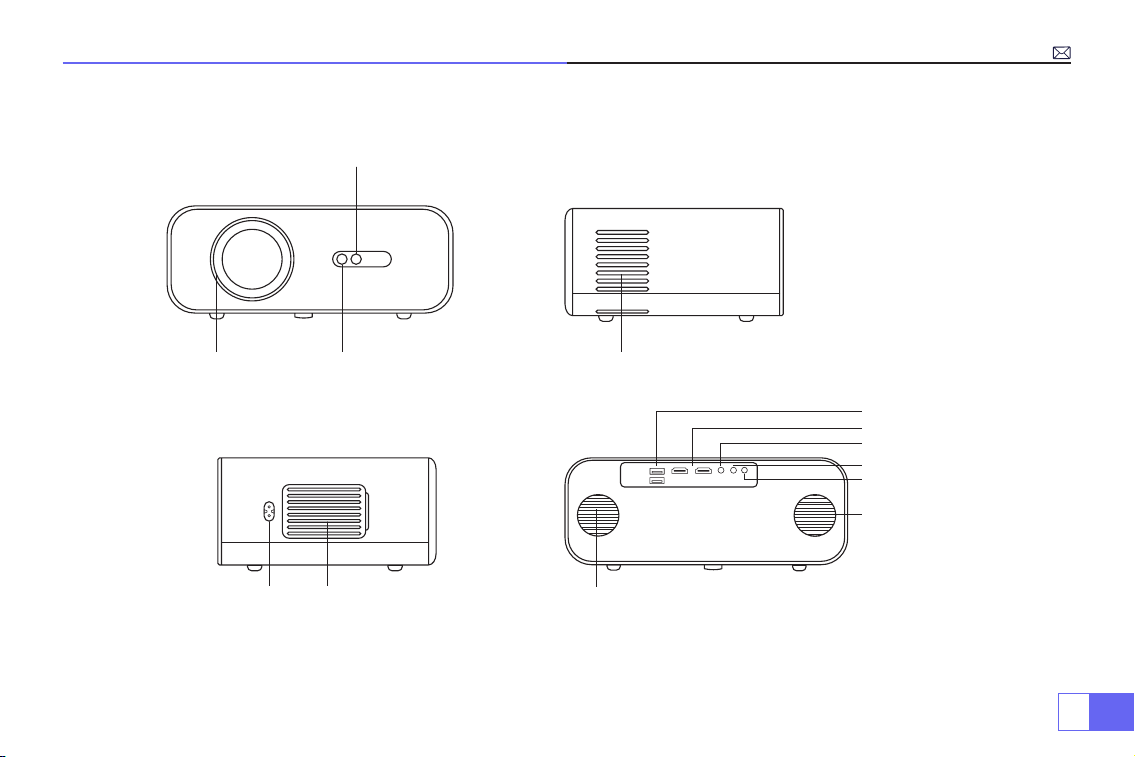
JP
135
製品仕様
4.
排気口
5. 6.
電源ジャック 吸気口
1. 2.
3.
フォーカスレンズ IR 信号受信
自動フォーカス
信号受信
7.
8.
9.
10.
1 1.
12.
13.
内蔵スピーカー ( 左 )
USB 1&2 端子
HDMI 1&2 端子
AV 端子
3.5mm 音声端子
IR 信号受信
内蔵スピーカー ( 右 )

JP
136
1.
2.
3.
4.
5.
6.
7.
8.
9.
10.
1 1.
信号源キー
上
戻り
左
右
下
電源ボタン
OK ボタン
レベルスタンド調整
取り付け穴 (M5*12mm)
ラベル付き蓋(内部パネル清掃用)
注意:天井取り付けの場合は、4 つの黒いゴムをゆっくりと取り外してから天井用の穴があります。(対応ネジサイズ:
M5*12mm)
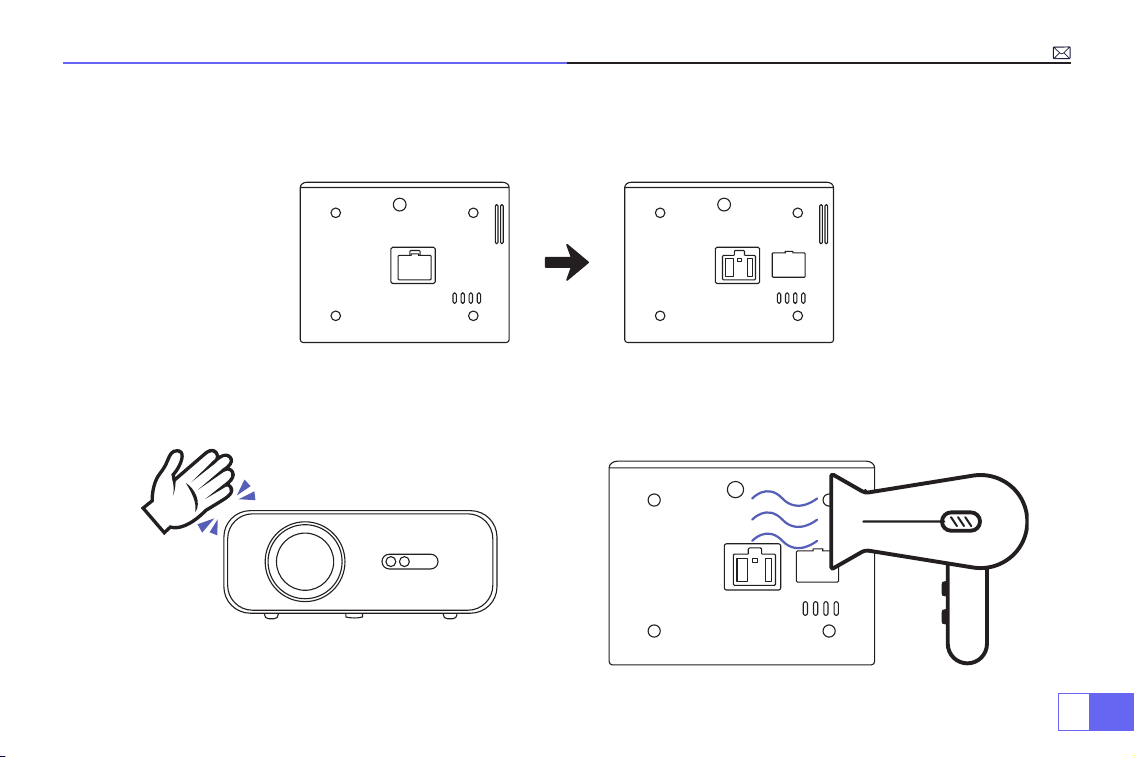
JP
137
黒点削除方法
プロジェクターの背面にある蓋を開けます。
方法 1 方法 2
ヘアドライヤーを使用して外から穴を合わせて風でほこりを取
り除く(注意:熱風モードを使用しないでください)
プロジェクター本体を手で軽くたたく
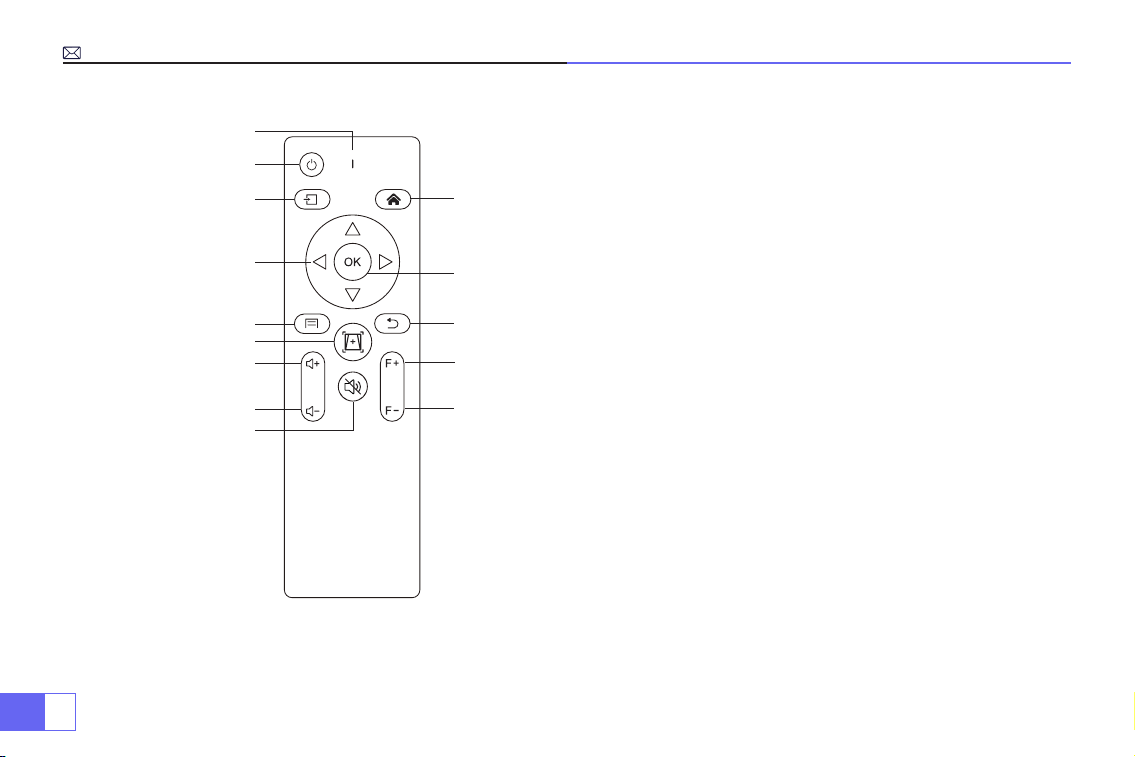
JP
138
1.
10.
12.
13.
14.
1 1.
2.
3.
4.
5.
7.
8.
9.
6.
リモコン仕様
1. 信号表示灯
2. 電源
3. 信号源
4. 矢印キー
5. メニュー
6. 自動フォーカスと台形補正
7. 音量 +
8. 音量 -
9. 消音
10. ホームページ
11. OK ボタン
12. 戻りボタン
13. 手動 フォーカス +
14. 手動 フォーカス -
注意:1. リモコンを使用しながら、IR 信号受信に向ける必要があります。(AAA バッテリーが別途購入する必要があります)
2. 電池の液漏れによる腐食を防ぐため、長期間使用しない場合は電池を取り出してください。

JP
139
仕様書
モデル番号 .: P62
イメージングシステム LCD 電源 AC100-240V/50-60Hz
光源 LED 本体サイズ 25.7*20*10.3CM
LED カラー 16.8M Full Color ネイティブ解像度 リアル 1920*1080 Full HD
投影距離 1.5-7m 入力端子 HDMI*2/VGA/AV/ USB*2
投影サイズ 50-300” ズーム機能 100%-50%
アスペクト 16:9 /4:3/ 自動 出力端子 オーディオ
台形補正 自動 フォーカス 自動
投影サイズ
投射距離 画面サイズ 投射距離 画面サイズ
1.5m 35’’ 3.9m 120’’
1.7m 50’’ 5.5m 180’’
2.4m 72’’ 7.0m 300’’
3.3m 100’’
次の表を参照して、投影のサイズと距離を調整してください。
★最適な投射距離:3.0m
上の表の画面サイズに参照して ±3%を考慮してください。
最小距離または最大距離を超えると、画像がぼやける可能性
があります。
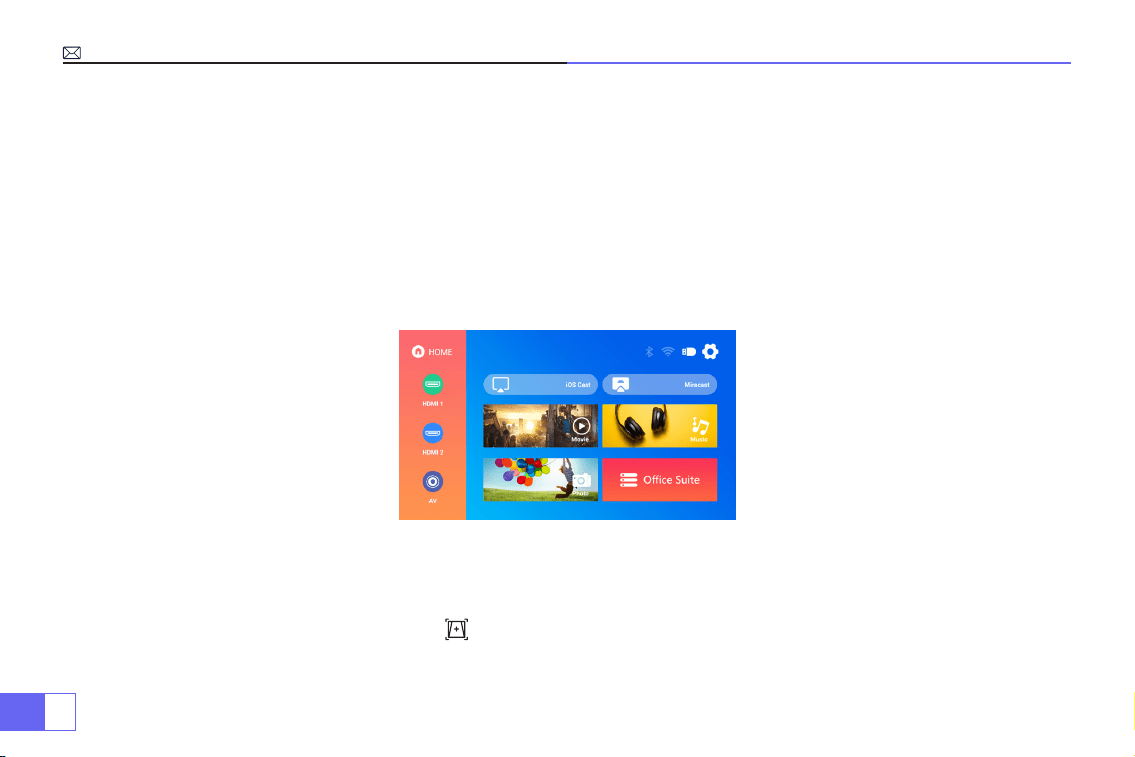
JP
140
設定手順
1. 電源起動
2. フォーカスと台形補正
はっきり見えるために、カーテンを引いて、暗い部屋でこのプロジェクターを使用してください。プロジェクターを慎重に使
用してください。落としたり、ぶつけたりすると、部品が損傷したり、画像がぼやけたり、異常に表示されたりすることにな
ります。
· レンズキャップを外し、プロジェクターと電源ケーブルで接続します。
· 図のような起動画面が表示されます。
(1) 自動フォーカスと台形補正 .
最初にプロジェクターを壁に向けて水平に置き、電源を入れて、スクリーンからの投影距離に基づいて画像の焦点が自動的に
合わせられ、長方形に調整されます。または " " 自動フォーカスと台形補正キー を直接に押せばいいです。
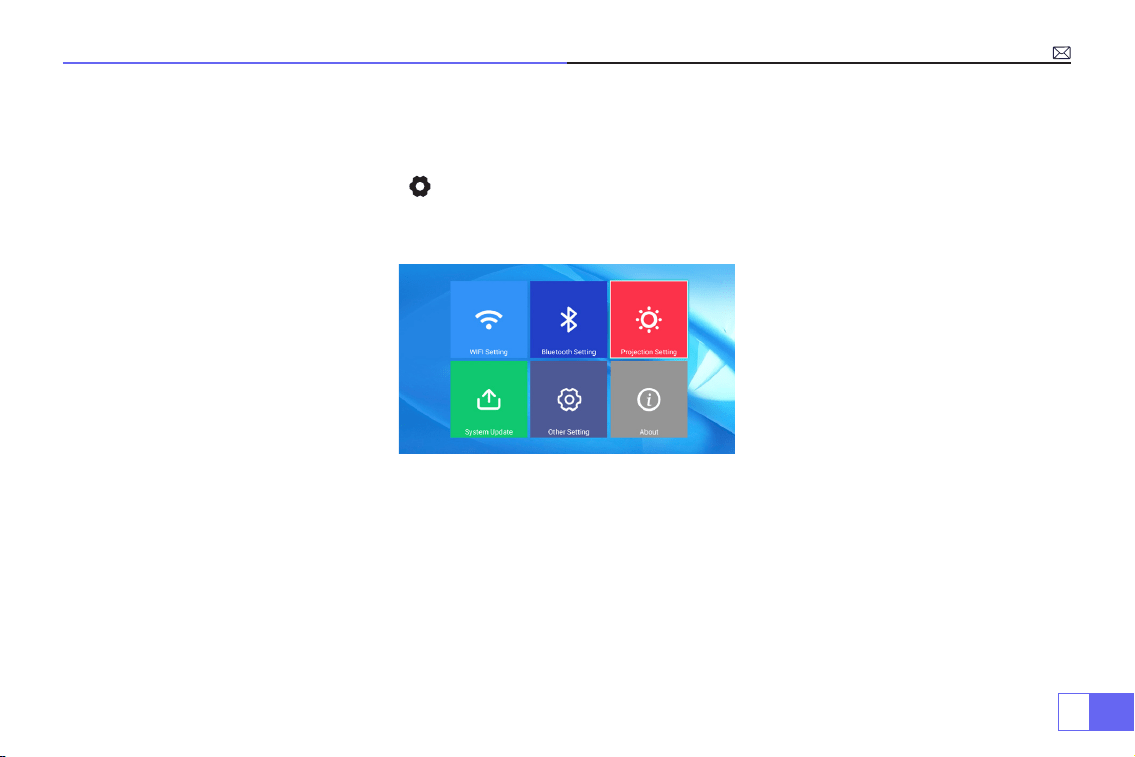
JP
141
画像がぼやけている場合は、リモコンのフォーカスボタン ''F+'' ''F-'' を押してレンズのフォーカスを調整し、画像が鮮明になる
まで調整ボタンをタップまたは長押しします。
(2) 投影設定方法
ホームページの右上隅にある設定アイコン を選択し、リモコンの「OK」キーを押して設定インターフェイスに入り、「投
影画像設定」を選択した後、投影設定で好きなモードを選択し、必要に応じて台形補正します。
· 手動キーストーン
「手動台形補正」に入った後、必要に応じて「4 点台形補正」を設定できます:水平値 ±96、垂直値 ±54
「OK」ボタンをクリックして、最初に調整したいポイントを選択し、次に「▶」または「▼」ボタンを押して、以下に示すよ
うに必要な値を設定します。
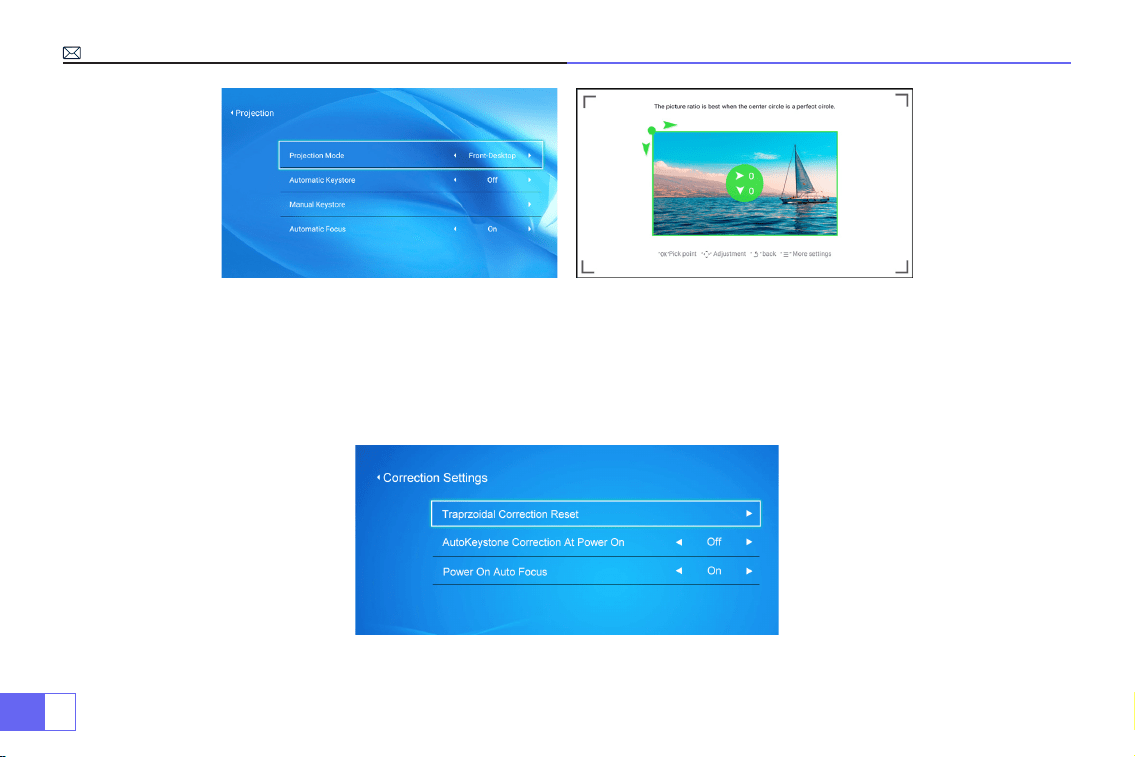
JP
142
· デジタルズーム
ズーム値を
100%-50%
にして、「
OK
」ボタンをクリックして入力し、「▲」または「▼」ボタンを押して、以下に示すように
必要な値を設定します。
(
注意
:
ズーム値は、
4
点台形補正の値の影響を受けます。)
· 台形補正リセット設定
台形補正のリセット : [OK] を押すと、画像は元のキーストーン補正設定に戻されます。

JP
143
3. 信号源の選択
· 入力デバイスを接続し、信号源ボタンを選択して、対応する信号ソース (HDMI1、HDMI2、AV など ) を選択します。
· USB デバイスの場合、自動的に認識されるため、信号源を選択する必要はありません。
· リモコンで操作する場合:「 」を押してから「▶▶」または「▲▼」を押して対応する入力信号を選択し、「OK」を押
して確認します。
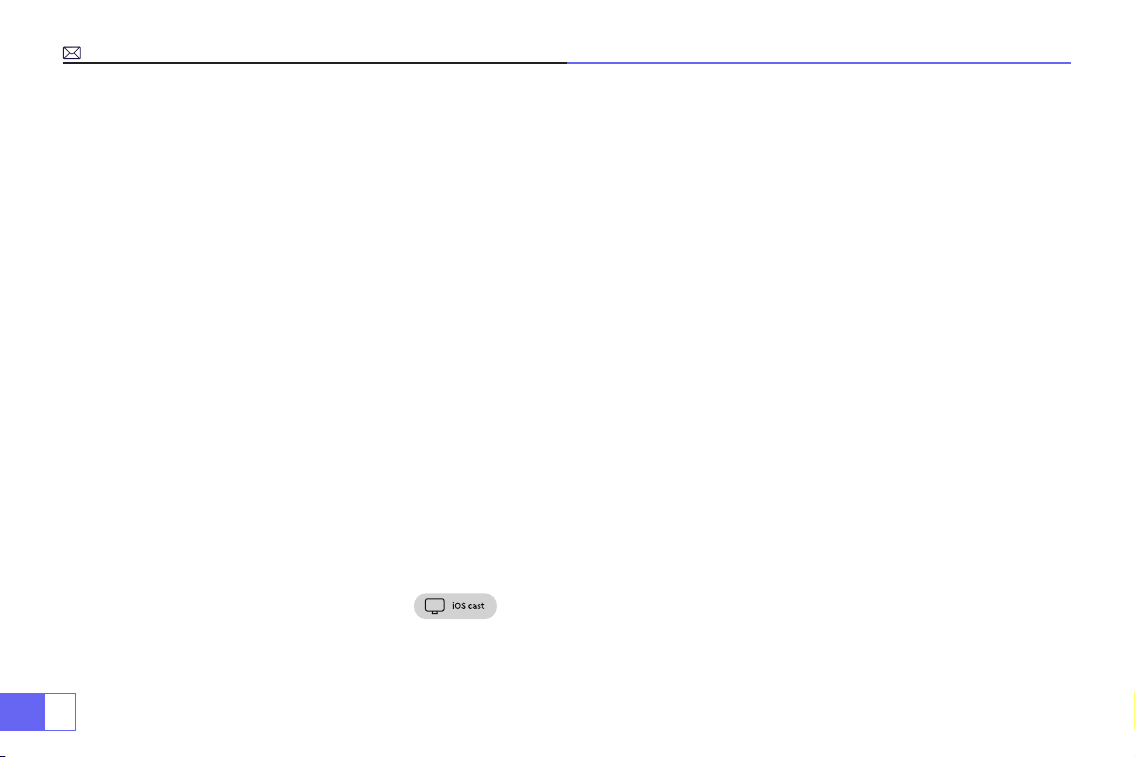
JP
144
スマホや iPad などとの接続
WiFi 設定の使用方法
iOS デバイスの場合
注意:①このプロジェクターはワイヤレス接続のみをサポートしており、有線接続は対応できません。
②ワイヤレスミラーリングするとき、ネットワークは画像の滑らかさに影響を与えます。100Mbps 以上ネットワークをお勧め
します。 ワイヤレスで画面ミラーリングするときは、デバイスをプロジェクターの近くに置いてください。1 メートル以内の
距離をお勧めします。
ホームページの右上隅にある設定アイコンを選択し、リモコンの「OK」キーを押して設定インターフェースに入り、「WiFi 設
定」を選択します。
接続方法:自宅 Wi-Fi での設定
注意:デバイスとプロジェクターは同じ自宅
WiFi
に接続する必要があります。
1. プロジェクターの WiFi 設定をオンにします。
2. 接続する自宅 WiFi を選択して正しいパスワードを入力し、[ok] をクリックして接続します。接続を確保するために 3~5 秒待
ちます。接続されると、接続されている WiFi のパスワードを自動に記憶します。
3.iOS デバイスの WiFi 設定をオンにしてから、プロジェクターと同じ自宅 WiFi に接続します。
4. プロジェクターの入力ソース「IOS Cast」 を選択します。
5.iOS デバイスのコントロールセンターを開き、「画面ミラーリング」を開き、本機のデバイス名 (WiMiUS-P62Projector) を選
択します。
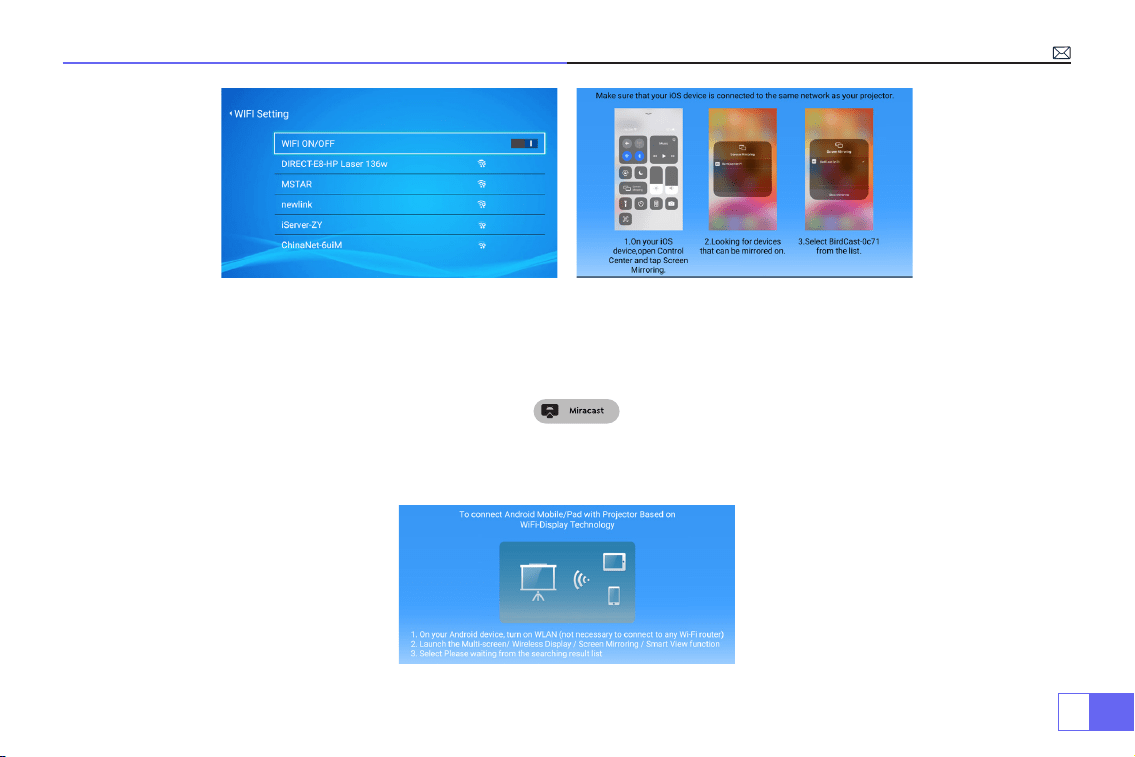
JP
145
Android システムの場合
この機能を使用するには、Android デバイスが画面ミラーリングをサポートする必要があります。
1. プロジェクターの電源を入れ、入力ソース「Miracast」 を選択し、画面ミラーリングのインターフェイスに入り
ます。
2. Androidデバイスのコントロールセンターを開き、「画面ミラーリング」機能を開き、本機のデバイス名(WiMiUS-P62Projector)
を選択します。
方法 1
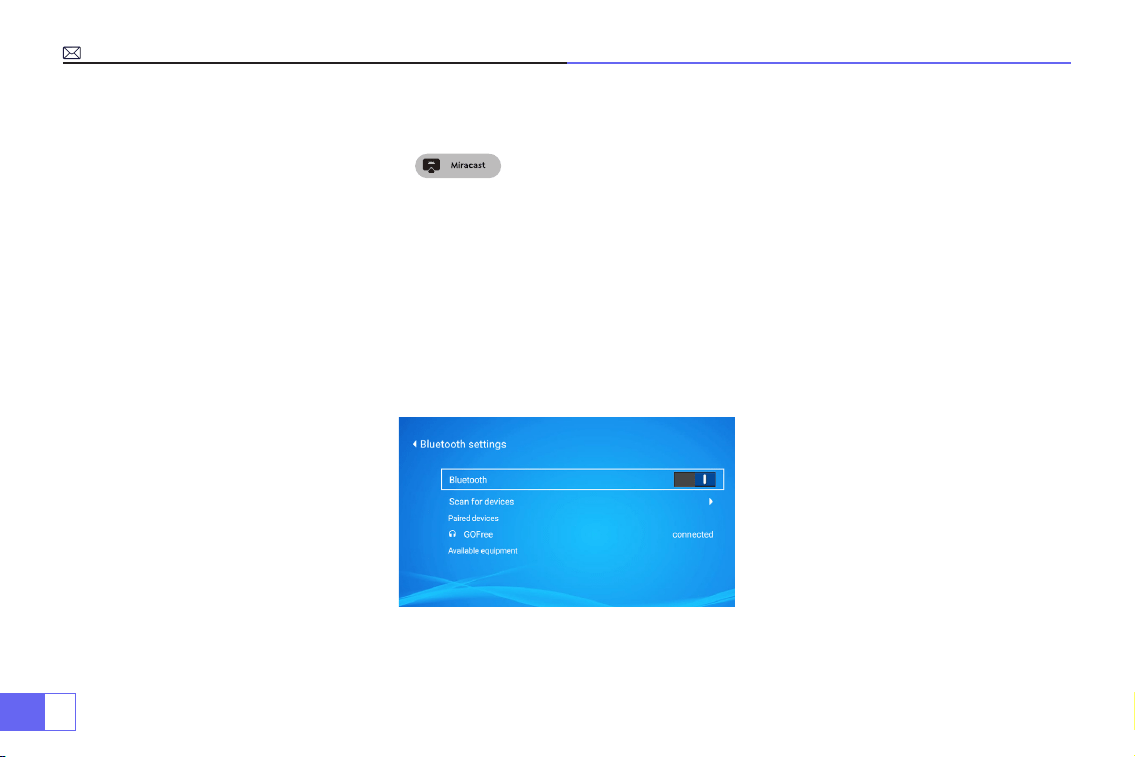
JP
146
Bluetooth スピーカーと接続する
1. Bluetooth スピーカーの電源を起動します。
2. プロジェクターの Bluetooth 設定をオンにします。
3. Bluetooth スピーカーをプロジェクターと接続します。
Bluetooth スピーカー、Bluetooth ヘッドフォン、iPhone Airpods、Bluetooth イヤフォンと互換性があります。
1.Android デバイスの WiFi 設定をオンにして、自宅 WiFi を接続します。
2. プロジェクターの入力ソース「MiraCast」 を選択します。
3.Android デバイスのコントロールセンターを開き、「画面ミラーリング」機能を開き、本機のデバイス名を選択して接続します。
方法 2:自宅の Wi-Fi での設定

JP
147
他の機器との接続
サポートされているマルチメディア再生フォーマット
①プロジェクターと PC を HDMI ケーブルで接続します。
②入力信号「HDMI」を選択します。
USB デバイスの場合、信号ソースを選択する必要はありません。
①ホームページに必要なカテゴリ「映画」、「音楽」、「写真」、または「Office Suite」を選択し、リモコンの「OK」キー
を押して対応するカテゴリに入ります。
②選択するプログラムに対応:「写真」「音楽」「映画」または「Office Suite」。
③再生したいファイルを選択し、「OK」キーを押してファイルを再生または一時停止します。 (USB メモリーを接続しないと、
必要なカテゴリを入力できません。)
注意:「Office Suite」で PPT ファイルを再生できます。
1.PC との接続
2.USB 接続
画像フォーマット JPG、PNG、BMP、JPEG
オーディオフォーマット MP3、AAC、WAV、WMA、M4A、OGG、FLAC
ビデオフォーマット MP4、MKV、WMV、3GP、MPG、TP、TS、F4V、DAT、FLV、TRP
ファイルフォーマット TXT、EXCEL、WORD、PPTX
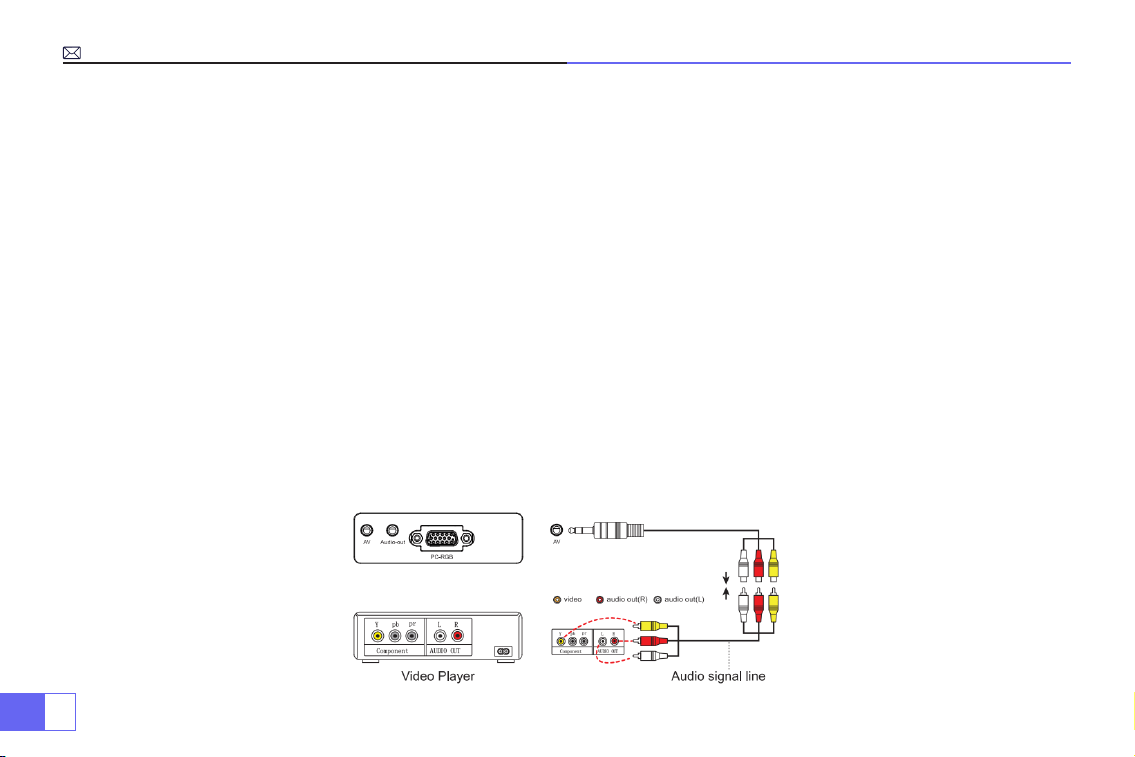
JP
148
①入力信号「HDMI」を選択します。
② Type-C-HDMI アダプターで MacBook を接続して、ミニディスプレイ -HDMI アダプターで MacBook Air に接続します。(ア
ダプターは含まれていません)。
①スピーカーに AUX 端子がある場合は、3.5mm オーディオケーブルで下記の図のに示すようにプロジェクターとスピーカー
を接続します。
②ホームページ に入り、[AV] 信号源を選択します。
③質問などありましたら、メール([email protected])にてお気軽にお問い合わせください。
① DVD プレーヤーとプロジェクターの電源をオンにします。
②パッケージの 3-in-1 AV ケーブルで、DVD プレーヤーの RCA ケーブルに接続します。
③黒いコネクターをプロジェクターの AV 端子に接続し、ホームページに入り 、[AV] 信号源を選択します。
3.MacBook または Mac Book Air との接続
4. サウンドバーとの接続
5.DVD との接続

JP
149
① TV スティックをプロジェクターの HDMI 端子に差し込みます。
②入力信号「HDMI」を選択します。
注意:4K TV スティックではなく、1080P TV スティックのみをサポートします。
①入力信号「HDMI」を選択します。
② HDMI ケーブルで XBOX / PS4 に接続します。
6.Fire TV Stick との接続
7.XBOX/PS4 との接続
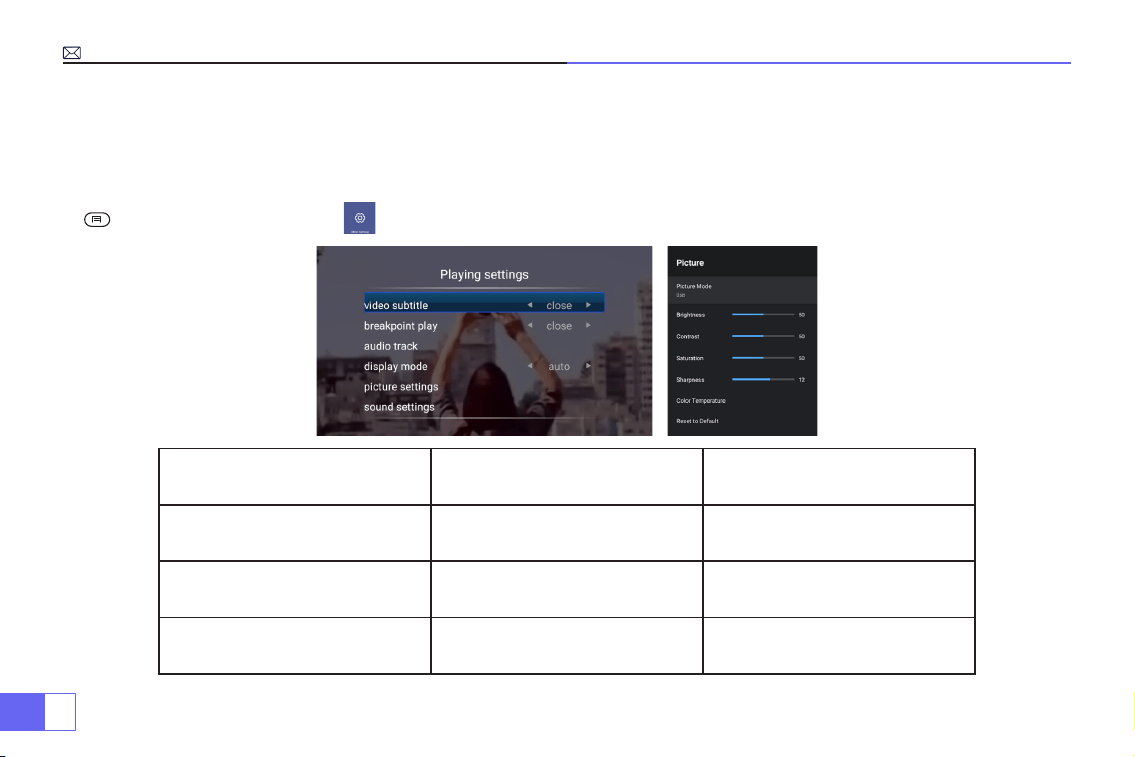
JP
150
メニュー
1. 画像設定
動画再生時のみ「画像モード」を設定できます。
「 」を押して、リモコンの設定 を選択し、個人設定を行います。
画像設定 メニュー 機能
画像モード
ユーザー / 標準 / 鮮やか / スポーツ /
映画 / ゲーム / 節電
「コントラスト / 明るさ / 色調 / シャ
ープネス」を調整する
色温度 ユーザー / クール / 標準 / ウォーム 赤 / 青 / 緑の値を調整する
アスペクト比 16:9/4:3/ 自動 / フル
アスペクト比により、画像表示方法
を設定できます
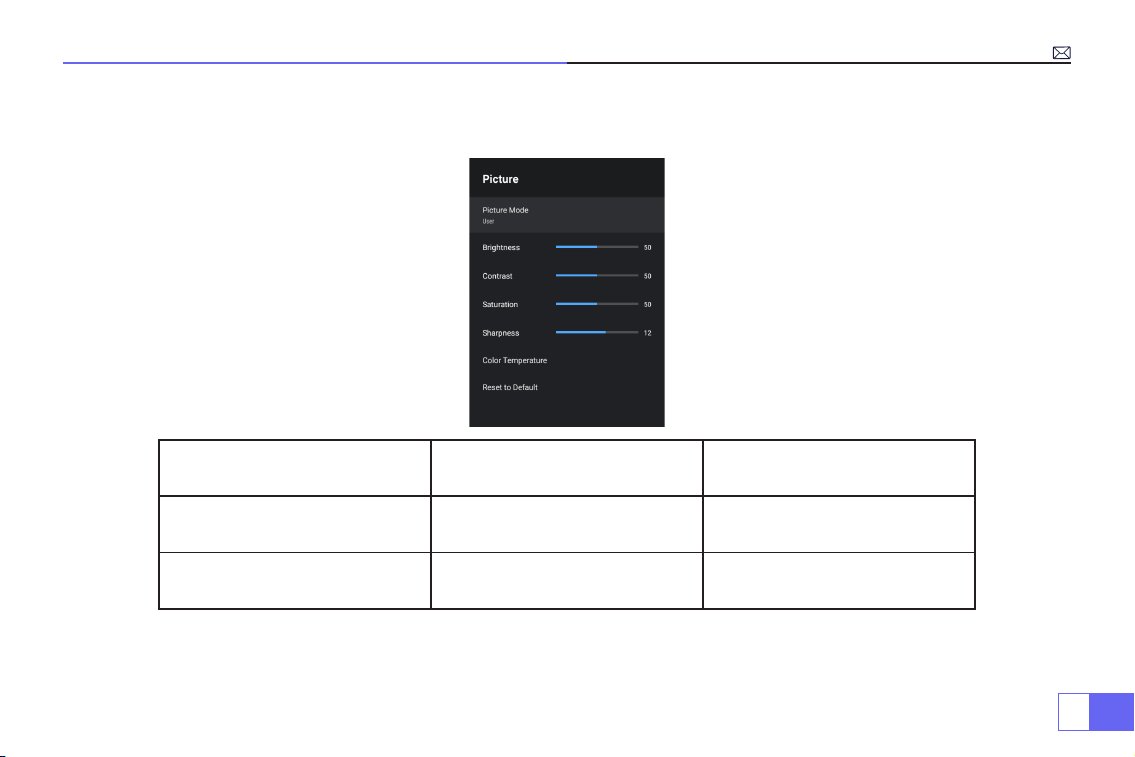
JP
151
2. 音声設定
動画再生時のみ「サウンドモード」を設定できます。
音声設定 メニュー 機能
サウンドモード
ユーザー / 標準 / 鮮やか / スポーツ /
映画 / 音楽 / ニュース
音声モードを好きに合わせて調整で
きます
イコライザー詳細 120/500/1.5K/5K/10K Hz トーンを調整します
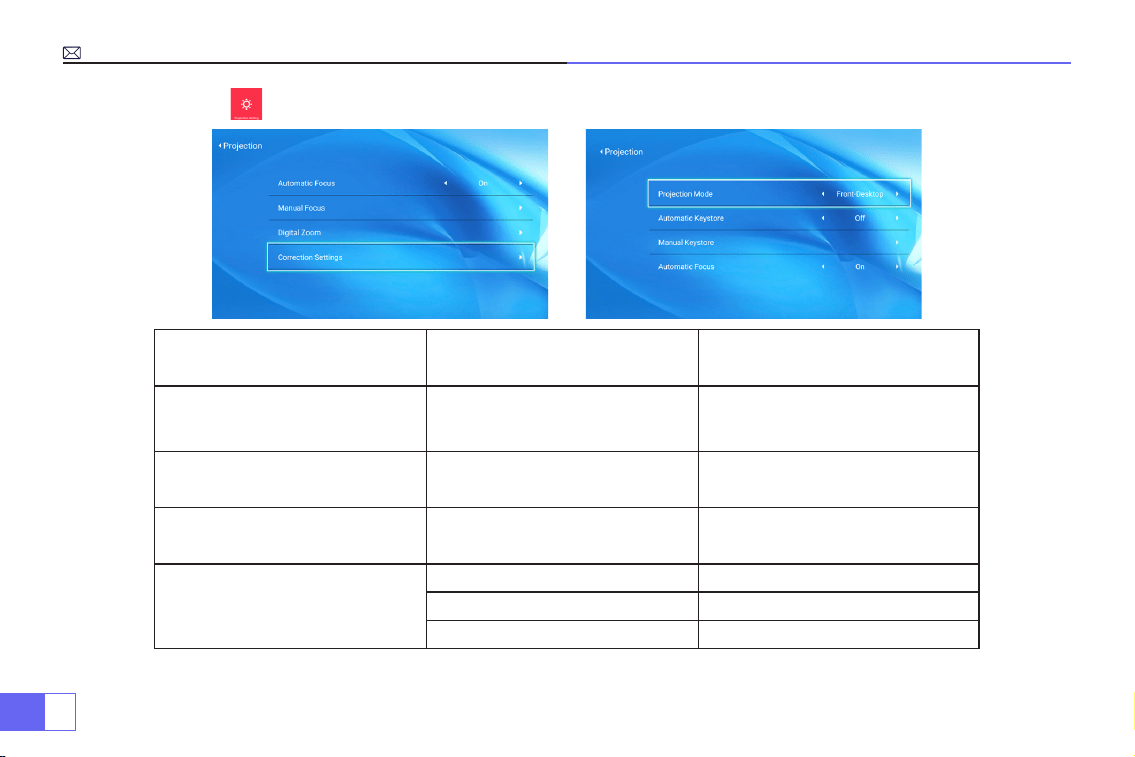
JP
152
3. 投影画像設定
投影画像設定 メニュー 機能
投影モード
フロント / リア / フロント - 天井 /
リア - 天井
投影方法を選択し、画像を反転します
手動台形補正 4 点補正機能
4 点を調整して、投影された画像を長
方形にする
デジタルズーム 100%-50% 画像サイズを調整する
台形補正設定
台形補正リセット 自動台形補正
自動台形補正 オン / オフ
自動フォーカス補正 オン / オフ
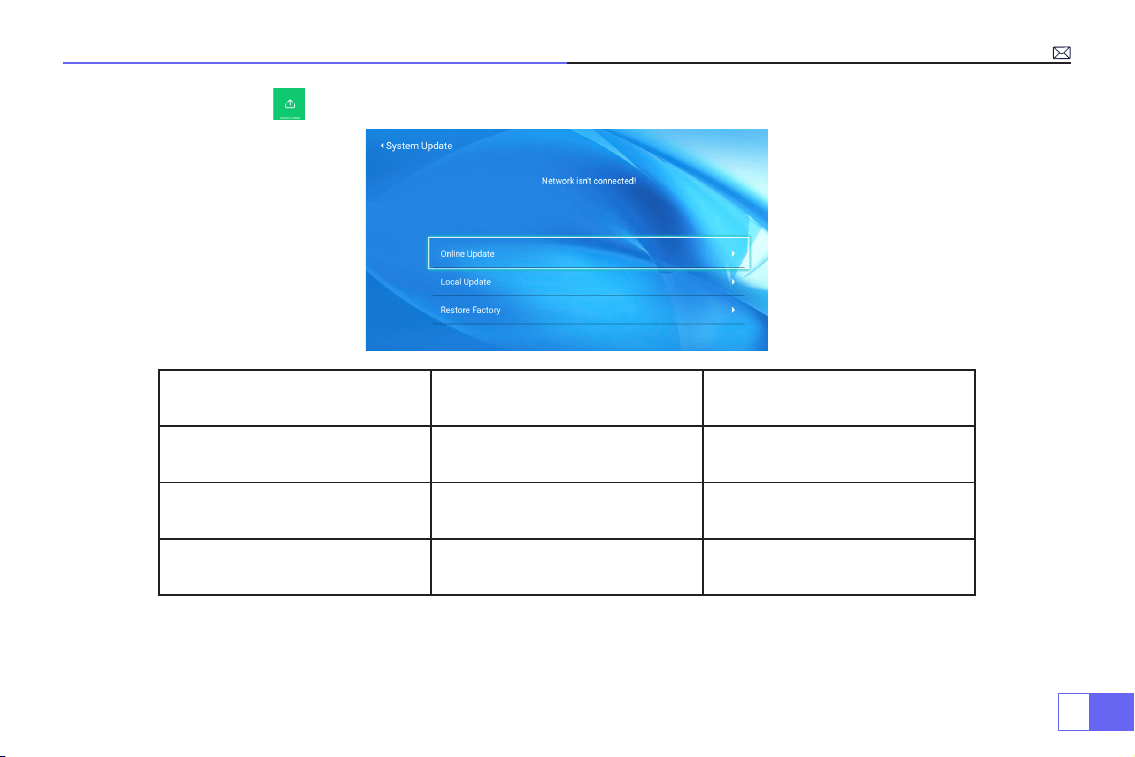
JP
153
4.System Update
システムアップデート メニュー 機能
オンラインアップデート オンラインアップデート システムをオンラインで更新します
ローカル更新 ローカル更新 オフラインで更新します
工場出荷時の設定に復元 リセット
すべての設定を工場出荷時の設定に
戻します
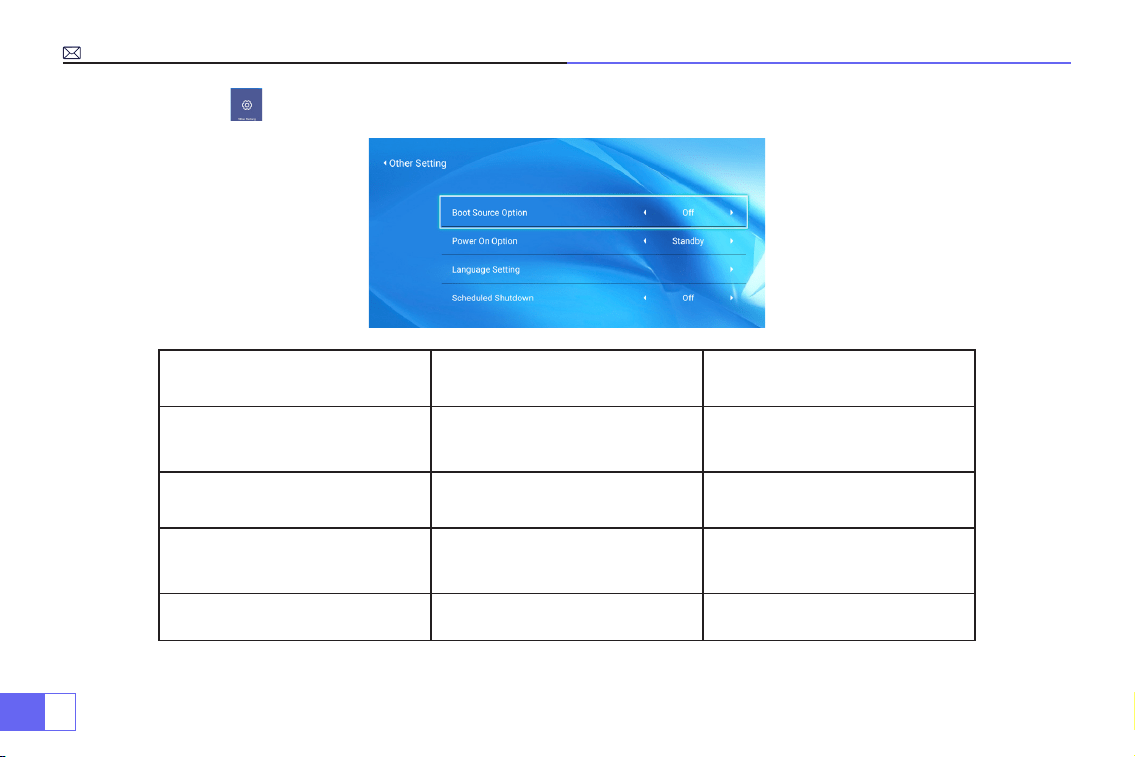
JP
154
5. その他の設定
その他の設定 メニュー 機能
信号源 HDMI 1/HDMI2/AV/ オフ デフォルトの信号源を選択します
電源オンオプション 直接 / 待機 電源オンのモードを選択します
言語
英語 / ドイツ語 / フランス語 / イタリ
ア語 / デンマーク語 / ロシア語 / 日本
語/など
対応する言語を選択します
スリープタイマー
OFF/10min/20min/30min/60min/120
min
プロジェクターのスリープ時間を設
定します

JP
155
6. システムバージョン
FAQ
問題 対応
App Netflix、Hulu、Prime で動画を再生できない
これらのアプリは HDCP で制限されています。 このモデルは HDCP
をサポートしていないため、サポートできません。
Wifi 接続が安定していない
1) 携帯と自宅の wi-fi のネットワークが正常かどうかを確認してくださ
い。
2)携帯とプロジェクターの距離を 1 メートル以内にしてください。
電源に接続するとインジケータランプが消灯する
1)電源ケーブルが正しく接続されていません。
2)プロジェクターの電源ケーブルがオフになっています。
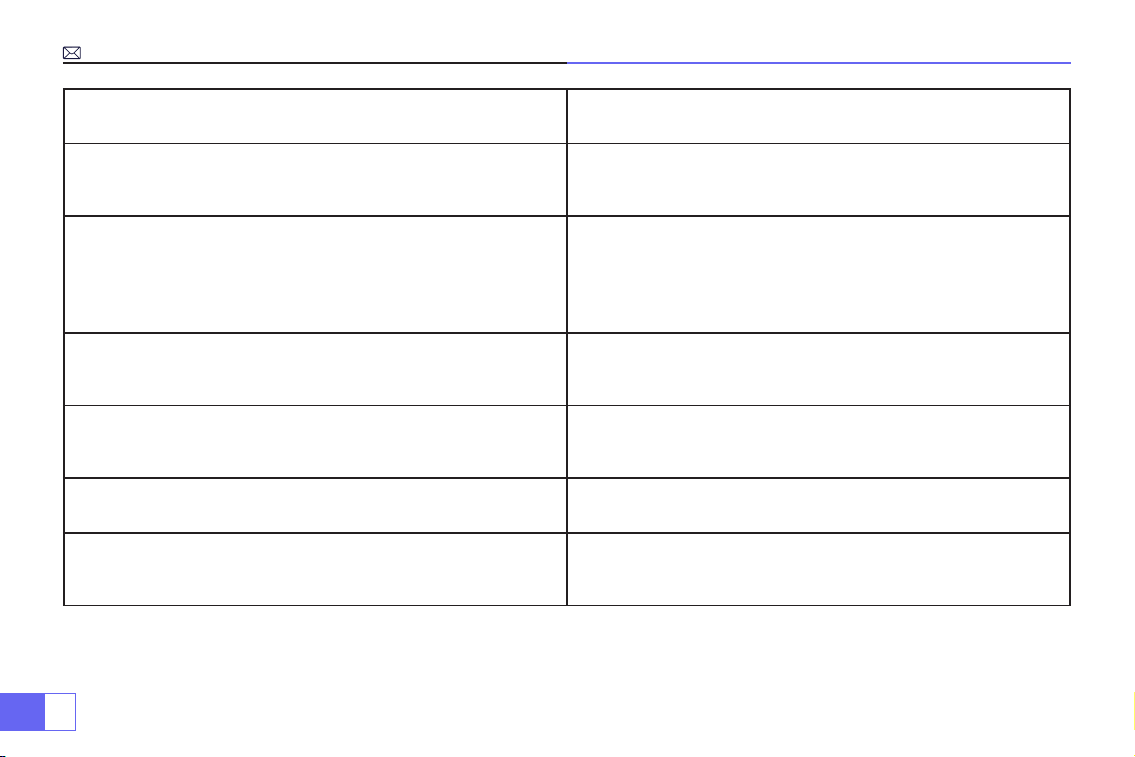
JP
156
問題 対応
リモコンの電源ボタンを押してもプロジェクターがオンにならない
1)リモコンの電池が切れました。
2)リモコンと IR 間の信号を妨害しているものがあります。
3)強光が IR を照らします。
画面に画像がない
1)入力信号設定は正しいですか。
2)入力信号はありますか。
3)入力ケーブルが正しく差し込まれていますか、それとも間違った位
置にありますか。
4)PC モードでは、リフレッシュレートは 75 KHz を超えていますか。
画像があって、音が出ない
1) 入力ケーブルは正しく接続されていますか。
2)最小音量または消音モードですか。
3)入力デバイスのドルビーをオフにします。
しばらくオンにすると、自動的にオフになる
1)換気口の周りに障害物はありますか?
2)低電圧または大きな電圧変動。
3)過熱保護機能が動作しました。
ハードドライブまたは USB メモリーに接続するときに認識されていな
い
1)デバイスを再接続します。
2)デバイスが破損していないか確認してください。
映画を再生できない
1)ビデオのファイル形式は正しいですか。
2)ファイルが壊れていますか。
3)デバイスが壊れていますか。
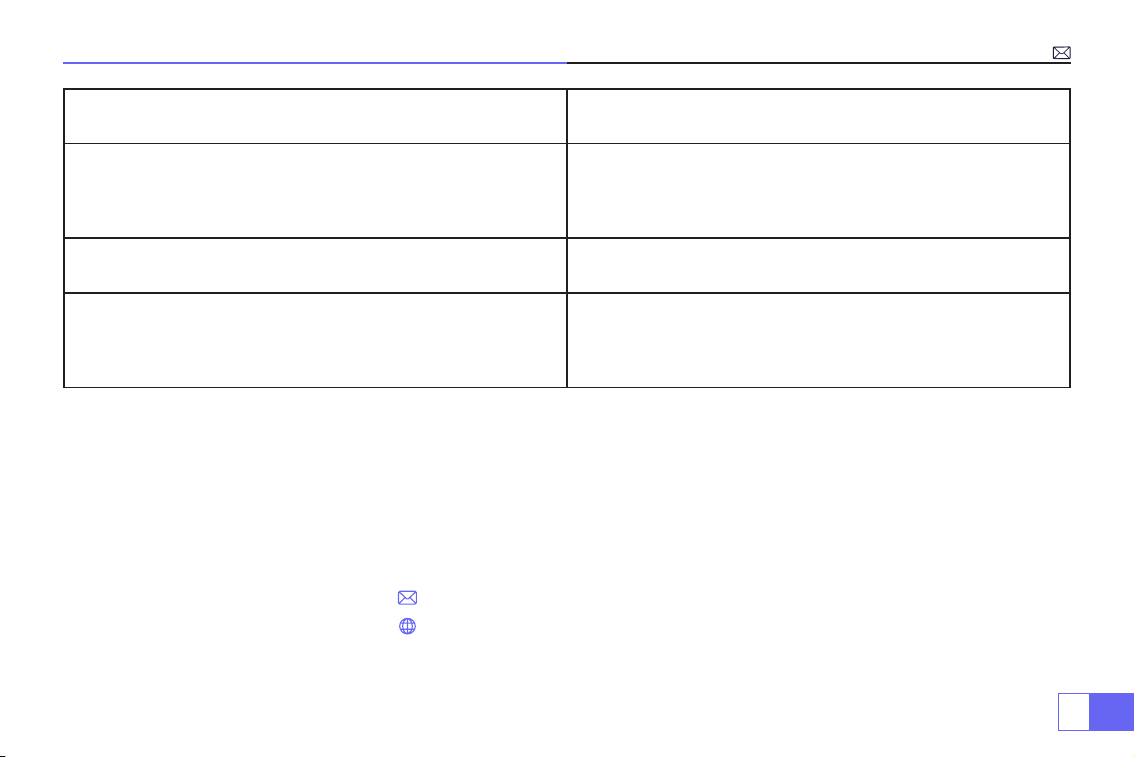
JP
157
お問い合わせ:
問題 対応
Bluetooth スピーカーに対応していない
1) プロジェクタは、JBL の一部のバージョンの Bluetooth スピーカー
と互換性がない場合があります。
し、Bluetooth スピーカーのバージョンをお知らせください。
画像に黒い点がある 弊社に連絡して、それらを削除します。
画像がぼやける
画像をはっきり見えるには、以下の 3 つの手順に従ってください。
1. プロジェクターを特にスクリーンに設置してください。
2. 台形補正を調整して、画像を長方形にします。
3. フォーカスダイヤルを調整して、画像をはっきりさせます。
Email:
Website: www.wimius.com
WiMiUS P62 プロジェクターをお買い上げいただき誠にありがとうございます。本機を安全に正しく使用していただくため、
ご使用の前に、この取扱説明書をよくお読みください。
弊社製品に関してご不明な点やご質問、ご要望などございましたら、メール([email protected])にてお気軽にお問
い合わせください。

FCC Statement
This device complies with Part 15 of the FCC Rules. Operation is subject to the following two conditions:
(1)This device may not cause harmful interference, and
(2)This device must accept any interference received, including interference that may cause undesired operation.
Warning: Changes or modifications not expressly approved by the party responsible for compliance could void the user's authority to operate the
equipment.
Note: This equipment has been tested and found to comply with the limits for a Class B digital device, pursuant to Part 15 of the FCC Rules. These limits are
designed to provide reasonable protection against harmful interference in a residential installation. This equipment generates uses and can radiate radio
frequency energy and, if not installed and used in accordance with the instructions, may cause harmful interference to radio communications. However,
there is no guarantee that interference will not occur in a particular installation. If this equipment does cause harmful interference to radio or television
reception, which can be determined by turning the equipment off and on, the user is encouraged to try to correct the interference by one or more of the
following measures:
Reorient or relocate the receiving antenna.
Increase the separation between the equipment and receiver.
Connect the equipment into an outlet on a circuit different from that to which the receiver is connected.
Consult the dealer or an experienced radio/TV technician for help.
Power Input: AC100-240V, 50-60HZ, 110W
FCC ID: 2A4K9-U5
FCC Radiation Exposure Statement
This equipment complies with FCC radiation exposure limits set forth for an uncontrolled environment. This equipment should be installed and operated
with minimum distance 20cm between the radiator & your body.
This device contains licence-exempt transmitter(s)/receiver(s) that comply withInnovation, Science and Economic DevelopmentCanada’s licence-
exempt RSS(s). Operation is subject to the following two conditions:
(1)This device may not cause interference.
(2)This device must accept any interference, including interference that may cause undesired operation of the device.
L’émetteur/récepteur exempt de licence contenu dans le présent appareil est conforme aux CNR d’Innovation, Sciences et Développement économique

Canada applicables aux appareils radio exempts de licence. L’exploitation est autorisée aux deux conditions suivantes :
(1)L' appareil ne doit pas produire de brouillage;
(2)L' appareil doit accepter tout brouillage radioélectrique subi, même si le brouillage est susceptible d' en compromettre le fonctionnement.
This equipment complies with IC exposure limits set forth for an uncontrolled environment. This equipment shall be installed and operated with minimum
distance 20cm between the radiator & body.
Correct Disposal of this product
This marking indicates that this product should not be disposed with other household wastes throughout
the EU. To prevent possible harm to the environment or human health from uncontrolled waste disposal,
recycle it responsibly to promote the sustainable reuse of material resources. To return your used device,
please use the return and collection systems or contact the retailer where the product was purchased.
They can take this product for environmental safe recycling.
Declaration of Conformity
We (Manufacturer is responsible for this declaration)
YABER TECHNOLOGIES CO.,LIMITED
(Company name)
Room 406, 4 Floor, B Building, BanTian International Center, HuanCheng South Road, BanTian Street, LongGang
District, Shenzhen
(Company address)
declare under our sole responsibility that the product
Trade name: MiMiUS
Equipment: Entertainment Projector

Model No. : P62
to which this declaration relates is in conformity with the essential requirement set out in the Council Directive on the
Approximation of the laws of the Member States relating to RED Directive(2014/53/EU) & RoHS(2011/65/EU) product
is responsible to afx CE marking, the following standards were applied:
EN 62368-1:2014+A11:2017
EN IEC 62311:2020
ETSI EN 301 489-1 V2.2.3(2019-11)
ETSI EN 301 489-17 V3.2.4(2020-09)
EN 55032:2015
EN 55035:2017
EN 61000-3-2:2019
EN 61000-3-3:2013+A1:2019
ETSI EN 300 328 V2.2.2(2019-07)IEC62321-3-1:2013
IEC62321-4:2013
IEC62321-5:2013
IEC62321-6:2015
IEC62321-7-1:2015
IEC62321-7-2:2017
IEC62321-8:2017
Full Name: George.wang Position: Approbation Manager
Signature: George.wang Place/Date: Shenzhen,China/Mar.10-2022