User Manual
GUITAR LINK UCG102
The Ultimate Guitar-to-USB Interface for Recording and
Jamming with your PC/Mac or iOS device
V 3.0
2 GUITAR LINK UCG102
(EN)
Safety Instruction
1. Read these instructions.
2. Keep these instructions.
3. Heed all warnings.
4. Follow all instructions.
5. Do not use this apparatus near water.
6. Clean only with dry cloth.
7. Do not block any ventilation openings. Install in accordance
with the manufacturer’s instructions.
8. Do not install near any heat sources such as radiators, heat
registers, stoves, or other apparatus (including ampliers) that
produce heat.
9. Use only attachments/accessories specied by the
manufacturer.
10. Use only with the cart, stand, tripod, bracket,
or table specied by the manufacturer, or sold with
the apparatus. When a cart is used, use caution when
moving the cart/apparatus combination to avoid
injury from tip-over.
11. Correct disposal of this product: This symbol
indicates that this product must not be disposed of
with household waste, according to the WEEE
Directive (2012/19/EU) and your national law. This
product should be taken to a collection center licensed for the
recycling of waste electrical and electronic equipment (EEE).
Themishandling of this type of waste could have a possible
negative impact on the environment and human health due to
potentially hazardous substances that are generally associated
with EEE. At the same time, your cooperation in the correct
disposal of this product will contribute to the ecient use of
natural resources. For more information about where you can
take your waste equipment for recycling, please contact your
local city oce, or your household waste collection service.
12. Do not install in a conned space, such as a book case or
similar unit.
13. Do not place naked ame sources, such as lighted candles,
on the apparatus.
(ES)
Instrucción de seguridad
1. Lea las instrucciones.
2. Conserve estas instrucciones.
3. Preste atención a todas las advertencias.
4. Siga todas las instrucciones.
5. No use este aparato cerca del agua.
6. Limpie este aparato con un paño seco.
7. No bloquee las aberturas de ventilación. Instale el equipo de
acuerdo con las instrucciones del fabricante.
3User Manual
8. No instale este equipo cerca de fuentes de calor tales como
radiadores, acumuladores de calor, estufas u otros aparatos
(incluyendo amplicadores) que puedan producir calor.
9. Use únicamente los dispositivos o accesorios especicados
por el fabricante.
10. Use únicamente la carretilla, plataforma,
trípode, soporte o mesa especicados por el
fabricante o suministrados junto con el equipo.
Altransportar el equipo, tenga cuidado para evitar daños y caídas
al tropezar con algún obstáculo.
11.
Cómo debe deshacerse
de este aparato:
Estesímbolo indica que este aparato no debe ser
tratado como basura orgánica, según lo indicado en
la Directiva WEEE (2012/19/EU) y a las normativas
aplicables en su país. En lugar de ello deberá llevarlo al punto
limpio más cercano para el reciclaje de sus elementos eléctricos /
electrónicos (EEE). Al hacer esto estará ayudando a prevenir las
posibles consecuencias negativas para el medio ambiente y la
salud que podrían ser provocadas por una gestión inadecuada de
este tipo de aparatos. Además, el reciclaje de materiales ayudará
a conservar los recursos naturales. Para más información acerca
del reciclaje de este aparato, póngase en contacto con el
Ayuntamiento de su ciudad o con el punto limpio local.
12. No instale esta unidad en un espacio muy reducido, tal como
encastrada en una librería o similar.
13. No coloque objetos con llama, como una vela encendida,
sobre este aparato.
(FR)
Consignes de sécurité
1. Lisez ces consignes.
2. Conservez ces consignes.
3. Respectez tous les avertissements.
4. Respectez toutes les consignes d’utilisation.
5. N’utilisez jamais l’appareil à proximité d’un liquide.
6. Nettoyez l’appareil avec un chion sec.
7. Veillez à ne pas empêcher la bonne ventilation de l’appareil
via ses ouïes de ventilation. Respectez les consignes du fabricant
concernant l’installation de l’appareil.
8. Ne placez pas l’appareil à proximité d’une source de chaleur
telle qu’un chauage, une cuisinière ou tout appareil dégageant
de la chaleur (y compris un ampli de puissance).
9. Utilisez exclusivement des accessoires et des appareils
supplémentaires recommandés par le fabricant.
10. Utilisez exclusivement des chariots, des diables,
des présentoirs, des pieds et des surfaces de travail
recommandés par le fabricant ou livrés avec le produit.
Déplacez précautionneusement tout chariot ou diable chargé pour
éviter d’éventuelles blessures en cas de chute.
4 GUITAR LINK UCG102
11. Mise au rebut appropriée de ce produit: Ce
symbole indique qu’en accord avec la directive DEEE
(2012/19/EU) et les lois en vigueur dans votre pays, ce
produit ne doit pas être jeté avec les déchets
ménagers. Ce produit doit être déposé dans un point
de collecte agréé pour le recyclage des déchets d’équipements
électriques et électroniques (EEE). Une mauvaise manipulation de
ce type de déchets pourrait avoir un impact négatif sur
l’environnement et la santé à cause des substances potentiellement
dangereuses généralement associées à ces équipements. En même
temps, votre coopération dans la mise au rebut de ce produit
contribuera à l’utilisation ecace des ressources naturelles. Pour
plus d’informations sur l’endroit où vous pouvez déposer vos
déchets d’équipements pour le recyclage, veuillez contacter votre
mairie ou votre centre local de collecte des déchets.
12. N’installez pas l’appareil dans un espace conné tel qu’une
bibliothèque ou meuble similaire.
13. Ne placez jamais d’objets enammés, tels que des bougies
allumées, sur l’appareil.
(DE)
Wichtige Sicherheitshinweise
1. Lesen Sie diese Hinweise.
2. Bewahren Sie diese Hinweise auf.
3. Beachten Sie alle Warnhinweise.
4. Befolgen Sie alle Bedienungshinweise.
5. Betreiben Sie das Gerät nicht in der Nähe von Wasser.
6. Reinigen Sie das Gerät mit einem trockenen Tuch.
7. Blockieren Sie nicht die Belüftungsschlitze. Beachten Sie
beim Einbau des Gerätes die Herstellerhinweise.
8. Stellen Sie das Gerät nicht in der Nähe von Wärmequellen
auf. Solche Wärmequellen sind z. B. Heizkörper, Herde oder andere
Wärme erzeugende Geräte (auch Verstärker).
9. Verwenden Sie nur Zusatzgeräte/Zubehörteile, die laut
Hersteller geeignet sind.
10.
Verwenden Sie nur Wagen, Standvorrich-
tungen, Stative, Halter oder Tische, die vom
Hersteller benannt oder im Lieferumfang
des Geräts
enthalten sind. Falls Sie einen Wagen benutzen, seien Sie
vorsichtig beim Bewegen der Wagen- Gerätkombination, um Verletzungen
durch Stolpern zu vermeiden.
11. Korrekte Entsorgung dieses Produkts: Dieses
Symbol weist darauf hin, das Produkt entsprechend der
WEEE Direktive (2012/19/EU) und der jeweiligen
nationalen Gesetze nicht zusammen mit Ihren
Haushaltsabfällen zu entsorgen. DiesesProdukt sollte bei einer
autorisierten Sammelstelle für Recycling elektrischer und
elektronischer Geräte (EEE) abgegeben werden. Wegen bedenklicher
Substanzen, diegenerell mit elektrischen und elektronischen Geräten
5User Manual
in Verbindung stehen, könnte eine unsachgemäße Behandlung dieser
Abfallart eine negative Auswirkung auf Umwelt und Gesundheit
haben. Gleichzeitig gewährleistet Ihr Beitrag zur richtigen Entsorgung
dieses Produkts die eektive Nutzung natürlicher Ressourcen.
Fürweitere Informationen zur Entsorgung Ihrer Geräte bei einer
Recycling-Stelle nehmen Sie bitte Kontakt zum zuständigen
städtischen Büro, Entsorgungsamt oder zu Ihrem
Haushaltsabfallentsorger auf.
12. Installieren Sie das Gerät nicht in einer beengten
Umgebung, zum Beispiel Bücherregal oder ähnliches.
13. Stellen Sie keine Gegenstände mit oenen Flammen, etwa
brennende Kerzen, auf das Gerät.
(PT)
Instruções de Seguranç Importantes
1. Leia estas instruções.
2. Guarde estas instruções.
3. Preste atenção a todos os avisos.
4. Siga todas as instruções.
5. Não utilize este dispositivo perto de água.
6. Limpe apenas com um pano seco.
7. Não obstrua as entradas de ventilação. Instale de acordo
com as instruções do fabricante.
8. Não instale perto de quaisquer fontes de calor tais como
radiadores, bocas de ar quente, fogões de sala ou outros
aparelhos (incluindo amplicadores) que produzam calor.
9. Utilize apenas ligações/acessórios especicados
pelofabricante.
10. Utilize apenas com o carrinho, estrutura, tripé,
suporte, ou mesa especicados pelo fabricante ou
vendidos com o dispositivo. Quando utilizar um
carrinho, tenha cuidado ao mover o conjunto carrinho/
dispositivo para evitar danos provocados pela terpidação.
11.
Correcta eliminação deste produto: este símbolo
indica que o produto não deve ser eliminado
juntamente com os resíduos domésticos, segundo a
Directiva REEE (2012/19/EU) e a legislação nacional. Este
produto deverá ser levado para um centro de recolha licenciado para
a reciclagem de resíduos de equipamentos eléctricos e electrónicos
(EEE). O tratamento incorrecto deste tipo de resíduos pode ter um
eventual impacto negativo no ambiente e na saúde humana devido a
substâncias potencialmente perigosas que estão geralmente
associadas aos EEE. Ao mesmo tempo, a sua colaboração para a
eliminação correcta deste produto irá contribuir para a utilização
eciente dos recursos naturais. Para mais informação acerca dos
locais onde poderá deixar o seu equipamento usado para reciclagem,
é favor contactar os serviços municipais locais, a entidade de gestão
de resíduos ou os serviços de recolha de resíduos domésticos.
6 GUITAR LINK UCG102
12. Não instale em lugares connados, tais como estantes ou
unidades similares.
13. Não coloque fontes de chama, tais como velas acesas,
sobreo aparelho.
(IT)
Istruzioni di sicurezza importanti
1. Leggere queste istruzioni.
2. Conservare queste istruzioni.
3. Prestare attenzione a tutti gli avvisi.
4. Applicare tutte le istruzioni.
5. Non utilizzare questo dispositivo vicino l’acqua.
6. Pulire esclusivamente con un panno asciutto.
7. Non bloccare le aperture di ventilazione. Installare in
conformità con le istruzioni del produttore.
8. Non installare vicino a fonti di calore come radiatori,
termoregolatori, stufe o altri apparecchi (inclusi amplicatori)
che producono calore.
9. Utilizzare esclusivamente dispositivi/accessori specicati
dal produttore.
10. Utilizzare solo carrelli, supporti, treppiedi,
stae o tavoli indicati dal produttore o venduti con
l’apparecchio. Utilizzando un carrello, prestare
attenzione quando si sposta la combinazione carrello/
apparecchio per evitare lesioni dovute al ribaltamento.
11.
Smaltimento corretto di questo prodotto: questo
simbolo indica che questo dispositivo non deve essere
smaltito insieme ai riuti domestici, secondo la Direttiva
RAEE (2012/19 / UE) e la vostra legislazione nazionale.
Questo prodotto deve essere portato in un centro di raccolta
autorizzato per il riciclaggio di riuti di apparecchiature elettriche ed
elettroniche (RAEE). La cattiva gestione di questo tipo di riuti
potrebbe avere un possibile impatto negativo sull’ambiente e sulla
salute umana a causa di sostanze potenzialmente pericolose che sono
generalmente associate alle apparecchiature elettriche ed
elettroniche. Nello stesso tempo la vostra collaborazione al corretto
smaltimento di questo prodotto contribuirà all’utilizzo eciente delle
risorse naturali. Per ulteriori informazioni su dove è possibile
trasportare le apparecchiature per il riciclaggio vi invitiamo a
contattare l’ucio comunale locale o il servizio di raccolta dei
riutidomestici.
12. Non installare in uno spazio ristretto, come in una libreria o
in una struttura simile.
13. Non collocare sul dispositivo fonti di amme libere, come
candele accese.
(NL)
Belangrijke veiligheidsvoorschriften
1. Lees deze voorschriften.
2. Bewaar deze voorschriften.
3. Neem alle waarschuwingen in acht.

7User Manual
4. Volg alle voorschriften op.
5. Gebruik dit apparaat niet in de buurt van water.
6. Reinig het uitsluitend met een droge doek.
7. Let erop geen van de ventilatie-openingen te bedekken. Plaats
en installeer het volgens de voor- schriften van de fabrikant.
8. Het apparaat mag niet worden geplaatst in de buurt van
radiatoren, warmte-uitlaten, kachels of andere zaken (ook
versterkers) die warmte afgeven.
9. Gebruik uitsluitend door de producent gespeci- ceerd
toebehoren c.q. onderdelen.
10. Gebruik het apparaat uitsluitend in combinatie
met de wagen, het statief, de driepoot, de beugel of
tafel die door de producent is aangegeven, of die in
combinatie met het apparaat wordt verkocht. Bij gebruik van een
wagen dient men voorzichtig te zijn bij het verrijden van de
combinatie wagen/apparaat en letsel door vallen te voorkomen.
11. Correcte afvoer van dit product: dit symbool
geeft aan dat u dit product op grond van de
AEEA-richtlijn (2012/19/EU) en de nationale wetgeving
van uw land niet met het gewone huishoudelijke afval
mag weggooien. Dit product moet na aoop van de
nuttige levensduur naar een ociële inzamelpost voor afgedankte
elektrische en elektronische apparatuur (AEEA) worden gebracht,
zodat het kan worden gerecycleerd. Vanwege de potentieel
gevaarlijke stoen die in elektrische en elektronische apparatuur
kunnen voorkomen, kan een onjuiste afvoer van afval van het
onderhavige type een negatieve invloed op het milieu en de
menselijke gezondheid hebben. Een juiste afvoer van dit product is
echter niet alleen beter voor het milieu en de gezondheid, maar
draagt tevens bij aan een doelmatiger gebruik van de natuurlijke
hulpbronnen. Voor meer informatie over de plaatsen waar u uw
afgedankte apparatuur kunt inleveren, kunt u contact opnemen
met uw gemeente of de plaatselijke reinigingsdienst.
12. Installeer niet in een kleine ruimte, zoals een boekenkast of
iets dergelijks.
13. Plaats geen open vlammen, zoals brandende kaarsen,
ophet apparaat.
(SE)
Viktiga säkerhetsanvisningar
1. Läs dessa anvisningar.
2. Spara dessa anvisningar.
3. Beakta alla varningar.
4. Följ alla anvisningar.
5. Använd inte apparaten i närheten av vatten.
6. Rengör endast med torr trasa.
7. Blockera inte ventilationsöppningarna. Installera enligt
tillverkarens anvisningar.
8 GUITAR LINK UCG102
8. Installera aldrig intill värmekällor som värme- element,
varmluftsintag, spisar eller annan utrustning som avger värme
(inklusive förstärkare).
9. Använd endast tillkopplingar och tillbehör som angetts
avtillverkaren.
10. Använd endast med vagn, stativ, trefot,
hållare eller bord som angetts av tillverkaren, eller
som sålts till-sammans med apparaten. Om du
använder en vagn, var försiktig, när du föryttar kombinationen
vagn-apparat, för att förhindra olycksfall genom snubbling.
11. Kassera produkten på rätt sätt: den här
symbolen indikerar att produkten inte ska kastas i
hushållssoporna, enligt WEEE direktivet (2012/19/
EU) och gällande, nationell lagstiftning. Produkten
ska lämnas till ett auktoriserat återvinningsställe för
elektronisk och elektrisk utrustning (EEE). Om den här sortens
avfall hanteras på fel sätt kan miljön, och människors hälsa,
påverkas negativt på grund av potentiella risksubstanser som
ofta associeras med EEE. Avfallshanteras produkten däremot på
rätt sätt bidrar detta till att naturens resurser används på ett
bra sätt. Kontakta kommun, ansvarig förvaltning eller
avfallshanteringsföretag för mer information om
återvinningscentral där produkten kan lämnas.
12. Installera inte i ett trångt utrymme, t.ex. i en bokhylsa eller
liknande enhet.
13. Placera inte källor med öppen eld, t.ex. tända ljus,
påapparaten.
(PL)
Ważne informacje o bezpieczeństwie
1. Proszę przeczytać poniższe wskazówki.
2. Proszę przechowywać niniejszą instrukcję.
3. Należy przestrzegać wszystkich wskazówek
ostrzegawczych.
4. Należy postępować zgodnie z instrukcją obsługi.
5. Urządzenia nie wolno używać w pobliżu wody.
6. Urządzenie można czyścić wyłącznie suchą szmatką.
7. Nie zasłaniać otworów wentylacyjnych. W czasie podłączania
urządzenia należy przestrzegać zaleceń producenta.
8. Nie stawiać urządzenia w pobliżu źródeł ciepła takich,
jak grzejniki, piece lub urządzenia produkujące ciepło
(np.wzmacniacze).
9. Używać wyłącznie sprzętu dodatkowego i akcesoriów
zgodnie z zaleceniami producenta.
10. Używać jedynie zalecanych przez producenta
lub znajdujących się w zestawie wózków, stojaków,
statywów, uchwytów i stołów. W przypadku
posługiwania się wózkiem należy zachować szczególną
ostrożność w trakcie przewożenia zestawu, aby uniknąć
niebezpieczeństwa potknięcia się i zranienia.
9User Manual
11. Prawidłowa utylizacja produktu: Ten symbol
wskazuje, że tego produktu nie należy wyrzucać
razem ze zwykłymi odpadami domowymi, tylko
zgodnie z dyrektywą w sprawie zużytego sprzętu
elektrycznego i elektronicznego (WEEE) (2012/19/
EU) oraz przepisami krajowymi. Niniejszy produkt należy
przekazać do autoryzowanego punktu zbiórki zużytego sprzętu
elektrycznego i elektronicznego. Niewłaściwe postępowanie z
tego typu odpadami może wywołać szkodliwe działanie na
środowisko naturalnej i zdrowie człowieka z powodu
potencjalnych substancji niebezpiecznych zaliczanych jako
zużyty sprzęt elektryczny i elektroniczny. Jednocześnie, Twój
wkład w prawidłową utylizację niniejszego produktu przyczynia
się do oszczędnego wykorzystywania zasobów naturalnych.
Szczegółowych informacji o miejscach, w których można
oddawać zużyty sprzęt do recyklingu, udzielają urzędy miejskie,
przedsiębiorstwa utylizacji odpadów lub najbliższy zakład
utylizacji odpadów.
12. Nie instaluj w ograniczonej przestrzeni, takiej jak półka na
książki lub podobny zestaw.
13. Nie stawiaj na urządzeniu źródeł otwartego ognia, takich
jak zapalone świece.
(JP) 安全指示
1. これらの指示をお読みください。
2. これら の 指 示を 守 ってください 。
3. すべ ての 警 告に注 意してください 。
4. すべての指示に従ってください。
5. この装置を水の近くで使用しないでください。
6. 乾 いた布 で の み 拭 いてください 。
7. 換気口をふさがないでください。製造元の指
示に従ってインストールしてください。
8. ラジエーター、ヒートレジスター、
ス ト ー ブ 、ま た は 熱 を 発 生 す る そ の 他 の
装置 (アンプを含む) などの熱源の近くに設置し
ないでください。
9. 製 造 元が指定したアタッチメント/アクセサリ
の み を 使 用してください 。
10. 製 造 元 が 指 定 し た 、ま た は
装置と一緒に販 売されたカート、スタン
ド、三脚、ブラケット、
またはテーブルでのみ使用してください。カート
を使用する場合は、カートと装置の組み合わせを
移動するときに、転 倒による怪我を防ぐように注
意してください 。
10 GUITAR LINK UCG102
11. この
製品
の正しい廃棄: この記号
は、
WEEE
指令
(2012/19 / EU)
および国内法
に 従 っ て 、こ の 製 品 を 家 庭 ご み と 一 緒 に
廃 棄しては ならないことを示していま
す。この製品は、廃電気電子機器
(EEE)
のリサ イク
ルを許可された収集センターに持ち込む必要があ
り ま す 。こ の 種 の 廃 棄 物 の 取 り 扱 い を 誤 る と 、一
般に
EEE
に関連する潜在的に危険な物質が原因
で、環境と人間の健康に悪影響を与える可能性が
あります。同時に、この製品の正しい廃棄にご協
力いただくことで、天然資源の効率的な利用に貢
献 し ま す。廃 棄 物 を リ サ イクル す る 場 所 の 詳 細 に
つ い て は 、最 寄 り の 市 役 所 ま た は 家 庭 ご み 収 集 サ
ービスにお問い合わせください。
12. 本棚などの狭い場 所には設置しないでくだ
さい。
13. 火のともったろうそくなどの 裸 火 源を 装 置の
上に置かないでください。
(CN) 安全须知
1. 请阅读这些说明。
2. 请妥善保存这些说明。
3. 请注意所有的警示。
4. 请遵守所有的说明。
5. 请勿在靠近水的地方使用本产品。
6. 请用干布清洁本产品。
7. 请勿堵塞通风孔, 安装本产品时请遵照厂家的
说明, 通风孔不要覆盖诸如报纸、桌布和窗帘等物
品而妨碍通风。
8. 请勿将本产品安装在热源附近, 如暖气片, 炉子
或其它产生热量的设备 (包括功放器)。
产品上不要放置裸露的火焰源, 如点燃的蜡烛。
9. 请只使用厂家指定的附属设备和配 件。
10. 请只使用厂家指定的或随货销售
的手推车, 架子, 三 角架, 支架和桌子。
若使用手推车来搬运设备, 请注意安全
放置设备, 以 避免手推车和设备倾倒而
受伤。

11User Manual
11. 如果液体流入或异物落入设备内, 设备遭雨
淋或受潮, 设备不能正常运作或被摔坏等,
设备受损需进行维修时, 所有维修均须由合格的
维修人员进行维修。

12 GUITAR LINK UCG102
1. Introduction
Thank you for expressing your condence in us by purchasing
the GUITAR LINK UCG102. Your computer will become the
ultimate working platform on which you can use the classic
eects, inthe studio as well as on stage. With a notebook,
aguitar and the UCG102, it is now possible to work on the go,
be it train or hotel. The GUITAR LINK UCG102’s scope of delivery
includes a rst-class modeling software with virtual amps
and eects pedals. Accompany songs in MP3-, WAV- andAIFF-
format which you can play from your PC or Mac computer.
Aheadphone connection with a volume regulator is also
available so that you can enjoy the session with your favorite
volumes undisturbed, entirely after the motto“Plug‘n Rock”.
1.1 Before you get started
1.1.1 Shipment
Your GUITAR LINK UCG102 was carefully packed at the assembly
plant to assure secure transport. Should the condition of the
cardboard box suggest that damage may have taken place,
pleaseinspect the unit immediately and look for physical
indications of damage.
◊ ◊ Damaged equipment should NEVER be sent directly
to us. Please inform the dealer from whom you
acquired the unit immediately as well as the
transportation company from which you took delivery.
Otherwise, all claims for replacement/repair may be
rendered invalid.
◊ ◊ Please always use the original packaging to avoid
damage due to storage or shipping.
◊ ◊ Never let unsupervised children play with the device
or with its packaging.
◊ ◊ Please dispose of all packaging materials in an
environmentally friendly fashion.
1.2 Online registration
Please register your new Behringer equipment right after your
purchase by visiting behringer.com and read the terms and
conditions of our warranty carefully.
Should your Behringer product malfunction, it is our intention
to have it repaired as quickly as possible. To arrange for
warranty service, please contact the Behringer retailer from
13User Manual
whom the equipment was purchased. Should your Behringer
dealer not be located in your vicinity, you may directly contact
one of our subsidiaries. Corresponding contact information is
included in the original equipment packaging (Global Contact
Information/European Contact Information). Should your
country not be listed, please contact the distributor nearest
you. A list of distributors can be found in the support area of our
website (behringer.com).
Registering your purchase and equipment with us helps us
process your repair claims more quickly and eciently.
Thank you for your cooperation!
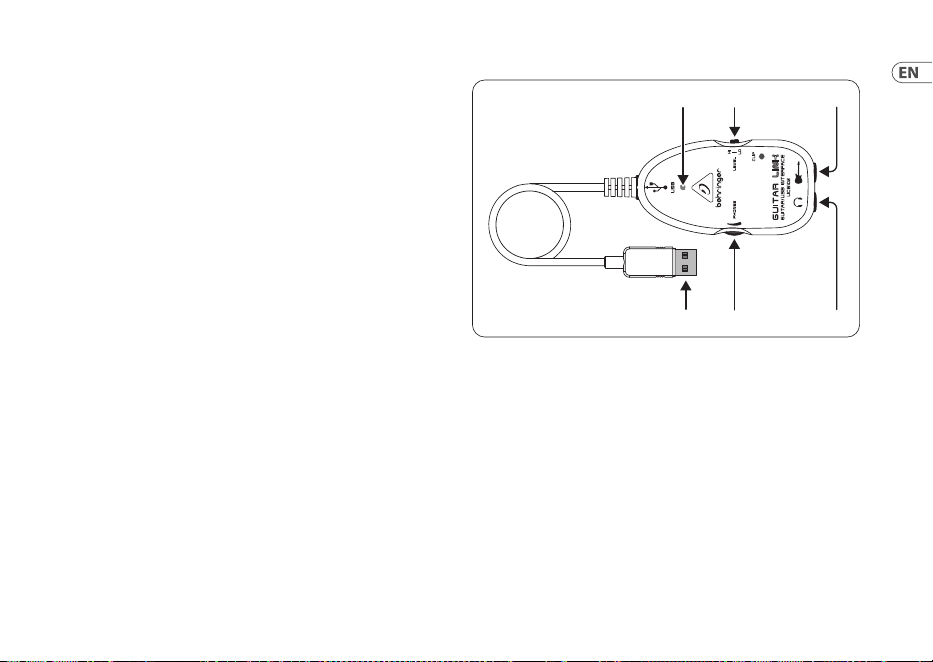
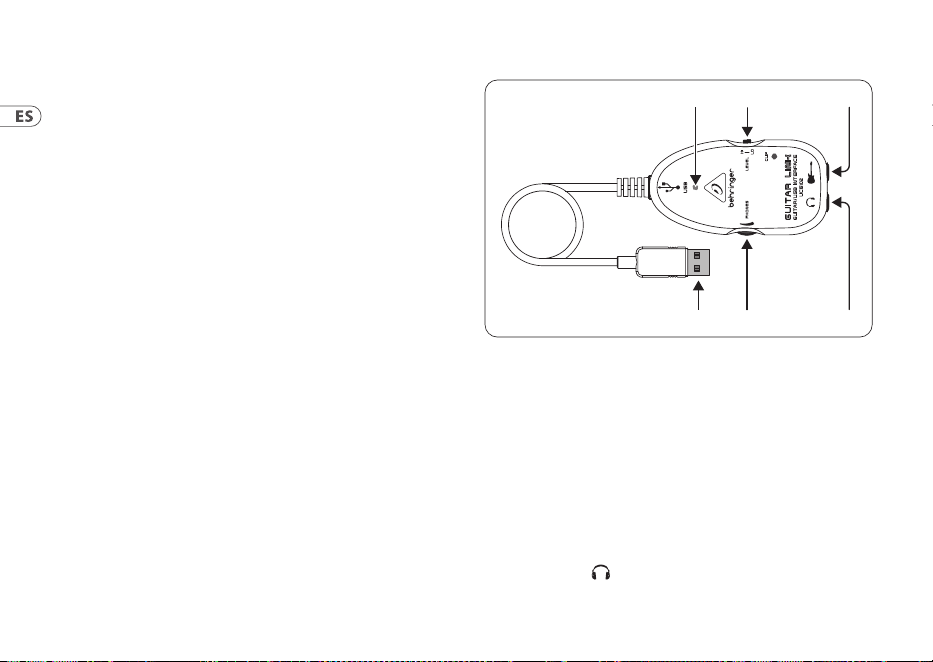
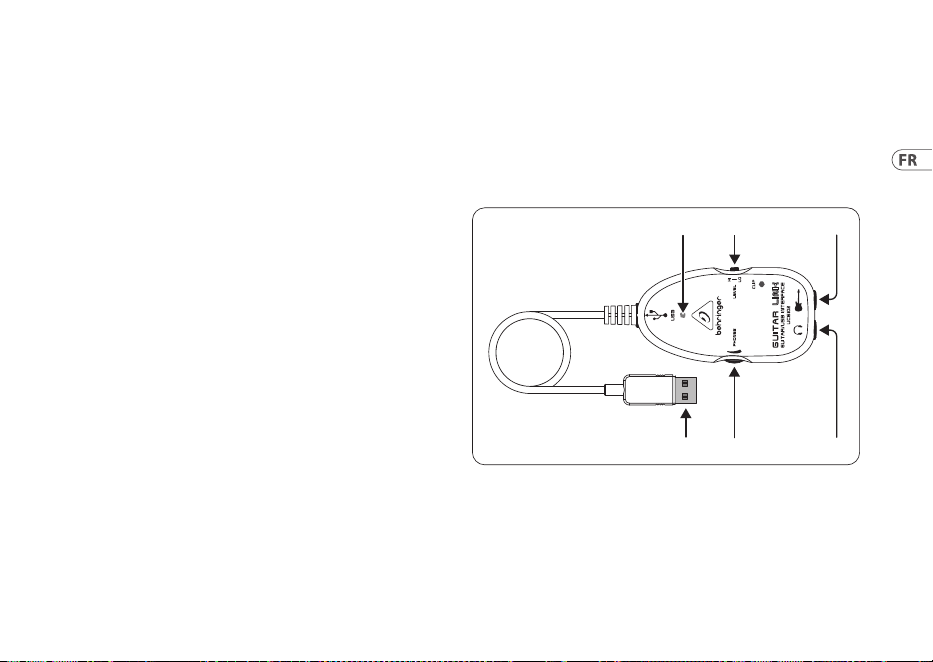
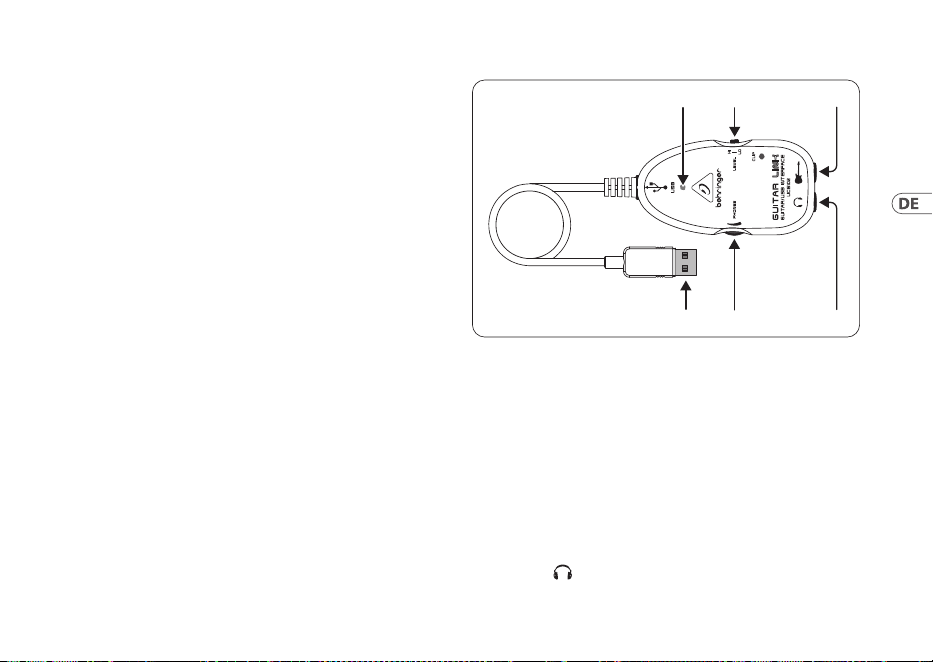
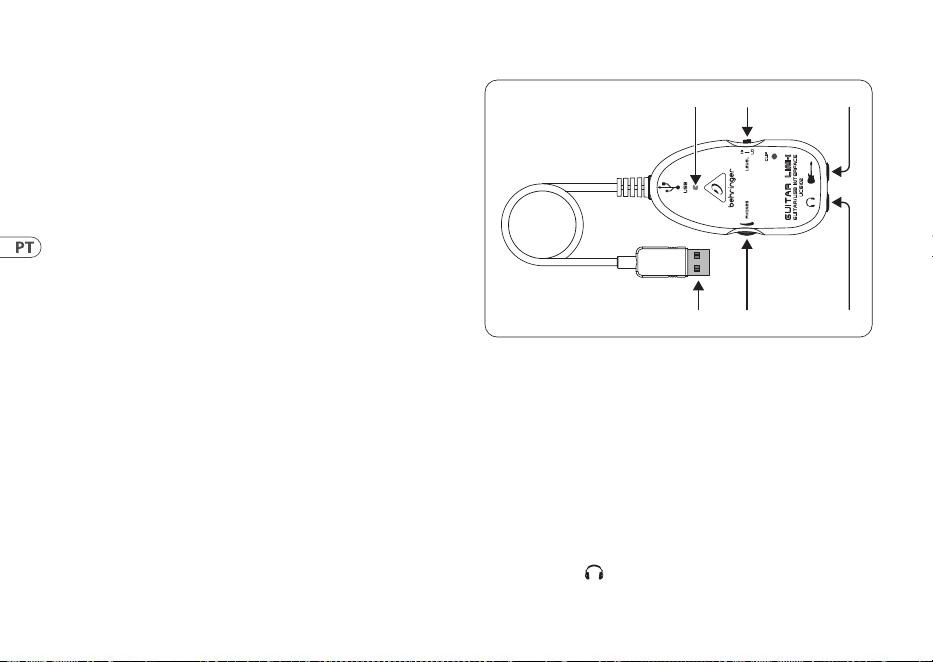
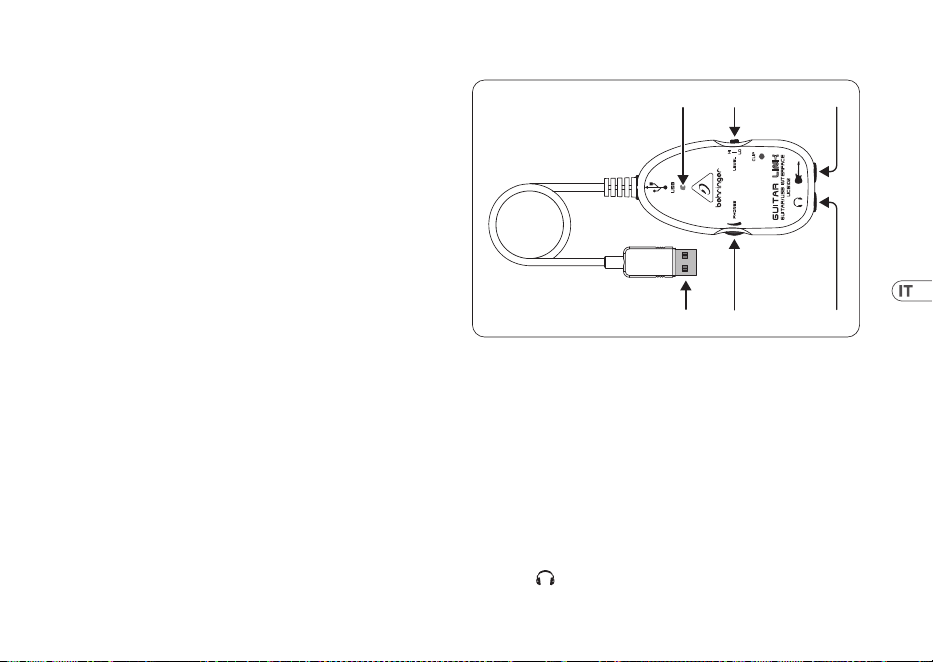
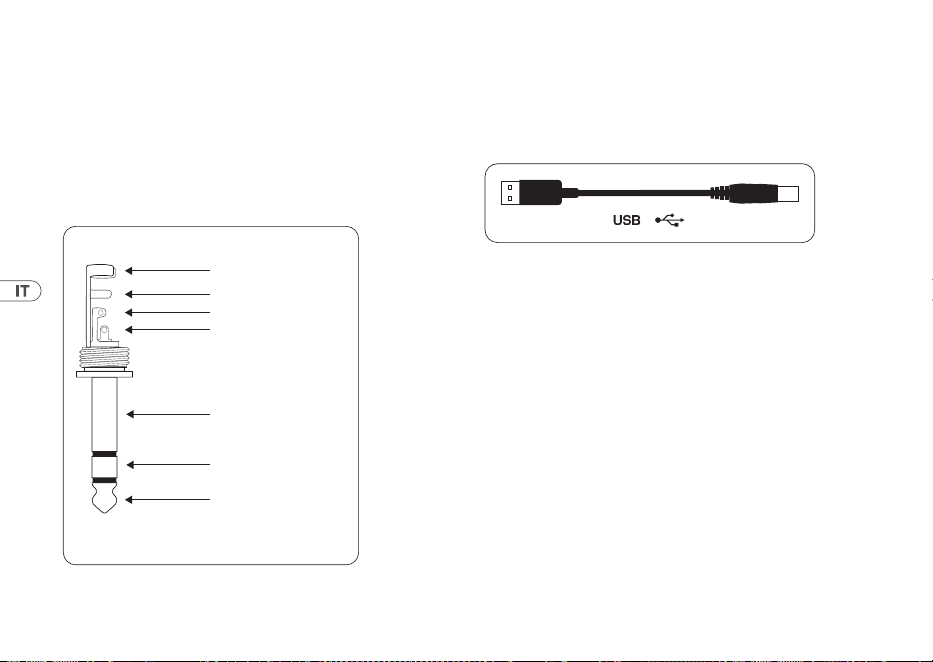
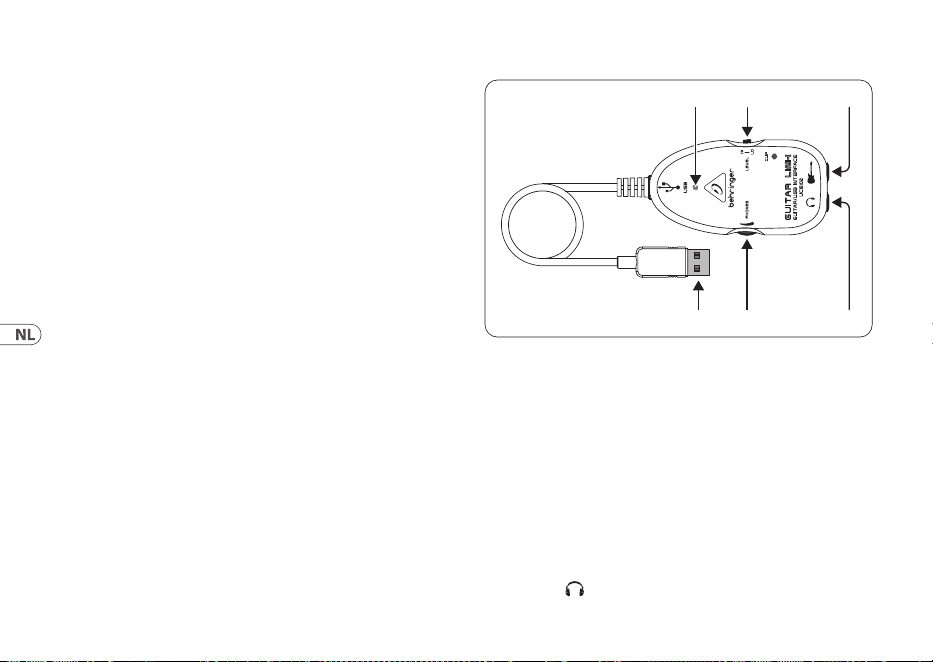
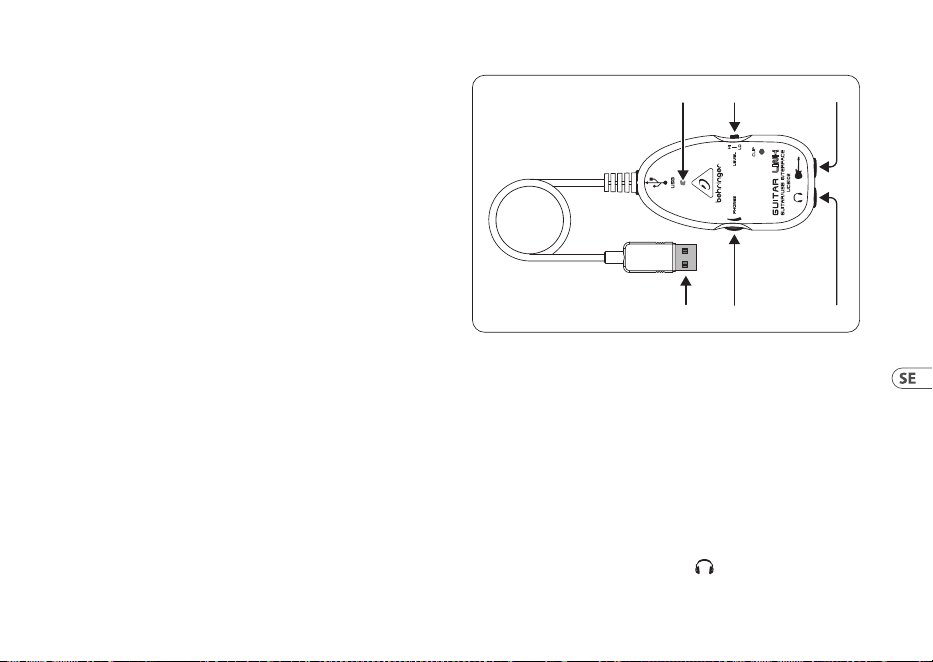
2. Controls and Connections
You can connect the UCG102 directly to an amp by means of
the jack connector and to your PC or Mac computer by using
the USB connector. The USB connection supplies the power for
theUCG102.
(1) (2) (3)
(5) (4)
(6)
Fig. 2.1: Control elements and connections
(1) You can connect the guitar to your computer via USB
connection. The blue control LED (6) indicates that a
connection to the computer has been established.
(2) The VOLUME control adjusts the volume level of the
headphones output. Turn the control fully to the left
before you connect the headphones. Thishelps you avoid
the damage that is caused by high volumesettings.
14 GUITAR LINK UCG102
(3) You can use a commercially available ¼" jack for
the -connection.
◊ ◊ We would like to draw your attention to the fact
that extremely loud sound levels may damage your
hearing as well as your headphones/loudspeakers.
Turn the VOLUME control fully clockwise before you
switch on the unit. Be careful to select a suitable
volume at all times.
(4) You can connect the UCG102 to your guitar via the guitar
input (¼"jack). Use a commercial ¼" mono jack cable.
(5) You can modify the guitar signal with the LEVEL switch.
Athigh signal levels, the CLIP LED (above the Behringer
LOGO) will light up red in which case you should set the
LEVEL switch to LOW.
(6) The blue LED indicates the status of the USB connection.
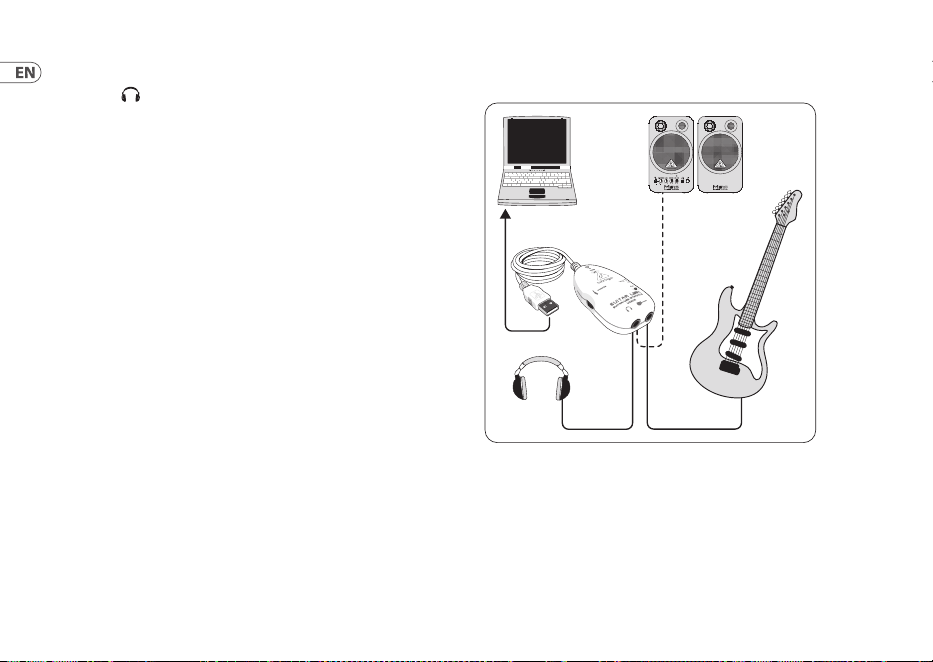
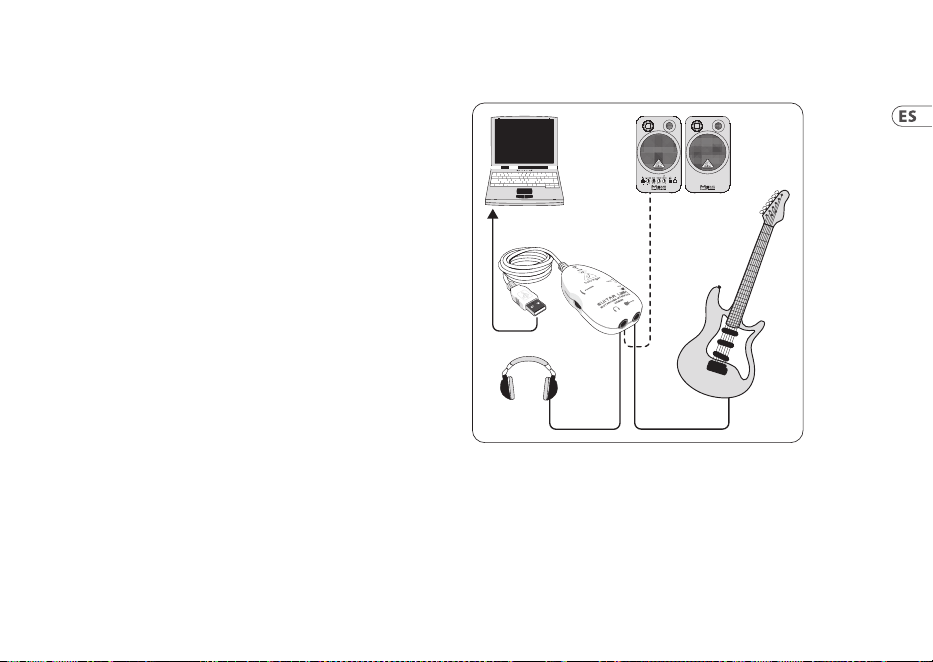
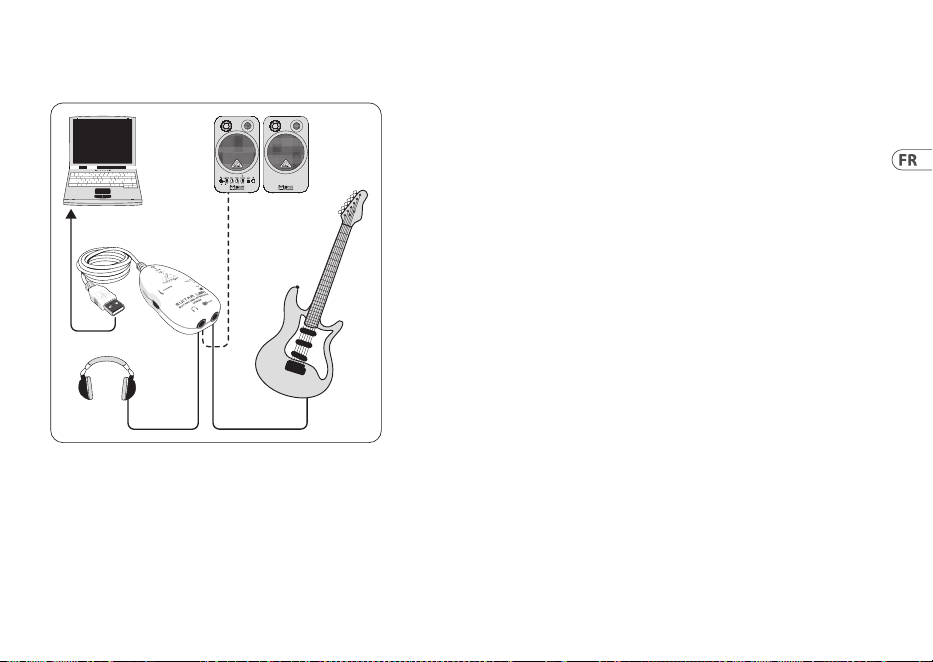
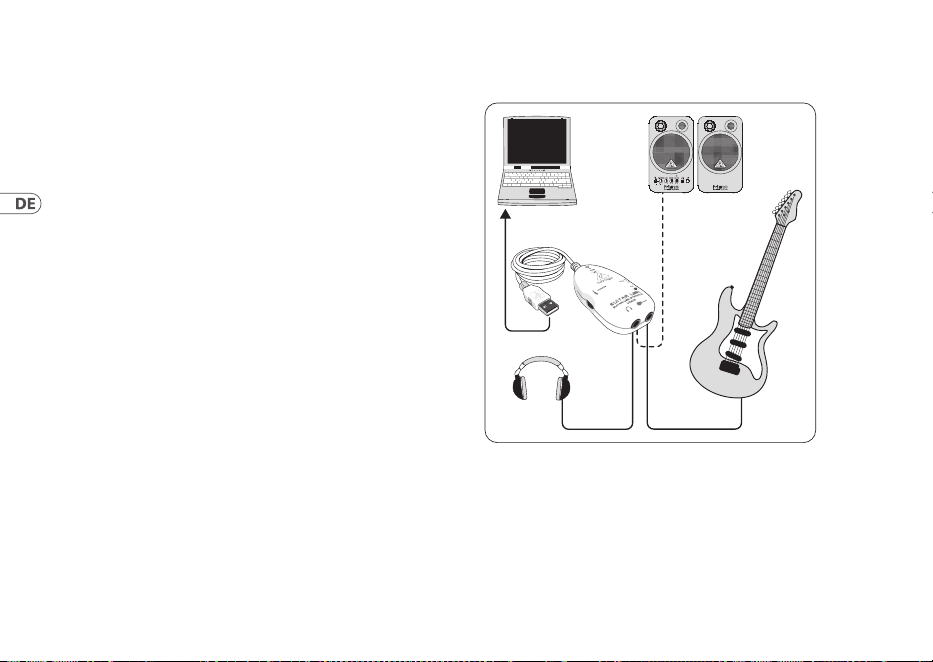
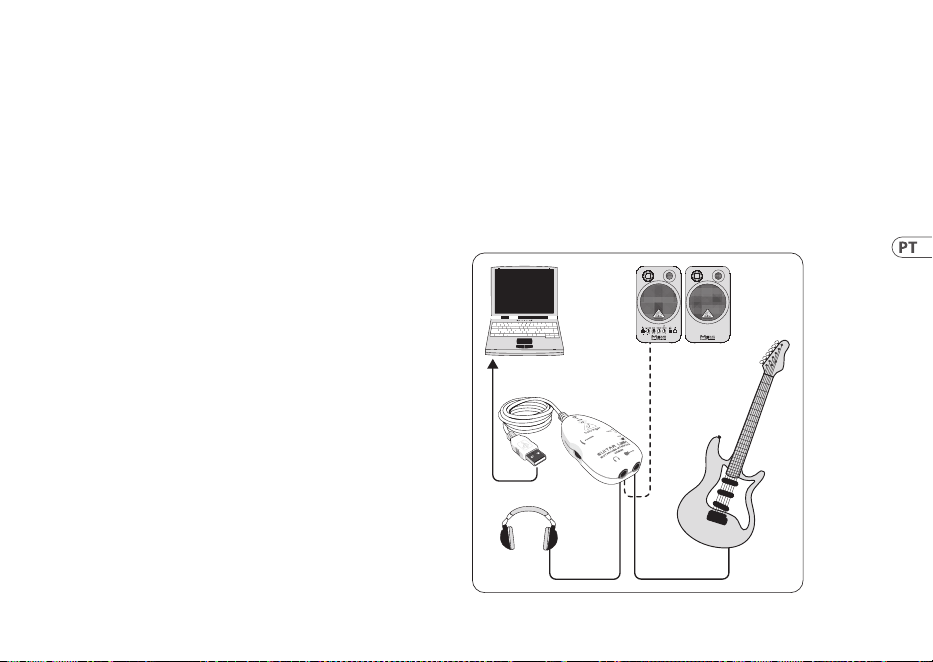
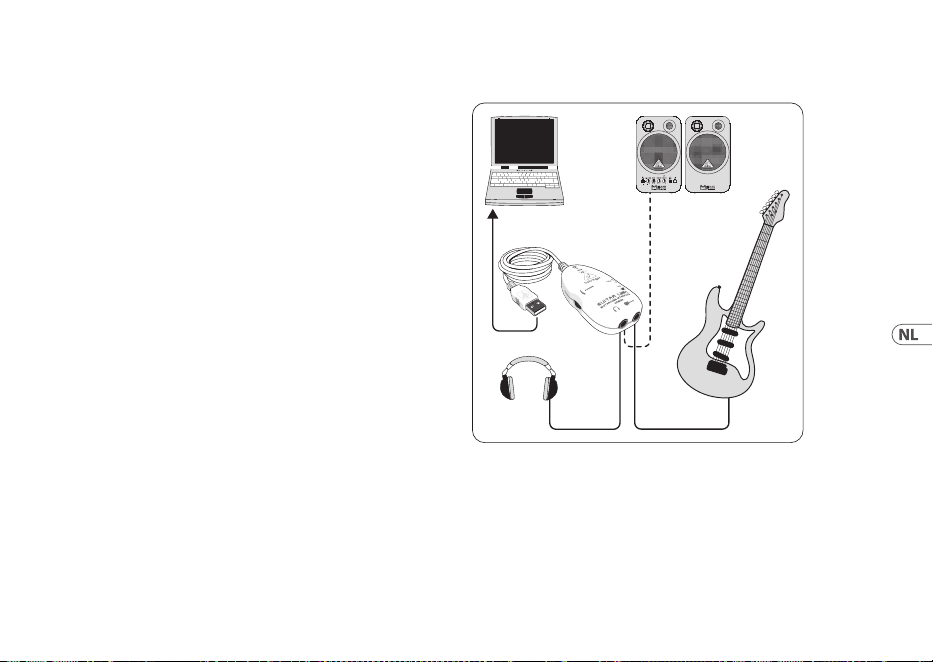
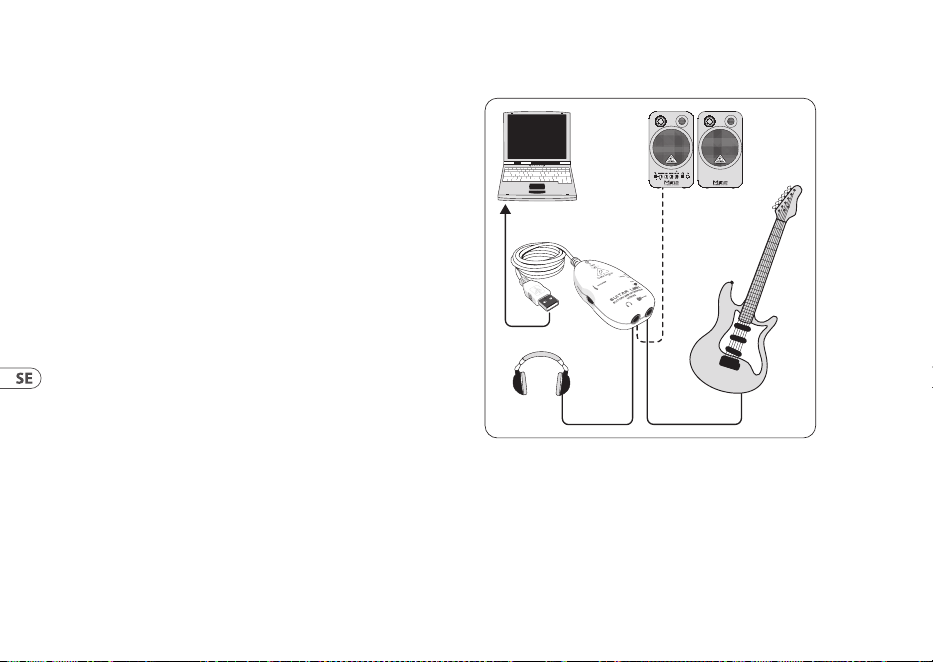
3. Application Example
You can connect the UCG102 directly to your computer in order to
record, play along to a playback or play directly over the modeling
amps and eects. The UCG102 lets you get started immediately,
wherever you are. Simply hook up and start to rock.
3.1 Operation of the connector
UCG102
PC/Mac
Monitor
MS16
(optional)
HPS3000
Guitar
Fig. 3.1: Wiring of the UCG102
Use the USB cable to connect the GUITAR LINK UCG102
toyourcomputer. The USB unit of the UCG102 is bus
powered—noseparate power supply is needed. The blue LED
(6) lights up and the system indicates the connection of a USB
audio unit.
15User Manual
Connect your headphones to the PHONES connector on
theUCG102.
If you don’t want to use your headphones, you can also
connect a pair of active monitors to the PHONES connector—
theBehringer MONITOR SPEAKERS Series, MS16,MS20, MS40,
B2030A or B2031A are perfect choices forthisapplication.
4. Audio Connections
With the integrated USB interface, you can change your
computer to an ultimate recording studio. Whetheryou
rehearse at home or in the studio, the used audio connections
always remain the same.
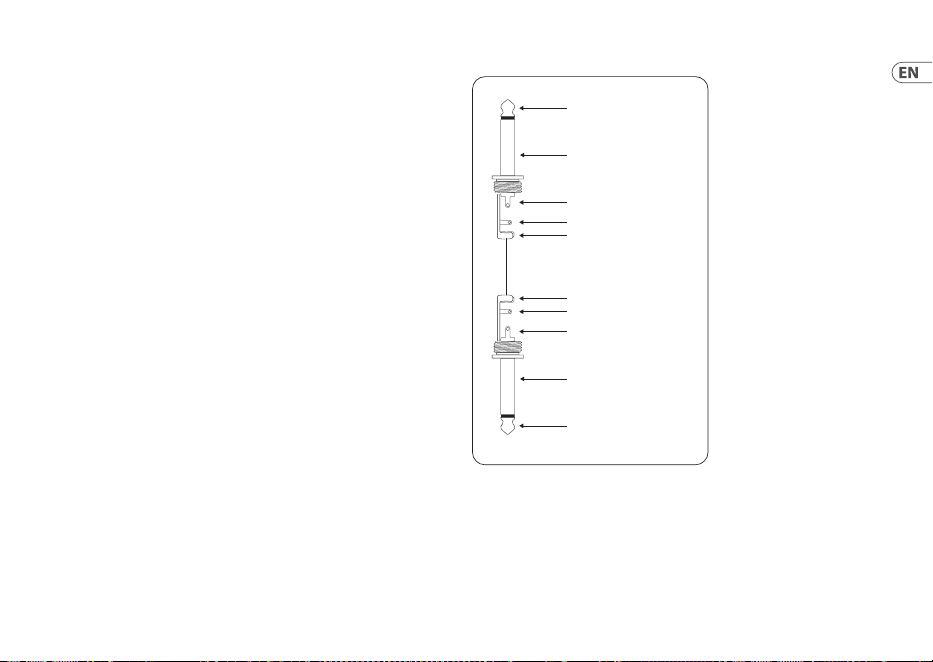
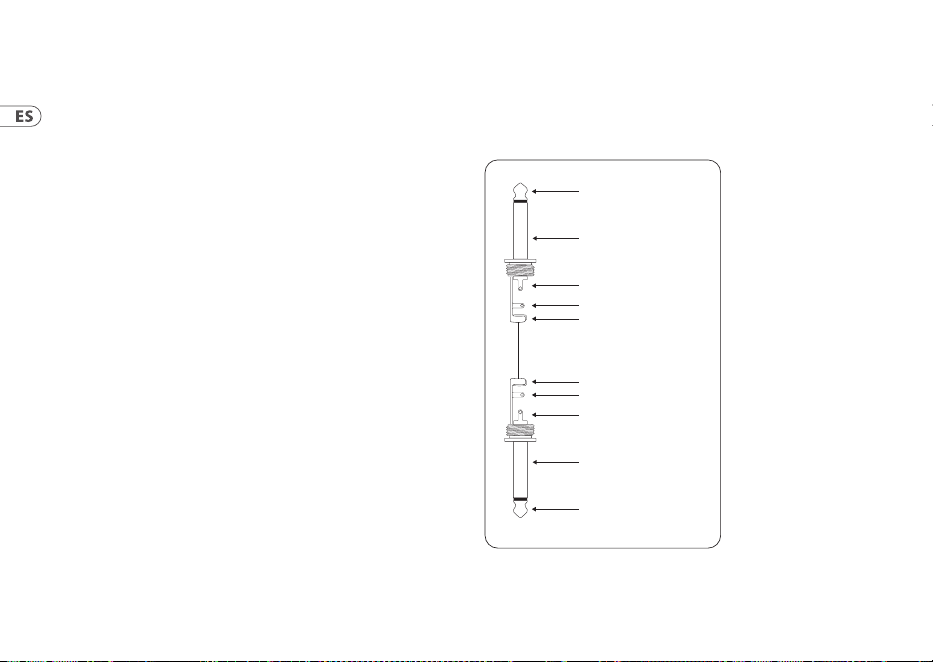
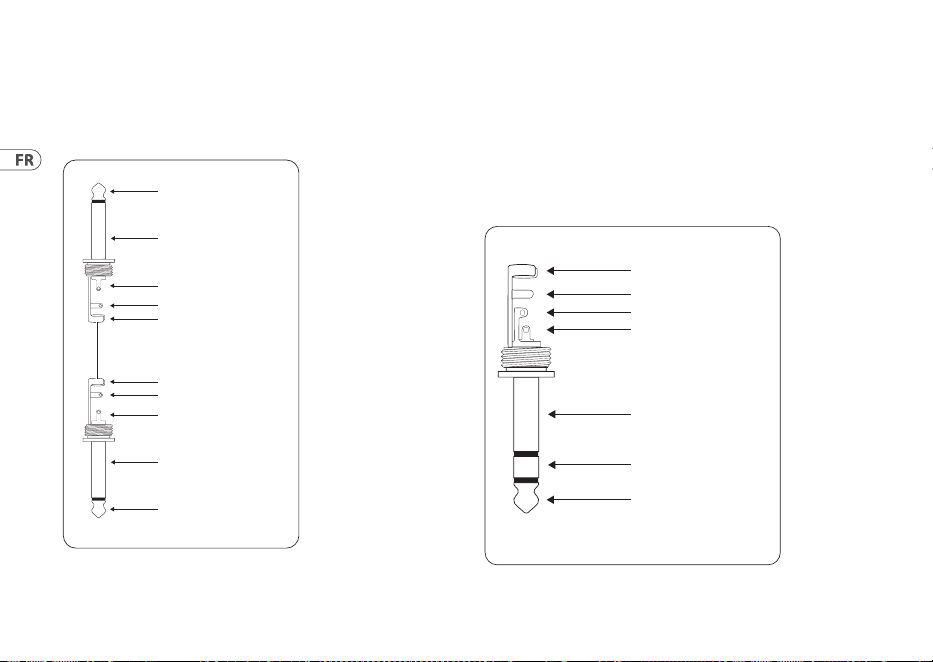
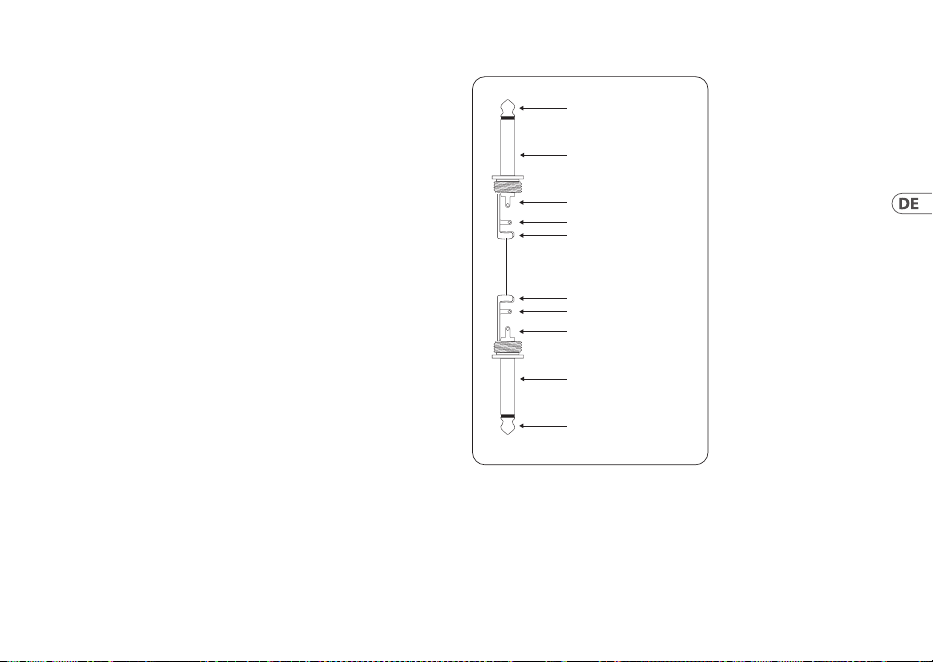
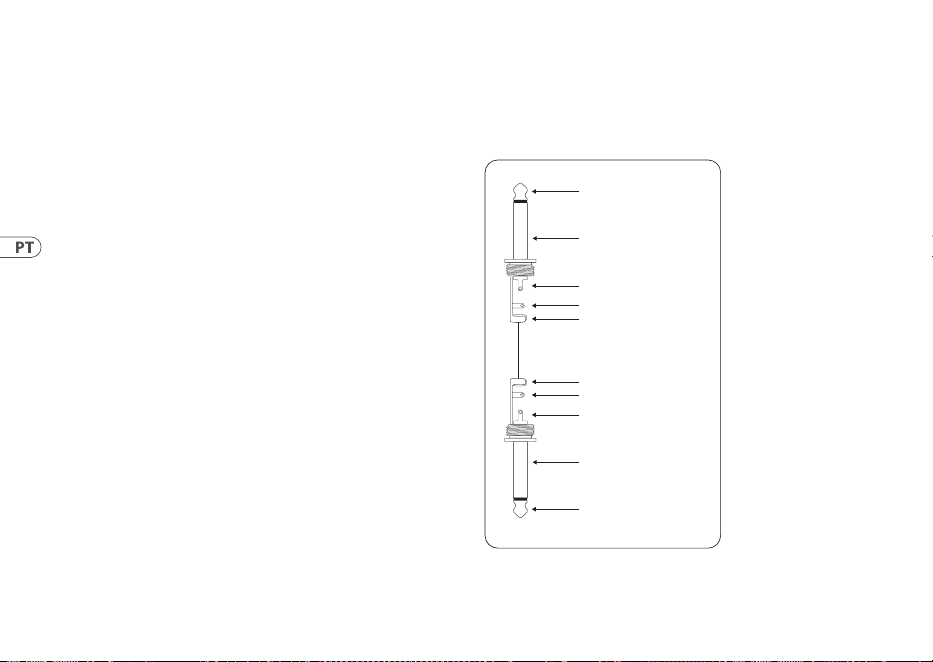
4.1 Wiring
You connect the UCG102 to your guitar via a standard
instrumentcable.
strain relief clamp
strain relief clamp
sleeve
sleeve
tip
tip
sleeve
ground/shield
sleeve
ground/shield
tip
signal
tip
signal
Fig. 4.1: Unbalanced instrument cable with ¼" TS connector
16 GUITAR LINK UCG102
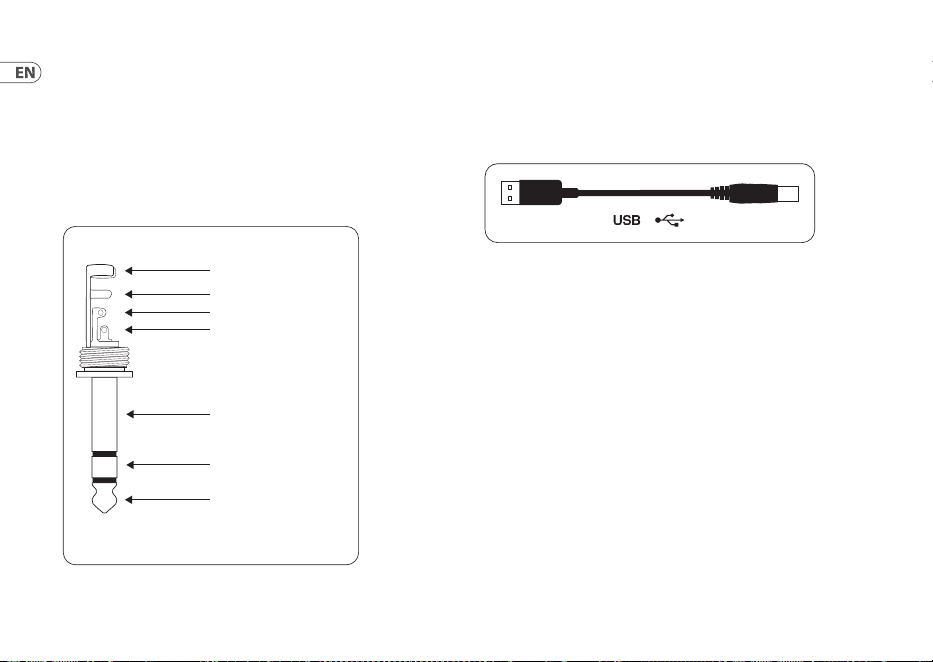
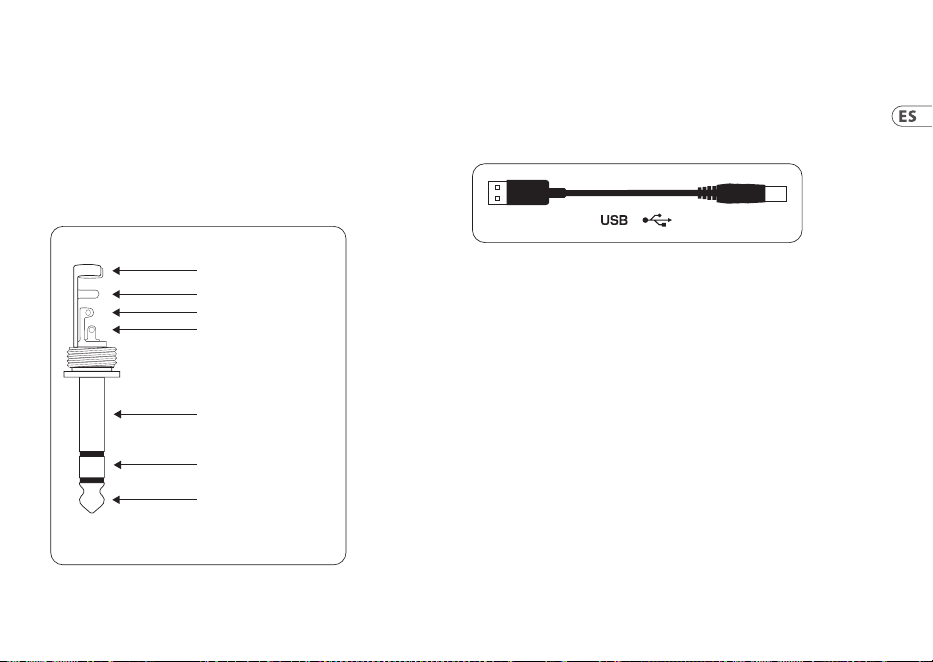
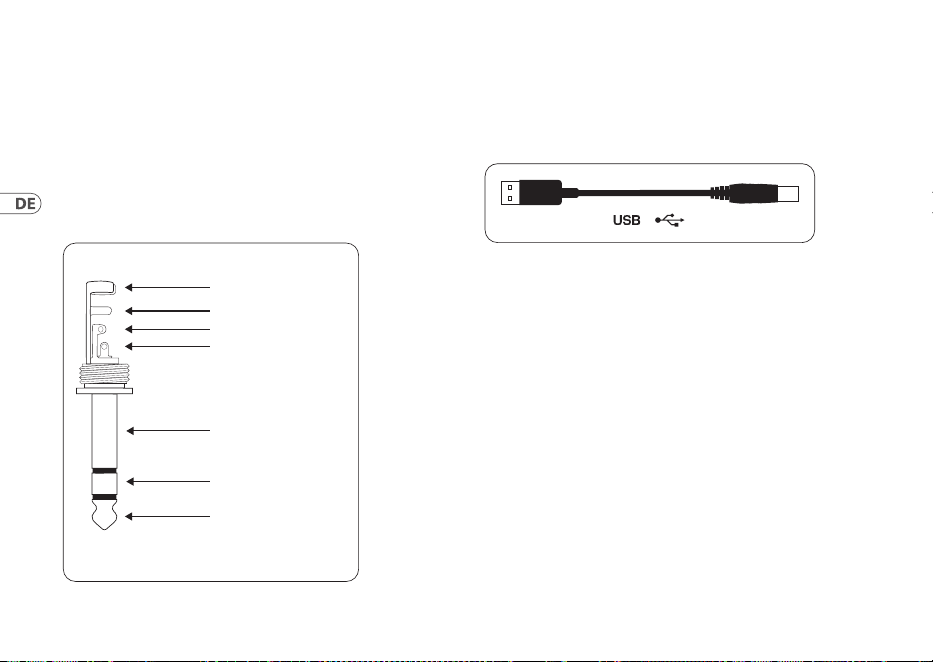
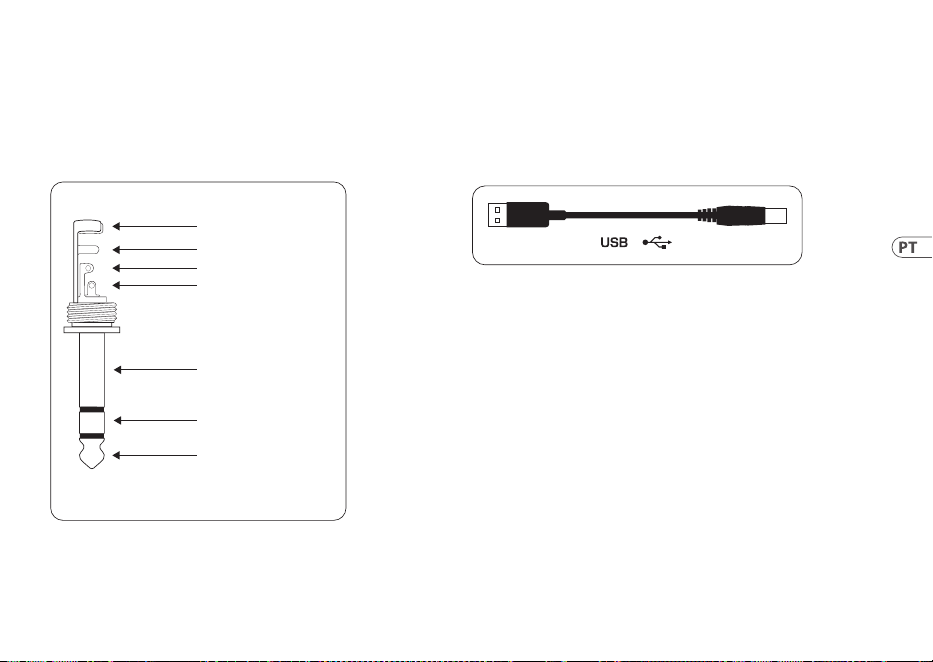
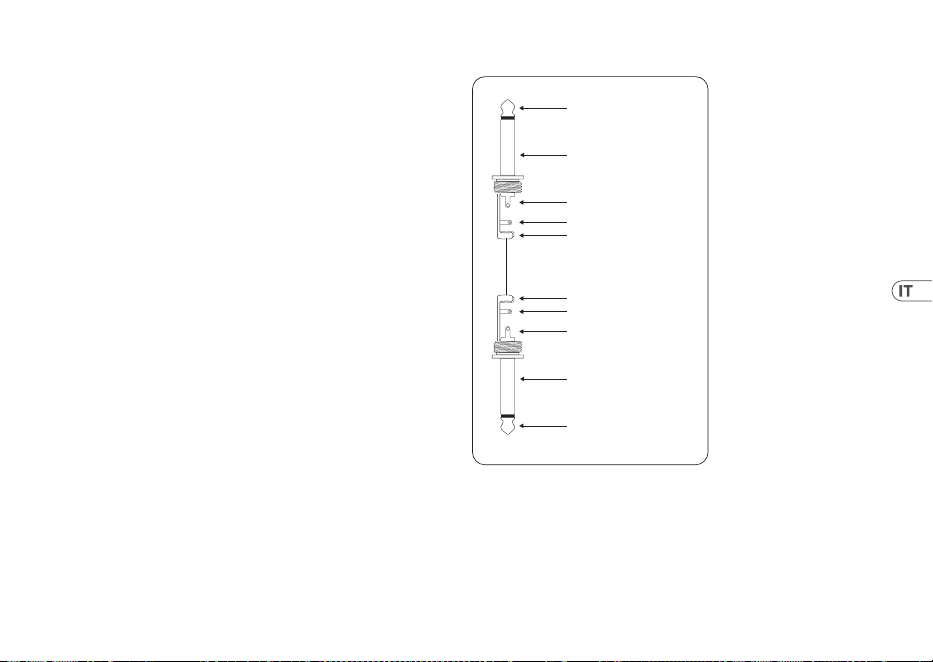
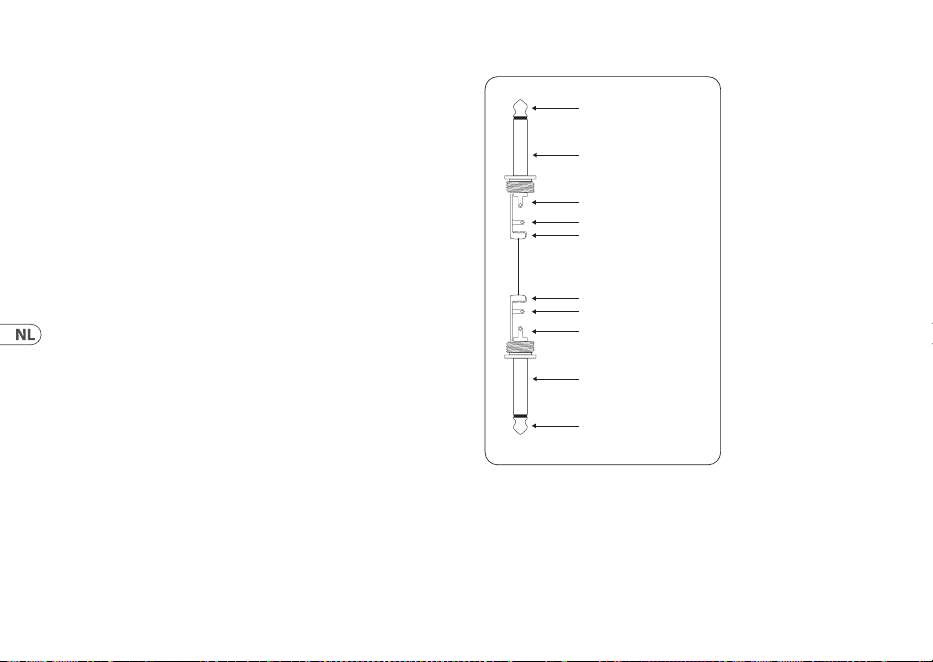
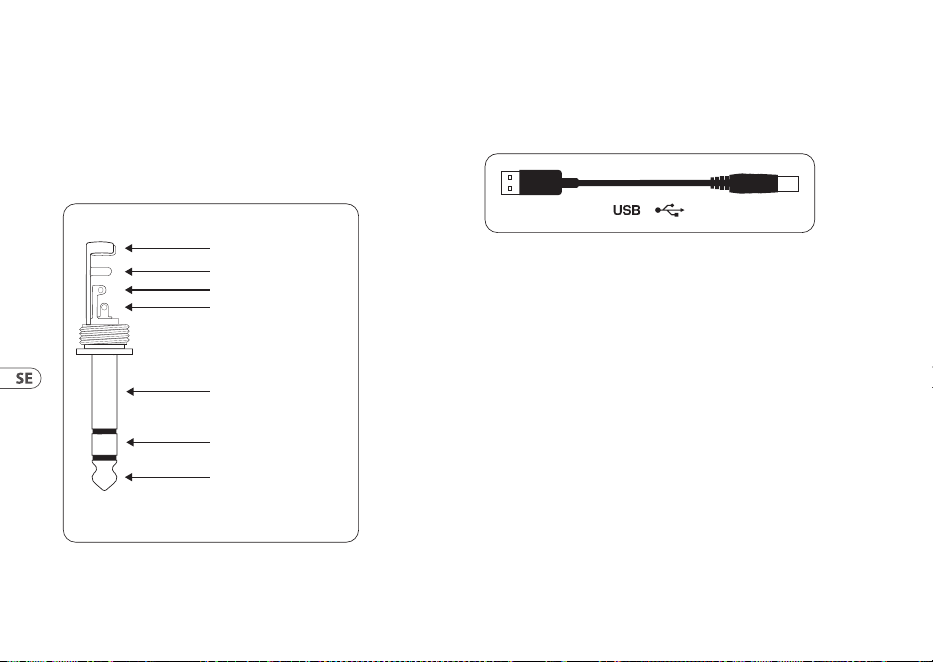
4.2 Headphone connection
The UCG102 provides a connection for head-phones. Youcan
connect any standard com-mercial headphone with a
¼" TRS jack plug. Formini TRS jack plugs, you will need a
suitableadapter. Youcan see the required pin allocation from
thefollowingdiagram.
strain relief clamp
sleeve
ring
tip
sleeve
ground/shield
For connection of balanced and unbalanced plugs,
ring and sleeve have to be bridged at the stereo plug.
Balanced ¼" TRS connector
ring
cold (-ve)
tip
hot (+ve)
Fig. 4.2: TRS stereo connector
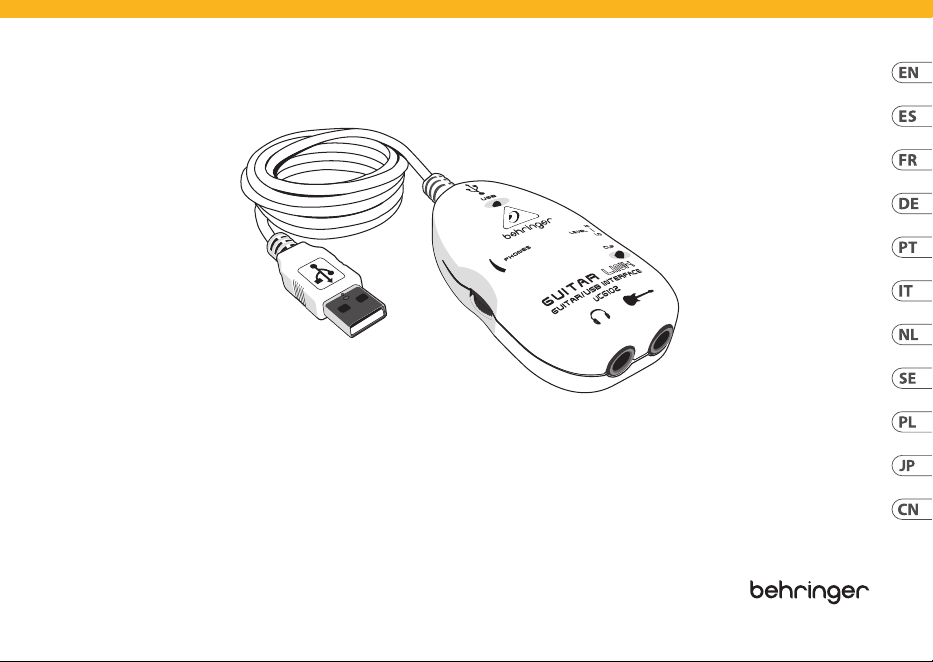
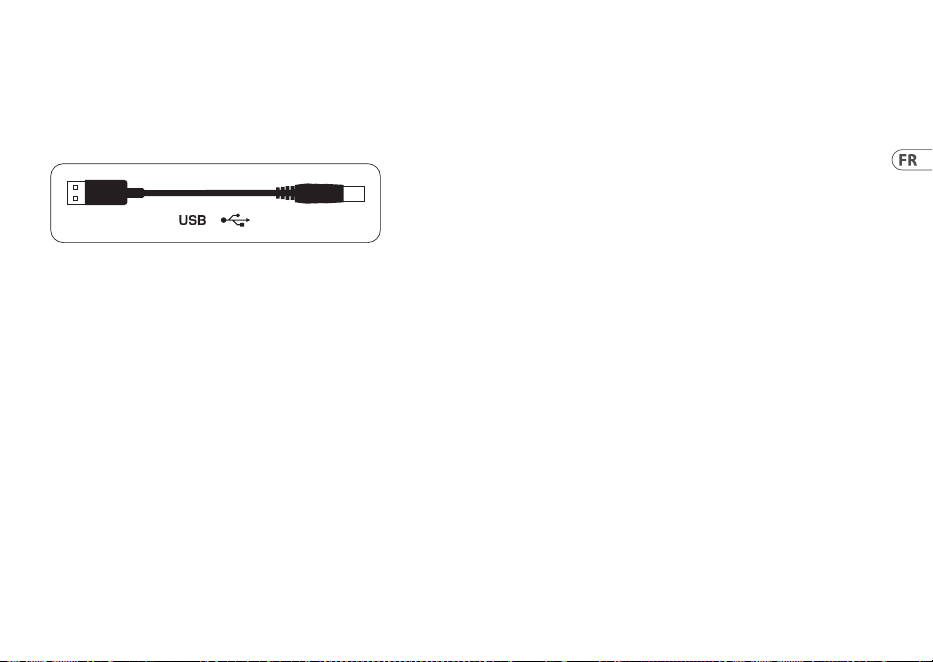
4.3 USB cable
The UCG102 comes with a USB cable for connecting
USB-compatible devices like notebooks.
Fig. 4.3: USB connector cable

17User Manual
1. Introducción
Gracias por la conanza que has depositado en nosotros al
adquirir la GUITAR LINK UCG102.
Tu ordenador se convertirá en la mejor plataforma de trabajo
para utilizar todo tipo de efectos en estudio o en directo. Con tu
ordenador portátil, tu guitarra y tu UCG102 podrás trabajar fácil
y cómodamente en cualquier lugar.
La UCG102 incluye software de modelado de primera
clase con amplicadores y pedales de efectos virtuales.
Reproducecanciones enformato MP3, WAV y AIFF en tu Maco
PC y toca tu guitarra al mismotiempo.
También incluye una salida de auriculares con control de nivel
dedicado para que puedas tocar con tu banda favorita sin ser
molestado. Conéctate y ¡empieza a rockear!
1.1 Antes de empezar
1.1.1 Suministro
La UCG102 de Behringer fue embalada cuidadosamente
en nuestra fábrica para garantizar un transporte seguro.
Noobstante, si la caja presentara daños, revisa enseguida si tu
guitarra ha sufrido algún desperfecto exterior.
◊ ◊ En caso de presentarse algún daño en el equipo,
NO lo envíes de vuelta a Behringer, ponte en contacto
con el distribuidor y la empresa transpor-tista, ya
que de lo contrario puede extinguirse tu derecho a
indemnización por daños
◊ ◊ Usa siempre el embalaje original para evitar daños
durante el almacenamiento o transporte.
◊ ◊ No permitas nunca que niños jueguen con el aparato o
los materiales suministrados en el embalaje.
◊ ◊ Al desechar los materiales de embalaje por favor hazlo
de manera ecológica.
1.1.2 Registro en línea
Por favor registre su equipo Behringer en nuestra página web
behringer.com lo más pronto posible después de su compra,
ylea detalladamente los términos y condiciones degarantía.
18 GUITAR LINK UCG102
Si su producto Behringer no funcionara correctamente,
nuestroobjetivo es repararlo lo más rápido posible. Paraobtener
servicio de garantía, por favor póngase en contacto con el
distribuidor donde compró el aparato. Si dicho distribuidor
no se encontrara en su localidad, póngase en contacto con
alguna de nuestras subsidiarias. Lainformación de contacto
correspondiente puede encontrarla en la documentación
original suministrada con el producto (Informaciónde Contacto
Global/Información de Contacto en Europa). Si su país no
estuviera en la lista, contacte al distribuidor más cercano a usted.
Puedeencontrar una lista de distribuidores en el área de soporte
de nuestra página web (behringer.com).
El registro de sus equipos agiliza el proceso de reclamación y
reparación en garantía.
¡Gracias por su cooperación!
2. Elementos de Control y
Conexiones
Tu UCG102 se conecta mediante un cable jack de 6,3 mm a tu
guitarra y con el cable USB a tu PC o Mac. La UCG102 se alimenta
directamente a través del conector USB.
(1) (2) (3)
(5) (4)
(6)
Fig. 2.1: Elementos de control y conexiones
(1) Utiliza este conector USB para conectar tu UCG102 a tu
ordenador. El LED azul (6) indica si existe una conexión
entre la guitarra y elordenador.
(2) Utiliza el control PHONES para ajustar el volumen de la
salida de auriculares. Antes de conectar tus auriculares a
la UCG102 gira este control hasta el mínimo para evitar
daños debidos a un volumen muy alto.
(3) En la salida puedes conectar unos auriculares estándar
con conector jack de 6,3 mm.
19User Manual
◊ ◊ Te advertimos que los volúmenes elevados pueden
ser perjudiciales para el oído y/o pueden dañar tus
auriculares y altavoces. Antes de conectar tu guitarra,
asegúrate de que el control de volumen esté girado
hasta el nivel mínimo. Procura siempre utilizar un
volumen apropiado.
(4) Conecta tu guitarra en esta entrada con jack de 6,3 mm.
(5) Con el botón LEVEL puedes reducir el nivel de la señal
de guitarra en caso de que el LED rojo de saturación
(Clip,arriba del logo de Behringer) se encienda constante-
mente. Para ello, conmuta el botón a la posiciónLOW.
(6) Este LED azul indica el estado de la conexión a través
delcableUSB.
3. Ejemplos de Aplicación
La GUITAR LINK UCG102 es una interfaz excepcional que
puedes usar para conectar tu guitarra directamente a un
ordenador para grabar, tocar con música pregrabada, y usar
amplicadores y pedales de efectos modelados. Tu UCG102 te
permite adaptarte fácilmente a cualquier situación.
3.1 Conexión de la UCG102
UCG102
PC/Mac
Monitor
MS16
(optional)
HPS3000
Guitar
Fig. 3.1: Conexión de la UCG102
20 GUITAR LINK UCG102
Conecta la UCG102 a tu ordenador con el cable USB. Alconectar
tu interfaz al ordenador, éste proveerá de energía a la UCG102
através del puerto USB, lo que se indica mediante el LED azul
(6). Tu ordenador debe reconocer automáticamente la conexión
de un dispositivo de audio USBal sistema.
Si deseas utilizar auriculares, conéctalos en la salida PHONES
que se encuentra junto al conector de guitarra. Si lo preeres,
tambiénpuedes conectar un par de altavoces activos a la salida
de auriculares. Losaltavoces MONITOR SPEAKERS MS16, MS20,
MS40, B2030A o B2031A de Behringer son una excelente opción.
Si posees un mezclador puedes hacer lo siguiente: conecta una
entrada estéreo del mezclador en la salida PHONES de tu guitarra,
y conecta unos altavoces activos en la salida de sala de control
(Control Room) delmezclador.
4. Conexiones de Audio
El conector USB te permite convertir tu ordenador en el estudio
de grabación ideal. No importa si estás practicando en casa o
grabando en el estudio, las conexiones de audio son siempre
las mismas:
4.1 Conexiones
Conecta tu UCG102 a tu guitarra con un cable estándar con
conectores jack de 6,3 mm.
strain relief clamp
strain relief clamp
sleeve
sleeve
tip
tip
sleeve
ground/shield
sleeve
ground/shield
tip
signal
tip
signal
Fig. 4.1: C able con conectores jack mono de 6,3 mm
21User Manual
4.2 Conexión de auriculares
La UCG102 dispone de una salida de auriculares a la que puedes
conectar un par de auriculares con conector tipo jack estéreo de
6,3mm. Si tus auriculares disponen de conector tipo minijack
necesitas un adaptador adecuado. La correcta asignación de
polos se muestraacontinuación:
strain relief clamp
sleeve
ring
tip
sleeve
ground/shield
For connection of balanced and unbalanced plugs,
ring and sleeve have to be bridged at the stereo plug.
Balanced ¼" TRS connector
ring
cold (-ve)
tip
hot (+ve)
Fig. 4.2: Jack estéreo
4.3 Cable USB
La UCG102 dispone de un cable USB para conectarla a cualquier
dispositivo con puerto USB, como un ordenadorportátil.
Fig. 4.3: Cable USB

22 GUITAR LINK UCG102
1. Introduction
Merci de la conance que vous nous avez prouvée en achetant
le GUITAR LINK UCG102.
Grâce à lui, vous allez transformer votre ordinateur en station
de travail dotée de tous les outils standard pour le studio et
la scène. Avecun ordinateur portable, une guitare et votre
UCG102, vouspourrez travailler de façon mobile, parexemple
en train ou à l’hôtel.
Votre UCG102 est vendu avec un logiciel spécialisé dans la
modélisation d’amplis guitare et d’eets, mais aussi avec des
morceaux d’accompagnement aux formats MP3, WAV et AIFF
pour Mac ou PC.
Votre UCG102 possède une sortie casque avec réglage de
volume pour que vous puissiez jouer sur les morceaux de vos
groupes préférés dans la plus pure tradition « Plug‘n Rock ».
1.1 Avant de commencer
1.1.1 Livraison
Votre UCG102 a été emballé avec le plus grand soin dans
nos usines pour lui garantir un transport en toute sécurité.
Cependant,sil’emballage vous parvient endommagé,
vériezqu’il ne présente aucun signe extérieur de dégâts.
◊ ◊ En cas de dommages, ne nous renvoyez PAS l’appareil
mais informez votre revendeur et la société de
transport sans quoi vous perdrez tout droit aux
prestations de garantie.
◊ ◊ Utilisez toujours l’emballage d’origine pour stocker ou
expédier votre produit afin de lui épargner tout risque
de dommages.
◊ ◊ Ne laissez jamais d’enfant sans surveillance jouer avec
l’appareil ou son emballage.
◊ ◊ Pensez à respecter l’environnement si vous jetez tout
ou partie de l’emballage.
23User Manual
1.1.2 Enregistrement en ligne
Veuillez enregistrer rapidement votre nouvel équipement
Behringer sur notre site Internet behringer.com. Vous y
trouverez également nos conditions de garantie.
Au cas où votre produit tombe en panne, nous tenons à ce qu’il
soit réparé dans les plus brefs délais. Pour ce faire, contactez le
revendeur Behringer chez qui vous avez acheté votre matériel.
Si votre détaillant est loin de chez vous, vouspouvez également
vous adresser directement à l’une de nos liales. Vous trouverez
la liste de nos liales dans l’emballage d’origine de votre
produit (« Global Contact Information/European Contact
Information »). Si vous n’y trouvez pas de contact pour votre
pays, adressez-vous au distributeur le plus proche de chez vous.
Vous trouverez les contacts correspondants dans la zone
« Support » de notre site behringer.com.
Le fait d’enregistrer votre produit ainsi que sa date d’achat
simplie grandement sa prise en charge sous garantie.
Merci pour votre coopération !
2. Commandes et Connexions
Vous pouvez câbler votre UCG102 à un ampli grâce à sa sortie
jack et à votre ordinateur (PC ou Mac) grâce au connecteur
USB. La liaison USB transporte aussi la tension d’alimentation
del’UCG102.
(1) (2) (3)
(5) (4)
(6)
Fig. 2.1: Commandes et connexions
(1) Utilisez le connecteur USB pour raccorder votre UCG102 à
votre ordinateur. La LED bleue (6) s’allume pour indiquer
que la liaison est correctement établie.

24 GUITAR LINK UCG102
(2) Tournez le potentiomètre PHONES pour régler le volume
de la sortie casque. Placez-le au minimum avant de
raccorder votre casque à l’UCG102 an de lui éviter tout
dommage du fait de volumes sonores trop élevés.
(3) Utilisez la sortie casque pour le câblage d’un casque
audio standard avec jack de 6,3 mm.
◊ ◊ Des volumes sonores élevés peuvent endommager
votre système auditif ainsi que votre casque et
vos haut-parleurs. Avant d’allumer votre système,
placez le potentiomètre PHONES en butée gauche.
Travaillez toujours à des puissances raisonnables.
(4) INPUT est l’entrée de l’UCG102. Elle est conçue pour
recevoir le signal de votre guitare. Pour cette liaison,
utilisez un câble monté en jacks mono de 6,3 mm.
(5) Utilisez le sélecteur LEVEL pour atténuer le signal de la
guitare lorsque la LED rouge Clip s’allume souvent sur les
notes les plus fortes. Dans ce cas, placez le sélecteur LEVEL
en position LOW.
(6) La LED bleue indique le statut de la liaison USB.
3. Exemple D’utilisation
Vous pouvez relier votre UCG102 directement à un ordinateur
pour vous enregistrer, jouer sur un enregistrement témoin ou
utiliser des sons créés avec des modélisations d’ampli et d’eet.
Votre UCG102 vous permet de travailler immédiatement et
partout. Branchez-vous et jouez sanstarder!
25User Manual
3.1 Câblage de l’UCG102
UCG102
PC/Mac
Monitor
MS16
(optional)
HPS3000
Guitar
Fig. 3.1: Câblage de l’UCG102
Raccordez l’UCG102 à l’ordinateur grâce à son câble USB.
Outredes signaux audio, la liaison USB transporte également
la tension électrique nécessaire au fonctionnement du
module USB de l’UCG102. La LED bleue au-dessus du logo
Behringer (6) s’allume et l’ordinateur indique avoir identié un
périphérique audio USB.
Câblez un casque à la sortie PHONES de l’UCG102. Si vous ne
souhaitez pas jouer au casque, vous pouvez également utiliser
la sortie PHONES pour alimenter une paire de moniteurs actifs
tels que les MONITOR SPEAKERS série MS16, MS20, MS40,
B2030A oder B2031A Behringer.
4. Liaisons Audio
Grâce au module USB de l’UGC102, vous pouvez à présent
transformer votre ordinateur en studio d’enregistrement
ultime. Que vous jouiez à la maison ou en studio, le câblage
reste toujours le même.
26 GUITAR LINK UCG102
4.1 Câblage
Reliez l’UCG102 à votre guitare grâce à un câble instrument
standard monté en jacks.
strain relief clamp
strain relief clamp
sleeve
sleeve
tip
tip
sleeve
ground/shield
sleeve
ground/shield
tip
signal
tip
signal
Fig. 4.1: Câble asymétrique monté en jacks mono
4.2 Câblage d’un casque
Votre UCG102 possède une sortie casque permettant le câblage
d’un casque audio standard avec connecteur jack stéréo.
Utilisezun adaptateur stéréo jack/mini-jack si votre casque
dispose d’un connecteur mini-jack. L’illustrationsuivante décrit
le brochage duconnecteur.
strain relief clamp
sleeve
ring
tip
sleeve
ground/shield
For connection of balanced and unbalanced plugs,
ring and sleeve have to be bridged at the stereo plug.
Balanced ¼" TRS connector
ring
cold (-ve)
tip
hot (+ve)
Fig. 4.2: Jack stéréo
27User Manual
4.3 Câblage en USB
Votre UCG102 possède un connecteur USB pour le câblage de la
guitare avec un équipement USB comme un ordinateur.
Fig. 4.3: Câble USB

28 GUITAR LINK UCG102
1. Einführung
Herzlichen Dank für das Vertrauen, das Du uns mit dem Kauf
der USB-Schnittstelle GUITAR LINK UCG102 entgegengebracht
hast. DeinComputer wird zur ultimativen Arbeitsplattform,
aufder Du Eekte wie im Studio oder auf der Bühne nutzen
kannst. Zusammenmit einem Notebook, einer Gitarre
und dem UCG102 sind Produktionen jetzt auch unterwegs
möglich. Im Lieferumfang des UCG102 ist eine erstklassige
Modeling Software mit virtuellen Amps und Eektpedalen
enthalten. MitDeinem Mac oder PC lassen sich Songs im MP3-,
WAV- und AIFF-Format abspielen. EinKopfhöreranschluss mit
einem Lautstärkeregler ist ebenfalls vorhanden, damitDu
die Session mit Deiner Lieblingsband ungestört genießen
kannst – nach dem Motto„Plug‘n Rock“.
1.1 Bevor du beginnst
1.1.1 Auslieferung
Das UCG102 wurde im Werk sorgfältig verpackt, um einen
sicheren Transport zu gewährleisten. Weist der Karton
trotzdem Beschädigungen auf, überprüfe das Gerät bitte sofort
auf äußereSchäden.
◊ ◊ Schicke das Gerät bei eventuellen Beschädigungen
NICHT an uns zurück, sondern benachrichtige
unbedingt zuerst Deinen Händler und das
Transportunternehmen, da sonst jeglicher
Schadenersatzanspruch erlöschen kann.
◊ ◊ Verwende bitte immer die Original-verpackung,
um Schäden bei Lagerung oder Versand zu vermeiden.
◊ ◊ Lass Kinder niemals unbeaufsichtigt mit dem Gerät
oder den Verpackungsmaterialien hantieren.
◊ ◊ Bitte entsorge alle Verpackungsmaterialien
umweltgerecht.
1.1.2 Online-registrierung
Registrieren Sie bitte Ihr neues Behringer-Gerät möglichst
direkt nach dem Kauf unter behringer.com im Internet und
lesen Sie bitte die Garantiebedingungen aufmerksam.
Sollte Ihr Behringer-Produkt einmal defekt sein, möchtenwir,
dass es schnellstmöglich repariert wird. Bitte wenden Sie sich
direkt an den Behringer-Händler, bei dem Sie Ihr Gerät gekauft
haben. Falls Ihr Behringer-Händler nicht in der Nähe ist, können
29User Manual
Sie sich auch direkt an eine unserer Niederlassungen wenden.
Eine Liste mit Kontaktadressen unserer Niederlassungen
nden Sie in der Originalverpackung ihres Geräts (Global
Contact Information/European Contact Information). Sollte für
Ihr Land keine Kontaktadresse verzeichnet sein, wenden Sie
sich bitte an den nächstgelegenen Distributor. Im Support-
Bereich unserer Website /behringer.com nden Sie die
entsprechendenKontaktadressen.
Ist Ihr Gerät mit Kaufdatum bei uns registriert, erleichtertdies
die Abwicklung im Garantiefall erheblich.
Vielen Dank für Ihre Mitarbeit!
2. Bedienungselemente und
Anschlüsse
Verbinde das UCG102 über den Klinkenanschluss mit Deiner
Gitarre und über den USB-Anschluss mit Deinem PC/Mac.
Die USB-Verbindung stellt gleichzeitig die Stromversorgung des
UCG102 dar.
(1) (2) (3)
(5) (4)
(6)
Abb. 2.1: Bedienungselemente und Anschlüsse
(1) Über den USB-Anschluss verbindest Du das UGC102 mit dem
USB-Anschluss am Computer. Die blaue Kontroll-LED (6)
zeigtan, dassdie Verbindung zum Computer hergestellt ist.
(2) Mit dem PHONES-Regler stellst Du die Lautstärke für den
Kopfhörerausgang ein. Drehe den Regler auf Minimum,
bevor Du einen Kopfhörer anschließt, umSchädi-gungen
durch zu hohe Lautstärke zuvermeiden.
(3) An den -Anschluss kannst Du einen handelsüblichen
Kopfhörer mit 6,3-mm-Klinkenstecker anschließen.
30 GUITAR LINK UCG102
◊ ◊ Wir möchten Dich darauf hinweisen, dass hohe
Lautstärken das Gehör schädigen und/oder
Kopfhörer bzw. Lautsprecher beschädigen können.
Drehe bitte den PHONES-Regler auf Linksanschlag,
bevor Du das Gerät einschaltest. Achte stets auf eine
angemessene Lautstärke.
(4) Über den Gitarrenanschluss (6,3-mm-Klinke) verbindestDu
das UCG102 mit Deiner Gitarre. Benutzedazu ein
handelsübliches 6,3-mm-Monoklinkenkabel.
(5) Mit dem LEVEL-Schalter kannst Du das Gitarrensignal
abschwächen, falls bei kräftigen Impulsen die rote
Clip-LED häug aueuchtet. Nur dann solltest Du den
LEVEL-Schalter auf LOW stellen.
(6) Die blaue LED zeigt Dir die Betriebs-bereitschaft der
USB-Verbindung an.
3. Anwendungsbeispiel
Du kannst das UCG102 direkt an Deinen Computer anschließen,
um aufzunehmen, zu einem Playback zu jammen oder direkt
über Modeling-Amps und Eekte zu spielen. Plug & Play:
Mitdem UCG102 bist Du in der Lage, überall sofort loszulegen.
3.1 Verwendung der Anschlüsse
UCG102
PC/Mac
Monitor
MS16
(optional)
HPS3000
Guitar
Abb. 3.1: Verkabelung des UCG102
Schließe das UCG102 über das USB-Kabel am
Rechneran. DieUSB-Verbindung stellt auch gleichzeitig
die Stromversorgung des USB-Moduls im UCG102
dar.DieblaueLED (6) leuchtet und das System meldet den
Anschluss einesUSB-Audiogeräts.
31User Manual
Verbinde einen Kopfhörer mit dem PHONES-Anschluss
desUCG102.
Wenn Du nicht über den Kopfhörer spielen möchtest,
kannst Du statt dessen auch ein Paar Aktivlautsprecher an
der PHONES-Buchse anschließen – die Behringer Aktiv-
Studiomonitore MS16, MS20, MS40, B2030A oder B2031A sind
dazu idealgeeignet!
4. Audioverbindungen
Über die integrierte USB-Schnittstelle verwandelst Du Deinen
Computer in ein ultimatives Aufnahmestudio. Ob im Proberaum
oder im Studio, die verwendeten Audioverbindungen bleiben
immer diegleichen:
4.1 Verkabelung
Schließe das UCG102 mit einem handelsüblichen Klinkenkabel
an Deine Gitarre an.
strain relief clamp
strain relief clamp
sleeve
sleeve
tip
tip
sleeve
ground/shield
sleeve
ground/shield
tip
signal
tip
signal
Abb. 4.1: Unsymmetrisches Klinkenkabel mit Monoklinkensteckern
32 GUITAR LINK UCG102
4.2 Kopfhöreranschluss
Das UCG102 verfügt über einen Kopfhöreran-schluss.
Hier kannst Du jeden handelsüblichen Stereokopfhörer
mit 6,3-mm-Stereoklinkenstecker anschließen.
Für3,5-mm-Klinkenanschlüsse benötigst Du einen geeigneten
Adapter. Die notwendige Steckerbelegung kannst Du der
folgenden Abbildung entnehmen.
strain relief clamp
sleeve
ring
tip
sleeve
ground/shield
For connection of balanced and unbalanced plugs,
ring and sleeve have to be bridged at the stereo plug.
Balanced ¼" TRS connector
ring
cold (-ve)
tip
hot (+ve)
Abb. 4.2: Stereoklinkenstecker
4.3 USB-Kabel
Das UCG102 verfügt über einen USB-Anschluss für alle
USB-tauglichen Endgeräte, wie z. B. ein Notebook.
Abb. 4.3: USB-Steckerkabel

33User Manual
1. Introdução
Muito obrigado pela conança que demonstrou em nós ao
adquirir a GUITAR LINK UCG102.
O seu computador tornou-se a sua plataforma de trabalho, no
qual pode processar os efeitos clássicos, tal como em estúdio ou
nos bastidores. Com um computador portátil e a GUITAR LINK
UCG102, pode trabalhar a caminho, no comboio ou no hotel.
O UCG102 inclui um software de modelação de primeira classe
com amplicadores virtuais e pedais de efeitos. Toquecom o
seu Mac ou PC, utilizando música em formato MP3, WAV e AIFF.
Também está disponível uma ligação para auscultadores,
paraque possa desfrutar da sessão com a sua banda preferida
sem interrupções, sob o mote “Plug‘n Rock”.
1.1 Antes de começar
1.2 Conteúdo
A GUITAR LINK UCG102 foi embalada cuidadosamente de
fábrica, para garantir um transporte seguro. No entanto,
se a embalagem apresentar danos, verique o aparelho
cuidadosamente em busca de danos externos.
◊ ◊ Em caso de eventuais danos, NÃO nos devolva
o aparelho, mas contacte imediatamente o seu
vendedor e a empresa transportadora; caso contrário,
pode anular qualquer direito a indemnização.
◊ ◊ Por favor, use sempre a embalagem original,
para evitar danos no transporte ou no envio.
◊ ◊ Nunca deixe crianças utilizarem o aparelho ou os
materiais de embalagem sem vigilância.
◊ ◊ Por favor, elimine todos os materiais de embalagem
de forma amiga do ambiente.
1.2.1 Registo online
Por favor, após a compra, registe o seu aparelho Behringer,
logopossível, em behringer.com usando a Internet e leia com
atenção as condições de garantia.
Se o produto Behringer avariar, teremos todo o gosto
em repará-lo o mais depressa possível. Por favor,
dirija-sedirectamente ao revendedor Behringer onde comprou
o aparelho. Se o revendedor Behringer não se localizar nas
proximidades, poder-se-á dirigir também directamente às
nossas representações. Na embalagem original encontra-se uma
34 GUITAR LINK UCG102
lista com os endereços de contacto das representações Behringer
(Global Contact Information/European Contact Information). Se
não constar um endereço de contacto para o seu país, entre em
contacto com o distribuidor mais próximo. Na área de assistência
da nossa página behringer.com encontrará os respectivos
endereços de contacto.
Se o aparelho estiver registado nos nossos serviços com a
data de compra, torna-se mais fácil o tratamento em caso de
utilização dagarantia.
Muito obrigado pela colaboração!
2. Componentes e Ligações
Pode ligar o UCG102 directamente a um amplicador através da
ligação de jaque e ao seu PC ou Mac, utilizando a ligação USB.
A ligação USB fornece energia ao UCG102.
(1) (2) (3)
(5) (4)
(6)
Fig. 2.1: Componentes e ligações
(1) Com a ligação USB, pode ligar a guitarra através do
conector USB ao computador. O LED azul (6) decontrolo
indica que a ligação ao computador foiestabelecida.
(2) Com o regulador PHONES, ajusta-se o volume de som da
saída dos auscultadores. Gire o regulador completamente
para a esquerda antes de ligar os auscultadores, para evitar
danos causados por um volume de som demasiado alto.
(3) Pode ligar -uns auscultadores normais com uma cha
jack de6,3 mm.
35User Manual
◊ ◊ Advertimos que um elevado volume de som pode
prejudicar os ouvidos e/ou danificar os auscultadores ou
as colunas. Por favor, rode o regulador de PHONES para
a esquerda, antes de ligar o aparelho. Observe sempre
uma intensidade sonora razoável.
(4) O jaque indicado com INPUT é a entrada de tomada jaque
de 6,3mm do UCG102, na qual você pode ligar a sua
guitarra. Paraisso, utilize um cabo de jaque mono de
6,3 mm que se encontra nas casa de comércio (nãono
mercado de materiais de construção, mas em casas
especializadas em música).
(5) Pode modicar o sinal da guitarra com o interruptor
LEVEL. Com altos níveis de sinal, acende-se a luz vermelha
do LED CLIP (acima do logótipo Behringer) e, neste caso,
deve-se comutar o interruptor LEVEL paraLOW.
(6) O LED azul indica o estado da liga ção USB.
3. Exemplo de Aplicação
Pode ligá-la directamente ao seu computador para gravar,
improvisaruma reprodução ou reproduzir directamente através do
amplicador de modelação e dos pedais de efeitos. Com a UCG102,
pode dominar tudo ao primeiro toque. Basta ligar e rockar.
3.1 Utilização da UCG102
UCG102
PC/Mac
Monitor
MS16
(optional)
HPS3000
Guitar
Fig. 3.1: Cablagem da UCG102
36 GUITAR LINK UCG102
Ligue a UCG102 com o cabo USB fornecido ao computador.
Aligação USB apresenta a mesma ligação eléctrica do
módulo USB na UCG102. OLED azul por baixo da ligação USB
(6) acende-se e o sistema indica que foi ligado um aparelho
áudioUSB.
Ligue uns auscultadores com a ligação PHONES da GUITAR
LINK 102, que se encontra directamente acima da ligação USB.
Sejá não desejar tocar com os auscultadores, também pode
ligar umas colunas ao conector PHONES - as colunas Behringer
MONITOR SPEAKERS MS16, MS20, MS40, B2030Aou B2031A são
a opção ideal.
4. Ligações Áudio
Através da interface USB integrada, transforma o seu
computador num avançado estúdio de gravação. Querensaie
em estúdio ou em casa, asligações áudio utilizadas
permanecem sempre as mesmas:
4.1 Cablagem
Para ligar o UCG102 a outros aparelhos áudio, énecessárioum
cabo jaque comum.
strain relief clamp
strain relief clamp
sleeve
sleeve
tip
tip
sleeve
ground/shield
sleeve
ground/shield
tip
signal
tip
signal
Fig 4.1: A instalação de um cabo mono jaque
37User Manual
4.2 Ligação para auscultadores
O UCG102 possui uma ligação para auscultadores. Pode ligar
aqui quaisquer auscultadores estéreo normais com cha de
jaque estéreo de 6,3 mm.
strain relief clamp
sleeve
ring
tip
sleeve
ground/shield
For connection of balanced and unbalanced plugs,
ring and sleeve have to be bridged at the stereo plug.
Balanced ¼" TRS connector
ring
cold (-ve)
tip
hot (+ve)
Fig. 4.2: jaque estéreo de 6,3 mm
4.3 Cabo USB
A UCG102 dispõe de uma ligação USB para todos os terminais
USB adequados, por exemplo, um computador portátil. Paratal,
basta ligar um este cabo USB disponível nomercado.
Fig. 4.3: Cabo de ligação USB

38 GUITAR LINK UCG102
1. Introduzione
Grazie per averci espresso la tua ducia acquistando GUITAR
LINK UCG102. Il tuo computer diventerà la piattaforma di lavoro
denitiva su cui potrai utilizzare gli eetti classici, sia in studio
che sul palco. Con un notebook, una chitarra e l'UCG102 è ora
possibile lavorare in viaggio, in treno o in hotel. La fornitura
del GUITAR LINK UCG102 include un software di modellazione
di prima classe con amplicatori virtuali e pedali per eetti.
Accompagna brani in formato MP3, WAV e AIFF che puoi
riprodurre dal tuo PC o computer Mac. È disponibile anche una
connessione per cue con regolatore di volume per goderti la
sessione con i tuoi volumi preferiti indisturbati, interamente
seguendo il motto “Plug'n Rock”.
1.1 Prima di iniziare
1.1.1 Spedizione
La tua GUITAR LINK UCG102 è stata accuratamente imballata
presso l'impianto di assemblaggio per garantire un trasporto
sicuro. Se le condizioni della scatola di cartone suggeriscono
che potrebbe essersi vericato un danno, ispezionare
immediatamente l'unità e cercare indicazioni siche di danni.
◊ ◊ L'attrezzatura danneggiata non deve MAI essere
inviata direttamente a noi. Si prega di informare
immediatamente il rivenditore da cui avete
acquistato l'unità e la società di trasporti da cui
avete ricevuto la consegna. In caso contrario, tutte
le richieste di sostituzione / riparazione potrebbero
essere annullate.
◊ ◊ Si prega di utilizzare sempre l'imballaggio originale
per evitare danni dovuti allo stoccaggio o alla
spedizione.
◊ ◊ Non lasciare mai che bambini senza sorveglianza
giochino con il dispositivo o con la sua confezione.
◊ ◊ Smaltire tutti i materiali di imballaggio in modo
ecologico.
1.2 Registrazione online
Registra la tua nuova attrezzatura Behringer subito dopo
l'acquisto visitando behringer.com e leggi attentamente i
termini e le condizioni della nostra garanzia.
39User Manual
In caso di malfunzionamento del tuo prodotto Behringer, è
nostra intenzione farlo riparare il più rapidamente possibile.
Per organizzare il servizio di garanzia, contattare il rivenditore
Behringer da cui è stata acquistata l'attrezzatura. Se il tuo
rivenditore Behringer non si trova nelle tue vicinanze, puoi
contattare direttamente una delle nostre liali. Le informazioni
di contatto corrispondenti sono incluse nella confezione
dell'apparecchiatura originale (Informazioni di contatto
globali / Informazioni di contatto europee). Se il tuo paese non
è elencato, contatta il distributore più vicino. Un elenco dei
distributori può essere trovato nell'area di supporto del nostro
sito web (behringer.com).
La registrazione del tuo acquisto e dell'attrezzatura presso di
noi ci aiuta a elaborare le tue richieste di riparazione in modo
più rapido ed eciente.
Grazie per la collaborazione!
2. Controlli e connessioni
È possibile collegare l'UCG102 direttamente a un amplicatore
tramite il connettore jack e al PC o computer Mac utilizzando il
connettore USB. La connessione USB fornisce l'alimentazione
per l'UCG102.
(1) (2) (3)
(5) (4)
(6)
Fig. 2.1: Elementi di controllo e connessioni
(1) È possibile collegare la chitarra al computer tramite
connessione USB. Il LED di controllo blu (6) indica che è
stata stabilita una connessione al computer.
(2) Il controllo VOLUME regola il livello del volume dell'uscita
delle cue. Ruotare il controllo completamente a sinistra
prima di collegare le cue. Questo ti aiuta a evitare i danni
causati dalle impostazioni di volume elevato.
(3) È possibile utilizzare un jack da ¼" disponibile in commercio
per il collegamento.

40 GUITAR LINK UCG102
◊ ◊ Vorremmo attirare la vostra attenzione sul fatto che
livelli sonori estremamente alti possono danneggiare
l'udito e le cuffie / altoparlanti. Ruotare il controllo
VOLUME completamente in senso orario prima
di accendere l'unità. Fare sempre attenzione a
selezionare un volume adatto.
(4) È possibile collegare l'UCG102 alla chitarra tramite
l'ingresso della chitarra (jack da ¼"). Utilizzare un cavo
jack mono da ¼" commerciale.
(5) È possibile modicare il segnale della chitarra con
l'interruttore LEVEL. A livelli di segnale alti, il LED CLIP
(sopra il LOGO Behringer) si illuminerà di rosso, nel qual
caso dovreste impostare l'interruttore LEVEL su LOW.
(6) Il LED blu indica lo stato della connessione USB.
3. Esempio di applicazione
È possibile collegare l'UCG102 direttamente al computer per
registrare, suonare insieme a una riproduzione o suonare
direttamente su amplicatori ed eetti di modellazione.
UCG102 ti consente di iniziare immediatamente, ovunque tu sia.
Basta collegarsi e iniziare a suonare.
3.1 Funzionamento del connettore
UCG102
PC/Mac
Monitor
MS16
(optional)
HPS3000
Guitar
Fig. 3.1: Cablaggio dell'UCG102
Usa il cavo USB per collegare GUITAR LINK UCG102 al tuo
computer. L'unità USB dell'UCG102 è alimentata dal bus, non è
necessaria un'alimentazione separata. Il LED blu (6) si accende e
il sistema indica il collegamento di un'unità audio USB.
41User Manual
Collega le tue cue al connettore PHONES sull'UCG102.
Se non vuoi usare le tue cue, puoi anche collegare un paio
di monitor attivi al connettore PHONES: i Behringer MONITOR
SPEAKERS Series, MS16, MS20, MS40, B2030A o B2031A sono
scelte perfette per questa applicazione.
4. Collegamenti audio
Con l'interfaccia USB integrata, puoi cambiare il tuo computer
in uno studio di registrazione denitivo. Che tu provi a casa o
in studio, le connessioni audio utilizzate rimangono sempre le
stesse.
4.1 Cablaggio
Colleghi l'UCG102 alla tua chitarra tramite un cavo per
strumenti standard.
strain relief clamp
strain relief clamp
sleeve
sleeve
tip
tip
sleeve
ground/shield
sleeve
ground/shield
tip
signal
tip
signal
Fig. 4.1: Cavo strumento sbilanciato con connettore TS da ¼"
42 GUITAR LINK UCG102
4.2 Collegamento delle cue
L'UCG102 fornisce una connessione per le cue. È possibile
collegare qualsiasi cua commerciale standard con una presa
jack TRS da ¼". Per le spine jack mini TRS, è necessario un
adattatore adatto. È possibile vedere l'assegnazione dei pin
richiesta dal diagramma seguente.
strain relief clamp
sleeve
ring
tip
sleeve
ground/shield
For connection of balanced and unbalanced plugs,
ring and sleeve have to be bridged at the stereo plug.
Balanced ¼" TRS connector
ring
cold (-ve)
tip
hot (+ve)
Fig. 4.2: Connettore stereo TRS
4.3 cavo USB
L'UCG102 viene fornito con un cavo USB per il collegamento di
dispositivi compatibili con USB come i notebook.
Fig. 4.3: Cavo connettore USB

43User Manual
1. Invoering
Dank u voor het uiten van uw vertrouwen in ons door de
aanschaf van de GUITAR LINK UCG102. Je computer wordt
het ultieme werkplatform waarop je de klassieke eecten
kunt gebruiken, zowel in de studio als op het podium.
Met een notebook, een gitaar en de UCG102 is het nu
mogelijk om onderweg te werken, of het nu trein of hotel
is. De leveringsomvang van de GUITAR LINK UCG102 omvat
eersteklas modelleringssoftware met virtuele versterkers en
eectpedalen. Begeleid liedjes in MP3-, WAV- en AIFF-indeling
die u kunt afspelen vanaf uw pc of Mac-computer. Er is ook een
hoofdtelefoonaansluiting met volumeregelaar beschikbaar
zodat u ongestoord kunt genieten van de sessie met uw favoriete
volumes, geheel volgens het motto “Plug’n Rock”.
1.1 Voordat je begint
1.1.1 Verzending
Uw GUITAR LINK UCG102 werd zorgvuldig verpakt in de
assemblagefabriek om een veilig transport te garanderen. Mocht
de staat van de kartonnen doos erop wijzen dat er mogelijk
schade is opgetreden, inspecteer het apparaat dan onmiddellijk
en zoek naar fysieke tekenen van schade.
◊ ◊ Beschadigde apparatuur mag NOOIT rechtstreeks
naar ons worden opgestuurd. Informeer onmiddellijk
de dealer waar u het apparaat heeft gekocht en het
transportbedrijf waar u het heeft afgeleverd. Anders
kunnen alle aanspraken op vervanging / reparatie
komen te vervallen.
◊ ◊ Gebruik altijd de originele verpakking om schade
tijdens opslag of verzending te voorkomen.
◊ ◊ Laat kinderen nooit zonder toezicht met het apparaat
of de verpakking spelen.
◊ ◊ Voer al het verpakkingsmateriaal op een
milieuvriendelijke manier af.
1.2 Online registratie
Registreer uw nieuwe Behringer-apparaat direct na aankoop op
behringer.com en lees de garantievoorwaarden aandachtig door.
Mocht uw Behringer-product defect raken, dan is het onze
bedoeling om het zo snel mogelijk te laten repareren. Neem voor
het regelen van garantieservice contact op met de Behringer-
dealer waar u het apparaat hebt gekocht. Als uw Behringer-
dealer niet bij u in de buurt is gevestigd, kunt u rechtstreeks
44 GUITAR LINK UCG102
contact opnemen met een van onze dochterondernemingen.
Overeenkomstige contactgegevens zijn opgenomen in de
originele verpakking van de apparatuur (Global Contact
Information / European Contact Information). Als uw land niet
in de lijst staat, neem dan contact op met de dichtstbijzijnde
distributeur. Een lijst met distributeurs is te vinden in het
ondersteuningsgedeelte van onze website (behringer.com).
Door uw aankoop en apparatuur bij ons te registreren, kunnen
wij uw reparatieclaims sneller en eciënter verwerken.
Bedankt voor je medewerking!
2. Bedieningselementen en
aansluitingen
U kunt de UCG102 rechtstreeks op een versterker aansluiten via
de jack-connector en op uw pc of Mac-computer met behulp
van de USB-connector. De USB-aansluiting levert de stroom voor
deUCG102.
(1) (2) (3)
(5) (4)
(6)
Afb. 2.1: Bedieningselementen en aansluitingen
(1) U kunt de gitaar via een USB-verbinding op uw computer
aansluiten. De blauwe controle-LED (6) geeft aan dat er
een verbinding met de computer tot stand is gebracht.
(2) De VOLUME-regeling past het volumeniveau van de
hoofdtelefoonuitgang aan. Draai de regelaar helemaal
naar links voordat je de koptelefoon aansluit. Dit helpt u
de schade te voorkomen die wordt veroorzaakt door hoge
volume-instellingen.
(3) U kunt een in de handel verkrijgbare ¼" jack gebruiken
voor de -aansluiting.
45User Manual
◊ ◊ Wij willen uw aandacht vestigen op het feit dat
extreem hoge geluidsniveaus zowel uw gehoor als uw
koptelefoon / luidsprekers kunnen beschadigen. Draai
de VOLUME-regelaar volledig met de klok mee voordat
u het apparaat inschakelt. Zorg ervoor dat u altijd een
geschikt volume kiest.
(4) U kunt de UCG102 op uw gitaar aansluiten via de
gitaaringang (¼" jack). Gebruik een in de handel
verkrijgbare ¼" mono jack-kabel.
(5) U kunt het gitaarsignaal wijzigen met de LEVEL-
schakelaar. Bij hoge signaalniveaus licht de CLIP-LED
(boven het Behringer-LOGO) rood op. In dat geval moet u
de LEVEL-schakelaar op LOW zetten.
(6) De blauwe LED geeft de status van de USB-verbinding aan.
3. Toepassingsvoorbeeld
U kunt de UCG102 rechtstreeks op uw computer aansluiten om
op te nemen, mee te spelen met een playback of rechtstreeks
over de modelversterkers en eecten te spelen. Met de UCG102
kunt u direct aan de slag, waar u ook bent. Gewoon aansluiten en
beginnen te rocken.
3.1 Werking van de connector
UCG102
PC/Mac
Monitor
MS16
(optional)
HPS3000
Guitar
Afb.3.1: Bedrading van de UCG102
Gebruik de USB-kabel om de GUITAR LINK UCG102 op uw
computer aan te sluiten. De USB-eenheid van de UCG102 wordt
gevoed via de bus - er is geen aparte voeding nodig. De blauwe
LED (6) licht op en het systeem geeft de aansluiting van een
USB-audio-unit aan.
46 GUITAR LINK UCG102
Sluit uw hoofdtelefoon aan op de PHONES-connector op
deUCG102.
Als u uw hoofdtelefoon niet wilt gebruiken, kunt u ook een
paar actieve monitoren aansluiten op de PHONES-connector
- de Behringer MONITOR SPEAKERS-serie, MS16, MS20, MS40,
B2030A of B2031A zijn perfecte keuzes voor deze toepassing.
4. Audio-aansluitingen
Met de ingebouwde USB interface verander je je computer in een
ultieme opnamestudio. Of je nu thuis of in de studio repeteert,
de gebruikte audio-aansluitingen blijven altijd hetzelfde.
4.1 Bedrading
Je sluit de UCG102 aan op je gitaar via een standaard
instrumentenkabel.
strain relief clamp
strain relief clamp
sleeve
sleeve
tip
tip
sleeve
ground/shield
sleeve
ground/shield
tip
signal
tip
signal
Afb. 4.1: Ongebalanceerde instrumentkabel met ¼" TS-connector

47User Manual
4.2 Koptelefoon aansluiting
De UCG102 biedt een aansluiting voor koptelefoons. U kunt elke
standaard commerciële hoofdtelefoon aansluiten met een ¼"
TRS-jackplug. Voor mini-TRS-jackpluggen heeft u een geschikte
adapter nodig. U kunt de vereiste pintoewijzing zien in het
volgende diagram.
strain relief clamp
sleeve
ring
tip
sleeve
ground/shield
For connection of balanced and unbalanced plugs,
ring and sleeve have to be bridged at the stereo plug.
Balanced ¼" TRS connector
ring
cold (-ve)
tip
hot (+ve)
Afb.4.2: TRS-stereoconnector
4.3 USB-kabel
De UCG102 wordt geleverd met een USB-kabel voor het
aansluiten van USB-compatibele apparaten zoals notebooks.
Afb.4.3: USB-aansluitkabel

48 GUITAR LINK UCG102
1. Introduktion
Tack för att du uttryckte ditt förtroende för oss genom att
köpa GUITAR LINK UCG102. Din dator blir den ultimata
arbetsplattformen där du kan använda de klassiska eekterna,
både i studion och på scenen. Med en anteckningsbok, en gitarr
och UCG102 är det nu möjligt att arbeta på språng, vare sig det
är tåg eller hotell. GUITAR LINK UCG102: s leverans omfattar en
förstklassig modelleringsprogramvara med virtuella förstärkare
och eektpedaler. Följ låtar i MP3-, WAV- och AIFF-format som
du kan spela från din PC eller Mac-dator. En hörlursanslutning
med en volymregulator nns också så att du kan njuta av
sessionen med dina favoritvolymer ostörd, helt efter mottot
”Plug’n Rock”.
1.1 Innan du börjar
1.1.1 Sändning
Din GUITAR LINK UCG102 packades noggrant vid
monteringsanläggningen för att säkerställa säker transport.
Omkartongens tillstånd antyder att skador kan ha ägt rum ska
du omedelbart inspektera enheten och leta efter fysiska tecken
på skador.
◊ ◊ Skadad utrustning ska ALDRIG skickas direkt till oss.
Meddela genast återförsäljaren från vilken du köpte
enheten samt transportföretaget från vilket du tog
emot leveransen. Annars kan alla anspråk på utbyte /
reparation bli ogiltiga.
◊ ◊ Använd alltid originalförpackningen för att undvika
skador på grund av lagring eller frakt.
◊ ◊ Låt aldrig barn utan tillsyn leka med enheten eller
med förpackningen.
◊ ◊ Kassera allt förpackningsmaterial på ett
miljövänligt sätt.
1.2 Online registrering
Registrera din nya Behringer-utrustning direkt efter ditt köp
genom att besöka behringer.com och läs villkoren i vår garanti
noggrant.
Om din Behringer-produkt inte fungerar, är det vår avsikt att
reparera den så snabbt som möjligt. För att ordna garantiservice,
vänligen kontakta Behringer-återförsäljaren som utrustningen
köptes från. Om din Behringer-återförsäljare inte nns i
49User Manual
din närhet kan du kontakta ett av våra dotterbolag direkt.
Motsvarande kontaktinformation ingår i originalutrustningens
förpackning (global kontaktinformation / europeisk
kontaktinformation). Om ditt land inte är listat, kontakta
närmaste distributör. En lista med distributörer nns i
supportområdet på vår webbplats (behringer.com).
Att registrera ditt köp och din utrustning hos oss hjälper oss att
behandla dina reparationsanspråk snabbare och mer eektivt.
Tack för ditt samarbete!
2. Kontroller och anslutningar
Du kan ansluta UCG102 direkt till en förstärkare med hjälp
av jackkontakten och till din PC eller Mac-dator med USB-
kontakten. USB-anslutningen levererar ström till UCG102.
(1) (2) (3)
(5) (4)
(6)
Bild 2.1: Kontrollelement och anslutningar
(1) Du kan ansluta gitarr till din dator via USB-anslutning.
Den blå kontrollampan (6) indikerar att en anslutning till
datorn har upprättats.
(2) VOLUME-kontrollen justerar volymnivån för hörlurarnas
utgång. Vrid kontrollen helt åt vänster innan du ansluter
hörlurarna. Detta hjälper dig att undvika skador som
orsakas av höga volyminställningar.
(3) Du kan använda ett commerc“ -uttag som nns i
handeln för anslutningen.
50 GUITAR LINK UCG102
◊ ◊ Vi vill uppmärksamma dig på att extremt höga
ljudnivåer kan skada din hörsel såväl som dina
hörlurar / högtalare. Vrid VOLUME-reglaget helt
medurs innan du slår på enheten. Var alltid försiktig
med att välja en lämplig volym.
(4) Du kan ansluta UCG102 till din gitarr via gitarringången
(¼" jack). Använd en kommersiell ¼" mono jack kabel.
(5) Du kan ändra gitarrsignalen med LEVEL-omkopplaren. Vid
höga signalnivåer tänds CLIP-lysdioden (ovanför Behringer
LOGO) rött, i vilket fall du bör ställa in LEVEL-omkopplaren
på LOW.
(6) Den blå lysdioden indikerar USB-anslutningens status.
3. Användningsexempel
Du kan ansluta UCG102 direkt till din dator för att spela
in, spela med till en uppspelning eller spela direkt över
modelleringsförstärkarna och eekterna. UCG102 låter dig komma
igång direkt, var du än är. Anslut helt enkelt och börja gunga.
3.1 Anslutningens funktion
UCG102
PC/Mac
Monitor
MS16
(optional)
HPS3000
Guitar
Bild 3.1: Kabeldragning av UCG102
Använd USB-kabeln för att ansluta GUITAR LINK UCG102 till din
dator. USB-enheten på UCG102 är bussdriven - ingen separat
strömförsörjning behövs. Den blå lysdioden (6) tänds och
systemet anger anslutningen till en USB-ljudenhet.

51User Manual
Anslut dina hörlurar till PHONES-kontakten på UCG102.
Om du inte vill använda dina hörlurar kan du också ansluta
ett par aktiva bildskärmar till PHONES-kontakten - Behringer
MONITOR SPEAKERS Series, MS16, MS20, MS40, B2030A eller
B2031A är perfekta val för denna applikation.
4. Ljudanslutningar
Med det integrerade USB-gränssnittet kan du byta dator till en
ultimat inspelningsstudio. Oavsett om du tränar hemma eller i
studion förblir de använda ljudanslutningarna alltid desamma.
4.1 Kabeldragning
Du ansluter UCG102 till din gitarr via en
standardinstrumentkabel.
strain relief clamp
strain relief clamp
sleeve
sleeve
tip
tip
sleeve
ground/shield
sleeve
ground/shield
tip
signal
tip
signal
Bild 4.1: Obalanserad instrumentkabel med ¼" TS-kontakt
52 GUITAR LINK UCG102
4.2 Hörlursanslutning
UCG102 tillhandahåller en anslutning för hörlurar. Du kan
ansluta alla vanliga kommersiella hörlurar med en ¼" TRS-
uttagskontakt. För mini-TRS-uttag behöver du en lämplig
adapter. Du kan se önskad stiftallokering från följande diagram.
strain relief clamp
sleeve
ring
tip
sleeve
ground/shield
For connection of balanced and unbalanced plugs,
ring and sleeve have to be bridged at the stereo plug.
Balanced ¼" TRS connector
ring
cold (-ve)
tip
hot (+ve)
Bild 4.2: TRS stereokontakt
USB-kabel
UCG102 levereras med en USB-kabel för anslutning av USB-
kompatibla enheter som bärbara datorer.
Bild 4.3: USB-anslutningskabel

53User Manual
1. Wprowadzenie
Dziękujemy za okazane nam zaufanie kupując GUITAR LINK
UCG102. Twój komputer stanie się najlepszą platformą roboczą,
na której możesz używać klasycznych efektów zarówno w
studio, jak i na scenie. Z notebookiem, gitarą i UCG102 można
teraz pracować w podróży, czy to w pociągu, czy w hotelu.
Zakres dostawy GUITAR LINK UCG102 obejmuje najwyższej
klasy oprogramowanie do modelowania z wirtualnymi
wzmacniaczami i pedałami efektów. Towarzysz utwory w
formacie MP3, WAV i AIFF, które można odtwarzać z komputera
PC lub Mac. Dostępne jest również złącze słuchawkowe z
regulatorem głośności, dzięki czemu możesz bez przeszkód
cieszyć się sesją ze swoimi ulubionymi dźwiękami, zgodnie z
mottem „Plug’n Rock”.
1.1 Zanim zaczniesz
1.1.1 Wysyłka
Twój GUITAR LINK UCG102 został starannie zapakowany w
zakładzie montażowym, aby zapewnić bezpieczny transport.
Jeśli stan kartonu sugeruje, że mogło dojść do uszkodzenia,
należy natychmiast sprawdzić urządzenie i poszukać zycznych
oznak uszkodzenia.
◊ ◊ NIGDY nie wysyłaj uszkodzonego sprzętu
bezpośrednio do nas. Niezwłocznie poinformuj
sprzedawcę, od którego nabyłeś urządzenie, a także
firmę transportową, od której przyjąłeś dostawę.
W przeciwnym razie wszelkie roszczenia dotyczące
wymiany / naprawy mogą zostać unieważnione.
◊ ◊ Zawsze używaj oryginalnego opakowania,
aby uniknąć uszkodzeń w czasie przechowywania
lub wysyłki.
◊ ◊ Nigdy nie pozwalaj dzieciom bez nadzoru bawić się
urządzeniem lub jego opakowaniem.
◊ ◊ Prosimy o utylizację wszystkich materiałów
opakowaniowych w sposób przyjazny dla środowiska.
1.2 Rejestracja online
Zarejestruj swój nowy sprzęt Behringer zaraz po dokonaniu
zakupu, odwiedzając stronę behringer.com i uważnie przeczytaj
warunki naszej gwarancji.
Naszym zamiarem jest jak najszybsza naprawa w przypadku
awarii produktu Behringer. Aby umówić się na serwis
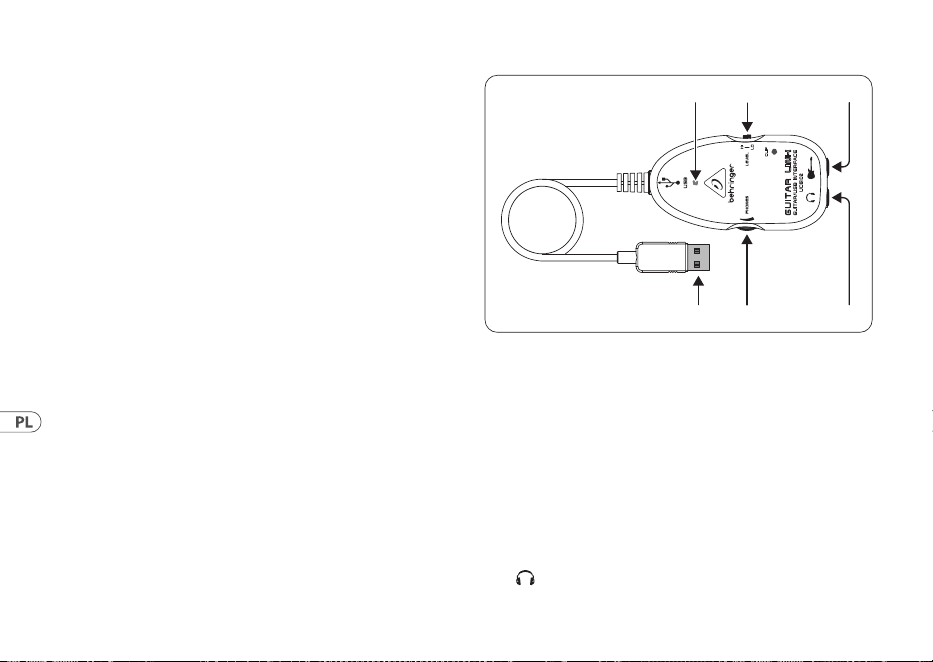
54 GUITAR LINK UCG102
gwarancyjny, należy skontaktować się ze sprzedawcą Behringer,
u którego zakupiono sprzęt. Jeżeli Twój dealer Behringer
nie znajduje się w Twojej okolicy, możesz bezpośrednio
skontaktować się z jednym z naszych oddziałów. Odpowiednie
dane kontaktowe znajdują się na oryginalnym opakowaniu
sprzętu (Globalne informacje kontaktowe / Europejskie
informacje kontaktowe). Jeśli Twojego kraju nie ma na liście,
skontaktuj się z najbliższym dystrybutorem. Listę dystrybutorów
można znaleźć w obszarze wsparcia na naszej stronie
internetowej (behringer.com).
Rejestracja u nas zakupu i sprzętu pomaga nam szybciej i
efektywniej rozpatrywać reklamacje dotyczące napraw.
Dziękuję za współpracę!
2. Sterowanie i połączenia
Możesz podłączyć UCG102 bezpośrednio do wzmacniacza za
pomocą złącza jack oraz do komputera PC lub Mac za pomocą
złącza USB. Złącze USB zapewnia zasilanie UCG102.
(1) (2) (3)
(5) (4)
(6)
Rys. 2.1: Elementy sterujące i przyłącza
(1) Możesz podłączyć gitarę do komputera przez złącze USB.
Niebieska kontrolna dioda LED (6) wskazuje, że połączenie
z komputerem zostało nawiązane.
(2) Pokrętło VOLUME reguluje poziom głośności na wyjściu
słuchawkowym. Przed podłączeniem słuchawek obróć
regulator do końca w lewo. Pomaga to uniknąć szkód
spowodowanych ustawieniami dużej głośności.
(3) Do połączenia można użyć dostępnego w handlu
gniazda¼".
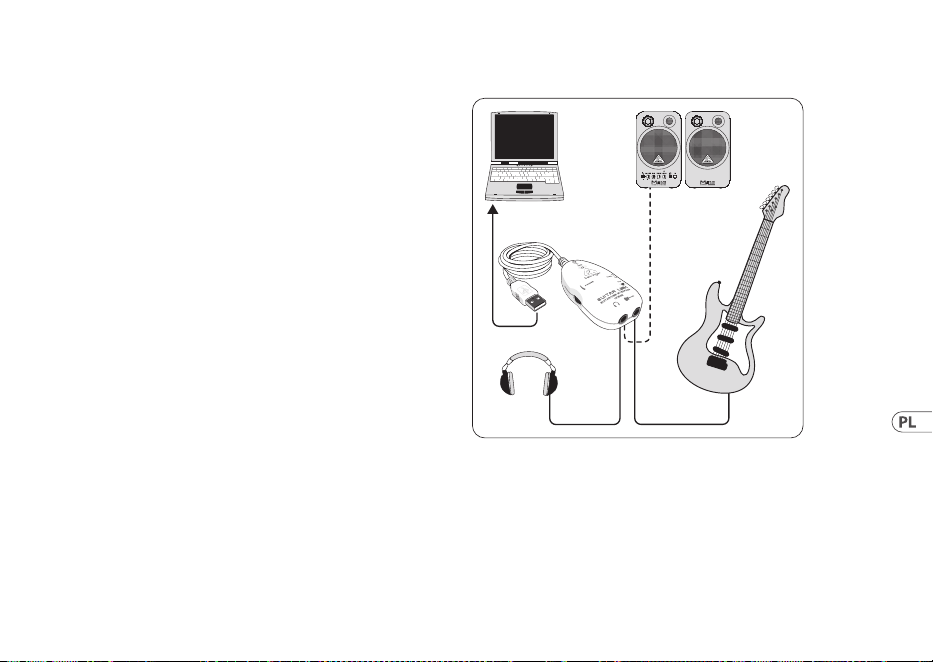
55User Manual
◊ ◊ Chcielibyśmy zwrócić uwagę na fakt, że ekstremalnie
głośny dźwięk może uszkodzić słuch, a także
słuchawki / głośniki. Przed włączeniem urządzenia
obróć regulator VOLUME do końca w prawo. Zawsze
uważaj, aby wybrać odpowiednią głośność.
(4) Możesz podłączyć UCG102 do gitary przez wejście
gitarowe (jack ¼"). Użyj dostępnego w handlu kabla jack
mono ¼".
(5) Możesz modykować sygnał gitary za pomocą
przełącznika LEVEL. Przy wysokich poziomach sygnału
dioda CLIP (nad LOGO Behringer) zaświeci się na czerwono,
w takim przypadku należy ustawić przełącznik LEVEL w
położeniu LOW.
(6) Niebieska dioda LED wskazuje stan połączenia USB.
3. Przykład zastosowania
Możesz podłączyć UCG102 bezpośrednio do komputera, aby
nagrywać, odtwarzać do odtwarzania lub odtwarzać bezpośrednio
na modelujących wzmacniaczach i efektach. UCG102 umożliwia
natychmiastowe rozpoczęcie pracy, gdziekolwiek jesteś. Po prostu
podłącz i zacznij grać.
3.1 Działanie złącza
UCG102
PC/Mac
Monitor
MS16
(optional)
HPS3000
Guitar
Rys. 3.1: Okablowanie UCG102
Użyj kabla USB, aby podłączyć GUITAR LINK UCG102 do
komputera. Jednostka USB UCG102 jest zasilana z magistrali
- nie jest potrzebne oddzielne zasilanie. Zapala się niebieska
dioda LED (6), a system sygnalizuje podłączenie urządzenia
audio USB.
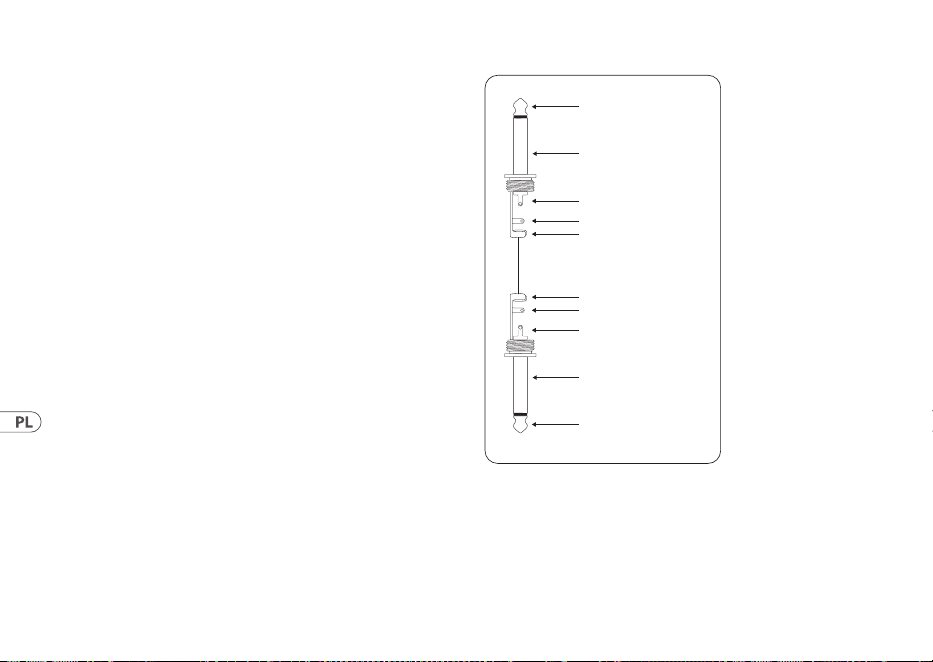
56 GUITAR LINK UCG102
Podłącz słuchawki do złącza PHONES w UCG102.
Jeśli nie chcesz używać swoich słuchawek, możesz również
podłączyć parę aktywnych monitorów do złącza PHONES - seria
Behringer MONITOR SPEAKERS, MS16, MS20, MS40, B2030A lub
B2031A są idealnym wyborem do tego zastosowania.
4. Połączenia audio
Dzięki zintegrowanemu interfejsowi USB możesz zmienić swój
komputer w doskonałe studio nagrań. Niezależnie od tego,
czyćwiczysz w domu, czy w studio, używane złącza audio
zawsze pozostają takie same.
4.1 Okablowanie
Podłącz UCG102 do gitary za pomocą standardowego kabla
instrumentalnego.
strain relief clamp
strain relief clamp
sleeve
sleeve
tip
tip
sleeve
ground/shield
sleeve
ground/shield
tip
signal
tip
signal
Rys. 4.1: Niezbalansowany kabel instrumentu ze złączem ¼" TS
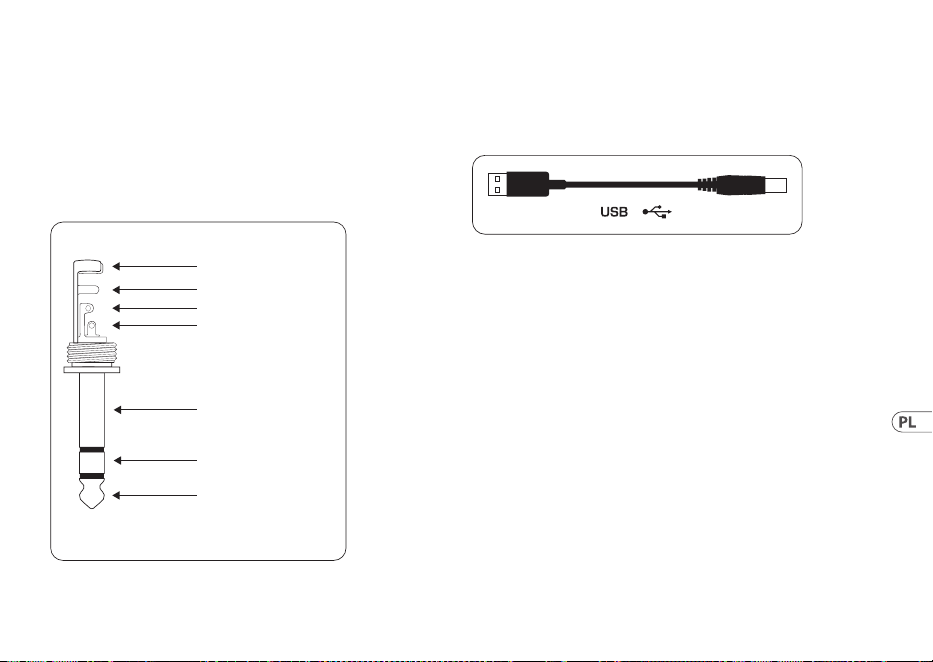
57User Manual
4.2 Złącze słuchawkowe
UCG102 zapewnia połączenie dla słuchawek. Możesz podłączyć
dowolne standardowe słuchawki komercyjne z wtykiem jack
¼"TRS. Do wtyków mini TRS potrzebny będzie odpowiedni
adapter. Wymagane rozmieszczenie pinów można zobaczyć na
poniższym schemacie.
strain relief clamp
sleeve
ring
tip
sleeve
ground/shield
For connection of balanced and unbalanced plugs,
ring and sleeve have to be bridged at the stereo plug.
Balanced ¼" TRS connector
ring
cold (-ve)
tip
hot (+ve)
Rys. 4.2: Złącze stereo TRS
4.3 Kabel USB
UCG102 jest wyposażony w kabel USB do podłączania urządzeń
zgodnych ze standardem USB, takich jak notebooki.
Rys. 4.3: Kabel złącza USB

58 GUITAR LINK UCG102
1. はじめに
GUITAR LINK UCG102 ギターをお買い求め頂き、
誠 にありがとうございます。
あ な た の コ ン ピ ュ ー タ ー は 、ス タ ジ オ や ス テ ー ジ に
おいて伝統的なエフェクトを使用する事が出来るワ
ーキングステーションとなるでしょう。
ノートブック PC と GUITAR LINK UCG102 ギターがあれ
ば、ホテルの部屋でも移動中の車の中でも、すぐに
プレイすることが 出 来ます。
あなたのコンピューターまたは Mac で使用出来る
MP3, WAV, AIFF フォーマットでプ レ イが 出 来 ま す。
1.1 ご使用の前に
1.1.1 出荷
あなたの UCG102 ギ タ ー は 、安 全 な 輸 送 の た め に 工
場出荷時に十分な注意を払って梱包されています
が 、万 が 一 包 装 ダ ン ボ ー ル に 損 傷 を 発 見 し た 場 合
には、製品本体の損傷についても確認を行なってく
ださい。
◊ ◊ 装置が万が一故障した場合には、保証請求権
が無効となる恐れがありますので当社へ直接返
送せず、必ず販売店および運送会社へ御連絡く
ださい。
◊ ◊ 本製品の保管や運送の際には、製品への損傷を
避けるため、常にオリジナルの梱包を使用する
ようにしてください 。
◊ ◊ 製品および梱包材などは、お子様の手の届かな
いところに保 管してください 。
◊ ◊ 梱包材などを廃棄する場合には、環境保護に適
した 方 法 を心 が けてください 。
1.1.2 オンライン登録
ご 購 入 後 は 、新 し い Behringer 機器をぜひご登録く
ださい。behringer.com にアクセスして、保証条件をご
確認ください。
Behringer 販売代理店がお近くにない場合
は、behringer.com の “Support” に記載されている
該当地域の Behringer 代理店までお問い合わせ
く だ さ い 。該 当 地 域 が 記 載 さ れ て い な い 場 合
は、behringer.com の “Support” にある “OnlineSupport”
で問題を解決できるかどうか確認してください。
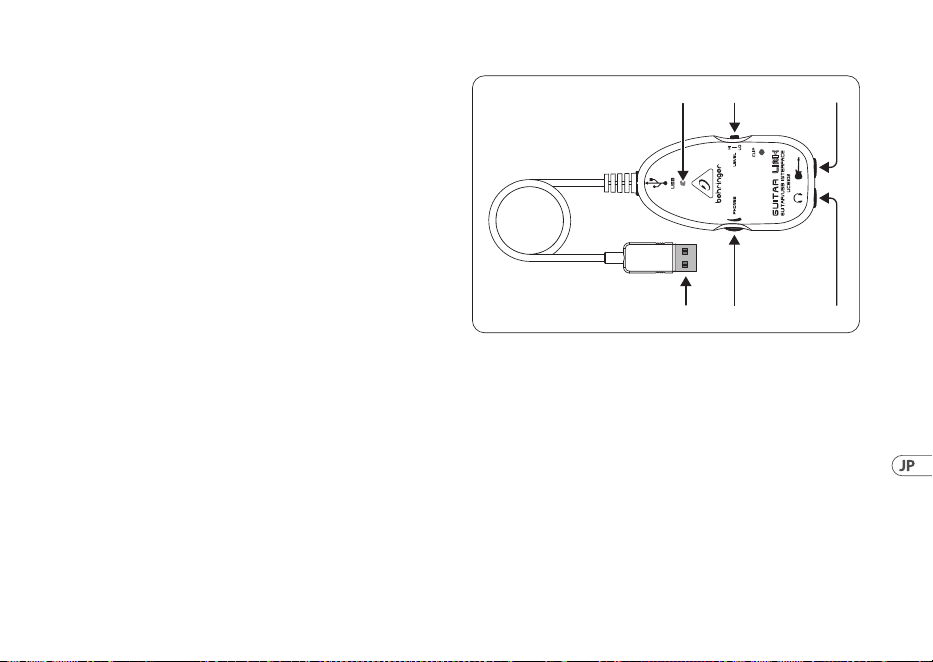
59User Manual
または、製品を返品する前に、behringer.com でオンラ
イン保証請求の手続きを取ってください。
購入情報と機器を登録しておくことで、お客様から
の修理のご依頼を迅速かつ効率的に処理すること
が できます。
製品の登録にご協力ください!
2. 操作部および各接続端子
UCG102 ギターは、USB ケーブルを 経 由してコンピュー
ターまたは Mac と接続することが出来ます。また標
準ジャックを通して、ギターアンプと直接 接続するこ
とが可能です。また同時に USB 接続端子を通じて電
源 供 給 を行なうこともできます。
(1) (2) (3)
(5) (4)
(6)
図 2.1: 操作部および各接続端子
(1) USB ケーブルを接続して、コンピューターと接
続 し て 下 さ い 。接 続 さ れ る と 青 色 の コ ン ト ロ ー
ル LED (6) が点灯し、コンピューターと接続され
たことが 表 示 されます。
(2) PHONES コ ン ト ロ ー ラ ー を 使 用 し て 、ヘ ッ ド フ ォ ン 出 力 の
音量を調節することが出来ます。大音量による聴覚障
害を避けるため、ヘッドフォンを接続する前には、必ず
このコントローラ ー を 最 低 ま で 絞りきってください 。
(3) ヘッドフォン端子にヘッドフォンを差込むことが出来ます。
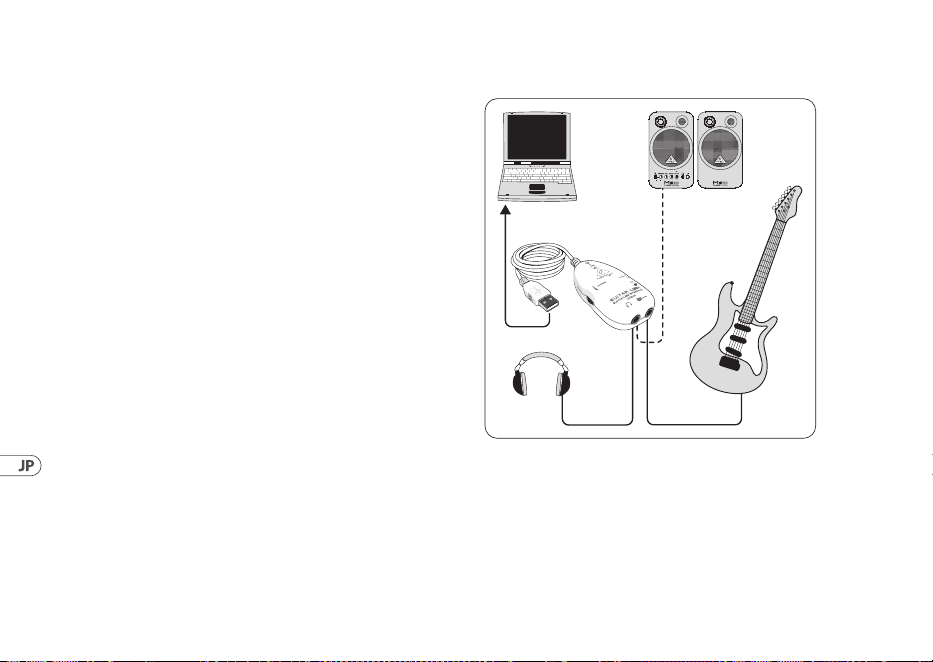
60 GUITAR LINK UCG102
◊ ◊ 大 音 量で の 使 用 は 聴 覚 障 害また はヘッドフォン
故障の原因となる場合がありますので、本体機
器 に 電 源 を 投 入 す る 際 は 、音 量 が ゼ ロ の 状 態 に
廻りきっていることを確 認してください 。また常
に適切な音量での使用を心がけてください。
(4) この 6.3 mm ギター入力端 子にギターを接続します。
ケーブル は 市 販 の 6.3 mm モノラルフォンジャックを 使
用してください 。
(5) LEVEL スイッチでギター信号をモディファイできます。
信号レベルが高いと Behringer ロゴ上にある CLIP LED
が赤く点灯しますので、その場合は LEVEL スイッチを
LOW に 設 定してください 。
(6) パワー LED は USB による電源供給の状態を表示
します。
3. アプリケーション 使 用例
UCG102 は 、直 接コンピューターに接 続してレコーディ
ング、プレイバックに合わせての演奏、モデリングア
ンプやエフェクトとの演奏が可能です。UCG102 は接
続が非常に簡単に行えるため、どこにいても即座に
自由なジャミングが可能となるのです。
3.1 USB 端子の接続方法
UCG102
PC/Mac
Monitor
MS16
(optional)
HPS3000
Guitar
図 3.1: USB ギターの接続 例
GUITAR LINK UCG102 をコンピューターと接続する際
は、USB ケ ーブル を 使 用してください 。
コンピュー ター上 の USB バスによって UCG102 ギター
の USB ユ ニ ット が 駆 動 さ れ ま す の で 、別 々 の 電 源 供
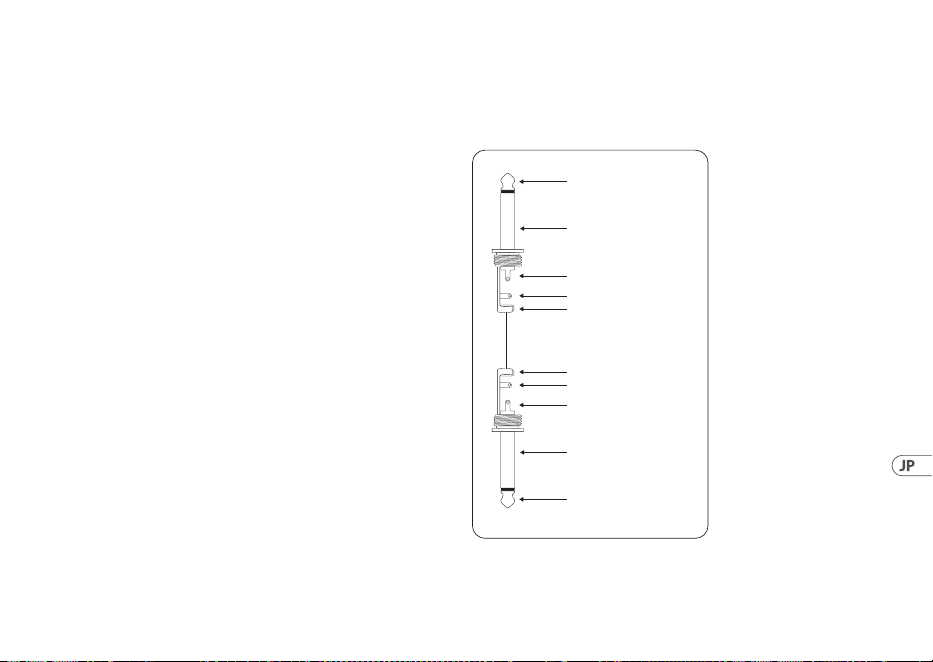
61User Manual
給は 必要ありません。USB コネクターの下の青色の
LED (6) が 点 灯 し 、シ ス テ ム は オ ー デ ィ オ 信 号 が 接 続
されたことを 示します。
ヘッド フォンを UCG102 の PHONES 端子に接続し
ます。
ヘ ッ ド フ ォ ン を 使 用 し た く な い 場 合 は 、こ の PHONES
端子に 2 台のアクティブモニターを接 続すること
もできます。Behringer MONITOR SPEAKERS シリーズの
MS16, MS20, MS40, B2030A‚ および B2031A.などが最適
です。
4. オーディオ接続 端子
内蔵の USB インターフェースを使えば、コンピュータ
ーを 究 極のレコー ディングスタジオに 変えることが
できます。スタジオでも自宅でも、常にオーディオ接
続 は同じ状 態となります。
4.1 ワイアリング
標 準 楽 器 ケーブル を 使 用して UCG102 とギターを接
続します。
strain relief clamp
strain relief clamp
sleeve
sleeve
tip
tip
sleeve
ground/shield
sleeve
ground/shield
tip
signal
tip
signal
図 4.1: 6.3 mm モノラルジャックアンバランス型
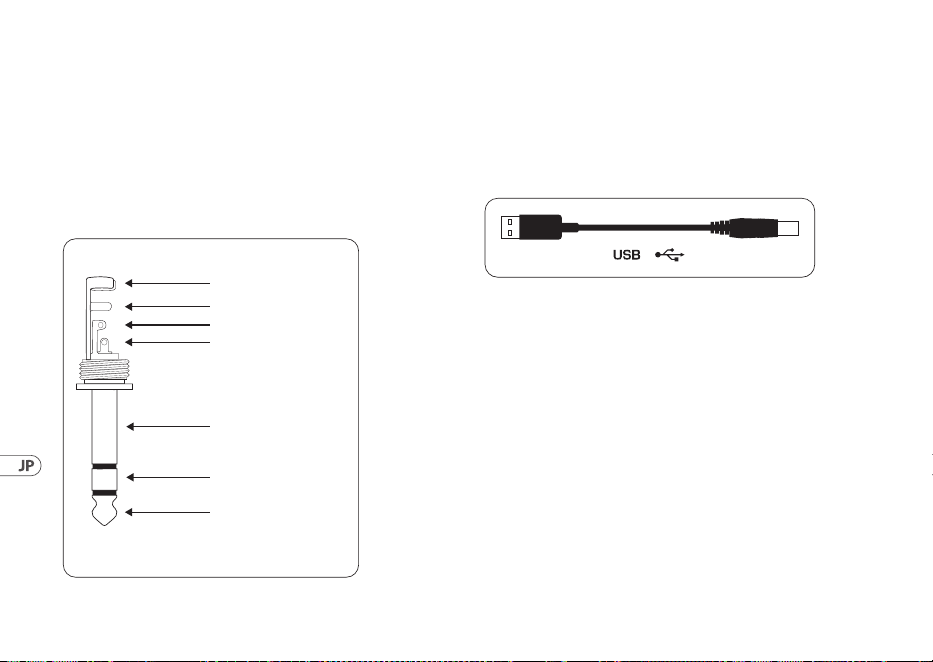
62 GUITAR LINK UCG102
4.2 ヘッドフォン 接 続 端 子
UCG102 ギター本体には、ヘッドフォン接続端子があ
りま す。6.3 mm ステレオフォンジャックを備えたヘッ
ド フ ォ ン で あ れ ば 、ど の よ う な タ イ プ の も の で も 使 用
出 来 ま す 。ピ ン ジ ャ ッ ク を ご 使 用 の 場 合 、変 換 プ ラ
グを予めご用意下さい。以下の図から必須のピン配
分を見ることが で きます。
strain relief clamp
sleeve
ring
tip
sleeve
ground/shield
For connection of balanced and unbalanced plugs,
ring and sleeve have to be bridged at the stereo plug.
Balanced ¼" TRS connector
ring
cold (-ve)
tip
hot (+ve)
図 4.2: ヘッド フォン・ステレオフォン ジャック
4.3 USB ケーブル
UCG102 ギターの USB 出力は、例えばノートブック PC
のような、USB 互換性を持つ製品へ接続します。付属
の も の 以 外 で も 、標 準 的 な USB ケーブルで もつなぐ
ことが 出来ます。
図 4.3: USB 接 続 ケーブル

63User Manual
1. 简介
感谢你对我们的信任, 购买了百灵达的 GUITAR LINK
UCG102。 有了它, 你的电脑就成了你的工作室, 你能象
在录音室或舞台上一样, 使用经典的效果。
用笔记本电脑和百灵达的 GUITAR LINK UCG102, 你便能
在 火车 上 或 旅馆 里 开始工作 了。
随货还供应一流的模拟功放和效果踏板软件。
你能伴随 Mac 电脑或 PC 电脑播放的 MP3, WAV 和 AIFF
的音乐进行演奏。
耳机插口使你能不受干扰地与你的乐队进行演奏
–既插既能摇滚。
1.1 在你开始以前
1.1.1 供货
百灵达 GUITAR LINK UCG102 在厂内进行了仔细的包装,
以确保安全可靠的运输。 但是, 我们还是建议, 你要
仔细产品的包装和包装内容, 以便确认产品在运输
中没有损坏。
◊ ◊ 若发现有损坏时, 请不要将设备寄回百灵达公
司。 请务必首先通知销售商和运输公司, 否则索
赔权可能会失效。
◊ ◊ 为了避免储藏或运输中产品所到损坏, 请始终使
用原包装材料。
◊ ◊ 在无人看管的情况下, 小孩不能玩弄产品或包装
用的材料。
◊ ◊ 请以环保的要求, 处理所有的包装材料。
1.1.2 网上登记
在购买 Behringer 产品之后, 请您尽可能立即在网站
behringer.com 进行登记, 并仔细阅读产品质量担保服
务规定。
所购买的 Behringer 产品一旦出现故障或损坏, 本公司
承诺为您提供及时的产品维修服务。 请直接与您
的 Behringer 特许经销商联系。 若 Behringer 特许经
销商不在附近, 您也可直接与本公司的分公司联系。
在产品包装里放有联系地址 (全球联系信息 / 欧洲
联系信息)。 如您所在的国家没有本公司所设的联
系处, 可与离您最近的批发商联系。 您可在我们的网
页上 (behringer.com) 的技术支持处, 得到批发商的联
系地址。
请在登记时, 务必写明您购买产品的日期, 以便本公
司能更快更有效地为您提供产品质量的担保服务。
衷心感谢您的合作!
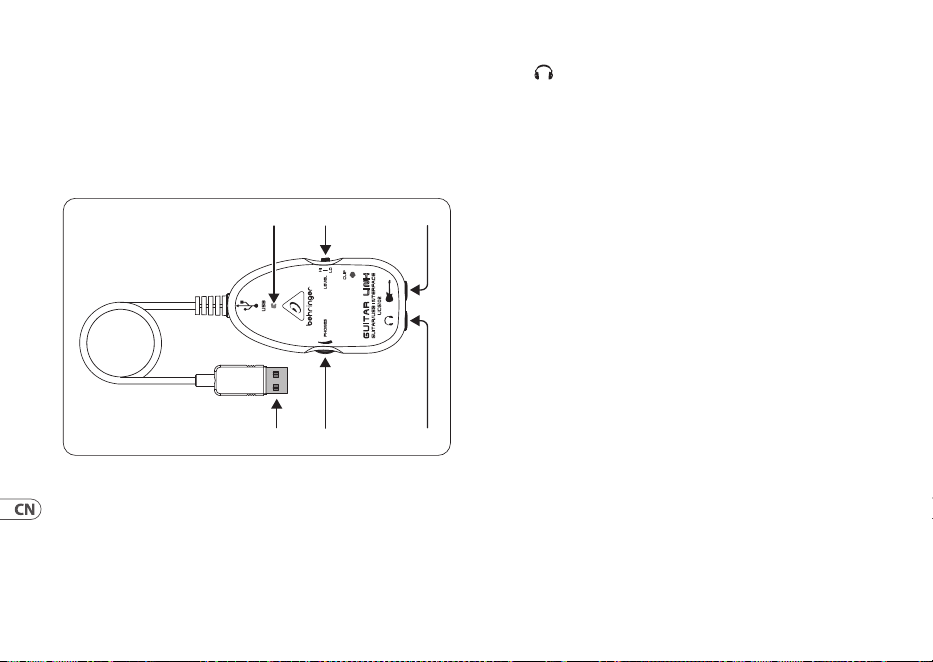
64 GUITAR LINK UCG102
2. 控制元件和接插口
用吉他上的 6.3 毫米插口, 你能直接将你的 UCG102
与功放器连接, 或者你可用随货供应的 USB 电线将
它与你的电脑 / MAC 电脑连接。 USB 连接同时给吉他
提供电源。
(1) (2) (3)
(5) (4)
(6)
图 2.1: 控制元件和接插口
(1) 用这个 USB 插口可将你的吉他与电脑上的 USB 插口连
接。 蓝色的发光二极管象时连接成功。
(2) 用这一PHONES 调节钮, 你能调节吉他输出端的音量。
耳机的音量, 需通过电脑上的软件进行调节。
(3) 在 这个插口上, 你可插上配有 6.3 毫米插头的
耳机。
◊ ◊ 请你注意: 高的音量会损坏听力和 / 或耳机和音
响设备。 在将设备打开前, 请将 PHONES 调节钮向
左打到底。 请始终使用适当的音量。
(4) UCG102 上 INPUT (输入) 插口是 6.3 毫米插口, 你可将吉
他插入这一插口。 请使用单声 6.3 毫米的电线 (请在乐器
店里购买这种电线)。
(5) 利用容量调节器您能调节耳机输出端的声音强度。 在您
连接一个耳机前, 请您将调节器向左方旋转; 这样可以
使您避免过响的声音弄伤
(6) 电源灯为您表明 USB 电压供应的状况。
3. 使用举例
您能直接将它与电脑连接, 进行录音, 伴随您所喜
欢的音乐进行演奏, 或者您能直接通过模拟功放和
效果踏板进行演奏。 有了 UCG102, 无论在什么地方,
您都能进行演奏。 非常简单–既插既能摇滚。
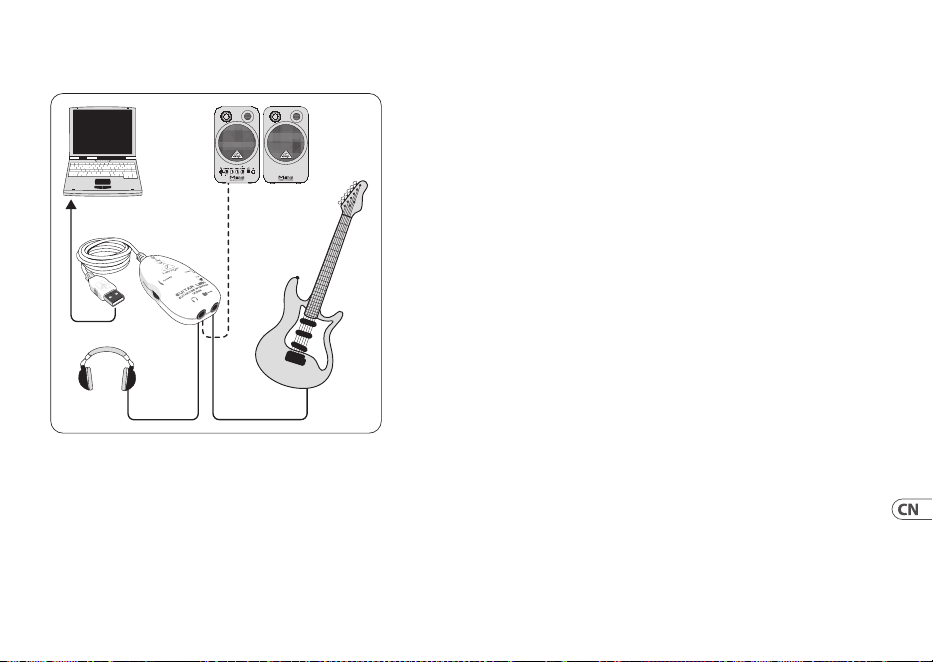
65User Manual
3.1 UCG102 插口的使用
UCG102
PC/Mac
Monitor
MS16
(optional)
HPS3000
Guitar
图 3.1: UCG102 吉他的连线
请用随货供应的 GUITAR LINK UCG102 与电脑连接。
UCG102 的 USB 插口能给您的吉他提供电源, 无需另外
的电源供应。 USB 插口下的蓝色发光二极管会发亮,
您的电脑便会显示, 有连接上一个 USB 设备。
在 USB 插口的上方, 有一个耳机插口, 可用来连接耳
机。 如果您不想使用耳机的话, 您可在此插口上连接
有源音箱百灵达的监听音箱 MS16, MS20, MS40, B2030A,
B2031A 非常合适这种使用场合。
4. 音频连接
用 USB 插口的话, 您能将您的电脑变成一个一流的录
音室。 不管是在录音室还是在家里演奏, 音频的连接
方法是一样的。
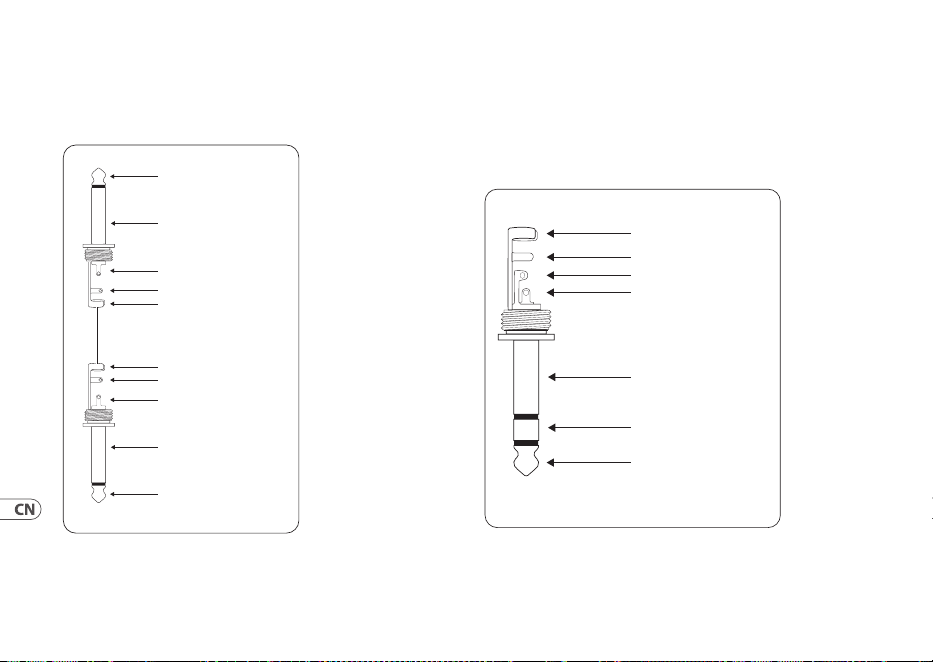
66 GUITAR LINK UCG102
4.1 连线
GUITAR LINK UCG102 吉他与您的功放连接的话,
您需要一根乐器线。
strain relief clamp
strain relief clamp
sleeve
sleeve
tip
tip
sleeve
ground/shield
sleeve
ground/shield
tip
signal
tip
signal
图 4.1: 非平衡式乐器线
4.2 耳机连接
UCG102 吉他提供一个耳机插口。 你能使用一般配有
立体声 6.3 毫米插头的耳机。 如果只配有小型插头
的话, 您便需要一个适配插头。 插头的电线连接,
请看下图。
strain relief clamp
sleeve
ring
tip
sleeve
ground/shield
For connection of balanced and unbalanced plugs,
ring and sleeve have to be bridged at the stereo plug.
Balanced ¼" TRS connector
ring
cold (-ve)
tip
hot (+ve)
图 4.2: 立体声插头

67User Manual
4.3 USB 电线
UCG102 吉他配有一个 USB 输出端, 可用来连接与 USB
兼容的设备, 如: 笔记本电脑和。 您可使用任何标准
的 USB 电线。
图 4.3: USB 输出端
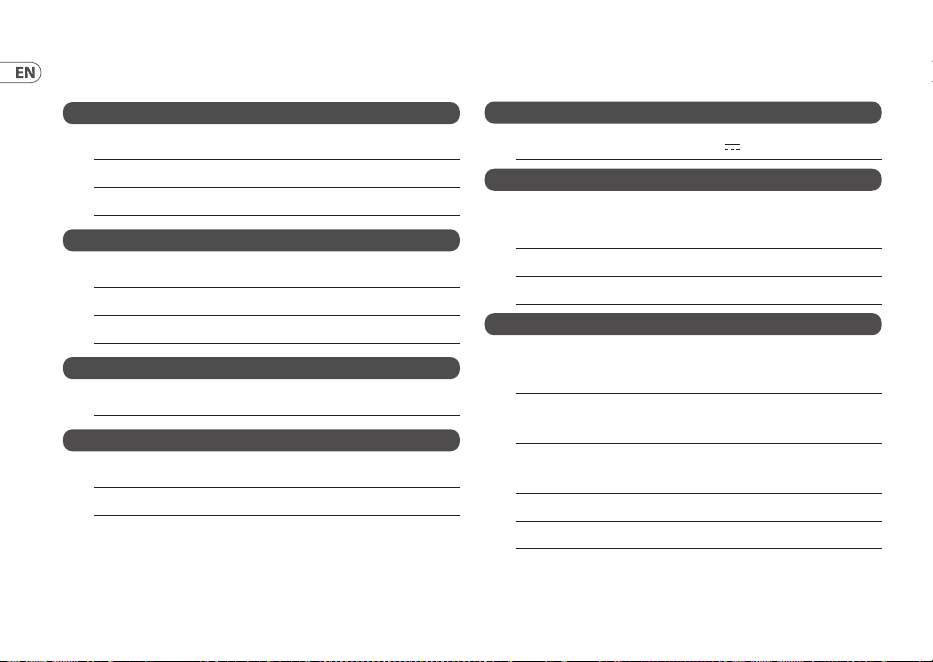
68 GUITAR LINK UCG102
5. Specications
Guitar In
Connector ¼" TRS
Input Impedance (High) 250 kΩ
Input Impedance (Low) 400 kΩ
Phones Out
Connector ¼" TRS
Output impedance approx. 50 Ω
Max. output pegel -2 dBu,2 x 3.7 mW @ 100 Ω
USB 1.1
Connector type A
Digital Processing
Converter 16-bit converter
Sample rate 32.0 / 44.1 / 48 kHz
Power Supply
USB connection 5 V , 100 mA max.
Dimensions / Weight
Dimensions (H x W x D) approx. 1 x 2 x 3 ¾"
approx. 24.6 x 50.8 x 95.6 mm
Cable length approx. 5 9/10" / 15 cm
Weight approx. 0.198 lbs / 0.09 kg
System Requirements (PC / Mac)
Operating system Win XP / Win 7 / Win 8 /
Win 8.1 / Mac OS X
Processor min. (PC) Pentium 700 MHz /
Athlon XP 1.33 GHz
Processor min. (Mac) G4 733 MHz /
Intel Core Duo 1.66
RAM (PC) 256 MB
RAM (Mac) 512 MB
69User Manual
Software
Applications please see “Software
Installation Guide”
Driver (Windows) high-performance driver
Behringer USB AUDIO for
Win 98 (SE) / ME / 2000 /
XP/Vista / Win 7 / Win 8 /
Win 8.1
Driver (Mac OS X) Core Audio
Behringer is constantly striving to maintain the highest professional standards.
As a result of these efforts, modifications may be made from time to time to existing
products without prior notice. Specifications and appearance may differ from those listed
or illustrated.
70 GUITAR LINK UCG102
5. 技术参数
吉他输入
连接器 ¼" TRS
输入阻抗(高) 250 kΩ
输入阻抗(低) 400 kΩ
电话出去
连接器 ¼" TRS
输出阻抗 大约 50 Ω
最大限度。 输出 pegel -2 dBu, 2 x 3.7 mW @ 100 Ω
USB 1.1
连接器 A 型
数字处理
转炉 16 位转换器
采样率 32.0 / 44.1 / 48 kHz
电源
USB 连接 5 V , 最大 100 mA
尺寸 / 重量
尺寸 (高 x 宽 x 深) 大约 1 x 2 x 3 ¾"
大约 24.6 x 50.8 x 95.6 mm
电缆长度 大约 5 9/10" / 15 cm
重量 大约 0.198 lbs / 0.09 kg
系统要求 (PC / Mac)
操作系统 Win XP / Win 7 / Win 8 /
Win 8.1 / Mac OS X
处理器最小值 奔腾 700 MHz /
(个人电脑) 速龙 XP 1.33 GHz
处理器最小值 G4 733 MHz /
(苹果电脑) 英特尔酷睿 1.66
内存 (PC) 256 MB
记忆体 (Mac) 512 MB
71User Manual
软件
应用领域 请参阅“软件
安装指南”
驱动程式( Windows ) 高性能驱动器
适用于 Win 98(SE)/ ME /
2000 / XP / Vista / Win 7 /
Win 8 / Win 8.1 的百灵达
USB 音频
驱动程序( Mac OS X ) 核心音频
百灵达一直在努力保持最高的专业水准。 由于这些努力, 可能会不时
对现有产品进行修改,恕不另行通知。 规格和外观可能与所列或所示
的有所不同。
72 GUITAR LINK UCG102
FEDERAL COMMUNICATIONS
COMMISSION COMPLIANCE
INFORMATION
Responsible Party Name: Music Tribe Commercial NV Inc.
Address: 122 E. 42nd St.1,
8th Floor NY, NY 10168,
United States
Email Address: [email protected]
GUITAR LINK UCG102
This equipment has been tested and found to comply with the limits
for a Class B digital device, pursuant to part 15 of the FCC Rules. These
limits are designed to provide reasonable protection against harmful
interference in a residential installation. This equipment generates,
uses and can radiate radio frequency energy and, if not installed
and used in accordance with the instructions, may cause harmful
interference to radio communications.
However, there is no guarantee that interference will not occur
in a particular installation. If this equipment does cause harmful
interference to radio or television reception, which can be determined
by turning the equipment o and on, the user is encouraged to try to
correct the interference by one or more of the following measures:
• • Reorient or relocate the receiving antenna.
• • Increase the separation between the equipment and receiver.
• • Connect the equipment into an outlet on a circuit dierent from
that to which the receiver is connected.
• • Consult the dealer or an experienced radio/TV technician for help.
This equipment complies with Part 15 of the FCC Rules. Operation is
subject to the following two conditions:
(1) This device may not cause harmful interference, and
(2) This device must accept any interference received, including
interference that may cause undesired operation.
Important information:
Changes or modications to the equipment not expressly approved by
Music Tribe can void the user's authority to use the equipment.
Behringer
GUITAR LINK UCG102

73User Manual
Hereby, Music Tribe declares that this product is in compliance with Directive 2014/30/EU, Directive 2011/65/EU and
Amendment 2015/863/EU, Directive 2012/19/EU, Regulation 519/2012 REACH SVHC and Directive 1907/2006/EC.
Full text of EU DoC is available at https://community.musictribe.com/
EU Representative: Music Tribe Brands DK A/S
Address: Gammel Strand 44, DK-1202 København K, Denmark
UK Representative: Music Tribe Brands UK Ltd.
Address: 8
th
Floor, 20 Farringdon Street London EC4A 4AB, United Kingdom

We Hear You
