
AIR OPERATED COIL SPRING COMPRESSOR
2500KG
MODEL NO: RE2500
Thank you for purchasing a Sealey product. Manufactured to a high standard, this product will, if used according to these
instructions, and properly maintained, give you years of trouble free performance.
IMPORTANT: PLEASE READ THESE INSTRUCTIONS CAREFULLY. NOTE THE SAFE OPERATIONAL REQUIREMENTS, WARNINGS & CAUTIONS. USE
THE PRODUCT CORRECTLY AND WITH CARE FOR THE PURPOSE FOR WHICH IT IS INTENDED. FAILURE TO DO SO MAY CAUSE DAMAGE AND/OR
PERSONAL INJURY AND WILL INVALIDATE THE WARRANTY. KEEP THESE INSTRUCTIONS SAFE FOR FUTURE USE.
1. SAFETY
1.1. GENERAL SAFETY
WARNING! It is compulsory to read this manual before using this equipment. The proper operation and full compliance of this
product’s performance is guaranteed only if all the instructions provided in this manual are closely adhered to.
The usage of this machine requires particular attention. Compressed springs can be potential dangers due to force collected
because of compression. This machine must be used always with its specific frontal protection mounted correctly on the
frame.
WARNING! Ensure Health & Safety, local authority, and general workshop practice regulations are adhered to when using this equipment.
WARNING! Wear approved safety hand and eye protection (standard spectacles are not adequate).
WARNING! TRAPPING DANGER – Keep hands and fingers away from the spring and compressing jaws in use.
9 Keep the work area clean, uncluttered and ensure there is adequate lighting.
9 Maintain correct balance and footing. Ensure the floor is not slippery and wear non-slip shoes.
9 Remove ill-fitting clothes. Remove ties, watches, rings, other loose jewellery. Contain and/or tie back long hair.
9 Wear appropriate protective clothing.
9 Familiarise yourself with the applications, limitations and potential hazards of the spring compressor.
9 The machine is equipped with pictograms that show remaining risks and individual protection measures to be used during working
operations. The pictograms are integral part of the product. In case of loss, deterioration or illegibility, require the pictograms to the
constructor in order to substitute them immediately. Replace the pictograms always in the same place where they were removed.
8 DO NOT use the spring compressor for a task it was not designed to perform.
8 DO NOT allow untrained persons to use the spring compressor.
1.2. PRE-OPERATIONAL SAFETY
8 DO NOT operate compressor if parts are damaged or missing as this may cause failure and/or personal injury.
9 Before commencing compression, make a visual inspection of machine to ensure pins are securely positioned and that there is no sign
of wear or fatigue – if found, DO NOT use and refer to your local Sealey stockist for advice and replacement parts.
9 Ensure that spring holding attachments are correctly attached and positioned before use.
9 Before commencing compression of spring, ensure coils of the spring are seated securely in the yokes of the compressor and cannot slide out
during compression.
9 ALWAYS ensure that the safety guard locks in place.
1.3. OPERATIONAL SAFETY
9 When applying compression to the spring, always stand to one side of the compressor.
▲ DANGER! Stop compressing the spring before the coils touch / bind.
▲ DANGER! Before attempting to remove top cap nut, always use a tool or similar to test if the compression has been relieved, DO NOT
use your hands / fingers.
9 We recommend the use of purpose made strut tools to remove the top-nut from the shock absorber piston.
9 Once compressed, and the strut removed, we recommend releasing the tension on the spring. DO NOT leave the spring under
compression in the machine unattended and DO NOT leave in compression for prolonged periods, i.e. overnight.
9 Before releasing the compression ensure that the top strut-nut is securely tightened to the manufacturer’s tolerance.
9 Release the compression slowly keeping your hands and fingers away from the spring assembly.
9 Be sure that the tension on the spring is fully controlled by the strut assembly before removing it from the yokes of the compressor.
1.4. POST OPERATIONAL SAFETY
9 When not in use, clean and store the spring compressor in a safe, dry, childproof location.
9 Maintain the spring compressor in good condition. Replace or repair damaged parts. Use genuine parts only.
9 Unauthorised parts may be dangerous and will invalidate the warranty.
2. INTRODUCTION
Designed for fast and safe compression of suspension coil springs. Air powered system operated by foot pump for ease of use. High-capacity
unit featuring 2500kg maximum load. Features safety cage. Includes a suspension strut clamp. Fits a wide range of left and right-handed coil
spring congurations and diameters.
Refer to
instructions
Wear eye
protection
Wear protective
gloves
Beware
coil binding
RE2500 Issue 2 18/12/24
Original Language Version
© Jack Sealey Limited
Wear safety
footwear
Warning:
Keep bystanders
away
Warning:
Crushing of
hands
General
Warning
3. SPECIFICATION
Model no: ..................................................................RE2500
Weight: ...........................................................................74kg
Maximum Load: ......................................................... 2500kg
Upper Arm Travel: ...................................................... 330mm
Actuation: .............................................................. Foot Pedal
Maximum Air Pressure: ................................... 145psi (10bar)
4. PREPARATION
4.1. HANDLING
The machine is heavy. It is necessary to use a trolley for handling and carriage.
Fix the package the trolley with straps in order to balance it. Handle with care in order to avoid falling.
4.2. UNPACKING
The machine is packed in a cardboard box of closed by metal clips. On the package there are arrows indicating how to handle the box.
Lay down the package in order to unpack the machine. Remove the metal clips carefully on the top of the box and unpack the machine
slipping it out of the package.
Inside the box there are components and accessories of the machine. Pay attention, not throw them with the package.
It is recommended not to leave packaging parts within access children. Recycle appropriately.
4.3. SITE OF INSTALLATION
Machine can be sited anywhere with access to an air supply.
8 DO NOT use with lighting lower than 600 lux.
Machine can be easily moved because it is not xed to the oor.
5. ASSEMBLY
Numbers in brackets refer to attached Parts List. Refer to Parts List for details of correct xings to use.
Original Language Version
© Jack Sealey Limited
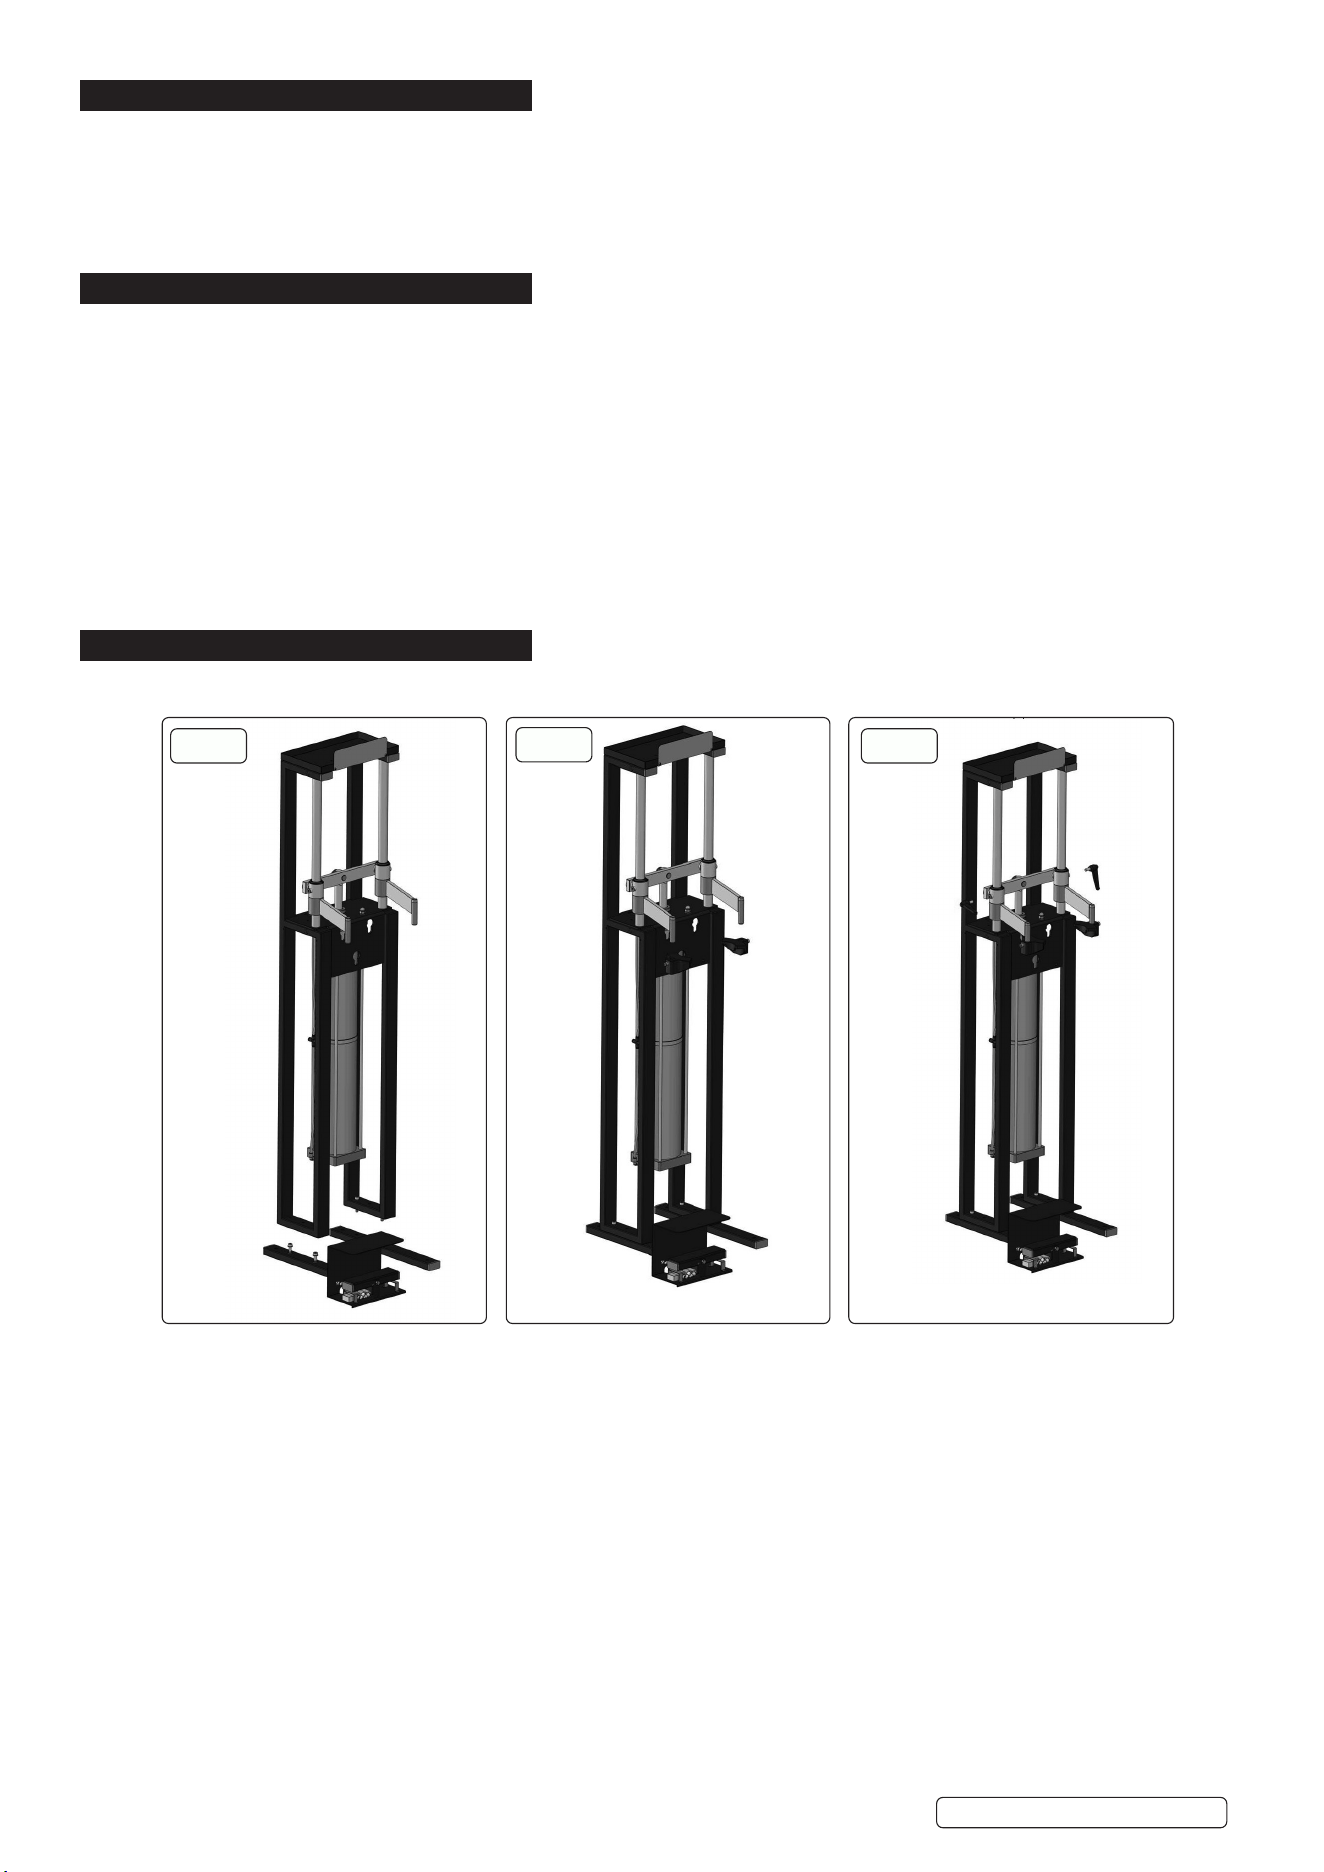
Fit feet. Fit left (pedal 29) and right (foot
pedal holder 30).
Fit moveable clamps (6) to left and right
arm assemblies (2 & 3).
Fit lock handles (4) into left hand and
right hand column (10).
Step 1
Step 2
Step 3
The A-weighted Sound Pressure of the product is less than 70dB(A)
Moveable
clamp
Feet
assemblies
Lock
handle
RE2500 Issue 2 18/12/24
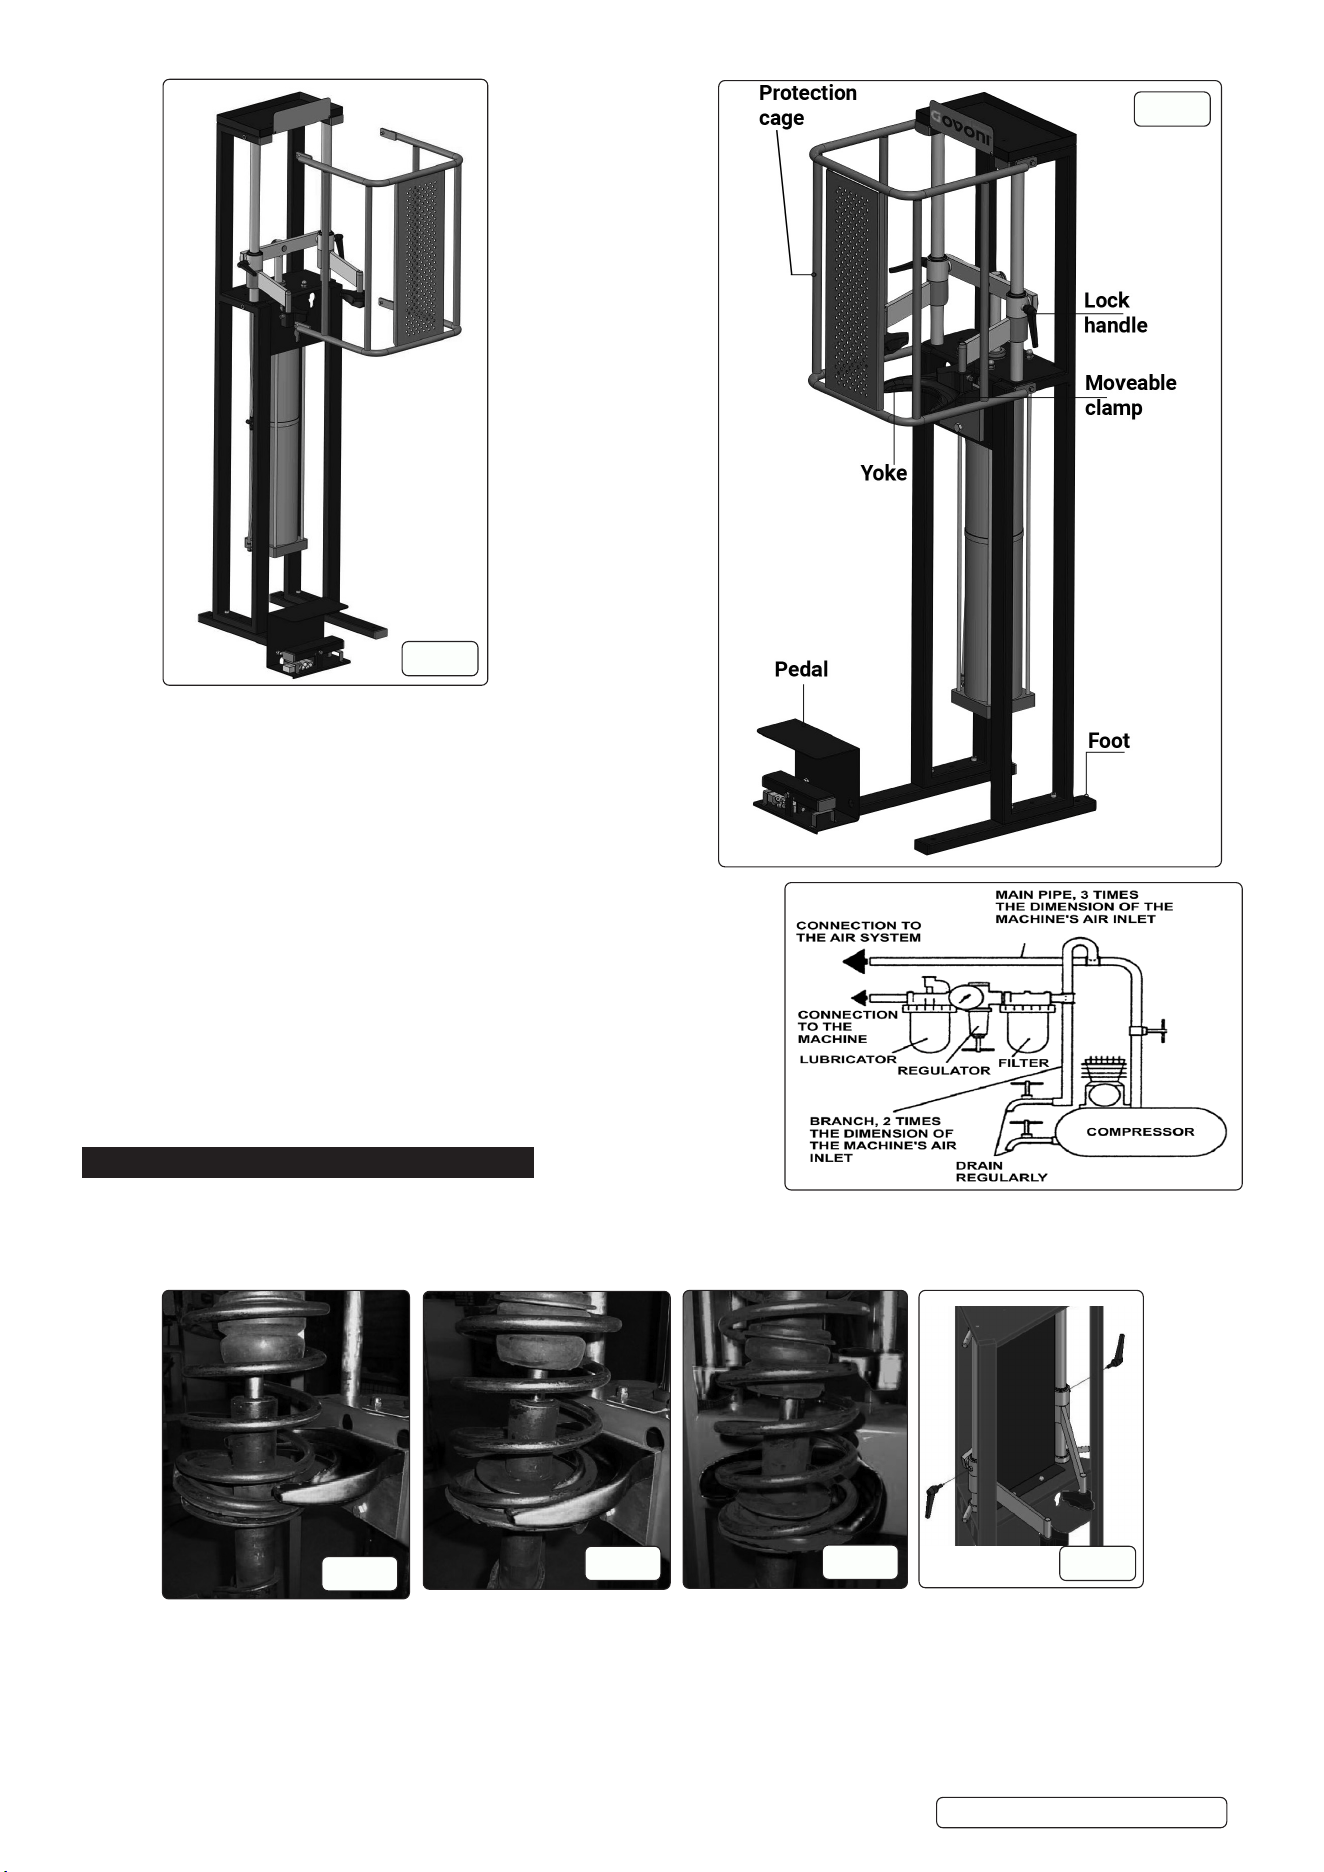
5.1. AIR SUPPLY
WARNING! Ensure the air supply is always clean and is between
5 and 8 bar whilst operating the compressor. Too high an air pressure
and unclean air will shorten the product life due to excessive wear,
and may be dangerous causing damage and/or personal injury.
5.2. Ensure foot control lever is in the ‘O’ position before connecting air supply.
5.3. Drain the air supply water separator daily to avoid water in the air line which
may damage the ram. Always use a line lubricator with these tools.
The use of an appropriate filter-regulator-lubricator assembly is
recommended. See diagram on right of page.
5.4. Connect to compressed air system.
5.5. Press the foot control lever to get the machine in a position to operate.
5.6. Fit lower yoke bracket (22).
NOTE: NEVER LUBRICATE THE SLIDING PARTS (COLUMNS) WITH
GREASE OR OIL. Every 200 working cycles, and however each 60 days,
remove the dirty and the dust to the sliding parts using a dry rag.
6. OPERATION
6.1. DISASSEMBLY
6.1.1. It is advisable to unlock the nut of shock absorber caps before using the machine.
6.1.2. Some automotive manufacturers prescribe to unlock the locking nuts of the caps before dismounting the shock absorbers from the car.
Refer to Manufacturer’s information.
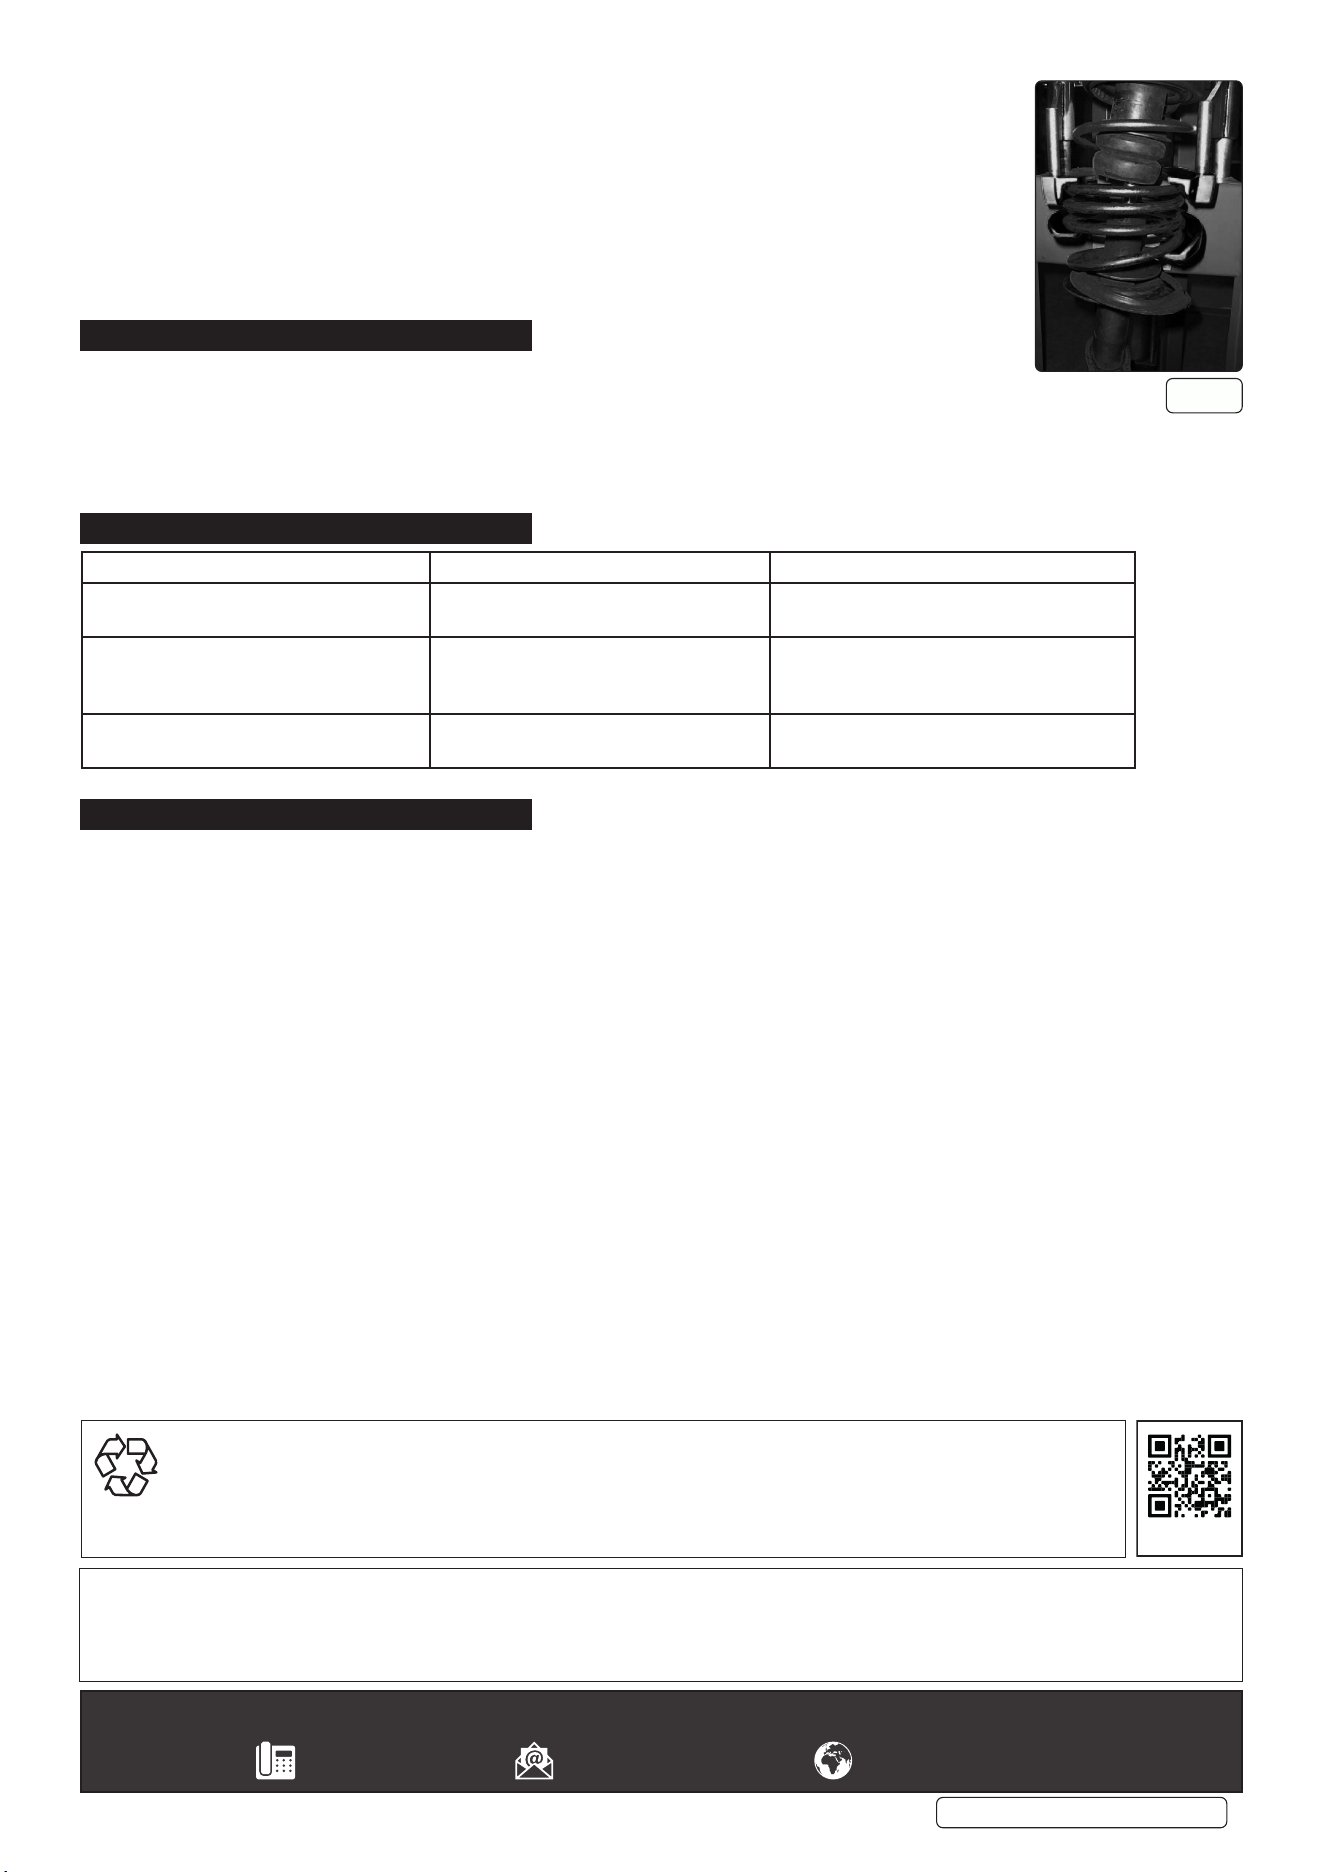
6.1.3. Position the shock absorber on the lower yoke bracket in the rst coil (g.1), rotate the shock absorber and lock it in the bracket in the
maximum slipping point (g.2).
6.1.4. Put the small arms near the spring and insert the upper clamps in the rst coil available (see g.3).
6.1.5. After having found the right position of the spring on the bracket and after having adjusted the upper clamps, lock the adjustable arms
(g.4) by doing up the lock handles (4).
6.1.6. Compress the spring using the foot control lever only to release the pressure that the spring exerts on the spring cap.
8 DO NOT over compress the spring, see g.5.
6.1.7. Remove the spring cap from the shock absorber by unscrewing the nut.
Original Language Version
© Jack Sealey Limited
Fit protection cage (21).
g.1
g.2
g.3
g.4
Step 4
Step 5
Protection
cage
RE2500 Issue 2 18/12/24
6.1.8. Release the compression of the spring and replace the old spring with the new one.
6.2. ASSEMBLY
6.2.1. To assemble perform the above operations in reverse.
6.2.2. Put the new spring in the same position where the old one was.
6.2.3. Press the foot control lever in order to compress the spring. DO NOT over compress the spring.
6.2.4. Fit the spring cap and fit the correct nut to the top of the shock absorber.
6.2.5. Now the shock absorber is mounted, use the foot control lever to release completely the spring, then move the
arms on the outside and remove the shock absorber now reassembled.
7. MAINTENANCE
7.1. ORDINARY MAINTENANCE
7.1.1. Periodically (every 2 months, or when it is necessary), clean the sliding columns from dust, earth etc. WITH A DRY RAG.
NEVER USE OIL, DETERGENT OR PENETRATING OIL TYPE PRODUCTS.
7.2. EXTRAORDINARY MAINTENANCE
7.2.1. Extraordinary maintenance operations are to be carried out by qualified personnel; it is advisable to refer to an authorized stockists for
repair operations and original spare parts.
8. TROUBLESHOOTING
9. TRANSPORT
9.1. The machine is heavy, use a trolley for handling and carriage. Follow the instructions on the box for handling.
Sealey Group, Kempson Way, Suffolk Business Park, Bury St Edmunds, Suffolk. IP32 7AR
01284 757500 sales@sealey.co.uk www.sealey.co.uk
ENVIRONMENT PROTECTION
Recycle unwanted materials instead of disposing of them as waste. All tools, accessories and packaging should be sorted,
taken to a recycling centre and disposed of in a manner which is compatible with the environment. When the product
becomes completely unserviceable and requires disposal, drain any fluids (if applicable) into approved containers and
dispose of the product and fluids according to local regulations.
Note: It is our policy to continually improve products and as such we reserve the right to alter data, specifications and component parts without prior
notice.
Important: No Liability is accepted for incorrect use of this product.
Warranty: Guarantee is 12 months from purchase date, proof of which is required for any claim.
g.5
Operational anomalies Causes Solutions
Machine does not work Control the connection to the
compressed air system
Connect the machine to air system
The two arms do not run properly along
the arms
Dust and dirt on the columns Clean the columns and the sliding parts
with a dry rag. NEVER LUBRICATE WITH
GREASE OR OILS
The piston’s shaft after moving forward
does not keep in position and retracts
Lack of air in the cylinder Contact Sealey for repair
REGISTER YOUR
PURCHASE HERE
Original Language Version
© Jack Sealey Limited
RE2500 Issue 2 18/12/24
