STEEL TYRE BEAD SEATER 6L
MODEL NO:TC006
Thank you for purchasing a Sealey product. Manufactured to a high standard, this product will, if used according to these instructions,
and properly maintained, give you years of trouble free performance.
IMPORTANT: PLEASE READ THESE INSTRUCTIONS CAREFULLY. NOTE THE SAFE OPERATIONAL REQUIREMENTS, WARNINGS & CAUTIONS. USE
THE PRODUCT CORRECTLY AND WITH CARE FOR THE PURPOSE FOR WHICH IT IS INTENDED. FAILURE TO DO SO MAY CAUSE DAMAGE AND/OR
PERSONAL INJURY AND WILL INVALIDATE THE WARRANTY. KEEP THESE INSTRUCTIONS SAFE FOR FUTURE USE.
1. SAFETY
9 Familiarise yourself with the application and limitations of the bead seater.
9 Ensure the beed seater is in good order and condition before use. If in any doubt DO NOT use the unit and contact your service
agent.
WARNING! Bead seater must only be serviced by an authorised agent. DO NOT tamper with, or attempt to adjust, pressure switch or
safety valve.
9 Maintain the bead seater in good condition and replace any damaged or worn parts. Use genuine parts only. Unauthorised parts may
be dangerous and will invalidate your warranty.
9 Use the bead seater in a well ventilated area.
9 Keep tools and other items away from the bead seater when it is in use, and keep area clean and clear of unnecessary items.
9 Keep children and unauthorised persons away from the working area.
8 DO NOT disassemble bead seater for any reason. The unit must be checked by qualied personnel only.
8 DO NOT operate within the vicinity of ammable liquids, gases or solids.
8 DO NOT use this product to perform a task for which it has not been designed
8 DO NOT deface the certification plate attached to the bead seater tank.
8 DO NOT cover the bead seater or restrict air flow around the unit whilst operating.
▲ DANGER! DO NOT direct the output jet of air towards people or animals.
8 DO NOT allow anyone to operate the bead seater unless they have received full instructions.
WARNING! The air tank is a pressure vessel and the following safety measures apply:
8 DO NOT tamper with the safety valve, DO NOT modify or alter the tank in any way and DO NOT strap anything to the tank.
8 DO NOT subject the tank to impact, vibration or to heat and DO NOT allow contact with abrasives or corrosives.
9 Drain condensation from tank daily and inspect inside walls for corrosion every three months and have a detailed tank inspection carried
out annually. The tank shell must not fall below the certified thickness at any point.
WARNING! For this reason DO NOT tamper with, or adjust, the pre-set switch or safety valve.
1.1. INSPECTION OF PRESSURE TANK BOTH INTERNAL AND EXTERNAL.
Under the PRESSURE SYSTEMS SAFETY REGULATIONS 2000 it is the responsibility of the owner of the bead seater to initiate a
system of inspection that both defines the frequency of the inspection and appoints a person who has specific responsibility for carrying
out the inspection.
8 DO NOT carry out any welding operations on any pressurised parts of the vessel.
9 When not in use, store the bead seater carefully in a safe, dry, childproof location.
9 Wear appropriate Personal Protective Equipment. A full range of Personal Protective Equipment is available from your Sealey stockist.
2. INTRODUCTION
The easy and instant way to seat tubeless tyre beads. Dumps air into the tyre void, forcing the bead to seat against the rim for
ination. Air release is controlled by a trigger lever. Fully certied 6l steel tank with gauge and safety valve prevents over-pressurising.
Suitable for use on cars, commercials, agricultural and ATV tyres. Maximum air pressure 145psi (10bar) Working pressure 87-116psi
(6-8bar).
3. SPECIFICATION
Refer to
instruction
manual
Wear eye
protection
TC006 Issue:1 10/07/24
Original Language Version
© Jack Sealey Limited
Wear ear
protection
Wear
protective
gloves
Wear
a mask
Model No: TC006
Maximum Pressure: 145psi(10bar)
Nett Weight: 6.5kg
Operating Temperature: -20 to 70°
Tank Capacity: 6L
Tank thickness: 2.5mm
Conforms to EN 286-1 standard
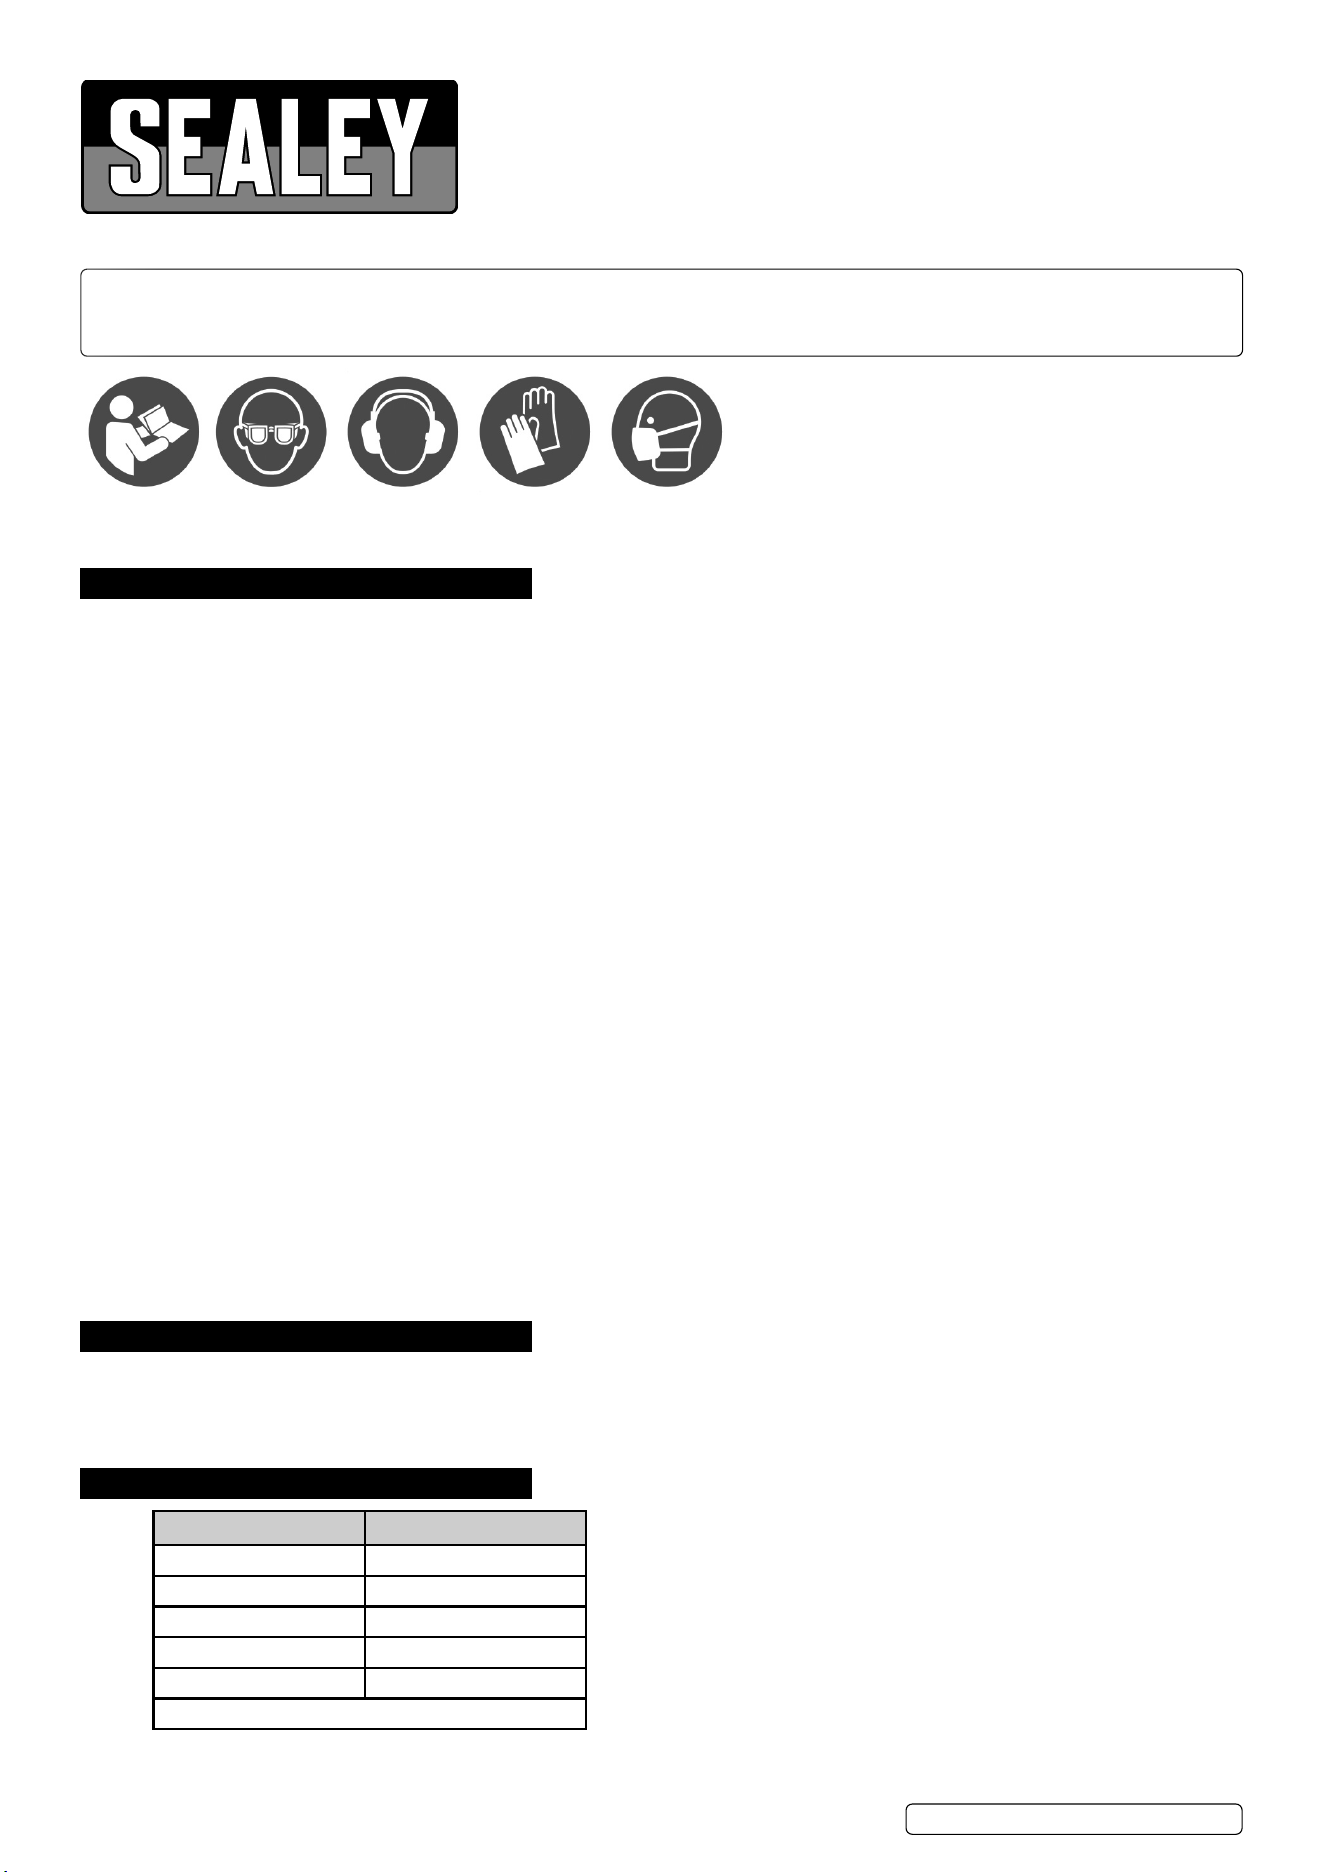
4. a ASSEMBLY
4.1. Insert the operation bar into the tank body and turn clockwise until it locks. Back off to align centrally and tighten lock nut (fig.1).
4.2.
4.3.
4.4.
4.5.
4.6.
4.7.
4.8.
4.9.
4.10.
4.11.
4.12.
4.13.
4.14.
4.15.
4.16.
4.17.
4.18.
4.19.
4.20.
4.21.
4.22.
4.23.
4.24.
4.25.
5. op OPERATION
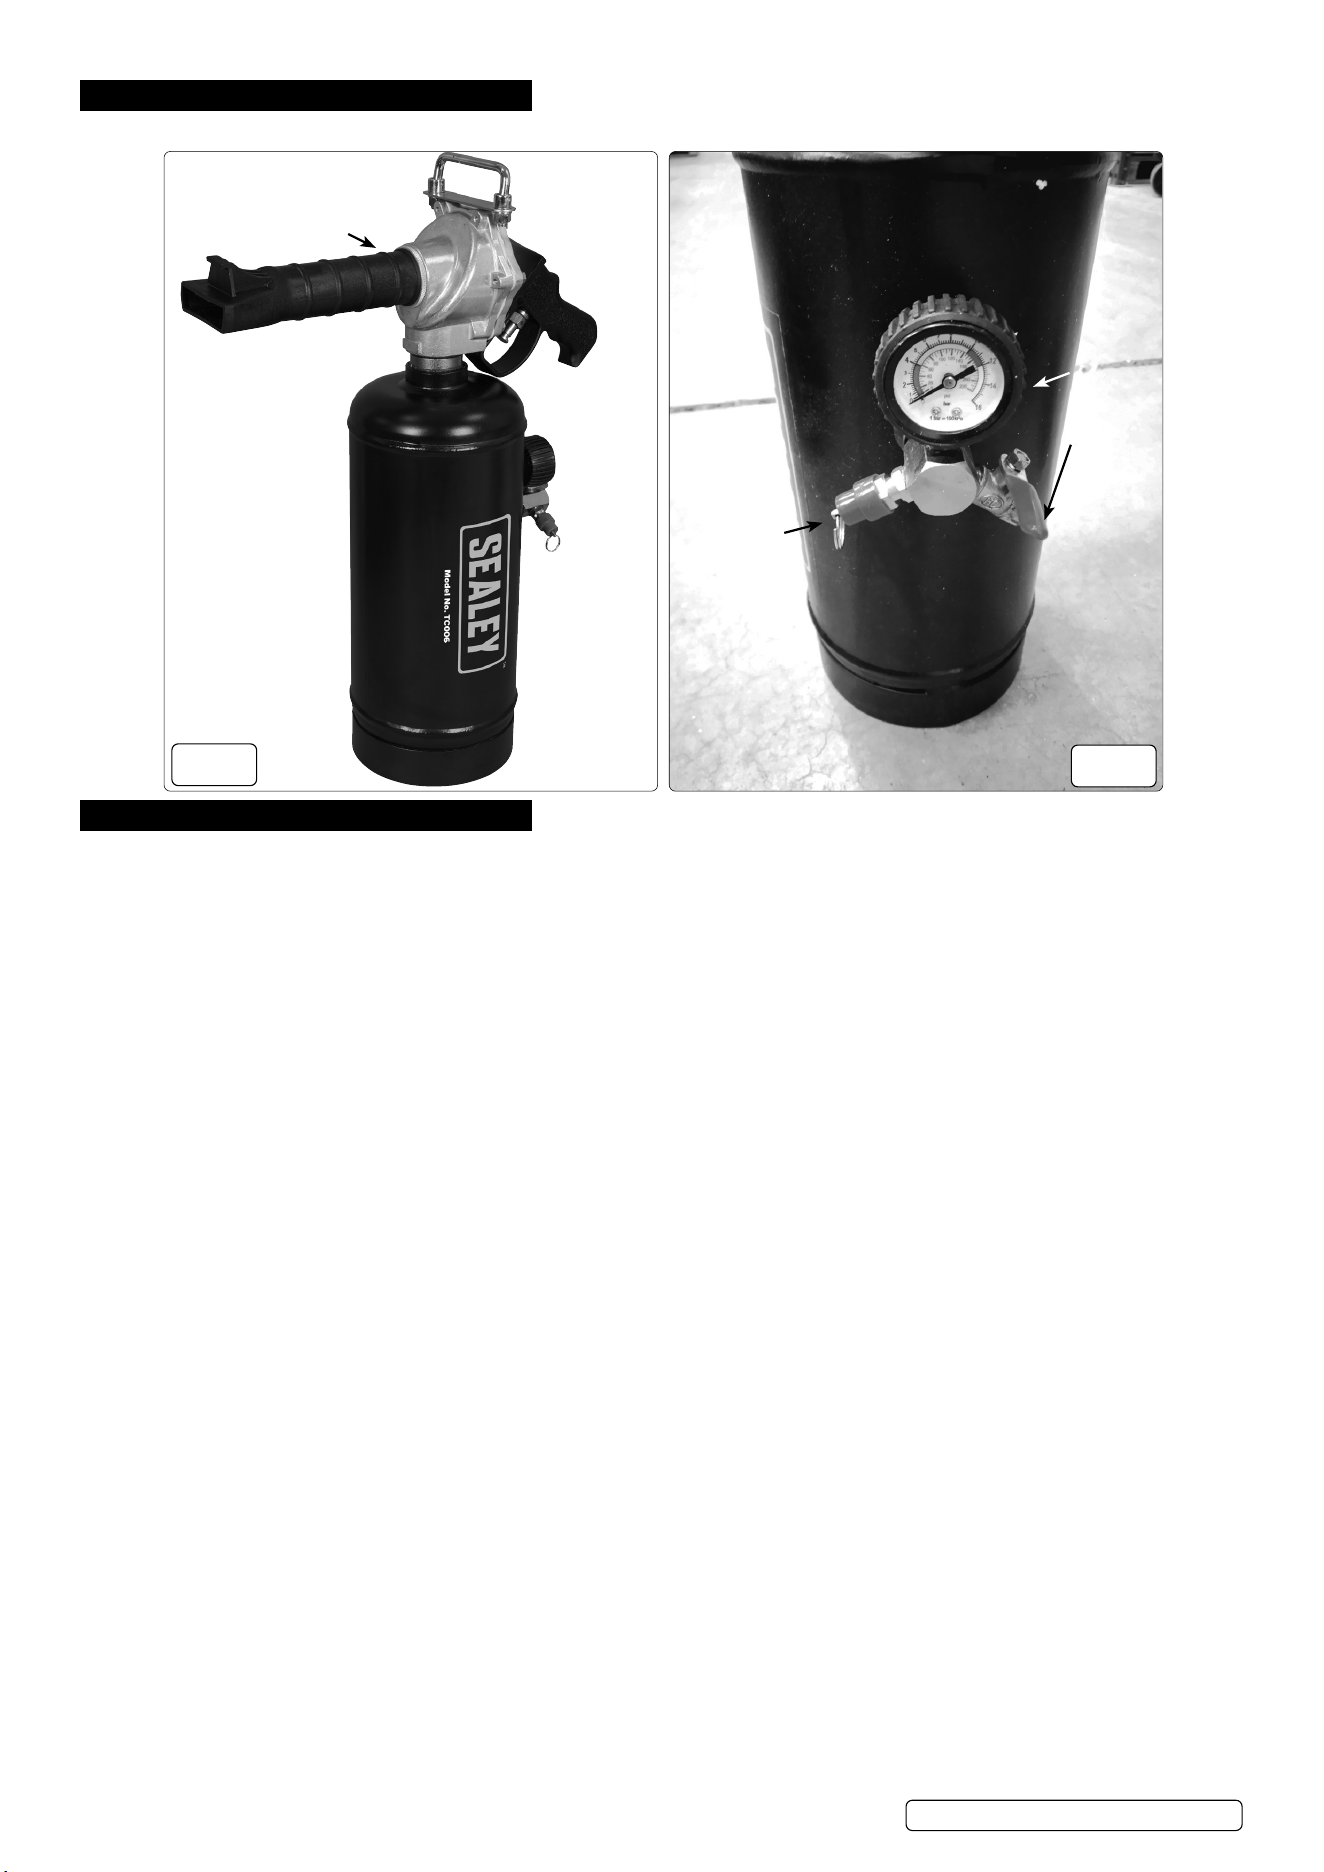
5.1. CHARGING (fig.2)
5.2. Connect via an appropriate fitting to an air line.
5.3. Open the air line and the air cock on the inlet fitting.
5.4. Fill the air reservoir to air line pressure (145psi maximum) and close the inlet connector cock.
5.5. Close the cock on the air line and disconnect.
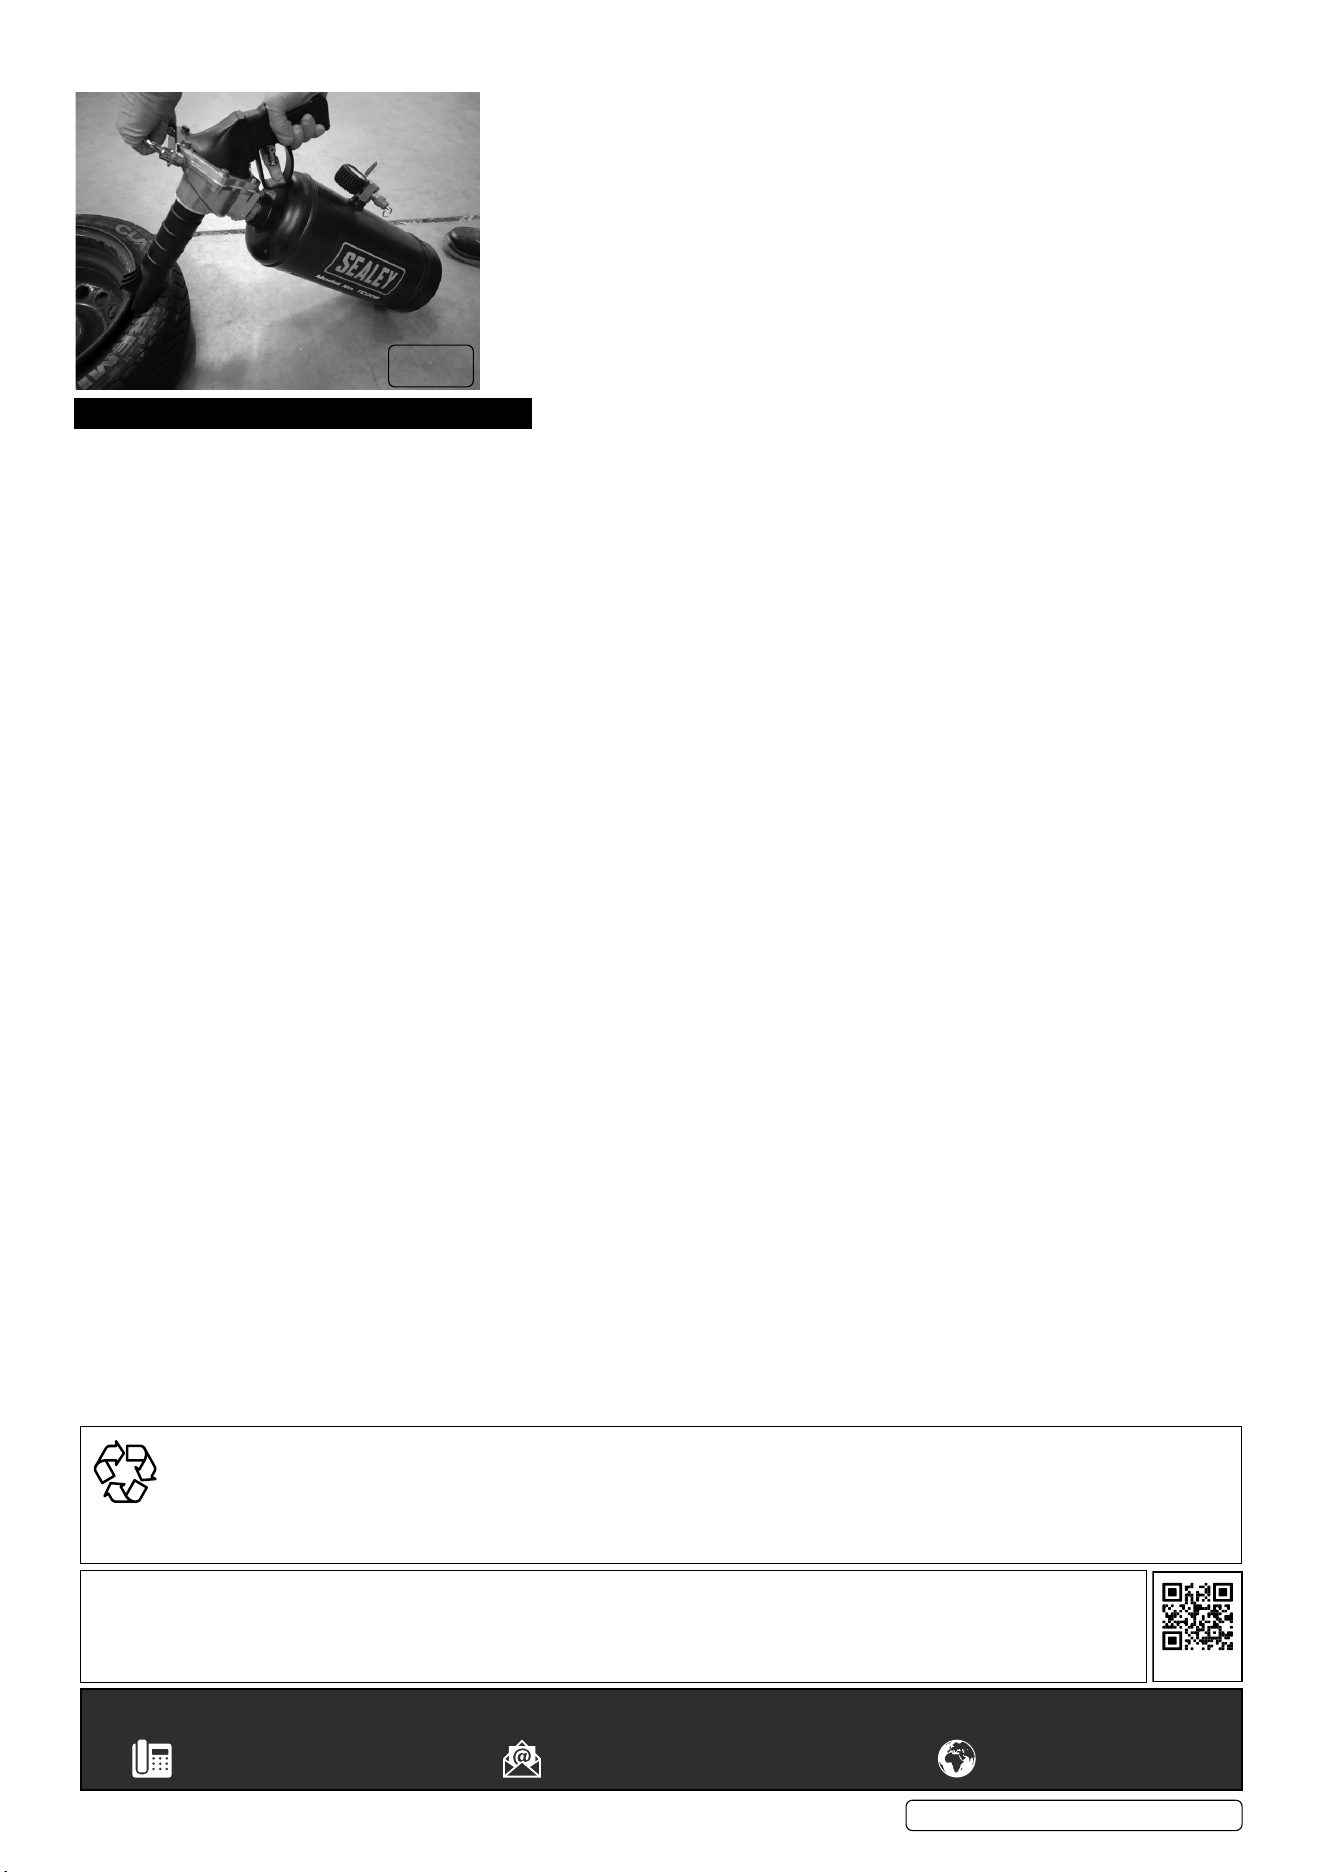
5.6. USING THE STEEL TYRE BEAD SEATER IN THE HORIZONTAL POSITION (fig.3)
5.7. Point the operation bar, so that the operation bar is on the top.
5.8. Ensure that both beads of the tyre have been well lubricated and position the wheel on a stand, the valve stem should be pointing
upwards and the wheel should be off the ground and the lower bead should be already seated.
5.9. Attach an air line to the valve stem to simultaneously assist in the inflation process.
5.10. Position the bead seater so that the weight of the unit is supported, rest the operation bar on the rim of the wheel directly opposite
the valve stem. Attach an air line to the valve stem to simultaneously assist in the inflation process.
5.11. Before use, the safety key should be removed from behind the trigger button
5.12. The bead seater should be positioned at an angle of between 50 and 70 degrees, so that the barrel is pointing directly into the largest gap
between the tyre and the wheel.
5.13. Holding the bead seater securely with one hand and keeping it steady against the wheel, press the trigger button to release the stored air,
and withdraw the nozzle from the bead/tyre interface.
5.14. If the bead does not seat, recharge the tank to a higher pressure and repeat the procedure.
NOTE: Once the bead has been set; if required, move the wheel into a tyre cage and inflate to the manufacturer’s recommended
pressure
5.15. USING THE BEAD SEATER IN THE UPRIGHT POSITION (TRUCK TYRES ONLY).
5.15.1. Adjust the operation bar, so that the operation bar is on the bottom..
5.15.2. Position the wheel against a wall or a solid prop. Make sure that the valve stem is at the bottom and facing towards you.
5.15.3. Attach an air line to the valve stem to simultaneously assist in the inflation process.
5.15.4. The position bar should be positioned at an angle of between 50 and 70 degrees, so that the operation bar is pointing directly into the
largest gap between the tyre and the wheel.
5.15.5. Holding the bead seater securely with one hand and keeping it steady against the wheel, remove the safety key and press the trigger to
release the stored air.
5.15.6. If the bead does not seat, recharge the tank to a higher pressure and repeat the procedure.
NOTE: Once the bead has been set, if required, move the wheel into a tyre cage and inflate to the manufacturer’s recommended
pressure. If the bead does not seat, recharge the tank to a higher pressure and repeat the procedure.
WARNING! Always wear the personal safety equipment as stated in section 1.1 whilst using this product.
TC006 Issue:1 10/07/24
Original Language Version
© Jack Sealey Limited
Lock nut
Operation bar
Tank body
Pressure
gauge
Pressure
relief valve
fig.
1
fig.
2
Pressure
gauge
Shut o
valve
Pressure
relief valve
TC006 Issue:1 10/07/24
Original Language Version
© Jack Sealey Limited
Sealey Group, Kempson Way, Suffolk Business Park, Bury St Edmunds, Suffolk. IP32 7AR
01284 757500 sales@sealey.co.uk www.sealey.co.uk
Note: It is our policy to continually improve products and as such we reserve the right to alter data, specifications and component parts
without prior notice.
Important: No Liability is accepted for incorrect use of this product.
Warranty: Guarantee is 12 months from purchase date, proof of which is required for any claim.
REGISTER YOUR
PURCHASE HERE
ENVIRONMENT PROTECTION
Recycle unwanted materials instead of disposing of them as waste. All tools, accessories and packaging should be sorted, taken to
a recycling centre and disposed of in a manner which is compatible with the environment. When the product becomes completely
unserviceable and requires disposal, drain any fluids (if applicable) into approved containers and dispose of the product and fluids
according to local regulations.
6. MAINTENANCE.
6.1. Should there appear to be any loss of efficiency when using the bead seater, ensure first that the air tool is clean and functioning properly.
If the air tool is unsatisfactory then refer to Sealey stockist.
.
fig.
3