HYS-AFO-05B
easy cooking & healthy eating
Important Safeguards................................................3-5
Know Your Air Fryer Oven....................................6-7
Before First Use................................................................8
Using Your Air Fryer Oven...................................9-14
Air Fry Tips...........................................................................15
Troubleshooting..................................................................16
Cleaning&Maintenance................................................17
How To Set...............................................................18-21
Accessories Instructions..................................22-28
Accessories Combination..............................29-30
About HYSapientia Dual Zone Air Fryer
Oven..........................................................................................31
Frequently Asked Questions...............................32
supervised to ensure that they do
not play with the appliance.
11. Do not let the cord hang over the
edge of the table or counter or
touch hot surfaces.
12.To protect against electric shock,
do not immerse cord, plugs, or
appliance in water or other liquid.
Do not plug in the appliance or
operate the control panel with wet
hands.
13. Never connect this appliance to
an external timer switch or
separate remote-control system
in order to avoid a hazardous
situation. To disconnect, turn off
the appliance, then remove plug
from wall outlet.
14. Do not place the appliance on
or near combustible materials
such as a tablecloth or curtain.
The accessible surfaces may
become hot during use. Do not
place on or near a hot gas or
electric burner, or in a heated oven.
15. Do not place the appliance against
a wall or against other appliances.
Leave at least 5cm of free space on
the back and sides and 5cm of free
space above the appliance. Do not
place anything on top of the
appliance.
16. Do not use the appliance for any
other purpose than described in
this manual. The use of accessory
attachments not recommended
by the appliance manufacturer
may cause injuries.
17. Do not let the appliance operate
unattended. Extreme caution
must be used when moving an
appliance containing hot oil or
other hot liquids.
1. Read all instructions.
2. The appliances are not intended
to be operated by means ofan
external timer or separate
remote-control system.
3. Hot surface.
4. If the supply cord is damaged,
it must be replaced by a special
cord or assembly available from
the manufacturer or its service
agent.
5. cleaning and user maintenance
shall not be made by children
without supervision.
6. This appliance is not intended
for use by persons (including
children younger than 8) with
reduced physical, sensory or
mental capabilities, or lack of
experience and knowledge,
unless they have supervision.
7. Check if the voltage indicated
on the appliance corresponds
to the local main voltage before
you connect the appliance.
8. Do not use the appliance if
the plug, the main cord or the
appliance itself is damaged.
Always make sure that the plug
is inserted properly into a wall
outlet.
9. Do not operate any appliance
with a damaged cord or plug,
after the appliance malfunctions,
or has been damaged in any
manner.
Return appliance to the nearest
authorized service facility for
examination, repair, or
adjustment.
10. Close supervision is necessary
when any appliance is used near
children. Children should be
When using electric appliances, basic safety precautions should
always be followed:
18. Do not use outdoors.
19. Do not touch hot surfaces and
the air outlet on the back; use
the handle. During air frying,
hot steam is released through
the air outlet. Keep your hands
and face a safe distance from
steam and vents. Also be aware
of hot steam and air when
removing the accessories from
device.
20. After using the appliance, avoid
contact with the hot metal
inside. Unplug from outlet
when not in use and before
cleaning. Allow to cool before
cleaning the appliance.
21. Immediately unplug the
appliance if you see dark
smoke coming out of the
appliance. Wait for the smoke
emission to stop before you
remove the pan from the
appliance.
22. Do not use appliance for other
than intended use.
23. Use extreme caution when
removing tray or disposing of
hot grease.
24. Do not clean with metal
scouring pads. Pieces can break
off the pad and touch electrical
parts, creating a risk of electric
shock.
25. Oversize foods or metal utensils
must not be inserted in a
toaster-oven as they may create
a fire or risk of electric shock.
26. A fire may occur if the air fryer
oven is covered or touching
flammable material, including
curtains, draperies, walls, and
the like, when in operation. Do
not store any item on top of the
appliance when in operation.
27. Extreme caution should be
exercised when using
containers constructed of
anything other than metal or
glass.
28. Do not store any materials,
other than manufacturers
recommended accessories, in
this oven when not in use.
29. Do not place any of the
following materials in the oven:
paper, cardboard, plastic, and
the like.
30. Turn off the appliance by
pressing START/STOP.
31. For household use only.
32. It is recommended that you
wear oven mitts and use the
included tray handles to
remove cooked food.
33. After the oven is finished, the
fan will continue to work to
achieve the effect of heat
dissipation.When the oven door
is opened after cooking, please
do not put your face close to
the oven to avoid being burned
by the hot air.
34. Choose suitable accessories
according to different cooking
purposes.Please remove the
bake tray, oven rack or air fryer
basket when all accessories are
cool.
35. Do not heat plastic, wood
glass,glazed china, beverage cans
and nonfood items in the oven.
36. The air fryer does not have a microwave function, so if you want to
heat food, you can wrap it in aluminium foil and heat it at 100°C.
37. Do not use this product near showers, bathtubs, washbasins,
swimming pools, etc. Do not rinse this product with water.
38. In order to ensure your safety and the stability of the product's
performance, we strongly advise against attempting to
disassemble the product without authorization. Product
disassembly may result in severe damage and void the warranty.
We do not take responsibility for any injuries or malfunctions
caused by unauthorized disassembly.
If you need to clean or repair the internal components of the
product, please follow these steps:
Wear gloves: Before engaging in any cleaning or maintenance
operations, ensure that you wear appropriate gloves.
Contact customer support: Before proceeding with any
disassembly, cleaning, or maintenance operations, please get in
touch with our customer support team. Our professional team will
provide you with detailed operational guidelines and advice.
By following the above steps, you can ensure not only safety but
also maximize the product's lifespan during maintenance.
39. Do not operate simultaneously with other high-power appliances to
prevent voltage overload and potential power interruption.
CORD SAFETY
• A short power-supply cord is provided to reduce risk of
becoming entangled in or tripping over a longer cord.
• Extension cords may be used if care is exercised in their use.
• If an extension cord is used:
a. The marked electrical rating of the extension cord should be at
least equal to the electrical rating of the appliance; and
b. The longer cord should be arranged so that it will not drape
over the countertop or tabletop where it can be pulled on by
children or tripped over.
:
When used for the first time, white smoke and odor are
normal.
Power:
220-240V 50/60HZ 2400W

1. Control Panel
2. Door of compartment 1
3. Door of compartment 2
4. Power Cord
5. Fetch Rack
6. Bake Tray/Crumb Tray
7. Oven Rack
8. Air Fryer basket
9. Rotisserie Rack
10. Half-width Air Fryer Basket
11. Half-width Oven Rack
12. Half-width Bake Tray/Crumb Tray
13. Divider Board
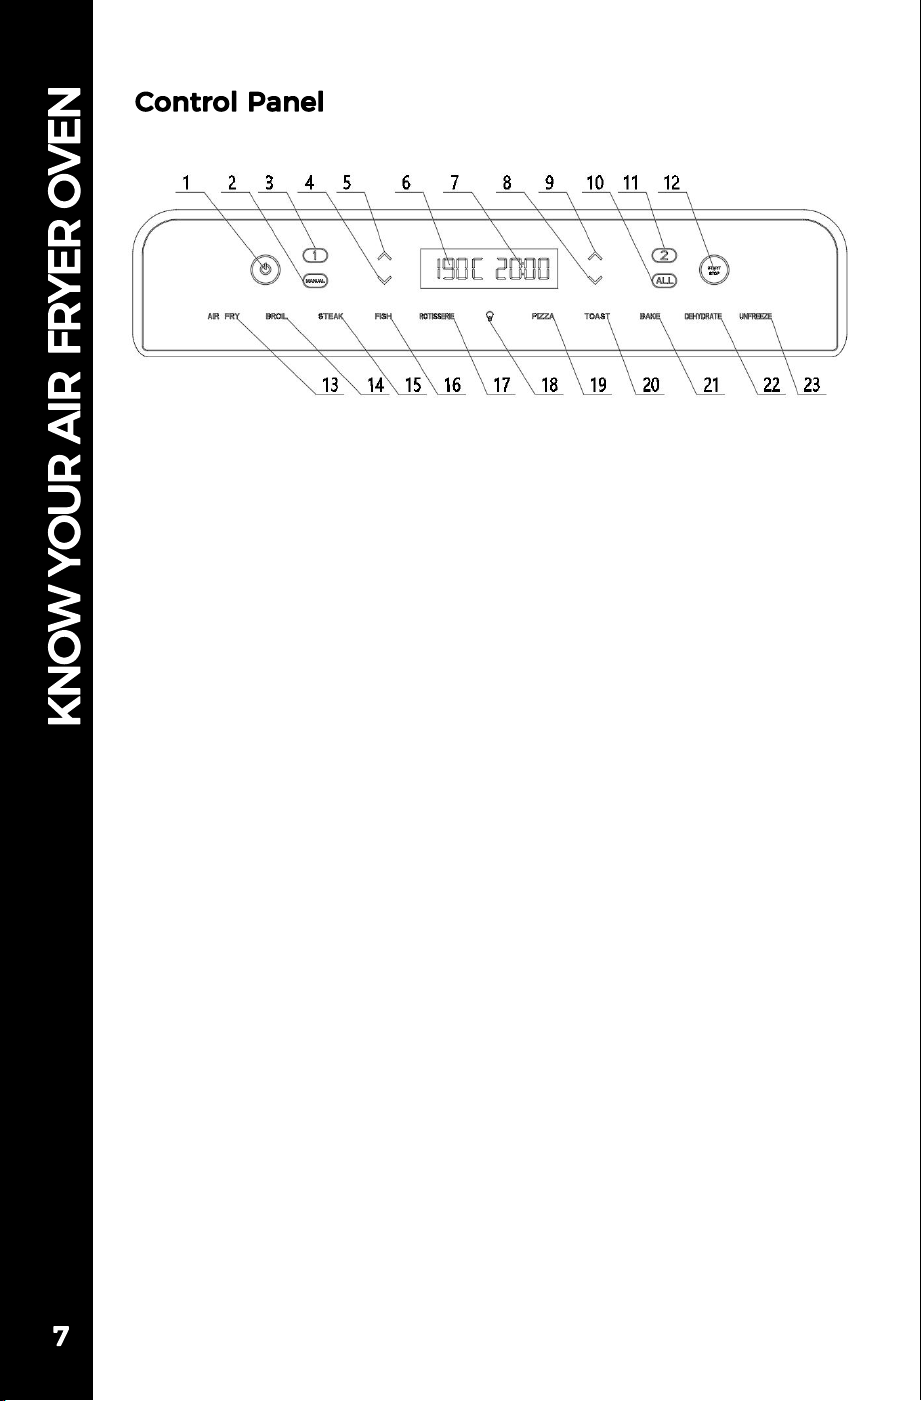
1. Power ON/OFF
2. Whole Compartment Manual Mode
3. Compartment 1 Selection
4. Temperature Down
5. Temperature Up
6. Temperature Display
7. Time Display
8. Time Down
9. Time Up
10. Whole Compartment Mode
11. Compartment 2 Selection
12. START/STOP
13. AIR FRY
14. BROIL
15. STEAK
16. FISH
17. ROTISSERIE
18. Light Switch
19. PIZZA
20. TOAST
21. BAKE
22. DEHYDRATE
23. UNFREEZE
1. Remove all packaging materials before first use.
2. Wash the Air Fryer Basket, Oven Rack and Bake Tray
with hot water, some dishwashing liquid, and a non-abrasive
sponge. Dry before placing trays into Air Fryer Oven.
3. Place the Bake Tray in the bottom of the Air Fryer Oven.
• Do not place the Air Fryer Oven against a wall or
against other appliances. It is important to leave at least
5cm of free space on the back and sides, and 5cm of free
space above the Air Fryer Oven to allow for proper
ventilation.
• Do not put anything on top of the Air Fryer Oven.
1.In standby mode, press or to enter the Single Compartment
Working Mode with the default AIR FRY function ( and AIR FRY
start blinking for 5s and then steady on). Other modes are semi-bright,
DEHYDRATE and UNFREEZE these two modes are not available in
Single Compartment Working Mode.Press the add or subtract symbol
on the left side to adjust the temperature. Every time you press add or
subtract 5°C, press for a long time to quickly add or subtract; Press the
add or subtract symbol on the right side to adjust the setting time.Press
add or subtract for 1 Min each time, press for a long time to add or
subtract quickly. Press the start key to start the program, and the light
ring around the start key is steady on.
USING YOUR AIR FRYER OVEN
The Air Fryer Oven preset function is only for reference; the actual
cooking time and temperature can be set according to the specific food.
Operating Instructions
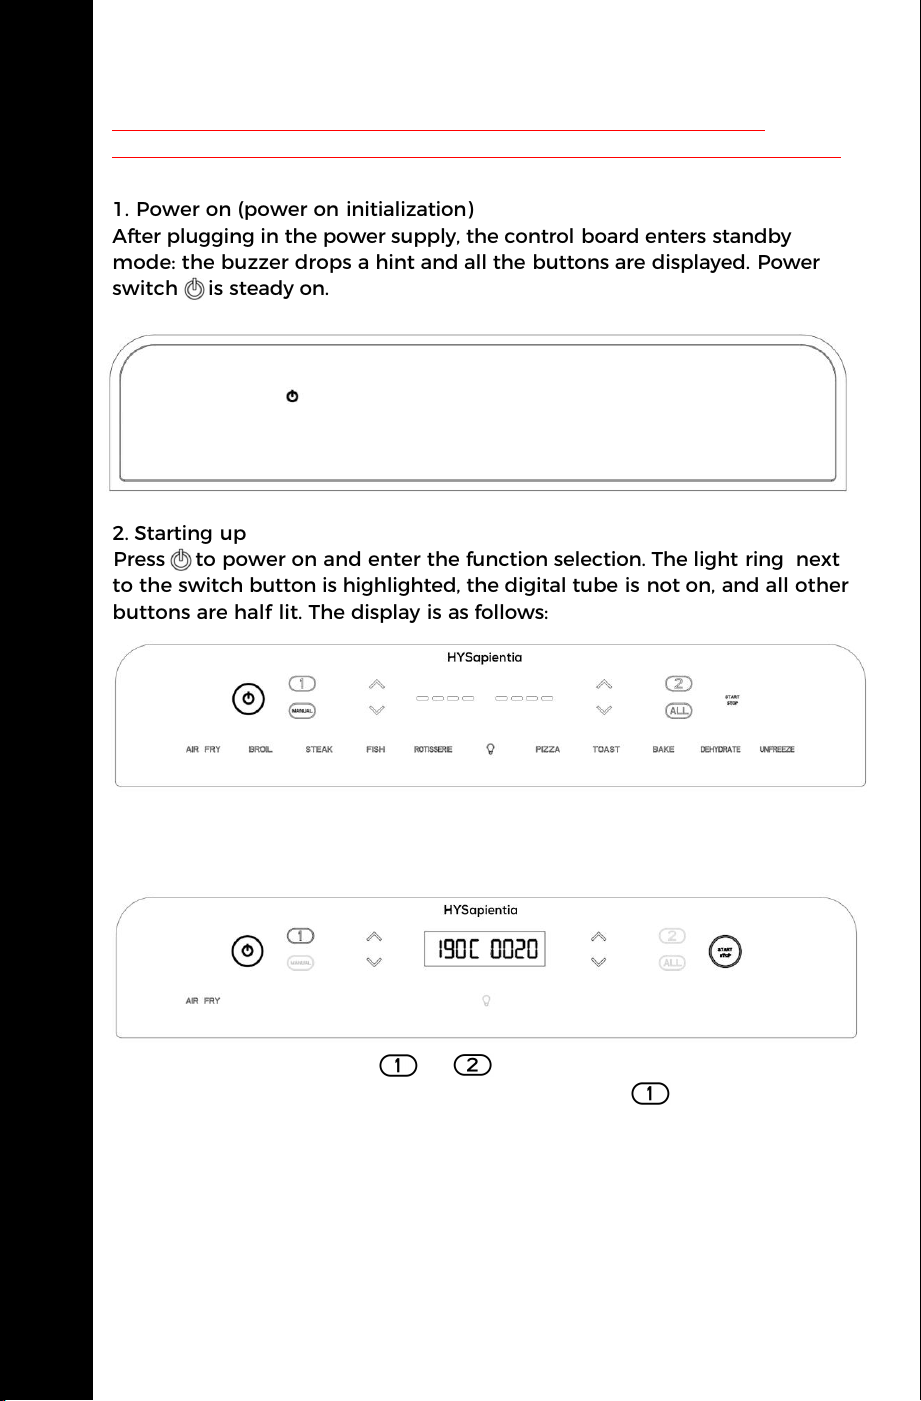
1. Power on (power on initialization)
After plugging in the power supply, the control board enters standby
mode: the buzzer drops a hint and all the buttons are displayed. Power
switch is steady on.
2. Starting up
Press to power on and enter the function selection. The light ring next
to the switch button is highlighted, the digital tube is not on, and all other
buttons are half lit. The display is as follows:
3.Program setting and startup
Single Compartment Working Mode:
USING YOUR AIR FRYER OVEN
9
2.When the start button is pressed again, the program will pause. The light ring
outside the start button will flash at an interval of 0.5s, the temperature display
on the left digital tube will remain on, and the time display on the right digital
tube will pause and flash at an interval of 0.5s.
3.When the door is opened during the working process, the light will be on and
enter the pause mode, the digital tube on the left will display OPEN, and the
time display on the digital tube on the right will suspend and blink at an interval
of 0.5s.
4.When the program counts down to the last minute, the light will
automatically turn on. When the work is finished, the buzzer rings three times,
the digital tube displays HOT END, and the light is turned off after 30s. When
there is no action after completion, the buzzer sounds three times every one
minute. If an action such as opening the door or pressing the start key is
detected, the buzzer prompt is stopped.
5.After work, the motor of the corresponding chamber will continue to operate for
one minute and enter the cooling mode.
6.Return to function selection after the cooling mode ends.
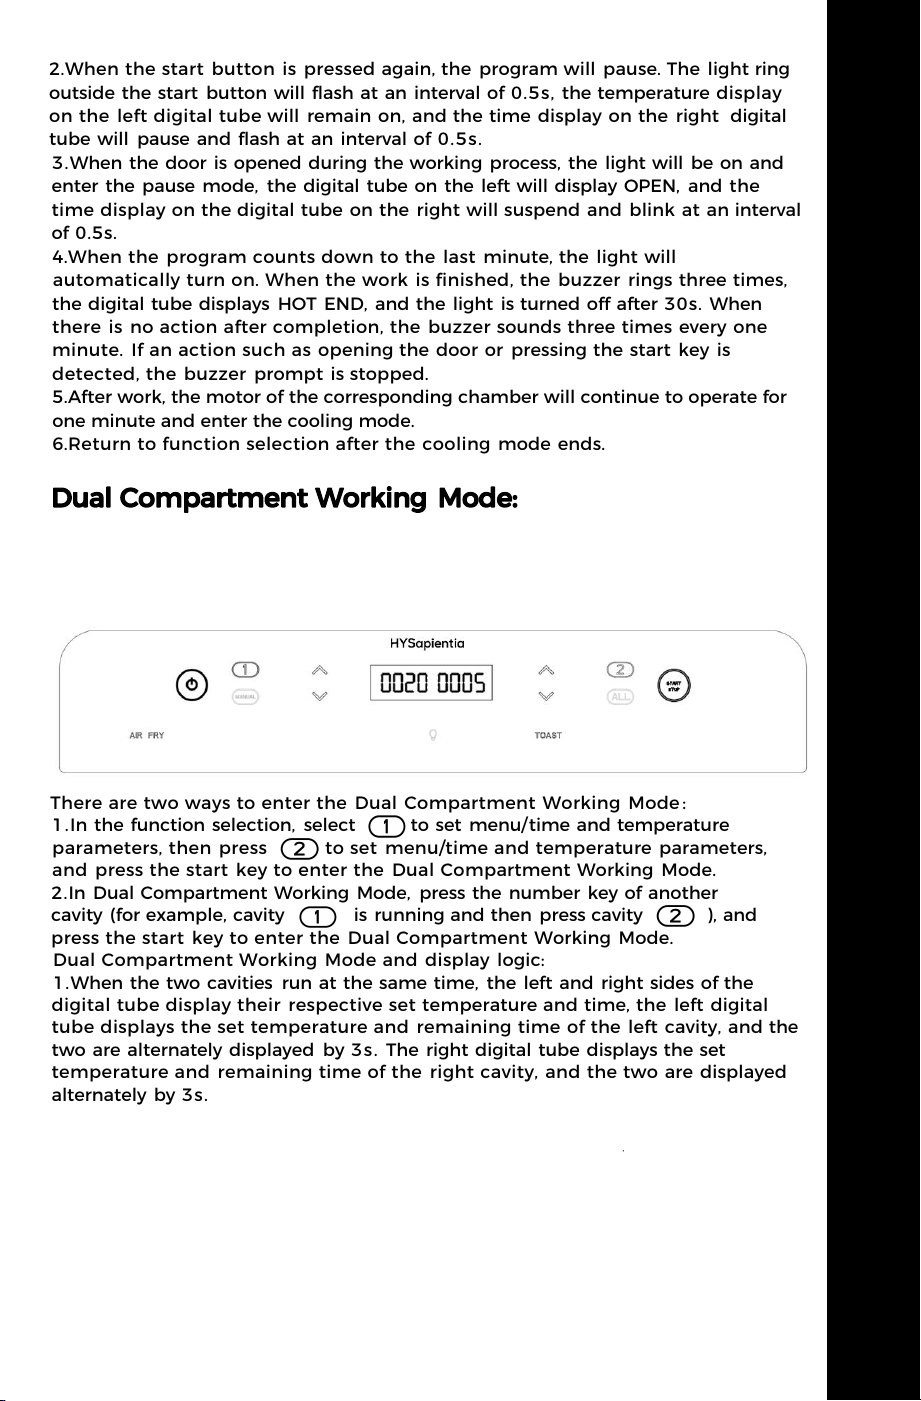
There are two ways to enter the Dual Compartment Working Mode :
1.In the function selection, select to set menu/time and temperature
parameters, then press to set menu/time and temperature parameters,
and press the start key to enter the Dual Compartment Working Mode.
2.In Dual Compartment Working Mode, press the number key of another
cavity (for example, cavity is running and then press cavity ), and
press the start key to enter the Dual Compartment Working Mode.
Dual Compartment Working Mode and display logic:
1.When the two cavities run at the same time, the left and right sides of the
digital tube display their respective set temperature and time, the left digital
tube displays the set temperature and remaining time of the left cavity, and the
two are alternately displayed by 3s. The right digital tube displays the set
temperature and remaining time of the right cavity, and the two are displayed
alternately by 3s.
2.If you want to adjust the corresponding time and temperature when the
double cavity is running, press the corresponding cavity digital key, and the
digital tube on the corresponding side blinks and displays according to the
adjustment content. After parameter adjustment, the digital tube blinks for 5s
and automatically starts the adjusted temperature and time.
USING YOUR AIR FRYER OVEN
10
USING YOUR AIR FRYER OVEN
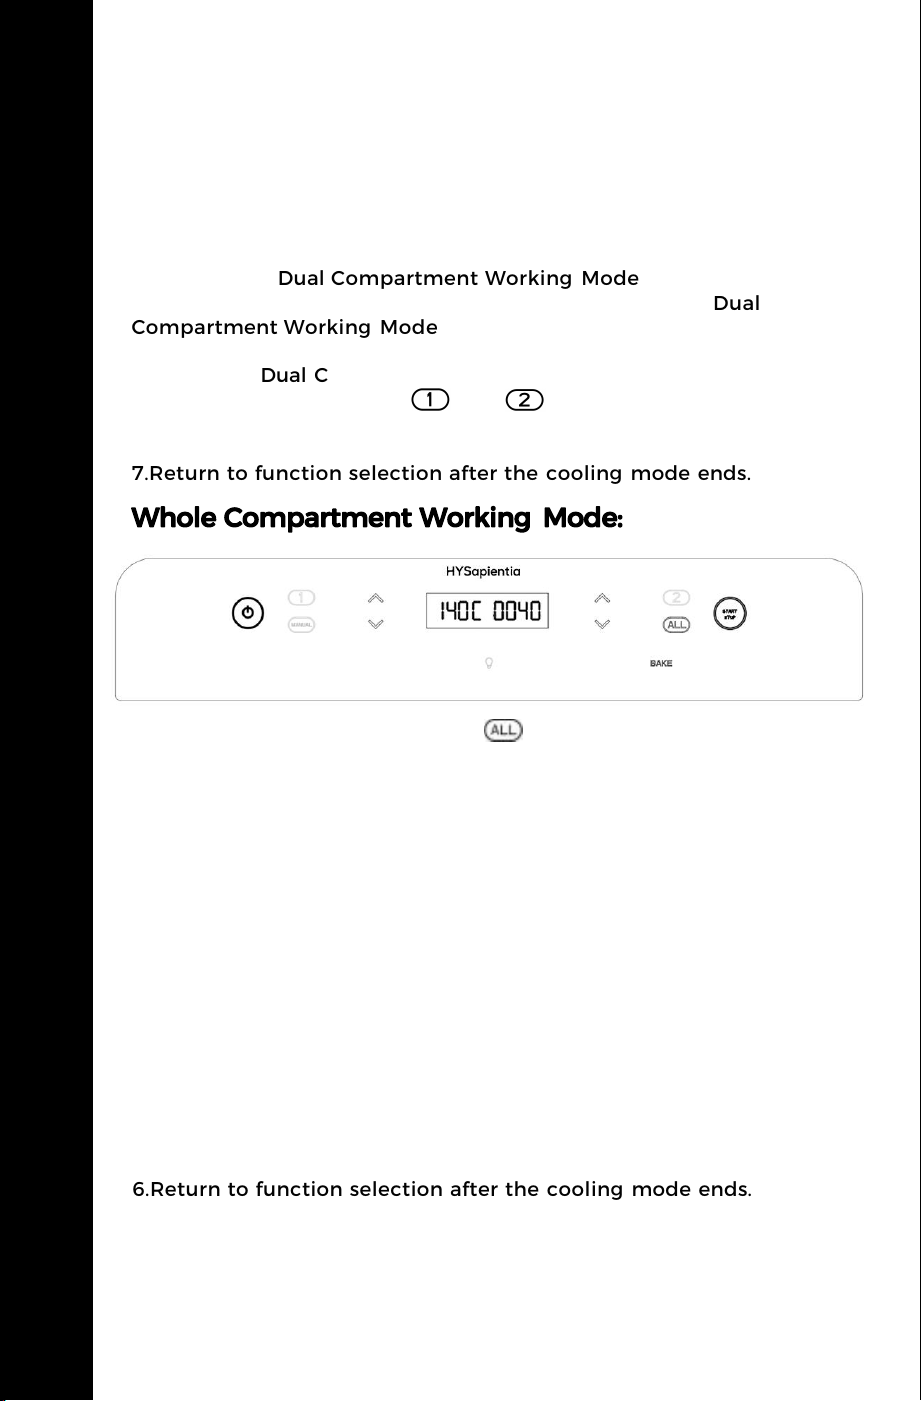
1.In the function selection, press to enter the Whole
Compartment Working Mode (In this mode, the right NTC acts as the
temperature sensing NTC, and the left NTC does not participate in
temperature sensing). All function keys at the bottom are enabled.
2.When running in Whole Compartment Working Mode, the left
digital tube displays the current set temperature, and the right
digital tube displays the set time.
3.After the pause key is pressed, the time is paused and the interval is
0.5s flashing. At this time, the light ring of the start key blinks along
with the digital tube.
4.When the program counts down to the last minute, the light will
turn on automatically. When the work is finished, the buzzer rings
three times, the digital tube displays HOT END, and the light is turned
off after 30s. When there is no action after completion, the buzzer
sounds three times every one minute. If an action such as opening
the door or pressing the start key is detected, the buzzer prompt is
stopped.
5.After the end of the work, the motors on both sides will continue
to work for one minute and enter the cooling mode.
6.Return to function selection after the cooling mode ends.
USING YOUR AIR FRYER OVEN
3.Opening the door of the corresponding cavity displays the OPEN
prompt for the corresponding cavity.
4.When the corresponding cavity is running, the digital tube shows
the countdown for one minute, the corresponding cavity opens the
light prompt, and the corresponding digital tube shows the HOT
END prompt when the program is finished. Other logic is the same
as that of the Dual Compartment Working Mode.
5.DEHYDRATE and UNFREEZE these two modes in the Dual
Compartment Working Mode can not be selected, directly
extinguished.
6.When the Dual Compartment Working Mode is running or
suspended, long press the or by 2s to end the program
of the corresponding cavity and restore the Single Compartment
Working Mode state.
7.Return to function selection after the cooling mode ends.
USING YOUR AIR FRYER OVEN
11
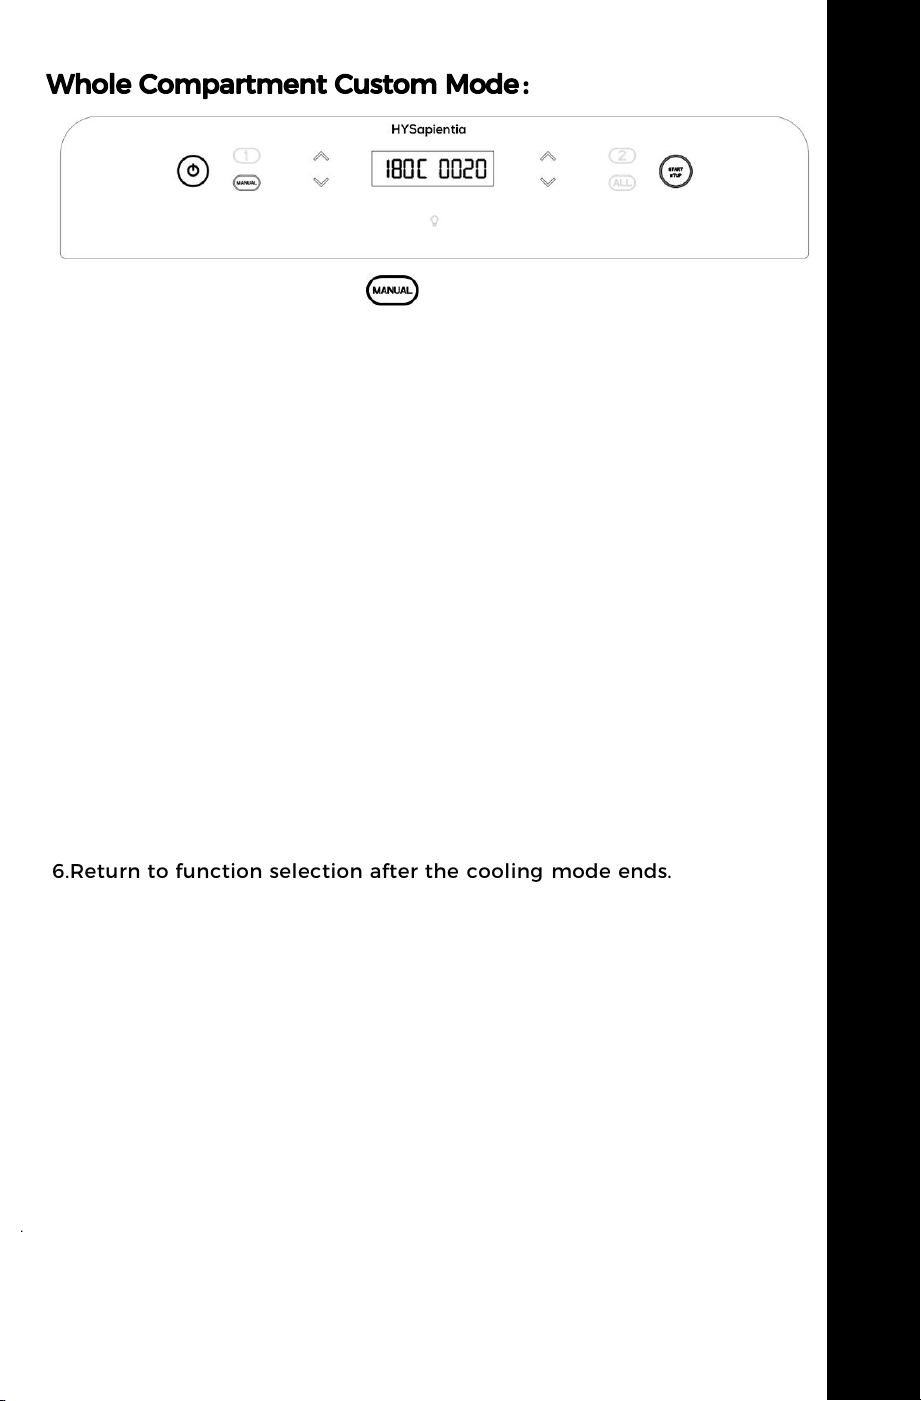
1.In the standby mode, press to enter the Whole Compartment
Custom Mode. The Whole Compartment Custom Mode is only
applicable to the Whole Compartment Working Mode (the
temperature sensing logic is consistent); The default temperature and
time are 180 degrees for 20 minutes. Press the Start button to start
running the set time and temperature. All the function keys at the
bottom are off, only the light button remains.
2.When the Whole Compartment Custom Mode is running, the left
digital tube displays the current set temperature, and the right digital
tube is the time.
3.After the pause key is pressed, the time is paused and the interval is
0.5s flashing. At this time, the light ring of the start key blinks along
with the digital tube.
4.When the program counts down to the last minute, the lights will
turn on automatically. When the work is finished, the buzzer rings
three times, the digital tube displays HOT END, and the light is
turned off after 30s. When there is no action after completion, the
buzzer sounds three times every one minute. If an action such as
opening the door or pressing the start key is detected, the buzzer
prompt is stopped.
5.After the end of the work, the motors on both sides will continue to
work for one minute and enter the cooling mode.
6.Return to function selection after the cooling mode ends.
USING YOUR AIR FRYER OVEN
USING YOUR AIR FRYER OVEN
12

USING YOUR AIR FRYER OVEN
USING YOUR AIR FRYER OVEN
13
General display and operation logic:
1.The temperature column displays the set temperature, and the time
column counts down the minutes. Return to the default display state
of the current menu when returning to zero (the current menu is
highlighted);After cooling,it enters the standby state.
2.Press the temperature adjustment on the left side to adjust the
set temperature by ± 5°C each time, and the buzzer will ring once
each time; Long press more than 2s, the temperature can be quickly
increased or decreased; When the Single Compartment / Whole
Compartment / Custom three modes are running, press the direct
adjustment, and the Dual Compartment Mode needs to press the
corresponding cavity selection button before entering the adjustment;
3.Press the time adjustment on the right side to adjust the set time
by ±1 minute each time, and the buzzer will ring once each time;
Long press more than 2s, the time can be quickly added or
subtracted; When the Single Compartment / Whole Compartment /
Custom three modes are running, press the direct adjustment, and
the Dual Compartment Mode needs to press the corresponding cavity
selection button before entering the adjustment;
4.Press the light button to turn the left and right halogen lights on or
off at the same time. Turn off automatically after forgetting to turn off
the light for 60s;The light icon is highlighted when the halogen light
is on and half light when the light is off;
5.The light ring of the program switch lights up only when the
program is working or the program is paused.(The light ring blinks
when paused except in Dual Compartment Working Mode)
*The process of pressing the program start/stop:the minute value in
the time bar and the program switch light flash, and the buzzer will
remind the user three times every 1min until the icon is pressed again
to continue working.
*During program operation, open an oven door and trigger the
microswitch,the digital tube on the corresponding side will display
OPEN and flash; When the door is opened, the halogen light is on, the
light button flashes synchronously, and the halogen light is only
extinguished when the door is closed. At the same time, the program
stops working and automatically continues to work after closing the
door.
After the program is finished, open an oven door and trigger the
microswitch, the digital tube on the corresponding side displays open
but does not flash, and the program switch light shows normally
without flashing; When the door is opened, the halogen light is on,
the light button is displayed synchronously but does not flash, and
the halogen light is only extinguished when the door is closed.
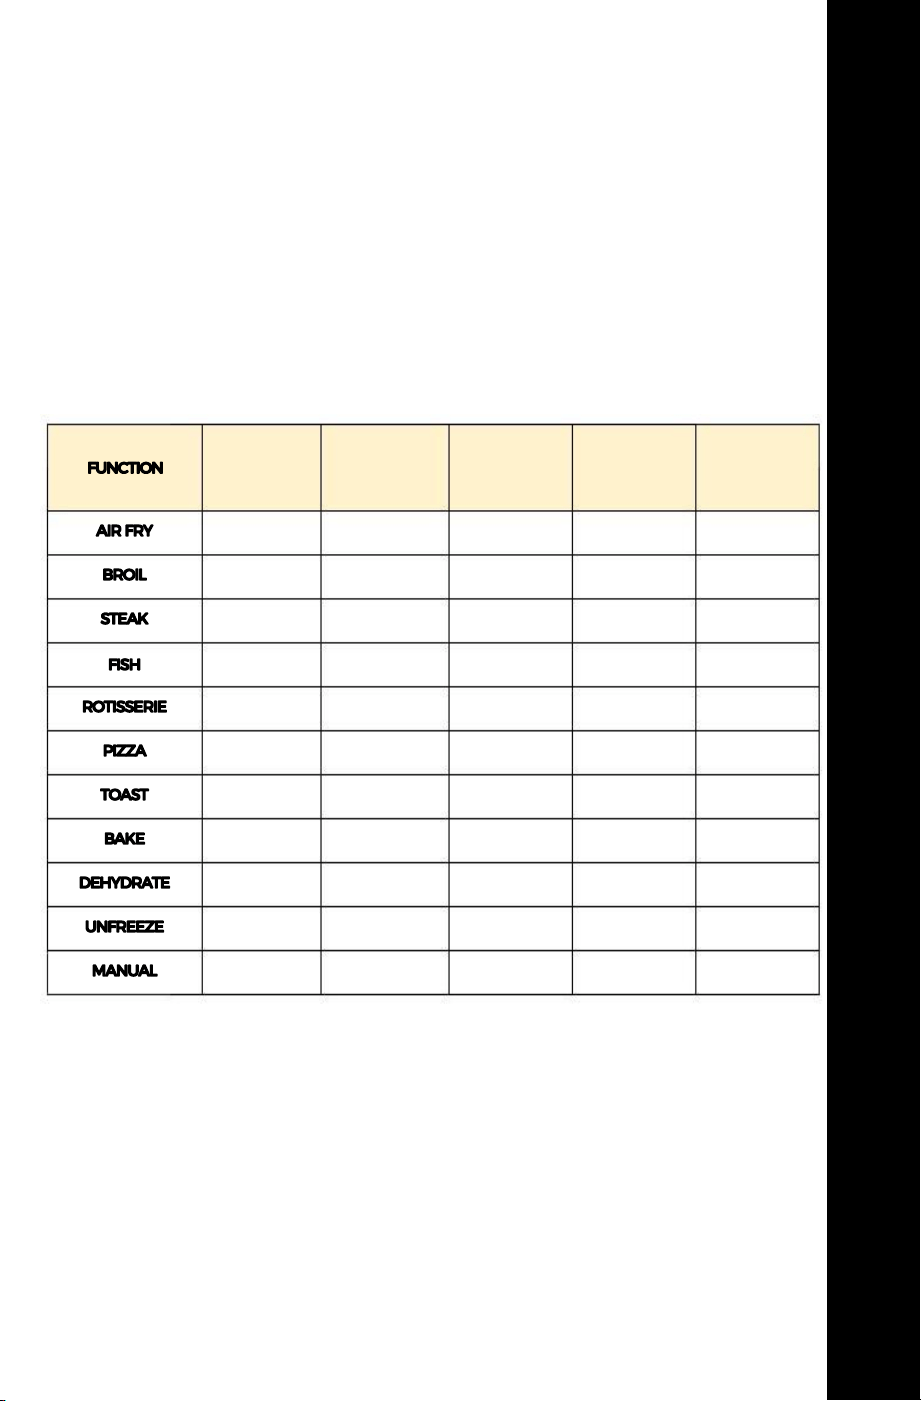
Preset Program
The oven is designed with several preset programs, as shown in the
following figure. Preset programs automatically control cooking time
and temperature. Select a preset program, the display will show the
corresponding time and temperature, and the icon lights up. Press the
Start button and the oven works according to the selected preset
program.
*The above parameters are only for reference. In order to improve the
cooking effect, the above parameters can be adjusted.
USING YOUR AIR FRYER OVEN
USING YOUR AIR FRYER OVEN
14
temperature
range
60-230°C
60-230°C
60-230°C
60-230°C
60-230°C
60-230°C
60-230°C
60-140°C
60-70°C
40-70°C
40-230°C
Synchronous
motor
ON
ON
OFF
ON
ON
OFF
OFF
OFF
ON
OFF
ON
default
temp
190°C
180°C
190°C
180°C
180°C
200°C
200°C
140°C
70°C
60°C
180°C
default time
20min
20min
12min
25min
45min
7min
5min
40min
4h
30min
20min
time range
5min-1h
5min-1h
5min-1h
5min-1h
5min-1h
5min-1h
5min-1h
5min-1h
5min-8h
5min-1h
5min-1h
The synchronous motor (Rotisserie) is only available in the whole compartment mode.
• Make sure air can circulate around food and trays.
• Place the bake tray on the bottom layer as the crumb tray in
the air fryer oven.
AIR FRY TIPS
TIPS ON USING THE AIR FRY SETTING
The air fryer oven boasts excellent cooking speed. To achieve optimal
results, pay attention to the varying temperature requirements for
different foods, and it is advisable to avoid using excessively high
temperatures to ensure that the food retains its ideal texture and
nutritional value. You can check for doneness three quarters of the
way through the cook time.
Foods that are covered benefit from the air fry's even heat and will
cook faster without any moisture loss.
The high temperature air circulation produces roasted foods that are
golden brown on the outside and juicy and tender on the inside.
Even cooking means that you can use more than one rack and you
do not have to turn foods or rotate bake trays.
Below are foods that benefit from this air fryer oven and when to
use it:
Roast:
Meat, vegetables, whole fish, etc.
Bake:
Cake, pastries, cookies, biscuits, etc.
Broil:
Meat,Pies, fish, for melting cheese, etc. for browning the top of
casseroles.
Pizza:
Use the lower rack position and check often so the cheesedoes not
burn.
Ensure the unit is plugged into a
dedicated power outlet.
The Air Fryer Oven
does not work
Synchronous
motor(Rotary) not
working
Food didn't get
crispy
Solution
Problem
Food is not
cooked
Use smaller batches for more even
cooking
Raise temperature and continue cooking
Food is not fried
evenly
Turn over food halfway through cooking
process
Cook similar sized foods together
White smoke is
coming out of the
Air Fryer Oven
Clean the Air Fryer Oven and accessories
after each use to remove greasy residue
Ensure that the food is evenly placed in the oven,
avoiding overlapping or overcrowding. This will
ensure smooth air circulation, leading to even
heating of the food.
Excessive moisture can make the food soft
instead of crispy. Before cooking, try to dry the
food as much as possible or remove any excess
moisture.
Make sure to place the food in the oven for a
sufficient amount of time as indicated in the
cook book, allowing it to fry to crispiness
completely.
Select one of these five modes:
AIR FRY,FISH,ROTISSERIE,DEHYDRATE,BROIL
Never immerse cords, plugs, or the appliance in water or
any other liquid. Do not plug in the appliance or operate the control
panel with wet hands.
• Clean the appliance after every use.
• Always unplug the appliance and let it cool down completely
before cleaning.
• Never use abrasive or corrosive products to clean the appliance.
• Utensils are dishwasher safe.
• Before the first use, clean all components with hot water,detergent,
and a non-abrasive sponge, then wipe the interior and exterior. Wipe
the air fryer with a damp cloth.
• Always place the bake tray at the bottom of the cooking to collect
grease from fried food and for easy cleaning.
• Use a damp soapy cloth or sponge to clean the interior walls and
bottom of the oven. Avoid using acidic or abrasive cleaning products
as they may harm the oven's surface. It is recommended to use an
oven-specific cleaning agent. Also, do not use steel wool pads on the
air fryer oven or its accessories.
• Make sure to clean the bake tray every time you use it. Excess
food particles may smoke at high temperatures and can be difficult
to remove from the tray. To remove grease or burnt food particles
from the tray, you can soak it in hot soapy water or use a non-abrasive
cleaning tool. Do not operate the oven without the bake tray in place.
• Regularly clean the air fryer oven's air outlet to remove any excess
grease that may accumulate after cooking, preventing it from
smoking during subsequent use. Make sure the cleaning methods
used adhere to the manufacturer's recommendations and avoid
using cleaning agents containing acidic components.
• Unplug the appliance and let it cool.
• Ensure all parts are clean and dry.
• Store the appliance in a clean and dry place.
Do not throw away the appliance with the normal household
waste at the end of its life, but hand it in at an official collection
point for recycling. By doing this, you help to preserve the
environment.
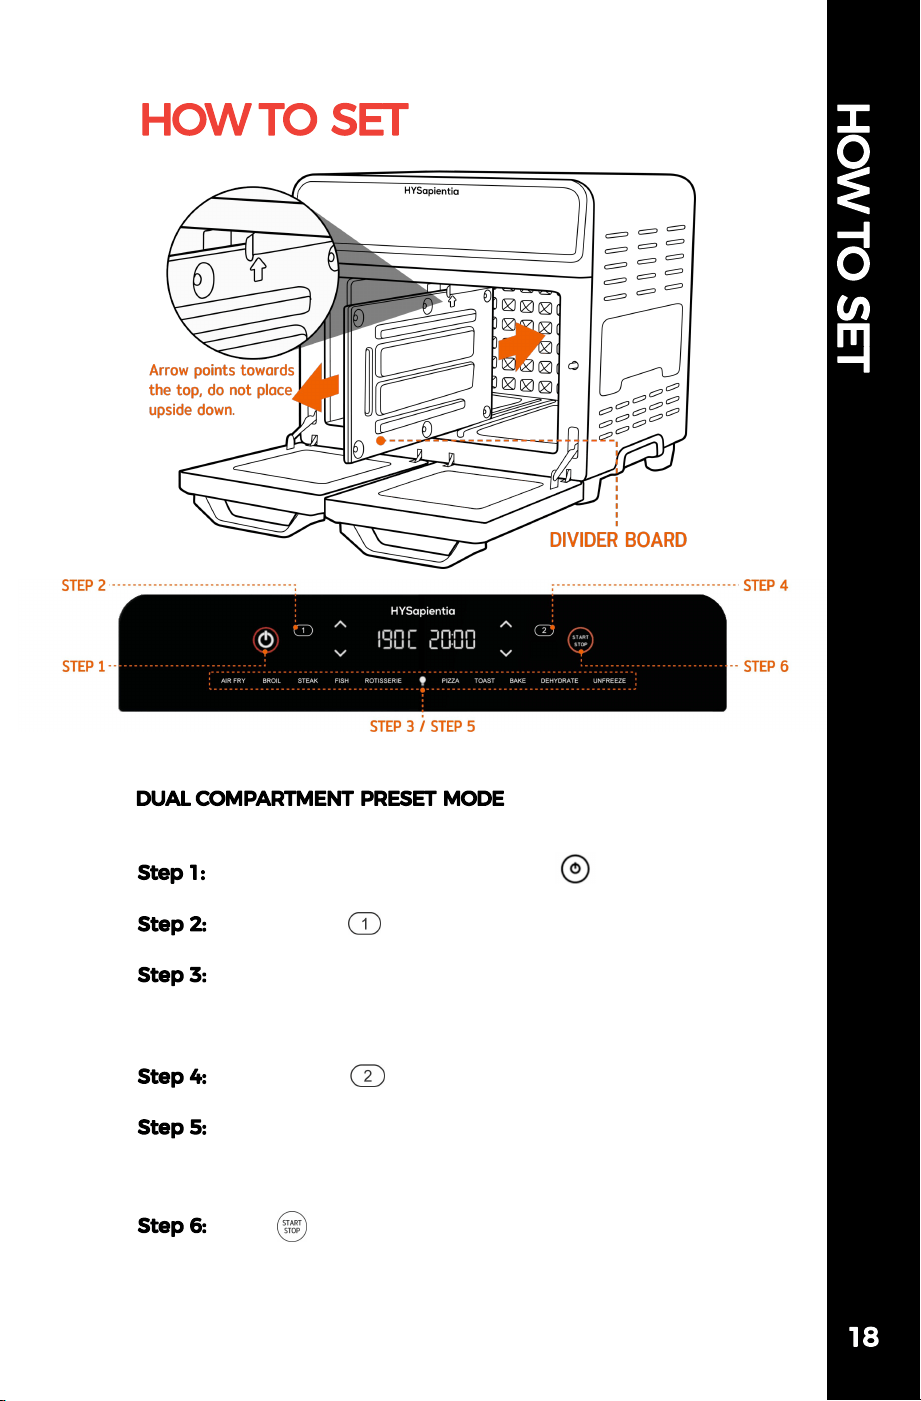
Before starting, please insert the divider board into the
oven cavity.
Plug in the power cord, then click " ".
(ON/OFF)
Click button " " to select Compartment 1.
Press the mode button, and select the mode.
(AIR FRY, BROIL, STEAK, FISH, ROTISSERIE, PIZZA, TOAST,
BAKE, DEHYDRATE, UNFREEZE)
Click button " " to select Compartment 2.
Press the mode button, and select the mode.
(AIR FRY, BROIL, STEAK, FISH, ROTISSERIE, PIZZA, TOAST,
BAKE, DEHYDRATE, UNFREEZE)
Click " " to begin operation.
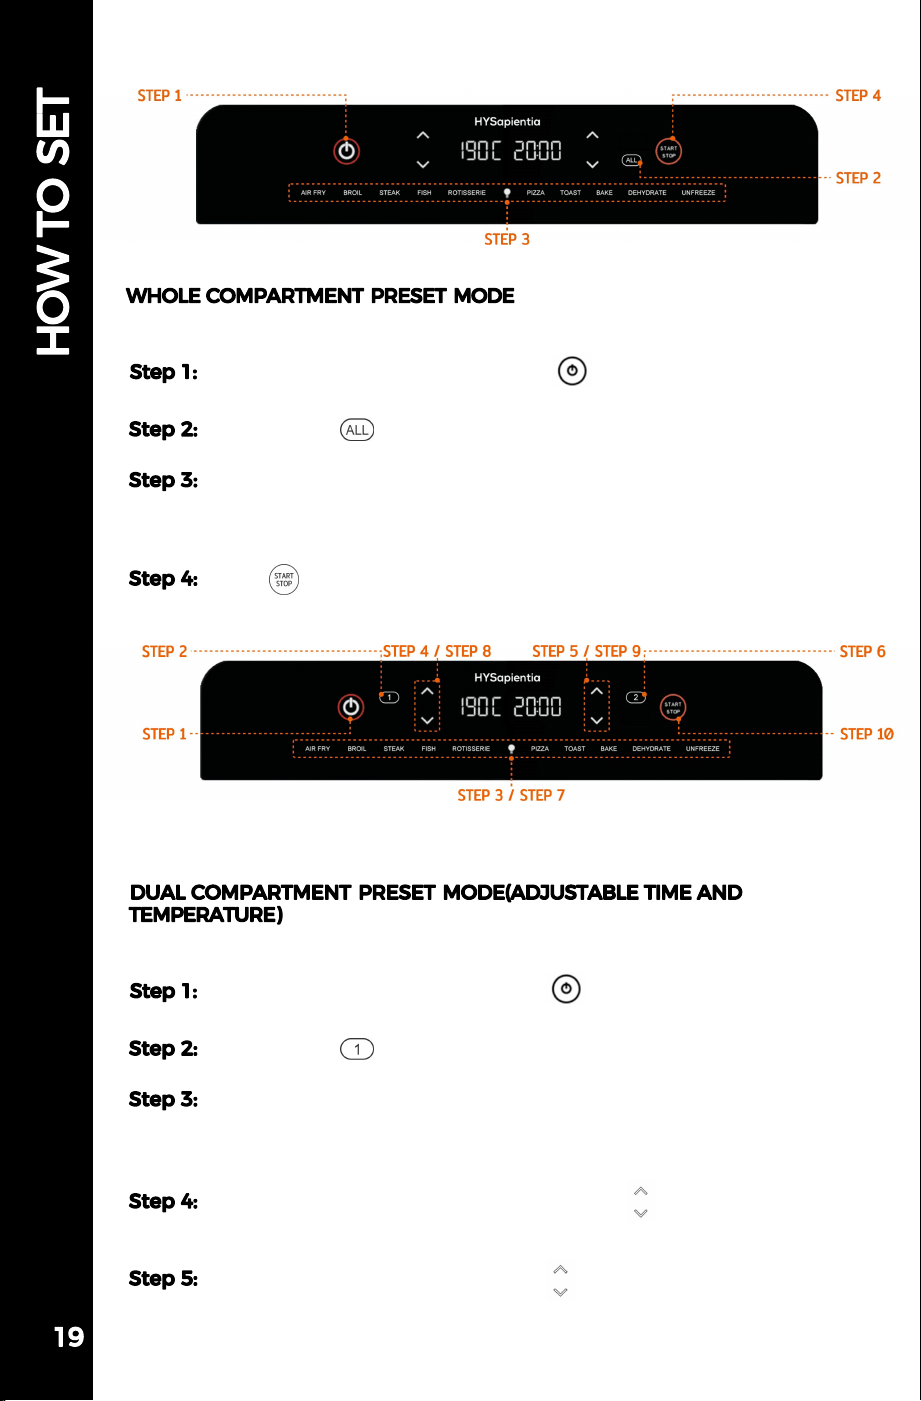
Before starting, please insert the divider board into the oven cavity.
Plug in the power cord, then click " ".
(ON/OFF)
Click button " " to select Compartment 1.
Press the mode button and select the mode.
(AIR FRY, BROIL, STEAK, FISH, ROTISSERIE, PIZZA, TOAST, BAKE,
DEHYDRATE, UNFREEZE)
Click the temperature adjustment arrow " " to adjust the
temperature.
Click the time adjustment arrow " " to adjust the time.
Before starting, please remove the divider board from the oven cavity.
Plug in the power cord, then press " ".
(ON/OFF)
Click button " " to select the whole compartment mode.
Press the mode button, and select the mode.
(AIR FRY, BROIL, STEAK, FISH, ROTISSERIE, PIZZA, TOAST, BAKE,
DEHYDRATE, UNFREEZE)
Click " " to begin operation.
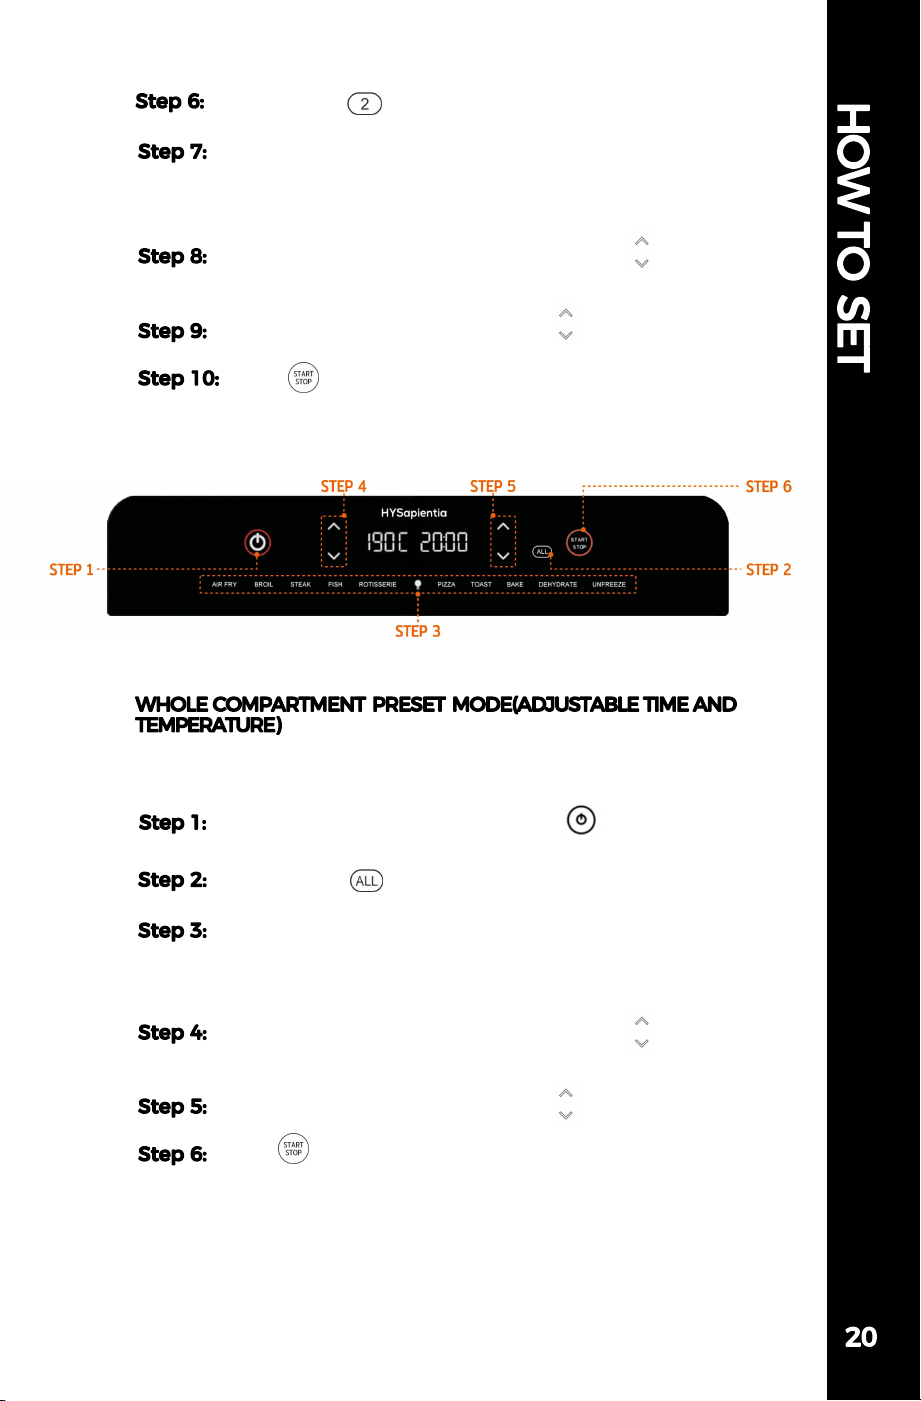
Before starting, please remove the divider board from the oven
cavity.
Plug in the power cord, then press " ".
(ON/OFF)
Click button " " to select the whole compartment mode.
Press the mode button and select the mode.
(AIR FRY, BROIL, STEAK, FISH, ROTISSERIE, PIZZA, TOAST, BAKE,
DEHYDRATE, UNFREEZE)
Click the temperature adjustment arrow " " to adjust
the temperature.
Click the time adjustment arrow " " to adjust the time.
Click " " to begin operation.
Click button " " to select Compartment 2.
Press the mode button and select the mode.
(AIR FRY, BROIL, STEAK, FISH, ROTISSERIE, PIZZA, TOAST,
BAKE, DEHYDRATE, UNFREEZE)
Click the temperature adjustment arrow " " to adjust
the temperature.
Click the time adjustment arrow " " to adjust the time.
Click " " to begin operation.
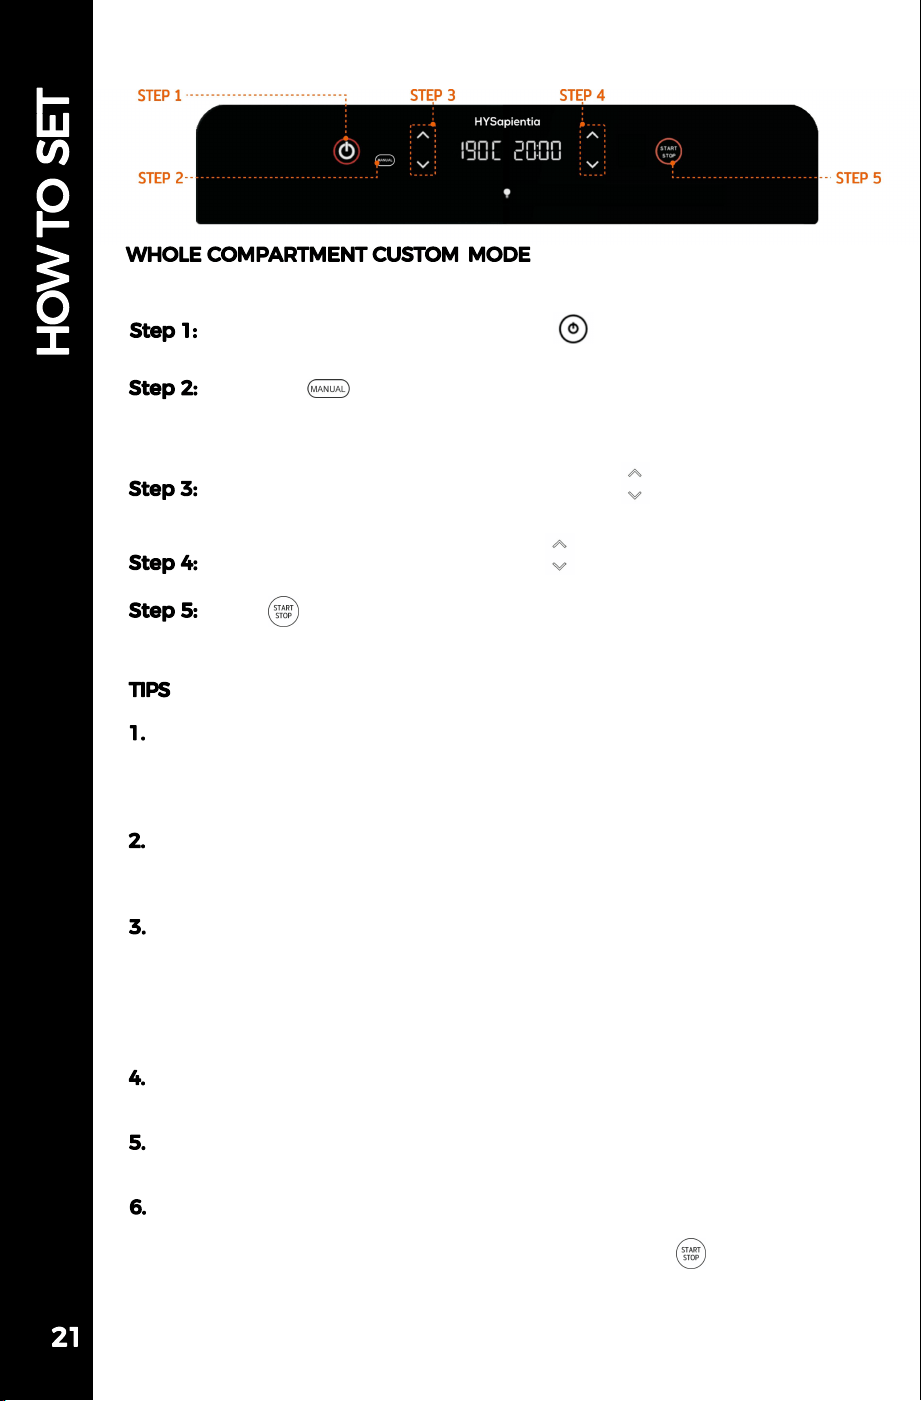
Please remove the divider board from the oven cavity before starting.
Plug in the power cord, then press " ".
(ON/OFF)
Click the " " button.
(In this mode, all the function preset buttons at the bottom are
disabled, leaving only the oven light button.)
Click the temperature adjustment arrow " " to adjust the
temperature.
Click the time adjustment arrow " " to adjust the time.
Click " " to begin operation.
After selecting the cooking mode, the screen indicator blinks for five
seconds. If no preset mode is chosen within this time, the screen will
be locked, and you must select the cooking mode again before being
able to choose a preset mode.
If you need to move accessories or divider boards during the cooking
process, please take precautions against scalding or wait for the
equipment to cool completely before proceeding.
The air fryer oven cannot directly adjust the fan speed. If you wanna
to reduce the fan speed a little lower, you can select the "Bake" mode.
In the "Bake" mode, the oven will operate at a low fan speed.
Additionally, for safety reasons, the temperature adjustment range in
this mode can only be between 60°C and 140°C. Please note that in any
mode, the fan cannot be turned off.
When using the air fryer oven, it is necessary to use a bake tray at
the bottom to collect grease and residue from the food.
After pausing or turning off the oven, the fan will continue to
operate for 1 minute.
If you want to use only one compartment in the dual compartment
mode, select the cooking mode or customize the temperature and
time for the corresponding compartment, then press " " to begin
operation.

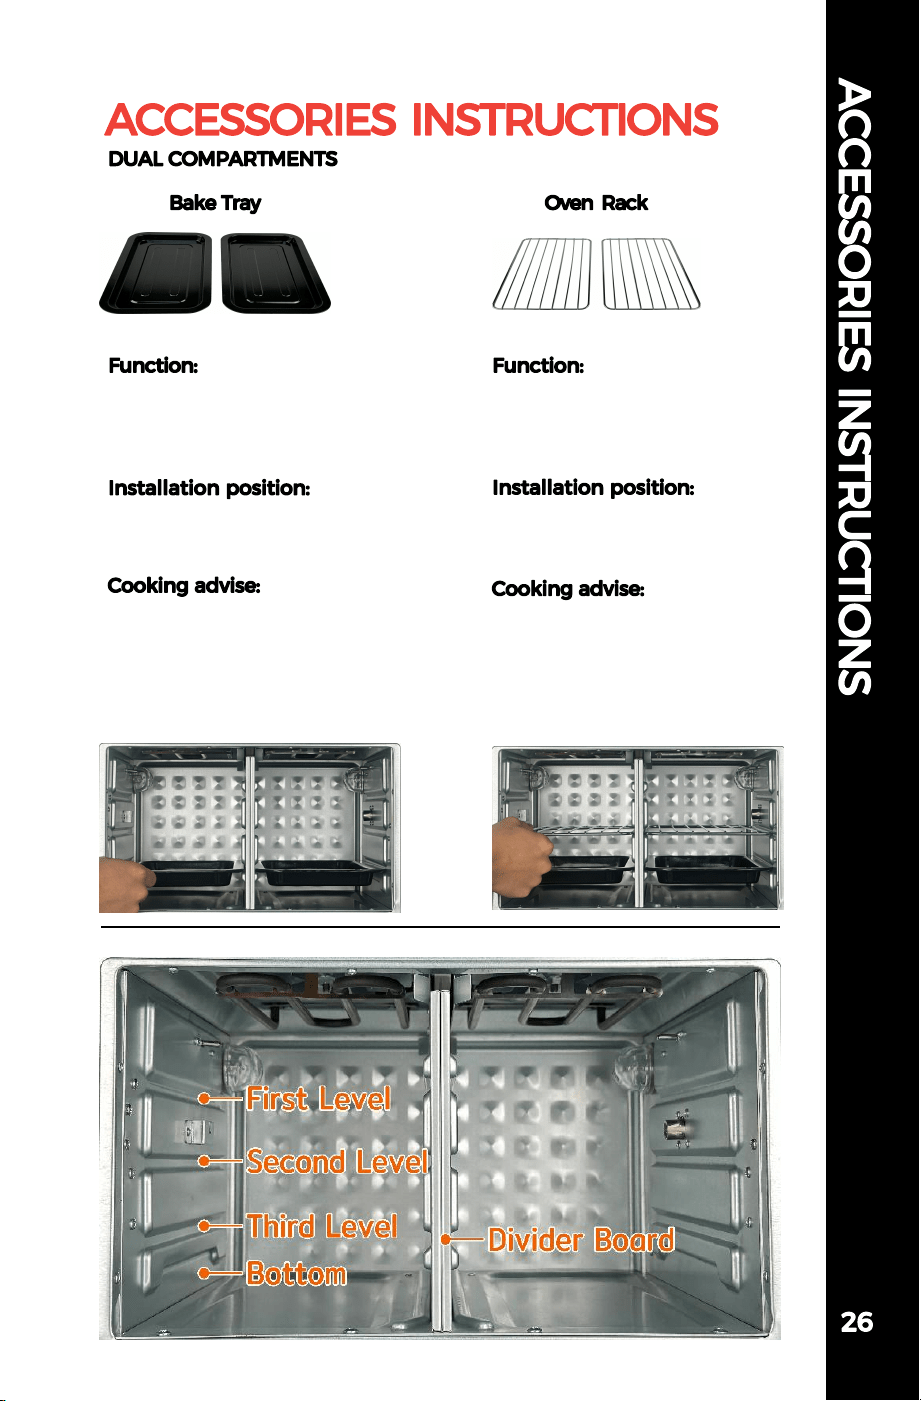
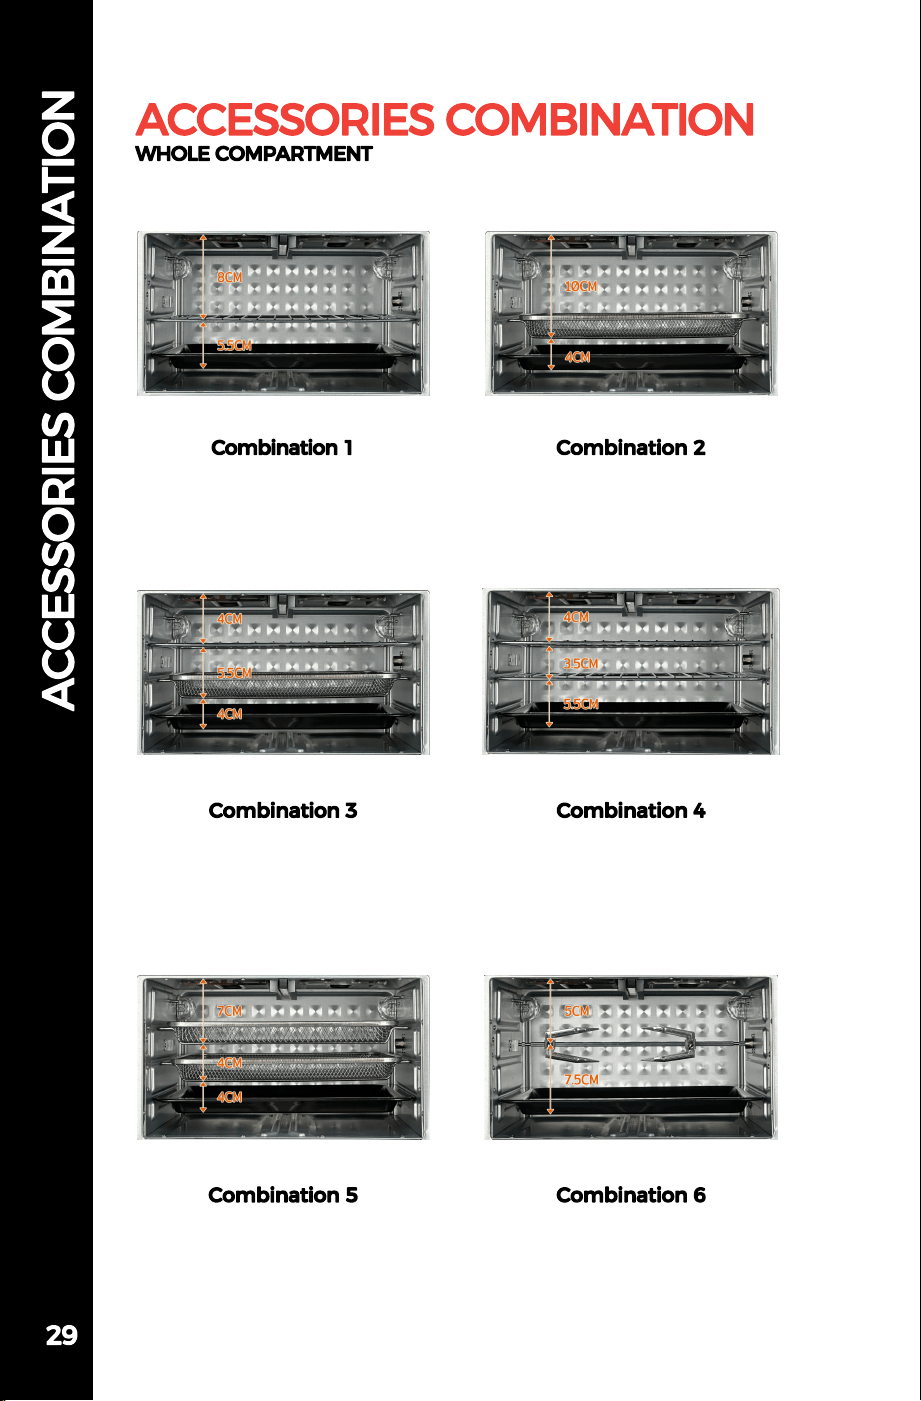
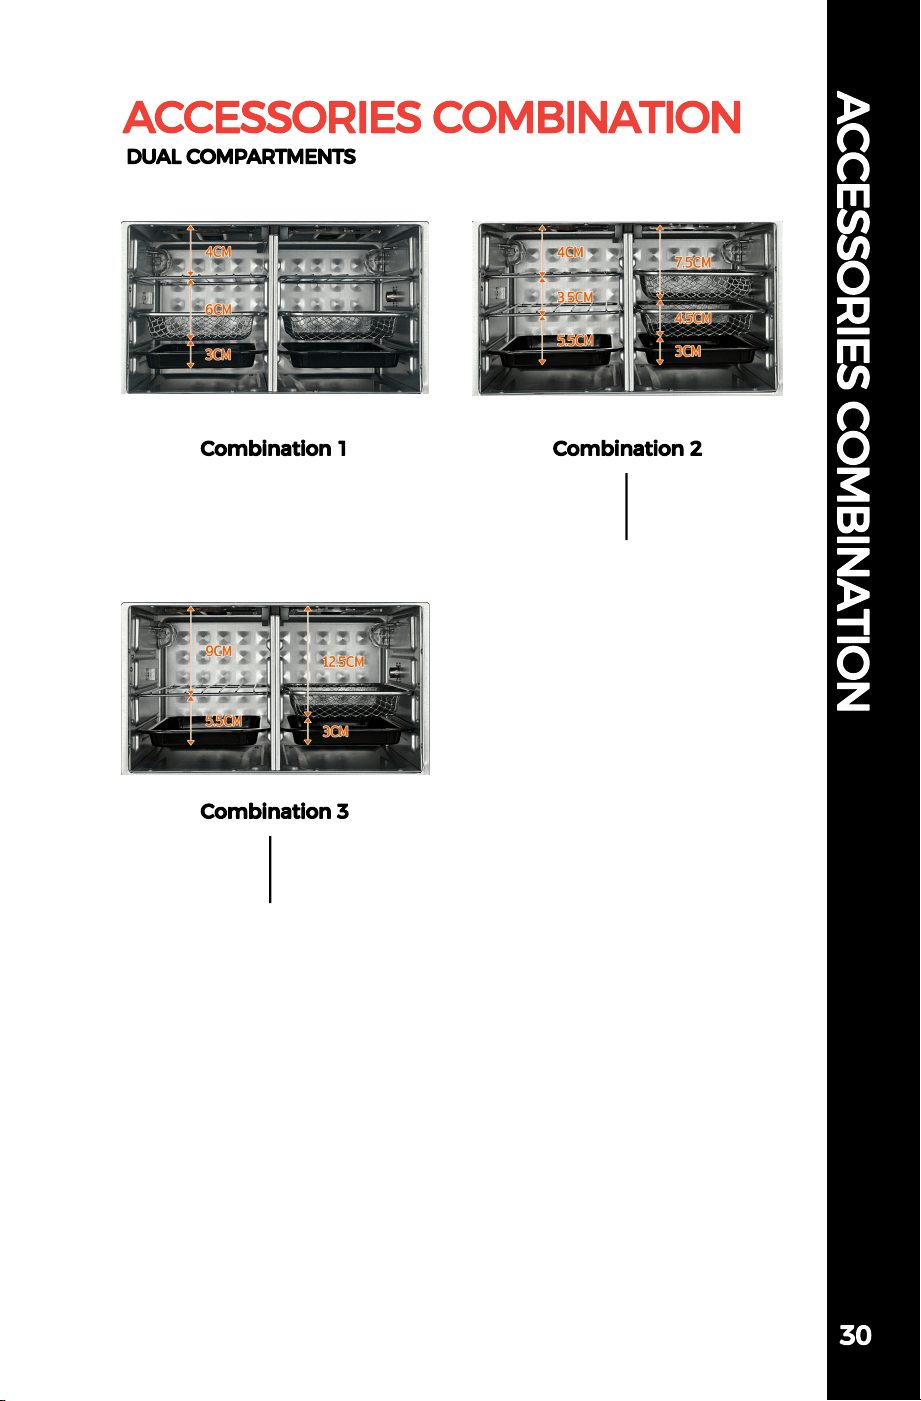
Use an Oven Rack to allow
hot air to heat food evenly
from the top fan.
Place the Oven Rack on level
1.2
Steak/Chicken/Fish/Toast/
Potato/Sausage
The Bake Tray is deep enough
to cook food or use it as a
crumb tray.
Place the Bake Tray on level 1.
2. 3
Pie/Cake/Pizza/Whole Chicken
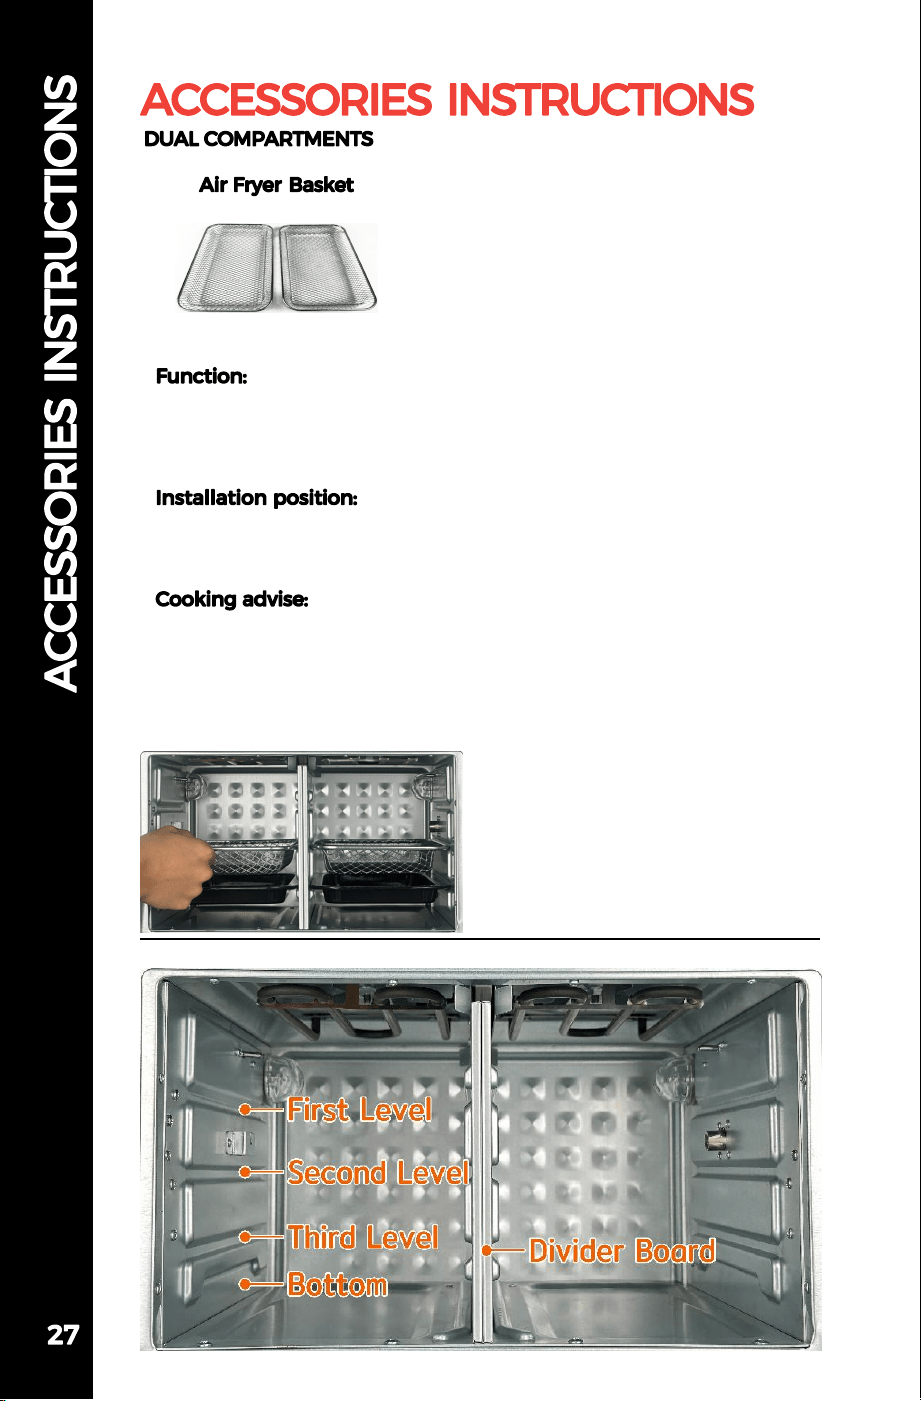
Oven Cavity Diagram
Oven RackBake Tray
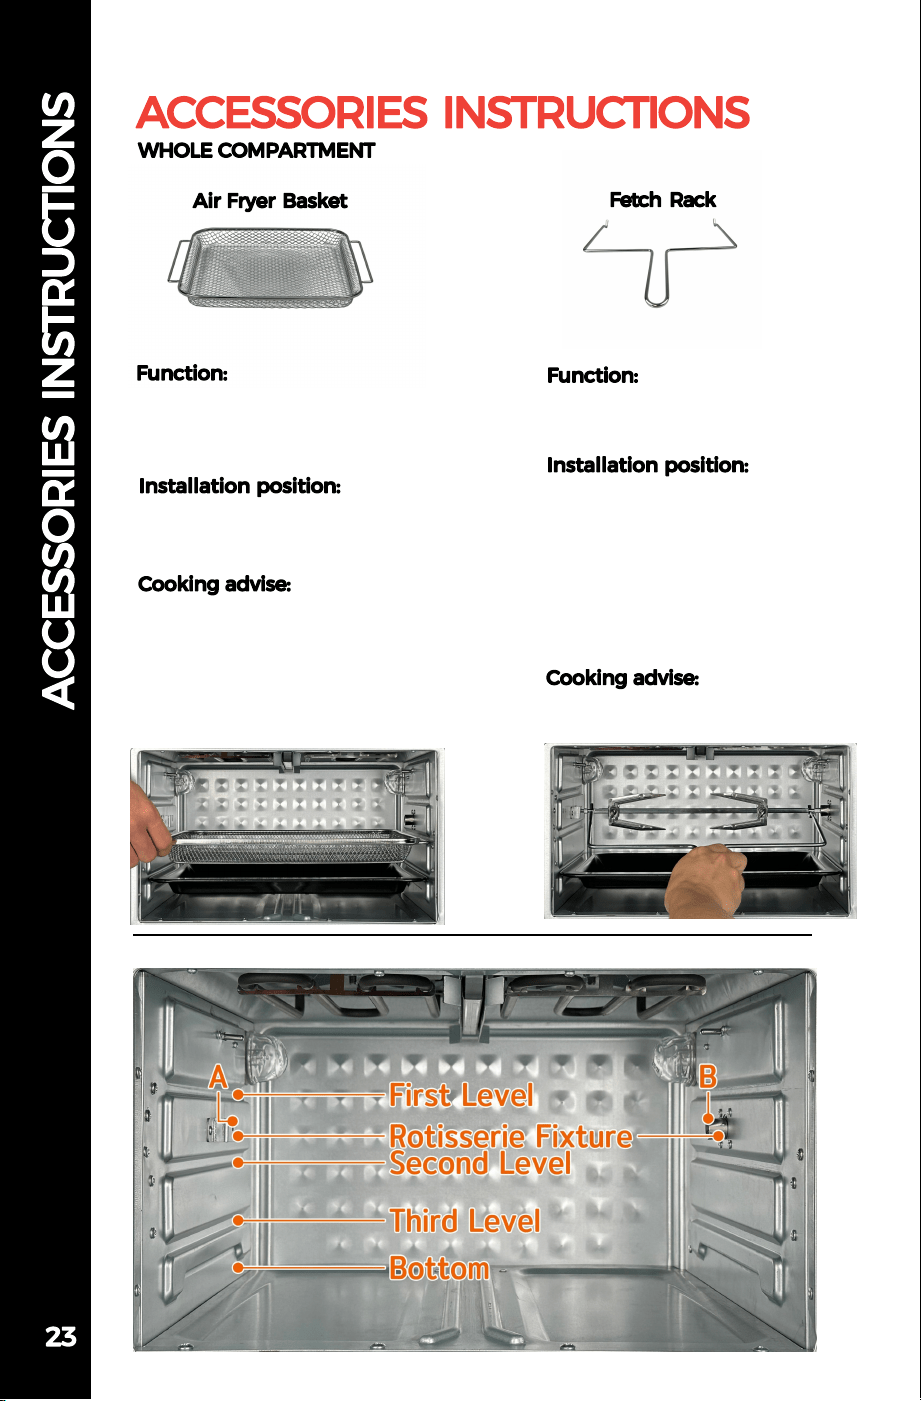
Use Fetch Rack to install and
remove the rotisserie rack.
1.When installing, align both
ends of the same letter, first
align the B end, and then
install the A end.
2.When taking out, lift end A
first, and pull out end B
outwards.
No food contact
Air Fryer Basket can hold
more small and large
quantities of food.
Place the Air Fryer Basket on
level 1.2
Fries/Chicken Nuggets/
Potato Wedges/Doritos
Oven Cavity Diagram
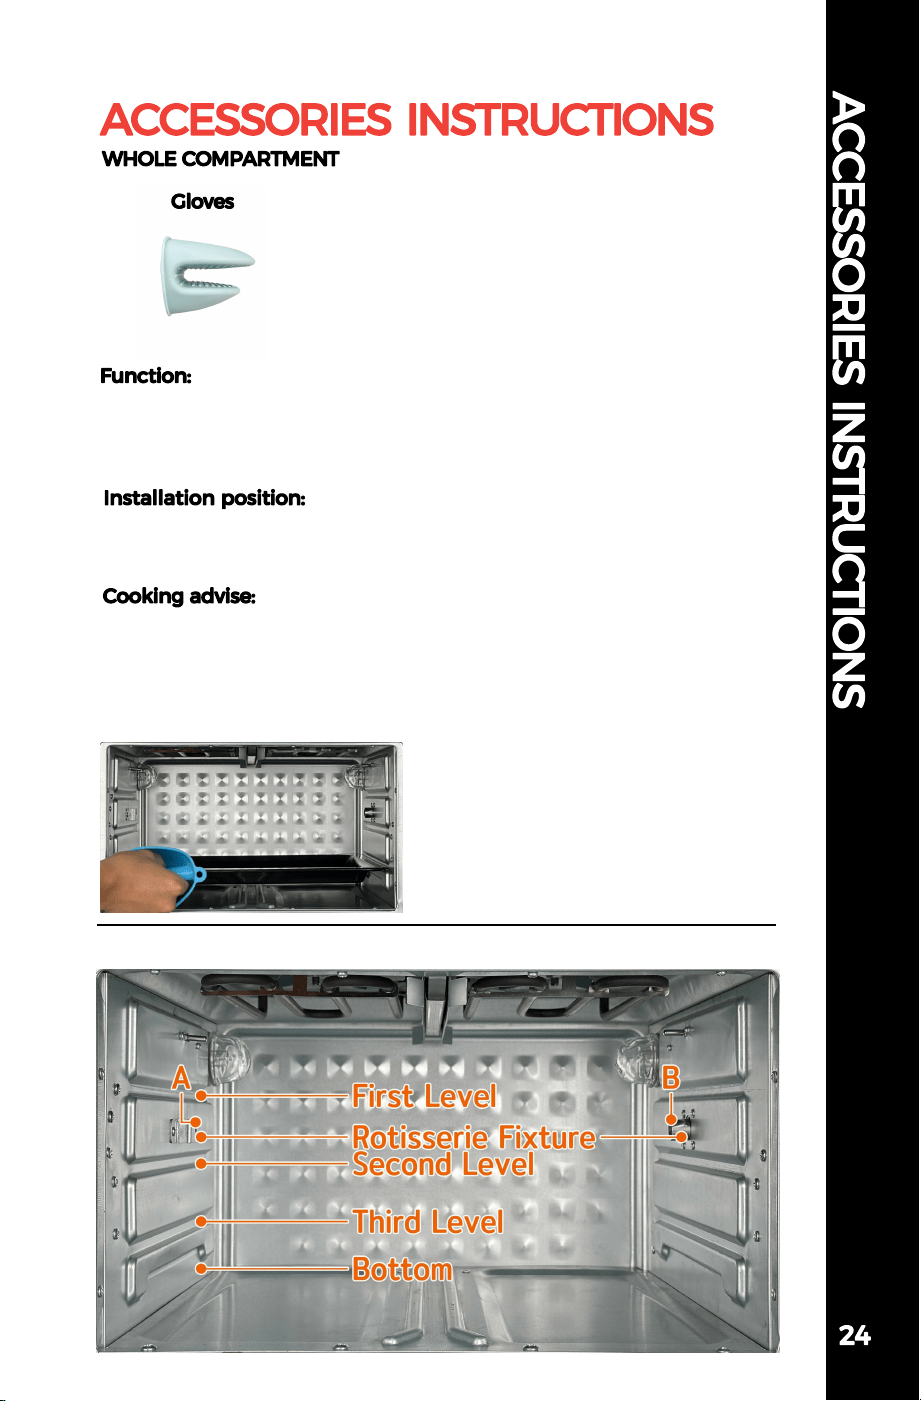
Use Gloves to remove all
accessories after cooking to
prevent burns.
Wear gloves and move hot
accessories.
No food contact
Oven Cavity Diagram
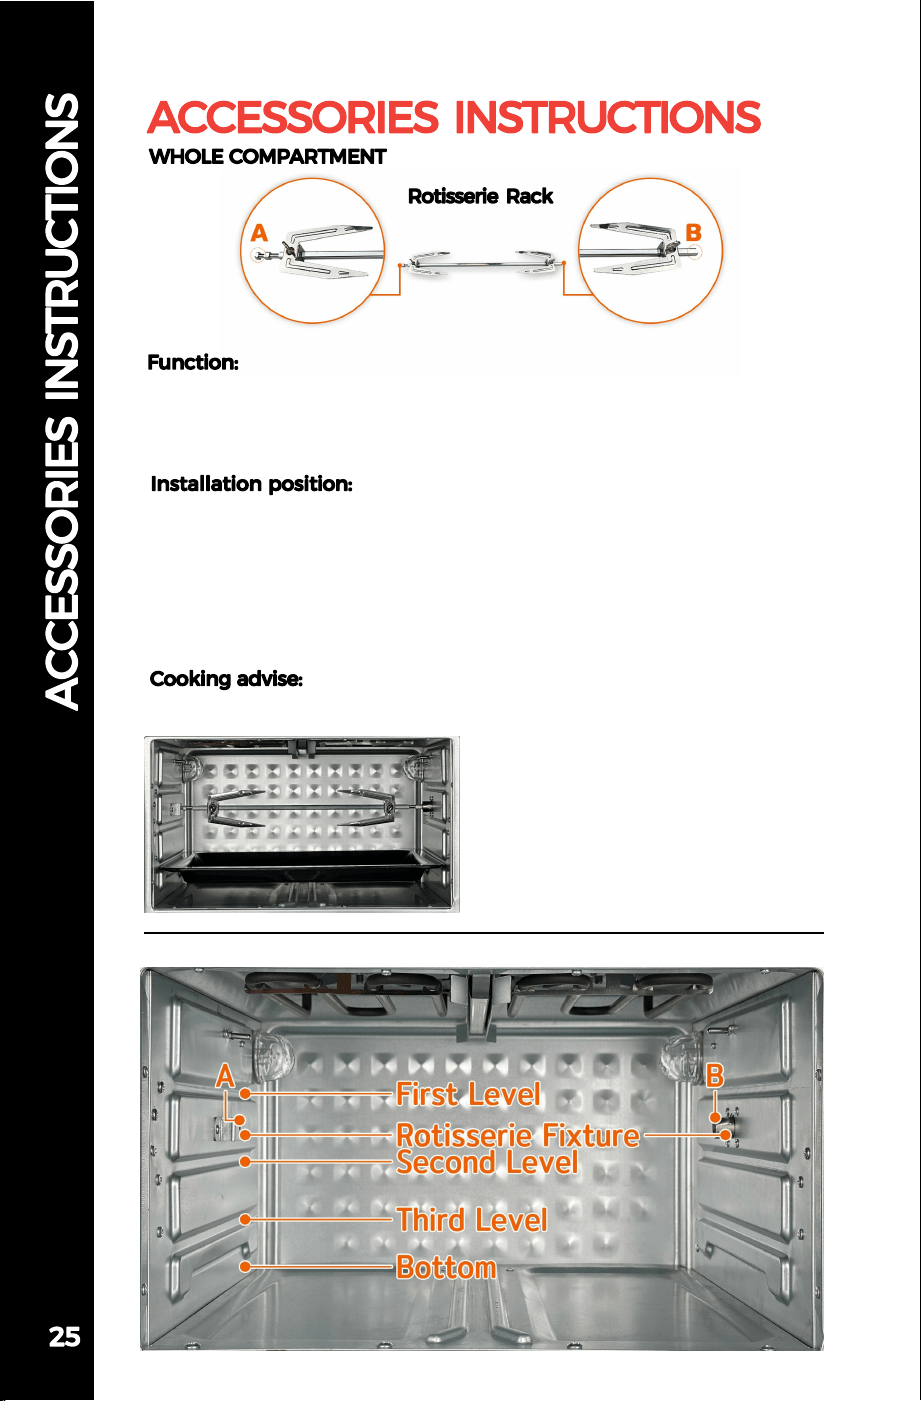
Rotisserie Rack can fix larger food and the synchronous motor in
the oven makes the food rotate 360 degrees in the oven to
achieve the best cooking effect.
1.Pass the shaft through the fork, adjusting the distance of the
fork according to the size of the food.
2.Pass the screw through the hole above the fork and tighten to
secure the fork.
3.When installing, align the two ends of the same letter, first
align the B end, and then install the A end.
Whole Chicken/Pork Knuckle
Oven Cavity Diagram
Use an Oven Rack to allow
hot air to heat food evenly
from the top fan.
Place the Oven Rack on level
1.2.
Steak/Chicken/Fish/Toast/
Potato/Sausage
The Bake Tray is deep enough
to cook food or use it as a
crumb tray.
Place the Bake Tray on level
1.2.3
Pie/Cake/Fish/Meat
Oven Cavity Diagram
Oven Cavity Diagram
Air Fryer Basket can hold
more small and large
quantities of food.
Place the Air Fryer Basket
on level 1.2
Fries/Chicken Nuggets/
Potato Wedges/Doritos
Please place the Bake Tray at the bottom when cooking to catch
any crumbs or grease drips.
Be careful not to reverse the ends of the Rotisserie, otherwise it
will cause motor failure.
All accessories are dishwasher safe (except gloves).
Please refrain from touching the accessories with your hands
before they cool down.
Please keep the rotisserie rack out of the reach of children to
prevent accidental swallowing of screws.
Do not heat the gloves in the oven.
Some special foods may cause the accessories to get dirty after
heating, but the accessories themselves will not fade.
All accessories are free of teflon coating.
Ensure to clean the oven and accessories regularly to maintain
their performance and hygiene.
10.Please wear protective gloves before cleaning.
Air Fryer Basket
Air Fryer Basket
Bake Tray
Oven Rack
Air Fryer Basket
Bake Tray
Oven Rack
Oven Rack
Bake Tray
Air Fryer Basket
Bake Tray
Oven Rack
Bake Tray
Rotisserie Rack
Oven Rack
Air Fryer Basket
Bake Tray
Oven Rack
Oven Rack
Bake Tray
Air Fryer Basket
Air Fryer Basket
Bake Tray
Oven Rack
Bake Tray
Air Fryer Basket
Bake Tray
The HYSapientia Dual Zone Air Fryer Oven combines the functionalities
of a regular oven and an air fryer while incorporating a dual-zone design.
It is equipped with top heating tubes and two high-speed fan structures.
When the fans and heating tubes operate simultaneously, it enables fast
grilling, baking, and dehydration. The dual-zone design not only
enhances efficiency but also brings more cooking possibilities.
The HYSapientia Dual Zone Air Fryer Oven is equipped with two
high-speed fans running each with a speed of more than 2000rpm,
whereas a typical convection oven usually has a low-speed fan operating
at around 1000rpm.
The HYSapientia Dual Zone Air Fryer Oven employs a special air duct
that can absorb air from both sides of the oven, generating a 360°
thermal cyclone at the top of the oven, thus creating a powerful hot air
effect similar to an air fryer.
Compared to the HYSapientia Dual Zone Air Fryer Oven, a regular
convection oven typically requires more time to cook food, whereas the
HYSapientia Dual Zone Air Fryer Oven achieves higher efficiency and
energy savings.
The HYSapientia Dual Zone Air Fryer Oven is made of stainless steel,
while most air fryers are made of plastic.
The HYSapientia Dual Zone Air Fryer Oven has a larger capacity
compared to most air fryers.
The HYSapientia Dual Zone Air Fryer Oven does not contain any teflon
coatings.
What if my food is not cooked or overcooked in the preset mode?
If the food is not cooked or overcooked in a specific preset mode,
you can slightly adjust the temperature and time in that mode for the
next cooking, as the preset mode is only for reference.
Does the air fryer have a microwave function?
The air fryer does not have a microwave function. If you want to heat
food, you can wrap it in aluminum foil and set the temperature to
around 100°C.
What if the air fryer fills with oily smoke during cooking?
The air fryer oven is equipped with a heating tube at the top, and the
internal temperature of the oven can rise rapidly when the high-speed
fan is in operation. Therefore, when cooking fatty meats such as pork or
lamb, if smoke is generated, please carefully adjust the temperature
slightly lower. Additionally, we strongly remind you to place the crumb
tray underneath to collect the oil.
Why does the fan keep operating when the oven stops working?
When the oven stops working the oven heater turns off, but the fan
continues to operate for one minute in cooling mode
Why does moisture appear above the oven door frame?
When cooking food with high water content, such as frozen food
with ice, the water evaporates into vapor due to the rising temperature.
When the temperature decreases, the water vapor on the surface
condenses into droplets, which is a normal phenomenon.
Why do air fryer ovens have small vents on their door panels?
The air fryer oven utilizes small vents on the door panel for heat
dissipation during operation.It is normal for hot air to escape through
these vents while in use.

Support Web:www.hysapientia.com
Support E-mail:service@hysapientia.com
easy cooking & healthy eating
Web
Cook
Book
