

CUSTOMER CARE LINE:
USA/Canada 1-800-231-9786
Accessories/Parts (USA/Canada)
Accesorios/Partes (EE.UU/Canadá)
1-800-738-0245
For online customer service
and to register your product,
go to www.prodprotect.com/applica
3-yEAR LIMITEd wARRANTy
2010/ 5-7-11
MOdEL/MOdELO
GR0215G
Find additional healthy recipes at
www.georgeforemancooking.com
Copyright © 2010 Applica Consumer Products, Inc.

32
Please Read and Save this Use and Care Book
IMPORTANT SAFEGUARDS
When using electrical appliances, basic safety precautions should always be
followed, including the following:
❑ Read all instructions.
❑ Do not touch hot surfaces. Use handles or knobs.
❑ To protect against electric shock do not immerse cord, plugs or appliance
in water or other liquid.
❑ Close supervision is necessary when any appliance is used by or near
children.
❑ Unplug from outlet when not in use and before cleaning. Allow to cool
before putting on or taking off parts, and before cleaning the appliance.
❑ Do not operate any appliance with a damaged cord or plug, or after the
appliance malfunctions or has been damaged in any manner. Return
appliance to the nearest authorized service facility for examination, repair
or adjustment. Or, call the appropriate toll-free number on the cover of this
manual.
❑ The use of accessory attachments not recommended by the appliance
manufacturer may cause injuries.
❑ Do not use outdoors.
❑ Do not let cord hang over edge of table or counter, or touch hot surfaces.
❑ Do not place on or near a hot gas or electric burner, or in a heated oven.
❑ Extreme caution must be used when moving an appliance containing hot
oil or other hot liquids.
❑ Always attach plug to appliance first, then plug cord into the wall outlet.
To disconnect, turn any control to OFF, then remove plug from wall outlet.
❑ Do not use appliance for other than intended use.
SAvE ThESE INSTRUCTIONS.
This product is for household use only.
POLARIZED PLUG (120v Models Only)
This appliance has a polarized plug (one blade is wider than the other). To reduce
the risk of electric shock, this plug is intended to fit into a polarized outlet only one
way. If the plug does not fit fully into the outlet, reverse the plug. If it still does not fit,
contact a qualified electrician. Do not attempt to modify the plug in any way.
TAMPER-RESISTANT SCREW
Warning: This appliance is equipped with a tamper-resistant screw to prevent
removal of the outer cover. To reduce the risk of fire or electric shock, do not
attempt to remove the outer cover. There are no user-serviceable parts inside.
Repair should be done only by authorized service personnel.
ELECTRICAL CORD
a) A short power-supply cord (or detachable power-supply cord) is to be provided
to reduce the risk resulting from becoming entangled in or tripping over a longer
cord.
b) Longer detachable power-supply cords or extension cords are available and may
be used if care is exercised in their use.
c) If a long detachable power-supply cord or extension cord is used,
1) The marked electrical rating of the detachable power-supply cord or extension
cord should be at least as great as the electrical rating of the appliance,
2) If the appliance is of the grounded type, the extension cord should be a
grounding-type 3-wire cord, and
3) The longer cord should be arranged so that it will not drape over the
countertop or tabletop where it can be pulled on by children or tripped over.
Note: If the power supply cord is damaged, it should be replaced by qualified
personnel; in Latin America, by an authorized service center.
54
Product may vary slightly from what is illustrated.
how to Use
This product is for household use only.
GETTING STARTED
• Removeallpackingmaterialand,ifapplicable,anystickersfromtheproduct;
remove and save literature.
• Pleasegotowww.prodprotect.com/applicatoregisteryourwarranty;foradditional
information go to www.georgeforemancooking.com.
• Yourappliancecomespartiallyassembledinthebox.
• WashgriddleanddriptrayasinstructedinCAREANDCLEANINGsectionofthis
manual. This will remove any traces of dust or residue left from manufacturing and
shipping.
Note: Make sure all pieces are dry prior to use.
• Selectadry,levellocationonaheatresistantsurfacewhereunitistobeused,
leaving enough space between back of unit and wall to allow heat to ow without
damage to cabinets and walls.
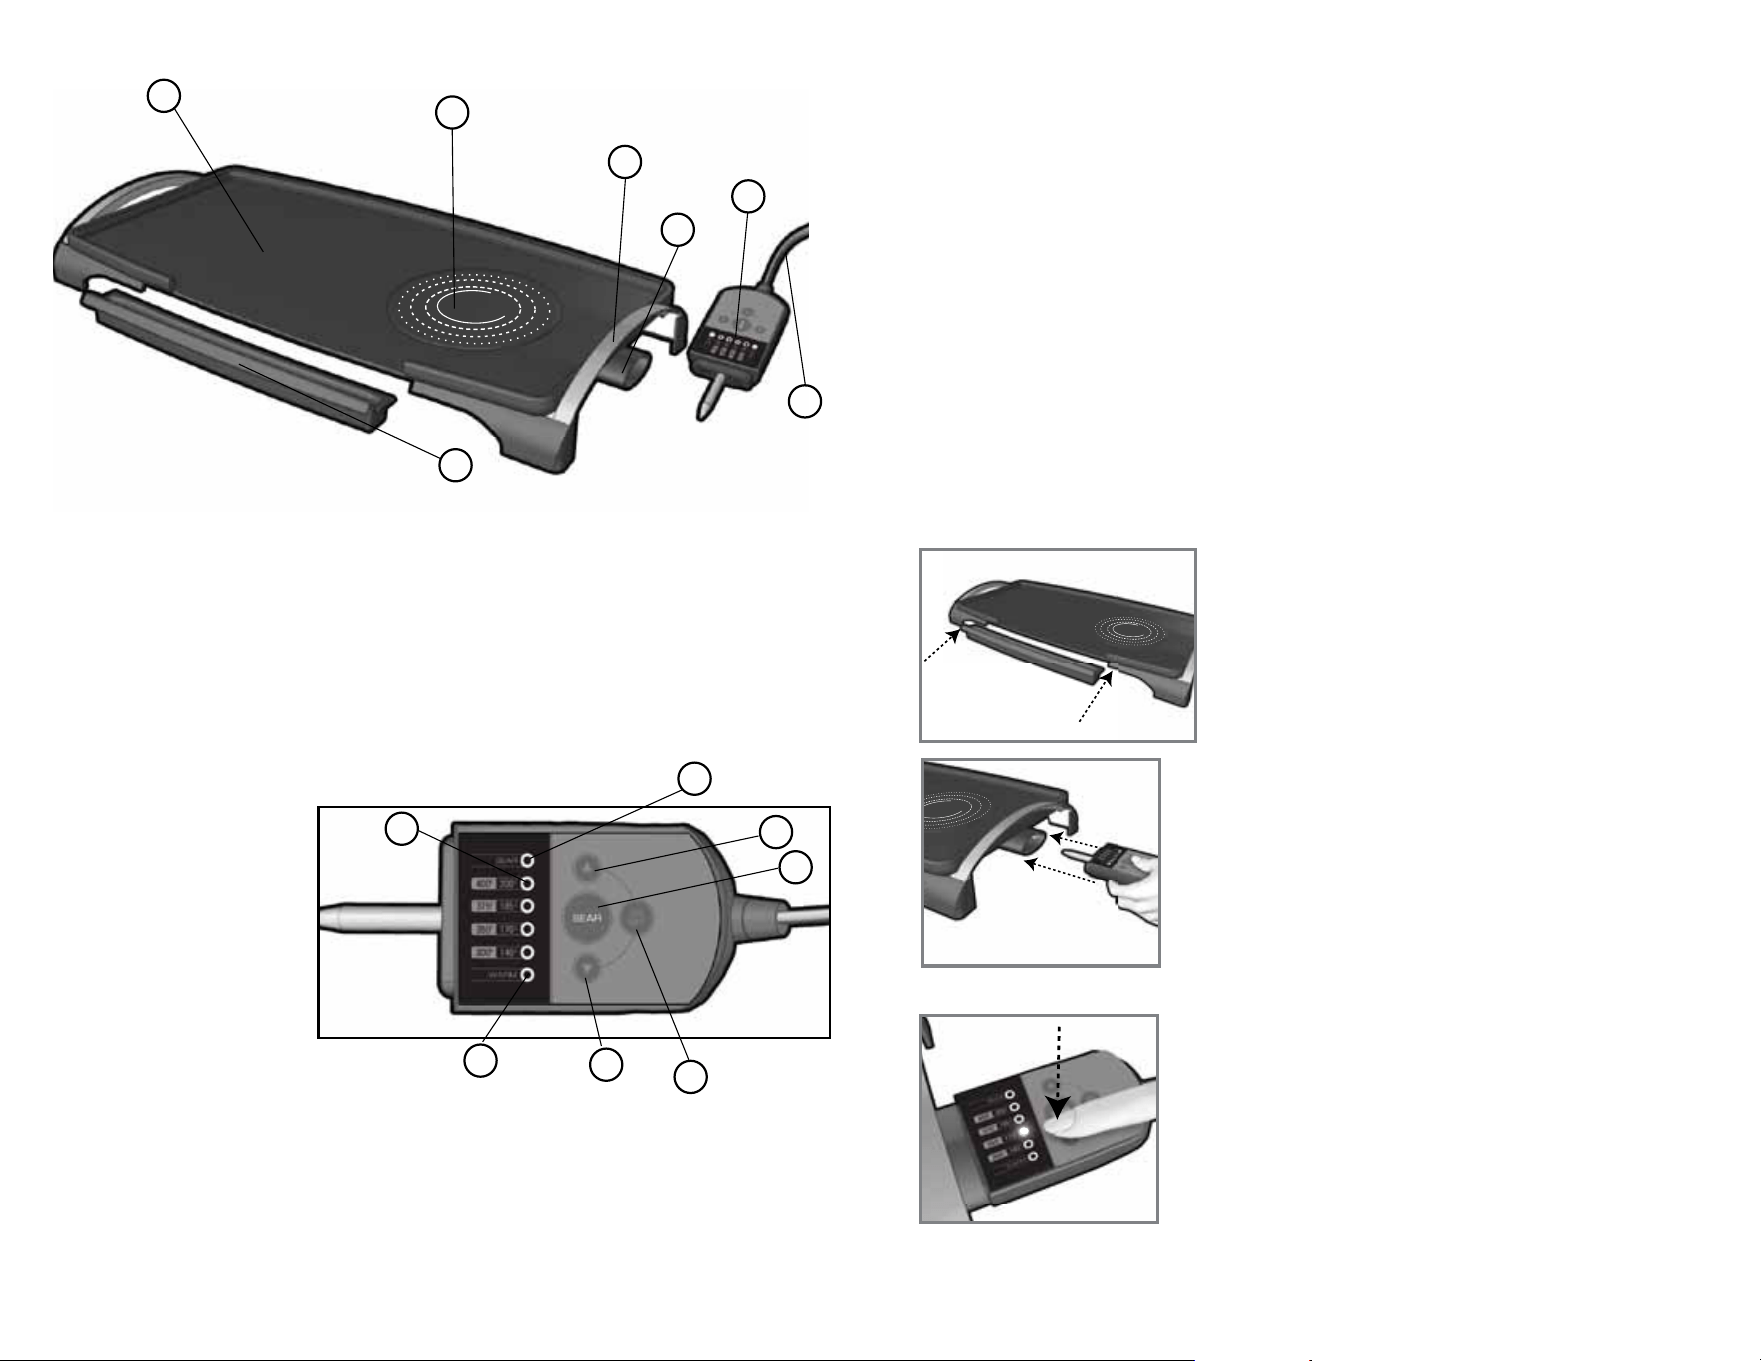
DRIP TRAY
Placethedriptrayunderthefrontsectionofthe
griddle through the projections on either side of the
opening (B).
POWER CORD
Unwind the cord and insert the temperature control probe
into the probe receptacle on the right side of the griddle
(C).
USING YOUR GRIDDLE
1. Plugcordintoastandardelectricaloutlet.PresstheON/
OFF button in the center of the temperature control
probe. The light next to the WARM setting will ash
green.
2. To begin preheating, set the desired temperature by
pressingtheUP(▲) button on the temperature control
probe until the orange light to the right of the desired
temperature setting begins to ash (D).
3. The temperature can be changed at any time by
pressingtheUP(▲)orDOWN(▼) buttons on the
temperature control probe repeatedly. The non-sear
temperature settings range from 300°F to 400°F (see
COOKINGCHARTforsuggestedtemperaturesettings).
1. SEARindicatorlight
2. Temperature up (▲) button
3. SEARbutton
4. ON/OFFbutton
5. Temperature down (▼) button
6. WARM indicator light
7. Temperature indicator lights
A1
1
2
3
4
5
6
7
A2
1
2
3
4
5
6
7
B
C
D
1. Griddleplate(regularcookingsurface)
2. HotZone™cookingarea
3. Cool touch handle (both sides)
4. Probereceptacle
† 5. Temperaturecontrolprobe(Part#GR0215G-01)
6. Powercord
† 7. Driptray(Part#GR0215G-02)
Note: †indicatesconsumerreplaceable/removableparts

76
4. Allow the griddle to heat 5 to 8 minutes. The light next to the selected temperature
will become constant when the set temperature is reached.
Note: When a new higher temperature is selected, the light next to that setting on
the temperature control probe will ash until that temperature is reached. If a lower
temperature is selected, the light will remain constant next to the lower temperature
setting.
5. Carefully place the foods to be cooked on the griddle.
Note: Do not overload the griddle.
6. When cooking is complete, remove the cooked food using a nylon, wood or plastic
spatula.
Note: Always use heatproof plastic, nylon or wood utensils to avoid scratching the
nonsticksurfaceofthegriddle.Neverusemetalskewers,tongs,forksorknives.
7. Whennishedcooking,presstheON/OFFbuttonandunplugtheappliance.
8. Allow the drip tray to cool before removing it from under the griddle ; use both
hands to remove smoothly. Be sure the liquid in the drip tray has cooled before
emptying it. Wash and dry the drip tray after each use.
Important: Do not leave the appliance unattended during use.
Important: The heat continues to be ON until the griddle is turned o.
FOOD TEMPERATURE TIME DIRECTIONS
Bacon 350°F 8 to 14
minutes
Turn often for even
browning.
Sausage,fresh
links and patties
350°F 8 to 12
minutes
Turn often for even
browning and thorough
cooking.
Sausage,frozen
links and patties
350°F 8 to 14
minutes
Turn often for even
browning and thorough
cooking.
French toast 350°F 6 to 10
minutes
Lightly butter the griddle
before cooking each side.
Turn once.
Pancakes 400°F 3 to 5
minutes
Lightly grease griddle
with oil. Use about 3 to
4 tbsp. batter for each
pancake. Turn once
bubbles appear on
surface and side facing
griddle is golden.
FOOD TEMPERATURE TIME DIRECTIONS
Eggs 350°F 3 to 4
minutes
Lightly butter the griddle
before cooking.
Hamslices 350°F 4 to 6
minutes
Cook until browned on
both sides and heated
through; turn once.
Canadian bacon 350°F 3 to 4
minutes
Cook until browned on
both sides; turn once.
Hotdogs 350°F 6 to 8
minutes
Turn often to brown on all
sides and cook through.
Sandwiches 350°F 6 to 8
minutes
Lightly butter the griddle
before cooking or butter
outside of both slices of
bread; cook until golden
on both sides and heated
through.
Vegetables 350°F 6 to 8
minutes
Add a small amount of oil,
if desired.
COOKING ChART WhEN "SEAR" FUNCTION
IS NOT IN USE:
TIPS AND hINTS
• Donotuseaerosolcookingsprayonthenonsticksurface;useasmallamountofoil
or butter, if desired.
• Spacefoodsevenlyonthegriddle.
• Donotoverloadthegriddle.
• Whencookingcycleistoberepeated,allowthegriddletoreturntotheset
temperature.

98
hOW TO USE ThE hOT ZONE SEAR FUNCTION
This unique feature allows you to sear meats, sh, vegetables and fruits for up to 2
minutes at a high temperature and then automatically lowers the griddle temperature to
the original setting to continue cooking.
Note:TheSEARfunctioncanbeusedatanytimeduringthecookingcycle.
UsingSEARatthebeginningofthecookingcycle:
1. To begin preheating, set the desired temperature by
pressingtheUP(
▲
) button on the temperature control
probe until the light to the right of the desired setting
begins to ash.
2. PresstheSEARbuttononthetemperaturecontrol
probetoraisethetemperatureintheHotZone™area
ofthegriddleto520°F.ThelightnexttoSEARonthe
temperature control probe will begin ashing and the
orangelightundertheSEARbuttonwillbeilluminated(E).
3. WhentheHotZone™areaisfullyheated,thelightnexttoSEARonthetemperature
controlprobewillbecomeconstant.TheHotZone™areawillholdthattemperature
for approximately 2 minutes
Note: It is not necessary to wait for the griddle to heat to the preset temperature before
selectingSEAR.
4. CarefullyplacethefoodtobesearedontheHotZone™area.Searfoodoneachside
for about 1 minute.
5. After about 2 minutes, the temperature on the temperature control probe will change
to the preset temperature initially selected. (For example, if you select 350°F and then
SEAR,thegriddlewillreturnto350°Fafterthesearingfunction
is complete.)
Note:YoucanturnoSEARbyeitherpressingtheDown(
▼
) button or by pressing the
desired temperature. The griddle will automatically revert to the preset temperature.
6. To continue cooking, move the food to the regular cooking area of the griddle.
7. Ifyouhavemorefoodtosear,presstheSEARbuttonagainandfollowsteps2–4.
Note:WhenusingSEAR,watchfoodsthatareontherestofthegriddlecarefully;turn
often to maintain even cooking.
Using SEAR in the middle or at the end of the cooking cycle:
1. Followsteps1to6intheHOWTOUSEonpages5-6.
2. PresstheSEARbuttononthetemperaturecontrolprobetoraisethetemperature
intheHotZone™areato520°F(see Illustration E).ThelightnexttoSEARonthe
temperaturecontrolprobewillbeginashingandtheorangelightundertheSEAR
button will be illuminated.
3. WhentheHotZone™areaisfullyheated,thelightnexttoSEARonthetemperature
control probe will become constant. It will hold that temperature for approximately
2 minutes.
4. Followsteps4to7inUSINGSEARATTHEBEGINNINGOFTHECOOKINGCYCLE.
E
FOOD TO BE
COOKED
INTERNAL TEMPERATURE
(MEDIUM)
INTERNAL TEMPERATURE
(WELL DONE / FULLY
COOKED)
Chicken Breast 170°F 77°C
Chicken Thigh 180°F 82°C
Beef/Lamb/Veal 160°F 71°C 170°F 77°C
Pork 160°F 71°C
Reheated cooked
meats and poultry
165°F 74°C
GUIDE FOR COOKING MEAT AND POULTRY ON
ThE hOT ZONE™ SEAR & GRIDDLE
TIPS AND hINTS FOR USING ThE hOT ZONE™ AREA
• BesureHotZone™areaispreheatedbeforeusetoassureevensearing.
• Meats,poultry,sh,andvegetablescanbesearedontheHotZone™areaandthen
moved to regular cooking surface of the griddle to complete cooking.
• Useameatthermometerwhencookingmeatandpoultrytotestfordoneness.
• Remembertosetthetemperaturesettingtoapproximately350°Fontheregular
cooking surface of griddle before searing to allow for adequate cooking once meats
are seared.
• Foods–suchasthinlyslicedbeef,shrimpandscallops–mayonlyrequireanother
3 to 5 minutes to complete cooking once they have been seared.

1110
Care and Cleaning
This product contains no user serviceable parts. Refer service to qualied service
personnel.
CLEANING
Warning: To avoid electric shock, unplug from outlet when not in use and before
cleaning. Do not immerse temperature control probe, cord or plug in water or other
liquid.
Caution: To avoid accidental burns, allow griddle to cool completely before cleaning.
1. Before cleaning, turn the temperature control probe OFF and unplug from the
wall outlet. Remove temperature control probe, wipe with a damp cloth and dry
thoroughly.
2. Mare sure drip tray is under front of griddle. Using a nylon, wood or plastic spatula,
scrapeoanyexcessfatandfoodparticles.
3. Empty the drip tray. The drip tray may be washed in the dishwasher, top-rack only.
Do not wash griddle in the dishwasher.
4. Wash griddle, drip tray and spatula with warm soapy water; rinse and dry
thoroughly.
Caution: Temperature control probe and probe receptacle must always be
completely dry before use.
5. Stubborn Build-up: If necessary, use a nonmetallic scrubbing pad to clean the
griddle. Do not use steel wool or scouring pads on any part of the appliance. For
stuck-onfood,tryusingSoftScrub
®
or Bar Keepers Friend
®
to clean the cooking
surface of the griddle.
STORAGE
Unplugunit,allowtocoolandcleanbeforestoring.Storeinaclean,dryplace.Never
storegriddlewhileitishotorstillpluggedin.Neverwrapcordtightlyaroundthe
appliance, as this could cause the cord to fray and break.
TROUBLEShOOTING
PROBLEM POSSIBLE CAUSE SOLUTION
Finish on griddle has cut
marks.
Metal utensils have been
used.
Always use heatproof
plastic, nylon or wood
utensils to avoid
scratching the nonstick
surface of the griddle.
Neverusemetalskewers,
tongs, forks or knives.
The griddle is not cooking
well; food is undercooked.
Griddlewasnotfully
preheated before use.
Always preheat griddle
until light next to
selected temperature
becomes constant before
cooking any foods.
There is food buildup on
the griddle.
Griddlenotproperly
cleaned after use.
Use a nylon scrubbing
pad and hot soapy water
to clean the griddle.
Do not use steel wool
scrubbing pads or
abrasive cleaners to clean
the nonstick surface.
Griddledoesnotturnon. Griddleisnotpluggedin. Check to be sure
appliance is plugged in
to a working outlet and
temperature control
probe is turned on
and set to the desired
temperature setting.
My griddle has white
spots on it.
The water from cleaning
has dried on the surface
of the griddle.
Dry griddle immediately
after washing.

1312
Recipes
Find additional recipes for healthy, gourmet meals at
www.georgeforemancooking.com!
ChICKEN DINNER IN A hURRY
1 tbsp. fresh rosemary, chopped
1 tbsp. fresh thyme leaves, chopped
1 large clove garlic, minced
1½ tsp. salt
¼ tsp. coarse black pepper
2 tsp. olive oil
1 lb. chicken tenderloins
¾ lb. red skin potatoes, sliced
1 small white onion, halved and thinly sliced
1 small red onion, halved and thinly sliced
Chopped parsley
Inasmallbowl,combinerosemary,thyme,garlic,½tsp.salt,1/8tsp.pepperand1tsp.
oliveoil.Placechickeninamediumbowl.Addhalfofrosemarymixtureandtosstoblend.
Setremainderaside.Allowtomarinate10minutes.
Preheatgriddleto350°F.Sautépotatoesandonionsinremaining1tsp.oliveoilforabout
5minutes.Seasonwithreservedrosemarymixture,1tsp.saltand1/8tsp.pepper.Toss
occasionally to cook evenly.
PressSEARbutton.WhentheHotZone™areaispreheated,thelightonthecontrolwill
stop ashing. Add chicken and sear for 1 minute on each side. Meanwhile, continue to
cook potato mixture until tender, turning often.
Move chicken to regular cooking surface on the griddle and continue to cook until fully
cooked (a meat thermometer inserted into the tenderloin will register 180°F).
Makes 3 to 4 servings.
ShRIMP ON ThE GRIDDLE
2 tbsp. fresh cilantro, chopped
2 large clove garlic, minced
½ tsp. salt
½ tsp. crushed red pepper akes
2 tbsp. fresh lemon juice
1 tbsp. olive oil
¾ lb. jumbo shrimp, shelled and deveined
¾ cup sliced green onions
¾ cup chopped red pepper
1½ cups packed baby spinach leaves
1 cup whole kernel corn
In a medium bowl, combine 1 tbsp. chopped cilantro, 1 clove of garlic, ¼ tsp. salt, red
pepper akes, lemon juice and 2 tsp. olive oil. Add shrimp and toss to coat. Allow to
marinate at least 10 minutes.
Preheatgriddleto350°F.Sautégreenonionsandredpepperinremaining2tsp.oliveoil
forabout2minutes.Seasonwithremainingmincedgarlicand¼tsp.salt.
PressSEARbutton;whenHotZone™areaispreheated,thelightonthecontrolwillstop
ashing. Add shrimp and sear for 1 minute on each side. Meanwhile, continue to cook
pepper mixture, turning often.
Move shrimp to regular cooking surface on the griddle and continue to cook until fully
cooked; add spinach and corn to pepper mixture and cook until spinach is just wilted.
Makes 3 servings.

1514
ORANGE FLAvORED SALMON
1 small purple onion, halved and thinly sliced
1 tsp. olive oil
¾ tsp. salt
1/8tsp.pepper
½ lb. salmon llet
1 tbsp. snipped fresh dill
1 large navel orange, sliced
1 tbsp. chopped parsley
Preheatgriddleto350°F.Sautéonioninoliveoilfor2minutes,turningoften.Add¼tsp.
salt and pepper.
PressSEARbutton;whenHotZone™areaispreheated,thelightonthecontrolwillstop
ashing.Seasonsalmonwithremaining1tsp.saltandsearfor1minuteoneachside.
Meanwhile, continue to cook onion, turning often.
Movesalmontoregularcookingsurfaceofthegriddle.Sprinklewithdill.Continueto
cook 3 to 4 minutes.
PressSEARbuttonagain;whenHotZone™areaispreheated,thelightonthecontrolwill
stop ashing. Add orange slices and sear for 1 minute on each side.
Cook until salmon akes easily when tested with a fork.
Servegarnishedwithonionandorange.Sprinkleallwithparsley.
Makes 2 servings.
STEAK A LA ROMA
1 small onion, halved and thinly sliced
1½ cups sliced zucchini
1 small yellow squash, halved and sliced
1 tbsp. olive oil
1 Roma tomato, coarsely chopped
2 tbsp. julienned fresh basil
½ tsp. salt
½ tsp. black pepper
2 thin slices boneless strip steak (about 6 oz.)
½ tsp. Adobo seasoning
Preheatgriddleto350°F.Sautéonion,zucchiniandyellowsquashinoliveoilfor5
minutes, turning often. Add basil, salt and ¼ tsp. pepper.
PressSEARbutton;whenHotZone™areaispreheated,thelightonthecontrolwillstop
ashing. Meanwhile, season beef on both sides with Adobo seasoning and remaining ¼
tsp. pepper.
Searmeatfor1minuteoneachside.Meanwhile,continuetocookvegetablemixture
until tender, turning often. When nished searing, move steak to regular cooking surface
of the griddle and continue to cook until fully cooked.
Makes 2 servings.
ASIAN MARINATED SEA SCALLOPS
¾ lb. sea scallops
3 tbsp. bottled teriyaki marinade
2 tsp. grated fresh ginger
1 medium clove garlic, minced
1 tsp. sesame oil
1 pkg. (3.5 oz.) fresh oyster mushrooms*
1½ cups fresh snow peas (about 3 oz.)
1 cup julienne carrots
1/3cupchoppedredpepper
2 tsp. vegetable oil
In a medium bowl, combine 2 tbsp. teriyaki marinade, 1 tsp grated ginger, garlic and ½
tsp. sesame oil. Add scallops and toss to coat. Allow to marinate at least 10 minutes.
Preheatgriddleto350°F.Sautémushrooms,snowpeas,carrotsandredpepperin
vegetableoilforabout2minutes.Seasonwithremaining1tsp.ginger.
PressSEARbutton;whenHotZone™areaispreheated,thelightonthecontrolwillstop
ashing. Add scallops and sear for 1 minute on each side. Meanwhile, continue to cook
mushroom mixture, turning often.
Move scallops to regular cooking surface of the griddle and continue to cook scallops and
vegetable mixture until fully cooked, adding remaining 1 tbsp. teriyaki sauce to vegetable
mixture.
Makes 3 servings.
*Shitakemushroomsmaybesubstitutedforoystermushrooms

1716
Por favor lea este instructivo antes de usar el producto
INSTRUCCIONES IMPORTANTES
DE SEGURIDAD
Cuandoseusanaparatoseléctricos,siempresedebenrespetarlassiguientes
medidas básicas de seguridad:
❑ Porfavorleatodaslasinstrucciones.
❑ Notoquelassuperficiescalientes.Uselasasasolasperillas.
❑ Afindeprotegersecontraunchoqueeléctricoylesionesalaspersonas,
no sumerja el cable, los enchufes ni el aparato en agua ni en ningún otro
líquido.
❑ Todoaparatoeléctricousadoenlapresenciadelosniñosoporellos
mismos requiere la supervisión de un adulto.
❑ Desconecteelaparatodeltomacorrientecuandonoestéenusoyantes
de limpiarlo. Espere que el aparato se enfríe antes de instalarle o retirarle
piezas y antes de limpiarlo.
❑ Nouseningúnaparatoeléctricoquetengaelcableoelenchufeaveriado,
quepresenteunproblemadefuncionamientooqueestédañado.Acudaa
un centro de servicio autorizado para que lo examinen, reparen o ajusten o
llame gratis al número correspondiente en la cubierta de este manual.
❑ El uso de accesorios no recomendados por el fabricante del aparato puede
ocasionarincendio,choqueeléctricoolesionesalaspersonas.
❑ Nouseesteaparatoalaintemperie.
❑ Nopermitaqueelcablecuelguedelbordedelamesaodelmostradorni
que entre en contacto con superficies calientes.
❑ Nocoloqueelaparatosobrenicercadelashornillasdegasoeléctricasni
adentro de un horno caliente.
❑ Sedebetenermuchísimocuidadoalmoverunaparatocuandotieneaceite
u otros líquidos calientes.
❑ Siempreconecteprimeroelcablealaparatoydespués,enchúfeloala
tomadecorriente.Paradesconectar,ajustetodocontrolalaposiciónde
apagado(OFF)ydespués,retireelenchufedelatomadecorriente.
❑ Este aparato se debe usar únicamente con el fin previsto.
CONSERvE ESTAS
INSTRUCCIONES.
Este aparato eléctrico es para uso doméstico
únicamente.
1918
ENChUFE POLARIZADO (Solamente para los modelos de 120v)
Este aparato cuenta con un enchufe polarizado (un contacto es más ancho que
elotro).Afindereducirelriesgodeunchoqueeléctrico,esteenchufeencaja
enuntomacorrientepolarizadaenunsolosentido.Sielenchufenoentraenel
tomacorriente,inviértaloysiaunasínoencaja,consulteconunelectricista.Porfavor
no trate de alterar esta medida de seguridad.
TORNILLO DE SEGURIDAD
Advertencia: Este aparato cuenta con un tornillo de seguridad para evitar la
remoción de la cubierta exterior del mismo. A fin de reducir el riesgo de incendio
o de choque eléctrico, por favor no trate de remover la cubierta exterior. Este
producto no contiene piezas reparables por el consumidor. Toda reparación se
debe llevar a cabo únicamente por personal de servicio autorizado.
CABLE ÉLECTRICO
a) Elproductosedebedeproporcionarconuncableeléctricocorto(ouno
separable), a fin de reducir el riesgo de tropezar o de enredarse en un cable más
largo.
b) Existencableseléctricosmáslargosyseparablesocablesdeextensiónqueuno
puede utilizar si toma el cuidado debido.
c) Siseutilizauncableseparableodeextensión,
1) Elrégimennominaldelcableseparableodelcabledeextensióndebeser,
comomínimo,igualaldelrégimennominaldelaparato.
2) Sielaparatoesdeconexiónatierra,elcabledeextensióndebeseruncablede
tres alambres de conexión a tierra.
3) Uno debe de acomodar el cable más largo de manera que no cuelgue del
mostradorodelamesa,paraevitarqueunniñotiredelmismooquealguien
se tropiece.
Nota:Sielcordóndealimentaciónestadañado,enAméricaLatinadebesustituirse
por personal calificado o por el centro de servicio autorizado.
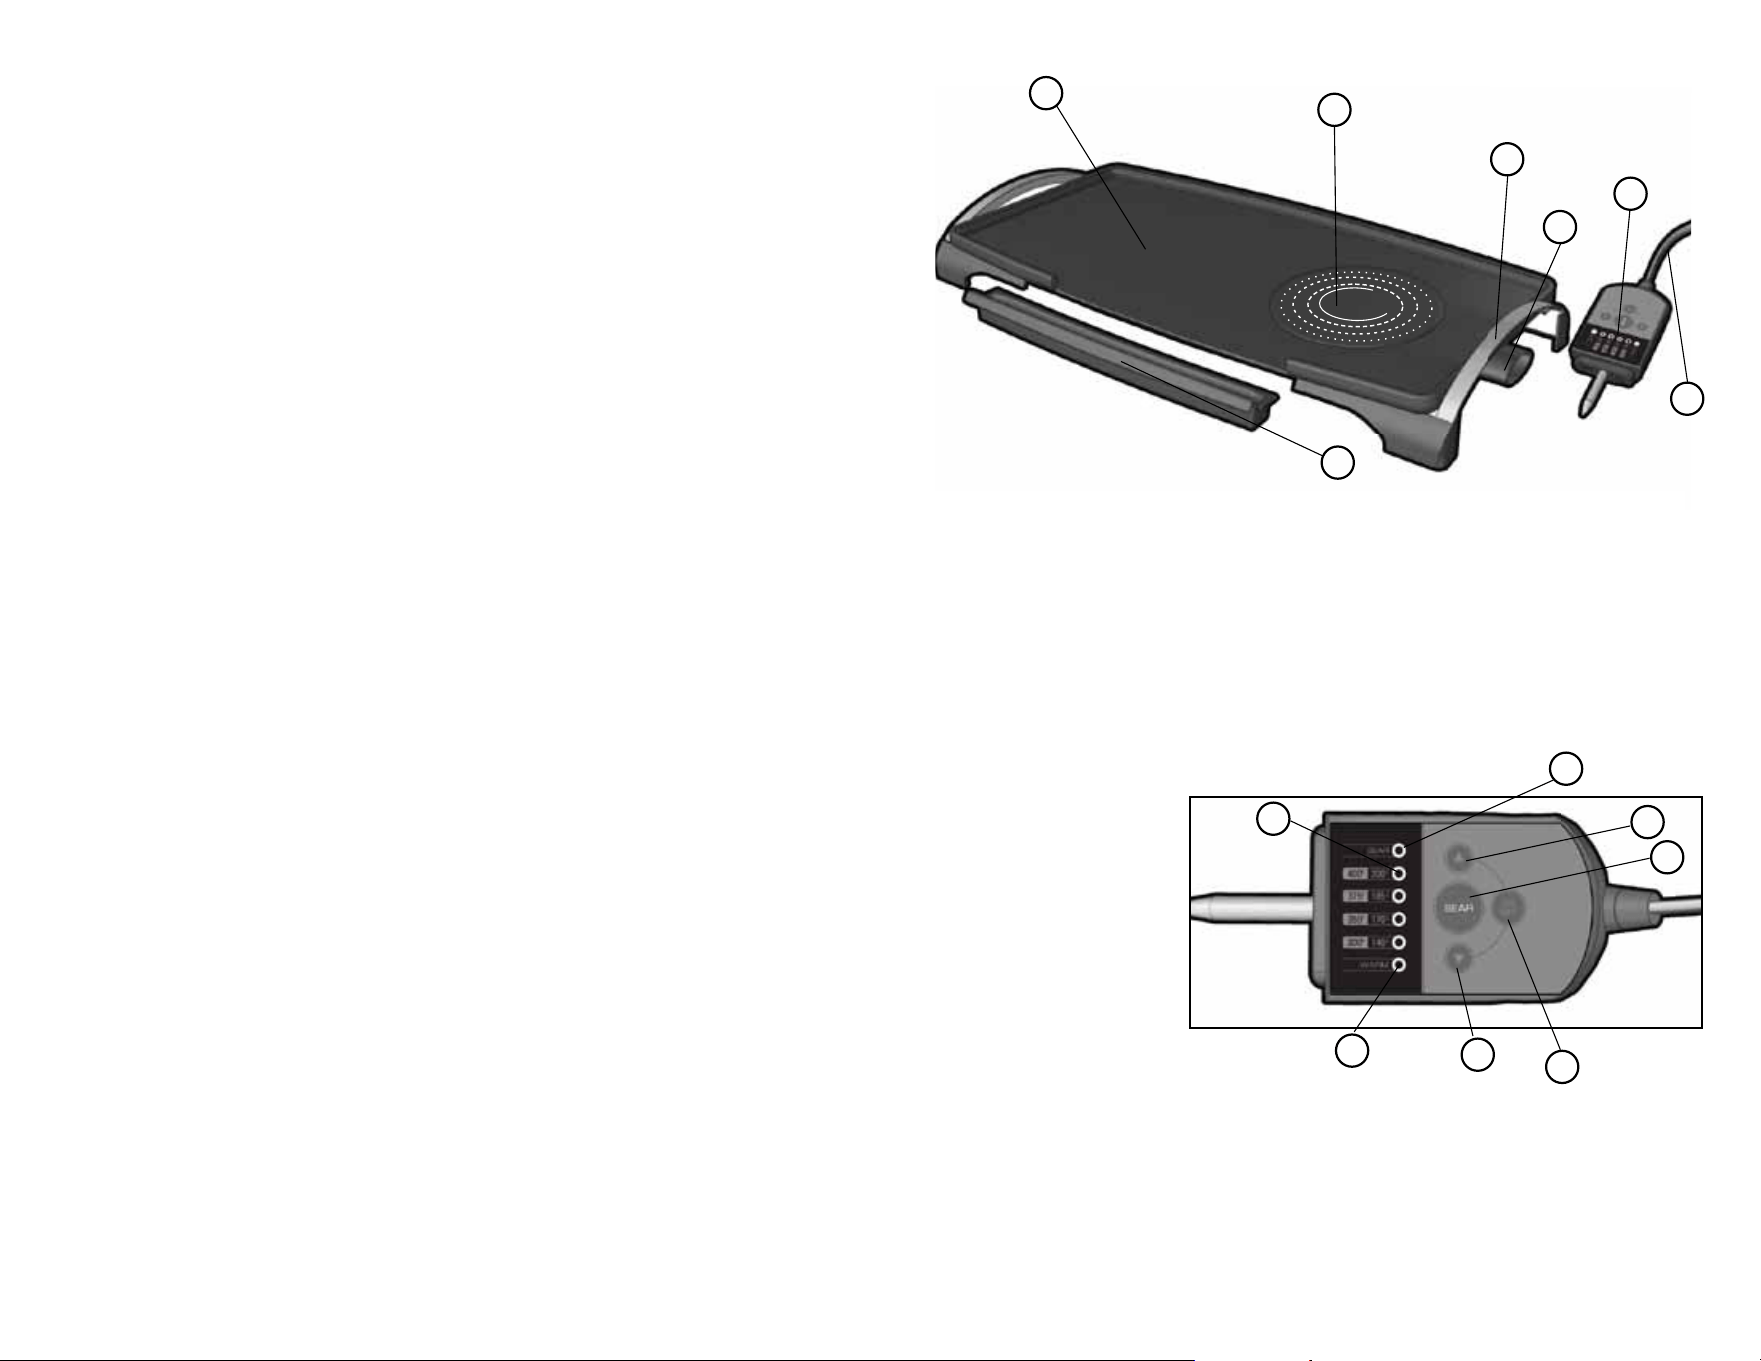
El producto puede variar ligeramente del que aparece ilustrado aquí.
A1
1
2
3
4
5
6
7
1. Placadelaplancha(superficieregulardecocción)
2. ÁreadecocciónHotZone™
3. Asas frías al tacto (a ambos lados)
4. Receptáculo para la sonda
† 5. Sondadecontroldetemperatura(PiezaNoGR0215G-01)
6. Cable
† 7. Bandejadegoteo(PiezaNoGR0215G-02)
Nota: †indicapiezasremovibles/reemplazablesporelconsumidor
1. LuzindicadoradeSELLAR(SEAR)
2. Botón de subir (▲) la temperatura
3. BotóndeSELLAR(SEAR)
4. BotóndeENCENDER/APAGAR(ON/OFF)
5. Botón de bajar (▼) la temperatura
6. LuzindicadoradeCALENTAR(WARM)
7. Luces indicadoras de la temperatura
A2
1
2
3
4
5
6
7

2120
Como usar
Esteproductoesparausodomésticosolamente.
PARA COMENZAR
• Retiretodoelmaterialdeempaqueycualquieretiquetaquetengaelproducto;
retire y guarde el material de lectura.
• Asegúresedetenertodaslaspiezasqueaparecenenlalistaenlapágina19.
• Porfavor,irawww.prodprotect.com/applicapararegistrarsugarantía;para
información adicional, ir a www.georgeforemancooking.com.
• LavelaplanchaylabandejadegoteocomoseinstruyeenCUIDADOYLIMPIEZA.
Esto retira cualquier polvo o residuo que quede de la fabricación
y el envío.
Importante: Asegúrese de que todas las piezas estén secas antes de usarlas.
• Seleccioneunlugarseco,nivelado,sobreunasupercieresistentealcalordonde
va a utilizar la unidad. Deje suciente espacio entre la parte de atrás de la unidad y
lasparedesparapermitirqueelcaloruyasincausardañosalosgabinetesyalas
paredes.
BANDEJA DE GOTEO
Deslice la bandeja de goteo en las guías debajo de la
sección frontal de la plancha (B).
CABLE ELÉCTRICO
Desenrolle el cable e inserte la sonda de control de
temperatura en su receptáculo, ubicado en el lado derecho
de la plancha (C).
USO DE SU PLANChA
1. Enchufe el cable a un tomacorriente estándar. Oprima
elbotóndeENCENDER/APAGAR(ON/OFF)enelcentro
de la sonda de control de temperatura. La luz al lado
deCALENTAR(WARM)seprenderáenverde,deforma
intermitente.
2. Paracomenzaraprecalentar,presioneelbotón
deSUBIR(▲) para ajustar la temperatura según
desee, hasta que la luz naranja a la derecha del
nivel de temperatura que desee se prenda de forma
intermitente (D).
3. Nota:Paracambiarlatemperaturaencualquiermomento,presioneelbotónde
SUBIR(▲) o BAJAR (▼) repetidamente. Los niveles de temperatura que no son para
SELLARseencuentranentre300°Fy400°F(verTABLADECOCINAparalosniveles
sugeridos).
B
C
4. Permitaquelaplanchasecalientede5a8minutos.Laluzalladodelatemperatura
seleccionada deja de prenderse intermitentemente cuando alcanza la temperatura
ajustada.
Nota: Cuando se selecciona una nueva temperatura más alta, la luz en la sonda de
temperatura al lado del nivel seleccionado se prende de forma intermitente hasta
alcanzarlatemperatura.Siseseleccionaunatemperaturamásbaja,laluzalladodel
nivel permanece prendida.
5. Cuidadosamente coloque los alimentos que va a cocinar sobre la plancha.
Importante: No sobrellene la plancha.
6. Cuando termine de cocinar, retire los alimentos cocinados de la plancha usando
una espátula plástica, de madera o de nailon resistente al calor.
Importante: Nunca use pinchos, pinzas, tenedores o cuchillos de metal; rayan la
capa de cerámica antiadherente sobre la supercie de cocción.
7. Cuandoterminedecocinar,presioneelbotóndeENCENDER/APAGAR(ON/OFF)y
desenchufeelelectrodoméstico.
8. Permitaquelabandejadegoteoseenfríeantesderetirarladedebajodela
plancha; use ambas manos y retire lentamente. Asegúrese de que el líquido en la
bandeja se haya enfriado antes de vaciarlo. Lave y seque la bandeja de goteo luego
de cada uso.
Importante: No deje el electrodoméstico desatendido durante su uso.
Importante: El calor continúa ENCENDIDO hasta que la plancha se apague.
ALIMENTO TEMPERATURA TIEMPO DIRECCIONES
Tocino 350 °F 8 a 14
minutos
Délevueltasamenudo
para dorarlo de forma
uniforme.
Tocino
canadiense
350 °F 3 a 4
minutos
Cocinar hasta que se dore
poramboslados;déle
vuelta una vez.
Huevos 350 °F 3 a 4
minutos
Ligeramente úntele
mantequilla a la plancha
antes de cocinar.
Tostada francesa 350 °F 6 a 10
minutos
Ligeramente úntele
mantequilla a la plancha
antesdecocinar.Déle
vuelta una vez.
TABLA DE COCINA
Nota: Esta tabla proporciona los tiempos que se utilizan para cocinar sobre la
superciedecocciónregulardelaplancha.ConsultelasinstruccionesdeCÓMOUSAR
LAFUNCIÓNPARASELLARHOTZONEparadetallesacercadecomococinarenelárea
decocciónHotZone™.
D

2322
ALIMENTO TEMPERATURA TIEMPO DIRECCIONES
Rebanadas de
jamón
350°F 4 a 6
minutos
Cocinar hasta que se
doren por ambos lados y
se calienten por dentro;
délevueltaunavez.
Perroscalientes 350 °F 6 a 8
minutos
Darle vueltas a menudo
para que se doren por
todos lados y se cocinen
por dentro.
Panqueques 400 °F 3 a 5
minutos
Ligeramente úntele
aceite a la plancha. Use
alrededor de 3 a 4 cdas.
de mezcla por cada
panqué.Délevueltauna
vez–luegoqueaparecen
burbujas en la superficie
y el lado que queda hacia
la plancha está dorado.
Sándwiches 350 °F 6 a 8
minutos
Ligeramente úntele
mantequilla a la plancha
antes de cocinar o úntele
mantequilla por fuera
a ambas rebanadas de
pan; cocinar hasta que se
doren por ambos lados y
se calienten por dentro.
Salchichasy
hamburguesas
frescas
350 °F 8 a 12
minutos
Délevueltasamenudo
para que se doren de
forma uniforme y se
cocinen por dentro.
Salchichasy
hamburguesas
congeladas
350 °F 8 a 14
minutos
Délevueltaamenudo
para que se doren de
forma uniforme y se
cocinen por dentro.
Vegetales 350 °F 6 a 8
minutos
Añadaunapequeña
cantidad de aceite, si lo
desea.
COMO USAR LA FUNCION PARA SELLAR hOT ZONE™
EstafunciónlepermiteSELLARcarnes,pescado,vegetalesyfrutashastapor2minutosa
una temperatura alta; luego automáticamente baja la temperatura de la plancha al nivel
original para continuar cocinando.
Nota:LafuncióndeSELLARsepuedeutilizarencualquiermomentomientrascocina.
Uso de la función de SELLAR (SEAR) al principio de la cocción:
1. Paracomenzaraprecalentar,Ajustelatemperaturaquedeseepresionandoelbotón
deSUBIR(
▲
) en la sonda hasta que la luz al lado del nivel de temperatura deseado se
prenda de forma intermitente.
2. PresioneelbotóndeSELLAR(SEAR)paraelevar
latemperaturadeláreadecocciónHotZone™.Laluz
indicadoradeSELLAR(SEAR)seprenderádeforma
intermitenteylaluznaranjadebajodelbotónSELLAR
(SEAR)estaráiluminada(E).
3. CuandoeláreadecocciónHotZone™secalientepor
completo,laluzindicadoradeSELLAR(SEAR)dejará
detitilar.EláreadecocciónHotZone™mantendráesa
temperatura por aproximadamente 2 minutos.
Nota:Noesnecesarioesperaraquelaplanchasecalientealatemperaturapreajustada
antesdeseleccionarlafuncióndeSELLAR(SEAR).
4. CuidadosamentecoloquelosalimentosquevaaSELLAReneláreaHotZone™.Selle
los alimentos alrededor de 1 minuto por cada lado.
5. Luego de alrededor de 2 minutos, la temperatura en la sonda de control de
temperaturacambiaráalatemperaturainicialmenteseleccionada.(Porejemplo,si
ustedselecciona350°FyluegoseleccionaSELLAR(SEAR),laplancharegresaráa
350°FluegoquelafuncióndeSELLARtermine.)
Nota:ParaapagarlafuncióndeSELLAR(SEAR),presioneelbotóndeSUBIR(
▲
) o BAJAR
(
▼
). La plancha automáticamente vuelve a la temperatura preajustada.
6. Paracontinuarcocinando,muevalosalimentosalasupercieregulardecoccióndela
plancha.
7. SiustedtienemásalimentosqueSELLAR,presioneelbotónSELLAR(SEAR)otravezy
sigalospasos2–4.
Nota:CuandouselafuncióndeSELLAR(SEAR),observecuidadosamenteelrestodelos
alimentossobrelaplancha;délesvueltaamenudoparamantenerlacocciónuniforme.
CONSEJOS
• Noutiliceatomizadorparacocinarsobrelasupercieantiadherente;useuna
pequeñacantidaddeaceiteomantequilla,silodesea.
• Separelosalimentosdeformauniformesobrelaplancha.
• Nosobrellenelaplancha.
• Cuandovayaarepetirelciclodecocción,permitaquelaplanchavuelvaala
temperatura ajustada.
E

2524
Uso de la función de SELLAR (SEAR) a la mitad o al nal del ciclo de cocción:
1. Sigalospasosdel1al6enlasecciónCÓMOUSARenlapáginas20-21.
2. PresioneelbotóndeSELLAR(SEAR)enlasondadecontroldetemperaturapara
elevarlatemperaturaeneláreadecocciónHotZone™a520°F(verIlustraciónE).
LaluzindicadoradelafuncióndeSELLAR(SEAR)seprenderádeformaintermitente
ylaluznaranjadebajodelbotóndeSELLAR(SEAR)seiluminará.
3. CuandoeláreaHotZone™secalienteporcompleto,laluzindicadoradeSELLAR
(SEAR)dejarádetitilar.Laplanchaaguantarálatemperaturaporaproximadamente
2 minutos.
4. Sigalospasosdel4a7enUSODELAFUNCIÓNDESELLARALINICIODELA
COCCIÓN.
CONSEJOS PARA EL USO DEL AREA hOT ZONE™
• Asegúresedequeeláreadecocciónestéprecalentadaantesdeusarlaparaasegurar
que los alimentos se abrasen de forma uniforme.
• Lascarnes,lasaves,elpescadoylasfrutassepuedenSELLAReneláreaHotZone™y
luego moverse al área de cocción regular de la plancha.
• Alcocinarcarnesyaves,useuntermómetroparacarnesparaprobarlatemperatura
de los alimentos.
• Recuerdeajustarelniveldetemperaturaaaproximadamente350°Fenlasupercie
decocciónregularantesdeSELLARlascarnes,parapermitirquesecocinendeforma
adecuada una vez que se sellen.
• Losalimentos–comolacarneentajadasnas,loscamaronesylasvieiras–pueden
que solo requieran otros 3 o 5 minutos para que se terminen de cocinar luego de
sellarlos.
ALIMENTOS A COCINAR TEMPERATURA INTERNA
(TÉRMINO MEDIO)
TEMPERATURA
INTERNA (BIEN hEChO/
COMPLETAMENTE
COCINADO)
Pechugadepollo 170 °F 77 °C
Muslo de pollo 180 °F 82 °C
Carne/Cordero/Ternera 160 °F 71 °C 170 °F 77 °C
Puerco 160 °F 71 °C
Carnes y aves recalentadas 165 °F 74 °C
GUÍA PARA COCINAR CARNE Y AvES EN LA
PLANChA hOT ZONE™
Cuidado y limpieza
Esteaparatonocontienepiezasreparablesporelconsumidor.Paraservicio,porfavor
acuda a personal calicado.
LIMPIEZA
Advertencia: Para evitar descargas eléctricas, cuando la unidad no esté en uso y
antes de limpiarla, desenchúfela del tomacorriente. No sumerja la sonda de control
de temperatura, el enchufe, ni el cable, en agua o ningún otro líquido.
Precaución: Para evitar quemadas accidentales, permita que la plancha se enfríe
completamente antes de limpiarla.
1. Apague OFF la sonda de control de temperatura y desenchúfela del tomacorriente
antesdelimpiarla.Retirelasondadecontroldetemperatura,límpielaconunpaño
húmedoyséquelabien.
2. Coloque la bandeja de goteo debajo de la plancha. Con una espátula de nylon,
madera, o de plástico quite cualquier exceso de grasa o partículas de comida.
3. Vacíe la bandeja de goteo. La bandeja solo puede lavarse en la parte de arriba de la
lavaplatos.Nolavelaplanchaenlalavaplatos.
4. Limpielasuperciedelaplanchaconaguatibiajabonada;enjuáguelayséquela
bien.
Precaución: La sonda de control de temperatura y su receptáculo siempre deben
estar completamente secos antes de usarlos.
5. Residuos difíciles:Siesnecesario,useunaalmohadillanometálicaparalimpiarla
superciedecoccióndelaplancha.Nouseestropajosdealuminionialmohadillas
conlimpiadoresabrasivossobrepartealgunadeesteelectrodoméstico.Paralos
alimentosquesepeguen,pruebeusarSoftScrub®oBarKeepersFriend®para
limpiar la supercie de cocción de la plancha.
ALMACENAMIENTO
Desenchufelaunidad,antesdeguardarla,permitaqueseenfríeylímpiela.Guárdela
enunlugarlimpioyseco.Nuncaguardelaplanchamientrasestécalienteoenchufada.
Nuncaaprieteelcablealenredarloalrededordelelectrodoméstico,yaquepuede
causar que el cable se deshilache y se rompa.

2726
RESOLUCIÓN DE PROBLEMAS O FALLAS
PROBLEMA CAUSA POSIBLE SOLUCIÓN
La terminación de la
plancha tiene marcas
de cortes.
Puedequeseutilizaran
utensilios de metal.
Siempreutiliceutensilios
de plástico, nylon o madera
resistentes al calor para
evitar rayar la superficie de
laplancha.Nuncautilice
pinchos, pinzas, tenedores o
cuchillos de metal.
La plancha no está
cocinando bien; los
alimentos no están
suficientemente
cocinados.
La plancha no
se precalentó
completamente antes de
usar.
Siempreprecalientela
plancha hasta que la luz
al lado de la temperatura
seleccionada se quede
prendida constante.
Hayacumulaciónde
alimentos sobre la
plancha.
La plancha no se limpió
de forma adecuada luego
de su uso.
Use una almohadilla de
nailon y agua caliente
jabonada para limpiar la
plancha.Nouseestropajos
de aluminio o limpiadores
abrasivos para limpiar la
superficie antiadherente.
La plancha no
enciende.
La plancha no está
conectada.
Revise si el
electrodoméstico
está enchufado a un
tomacorriente que funcione
y que la sonda de control de
temperaturaestéencendida
y ajustada al nivel que
desee.
La plancha tiene
manchas blancas.
El agua de limpiar se secó
sobre la superficie de la
plancha.
Sequelaplancha
inmediatamentedespués
de lavarla.
RECETAS
Encuentre aun más recetas para preparar comidas saludables gourmet en
www.georgeforemancooking.com
CENA DE POLLO RÁPIDA
1 cda. de romero fresco, picado
1 cda. de hojas de tomillo frescas, picadas
1 diente de ajo grande, picadito
1½ cdta. sal
¼ cdta. pimienta negra gruesa
2 cdta. de aceite de oliva
1 lb. letes de pollo
¾ lb. papas rojas, en rebanadas
1cebollablancapequeña,alamitadyentajadasnas
1cebollarojapequeña,alamitadyentajadasnas
Perejilpicado
Enunrecipientepequeño,combineelromero,eltomillo,elajo,la½cdta.desal,1/8
cdta. de pimienta y 1 cdta. de aceite de oliva. Coloque el pollo en un recipiente mediano.
Añadalamitaddelamezcladeromerilloymezcle.Dejeelrestoaparte.Permitaquese
adobe durante 10 minutos.
Precalientelaplanchaa350°F.Sofríalaspapasylacebollaenelrestodelaceitedeoliva
alrededorde5minutos.Sazónelasconlamezcladeromeroreservada,lacdta.desaly1/8
cdta. de pimienta. Vírelas ocasionalmente para que se cocinen de forma uniforme.
PresioneelbotóndeSELLAR(SEAR).CuandoeláreadecocciónHotZone™seprecalienta,
laluzindicadoraSELLAR(SEAR)dejadetitilar.Añadaelpolloyabráselo1minutopor
cada lado. Mientras tanto, continúe cocinando la mezcla de papa hasta que se suavice,
revolviendo a menudo.
Continúe cocinando el pollo hasta que se haga por completo (un termómetro para carne
insertado en el lete debe registrar 180 °F).
Rinde de 3 a 4 porciones.

2928
CAMARONES A LA PLANChA
2 cda. de cilantro fresco, picado
2 dientes de ajo grandes, picaditos
½ cdta. de sal
½ cdta. de pimienta roja aplastada
2 cdas. jugo de limón fresco
1 cda. de aceite de oliva
¾ lb. camarones jumbo, sin piel ni vena
¾ taza de cebollinos en tajadas
¾ taza de pimiento rojo picado
1½tazasdehojasdeespinacabebéempaquetada
1 taza de maíz de mazorca entera
En un recipiente mediano, combine 1 cda. de cilantro picado, 1 diente de ajo, ¼ cdta. de
sal,lapimientaroja,eljugodelimóny2cdas.deaceitedeoliva.Añadaloscamaronesy
revuelvaparaquesecubranbien.Permitaqueseadobenporlomenos10minutos.
Precalientelaplanchaa350°F.Sofríaloscebollinosylapimientarojaenelrestodelas
2cdta.deaceitedeolivaalrededorde2minutos.Sazoneconelrestodelajopicadoyla
¼ cdta. de sal.
PresioneelbotóndeSELLAR(SEAR);cuandoeláreadecocciónHotZone™seprecaliente
laluzindicadoradeSELLAR(SEAR)dejarádetitilar.AñadaloscamaronesydéjelosSELLAR
1minutoporcadalado.Mientrastanto,continuécocinandolamezcladepimiento,
revolviendo a menudo.
Continúecocinandoloscamaroneshastaquehagancompletamente;añadalaespinacay
el maíz a la mezcla de pimiento y cocínelos hasta que la espinaca se marchite.
Rinde 3 porciones.
SALMÓN CON SABOR A NARANJA
1cebollamoradapequeña,alamitadyentajadas
1 cdta. aceite de oliva
¾ cdta. de sal
1/8cdta.pimienta
½ lb. lete de salmón
1 cda. eneldo fresco picado
1 naranja sin semillas grande, en tajadas
1 cda. perejil picado
Precalientelaplanchaa350°F.Sofríalacebollaenaceitedeolivapor2minutos,
revolviendoamenudo.Añada¼cdta.desalypimienta.
PresioneelbotóndeSELLAR(SEAR);cuandoeláreadecocciónHotZone™seprecalienta,
laluzindicadoradeSELLAR(SEAR)dejadetitilar.Sazoneelsalmónconelrestodela1
cdta.desalydéjeloSELLAR1minutoporcadalado.Mientrastanto,continuécocinando
la cebolla revolviendo a menudo.
Mueva el salmón a la supercie de cocción regular de la plancha. Rocíelo con el eneldo.
Continuécocinándolode3a4minutos.
PresioneelbotóndeSELLAR(SEAR)otravez;cuandoeláreadecocciónHotZone™se
precalienta,laluzindicadoradeSELLAR(SEAR)dejadetitilar.Añadalastajadasdenaranja
ydéjelasSELLAR1minutoporcadalado.
Cocinar hasta que el salmón se desmenuce fácilmente al probarlo con un tenedor.
Serviradornadoconlacebollaylanaranja.Rocíeconperejil.
Rinde 2 porciones.

3130
BISTEC A LA ROMA
1cebollapequeña,alamitadyentajadas
1½ tazas de calabacín en tajadas
1calabazaamarillapequeña,alamitadyentajadas
1 cda. aceite de oliva
1 tomate Roma, picado en trozos
2 cda. albahaca fresca picada en juliana
½ cdta. de sal
½ cdta. pimienta negra
2 tajadas nas de lete sin hueso (alrededor de 6 oz.)
½ cdta. sazón Adobo
Precalientelaplanchaa350°F.Sofríalacebolla,elcalabacínylacalabazaamarillaen
aceitedeolivepor5minutos,revolviendoamenudo.Añadalaalbahaca,lasalylacdta.
de pimienta.
PresioneelbotóndeSELLAR(SEAR)otravez;cuandoeláreadecocciónHotZone™se
precalienta,laluzindicadoradeSELLAR(SEAR)dejadetitilar.Mientrastanto,sazonela
carne por ambos lados con sazón Adobo y el resto del ¼ cdta. de pimienta.
DejelacarneSELLAR1minutoporcadalado.Mientrastanto,continúecocinandola
mezcla de vegetales hasta que se suavicen, revolviendo a menudo.
Rinde 2 porciones.
vIEIRAS MARINAS ADOBADAS A LA ASIATICA
¾ lb. vieiras marinas
3 cdas. adobo teriyaki en botella
2 cdta. jengibre fresco rayado
1 diente de ajo mediano, picado
1 cdta. aceite de ajonjolí
1paquete(3.5oz.)dechampiñonesdeostrafrescos*
1½ tazas de guisantes frescos (alrededor de 3 oz.)
1 taza zanahorias juliana
1/3tazadepimientorojopicado
2 cdta. Aceite vegetal
En un recipiente mediano, mezcle 2 cdas. de adobo teriyaki, 1 cdta. de jengibre rayado y
½cdta.deaceitedeajonjolí.Añadalasvieirasydélevueltasparacubrirlos.Permitaque
se adoben por lo menos 10 minutos.
Precalientelaplanchaa350°F.Sofríaloschampiñones,losguisantes,laszanahoriasyel
pimientorojoenaceitevegetalalrededorde2minutos.Sazónelosconelrestodela1
cdta. de jengibre.
PresioneelbotóndeSELLAR(SEAR;cuandoeláreadecocciónHotZone™seprecalienta,
laluzindicadoradeSELLAR(SEAR)dejadetitilar.AñadalasvieirasydéjelasSELLAR1
minutoporcadalado.Mientrastantocontinúecocinandolamezcladechampiñones,
revolviendo a menudo.
Continúe cocinando las vieiras y los vegetales hasta que se hagan completamente,
añadiendoelrestodela1cda.desalsateriyakialamezcladevegetales.
Rinde 3 porciones.
*LoschampiñonesdeostrapuedensersustituidosporchampiñonesdeShitake.

3332
NEED hELP?
For service, repair or any questions regarding your appliance, call the appropriate
800numberoncoverofthisbook.PleaseDONOTreturntheproducttotheplaceof
purchase.Also,pleaseDONOTmailproductbacktomanufacturer,norbringittoa
service center.
Youmayalsowanttoconsultthewebsitelistedonthecoverofthismanual.
Three-Year Limited Warranty
(Applies only in the United States and Canada)
What does it cover?
• Anydefectinmaterialorworkmanshipprovided;however,Applica’sliabilitywillnot
exceed the purchase price of product.
For how long?
• Threeyearsfromthedateoforiginalpurchasewithproofofsuchpurchase.
What will we do to help you?
• Provideyouwithareasonablysimilarreplacementproductthatiseithernew
or factory refurbished.
how do you get service?
• Saveyourreceiptasproofofdateofsale.
• Checkouron-lineservicesiteatwww.prodprotect.com/applica,orcallour
toll-free number, 1-800-231-9786, for general warranty service.
• Ifyouneedpartsoraccessories,pleasecall1-800-738-0245.
What does your warranty not cover?
• Damagefromcommercialuse
• Damagefrommisuse,abuseorneglect
• Productsthathavebeenmodifiedinanyway
• Productsusedorservicedoutsidethecountryofpurchase
• Glasspartsandotheraccessoryitemsthatarepackedwiththeunit
• Shippingandhandlingcostsassociatedwiththereplacementoftheunit
• Consequentialorincidentaldamages(Pleasenote,however,thatsomestatesdo
not allow the exclusion or limitation of consequential or incidental damages, so this
limitation may not apply to you.)
how does state law relate to this warranty?
• Thiswarrantygivesyouspecificlegalrights,andyoumayalsohaveotherrightsthat
vary from state to state or province to province.
MadeinPeople’sRepublicofChina
PrintedinPeople’sRepublicofChina

3534
¿NECESITA AYUDA?
Paraservicio,reparacionesopreguntasrelacionadasalproducto,porfavorllamegratis
alnúmero“800”queapareceenlacubiertadeestemanual.Nodevuelvaelproductoal
establecimientodecompra.Noenvíeelproductoporcorreoalfabricantenilollevea
uncentrodeservicio.Tambiénpuedeconsultarelsitiowebqueapareceenlacubierta
de este manual.
Tres años de garantía limitada
(Aplica solamente en Estados Unidos o Canadá)
¿Qué cubre la garantía?
• Lagarantíacubrecualquierdefectodematerialesodemanodeobra.Applicano
se responsabiliza por ningún costo que exceda el valor de compra del producto.
¿Por cuánto tiempo es válida la garantía?
• Portresañosapartirdelafechaoriginaldecompramientrasquetengauna
prueba de la compra.
¿Qué clase de asistencia recibe el consumidor?
• Elconsumidorrecibeunproductodereemplazonuevoorestauradodefábrica,
parecido al original.
¿Cómo se obtiene el servicio necesario?
• Conserveelrecibooriginalcomocomprobantedelafechadecompra.
• Sepuedevisitarelsitiowebdeasistenciaalconsumidor
www.prodprotect.com/applica,osepuedellamargratisalnúmero
1-800-231-9786, para obtener información relacionada al servicio de garantía.
• Sinecesitapiezasoaccesorios,porfavorllamegratisal1-800-738-0245.
¿Qué aspectos no cubre esta garantía?
• Losdañosalproductoocasionadosporelusocomercial
• Losdañosocasionadosporelmaluso,abusoonegligencia
• Losproductosquehansidoalteradosdecualquiermanera
• Losproductosutilizadosoreparadosfueradelpaísoriginaldecompra
• Laspiezasdevidrioydemásaccesoriosempacadosconelaparato
• Losgastosdetramitaciónyembarquerelacionadosconelreemplazodelproducto
• Losdañosyperjuiciosindirectosoincidentales(sinembargo,porfavorobserve
quealgunosestadosnopermitenlaexclusiónnilalimitacióndelosdañosy
perjuicios indirectos ni incidentales, de manera que esta restricción podría no
aplicar a usted).
¿Qué relación tiene la ley estatal con esta garantía?
• Estagarantíaleotorgaderechoslegalesespecíficosyelconsumidorpodríatener
otros derechos que varían de una región a otra.
FabricadoenlaRepúblicaPopulardeChina
ImpresoenlaRepúblicaPopulardeChina