
HYS-AFO-01B
easy cooking & healthy eating

Important Safeguards................................................3-5
Know Your Air Fryer Oven....................................6-7
Before First Use................................................................8
Using Your Air Fryer Oven...................................9-11
Air Fry Tips...........................................................................12
Troubleshooting..................................................................13
Cleaning&Maintenance................................................14
How To Set...............................................................15-16
Accessories Instructions..................................17-22
Accessories Combination..............................23-24
About HYSapientia Air Fryer Oven....................25
Frequently Asked Questions...............................26
supervised to ensure that they do
not play with the appliance.
11. Do not let the cord hang over the
edge of the table or counter or
touch hot surfaces.
12.To protect against electric shock,
do not immerse cord, plugs, or
appliance in water or other liquid.
Do not plug in the appliance or
operate the control panel with wet
hands.
13. Never connect this appliance to
an external timer switch or
separate remote-control system
in order to avoid a hazardous
situation. To disconnect, turn off
the appliance, then remove plug
from wall outlet.
14. Do not place the appliance on
or near combustible materials
such as a tablecloth or curtain.
The accessible surfaces may
become hot during use. Do not
place on or near a hot gas or
electric burner, or in a heated oven.
15. Do not place the appliance against
a wall or against other appliances.
Leave at least 5cm of free space on
the back and sides and 5cm of free
space above the appliance. Do not
place anything on top of the
appliance.
16. Do not use the appliance for any
other purpose than described in
this manual. The use of accessory
attachments not recommended
by the appliance manufacturer
may cause injuries.
17. Do not let the appliance operate
unattended. Extreme caution
must be used when moving an
appliance containing hot oil or
other hot liquids.
1. Read all instructions.
2. The appliances are not intended
to be operated by means ofan
external timer or separate
remote-control system.
3. Hot surface.
4. If the supply cord is damaged,
it must be replaced by a special
cord or assembly available from
the manufacturer or its service
agent.
5. cleaning and user maintenance
shall not be made by children
without supervision.
6. This appliance is not intended
for use by persons (including
children younger than 8) with
reduced physical, sensory or
mental capabilities, or lack of
experience and knowledge,
unless they have supervision.
7. Check if the voltage indicated
on the appliance corresponds
to the local main voltage before
you connect the appliance.
8. Do not use the appliance if
the plug, the main cord or the
appliance itself is damaged.
Always make sure that the plug
is inserted properly into a wall
outlet.
9. Do not operate any appliance
with a damaged cord or plug,
after the appliance malfunctions,
or has been damaged in any
manner.
Return appliance to the nearest
authorized service facility for
examination, repair, or
adjustment.
10. Close supervision is necessary
when any appliance is used near
children. Children should be
When using electric appliances, basic safety precautions should
always be followed:
18. Do not use outdoors.
19. Do not touch hot surfaces and
the air outlet on the back; use
the handle. During air frying,
hot steam is released through
the air outlet. Keep your hands
and face a safe distance from
steam and vents. Also be aware
of hot steam and air when
removing the accessories from
device.
20. After using the appliance, avoid
contact with the hot metal
inside. Unplug from outlet
when not in use and before
cleaning. Allow to cool before
cleaning the appliance.
21. Immediately unplug the
appliance if you see dark
smoke coming out of the
appliance. Wait for the smoke
emission to stop before you
remove the pan from the
appliance.
22. Do not use appliance for other
than intended use.
23. Use extreme caution when
removing tray or disposing of
hot grease.
24. Do not clean with metal
scouring pads. Pieces can break
off the pad and touch electrical
parts, creating a risk of electric
shock.
25. Oversize foods or metal utensils
must not be inserted in a
toaster-oven as they may create
a fire or risk of electric shock.
26. A fire may occur if the air fryer
oven is covered or touching
flammable material, including
curtains, draperies, walls, and
the like, when in operation. Do
not store any item on top of the
appliance when in operation.
27. Extreme caution should be
exercised when using
containers constructed of
anything other than metal or
glass.
28. Do not store any materials,
other than manufacturers
recommended accessories, in
this oven when not in use.
29. Do not place any of the
following materials in the oven:
paper, cardboard, plastic, and
the like.
30. Turn off the appliance by
pressing START/STOP.
31. For household use only.
32. It is recommended that you
wear oven mitts and use the
included tray handles to
remove cooked food.
33. After the oven is finished, the
fan will continue to work to
achieve the effect of heat
dissipation.When the oven door
is opened after cooking, please
do not put your face close to
the oven to avoid being burned
by the hot air.
34. Choose suitable accessories
according to different cooking
purposes.Please remove the
bake tray, oven rack or air fryer
basket when all accessories are
cool.
35. Do not heat plastic, wood
glass,glazed china, beverage cans
and nonfood items in the oven.
36. The air fryer does not have a microwave function, so if you want to
heat food, you can wrap it in aluminium foil and heat it at 100°C.
37. Do not use this product near showers, bathtubs, washbasins,
swimming pools, etc. Do not rinse this product with water.
38. In order to ensure your safety and the stability of the product's
performance, we strongly advise against attempting to
disassemble the product without authorization. Product
disassembly may result in severe damage and void the warranty.
We do not take responsibility for any injuries or malfunctions
caused by unauthorized disassembly.
If you need to clean or repair the internal components of the
product, please follow these steps:
Wear gloves: Before engaging in any cleaning or maintenance
operations, ensure that you wear appropriate gloves.
Contact customer support: Before proceeding with any
disassembly, cleaning, or maintenance operations, please get in
touch with our customer support team. Our professional team will
provide you with detailed operational guidelines and advice.
By following the above steps, you can ensure not only safety but
also maximize the product's lifespan during maintenance.
39. Do not operate simultaneously with other high-power appliances to
prevent voltage overload and potential power interruption.
CORD SAFETY
• A short power-supply cord is provided to reduce risk of
becoming entangled in or tripping over a longer cord.
• Extension cords may be used if care is exercised in their use.
• If an extension cord is used:
a. The marked electrical rating of the extension cord should be at
least equal to the electrical rating of the appliance; and
b. The longer cord should be arranged so that it will not drape
over the countertop or tabletop where it can be pulled on by
children or tripped over.
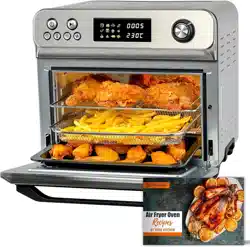
:
When used for the first time, white smoke and odor are
normal.
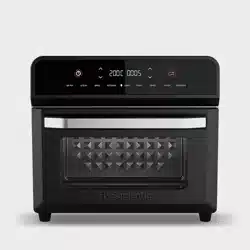
Power:
220-240V 50/60HZ 1800W
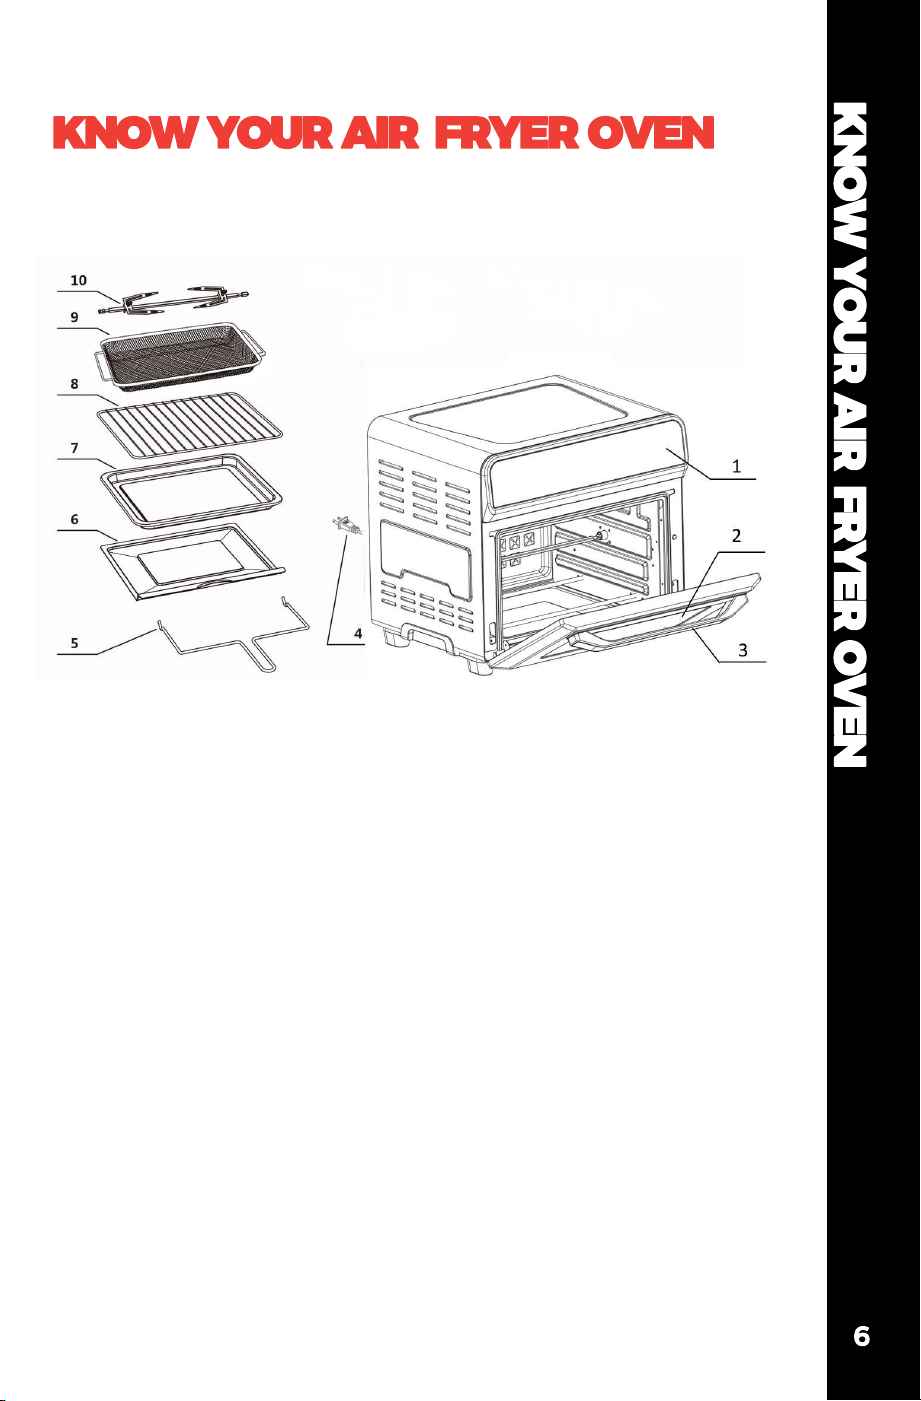
1. Control Panel
2. Glass Door
3. Door Handle
4. Power Cord
5. Fetch Rack
6. Crumb Tray
7. Bake Tray
8. Oven Rack
9. Air Fryer Basket
10. Rotisserie Rack
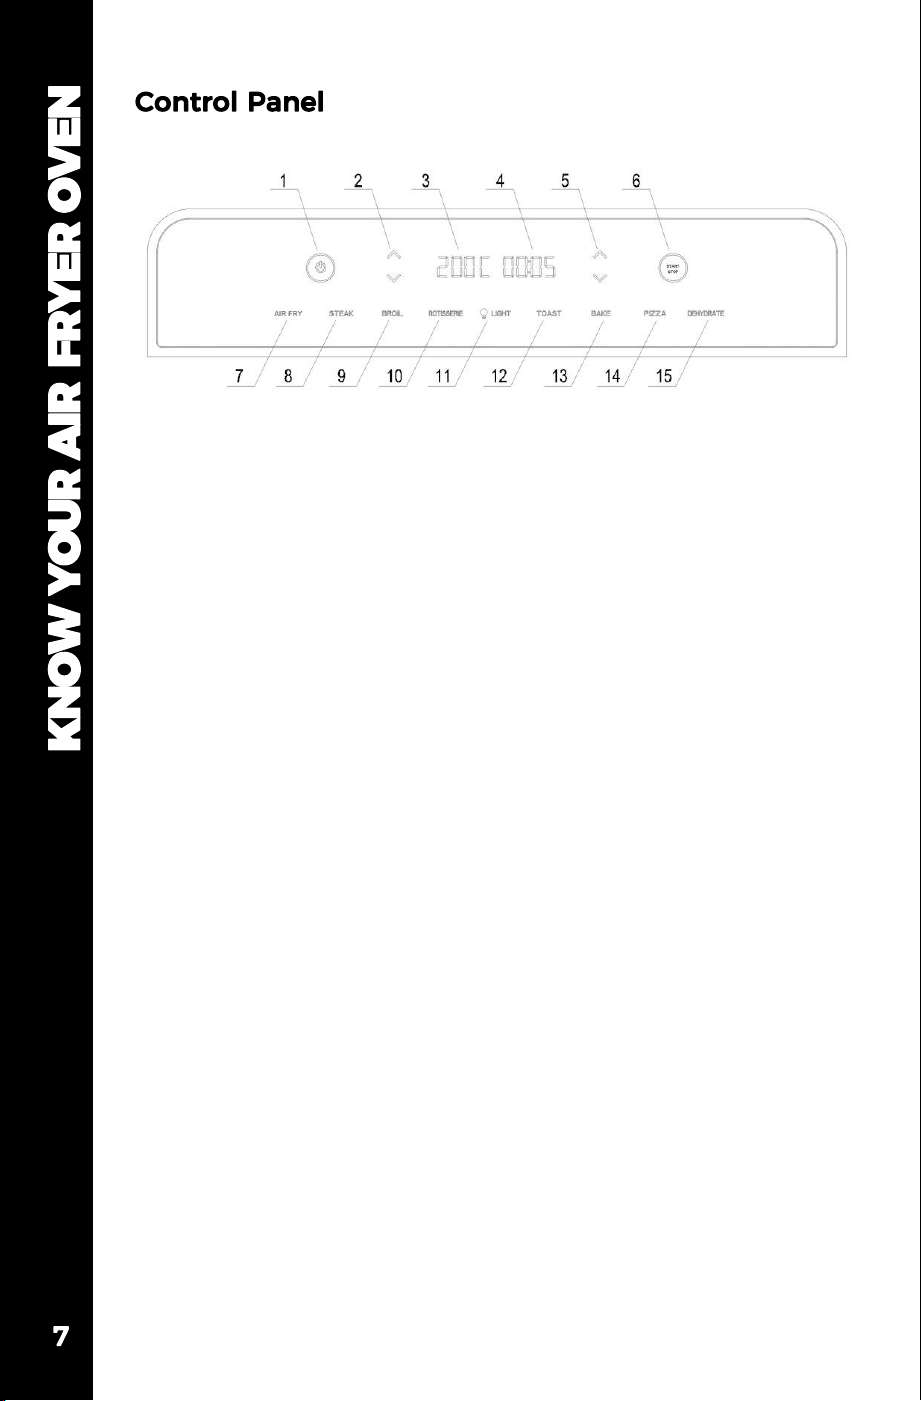
1. Power ON/OFF Button
2. Temperature Control Button
3. Temperature Display
4. Time Display
5. Time Control Button
6. Start/Pause
7. AIR FRY Menu
8. STEAK Menu
9. BROIL Menu
10. ROTISSERIE Menu
11. Light Button
12. TOAST Menu
13. BAKE Menu
14. PIZZA Menu
15. DEHYDRATE Menu
1. Remove all packaging materials before first use.
2. Wash the Air Fryer Basket, Oven Rack, Bake Tray, and Crumb
Tray with hot water, some dishwashing liquid, and a non-
abrasive sponge. Dry before placing trays into Air Fryer Oven.
3. Place the Crumb Tray in the bottom of the Air Fryer Oven.
• Do not place the Air Fryer Oven against a wall or against
other appliances. It is important to leave at least 5-10cm of
free space on the back and sides, and 5-10cm of free space
above the Air Fryer Oven to allow for proper ventilation.
• Do not put anything on top of the Air Fryer Oven.
USING YOUR AIR FRYER OVEN
9
2.Starting up
Press to start the machine, the LED screen will be on, and the default Air
Fry mode will be displayed. The display is as follows:
USING YOUR AIR FRYER OVEN
The Air Fryer Oven preset function is only for reference; the actual
cooking time & temperature can be setted according to the specific food
Product Features
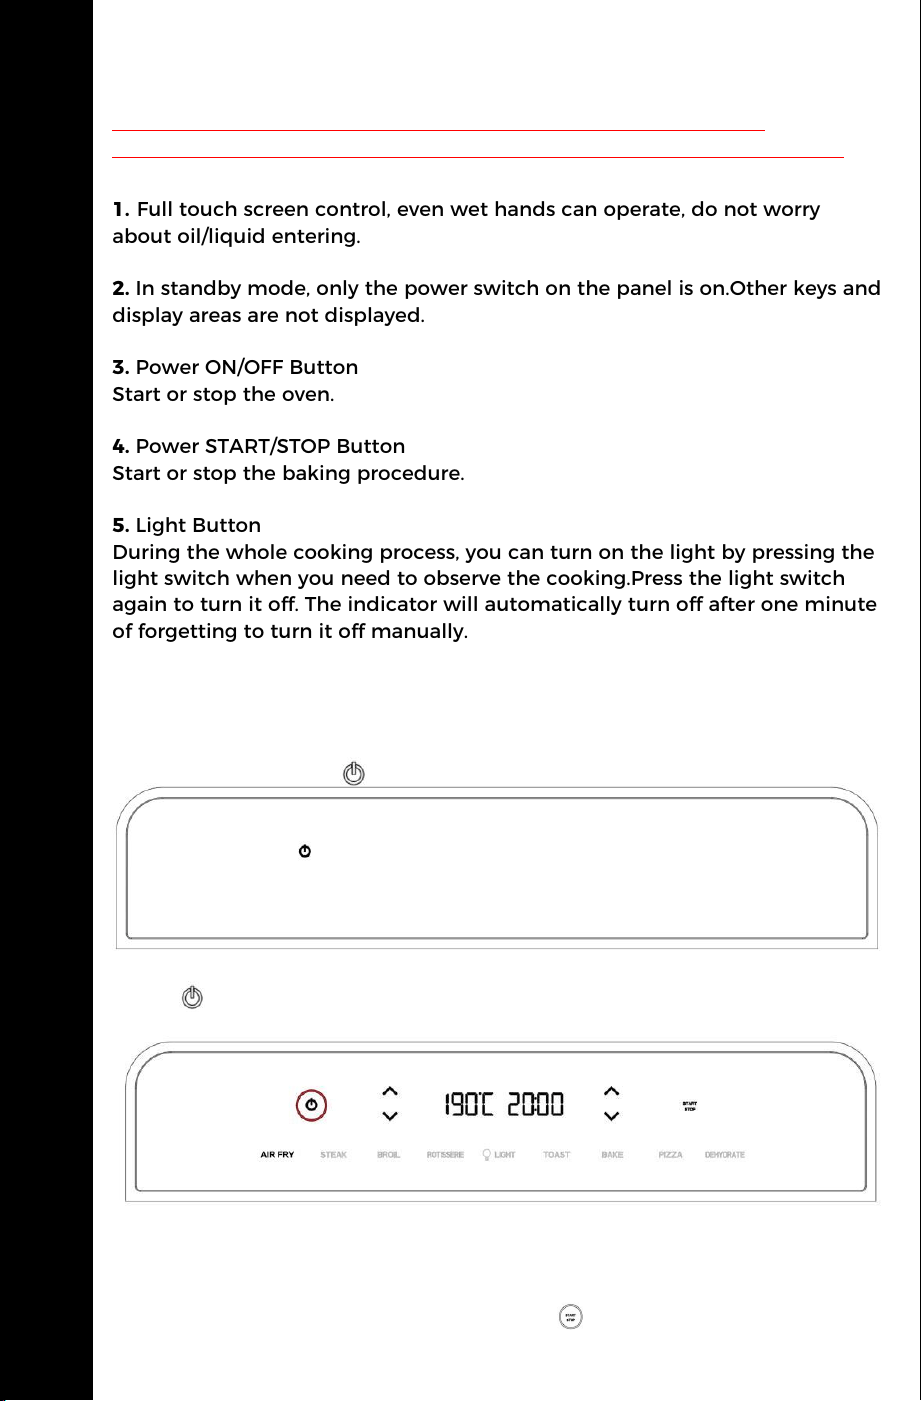
1. Full touch screen control, even wet hands can operate, do not worry
about oil/liquid entering.
2. In standby mode, only the power switch on the panel is on.Other keys and
display areas are not displayed.
3. Power ON/OFF Button
Start or stop the oven.
4. Power START/STOP Button
Start or stop the baking procedure.
5. Light Button
During the whole cooking process, you can turn on the light by pressing the
light switch when you need to observe the cooking.Press the light switch
again to turn it off. The indicator will automatically turn off after one minute
of forgetting to turn it off manually.
Operating Instructions
1.Power on (power on initialization), standby mode Plug the control board
into the power supply and enter the standby mode: the buzzer rings once.
Power switch display
The symbol of Air Fry menu / power switch / temperature regulation / time
regulation / program switch is highlighted, and other symbols are half lit.
The above process is defined as the startup screen;Select other menus, the
selected menu will be highlighted, and other menus will be semi
highlighted;After selecting the mode, press to start, and press again to
enter the pause process.
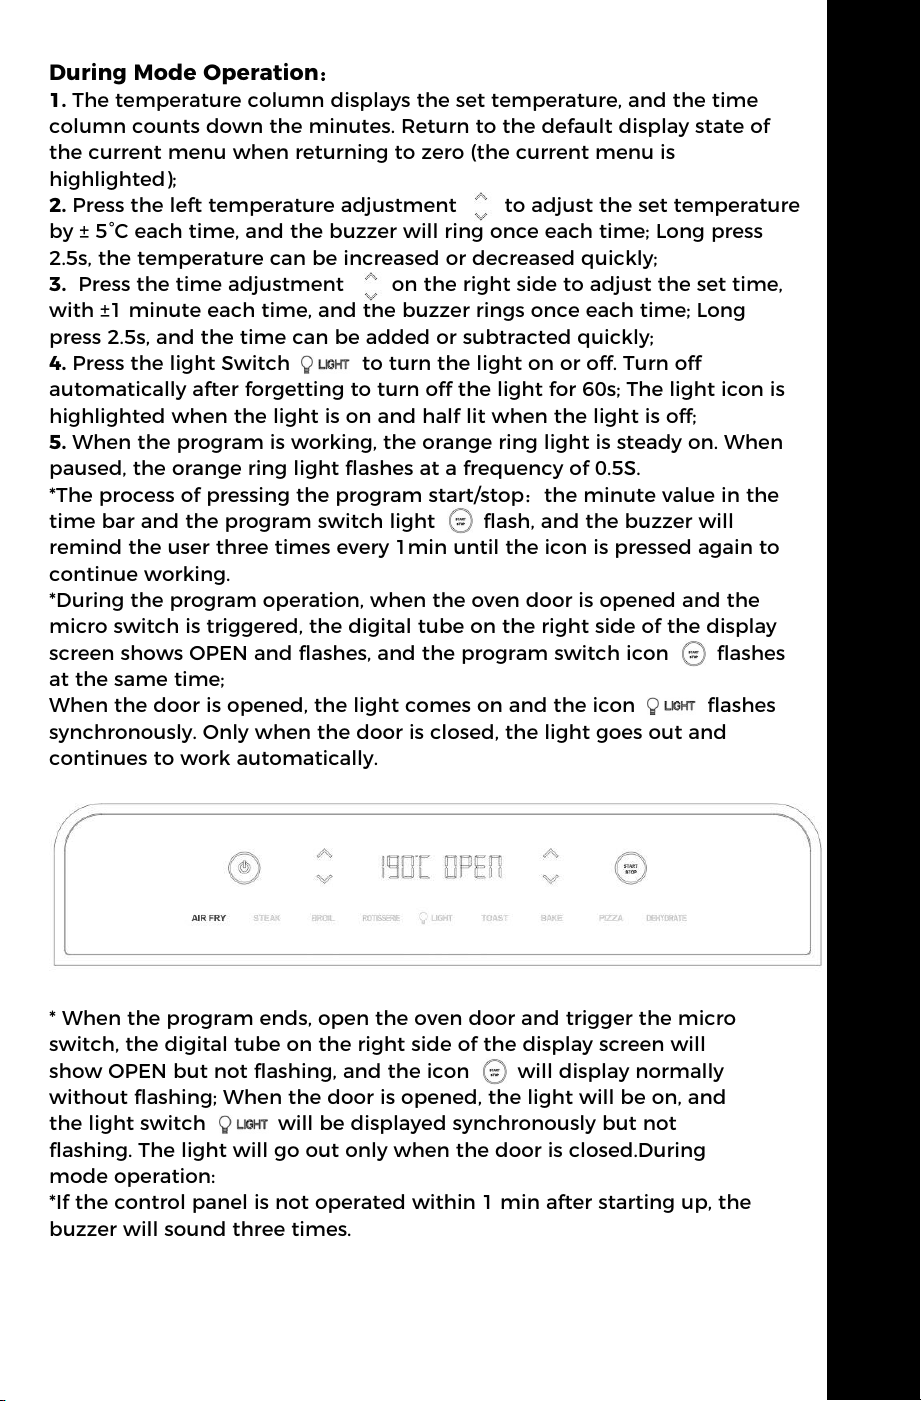
During Mode Operation:
1. The temperature column displays the set temperature, and the time
column counts down the minutes. Return to the default display state of
the current menu when returning to zero (the current menu is
highlighted);
2. Press the left temperature adjustment to adjust the set temperature
by ± 5°C each time, and the buzzer will ring once each time; Long press
2.5s, the temperature can be increased or decreased quickly;
3. Press the time adjustment on the right side to adjust the set time,
with ±1 minute each time, and the buzzer rings once each time; Long
press 2.5s, and the time can be added or subtracted quickly;
4. Press the light Switch to turn the light on or off. Turn off
automatically after forgetting to turn off the light for 60s; The light icon is
highlighted when the light is on and half lit when the light is off;
5. When the program is working, the orange ring light is steady on. When
paused, the orange ring light flashes at a frequency of 0.5S.
*The process of pressing the program start/stop:the minute value in the
time bar and the program switch light flash, and the buzzer will
remind the user three times every 1min until the icon is pressed again to
continue working.
*During the program operation, when the oven door is opened and the
micro switch is triggered, the digital tube on the right side of the display
screen shows OPEN and flashes, and the program switch icon flashes
at the same time;
When the door is opened, the light comes on and the icon flashes
synchronously. Only when the door is closed, the light goes out and
continues to work automatically.
USING YOUR AIR FRYER OVEN
10
* When the program ends, open the oven door and trigger the micro
switch, the digital tube on the right side of the display screen will
show OPEN but not flashing, and the icon will display normally
without flashing; When the door is opened, the light will be on, and
the light switch will be displayed synchronously but not
flashing. The light will go out only when the door is closed.During
mode operation:
*If the control panel is not operated within 1 min after starting up, the
buzzer will sound three times.
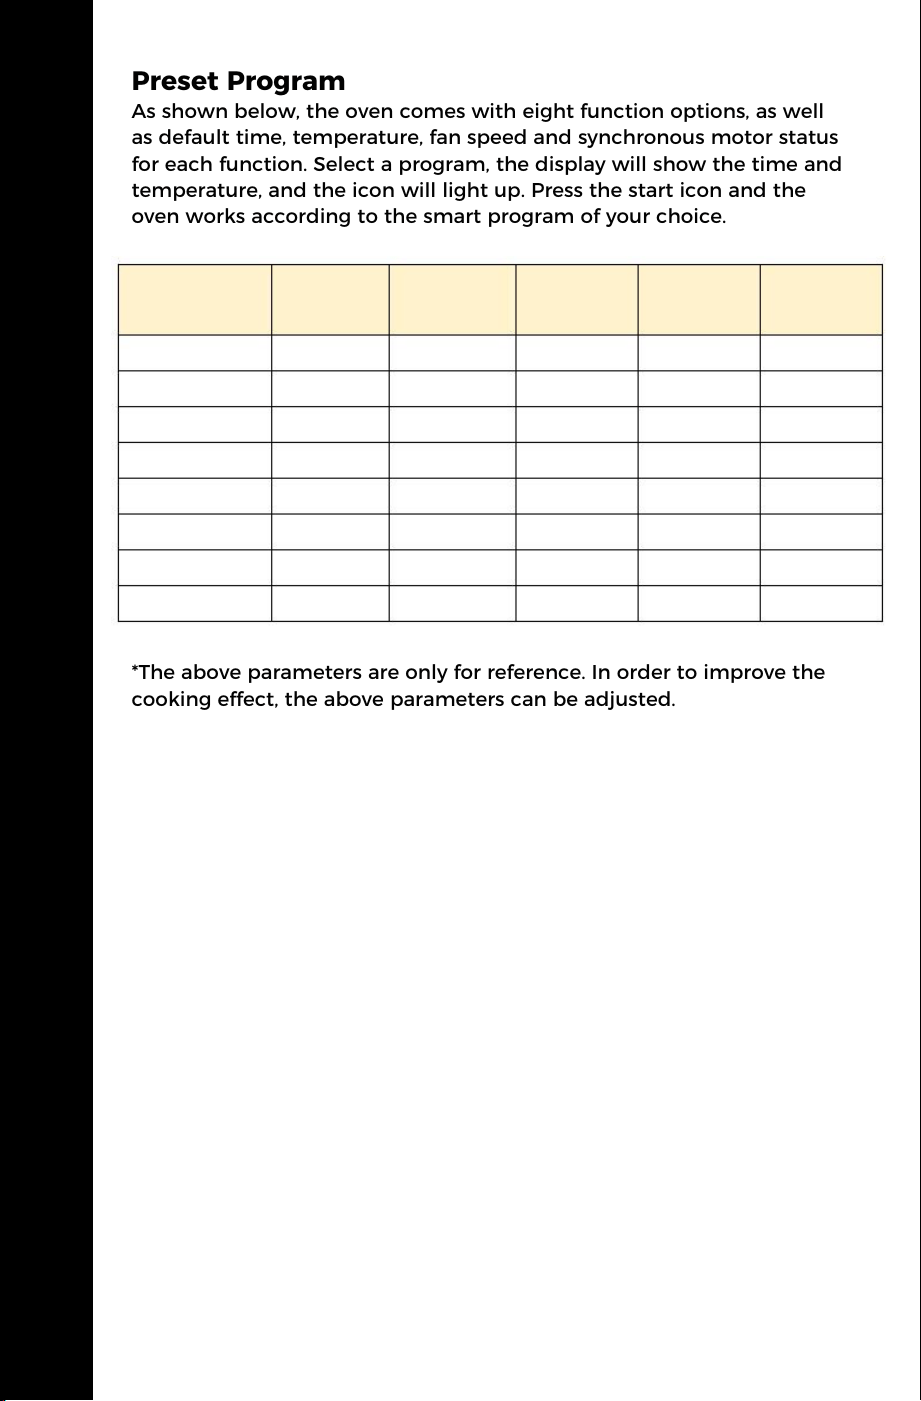
Preset Program
As shown below, the oven comes with eight function options, as well
as default time, temperature, fan speed and synchronous motor status
for each function. Select a program, the display will show the time and
temperature, and the icon will light up. Press the start icon and the
oven works according to the smart program of your choice.
USING YOUR AIR FRYER OVEN
11
Function
Default
Temp
/Time
Default
Fan
Speed
Synchronous
Motor
Time Range
Temp Range
Air Fry
Steak
Broil
Rotisserie
Toast
Bake
Pizza
Dehydrate
190°C/20min
190°C/12min
180°C/20min
180°C/45min
200°C/5min
140°C/40min
200°C/7min
70°C/240min
High
High
High
High
High
Low
High
High
ON
OFF
ON
ON
OFF
OFF
OFF
ON
5min-1h
5min-1h
5min-1h
5min-1h
5min-1h
5min-1h
5min-1h
5min-8h
60-230°C
60-230°C
60-230°C
60-230°C
60-230°C
60-140°C
60-230°C
60-70°C
*The above parameters are only for reference. In order to improve the
cooking effect, the above parameters can be adjusted.

AIR FRYER TIPS
12
AIR FRY TIPS
TIPS ON USING THE AIR FRY SETTING
The air fryer oven boasts excellent cooking speed. To achieve optimal
results, pay attention to the varying temperature requirements for
different foods, and it is advisable to avoid using excessively high
temperatures to ensure that the food retains its ideal texture and
nutritional value. You can check for doneness three quarters of the
way through the cook time.
Foods that are covered benefit from the air fry's even heat and will
cook faster without any moisture loss.
The high temperature air circulation produces roasted foods that are
golden brown on the outside and juicy and tender on the inside.
Even cooking means that you can use more than one rack and you
do not have to turn foods or rotate bake trays.
Below are foods that benefit from this air fryer oven and when to
use it:
Rotisserie:
Meat, vegetables, whole fish, etc.
Bake:
Cake,pastries, cookies, biscuits, etc.
Broil:
Meat, pies,fish, for melting cheese, etc. for browning the top of
casseroles.
Pizza:
Use the lower rack position and check often so the cheesedoes not
burn.
Additional tips:
• Make sure air can circulate around food and trays.

13
Select one of these four modes:
AIR FRY,ROTISSERIE,BROIL,DEHYDRATE
Ensure the unit is plugged into a
dedicated power outlet.
The Air Fryer Oven
does not work
Synchronous
motor(Rotary) not
working
Food didn't get
crispy
Solution
Problem
Food is not
cooked
Use smaller batches for more even
cooking
Raise temperature and continue cooking
Food is not fried
evenly
Turn over food halfway through cooking
process
Cook similar sized foods together
White smoke is
coming out of the
Air Fryer Oven
Clean the Air Fryer Oven and accessories
after each use to remove greasy residue
Ensure that the food is evenly placed in the oven,
avoiding overlapping or overcrowding. This will
ensure smooth air circulation, leading to even
heating of the food.
Excessive moisture can make the food soft
instead of crispy. Before cooking, try to dry the
food as much as possible or remove any excess
moisture.
Make sure to place the food in the oven for a
sufficient amount of time as indicated in the
cook book, allowing it to fry to crispiness
completely.

14
Never immerse cord, plugs, or appliance in water or other
liquid.Do not plug in the appliance or operate the control panel with
wet hands.
• Clean the appliance after every use.
• Always unplug the appliance and let it cool down completely
before cleaning.
• Never use abrasive or corrosive products to clean the appliance.
• Utensils are dishwasher safe.
• Before the first use, clean all components with hot water,detergent,
and a non-abrasive sponge, then wipe the interior and exterior. Wipe
the air fryer with a damp cloth.
• Use a damp soapy cloth or sponge to clean the interior walls and
bottom of the oven. Avoid using acidic or abrasive cleaning products
as they may harm the oven's surface. It is recommended to use an
oven-specific cleaning agent. Also, do not use steel wool pads on the
air fryer oven or its accessories.
• Make sure to clean the bake tray every time you use it. Excess
food particles may smoke at high temperatures and can be difficult
to remove from the tray. To remove grease or burnt food particles
from the tray, you can soak it in hot soapy water or use a non-abrasive
cleaning tool. Do not operate the oven without the bake tray in place.
• Regularly clean the air fryer oven's air outlet to remove any excess
grease that may accumulate after cooking, preventing it from
smoking during subsequent use. Make sure the cleaning methods
used adhere to the manufacturer's recommendations and avoid
using cleaning agents containing acidic components.
• Unplug the appliance and let it cool down.
• Make sure all parts are clean and dry.
• Store the appliance in a clean and dry place.
Do not throw away the appliance with the normal household
wasteat the end of its life, but hand it in at an official collection
point for recycling. By doing this, you help to preserve the
environment.
15
HOW TO SET
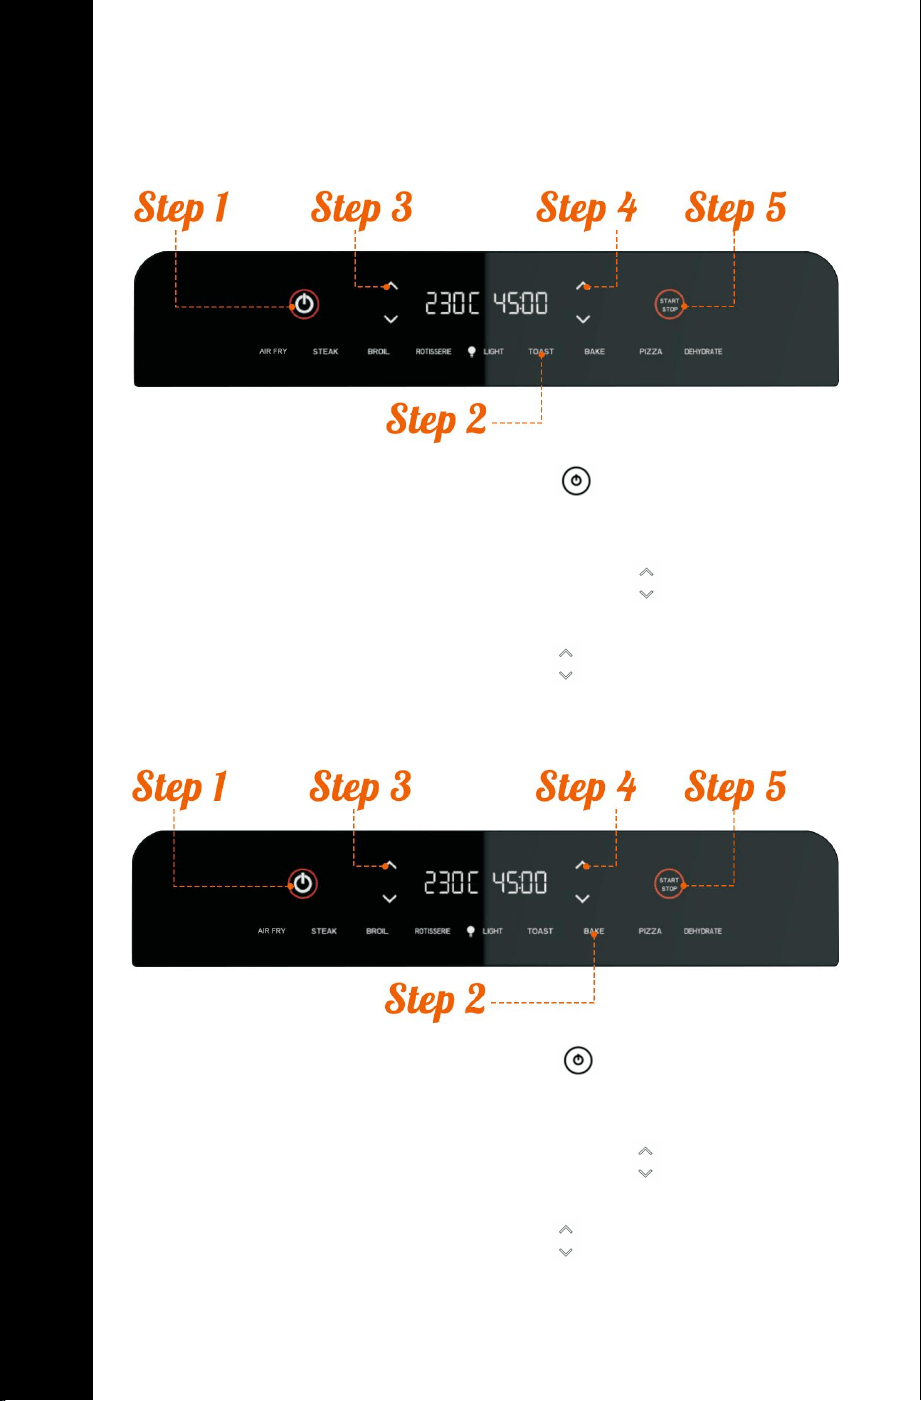
FREE SETTING
ADJUST FREELY ACCORDING TO YOUR NEEDS
FREE SELECTION MODE 1
Step 1: Plug in the power cord, then click " ".
(ON/OFF)
Step 2: Select the “TOAST” .
Step 3: Click the temperature adjustment arrow " " to adjust the
temperature.
Step 4: Click the time adjustment arrow " " to adjust the time.
Step 5: Press the start button.
FREE SELECTION MODE 2
Step 1: Plug in the power cord, then click " ".
(ON/OFF)
Step 2: Select the “BAKE” .
Step 3: Click the temperature adjustment arrow " " to adjust the
temperature.
Step 4: Click the time adjustment arrow " " to adjust the time.
Step 5: Press the start button.
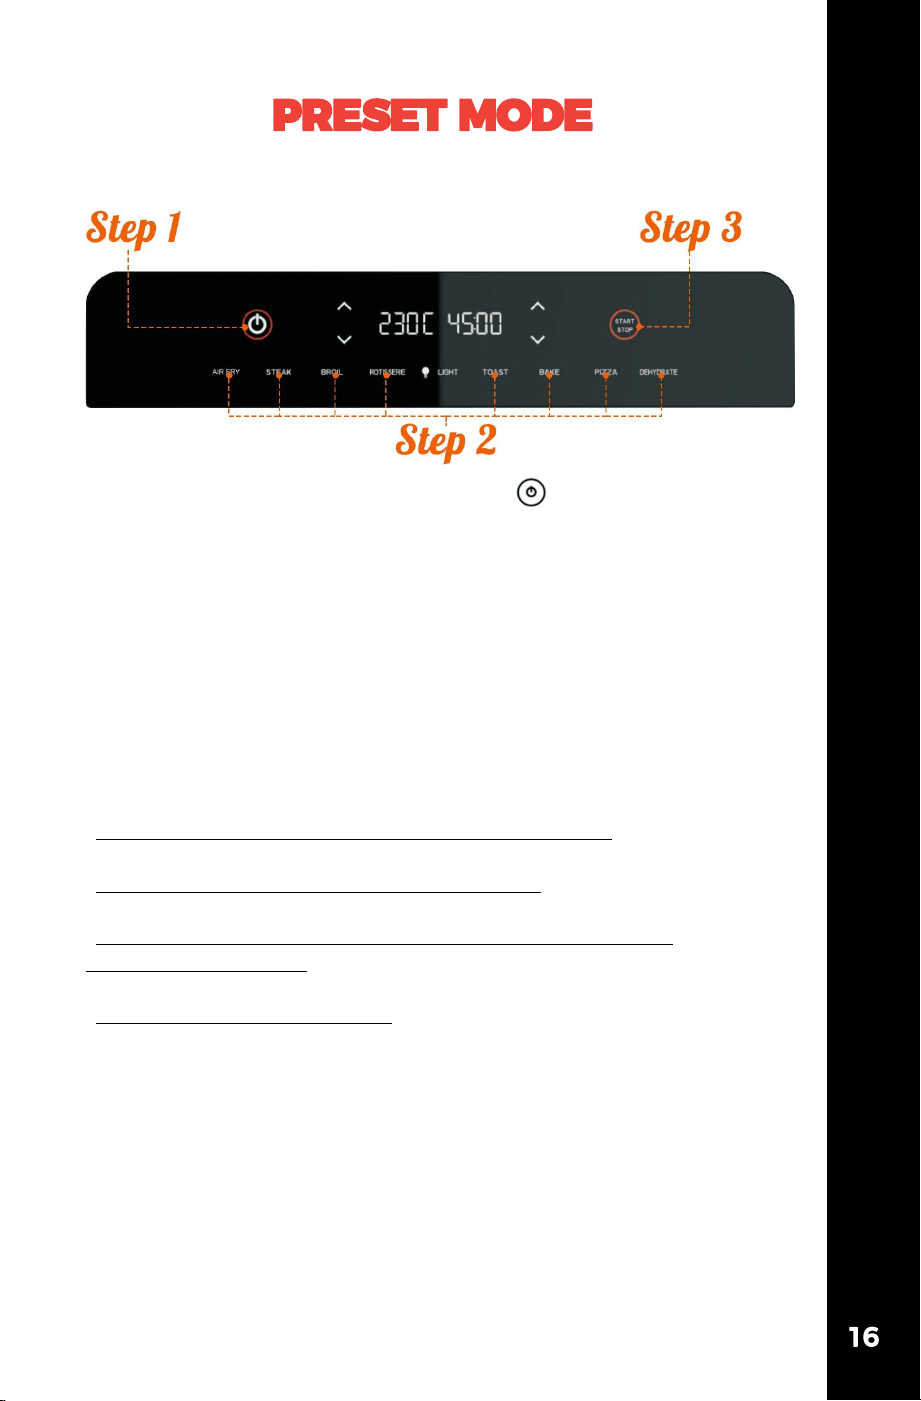
Step 1: Plug in the power cord, then click " ".
(ON/OFF)
Step 2:Select any cooking mode by clicking on the LED screen.(AIR
FRY/STEAK/BROIL/ROTISSERIE/TOAST/BAKE/PIZZA
/DEHYDRATE)
Step 3: Press the start button.
Note:
· Press the power button after closing the glass door.
· Instructions for use included in the package.
· During operation, do not directly touch the outside of the
oven with your hands.
· Please wash in time after use.
SETTINGS TO QUICKLY COOK YOUR FAVORITE MEALS
HOW TO SET
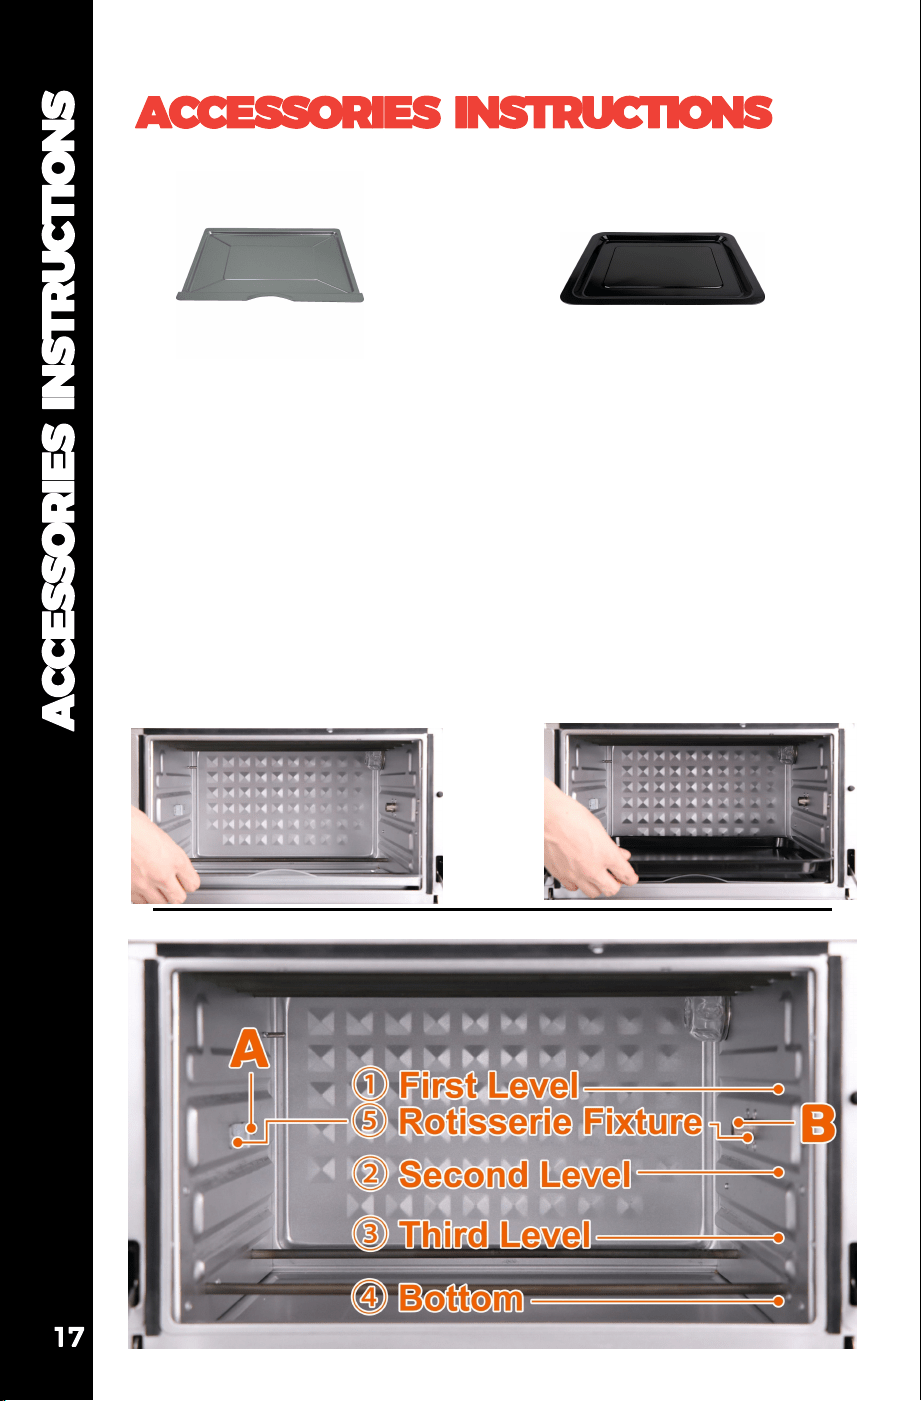
Function:
Intercepts grease and crumbs
that fall out during food
cooking.
Installation Method:
Place the Crumb Tray under
the bottom heating tube as
shown in the picture.
Cooking advise:
No food contact
Position: 4
COMPLIMENTARY ACCESSORIES
Oven Cavity Diagram
Crumb Tray
Bake Tray
Function:
Bake Tray have depth to
better hold food and receive
hot air from the top.
Installation Method:
Place the Bake Tray on level 1.
2.3
Cooking advise:
Pie/Cake/Pizza/
Whole Chicken
Position: 1 2 3
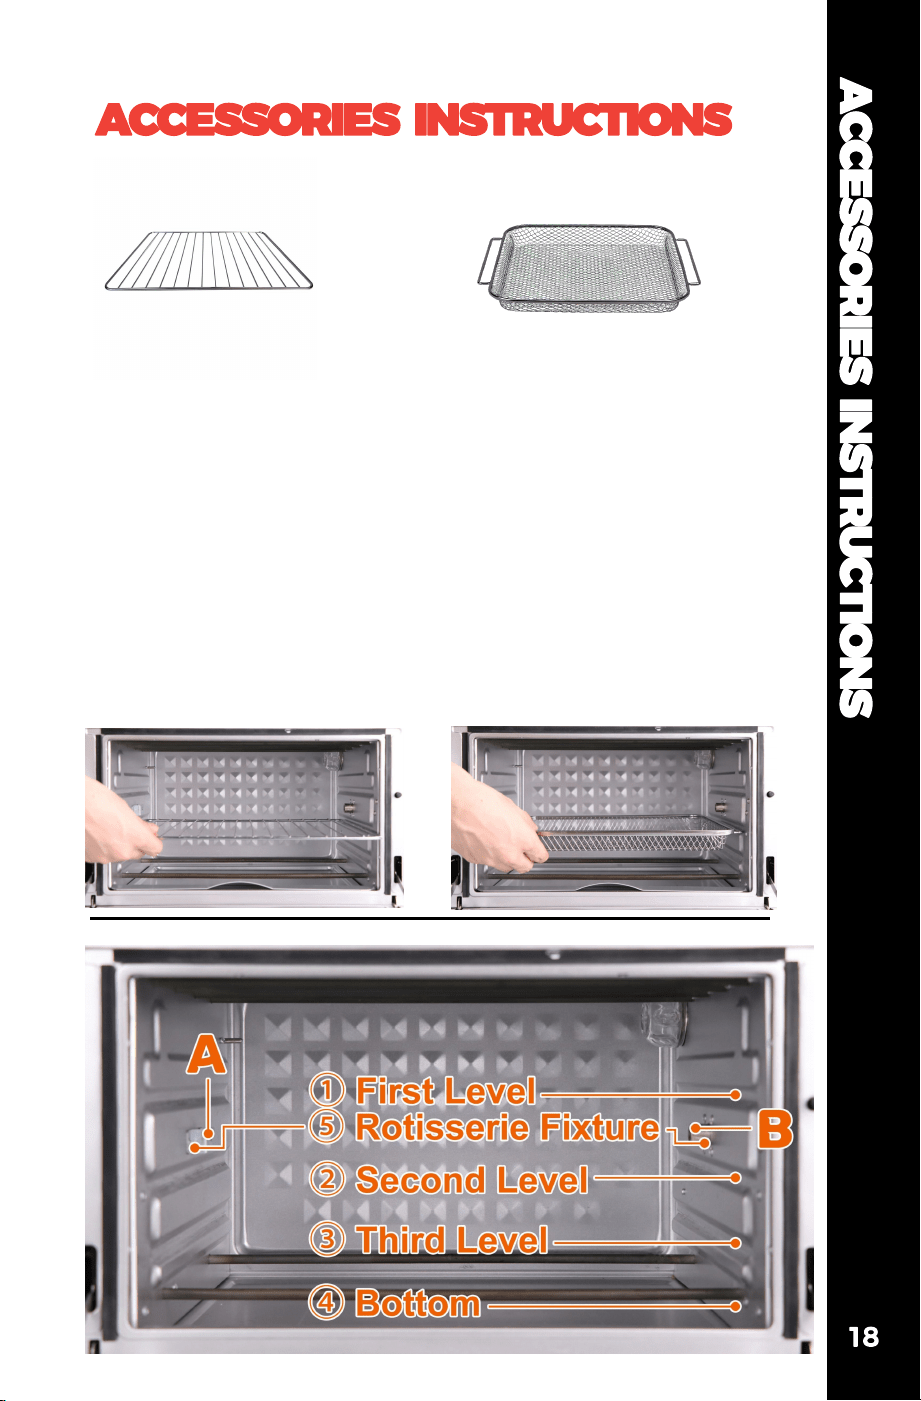
Function:
Use an Oven Rack to allow
hot air to heat food evenly
from the top fan and bottom
heat pipes.
Installation Method:
Place the Oven Rack on level
1.2.3
Cooking advise:
Steak/Chicken/Fish/Toast/
Sausage
Position: 1 2 3
COMPLIMENTARY ACCESSORIES
Oven Cavity Diagram
Air Fryer Basket
Oven Rack
Function:
Air Fryer Basket can hold
more small and large
quantities of food.
Installation Method:
Place the Air Fryer Basket on
level 1.2.3
Cooking advise:
Fries/Chicken Nuggets/
Potato Wedges/Doritos
Position: 1 2 3
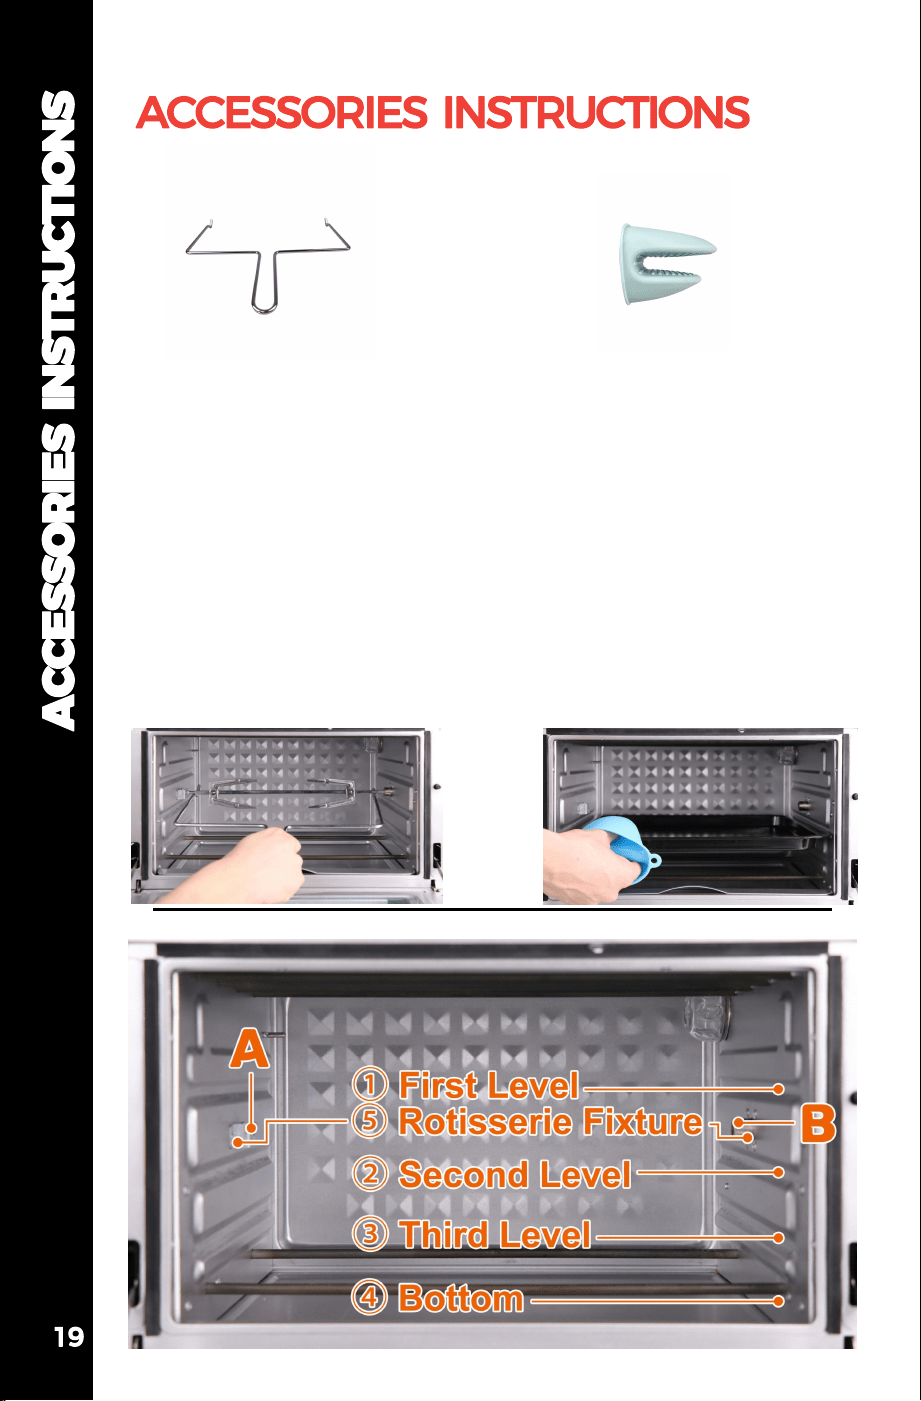
Function:
Use Fetch Rack to install and
remove the rotisserie rack.
Installation Method:
1.When installing, align both
ends of the same letter, first
align the B end, and then
install the A end.
2.When taking out, lift end A
first, and pull out end B
outwards.
Cooking advise:
No food contact
COMPLIMENTARY ACCESSORIES
Oven Cavity Diagram
Fetch Rack
Gloves
Function:
Use Gloves to remove all
accessories after cooking to
prevent burns.
Installation Method:
Wear gloves and move hot
accessories.
Cooking advise:
No food contact
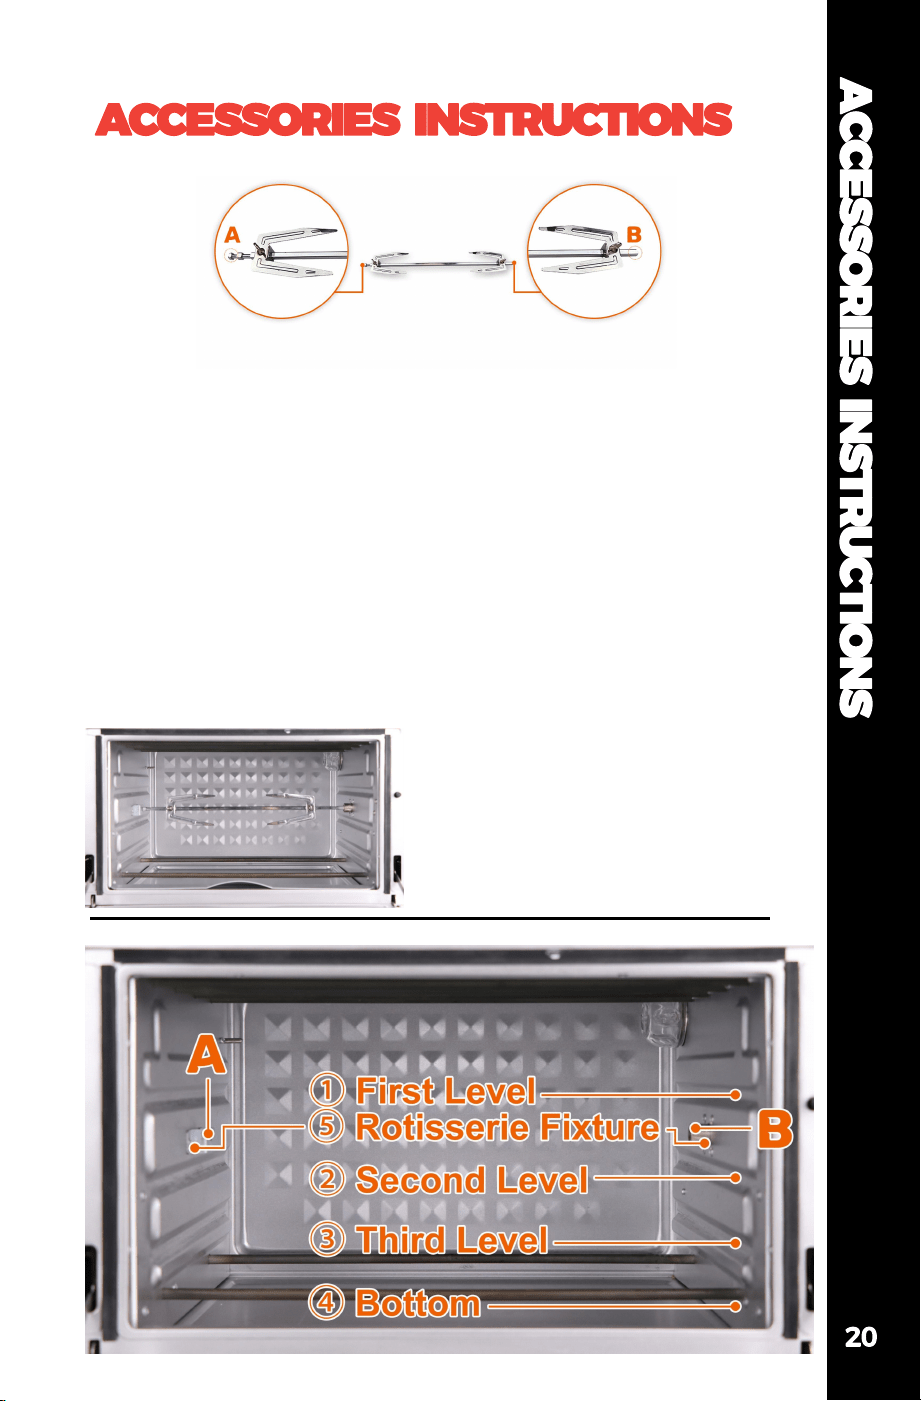
Function:
Rotisserie Rack can fix larger food and the synchronous motor in
the oven makes the food rotate 360 degrees in the oven to
achieve the best cooking effect.
Installation Method:
1.Pass the shaft through the fork, adjusting the distance of the fork
according to the size of the food.
2.Pass the screw through the hole above the fork and tighten to
secure the fork.
3.When installing, align the two ends of the same letter, first align
the B end, and then install the A end.
Cooking advise:
Whole Chicken/Pork Knuckle
COMPLIMENTARY ACCESSORIES
Oven Cavity Diagram
Rotisserie Rack
Position: 5
ACCESSORIES INSTRUCTIONS
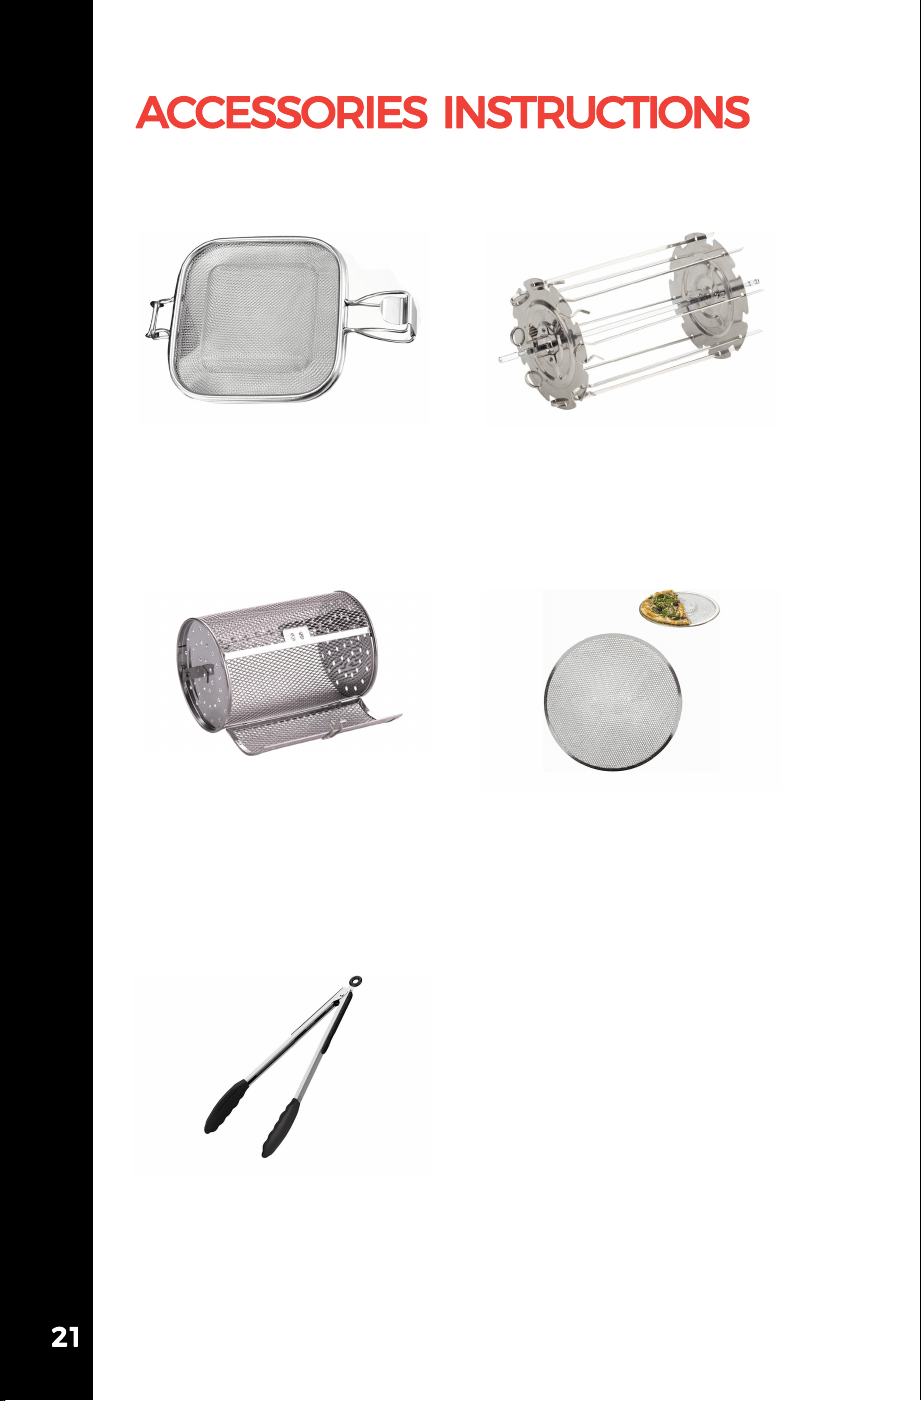
OPTIONAL ACCESSORIES
25.5.×16.5CM
Cooking advise:
Panini/Sandwich
Panini Maker Mold Kebab Rotary Rack
Rolling Grill Basket Pizza Baking Sieve
Kitchen Tongs
18×14CM
Cooking advise:
Chicken Kebabs
/Mutton Kebabs
18×12×12CM
Cooking advise:
Fries/Chicken Nuggets
d:25.5CM
Cooking advise:
Pizza
26.9×3.8CM
1. Optional accessories need to be purchased separately.
2. Be careful not to reverse the ends of the Rotisserie, otherwise it
will cause motor failure.
3. The Crumb Tray must be placed in the designated position -
under the bottom heating tube.
4. All accessories are dishwasher safe.(except gloves)
5. Please refrain from touching the items with your hands until
they have cooled.
6. Please put the Rotisserie rack out of the reach of children to
avoid accidentally swallowing the screws.
7. Please do not heat the gloves in the oven.
8. Some special foods may cause the accessories to be stained
after heating, but the accessories themselves will not fade.
9.All accessories are free of teflon coating.
10.Ensure to clean the oven and accessories regularly to maintain
their performance and hygiene.
11.Please wear protective gloves before cleaning.
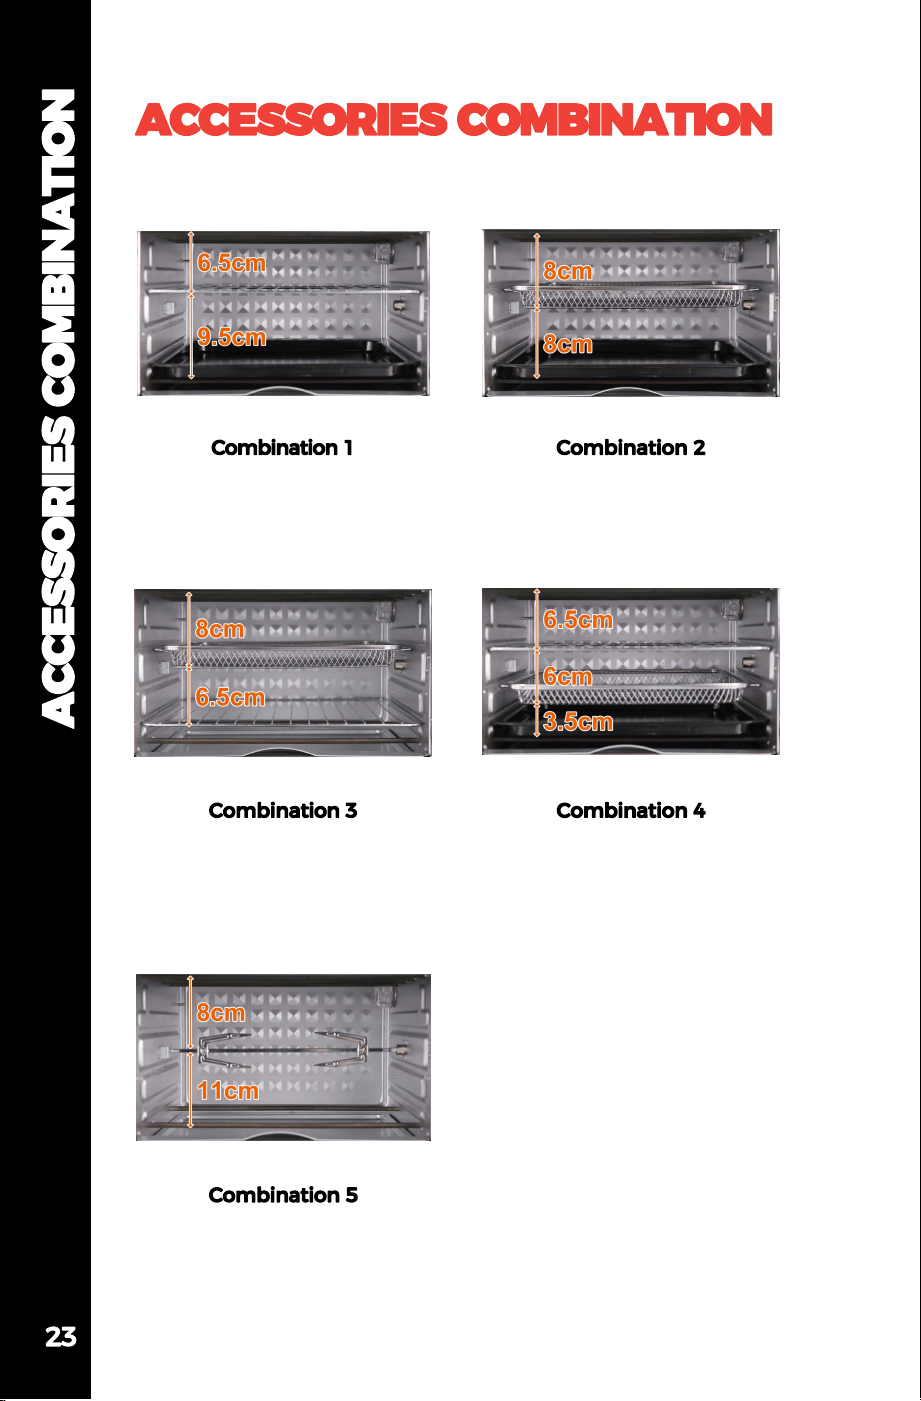
Air Fryer Basket
Oven Rack
Air Fryer Basket
Oven Rack
Bake Tray
Air Fryer Basket
Bake Tray
Oven Rack
Bake Tray
Rotisserie Rack
COMPLIMENTARY ACCESSORIES
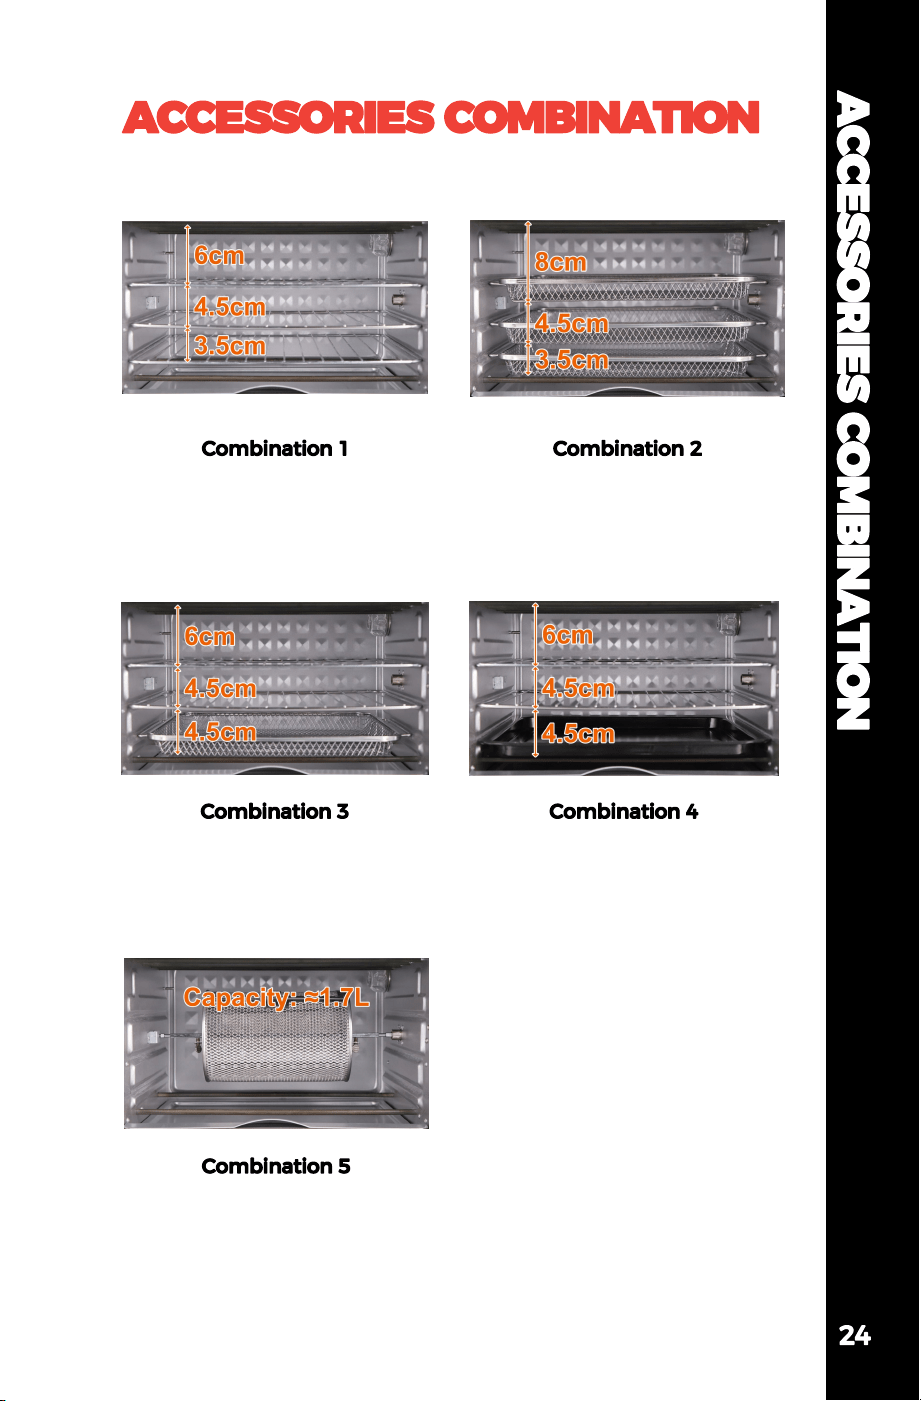
OPTIONAL ACCESSORIES
Three Oven Racks
Three Air Fryer Baskets
Two Oven Racks
Air Fryer Basket
Two Oven Racks
Bake Tray
Rolling Grill Basket
How HYSapientia Air Fryer Oven works?
HYSapientia Air Fryer Oven is combined with both normal oven and air
fryer function. It has upper and lower heating tubes + high-speed fan
structure, when the fan and heating tube operating together, it is
equivalent to having functions such as air frying, fast grilling/ baking/
roasting/dehydration etc...
How HYSapientia Air Fryer Oven differentiates from the Normal
Convection Oven?
1. HYSapientia Air Fryer Oven has high speed fan with the speed
between 2000rpm. But Normal Convection Oven has low speed fan with
the speed only about 1000rpm.
2. HYSapientia Air Fryer Oven has the special air duct which can absorb
the air from two sides of the oven and generate 360°thermal cyclone on
the top of oven, then powerful hot wind causes the air fryer effect.
How HYSapientia Air Fryer Oven differentiates from the Normal Air
Fryer?
1. HYSapientia Air Fryer Oven is made of the stainless steel, but most Air
Fryer is made of the plastic.
2. HYSapientia Air Fryer Oven has large capacity compare with most Air
Fryer Oven.
FREQUENTLY ASKED QUESTIONS
How can I switch the air fryer oven to the oven function?
You can select the Bake mode, which is an oven function with
temperature range of 60-140°C and time of 5-60 minutes.Also adjustable
for high and low speed fan.
What if my food is not cooked or over cooked when it's in preset
mode?
If the food is not cooked or over cooked in the certain preset mode,
so for next cooking you can slight adjust the temperature and time in
this mode,as the preset mode just for the reference.
Does the Air Fryer Oven have the microwave function?
The air fryer oven does not have microwave function, if you want to
heat up the food, you can wrap it with aluminum foil and set the
temperature around 100°C.
What if the Air Fryer Oven fill with oily smoke when cooking?
There is not just the heat tube on the top but also at the bottom of
air fryer oven, also the oven inner temperature can rise rapidly when
operation with the high speed fan. So when you cook the meat with rich
fat, such as pork or lamb, carefully adjusting the temperature a bit lower
if the smoke generated, also we strongly remind to place the crumb tray
underneath to collect the oil.
Why does the fan keep operating when the oven stop working?
When the oven stopped and the temperature is above 80°C, the oven
heater will turn off and the fan will continue to run for a minute to help
dissipate the hot air inside and cool down the oven.
Why does moisture appear above the oven door frame?
When cooking food with high water content, such as frozen food
with ice shards, the water vaporizes into water vapor due to temperature
rise. When the temperature is lowered, the water vapor on the surface
will liquefy into water droplets, which is a normal phenomenon.
FREQUENTLY ASKED
QUESTIONS

Support Web:www.hysapientia.com
Support E-mail:service@hysapientia.com
easy cooking & healthy eating
Web
Cook
Book