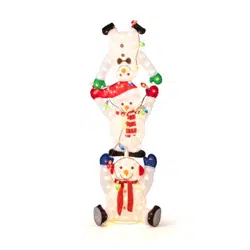

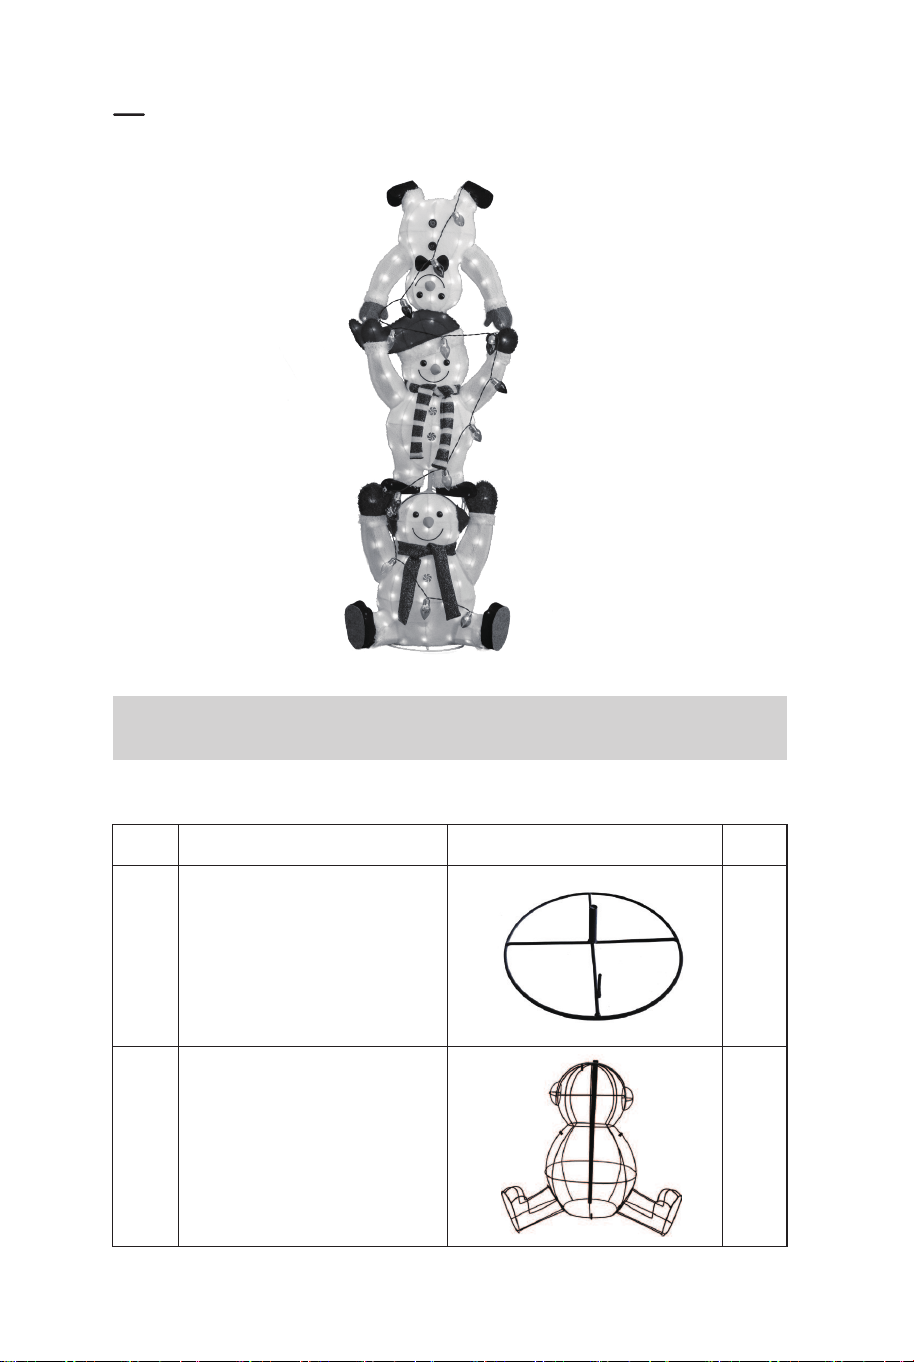
Lighted Stacked Snowman
Bonhomme de Neige Empilé Éclairé
CM24283
THIS INSTRUCTION BOOKLET CONTAINS IMPORTANT SAFETY INFORMATION. PLEASE READ AND KEEP FOR FUTURE REFERENCE.
If you're having difficulty, our friendly
customer team is always here to help.
USA office: Fontana AUS office: Truganina
GBR office: Ipswich FRA office: Saint Vigor d'Ymonville
AUS:cs.au@costway.com
GBR:cs.uk@costway.com
FRA:cs.fr@costway.com
Before You Start
Please read all instructions carefully.
Retain instructions for future reference.
Separate and count all parts and hardware.
Read through each step carefully and follow the proper order.
We recommend that, where possible, all items are assembled near to the area in
which they will be placed in use, to avoid moving the product unnecessarily once
assembled.
Always place the product on a flat, steady and stable surface.
Keep all small parts and packaging materials for this product away from babies
and children as they potentially pose a serious choking hazard.
FR
Veuillez lire attentivement toutes les instructions.
Conservez les instructions pour vous y référer ultérieurement.
Vérifiez toutes les pièces et les accessoires.
Lisez attentivement chaque étape et suivez l’ordre correct.
Nous recommandons que, dans la mesure du possible, tous les produits
soient assemblés à proximité de la zone où ils seront utilisés, afin d’éviter tout
déplacement inutile du produit une fois assemblé.
Placez toujours le produit sur une surface plane et stable.
Conservez toutes les petites pièces de ce produit et les matériaux d’emballage
hors de portée des bébés et des enfants, car ils pourraient présenter un risque
d’étouffement.
Avant de Commencer
Operation and Safety Instructions
— FOR INDOOR AND OUTDOOR USE —
PARTS:
Part Description
Base
1
1
Sitting Snowman
Illustration Qty
EN
EN
A
B
02 03
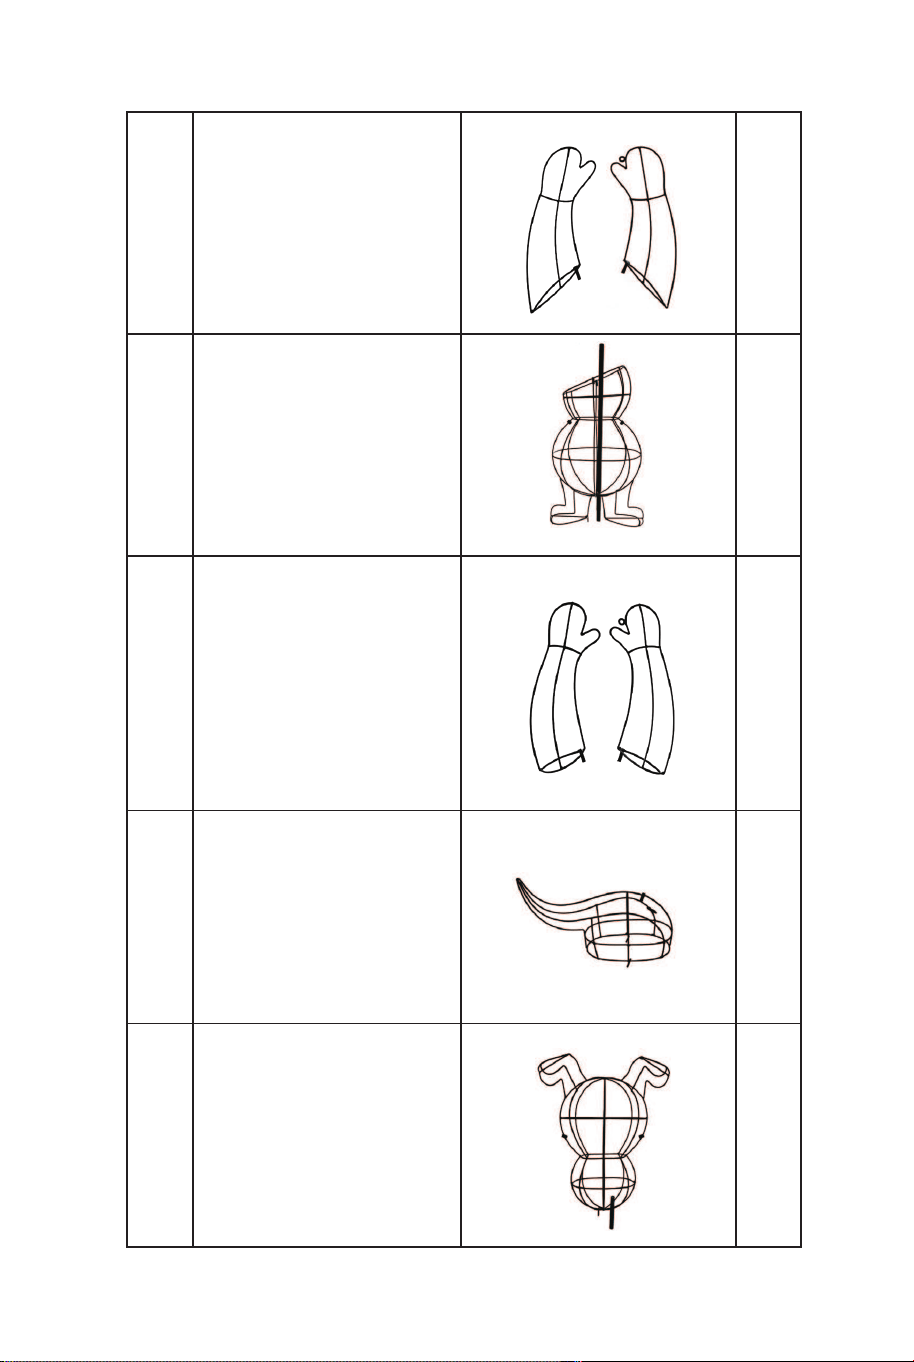
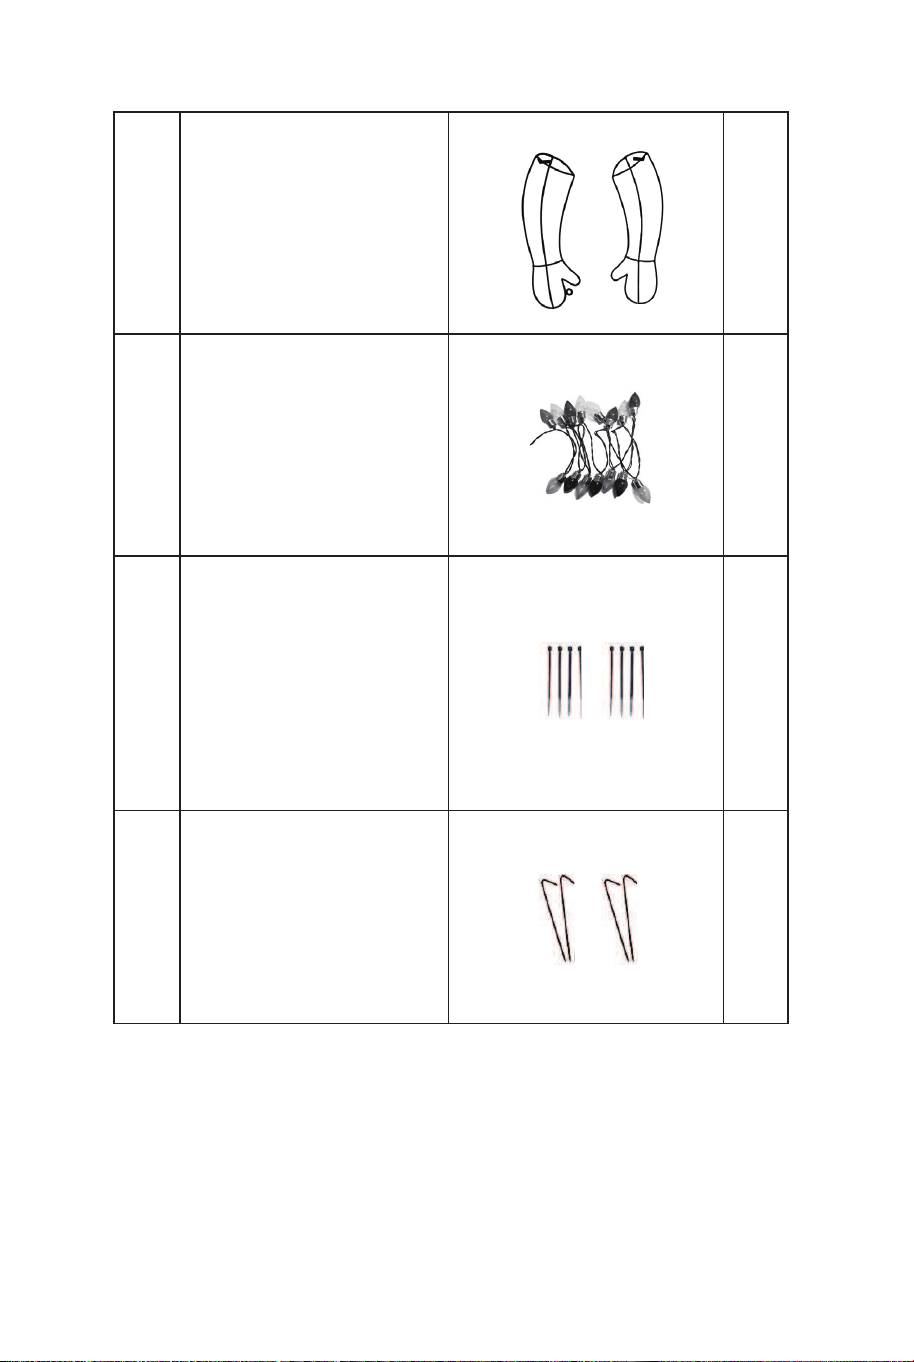
Arms of Sitting Snowman
2
1
Standing Snowman
C
D
2
Arms of Standing Snowman
E
1
Hat
F
1
Head standing Snowman
G
Arms of Head
standing Snowman
2
1
C7 String
H
I
16
Plastic Ties
J
4
Ground Stakes
K
04 05
Arms of Sitting Snowman
2
1
Standing Snowman
C
D
2
Arms of Standing Snowman
E
1
Hat
F
1
Head standing Snowman
G
Arms of Head
standing Snowman
2
1
C7 String
H
I
16
Plastic Ties
J
4
Ground Stakes
K
04 05

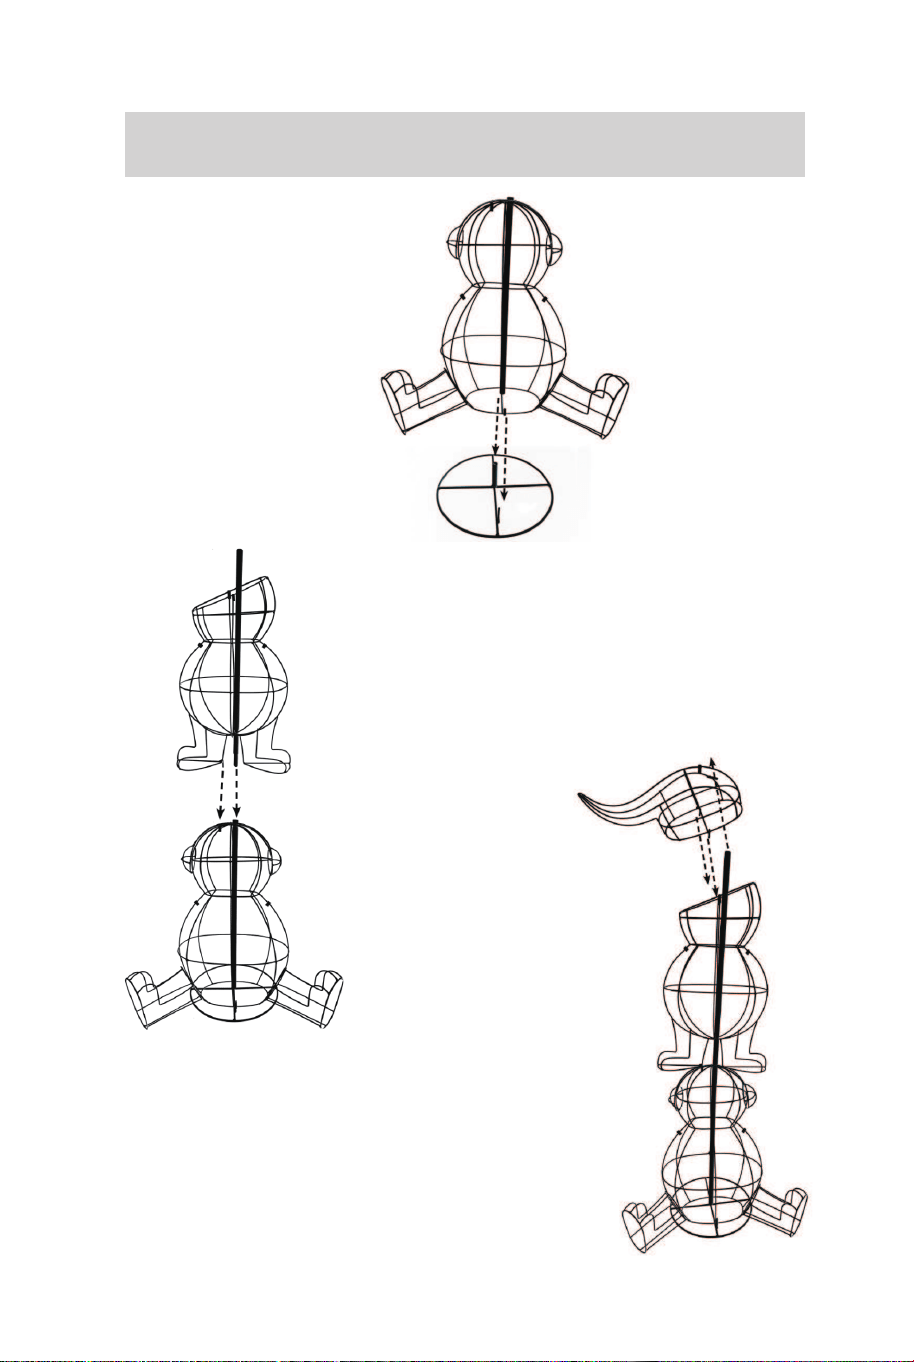
To Assemble
1.Remove all the parts
from the box carefully and
lay out the components.
2.Insert the prongs of the
Base (A) into the
corresponding rings on
Sitting Snowman (B).
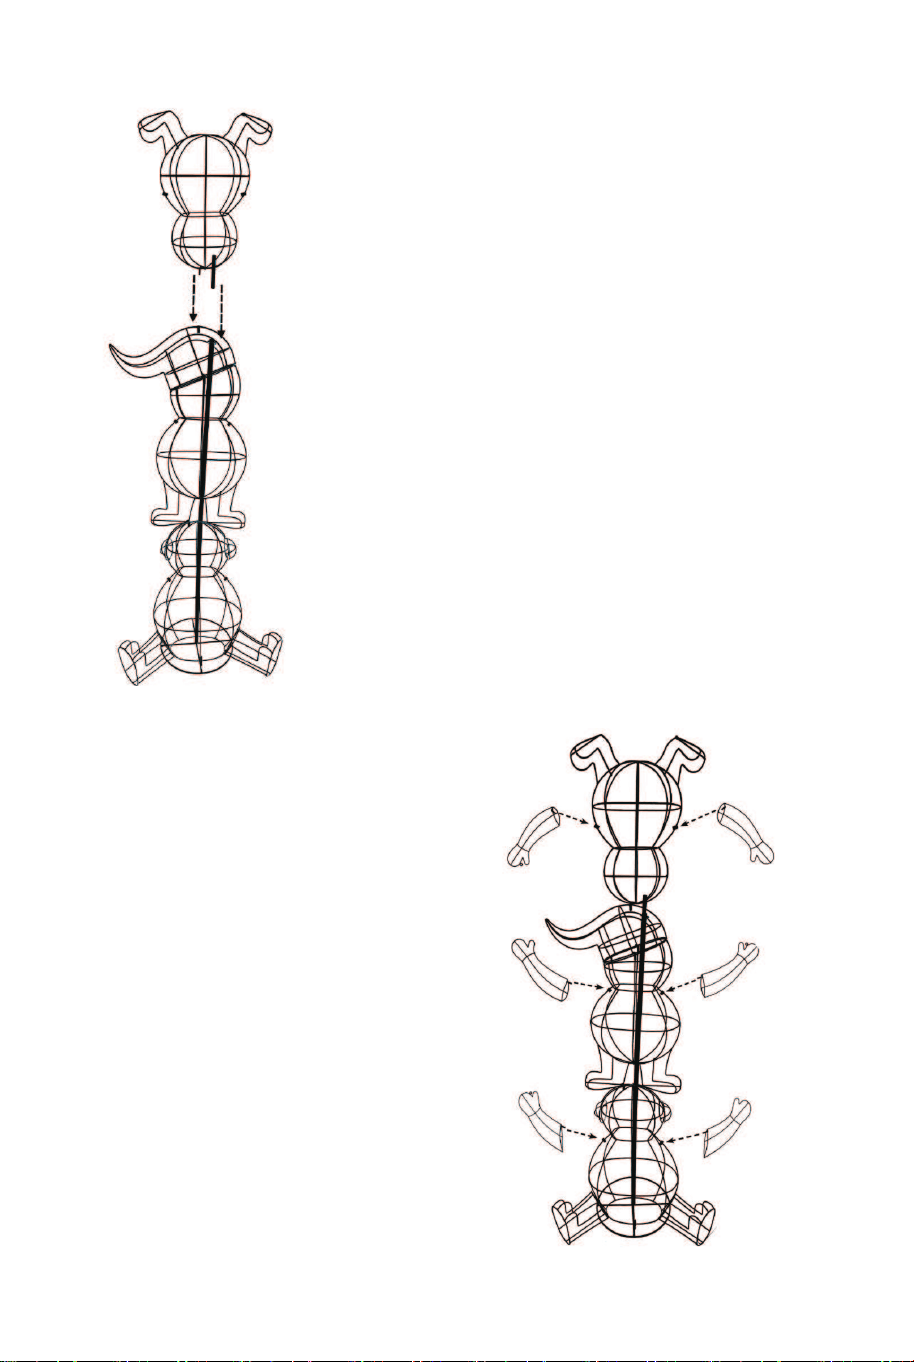
6.Insert the Arms of the 3
snowmen (C, E, and H)
into the corresponding
rings on 3 snowmen body
(B, D, G).
5.Insert the prongs of the Head Standing
Snowman (G) into the corresponding
rings on Standing Snowman (D) and the
Hat (E).
3.Insert the prongs on the
feet of the Standing
Snowman (D) into the
corresponding rings on
the head of the Sitting
Snowman (B).
4.Insert the prongs of the
Hat (F) into the
corresponding rings on
head of the Standing
Snowman (D). Make sure
the pole of the Standing
Snowman (D) goes through
the hole on the Hat (F).
06 07

To Assemble
1.Remove all the parts
from the box carefully and
lay out the components.
2.Insert the prongs of the
Base (A) into the
corresponding rings on
Sitting Snowman (B).
6.Insert the Arms of the 3
snowmen (C, E, and H)
into the corresponding
rings on 3 snowmen body
(B, D, G).
5.Insert the prongs of the Head Standing
Snowman (G) into the corresponding
rings on Standing Snowman (D) and the
Hat (E).
3.Insert the prongs on the
feet of the Standing
Snowman (D) into the
corresponding rings on
the head of the Sitting
Snowman (B).
4.Insert the prongs of the
Hat (F) into the
corresponding rings on
head of the Standing
Snowman (D). Make sure
the pole of the Standing
Snowman (D) goes through
the hole on the Hat (F).
06 07

To Use
WARNING:
1.Insert the plugs of the standing snowman, head standing
snowman and C7 lighting string into the End connecter of the
standing snowman. To illuminate, plug the power cord into a
standard 120-volt AC electrical outlet.
2.To shut off, unplug the power cord from the outlet.
To reduce the risk of fire or electric shock, if one or more bulbs do
not illuminate, replace the bulb(s) according to the "User Servicing
Instructions" section of the included "Important Safety Instructions"
sheet.
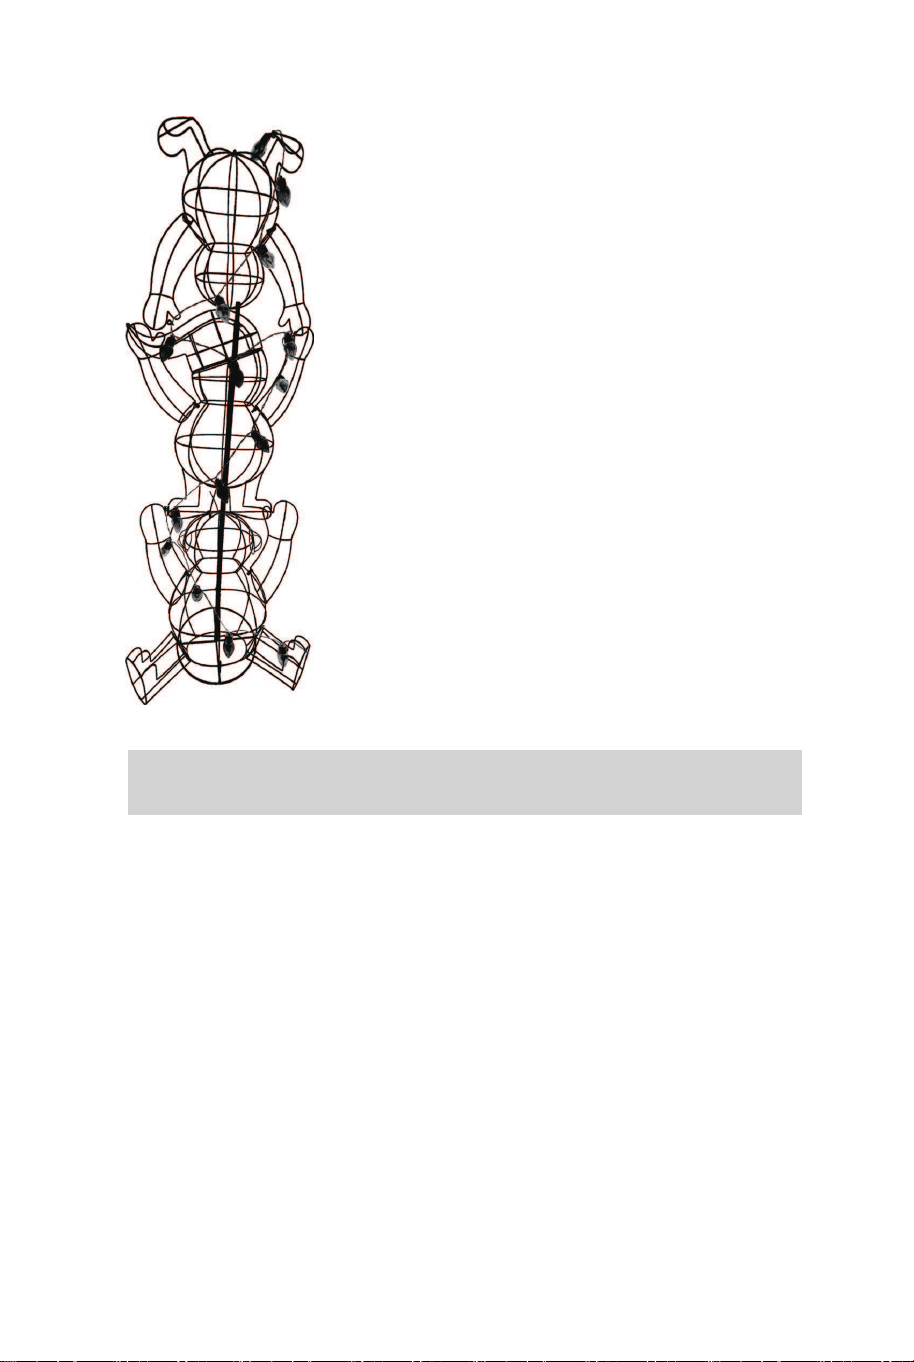
7.Secure the C7 Lighting
String (I) to the hold of the
stacked snowmen with
plastic ties.
8.Secure the installing
points with plastic ties and
secure the base to the
soft ground by fully
inserting 4 stakes into the
ground.
Instructions d'Utilisation
et de Sécurité
- POUR UTILISATION INTÉRIEURE ET EXTÉRIEURE –
PIÈCES:
Pièce Description
Base
1
1
Bonhomme de Neige Assis
Illustration Qté
FR
A
B
08 09

To Use
WARNING:
1.Insert the plugs of the standing snowman, head standing
snowman and C7 lighting string into the End connecter of the
standing snowman. To illuminate, plug the power cord into a
standard 120-volt AC electrical outlet.
2.To shut off, unplug the power cord from the outlet.
To reduce the risk of fire or electric shock, if one or more bulbs do
not illuminate, replace the bulb(s) according to the "User Servicing
Instructions" section of the included "Important Safety Instructions"
sheet.
7.Secure the C7 Lighting
String (I) to the hold of the
stacked snowmen with
plastic ties.
8.Secure the installing
points with plastic ties and
secure the base to the
soft ground by fully
inserting 4 stakes into the
ground.
Instructions d'Utilisation
et de Sécurité
- POUR UTILISATION INTÉRIEURE ET EXTÉRIEURE –
PIÈCES:
Pièce Description
Base
1
1
Bonhomme de Neige Assis
Illustration Qté
FR
A
B
08 09

Bras de Bonhomme de
Neige Assis
2
1
Bonhomme de Neige Debout
C
D
2
Bras de Bonhomme de
Neige Debout
E
1
Chapeau
F
1
Tête de Bonhomme de
Neige Debout
G
Bras de Tête
Bonhomme de Neige
Debout
2
1
Corde C7
H
I
16
Attaches en Plastique
J
4
Piquets au Sol
K
10 11

Bras de Bonhomme de
Neige Assis
2
1
Bonhomme de Neige Debout
C
D
2
Bras de Bonhomme de
Neige Debout
E
1
Chapeau
F
1
Tête de Bonhomme de
Neige Debout
G
Bras de Tête
Bonhomme de Neige
Debout
2
1
Corde C7
H
I
16
Attaches en Plastique
J
4
Piquets au Sol
K
10 11
Pour Assembler
1.Retirez soigneusement
toutes les pièces de la
boîte et disposez les
composants.
2.Insérez les broches de
la base (A) dans les
anneaux correspondants
du bonhomme de neige
assis (B).
6.Insérez les bras des 3
bonhommes de neige (C,
E et H) dans les anneaux
correspondants sur le
corps des 3 bonhommes
de neige (B, D, G).
5.Insérez les griffes du bonhomme de
neige debout (G) dans les anneaux
correspondants du bonhomme de neige
debout (D) et du chapeau (E).
3.Insérez les griffes des
pieds du bonhomme de
neige debout (D) dans les
anneaux correspondants
sur la tête du bonhomme
de neige assis (B).
4.Insérez les griffes du
chapeau (F) dans les
anneaux correspondants
sur la tête du bonhomme
de neige debout (D).
Assurez-vous que la
perche du bonhomme de
neige debout (D) passe par
le trou du chapeau (F).
12 13
Instructions De Retour / Réclamation De Dommages
Dans le cas où un retour est requis, l'article doit être retourné dans sa boîte
d'origine. Sans cela, votre retour ne sera pas accepté.
NE PAS jeter la boîte/l'emballage d'origine.
Prenez une photo des marquages de la boîte.
Prenez une photo des dommages (le cas échéant).
Envoyez-nous un e-mail avec les images demandées.
Une photo des marquages (texte) sur le côté de la boîte est requise au cas où
une pièce serait nécessaire pour le remplacement. Cela aide notre personnel à
identifier votre numéro de produit pour s'assurer que vous recevez les bonnes
pièces.
Une photo des dommages est toujours requise pour déposer une réclamation et
obtenir rapidement votre remplacement ou votre remboursement. Assurez-vous
d'avoir la boîte même si elle est endommagée.
Envoyez-nous un e-mail directement depuis le marché où votre article a été
acheté avec les images ci-jointes et une description de votre réclamation.
FR
In case a return is required, the item must be returned in original box. Without this
your return will not be accepted.
DO NOT discard the box / original packaging.
Take a photo of the box markings.
Take a photo of the damaged part (if applicable).
Send us an email with the images requested.
A photo of the markings (text) on the side of the box is required in case a part is
needed for replacement. This helps our staff identify your product number to
ensure you receive the correct parts.
A photo of the damage is always required to file a claim and get your replacement
or refund processed quickly. Please make sure you have the box even if it is
damaged.
Email us directly from marketplace where your item was purchased with the
attached images and a description of your claim.
EN
Return / Damage Claim Instructions
Instructions De Retour / Réclamation De Dommages
Pour Utiliser
AVERTISSEMENT :
1. Insérez les fiches du bonhomme de neige debout, du bonhomme
de neige debout et de la guirlande lumineuse C7 dans le connecteur
d'extrémité du bonhomme de neige debout. Pour éclairer, branchez
le cordon d'alimentation dans une prise électrique standard de 120
volts CA.
2. Pour éteindre, débranchez le cordon d'alimentation de la prise.
Pour réduire le risque d'incendie ou de choc électrique, si une ou
plusieurs ampoules ne s'allument pas, remplacez la ou les
ampoules conformément à la section « Instructions d'Entretien de
l'Utilisateur » de la feuille « Instructions de Sécurité Importantes »
incluse.
7.Fixez la guirlande
lumineuse C7 (I) à la prise
des bonhommes de neige
empilés avec des
attaches en plastique.
8.Sécurisez les points
d'installation avec des
attaches en plastique et
fixez la base au sol mou
en insérant complètement
4 piquets dans le sol.
14 15
Instructions De Retour / Réclamation De Dommages
Dans le cas où un retour est requis, l'article doit être retourné dans sa boîte
d'origine. Sans cela, votre retour ne sera pas accepté.
NE PAS jeter la boîte/l'emballage d'origine.
Prenez une photo des marquages de la boîte.
Prenez une photo des dommages (le cas échéant).
Envoyez-nous un e-mail avec les images demandées.
Une photo des marquages (texte) sur le côté de la boîte est requise au cas où
une pièce serait nécessaire pour le remplacement. Cela aide notre personnel à
identifier votre numéro de produit pour s'assurer que vous recevez les bonnes
pièces.
Une photo des dommages est toujours requise pour déposer une réclamation et
obtenir rapidement votre remplacement ou votre remboursement. Assurez-vous
d'avoir la boîte même si elle est endommagée.
Envoyez-nous un e-mail directement depuis le marché où votre article a été
acheté avec les images ci-jointes et une description de votre réclamation.
FR
In case a return is required, the item must be returned in original box. Without this
your return will not be accepted.
DO NOT discard the box / original packaging.
Take a photo of the box markings.
Take a photo of the damaged part (if applicable).
Send us an email with the images requested.
A photo of the markings (text) on the side of the box is required in case a part is
needed for replacement. This helps our staff identify your product number to
ensure you receive the correct parts.
A photo of the damage is always required to file a claim and get your replacement
or refund processed quickly. Please make sure you have the box even if it is
damaged.
Email us directly from marketplace where your item was purchased with the
attached images and a description of your claim.
EN
Return / Damage Claim Instructions
Instructions De Retour / Réclamation De Dommages
Pour Utiliser
AVERTISSEMENT :
1. Insérez les fiches du bonhomme de neige debout, du bonhomme
de neige debout et de la guirlande lumineuse C7 dans le connecteur
d'extrémité du bonhomme de neige debout. Pour éclairer, branchez
le cordon d'alimentation dans une prise électrique standard de 120
volts CA.
2. Pour éteindre, débranchez le cordon d'alimentation de la prise.
Pour réduire le risque d'incendie ou de choc électrique, si une ou
plusieurs ampoules ne s'allument pas, remplacez la ou les
ampoules conformément à la section « Instructions d'Entretien de
l'Utilisateur » de la feuille « Instructions de Sécurité Importantes »
incluse.
7.Fixez la guirlande
lumineuse C7 (I) à la prise
des bonhommes de neige
empilés avec des
attaches en plastique.
8.Sécurisez les points
d'installation avec des
attaches en plastique et
fixez la base au sol mou
en insérant complètement
4 piquets dans le sol.
14 15

Lighted Stacked Snowman
Bonhomme de Neige Empilé Éclairé
CM24283
THIS INSTRUCTION BOOKLET CONTAINS IMPORTANT SAFETY INFORMATION. PLEASE READ AND KEEP FOR FUTURE REFERENCE.
If you're having difficulty, our friendly
customer team is always here to help.
USA office: Fontana AUS office: Truganina
GBR office: Ipswich FRA office: Saint Vigor d'Ymonville
AUS:cs.au@costway.com
GBR:cs.uk@costway.com
FRA:cs.fr@costway.com
