THIS INSTRUCTION BOOKLET CONTAINS IMPORTANT SAFETY INFORMATION. PLEASE READ AND KEEP FOR FUTURE REFERENCE.
EN DE FR ES IT PL
USER'S MANUAL/HANDBUCH
/MANUEL DE L'UTILISATEUR/MANUAL DEL USUARIO
/MANUALE UTENTE/INSTRUKCJA OBSŁUGI
GP11661
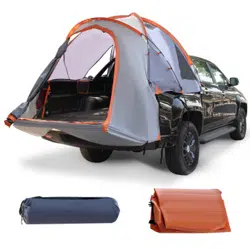
Truck Tent / LKW-Zelt
/ Tente de Camion / Tienda para Camión / Tenda per Camion
/ Plandeka do samochodu

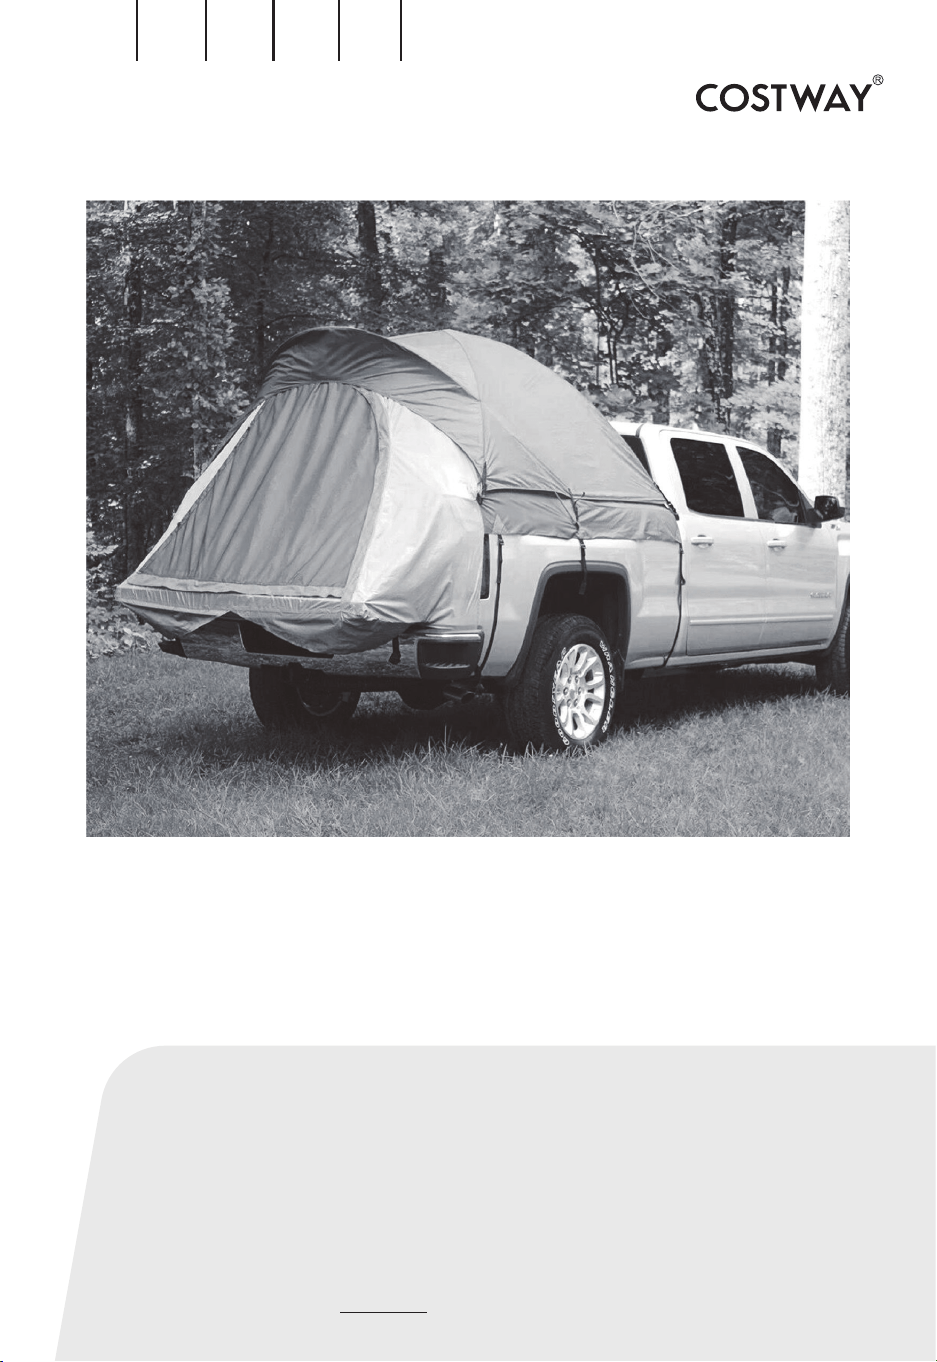
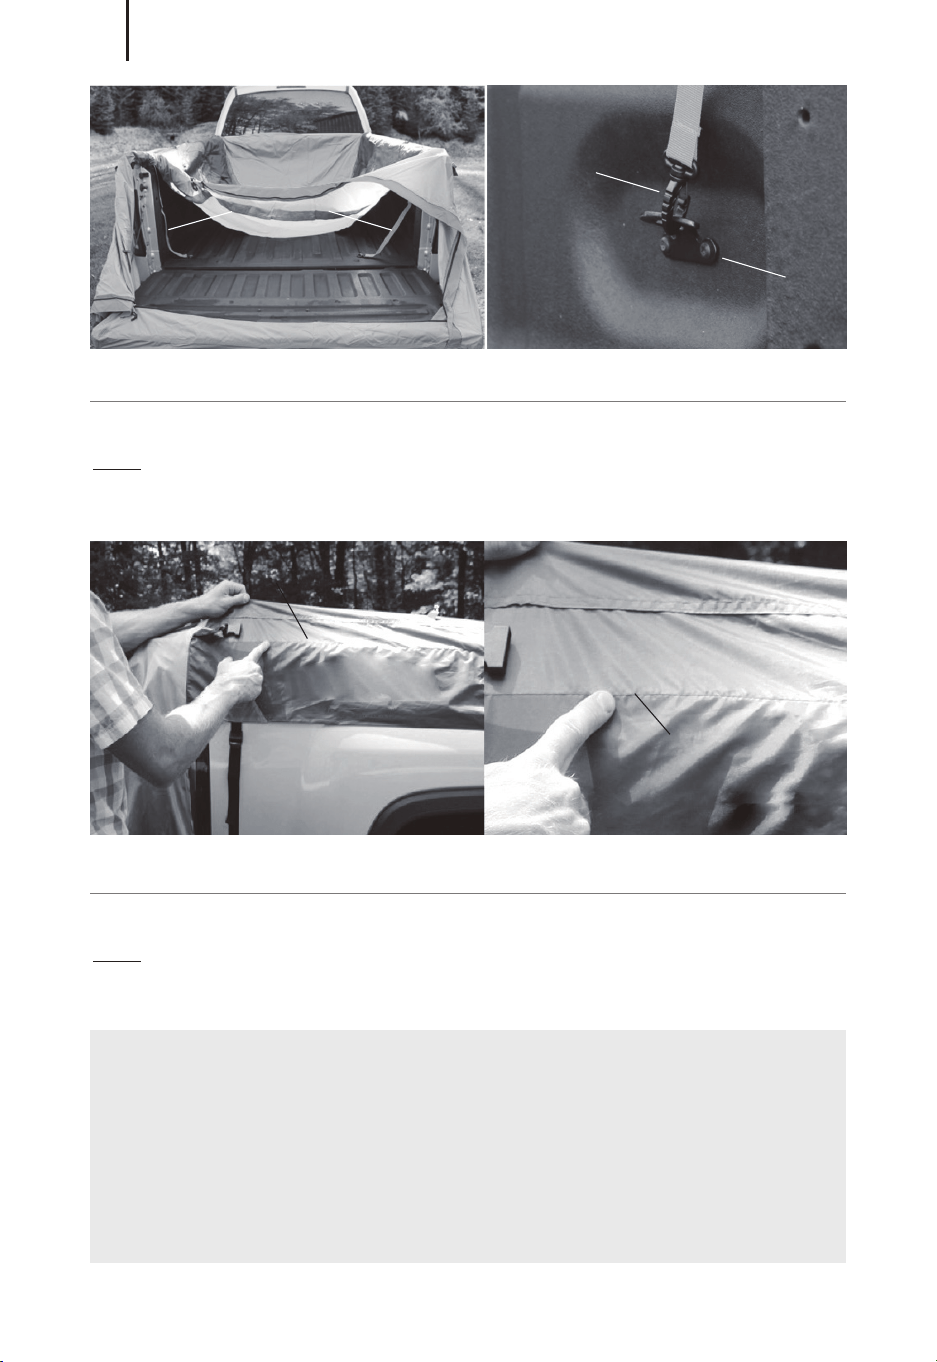
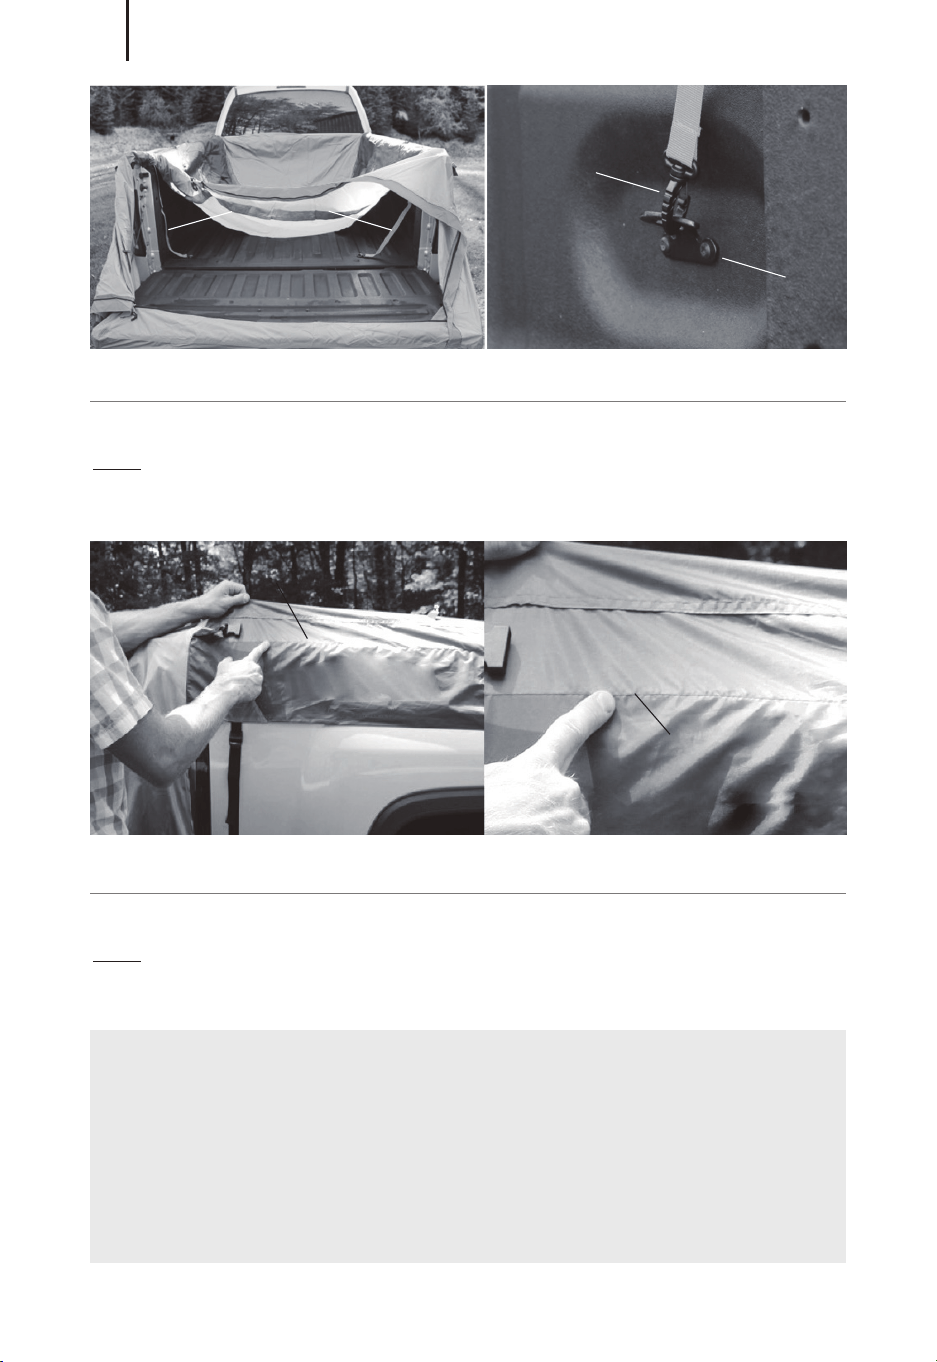
Open the tailgate. Place the tent in your
truck bed with the mesh window side
facing up. Slip the tent over the tail-gate
and tie the tailgate strap underneath.
01
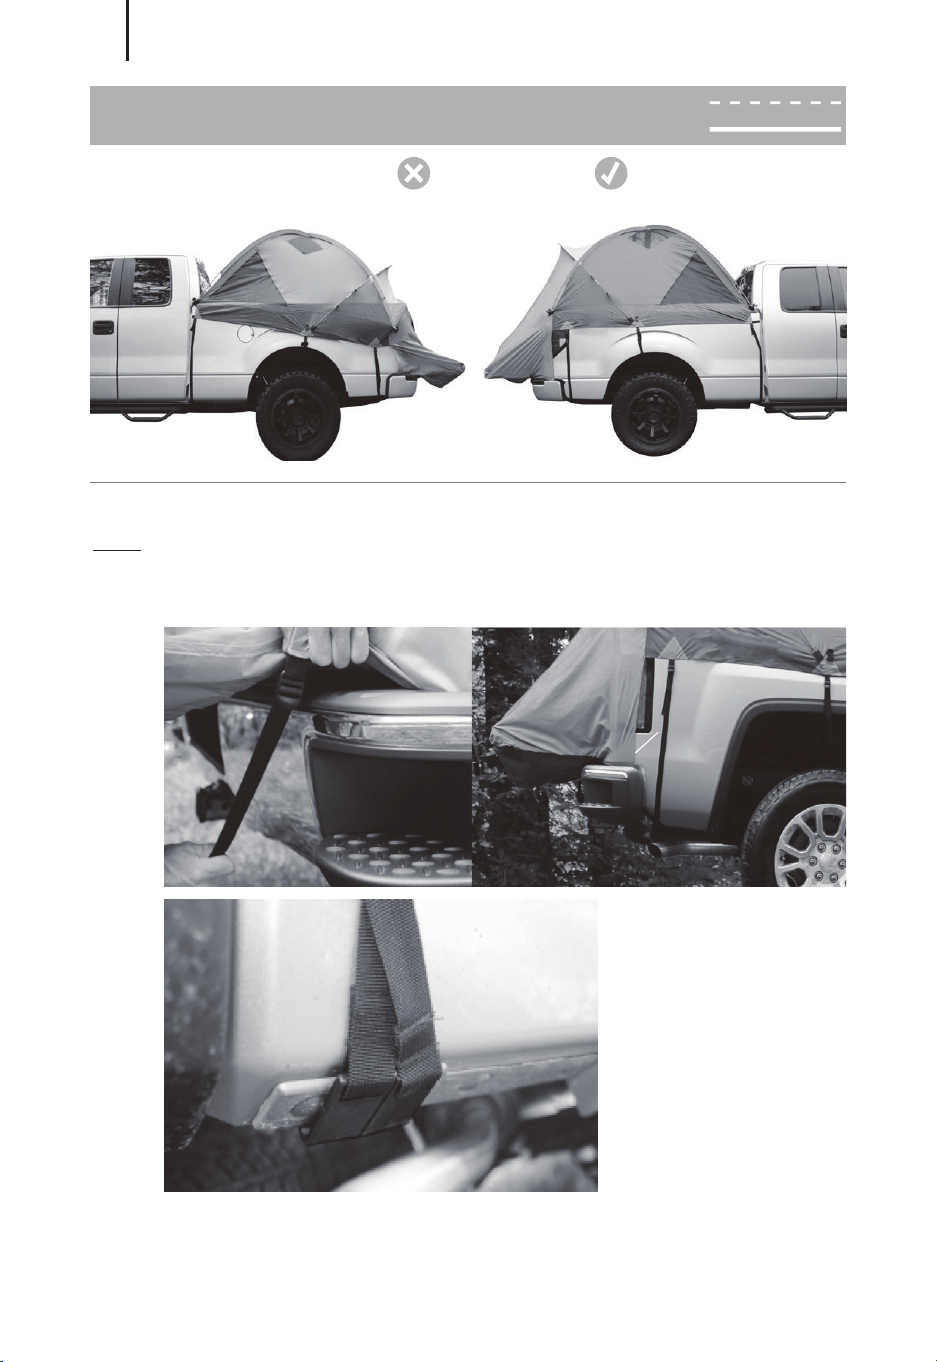
Pull the tent forward so that it covers the
entire truck bed (Fig 1). The front corner
of the tent has a gap with the front corner
of the bed (Fig 2).
02
Loosely attach the C straps
to the bottom of the truck
bed (Fig 3).
03
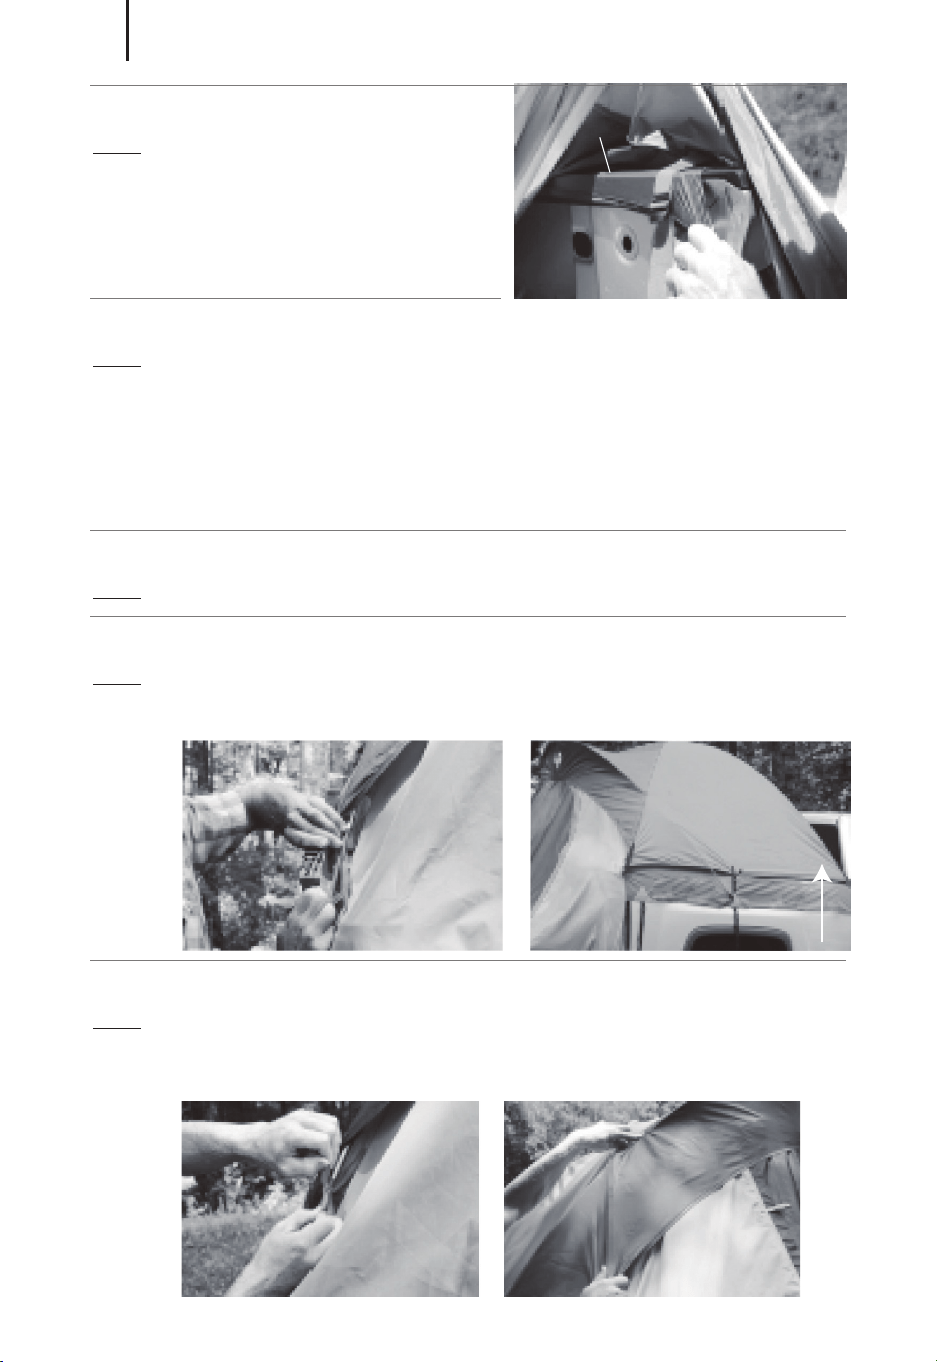
Open the door of the tent. Connect the orange swivel belt to the
corner cleat of the truck bed (Fig 4 and Fig 5).
04
Fig 1
Fig 2
CAUTION: DO NOT USE EXCESSIVE FORCE WHEN
TIGHTENING THE STRAPS.
A
B
C
D
Fig 3
Set Up The Truck Tent
EN
02

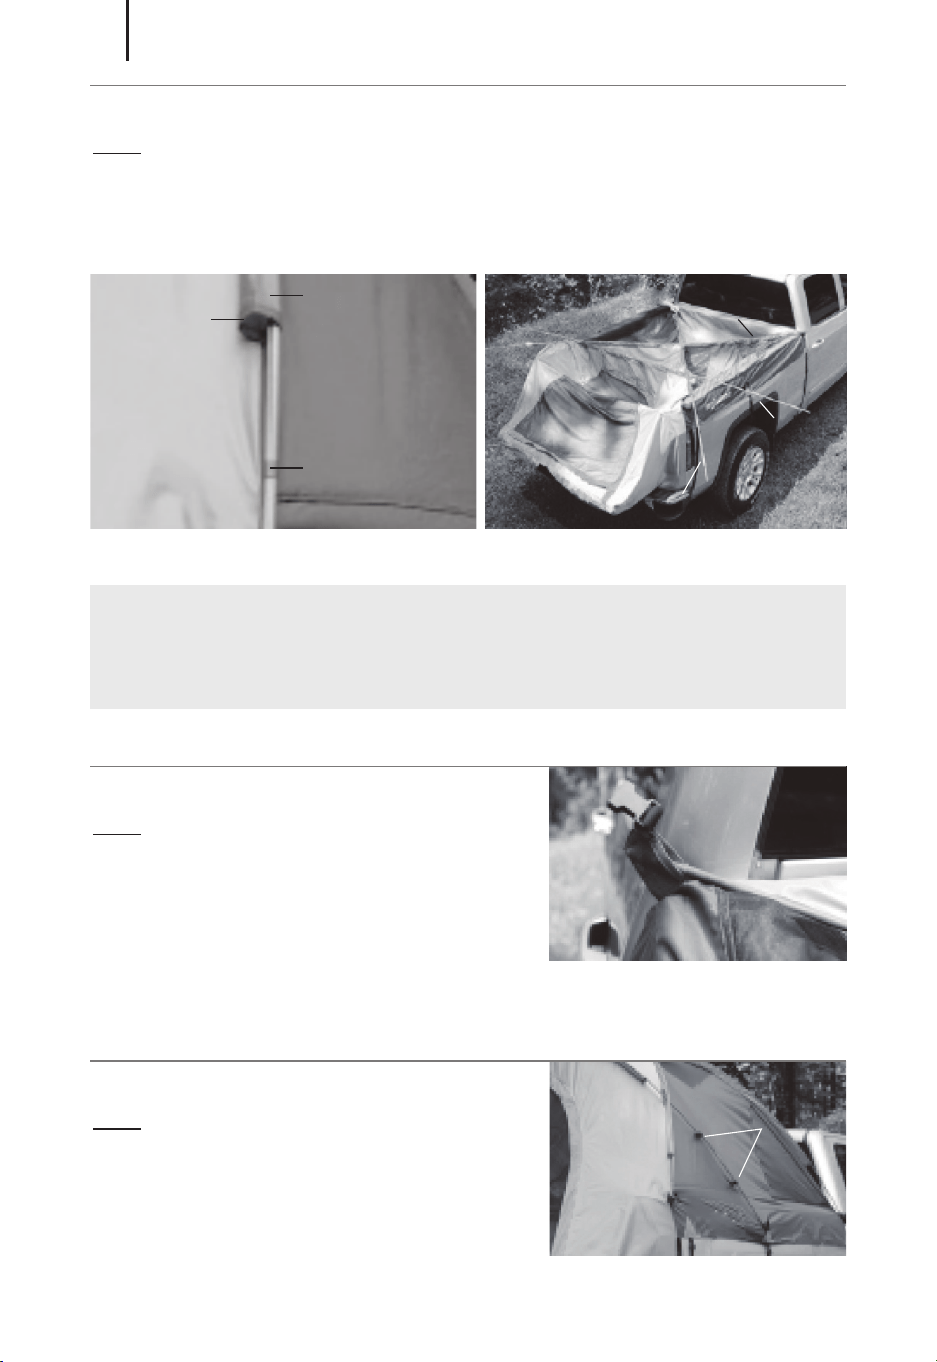
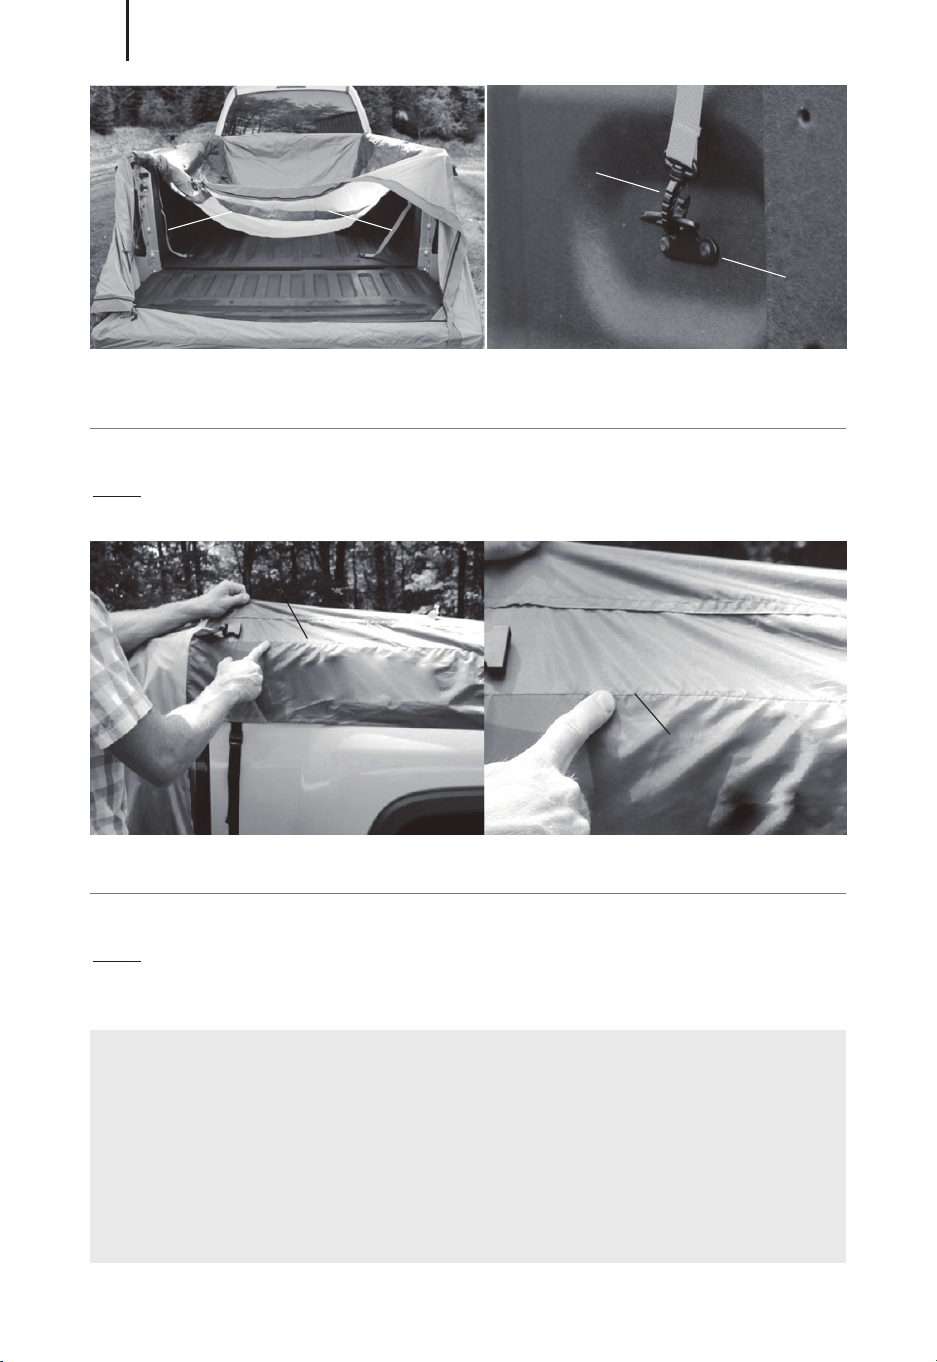
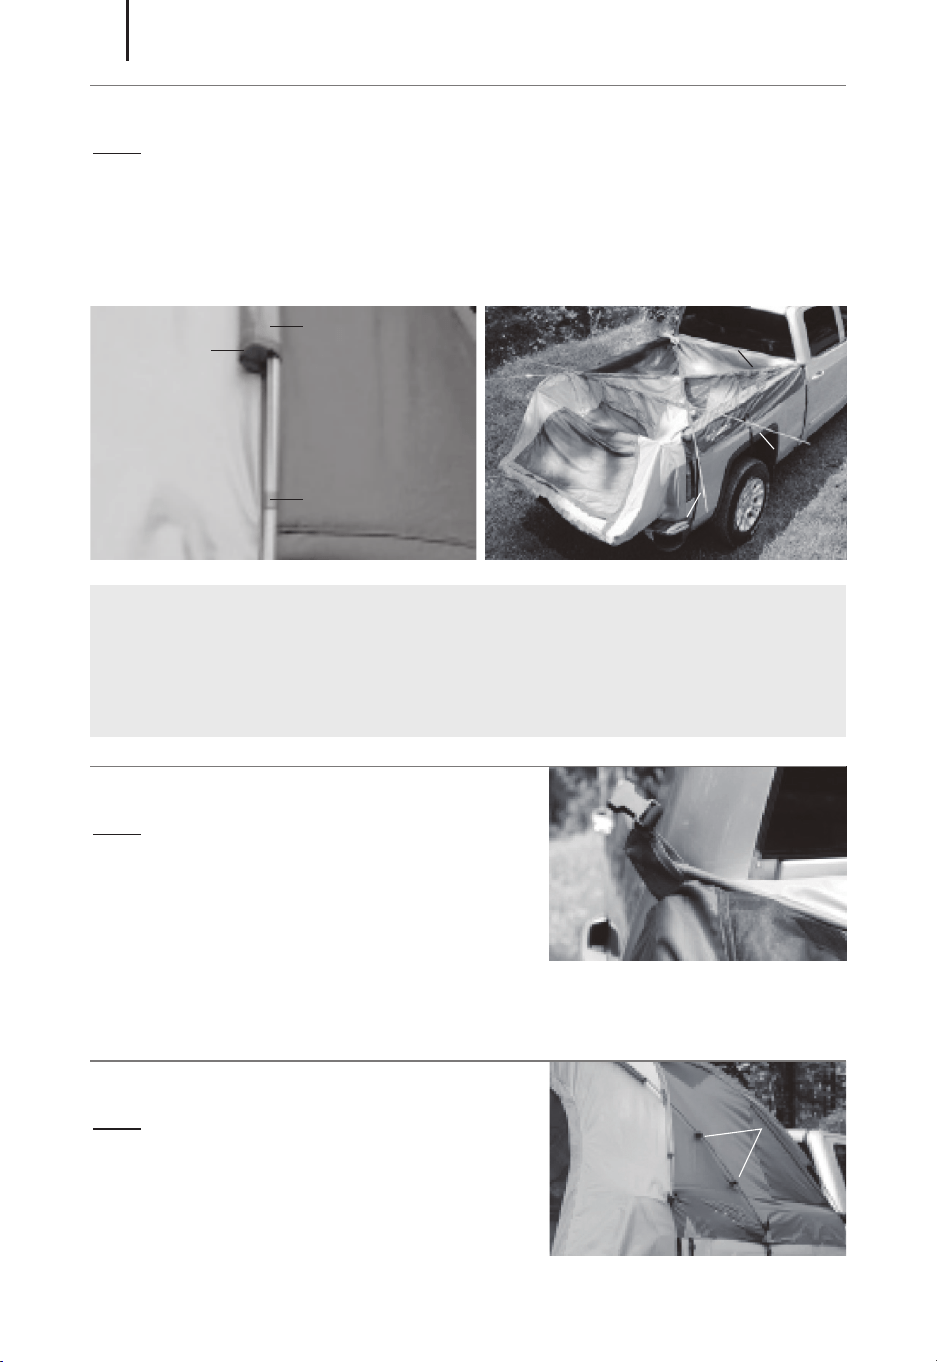
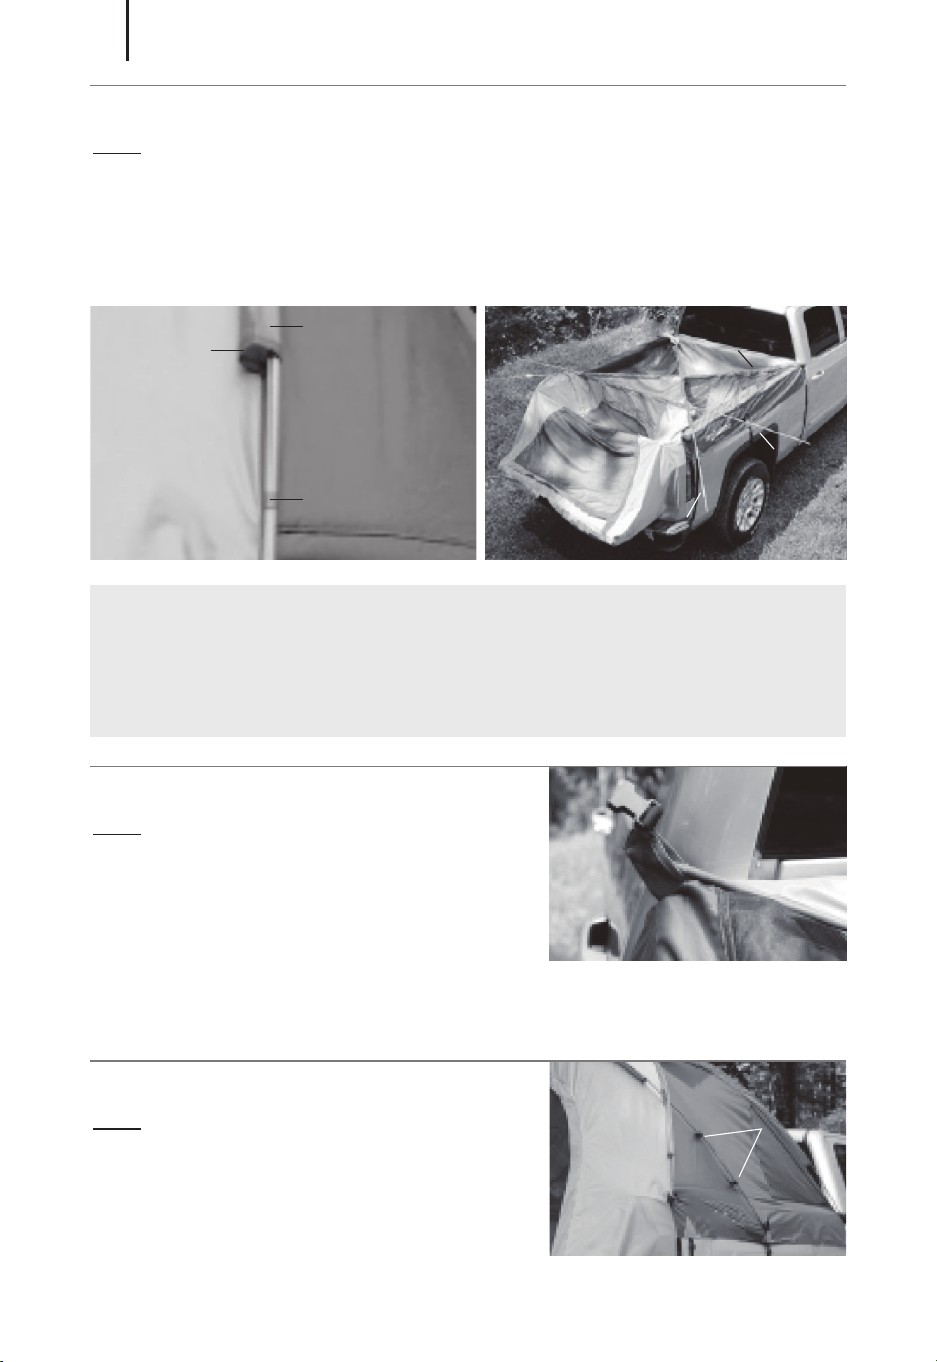
Tighten the orange straps to let the inner flap seam align
with the top edge of the bed rail (Fig 6 and Fig 7).
05
Attach the A and B straps to the bottom of the truck bed
and tighten the A, B, and C straps (Fig 3).
06
WARNING: DO NOT OVERTIGHTEN THE A, B AND C
STRAPS WHICH WILL PULL THE INNER FLAP SEAMS BELOW
THE TOP EDGES OF THE BED RAILS (FIG 8). IF THE STRAPS
ARE OVERTIGHTENED, THE TENT’S DOOR ZIPPER WILL BE
DIFFICULT TO CLOSE AND MAY BE DAMAGED.
Fig 4 Fig 5
Corner Cleats
Swivel
Clip
Corner
Cleat
Fig 6 Fig 7
Inner Flap Seam
Inner Flap Seam
EN
03
Tighten the tailgate strap (Fig 9). Place the tailgate side
flaps behind the bumper (on most trucks) (Fig 10). Put the
D straps over the A straps and attach them to the bottom of
the truck bed (Fig 11).
07
Inner Flap Seam
Truck Bed Rail
Fig 9 Fig 10
Tailgate
Side Flap
A
D
Fig 11
D
A
EN
04
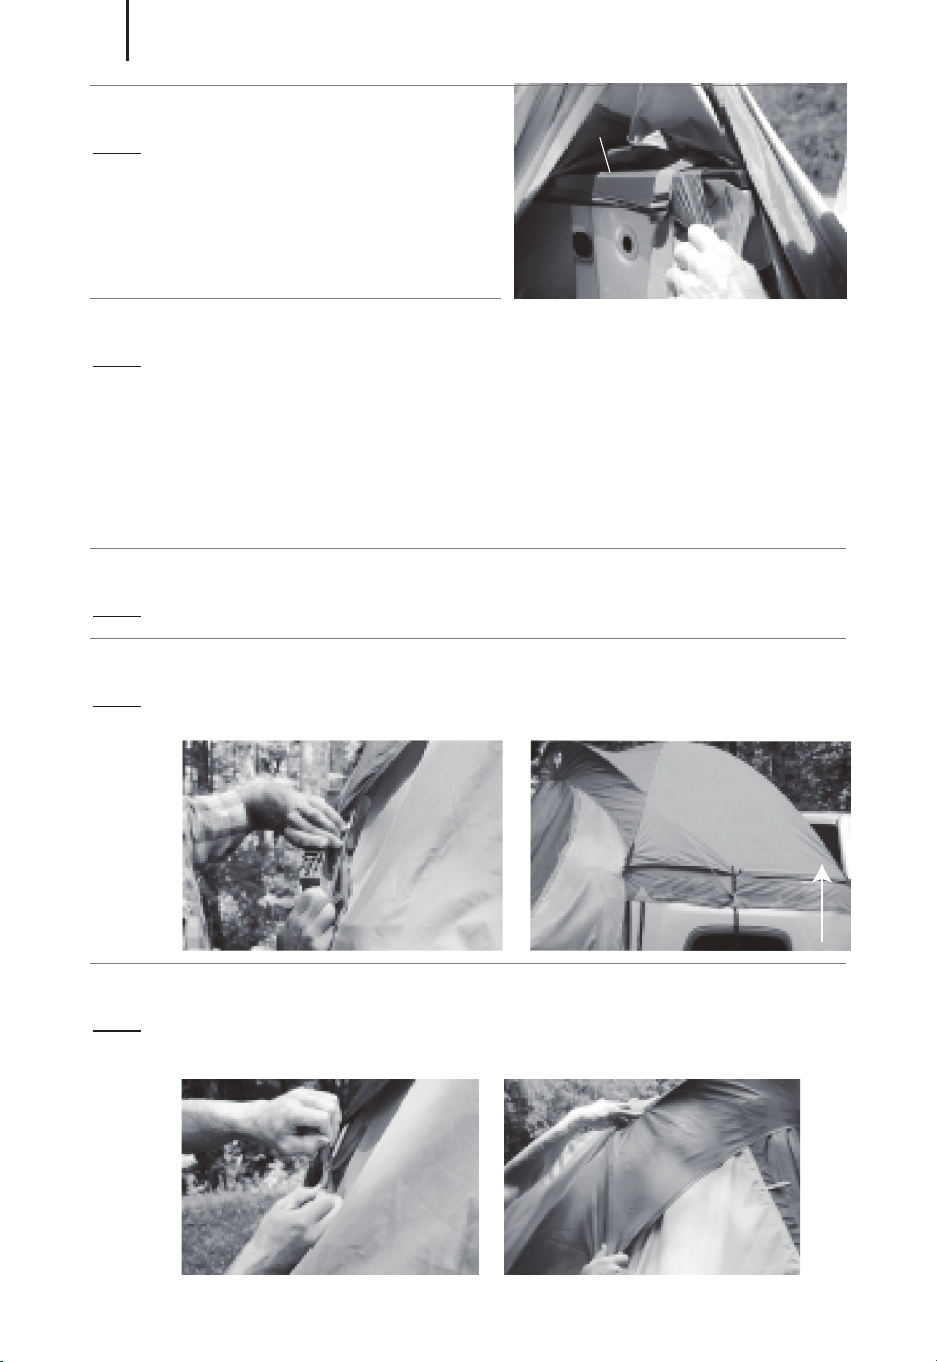
Put all (3) tent poles through their matching color pole
sleeves (Fig 12). The (2) front poles are marked with
or-ange tape and the rear pole is marked with gray tape
(Fig 12 and Fig 13). The gray-marked pole should be
placed under the (2) orange-marked poles (Fig 13).
08
Raise each orange-marked pole by
inserting their ends into their matching
color pole pockets (Fig 14). Raise the
gray-marked pole by the same
method.
09
Attach the (4) pole clips to the
gray-marked pole (Fig 15).
10
CAUTION: DO NOT USE EXCESSIVE FORCE WHEN RAISING
THE POLES. MAKE SURE THE POLE SLEEVES SLIDE OVER
THE POLES WITHOUT HANGING UP.
Gray-
Marked
Pole
Pole
Sleeve
Orange
Tape
Orange-Marked
Pole
Orange-Marked Pole
Orange
Marking
Fig 12
Fig 14
Fig 15
Fig 13
Pole Clips
EN
05

Set Up The Rainfly
Position the inner flaps on
the top of the bed rails,
un-der the orange straps,
and pull out the
11
Adjust straps. Make sure that the inner side flap seams
align with the top outer edges of the bed rails (Fig 16).
12
Position the rainfly over the tent with the logo over the
tent’s door.
Connect the (3) buckles on each side of the tent (Fig 17)
and adjust their straps. The rainfly should cover the
win-dows on both sides of the tent (Fig 18).
The use of the rainfly is optional, depending on weather conditions.
01
Tie the (3) strings at the rear edge of the rainfly to the tent
poles (Fig 19). Line up the seams of the rainfly with the
tent poles underneath (Fig 20).
03
02
Inner Flap
Fig 16
Fig 17 Fig 18
Fig 19 Fig 20
EN
06
Take Down The Tent
Release the pole clips and take the poles out of the pole
pockets. Lower the tent and remove the poles from the
pole sleeves. Fold the poles and place them into the pole
bag.
Unclip the A, B, and C straps and loosen the tailgate strap.
01
02
Tilt the tailgate up and release the orange straps.
03
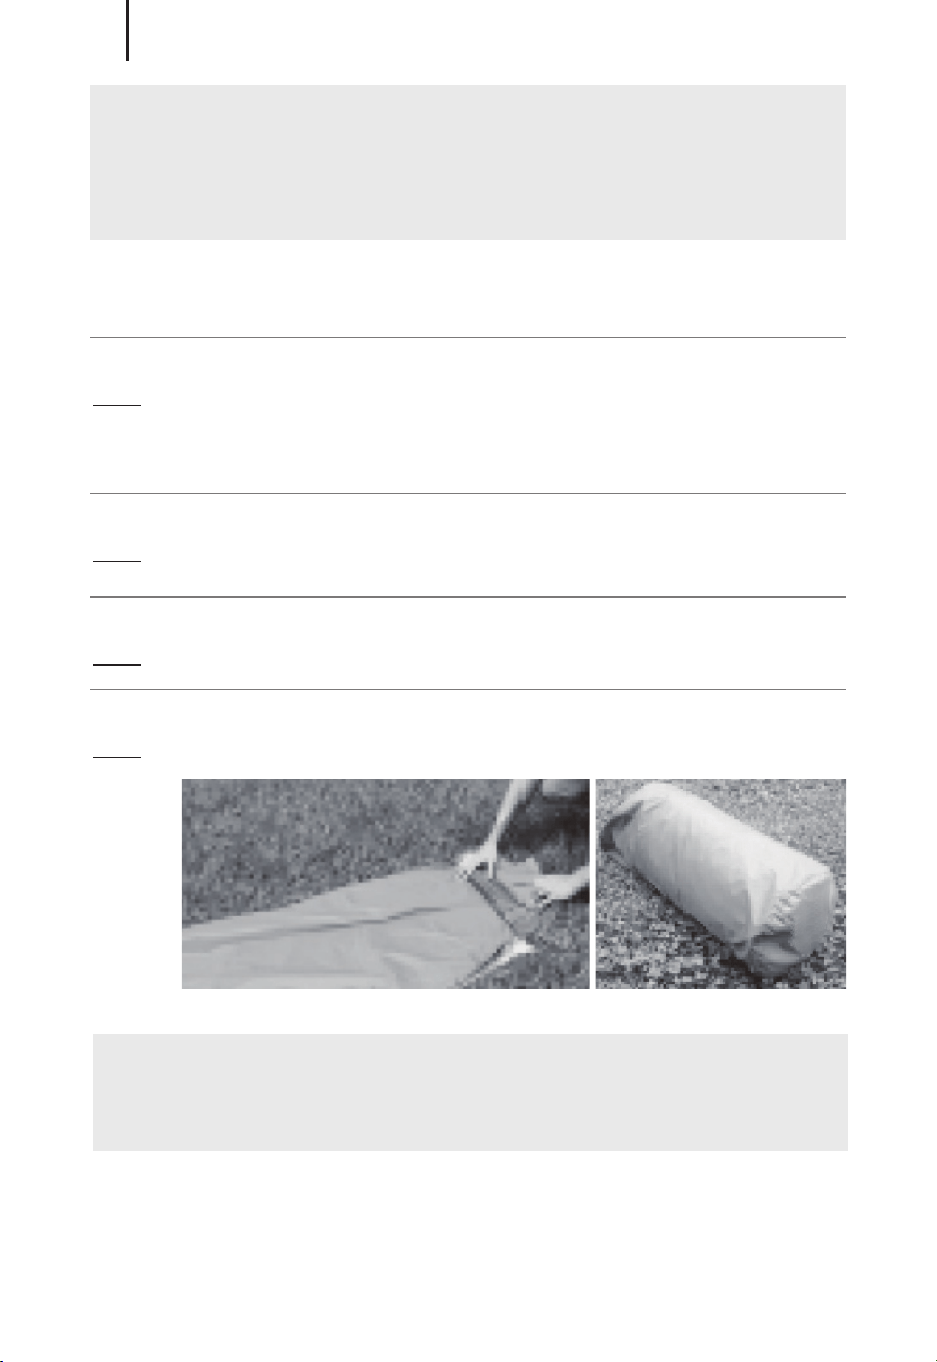
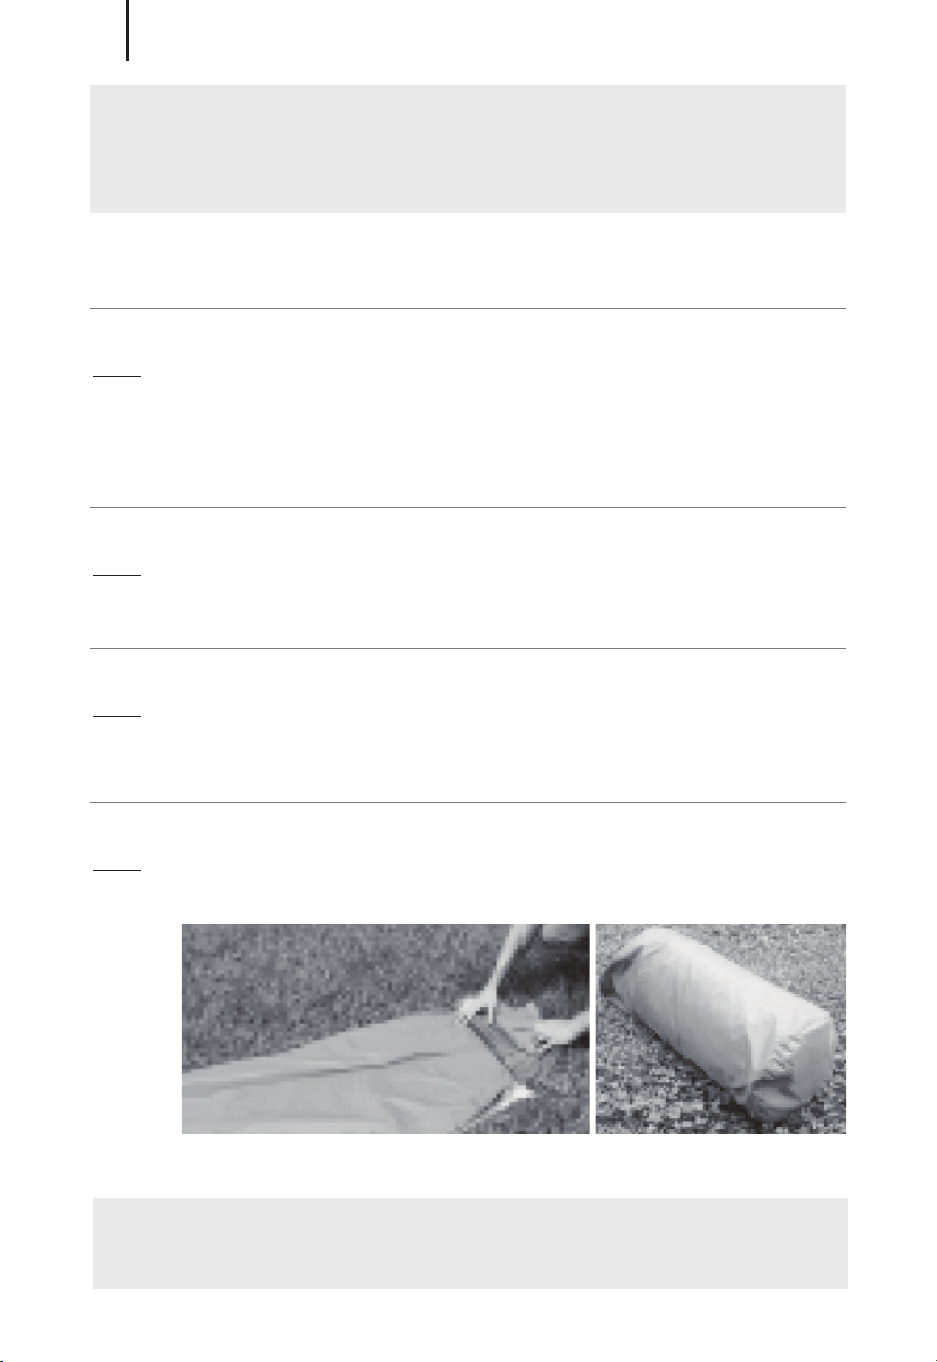
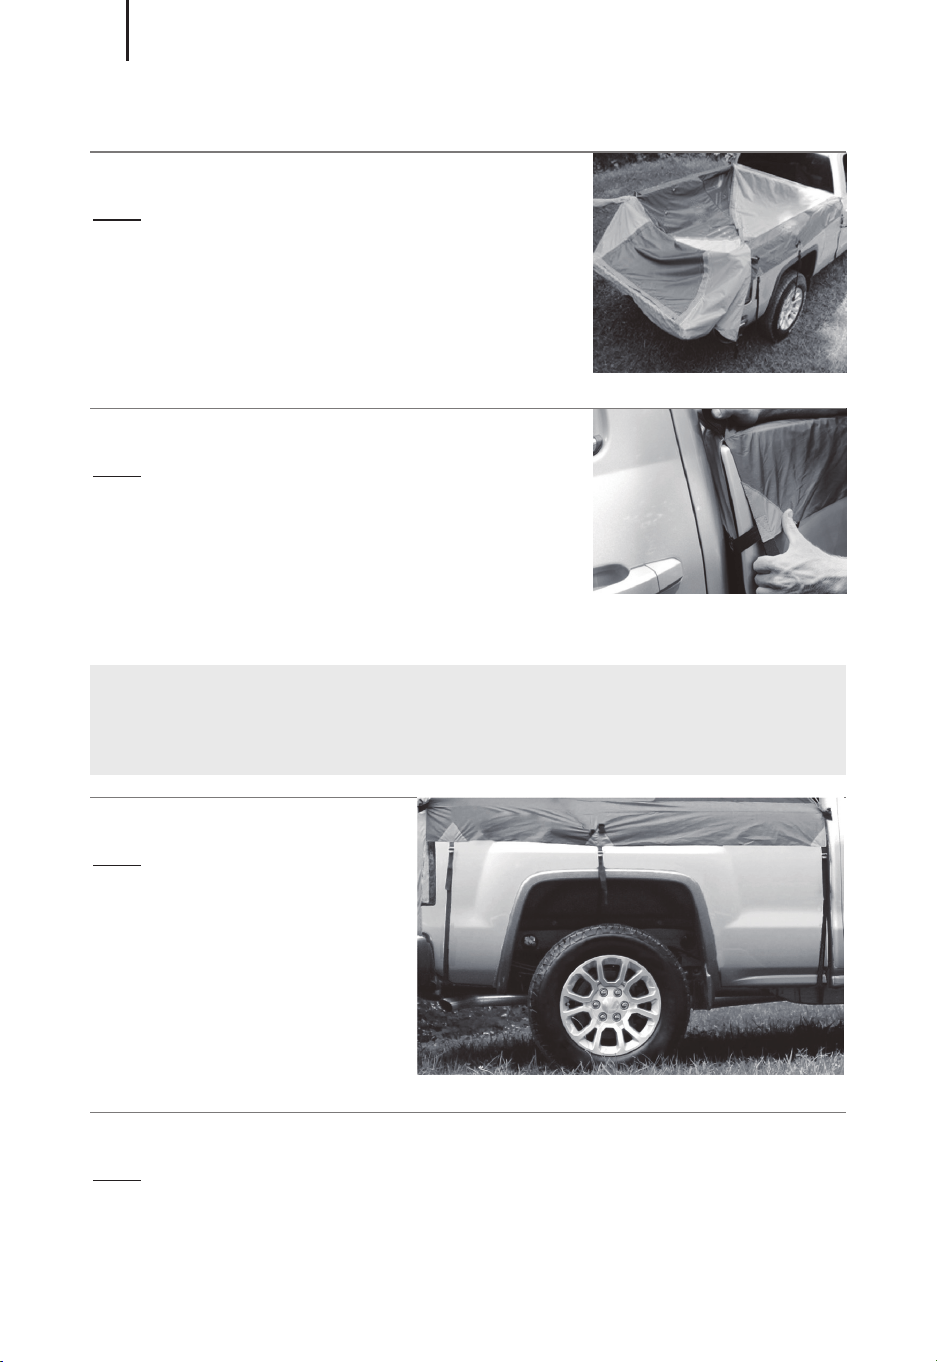
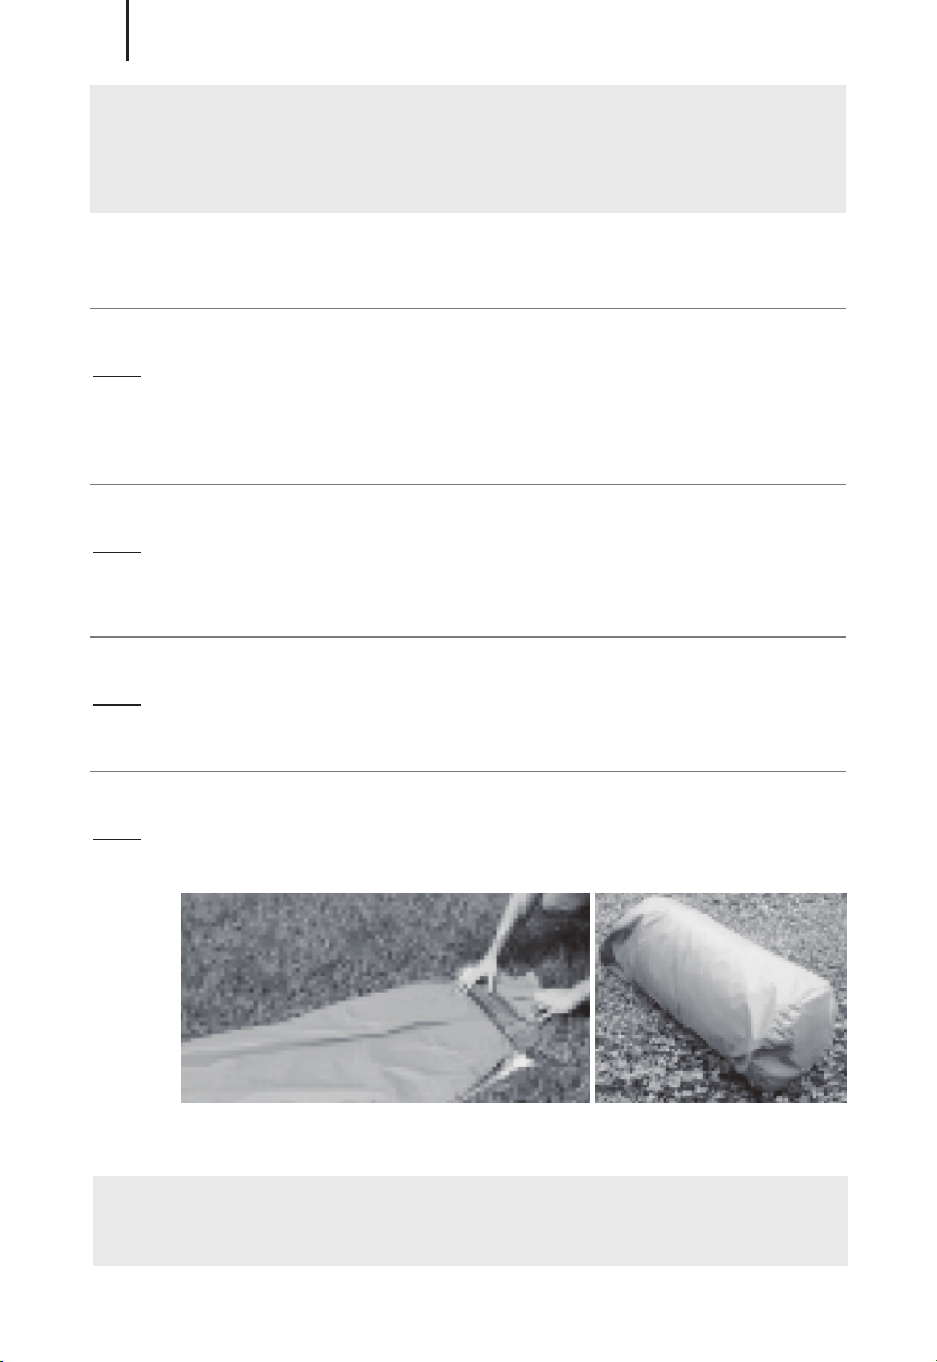
Roll the tent, the rainfly, and the pole bag together (Fig
21). Place the rolled up tent into the stuff sack (Fig 22).
04
WARNING: KEEP ALL FLAME AND HEAT SOURCES AWAY
FROM THIS TENT FABRIC.
CAUTION: DO NOT DRIVE WITH THE TENT SET UP. DO NOT
RUN THE TRUCK ENGINE WHEN ANYONE IS INSIDE THE
TENT.
Fig 21 Fig 22
EN
07

Öffnen Sie die Heckklappe. Legen Sie das
Zelt mit der Netzfensterseite nach oben
auf die Ladefläche Ihres Lkw. Schieben Sie
das Zelt über die Heckklappe und binden
Sie den Heckklappengurt darunter fest.
01
Ziehen Sie das Zelt nach vorne, so dass es
die gesamte Ladefläche abdeckt (Abb. 1).
Die vordere Ecke des Zeltes hat einen
Spalt zur vorderen Ecke der Ladefläche
(Abb. 2).
02
Befestigen Sie die C-Gurte
locker an der Unterseite
der Ladefläche (Abb. 3).
03
Öffnen Sie die Tür des Zelts. Verbinden Sie den orangefarbenen
Schwenkgurt mit der Eckklemme der Ladefläche (Abb. 4 und Abb. 5).
04
Abb. 1
Abb. 2
VORSICHT: WENDEN SIE BEIM ANZIEHEN DER GURTE
KEINE ÜBERMÄSSIGE KRAFT AN.
A
B
C
D
Abb. 3
DE
Aufbau des LKW-Zeltes
08

Ziehen Sie die orangefarbenen Gurte so an, dass die Naht
der Innenklappe mit der Oberkante des Bettgitters
übereinstimmt (Abb. 6 und Abb. 7).
05
Befestigen Sie die Gurte A und B an der unteren Außenlippe
der Ladefläche und ziehen Sie die Gurte A, B und C fest
(Abb. 3).
06
WARNUNG: ZIEHEN SIE DIE A-, B- UND C-RIEMEN NICHT ZU
FEST AN, DA SONST DIE INNEREN KLAPPENNÄHTE UNTER DIE
OBEREN KANTEN DER BETTSCHIENEN GEZOGEN WERDEN
(Abb. 8). WENN DIE GURTE ZU FEST ANGEZOGEN WERDEN,
LÄSST SICH DER REISSVERSCHLUSS DER ZELTTÜR NUR
SCHWER SCHLIESSEN UND KANN BESCHÄDIGT WERDEN.
Abb. 4 Abb. 5
Eckklemmen
Drehklemmen
Eckklemmen
Abb. 6 Abb. 7
Innere Klappennaht
Innere Klappennaht
DE
09

Ziehen Sie den Heckklappengurt fest (Abb.9). Legen Sie die
Seitenklappen der Heckklappe hinter die Stoßstange (bei
den meisten Lkw) (Abb. 10). Legen Sie die D-Gurte über die
A-Gurte und befestigen Sie sie an der Unterseite der
Ladefläche (Abb. 11).
07
Innere Klappennaht
Lkw-Ladefläche-Schiene
Abb. 9 Abb. 10
Seitliche
Heckklappe
A
D
Abb. 11
D
A
DE
10

Stecken Sie alle (3) Zeltstangen durch ihre farblich pas-
senden Stangenhülsen (Abb. 12). Die (2) vorderen Stan-
gen sind mit orangefarbenem Klebeband und die hintere
Stange mit grauem Klebeband markiert (Abb. 12 und Abb.
13). Die grau markierte Stange sollte unter die (2) orange
markierten Stangen gesteckt werden (Abb. 13).
08
Heben Sie die orange markierte
Stange an, indem Sie ihre Enden in
die farblich passenden
Stangentaschen stecken (Abb. 14).
Heben Sie den grau markierten Mast
auf die gleiche Weise an.
09
Befestigen Sie die (4)
Mastklammern an dem grau
markierten Mast (Abb. 15).
10
VORSICHT: WENDEN SIE BEIM ANHEBEN DER STANGEN
KEINE ÜBERMÄSSIGE KRAFT AN. ACHTEN SIE DARAUF,
DASS DIE MASTENHÜLSEN ÜBER DIE MASTEN GLEITEN,
OHNE SICH AUFZUHÄNGEN.
Grau markierter
Stange
Mastenhülse
Orangefarbenes
Klebeband
Orange markierter
Stange
Orange markierter
Stange
Orange
Markierung
Abb. 12
Abb. 14
Abb. 15
Abb. 13
Klemmen für
die Stange
DE
11
Aufstellen des Regenschutzes
Positionieren Sie die inneren
Laschen oben an den
Bettschienen unter den
orangefarbenen Gurten und
ziehen Sie die Lose heraus
(Abb. 16).
11
Passen Sie die Gurte an. Achten Sie darauf, dass die Nähte
der inneren Seitenklappen mit den oberen Außenkanten
der Bettgitter übereinstimmen (Abb. 16).
12
Positionieren Sie das Regenschutz so über dem Zelt, dass
sich das Logo über der Zelteingangstür befindet.
Die Verwendung des Regenschutzes ist je nach Wetterbedingungen
optional.
01
Befestigen Sie die (3) Schnüre an der Hinterkante des
Regenschutzes an den Zeltstangen (Abb. 19). Richten Sie
die Nähte des Regenschutzes an den darunter liegenden
Zeltstangen aus (Abb. 20).
03
02
Innere Klappe
Abb. 16
Abb. 17 Abb. 18
Abb. 19 Abb. 20
DE
Verbinden Sie die (3) Schnallen auf jeder Seite des Zeltes
(Abb. 17) und stellen Sie die Bänder ein. Das Regenschutz
sollte die Fenster auf beiden Seiten des Zeltes abdecken
(Abb. 18).
12

Abbauen des Zeltes
Lösen Sie die Stangenclips und nehmen Sie die Stangen
aus den Stangentaschen. Senken Sie das Zelt ab und
nehmen Sie die Stange aus den Stangentaschen. Falten Sie
die Stange zusammen und legen Sie es in die
Stangentasche.
Lösen Sie die A-, B- und C-Gurte und lösen Sie den
Heckklappengurt.
01
02
Kippen Sie die Heckklappe nach oben und lösen Sie die
orangefarbenen Gurte.
03
Rollen Sie das Zelt, das Regenschutz und die Stangentasche
zusammen (Abb. 21). Legen Sie das aufgerollte Zelt in den
Packsack (Abb. 22).
04
WARNUNG: HALTEN SIE ALLE FLAMMEN UND
WÄRMEQUELLEN VON DIESEM ZELTSTOFF FERN.
VORSICHT: FAHREN SIE NICHT MIT AUFGESTELLTEM ZELT.
LASSEN SIE DEN MOTOR DES FAHRZEUGS NICHT LAUFEN,
WENN SICH JEMAND IM ZELT BEFINDET.
Abb. 21 Abb. 22
DE
13

Ouvrez le hayon. Placez la tente dans
votre lit de camion avec la fenêtre de la
vitre maille tournée vers le haut. Glissez la
tente sur la porte de la queue et attachez
la sangle de hayon en dessous.
01
Tirez la tente en avant de sorte qu'il
couvre tout le lit de camion (Fig 1). Le coin
avant de la tente a une lacune avec le coin
avant du lit (Fig. 2).
02
Lâchement fixer les
sangles C au fond du lit de
camion (Fig 3).
03
Ouvrez la porte de la tente. Connectez la courroie pivotante orange
au banc de coin du lit de camion (Fig 4 et Fig 5).
04
Fig 1
Fig 2
ATTENTION: N'UTILISEZ PAS DE FORCE EXCESSIVE LORS
DU SERRAGE DES SANGLES.
A
B
C
D
Fig 3
FR
Mettre en Place la Tente de Camion
14
Serrer les sangles orange pour laisser la couture de rabat
interne aligner avec le bord supérieur du rail de lit (Fig 6 et
Fig 7).
05
Fixez les sangles A et B au bas du lit de camion et serrez les
sangles A, B et C (Fig 3).
06
AVERTISSEMENT: NE PAS SUR NE PAS SURVEILLER LES
STRAPTES A, B ET C QUI EXTRAIRE LES COUTURES DE RABAT
INTERNES SOUS LES BORDS SUPÉRIEURS DES RAILS DE LIT
(FIG 8). SI LES SANGLES SONT TROP SERRÉES, LA
FERMETURE À GLISSIÈRE DE LA PORTE DE LA TENTE SERA
DIFFICILE À FERMER ET PEUT ÊTRE ENDOMMAGÉE.
Fig 4 Fig 5
Caliers d'Angle
Clip Pivotant
Calier d'Angle
Fig 6 Fig 7
Couture à Rabat
Intérieur
Couture à Rabat Intérieur
FR
15

Serrer la sangle de hayon (Fig 9). Placez les rabats latéraux
haygate derrière le pare-chocs (sur la plupart des camions)
(Fig 10). Placez les sangles D sur les sangles et fixez-les au
fond du lit de camion (Fig 11).
07
Couture à Rabat Intérieur
Rail de Lit de Camion
Fig 9 Fig 10
Rabat Latéral
sur le Hayon
A
D
Fig 11
D
A
FR
16

Mettez tous (3) pôles de tente à travers leurs manches de
pôle couleur assorties (Fig 12). Les (2) pôles avant sont
marqués d'une bande d'orge et le pôle arrière est marqué
de bande grise (Fig 12 et Fig 13). Le pôle gris marqué doit
être placé sous les (2) pôles marqués à orange (Fig 13).
08
Élever chaque pôles marqués
orange en insérant leurs extrémités
dans leurs poches de pôle couleur
correspondantes (Fig 14). Soulevez
le pôle gris marqué par la même
méthode.
09
Fixez les (4) clips de pôle sur le pôle
marqué gris (Fig 15).
10
ATTENTION: N'UTILISEZ PAS DE FORCE EXCESSIVE LORS
DE LA LEVÉE DES PÔLES. ASSUREZ-VOUS QUE LES
MANCHES DE PÔLE GLISSENT SUR LES PÔLES SANS
RACCOURCIR.
Pôle Marqué Gris
Manchon à
la Pôle
Bande Orange
Pôle Marqué Orange
Pôle Marqué Orange
Marquage
Orange
Fig 12
Fig 14
Fig 15
Fig 13
Clips Pôles
FR
17

Mettre en Place la Pluie Pluviale
Positionnez les rabats
internes sur le dessus des
rails de lit, sous les sangles
orange et retirez le mou
(Fig 16).
11
Ajuster les sangles. Assurez-vous que les coutures de
rabat latéraux internes s'alignent sur les bords extérieurs
supérieurs des rails de lit (Fig 16).
12
Positionnez la pluie pluviale sur la tente avec le logo sur la
porte de la tente.
L'utilisation de la pluie pluviale est facultative, en fonction des
conditions météorologiques.
01
Cravate les (3) cordes au bord arrière de la pluie pluviale
aux pôles de la tente (Fig 19). Alignez les coutures de la
pluie pluviale avec les pôles de tente dessous (Fig 20).
03
02
Rabat Intérieur
Fig 16
Fig 17 Fig 18
Fig 19 Fig 20
FR
Connectez les (3) boucles de chaque côté de la tente (Fig
17) et ajustez leurs sangles. La pluie pluviale doit couvrir
les fenêtres des deux côtés de la tente (Fig 18).
18
Rangez la Tente
Relâchez les clips de poteau et sortez les poteaux des
poches pour poteaux. Abaissez la tente et retirez les
arceaux des manchons d'arceaux. Pliez les bâtons et
placez-les dans le sac pour bâtons.
Déclipsez les sangles A, B et C et desserrez la sangle du
hayon.
01
02
Faites basculer le hayon vers le haut et relâchez les
sangles orange.
03
Enroulez la tente, le double toit et le sac pour arceaux
ensemble (Fig 21). Placez la tente enroulée dans le sac de
rangement (Fig 22).
04
AVERTISSEMENT : GARDER TOUTES LES FLAMMES ET LES
SOURCES DE CHALEUR À L'ÉCART DE CE TISSU DE TENTE.
ATTENTION: NE CONDUISEZ PAS AVEC LA TENTE
CONFIGURÉE. NE PAS GÉRER LE MOTEUR DE CAMION
LORSQUE QUELQU'UN EST À L'INTÉRIEUR DE LA TENTE.
Fig 21 Fig 22
FR
19

Abra el portón tresero. Coloque la tienda
en la plataforma del camión con el lado de
la ventana de malla hacia arriba. Deslice la
tienda sobre el portón trasero y ate la
correa del portón trasero por debajo.
01
Tire de la tienda hacia adelante para que
cubra toda la plataforma del camión
(Fig.1). La esquina delantera de la tienda
tiene un espacio con la esquina delantera
de la plataforma (Fig.2).
02
Sujete sin apretar las
correas (C) a la parte
inferior de la plataforma
del camión (Fig.3).
03
Abra la puerta de la tienda. Conecte la correa giratoria naranja a la
abrazadera de la esquina de la plataforma del camión (Fig.4 y Fig.5).
04
Fig.1
Fig.2
ATENCIÓN: NO USE FUERZA EXCESIVA AL APRETAR LAS
CORREAS.
A
B
C
D
Fig.3
ES
Montar la Tienda para Camión
20
Apriete las correas naranjas para que la costura de la solapa
interior se alinee con el borde superior de la barandilla de la
plataforma del camión (Fig.6 y Fig.7).
05
Fije las correas (A) y (B) en la parte inferior de la
plataforma del camión y apriete las correas (A, B y C)
(Fig.3).
06
ADVERTENCIA: NO APRIETE DEMASIADO LAS CORREAS (A,
B Y C) QUE TIRARÁN DE LAS COSTURAS DE SOLAPA
INTERIOR DEBAJO DE LOS BORDES SUPERIORES DE LAS
BARANDILLAS DE LA PLATAFORMA DEL CAMIÓN (FIG.8). SI
LAS CORREAS ESTÁN DEMASIADO APRETADAS, LA
CREMALLERA DE LA PUERTA DE LA TIENDA SERÁ DIFÍCIL DE
CERRAR Y PUEDE DAÑARSE.
Fig.4 Fig.5
Clip giratorio
Abrazadera de esquina
Clip giratorio
Fig.6 Fig.7
Costura de solapa
interior
Costura de solapa interior
ES
21

Apriete la correa del portón trasero (Fig.9). Coloque las
solapas laterales del portón trasero detrás del parachoques
(en la mayoría de los camiones) (Fig.10). Coloque las
correas (D) sobre las correas (A) y fíjelas a la parte inferior
de la plataforma del camión (Fig.11).
07
Costura de solapa interior
Barandilla de la plataforma del camión
Fig.9 Fig.10
Solapa lateral del
portón trasero
A
D
Fig.11
D
A
ES
22
Inserte todos los (3) postes de tienda a través de las
mangas de los postes del mismo color (Fig.12). Los (2)
postes delanteros están marcados con cinta naranja y el
poste trasero está marcado con cinta gris (Fig.12 y
Fig.13). El poste marcado en gris debe pasar por debajo
de los (2) postes marcados en naranja (Fig.13).
08
Levante los postes marcados en
naranja insertando sus extremos en
los bolsillos de los postes del mismo
color (Fig.14). Levante el poste
marcado en gris con el mismo
método.
09
Fije los (4) clips de poste en el poste
marcado en gris (Fig.15).
10
ATENCIÓN: NO USE FUERZA EXCESIVA AL LEVANTAR LOS
POSTES. ASEGÚRESE DE QUE LAS MANGAS DE LOS
POSTES SE DESLICEN SOBRE LOS POSTES SIN AFECTARSE.
Poste marcado en gris
Manga de
poste
Cinta naranja
Poste marcado en naranja
Poste marcado en naranja
Marcado en
naranja
Fig.12
Fig.14
Fig.15
Fig.13
Clips de poste
ES
23

Montar la Cubierta Protectora para Lluvia
Coloque las solapas
interiores en la parte
superior de las barandillas de
la plataforma del camión,
debajo de las correas
naranjas, y tire de la holgura
(Fig.16).
11
Ajuste las correas. Asegúrese de que las costuras de las
solapas laterales interiores se alineen con los bordes
exteriores superiores de las barandillas de la plataforma
del camión (Fig.16).
12
Coloque la cubierta protectora sobre la tienda con el
logotipo sobre la puerta de la tienda.
El uso de la cubierta protectora para lluvia es opcional, dependiendo
de las condiciones climáticas.
01
Ate las (3) cuerdas en el borde trasero de la cubierta
protectora a los postes de la tienda (Fig.19). Alinee las
costuras de la cubierta protectora con los postes de la
tienda que se encuentran debajo (Fig. 20).
03
02
Solapa interior
Fig.16
Fig.17 Fig.18
Fig.19 Fig.20
ES
Conecte las (3) hebillas a cada lado de la tienda (Fig.17) y
ajuste las correas. La cubierta protectora para lluvia debe
cubrir las ventanas a ambos lados de la tienda (Fig.18).
24
Desmontar la Tienda
Suelte los clips de los postes y saque los postes de los
bolsillos de los postes. Baje la tienda y retire los postes de
las mangas de los postes. Doble los postes y colóquelos en
la bolsa de postes.
Desenganche las correas (A, B y C) y afloje la correa del
portón trasero.
01
02
Incline el portón trasero hacia arriba y suelte las correas
naranjas.
03
Enrolle la tienda, la cubierta protectora para lluvia y la bolsa
de postes juntas (Fig.21). Coloque la tienda enrollada en la
bolsa (Fig.22).
04
ADVERTENCIA: MANTENGA TODAS LAS FUENTES DE
LLAMA Y CALOR ALEJADAS DE LA TELA DE TIENDA.
ATENCIÓN: NO CONDUZCA CON LA TIENDA INSTALADA.
NO HAGA FUNCIONAR EL MOTOR DEL CAMIÓN CUANDO
HAY ALGUIEN DENTRO DE LA TIENDA.
Fig.21 Fig.22
ES
25
Aprire il portellone. Posizionare la tenda
nel pianale del camion con il lato della
finestra in rete rivolto verso l'alto. Infilare
la tenda sul portellone e legare la cinghia
del portellone sottostante.
01
Tirare la tenda in avanti in modo che copra
l'intero pianale del camion (Fig.1). L'angolo
anteriore della tenda ha uno spazio vuoto
con l'angolo anteriore del pianale del
camion. (Fig.2)
02
Fissare senza stringere le
cinghie (C) al fondo del
pianale del camion (Fig.3).
03
Aprire la porta della tenda. Collegare la cinghia girevole arancione
alla galloccia angolare del pianale del camion (Fig.4 e Fig.5).
04
Fig.1
Fig.2
ATTENZIONE: NON ESERCITARE UNA FORZA ECCESSIVA
DURANTE IL SERRAGGIO DELLE CINGHIE.
A
B
C
D
Fig.3
IT
Montare la Tenda per Camion
26
Stringere le cinghie arancioni per far allineare la cucitura
interna della patta con il bordo superiore della guida del
pianale del camion (Fig.6 e Fig.7).
05
Attaccare le cinghie (A) e (B) al bordo esterno inferiore del
pianale del camion e stringere le cinghie ( A, B e C ) (Fig.3).
06
AVVERTENZA: NON STRINGERE ECCESSIVAMENTE LE
CINGHIE (A, B E C) CHE TIRERANNO LE CUCITURE INTERNE
DELLE PATTE SOTTO I BORDI SUPERIORI DELLE GUIDE DEL
PIANALE DEL CAMION (FIG.8). SE LE CINGHIE SONO TROPPO
STRETTE, LA CERNIERA DELLA PORTA DELLA TENDA SARÀ
DIFFICILE DA CHIUDERE E POTREBBE DANNEGGIARSI.
Fig.4 Fig.5
Galloccia angolare
Clip girevole
Galloccia angolare
Fig.6 Fig.7
Cucitura interna
della patta
Cucitura interna della patta
IT
27

Stringere la cinghia del portellone (Fig.9). Posizionare le
patte laterali del portellone dietro il paraurti (sulla maggior
parte dei camion) (Fig.10). Mettere le cinghie (D) sopra le
cinghie (A) e fissarle al fondo del pianale del camion
(Fig.11).
07
Cucitura interna della patta
Guida del pianale del camion
Fig.9 Fig.10
Patta laterale
del portellone
A
D
Fig.11
D
A
IT
28

Inserire tutti (3) i pali della tenda attraverso i manicotti dei
pali dello stesso colore (Fig.12). I 2 pali anteriori sono
contrassegnati con nastro arancione e il palo posteriore è
contrassegnato con nastro grigio (Fig.12 e Fig.13). Il palo
contrassegnato in grigio dovrebbe passare sotto i (2) pali
contrassegnati in arancione (Fig.13).
08
Sollevare i pali marcati in arancione
inserendo le loro estremità nelle
tasche dei pali dello stesso colore
(Fig.14). Sollevare il palo marcato in
grigio con lo stesso metodo.
09
Fissare le 4 clip per palo al palo
marcato in grigio (Fig.15).
10
ATTENZIONE: NON USARE UNA FORZA ECCESSIVA
QUANDO SI SOLLEVANO I PALI. ASSICURARSI CHE I
MANICOTTI DEI PALI SCIVOLINO SUI PALI SENZA
RIAGGANCIARE.
Palo marcato in grigio
Manicotto
del palo
Nastro
arancione
Palo marcato in arancione
Palo marcato in arancione
Marcatura
arancione
Fig.12
Fig.14
Fig.15
Fig.13
Clip per palo
IT
29

Montare il parapioggia
Posizionare le patte interne
sulla parte superiore delle
guide del del pianale del
camion, sotto le cinghie
arancioni, ed estrarre
l'allentamento (Fig.16).
11
Regolare le cinghie. Assicurarsi che le cuciture delle patte
laterali interne siano allineate con i bordi esterni superiori
delle guide del del pianale del camion (Fig.16).
12
Posiziona il parapioggia sopra la tenda con il logo sopra la
porta della tenda.
L'uso del parapioggia è facoltativo, a seconda delle condizioni
meteorologiche.
01
Legare le 3 corde sul bordo posteriore del parapioggia ai
pali della tenda (Fig.19). Allineare le cuciture del
parapioggia con i pali della tenda sotto (Fig.20).
03
02
Patta interna
Fig.16
Fig.17 Fig.18
Fig.19 Fig.20
IT
Collegare le 3 fibbie su ogni lato della tenda (Fig.17) e
regolare le cinghie. Il parapioggia dovrebbe coprire le
finestre su entrambi i lati della tenda (Fig.18).
30
Smontare la tenda
Rilasciare i clip per pali ed estrarre i pali dalle tasche per
pali. Abbassare la tenda e rimuovere i pali dai manicotti dei
pali. Piegare i pali e metterli nelle tasche per pali.
Sganciare le cinghie (A, B e C) e allentare la cinghia del
portellone.
01
02
Inclinare il portellone verso l'alto e rilasciare le cinghie
arancioni.
03
Arrotolare insieme la tenda, il parapioggia e la tasca per i pali
(Fig.21). Inserire la tenda arrotolata nella borsa (Fig.22).
04
AVVERTENZA: TENERE TUTTE LE FIAMME E LE FONTI DI
CALORE LONTANE DA QUESTO TESSUTO PER TENDE.
ATTENZIONE: NON GUIDARE CON LA TENDA MONTATA.
NON AZIONARE IL MOTORE DEL CAMION QUANDO
QUALCUNO È ALL'INTERNO DELLA TENDA.
Fig.21 Fig.22
IT
31

Otwórz tylną klapę. Umieść namiot z
oknem z siatki, skierowanym ku górze.
Przesuń namiot przez tylną klapę i zawiąż
pod spodem pasek od tylnej klapy.
01
Pociągnij namiot do przodu tak, aby
zakrył całą skrzynię ładunkową pojazdu
(rys. 1). Przedni narożnik namiotu
posiada szczelinę (dopasowana do
skrzyni ładunkowej)(rys. 2).
02
Luźno przymocuj paski C
do dołu skrzyni ładunkowej
(Rys. 3).
03
Otwórz drzwi namiotu. Podłącz pomarańczowy pasek do łącznika
narożnego.
04
rys. 1
rys. 2
UWAGA: NIE NALEŻY UŻYWAĆ NADMIERNEJ SIŁY
PODCZAS DOCISKANIA PASÓW.
A
B
C
D
rys. 3
PL
Ustawienie
32

Zaciśnij pomarańczowe paski, aby szew wewnętrzny klapy
został dopasowany do górnej krawędzi skrzyni ładunkowej
pojazdu (rys. 6 i rys. 7).
05
Zamocuj paski A i B na spodzie skrzyni pojazu i zaciśnij
paski A, B i C (Rys. 3).
06
UWAGA: NIE DOCISKAJ PASÓW A, B I C ZBYT MOCNO,
GDYŻ SPOWODOWUJE TO NIEPRAWIDŁOWE UŁOŻENIE
WEWNĘTRZNYCH SZWÓW KLAP (ZNAJDĄ SIĘ PONIŻEJ
KRAWĘDZI SKRZYNI ŁADUNKOWEJ). JEŚLI PASY ZOSTANĄ
ZBYT MOCNO DOCIŚNIĘTE, TRUDNO BĘDZIE OPEROWAĆ
SUWAKIEM DRZWI NAMIOTU, W EFEKCIE MOŻE TO
DOPROWADZIĆ DO JEGO USZKODZENIA.
rys. 4 rys. 5
Łącznik narożny
Klips obrotowy
Łącznik narożny
rys. 6 rys. 7
Wewnętrzne
szwy klap
Wewnętrzne szwy klap
PL
33

Napnij pasek klapy tylnej (Rys. 9). Umieść klapy boczne za
zderzakiem (u większości pojazdów) (Rys. 10). Przełóż
paski D przez paski A i przymocuj je do dna skrzyni
ładunkowej pojazdu (Rys. 11).
07
Wewnętrzne szwy klap
Szyna skrzyni ładunkowej
rys. 9 rys. 10
Klapa boczna na
tylnej klapie
A
D
rys. 11
D
A
PL
34
Włóż wszystkie (3) słupki do namiotu zwracając uwagę na
pasujące do nich kolorowe osłony (rys. 12). Przednie (2)
słupki są oznaczone paskiem koloru pomarańczowego, a
tylne - są oznaczone szarym paskiem (rys. 12 i rys. 13).
Szary słupek należy umieścić pod (2) słupkami oznac-
zonymi kolorem pomarańczowym (rys. 13).
08
Podnieś każdy oznaczony na
pomarańczowo słupek, wkładając jego
końce do odpowiednich kolorowych
kieszeni(rys. 14). Podnieś oznaczony na
szaro słupek i powtórz krok (tak samo
jak w przypadku pomarańczowego
słupka).
09
Zamocuj (4) zaciski słupka na
słupku oznaczonym na szaro (rys.
15).
10
UWAGA: NIE UŻYWAJ NADMIERNEJ SIŁY PODCZAS
PODNOSZENIA SŁUPKÓW UPEWNIJ SIĘ, ŻE RĘKAWY
PASUJĄ DO SŁUPKÓW (BEZ POTRZEBY SKRACANIA)
Słupek oznaczony
kolorem szarym
Rękaw do
słupka
Pomarańczowy
pas
Słupek oznaczony kolorem
pomarańczowym
Słup oznaczony kolorem
pomarańczowym
Pomarańczowe
oznaczenie
rys. 12
rys. 14
rys. 15
rys. 13
Zaciski słupków
PL
35
Właściwe umieszczenie deszczownicy
Ustaw klapy wewnętrzne
na górze szyn skrzyni
ładunkowej, pod
pomarańczowymi paskami i
pozbądź się poluzowań
(rys. 16).
11
Wyreguluj pasy. Upewnij się, że szwy wewnętrznych klap
bocznych pokrywają się z zewnętrzną górną krawędzią
szyn skrzyni ładunkowej (rys. 16).
12
Umieść deszczownicę na namiocie z logo zwróconym w
stronę drzwi namiotu.
Stosowanie deszczownicy jest opcjonalne (w zależności od
warunków pogodowych).
01
Przywiąż (3) liny na tylnej krawędzi deszczownicy do
słupków namiotu (rys. 19). Wyrównaj szwy deszczownicy
ze słupkami namiotu pod spodem (rys. 20).
03
02
Klapa wewnętrzna
rys. 16
rys. 17 rys. 18
rys. 19 rys. 20
PL
Połącz (3) klamry po obu stronach namiotu (rys. 17) i
wyreguluj paski. Deszczownica powinna zakrywać okna po
obu stronach namiotu (rys. 18).
36

Przechowywanie
Zwolnij zaciski słupków i wyciągnij słupki z kieszeni. Wyjmij
słupki z rękawów. Złóż słupki i umieść je w torbie.
Odepnij paski A, B i C i poluzuj pasek klapy tylnej.
01
02
Przechyl klapę do góry i zwolnij pomarańczowe paski.
03
Zwiń plandekę, tropik i torbę na słupki razem (rys. 21).
Umieść zawinięty namiot w torbie do przechowywania
(rys. 22).
04
OSTRZEŻENIE: TRZYMAJ PRODUKT Z DALA OD ŹRÓDEŁ
CIEPŁA I OGNIA.
UWAGA: NIE WOLNO JEŹDZIĆ POJAZDEM Z NAMIOTEM
PRZYMOCOWANYM DO SKRZYNI ŁADUNKOWEJ. NIE WOLNO
WŁĄCZAĆ SILNIKA POJAZDU, GDY WE WNĘTRZU NAMIOTU
KTOŚ SIĘ ZNAJDUJE.
rys. 21 rys. 22
PL
37
EN
DE
FR
ES
IT
PL
With your inspiring rating, COSTWAY will be more consistent to offer you EASY
SHOPPING EXPERIENCE, GOOD PRODUCTS and EFFICIENT SERVICE!
Mit Ihrer inspirierenden Bewertung wird COSTWAY konsistenter sein, um Ihnen EIN
SCHÖNES EINKAUFSERLEBNIS, GUTE PRODUKTE und EFFIZIENTEN SERVICE zu
bieten!
Avec votre évaluation inspirante, COSTWAY continuera à fournir une EXPÉRIENCE
D’ACHAT PRATIQUE, des PRODUITS DE QUALITÉ et un SERVICE EFFICACE !
Con su calificación inspiradora, COSTWAY será más consistente para ofrecerle
EXPERIENCIA DE COMPRA FÁCIL, BUENOS PRODUCTOS y SERVICIO EFICIENTE.
Con la tua valutazione incoraggiante, COSTWAY sarà più coerente per offrirti
ESPERIENZA DI ACQUISTO FACILE, BUONI PRODOTTI e SERVIZIO EFFICIENTE!
Dzięki twojej opinii COSTWAY będzie mógł oferować jeszcze WYGODNIEJSZE
ZAKUPY, LEPSZE PRODUKTY i SPRAWNIEJSZĄ OBSŁUGĘ KLIENTA.
US office: Fontana UK office: Ipswich AU office: Truganina
DE office: FDS GmbH, Neuer Höltigbaum 36, 22143 Hamburg, Deutschland
FR office: Saint Vigor d'Ymonville
PL office: Gdańsk
