NP10844
If you're having difficulty, our friendly
customer team is always here to help.
THIS INSTRUCTION BOOKLET CONTAINS IMPORTANT SAFETY INFORMATION. PLEASE READ AND KEEP FOR FUTURE REFERENCE.
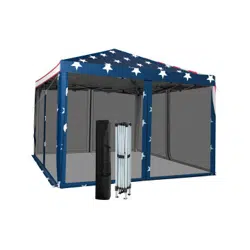
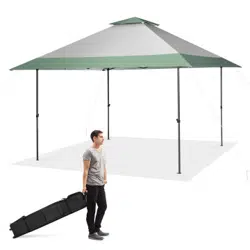
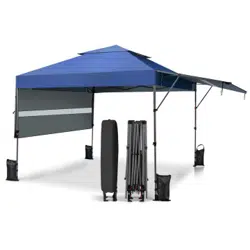
Pop Up Canopy/Pavillon/
Auvent Escamotable/Pabellón/
Gazebo/Składany pawilon ogrodowy
AUS:cs.au@costway.com
FRA:cs.fr@costway.com
DEU:cs.de@costway.com
ITA:cs.it@costway.com ESP:cs.es@costway.com
POL:sklep@costway.com
GBR:cs.uk@costway.com
DEU office: FDS GmbH, Neuer Höltigbaum 36, 22143 Hamburg, Deutschland
ITA office: Milano
FRA office: Saint Vigor d'Ymonville
POL office: GdańskGBR office: IpswichAUS office: TruganinaUSA office: Fontana
Before You Start
Please read all instructions carefully.
Retain instructions for future reference.
Separate and count all parts and hardware.
Read through each step carefully and follow the proper order.
We recommend that, where possible, all items are assembled near to the area in
which they will be placed in use, to avoid moving the product unnecessarily once
assembled.
Always place the product on a flat, steady and stable surface.
Keep all small parts and packaging materials for this product away from babies
and children as they potentially pose a serious choking hazard.
EN
DE
Bitte lesen Sie alle Anweisungen sorgfältig durch.
Bewahren Sie die Anweisungen zum zukünftigen Verwendung auf.
Überprüfen Sie, ob alle Teile und Zubehörteile vorhanden sind.
Lesen Sie jeden Schritt sorgfältig durch und befolgen Sie die richtige Reihenfolge.
Wir empfehlen, alle Teile möglichst in der Nähe des Aufstellungsortes zu
montieren, um unnötige Bewegungen nach der Montage zu vermeiden.
Stellen Sie den Artikel immer auf eine ebene, feste und stabile Fläche.
Halten Sie alle kleinen Teile und Verpackungsmaterialien fern von Babys und
Kindern, ansonsten besteht Erstickungsgefahr.
Vor dem Beginnen
FR
Veuillez lire attentivement toutes les instructions.
Conservez les instructions pour vous y référer ultérieurement.
Vérifiez toutes les pièces et les accessoires.
Lisez attentivement chaque étape et suivez l’ordre correct.
Nous recommandons que, dans la mesure du possible, tous les produits soient
assemblés à proximité de la zone où ils seront utilisés, afin d’éviter tout
déplacement inutile du produit une fois assemblé.
Placez toujours le produit sur une surface plane et stable.
Conservez toutes les petites pièces de ce produit et les matériaux d’emballage
hors de portée des bébés et des enfants, car ils pourraient présenter un risque
d’étouffement.
Lea atentamente todas las instrucciones.
Conserve las instrucciones para futuras consultas.
Separe y cuente todas las piezas y los accesorios.
Lea detenidamente cada paso y siga el orden correcto.
Recomendamos que, siempre que sea posible, todos los elementos se monten
cerca de la zona en la que se van a utilizar, para evitar mover el producto
innecesariamente una vez montado.
Coloque siempre el producto sobre una superficie plana, estable y firme.
Mantenga todas las piezas pequeñas y los materiales de embalaje de este
producto lejos de los bebés y los niños, ya que pueden representar un grave
riesgo de asfixia.
ES
Avant de Commencer
Antes de Empezar
02 03

Si prega di leggere attentamente tutte le istruzioni.
Conservare le istruzioni per riferimento futuro.
Separare e contare tutte le parti e gli accessori.
Leggere attentamente ogni passo e seguire l'ordine corretto.
Si consiglia, ove possibile, di assemblare tutti gli articoli vicino alla zona in cui
verranno posti in uso, per evitare di spostare inutilmente il prodotto una volta
assemblato.
Posizionare sempre il prodotto su una superficie piana, stabile.
Tenere tutte le piccole parti e i materiali di imballaggio di questo prodotto lontano
dalla portata di neonati e bambini, in quanto possono costituire un serio pericolo
di soffocamento.
Zapoznaj się z instrukcją.
Zachowaj instrukcję do wglądu.
Posortuj części i upewnij się, że zestaw jest kompletny.
Zapoznaj się ze sposobem montażu i postępuj zgodnie z instrukcją.
Zalecamy, aby montaż odbywał się możliwie najbliżej miejsca docelowego
położenia produktu, aby uniknąć niepotrzebnego przesuwania.
Upewnij się, że produkt znajdzie się na płaskiej i stabilnej po wierzchni.
Upewnij się, że materiały wykorzystane podczas pakowania produktu.
oraz jego elementy znajdują się poza zasięgiem dzieci.
IT
PL
Prima di Iniziare
Zanim Zaczniesz
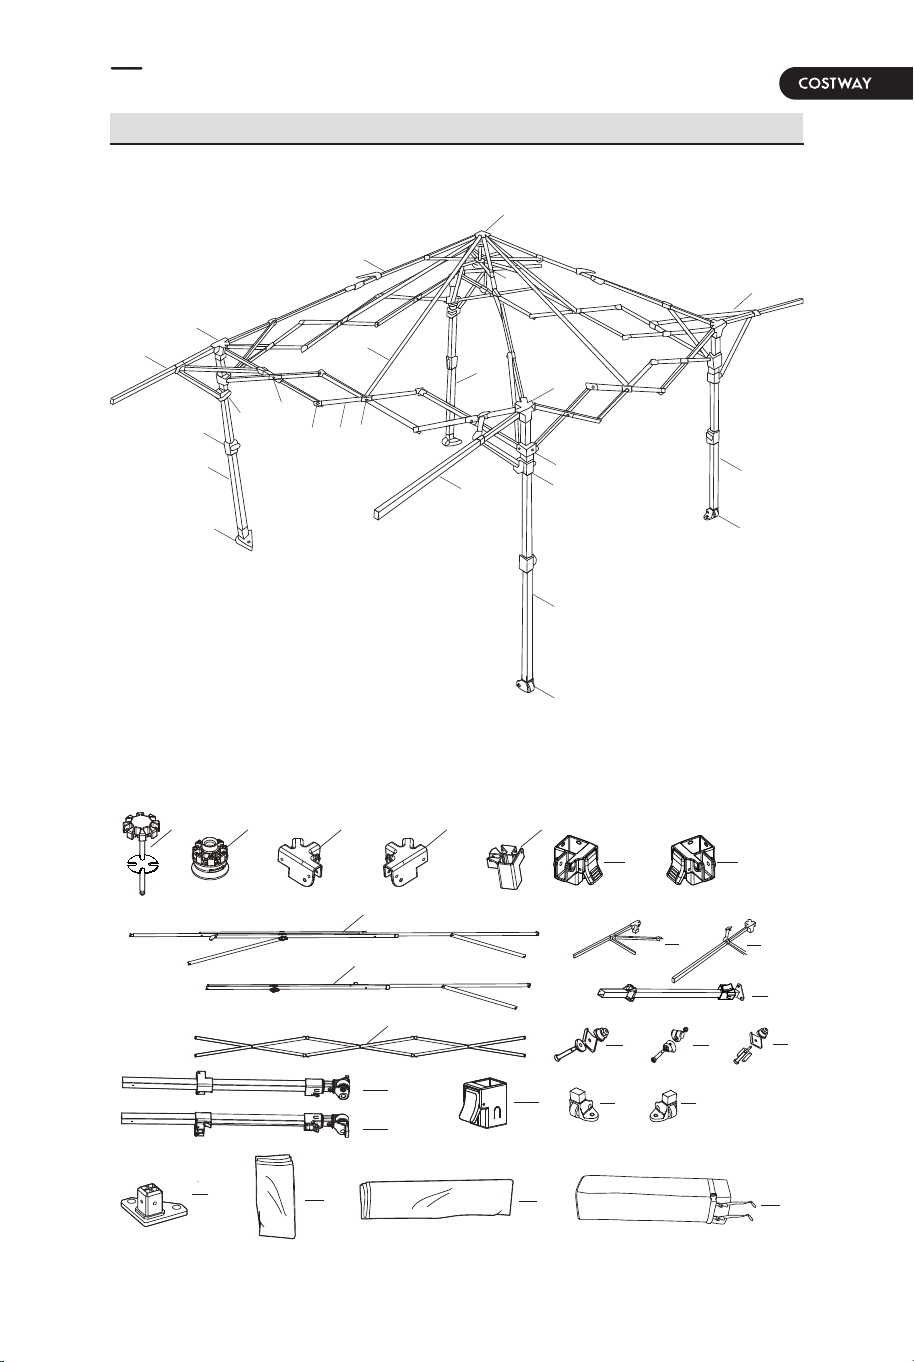
Spare Parts
EN
A
B
C(L)
D
K(L)
K(L)
K(R)
H
P
I
H
E
F
L
E1
N
M
C(R)
J(R)
J(L)
G(L)
O(L)
O(R)
G(R)
DC(L)BA C(R)
E
E1
F
G(L)
G(R)
I
H
J(L) J(R)
K(R)
K(L)
L
M
N
O(L) O(R)
Q
R
P
S
04 05

Si prega di leggere attentamente tutte le istruzioni.
Conservare le istruzioni per riferimento futuro.
Separare e contare tutte le parti e gli accessori.
Leggere attentamente ogni passo e seguire l'ordine corretto.
Si consiglia, ove possibile, di assemblare tutti gli articoli vicino alla zona in cui
verranno posti in uso, per evitare di spostare inutilmente il prodotto una volta
assemblato.
Posizionare sempre il prodotto su una superficie piana, stabile.
Tenere tutte le piccole parti e i materiali di imballaggio di questo prodotto lontano
dalla portata di neonati e bambini, in quanto possono costituire un serio pericolo
di soffocamento.
Zapoznaj się z instrukcją.
Zachowaj instrukcję do wglądu.
Posortuj części i upewnij się, że zestaw jest kompletny.
Zapoznaj się ze sposobem montażu i postępuj zgodnie z instrukcją.
Zalecamy, aby montaż odbywał się możliwie najbliżej miejsca docelowego
położenia produktu, aby uniknąć niepotrzebnego przesuwania.
Upewnij się, że produkt znajdzie się na płaskiej i stabilnej po wierzchni.
Upewnij się, że materiały wykorzystane podczas pakowania produktu.
oraz jego elementy znajdują się poza zasięgiem dzieci.
IT
PL
Prima di Iniziare
Zanim Zaczniesz
Spare Parts
EN
A
B
C(L)
D
K(L)
K(L)
K(R)
H
P
I
H
E
F
L
E1
N
M
C(R)
J(R)
J(L)
G(L)
O(L)
O(R)
G(R)
DC(L)BA C(R)
E
E1
F
G(L)
G(R)
I
H
J(L) J(R)
K(R)
K(L)
L
M
N
O(L) O(R)
Q
R
P
S
04 05

Setting Up the Canopy
1
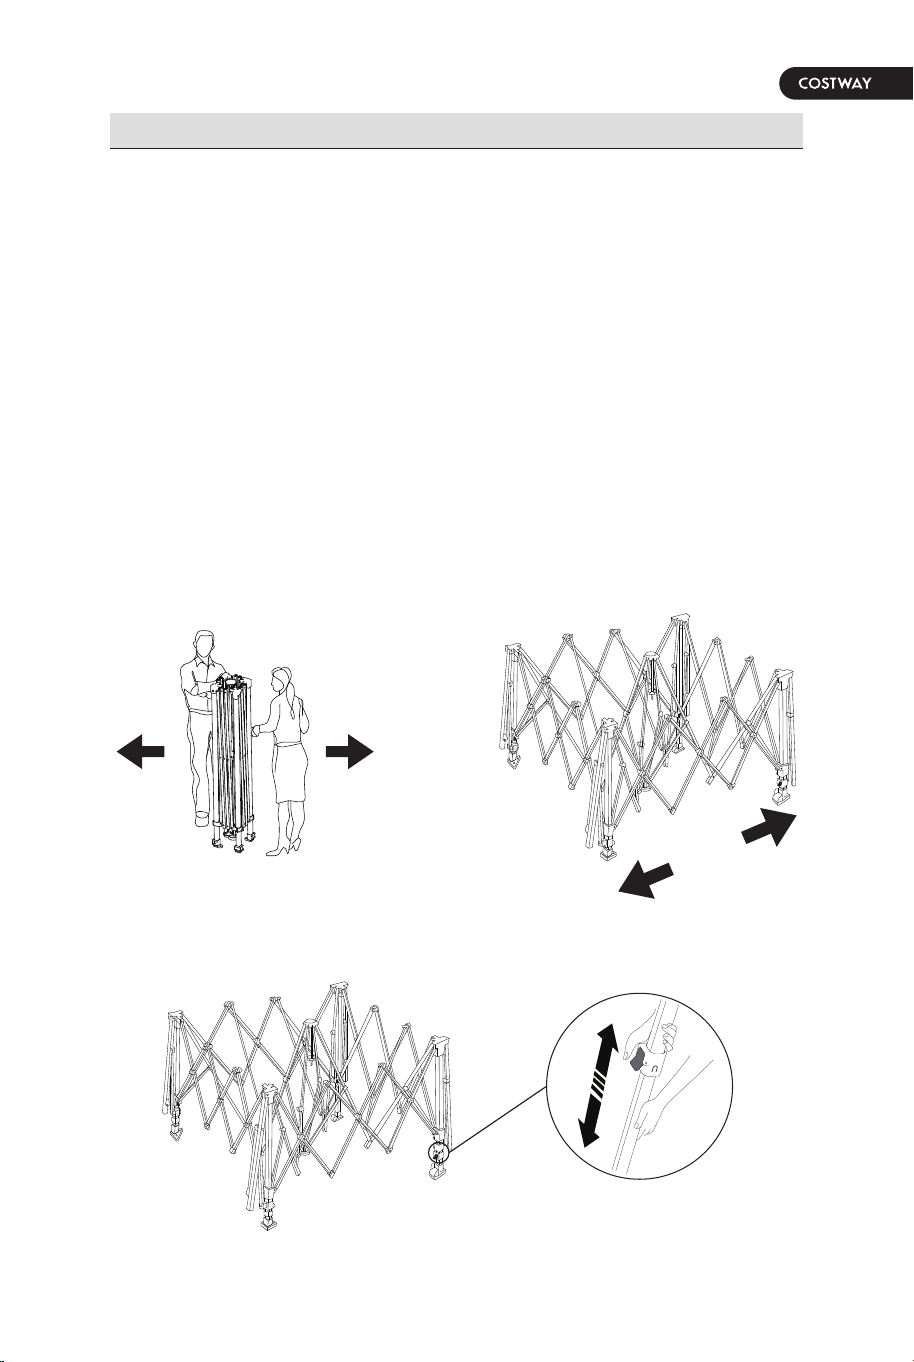
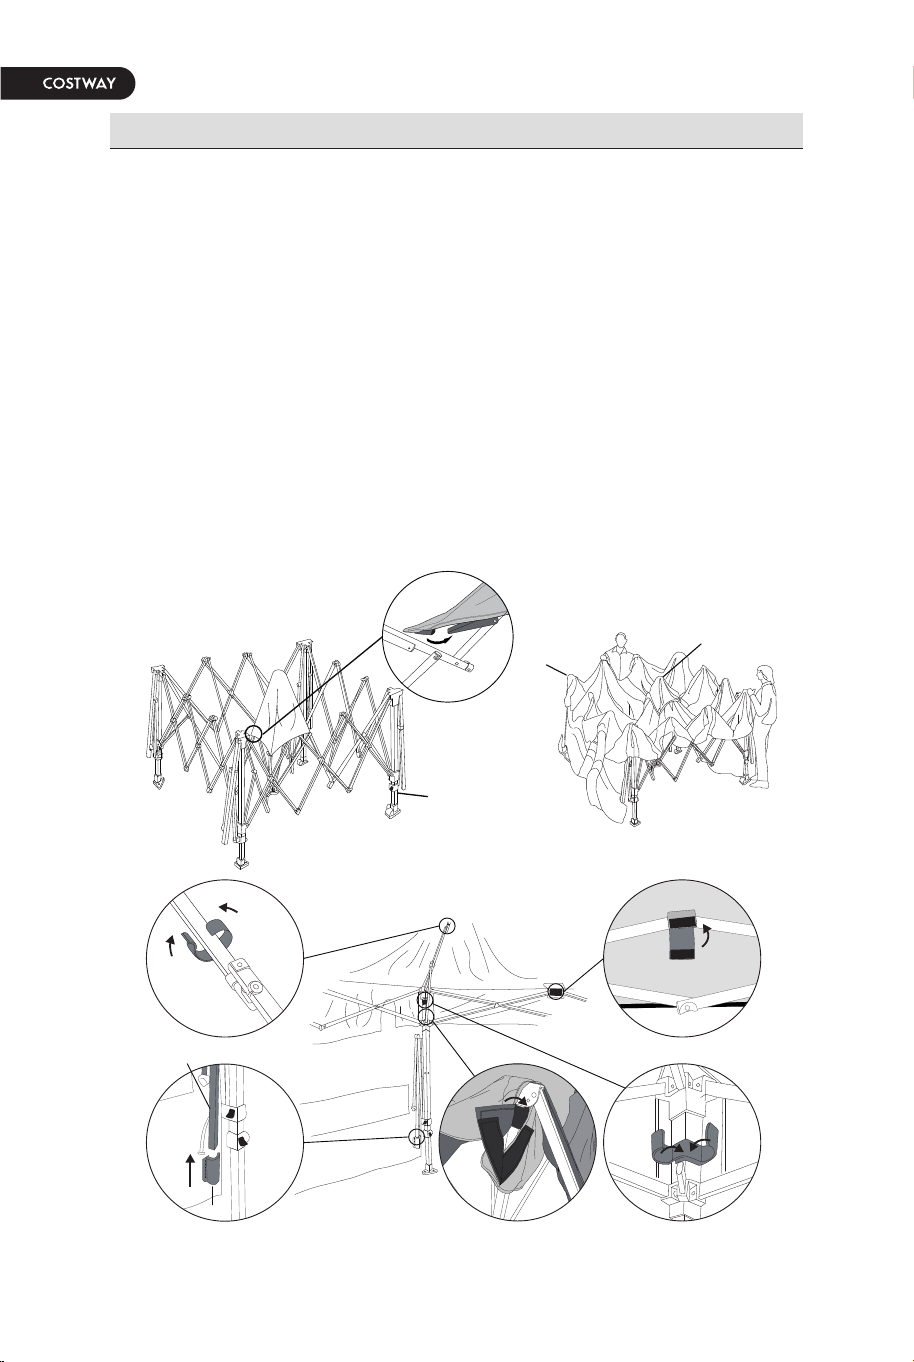
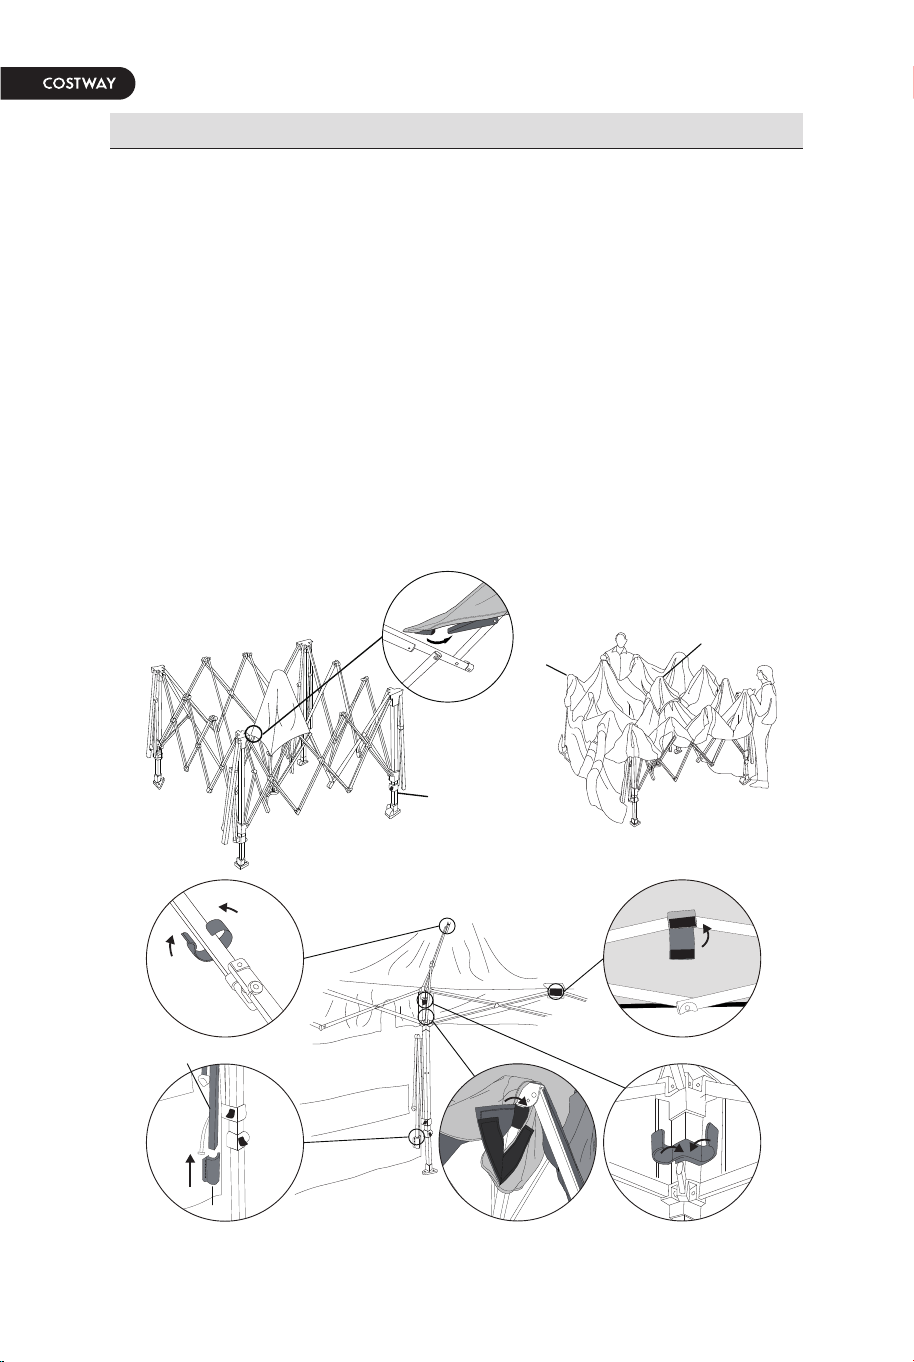
OPENING THE CANOPY FRAME
□
With a partner, stand across from each other.
Grasp a truss at the top of the frame (a) and the other truss at
the bottom, as shown. Lift slightly off ground and step
backwards while squeezing trusses together.
Lift up one side. Grasp the outer or upper leg with one hand and
pull out the inner leg with the other.
Extend until the button engages.
□
□
x4
90%
Part
A
B
C(L)
C(R)
D
E
E1
F
G(L)
G(R)
H
I
J(L)
J(R)
K(L)
K(R)
L
M
N
O(L)
O(R)
P
Q
R
S
Description
Central Pole
Central Bottom Hub
Leg Cap(L eft)
Leg Cap(Right)
Slider
Ceiling Assembly
Ceiling Reinforce Assembly
Eave Assembly
Leg with wheel(Left)
Leg with wheel(Right)
Leg without wheel
Leg Extender
Awning Slider(L eft)
Awning Slider(Right)
Awning Tube Assembly(Left)
Awning Tube Assembly(Right)
M5 Bolt Kit
M4 Bolt Kit
M5-Bolt Kit(w/U Bracket)
Foot with wheel(Left)
Foot with wheel(Right)
Foot without wheel
Small Top Fabric-Grey
Small Top Fabric-White
Small Top Fabric-Navy Blue
Large Top Fabric-Grey
Large Top Fabric-White
Large Top Fabric-Navy Blue
Stow N Go Bag
Spare Parts
06 07
Setting Up the Canopy
1
OPENING THE CANOPY FRAME
□
With a partner, stand across from each other.
Grasp a truss at the top of the frame (a) and the other truss at
the bottom, as shown. Lift slightly off ground and step
backwards while squeezing trusses together.
Lift up one side. Grasp the outer or upper leg with one hand and
pull out the inner leg with the other.
Extend until the button engages.
□
□
x4
90%
Part
A
B
C(L)
C(R)
D
E
E1
F
G(L)
G(R)
H
I
J(L)
J(R)
K(L)
K(R)
L
M
N
O(L)
O(R)
P
Q
R
S
Description
Central Pole
Central Bottom Hub
Leg Cap(L eft)
Leg Cap(Right)
Slider
Ceiling Assembly
Ceiling Reinforce Assembly
Eave Assembly
Leg with wheel(Left)
Leg with wheel(Right)
Leg without wheel
Leg Extender
Awning Slider(L eft)
Awning Slider(Right)
Awning Tube Assembly(Left)
Awning Tube Assembly(Right)
M5 Bolt Kit
M4 Bolt Kit
M5-Bolt Kit(w/U Bracket)
Foot with wheel(Left)
Foot with wheel(Right)
Foot without wheel
Small Top Fabric-Grey
Small Top Fabric-White
Small Top Fabric-Navy Blue
Large Top Fabric-Grey
Large Top Fabric-White
Large Top Fabric-Navy Blue
Stow N Go Bag
Spare Parts
06 07

3
ATTACHING THE CANOPY
□
□
Lift up one side of the frame (a) and walk under it.
Place one hand on the upper frame and use the other hand to
push the central hub straight up until it clicks into the central
pole.
Setting Up the Canopy
CLICK!
Setting Up the Canopy
2
ATTACHING THE CANOPY
□
□
Attach small top fabric (c) by inserting corner pocket over Vent
Finger lifts.
Unfold the large top fabric (b) over the frame. Line up the
awning panels on same sides as the awning hardware. Insert
awning panel pockets on the awning arms.
Secure canopy to the corner of the frame and wrap the fabric
flaps together with the hook and loop.
□
x4
a
b
c
x4x4 x4
x4
x8
Awning arm
Pocket
08 09

Setting Up the Canopy
4
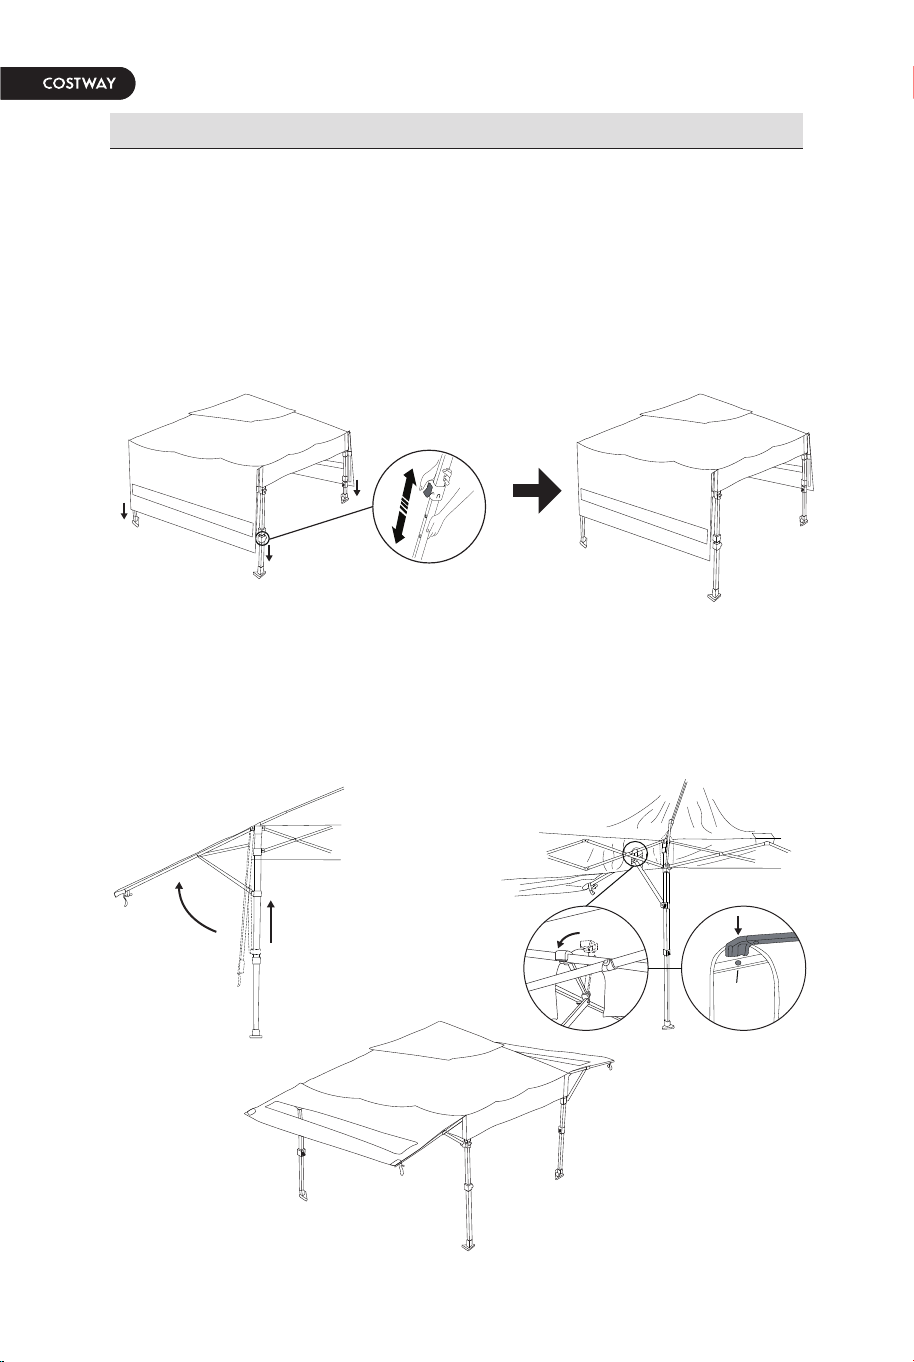
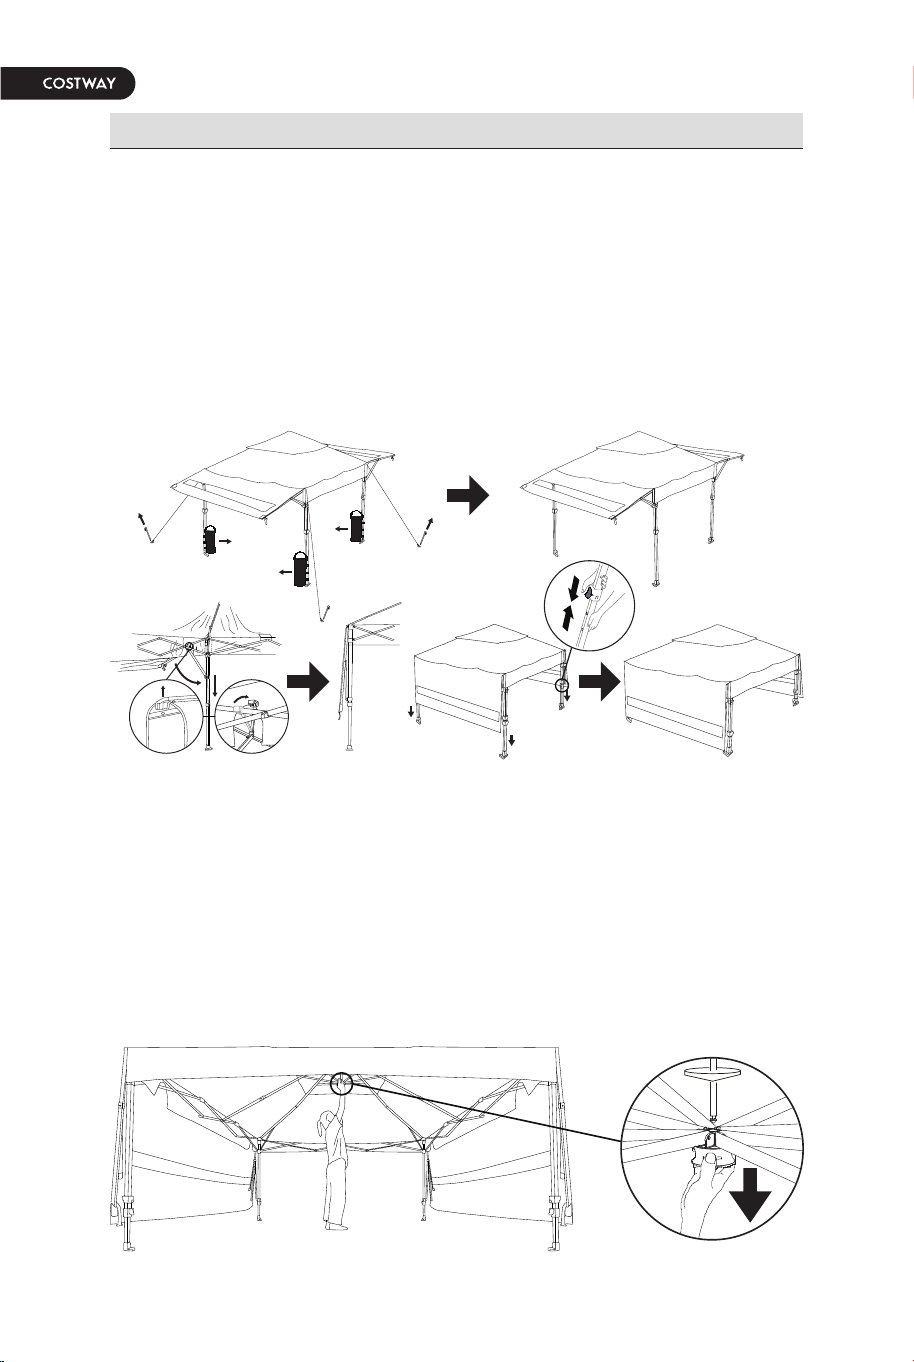
ADJUSTING THE CANOPY HEIGHT
□
□
Lift up one side. Grasp the outer or upper leg with one hand and
pull out the inner leg with the other.
Extend until the button engages.
Set legs to desired height.
□
5
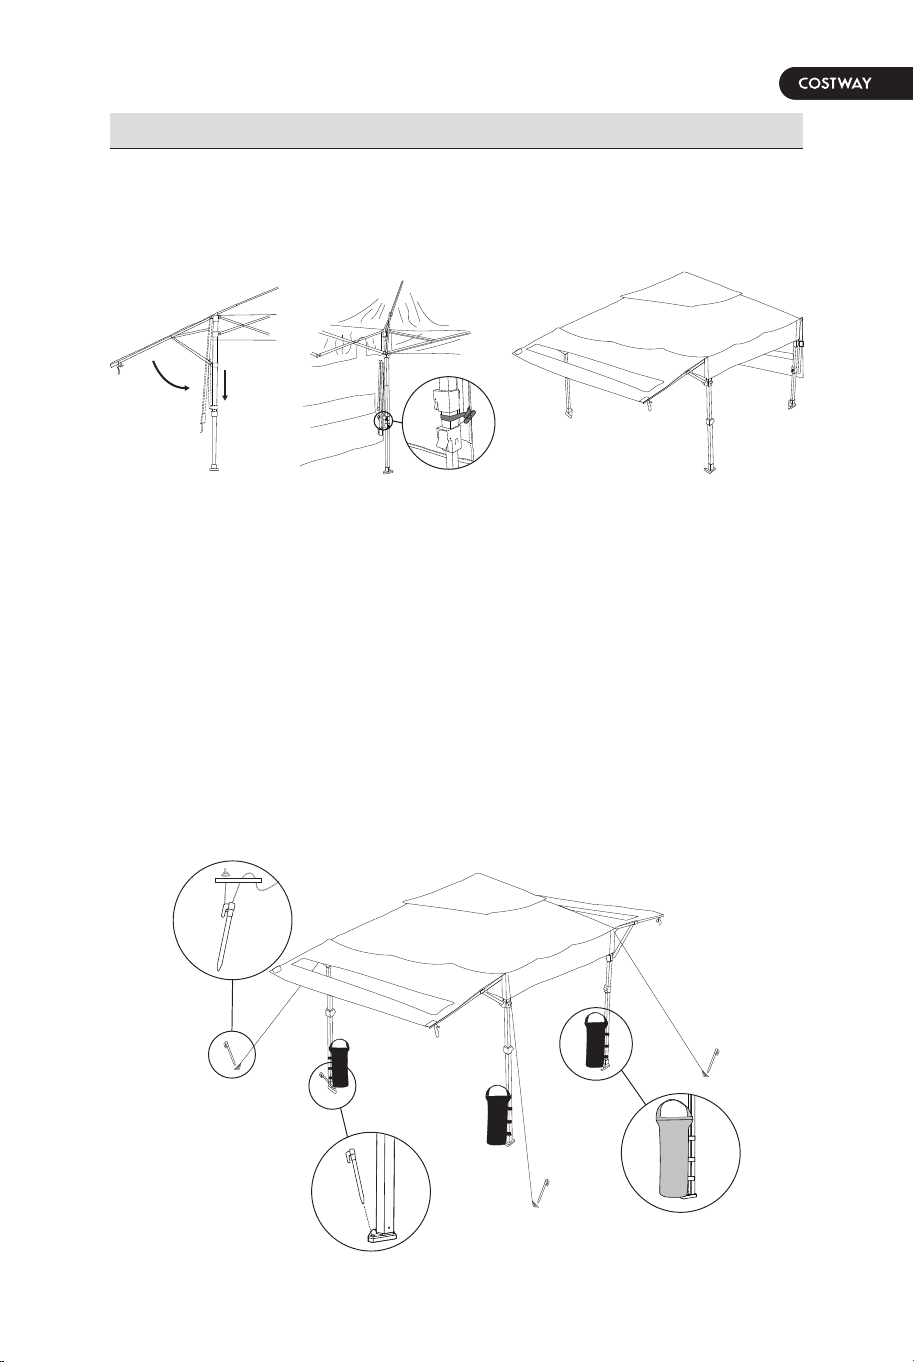
OPERATING THE AWNING PANELS
□
□
Pull up one side of the awning panel arms until the support arm
locks into hole on leg.
Rotate the stabilizer bar and slid over the rivet on the upper
perimeter truss as shown.
x4
Rivet
x4
6
□
CONFIGURING DESIRED SETUP FOR AWNINGS
Secure the strap around leg with toggle.
7
□
SECURING THE CANOPY IN PLACE
Fill the weight bag(d) with sand or gravel.
Connect the hook and loops of the weight bag around each leg.
The included weight bags are designed for quick and easy use.
Insert a stake into the foot of each canopy leg.
Measure out each leg to a proper distance and secure four
stakes(e) to the ground. Tie the pre-attached ropes to the stakes
in the ground. Ensure the ropes have the proper tension by
adjusting the plastic adjusters on the ropes.
Setting Up the Canopy
□
□
10 11

Setting Up the Canopy
4
ADJUSTING THE CANOPY HEIGHT
□
□
Lift up one side. Grasp the outer or upper leg with one hand and
pull out the inner leg with the other.
Extend until the button engages.
Set legs to desired height.
□
5
OPERATING THE AWNING PANELS
□
□
Pull up one side of the awning panel arms until the support arm
locks into hole on leg.
Rotate the stabilizer bar and slid over the rivet on the upper
perimeter truss as shown.
x4
Rivet
x4
6
□
CONFIGURING DESIRED SETUP FOR AWNINGS
Secure the strap around leg with toggle.
7
□
SECURING THE CANOPY IN PLACE
Fill the weight bag(d) with sand or gravel.
Connect the hook and loops of the weight bag around each leg.
The included weight bags are designed for quick and easy use.
Insert a stake into the foot of each canopy leg.
Measure out each leg to a proper distance and secure four
stakes(e) to the ground. Tie the pre-attached ropes to the stakes
in the ground. Ensure the ropes have the proper tension by
adjusting the plastic adjusters on the ropes.
Setting Up the Canopy
□
□
10 11

Taking Down the Canopy
2
□
UNLOCKING THE CANOPY
From underneath the canopy, press in the red lock button. Pull
down on the central hub until it is separated from the central
pole.
1
□
□
REMOVING THE STAKES AND RETRACTING THE LEGS
Remove all weight pockets and stakes from the ground.
Lower awning panels by lifting stabilizer bar and rotate back to
the upper leg.
Press the push button on each leg and retract the legs to their
original height.
□
x4
x4
3
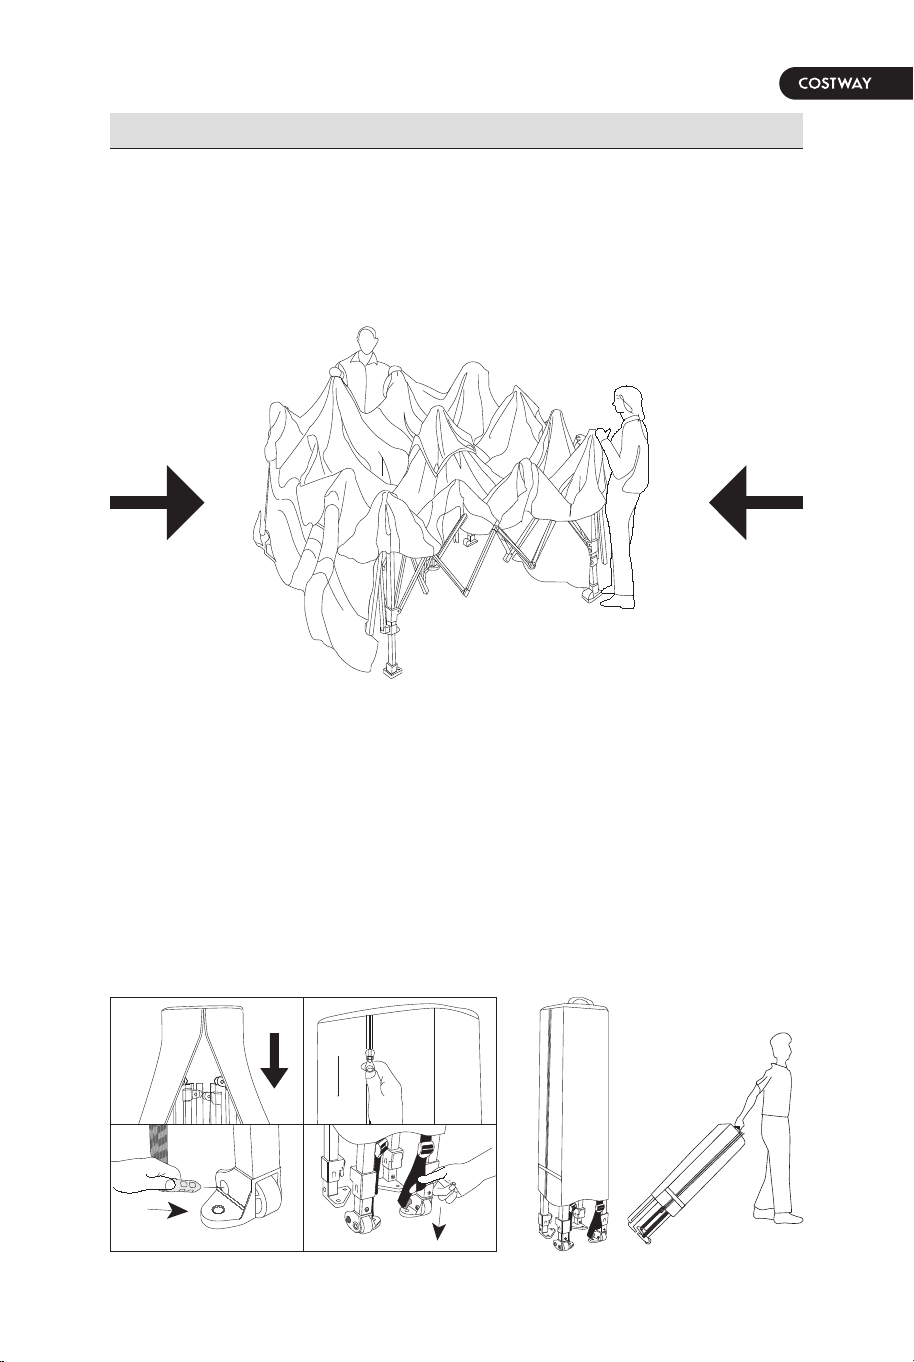
FOLDING THE FRAME
4
□
□
PACKING THE CANOPY IN THE STORAGE BAG
Position the cover bag straps to align with the 2 wheeled legs.
Slide down the bag over the closed frame. Zip the cover closed.
Loosen the strap and insert the red plug into the opening in the
footpad and tighten straps by pulling down the strap loop.
Taking Down the Canopy
□
Lift the canopy off the ground 2-3 inches and walk it in from both
sides until the frame is fully closed.
x2
x2
12 13

Taking Down the Canopy
2
□
UNLOCKING THE CANOPY
From underneath the canopy, press in the red lock button. Pull
down on the central hub until it is separated from the central
pole.
1
□
□
REMOVING THE STAKES AND RETRACTING THE LEGS
Remove all weight pockets and stakes from the ground.
Lower awning panels by lifting stabilizer bar and rotate back to
the upper leg.
Press the push button on each leg and retract the legs to their
original height.
□
x4
x4
3
FOLDING THE FRAME
4
□
□
PACKING THE CANOPY IN THE STORAGE BAG
Position the cover bag straps to align with the 2 wheeled legs.
Slide down the bag over the closed frame. Zip the cover closed.
Loosen the strap and insert the red plug into the opening in the
footpad and tighten straps by pulling down the strap loop.
Taking Down the Canopy
□
Lift the canopy off the ground 2-3 inches and walk it in from both
sides until the frame is fully closed.
x2
x2
12 13
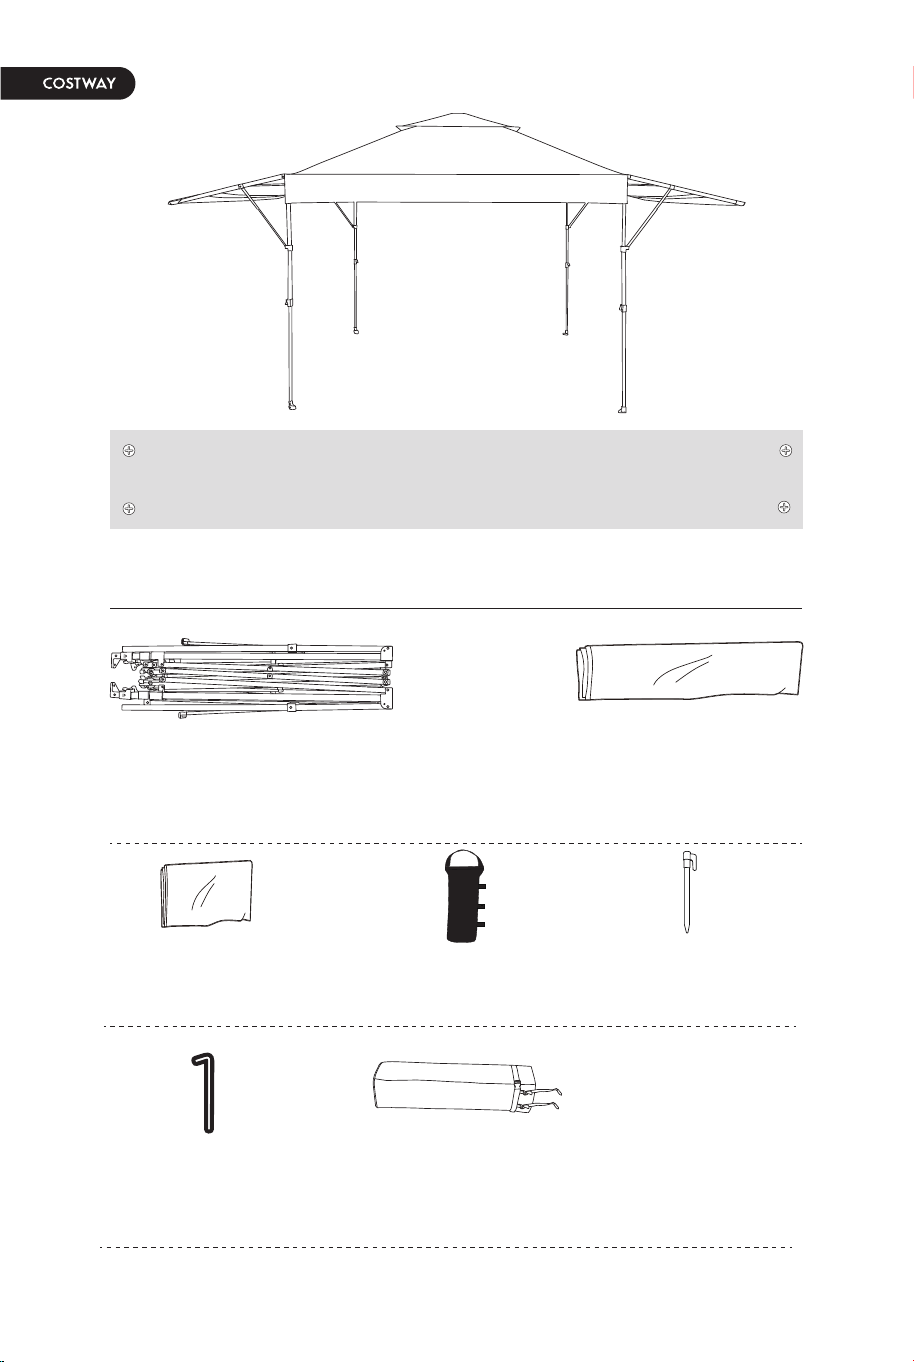
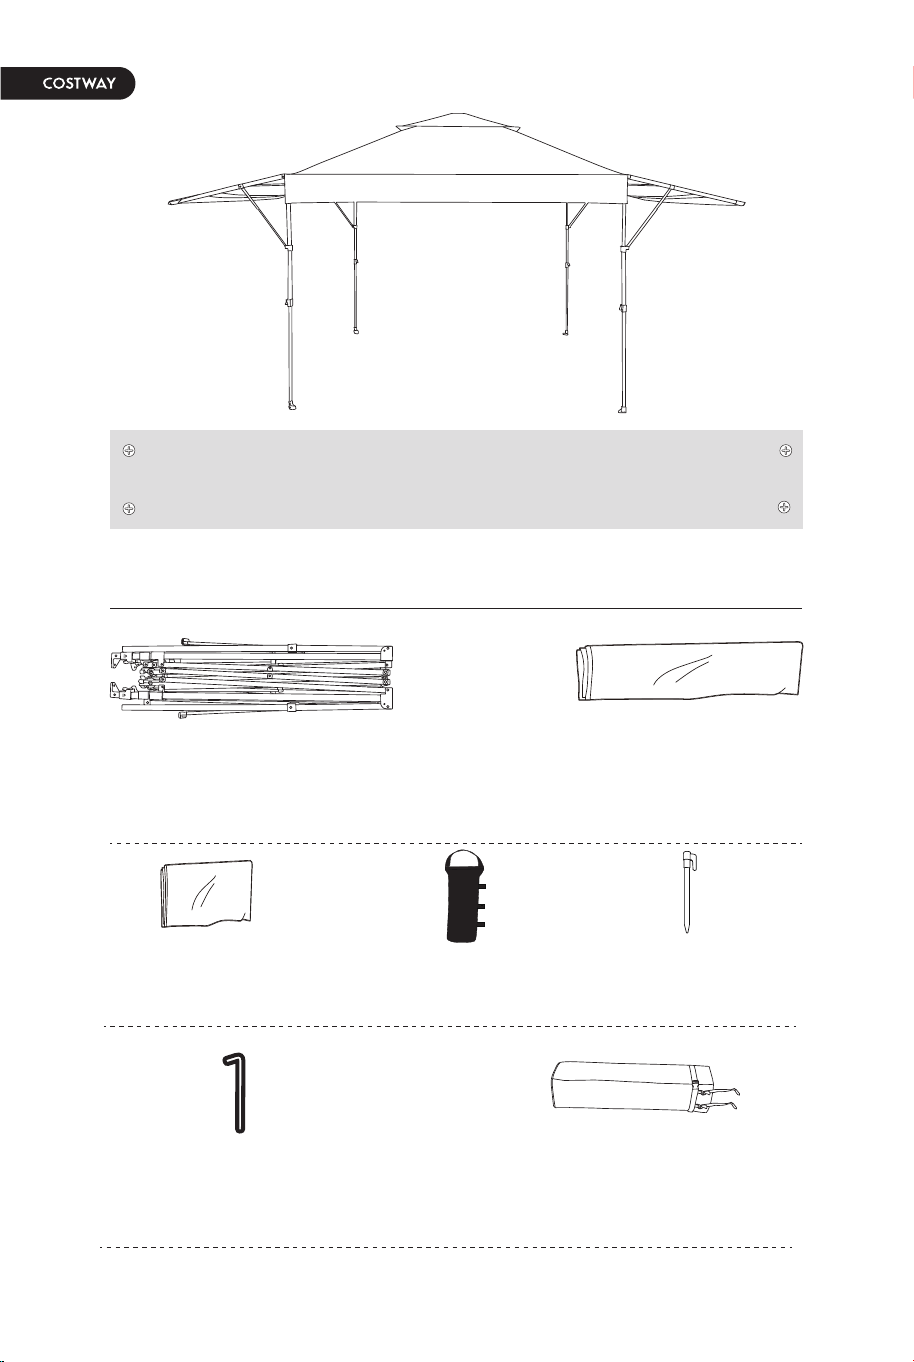
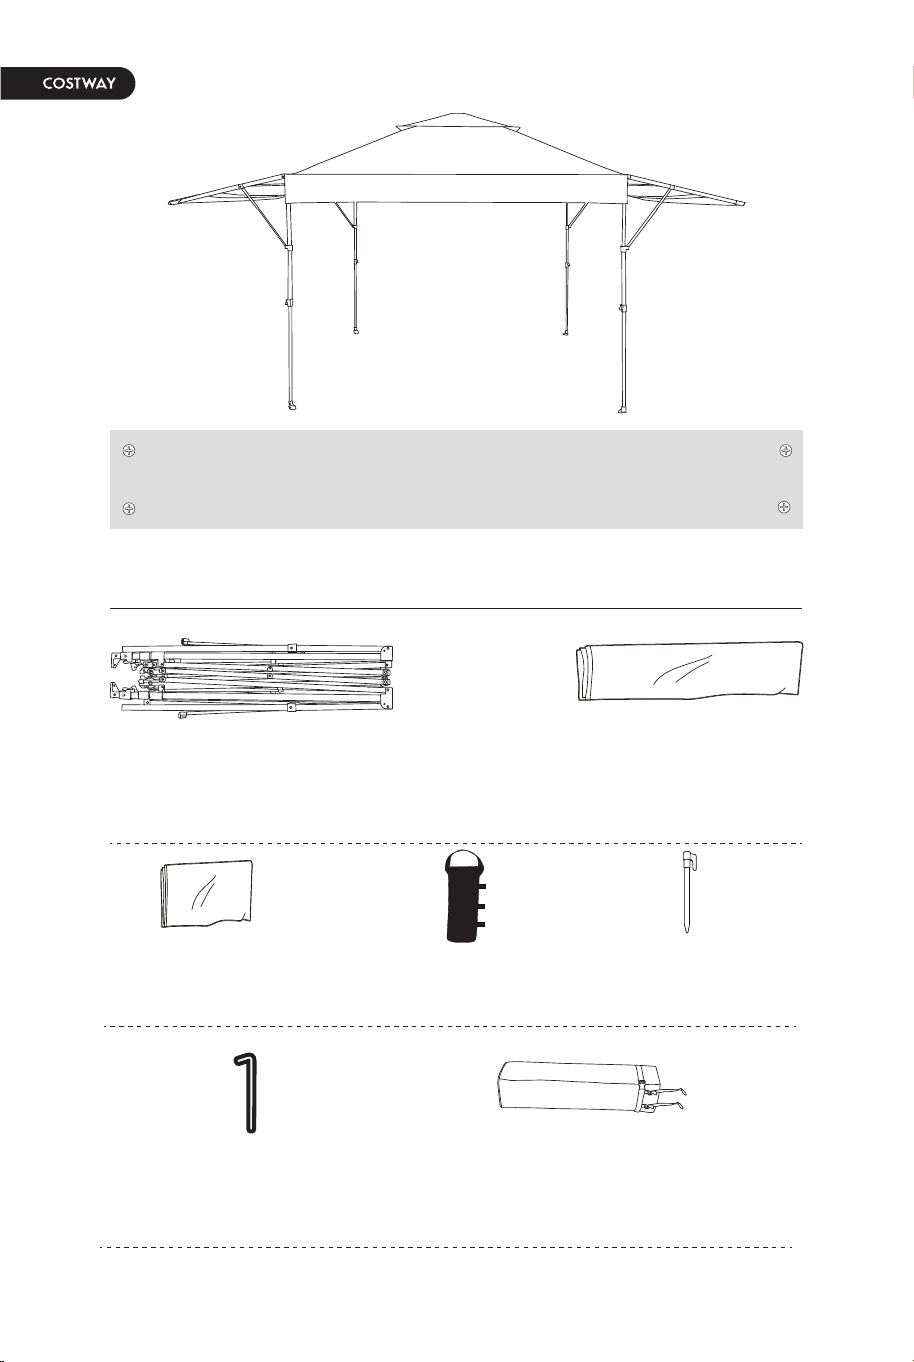
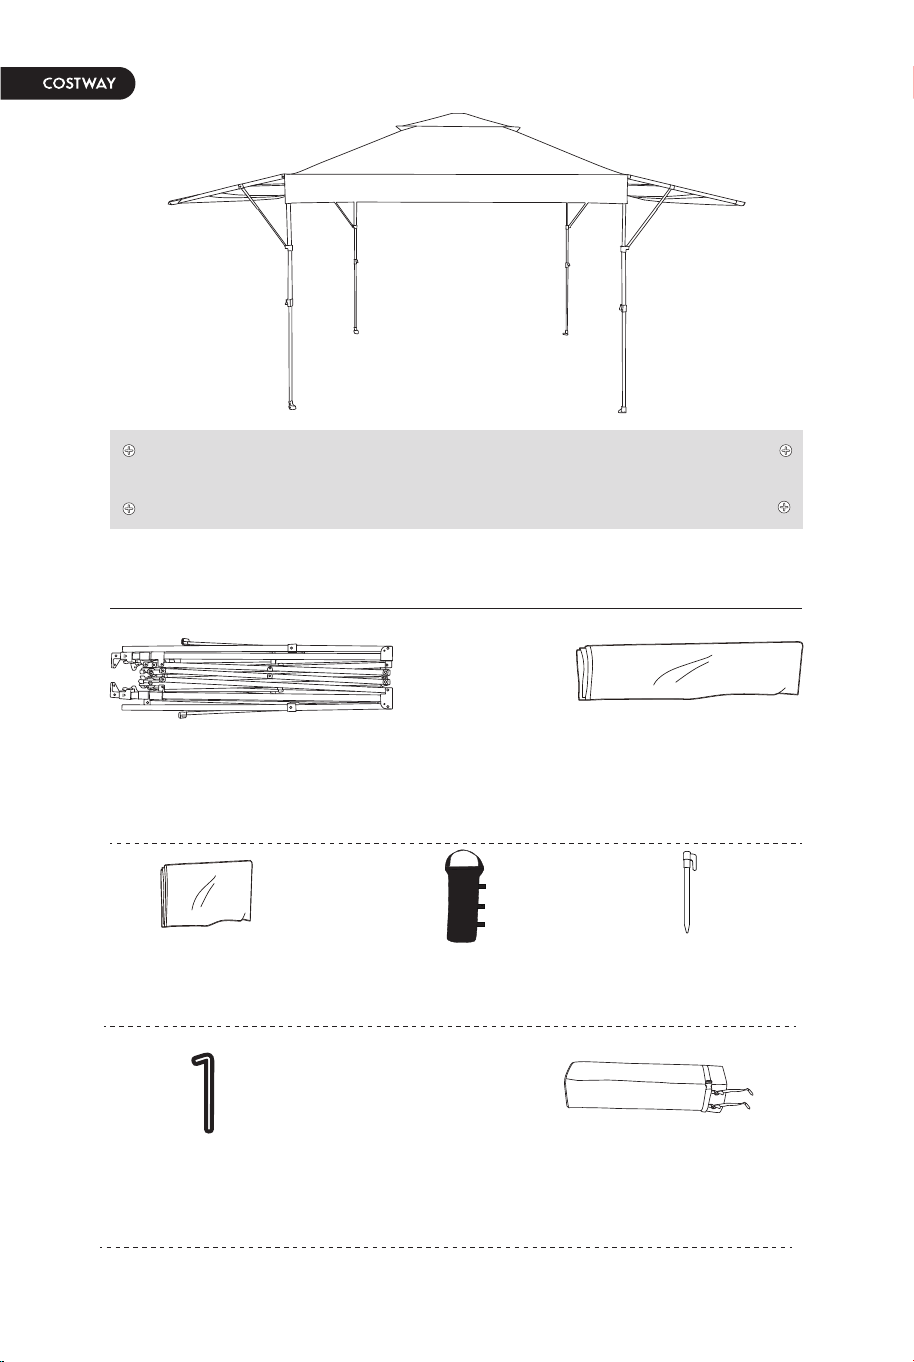
PACKAGE CONTENTS
a - Frame (with
guy ropes
pre-attached)
x1
d - Weight Bag
x4
e - Stake
x8
f - Hex wrenc (for
maintenance only)
x1
g - Stow N Go
Bag
x1
b - Large Top
Fabric
x1
c - Small Top
Fabric
x1
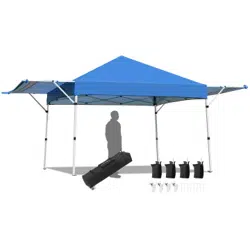
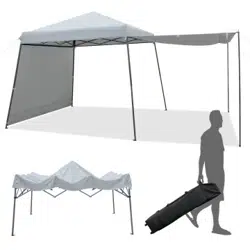
Use and Care Guide
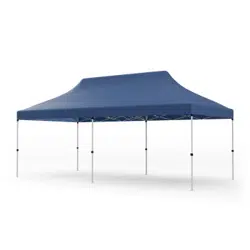
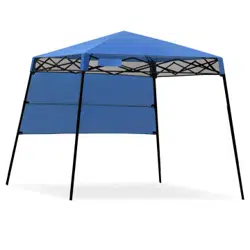
18 ft. x 10 ft. Mighty Shade Instant Canopy with Extended
Shade Panels
Teile
DE
A
B
C(L)
D
K(L)
K(L)
K(R)
H
P
I
H
E
F
L
E1
N
M
C(R)
J(R)
J(L)
G(L)
O(L)
O(R)
G(R)
DC(L)BA C(R)
E
E1
F
G(L)
G(R)
I
H
J(L) J(R)
K(R)
K(L)
L
M
N
O(L) O(R)
Q
R
P
S
14 15

PACKAGE CONTENTS
a - Frame (with
guy ropes
pre-attached)
x1
d - Weight Bag
x4
e - Stake
x8
f - Hex wrenc (for
maintenance only)
x1
g - Stow N Go
Bag
x1
b - Large Top
Fabric
x1
c - Small Top
Fabric
x1
Use and Care Guide
18 ft. x 10 ft. Mighty Shade Instant Canopy with Extended
Shade Panels
Teile
DE
A
B
C(L)
D
K(L)
K(L)
K(R)
H
P
I
H
E
F
L
E1
N
M
C(R)
J(R)
J(L)
G(L)
O(L)
O(R)
G(R)
DC(L)BA C(R)
E
E1
F
G(L)
G(R)
I
H
J(L) J(R)
K(R)
K(L)
L
M
N
O(L) O(R)
Q
R
P
S
14 15

Besteigen Sie den Pavillon
1
ÖFFNEN SIE DEN PAVILLONRAHMEN
□
Stellen Sie sich mit einem Partner gegenüber.
Fassen Sie eine Strebe oben am Rahmen (a) und die andere
Strebe unten an, wie abgebildet. Heben Sie sich leicht vom
Boden ab und treten Sie zurück, während Sie die Traversen
festziehen.
Heben Sie eine Seite an. Fassen Sie das äußere oder obere
Bein mit einer Hand und ziehen Sie das innere Bein mit der
anderen heraus. Verlängern, bis der Knopf passt.
□
□
x4
90%
Teile
A
B
C(L)
C(R)
D
E
E1
F
G(L)
G(R)
H
I
J(L)
J(R)
K(L)
K(R)
L
M
N
O(L)
O(R)
P
Q
R
S
Beschreibung
Zentrale Stelle
Untere mittlere Nabe
Beinabdeckung (links)
Beinabdeckung (rechts)
Schieberegler
Montage des Daches
Montage der Dachverstärkung
Montage der Traufe
Bein mit Rad (links)
Bein mit Rad (rechts)
Bein ohne Rad
Beinverlängerer
Pavillon-Schieberegler (links)
Schieberegler der Station (rechts)
Stationsrohrmontage (links)
Montage des Haubenrohrs (rechts)
Schraubensatz M5
Schraubensatz M4
Schraubensatz M5 (mit U-Bügel)
Fuß mit Rad (links)
Fuß mit Rad (rechts)
Fuß ohne Rad
Kleiner Oberstoff - Grau
Oberstoff klein - Weiß
Oberstoff klein - Marineblau
Oberstoff groß - Grau
Oberstoff groß - Weiß
Großes Taschentuch - Marine
Aufbewahrungstasche
Teile
16 17
3
VERRIEGELN SIE DEN RAHMEN
□
□
Heben Sie eine Seite des Rahmens (B) an und gehen Sie
darunter.
Legen Sie eine Hand auf den oberen Rahmen und drücken Sie
mit der anderen die Mittelnabe nach oben, bis sie in den
Mittelpfosten einrastet.
Besteigen Sie den Pavillon
KLICKEN!
Besteigen Sie den Pavillon
2
REPARIEREN SIE DEN PAVILLON
□
□
Bringen Sie den kleinen Oberstoff (c) an, indem Sie die
Ecktasche über die Erhebungen der Lüftungsfinger stecken.
Falten Sie den großen Verdeckstoff (b) über den Rahmen.
Richten Sie die Verdeckplatten auf den gleichen Seiten wie das
Verdeckzubehör aus. Stecken Sie die Taschen der Überdachung
in die Überdachungsarme.
Befestigen Sie das Verdeck an der Ecke des Rahmens und
haken Sie die Stofflaschen zusammen.
□
x4
a
b
c
x4x4 x4
x4
x8
Baldachinarm
Tasche
18 19
Besteigen Sie den Pavillon
4
DIE HÖHE DES VERDECKS EINSTELLEN
□
□
Heben Sie eine Seite an. Fassen Sie das äußere oder obere
Bein mit einer Hand und ziehen Sie das innere Bein mit der
anderen heraus.
Verlängern, bis der Knopf passt.
Stellen Sie die Beine auf die gewünschte Höhe ein.
□
5
VERWALTEN SIE DIE PAVILION-PANEELE
□
□
Ziehen Sie eine Seite der Haubenarme nach oben, bis der
Stützarm in das Loch im Bein passt.
Drehen Sie die Stabilisatorstange und schieben Sie sie wie
abgebildet über die Niete an der oberen Begrenzungsstrebe.
x4
Niet
x4
6
□
FESTLEGEN SIE DAS GEWÜNSCHTE
LAYOUT FÜR DEN PAVILLON
Sichern Sie den Gurt mit der Arretierung um das Bein.
7
□
SICHERUNG DES PAVILLONS AN SEINEM PLATZ
Füllen Sie den Gewichtssack (d) mit Sand oder Kies. Verbinden
Sie die Haken und Schlaufen des Hantelsacks um jedes Bein.
Die mitgelieferten Gewichtsbeutel sind für eine schnelle und
einfache Anwendung konzipiert.
Stecken Sie einen Pflock in den Fuß eines jeden Pavillonbeins.
Messen Sie jedes Bein in einem angemessenen Abstand und
befestigen Sie vier Pflöcke (e) im Boden. Befestigen Sie die
vorbereiteten Seile an den Pfählen im Boden. Stellen Sie sicher,
dass die Seile die richtige Spannung haben, indem Sie die
Kunststoffeinsteller an den Seilen einstellen.
Besteigen Sie den Pavillon
□
□
20 21
Besteigen Sie den Pavillon
4
DIE HÖHE DES VERDECKS EINSTELLEN
□
□
Heben Sie eine Seite an. Fassen Sie das äußere oder obere
Bein mit einer Hand und ziehen Sie das innere Bein mit der
anderen heraus.
Verlängern, bis der Knopf passt.
Stellen Sie die Beine auf die gewünschte Höhe ein.
□
5
VERWALTEN SIE DIE PAVILION-PANEELE
□
□
Ziehen Sie eine Seite der Haubenarme nach oben, bis der
Stützarm in das Loch im Bein passt.
Drehen Sie die Stabilisatorstange und schieben Sie sie wie
abgebildet über die Niete an der oberen Begrenzungsstrebe.
x4
Niet
x4
6
□
FESTLEGEN SIE DAS GEWÜNSCHTE
LAYOUT FÜR DEN PAVILLON
Sichern Sie den Gurt mit der Arretierung um das Bein.
7
□
SICHERUNG DES PAVILLONS AN SEINEM PLATZ
Füllen Sie den Gewichtssack (d) mit Sand oder Kies. Verbinden
Sie die Haken und Schlaufen des Hantelsacks um jedes Bein.
Die mitgelieferten Gewichtsbeutel sind für eine schnelle und
einfache Anwendung konzipiert.
Stecken Sie einen Pflock in den Fuß eines jeden Pavillonbeins.
Messen Sie jedes Bein in einem angemessenen Abstand und
befestigen Sie vier Pflöcke (e) im Boden. Befestigen Sie die
vorbereiteten Seile an den Pfählen im Boden. Stellen Sie sicher,
dass die Seile die richtige Spannung haben, indem Sie die
Kunststoffeinsteller an den Seilen einstellen.
Besteigen Sie den Pavillon
□
□
20 21

Abbau des Pavillon
2
□
AUFSCHLIESSEN DES PAVILLONS
Gehen Sie unter das Vordach und drücken Sie den roten
Verriegelungsknopf. Ziehen Sie die mittlere Nabe nach unten,
bis sie sich von der mittleren Säule löst.
1
□
□
DIE RUNGEN ENTFERNEN UND DIE BEINE EINZIEHEN
Entfernen Sie alle Gewichtssäcke und Pflöcke vom Boden.
Senken Sie die Markisentücher ab, indem Sie die
Stabilisierungsstange anheben und an das obere Bein
schwenken.
Drücken Sie den Knopf an jedem Bein und ziehen Sie die Beine
auf ihre ursprüngliche Höhe zurück.
□
x4
x4
3
RAHMEN FALTEN
4
□
□
VERPACKEN DES PAVILLONS IN DER AUFBEWAHRUNGSTASCHE
Positionieren Sie die Gurte der Aufbewahrungstasche so, dass
sie mit den 2 Beinen mit Rädern ausgerichtet sind. Schieben Sie
die Tasche über den geschlossenen Rahmen. Schließen Sie den
Beutel mit dem Reißverschluss.
Lösen Sie den Gurt, stecken Sie den roten Stecker in die
Beinöffnung und ziehen Sie den Gurt fest, indem Sie an der
Gurtschlaufe nach unten ziehen.
Abbau des Pavillon
□
Heben Sie die Kabinenhaube um 5 bis 7,6 cm vom Boden ab
und ziehen Sie sie von beiden Seiten ein, bis der Rahmen
vollständig geschlossen ist.
x2
x2
22 23

Abbau des Pavillon
2
□
AUFSCHLIESSEN DES PAVILLONS
Gehen Sie unter das Vordach und drücken Sie den roten
Verriegelungsknopf. Ziehen Sie die mittlere Nabe nach unten,
bis sie sich von der mittleren Säule löst.
1
□
□
DIE RUNGEN ENTFERNEN UND DIE BEINE EINZIEHEN
Entfernen Sie alle Gewichtssäcke und Pflöcke vom Boden.
Senken Sie die Markisentücher ab, indem Sie die
Stabilisierungsstange anheben und an das obere Bein
schwenken.
Drücken Sie den Knopf an jedem Bein und ziehen Sie die Beine
auf ihre ursprüngliche Höhe zurück.
□
x4
x4
3
RAHMEN FALTEN
4
□
□
VERPACKEN DES PAVILLONS IN DER AUFBEWAHRUNGSTASCHE
Positionieren Sie die Gurte der Aufbewahrungstasche so, dass
sie mit den 2 Beinen mit Rädern ausgerichtet sind. Schieben Sie
die Tasche über den geschlossenen Rahmen. Schließen Sie den
Beutel mit dem Reißverschluss.
Lösen Sie den Gurt, stecken Sie den roten Stecker in die
Beinöffnung und ziehen Sie den Gurt fest, indem Sie an der
Gurtschlaufe nach unten ziehen.
Abbau des Pavillon
□
Heben Sie die Kabinenhaube um 5 bis 7,6 cm vom Boden ab
und ziehen Sie sie von beiden Seiten ein, bis der Rahmen
vollständig geschlossen ist.
x2
x2
22 23
PAKET INHALT
a - Rahmen (mit
vormontierten
Abspannseilen)
x1
d - Beutel mit
Gewichten
x4
e - Einsatz
x8
f - Sechskantschlüssel (nur für
Wartungszwecke)
x1
g - Aufbewahrungstasche
x1
b - Großes
Obertuch
x1
c - Kleines
Top-Tuch
x1
Gebrauchs- und Pflegeanleitung
550 cm x 305 cm großer Schirm
Sofortige Überdachung mit erweiterten Schattenpaneelen
Pièces de Rechange
FR
A
B
C(L)
D
K(L)
K(L)
K(R)
H
P
I
H
E
F
L
E1
N
M
C(R)
J(R)
J(L)
G(L)
O(L)
O(R)
G(R)
DC(L)BA C(R)
E
E1
F
G(L)
G(R)
I
H
J(L) J(R)
K(R)
K(L)
L
M
N
O(L) O(R)
Q
R
P
S
24 25

Installation de la Verrière
1
OUVERTURE DU CADRE DE L'AUVENT
□
Avec un partenaire, tenez-vous face à face.
Saisissez une ferme en haut du cadre (a) et l'autre ferme en
bas, comme illustré. Soulevez légèrement du sol et reculez tout
en serrant les fermes ensemble.
Soulevez un côté. Saisissez la jambe extérieure ou supérieure
d'une main et tirez le pied intérieur de l'autre. Prolongez jusqu'à
ce que le bouton s'enclenche.
□
□
x4
90%
Partie
A
B
C(L)
C(R)
D
E
E1
F
G(L)
G(R)
H
I
J(L)
J(R)
K(L)
K(R)
L
M
N
O(L)
O(R)
P
Q
R
S
Description
Pôle central
Moyeu inférieur central
Capuchon de pied (gauche)
Casquette de pied (droite)
Glissière
Assemblage de plafond
Assemblage de renfort de plafond
Assemblage avant-toit
Pied avec roue (gauche)
Pied avec roue (droite)
Pied sans roue
Extension de pied
Curseur d'auvent (gauche)
Curseur d'auvent (droite)
Ensemble de tube d'auvent (gauche)
Ensemble de tube d'auvent (droit)
Kit de boulons M5
Kit de boulons M4
Kit de boulons M5 (avec support en U)
Pied avec roue (Gauche)
Pied avec roue (Droit)
Pied sans roue
Petit Top Tissu-Gris
Petit Top Tissu-Blanc
Tissu Petit Haut-Bleu Marine
Grand Top Tissu-Gris
Grand Top Tissu-Blanc
Tissu Haut Large-Bleu Marine
Sac Stow N Go
Pièces de Rechange
26 27
3
FIXATION DE L'AUVENT
□
□
Soulevez un côté du cadre (a) et passez dessous.
Placez une main sur le cadre supérieur et utilisez l'autre main
pour pousser le moyeu central vers le haut jusqu'à ce qu'il
s'enclenche dans le poteau central.
Installation de la Verrière
CLIQUER
Installation de la Verrière
2
FIXATION DE L'AUVENT
□
□
□
Fixez le petit tissu supérieur (c) en insérant la poche d'angle sur
les ascenseurs Vent Finger.
Dépliez le grand tissu supérieur (b) sur le cadre. Alignez les
panneaux de l'auvent sur les mêmes côtés que la quincaillerie
de l'auvent. Insérez les pochettes des panneaux d'auvent sur les
bras de l'auvent.
Fixez l'auvent au coin du cadre et enroulez les rabats en tissu
avec le crochet et la boucle
x4
a
b
c
x4x4 x4
x4
x8
Bras de store
Poche
28 29

Installation de la Verrière
4
RÉGLAGE DE LA HAUTEUR DE LA VOILURE
□
□
Soulevez un côté. Saisissez la jambe extérieure ou supérieure
d'une main et tirez le pied intérieur de l'autre.
Prolongez jusqu'à ce que le bouton s'enclenche.
Réglez les pieds à la hauteur désirée.
5
UTILISATION DES PANNEAUX DU STORE
□
□
Tirez vers le haut un côté des bras du panneau de l'auvent jusqu'à
ce que le bras de support se verrouille dans le trou du pied.
Faites pivoter la barre stabilisatrice et glissez-la sur le rivet de la
ferme périmétrique supérieure, comme illustré.
x4
Rivet
x4
6
□
CONFIGURATION DE LA CONFIGURATION SOUHAITÉE
POUR LES AUVENTS
Fixez la sangle autour de la jambe avec une bascule.
7
□
FIXATION DE L'AUVENT EN PLACE
Remplissez le sac de poids (d) avec du sable ou du gravier.
Connectez le crochet et les boucles du sac de poids autour de
chaque jambe. Les sacs de poids inclus sont conçus pour une
utilisation rapide et facile.
Insérez un piquet dans le pied de chaque pied de la canopée.
Mesurez chaque pied à une distance appropriée et fixez quatre
piquets (e) au sol. Attachez les cordes pré-attachées aux piquets
dans le sol. Assurez-vous que les cordes ont la bonne tension
en ajustant les ajusteurs en plastique sur les cordes.
Installation de la Verrière
□
□
□
30 31

Installation de la Verrière
4
RÉGLAGE DE LA HAUTEUR DE LA VOILURE
□
□
Soulevez un côté. Saisissez la jambe extérieure ou supérieure
d'une main et tirez le pied intérieur de l'autre.
Prolongez jusqu'à ce que le bouton s'enclenche.
Réglez les pieds à la hauteur désirée.
5
UTILISATION DES PANNEAUX DU STORE
□
□
Tirez vers le haut un côté des bras du panneau de l'auvent jusqu'à
ce que le bras de support se verrouille dans le trou du pied.
Faites pivoter la barre stabilisatrice et glissez-la sur le rivet de la
ferme périmétrique supérieure, comme illustré.
x4
Rivet
x4
6
□
CONFIGURATION DE LA CONFIGURATION SOUHAITÉE
POUR LES AUVENTS
Fixez la sangle autour de la jambe avec une bascule.
7
□
FIXATION DE L'AUVENT EN PLACE
Remplissez le sac de poids (d) avec du sable ou du gravier.
Connectez le crochet et les boucles du sac de poids autour de
chaque jambe. Les sacs de poids inclus sont conçus pour une
utilisation rapide et facile.
Insérez un piquet dans le pied de chaque pied de la canopée.
Mesurez chaque pied à une distance appropriée et fixez quatre
piquets (e) au sol. Attachez les cordes pré-attachées aux piquets
dans le sol. Assurez-vous que les cordes ont la bonne tension
en ajustant les ajusteurs en plastique sur les cordes.
Installation de la Verrière
□
□
□
30 31

Démonter la Canopée
2
□
DÉVERROUILLAGE DE L'AUVENT
Depuis le dessous de la verrière, appuyez sur le bouton de
verrouillage rouge. Tirez sur le moyeu central jusqu'à ce qu'il soit
séparé du poteau central.
1
□
□
ENLEVER LES PIQUETS ET RETRACTER LES PIEDS
Retirez toutes les poches de poids et les piquets du sol.
Abaissez les panneaux de l'auvent en soulevant la barre
stabilisatrice et faites-les pivoter vers la jambe supérieure.
Appuyez sur le bouton poussoir de chaque pied et rétractez les
pieds à leur hauteur d'origine.
□
x4
x4
3
PLIER LE CADRE
4
□
□
EMBALLAGE DE LA CANOPY DANS LE SAC DE RANGEMENT
Positionnez les sangles du sac de couverture pour les aligner
avec les 2 pieds à roulettes. Faites glisser le sac sur le cadre
fermé. Zip la couverture fermée.
Desserrez la sangle et insérez le bouchon rouge dans
l'ouverture du repose-pieds et serrez les sangles en tirant sur la
boucle de la sangle.
Démonter la Canopée
□
Soulevez la verrière du sol de 2 à 3 pouces et avancez-la des
deux côtés jusqu'à ce que le cadre soit complètement fermé.
x2
x2
32 33
Démonter la Canopée
2
□
DÉVERROUILLAGE DE L'AUVENT
Depuis le dessous de la verrière, appuyez sur le bouton de
verrouillage rouge. Tirez sur le moyeu central jusqu'à ce qu'il soit
séparé du poteau central.
1
□
□
ENLEVER LES PIQUETS ET RETRACTER LES PIEDS
Retirez toutes les poches de poids et les piquets du sol.
Abaissez les panneaux de l'auvent en soulevant la barre
stabilisatrice et faites-les pivoter vers la jambe supérieure.
Appuyez sur le bouton poussoir de chaque pied et rétractez les
pieds à leur hauteur d'origine.
□
x4
x4
3
PLIER LE CADRE
4
□
□
EMBALLAGE DE LA CANOPY DANS LE SAC DE RANGEMENT
Positionnez les sangles du sac de couverture pour les aligner
avec les 2 pieds à roulettes. Faites glisser le sac sur le cadre
fermé. Zip la couverture fermée.
Desserrez la sangle et insérez le bouchon rouge dans
l'ouverture du repose-pieds et serrez les sangles en tirant sur la
boucle de la sangle.
Démonter la Canopée
□
Soulevez la verrière du sol de 2 à 3 pouces et avancez-la des
deux côtés jusqu'à ce que le cadre soit complètement fermé.
x2
x2
32 33
CONTENU DE COLIS
a-Cadre (cordon de
serrage préinstallé)
x1
d-Sac de Poids
x4
e-Piquets de
Terre
x8
f-Clé Hexagonale
(maintenance uniquement)
x1
g-Sac Stow N Go
x1
b-Grande Toile
Supérieure
x1
c-Petite Toile
Supérieure
x1
Guide d'Utilisation et d'Entretien
Ombre Puissante 18 pi x 10 pi
Auvent Instantané avec Panneaux d'Ombrage Étendus
Piezas
ES
A
B
C(L)
D
K(L)
K(L)
K(R)
H
P
I
H
E
F
L
E1
N
M
C(R)
J(R)
J(L)
G(L)
O(L)
O(R)
G(R)
DC(L)BA C(R)
E
E1
F
G(L)
G(R)
I
H
J(L) J(R)
K(R)
K(L)
L
M
N
O(L) O(R)
Q
R
P
S
34 35

Montar el Pabellón
1
ABRIR EL MARCO DEL PABELLÓN
□
Con un compañero, pónganse frente a frente.
Agarre una cercha en la parte superior del marco (a) y la otra
cercha en la parte inferior, como se muestra. Levante
ligeramente del suelo y dé un paso hacia atrás mientras aprieta
las cerchas.
Levante un lado. Agarre la pata exterior o superior con una
mano y saque la pata interior con la otra. Extienda hasta que el
botón encaje.
□
□
x4
90%
Pieza
A
B
C(L)
C(R)
D
E
E1
F
G(L)
G(R)
H
I
J(L)
J(R)
K(L)
K(R)
L
M
N
O(L)
O(R)
P
Q
R
S
Descripción
Poste central
Cubo central inferior
Tapa de pata (izquierda)
Tapa de pata (derecha)
Deslizador
Conjunto de techo
Conjunto de refuerzo de techo
Conjunto de alero
Pata con rueda (izquierda)
Pata con rueda (derecha)
Pata sin rueda
Extensor de pata
Deslizador de pabellón (izquierdo)
Deslizador de pabellón (derecho)
Conjunto de tubo de pabellón (izquierdo)
Conjunto de tubo de pabellón (derecho)
Kit de perno M5
Kit de perno M4
Kit de perno M5 (con soporte U)
Pie con rueda (izquierdo)
Pie con rueda (derecho)
Pie sin rueda
Tejido superior pequeño - Gris
Tejido superior pequeño - Blanco
Tejido superior pequeño - Azul marino
Tejido superior grande - Gris
Tejido superior grande - Blanco
Tejido superior grande - Azul marino
Bolsa de almacenamiento
Piezas
36 37

3
BLOQUEAR EL MARCO
□
□
Levante un lado del marco (B) y pase por debajo.
Coloque una mano en el marco superior y utilice la otra para
empujar el cubo central hacia arriba hasta que encaje en el
poste central.
Montar el Pabellón
¡HAGA CLIC!
Montar el Pabellón
2
FIJAR EL PABELLÓN
□
□
Fije la tela superior pequeña (c) introduciendo el bolsillo de
esquina sobre las elevaciones de los dedos de ventilación.
Despliegue la tela superior grande (b) sobre el marco. Alinee los
paneles del pabellón en los mismos lados que los accesorios
del pabellón. Inserte los bolsillos de los paneles del pabellón en
los brazos del pabellón.
Asegure el pabellón a la esquina del marco y envuelva las
solapas de tela juntas con el gancho y el bucle.
□
x4
a
b
c
x4x4 x4
x4
x8
Brazo del pabellón
Bolsillo
38 39

Montar el Pabellón
4
AJUSTAR LA ALTURA DEL PABELLÓN
□
□
Levante un lado. Agarre la pata exterior o superior con una
mano y saque la pata interior con la otra.
Extienda hasta que el botón encaje.
Ajuste las patas a la altura deseada.
□
5
MANEJAR LOS PANELES DEL PABELLÓN
□
□
Tire hacia arriba de un lado de los brazos del panel del pabellón
hasta que el brazo de soporte encaje en el agujero de la pata.
Gire la barra estabilizadora y deslícela sobre el remache de la
cercha perimetral superior, tal como se muestra.
x4
Remache
x4
6
□
CONFIGURAR LA DISPOSICIÓN DESEADA PARA EL PABELLÓN
Asegure la correa alrededor de la pata con el dispositivo de
cierre.
7
□
ASEGURAR EL PABELLÓN EN SU LUGAR
Llene la bolsa de peso (d) con arena o grava. Conecte los
ganchos y bucles de la bolsa de peso alrededor de cada pata.
Las bolsas de peso incluidas están diseñadas para un uso
rápido y fácil.
Inserte una estaca en el pie de cada pata del pabellón.
Mida cada pata a una distancia adecuada y fije cuatro estacas
(e) al suelo. Ate las cuerdas preconectadas a las estacas en el
suelo. Asegúrese de que las cuerdas tienen la tensión adecuada
ajustando los reguladores de plástico de las cuerdas.
Montar el Pabellón
□
□
40 41

Montar el Pabellón
4
AJUSTAR LA ALTURA DEL PABELLÓN
□
□
Levante un lado. Agarre la pata exterior o superior con una
mano y saque la pata interior con la otra.
Extienda hasta que el botón encaje.
Ajuste las patas a la altura deseada.
□
5
MANEJAR LOS PANELES DEL PABELLÓN
□
□
Tire hacia arriba de un lado de los brazos del panel del pabellón
hasta que el brazo de soporte encaje en el agujero de la pata.
Gire la barra estabilizadora y deslícela sobre el remache de la
cercha perimetral superior, tal como se muestra.
x4
Remache
x4
6
□
CONFIGURAR LA DISPOSICIÓN DESEADA PARA EL PABELLÓN
Asegure la correa alrededor de la pata con el dispositivo de
cierre.
7
□
ASEGURAR EL PABELLÓN EN SU LUGAR
Llene la bolsa de peso (d) con arena o grava. Conecte los
ganchos y bucles de la bolsa de peso alrededor de cada pata.
Las bolsas de peso incluidas están diseñadas para un uso
rápido y fácil.
Inserte una estaca en el pie de cada pata del pabellón.
Mida cada pata a una distancia adecuada y fije cuatro estacas
(e) al suelo. Ate las cuerdas preconectadas a las estacas en el
suelo. Asegúrese de que las cuerdas tienen la tensión adecuada
ajustando los reguladores de plástico de las cuerdas.
Montar el Pabellón
□
□
40 41
Desmontar el Pabellón
2
□
DESBLOQUEAR EL PABELLÓN
Pase por debajo del pabellón y presione el botón rojo de
bloqueo. Tire hacia abajo del cubo central hasta que se separe
del poste central.
1
□
□
RETIRAR LAS ESTACAS Y RETRAER LAS PATAS
Retire todas las bolsas de peso y las estacas del suelo.
Baje los paneles del toldo levantando la barra estabilizadora y
gire hacia la pata superior.
Presione el botón de cada pata y retraiga las patas a su altura
original.
□
x4
x4
3
PLEGAR EL MARCO
4
□
□
EMPACAR EL PABELLÓN EN LA BOLSA DE ALMACENAMIENTO
Coloque las correas de la bolsa de almacenamiento para que se
alineen con las 2 patas con ruedas. Deslice la bolsa sobre el
marco cerrado. Cierre la bolsa con la cremallera.
Afloje la correa e inserte el tapón rojo en la abertura de la pata y
apriete la correa tirando hacia abajo del lazo de la correa.
Desmontar el Pabellón
□
Levante el pabellón del suelo entre 5 cm y 7,6 cm y acérquelo
por ambos lados hasta que el marco esté completamente
cerrado.
x2
x2
42 43

Desmontar el Pabellón
2
□
DESBLOQUEAR EL PABELLÓN
Pase por debajo del pabellón y presione el botón rojo de
bloqueo. Tire hacia abajo del cubo central hasta que se separe
del poste central.
1
□
□
RETIRAR LAS ESTACAS Y RETRAER LAS PATAS
Retire todas las bolsas de peso y las estacas del suelo.
Baje los paneles del toldo levantando la barra estabilizadora y
gire hacia la pata superior.
Presione el botón de cada pata y retraiga las patas a su altura
original.
□
x4
x4
3
PLEGAR EL MARCO
4
□
□
EMPACAR EL PABELLÓN EN LA BOLSA DE ALMACENAMIENTO
Coloque las correas de la bolsa de almacenamiento para que se
alineen con las 2 patas con ruedas. Deslice la bolsa sobre el
marco cerrado. Cierre la bolsa con la cremallera.
Afloje la correa e inserte el tapón rojo en la abertura de la pata y
apriete la correa tirando hacia abajo del lazo de la correa.
Desmontar el Pabellón
□
Levante el pabellón del suelo entre 5 cm y 7,6 cm y acérquelo
por ambos lados hasta que el marco esté completamente
cerrado.
x2
x2
42 43
CONTENIDO DEL PAQUETE
a - Marco (con cuerdas de
sujeción prefijadas)
x1
d - Bolsa de
pesos
x4
e - Estaca
x8
f - Llave hexagonal (solo
para mantenimiento)
x1
g - Bolsa de
almacenamiento
x1
b - Tela superior
grande
x1
c - Tela superior
pequeña
x1
Guía de Uso y Cuidado
550 cm x 305 cm Sombra Grande
Pabellón Instantáneo con Paneles de Sombra Extendidos
Parte
IT
A
B
C(L)
D
K(L)
K(L)
K(R)
H
P
I
H
E
F
L
E1
N
M
C(R)
J(R)
J(L)
G(L)
O(L)
O(R)
G(R)
DC(L)BA C(R)
E
E1
F
G(L)
G(R)
I
H
J(L) J(R)
K(R)
K(L)
L
M
N
O(L) O(R)
Q
R
P
S
44 45

Installazione del Gazebo
1
APRIRE LA CORNICE DEL GAZEBO
□
Con un partner, stare uno di fronte all'altro.
Afferrare un traliccio nella parte superiore del telaio (a) e l'altro
traliccio in basso, come mostrato. Sollevare leggermente da
terra e fare un passo indietro mentre si stringono insieme i
tralicci.
Alzare un lato. Afferrare la gamba esterna o superiore con una
mano ed estrai la gamba interna con l'altra. Estendere finché il
pulsante non si innesta.
□
□
x4
90%
Parte
A
B
C(L)
C(R)
D
E
E1
F
G(L)
G(R)
H
I
J(L)
J(R)
K(L)
K(R)
L
M
N
O(L)
O(R)
P
Q
R
S
Descrizione
Polo centrale
Mozzo centrale inferiore
Coprigambe (sinistra)
Coprigambe (destra)
Dispositivo di scorrimento
Assemblaggio del soffitto
Assemblaggio di rinforzo del soffitto
Assemblaggio di gronda
Gamba con ruota (sinistra)
Gamba con ruota (destra)
Gamba senza ruota
Estensore per le gambe
Cursore della tenda da sole (sinistra)
Cursore della tenda da sole (a destra)
Gruppo tubo tenda (sinistra)
Gruppo tubo tenda (destra)
Kit bulloni M5
Kit bulloni M4
Kit bulloni M5 (con staffa U)
Piede con ruota (sinistra)
Piede con ruota (destra)
Piede senza ruota
Tessuto superiore piccolo grigio
Tessuto superiore piccolo bianco
Tessuto superiore piccolo blu navy
Tessuto superiore piccolo grande grigio
Tessuto superiore piccolo grande bianco
Tessuto superiore piccolo grande blu scuro
Borsa
Parte
46 47

3
ATTACCARE LA COPERTINA
□
□
Sollevare un lato del telaio (a) e camminarci sotto.
Mettere una mano sul telaio superiore e usa l'altra mano per
spingere il mozzo centrale verso l'alto finché non scatta nel palo
centrale.
Installazione del Gazebo
CLICK!
Installazione del Gazebo
2
ATTACCARE LA COPERTINA
□
□
Attaccare il tessuto superiore piccolo (c) inserendo la tasca
d'angolo sopra i sollevatori.
Aprire il tessuto superiore grande (b) sopra il telaio. Allineare i
pannelli della tenda da sole sugli stessi lati del ferramenta della
tenda da sole. Inserire le tasche del pannello della tenda da sole
sui bracci della tenda da sole.
Fissare il baldacchino all'angolo del telaio e avvolgere le alette
in tessuto insieme al gancio e anello.
□
x4
a
b
c
x4x4 x4
x4
x8
Awning arm
Pocket
48 49

Installazione del Gazebo
4
REGOLAZIONE DELL'ALTEZZA DEL GAZEBO
□
□
Alzare un lato. Afferrare la gamba esterna o superiore con una
mano ed estrarre la gamba interna con l'altra.
Estendere finché il pulsante non si innesta.
Impostare le gambe all'altezza desiderata.
□
5
AZIONARE I PANNELLI DELLA TENDA
□
□
Sollevare un lato dei bracci del pannello della tenda da sole
finché il braccio di supporto non si blocca nel foro sulla gamba.
Ruotare la barra stabilizzatrice e far scorrere il rivetto sul
traliccio perimetrale superiore come mostrato.
x4
Rivet
x4
6
□
CONFIGURA LA PREPARAZIONE DESIDERATA
PER TENDE DA SOLE
Fissare la cinghia intorno alla gamba con la linguetta.
7
□
FISSARE IL GAZEBO IN POSIZIONE
Riempire il sacco dei pesi (d) con sabbia o ghiaia. Collega il
gancio e gli anelli della borsa per pesi attorno a ciascuna
gamba. Le borse per pesi incluse sono progettate per un uso
facile e veloce.
Inserire un picchetto nel piede di ciascuna gamba del
baldacchino.
Misurare ciascuna gamba a una distanza adeguata e fissare
quattro picchetti (e) a terra. Legare le corde pre-attaccate ai
picchetti nel terreno. Assicurarsi che le corde abbiano la giusta
tensione regolando i regolatori di plastica sulle corde.
Installazione del Gazebo
□
□
50 51

Installazione del Gazebo
4
REGOLAZIONE DELL'ALTEZZA DEL GAZEBO
□
□
Alzare un lato. Afferrare la gamba esterna o superiore con una
mano ed estrarre la gamba interna con l'altra.
Estendere finché il pulsante non si innesta.
Impostare le gambe all'altezza desiderata.
□
5
AZIONARE I PANNELLI DELLA TENDA
□
□
Sollevare un lato dei bracci del pannello della tenda da sole
finché il braccio di supporto non si blocca nel foro sulla gamba.
Ruotare la barra stabilizzatrice e far scorrere il rivetto sul
traliccio perimetrale superiore come mostrato.
x4
Rivet
x4
6
□
CONFIGURA LA PREPARAZIONE DESIDERATA
PER TENDE DA SOLE
Fissare la cinghia intorno alla gamba con la linguetta.
7
□
FISSARE IL GAZEBO IN POSIZIONE
Riempire il sacco dei pesi (d) con sabbia o ghiaia. Collega il
gancio e gli anelli della borsa per pesi attorno a ciascuna
gamba. Le borse per pesi incluse sono progettate per un uso
facile e veloce.
Inserire un picchetto nel piede di ciascuna gamba del
baldacchino.
Misurare ciascuna gamba a una distanza adeguata e fissare
quattro picchetti (e) a terra. Legare le corde pre-attaccate ai
picchetti nel terreno. Assicurarsi che le corde abbiano la giusta
tensione regolando i regolatori di plastica sulle corde.
Installazione del Gazebo
□
□
50 51

Smontare il Gazebo
2
□
SBLOCCARE IL GAZEBO
Andare sotto il gazebo, premere il pulsante di blocco rosso.
Abbassare il mozzo centrale fino a separarlo dal polo centrale.
1
□
□
RIMUOVERE I PICCHETTI E RETRARE LE GAMBE
Rimuovere tutte le tasche dei pesi e i paletti da terra.
Abbassare i pannelli della tenda da sole sollevando la barra
stabilizzatrice e ruotandoli all'indietro fino alla parte superiore
della gamba.
Premere il pulsante su ciascuna gamba e riportare le gambe
alla loro altezza originale.
□
x4
x4
3
PIEGARE IL TELAIO
4
□
□
METTERE IL GAZEBO NELLA BORSA DI CONSERVAZIONE
Posizionare le cinghie della borsa di copertura in modo che
siano allineate con le 3 gambe con ruote. Far scorrere la borsa
sul telaio chiuso. Chiudere il zip del coperchio.
Allentare la cinghia e inserire il tappo rosso nell'apertura del
poggiapiedi e stringere le cinghie tirando verso il basso il
passante della cinghia.
Smontare il Gazebo
□
Sollevare il gazebo a 5-7,6 cm da terra e tirarlo più vicino su
entrambi i lati fino a quando il telaio non è completamente
chiuso.
x2
x2
52 53

Smontare il Gazebo
2
□
SBLOCCARE IL GAZEBO
Andare sotto il gazebo, premere il pulsante di blocco rosso.
Abbassare il mozzo centrale fino a separarlo dal polo centrale.
1
□
□
RIMUOVERE I PICCHETTI E RETRARE LE GAMBE
Rimuovere tutte le tasche dei pesi e i paletti da terra.
Abbassare i pannelli della tenda da sole sollevando la barra
stabilizzatrice e ruotandoli all'indietro fino alla parte superiore
della gamba.
Premere il pulsante su ciascuna gamba e riportare le gambe
alla loro altezza originale.
□
x4
x4
3
PIEGARE IL TELAIO
4
□
□
METTERE IL GAZEBO NELLA BORSA DI CONSERVAZIONE
Posizionare le cinghie della borsa di copertura in modo che
siano allineate con le 3 gambe con ruote. Far scorrere la borsa
sul telaio chiuso. Chiudere il zip del coperchio.
Allentare la cinghia e inserire il tappo rosso nell'apertura del
poggiapiedi e stringere le cinghie tirando verso il basso il
passante della cinghia.
Smontare il Gazebo
□
Sollevare il gazebo a 5-7,6 cm da terra e tirarlo più vicino su
entrambi i lati fino a quando il telaio non è completamente
chiuso.
x2
x2
52 53

CONTENUTO DEL PACCO
a - Telaio (con
tiranti premontati)
x 1
d - Borsa per
pesi
x 4
e - Picchetti a
terra
x 8
f - Chiave esagonale
(solo per manutenzione)
x 1
g – Borsa
x 1
b - Tessuto
superiore grande
x 1
c - Tessuto
superiore piccolo
x 1
Guida all'Uso e alla Cura
550 cm x 305 cm Ombra Possente Tettoia Istantanea con
Pannelli Ombreggianti Estesi
Lista części
PL
A
B
C(L)
D
K(L)
K(L)
K(R)
H
P
I
H
E
F
L
E1
N
M
C(R)
J(R)
J(L)
G(L)
O(L)
O(R)
G(R)
DC(L)BA C(R)
E
E1
F
G(L)
G(R)
I
H
J(L) J(R)
K(R)
K(L)
L
M
N
O(L) O(R)
Q
R
P
S
54 55
Rozkładanie pawilonu ogrodowego
1
ROZKŁADANIE RAMY
□
Wraz z drugą osobą złapcie ramę z obu jej stron.
Trzymając za łączniki w górnej i dolnej części ramy (A), lekko
unieście i pociągnijcie ramę na zewnątrz, jednocześnie
ściskając łączniki do środka, tak jak pokazano na rysunku.
Unieście jedną stronę pawilonu ogrodowego. Chwyćcie jedną
ręką górną część, a drugą ręką dolną część nogi. Pociągnijcie,
aż zatrzask sprężynowy zablokuje się w otworze.
□
□
x4
90%
Część
A
B
C(L)
C(R)
D
E
E1
F
G(L)
G(R)
H
I
J(L)
J(R)
K(L)
K(R)
L
M
N
O(L)
O(R)
P
Q
R
S
Nazwa
Główny drążek
Element rozporowy
Nasadka na nogę (lewa)
Nasadka na nogę (prawa)
Prowadnica
Drążek zadaszenia
Wspornik zadaszenia
Stelaż zadaszenia
Noga z kółkiem (lewa)
Noga z kółkiem (prawa)
Noga bez kółka
Przedłużka nogi
Prowadnica zadaszenia (lewa)
Prowadnica zadaszenia (prawa)
Rama daszku (lewa)
Rama daszku (prawa)
Zestaw mocujący M5
Zestaw mocujący M4
Zestaw mocujący M5 ze wspornikiem w kształcie litery U
Stopka z kółkiem (lewa)
Stopka z kółkiem (prawa)
Stopka bez kółka
Małe zadaszenie z tkaniny - szare
Małe zadaszenie z tkaniny - białe
Małe zadaszenie z tkaniny - granatowe
Duże zadaszenie z tkaniny - szare
Duże zadaszenie z tkaniny - białe
Duże zadaszenie z tkaniny - granatowe
Torba transportowa
Lista części
56 57

3
MONTAŻ ZADASZENIA
□
□
Unieś jedną stronę ramy (A), tak aby pod nią wejść.
Trzymając jedną rękę na górnej części ramy, pchnij drugą ręką
element rozporowy w górę, aż zablokuje się na głównym
drążku.
Rozkładanie pawilonu ogrodowego
KLIK!
Rozkładanie pawilonu ogrodowego
2
MONTAŻ ZADASZENIA
□
□
Rozłóż małe zadaszenie z tkaniny (C), wsuwając elementy ramy
w kieszenie na tkaninie.
Rozłóż duże zadaszenie (B) nad ramą pawilonu ogrodowego,
tak aby tkanina dodatkowych daszków znalazła się na
elementach ich ramy. Wsuń elementy ramy w kieszenie w
tkaninie.
Przymocuj zadaszenie w narożnikach ramy za pomocą pasków
na rzepy.
□
x4
a
b
c
x4x4 x4
x4
x8
Drążek pawilonu ogrodowego
Kieszenie
58 59

Rozkładanie pawilonu ogrodowego
4
REGULACJA WYSOKOŚCI
□
□
Unieś jedną stronę pawilonu ogrodowego. Chwyć jedną ręką
górną część, a drugą ręką dolną część nogi.
Pociągnij, aż zatrzask sprężynowy zablokuje się w otworze.
Wyreguluj wszystkie nogi na żądaną wysokość.
□
5
UŻYTKOWANIE DODATKOWYCH DASZKÓW
□
□
Pociągnij ramiona dodatkowego daszku, tak aby wsporniki
zablokowały się w otworach na nogach.
Obróć drążek stabilizujący i nasuń na element stelażu
zadaszenia, tak jak pokazano na rysunku.
x4
x4
6
□
KONFIGURACJA DASZKÓW
Zamocuj paski wokół nóg pawilonu.
7
□
MOCOWANIE PAWILONU DO PODŁOŻA
Wypełnij obciążniki (D) piaskiem lub żwirem. Następnie
przymocuj obciążniki do nóg pawilonu za pomocą pasków na
rzepy. Dołączone do zestawu obciążniki zostały zaprojektowane
z myślą o szybkim i łatwym montażu.
Zamocuj kotwę na każdej nodze pawilonu.
Odmierz odpowiednią odległość od każdej nogi, a następnie
przymocuj cztery kotwy (E) do podłoża. Przymocuj liny, które
znajdują się w górnej części pawilonu do kotew w ziemi.
Wyreguluj plastikowe elementy na linach, aby upewnić się, że
liny są odpowiednio naprężone.
Rozkładanie pawilonu ogrodowego
□
□
Element
stelażu
60 61
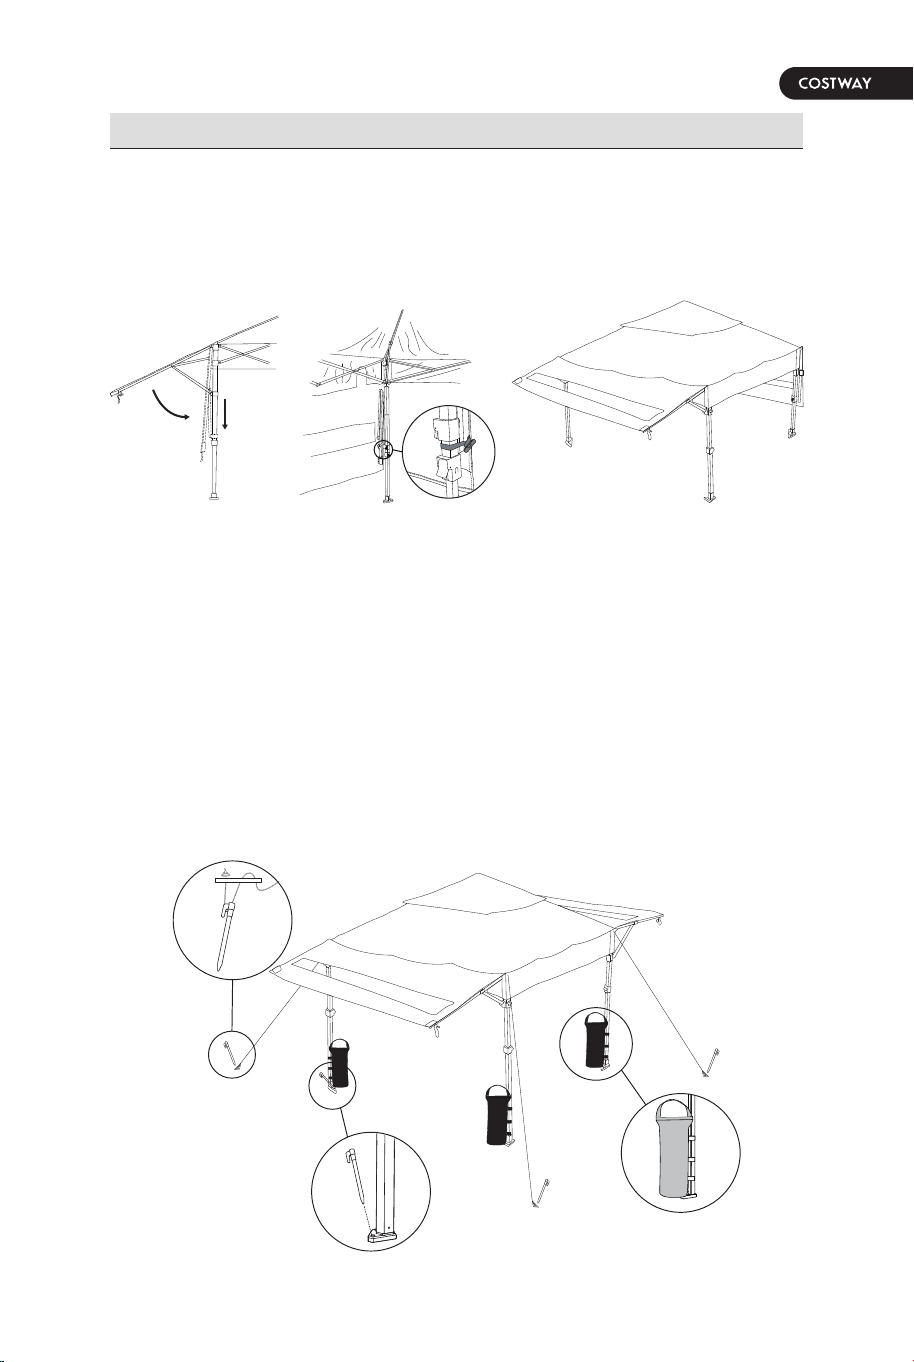
Rozkładanie pawilonu ogrodowego
4
REGULACJA WYSOKOŚCI
□
□
Unieś jedną stronę pawilonu ogrodowego. Chwyć jedną ręką
górną część, a drugą ręką dolną część nogi.
Pociągnij, aż zatrzask sprężynowy zablokuje się w otworze.
Wyreguluj wszystkie nogi na żądaną wysokość.
□
5
UŻYTKOWANIE DODATKOWYCH DASZKÓW
□
□
Pociągnij ramiona dodatkowego daszku, tak aby wsporniki
zablokowały się w otworach na nogach.
Obróć drążek stabilizujący i nasuń na element stelażu
zadaszenia, tak jak pokazano na rysunku.
x4
x4
6
□
KONFIGURACJA DASZKÓW
Zamocuj paski wokół nóg pawilonu.
7
□
MOCOWANIE PAWILONU DO PODŁOŻA
Wypełnij obciążniki (D) piaskiem lub żwirem. Następnie
przymocuj obciążniki do nóg pawilonu za pomocą pasków na
rzepy. Dołączone do zestawu obciążniki zostały zaprojektowane
z myślą o szybkim i łatwym montażu.
Zamocuj kotwę na każdej nodze pawilonu.
Odmierz odpowiednią odległość od każdej nogi, a następnie
przymocuj cztery kotwy (E) do podłoża. Przymocuj liny, które
znajdują się w górnej części pawilonu do kotew w ziemi.
Wyreguluj plastikowe elementy na linach, aby upewnić się, że
liny są odpowiednio naprężone.
Rozkładanie pawilonu ogrodowego
□
□
Element
stelażu
60 61

Składanie pawilonu ogrodowego
2
□
OBLOKOWANIE RAMY
Wejdź pod zadaszenie i naciśnij czerwoną blokadę na elemencie
rozporowym, aby odblokować ramę. Pociągnij element
rozporowy w dół, aby zsunął się z głównego drążka.
1
□
□
DEMONTAŻ KOTEW I SKŁADANIE NÓG
Zdemontuj obciążniki i wyciągnij wszystkie kotwy z ziemi.
Opuść daszki, podnosząc drążki stabilizujące i obracając je z
powrotem w kierunku nóg pawilonu.
Wciśnij zatrzask sprężynowy na każdej nodze i wsuń nogi, aby
je złożyć.
□
x4
x4
3
SKŁADANIE RAMY
4
□
□
UMIESZCZANIE PAWILONU W TORBIE
Wyrównaj paski torby z 2 nogami z kółkami i nasuń torbę na
złożoną ramę, tak jak pokazano na rysunku.
Poluzuj paski i włóż czerwone zawleczki do otworów w stopkach
pawilonu. Następnie zaciśnij paski.
Składanie pawilonu ogrodowego
□
Wraz z drugą osobą unieście ramę na ok. 5-7,5 cm. Stańcie po
obu stronach ramy i złóżcie ramę do wewnątrz.
x2
x2
62 63

Składanie pawilonu ogrodowego
2
□
OBLOKOWANIE RAMY
Wejdź pod zadaszenie i naciśnij czerwoną blokadę na elemencie
rozporowym, aby odblokować ramę. Pociągnij element
rozporowy w dół, aby zsunął się z głównego drążka.
1
□
□
DEMONTAŻ KOTEW I SKŁADANIE NÓG
Zdemontuj obciążniki i wyciągnij wszystkie kotwy z ziemi.
Opuść daszki, podnosząc drążki stabilizujące i obracając je z
powrotem w kierunku nóg pawilonu.
Wciśnij zatrzask sprężynowy na każdej nodze i wsuń nogi, aby
je złożyć.
□
x4
x4
3
SKŁADANIE RAMY
4
□
□
UMIESZCZANIE PAWILONU W TORBIE
Wyrównaj paski torby z 2 nogami z kółkami i nasuń torbę na
złożoną ramę, tak jak pokazano na rysunku.
Poluzuj paski i włóż czerwone zawleczki do otworów w stopkach
pawilonu. Następnie zaciśnij paski.
Składanie pawilonu ogrodowego
□
Wraz z drugą osobą unieście ramę na ok. 5-7,5 cm. Stańcie po
obu stronach ramy i złóżcie ramę do wewnątrz.
x2
x2
62 63
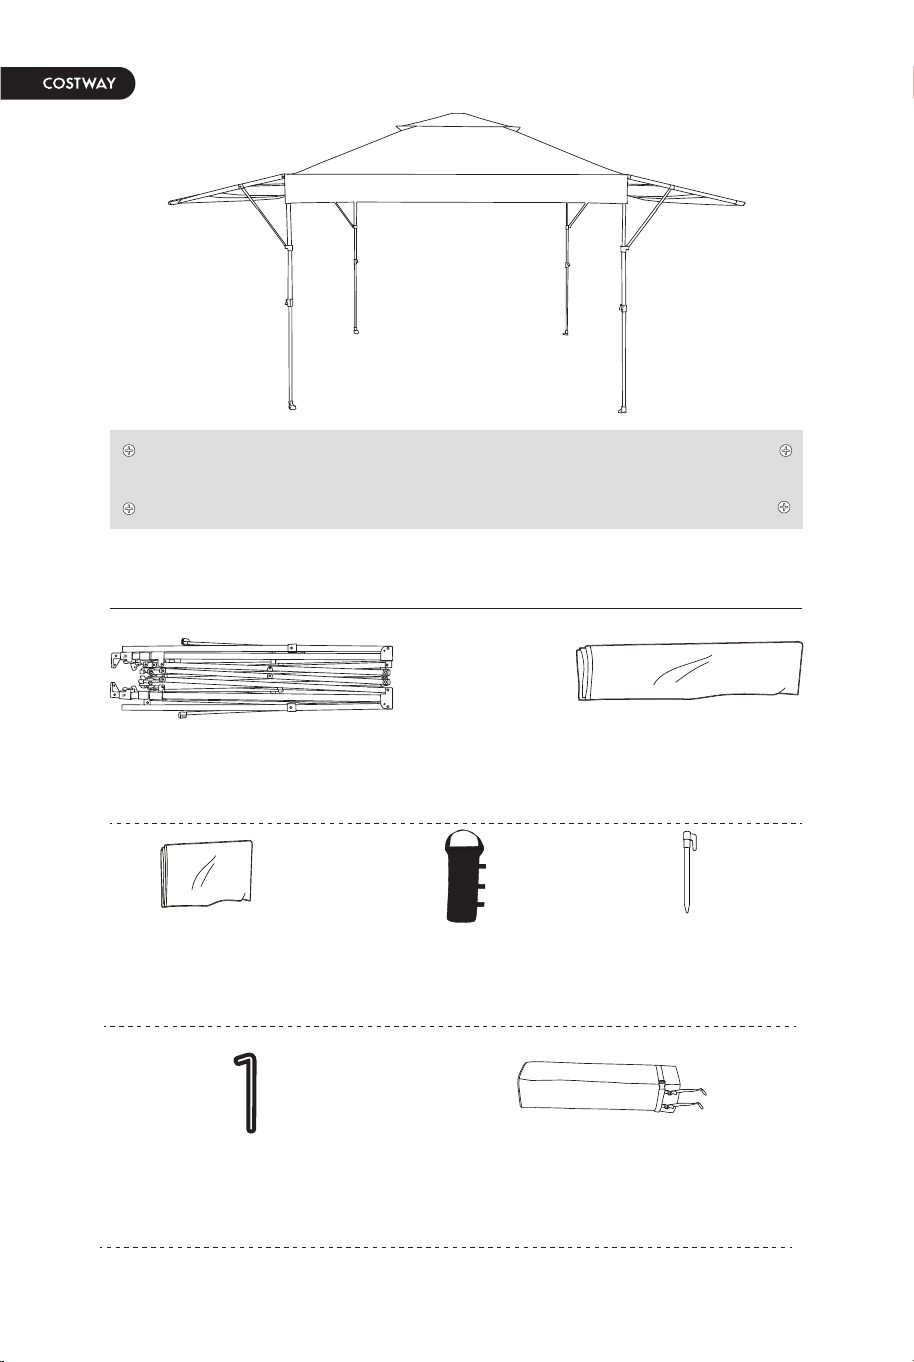
ZAWARTOŚĆ OPAKOWANIA
a - A.Rama (ze wstępnie
zamocowanymi linami)
x 1
d - Obciążnik
x 4
e - Kotwa
mocująca
x 8
f - Klucz imbusowy
(do konserwacji)
x 1
g – Torba
transportowa
x 1
b - Duże zadaszenie
z tkaniny
x 1
c - Małe zadaszenie
z tkaniny
x 1
Instrukcja montażu i użytkowania
Składany pawilon ogrodowy z dodatkowymi daszkami
przeciwsłonecznymi
In case a return is required, the item must be returned in original box. Without this
your return will not be accepted.
DO NOT discard the box / original packaging.
Take a photo of the box markings.
Take a photo of the damaged part (if applicable).
Send us an email with the images requested.
A photo of the markings (text) on the side of the box is required in case a part is
needed for replacement. This helps our staff identify your product number to
ensure you receive the correct parts.
A photo of the damage is always required to file a claim and get your replacement
or refund processed quickly. Please make sure you have the box even if it is
damaged.
Email us directly from marketplace where your item was purchased with the
attached images and a description of your claim.
Falls eine Rücksendung erforderlich ist, muss der Artikel in der
Originalverpackung zurückgeschickt werden. Andernfalls wird Ihre Rücksendung
nicht angenommen.
Werfen Sie den Karton / die Originalverpackung NICHT weg.
Machen Sie ein Foto von der Beschriftung des Kartons.
Machen Sie ein Foto des beschädigten Teils (falls zutreffend).
Schicken Sie uns eine E-Mail mit dem gewünschten Foto.
Für den Fall, dass ein Ersatzteil benötigt wird, benötigen wir ein Foto der
Beschriftung (Text) auf der Seite des Kartons. So können unsere Mitarbeiter Ihre
Artikelnummer identifizieren und sicherstellen, dass Sie die richtigen Teile
erhalten.
Ein Foto des beschädigten Teils ist immer erforderlich, um eine Reklamation
einzureichen und eine schnelle Bearbeitung Ihres Ersatzteils oder Ihrer
Rückerstattung zu gewährleisten. Bitte stellen Sie sicher, dass Sie den Karton
haben, auch wenn er beschädigt ist.
Schicken Sie uns eine E-Mail direkt vom Marktplatz, auf dem Sie den Artikel
gekauft haben, mit den angehängten Fotos und einer Beschreibung Ihrer
Reklamation.
EN
DE
Return / Damage Claim Instructions
Rücksendung / Beschädigung Anweisungen
64 65
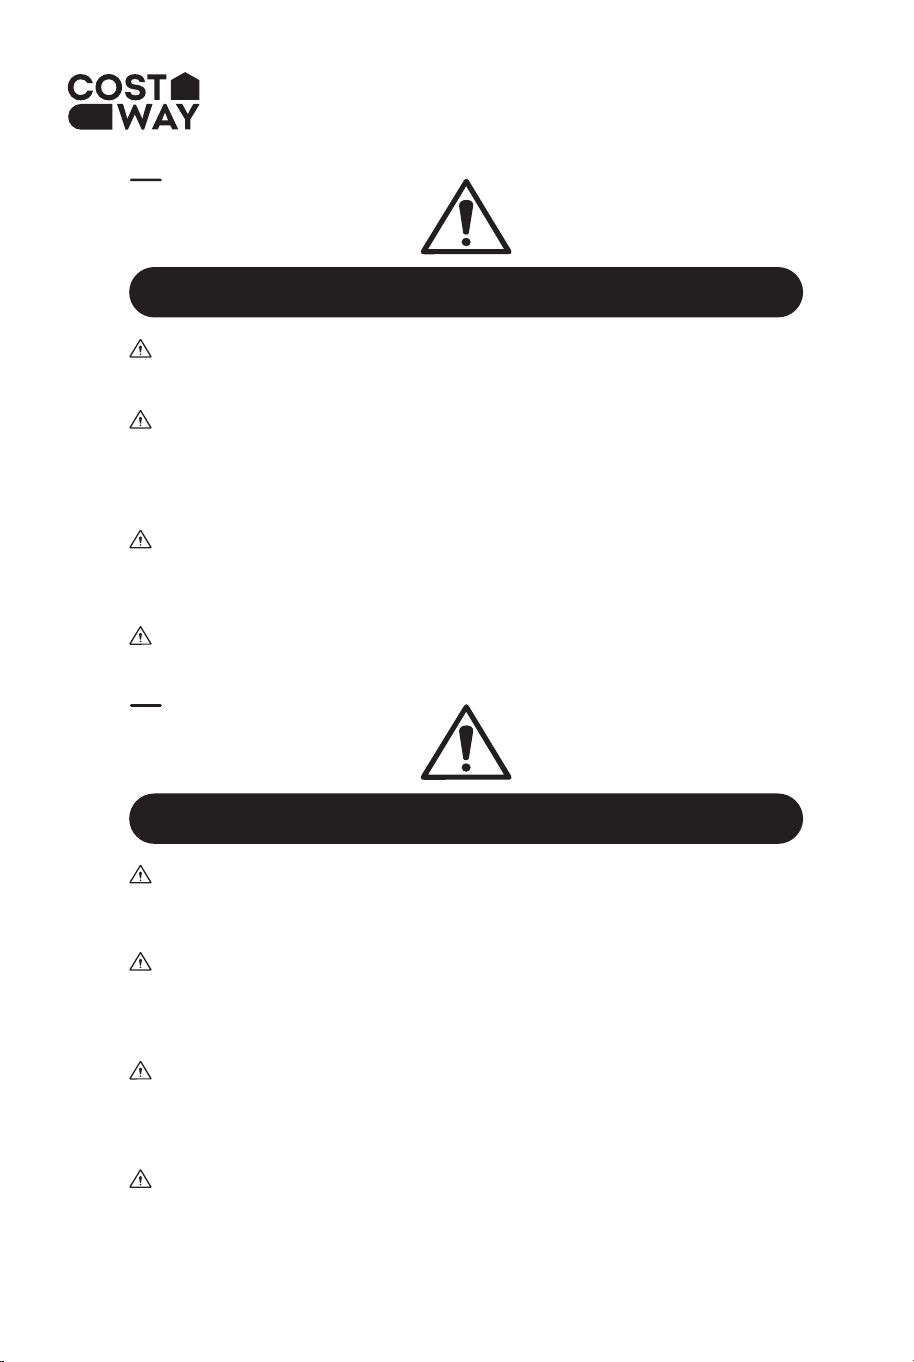
Instructions De Retour / Réclamation De Dommages
Dans le cas où un retour est requis, l'article doit être retourné dans sa boîte
d'origine. Sans cela, votre retour ne sera pas accepté.
NE PAS jeter la boîte/l'emballage d'origine.
Prenez une photo des marquages de la boîte.
Prenez une photo des dommages (le cas échéant).
Envoyez-nous un e-mail avec les images demandées.
Une photo des marquages (texte) sur le côté de la boîte est requise au cas où une
pièce serait nécessaire pour le remplacement. Cela aide notre personnel à
identifier votre numéro de produit pour s'assurer que vous recevez les bonnes
pièces.
Une photo des dommages est toujours requise pour déposer une réclamation et
obtenir rapidement votre remplacement ou votre remboursement. Assurez-vous
d'avoir la boîte même si elle est endommagée.
Envoyez-nous un e-mail directement depuis le marché où votre article a été
acheté avec les images ci-jointes et une description de votre réclamation.
Instrucciones de Devolución / Reclamación de Daños
En caso de que se requiera una devolución, el artículo debe ser devuelto en la
caja original. Sin esto su devolución no será aceptada.
NO deseche la caja/embalaje original.
Tome una foto de las marcas de la caja.
Tome una foto de los daños (si procede).
Envíenos un correo electrónico con las imágenes solicitadas.
Se requiere una foto de las marcas (texto) en el lado de la caja en caso de que se
necesite una pieza para reemplazarla. Esto ayuda a nuestro personal a identificar
su número de producto para asegurarse de que recibe las piezas correctas.
Una foto de los daños es siempre necesaria para presentar una reclamación y
conseguir que su reemplazo o reembolso sea procesado rápidamente. Por favor,
asegúrese de tener la caja aunque esté dañada.
Envíenos un correo electrónico directamente desde el mercado donde se compró
su artículo con las imágenes adjuntas y una descripción de su reclamación.
FR
ES
Nel caso in cui sia richiesto un reso, l'articolo deve essere restituito nella scatola
originale. Senza la scatola originale il tuo reso non sarà accettato.
NON scartare la scatola / confezione originale.
Fare una foto dei contrassegni sulla scatola.
Fare una foto di Danno (se è applicabile).
Inviarci una mail con le immagini richieste.
È necessaria una foto dei contrassegni (testo) sul lato della scatola nel caso in
cui la parte debba essere sostituita. Questo aiuta il nostro staff a identificare il
numero del tuo prodotto per assicurarti di ricevere le parti corrette.
Una foto del danno è sempre necessaria per presentare un reclamo e ottenere
rapidamente la sostituzione o il rimborso. Assicurati di avere la scatola anche se
è danneggiata.
Inviarci un’e-mail direttamente dal mercato in cui è stato acquistato il tuo articolo
con le immagini allegate e una descrizione del tuo reclamo.
Jeśli chcesz zwrócić produkt, musi znajdować się on w oryginalnym opakowaniu.
Towar zwrócony w nieoryginalnym opakowaniu nie zostanie przyjęty.
Nie wyrzucaj oryginalnego opakowania.
Zrób zdjęcie oznaczeń na opakowaniu.
Zrób zdjęcie uszkodzonej części (jeśli dotyczy).
Skontaktuj się z nami.
Jeśli jakakolwiek część wymaga wymiany, zrób zdjęcie oznaczeń kodu produktu,
który znajduje się na opakowaniu. Pozwoli nam to zidentyfikować produkt i
dostarczyć ci właściwą część.
Jeśli chcesz złożyć reklamację, zrób zdjęcie uszkodzonej części. Pozwoli nam to
zatwierdzić reklamację i zlecić zwrot środków na twoje konto. Do złożenia
reklamacji potrzebne będzie oryginalne opakowanie.
Skontaktuj się z nami telefonicznie, mailowo lub poprzez formularz kontaktowy.
Załącz zdjęcia produktu i opis roszczenia.
IT
PL
Istruzioni Per La Restituzione / Reclamo Per Danni
Zwroty i reklamacje
66 67

NP10844
If you're having difficulty, our friendly
customer team is always here to help.
THIS INSTRUCTION BOOKLET CONTAINS IMPORTANT SAFETY INFORMATION. PLEASE READ AND KEEP FOR FUTURE REFERENCE.
Pop Up Canopy/Pavillon/
Auvent Escamotable/Pabellón/
Gazebo/Składany pawilon ogrodowy
AUS:cs.au@costway.com
FRA:cs.fr@costway.com
DEU:cs.de@costway.com
ITA:cs.it@costway.com ESP:cs.es@costway.com
POL:sklep@costway.com
GBR:cs.uk@costway.com
DEU office: FDS GmbH, Neuer Höltigbaum 36, 22143 Hamburg, Deutschland
ITA office: Milano
FRA office: Saint Vigor d'Ymonville
POL office: GdańskGBR office: IpswichAUS office: TruganinaUSA office: Fontana