3
21
4 7
1
24
5 6
8 10
13
2
14
1111
17
18
19
23
12
19
15
16
9
20
22
WARRANTY
WARRANTY / GUARANTEE
INFORMATION
Terms and Conditions for “100% Guaranteed To Work” policy, and
the seperate 1 Year Limited Warranty against defects in material and
workmanship can be found at www.oneforall.com/remoteguarantee,
or you may request hard copies by calling 855-716-2573, or via mail
to Universal Electronics Inc. 15147 N. Scottsdale Road, Suite H300,
Scottsdale, Arizona 85254. Please include your full name, product in
-
formation, and contact information in your request communication.
LEGAL NOTICES
FCC STATEMENT:
FCC ID: MG3-117966
This equipment has been tested and found to comply with the
limits for a Class B digital device, pursuant to part 15 of the FCC
Rules. These limits are designed to provide reasonable protection
against harmful interference in a residential installation. This equip
-
ment generates, uses and can radiate radio frequency energy and,
if not installed and used in accordance with the instructions, may
cause harmful interference to radio communications. However,
there is no guarantee that interference will not occur in a particular
installation. If this equipment does cause harmful interference to
radio or television reception, which can be determined by turning
the equipment off and on, the user is encouraged to try to correct
the interference by one or more of the following measures:
- Reorient or relocate the receiving antenna.
- Increase the separation between the equipment and
receiver.
- Connect the equipment into an outlet on a circuit different
from that to which the receiver is connected.
- Consult the dealer or an experienced radio/TV technician for
help.
This device complies with part 15 of the FCC Rules. Operation
is subject to the following two conditions: (1) This device may
not cause harmful interference, and (2) this device must accept
any interference received, including interference that may cause
undesired operation.
Caution: Changes or modications not expressly approved by the
party responsible for compliance could void the user’s
authority to operate the equipment.
www.oneforall.com
I
II
IV
III
4 X AAA
ENGLISH | ESPAÑOL
SMART
CONTROL PRO
URC 7966
www.oneforall.com/mynevo
Virtual Agent
If you need help at any time during setup,
please use the Virtual Agent in the app.
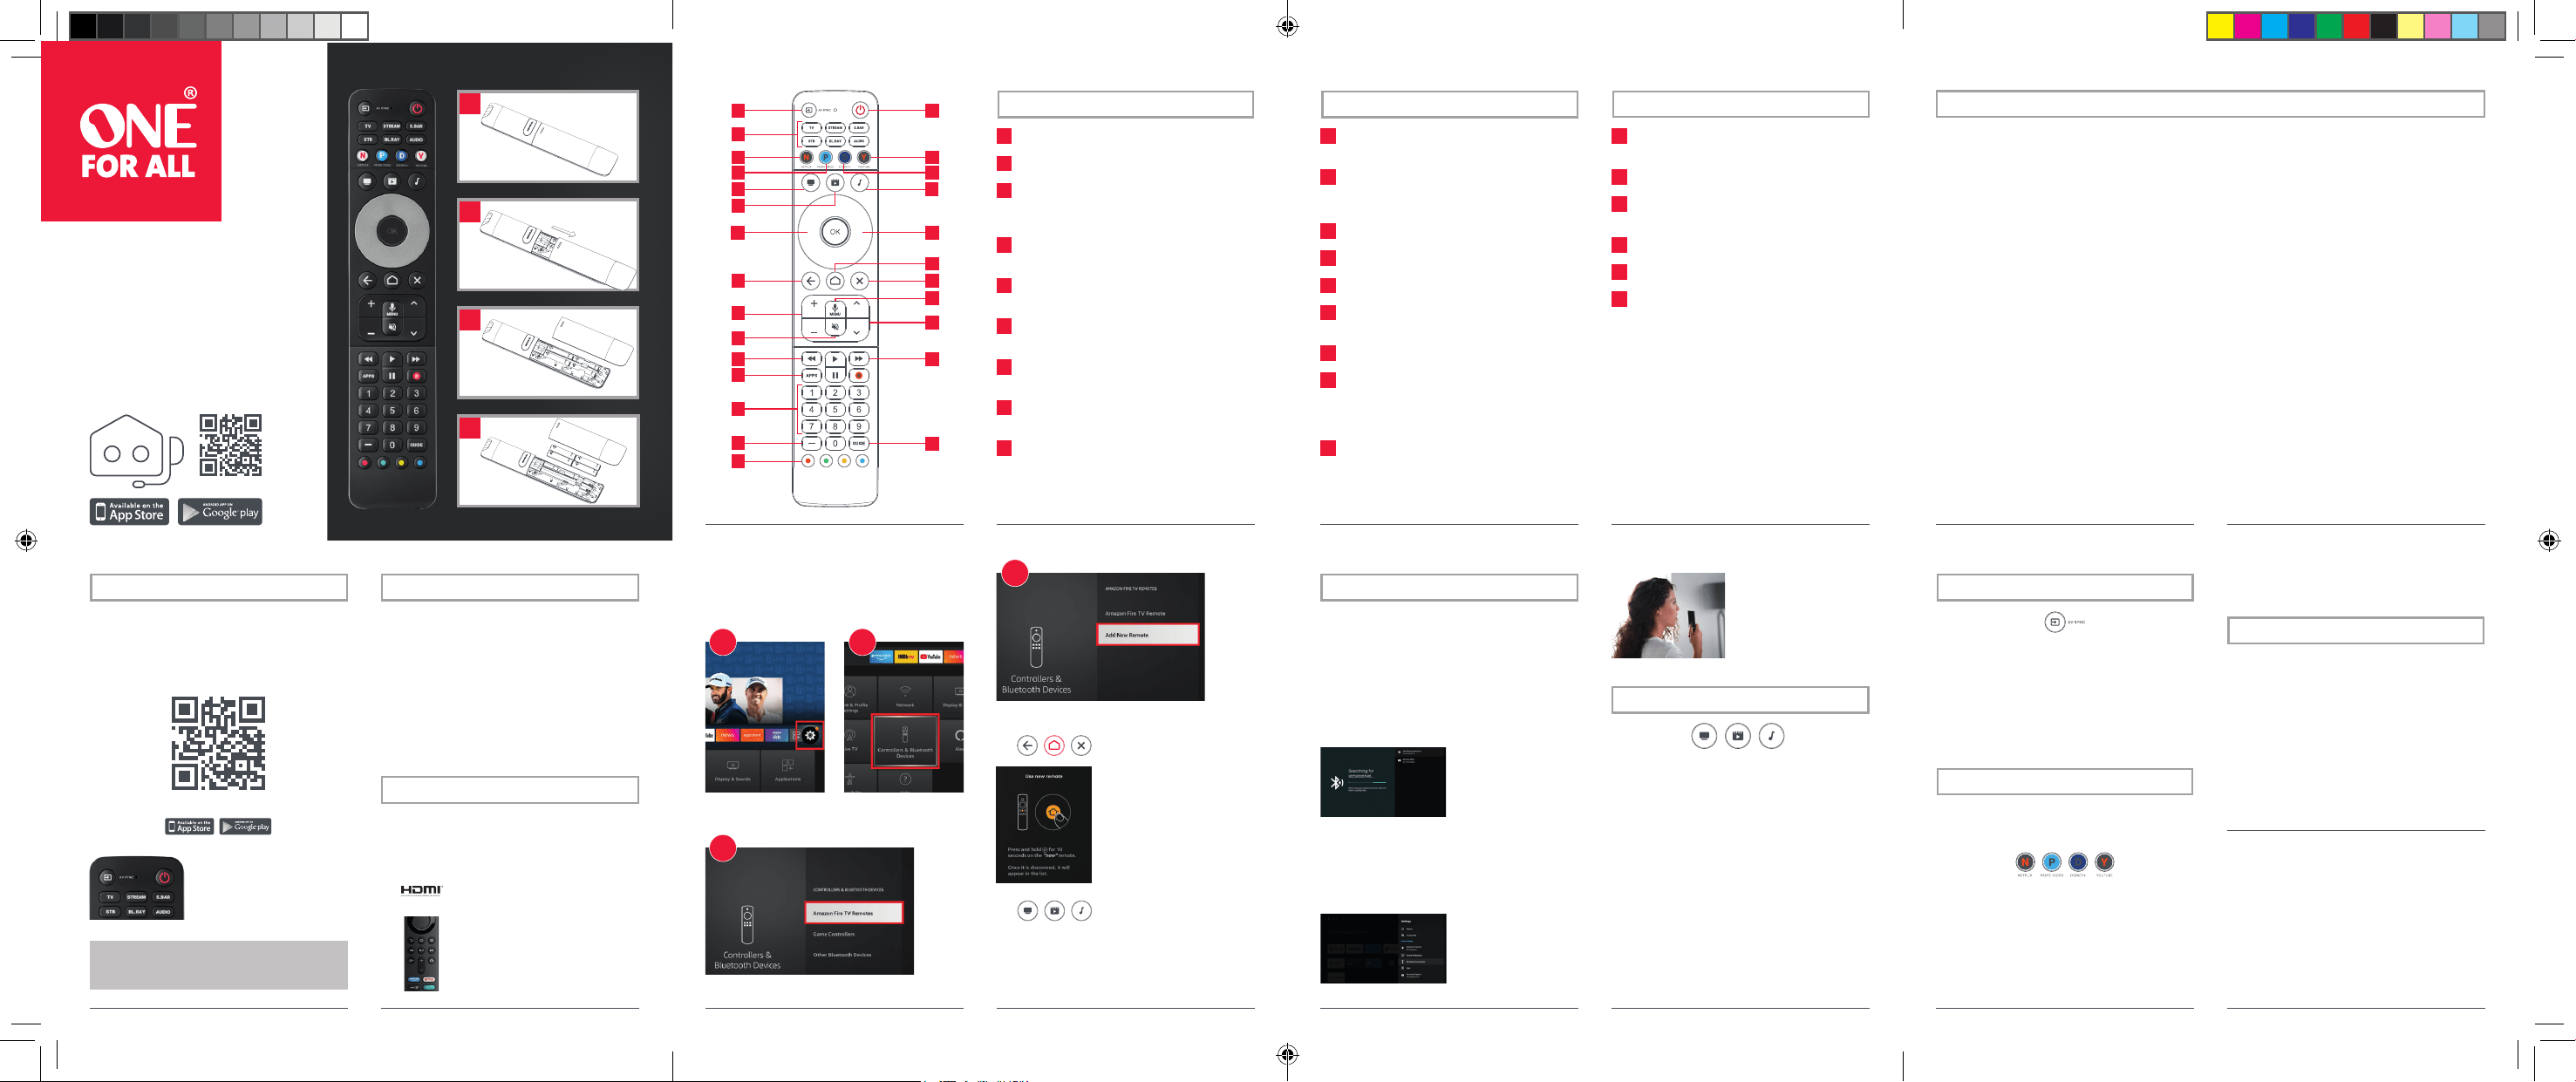
Amazon Fire TV Remotes
Add New Remote
Settings Controllers and Bluetooth
Devices
www.oneforall.com/mynevo
SETUP DEVICE SETUP
ACTIVITY SETUP
AMAZON FIRE STICK / CUBE SETUP
GOOGLE TV SETUP
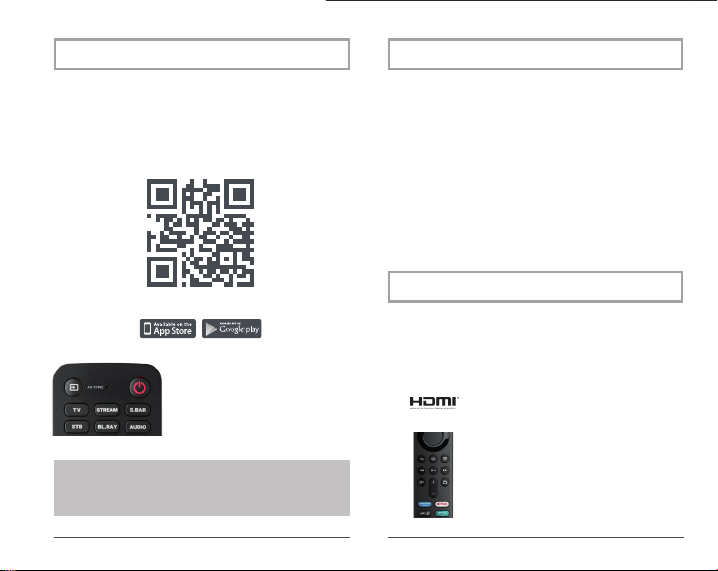
To set up the remote, rstly please download the My
Nevo app. This app communicates with the remote using
Bluetooth Low Energy or BLE. You can get this app by
scanning the QR code below, or by searching for “My Nevo”
in the App or Play Store.
When you rst use the app, it may
take up to 30 seconds to connect
to your remote. This is a one time
check to see the rmware of the
remote is up to date.
iOS version of setup app requires iPhone 8 or newer or
second-generation SE. First generation SE and iPhone
7 and older are not supported..
Once the app has located your remote, you can follow the
instructions to set it up to control your Audio Video devices
– we recommend setting up your TV rst of all.
You can then add other devices such as set top boxes and
sound bars. You can set up one TV, and up to 5 other devices
that you use as source of your viewing content, for example
a streaming box, satellite or cable and a Blu-ray player.
When you set these up, the remote will also do a quick test
to see which HDMI Input of your TV your source devices are
connected to.
If you have an Amazon Fire Edition Television, this can be
setup as a normal TV. However if you have an Amazon Fire
Stick or Cube, the procedure is slightly dierent. You will
need the original Fire remote control. Next perform the
following 5 steps:
1.
First, simply turn on your TV and select the
input you have the Fire device connected to.
2. Secondly, press any button on the original
Fire remote to wake it up.
The Smart Control Pro can also control devices using the
Google TV operating system, such as a newer Google
Chromecast (with Google TV), or a Sony or TCL TV. It can
also support some systems running Android TV, such as the
Nvidia Shield.
To set up the device using the My Nevo app, select the
device type, for example a TV or a Streaming Device, and
select Google TV.
Next, when prompted by
the My Nevo app open
the Settings Menu on your
Google TV device and select
Remotes and Accessories
and then Pair New accesso
-
ry. The Google TV device should start searching and at that
point you will be asked by the My Nevo app to hold down
the Home key for 10 seconds. After 10 seconds your Google
TV Device should nd the Smart Control Pro – please select
it using the ORIGINAL REMOTE.
After this the Google TV
Device should be set up as
a device on the STREAM key
of the Smart Control Pro
remote as well as added to
an Activity.
The Smart Control Pro can
also use voice search on
Google TV devices. Simply
hold down the Menu/Mic
button and hold the top of
the remote close to your
mouth to speak.
2 3 4
8765
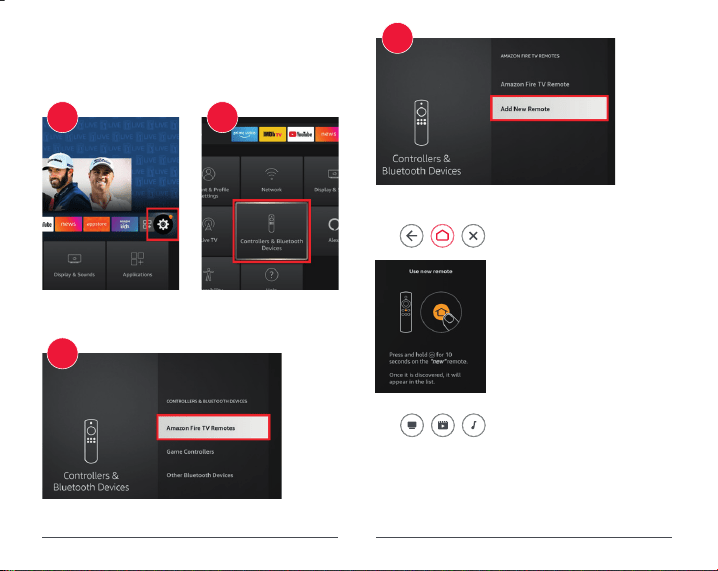
3. Next, using your original Fire remote select “Settings
> Controllers and Bluetooth Devices > Amazon Fire
Remotes > Add New Remote
4. Hold down the Home key on your
NEW Smart Control Pro Remote
for 10 seconds. The remote will
appear as an Amazon Remote,
now press the Select key on the
ORIGINAL AMAZON REMOTE to
select it. The OFA Remote is now
paired with the Amazon Fire
device, but it needs to be added to
an Activity to control it.
5. The Amazon Fire will automatical
-
ly be set up on the STREAM device
key, as well as added to an Activity.
The Smart Control Pro combines devices into Activities for
ease of control. An Activity can contain up to 3 devices; a
TV, a source device and an audio device such as a sound bar,
and a good example of an Activity is Watch TV. If for example
you set up a TV, an Amazon Fire stick and a sound bar, the
remote will control all these.
Pressing the Watch TV key will turn on these three devices
and select the right input on your TV.
The remote will remember which devices are powered on,
and pressing the Power key will turn them all o at once.
1
3
4
2
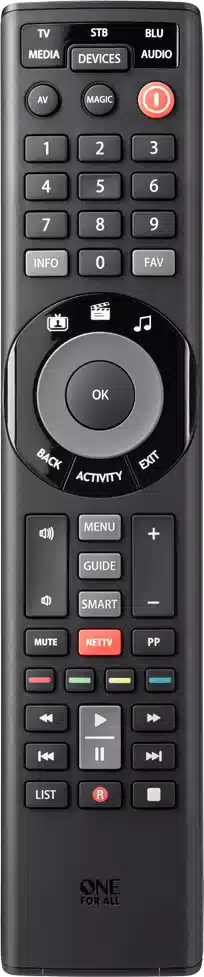
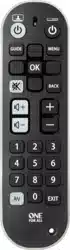
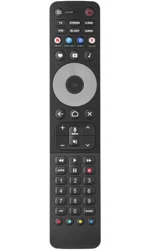
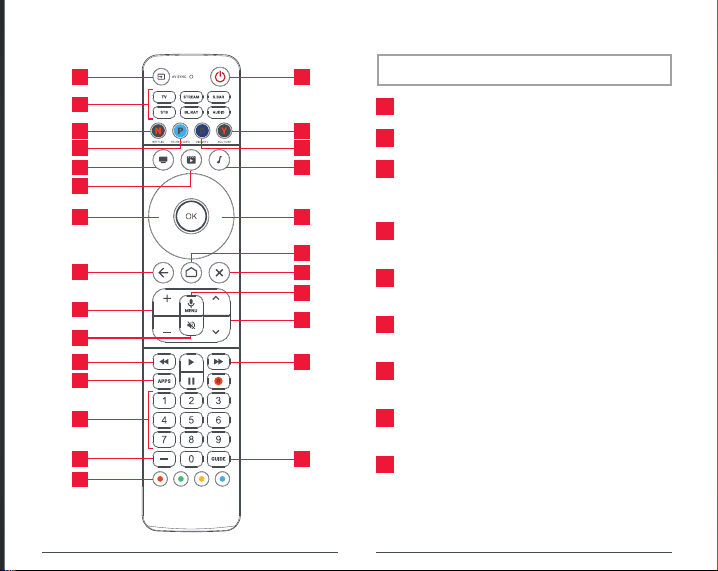
KEY DESCRIPTION KEY DESCRIPTION
KEY DESCRIPTION
1
INPUT Selects the Input of the current device
2
POWER On / O
3
TV_STREAM_S. BAR_STB_BL.RAY_AUDIO
Device keys – press these to select the device you
want to control
4
NETFLIX Netix (if available). Can be programmed
as an App Shortcut
5
PRIME VIDEO Amazon Prime Video (if available).
Can be programmed as an App Shortcut
6
DISNEY + Disney+ (if available). Can be
programmed as an App Shortcut
7
YOUTUBE YouTube (if available). Can be
programmed as an App Shortcut
8
WATCH TV Combines up to 3 Devices; a TV, a
source device and an audio device
9
WATCH MOVIE Combines up to 3 Devices; a TV, a
source device and an audio device
10
LISTEN TO MUSIC Combines up to 3 Devices; a TV,
a source device and an audio device
11
UP_LEFT_OK_RIGHT_DOWN
Navigate and select items in the menu of the
current device
12
BACK One step back in the menu
13
HOME Home /Smart Menu
14
EXIT Exit the Menu
15
VOL +_VOL - Controls the Volume of the current
Audio Device
16
MUTE Mute
17
MIC / MENU Settings or Options Menu – When
controlling a device using the Google TV OS,
holding this key down will give access to Voice
Commands
18
CH +_CH - Channel Up and Down
19
REW_PLAY_FF_PAUSE_REC Controls the playback
of the current show or disc
20
APPS Apps Menu
21
Digits 0-9 Digits 0-9 for channel selection for
channel selection
22
DASH Delimiter for selection of sub-channels
23
GUIDE TV Guide
24
RED_GREEN_YELLOW_BLUE Quick access
buttons for the menu of the current device
APP SHORTCUT KEYS
TIPS AND TRICKS
The remote also features 4 app shortcut keys, which will
give direct access to your favorite streaming apps, such as
Netix or Amazon Prime Video.
If your original remote control had keys to directly access
these services, these keys will act the same. But if not you
can program them to mimic a sequence of keys (a macro)
used to access the app.
To program the macro, you rst need to know the sequence
of keys you need to press to always bring up the service you
prefer. For example on an Apple TV, the sequence is Back (or
Home), Menu Down, Menu Right (until the app is selected)
and OK.
• To power on the devices in the Activity, press the
Activity key.
• To power o your devices, press the Power key.
• The remote will remember which devices are on or
o and which HDMI Input was last selected.
- This can go out of sync, for example if the original
remotes are used
- If you don’t see the picture or a device is not
powered on when it should be, press and hold the
AV sync key.
•
If you need help, the My Nevo app has a help section, just
scroll to the right from the main menu and select “Help”.
To program the Macro, go to the App Shortcut section in the
My Nevo app. You can program one macro per key.
AV SYNC
The Input key is used to manually select the HDMI Input of
your TV. If you press and release it you should see the Input
Selection screen of your TV. But it also has a secondary
function. After pressing the Activity key, if you nd that one
or more of the desired devices did not power on, or that the
TV is on the wrong HDMI Input, hold down this key for 2
seconds. The remote will then try to correct this for you, by
resending the appropriate Power and Input commands.
Customer Support: 855-716-2573 (toll free)
OFA warranty/terms & conditions:
855-569-6595 (toll free) www.oneforall.com
Universal Electronics Inc.
15147 N. Scottsdale Road, Suite H300, Scottsdale,
Arizona 85254
One For All is a registered trademark of UEI,
Made in China, Hecho en China
713320 RDN1080823
713320_Smart Control Pro_URC7966_US_112x176_RDN1080823.indd 1-4713320_Smart Control Pro_URC7966_US_112x176_RDN1080823.indd 1-4 08-08-2023 18:1408-08-2023 18:14
3
21
4 7
1
24
5 6
8 10
13
2
14
1111
17
18
19
23
12
19
15
16
9
20
22
WARRANTY
WARRANTY / GUARANTEE
INFORMATION
Terms and Conditions for “100% Guaranteed To Work” policy, and
the seperate 1 Year Limited Warranty against defects in material and
workmanship can be found at www.oneforall.com/remoteguarantee,
or you may request hard copies by calling 855-716-2573, or via mail
to Universal Electronics Inc. 15147 N. Scottsdale Road, Suite H300,
Scottsdale, Arizona 85254. Please include your full name, product in
-
formation, and contact information in your request communication.
LEGAL NOTICES
FCC STATEMENT:
FCC ID: MG3-117966
This equipment has been tested and found to comply with the
limits for a Class B digital device, pursuant to part 15 of the FCC
Rules. These limits are designed to provide reasonable protection
against harmful interference in a residential installation. This equip
-
ment generates, uses and can radiate radio frequency energy and,
if not installed and used in accordance with the instructions, may
cause harmful interference to radio communications. However,
there is no guarantee that interference will not occur in a particular
installation. If this equipment does cause harmful interference to
radio or television reception, which can be determined by turning
the equipment off and on, the user is encouraged to try to correct
the interference by one or more of the following measures:
- Reorient or relocate the receiving antenna.
- Increase the separation between the equipment and
receiver.
- Connect the equipment into an outlet on a circuit different
from that to which the receiver is connected.
- Consult the dealer or an experienced radio/TV technician for
help.
This device complies with part 15 of the FCC Rules. Operation
is subject to the following two conditions: (1) This device may
not cause harmful interference, and (2) this device must accept
any interference received, including interference that may cause
undesired operation.
Caution: Changes or modications not expressly approved by the
party responsible for compliance could void the user’s
authority to operate the equipment.
www.oneforall.com
I
II
IV
III
4 X AAA
ENGLISH | ESPAÑOL
SMART
CONTROL PRO
URC 7966
www.oneforall.com/mynevo
Virtual Agent
If you need help at any time during setup,
please use the Virtual Agent in the app.
Amazon Fire TV Remotes
Add New Remote
Settings Controllers and Bluetooth
Devices
www.oneforall.com/mynevo
SETUP DEVICE SETUP
ACTIVITY SETUP
AMAZON FIRE STICK / CUBE SETUP
GOOGLE TV SETUP
To set up the remote, rstly please download the My
Nevo app. This app communicates with the remote using
Bluetooth Low Energy or BLE. You can get this app by
scanning the QR code below, or by searching for “My Nevo”
in the App or Play Store.
When you rst use the app, it may
take up to 30 seconds to connect
to your remote. This is a one time
check to see the rmware of the
remote is up to date.
iOS version of setup app requires iPhone 8 or newer or
second-generation SE. First generation SE and iPhone
7 and older are not supported..
Once the app has located your remote, you can follow the
instructions to set it up to control your Audio Video devices
– we recommend setting up your TV rst of all.
You can then add other devices such as set top boxes and
sound bars. You can set up one TV, and up to 5 other devices
that you use as source of your viewing content, for example
a streaming box, satellite or cable and a Blu-ray player.
When you set these up, the remote will also do a quick test
to see which HDMI Input of your TV your source devices are
connected to.
If you have an Amazon Fire Edition Television, this can be
setup as a normal TV. However if you have an Amazon Fire
Stick or Cube, the procedure is slightly dierent. You will
need the original Fire remote control. Next perform the
following 5 steps:
1.
First, simply turn on your TV and select the
input you have the Fire device connected to.
2. Secondly, press any button on the original
Fire remote to wake it up.
The Smart Control Pro can also control devices using the
Google TV operating system, such as a newer Google
Chromecast (with Google TV), or a Sony or TCL TV. It can
also support some systems running Android TV, such as the
Nvidia Shield.
To set up the device using the My Nevo app, select the
device type, for example a TV or a Streaming Device, and
select Google TV.
Next, when prompted by
the My Nevo app open
the Settings Menu on your
Google TV device and select
Remotes and Accessories
and then Pair New accesso
-
ry. The Google TV device should start searching and at that
point you will be asked by the My Nevo app to hold down
the Home key for 10 seconds. After 10 seconds your Google
TV Device should nd the Smart Control Pro – please select
it using the ORIGINAL REMOTE.
After this the Google TV
Device should be set up as
a device on the STREAM key
of the Smart Control Pro
remote as well as added to
an Activity.
The Smart Control Pro can
also use voice search on
Google TV devices. Simply
hold down the Menu/Mic
button and hold the top of
the remote close to your
mouth to speak.
2 3 4
8765
3. Next, using your original Fire remote select “Settings
> Controllers and Bluetooth Devices > Amazon Fire
Remotes > Add New Remote
4. Hold down the Home key on your
NEW Smart Control Pro Remote
for 10 seconds. The remote will
appear as an Amazon Remote,
now press the Select key on the
ORIGINAL AMAZON REMOTE to
select it. The OFA Remote is now
paired with the Amazon Fire
device, but it needs to be added to
an Activity to control it.
5. The Amazon Fire will automatical
-
ly be set up on the STREAM device
key, as well as added to an Activity.
The Smart Control Pro combines devices into Activities for
ease of control. An Activity can contain up to 3 devices; a
TV, a source device and an audio device such as a sound bar,
and a good example of an Activity is Watch TV. If for example
you set up a TV, an Amazon Fire stick and a sound bar, the
remote will control all these.
Pressing the Watch TV key will turn on these three devices
and select the right input on your TV.
The remote will remember which devices are powered on,
and pressing the Power key will turn them all o at once.
1
3
4
2
KEY DESCRIPTION KEY DESCRIPTION
KEY DESCRIPTION
1
INPUT Selects the Input of the current device
2
POWER On / O
3
TV_STREAM_S. BAR_STB_BL.RAY_AUDIO
Device keys – press these to select the device you
want to control
4
NETFLIX Netix (if available). Can be programmed
as an App Shortcut
5
PRIME VIDEO Amazon Prime Video (if available).
Can be programmed as an App Shortcut
6
DISNEY + Disney+ (if available). Can be
programmed as an App Shortcut
7
YOUTUBE YouTube (if available). Can be
programmed as an App Shortcut
8
WATCH TV Combines up to 3 Devices; a TV, a
source device and an audio device
9
WATCH MOVIE Combines up to 3 Devices; a TV, a
source device and an audio device
10
LISTEN TO MUSIC Combines up to 3 Devices; a TV,
a source device and an audio device
11
UP_LEFT_OK_RIGHT_DOWN
Navigate and select items in the menu of the
current device
12
BACK One step back in the menu
13
HOME Home /Smart Menu
14
EXIT Exit the Menu
15
VOL +_VOL - Controls the Volume of the current
Audio Device
16
MUTE Mute
17
MIC / MENU Settings or Options Menu – When
controlling a device using the Google TV OS,
holding this key down will give access to Voice
Commands
18
CH +_CH - Channel Up and Down
19
REW_PLAY_FF_PAUSE_REC Controls the playback
of the current show or disc
20
APPS Apps Menu
21
Digits 0-9 Digits 0-9 for channel selection for
channel selection
22
DASH Delimiter for selection of sub-channels
23
GUIDE TV Guide
24
RED_GREEN_YELLOW_BLUE Quick access
buttons for the menu of the current device
APP SHORTCUT KEYS
TIPS AND TRICKS
The remote also features 4 app shortcut keys, which will
give direct access to your favorite streaming apps, such as
Netix or Amazon Prime Video.
If your original remote control had keys to directly access
these services, these keys will act the same. But if not you
can program them to mimic a sequence of keys (a macro)
used to access the app.
To program the macro, you rst need to know the sequence
of keys you need to press to always bring up the service you
prefer. For example on an Apple TV, the sequence is Back (or
Home), Menu Down, Menu Right (until the app is selected)
and OK.
• To power on the devices in the Activity, press the
Activity key.
• To power o your devices, press the Power key.
• The remote will remember which devices are on or
o and which HDMI Input was last selected.
- This can go out of sync, for example if the original
remotes are used
- If you don’t see the picture or a device is not
powered on when it should be, press and hold the
AV sync key.
•
If you need help, the My Nevo app has a help section, just
scroll to the right from the main menu and select “Help”.
To program the Macro, go to the App Shortcut section in the
My Nevo app. You can program one macro per key.
AV SYNC
The Input key is used to manually select the HDMI Input of
your TV. If you press and release it you should see the Input
Selection screen of your TV. But it also has a secondary
function. After pressing the Activity key, if you nd that one
or more of the desired devices did not power on, or that the
TV is on the wrong HDMI Input, hold down this key for 2
seconds. The remote will then try to correct this for you, by
resending the appropriate Power and Input commands.
Customer Support: 855-716-2573 (toll free)
OFA warranty/terms & conditions:
855-569-6595 (toll free) www.oneforall.com
Universal Electronics Inc.
15147 N. Scottsdale Road, Suite H300, Scottsdale,
Arizona 85254
One For All is a registered trademark of UEI,
Made in China, Hecho en China
713320 RDN1080823
713320_Smart Control Pro_URC7966_US_112x176_RDN1080823.indd 1-4713320_Smart Control Pro_URC7966_US_112x176_RDN1080823.indd 1-4 08-08-2023 18:1408-08-2023 18:14

3
21
4 7
1
24
5 6
8 10
13
2
14
1111
17
18
19
23
12
19
15
16
9
20
22
WARRANTY
WARRANTY / GUARANTEE
INFORMATION
Terms and Conditions for “100% Guaranteed To Work” policy, and
the seperate 1 Year Limited Warranty against defects in material and
workmanship can be found at www.oneforall.com/remoteguarantee,
or you may request hard copies by calling 855-716-2573, or via mail
to Universal Electronics Inc. 15147 N. Scottsdale Road, Suite H300,
Scottsdale, Arizona 85254. Please include your full name, product in
-
formation, and contact information in your request communication.
LEGAL NOTICES
FCC STATEMENT:
FCC ID: MG3-117966
This equipment has been tested and found to comply with the
limits for a Class B digital device, pursuant to part 15 of the FCC
Rules. These limits are designed to provide reasonable protection
against harmful interference in a residential installation. This equip
-
ment generates, uses and can radiate radio frequency energy and,
if not installed and used in accordance with the instructions, may
cause harmful interference to radio communications. However,
there is no guarantee that interference will not occur in a particular
installation. If this equipment does cause harmful interference to
radio or television reception, which can be determined by turning
the equipment off and on, the user is encouraged to try to correct
the interference by one or more of the following measures:
- Reorient or relocate the receiving antenna.
- Increase the separation between the equipment and
receiver.
- Connect the equipment into an outlet on a circuit different
from that to which the receiver is connected.
- Consult the dealer or an experienced radio/TV technician for
help.
This device complies with part 15 of the FCC Rules. Operation
is subject to the following two conditions: (1) This device may
not cause harmful interference, and (2) this device must accept
any interference received, including interference that may cause
undesired operation.
Caution: Changes or modications not expressly approved by the
party responsible for compliance could void the user’s
authority to operate the equipment.
www.oneforall.com
I
II
IV
III
4 X AAA
ENGLISH | ESPAÑOL
SMART
CONTROL PRO
URC 7966
www.oneforall.com/mynevo
Virtual Agent
If you need help at any time during setup,
please use the Virtual Agent in the app.
Amazon Fire TV Remotes
Add New Remote
Settings Controllers and Bluetooth
Devices
www.oneforall.com/mynevo
SETUP DEVICE SETUP
ACTIVITY SETUP
AMAZON FIRE STICK / CUBE SETUP
GOOGLE TV SETUP
To set up the remote, rstly please download the My
Nevo app. This app communicates with the remote using
Bluetooth Low Energy or BLE. You can get this app by
scanning the QR code below, or by searching for “My Nevo”
in the App or Play Store.
When you rst use the app, it may
take up to 30 seconds to connect
to your remote. This is a one time
check to see the rmware of the
remote is up to date.
iOS version of setup app requires iPhone 8 or newer or
second-generation SE. First generation SE and iPhone
7 and older are not supported..
Once the app has located your remote, you can follow the
instructions to set it up to control your Audio Video devices
– we recommend setting up your TV rst of all.
You can then add other devices such as set top boxes and
sound bars. You can set up one TV, and up to 5 other devices
that you use as source of your viewing content, for example
a streaming box, satellite or cable and a Blu-ray player.
When you set these up, the remote will also do a quick test
to see which HDMI Input of your TV your source devices are
connected to.
If you have an Amazon Fire Edition Television, this can be
setup as a normal TV. However if you have an Amazon Fire
Stick or Cube, the procedure is slightly dierent. You will
need the original Fire remote control. Next perform the
following 5 steps:
1.
First, simply turn on your TV and select the
input you have the Fire device connected to.
2. Secondly, press any button on the original
Fire remote to wake it up.
The Smart Control Pro can also control devices using the
Google TV operating system, such as a newer Google
Chromecast (with Google TV), or a Sony or TCL TV. It can
also support some systems running Android TV, such as the
Nvidia Shield.
To set up the device using the My Nevo app, select the
device type, for example a TV or a Streaming Device, and
select Google TV.
Next, when prompted by
the My Nevo app open
the Settings Menu on your
Google TV device and select
Remotes and Accessories
and then Pair New accesso
-
ry. The Google TV device should start searching and at that
point you will be asked by the My Nevo app to hold down
the Home key for 10 seconds. After 10 seconds your Google
TV Device should nd the Smart Control Pro – please select
it using the ORIGINAL REMOTE.
After this the Google TV
Device should be set up as
a device on the STREAM key
of the Smart Control Pro
remote as well as added to
an Activity.
The Smart Control Pro can
also use voice search on
Google TV devices. Simply
hold down the Menu/Mic
button and hold the top of
the remote close to your
mouth to speak.
2 3 4
8765
3. Next, using your original Fire remote select “Settings
> Controllers and Bluetooth Devices > Amazon Fire
Remotes > Add New Remote
4. Hold down the Home key on your
NEW Smart Control Pro Remote
for 10 seconds. The remote will
appear as an Amazon Remote,
now press the Select key on the
ORIGINAL AMAZON REMOTE to
select it. The OFA Remote is now
paired with the Amazon Fire
device, but it needs to be added to
an Activity to control it.
5. The Amazon Fire will automatical
-
ly be set up on the STREAM device
key, as well as added to an Activity.
The Smart Control Pro combines devices into Activities for
ease of control. An Activity can contain up to 3 devices; a
TV, a source device and an audio device such as a sound bar,
and a good example of an Activity is Watch TV. If for example
you set up a TV, an Amazon Fire stick and a sound bar, the
remote will control all these.
Pressing the Watch TV key will turn on these three devices
and select the right input on your TV.
The remote will remember which devices are powered on,
and pressing the Power key will turn them all o at once.
1
3
4
2
KEY DESCRIPTION KEY DESCRIPTION
KEY DESCRIPTION
1
INPUT Selects the Input of the current device
2
POWER On / O
3
TV_STREAM_S. BAR_STB_BL.RAY_AUDIO
Device keys – press these to select the device you
want to control
4
NETFLIX Netix (if available). Can be programmed
as an App Shortcut
5
PRIME VIDEO Amazon Prime Video (if available).
Can be programmed as an App Shortcut
6
DISNEY + Disney+ (if available). Can be
programmed as an App Shortcut
7
YOUTUBE YouTube (if available). Can be
programmed as an App Shortcut
8
WATCH TV Combines up to 3 Devices; a TV, a
source device and an audio device
9
WATCH MOVIE Combines up to 3 Devices; a TV, a
source device and an audio device
10
LISTEN TO MUSIC Combines up to 3 Devices; a TV,
a source device and an audio device
11
UP_LEFT_OK_RIGHT_DOWN
Navigate and select items in the menu of the
current device
12
BACK One step back in the menu
13
HOME Home /Smart Menu
14
EXIT Exit the Menu
15
VOL +_VOL - Controls the Volume of the current
Audio Device
16
MUTE Mute
17
MIC / MENU Settings or Options Menu – When
controlling a device using the Google TV OS,
holding this key down will give access to Voice
Commands
18
CH +_CH - Channel Up and Down
19
REW_PLAY_FF_PAUSE_REC Controls the playback
of the current show or disc
20
APPS Apps Menu
21
Digits 0-9 Digits 0-9 for channel selection for
channel selection
22
DASH Delimiter for selection of sub-channels
23
GUIDE TV Guide
24
RED_GREEN_YELLOW_BLUE Quick access
buttons for the menu of the current device
APP SHORTCUT KEYS
TIPS AND TRICKS
The remote also features 4 app shortcut keys, which will
give direct access to your favorite streaming apps, such as
Netix or Amazon Prime Video.
If your original remote control had keys to directly access
these services, these keys will act the same. But if not you
can program them to mimic a sequence of keys (a macro)
used to access the app.
To program the macro, you rst need to know the sequence
of keys you need to press to always bring up the service you
prefer. For example on an Apple TV, the sequence is Back (or
Home), Menu Down, Menu Right (until the app is selected)
and OK.
• To power on the devices in the Activity, press the
Activity key.
• To power o your devices, press the Power key.
• The remote will remember which devices are on or
o and which HDMI Input was last selected.
- This can go out of sync, for example if the original
remotes are used
- If you don’t see the picture or a device is not
powered on when it should be, press and hold the
AV sync key.
•
If you need help, the My Nevo app has a help section, just
scroll to the right from the main menu and select “Help”.
To program the Macro, go to the App Shortcut section in the
My Nevo app. You can program one macro per key.
AV SYNC
The Input key is used to manually select the HDMI Input of
your TV. If you press and release it you should see the Input
Selection screen of your TV. But it also has a secondary
function. After pressing the Activity key, if you nd that one
or more of the desired devices did not power on, or that the
TV is on the wrong HDMI Input, hold down this key for 2
seconds. The remote will then try to correct this for you, by
resending the appropriate Power and Input commands.
Customer Support: 855-716-2573 (toll free)
OFA warranty/terms & conditions:
855-569-6595 (toll free) www.oneforall.com
Universal Electronics Inc.
15147 N. Scottsdale Road, Suite H300, Scottsdale,
Arizona 85254
One For All is a registered trademark of UEI,
Made in China, Hecho en China
713320 RDN1080823
713320_Smart Control Pro_URC7966_US_112x176_RDN1080823.indd 1-4713320_Smart Control Pro_URC7966_US_112x176_RDN1080823.indd 1-4 08-08-2023 18:1408-08-2023 18:14
3
21
4 7
1
24
5 6
8 10
13
2
14
1111
17
18
19
23
12
19
15
16
9
20
22
WARRANTY
WARRANTY / GUARANTEE
INFORMATION
Terms and Conditions for “100% Guaranteed To Work” policy, and
the seperate 1 Year Limited Warranty against defects in material and
workmanship can be found at www.oneforall.com/remoteguarantee,
or you may request hard copies by calling 855-716-2573, or via mail
to Universal Electronics Inc. 15147 N. Scottsdale Road, Suite H300,
Scottsdale, Arizona 85254. Please include your full name, product in
-
formation, and contact information in your request communication.
LEGAL NOTICES
FCC STATEMENT:
FCC ID: MG3-117966
This equipment has been tested and found to comply with the
limits for a Class B digital device, pursuant to part 15 of the FCC
Rules. These limits are designed to provide reasonable protection
against harmful interference in a residential installation. This equip
-
ment generates, uses and can radiate radio frequency energy and,
if not installed and used in accordance with the instructions, may
cause harmful interference to radio communications. However,
there is no guarantee that interference will not occur in a particular
installation. If this equipment does cause harmful interference to
radio or television reception, which can be determined by turning
the equipment off and on, the user is encouraged to try to correct
the interference by one or more of the following measures:
- Reorient or relocate the receiving antenna.
- Increase the separation between the equipment and
receiver.
- Connect the equipment into an outlet on a circuit different
from that to which the receiver is connected.
- Consult the dealer or an experienced radio/TV technician for
help.
This device complies with part 15 of the FCC Rules. Operation
is subject to the following two conditions: (1) This device may
not cause harmful interference, and (2) this device must accept
any interference received, including interference that may cause
undesired operation.
Caution: Changes or modications not expressly approved by the
party responsible for compliance could void the user’s
authority to operate the equipment.
www.oneforall.com
I
II
IV
III
4 X AAA
ENGLISH | ESPAÑOL
SMART
CONTROL PRO
URC 7966
www.oneforall.com/mynevo
Virtual Agent
If you need help at any time during setup,
please use the Virtual Agent in the app.
Amazon Fire TV Remotes
Add New Remote
Settings Controllers and Bluetooth
Devices
www.oneforall.com/mynevo
SETUP DEVICE SETUP
ACTIVITY SETUP
AMAZON FIRE STICK / CUBE SETUP
GOOGLE TV SETUP
To set up the remote, rstly please download the My
Nevo app. This app communicates with the remote using
Bluetooth Low Energy or BLE. You can get this app by
scanning the QR code below, or by searching for “My Nevo”
in the App or Play Store.
When you rst use the app, it may
take up to 30 seconds to connect
to your remote. This is a one time
check to see the rmware of the
remote is up to date.
iOS version of setup app requires iPhone 8 or newer or
second-generation SE. First generation SE and iPhone
7 and older are not supported..
Once the app has located your remote, you can follow the
instructions to set it up to control your Audio Video devices
– we recommend setting up your TV rst of all.
You can then add other devices such as set top boxes and
sound bars. You can set up one TV, and up to 5 other devices
that you use as source of your viewing content, for example
a streaming box, satellite or cable and a Blu-ray player.
When you set these up, the remote will also do a quick test
to see which HDMI Input of your TV your source devices are
connected to.
If you have an Amazon Fire Edition Television, this can be
setup as a normal TV. However if you have an Amazon Fire
Stick or Cube, the procedure is slightly dierent. You will
need the original Fire remote control. Next perform the
following 5 steps:
1.
First, simply turn on your TV and select the
input you have the Fire device connected to.
2. Secondly, press any button on the original
Fire remote to wake it up.
The Smart Control Pro can also control devices using the
Google TV operating system, such as a newer Google
Chromecast (with Google TV), or a Sony or TCL TV. It can
also support some systems running Android TV, such as the
Nvidia Shield.
To set up the device using the My Nevo app, select the
device type, for example a TV or a Streaming Device, and
select Google TV.
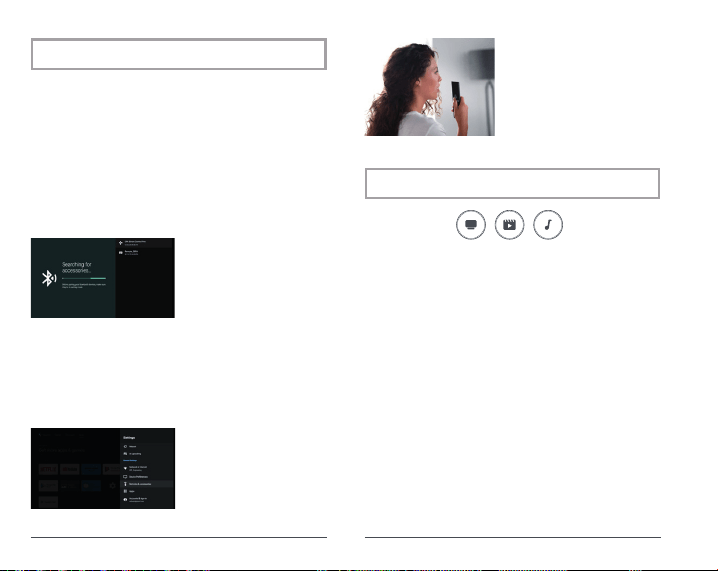
Next, when prompted by
the My Nevo app open
the Settings Menu on your
Google TV device and select
Remotes and Accessories
and then Pair New accesso
-
ry. The Google TV device should start searching and at that
point you will be asked by the My Nevo app to hold down
the Home key for 10 seconds. After 10 seconds your Google
TV Device should nd the Smart Control Pro – please select
it using the ORIGINAL REMOTE.
After this the Google TV
Device should be set up as
a device on the STREAM key
of the Smart Control Pro
remote as well as added to
an Activity.
The Smart Control Pro can
also use voice search on
Google TV devices. Simply
hold down the Menu/Mic
button and hold the top of
the remote close to your
mouth to speak.
2 3 4
8765
3. Next, using your original Fire remote select “Settings
> Controllers and Bluetooth Devices > Amazon Fire
Remotes > Add New Remote
4. Hold down the Home key on your
NEW Smart Control Pro Remote
for 10 seconds. The remote will
appear as an Amazon Remote,
now press the Select key on the
ORIGINAL AMAZON REMOTE to
select it. The OFA Remote is now
paired with the Amazon Fire
device, but it needs to be added to
an Activity to control it.
5. The Amazon Fire will automatical
-
ly be set up on the STREAM device
key, as well as added to an Activity.
The Smart Control Pro combines devices into Activities for
ease of control. An Activity can contain up to 3 devices; a
TV, a source device and an audio device such as a sound bar,
and a good example of an Activity is Watch TV. If for example
you set up a TV, an Amazon Fire stick and a sound bar, the
remote will control all these.
Pressing the Watch TV key will turn on these three devices
and select the right input on your TV.
The remote will remember which devices are powered on,
and pressing the Power key will turn them all o at once.
1
3
4
2
KEY DESCRIPTION KEY DESCRIPTION
KEY DESCRIPTION
1
INPUT Selects the Input of the current device
2
POWER On / O
3
TV_STREAM_S. BAR_STB_BL.RAY_AUDIO
Device keys – press these to select the device you
want to control
4
NETFLIX Netix (if available). Can be programmed
as an App Shortcut
5
PRIME VIDEO Amazon Prime Video (if available).
Can be programmed as an App Shortcut
6
DISNEY + Disney+ (if available). Can be
programmed as an App Shortcut
7
YOUTUBE YouTube (if available). Can be
programmed as an App Shortcut
8
WATCH TV Combines up to 3 Devices; a TV, a
source device and an audio device
9
WATCH MOVIE Combines up to 3 Devices; a TV, a
source device and an audio device
10
LISTEN TO MUSIC Combines up to 3 Devices; a TV,
a source device and an audio device
11
UP_LEFT_OK_RIGHT_DOWN
Navigate and select items in the menu of the
current device
12
BACK One step back in the menu
13
HOME Home /Smart Menu
14
EXIT Exit the Menu
15
VOL +_VOL - Controls the Volume of the current
Audio Device
16
MUTE Mute
17
MIC / MENU Settings or Options Menu – When
controlling a device using the Google TV OS,
holding this key down will give access to Voice
Commands
18
CH +_CH - Channel Up and Down
19
REW_PLAY_FF_PAUSE_REC Controls the playback
of the current show or disc
20
APPS Apps Menu
21
Digits 0-9 Digits 0-9 for channel selection for
channel selection
22
DASH Delimiter for selection of sub-channels
23
GUIDE TV Guide
24
RED_GREEN_YELLOW_BLUE Quick access
buttons for the menu of the current device
APP SHORTCUT KEYS
TIPS AND TRICKS
The remote also features 4 app shortcut keys, which will
give direct access to your favorite streaming apps, such as
Netix or Amazon Prime Video.
If your original remote control had keys to directly access
these services, these keys will act the same. But if not you
can program them to mimic a sequence of keys (a macro)
used to access the app.
To program the macro, you rst need to know the sequence
of keys you need to press to always bring up the service you
prefer. For example on an Apple TV, the sequence is Back (or
Home), Menu Down, Menu Right (until the app is selected)
and OK.
• To power on the devices in the Activity, press the
Activity key.
• To power o your devices, press the Power key.
• The remote will remember which devices are on or
o and which HDMI Input was last selected.
- This can go out of sync, for example if the original
remotes are used
- If you don’t see the picture or a device is not
powered on when it should be, press and hold the
AV sync key.
•
If you need help, the My Nevo app has a help section, just
scroll to the right from the main menu and select “Help”.
To program the Macro, go to the App Shortcut section in the
My Nevo app. You can program one macro per key.
AV SYNC
The Input key is used to manually select the HDMI Input of
your TV. If you press and release it you should see the Input
Selection screen of your TV. But it also has a secondary
function. After pressing the Activity key, if you nd that one
or more of the desired devices did not power on, or that the
TV is on the wrong HDMI Input, hold down this key for 2
seconds. The remote will then try to correct this for you, by
resending the appropriate Power and Input commands.
Customer Support: 855-716-2573 (toll free)
OFA warranty/terms & conditions:
855-569-6595 (toll free) www.oneforall.com
Universal Electronics Inc.
15147 N. Scottsdale Road, Suite H300, Scottsdale,
Arizona 85254
One For All is a registered trademark of UEI,
Made in China, Hecho en China
713320 RDN1080823
713320_Smart Control Pro_URC7966_US_112x176_RDN1080823.indd 1-4713320_Smart Control Pro_URC7966_US_112x176_RDN1080823.indd 1-4 08-08-2023 18:1408-08-2023 18:14
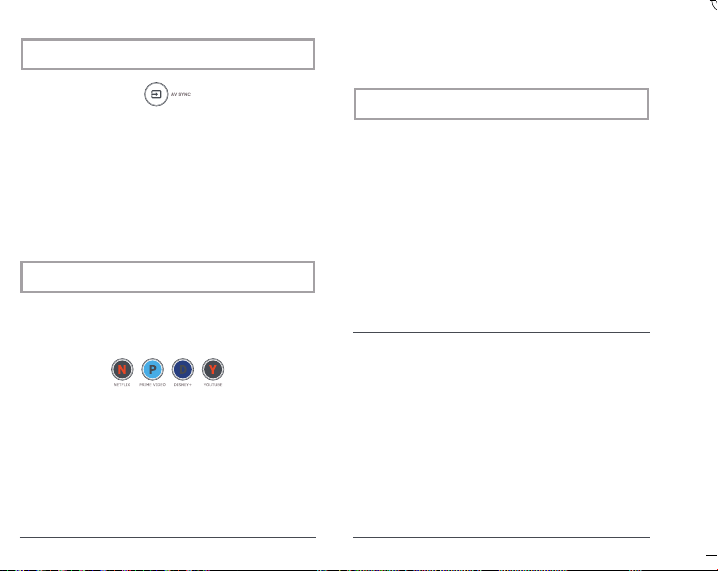
3
21
4 7
1
24
5 6
8 10
13
2
14
1111
17
18
19
23
12
19
15
16
9
20
22
WARRANTY
WARRANTY / GUARANTEE
INFORMATION
Terms and Conditions for “100% Guaranteed To Work” policy, and
the seperate 1 Year Limited Warranty against defects in material and
workmanship can be found at www.oneforall.com/remoteguarantee,
or you may request hard copies by calling 855-716-2573, or via mail
to Universal Electronics Inc. 15147 N. Scottsdale Road, Suite H300,
Scottsdale, Arizona 85254. Please include your full name, product in
-
formation, and contact information in your request communication.
LEGAL NOTICES
FCC STATEMENT:
FCC ID: MG3-117966
This equipment has been tested and found to comply with the
limits for a Class B digital device, pursuant to part 15 of the FCC
Rules. These limits are designed to provide reasonable protection
against harmful interference in a residential installation. This equip
-
ment generates, uses and can radiate radio frequency energy and,
if not installed and used in accordance with the instructions, may
cause harmful interference to radio communications. However,
there is no guarantee that interference will not occur in a particular
installation. If this equipment does cause harmful interference to
radio or television reception, which can be determined by turning
the equipment off and on, the user is encouraged to try to correct
the interference by one or more of the following measures:
- Reorient or relocate the receiving antenna.
- Increase the separation between the equipment and
receiver.
- Connect the equipment into an outlet on a circuit different
from that to which the receiver is connected.
- Consult the dealer or an experienced radio/TV technician for
help.
This device complies with part 15 of the FCC Rules. Operation
is subject to the following two conditions: (1) This device may
not cause harmful interference, and (2) this device must accept
any interference received, including interference that may cause
undesired operation.
Caution: Changes or modications not expressly approved by the
party responsible for compliance could void the user’s
authority to operate the equipment.
www.oneforall.com
I
II
IV
III
4 X AAA
ENGLISH | ESPAÑOL
SMART
CONTROL PRO
URC 7966
www.oneforall.com/mynevo
Virtual Agent
If you need help at any time during setup,
please use the Virtual Agent in the app.
Amazon Fire TV Remotes
Add New Remote
Settings Controllers and Bluetooth
Devices
www.oneforall.com/mynevo
SETUP DEVICE SETUP
ACTIVITY SETUP
AMAZON FIRE STICK / CUBE SETUP
GOOGLE TV SETUP
To set up the remote, rstly please download the My
Nevo app. This app communicates with the remote using
Bluetooth Low Energy or BLE. You can get this app by
scanning the QR code below, or by searching for “My Nevo”
in the App or Play Store.
When you rst use the app, it may
take up to 30 seconds to connect
to your remote. This is a one time
check to see the rmware of the
remote is up to date.
iOS version of setup app requires iPhone 8 or newer or
second-generation SE. First generation SE and iPhone
7 and older are not supported..
Once the app has located your remote, you can follow the
instructions to set it up to control your Audio Video devices
– we recommend setting up your TV rst of all.
You can then add other devices such as set top boxes and
sound bars. You can set up one TV, and up to 5 other devices
that you use as source of your viewing content, for example
a streaming box, satellite or cable and a Blu-ray player.
When you set these up, the remote will also do a quick test
to see which HDMI Input of your TV your source devices are
connected to.
If you have an Amazon Fire Edition Television, this can be
setup as a normal TV. However if you have an Amazon Fire
Stick or Cube, the procedure is slightly dierent. You will
need the original Fire remote control. Next perform the
following 5 steps:
1.
First, simply turn on your TV and select the
input you have the Fire device connected to.
2. Secondly, press any button on the original
Fire remote to wake it up.
The Smart Control Pro can also control devices using the
Google TV operating system, such as a newer Google
Chromecast (with Google TV), or a Sony or TCL TV. It can
also support some systems running Android TV, such as the
Nvidia Shield.
To set up the device using the My Nevo app, select the
device type, for example a TV or a Streaming Device, and
select Google TV.
Next, when prompted by
the My Nevo app open
the Settings Menu on your
Google TV device and select
Remotes and Accessories
and then Pair New accesso
-
ry. The Google TV device should start searching and at that
point you will be asked by the My Nevo app to hold down
the Home key for 10 seconds. After 10 seconds your Google
TV Device should nd the Smart Control Pro – please select
it using the ORIGINAL REMOTE.
After this the Google TV
Device should be set up as
a device on the STREAM key
of the Smart Control Pro
remote as well as added to
an Activity.
The Smart Control Pro can
also use voice search on
Google TV devices. Simply
hold down the Menu/Mic
button and hold the top of
the remote close to your
mouth to speak.
2 3 4
8765
3. Next, using your original Fire remote select “Settings
> Controllers and Bluetooth Devices > Amazon Fire
Remotes > Add New Remote
4. Hold down the Home key on your
NEW Smart Control Pro Remote
for 10 seconds. The remote will
appear as an Amazon Remote,
now press the Select key on the
ORIGINAL AMAZON REMOTE to
select it. The OFA Remote is now
paired with the Amazon Fire
device, but it needs to be added to
an Activity to control it.
5. The Amazon Fire will automatical
-
ly be set up on the STREAM device
key, as well as added to an Activity.
The Smart Control Pro combines devices into Activities for
ease of control. An Activity can contain up to 3 devices; a
TV, a source device and an audio device such as a sound bar,
and a good example of an Activity is Watch TV. If for example
you set up a TV, an Amazon Fire stick and a sound bar, the
remote will control all these.
Pressing the Watch TV key will turn on these three devices
and select the right input on your TV.
The remote will remember which devices are powered on,
and pressing the Power key will turn them all o at once.
1
3
4
2
KEY DESCRIPTION KEY DESCRIPTION
KEY DESCRIPTION
1
INPUT Selects the Input of the current device
2
POWER On / O
3
TV_STREAM_S. BAR_STB_BL.RAY_AUDIO
Device keys – press these to select the device you
want to control
4
NETFLIX Netix (if available). Can be programmed
as an App Shortcut
5
PRIME VIDEO Amazon Prime Video (if available).
Can be programmed as an App Shortcut
6
DISNEY + Disney+ (if available). Can be
programmed as an App Shortcut
7
YOUTUBE YouTube (if available). Can be
programmed as an App Shortcut
8
WATCH TV Combines up to 3 Devices; a TV, a
source device and an audio device
9
WATCH MOVIE Combines up to 3 Devices; a TV, a
source device and an audio device
10
LISTEN TO MUSIC Combines up to 3 Devices; a TV,
a source device and an audio device
11
UP_LEFT_OK_RIGHT_DOWN
Navigate and select items in the menu of the
current device
12
BACK One step back in the menu
13
HOME Home /Smart Menu
14
EXIT Exit the Menu
15
VOL +_VOL - Controls the Volume of the current
Audio Device
16
MUTE Mute
17
MIC / MENU Settings or Options Menu – When
controlling a device using the Google TV OS,
holding this key down will give access to Voice
Commands
18
CH +_CH - Channel Up and Down
19
REW_PLAY_FF_PAUSE_REC Controls the playback
of the current show or disc
20
APPS Apps Menu
21
Digits 0-9 Digits 0-9 for channel selection for
channel selection
22
DASH Delimiter for selection of sub-channels
23
GUIDE TV Guide
24
RED_GREEN_YELLOW_BLUE Quick access
buttons for the menu of the current device
APP SHORTCUT KEYS
TIPS AND TRICKS
The remote also features 4 app shortcut keys, which will
give direct access to your favorite streaming apps, such as
Netix or Amazon Prime Video.
If your original remote control had keys to directly access
these services, these keys will act the same. But if not you
can program them to mimic a sequence of keys (a macro)
used to access the app.
To program the macro, you rst need to know the sequence
of keys you need to press to always bring up the service you
prefer. For example on an Apple TV, the sequence is Back (or
Home), Menu Down, Menu Right (until the app is selected)
and OK.
• To power on the devices in the Activity, press the
Activity key.
• To power o your devices, press the Power key.
• The remote will remember which devices are on or
o and which HDMI Input was last selected.
- This can go out of sync, for example if the original
remotes are used
- If you don’t see the picture or a device is not
powered on when it should be, press and hold the
AV sync key.
•
If you need help, the My Nevo app has a help section, just
scroll to the right from the main menu and select “Help”.
To program the Macro, go to the App Shortcut section in the
My Nevo app. You can program one macro per key.
AV SYNC
The Input key is used to manually select the HDMI Input of
your TV. If you press and release it you should see the Input
Selection screen of your TV. But it also has a secondary
function. After pressing the Activity key, if you nd that one
or more of the desired devices did not power on, or that the
TV is on the wrong HDMI Input, hold down this key for 2
seconds. The remote will then try to correct this for you, by
resending the appropriate Power and Input commands.
Customer Support: 855-716-2573 (toll free)
OFA warranty/terms & conditions:
855-569-6595 (toll free) www.oneforall.com
Universal Electronics Inc.
15147 N. Scottsdale Road, Suite H300, Scottsdale,
Arizona 85254
One For All is a registered trademark of UEI,
Made in China, Hecho en China
713320 RDN1080823
713320_Smart Control Pro_URC7966_US_112x176_RDN1080823.indd 1-4713320_Smart Control Pro_URC7966_US_112x176_RDN1080823.indd 1-4 08-08-2023 18:1408-08-2023 18:14
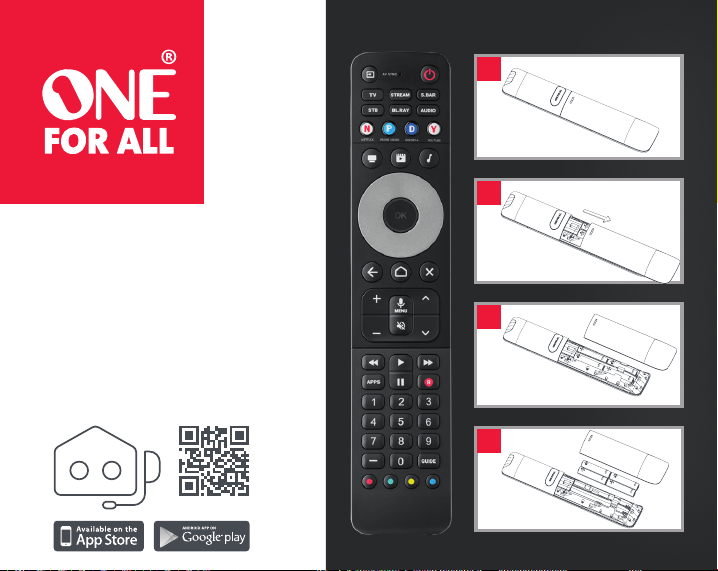
ESPAÑOL | ENGLISH
SMART
CONTROL PRO
URC 7966
I
II
IV
III
4 X AAA
www.oneforall.com/mynevo
Agente virtual
Si necesita ayuda en cualquier momento
durante la conguraciòn, puede utilizar
el Agente virtual en la aplicaciòn.
3
21
4 7
1
24
5 6
8 10
13
2
14
1111
17
18
19
23
12
19
15
16
9
20
22
WARRANTY
GARANTÍA / INFORMACIÓN DE
GARANTÍA
Los términos y condiciones para la política de “Compatibilidad
100% Garantizada” y separadamente 1 año de Garantía Limitada
contra defectos de material y mano de obra pueden encontrarse
en www.oneforall.com/remoteguarantee, si lo desea puede solicitar
la copia física llamando al 855-716-2573, o por correo a Universal
Electronics Inc. 15147 N. Scottsdale Road, Suite H300, Scottsdale,
Arizona 85254. Por favor incluya su nombre completo, información
de su producto y todos sus datos de contacto en su petición.
Para productos de venta en Mexico los terminos y condiciones a
continuación se aplican.
AVISOS LEGALES
DECLARACIÓN DE LA FCC:
FCC ID: MG3-117966
Este equipo ha sido sometido a prueba y se ha determinado
que satisface los límites establecidos para ser clasicado como
dispositivo digital de Clase B, de acuerdo con la Parte 15 del regla
-
mento FCC. Estos límites están diseñados para proporcionar una
protección razonable contra interferencias dañinas en un ambiente
residencial. Este dispositivo genera, utiliza y puede irradiar energía
de radiofrecuencia y, si no es instalado y utilizado de acuerdo a
las instrucciones, puede causar interferencias perjudiciales en las
comunicaciones de radio. Sin embargo, no se garantiza que no
ocurrirá interferencia en una instalación particular. Si el equipo
causa interferencias perjudiciales en la recepción de la señal de
radio o televisión, lo cual puede comprobarse entendiéndolo y
apagándolo alternativamente, se recomienda al usuario corregir la
interferencia por uno de los siguientes procedimientos:
- Cambie la orientación o la ubicación de la antena receptora.
- Aumente la distancia entre el equipo y el receptor.
- Conecte el equipo a un tomacorriente de un circuito distinto
de aquel al que está conectado el receptor.
- Solicite consejo al distribuidor o a un técnico experto en
radio y televisión para obtener ayuda.
Este dispositivo satisface la parte 15 del reglamento FCC. Su utiliza
-
ción está sujeta a las siguientes dos condiciones: (1) este dispositivo
no puede causar interferencia dañina, y (2) este dispositivo debe
aceptar cualquier interferencia recibida incluyendo interferencias
que puedan causar una operación no deseada.
Cuidado: Cualquier cambio o modicación que no esté aprobado
expresamente por la parte responsable por el cumpli
-
miento puede anular la autoridad del usuario para operar
el equipo.
www.oneforall.com
Amazon Fire TV Remotes
Add New Remote
Settings Controllers and Bluetooth
Devices
www.oneforall.com/mynevo
CONFIGURACIÓN CONFIGURACIÓN DEL DISPOSITIVO
CONFIGURACIÓN DE ACTIVIDADES
CONFIGURACIÓN
DE AMAZON FIRE STICK/CUBE
CONFIGURACIÓN DE GOOGLE TV
Para congurar el mando a distancia, descargue en primer
lugar la aplicación My Nevo. Esta aplicación se comunica
con el mando a distancia mediante Bluetooth Low Energy
o BLE. Puede obtener esta aplicación escaneando el código
QR que aparece a continuación o buscando “My Nevo”
en App Store o Play Store.
Cuando utilice la aplicación por
primera vez, puede tardar hasta
30 segundos en conectarse con el
mando a distancia. Este chequeo solo
tendrá lugar una vez, para ver si el
rmware del mando está actualizado.
La versión iOS de la aplicación de conguración
requiere un iPhone 8 o posterior o un SE de segunda
generación. La primera generación SE y el iPhone
7 y anteriores no son compatibles.
Una vez que la aplicación haya localizado su mando a
distancia, puede seguir las instrucciones de conguración
para controlar sus dispositivos de Audio/Video –le recomen
-
damos que primero congure su televisor.
A continuación, puede añadir otros dispositivos como
descodicadores y barras de sonido. Puede congurar un
televisor y hasta 5 dispositivos más que utilice como fuente
de sus contenidos de visualización, por ejemplo una caja de
streaming, satélite o cable y un reproductor de Blu-ray.
Cuando los congure, el mando a distancia también reali
-
zará una prueba rápida para ver a qué entrada HDMI de su
televisor están conectados sus dispositivos fuente.
conguración como un televisor normal. Sin embargo, si
tiene un Amazon Fire Stick o Cube, el procedimiento es
ligeramente diferente. Necesitará el mando a distancia Fire
original. A continuación siga los siguientes 5 pasos:
1.
En primer lugar, simplemente encienda el
televisor y seleccione la entrada a la que
tiene conectado el dispositivo Fire.
2. En segundo lugar, pulse cualquier botón
del mando Fire remoto para activarlo.
Smart Control Pro también puede controlar dispositivos
que utilicen el sistema operativo Google TV, como el nuevo
Google Chromecast (con Google TV), o los televisores
Sony o TCL. También también es compatible con algunos
sistemas que ejecutan Android TV, como el Nvidia Shield.
Para congurar el dispositivo mediante la aplicación My
Nevo, seleccione el tipo de dispositivo, por ejemplo un tele
-
visor o un dispositivo de streaming, y seleccione Google TV.
A continuación, cuando
lo indique la aplicación
My Nevo, abra el menú de
conguración del dispo-
sitivo Google TV y selecci-
one Mandos a distancia y
accesorios y luego Emparejar nuevo accesorio. El dispositivo
de Google TV debe comenzar a buscar y en ese la aplicación
My Nevo le pedirá mantener pulsada la tecla la tecla Inicio
durante 10 segundos. Después de 10 segundos su disposi
-
tivo Google TV debe encontrar el Smart Control Pro - por
favor seleccione usando el REMOTO ORIGINAL.
Despues de esto el dispo-
sitivo Google TV debería
estar congurado como
dispositivo en la tecla STREAM
del mando a distancia Smart
Control Pro y quedar añadido
una actividad.
El Smart Control Pro
también puede utilizar
la búsqueda por voz en
dispositivos TV. Basta con
mantener pulsado el botón
Menú/Micrófono y acercar
la parte superior del mando
cerca de la boca para hablar.
2 3 4
8765
3. A continuación, con el mando Fire original seleccione
“Ajustes > Mandos y dispositivos Bluetooth > Amazon
Fire Mandos a distancia > Añadir nuevo mando a
distancia.
4. Mantenga pulsada la tecla Home
de su NUEVO Smart Control Pro
Remote durante 10 segundos. El
mando aparecerá como Amazon
Remote, Ahora pulsa la tecla
Select del AMAZON REMOTE
ORIGINAL para seleccionarlo. El
OFA Remote está ahora empareja
-
do con el dispositivo Amazon Fire
pero es necesario añadirlo a una
Actividad para controlarlo.
5. El Amazon Fire se instalará
automáticamente en el disposi
-
tivo STREAM y se añadirá a una
actividad.
Smart Control Pro combina los dispositivos en Actividades
para facilitar el control de los dispositivos. Una Actividad
puede contener hasta 3 dispositivos; un TV, un dispositivo
fuente y un dispositivo de audio como una barra de sonido.
Un buen ejemplo de una Actividad es Ver TV. Si, por ejemplo
congurase un televisor, un Fire Stick de Amazon y una
barra de sonido, mando a distancia controlará todos estos
dispositivos.
Al pulsar la tecla Ver TV se encenderán estos tres dispositivos
y seleccionará la entrada correcta en su televisor.
El mando recordará qué dispositivos están encendidos,
y pulsando la tecla Power los apagará todos a la vez.
1
3
4
2
DESCRIPCIÓN DE LAS TECLAS DESCRIPCIÓN DE LAS TECLAS
DESCRIPCIÓN DE LAS TECLAS
1
ENTRADA Selecciona la entrada del dispositivo
actual
2
POWER Encendido / Apagado
3
TV_STREAM_S. BAR_STB_BL.RAY_AUDIO
Teclas de dispositivo - púlselas para seleccionar el
dispositivo que desea controlar
4
NETFLIX Netix (si está disponible). Se puede
programar como un acceso directo a la aplicación
5
PRIME VIDEO Amazon Prime Video (si está
disponible). Se puede programar como un acceso
directo de la aplicación
6
DISNEY + Disney+ (si está disponible). Puede
programarse como un acceso directo a la
aplicación
7
YOUTUBE YouTube (si está disponible). Puede
programarse como un acceso directo a la
aplicación
8
VER TV Combina hasta 3 dispositivos: un televisor,
un dispositivo fuente y un dispositivo de audio.
9
VER PELÍCULA Combina hasta 3 dispositivos: un
televisor, un dispositivo fuente y un dispositivo de
audio.
10
ESCUCHAR MÚSICA Combina hasta 3 dispositivos:
un televisor, un dispositivo fuente y un dispositivo
de audio.
11
ARRIBA_IZQUIERDA_OK_DERECHA_ABAJO
Navega y selecciona elementos en el menú del
dispositivo actual
12
ATRÁS Un paso atrás en el menú
13
HOME Menú Home /Smart
14
EXIT Salir del Menú
15
VOL +_VOL - Controla el Volumen del Dispositivo
de Audio actual
16
MUTE Silenciar
17
MIC / MENU Menú de Ajustes u Opciones -
Cuando se controla un dispositivo utilizando el
SO Google TV, manteniendo pulsada esta tecla se
accede a los Comandos de Voz
18
CH +_CH - Subir y bajar canal
19
REW_PLAY_FF_PAUSE_REC Controla la
reproducción del programa o disco actual
20
APPS Menú de aplicaciones
21
Digits 0-9 Dígitos 0-9 para selección de canal para
selección de canal
22
DASH Delimitador para la selección de subcanales
23
GUIDE Guía de TV
24
RED_GREEN_YELLOW_BLUE Botones de acceso
rápido al menú del dispositivo actual
TECLAS DE ACCESO DIRECTO A APLICACIONES
CONSEJOS Y TRUCOS
El control remoto también cuenta con 4 teclas de acceso
directo a aplicaciones, que le darán acceso directo a sus
aplicaciones de transmisión favoritas, como Netix o
Amazon Prime Video.
Si su mando a distancia original tenía teclas para acceder
directamente a a estos servicios, estas teclas actuarán igual.
Si no las tenía, podrá programarlas para que imiten una
secuencia de teclas (un macro) para acceder a la aplicación.
Para programar el macro, primero necesita saber la secuen
-
cia de teclas que debe pulsar para que aparezca siempre
el servicio en cuestión. Por ejemplo, en un Apple TV, la
secuencia es Atrás (o Inicio), Menú Abajo, Menú Derecha
(hasta que se seleccione la aplicación) y Aceptar.
Para programar el macro, vaya a la sección Acceso directo
de la aplicación en la sección Mi aplicación Nevo. Puede
programar un macro por tecla.
la entrada HDMI de su televisor. Si la pulsa y la suelta, verá la
pantalla de selección de entrada de su televisor.
de su televisor. Pero también tiene una función secundaria.
Después de pulsar la tecla Actividad, si comprueba que uno
o más de los dispositivos deseados no se encendieron, o
que el TV está en la entrada HDMI equivocada, mantenga
pulsada esta tecla durante 2 segundos. El mando a distancia
intentará corregir la situación reenviando los comandos de
Encendido y Entrada apropiados.
• Para encender los dispositivos de la Actividad, pulse
la tecla de la actividad correspondiente.
• Para apagar los dispositivos, pulse la tecla Encendido.
• El mando a distancia recordará qué dispositivos
están encendidos o apagados y qué entrada HDMI se
seleccionó por última vez.
- Esto puede desincronizarse, por ejemplo, si utiliza
los mandos a distancia originales
- Si no ve la imagen o un dispositivo no está encen
-
dido cuando debería, mantenga pulsada la tecla
Sincronización AV.
•
Si necesita ayuda, la aplicación My Nevo tiene una
sección de ayuda, simplemente desplácese hacia
la derecha desde el menú principal y seleccione “Ayuda”.
SINCRONIZACIÓN AV
La tecla Entrada se utiliza para seleccionar manualmente
Customer Support: 855-716-2573 (toll free)
OFA warranty/terms & conditions:
855-569-6595 (toll free) www.oneforall.com
Universal Electronics Inc.
15147 N. Scottsdale Road, Suite H300, Scottsdale,
Arizona 85254
One For All is a registered trademark of UEI,
Made in China, Hecho en China
713320 RDN1080823
713320_Smart Control Pro_URC7966_US_112x176_RDN1080823.indd 5-8713320_Smart Control Pro_URC7966_US_112x176_RDN1080823.indd 5-8 08-08-2023 18:1408-08-2023 18:14
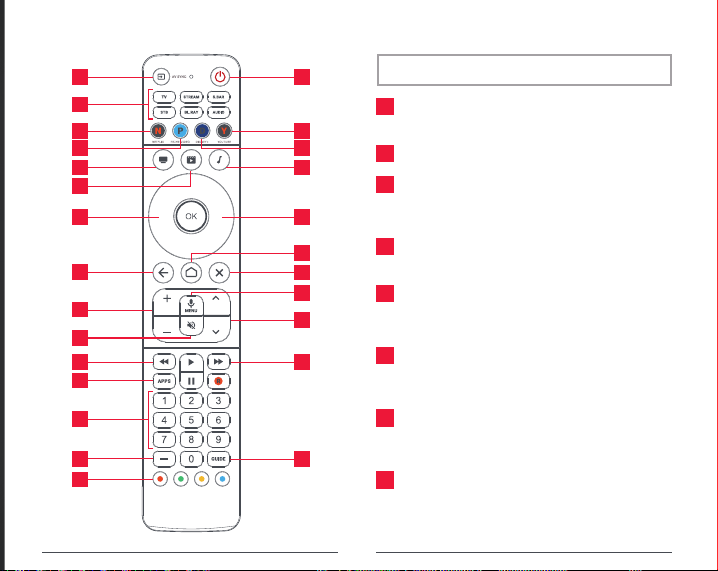
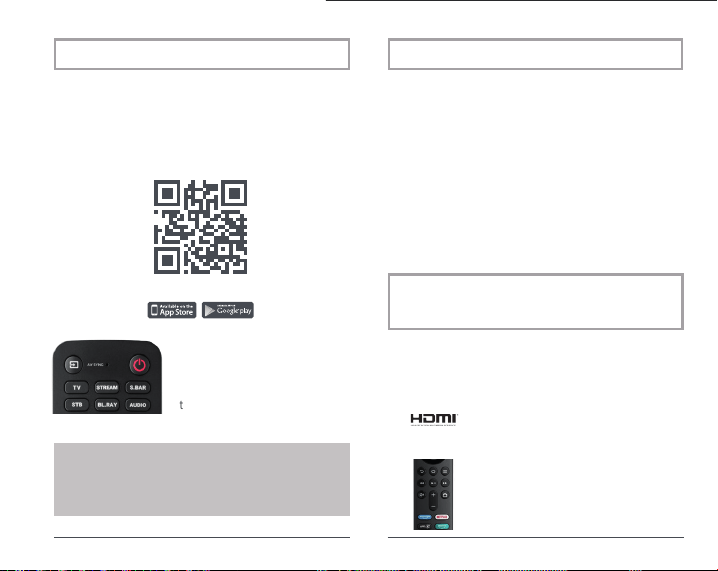
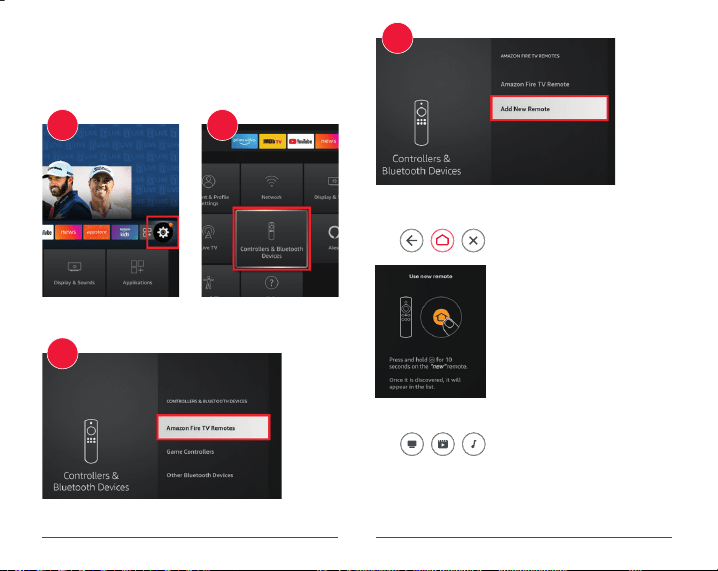
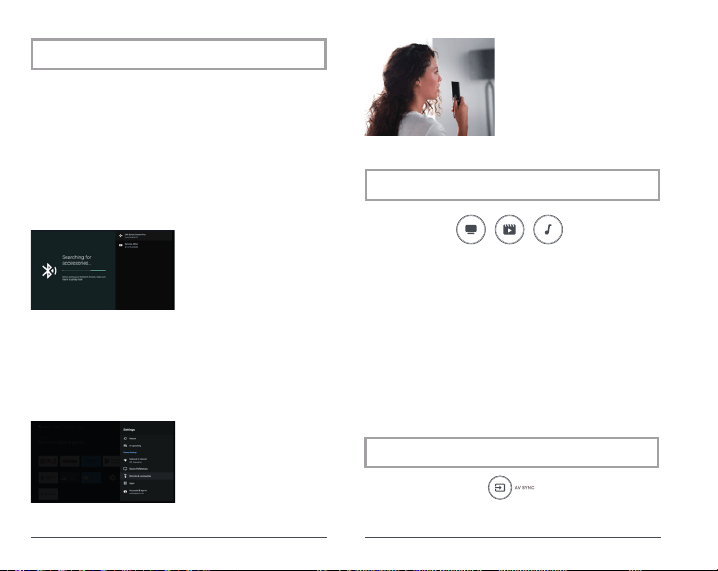
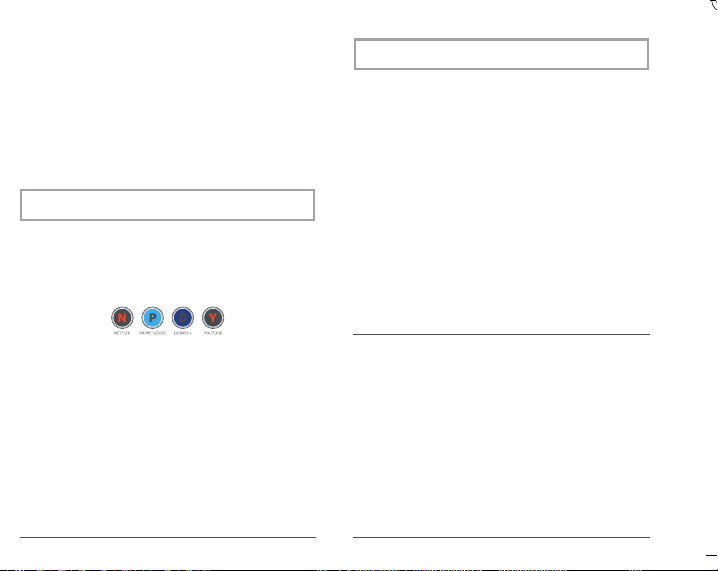