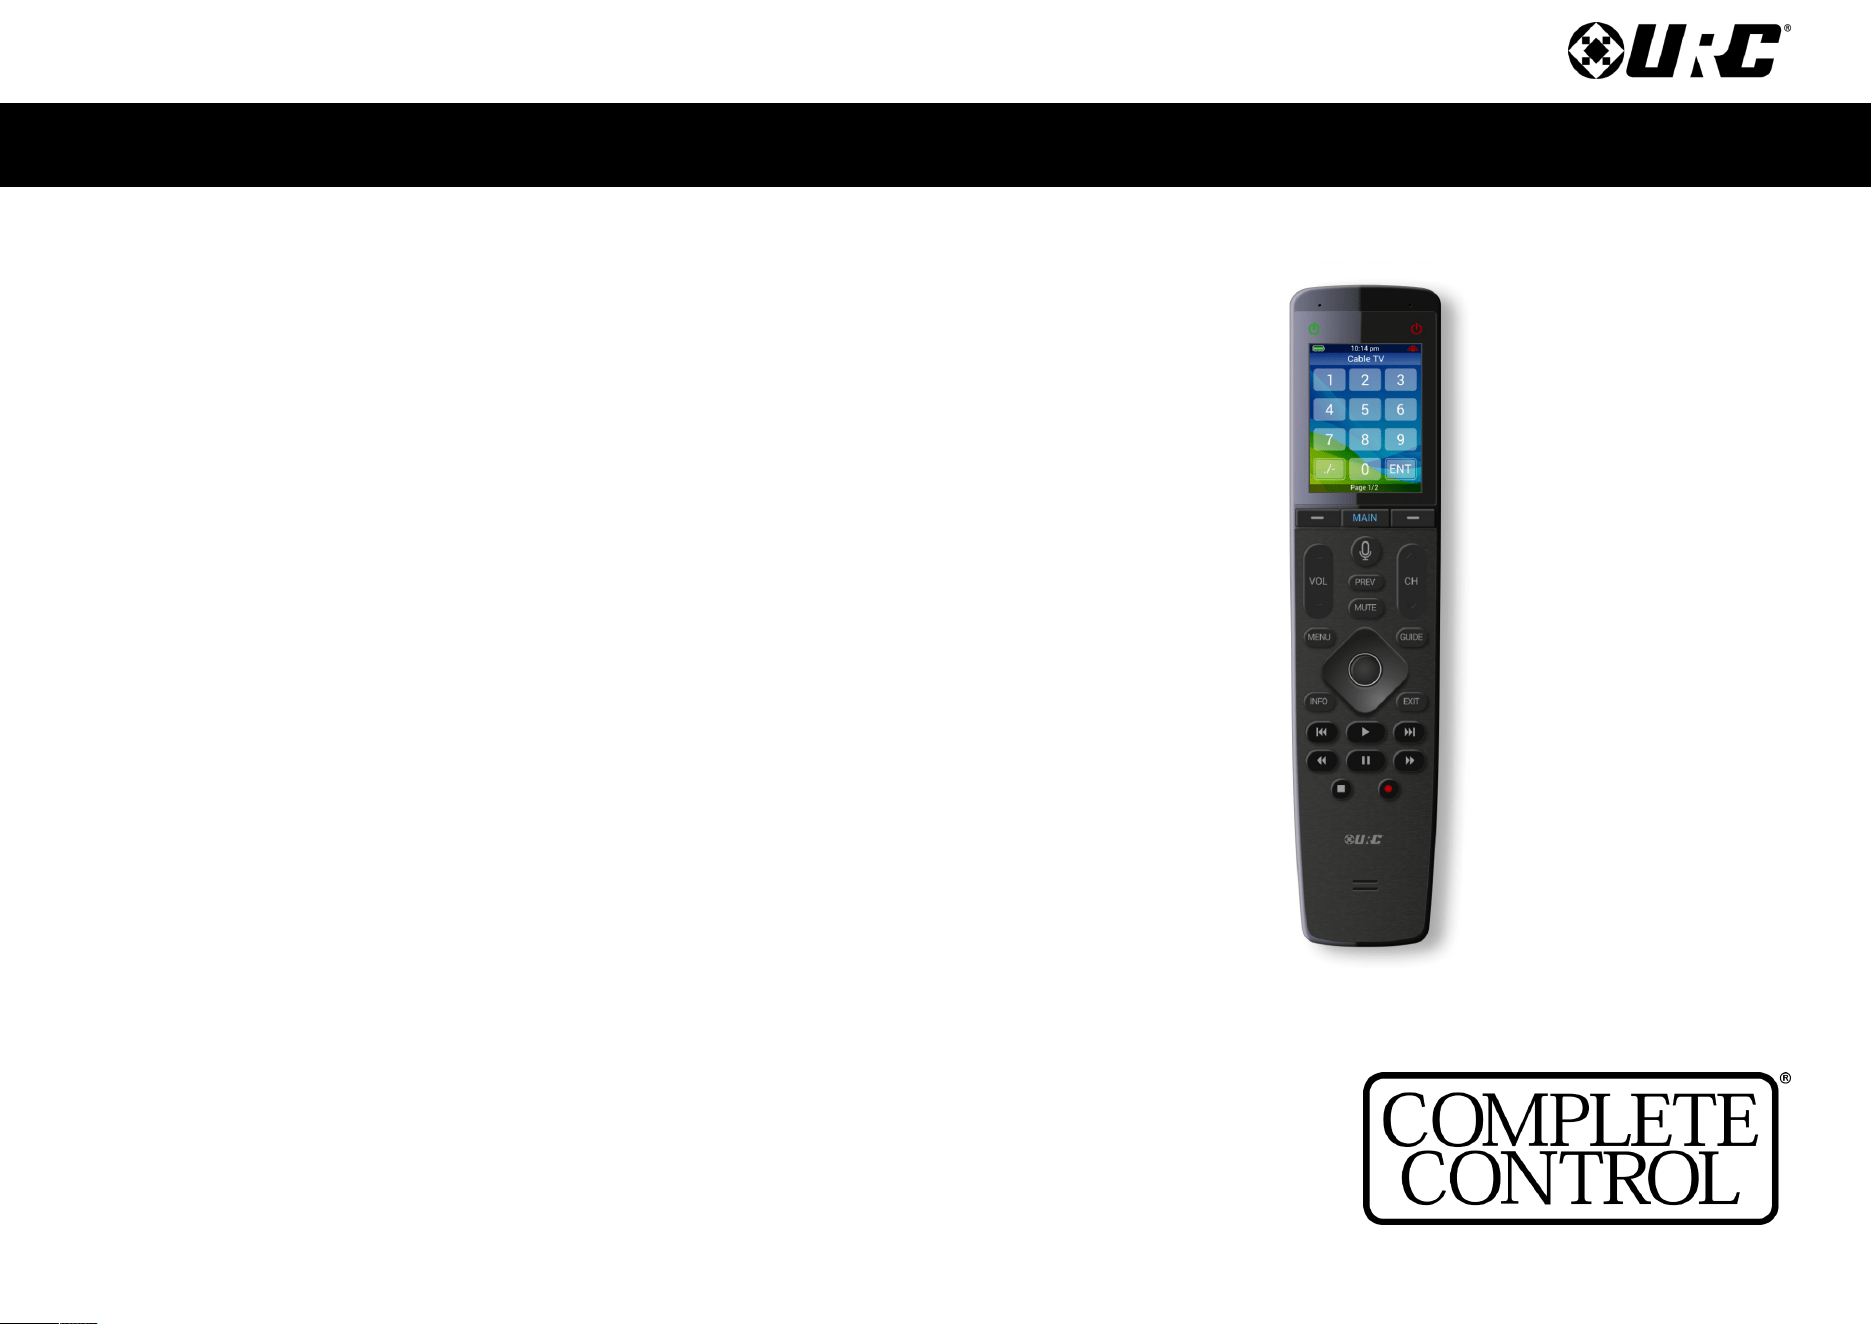
MX-1400
Owner’s Manual
Complete Control
MX-1400
Owner’s Manual
Complete Control
MX-1400
Owner’s Manual
Rev 1.4
Table of ContentsIntroducing the MX-1400
Thank you for purchasing URC’s MX-1400 wand remote control. Its easy
and intuitive use helps to simplify your life while adding control of more
things than thought possible.
Online Support:
Complete Control is sold both direct and through distribution. URC
devices must be installed and programmed by a certified custom
integrator.
End-User Support:
Visit the
URC Home Page for product information, owner’s manuals, and
support contact information.
Contact Support:
For questions or assistance, please contact your custom integrator/
programmer.
My Installer/Programmer
Features & Benefits ................................................................................. 1
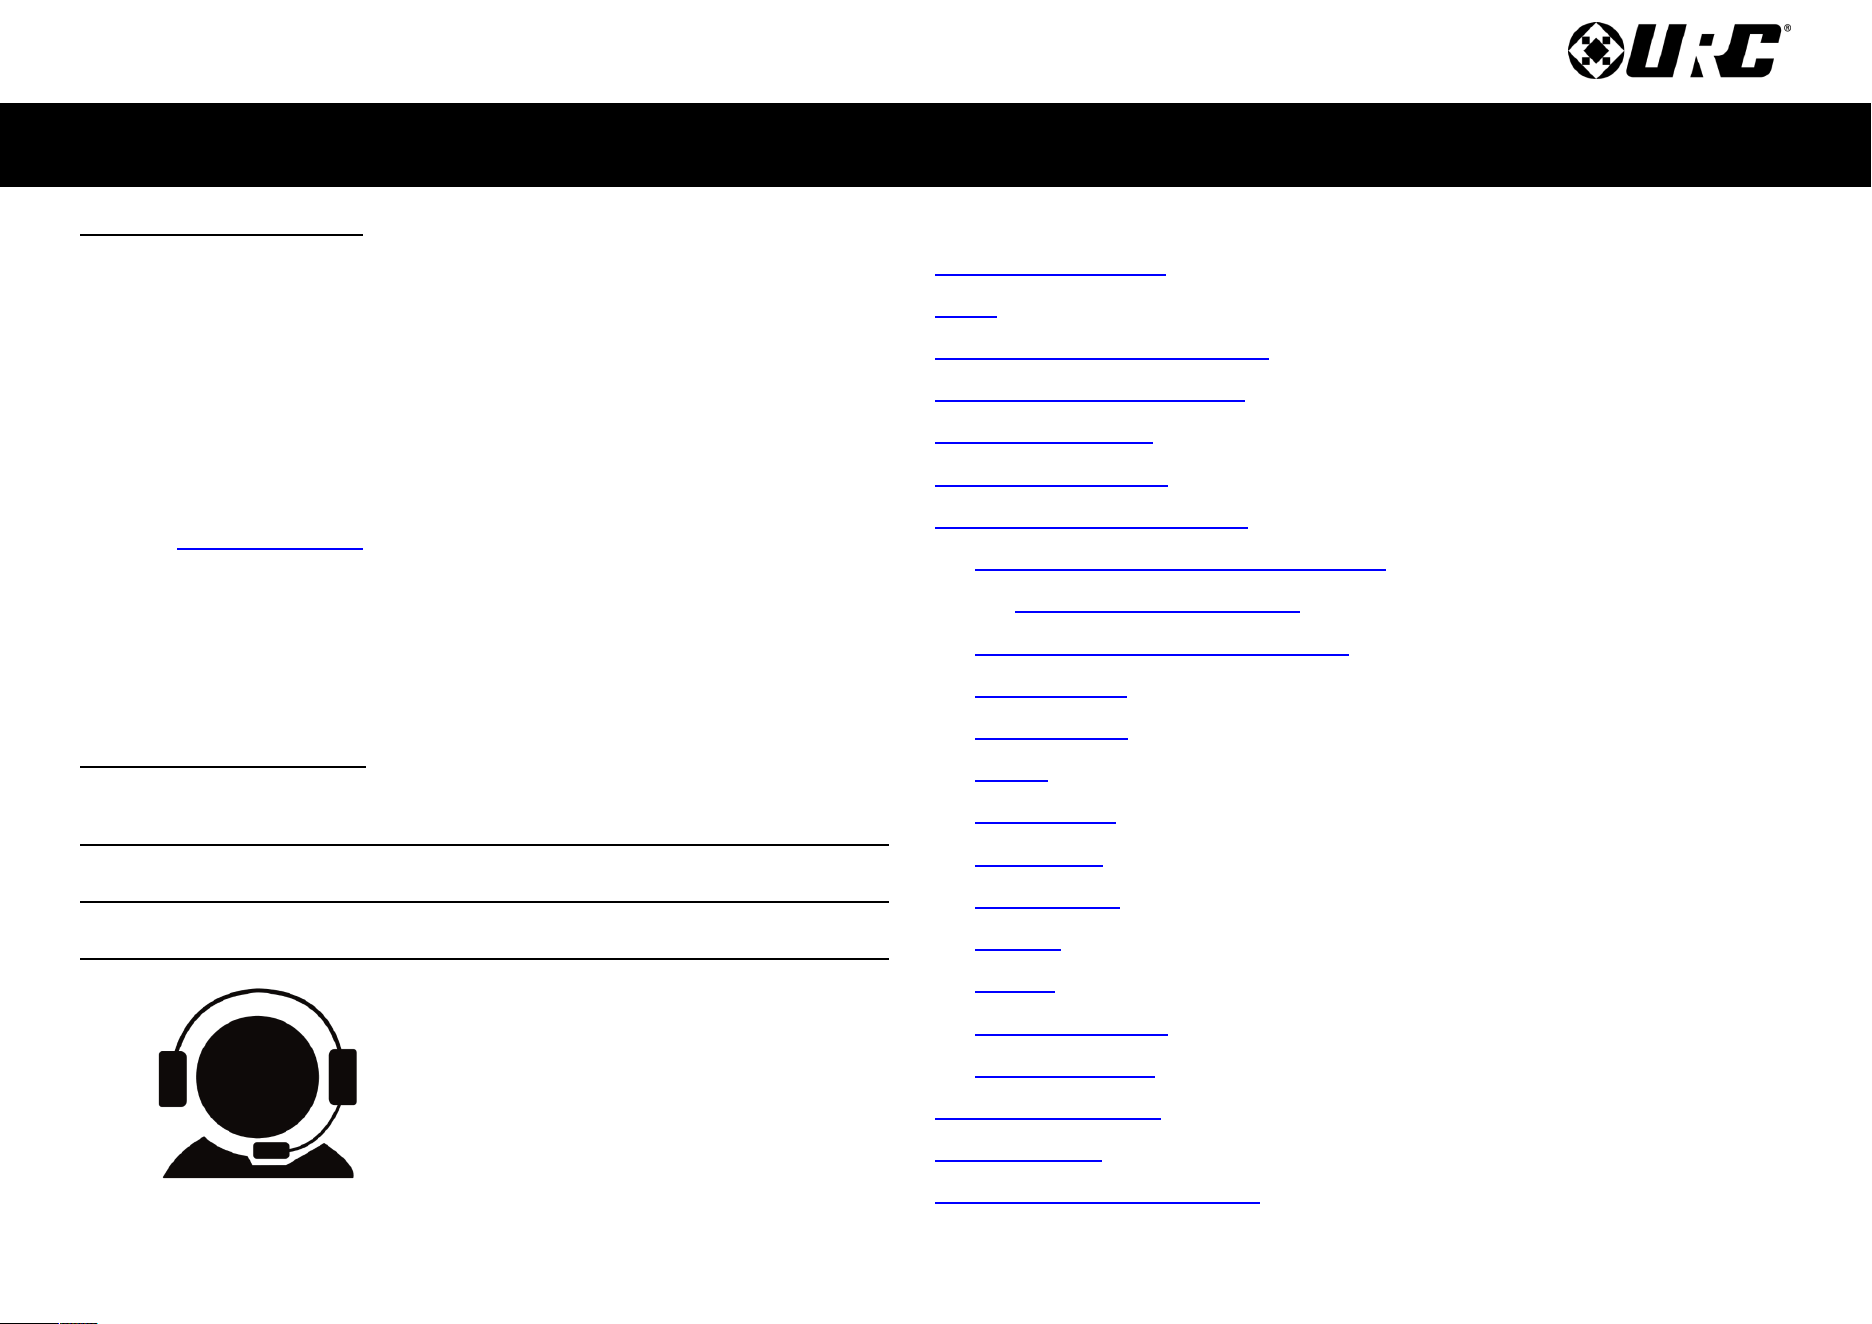
Parts ........................................................................................................ 2
Connecting the Battery Pack ................................................................... 3
Using the Charging Cradle ....................................................................... 3
Using the MX-1400 ................................................................................... 4
Using Voice Control ................................................................................. 7
Displaying the Setup Menu ...................................................................... 8
Alexa Voice Assistant & WiFi Setup ....................................................9
Voice Assistant Settings ............................................................. 15
Comcast Xfinity Voice Assistant ....................................................... 16
Sleep Timers ..................................................................................... 20
Event Timers ..................................................................................... 20
Power ................................................................................................ 21
Date & Time....................................................................................... 21
Brightness ........................................................................................ 22
Button Beep ...................................................................................... 22
System .............................................................................................. 23
Pickup............................................................................................... 23
Software Update................................................................................ 24
Factory Default ................................................................................. 24
Manual Wi-Fi Setup ................................................................................ 25
Specifications ........................................................................................ 32
Limited Warranty Statement ................................................................... 32
Technical Support
Toll Free: 800-904-0800
Main: 914-835-4484
To open a support ticket go to:
H o u r s : 9 : 0 0 a m - 6 pm E S T M - F

1
Complete Control
MX-1400
Owner’s Manual
Table of Contents
Features & Benefits
• IR/RF Device Control: This unit can directly control the IR device’s in
your home. You can also use RF to control devices located in different
rooms by integrating an MRF base station.
• Quick Connect Wi-Fi: When woken up, the remote connects to the
wireless network (2.4 GHz) for control via a Voice Assistant.
• Voice Assistant Ready: Enable the built-in Amazon Alexa service to
send commands verbally from the remote by pushing the press-to-talk
microphone button.
• User Interface Customization: Each Main Menu button can be
customized for activities, such as watching TV or listening to the radio.
These activities can contain multiple commands (macros) which enable a
single button press to turn the needed devices ON or OFF.
• Complete Control PC Editor: The MX-1400 is programmed using
advanced configuration software called Complete Control. To fully
automate an audio/video system, the programmer must have a detailed
knowledge of each component and how the system connects and
operates.
3
Complete Control
MX-1400
Owner’s Manual
Table of Contents
Connecting the Battery Pack
A battery is included in the box when shipped from the factory. Press the
spring lock down to unlock and remove the cover. Place the battery into the
battery compartment, making sure to align the contacts on the battery with
the contacts within the MX-1400’s battery compartment. The battery snaps
into place when aligned properly. Replace the battery cover.
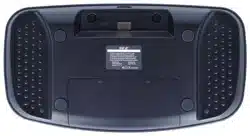
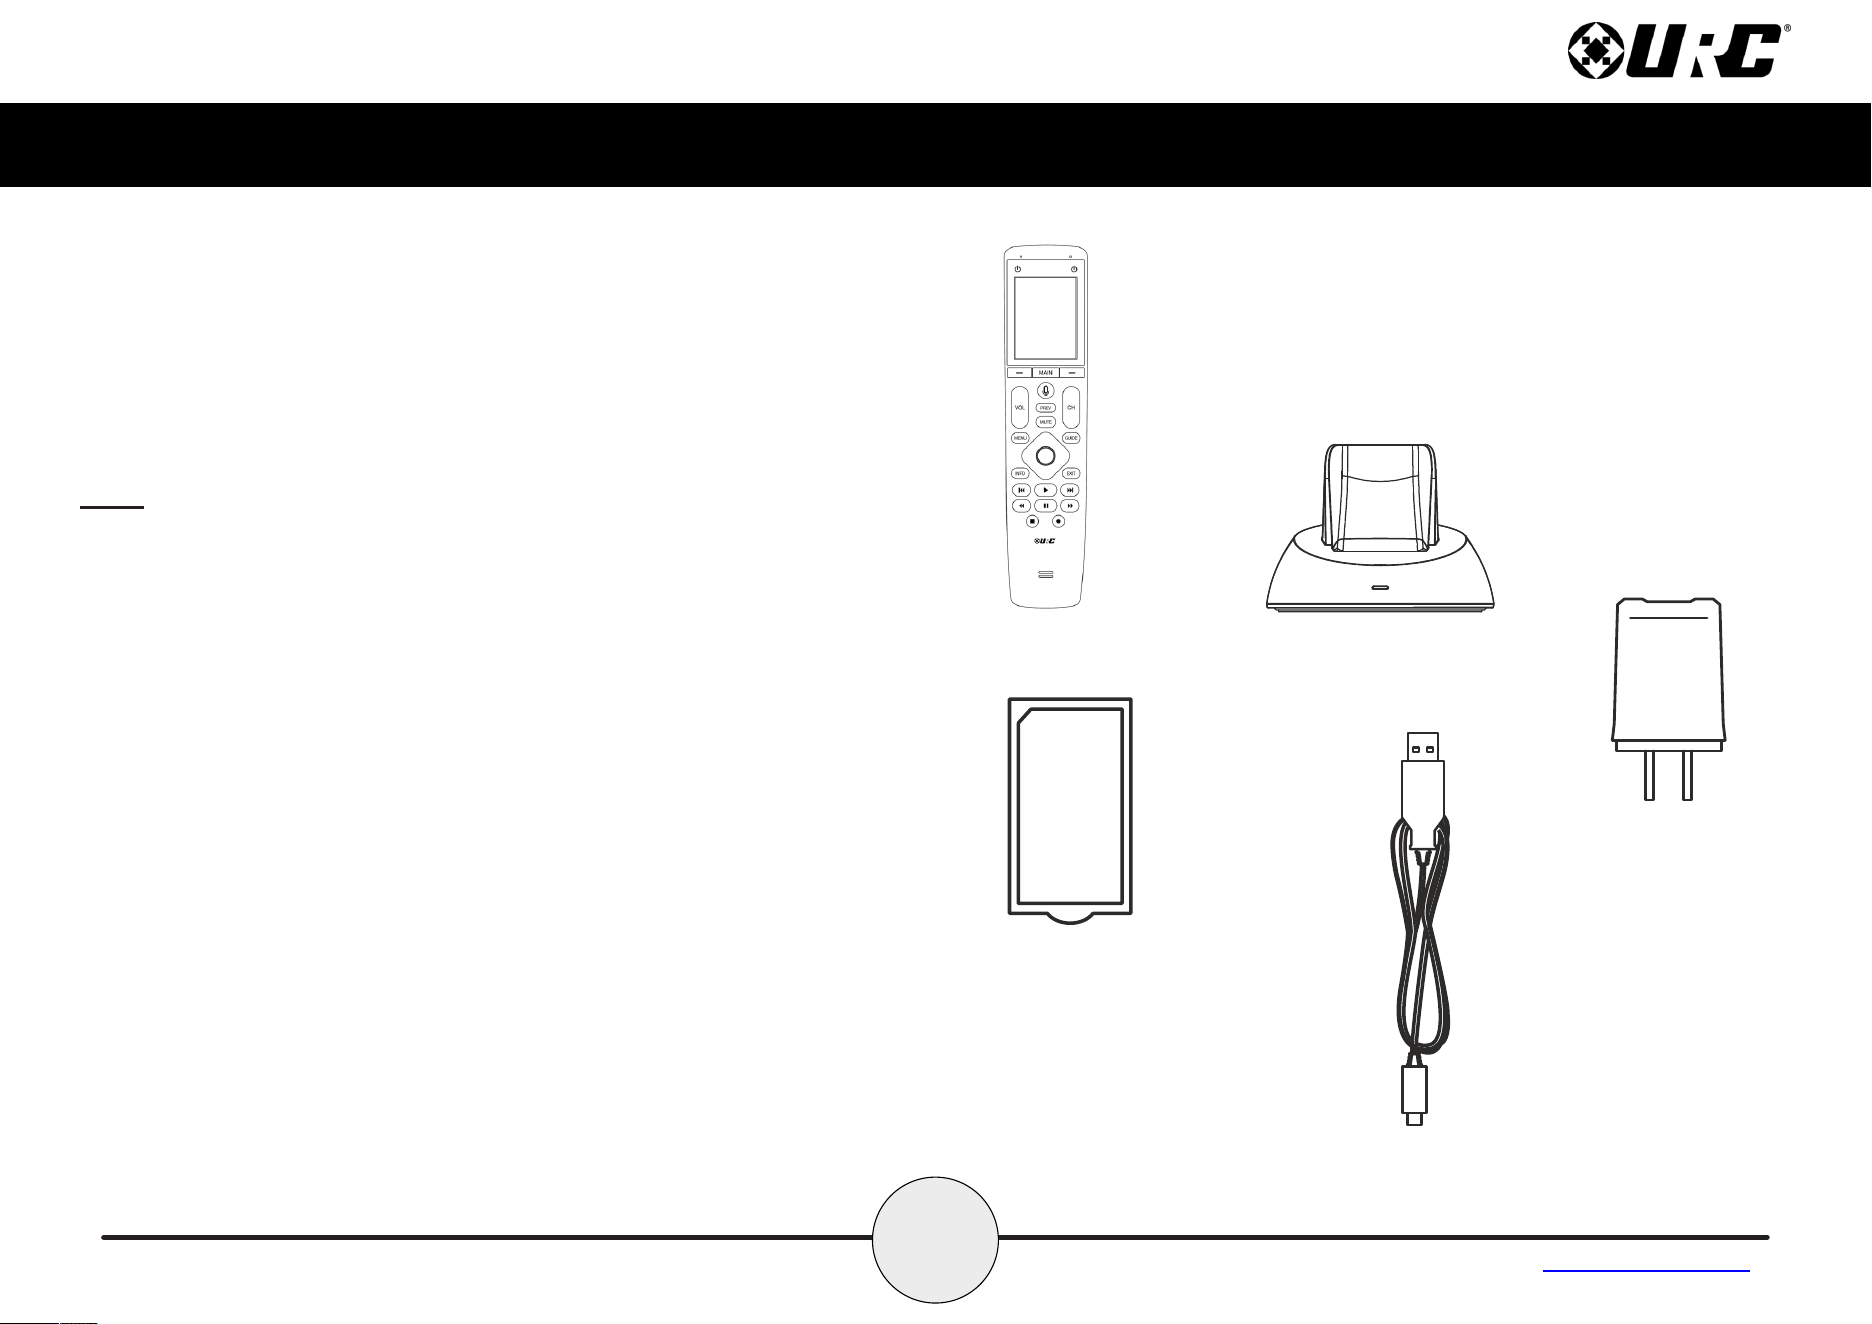
Using the Charging Cradle
Plug the USB power adapter into a power outlet and the USB-C cable into the
rear of the charging cradle. Gently place the MX-1400 into the cradle, so that
the remote automatically aligns itself to the contacts on the charging cradle.
The status light immediately illuminates.
It is possible to connect the USB-C cable directly into the bottom of the
MX-1400.
There are three (3) status light conditions:
• Red: Indicates the the remote’s battery is charging
• Blue: Indicates that the remote’s battery is off the charging dock
• White: Indicates that the remote’s battery is fully charged
4
Complete Control
MX-1400
Owner’s Manual
Table of Contents
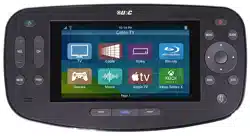
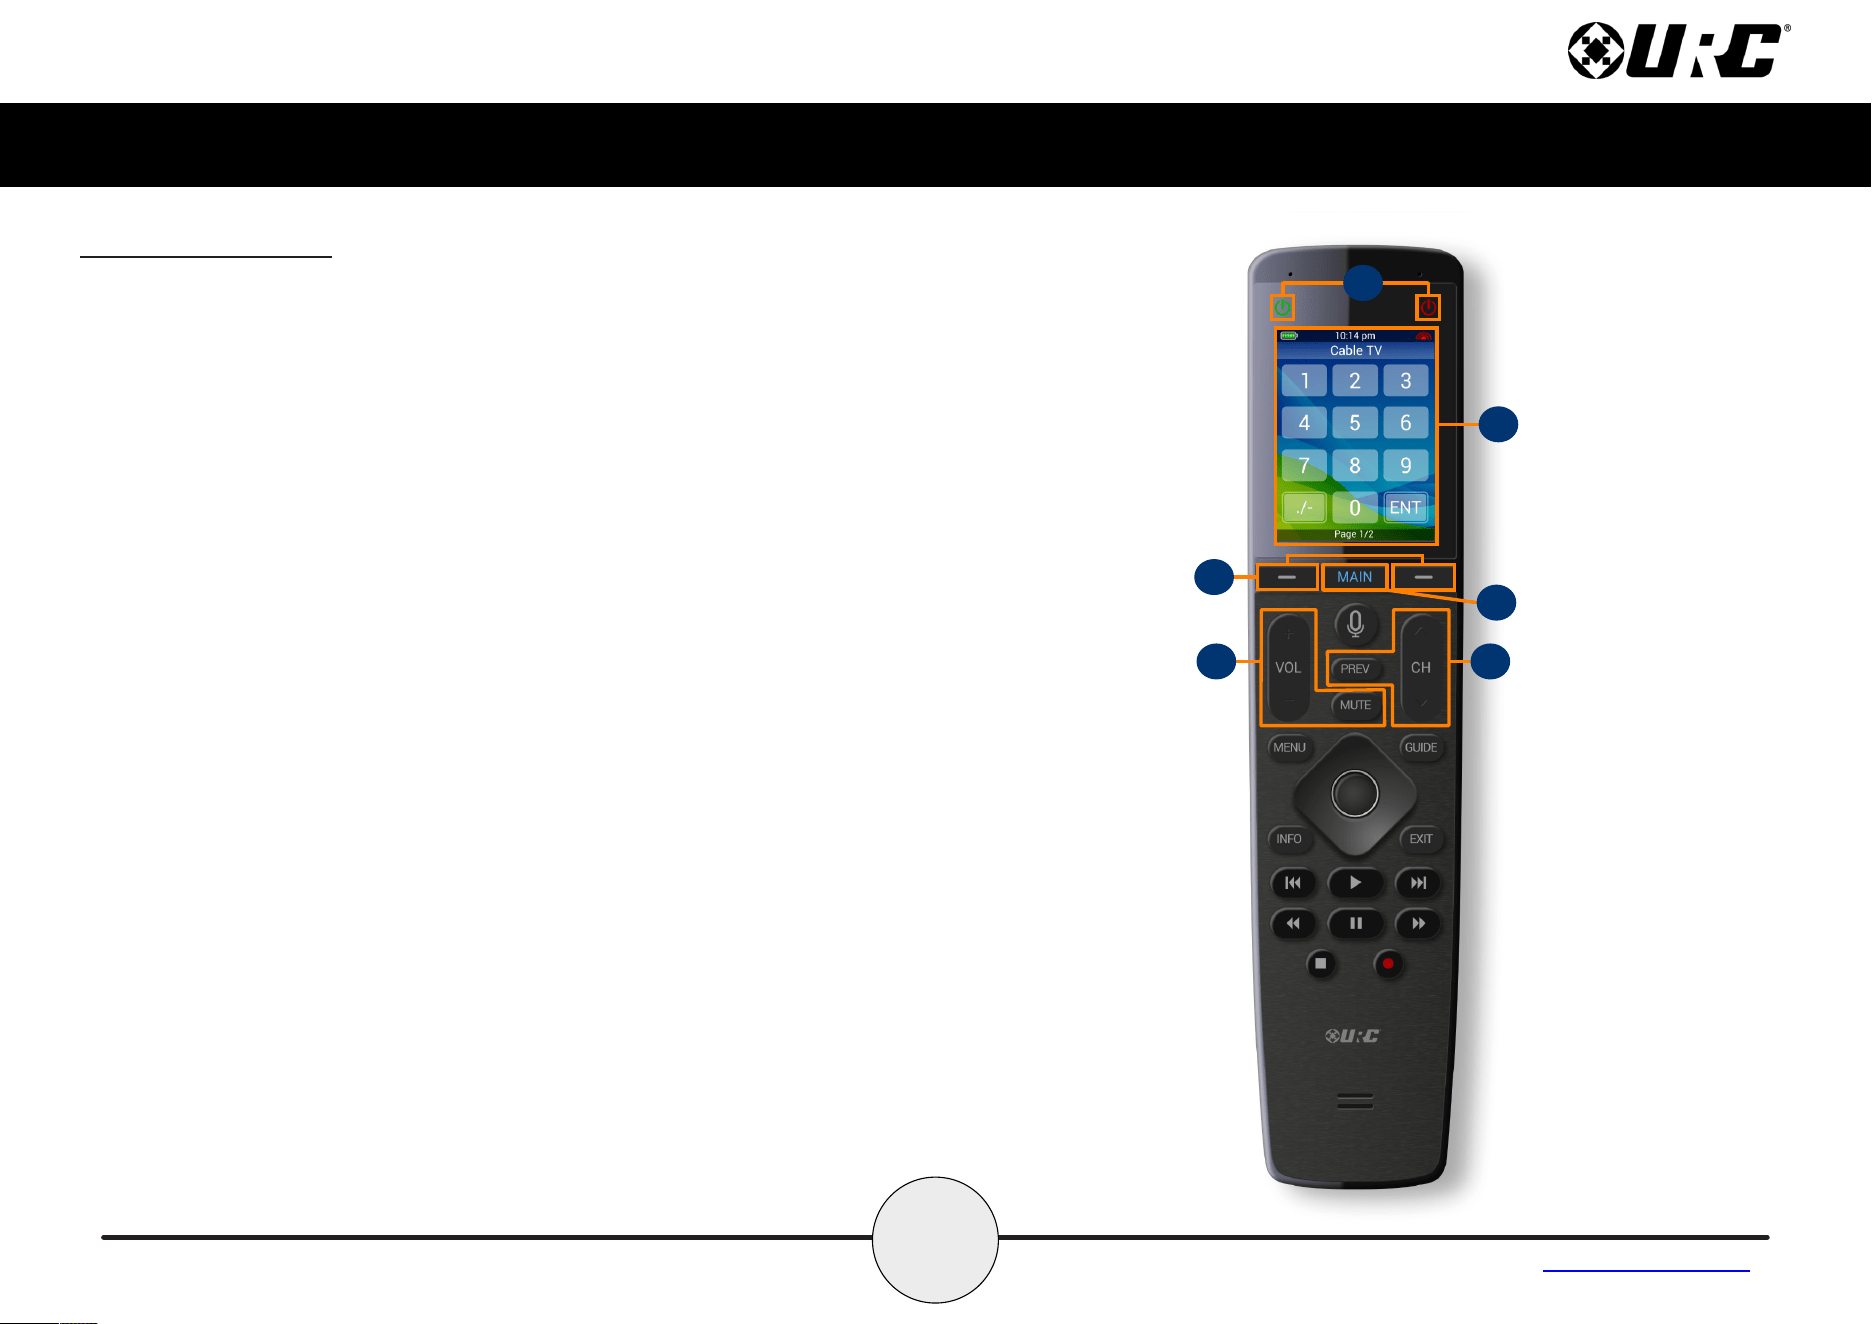
Using the MX-1400
The Main Menu pages display activities and/or devices. Press the Main
button to access the Main Menu. Larger systems may have more than one
(1) page. Press either of the Page buttons to view additional Main Menu
pages.
Although the MX-1400 is programmed with custom layouts and devices, there
are persistent buttons that maintain a steady function:
A. Power On/Off: With a single press of either button, the Complete
Control system turns the device On or Off.
B. Capacitive Touch Screen: The specific function of each button is
linked to the screen icon associated to the LCD screen. These buttons
are used to select activities, devices, functions, navigate, and more.
Speak with your custom integrator for more details.
C. Page Left/Right: These buttons are used to navigate through the
various Main Menu and Device/Activity Menu pages.
D. Main: By default, this button returns the user to the previous menu.
E. Vol+, Vol-, & Mute: Used to increase, decrease, or toggle the mute
status of the active audio device.
F. CH+, CH-, & Prev: Used to change a Cable/SAT channel up or down
or to navigate through a device’s on-screen menus. The Prev button
returns to the device’s previous channel or can be used to return the
user to a previous menu.
G. Microphone: Select this button to interact with the native voice
assistant service. When pressed, the microphone activates and listens
to your verbal commands. The microphone is shut off when the button
is no longer pressed.
E F
C
D
A
B
5
Complete Control
MX-1400
Owner’s Manual
Table of Contents
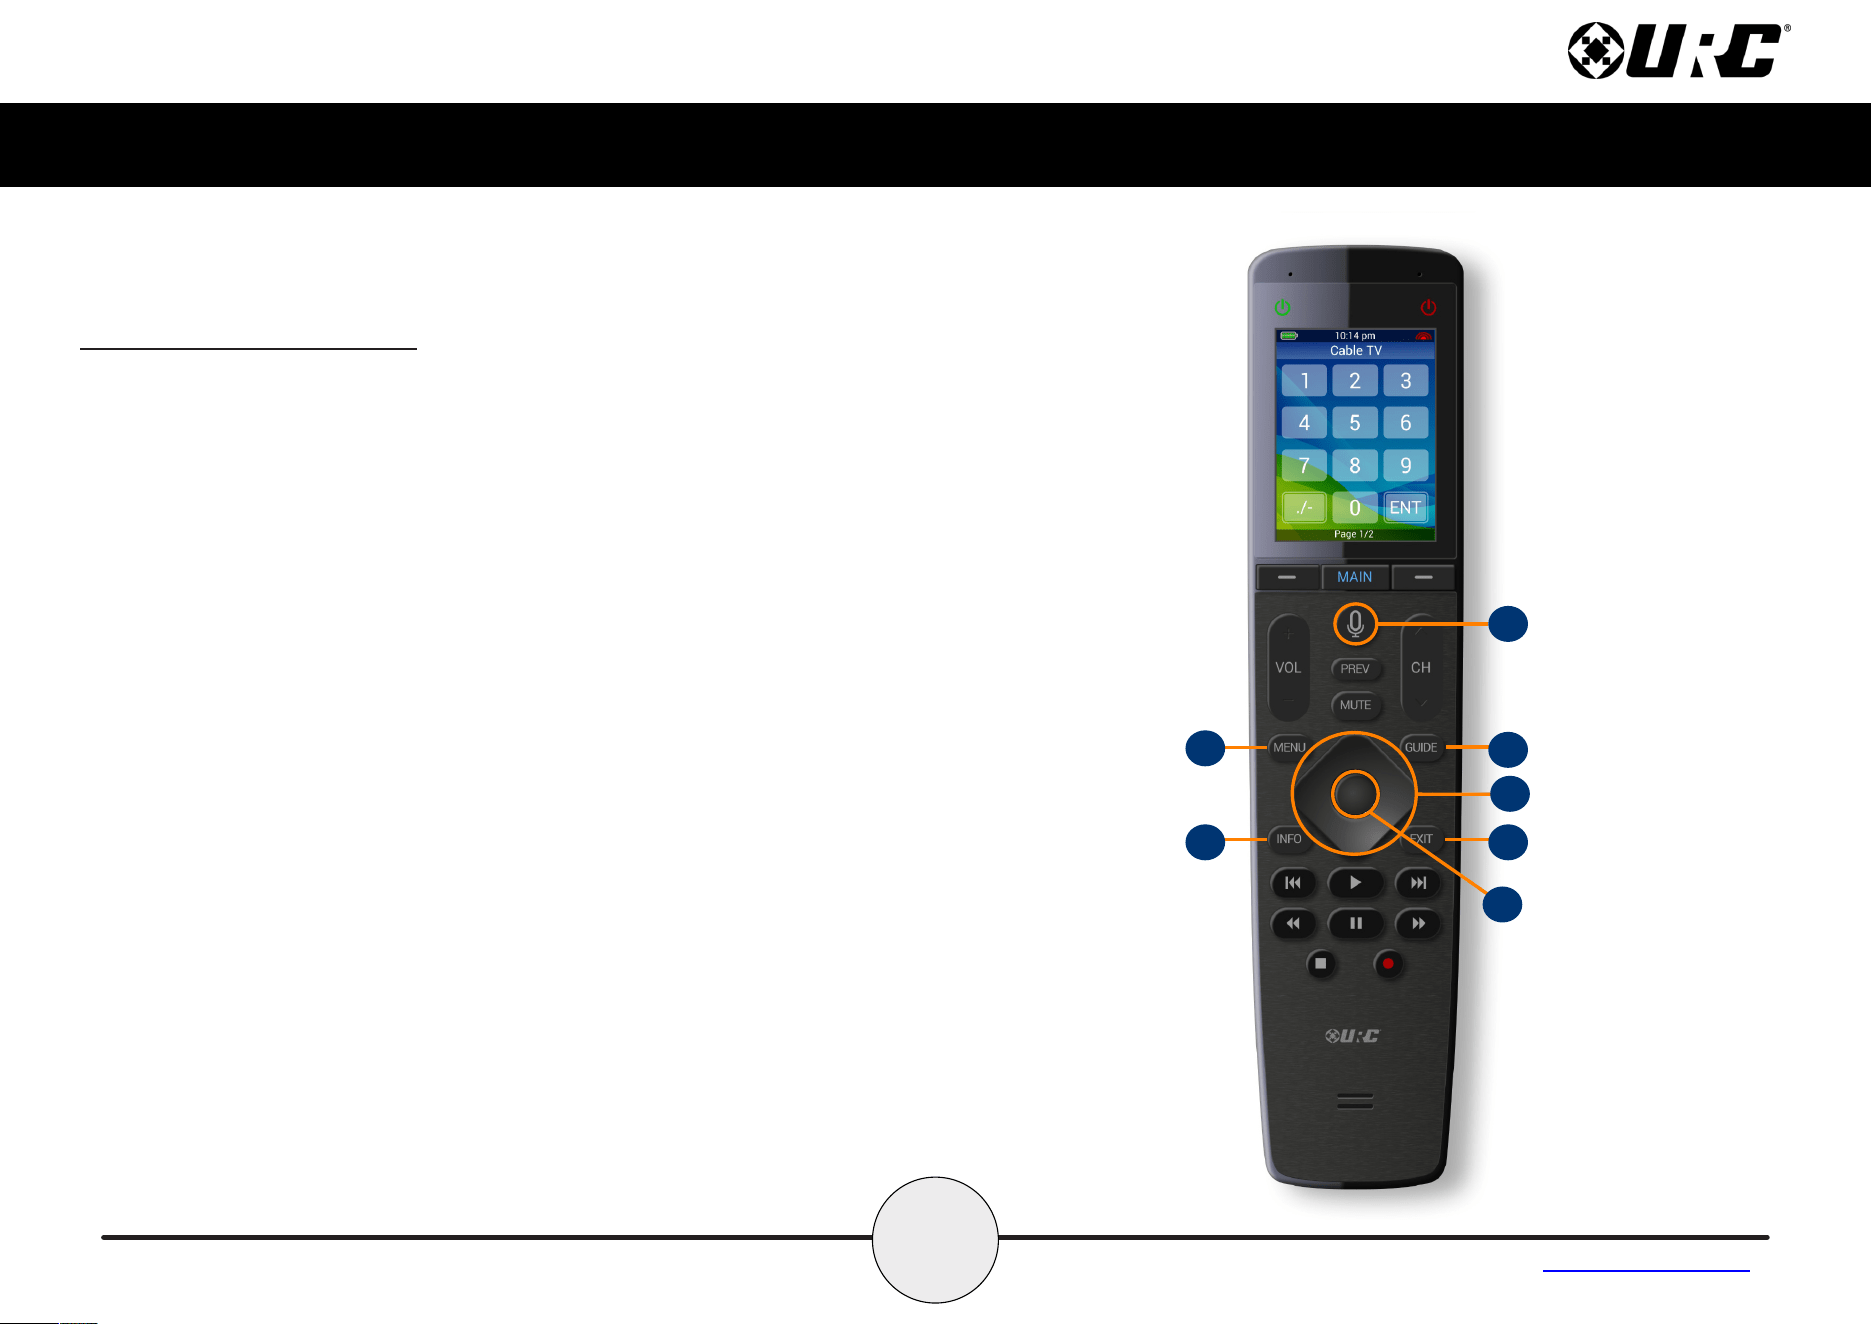
H. Navigation Keys: Comprised of up, down, left, and right. These
buttons are used to navigate through the menus and/or devices.
I. Select: Center button of navigation keys, used to confirm selections
displayed on a viewing device.
J. Menu: Displays the on-screen menu of the active device.
K. Guide: Displays the channel guide for the device’s on-screen display.
L. Info: Displays channel information for the device’s on-screen display.
M. Exit: Closes out any open menus or guides on the display or returns
to the previous menu.
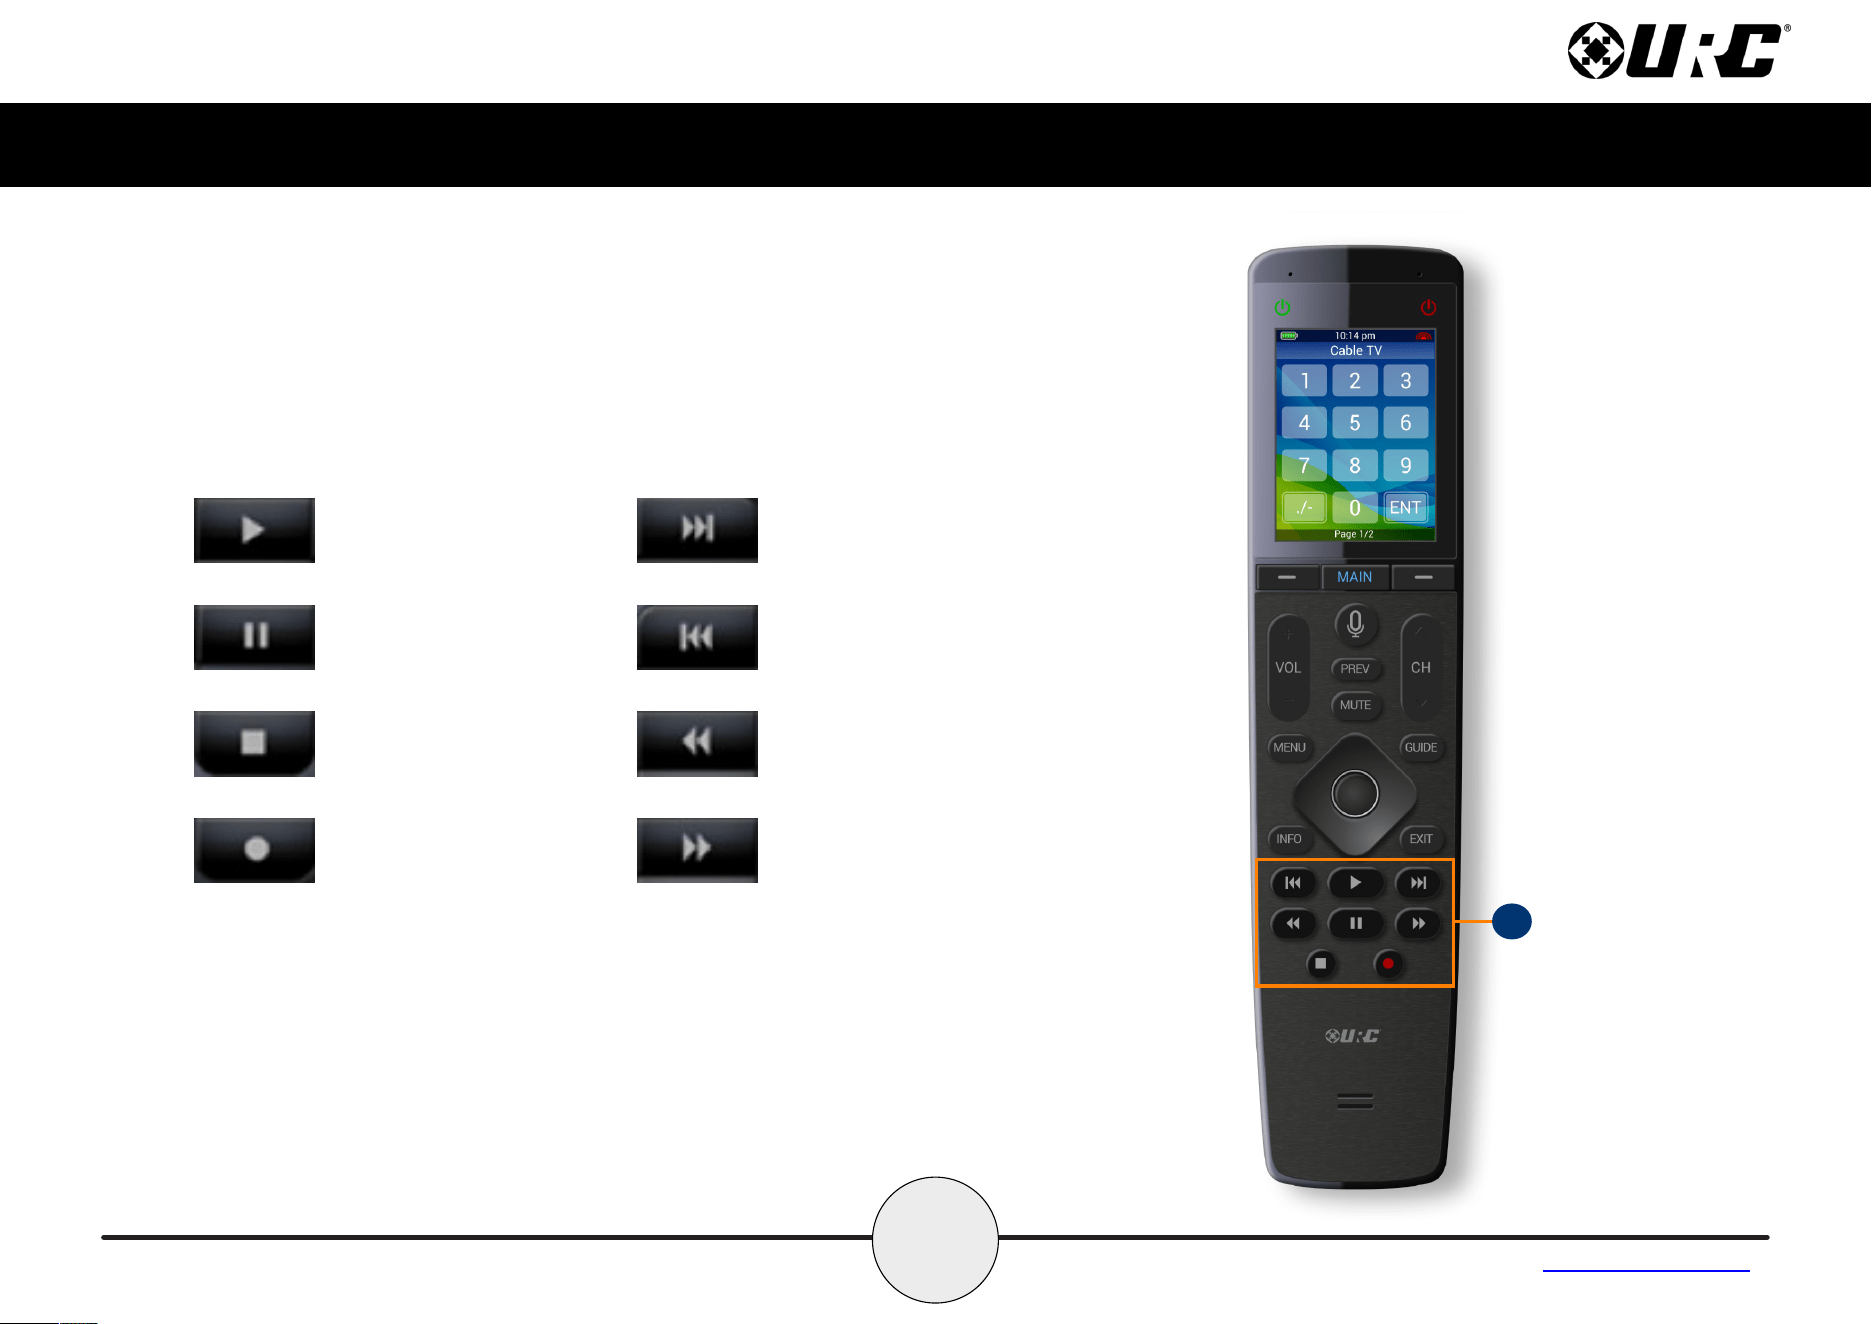
N. Transport Buttons: These are the available buttons:
G
K
H
M
I
J
L
Using the MX-1400 (cont’d)
7
Complete Control
MX-1400
Owner’s Manual
Table of Contents
Using Voice Control
The MX-1400 has the capability of using Amazon Alexa Voice Assistant to
control activities and devices programmed within the Alexa system.
For instructions on how to enable the Alexa Voice service, refer to page 9.
The MX-1400 preserves your privacy with a push-to-talk button on the remote
control. This means the Alexa Service is only listening when you want it too.
Issuing Voice Commands
Voice Commands can be issued easily and intuitively with the push-to-talk
button. This button removes the need to say “Alexa…”.
Press-and-hold the button and say phrases such as…
• “Set living room temperature to 72 degrees.”
• “Turn on patio lights.”
• “Turn off kitchen lights.”
• And much more…
The MX-1400 does not support the following Amazon Alexa features:
• Audio Playback via Amazon Music, Audible, or other music
services.
• Alexa Drop-In, calls, or video calls
• No graphical feedback
8
Complete Control
MX-1400
Owner’s Manual
Table of Contents
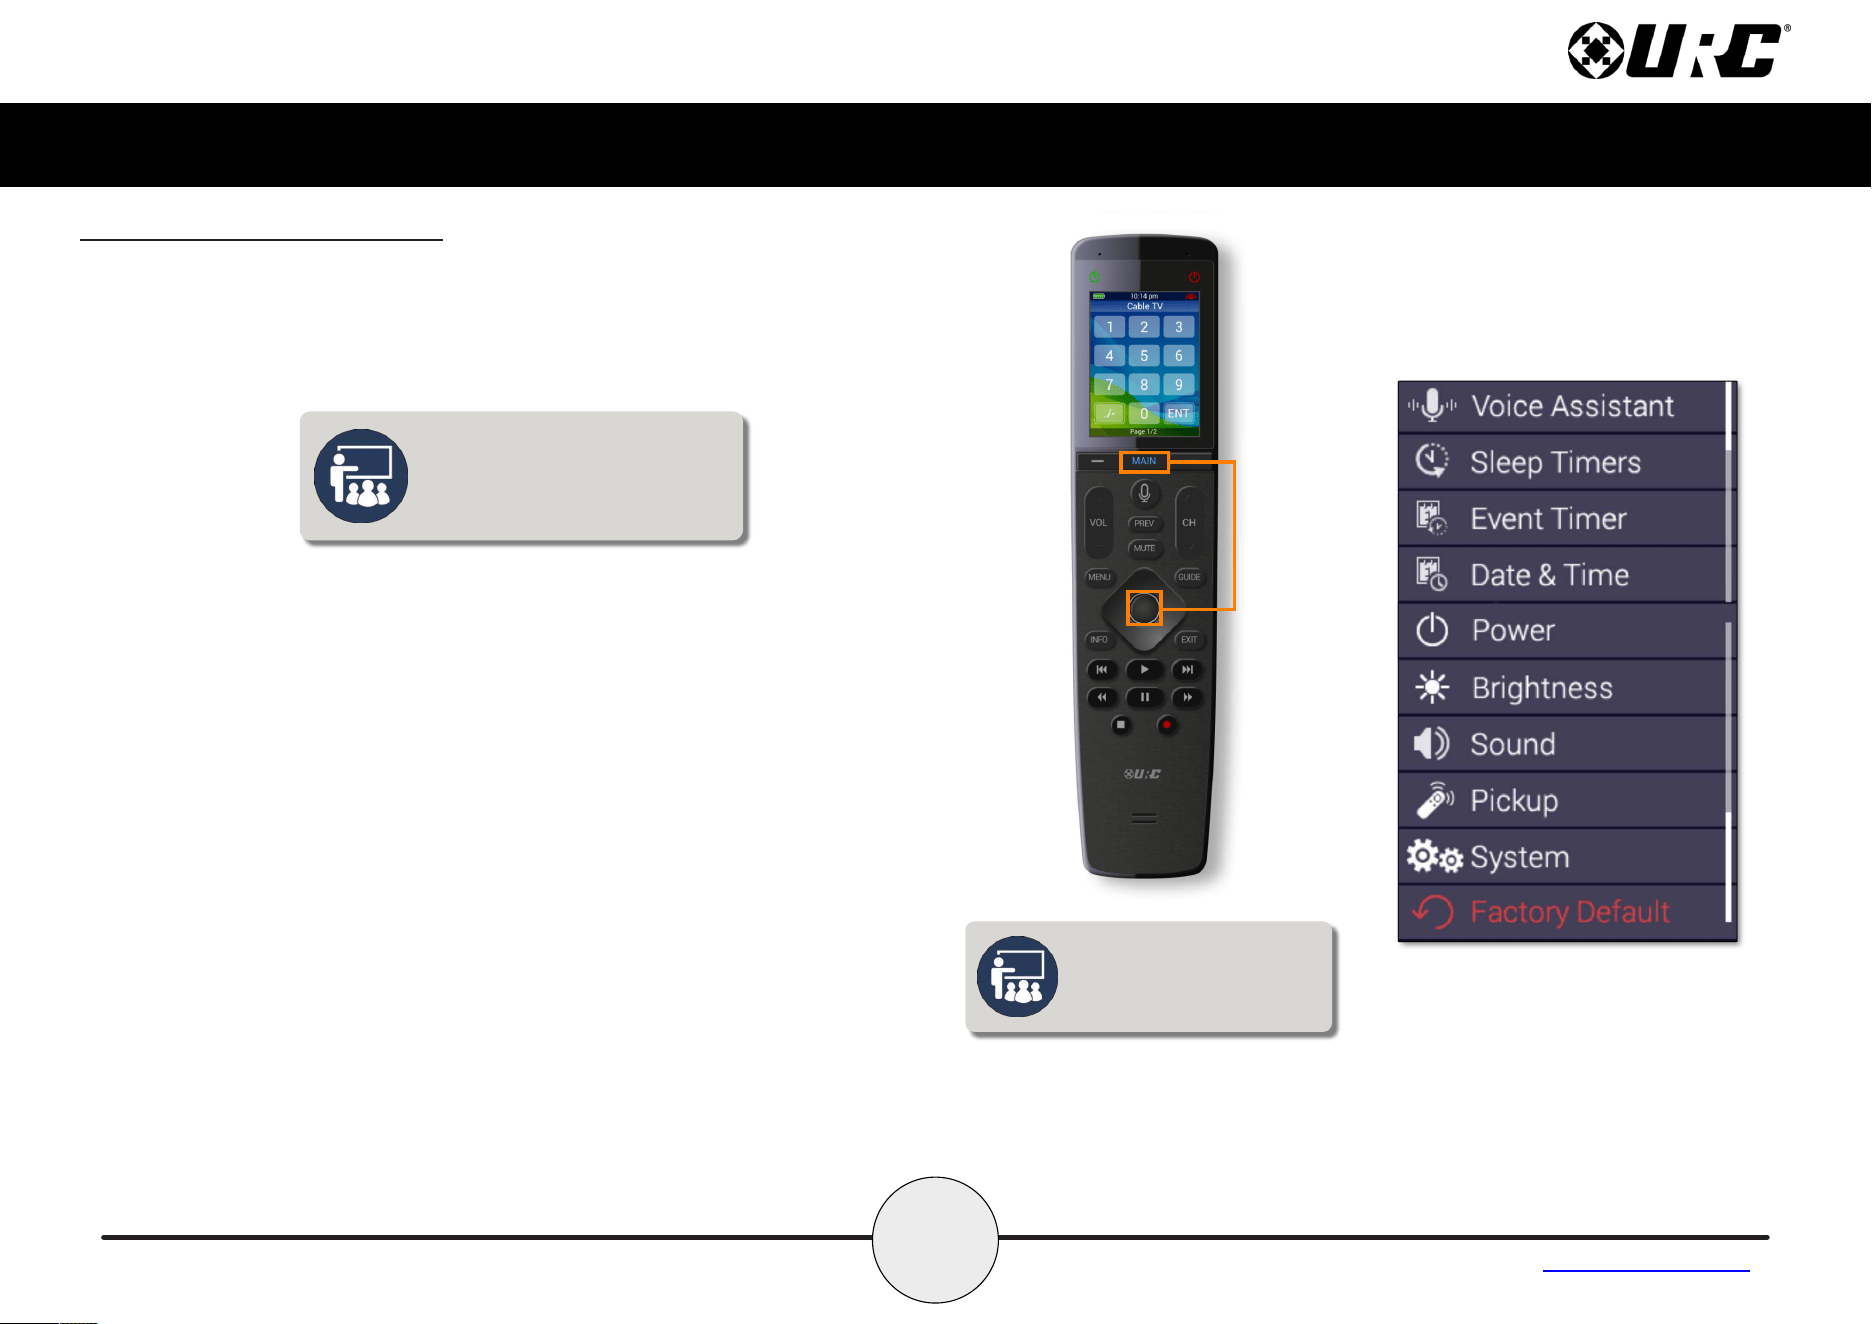
Displaying the Setup Menu
The Setup Menu allows users to configure or change certain behaviors of the
MX-1400.
Enter the Setup Menu by pressing and holding the Main and Select (see
image at the right) buttons for greater than three (3) seconds.
Use the up and down navigation buttons to maneuver between the two Setup
pages. To select an option, highlight the desired setting and press the
“Select” key at the center of the navigation keys.
To return to a previous page press the left page button (at the left of Main
Menu). Press the Main or Exit button to return the remote to the Main Menu.
The Setup Menu times out after sixty
(60) seconds and returns the
MX-1400 to the system’s Main Menu.
• Sleep Timers
• Network
• Voice Assistant
• Brightness
• System
• Button Light
• Power
• Date & Time
• Button Beep
• Pickup
• Software Update
• Factory Default
Image on display presents all
the options available on the
two (2) Settings Menu pages.
9
Complete Control
MX-1400
Owner’s Manual
Table of Contents
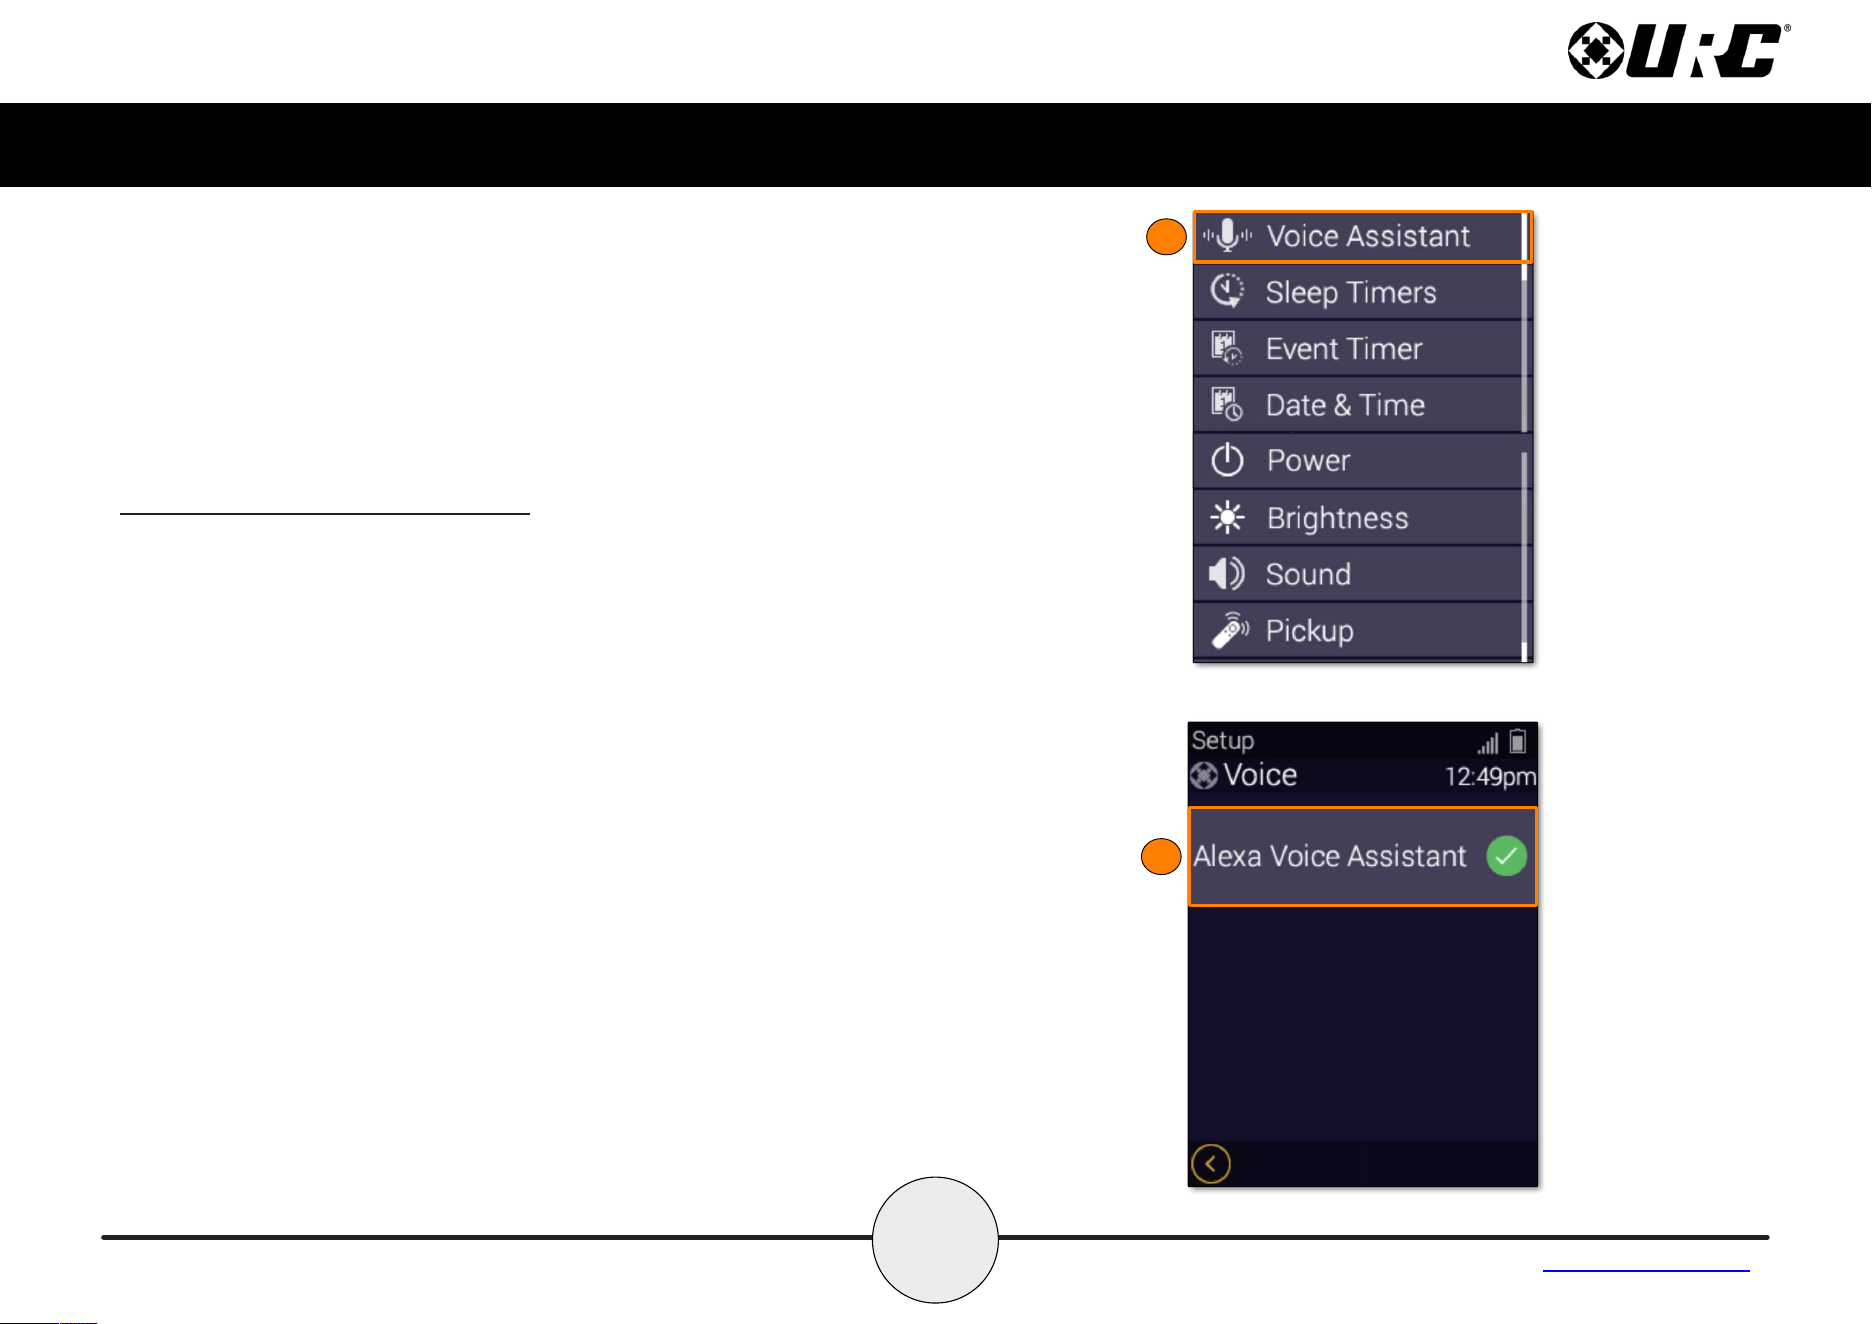
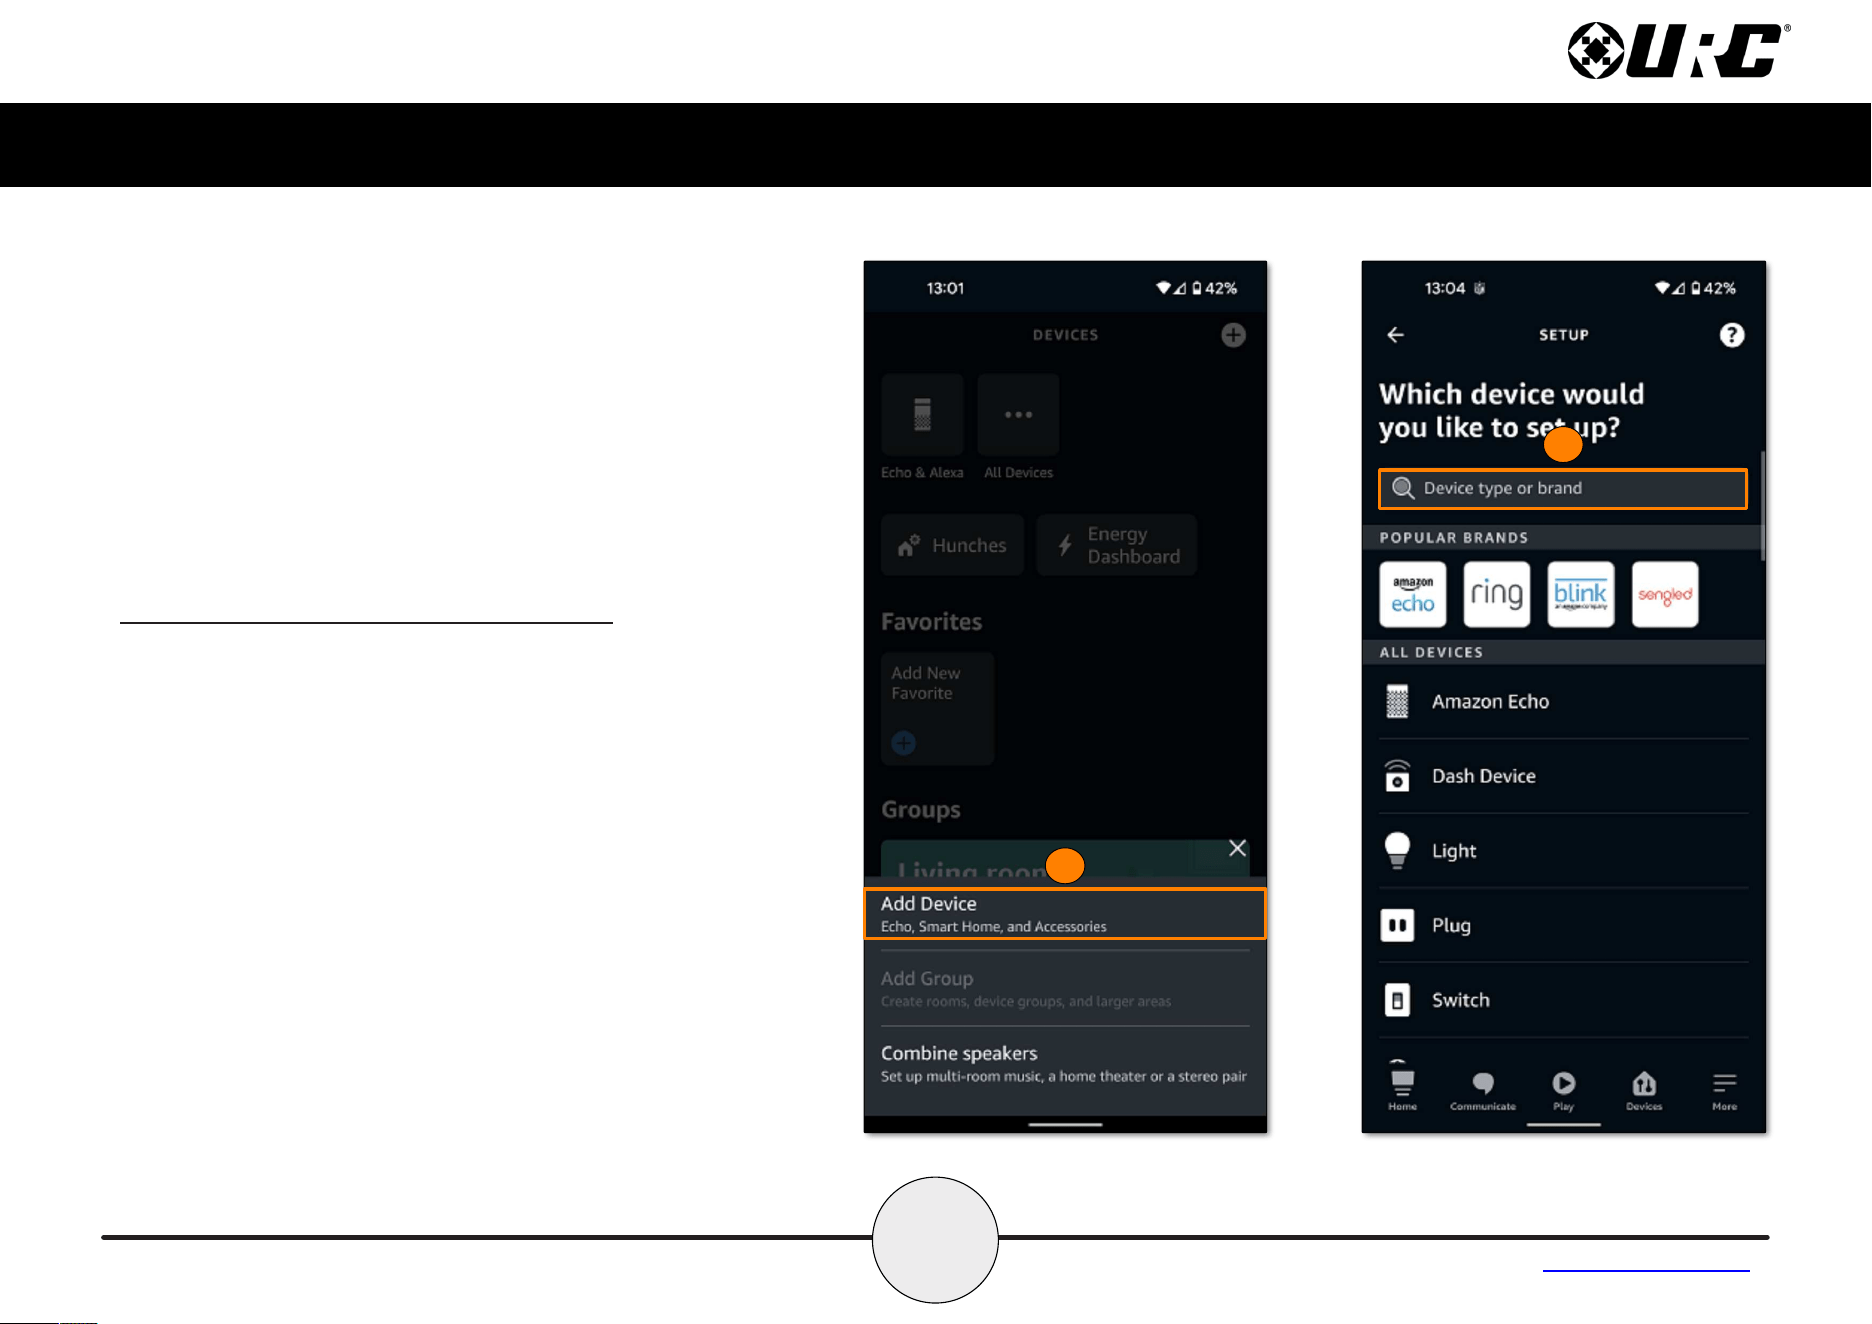
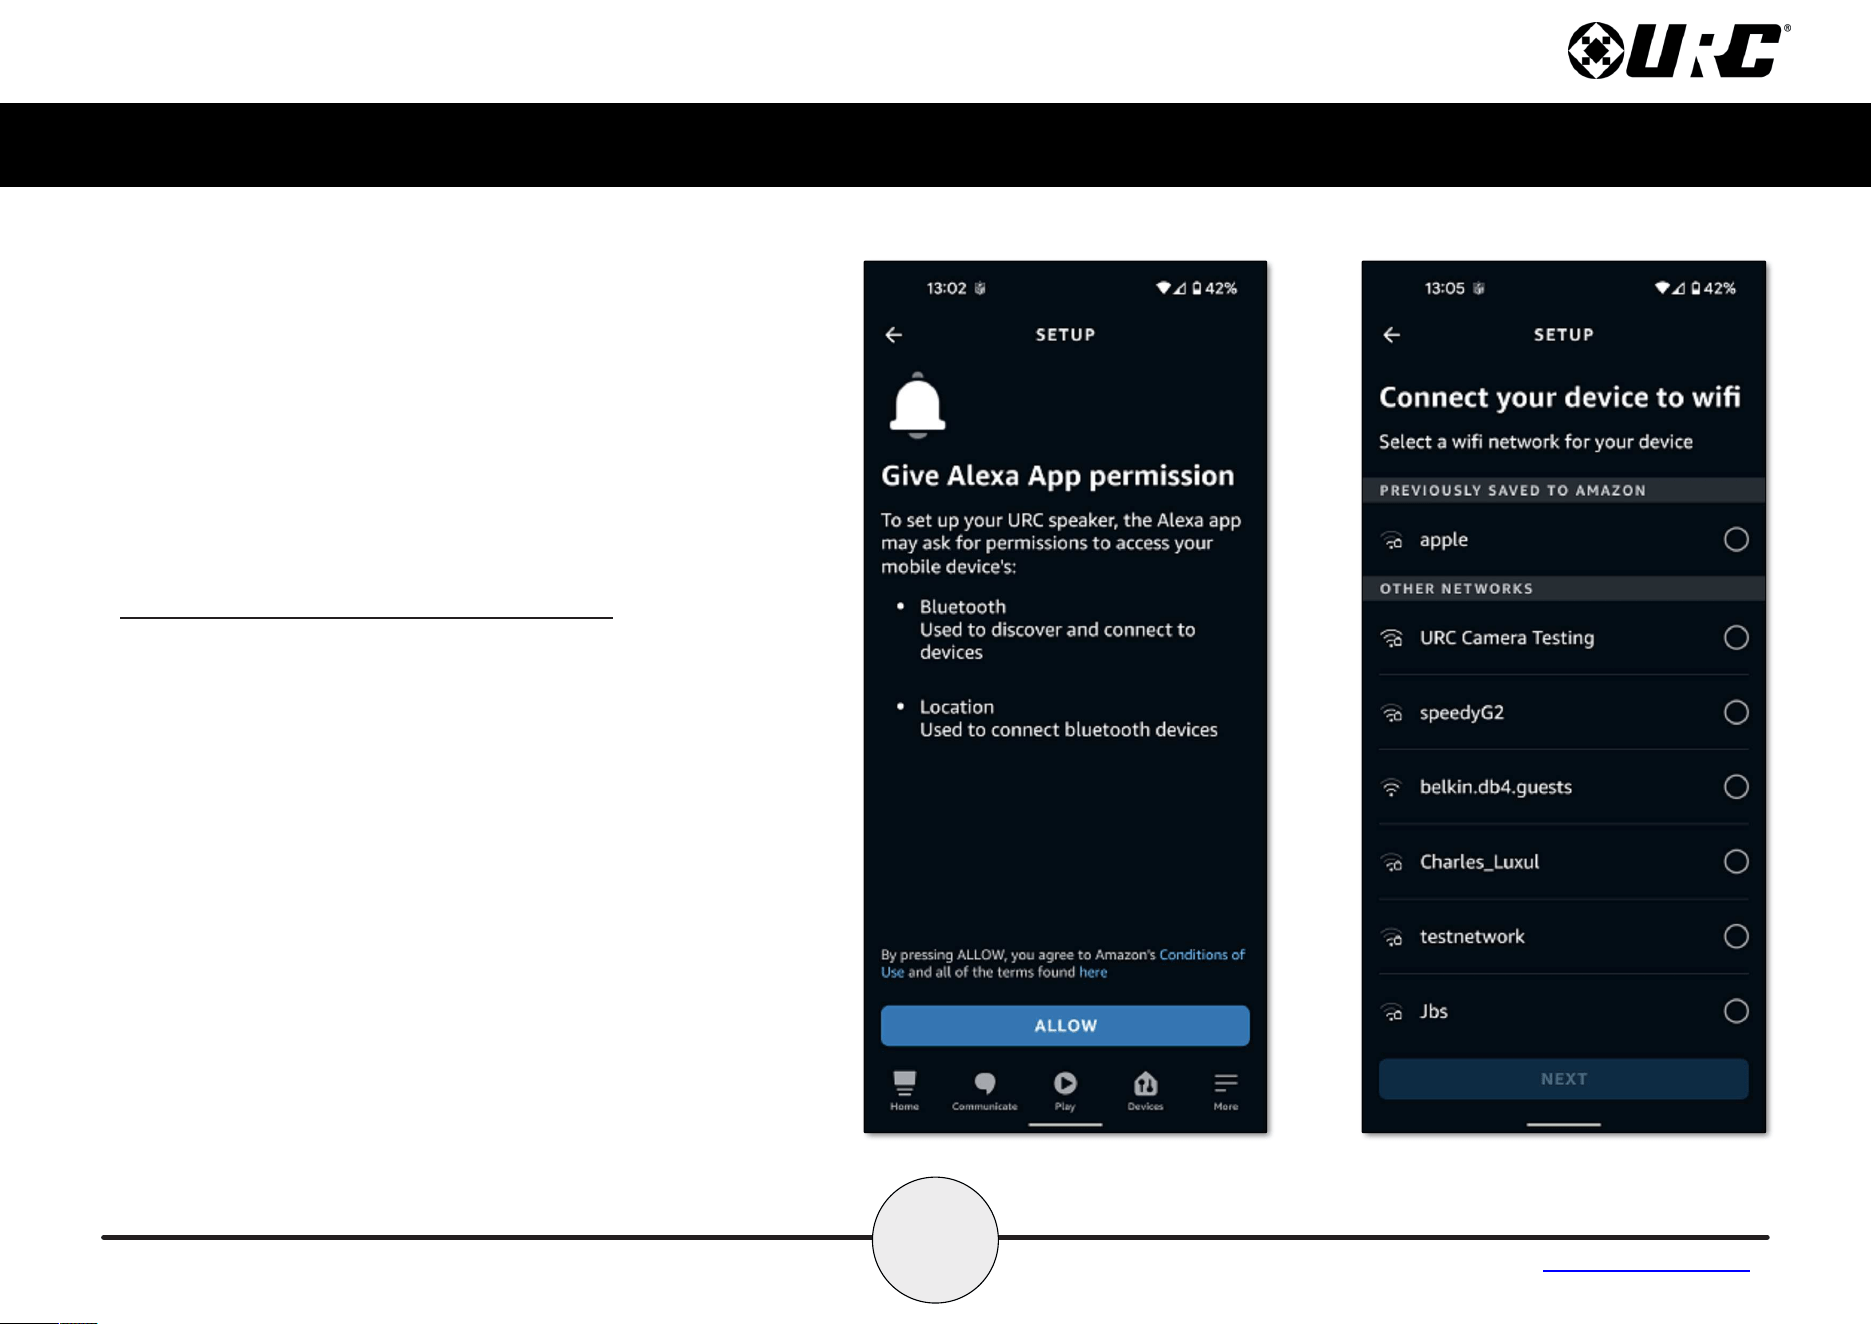
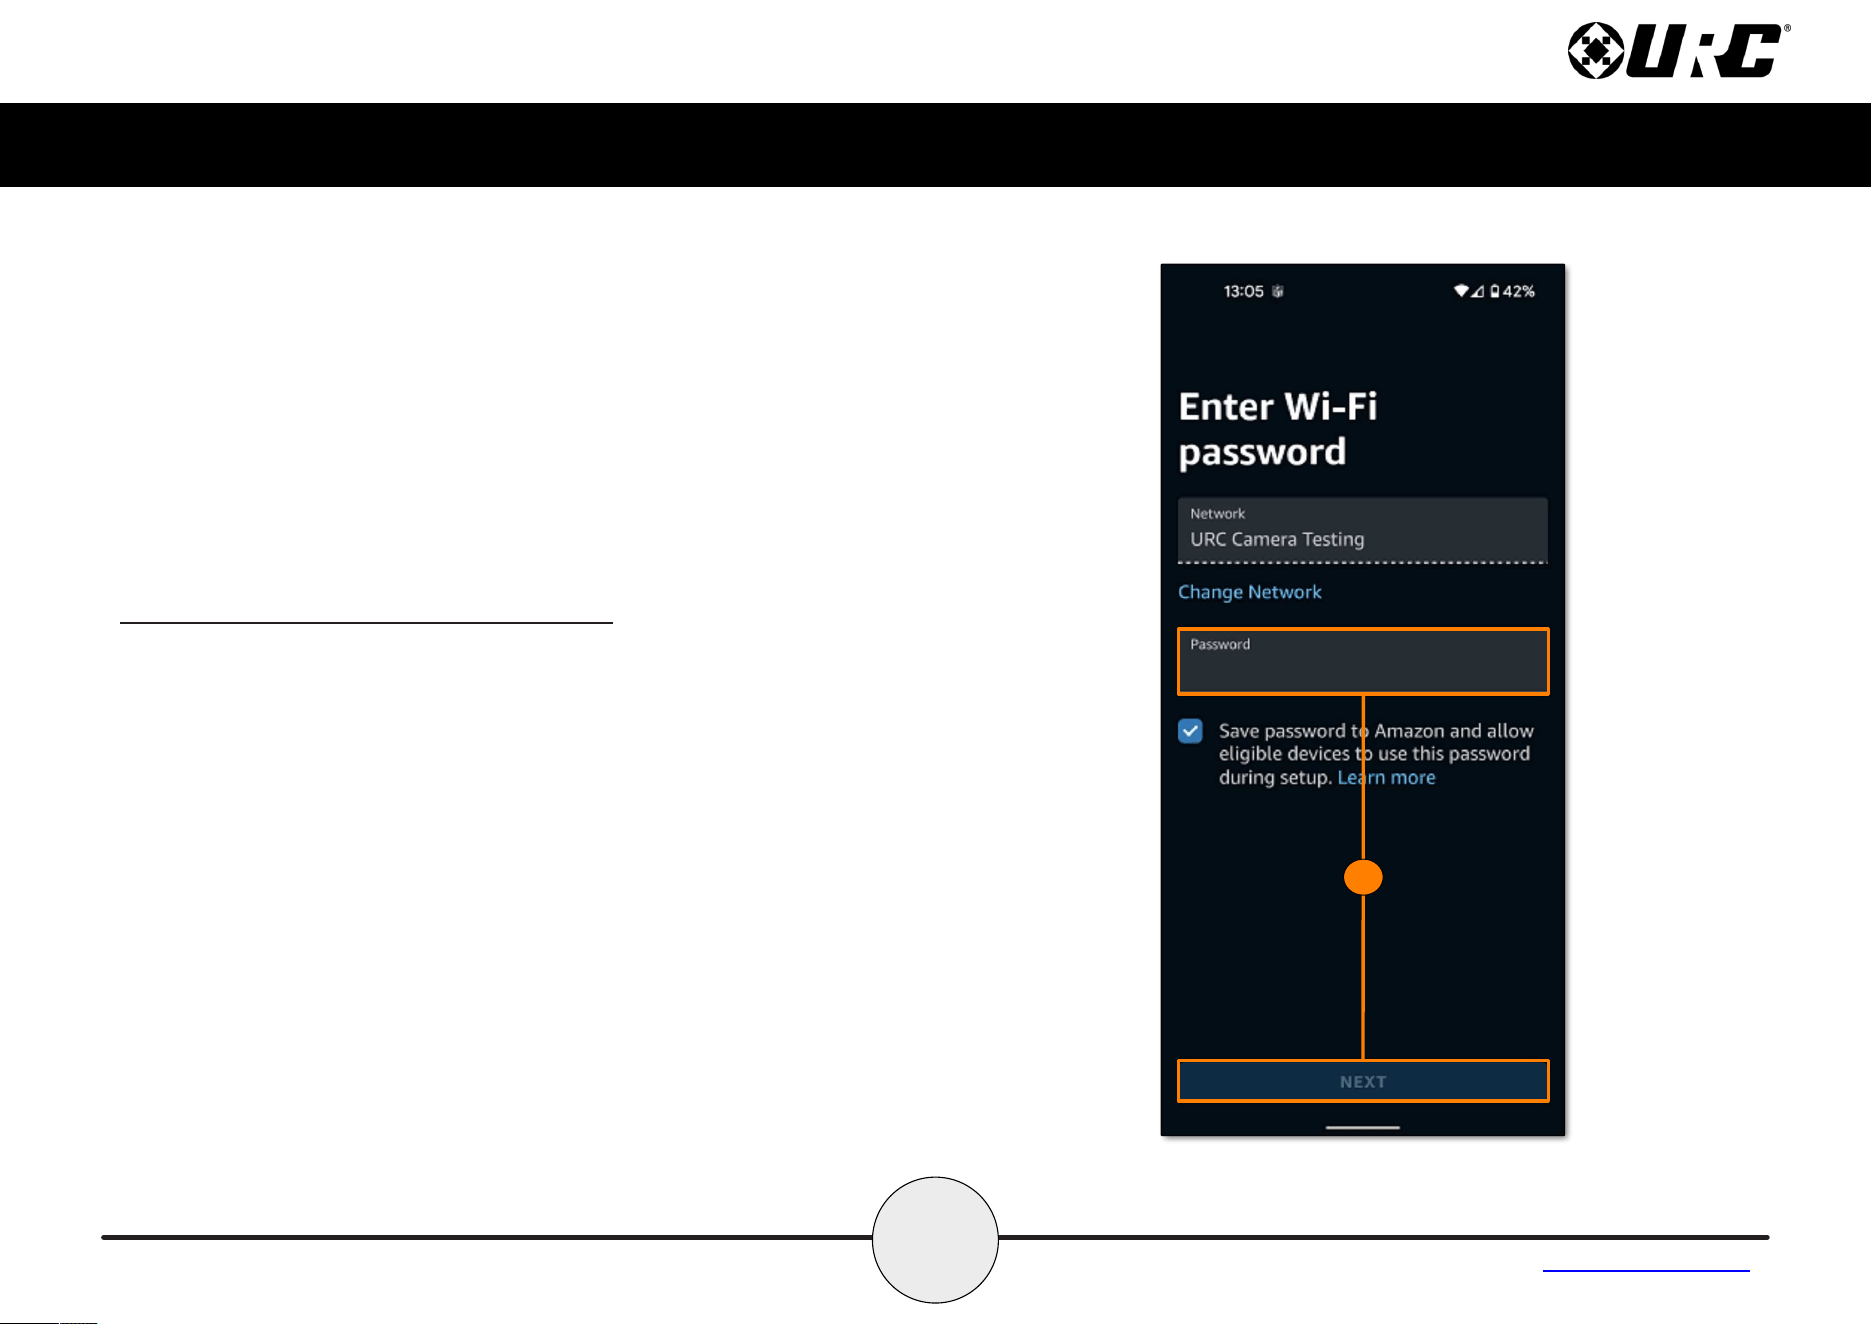
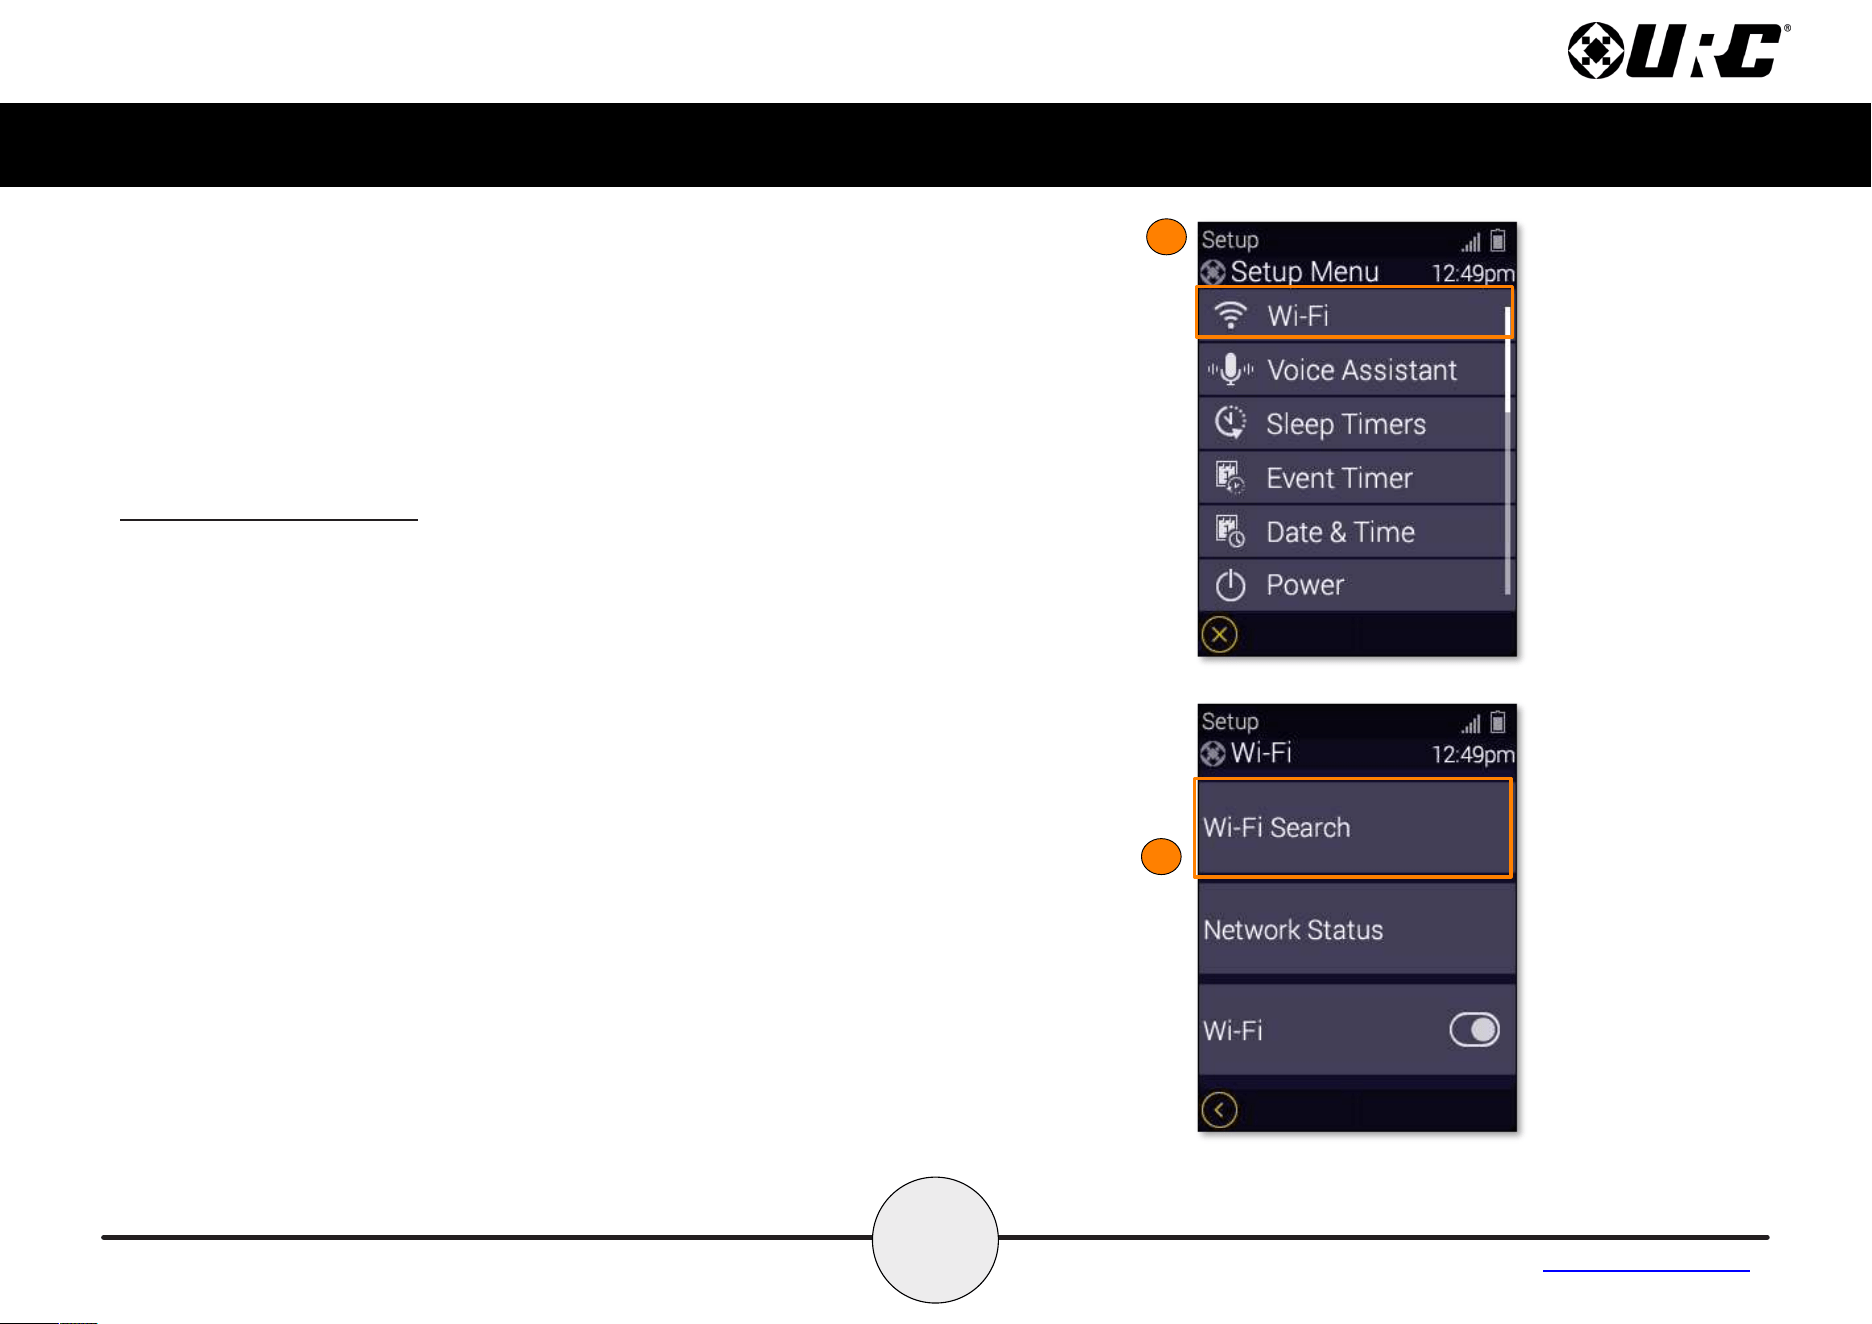
Alexa Voice Assistant & WiFi Setup
This option allows you to integrate your Amazon Alexa voice assistant with
the MX-1400. Once enabled, use the push-to-talk button to issue vocal
commands to the Alexa system.
Follow these instructions to enable the Alexa Voice Assistant service and
connect the remote to a WiFi network:
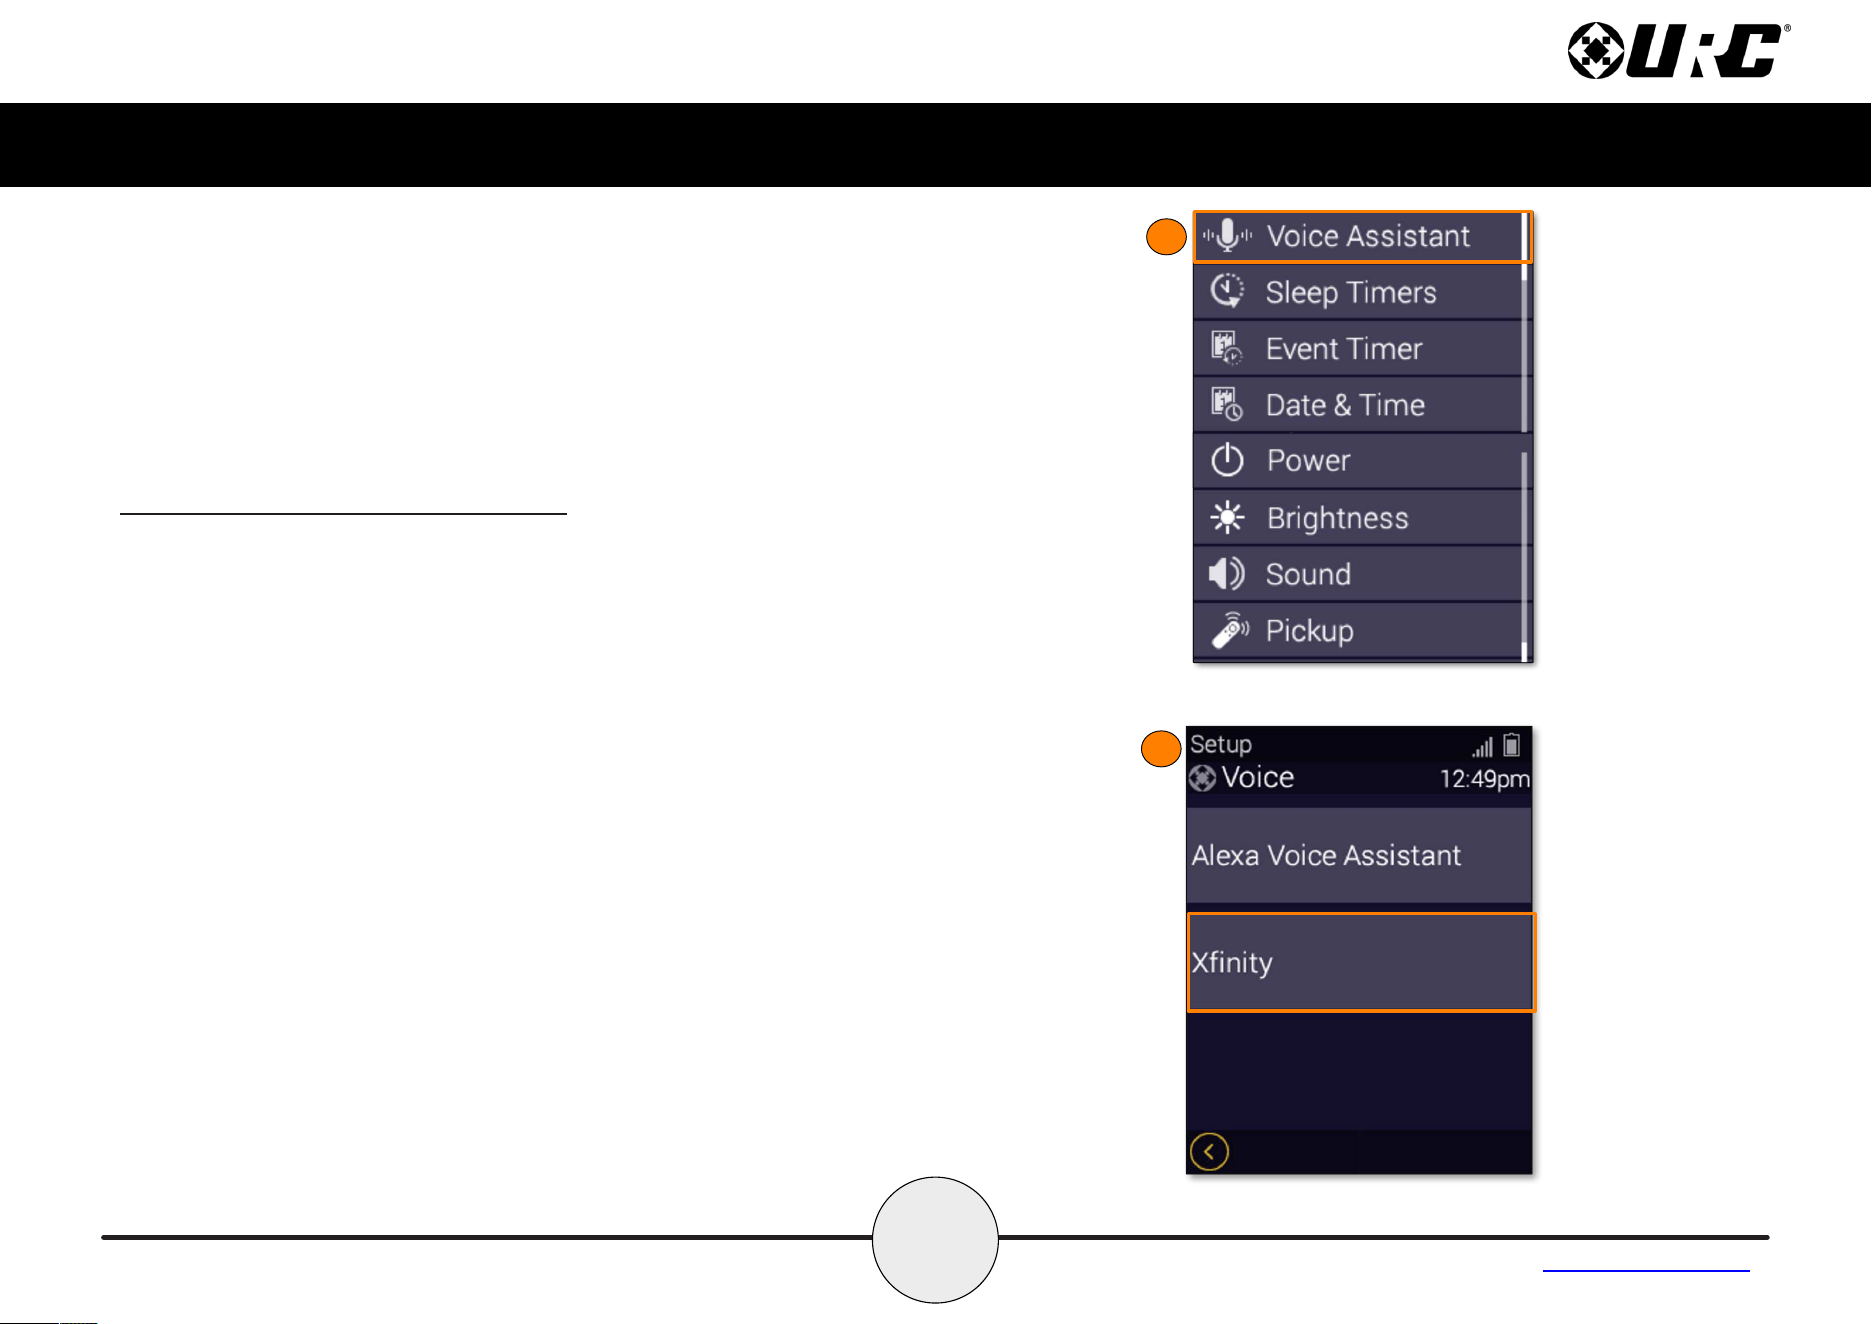
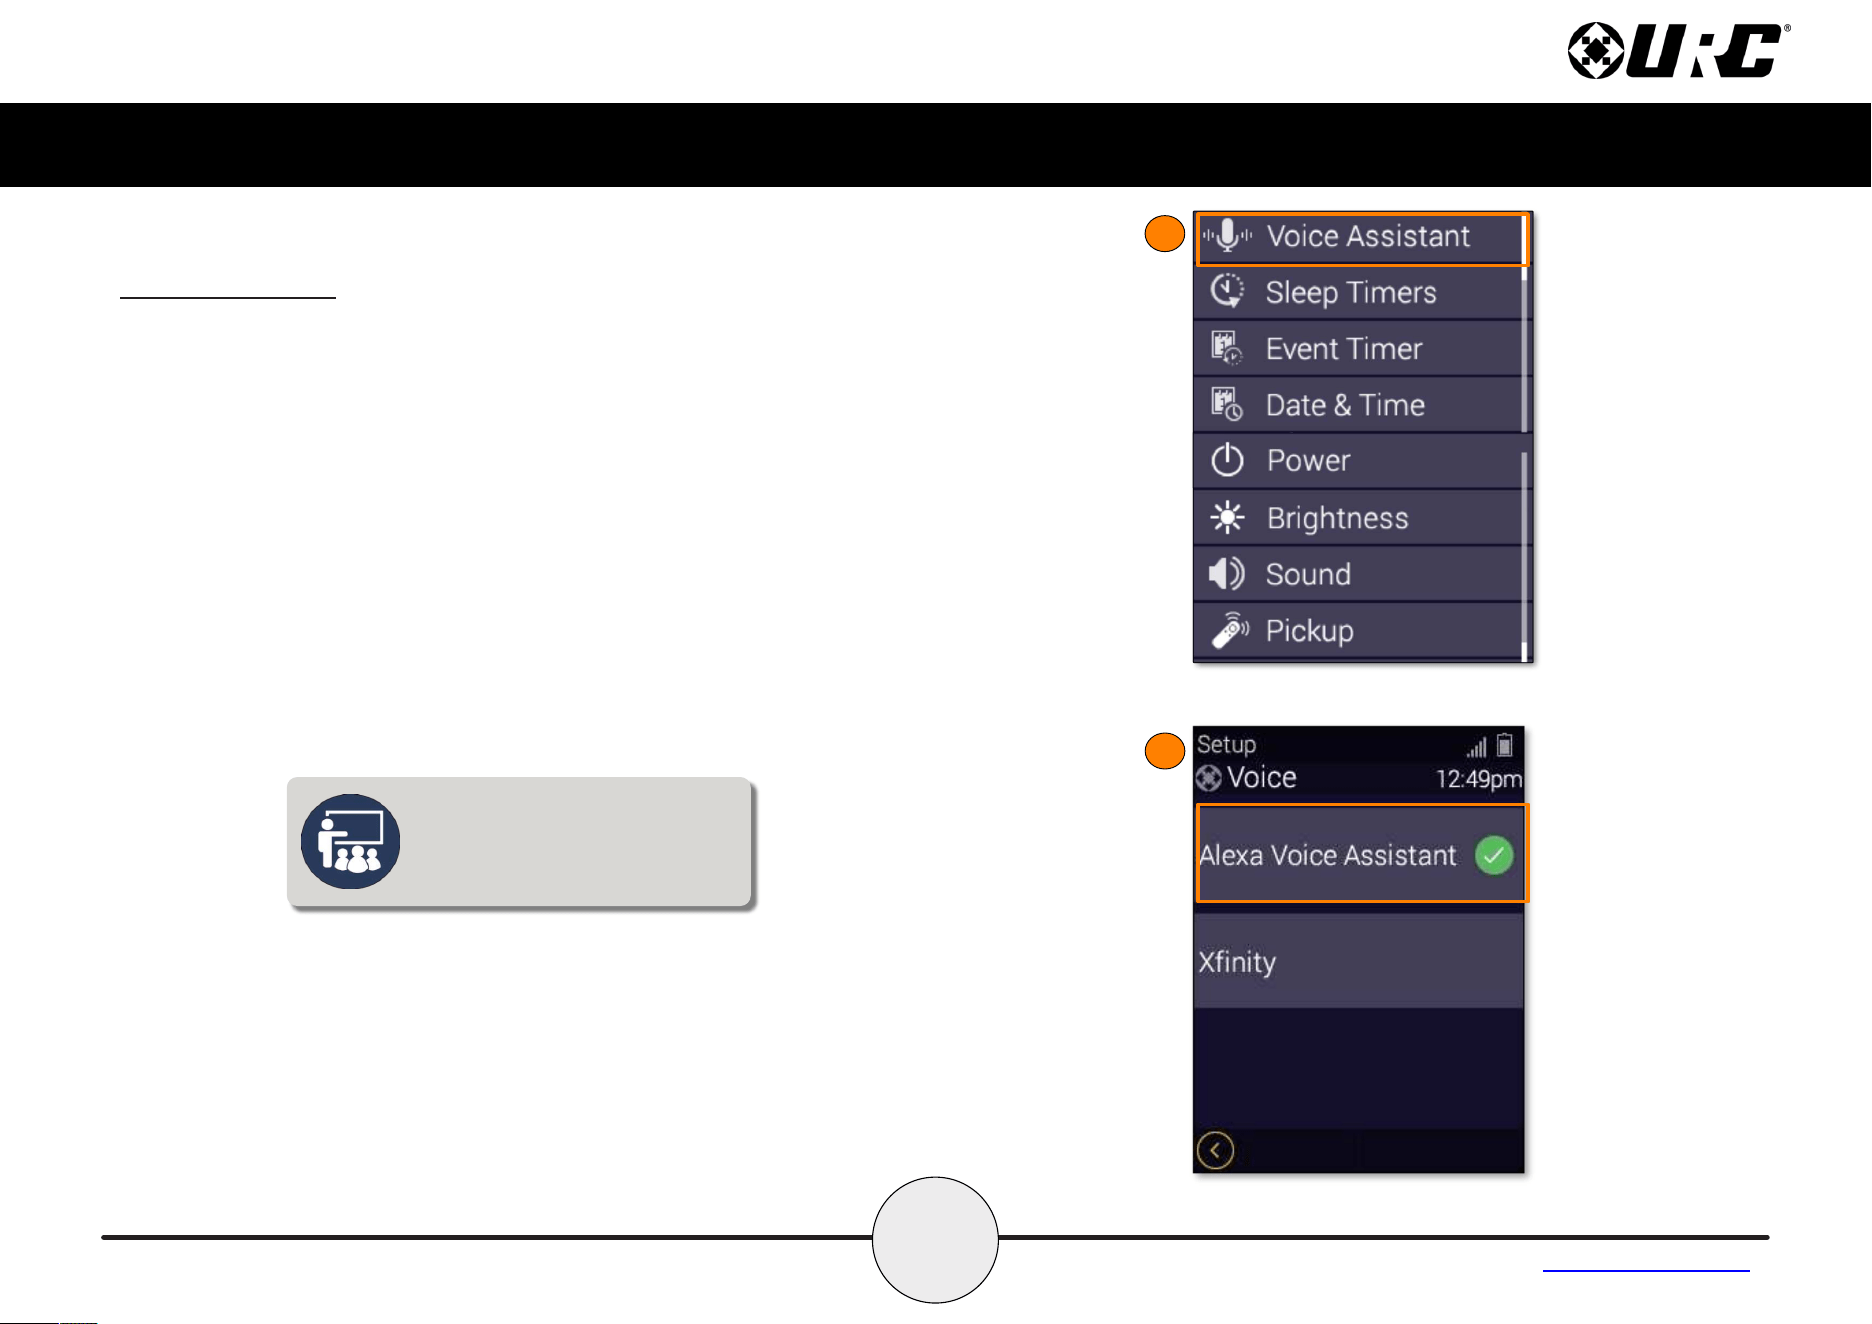
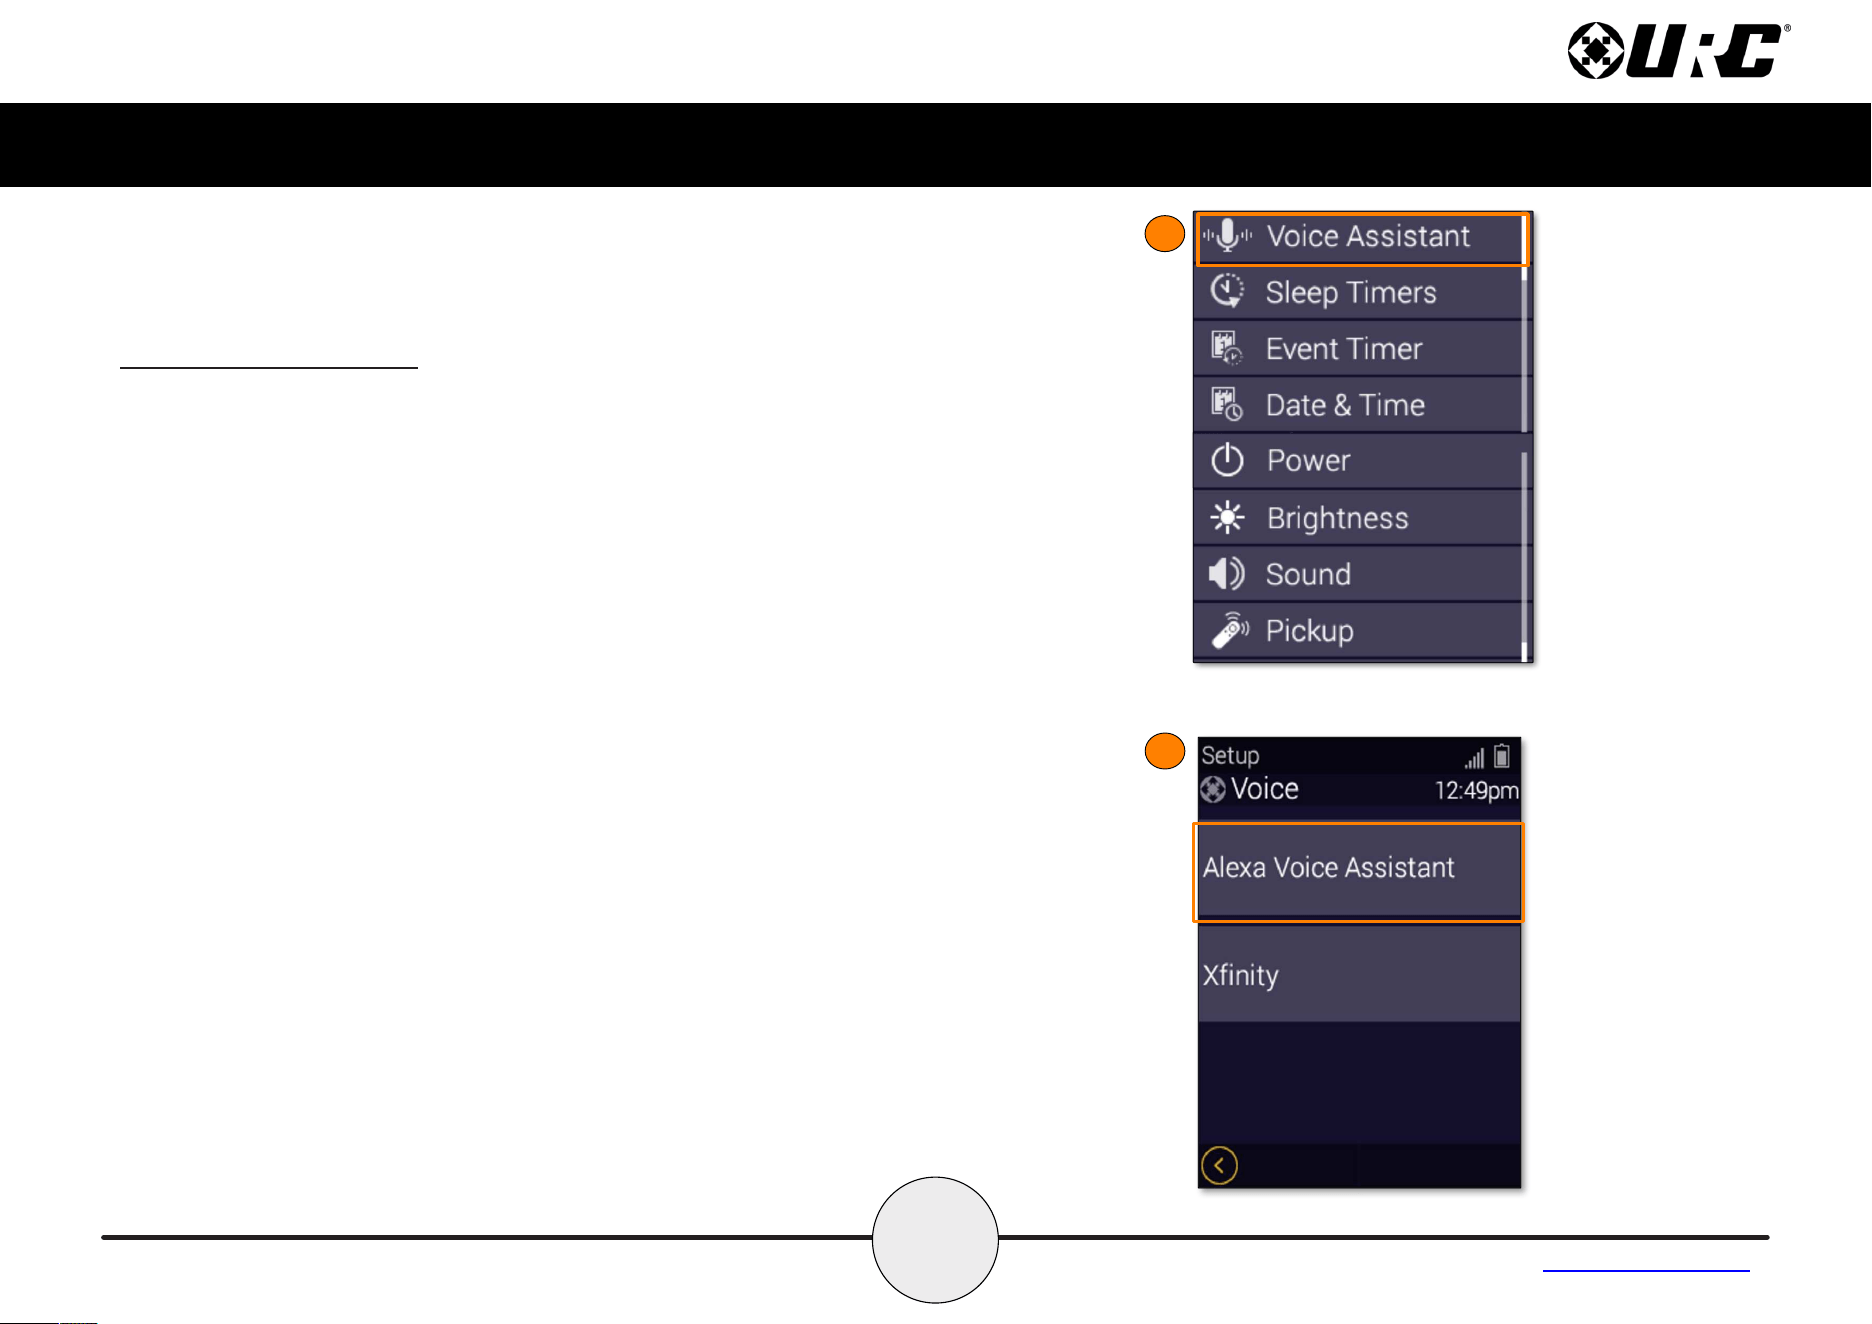
1. From the Settings Menu, select Voice Assistant.
2. Select Alexa Voice Assistant.
1
2
10
Complete Control
MX-1400
Owner’s Manual
Table of Contents
3
4
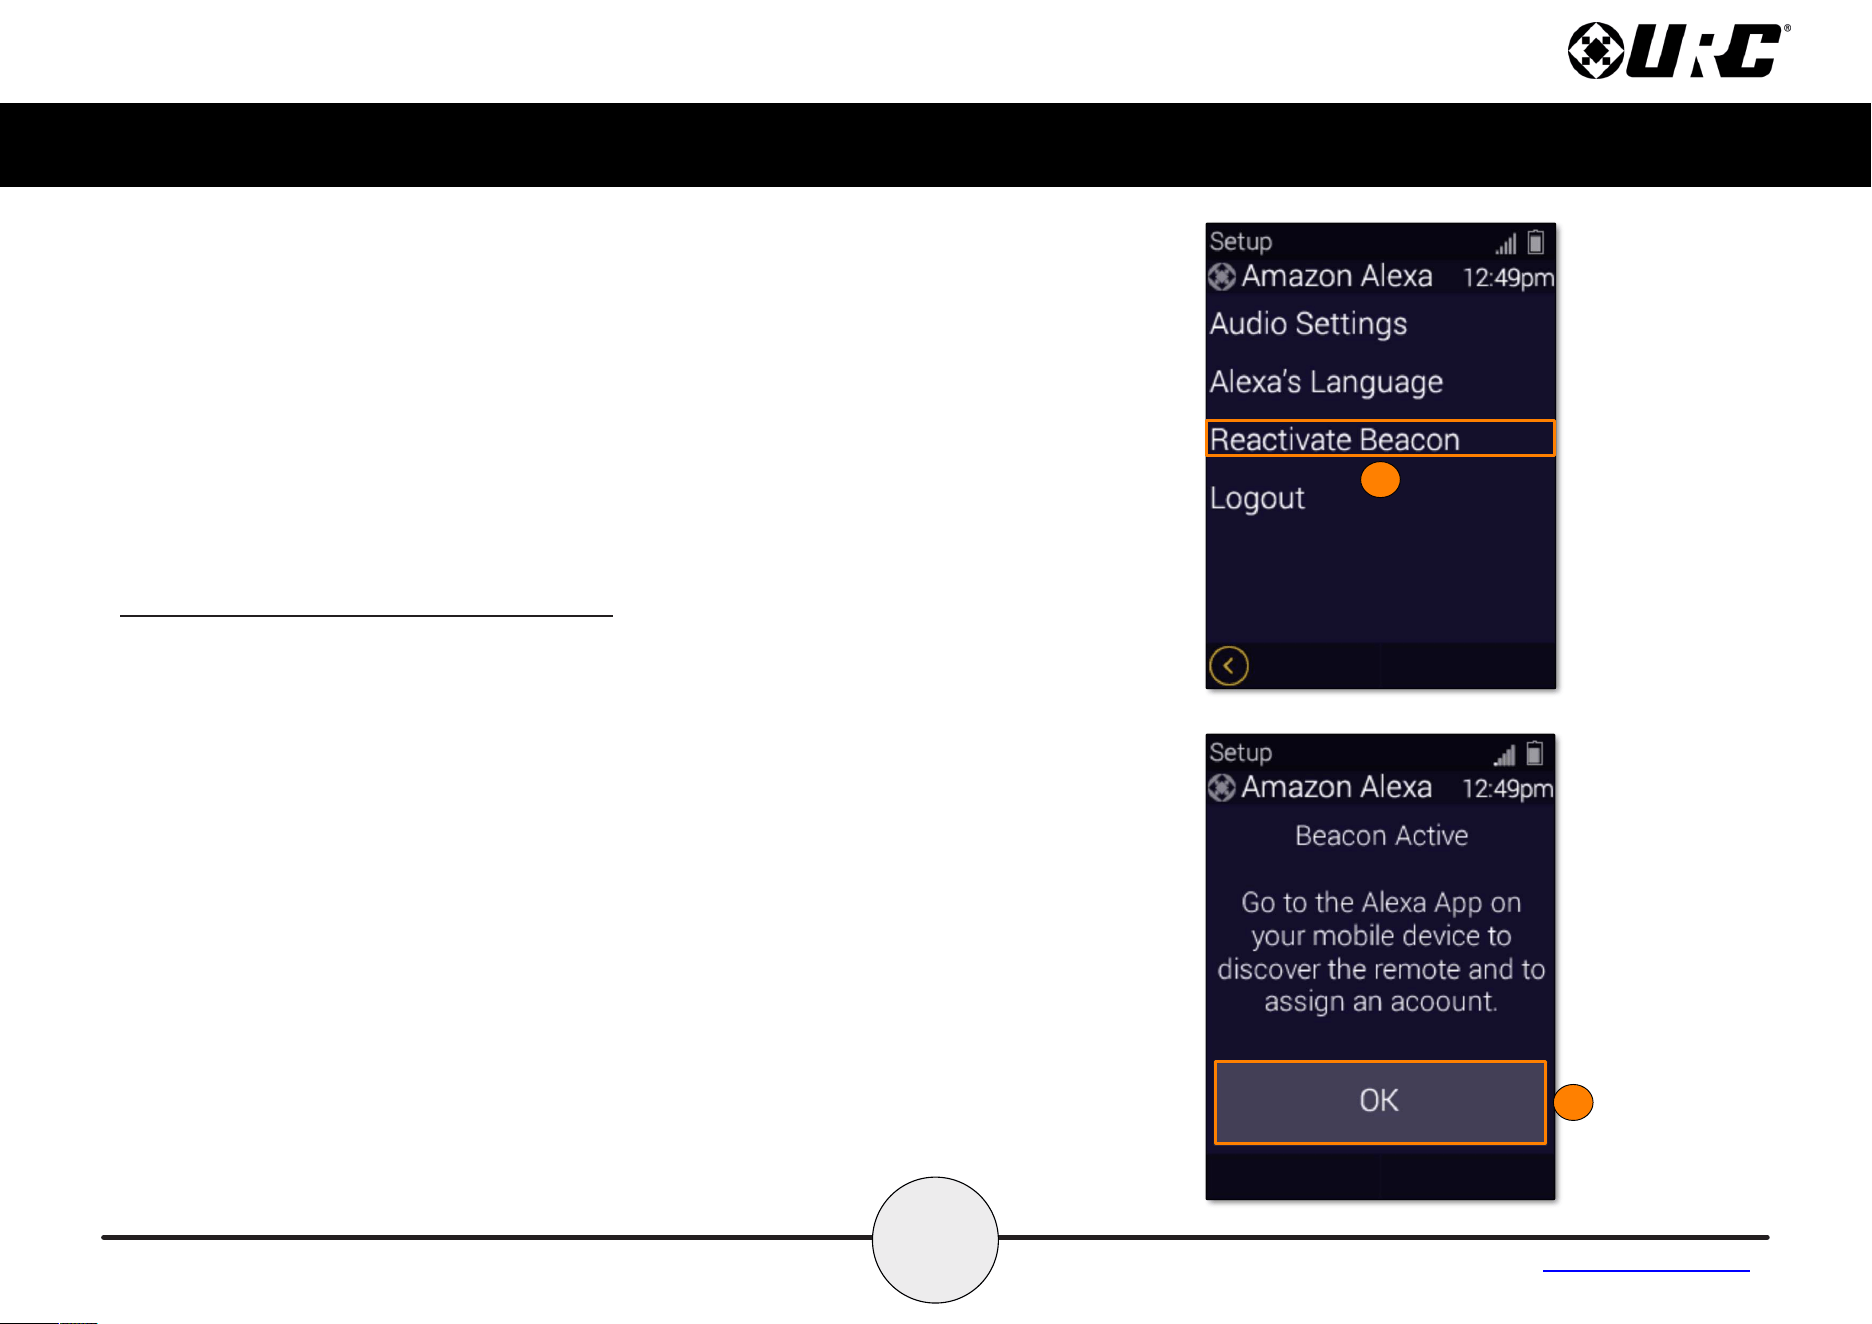
Alexa Voice Assistant & WiFi Setup (cont’d)
3. Select Reactivate Beacon. [Note: If the ‘Reactivate Beacon’
button is grayed out, then the beacon for Alexa discovery is
currently active.]
4. The FFS beacon is activated. Select OK and open the Alexa app
on a smart phone or tablet.
12
Complete Control
MX-1400
Owner’s Manual
Table of Contents
Alexa Voice Assistant & WiFi Setup (cont’d)
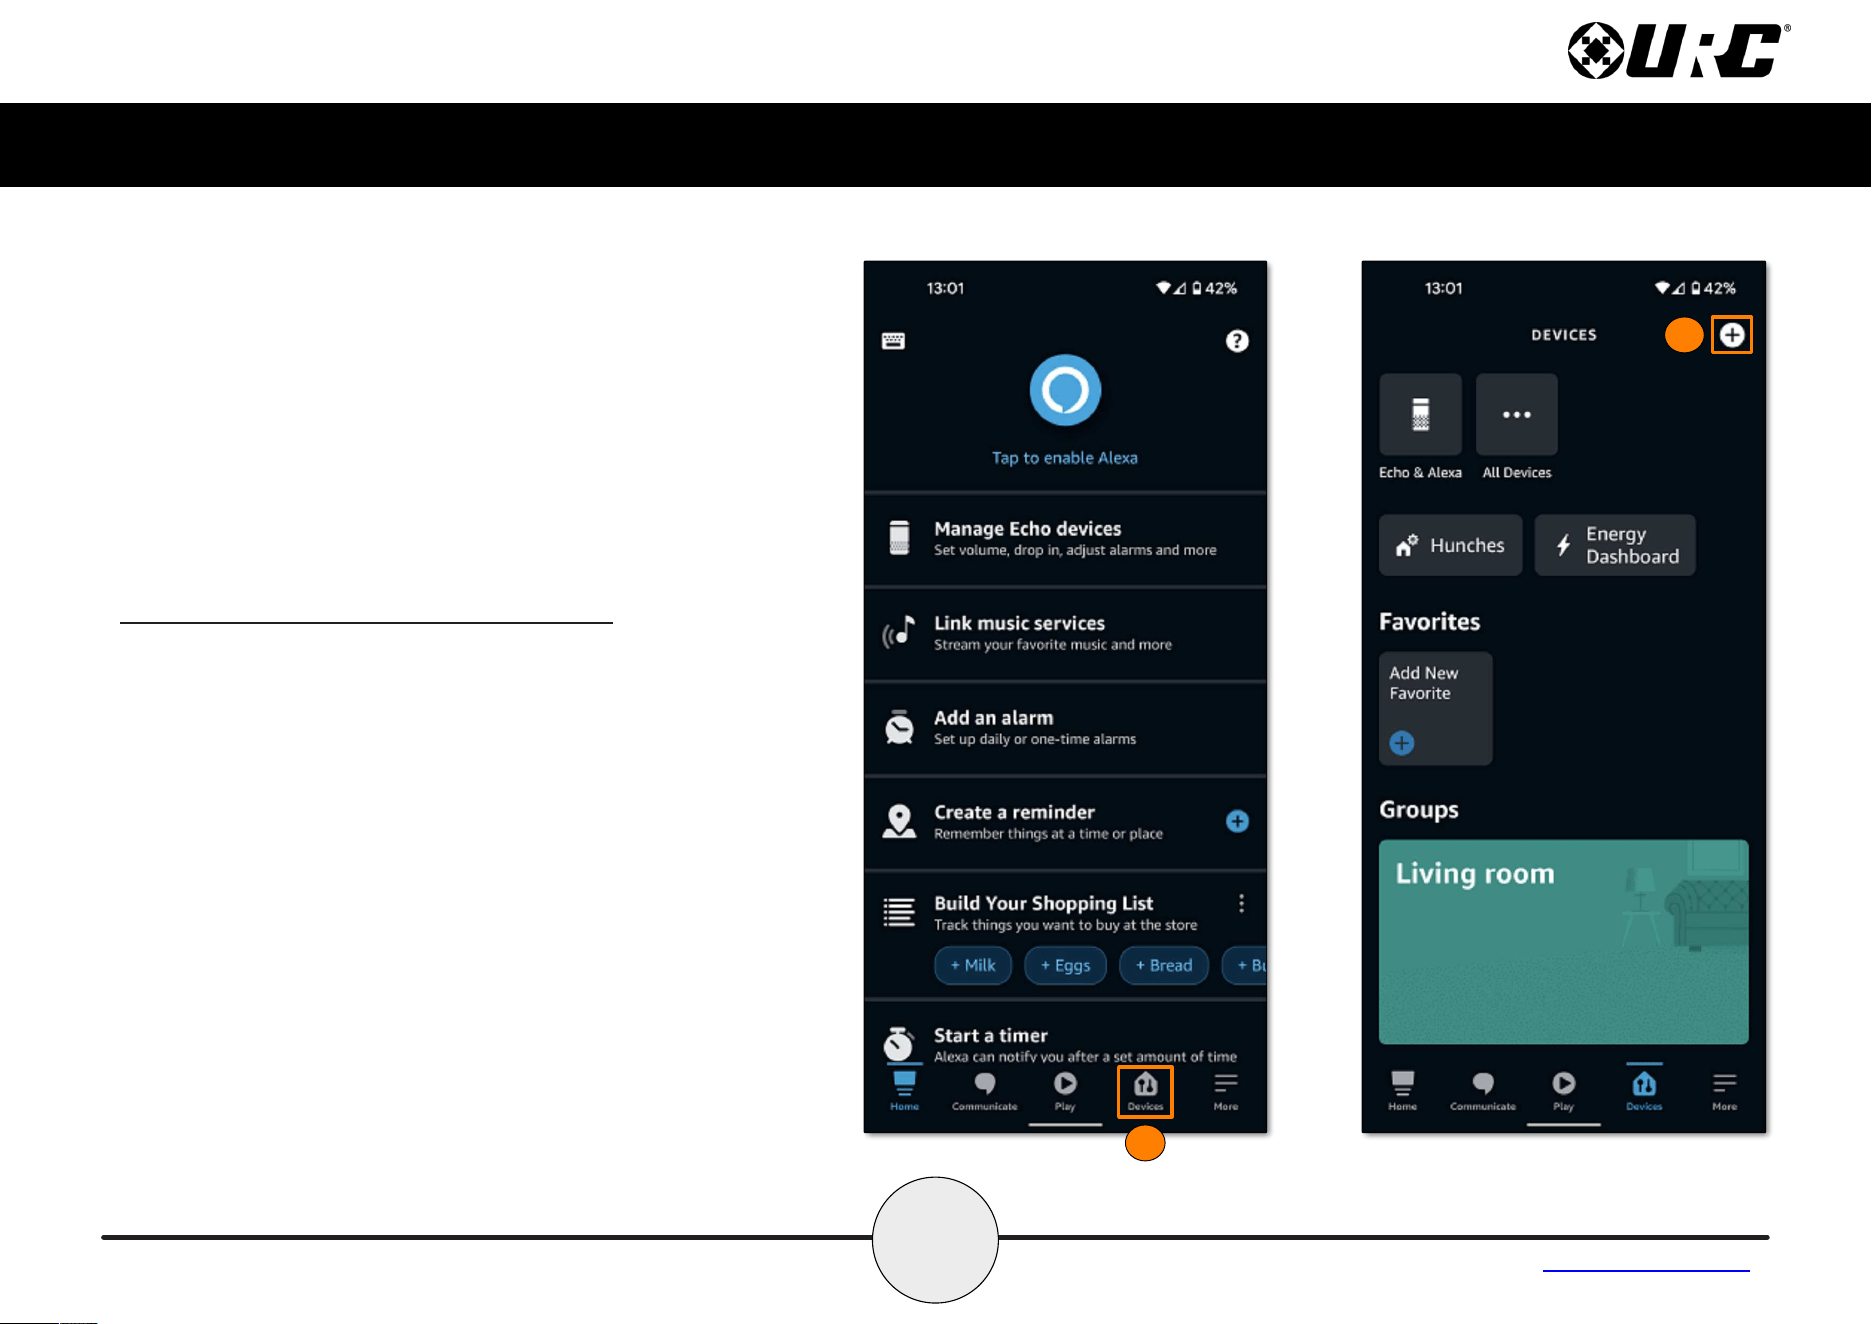
7. Select Add Device.
8. Type “URC” into the search bar at the top and select
the only option that is displayed.
7
8
• Note: The search results will display a device
called “URC Remote”. This is the MX-1400.

15
Complete Control
MX-1400
Owner’s Manual
Table of Contents
Voice Assistant Settings
After setup, the Voice Assistance menu offers a few features to customize
how the remote interacts with Alexa.
• Audio Settings: Allows for Voice Volume and the Audio Cue
levels to be adjusted.
• Alexa’s Language: Allows for Alexa’s language/accent to be set
to one of a variety of options.
• Logout: Selecting Logout removes Alexa integration from the
remote. The Mic button no longer functions with Alexa until it has
been configured again.
16
Complete Control
MX-1400
Owner’s Manual
Table of Contents
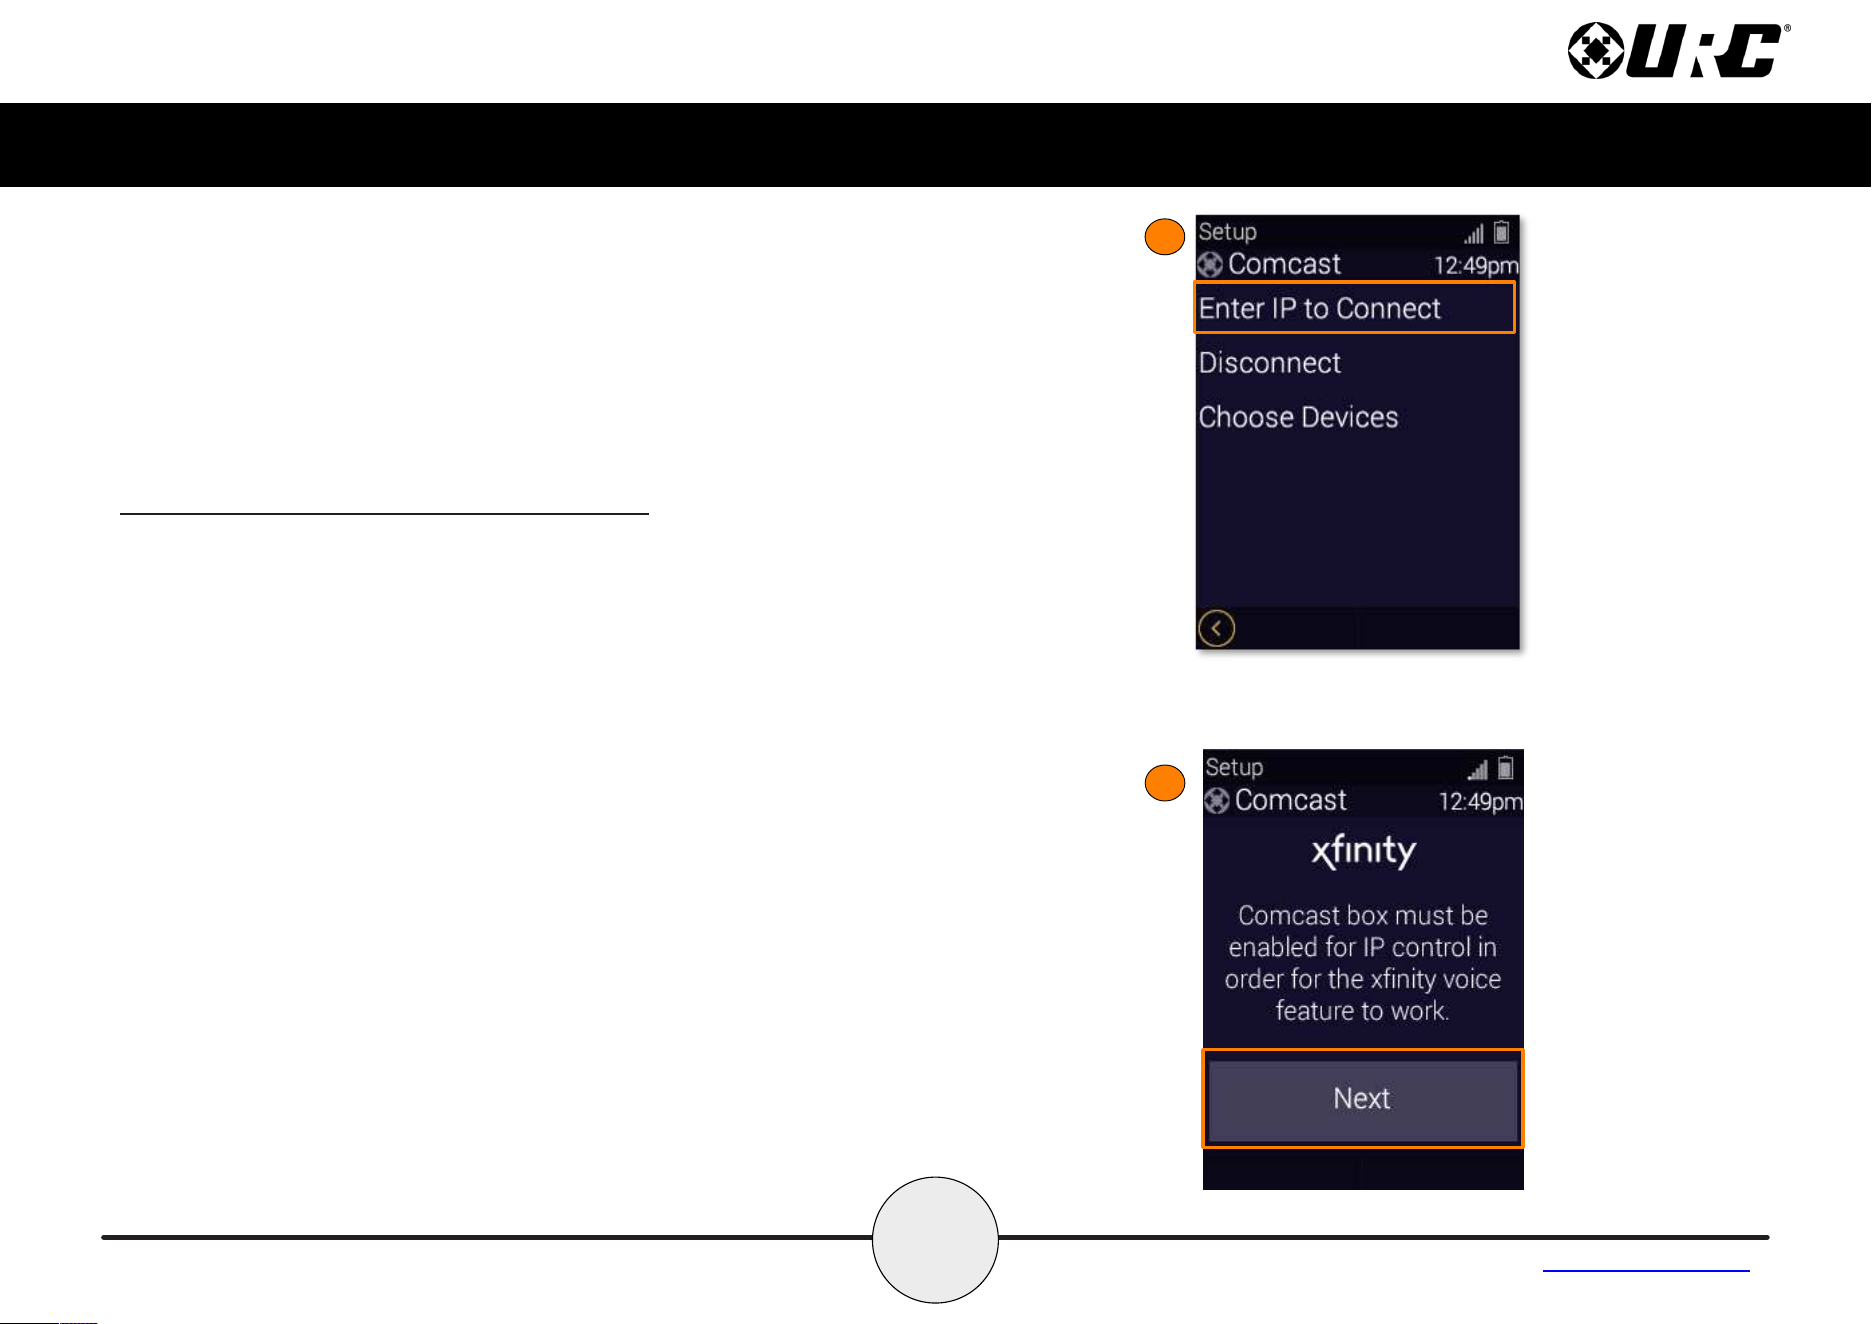
Comcast Xfinity Voice Assistant Setup
This option allows you to integrate your Comcast Xfinity voice assistant
with the MX-1400. Once enabled, use the push-to-talk button to issue
vocal commands to the Comcast Xfinity system.
It is recommended that the sleep mode of the Comcast/Xfinity box be
disabled.
Follow these instructions to enable the Comcast Xfinity Assistant service:
1. From the Settings Menu, select Voice Assistant.
2. Select Xfinity.
1
2
17
Complete Control
MX-1400
Owner’s Manual
Table of Contents
Comcast Xfinity Voice Assistant Setup (cont’d)
3. From the Comcast Menu, select Enter IP to Connect (IP address of
the Comcast Box).
4. Select Next when prompted “Comcast box must be enabled for IP
control in order for the Xfinity voice feature to work”.
3
4
18
Complete Control
MX-1400
Owner’s Manual
Table of Contents
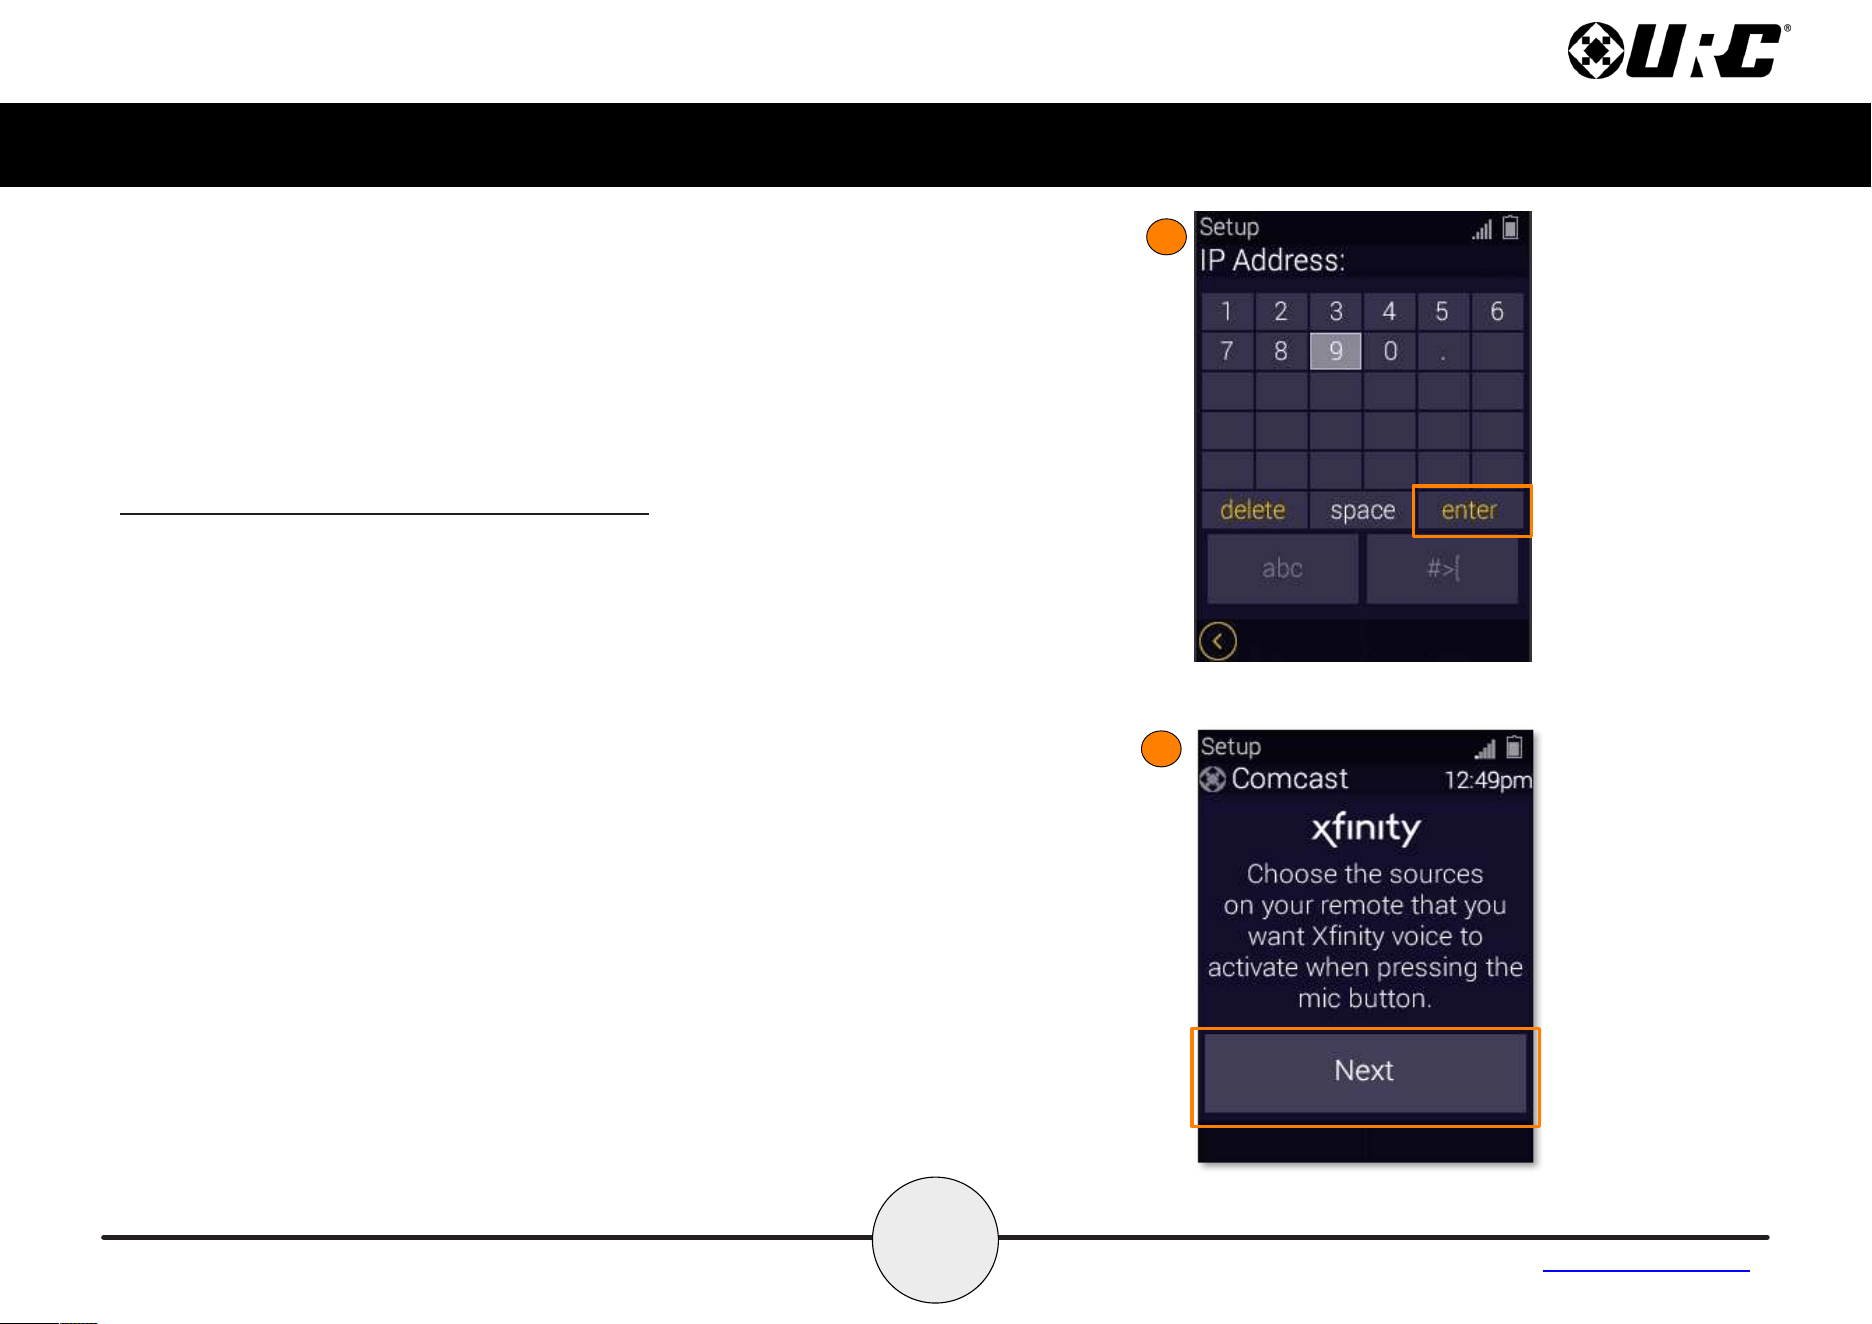
Comcast Xfinity Voice Assistant Setup (cont’d)
5. Enter the IP address of the Comcast box, then select enter.
6. Select Next when prompted to “Choose the sources on your
remote that you want Xfinity voice to activate when pressing the
mic button”.
5
6
19
Complete Control
MX-1400
Owner’s Manual
Table of Contents
Comcast Xfinity Voice Assistant Setup (cont’d)
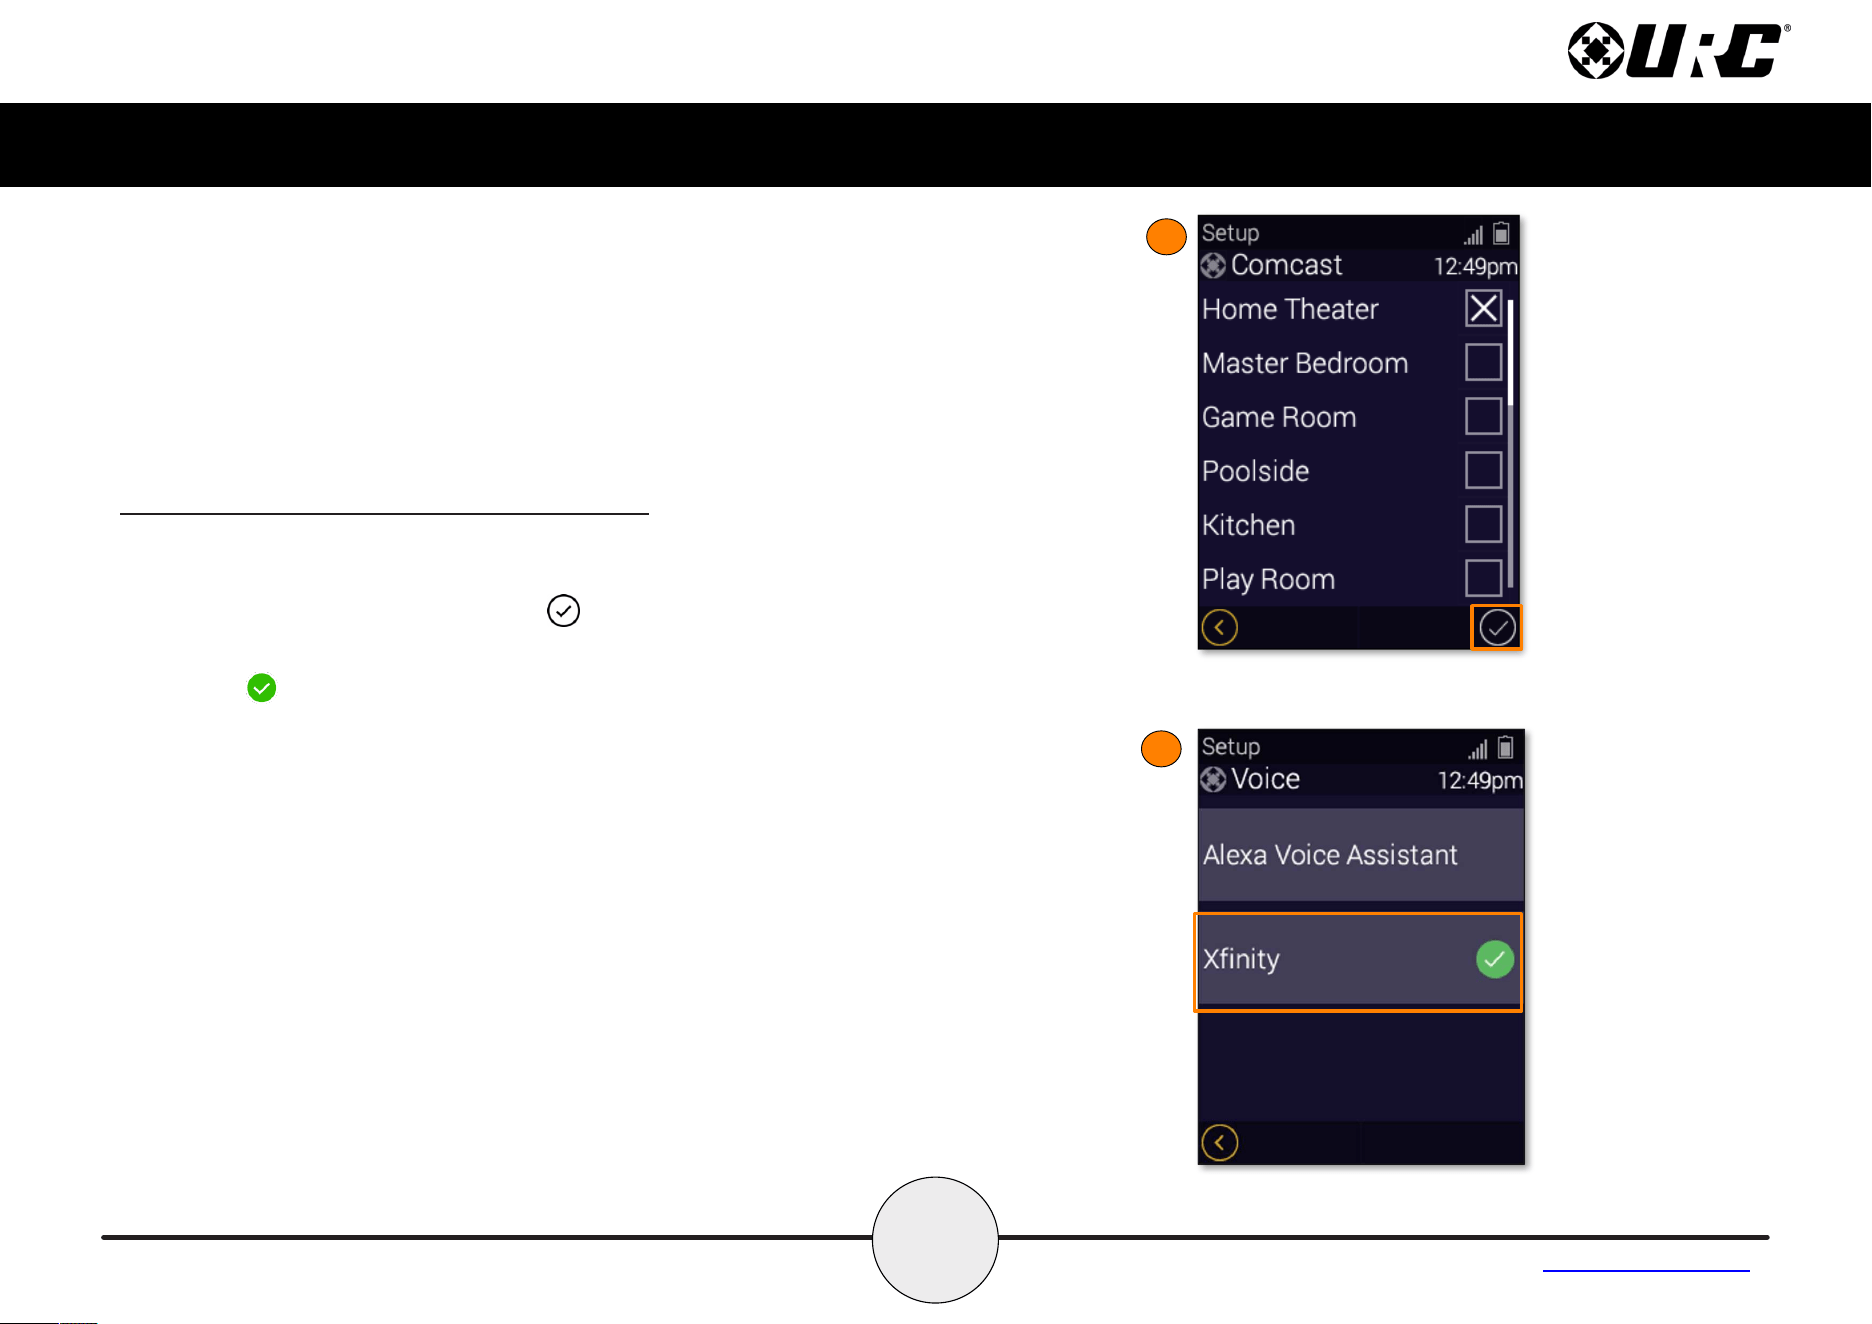
7. Select the sources that you want Xfinity voice to activate when
pressing the mic button. Select once your selection(s) have
been made.
8. The indicates that a connection was successfully made with the
Comcast box.
7
8
20
Complete Control
MX-1400
Owner’s Manual
Table of Contents
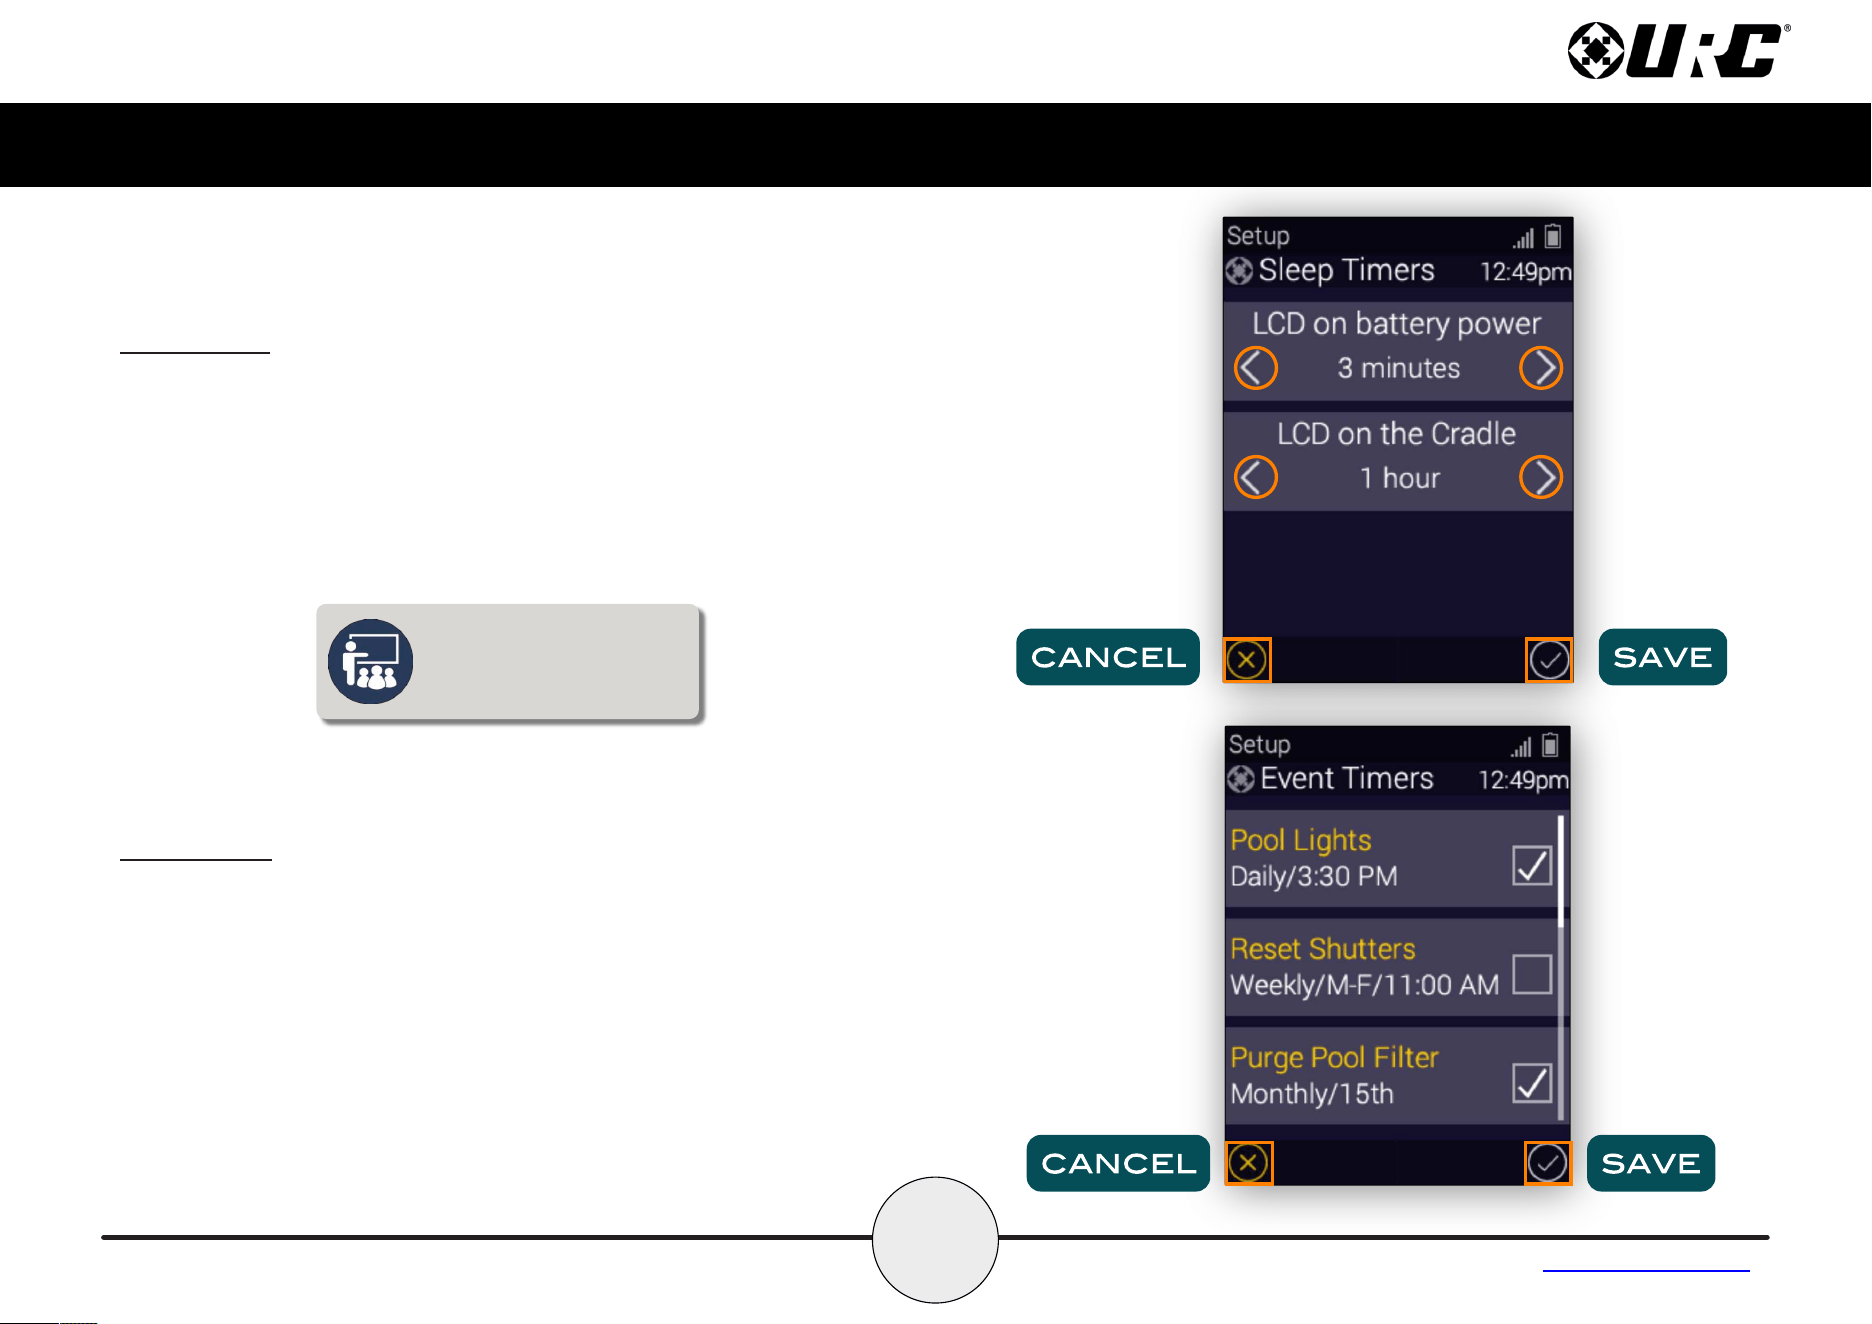
Sleep Timers
Adjust the screen and button sleep times by pressing the adjacent LCD
buttons to increase or decrease the sleep timer.
Once the times have been adjusted, press the Save button. Pressing
Cancel reverts the remote to the last saved setting.
Event Timers
Allows for event timers to be enabled or disabled individually.
Once the timers have been adjusted, press the Save button. Pressing
Cancel reverts the remote to the last saved setting.
These events are setup by the installer in the Complete Control
Programming software. If the Event Timer list is empty, then you can
speak with your installer to have specific events added.
Leaving the remote’s display on
for long periods of time may
reduce your device’s battery life.
21
Complete Control
MX-1400
Owner’s Manual
Table of Contents
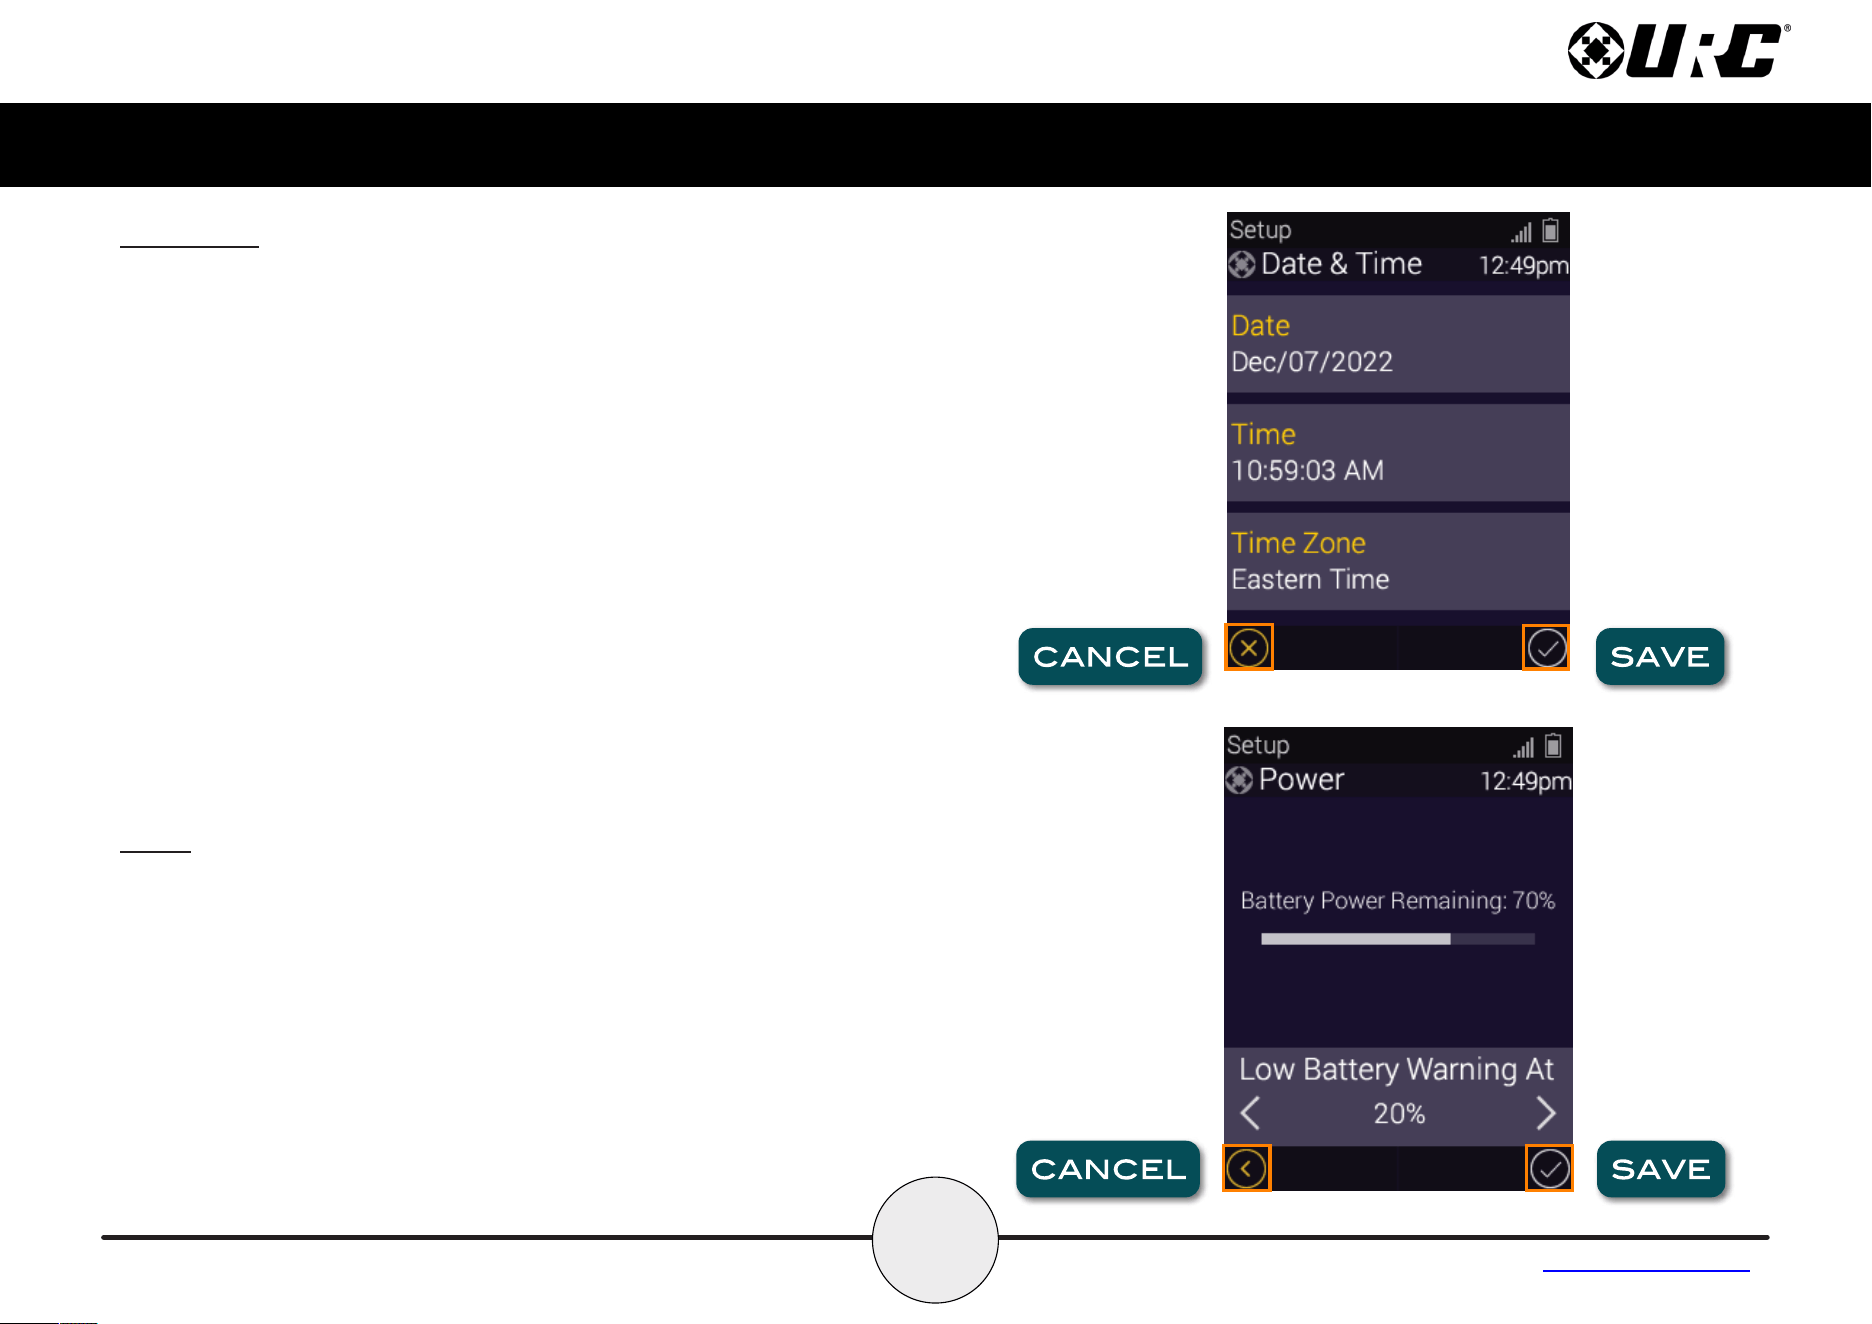
Power
Displays the remote’s remaining battery level. Adjust when the “Low
Battery” warning screen appears.
Once the Power settings have been adjusted, press the Save button.
Pressing Cancel reverts the remote to the last saved setting.
Date & Time
The remote’s date and time settings have been set by your certified
custom integrator. If needed, the date and time settings can be manually
changed here.
If the system’s date and time are adjusted, the MX-1400 adopts the new
date and time globally.
If the advanced system controller is reset, it defaults to the program’s
default location using the Internet. If Internet is not present, the date and
time must be entered manually from a URC interface such as the
MX-1400.
Once the date and time settings have been adjusted, press the Save
button. Pressing Cancel reverts the remote to the last saved setting.
22
Complete Control
MX-1400
Owner’s Manual
Table of Contents
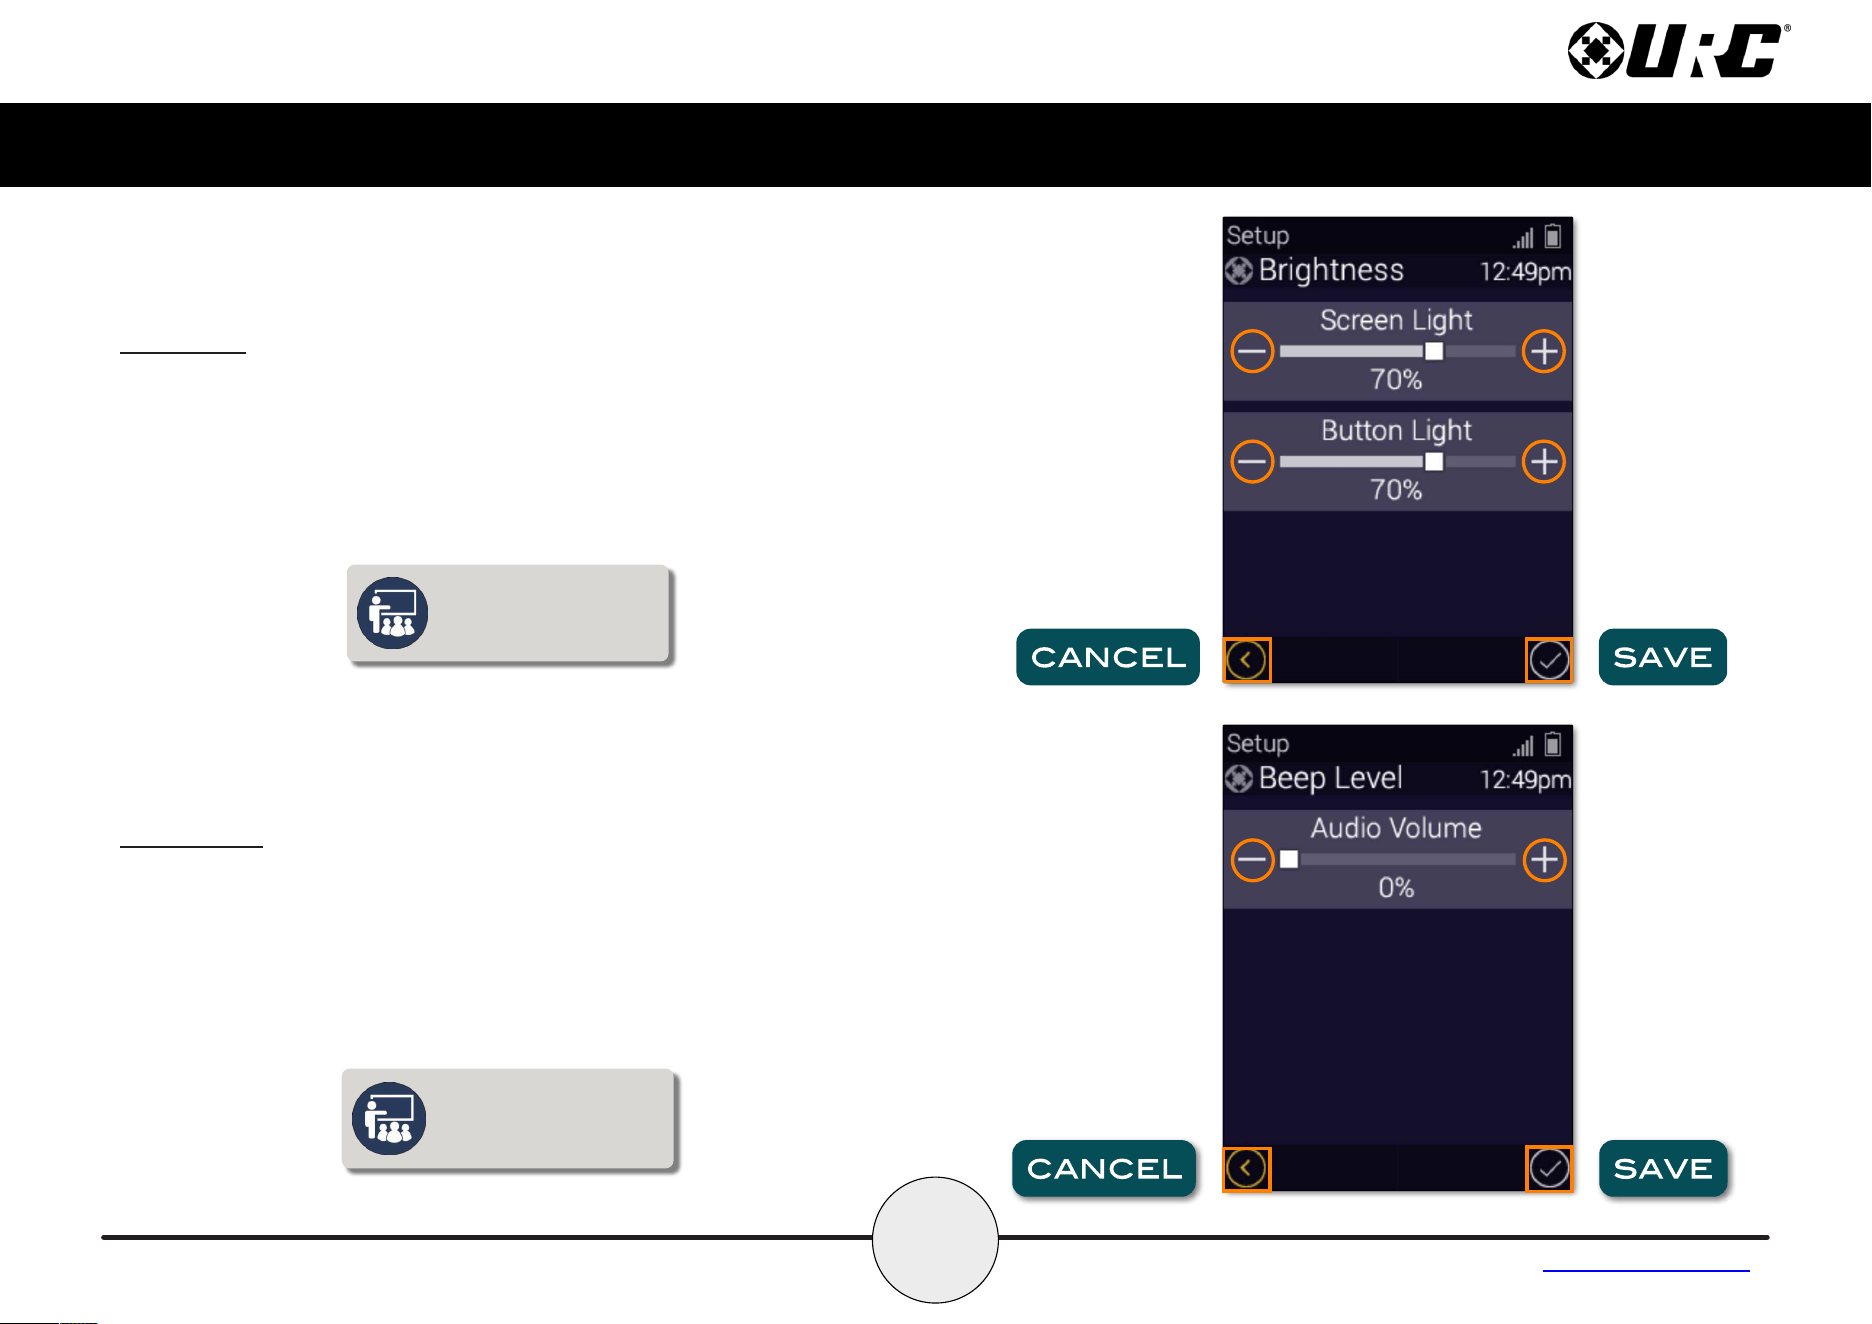
Brightness
Adjust the screen and button brightness by pressing the adjacent LCD
buttons to increase or decrease the brightness level.
Once the brightness has been adjusted, press the Save button. Pressing
Cancel reverts the remote to the last saved setting.
High brightness levels may
reduce the MX-1400’s
battery life.
Button Beep
Adjust the button “beep” of the remote. Press the adjacent LCD buttons to
increase or decrease the volume level.
Once the sound has been adjusted, press the Save button. Pressing
Cancel reverts the remote to the last saved setting.
Higher sound levels may
reduce the MX-1400’s
battery life.
23
Complete Control
MX-1400
Owner’s Manual
Table of Contents
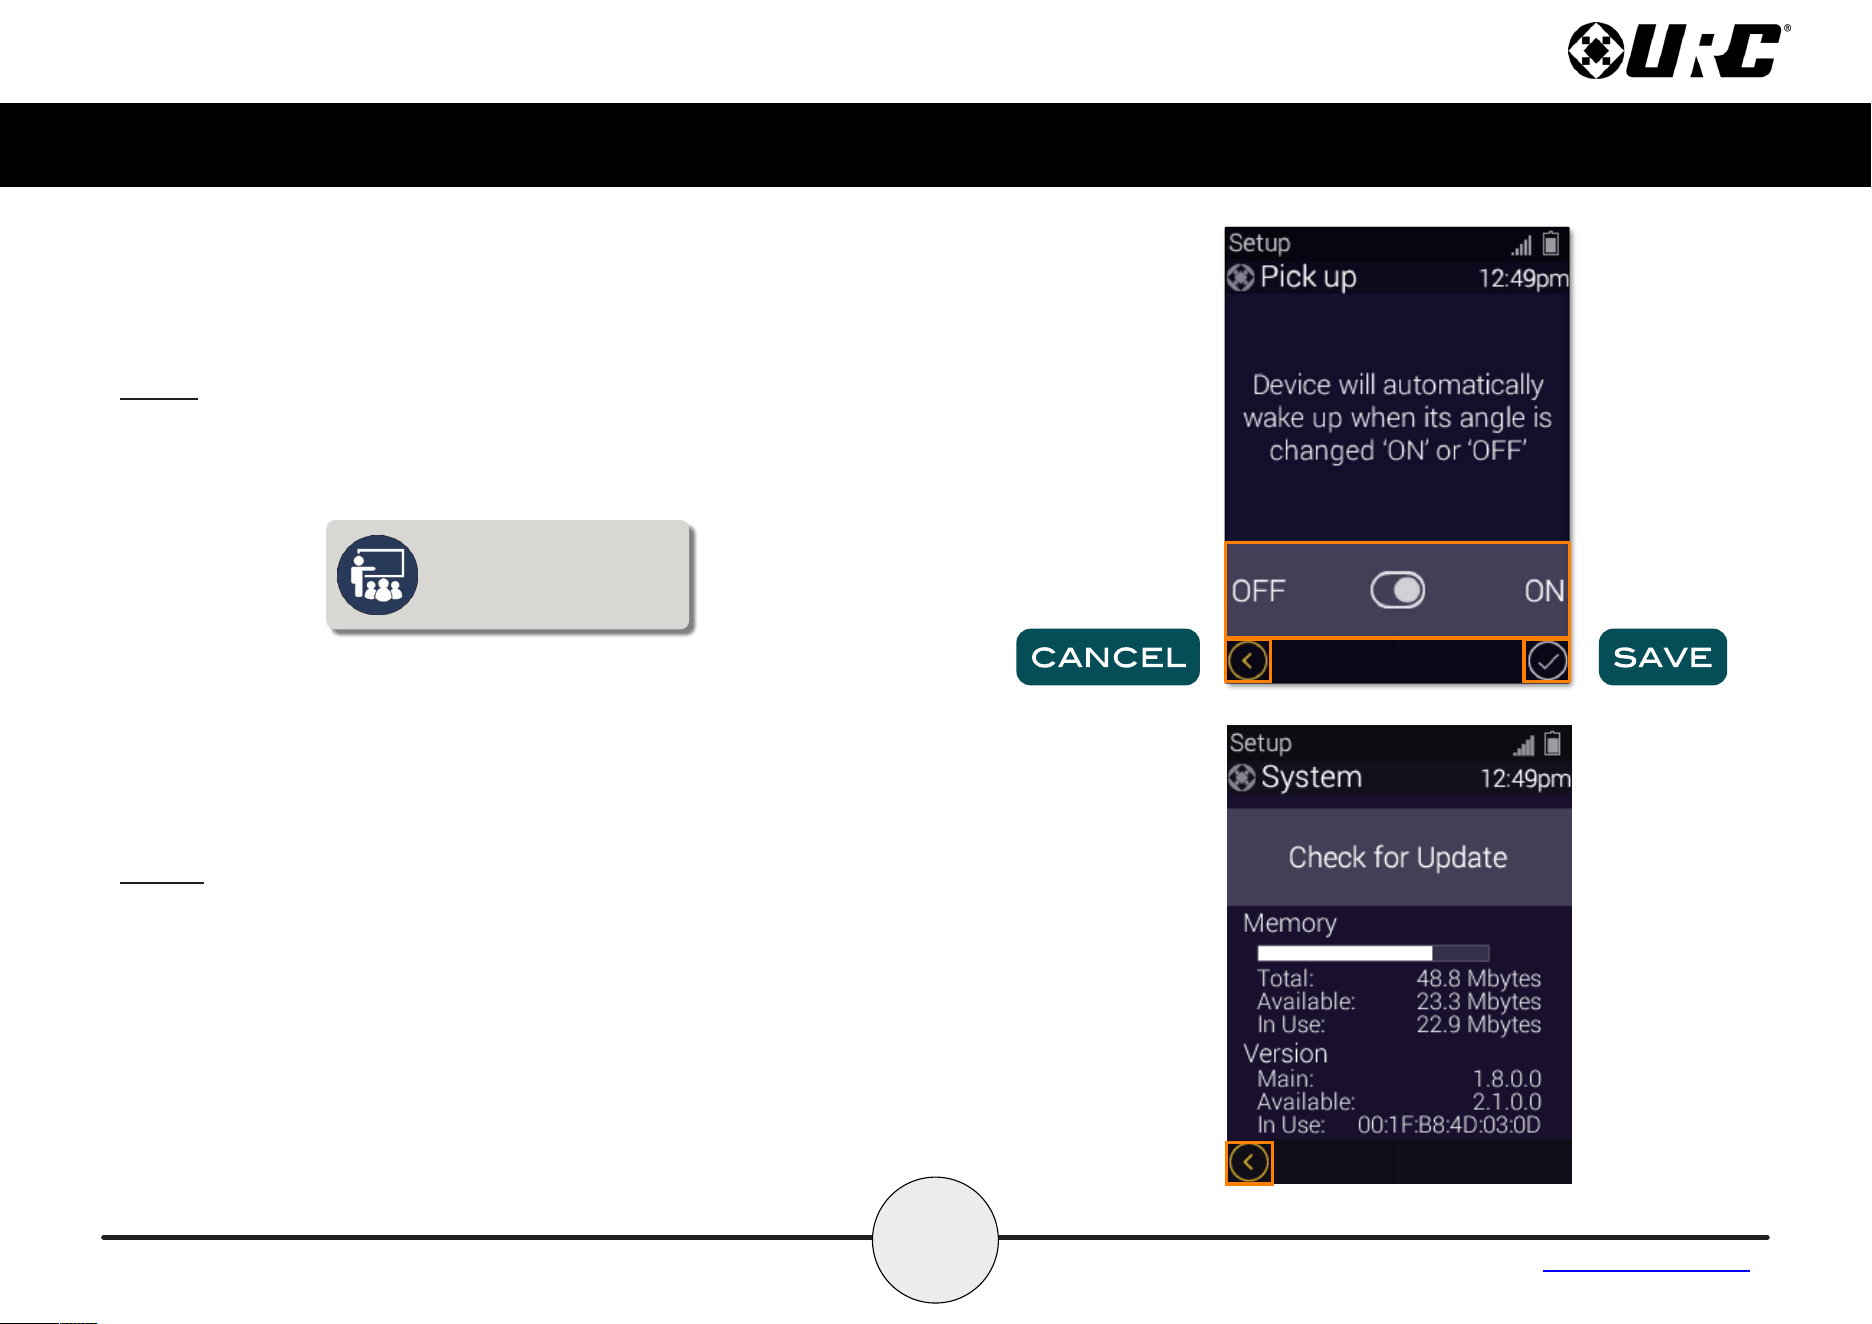
System
Displays information about the remote’s operating system, memory, etc.
Pressing the Exit button exits to the remote’s System Menu.
Pickup
Turn on or off the remote’s pickup sensor. When enabled, the MX-1400
turns on when the remote is picked up. Select Yes (turn on) or No (turn
off).
Enabling the pickup sensor
may reduce the MX-1400’s
battery life.
24
Complete Control
MX-1400
Owner’s Manual
Table of Contents
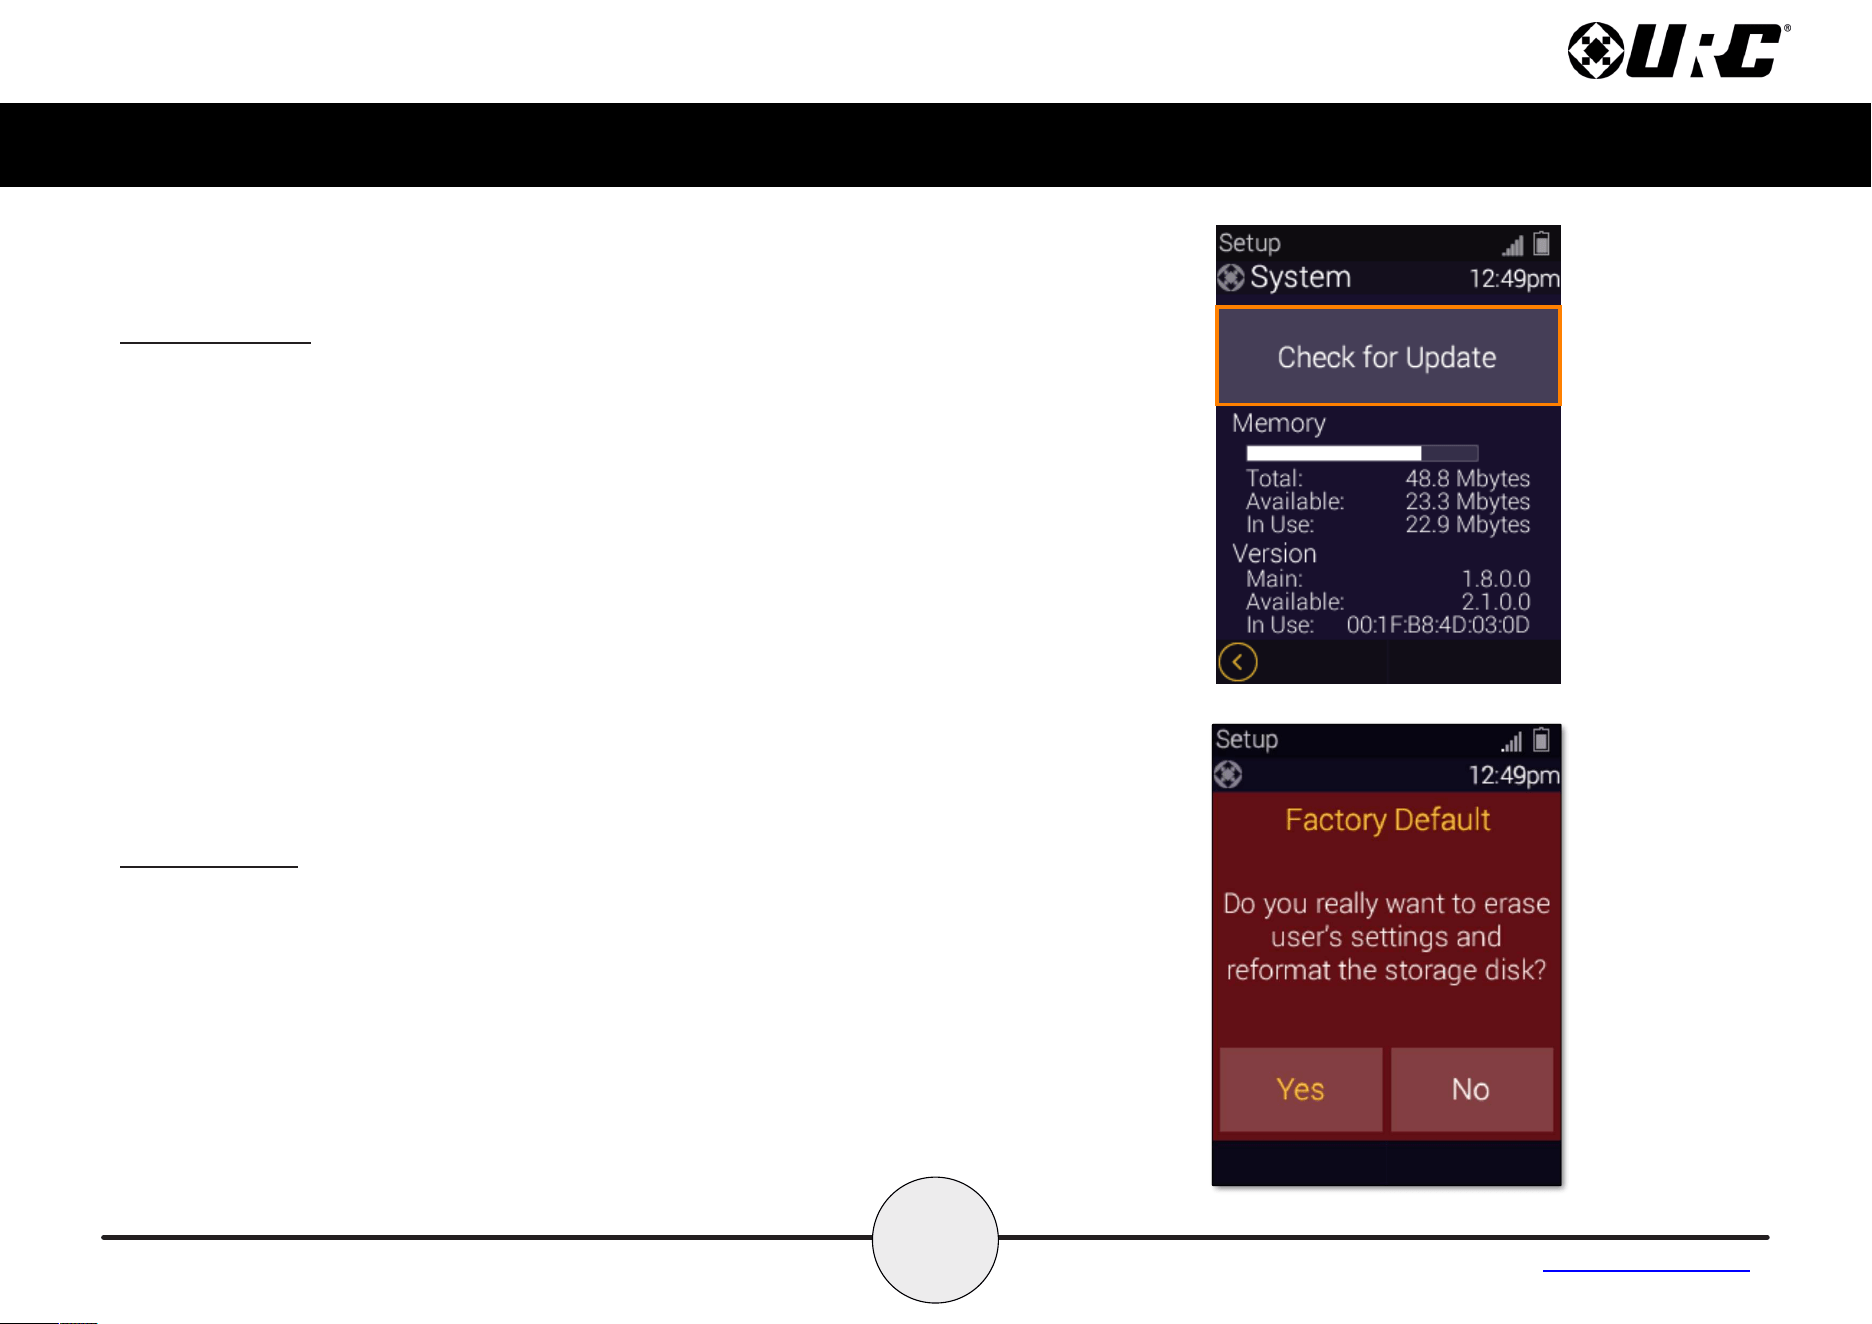
Software Update
URC’s system has the ability to be programmed by a certified URC
programmer remotely (after initial installation). There may be situations
where the device may need to have the software update applied manually.
Select this option only when instructed by your certified URC integrator or
URC’s Technical Support Team.
Factory Default
Resets the memory of the MX-1400 to the factory settings. All existing
programming is erased. The device requires reconfiguration by your
certified URC integrator.
Press and Hold the ‘Factory Default’ button in the settings menu for seven
(7) seconds to display the Factory Default confirmation screen.
WARNING! Only use this button when instructed by URC’s Technical
Support team.
25
Complete Control
MX-1400
Owner’s Manual
Table of Contents
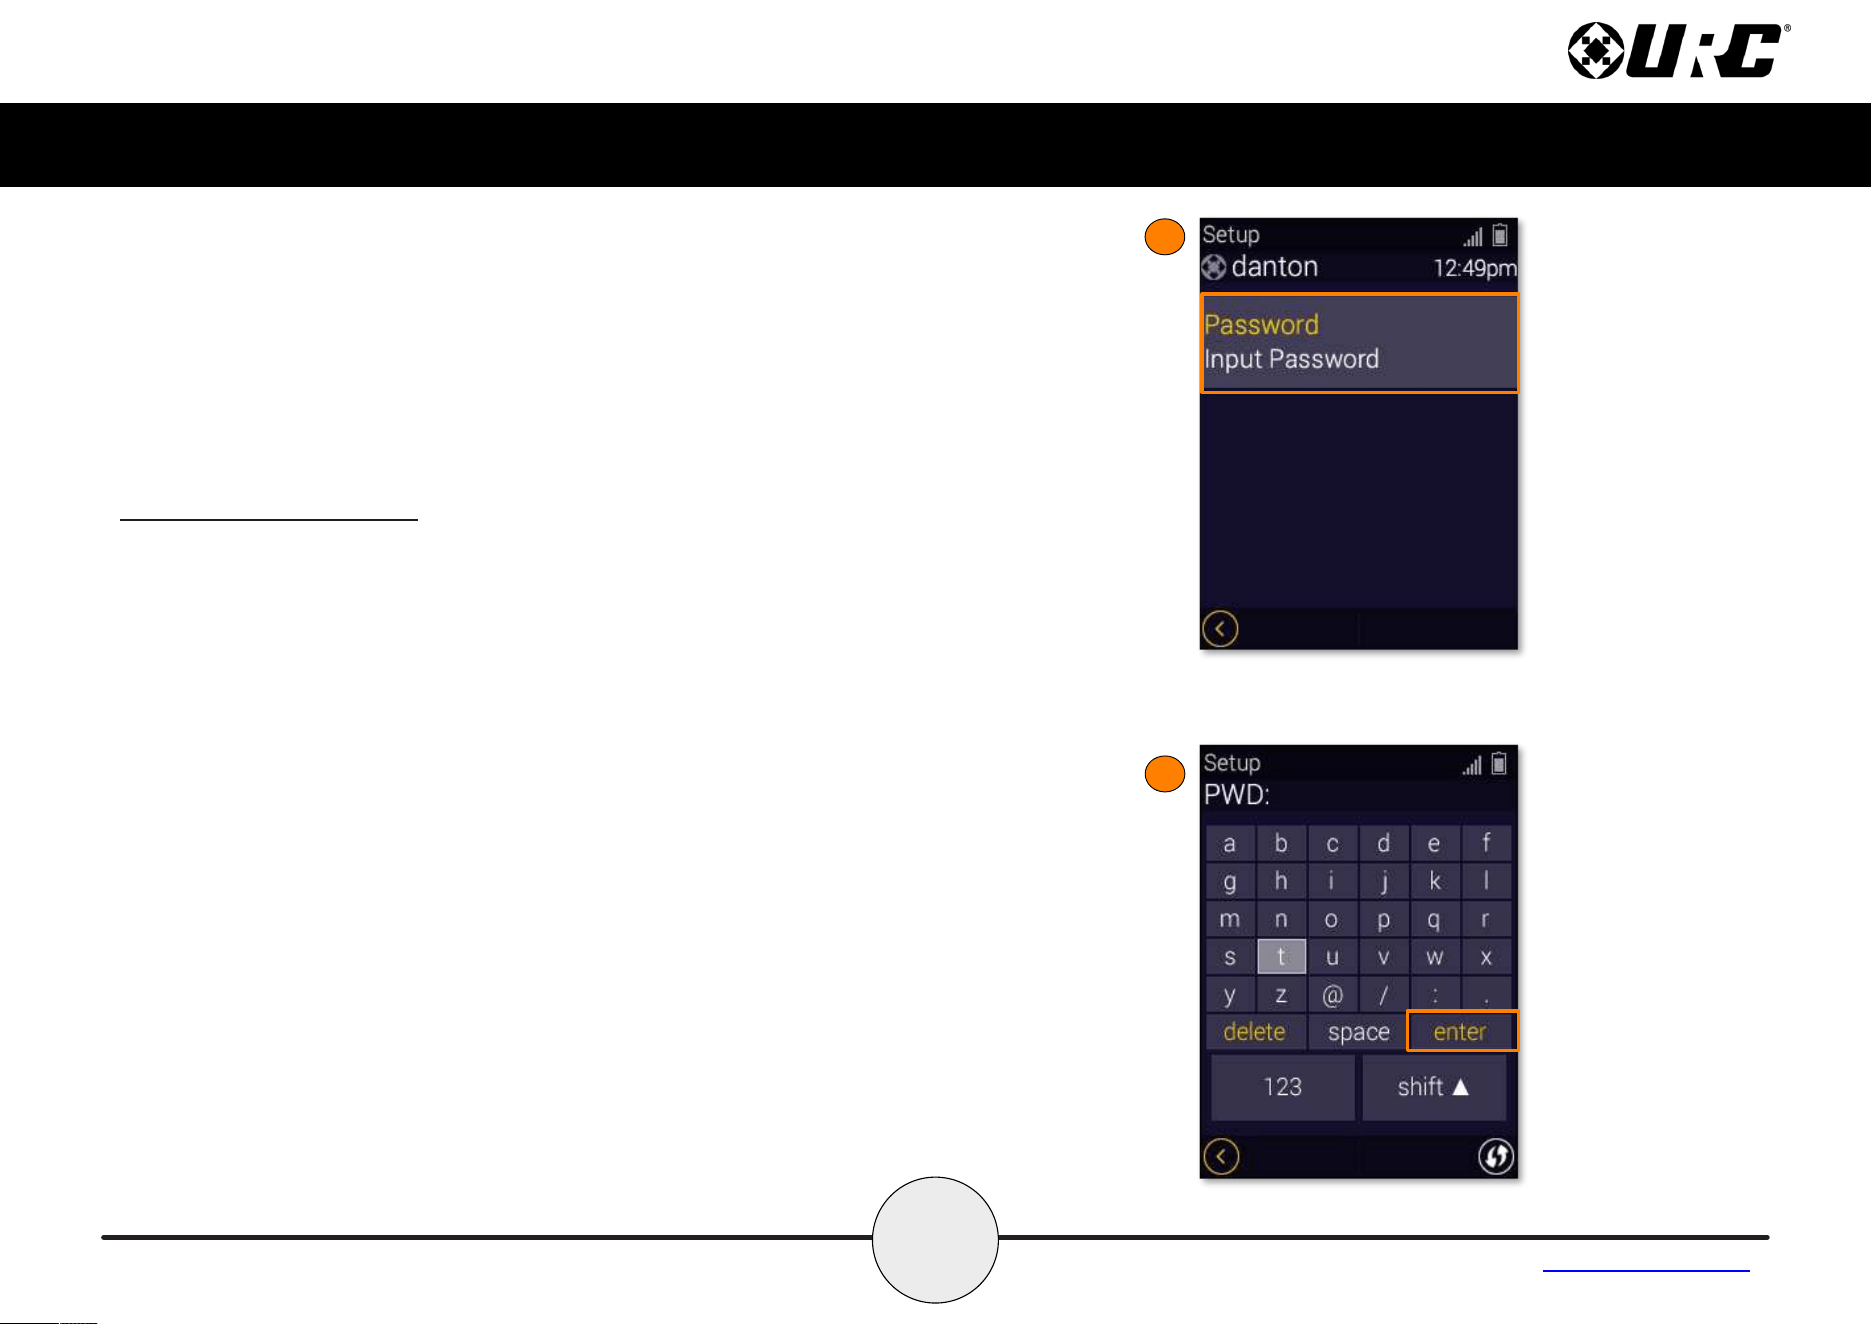
Manual WiFi Setup
This option allows you to configure the MX-1400’s WiFi manually if
choosing not to do it via the Alexa app.
If your WiFi was connected via the Alexa app then you must logout and
disable that connection first before the manual setup process.
Proceed to Step 9 manual WiFi configuration if it was not configured via
Amazon Alexa app.
1. From the Settings Menu, select Voice Assistant.
2. Select Alexa Voice Assistant.
1
2
Manual Wi-Fi setup cannot be used if
you wish to use Alexa on the remote.
When using Alexa, Alexa will manage
the remote’s Wi-Fi
26
Complete Control
MX-1400
Owner’s Manual
Table of Contents
Manual WiFi Setup (cont’d)
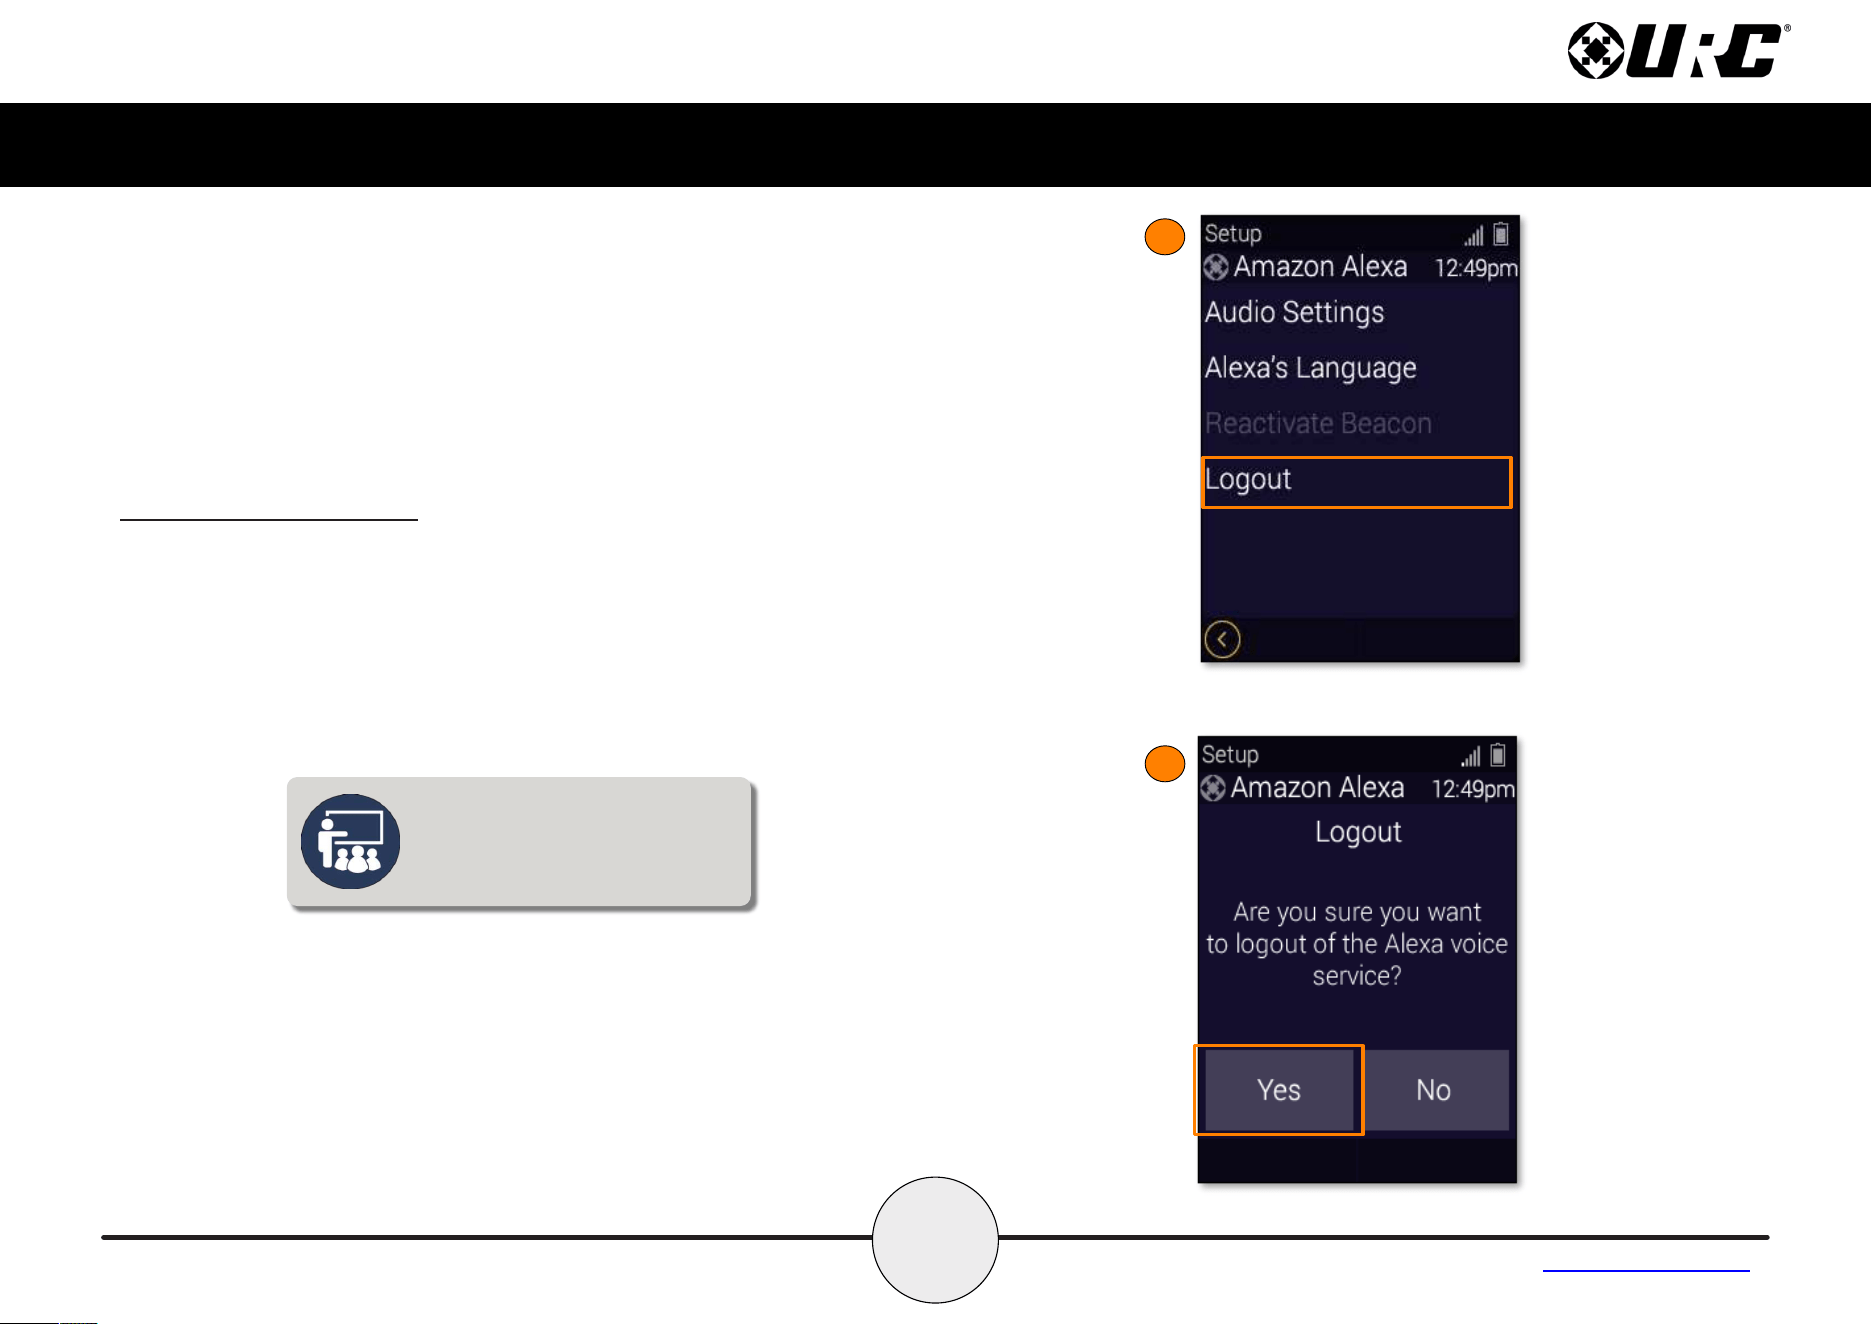
3. From the Amazon Alexa Menu, select Logout.
4. Select Yes, when you are asked “Are you sure you want to logout
of the Alexa voice service?”.
3
4
The MX-1400 will automatically reboot
after conrming that you’re sure that
you want to logout of the Alexa voice
service.
28
Complete Control
MX-1400
Owner’s Manual
Table of Contents
Manual WiFi Setup (cont’d)
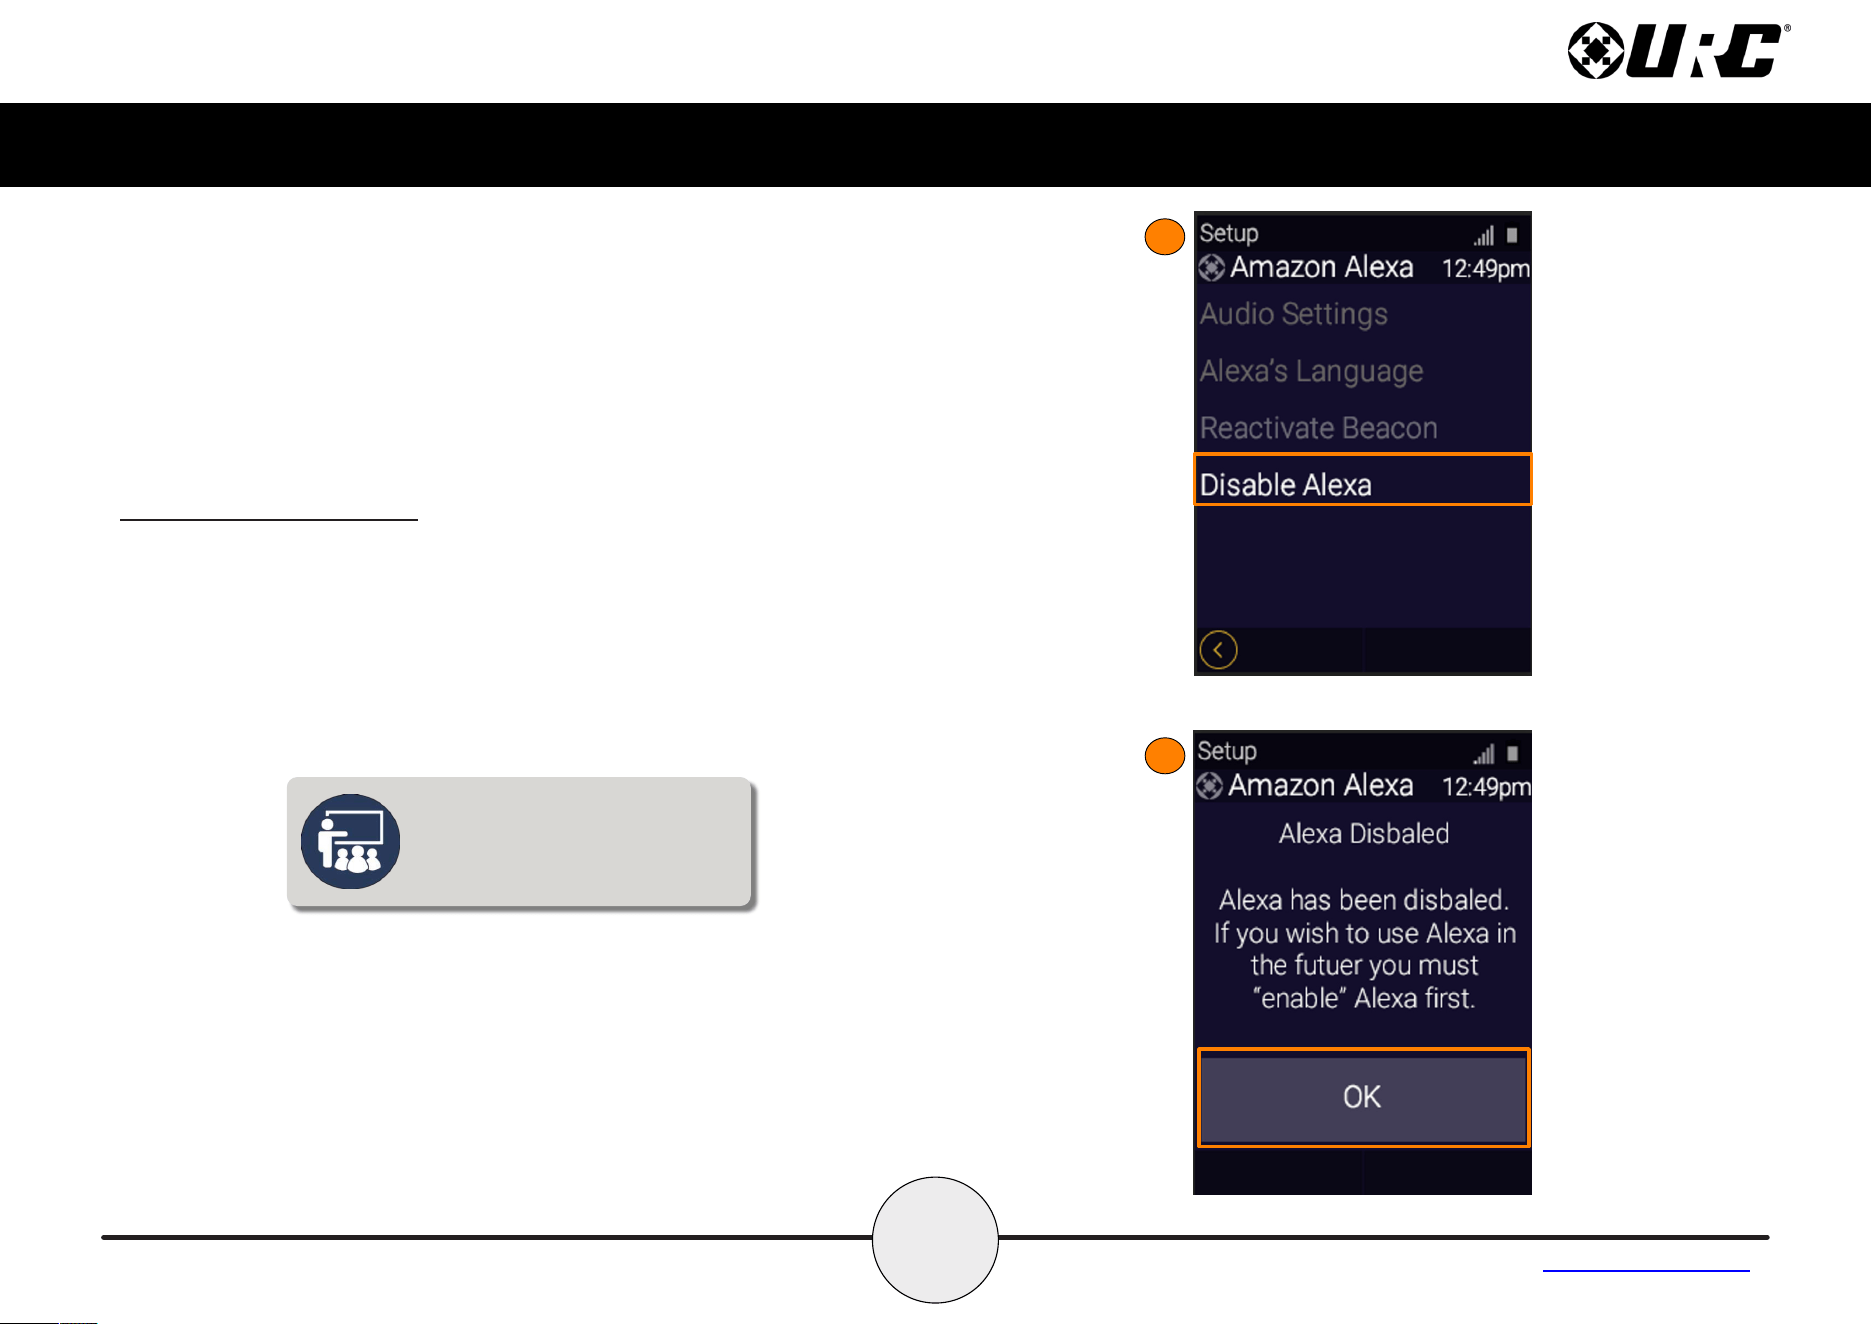
7. Select Disable Alexa.
8. Select OK when you are prompted that “Alexa has been disabled.
If you wish to use Alexa in the future you must “enable” Alexa
first”.
7
8
The MX-1400 will automatically reboot
after conrming that you want to
disable Alexa.

32
Complete Control
MX-1400
Owner’s Manual
Table of Contents
Specifications
These are the technical specifications for the MX-1400:
Microprocessor: ARM Cortex-M7 Core 600MHz
Memory: 64MB NOR Flash Memory
RAM: 32MB SDRAM
Wi-Fi: 802.11 a/b/g/n/ac
LCD: 240 x 320, 2.4” TFT LCD with C-Touch module
Photo Diode: SMD TYPE x 2EA
IR: SMD TYPE x 2EA
IR Range (Line of Sight via Infrared): 30 to 50 feet, depending on the
environment
RF Range (Radio Frequency): 50 to 100 feet, depending on the environment
Microphone: 2 Ch
Speaker: Mono 1.5W x 1
Battery: Lithium Polymer, 3.7V, 1960mAh
Battery Charging Time: 2.5 Hours
Power: 5.0V 2.0A
Operating Temp: 0~40 ℃
Size: 220 X 50 X 23.8 (mm)
Product Weight: 176.7g (with battery loaded)
Cradle Weight: 139.8g
Warning!
The manufacturer is not responsible for any Radio or TV interference caused
by unauthorized modifications to this equipment.
Changes or modifications not expressly approved by the manufacturer could
void the user's authority to operate the equipment.
Limited Warranty Statement
https://www.urc-automation.com/legal/warranty-statement/
End User Agreement
The terms and conditions of the End User Agreement available at
https://www.urc-automation.com/legal/end-user-agreement/ shall apply.
Federal Communication Commission Interference Statement
This equipment has been tested and found to comply with the limits for a
Class B digital device, pursuant to part 15 of the FCC Rules. These limits are
designed to provide reasonable protection against harmful interference in a
residential installation.
This equipment generates, uses and can radiate radio frequency energy and,
if not installed and used in accordance with the instructions, may cause
harmful interference to radio communications. However, there is no guarantee
that interference will not occur in a particular installation. If this equipment
does cause harmful interference to radio or television reception, which can be
determined by turning the equipment off and on, the user is encouraged to try
to correct the interference by one more of the following measures:
• Reorient or relocate the receiving antenna.
• Increase the separation between the equipment and receiver.
• Connect the equipment into an outlet on a circuit different from that to
which the receiver is connected.
• Consult the dealer or an experienced radio/TV technician for help.
33
Complete Control
MX-1400
Owner’s Manual
Table of Contents
Regulatory Information to the User
• CE conformity Notice Products with “CE” marking comply EMC Directive
2014/30/EU issued by the commission of the European Community.
1. EMC Directive
• Emission
• Immunity
• Power
• Declaration of Conformity
“Hereby, Universal Remote Control Inc. declares that this MX-1400 is in
compliance with the Essential requirements.”
Importer & Manufacturer
• Importer:
Universal Remote Control, Inc.
500 Mamaroneck Ave
Harrison, NY 10528
• Manufacturer:
OHSUNG ELECTRONICS CO., LTD.
#181 Gongdan-Dong, Gumi, Gyeongbuk Republic of Korea
Rechargeable Lithium Polymer Battery Precautions & Information
• If you will not be using your remote control for an extended period of time,
please remove the battery.
• Do not attempt to disassemble, alter, or apply heat to the battery.
• Use care to avoid dropping the battery or subjecting it to severe impact
that could damage it.
• The battery should not be immersed in water.
• Risk of explosion if the battery is replaced by an incorrect type.
• Dispose of used batteries according to the instructions.
• Lithium Polymer batteries are recyclable. For information on local drop-off
site, please visit
www.rbrc.com or call toll free 1-800-822-8837.