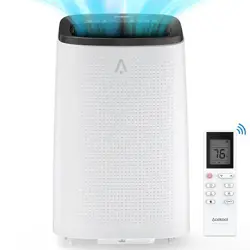
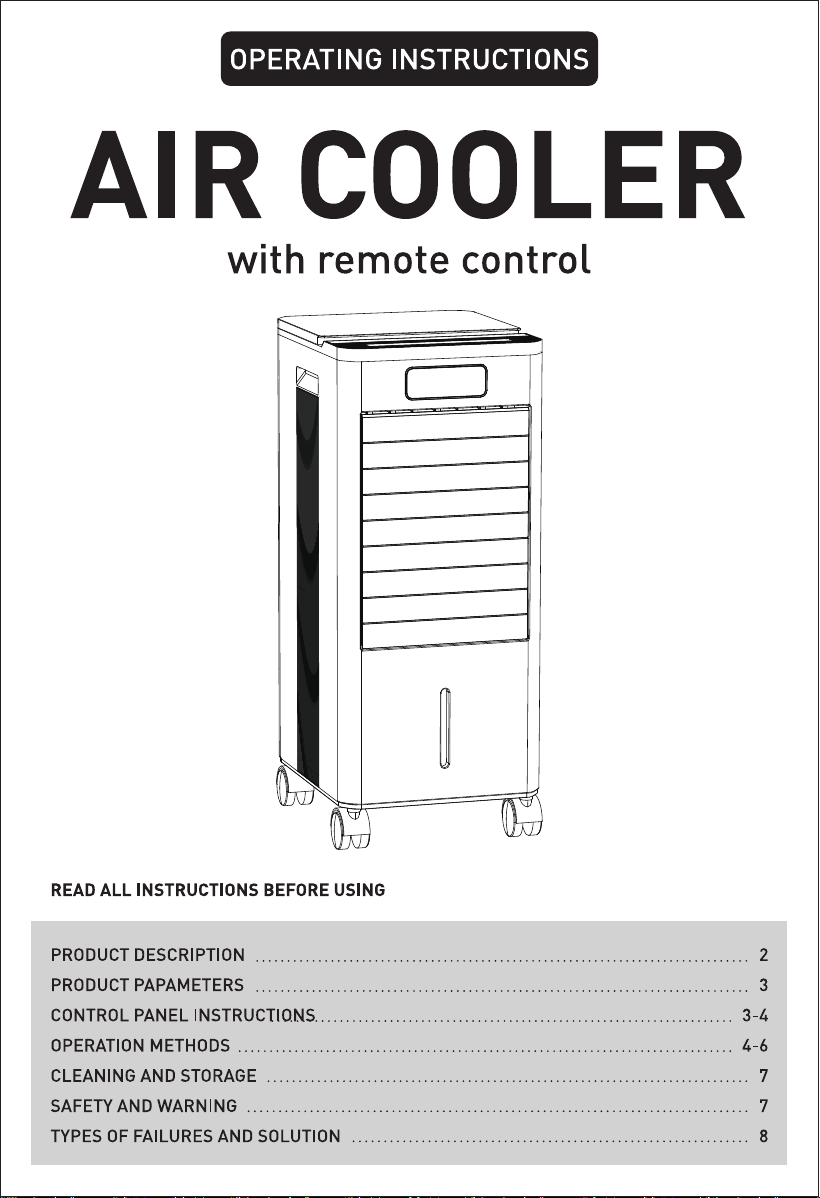
with remote control
READ ALL INSTRUCTIONS BEFORE USING
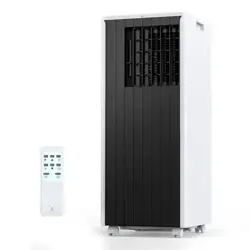
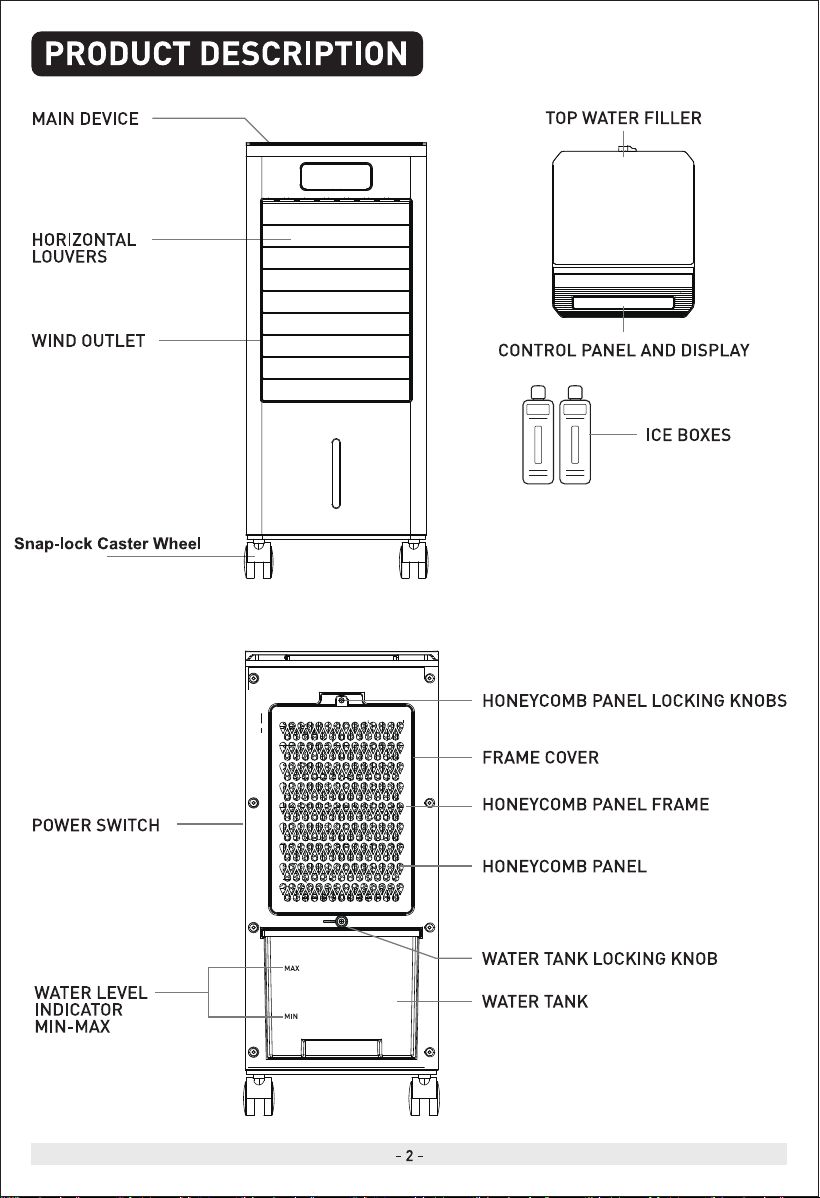
PRODUCT DESCRIPTION
PRODUCT PAPAMETERS
CONTROL PANEL INSTRUCTIONS..
OPERATION METHODS
CLEANING AND STORAGE
SAFETY AND WARNING
TYPES OF FAILURES AND SOLUTION
OPERATING INSTRUCTIONS
AIR COOLER
3-4
4-6
2
3
7
7
8
PRODUCT DESCRIPTION
MAIN DEVICE
HORIZONTAL
LOUVERS
WIND OUTLET
Snap-lock Caster Wheel
POWER SWITCH
WATER LEVEL
INDICATOR
MIN-MAX
-2
TOP WATER FILLER
CONTROL PANEL AND DISPLAY
ICE BOXES
HONEYCOMB PANEL LOCKING KNOBS
FRAME COVER
HONEYCOMB PANEL FRAME
HONEYCOMB PANEL
WATER TANK LOCKING KNOB
WATER TANK

PRODUCT PAPAMETERS
Model
Rated Voltage
Rated Frequency
Rated Power
Water Tank Capacity
Rated Evaporation Capacity
Wind Speed
Maximum Wind Speed
Mode
Swing Angle
Timing Function
Remote Control Distance
FK2306Y
120v-
50/60Hz
65W
4.5L-7L
0.3-0.5L/H
Low Speed, Medium Speed, High Speed
6m/s
Normal Mode, Natural Mode, Sleep Mode
Left-Right 600(Automatic). Up-Down 1200(Manual)
I-12Hours
26ft
CONTROL PANEL INSTRUCTIONS
Lock cool
Swing
0
Timer Mode
O
Speed
O
On/Off
Plug into a power outlet, you will hear the buzzer "beeps" once, and the machine enters the
standby state.
On/Off:
Press the "On/Off" button to turn it on, the wind is low-speed and the wind type is
•normal". Press this button again to turn the machine off.
Mode:
When the product is in working, touch "Mode" one time or more times, the corresponding
icon will be light up and the mode is cycled as follows:
NATU SLEEP
+ Speed:
Touch "Speed" one time or more times, the wind speed is cycled as follows:
Fl (LOW') F2(MED) F3(HlGH)
-3
Swing:
Touch "Swing" one time or more times, automatic horizontal swing will be start or stop ,
corresponding indicator light will be on or off.
n cool:
Touch "Cool", cool function start work and indicator light will be light up.
('¯Ä Timer:
When the unit is working, touch "Timer "one time or more times, timer will be cycled as
follows:
on
(O Child lock button:
The first time you press " "keys. except" "All keys except the key will be locked and
cannot be controlled; only press again" " key to unlock and restore control.
Note:
The machine comes with a screen-off function. If the machine is not operated within 3
minutes, the display will automatically turn off.
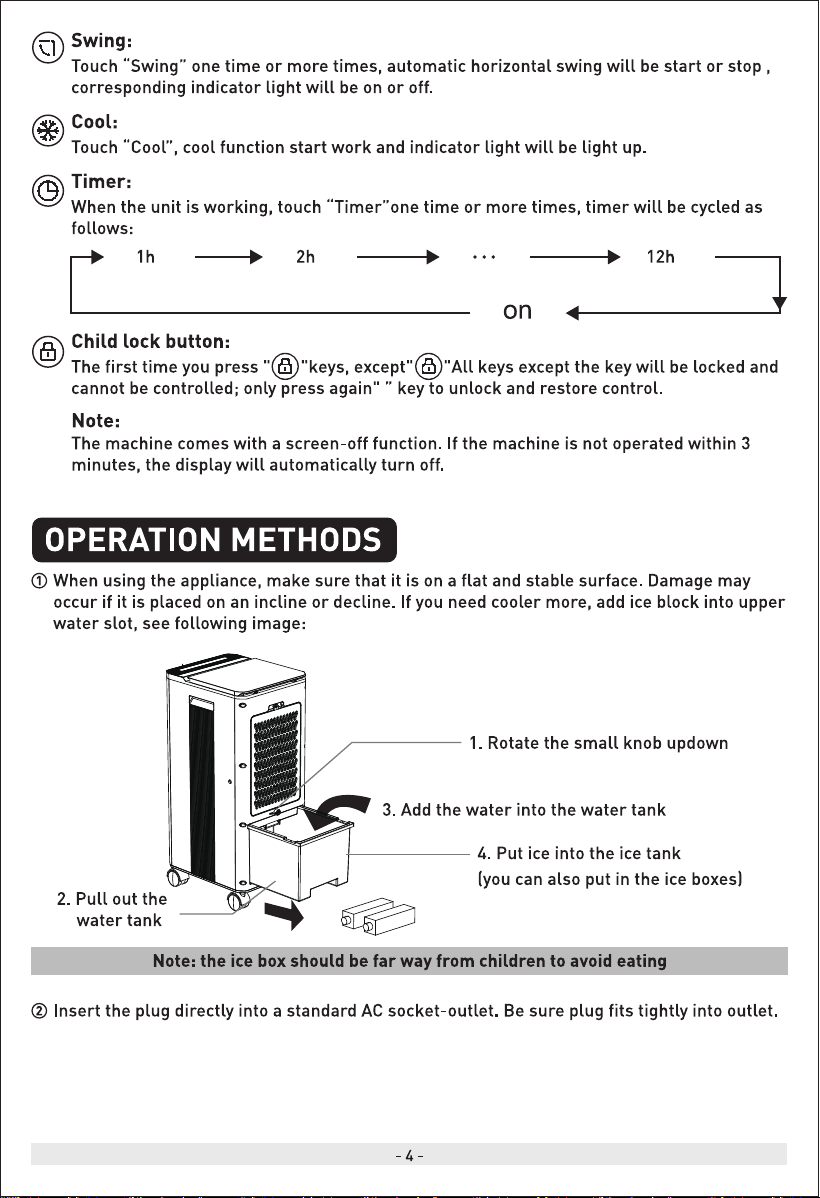
OPERATION METHODS
O When using the appliance, make sure that it is on a flat and stable surface. Damage may
occur if it is placed on an incline or decline. If you need cooler more, add ice block into upper
water slot, see following image:
I. Rotate the small knob updown
3. Add the water into the water tank
4. Put ice into the ice tank
(you can also put in the ice boxes)
2. Pull out the
water tank
Note: the ice box should be far way from children to avoid eatin
@ Insert the plug directly into a standard AC socket-outlet. Be sure plug fits tightly into outlet.
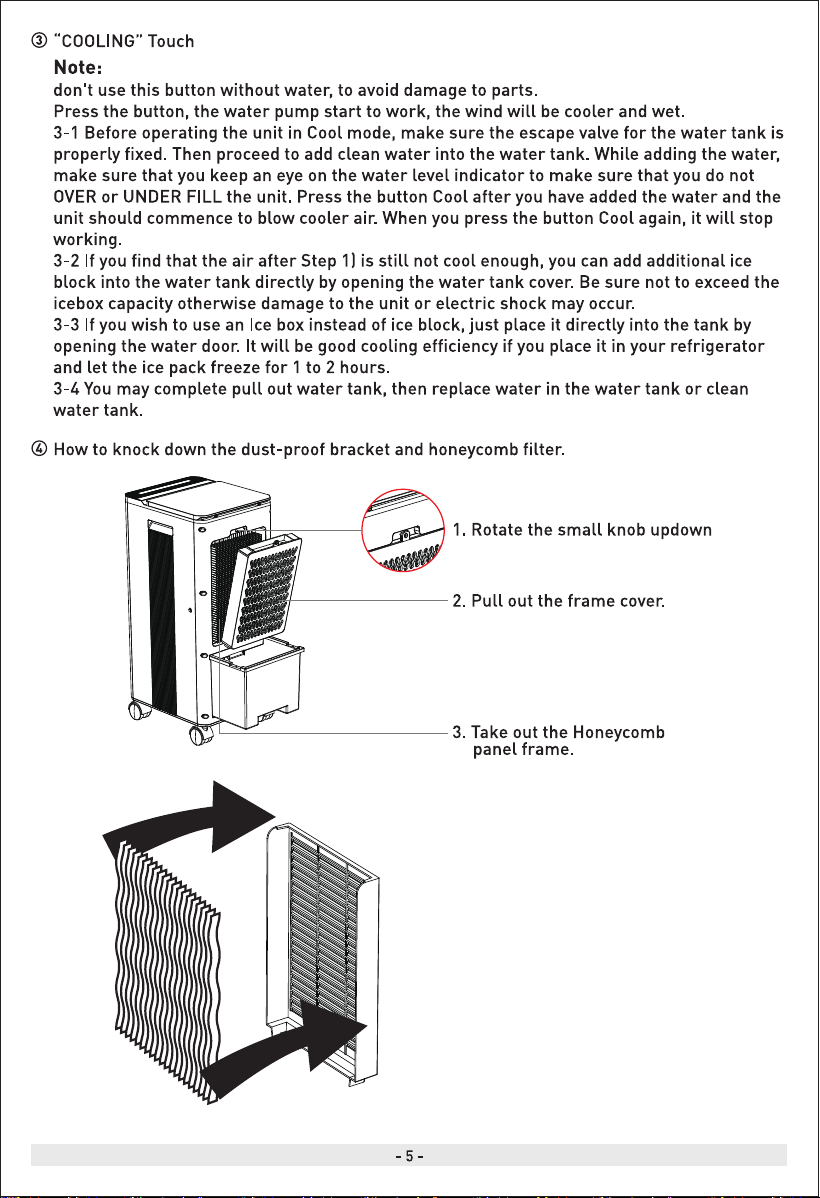
@ "COOLING" Touch
Note:
don't use this button without water, to avoid damage to parts.
Press the button, the water pump start to work, the wind will be cooler and wet.
3-1 Before operating the unit in Cool mode, make sure the escape valve for the water tank is
properly fixed. Then proceed to add clean water into the water tank. While adding the water,
make sure that you keep an eye on the water level indicator to make sure that you do not
OVERor UNDER FILL the unit. Press the button Cool after you have added the water and the
unit should commence to blow cooler air. When you press the button Cool again, it will stop
working.
3-2 If you find that the air after Step 1) is still not cool enough, you can add additional ice
block into the water tank directly by opening the water tank cover. Be sure not to exceed the
icebox capacity otherwise damage to the unit or electric shock may occur.
3-3 If you wish to use an Ice box instead of ice block, just place it directly into the tank by
opening the water door. It will be good cooling efficiency if you place it in your refrigerator
and let the ice pack freeze for 1 to 2 hours.
3-4 You may complete pull out water tank, then replace water in the water tank or clean
water tank.
@ How to knock down the dust-proof bracket and honeycombfilter.
I. Rotate the small knob updown
2. Pull out the frame cover.
3. Take out the Honeycomb
panel frame.
-5-
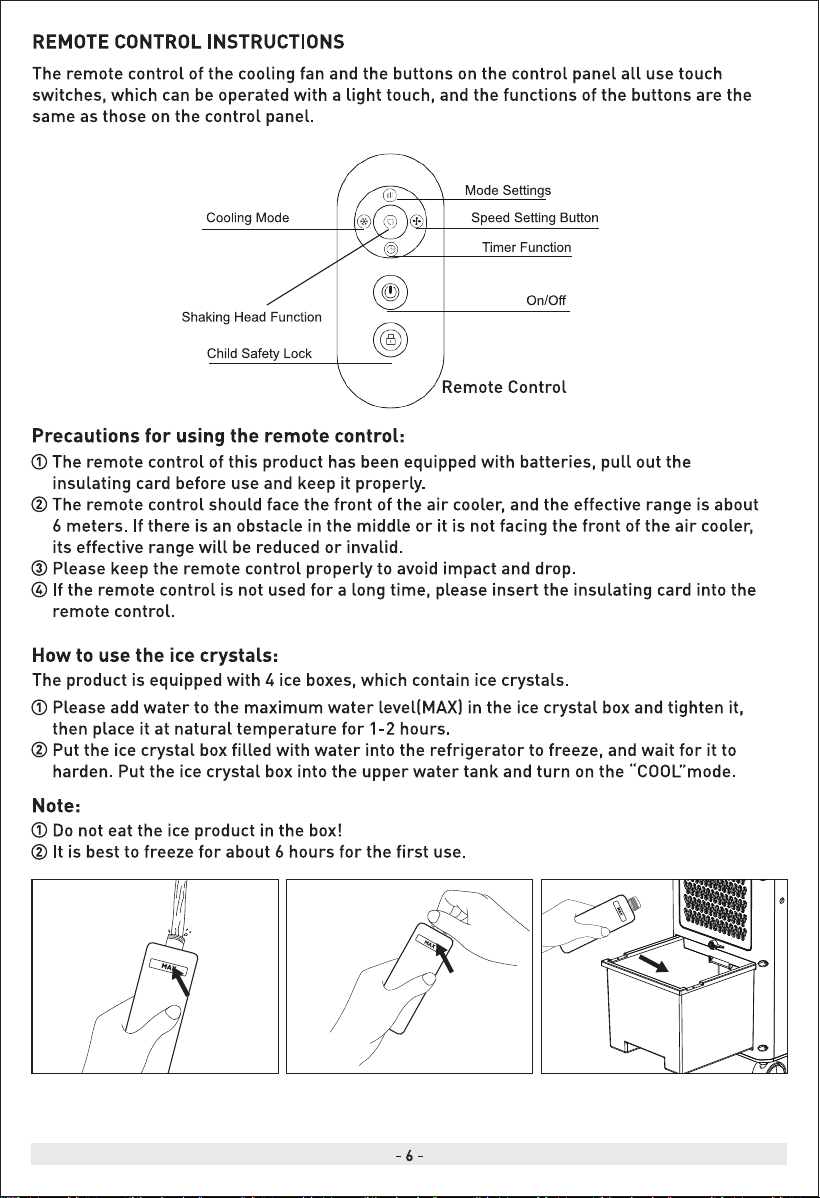
REMOTE CONTROL INSTRUCTIONS
The remote control of the cooling fan and the buttons on the control panel all use touch
switches, which can be operated with a light touch, and the functions of the buttons are the
same as those on the control panel.
Cooling Mode
Shaking Head Function
Child Safety Lock
Mode Settings
Speed Setting Button
Timer Function
On/Off
Remote Control
Precautions for using the remote control:
O The remote control of this product has been equipped with batteries, pull out the
insulating card before use and keep it properly.
@ The remote control should face the front of the air cooler, and the effective range is about
6 meters. If there is an obstacle in the middle or it is not facing the front of the air cooler,
its effective range will be reduced or invalid.
@ Please keep the remote control properly to avoid impact and drop.
@ If the remote control is not used for a long time, please insert the insulating card into the
remote control.
How to use the ice crystals:
The product is equipped with 4 ice boxes, which contain ice crystals.
O Please add water to the maximum water level(MAX) in the ice crystal box and tighten it,
then place it at natural temperature for 1-2 hours
@ Put the ice crystal box filled with water into the refrigerator to freeze. and wait for it to
harden. Put the ice crystal box into the upper water tank and turn on the "COOL"mode.
Note:
O DO not eat the ice product in the box!
@ It is best to freeze for about 6 hours for the first use.

o
I Removethe insulatingstrip
eoe
O
@ Reinsertthebatteryholder
CR2025 W
Press
Replace the battery
Eject the battery holder
I .1tis necessary to unplug the insulating plastic piece at the bottom of
the remote control before the remote control can be powered on and used normally.
2. Press the locking button to pop out the battery holder.
3.RepIace with the same battery (CR2025 3V) type with the (+) side facing up.
4.Push in the holder until securely locked into place.
Note:lf the indicator on the remote control doesn't turn on any more,please consider
replacing the battery.
CLEANING AND STORAGE
O Always remove the plug from the socket-outlet and allow the fan blower to stop acting
before clean it.
@ Clean the external surfaces of the unit with a soft damp (not dripping wet) cloth.
@ After extended periods of use, be sure to replace the water in the tank with fresh clean
water at least weekly. Also remember to clean the filter by unscrewing the filter and
removing the filter cradle. It should be cleaned in a mild soapy solution and then left to dry
before replacing the filter.
@ When the unit is not in use, make sure that it is unplugged from the wall socket, water is
drained thoroughly and it is placed back into its original box for storage until later use
@ In case of malfunction or doubt, do not try to repair the fan yourself, it may result in a fire
hazard or electric shock.
SAFETY AND WARNING
O The product is for household use only.
@ Connect the appliance to single-phase AC supply of the voltage specified on the rating label.
@ Always turn the product to the OFF position and unplug it from the electrical outlet when not
in use.
@ Extreme caution is necessarywhen the appliance is used by or near children, invalids or
elderly person
@ Do not run cord under carpeting and do not cover cord with throw rugs, runners or the like.
Arrange cord away from traffic area and where it will not be tripped over.
@ Do not operate the appliance with a damaged cord or plug, or after the unit malfunctions,
has been dropped, or damaged in any manner.
O If the supply cord is damaged, it must be replaced by the manufacturer or its service agent
or a similarly qualified person to avoid a hazard.
@ Use the appliance in a well-ventilated area. While using, distance of no less than 20cm
should be kept away from wall or corner to ensure the air intakes or exhaust openings
should not be blocked unexpectedly. The unit must not be located immediately below or
besides a curtain or the likes
O Do not insert or allow fingers or any other objects into grill to avoid a mechanical danger
when in use. Do not block air intakes or exhaust openings in any manner.
@ Adequate clean water should be put into the tank within the water level limits as shown by
the water level indicator. Make sure that you DO NOT add water whilst the power is on.
O If you want to move the product whilst water is in the tank, unplug it and push it slowly and
very lightly on the side of the unit to avoid water spillage. The best method would be to drain
the unit using the valve at the bottom of the unit.
@ Please keep the ice crystals box provided away from children, as it is a chemical based
substance that is harmful if swallowed. Also make sure that the ice pack is not placed in
direct sunshine. The ice crystal can be used over 5 years. When scrapping the appliance,
follow the regulations concerning the disposal of ice crystals.
@ Use the appliance on flat, dry floor only.
@ This appliance is not intended for use by persons (including children) with reduced physical,
sensory or mental capabilities, or lack of experience and knowledge, unless they have been
given supervision or instruction concerning use of the appliance by a person responsible for
their safety.
@ Children should be supervised to ensure that they do not play with the appliance.
-8
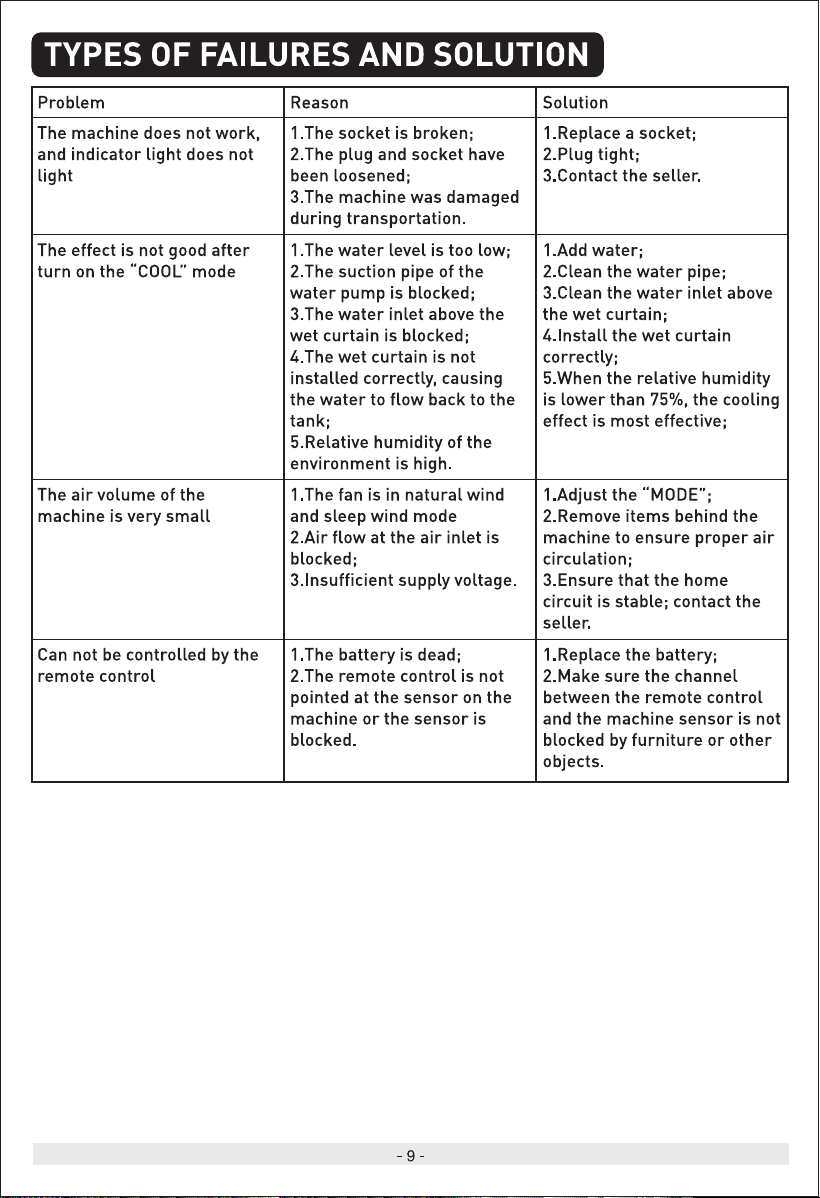
TYPES OF FAILURES AND SOLUTION
Problem
The machine does not work,
and indicator light does not
light
The effect is not good after
turn on the "COOL" mode
The air volume of the
machine is very small
Can not be controlled by the
remote control
Reason
1.The socket is broken;
2.The plug and socket have
been loosened;
3.The machine was damaged
during transportation.
I. The water level is too low;
2.The suction pipe of the
water pump is blocked;
3.The water inlet above the
wet curtain is blocked;
4. The wet curtain is not
installed correctly, causing
the water to flow back to the
tank;
5.ReIative humidity of the
environment is high.
I.The fan is in natural wind
and sleep wind mode
2.Air flow at the air inlet is
blocked;
3.1nsufficient supply voltage
I. The battery is dead;
2. The remote control is not
pointed at the sensor on the
machine or the sensor is
blocked.
-9
Solution
I.RepIace a socket;
2.Plug tight;
3.Contact the seller.
I. Add water;
2.Clean the water pipe;
3.CIean the water inlet above
the wet curtain;
4. Install the wet curtain
correctly;
5.When the relative humidity
is lower than 75%, the cooling
effect is most effective;
1.Adjust the "MODE";
2.Remove items behind the
machine to ensure proper air
circulation;
3.Ensure that the home
circuit is stable; contact the
seller.
I .RepIace the battery;
2.Make sure the channel
between the remote control
and the machine sensor is not
blocked by furniture or other
objects.
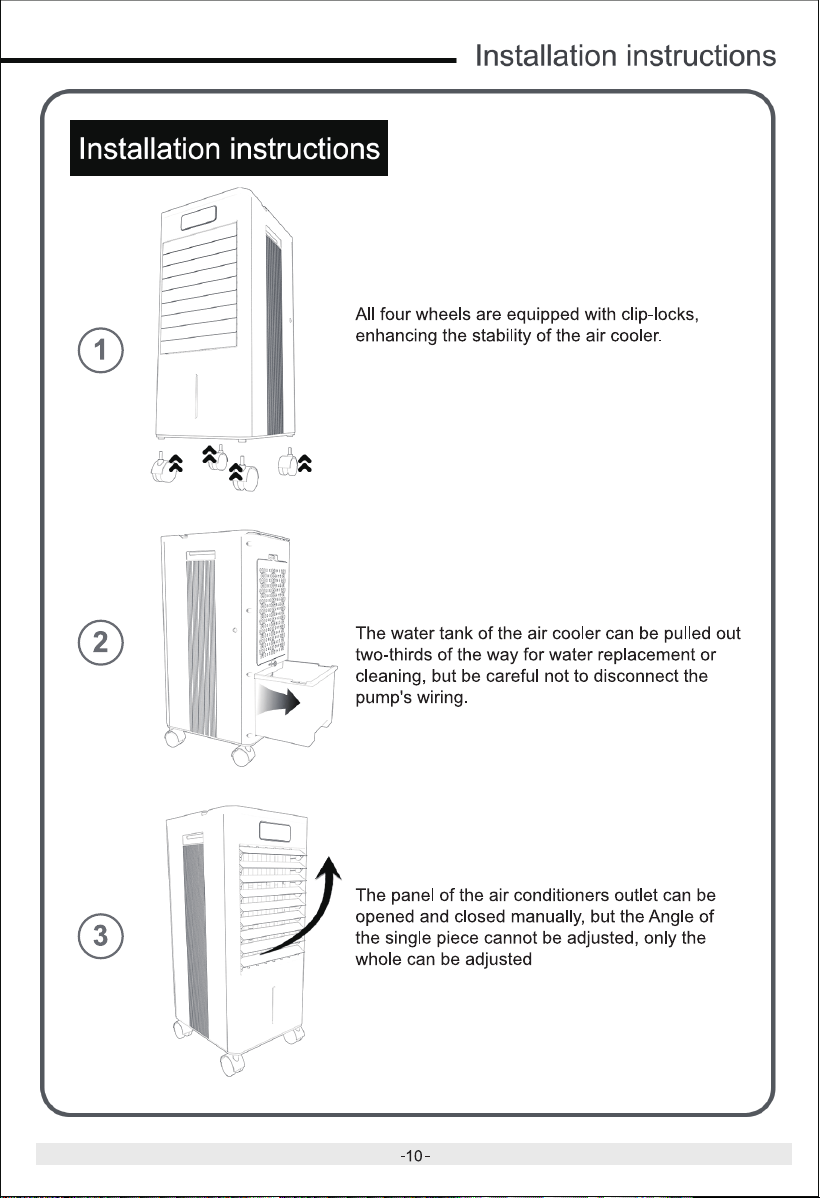
Installation instructions
Installation instructions
2
3
All four wheels are equipped with clip locks,
enhancing the stability of the air cooler.
The water tank of the air cooler can be pulled out
two-thirds of the way for water replacement or
cleaning, but be careful not to disconnect the
pump's wiring.
The panel of the air conditioners outlet can be
opened and closed manually, but the Angle of
the single piece cannot be adjusted, only the
whole can be adjusted
-10-
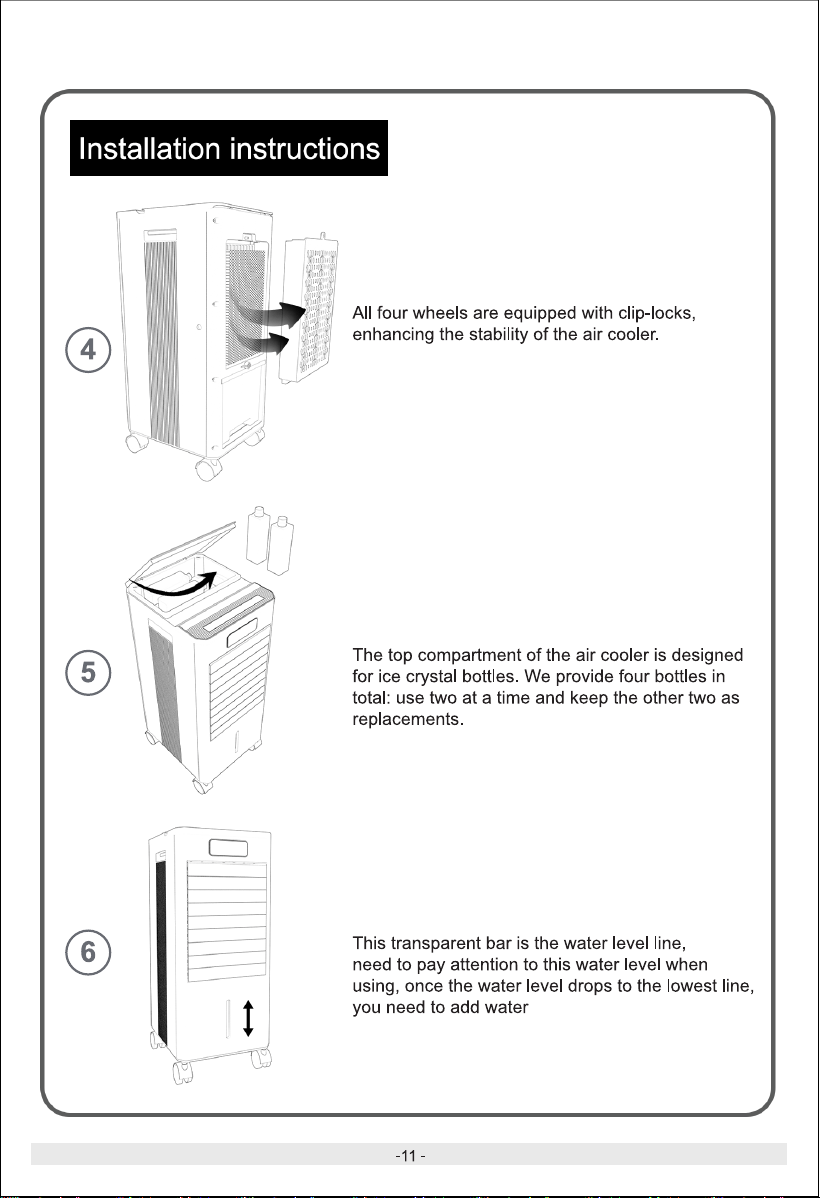
Installation instructions
4
5
6
All four wheels are equipped with clip-locks,
enhancing the stability of the air cooler.
The top compartment of the air cooler is designed
for ice crystal bottles. We provide four bottles in
total: use two at a time and keep the other two as
replacements
This transparent bar is the water level line,
need to pay attention to this water level when
using, once the water level drops to the lowest line,
you need to add water
-11-