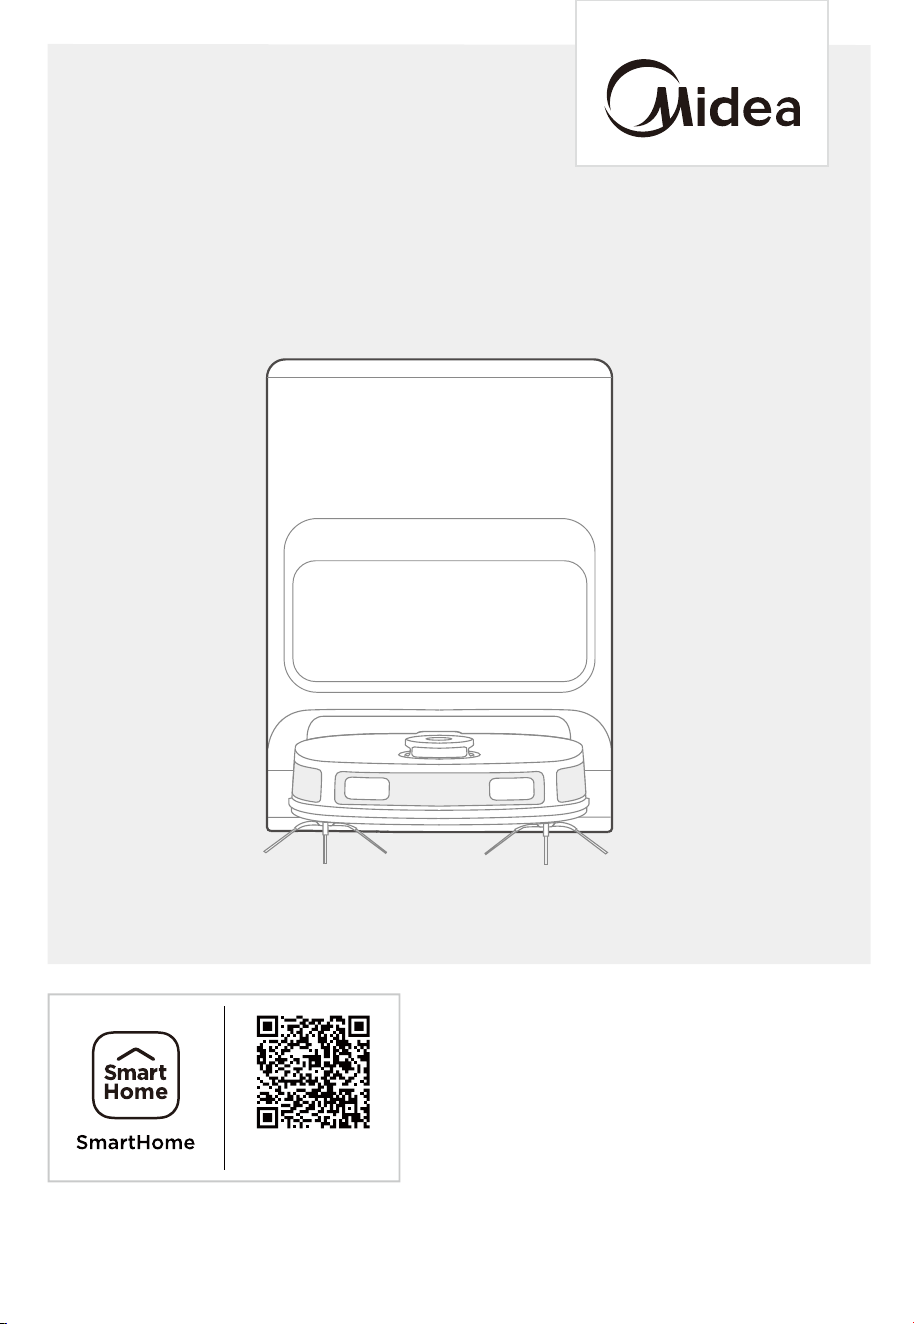
V12
USER MANUAL
Warning notices: Before using this product, please read this manual carefully and keep it for future reference.
The design and specifications are subject to change without prior notice for product improvement.
Consult with your dealer or manufacturer for details.
The diagram above is just for reference. Please take the appearance of the actual product as the standard.
Robot Vacuum Cleaner
Download the app
& activate product

THANK YOU LETTER
Thank you for choosing Midea! Before using your new Midea product, please read
this manual thoroughly to ensure that you know how to operate the features and
functions that your new appliance oers in a safe way.
CONTENTS
SAFETY INSTRUCTIONS
TECHNICAL DATA
IN THE BOX
Components in Package
Introduction to Parts of Robot Vacuum
Introduction to Self-Cleaning Base
PREPARATIONS BEFORE USE
01
06
07
07
08
09
10
Placement of Self-Cleaning Base
Installation of Side Brush to Robot Vacuum
Installation of the Mopping Cloth
Power on & Charging
Environmental Requirements
Preparations of the Water Tank
Setting Up App
Using SmartHome App
10
10
11
11
12
12
13
14

CONTENTS
GETTING STARTED
Start / Pause / Resume
Spot Cleaning
Recharge
Washing the Mopping Cloth
Drying
Status Indicators of Robot Vacuum
Self-Cleaning Base Buttons
Status Indicators of Self-Cleaning Base
MAINTENANCE
Maintenance of Dust Bin (Clean as needed)
Dust Bag Replacement
Maintenance of Main Brush (Weekly cleaning is recommended)
Cleaning of Side Brush (Weekly cleaning is recommended)
Cleaning of Driving Wheel (Weekly cleaning is recommended)
Cleaning of the Base Station
TRADEMARKS, COPYRIGHTS
AND LEGAL STATEMENT
15
15
15
15
16
16
16
17
17
18
18
18
19
20
20
21
23
TROUBLESHOOTING 22
DISPOSAL AND RECYCLING 24
DATA PROTECTION NOTICE 25

SAFETY INSTRUCTIONS
1
Warning for the machine
This appliance can be used by children aged from 8 years and above and
persons with reduced physical, sensory or mental capabilities or lack of
experience and knowledge if they have been given supervision or instruction
concerning use of the appliance in a safe way and understand the hazards
involved.
Children shall not play with the appliance.
Cleaning and user maintenance shall not be made by children without
supervision.
Plug must be removed from the socket-outlet before cleaning or maintaining
the appliance. Switch o before cleaning or maintaining the appliance.
If the supply cord is damaged, it must be replaced by the manufacturer, its
service agent or similarly qualified persons in order to avoid a hazard.
WARNING: For the purposes of recharging the battery, only use the
detachable supply unit provided with this appliance.
Use only with WS2301 supply unit.
This appliance contains batteries that are only replaceable by skilled
persons.
Do not bring the smart robot close to heat source, radiation or burning
cigarette butts. It is strictly forbidden to vacuum the following objects:
1) All liquids such as water and solvents;
2) Lime, cement dust and other construction dust and garbage;
3) Heat generating objects, such as unextinguished carbon butts, cigarette
butts;
4) Sharp fragments, such as glass, etc.;
5) Flammable and explosive items, such as gasoline and alcohol products.
Before using, please remove all fragile items from the ground (such as
glasses, lamps, etc.), and items that may be tangled with the side brush,
Roller brush and drive wheels(such as wires, curtains and other
easily-entangled materials).
Please pay attention to your hair and avoid entanglement on wheels or roller
brushes when using, cleaning and maintaining the robot.
Do not use this product at an altitude of more than 2000m.
1.
2.
3.
4.
5.
6.
7.
8.
9.
2
10.
11.
12.
13.
Correct Disposal of this product.
This marking indicates that this product should not be
disposed of with other household wastes throughout the EU.
To prevent possible harm to the environment or human health
from uncontrolled waste disposal, recycle it responsibly to
promote the sustainable reuse of material resources. To return
your used device, please use the return and collection systems
or contact the retailer where the product was purchased. They
can take this product for environmentally safe recycling.
Warranty Information
The manufacturer provides warranty in accordance with the legislation of the
customer's own country of residence, with a minimum of 1 year (Germany: 2
years), starting from the date on which the appliance is sold to the end user.
The warranty only covers defects in material or workmanship.
The repairs under warranty may only be carried out by an authorized service
centre. When making a claim under warranty, the original bill of purchase (with
purchase date) must be submitted.The warranty will not apply in cases of:
- Normal wear and tear
- Incorrect use, e.g. overloading of the appliance, use of non-approved
accessories
- Use of force, damage caused by external influences
- Damage caused by non-observance of the user
manual, e.g. connection to an unsuitable mains supply or non-compliance with
the installation instructions
- Partially or completely dismantled appliances
Wireless network: 2400-2483.5MHz, MAX POWER:20dBm.
BLUETOOTH MAX POWER:10dBm
To satisfy RF exposure requirements, a separation distance of 20 cm or more
should be maintained between the antenna of this device and persons during
device operation. To ensure compliance, operations at closer than this
distance is not recommended.
CLASS 1 LASER PRODUCT
INVISIBLE LASER RADIATION
(Note: Laser classified to Class 1 according to IEC60825-1:2014)
SAFETY INSTRUCTIONS

3
1.
2.
3.
4.
5.
6.
“IMPORTANT SAFETY INSTRUCTIONS – SAVE THESE INSTRUCTIONS" and
"DANGER – TO REDUCE THE RISK OF FIRE OR ELECTRIC SHOCK,
CAREFULLY FOLLOW THESE INSTRUCTIONS".
This appliance can be used by children aged from 8 years and above and
persons with reduced physical, sensory or mental capabilities or lack of
experience and knowledge if they have been given supervision or instruction
concerning use of the appliance in a safe way and understand the hazards
involved.
Children shall not play with the appliance.
Cleaning and user maintenance shall not be made by children without
supervision.
Plug must be removed from the socket-outlet before cleaning or maintaining
the appliance.
Switch o before cleaning or maintaining the appliance.
If the supply cord is damaged, it must be replaced by the manufacturer, its
service agent or similarly qualified persons in order to avoid a hazard.
Docking base is only applicable to the product V12. (Battery pack
type: Li-ion, DC 14.4 V, 5200 mAh)
The Docking base will automatically start charging after Robot Vacuum
Cleaner returned to the base.
Warning: The battery charger (Docking station) is not intended to charge
non-rechargeable batteries.
Warning for docking station
SAFETY INSTRUCTIONS

4
The product must be powered o before removing the battery.
Please note that do not disassemble the battery by yourself.
If you need to replace it, please contact the after-sales service center.
Please dispose of used battery according to local laws and regulations
Do not dismantle, open or shred the battery.
Do not expose batteries to heat or fire. Avoid storage in direct sunlight.
Do not short-circuit a battery.
Do not store batteries haphazardly in a box or drawer where they may
short-circuit each other or be short-circuited by other metal objects.
Do not subject batteries to mechanical shock.
In the event of a leaking, do not allow the liquid to come in contact with
the skin or eyes. If contact has been made, wash the aected area with
copious amounts of water and seek medical advice.
Do not use any charger other than that specifically provided for use with
the equipment.
Do not use any battery which is not designed for use with the equipment.
Do not mix dierent manufacture, capacity, size or type within a device.
Keep batteries out of the reach of children.
Seek medical advice immediately if the battery has been swallowed.
Keep batteries clean and dry.
Do not leave a battery on prolonged charge when not in use.
After extended periods of storage, it may be necessary to charge and
discharge the batteries several times to obtain maximum performance.
The batteries give their best performance when they are operated at
normal room temperature (20 °C ± 5 °C).
Retain the original product literature for future reference.
The battery may be irreversibly damaged if the battery is in low power for
a long time. It is recommended that the battery retain sucient power
before storage.
1.
2.
3.
4.
5.
6.
7.
8.
9.
10.
11.
12.
13.
14.
15.
16.
17.
18.
19.
20.
21.
Warning for battery
SAFETY INSTRUCTIONS
5
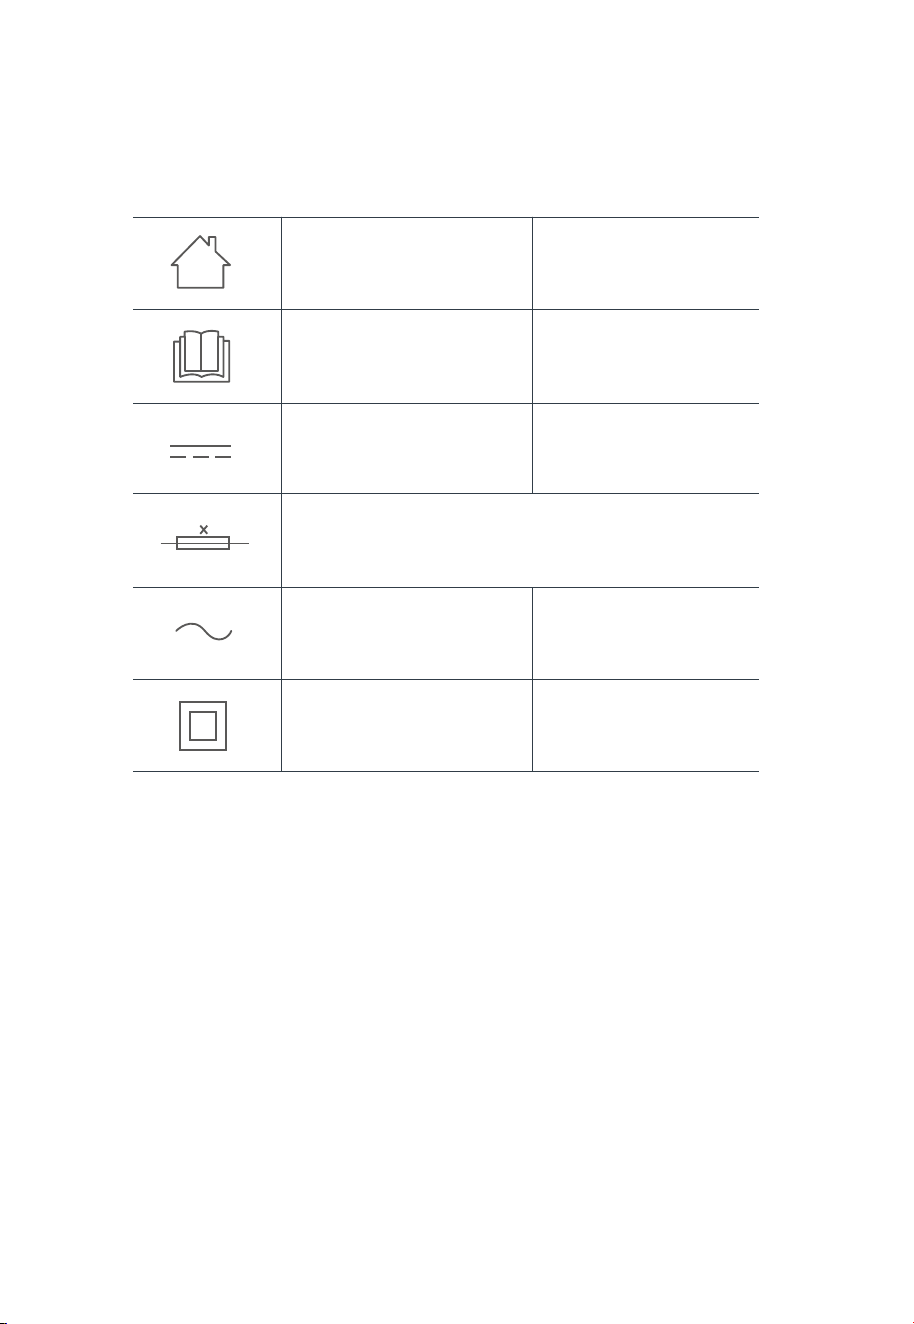
[symbol IEC 60417-5957
( 2004-12 )]
[symbol ISO 7000-0790
( 2004-01 )]
[symbol IEC 60417-5031
( 2002-10 )]
[symbol IEC 60417-5032
( 2002-10 )]
[symbol IEC 60417-5172
( 2003-02 )]
time-lag miniature fuse-link where X is the symbol for the
time/current characteristic as given in IEC 60127
for indoor use only
read operator's manual
direct current
alternating current
class II equipment
SAFETY INSTRUCTIONS
TECHNICAL DATA
6
Product Model: V12
Host Charging Voltage: 19V
Host Rated Voltage: 14.4V
Host Rated Power: 65W
Docking Station Model: WS2301
Docking Station Input: 220-240V~, 50-60Hz
Charging Power: 39.5W
Charging and Hot Drying: 145W
Charging and Cold Drying: 43W
Dust collection mode: 1000W
Docking Station Output: 19V , 2A
Battery Model: BP14452G
Battery Rated Voltage: 14.4V
Battery Capacity: 5200mAh 74.88Wh
Charging Limit Voltage: 16.8V
1.
2.
3.
4.
5.
6.
7.
8.
9.
10.
11.
12.
13.
14.
15.
Midea Robozone Technology Co., Ltd
No.39 Caohu Avenue, Xiangcheng Economic
Development Zone,Suzhou, Jiangsu, China
MIDEA HOME APPLIANCES UK LTD
Ground Floor, Conavon Court, 12 Blackfriars St,
Manchester, UK, M3 5BQ
Note: You can also view the instructions on the app.
IN THE BOX
7
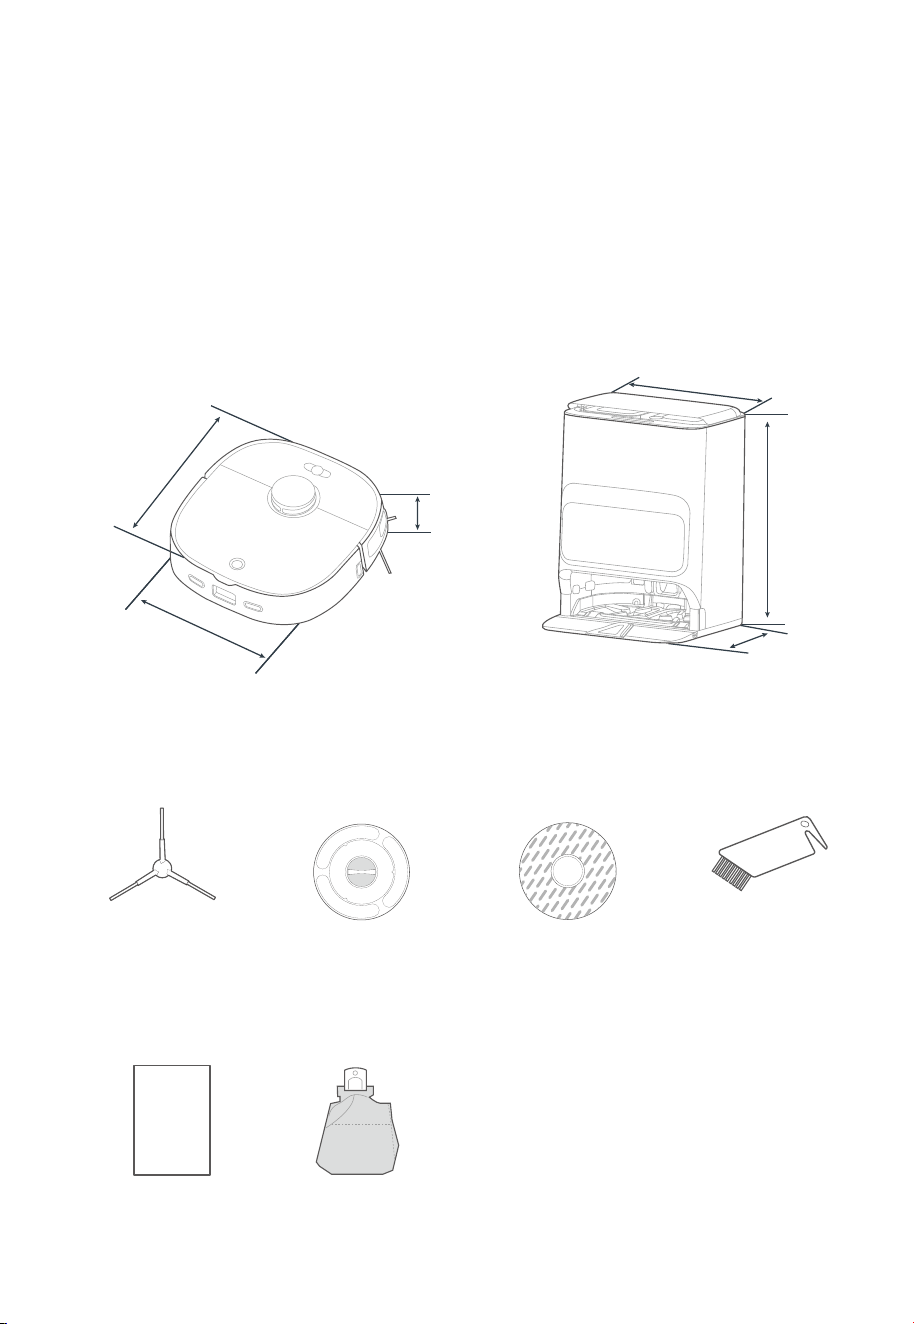
Components in Package
Robot Vacuum Self-Cleaning Base
567mm
412mm
379mm
342.5mm
350mm
108mm
Side Brush x2 Mopping Holder x2 Mopping Cloth x2 Cleaning Brush
Instruction Manual Dust Bag
IN THE BOX
8
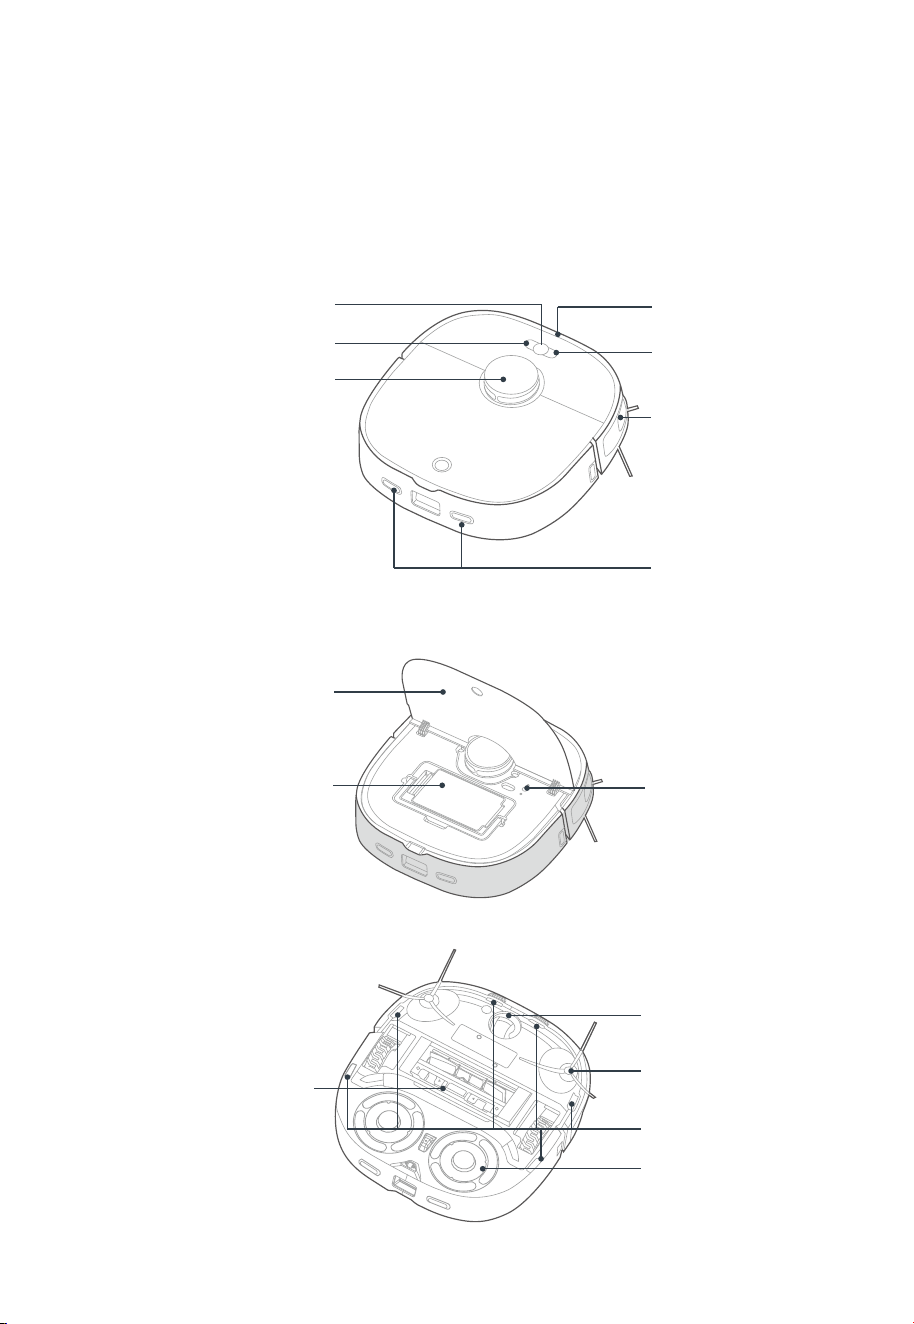
Introduction to Parts of Robot Vacuum
Main View (with lid closed)
Start/Pause Button
Spot Cleaning Button
LiDAR Sensor
Bumper
Docking Button
Edge Sensor
Charging Contacts
Main View (with lid open)
Lid
Dust Bin
Wireless Network
Pairing Button
Bottom View
Cover Plate of Main Brush
Omni-directional Wheel
Side Brush
Cli Sensor
Mopping Holder

Introduction to Self-Cleaning Base
IN THE BOX
9
Main View
Top View
Base Station Lid
Indicator & Button Area
Dust Collector
Mop Cleaning Tray
Cleaning Tray Release Button
(with a removable tray)
Waste Water Tank
(Grey, on the left)
Clean Water Tank
(Transparent, on the right)
Start/Pause Button
Indicator Area
Recall/Exit Button
Power Cord
Storage Slot
Charging
Contacts
Back View Inlet
Notes
PREPARATIONS BEFORE USE
10
1. Do not expose the base under direct sunlight.
2. Do not cover the signal transmission area of the self-cleaning base with objects such as stickers.
3. Do not place the base on floors with carpet or other soft coverings.
4. Please keep the charging area dry.
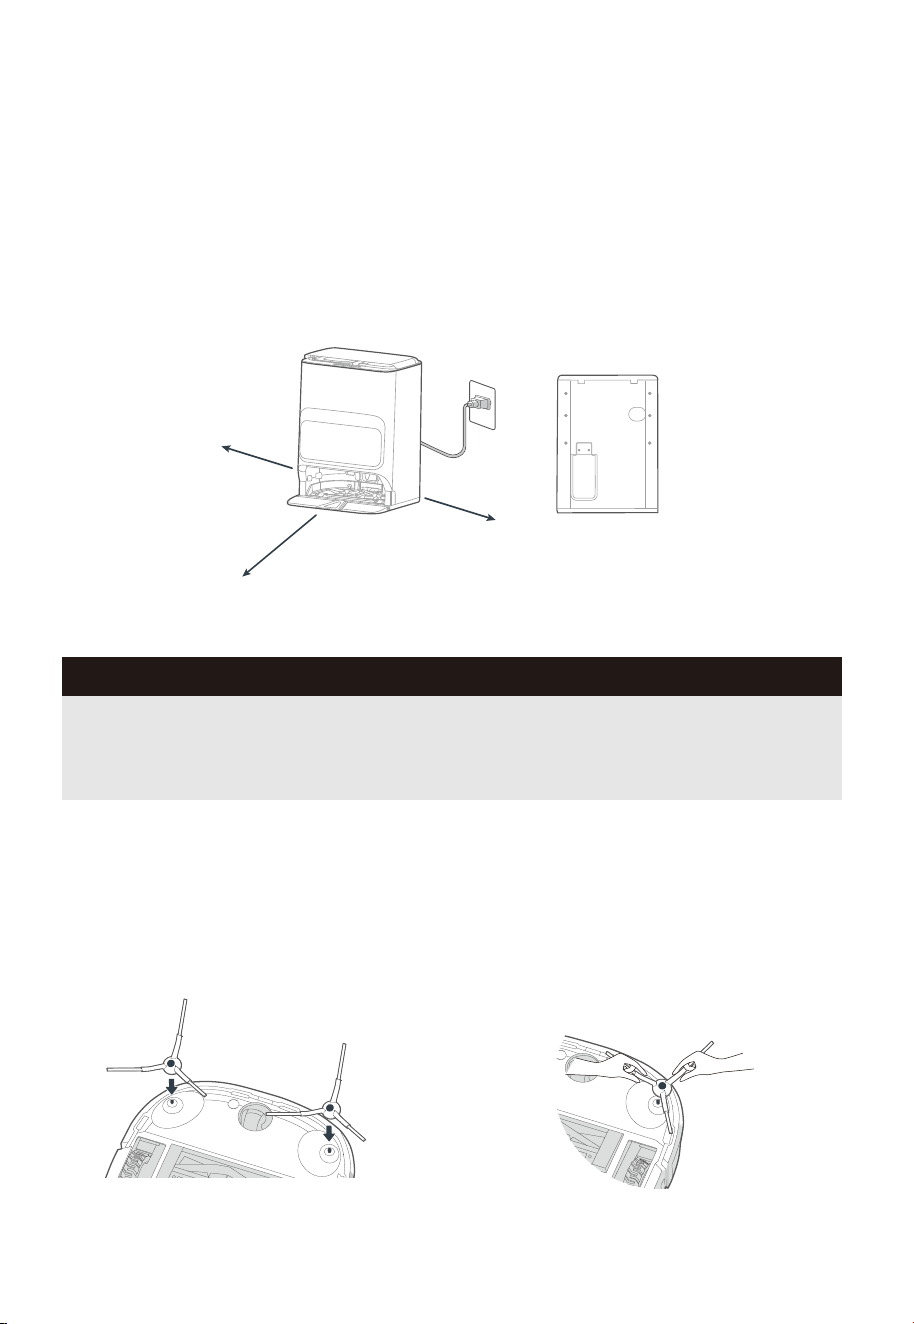
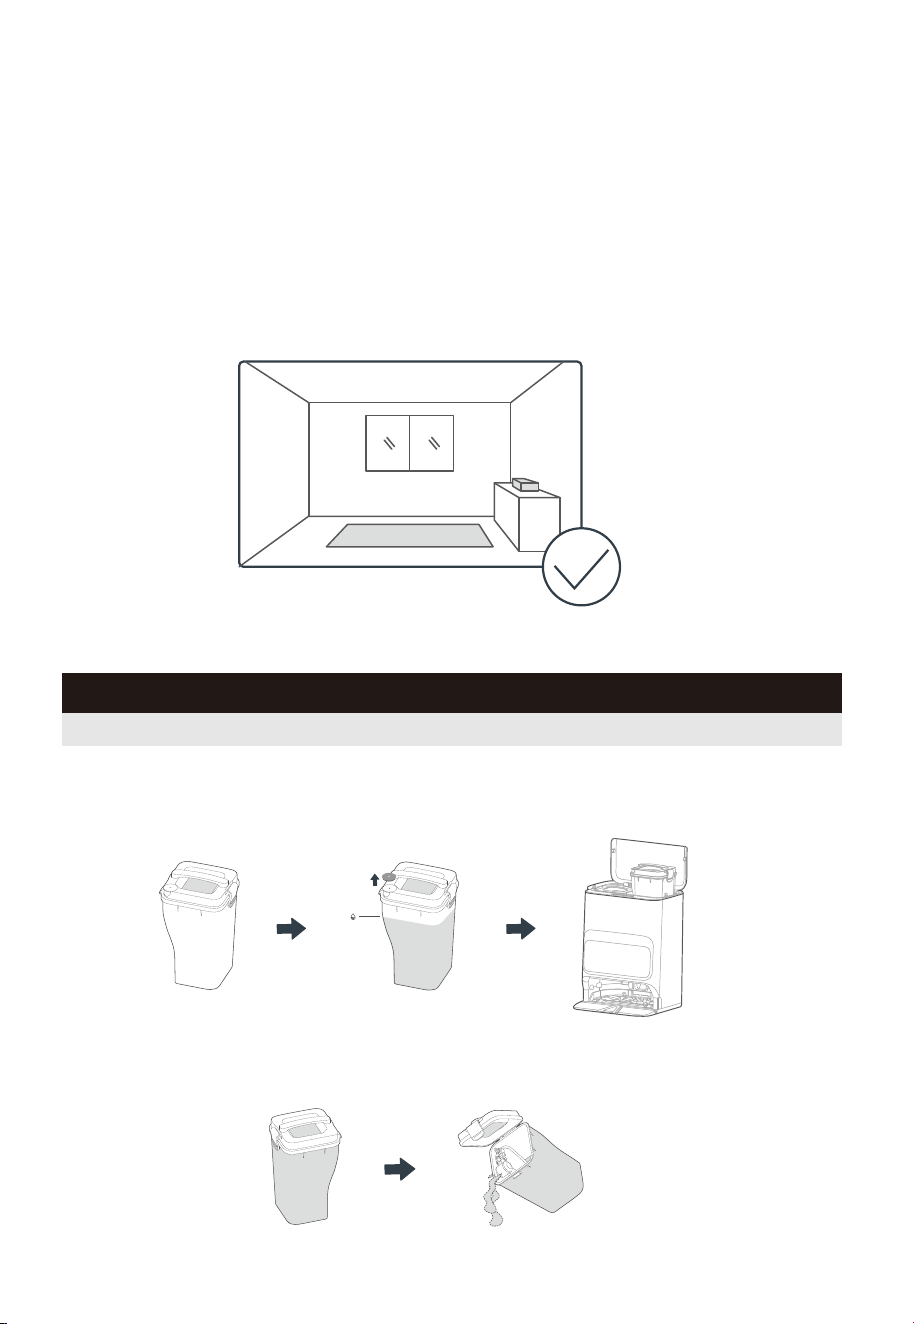
Placement of the Self-Cleaning Base
Place the self-cleaning base on a hard surface against a wall, with clear space of at least 0.5
meters on the left and right sides and 1.3 meters in front.
Plug the power cord into an electrical outlet. Then wind the excess cable around the power cord
storage slot on the back to avoid aecting the proper function of the robot vacuum.
1.
2.
Installation of Side Brush to Robot Vacuum
Turn the main unit over. Attach the side
brush to its color-matched post and press
down until they fit into place.
1. To remove the side brush, grab the
rubber-coated legs of the side brush with
both hands (be careful not to pull the hair
bundle vigorously) and pull it out.
2.
0.5m
0.5m
1.3m
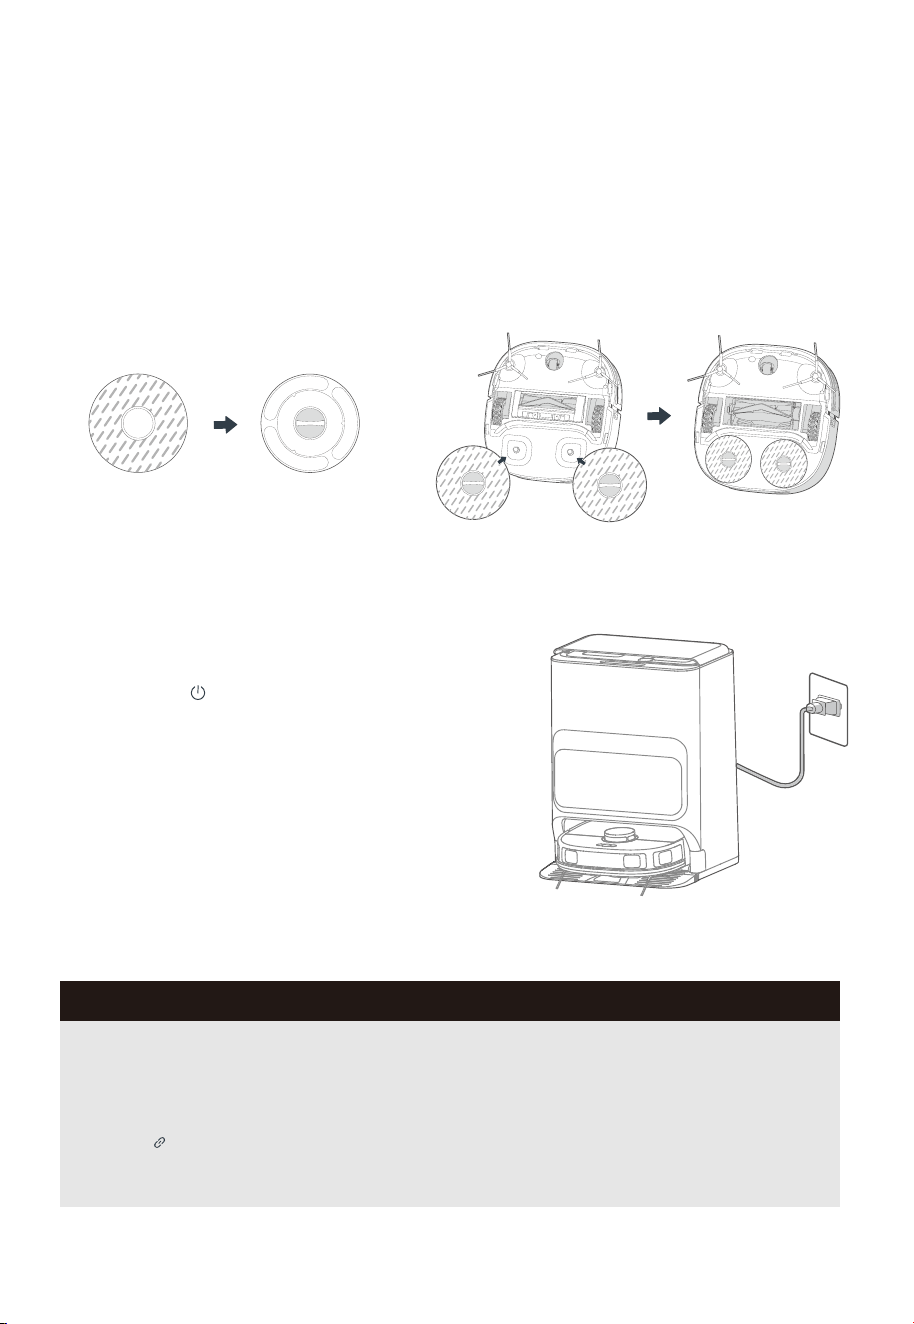
Power on & Charging
Press and hold " " button to power on the robot
vacuum. After the power indicator turns on, put the
robot vacuum into the self-cleaning base for charging, as
shown in the figure. To ensure that the robot vacuum is
always ready for use, keep it in the charging state.
PREPARATIONS BEFORE USE
Installation of the Mopping Cloth
As shown in the figure, align the mopping
cloth centrally with the mopping holder and
apply it evenly.
1. Press the mopping module into the robot to
complete the installation.
2.
Notes
1. If you manually put the robot vacuum into the base, ensure that the side with the charging
contacts is placed inside.
2. Ensure that the robot vacuum is fully charged before first use.
3. After the robot vacuum is manually put into the base, the robot vacuum will automatically
power on and pair with the base.
4. If the " " indicator light shows steady-on white light, it means the robot is successfully
connected to the self-cleaning base. If the light flashes quickly, see "Common Problems".
11
PREPARATIONS BEFORE USE
12
PREPARATIONS BEFORE USE
Environmental Requirements
Before using the robot vacuum, please make sure the area to be cleaned is free from items
that may be tangled/stuck with the robot vacuum (such as wires, hard objects, iron nails,
glasses and other sharp fragments), and items that may be dragged or knocked down by the
robot vacuum (such as valuable objects, fragile objects and dangerous objects likely to fall).
This helps ensure that the robot vacuum does not cause personal injury or property damage.
Preparations of the Water Tank
To empty the dirty water, remove the Waste water tank on the left, open the lid, and pour
out the water.
2.
To add clean water, remove the clean water tank on the right, open the lid, and fill the tank
with clean water to the MAX mark. Then reinstall the tank.
1.
MAX
Notes
Do not add hot water or unauthorized detergent into the tank to prevent clogging.
PREPARATIONS BEFORE USE
13
Setting Up App
Notes
1. The app supports iOS versions 13.0 and above and Android versions 8.0 and above. The app
is not available for use with tablets.
2. This model does not support a WEP encrypted router.
3. The home wireless network name and password must contain only letters, numbers and
standard symbols.
4. The network accessing configuration of the robot requires a wireless network of 2.4GHz
frequency range.
5. The robot must be connected to wireless network to enable controlling the robot using the
app. Once you have set up the app and connected the robot to wireless network, the app can
be used to control the robot in wireless network/2G/3G/4G/5G network environment.
6. If your home wireless network password is changed or the router is replaced, the robot will
show as oine in the app; you will need to reconnect the robot to wireless network following
the wireless network connection instructions.
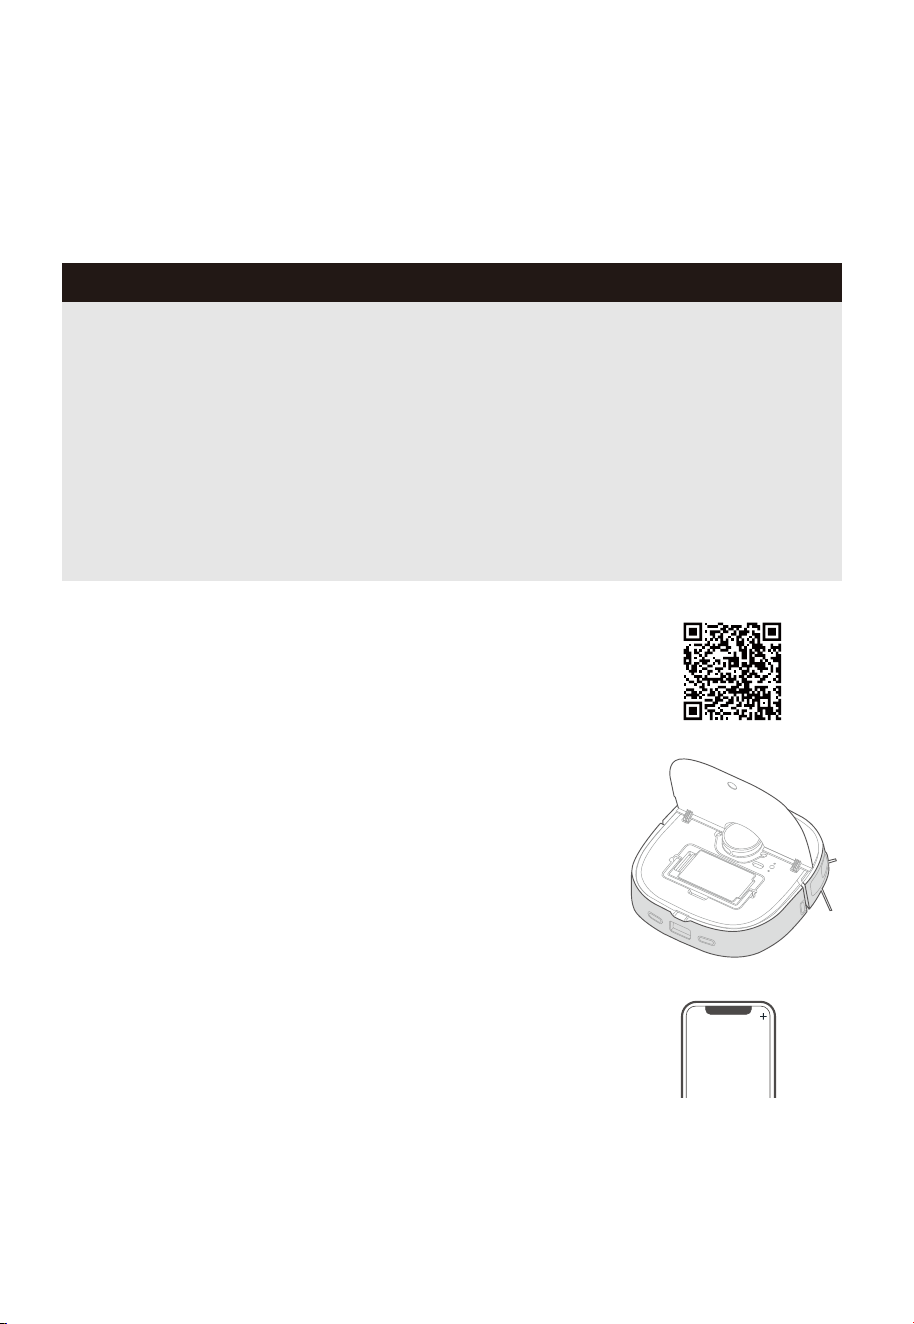
Download the App
Scan the following QR code or search for SmartHome* to
download the App. Follow the instructions in the app to create
a new account or login.
Connect the Device
1. Connect your robot to the network that you plan to use for
operating the robot. Make sure the robot is placed within good
wireless network coverage.
2. After assembling and powering on the robot, open the robot
cover. Press and hold the wireless network pairing button for 3
seconds until you hear a beep. The network indicator light
should start flashing. Follow instructions in app for next steps.
Add Device
Click “+” or "Add Device" in the App to add the device.
Choose V12.
Notes
PREPARATIONS BEFORE USE
14
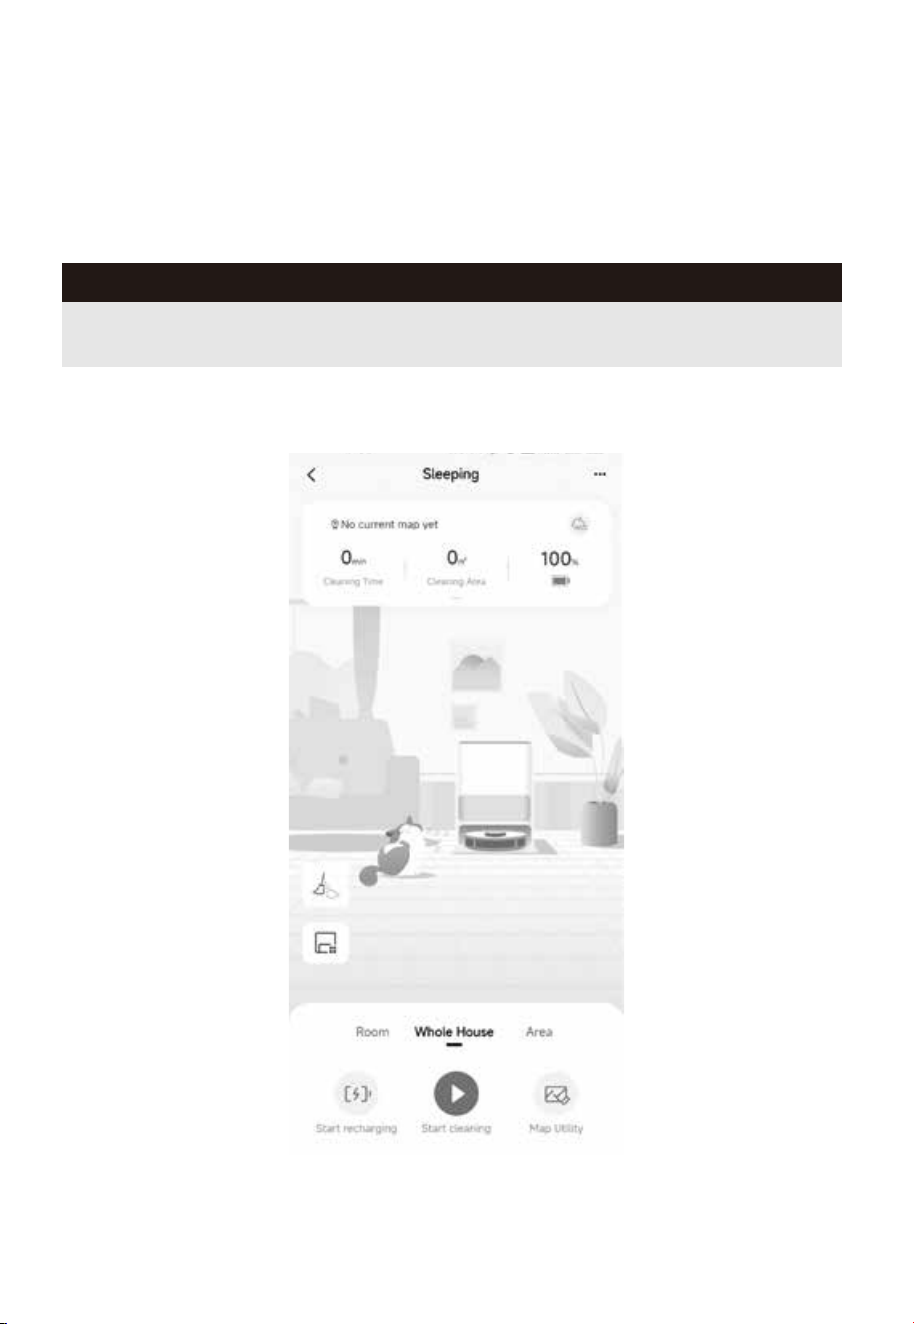
Using SmartHome App
The content of the App is subject to the upgraded version of the App. The interface is only for
reference, and will be updated continuously.
GETTING STARTED
15
Notes
1. Make sure that the mopping cloths are installed properly before use, otherwise the robot will
not start normally.
2. This product is intended for indoor use only. Do not use it outdoors.
3. Do not submerge the robot vacuum in water. Doing so may damage the equipment, causing
a short circuit or current leakage.
1.0m 1.0m
1.0m 1.0m
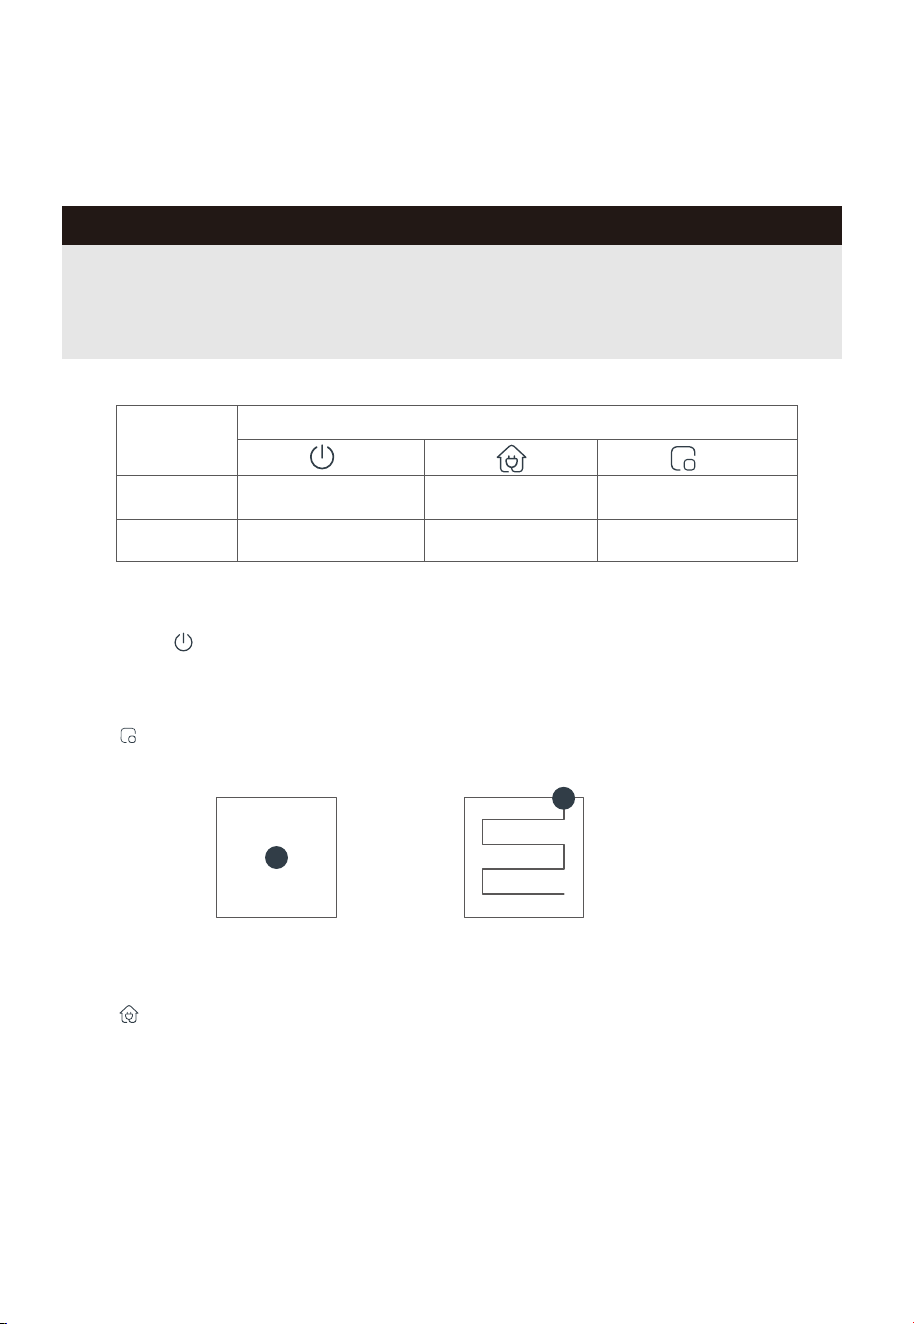
Spot Cleaning
Press " " briefly to start spot cleaning. The robot vacuum will clean a square-shaped area
(1.0m x 1.0m) with the current location as the center.
Press " " briefly. The robot vacuum will move from the current location to the self-cleaning base
for charging.
Recharge
Start / Pause / Resume
Briefly Press " " to start/pause/resume cleaning or use your App to control.
Operation
Briefly Press
Start/resume/pause Return to the base Start spot cleaning
Shut down
/
Press and
hold
Button
Enable/Disable child lock
GETTING STARTED
16
Washing the Mopping Cloth
The robot vacuum returns to the self-cleaning base to wash the mopping cloth after mopping an
area of 10 square meters. You can manually specify the washing frequency in the app as required.
After completing a mopping task, the robot vacuum will return to the self-cleaning base and
automatically wash the mopping cloth. (The washing cycle takes some time to complete.)
Emptying
After cleaning, the robot will return to the self-cleaning base and automatically begin self-emptying.
More self-emptying settings can be enabled in the app, such as manual emptying. Avoid manual
emptying frequently.
After the robot finishes mop washing, it will automatically initiate mop drying process (hot air drying,
by default). You can modify the functions in the app.
Mop Drying
Notes
1. Do not remove the robot vacuum from the self-cleaning base when it is washing the mopping
cloth. Doing so may damage the water refilling pipe.
2. Do not move the self-cleaning base after the robot vacuum starts cleaning.
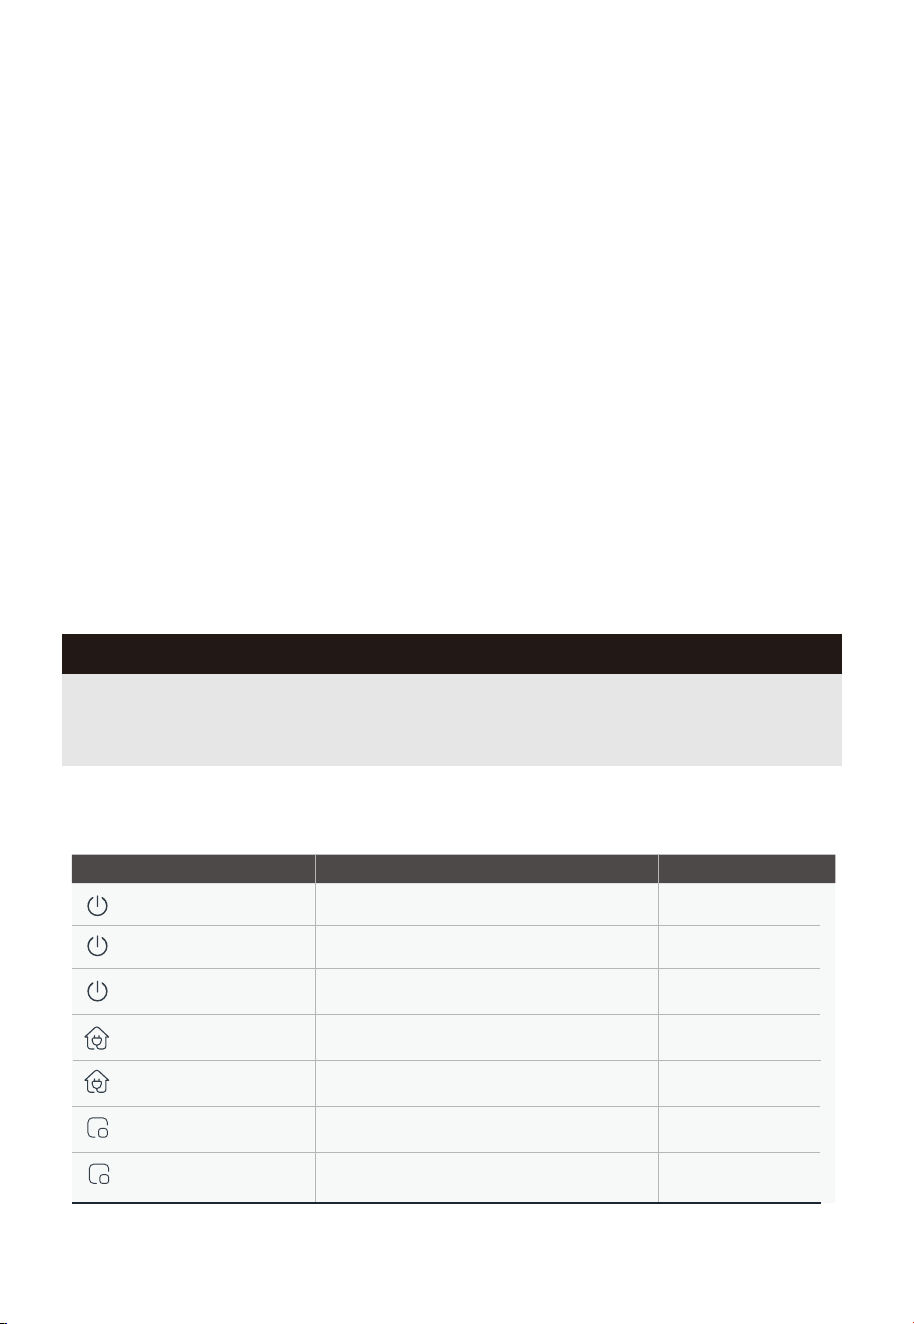
Status Indicators of Robot Vacuum
Indicator Light Status
Steady-on white light
Charging
Flashing red light
An error occurs
Steady-on white light Docking
Steady-on red light Low battery and docking
Steady-on blue light
Zone cleaning--mopping
Actions
/
/
Refer to "Common
Problems"
/
/
/
Standby/Sweeping/Docking
Flashing white light
Steady-on white light
Zone cleaning--vacuuming
/
GETTING STARTED
17
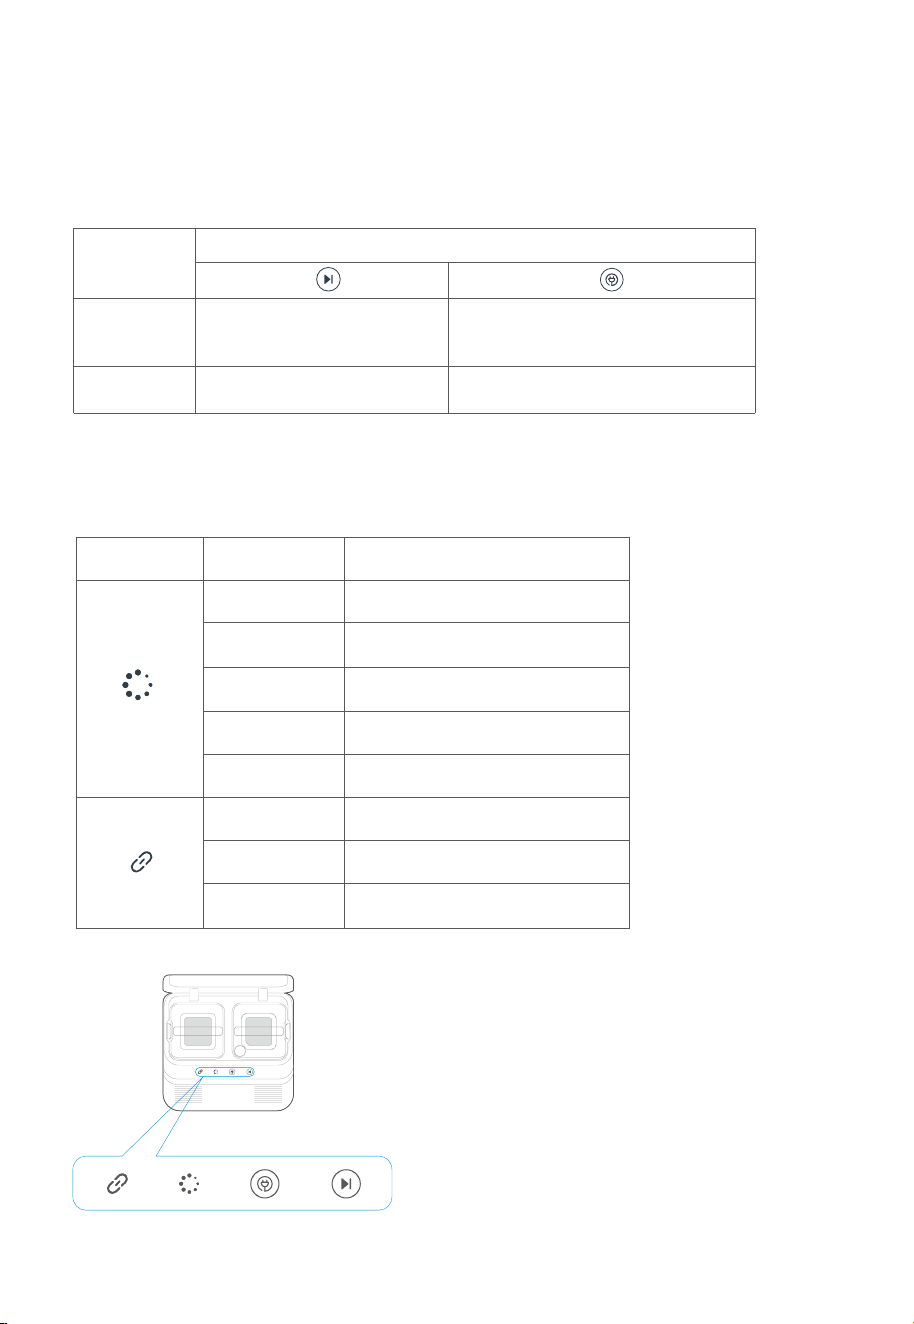
Self-Cleaning Base Buttons
Operation
Briefly Press
Start/resume/pause
Recall the robot vacuum to the
base/Enable the robot vacuum
to exit the base
Stop a cleaning task
Press and
hold
Button
/
Status Indicators of Self-Cleaning Base
Indicator Light Pattern Status
Flashing white Robot is charging
Steady-on white
light
Robot is cleaning or docking
Steady-on blue
light
Robot is going back to wash the
mops
Steady-on red
light
Battery level < 20%, robot is going
to recharge
Flashing red
There is an error. See “Common
Problems”.
Steady-on white
light
Robot is successfully connected to
the self-cleaning base
Flashing white
softly
Robot is connecting to the
self-cleaning base
Flashing white
quickly
Robot is disconnected from the
self-clean ing base
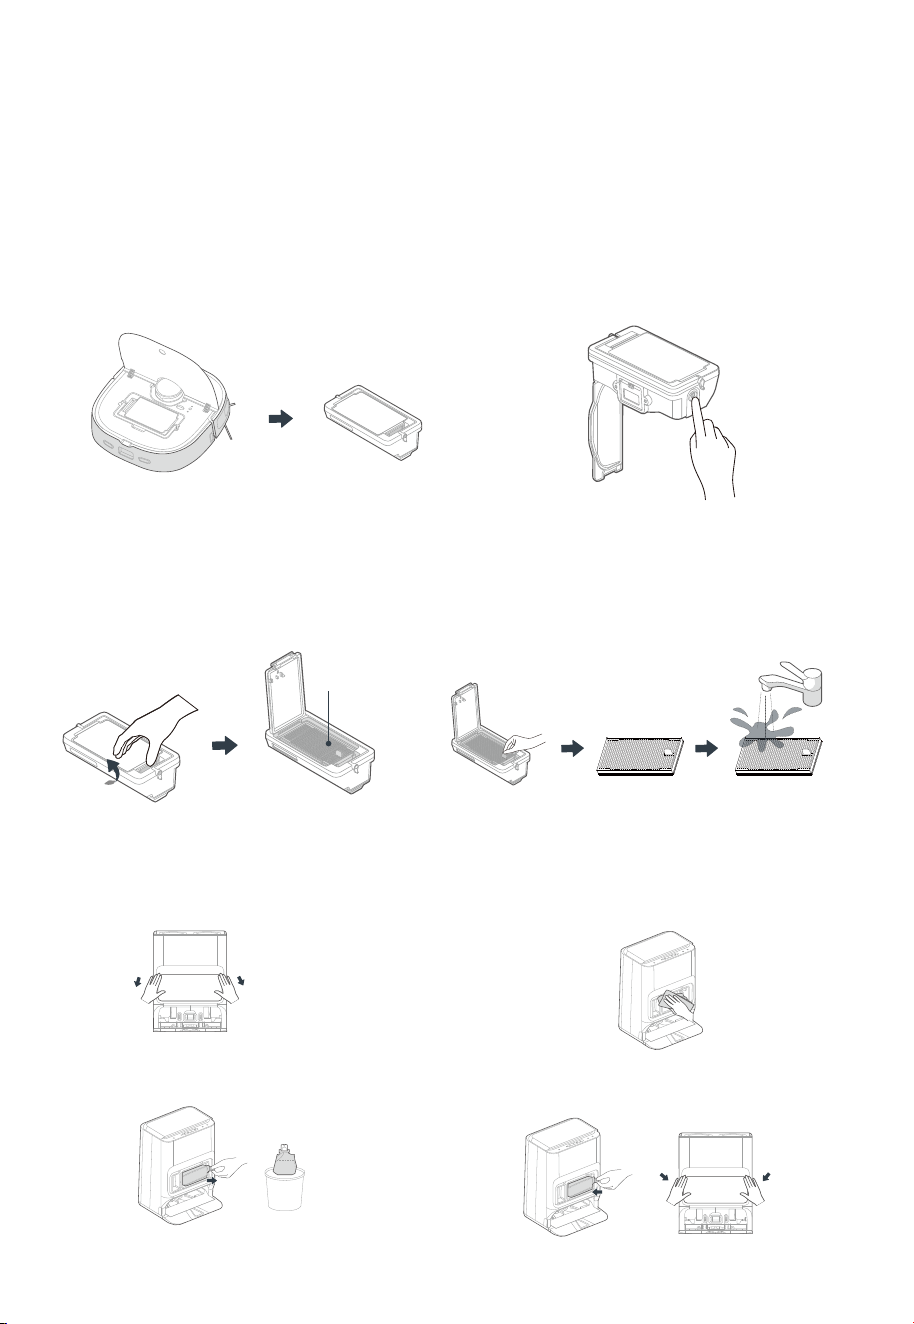
Maintenance of Dust Bin (Clean as needed)
MAINTENANCE
Open the upper lid of the robot vacuum.
Then, lift the handle of the dust bin and pull
the bin out.
1. Press the Opening button on the side of
the dust bin to open it. Then, dispose of
the dust.
2.
Press the buckle on the cover plate of the
dust bin to open the filter mesh cover.
3. Pinch the filter mesh and lift it up.
You can wash the filter mesh in water,
but make sure it is dry before putting it
back in the dust bin. To ensure optimal
filtering, it is recommended to clean and
replace the filter mesh regularly.
4.
Dust Bag Replacement
Remove the dust collector cover.
1.
Pull the used disposable dust bag out of
the dust collector.
2.
You can use a soft, dry cloth to wipe and
clean the dust collector.
3.
Place a new dust bag, sliding the paper
card into the rails. Re-install the dust
collector cover.
4.
18
Filter Mesh
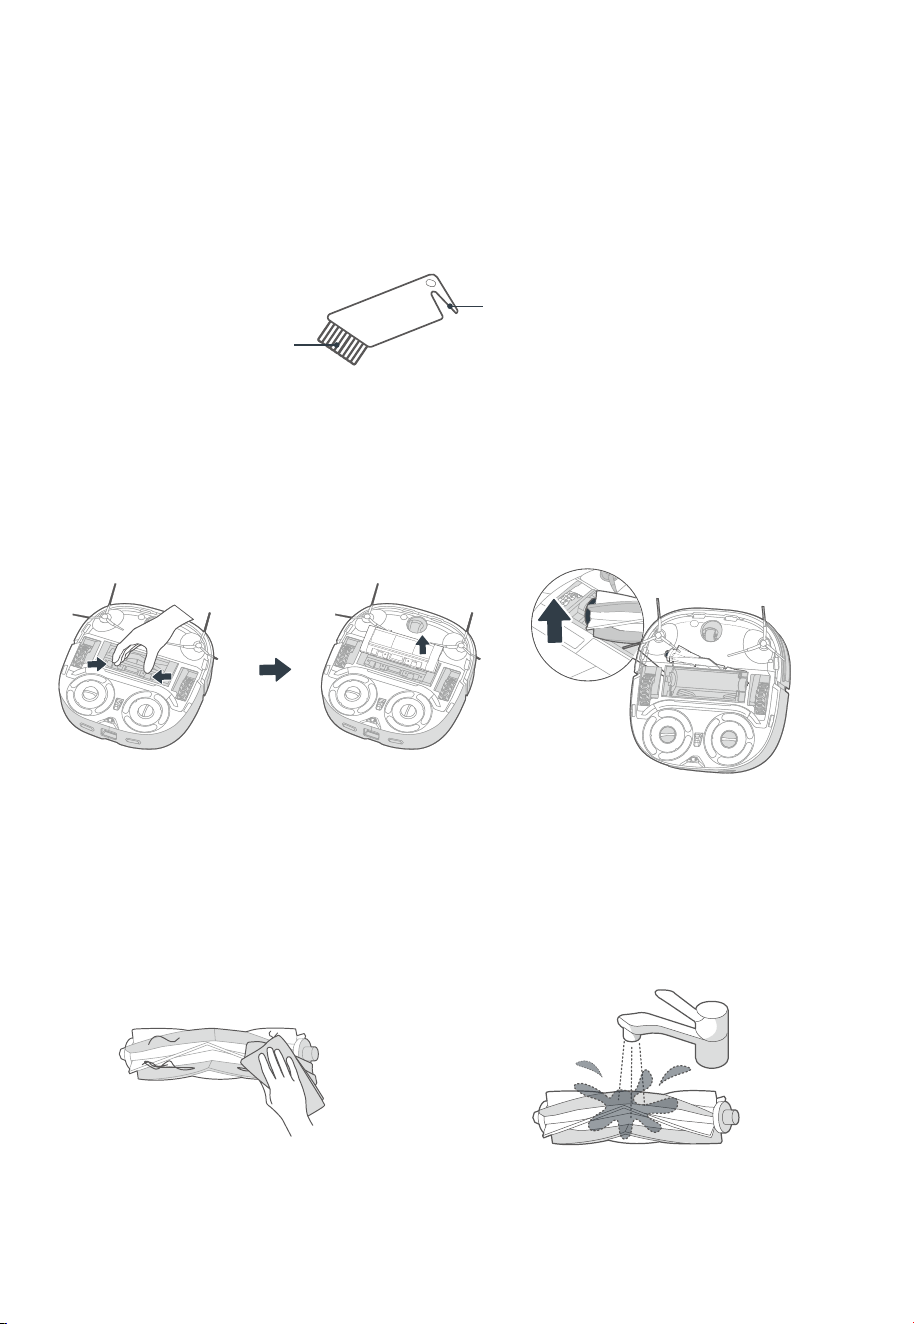
MAINTENANCE
How to use the cleaning brush:
ŗ Cut the hair entangled on the main brush body with the blade.
Ř Brush o the cut hair with the brush.
Brush
Blade
Maintenance of Main Brush (Weekly cleaning is recommended)
Press and hold the left and right release
buttons on the cover plate of the main
brush and lift out the cover plate.
1. Lift the red side of the main brush to take
it out.
2.
Cut any hairs wrapped around the main
brush by using the cleaning brush in the
accessories box. Then, clean the main
brush and its cover plate by using the
cleaning brush or a soft cloth.
3. Wash the main brush with water and dry
it. After cleaning, install the main brush
and then the cover plate into the robot
vacuum.
4.
19
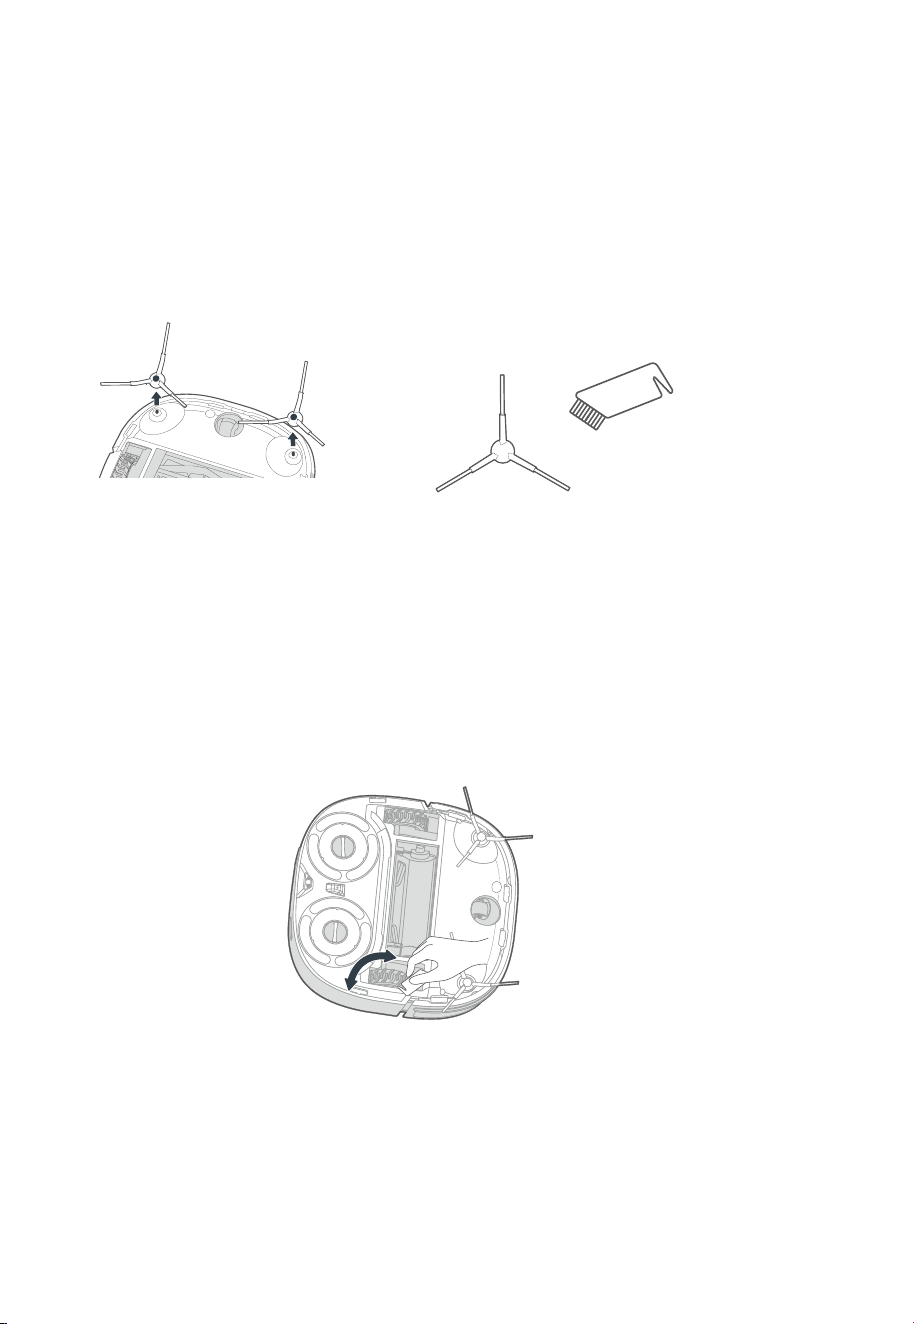
20
Pull out the side brush. Remove dust on the side brush.
Cleaning of Side Brush (Weekly cleaning is recommended)
Cleaning of Driving Wheel (Weekly cleaning is recommended)
Rotate the driving wheel back and forth to remove debris and clean it with the cleaning brush
in the accessories box or a soft cloth.
MAINTENANCE
21
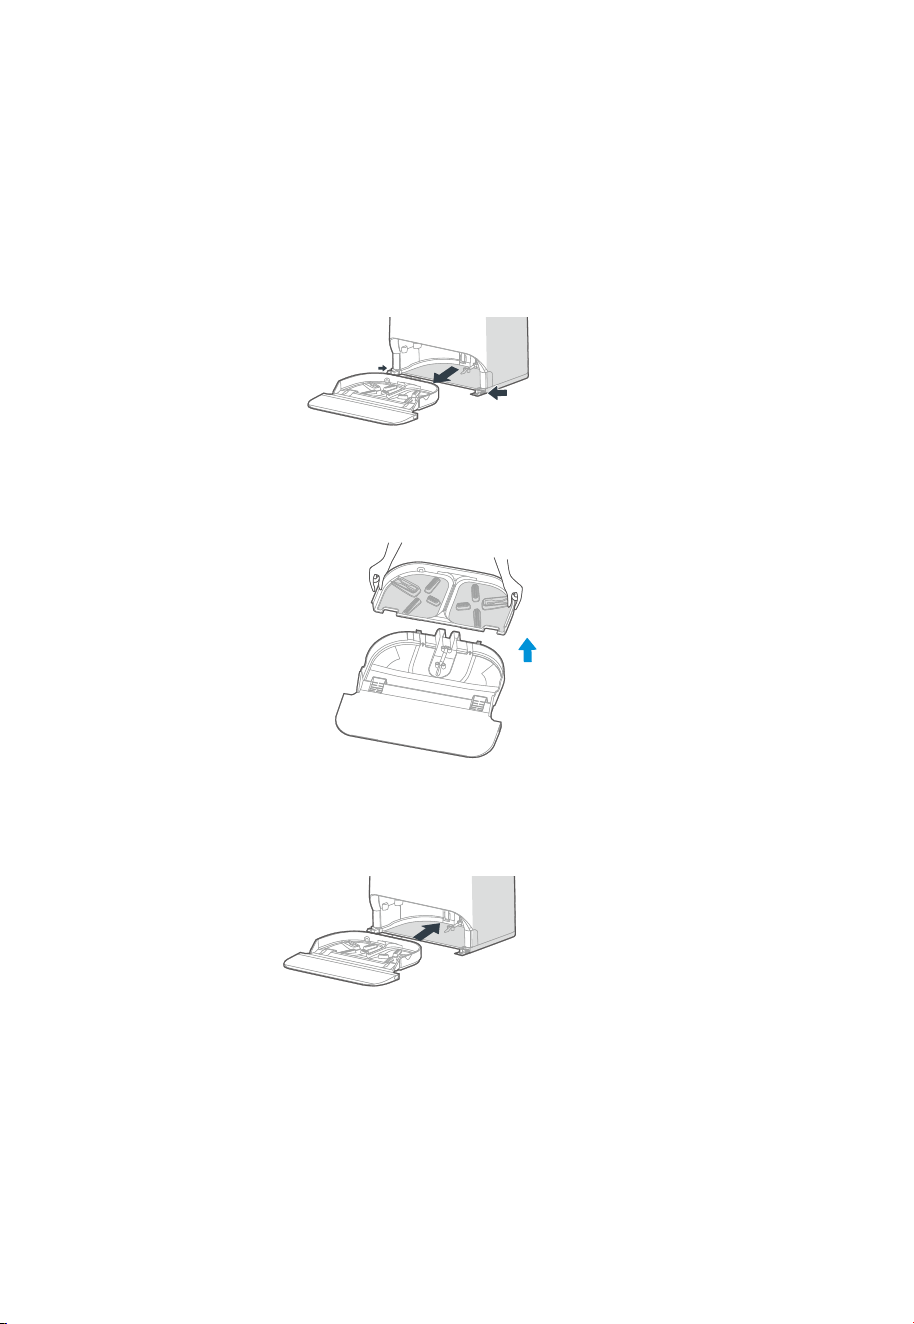
MAINTENANCE
Cleaning of the Base Station
Press and hold the left and right release buttons on the bottom of the self-cleaning base and
take out the mop cleaning tray.
1.
Take out the small tray and rinse both parts with clean water. Make sure the cleaning tray is
completely dry before placing it back.
2.
Put the mop cleaning tray back into the base.
3.
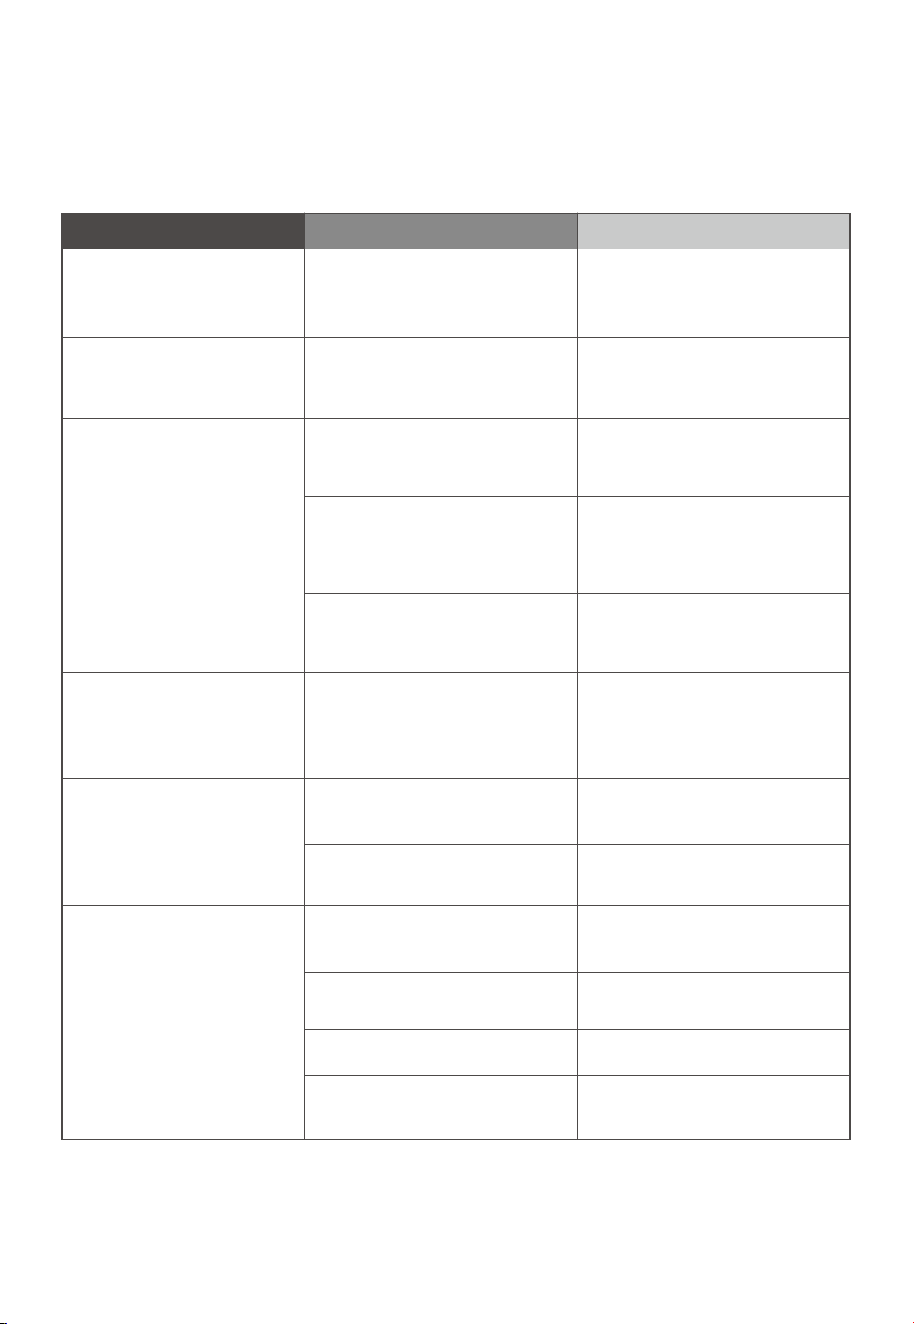
22
The robot vacuum
cannot be recharged
Faults
Possible Causes
The robot vacuum is not in
contact with the charging
contacts.
Place the robot vacuum in front of
the self-cleaning base and press
the docking button.
Actions
The robot vacuum
cannot return for
charging
The self-cleaning base is
placed improperly.
Place the self-cleaning base on a
level surface that is free of
obstacles.
The robot vacuum is
entangled/stuck by objects
(such as cords)on the floor.
Please put away the scattered
cords and objects on the floor.
The robot vacuum
is trapped
The side brush/main brush is
stuck so that the robot vacuum
cannot move normally.
Remove the objects that cause the
main brush/side brush to be stuck,
place the robot vacuum on flat
ground, and power on the robot
vacuum the docking button.
The robot vacuum is stuck by
obstacles.
Action 1: Remove the obstacles in
time.
Action 2: Set restricted zones in
the app.
The cleaning task has
not been completed,
but the robot vacuum
returns for charging
or stops working
The robot vacuum is out of
power.
Let the robot vacuum return for
charging.
The cleaning schedule is
cancelled in the app.
Reset the cleaning schedule in
the app.
The robot vacuum
fails to clean as
scheduled
The robot vacuum is in Do Not
Disturb mode.
Disable Do Not Disturb or adjust
the Do Not Disturb time period.
The robot vacuum
moves backward
The protective cover of
navigation module is stuck.
Gently tap the protective cover
and remove the small objects.
There is an obstacle ahead. Remove the obstacle in time.
The front bumper is stuck.
Gently tap the front bumper to
remove foreign matters.
There is dust accumulated
in the cli sensors.
Clean the dust accumulated on
the surface of cli sensor.
TROUBLESHOOTING
23
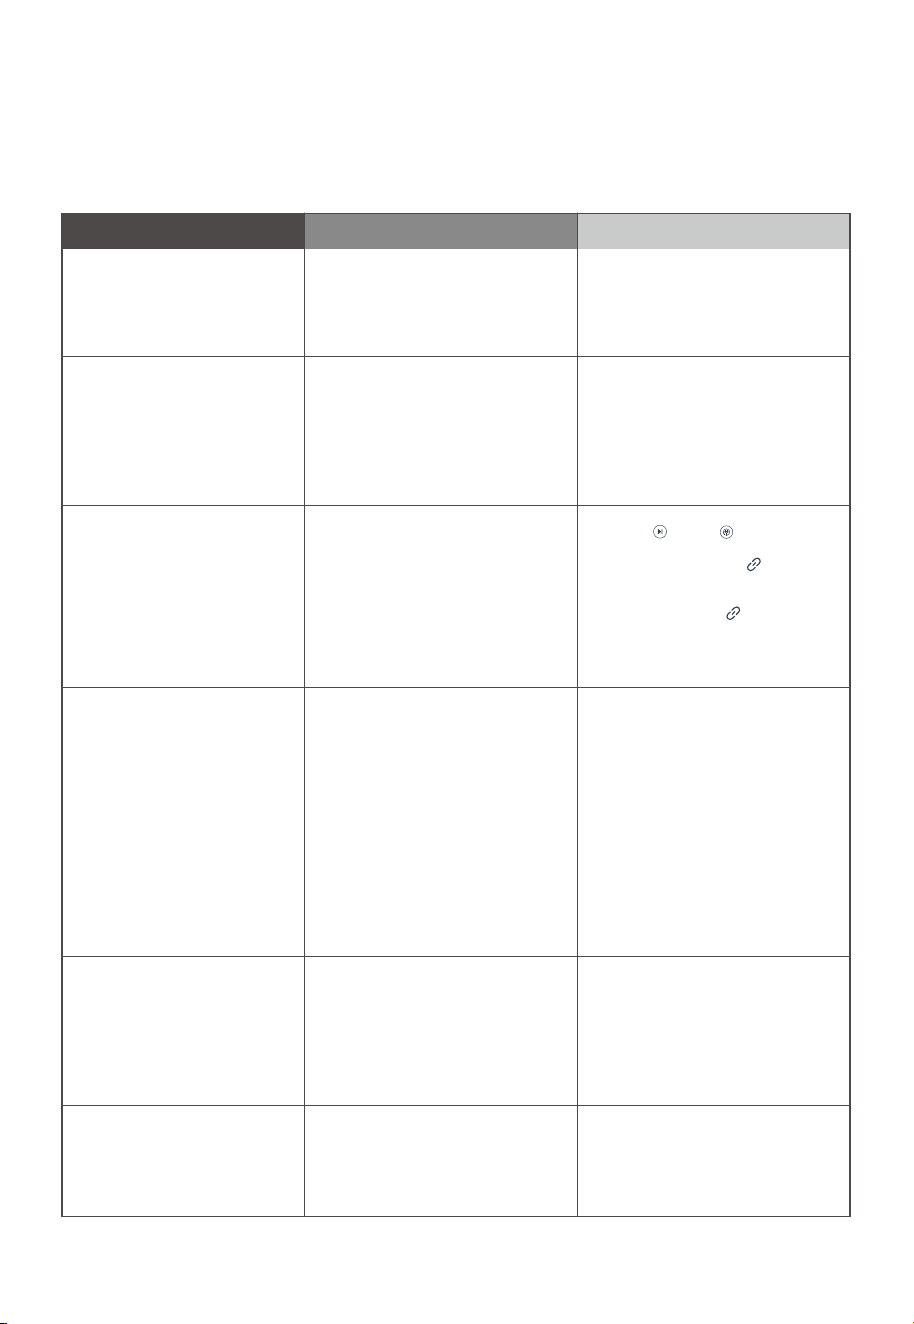
TROUBLESHOOTING
Faults
Possible Causes
Actions
The robot vacuum has
no sound
· The sound is set to mute or low
volume.
· The robot vacuum is in "Do Not
Disturb Mode".
· Turn up the volume.
· Turn o "Do Not Disturb Mode"
The app operation
response delays
Please check whether the
following problems occur:
· The network is busy.
· wireless network signal
reception of the phone is poor.
· The network bandwidth is
insucient.
Please try the following actions:
· Restart the router and reduce
the number of users accessed.
· Check the phone settings.
· Increase the network
bandwidth.
The app shows that
the connection is
abnormal and requires
reconnection
The robot vacuum is disconnected
from the self-cleaning base.
Press " " and " " on the
self-cleaning base simultaneously
for 5 seconds. The " " light will
flash when the robot vacuum is
connecting to the self-cleaning
base. When the " " connection
succeeds, you will hear a beep
sound and the light on the
self-cleaning base will stay on.
The APP shows that
the connection is
disconnected
Please check whether the
following problems occur:
· The phone is not connected
to the network properly.
· The router is not working
properly.
· The robot vacuum is not
powered on.
· The wireless network info
of the device is cleared.
· The wireless network password
or network has been changed.
Please try the following actions:
· Reconnect the phone
network.
· Restart the router.
· Turn on the power switch of
the robot vacuum.
· Add new appliance in the
APP.
· After the system is started, press
the wireless network pairing
button for 3 seconds. Release the
button until you hear a beep
sound.
· Add the device again according
to instructions on the phone.
After the robot vacuum
returns to the
self-cleaning base, the
mopping cloth is not
washed automatically
· The clean water tank is empty.
· The used water tank is full.
· Take out the clean water tank
and refill the water.
· Take out the used water tank and
empty the water.
Dust leaks from the
robot vacuum during
operation
The inlet of the dust bin is
stuck by small objects.
Remove the small objects on
the inlet.
24
DISPOSAL AND RECYCLING
Important instructions for environment
Compliance with the WEEE Directive and Disposing of the Waster Product:
This product complies with EU WEEE Directive (2012/19/EU). This product bears a classification
symbol for waster electrical and electronic equipment (WEEE).
This symbol indicates that this product shall not be disposed with other
household wastes at the end of its service life. Used device must be
returned to ocial collection point for recycling of electrical electronic
devices. To find these collection systems please contact to your local
authorities or retailer where the product was purchased. Each
household performs important role in recovering and recycling of old
appliance. Appropriate disposal of used appliance helps prevent
potential negative consequences for the environment and human
health.
logo, word marks, trade name, trade dress and all versions thereof are valuable assets of
Midea Group and/or its aliates (“Midea”), to which Midea owns trademarks, copyrights and other
intellectual property rights, and all goodwill derived from using any part of an Midea trademark. Use
of Midea trademark for commercial purposes without the prior written consent of Midea may
constitute trademark
infringement or unfair competition in violation of relevant laws.
This manual is created by Midea and Midea reserves all copyrights thereof. No entity or individual
may use, duplicate, modify, distribute in whole or in part this manual, or bundle or sell with other
products without the prior written consent of Midea.
All the described functions and instructions were up to date at the time of printing this manual.
However, the actual product may vary due to improved functions and designs.
TRADEMARKS, COPYRIGHTS
AND LEGAL STATEMENT
25
Compliance with RoHS Directive
The product you have purchased complies with EU RoHS Directive (2011/65/EU). It does not contain
harmful and prohibited materials specified in the Directive.
Package information
Packaging materials of the product are manufactured from recyclable
materials in accordance with our National Environment Regulations. Do
not dispose of the packaging materials together with the domestic or
other wastes. Take them to the packaging material collection points
designated by the local authorities.
DATA PROTECTION NOTICE
For the provision of the services agreed with the customer,
we agree to comply without restriction with all stipulations of applicable data protection law, in line
with agreed countries within which services to the customer will be delivered, as well as, where
applicable, the EU General Data Protection Regulation (GDPR).
Generally, our data processing is to fulfil our obligation under contract with you and for product
safety reasons, to safeguard your rights in connection with warranty and product registration
questions. In some cases, but only if appropriate data protection is ensured, personal data might be
transferred to recipients located outside of the European Economic Area.
Further information are provided on request. You can contact our Data Protection Ocer via
[email protected]. To exercise your rights such as right to object your personal date being
processed for direct marketing purposes, please contact us via [email protected]. To find
further information, please follow the QR Code.
Declaration of Conformity (DoC)
Unique identification of this DoC: V12-001
We Midea Robozone Technology Co.,Ltd.
No.39 Caohu Avenue, Xiangcheng Economic Development Zone, Suzhou, Jiangsu, China
responsibility that the product:
product name:Robot Vacuum Cleaner
trade name:Midea/eureka/Comfee/obode
type or model:V12
to which this declaration relates is in conformity with the essential requirements and other relevant
requirements of the Directive:
Low Voltage Directive 2014/35/EU
Electromagnetic Compatibility Directive 2014/30/EU
Radio Equipment Directive 2014/53/EC
ErP Directive 2009/125/EC STR: COMMISSION REGULATION (EU) 2023/826
ROHS Directive 2011/65/EU
(EC)No 1907/2006
The product is in conformity with the following standards and/or other normative documents:
EN IEC 60335-2-29:2021+A1:2021EN 60335-2-2:2010+A11:2012+ A1:2013
EN 60335-1:2012+A11:2014+A13:2017+A1:2019A14:2019+ A2:2019+A15:2021
EN 62233:2008
EN 61000-3-3: 2013+ A1:2019+A2:2021 EN IEC 55014-1: 2021
EN IEC 55014-2: 2021 EN IEC 61000-3-2: 2019+A1:2021
EN 300 328 V2.2.2 EN 301 489-1 V2.2.3 EN 301 489-17 V3.2.4 EN 62479:2010
EN 62321-4:2017 EN 62321-5:2013 EN 62321-6:2015 EN 62321-7-1:2015 EN 62321-7-2:2017
EN 62321-8:2017
Supplementary information:
Technical file held by: Midea Robozone Technology Co.,Ltd.
Place and date of issue (of this DoC): CHINA 2023-12-20
Signed by or for the manufacturer Name (in print):
(Signature of authopised person) Title: Certified engineer