VortexIQ™ 40 Cordless
Stick Vacuum
Questions or Concerns?
Please contact us Mon–Fri, 9:00 am–5:00 pm PST/PDT
at [email protected] or at (888) 726-8520.
USER MANUAL
Model: LSV-VF401-AUS

2
Table of Contents
Package Contents
Specifications
Safety Instructions
Getting to Know Your Vacuum
Control Panel
Using Your Vacuum
Care & Maintenance
Cleaning
Storage
Troubleshooting
Warranty Information
Customer Support
2
2
3
5
6
7
9
12
15
16
18
19
Specifications
Models LSV-VF401-AUS
Battery Type DC 25.9V, 2500mAh
Li-ion battery
Charging Input AC 100–240V,
50/60Hz 0.5A
Charging Time 4–5 hours
Dimensions 9.8 × 9.1 × 46.1 in /
25 × 23 × 117 cm
Weight 7.1 lb / 3.2 kg
Dust Bin Capacity 2.5 cups / 0.6 L
Runtime 40 minutes on low
(1 battery)
80 minutes on low
(2 batteries)
Rated Power 400W
Suction Power 130AW
Package Contents
1 × Vacuum Body
1 × Stick
1 × Vacuum Head
1 × Telescoping Crevice Tool
1 × 2-in-1 Dusting Brush
1 × Charging Dock with Accessory Holder
3 × Screws
3 × Wall Anchors
1 × Charger
1 × User Manual
1 × Quick Start Guide

3
• Do not leave the vacuum unattended while it is
on. Unplug from outlet when not charging and
before servicing.
• Do not use outdoors or on wet surfaces.
• The vacuum is not a toy. Do not allow children to
play with the vacuum.
• Close supervision is necessary when the vacuum is
used by persons (including children) with reduced
physical, sensory, or mental capacities, or lack of
experience and knowledge, unless they have been
given supervision or instruction on how to use the
vacuum and understand the hazards involved.
• Children should not clean or perform maintenance
on the vacuum without supervision.
• Only use the vacuum as described in this manual.
• Do not use your vacuum if it is damaged or not
working correctly, or if the charger or plug is
damaged. Do not try to repair it yourself. Contact
Customer Support (see page 19).
• Do not handle the charger or vacuum with
wet hands.
• Do not put any object into any opening. Do
not use the vacuum with any opening blocked.
Keep free of dust, lint, hair, or anything that may
reduce air flow.
• Keep hair, loose clothing, fingers, and all body
parts away from openings and moving parts.
• Use extra care when cleaning on stairs.
• Do not vacuum the following or use where they
may be present:
WARNING – To reduce the risk of fire, electric shock, or injury:
When using this vacuum, basic precautions should always be followed, including the following:
READ ALL INSTRUCTIONS
• Large or sharp objects such as glass shards
• Flammable or combustible liquids such as
solvents or detergents
• Inflammable or explosive substances such as
gasoline or alcohol
IMPORTANT SAFETY
INSTRUCTIONS
• Risk of injury. Roller brush may start unexpectedly.
Remove the main body before cleaning or servicing.
• Prevent unintentional starting. Ensure the switch is
in the “O” position before picking up or carrying
the vacuum. Carrying the vacuum with your finger
on the switch may cause accidents.
• Always turn the vacuum o before connecting
or disconnecting the stick, nozzles, brushes, or
vacuum head.
• Do not vacuum water or any liquids.
• Do not vacuum anything that is burning or smoking,
such as cigarettes, matches, or hot ashes.
• Do not use without dust bin and filters in place.
• Do not point the vacuum at any person or animal
while it is on.
• Store the vacuum on a small stand or flat surface,
or hang it from the wall.
• Do not use aftermarket or third-party
accessories with the vacuum. Only use the
accessories provided.
• Children should be supervised to ensure that
they do not play with the vacuum.

4
SAFETY INSTRUCTIONS (CONT.)
• Do not pull or carry the vacuum by the charging
cable, use the cable as a handle, close a door on
the cable, or pull the cable around sharp edges or
corners. Do not run any appliance over the cable.
• Do not pull on the cable to remove it from the
outlet. Only use the plug to pull it out from
the outlet.
• Never place the charger or its cable near any
heat source.
• Keep the charging cable out of areas where
people walk often. Place the cable where it will
not be tripped over.
• Do not use the charger to charge other appliances
besides this vacuum.
• Only recharge the vacuum with the charger
specified by Arovast Corporation. A charger
that is suitable for one type of appliance may
create a risk of fire when used with another
battery pack. To request a new charger, contact
Customer Support (see page 19).
• Only use the battery pack specifically designed for
this vacuum. Use of any other battery packs may
create a risk of injury and fire. To request a new
battery, contact Customer Support (see page 19).
• When the battery pack is not in use, keep it away
from other metal objects, like paper clips, coins,
keys, nails, screws, or other small metal objects
that can make a connection from one terminal to
another. Shorting the battery terminals together
may cause burns or a fire.
Battery & Charger
WARNING: Read all safety warnings and instructions. Failure to follow the warnings and
instructions may result in electric shock, fire, and/or serious injury.
• Under abusive conditions, liquid may be ejected
from the battery. Avoid contact. If contact
occurs, flush with water. If liquid contacts eyes,
immediately flush with water and seek medical
help. Liquid ejected from the battery may cause
irritation or burns.
• Do not use the battery pack or vacuum if they
are damaged or modified. Damaged or modified
batteries may exhibit unpredictable behavior
resulting in fire, explosions, or risk of injury.
• Have servicing performed only by a qualified repair
person using identical replacement parts. This will
ensure that the safety of the vacuum is maintained.
• Do not modify or attempt to repair the vacuum or
the battery pack except as indicated in the manual.
• Do not expose the battery pack or vacuum to fire
or excessive temperatures. The battery used in
this device may present a risk of fire or chemical
burn if mistreated. Do not disassemble, short
contacts, heat above 140°F (60°C), or incinerate.
• Follow all charging instructions and do not
charge the battery pack or vacuum outside of the
temperature range specified in the instructions.
Charging improperly or at temperatures outside
of the specified range may damage the battery
and increase the risk of fire.
• For use only with the FBP063 battery pack
manufactured by Suzhou EUP Electric Co., Ltd.
• WARNING: Do not use with non-rechargeable
batteries.
SAVE THESE INSTRUCTIONS
NOT FOR COMMERCIAL USE
HOUSEHOLD USE ONLY
5
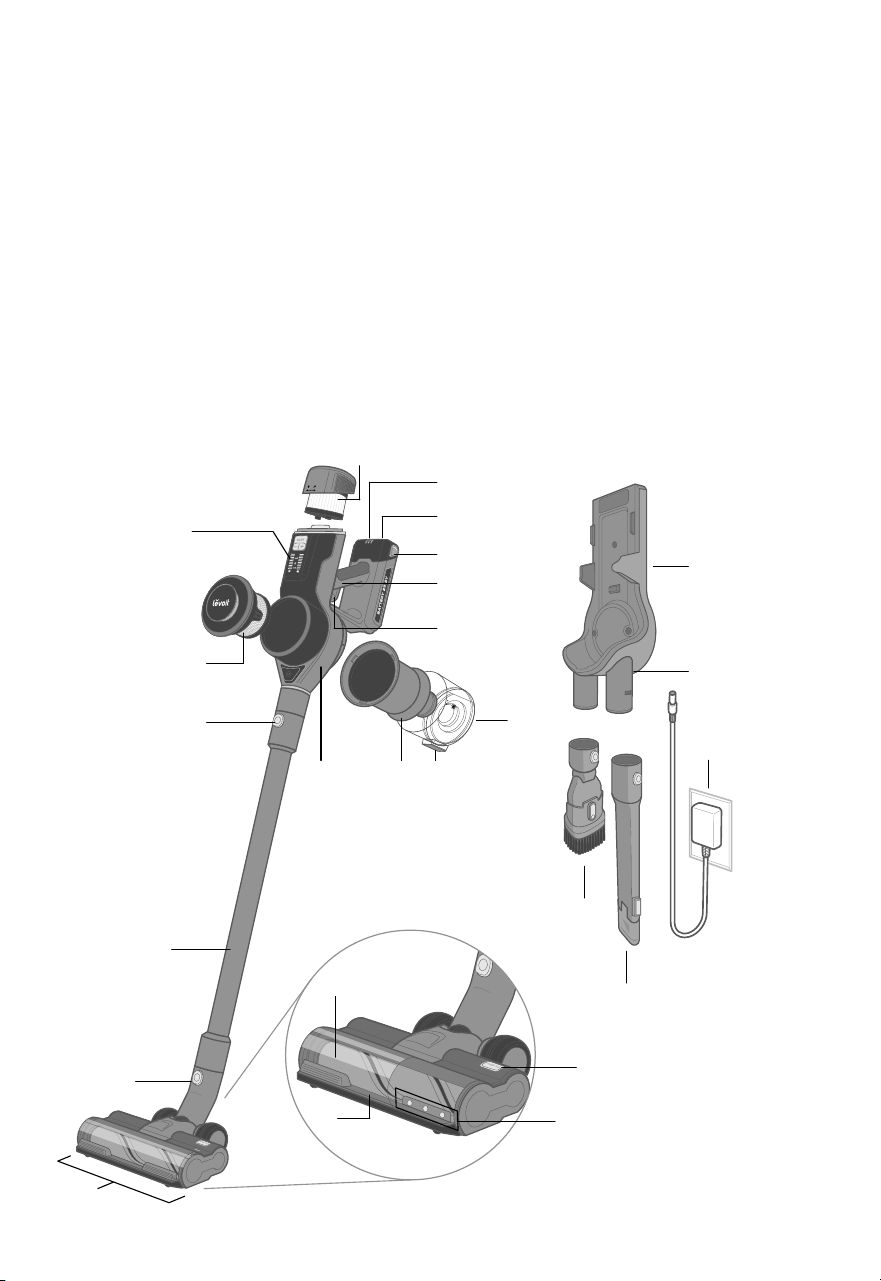
GETTING TO KNOW YOUR VACUUM
A. Control Panel
B. HEPA-Type Pre-Filter
C. Vacuum Body Release Button
D. Stick
E. Vacuum Head Release Button
F. Vacuum Head
G. Roller Brush Cushion
H. Roller Brush
I. LED Lights
J. Roller Brush Release Button
K. Telescoping Crevice Tool
L. 2-in-1 Dusting Brush
M. Charger
N. Charging Port (Dock)
O. Charging Dock with Accessory Holder
P. Dust Bin
Q. Dust Bin Release Button
R. Metal Filter
S. Vacuum Body
T. On/O Trigger
U. Handle
V. Battery Release Button
W. Charging Port (Body)
X. Battery Indicator Lights
Y. HEPA-Type Main Filter
A
B
C
G
E
D
K
L
R QS
H
P
X
W
Y
V
F
J
I
T
U
O
N
M
6
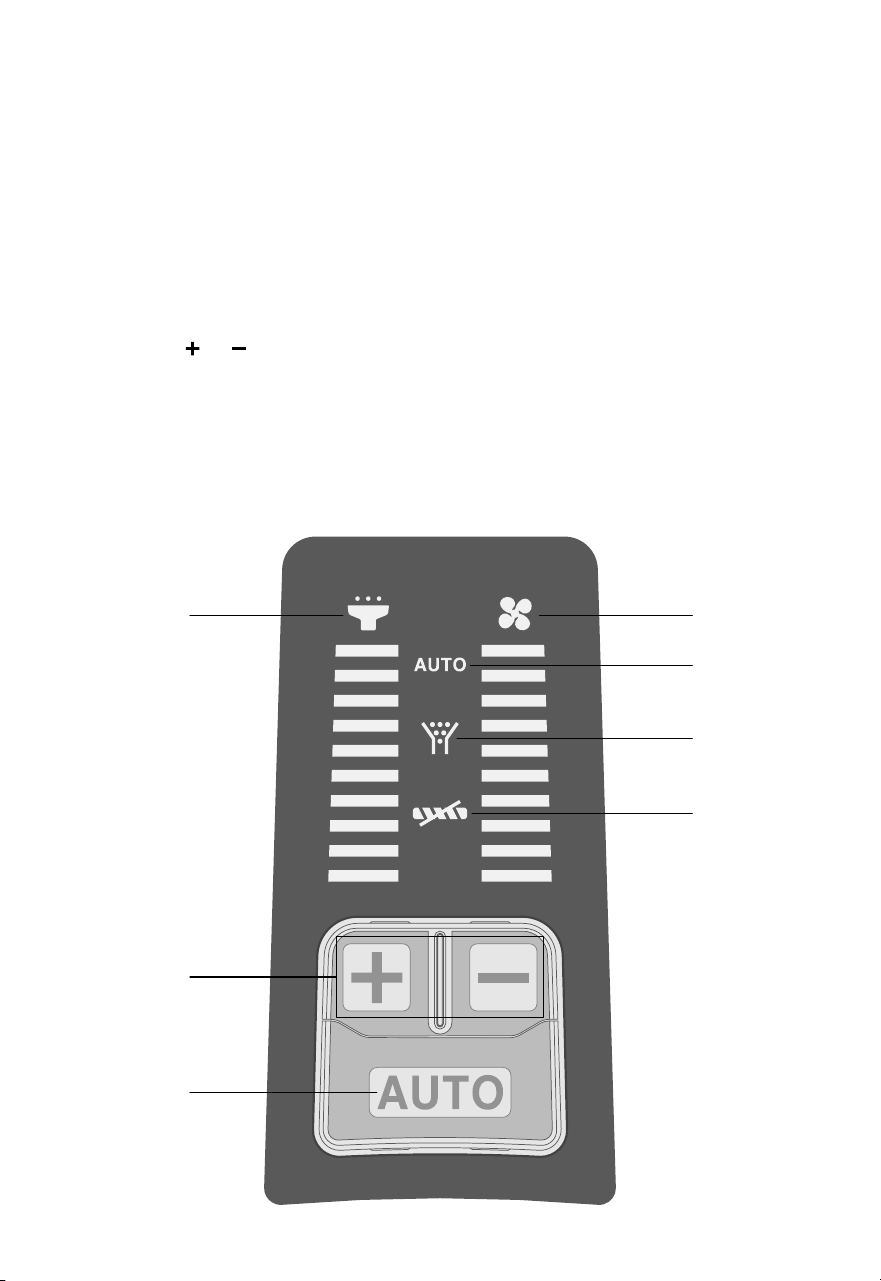
CONTROL PANEL
A. Auto Mode Button
• Press to turn on Auto Mode (see
Auto Mode, page 9).
• Automatically adjusts power to match
the amount of dust.
• Increase or decrease power manually
to exit Auto Mode.
B. Increase/Decrease Power
• Press or to manually increase
or decrease suction power.
C. Dust Level Indicator
• Indicates the level of dust detected
by the dust sensor.
D. Power Level Indicator
• Indicates the level of vacuum
suction power.
E. Auto Mode Indicator
• Indicates when Auto Mode is active.
F. Airflow Blockage Indicator
• Indicates that the vacuum airflow is
blocked.
G. Roller Brush Blockage Indicator
• Indicates that the roller brush is
blocked (see Cleaning the Roller
Brush, page 14).
C D
E
F
G
B
A
7
USING YOUR VACUUM
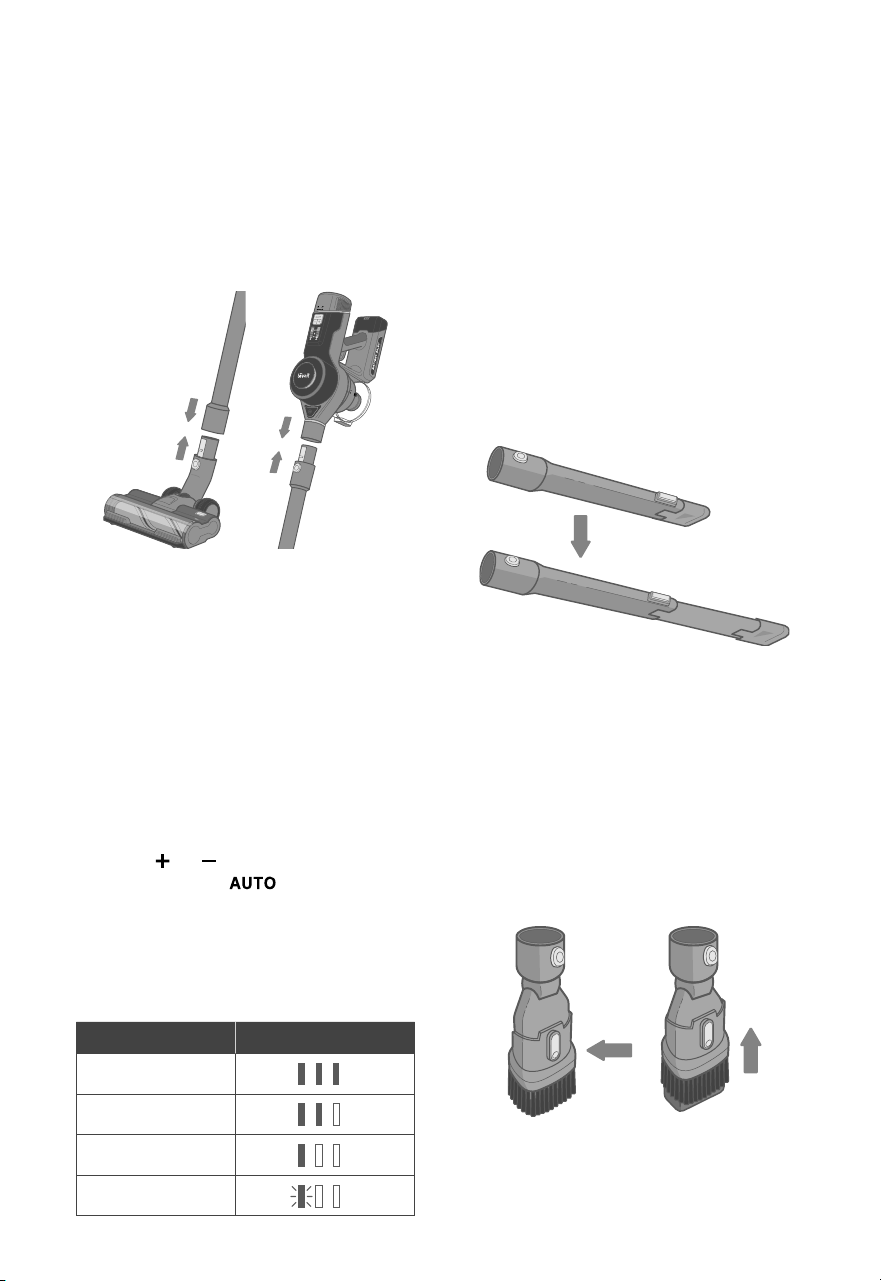
1. Attach the vacuum head or nozzle
attachment to the bottom of the stick and
attach the vacuum body to the top of the
stick [Figure 1.1].
Figure 1.1
Note: There is a clicking sound when the
parts are properly joined together.
Note: Fully charge the battery before first use.
Note: The vacuum will remember its
previous mode and suction settings the next
time it is turned on.
2. Charge the vacuum (see page 9).
3. Press the On/O Trigger to turn the vacuum
on. The vacuum will default to Auto Mode.
Battery Indicator Light Chart
(During Use)
Nozzle Attachments
Your vacuum comes with nozzle attachments
to help you tackle almost any cleanup job.
Telescoping Crevice Tool
• Press button to extend the crevice
nozzle [Figure 1.2].
• Use to clean hard-to-reach places.
• Good for reaching small cracks and
crevices in furniture, the corners of a
room, or a car.
Figure 1.3
Figure 1.2
2-in-1 Dusting Brush
• Press button to slide bristles up/down and
switch between upholstery brush and
duster [Figure 1.3].
• Use upholstery brush to clean soft
furnishings and upholstery.
• Use bristles to clean dust and hard
surfaces.
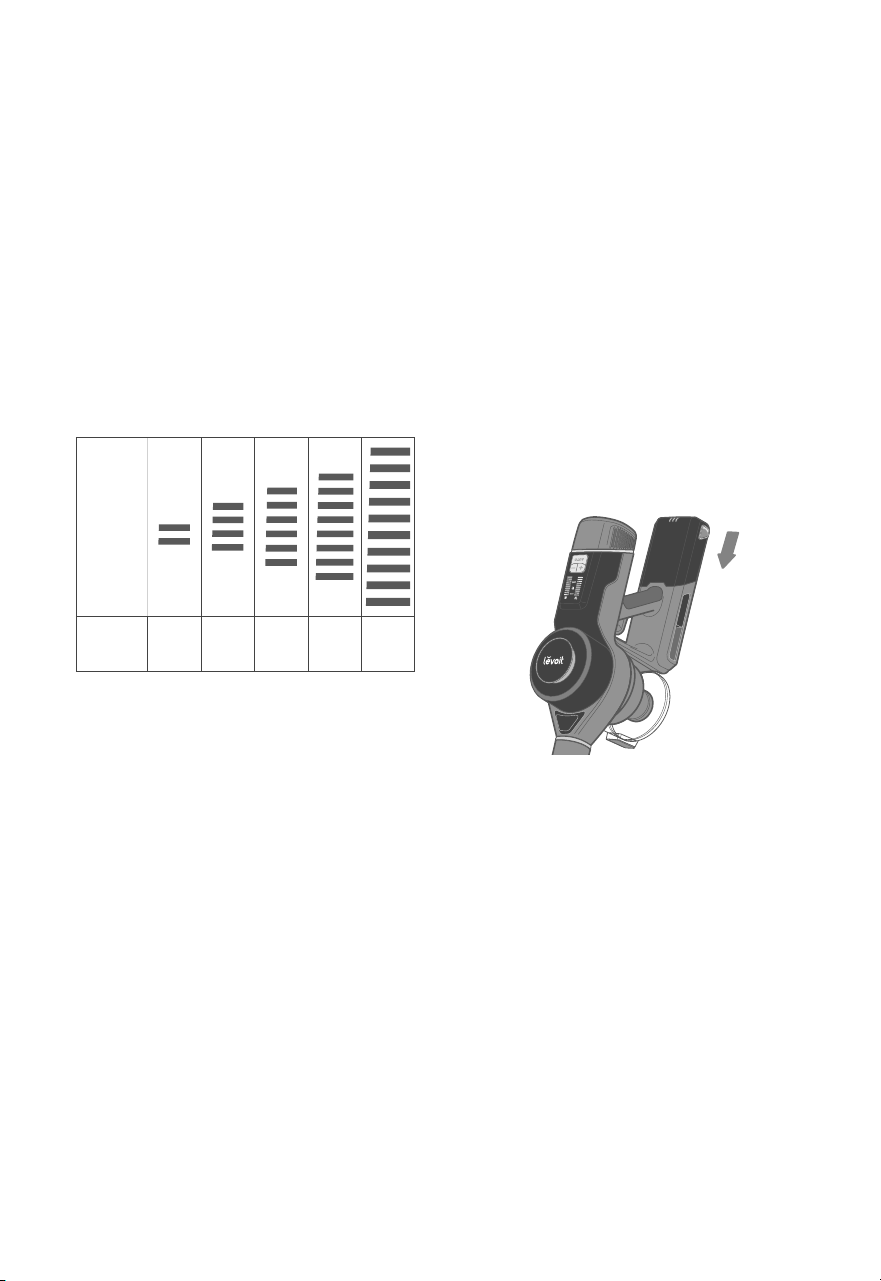
Battery Level Battery Indicator
70–100%
50–70%
20–50%
0–20%
4. Press or to manually control suction
power, or press to go back to Auto
Mode.
5. Press the On/O Trigger to turn the vacuum o.
8
USING YOUR VACUUM (CONT.)
Nozzle Attachments (cont.)
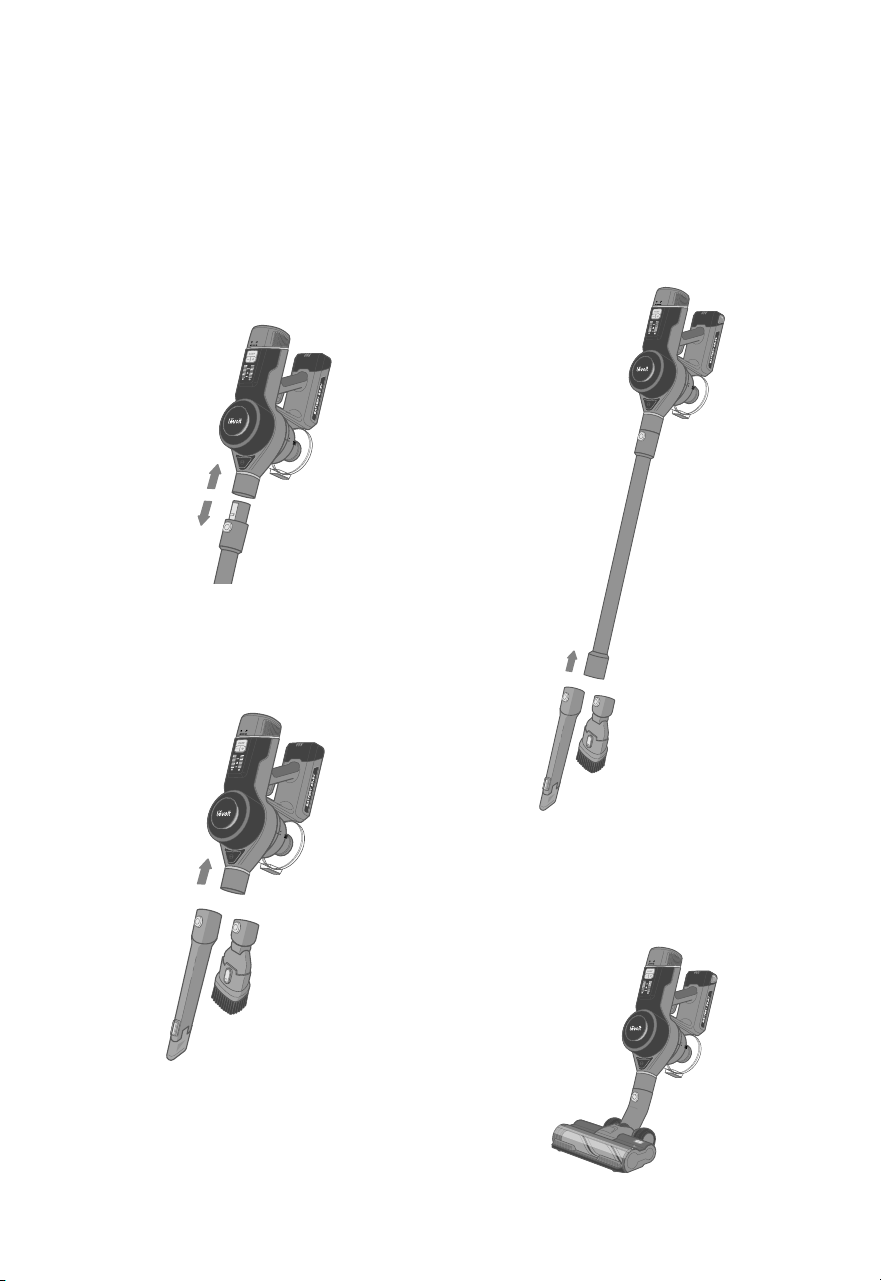
To use a nozzle attachment:
1. Press and hold the Vacuum Body
Release Button and gently pull
the vacuum body from the stick
[Figure 1.4].
Figure 1.4
Figure 1.5
Figure 1.6
Figure 1.7
2. Slide the crevice tool or dusting brush
onto the vacuum body [Figure 1.5].
3. Optionally, leave the stick attached
to the vacuum body and press the
Vacuum Head Release Button to
remove the vacuum head. Then,
attach the nozzle or brush to the end
of the stick [Figure 1.6].
Note: You can also attach the vacuum body
directly to the vacuum head [Figure 1.7].
9
Auto Mode utilizes DPC Technology™
(Dynamic Power Control Technology), which
uses infrared sensors to automatically detect
the amount of dust and debris that is traveling
through the vacuum, and then adjusts the
suction power to accommodate the amount
of dust. If there is more dust, the suction
power will be higher, and if there is less dust,
the suction power will be lower.
Auto Mode
USING YOUR VACUUM (CONT.)
CARE &
MAINTENANCE
Battery Installation
Your vacuum uses a 2500mAh Li-ion
battery. On a full charge, the battery lasts
approximately 40 minutes on power level 1.
Use the included charger and charging dock
to charge the vacuum.
Charging the Vacuum
Note:
• To maintain the life of the battery, store
the vacuum in a cool, dry place.
• Store the battery in a semi-charged
state (at least half charged).
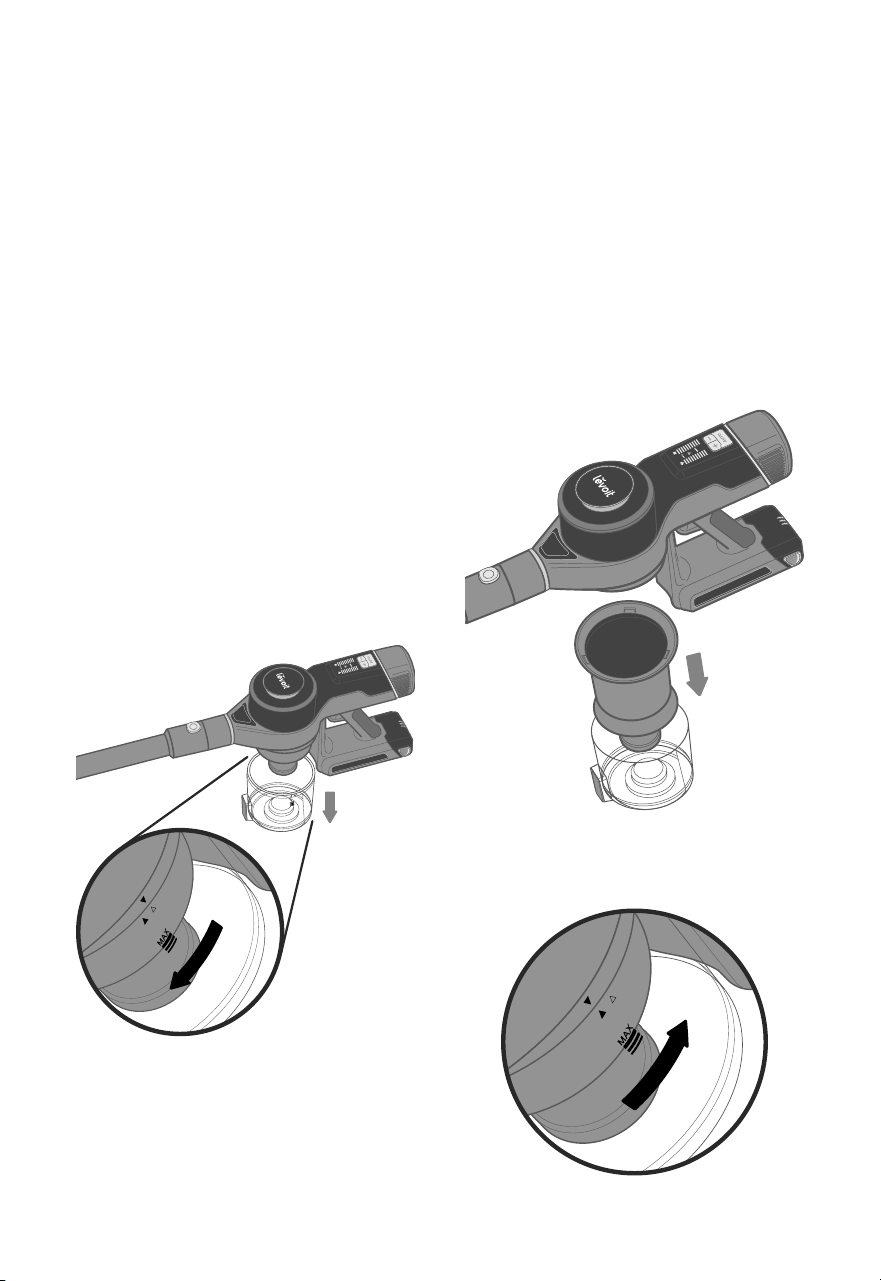
1. Turn the vacuum o. Press the Battery
Release Button and remove the battery.
2. To reinstall, slide the battery into the slot
in the vacuum body [Figure 2.1]. There
will be a clicking sound when the battery
is properly installed.
Figure 2.1
Note: Make sure the vacuum is turned o
before charging.
Dust
Level
l
Power
Level
1 2 3 4 5

10
CARE & MAINTENANCE (CONT.)
Note:
• The charging dock must be high enough on
the wall to allow the vacuum to stand up.
• Make sure that the wall is free of gas pipes,
water pipes, electrical cables, and wires.
1. Mount the charging dock by screwing it into
the wall near a power outlet [Figure 2.2].
Figure 2.2
2. Insert the charger into the charging port
on the dock. Plug the charger into the
outlet [Figure 2.3].
Figure 2.3
Alternatively, the battery can be charged
separate from the vacuum body.
1. Press the Battery Release Button to
remove the battery.
2. Insert the charger into the charging port
on the battery [Figure 2.5].
3. Plug the charger into an outlet. The
battery indicator lights will blink while
charging.
Note: The nozzle attachments can also be
stored on the charging dock.
Note: Charging time is about 4–5 hours.
3. Hang the vacuum on the charging dock
[Figure 2.4]. The battery indicator lights
will blink while charging.
4. When the vacuum is fully charged, the 3
battery indicator lights will turn solid.
Figure 2.4
Figure 2.5
11
CARE & MAINTENANCE (CONT.)
Note: Holding the dust bin inside a trash
can prevents dust from spilling out.
When dust in the dust bin reaches the MAX
line, empty the dust bin.
Note: Do not overfill the dust bin. If the dust bin
is too full, it may aect the performance of the
vacuum.
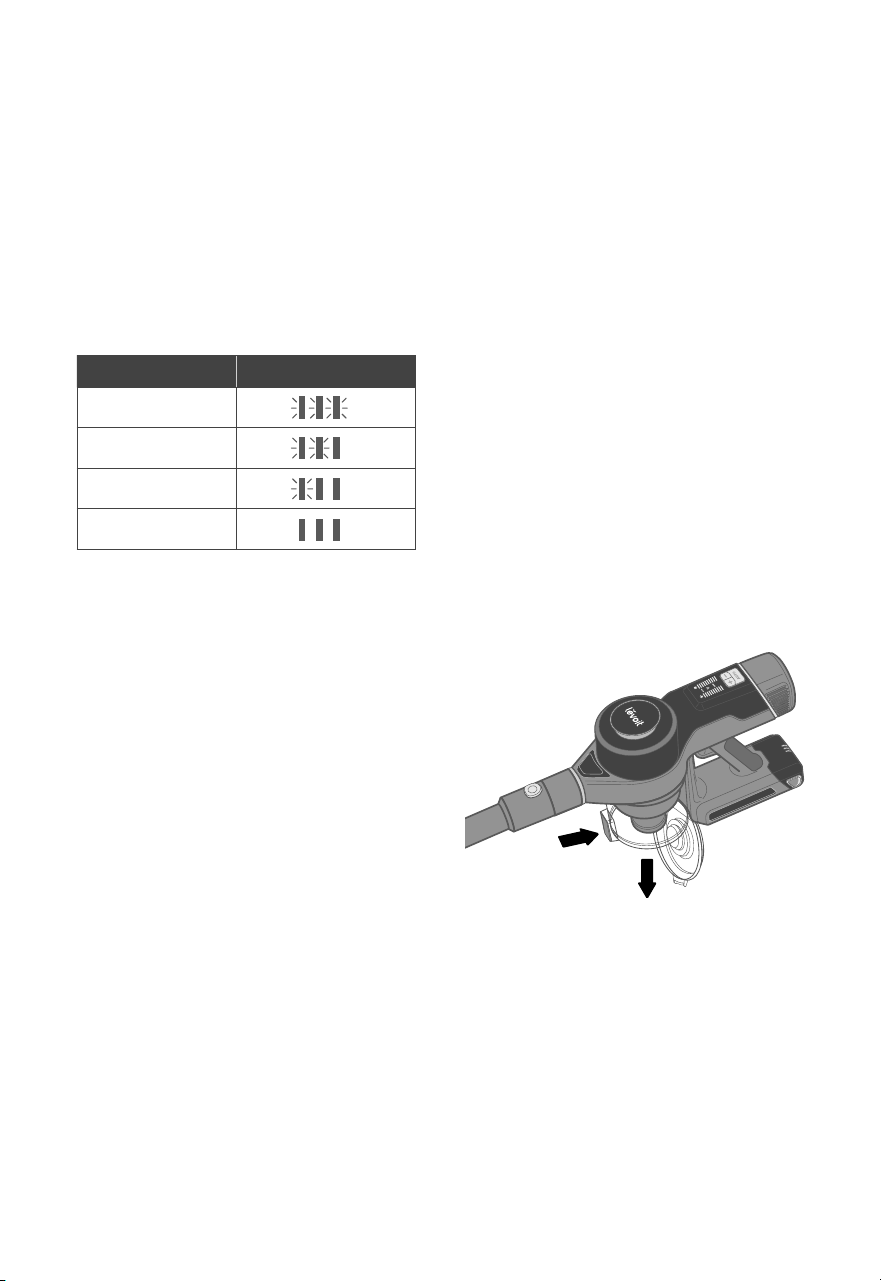
1. Turn the vacuum o. Remove the
vacuum body by pressing the
Vacuum Body Release Button.
2. Hold the dust bin over a trash can
and press the Dust Bin Release
Button [Figure 2.6]. Use caution,
as the door will automatically open
when the release button is pushed.
Battery Indicator Light Chart
(While Charging)
Emptying the Dust Bin
Figure 2.6
Warning:
• Only charge the battery with the charger
specified by Levoit.
• If you are not using the battery for an
extended period, store it in a cool, dry place.
• Store the battery in a semi-charged state
(at least half charged) and maintain this by
charging the battery every 3 months.
• If you need an additional battery, contact
Customer Support (see page 19).
Battery Level Battery Indicator
0–30%
30–60%
60–85%
85–100%
Charging the Vacuum (cont.)
3. Empty out debris and dirt, then close
the door.
4. When the vacuum is fully charged, the 3
battery indicator lights will turn solid.
12
Figure 3.1
Figure 3.2
Figure 3.3
CLEANING
Cleaning the Vacuum Body
Cleaning the Dust Bin &
Metal Filter
1. Turn the vacuum o.
2. Wipe the vacuum body down with a
damp cloth.
3. Allow the vacuum body to completely dry
before using.
1. Make sure the vacuum is o and the dust
bin is completely empty before cleaning
(see Emptying the Dust Bin, page 11).
2. Rotate the dust bin clockwise to remove
it [Figure 3.1]. Empty out any remaining
dust and debris.
Note: Do not allow water to enter the
internal parts or motor of the vacuum.
Note: Do not allow water to enter the
internal parts or motor of the vacuum.
3. Rotate the metal filter clockwise to
remove it [Figure 3.2].
4. Rinse the dust bin and metal filter
with water and allow them to dry.
Make sure the parts are completely
dry before using.
5. Reattach the metal filter and dust bin to
the vacuum body [Figure 3.3].
13
CARE & MAINTENANCE (CONT.)
To maintain the performance of your filters, they
should be routinely washed and replaced.
• The pre-filter should be washed once a
month and replaced after 6 months.
• The main filter should be washed once
every 6 months and replaced after 1
year.
• Do not put filters in a dishwasher,
washing machine, tumble dryer, oven,
or microwave, or place near an open
flame.
• Never operate the vacuum without the
dust bin or filters properly installed.
• Frequent use may require cleaning the
filters more often. Cleaning the filters
regularly helps maintain your vacuum’s
cleaning performance.
• You may need to replace the filters
more frequently depending on your
use and environment.
• If the surrounding humidity is high,
please allow the filters to air-dry
for a longer period of time before
reinstalling them back into the vacuum.
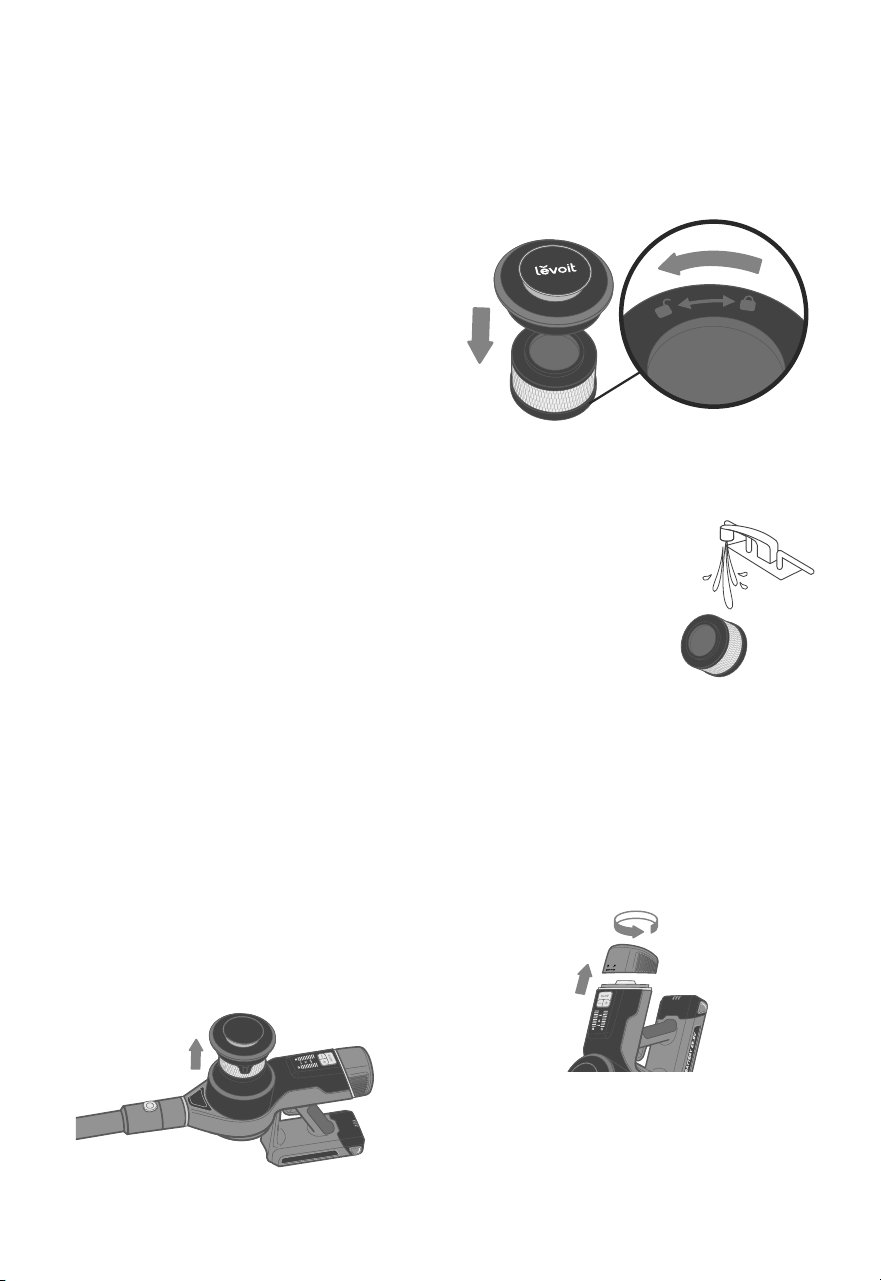
Cleaning the HEPA-Type Filters
Replacement Filters: To maintain the
performance of your vacuum, only use ocial
Levoit filters. For more information, contact
Customer Support (see page 19).
HEPA-Type Pre-Filter
1. Pull up on the pre-filter housing to
remove it from the top of the vacuum
body [Figure 3.4].
HEPA-Type Main Filter
1. Rotate the main filter housing
counterclockwise to remove it from
the back end of the vacuum body
[Figure 3.6].
2. Rotate the pre-filter counterclockwise
to remove it from the housing
[Figure 3.5].
Figure 3.4
Figure 3.6
Figure 3.5
3. Gently tap the pre-
filter over a trash can
to remove dust and
debris.
4. If necessary, run
the pre-filter under
running water to
wash it. Allow it to
air-dry completely for
24 hours under the sun or in a dry,
ventilated place before reinstallation.
14
CARE & MAINTENANCE (CONT.)
Figure 3.7
2. Rotate the main filter
counterclockwise to remove it from
the housing [Figure 3.7].
3. Gently tap the main
filter over a trash can
to remove dust and
debris.
4. If necessary, run the
main filter under
running water to wash
it. Allow it to air-dry completely for
24 hours under the sun or in a dry,
ventilated place before reinstallation.
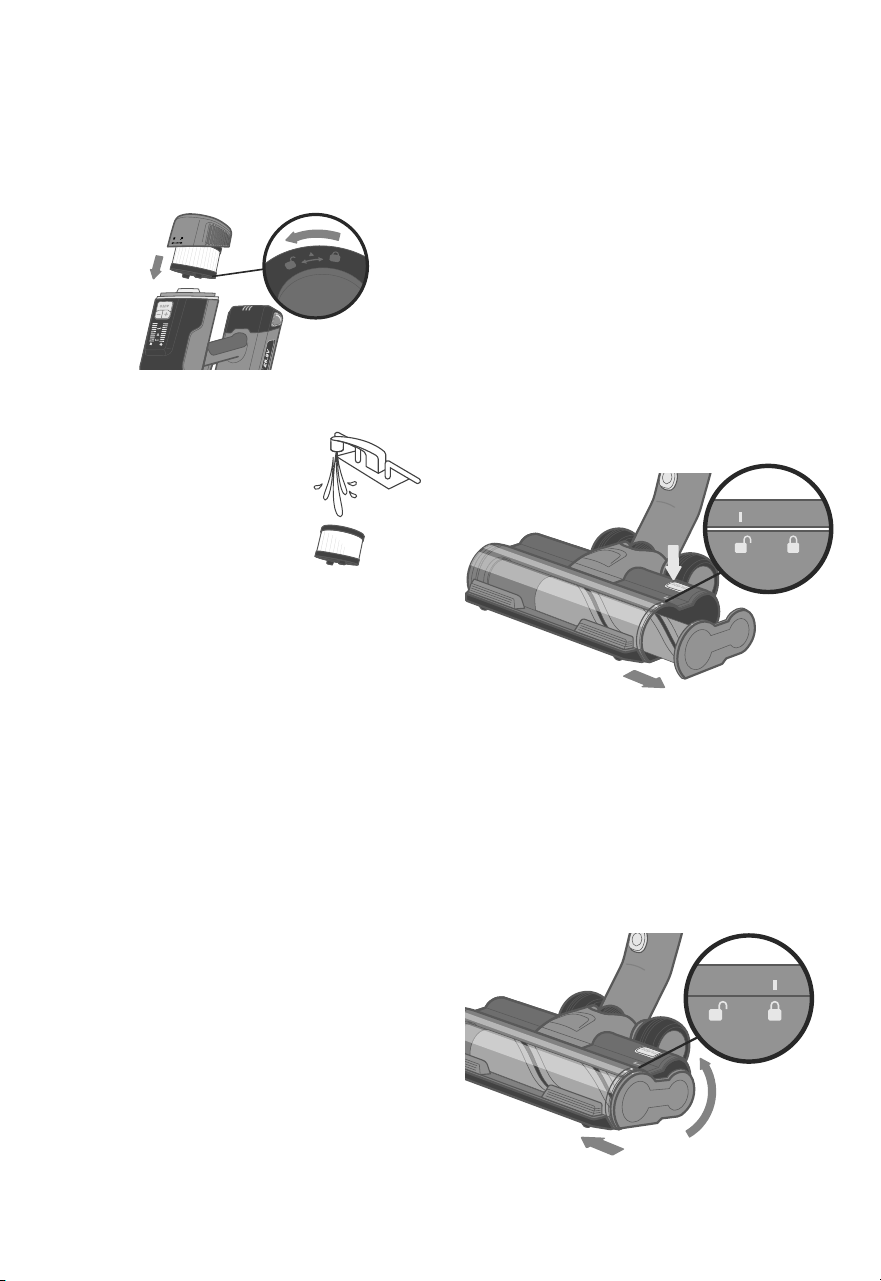
Periodically check the roller brush for hair or
debris. The roller brush will automatically shut
o if it is blocked or jammed. Clean the roller
brush every 4–5 uses to avoid blockage or
jamming.
1. Turn the vacuum o. Detach the
vacuum head from the stick by
pressing the Vacuum Head Release
Button.
2. Press the Roller Brush Release
Button and pull out the roller brush
[Figure 3.8].
Cleaning the Roller Brush
Figure 3.8
Figure 3.9
3. If the roller brush is jammed, carefully
use a pair of scissors or a sharp knife
to remove any hair or debris tangled
around the roller brush.
4. Insert the roller brush back into the
vacuum head. Slide the side panel up
to lock it in place [Figure 3.9].
15
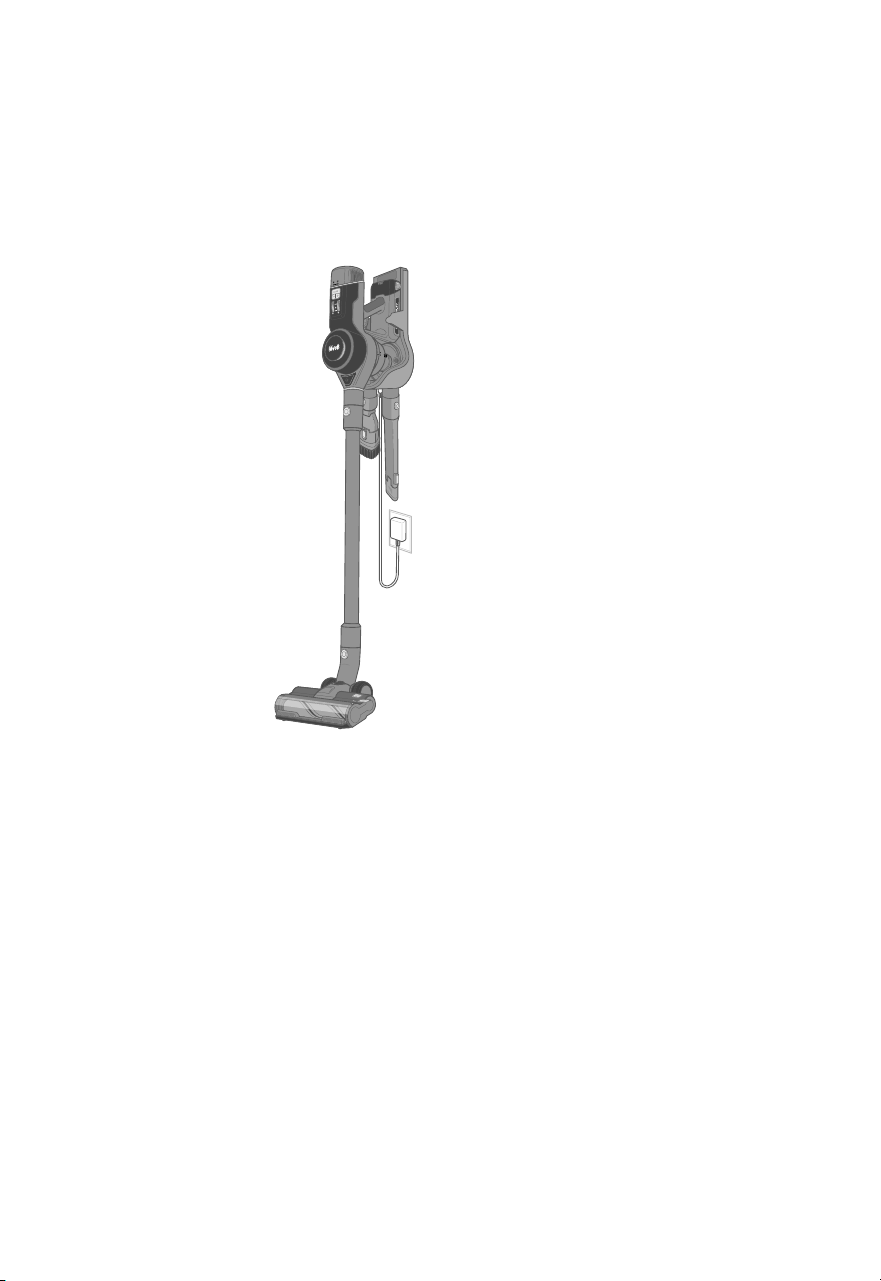
When the vacuum is not in use, store it on the
charging dock:
1. Mount the charging dock by screwing
it into the wall (see Charging the
Vacuum, page 9).
Figure 4.1
STORAGE
Note:
• Always store the vacuum on flat ground.
If the vacuum is stored on a slanted
surface it may fall and be damaged.
• If storing for long periods of time,
periodically charge the battery to
preserve the life of the battery.
Disposing of the Battery
• The battery contains materials that are harmful
to the environment and must be removed
from the vacuum before it is discarded.
• When removing the battery, the vacuum must
be turned o.
• Discarded batteries should be handled
properly. Do not put batteries into fire, water,
or soil.
• If battery leakage touches skin or clothing,
flush with water immediately to avoid skin
injury and seek medical help.
2. Hang the
vacuum on the
charging dock
[Figure 4.1].
3. Place the nozzle
attachments in
the slots on the
charging dock.
16
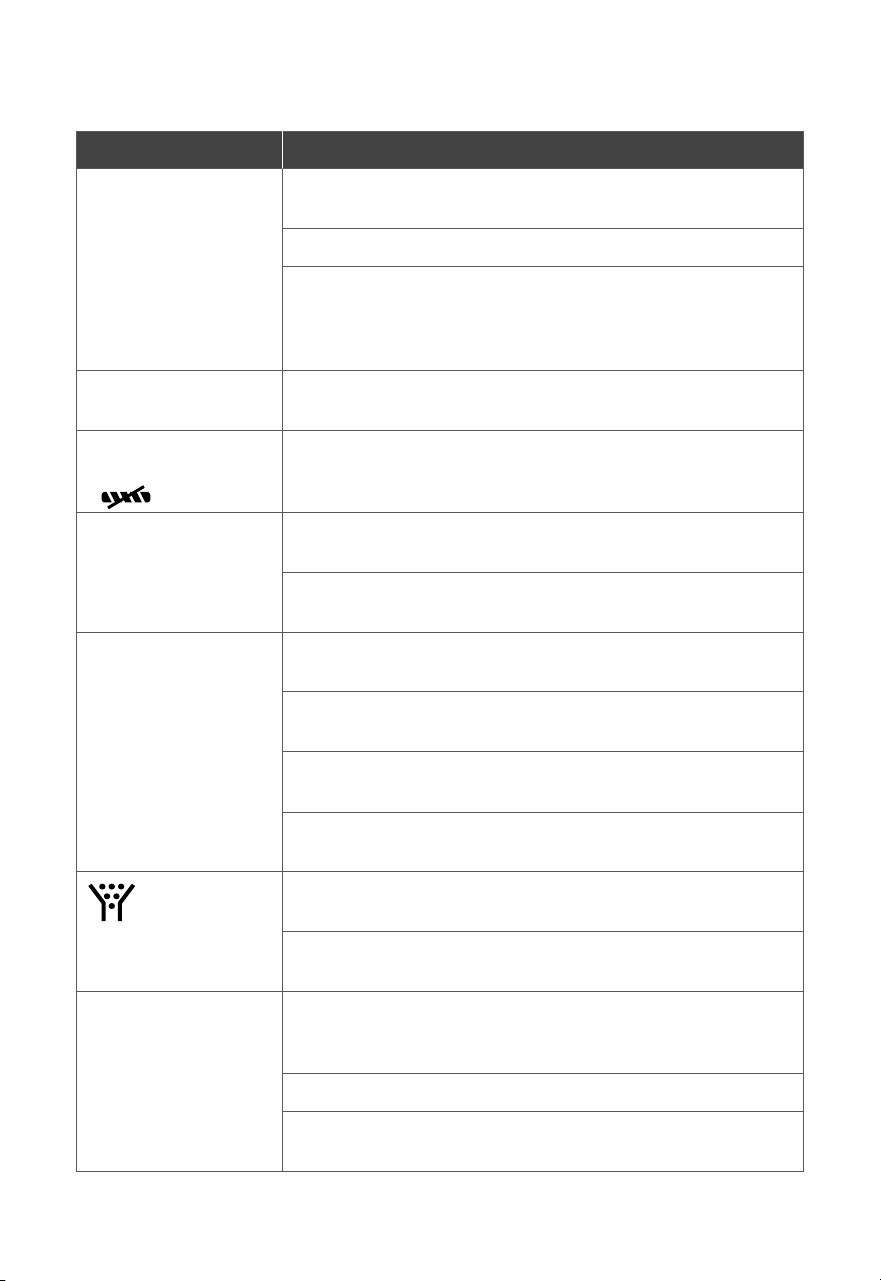
Problem Possible Solution
Vacuum will not turn on The battery is not installed correctly (see Battery Installation,
page 9).
Recharge the vacuum (see Charging the Vacuum, page 9).
The vacuum motor overheated. Empty the dust container and
check for blockage inside the vacuum head and stick. Remove any
blockage and clean the filters (see Cleaning, page 12). Allow the
vacuum to cool for 1 hour before turning it back on.
Vacuum is not charging The charger is not properly plugged in (see Charging the
Vacuum, page 9).
Roller brush is not
turning
( light flashes)
Clean the roller brush and remove any debris blocking the brush
(see Cleaning the Roller Brush, page 14).
Vacuum makes an
abnormal noise
Clean the roller brush and remove any debris blocking the brush
(see Cleaning the Roller Brush, page 14).
Check for blockage inside the vacuum body, vacuum head, and
stick. Remove any blockage (see Cleaning, page 12).
Vacuum has low
suction power
Battery may be low. Recharge the battery to full charge (see
Charging the Vacuum, page 9).
Clean the roller brush and remove any debris blocking the brush
(see Cleaning the Roller Brush, page 14).
The dust bin and filters may be full. Empty the dust bin and
clean the filters (see Cleaning, page 12).
Check for blockage inside the vacuum body, vacuum head, and
stick. Remove any blockage (see Cleaning, page 12).
light flashes
The dust bin and filters may be full. Empty the dust bin and clean
the filters (see Cleaning, page 12).
Check for blockage inside the vacuum body, vacuum head, and
stick. Remove any blockage (see Cleaning, page 12).
Vacuum releases a bad
or unusual smell
The environment’s relative humidity may be high or the vacuum
may have absorbed water and caused the filter to grow mold.
Replace the filters (contact Customer Support, page 19).
The filters may be dirty. Clean the filters (see Cleaning, page 12).
The dust bin may be dirty. Empty and clean the dust bin (see
Cleaning, page 12).
TROUBLESHOOTING
If your problem is not listed, please contact Customer Support (see page 19).

17
FEDERAL COMMUNICATION COMMISSION
INTERFERENCE STATEMENT – PART 15
FCC SDOC SUPPLIER’S DECLARATION OF
CONFORMITY
This device complies with Part 15 of the FCC Rules. Operation is subject to the following two conditions:
1. This device may not cause harmful interference, and
2. This device must accept any interference received, including interference that may cause undesired operation.
NOTE: This equipment has been tested and found to comply with the limits for a Class B digital device, pursuant to
Part 15 of the FCC Rules. These limits are designed to provide reasonable protection against harmful interference in a
residential installation. This equipment generates, uses and can radiate radio frequency energy and, if not installed and
used in accordance with the instructions, may cause harmful interference to radio communications. However, there is no
guarantee that interference will not occur in a particular installation. If this equipment does cause harmful interference to
radio or television reception, which can be determined by turning the equipment o and on, the user is encouraged to try
to correct the interference by one or more of the following measures:
• Reorient or relocate the receiving antenna.
• Increase the separation between the equipment and receiver.
• Connect the equipment into an outlet on a circuit dierent from that to which the receiver is connected.
• Consult the dealer or an experienced radio/TV technician for help.
FCC Caution: Any changes or modifications not expressly approved by the party responsible for compliance could void
the user’s authority to operate this equipment.
Arovast Corporation hereby declares that this equipment is in compliance with FCC requirements.
The declaration of conformity may be consulted in the support section of our website, accessible from www.levoit.com

18
Arovast will not be liable for indirect, incidental, or
consequential damages in connection with the use of
the product covered by this warranty.
This warranty extends only to the original consumer
purchaser of the product and is not transferable to any
subsequent owner of the product regardless of whether
the product is transferred during the specified term of
the warranty.
This warranty does not extend to products purchased
from unauthorized sellers. Arovast’s warranty extends
only to products purchased from authorized sellers
that are subject to Arovast’s quality controls and have
agreed to follow its quality controls.
All implied warranties are limited to the period of this
limited warranty.
This warranty gives you specific legal rights and you
may also have other rights which vary from state
to state. Some states do not allow the exclusion or
limitation of incidental or consequential damages, so
the above limitation or exclusion may not apply to you.
If you discover that your product is defective within the
specified warranty period, please contact Customer
Support via [email protected]. DO NOT dispose of
your product before contacting us. Once our Customer
Support Team has approved your request, please return
the product with a copy of the invoice and order ID.
Every Levoit product automatically includes a
2-year warranty. To make the customer support
process quick and easy, register your product
online at www.levoit.com/warranty.
This warranty is made by:
Arovast Corporation
1202 N. Miller St., Suite A
Anaheim, CA 92806
Product Name Levoit VortexIQ™ 40
Cordless Stick Vacuum
Model LSV-VF401-AUS
For your own reference, we strongly recommend that you
record your order ID and date of purchase.
Date of Purchase
Order ID
WARRANTY INFORMATION
Terms & Policy
Arovast Corporation (“Arovast”) warrants this product
to the original purchaser to be free from defects in
material and workmanship, under normal use and
conditions, for a period of 2 years from the date of
original purchase.
Arovast agrees, at our option during the warranty
period, to repair any defect in material or workmanship
or furnish an equal product in exchange without charge,
subject to verification of the defect or malfunction and
proof of the date of purchase.
There is no other express warranty. This warranty
does not apply:
• If the product has been modified from its
original condition;
• If the product has not been used in
accordance with directions and instructions in
the user manual;
• To damages or defects caused by accident,
abuse, misuse or improper or inadequate
maintenance;
• To damages or defects caused by service
or repair of the product performed by an
unauthorized service provider or by anyone
other than Arovast;
• To damages or defects occurring during
commercial use, rental use, or any use for
which the product is not intended;
• To damages or defects exceeding the cost of
the product.

19
CUSTOMER SUPPORT
If you have any questions or concerns about your
new product, please contact our helpful Customer
Support Team.
Arovast Corporation
1202 N. Miller St., Suite A
Anaheim, CA 92806
Email: [email protected]
Toll-Free: (888) 726-8520
Mon–Fri, 9:00 am–5:00 pm PST/PDT
Support Hours
*Please have your order invoice and order ID ready
before contacting Customer Support.

A2-03.00_D_22I30_us
/LEVOITLIFESTYLE
/LEVOIT
/LEVOIT
/LEVOITLIFESTYLE
/LEVOITLIFESTYLE
LEVOIT.COM
