
If you have any questions please email to [email protected]
2EN
If you have any questions please email to support09@laresar.us
3 EN
CONTENTS
1.SAFETY INSTRUCTIONS - - - - - - - - - - - - - - - - - - - - - - - - - - 3
2.Packing List - - - - - - - - - - - - - - - - - - - - - - - - - - - - - - - - 7
3.Basic Paramters - - - - - - - - - - - - - - - - - - - - - - - - - - - - - - 8
4.Product Introduction - - - - - - - - - - - - - - - - - - - - - - - - - - - 9
5.Preparation - - - - - - - - - - - - - - - - - - - - - - - - - - - - - - - - 12
6.Use Instructions - - - - - - - - - - - - - - - - - - - - - - - - - - - - - - 16
7.Routine Maintenance - - - - - - - - - - - - - - - - - - - - - - - - - - - 21
8.Common Problems - - - - - - - - - - - - - - - - - - - - - - - - - - - - 27
9.Troubleshooting - - - - - - - - - - - - - - - - - - - - - - - - - - - - - - 29
1.SAFETY INSTRUCTIONS
Use Restrictions
• This machine is only used for floor cleaning at home. Please do not use it outdoors (such as an open balcony), in non-
ground areas (such as a sofa), and in commercial or industrial environments.
• Do not use the machine in suspended environments without protective fences, such as duplex floors, open balconies,
and the top of the furniture.
• Do not use the product in an environment where the temperature is above 40°C or below 0°C, or there are liquids and
viscous objects on the ground.
• Hang up the ground cable at home before use to avoid dragging the cable when the machine is running.
• Put away the fragile objects and sundries (such as vases and plastic bags) on the ground. Otherwise, the machine
may be blocked or a slight collision may cause damage to valuables at home.
• Keep the machine away from people (including children) with physical, mental or sensory impairments.
• Do not allow children to use the machine as a toy. Please keep children and pets away from the machine when the
machine is running.
• Keep the cleaning brush at a place that cannot be reached by children.
• Do not place any object (including children and pets) on the stationary or moving machine.
• When the machine is working, keep the hair of humans or pets or fingers far away from the suction port of the
machine.

If you have any questions please email to support09@laresar.us
2
EN
If you have any questions please email to [email protected]
3
EN
CONTENTS
1.SAFETY INSTRUCTIONS - - - - - - - - - - - - - - - - - - - - - - - - - - 3
2.Packing List - - - - - - - - - - - - - - - - - - - - - - - - - - - - - - - - 7
3.Basic Paramters - - - - - - - - - - - - - - - - - - - - - - - - - - - - - - 8
4.Product Introduction - - - - - - - - - - - - - - - - - - - - - - - - - - - 9
5.Preparation - - - - - - - - - - - - - - - - - - - - - - - - - - - - - - - - 12
6.Use Instructions - - - - - - - - - - - - - - - - - - - - - - - - - - - - - - 16
7.Routine Maintenance - - - - - - - - - - - - - - - - - - - - - - - - - - - 21
8.Common Problems - - - - - - - - - - - - - - - - - - - - - - - - - - - - 27
9.Troubleshooting - - - - - - - - - - - - - - - - - - - - - - - - - - - - - - 29
1.SAFETY INSTRUCTIONS
Use Restrictions
• This machine is only used for floor cleaning at home. Please do not use it outdoors (such as an open balcony), in non-
ground areas (such as a sofa), and in commercial or industrial environments.
• Do not use the machine in suspended environments without protective fences, such as duplex floors, open balconies,
and the top of the furniture.
• Do not use the product in an environment where the temperature is above 40°C or below 0°C, or there are liquids and
viscous objects on the ground.
• Hang up the ground cable at home before use to avoid dragging the cable when the machine is running.
• Put away the fragile objects and sundries (such as vases and plastic bags) on the ground. Otherwise, the machine
may be blocked or a slight collision may cause damage to valuables at home.
• Keep the machine away from people (including children) with physical, mental or sensory impairments.
• Do not allow children to use the machine as a toy. Please keep children and pets away from the machine when the
machine is running.
• Keep the cleaning brush at a place that cannot be reached by children.
• Do not place any object (including children and pets) on the stationary or moving machine.
• When the machine is working, keep the hair of humans or pets or fingers far away from the suction port of the
machine.

If you have any questions please email to [email protected]
4EN
If you have any questions please email to support09@laresar.us
5 EN
Battery and Charging
Correct Disposal of this product
• Do not use the machine to clean-burning objects, such as unextinguished cigarette butts.
• Do not use the machine to clean long-haired carpets. Some dark carpets may not be cleaned normally.
• Do not use the machine to vacuum hard or sharp objects, such as decoration waste, glass, and iron nails.
• Please clean or maintain the machine and docking station when the machine is powered off or when the power
supply is disconnected.
• Do not use a damp cloth or any liquid to wipe any part of the machine.• Do not use the mopping function on the
carpet or the top of the furniture.
• Please follow the instructions in this manual when using the machine. The user should be liable for any loss and injury
caused by improper use.
• Do not use any third-party batteries, docking stations, or chargers.
• Do not disassemble, repair, or modify the battery or docking station without permission.
• Do not place the docking station near heat sources, such as radiators.
• Do not use a damp cloth or wet hands to wipe or clean the docking station shrapnel.
• Dispose of used batteries properly, and send them to professional recycling agencies.
• If the power cord is damaged or broken, stop using it immediately and buy a new one through offcial channels.
• To transport the machine, ensure that the machine is powered off. It is recommended that you use the original box
for packaging.
• If you do not use the machine for a long time, power it off and keep it in a dry and cool place. Charge the machine at
least once every 3 months to avoid damage to the battery due to excessive discharge.
This device complies with Part 15 of the FCC Rules. Operation is subject to the following two conditions:
(1)This device may not cause harmful interference.
(2)This device must accept any interference received, including interference that may cause undesired operation.
Warning: Changes or modifications not expressly approved by the party responsible for compliance could void the
user's authority to operate the equipment.
NOTE: This equipment has been tested and found to comply with the limits for a Class B digital device, pursuant to
Part 15 of the FCC Rules. These limits are designed to provide reasonable protection against harmful interference in
a residential installation. This equipment generates uses and can radiate radio frequency energy and, if not installed
and used in accordance with the instructions, may cause harmful interference to radio communications. However,
there is no guarantee that interference will not occur in a particular installation. If this equipment does cause harmful
interference to radio or television reception, which can be determined by turning the equipment off and on, the user is
encouraged to try to correct the interference by one or more of the following measures:
Reorient or relocate the receiving antenna.
Increase the separation between the equipment and receiver.
Connect the equipment into an outlet on a circuit different from that to which the receiver is connected.
Consult the dealer or an experienced radio/TV technician for help.
For the purposes of recharging the battery, only use the detachable supply unit provided with this appliance.
This marking indicates that this product should not be disposed with other household wastes throughout the
EU. To prevent possible harm to the environment or human health from uncontrolled waste disposal, recycle
it responsibly to promote the sustainable reuse of material resources. To return your used device, please use
the return and collection systems or contact the retailer where the product was purchased. They can take this
product for environmentally safe recycling.
FCC STATEMENT

If you have any questions please email to support09@laresar.us
4
EN
If you have any questions please email to support09@laresar.us
5
EN
Battery and Charging
Correct Disposal of this product
• Do not use the machine to clean-burning objects, such as unextinguished cigarette butts.
• Do not use the machine to clean long-haired carpets. Some dark carpets may not be cleaned normally.
• Do not use the machine to vacuum hard or sharp objects, such as decoration waste, glass, and iron nails.
• Please clean or maintain the machine and docking station when the machine is powered off or when the power
supply is disconnected.
• Do not use a damp cloth or any liquid to wipe any part of the machine.• Do not use the mopping function on the
carpet or the top of the furniture.
• Please follow the instructions in this manual when using the machine. The user should be liable for any loss and injury
caused by improper use.
• Do not use any third-party batteries, docking stations, or chargers.
• Do not disassemble, repair, or modify the battery or docking station without permission.
• Do not place the docking station near heat sources, such as radiators.
• Do not use a damp cloth or wet hands to wipe or clean the docking station shrapnel.
• Dispose of used batteries properly, and send them to professional recycling agencies.
• If the power cord is damaged or broken, stop using it immediately and buy a new one through offcial channels.
• To transport the machine, ensure that the machine is powered off. It is recommended that you use the original box
for packaging.
• If you do not use the machine for a long time, power it off and keep it in a dry and cool place. Charge the machine at
least once every 3 months to avoid damage to the battery due to excessive discharge.
This device complies with Part 15 of the FCC Rules. Operation is subject to the following two conditions:
(1)This device may not cause harmful interference.
(2)This device must accept any interference received, including interference that may cause undesired operation.
Warning: Changes or modifications not expressly approved by the party responsible for compliance could void the
user's authority to operate the equipment.
NOTE: This equipment has been tested and found to comply with the limits for a Class B digital device, pursuant to
Part 15 of the FCC Rules. These limits are designed to provide reasonable protection against harmful interference in
a residential installation. This equipment generates uses and can radiate radio frequency energy and, if not installed
and used in accordance with the instructions, may cause harmful interference to radio communications. However,
there is no guarantee that interference will not occur in a particular installation. If this equipment does cause harmful
interference to radio or television reception, which can be determined by turning the equipment off and on, the user is
encouraged to try to correct the interference by one or more of the following measures:
Reorient or relocate the receiving antenna.
Increase the separation between the equipment and receiver.
Connect the equipment into an outlet on a circuit different from that to which the receiver is connected.
Consult the dealer or an experienced radio/TV technician for help.
For the purposes of recharging the battery, only use the detachable supply unit provided with this appliance.
This marking indicates that this product should not be disposed with other household wastes throughout the
EU. To prevent possible harm to the environment or human health from uncontrolled waste disposal, recycle
it responsibly to promote the sustainable reuse of material resources. To return your used device, please use
the return and collection systems or contact the retailer where the product was purchased. They can take this
product for environmentally safe recycling.
FCC STATEMENT

If you have any questions please email to support09@laresar.us
6EN
If you have any questions please email to support09@laresar.us
7 EN
FCC Radiation Exposure Statement
IC Statement
This equipment complies with FCC radiation exposure limits set forth for an uncontrolled environment. This
equipment should be installed and operated with minimum distance 20cm between the radiator & your body.
This device contains licence-exempt transmitter(s)/receiver(s) that comply with Innovation, Science and Economic
Development Canada's licence-exempt RSS(s). Operation is subject to the following two conditions:
(1)This device may not cause interference.
(2)This device must accept any interference, including interference that may cause undesired operation of the device.
This equipment complies with IC exposure limits set forth for an uncontrolled environment. This equipment shall be
installed and operated with minimum distance 20cm between the radiator & body
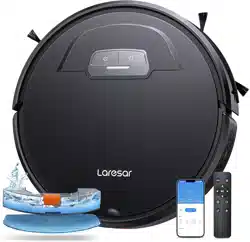
Robotic Vacuum Cleaner Charging Dock Water Tank Dust Bin
Mopping Cloth Holder Mopping Cloth
Spare HEPA Filter and
Sponge
Power Adapter (for
Charging Station)
Remote Control with
Battery Magnetic Strip Side Brush Cleaning Brush
2.Packing List

If you have any questions please email to support09@laresar.us
6
EN
If you have any questions please email to support09@laresar.us
7
EN
FCC Radiation Exposure Statement
IC Statement
This equipment complies with FCC radiation exposure limits set forth for an uncontrolled environment. This
equipment should be installed and operated with minimum distance 20cm between the radiator & your body.
This device contains licence-exempt transmitter(s)/receiver(s) that comply with Innovation, Science and Economic
Development Canada's licence-exempt RSS(s). Operation is subject to the following two conditions:
(1)This device may not cause interference.
(2)This device must accept any interference, including interference that may cause undesired operation of the device.
This equipment complies with IC exposure limits set forth for an uncontrolled environment. This equipment shall be
installed and operated with minimum distance 20cm between the radiator & body
Robotic Vacuum Cleaner Charging Dock Water Tank Dust Bin
Mopping Cloth Holder Mopping Cloth
Spare HEPA Filter and
Sponge
Power Adapter (for
Charging Station)
Remote Control with
Battery Magnetic Strip Side Brush Cleaning Brush
2.Packing List

If you have any questions please email to support09@laresar.us
8EN
If you have any questions please email to support09@laresar.us
9 EN
3.Basic Paramters 4.Product Introduction
Robot Specification
Product Model Evol 3
Dimensions 320 x 320 x 76 mm
Battery 3200 mAh
Rated voltage 14.4V
Rated power 42W
Charging time 300mins
Dust box capacity 450ml
Water tank capacity 250ml
Charging dock Specification
Dimensions 158 x147 x84 mm
Rated input 19V
⎓
0.6A
Rated output 19V
⎓
0.6A
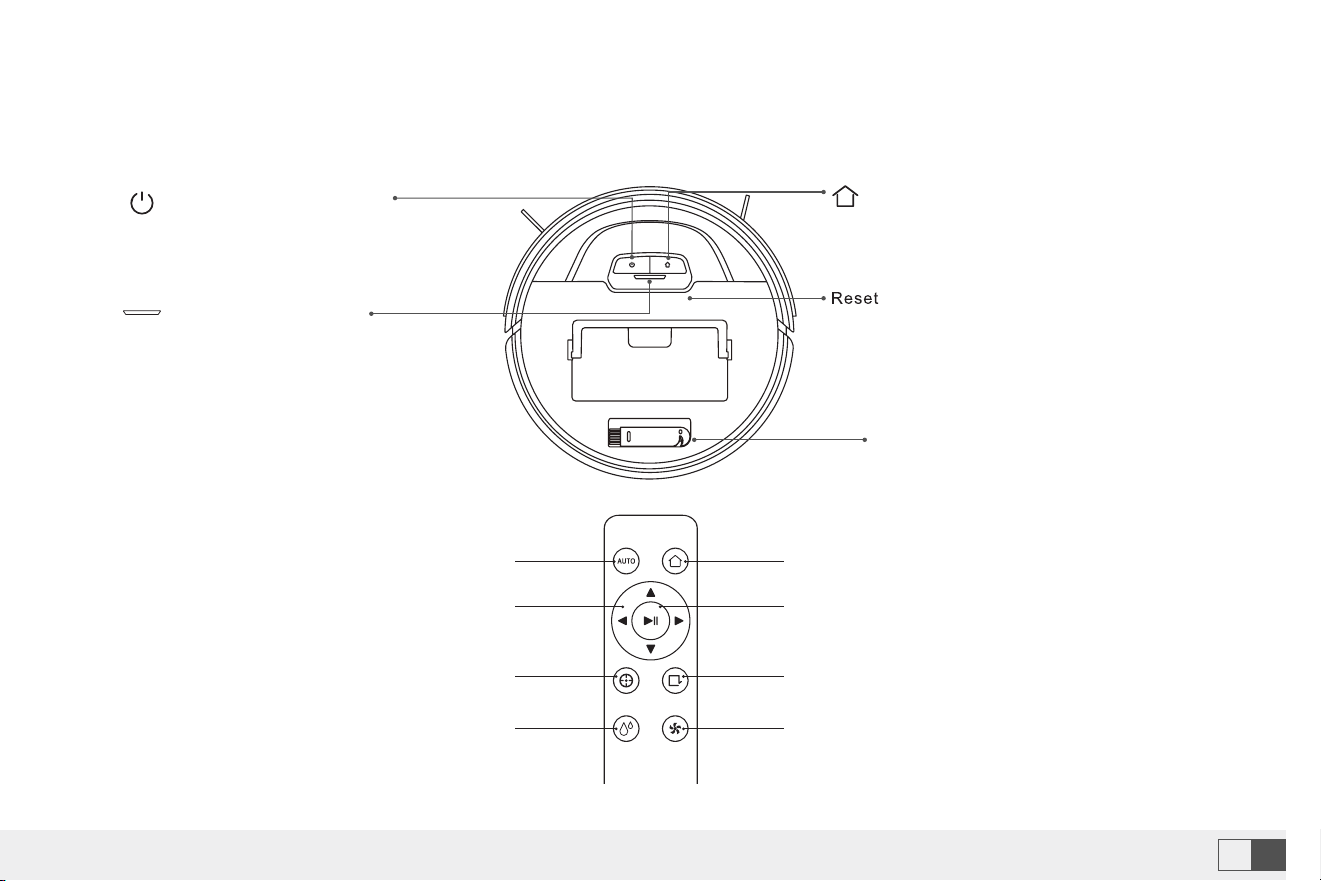
Home Button
• Return to Charging dock: Short press
Reset Button
• Use a needle to press this button to reset
the device
Cleaning Brush
Indicator Light
• Blue light: Normal
• Red light: Error
• Blinking blue light: Connecting
network
• Flashing purple light: Looking for a
robot
Clean/Power Button
• Short press to start cleaning or
pause
• Power on or off by pressing
this button 3s
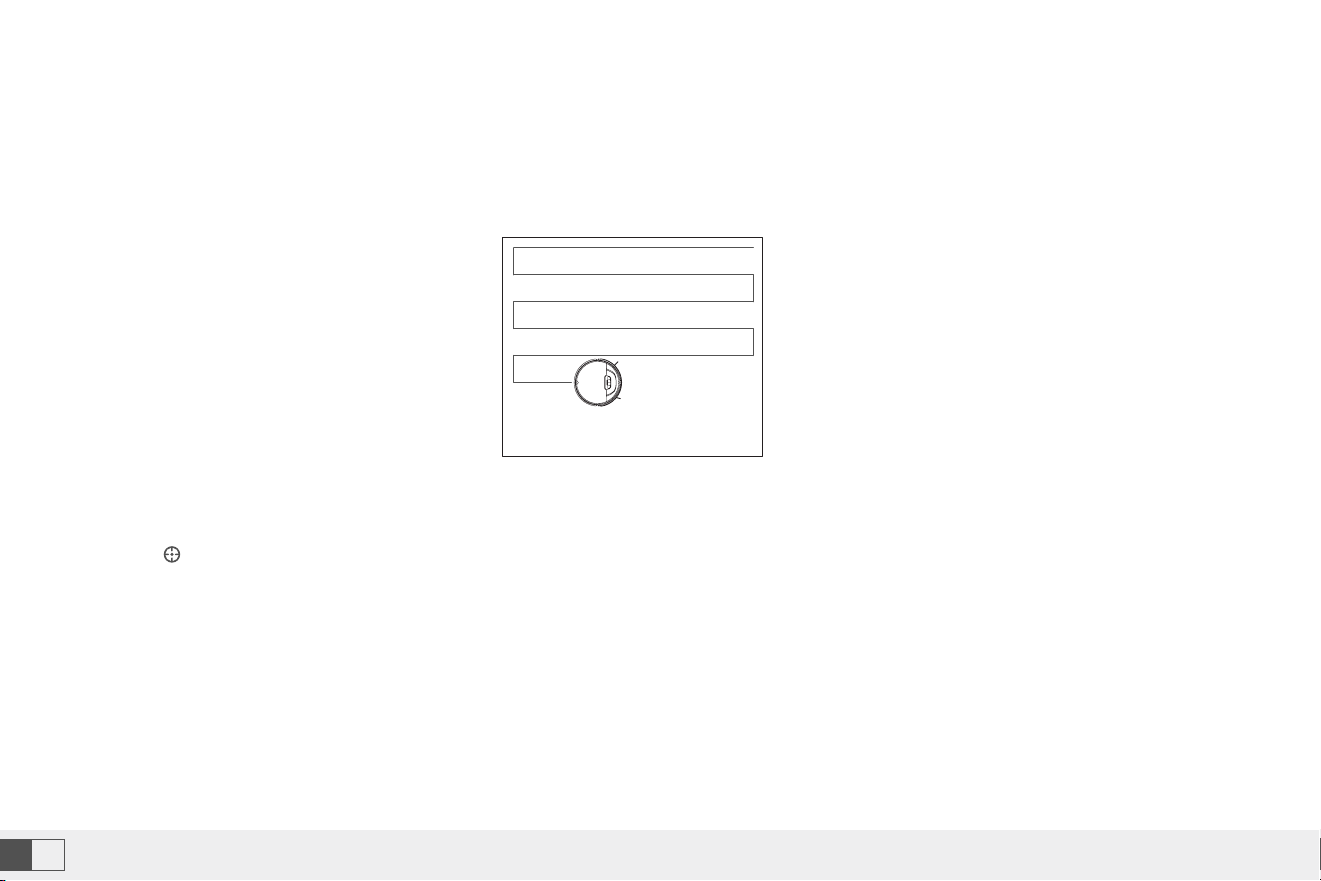
Automatic cleaning Start recharging
Direction buttons Pause/ Start
Spot cleaning Edge cleaning
Mop Water Control :
High/Middle/Low
Suction level
Remote Control
Note: Set High, robot says 3"Di". Middle, robot says 2"Di". Low, robot says 1"Di".
If you have any questions please email to support09@laresar.us
8
EN
If you have any questions please email to support09@laresar.us
9
EN
3.Basic Paramters 4.Product Introduction
Robot Specification
Product Model Evol 3
Dimensions 320 x 320 x 76 mm
Battery 3200 mAh
Rated voltage 14.4V
Rated power 42W
Charging time 300mins
Dust box capacity 450ml
Water tank capacity 250ml
Charging dock Specification
Dimensions 158 x147 x84 mm
Rated input 19V
⎓
0.6A
Rated output 19V
⎓
0.6A
Home Button
• Return to Charging dock: Short press
Reset Button
• Use a needle to press this button to reset
the device
Cleaning Brush
Indicator Light
• Blue light: Normal
• Red light: Error
• Blinking blue light: Connecting
network
• Flashing purple light: Looking for a
robot
Clean/Power Button
• Short press to start cleaning or
pause
• Power on or off by pressing
this button 3s
Automatic cleaning Start recharging
Direction buttons Pause/ Start
Spot cleaning Edge cleaning
Mop Water Control :
High/Middle/Low
Suction level
Remote Control
Note: Set High, robot says 3"Di". Middle, robot says 2"Di". Low, robot says 1"Di".
If you have any questions please email to support09@laresar.us
10EN
If you have any questions please email to support09@laresar.us
11 EN
1
1
2
2
3
4
5
5
7
6
8
3
4
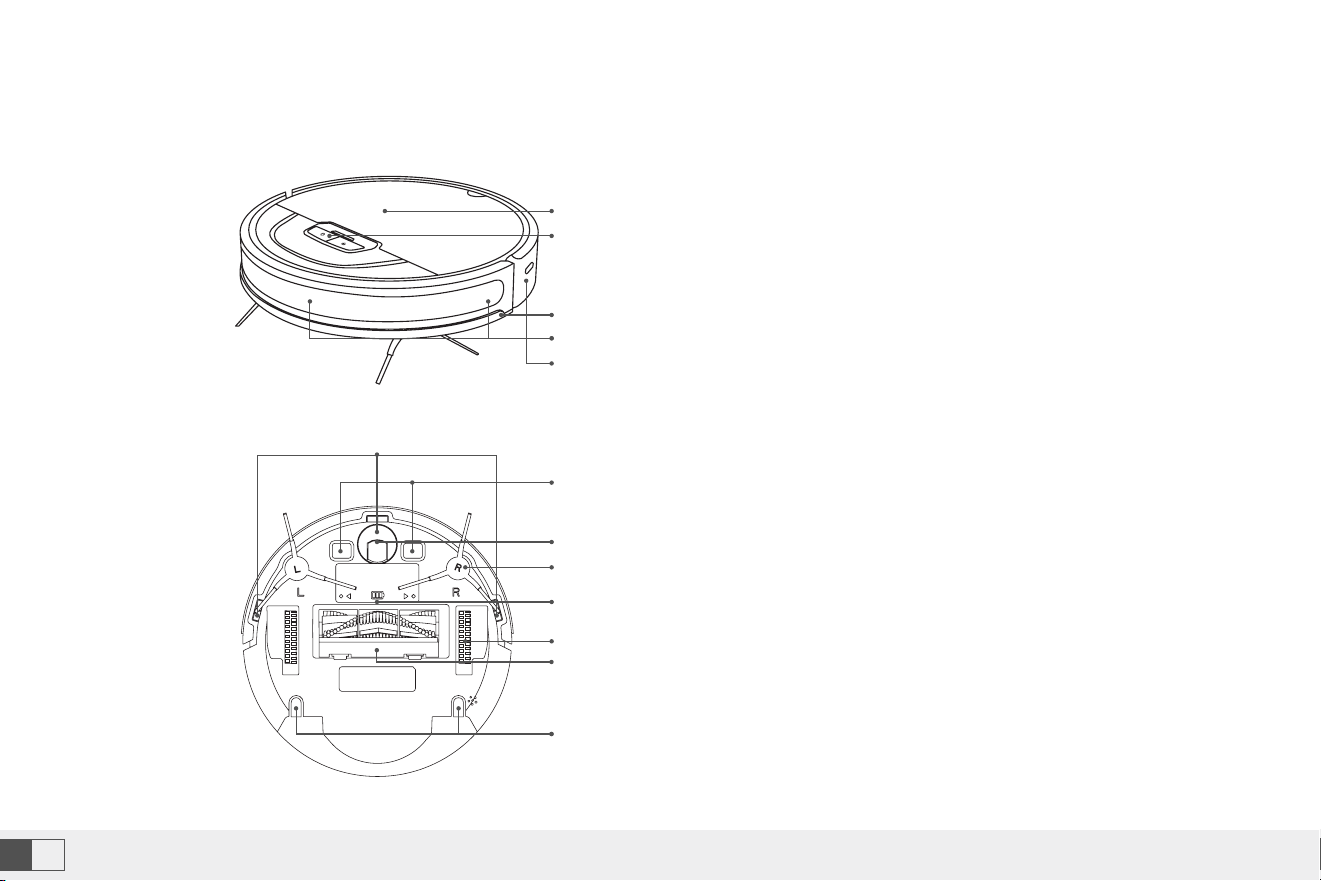
1. Top Cover
2. Button
3. Bumper
4. Infrared Anti-Collision Sensor
5. Infrared Light Receiving Sensor
1. Cliff Sensor
2. Charging Contact
3. Universal Wheel
4. Side Brush
5. Battery Cover
6. Drive Wheel
7. Rolling Brush
8. Installation Hole for Mopping Cloth Holder
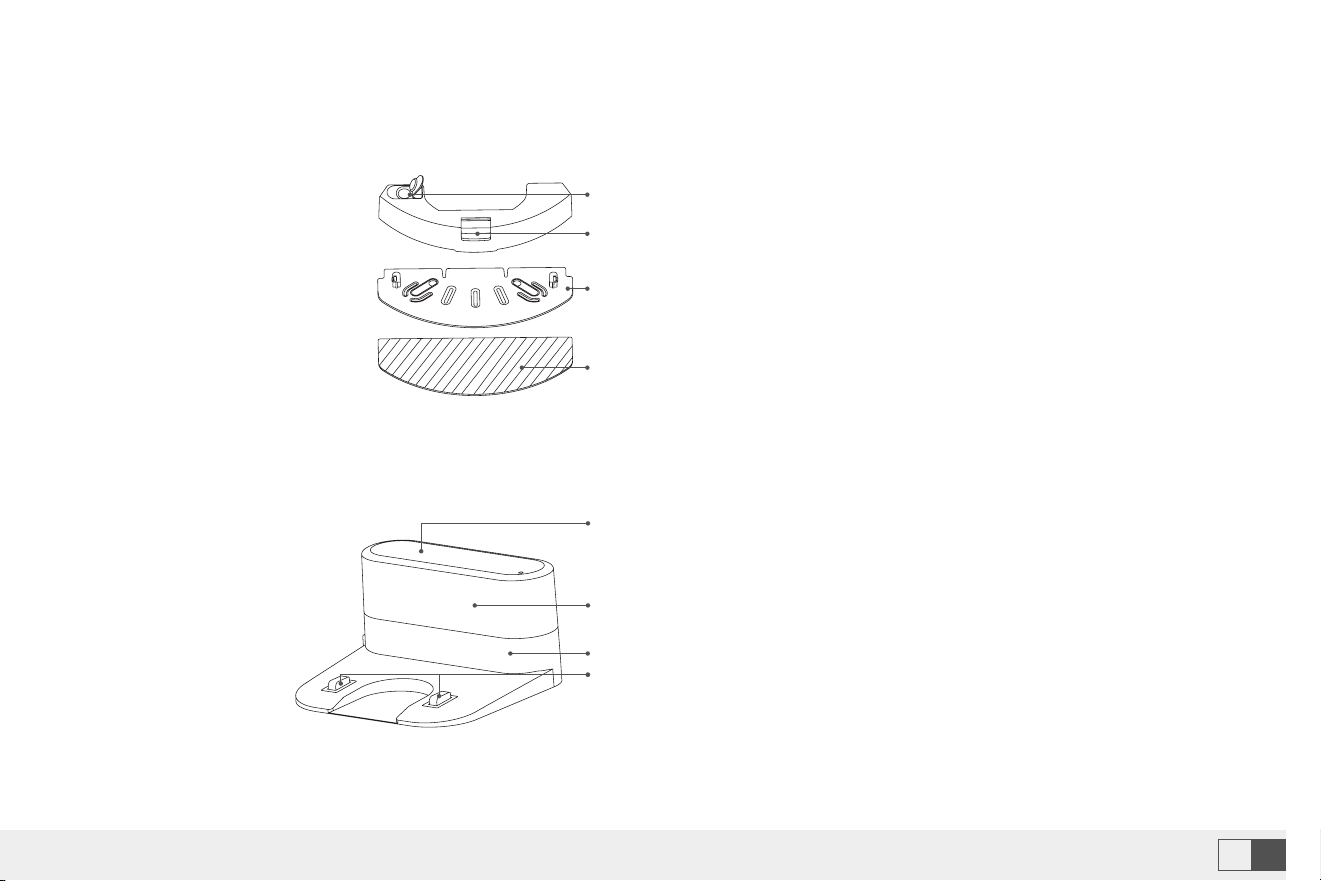
Electric Control Water Tank and Rag Components
Sensor and its Structure
Charging Station
1
2
1
3
4
2
3
4
1. Water Inlet
2. Water Tank Button
3. Mopping Cloth Holder
4. Mopping Cloth
1. Power Indicator
2. Signal Transmitting Area
3. Power Interface
4. Charging Pins
If you have any questions please email to support09@laresar.us
10
EN
If you have any questions please email to support09@laresar.us
11
EN
1
1
2
2
3
4
5
5
7
6
8
3
4
1. Top Cover
2. Button
3. Bumper
4. Infrared Anti-Collision Sensor
5. Infrared Light Receiving Sensor
1. Cliff Sensor
2. Charging Contact
3. Universal Wheel
4. Side Brush
5. Battery Cover
6. Drive Wheel
7. Rolling Brush
8. Installation Hole for Mopping Cloth Holder
Electric Control Water Tank and Rag Components
Sensor and its Structure
Charging Station
1
2
1
3
4
2
3
4
1. Water Inlet
2. Water Tank Button
3. Mopping Cloth Holder
4. Mopping Cloth
1. Power Indicator
2. Signal Transmitting Area
3. Power Interface
4. Charging Pins
If you have any questions please email to support09@laresar.us
12EN
If you have any questions please email to support09@laresar.us
13 EN
5.Preparation
Precautions
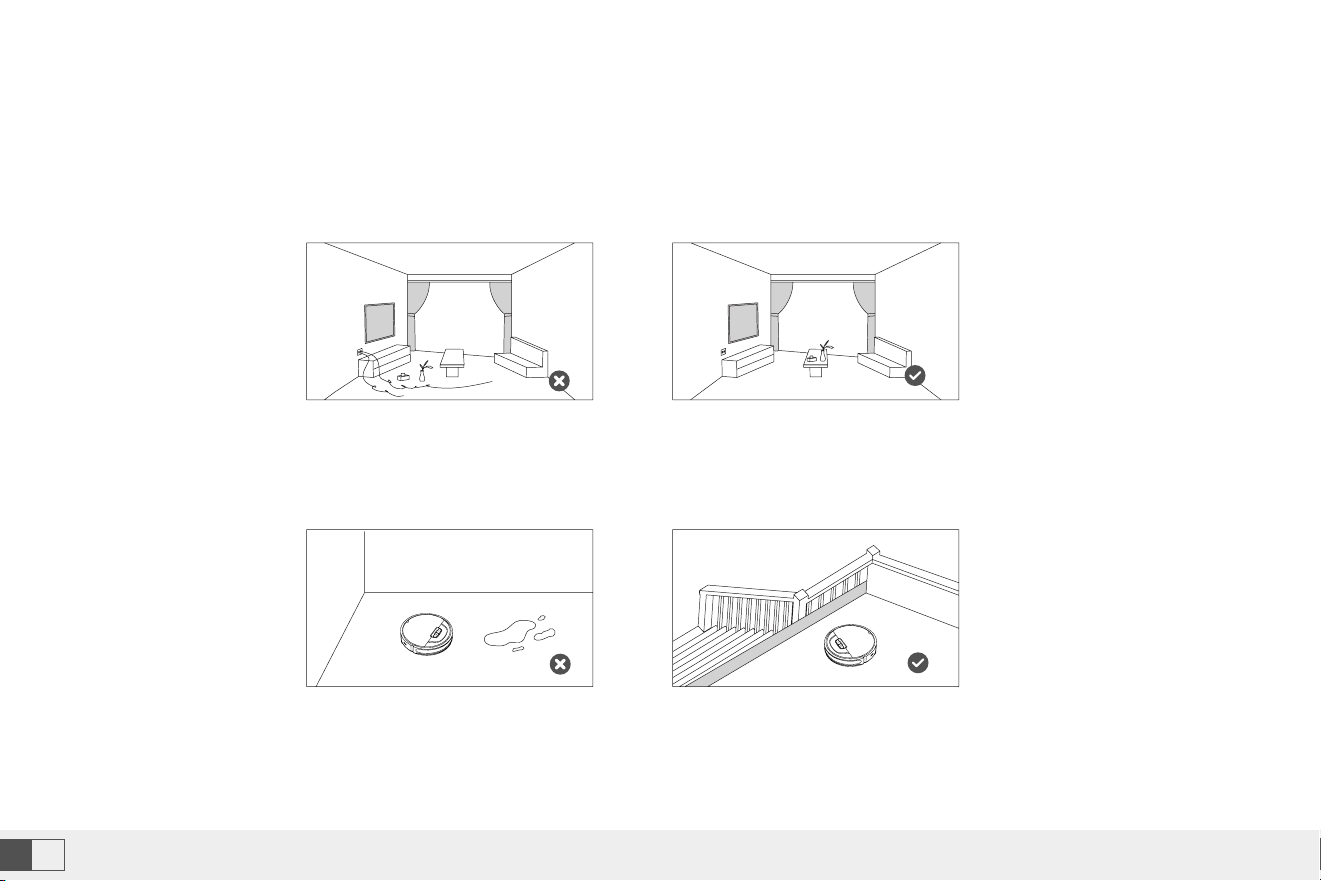
• Before starting the vacuum cleaner, clean up wires and sundries scattered on the ground, and remove easy-to-fall,
fragile, valuable and potentially dangerous items. Avoid being entangled, jammed, dragged, or knocked down by the
robot; otherwise, personal or property damage may be caused.
• Do not use the robot to vacuum liquid. otherwise it will
damage the fan and affect the performance of the robot.
• When used in a suspended circumstance, it shall be
protected by rails to avoid accidental falling or pushing
other articles from falling.
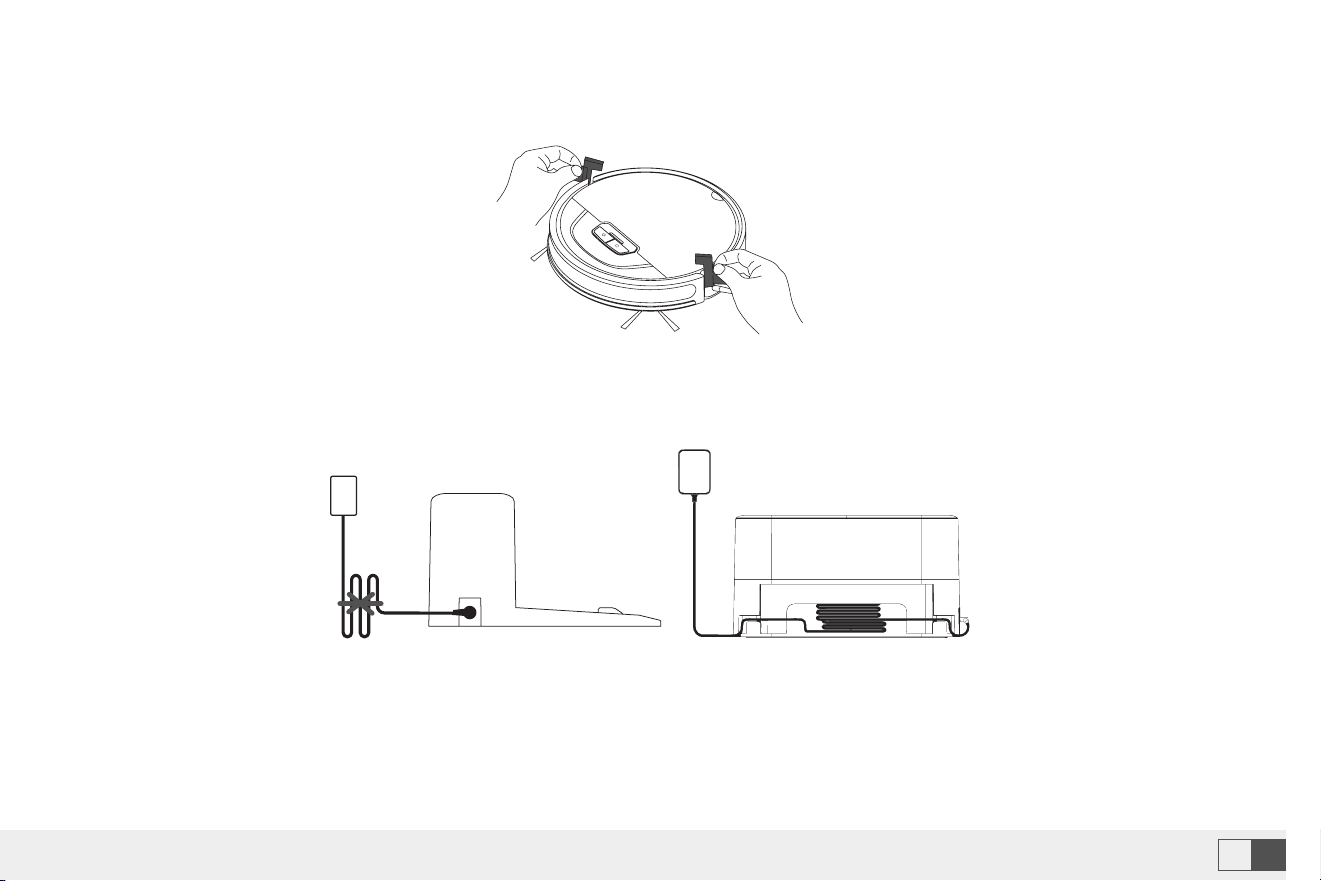
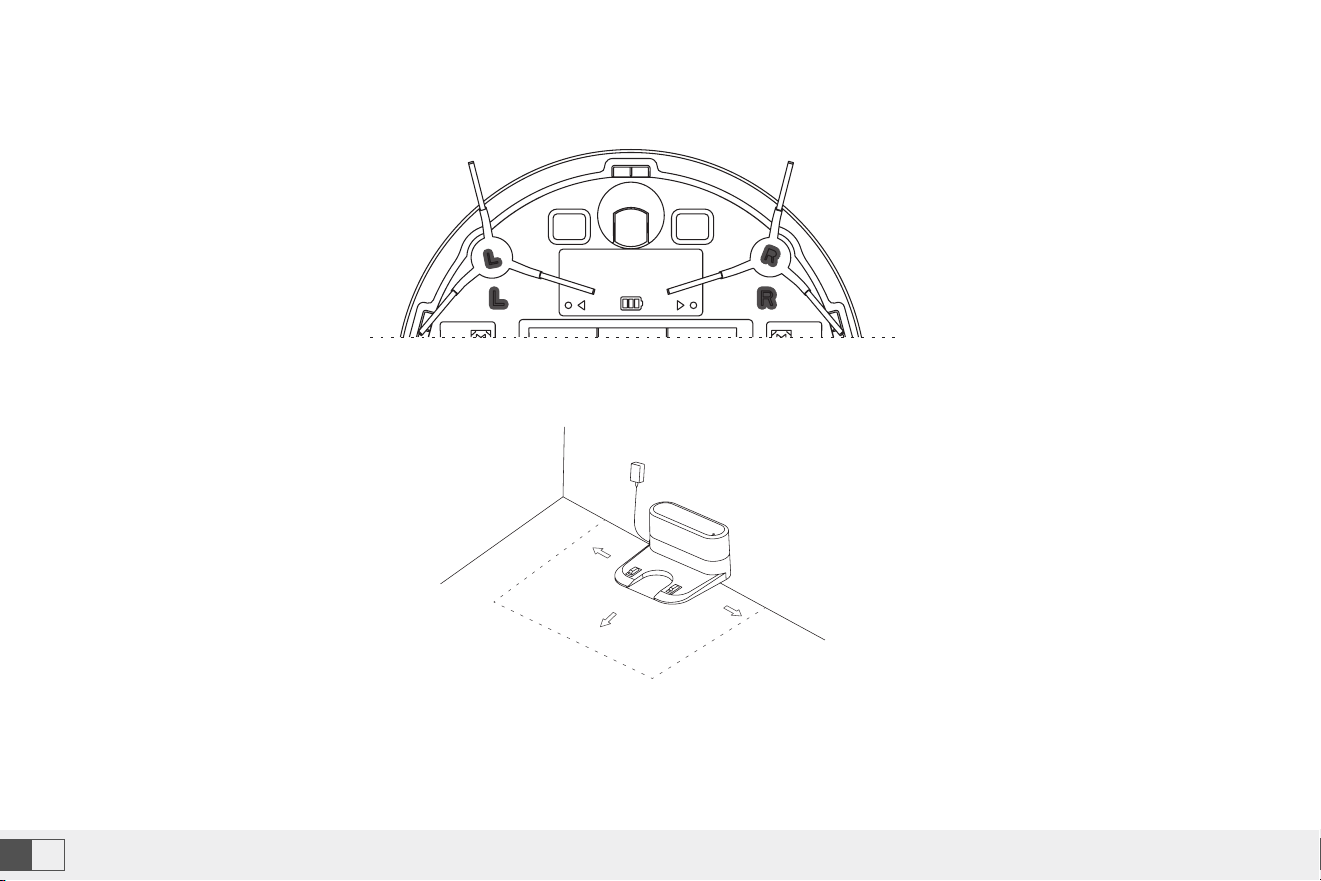
1.Remove the protection material from both sides of the robot
2.Install side brushes
• Put the left brush (L) and right brush (R) against the letters L and R on the bottom respectively; move down for “click”
to finish installation.
If you have any questions please email to support09@laresar.us
12
EN
If you have any questions please email to support09@laresar.us
13
EN
5.Preparation
Precautions
• Before starting the vacuum cleaner, clean up wires and sundries scattered on the ground, and remove easy-to-fall,
fragile, valuable and potentially dangerous items. Avoid being entangled, jammed, dragged, or knocked down by the
robot; otherwise, personal or property damage may be caused.
• Do not use the robot to vacuum liquid. otherwise it will
damage the fan and affect the performance of the robot.
• When used in a suspended circumstance, it shall be
protected by rails to avoid accidental falling or pushing
other articles from falling.
1.Remove the protection material from both sides of the robot
2.Install side brushes
• Put the left brush (L) and right brush (R) against the letters L and R on the bottom respectively; move down for “click”
to finish installation.
If you have any questions please email to support09@laresar.us
14EN
If you have any questions please email to support09@laresar.us
15 EN
3.Take out and place the dust collection charging base on a flat floor against the wall and tidy up the redundant wires.
4.Ensure space more than 0.5m from the left and right to the charging base and 1.5m in front of the charging base.
5.Do not move the charging base at will, avoid direct sunlight on the charing base.
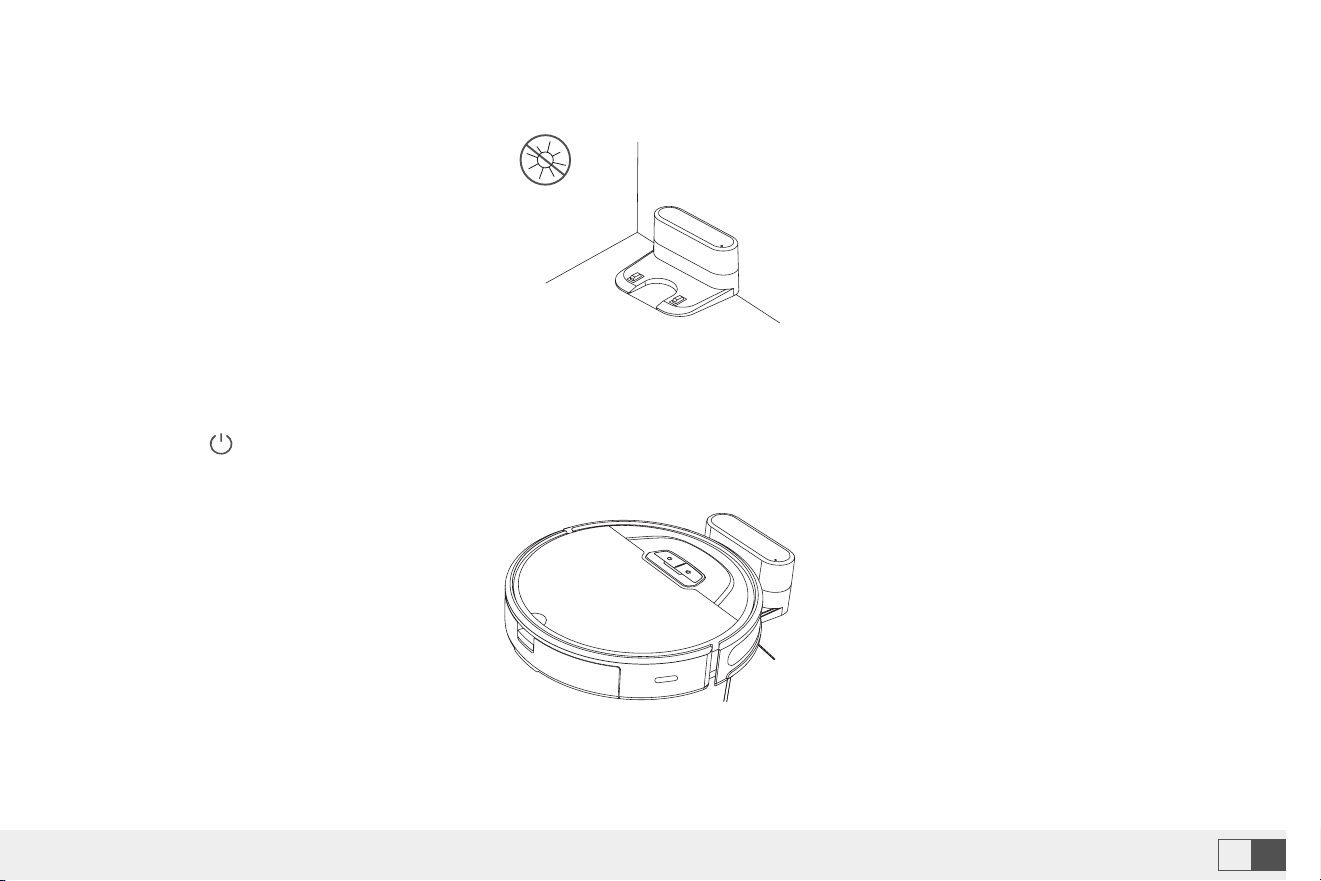
6.Power on and charging
• Hold the button to power on the machine. When the indicator is on, put the robot against the charging dock for
charging. The voice of “start charging” prompts successful charging.
Note:
• Ensure a space more than 0.5 m from the left and right of the charging dock and 1.5 m in front of the charging dock.
• The power line perpendicular to the ground may be dragged by the robot, resulting in the dock power-off.
• The charging indicator is kept on when electrified.
Note:
• The machine cannot power on in case of insuffcient battery. Please place the robot on the dock to allow automatic
power on.
Note:
• Sunlight may interfere signals of return-for-charging, and then the robot fails to return back to the charging dock.
>0.5
m
>0.5
m
>1.5m
If you have any questions please email to support09@laresar.us
14
EN
If you have any questions please email to support09@laresar.us
15
EN
3.Take out and place the dust collection charging base on a flat floor against the wall and tidy up the redundant wires.
4.Ensure space more than 0.5m from the left and right to the charging base and 1.5m in front of the charging base.
5.Do not move the charging base at will, avoid direct sunlight on the charing base.
6.Power on and charging
• Hold the button to power on the machine. When the indicator is on, put the robot against the charging dock for
charging. The voice of “start charging” prompts successful charging.
Note:
• Ensure a space more than 0.5 m from the left and right of the charging dock and 1.5 m in front of the charging dock.
• The power line perpendicular to the ground may be dragged by the robot, resulting in the dock power-off.
• The charging indicator is kept on when electrified.
Note:
• The machine cannot power on in case of insuffcient battery. Please place the robot on the dock to allow automatic
power on.
Note:
• Sunlight may interfere signals of return-for-charging, and then the robot fails to return back to the charging dock.
>0.5
m
>0.5
m
>1.5m

If you have any questions please email to support09@laresar.us
16EN
If you have any questions please email to support09@laresar.us
17 EN
The magnetic strip can be set to separate restricted zones (such as washing rooms and kitchens).
6.Use Instructions
Power on and off the machine
Cleaning/Pause
Charging
Virtual wall
• Tap and hold the button for 3 seconds to power on the machine.Then, the power indicator is on, and the vacuum
cleaner enters the standby state. Tap and hold the button for 3 seconds to power off the machine.
• Note: The robot in the charging state cannot be powered off.
Once the machine powers on, tap the button on the robot or use the controller or the smart APP to start cleaning.
Auto mode: After cleaning, the robot automatically returns to the dock for charging.
Manual mode: In the pause state, press the button to activate the “return for charging” mode or use the controller or
the smart APP for charging.
Note: Fix the magnetic strip to the ground to avoid peeling off; otherwise affecting the result of the visual wall.
Note:
• The machine cannot clean liquid.
• If the power is lower than 15%, the machine cannot work. Therefore, charge the machine before cleaning.
• If the power is lower than 15% during cleaning, the machine will automatically return back to the dock for charging.
• Before cleaning, tidy up all kinds of wires on the ground (including the power cord of the dock). Otherwise, the machine may drag the
wires while cleaning, which may cause power failures of other electric appliance or damage items or wires.
Magnetic strip

If you have any questions please email to support09@laresar.us
16
EN
If you have any questions please email to support09@laresar.us
17
EN
The magnetic strip can be set to separate restricted zones (such as washing rooms and kitchens).
6.Use Instructions
Power on and off the machine
Cleaning/Pause
Charging
Virtual wall
• Tap and hold the button for 3 seconds to power on the machine.Then, the power indicator is on, and the vacuum
cleaner enters the standby state. Tap and hold the button for 3 seconds to power off the machine.
• Note: The robot in the charging state cannot be powered off.
Once the machine powers on, tap the button on the robot or use the controller or the smart APP to start cleaning.
Auto mode: After cleaning, the robot automatically returns to the dock for charging.
Manual mode: In the pause state, press the button to activate the “return for charging” mode or use the controller or
the smart APP for charging.
Note: Fix the magnetic strip to the ground to avoid peeling off; otherwise affecting the result of the visual wall.
Note:
• The machine cannot clean liquid.
• If the power is lower than 15%, the machine cannot work. Therefore, charge the machine before cleaning.
• If the power is lower than 15% during cleaning, the machine will automatically return back to the dock for charging.
• Before cleaning, tidy up all kinds of wires on the ground (including the power cord of the dock). Otherwise, the machine may drag the
wires while cleaning, which may cause power failures of other electric appliance or damage items or wires.
Magnetic strip
If you have any questions please email to support09@laresar.us
18EN
If you have any questions please email to support09@laresar.us
19 EN
Automatic cleaning
DND mode
Scheduled cleaning
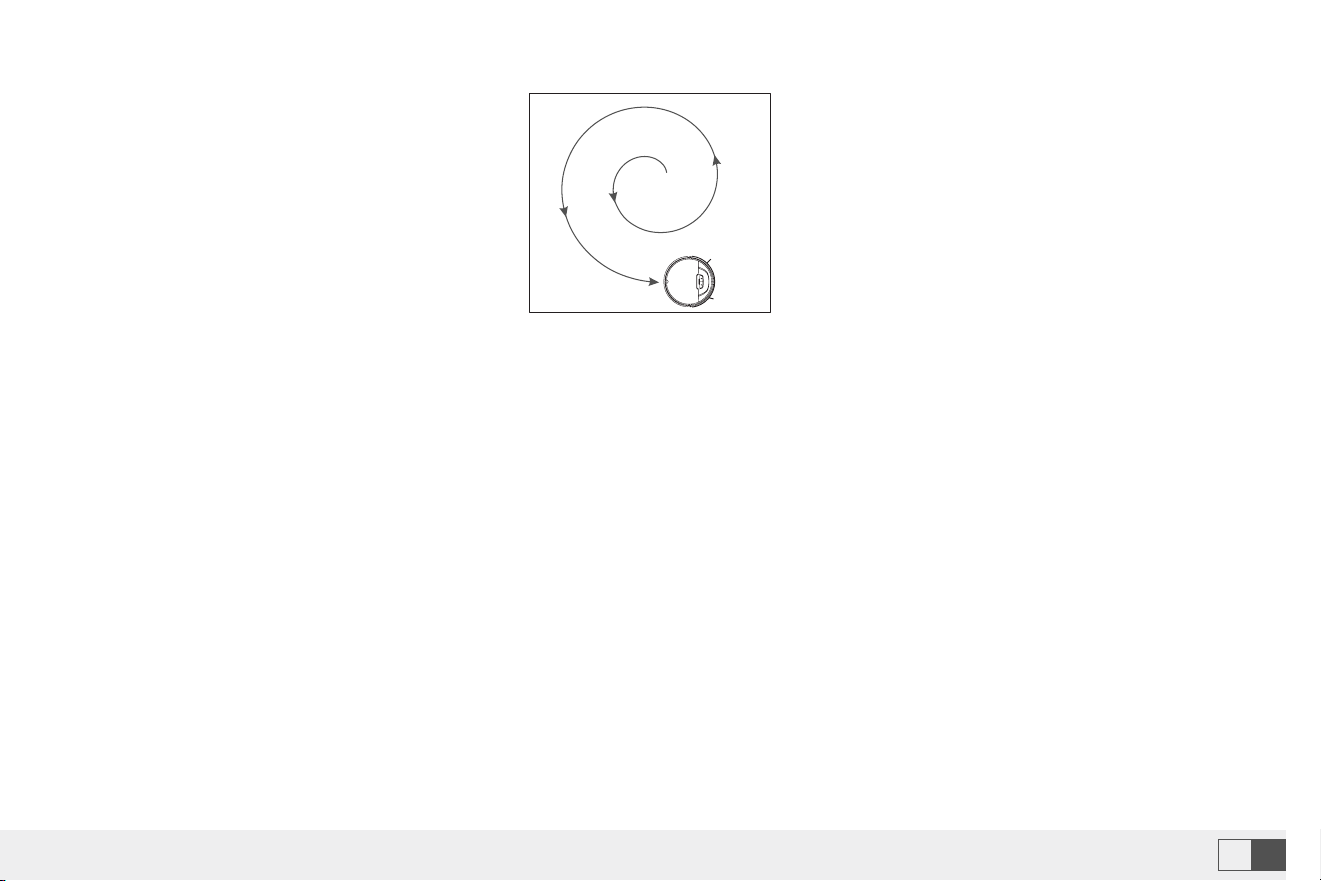
Spot cleaning
Spot cleaning
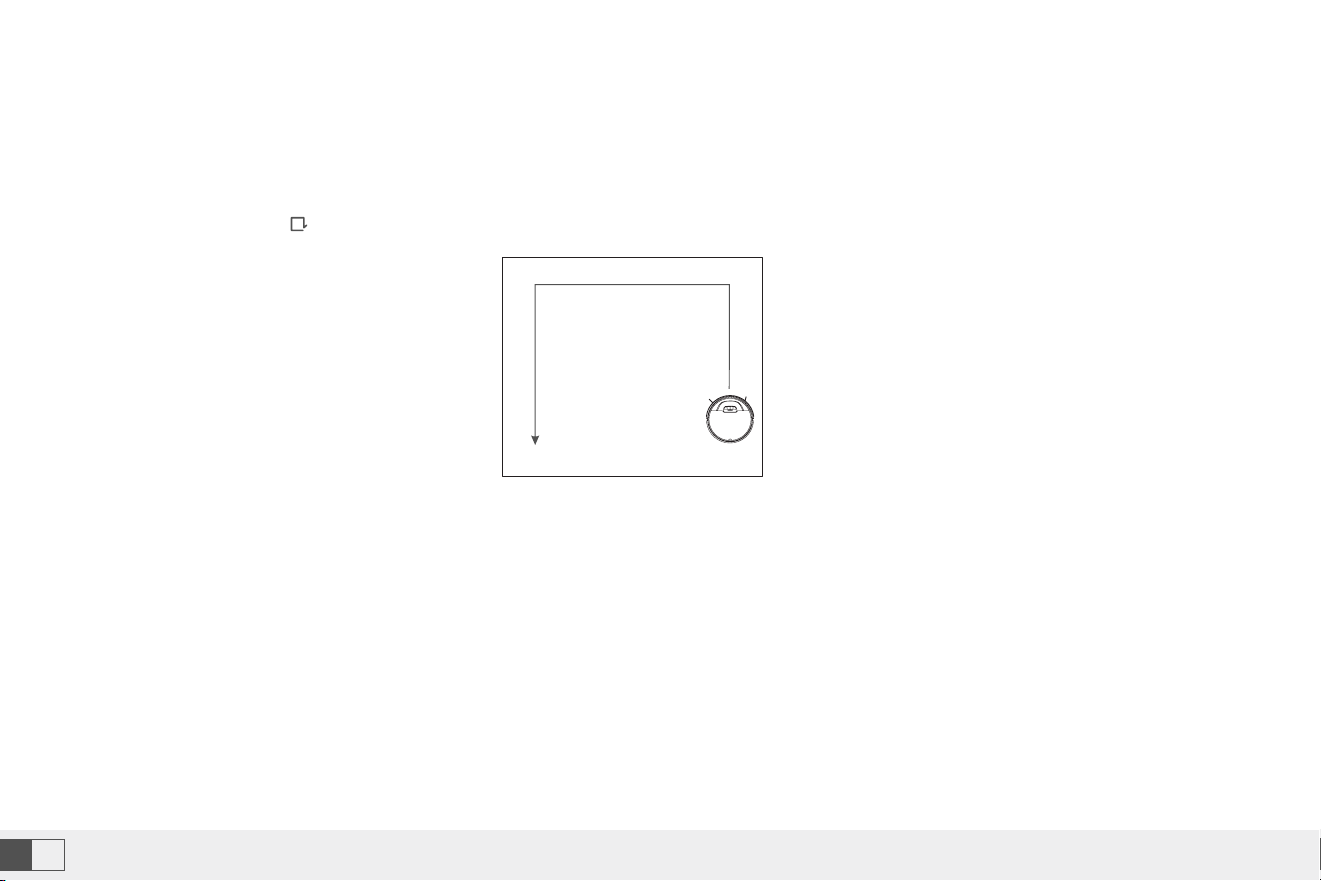
Upon power on, the machine plans its cleaning route in a zigzag way and finishes cleaning the whole room in an
orderly and efficent manner. Once cleaning ends, the machine will automatically return to the dock for charging
(cleaning mode by default).
No voice prompt in DND mode. Use the smart APP to enable or disable the DND mode.
Use the smart APP to set the time for cleaning. The robot will start cleaning automatically at the scheduled time. Upon
cleaning, it will return to the dock for charging (7x24h scheduling supported).
Use the button on the controller so that the machine will take itself as a center to sweep a round zone with the
diameter of 1.2 m. Upon cleaning, the robot will automatically return to the starting point and stop work.(The direction
key on the smart APP can also be used to manually control the machine to the cleaning position.)
Cleaned
To be cleaned
If you have any questions please email to support09@laresar.us
18
EN
If you have any questions please email to support09@laresar.us
19
EN
Automatic cleaning
DND mode
Scheduled cleaning
Spot cleaning
Spot cleaning
Upon power on, the machine plans its cleaning route in a zigzag way and finishes cleaning the whole room in an
orderly and efficent manner. Once cleaning ends, the machine will automatically return to the dock for charging
(cleaning mode by default).
No voice prompt in DND mode. Use the smart APP to enable or disable the DND mode.
Use the smart APP to set the time for cleaning. The robot will start cleaning automatically at the scheduled time. Upon
cleaning, it will return to the dock for charging (7x24h scheduling supported).
Use the button on the controller so that the machine will take itself as a center to sweep a round zone with the
diameter of 1.2 m. Upon cleaning, the robot will automatically return to the starting point and stop work.(The direction
key on the smart APP can also be used to manually control the machine to the cleaning position.)
Use the button on the controller so that the machine will take itself as a center to sweep a round zone with the
diameter of 1.2 m. Upon cleaning, the robot will automatically return to the starting point and stop work.(The direction
key on the smart APP can also be used to manually control the machine to the cleaning position.)
Cleaned
To be cleaned
If you have any questions please email to support09@laresar.us
20EN
If you have any questions please email to support09@laresar.us
21 EN
Edge cleaning
Suction control
• For indoor cleaning, the machine normally sweeps along a fixed object (such as walls). On ce cleaning finishes along
all sides, it returns to the charging dock.
• Press the button of on the controller or use the smart APP to quickly enable the side cleaning function.
• Use the smart APP to select the strong, normal and quiet modes (normal by default).
• Use the smart APP to select the high, medium and low modes (medium by default).
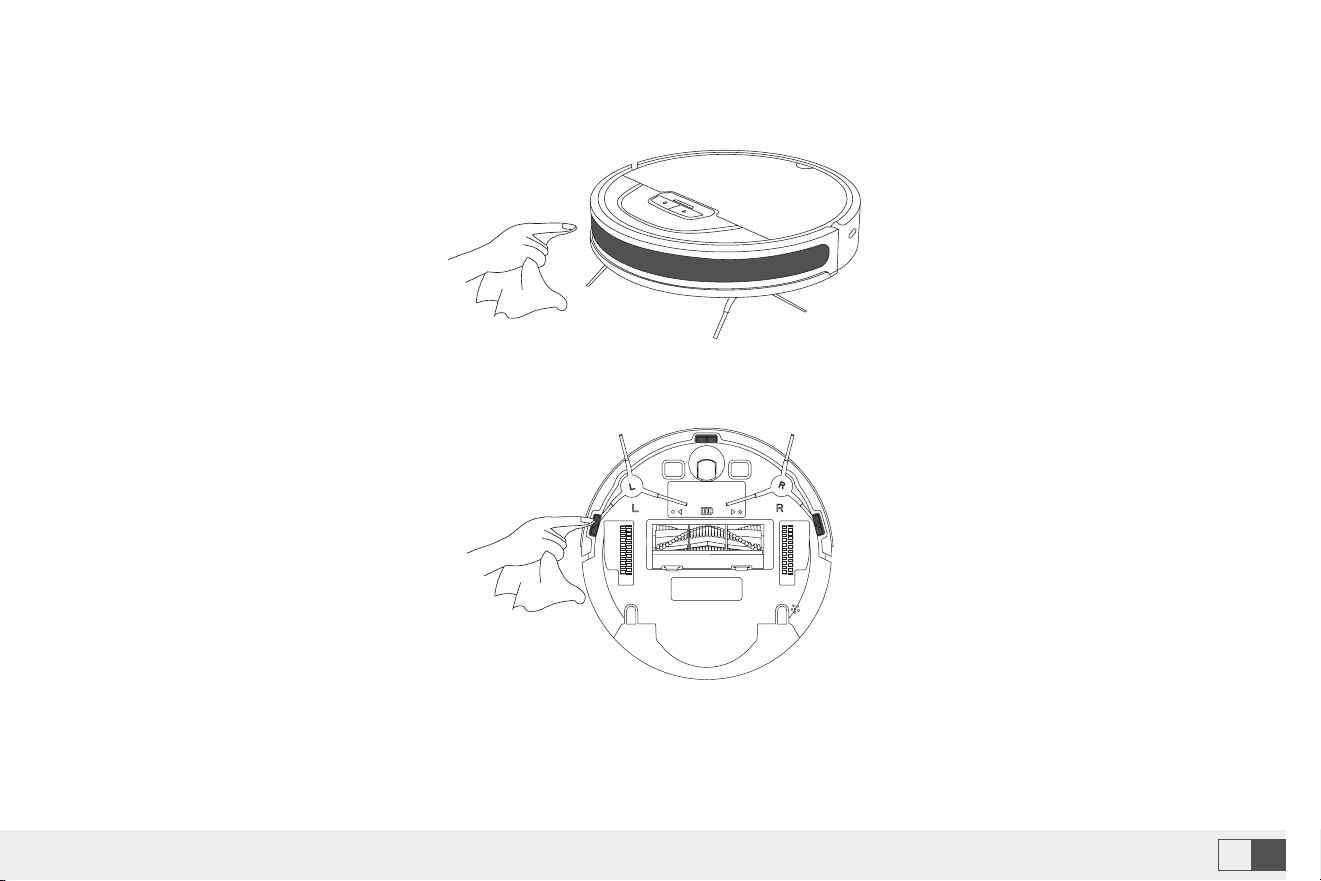
7.Routine Maintenance
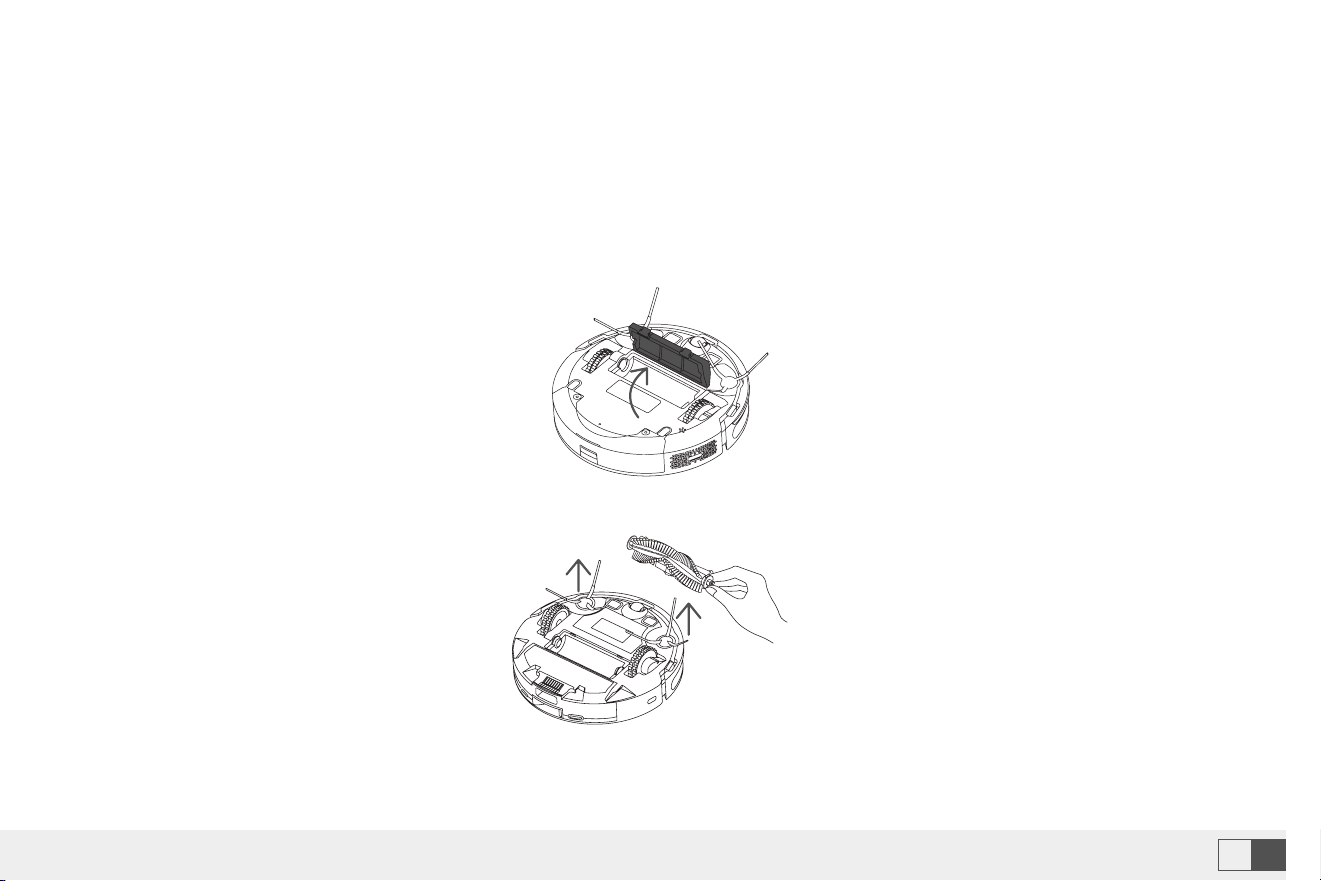
Roller brush (Recommended cleaning frequency: weekly)
1. Flip the machine, press the buckle on the roller brush cover, and remove the roller brush cover.
2. Remove the roller brush.
If you have any questions please email to support09@laresar.us
20
EN
If you have any questions please email to support09@laresar.us
21
EN
Edge cleaning
Suction control
• For indoor cleaning, the machine normally sweeps along a fixed object (such as walls). On ce cleaning finishes along
all sides, it returns to the charging dock.
• Press the button of on the controller or use the smart APP to quickly enable the side cleaning function.
• Use the smart APP to select the strong, normal and quiet modes (normal by default).
• Use the smart APP to select the high, medium and low modes (medium by default).
7.Routine Maintenance
Roller brush (Recommended cleaning frequency: weekly)
1. Flip the machine, press the buckle on the roller brush cover, and remove the roller brush cover.
2. Remove the roller brush.
If you have any questions please email to support09@laresar.us
22EN
If you have any questions please email to support09@laresar.us
23 EN
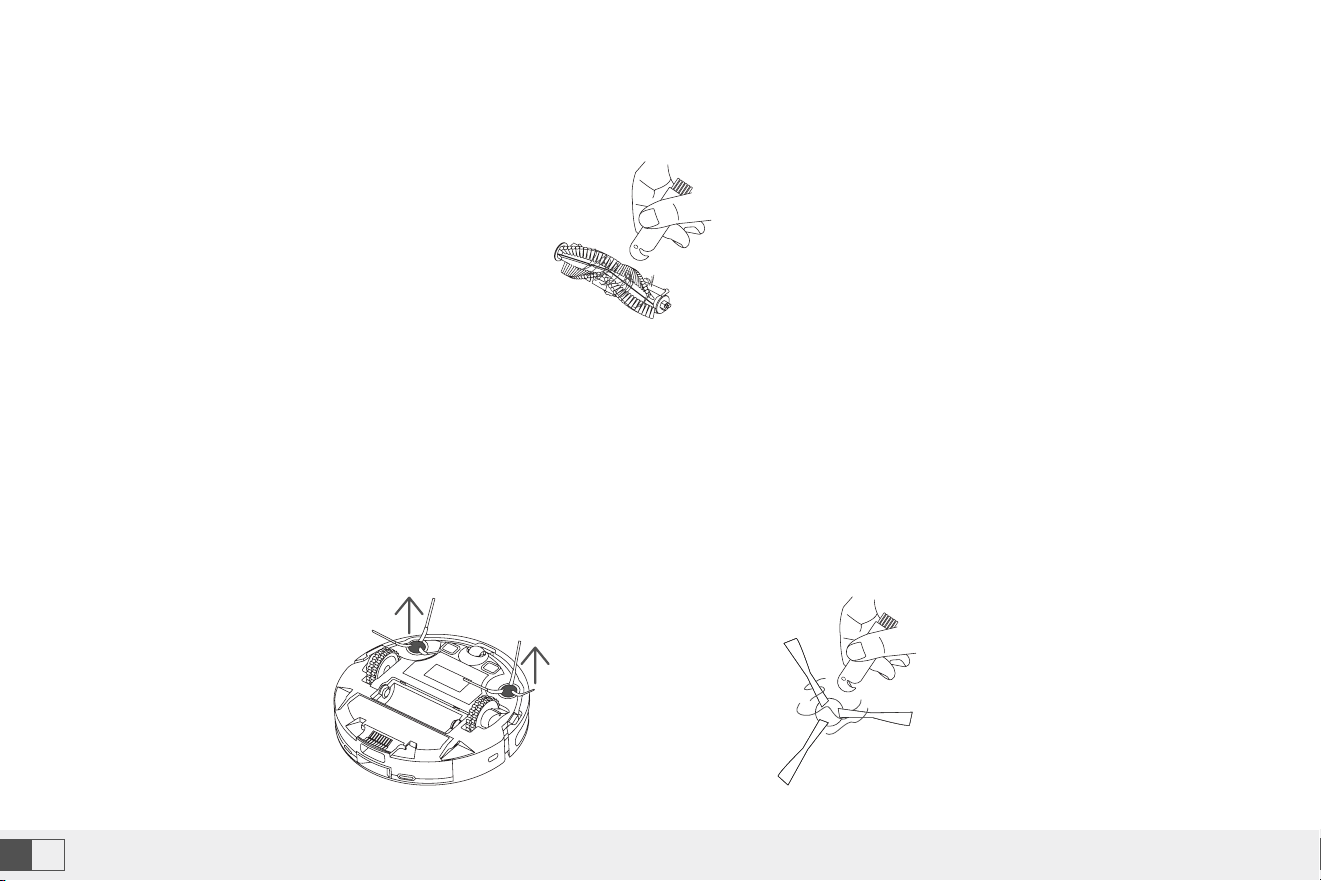
3. Use the cleaning brush that comes with the machine to remove the dust in the main brush and the roller brush
cavity, and then clean the objects entangled on the roller brush.
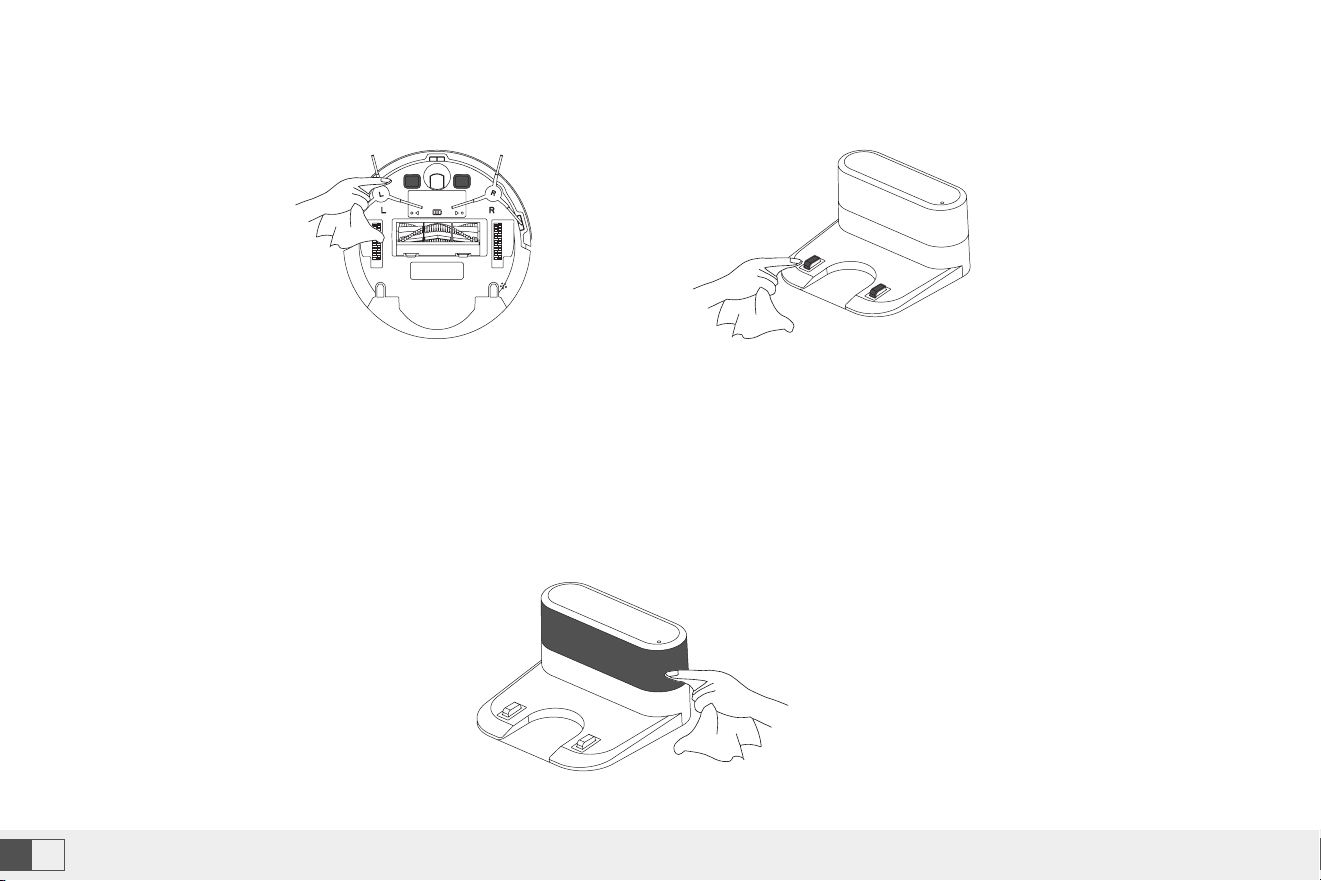
1. Flip the machine, and pull out the side brushes vertically
2. Remove the entangled hair and dirt, and then reinstall the side brushes.
3. Align the left side brush (L) and right side brush (R) with the letters L and R on the bottom cover, and press the side
brushes to reinstall them.
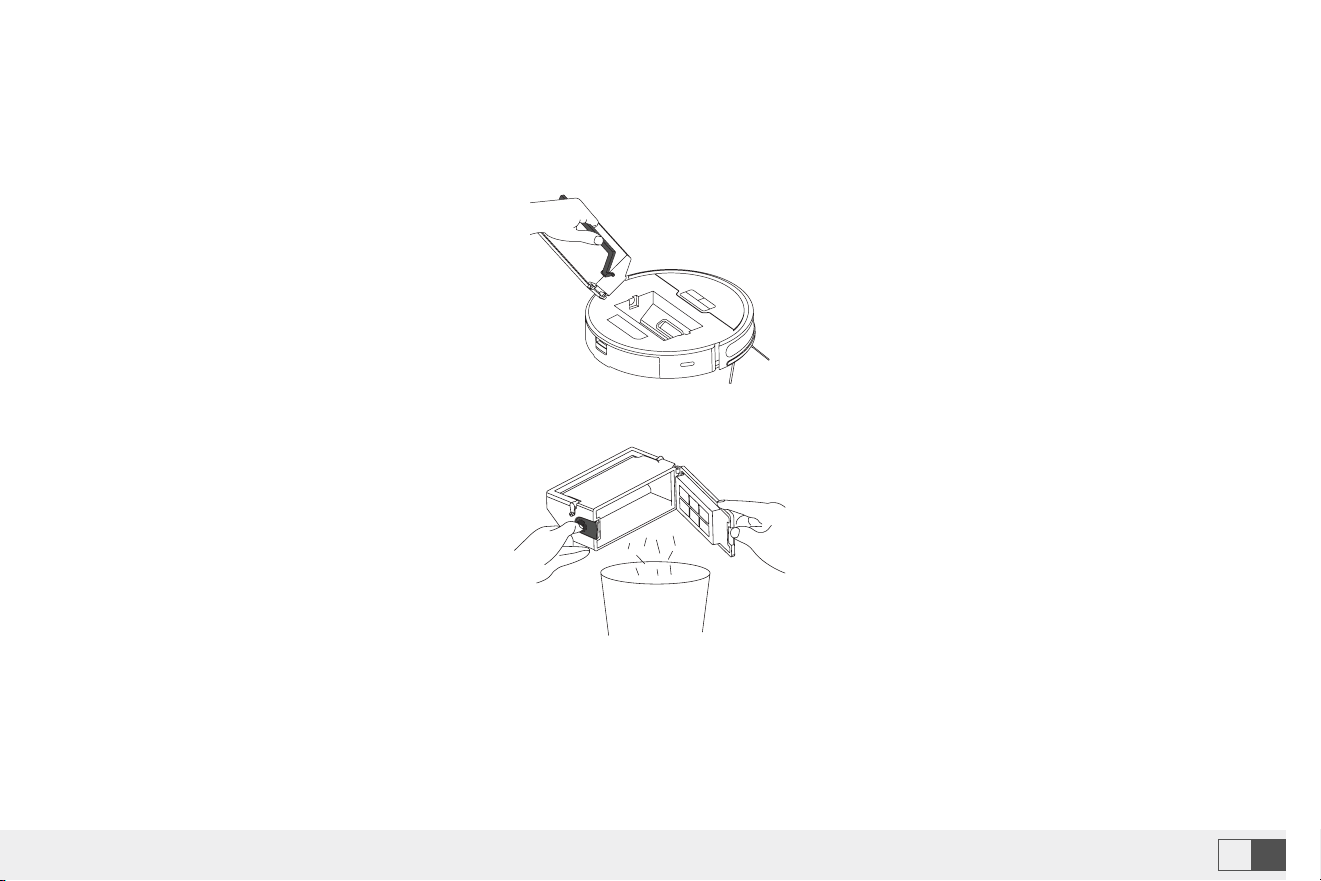
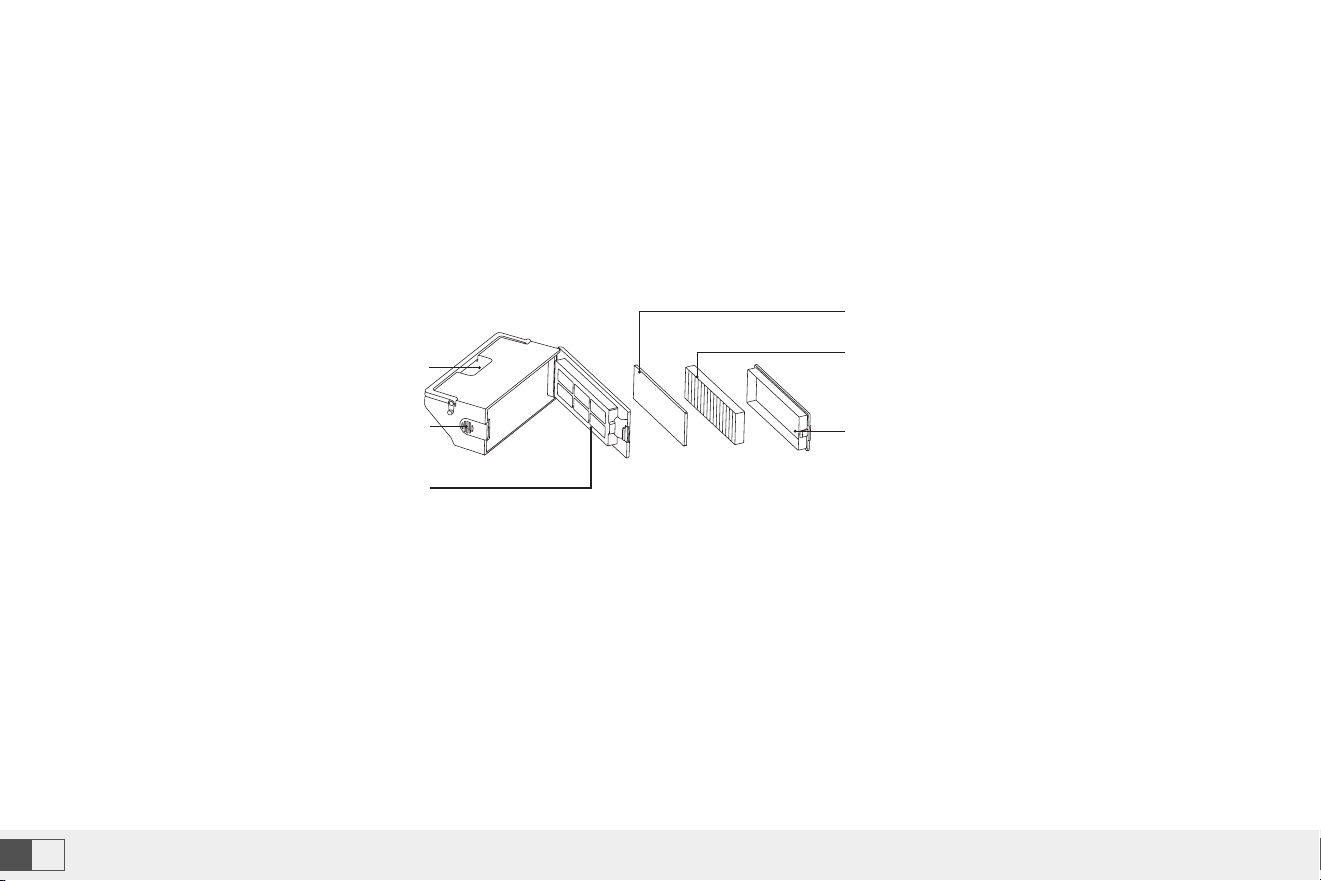
1. Remove the machine cover, lift the handle of the dust box, and take out the dust box.
Note: It is recommended that you replace the side brushes every 3 months to ensure the cleaning effect.
Side brush (Recommended cleaning frequency: weekly)
Dust box and filter (Recommended cleaning frequency: after each cleaning)
2. Press the switch of the dust box, open the dust box, and dump.
If you have any questions please email to support09@laresar.us
22
EN
If you have any questions please email to support09@laresar.us
23
EN
3. Use the cleaning brush that comes with the machine to remove the dust in the main brush and the roller brush
cavity, and then clean the objects entangled on the roller brush.
1. Flip the machine, and pull out the side brushes vertically
2. Remove the entangled hair and dirt, and then reinstall the side brushes.
3. Align the left side brush (L) and right side brush (R) with the letters L and R on the bottom cover, and press the side
brushes to reinstall them.
1. Remove the machine cover, lift the handle of the dust box, and take out the dust box.
Note: It is recommended that you replace the side brushes every 3 months to ensure the cleaning effect.
Side brush (Recommended cleaning frequency: weekly)
Dust box and filter (Recommended cleaning frequency: after each cleaning)
2. Press the switch of the dust box, open the dust box, and dump.
If you have any questions please email to support09@laresar.us
24EN
If you have any questions please email to support09@laresar.us
25 EN
1. After the machine is used for a long time, remove the filter gauze and HEPA filter.
2. Put the removed prefilter and dust box under the faucet for washing (the HEPA filter cannot be washed by water).
3. Remove the water droplets, and dry the filter and dust box thoroughly before use.Press the switch of the dust box,
open the dust box, and dump.
Note:
• Use clean water for washing, and do not add any detergent.
• Do not use a brush or fingers to clean the filter.
• Dry the filters thoroughly for at least 24 hours.
• It is recommended that you replace a set of filters every 3 months.
Clean the dust box Clean the infrared anti-collision sensor (Recommended cleaning frequency: monthly)
Clean the cliff sensor (Recommended cleaning frequency: monthly)
Filter Cover
Handle
Pre-filter
Dust Bin Open
Button
HEPA Filter
Sponge
If you have any questions please email to support09@laresar.us
24
EN
If you have any questions please email to support09@laresar.us
25
EN
1. After the machine is used for a long time, remove the filter gauze and HEPA filter.
2. Put the removed prefilter and dust box under the faucet for washing (the HEPA filter cannot be washed by water).
3. Remove the water droplets, and dry the filter and dust box thoroughly before use.Press the switch of the dust box,
open the dust box, and dump.
Note:
• Use clean water for washing, and do not add any detergent.
• Do not use a brush or fingers to clean the filter.
• Dry the filters thoroughly for at least 24 hours.
• It is recommended that you replace a set of filters every 3 months.
Clean the dust box Clean the infrared anti-collision sensor (Recommended cleaning frequency: monthly)
Clean the cliff sensor (Recommended cleaning frequency: monthly)
Filter Cover
Handle
Pre-filter
Dust Bin Open
Button
HEPA Filter
Sponge
If you have any questions please email to support09@laresar.us
26EN
If you have any questions please email to support09@laresar.us
27 EN
Clean the charging contact (recommended cleaning)
Upgrade the firmware
Battery
Clean the signal transmission zone (Recommended cleaning frequency: monthly)
Start the smart phone app, and enter the firmware upgrade page. After the new firmware is detected, follow the
instructions to upgrade the firmware. To upgrade the firmware, the power must be equal to or greater than 50%. It is
recommended that you place the machine on the docking station for upgrade.
• Machine is equipped with a high-performance rechargeable lithium battery pack. To maintain battery performance,
keep the machine in charging state in daily use.
• If you do not use the machine for a long time, power it off and store it properly.Charge the machine at least once every
3 months to avoid damage to the battery due to excessive discharg.
8.Common Problems
Problem Solution
Failed to power on the machine
. The battery power is insuffcient. Please place the machine on the docking station, and
align it with the charging electrode. The machine will be automatically powered on.
. The ambient temperature is below 0°C or above 40°C. Please use the machine when the
ambient temperature is 0°C to 40°C.
Failed to charge the machine
. Move the machine away from the docking station, and check whether the indicator of
the docking station is on. Make sure that both ends of the power adapter are properly
connected.
. The docking station is not in proper contact with the machine. Please clean the docking
station shrapnel and the charging contact on the machine, or push the side brush to one
side.
Failed to return to the docking station
. The machine is too far away from the docking station. Try to place the machine near the
docking station.

If you have any questions please email to support09@laresar.us
26
EN
If you have any questions please email to support09@laresar.us
27
EN
Clean the charging contact (recommended cleaning)
Upgrade the firmware
Battery
Clean the signal transmission zone (Recommended cleaning frequency: monthly)
Start the smart phone app, and enter the firmware upgrade page. After the new firmware is detected, follow the
instructions to upgrade the firmware. To upgrade the firmware, the power must be equal to or greater than 50%. It is
recommended that you place the machine on the docking station for upgrade.
• Machine is equipped with a high-performance rechargeable lithium battery pack. To maintain battery performance,
keep the machine in charging state in daily use.
• If you do not use the machine for a long time, power it off and store it properly.Charge the machine at least once every
3 months to avoid damage to the battery due to excessive discharg.
8.Common Problems
Problem Solution
Failed to power on the machine
. The battery power is insuffcient. Please place the machine on the docking station, and
align it with the charging electrode. The machine will be automatically powered on.
. The ambient temperature is below 0°C or above 40°C. Please use the machine when the
ambient temperature is 0°C to 40°C.
Failed to charge the machine
. Move the machine away from the docking station, and check whether the indicator of
the docking station is on. Make sure that both ends of the power adapter are properly
connected.
. The docking station is not in proper contact with the machine. Please clean the docking
station shrapnel and the charging contact on the machine, or push the side brush to one
side.
Failed to return to the docking station
. The machine is too far away from the docking station. Try to place the machine near the
docking station.

If you have any questions please email to support09@laresar.us
28EN
If you have any questions please email to support09@laresar.us
29 EN
Problem Solution
Abnormal behavior . Power off the machine and then on again.
There is abnormal noise during cleaning
. The roller brush, side brushes, or wheels may be entangled with foreign objects. Please
clean them after stopping the machine.
The cleaning performance is degraded, or
ash is dropped
. The dust blocked. Clean or replace the filter.
. The roller x is full. Clean the dust box.
. The filter brush is entangled with foreign objects. Clean the roller brush.
The Wi-Fi network cannot be connected
. The Wi-Fi signal is not good. Ensure that the machine is located in a place with good Wi-
Fi signals.
. The Wi-Fi connection is abnormal. Reset the Wi-Fi settings, download the app of the
latest version, and try to connect to the Wi-Fi network again.
. The password is incorrect.
. This machine supports only the 2.4 GHz band.
Scheduled cleaning cannot be carried out
. The power is insuffcient. Scheduled cleaning will be started only when the remaining
power is 15% or above.
Is any power consumed if the machine
always stays at the docking station?
. The power consumption is extremely low when the machine always stays at the docking
station. This helps to keep the battery in the best performance.
Is it necessary to charge the battery for 16
hours when the machine is used for the
first three times?
. The lithium battery does not have a memory effect. It can be used instantly after it is fully
charged. There is no need to wait.
9.Troubleshooting
Problem Solution
Error 1: Insert dustbin . Cleaning is triggered when the dust box is taken out. Please reinstall the dust box.
Error 2: Put the vacuum on the floor
before starting
. You may pick up the machine, or the machine is suspended in the air. Please move
the machine to a level ground and start again.
Error 3: Put the machine flat on the
ground before starting
. The machine is tilted. Please move the machine to a level ground before starting.
Error 4: Front bumper is stuck
. The edge or anti-collision sensor is stuck. Please push the pumper left and right to
confirm that it is not stuck.
Error 5: Battery is low, please recharge . Put the machine on the docking station for charging.
Error 6: The vacuum is stuck . Please move the machine to an open ground before starting.
Error 7 : Side brush is stuck
. The side brush may be stuck or entangled with foreign objects. Please check the
side brush and remove the foreign objects.
Error 8: Wheels are Stuck
. The wheels may be stuck or entangled with foreign objects. Please check the
wheels and remove the foreign objects.
Error 9: Main Brush is Stuck
. The roller brush may be stuck or entangled with foreign objects. Please check the
roller brush and remove the foreign objects.

If you have any questions please email to support09@laresar.us
28
EN
If you have any questions please email to support09@laresar.us
29
EN
Problem Solution
Abnormal behavior . Power off the machine and then on again.
There is abnormal noise during cleaning
. The roller brush, side brushes, or wheels may be entangled with foreign objects. Please
clean them after stopping the machine.
The cleaning performance is degraded, or
ash is dropped
. The dust blocked. Clean or replace the filter.
. The roller x is full. Clean the dust box.
. The filter brush is entangled with foreign objects. Clean the roller brush.
The Wi-Fi network cannot be connected
. The Wi-Fi signal is not good. Ensure that the machine is located in a place with good Wi-
Fi signals.
. The Wi-Fi connection is abnormal. Reset the Wi-Fi settings, download the app of the
latest version, and try to connect to the Wi-Fi network again.
. The password is incorrect.
. This machine supports only the 2.4 GHz band.
Scheduled cleaning cannot be carried out
. The power is insuffcient. Scheduled cleaning will be started only when the remaining
power is 15% or above.
Is any power consumed if the machine
always stays at the docking station?
. The power consumption is extremely low when the machine always stays at the docking
station. This helps to keep the battery in the best performance.
Is it necessary to charge the battery for 16
hours when the machine is used for the
first three times?
. The lithium battery does not have a memory effect. It can be used instantly after it is fully
charged. There is no need to wait.
9.Troubleshooting
Problem Solution
Error 1: Insert dustbin . Cleaning is triggered when the dust box is taken out. Please reinstall the dust box.
Error 2: Put the vacuum on the floor
before starting
. You may pick up the machine, or the machine is suspended in the air. Please move
the machine to a level ground and start again.
Error 3: Put the machine flat on the
ground before starting
. The machine is tilted. Please move the machine to a level ground before starting.
Error 4: Front bumper is stuck
. The edge or anti-collision sensor is stuck. Please push the pumper left and right to
confirm that it is not stuck.
Error 5: Battery is low, please recharge . Put the machine on the docking station for charging.
Error 6: The vacuum is stuck . Please move the machine to an open ground before starting.
Error 7 : Side brush is stuck
. The side brush may be stuck or entangled with foreign objects. Please check the
side brush and remove the foreign objects.
Error 8: Wheels are Stuck
. The wheels may be stuck or entangled with foreign objects. Please check the
wheels and remove the foreign objects.
Error 9: Main Brush is Stuck
. The roller brush may be stuck or entangled with foreign objects. Please check the
roller brush and remove the foreign objects.