2
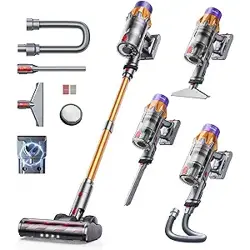
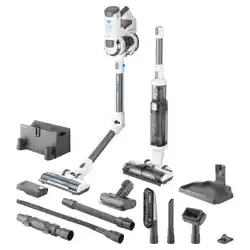
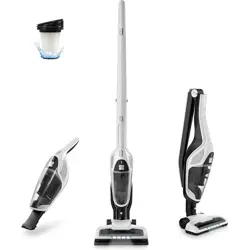
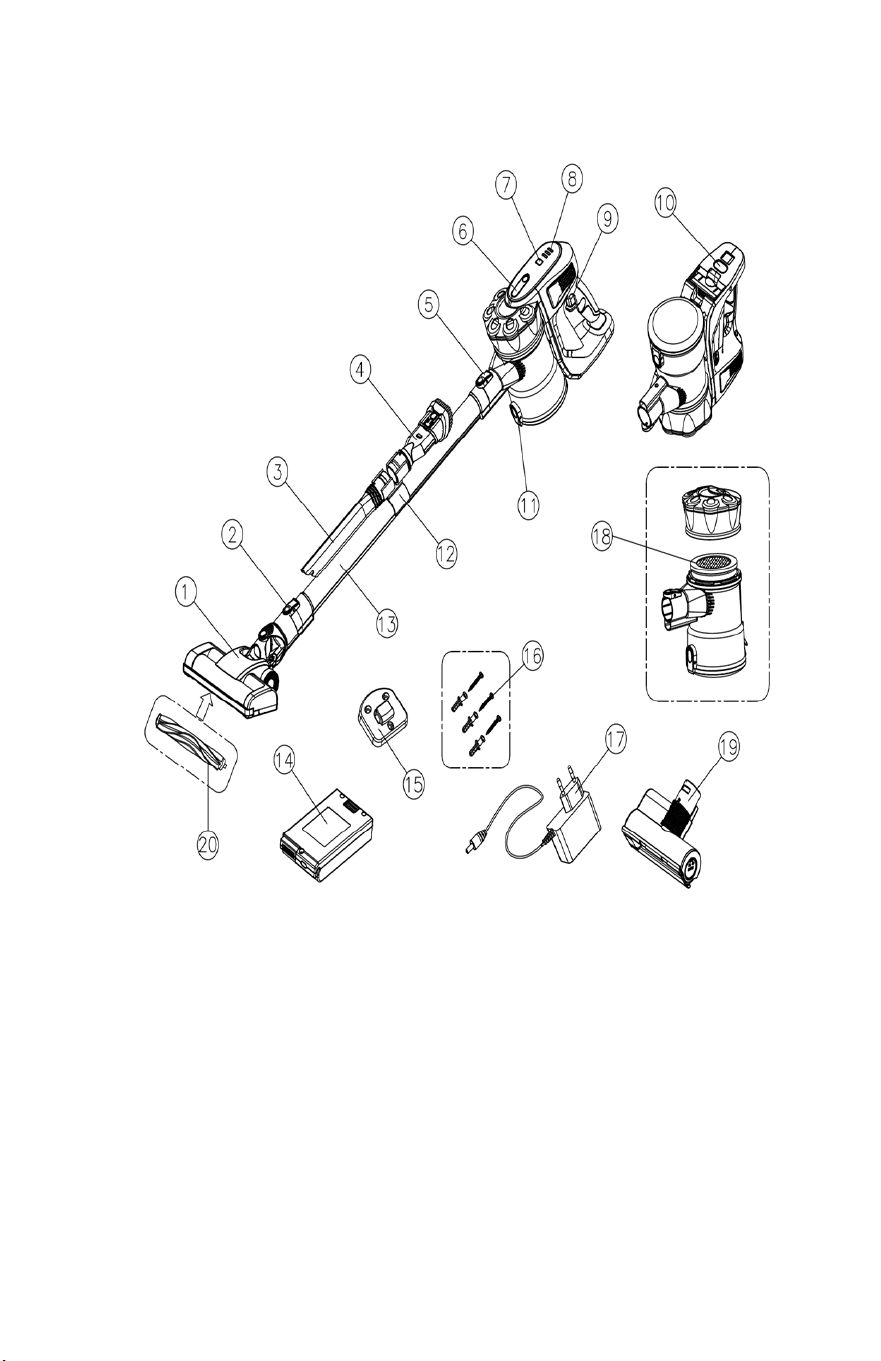
Components and Equipment
1. Motorized Illuminated Floor Brush
11. Dust release button
2. Floor Release button
12. Tool Holder
3. Crevice nozzle
13. Extension tube
4. Combo Tool
14. Battery Pack (x2)
5. Extension tube release button
15. Wall Hanger
6. Dust container release button
16. Wall Hanger Screws
7. Power adjustment key
17. Charger
8. Indicator lights
18. Round Microfiber Filter
9. ON/OFF button
19. Motorized upholstery nozzle
10. Battery pack release button
20. Soft Roller Brush (spare
included)

3
IMPORTANT SAFETY INSTRUCTIONS
READ ALL INSTRUCTIONS BEFORE USING APPLIANCE
WARNING:
TO REDUCE THE RISK OF FIRE, ELECTRICAL SHOCK OR INJURY:
1. Never charge the battery or appliance for extended periods of
time.
2. Do not use this vacuum cleaner if the charger or battery are
damaged.
3. Do not use this product without the dust container and filter in
place.
4. Do not handle the plug, charger or appliance with wet hands.
5. Do not operate this vacuum for extended periods of time near
heat sources, such as fires, radiators, heater, lit cigarettes etc.
6. This product features a thermal safety auto shut-off device. If
the vacuum overheats, the power will instantly stop. In this
event, the device should be switched off. Clean the filter, check
for clogs and obstructions and turn switch back on.
7. Do not unplug by pulling the cord. Grasp the plug to unplug, not
the cord.
8. Ensure that all vents and openings are kept clear of dust, lint,
hair and anything that may reduce airflow. It may cause the
product to overheat.
9. Ensure that hair, loose clothing, fingers and all parts of body are
kept away from the openings and moving parts of the vacuum.
10. This product uses a lithium-ion battery. Waste batteries should
be recycled per your local laws and ordinances.
11. Only use with original manufacturers batteries.
12. Store battery away from high temperatures.
13. Do not try to open the battery under any circumstances.

4
14. This battery is a sealed unit and under normal circumstances
poses no safety concern. In the unlikely event that acid liquid
leaks from the battery, ensure that liquid stays away from skin
and eyes. If liquid comes into contact with skin. Rinse with
clean, fresh water and seek medical advice. If liquid comes into
contact with eyes, rinse with clean fresh water and seek medical
attention immediately.
15. Extra care must be taken when cleaning on the stairs.
16. Ensure the appliance is turned off before connecting any
accessories.
17. This appliance should not be used on liquids or wet surfaces.
18. Do not pick up burning or smoking items, such as cigarettes,
matches or hot ashes.
19. Do not leave this product under direct sunlight for extended
periods.
20. This vacuum cleaner is not intended for use by children or
persons with reduced physical abilities, unless they are under
supervision.
21. Do not allow children to play with the vacuum cleaner as a toy.
22. If appliance needs repairing, this must be done by a qualified
professional or electrician to avoid injury or further damage to
the product.
SAVE THESE INSTRUCTIONS
5
ACCESSORIES
Extension Tube: Use for extended reach when using as an upright unit
or for hard to reach places.
Motorized Illuminated Floor Brush: Use this for hard floors and
tight knit rugs and carpets. Easily picks up dirt dust and small debris.
Motorized Upholstery Nozzle: Use this for upholstery, stairs,
vehicles etc.
Combo Tool: Use this for vacuuming fabric furnishings such as sofas
armchairs and curtains.
Crevice Nozzle: Features a narrow nozzle that makes for quick, easy
cleanup of tight spaces such as corners and hard to reach areas.
ASSEMBLY INSTRUCTIONS
NOTE: Before assembling the vacuum, install the included wall mount
hook to the wall. Ensure the wall mount is placed high enough for the
vacuum to be securely mounted.
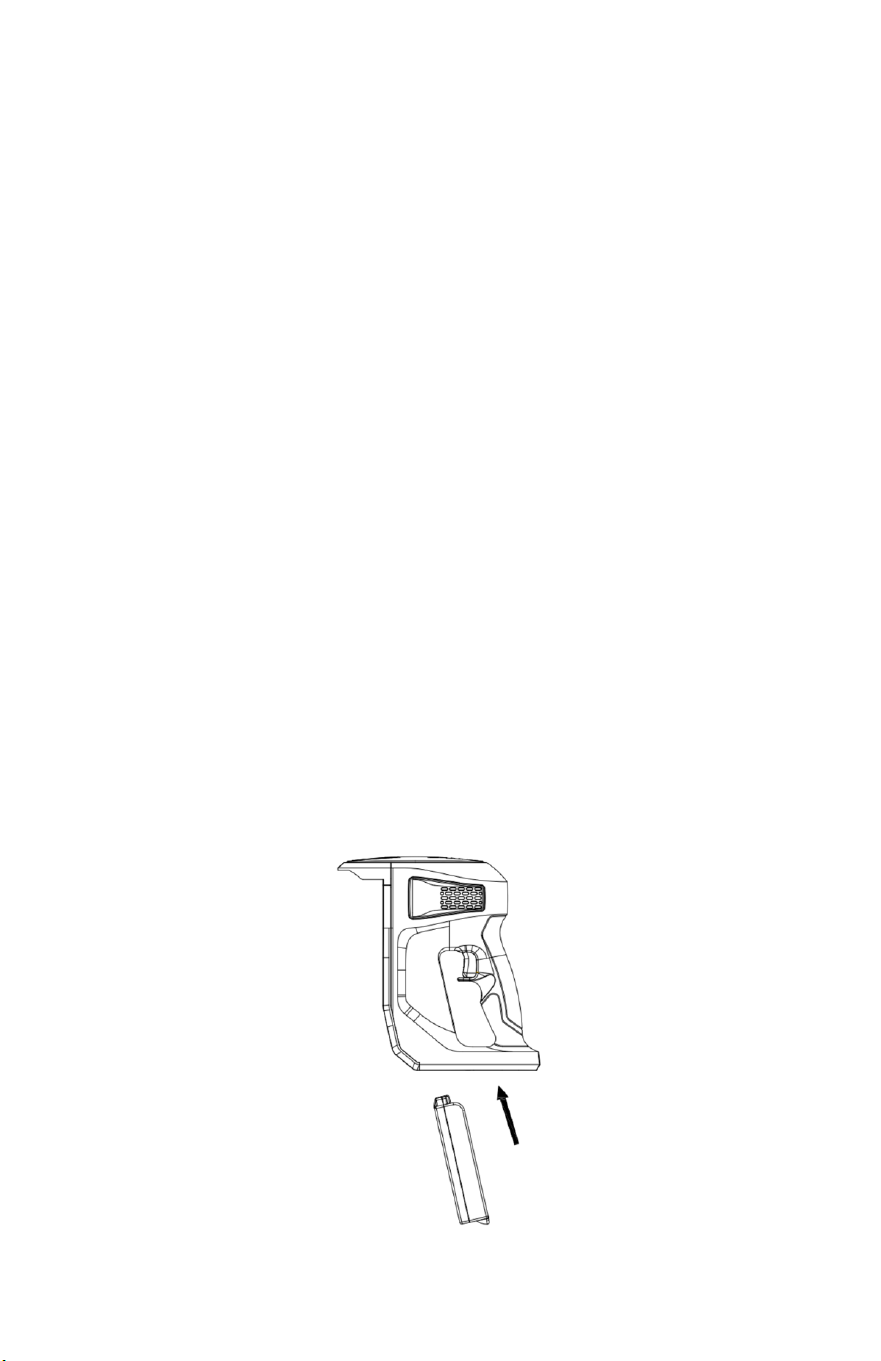
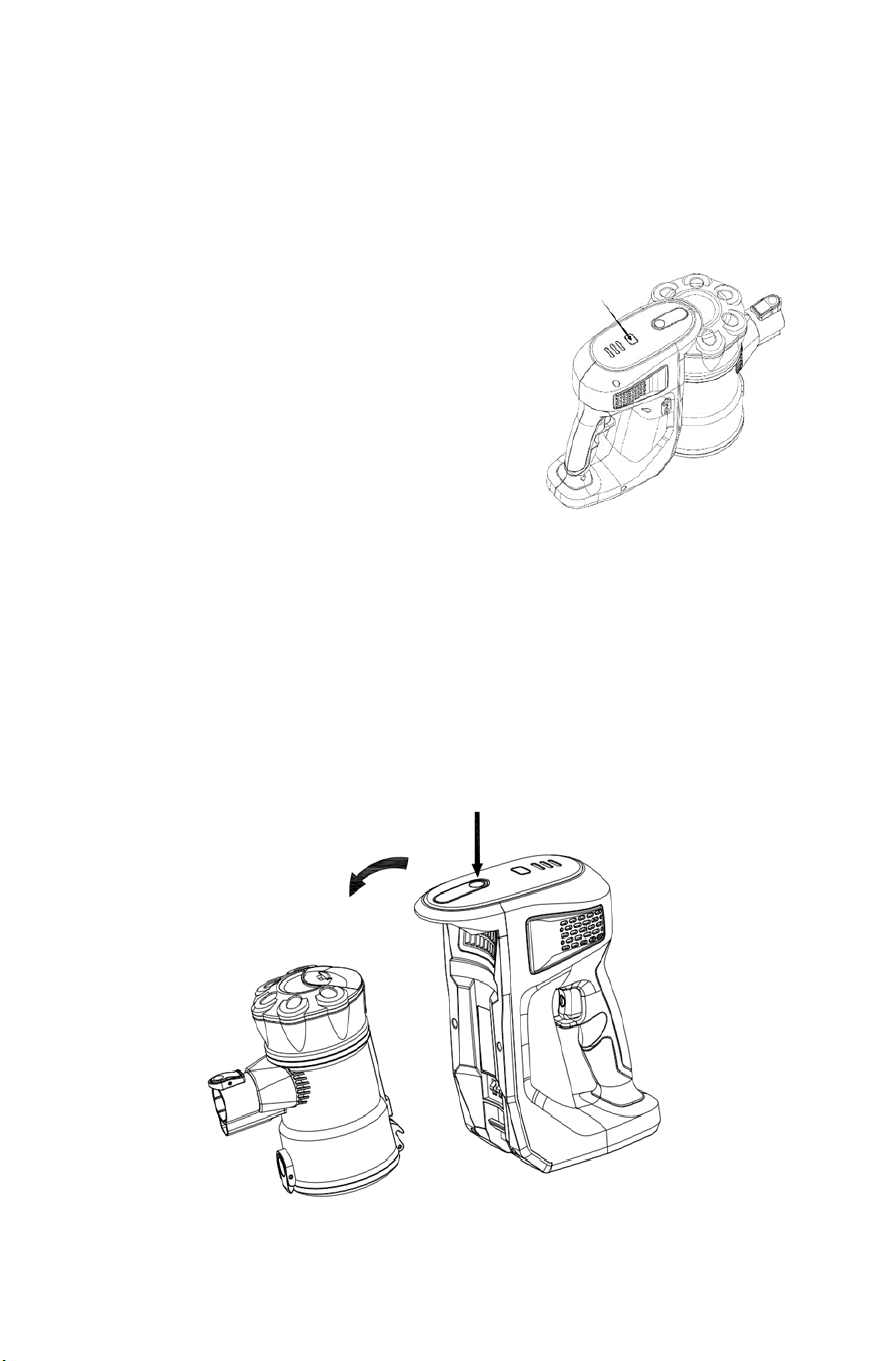
Assembling the main body:
1. Install the battery into the housing by sliding it into the
appropriate slot. It will "click" into place.
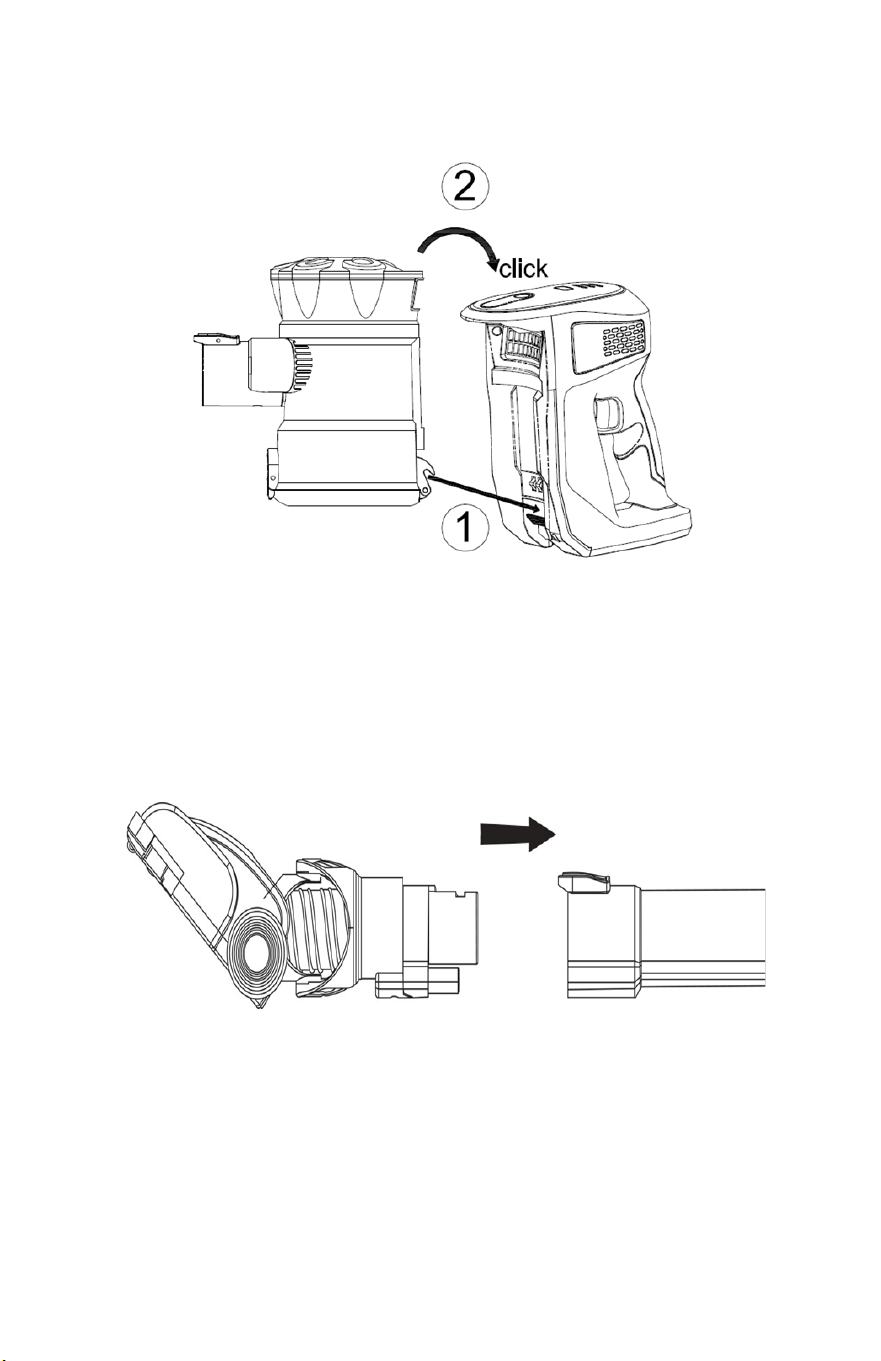
6
2. Install the dust container by inserting the clip into the main
body, then put the upper side into place. It will "click" to secure.
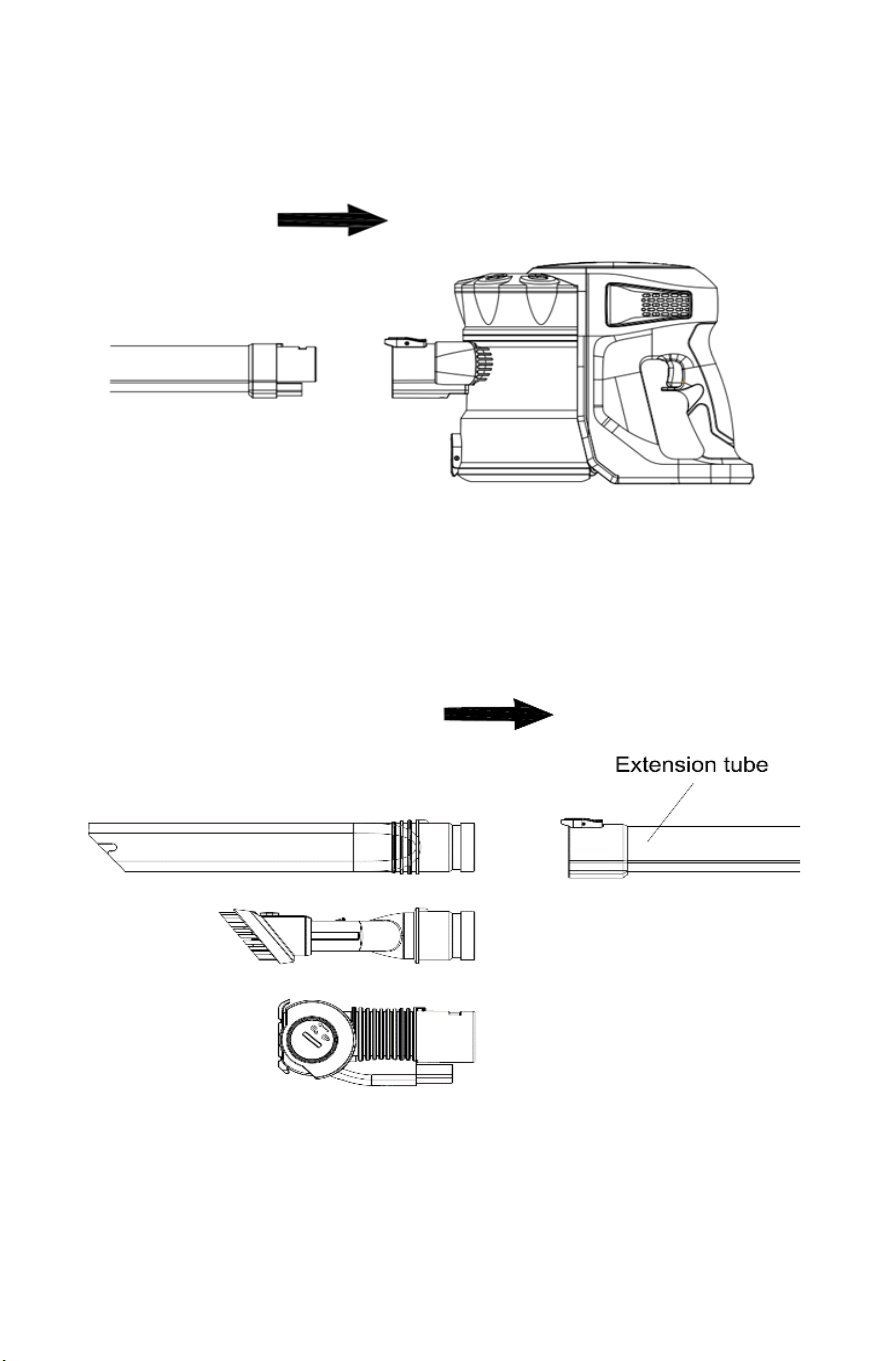
Assembling the motorized illuminated floor brush:
1. Insert the connector of the motorized illuminated floor brush
into the base of the extension tube by clicking it into place.
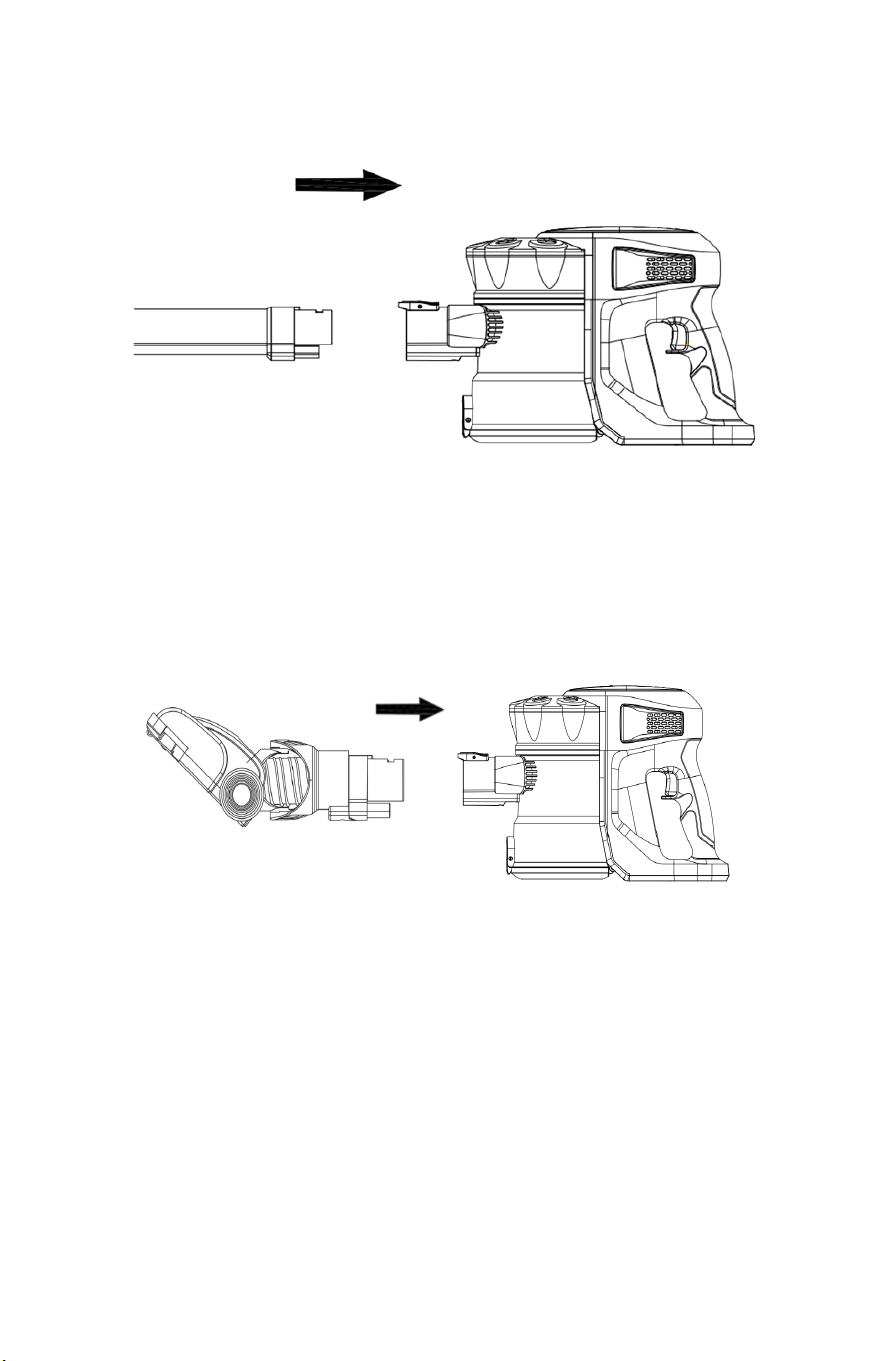
7
2. Attach the motorized illuminated floor brush and extension tube
to the main body by slotting it into place.
3. If using the motorized illuminated floor brush without the
extension tube, simply attach it to the main body. It will "click"
when secure.
*Repeat Steps 1-3 if using motorized upholstery nozzle*
8
Assembling the accessories:
1. Attach the extension tube to the main body by slotting it into
place.
2. Attach the accessory to the base of the extension tube via the
connector. It will "click" into place.
9
3. If using accessories without the extension tube, simply attach
them to the main body. It will "click" when secure.
BEFORE FIRST USE
1. Hang the vacuum unit on the wall mount to ensure the vacuum
is placed high enough for the vacuum to be securely mounted.
2. Ensure the dust bin is clean and the vacuum is free from
blockages.
3. Remove any sharp or large objects from the path before using,
as these may damage the vacuum.
NOTE: In the event of a maintenance issue with the product such as a
jammed brush roller, all three BLUE indicator lights will flash on around
10 seconds then off until the issue is resolved, in this case turn the
cleaner off until the issue is rectified.
10
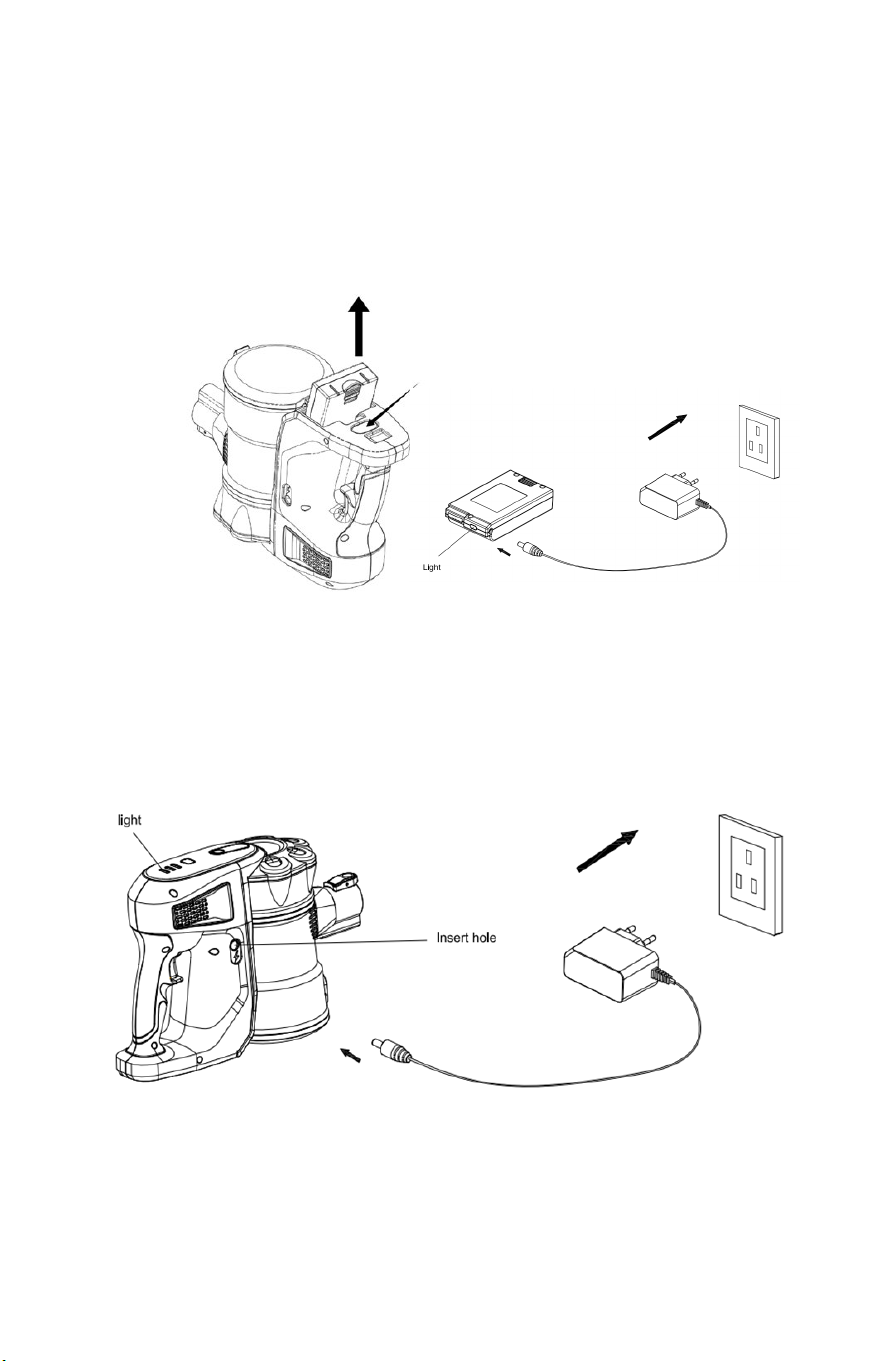
Battery Charging:
1. Push the release button and take the battery module out.
Plug the cable into the power inlet located on the side of the
battery. When charging, the indicator light will be illuminated
RED. Once fully charged this indicator light will turn BLUE. Once
fully charged, remove the charger plug from the outlet.
2. You can also charge the battery while it is inside the vacuum.
The three blue indicator lights will indicate one by one to show
the battery being charged. When the battery is fully charged, all
three lights will stay blue.
11
OPERATING THE VACUUM
CAUTION: The vacuum must be fully charged before using for the first
time.
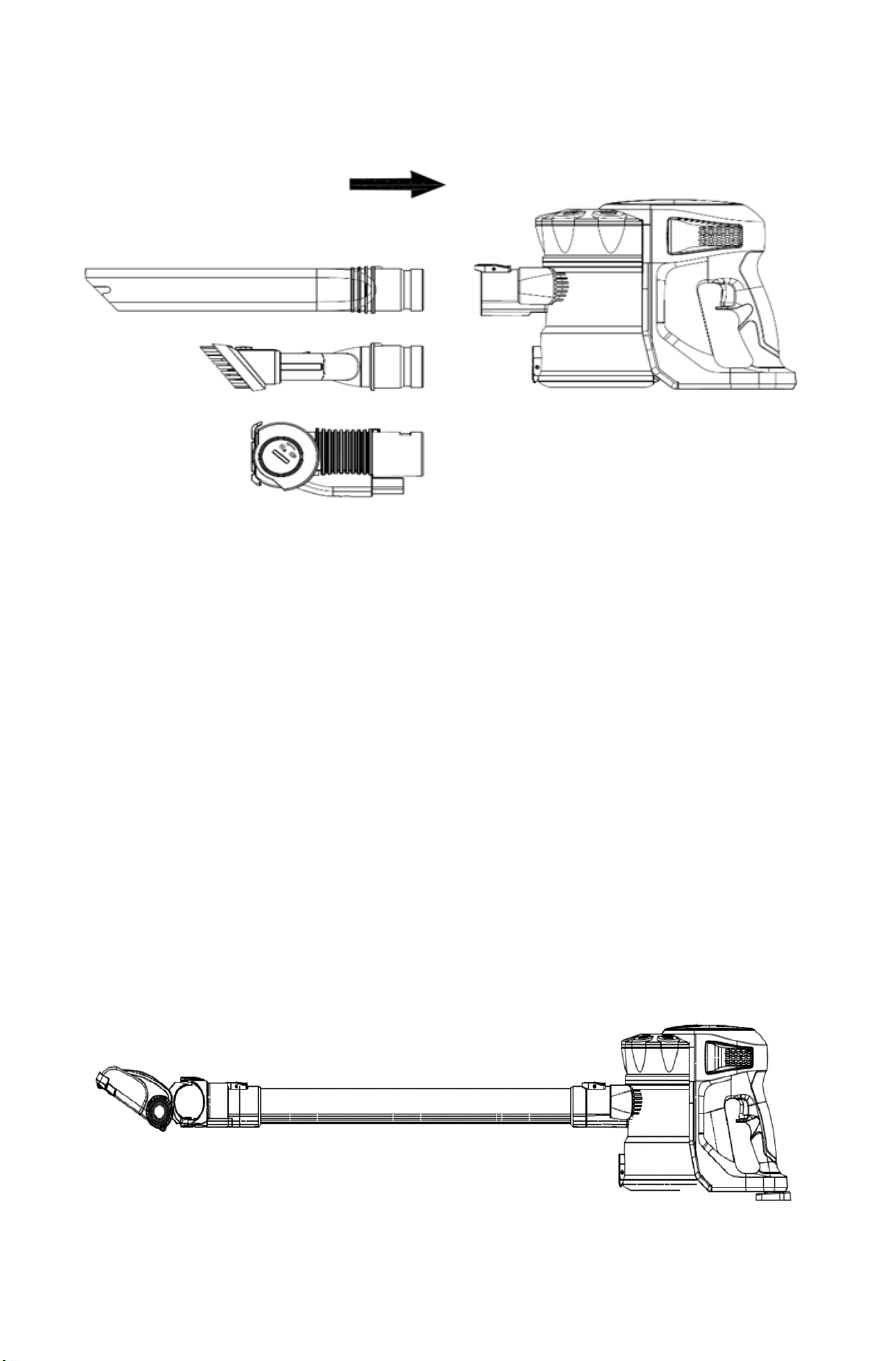
1. Remove the vacuum cleaner from
the wall mounts. If using as a
hand- held unit, remove the extension
tube and attach the desired accessory.
2. Use the Power ON/OFF button to turn
on the vacuum.
3. For a stronger suction, press the power
adjustment key to increase the
strength.
4. To turn off the vacuum, press the power
ON/OFF button again.
MAINTAINING THE VACUUM
Cleaning the dust container:
1. Press the dust container release button to take the dust
container out.
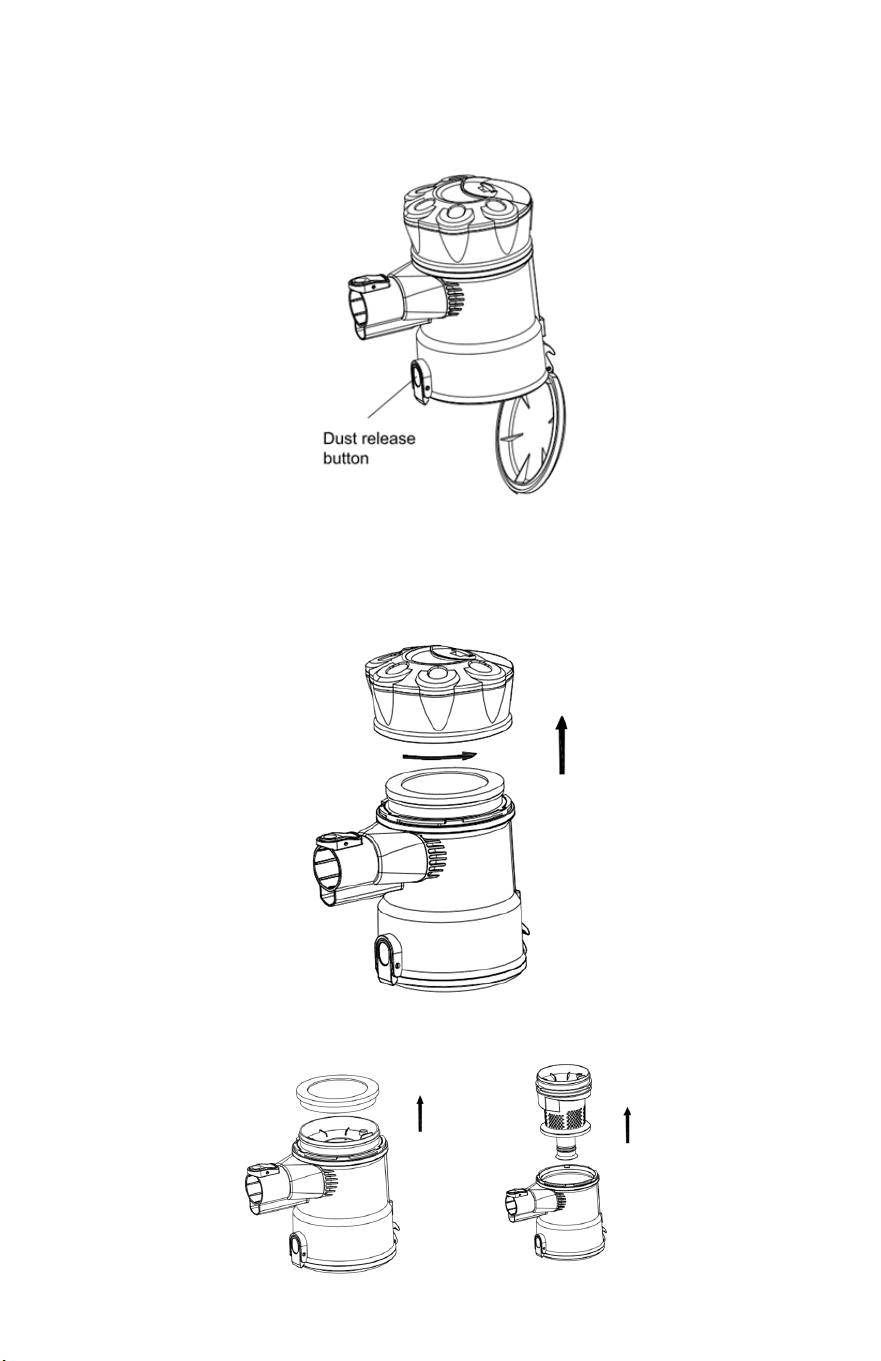
12
2. Press the dust release button to open the bottom cover and
expel dirt. Wipe to clean the dust container. Do not immerse in
water.
Cleaning the filter:
1. Remove the dust container from the main body.
2. Twist counterclockwise to remove the filter cover.
3. Lift to remove the microfiber filter.
13
4. Rinse the filters thoroughly under cold water. Do not use soap
or other cleaning solvents.
5. COMPLETELY air dry the filter before reassembling.
6. The dust container can also be rinsed and cleaned in cold water.
Must air dry or wipe dry completely before use.
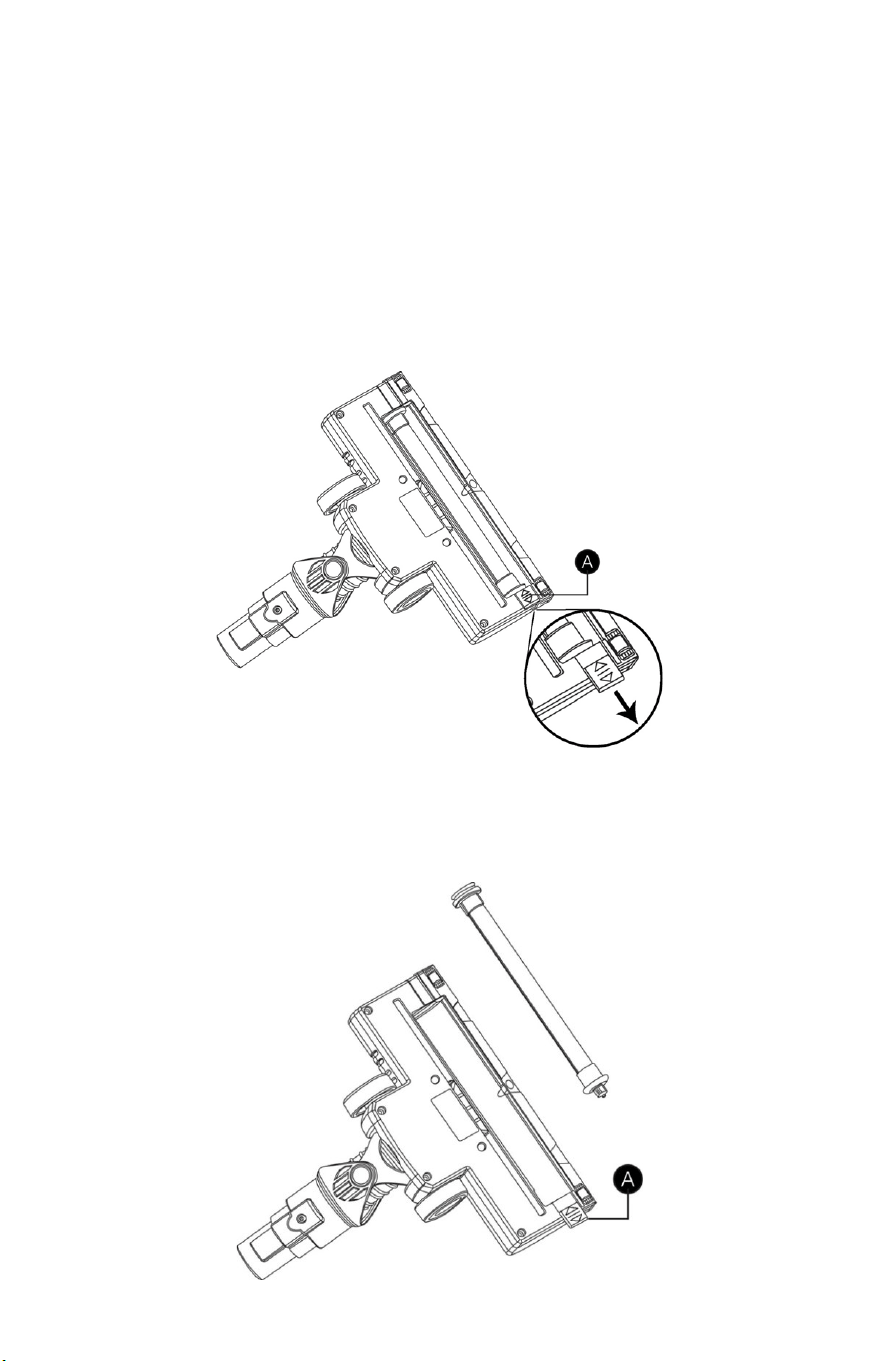
Cleaning the brush roller:
1. Remove the brush roller from the brush housing. Slide the brush
roller fastener (A) away from the brush as below.
2. Carefully clean and remove the hair and debris from the brush
roller. Wipe to clean only, do not use any soap or harsh cleaning
solvents.
3. If brush roller is damp, allow to dry completely before replacing.
4. Slide fastener (A) to original position to secure the brush roller.

14
TROUBLESHOOTING
The vacuum will not power on:
• This may be caused by a dead battery. This can occur if the
vacuum has been used or stored for an extended period of time.
Connect the vacuum to the charger and allow for a full charging
cycle to complete.
The vacuum stopped suddenly:
• This will occur if the safety/ thermal cut-out device has been
activated. This device is designed to prevent your vacuum from
overheating. Ensure the vacuum is turned off, disconnect and
remove any blockage from all accessories and extension tube.
• Empty the dust container and clean or replace the filter.
• Replace/recharge battery
The suction of the vacuum has reduced:
• Turn the vacuum off. Disconnect the floor head, extension tube
and any accessories. Check for and remove any blockages from
the dustbin filter, air duct, extension tube floor head and
accessories.
Motorized floor head is not rotating:
• This tends to occur when there are too many fibers wrapped
around the brush roll restricting movement. Consult the
maintenance section of this manual for instructions on how to
appropriately clean the brush roll.
The charging indicator light does not flash up:
• There may be a bad battery.
• There may be a bad charger.
• There may be a bad outlet.
The run time of the vacuum is less than it used to be:
• Ensure the battery has completed a full charging cycle. An
insufficient charging cycle will result in reduced run time.
• There may be reduced energy discharge in the battery. This is
normal and gradually occurs in all batteries over time.

15
SPECIFICATIONS
Input Voltage - Charger
100-240V 50/60Hz
Operating Voltage
22V
Operating Power
200W
Floor Brush Power
12W
Battery Capacity
2200mAh
Charging Time
2 Hours
Dust Bin Capacity
2 Quart
DISPOSAL
This vacuum cleaner is supplied with a lithium-ion battery. This must be
disposed of properly, in accordance to your local laws and ordinances.

16
Atrix Rapid Red Cordless Stick Vacuum
WARRANTY INFORMATION
Warranty/Service Information: For warranty service
information, please contact Atrix or your local Atrix distributor.
Atrix Rapid Red Cordless Stick Vacuum Limited Warranty: To the
original user purchasing the Atrix Rapid Red Cordless Stick Vacuum,
Atrix warrants that the vacuum will be free of defects in material and
manufacture for a period of one (1) year from the date of purchase.
Should any failure to conform to this warranty appear within this
period, Atrix will, at its option, repair or replace the defective product.
It is the user’s responsibility, with an approved SRA (Service Return
Authorization) number to return the product, freight prepaid, to Atrix.
These remedies are the users exclusive remedies for breach of this
warranty.
Exclusions to warranty coverage: The above warranty will not
apply to any special configurations or to any unit that have been
modified, or damaged by negligence, misuse, accident or failure to
follow Atrix Instruction manual. Consumable supplies, such as filters,
accessories, and motor brushes are not covered by this warranty.
Disclaimer of Warranty: EXCEPT FOR THE IMPLIED WARRANTIES
OF TITLE AND AGAINST PATENT INFRINGEMENT, ATRIX MAKES NO
OTHER WARRANTIES WITH RESPECT TO THE ATRIX VACUUM
CLEANER, EXPRESS OR IMPLIED, INCLUDING BUT NOT LIMITED TO
ANY IMPLIED WARRANTY OF MERCHANTABILITY OR FITNESS FOR A
PARTICULAR PURPOSE.
Limitation of Liability: ATRIX WILL NOT BE LIABLE UNDER ANY
CIRCUMSTANCES FOR ANY COINCIDENTAL, SPECIAL, OR
CONSEQUENTIAL DAMAGES OR ECONOMICAL LOSS, BASED UPON
BREACH OF WARRANTY, BREACH OF CONTRACT, NEGLIGENCE,
STRICT LIABILITY IN TORT OR ANY OTHER LEGAL THEORY, EVEN IF
ATRIX HAS BEEN ADVISED OF THE POSSIBILITY OF SUCH DAMAGES
INCLUDING, BUT NOT LIMITED TO LOSS OF PROFITS, REVENUE,
EQUIPMENT USE, DATA OR INFORMATION OF ANY KIND. THE
LIABILITY OF ATRIX SHALL NOT UNDER ANY CIRCUMSTANCE, EXCEPT
AS EXPRESSLY PROVIDED HEREIN, EXCEED THE PRICE OF THE ATRIX
BACKPACK VACUUM.
To Register your Warranty Visit:
www.atrix.com