

User Manual
Product:
WHVCSV05SB
© 2025 RVM Australia Pty Ltd. All Rights Reserved

Contents
Safety Information
Important Safety Instructions..................................................................1-2
Lithium Ion Battery Safety...........................................................................3
Electrical Requirements..............................................................................4
Setup & Operation
Installation Guide.........................................................................................4
Parts & Features...........................................................................................5
Wall Mount...................................................................................................6
Assembly..................................................................................................6-7
Operation..................................................................................................8
Cleaning & Care......................................................................................9-10
Support & Warranty
Troubleshooting..........................................................................................11
Peace of Mind Guarantee............................................................................13
Warranty................................................................................................14-16
*Figures and illustrations on all artworks are provided for reference only and may dier from the
actual product appearance.
*Product design and specifications may be changed without notice.

Important Safety Instructions
© 2025 RVM Australia Pty Ltd. All Rights Reserved
1
DANGER
WARNING
1. Read all instructions carefully before using this appliance.
2. Always turn the power o at the power outlet before you insert or remove the power plug.
Remove by grasping the plug and do not pull on the cord.
3. DANGER: Do not operate the appliance if:
• the power cord or plug is split, melted or damaged;
• the appliance has malfunctioned;
• the appliance has been damaged in any manner.
• the appliance has been left outdoors or has been exposed to water.
If any of the above incidents occur, return your appliance to the nearest authorised service
center for examination, repair or adjustment.
4. DANGER: Do not attempt to disassemble, adjust or repair the appliance yourself.
5. DANGER: Do not under any circumstances immerse the power cord, mains plug or appliance
body in water or any other liquid.
Immediate hazards which WILL result in severe personal injury or
death.
6. WARNING: If the charging cord is damaged, it must be replaced by the manufacturer, its service
agent or a similarly qualified person in order to avoid a hazard.
7. WARNING: Do not use to collect anything that is burning or smoking, such as cigarettes,
matches or hot ashes.
8. WARNING: Do not cover any of the vents or openings of the appliance and do not attempt to
operate the appliance if any of the vents or openings are blocked. Keep all vents and openings
free of dust, lint, hair and anything that may reduce the air flow to or from the appliance.
9. WARNING: Ensure the appliance and it’s accessories are cleaned regularly and according to the
cleaning & care instructions within this user manual.
10. WARNING: Ensure that all hair, loose clothing, fingers and all parts of the body are kept away
from the openings and moving parts of the appliance.
11. WARNING: Do not use outdoors or on wet surfaces.
12. WARNING: Incorrect operation and improper use may damage the appliance or parts thereof,
and cause severe personal injury.
13. WARNING: This appliance includes lithium ion batteries, do not incinerate or expose them to
high temperatures. Under extreme conditions, the battery or battery cells may leak. If so, do not
touch or allow the liquid to come in contact with any of your body parts. Use gloves to dispose
of the battery in accordance with your local regulations. If the liquid has come in contact with
yourself, wash immediately and seek medical attention.
14. WARNING: Do not use to collect flammable or combustible liquids, such as gasoline, chlorine,
bleach or drain cleaner. Do not use in areas where these may be present.
15. WARNING: Always ensure your hands are dry before handling the power cord plug or switching
on the power outlet.
16. WARNING: Do not use the appliance to collect fine dust such as flour, concrete or plaster.
17. WARNING: Do not use the appliance near fire sources or other high temperature environments.
Hazards or unsafe practices which COULD result in severe personal
injury or death.

Important Safety Instructions
2
CAUTION
Hazards or unsafe practices which COULD result in minor personal
injury.
18. WARNING: Avoid contact between the battery and small metallic objects such as paper clips,
coins, keys, nails or screws.
19. WARNING: Do not leave the battery charging unattended and remove from charge once fully
charged. Do not over charge or over-discharge the battery.
20. CAUTION: Close supervision is necessary when this appliance is used near children.
21. CAUTION: Keep the appliance and its power cord out of reach of children.
22. CAUTION: When operating the appliance on stairs or a ledge, take extra care and ensure you are
in a stable position at all times.
23. This appliance is not intended to be operated by means of an external timer or separate remote-
control system.
24. This appliance is deemed for use indoors only.
25. Children should not play with the appliance.
26. Always charge this appliance with a power outlet of the voltage (A.C. only) marked on the rating
label of the appliance.
27. Do not use the appliance for any purpose other than its intended use.
28. Do not place the appliance on top of any other appliance.
29. Keep liquids away from the appliance.
30. Do not place anything on top of the appliance.
31. This appliance is not intended for use by persons (including children) with reduced physical,
sensory or metal capabilities or lack of experience and knowledge unless they have been
given supervision or instruction concerning use of the appliance in a safe way by the person
responsible for their safety, and understand the hazards involved.
32. This appliance is intended to be used in private households and not in applications such as:
• sta kitchen areas, oces and other working environments;
• farm houses;
• by guests in hotels, motels and other residential type environments;
• bed and breakfast type environments;
• commercial environments.
33. Ensure all controls are turned o before switching the appliance o from power.
34. Do not attempt to operate without the filters.
35. Ensure the filters are cleaned regularly as per the instructions within the Cleaning & Care section
of this manual.
36. Only use the battery and battery charger supplied with this appliance.
37. When first using the battery or using after long-term storage, ensure to fully charge the battery
before removing from charge. Ensure the battery is charged and fully discharged at least once
every three months. To fully discharge the battery, use the unit as usual however do not charge
the battery after use until the battery completely runs out of power.
38. Do not use the appliance with any accessories other than the ones supplied with the appliance.

Lithium-Ion Battery Safety
© 2025 RVM Australia Pty Ltd. All Rights Reserved
3
USER
MANUAL
This product contains a lithium-ion battery, a high-performance energy source that requires proper
handling. Failure to follow these guidelines may result in damage, overheating, fire, or injury. Please
adhere to the instructions to maintain safety and prolong the life of your battery.
Follow all instructions within this user manual, including but not limited to
instructions regarding charging, storing and handling the lithium-ion battery.
Do not modify or attempt to repair the lithium-ion battery.
Handle the lithium-ion battery with care. Do not drop, submerge or pierce the
lithium-ion battery.
Do not charge or store the lithium-ion battery in extreme temperatures.
Never leave the lithium-ion battery to charge unattended or overnight. Never
leave the lithium-ion battery charging after it is fully charged, remove once fully
charged.
Always ensure to plug the charger for the lithium-ion battery directly into the
power outlet in the wall. Do not use power boards or extension cords to charge
the lithium-ion battery.
Only use the original charger and equipment provided with the appliance. Do not
use any third-party or unauthorised chargers or equipment for this appliance.

4
Electrical Requirements
Installation Guide
Do not attempt to modify the charging cord or plug in any way.
If the charging cord is too short, do not use an extension cord. Have a qualified electrician or
serviceman install an outlet near the appliance.
Westinghouse recommends the use of a residual current device (RCD) with a tripping current that
does not exceed 30mA in the electrical circuit supplying power to all appliances.
Neither Westinghouse nor the retailer can accept any liability for damage to the product or personal
injury as a result of a failure to observe the electrical connection procedures or instructions within
this manual.
1. Carefully remove the appliance from the box.
2. Remove any packaging around the appliance. Do not remove any warning labels.
3. Clean the appliance and it’s accessories, following the Cleaning & Care instructions within this
manual.
4. Ensure to read the Operation instructions within this manual before your first use, and always
follow these instructions when operating the appliance.
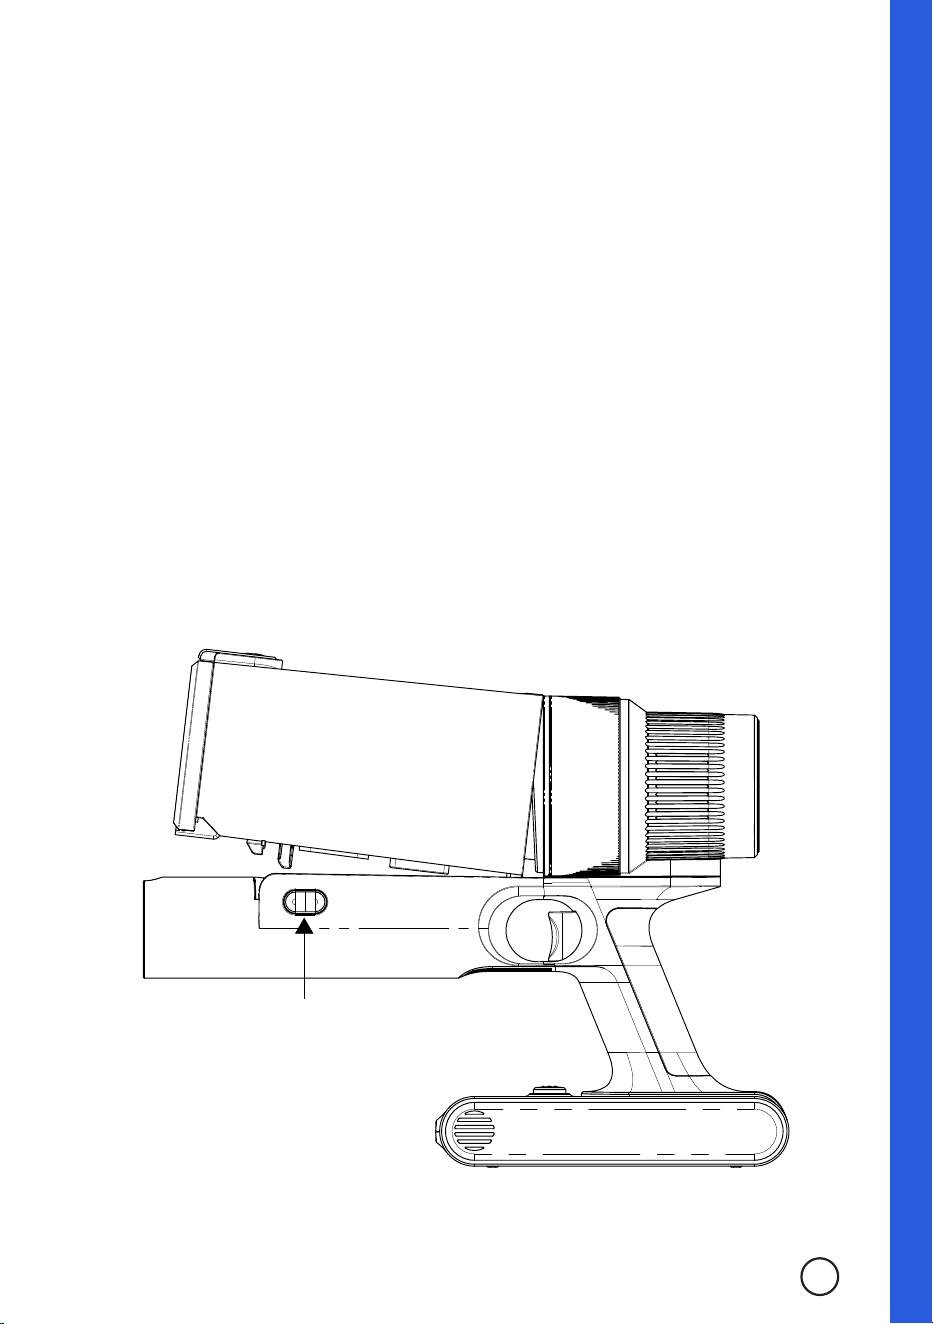
5. The charger of this appliance can be attached within the wall mount included, so that the
battery can be charged when the unit is hung in the wall mount without removing the battery
from the main unit. Should you wish to attach the charger to the wall mount, follow the below
instructions.
NOTE: As it is a tight fit to mount the charger to the wall mount, it can be dicult to remove after
installed. Ensure that you do wish to mount the charger to the wall mount first before proceeding.
a. Insert the charger port into the space at the back of the wall
mount which opens up to the inside of the main body holder.
Ensure the charger port is pushed up into the wall mount so
that the charger port extends completely into the battery
holder of the wall mount.
b. Align the charger mount clip with the wall mount so that the
clip will prevent the charger port from lowering or coming
loose. Insert the charger mount clip into the wall mount.
c. The clip should click into place when secure, the two upper
prongs will insert into the bottom of the battery holder, and
the rest of the clip will sit tight against the charger port so
that it will not budge from this position.
d. Should you wish to remove the charger from the wall mount,
you will need to push both upper prongs downward out of
the battery holder, and pull the charger mount clip outward
from the wall mount at the same time. As it is a tight fit for
this clip, this can be dicult. Ensure you wish to mount the
charger first before proceeding.
Charger
Mount Clip
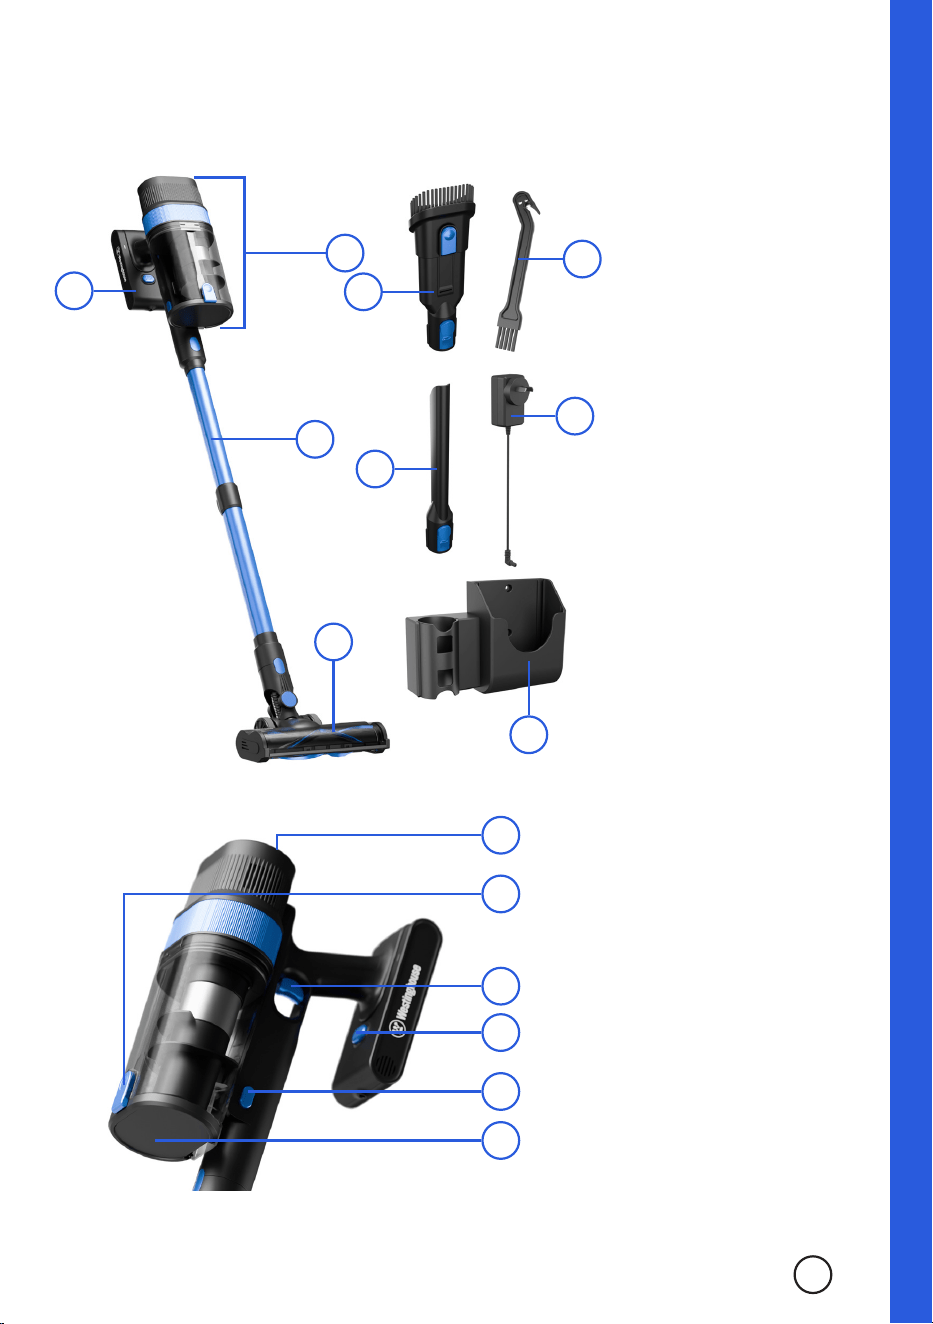
Parts & Features
1. Battery
2. Main Body
3. Telescopic
Vacuum Tube
4. Power Brush
5. 2 in 1 Nozzle
6. Crevice Nozzle
7. Brush/Tangle
Tool
8. Charger
9. Wall Mount
© 2025 RVM Australia Pty Ltd. All Rights Reserved
5
1
2
3
4
6
5
8
9
A
C
D
B
E
F
A. Display Screen
B. Dust Container
Cover Release
C. On/O Trigger
D. Battery
Release Button
E. Dust Container
Release Button
F. Dust Container
Cover
7
6
Wall Mount
Before assembling the appliance, the Wall Mount Storage Unit can be mounted to the wall.
1. Select the correct wall and location to mount the storage unit. Ensure the wall is made of brick
only, as the fixing’s provided are not made for Gyprock mounting. If you wish to mount the wall
mount to a Gyprock wall, use appropriate fixings instead of the ones supplied with the unit. Also
ensure that the position chosen is high enough to fit the entire appliance at full height.
2. Place the unit against the wall in your selected location and mark the wall where the mounting
holes sit against the wall.
3. Remove the unit and drill into the wall where the markings have been left. Insert the wall plugs
into the wall, then put the unit in place on the wall and insert the screws.
4. Tighten the screws using a Philips head screwdriver.
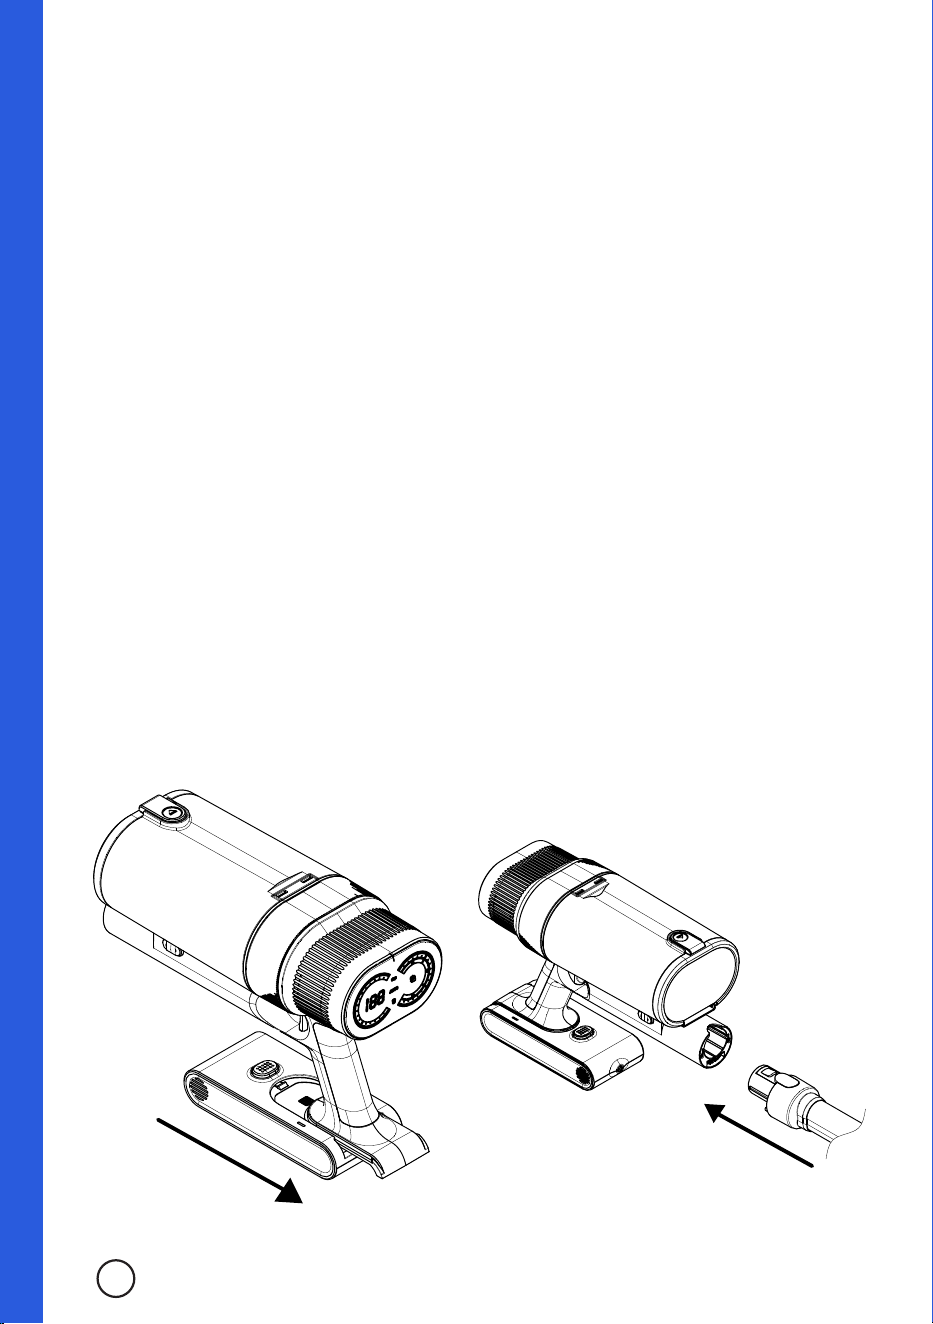
Assembly
1. Charge the battery until it is fully charged. The LED lights on the top of the battery will flash blue
whilst charging and will stay a constant blue once fully charged.
2. Once the battery is fully charged, slide the battery into the Vacuum Body. When it is correctly
installed, the battery will “click” into place.
3. To insert either the Power Brush or one of the nozzles into the Vacuum Tube or Body, align the
brush’s or nozzle’s release button to the indent of the Vacuum Body or Tube and push in until
they “click” together.
4. To remove an attachment, push down the oval shaped connector release and pull the
attachment away from the Main Body.
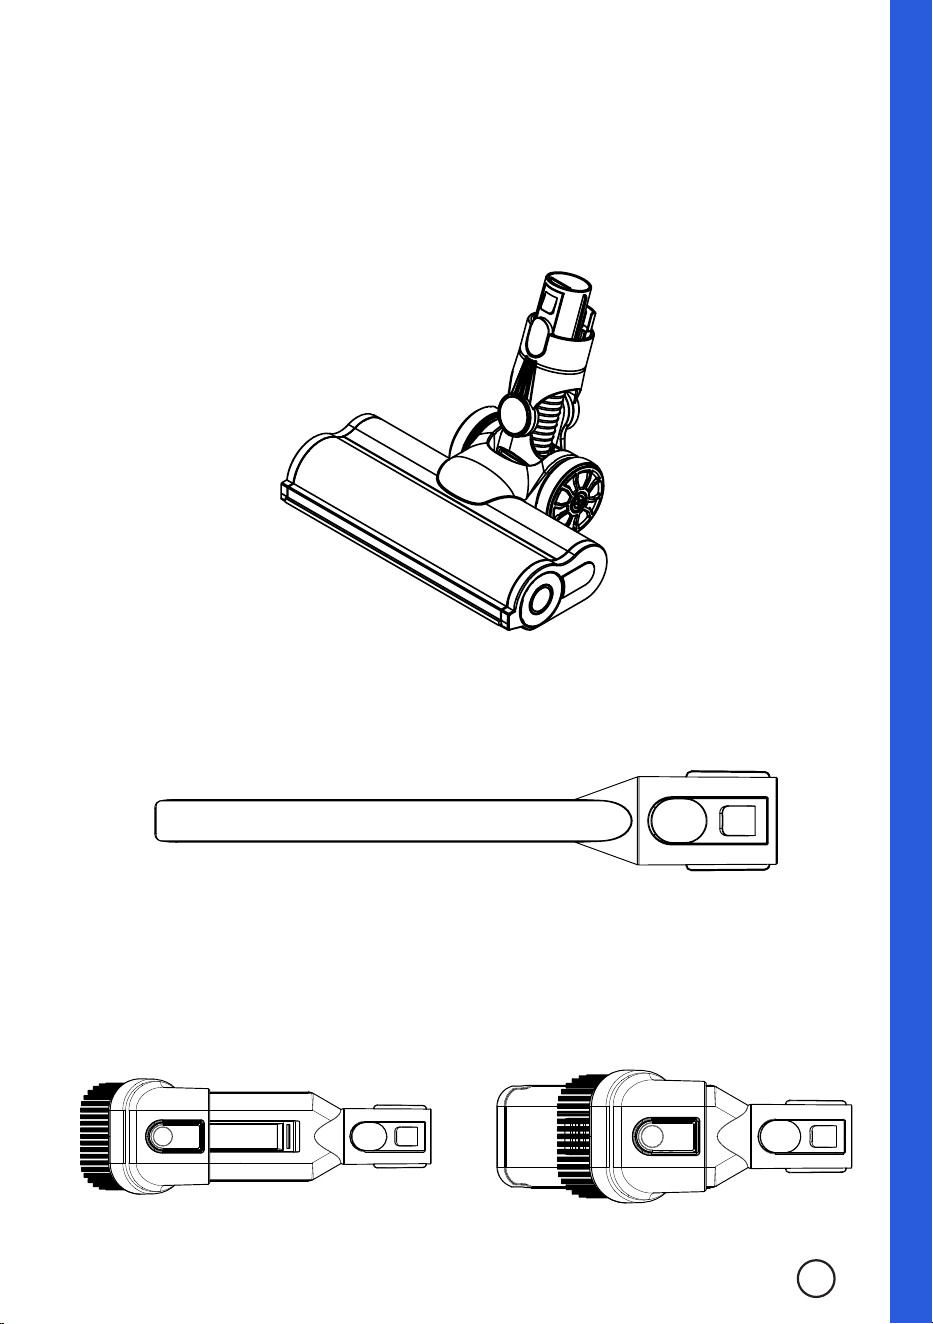
Power Brush
The Power Brush is designed for most floor cleaning applications. It can be used on both soft and hard
floors, however all cordless vacuum cleaners perform their best on hard floors.
Assembly
Crevice Nozzle
The Crevice Nozzle is designed for use in narrow spaces such as corners and hard to reach areas.
2 in 1 Nozzle
The 2 in 1 Nozzle has two separate formations. With the brush side pulled forward, it can be used for
upholstery or stubborn surfaces. Alternatively, with the brush side pulled back, it can be used as a
wide ended nozzle.
© 2025 RVM Australia Pty Ltd. All Rights Reserved
7
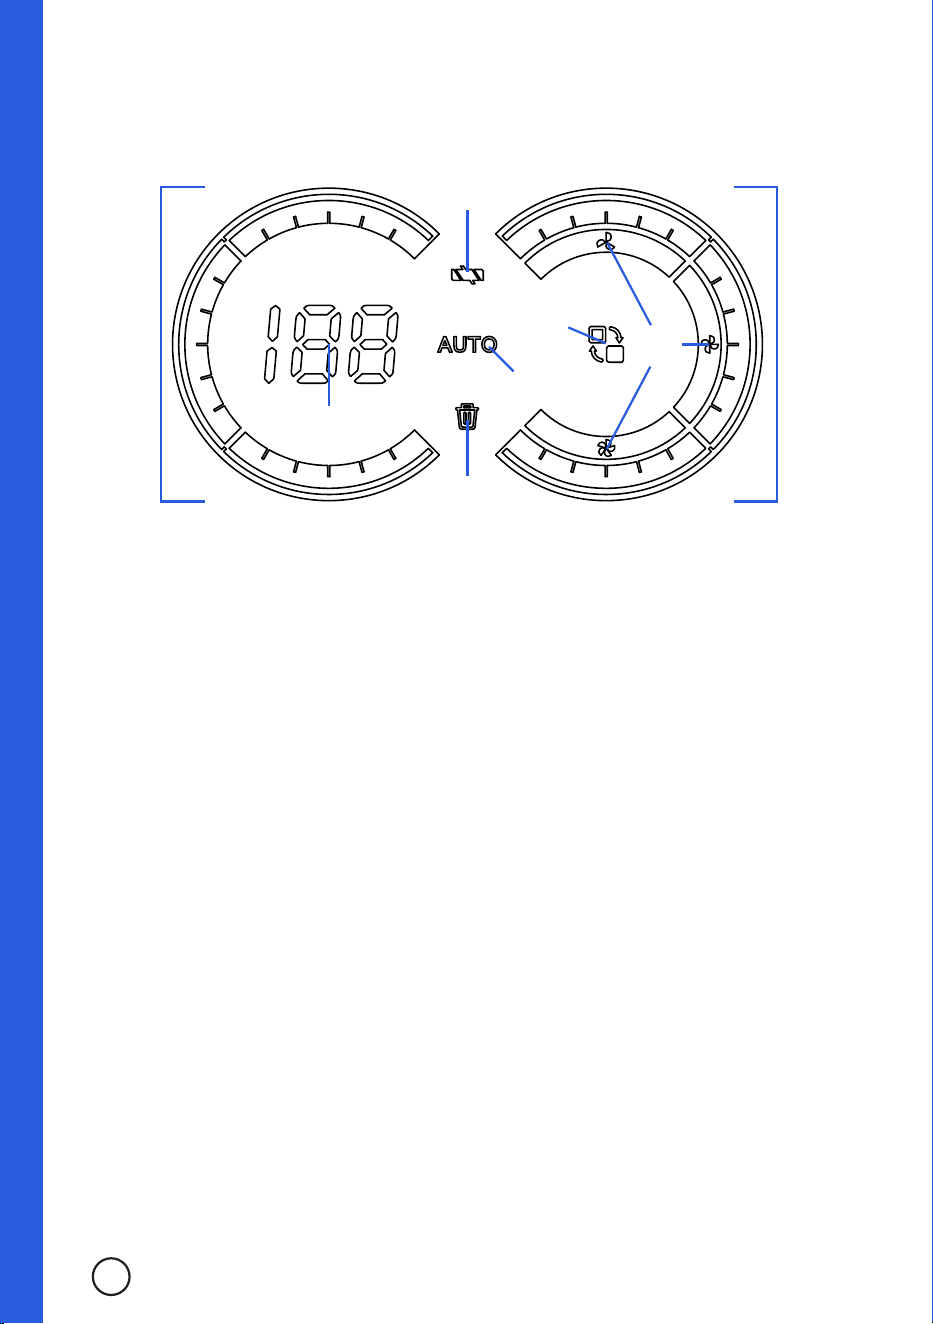
Operation
1. Once the appliance is assembled into your desired configuration, pull the On/O trigger once to
switch the appliance on. The appliance will start up in Auto Mode.
2. To adjust the power levels manually, press/touch the Mode Switch to cycle through the dierent
options. The dierent power levels are indicated by their corresponding colours and Mode
Display icons.
Low: The Power Level Display will illuminate blue and the top Mode Display will illuminate.
Mid: The Power Level Display will illuminate purple and the right Mode Display will illuminate.
High: The Power Level Display will illuminate red and the bottom Mode Display will illuminate.
Auto: The Auto Mode Indicator will illuminate.
3. As the battery level decreases, the Battery Level Ring and Battery Level Indicator will decrease
to demonstrate the battery level. The Battery Level Indicator shows the percentage of battery
level left. When the battery level is running low, the blue LED lights on the top of the battery will
begin flashing.
4. To end operation of the appliance once finished with the task, pull the On/O Trigger to switch
the appliance o. Once the unit is turned o it will operate at full speed to clear any leftover
debris in the tubes, before switching o entirely shortly after.
Charging
To charge the battery of the appliance, simply insert the circular end of the Charger into the battery
port. The battery does not need to be removed from the Main Body to charge, it can be charged whilst
attached. The circular end of the Charger can be attached within the Wall Mount so that the battery is
charged whilst the appliance is attached to the mount.
WARNING: Do not use to collect anything that is burning or smoking, such as cigarettes, matches or
hot ashes.
WARNING: Ensure that all hair, loose clothing, fingers and all parts of the body are kept away from the
openings and moving parts of the appliance.
WARNING: Do not use to collect flammable or combustible liquids, such as gasoline, chlorine, bleach
or drain cleaner. Do not use in areas where these may be present.
Brush Error
Indicator
Battery Level
Indicator
Battery
Level Ring
Auto Mode
Indicator
Dust Full
Indicator
Mode
Switch
Mode
Display
Power
Level
Display
8
© 2025 RVM Australia Pty Ltd. All Rights Reserved
9
Cleaning & Care
Outside Surfaces of the Appliance
1. Clean the outside surfaces of the appliance with a soft, damp and non-abrasive cloth.
2. If necessary, a small amount of mild detergent can be applied to the cloth before cleaning the
outside surfaces of the appliance. Do not directly apply mild detergent or any liquids on the
appliance.
Emptying the Dust Container
1. Push the Dust Container Release Buttons on both sides of the Main Body and tilt the Dust
Container away from the Main Body to remove it.
2. Hold the Dust Container over a waste bin with the Dust Container Cover pointed into the bin.
Push the Dust Container Cover Release down to open and release the contents into the waste
bin.
3. Once empty, push the Dust Container Cover until it “clicks” back into place and the Dust
Container is sealed once more. Return the Dust Container to the Main Body, align the Dust
Container with the Dust Container Cover Release facing upward and push to “click” back into the
Main Body.

Cleaning the Dust Container and Filters
1. Disconnect the Dust Container from the Main Body.
2. Remove the HEPA filter from the top of the Dust Container. The filter can be washed with cold
water. Do not use abrasive cloths or brushes on the filter, as this can damage the filter.
3. With the filter removed from the Dust Container, now lift the plate underneath the filter. This has
the inner cone and other filter parts attached. These can all be detached and cleaned under cold
water. Ensure the filter, plate, inner cone and other filter parts are all completely dried before
reassembling the Dust Container.
Cleaning & Care
Cleaning the Power Brush Roller
1. Press the end cap of the Power Brush to pop out the Power Brush Roller an pull it outward.
2. The Power Brush Roller can be washed under cold water and rinsed. Ensure the Power Brush
Roller is dried completely before returning to the Power Brush.
3. Once dried, re-insert the Power Brush Roller into the Power Brush and align the grooves of the
end cap with the Power Brush receiving end.
10
Troubleshooting
Before calling for service, if the appliance fails to operate:
• Check that the charger is plugged in correctly and securely. If it is not, remove the plug from
the power outlet, wait 10 seconds and then plug it back in correctly and securely to test the
charging.
• Inspect your home’s circuit breakers to see if any have blown or tripped. If these seem to be
working correctly, test another appliance in the same power outlet to ensure the power outlet is
working correctly. If appropriate, test the charger in another power outlet within your house.
• Ensure that you have read and followed all instructions within this manual, including but not
limited to the instructions within the following segments of this manual:
» Important Safety Instructions;
» Electrical Requirements;
» Installation Guide;
» Operation;
» Cleaning & Care.
• Review the below Troubleshooting chart and attempt to remedy the issue if appropriate/
applicable in your situation.
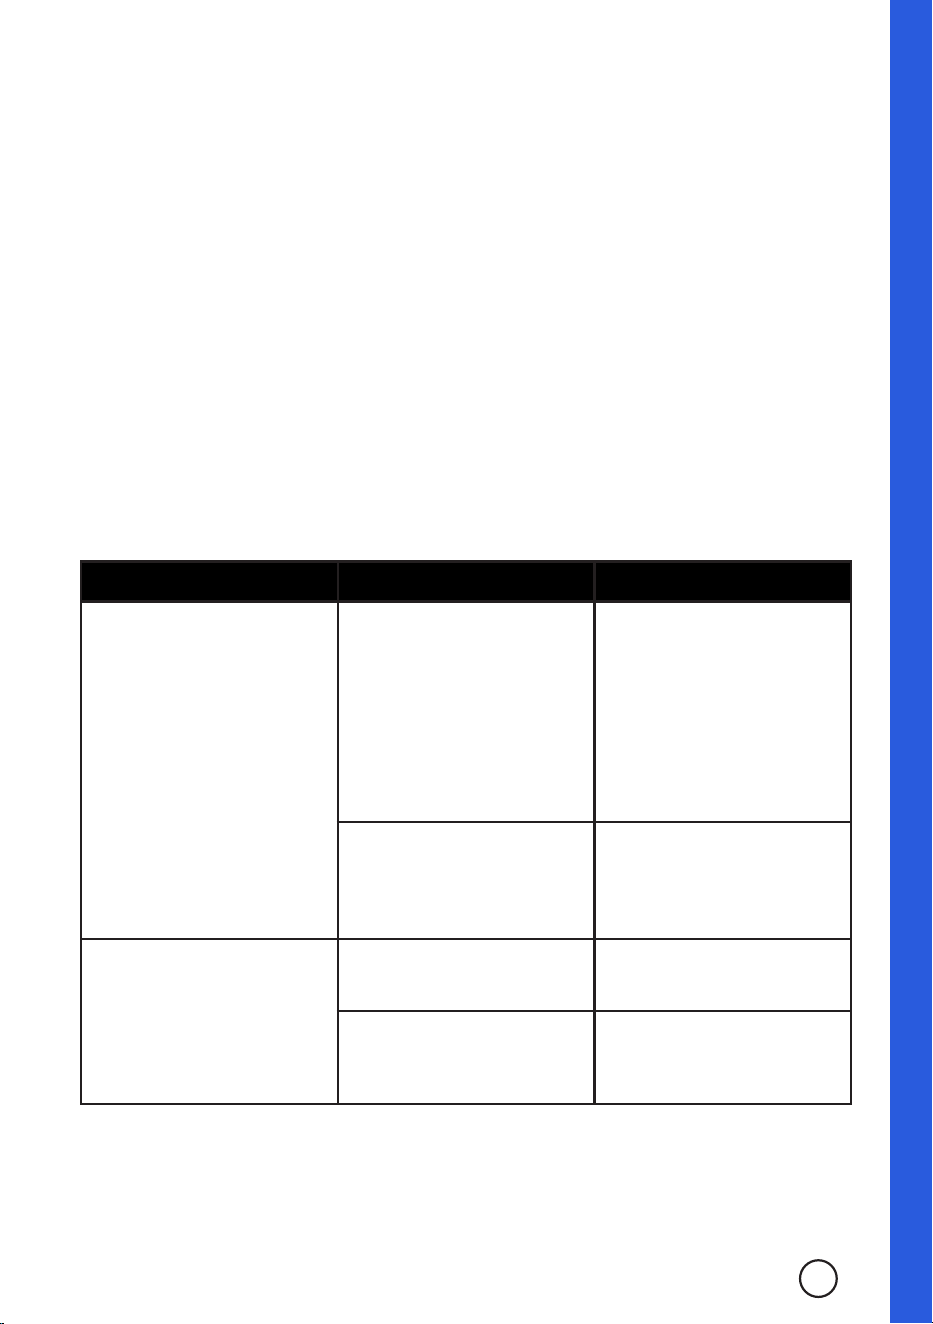
TROUBLE POSSIBLE CAUSE POSSIBLE REMEDY
The vacuum cleaner does not
switch on.
Battery is not connected
properly.
Remove the battery and ensure
the pins on the battery and
the vacuum cleaner are not
damaged. If not damaged,
then ensure the battery is
being inserted in the correct
orientation and is not being
forced misaligned.
Battery is not charged
suciently.
Fully charge the battery until
the LED indicator on the battery
lights up blue. Then reinsert
into the unit and try again.
Suction power is low.
Dust container is full.
Empty the dust container and
try again.
Blockage in filters or tubes.
Clean the filters, Vacuum Tube
and/or nozzles to remove any
blockages.
If none of the above solves the problem, DO NOT try to adjust or repair the appliance yourself.
Should you be unable to contact your place of purchase for assistance or resolution, call our
customer service centre at:
Australia: 1300 883 109
Mon-Fri 8:00am - 4:00pm AWST
New Zealand: 0508 776 546
Mon-Fri 8:30am - 4:30pm NZDT
© 2025 RVM Australia Pty Ltd. All Rights Reserved
11

Visit our website for
FAQ’s, helpful tips & hints
or to leave a review.
@
Westinghouse Small Appliances Australia
@
westinghousesmallappliancesau

Peace of Mind Guarantee
Our Westinghouse small appliances are backed by a 12 month guarantee as part of our dedication to
provide quality products for our customers. This means that if you purchase a Westinghouse small
appliance which has a manufacturer defect/fault, or does not meet the seller’s specifications as a
result of a defect/fault, then the seller will either repair or replace the unit, or refund the purchase
price of the unit at their own discretion (refer to clause 4 of the Limited Warranty).
This does not apply to products which have been misused/abused, poorly maintained or serviced,
damaged due to negligent handling, accidentally damaged or normal wear and tear. Ensure to follow
all instructions within this instruction manual, including the Cleaning & Care section for correct
maintenance. (See page 8)
Your warranty does not cover the following:
• Damage caused by power surges, voltage supply issues, power dips or usage of the
incorrect voltage.
• Damage caused by service or modification of the unit which are not performed by
authorised service centres or personnel.
• Damage caused by the use of accessories, attachments, consumables, parts or devices which
are not produced for the product by Westinghouse and it’s licensees.
• Damage caused by exposure of the product to abnormally corrosive conditions.
• Damage caused by incorrect or improper operation and/or installation.
• Damage caused by a failure to follow additional instructions.
• Products which have had the serial number and/or rating label removed.
• Usage of the product which are outside of the intended applications (refer to page 1-2).
• Freight costs incurred during a claim, consumables, loss, damage or accessories which require
periodic replacement by nature (filters, seals etc.).
How to claim under this warranty:
1. Carefully check the operating instructions, user manual and the terms of this warranty;
2. Have the model and serial number of the appliance available;
3. Have the proof of purchase (e.g. receipt) available;
4. Return the unit to place of purchase;
5. If unable to return to the place of purchase, call our service centre on 1300 883 109.
If your warranty claim is accepted, the product may be replaced with a similar or refurbished unit
or repaired using refurbished parts. If your warranty claim is not accepted, the seller will inform you
and provide any further options which are available in your situation. If the product is to be repaired
or shipped as a result of this, you will be responsible for the cost of repair and/or any freight charges
incurred.
To register your product, view the most up-to-date user manuals and FAQ’s, visit the product page by
scanning the QR code on your product’s cord label.
© 2025 RVM Australia Pty Ltd. All Rights Reserved
13

14
Limited Warranty
1. Nothing in this Warranty aects the Consumer’s rights under the Australian Consumer Law. The
benefits to the Consumer under this Warranty are in addition to the rights and remedies of the
buyer under any Consumer Guarantees. The Australian Consumer Law requires that we confirm
that:
Our goods come with guarantees that cannot be excluded under the Australian Consumer
Law. You are entitled to a replacement or refund for a major failure and for compensation for
any other reasonably foreseeable loss or damage. You are also entitled to have the goods
repaired or replaced if the goods fail to be of acceptable quality and the failure does not amount
to a major failure.
2. Subject to Clause 1, the Seller warrants that Westinghouse branded products will be free of
manufacturing defects and will perform to the Seller’s specifications subject to the following
clauses.
3. The benefit of this Warranty extends only to the owner of the property in which the Products
manufactured or supplied by the Seller are installed and used by the owner for the duration of
the Warranty Period under standard domestic applications.
4. The Warranty commences on the date of the purchase of the product and continues for the
benefit of the Owner for the Warranty Period. If within the Warranty Period a manufacturing
defect is discovered in the Product, or the Product fails to perform to the Seller’s specifications
as a result of some defect in material or workmanship in the Product, then the Seller will at its
own discretion:
a. Repair or replace the Product at the cost of the Seller. Goods repaired or replaced under this
Warranty will be warranted for the remaining period of the Warranty. Products presented
for repair may be replaced by refurbished products of the same type rather than being
repaired. Refurbished parts may be used to repair the products.
b. Refund the purchase price paid by the consumer.
5. The Warranty does not apply to Product that :
a. Has failed due to excessive wear and tear beyond what is considered to be reasonable.
b. Has been misused or neglected.
c. Has been damaged accidentally or by acts of God including fire and flooding.
d. Has been used or operated contrary to operating or maintenance instructions.
e. Has been damaged by the Consumer or a third party authorised to act for the consumer in
transit from the Sellers store to the Consumer.
f. Has been modified, altered or tampered with by unauthorized persons.
g. Damage caused by insects or vermin and claims based on the presence of insects or
vermin.
h. Has been used in commercial situations or applications.

Limited Warranty
It also excludes breakables such as glass and ceramic items, consumable items such as those
that require periodic replacement as part of the ordinary use, lack of care or maintenance of
the product or as directed by the instruction booklet, minor cosmetic issues (including, without
limitation, paint and coatings) and normal wear and tear, and does not cover the cost of claiming
under the warranty or transporting the goods to and from the place of purchase.
6. In order to make a claim under the Warranty, the Owner must, where possible return the goods
to the Seller’s store at the Owner’s cost. Proof of purchase must be supplied in all cases.
7. The seller will examine any returned Products and if the Seller determines that there is an
apparent defect through no fault of the Owner, the Seller will:
a. Make note of the Owner’s contact details including the Owner’s telephone number which
the owner can be contacted during business hours, postal address and e-mail address.
b. Make note of the defects reported by the Owner.
c. Take back the defective goods from the owner and determine within a reasonable time
through dialogue with the Seller whether the goods are defective.
d. Advise the owner within a reasonable time frame whether it accepts or rejects the Product
claim.
e. If the Seller accepts the return of the Product, the Seller must arrange to have
i. The Product repaired or,
ii. Replace the damaged or faulty Product or,
iii. Refund the purchase price.
Note that repairs or replacements may be done with refurbished items or parts, or replaced with
a similar item.
8. The Seller will not accept any returned Product which has not been returned strictly in
accordance with this Warranty.
15
© 2025 RVM Australia Pty Ltd. All Rights Reserved

Limited Warranty
16
9. For the purpose of this Warranty:
a. Australian Consumer Law means the law as set out in Schedule 2 of the Competition and
Consumer Act 2010 (Cth).
b. Consumer means the Purchaser of goods from the seller.
c. Consumer means a Consumer as that term is set out in section 3 of the Australian
Consumer Law.
d. Consumer Guarantees means the guarantees under the Australian Consumer Law.
e. Implied terms means any guarantees, conditions, warranties or other terms implied by any
Australian Commonwealth, State or Territory laws, (excluding the Australian Consumer
Law) or the law of any other jurisdiction.
f. Owner has the meaning set out in clause 3.
g. Warranty means this warranty.
h. Product means the Product/s bought by the Owner from the Seller that fall under this
warranty.
i. Warranty Period means:
i. In relation to Cast Iron Cookware: 3 Year Limited Warranty
ii. In relation to Non-Stick Cookware: 3 Year Limited Warranty
iii. In relation to Cooking Utensils: 3 Year Limited Warranty
iv. In relation to Knives/Knife Block Sets: 3 Year Limited Warranty
v. In relation to Stainless Steel Cookware: 10 Year Limited Warranty
vi. In relation to Chopping boards: 1 Year Limited Warranty
vii. In relation to Small Appliances: 1 Year Limited Warranty

Notes

www.westinghousesmallappliances.com.au
1300 883 109
13 Merino Entrance, Cockburn Central 6164, WA
and Westinghouse are trademarks of Westinghouse Electric Corporation.
Used under license by RVM Australia Pty Ltd.