Coway Air Purier
AP-1518R
FEATURES
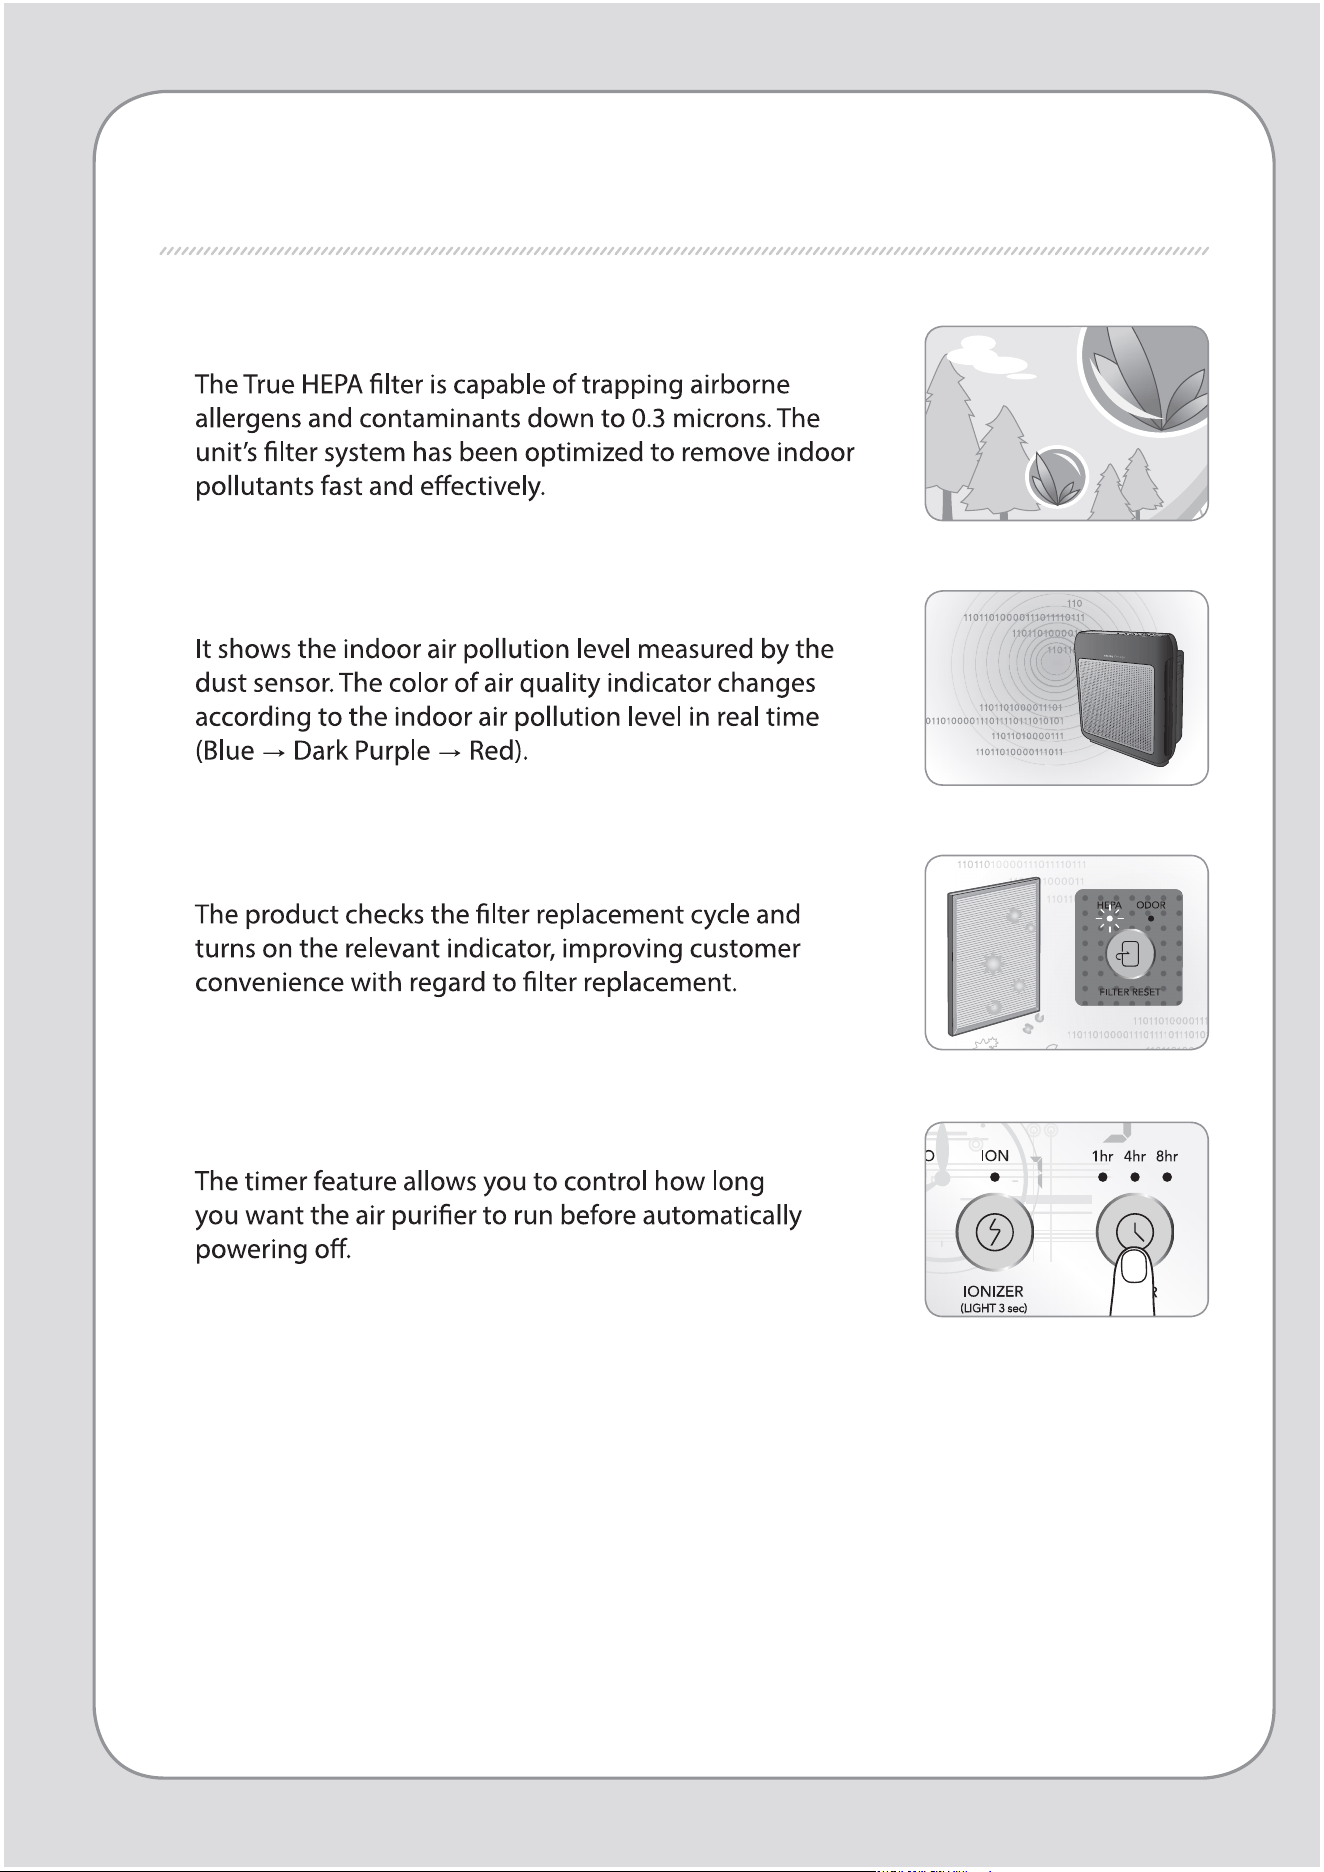
1. Excellent air purication performance
2. Air quality indicator
3. Filter replacement indicator
4. Timer
2
1
DEAR CUSTOMERS
Coway air purier.
FEATURES / CONTENTS
Coway
CONTENTS
- Keep your instruction manual in a readily accessible or visible place. -
FOR INFORMATION
MAINTENANCE
HOW TO USE
OTHERS
03
SAFETY INFORMATION
07
PARTS NAME
09
AIR PURIFICATION PROCESS
| 10 |
BEFORE USE
| 11 |
INDICATORS AND BUTTONS
| 13 |
HOW TO USE
| 14 |
ADJUST PARTICLE SENSOR
| 15 |
CLEANING METHOD
| 17 |
FILTER REPLACEMENT
| 18 |
TROUBLE SHOOTING
| 19 |
PRODUCT SPECIFICATION
| 23 |
WARRANTY
SAFETY PRECAUTIONS
DANGER : Failing to follow the precautions below
may result in serious injury or even death.

4
3
SAFETY PRECAUTIONS | Danger
For Information
WARNING : Failing to follow the precautions below
may result in considerable physical
injury or property damage.
SAFETY PRECAUTIONS
6
5
SAFETY PRECAUTIONS
|
Warning | Caution
For Information
CAUTION : Failing to follow the precautions below
may result in slight physical injury or
property damage.
READ AND SAVE THESE INSTRUCTIONS
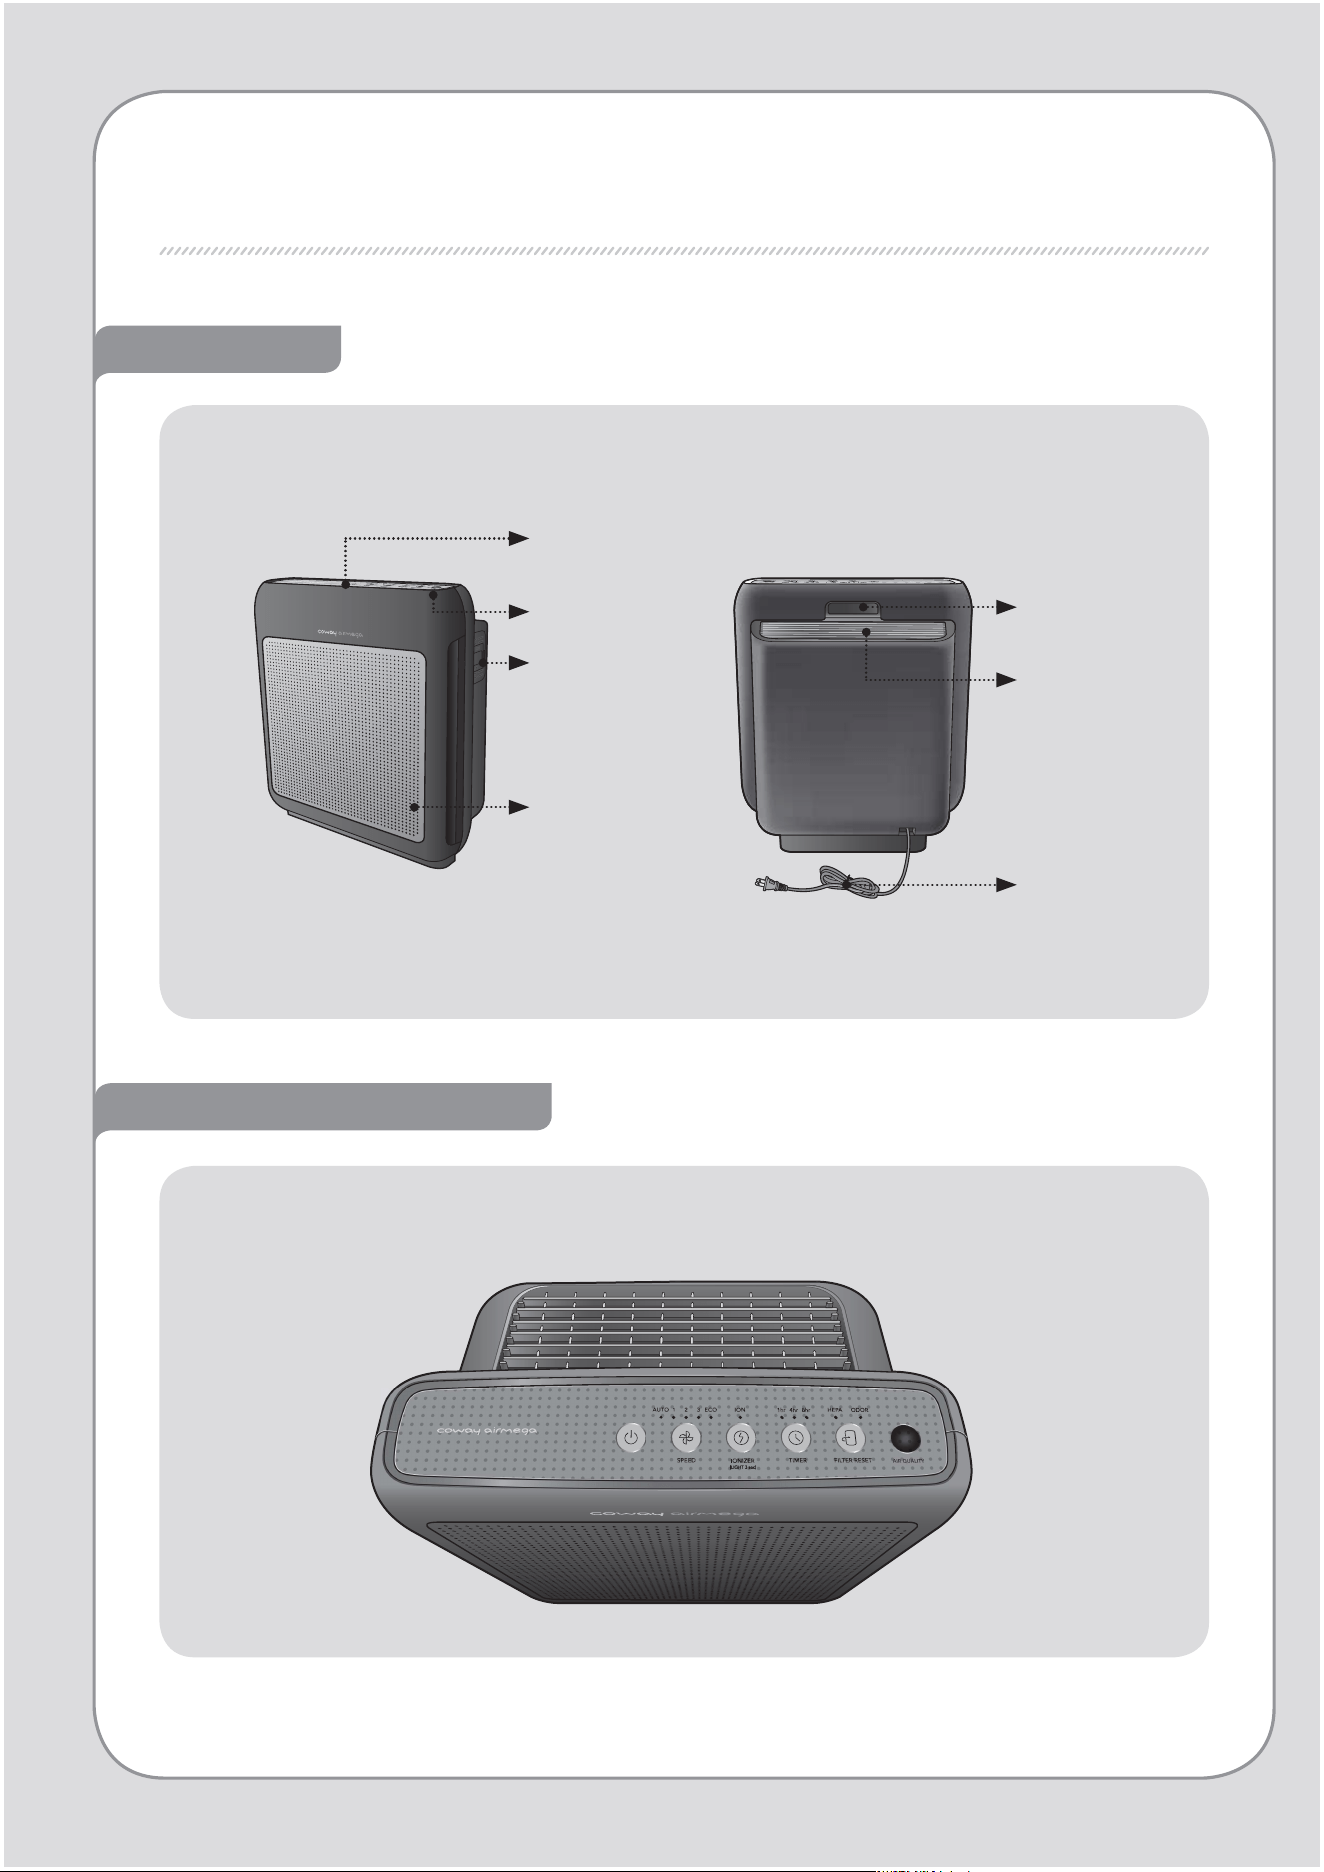
PARTS NAME
Front / Rear
Air quality
indicator
Air quality
sensor
Front cover
Operation /
Indication
part
Operation / Indication part
Handle
Air outlet
Power cord
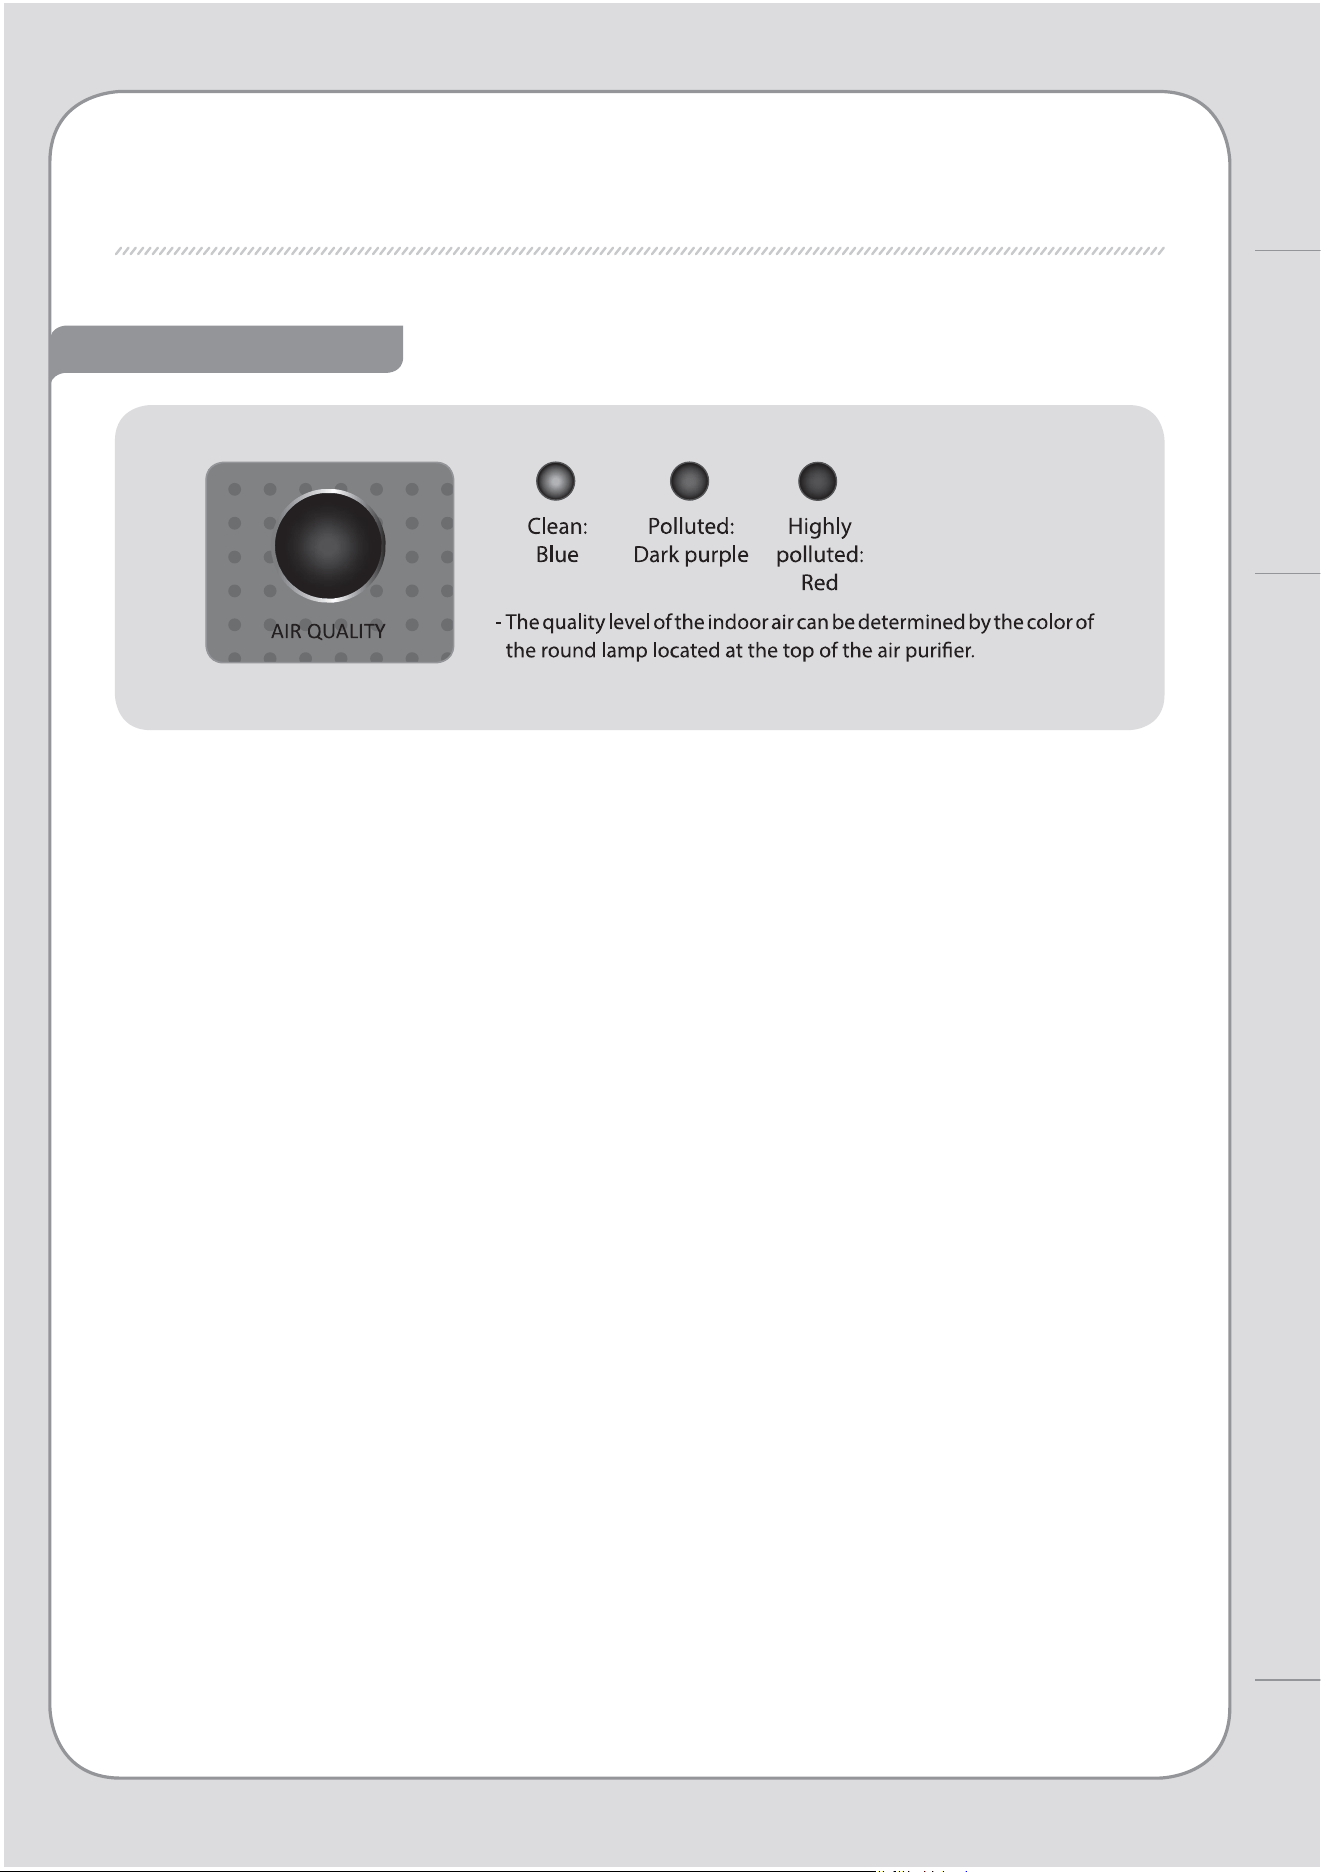
Air quality indicator
8
7
PARTS NAME
For Information
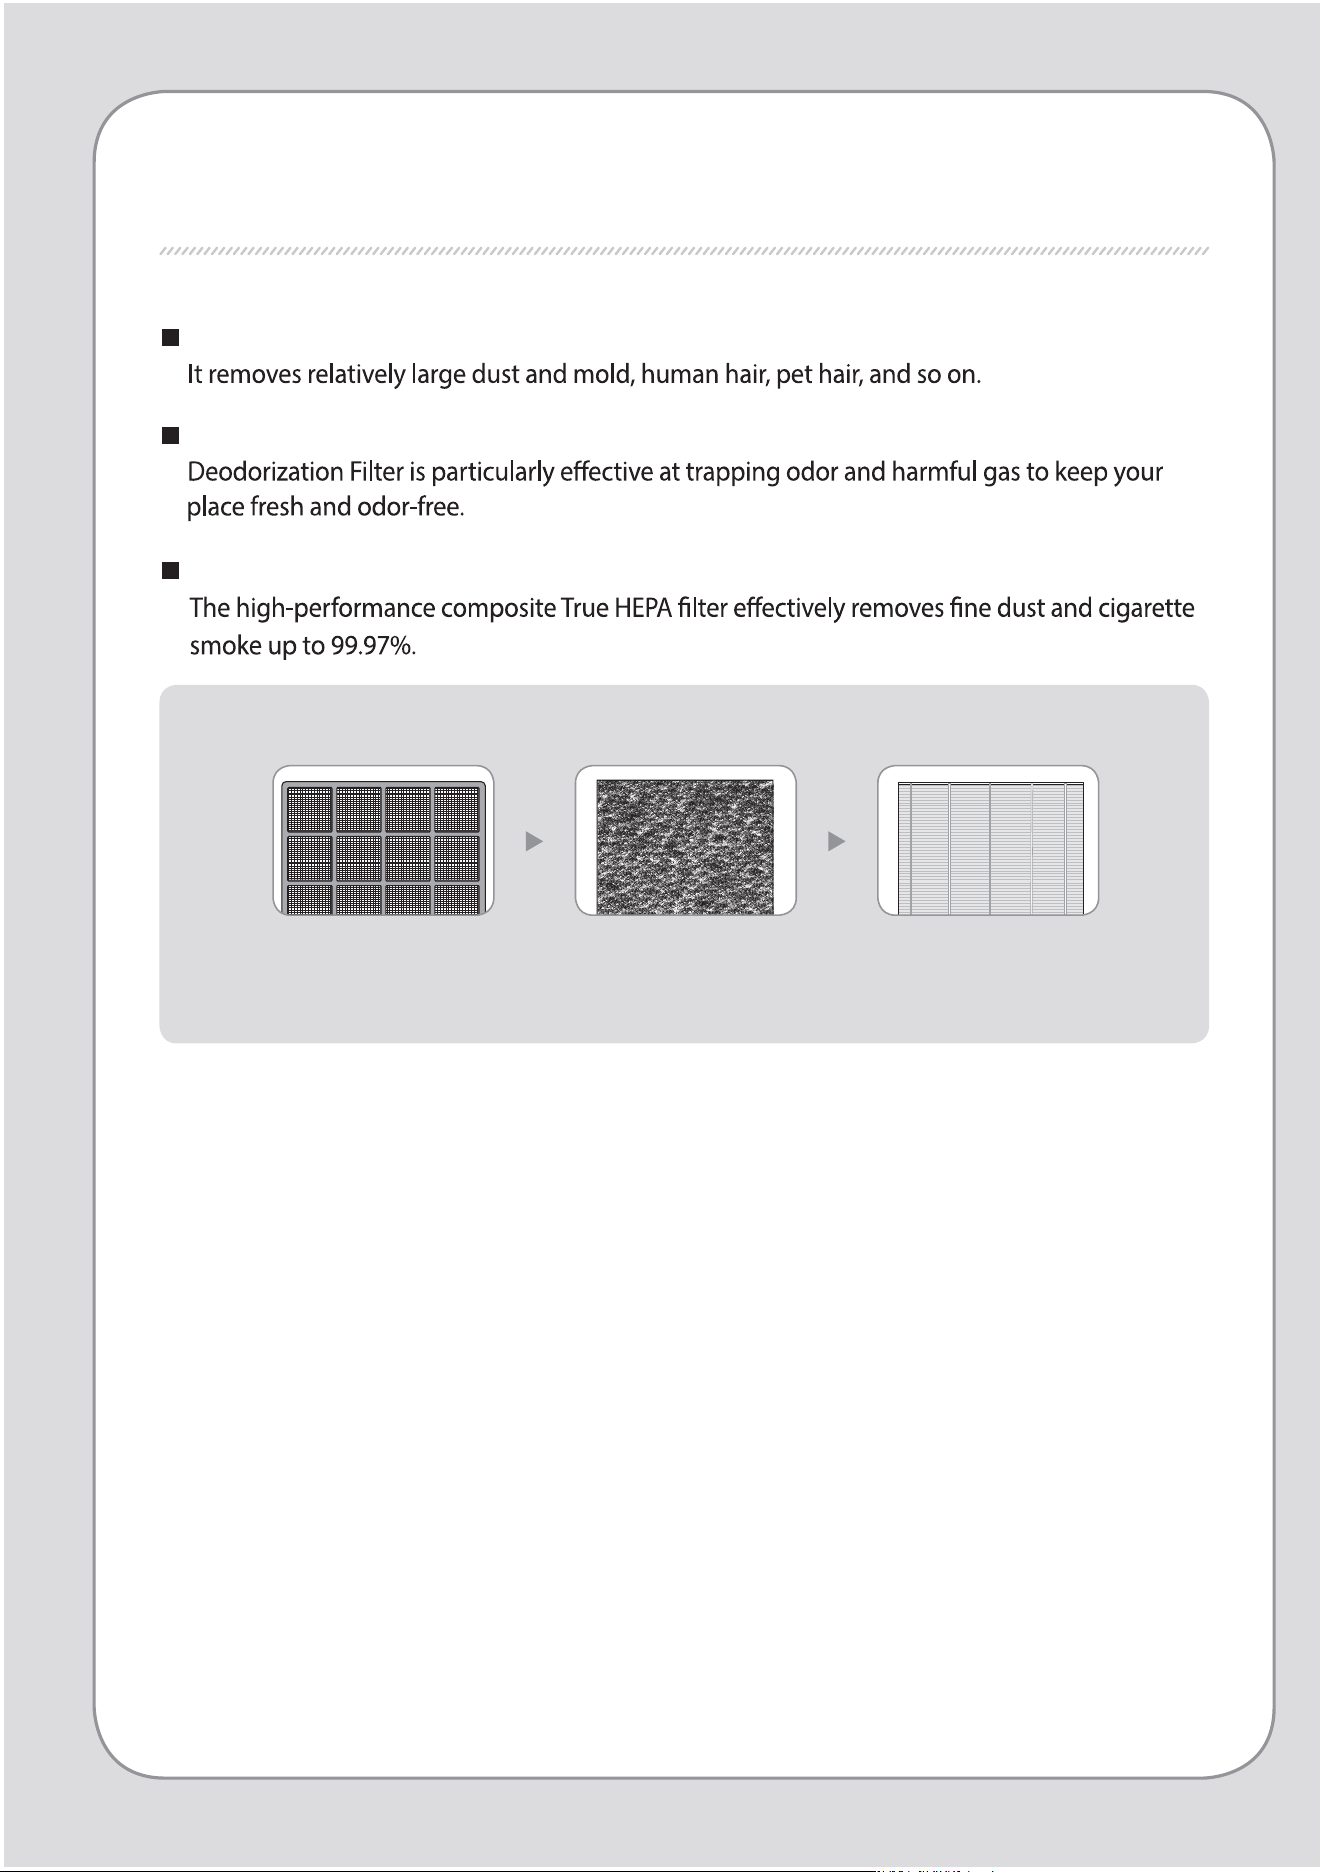
AIR PURIFICATION PROCESS
Pre-lter
Deodorization lter
True HEPA lter
1. Pre- lter 2. Deodorization lter 3. True HEPA lter

10
9
BEFORE USE
FILTER INSTALLATION
PLEASE CHECK BEFORE USE!
Order of lters : Pre-lter Deodorization lter True HEPA lter
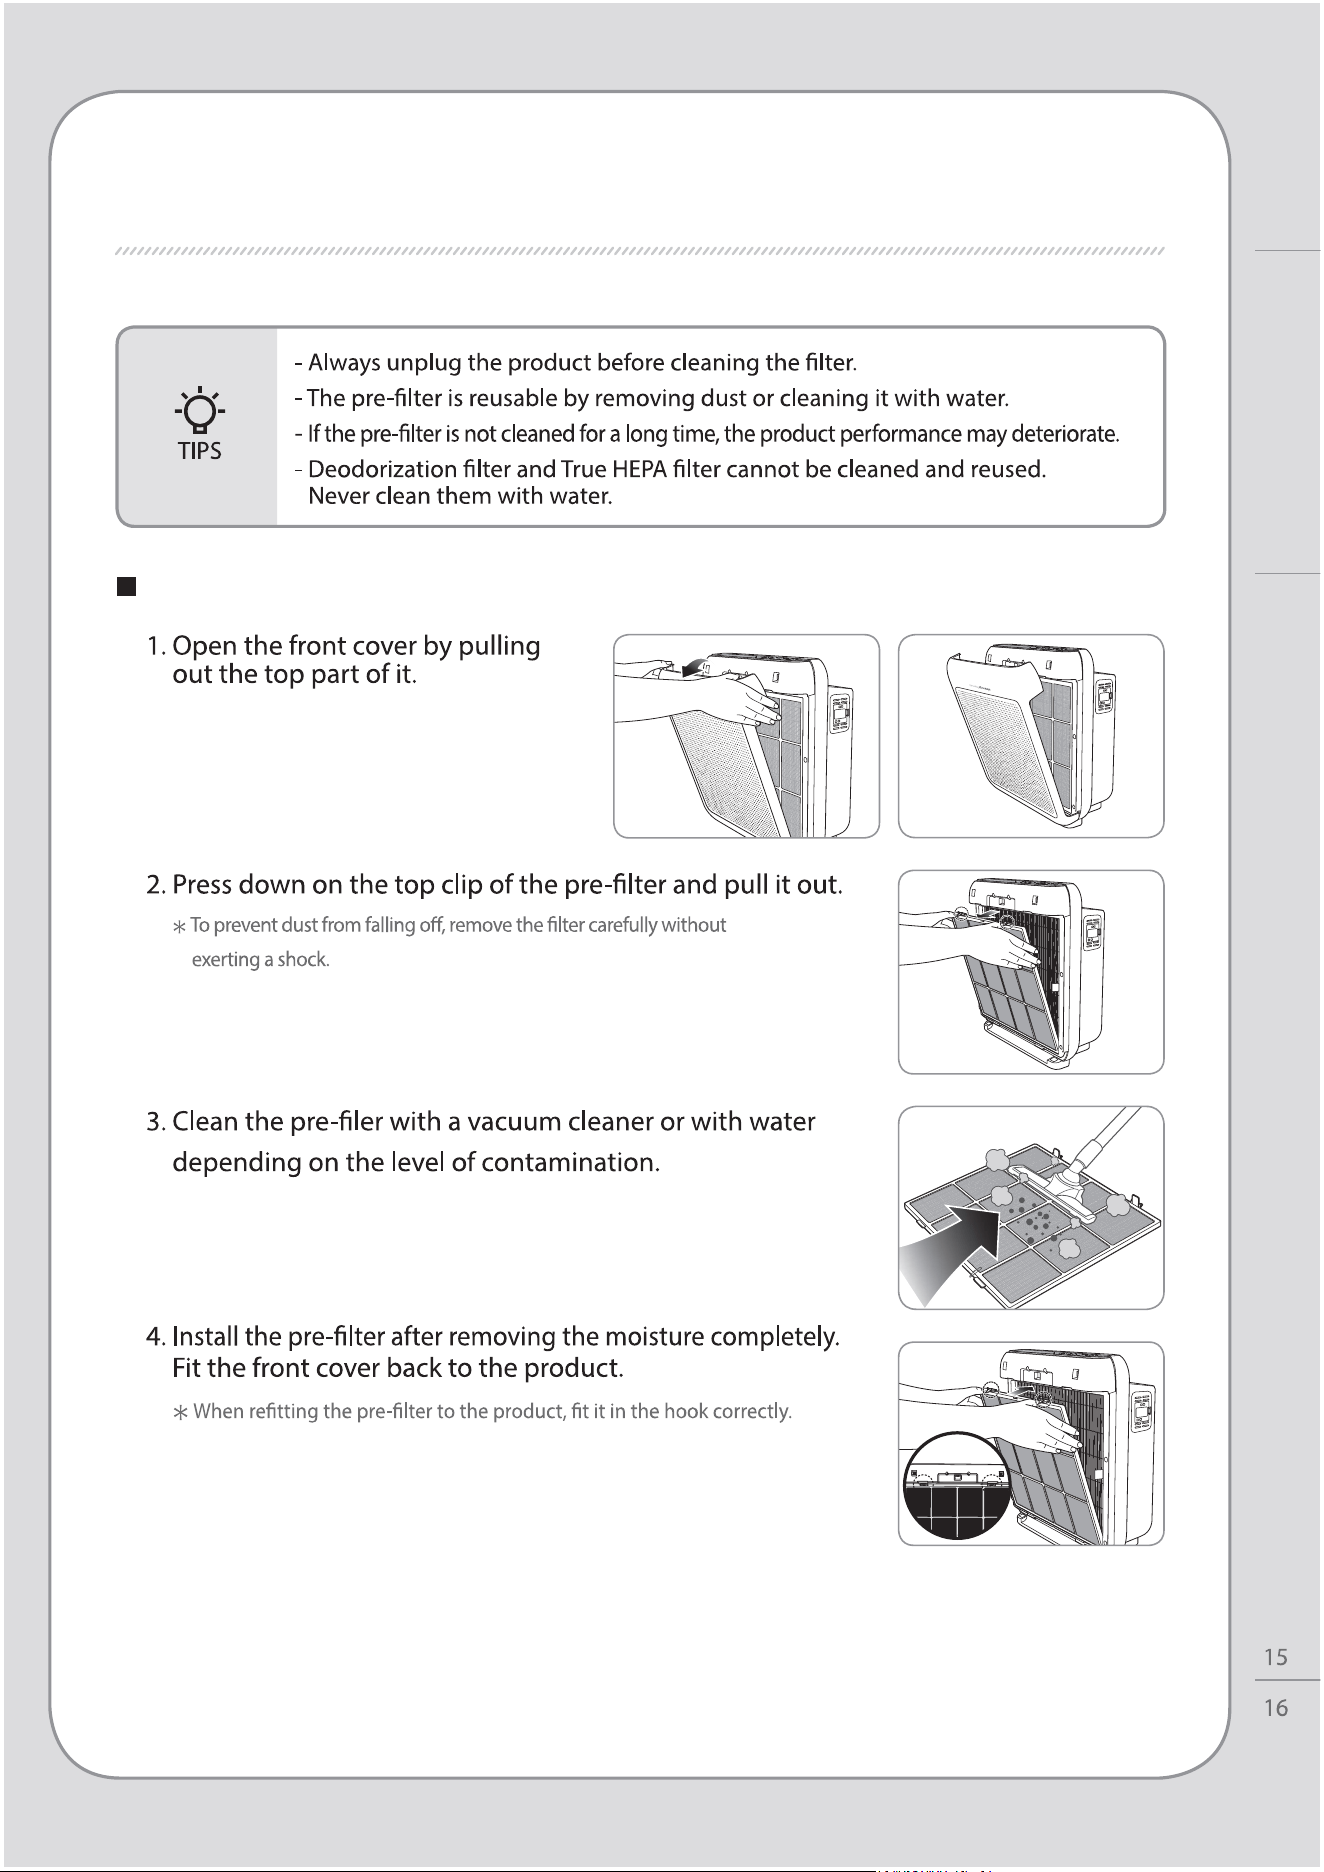
1. Open the front cover.
2. Take out lters and remove the plastic bag.
3. Install the lters as following
order: Pre-lter Deodorization
lter True HEPA lter
The product is for 120 V~, 60 Hz only.
How to Use
AIR PURIFICATION PROCESS / BEFORE USE
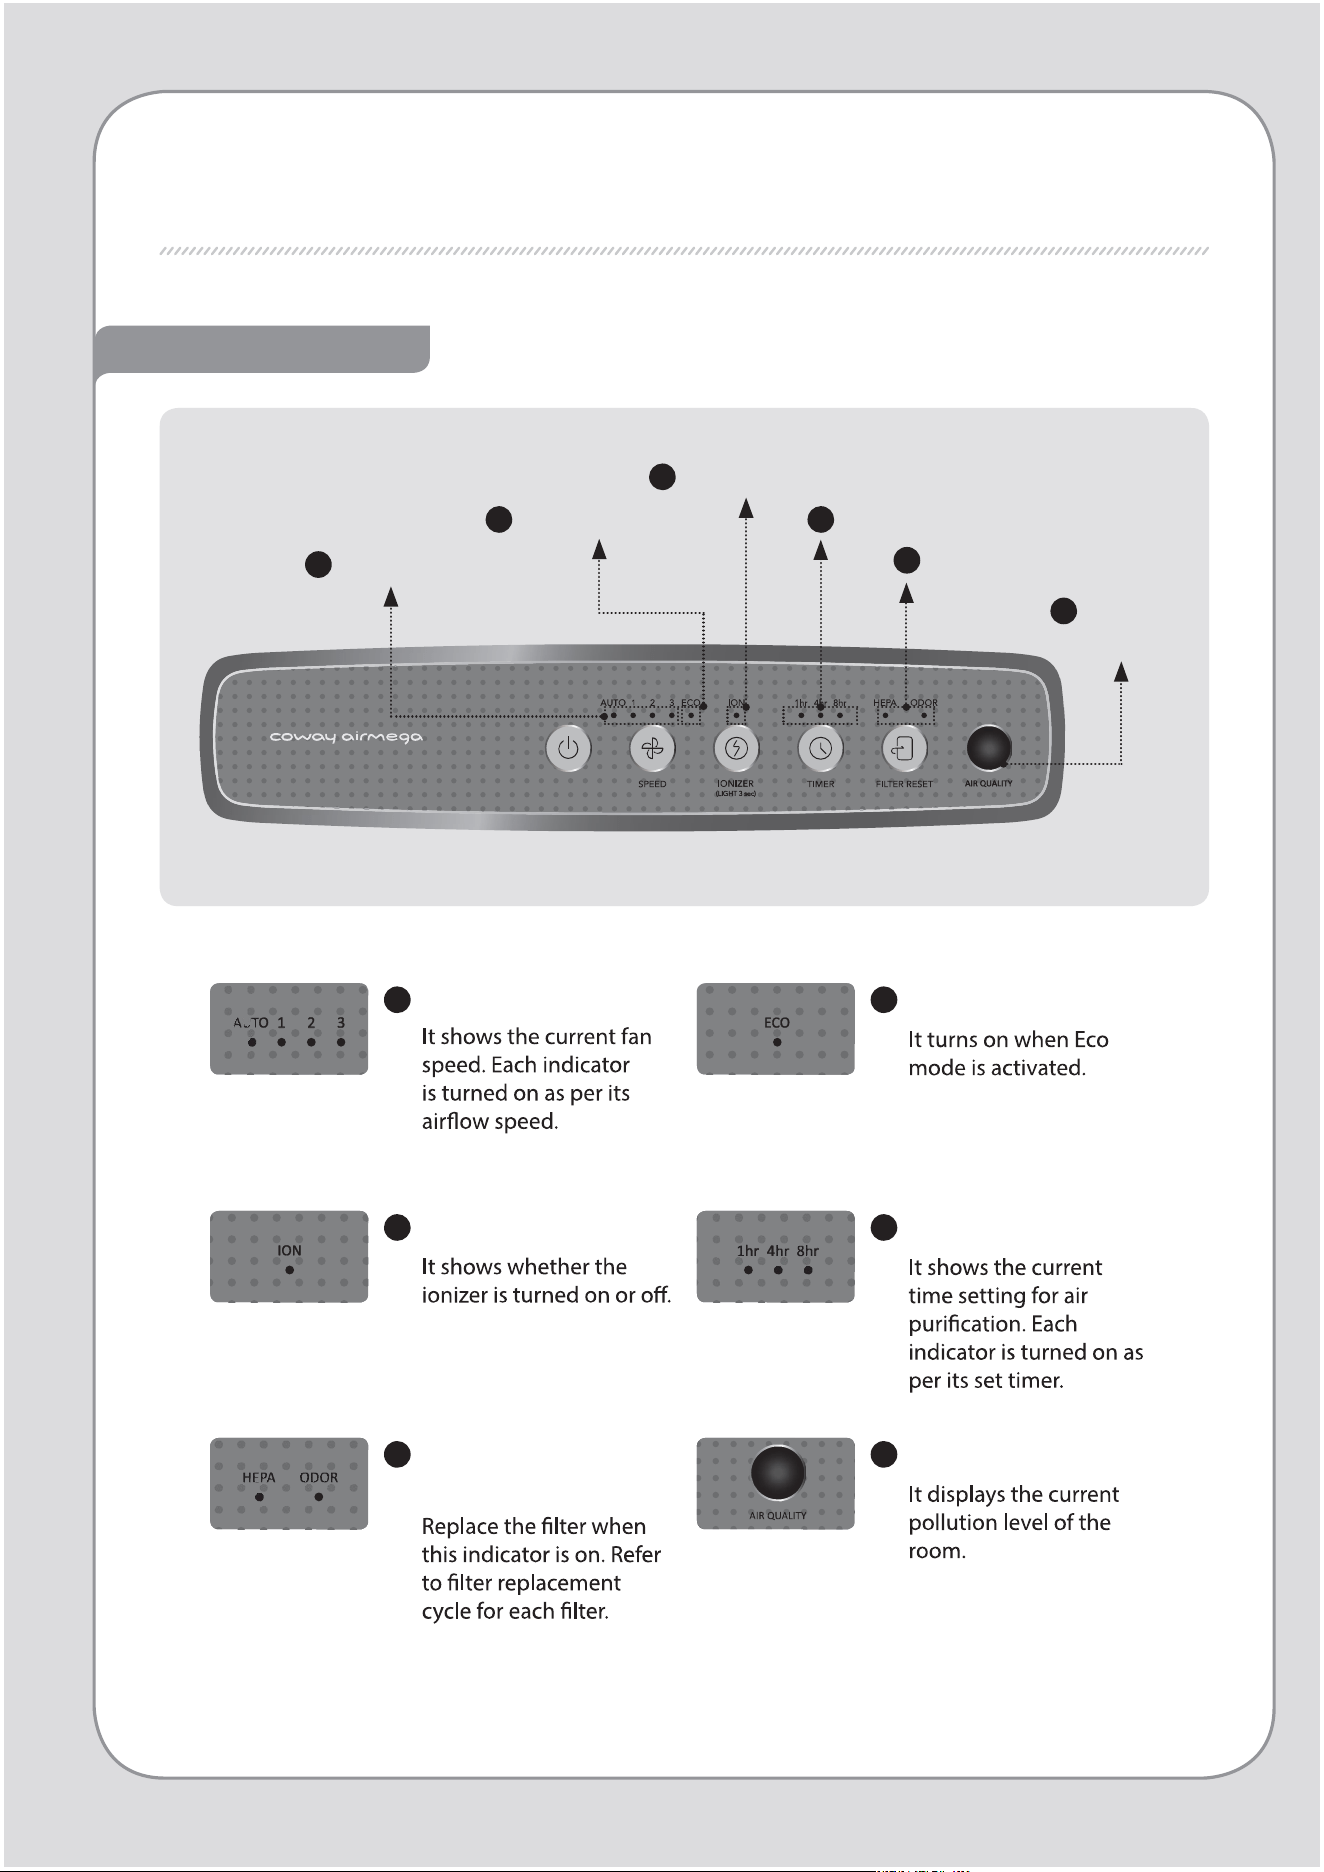
INDICATORS AND BUTTONS
INDICATION PART
6
5
Filter replacement
indicator
Air quality
indicator
3
Ionizer indicator
4
Timer indicator
2
Eco mode indicator
1
Speed indicator
1
Speed indicator
2
Eco mode indicator
3
Ionizer indicator
4
Timer indicator
5
Filter replacement
indicator
6
Air quality indicator
1
Power Button
5
2
3
4
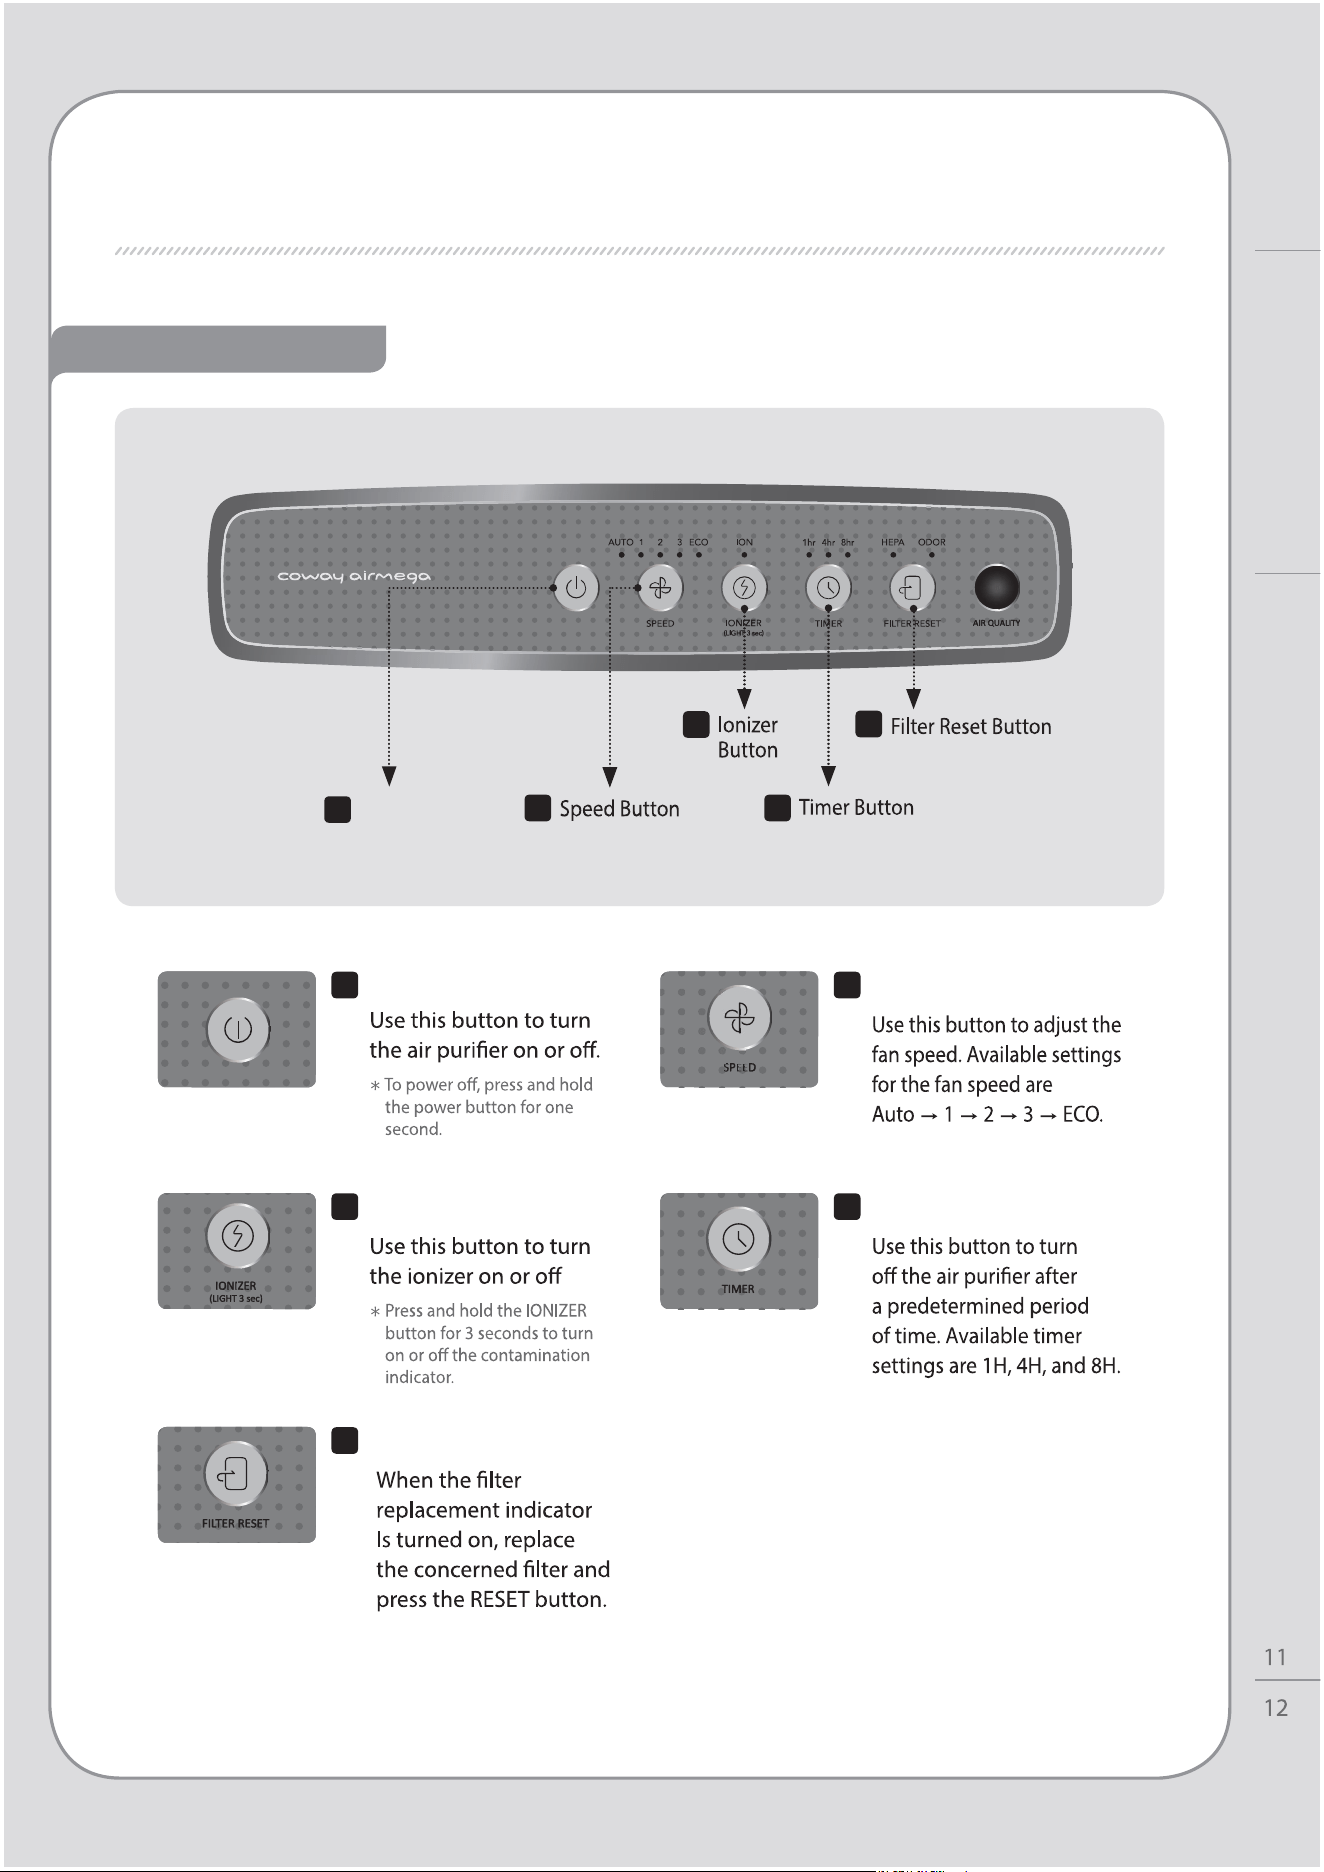
OPERATION PART
1
Power Button
2
Speed Button
4
Timer Button
5
Filter Reset Button
How to Use
INDICATORS AND BUTTONS
3
Ionizer button
HOW TO USE
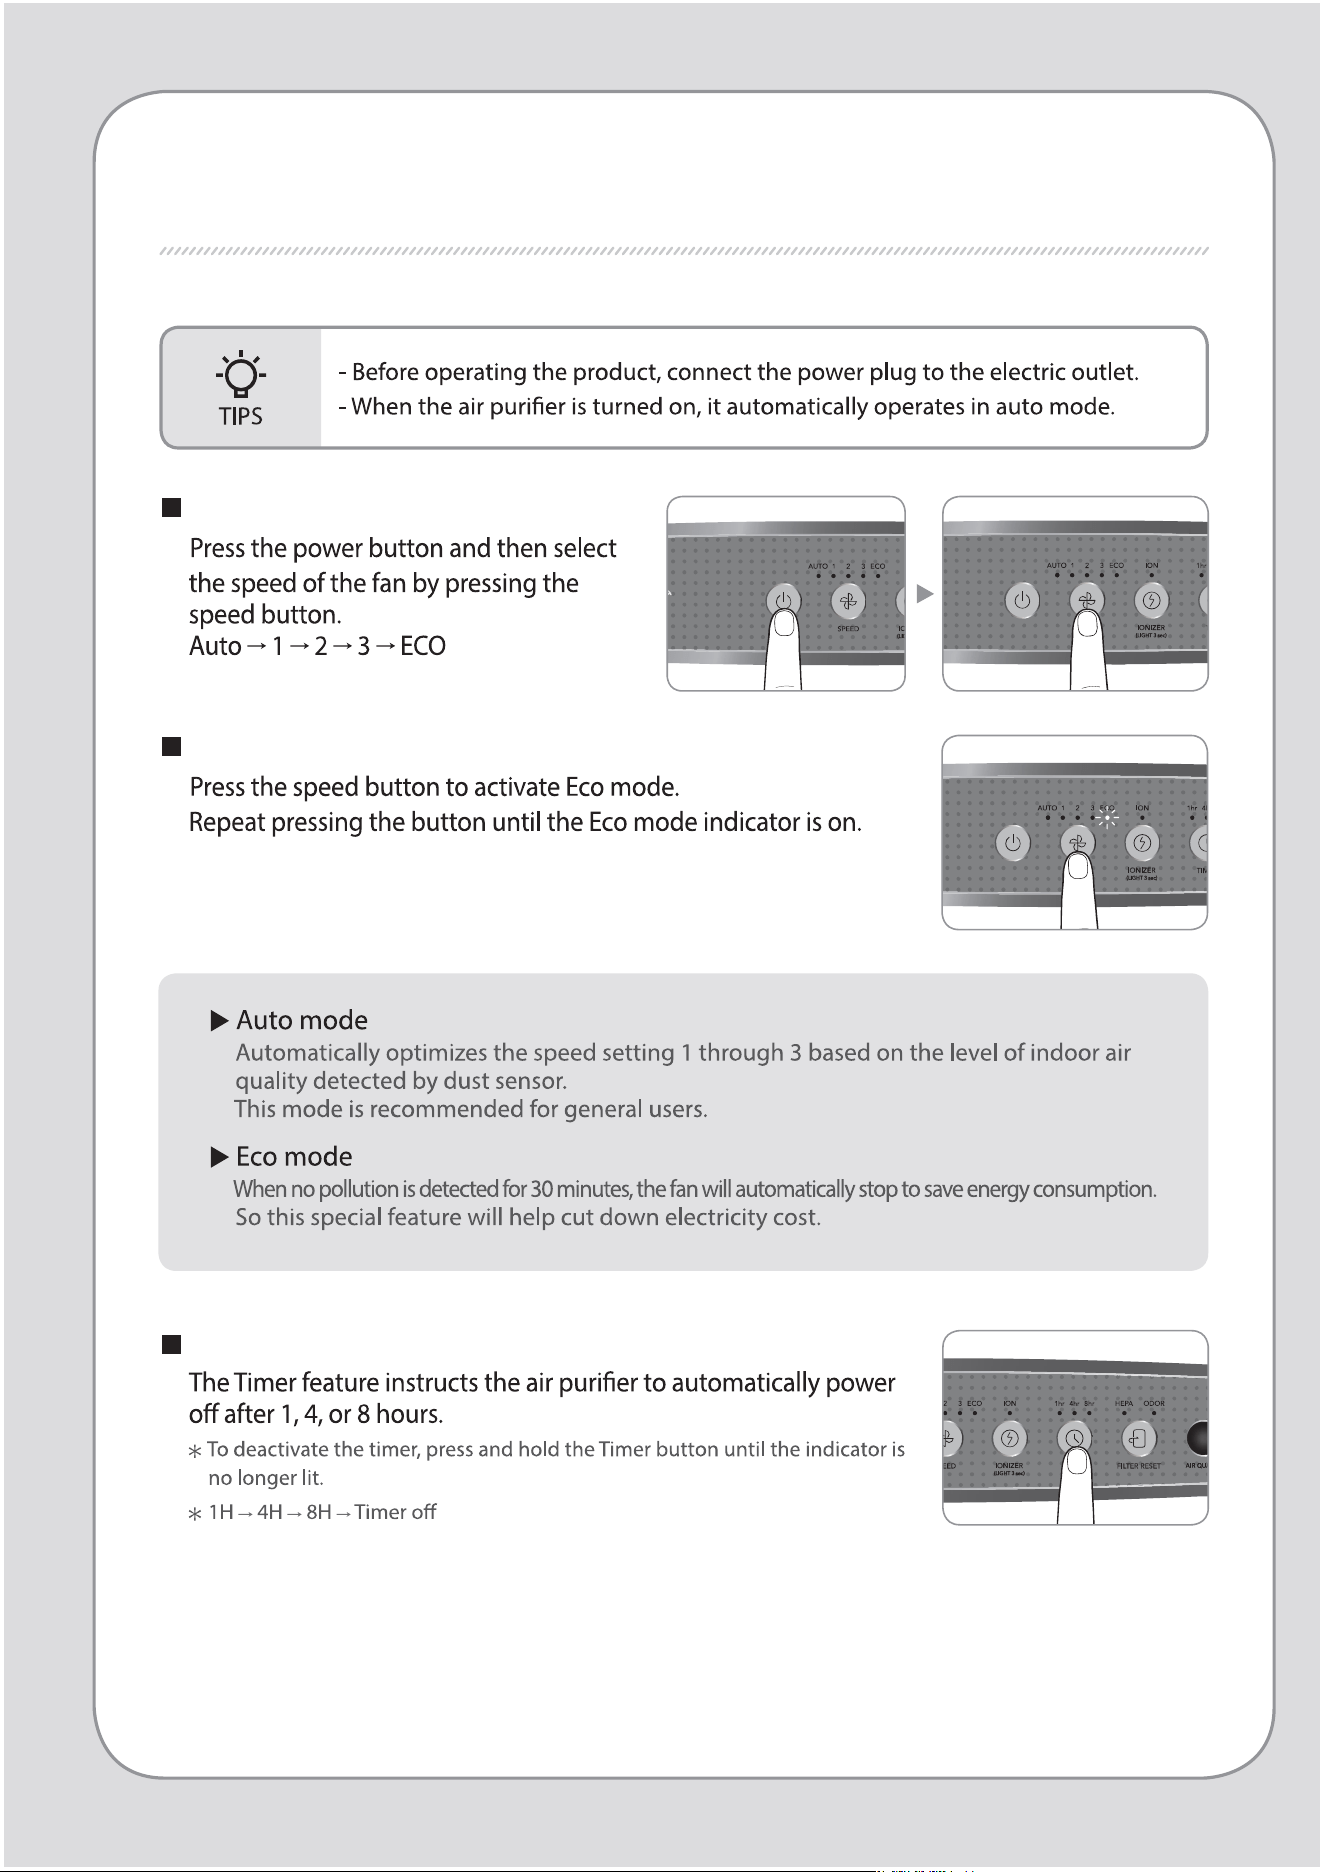
Manual & Auto mode
To select the auto mode
Timer activation/deactivation

HOW TO USE / ADJUST AIR QUALITY SENSOR
ADJUST AIR QUALITY SENSOR
1. While the air purier is on, press the airow speed
button and ionizer button for 2 seconds.
2. The speed indicator will ash at 1.0 second intervals
with beep. The speed indicator blinks to show the
sensor sensitivity.
4. Press the airow speed button and ionizer button
for 2 seconds.
The air purier will then resume normal operations.
3. Adjust the sensitivity by pressing the speed button.
The speed indicator blinks to show the sensor sensitivity.
Speed step 1 Speed step 2 Speed step 3
2 seconds
2 seconds
2 seconds
2 seconds
How to Use
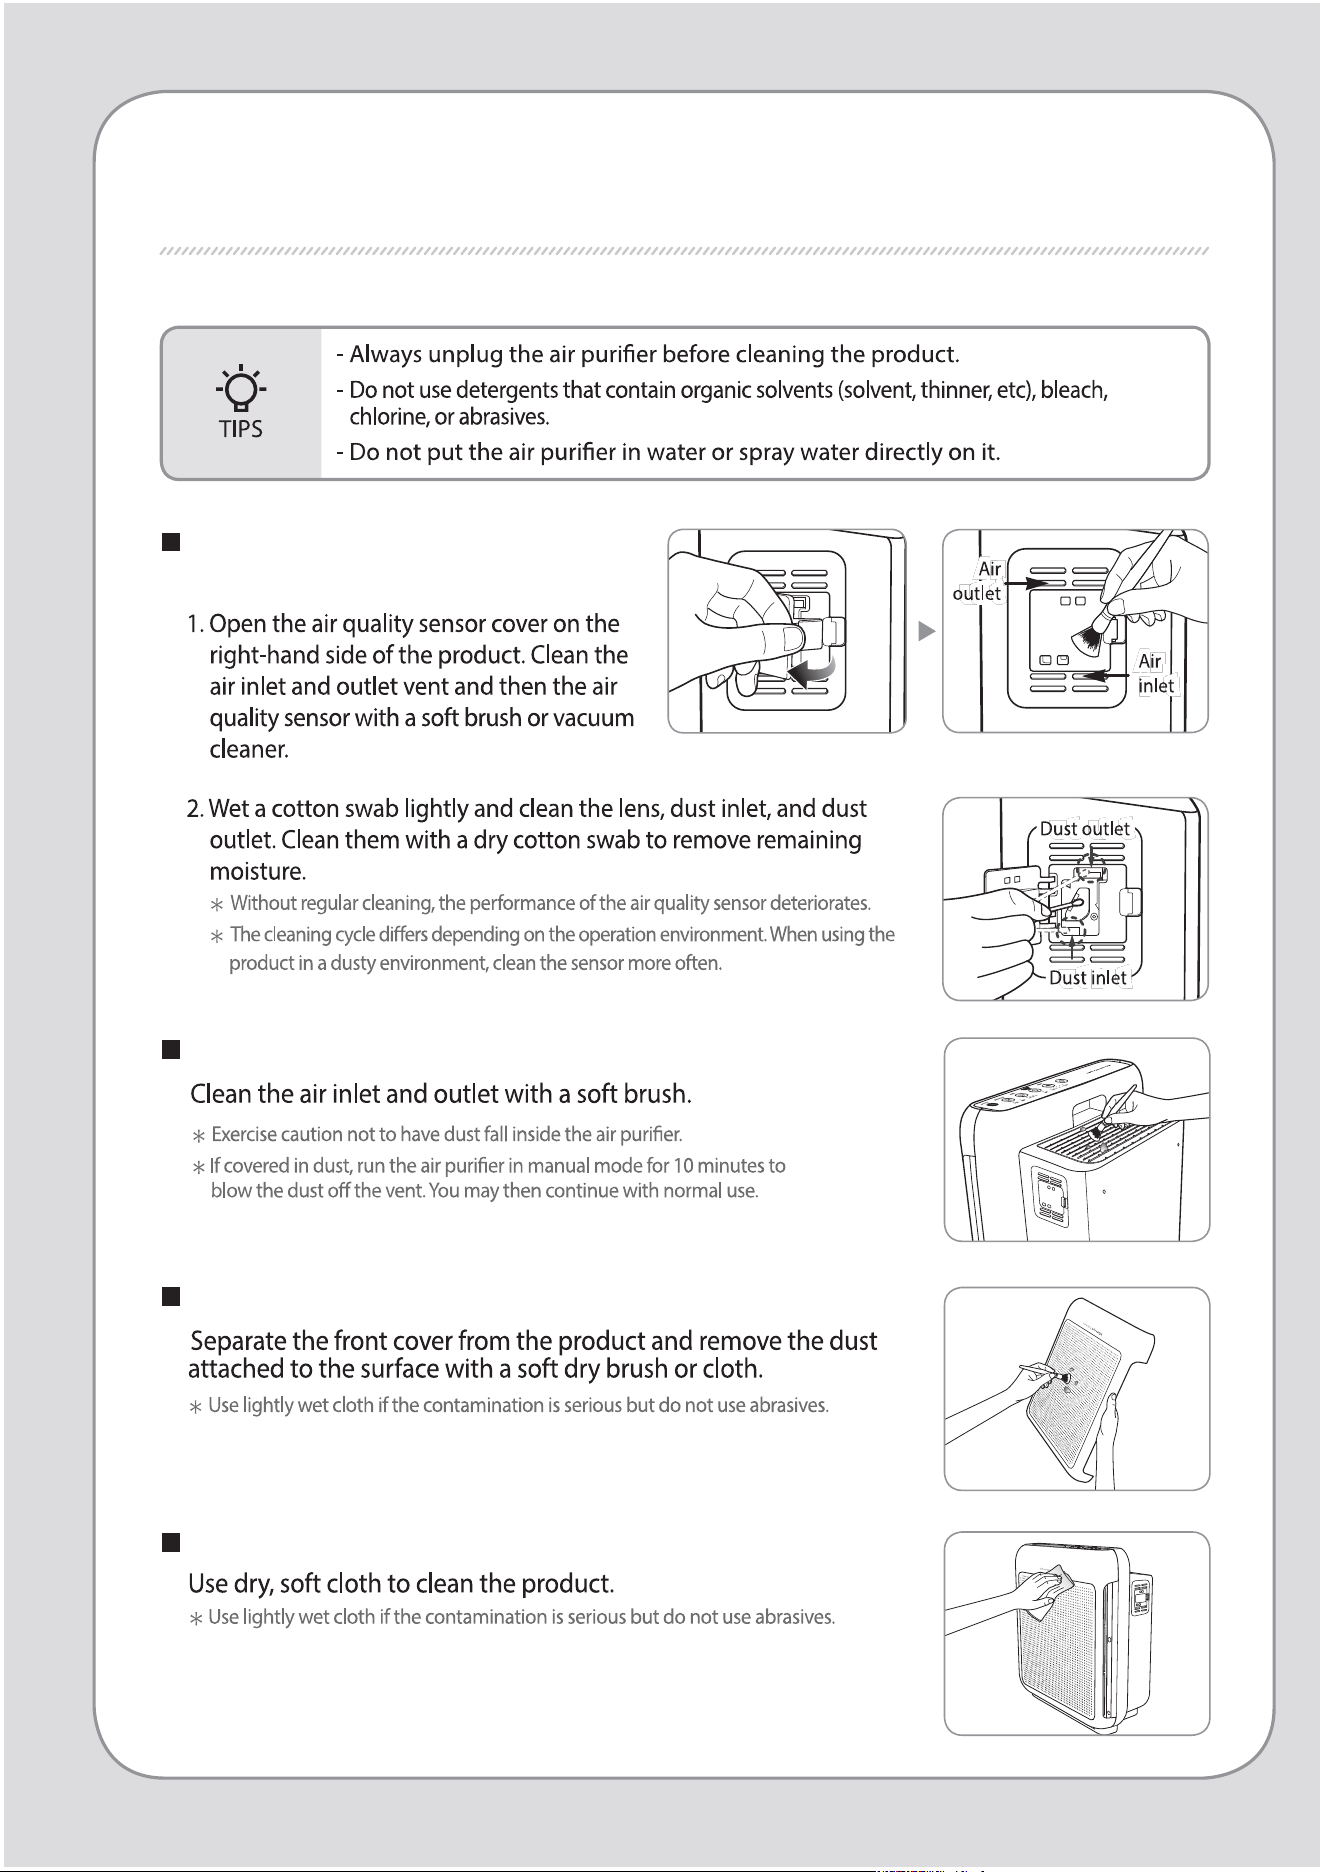
CLEANING METHOD
Cleaning the air quality sensor
(every 2 months)
Cleaning the air inlet and outlet (every 2 months)
Cleaning the front cover
Cleaning the product body (every 2 ~ 4 weeks)
CLEANING METHOD
Maintenance
Cleaning the pre-lter (every 2 ~ 4 weeks)
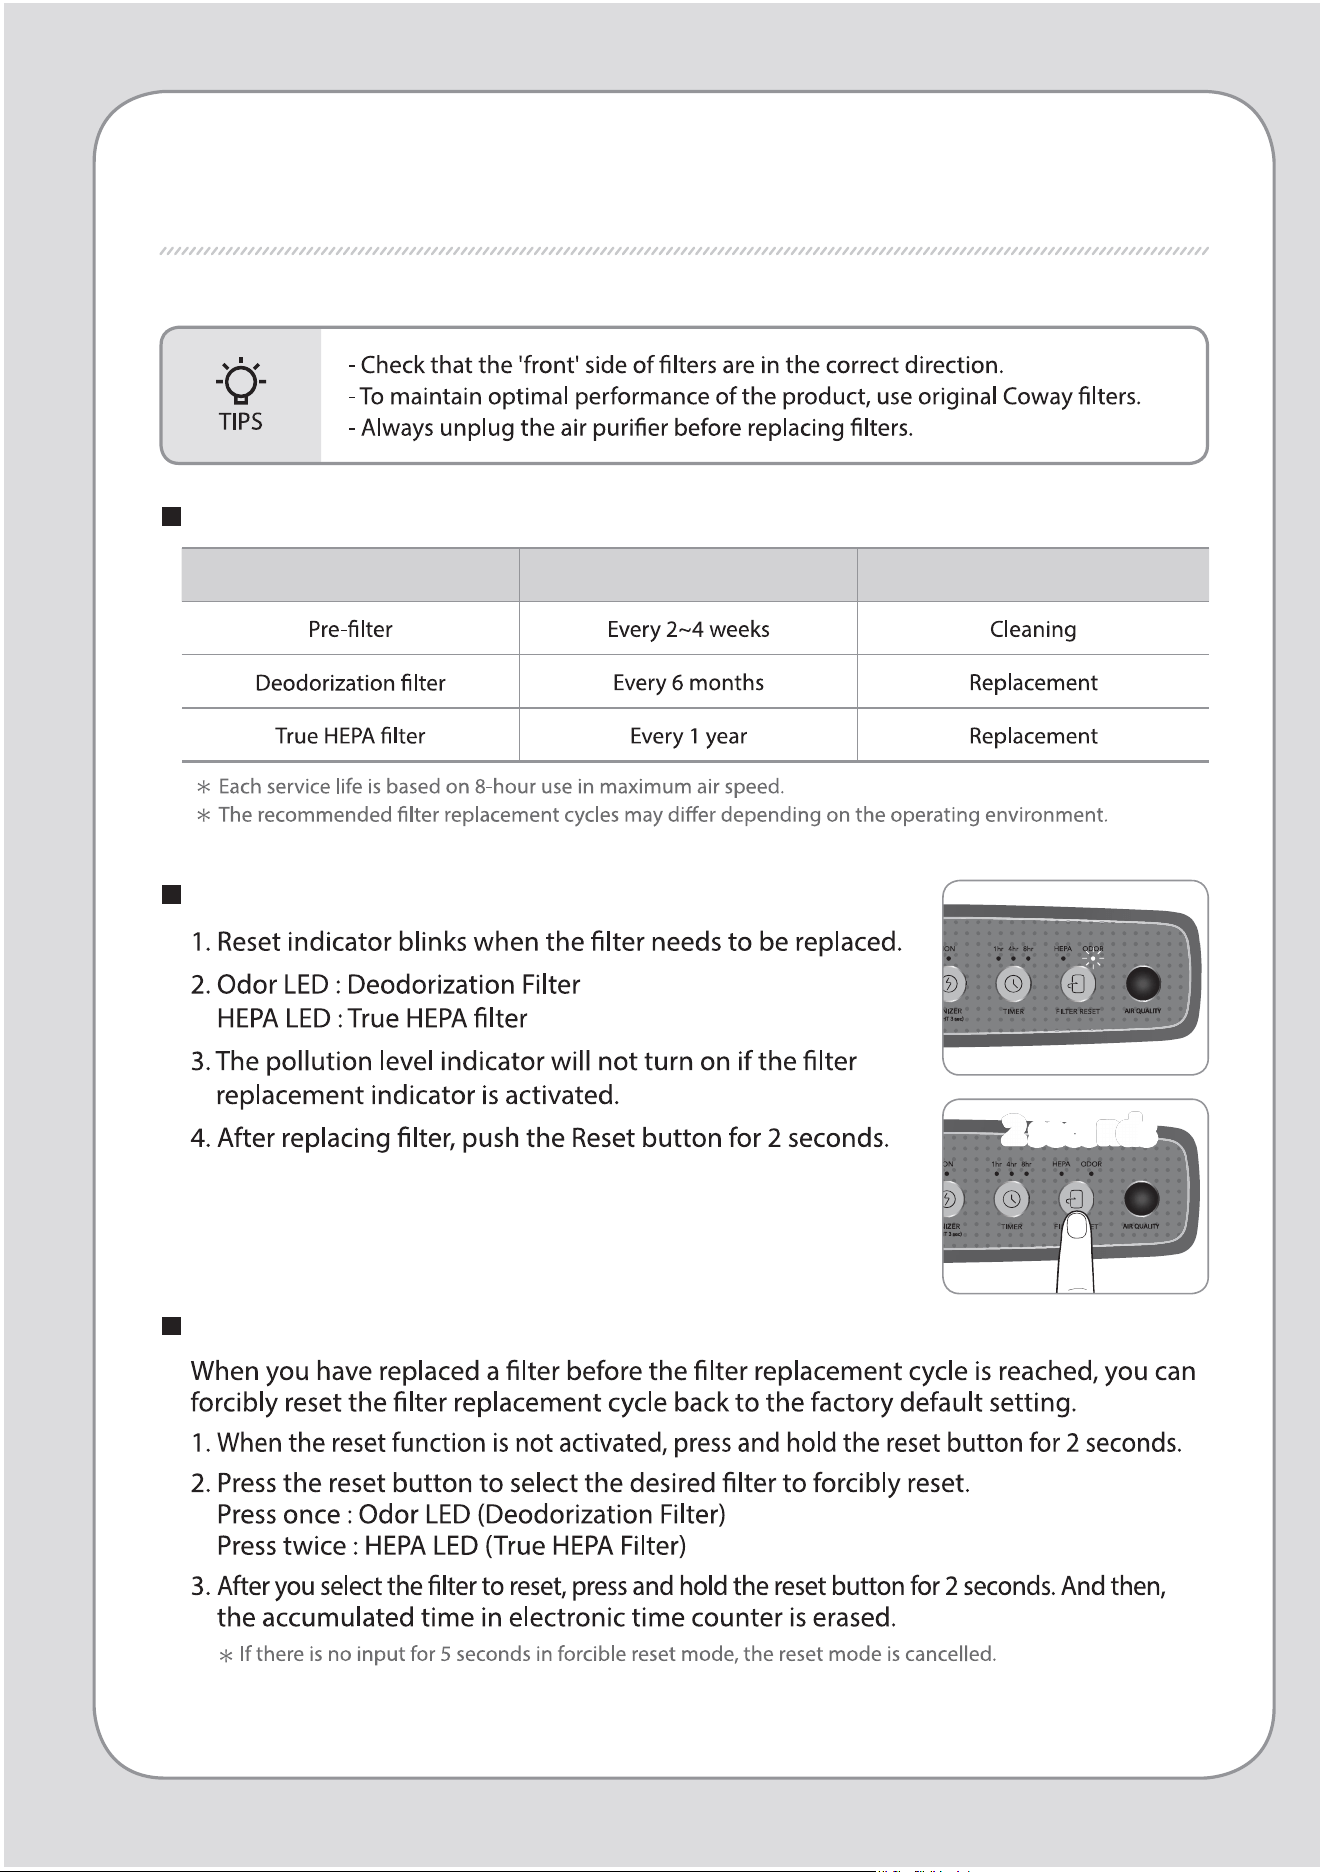
Resetting the lter replacement indicator
Filter cleaning and replacement cycles
Filter Cycles Method
FILTER REPLACEMENT
Forcible reset mode
2 seconds
2 seconds

FILTER REPLACEMENT / TROUBLESHOOTING
Others
TROUBLESHOOTING
Problems Check Possible solutions
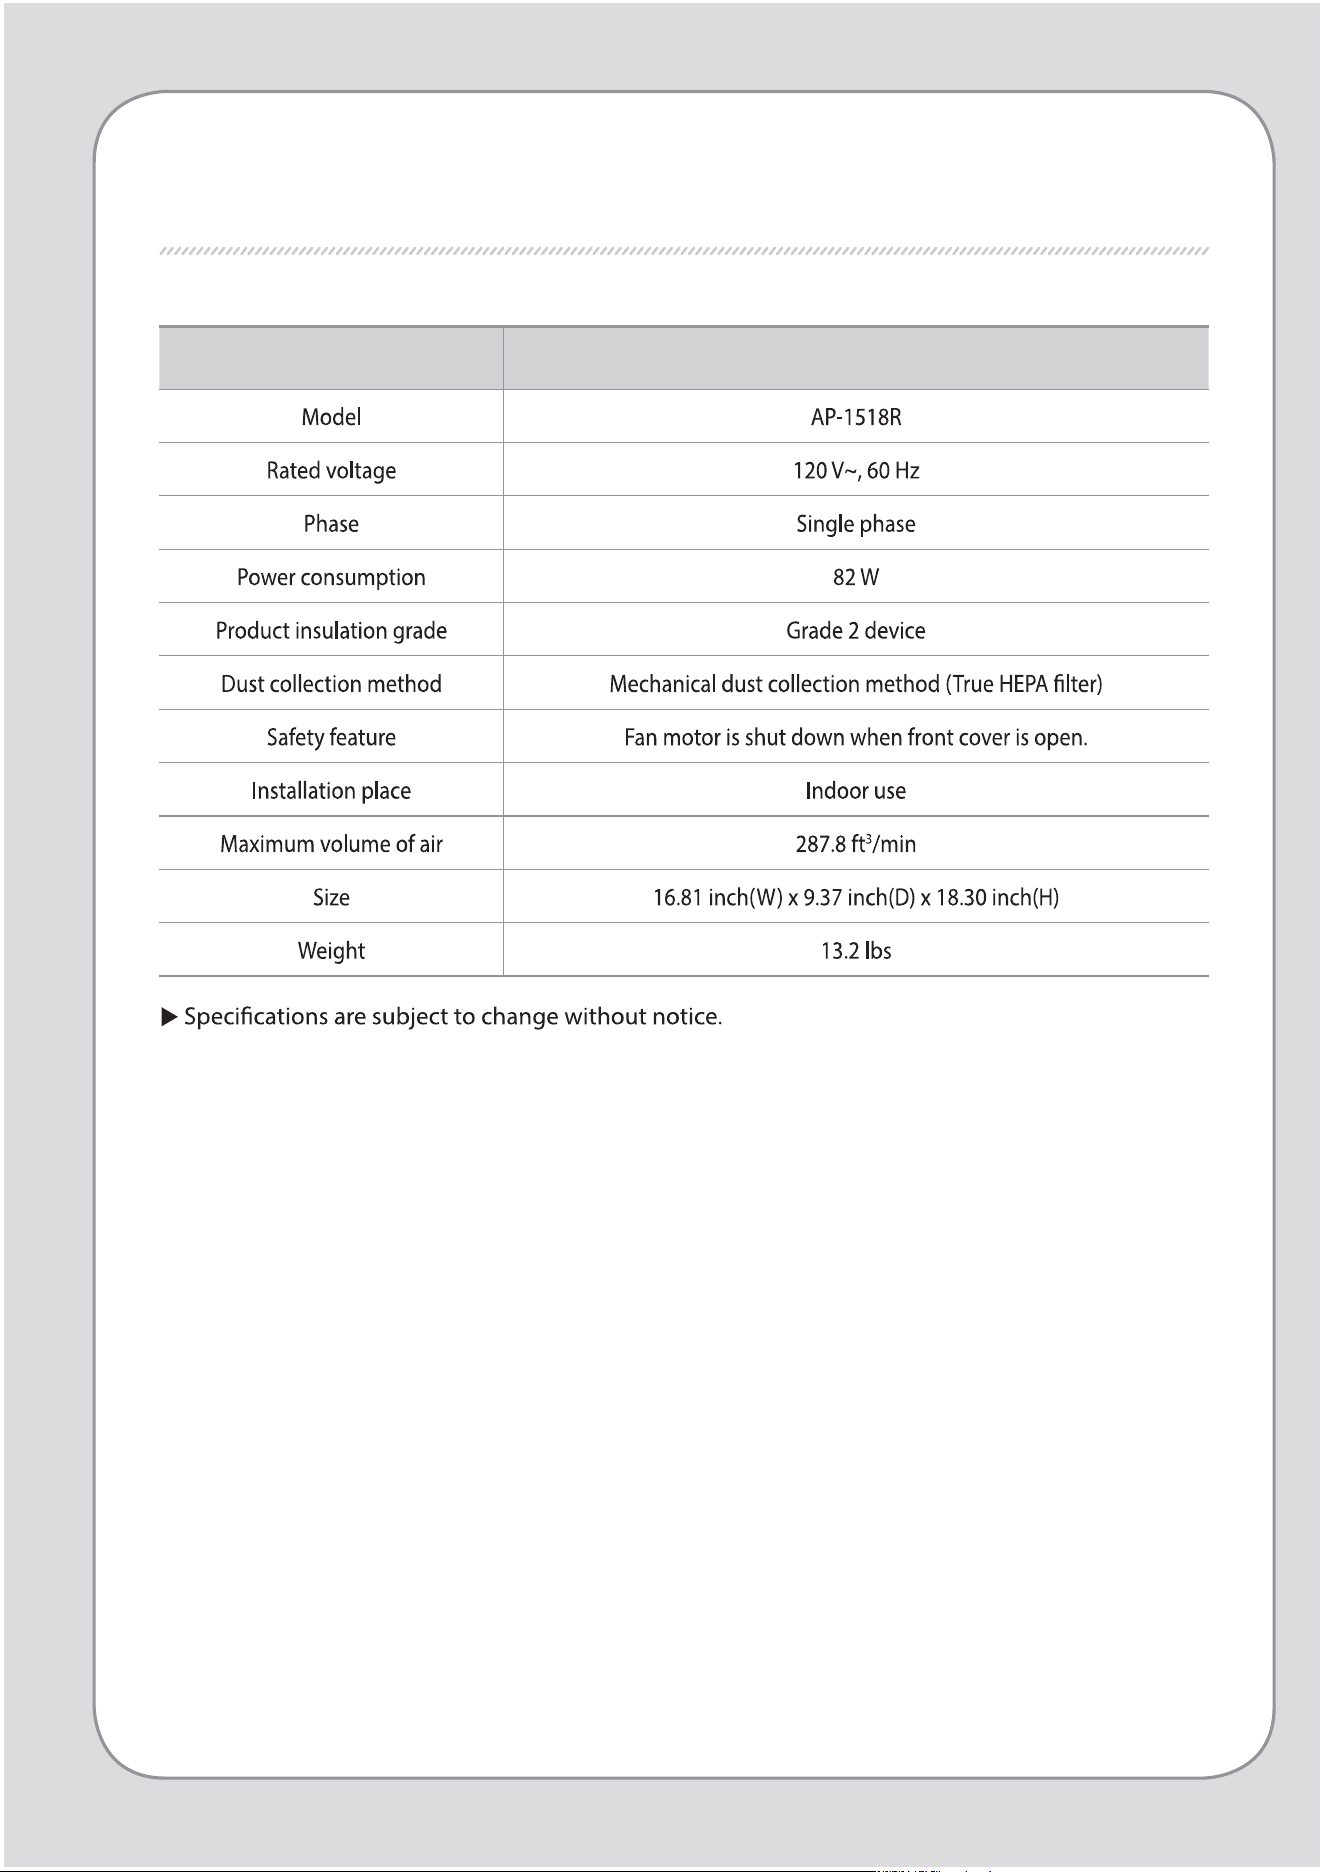
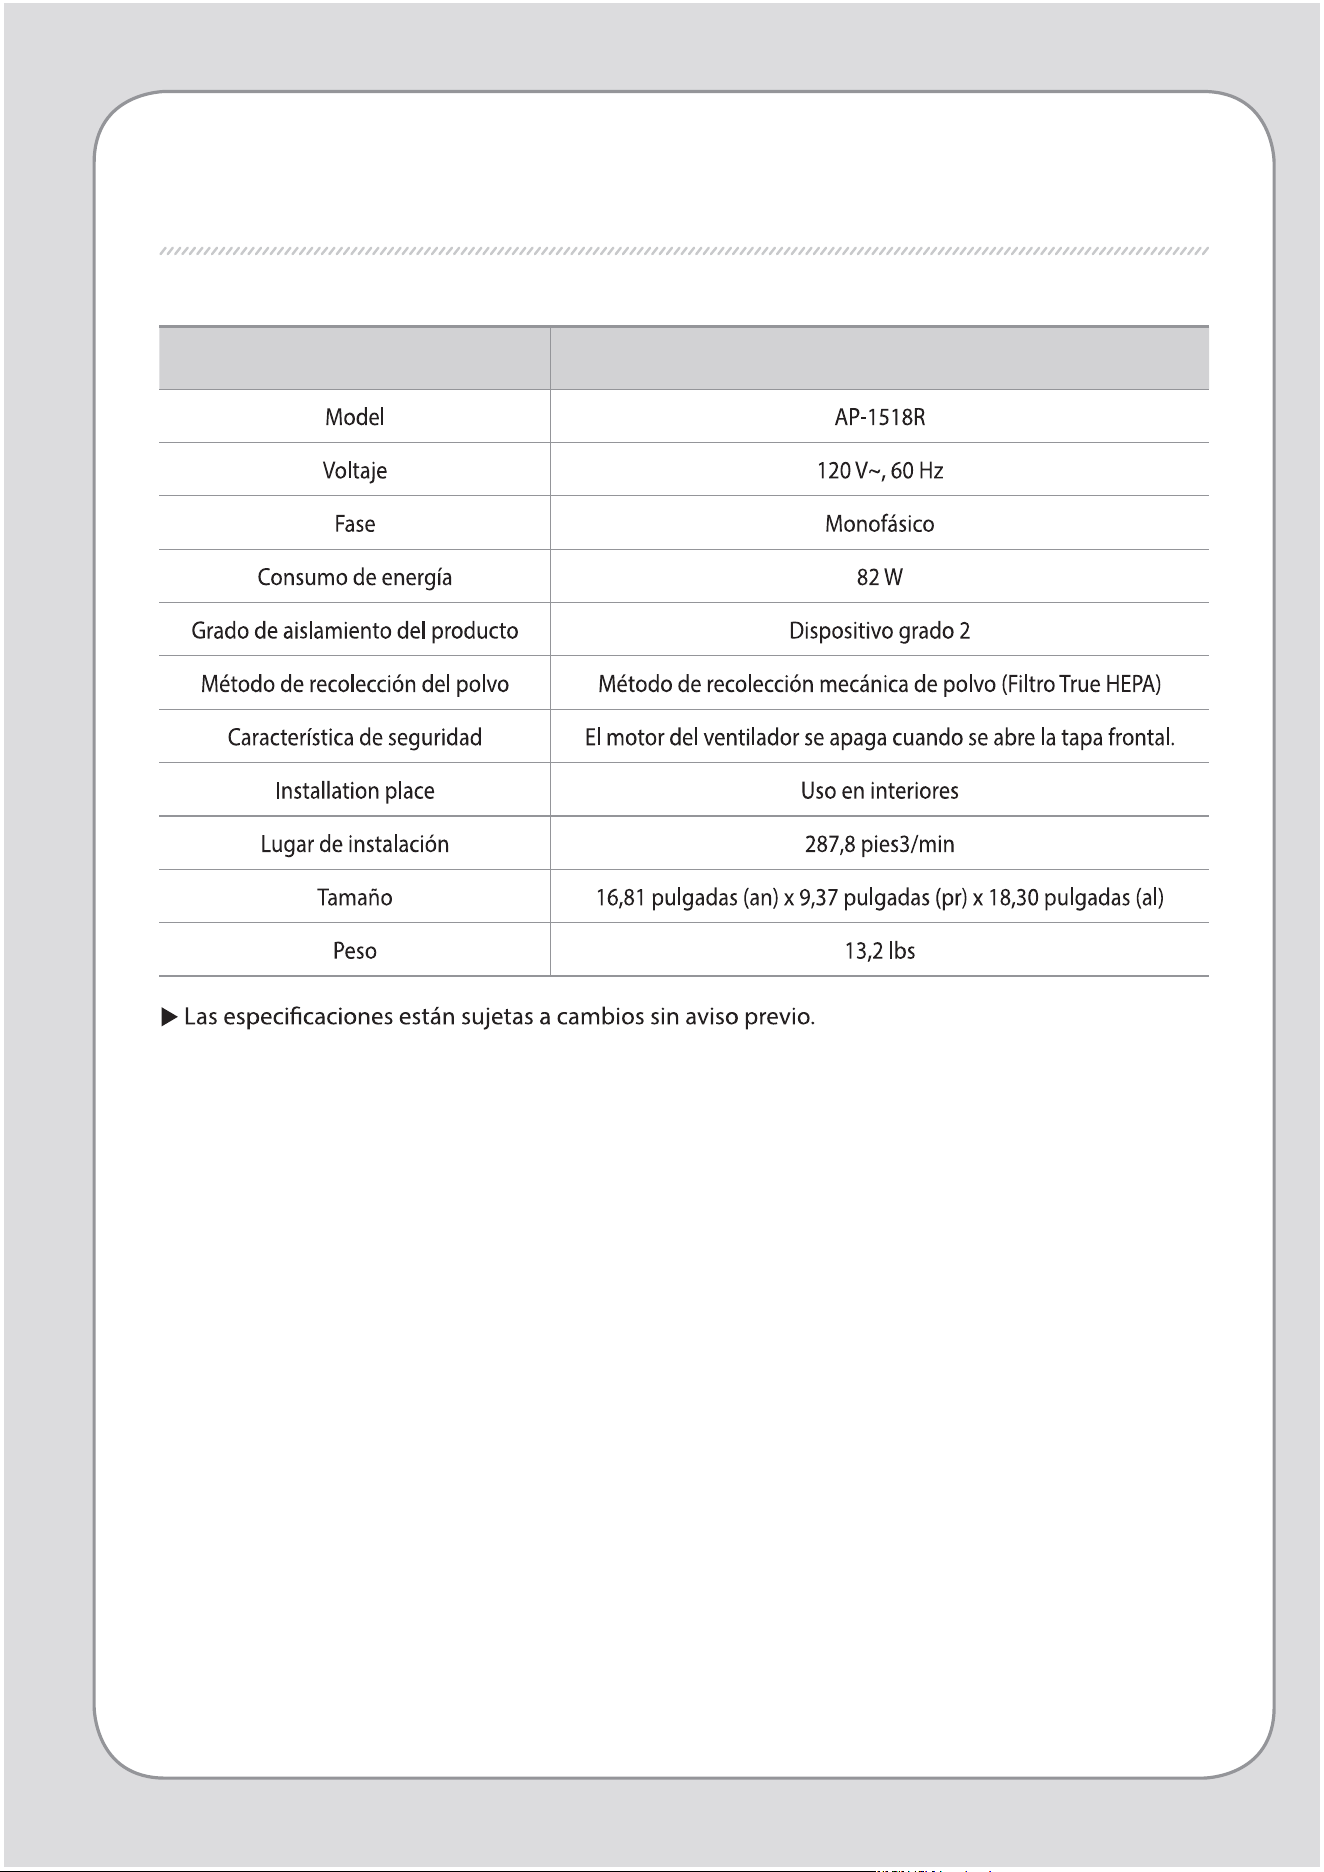
Product specication Air Purier
PRODUCT SPECIFICATION

SPECIFICATIONS
Others
MEMO
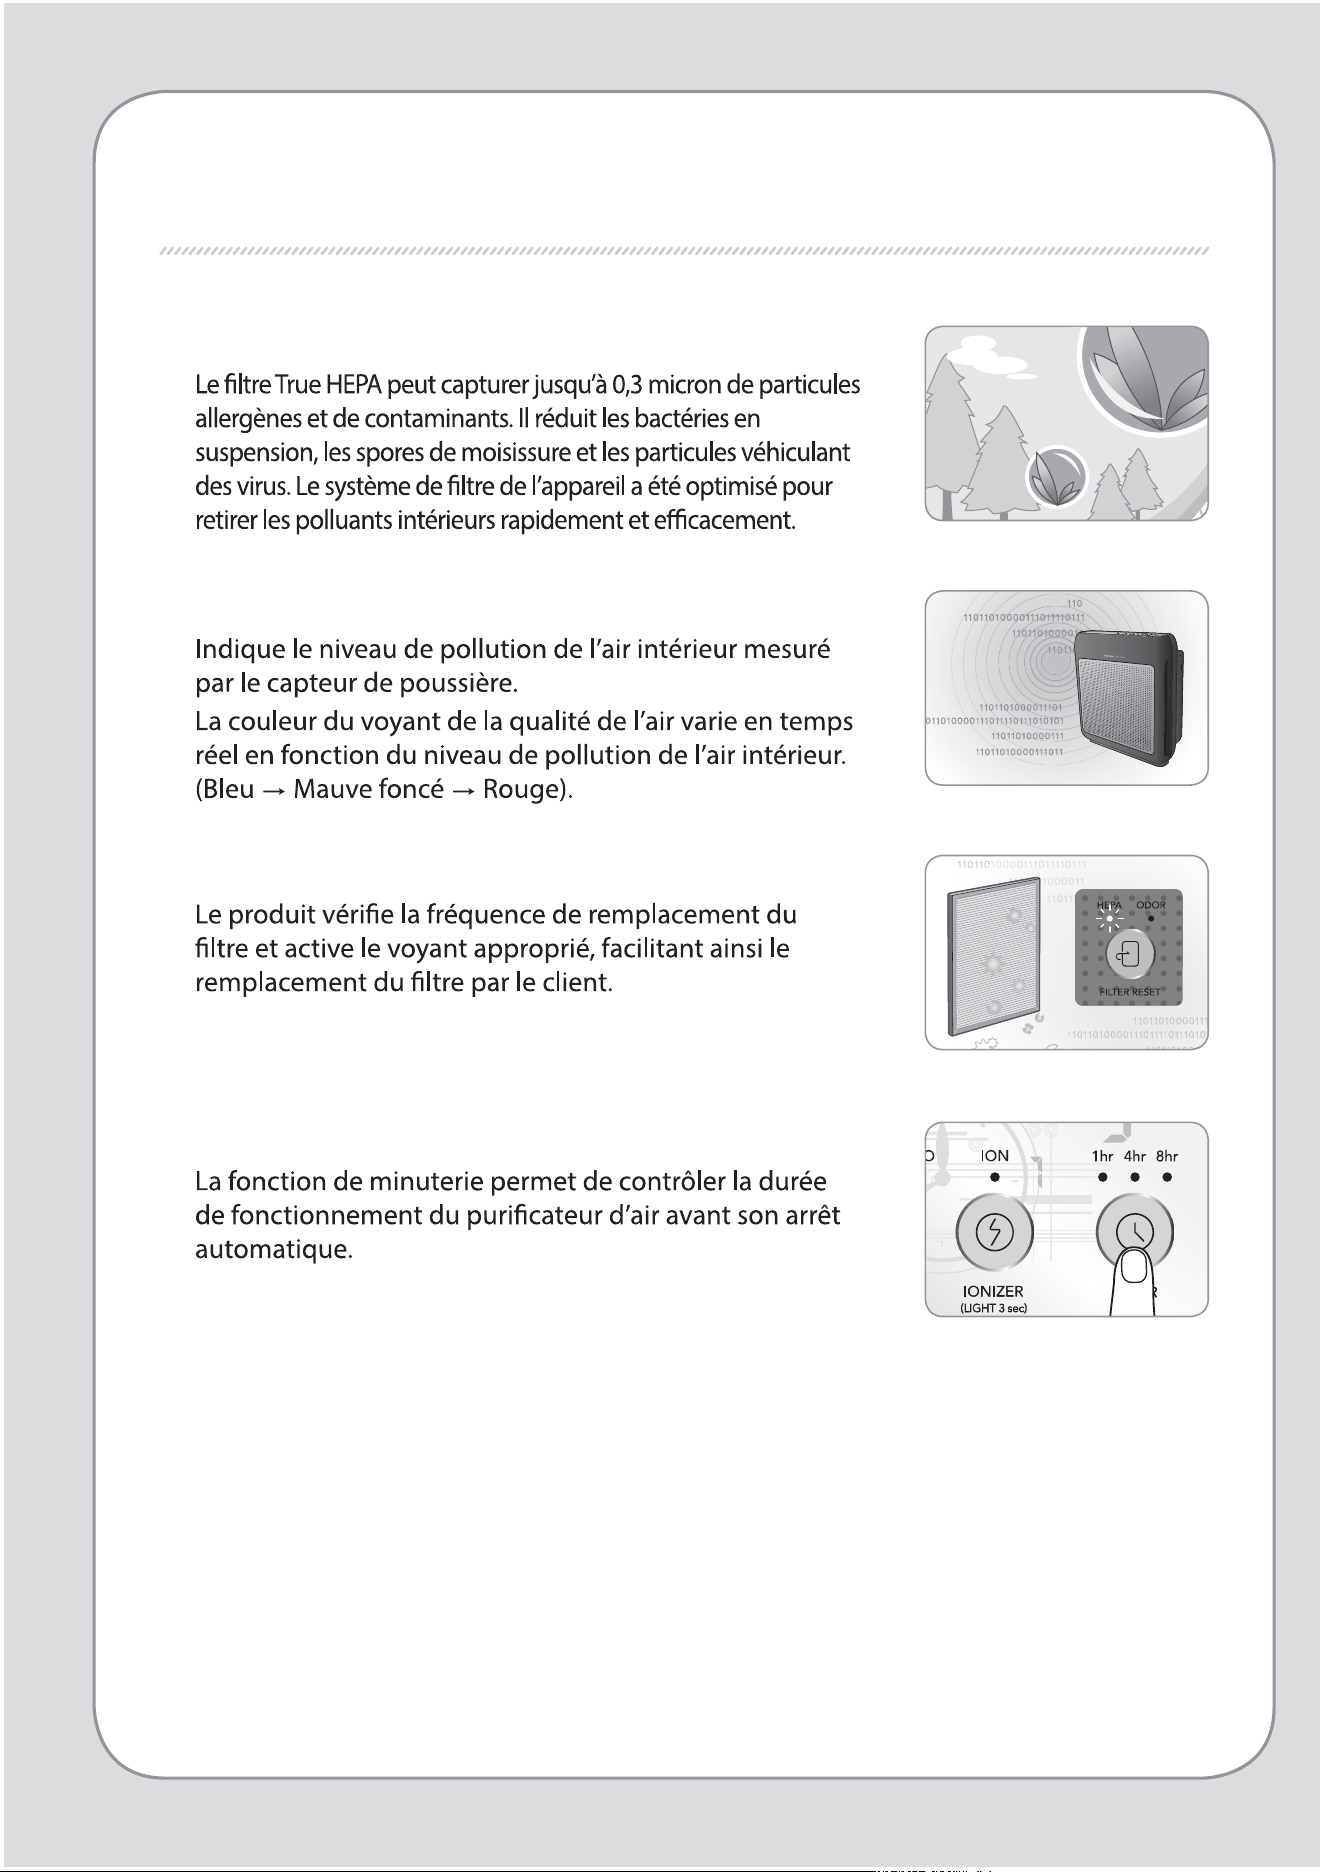
FONCTIONNALITÉS
1.
Excellente performance de purication d’air
2. Voyant de la qualité de l’air
3. Voyant de remplacement des ltres
4. Minuterie
2
1
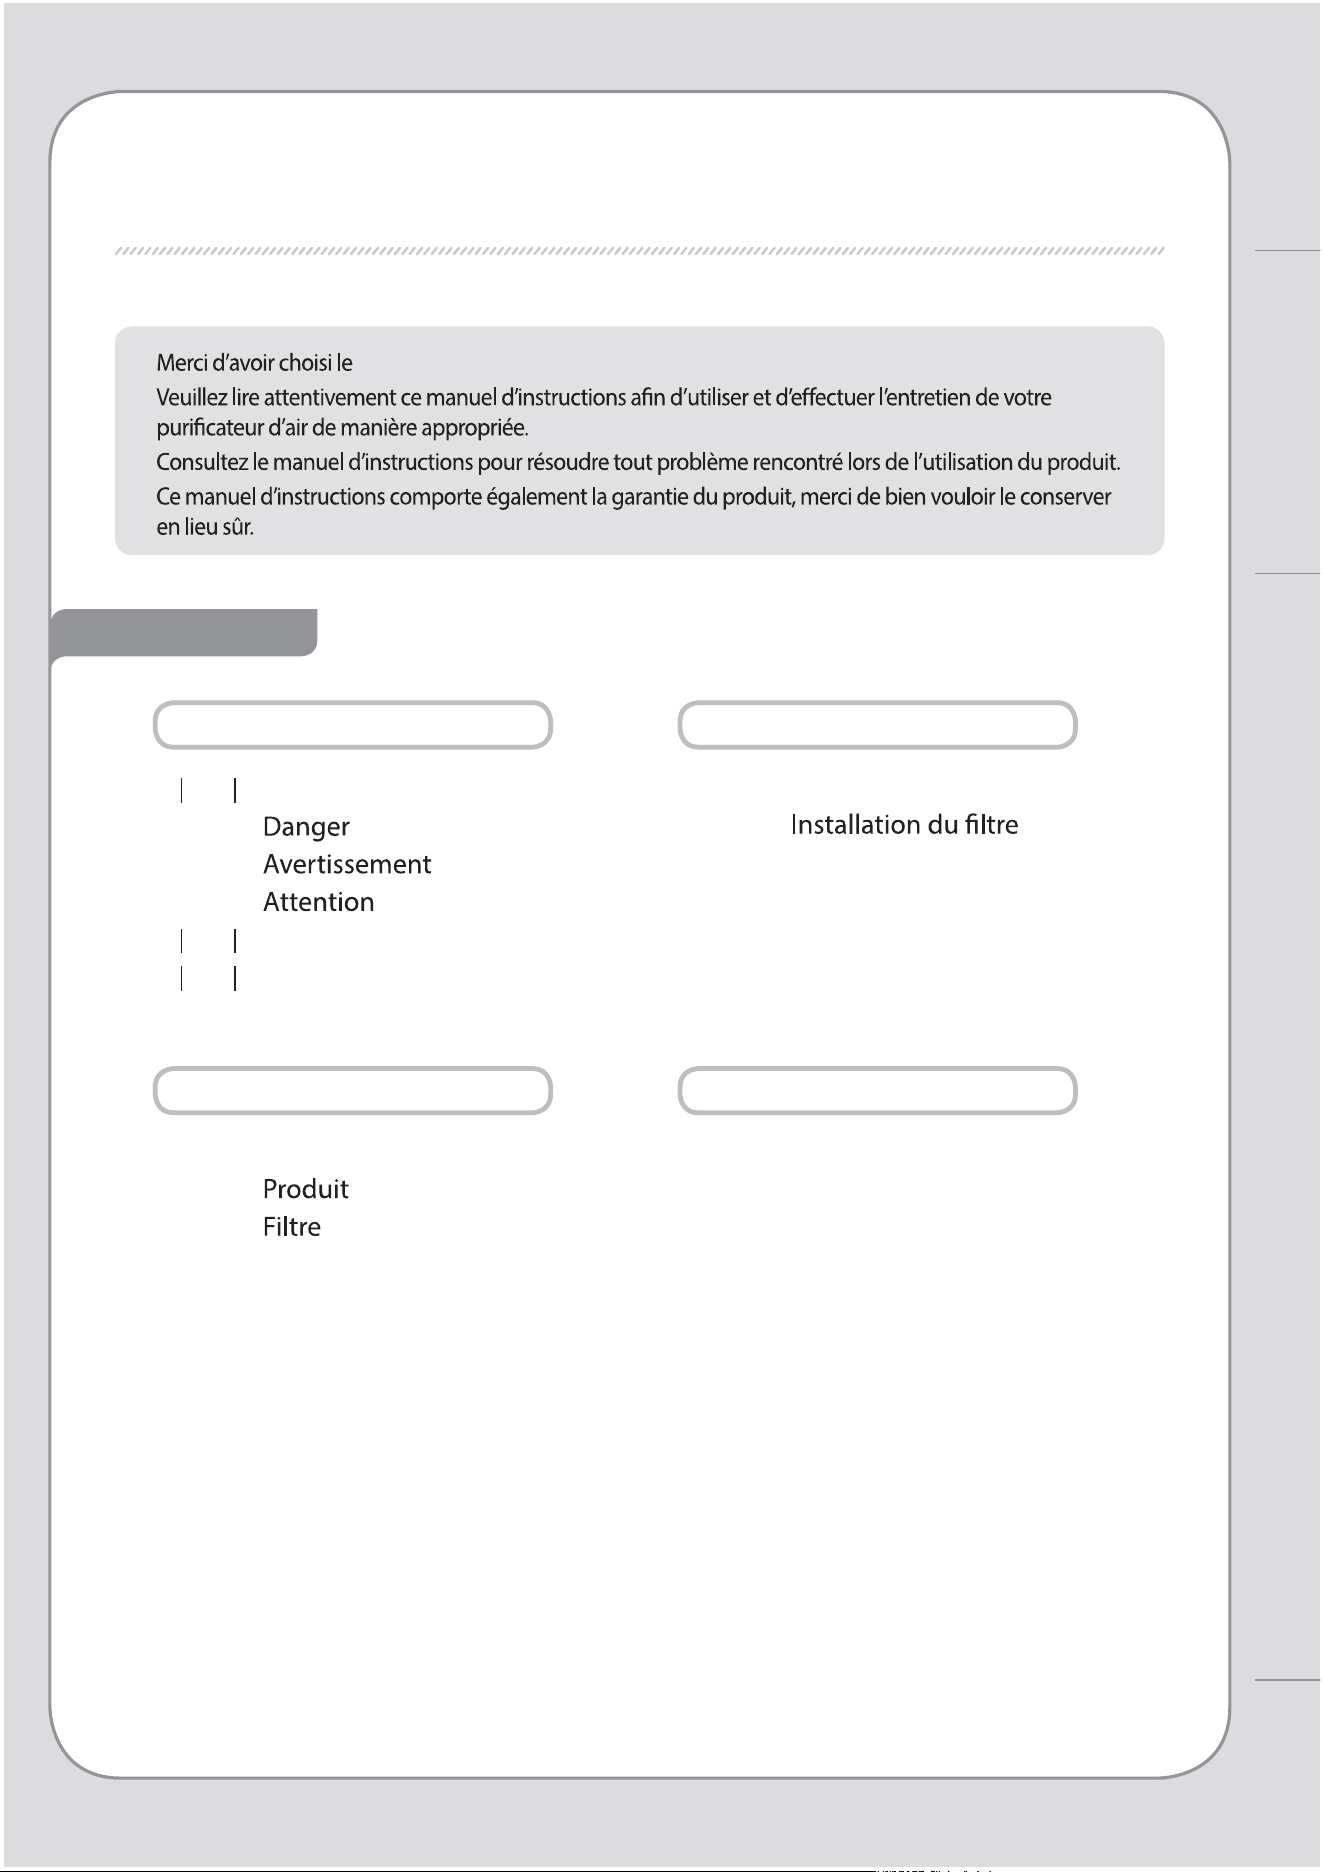
CHERS CLIENTS
puricateur d’air Coway.
SOMMAIRE
- Conservez votre manuel d’instructions en évidence ou à portée de main. -
FONCTIONNALITÉS / SOMMAIRE
Coway
À TITRE D’INFORMATION
ENTRETIEN
UTILISATION
AUTRES
03
CONSIGNES DE SÉCURITÉ
07
NOM DES PIÈCES
09
PROCESSUS DE
PURIFICATION DE L'AIR
| 10 |
PRÉPARATION
| 11 |
VOYANTS ET COMMANDES
| 13 |
UTILISATION
| 14 |
RÉGLAGE DU CAPTEUR DE
QUALITÉ DE L'AIR
| 15 |
PROCÉDURE DE NETTOYAGE
| 17 |
REMPLACEMENT DES
FILTRES
| 18 |
DÉPANNAGE
| 19 |
SPÉCIFICATIONS
DU PRODUIT
CONSIGNES DE SÉCURITÉ
DANGER:
Le non-respect des précautions ci-dessous peut
entraîner un risque de blessures graves, voire
mortelles.
4
3
CONSIGNES DE SÉCURITÉ | Danger
À titre d’information
AVERTISSEMENT: En cas de-non respect des consignes
ci-dessous, il existe un risque de
blessures graves ou de
dommages
matériels.
CONSIGNES DE SÉCURITÉ
6
5
ATTENTION: En cas de-non respect des consignes ci-
dessous, il existe un risque de blessures
légères ou de dommages matériels.
LISEZ ET CONSERVEZ CES CONSIGNES PRÉCIEUSEMENT
CONSIGNES DE SÉCURITÉ | Avertissement | Attention
À titre d’information
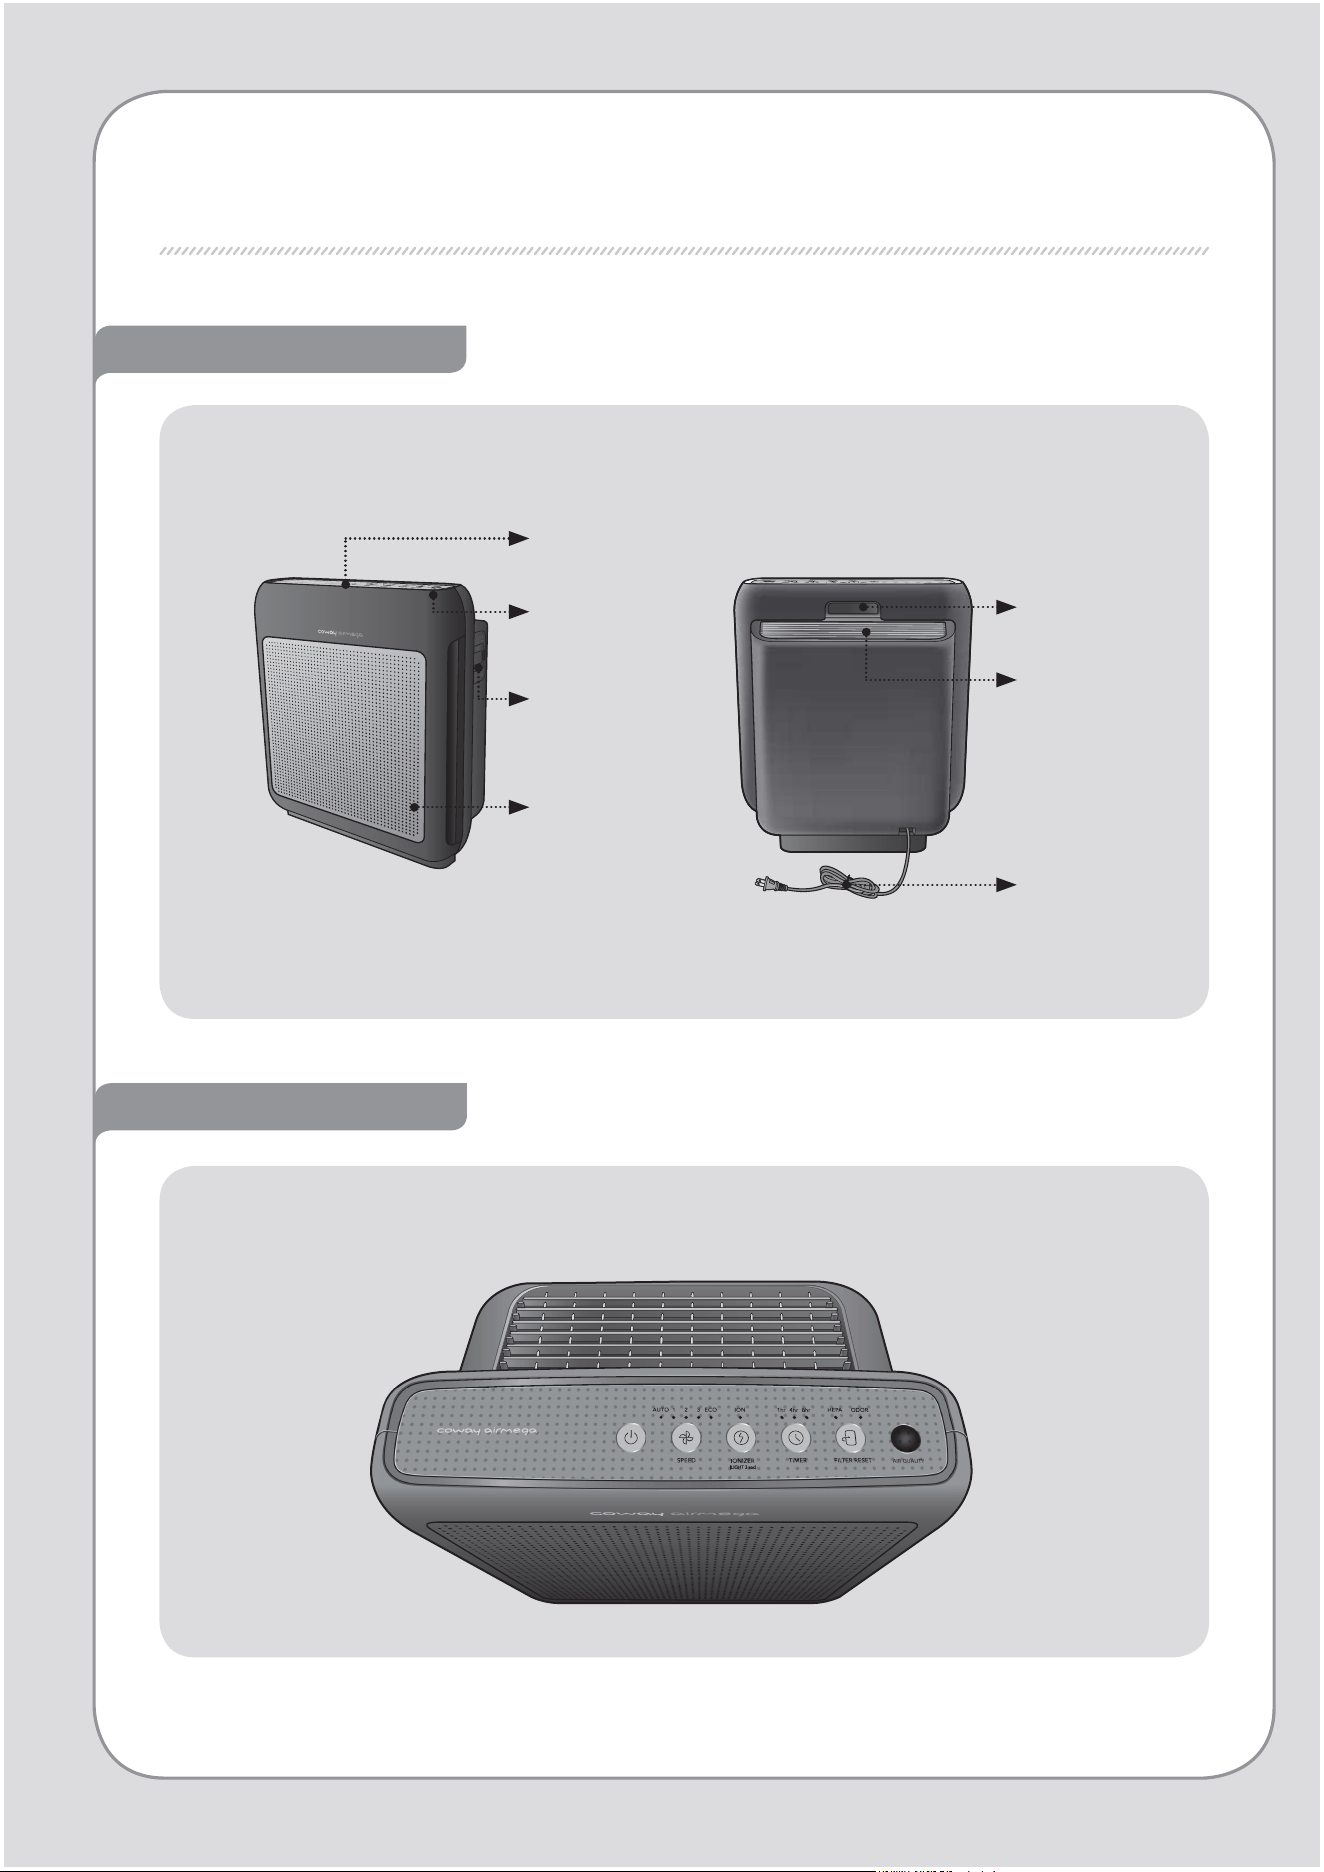
NOM DES PIÈCES
Vues avant et arrière
Voyant
indiquant la
qualité de l’air
Capteur de
qualité de l’air
Capot avant
Composants
d’achage/
Composants de
commande
Commande / Voyant
Poignée
Sortie d’air
Cordon
d’alimentation
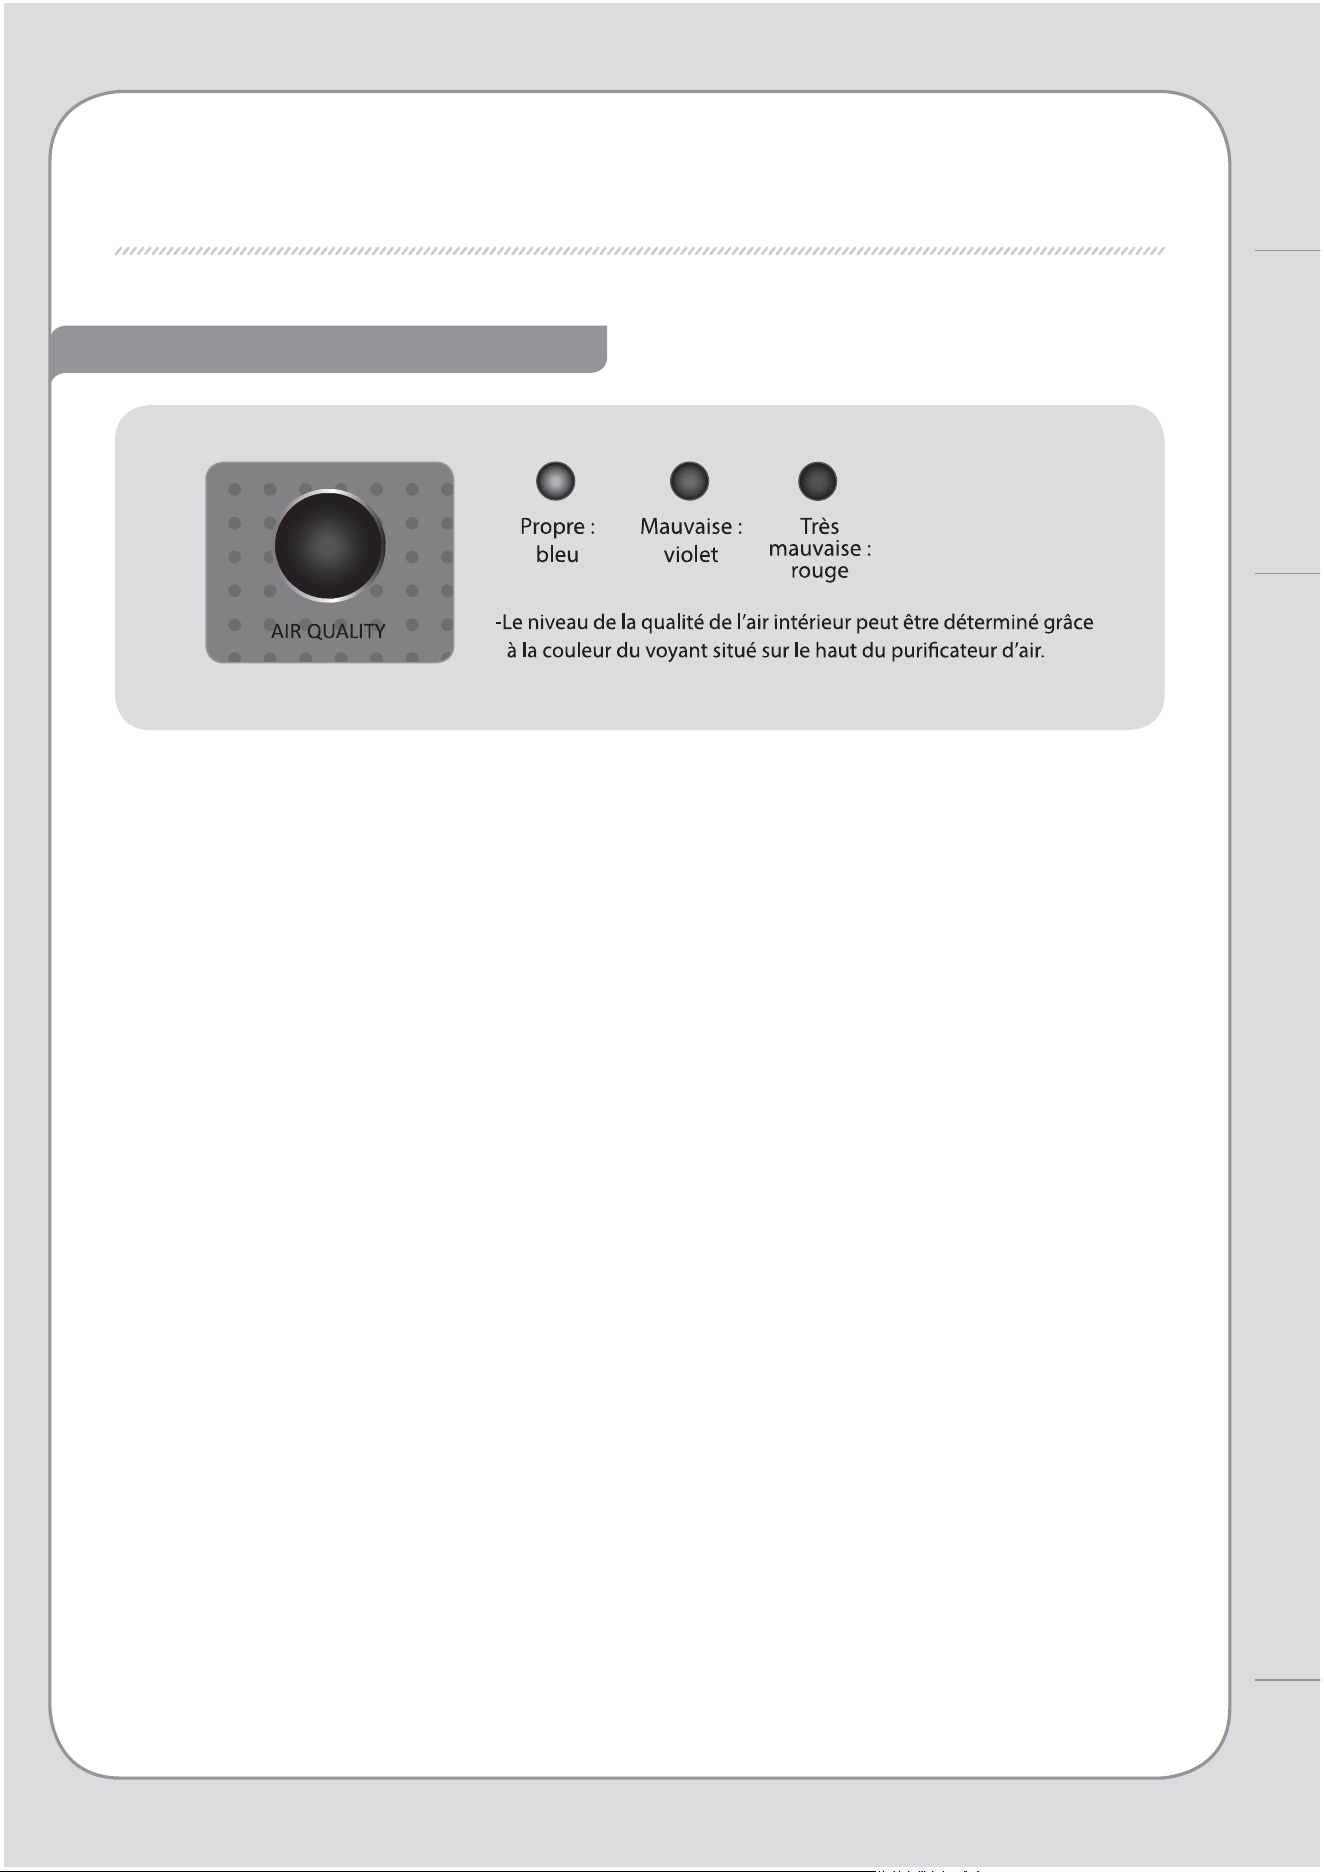
Voyant indiquant la qualité de l’air
8
7
NOM DES PIÈCES
À titre d’information
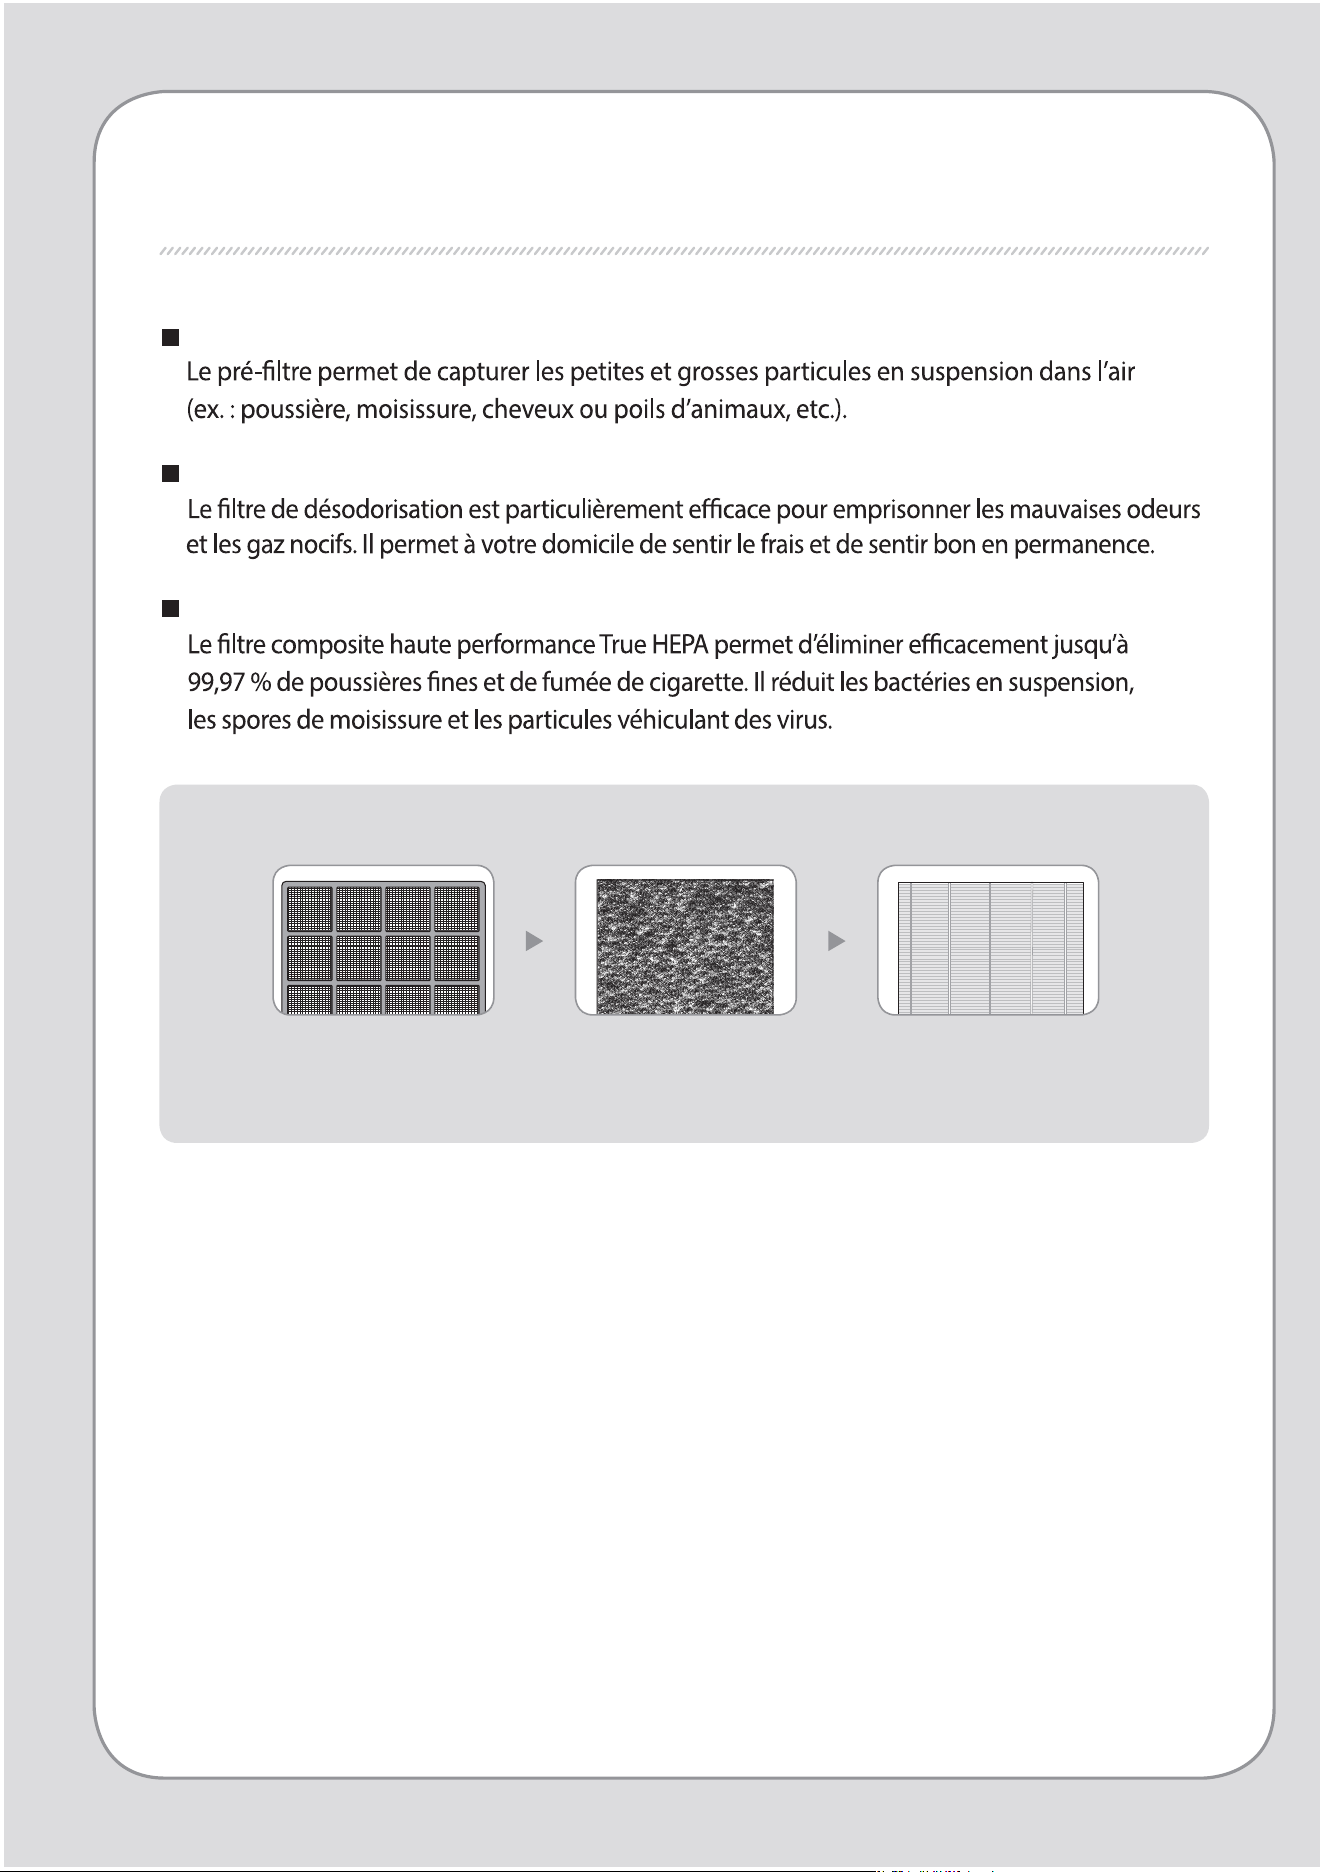
PROCESSUS DE PURIFICATION DE L'AIR
Pré-ltre
Filtre de désodorisation
Filtre True HEPA
1. Pré-ltre 2. Filtre de
désodorisation
3. Filtre True HEPA
10
9
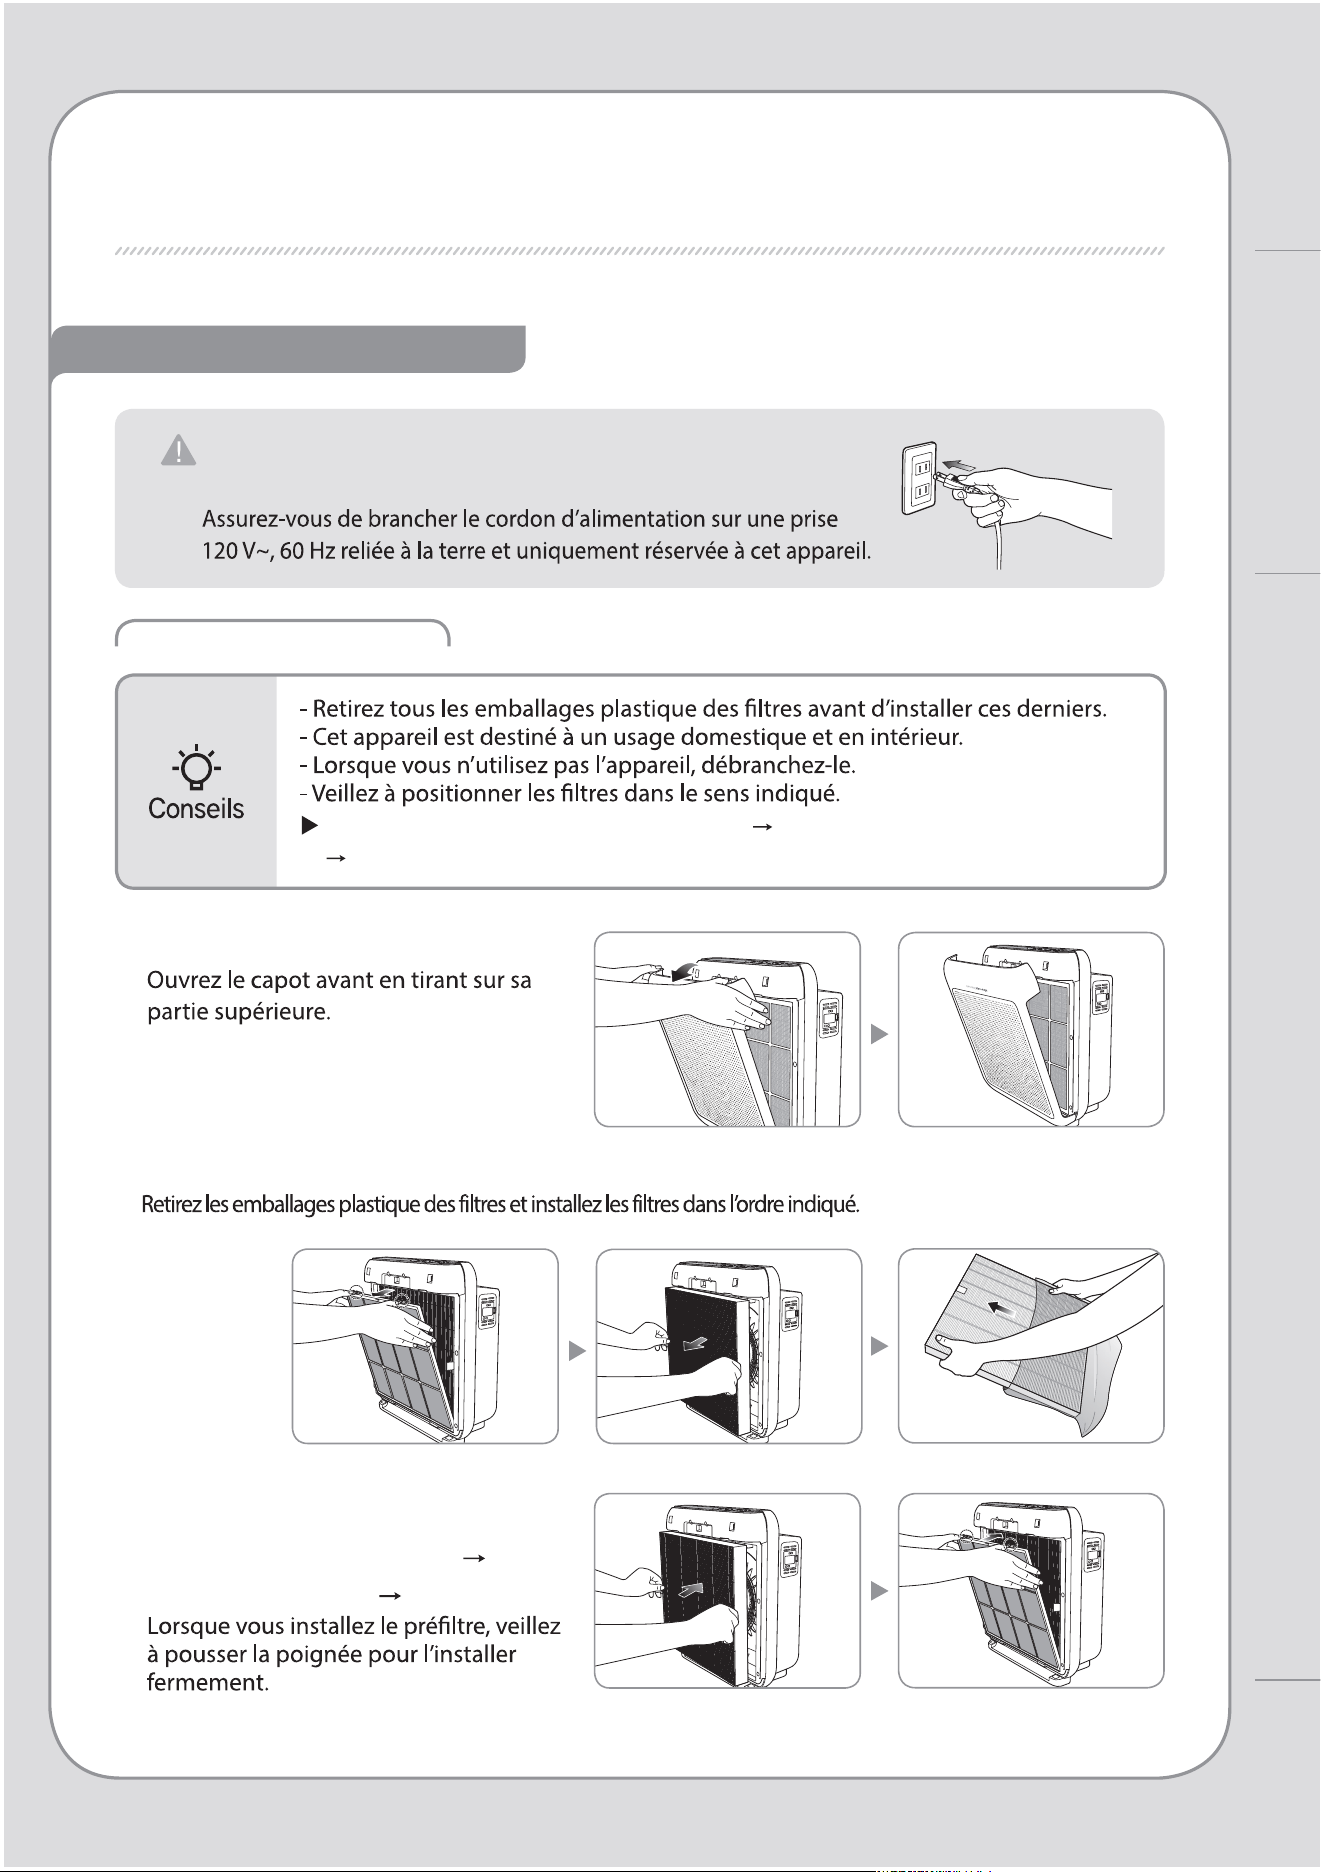
PRÉPARATION
Installation du Filtre
À vérier avant utilisation
Ordre de montage des ltres: pré-ltre Filtre de désodorisation
Filtre True HEPA
1. Ouvrez le capot avant.
2. Extrayez les ltres et retirez les emballages plastique.
3. Installez les ltres dans l’ordre
suivant : Filtre True HEPA Filtre
de désodorisation pré-ltre.
Cet appareil est conçu pour une alimentation
120V~, 60Hz uniquement.
PROCESSUS DE PURIFICATION DE L’AIR / PRÉPARATION
Utilisation
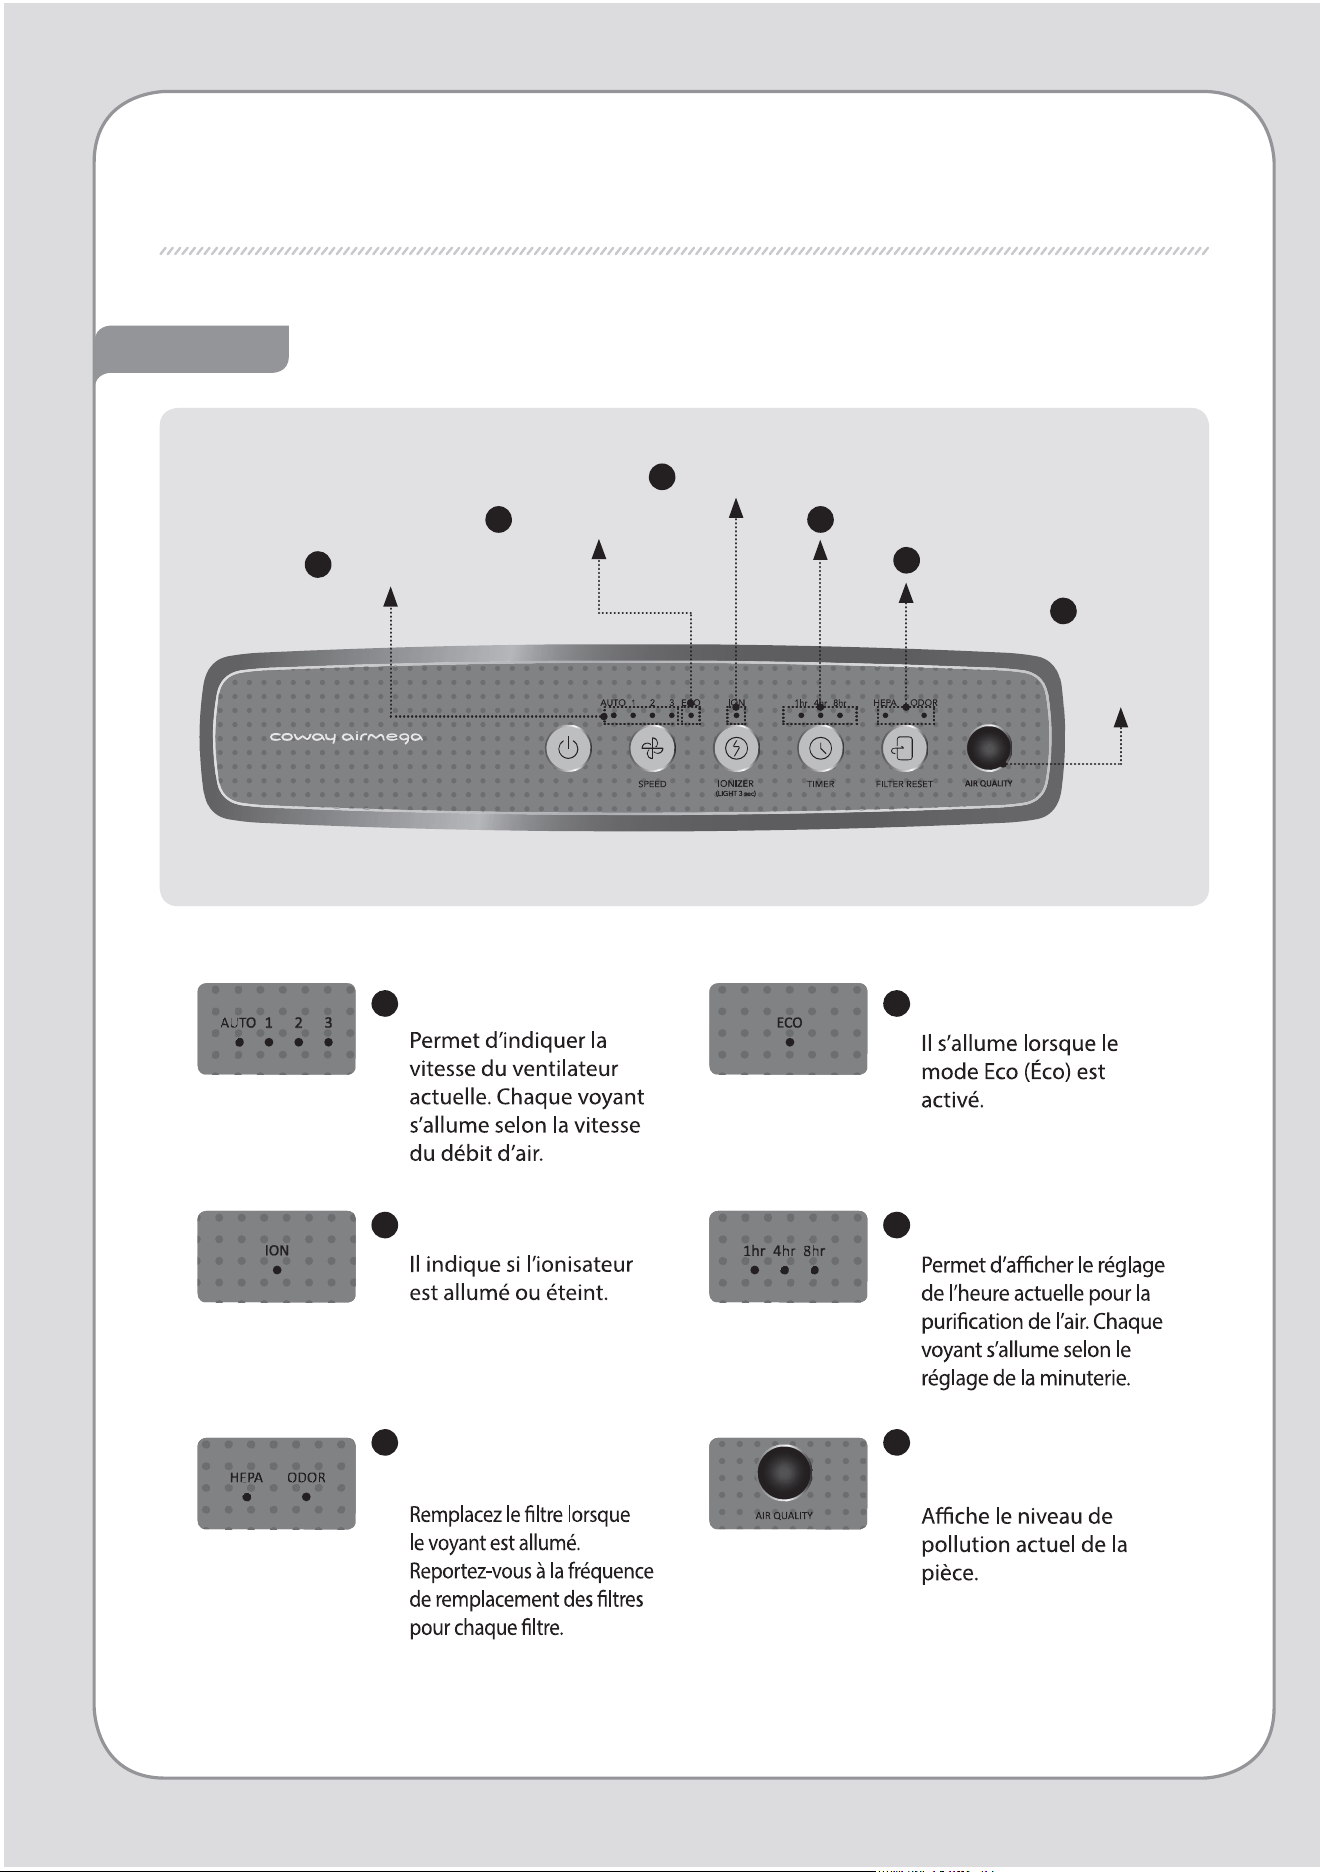
VOYANTS ET COMMANDES
Voyant
6
5
Voyant de remplacement
du ltre
Voyant
indiquant la
qualité de
l’air
3
Voyant de l’ionisateur
4
Voyant de minuterie
2
Voyant du mode Éco
1
Voyant de débit
1
Voyant de débit
2
Voyant du mode Éco
3
Voyant de l’ionisateur
4
Voyant de minuterie
5
Voyant de
remplacement du ltre
6
Voyant indiquant la
qualité de l’air
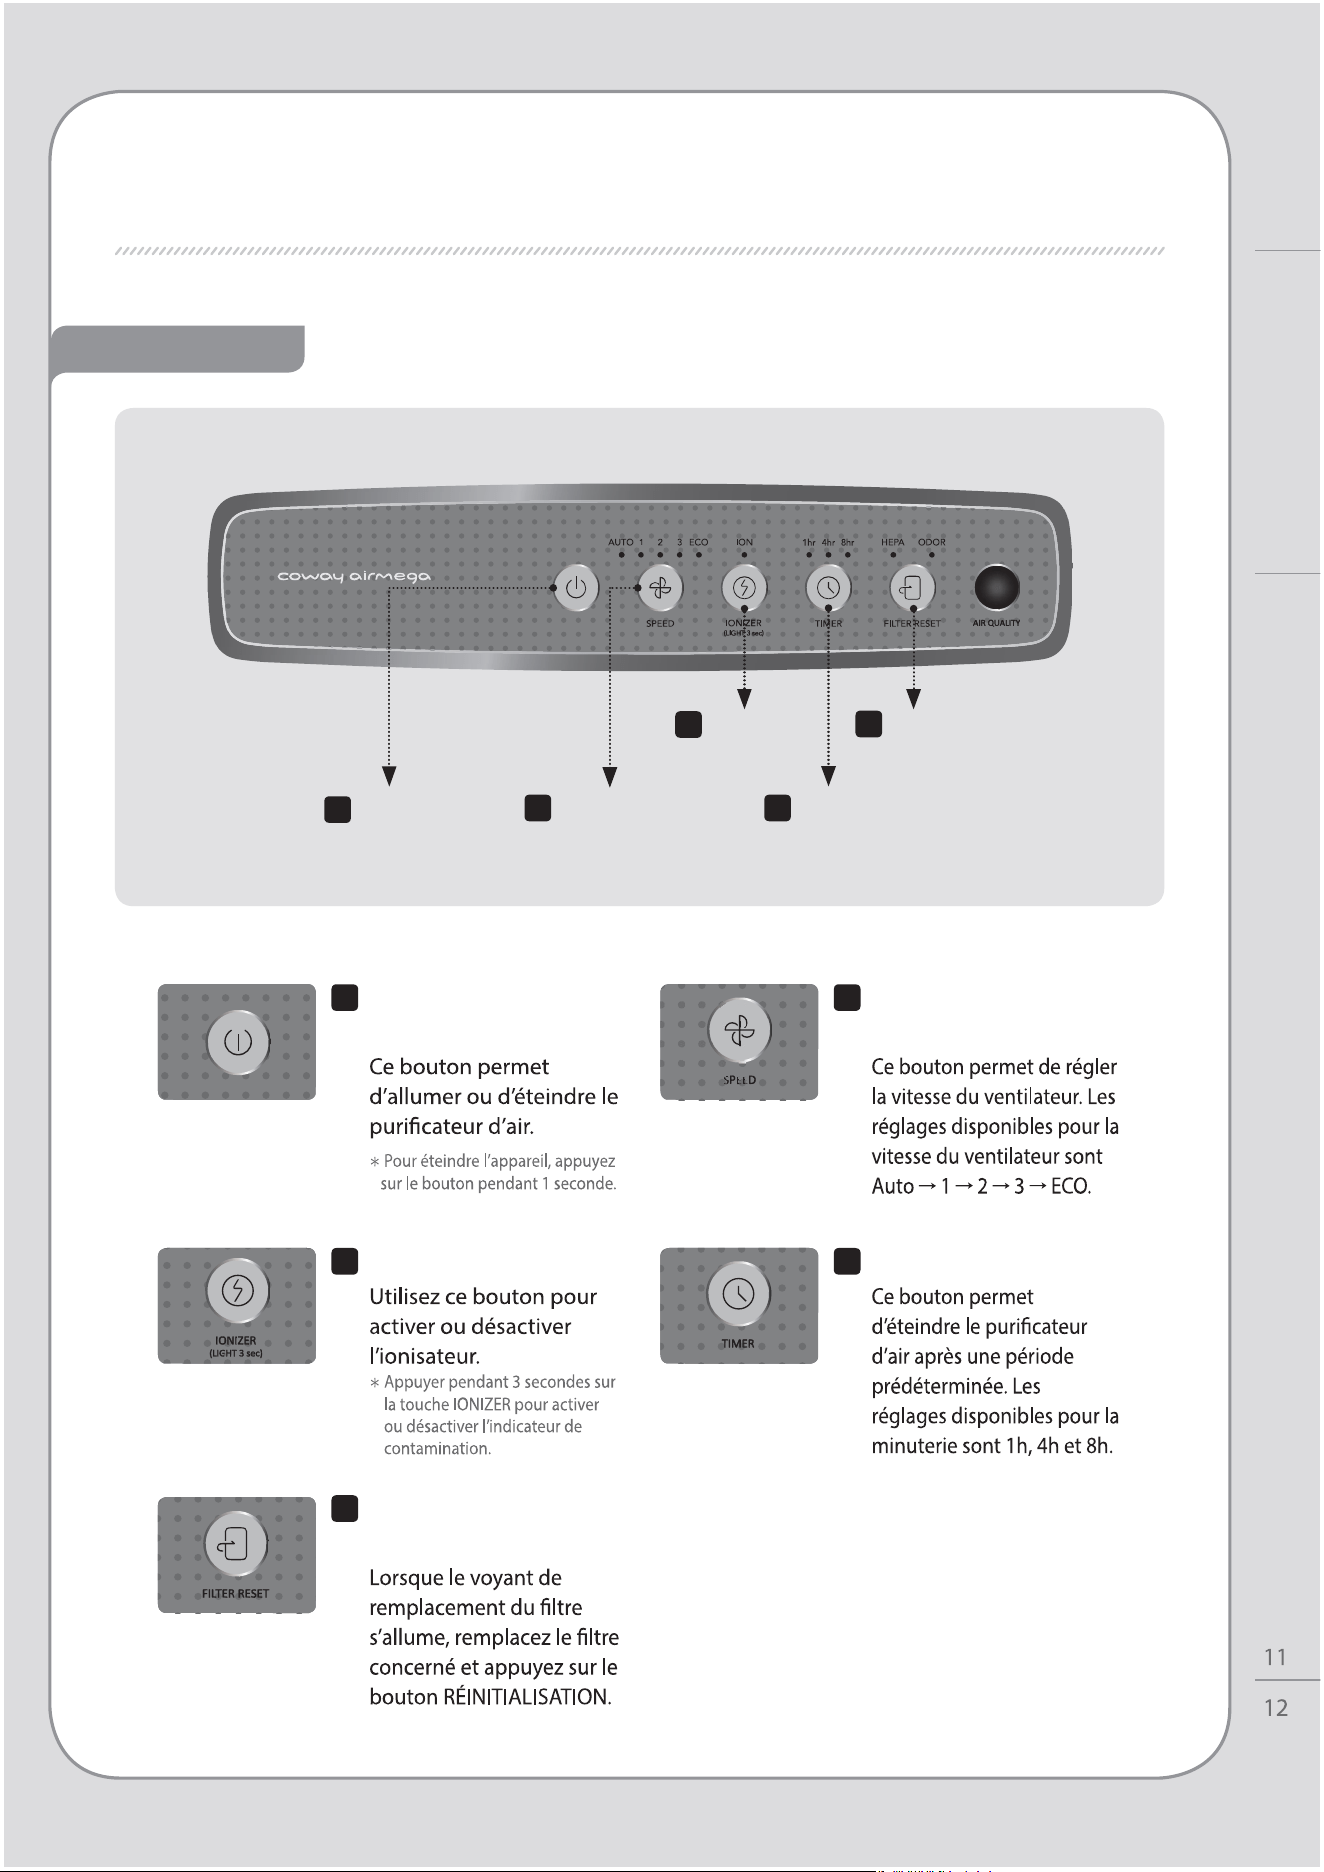
Commande
Utilisation
VOYANTS ET COMMANDES
1
Bouton de mise
en marche
5
Bouton de réinitialisation
des ltres
2
Bouton de réglage
du débit
3
Bouton de
l’ionisateur
4
Bouton de minuterie
1
Bouton de mise en
marche
2
Bouton de réglage du
débit
4
Bouton de minuterie
5
Bouton de
réinitialisation des ltres
3
Bouton de l’ionisateur

UTILISATION
Mode manuel et automatique
Utilisation du mode Éco
Activation/Désactivation de la minuterie
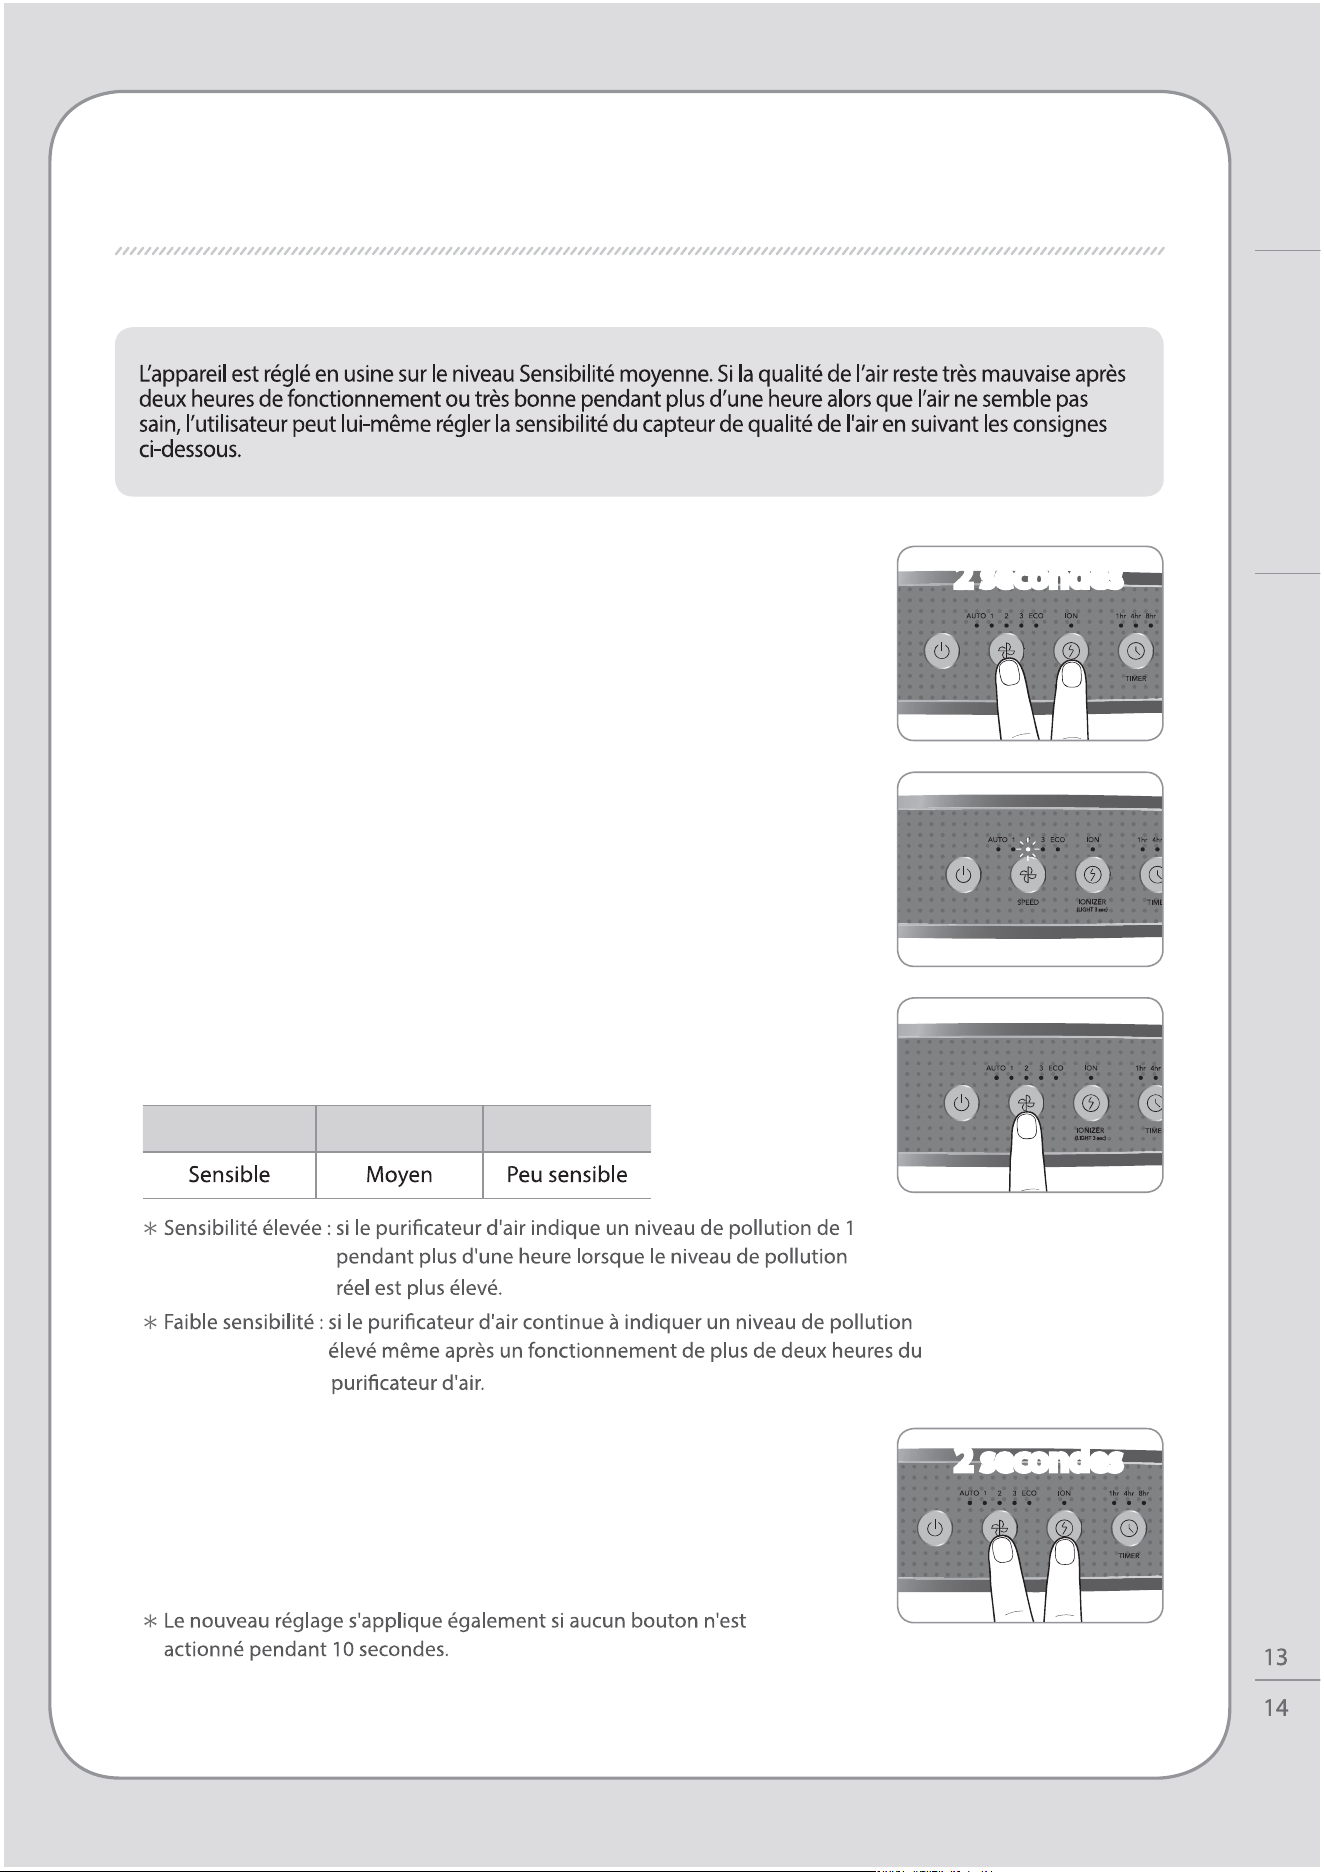
RÉGLAGE DU CAPTEUR DE QUALITÉ DE L'AIR
1.
Lorsque le puricateur d’air est sous tension, appuyez
pendant deux secondes sur les boutons de réglage du
débit d’air avec bouton de l’ionisateur.
2. Le voyant de débit clignote par intervalles de 1,0 seconde.
Le voyant de débit clignote pour acher la sensibilité du
capteur.
4. Appuyez sur le bouton de réglage du débit avec
bouton de l’ionisateurpendant 2 secondes pour
appliquer le nouveau réglage de sensibilité du
capteur. Le puricateur d’air reprend alors un
fonctionnement normal.
3. Réglez la sensibilité en actionnant le bouton de débit.
Le voyant de débit clignote pour acher la sensibilité
du capteur.
Vitesse1 Vitesse2 Vitesse3
2 secondes
2 secondes
UTILISATION / RÉGLAGE DU CAPTEUR DE QUALITÉ DE L’AIR
Utilisation
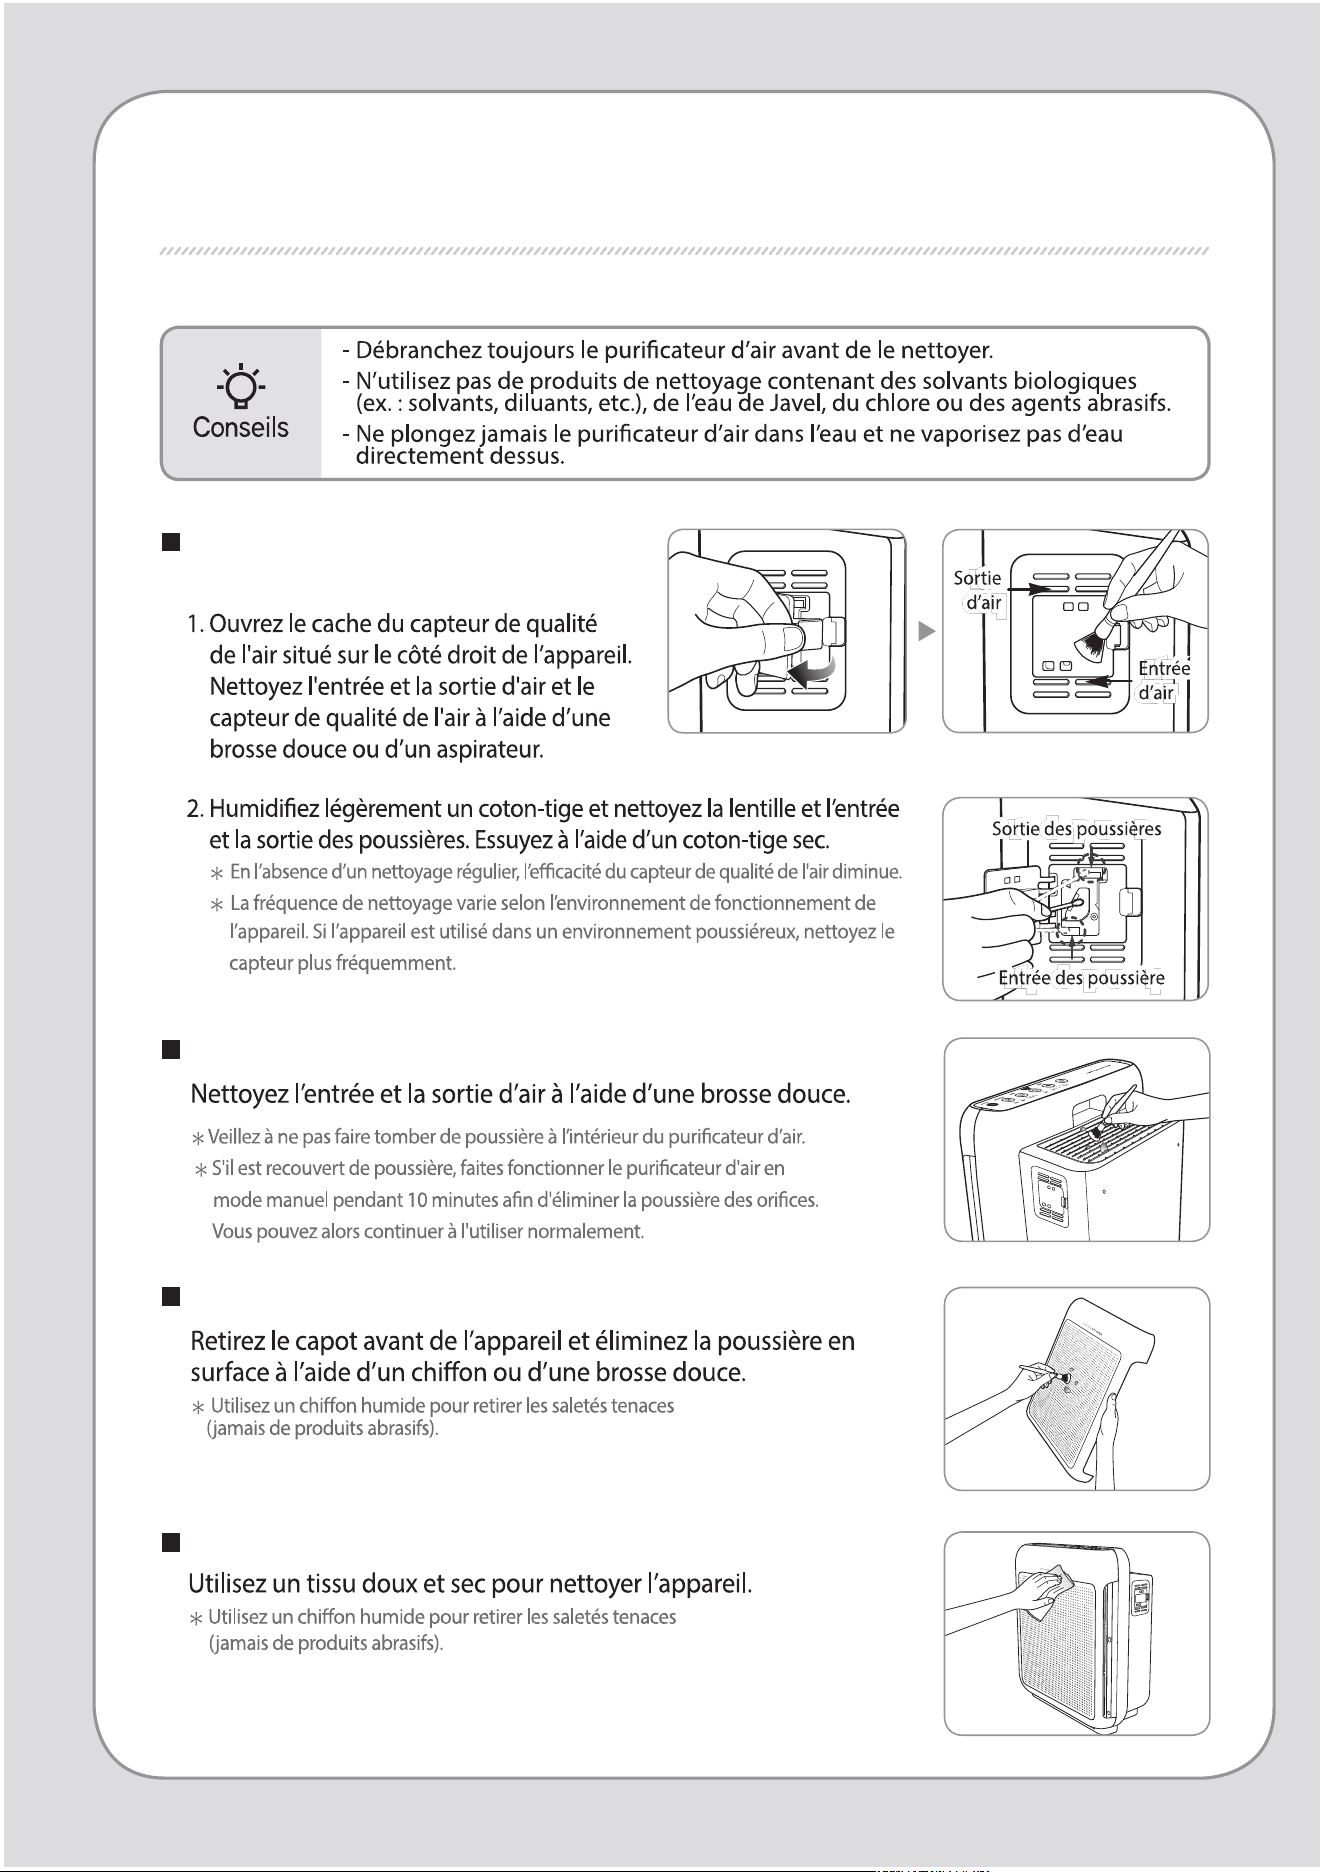
PROCÉDURE DE NETTOYAGE
Nettoyage du capteur de la qualité
de l’air (tous les 2 mois)
Nettoyage de l’entrée et de la sortie d’air (tous les 2 mois)
Nettoyage de la façade
Nettoyage du corps de l’appareil (toutes les 2 à 4semaines)

Nettoyage du pré-ltre (toutes les 2 à 4semaines)
PROCÉDURE DE NETTOYAGE
Entretien
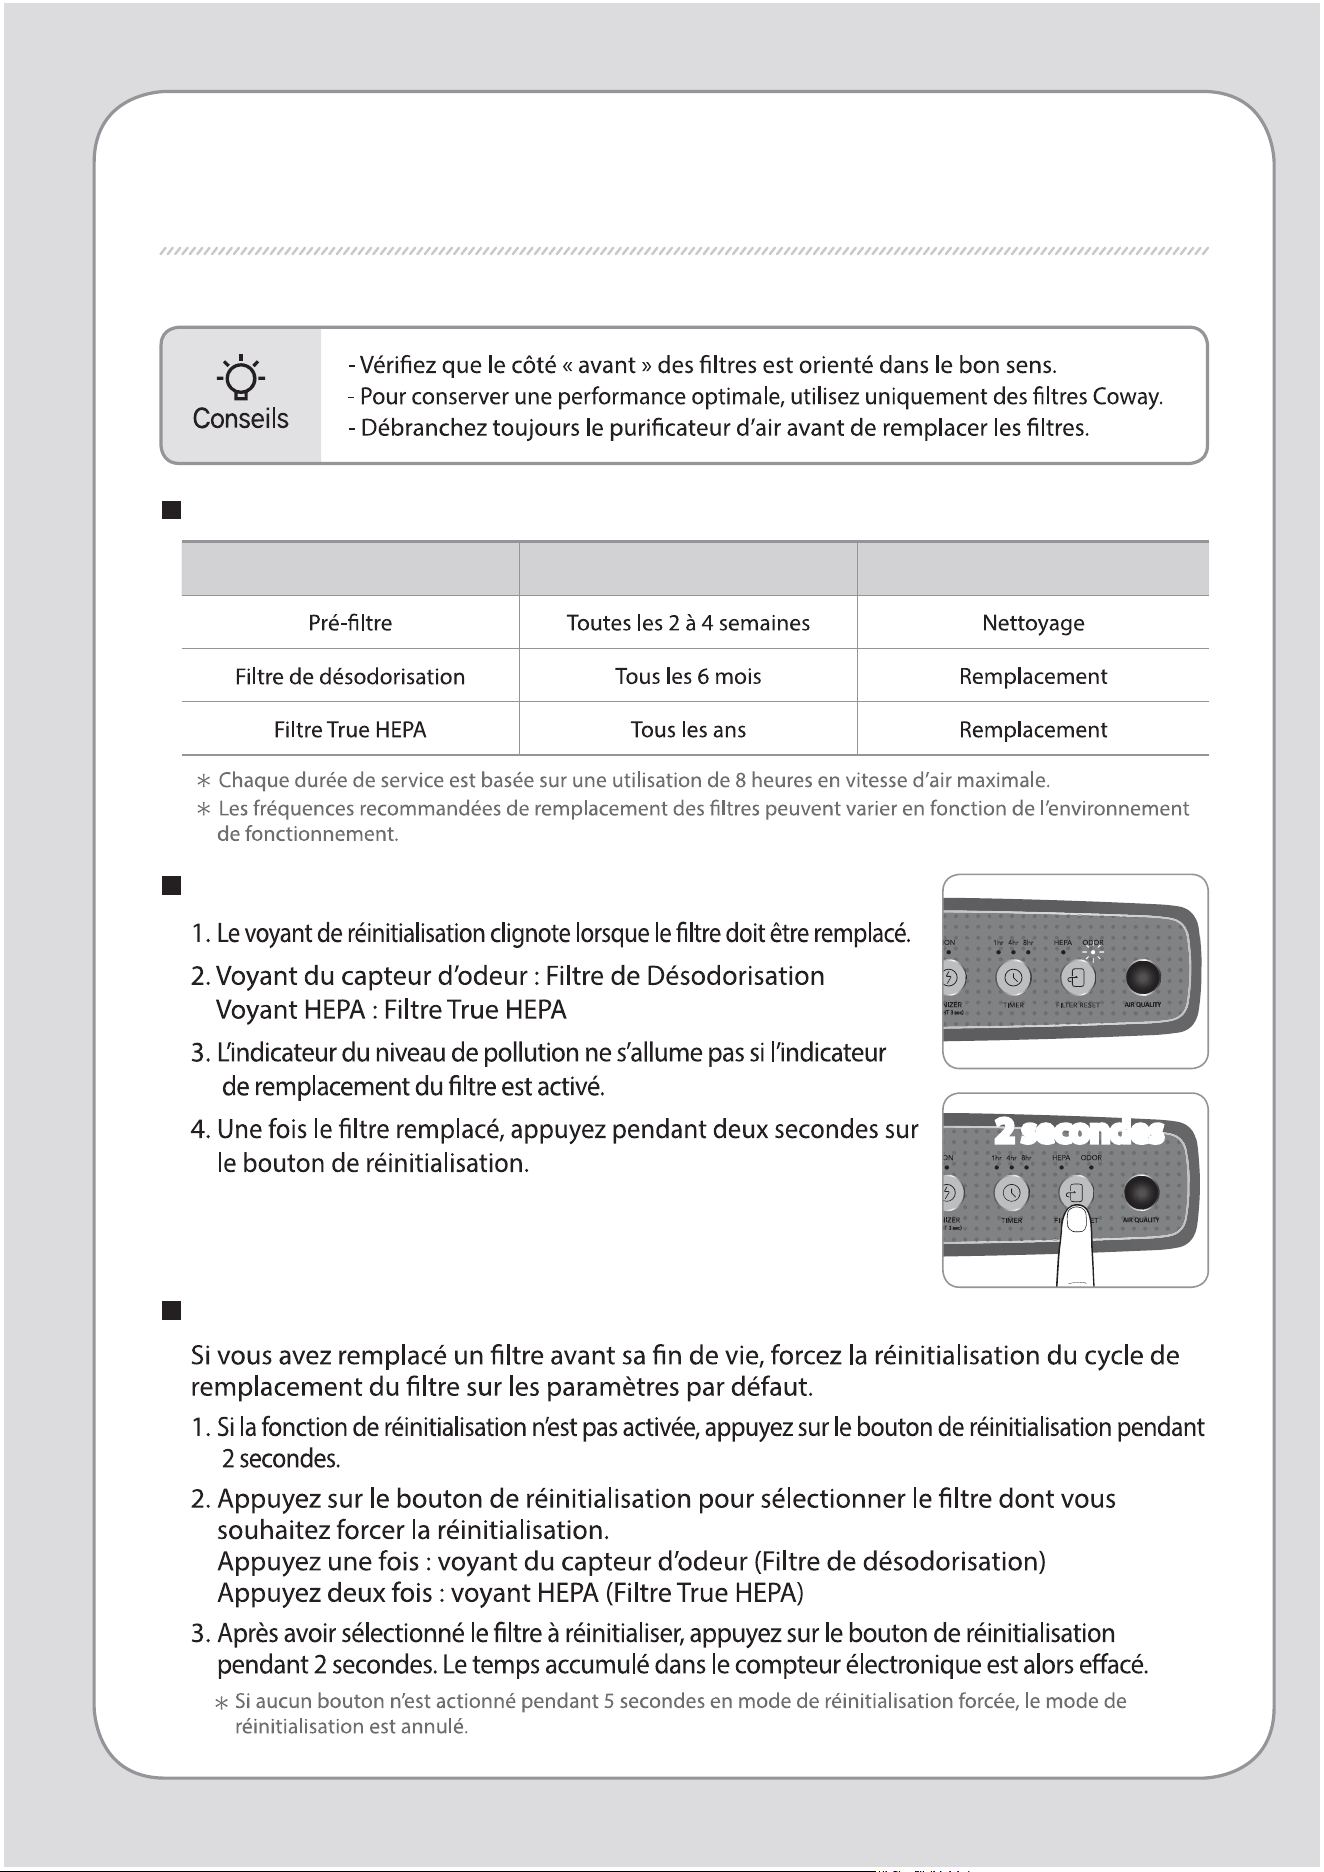
Réinitialisation de l’indicateur de remplacement du ltre
Cycles de nettoyage et remplacement de ltre
Filtre Cycles Méthode
REMPLACEMENT DES FILTRES
Mode de réinitialisation forcée
2 secondes
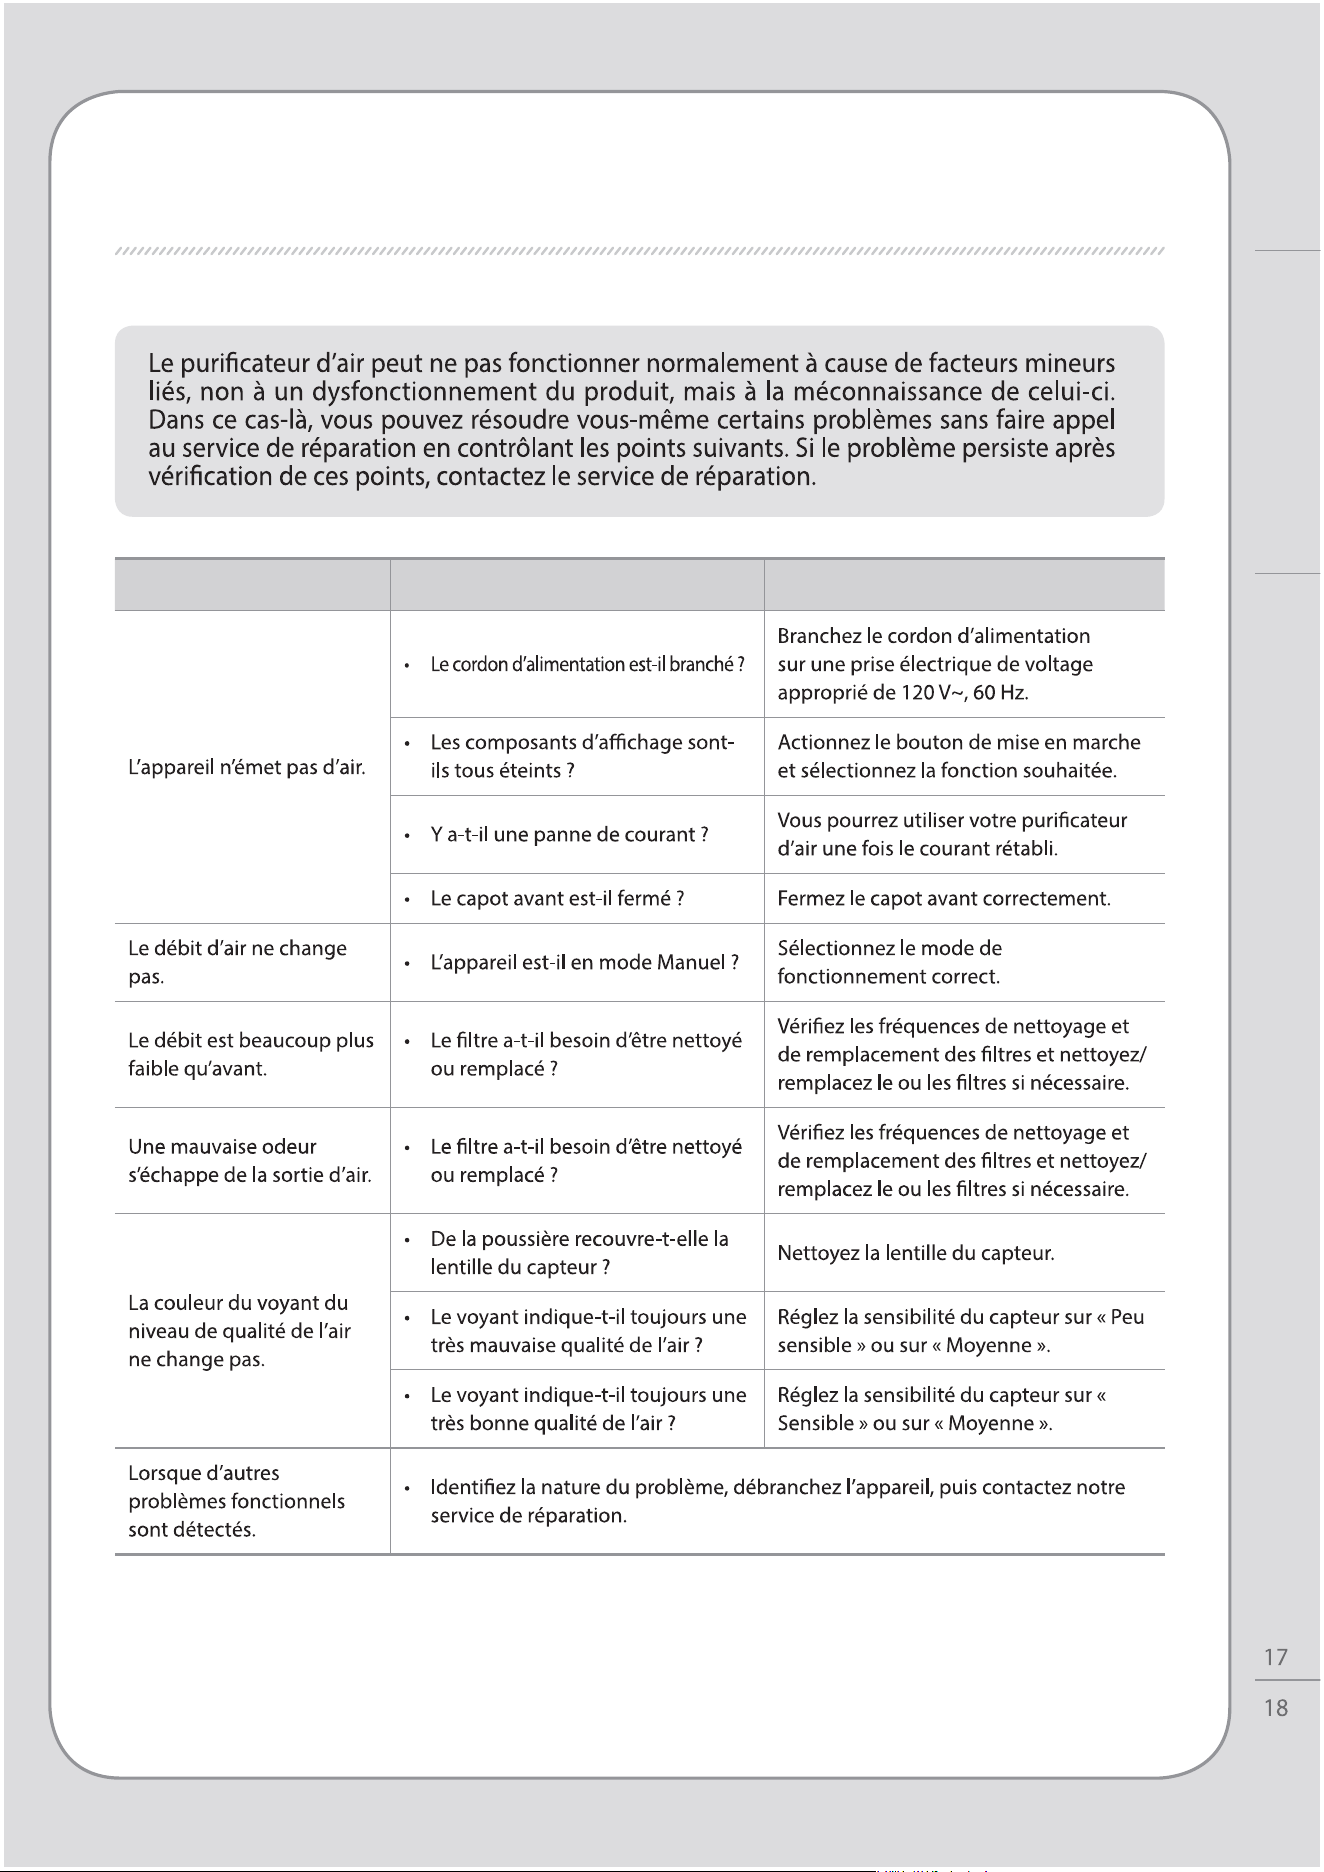
DÉPANNAGE
Problème Contrôle Solution
REMPLACEMENT DES FILTRES / DÉPANNAGE
Autre
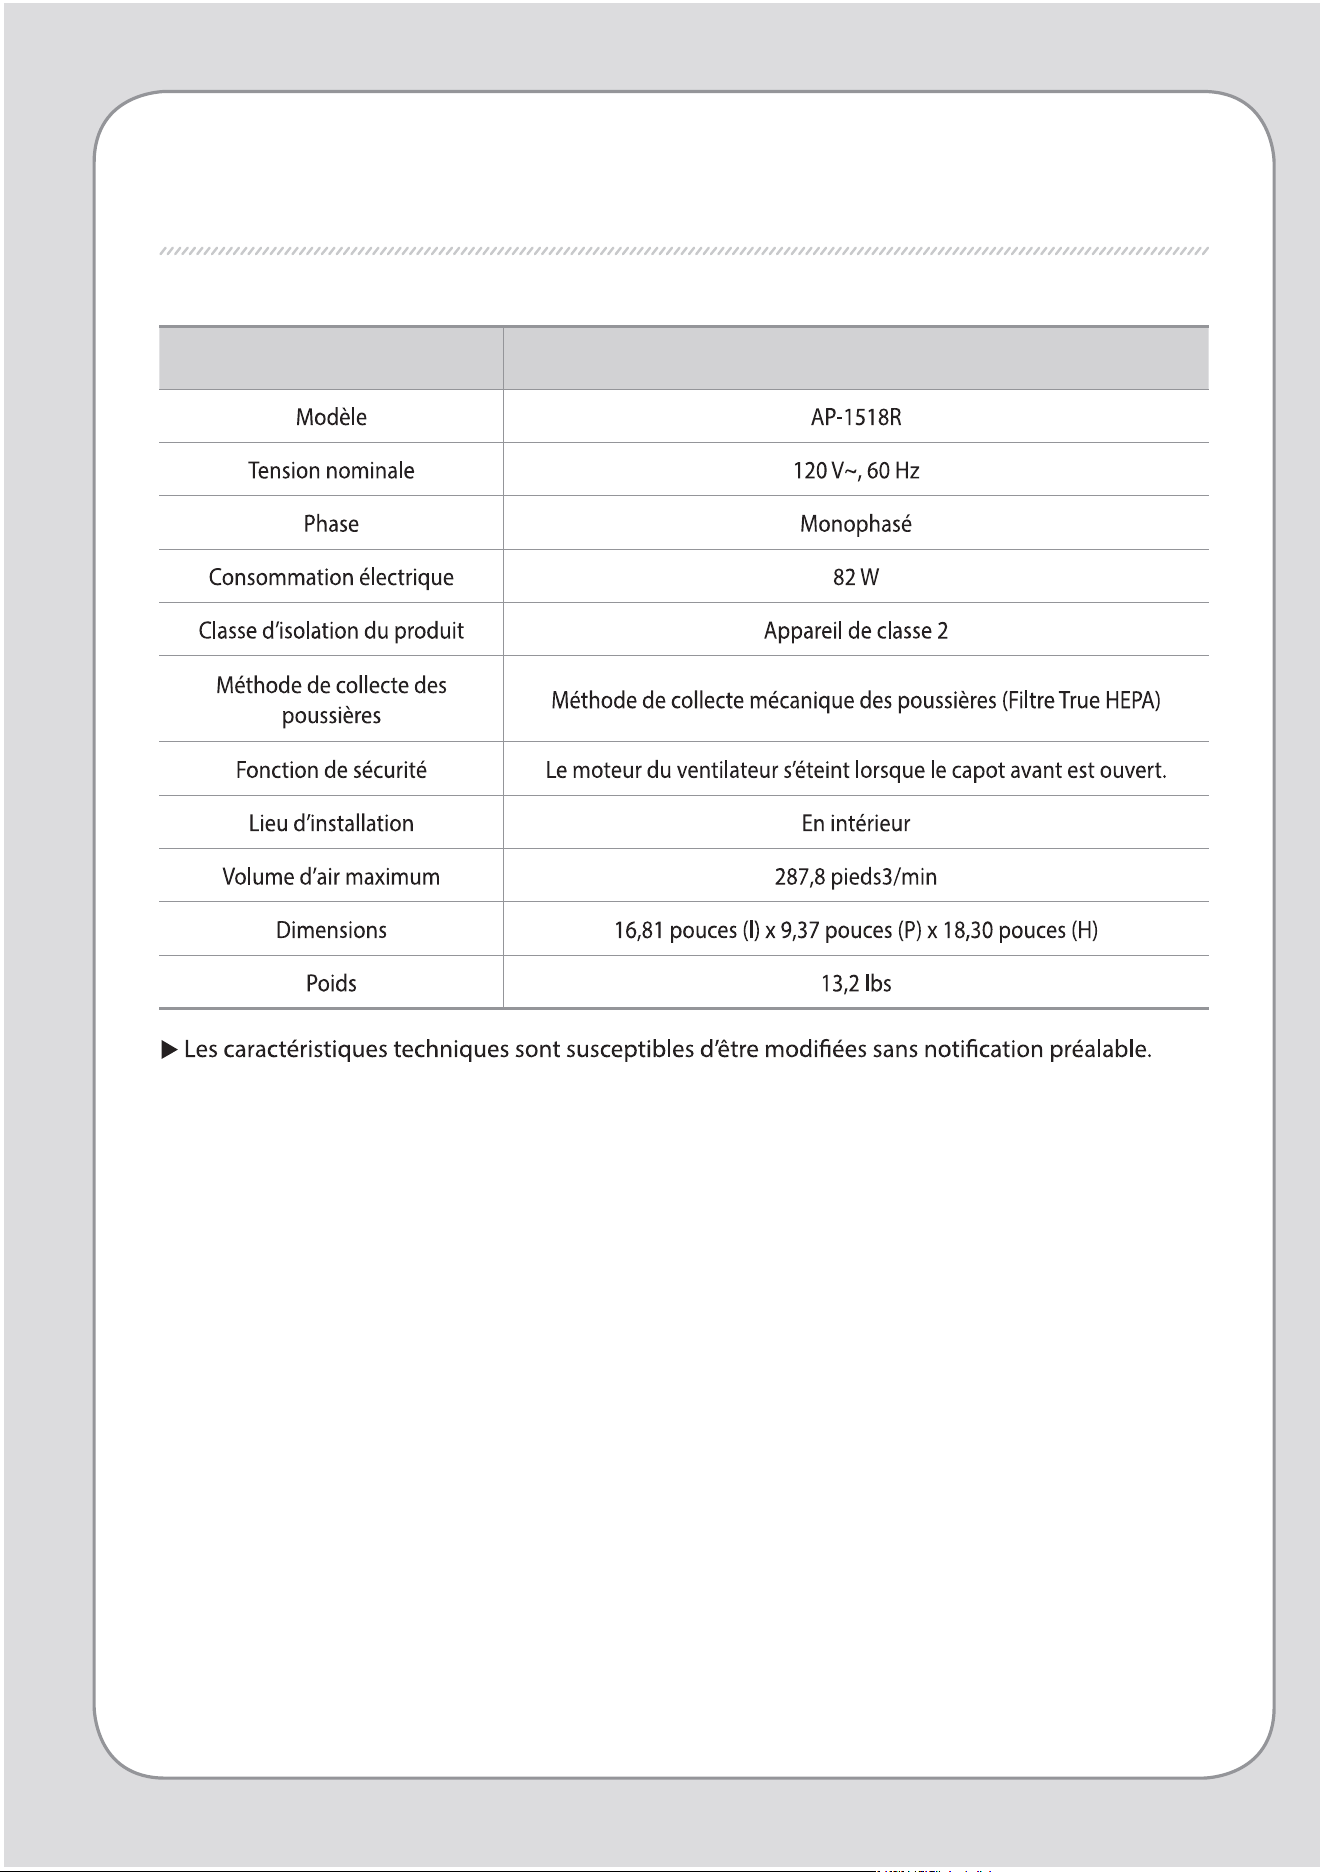
Caractéristiques techniques
Puricateur d’air
SPÉCIFICATIONS DU PRODUIT

MEMO
SPÉCIFICATIONS DU PRODUIT
Autre
CARACTERÍSTICAS
1.
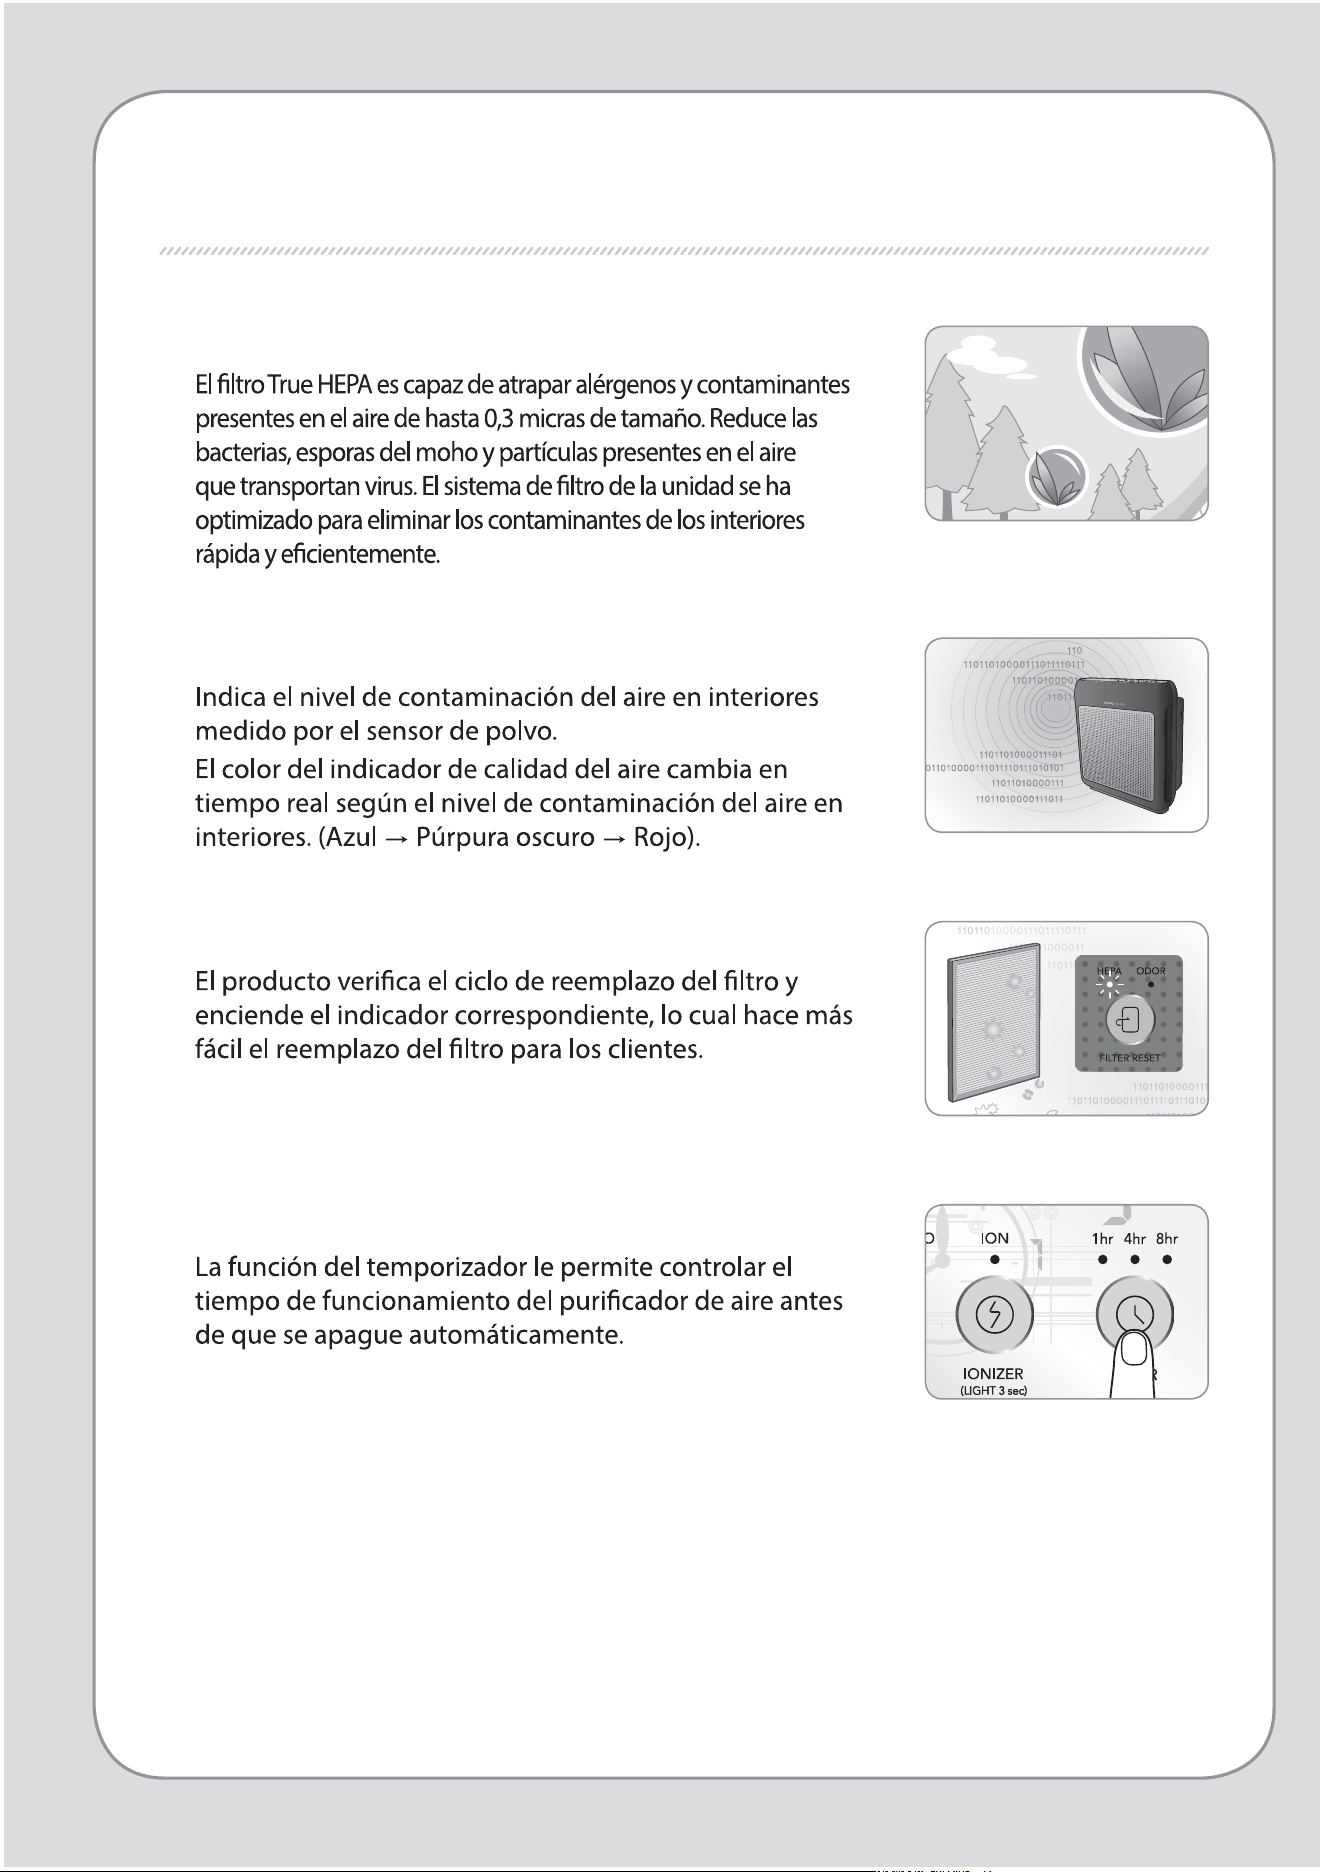
Excelente desempeño en la puricación del aire
2. Indicador de calidad del aire
3. Indicador de reemplazo de ltros
4. Temporizador
2
1
ESTIMA DOS CLIENTES
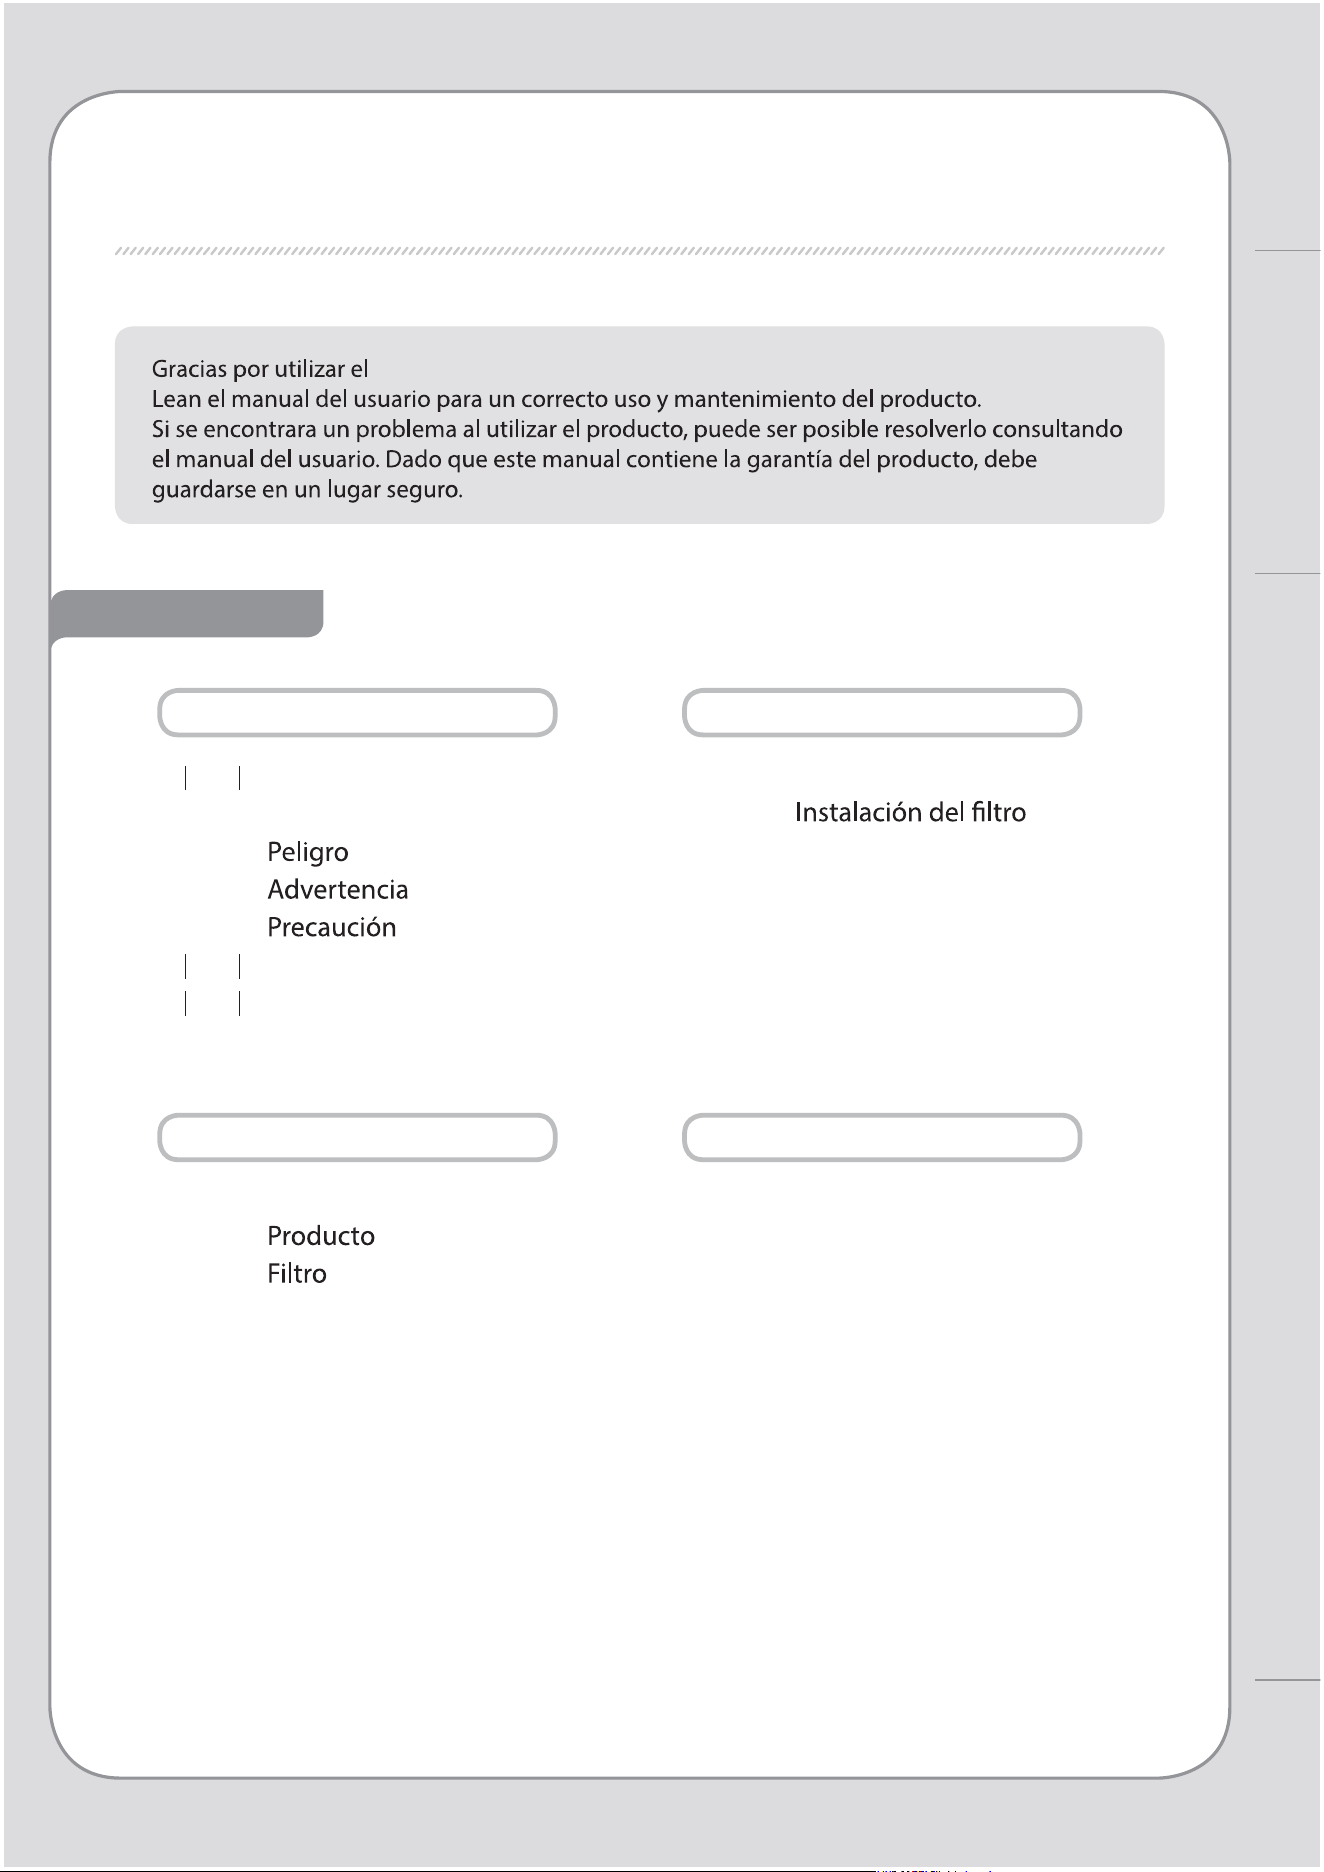
CONTENIDOS
- Guarde el manual de instrucciones en un lugar visible o de fácil acceso. -
Coway
Puricador de aire Coway.
CARACTERÍSTICAS / CONTENIDO
PARA INFORMACIÓN
MANTENIMIENTO
INSTRUCCIONES DE USO
OTROS
03
INFORMACIÓN DE
SEGURIDAD
07
NOMBRES DE LAS PIEZAS
09
PROCESO DE PURIFICACIÓN
DE AIRE
| 10 |
ANTES DE USAR
| 11 |
INDICADORES Y BOTONES
| 13 |
INSTRUCCIONES DE USO
| 14 |
AJUSTE DEL SENSOR DE
PARTÍCULAS
| 15 |
MÉTODO DE LIMPIEZA
| 17 |
REEMPLAZO DEL FILTRO
| 18 |
TROUBLESHOOTING
| 19 |
ESPECIFICACIONES
INFORMACIÓN DE SEGURIDAD
PELIGRO: Si no se adoptan las siguientes
precauciones se pueden producir lesiones
físicas graves o incluso la muerte.
4
3
INFORMACIÓN DE SEGURIDAD | Peligro
Para información
ADVERTENCIA: Si no se adoptan las siguientes
precauciones, se pueden producir lesiones
de consideración o daños a la propiedad.
INFORMACIÓN DE SEGURIDAD
6
5
PRECAUCIÓN: De no adoptar las precauciones
siguientes se pueden producir
lesiones leves o daños a la propiedad.
LEA Y GUARDE ESTAS INSTRUCCIONES
INFORMACIÓN DE SEGURIDAD | Advertencia | Precaución
Para información
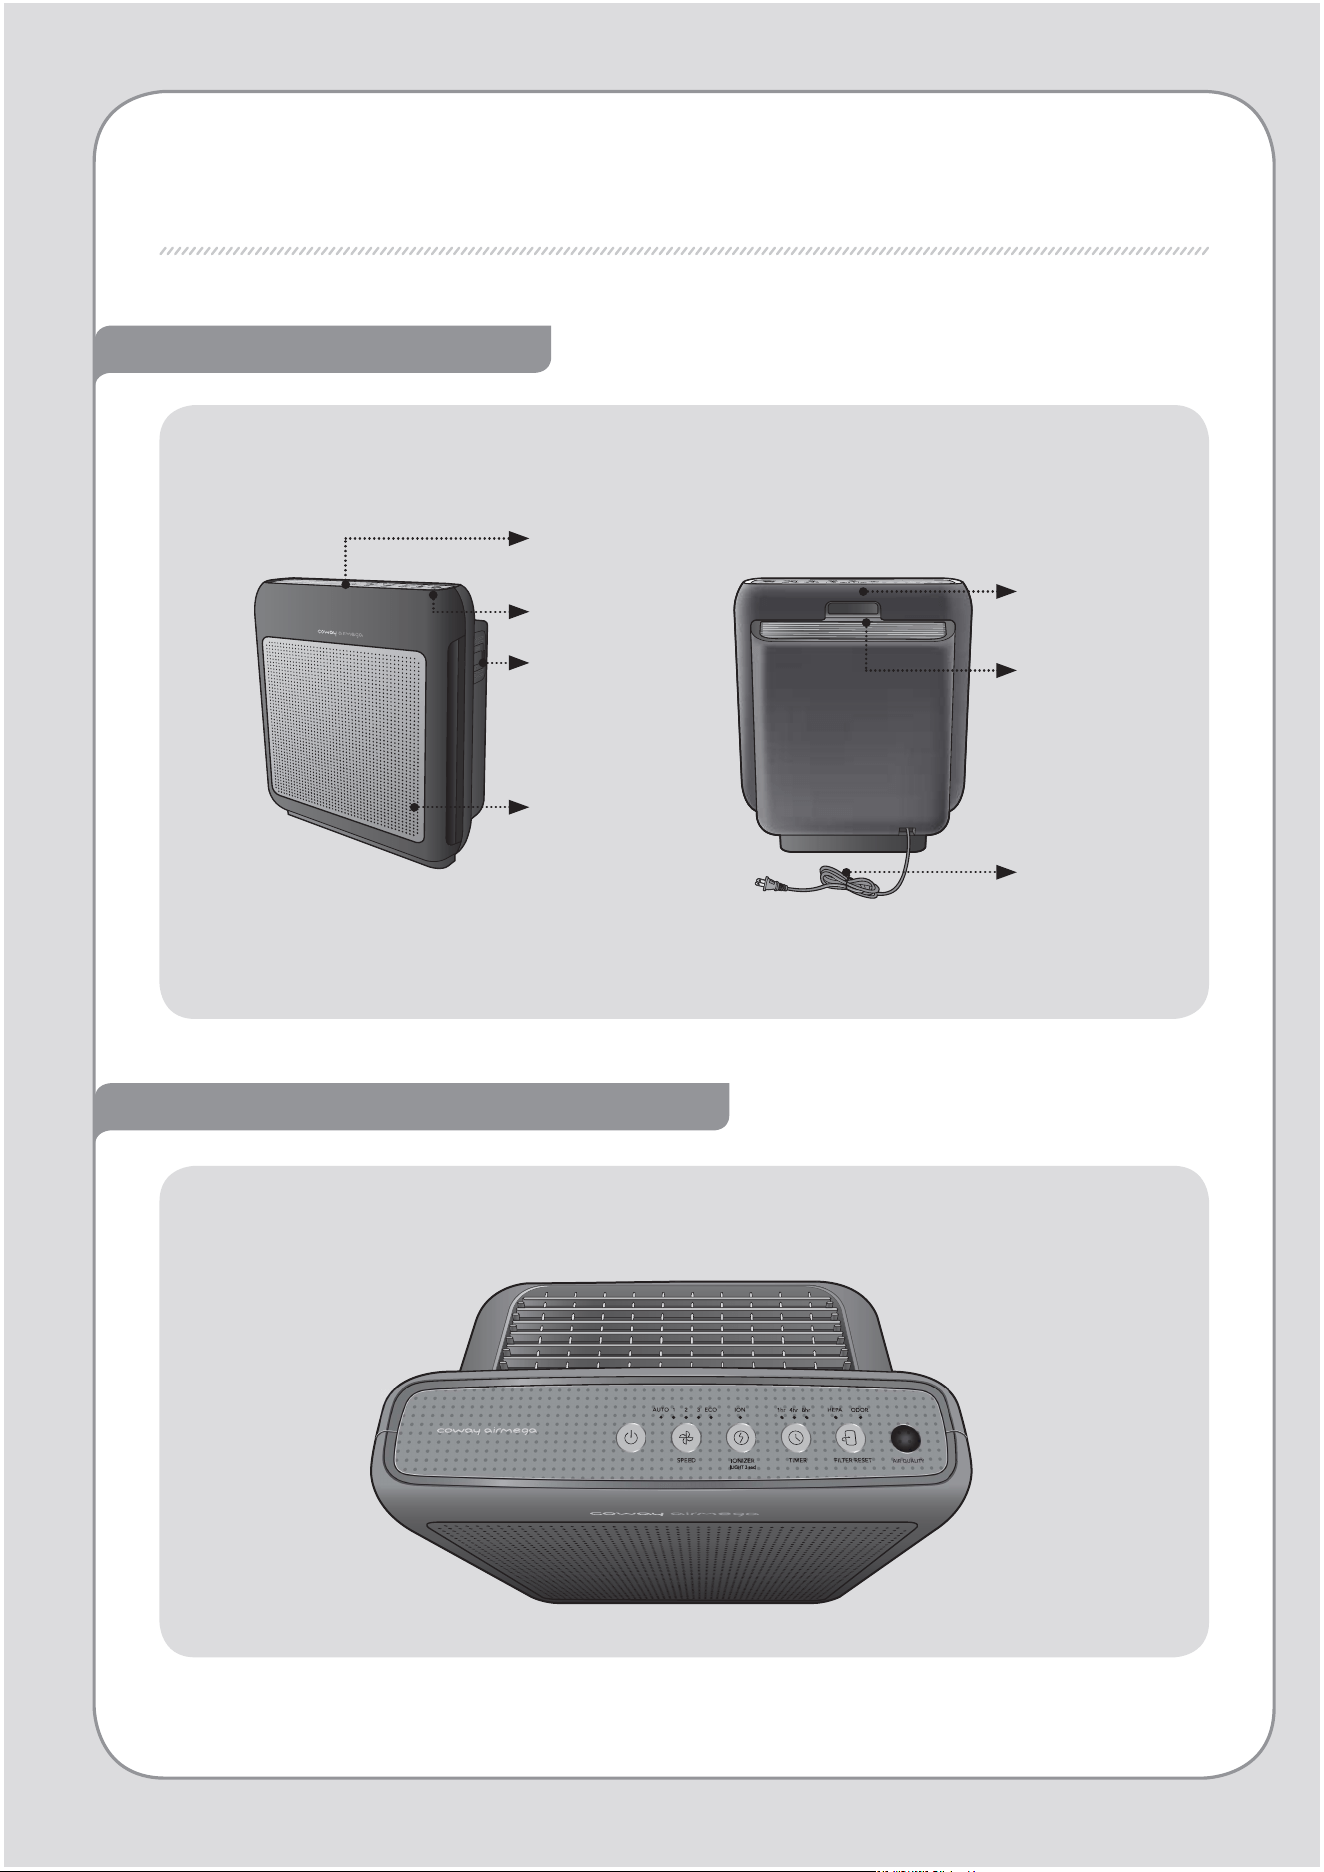
NOMBRES DE LAS PIEZAS
Parte frontal / Parte trasera
Indicadores de estado y funcionamiento
Asa
Indicador de
calidad del aire
Sensor de
calidad del aire
Tapa frontal
Parte de visualización/
Parte de operación
Salida de
aire
Cable de
alimentación
8
7
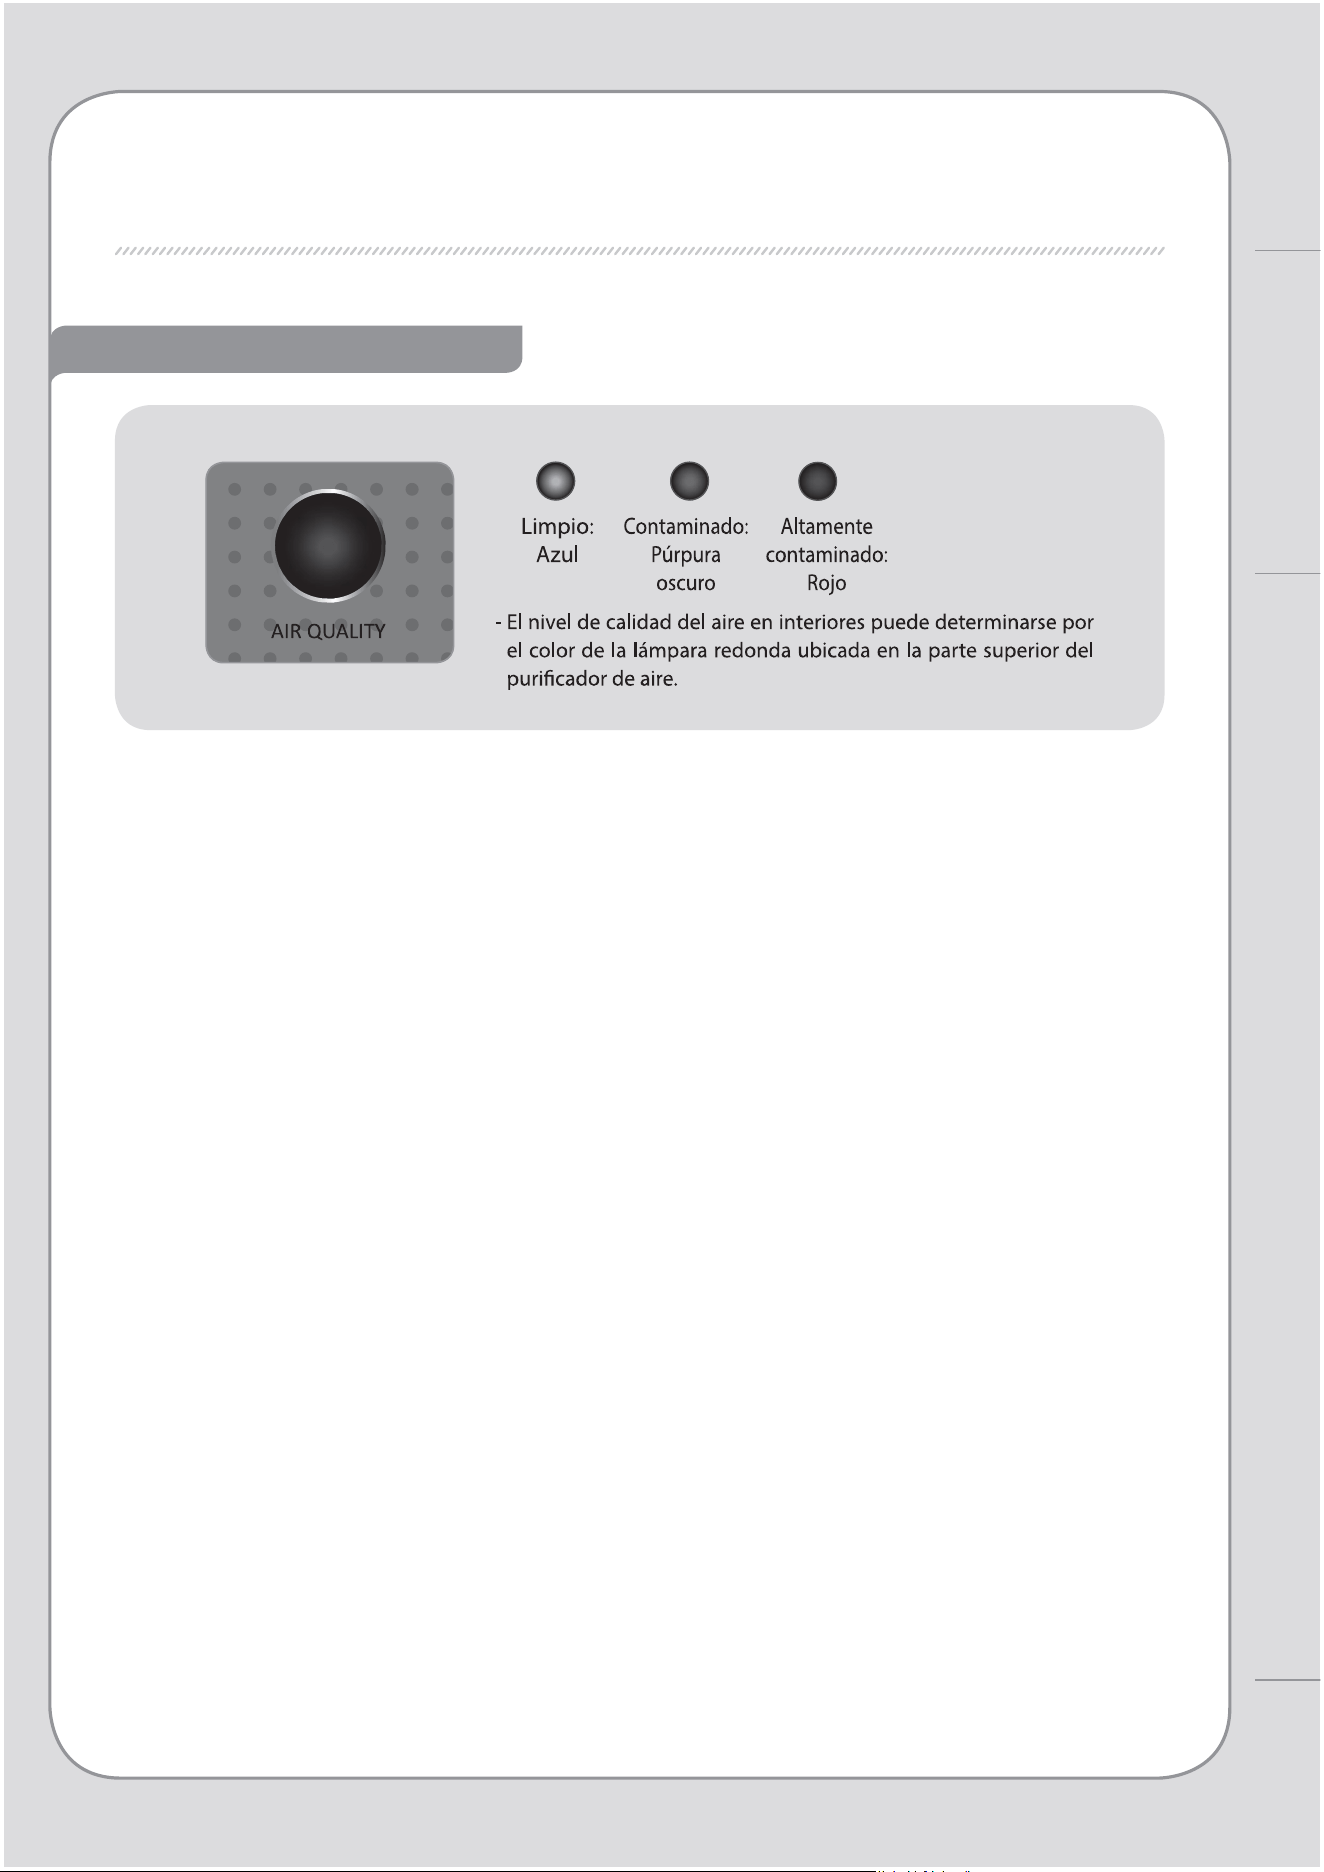
Indicador de calidad del aire
NOMBRES DE LAS PIEZAS
Para información
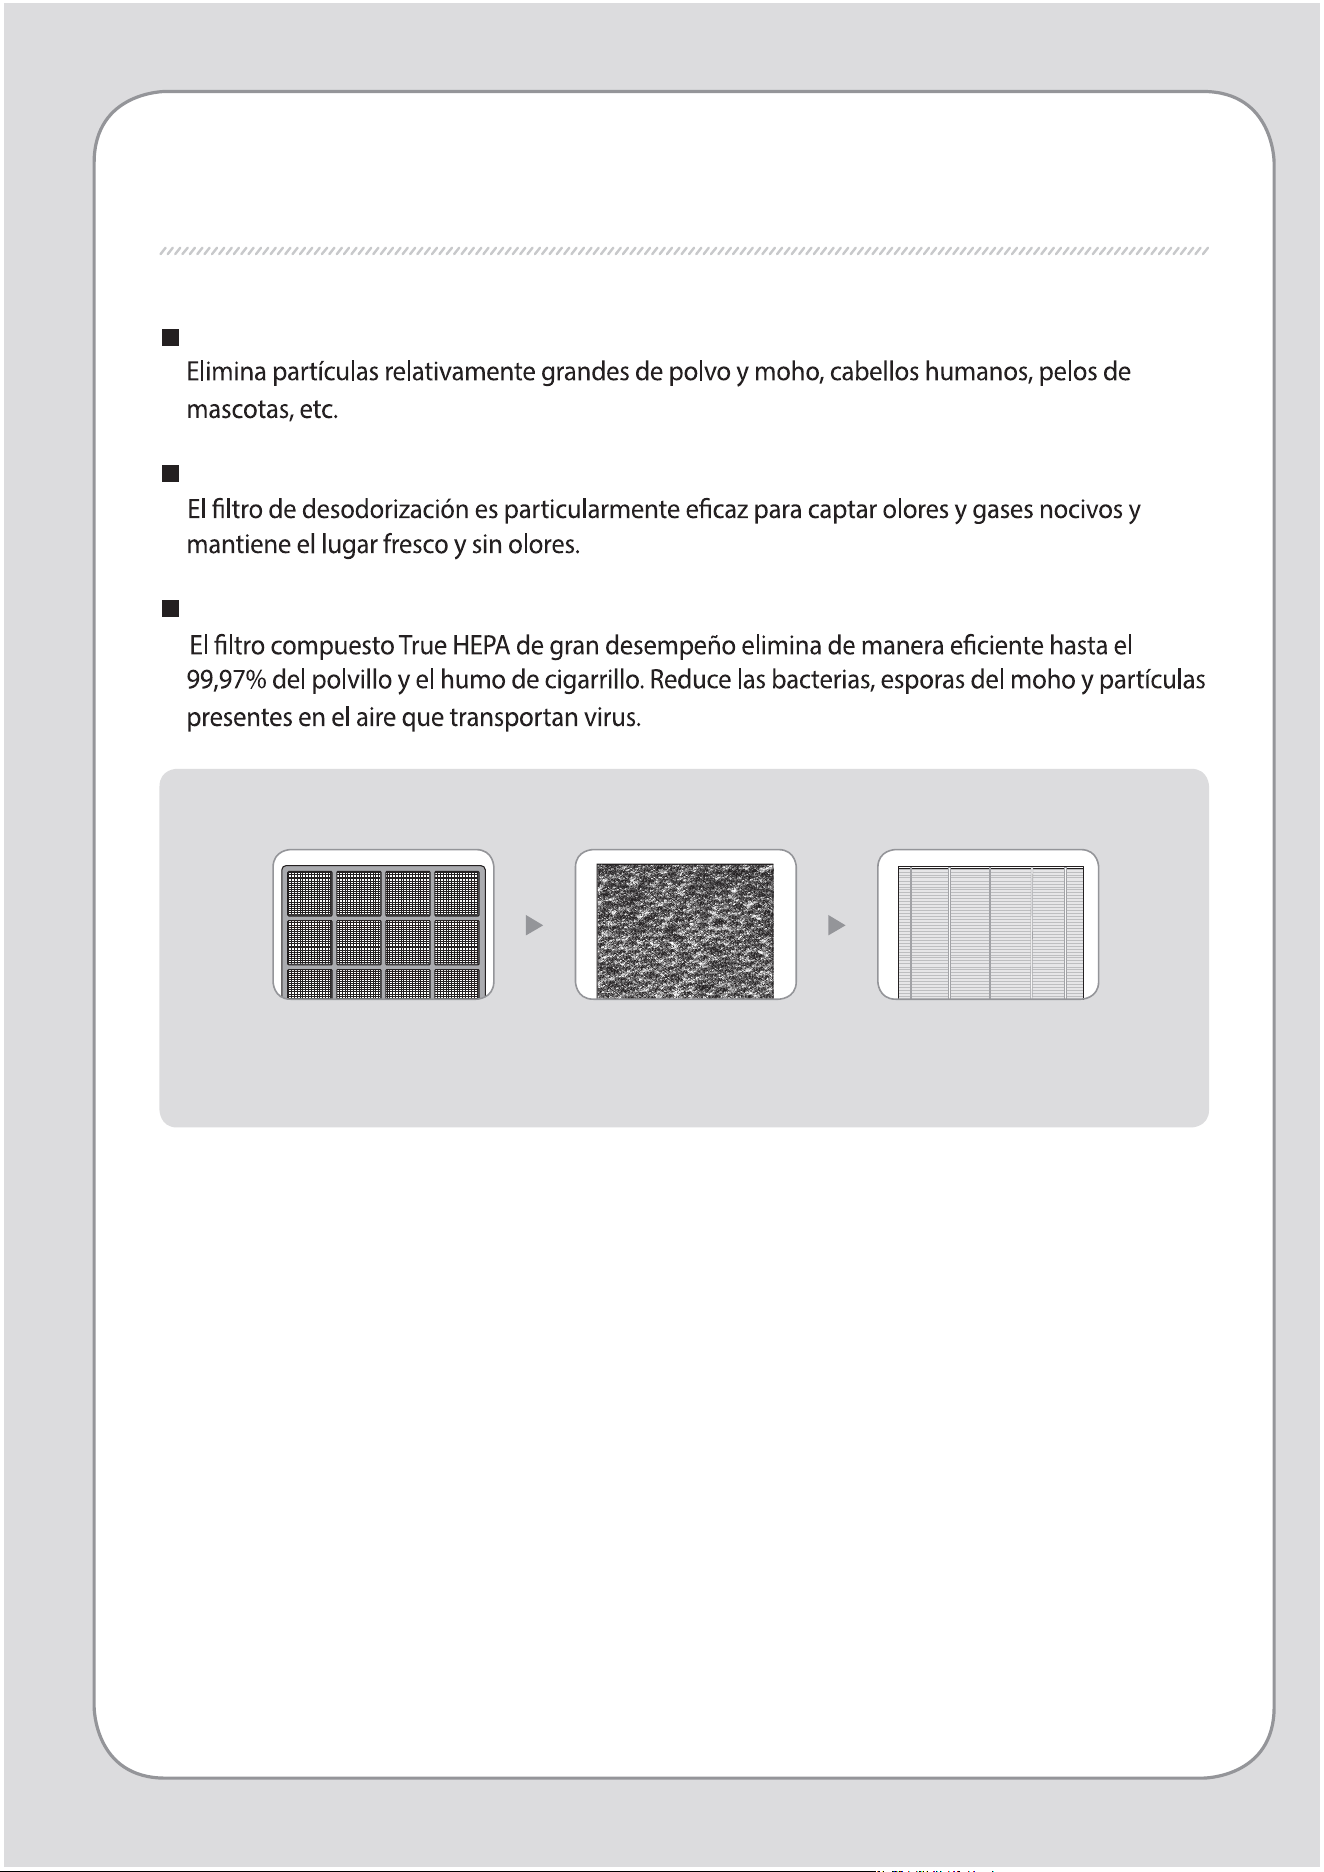
PROCESO DE PURIFICACIÓN DE AIRE
Preltro
Filtro de desodorización
Filtro True HEPA
1. Preltro 2. Filtro de desodorización 3. Filtro True HEPA
10
9
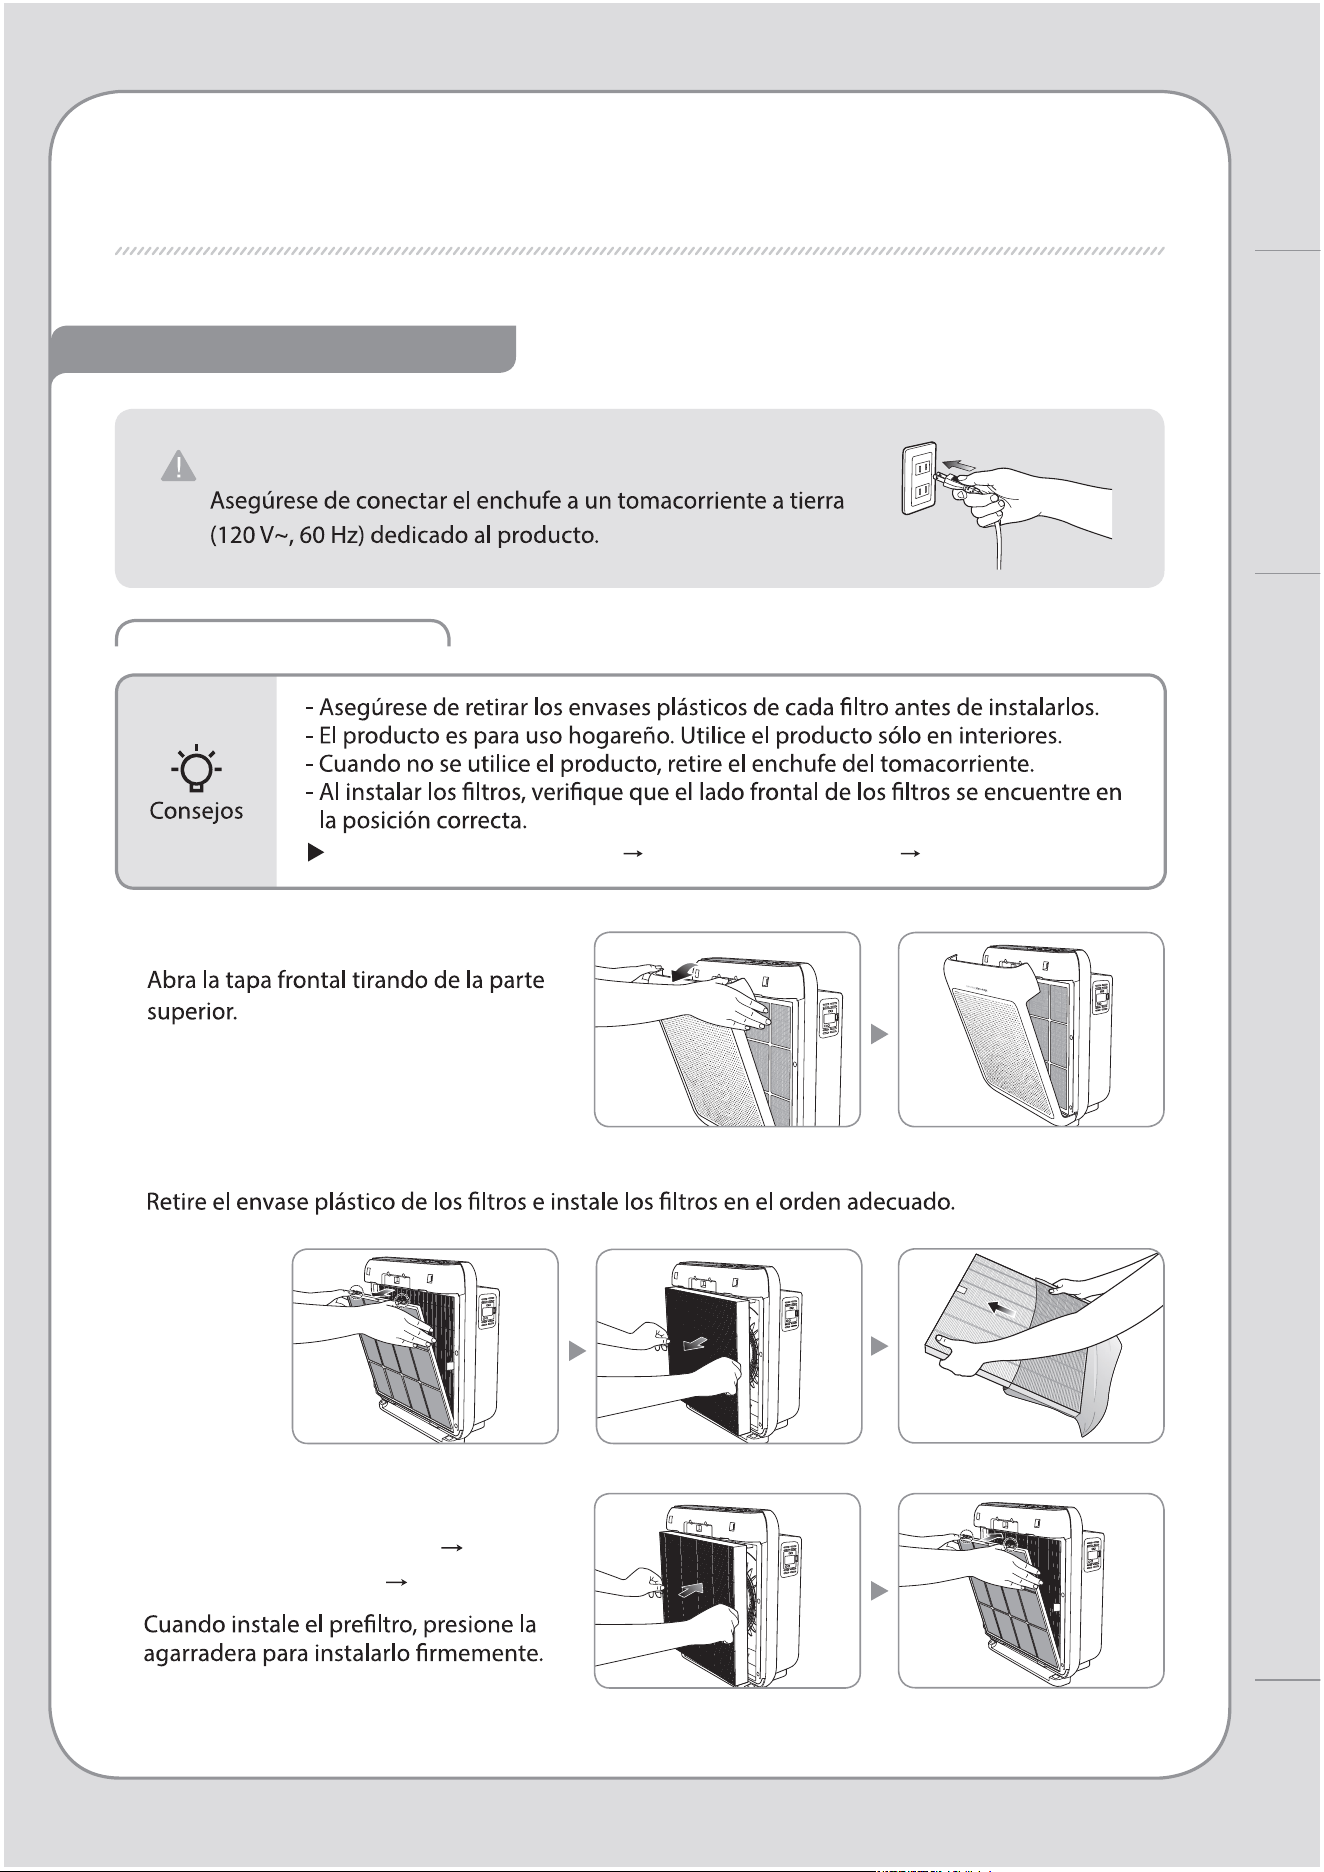
ANTES DE USAR
INSTALACIÓN DEL FILTRO
VERIFIQUE ANTES DE USAR
1. Abra la tapa frontal.
2. Saque los ltros y retire el envase plástico.
3. Instale los ltros en el siguiente
orden: Filtro True HEPA Filtro
de desodorización Preltro.
Este producto es sólo para 120 V~, 60 Hz.
Orden de los ltros: Preltro Filtro de desodorización Filtro True HEPA
Instrucciones de uso
PROCESO DE PURIFICACIÓN DE AIRE / ANTES DE USAR
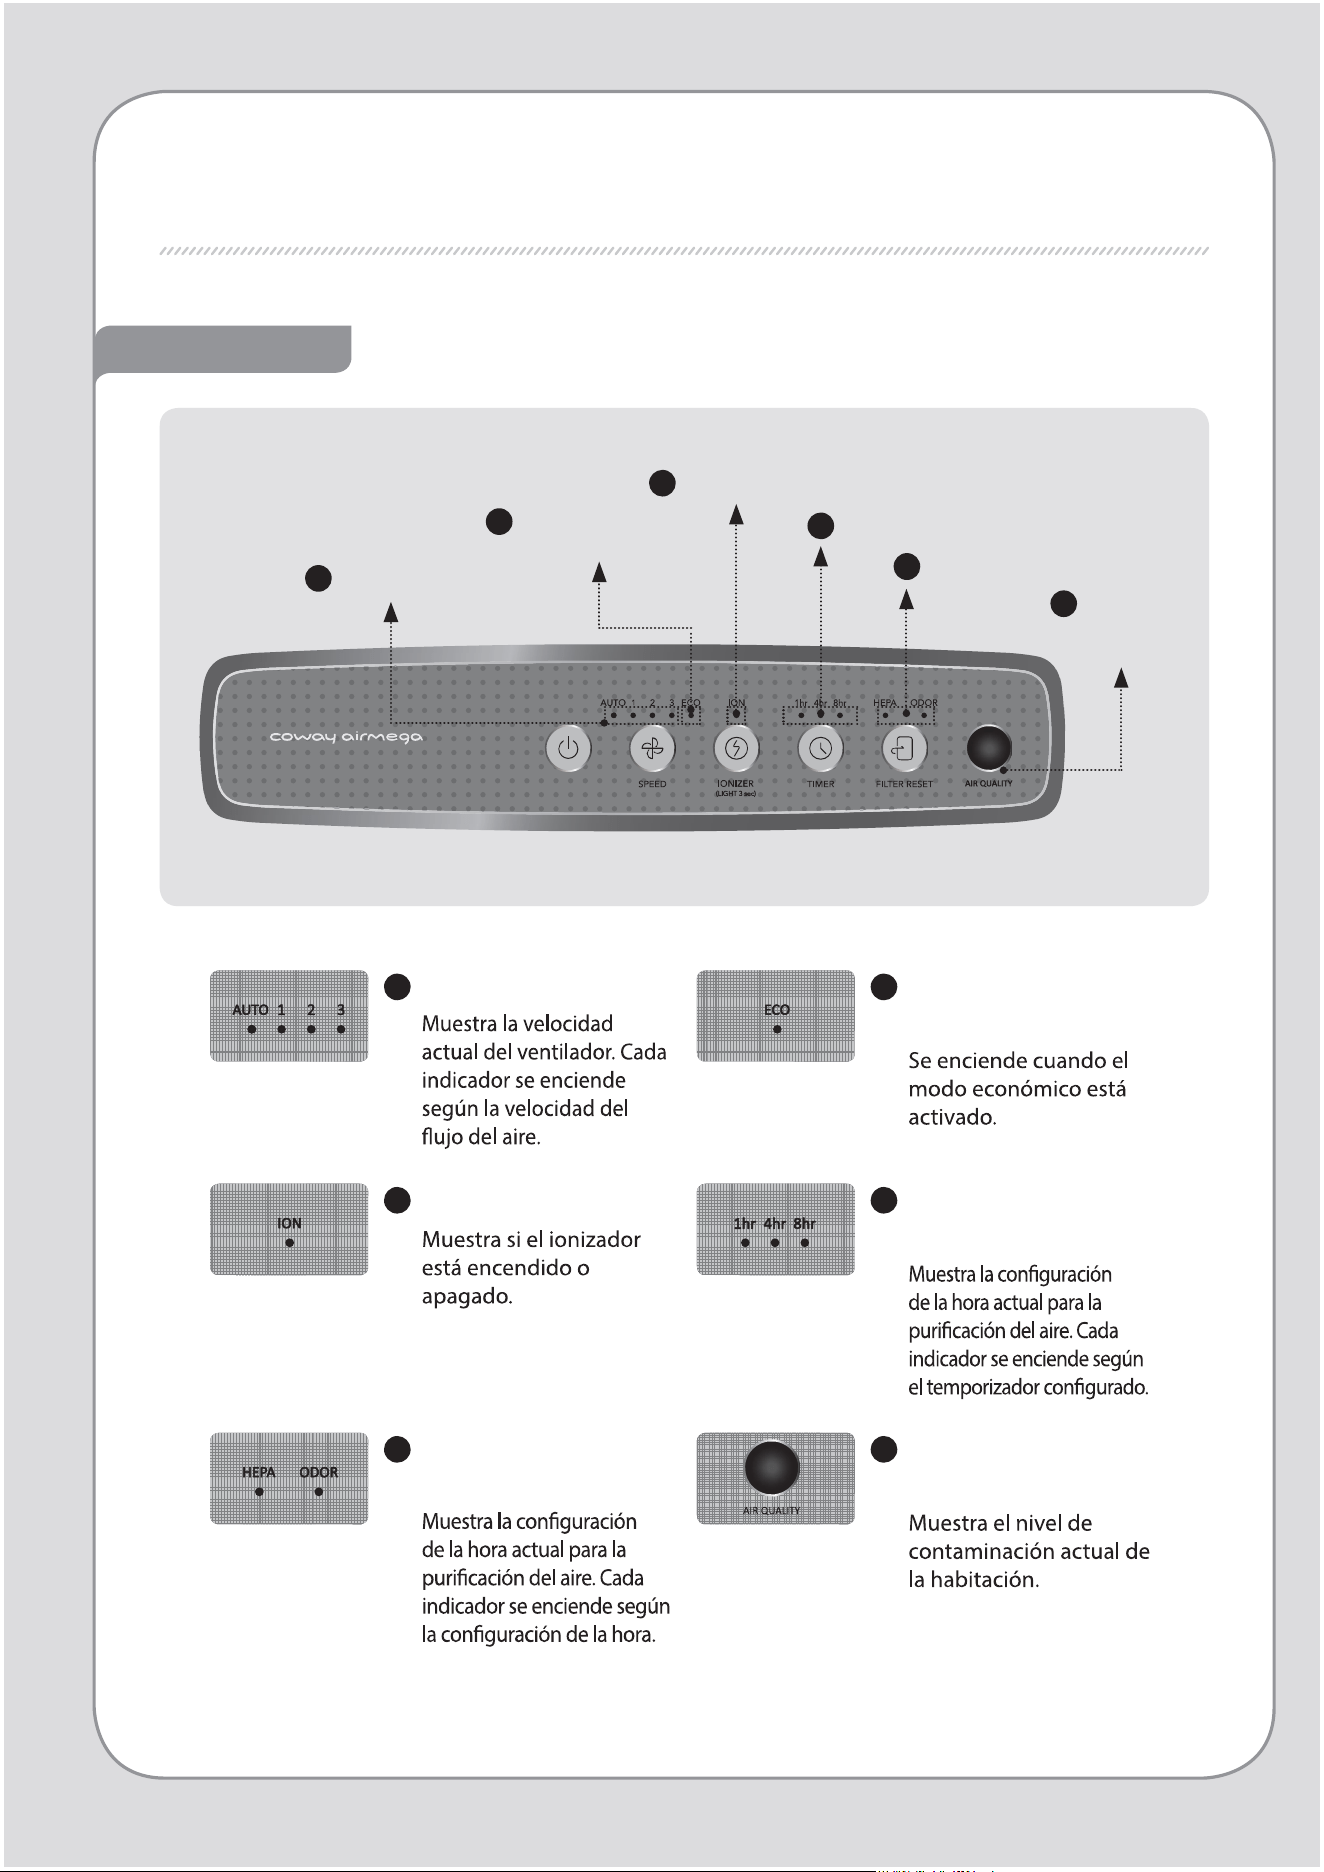
INDICADORES Y BOTONES
Indicadores
6
5
Indicador de reemplazo
de ltros
Indicador
de calidad
del aire
3
Ionizer indicator
4
Indicador de temporizador
2
Indicador del modo
económico
1
Indicador de velocidades
1
Indicador de velocidades
2
Indicador del modo
económico
3
Indicador ionizador
4
Indicador de
temporizador
5
Indicador de
reemplazo de ltros
6
Indicador de calidad
del aire
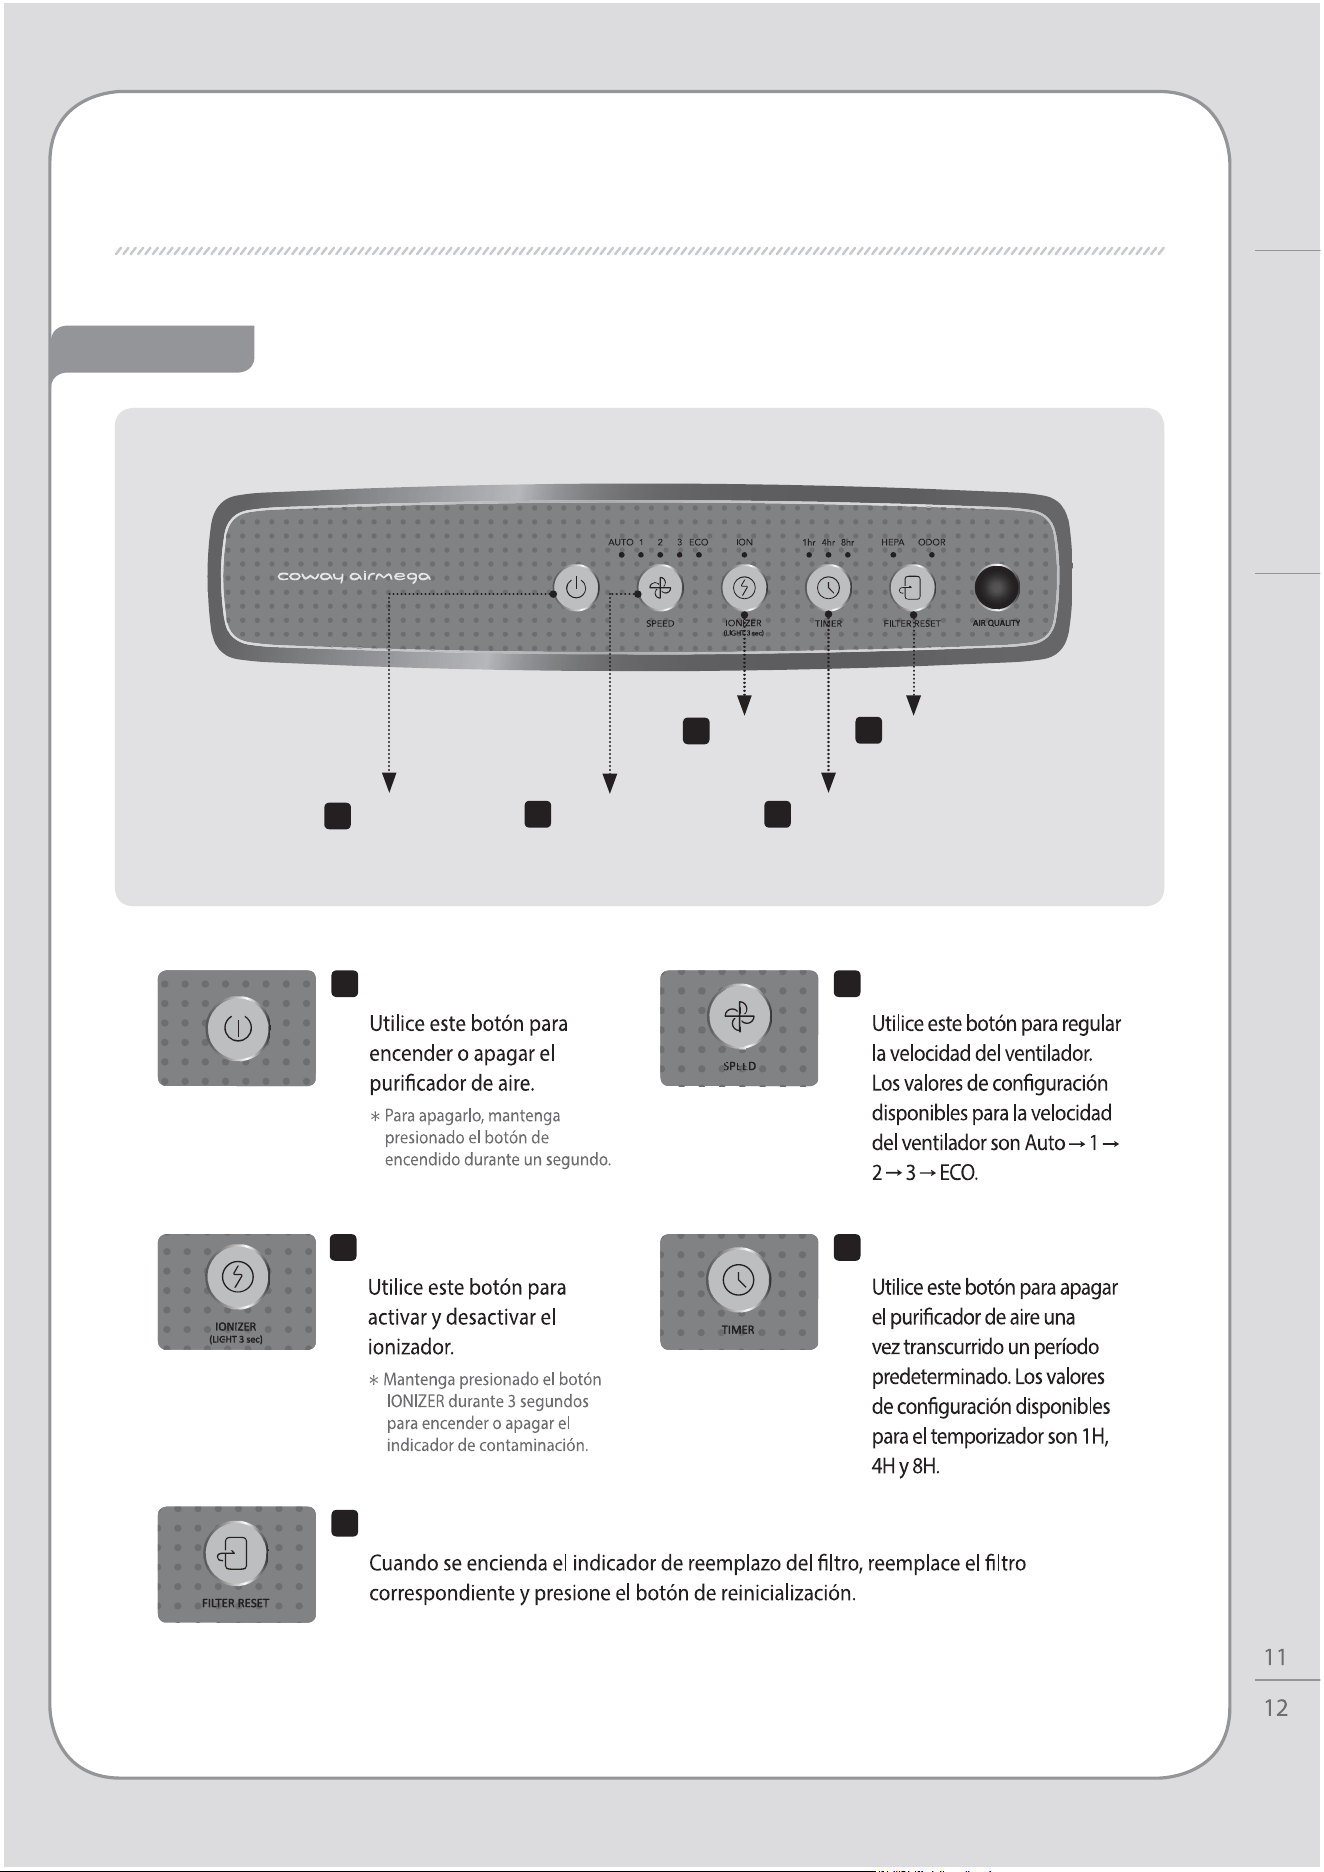
Botones
1
Botón de
encendido
5
Botón de
reinicialización del
ltro
2
Botón de
velocidades
3
Botón
ionizador
4
Botón de
temporizador
1
Botón de encendido
2
Botón de velocidades
4
Botón de temporizador
5
Botón de reinicialización del ltro
Instrucciones de uso
INDICADORES Y BOTONES
3
Botón ionizador
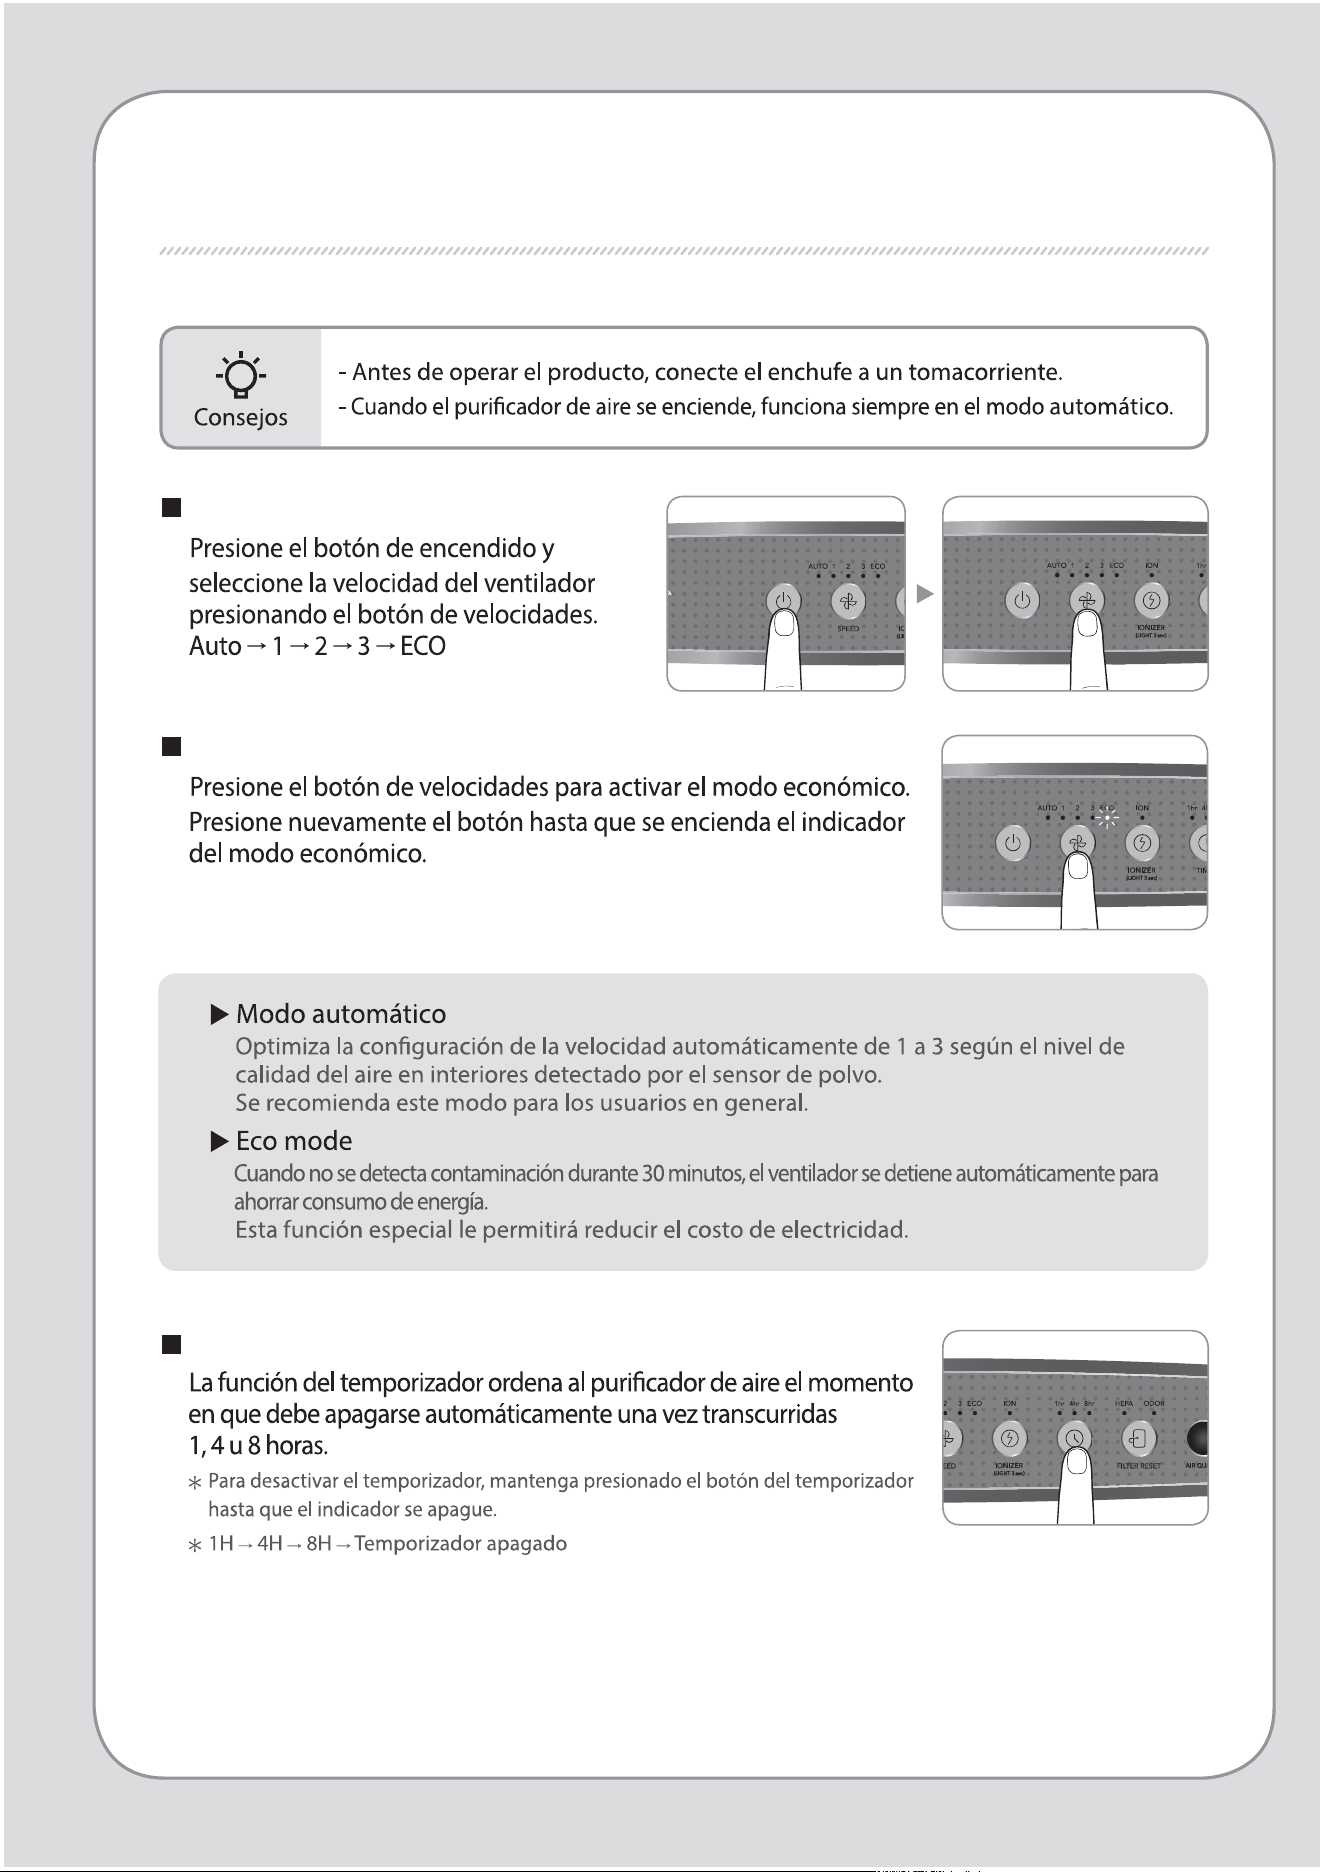
INSTRUCCIONES DE USO
Modo manual y automático
Para operación en modo económico
Activación/desactivación del temporizador
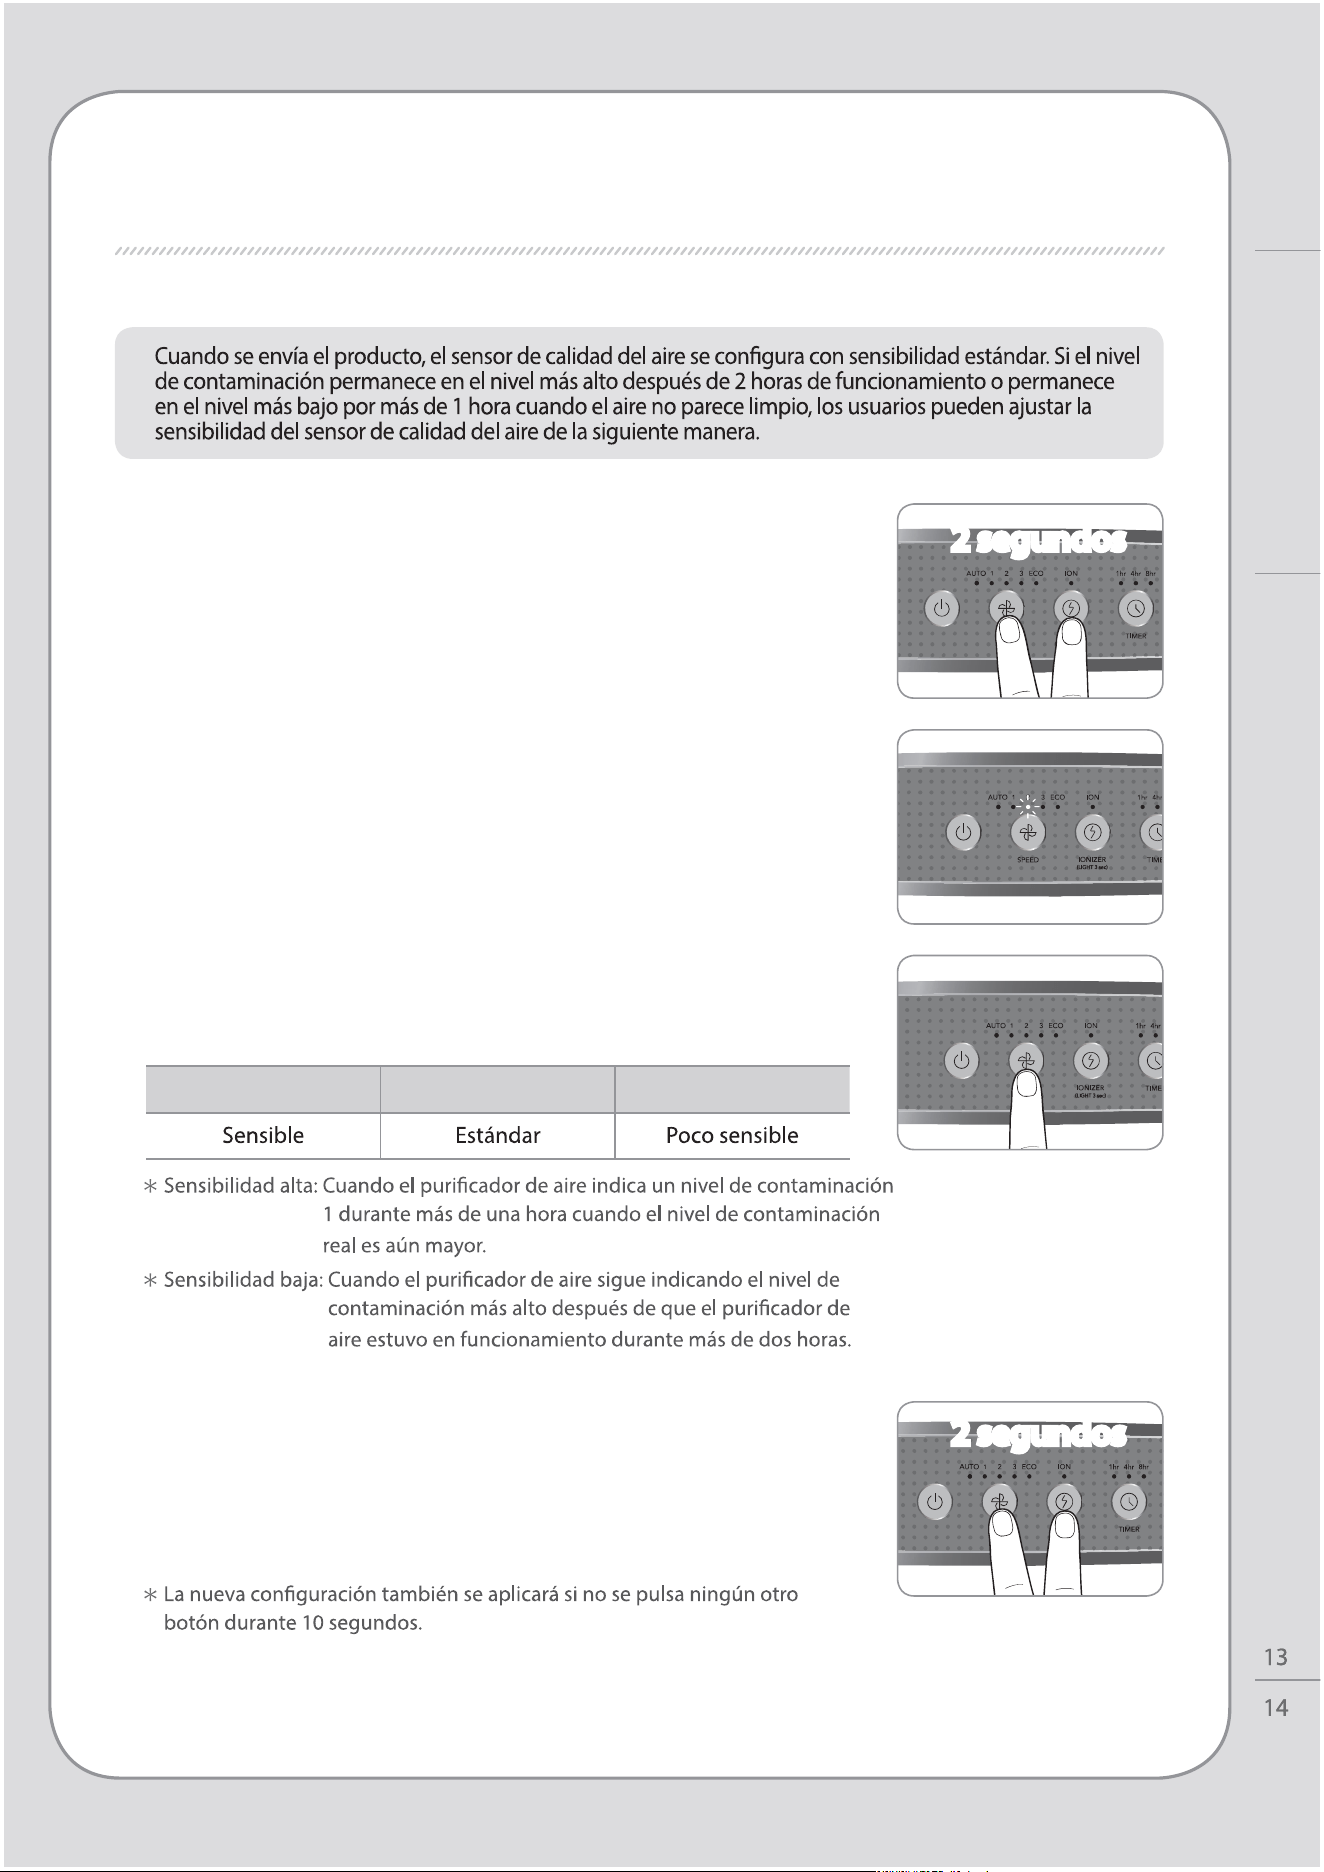
AJUSTE DEL SENSOR DE PARTÍCULAS
1. Cuando el puricador de aire se encuentre
encendido, presione el botón de velocidades con
botón ionizador del ujo del aire durante dos
segundos.
2. El indicador de velocidad parpadeará en intervalos de
1,0 segundos. El indicador de velocidad parpadea para
mostrar la sensibilidad del sensor.
4. Presione el botón de velocidades con botón
ionizador durante 2 segundos para aplicar la nueva
conguración de sensibilidad del sensor..
El puricador de aire reanudará su funcionamiento
normal.
3. Ajuste la sensibilidad presionando el botón de
velocidades. El indicador de velocidad parpadea para
mostrar la sensibilidad del sensor.
Velocidad etapa 1 Velocidad etapa 2 Velocidad etapa 3
2 segundos
2 segundos
INSTRUCCIONES DE USO / AJUSTE DEL SENSOR DE PARTÍCULAS
Instrucciones de uso
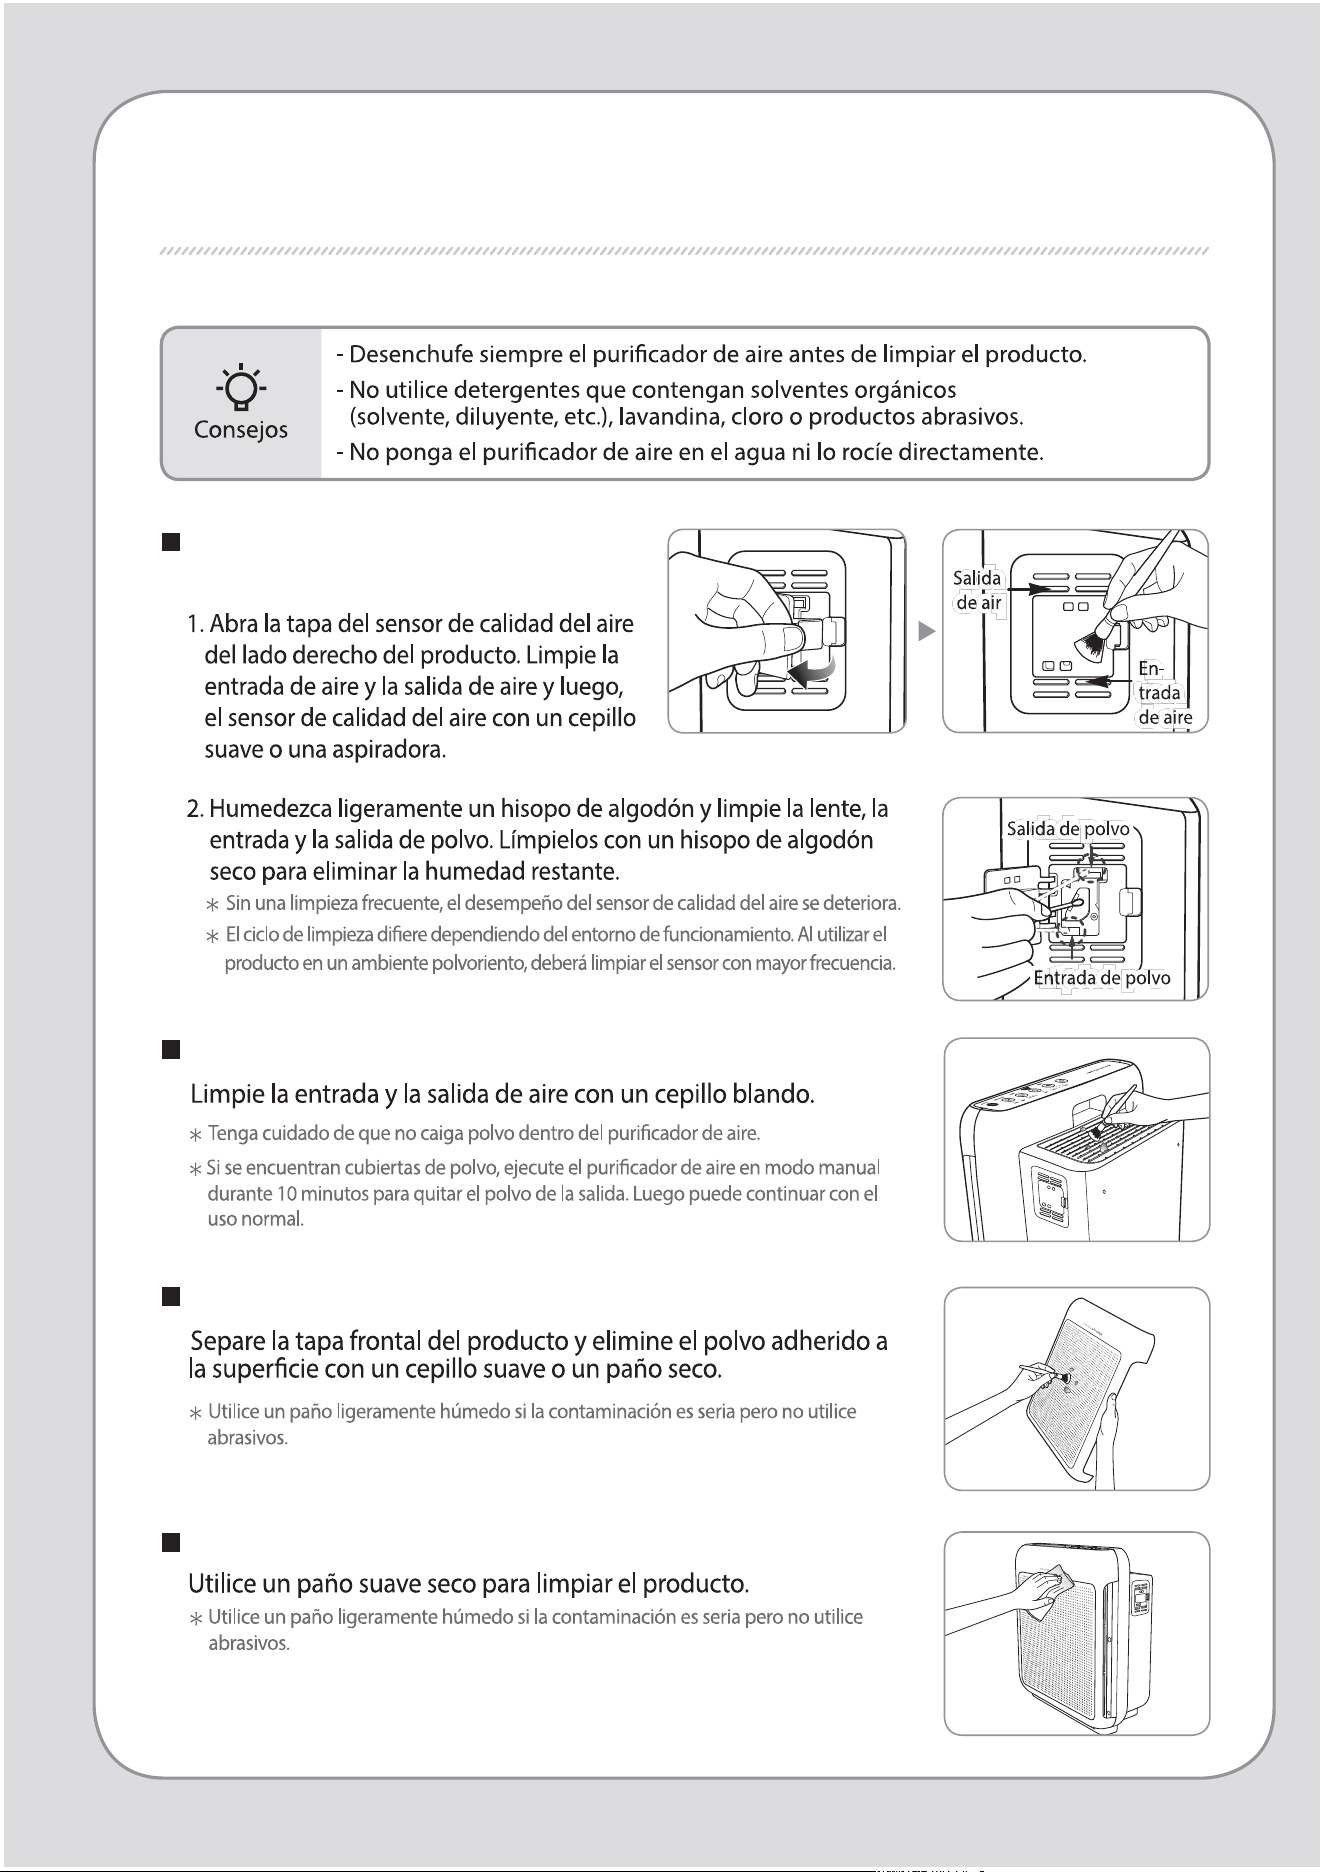
MÉTODO DE LIMPIEZA
Limpieza del sensor de calidad del
aire (cada 2 meses)
Limpieza de la toma y la salida de aire (cada 2 meses)
Limpieza de la tapa frontal.
Limpieza de la estructura del producto (cada 2 a 4 semanas)
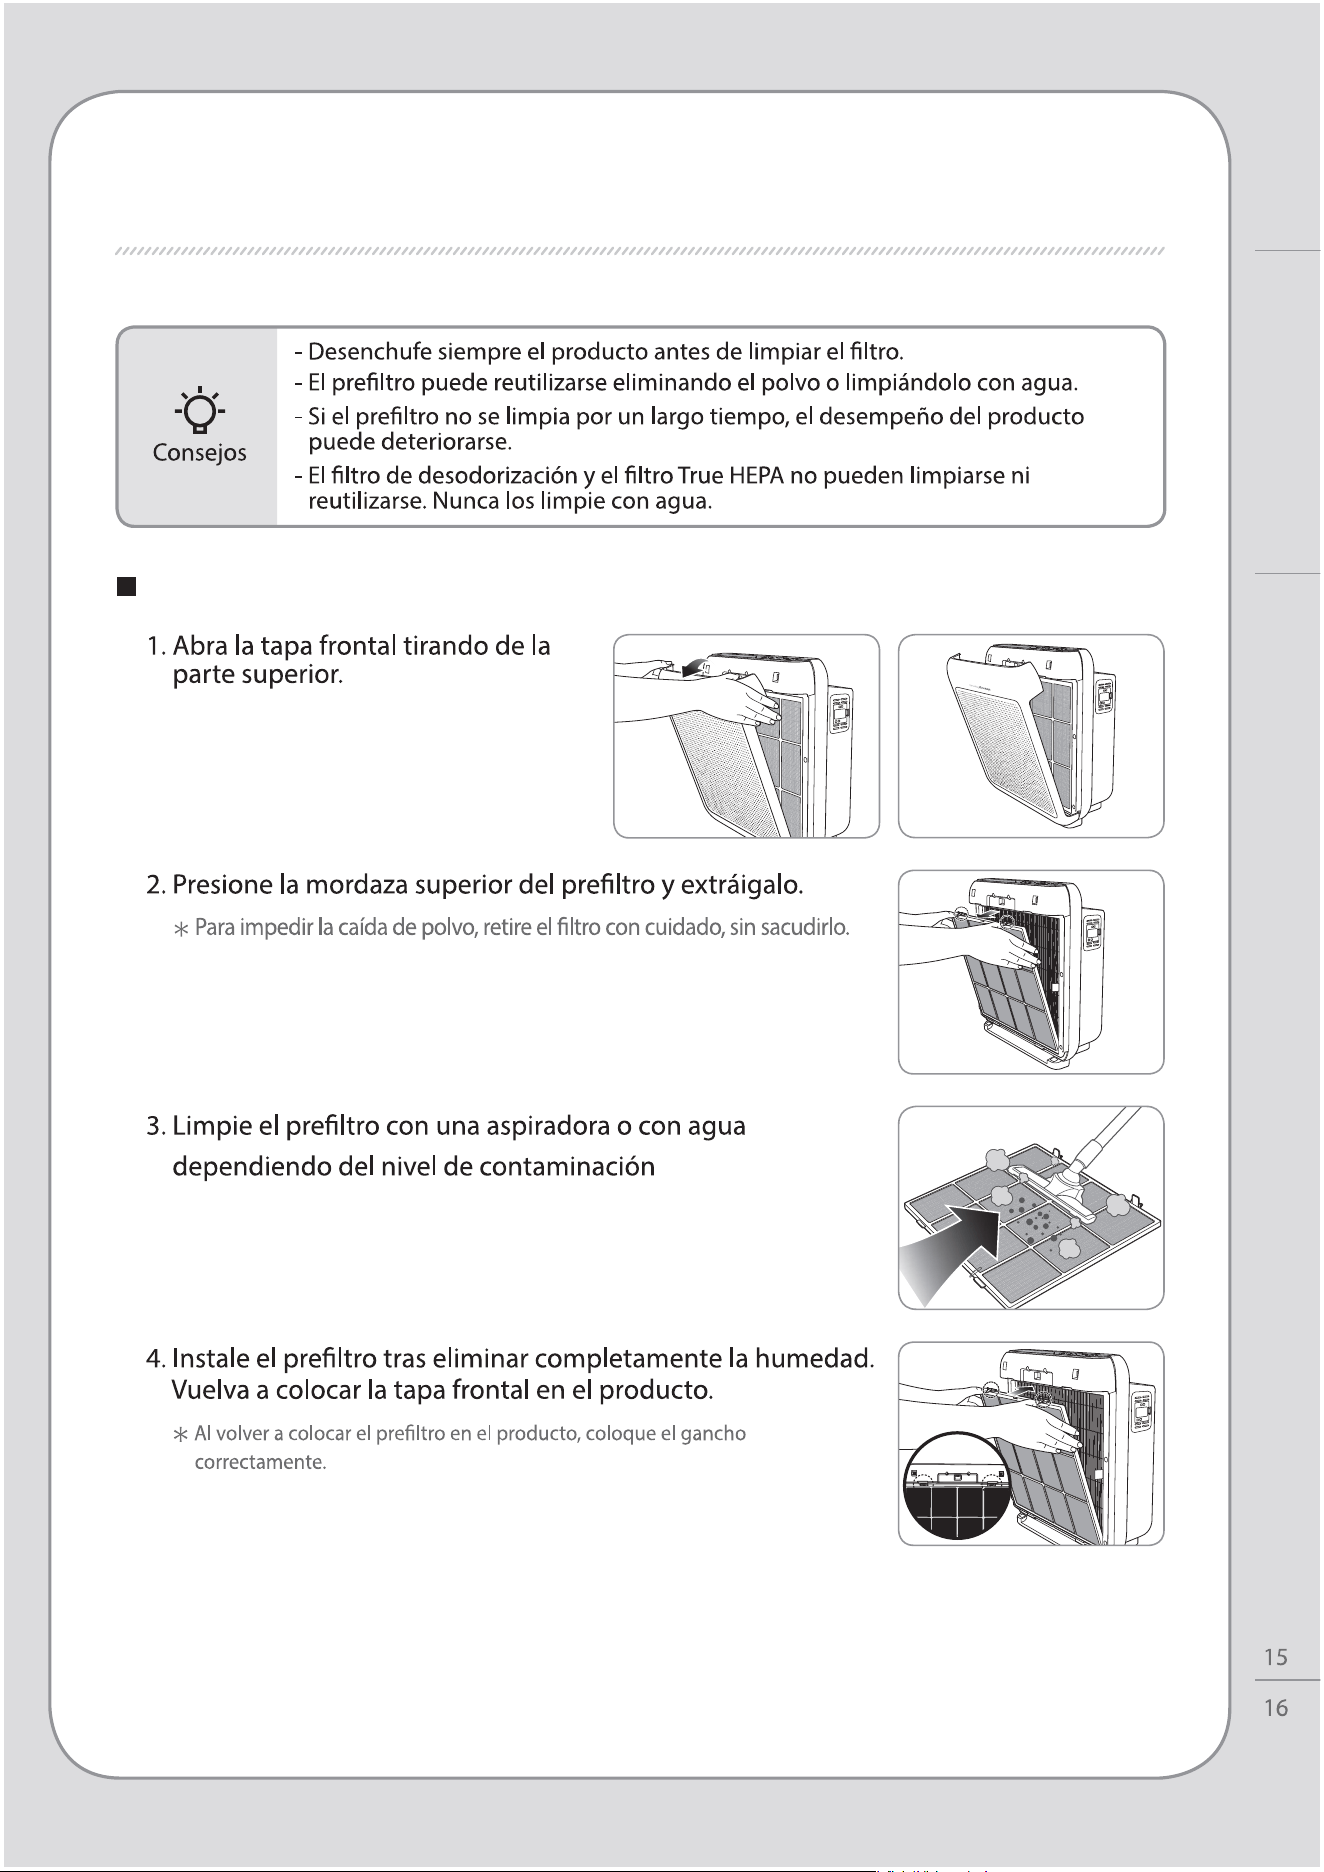
Limpieza del preltro (cada 2 a 4 semanas)
MÉTODO DE LIMPIEZA
Mantenimiento
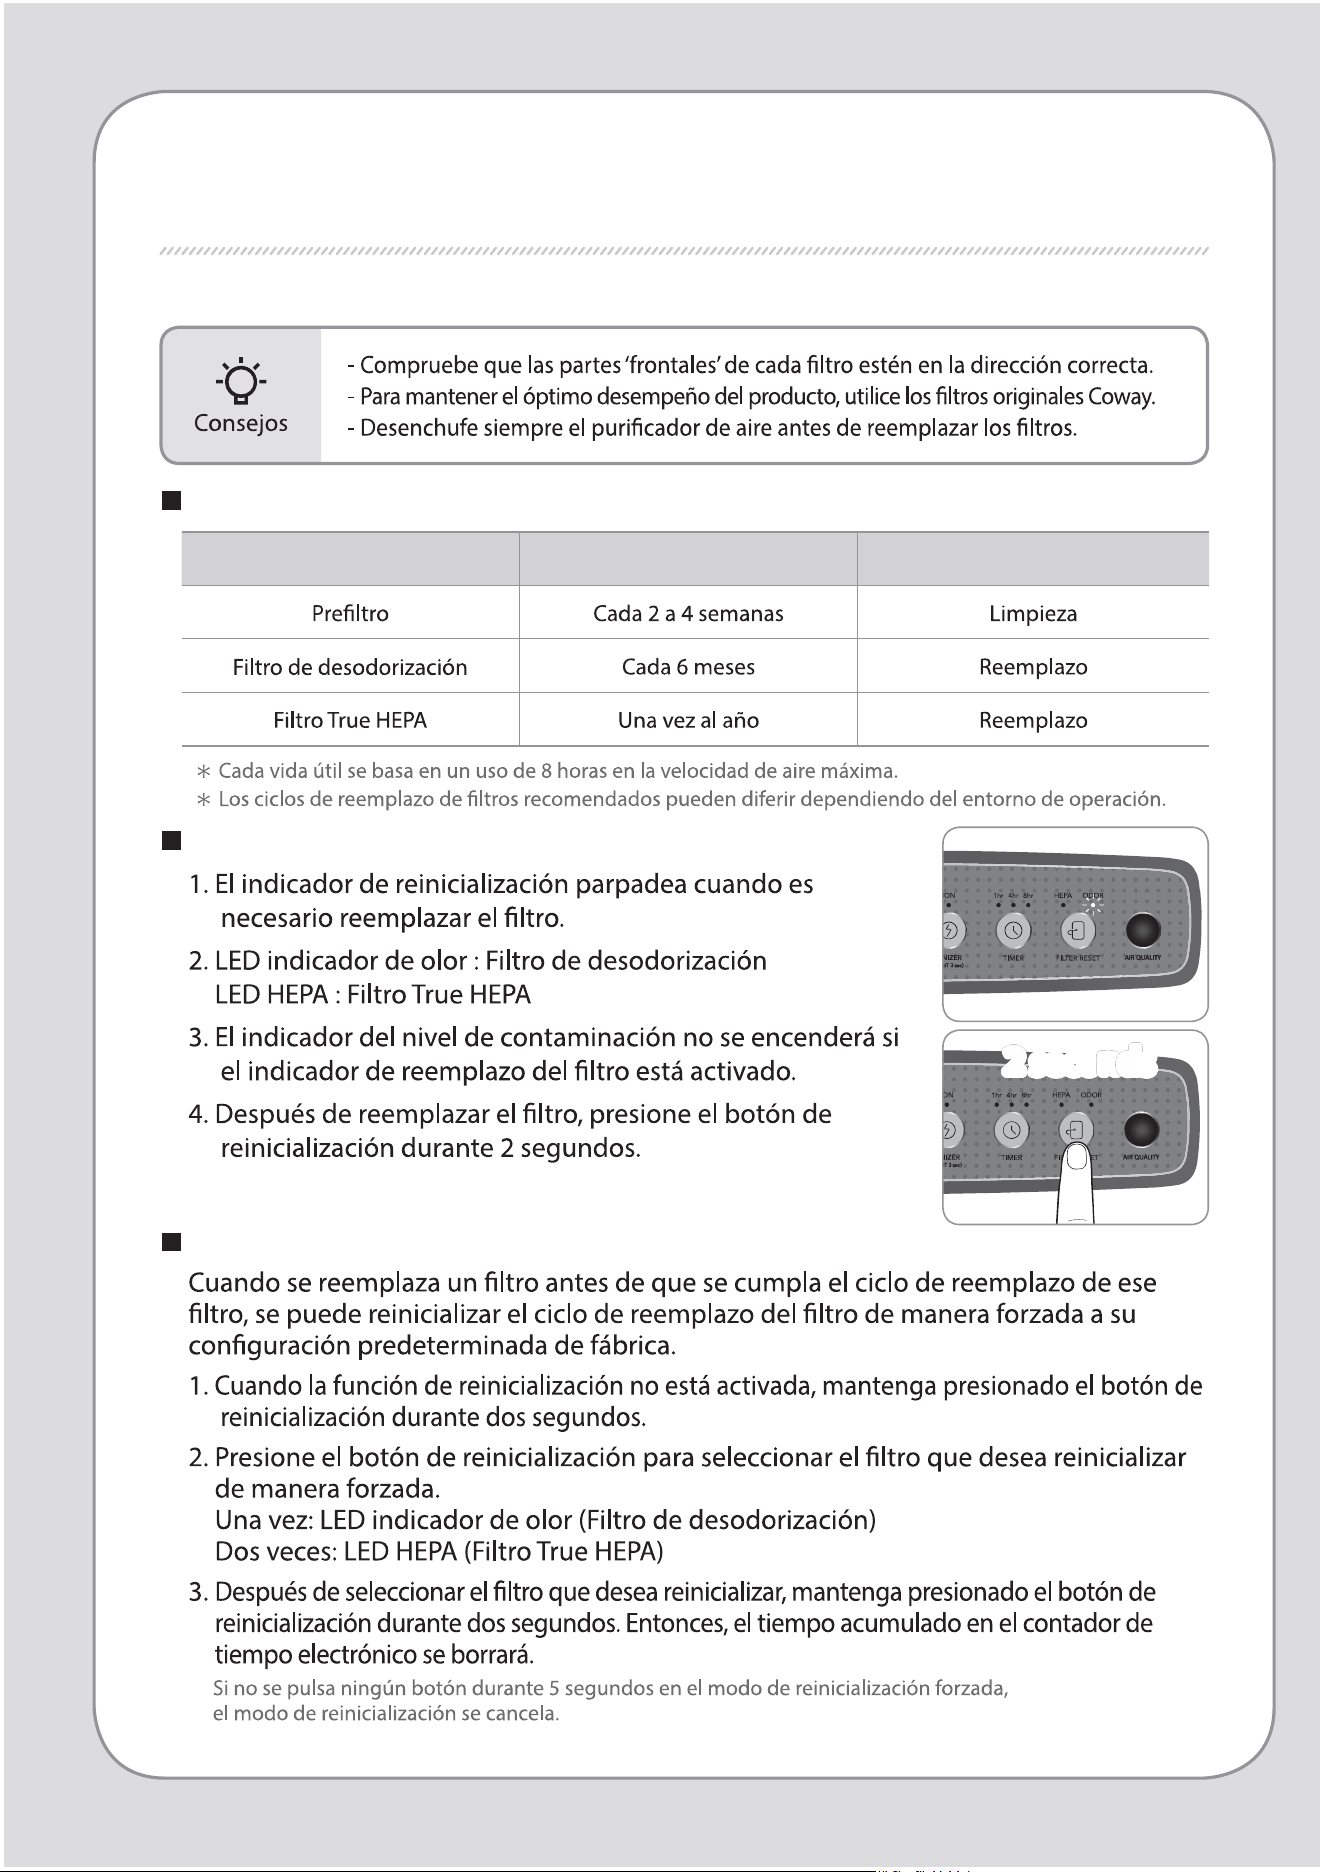
Reinicialización del indicador de reemplazo del ltro
Ciclos de limpieza y reemplazo de ltros
Filtro Ciclos Método
REEMPLAZO DEL FILTRO
Modo de reinicialización forzada
2 seconds
2 seconds
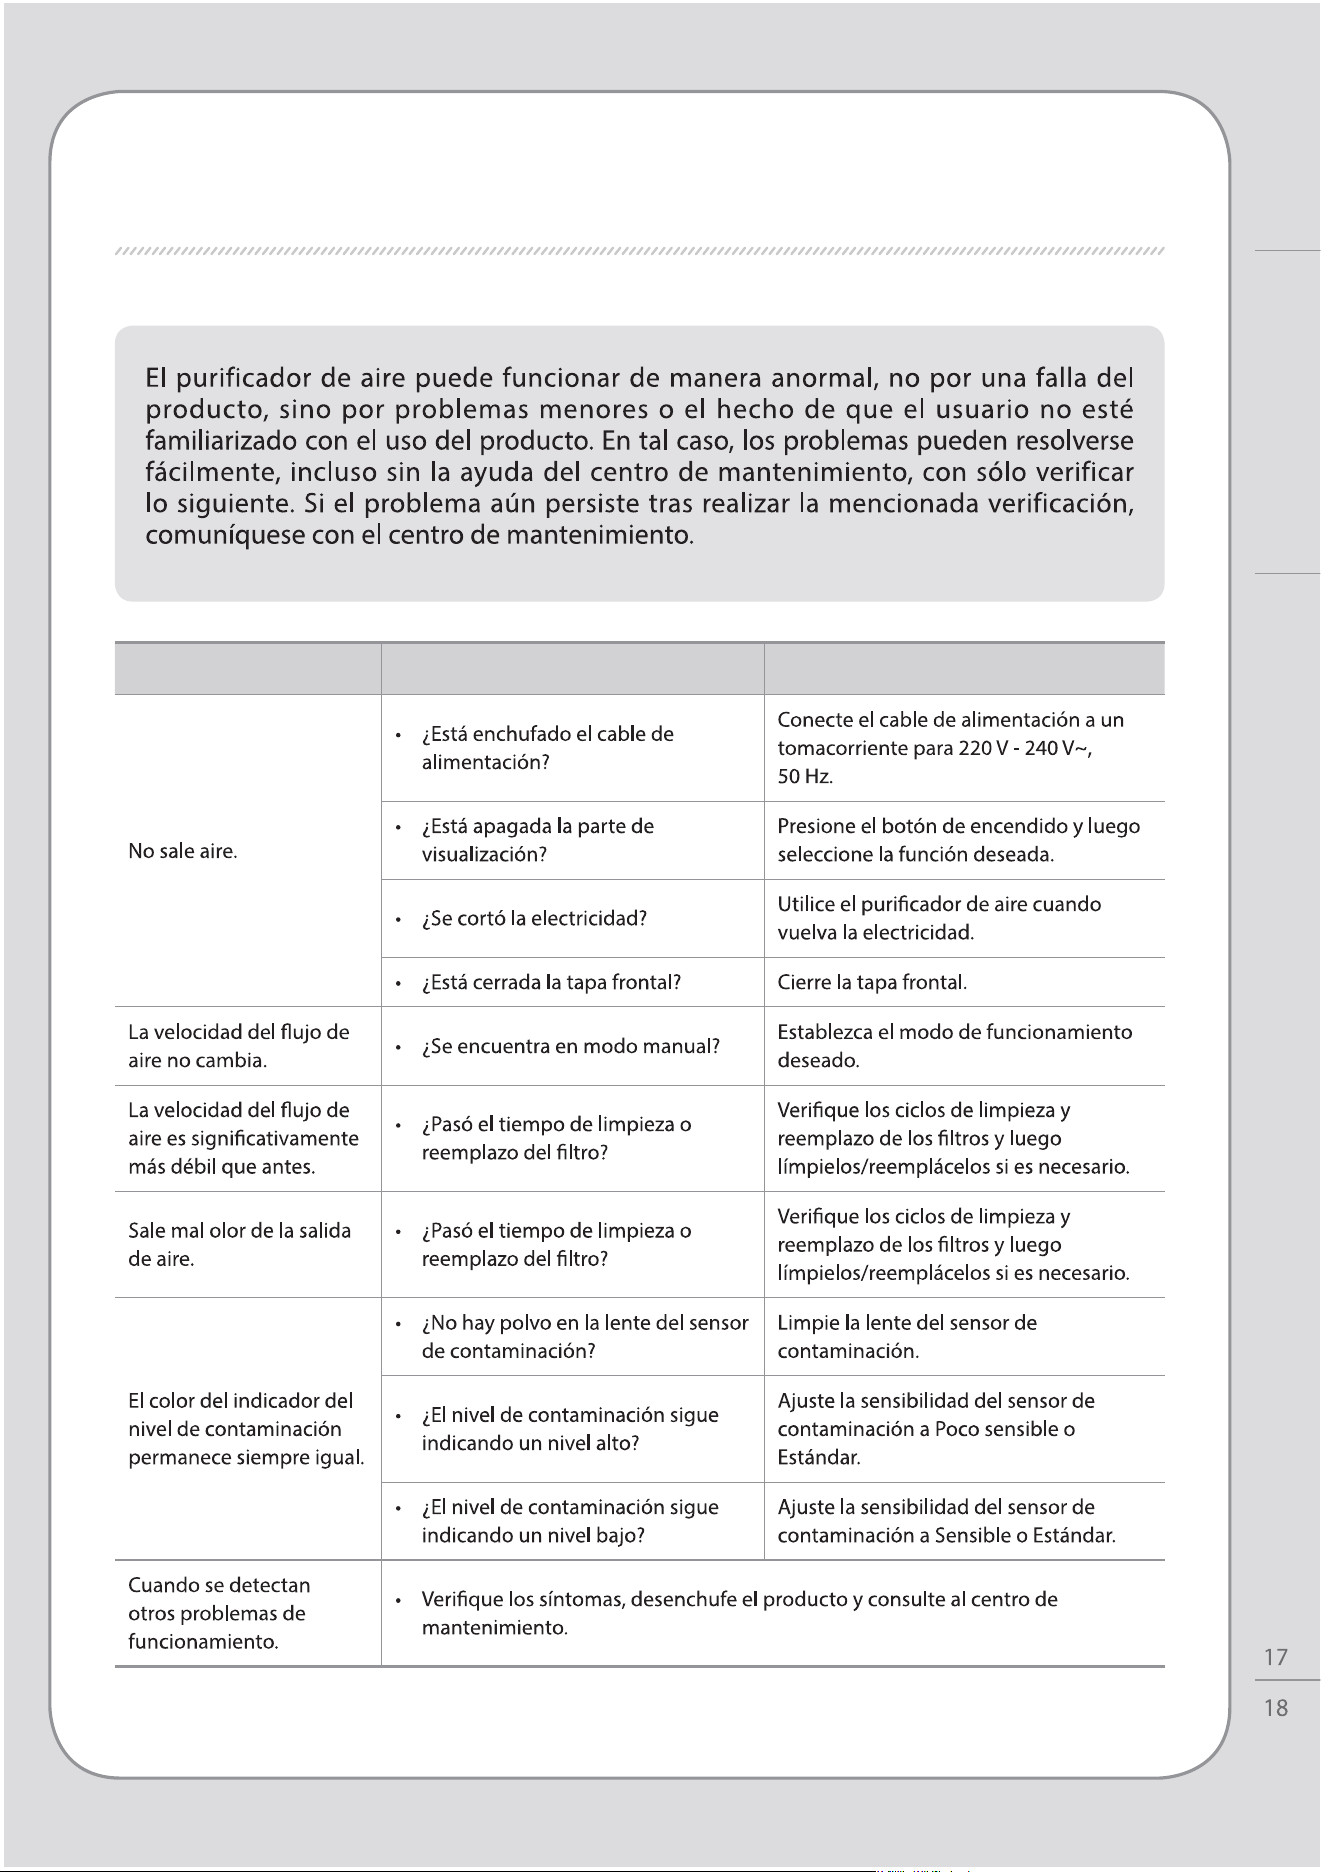
TROUBLESHOOTING
Síntoma Vericación Medidas que tomar
REEMPLAZO DEL FILTRO / TROUBLESHOOTING
Otros
Especicaciones del producto Air Purier
ESPECIFICACIONES

ESPECIFICACIONES
Others
MEMO

MEMO

Others
MEMO

MEMO

LIMITED WARRANTY (USA/CANADA/MEXICO)
ARBITRATION NOTICE: THIS LIMITED WARRANTY
CONTAINS AN ARBITRATION PROVISION THAT
REQUIRES YOU AND COWAY TO RESOLVE
DISPUTES BY BINDING ARBITRATION INSTEAD OF
IN COURT, UNLESS YOU CHOOSE TO OPT OUT. IN
ARBITRATION, CLASS ACTIONS AND JURY TRIALS
ARE NOT PERMITTED. PLEASE SEE THE SECTION
TITLED “PROCEDURE FOR RESOLVING DISPUTES”
BELOW.
Warranty Period Scope of Warranty Remark
THIS WARRANTY IS IN LIEU OF ANY OTHER
WARRANTY, EXPRESS OR IMPLIED, INCLUDING
WITHOUT LIMITATION, ANY WARRANTY OF
MERCHANTABILITY OR FITNESS FOR A PARTICULAR
PURPOSE. TO THE EXTENT ANY IMPLIED WARRANTY
IS REQUIRED BY LAW, IT IS LIMITED IN DURATION TO
THE EXPRESS WARRANTY PERIOD ABOVE. NEITHER
THE MANUFACTURER NOR ITS DISTRIBUTOR SHALL
BE LIABLE FOR ANY INCIDENTAL, CONSEQUENTIAL,
INDIRECT, SPECIAL, OR PUNITIVE DAMAGES OF
ANY NATURE, INCLUDING WITHOUT LIMITATION,
LOST REVENUES OR PROFITS, OR ANY OTHER
DAMAGE WHETHER BASED IN CONTRACT, TORT, OR
OTHERWISE.
THIS LIMITED WARRANTY DOES NOT COVER:
WARRANTY
Others
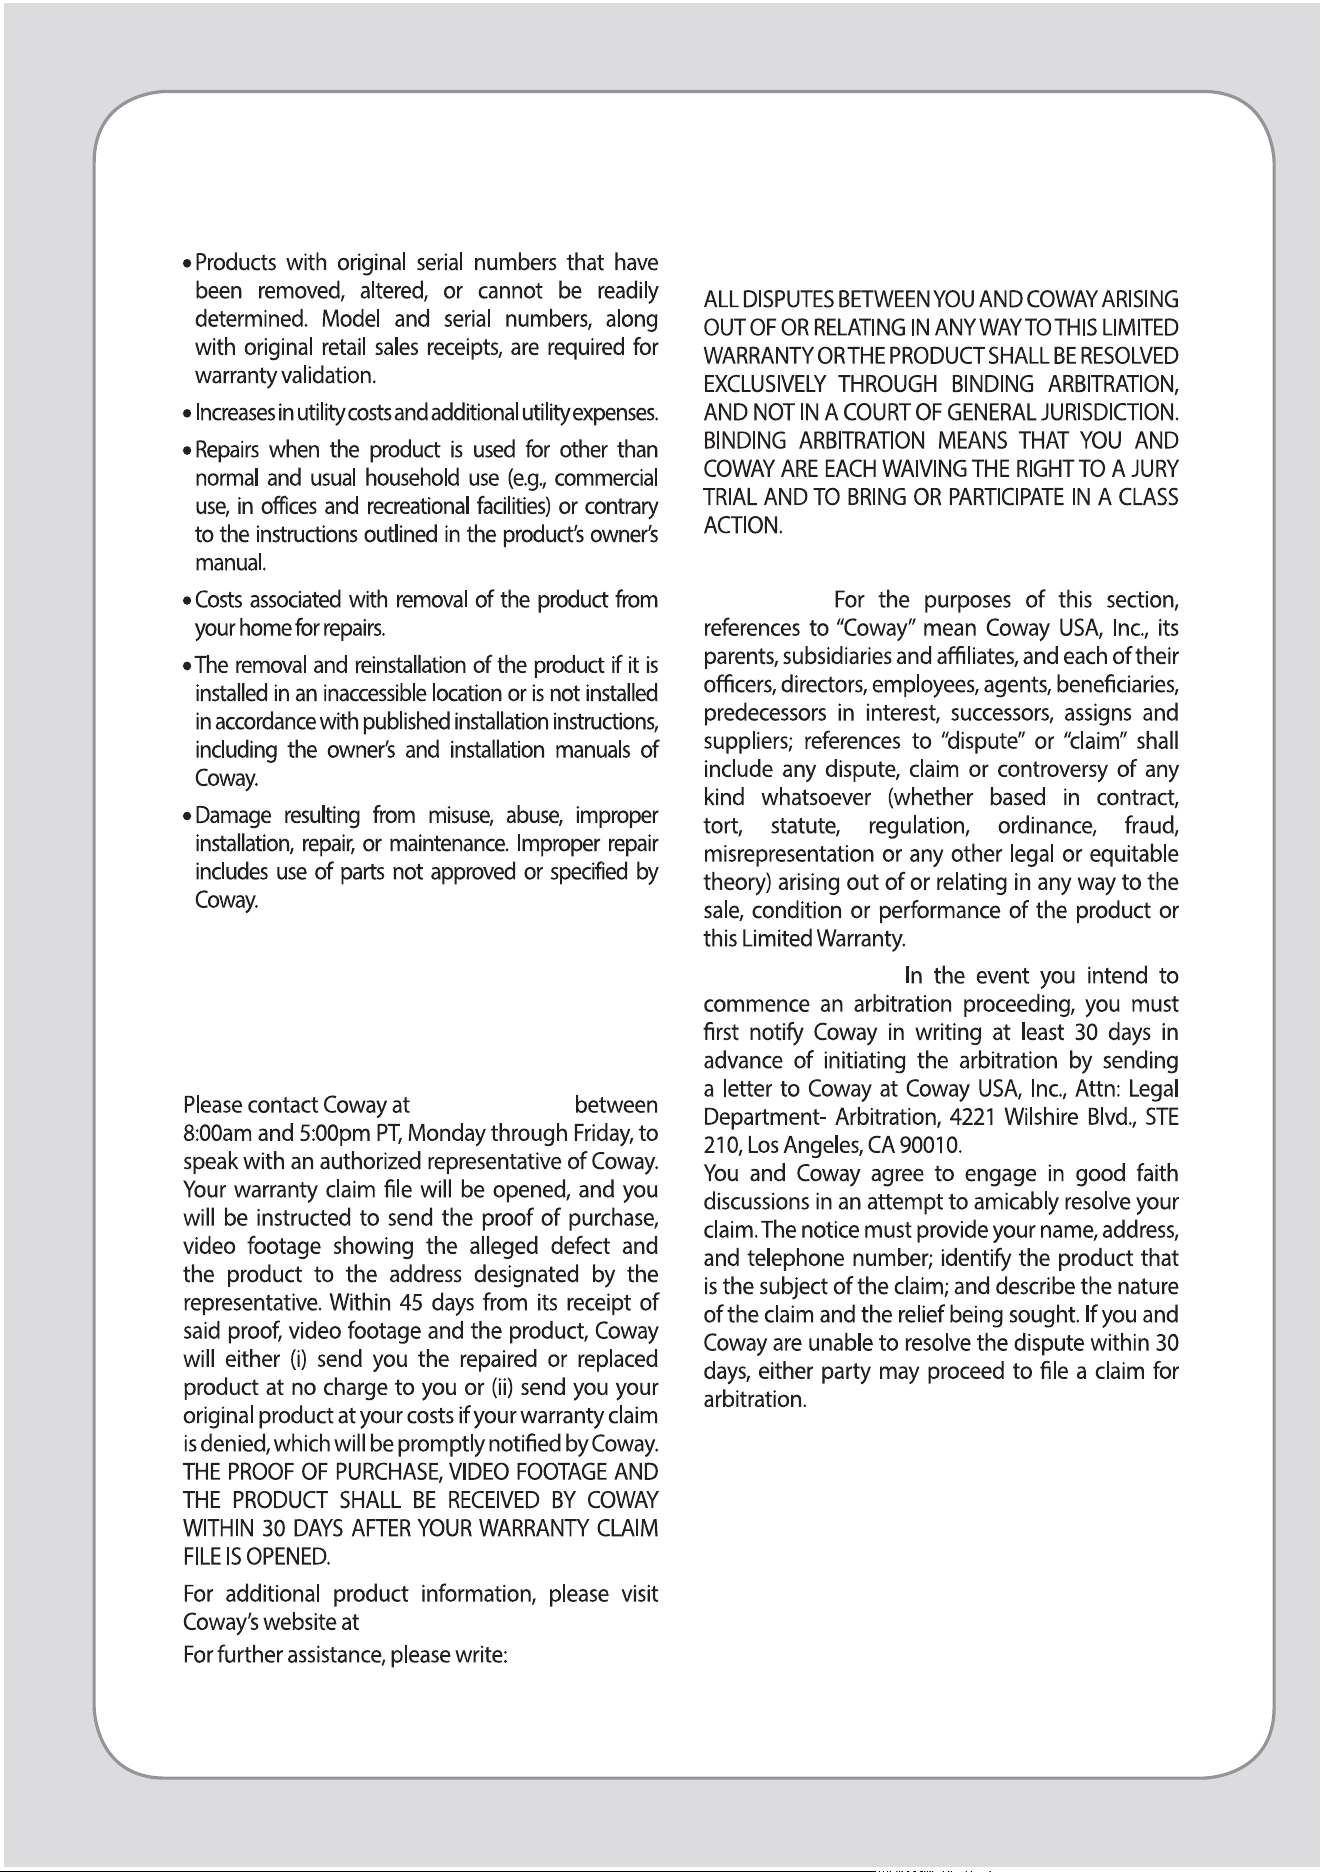
The cost of repair or replacement under these
excluded circumstances shall be borne by the
consumer.
TO OBTAIN WARRANTY SERVICE:
1-800-285-0982
http://www.cowaymega.com
Coway USA, Inc. 4221 Wilshire Blvd., STE 210
Los Angeles, CA 90010
PROCEDURE FOR RESOLVING DISPUTES:
Denitions.
Notice of Dispute.
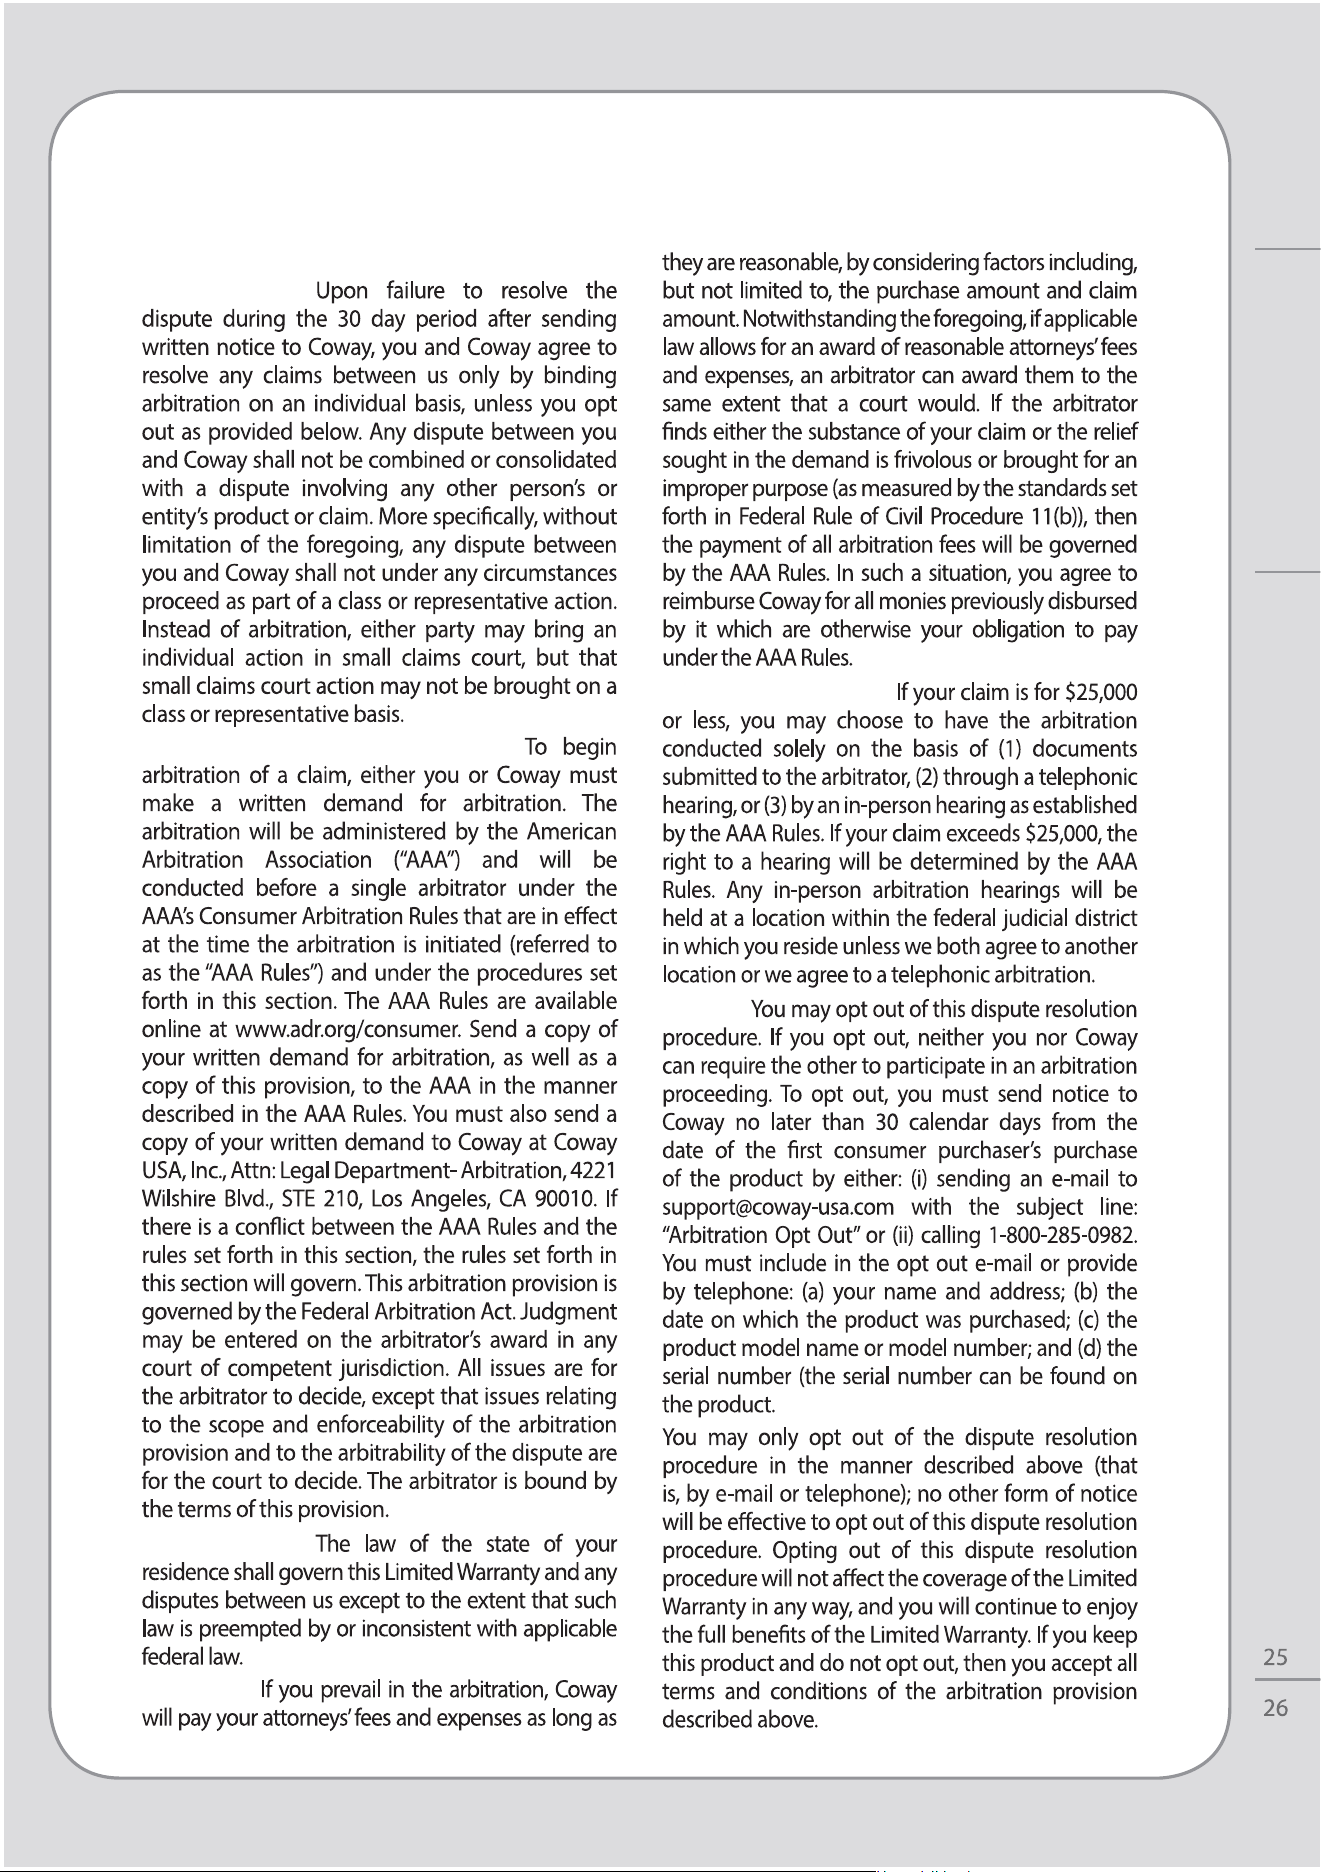
Agreement to Binding Arbitration and Class
Action Waiver.
Arbitration Rules and Procedures.
Governing Law.
Fees/Costs.
Hearings and Location.
Opt Out.
WARRANTY
Others

www.cowaymega.com
