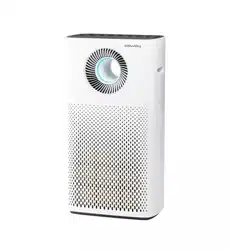
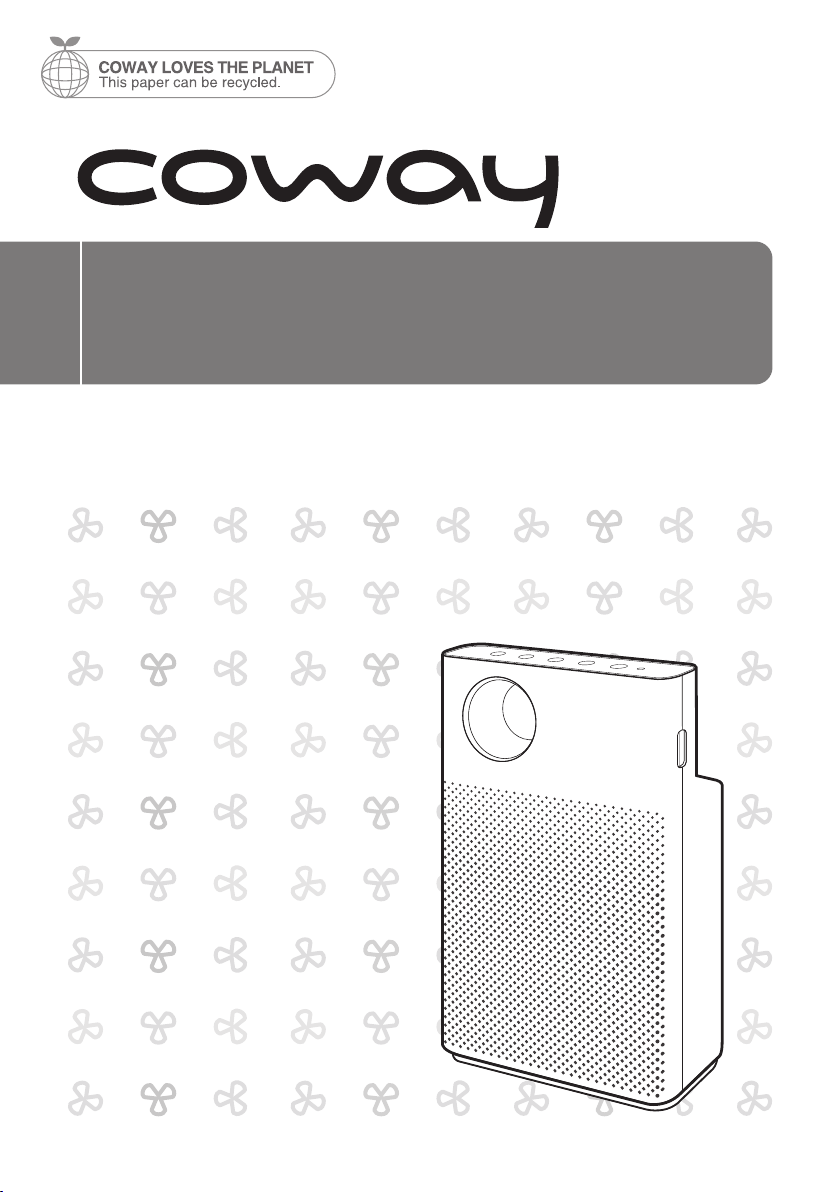
Coway Air Purier
AP-1018F
• This product is for domestic use only. It cannot be used in an overseas country
where the power voltage is dierent.
• Warranty card is included in this user’s manual.
• Read and save these instructions.

FEATURES
3. Detachable air vent grille
Detachable vent grilles are installed on the purier top
for easier, more eective cleaning than in other products
with xed covers.
4. Elegant design
A slim, neat design makes this purier blend in anywhere.
1.
Smart eco
The smart power saving feature automatically switches
to smart eco mode if the purier does not run for a set
period of time.
- Enters standby mode when the air stays clean for
at least 10 minutes.
2. Excellent air purication ability
A powerful HEPA lter removes ne dust from indoor
air as part of an optimized lter system that quickly
eliminates contamination.

2
1
DEAR CUSTOMERS
Thank you for using the Coway air purier.
Please be sure to read this instruction manual to use and maintain your air purier correctly.
If you experience any problems during use, you can refer to this instruction manual to resolve them.
This user manual contains the product warranty, so please store it safely.
CONTENTS
FEATURES / CONTENTS
Coway
- Keep your instruction manual in a readily accessible or visible place.-
FOR INFORMATION
MAINTENANCE
HOW TO USE
OTHERS
| 03 |
SAFETY INFORMATION
Danger
Warning
Caution
| 07 |
PARTS NAME
| 09 |
AIR PURIFICATION PROCESS
| 10 |
BEFORE USE
How to install lter
| 11 |
INDICATORS AND BUTTONS
| 13 |
HOW TO USE
| 14 |
ADJUST PARTICLE SENSOR
| 15 |
CLEANING METHOD
Product
Filter
| 17 |
FILTER REPLACEMENT
| 19 |
TROUBLE SHOOTING
| 20 |
PRODUCT SPECIFICATION
| 21 |
WARRANTY
SAFETY INFORMATION
DANGER : Failing to follow the precautions below may result
in serious injury or even death.
•
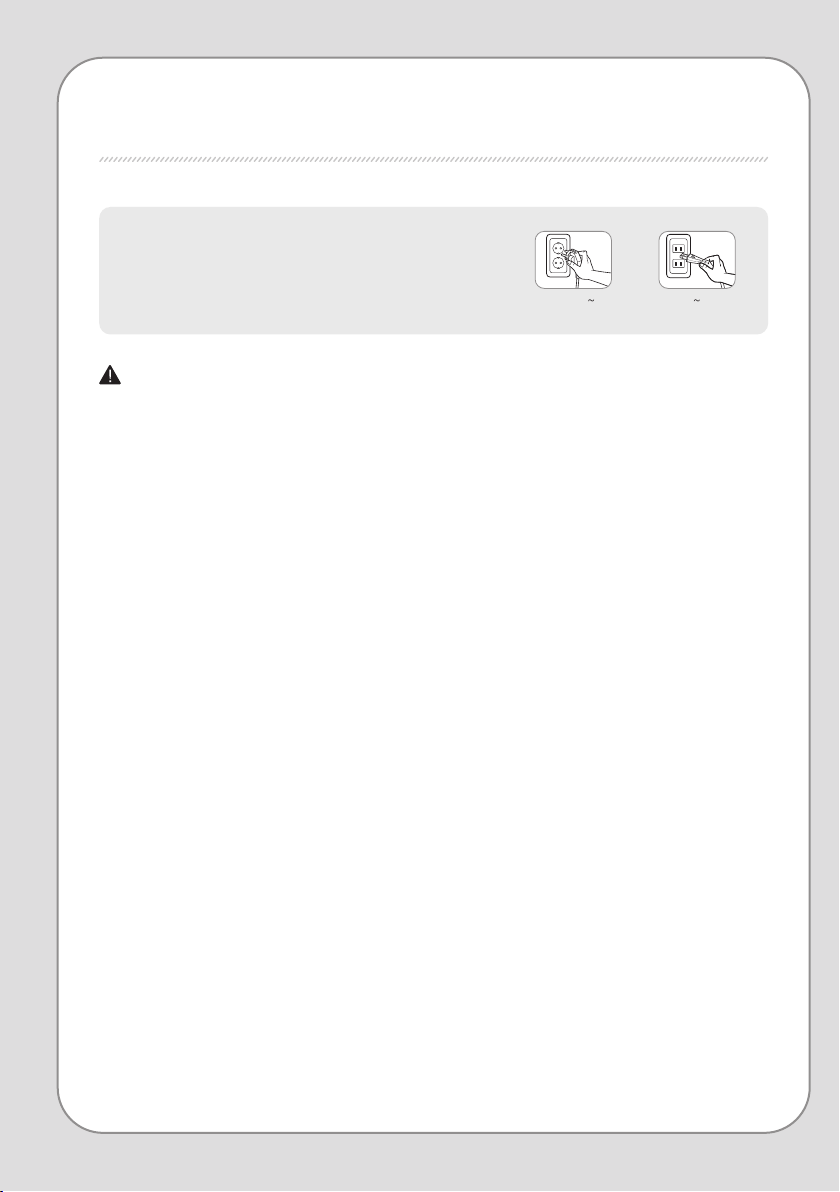
Do not use damaged power plugs or loose sockets.
•
The power plug must be plugged into 220 V – 240 V~ 50 Hz / 60 Hz.
•
Do not pull on the power cord to move the device.
•
Do not touch the power plug with wet hands.
•
To avoid damaging or warping the power cord, do not use excessive
force to bend the power cord or put heavy objects on top of it.
•
Do not repeatedly connect and disconnect the power plug.
•
If water enters the power supply, unplug the power and completely
dry before using again.
•
Be sure to unplug the power during product repair, maintenance or
part replacement.
•
If the power plug's pins or contact area become covered in dust or
water, wipe them thoroughly.
•
Do not plug several electric appliances into one socket, and use only
a dedicated socket.
•
Unplug the power when not used for a long time.
•
Do not carelessly connect or tamper with the power cord.
•
If the power cord is damaged, do not replace it yourself. Contact a
service center to have it replaced.
•
Do not install near electric heaters.
•
Do not put on top of electric products like heaters or televisions.
The following information is for user
safety that should be observed.
It is to ensure user safety and prevent property damage.
Please read the precautions carefully and use the
product correctly.
for 220 V - 240 V use only for 120 V use only

4
3
SAFETY INFORMATION | Danger
Coway
•
Do not install in places with a lot of humidity or dust or places where
water (rainwater) splashes.
•
Do not use or store combustible gases or ammable materials near
this product.
•
If there is a strange sound, burning smell, or smoke from the device,
immediately unplug the power plug and contact a service center.
•
Never immerse the product in water.
•
Do not spray ammable materials such as insecticides or air
fresheners on the intake.
•
Do not open, repair, or modify the device yourself.
•
Do not put bowls of water, chemicals, food, small metal objects, or
ammable materials on top of this product.
•
Unplug the power before cleaning.
•
If the purier falls over and gets wet during use, A/S maintenance is
required before further use.
•
Do not spray water directly on the device or use benzene, thinners,
etc. to wipe it during cleaning.
•
Do not insert sharp objects such as picks into the air quality sensor.
•
Do not put ngers or foreign matter (pins, sticks, coins, etc.) into the vent.
•
Do not let children hang from or climb on the purier.
•
Be careful that children do not put their hands in the vent.
•
Replace the lter with a new one when the time comes.
•
Do not spray water directly on the purier.

WARNING : Failing to follow the precautions below may
result in considerable physical injury or property
damage.
• Do not unplug by pulling on the power cord.
• Plug into a power socket connected to an earth leakage circuit breaker
(current sensitivity 30 mA or less).
•
If extending the power cord, only use with sockets and cords of 250V/15A
and use by itself.
•
Do not use in baths, showers, swimming pools, or other areas where the
purier may be in direct contact with water.
SAFETY INFORMATION
CAUTION : Failing to follow the precautions below may result
in slight physical injury or property damage.
• Do not unplug the power or move the purier while it is operating.
• If unusual sound, odor, or smoke comes from the purier, immediately
unplug the power and call our service center.
• Do not install on a slope.
• Do not excessively impact or use excessive force on this product.
• Use at least 20 cm away from walls or other objects on each side.
• Install the purier in a place where it is not blocked on any side so air
can circulate well.
• Install at least 2 m away from TVs and other electronic items.
•
Do not use in BBQ or other restaurants where odor, smoke, or oil may
occur.
• Do not use in direct sunlight.
• Do not install in a high place.
• Do not use extreme force on the purier.
6
5
• Do not push or lean on the purier. The purier may fall over.
• Do not use for a long time in places that are sealed or where children,
the elderly, or sick people are.
• Do not block the vent with laundry or curtains.
• Remove dust from the pre-lter with a vacuum cleaner or water.
• Periodically wash the pre-lter and dry it well in a shady place with
good ventilation.
• People with physical, sensory, or mental impairment as well as children
must be supervised or guided while using the device.
• It is advisable to supervise children so they do not play with the device.
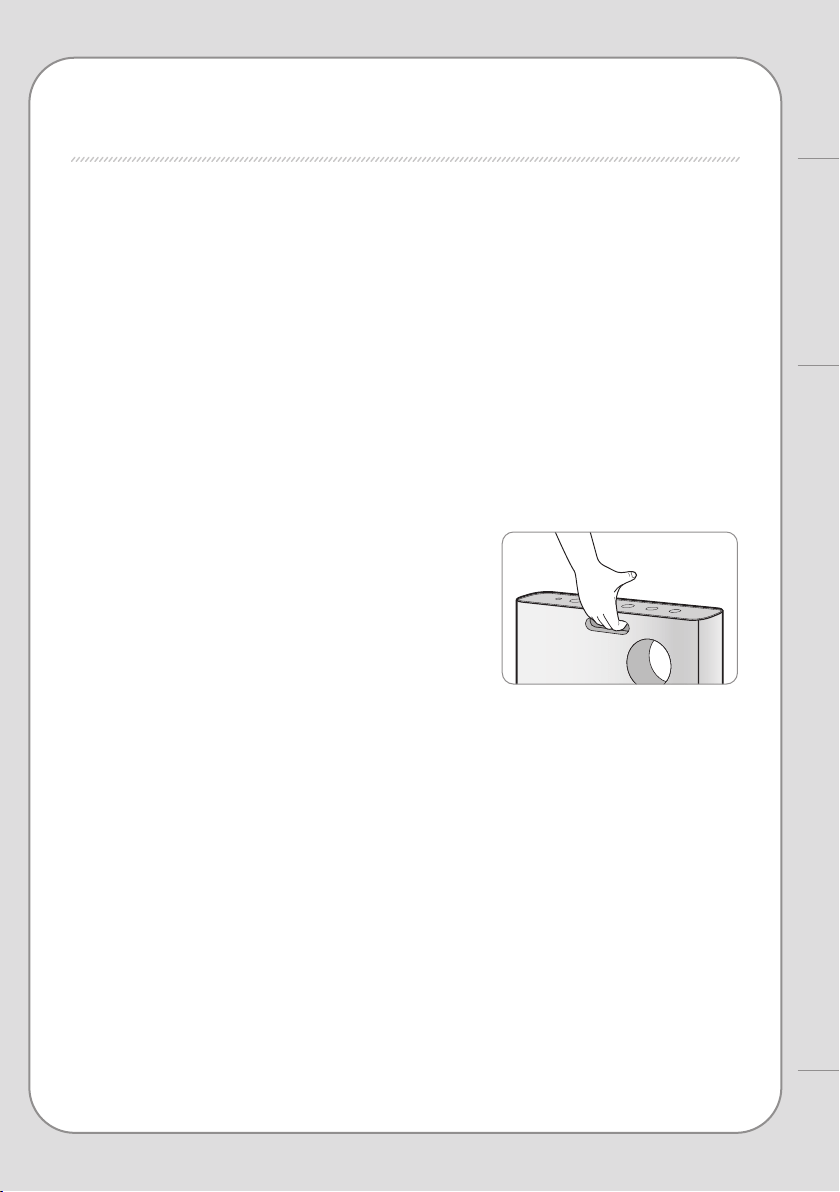
• When moving the purier, lift the top as
well with your thumb as in the photo.
The purier may fall over.
Coway
SAFETY INFORMATION
|
Warning | Caution
READ AND SAVE THESE INSTRUCTIONS
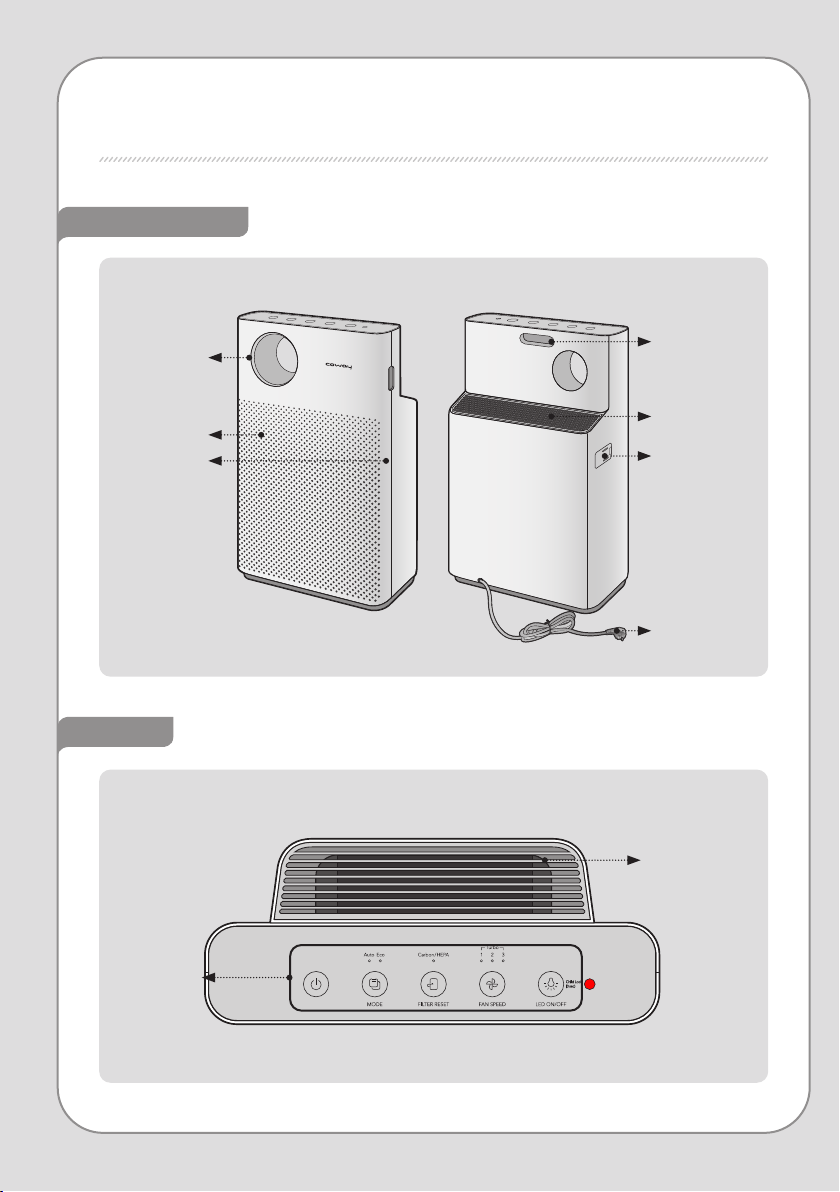
PARTS NAME
Top
Rear / Front
Detachable
top outlet grille
Indicators/
Buttons
Air vent
Power cord
Air quality
sensor
Rear handle
Air inlet
Front cover
Contamination
indicator

User manual
8
7
Coway
PARTS NAME
Components

AIR PURIFICATION PROCESS
■ Pre-lter
Removes large dust and mold, hair, pet fur, etc.
■ Deodorization lter
The granular activated carbon deodorizing lter eectively removes odors including food smells and
unpleasant household odors and harmful gases.
■ HEPA lter
The high-performance synthetic HEPA lter is excellent at removing cigarette smoke and ne dust.
1. Pre-lter
▶
▶
2. Deodorization lter 3. HEPA lter
10
9
BEFORE USE
How to Use
AIR PURIFICATION PROCESS / BEFORE USE
How to install lter
Please check before use
The product is for 220 V – 240 V~ 50 Hz / 60 Hz only.
Make sure to connect the power plug to a grounded electric outlet
(220 V – 240 V~ 50 Hz / 60 Hz) dedicated to the product.
- Be sure to install the lter after removing the plastic packaging.
- Only use it indoors.
- When not in use, remove the power plug from the socket.
- During lter assembly, check the front of the lters.
▶
Filter assembly order
:
HEPA lter
→
Deodorizing lter
→
Pre-lter
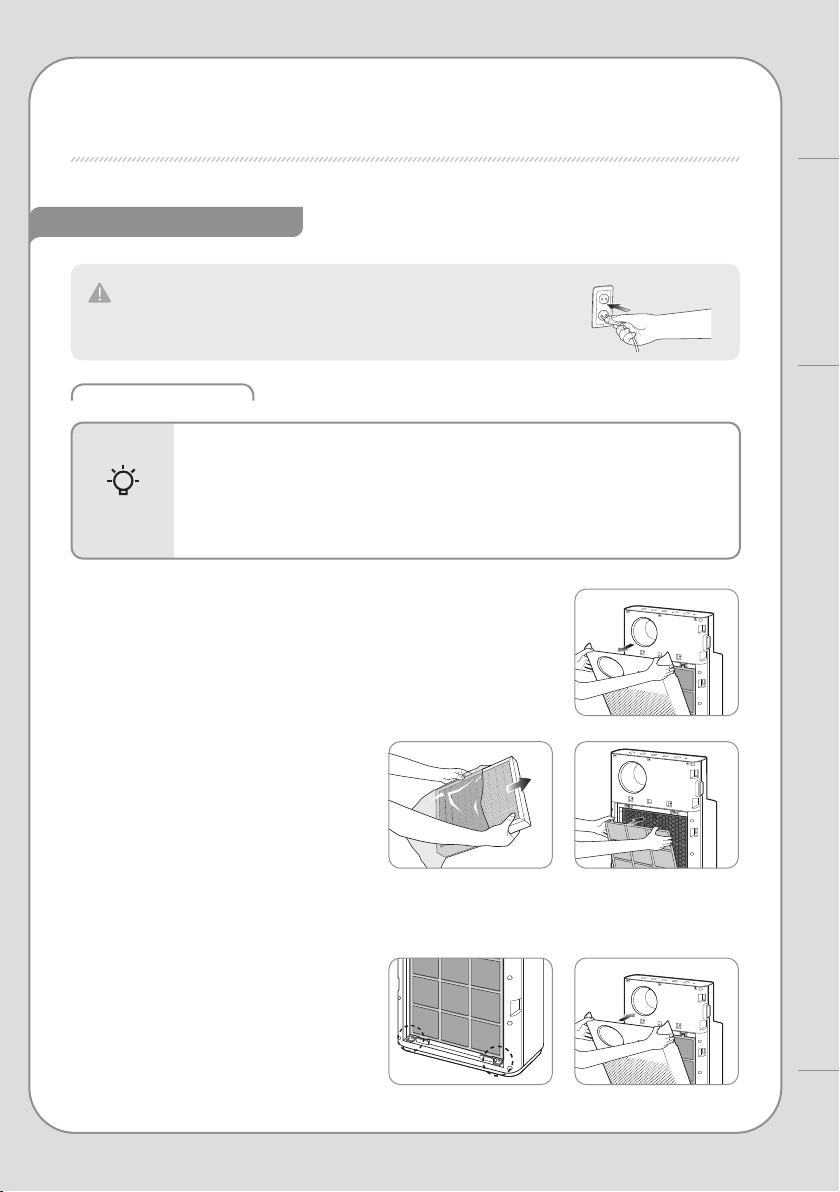
Tips
▶
1. Open the front cover.
Pull the upper part of the front cover to open.
3. Reattach the front cover.
Fit the two tabs on the bottom part of the
front cover into their slots and push to install.
If the front cover is not properly attached,
the product will not operate.
2. Take out the lter and remove
the plastic packaging.
Remove the plastic packaging from lters,
excluding the pre-lter, and assemble them
in the purier in order.
Filter assembly order : HEPA lter → Deodorizing
lter → Pre-lter
2
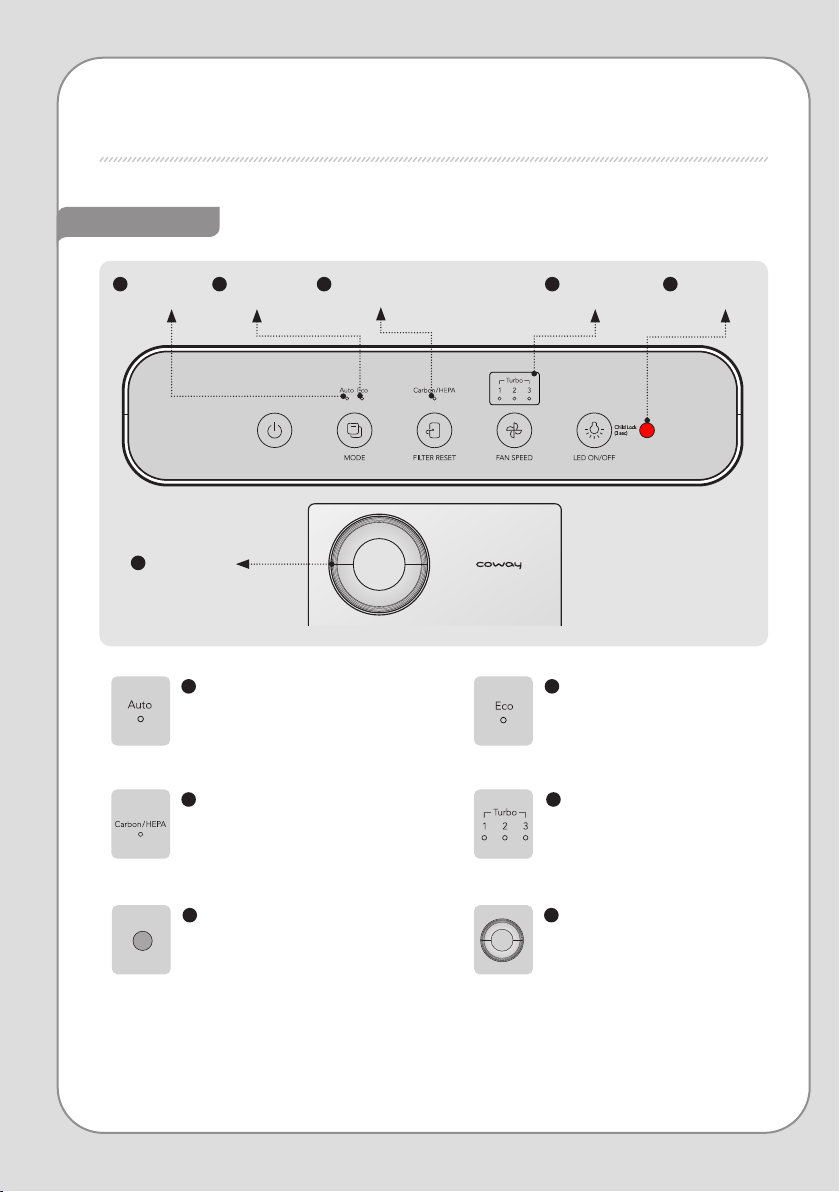
Eco mode indicator
This indicator is illuminated if
eco mode is on.
5
Light sensor
It indicates the air speed level from
1 to turbo. When it is turbo level,
all LED will be illuminated.
Indicators
INDICATORS AND BUTTONS
1
Auto mode indicator
This indicator is illuminated if
auto mode is on.
3
Filter replacement indicator
This indicator is illuminated when it is
time to replace the lters
(HEPA, CARBON).
4
Air speed mode indicator
Selected air speed level indicator
illuminates.
6
Air quality indicator
Indoor contamination is shown
by LED color.
Clean (blue) → Slight (green) →
Heavy (yellow) → Severe (red)
6
Contamination
indicator
1
Auto mode
indicator
2
Eco mode
indicator
3
Filter replacement
indicator
4
Air speed mode
indicator
5
Light sensor

1
Power button
2
Mode button
4
Air speed button
5
Mood/lock button
3
Filter reset
button
12
11
How to Use
INDICATORS AND BUTTONS
Buttons
1
Power button
Use when turning the purier on
and o.
The purier begins operating in auto
mode the rst time, and if it is turned o
and on again while in operation, runs in
the mode it was in before it stopped.
3
Filter reset button
Pressing 3 seconds resets the lter
change interval.
5
Mood/lock button
Turns the air quality indicator on or o.
Press once to turn o the air quality indicator, press again to turn o all indicators, and press one
more time to turn all indicators on.
Press and hold the lock button for 3 seconds to lock all buttons, and press and hold for another 3 seconds to unlock.
2
Mode button
Press the mode button to go from
Auto → Eco mode.
4
Air speed button
Press the air speed button to
cycle air speed between
1 → 2 → 3 → Turbo
▶
HOW TO USE
▶
- Plug the power plug into a socket before operating the purier.
- When the purier is turned on, it starts in auto mode by default.
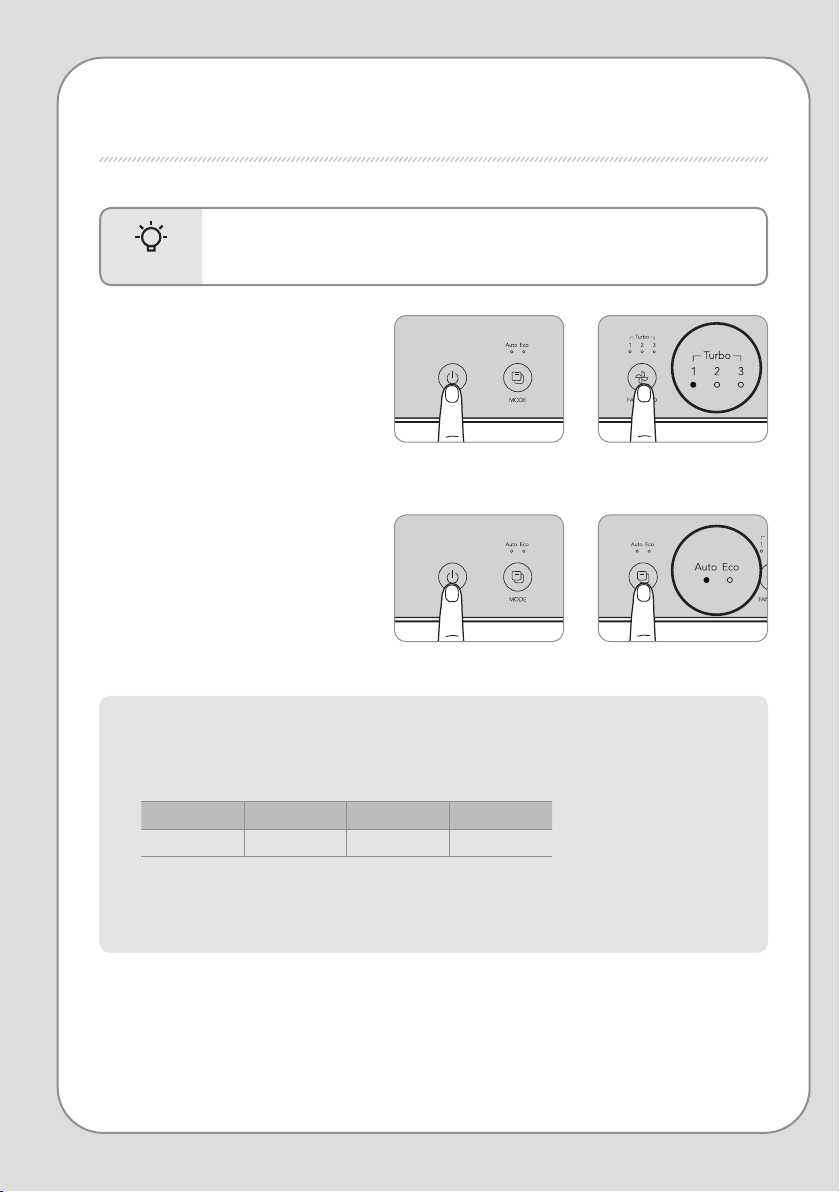
Tips
■ To op erate m anu all y
Press the power button to turn on the
purier, and press the air speed button to
choose your desired air speed.
(1 → 2 → 3 → Turbo)
Press the air speed button while operating
automatically (Auto / Eco) to immediately
convert to manual operation.
■ To op erate a uto mati ca lly
Press the power button to turn on the
purier and press the mode button to
select your desired operating mode.
(Auto → Eco)
▶ Auto mode
Operates eectively by automatically adjusting the air speed (auto level 1 → auto level 2 → auto level 3) depending
on the indoor pollution level detected by the sensor.
This is a convenient operating mode for most users.
Pollution level 1 Pollution level 2 Pollution level 3, 4
Air speed Auto level 1 Auto level 2 Auto level 3
The air speed indicator is o during auto mode.
▶ Eco mode
Enters standby mode when the air stays clean for at least 10 minutes.
14
13
How to Use
HOW TO USE / ADJUST PARTICLE SENSOR
When you rst turn on the purier, the air quality sensor is set to standard. You can adjust the
sensitivity as follows if the air quality LED stays at severe even after the purier runs for 2 hours or
more with high pollution or the air quality LED stays at clean even if the pollution is high.
How to adjust the sensitivity of the pollution sensor
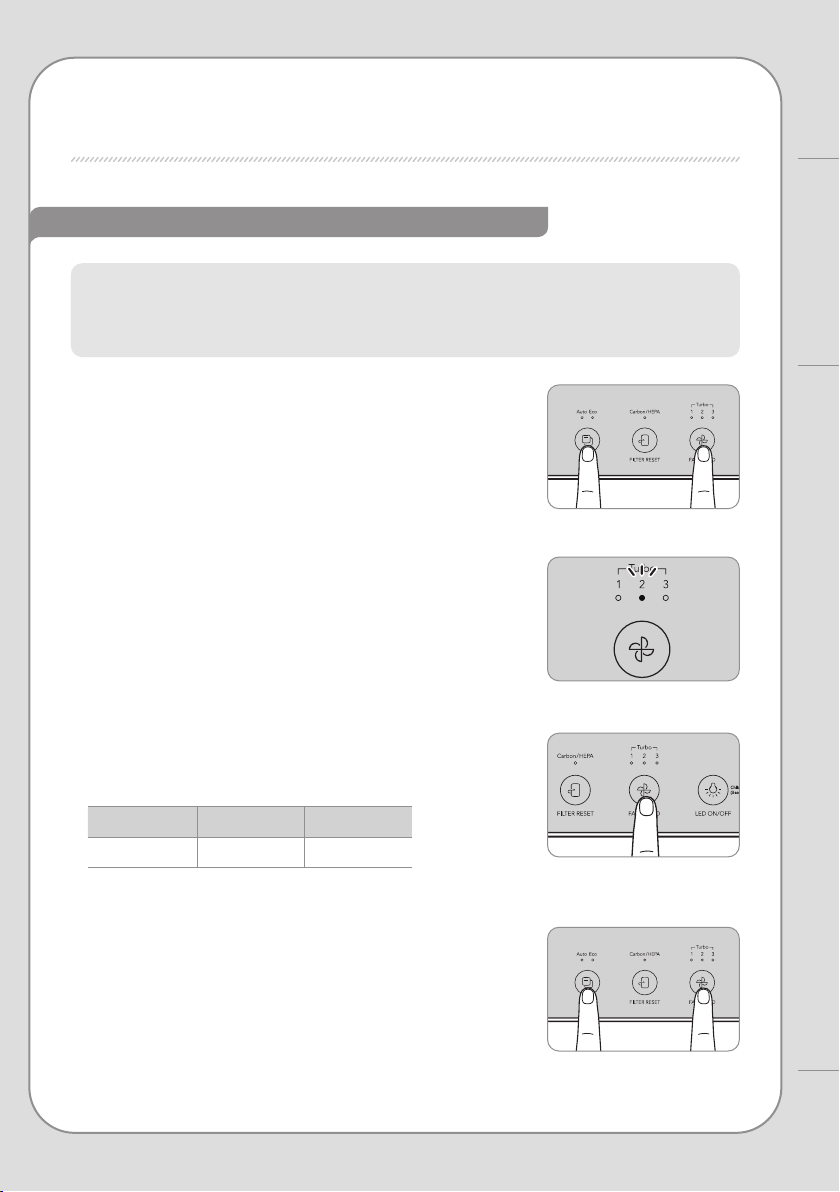
ADJUST PARTICLE SENSOR
1 sec.1 sec.
3 sec.3 sec.
1. Press and hold the air speed button and mode
button simultaneously for about 1 second while
the purier is running.
2. The air speed mode indicator ashes at intervals of
about 0.5 seconds.
4. Press the air speed and mode buttons
simultaneously for at least 3 seconds again
to enter your selected sensitivity to operate the
purier normally.
If the air speed button and mode button are not pressed for
10 seconds after selecting sensitivity, the selected sensitivity is
automatically input.
3. Press the air speed button to adjust to your desired
sensor sensitivity. When sensor sensitivity is selected,
the air speed mode indicator ashes as follows.
1 2 3
Sensitive Standard Insensitive
CLEANING METHOD
▶
Vent
Air inlet
▶
Dust outlet
Dust inlet
- Always unplug the power before cleaning.
- Do not use detergents containing organic solvents (solvents, thinners, etc.),
bleach, chlorine, or abrasives to clean.
- Do not immerse the purier in water or sprinkle water on it.
Tips
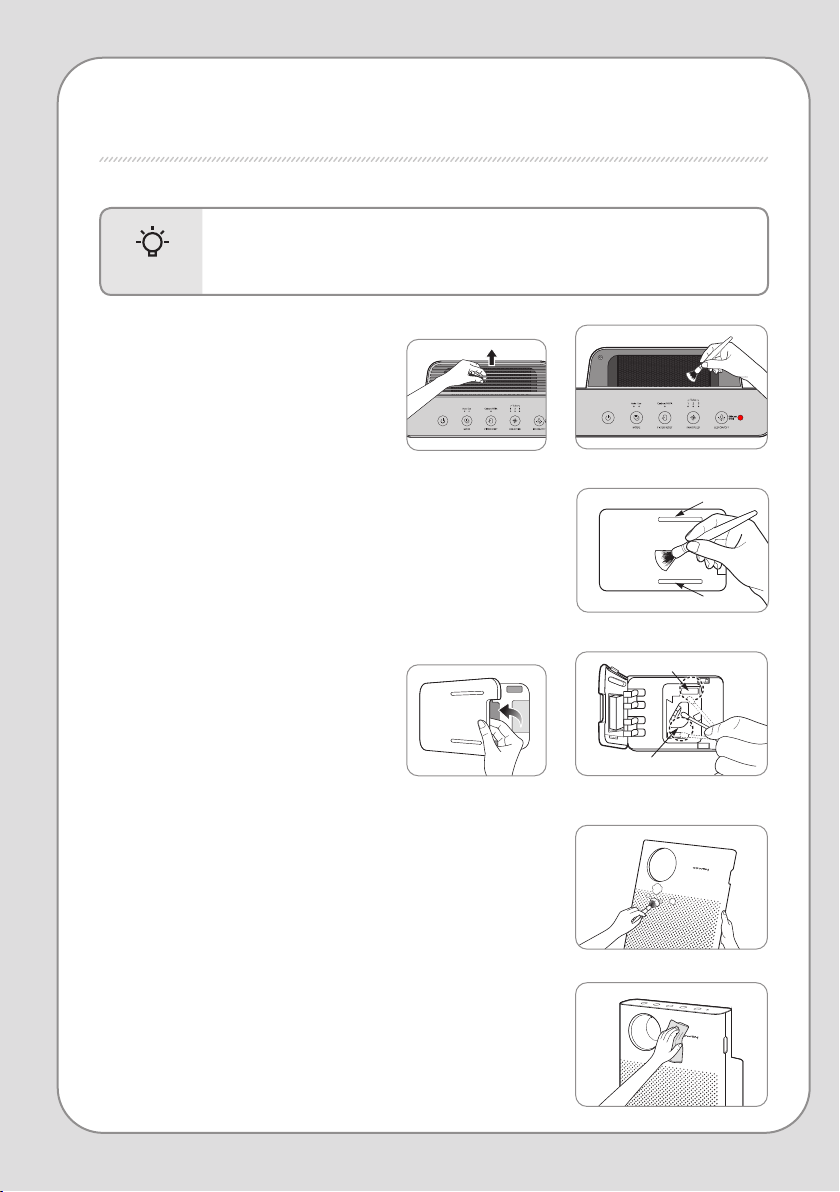
■ Cleaning the air quality sensor (clean every 2 months)
1. Clean the air quality sensor air inlet and vent with a soft brush
or vacuum cleaner.
Take care that dust does not fall inside the purier while cleaning.
2. Open the air quality sensor cover on the upper rear of the purier.
(Use the slots on the air quality sensor cover to open it.)
Wet a cotton ball with a small amount of water and
wipe the lens, dust inlet, and outlet, then
wipe again with a dry cotton ball to remove
moisture.
If cleaning is not done regularly, the air quality
sensor may not work as well.
Clean more often in very dusty environments.
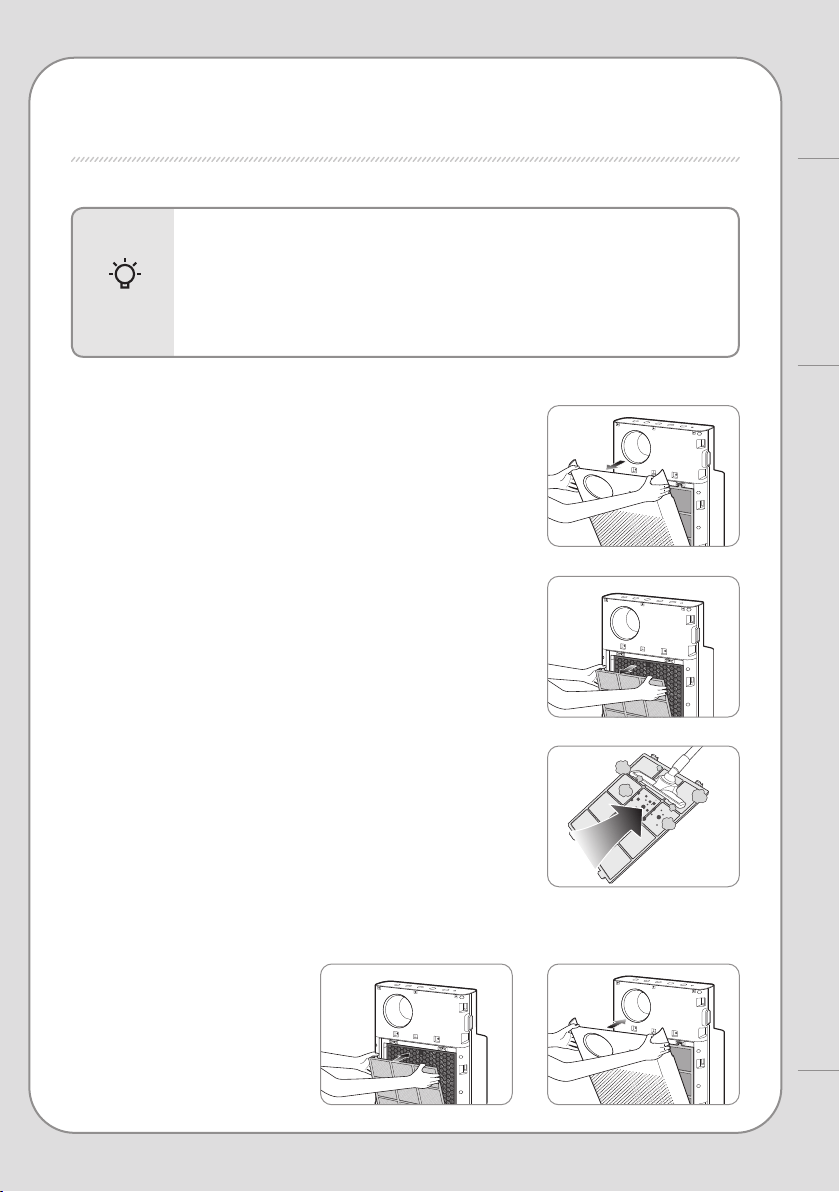
■ Cleaning the front cover
Remove the front cover from the purier and then wipe away dust
stuck to the surface with a soft, dry cloth or soft brush.
If there is severe contamination, use a damp cloth (do not use abrasives).
■ Cleaning the vent and detachable
vent grille
Lift the detachable vent grille on top of the
vent, then clean the grill and vent with a soft
brush or vacuum cleaner.
Be careful not to let dust enter the vent
while cleaning.
■ Cleaning the purier
Wipe with a soft, dry cloth.
If there is severe contamination, use a damp cloth (do not use abrasives).
16
15
CLEANING METHOD
Maintenance
▶
- Always unplug the power before cleaning the lters.
- The pre-lter can be reused after removing dust and cleaning with water.
- If the pre-filter is not cleaned for a long time, the product performance may
decrease and problems may occur.
- The tailored lter, deodorizing lter and HEPA lter cannot be reused after cleaning.
Never clean them with water.
Tips
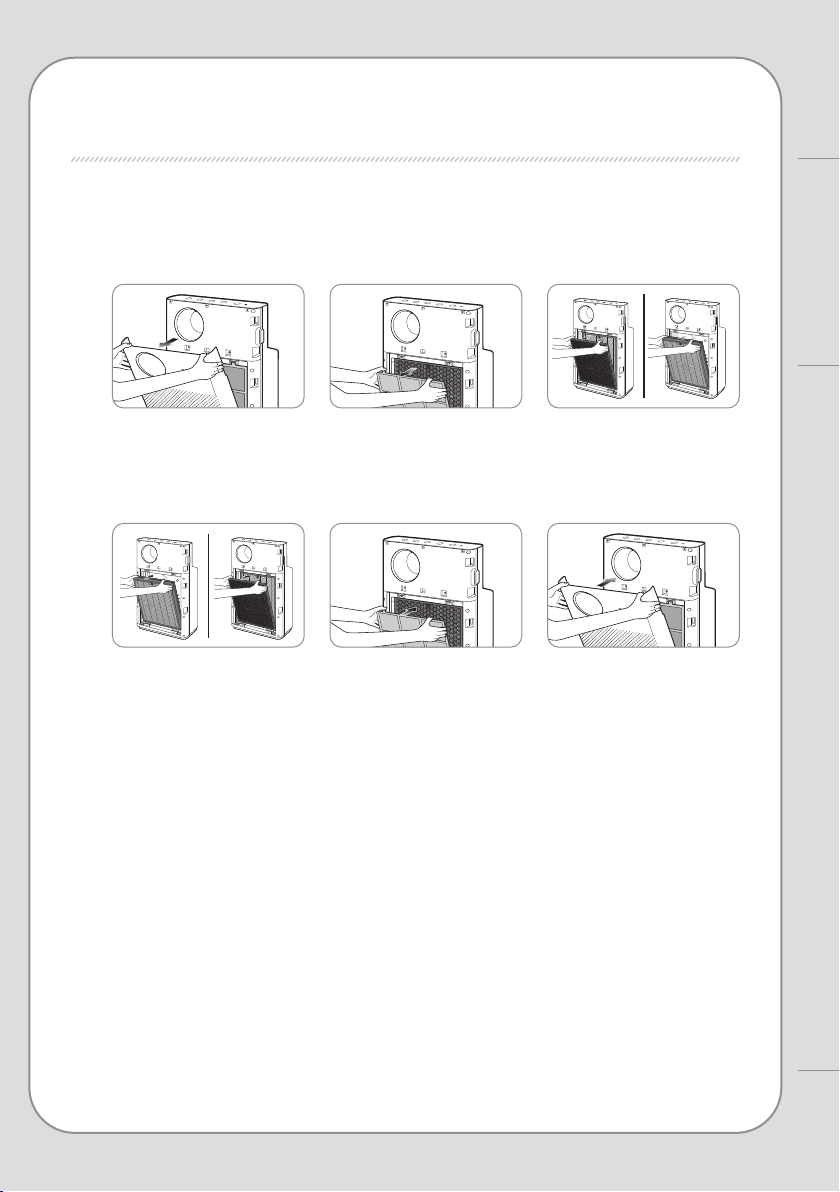
■ Pre-lter (clean every 2-4 weeks)
1. Pull the upper part of the front cover to open.
2. Pull the pre-lter handle to take it out.
Be careful that dust doesn't fall out during removal.
3. Remove dust with water or a vacuum cleaner depending on the
degree of contamination
Be careful not to let dust enter the purier while cleaning.
4. Push the completely dry pre-lter all the way into the purier to install it. Close the front cover again.

■ How to replace
- Refer to the lter installation method specied on page 10 to replace the lters.
- During lter assembly, be sure to check the front.
- Only use genuine Coway lters to keep the purier at its optimal performance.
- Always unplug the power plug before replacing lters.
■ Filter cleaning and replacement cycle
FILTER REPLACEMENT
Based on 24 hour (1 day) use at low air speed
The lter replacement cycle is the recommended cycle and may vary depending on usage environment.
Filter
Cleaning /
replacement time
Cleaning /
replacement
Pre-lter Once / 2-4 weeks Clean and wash
Deodorization lter Once / 12 months Replace
HEPA lter Once / 12 months Replace
18
17
FILTER REPLACEMENT
Maintenance
▶ ▶
▶ ▶
■ How to replace deodorizing/HEPA lters (replace every 12 months)
1. Open the front cover and remove the pre-lter from the purier, then take out the deodorizing lter
and HEPA lter.
2. Replace them with a new deodorizing lter and new HEPA lter with the plastic packaging removed.
Reassemble the purier in the reverse order you disassembled it and close the front cover.
Check the lters' front display.

TROUBLE SHOOTING
The product may not operate correctly due to trivial reasons or inexperienced usage, although
these are not product malfunctions.
In such cases, the problem can be solved easily without the
help of a service center
if the following items are checked. If the problem is not resolved even after
checking the following,
please contact a service center.
Problem Check Possible Solutions
There is no breeze.
• Is the power plugged in?
Plug the power cord into a 220 V - 50 Hz
socket.
• Is the entire display o?
Press the power button, then select your
desired feature.
• Is there a power failure?
After the power comes back on, use the
purier.
Air speed doesn't
change.
• Is the automatic indicator o?
You can o nly se lec t air sp eed in ma nua l
mode (normal).
• Is the silent indicator o?
You can o nly se lec t air sp eed in ma nua l
mode (normal).
Air speed is very low.
• Is it past time for lter cleaning and
replacement?
Check your lter cleaning and
replacement cycle and clean or replace
lters.
Pollution level
doesn't change.
• Is there dust on the air quality sensor
lens ?
Clean the air quality sensor lens (p. 15).
• Does the pollution level continuously
appear high?
Set your pollution sensitivity to
insensitive or standard (p. 14).
• Does the pollution level continuously
appear low?
Set your pollution sensitivity to sensitive
or standard (p. 14).
There's a smell from
the vent.
• Is it past time for lter cleaning and
replacement?
Check your lter cleaning and
replacement cycle and clean or replace
lters.
The air quality
indicator ashes.
• Request service.
If other functional
aws occur
• Check the problem, then unplug the power and request service.
20
19
TROUBLE SHOOTING / PRODUCT SPECIFICATION
Other
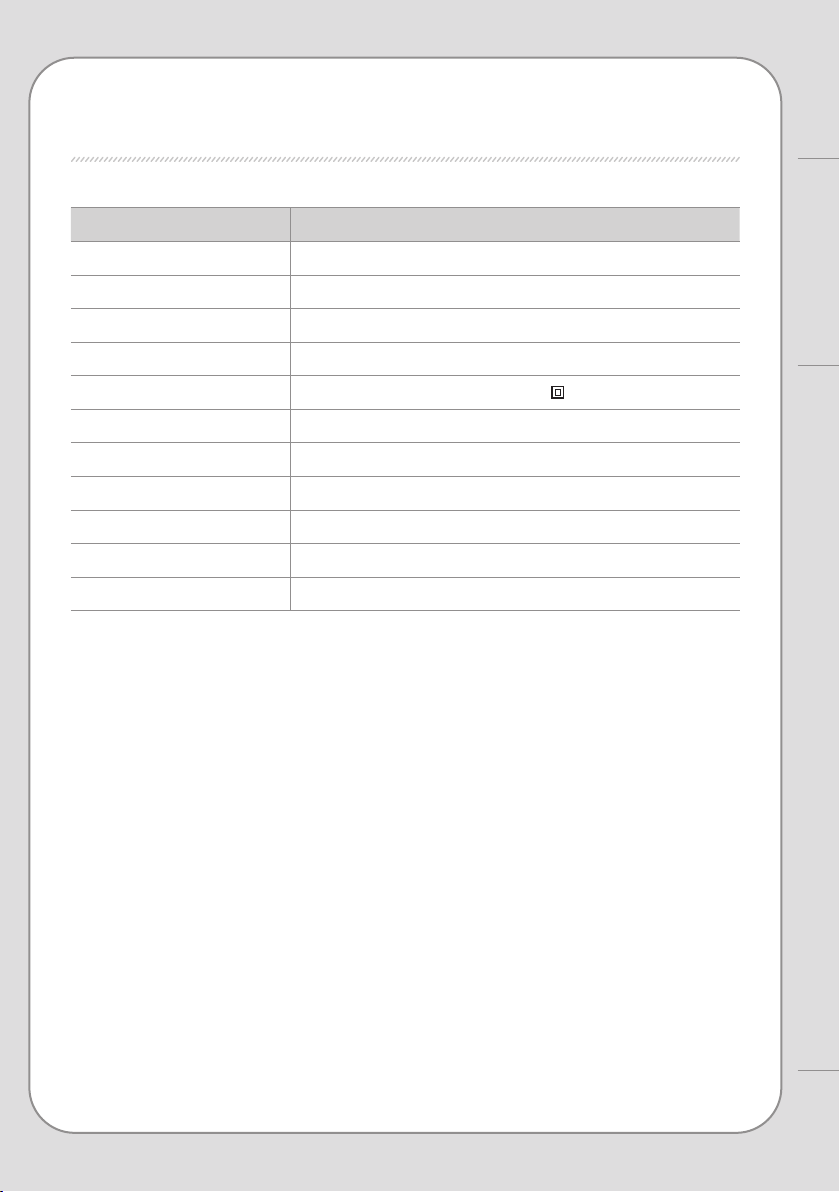
Product name Air purier
Model name AP-1018F
Rated voltage Refer to the rating plate
Phase Single-phase
Power consumption 38 W
Product insulation grade Class 2 device
Dust collection method Mechanical dust intake (HEPA lter)
Safety equipment Power blocked during door opening/closing
Installation location Indoors
Recommended area for use
33 ㎡
Product size 376 mm (width) x 183 mm (depth) x 641 mm (height)
Net weight 7.25 kg
▶ Specications may vary slightly without prior notice to improve product performance.
PRODUCT SPECIFICATION

WARRANTY DETAILS
Congratulations on your purchase! It is our aim to provide you with quality products
that you can trust. Our products come with guarantees that cannot be excluded
under the Australian Consumer Law. You are entitled to a replacement or a refund for
a major failure and for compensation for any other reasonably foreseeable loss or
damage.
You are also entitled to have the goods repaired or replaced if the goods fail to be of
acceptable quality and the failure does not amount to a major failure.
The Guarantee
The product is guaranteed to be free from defects in workmanship and parts for a
period of 24 months from date of purchase for domestic use and 12 months for
commercial use. Defects that occur within this warranty period, under normal use and
care, will be repaired, replaced or refunded at our discretion, solely at our option with
no charge for parts and labour. The benefits conferred by this warranty are in addition
to all rights and remedies in respect of the product that the consumer has under the
Trade Practices Act and similar state laws.
Proof of Purchase
This warranty is valid for the original purchase and is not transferable. Please keep
your purchase docket or receipt as proof of purchase and as proof of date on which
the purchase was made. The purchase docket (or a copy) or receipt must be
presented with the warranty when making a claim under this warranty.
Service during the Warranty Period
To claim for warranty, contact us on 1300 800 200 or [email protected] to
get an RA# (Return Authorization Number). Ensure that the RA# is clearly stated on
the outside of the packaging and that the product is properly packaged so that no
damage occurs to the product during transit. Shipping of the product back to us for
warranty will be at your cost. A product return without the RA# or proof of purchase
will not be accepted.
Extent of Warranty
This warranty is limited to defects in workmanship or parts. All defective products or
parts will be repaired or replaced. This warranty does not cover manuals and
packaging.
Normal Wear and Tear
This warranty does not cover normal wear and tear to the product or parts.

WARRANTY DETAILS
Coway
22
21
Exclusions
This warranty does not cover:
• Any defect caused by an accident, misuse, abuse, improper operation, lack of
reasonable care, unauthorised modification, loss of parts, tampering or attempted
repair by a person not authorised by the distributor.
• Any product that has been damaged by a lightning strike either directly or indirectly
or a main power surge or liquid ingress.
• The product if it is located outside of Australia.
• Any damage caused by improper power input or improper cable connection.
Andatech Pty. Ltd.
PO Box 3038, Nunawading VIC 3131, Australia.

www.coway.com
9235900
001