
Loading ...
Loading ...
Loading ...
10
Built-in Under-counter Instructions
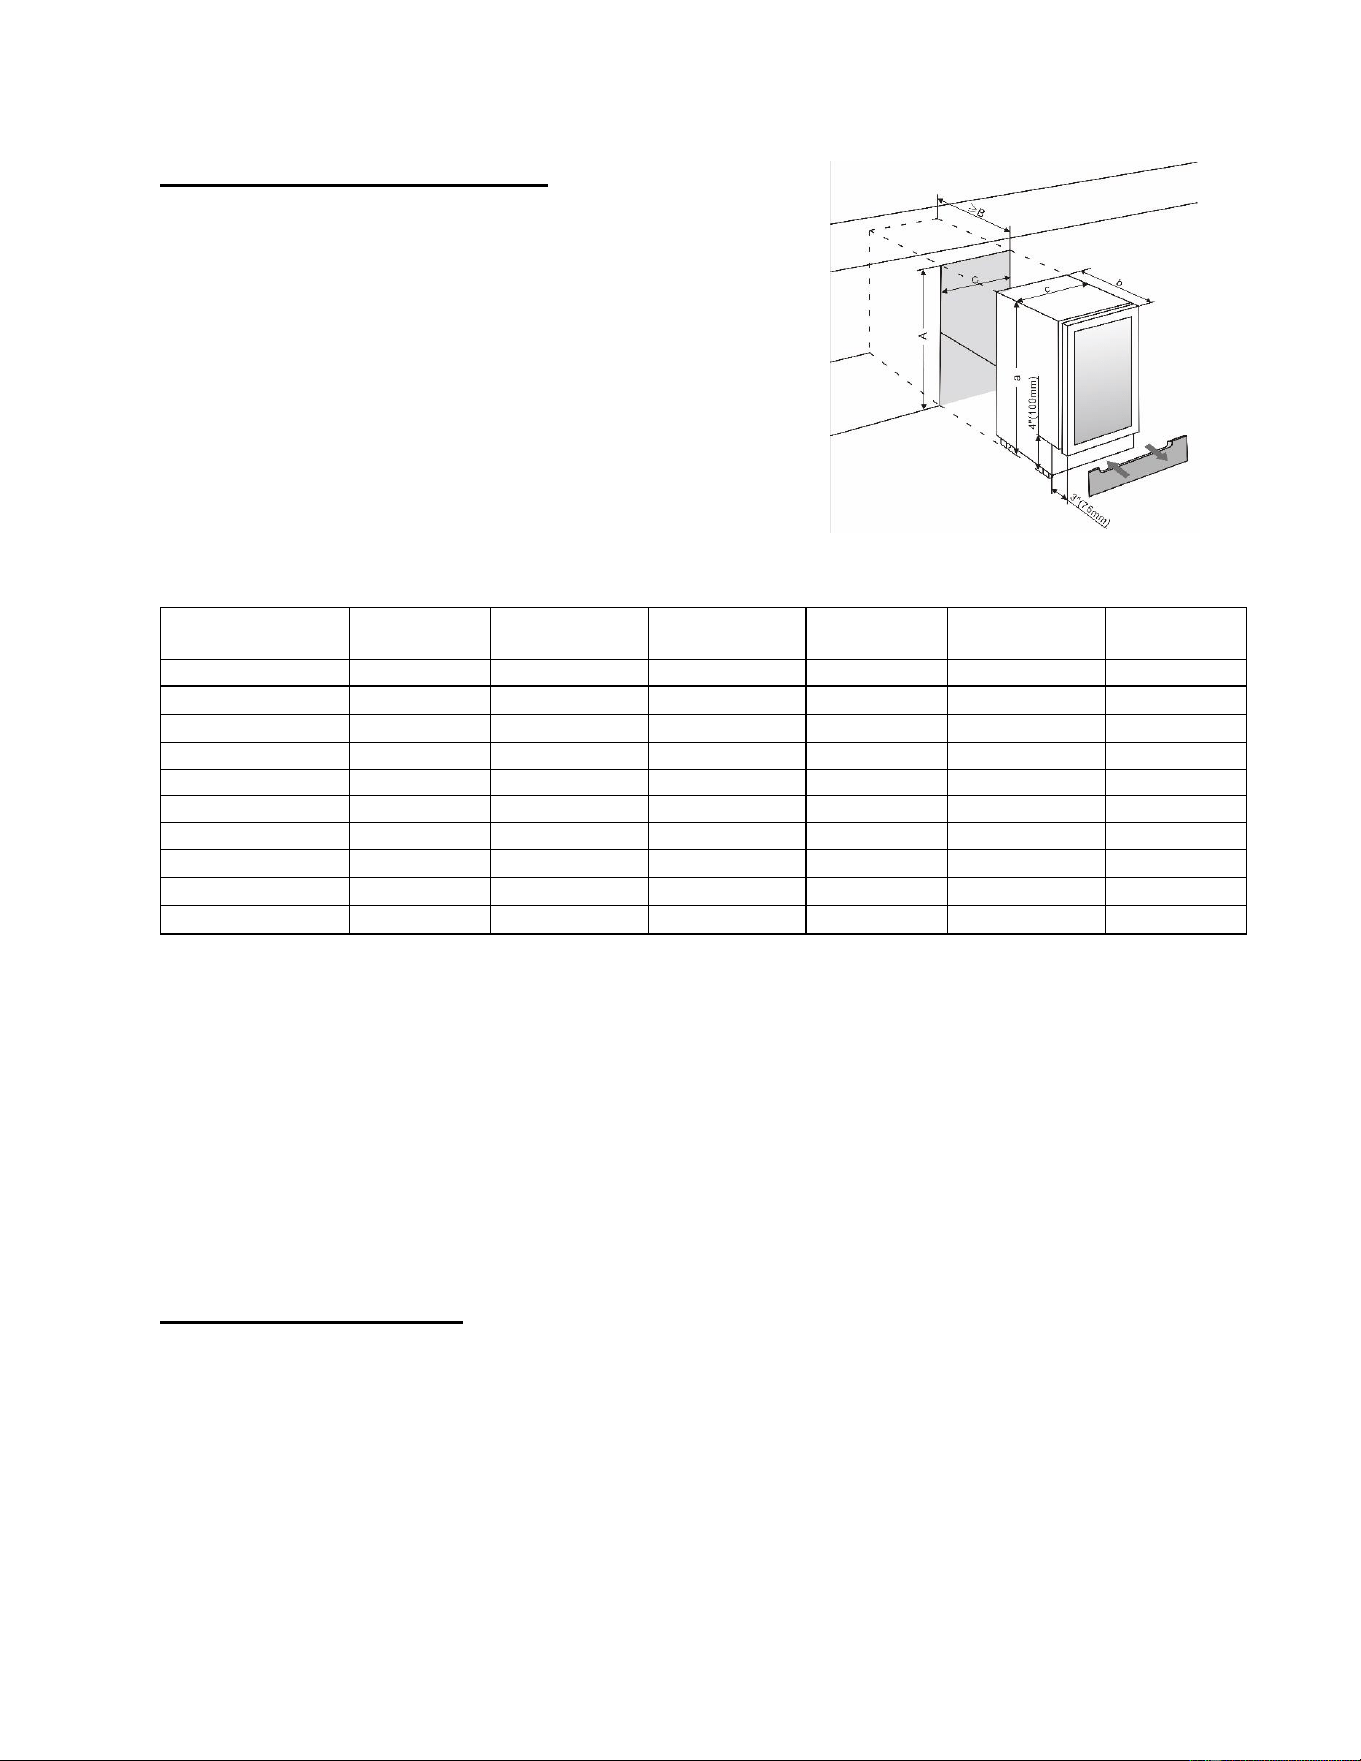
Make sure your installation does not block the front ventilation
grille. The unit is designed to fit under worktops, using the
height-adjustable ventilation grille to ensure that the feet are
concealed from front view.
If the unit is fully integrated to be installed for fitting kitchen
plinth, make sure that the ventilation gaps in the plinth are at
least 300 square centimeters and remove the ventilation
grilles, so that warm air can disperse unhindered. Otherwise,
the appliance has to work harder, resulting in an increase in
electricity consumption.
NOTE: When pushing the appliance into the niche, make
sure that the mains cable does not get trapped.
Model No.
a
(Inch/mm)
b
(Inch/mm)
c
(Inch/mm)
A
(Inch/mm)
B
(Inch/mm)
C
(Inch/mm)
ALBV15
32" / 813
23½" / 595
14⅞" / 377
32⅛" / 816
23⅝" / 600
15" / 380
CL181WBV
32" / 813
22¾" / 575
17¾" / 449
32⅛" / 816
22¾" / 575
18" / 455
AL57GPNR
32" / 813
22¾" / 575
23½" / 596
32⅛" / 816
22¾" / 575
23⅝" / 600
ASDW1522
32" / 813
18" / 455
14⅞" / 377
32⅛" / 816
18" / 455
15" / 380
SDHW1532
34" / 864
18" / 455
14⅞" / 377
34⅛" / 866
18" / 455
15" / 380
ASDW2412
32" / 813
18" / 455
23½" / 596
32⅛" / 816
18" / 455
23⅝" / 600
SDHW2442
34" / 864
18" / 455
23½" / 596
34⅛" / 866
18" / 455
23⅝" / 600
CL155WC1
34" / 864
22¾" / 575
14⅞" / 377
34⅛" / 866
22¾" / 575
15" / 380
CL18WC
34" / 864
22¾" / 575
17¾" / 449
34⅛" / 866
22¾" / 575
18" / 455
CL244WC2
34" / 864
22¾" / 575
23½" / 596
34⅛" / 866
22¾" / 575
23⅝" / 600
NOTE:
1. Models ALWC15, DBWC1541ADA and DBGR1562ASD have the same size as ALBV15.
2. Models CL18WC, DBWC1846 and DBGR1834 have the same size as CL181WBV.
3. Models ALFD24WBV, DBGR2461ADA and DBFD2495ADA have the same size as AL57GPNR.
4. Models ASDG1521, DBGR1563ASD and DBWC1542ASD have the same size as ASDW1522.
5. Models SDHG1533, DBGR1565SD and DBWC1544SD have the same size as SDHW1532.
6. Models ASDG2411, DBGR2464ASD and DBWC2443ASD have the same size as ASDW2412.
7. Models SDHG2443, DBGR2466SD and DBWC2445SD have the same size as SDHW2442.
8. Models CL156BV, DBWC1549 and DBGR1569 have the same size as CL155WC1.
9. Models CL181WBV, DBWC1846 and DBGR1834 have the same size as CL18WC.
10. Models CL24BV1, CLFD243WBV, DBWC2447, DBGR2435 and DBFD2496 have the same size
as CL244WC2.
Anti-tip Bracket Installation
To reduce the risk of tipping the unit by abnormal usage or improper loading, the appliance must be
secured by properly installing the anti-tip device packed with the appliance.
• Place the anti-tip bracket on the floor as shown in the figure. An anti-tip bracket must be installed
at the left side.
• Mark the locations of the 4 holes of the anti-tip bracket on the floor.
• Use a 5/16” masonry drill bit and insert plastic anchors.
• Secure bracket to floor using screws.
• Slide appliance into position and make sure the leg engages the anti-tip bracket.
Loading ...
Loading ...
Loading ...