Please give us a chance to make it right and do better !
Contact our friendly customer service department for help first.
Replacements for missing or damaged parts will be shipped ASAP !
Contact Us !
Do NOT return this item.
US:cs.us@costway.com
UK:cs.uk@costway.com
AU:cs.au@costway.com
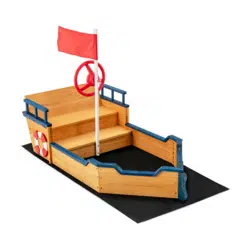
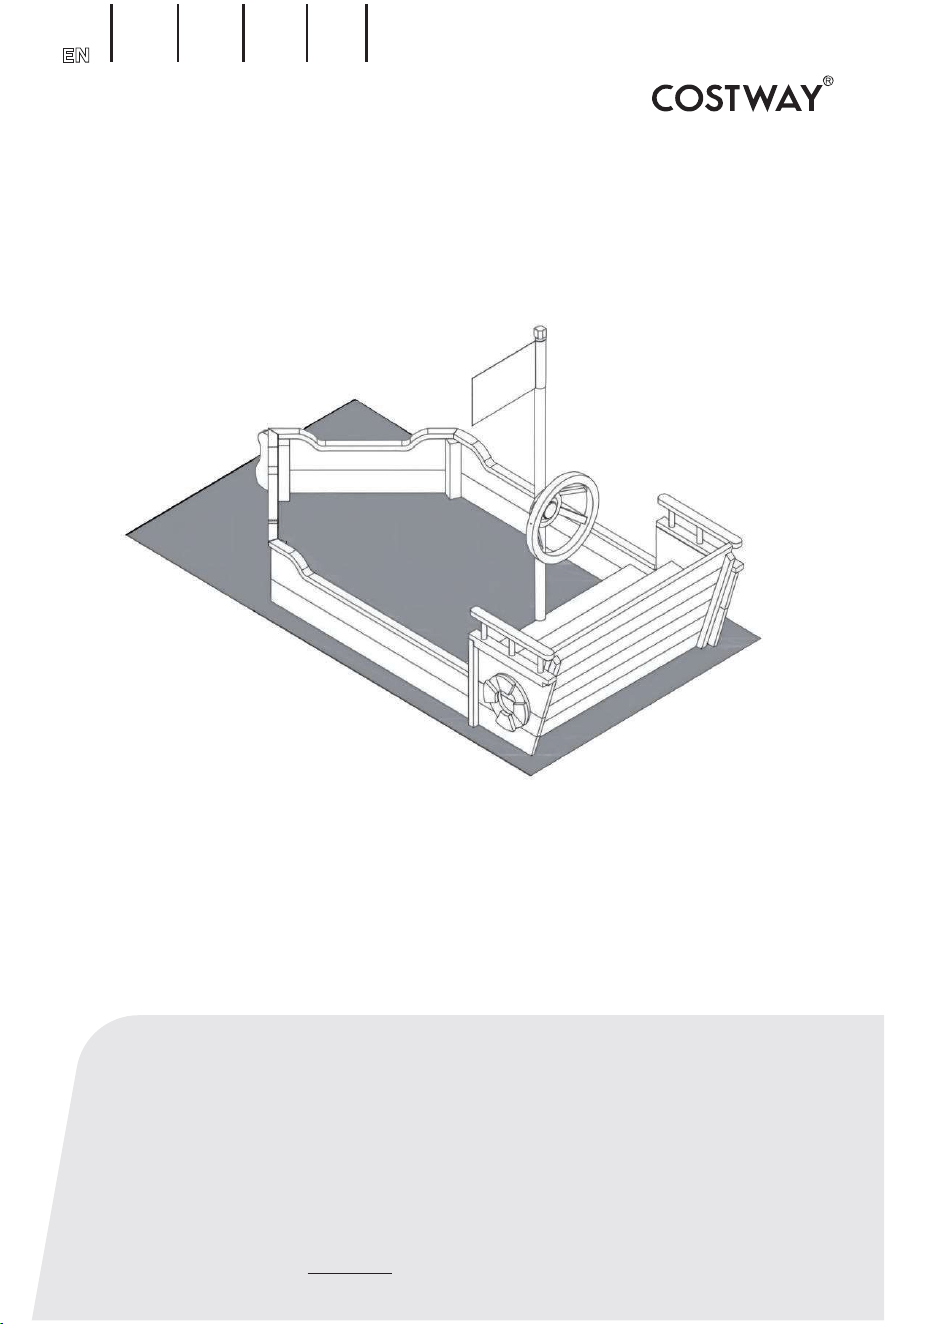
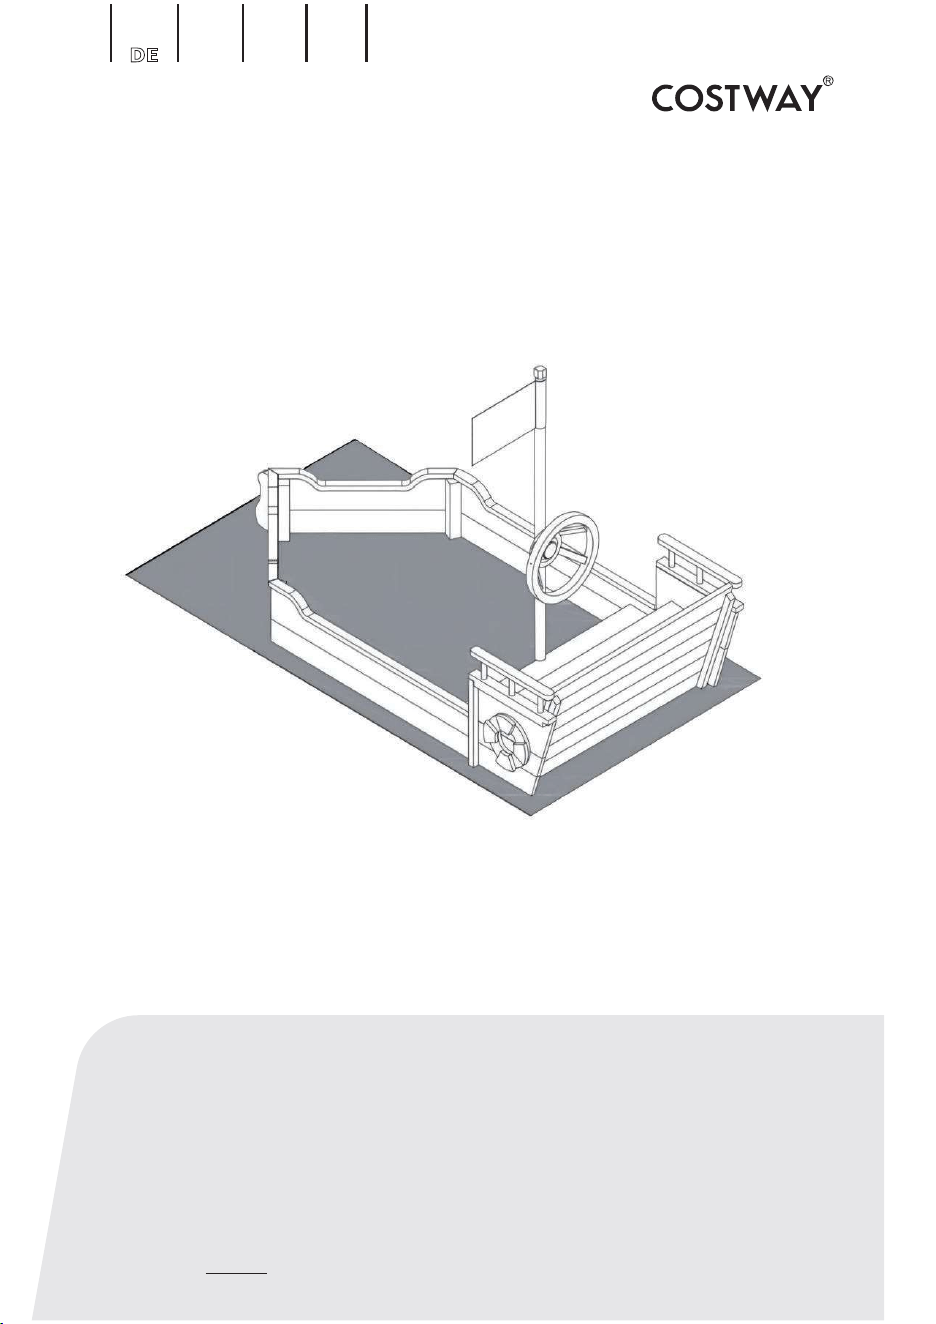
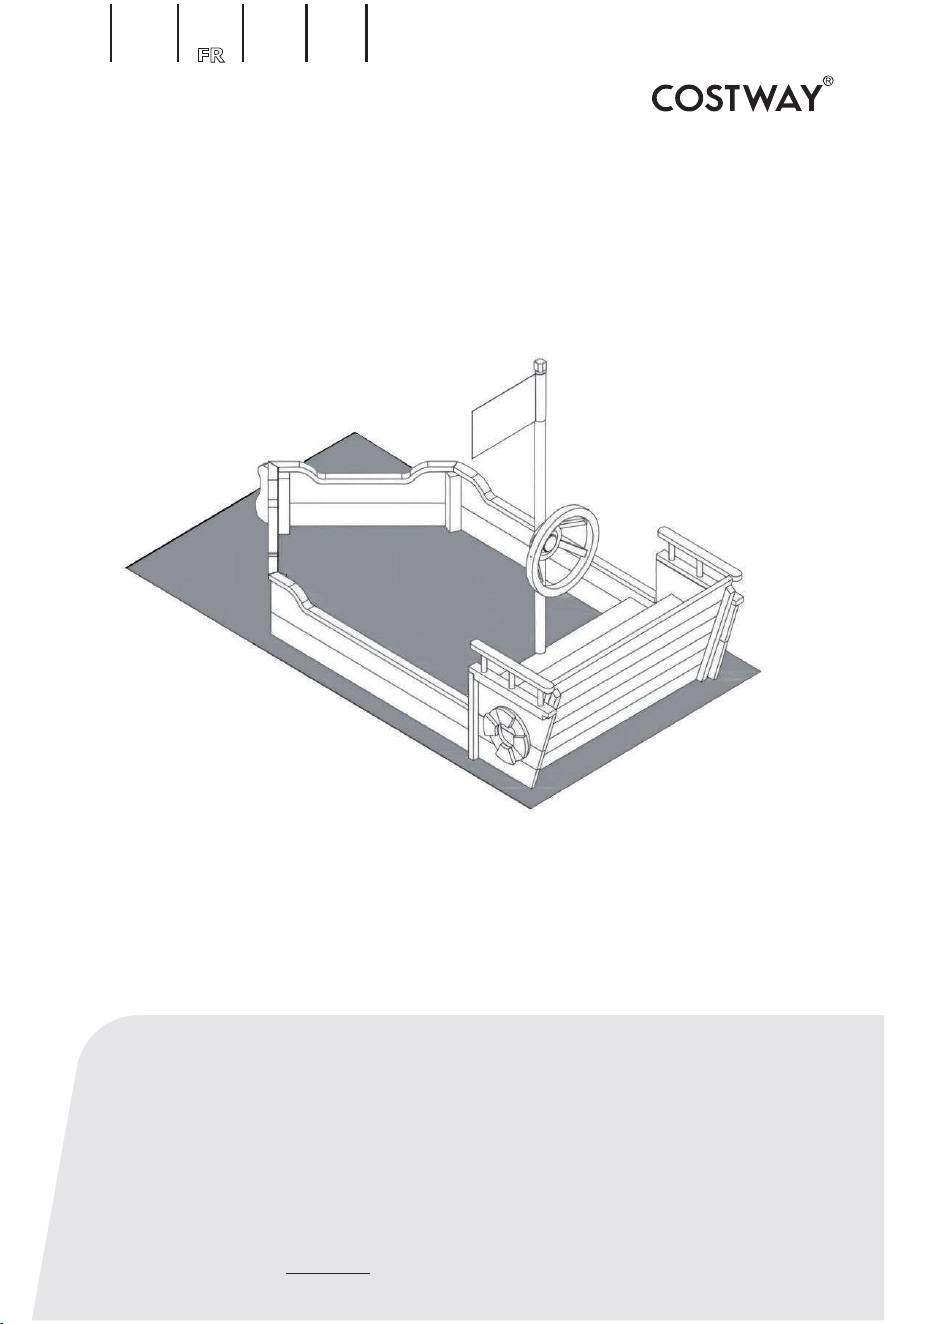
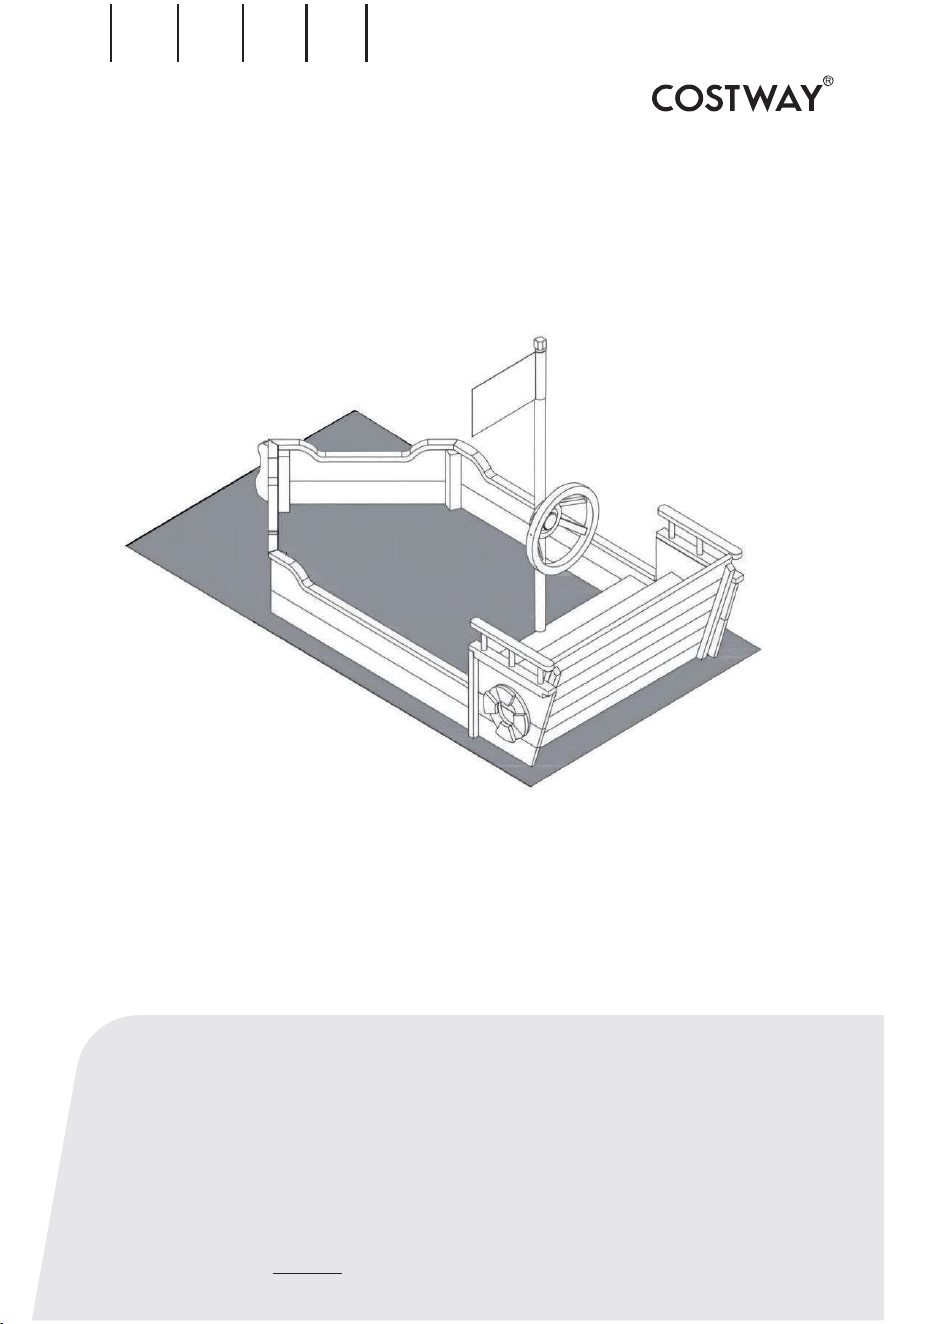
Kids Wooden Boat Sandbox
TS10028
USER’S MANUAL
THIS INSTRUCTION BOOKLET CONTAINS IMPORTANT SAFETY INFORMATION. PLEASE READ AND KEEP FOR FUTURE REFERENCE.
EN DE FR ES IT PL
US office: Fontana UK office: Ipswich AU office: Truganina
02 03
EN
Before You Start
Warning for Assembly
Assembled only by adults
Remove all Packaging, separate and count all parts and hardware.
Read through each step carefully and follow the proper order.
We recommend that, where possible, all items are assembled near the area in
which they will be placed in use, to avoid moving the product unnecessarily once
assembled.
Ensure a secure surface during installation, and place the product always on a flat,
steady and stable surface.
General Security Warning
Caution: The Product is not suitable for the children under 3 years
Danger: Keep all small parts and packaging materials for this product away from babies
and children, otherwise they may pose a choking hazard.
Danger: Lack of attachment may cause a risk of tipping.
WARNING:
CHOKING HAZARD-Small parts.
Not for children under 3 years.
0-3
Please read all instructions carefully and keep it for future reference.
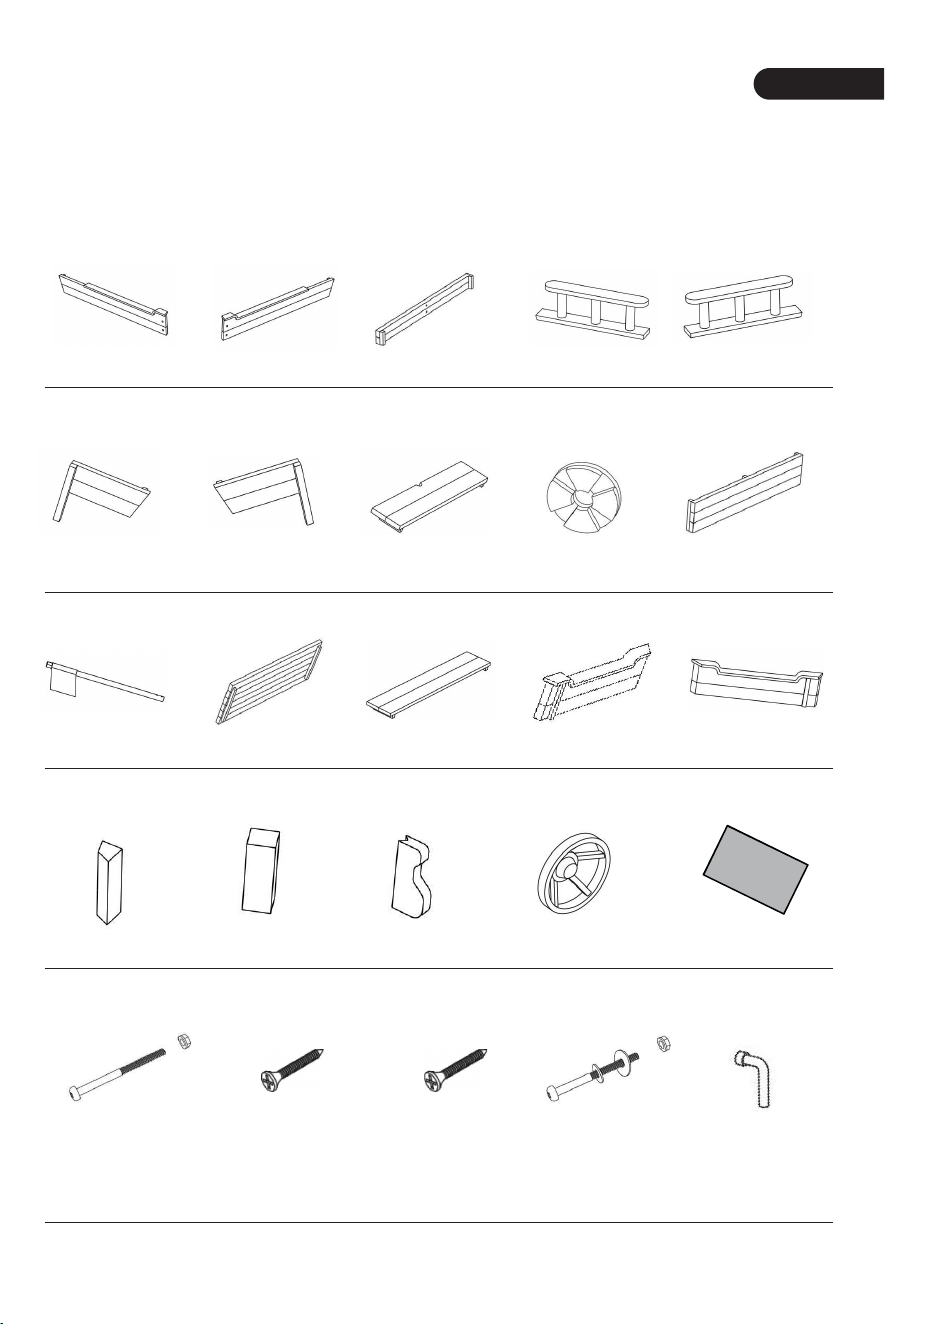
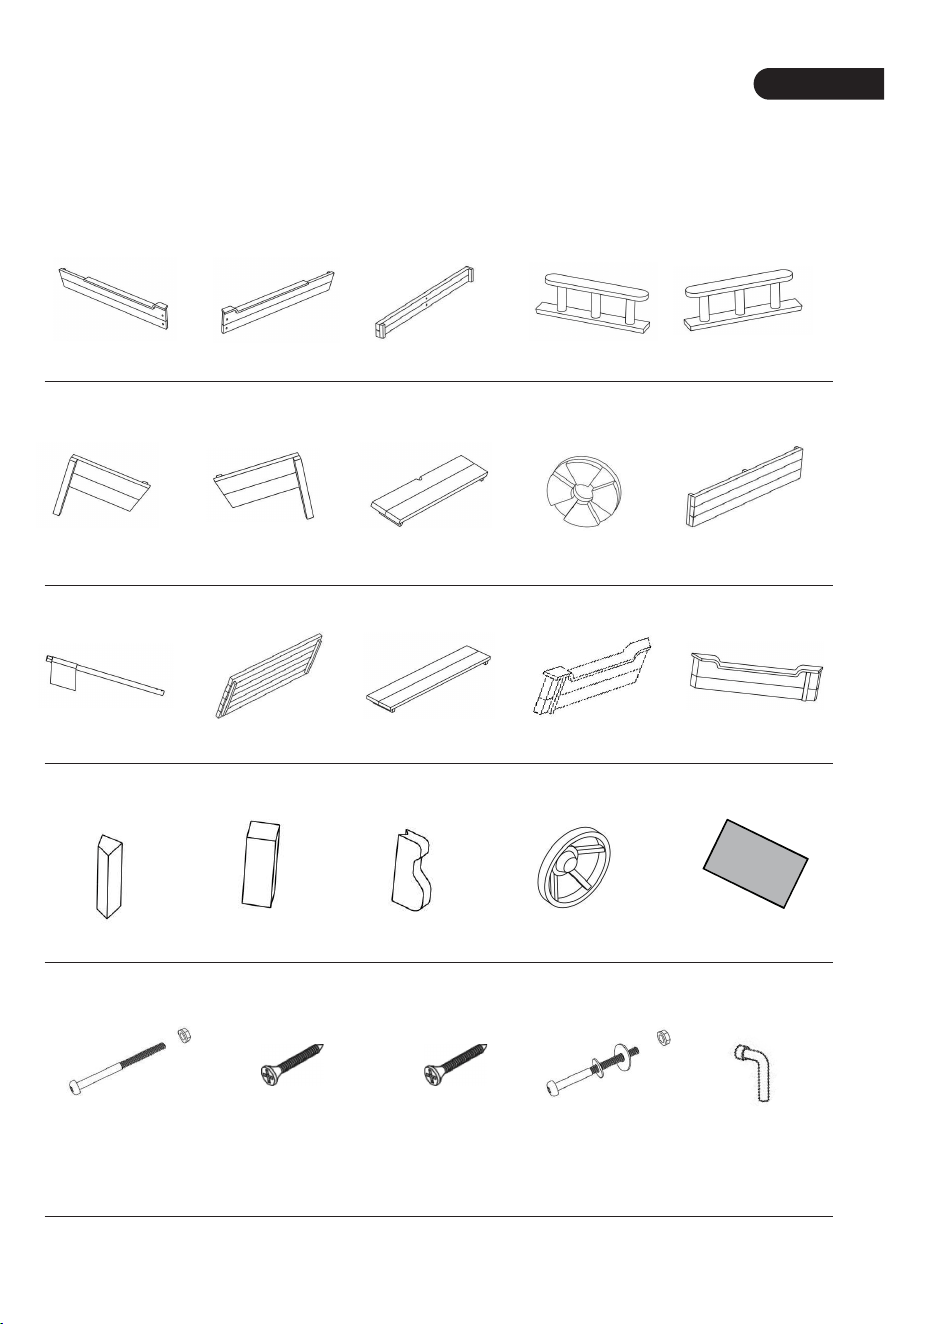
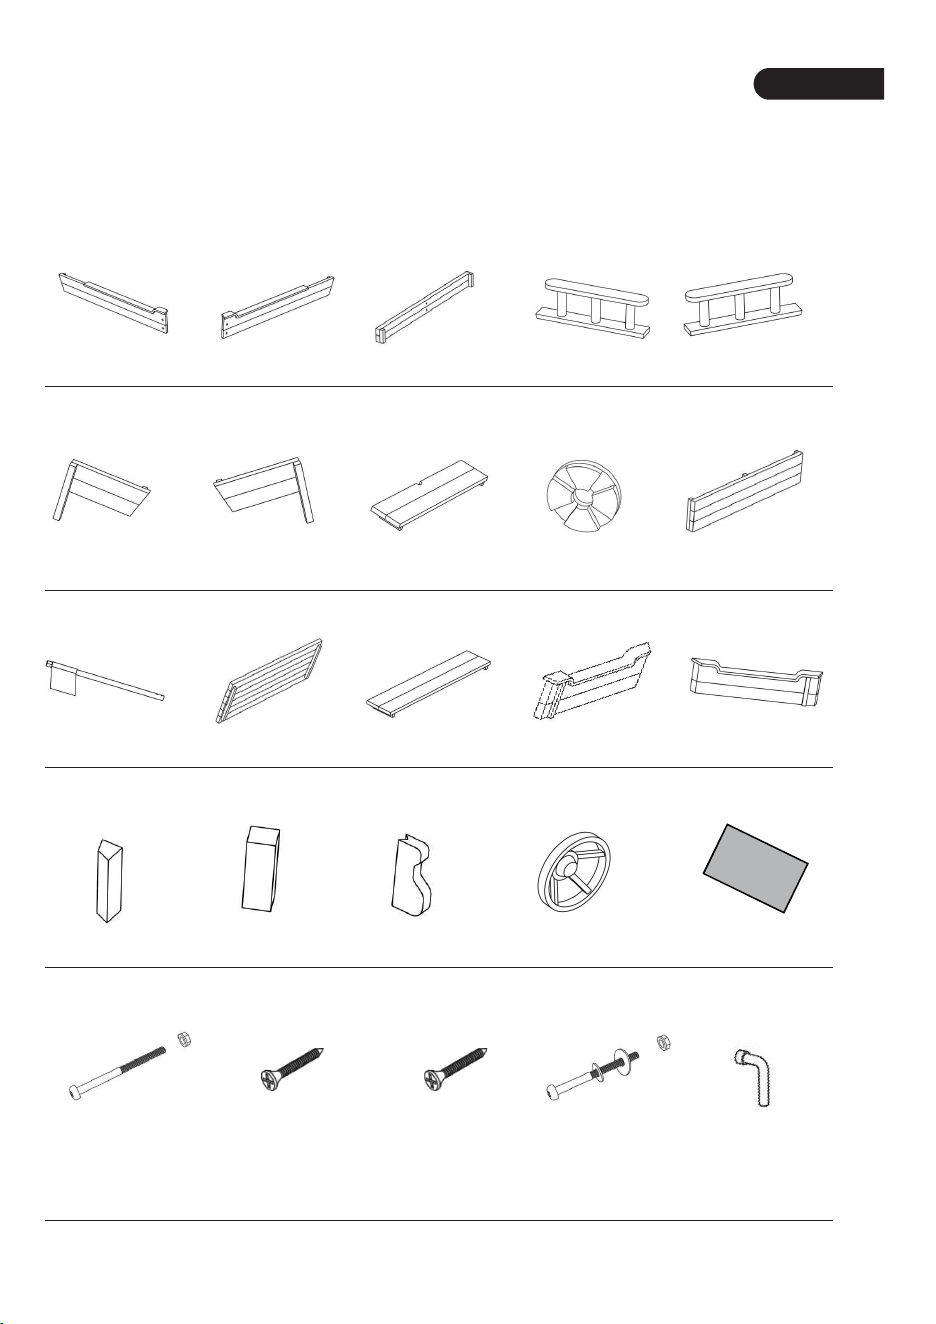
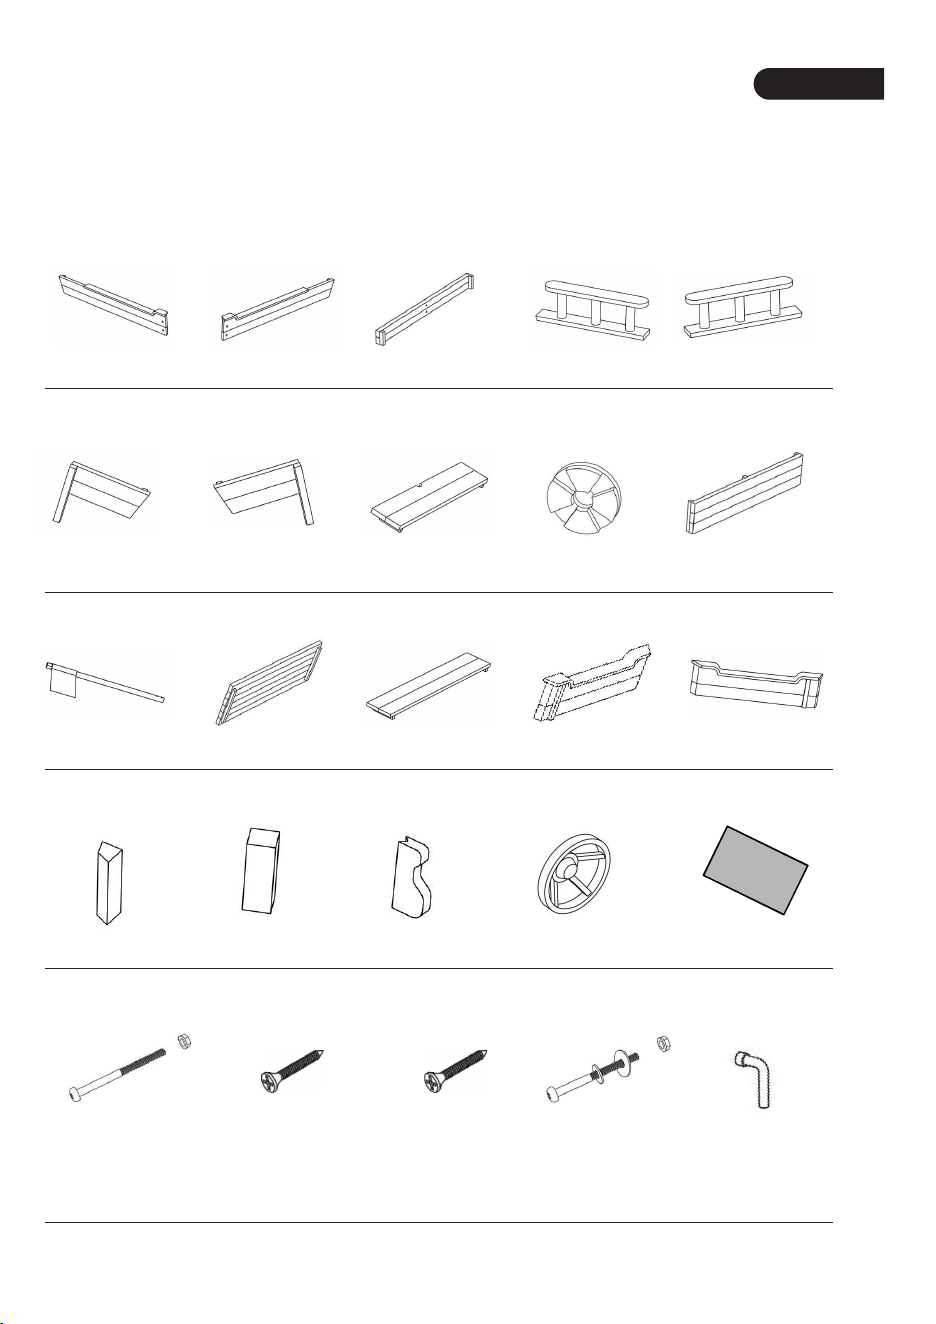
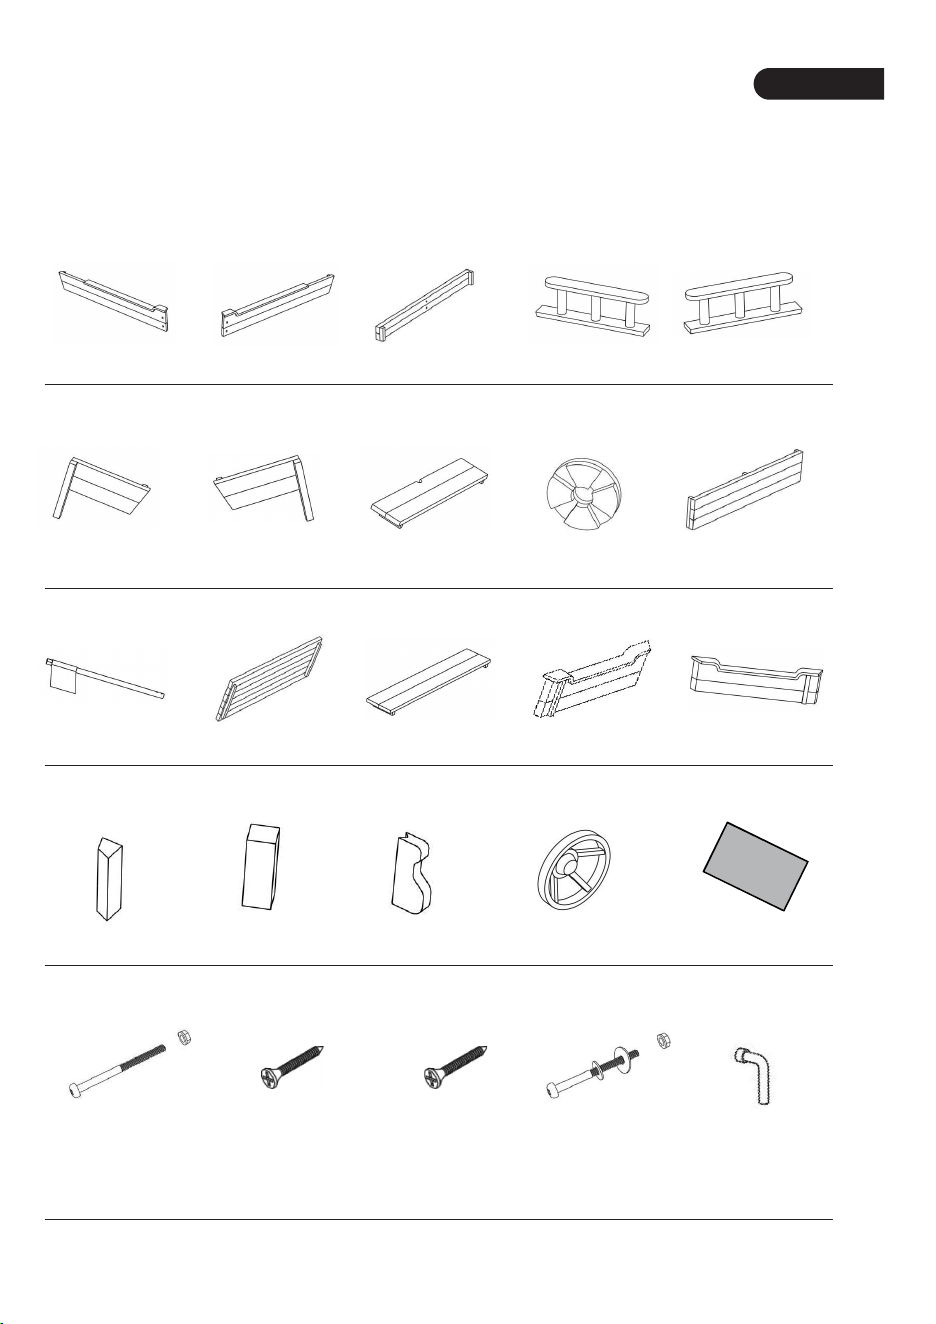
Parts and Hardware List
Not actual size
Side Board x1 Side Board x1 Side Board x1
Rail x1
Rail x1
Side Board x1 Side Board x1 Bench x1
Disk x2
Side Board x1
Flag x1 Backrest x1 Bench x1
Side Board x1
Side Board x1
Pole x2
Φ6*60
A x2
SCREW SCREW SCREW SCREW SPANNER
3.5*30
B x54
3.5*60
C x2
Φ6*65
D x1 E x1
Pole x1 Pole x1 Steering Wheel x1 Mat x1
1 2 3 4 5
6 7 8 9 10
11 12 13 14 15
16 17 18 19 20
Actual size
02 03
EN
Before You Start
Warning for Assembly
Assembled only by adults
Remove all Packaging, separate and count all parts and hardware.
Read through each step carefully and follow the proper order.
We recommend that, where possible, all items are assembled near the area in
which they will be placed in use, to avoid moving the product unnecessarily once
assembled.
Ensure a secure surface during installation, and place the product always on a flat,
steady and stable surface.
General Security Warning
Caution: The Product is not suitable for the children under 3 years
Danger: Keep all small parts and packaging materials for this product away from babies
and children, otherwise they may pose a choking hazard.
Danger: Lack of attachment may cause a risk of tipping.
WARNING:
CHOKING HAZARD-Small parts.
Not for children under 3 years.
0-3
Please read all instructions carefully and keep it for future reference.
Parts and Hardware List
Not actual size
Side Board x1 Side Board x1 Side Board x1
Rail x1
Rail x1
Side Board x1 Side Board x1 Bench x1
Disk x2
Side Board x1
Flag x1 Backrest x1 Bench x1
Side Board x1
Side Board x1
Pole x2
Φ6*60
A x2
SCREW SCREW SCREW SCREW SPANNER
3.5*30
B x54
3.5*60
C x2
Φ6*65
D x1 E x1
Pole x1 Pole x1 Steering Wheel x1 Mat x1
1 2 3 4 5
6 7 8 9 10
11 12 13 14 15
16 17 18 19 20
Actual size

04 05
EN
01
3.5*30
B x14
02
Φ6*60
A x2
3.5*30
B x2
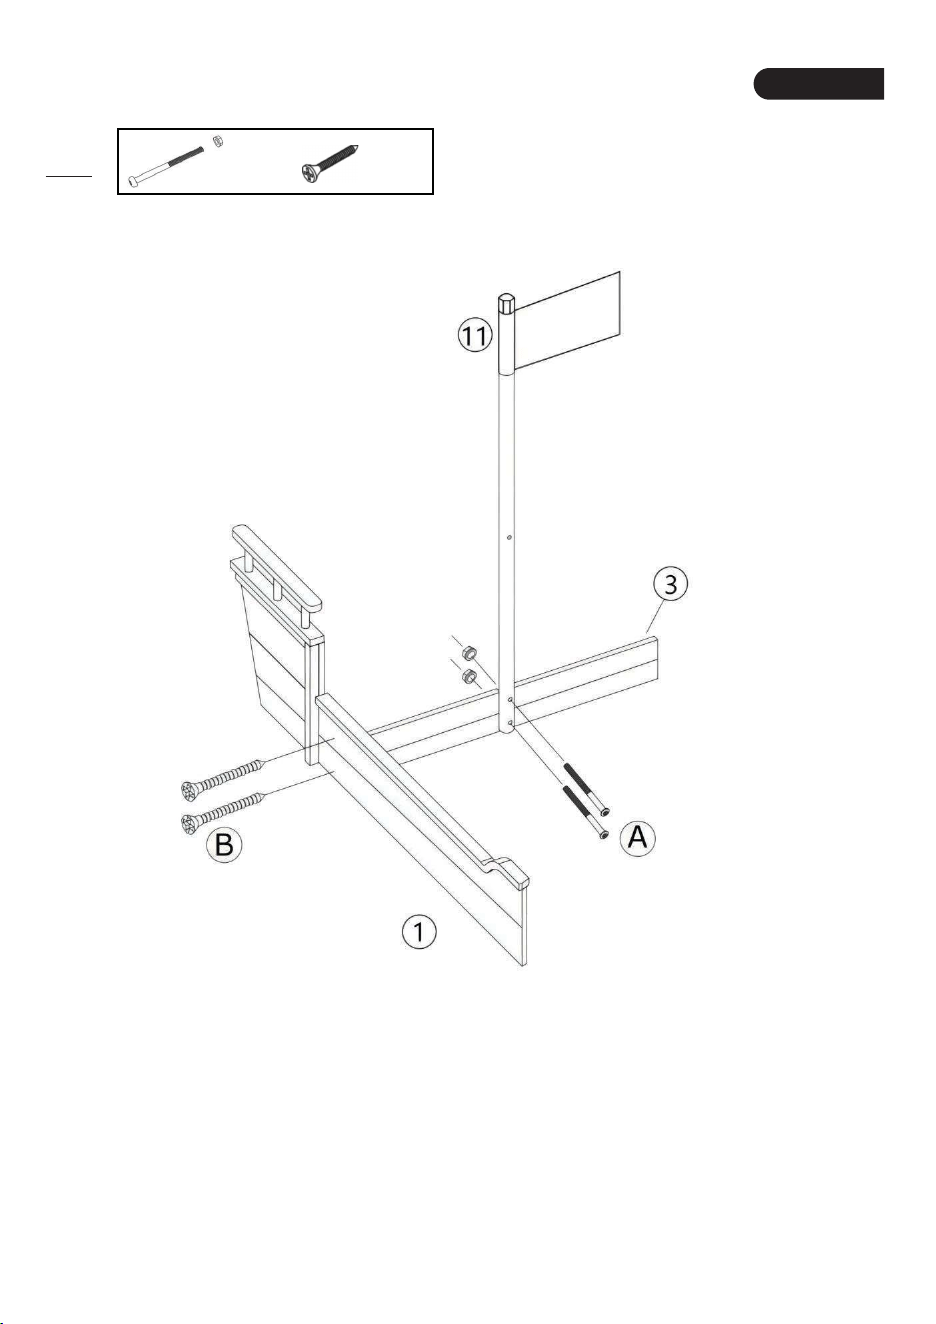
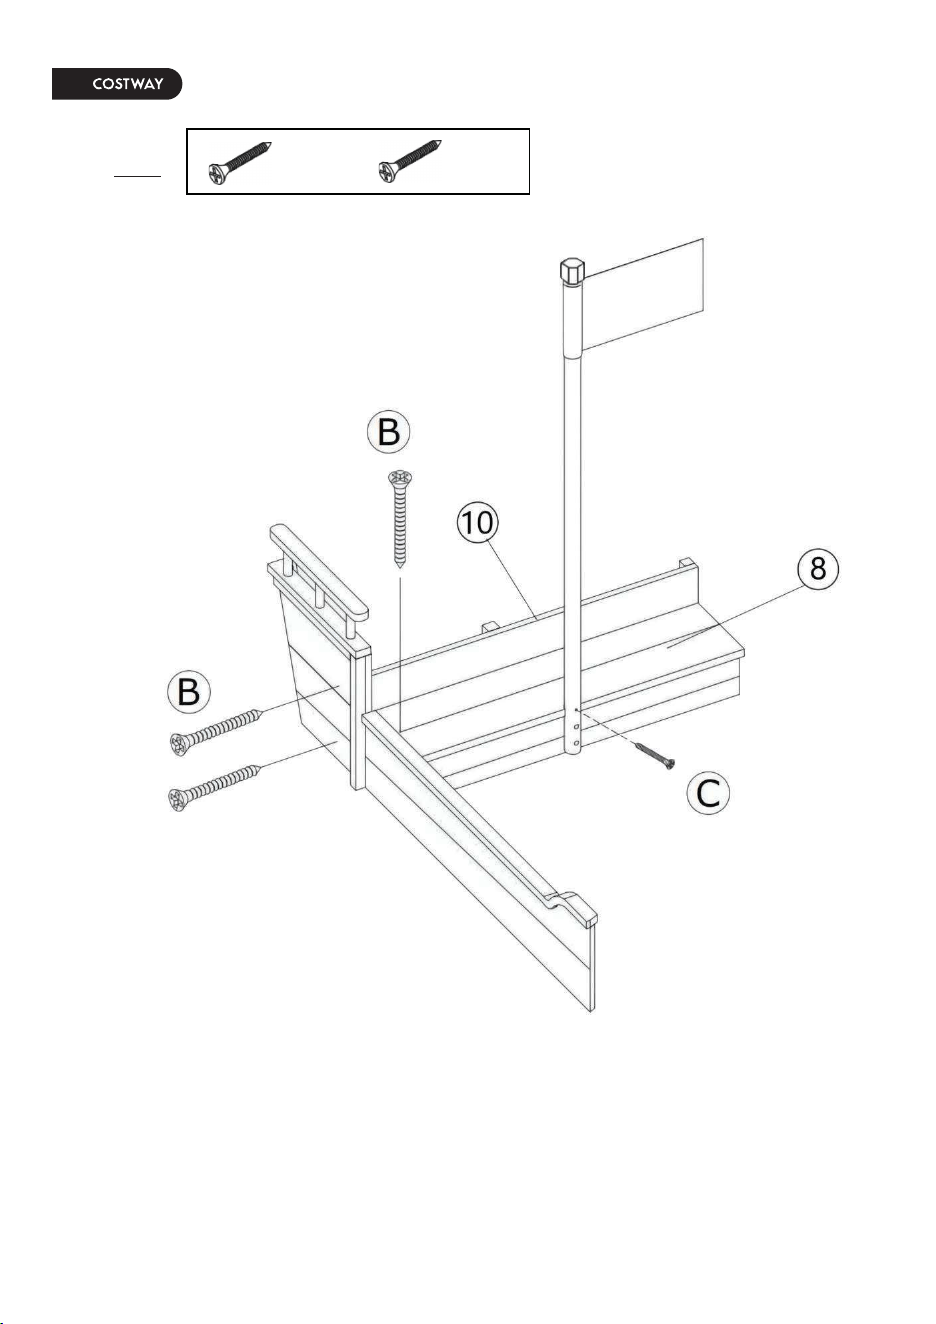
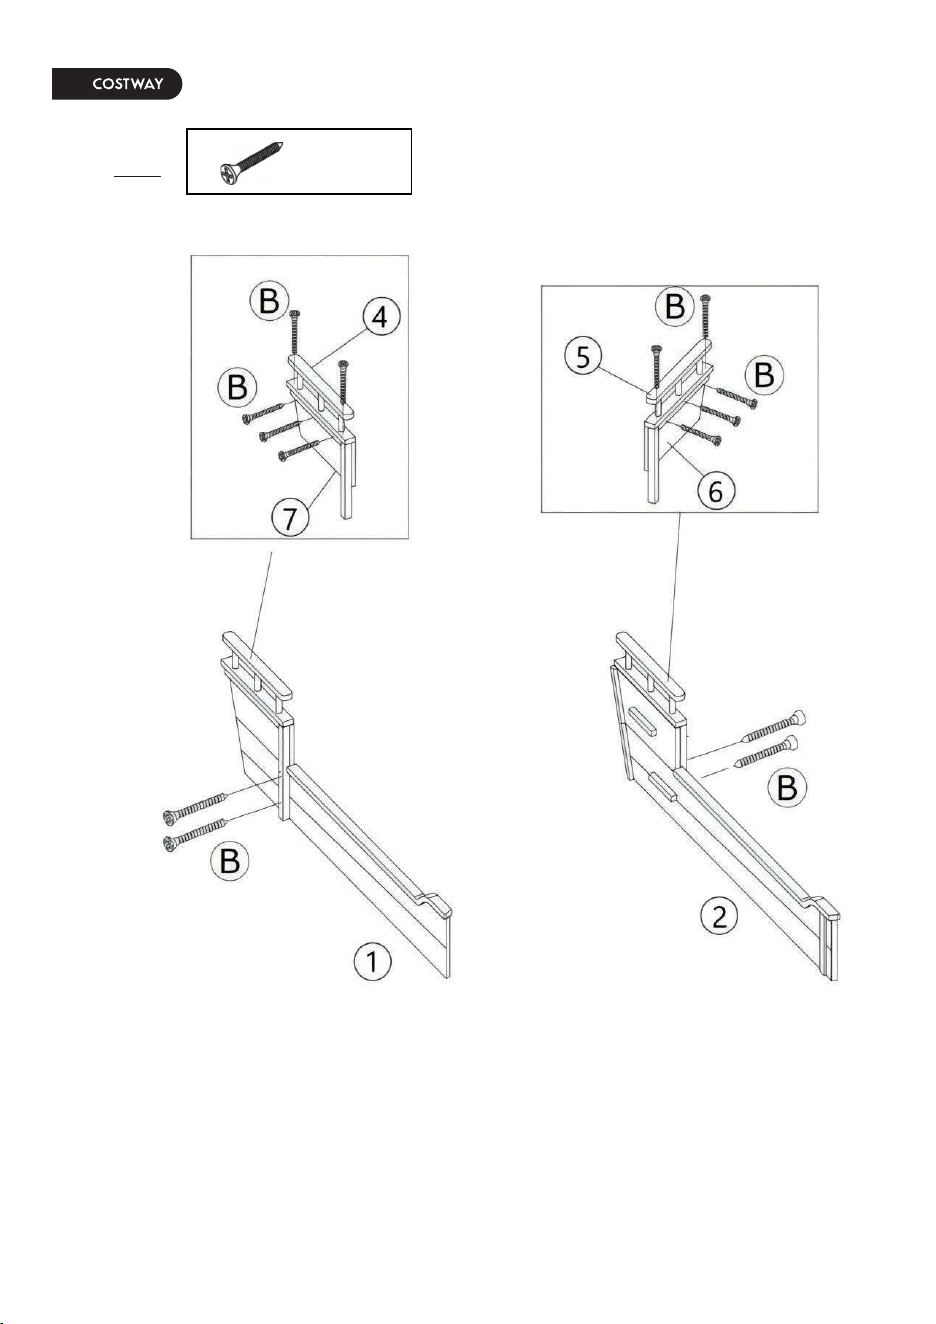
Use 5 screws (B) to assemble the rail (4) and the side board
(7) together, and then use 2 screws (B) to assemble it to the
side board (1). Use 5 screws (B) to assemble the rail (5) and
the side board (6) together, and then use 2 screws (B) to
assemble it to the side board (2).
Use 2 screws (B) to assemble the side board (3) to the side
board (1) completed in the previous step, and then use 2 screws
(A) to assemble the flag (11) to the side board (3).
04 05
EN
01
3.5*30
B x14
02
Φ6*60
A x2
3.5*30
B x2
Use 5 screws (B) to assemble the rail (4) and the side board
(7) together, and then use 2 screws (B) to assemble it to the
side board (1). Use 5 screws (B) to assemble the rail (5) and
the side board (6) together, and then use 2 screws (B) to
assemble it to the side board (2).
Use 2 screws (B) to assemble the side board (3) to the side
board (1) completed in the previous step, and then use 2 screws
(A) to assemble the flag (11) to the side board (3).

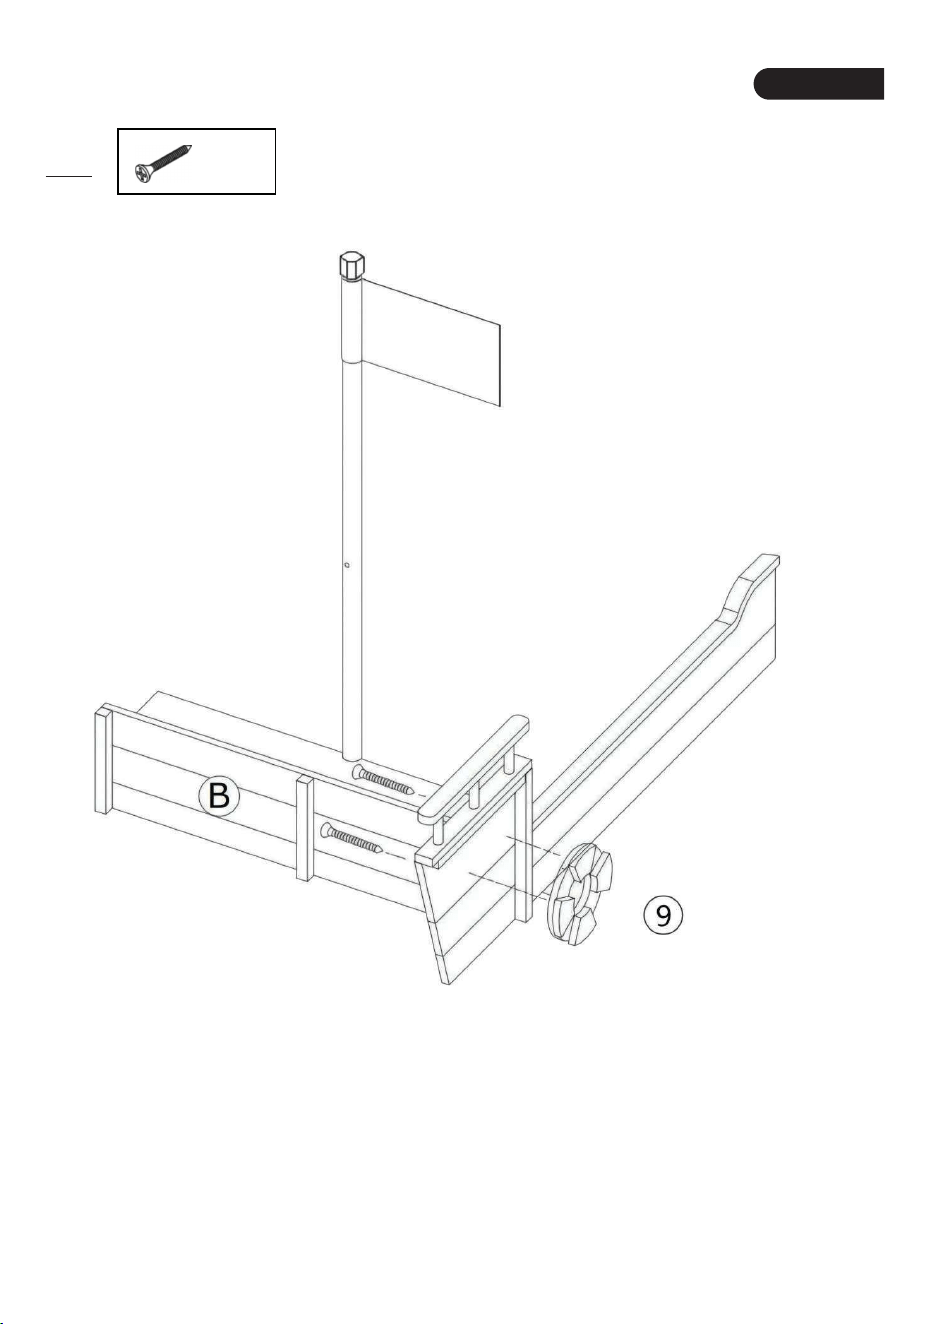
06 07
EN
03
3.5*30
B x3
04
3.5*30
B x2
3.5*60
C x1
Use 2 screws (B) to fix the side board (10) to the side board (1)
completed in the previous step. Fix the bench (8) to the side
board (1) with a screw (B), and then use a screw (C) to fix the
flag (11) to the bench (8).
Use 2 screws (B) to fix the disk (9) to the side board (7)
completed in the previous step.
08 09
EN
05
3.5*30
B x4
06
3.5*30
B x9
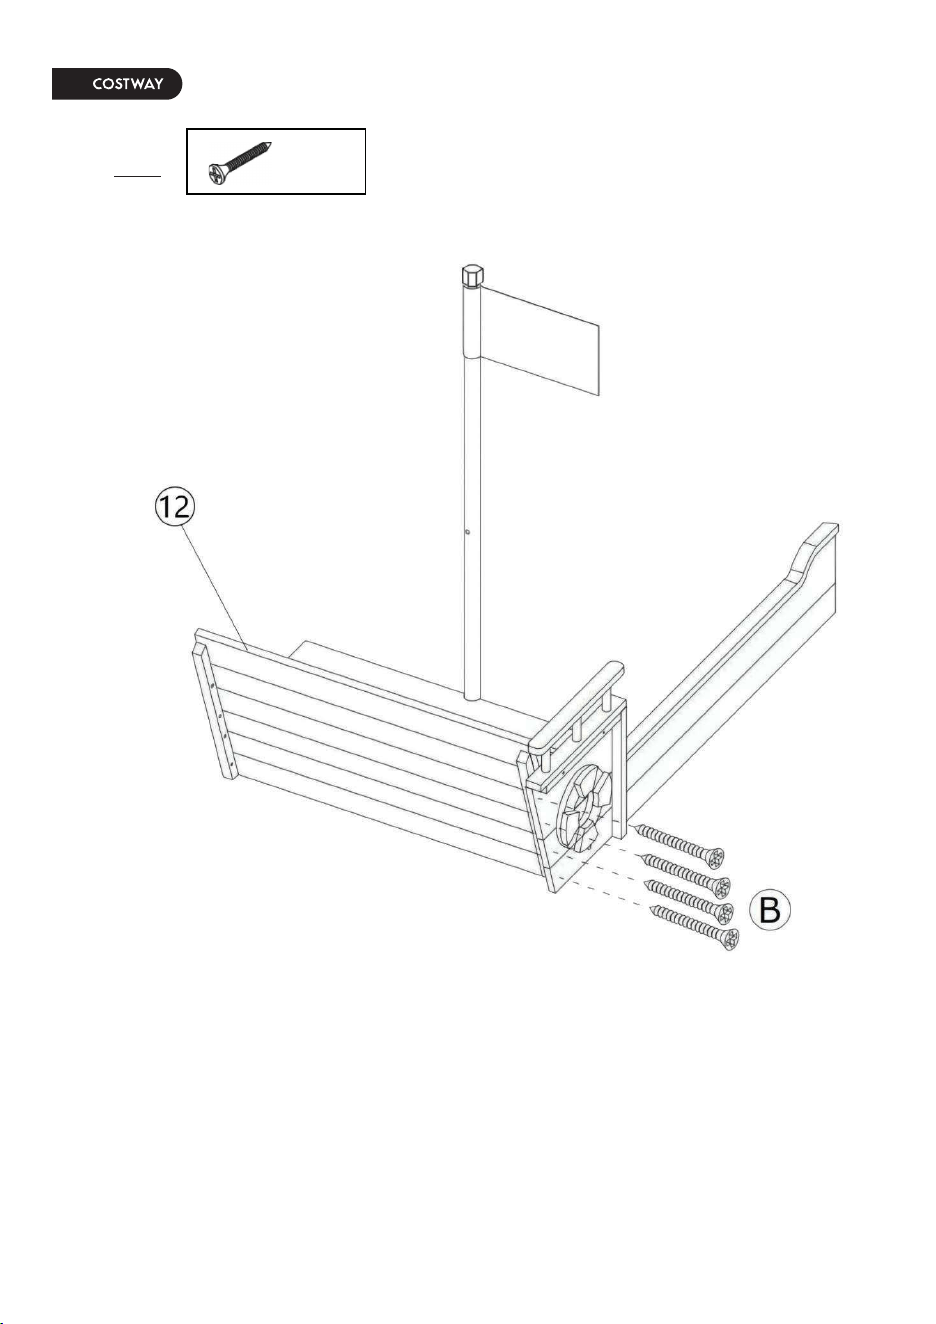
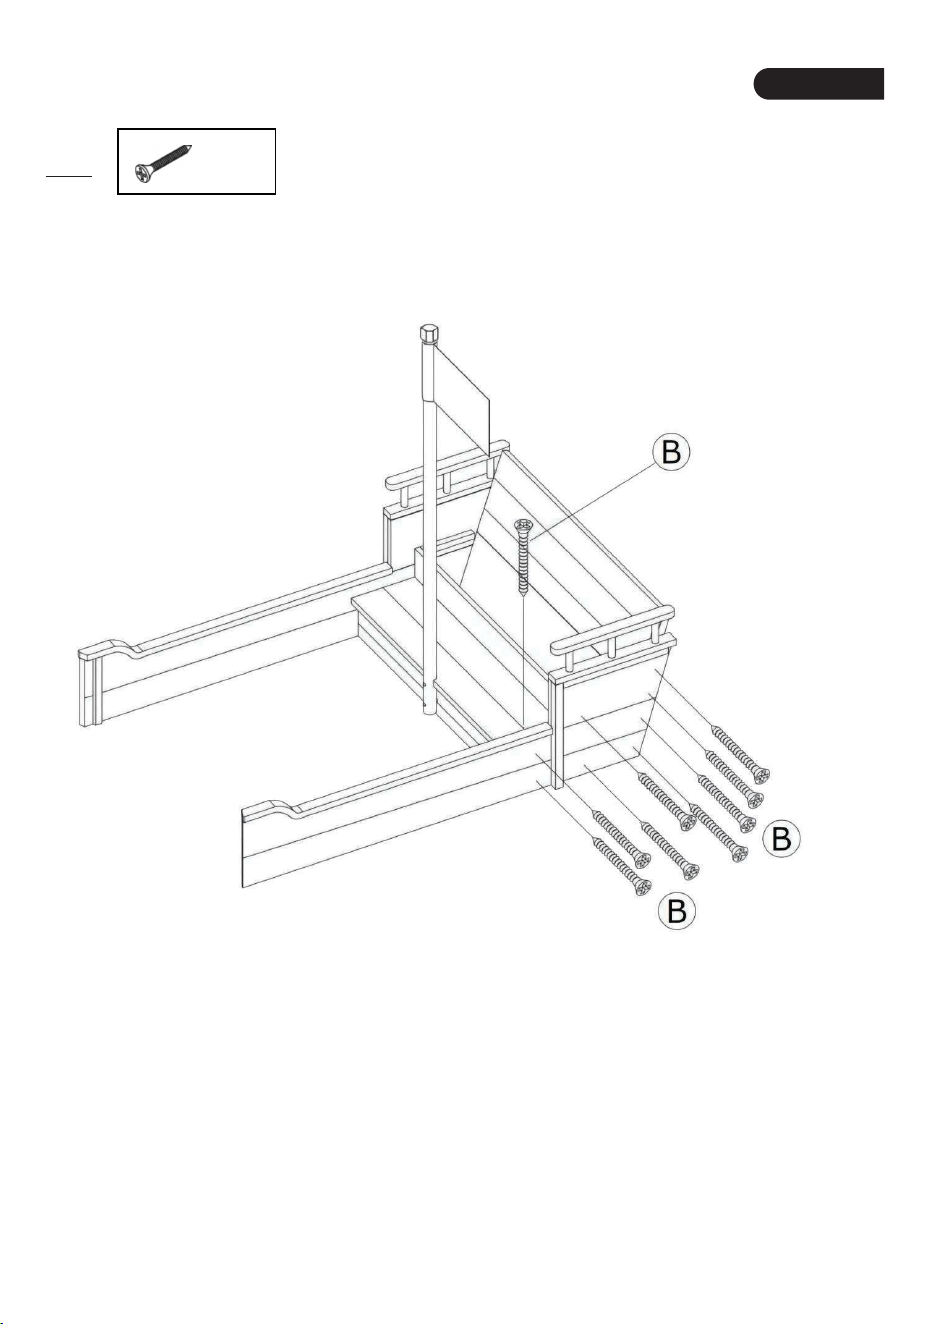
Use 4 screws (B) to fix the backrest (12) to the assembled side
boards (1 and 7).
Use 8 screws (B) to fix the other side of the sand boat, and use
a screw (B) to fix the bench (8) to the assembled side board (2).

08 09
EN
05
3.5*30
B x4
06
3.5*30
B x9
Use 4 screws (B) to fix the backrest (12) to the assembled side
boards (1 and 7).
Use 8 screws (B) to fix the other side of the sand boat, and use
a screw (B) to fix the bench (8) to the assembled side board (2).

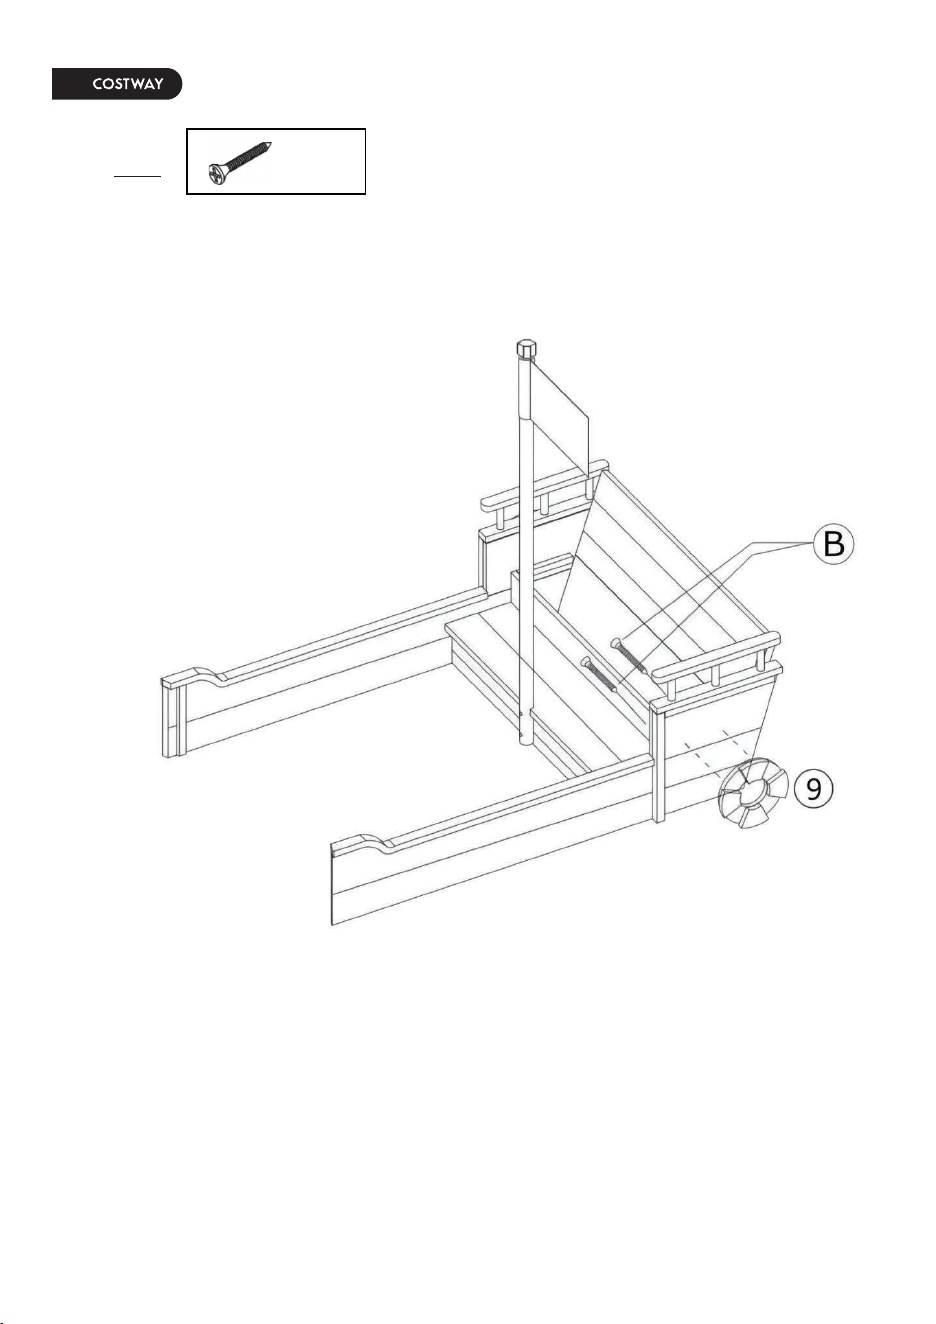
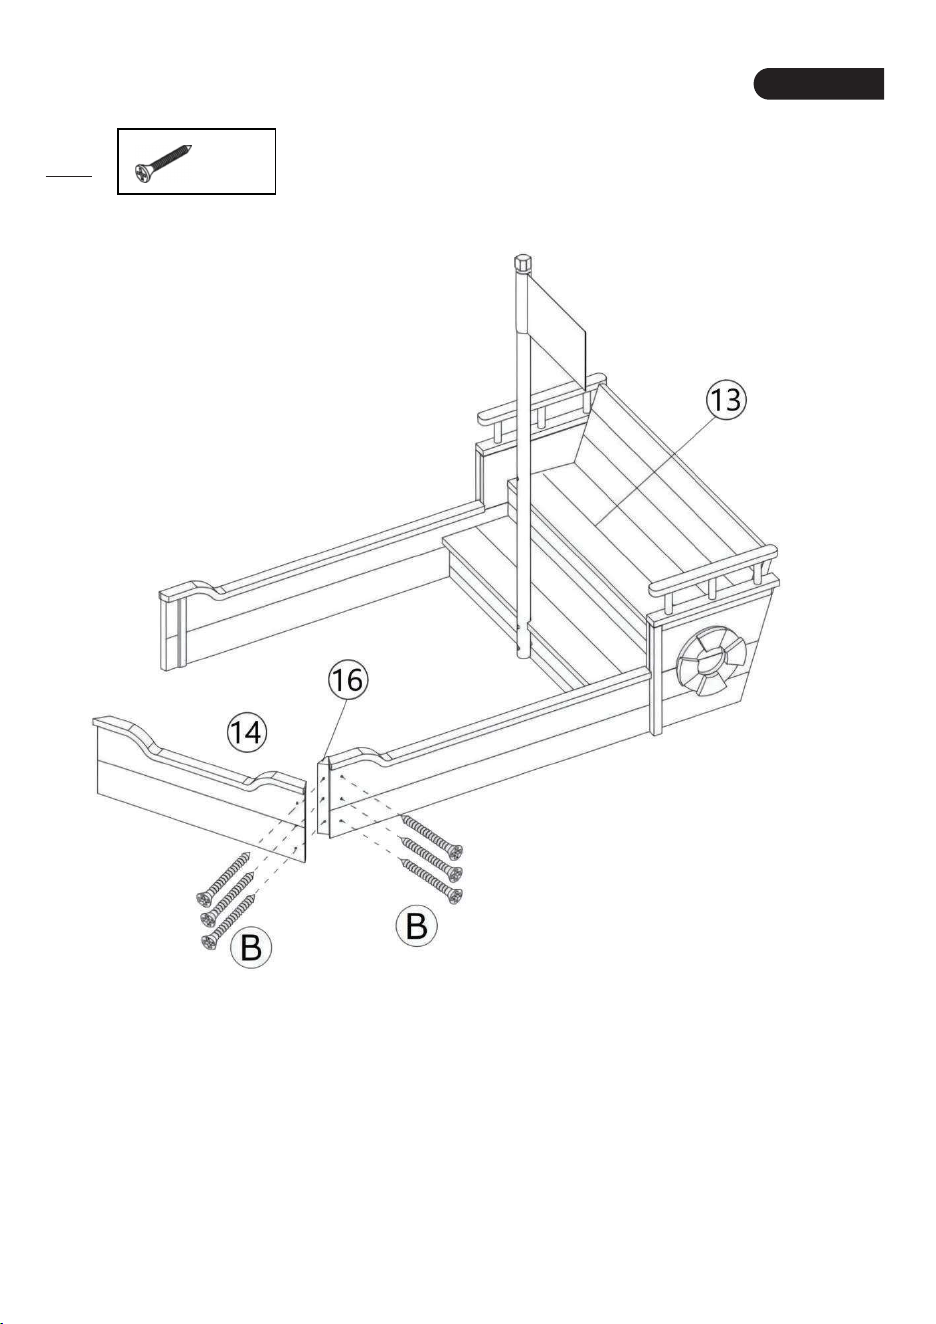
10 11
EN
07
3.5*30
B x2
08
3.5*30
Bx6
Fix the disk (9) to the side board (6) with 2 screws (B). Connect the side board (14) to the side board (2) through the
the pole (16) and fix them with 6 screws (B). Put the bench (13)
in the position as shown in the figure.

10 11
EN
07
3.5*30
B x2
08
3.5*30
Bx6
Fix the disk (9) to the side board (6) with 2 screws (B). Connect the side board (14) to the side board (2) through the
the pole (16) and fix them with 6 screws (B). Put the bench (13)
in the position as shown in the figure.
12 13
EN
09
3.5*30
Bx6
10
3.5*30
Bx6
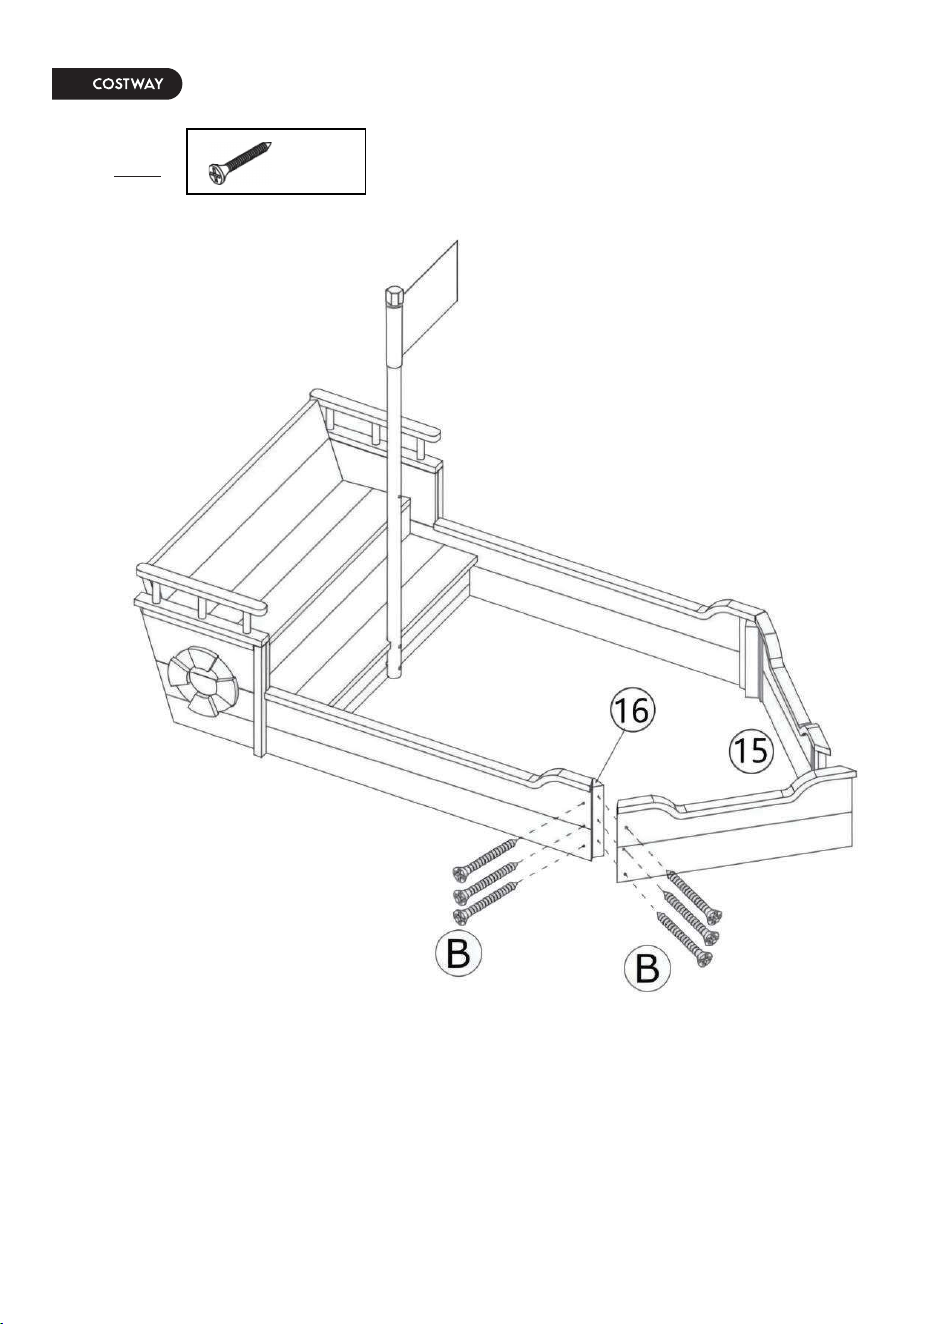
Connect the side board (15) to the other side board (1) through
the the pole (16) and fix them with 6 screws (B).
Connect the left side board (15) with the right side board (14) of
the sand boat through the pole (17) and fix them with 6 screws
(B).

12 13
EN
09
3.5*30
Bx6
10
3.5*30
Bx6
Connect the side board (15) to the other side board (1) through
the the pole (16) and fix them with 6 screws (B).
Connect the left side board (15) with the right side board (14) of
the sand boat through the pole (17) and fix them with 6 screws
(B).

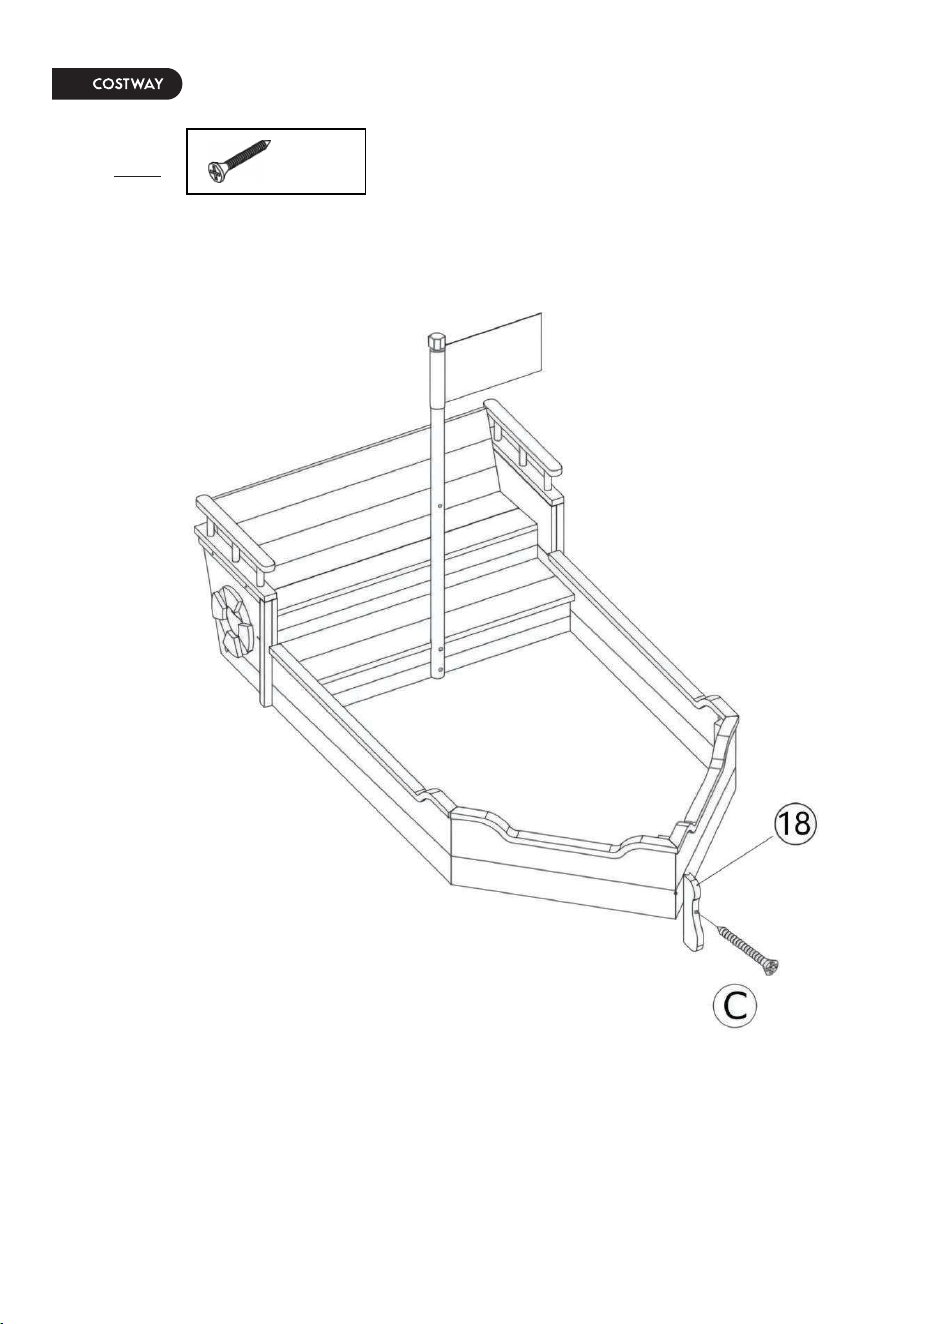
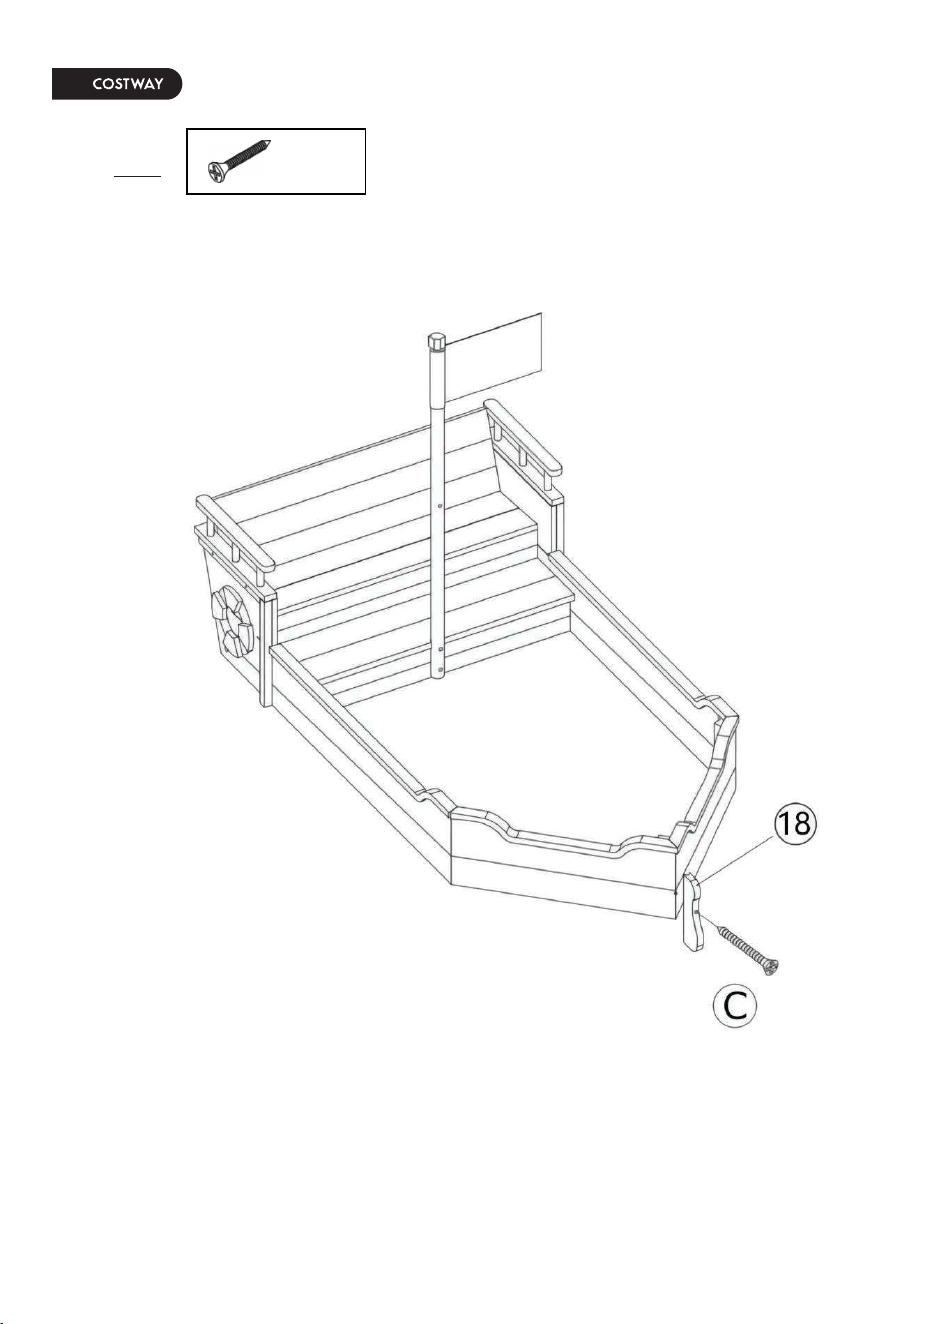
14 15
EN
11 12
3.5*60
C x1
Φ6*65
D x1
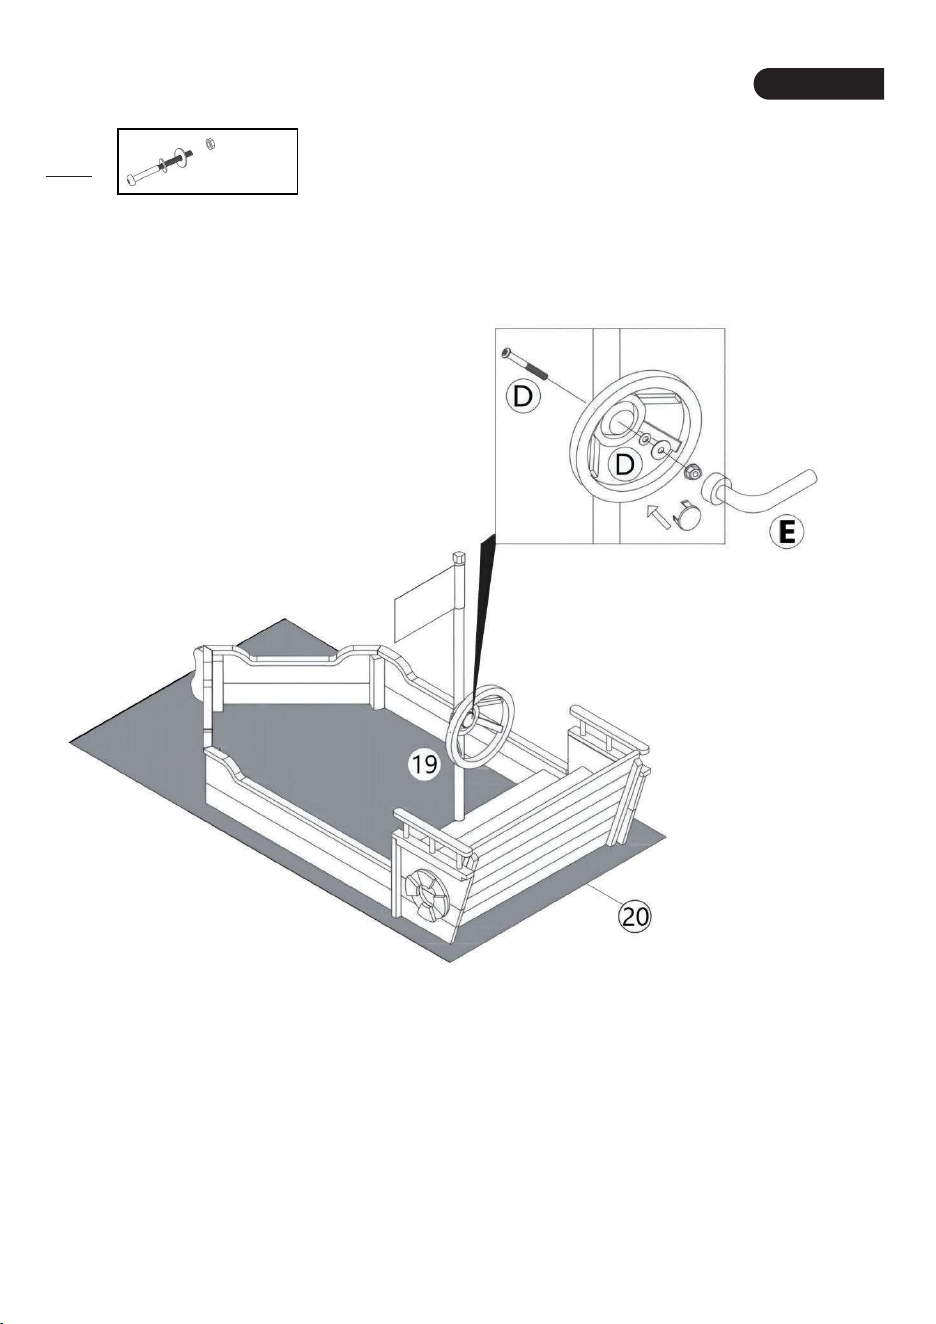
Fix the pole (18) to the middle position in the forefront of the
sand boat with a screw (C).
Take out the steering wheel (19) and fix it to the flagpole of as
shown in the figure. Lay the product on the floor mat (20) to
complete the assembly.

14 15
EN
11 12
3.5*60
C x1
Φ6*65
D x1
Fix the pole (18) to the middle position in the forefront of the
sand boat with a screw (C).
Take out the steering wheel (19) and fix it to the flagpole of as
shown in the figure. Lay the product on the floor mat (20) to
complete the assembly.

Bitte wenden Sie sich bei weiteren Fragen an unseren Kundenservice
Ersatzteile können so schnell wie möglich geliefert werden.
Sandkasten
TS10028
HANDBUCH
DIESE ANLEITUNG ENTHÄLT WICHTIGE SICHERHEITSINFORMATIONEN. BITTE SORGFÄLTIG LESEN UND ZUM SPÄTEREN NACHSCHLAGEN AUFBEWAHREN.
Deutsches Büro: FDS GmbH, Neuer Höltigbaum 36, 22143 Hamburg, Deutschland
Kontaktieren Sie uns !
Schicken Sie diesen Artikel NICHT zurück,
bitte wenden Sie sich an unseren Kundenservice.
EN DE FR ES IT PL
Bitte wenden Sie sich bei weiteren Fragen an unseren Kundenservice
Ersatzteile können so schnell wie möglich geliefert werden.
Sandkasten
TS10028
HANDBUCH
DIESE ANLEITUNG ENTHÄLT WICHTIGE SICHERHEITSINFORMATIONEN. BITTE SORGFÄLTIG LESEN UND ZUM SPÄTEREN NACHSCHLAGEN AUFBEWAHREN.
Deutsches Büro: FDS GmbH, Neuer Höltigbaum 36, 22143 Hamburg, Deutschland
Kontaktieren Sie uns !
Schicken Sie diesen Artikel NICHT zurück,
DE:cs.de@costway.com
bitte wenden Sie sich an unseren Kundenservice.
EN DE FR ES IT PL
02 03
Bevor Sie beginnen
Hinweis zur Montage
Montage nur durch Erwachsene
Entfernen Sie alle Verpackungen, Überprüfen Sie, ob alle Teile und Zubehörteile
vorhanden sind.
Lesen Sie jeden Montageschritt sorgfältig durch und folgen Sie den Anleitungen.
Wir empfehlen, alle Teile möglichst in der Nähe des Aufstellungsortes zu
montieren, um unnötige Bewegungen nach der Montage zu vermeiden.
Achten Sie bei der Montage auf einen sicheren Untergrund und stellen Sie den
Artikel immer auf eine ebene, feste und stabile Fläche.
Allgemeine Sicherheitswarnung
Warnung: Der Artikel ist nicht für Kinder unter 3 Jahren geeignet.
Warnung: Halten Sie alle Kleinteile und Verpackungsmaterialien, die verschluckt
werden können, von Babys und Kindern fern.
Warnung: Unsachgemäße Montage kann zu Kippgefahr führen.
Bitte sorgfältig lesen und zum späteren Nachschlagen aufbewahren.
0-3
ACHTUNG:
Nicht für Kinder unter 36 Monaten
geeignet. Enthält Kleinteile, die verschluckt
werden können.
( Erstickungsgefahr!)
DE
Teile- und Zubehörliste
Nicht tatsächliche Größe
Seitenwand x1 Seitenwand x1 Seitenwand x1
Armlehne x1
Armlehne x1
Seitenwand x1 Seitenwand x1 Bank x1
Reungsringx2
Seitenwand x1
Flagge x1 Rückenlehne x1 Bank x1
Seitenwand x1
Seitenwand x1
Pfosten x2
Φ6*60
A x2
Schraube Schraube Schraube Schraube Schraubenschlüssel
3.5*30
B x54
3.5*60
C x2
Φ6*65
D x1 E x1
Pfosten x1 Pfosten x1 Lenkrad x1 Maex1
1 2 3 4 5
6 7 8 9 10
11 12 13 14 15
16 17 18 19 20
Tatsächliche Größe

04 05
DE
01
3.5*30
B x14
02
Φ6*60
A x2
3.5*30
B x2
Verwenden Sie 5 Schrauben (B), um die Armlehne (4) und
das Seitenwand (7) zusammen zu montieren, und verwenden
Sie dann 2 Schrauben (B), um es am Seitenwand (1) zu
befestigen. Verwenden Sie 5 Schrauben (B), um die Armlehne
(5) und das Seitenwand (6) zu montieren, und verwenden Sie
dann 2 Schrauben (B), um es am Seitenwand (2) zu
befestigen.
Verwenden Sie 2 Schrauben (B), um das Seitenwand (3) mit
dem im vorherigen Schritt fertiggestellten Seitenwand (1) zu
verbinden, und verwenden Sie dann 2 Schrauben (A), um die
Flagge (11) am Seitenwand (3) zu befestigen.

06 07
DE
03
3.5*30
B x3
04
3.5*30
B x2
3.5*60
C x1
Befestigen Sie das Seitenwand (10) mit 2 Schrauben (B) an dem
in vorherigen Schritt fertiggestellten Seitenwand (1). Befestigen
Sie die Sitzbank (8) mit einer Schraube (B) an dem Seitenwand
(1) und befestigen Sie dann die Flagge (11) mit einer Schraube
(C) an der Sitzbank (8).
Befestigen Sie den Rettungsring (9) mit 2 Schrauben (B) an dem
in vorherigen Schritt fertiggestellten Seitenwand (7).

08 09
DE
05
3.5*30
B x4
06
3.5*30
B x9
Befestigen Sie die Rückenlehne (12) mit 4 Schrauben (B) an den
montierten Seitenwände (1 und 7).
Befestigen Sie die andere Seite des Sandbootes mit 8 Schrauben
(B) und befestigen Sie die Sitzbank (8) mit einer Schraube (B)
an dem montierten Seitenwand (2).

08 09
DE
05
3.5*30
B x4
06
3.5*30
B x9
Befestigen Sie die Rückenlehne (12) mit 4 Schrauben (B) an den
montierten Seitenwände (1 und 7).
Befestigen Sie die andere Seite des Sandbootes mit 8 Schrauben
(B) und befestigen Sie die Sitzbank (8) mit einer Schraube (B)
an dem montierten Seitenwand (2).
10 11
DE
07
3.5*30
B x2
08
3.5*30
Bx6
Befestigen Sie den Rettungsring (9) mit 2 Schrauben (B) an dem
Seitenwand (6).
Verbinden Sie das Seitenwand (14) mit dem Seitenwand (2)
durch die Pfosten (16) und befestigen Sie sie mit 6 Schrauben
(B). Bringen Sie die Bank (13) in die in der Abbildung gezeigte
Position.

12 13
DE
09
3.5*30
Bx6
10
3.5*30
Bx6
Verbinden Sie das Seitenwand (15) mit dem anderen
Seitenwand (1) durch die Pfosten (16) und befestigen Sie sie mit
6 Schrauben (B).
Verbinden Sie das linke Seitenwand (15) mit dem rechten
Seitenwand (14) des Sandbootes durch die Pfosten (17) und
befestigen Sie sie mit 6 Schrauben (B).

14 15
DE
11 12
3.5*60
C x1
Φ6*65
D x1
Befestigen Sie die Pfosten (18) mit einer Schraube (C) an der
mittleren Position im vorderen Teil des Sandbootes.
Nehmen Sie das Lenkrad (19) heraus und befestigen Sie es an
der Fahnenstange, wie in der Abbildung gezeigt. Legen Sie den
Artikel auf die Matte (20), um die Montage abzuschließen.

VEUILLEZ NOUS DONNER L’OCCASION DE L’AMÉLIORER !
Contactez notre service à la clientèle pour obtenir de l’aide.
Les remplacements de pièces manquantes ou endommagées seront
expédiés dès que possible !
Contactez-nous !
Ne retournez pas cet article.
FR : [email protected]
Bac à Sable
TS10028
MANUEL DE L’UTILISATEUR
CE MANUEL CONTIENT DES INFORMATIONS IMPORTANTES SUR LA SÉCURITÉ. VEUILLEZ LE LIRE ET LE CONSERVER POUR TOUTE RÉFÉRENCE FUTURE.
Contactez notre service à la clientèle pour obtenir de l’aide.
EN DE FR ES IT PL
FR office: Saint Vigor d'Ymonville
VEUILLEZ NOUS DONNER L’OCCASION DE L’AMÉLIORER !
Contactez notre service à la clientèle pour obtenir de l’aide.
Les remplacements de pièces manquantes ou endommagées seront
expédiés dès que possible !
Contactez-nous !
Ne retournez pas cet article.
FR : cs.fr@costway.com
Bac à Sable
TS10028
MANUEL DE L’UTILISATEUR
CE MANUEL CONTIENT DES INFORMATIONS IMPORTANTES SUR LA SÉCURITÉ. VEUILLEZ LE LIRE ET LE CONSERVER POUR TOUTE RÉFÉRENCE FUTURE.
Contactez notre service à la clientèle pour obtenir de l’aide.
EN DE FR ES IT PL
FR office: Saint Vigor d'Ymonville
02 03
Avant de Commencer
Avertissement pour l’Assemblage
Construction seulement par des adultes
Retirez tous les emballages, séparez et comptez toutes les pièces et le matériel.
Lisez attentivement chaque étape et suivez l’ordre correct.
Nous recommandons que, dans la mesure du possible, tous les articles soient
assemblés à proximité de la zone dans laquelle ils seront utilisés, afin d’éviter de
déplacer inutilement le produit une fois assemblé.
Assurez-vous que la surface soit solide pendant la construction et placez toujours le
produit sur une surface plane et stable.
Avertissement de Sécurité Générale
Attention : Le produit ne convient pas aux enfants de moins de 3 ans.
Danger : Gardez toutes les petites pièces et les matériaux d’emballage de ce produit
hors de la portée des bébés et des enfants pour éviter un risque d’étouffement.
Danger : Le manque de la fixation pourrait entraîner un risque de basculement.
Veuillez lire attentivement toutes les instructions et les conserver pour la référence
ultérieure.
0-3
AVERTISSEMENT:
RISQUED’ÉTOUFFEMENT
–Les petites pièces.Ne convient pas
aux enfants de moins de 3 ans.
FR
Liste des Pièces et Accessoires
Pas la dimension réelle
Panneau latéral x1 Panneau latéral x1 Panneau latéral x1
Accoudoir x1
Accoudoir x1
Panneau latéral x1 Panneau latéral x1 Banc x1
Bouée de sauvetage x2
Panneau latéral x1
Drapeau x1 Dossier x1 Banc x1
Panneau latéral x1
Panneau latéral x1
Poteau x2
Φ6*60
A x2
Vis Vis Vis Vis Clé
3.5*30
B x54
3.5*60
C x2
Φ6*65
D x1 E x1
Poteau x1 Poteau x1 Volant x1 Tapis x1
1 2 3 4 5
6 7 8 9 10
11 12 13 14 15
16 17 18 19 20
Dimension réelle

04 05
FR
01
3.5*30
B x14
02
Φ6*60
A x2
3.5*30
B x2
Utilisez 5 vis (B) pour assembler l’accoudoir (4) et le panneau
latéral (7), puis utilisez 2 vis (B) pour l'assembler au panneau
latéral (1). Utilisez 5 vis (B) pour assembler l’accoudoir (5) et
le panneau latéral (6), puis utilisez 2 vis (B) pour l'assembler
au panneau latéral (2).
Utilisez 2 vis (B) pour assembler le panneau latéral (3) au
panneau latéral (1) complété à l'étape précédente, puis utilisez
2 vis (A) pour assembler le drapeau (11) au panneau latéral (3).
06 07
FR
03
3.5*30
B x3
04
3.5*30
B x2
3.5*60
C x1
Utilisez 2 vis (B) pour fixer le panneau latéral (10) au panneau
latéral (1) complété à l'étape précédente. Fixez le banc (8) au
panneau latéral (1) avec une vis (B), puis utilisez une vis (C)
pour fixer le drapeau (11) au banc (8).
Utilisez 2 vis (B) pour fixer la bouée de sauvetage (9) au
panneau latéral (7) complété à l'étape précédente.

08 09
FR
05
3.5*30
B x4
06
3.5*30
B x9
Utilisez 4 vis (B) pour fixer le dossier (12) aux panneaux
latéraux assemblés (1 et 7).
Utilisez 8 vis (B) pour fixer l'autre côté du bateau de sable, et
utilisez une vis (B) pour fixer le banc (8) au panneau latéral
assemblé (2).
08 09
FR
05
3.5*30
B x4
06
3.5*30
B x9
Utilisez 4 vis (B) pour fixer le dossier (12) aux panneaux
latéraux assemblés (1 et 7).
Utilisez 8 vis (B) pour fixer l'autre côté du bateau de sable, et
utilisez une vis (B) pour fixer le banc (8) au panneau latéral
assemblé (2).

10 11
FR
07
3.5*30
B x2
08
3.5*30
Bx6
Fixez la bouée de sauvetage (9) au panneau latéral (6) avec 2
vis (B).
Connectez le panneau latéral (14) au panneau latéral (2) à
travers le poteau (16) et fixez-les avec 6 vis (B). Mettre le banc
(13) dans la position indiquée sur la figure.

10 11
FR
07
3.5*30
B x2
08
3.5*30
Bx6
Fixez la bouée de sauvetage (9) au panneau latéral (6) avec 2
vis (B).
Connectez le panneau latéral (14) au panneau latéral (2) à
travers le poteau (16) et fixez-les avec 6 vis (B). Mettre le banc
(13) dans la position indiquée sur la figure.

12 13
FR
09
3.5*30
Bx6
10
3.5*30
Bx6
Connectez le panneau latéral (15) à l'autre panneau latéral (1) à
travers le poteau (16) et fixez-les avec 6 vis (B).
Connectez la planche latérale gauche (15) avec la planche
latérale droite (14) du bateau de sable à travers le poteau (17)
et fixez-les avec 6 vis (B).

14 15
FR
11 12
3.5*60
C x1
Φ6*65
D x1
Fixez le poteau (18) à la position médiane à l'avant du bateau
de sable avec une vis (C).
Retirez le volant (19) et fixez-le au mât de drapeau comme
indiqué sur la figure. Posez le produit sur le tapis de sol (20)
pour terminer l'assemblage.
14 15
FR
11 12
3.5*60
C x1
Φ6*65
D x1
Fixez le poteau (18) à la position médiane à l'avant du bateau
de sable avec une vis (C).
Retirez le volant (19) et fixez-le au mât de drapeau comme
indiqué sur la figure. Posez le produit sur le tapis de sol (20)
pour terminer l'assemblage.

¡Por favor dénos una oportunidad para hacerlo bien y hacerlo mejor!
Primero póngase en contacto con nuestro amable departamento de
servicio al cliente para obtener ayuda. ¡Los reemplazos de piezas
faltantes o dañadas se enviarán lo antes posible!
¡Contáctenos!
NO devuelva este artículo.
ES : [email protected]
Arenero de Madera para Niños
TS10028
MANUAL DEL USUARIO
ESTE MANUAL DE INSTRUCCIONES CONTIENE
IMPORTANTES
INFORMACIONES DE SEGURIDAD, POR FAVOR, LÉALO Y GUÁRDELO PARA FUTURAS CONSULTAS.
Primero póngase en contacto con nuestro amable departamento
de servicio al cliente para obtener ayuda.
EN DE FR ES IT PL
¡Por favor dénos una oportunidad para hacerlo bien y hacerlo mejor!
Primero póngase en contacto con nuestro amable departamento de
servicio al cliente para obtener ayuda. ¡Los reemplazos de piezas
faltantes o dañadas se enviarán lo antes posible!
¡Contáctenos!
NO devuelva este artículo.
ES : cs.es@costway.com
Arenero de Madera para Niños
TS10028
MANUAL DEL USUARIO
ESTE MANUAL DE INSTRUCCIONES CONTIENE
IMPORTANTES
INFORMACIONES DE SEGURIDAD, POR FAVOR, LÉALO Y GUÁRDELO PARA FUTURAS CONSULTAS.
Primero póngase en contacto con nuestro amable departamento
de servicio al cliente para obtener ayuda.
EN DE FR ES IT PL

02 03
Antes de Empezar
Advertencia para el Montaje
El producto solo puede ser ensamblado por adultos.
Retire todo el embalaje, separe y cuente todas las piezas y los accesorios.
Lea detenidamente cada paso y siga el orden correcto.
Recomendamos que, siempre que sea posible, todos los elementos se monten cerca
de la zona en la que se van a utilizar, para evitar mover el producto innecesariamente
una vez montado.
Asegure una superficie segura durante el montaje, y coloque el producto siempre
sobre una superficie plana, firme y estable.
Advertencia de Seguridad General
Precaución: El producto no es adecuado para los niños menores de 3 años.
Peligro: Mantenga todas las piezas pequeñas y los materiales de empaque de este
producto fuera del alcance de los bebés y los niños, ya que, de lo contrario, pueden
suponer un peligro de asfixia.
Peligro: La falta de fijación puede provocar un riesgo de vuelco.
Lea atentamente todas las instrucciones y consérvelas para futuras consultas.
0-3
ADVERTENCIA:
PELIGRODEASFIXIA
- Piezas pequeñas.
No es adecuado para los niños menores de 3 años.
ES
Lista de Piezas y Accesorios
No es el tamaño real
Tablero lateral x1 Tablero lateral x1 Tablero lateral x1
Barandilla x1
Barandilla x1
Tablero lateral x1 Tablero lateral x1 Banco x1
Disco x2
Tablero lateral x1
Bandera x1 Respaldo x1 Banco x1
Tablero lateral x1
Tablero lateral x1
Poste x2
Φ6*60
A x2
TORNILLO TORNILLO TORNILLO TORNILLO LLAVE
3.5*30
B x54
3.5*60
C x2
Φ6*65
D x1 E x1
Poste x1 Poste x1 Volante x1 Alfombra x1
1 2 3 4 5
6 7 8 9 10
11 12 13 14 15
16 17 18 19 20
Tamaño real
04 05
ES
01
3.5*30
B x14
02
Φ6*60
A x2
3.5*30
B x2
Utilice 5 tornillos (B) para ensamblar la barandilla (4) al
tablero lateral (7), y luego utilice 2 tornillos (B) para
ensamblarlo al tablero lateral (1). Utilice 5 tornillos (B) para
ensamblar la barandilla (5) al tablero lateral (6), y luego
utilice 2 tornillos (B) para ensamblarlo al tablero lateral (2).
Utilice 2 tornillos (B) para ensamblar el tablero lateral (3) al
tablero lateral (1) completado en el paso anterior, y luego utilice
2 tornillos (A) para ensamblar la bandera (11) al tablero lateral
(3).

06 07
ES
03
3.5*30
B x3
04
3.5*30
B x2
3.5*60
C x1
Utilice 2 tornillos (B) para fijar el tablero lateral (10) al tablero
lateral (1) completado en el paso anterior. Fije el banco (8) al
tablero lateral (1) con un tornillo (B) y, a continuación, utilice un
tornillo (C) para fijar la bandera (11) al banco (8).
Utilice 2 tornillos (B) para fijar el disco (9) al tablero lateral (7)
completado en el paso anterior.

08 09
ES
05
3.5*30
B x4
06
3.5*30
B x9
Utilice 4 tornillos (B) para fijar el respaldo (12) a los tableros
laterales ensamblados (1 y 7).
Utilice 8 tornillos (B) para fijar el otro lado del arenero, y utilice
un tornillo (B) para fijar el banco (8) al tablero lateral
ensamblado (2).

08 09
ES
05
3.5*30
B x4
06
3.5*30
B x9
Utilice 4 tornillos (B) para fijar el respaldo (12) a los tableros
laterales ensamblados (1 y 7).
Utilice 8 tornillos (B) para fijar el otro lado del arenero, y utilice
un tornillo (B) para fijar el banco (8) al tablero lateral
ensamblado (2).

10 11
ES
07
3.5*30
B x2
08
3.5*30
Bx6
Fije el disco (9) al tablero lateral (6) con 2 tornillos (B). Conecte el tablero lateral (14) al tablero lateral (2) a través del
poste (16) y fíjelos con 6 tornillos (B). Coloque el banco (13) en
la posición indicada en la figura.

10 11
ES
07
3.5*30
B x2
08
3.5*30
Bx6
Fije el disco (9) al tablero lateral (6) con 2 tornillos (B). Conecte el tablero lateral (14) al tablero lateral (2) a través del
poste (16) y fíjelos con 6 tornillos (B). Coloque el banco (13) en
la posición indicada en la figura.

12 13
ES
09
3.5*30
Bx6
10
3.5*30
Bx6
Conecte el tablero lateral (15) al tablero lateral (1) a través del
poste (16) y fíjelos con 6 tornillos (B).
Conecte el tablero lateral izquierdo (15) con el tablero lateral
derecho (14) del arenero a través del poste (17) y fíjelos con 6
tornillos (B).

12 13
ES
09
3.5*30
Bx6
10
3.5*30
Bx6
Conecte el tablero lateral (15) al tablero lateral (1) a través del
poste (16) y fíjelos con 6 tornillos (B).
Conecte el tablero lateral izquierdo (15) con el tablero lateral
derecho (14) del arenero a través del poste (17) y fíjelos con 6
tornillos (B).

14 15
ES
11 12
3.5*60
C x1
Φ6*65
D x1
Fije el poste (18) en la posición central de la parte delantera del
arenero con un tornillo (C).
Saque el volante (19) y fíjelo al asta de la bandera como se
muestra en la figura. Coloque el producto sobre la alfombra de
suelo (20) para completar el montaje.

14 15
ES
11 12
3.5*60
C x1
Φ6*65
D x1
Fije el poste (18) en la posición central de la parte delantera del
arenero con un tornillo (C).
Saque el volante (19) y fíjelo al asta de la bandera como se
muestra en la figura. Coloque el producto sobre la alfombra de
suelo (20) para completar el montaje.

Sabbiera per Bambini
TS10028
MANUALE UTENTE
QUESTO MANUALE DI ISTRUZIONI CONTIENE IMPORTANTI INFORMAZIONI SULLA SICUREZZA. SI PREGA DI LEGGERE E CONSERVARE PER RIFERIMENTO FUTURO.
EN DE FR ES IT PL
Vi preghiamo di darci la possibilità di fare bene e fare di meglio!
Si prega di contattare prima il nostro servizio clienti per assistenza.
Le parti di ricambio per le parti mancanti o danneggiate verranno spedite al più presto!
Contattaci !
NON restituire questo articolo.
Si prega di contattare prima il nostro servizio clienti per assistenza.
Sabbiera per Bambini
TS10028
MANUALE UTENTE
QUESTO MANUALE DI ISTRUZIONI CONTIENE IMPORTANTI INFORMAZIONI SULLA SICUREZZA. SI PREGA DI LEGGERE E CONSERVARE PER RIFERIMENTO FUTURO.
EN DE FR ES IT PL
Vi preghiamo di darci la possibilità di fare bene e fare di meglio!
Si prega di contattare prima il nostro servizio clienti per assistenza.
Le parti di ricambio per le parti mancanti o danneggiate verranno spedite al più presto!
Contattaci !
NON restituire questo articolo.
IT: cs.it@costway.com
Si prega di contattare prima il nostro servizio clienti per assistenza.

02 03
Prima di iniziare
Avvertenza per il montaggio
Questo prodotto è montato dagli adulti.
Rimuovere tutti gli imballaggi, separare e contare tutte le parti e tutti gli accessori.
Leggere attentamente ogni passo e seguire l'ordine corretto.
Si consiglia, ove possibile, di montare tutti gli articoli vicino alla zona in cui
verranno posti in uso, per evitare di spostare inutilmente il prodotto una volta
assemblato.
Garantire una superficie sicura durante il montaggio e posizionare il prodotto
sempre su una superficie piana, stabile.
Si prega di leggere attentamente tutte le istruzioni e conservarle per riferimento futuro.
Avvertenza di sicurezza generale
Attenzione: Il prodotto non è adatto ai bambini sotto i 3 anni.
Pericolo: Tenere tutte le piccole parti e i materiali di imballaggio di questo prodotto
lontano da neonati e bambini, altrimenti potrebbero rappresentare un rischio di
soffocamento.
Pericolo: La mancanza di accessorio può causare un rischio di ribaltamento.
0-3
AVVERTENZA:
RISCHIODISOFFOCAMENTO
- Piccole parti.
Non per i bambini sotto i 3 anni.
IT
Lista delle Parti e degli Accessori
Non è la dimensione reale
Pannello laterale x1 Pannello laterale x1 Pannello laterale x1
Guida x1
Guida x1
Pannello laterale x1
Pannello laterale x1
Panca x1
Salvagente x2
Pannello laterale x1
Bandiera x1 Schienale x1 Panca x1
Pannello laterale x1
Pannello laterale x1
Palo x2
Φ6*60
A x2
VITE VITE VITE VITE CHIAVE
3.5*30
B x54
3.5*60
C x2
Φ6*65
D x1 E x1
Palo x1 Palo x1 Volante x1 Tappe�nox1
1 2 3 4 5
6 7 8 9 10
11 12 13 14 15
16 17 18 19 20
Dimensione reale

04 05
IT
01
3.5*30
B x14
02
Φ6*60
A x2
3.5*30
B x2
Usare 5 viti (B) per assemblare la guida (4) e il pannello
laterale (7) insieme, e poi usare 2 viti (B) per assemblarli al
pannello laterale (1), usare 5 viti (B) per assemblare la guida
(5) e il pannello laterale (6) insieme, e poi usare 2 viti (B) per
assemblarli al pannello laterale (2).
Usare 2 viti (B) per assemblare il pannello laterale (3) al
pannello laterale (1) completato nel passo precedente, e poi
usare 2 viti (A) per assemblare la bandiera (11) al pannello
laterale (3).

06 07
IT
03
3.5*30
B x3
04
3.5*30
B x2
3.5*60
C x1
Usare 2 viti (B) per fissare il pannello laterale (10) al pannello
laterale (1) completato nel passo precedente. Fissare la panca
(8) al pannello laterale (1) con una vite (B), poi utilizzare una
vite (C) per fissare la bandierina (11) alla panca (8).
Utilizzare 2 viti (B) per fissare la parte (9) al pannello laterale
(7) completato nel passo precedente.

08 09
IT
05
3.5*30
B x4
06
3.5*30
B x9
Utilizzare 4 viti (B) per fissare lo schienale (12) ai pannello
laterali assemblati (1 e 7).
Usare 8 viti (B) per fissare l'altro lato della sabbiera, e usare una
vite (B) per fissare la panca (8) al pannello laterale assemblato
(2).

08 09
IT
05
3.5*30
B x4
06
3.5*30
B x9
Utilizzare 4 viti (B) per fissare lo schienale (12) ai pannello
laterali assemblati (1 e 7).
Usare 8 viti (B) per fissare l'altro lato della sabbiera, e usare una
vite (B) per fissare la panca (8) al pannello laterale assemblato
(2).

10 11
IT
07
3.5*30
B x2
08
3.5*30
Bx6
Fissare la parte (9) al pannello laterale (6) con 2 viti (B). Collegare il pannello laterale (14) al pannello laterale (2)
attraverso il palo (16) e fissarli con 6 viti (B). Mettere la panca
(13) nella posizione come mostrato nella figura.
10 11
IT
07
3.5*30
B x2
08
3.5*30
Bx6
Fissare la parte (9) al pannello laterale (6) con 2 viti (B). Collegare il pannello laterale (14) al pannello laterale (2)
attraverso il palo (16) e fissarli con 6 viti (B). Mettere la panca
(13) nella posizione come mostrato nella figura.

12 13
IT
09
3.5*30
Bx6
10
3.5*30
Bx6
Collegare il pannello laterale (15) al pannello laterale (1)
attraverso il palo (16) e fissarli con 6 viti (B).
Collegare il pannelle laterale sinistro (15) e il pannelle laterale
destro (16) della sabbiera attraverso il palo (17) e fissarli con 6
viti (B).

12 13
IT
09
3.5*30
Bx6
10
3.5*30
Bx6
Collegare il pannello laterale (15) al pannello laterale (1)
attraverso il palo (16) e fissarli con 6 viti (B).
Collegare il pannelle laterale sinistro (15) e il pannelle laterale
destro (16) della sabbiera attraverso il palo (17) e fissarli con 6
viti (B).
14 15
IT
11 12
3.5*60
C x1
Φ6*65
D x1
Fissare il palo (18) alla posizione centrale nella parte anteriore
della sabbiera con una vite (C).
Estrarre il volante (19) e fissarlo all'asta della bandiera come
mostrato nella figura. Appoggiare il prodotto sul tappetino (20)
per completare il montaggio.

14 15
IT
11 12
3.5*60
C x1
Φ6*65
D x1
Fissare il palo (18) alla posizione centrale nella parte anteriore
della sabbiera con una vite (C).
Estrarre il volante (19) e fissarlo all'asta della bandiera come
mostrato nella figura. Appoggiare il prodotto sul tappetino (20)
per completare il montaggio.

Drewniana piaskownica
wkształciełodzi
TS10028
INSTRUKCJAOBSŁUGI
NINIEJSZA INSTRUKCJA ZAWIERA ISTOTNEINFORMACJEDOTYCZĄCEBEZPIECZEŃSTWA.PROSIMYOZAPOZNANIESIĘZNIĄIZACHOWANIEJEJDOWGLĄDUWPRZYSZŁOŚCI.
EN DE FR ES IT PL
Wrazieproblemówskontaktujsięznami!
Jeślipotrzebujeszpomocy,skontaktujsięznaszymprzyjaznymdziałemobsługiklienta.
Wymianauszkodzonychlubbrakującychczęścizostanieprzeprowadzona
takszybko,jaktomożliwe!
Nie zwracaj tego produktu.
Skontaktujsięznaszymdziałemobsługiklienta,abyuzyskać
pomoc.
Skontaktujsięznami!
PLoffice:Gdańsk

Drewniana piaskownica
wkształciełodzi
TS10028
INSTRUKCJAOBSŁUGI
NINIEJSZA INSTRUKCJA ZAWIERA ISTOTNEINFORMACJEDOTYCZĄCEBEZPIECZEŃSTWA.PROSIMYOZAPOZNANIESIĘZNIĄIZACHOWANIEJEJDOWGLĄDUWPRZYSZŁOŚCI.
EN DE FR ES IT PL
Wrazieproblemówskontaktujsięznami!
Jeślipotrzebujeszpomocy,skontaktujsięznaszymprzyjaznymdziałemobsługiklienta.
Wymianauszkodzonychlubbrakującychczęścizostanieprzeprowadzona
takszybko,jaktomożliwe!
Nie zwracaj tego produktu.
Skontaktujsięznaszymdziałemobsługiklienta,abyuzyskać
pomoc.
Skontaktujsięznami!
PL: sklep@costway.com
PLoffice:Gdańsk
02 03
Zanim Zaczniesz
Ostrzeżenie
Montażempowinnyzająćsięwyłącznieosobydorosłe
Usuńopakowanieiupewnijsię,żezestawzawierawszystkieczęściielementy
montażowe.
Przeczytajuważniekażdykrokipostępujwewłaściwejkolejności.
Zalecamy,abywmiaręmożliwościwszystkieelementybyłymontowanewpobliżu
miejsca,wktórymbędąużywane,abyuniknąćniepotrzebnegoprzenoszeniaproduktu
pozłożeniu.
Zapewnijbezpiecznąpowierzchniępodczasmontażuizawszeumieszczajprodukt
napłaskiejistabilnejpowierzchni.
Ogólneostrzeżeniadotyczącebezpieczeństwa
Uwaga:Produktniejestodpowiednidladzieciponiżej3lat
Niebezpieczeństwo:Trzymajwszystkiemałeczęściimateriałyopakowaniowedlatego
produktuzdalaodniemowlątidzieci,wprzeciwnymraziemogąstwarzaćryzyko
zadławienia.
Niebezpieczeństwo:Brakmocowaniamożespowodowaćryzykoprzewrócenia.
UWAGA:
RYZYKOZADŁAWIENIA
-Produktzawieramałeelementy.Nieodpowiednie
dladzieciponiżej3rokużycia.
0-3
Przeczytajuważniewszystkieinstrukcjeizachowajjenaprzyszłość.
PL
Listaczęści
Nierzeczywiste wymiary
Element burty x1 Element burty x1 Element burty x1
Reling x1
Reling x1
Element burty x1 Element burty x1 Ławeczkax1
Bulaj x2
Element burty x1
Maszt x1 Oparcie x1 Ławeczkax1
Element burty x1
Element burty x1
Łącznikburtyx2
Φ6*60
A x2
ŚRUBA ŚRUBA
ŚRUBA
ŚRUBA KLUCZ
3.5*30
B x54
3.5*60
C x2
Φ6*65
D x1 E x1
Łącznikburtyx1
Element ozdobny dziobu x1
Kołosterowex1 Mata x1
1 2 3 4 5
6 7 8 9 10
11 12 13 14 15
16 17 18 19 20
Rzeczywiste wymiary

04 05
EN
01
3.5*30
B x14
02
Φ6*60
A x2
3.5*30
B x2
Zapomocą5wkrętów(B)zmontujzesobąreling(4)i
elementburty(7).Następniezapomocą2wkrętów(B)
przykręćpołączonezesobączęścidoelementuburty(1).Za
pomocą5wkrętów(B)zmontujzesobąreling(5)ielement
burty(6).Następniezapomocą2wkrętów(B)przykręć
połączonezesobączęścidoelementuburty(2).
Zapomocą2wkrętów(B)przymocujelementburty(3)do
elementuburty(1)zkroku1.Następniezapomocą2śrub(A)
przymocuj maszt (11) do elementu burty (3).

06 07
EN
03
3.5*30
B x3
04
3.5*30
B x2
3.5*60
C x1
Zapomocą2wkrętów(B)przymocujelementburty(10)do
drugiegoelementuburty(1).Następnieprzymocujławeczkę(8)
doelementuburty(1)zapomocą2wkrętów(B).Nakońcu
przymocujmaszt(11)doławeczki(8)zapomocąwkrętu(C).
Zapomocą2wkrętów(B)przymocujbulaj(9)doelementu
burty (7).

08 09
EN
05
3.5*30
B x4
06
3.5*30
B x9
Zapomocą4wkrętów(B)przymocujoparcie(12)doelementów
burty (1 i 7).
Zapomocą8wkrętów(B)zamocujdrugąstronępiaskownicy.
Następnieprzyużyciuwkrętu(B)przymocujławeczkę(8)do
elementu burty (2).

08 09
EN
05
3.5*30
B x4
06
3.5*30
B x9
Zapomocą4wkrętów(B)przymocujoparcie(12)doelementów
burty (1 i 7).
Zapomocą8wkrętów(B)zamocujdrugąstronępiaskownicy.
Następnieprzyużyciuwkrętu(B)przymocujławeczkę(8)do
elementu burty (2).

10 11
EN
07
3.5*30
B x2
08
3.5*30
Bx6
Przymocujbulaj(9)doelementuburty(6)zapomocą2
wkrętów(B).
Połączelementburty(14)zdrugimelementemburty(2)za
pomocąłącznika(16),anastępniezamocujzapomocą6
wkrętów(B).Zamocujławeczkę(13)wpozycjipokazanejna
rysunku.

10 11
EN
07
3.5*30
B x2
08
3.5*30
Bx6
Przymocujbulaj(9)doelementuburty(6)zapomocą2
wkrętów(B).
Połączelementburty(14)zdrugimelementemburty(2)za
pomocąłącznika(16),anastępniezamocujzapomocą6
wkrętów(B).Zamocujławeczkę(13)wpozycjipokazanejna
rysunku.

12 13
EN
09
3.5*30
Bx6
10
3.5*30
Bx6
Połączelementburty(15)zdrugimelementemburty(1)za
pomocąłącznika(16),anastępniezamocujzapomocą6
wkrętów(B).
Połączlewy(15)iprawyelementburty(14)zapomocąłącznika
(17),anastępniezamocujzapomocą6wkrętów(B).

12 13
EN
09
3.5*30
Bx6
10
3.5*30
Bx6
Połączelementburty(15)zdrugimelementemburty(1)za
pomocąłącznika(16),anastępniezamocujzapomocą6
wkrętów(B).
Połączlewy(15)iprawyelementburty(14)zapomocąłącznika
(17),anastępniezamocujzapomocą6wkrętów(B).
14 15
EN
11 12
3.5*60
C x1
Φ6*65
D x1
Zamocujelementozdobnydziobu(18)naśrodkuprzedniej
częścipiaskownicyzapomocąwkrętu(C).
Przymocujkołosterowe(19)domasztu(8),takjakpokazano
narysunku.Następnieumieśćpiaskownicęnamacie(20),aby
zakończyćmontaż.

14 15
EN
11 12
3.5*60
C x1
Φ6*65
D x1
Zamocujelementozdobnydziobu(18)naśrodkuprzedniej
częścipiaskownicyzapomocąwkrętu(C).
Przymocujkołosterowe(19)domasztu(8),takjakpokazano
narysunku.Następnieumieśćpiaskownicęnamacie(20),aby
zakończyćmontaż.

Please give us a chance to make it right and do better !
Contact our friendly customer service department for help first.
Replacements for missing or damaged parts will be shipped ASAP !
Contact Us !
Do NOT return this item.
US:cs.us@costway.com
UK:cs.uk@costway.com
Kids Wooden Boat Sandbox
TS10028
USER’S MANUAL
THIS INSTRUCTION BOOKLET CONTAINS IMPORTANT SAFETY INFORMATION. PLEASE READ AND KEEP FOR FUTURE REFERENCE.
EN DE FR ES IT PL
US office: Fontana UK office: Ipswich AU office: Truganina
