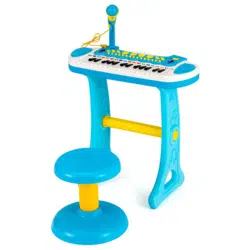

TM10060
31-Key Electronic Piano Toy
31-Tasten Elektronisches Klavier Spielzeug
Jouet de Piano Électronique à 31 Touches
Piano Electrónico de Juguete de 31 Teclas
Pianoforte Elettronico a 31 Tasti
Fortepian elektroniczny dla dzieci
IMPORTANT! READ CAREFULLY AND KEEP FOR
FUTURE REFERENCE.
If you're having difficulty, our friendly customer team is always here to help.
FRA:cs.fr@costway.com
DEU:cs.de@costway.com
ESP:cs.es@costway.com
POL:sklep@costway.comUSA:[email protected]
AUS:cs.au@costway.com
ITA:cs.it@costway.com
GBR:cs.uk@costway.com
DEU office: FDS GmbH, Neuer Höltigbaum 36, 22143 Hamburg, Deutschland
ITA office: Milano
FRA office: Saint Vigor d'Ymonville
POL office: Gdańsk
GBR office: IpswichAUS office: TruganinaUSA office: Fontana
Before You Start
Please read all instructions carefully and keep it for future reference.
EN
The product must be installed and used under the supervision of an
adult.
Read through each step carefully and follow the proper order.
Remove all packaging, separate and count all parts and hardware.
Please ensure that all parts are correctly installed, incorrect
installation can lead to a danger.
We recommend that, where possible, all items are assembled near
the area in which they will be placed in use, to avoid moving the
product unnecessarily once assembled.
Ensure a secure surface during installation, and always place the
product on a flat, steady and stable surface.
General Warnings
Attention: Children should use this product under the parental supervision.
Danger: Keep all small parts and packaging materials for this product
away from babies and children, otherwise they may pose a choking hazard.
Warning
WARNING:
CHOKING HAZARD
-Small parts.
Not for children under 3 years.
Allgemeine Achtung
Bevor Sie beginnen
Bitte sorgfältig lesen und zum späteren Nachschlagen aufbewahren.
DE
Vorsicht: Kinder sollten diesen Artikel unter elterlicher Aufsicht benutzen.
Gefahr: Halten Sie alle Kleinteile und Verpackungsmaterialien, die
verschluckt werden können, von Babys und Kindern fern.
Der Artikel muss unter der Aufsicht eines Erwachsenen montiert und
benutzt werden.
Lesen Sie jeden Schritt sorgfältig durch und befolgen Sie die richtige
Reihenfolge.
Entfernen Sie alle Verpackungen, Überprüfen Sie, ob alle Teile und
Zubehörteile vorhanden sind.
Bitte stellen Sie sicher, dass alle Teile richtig montiert sind, eine falsche
Montage kann zu einer Gefahr führen.
Wir empfehlen, alle Teile möglichst in der Nähe des Aufstellungsortes zu
montieren, um unnötige Bewegungen nach der Montage zu vermeiden.
Achten Sie bei der Montage auf einen sicheren Untergrund und stellen
Sie den Artikel immer auf eine ebene, feste und stabile Fläche.
Achtung
Achtung:
ERSTICKUNGSGEFAHR
-Kleine Teile.
Nicht für Kinder unter 3 Jahren.
02 03
Avant de Commencer
Veuillez lire attentivement toutes les instructions et les conserver pour
la référence ultérieure.
Le produit doit être installé et utilisé sous la surveillance d'un adulte.
Lisez attentivement chaque étape et suivez l'ordre correct.
Retirez tous les emballages, séparez et comptez toutes les pièces et le
matériel.
Veuillez vous assurer que toutes les pièces soient correctement
installées, une installation incorrecte peut entraîner un danger.
Nous recommandons que, dans la mesure du possible, tous les articles
soient assemblés à proximité de la zone dans laquelle ils seront utilisés,
afin d'éviter de déplacer inutilement le produit une fois assemblé.
Assurez-vous que la surface soit solide pendant l'assemblage et placez
toujours le produit sur une surface plane et stable.
FR
Avertissements Généraux
Avertissements
Attention : Les enfants doivent utiliser ce produit sous la surveillance de
leurs parents.
Danger : Gardez toutes les petites pièces et les matériaux d'emballage
de ce produit hors de la portée des bébés et des enfants pour éviter un
risque d'étouffement.
AVERTISSEMENT :
RISQUE D'ÉTOUFFEMENT
– Les petites pièces.
Ne convient pas aux enfants de
moins de 3 ans.
Antes de Empezar
Lea atentamente todas las instrucciones y consérvelas para futuras
consultas.
El producto debe ser instalado y utilizado bajo la supervisión de un adulto.
Lea detenidamente cada paso y siga el orden correcto.
Retire todo el embalaje, separe y cuente todas las piezas y los
accesorios.
Asegúrese de que todas las piezas estén instaladas correctamente, una
instalación incorrecta puede provocar un peligro.
Recomendamos que, siempre que sea posible, todos los elementos se
monten cerca de la zona en la que se van a utilizar, para evitar mover el
producto innecesariamente una vez montado.
Asegure una superficie segura durante el montaje, y coloque el producto
siempre sobre una superficie plana, firme y estable.
ES
Advertencias Generales
Advertencia
Atención: Los niños deben utilizar este producto bajo la supervisión de
sus padres.
Peligro: Mantenga todas las piezas pequeñas y los materiales de
embalaje de este producto fuera del alcance de los bebés y los niños, ya
que de lo contrario pueden suponer un peligro de asfixia.
ADVERTENCIA:
PELIGRO DE ASFIXIA
- Piezas pequeñas.
No es adecuado para niños
menores de 3 años.
04 05

Prima di Iniziare
Si prega di leggere attentamente tutte le istruzioni e conservarle per
riferimento futuro.
IT
Avvertenza per il Montaggio
Il prodotto deve essere installato e utilizzato sotto la supervisione di
un adulto.
Leggere attentamente ogni passo e seguire l'ordine corretto.
Rimuovere tutti gli imballaggi, separare e contare tutte le parti e tutti
gli accessori.
Si prega di assicurarsi che tutte le parti siano installate correttamente,
un'installazione errata può portare a un pericolo.
Si consiglia, ove possibile, di montare tutti gli articoli vicino alla zona
in cui verranno posti in uso, per evitare di spostare inutilmente il
prodotto una volta assemblato.
Garantire una superficie sicura durante il montaggio e posizionare il
prodotto sempre su una superficie piana, stabile.
Attenzione: I bambini devono usare questo prodotto sotto la
supervisione dei genitori.
Pericolo: Tenere tutte le piccole parti e i materiali di imballaggio di
questo prodotto lontano da neonati e bambini, altrimenti potrebbero
rappresentare un rischio di soffocamento.
Avvertenza
AVVERTENZA:
RISCHIO DI SOFFOCAMENTO
- Piccole parti.
Non per i bambini sotto i 3 anni.
Zanim Zaczniesz
Przeczytaj uważnie wszystkie instrukcje i zachowaj je na przyszłość.
Produkt musi złożony i używany pod nadzorem osoby dorosłej.
Przeczytaj uważnie każdy krok i postępuj we właściwej kolejności.
Usuń opakowanie i upewnij się, że zestaw zawiera wszystkie części i
elementy montażowe.
Upewnij się, że wszystkie części są poprawnie połączone,
nieprawidłowa instalacja może prowadzić do wypadku.
Zalecamy, aby w miarę możliwości wszystkie elementy były
montowane w pobliżu miejsca, w którym będą używane, aby uniknąć
niepotrzebnego przenoszenia produktu po złożeniu.
Zapewnij bezpieczną przestrzeń roboczą podczas montażu i upewnij
się, że produkt znajduje się na płaskiej i stabilnej powierzchni.
PL
Ogólne ostrzeżenia
Uwaga: Dzieci moga używać tego produktu jedynie pod nadzorem dorosłych.
Niebezpieczeństwo: Trzymaj wszystkie małe części i opakowania tego
produktu z dala od. niemowląt i dzieci - w przeciwnym razie mogą stwarzać
ryzyko zadławienia.
Uwaga
UWAGA:
RYZYKO ZADŁAWIENIA
- Produkt zawiera małe elementy.
Nieodpowiednie dla dzieci poniżej
3 roku życia.
06 07
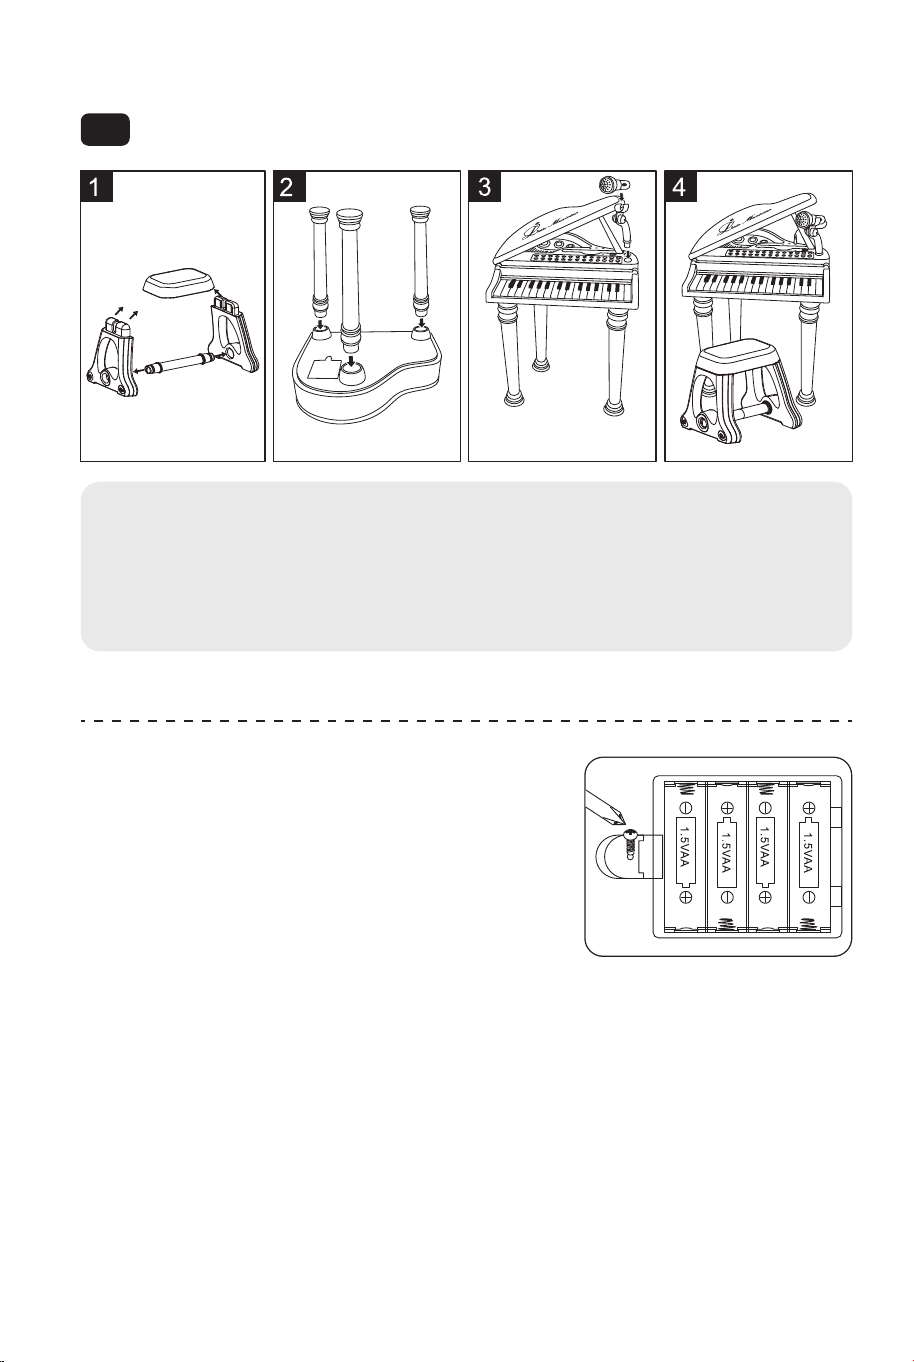
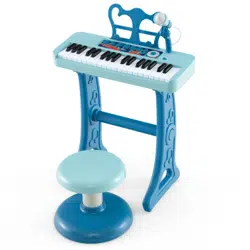
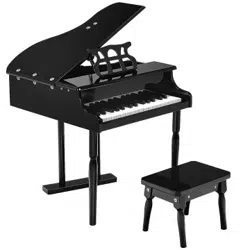
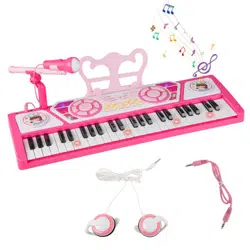
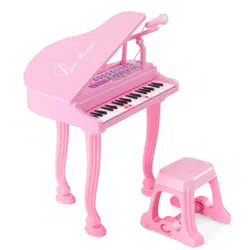
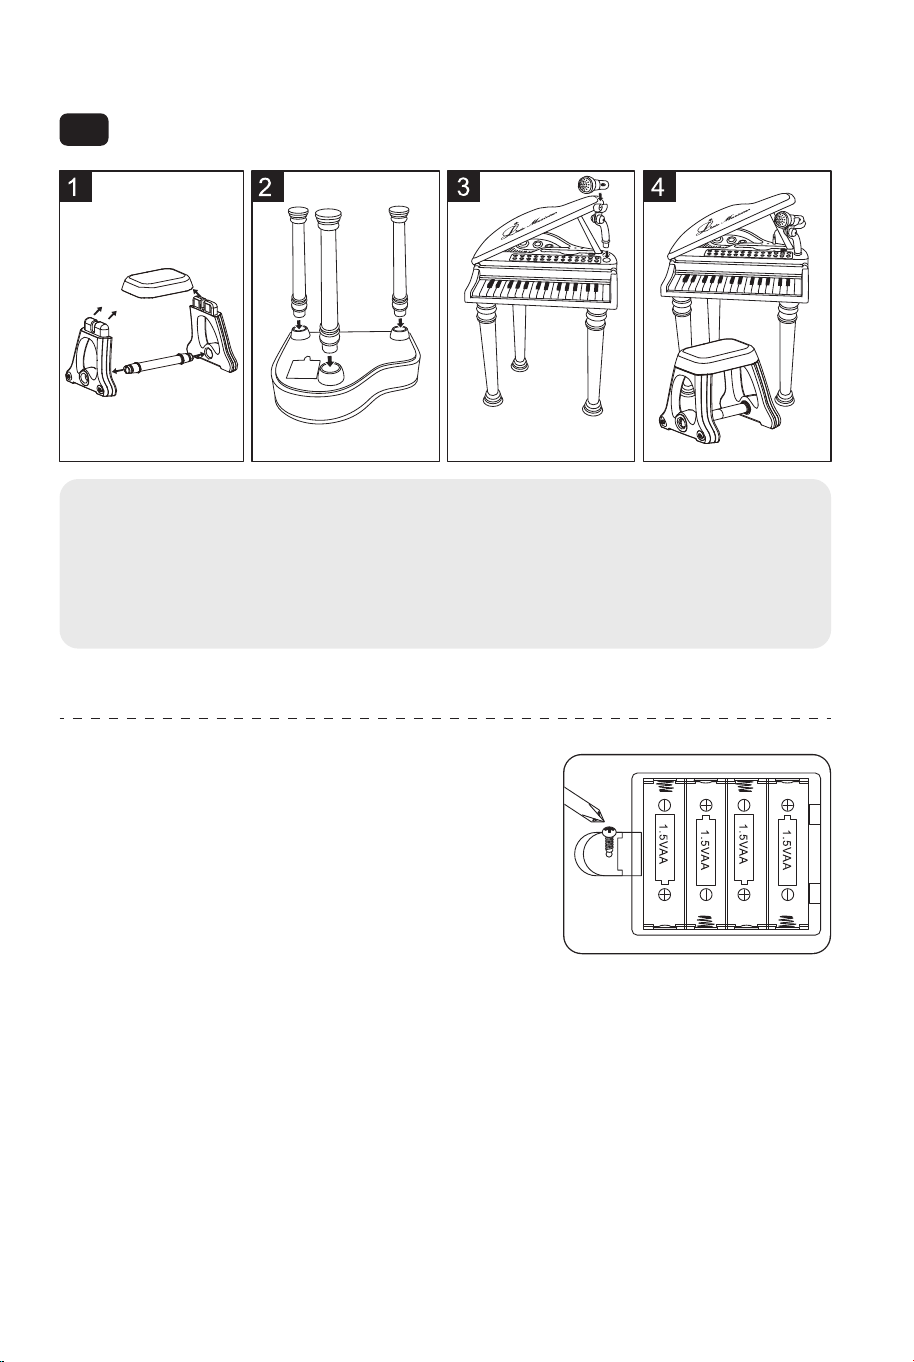
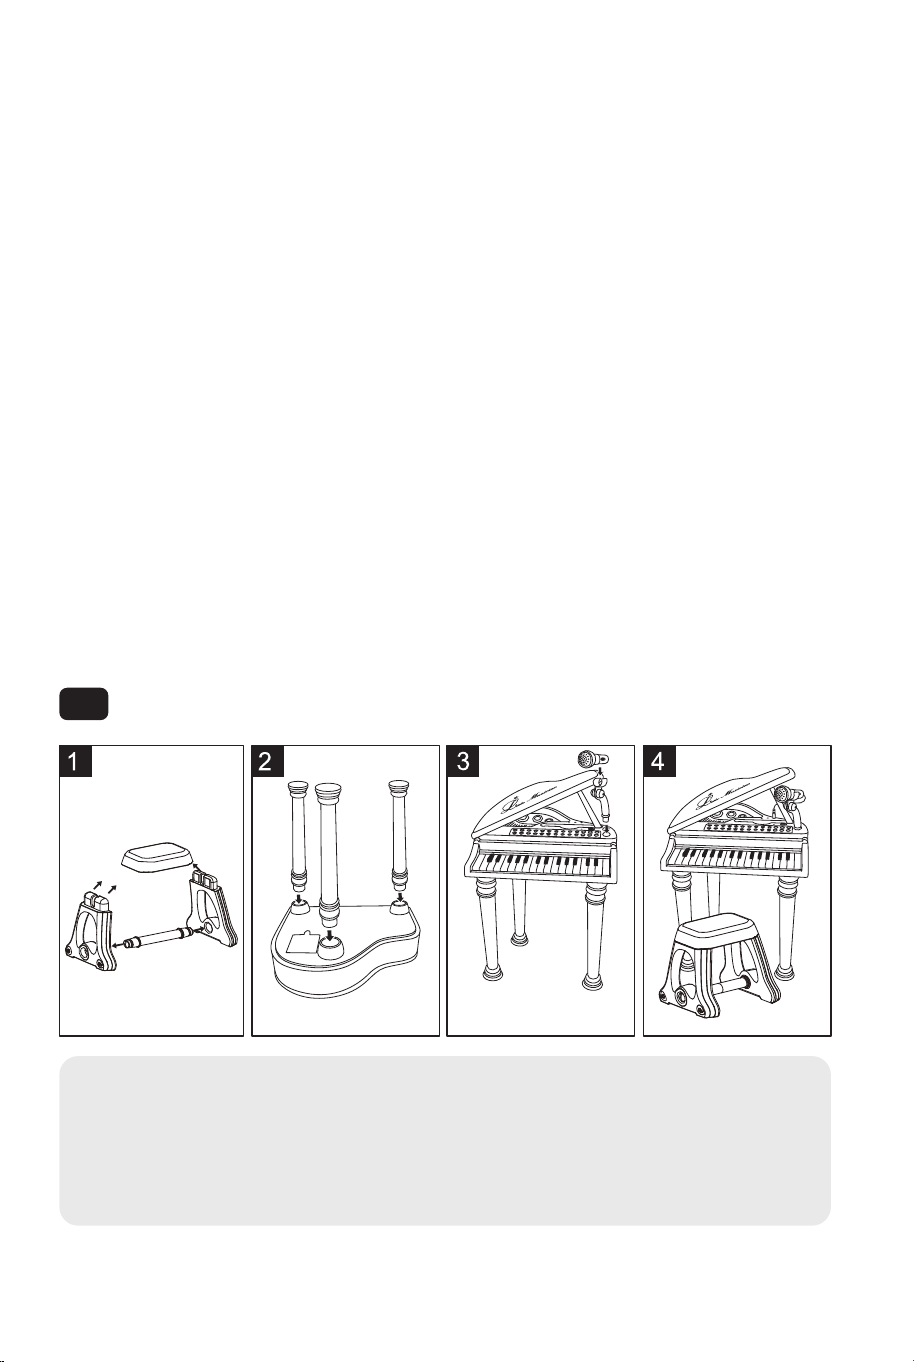
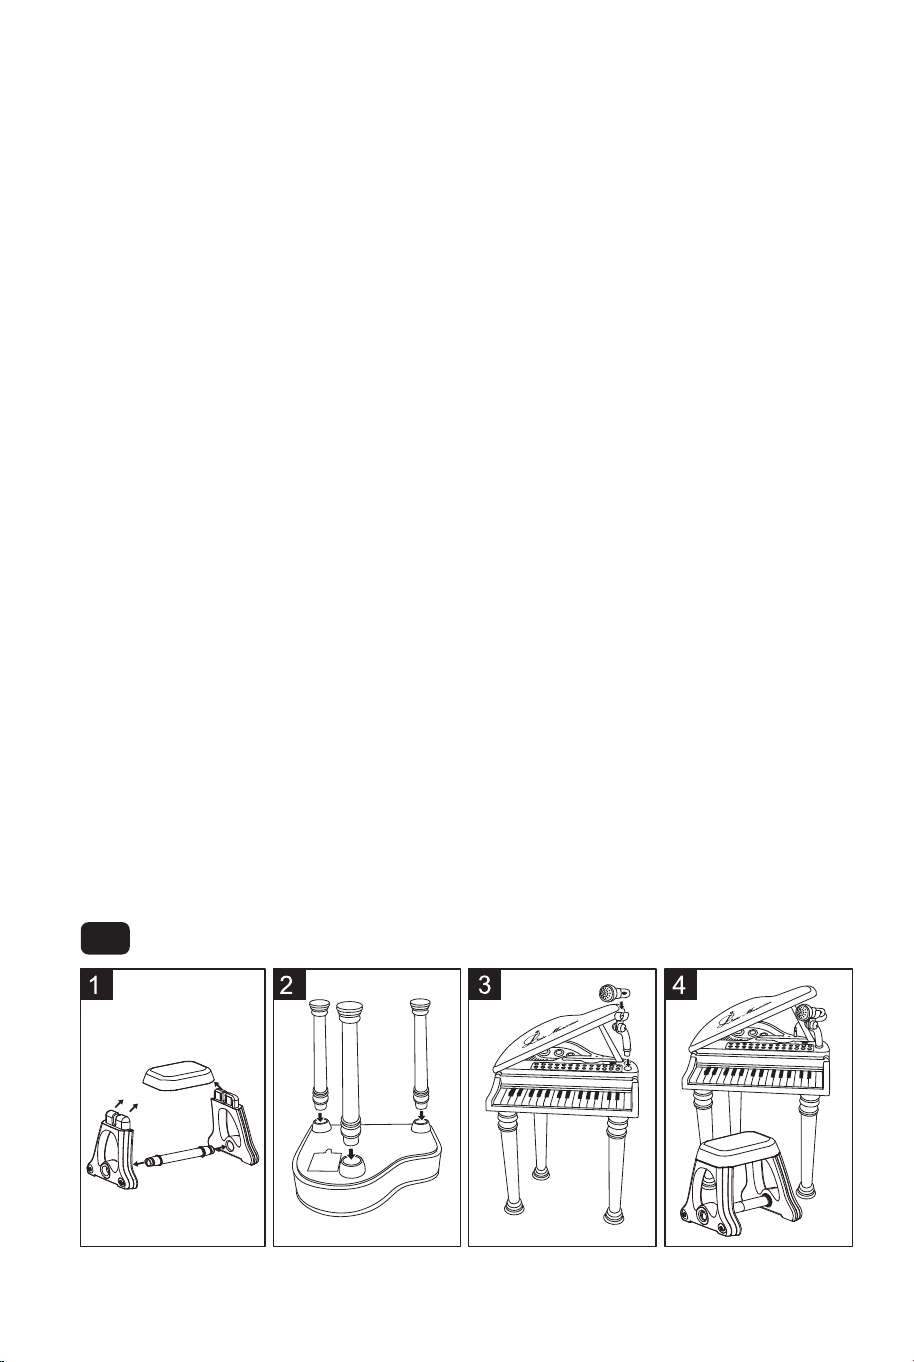
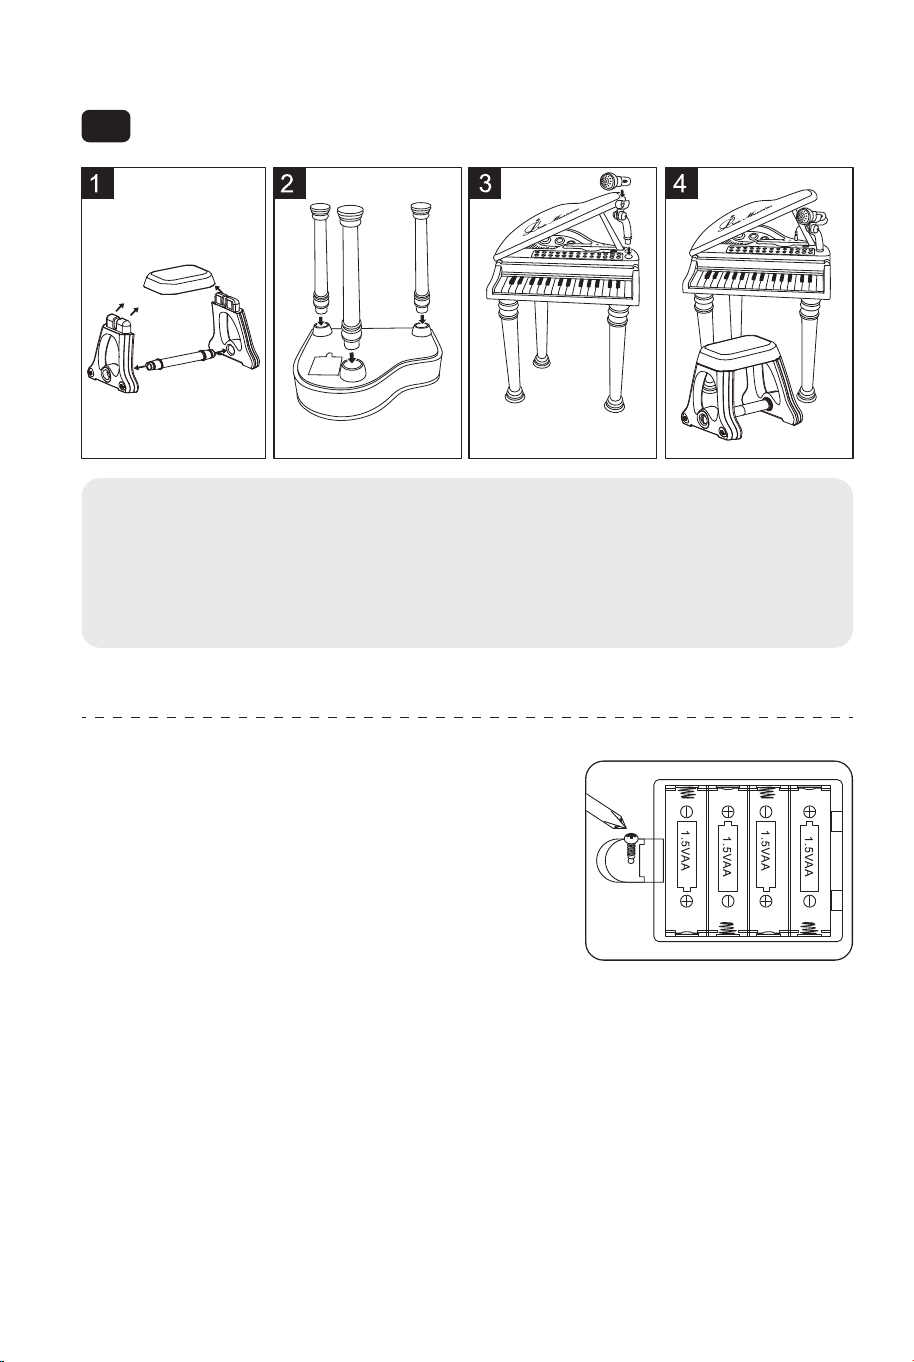
Installation Instruction
Functions Introduction:
EN
1. Install chair according to the picture.
2. Install 3 piano feet according to the picture.
3. Brace up the piano cover and insert the microphone.
4. Done!
This toy is intended to be assembled by the adult.
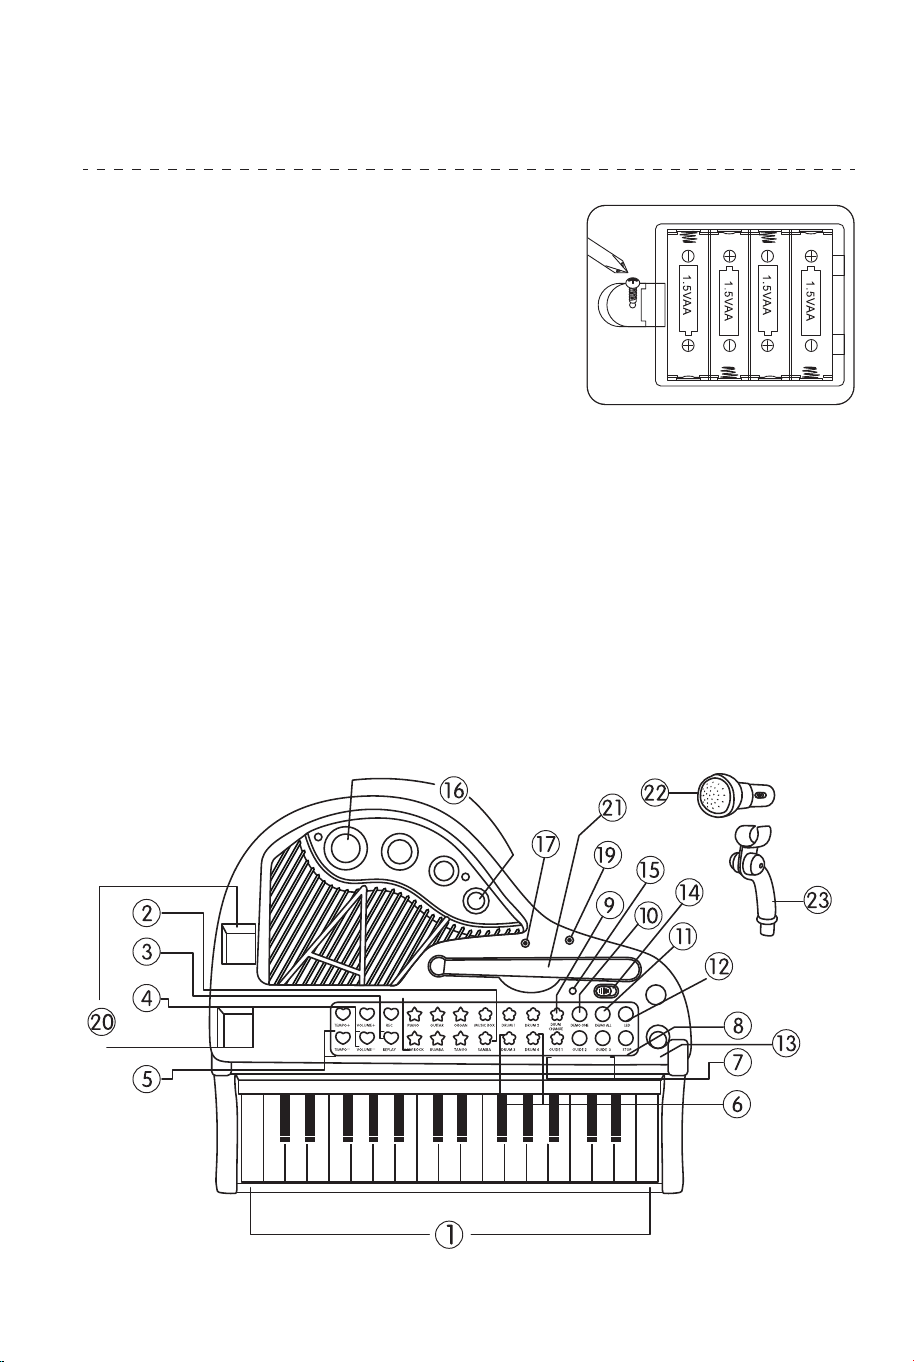
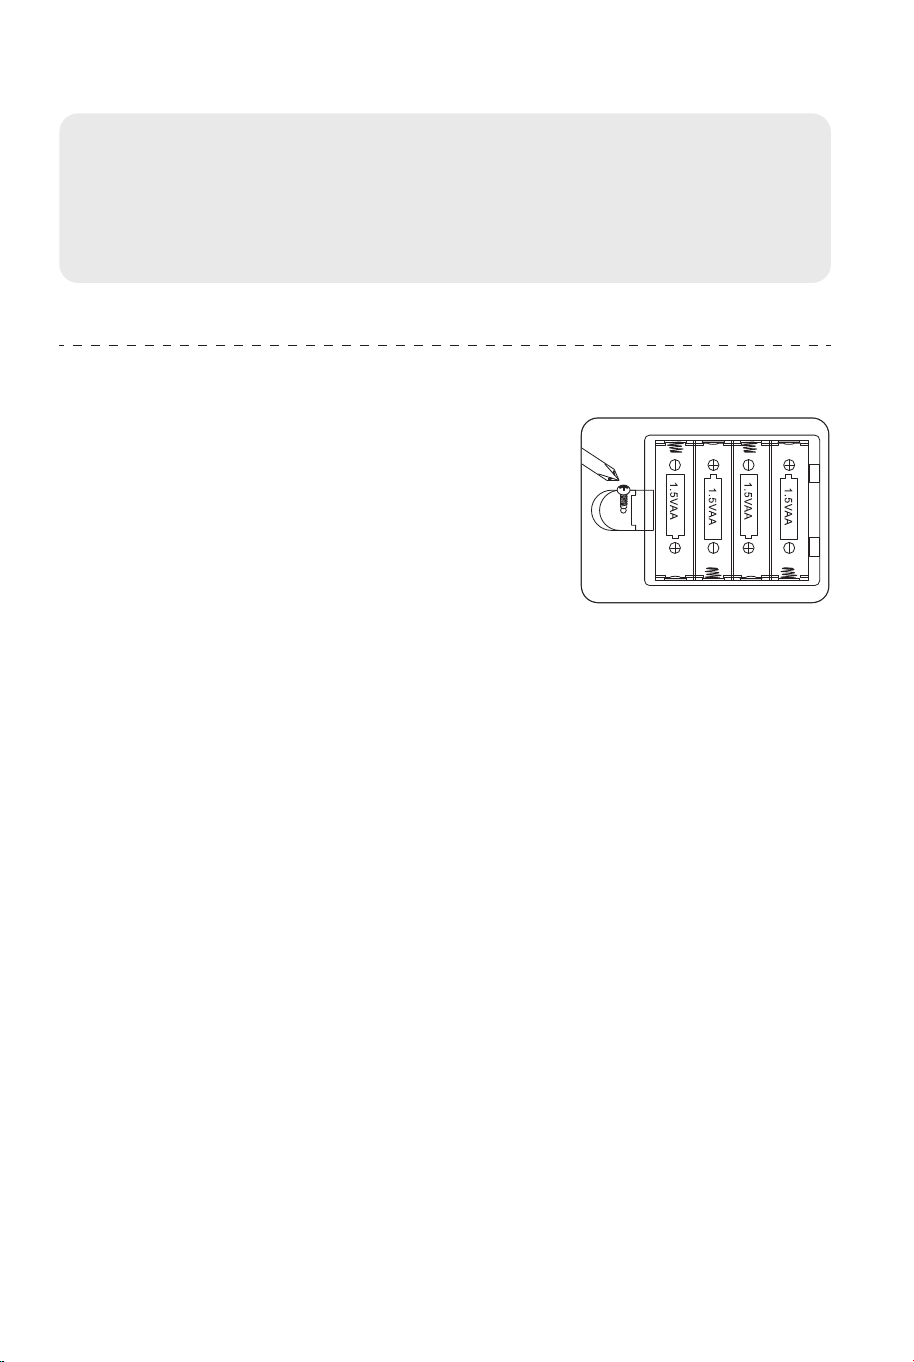
Battery installation diagram:
This toy is powered by four 1.5V "AA" batteries.
Open the battery cover under the piano bottom
and put the four batteries in it. Then cover it
and screw on screw.
Attention: Don't place the anode and cathode
wrongly when put in the batteries!
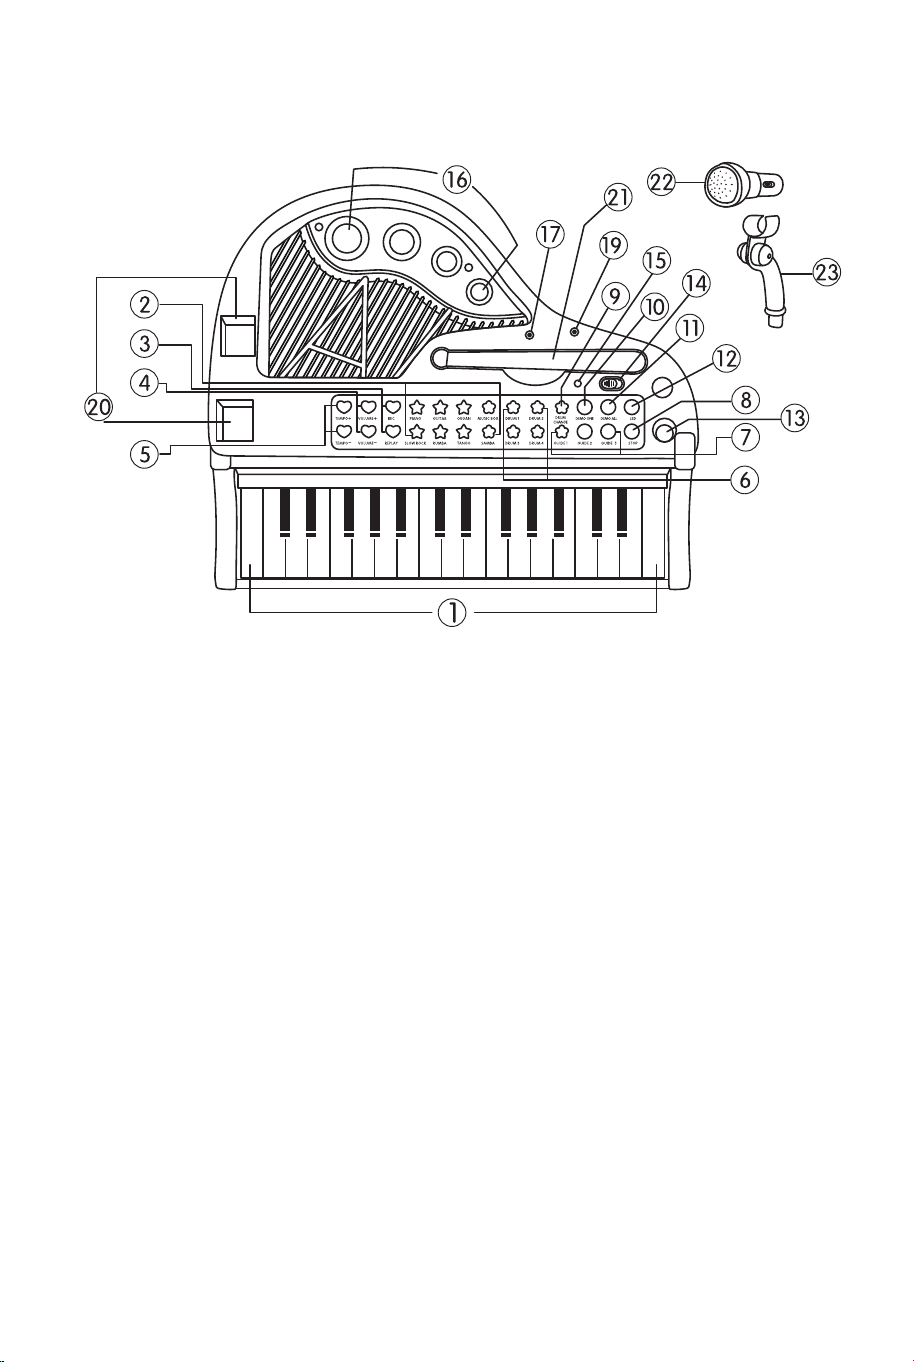
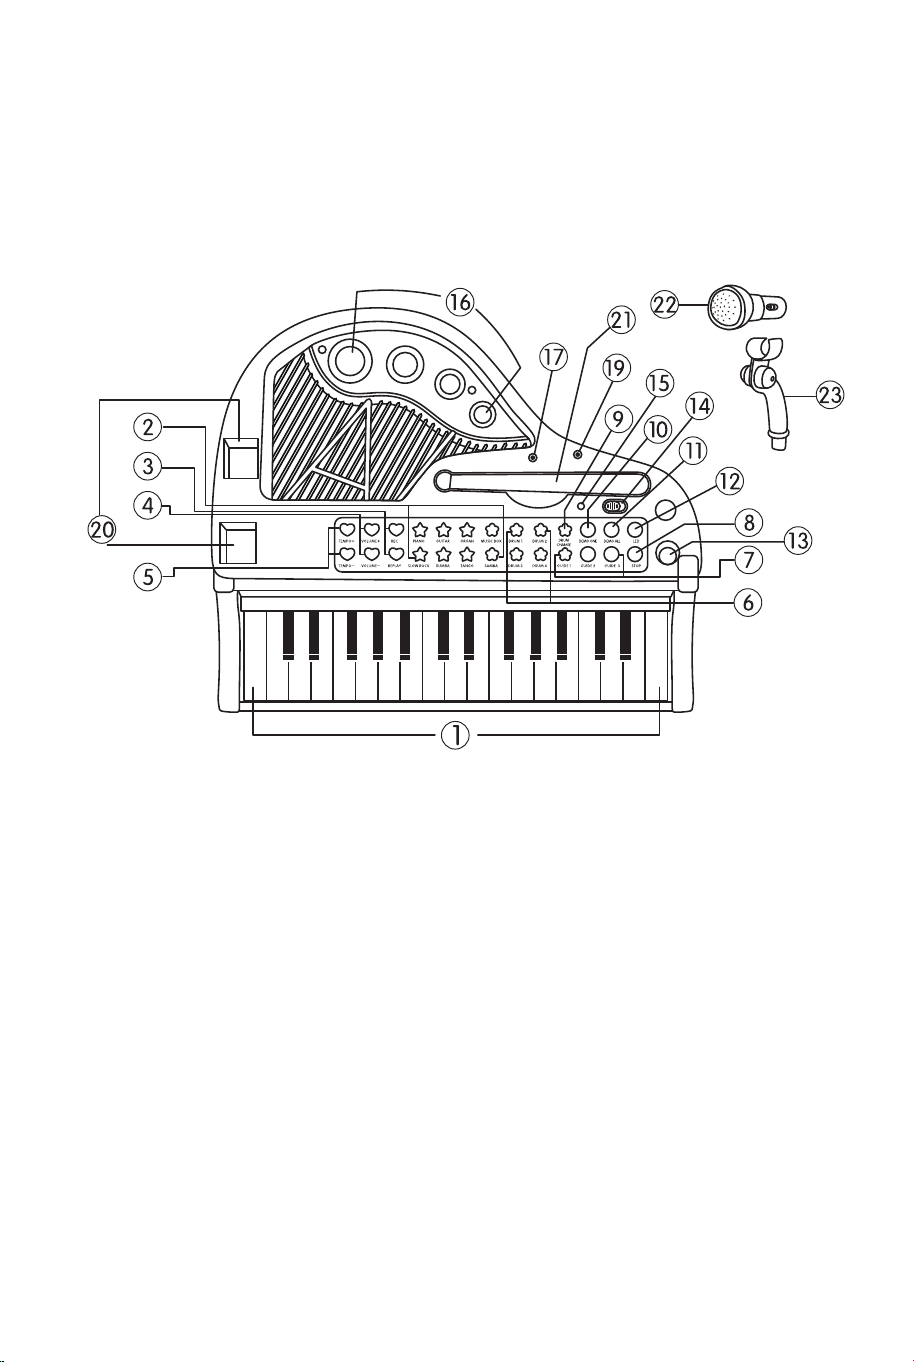
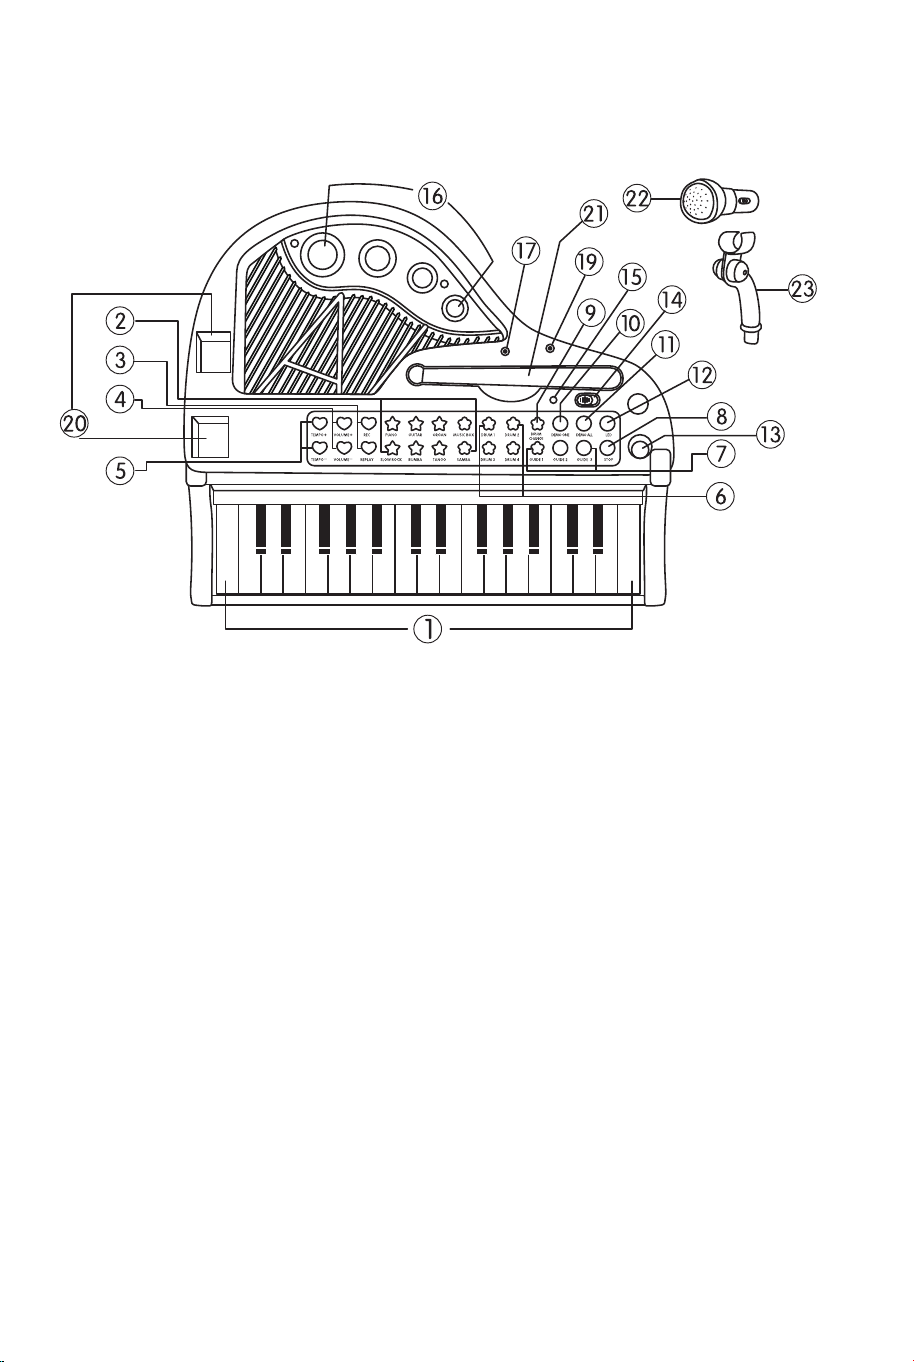
1. 31 keys
2. 8 percussion instruments
3. 3 teaching modes
4. 4 musical instruments
5. 4 accompaniment styles
6. 19 key lights
7. 22 demo songs
8. Colorful rhythm light
9. Light control function
10. Play function
11. Record function
12. Karaoke
13. External MP3 and mobile phone
14. Power saving mode after 2 minutes
without play
15. Equipped with microphone
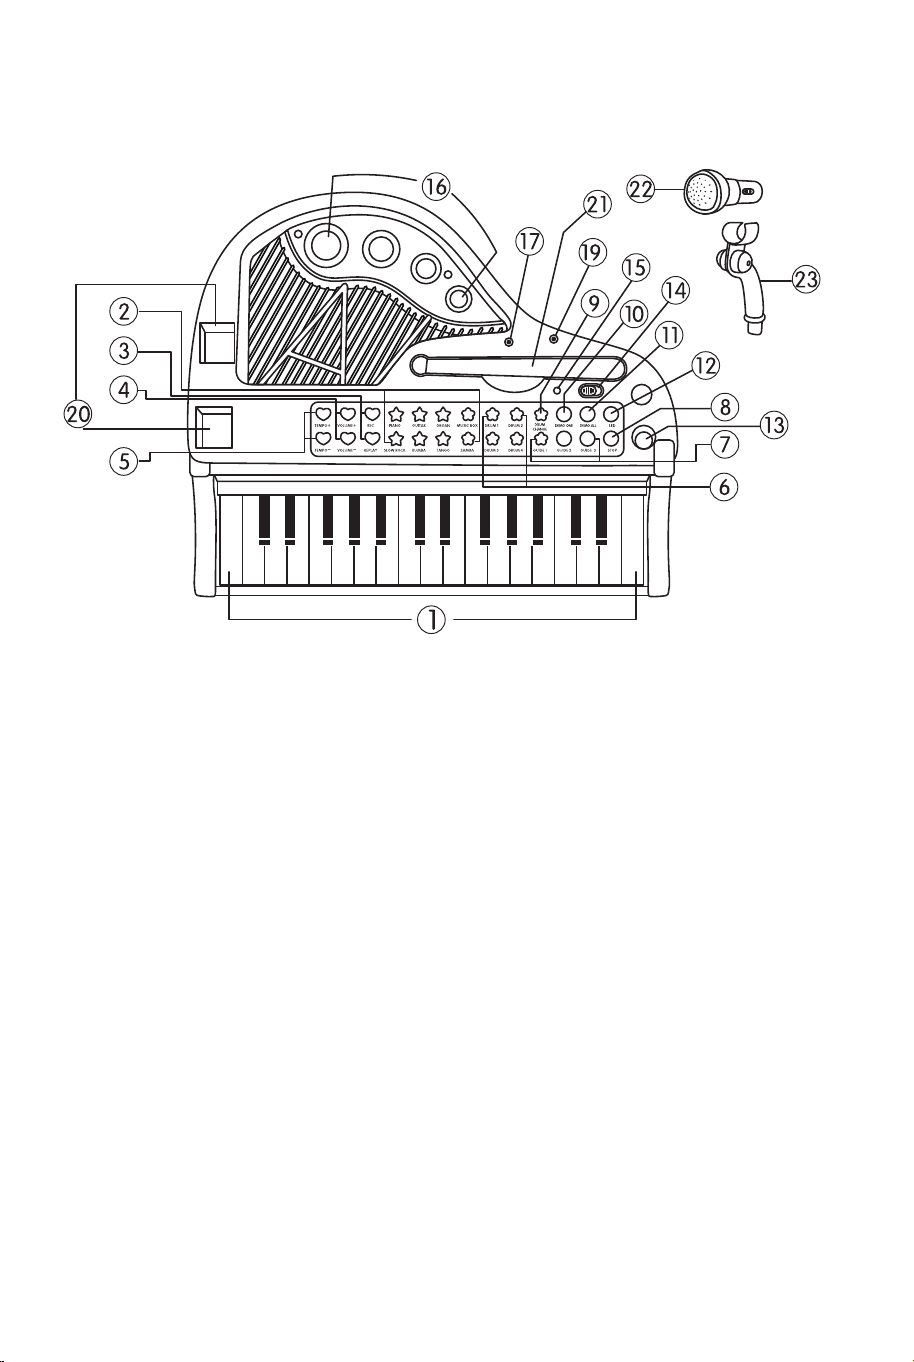
Introduction of the Piano Surface:
Detailed Function:
31 Black and White Keys: every white key with LED light.
8 Percussion Instruments: there are four drum buttons, and each one
corresponds to one sound. You can transform them through"DRUM CHANGE"
button.The other four percussion instruments have eight sound effects,
including cymbal, high notes, snare drum and bass drum, which can also be
transformed into kettle drum, scraper, hand bell and electronic drum.
1. 31 keys
2. Piano, Guitar, Organ, Music box,
Slow rock, Rumba, Tango, Samba
3. Record, Play
4. Volume+, Volume-
5. Tempo+, Tempo-
6. Drum1, Drum2, Drum3, Drum4
7. Guide 1, Guide 2, Guide 3
8. Stop
9. Drum change
10. Demo one
11. Demo all
12. LED
13. Socket for microphone
14. On/Off
15. Power light
16. 4 lights
17. Socket for MP3
19. MIC
20. Socket for piano cover
21. Piano cover bar
22. Microphone
23. Microphone stand
08 09
Installation Instruction
Functions Introduction:
EN
1. Install chair according to the picture.
2. Install 3 piano feet according to the picture.
3. Brace up the piano cover and insert the microphone.
4. Done!
This toy is intended to be assembled by the adult.
Battery installation diagram:
This toy is powered by four 1.5V "AA" batteries.
Open the battery cover under the piano bottom
and put the four batteries in it. Then cover it
and screw on screw.
Attention: Don't place the anode and cathode
wrongly when put in the batteries!
1. 31 keys
2. 8 percussion instruments
3. 3 teaching modes
4. 4 musical instruments
5. 4 accompaniment styles
6. 19 key lights
7. 22 demo songs
8. Colorful rhythm light
9. Light control function
10. Play function
11. Record function
12. Karaoke
13. External MP3 and mobile phone
14. Power saving mode after 2 minutes
without play
15. Equipped with microphone
Introduction of the Piano Surface:
Detailed Function:
31 Black and White Keys: every white key with LED light.
8 Percussion Instruments: there are four drum buttons, and each one
corresponds to one sound. You can transform them through"DRUM CHANGE"
button.The other four percussion instruments have eight sound effects,
including cymbal, high notes, snare drum and bass drum, which can also be
transformed into kettle drum, scraper, hand bell and electronic drum.
1. 31 keys
2. Piano, Guitar, Organ, Music box,
Slow rock, Rumba, Tango, Samba
3. Record, Play
4. Volume+, Volume-
5. Tempo+, Tempo-
6. Drum1, Drum2, Drum3, Drum4
7. Guide 1, Guide 2, Guide 3
8. Stop
9. Drum change
10. Demo one
11. Demo all
12. LED
13. Socket for microphone
14. On/Off
15. Power light
16. 4 lights
17. Socket for MP3
19. MIC
20. Socket for piano cover
21. Piano cover bar
22. Microphone
23. Microphone stand
08 09

3 Teaching Modes:
Button "GUIDE 1": Knock any key to play the melody.
Button "GUIDE 2": Learn to play the demonstration songs by following the
lighted keys.
Button "GUIDE 3": Play a song following the guidance of lights. Then only
accompaniment will be left. Practice playing the piano according to the demo
melody, and if you play it incorrectly, there will be a cue effect to remind you
and you can play it again. If the demo keys are with fluent lights, that means
you can learn to play another song.
4 Musical Instruments: There are four instruments for changing the voice of
the keys, which are "PIANO" "GUITAR" "ORGAN" "MUSIC BOX". Press the
instrument button to change the key voice into what you like.
4 Accompaniment Styles: These four buttons are meant for changing the
accompaniment styles, which are "SLOW ROCK" "RUMBA" "TANGO"
"SAMBA".
22 Demo Songs: Press the button"DEMO ALL"to play all the demo songs,
and learn to play the scales with the help of key lights. The songs will stop
when all are played. Also you can press "DEMO ONE" to choose another
song.
Rhythm Light: When playing songs, the four rhythm lights will shine with the
rhythm of melody, which adds dynamic effect to the music.
Light Control (Led): According to the need of the environment, you can press
this button to turn on or turn off the key lights or rhythm lights.
Stop: Under any circumstances, press this button to stop all.
Play Single Song: Press "DEMO ONE" to play one song and press this
button again to play another one. When the song is finished, the music will
stop, too. During the process of playing, there will be some key lights to help
you learn to play the songs.
Speed Control (Tempo+, Tempo-): There are 16 beat speed pieces of fine
tune accompaniment songs.
Record/ Play Function:
Record: Press "REC" button. At this time, you can play whichever song you
like and it will record 40 music notes at most.
Play: Press "REPLAY" button to play the record music, and this function only
works after recording.
Volume+, Volume-: Used for adjusting the volume of piano.
On: Play a piece of piano melody and all the key lights will flash in turn.
Power Saving Mode: If you don't press any button for more than two minutes,
it will enter power saving mode automatically. And it will play a melody as
prompt tone.
Off: Power off.
Installationsanleitung
Funktionen Einleitung:
DE
1.Installieren Sie den Stuhl entsprechend der Abbildung.
2.Installieren Sie 3 Klavierfüße entsprechend der Abbildung.
3.Bringen Sie die Klavierabdeckung an und setzen Sie das Mikrofon ein.
4.Fertig!
Dieses Spielzeug soll von einem Erwachsenen aufgebaut werden.
Schema für den Batterieaufbau:
Dieses Spielzeug wird mit vier
1,5-V-"AA"-Batterien betrieben. Öffnen Sie die
Batterieabdeckung unter dem Klavierboden und
legen Sie die vier Batterien ein. Dann decken
Sie es ab und schrauben Sie es fest.
Achtung: Legen Sie Anode und Kathode beim
Einsetzen der Batterien nicht falsch ein!
1. 31 Tasten
2. 8 Perkussionsinstrumente
3. 3 Lehrmethoden
4. 4 Musikinstrumente
5. 4 Begleitungsstile
6. 19 Leuchttasten
7. 22 Demo-Lieder
8. Buntes Rhythmuslicht
9. Lichtsteuerungsfunktion
10. Wiedergabefunktion
11. Aufnahme Funktion
12. Karaoke
13. Externer MP3 und Mobiltelefon
14. Energiesparmodus nach 2 Minuten
ohne Wiedergabe
15. Ausgestattet mit Mikrofon
10 11
Einführung der Klavieroberfläche:
Detaillierte Funktion:
31 schwarze und weiße Tasten: jede weiße Taste mit LED-Licht.
8 Percussion-Instrumente: Es gibt vier Trommeltasten, und jede entspricht
einem Sound. Die anderen vier Percussion-Instrumente haben acht Klangef-
fekte, darunter Becken, hohe Töne, kleine Trommel und große Trommel, die
auch in Pauke, Schaber, Handglocke und elektronische Trommel umgewan-
delt werden können.
1. 31 Tasten
2. Klavier, Gitarre, Orgel, Musikbox,
Slow Rock, Rumba, Tango, Samba
3. Aufnehmen, Abspielen
4. Lautstärke+, Lautstärke-
5. Tempo+, Tempo-
6. Trommel1, Trommel2, Trommel3,
Trommel4
7. Führung 1, Führung 2, Führung 3
8. Stop
9. Trommelwechsel
10. Demo eins
11. Demo alle
12. LED
13. Buchse für Mikrofon
14. Ein/Aus
15. Beleuchtung
16. 4 Lichter
17. Buchse für MP3
19. MIC
20. Buchse für Klavierdeckel
21. Stange für Klavierdeckel
22. Mikrofon
23. Mikrofonständer
3 Lehrmethoden:
Taste "GUIDE 1": Klopfen Sie eine beliebige Taste, um die Melodie zu
spielen.
Taste "GUIDE 2": Lernen Sie die Demonstrationslieder zu spielen, indem Sie
den beleuchteten Tasten folgen.
Taste "GUIDE 3": Wiedergabe eines Liedes entsprechend der Lichtführung.
Dann bleibt nur noch die Begleitung übrig. Üben Sie das Klavierspiel nach der
Demo-Melodie, und wenn Sie es falsch spielen, werden Sie durch einen
Cue-Effekt daran erinnert, und Sie können es erneut spielen. Wenn die
Demo-Tasten mit fließenden Lichtern angezeigt werden, bedeutet das, dass
Sie lernen können, ein anderes Lied zu spielen.
4 Musikinstrumente: Es gibt vier Instrumente zum Ändern der Tastenstimme:
"PIANO", "GUITAR", "ORGAN" und "MUSIC BOX". Drücken Sie die
Instrumententaste, um die Tastenstimme nach Ihren Wünschen zu ändern.
4 Begleitungsstile: Diese vier Tasten dienen zum Wechseln der
Begleitungsstile, die "SLOW ROCK" "RUMBA" "TANGO" "SAMBA" sind.
22 Demo Lieder: Drücken Sie die Taste "DEMO ALL", um alle Demosongs
abzuspielen und das Spielen der Tonleitern mit Hilfe der Tastenbeleuchtung zu
lernen. Die Lieder werden gestoppt, wenn alle gespielt sind. Sie können auch
"DEMO ONE" drücken, um einen anderen Song auszuwählen.
Rhythmus-Licht: Beim Abspielen von Songs leuchten die vier
Rhythmuslichter im Rhythmus der Melodie, was der Musik einen dynamischen
Effekt verleiht.
Lichtsteuerung (Led): Entsprechend dem Bedarf der Umgebung können Sie
diese Taste drücken, um die Tastenbeleuchtung oder die
Rhythmusbeleuchtung ein- oder auszuschalten.
Stop: Drücken Sie in jedem Fall diese Taste, um alles zu stoppen.
Einzelnes Lied abspielen: Drücken Sie "DEMO ONE", um einen Song
abzuspielen, und drücken Sie diese Taste erneut, um einen weiteren
abzuspielen. Wenn das Lied zu Ende ist, wird auch die Musik angehalten.
Während der Wiedergabe leuchten einige Tasten auf, um Ihnen zu helfen, die
Lieder zu spielen.
Geschwindigkeitskontrolle (Tempo+, Tempo-): Es gibt 16 Tempo-Stücke für
die Feinabstimmung der Begleitlieder.
Aufnahme-/Wiedergabefunktion:
Aufnehmen: Drücken Sie die Taste "REC". Zu diesem Zeitpunkt können Sie
ein beliebiges Lied abspielen und es werden maximal 40 Musiknoten
aufgenommen.
Abspielen: Drücken Sie die "REPLAY"-Taste, um die aufgenommene Musik
abzuspielen; diese Funktion funktioniert nur nach der Aufnahme.
12 13

Introduction des Fonctions :
1. 31 touches
2. 8 instruments de percussion
3. 3 modes d'apprentissage
4. 4 instruments de musique
5. 4 styles d'accompagnement
6. 19 touches lumineuses
7. 22 chansons de démonstration
8. Lumière rythmique colorée
9. Fonction de contrôle de la lumière
10. Fonction de lecture
11. Fonction d'enregistrement
12. Karaoké
13. MP3 externe et téléphone portable
14. Mode d'économie d'énergie après 2
minutes de non-lecture
15. Équipé d'un microphone
Lautstärke+, Lautstärke-: Dient zum Einstellen der Lautstärke des Klaviers.
An: Spielen Sie eine Klaviermelodie und alle Tastenleuchten blinken
abwechselnd.
Energiesparmodus: Wenn Sie mehr als zwei Minuten lang keine Taste
drücken, schaltet das Gerät automatisch in den Energiesparmodus. Und es
wird eine Melodie als Aufforderungston spielen.
Aus: Ausschalten.
Instructions d'Assemblage
FR
1. Installez le tabouret comme indiqué sur l'image.
2. Installez les 3 pieds de piano comme indiqué sur l'image.
3. Placez le couvercle du piano sur le piano et insérez le microphone.
4. Prêt !
Ce jouet doit être assemblé par un adulte.
Schéma d'Installation des Piles :
Ce jouet est alimenté par quatre piles « AA » de
1,5V. Ouvrez le couvercle du compartiment à piles
situé sous la base du piano et installez quatre
piles. Refermez le couvercle et le vissez.
Attention : Ne pas placer l'anode et la cathode
de manière incorrecte lors de l'insertion des piles !
Introduction de la surface du piano :
1. 31 touches
2. Piano, guitare, orgue, boîte à musique,
slow rock, rumba, tango, samba, samba.
3. Enregistrement, Lecture
4. Volume+, Volume-
5. Tempo+, Tempo-
6. Tambour 1, Tambour 2, Tambour 3,
Tambour 4
7. Guide 1, Guide 2, Guide 3
8. Arrêt
9.Changement de tambour
10. Démo un
11. Demo all
12. LED
13. Prise pour microphone
14. Marche/Arrêt
15. Feu d'allumage
16. 4 feux
17. Prise MP3
19. MIC
20. Prise pour le couvercle du
piano
21. Barre pour couvercle de
piano
22. Microphone
23. Support de microphone
14 15

Fonction détaillée :
31 Touches Noires et Blanches : Chaque touche blanche est dotée d'un
voyant lumineux.
8 Instruments de Percussion : Il y a quatre boutons de batterie, et chacun
correspond à un son. Vous pouvez les transformer grâce au bouton «
CHANGEMENT DE TAMBOUR ». Les quatre autres instruments de
percussion ont huit effets sonores, dont la cymbale, les notes aiguës, la caisse
claire et la grosse caisse, qui peuvent également être transformés en
bouilloire, en grattoir, en cloche à main et en tambour électronique.
3 Modes d'Apprentissage :
Bouton « GUIDE 1 » : Touchez n'importe quelle touche pour jouer la mélodie.
Bouton « GUIDE 2 » : Apprenez à jouer les chansons de démonstration en
suivant les touches éclairées.
Bouton « GUIDE 3 » : Jouez une chanson en suivant les indications des
lumières. Il ne reste alors que l'accompagnement. Entraînez-vous à jouer du
piano en suivant le morceau de démonstration. Si vous jouez mal, un signal
vous le rappellera et vous pourrez recommencer. Si les touches de démon-
stration sont accompagnées de voyants lumineux, cela signifie que vous
pouvez apprendre à jouer un autre morceau.
4 Instruments de musique : Quatre instruments permettent de modifier la
voix des touches : « PIANO », « GUITAR », « ORGAN » et « MUSIC BOX » («
PIANO », « GUITAR », « ORGAN » et « MUSIC BOX »). Appuyez sur le
bouton de l'instrument pour changer la voix des touches à votre convenance.
4 Styles d'accompagnement : Ces quatre boutons permettent de changer
les styles d'accompagnement, qui sont « SLOW ROCK », « RUMBA », «
TANGO » et « SAMBA ».
22 Morceaux de démonstration : Appuyez sur le bouton « DEMO ALL » pour
jouer tous les morceaux de démonstration et apprendre à jouer les gammes à
l'aide des voyants lumineux. Les chansons s'arrêtent lorsqu'elles ont toutes
été jouées. Vous pouvez également appuyer sur le bouton « DEMO ONE »
pour choisir une autre chanson.
Lumière rythmique : Lors de la lecture des chansons, les quatre lumières
rythmiques s'allument en rythme avec la mélodie, ajoutant un effet dynamique
à la musique.
Contrôle de la lumière (Led) : Selon les besoins de l'environnement, vous
pouvez appuyer sur ce bouton pour allumer ou éteindre les lumières des
touches ou les lumières rythmiques.
Arrêt : En toutes circonstances, appuyez sur ce bouton pour tout arrêter.
Jouer une seule chanson : Appuyez sur « DEMO ONE » pour jouer une
chanson et appuyez à nouveau sur ce bouton pour jouer une autre chanson.
Lorsque la chanson est terminée, la musique s'arrête également. Pendant la
lecture, des voyants lumineux s'allument pour vous aider à apprendre à jouer
les chansons.
Contrôle de la vitesse (Tempo+, Tempo-) : Il y a 16 morceaux de vitesse de
battement pour les chansons d'accompagnement.
Fonction d'enregistrement/lecture :
Enregistrement : Appuyez sur le bouton « REC ». A ce moment-là, vous
pouvez lire le morceau que vous voulez et l'appareil enregistrera 40 notes de
musique au maximum.
Lecture : Appuyez sur le bouton « REPLAY » pour lire la musique enregistrée ;
cette fonction ne fonctionne qu'après l'enregistrement.
Volume+, Volume- : Permet de régler le volume du piano.
Mise sous tension : Jouez un morceau de la mélodie du piano et tous les
voyants des touches clignoteront successivement.
Mode d'économie d'énergie : Si vous n'appuyez sur aucun bouton pendant
plus de deux minutes, l'appareil passe automatiquement en mode d'économie
d'énergie. Une mélodie est jouée en guise d'avertissement.
Mise hors tension : Met l'appareil hors tension.
Instrucciones de Montaje
ES
1. Instale el taburete según la imagen.
2. Instale las 3 patas de piano según la imagen.
3. Apuntale la tapa del piano e inserte el micrófono.
4. ¡Listo!
16 17
Función Detallada:
31 Teclas Blancas y Negras: Cada tecla blanca cuenta con luz LED.
8 Instrumentos de Percusión: Hay cuatro botones de tambor, y cada uno
corresponde a un sonido. Puedes transformarlos a través del botón "DRUM
CHANGE". Los otros cuatro instrumentos de percusión tienen ocho efectos de
sonido, incluyendo platillo, notas altas, caja y bombo, que también se pueden
transformar en tambor de caldera, rascador, campana de mano y tambor
electrónico.
3 Modos de Enseñanza:
Botón "GUIDE 1": Toque cualquier tecla para reproducir la melodía.
Botón "GUIDE 2": Aprenda a tocar las canciones de demostración siguiendo
las teclas iluminadas.
Botón "GUIDE 3": Toque una canción siguiendo la guía de las luces.
Entonces solo quedará el acompañamiento. Practique tocando el piano según
la melodía de demostración, y si la toca incorrectamente, habrá un efecto de
señal para recordárselo y podrá tocar de nuevo. Si las teclas de demostración
están con luces fluidas, significa que puede aprender a tocar otra canción.
4 Instrumentos Musicales: Hay cuatro instrumentos para cambiar la voz de
las teclas, que son "PIANO", "GUITAR", "ORGAN" y "MUSIC BOX" ("PIANO",
"GUITARRA", "ÓRGANO" y "CAJA DE MÚSICA"). Presione el botón del
instrumento para cambiar la voz de las teclas a la que más le guste.
4 Estilos de Acompañamiento: Estos cuatro botones sirven para cambiar
los estilos de acompañamiento, que son "SLOW ROCK" ("ROCK LENTO"),
"RUMBA", "TANGO" y "SAMBA".
22 Canciones de Demostración: Presione el botón "DEMO ALL" para tocar
todas las canciones de demostración, y aprenda a tocar las escalas con la
1. 31 teclas
2. Piano, guitarra, órgano, caja de
música, rock lento, rumba, tango, samba
3. Grabación, Reproducción
4. Volumen+, Volumen-
5. Tempo+, Tempo-
6. Tambor 1, Tambor 2, Tambor 3,
Tambor 4
7. Guía 1, Guía 2, Guía 3
8. Parada
9. Cambio de tambor
10. Demo uno
11. Demo todo
12. LED
13. Enchufe para micrófono
14. Encendido/Apagado
15. Luz de encendido
16. 4 luces
17. Enchufe para MP3
19. MIC
20. Enchufe para tapa de piano
21. Barra para tapa de piano
22. Micrófono
23. Soporte del micrófono
Introducción de la Superficie del Piano:
Introducción de las Funciones:
1. 31 teclas
2. 8 instrumentos de percusión
3. 3 modos de enseñanza
4. 4 instrumentos musicales
5. 4 estilos de acompañamiento
6. 19 luces de teclas
7. 22 canciones de demostración
8. Luz de ritmo de colores
9. Función de control de luz
10. Función de reproducción
11. Función de grabación
12. Karaoke
13. MP3 externo y teléfono móvil
14. Modo de ahorro de energía después de
2 minutos sin jugar
15. Equipado con micrófono
Este juguete debe ser montado por un adulto.
Diagrama de Instalación de Pilas:
Este juguete funciona con cuatro pilas "AA" de
1,5 V. Abra la tapa de las pilas situada debajo
de la parte inferior del piano e instale cuatro
pilas. A continuación, tape y atornille.
Atención: ¡No coloque el ánodo y el cátodo
incorrectamente cuando ponga las pilas!
18 19
ayuda de las luces de las teclas. Las canciones se detendrán cuando se
hayan tocado todas. También puede presionar el botón "DEMO ONE" para
elegir otra canción.
Luz de Ritmo: Al reproducir las canciones, las cuatro luces de ritmo brillarán
al ritmo de la melodía, lo que añade un efecto dinámico a la música.
Control de Luz (Led): Según las necesidades del entorno, puede presionar
este botón para encender o apagar las luces de las teclas o las luces de ritmo.
Parada: En cualquier circunstancia, presione este botón para detener todo.
Reproducir Canción Individual: Presione "DEMO ONE" para reproducir una
canción y vuelva a presionar este botón para reproducir otra. Cuando termine
la canción, la música también se detendrá. Durante el proceso de
reproducción, habrá algunas luces de teclas para ayudarle a aprender a tocar
las canciones.
Control de Velocidad (Tempo+, Tempo-): Hay 16 piezas de velocidad de
compás de canciones de acompañamiento de afinación fina.
Función de Grabación/ Reproducción:
Grabación: Presione el botón "REC". En este momento, puede reproducir la
canción que desee y grabará 40 notas musicales como máximo.
Reproducción: Presione el botón "REPLAY" para reproducir la música
grabada, y esta función solo funciona después de la grabación.
Volumen+, Volumen-: Sirve para ajustar el volumen del piano.
Encendido: Toque una pieza de melodía de piano y todas las luces de las
teclas parpadearán sucesivamente.
Modo de Ahorro de Energía: Si no presiona ningún botón durante más de
dos minutos, entrará automáticamente en el modo de ahorro de energía.
Tocará una melodía como tono de aviso.
Apagado: Se apaga.
Istruzioni per l'installazione
IT
1. Installare la sedia secondo l'illustrazione.
2. Installare 3 piedi per pianoforte secondo l'illustrazione.
3. Fissare il coperchio del pianoforte e inserire il microfono.
4. Finito!
Questo giocattolo deve essere assemblato da un adulto.
1. 31 Tasti
2. Pianoforte, Chitarra, Organo, Carillon, Slow
Rock, Rumba, Tango, Samba
3. Registrazione, riproduzione
4. Volume+, Volume-
5. Tempo+, Tempo-
6. Tamburo1, Tamburo2, Tamburo3, Tamburo4
12. LED
13. Presa per microfono
14. Acceso/Spento
15. luce di alimentazione
16. 4 Luci
17. Presa per MP3
19. MIC
Schema per il montaggio della batteria:
Questo giocattolo è alimentato da quattro batterie
"AA" da 1,5 V. Aprire il coperchio del vano batterie
sotto la base del pianoforte e inserire le quattro
batterie. Quindi coprirlo e avvitarlo bene.
Attenzione: Non inserire l'anodo e il catodo in
modo errato quando si inseriscono le batterie!
Introduzione della superficie del pianoforte:
Introduzione alle funzioni:
1. 31 Tasti
2. 8 Strumenti a percussione
3. 3 Metodi didattici
4. 4 Strumenti musicali
5. 4 Stili di accompagnamento
6. 19 tasti illuminati
7. 22 canzoni demo
8. Luce colorata del ritmo
9. Funzione di controllo della luce
10. Funzione di riproduzione
11. Funzione di registrazione
12. Karaoke
13. MP3 esterno e telefono cellulare
14. Modalità di risparmio energetico dopo 2
minuti senza riproduzione
15. Dotato di microfono
20 21
Funzione dettagliata:
31 tasti bianchi e neri: ogni tasto bianco con luce LED.
8 strumenti a percussione: I tasti della batteria sono quattro e ad ognuno
corrisponde un suono. Gli altri quattro strumenti a percussione hanno otto
effetti sonori, tra cui piatti, acuti, rullante e grancassa, che possono anche
essere convertiti in timpani, scraper, handbell e batteria elettronica.
Tasto "GUIDA 1": Toccare un tasto qualsiasi per suonare la melodia.
Tasto "GUIDA 2": Imparare a suonare i brani dimostrativi seguendo i tasti
illuminati.
Tasto "GUIDA 3": Riproduzione di un brano secondo la guida luminosa.
Rimane solo l'accompagnamento. Esercitarsi a suonare il pianoforte secondo
la melodia dimostrativa; se si sbaglia a suonare, un effetto cue lo ricorderà e si
potrà suonare di nuovo. Quando i tasti dimostrativi vengono visualizzati con
luci scorrevoli, significa che è possibile imparare a suonare un'altra canzone.
7. Guida 1, Guida 2, Guida 3
8. Fermo
9. Cambio del tamburo
10. Demo uno
11. Demo tutto
20. Presa per il coperchio del
pianoforte
21. Asta per il coperchio del pianoforte
22. Microfono
23. Supporto per microfono
4 Strumenti musicali: Ci sono quattro strumenti per cambiare la voce dei
tasti: "PIANO", "GUITAR", "ORGAN" e "MUSIC BOX". Premere il tasto dello
strumento per cambiare la voce della chiave a proprio piacimento.
4 stili di accompagnamento: Questi quattro tasti servono a cambiare gli stili
di accompagnamento: "SLOW ROCK" "RUMBA" "TANGO" "SAMBA".
22 canzoni demo: Premere il pulsante "DEMO ALL" per riprodurre tutti i brani
dimostrativi e imparare a suonare le scale con l'aiuto della spia della chiave. I
brani vengono interrotti quando sono stati suonati tutti. È anche possibile
premere "DEMO ONE" per selezionare un altro brano.
Luce del ritmo: Durante la riproduzione dei brani, le quattro luci ritmiche si
accendono a ritmo della melodia, conferendo alla musica un effetto dinamico.
Controllo della luce (Led): In base alle esigenze dell'ambiente, è possibile
premere questo pulsante per attivare o disattivare l'illuminazione dei tasti o del
ritmo.
Fermo: In ogni caso, premete questo pulsante per interrompere tutto.
Riproduzione di una singola canzone: Premere "DEMO ONE" per riprodurre
un brano e premere nuovamente questo pulsante per riprodurne un altro.
Quando il brano termina, anche la musica si ferma. Durante la riproduzione,
alcuni pulsanti si illuminano per facilitare la riproduzione dei brani.
Controllo della velocità (Tempo+, Tempo-): Ci sono 16 pezzi di tempo per
mettere a punto i brani di accompagnamento.
Funzione di registrazione/riproduzione:
Registrazione: Premere il pulsante "REC". A questo punto è possibile
riprodurre qualsiasi brano e verrà registrato un massimo di 40 note musicali.
Gioco: Premere il pulsante "REPLAY" per riprodurre la musica registrata;
questa funzione funziona solo dopo la registrazione.
3 Metodi didattici
Volume+, Volume-: Regola il volume del pianoforte.
Acceso: Suonando una melodia di pianoforte, tutte le luci dei tasti
lampeggiano alternativamente.
Modalità di risparmio energetico: Se non si preme alcun pulsante per più di
due minuti, l'unità passa automaticamente alla modalità di risparmio
energetico. Inoltre, riprodurrà una melodia come segnale acustico.
Spento: Spegnimento.
22 23
Instrukcja montażu
Opis funkcji
PL
1. Zmontuj stołek, jak pokazano na rysunku.
2. Zamocuj 3 nóżki fortepianu, jak pokazano na rysunku.
3. Zamocuj nakrywę fortepianu oraz mikrofon.
4. Montaż zakończony.
Wymagany montaż przez osobę dorosłą.
Instalacja baterii
Instrument jest zasilany 4 bateriami AA 1,5 V.
Otwórz pokrywę komory baterii i włóż do
komory 4 baterie AA 1,5V. Następnie zamknij
pokrywę komory baterii i dokręć śrubę.
Uwaga: Podczas wkładania baterii zwróć
uwagę na prawidłową polaryzację.
1. 31 klawiszy
2. 8 dźwięków instrumentów
perkusyjnych
3. 3 tryby nauki
4. 4 instrumenty muzyczne
5. 4 akompaniamenty
6. 19 podświetlanych klawiszy
7. 22 utwory demo
8. Kolorowe światełka
9. Przełącznik świateł
10. Funkcja Replay (odtwarzaj)
11. Funkcja Record (nagrywaj)
12. Karaoke
13. Wejście MP3, uchwyt na telefon
14. 2-minutowy tryb oszczędzania energii
15. Mikrofon w zestawie
Wykaz części i funkcji
Opis funkcji:
31 białych i czarnych klawiszy: białe klawisze są podświetlane diodami LED.
8 dźwięków instrumentów perkusyjnych: Cztery przyciski umożliwią
1. 31 klawiszy
2. Pianino, gitara, organy, pozytywka,
slow rock, rumba, tango, samba
3. Nagrywanie, odtwarzanie
4. Głośność+, Głośność-
5. Tempo+, Tempo-
6. Instrument perkusyjny 1, 2, 3 i 4
7. Tryb nauki 1, tryb nauki 2, tryb nauki 3
8. Stop
9. Zmiana instrumentów perkusyjnych
10. Pojedynczy utwór demo
11. Wszystkie utwory demo
12. LED
13. Gniazdo mikrofonu
14. On/Off
15. Kontrolka zasilania
16. 4 diody
17. Wejście MP3
19. MIC
20. Gniazdo nakrywy górnej
21. Rozpórka nakrywy górnej
22. Mikrofon
23. Wspornik mikrofonu
24 25

uzyskanie 8 dźwięków instrumentów perkusyjnych. Każdy przycisk umożliwia
wybór jednego instrumentu. Naciśnij przycisk „DRUM CHANGE”, aby zmienić
dźwięki instrumentów perkusyjnych. Dostępnych jest 8 dźwięków
instrumentów perkusyjnych: talerze, tomy, werble, bęben basowy, (po
naciśnięciu przycisku DRUM CHANGE) kotły, guiro, tamburyn i bęben
elektroniczny.
3 tryby nauki:
Przycisk „GUIDE 1”: Naciśnij dowolny klawisz, aby zagrać.
Przycisk „GUIDE 2”: Naucz się grać utwory demo zgodnie z podświetleniem
klawiszy.
Przycisk „GUIDE 3”: Zagraj utwór muzyczny w rytm akompaniamentu zgodnie z
podświetleniem klawiszy. Ćwicz grę z utworami demo. W przypadku błędu
rozlegnie się właściwy dźwięk i będziesz mógł zagrać dźwięk ponownie. Płynnie
zmieniające się oświetlenie oznacza, że możesz przejść do nauki następnego
utworu.
4 instrumenty muzyczne: Cztery instrumenty, które zmieniają dźwięki klawiszy:
PIANO (pianino), GUITAR (gitara), ORGAN (organy) oraz MUSICBOX
(pozytywka). Naciśnij przycisk wybranego instrumentu, aby zmienić dźwięk
klawiszy.
4 style akompaniamentu: Cztery przyciski umożliwiają wybór akompaniamentu
spośród następujących: „SLOW ROCK”, „RUMBA”, „TANGO” ORAZ „SAMBA”.
22 utwory demo
Naciśnij przycisk „DEMO ALL”, aby kolejno odtworzyć utwory demo. W trybie
demo diody klawiszy świecą, ucząc dziecko prawidłowej gry. Po odtworzeniu
wszystkich utworów demo instrument zatrzyma odtwarzanie. Naciśnij przycisk
„DEMO ONE”, aby przełączyć utwór na następny.
Efekty świetlne: Podczas odtwarzania utworów lub gry na instrumencie 4 diody
migają w rytm muzyki.
Przełącznik świateł (LED): Naciśnij przełącznik, aby włączyć lub wyłączyć efekty
świetlne.
Stop: Naciśnij przycisk w dowolnym momencie, aby zatrzymać instrument.
Pojedynczy utwór demo: Naciśnij przycisk „DEMO ONE”, aby odtworzyć jeden
utwór demo. Naciśnij przycisk ponownie, aby odtworzyć kolejny utwór demo.
Instrument zatrzyma odtwarzanie po odtworzeniu jednego utworu demo. W trybie
demo diody klawiszy świecą, ucząc dziecko prawidłowej gry.
Regulacja prędkości (Tempo+, Tempo-): 16 poziomów do precyzyjnego
ustawienia prędkości gry.
Funkcja nagrywania/odtwarzania:
Nagrywanie: Naciśnij przycisk „REC”. Każde naciśnięcie klawiszy zostanie
nagrane. Instrument może nagrać maksymalnie 40 nut.
Odtwarzanie: Naciśnij przycisk „REPLAY”, aby odtworzyć nagrane dźwięki.
Funkcja ta działa wyłącznie po uprzednim nagraniu dźwięków.
Volume+, Volume-: Naciśnij przycisk, aby zwiększyć lub zmniejszyć głośność.
On: Zagraj melodię, a diody klawiszy zaczną kolejno migać.
Tryb oszczędzania energii: Jeśli nie naciśniesz przycisków ani klawiszy przez
ponad 2 minuty, instrument odtworzy melodię i automatycznie przejdzie w tryb
oszczędzania energii.
Off: Wyłącz instrument.
26 27
EN
Return
/ Damage Claim Instructions
In case a return is required, the item must be returned in original
box. Without this your return will not be accepted.
DO NOT discard the box / original packaging.
A photo of the markings (text) on the side of the box is required in
case a part is needed for replacement. This helps our staff identify
your product number to ensure you receive the correct parts.
Take a photo of the box markings.
A photo of the damage is always required to file a claim and get
your replacement or refund processed quickly. Please make sure
you have the box even if it is damaged.
Take a photo of the damaged part (if applicable).
Email us directly from marketplace where your item was purchased
with the attached images and a description of your claim.
Send us an email with the images requested.
DE
Rücksendung
/ Beschädigung Anweisungen
Falls eine Rücksendung erforderlich ist, muss der Artikel in der
Originalverpackung zurückgeschickt werden. Andernfalls wird Ihre
Rücksendung nicht angenommen.
Werfen Sie den Karton / die Originalverpackung NICHT weg.
Für den Fall, dass ein Ersatzteil benötigt wird, benötigen wir ein
Foto der Beschriftung (Text) auf der Seite des Kartons. So können
unsere Mitarbeiter Ihre Artikelnummer identifizieren und
sicherstellen, dass Sie die richtigen Teile erhalten.
Machen Sie ein Foto von der Beschriftung des Kartons.
Ein Foto des beschädigten Teils ist immer erforderlich, um eine
Reklamation einzureichen und eine schnelle Bearbeitung Ihres
Ersatzteils oder Ihrer Rückerstattung zu gewährleisten. Bitte stellen
Sie sicher, dass Sie den Karton haben, auch wenn er beschädigt ist.
Machen Sie ein Foto des beschädigten Teils (falls zutreffend).
Schicken Sie uns eine E-Mail direkt vom Marktplatz, auf dem Sie
den Artikel gekauft haben, mit den angehängten Fotos und einer
Beschreibung Ihrer Reklamation.
Schicken Sie uns eine E-Mail mit dem gewünschten Foto.
28 29

FR
Instructions De Retour
/ Réclamation De Dommages
Dans le cas où un retour est requis, l'article doit être retourné dans
sa boîte d'origine. Sans cela, votre retour ne sera pas accepté.
NE PAS jeter la boîte/l'emballage d'origine.
Une photo des marquages (texte) sur le côté de la boîte est requise
au cas où une pièce serait nécessaire pour le remplacement. Cela
aide notre personnel à identifier votre numéro de produit pour
s'assurer que vous recevez les bonnes pièces.
Prenez une photo des marquages de la boîte.
Une photo des dommages est toujours requise pour déposer une
réclamation et obtenir rapidement votre remplacement ou votre
remboursement. Assurez-vous d'avoir la boîte même si elle est
endommagée.
Prenez une photo des dommages (le cas échéant).
Envoyez-nous un e-mail directement depuis le marché où votre
article a été acheté avec les images ci-jointes et une description de
votre réclamation.
Envoyez-nous un e-mail avec les images demandées.
ES
Instrucciones de Devolución
/ Reclamación de Daños
En caso de que se requiera una devolución, el artículo debe ser
devuelto en la caja original. Sin esto su devolución no será
aceptada.
NO deseche la caja/embalaje original.
Se requiere una foto de las marcas (texto) en el lado de la caja en
caso de que se necesite una pieza para reemplazarla. Esto ayuda
a nuestro personal a identificar su número de producto para
asegurarse de que recibe las piezas correctas.
Tome una foto de las marcas de la caja.
Una foto de los daños es siempre necesaria para presentar una
reclamación y conseguir que su reemplazo o reembolso sea
procesado rápidamente. Por favor, asegúrese de tener la caja
aunque esté dañada.
Tome una foto de las piezas dañadas (si procede).
Envíenos un correo electrónico directamente desde el mercado
donde se compró su artículo con las imágenes adjuntas y una
descripción de su reclamación.
Envíenos un correo electrónico con las imágenes solicitadas.
30 31

IT
Istruzioni Per La Restituzione
/ Reclamo Per Danni
Nel caso in cui sia richiesto un reso, l'articolo deve essere restituito
nella scatola originale. Senza la scatola originale il tuo reso non
sarà accettato.
NON scartare la scatola / confezione originale.
È necessaria una foto dei contrassegni (testo) sul lato della scatola
nel caso in cui la parte debba essere sostituita. Questo aiuta il
nostro staff a identificare il numero del tuo prodotto per assicurarti
di ricevere le parti corrette.
Fare una foto dei contrassegni sulla scatola.
Una foto del danno è sempre necessaria per presentare un
reclamo e ottenere rapidamente la sostituzione o il rimborso.
Assicurati di avere la scatola anche se è danneggiata.
Fare una foto di Danno (se è applicabile).
Inviarci un'e-mail direttamente dal mercato in cui è stato acquistato
il tuo articolo con le immagini allegate e una descrizione del tuo
reclamo.
Inviarci una mail con le immagini richieste.
PL
Zwroty i reklamacje
Jeśli chcesz zwrócić produkt, musi znajdować się on w oryginalnym
opakowaniu. Towar zwrócony w nieoryginalnym opakowaniu nie
zostanie przyjęty.
Nie wyrzucaj oryginalnego opakowania.
Jeśli jakakolwiek część wymaga wymiany, zrób zdjęcie oznaczeń
kodu produktu, który znajduje się na opakowaniu. Pozwoli nam to
zidentyfikować produkt i dostarczyć ci właściwą część.
Zrób zdjęcie oznaczeń na opakowaniu.
Jeśli chcesz złożyć reklamację, zrób zdjęcie uszkodzonej części.
Pozwoli nam to zatwierdzić reklamację i zlecić zwrot środków na
twoje konto. Do złożenia reklamacji potrzebne będzie oryginalne
opakowanie.
Zrób zdjęcie uszkodzonej części (jeśli dotyczy).
Skontaktuj się z nami telefonicznie, mailowo lub poprzez formularz
kontaktowy. Załącz zdjęcia produktu i opis roszczenia.
Skontaktuj się z nami.
32 33

TM10060
31-Key Electronic Piano Toy
31-Tasten Elektronisches Klavier Spielzeug
Jouet de Piano Électronique à 31 Touches
Piano Electrónico de Juguete de 31 Teclas
Pianoforte Elettronico a 31 Tasti
Fortepian elektroniczny dla dzieci
IMPORTANT! READ CAREFULLY AND KEEP FOR
FUTURE REFERENCE.
If you're having difficulty, our friendly customer team is always here to help.
FRA:cs.fr@costway.com
DEU:cs.de@costway.com
ESP:cs.es@costway.com
POL:sklep@costway.comUSA:[email protected]
AUS:cs.au@costway.com
ITA:cs.it@costway.com
GBR:cs.uk@costway.com
DEU office: FDS GmbH, Neuer Höltigbaum 36, 22143 Hamburg, Deutschland
ITA office: Milano
FRA office: Saint Vigor d'Ymonville
POL office: Gdańsk
GBR office: IpswichAUS office: TruganinaUSA office: Fontana