
If you're having difficulty, our friendly
customer team is always here to help.
USA office: Fontana AUS office: Truganina
GBR office: Ipswich FRA office: Saint Vigor d'Ymonville
AUS:cs.au@costway.com
GBR:cs.uk@costway.com
FRA:cs.fr@costway.com
AC10003
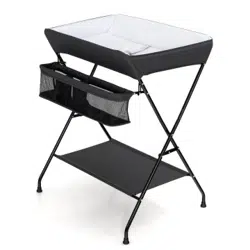
Baby Changing Table
Table à Langer
THIS INSTRUCTION BOOKLET CONTAINS IMPORTANT SAFETY INFORMATION. PLEASE READ AND KEEP FOR FUTURE REFERENCE.

If you're having difficulty, our friendly
customer team is always here to help.
USA office: Fontana AUS office: Truganina
GBR office: Ipswich FRA office: Saint Vigor d'Ymonville
AUS:cs.au@costway.com
GBR:cs.uk@costway.com
FRA:cs.fr@costway.com
AC10003
Baby Changing Table
Table à Langer
THIS INSTRUCTION BOOKLET CONTAINS IMPORTANT SAFETY INFORMATION. PLEASE READ AND KEEP FOR FUTURE REFERENCE.
Achtung! Halten Sie alle kleinteile und Verpackungsmaterialien fern
von Babys und Kindern, ansonsten besteht Erstickungsgefahr.
Der Artikel muss unter der Aufsicht eines Erwachsenen montiert und
benutzt werden.
Lesen Sie jeden Schritt sorgfältig durch und befolgen Sie die richtige
Reihenfolge.
Entfernen Sie alle Verpackungen, Überprüfen Sie, ob alle Teile und
Zubehörteile vorhanden sind.
Bitte stellen Sie sicher, dass alle Teile richtig montiert sind, eine falsche
Montage kann zu einer Gefahr führen.
Wir empfehlen, alle Teile möglichst in der Nähe des Aufstellungsortes
zu montieren, um unnötige Bewegungen nach der Montage zu
vermeiden.
Achten Sie bei der Montage auf einen sicheren Untergrund und stellen
Sie den Artikel immer auf eine ebene, feste und stabile Fläche.
Hinweis zur Montage
Bevor Sie beginnen
Bitte sorgfältig lesen und zum späteren Nachschlagen aufbewahren.
DE
Danger! Keep all small parts and packaging materials for this product
away from babies and children, otherwise they may pose a choking
hazard.
The product must be installed and used under the supervision of an
adult.
Read through each step carefully and follow the proper order.
Remove all packaging, separate and count all parts and hardware
before installation.
Please ensure that all parts are correctly installed, incorrect installation
can lead to a danger.
We recommend that, where possible, all items are assembled near the
area in which they will be placed in use, to avoid moving the product
unnecessarily once assembled.
Ensure a secure surface during installation, and place the product
always on a flat, steady and stable surface.
Before You Start
Please read all instructions carefully and keep it for future reference.
EN
General Warnings
02 03
EN
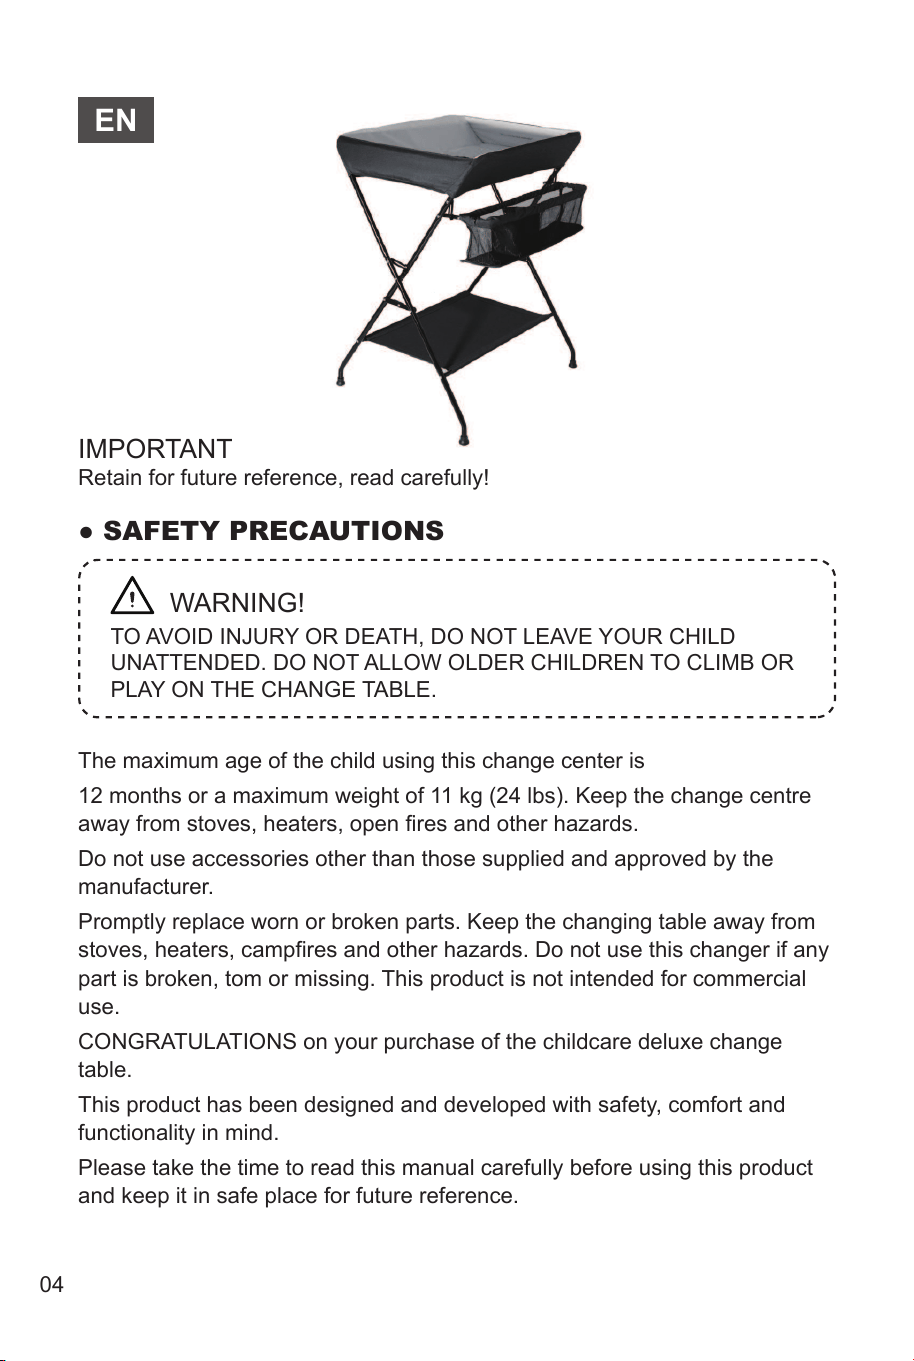
● SAFETY PRECAUTIONS
IMPORTANT
Retain for future reference, read carefully!
The maximum age of the child using this change center is
12 months or a maximum weight of 11 kg (24 lbs). Keep the change centre
away from stoves, heaters, open fires and other hazards.
Do not use accessories other than those supplied and approved by the
manufacturer.
Promptly replace worn or broken parts. Keep the changing table away from
stoves, heaters, campfires and other hazards. Do not use this changer if any
part is broken, tom or missing. This product is not intended for commercial
use.
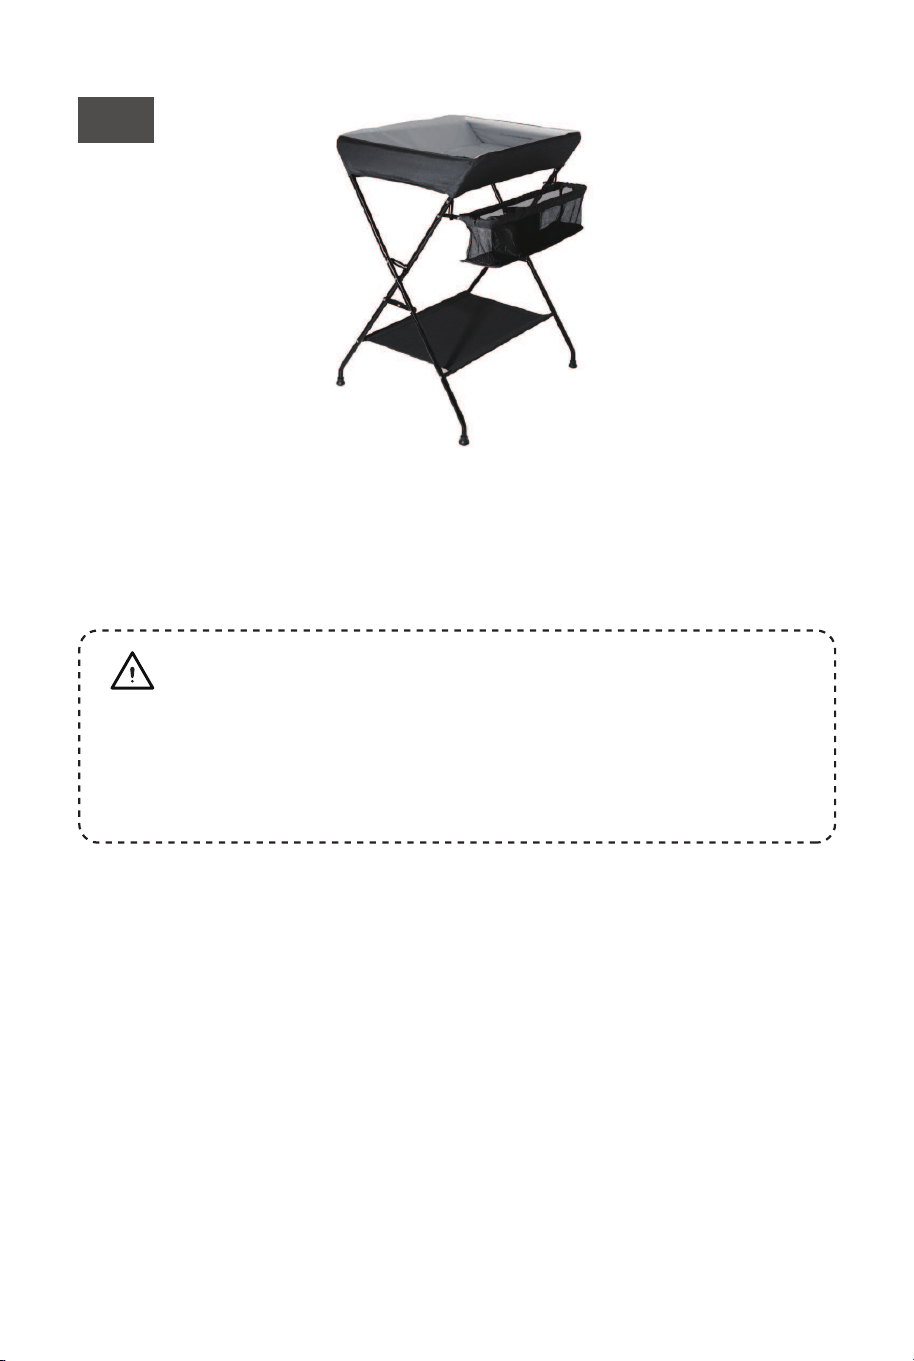
CONGRATULATIONS on your purchase of the childcare deluxe change
table.
This product has been designed and developed with safety, comfort and
functionality in mind.
Please take the time to read this manual carefully before using this product
and keep it in safe place for future reference.
WARNING!
TO AVOID INJURY OR DEATH, DO NOT LEAVE YOUR CHILD
UNATTENDED. DO NOT ALLOW OLDER CHILDREN TO CLIMB OR
PLAY ON THE CHANGE TABLE.
11kg (24 lbs)
0-12M
WARNING
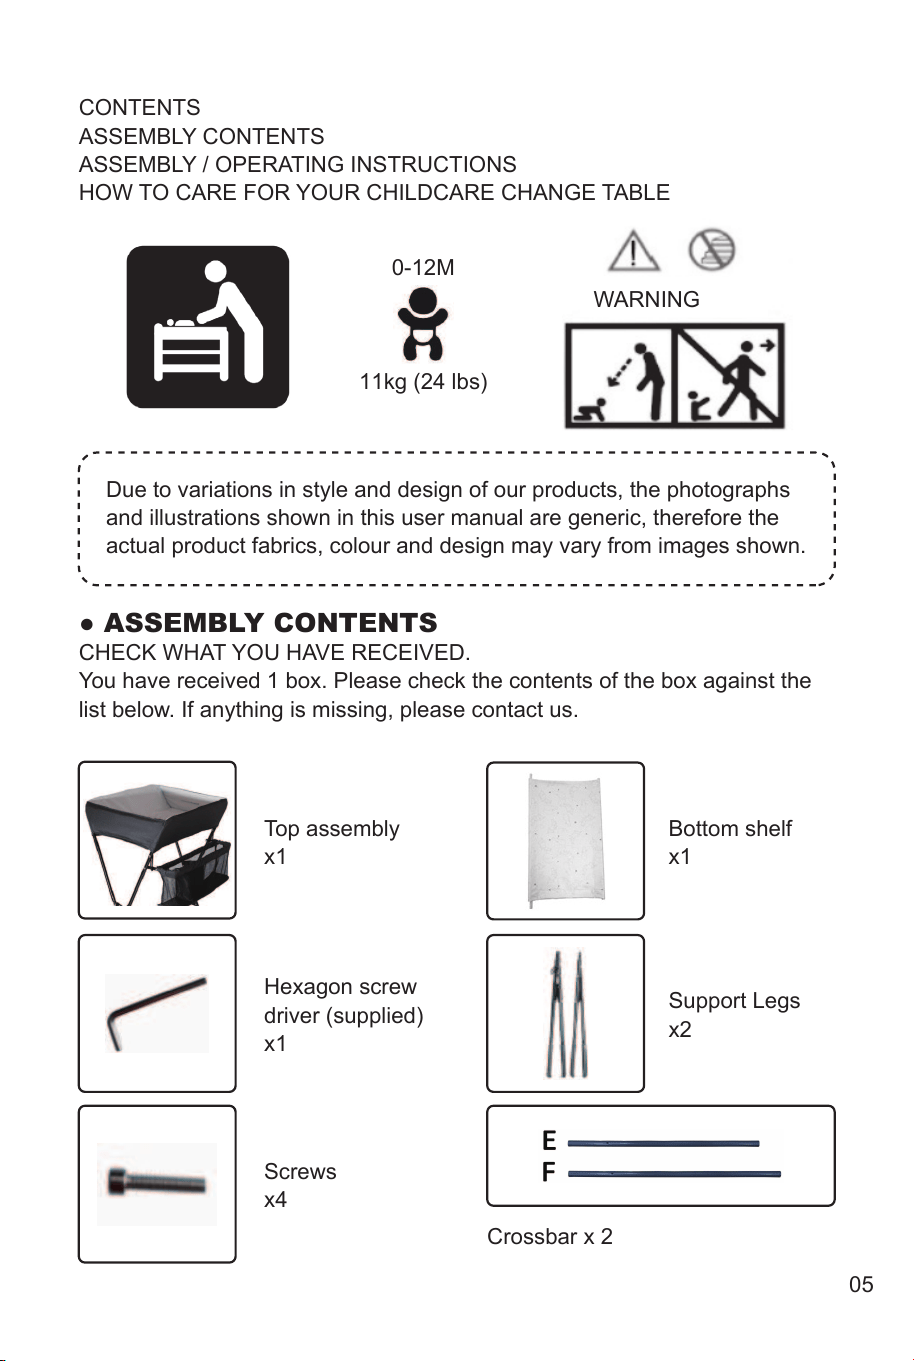
CONTENTS
ASSEMBLY CONTENTS
ASSEMBLY / OPERATING INSTRUCTIONS
HOW TO CARE FOR YOUR CHILDCARE CHANGE TABLE
● ASSEMBLY CONTENTS
CHECK WHAT YOU HAVE RECEIVED.
You have received 1 box. Please check the contents of the box against the
list below. If anything is missing, please contact us.
Top assembly
x1
Hexagon screw
driver (supplied)
x1
Bottom shelf
x1
Support Legs
x2
Crossbar x 2
Screws
x4
Due to variations in style and design of our products, the photographs
and illustrations shown in this user manual are generic, therefore the
actual product fabrics, colour and design may vary from images shown.
04 05
EN
● SAFETY PRECAUTIONS
IMPORTANT
Retain for future reference, read carefully!
The maximum age of the child using this change center is
12 months or a maximum weight of 11 kg (24 lbs). Keep the change centre
away from stoves, heaters, open fires and other hazards.
Do not use accessories other than those supplied and approved by the
manufacturer.
Promptly replace worn or broken parts. Keep the changing table away from
stoves, heaters, campfires and other hazards. Do not use this changer if any
part is broken, tom or missing. This product is not intended for commercial
use.
CONGRATULATIONS on your purchase of the childcare deluxe change
table.
This product has been designed and developed with safety, comfort and
functionality in mind.
Please take the time to read this manual carefully before using this product
and keep it in safe place for future reference.
WARNING!
TO AVOID INJURY OR DEATH, DO NOT LEAVE YOUR CHILD
UNATTENDED. DO NOT ALLOW OLDER CHILDREN TO CLIMB OR
PLAY ON THE CHANGE TABLE.
11kg (24 lbs)
0-12M
WARNING
CONTENTS
ASSEMBLY CONTENTS
ASSEMBLY / OPERATING INSTRUCTIONS
HOW TO CARE FOR YOUR CHILDCARE CHANGE TABLE
● ASSEMBLY CONTENTS
CHECK WHAT YOU HAVE RECEIVED.
You have received 1 box. Please check the contents of the box against the
list below. If anything is missing, please contact us.
Top assembly
x1
Hexagon screw
driver (supplied)
x1
Bottom shelf
x1
Support Legs
x2
Crossbar x 2
Screws
x4
Due to variations in style and design of our products, the photographs
and illustrations shown in this user manual are generic, therefore the
actual product fabrics, colour and design may vary from images shown.
04 05
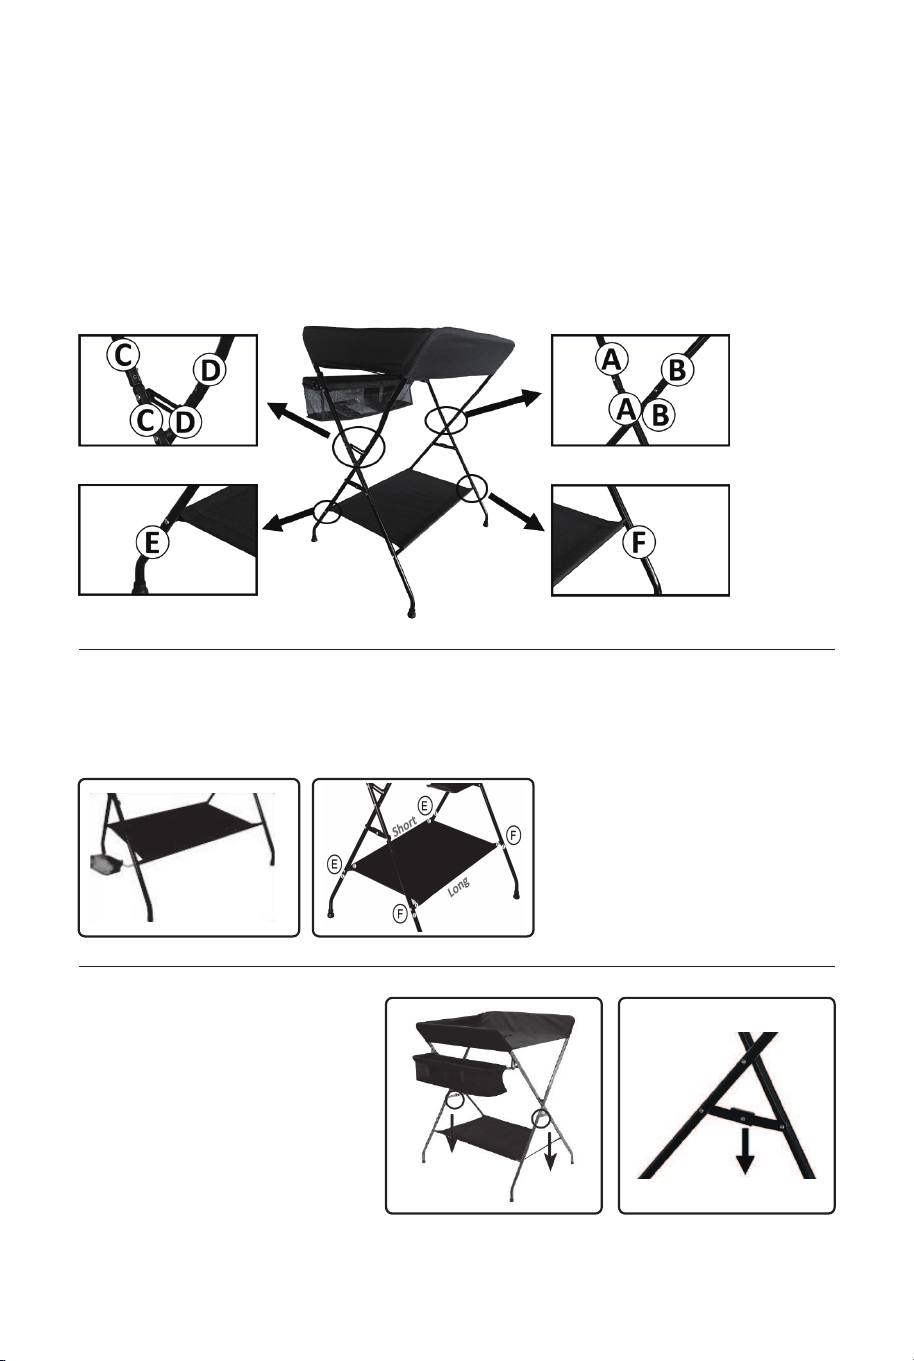
● ASSEMBLY / OPERATING INSTRUCTIONS
SUPPORT LEG ASSEMBLY
1. Lay the changing table on a flat surface.
2. Align and insert support legs into corresponding positions of the top
assembly.
3. While pressing in the pop-up pins, push the support legs into frame
completely until the pop-up pins are engaged.
BOTTOM SHELF ASSEMBLY
1. Open and stand the frame.
2. Secure all four corners of the support legs with screws supplied.
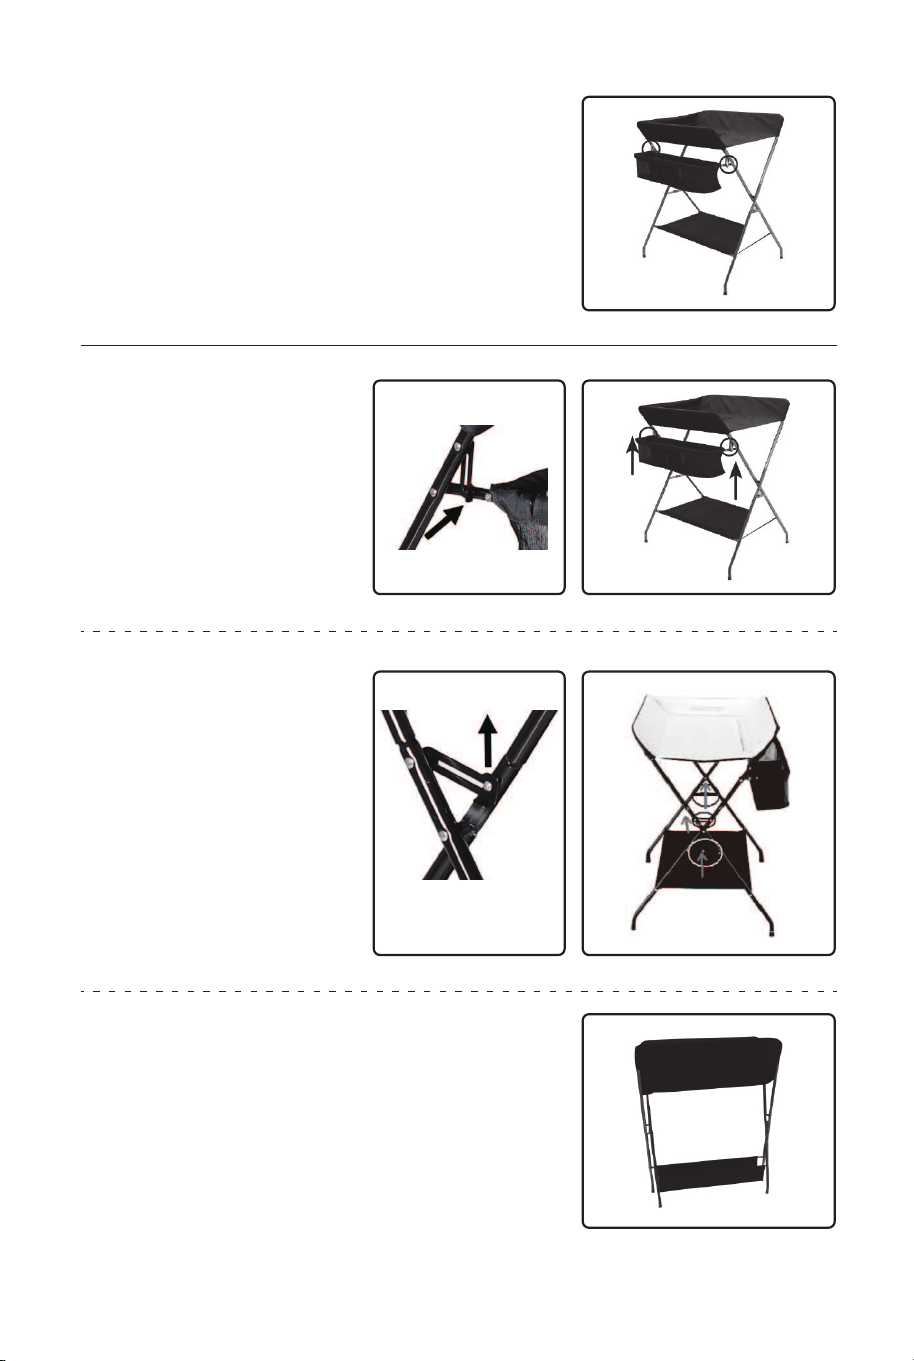
UNFOLD CHANGING
TABLE
1. Place the safety locks
down on both sides of the
frame.
Please note that there are long
and short connecting rods, if
you find that you cannot
assemble them, please try to
exchange the rods and
assemble again.
2. Make sure that the accessory tray holder
frame is locked correctly by pulling upwards
to ensure it does not lift.
2. Lift the frame safety
locks
There are safety locks on
both sides of the product,
release the secondary lock
first, then lift up the both
locks on both sides to fold
the product.
3. Close the frame
STORING YOUR
CHANGING TABLE
1. Pull safety locks forward
on accessory tray and lift
upwards.
Secondary Lock
06 07
● ASSEMBLY / OPERATING INSTRUCTIONS
SUPPORT LEG ASSEMBLY
1. Lay the changing table on a flat surface.
2. Align and insert support legs into corresponding positions of the top
assembly.
3. While pressing in the pop-up pins, push the support legs into frame
completely until the pop-up pins are engaged.
BOTTOM SHELF ASSEMBLY
1. Open and stand the frame.
2. Secure all four corners of the support legs with screws supplied.
UNFOLD CHANGING
TABLE
1. Place the safety locks
down on both sides of the
frame.
Please note that there are long
and short connecting rods, if
you find that you cannot
assemble them, please try to
exchange the rods and
assemble again.
2. Make sure that the accessory tray holder
frame is locked correctly by pulling upwards
to ensure it does not lift.
2. Lift the frame safety
locks
There are safety locks on
both sides of the product,
release the secondary lock
first, then lift up the both
locks on both sides to fold
the product.
3. Close the frame
STORING YOUR
CHANGING TABLE
1. Pull safety locks forward
on accessory tray and lift
upwards.
Secondary Lock
06 07

FR
● PRÉCAUTIONS DE SÉCURIT
IMPORTANT
Conservez ce manuel pour référence future, lisez-le attentivement!
L'âge maximum de l'enfant utilisant ce centre de change est de 12 mois ou
un poids maximum de 11 kg (24 lbs). Gardez le centre de change à l'écart
des poêles, des appareils de chauffage, des feux ouverts et autres dangers.
N'utilisez pas d'accessoires autres que ceux fournis et approuvés par le
fabricant.
Remplacez rapidement les pièces usées ou cassées. Gardez la table à
langer à l'écart des poêles, des chauffages, des feux de camp et autres
dangers. N'utilisez pas ce changeur si une pièce est cassée, tom ou
manquante. Ce produit n'est pas destiné à un usage commercial.
AVERTISSEMENT!
POUR ÉVITER DES BLESSURES OU LA MORT, NE LAISSEZ PAS
VOTRE ENFANT SANS SURVEILLANCE. NE LAISSEZ PAS LES
ENFANTS PLUS ÂGÉS MONTER OU JOUER SUR LA TABLE À
LANGER.
● HOW TO CARE FOR YOUR CHILDCARE CHANGE
TABLE
CLEANING
To ensure the long-lasting use of your change table, dry it with a soft
absorbent cloth after use. Use a damp cloth to clean the frame. Do not use
abrasive cleaners. Allow it to dry thoroughly. Removable and non-removable
fabric covers and trims may be cleaned using a damp cloth with soap or mild
detergent. Allow it dry completely before folding or storing it away. Do not dry
clean, or use bleach on fabrics or trims. Do not machine wash, tumble or
spin dry, unless the care labeling on the product permits these methods.
MAINTENANCE
Check the change table regularly to ensure that locking devices and
components are secure and working properly. Always check parts regularly
for tightness of screws, nuts and other fasteners. Tighten or replace if
required. To maintain the safety of your change table, seek prompt repairs
for bent, torn, worn or broken parts. Use only those parts and accessories
approved by the manufacturer. To prevent mould or mildew, do not fold or
store the product if it is damp or wet, Allow it to dry thoroughly. Always store
the product in a well ventilated area and away from direct sunlight.
If you have any difficulties in assembling the change table, please contact
us.
US Office: Fontana, California
UK Office: Ipswich
08 09
FÉLICITATIONS pour votre achat de la table à langer.
Ce produit a été conçu et développé dans un souci de sécurité, de confort et
de fonctionnalité.
Veuillez prendre le temps de lire attentivement ce manuel avant d'utiliser ce
produit et conservez-le en lieu sûr pour référence future.
11kg (24 lbs)
0-12M
AVERTISSEMENT
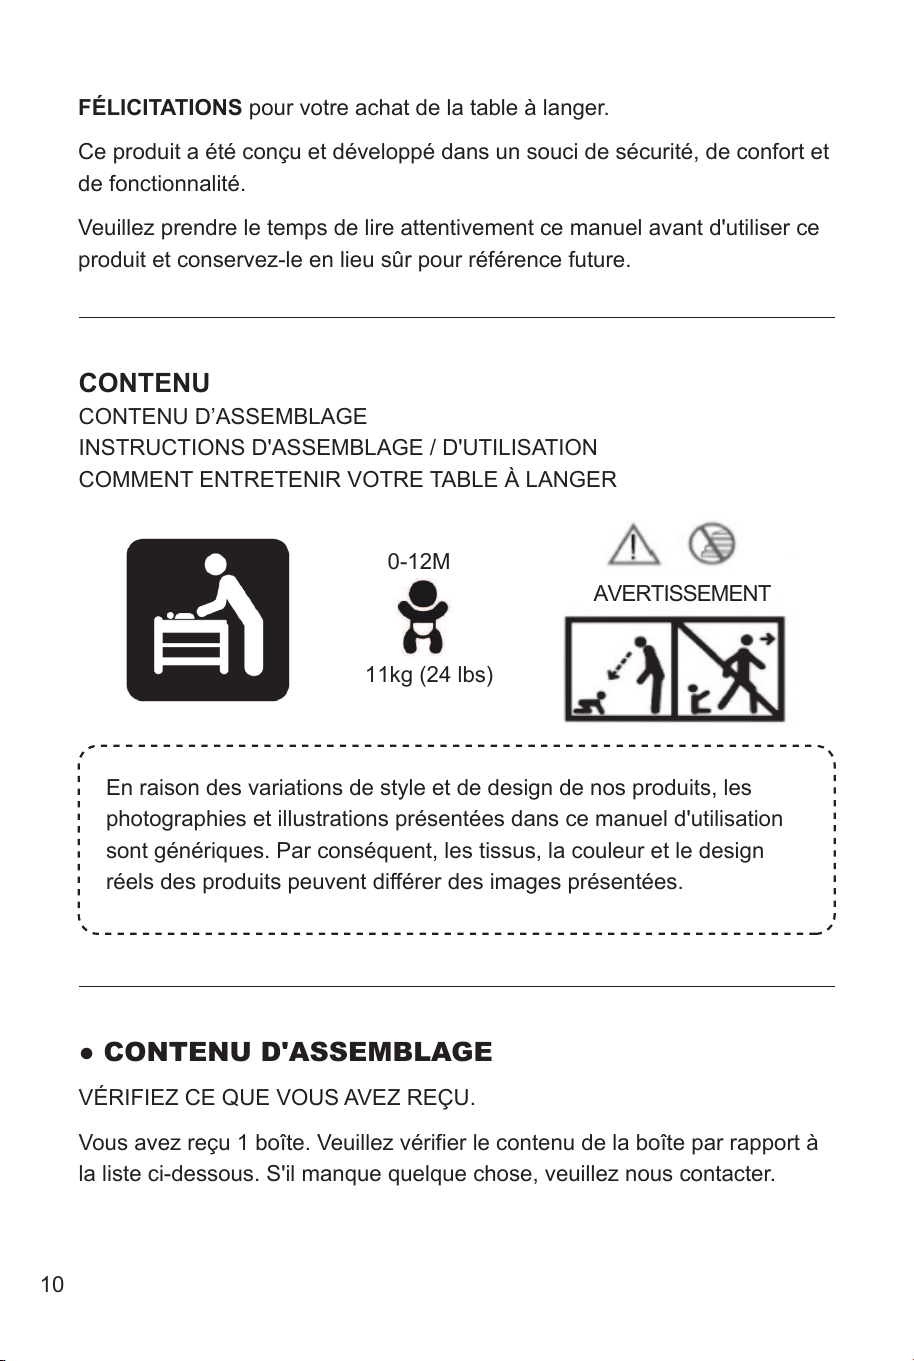
CONTENU
CONTENU D’ASSEMBLAGE
INSTRUCTIONS D'ASSEMBLAGE / D'UTILISATION
COMMENT ENTRETENIR VOTRE TABLE À LANGER
En raison des variations de style et de design de nos produits, les
photographies et illustrations présentées dans ce manuel d'utilisation
sont génériques. Par conséquent, les tissus, la couleur et le design
réels des produits peuvent différer des images présentées.
● CONTENU D'ASSEMBLAGE
VÉRIFIEZ CE QUE VOUS AVEZ REÇU.
Vous avez reçu 1 boîte. Veuillez vérifier le contenu de la boîte par rapport à
la liste ci-dessous. S'il manque quelque chose, veuillez nous contacter.
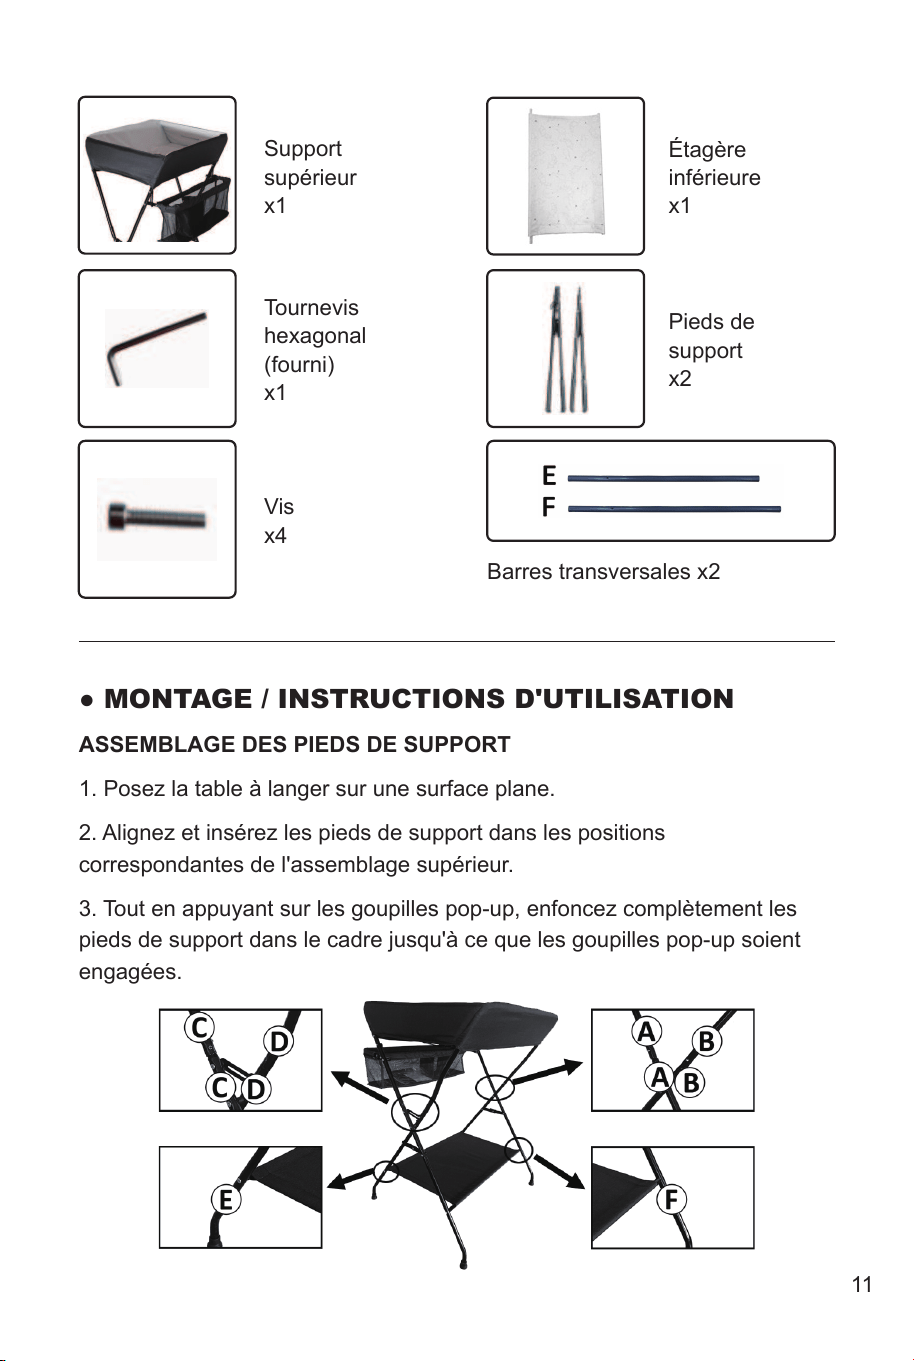
Support
supérieur
x1
Tournevis
hexagonal
(fourni)
x1
Étagère
inférieure
x1
Pieds de
support
x2
Barres transversales x2
Vis
x4
● MONTAGE / INSTRUCTIONS D'UTILISATION
ASSEMBLAGE DES PIEDS DE SUPPORT
1. Posez la table à langer sur une surface plane.
2. Alignez et insérez les pieds de support dans les positions
correspondantes de l'assemblage supérieur.
3. Tout en appuyant sur les goupilles pop-up, enfoncez complètement les
pieds de support dans le cadre jusqu'à ce que les goupilles pop-up soient
engagées.
10 11
FÉLICITATIONS pour votre achat de la table à langer.
Ce produit a été conçu et développé dans un souci de sécurité, de confort et
de fonctionnalité.
Veuillez prendre le temps de lire attentivement ce manuel avant d'utiliser ce
produit et conservez-le en lieu sûr pour référence future.
11kg (24 lbs)
0-12M
AVERTISSEMENT
CONTENU
CONTENU D’ASSEMBLAGE
INSTRUCTIONS D'ASSEMBLAGE / D'UTILISATION
COMMENT ENTRETENIR VOTRE TABLE À LANGER
En raison des variations de style et de design de nos produits, les
photographies et illustrations présentées dans ce manuel d'utilisation
sont génériques. Par conséquent, les tissus, la couleur et le design
réels des produits peuvent différer des images présentées.
● CONTENU D'ASSEMBLAGE
VÉRIFIEZ CE QUE VOUS AVEZ REÇU.
Vous avez reçu 1 boîte. Veuillez vérifier le contenu de la boîte par rapport à
la liste ci-dessous. S'il manque quelque chose, veuillez nous contacter.
Support
supérieur
x1
Tournevis
hexagonal
(fourni)
x1
Étagère
inférieure
x1
Pieds de
support
x2
Barres transversales x2
Vis
x4
● MONTAGE / INSTRUCTIONS D'UTILISATION
ASSEMBLAGE DES PIEDS DE SUPPORT
1. Posez la table à langer sur une surface plane.
2. Alignez et insérez les pieds de support dans les positions
correspondantes de l'assemblage supérieur.
3. Tout en appuyant sur les goupilles pop-up, enfoncez complètement les
pieds de support dans le cadre jusqu'à ce que les goupilles pop-up soient
engagées.
10 11
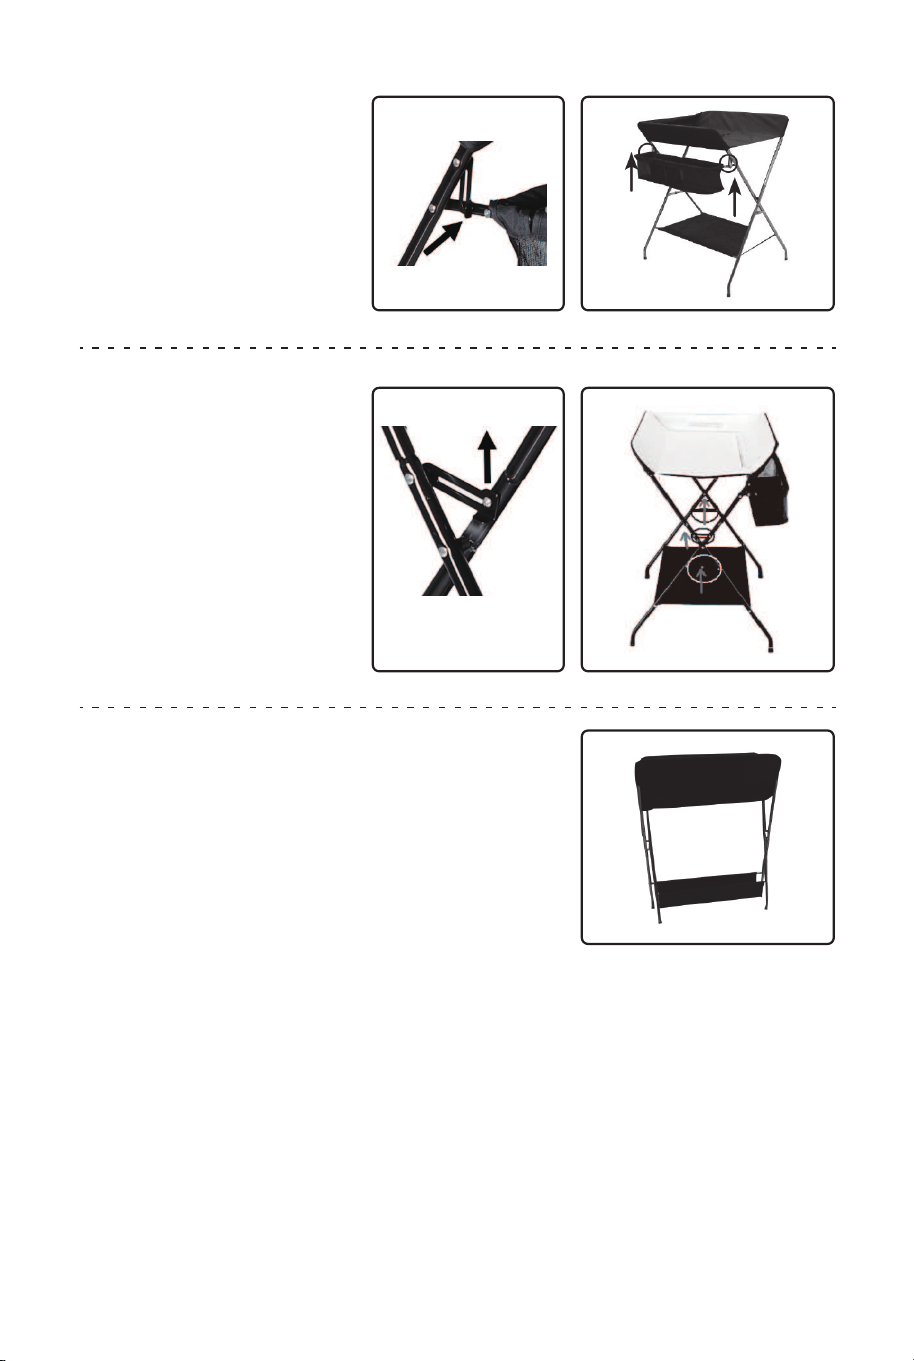
ASSEMBLAGE DE L'ÉTAGÈRE INFÉRIEURE
1. Ouvrez et tenez le cadre.
2. Fixez les quatre coins des pieds de force avec les vis fournies.
DÉPLIER LA TABLE À
LANGER
1. Placez les verrous de
sécurité sur les deux côtés
du cadre.
Veuillez noter qu’il existe des bielles longues et courtes, si vous constatez
que vous ne pouvez pas les assembler, essayez d’échanger les tiges et de
les assembler à nouveau.
2. Assurez-vous que le cadre du support de
plateau d'accessoires est correctement
verrouillé en le tirant vers le haut pour qu'il
ne se soulève pas.
2. Soulevez les verrous de
sécurité du cadre
Il y a des verrous de
sécurité des deux côtés du
produit, relâchez d'abord le
verrou secondaire, puis
soulevez les deux verrous
des deux côtés pour plier
le produit.
3. Fermez le cadre
RANGEMENT DE LA
TABLE À LANGER
1. Tirez les verrous de
sécurité vers l'avant sur le
plateau à accessoires et
soulevez-le.
Verrou
Secondaire
Court
Longue
12 13

● COMMENT ENTRETENIR VOTR TABLE À LANGER
NETTOYAGE
Pour assurer une utilisation durable de votre table à langer, séchez-la avec
un chiffon doux et absorbant après utilisation. Utilisez un chiffon humide
pour nettoyer le cadre. Ne pas utiliser de nettoyants abrasifs. Laissez-le
sécher complètement. Les couvertures et les garnitures en tissu amovibles
et non amovibles peuvent être nettoyées à l'aide d'un chiffon humide avec
du savon ou un détergent doux. Laissez-les sécher complètement avant de
la plier ou de la ranger. Ne nettoyez pas à sec ou n'utilisez pas d'eau de
javel sur les tissus ou les garnitures. Ne pas laver en machine, sécher par
culbutage ou au sèche-linge, sauf si l'étiquette d'entretien sur le produit
autorise ces méthodes.
ENTRETIEN
Vérifiez régulièrement la table à langer pour vous assurer que les dispositifs
de verrouillage et les composants sont sécurisés et fonctionnent
correctement. Vérifiez toujours les pièces régulièrement pour le serrage des
vis, écrous et autres fixations. Serrez ou remplacez si nécessaire.
Pour assurer la sécurité de votre table à langer, recherchez des réparations
à temps pour les pièces pliées, déchirées, usées ou brisées.
Utilisez uniquement les pièces et accessoires approuvés par le fabricant.
Pour éviter la formation de moisissure, ne pliez pas ou ne rangez pas le
produit s'il est humide ou mouillé. Laissez-le sécher complètement.
Rangez toujours le produit dans un endroit bien ventilé et à l'abri de la
lumière directe du soleil.
Si vous rencontrez des difficultés pour assembler la table à langer, veuillez
nous contacter.
US Office: Fontana, California
UK Office: Ipswich
Instructions De Retour / Réclamation De Dommages
Dans le cas où un retour est requis, l'article doit être retourné dans sa boîte
d'origine. Sans cela, votre retour ne sera pas accepté.
NE PAS jeter la boîte/l'emballage d'origine.
Prenez une photo des marquages de la boîte.
Prenez une photo des dommages (le cas échéant).
Envoyez-nous un e-mail avec les images demandées.
Une photo des marquages (texte) sur le côté de la boîte est requise au cas où une
pièce serait nécessaire pour le remplacement. Cela aide notre personnel à
identifier votre numéro de produit pour s'assurer que vous recevez les bonnes
pièces.
Une photo des dommages est toujours requise pour déposer une réclamation et
obtenir rapidement votre remplacement ou votre remboursement. Assurez-vous
d'avoir la boîte même si elle est endommagée.
Envoyez-nous un e-mail directement depuis le marché où votre article a été
acheté avec les images ci-jointes et une description de votre réclamation.
FR
In case a return is required, the item must be returned in original box. Without this
your return will not be accepted.
DO NOT discard the box / original packaging.
Take a photo of the box markings.
Take a photo of the damaged part (if applicable).
Send us an email with the images requested.
A photo of the markings (text) on the side of the box is required in case a part is
needed for replacement. This helps our staff identify your product number to
ensure you receive the correct parts.
A photo of the damage is always required to file a claim and get your replacement
or refund processed quickly. Please make sure you have the box even if it is
damaged.
Email us directly from marketplace where your item was purchased with the
attached images and a description of your claim.
EN
Return / Damage Claim Instructions
14 15
