
Please give us a chance to make it right and do better !
Contact our friendly customer service department for help first.
Replacements for missing or damaged parts will be shipped ASAP !
Contact Us !
Do NOT return this item.
US:cs.us@costway.com
UK:cs.uk@costway.com
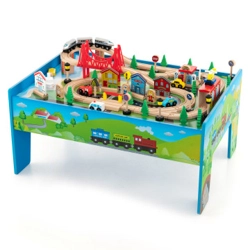
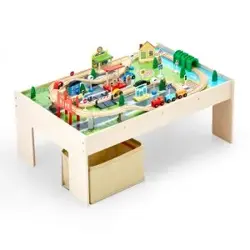
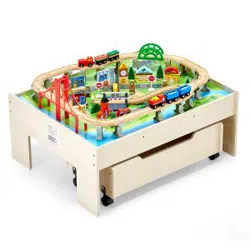
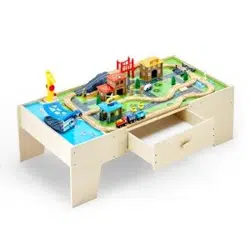
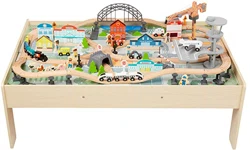
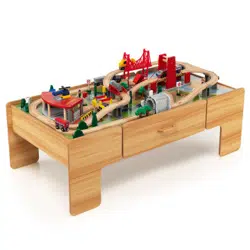
Wooden Train Table Set
TM10008
USER’S MANUAL
THIS INSTRUCTION BOOKLET CONTAINS IMPORTANT SAFETY INFORMATION. PLEASE READ AND KEEP FOR FUTURE REFERENCE.
US office: Fontana UK office: Ipswich AU office: Truganina

Please give us a chance to make it right and do better !
Contact our friendly customer service department for help first.
Replacements for missing or damaged parts will be shipped ASAP !
Contact Us !
Do NOT return this item.
US:cs.us@costway.com
UK:cs.uk@costway.com
Wooden Train Table Set
TM10008
USER’S MANUAL
THIS INSTRUCTION BOOKLET CONTAINS IMPORTANT SAFETY INFORMATION. PLEASE READ AND KEEP FOR FUTURE REFERENCE.
US office: Fontana UK office: Ipswich AU office: Truganina
02 03
Before You Start
Warning for Assembly
Assembled only by adults
Remove all Packaging, separate and count all parts and hardware.
Read through each step carefully and follow the proper order.
We recommend that, where possible, all items are assembled near the area in
which they will be placed in use, to avoid moving the product unnecessarily once
assembled.
Ensure a secure surface during installation, and place the product always on a flat,
steady and stable surface.
General Security Warning
Caution: The Product is not suitable for the children under 3 years
Danger: Keep all small parts and packaging materials for this product away from babies
and children, otherwise they may pose a choking hazard.
Danger: Lack of attachment may cause a risk of tipping.
WARNING:
CHOKING HAZARD-Small parts.
Not for children under 3 years.
0-3
Please read all instructions carefully and keep it for future reference.
Warning! Not suitable for children under 36 months due to
small parts-choking hazard.
Caution! Product should be used only for the purpose for
which it was designed. Children should not stand or climb
on the product.
• Toy to be assembled by a responsible adult
• Remove all packaging before giving to your child.
• Young children in play are unaware of potential hazards and
dangers, therefore responsible adult supervision is essential.
Please keep this packaging for reference since it contains
important information.
Adult assembly required. Please read enclosed instructions before
use. Young children in play are unaware of potential dangers and
hazards, therefore responsible adult supervision is essential.
Safety Battery Precaution
Non-rechargeable batteries are not to be recharged. Rechargeable
batteries are to be removed from the toy before before being
charged.
Safety Information
Safety Information
General safety
Important-Please read these instructions fully before assembly
or use
04 05
Rechargeable batteries are only to be charged under adult
supervision. Different types of batteries or new and used batteries
are not to be mixed. Only batteries of the same or equivalent types
as recommended are to be used. Batteries are to be inserted with
correct polarity. Exhausted batteries are to be removed from the
toy. The supply terminals are not to be short-circuited. Do not
dispose of the battery in fire, battery may leak or explode. Battery
should be replaced by an adult.
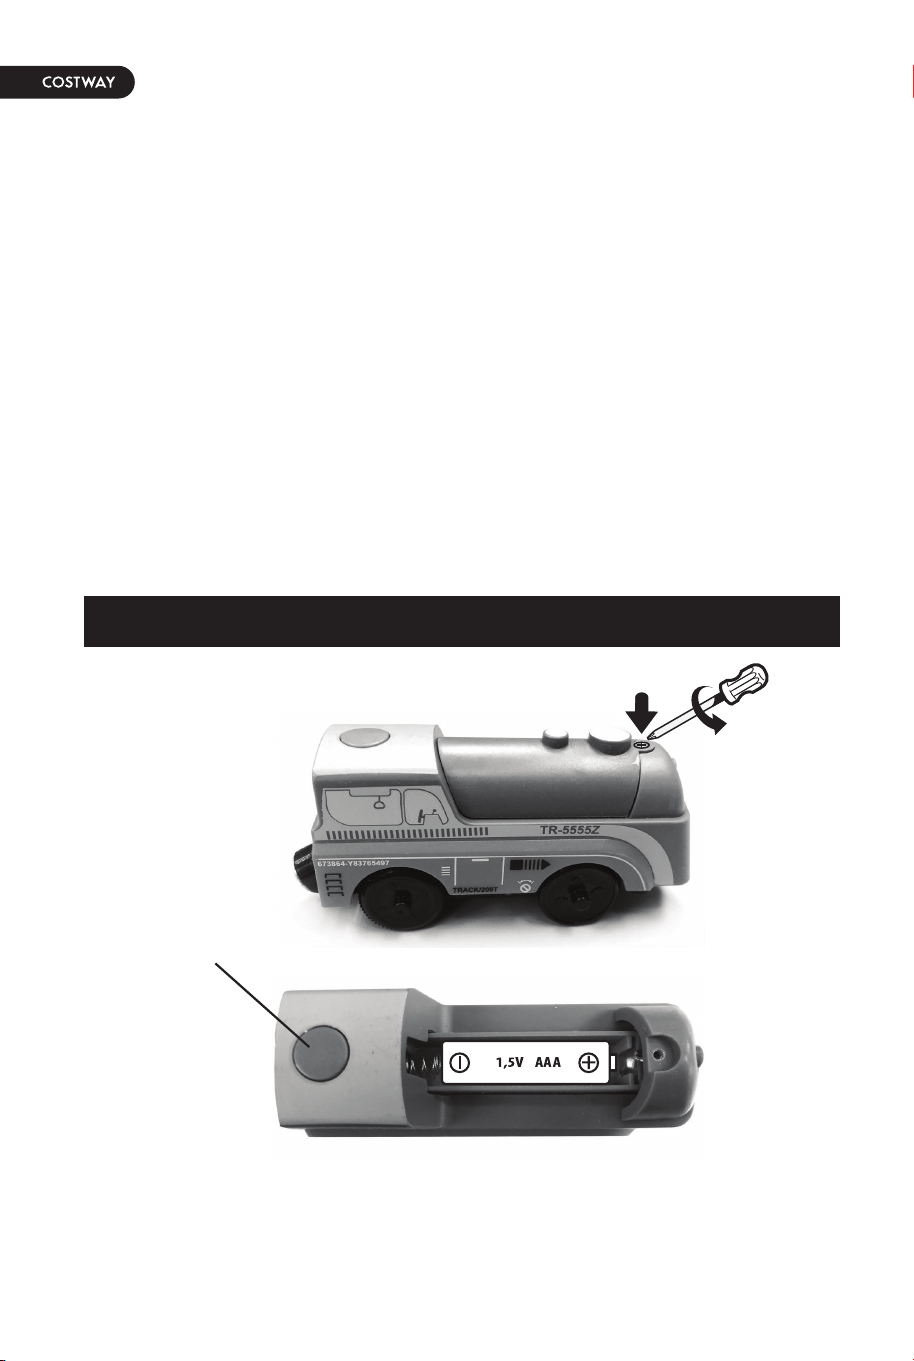
Battery Installation & Replacement
Loosen the screw with a screw driver to open battery compartment
door at the top of the product. Insert/replace the new battery in
the proper direction indicated inside the battery compartment.
Close and screw the battery door.
Electrical product waste should not be discarded with
household waste. Please actively support us in
conserving resources and protecting the environment
by returning the non-working electrical products to an
appropriate disposal/recycling center (if available).
*Your battery operated train is designed for use on the flat circuit of
track only. The battery operated train will not go uphill.
Battery Operated Train*_ Battery Included
Disposal Information
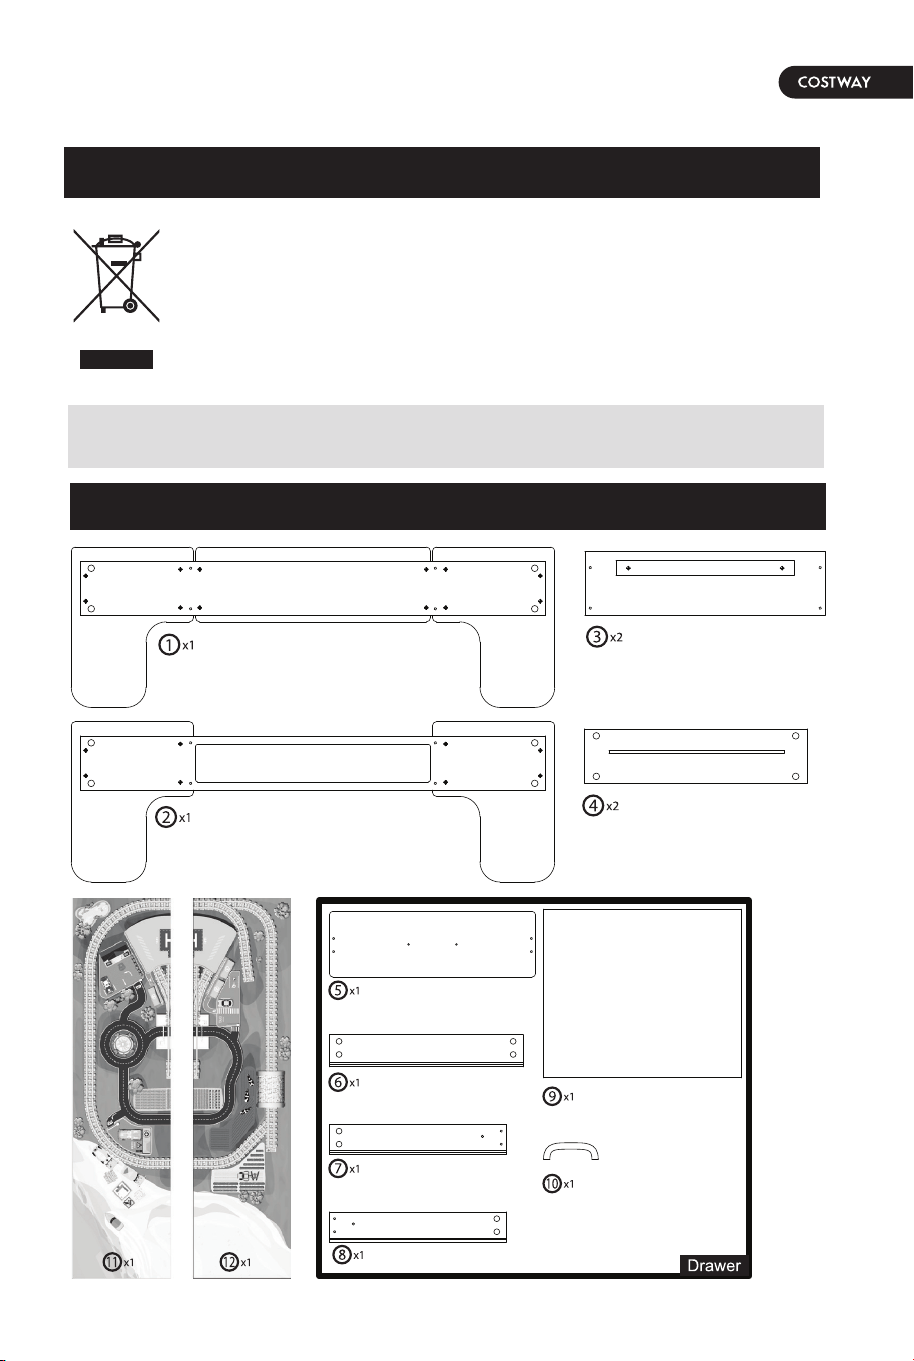
Please check that you have all the parts and fittings listed below
Open
On/Off switch
1xAAA packed separate
Table Parts
04 05
Rechargeable batteries are only to be charged under adult
supervision. Different types of batteries or new and used batteries
are not to be mixed. Only batteries of the same or equivalent types
as recommended are to be used. Batteries are to be inserted with
correct polarity. Exhausted batteries are to be removed from the
toy. The supply terminals are not to be short-circuited. Do not
dispose of the battery in fire, battery may leak or explode. Battery
should be replaced by an adult.
Battery Installation & Replacement
Loosen the screw with a screw driver to open battery compartment
door at the top of the product. Insert/replace the new battery in
the proper direction indicated inside the battery compartment.
Close and screw the battery door.
Electrical product waste should not be discarded with
household waste. Please actively support us in
conserving resources and protecting the environment
by returning the non-working electrical products to an
appropriate disposal/recycling center (if available).
*Your battery operated train is designed for use on the flat circuit of
track only. The battery operated train will not go uphill.
Battery Operated Train*_ Battery Included
Disposal Information
Please check that you have all the parts and fittings listed below
Open
On/Off switch
1xAAA packed separate
Table Parts
06 07
Note: The quantities below are the correct amount to complete
the assembly. In some cases more fittings may be supplied than
are required.
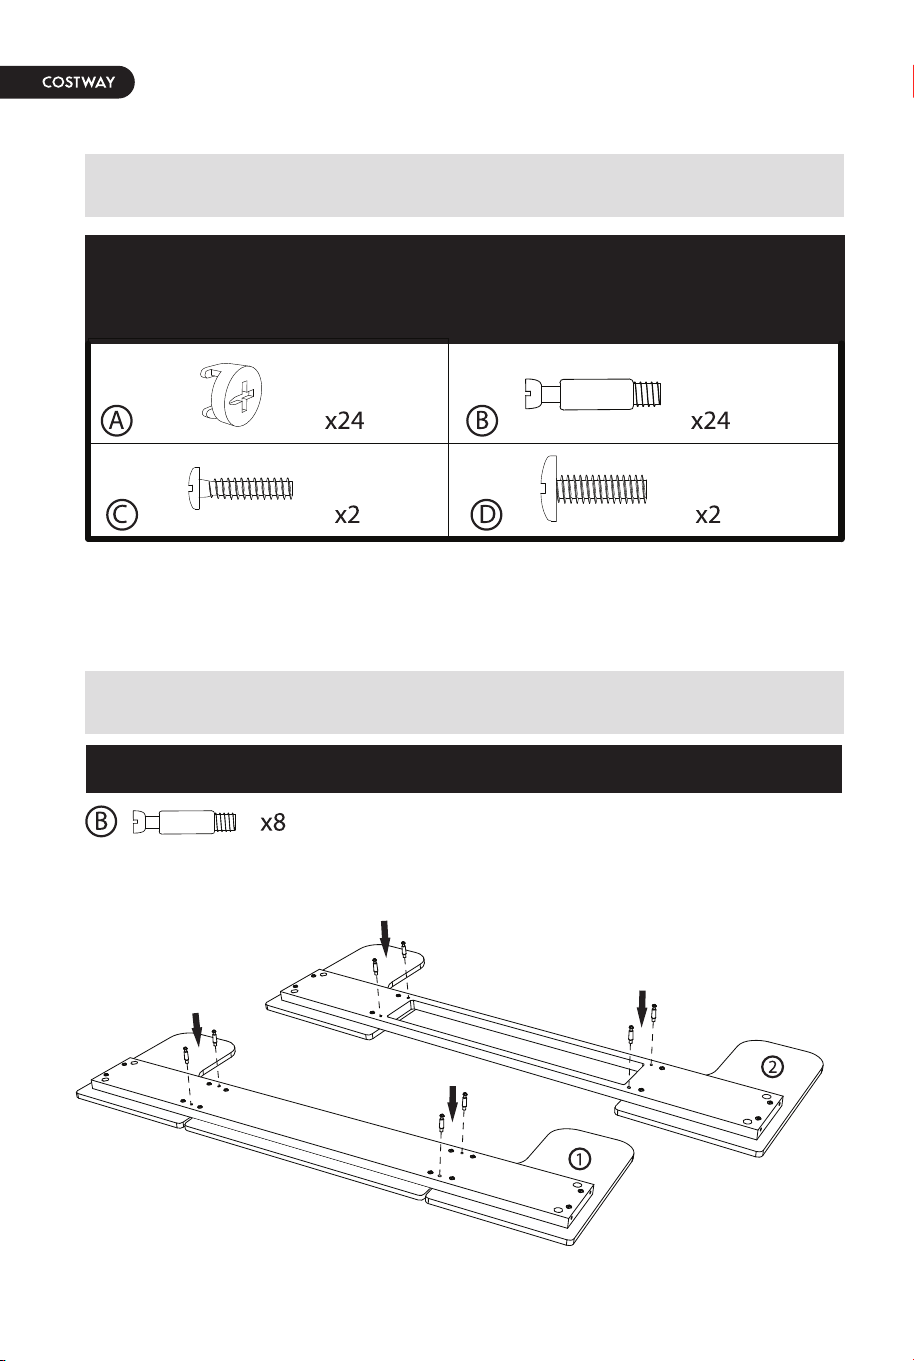
Hardware
Assembly Instructions
1
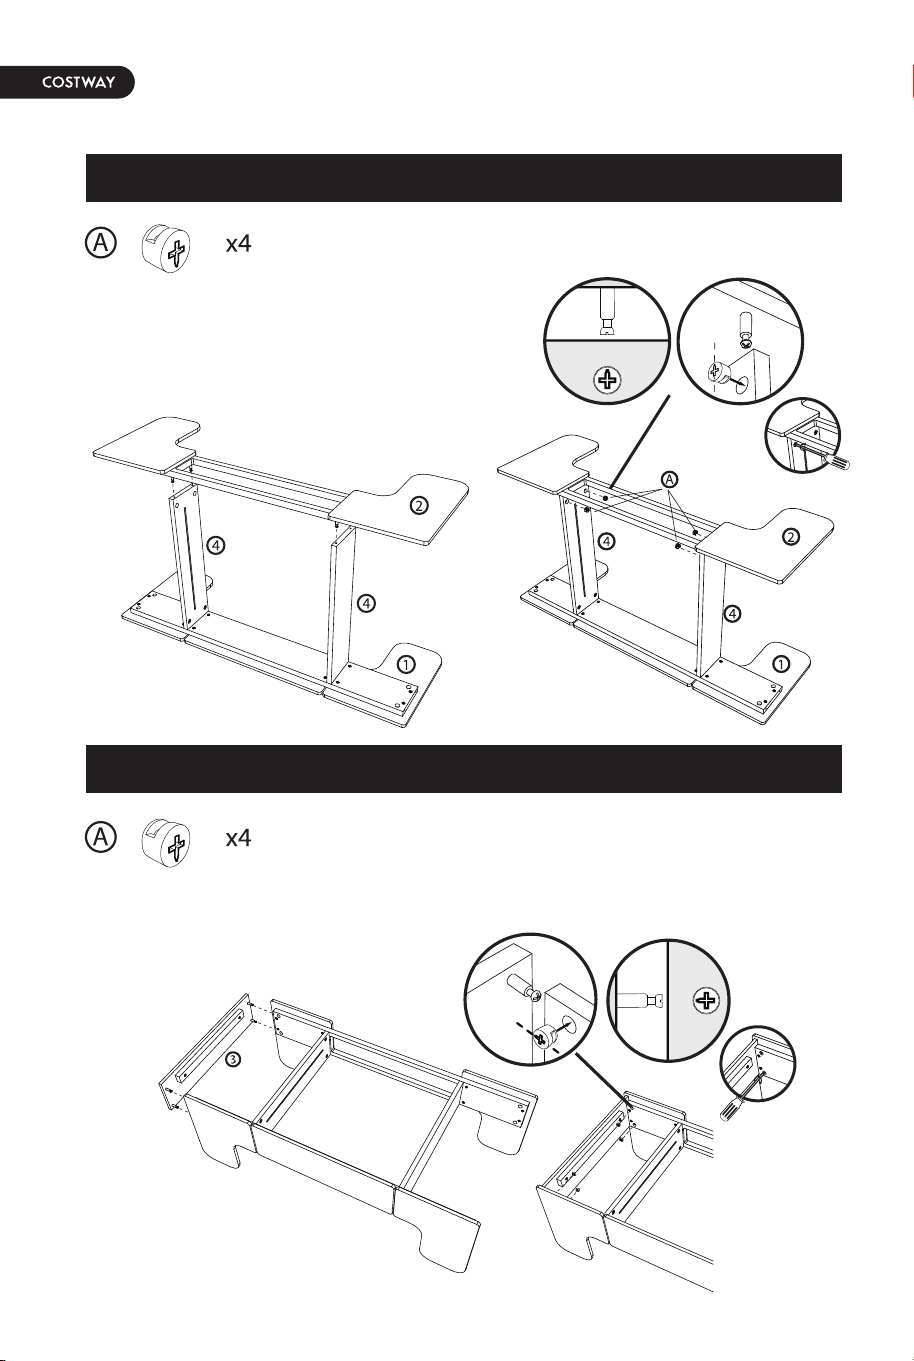
Insert cam bolts B into the corresponding holes of part 1 and part 2.
2
3
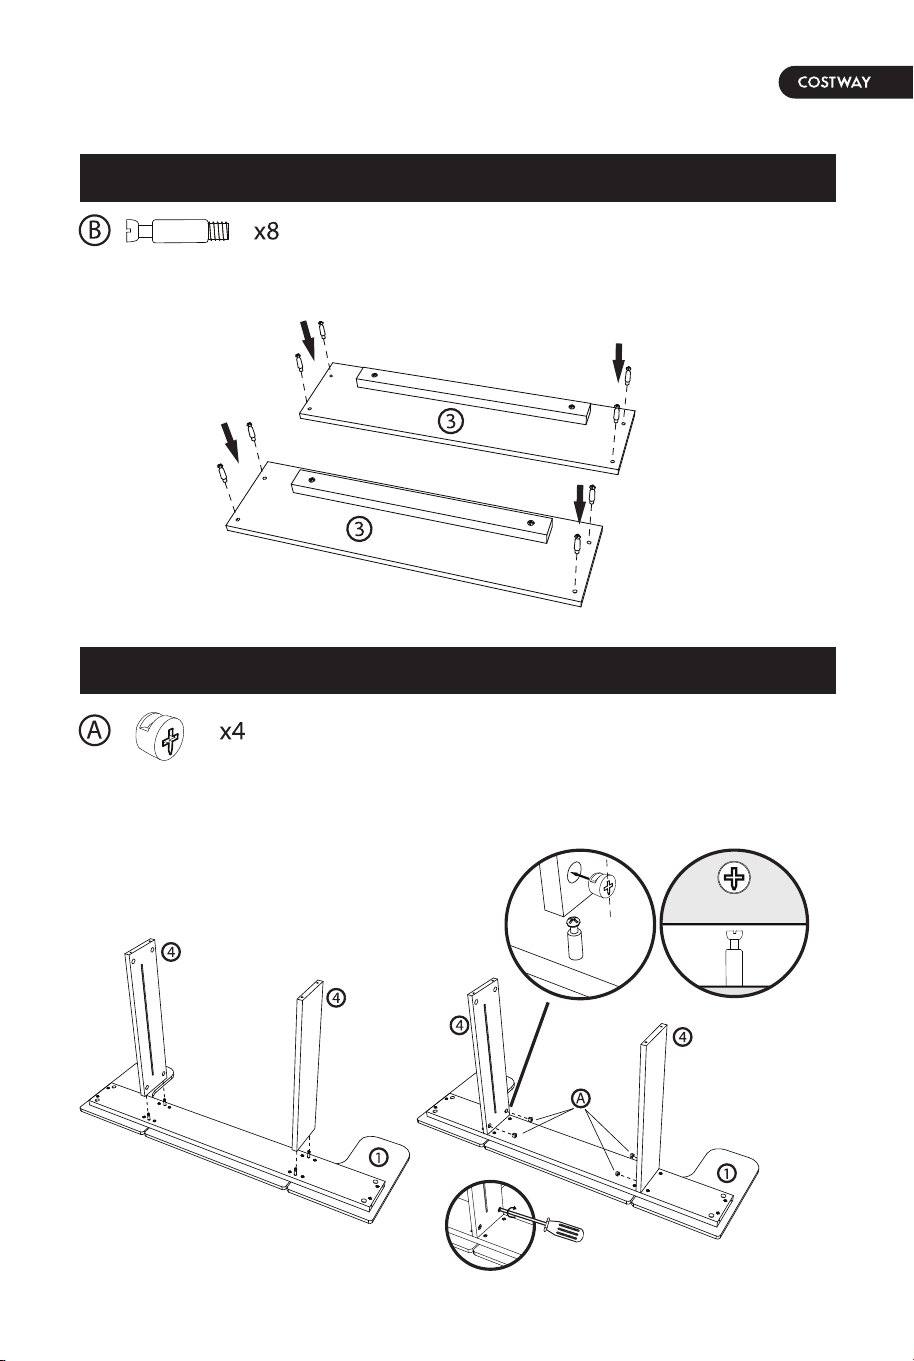
Insert cam bolts B into the corresponding holes of part 3.
Insert cam nuts A into the corresponding holes of part 4 in the
direction shown in the figure, insert it into part 1 and and then
tighten cam nuts A.
06 07
Note: The quantities below are the correct amount to complete
the assembly. In some cases more fittings may be supplied than
are required.
Hardware
Assembly Instructions
1
Insert cam bolts B into the corresponding holes of part 1 and part 2.
2
3
Insert cam bolts B into the corresponding holes of part 3.
Insert cam nuts A into the corresponding holes of part 4 in the
direction shown in the figure, insert it into part 1 and and then
tighten cam nuts A.
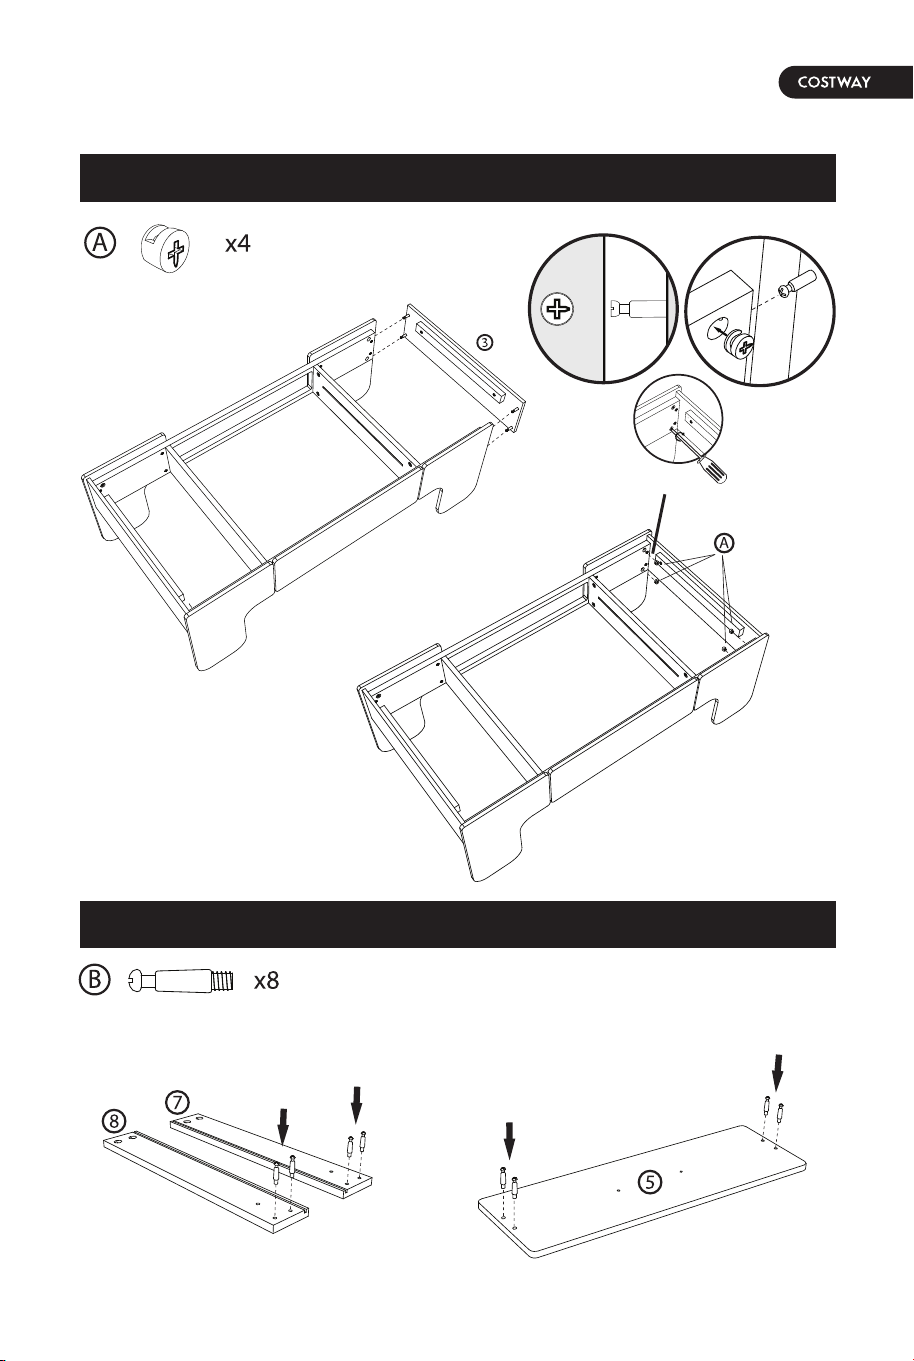
Insert cam nuts A into the corresponding
holes of part 4 in the direction shown in
the figure, insert part 2 into part 4, and
then tighten cam nuts A.
Same as Step 5.
Insert cam bolts B into the corresponding holes of part 7, 8, 5.
Insert cam nuts A into the holes of part 1 and part 2 as shown in the
figure, insert part 3 into the holes, and then tighten cam nuts A.
5
4
6
7
08 09
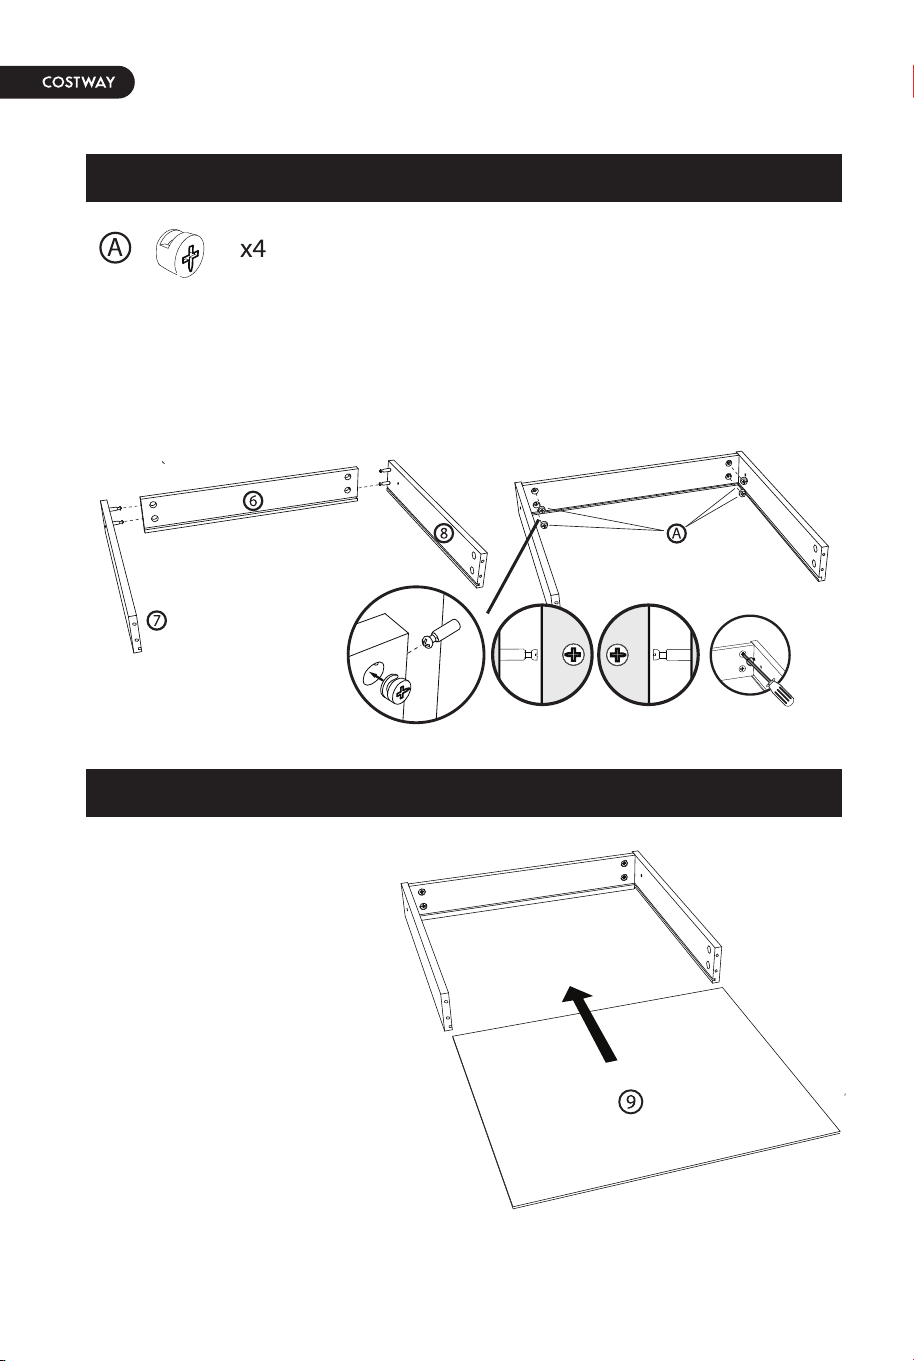
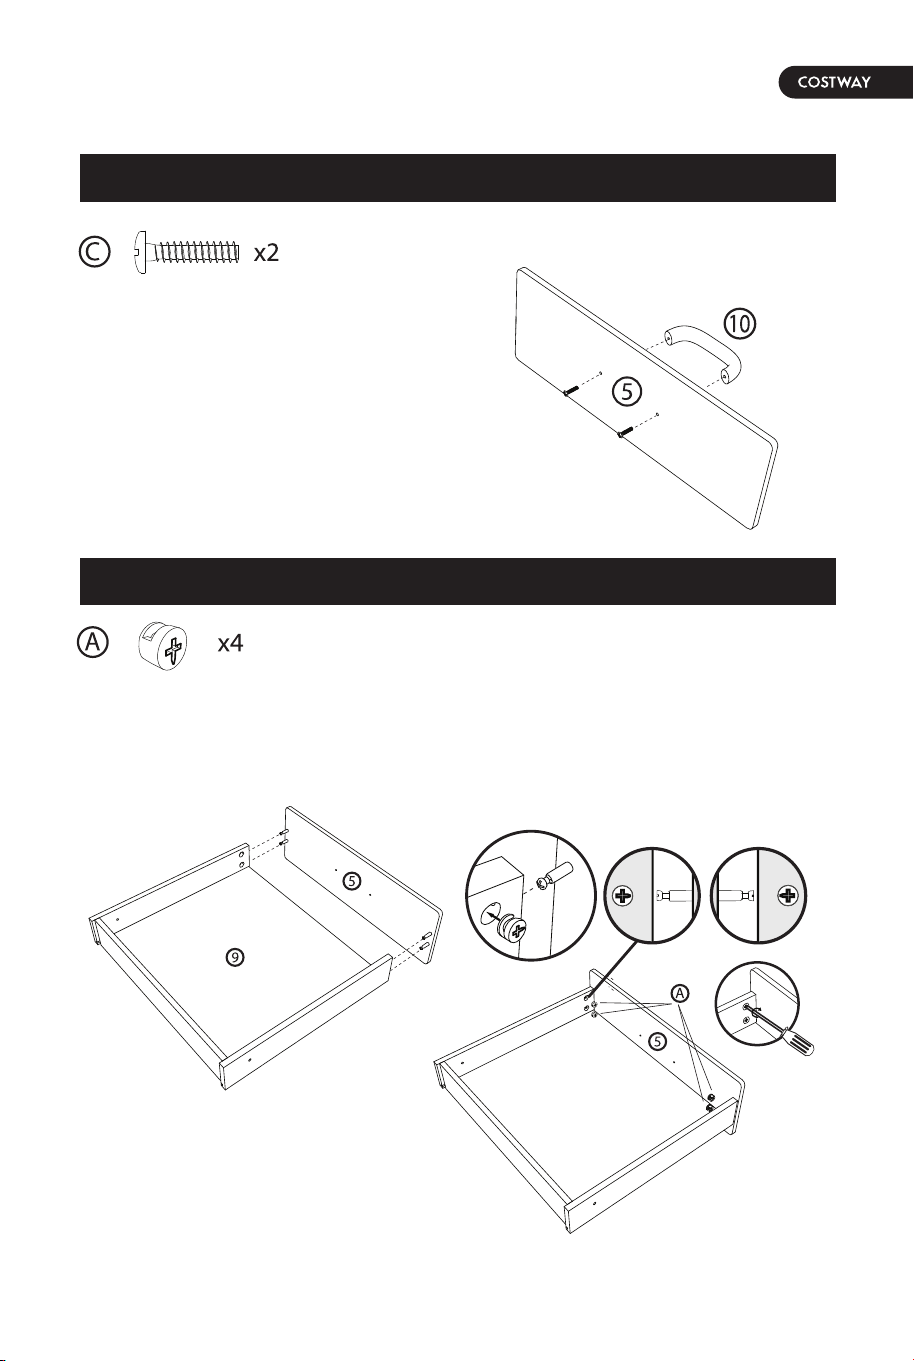
Insert cam nuts A into the corresponding holes of part 6 in the
direction shown in the figure, insert part 7 and part 8 into part 6,
and then tighten cam nuts A.
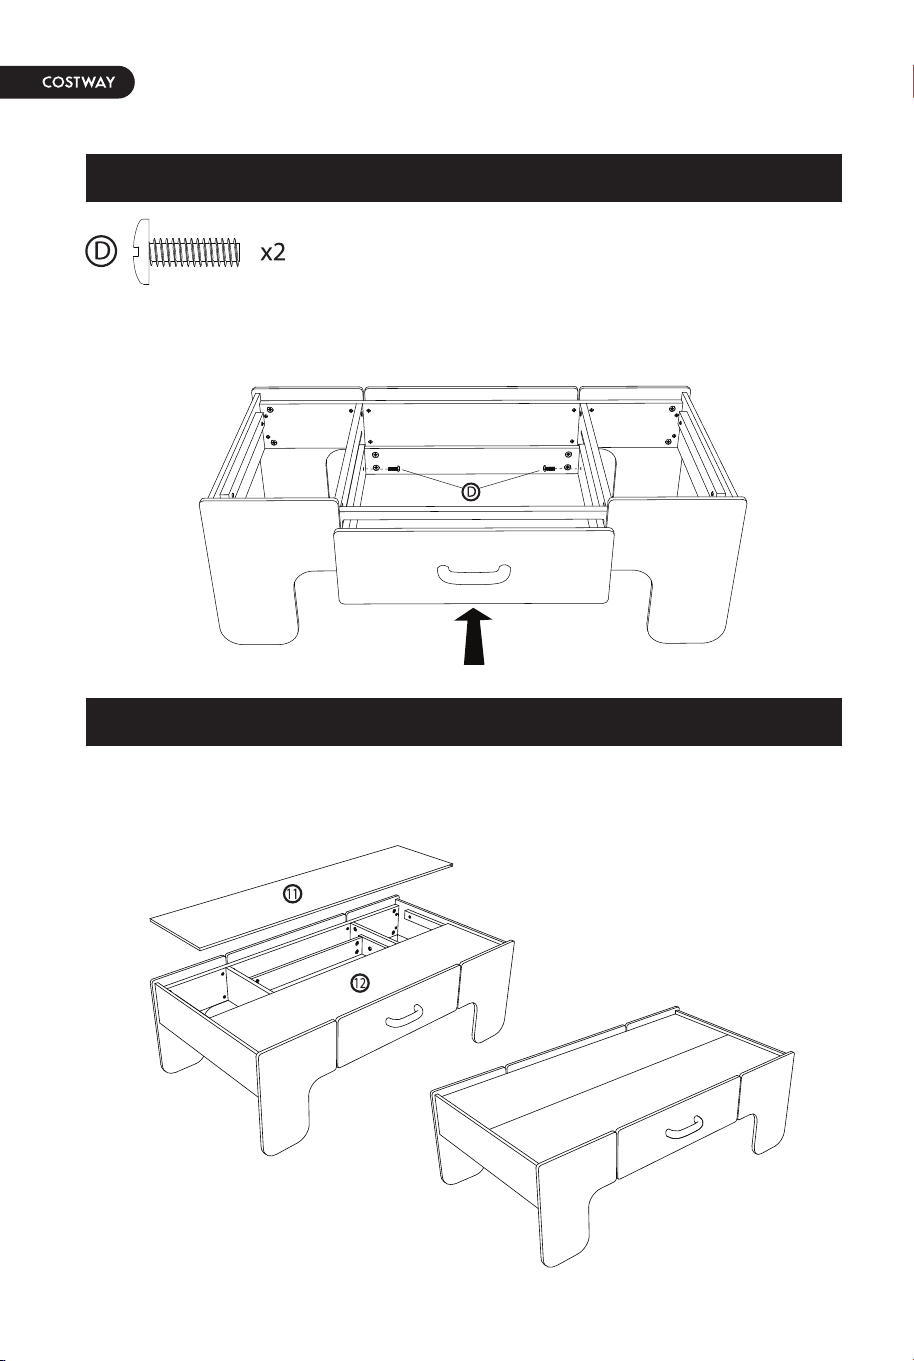
Fix the Part 10 (Drawer Handle)
with screws C.
Insert cam nuts A into the corresponding holes of part 7 and part 8
in the direction shown in the figure, insert part 5 and then tighten
cam nuts A.
Put part 9 into the slot.
10 11
9
8
10
11
Insert cam nuts A into the corresponding holes of part 6 in the
direction shown in the figure, insert part 7 and part 8 into part 6,
and then tighten cam nuts A.
Fix the Part 10 (Drawer Handle)
with screws C.
Insert cam nuts A into the corresponding holes of part 7 and part 8
in the direction shown in the figure, insert part 5 and then tighten
cam nuts A.
Put part 9 into the slot.
10 11
9
8
10
11
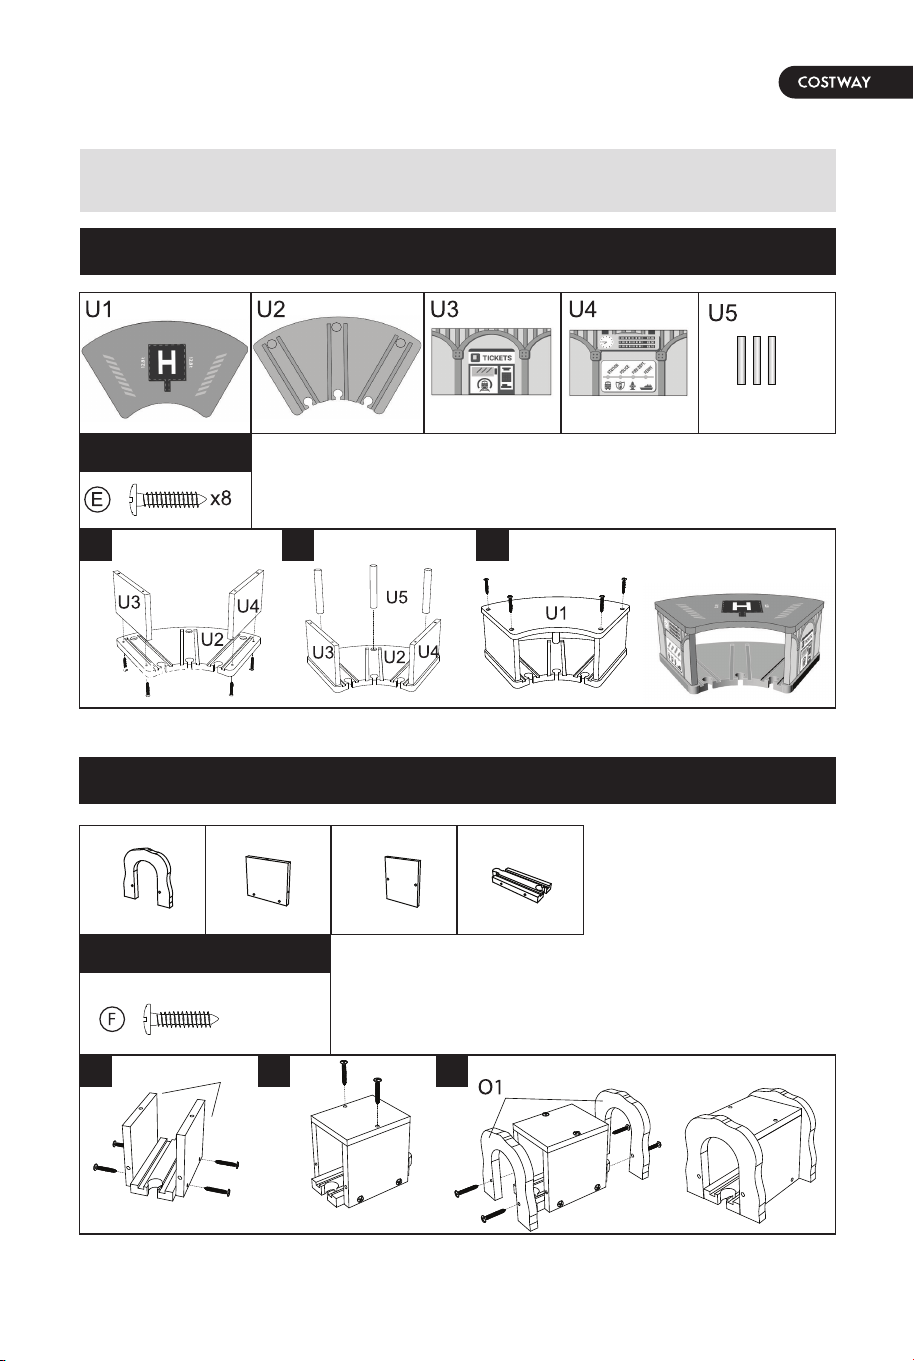
Station
Tunnel
12 13
13
12
Insert screws D into the corresponding holes as shown in the
figure.
Put part 11 and part 12 on the table.
Assembly Instructions
x1 x1 x1x1
x2 x2 x1 x1
x10
O1 O2 O3 O4
Hardware
1 2 3
1 2 3
O2
O4
O3
O2
O4
O3
O2
Hardware
Station
Tunnel
12 13
13
12
Insert screws D into the corresponding holes as shown in the
figure.
Put part 11 and part 12 on the table.
Assembly Instructions
x1 x1 x1x1
x2 x2 x1 x1
x10
O1 O2 O3 O4
Hardware
1 2 3
1 2 3
O2
O4
O3
O2
O4
O3
O2
Hardware
14 15
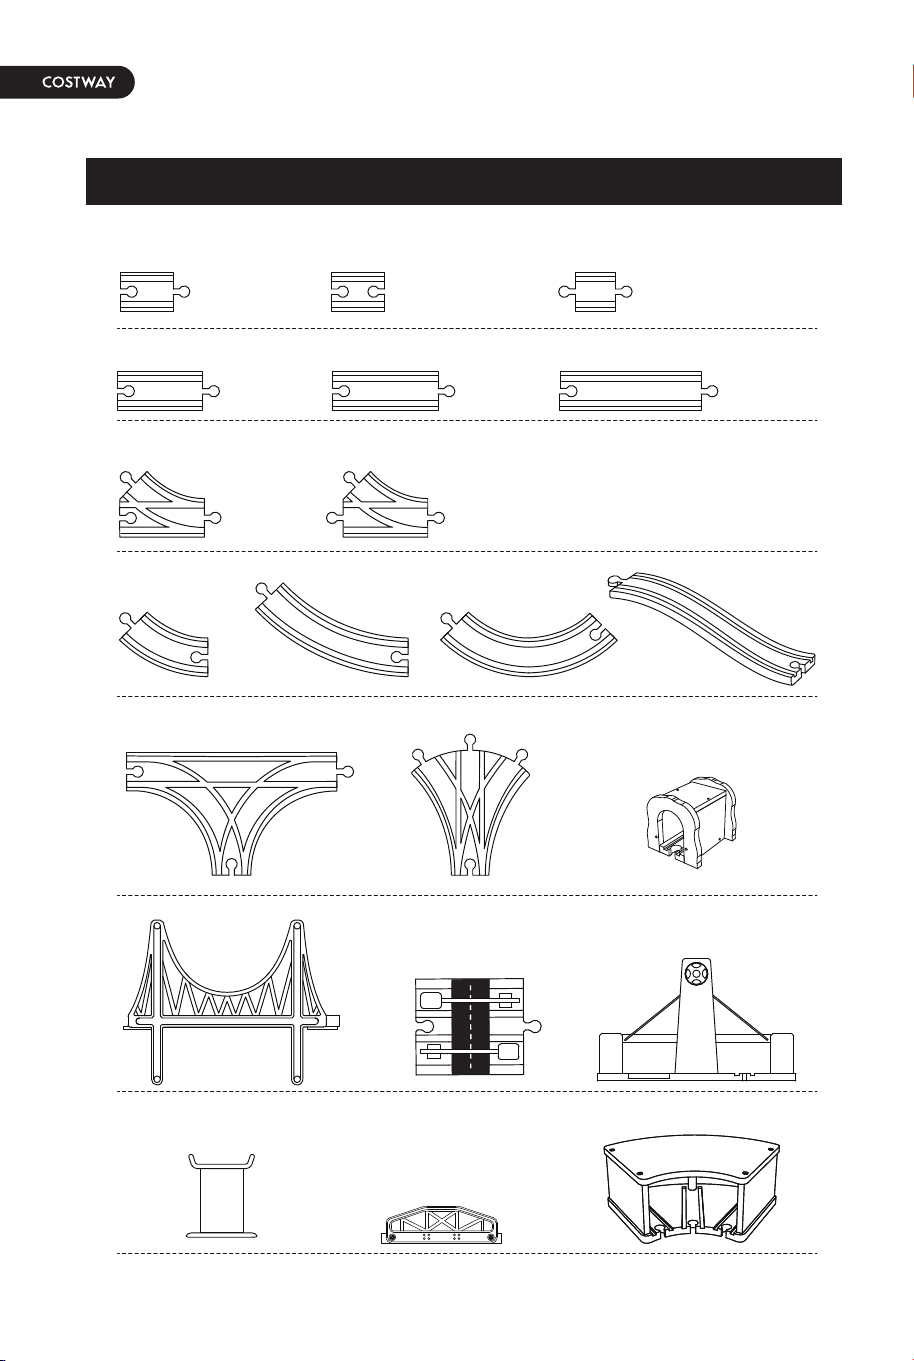
Tracks Parts
A x7
54mm
100mm 108mm 144mm
54mm 42mm
B x1 C x1
D x1 E x3
I x6
M x1 N x1
P x1 Q x1 R x1
S x9
T x1
U x1
O x1
J x8 K x1 L x3
G x1 H x1
F x1
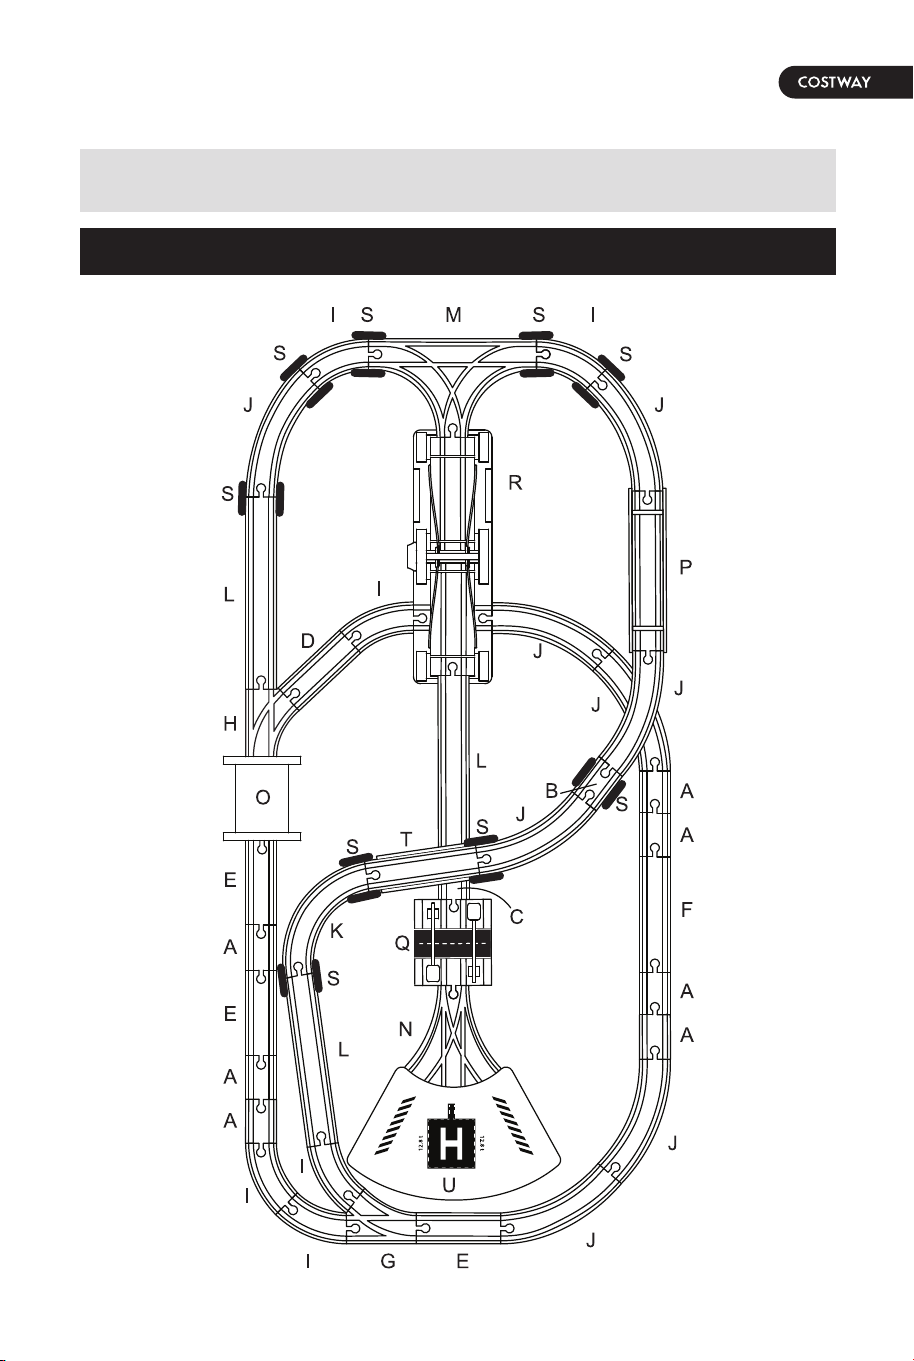
Tracks
Assembly Instructions
14 15
Tracks Parts
A x7
54mm
100mm 108mm 144mm
54mm 42mm
B x1 C x1
D x1 E x3
I x6
M x1 N x1
P x1 Q x1 R x1
S x9
T x1
U x1
O x1
J x8 K x1 L x3
G x1 H x1
F x1
Tracks
Assembly Instructions
- Wipe clean with a damp cloth only.
- Important: Check the product and fixings regularly to ensure no
parts are damaged, loose, lost or broken.
- Take care when moving the table.
- The product should be regularly inspected by an adult for broken
or damaged parts.
Warning! Not suitable for children under 36 months. Choking
hazard. Small parts.
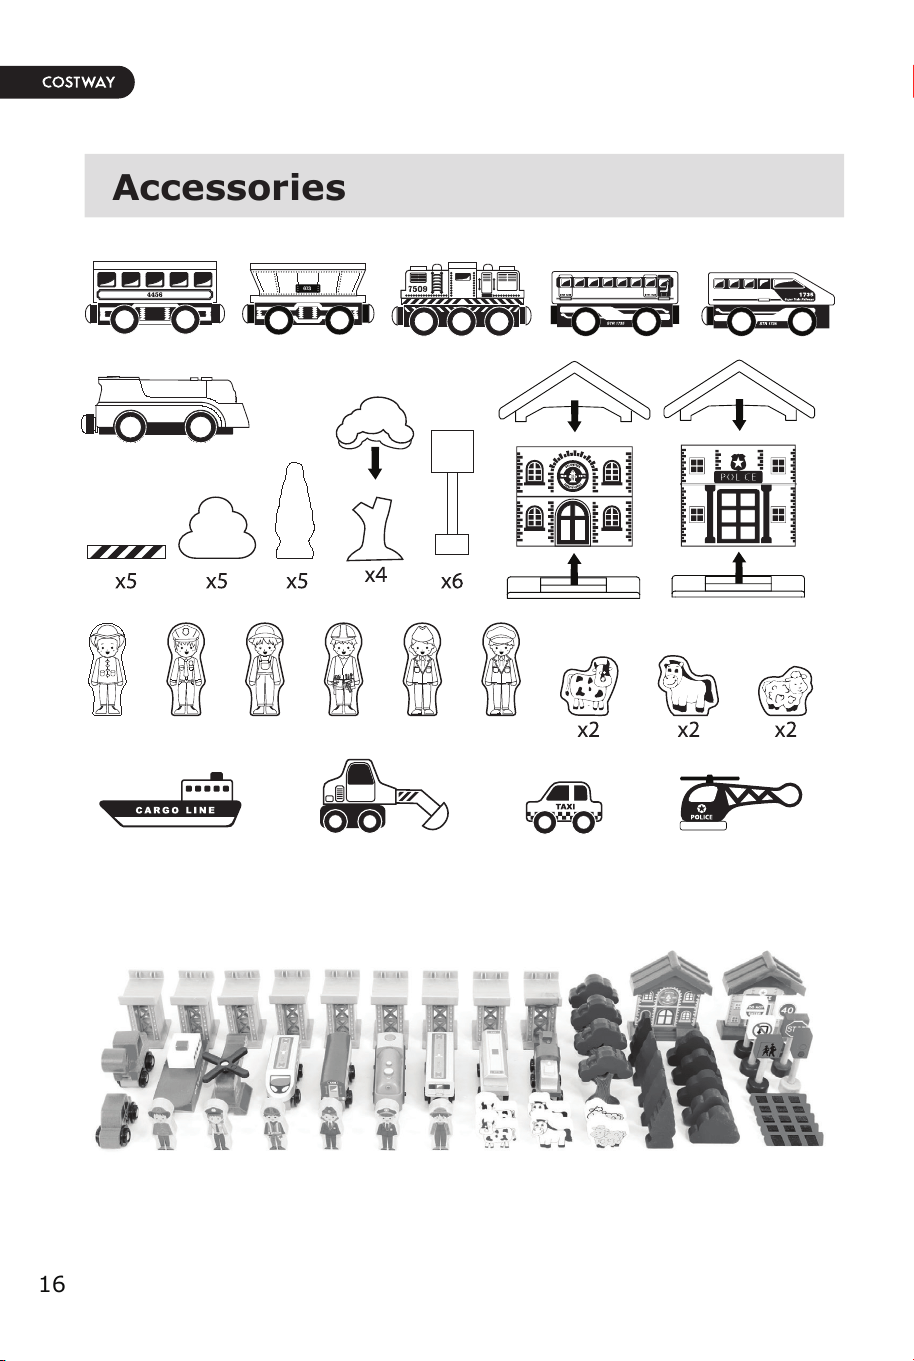
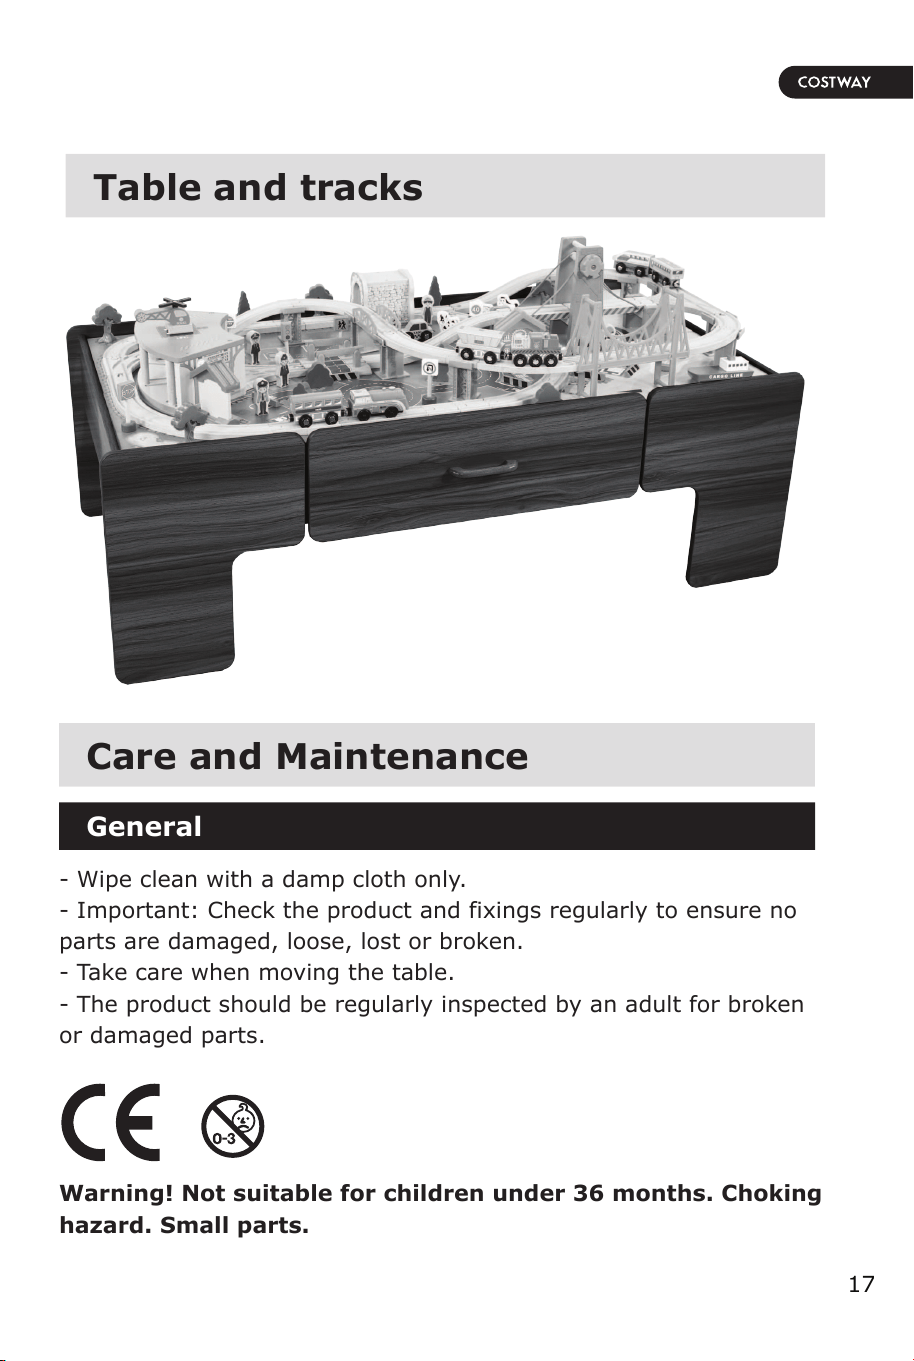
16 17
Accessories Table and tracks
General
Care and Maintenance
- Wipe clean with a damp cloth only.
- Important: Check the product and fixings regularly to ensure no
parts are damaged, loose, lost or broken.
- Take care when moving the table.
- The product should be regularly inspected by an adult for broken
or damaged parts.
Warning! Not suitable for children under 36 months. Choking
hazard. Small parts.
16 17
Accessories Table and tracks
General
Care and Maintenance