
Model: TT-SK027
TAOTRONICS PC GAMING SOUNDBAR
User Guide
Learn more about the EU Declaration of Conformity:
https://www.taotronics.com/downloads- TT-SK027 Boost-CE-Cert.html
EUROPE
E-mail:
EU Importer: ZBT International Trading GmbH
Address: Halstenbeker Weg 98C, 25462 Rellingen, Deutschland
NORTH AMERICA
E-mail: [email protected](US)
Tel: 1-888-456-8468 (Monday-Friday: 9:00 – 17:00 PST)
US Distributor: SUNVALLEYTEK INTERNATIONAL INC.
Address: 46724 Lakeview Blvd, Fremont, CA 94538
Manufacturer: Shenzhen NearbyExpress Technology Development Co.,Ltd.
Address: 333 Bulong Road, Shenzhen, China, 518129
MANUFACTURER
ASIA PACIFIC
E-mail: [email protected](JP)
JP Importer: 株式会社SUNVALLEY JAPAN
Address: 〒104-0032 東京都中央区八丁堀3丁目18-6 PMO京橋東9F
MADE IN CHINA
TT-SK027_V1.2
www.taotronics.com
Model: TT-SK027
TAOTRONICS PC GAMING SOUNDBAR
User Guide
Learn more about the EU Declaration of Conformity:
https://www.taotronics.com/downloads- TT-SK027 Boost-CE-Cert.html
EUROPE
E-mail:
support.uk@taotronics.com(UK)
support.de@taotronics.com(DE)
support.fr@taotronics.com(FR)
support.es@taotronics.com(ES)
support.it@taotronics.com(IT)
EU Importer: ZBT International Trading GmbH
Address: Halstenbeker Weg 98C, 25462 Rellingen, Deutschland
NORTH AMERICA
E-mail: support@taotronics.com(US)
support.ca@taotronics.com(CA)
Tel: 1-888-456-8468 (Monday-Friday: 9:00 – 17:00 PST)
US Distributor: SUNVALLEYTEK INTERNATIONAL INC.
Address: 46724 Lakeview Blvd, Fremont, CA 94538
Manufacturer: Shenzhen NearbyExpress Technology Development Co.,Ltd.
Address: 333 Bulong Road, Shenzhen, China, 518129
MANUFACTURER
ASIA PACIFIC
E-mail: support.jp@taotronics.com(JP)
JP Importer: 株式会社SUNVALLEY JAPAN
Address: 〒104-0032 東京都中央区八丁堀3丁目18-6 PMO京橋東9F
MADE IN CHINA
TT-SK027_V1.2
www.taotronics.com
USE GUIDE
1 2
3 4
5
PACKAGE CONTENTS
EN
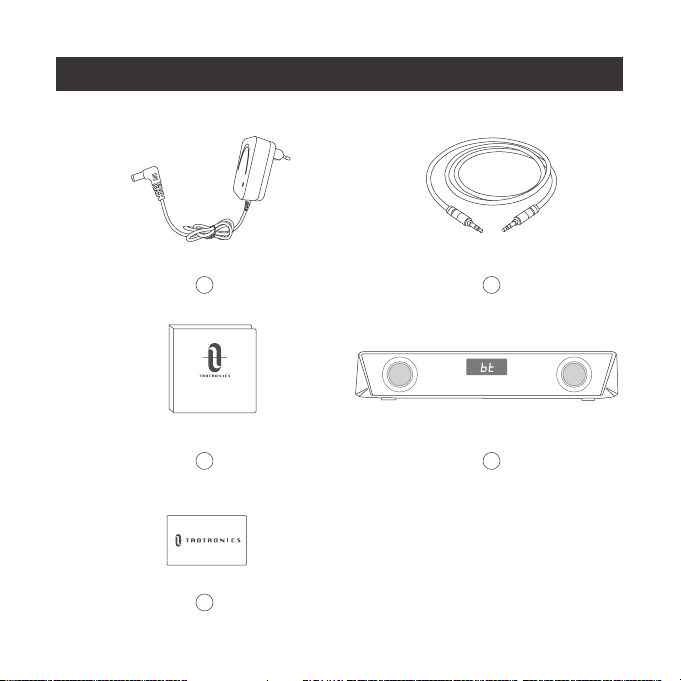
PACKAGE CONTENTS
1 x Power Adapter
1 x 3.5mm Audio Cable
1 x User Guide
1 x TaoTronics Sound Bar
(Model: TT-SK027)
1 x Thank You Card
1
2
3
4
5
DE
IM LIEFERUMFANG ENTHALTEN
1 x Netzteil
1 x 3.5mm Audiokabel
1 x Bedienungsanleitung
1 x TaoTronics-Soundbar
(Modell: TT-SK027)
1 x Dankeskarte
1
2
3
4
5
FR
CONTENU DE LA BOITE
1 x Adaptateur secteur
1 x Câble Audio 3.5mm
1 x Guide de l'utilisateur
1 x Barre de son TaoTroics
(Modèle : TT-SK027)
1 x Carte de remerciements
1
2
3
4
5
ES
CONTENIDO DEL PAQUETE
1 x Adaptador de alimentación
1 x Cable de Audio 3,5 mm
1 x Guía del usuario
1 x Barra de sonido TaoTronics
(modelo: TT-SK027)
1 x Tarjeta de agradecimiento
1
2
3
4
5
USE GUIDE
1 2
3 4
5
PACKAGE CONTENTS
EN
PACKAGE CONTENTS
1 x Power Adapter
1 x 3.5mm Audio Cable
1 x User Guide
1 x TaoTronics Sound Bar
(Model: TT-SK027)
1 x Thank You Card
1
2
3
4
5
DE
IM LIEFERUMFANG ENTHALTEN
1 x Netzteil
1 x 3.5mm Audiokabel
1 x Bedienungsanleitung
1 x TaoTronics-Soundbar
(Modell: TT-SK027)
1 x Dankeskarte
1
2
3
4
5
FR
CONTENU DE LA BOITE
1 x Adaptateur secteur
1 x Câble Audio 3.5mm
1 x Guide de l'utilisateur
1 x Barre de son TaoTroics
(Modèle : TT-SK027)
1 x Carte de remerciements
1
2
3
4
5
ES
CONTENIDO DEL PAQUETE
1 x Adaptador de alimentación
1 x Cable de Audio 3,5 mm
1 x Guía del usuario
1 x Barra de sonido TaoTronics
(modelo: TT-SK027)
1 x Tarjeta de agradecimiento
1
2
3
4
5
IT
CONTENUTO DELLA CONFEZIONE
1 x Adattatore di alimentazione
1 x Cavo Audio da 3,5mm
1 x Guida dell’ utente
1 x Soundbar TaoTronics
(modello: TT-SK027)
1 x Cartolina di ringraziamento
1
2
3
4
5
JP
パッケージ内容
1x電源アダプター
1x3.5mmオーディオケーブル
1xユーザーガイド
1xTaoTronicsサウンドバー
(モデル:TT-SK027)
1xサンキューカード
1
2
3
4
5
PRODUCT DIAGRAM
1 12
8 7 6 5 4 3
912 13 10 11 1213
DC
AUX OUTAUX IN

EN
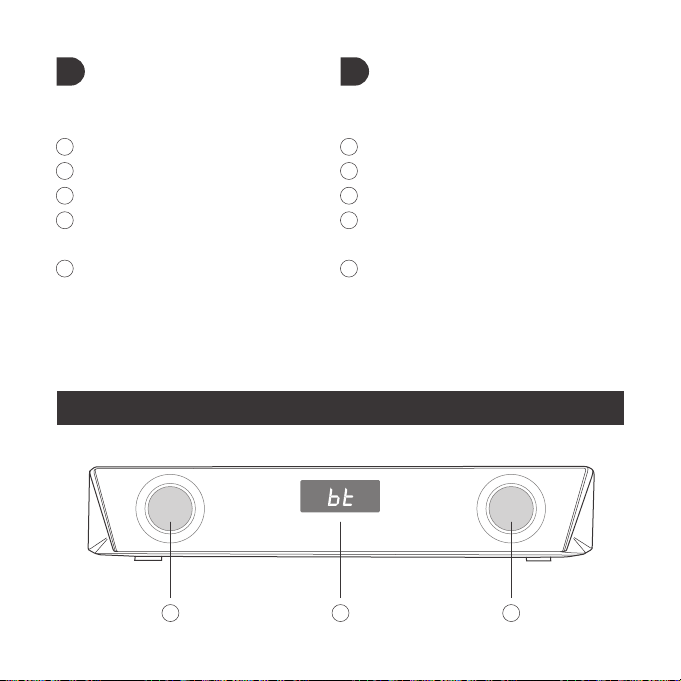
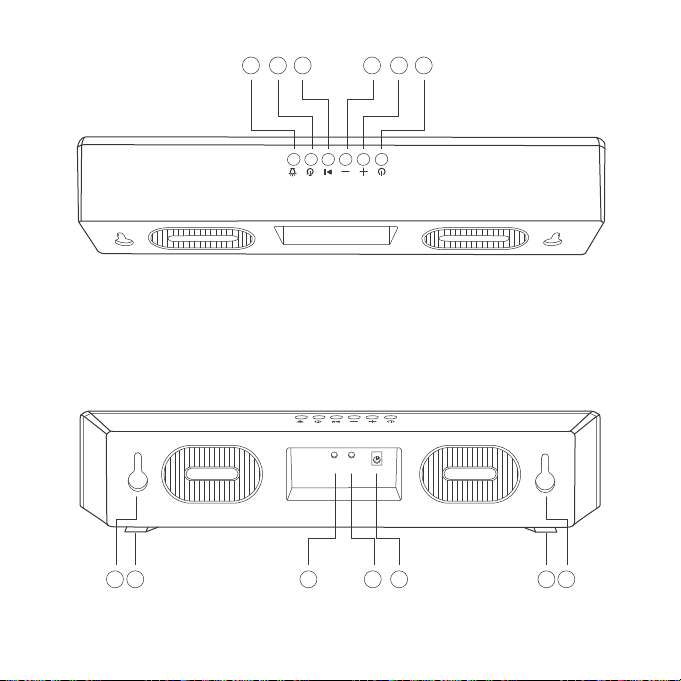
PRODUCT DIAGRAM
1
2
3
4
5
6
7
8
9
10
11
12
13
Speaker
LED Display
Power Button
Volume +
Volume –
Play / Pause
Timer Button
LED Mode Button
AUX Input port
AUX Output Port
Power Port
Mount Holes.
Rubber Feet
DE
PRODUKTABBILDUNG
1
2
3
4
5
6
7
8
9
10
11
12
13
Lautsprecher
LED-Anzeige
Powertaste
Lautstärke +
Lautstärke –
Wiedergabe / Pause
Timer-Taste
LED-Modustaste
AUX-Eingang
AUX-Ausgang
Montagelöcher
Montagelöcher
Gummifüßet
FR
SCHÉMA DU PRODUIT
1
2
3
4
5
6
7
8
9
10
11
12
13
Haut-parleur
Affichage LED
Bouton Alimentation
Volume +
Volume –
Lecture / Pause
Bouton de minuterie
Bouton Mode LED
Port d'entrée AUX
Port de sortie AUX
Port d'alimentation
Trous de montage
Coussinets en caoutchouc
ES
DIAGRAMA DEL PRODUCTO
1
2
3
4
5
6
7
8
9
10
11
12
13
Altavoz
Pantalla LED
Botón de Encendido
Volumen +
Volumen –
Reproducir / Pausar
Botón Del Temporizador
Botón de Modo LED
Puerto de Entrada AUX
Puerto de Salida AUX
Puerto de Alimentación
Orificios de instalación
Pies de Goma

EN
PRODUCT DIAGRAM
1
2
3
4
5
6
7
8
9
10
11
12
13
Speaker
LED Display
Power Button
Volume +
Volume –
Play / Pause
Timer Button
LED Mode Button
AUX Input port
AUX Output Port
Power Port
Mount Holes.
Rubber Feet
DE
PRODUKTABBILDUNG
1
2
3
4
5
6
7
8
9
10
11
12
13
Lautsprecher
LED-Anzeige
Powertaste
Lautstärke +
Lautstärke –
Wiedergabe / Pause
Timer-Taste
LED-Modustaste
AUX-Eingang
AUX-Ausgang
Montagelöcher
Montagelöcher
Gummifüßet
FR
SCHÉMA DU PRODUIT
1
2
3
4
5
6
7
8
9
10
11
12
13
Haut-parleur
Affichage LED
Bouton Alimentation
Volume +
Volume –
Lecture / Pause
Bouton de minuterie
Bouton Mode LED
Port d'entrée AUX
Port de sortie AUX
Port d'alimentation
Trous de montage
Coussinets en caoutchouc
ES
DIAGRAMA DEL PRODUCTO
1
2
3
4
5
6
7
8
9
10
11
12
13
Altavoz
Pantalla LED
Botón de Encendido
Volumen +
Volumen –
Reproducir / Pausar
Botón Del Temporizador
Botón de Modo LED
Puerto de Entrada AUX
Puerto de Salida AUX
Puerto de Alimentación
Orificios de instalación
Pies de Goma

IT
SCHEMA DEL PRODOTTO
2
3
1
4
5
6
7
8
9
10
11
12
13
Altoparlante
Display LED
Tasto di Alimentazione
Volume +
Volume –
Riproduzione/Pausa
Pulsante Timer
Pulsante Modalità LED
Porta in Ingresso AUX
Porta in Uscita AUX
1Porta di Alimentazione
Fori di montaggio
Piedini in Gomma
JP
製品外観
1
2
3
4
5
6
7
8
9
10
11
12
13
スピーカー
LEDディスプレイ
電源ボタン
ボリューム+
ボリューム‒
再生/一時停止
タイマーボタン
LEDモードボタン
AUX入力ポート
AUX出力ポート
電源ポート
取付孔
ラ バ ーフィート
Note:
The mounting screws are not provided.
please remove the protection from the rubber feet before first use.
Anmerkung:
Die Montageschraubenwerden nicht bereitgestellt.
Bitte nehmen Sie vor der ersten Benutzung den Schutz von den Gummifüßen ab.
Remarque:
Les vis de montage ne sont pas fournies.
Veuillez retirer la protection des coussinets en caoutchouc avant la première utilisation.
Nota:
Los tornillos de montaje no se proporcionan.
Por favor retire la protección de los pies de goma antes de usar por primera vez.
Nota:
Le viti di montaggio non sono fornite in dotazione.
Si prega di rimuovere la protezione dai piedini in gomma prima del primo utilizzo.
注意:
取付用のネジは付属しません。
購入して初めて使用する前に、ラバーフィートの保護カバーを外してください。
EN
DE
FR
ES
IT
JP

IT
SCHEMA DEL PRODOTTO
2
3
1
4
5
6
7
8
9
10
11
12
13
Altoparlante
Display LED
Tasto di Alimentazione
Volume +
Volume –
Riproduzione/Pausa
Pulsante Timer
Pulsante Modalità LED
Porta in Ingresso AUX
Porta in Uscita AUX
1Porta di Alimentazione
Fori di montaggio
Piedini in Gomma
JP
製品外観
1
2
3
4
5
6
7
8
9
10
11
12
13
スピーカー
LEDディスプレイ
電源ボタン
ボリューム+
ボリューム‒
再生/一時停止
タイマーボタン
LEDモードボタン
AUX入力ポート
AUX出力ポート
電源ポート
取付孔
ラ バ ーフィート
Note:
The mounting screws are not provided.
please remove the protection from the rubber feet before first use.
Anmerkung:
Die Montageschraubenwerden nicht bereitgestellt.
Bitte nehmen Sie vor der ersten Benutzung den Schutz von den Gummifüßen ab.
Remarque:
Les vis de montage ne sont pas fournies.
Veuillez retirer la protection des coussinets en caoutchouc avant la première utilisation.
Nota:
Los tornillos de montaje no se proporcionan.
Por favor retire la protección de los pies de goma antes de usar por primera vez.
Nota:
Le viti di montaggio non sono fornite in dotazione.
Si prega di rimuovere la protezione dai piedini in gomma prima del primo utilizzo.
注意:
取付用のネジは付属しません。
購入して初めて使用する前に、ラバーフィートの保護カバーを外してください。
EN
DE
FR
ES
IT
JP

CONTENTS
English
Deutsch
Français
Español
Italiano
日本語
01-11
12-22
23-33
34-44
45-55
56-66

CONTENTS
English
Deutsch
Français
Español
Italiano
日本語
01-11
12-22
23-33
34-44
45-55
56-66
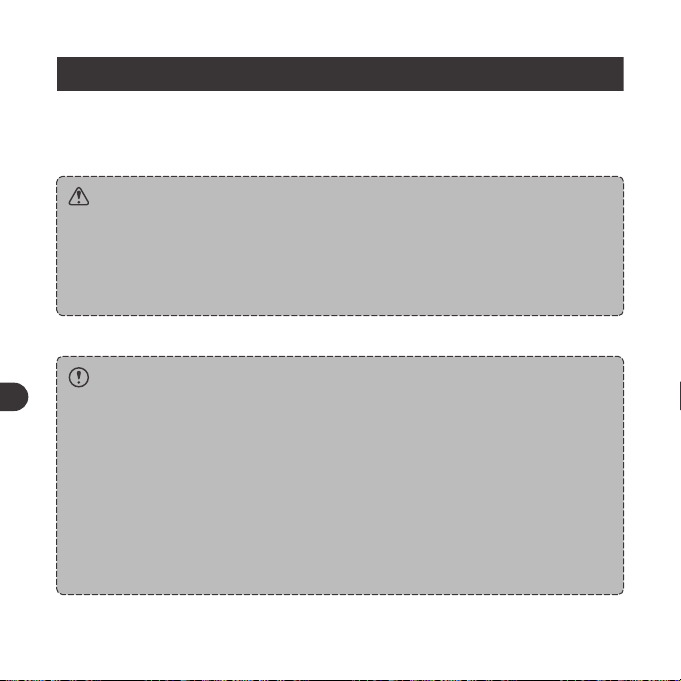
IMPORTANT SAFETY INSTRUCTIONS
Please read the instructions thoroughly before using this product and
retain it for future reference.
Warning
• Never place the Sound Bar near the heat sources.
• Only use this Sound Bar indoors.
• Never place this Sound Bar on other electrical equipment.
• Keep the product clean and dry. Do not clean the product with
detergent containing alcohol, ammonia, benzene or abrasives.
Caution
• Do not expose this product to high temperatures.
• Store this product in a dry place. Keep it away from humidity and
corrosives.
• Do not immerse the Sound Bar into water or expose them to
humidity for a long time.
• Avoid dropping.
• Close attention is needed when using near children.
• Unauthorized disassembly of any parts of this product is forbidden.
• Always ask a professional technician or authorized personnel for
repair.
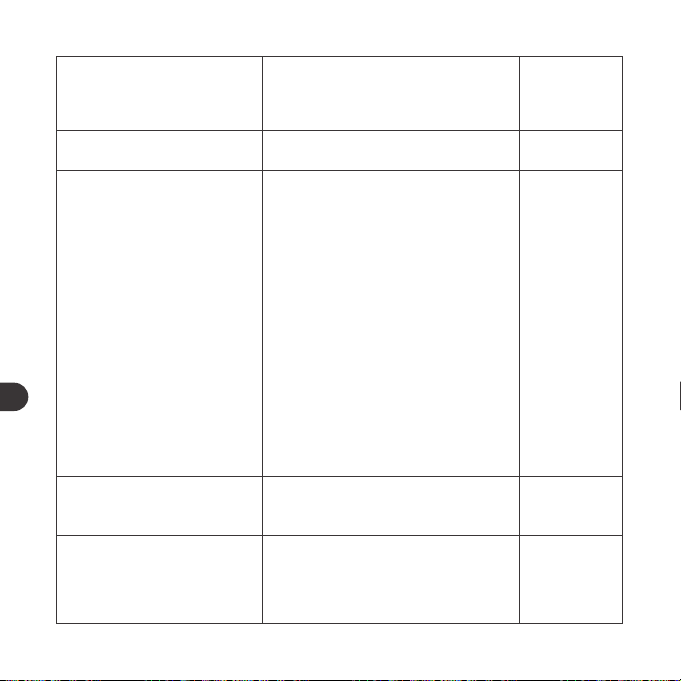
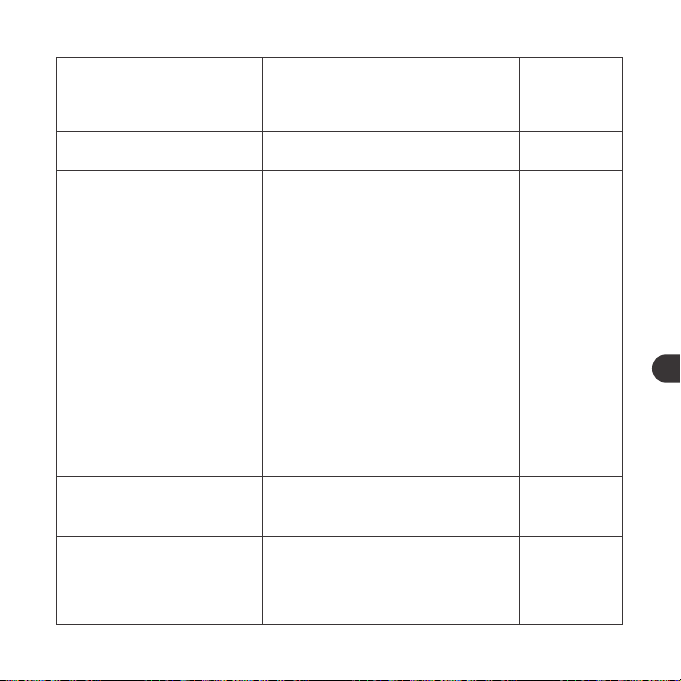
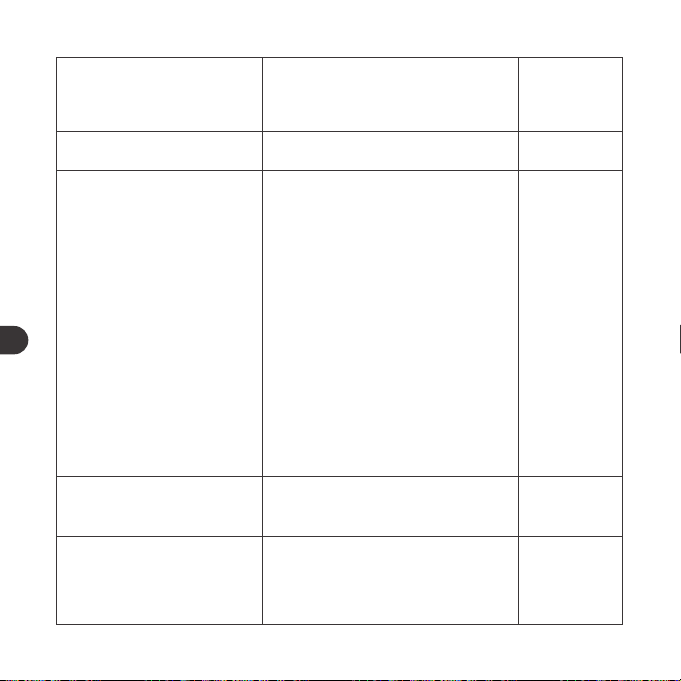
BUTTON CONTROL
Operation
Press and hold the Power
Button for three seconds
Press the Power Button
when the speaker is on
Press the Play / Pause button
Press and hold the Play /
Pause button
/
Press the Volume + button
Press the Volume - button
Press and hold the Volume +
button under the Bluetooth
mode
Function
Power On / Off
Mode Change (BT / LINE )
Play / Pause
Go into Pairing Mode
Successful Connection
Volume +
Volume -
Next Track
Voice Prompt
Beep sounds
/
/
/
Beep
Toots when
highest setting
is reached
/
/
01 03 05 07 09 11
13 15 17 19 21 23
25 27 29 31 33 35
37 39 41 43 45 47
49 51 53 55 57 59
61 63 65
02 04 06 08 10 12
14 16 18 20 22 24
26 28 30 32 34 36
38 40 42 44 46 48
50 52 54 56 58 60
62 64 66
EN EN

IMPORTANT SAFETY INSTRUCTIONS
Please read the instructions thoroughly before using this product and
retain it for future reference.
Warning
• Never place the Sound Bar near the heat sources.
• Only use this Sound Bar indoors.
• Never place this Sound Bar on other electrical equipment.
• Keep the product clean and dry. Do not clean the product with
detergent containing alcohol, ammonia, benzene or abrasives.
Caution
• Do not expose this product to high temperatures.
• Store this product in a dry place. Keep it away from humidity and
corrosives.
• Do not immerse the Sound Bar into water or expose them to
humidity for a long time.
• Avoid dropping.
• Close attention is needed when using near children.
• Unauthorized disassembly of any parts of this product is forbidden.
• Always ask a professional technician or authorized personnel for
repair.
BUTTON CONTROL
Operation
Press and hold the Power
Button for three seconds
Press the Power Button
when the speaker is on
Press the Play / Pause button
Press and hold the Play /
Pause button
/
Press the Volume + button
Press the Volume - button
Press and hold the Volume +
button under the Bluetooth
mode
Function
Power On / Off
Mode Change (BT / LINE )
Play / Pause
Go into Pairing Mode
Successful Connection
Volume +
Volume -
Next Track
Voice Prompt
Beep sounds
/
/
/
Beep
Toots when
highest setting
is reached
/
/
01 03 05 07 09 11
13 15 17 19 21 23
25 27 29 31 33 35
37 39 41 43 45 47
49 51 53 55 57 59
61 63 65
02 04 06 08 10 12
14 16 18 20 22 24
26 28 30 32 34 36
38 40 42 44 46 48
50 52 54 56 58 60
62 64 66
EN EN
Previous Track
Start / Pause Timing
Set the Light Mode
Answer / Hang up Phone
Call
Decline an Incoming Call
Press and hold the Volume -
button under the Bluetooth
mode
Press the Timer button
Press the LED Mode button
to choose the following four
light modes:
① Color carousel: where the
light will cycle through
different colors
② Breathing mode: where the
light will cycle through
different colors in a rhythm
resembling human breathing
③ Rhythm mode: where the
light color and brightness will
change automatically with the
music you are playing
④ Turn off the light
Press the Play / Pause button
Press and hold the Play / Pause
button
/
/
/
/
/
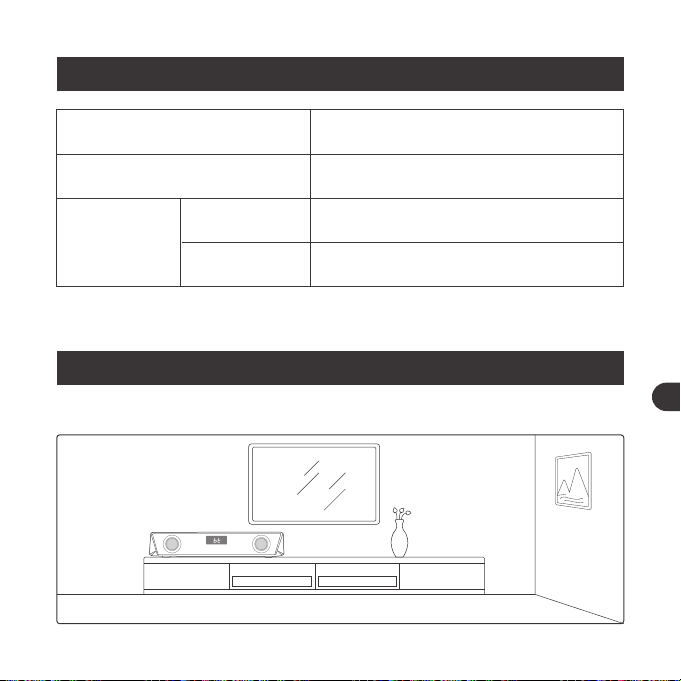
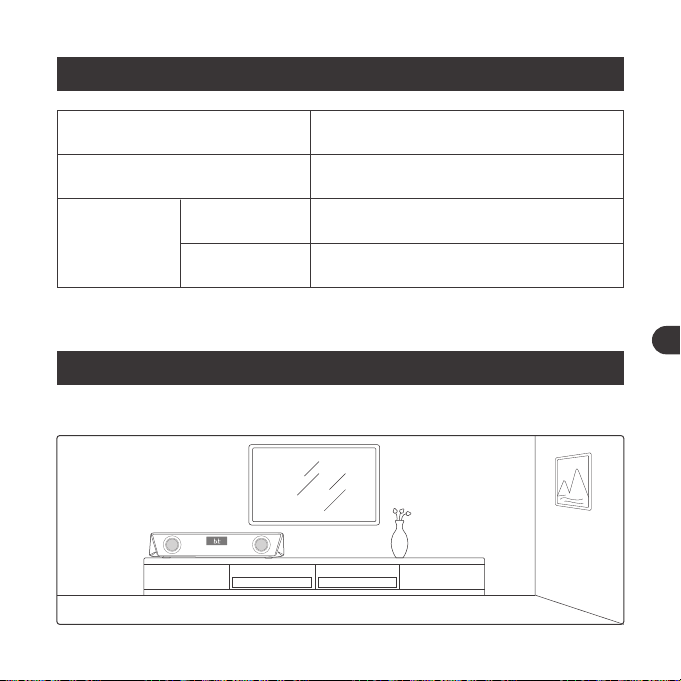
HOW TO USE
Place the unit
LED INDICATION
LED Status
Enter color carousel by default
with the LED display fast flashing
LED display fast flashes
LED display solid on
Operations
Power on
Bluetooth
Connection
Pairing
Connected
01 03 05 07 09 11
13 15 17 19 21 23
25 27 29 31 33 35
37 39 41 43 45 47
49 51 53 55 57 59
61 63 65
02 04 06 08 10 12
14 16 18 20 22 24
26 28 30 32 34 36
38 40 42 44 46 48
50 52 54 56 58 60
62 64 66
EN EN
Previous Track
Start / Pause Timing
Set the Light Mode
Answer / Hang up Phone
Call
Decline an Incoming Call
Press and hold the Volume -
button under the Bluetooth
mode
Press the Timer button
Press the LED Mode button
to choose the following four
light modes:
① Color carousel: where the
light will cycle through
different colors
② Breathing mode: where the
light will cycle through
different colors in a rhythm
resembling human breathing
③ Rhythm mode: where the
light color and brightness will
change automatically with the
music you are playing
④ Turn off the light
Press the Play / Pause button
Press and hold the Play / Pause
button
/
/
/
/
/
HOW TO USE
Place the unit
LED INDICATION
LED Status
Enter color carousel by default
with the LED display fast flashing
LED display fast flashes
LED display solid on
Operations
Power on
Bluetooth
Connection
Pairing
Connected
01 03 05 07 09 11
13 15 17 19 21 23
25 27 29 31 33 35
37 39 41 43 45 47
49 51 53 55 57 59
61 63 65
02 04 06 08 10 12
14 16 18 20 22 24
26 28 30 32 34 36
38 40 42 44 46 48
50 52 54 56 58 60
62 64 66
EN EN
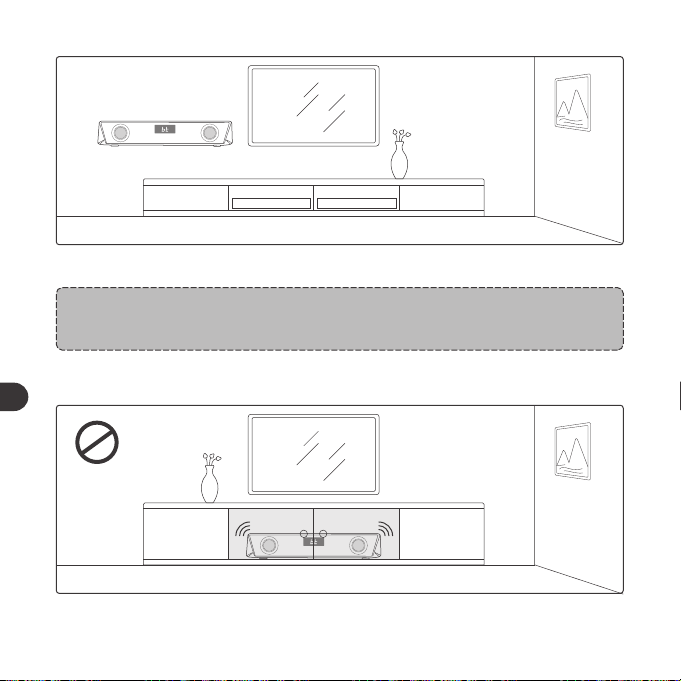
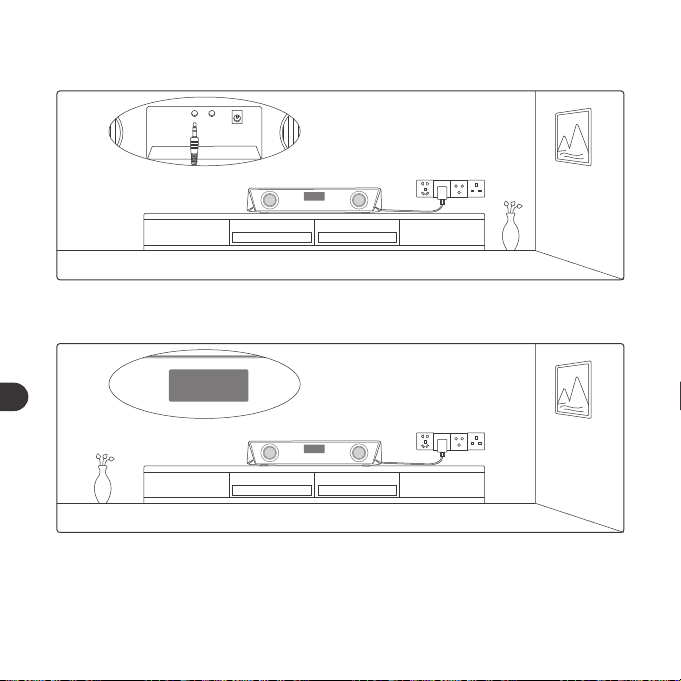
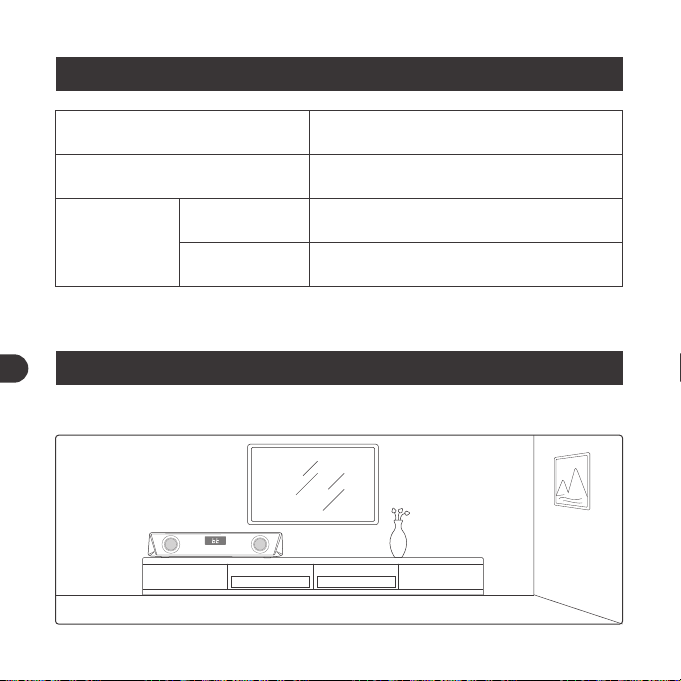
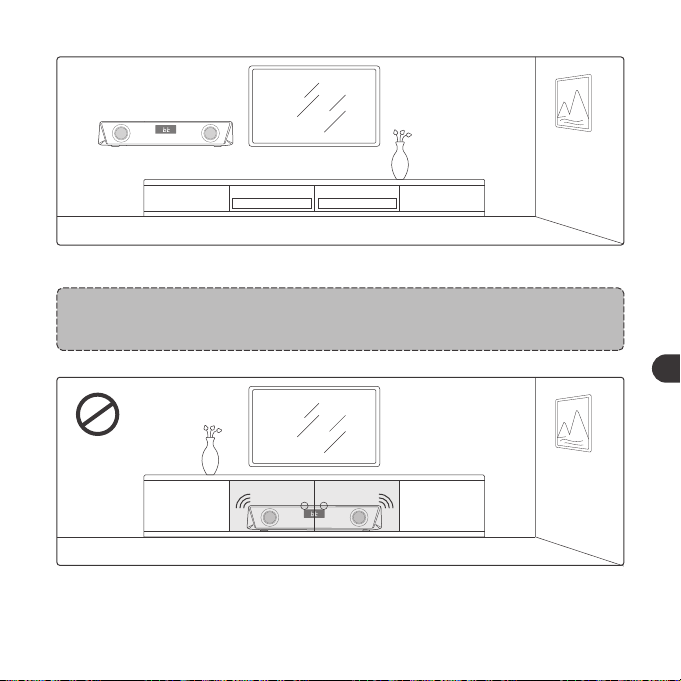
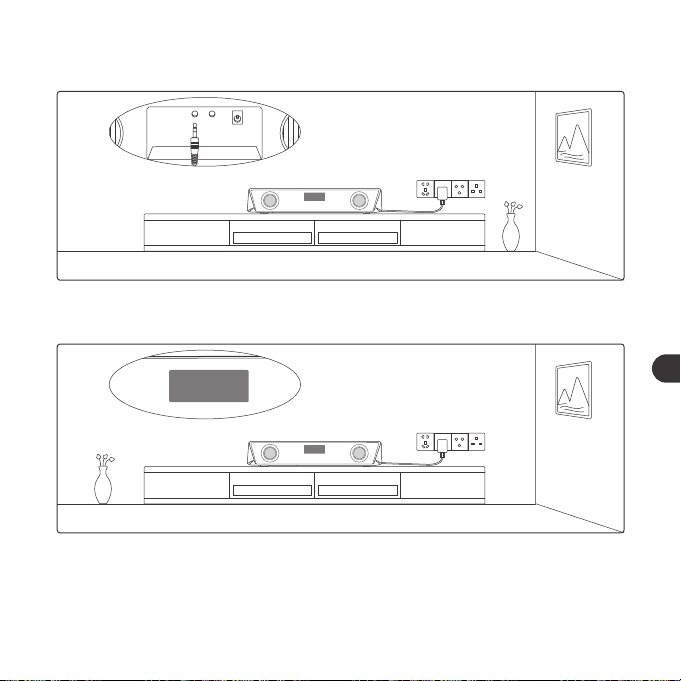
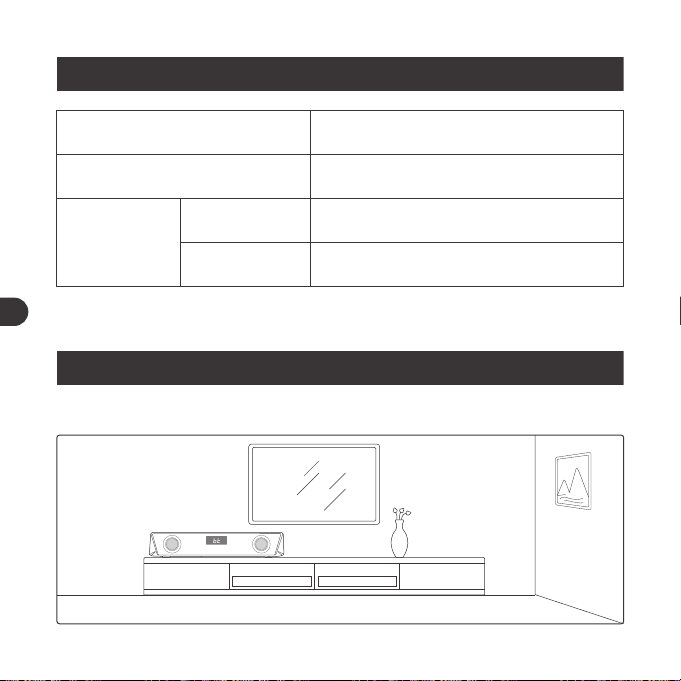
1. Place this unit on top of a table or mount it on the wall.
Note:
• The mounting screws are not provided.
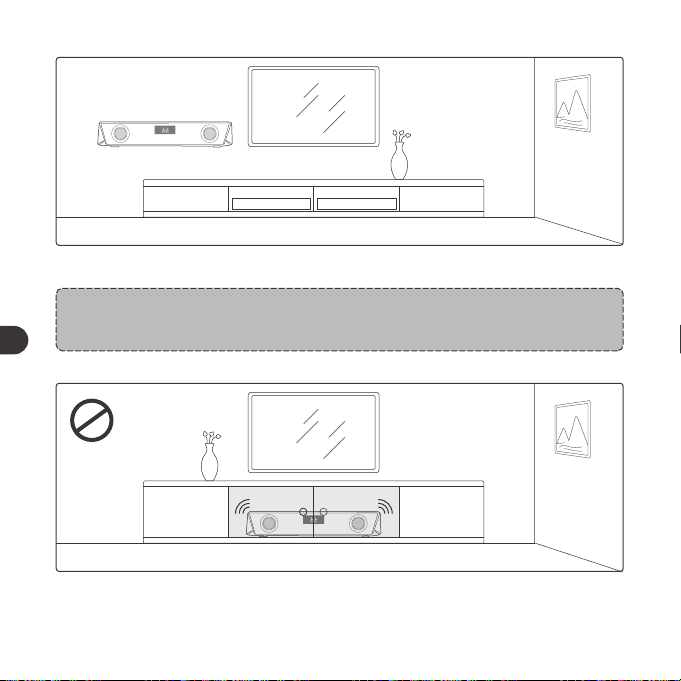
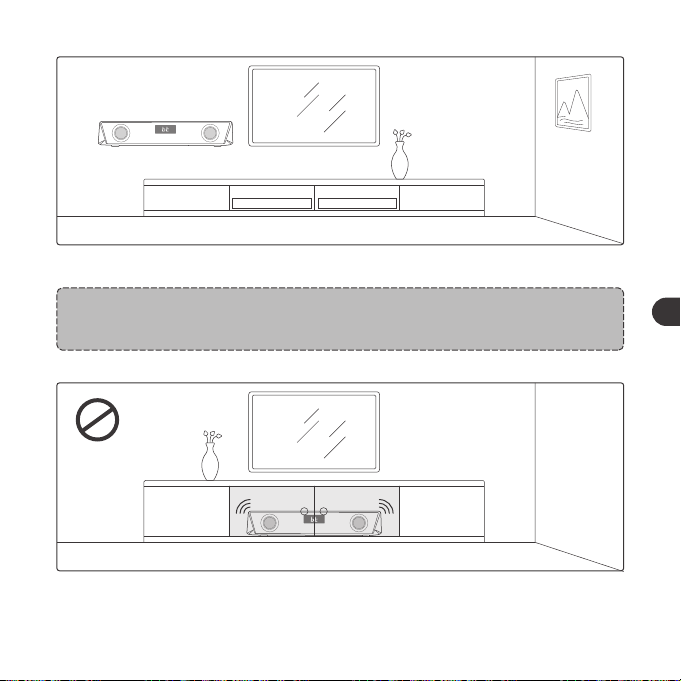
2. Never place this unit in an enclosed cabinet when the sound bar is playing.
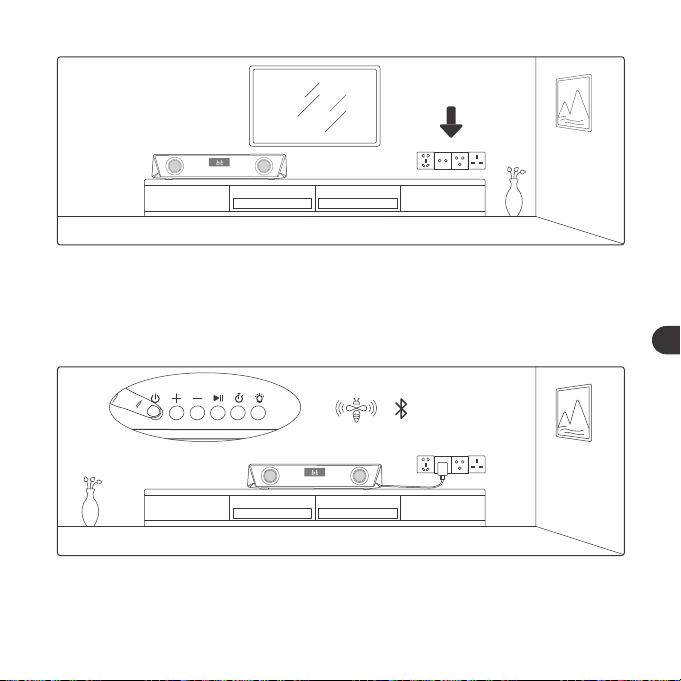
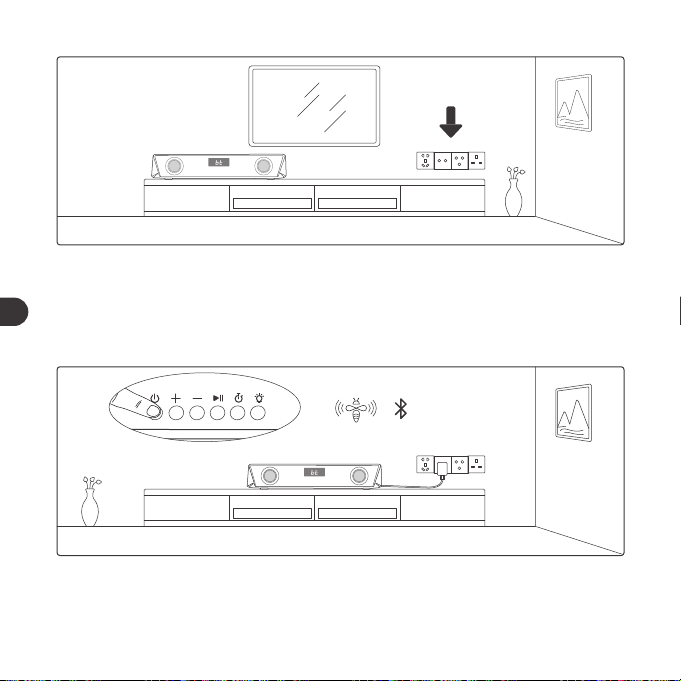
3. Install this unit near the AC outlet where the AC power plug can be easily
reached.
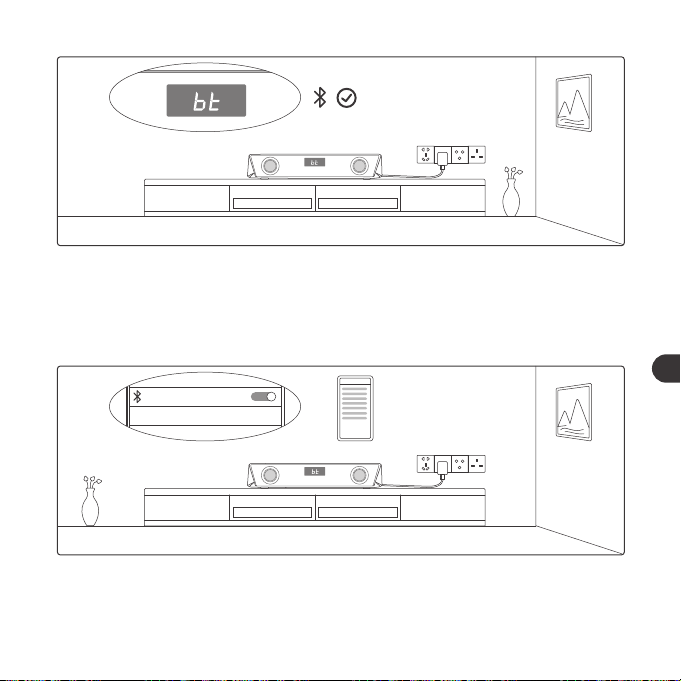
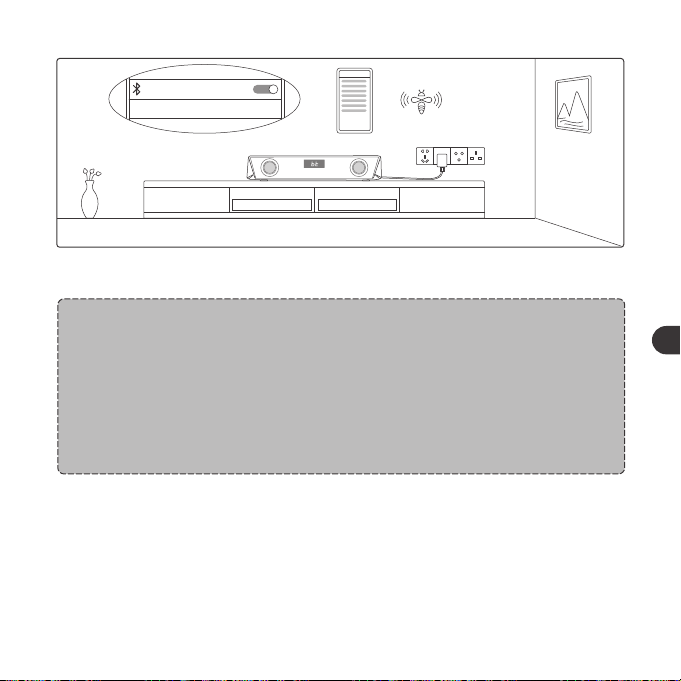
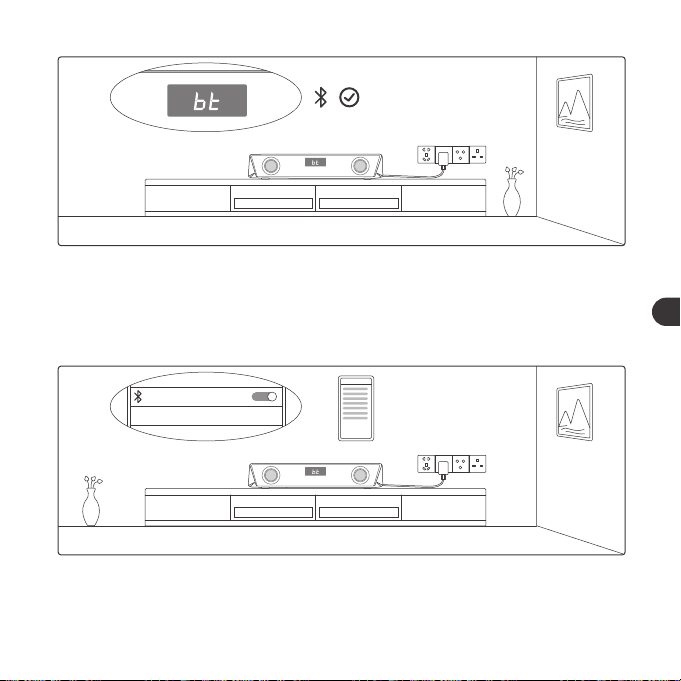
Bluetooth Connection
1. Plug the sound bar to power, press and hold the Power Button for three
seconds until the beep sounds are heard. The device is in the Bluetooth
mode initially.
01 03 05 07 09 11
13 15 17 19 21 23
25 27 29 31 33 35
37 39 41 43 45 47
49 51 53 55 57 59
61 63 65
02 04 06 08 10 12
14 16 18 20 22 24
26 28 30 32 34 36
38 40 42 44 46 48
50 52 54 56 58 60
62 64 66
EN EN

1. Place this unit on top of a table or mount it on the wall.
Note:
• The mounting screws are not provided.
2. Never place this unit in an enclosed cabinet when the sound bar is playing.
3. Install this unit near the AC outlet where the AC power plug can be easily
reached.
Bluetooth Connection
1. Plug the sound bar to power, press and hold the Power Button for three
seconds until the beep sounds are heard. The device is in the Bluetooth
mode initially.
01 03 05 07 09 11
13 15 17 19 21 23
25 27 29 31 33 35
37 39 41 43 45 47
49 51 53 55 57 59
61 63 65
02 04 06 08 10 12
14 16 18 20 22 24
26 28 30 32 34 36
38 40 42 44 46 48
50 52 54 56 58 60
62 64 66
EN EN
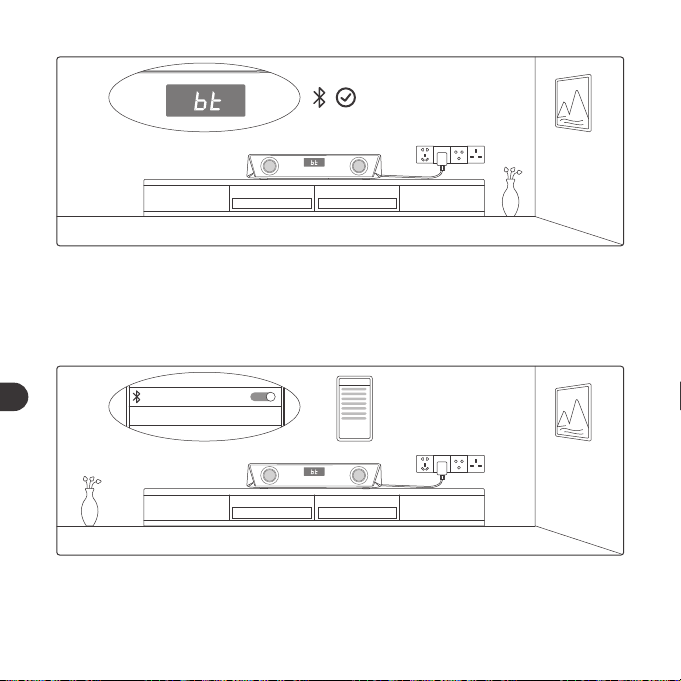
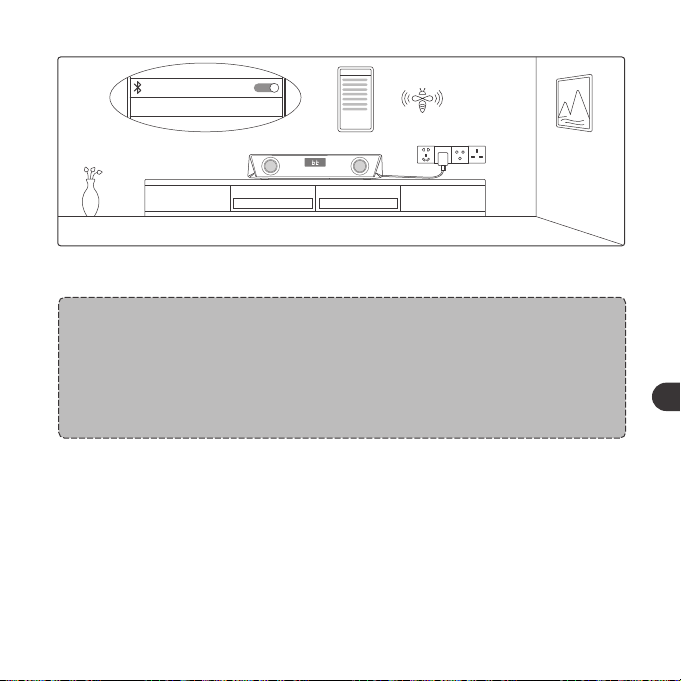
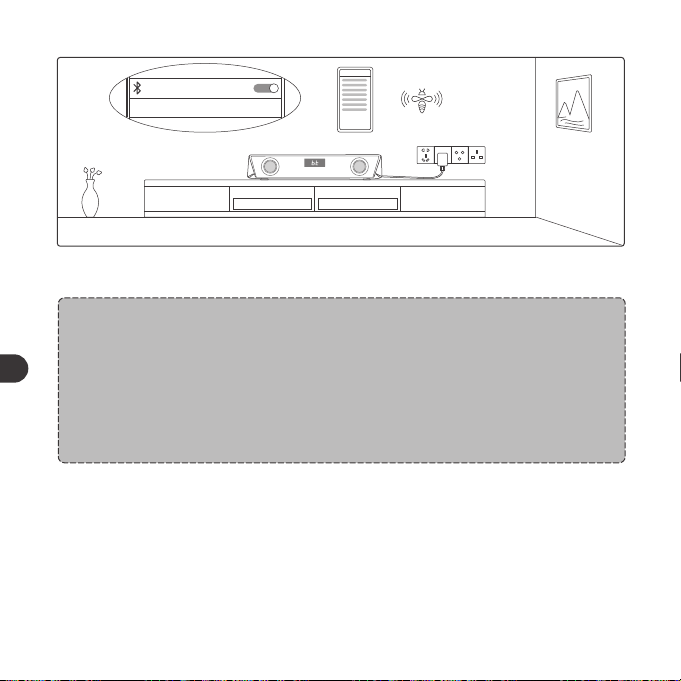
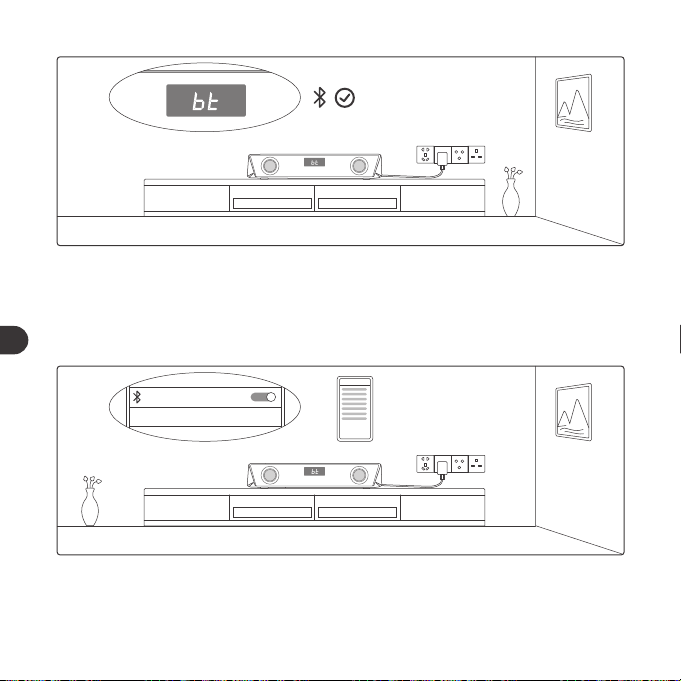
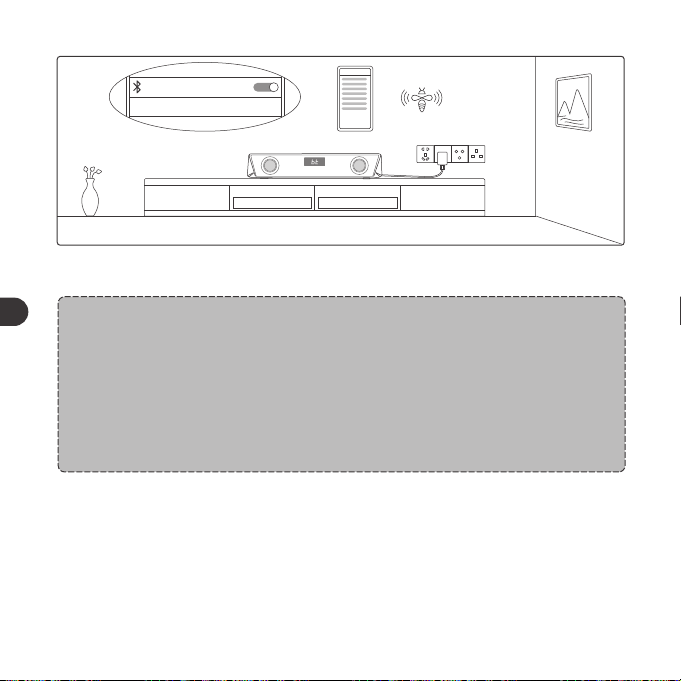
2. When the LED display starts to flash fast, activate the Bluetooth function on
your device and search for Bluetooth connections nearby.
SET UP
TaoTronics TT-SK027
Not Connected
3. Find “TaoTronics TT-SK027” in the search results and tap to connect.
SET UP
TaoTronics TT-SK027
Connected
4. A beep will be heard upon a successful connection.
Note:
• When it’s power on, the sound bar will automatically connect to the
device last paired if any. Otherwise, it will enter the pairing mode with
the LED display blinking fast.
• To change the connection, press and hold the Play / Pause button to
enter the pairing mode and connect another device.
Timer Button
1. Press once to start / pause timing.
2. Press twice to clear the timer display and set it to “00:00”.
3. Press and hold to exit timer mode and back to previous working and display
modes.
01 03 05 07 09 11
13 15 17 19 21 23
25 27 29 31 33 35
37 39 41 43 45 47
49 51 53 55 57 59
61 63 65
02 04 06 08 10 12
14 16 18 20 22 24
26 28 30 32 34 36
38 40 42 44 46 48
50 52 54 56 58 60
62 64 66
EN EN
LINE
DC
AUX OUTAUX IN
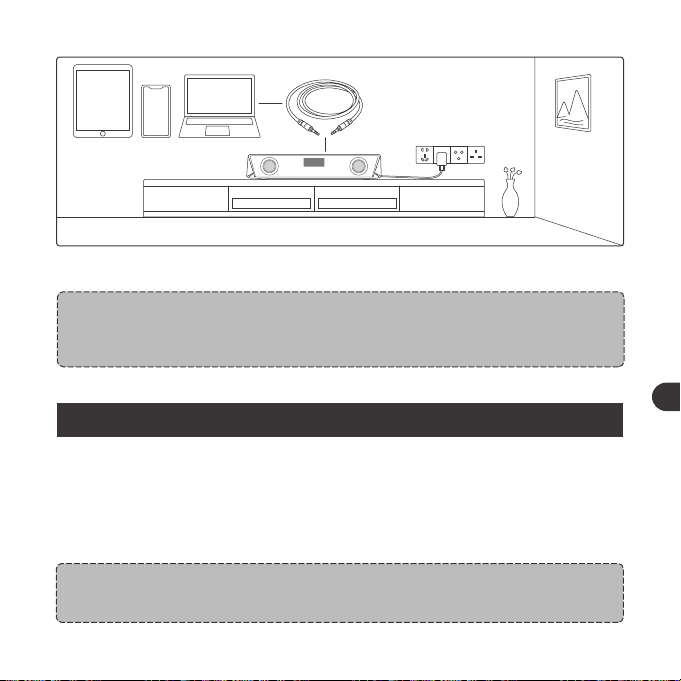
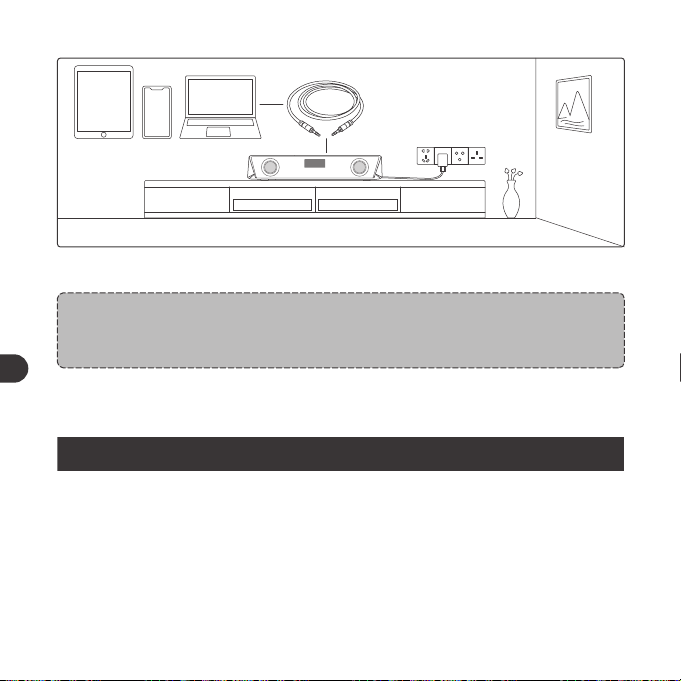
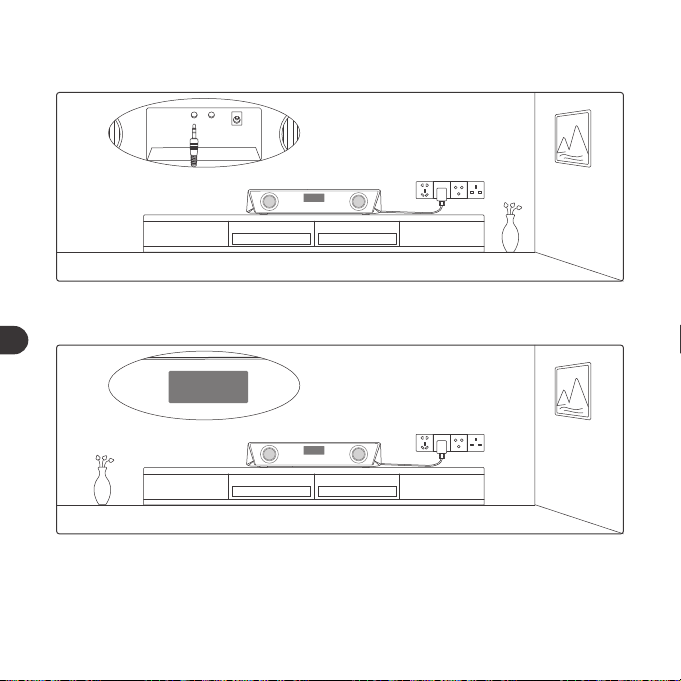
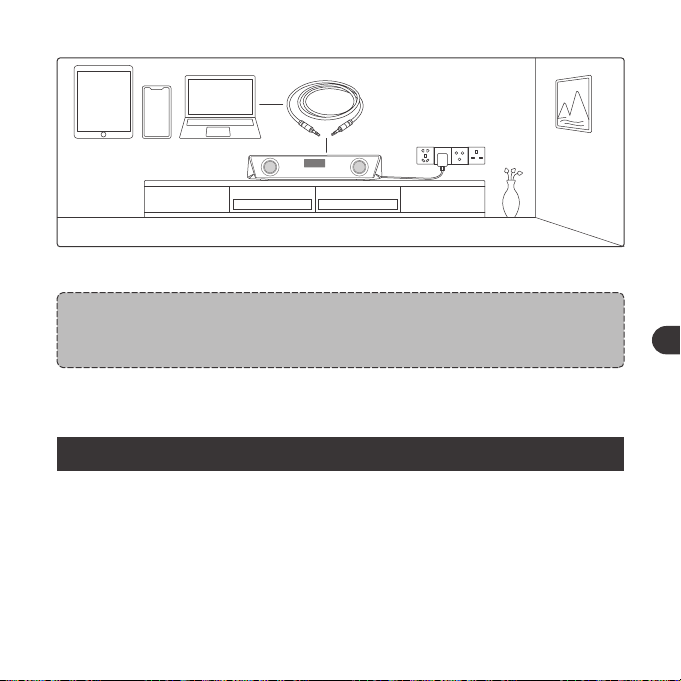
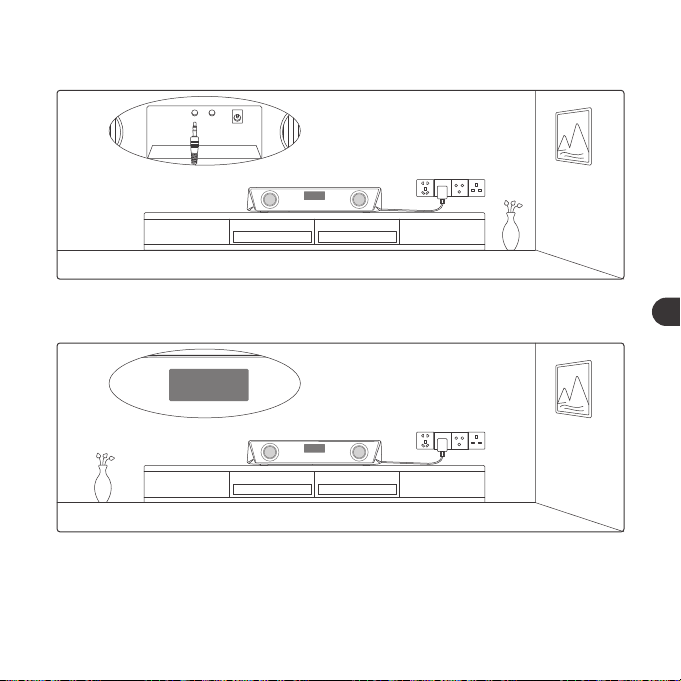
AUX Cable Connection
1. Plug in the AUX cable into the AUX input port at the back.
LINE
LINE
2. Press the power button to change to LINE mode, and the LED display will
show "LINE".
LINE
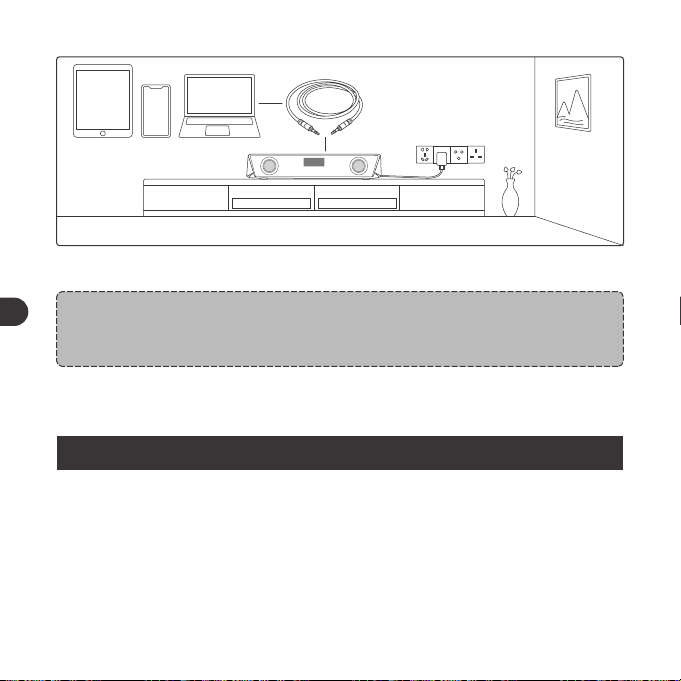
3. Connect to an AUX device via the cable.
Note:
• Do not insert anything into the product.
CLEANING AND MAINTENANCE
1. Clean the Sound Bar on a regular basis.
2. Use dry and soft cotton cloth to wipe the unit.
3. Keep away from sharp objects to avoid scratches.
4. Put the unit in a dry and shady place if it is to be idle for a long time.
5. Do not clean the product with detergent or chemicals.
Note:
• Once connected to the AUX Output port, the sound will be bypassed
to the audio device connected.
01 03 05 07 09 11
13 15 17 19 21 23
25 27 29 31 33 35
37 39 41 43 45 47
49 51 53 55 57 59
61 63 65
02 04 06 08 10 12
14 16 18 20 22 24
26 28 30 32 34 36
38 40 42 44 46 48
50 52 54 56 58 60
62 64 66
EN EN
LINE
DC
AUX OUTAUX IN
AUX Cable Connection
1. Plug in the AUX cable into the AUX input port at the back.
LINE
LINE
2. Press the power button to change to LINE mode, and the LED display will
show "LINE".
LINE
3. Connect to an AUX device via the cable.
Note:
• Do not insert anything into the product.
CLEANING AND MAINTENANCE
1. Clean the Sound Bar on a regular basis.
2. Use dry and soft cotton cloth to wipe the unit.
3. Keep away from sharp objects to avoid scratches.
4. Put the unit in a dry and shady place if it is to be idle for a long time.
5. Do not clean the product with detergent or chemicals.
Note:
• Once connected to the AUX Output port, the sound will be bypassed
to the audio device connected.
01 03 05 07 09 11
13 15 17 19 21 23
25 27 29 31 33 35
37 39 41 43 45 47
49 51 53 55 57 59
61 63 65
02 04 06 08 10 12
14 16 18 20 22 24
26 28 30 32 34 36
38 40 42 44 46 48
50 52 54 56 58 60
62 64 66
EN EN

WARRANTY AND SERVICE
If any problems occur, please contact the TaoTronics Customer Care Centre in
your country via the contact information listed in this User Guide.
WICHTIGE SICHERHEITSHINWEISE
Bitte lesen Sie sich die Hinweise sorgfältig durch, bevor Sie das Produkt
benutzen, und bewahren Sie sie zur künftigen Bezugnahme gut auf.
Warnung
• Stellen Sie die Soundbar nie in die Nähe von Hitzequellen.
• Verwenden Sie diese Soundbar nur in Innenräumen.
• Stellen Sie diese Soundbar nie auf andere elektrische Geräte.
• Halten Sie das Gerät sauber und trocken. Reinigen Sie das Produkt
nicht mit Reinigungsmitteln, die Alkohol, Ammoniak, Benzol oder
Schleifkörper enthalten.
Achtung
• Setzen Sie dieses Produkt keinen hohen Temperaturen aus.
• Lagern Sie dieses Produkt an einem trockenen Ort. Halten Sie es
von Feuchtigkeit und Korrosionsmitteln fern.
• Tauchen Sie die Soundbar nicht in Wasser und setzen Sie sie nicht l
ängere Zeit Feuchtigkeit aus.
• Lassen Sie das Produkt nicht herunterfallen.
• Bei Verwendung in der Nähe von Kindern ist Vorsicht geboten.
• Es ist verboten, jegliche Teile dieses Geräts unautorisiert
auseinanderzubauen.
• Suchen Sie bezüglich Reparaturen stets professionelle Techniker
oder autorisiertes Personal auf.
01 03 05 07 09 11
13 15 17 19 21 23
25 27 29 31 33 35
37 39 41 43 45 47
49 51 53 55 57 59
61 63 65
02 04 06 08 10 12
14 16 18 20 22 24
26 28 30 32 34 36
38 40 42 44 46 48
50 52 54 56 58 60
62 64 66
EN DE

Vorheriges Lied
Start / Pause Timer
Leuchtmodus einstellen
Anruf annehmen
/ auflegen
Eingehenden Anruf
abweisen
Halten Sie die Taste Lautstärke + im
Bluetooth-Modus gedrückt
Drücken Sie die Timer-Taste
Drücken Sie die LED-Modustaste, um
die folgenden vier Lichtmodi
auszuwählen:
① Beleuchtung auf Farbkarussell:
wobei das Licht verschiedene
Farben durchläuft
② Auf Atmungsmodus: wobei das
Licht durch verschiedene Farben
in einem Rhythmus zirkuliert, der
der menschlichen Atmung ähnelt
③ Rhythmusmodus: wobei sich
Lichtfarbe und -helligkeit
automatisch passend zur
wiedergegebenen Musik ändern
④ Auf Aus zu schalten
Drücken Sie die Taste Wiedergabe
/ Pause
Halten Sie die Taste Wiedergabe
/ Pause gedrückt
/
/
/
/
/
TASTENSTEUERUNG
Bedienung
Halten Sie die Powertaste drei S
ekunden lang gedrückt
Drücken Sie die Powertaste,
wenn der Lautsprecher an ist
Drücken Sie die Taste
Wiedergabe / Pause
Halten Sie die Taste Wiedergabe
/ Pause gedrückt
/
Drücken Sie die Taste
Lautstärke +
Drücken Sie die Taste
Lautstärke -
Halten Sie die Taste Lautstärke +
m Bluetooth-Modus gedrückt
Funktion
Ein- / Ausschalten
Mode Change (BT / LINE )
Wiedergabe / Pause
In den Kopplungsmodus
wechseln
Erfolgreiche Verbindung
Lautstärke +
Lautstärke -
Nächstes Lied
Sprachansage
Pieptöne
/
/
/
Piepton
/
/
Tutet, wenn die
höchste Einstellung
erreicht wird
01 03 05 07 09 11
13 15 17 19 21 23
25 27 29 31 33 35
37 39 41 43 45 47
49 51 53 55 57 59
61 63 65
02 04 06 08 10 12
14 16 18 20 22 24
26 28 30 32 34 36
38 40 42 44 46 48
50 52 54 56 58 60
62 64 66
DE DE
ANLEITUNG
Aufstellen des Geräts
BEDEUTUNG DER LED-ANZEIGEN
LED Status
Wechselt standardmäßig in den Farbkarussell-Modus,
wobei die LED-Anzeige schnell blinkt
LED-Anzeige schnell blinkt
LED-Anzeige blinkt schnell
Bedienung
Einschalten
Bluetooth
Verbindung
Koppeln
Verbunen
1. Stellen Sie das Gerät auf einen Tisch oder bringen Sie es an der Wand an.
Anmerkung:
• Montageschrauben sind nicht enthalten.
2. Stellen Sie dieses Gerät nie in geschlossene Schränke, während die
Soundbar abgespielt wird.
01 03 05 07 09 11
13
15 17 19 21 23
25 27 29 31 33 35
37 39 41 43 45 47
49 51 53 55 57 59
61 63 65
02 04 06 08 10 12
14
16 18 20 22 24
26 28 30 32 34 36
38 40 42 44 46 48
50 52 54 56 58 60
62 64 66
DE DE

3. Stellen Sie dieses Gerät in der Nähe einer Steckdose auf, zu der das
Stromkabel problemlos reicht.
Bluetooth-Verbindung
1. Schließen Sie die Soundbar am Strom an und halten Sie die Powertaste drei
Sekunden lang gedrückt, bis Pieptöne erklingen. Das Gerät befindet sich
anfangs im Bluetooth-Modus.
2. Wenn die LED-Anzeige anfängt, schnell zu blinken, aktivieren Sie die
Bluetooth-Funktion auf Ihrem Gerät und suchen Sie nach Bluetooth-
Verbindungen in der Nähe.
SET UP
TaoTronics TT-SK027 Not Connected
3. Suchen Sie in den Suchergebnissen nach “TaoTronics TT-SK027” und
tippen Sie zum Verbinden darauf.
01 03 05 07 09 11
13 15
17 19 21 23
25 27 29 31 33 35
37 39 41 43 45 47
49 51 53 55 57 59
61 63 65
02 04 06 08 10 12
14 16
18 20 22 24
26 28 30 32 34 36
38 40 42 44 46 48
50 52 54 56 58 60
62 64 66
DE DE
SET UP
TaoTronics TT-SK027
Connected
4. Nach erfolgreicher Verbindung ertönt ein Piepton.
Anmerkung:
• Beim Einschalten stellt die Soundbar automatisch eine Verbindung zu
dem zuletzt gekoppelten Gerät her, falls zutreffend. Andernfalls ruft sie
den Kopplungsmodus auf, während die LED-Anzeige schnell blinkt.
• Ändern Sie die Verbindung, indem Sie durch Gedrückthalten der T
aste Wiedergabe / Pause den Kopplungsmodus aufrufen und eine
Verbindung zu einem anderen Gerät herstellen.
Timer-Taste
1. Einmal drü cken, um den Timer zu starten / zu pausieren.
2. Zweimal drücken, um die Timeranzeige zu löschen und auf "00:00" zu
stellen.
3. Gedrückt halten, um den Timermodus zu verlassen und in die vorherigen
Betriebs- und Anzeigemodi zurückzukehren.
LINE
DC
AUX OUTAUX IN
AUX-Kabelverbindung
1. Stecken Sie das AUX-Kabel in den AUX-Eingang auf der Rückseite.
LINE
LINE
2. Drücken Sie die Ein / Aus-Taste, um in den LINE-Modus zu wechseln. Und
wird die LED-Anzeige dann "LINE" zeigen.
01 03 05 07 09 11
13 15 17
19 21 23
25 27 29 31 33 35
37 39 41 43 45 47
49 51 53 55 57 59
61 63 65
02 04 06 08 10 12
14 16 18
20 22 24
26 28 30 32 34 36
38 40 42 44 46 48
50 52 54 56 58 60
62 64 66
DE DE
LINE
3. Schließen Sie ein AUX-Gerät ans Kabel an.
Anmerkung:
• Sobald ein Audiogerät an den AUX-Ausgang angeschlossen ist, wird
der Sound über dieses Gerät wiedergegeben.
Anmerkung:
• Stecken Sie nichts in das Produkt.
GARANTIE UND SERVICE
Sollten Probleme auftreten, kontaktieren Sie bitte das TaoTronics
Kundenservice-Center in Ihrem Land mithilfe der Kontaktdetails in dieser
Bedienungsanleitung.
REINIGUNG UND PFLEGE
1. Reinigen Sie die Soundbar regelmäßig.
2. Verwenden Sie ein trockenes und weiches Baumwolltuch, um das Gerät
abzuwischen. Anmerkung: Stecken Sie nichts in das Produkt.
3. Schützen Sie es vor scharfkantigen Gegenständen, um Kratzer zu vermeiden.
4. Lagern Sie das Gerät an einem trockenen und schattigen Ort, wenn Sie es
längere Zeit nicht benutzen.
5. Reinigen Sie das Produkt nicht mit Reinigungsmitteln oder Chemikalien.
01 03 05 07 09 11
13 15 17 19
21 23
25 27 29 31 33 35
37 39 41 43 45 47
49 51 53 55 57 59
61 63 65
02 04 06 08 10 12
14 16 18 20
22 24
26 28 30 32 34 36
38 40 42 44 46 48
50 52 54 56 58 60
62 64 66
DE DE
CONSIGNES DE SÉCURITÉ IMPORTANTES
Veuillez lire les consignes en détail avant d'utiliser ce produit et les
conserver pour vous y référer à l'avenir.
Attention
• Ne jamais placer la barre de son près de sources de chaleur.
• N'utiliser cette barre de son qu'en intérieur.
• Ne jamais placer cette barre de son sur d'autres équipements
électriques.
• Garder l'appareil sec et propre. Ne pas nettoyer le produit avec des
détergents contenant de l'alcool, de l'ammoniac, du benzène ou des
abrasifs.
Mises en Garde
• Ne pas exposer ce produit à de fortes températures.
• Ranger ce produit dans un endroit sec. Tenir éloigné de l'humidité et
des éléments corrosifs.
• Ne pas immerger la barre de son dans l'eau ou l'exposer à l'humidité
pendant longtemps.
• Ne pas faire tomber.
• Une attention particulière est requise lors de l'utilisation près des
enfants.
• Le démontage non autorisé de quelconque partie de cet appareil
est interdit.
• Toujours demander l'aide d'un technicien professionnel ou un
personnel autorisé pour des réparations.
COMMANDES DES BOUTONS
Utilisation
Appuyez et maintenez le bouton
d'allumage pendant trois secondes
Maintenez le bouton d'allumage
lorsque l'enceinte est allumée
Appuyez sur le bouton Lecture
/ Pause
Appuyez et maintenez le bouton
Lecture / Pause
/
Appuyez sur le bouton
Volume +
Appuyez sur le bouton
Volume -
Appuyez et maintenez le
bouton Volume + en mode
Bluetooth
Fonction
Allumage / Extinction
Changement de mode
(BT / FILAIRE)
Lecture / Pause
Mode appairage
Connexion réussie
Volume +
Volume -
Piste suivante
Annonce
sonore
Bip sonore
/
/
/
Bip
/
/
Bip lorsque le
réglage maximal
est atteint
01 03 05 07 09 11
13 15 17 19 21
23
25 27 29 31 33 35
37 39 41 43 45 47
49 51 53 55 57 59
61 63 65
02 04 06 08 10 12
14 16 18 20 22
24
26 28 30 32 34 36
38 40 42 44 46 48
50 52 54 56 58 60
62 64 66
FR FR
Piste précédente
Démarrer / Arrêter le minuteur
Régler le mode
d'éclairage
Répondre / Raccrocher
un appel
Rejeter un appel entrant
Appuyez et maintenez le bouton
Volume - en mode Bluetooth
Appuyez sur le bouton Minuteur
Appuyez sur le bouton de Mode
LED pour choisir les quatre modes
d'éclairage suivants:
① éclairage en carrousel de
couleurs: es couleurs changeront
l'une après l'autre
②Mode de respiration: où la
lumière parcourt différentes
couleurs à un rythme qui
ressemble à la respiration humaine
③ Un assortiment de couleurs en
rythme: la couleur et la luminosité
changeront automatiquement en
rythme avec la musique
④ Pour éteindre l'éclairage.
Appuyez sur le bouton Lecture
/ Pause
Appuyez et maintenez le bouton
Lecture / Pause
/
/
/
/
/
UTILISATION
Placement de l'appareil
INDICATIONS LED
Statut de LED
Passe en carrousel de couleurs par défaut avec
l'affichage LED clignotant rapidement
L'affichage LED clignote rapidement
L'affichage LED reste fixe
Utilisations
Allumage
Bluetooth
Connexion
Appairage
Connecté
01 03 05 07 09 11
13 15 17 19 21 23
25 27 29 31 33 35
37 39 41 43 45 47
49 51 53 55 57 59
61 63 65
02 04 06 08 10 12
14 16 18 20 22 24
26 28 30 32 34 36
38 40 42 44 46 48
50 52 54 56 58 60
62 64 66
FR FR
1. Placer ce produit sur une table ou le fixer à un mur.
Note:
Les fixations ne sont pas fournies.
2. Ne jamais placer cet appareil dans une armoire fermée lorsque la barre de
son est en cours de lecture.
3. Installer cet appareil près d'une prise d'alimentation AC où le câble est
facilement accessible.
Connexion Bluetooth
1. Brancher la barre de son à l'alimentation, appuyez et maintenez le bouton
d'allumage pendant trois secondes jusqu'à entendre des bips sonores.
L'appareil passe en mode Bluetooth initialement.
01 03 05 07 09 11
13 15 17 19 21 23
25
27 29 31 33 35
37 39 41 43 45 47
49 51 53 55 57 59
61 63 65
02 04 06 08 10 12
14 16 18 20 22 24
26
28 30 32 34 36
38 40 42 44 46 48
50 52 54 56 58 60
62 64 66
FR FR
2. Lorsque l'affichage LED commence à clignoter rapidement, activez la
fonction Bluetooth sur votre appareil et recherchez les appareils Bluetooth
à proximité.
3. Trouvez “TaoTronics TT-SK027” dans les résultats de recherche et touchez
pour vous connecter.
SET UP
TaoTronics TT-SK027 Not Connected
SET UP
TaoTronics TT-SK027
Connected
4. Un bip sera entendu une fois la connexion réussie.
Remarques :
• Lorsqu'elle est mise sous tension, la barre de son se connecte
automatique ment à l'éventuel dernier appareil appairé. Dans le cas
contraire, elle passe en mode appairage avec Affichage LED clignotant
rapidement.
• Pour changer la connexion, appuyez et maintenez le bouton Lecture /
Pause enfoncé pour passer en mode appairage et vous connecter à un
autre appareil.
Bouton Minuteur
1. Appuyez une fois pour démarrer / arrêter la minuterie.
2. Appuyez deux fois pour réinitialiser le minuteur et le régler sur “00:00”.
3. Appuyez et maintenez pour quitter le mode minuteur et retourner au mode
précédent et à l'affichage associé.
01 03 05 07 09 11
13 15 17 19 21 23
25 27
29 31 33 35
37 39 41 43 45 47
49 51 53 55 57 59
61 63 65
02 04 06 08 10 12
14 16 18 20 22 24
26 28
30 32 34 36
38 40 42 44 46 48
50 52 54 56 58 60
62 64 66
FR FR
line
DC
AUX OUTAUX IN
Connexion par Câble AUX
1. Branchez le câble AUX au port d'entrée AUX à l'arrière.
LINE
LINE
2. Appuyez sur le bouton d'alimentation pour passer en mode LINE,
et l'affichage à LED indiquera "LINE".
LINE
3. Branchez l'autre extrémité du câble à l'appareil AUX.
Note:
• Une fois branché au câble de sortie AUX, le son sera diffusé à l'appareil
audio branché.
NETTOYAGE ET MAINTENANCE
1. Nettoyez régulièrement les Barre de son.
2. Utilisez un chiffon sec en coton doux pour essuyer l’appareil.
3. Tenir à l'écart des objets tranchants pour éviter les rayures.
4. Placez l'appareil dans un endroit sec et ombragé s'il doit rester inutilisé
pendant une longue période.
5. Ne nettoyez pas l’appareil avec du détergent ou des produits chimiques.
01 03 05 07 09 11
13 15 17 19 21 23
25 27 29
31 33 35
37 39 41 43 45 47
49 51 53 55 57 59
61 63 65
02 04 06 08 10 12
14 16 18 20 22 24
26 28 30
32 34 36
38 40 42 44 46 48
50 52 54 56 58 60
62 64 66
FR FR

Nota:
• N'insérez rien dans le produit.
GARANTIE ET SERVICE
En cas de problème, veuillez contacter le Centre de Support Client TaoTronics
de votre pays via les informations de contact listées dans le Guide d’Utilisation.
INSTRUCCIONES DE SEGURIDAD IMPORTANTES
Por favor lea cuidadosamente las instrucciones antes de usar este
dispositivo y guárdelas para futuras referencias.
Advertencia
• Nunca coloque la barra de sonido cerca de fuentes de calor.
• Sólo utilice esta barra de sonido dentro de la casa.
• Nunca poner esta barra de sonido en otros equipos eléctricos.
• Mantener el producto limpio y seco. No limpie el producto con
detergentes que contengan alcohol, amoníaco, benceno o productos
abrasivos.
Precaución
• No exponga el dispositivo a altas temperaturas.
• Guarde el dispositivo en un lugar seco. Manténgalo alejado de la
humedad y de agentes corrosivos.
• No sumerja a agua ni exponga la barra de sonido a humedad por
tiempo prolongado.
• No deje caer.
• Preste atención cuando utiliza el dispositivo cerca de niños.
• Esta prohibió desarmar cualquier parte del dispositivo sin
autorización.
• Siempre consulte a un técnico profesional o personal autorizado
para su reparación.
01 03 05 07 09 11
13 15 17 19 21 23
25 27 29 31
33 35
37 39 41 43 45 47
49 51 53 55 57 59
61 63 65
02 04 06 08 10 12
14 16 18 20 22 24
26 28 30 32
34 36
38 40 42 44 46 48
50 52 54 56 58 60
62 64 66
FR ES

FUNCIONES DE LOS BOTONES
Operación
Presione y mantenga presionado
el Botón de Encendido por tres
segundos
Presione el Botón de Encendido
una vez que la bocina este encendida
Presione el Botón de
Reproducir/Pausar
Presione y mantenga presionado
el Botón de Reproducir/Pausar
/
Presione el Botón de Volumen +
Presione el Botón de Volumen-
Presione y mantenga presionado
el Botón de Volumen+ al estar
en modo Bluetooth
Función
Encender/Apagar
Cambiar Modo (BT/LINE)
Reproducir/Pausar
Entrar en Modo de
Emparejamiento
Conexión Exitosa
Volumen +
Volumen-
Pista Siguiente
Aviso De Voz
Pitidos
/
/
/
Pitido
/
/
Pista Anterior
Iniciar/detener el Temporizador
Configuración del Modo
de Luz
Contestar/Colgar
Llamada
Rechazar Llamada
Entrante
Presione y mantenga presionado el
Botón de Volumen- al estar en modo
Bluetooth
Presione el Botón del Temporizador
Presione el botón de Modo LED
para seleccionar los siguientes
cuatro modos de luz:
① Luz de carrusel de color: en el
carrusel la luz ciclara entre
diferentes colores
② Modo de respiración: donde la
luz circulará a través de diferentes
colores en un ritmo que se
asemeja a la respiración humana
③ Modo de ritmo: donde el color
de la luz y el brillo cambiará
automáticamente con la música
④ Para apagar la luz
Presione el Botón de Reproducir
/Pausar
Presione y mantenga presionado
el Botón de Reproducir /Pausar
/
/
/
/
/
Pita al llegar a la
configuración más
alta
01 03 05 07 09 11
13 15 17 19 21 23
25 27 29 31 33
35
37 39 41 43 45 47
49 51 53 55 57 59
61 63 65
02 04 06 08 10 12
14 16 18 20 22 24
26 28 30 32 34
36
38 40 42 44 46 48
50 52 54 56 58 60
62 64 66
ES ES
COMO USAR
Instalación De La Unidad
INDICADORES LED
Indicador LED
Inicia el carrusel de colores y la pantalla
LED parpadea rápidamente
Pantalla LED parpadea rápidamente
Pantalla LED iluminada
Operaciones
Encendido
Conexión
Bluetooth
Emparejamiento
Conectado
1. Coloque el dispositivo sobre un mueble o móntela en la pared.
Nota:
Los tornillos de montaje no vienen incluidos.
2. Nunca coloque esta unidad en un gabinete cerrado mientras se reproduce
la barra de sonido.
01 03 05 07 09 11
13 15 17 19 21 23
25 27 29 31 33 35
37 39 41 43 45 47
49 51 53 55 57 59
61 63 65
02 04 06 08 10 12
14 16 18 20 22 24
26 28 30 32 34 36
38 40 42 44 46 48
50 52 54 56 58 60
62 64 66
ES ES
3. Instale esta unidad cerca de una toma de corriente alterna, para que pueda
acceder fácilmente a un enchufe de alimentación de corriente alterna.
Conexión Bluetooth
1. Enchufe la barra de sonido para encenderla, mantenga presionado el Botón
de Encendido por tres segundos hasta que se escuchen los pitidos. El
dispositivo ahorra está en modo Bluetooth.
2. Cuando la pantalla LED comenzara a parpadear rápidamente, active la
función Bluetooth de su dispositivo y busque conexiones Bluetooth
cercanas.
SET UP
TaoTronics TT-SK027 Not Connected
3. Busque “TaoTronics TT-SK027” en los resultados de búsqueda y toque para
conectarse.
01 03 05 07 09 11
13 15 17 19 21 23
25 27 29 31 33 35
37
39 41 43 45 47
49 51 53 55 57 59
61 63 65
02 04 06 08 10 12
14 16 18 20 22 24
26 28 30 32 34 36
38
40 42 44 46 48
50 52 54 56 58 60
62 64 66
ES ES
SET UP
TaoTronics TT-SK027
Connected
4. Se escuchará un pitido si la es conexión exitosa.
Notas:
• Cuando el producto esté encendido, la barra de sonido se conectará
automáticamente al último dispositivo asociado, si lo hay. De lo
contrario, entrará en el modo de asociación, en el que el pantalla LED
parpadeará rápidamente.
• Para cambiar la conexión, prisiones sin soltar el botón Reproducir /
Pausar para entrar en el modo de asociación y conéctese a otro
dispositivo.
Botón Del Temporizador
1. Presione una vez para iniciar/pausar el temporizador.
2. Presione dos veces para reiniciar el temporizador a “00:00”.
3. Mantenga presionado para salir del modo de temporizador y regresar al
modo de operacion y visualización.
line
DC
AUX OUTAUX IN
Conexión Por Cable AUX
1. Enchufe el cable AUX en el puerto de entrada AUX ubicado en la parte
trasera del dispositivo.
LINE
LINE
2. Presione el botón de encendido para cambiar al modo LINE, y la pantalla
LED mostrará "LINE.
01 03 05 07 09 11
13 15 17 19 21 23
25 27 29 31 33 35
37 39
41 43 45 47
49 51 53 55 57 59
61 63 65
02 04 06 08 10 12
14 16 18 20 22 24
26 28 30 32 34 36
38 40
42 44 46 48
50 52 54 56 58 60
62 64 66
ES ES
LINE
3. Conecte el cable a su dispositivo AUX.
Nota:
• Una vez conectado al puerto de salida AUX, el sonido será transmitido
al dispositivo de audio conectado.
Nota:
• No inserte nada en el dispositivo.
GARANTÍA Y SERVICIO
Si ocurre algún problema, por favor contacte el Centro de Atención al Cliente
de TaoTronics de su país a través de la información de contacto señalada en
esta Guía de Usuario.
LIMPIEZA Y MANTENIMIENTO
1. Limpie los Barra de sonido regularmente.
2. Use un paño de algodón suave y seco para limpiar la unidad.
3. Mantenga alejado de objetos afilados para evitar arañazos.
4. Coloque la unidad en un lugar seco y sombreado si va a estar inactiva por
mucho tiempo.
5. No limpie el dispositivo con detergente o productos químicos.
01 03 05 07 09 11
13 15 17 19 21 23
25 27 29 31 33 35
37 39 41
43 45 47
49 51 53 55 57 59
61 63 65
02 04 06 08 10 12
14 16 18 20 22 24
26 28 30 32 34 36
38 40 42
44 46 48
50 52 54 56 58 60
62 64 66
ES ES

IMPORTANTI ISTRUZIONI DI SICUREZZA
Si prega di leggere le istruzioni nella loro interezza prima di utilizzare il
prodotto e di conservarle per riferimento futuro.
Avvertenze
• Non collocare mai la Sound Bar vicino a fonti di calore.
• Utilizzare questa Sound Bar esclusivamente in interni.
• Non collocare mai questa Sound Bar su altri dispositivi elettrici.
• Tenere il prodotto pulito e asciutto. Non pulire con detergenti che
contengano alcol, ammoniaca, benzene o abrasivi.
Attenzione
• Non esporre questo prodotto ad elevate temperature.
• Riporre il prodotto in un luogo asciutto. Tenere al riparo da umidità e
agenti corrosivi.
• Non immergere la Sound Bar in acqua né esporla ad umidità per
lunghi periodi di tempo.
• Evitare le cadute.
• Prestare estrema attenzione durante l’utilizzo con bambini nelle
vicinanze.
• Lo smontaggio non autorizzato di qualsiasi parte di questo prodotto
è proibito.
• Rivolgersi sempre a tecnici professionisti o a personale autorizzato
per le riparazioni.
PULSANTI DI CONTROLLO
Operazione
Premere e tenere premuto il
Pulsante di Accensione per tre
secondi
Premere il Pulsante di Accensione
quando lo speaker è acceso
Premere il pulsante
Riproduzione/Pausa
Premere e tenere premuto il
pulsante Riproduzione/Pausa
/
Premere il pulsante Volume +
Premere il pulsante Volume -
Premere e tenere premuto il
pulsante Volume + in modalità
Bluetooth
Funzione
Accensione/Spegnimento
Modalità Cambio (BT/LINE)
Riproduzione/Pausa
Accesso alla modalità
Accoppiamento
Connessione avvenuta
con Successo
Volume +
Volume -
Traccia Successiva
Suono Vocale
Suoni di bip
/
/
/
Bip
/
/
Viene emesso un
suono al
raggiungimento del
01 03 05 07 09 11
13 15 17 19 21 23
25 27 29 31 33 35
37 39 41 43
45 47
49 51 53 55 57 59
61 63 65
02 04 06 08 10 12
14 16 18 20 22 24
26 28 30 32 34 36
38 40 42 44
46 48
50 52 54 56 58 60
62 64 66
IT IT

Traccia Precedente
Inizia/Metti in pausa il timer
Leuchtmodus einstellen
Rispondere/Riattaccare
una Telefonata
Rifiutare una Chiamata in
Arrivo
Premere e tenere premuto il
pulsante Volume - in modalità
Bluetooth
Premere il pulsante Timer
Premere il pulsante Modalità LED
per scegliere le seguenti quattro
modalità di illuminazione:
① Illuminazione tra modalità
multicolore: le luci passeranno in
rassegna diversi colori
② Modalità respiratoria: Le luci
passeranno in rassegna diversi
colori in un ritmo simile alla
respirazione umana
③ Modalità ritmica: il colore delle
luci e la luminosità cambieranno
automaticamente in base alla
musica che stai riproducendo
④ Per spegnere la luce
Premere il pulsante Riproduzione
/Pausa
Premere e tenere premuto il
pulsante Riproduzione/Pausa
/
/
/
/
/
MODALITA’ DI UTILIZZO
Posizionare il dispositivo
INDICATORI LED
LED Status
In modalità multicolore per default con la luce LED che
lampeggia velocemente
LED lampeggia velocemente
LED resta acceso
Operazioni
Accensione
Connessione
Bluetooth
Accoppiamento
Collegato
01 03 05 07 09 11
13 15 17 19 21 23
25 27 29 31 33 35
37 39 41 43 45
47
49 51 53 55 57 59
61 63 65
02 04 06 08 10 12
14 16 18 20 22 24
26 28 30 32 34 36
38 40 42 44 46
48
50 52 54 56 58 60
62 64 66
IT IT
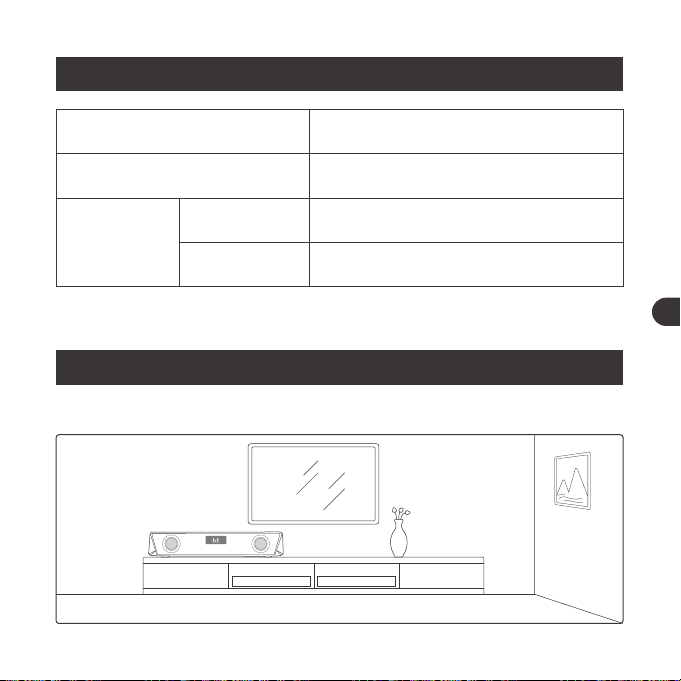
Traccia Precedente
Inizia/Metti in pausa il timer
Leuchtmodus einstellen
Rispondere/Riattaccare
una Telefonata
Rifiutare una Chiamata in
Arrivo
Premere e tenere premuto il
pulsante Volume - in modalità
Bluetooth
Premere il pulsante Timer
Premere il pulsante Modalità LED
per scegliere le seguenti quattro
modalità di illuminazione:
① Illuminazione tra modalità
multicolore: le luci passeranno in
rassegna diversi colori
② Modalità respiratoria: Le luci
passeranno in rassegna diversi
colori in un ritmo simile alla
respirazione umana
③ Modalità ritmica: il colore delle
luci e la luminosità cambieranno
automaticamente in base alla
musica che stai riproducendo
④ Per spegnere la luce
Premere il pulsante Riproduzione
/Pausa
Premere e tenere premuto il
pulsante Riproduzione/Pausa
/
/
/
/
/
MODALITA’ DI UTILIZZO
Posizionare il dispositivo
INDICATORI LED
LED Status
In modalità multicolore per default con la luce LED che
lampeggia velocemente
LED lampeggia velocemente
LED resta acceso
Operazioni
Accensione
Connessione
Bluetooth
Accoppiamento
Collegato
01 03 05 07 09 11
13 15 17 19 21 23
25 27 29 31 33 35
37 39 41 43 45
47
49 51 53 55 57 59
61 63 65
02 04 06 08 10 12
14 16 18 20 22 24
26 28 30 32 34 36
38 40 42 44 46
48
50 52 54 56 58 60
62 64 66
IT IT
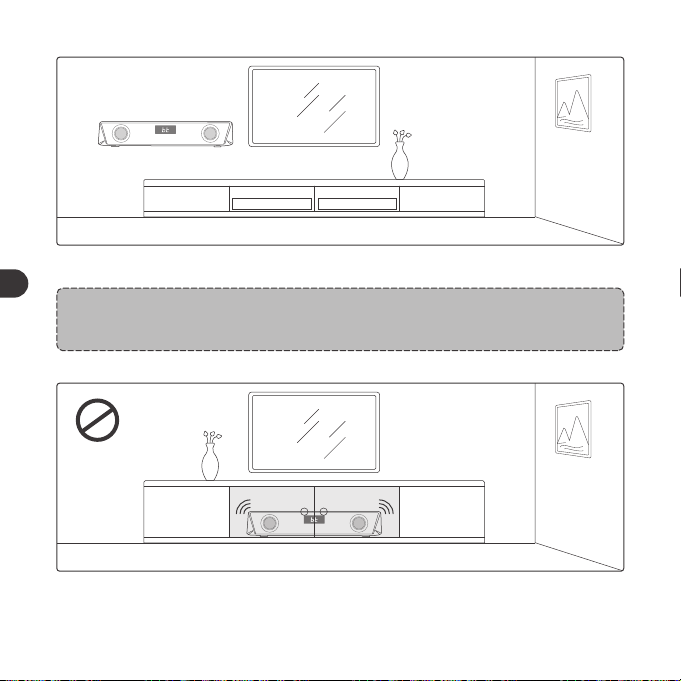
1. Posizionare il dispositivo su un tavolo o montarlo a parete.
Nota:
La viteria per il montaggio a parete non è fornita.
2. Non collocare mai questo dispositivo in un mobile chiuso quando la
soundbar è in riproduzione.
3. Installare questo dispositivo vicino a prese di corrente dove la spina possa
essere facilmente raggiunta.
Connessione Bluetooth
1. Collegare la sound bar ad una fonte di alimentazione, premere e tenere
premuto il Pulsante di Accensione per tre secondi finché si sentono dei
suoni di bip. Il dispositivo è inizialmente in modalità Bluetooth.
01 03 05 07 09 11
13 15 17 19 21 23
25 27 29 31 33 35
37 39 41 43 45 47
49 51 53 55 57 59
61 63 65
02 04 06 08 10 12
14 16 18 20 22 24
26 28 30 32 34 36
38 40 42 44 46 48
50 52 54 56 58 60
62 64 66
IT IT
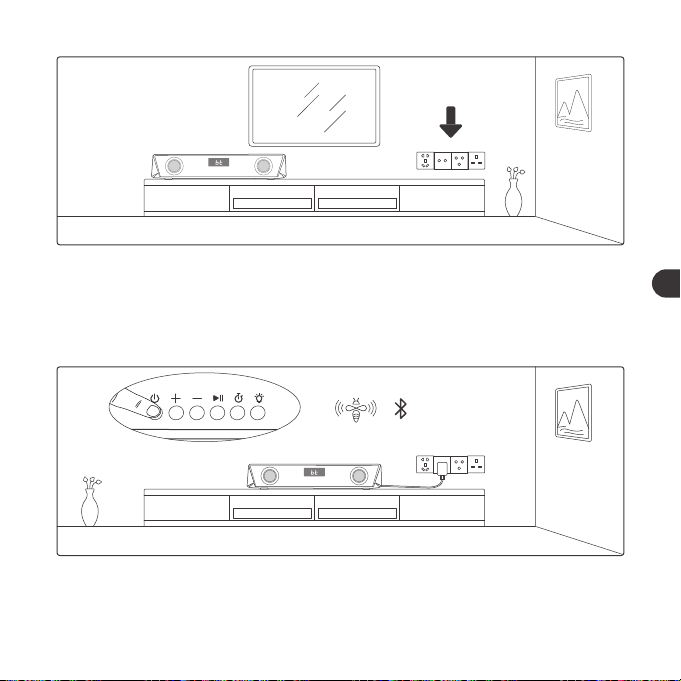
1. Posizionare il dispositivo su un tavolo o montarlo a parete.
Nota:
La viteria per il montaggio a parete non è fornita.
2. Non collocare mai questo dispositivo in un mobile chiuso quando la
soundbar è in riproduzione.
3. Installare questo dispositivo vicino a prese di corrente dove la spina possa
essere facilmente raggiunta.
Connessione Bluetooth
1. Collegare la sound bar ad una fonte di alimentazione, premere e tenere
premuto il Pulsante di Accensione per tre secondi finché si sentono dei
suoni di bip. Il dispositivo è inizialmente in modalità Bluetooth.
01 03 05 07 09 11
13 15 17 19 21 23
25 27 29 31 33 35
37 39 41 43 45 47
49 51 53 55 57 59
61 63 65
02 04 06 08 10 12
14 16 18 20 22 24
26 28 30 32 34 36
38 40 42 44 46 48
50 52 54 56 58 60
62 64 66
IT IT

2. Quando il display LED inizia a lampeggiare velocemente, attivare la
funzione Bluetooth sul proprio dispositivo e cercare le connessioni
Bluetooth nelle vicinanze.
SET UP
TaoTronics TT-SK027 Not Connected
3. Trovare “TaoTronics TT-SK027” nei risultati di ricerca e premere per collegare.
SET UP
TaoTronics TT-SK027
Connected
4. Si sentirà un suono di bip dopo che la connessione sarà avvenuta con
successo.
Nota:
• Al momento dell'accensione, la soundbar si collega automaticamente
all'ultimo dispositivo, se necessario. In caso contrario, entra in modalità
di associazione con il Display LED che lampeggia rapidamente.
• Per cambiare la connessione, tenere premuto il tasto Riproduzione/
Pausa per accedere alla modalità di associazione e connettere un altro
dispositivo.
Pulsante Timer
1. Premere una volta per far partire/mettere in pausa il timer.
2. Premere due volte per cancellare il display del timer e impostarlo su “00:00”.
3. Premere e tenere premuto per uscire dalla modalità timer e tornare alle
modalità di funzionamento e di visualizzazione precedenti.
01 03 05 07 09 11
13 15 17 19 21 23
25 27 29 31 33 35
37 39 41 43 45 47
49
51 53 55 57 59
61 63 65
02 04 06 08 10 12
14 16 18 20 22 24
26 28 30 32 34 36
38 40 42 44 46 48
50
52 54 56 58 60
62 64 66
IT IT
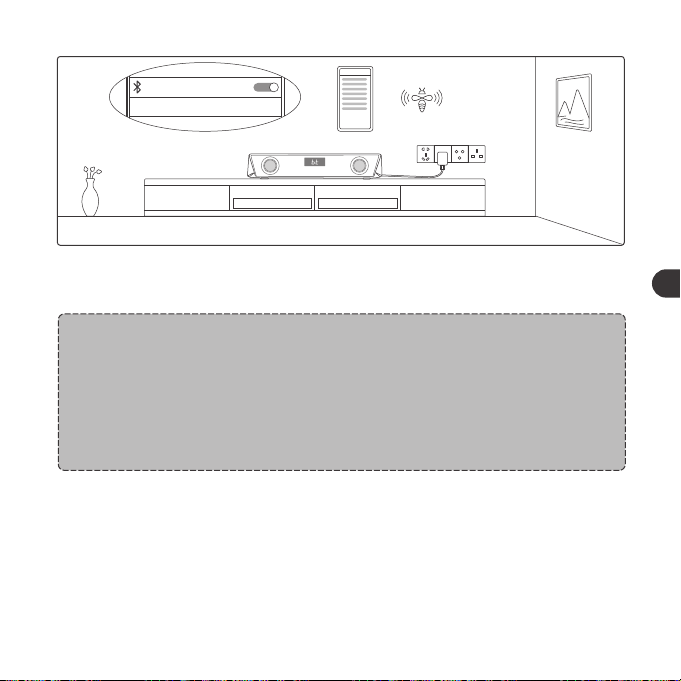
2. Quando il display LED inizia a lampeggiare velocemente, attivare la
funzione Bluetooth sul proprio dispositivo e cercare le connessioni
Bluetooth nelle vicinanze.
SET UP
TaoTronics TT-SK027 Not Connected
3. Trovare “TaoTronics TT-SK027” nei risultati di ricerca e premere per collegare.
SET UP
TaoTronics TT-SK027
Connected
4. Si sentirà un suono di bip dopo che la connessione sarà avvenuta con
successo.
Nota:
• Al momento dell'accensione, la soundbar si collega automaticamente
all'ultimo dispositivo, se necessario. In caso contrario, entra in modalità
di associazione con il Display LED che lampeggia rapidamente.
• Per cambiare la connessione, tenere premuto il tasto Riproduzione/
Pausa per accedere alla modalità di associazione e connettere un altro
dispositivo.
Pulsante Timer
1. Premere una volta per far partire/mettere in pausa il timer.
2. Premere due volte per cancellare il display del timer e impostarlo su “00:00”.
3. Premere e tenere premuto per uscire dalla modalità timer e tornare alle
modalità di funzionamento e di visualizzazione precedenti.
01 03 05 07 09 11
13 15 17 19 21 23
25 27 29 31 33 35
37 39 41 43 45 47
49
51 53 55 57 59
61 63 65
02 04 06 08 10 12
14 16 18 20 22 24
26 28 30 32 34 36
38 40 42 44 46 48
50
52 54 56 58 60
62 64 66
IT IT
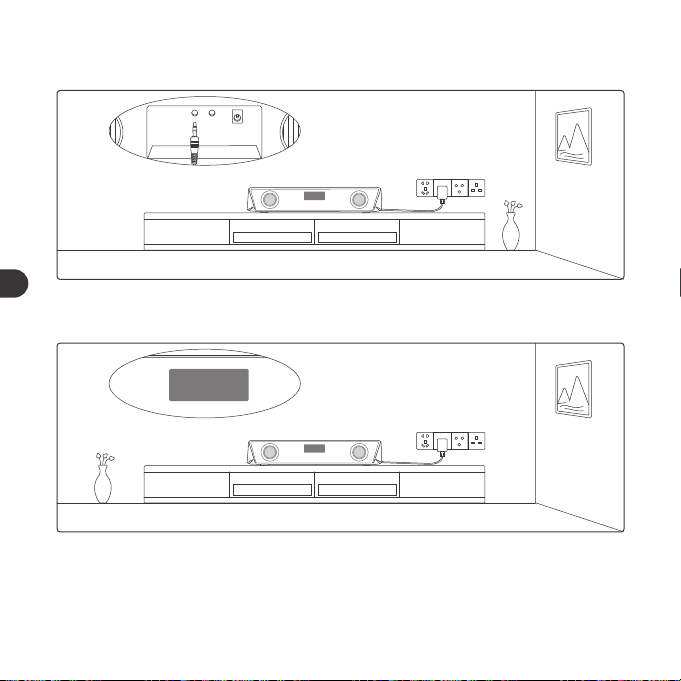
line
DC
AUX OUTAUX IN
Connessione via Cavo AUX
1. Collegare il cavo AUX nella porta di ingresso AUX sul retro.
LINE
LINE
2. Premere il pulsante di accensione per cambiare alla modalità LINE e il
display LED mostrerà "LINE.
LINE
3. Connettere ad un dispositivo dotato di uscita AUX attraverso il cavo.
Nota:
• Una volta collegato alla porta AUX in Uscita, il suono verrà bypassato
verso il dispositivo audio collegato.
PULIZIA E MANUTENZIONE
1. Pulire regolarmente gli Soundbar.
2. Utilizzare un panno di cotone asciutto e morbido per pulire il dispositivo.
3. Tenere lontano da oggetti appuntiti per evitare graffi.
4. Collocare il dispositivo in un luogo fresco e asciutto se non utilizzato per
lungo tempo.
5. Non pulire il prodotto con detergenti o prodotti chimici.
01 03 05 07 09 11
13 15 17 19 21 23
25 27 29 31 33 35
37 39 41 43 45 47
49 51
53 55 57 59
61 63 65
02 04 06 08 10 12
14 16 18 20 22 24
26 28 30 32 34 36
38 40 42 44 46 48
50 52
54 56 58 60
62 64 66
IT IT
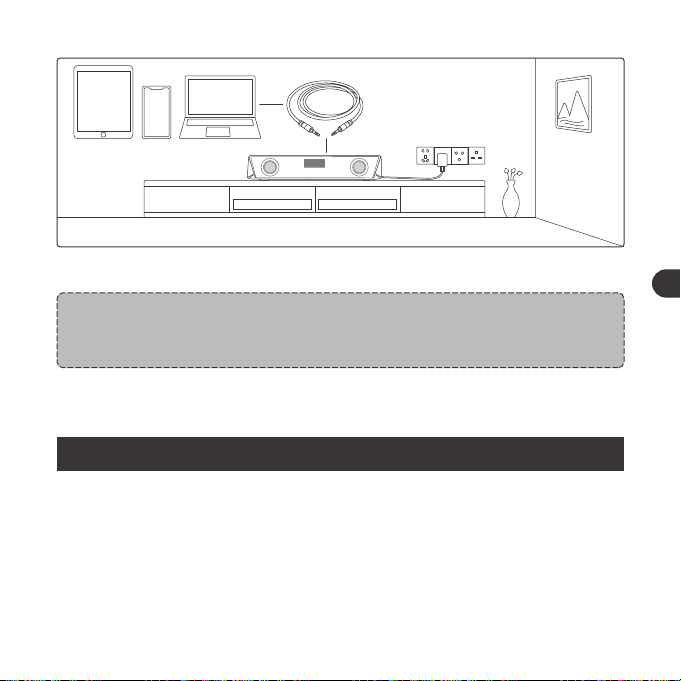
line
DC
AUX OUTAUX IN
Connessione via Cavo AUX
1. Collegare il cavo AUX nella porta di ingresso AUX sul retro.
LINE
LINE
2. Premere il pulsante di accensione per cambiare alla modalità LINE e il
display LED mostrerà "LINE.
LINE
3. Connettere ad un dispositivo dotato di uscita AUX attraverso il cavo.
Nota:
• Una volta collegato alla porta AUX in Uscita, il suono verrà bypassato
verso il dispositivo audio collegato.
PULIZIA E MANUTENZIONE
1. Pulire regolarmente gli Soundbar.
2. Utilizzare un panno di cotone asciutto e morbido per pulire il dispositivo.
3. Tenere lontano da oggetti appuntiti per evitare graffi.
4. Collocare il dispositivo in un luogo fresco e asciutto se non utilizzato per
lungo tempo.
5. Non pulire il prodotto con detergenti o prodotti chimici.
01 03 05 07 09 11
13 15 17 19 21 23
25 27 29 31 33 35
37 39 41 43 45 47
49 51
53 55 57 59
61 63 65
02 04 06 08 10 12
14 16 18 20 22 24
26 28 30 32 34 36
38 40 42 44 46 48
50 52
54 56 58 60
62 64 66
IT IT

Nota:
• Non inserire nulla dentro al prodotto.
GARANZIA E ASSISTENZA
Per qualsiasi problema si prega di contattare il Centro di Assistenza Clienti
TaoTronics nel proprio paese di residenza (vedi le informazioni di contatto
elencate nel presente Manuale Utente).
重要な安全上の注意
本製品をご利用いただく前に、説明書をよくお読みください。また、今後のために説
明書を保管ください。
注意
•サウンドバーは決して熱源の近くに置かないでください。
•サウンドバーは屋内専用です。
•サウンドバーは絶対に他の電化製品の上に置かないでください。
•製品をきれいな状態を保ち、乾燥した場所に保管してください。クリーニ
ングには、アルコール、アンモニア、ベンゼンまたは研磨剤を含む洗剤は
使わないでください。
警告
•高温は避けてください。
•乾燥した場所で保管ください。湿気や腐食物は避けてください。
•サウンドバーを湿気にさらしたり、水に濡らしたりしないでください。
•落下しないようご注意ください。
•子供が使う場合は、保護者の方が近くで監視が必要です。
•本製品のあらゆるパーツにおいて、許可されていない分解は禁止されてい
ます。
01 03 05 07 09 11
13 15 17 19 21 23
25 27 29 31 33 35
37 39 41 43 45 47
49 51 53
55 57 59
61 63 65
02 04 06 08 10 12
14 16 18 20 22 24
26 28 30 32 34 36
38 40 42 44 46 48
50 52 54
56 58 60
62 64 66
IT JP
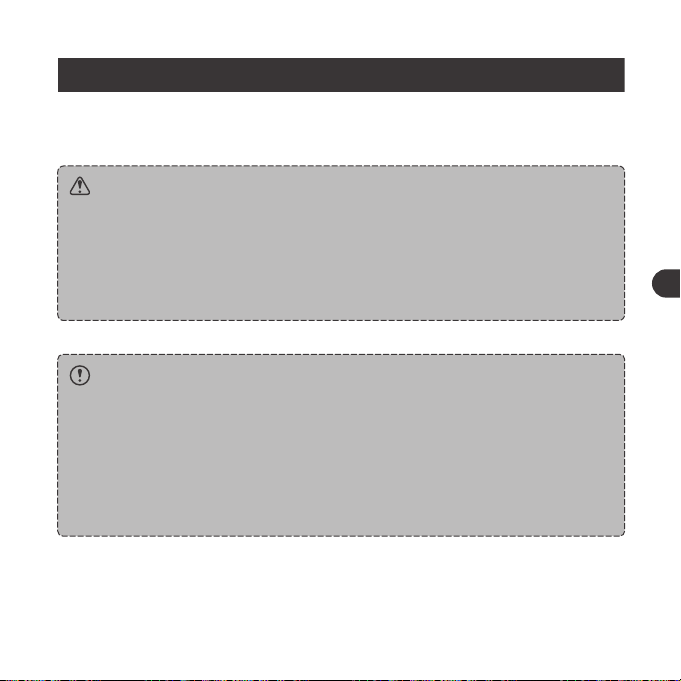

ボタンコントロ ー ル
操作
電源ボタンを3秒間長押し
スピーカーの電源が入ってい
る状態で電源ボタンを押す
再生/一時停止ボタンを押す
再生/一時停止ボタンを長押し
/
音量+ボタンを押す
音量-ボタンを押す
Bluetoothモードで、音量+ボ
タンを長押しンを長押し
機能
電源オン/オフ
モード変更(BT/LINE)
再生/一時停止
ペアリングモードに入る
接続成功
音量+
音量-
次の曲
音声プロンプト
ビープ音
/
/
/
ビープ音
/
/
前の曲
タイマーの開始/停止
ライトモード設定
通話の応答/終了
着信拒否
Bluetoothモードで、音量-ボタン
を長押し
タイマーボタンを押す
LEDモードボタンを押して、以下
の四つのライトモードに設定でき
ます。
①カラーカルーセルモード:異な
る色がサイクルする
②ブリージングモード:異なる色
が人間の呼吸に似ているリズム
でサイクルする
③リズムモード:再生している音
楽により自動で色と明るさが変
化
④オフモード:ライトを消すオフ
にします
再生/一時停止ボタンを押す
再生/一時停止ボタンを長押し
/
/
/
/
/
最高の設定音
に達したとき
01 03 05 07 09 11
13 15 17 19 21 23
25 27 29 31 33 35
37 39 41 43 45 47
49 51 53 55
57 59
61 63 65
02 04 06 08 10 12
14 16 18 20 22 24
26 28 30 32 34 36
38 40 42 44 46 48
50 52 54 56
58 60
62 64 66
JP JP
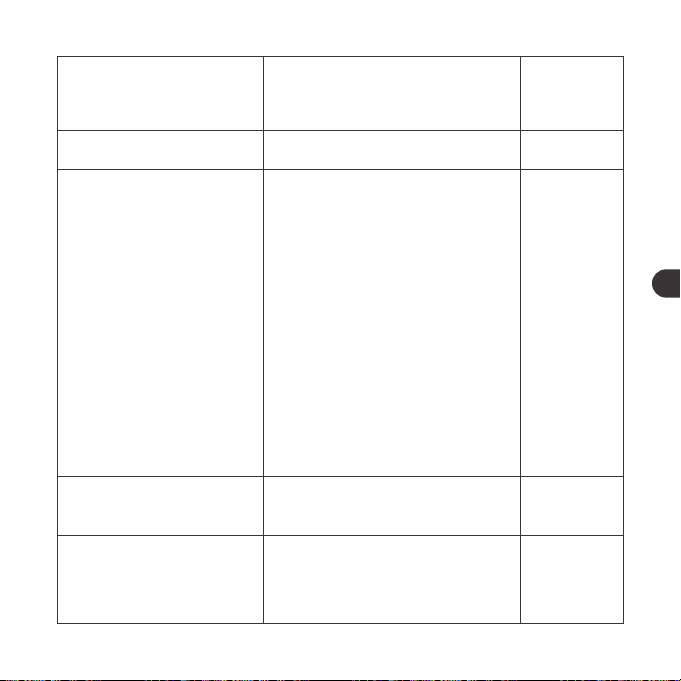
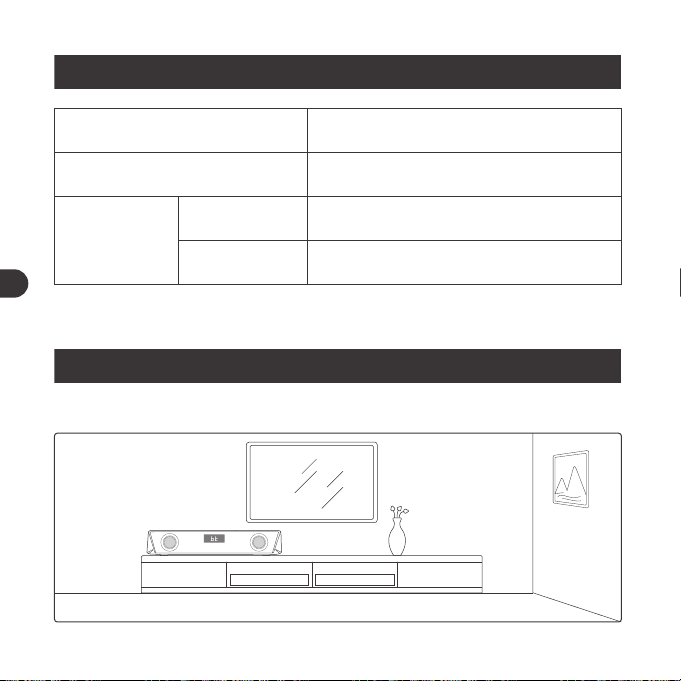
使い方
本体の設置
LED表示
LED状況
LEDは高速点滅、初期設定でカラーカルー
セルのライトモードに設定
LEDは高速点滅
LEDディスプレイ点灯
操作
電源オン
Bluetooth
接続
ペアリング
接続完了
1. テーブルの上に置くことと、壁に取り付けること、両方に対応しています。
注 意:
取り付けネジは含まれておりません。
2.サウンドバーが再生されているときは、本製品は、戸の閉まるキャビネットなどの
中に設置しないでください。
01 03 05 07 09 11
13 15 17 19 21 23
25 27 29 31 33 35
37 39 41 43 45 47
49 51 53 55 57
59
61 63 65
02 04 06 08 10 12
14 16 18 20 22 24
26 28 30 32 34 36
38 40 42 44 46 48
50 52 54 56 58
60
62 64 66
JP JP
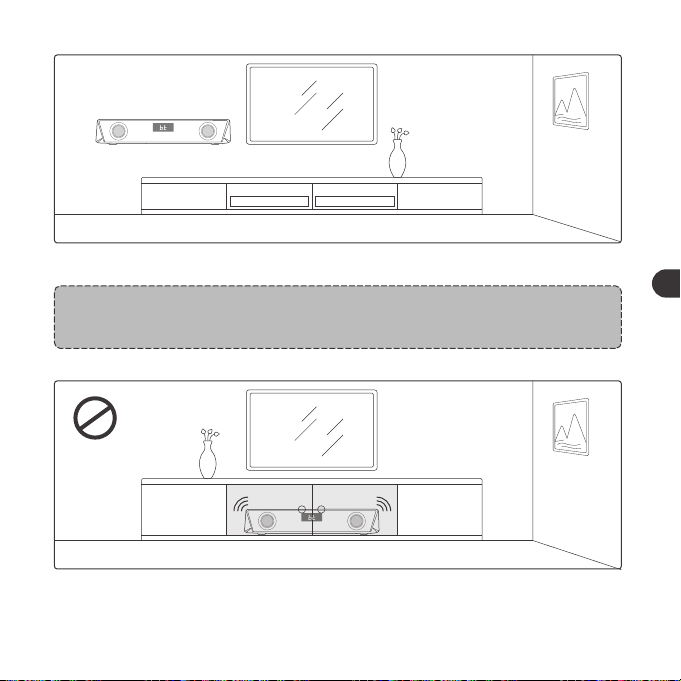
使い方
本体の設置
LED表示
LED状況
LEDは高速点滅、初期設定でカラーカルー
セルのライトモードに設定
LEDは高速点滅
LEDディスプレイ点灯
操作
電源オン
Bluetooth
接続
ペアリング
接続完了
1. テーブルの上に置くことと、壁に取り付けること、両方に対応しています。
注 意:
取り付けネジは含まれておりません。
2.サウンドバーが再生されているときは、本製品は、戸の閉まるキャビネットなどの
中に設置しないでください。
01 03 05 07 09 11
13 15 17 19 21 23
25 27 29 31 33 35
37 39 41 43 45 47
49 51 53 55 57
59
61 63 65
02 04 06 08 10 12
14 16 18 20 22 24
26 28 30 32 34 36
38 40 42 44 46 48
50 52 54 56 58
60
62 64 66
JP JP
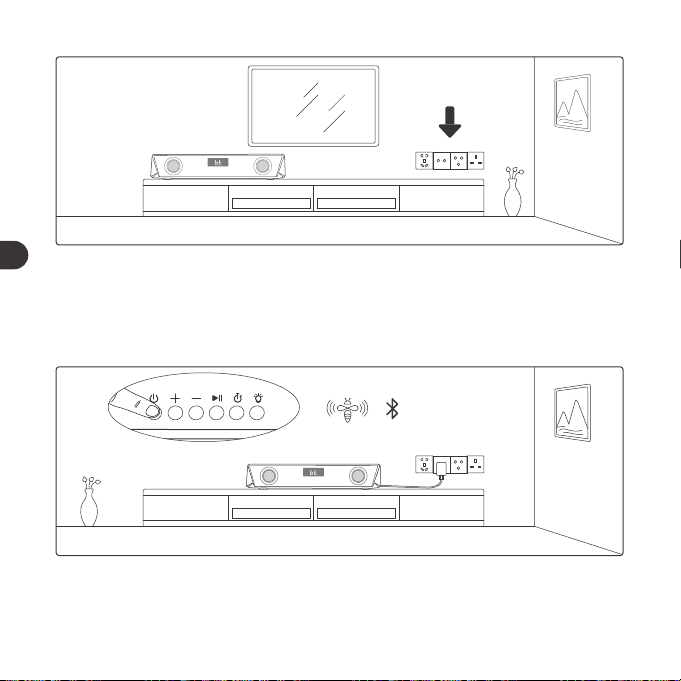
3.本体を届きやすい電源の近くに設置してください。
Bluetooth接続
1.サウンドバーを電源に接続し、ビープ音が聞こえるまで、電源ボタンを3秒間長押
しします。機器は、初期でBluetoothモードになっています。
2.LEDディスプレイが高速で点滅している際、サウンドバーがBluetoothペアリング
モードに入ります。スマホなどの設備で近くのBluetooth接続を検索してください。
SET UP
TaoTronics TT-SK027 Not Connected
3.検索結果から、“TaoTronicsTT-SK027”を探して、タップして接続します。
01 03 05 07 09 11
13 15 17 19 21 23
25 27 29 31 33 35
37 39 41 43 45 47
49 51 53 55 57 59
61 63 65
02 04 06 08 10 12
14 16 18 20 22 24
26 28 30 32 34 36
38 40 42 44 46 48
50 52 54 56 58 60
62 64 66
JP JP
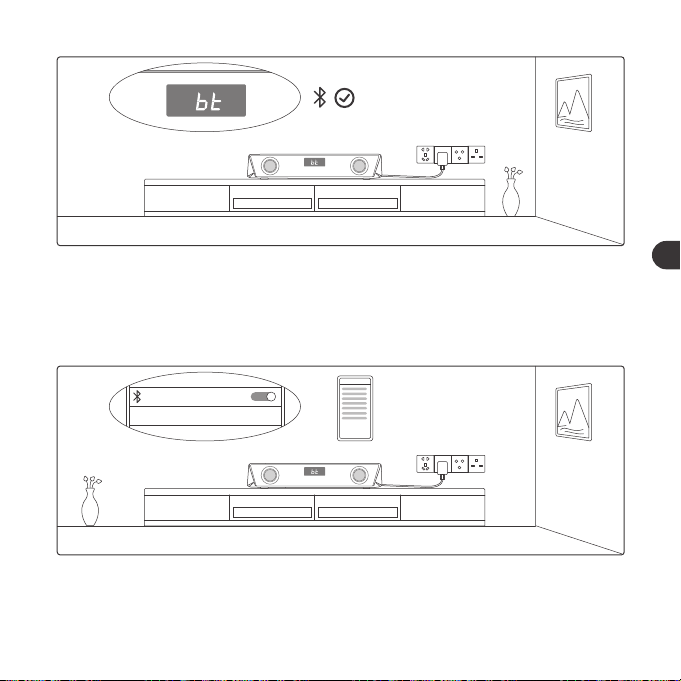
3.本体を届きやすい電源の近くに設置してください。
Bluetooth接続
1.サウンドバーを電源に接続し、ビープ音が聞こえるまで、電源ボタンを3秒間長押
しします。機器は、初期でBluetoothモードになっています。
2.LEDディスプレイが高速で点滅している際、サウンドバーがBluetoothペアリング
モードに入ります。スマホなどの設備で近くのBluetooth接続を検索してください。
SET UP
TaoTronics TT-SK027 Not Connected
3.検索結果から、“TaoTronicsTT-SK027”を探して、タップして接続します。
01 03 05 07 09 11
13 15 17 19 21 23
25 27 29 31 33 35
37 39 41 43 45 47
49 51 53 55 57 59
61 63 65
02 04 06 08 10 12
14 16 18 20 22 24
26 28 30 32 34 36
38 40 42 44 46 48
50 52 54 56 58 60
62 64 66
JP JP
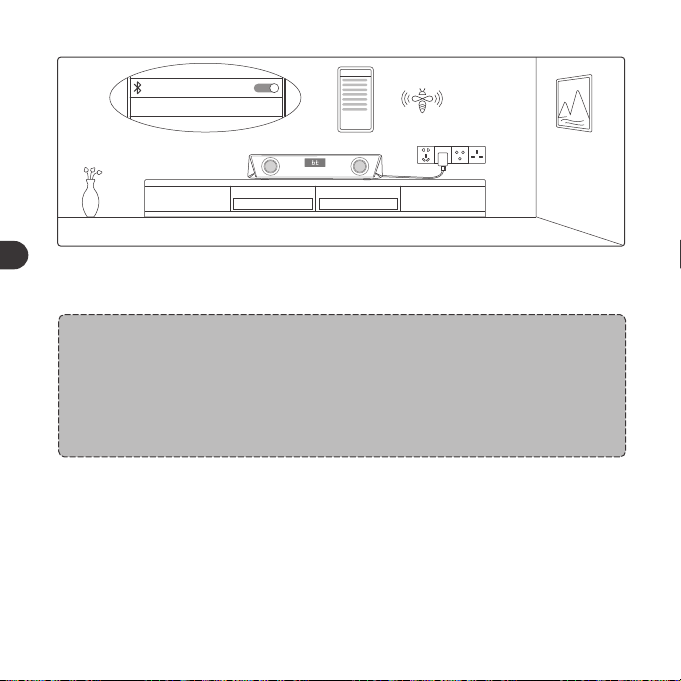
SET UP
TaoTronics TT-SK027
Connected
4.接続が完了するとビープ音が聞こえます。
注 意:
•電源がオンの場合、本機は自動的に接続していたBluetooth機器に接続しよ
うとします。自動的に接続できない場合、一度接続を解除してから接続操作を
行ってください。
•接続先を変更する場合は、再生/一時停止ボタンを押し続けてペアリングモ
ードに入り、別のデバイスに接続してください。
タイマーボタン
1.度押すと、タイマーの開始/停止
2.度押すと、タイマー表示をクリアし“00:00”に設定
3.長押しするとタイマーモードから、元のモードと表示へ戻ります。
line
DC
AUX OUTAUX IN
AUXケーブル接続
1.AUXケーブルを背面のAUX入力ポートにへ差し込みます。
LINE
LINE
2.電源ボタンを押してLINEモードに変更し、LED表示が「LINE」を表示されます。
01 03 05 07 09 11
13 15 17 19 21 23
25 27 29 31 33 35
37 39 41 43 45 47
49 51 53 55 57 59
61
63 65
02 04 06 08 10 12
14 16 18 20 22 24
26 28 30 32 34 36
38 40 42 44 46 48
50 52 54 56 58 60
62
64 66
JP JP
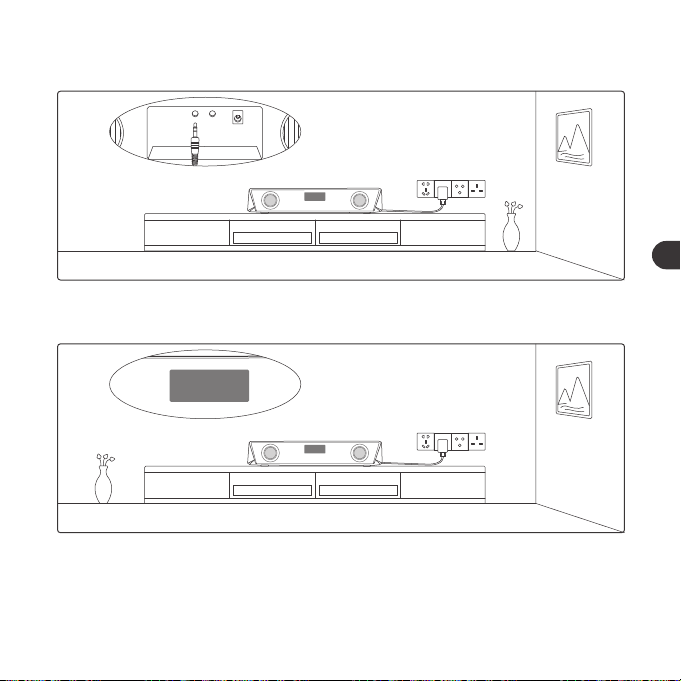
SET UP
TaoTronics TT-SK027
Connected
4.接続が完了するとビープ音が聞こえます。
注 意:
•電源がオンの場合、本機は自動的に接続していたBluetooth機器に接続しよ
うとします。自動的に接続できない場合、一度接続を解除してから接続操作を
行ってください。
•接続先を変更する場合は、再生/一時停止ボタンを押し続けてペアリングモ
ードに入り、別のデバイスに接続してください。
タイマーボタン
1.度押すと、タイマーの開始/停止
2.度押すと、タイマー表示をクリアし“00:00”に設定
3.長押しするとタイマーモードから、元のモードと表示へ戻ります。
line
DC
AUX OUTAUX IN
AUXケーブル接続
1.AUXケーブルを背面のAUX入力ポートにへ差し込みます。
LINE
LINE
2.電源ボタンを押してLINEモードに変更し、LED表示が「LINE」を表示されます。
01 03 05 07 09 11
13 15 17 19 21 23
25 27 29 31 33 35
37 39 41 43 45 47
49 51 53 55 57 59
61
63 65
02 04 06 08 10 12
14 16 18 20 22 24
26 28 30 32 34 36
38 40 42 44 46 48
50 52 54 56 58 60
62
64 66
JP JP

LINE
3.ケーブル経由でAUX機器を接続します。
注 意:
• AUX出力ポートへ接続すると、音声は接続された音声機器へ送られます。
注 意:
• 製品に何かを挿入することはしないでください。
保証とサービス
何か問題が起こった場合は、ユーザーガイドに掲載されているお住いの国の
TaoTronicsカスタマーセンターへご連絡ください。
クリーニング&メンテナンス
1.サウンドバーを定期的にクリーニングしてください。
2.本体を掃除する場合は乾いた柔らかい布で拭いてください。
3.傷を避けるために、尖ったものに近づけないでください。
4.長時間使用しない場合は、乾燥した日陰のある場所に保管してください。
5.クリーニングに、洗剤や化学薬品は使用しないでください。
01 03 05 07 09 11
13 15 17 19 21 23
25 27 29 31 33 35
37 39 41 43 45 47
49 51 53 55 57 59
61 63
65
02 04 06 08 10 12
14 16 18 20 22 24
26 28 30 32 34 36
38 40 42 44 46 48
50 52 54 56 58 60
62 64
66
JP JP
