Loading ...
Loading ...
Loading ...
2 | 3
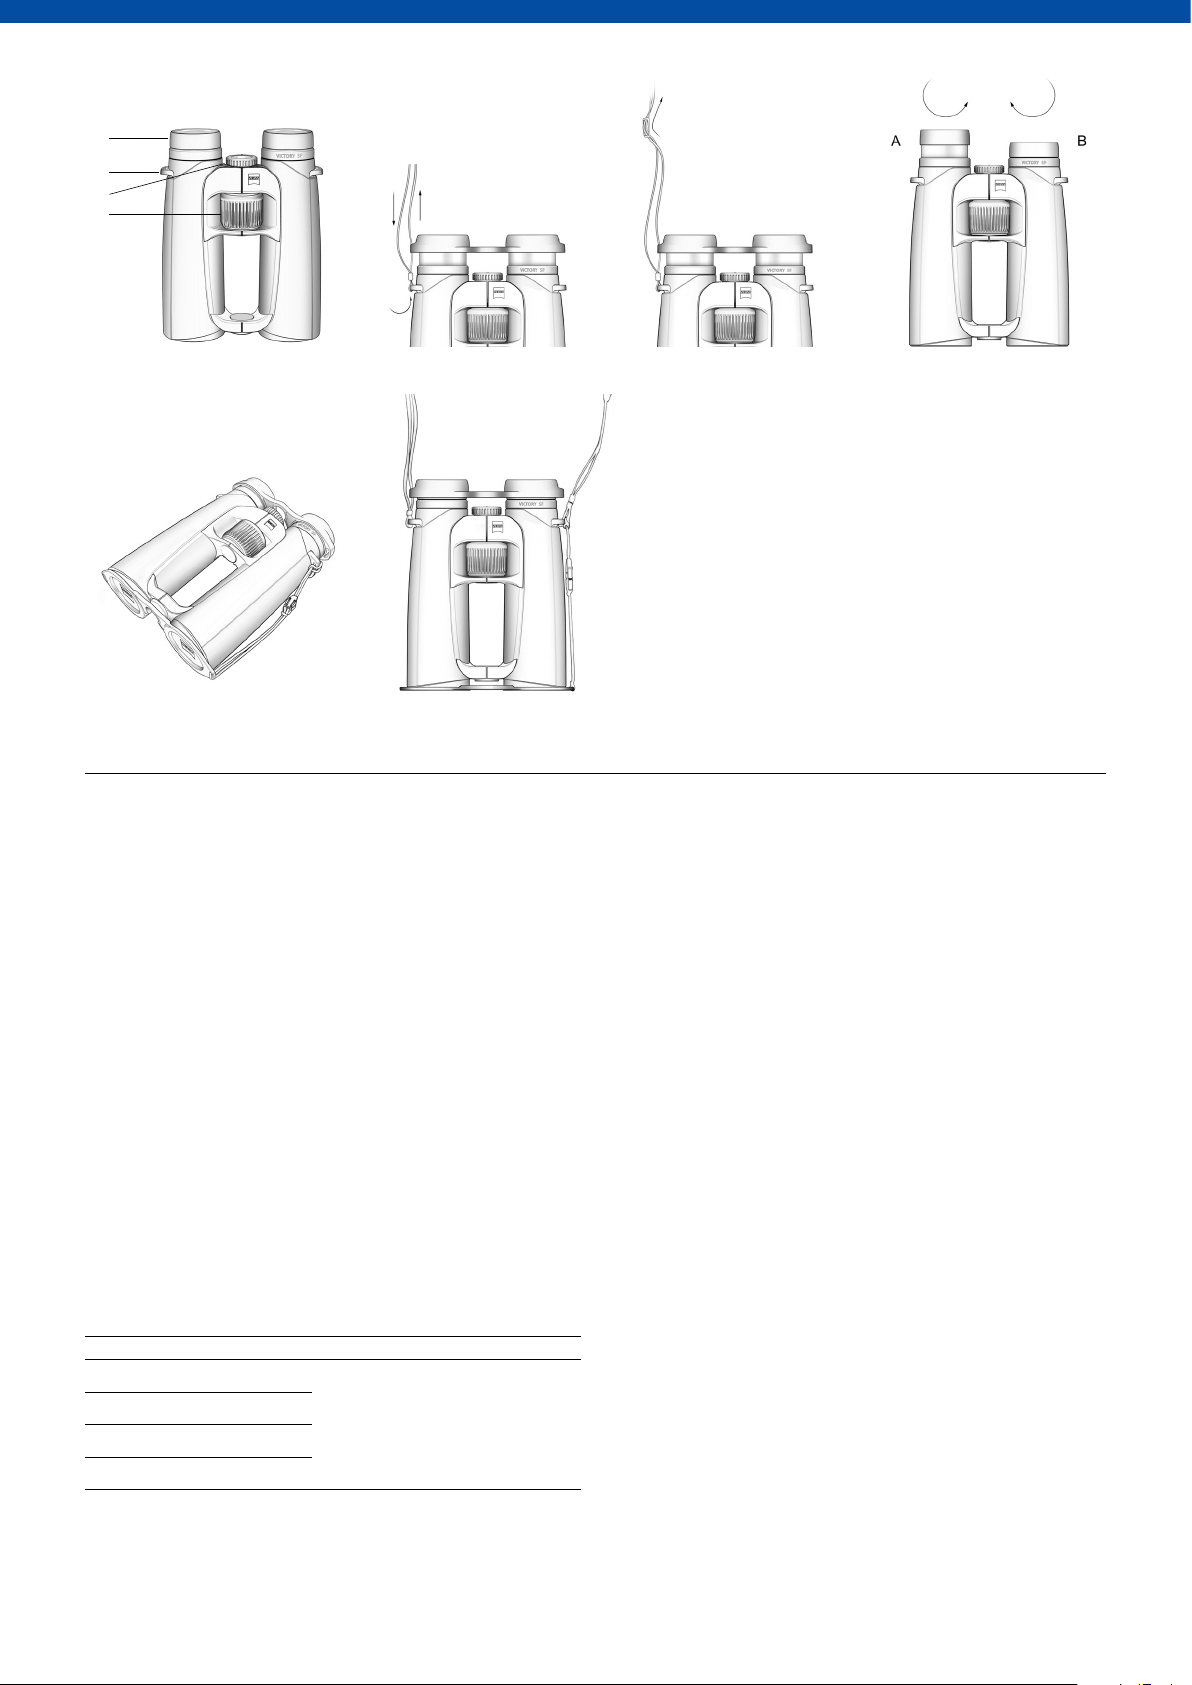
Fig. 3
Fig. 6Fig. 5
Fig. 1 Fig. 4Fig. 2
1
2
4
3
Congratulations on purchasing your new ZEISS VICTORY
®
SF binoculars. Enjoy the
memorable experience of realistic image reproduction featuring extreme bright-
ness and the finest reproduction of detail.
ZEISS products are famous for outstanding optical performance, precision engineer-
ing and a long service life. Please observe the following instructions for use in order
to obtain the best from your product and to ensure that they remain your constant
companion for many years to come.
IMPORTANT SAFETY INFORMATION
CAUTION
• Do not under any circumstances look through the binoculars at the sun or laser
light sources! Serious eye injury may otherwise result.
• Avoid touching the metal surface after exposure to sunlight or cold.
• Do not leave the removable exterior parts within reach of children (danger of
swallowing).
• Never leave the binoculars in the sun for extended periods of time without the
protective lens cap. The objective lens and eyepiece can function as a burning
glass and damage the interior components.
• Do not drop the device and avoid direct impact to it.
• Repairs should only be conducted by authorized repair shops or employees of
Carl Zeiss Sports Optics GmbH. Allowing the device to be repaired by unautho-
rized workshops or opening it improperly will render the warranty void.
PACKAGE CHECK LIST
ZEISS VICTORY SF binoculars
Product Order number Package check list
8 x 42 52 42 23 Binoculars
Eyepiece cap
Protective lens cap
Strap for fastening protective lens cap
Carrying strap
Carrying case
Lens cleaning cloth
Instructions for use
10 x 42 52 42 24
8 x 32 52 32 24
10 x 32 52 32 25
INSTRUCTIONS FOR USE
Aligning the eyecups, Viewing with and without glasses
When viewing without glasses, use the binoculars with the eyecups extended.
Todo this, turn the eyecups (Fig. 4) to the left (anti-clockwise) and upwards to
the top click stop position (Illustration A).
The eyecup can be locked in four positions – at the bottom and top and in two
intermediate positions. These adjustment options allow the distance of the eye
from the exit pupil (to eyepiece) to be varied according to the specific require-
ments of each user.
Note: If the eyecup is turned too far to the left when in the extended position,
itcan loosen. This is by design. For more information, see “Cleaning the eyecup”.
By turning to the right you get back to the various click stop positions.
When viewing with glasses, turn the eyecup down to the right (clockwise) until it
locks in the lowest click stop position (Illustration B).
Cleaning and replacing the eyecups
To replace the eyecups or for cleaning, they can be completely screwed off of the
binoculars. Turn the eyecups out as shown in Fig. 4 to the top click stop position
and turn one more thread in the same direction until the eyecup is completely
screwed out.
After cleaning, or replacing the eyecup, turn it to the right (clockwise) completely on
the eyepiece. (Also refer to setting for those who wear glasses). Using a slight jerk
to the right the thread of the eyepiece clicks into the lowest setting. Finally, you can
again set your desired distance between the eye and eyepiece using the click stops.
Adjusting the eye spacing (pupillary distance)
Bend the two barrels toward each other around the central axis, until the distance
of the two eyepieces corresponds to the distance between your eyes. This will
provide the optimum image for your eyes. The optimum eye spacing is achieved
when a circular image is seen when viewing through the binoculars with both eyes.
Focusing
The binoculars have a focusing wheel (Fig. 1 / 4) and a diopter adjustment wheel
(Fig. 1 / 3). To adjust the diopter, close your right eye and focus the image in the
left barrel using the centre focusing wheel (Fig. 1 / 4). Then close your left eye
and, if necessary, adjust the focus in the right barrel using the diopter adjustment
wheel (Fig. 1 / 3).
The diopter adjustment features a scale with the signs “+” and “–”, and has an
index point as a reference point. Note your personal setting, then you can quickly
set your own diopter setting on any binoculars.
DESCRIPTION OF
THE COMPONENTS
1. Eyecups
2. Carrying strap eyelets
3. Diopter compensation
4. Focusing wheel
Loading ...
Loading ...
Loading ...