User manual
DLP
®
Projector

English
2
TABLE OF CONTENTS
SAFETY ............................................................................................... 4
Important Safety Instruction....................................................................................................... 4
Cleaning the Lens...................................................................................................................... 5
3D Safety Information ................................................................................................................ 6
Copyright ................................................................................................................................... 6
Disclaimer .................................................................................................................................. 7
Trademark Recognition ............................................................................................................. 7
FCC ........................................................................................................................................... 7
Declaration of Conformity for EU countries ............................................................................... 8
WEEE ........................................................................................................................................ 8
INTRODUCTION ................................................................................ 9
Package Overview..................................................................................................................... 9
Standard accessories ................................................................................................................ 9
Optional accessories ................................................................................................................. 9
Product Overview ..................................................................................................................... 10
Connections.............................................................................................................................. 11
Keypad ..................................................................................................................................... 12
Remote control ......................................................................................................................... 13
SETUP AND INSTALLATION ........................................................... 14
Installing the projector .............................................................................................................. 14
Connecting sources to the projector ......................................................................................... 15
Adjusting the projector image ................................................................................................... 16
Remote setup ........................................................................................................................... 17
USING THE PROJECTOR ............................................................... 19
Powering on / o the projector .................................................................................................. 19
Selecting an input source ......................................................................................................... 21
Menu navigation and features .................................................................................................. 22
OSD Menu tree......................................................................................................................... 23
Display menu ............................................................................................................................ 30
Audio menu .............................................................................................................................. 35
Setup menu .............................................................................................................................. 36
Info menu.................................................................................................................................. 39

English
3
ADDITIONAL INFORMATION .......................................................... 40
Compatible resolutions ............................................................................................................. 40
Image size and projection distance .......................................................................................... 44
Projector dimensions and ceiling mount installation ................................................................. 45
IR remote codes ....................................................................................................................... 46
Troubleshooting ........................................................................................................................ 48
Warning indicators .................................................................................................................... 49
Specications ........................................................................................................................... 52
Optoma global oces ............................................................................................................... 53
English
4
SAFETY
Important Safety Instruction
±
±
±
±
±
±

English
5
±
±
±
Do not setup the projector in places where it might be subjected to vibration or shock.
Do not touch the lens with bare hands.
Remove battery/batteries from remote control before storage. If the battery/batteries are left in the
remote for long periods, they may leak.
Do not use or store the projector in places where smoke from oil or cigarettes may be present, as it can
adversely aect the quality of the projector performance.
Please follow the correct projector orientation installation as non standard installation may aect the
projector performance.
Use a power strip and or surge protector. As power outages and brown-outs can KILL devices
Cleaning the Lens

English
6
3D Safety Information
Warning
Photosensitive Seizure Warning and Other Health Risks
Copyright
©

English
7
Disclaimer
Trademark Recognition
DLP
®
TM
FCC
Notice: Shielded cables
Caution
Operation Conditions

English
8
Notice: Canadian users
Declaration of Conformity for EU countries
WEEE
Disposal instructions
English
9
INTRODUCTION
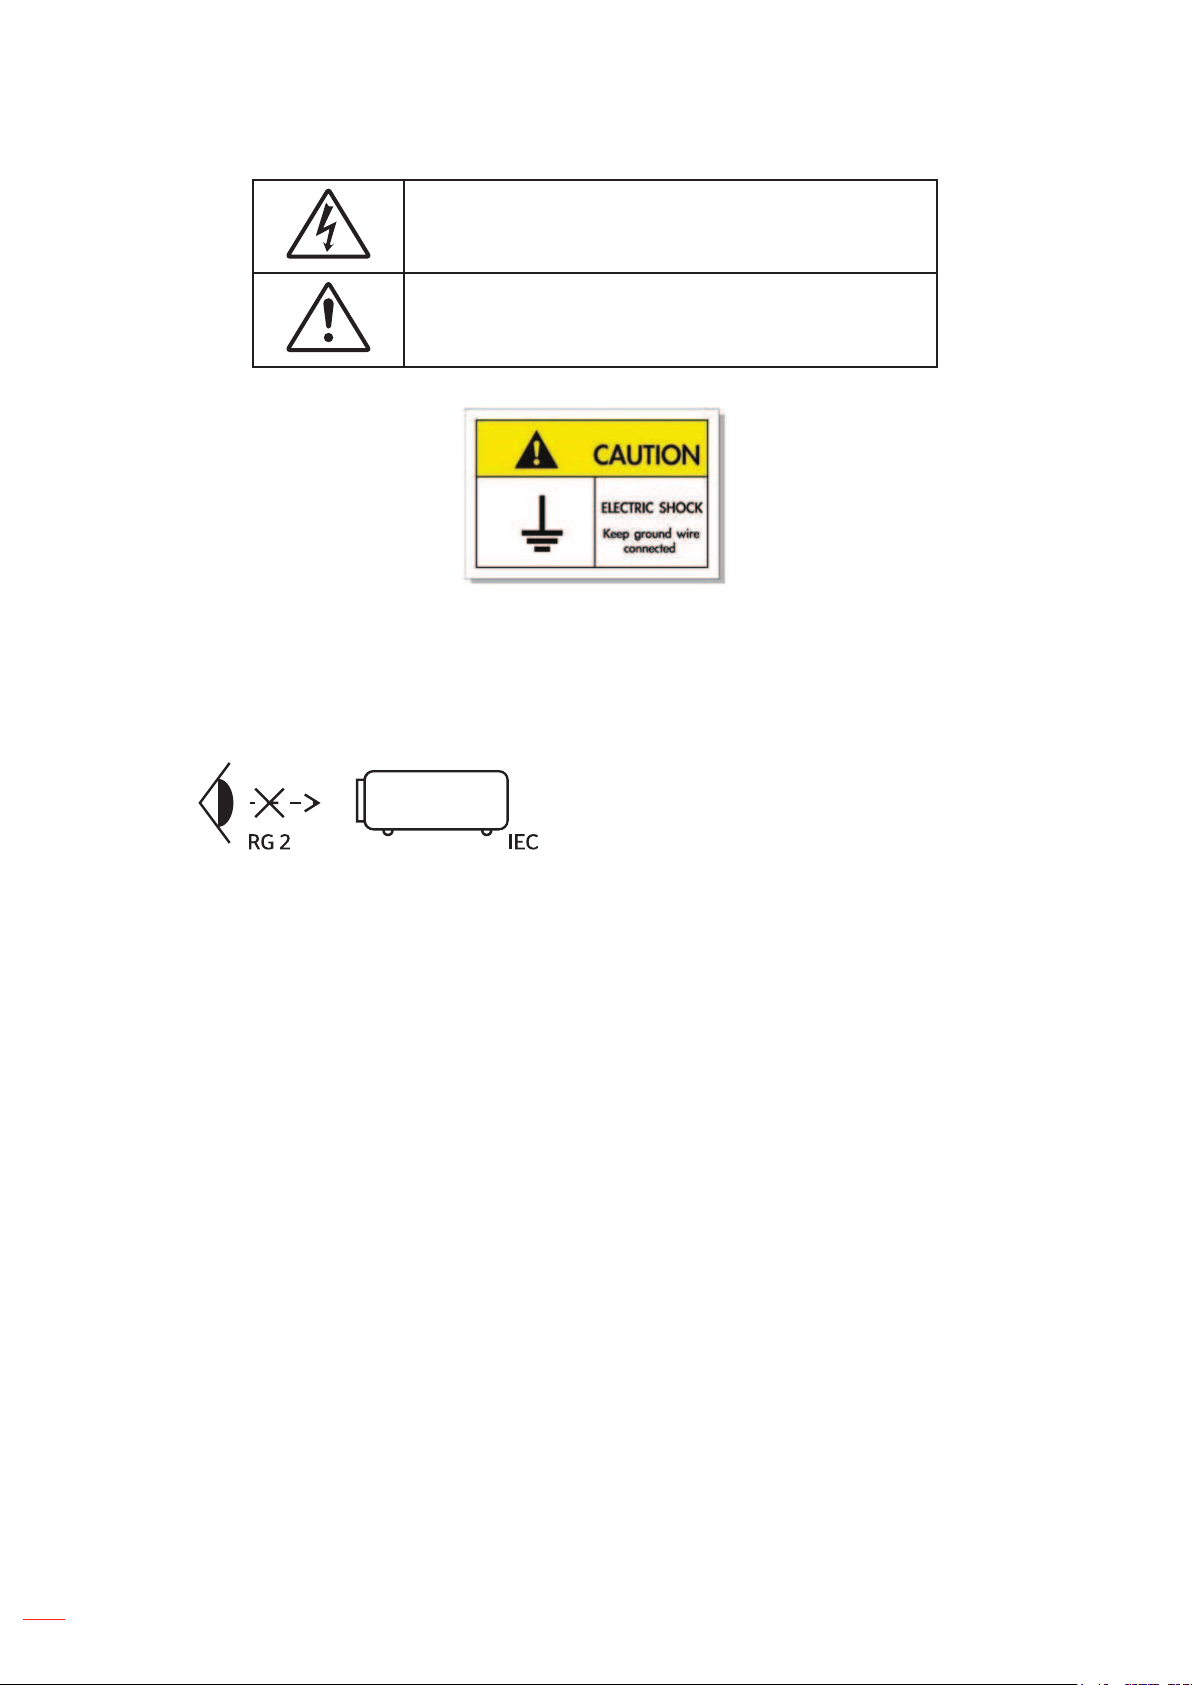
Package Overview
Standard accessories
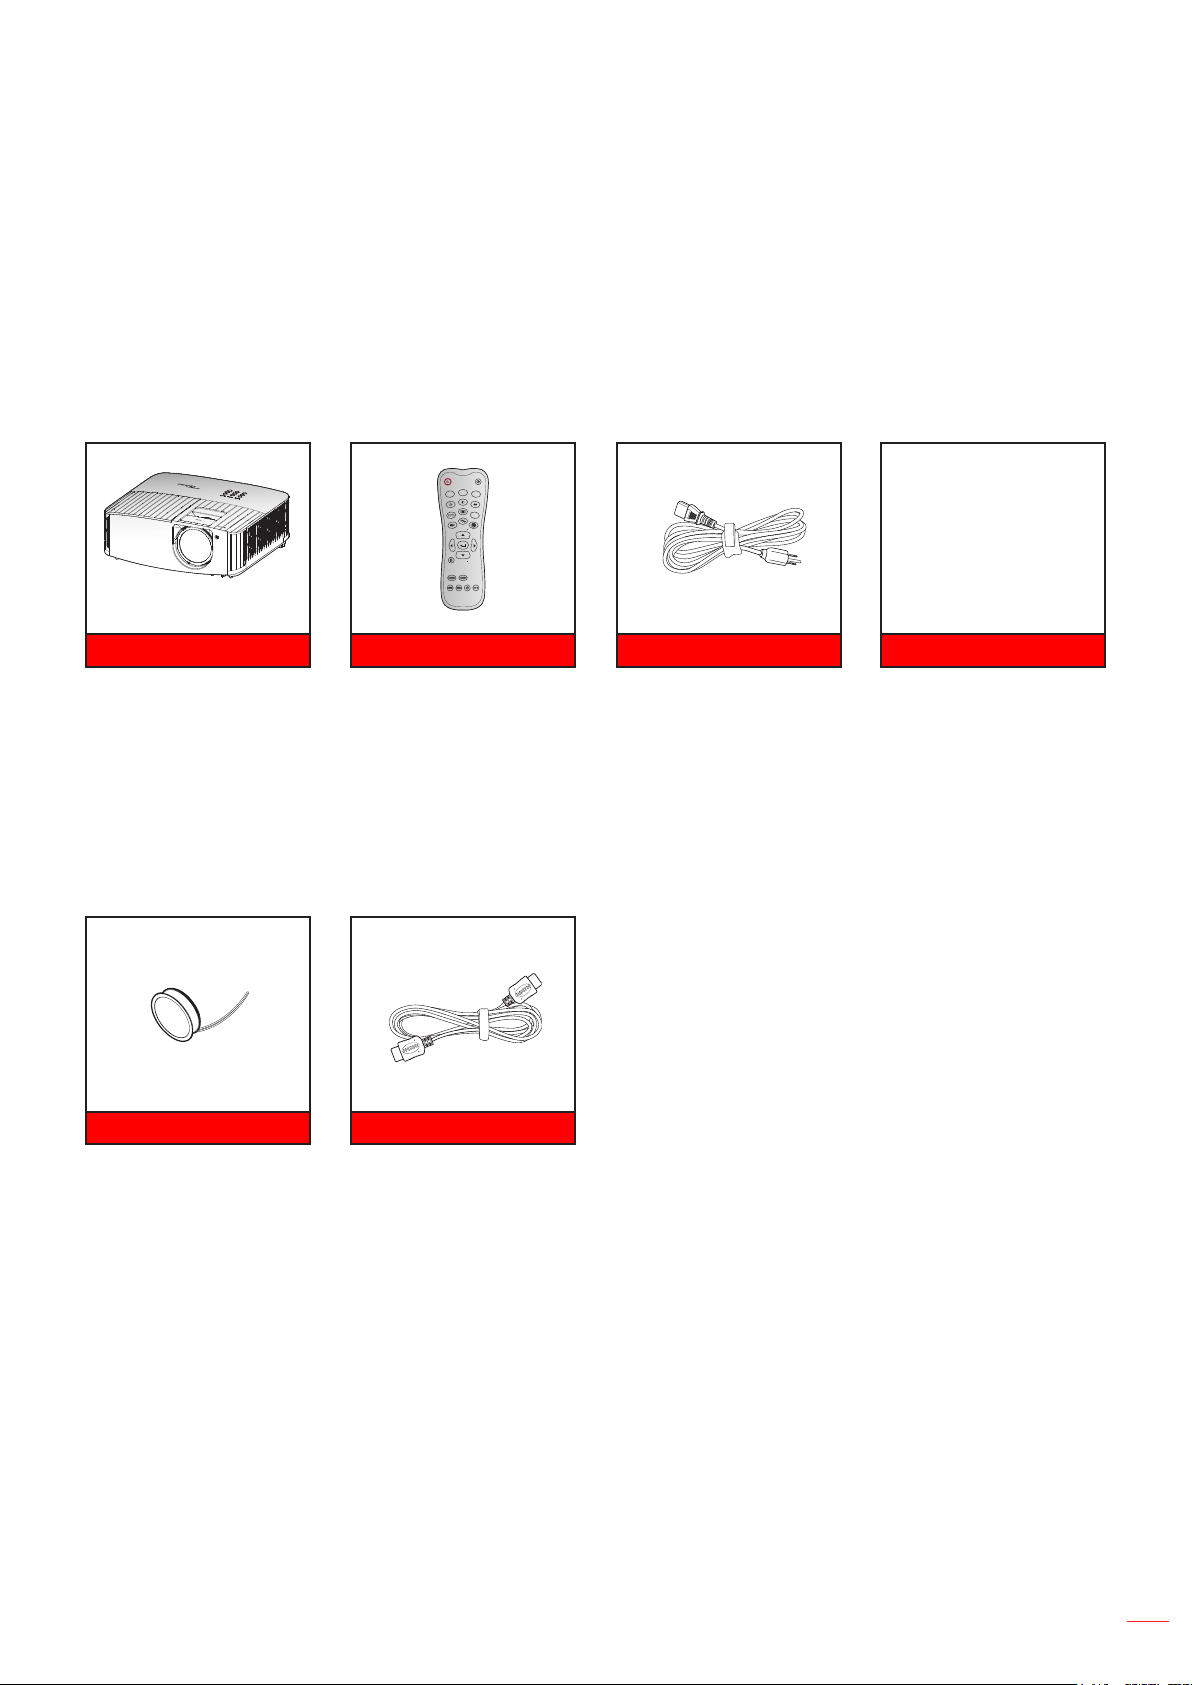
Optional accessories
Note: Optional accessories vary depending on model, specication and region.
Remote control Power leadProjector Documentation
Note:
The actual remote control may vary depending on the region.
The remote control is shipped with the batteries
* For warranty Information, please visit https://www.optoma.com/support/download.
Lens cap
ON
OFF
Menu
VGA1
HDMI1
User2
Contrast
Aspect ratio
DB
Volume
Source
Re-sync
User1
Brightness
Keystone
Mute
User3
Mode
3D
Sleep Timer
Volume
HDMI2
VGA2 Video YPbPr
HDMI cable

English
10
INTRODUCTION
Product Overview
Note:
Do not block projector intake and exhaust vents
When operating the projector in an enclosed space, allow at least 30 cm clearance around the intake
and exhaust vents.
No Item No Item
English
11
INTRODUCTION
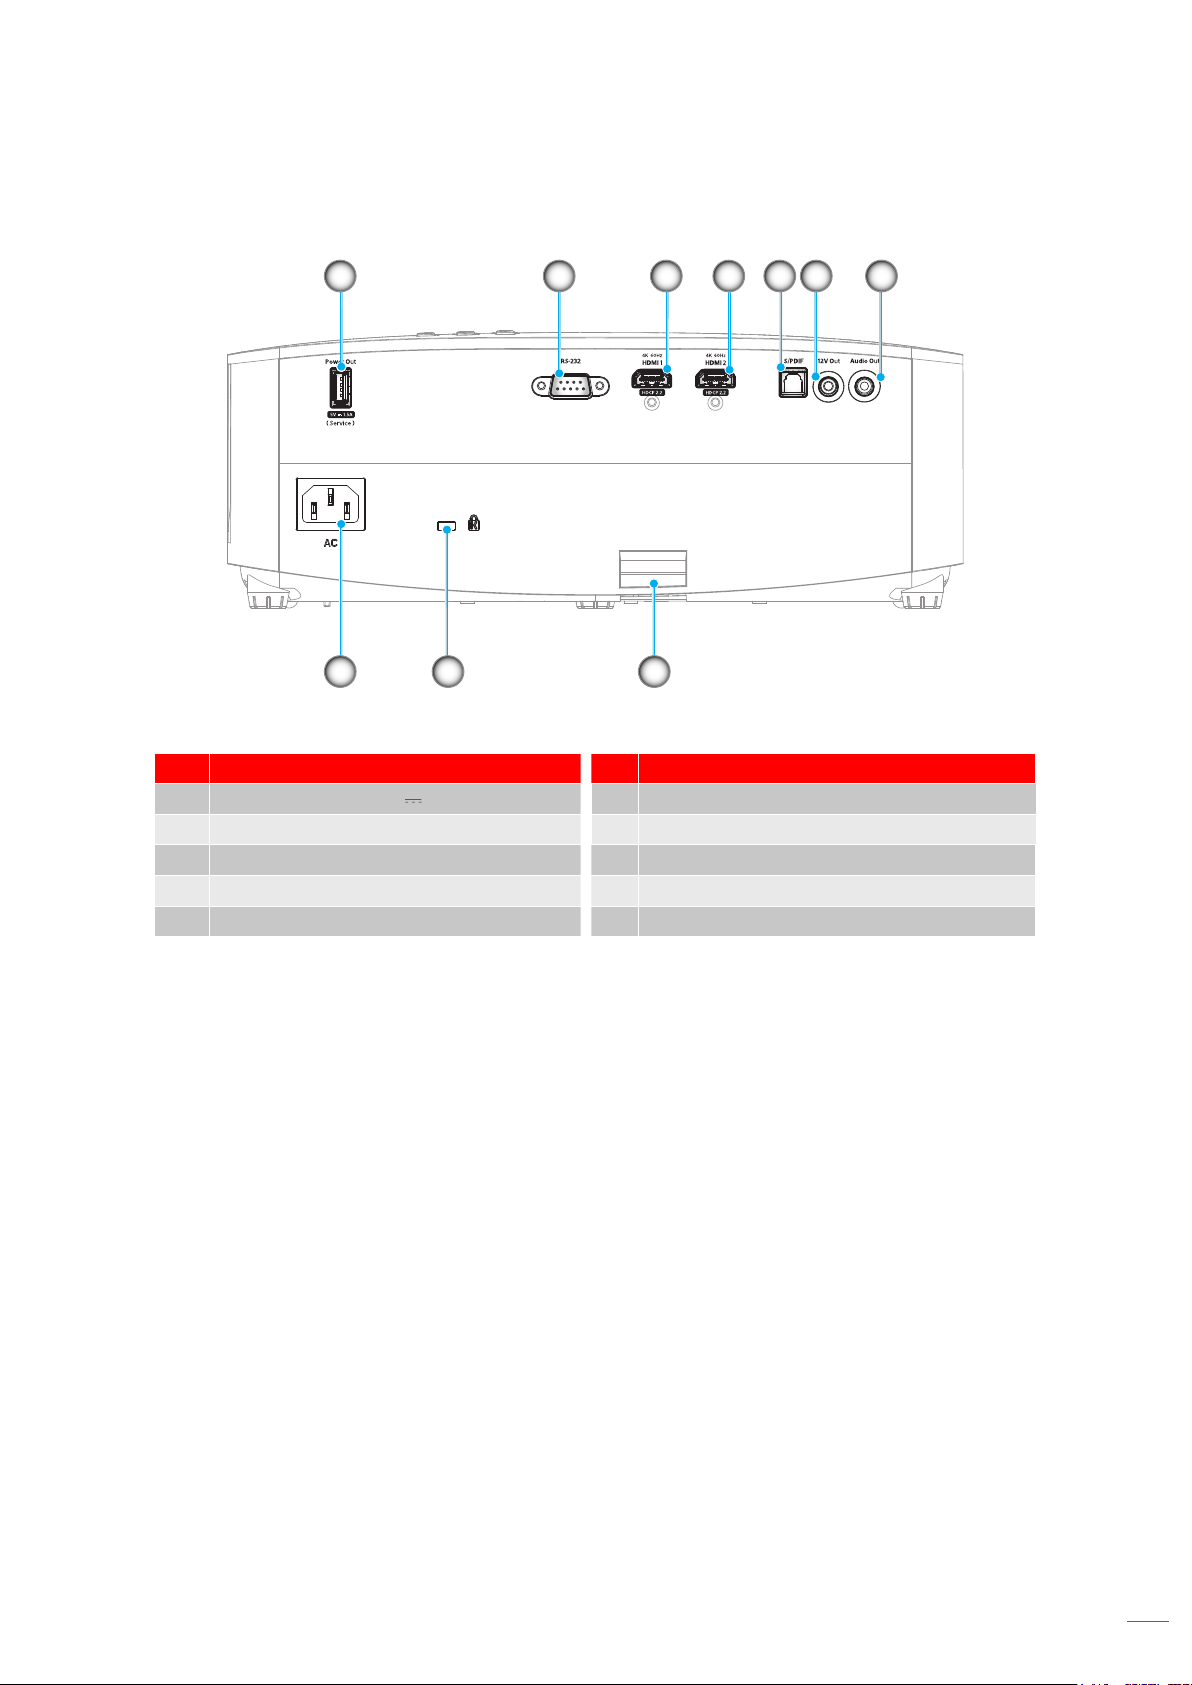
Connections
No Item No Item
TM
English
12
INTRODUCTION
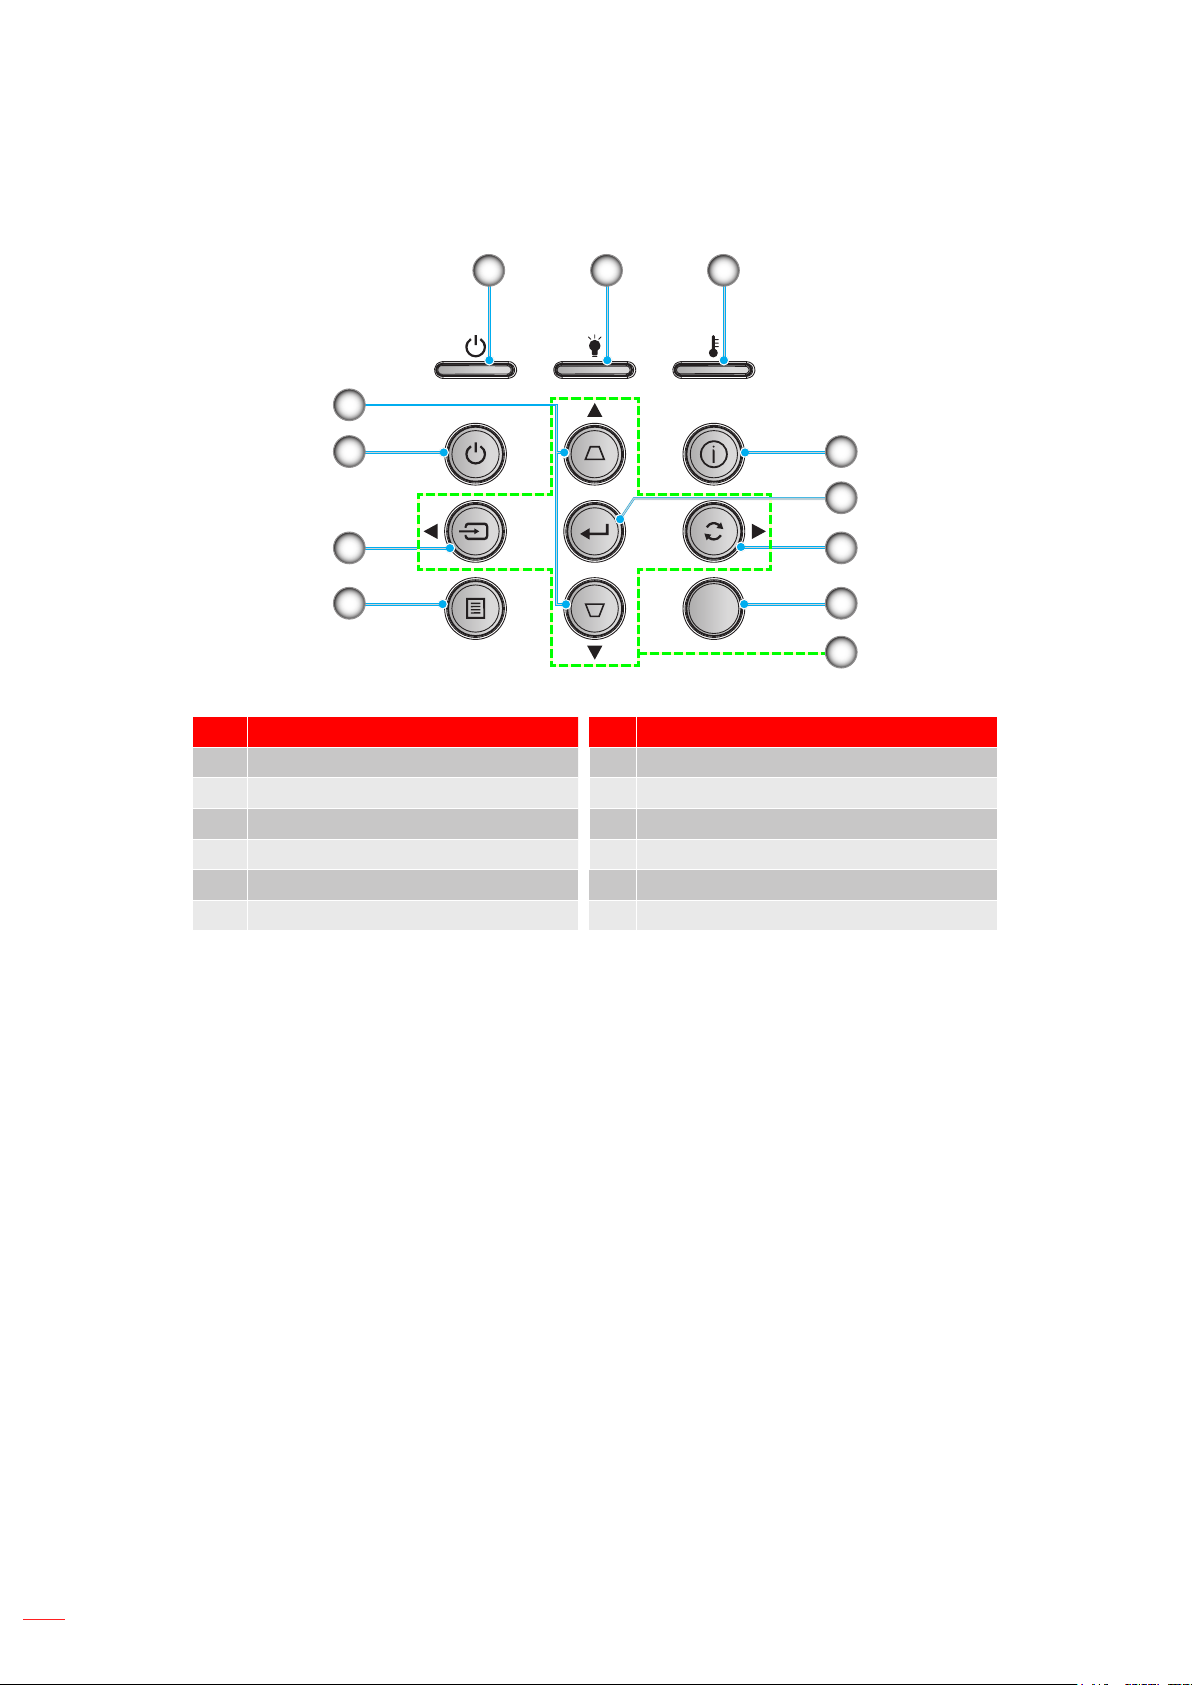
Keypad
No Item No Item
English
13
INTRODUCTION
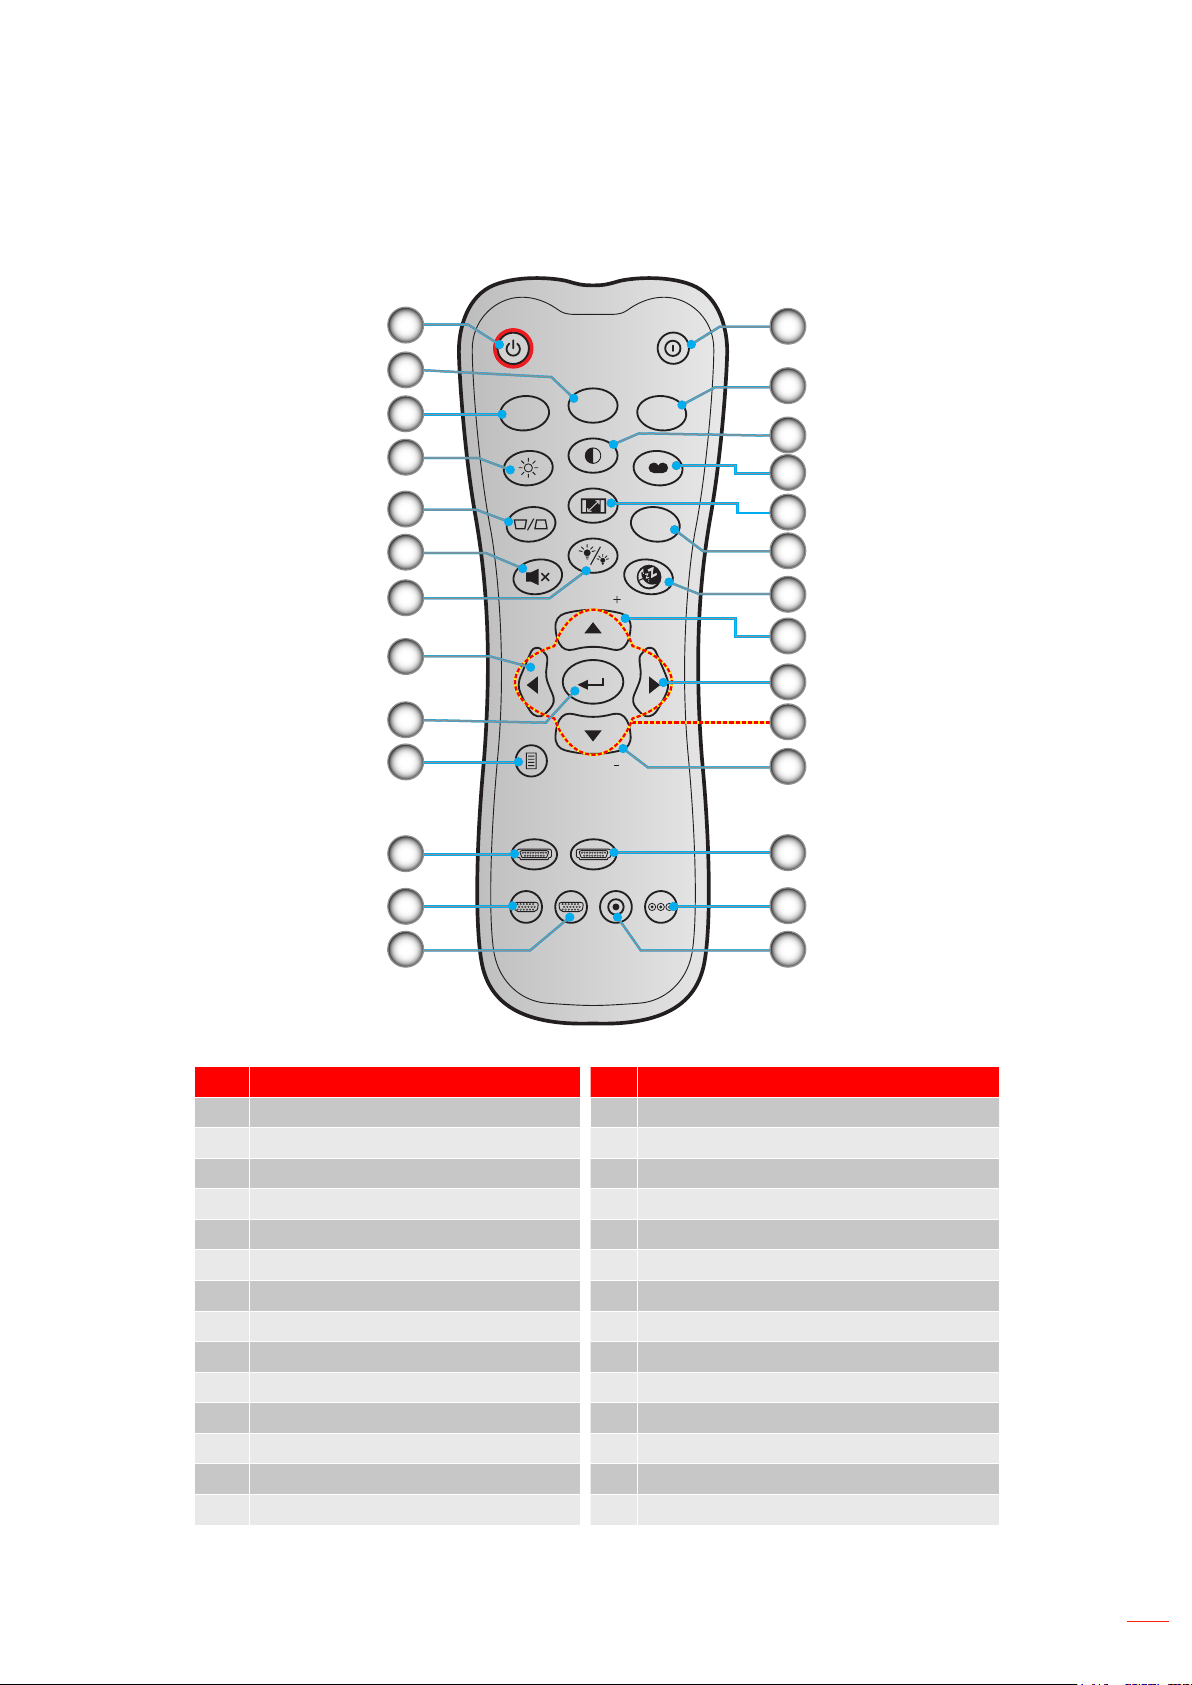
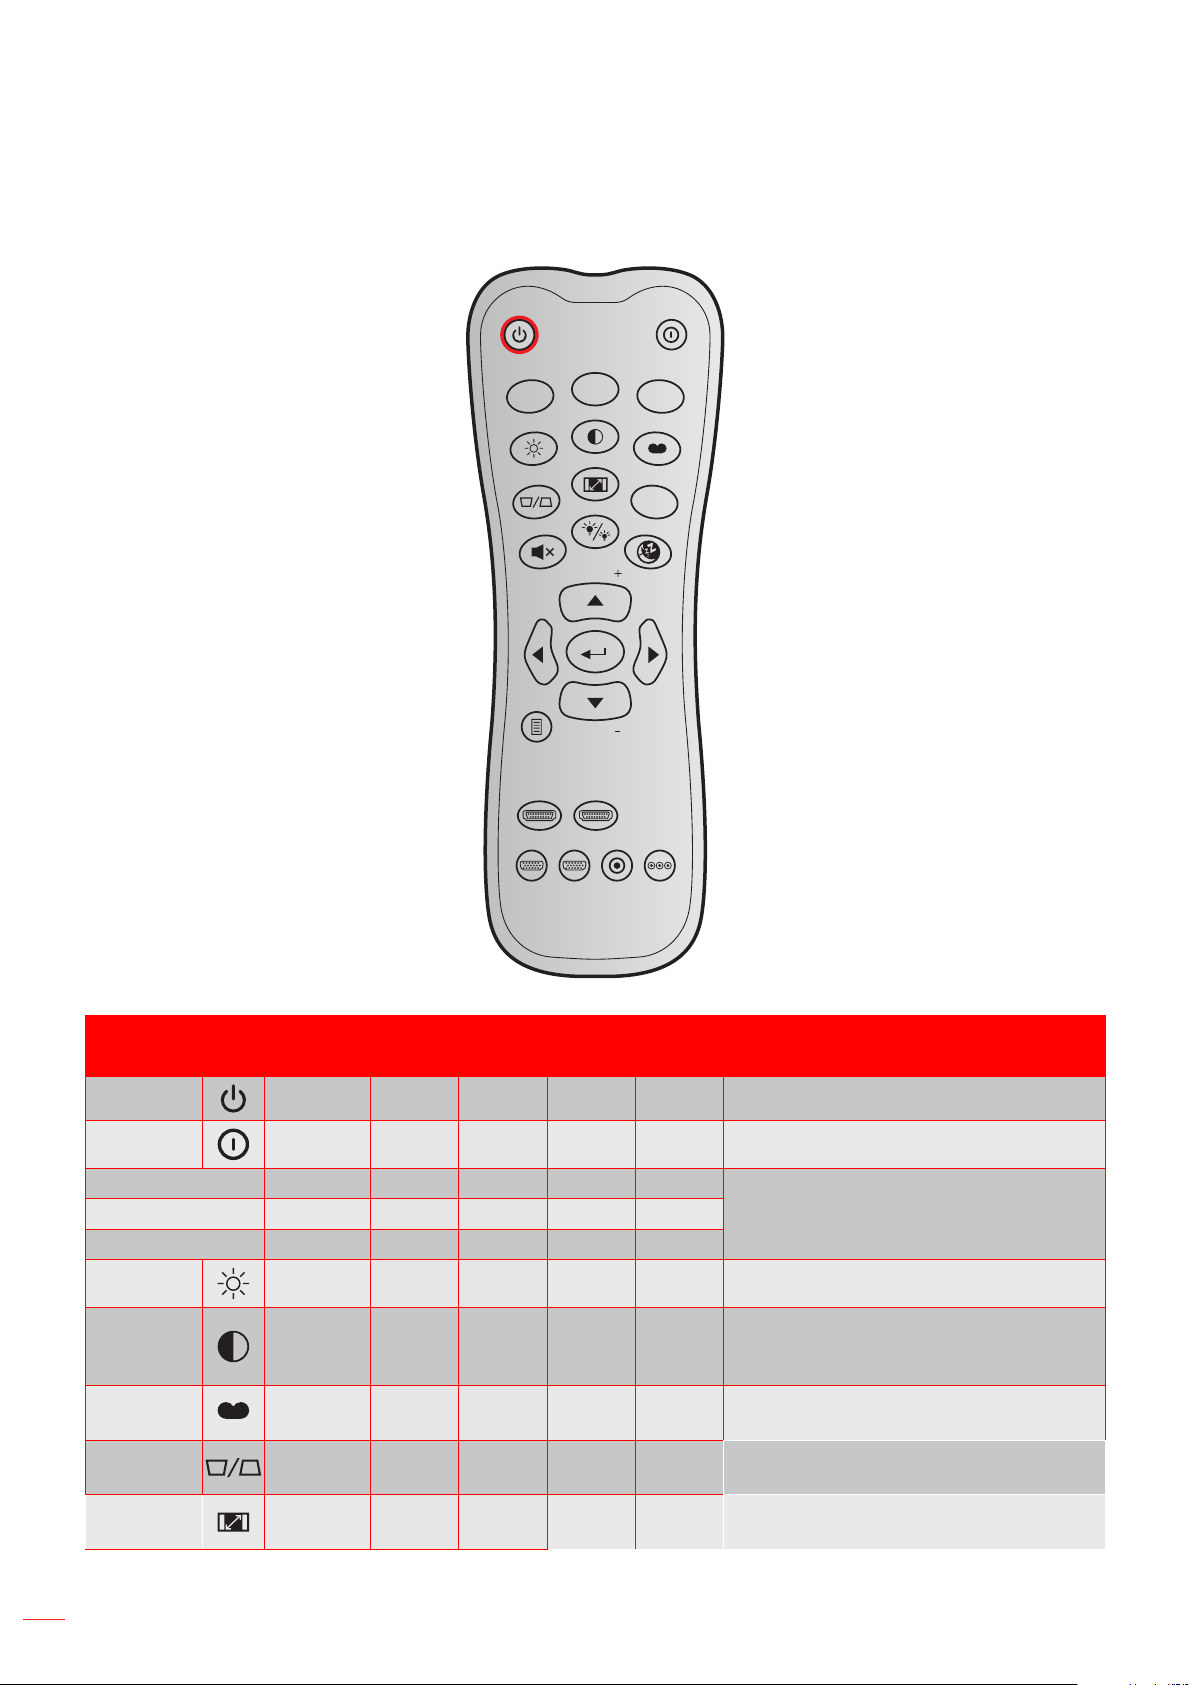
Remote control
ON
OFF
Menu
VGA1
HDMI1
User2
Contrast
Aspect ratio
DB
Volume
Source
Re-sync
User1
Brightness
Keystone
Mute
User3
Mode
3D
Sleep Timer
Volume
HDMI2
VGA2 Video YPbPr
No Item No Item
Note: Some keys may have no function for models that do not support these features.

English
14
SETUP AND INSTALLATION
Installing the projector
Table mount front Ceiling mount front
Table mount rear Ceiling mount rear
44
44
Note: The further away the projector is placed from the screen the projected image size increases and vertical
oset also increases proportionally.
IMPORTANT!
Do not operate the projector in any orientation other that table top or ceiling mount. The projector should
be horizontal and not tilted either forwards/backwards or left/right. Any other orientation will invalidate
the warranty and may shorten the lifetime of the projector lamp or the projector itself. For non-standard
installation advice please contact Optoma.

English
15
SETUP AND INSTALLATION
Connecting sources to the projector
No Item No Item
Note: To ensure the best image quality and avoid connection errors, we recommend the use of High Speed or
Premium Certied HDMI cables up to 5 meters.
English
16
SETUP AND INSTALLATION
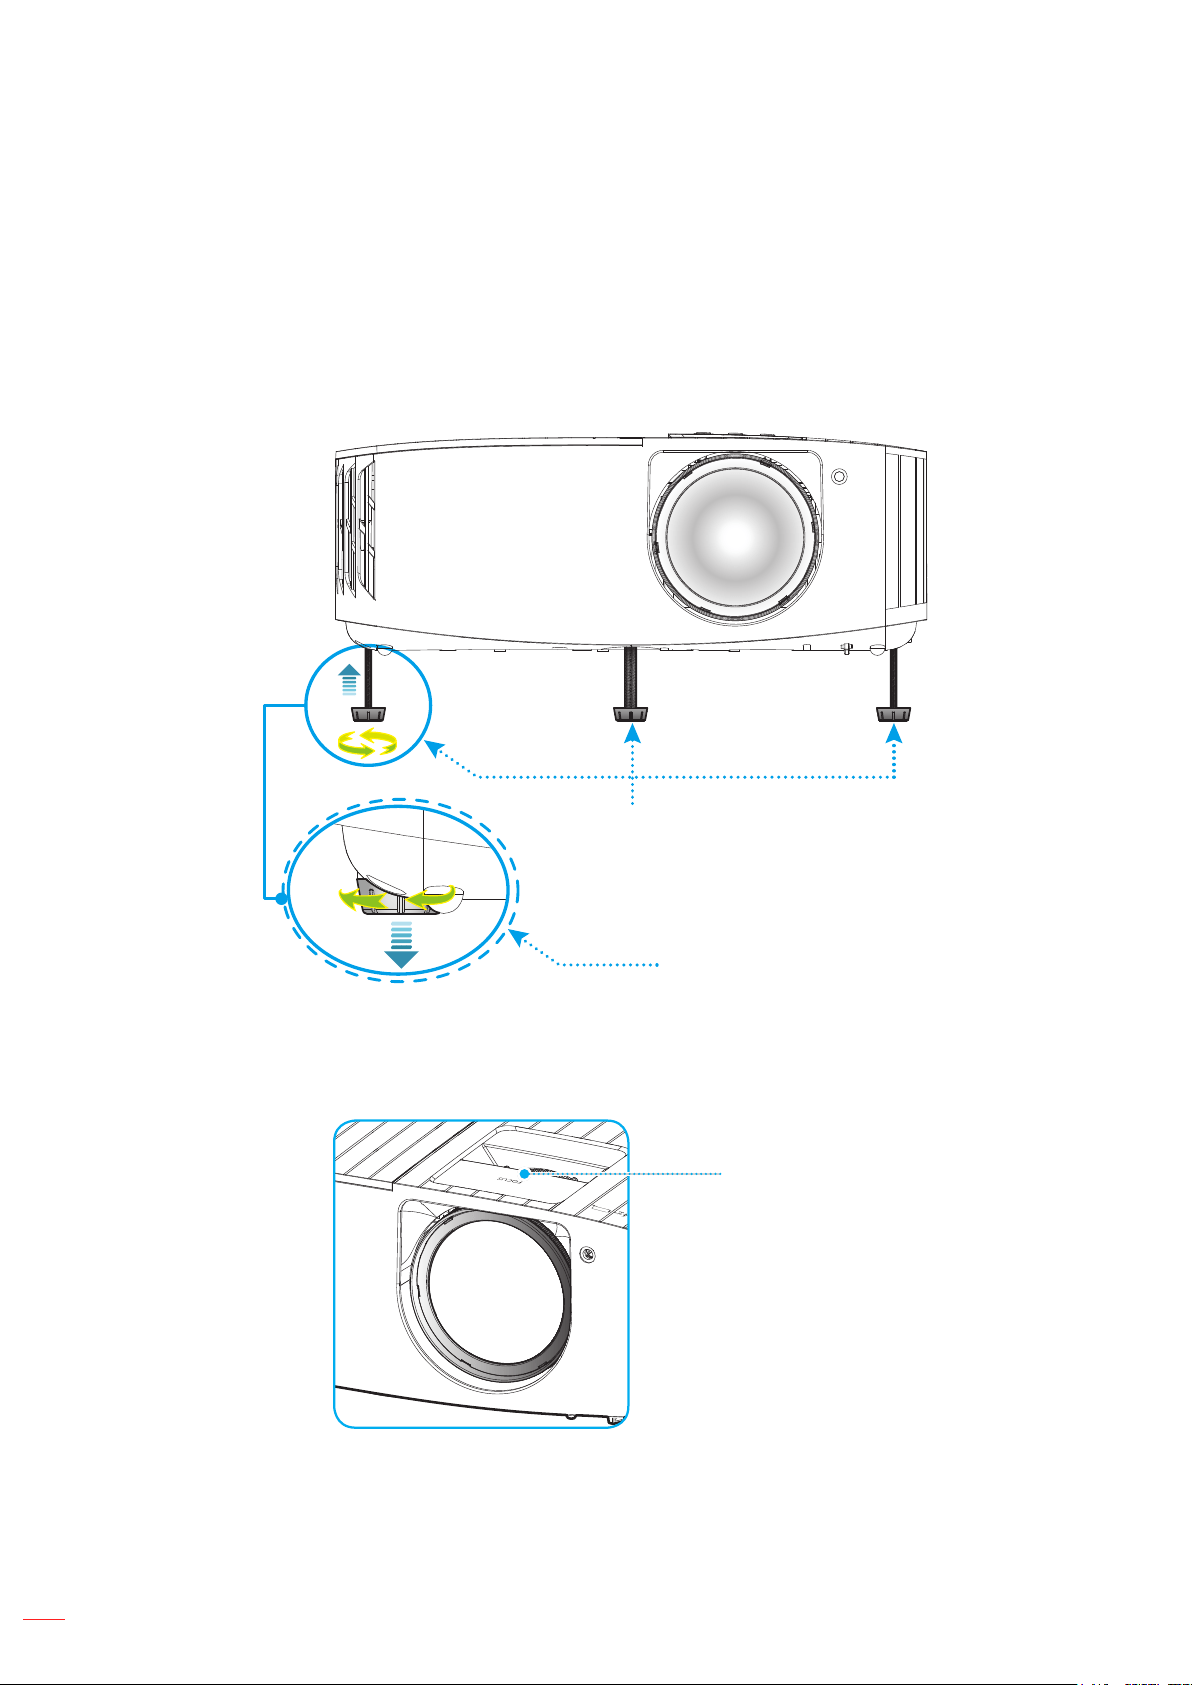
Adjusting the projector image
Image height
Focus
Note: The projector will focus at a distance of 0.4m to 3.3m.
English
17
SETUP AND INSTALLATION
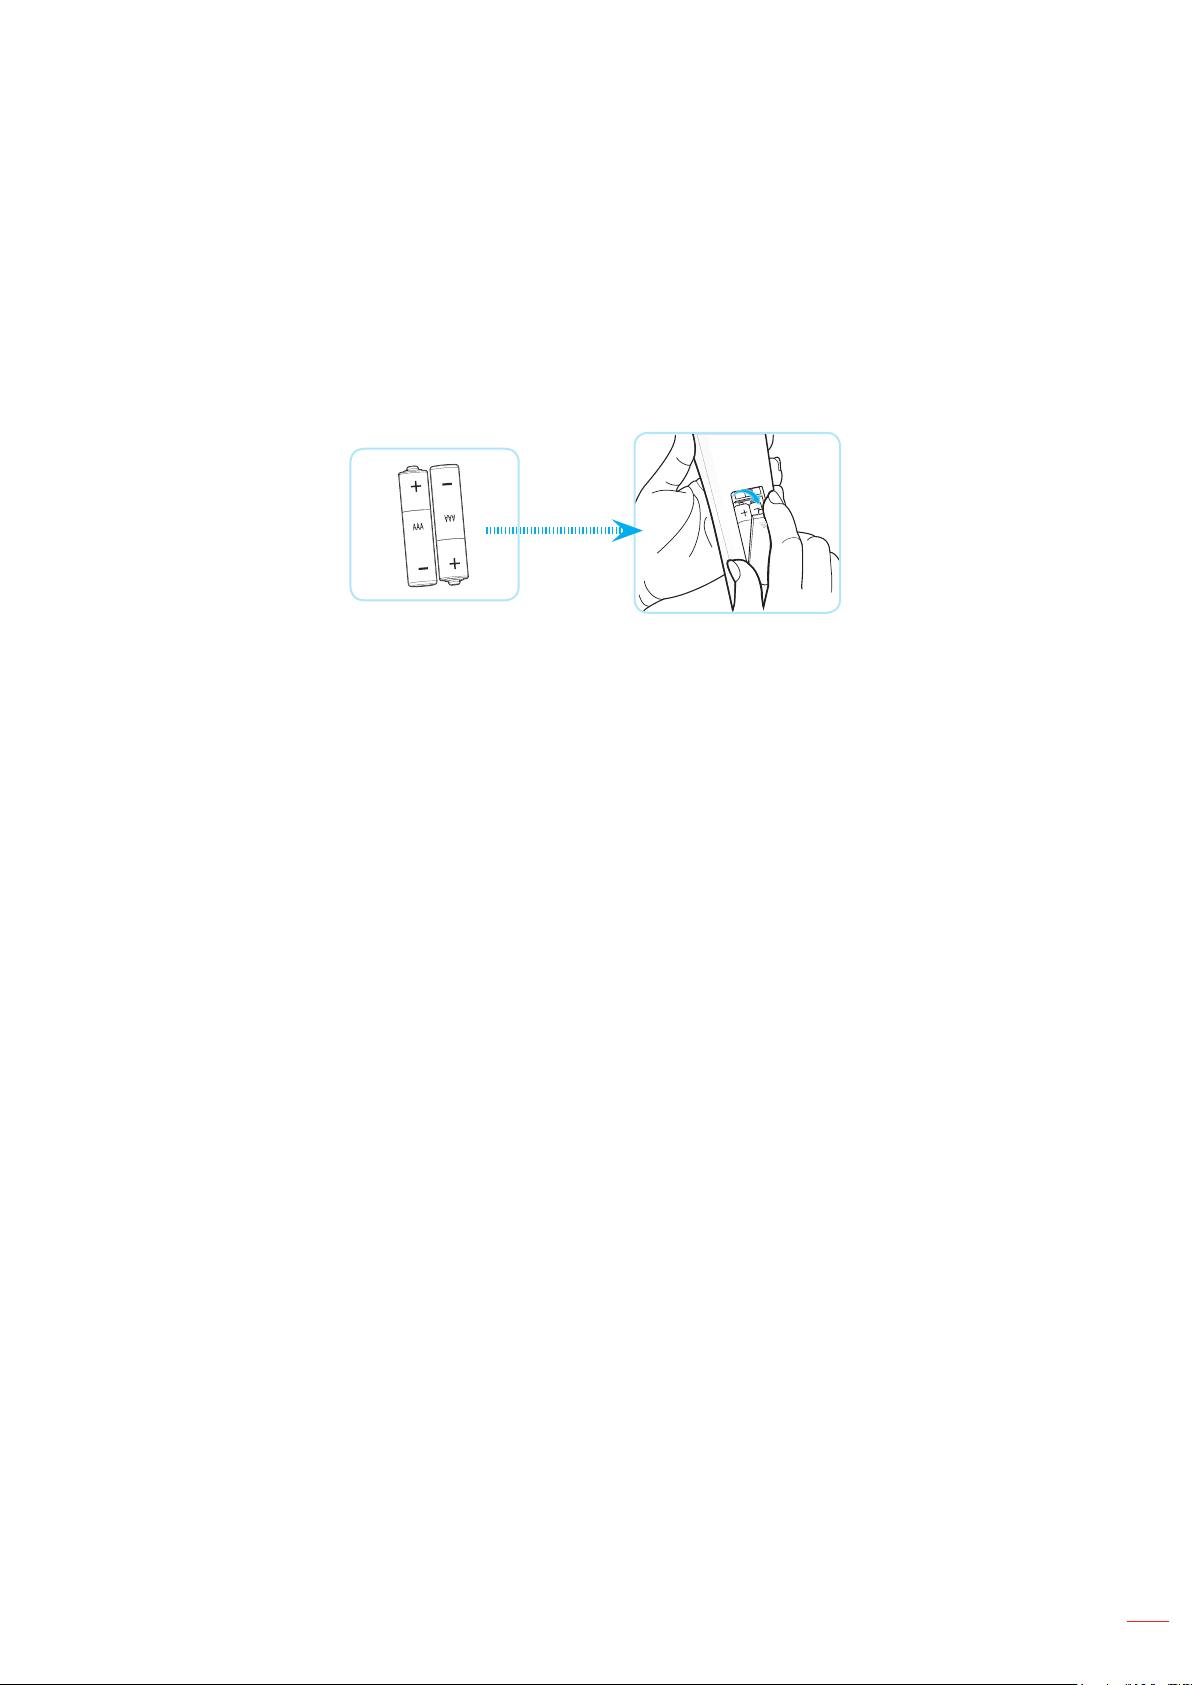
Remote setup
Installing / replacing the batteries
Note: Replace only with the same or equivalent type batteries.
CAUTION
English
18
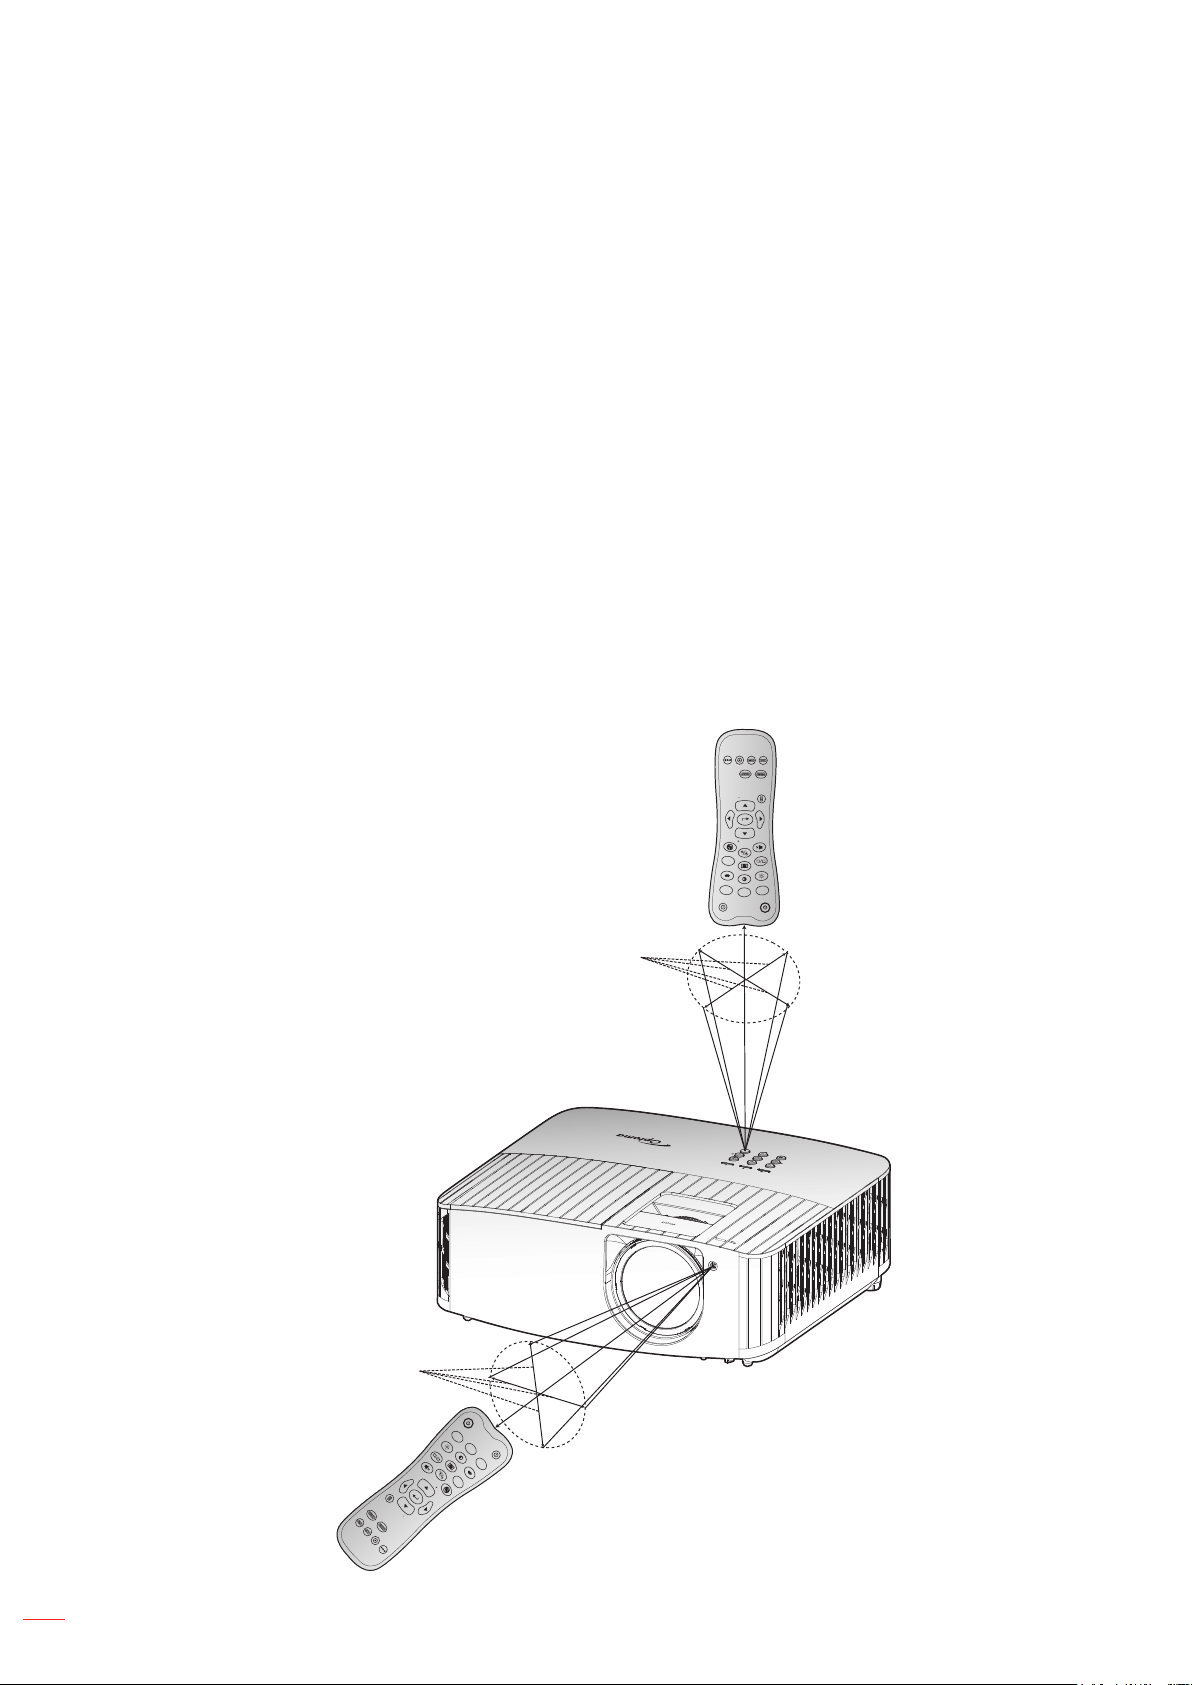
SETUP AND INSTALLATION
Eective range
Note: When pointing the remote control directly (0 degrees angle) on the IR sensor, the distance between the
remote control and the sensor should not be longer than 8 meters (~26 feet).
ON
OFF
Menu
VGA1
HDMI1
User2
Con trast
Asp ect ra tio
DB
Vol ume
Sou rce
Re- sync
User1
Bri ghtnes s
Key stone
Mut e
User3
Mod e
3D
Sle ep Tim er
Vol ume
HDMI2
VGA2
Video
YPbPr
ON
OFF
Menu
VGA1
HDMI1
User2
Con trast
Asp ect ra tio
DB
Vol ume
Sou rce
Re- sync
User1
Bri ghtnes s
Key stone
Mut e
User3
Mod e
3D
Sle ep Tim er
Vol ume
HDMI2
VGA2
Video
YPbPr
English
19
USING THE PROJECTOR
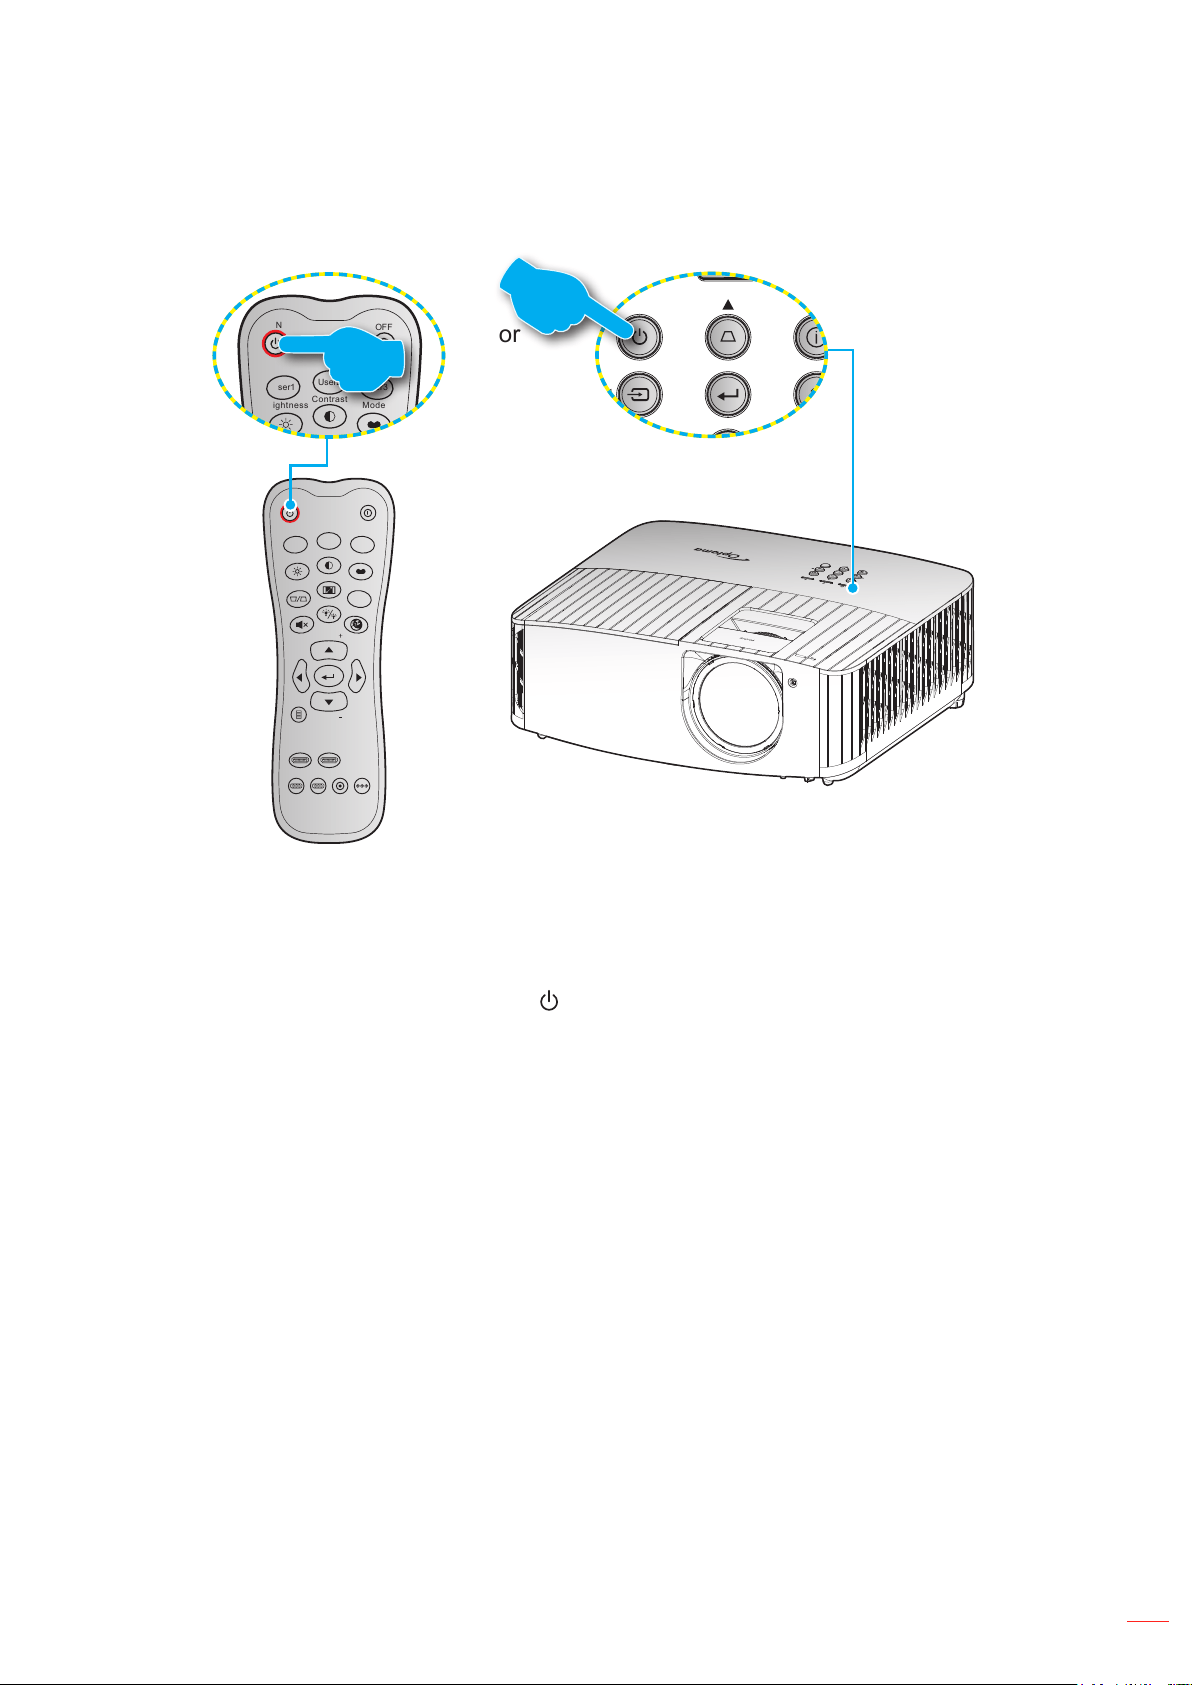
Powering on / o the projector
ON
OFF
Menu
VGA1
HDMI1
User2
Contrast
Aspect ratio
DB
Volume
Source
Re-sync
User1
Brightness
Keystone
Mute
User3
Mode
3D
Sleep Timer
Volume
HDMI2
VGA2 Video YPbPr
ON
OFF
User2
Contrast
Aspect ratio
User1
Brightness
User3
Mode
Powering on
Note: The rst time the projector is turned on, you will be prompted to select the preferred language, projection
orientation, and other settings.

English
20
USING THE PROJECTOR
Powering o
Note: It is not recommended that the projector is turned on immediately, right after a power o procedure.
English
21
USING THE PROJECTOR
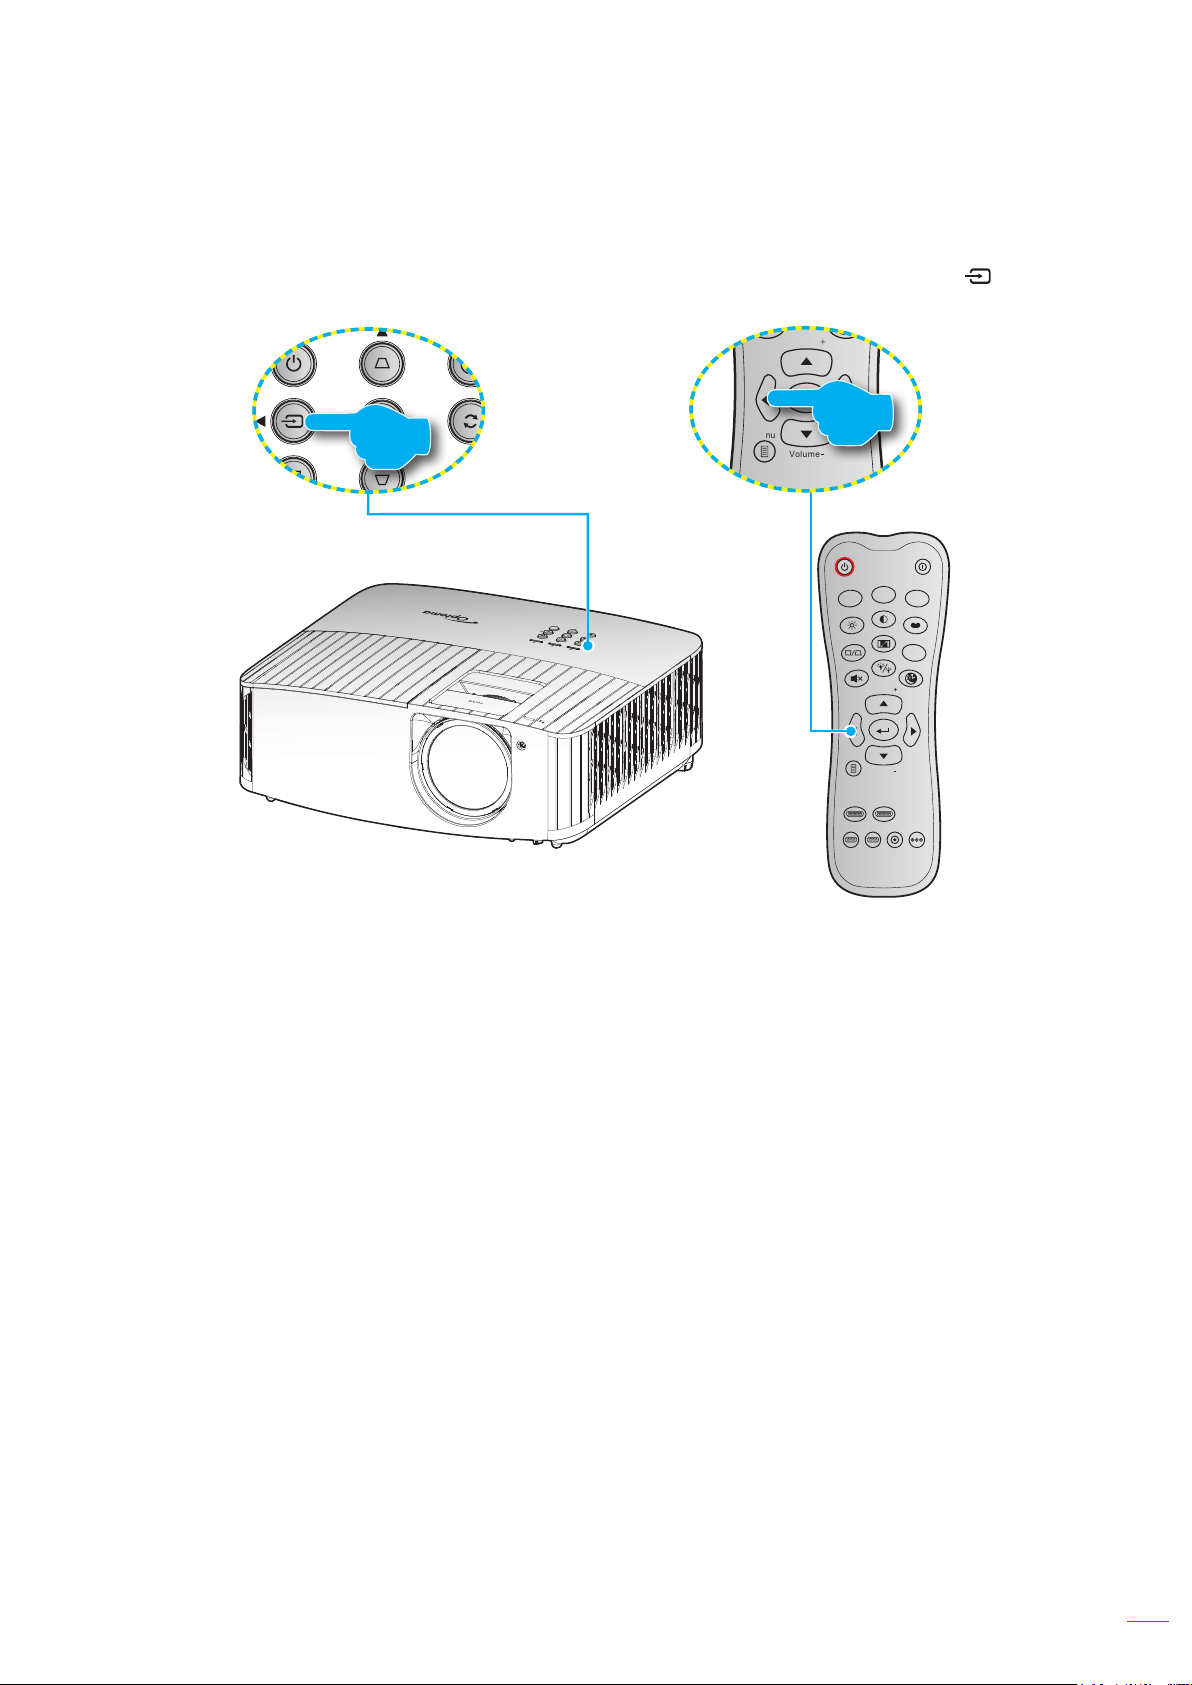
Selecting an input source
Source
ON
OFF
Menu
VGA1
HDMI1
User2
Contrast
Aspect ratio
DB
Volume
Source
Re-sync
User1
Brightness
Keystone
Mute
User3
Mode
3D
Sleep Timer
Volume
HDMI2
VGA2 Video YPbPr
Menu
Volume
Source
Re-sync
Volume
English
22
USING THE PROJECTOR
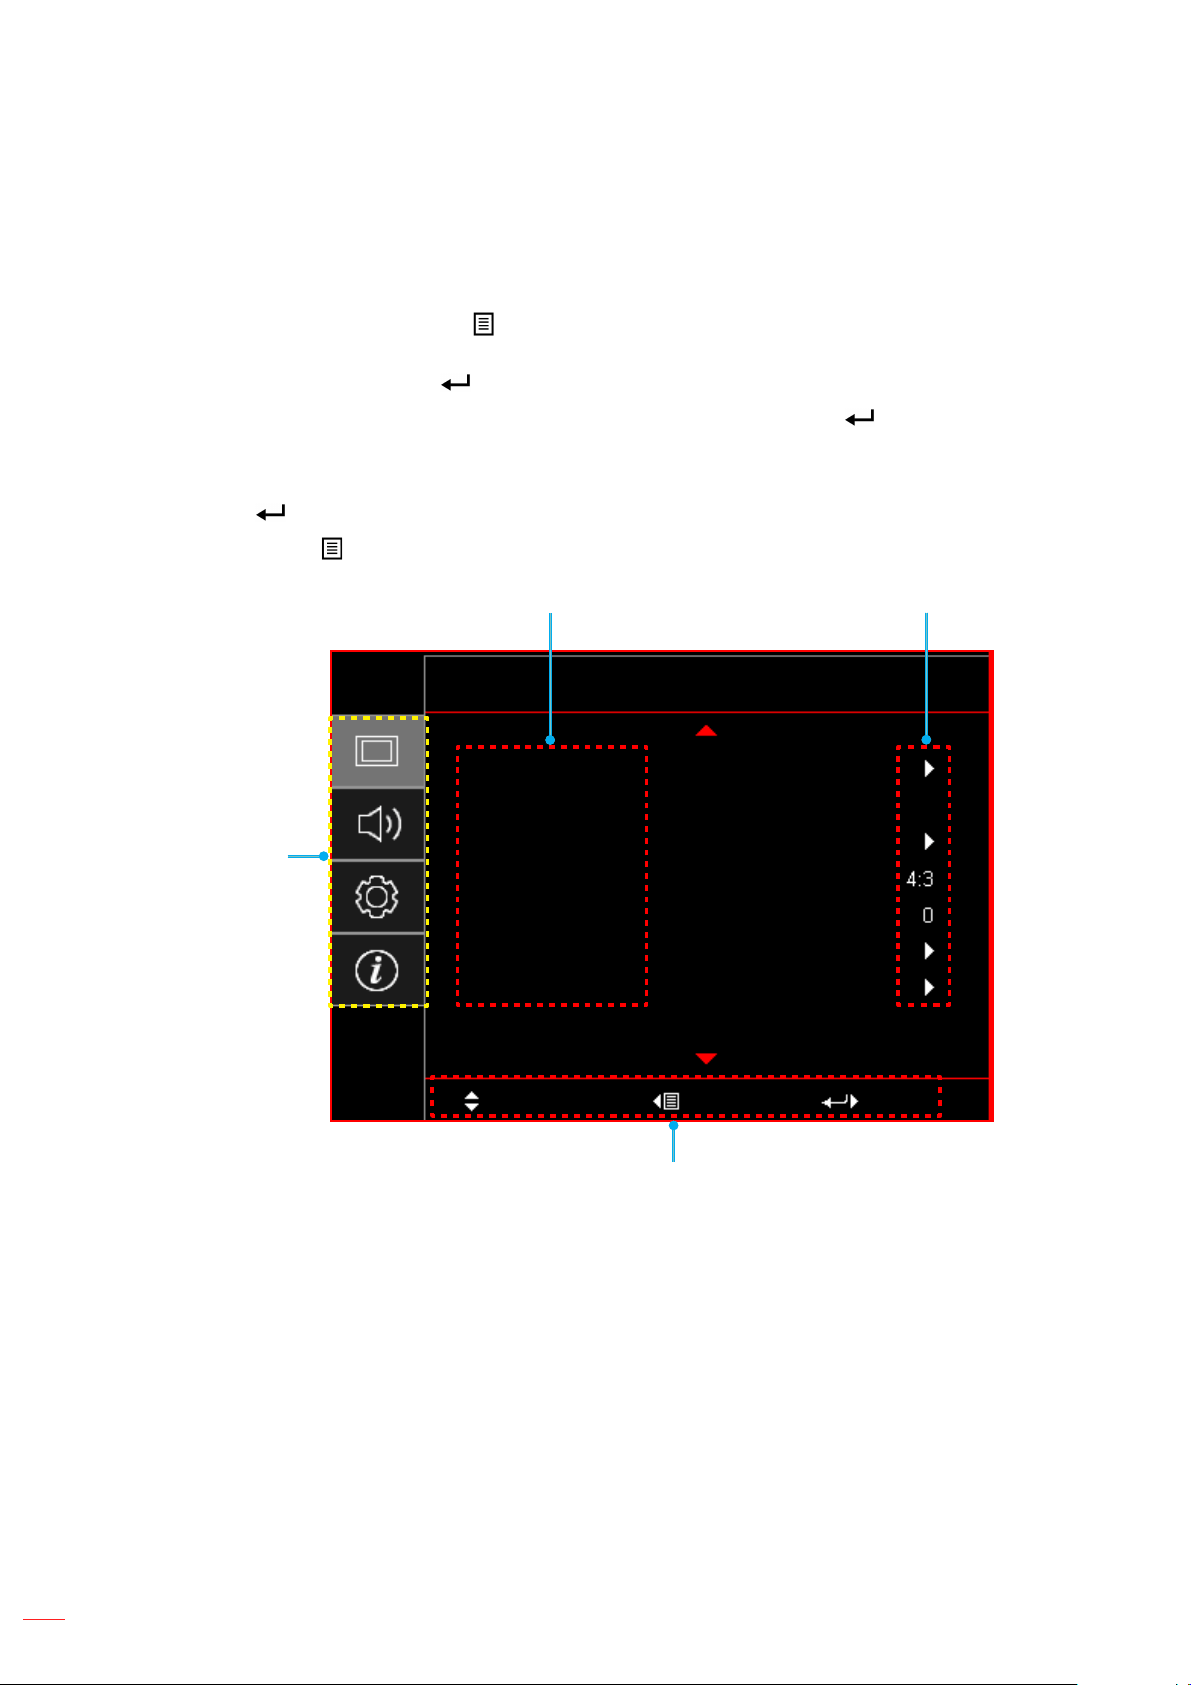
Menu navigation and features
pq
pq
tu
Display
English
23
USING THE PROJECTOR
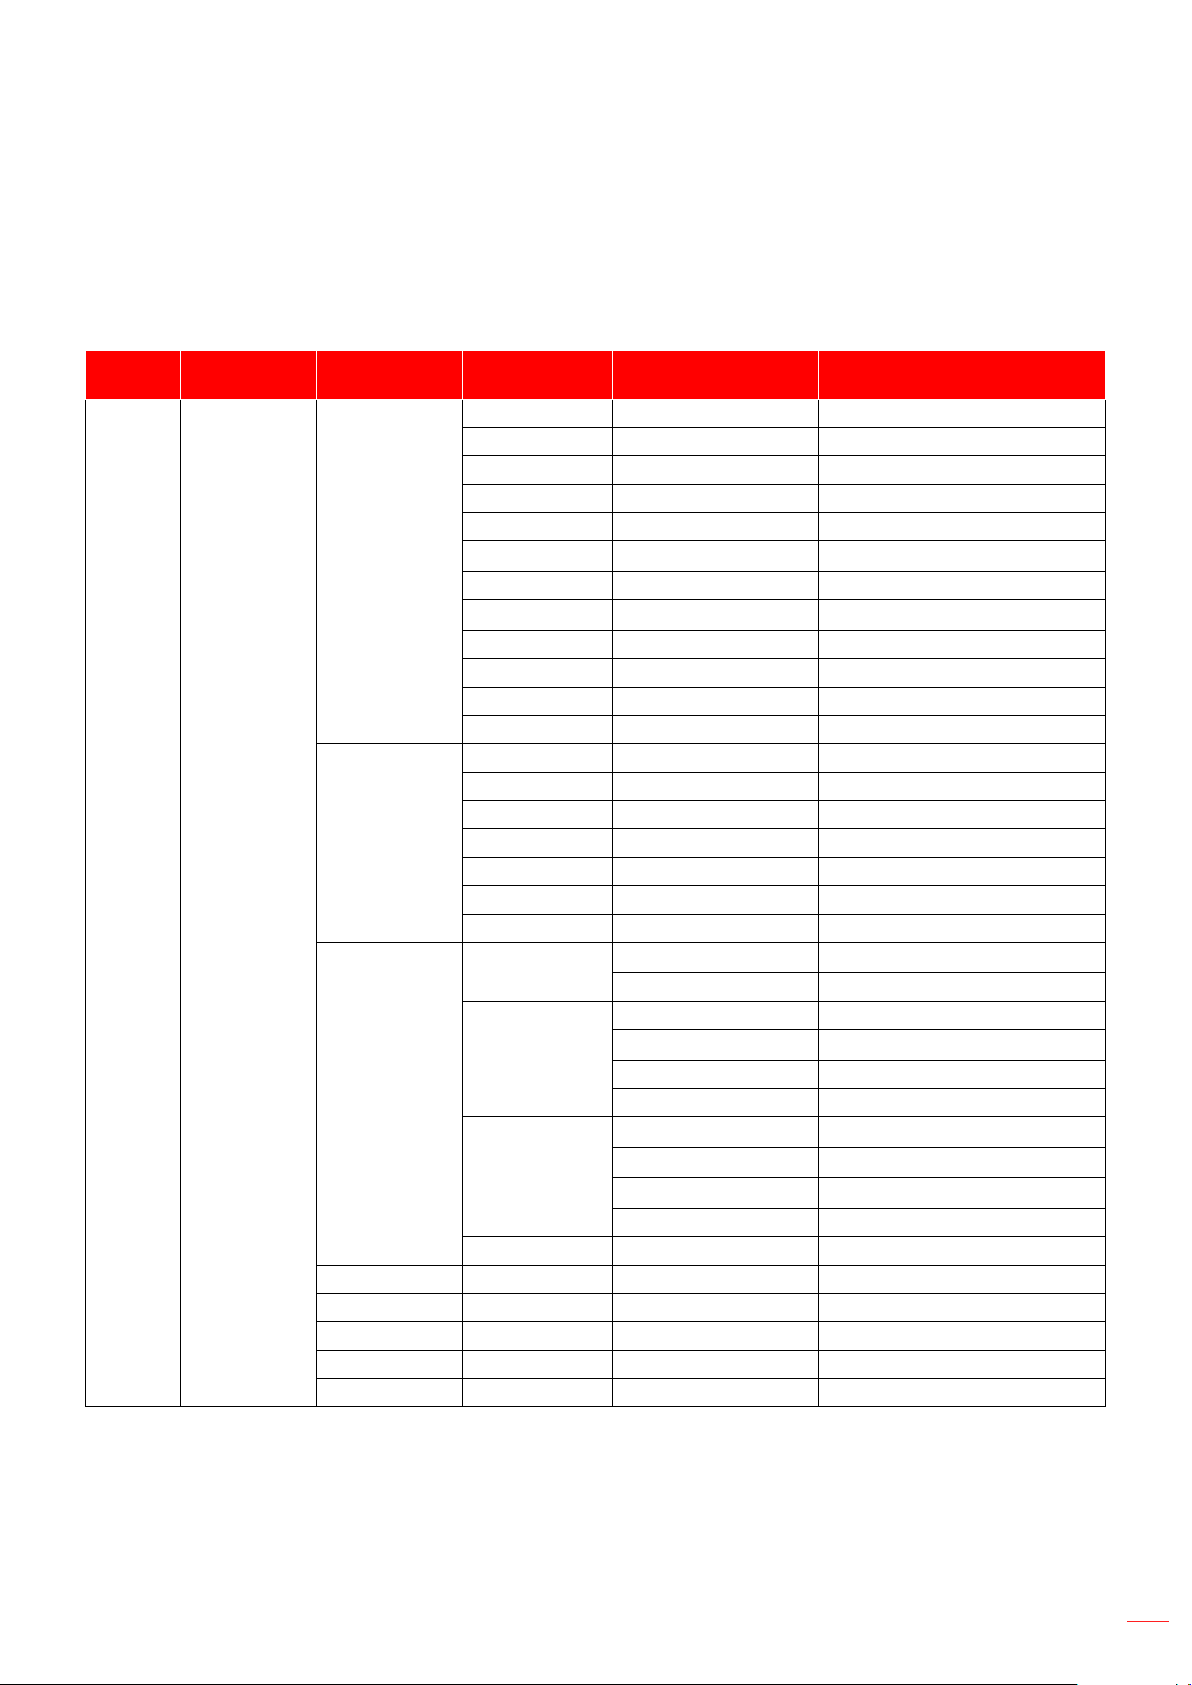
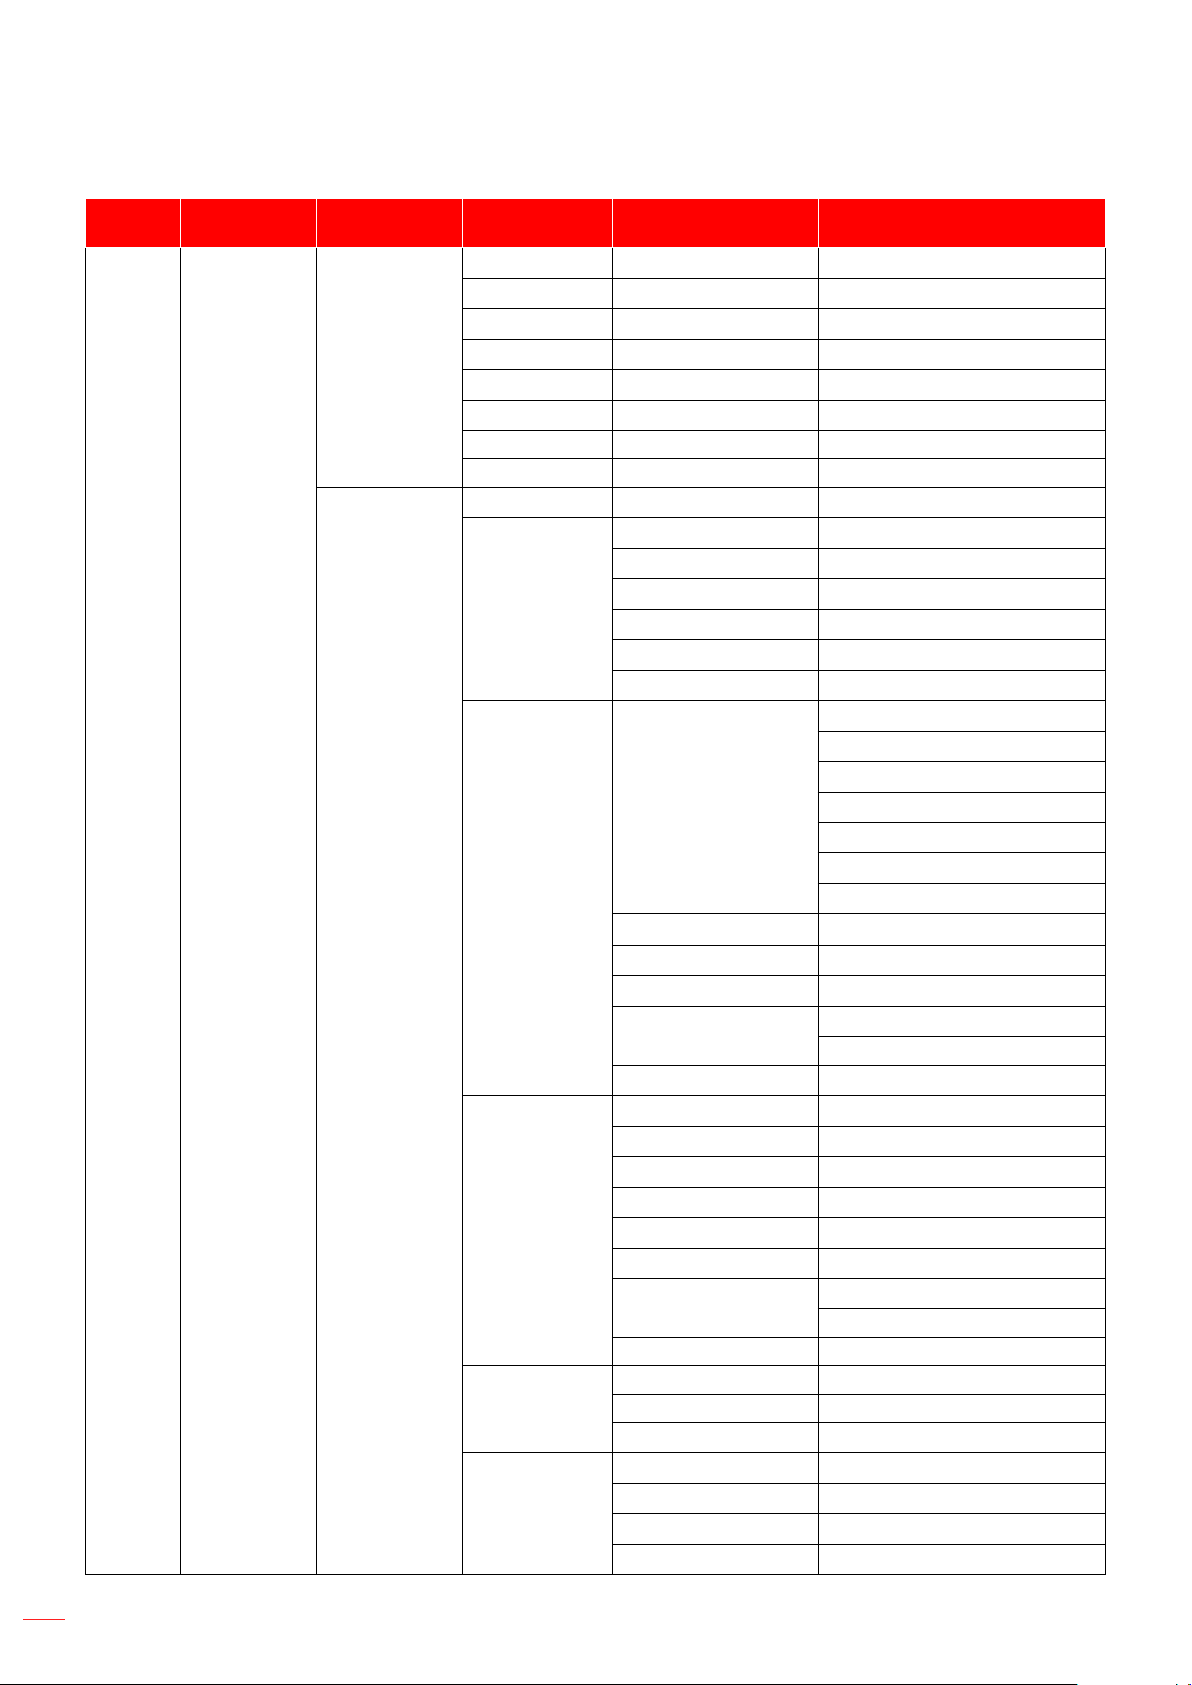
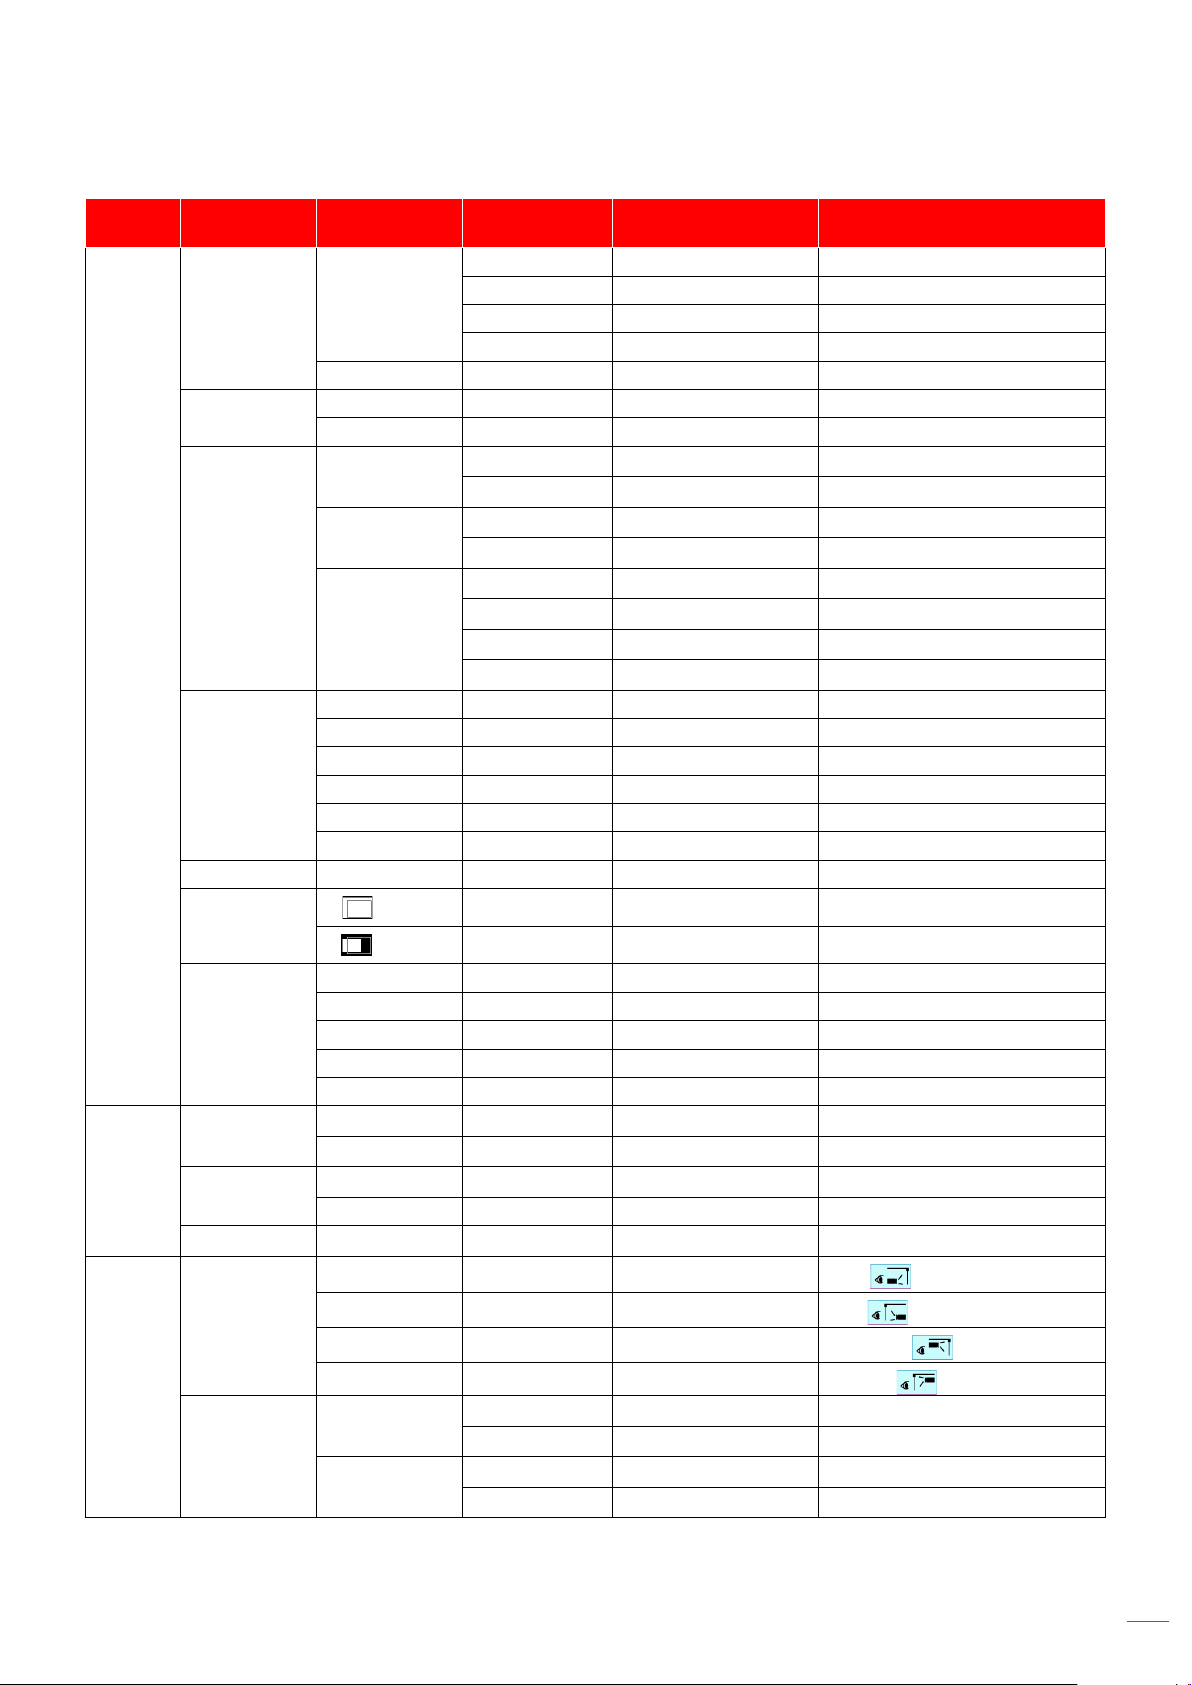
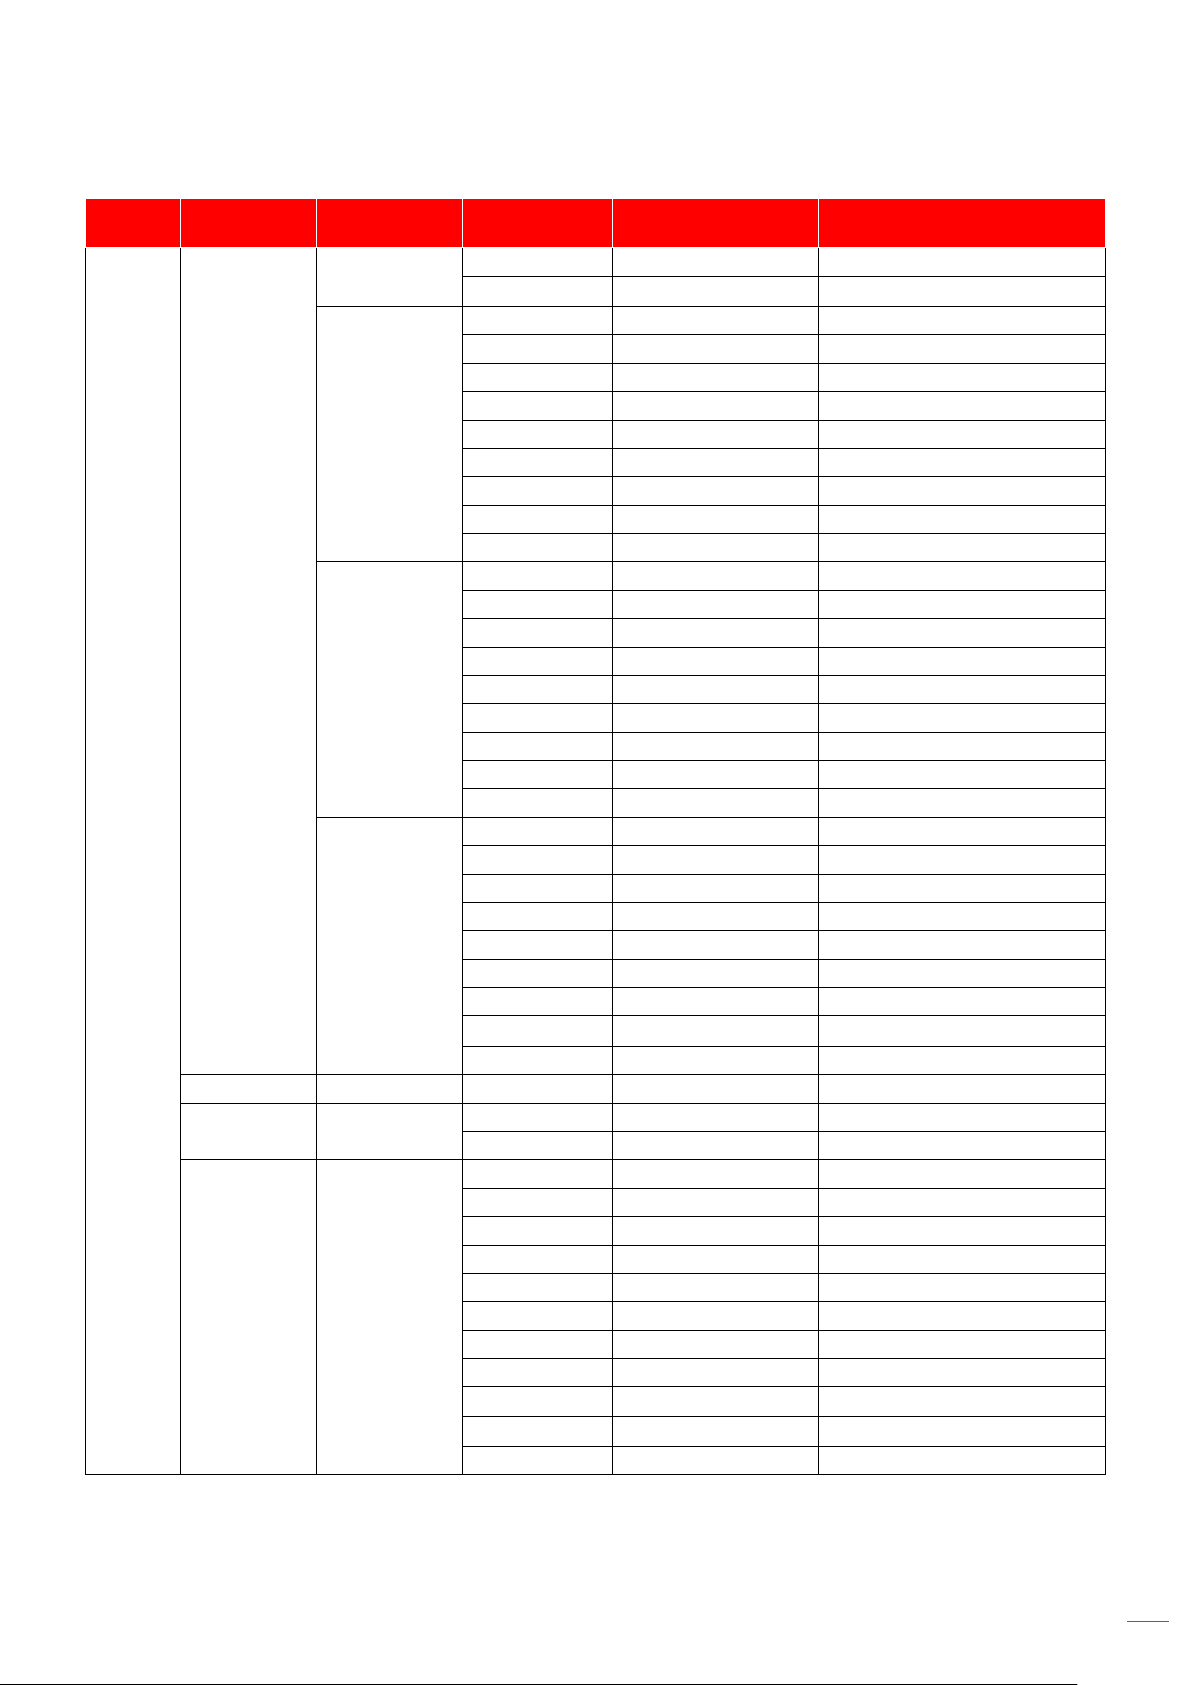
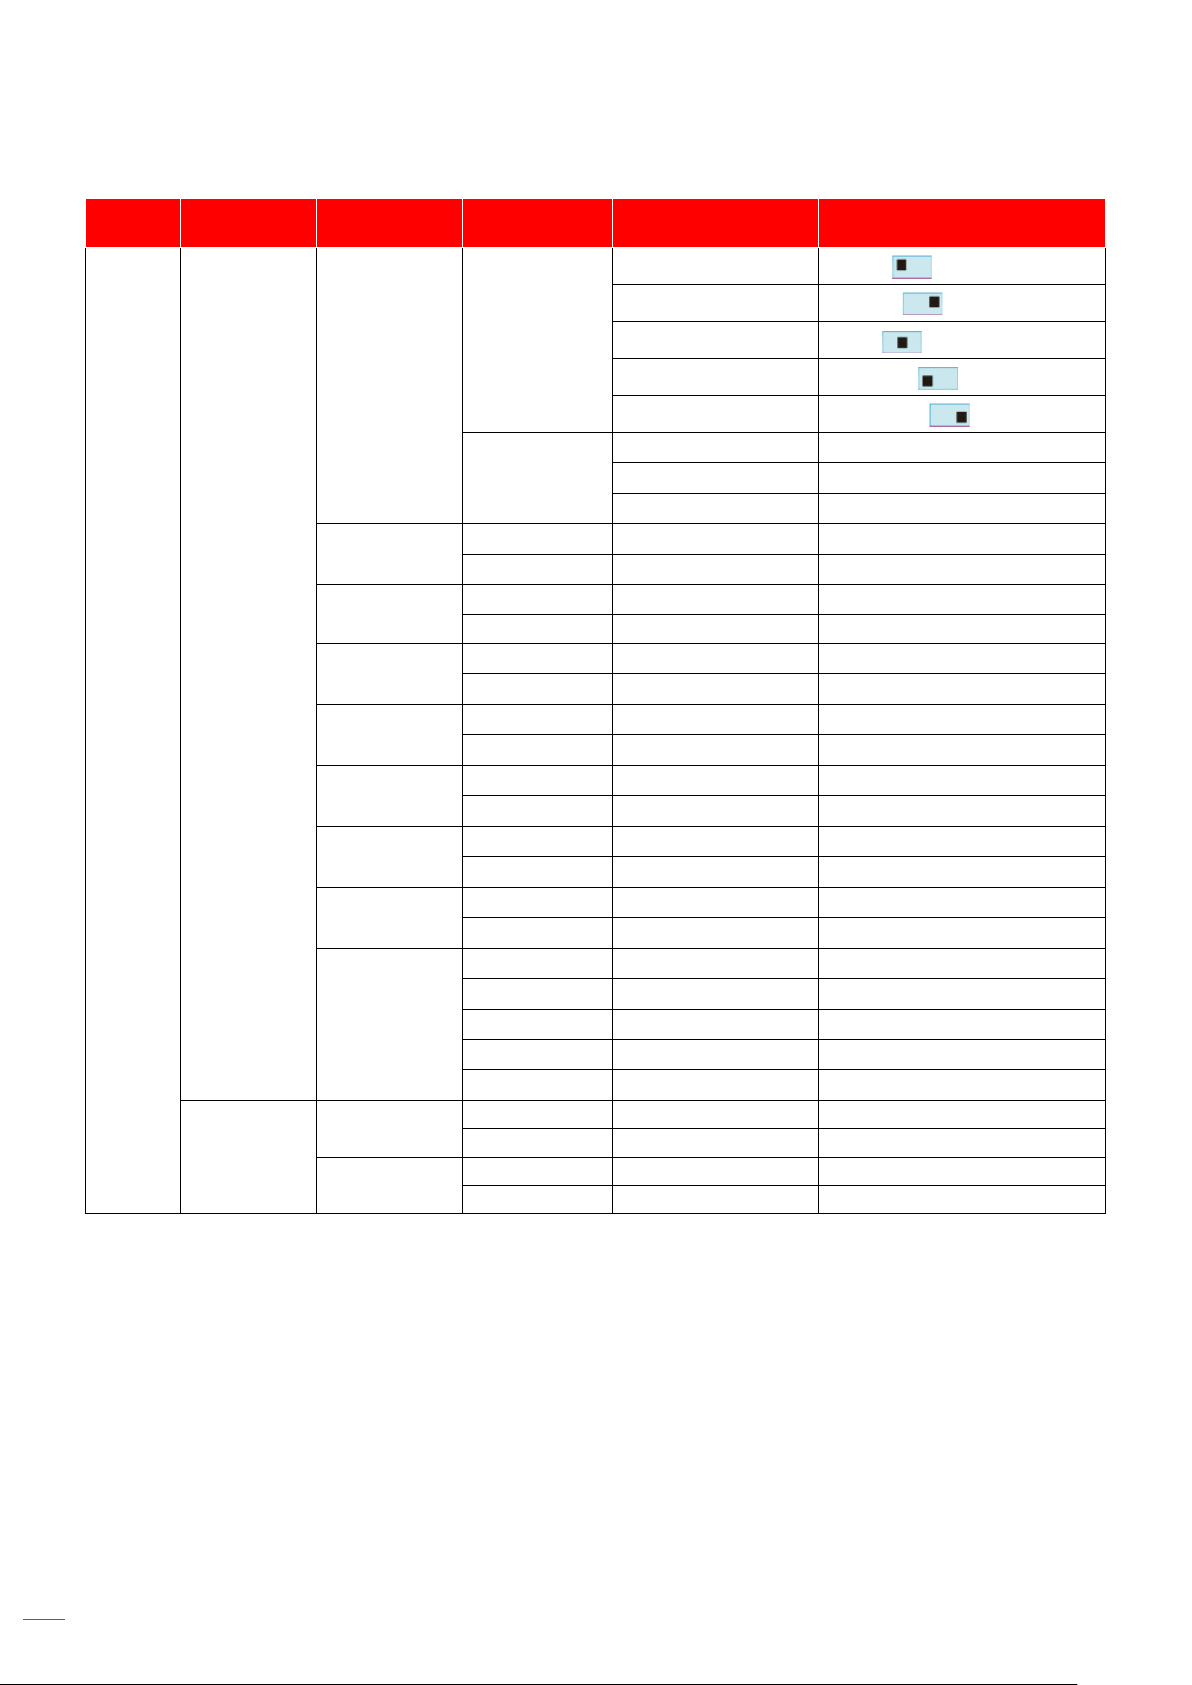
OSD Menu tree
Note:
The design function depends on model and region.
The functions are subject to the actual product, the changes will not be notied.
Main
Menu
Sub Menu Sub Menu 2 Sub Menu 3 Sub Menu 4 Values
Tint
English
24
USING THE PROJECTOR
Main
Menu
Sub Menu Sub Menu 2 Sub Menu 3 Sub Menu 4 Values
TM
B
Y
M
W
YUV
YUV
English
25
USING THE PROJECTOR
Main
Menu
Sub Menu Sub Menu 2 Sub Menu 3 Sub Menu 4 Values
SBS
LBX
H
V

English
26
USING THE PROJECTOR
Main
Menu
Sub Menu Sub Menu 2 Sub Menu 3 Sub Menu 4 Values
White
English
27
USING THE PROJECTOR
Main
Menu
Sub Menu Sub Menu 2 Sub Menu 3 Sub Menu 4 Values
簡体中文
繁體中文
日本語
한국어
English
28
USING THE PROJECTOR
Main
Menu
Sub Menu Sub Menu 2 Sub Menu 3 Sub Menu 4 Values

English
29
USING THE PROJECTOR
Main
Menu
Sub Menu Sub Menu 2 Sub Menu 3 Sub Menu 4 Values

English
30
USING THE PROJECTOR
Display menu
Image settings menu
Display Mode
Cinema
HDR
HLG
HDR SIM.
Game
Reference
Bright
User
3D
ISF Day
ISF Night
ISF 3D
Note: For access and calibration of ISF daytime and night viewing modes, please contact your local dealer.
Wall Color
Dynamic Range
HDR/HLG
O
Auto
HDR Picture Mode
Bright:
Standard:
Film:
Detail:

English
31
USING THE PROJECTOR
HLG Picture Mode
Bright:
Standard:
Film:
Detail:
HDR Strength
Brightness
Contrast
Sharpness
Color
Tint
Gamma
Film
Video
Graphics
Standard(2.2)
1.8 / 2.0 / 2.4
3D
Note: These options are only available if the 3D mode function is disabled. In 3D mode, user can only select “3D”
for Gamma setting.
Color Settings
BrilliantColor
TM
Color Temperature
Color Matching
±
±
±
±

English
32
USING THE PROJECTOR
±
±
RGB Gain/Bias:
±
±
Color Space (non-HDMI input only)
Color Space (HDMI input only)
Brightness Mode
Bright
Eco
Dynamic
Eco+
Reset
Enhanced Gaming menu
Note:
*Only for 1080p 240Hz signals.
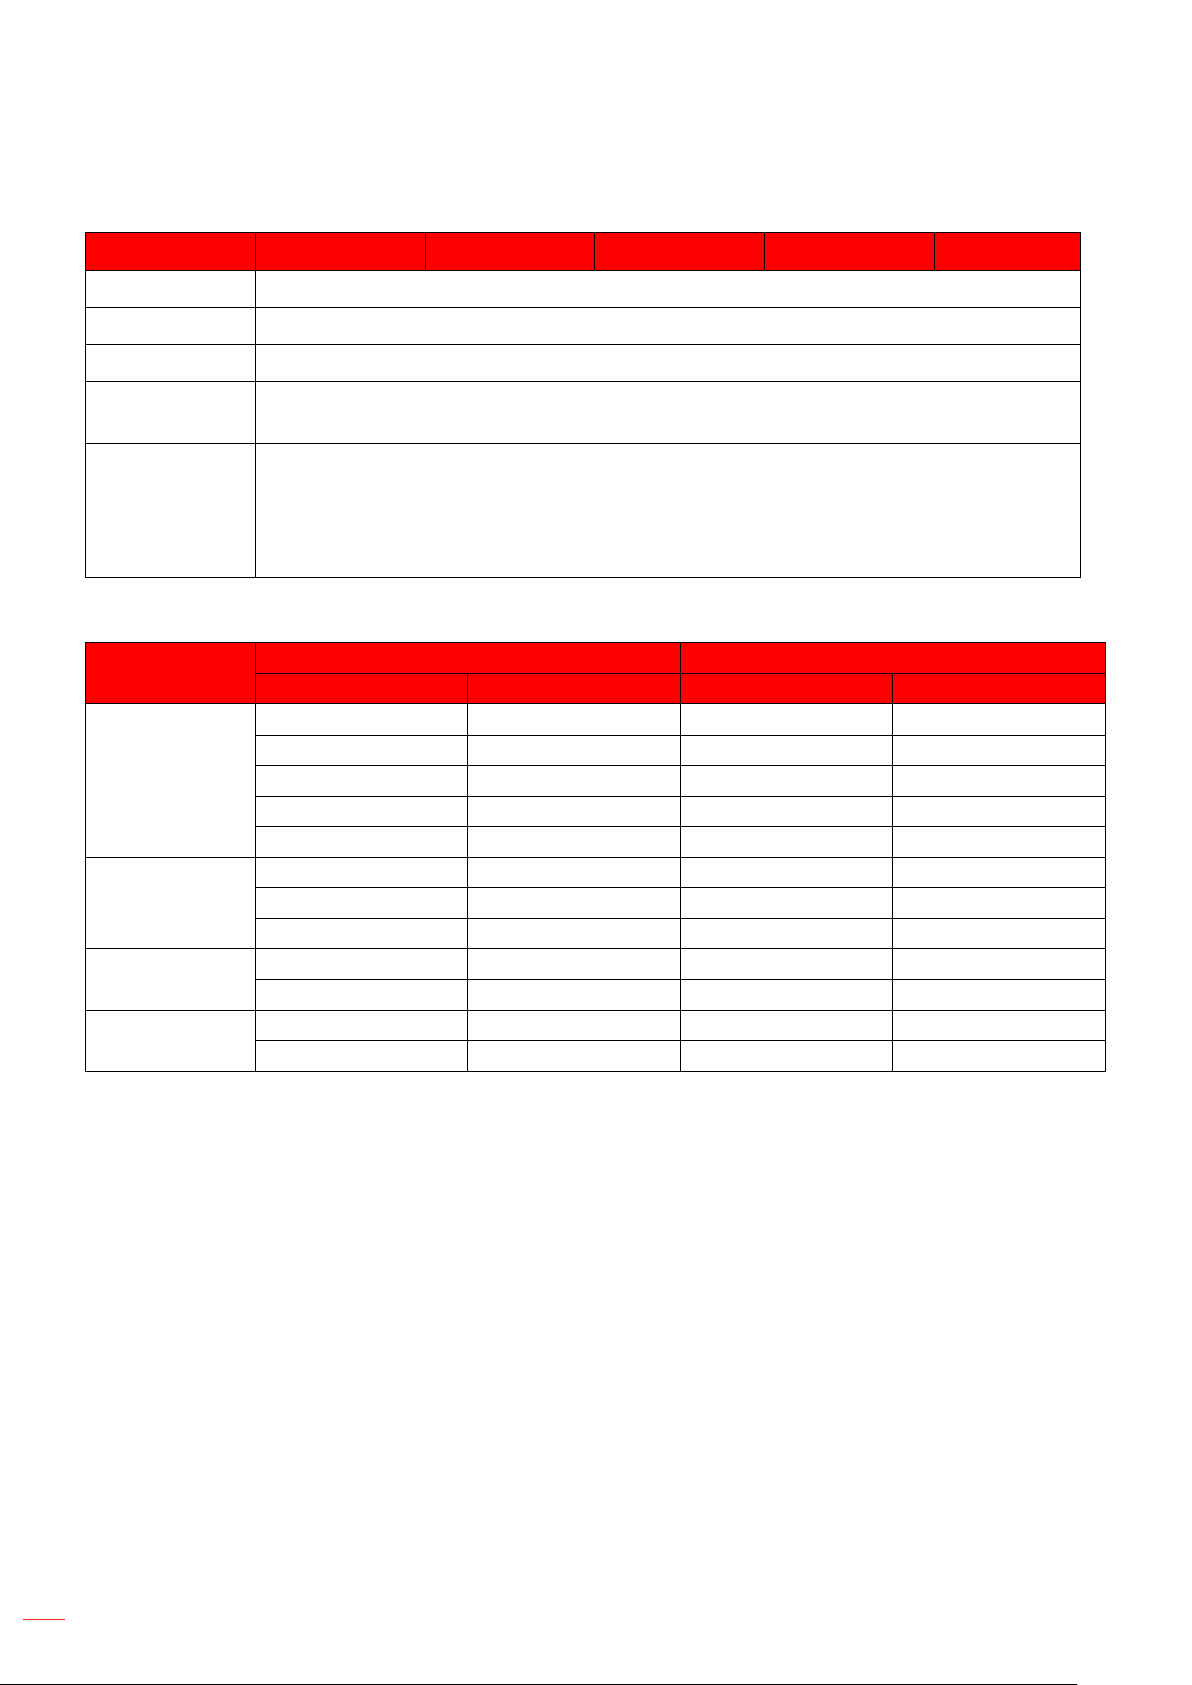
The input lag by signals is described in the following table:
The values in the table can vary slightly.
Source Timing Enhanced Gaming Output Resolution Input Lag
Please note that if “Enhanced Gaming” mode is enabled, the 3D, Aspect Ratio, Zoom, Image Shift,
and Geometric Correction functions are disabled automatically. These functions will be enabled again
if you disable “Enhanced Gaming” mode.

English
33
USING THE PROJECTOR
3D menu
3D Mode
3D Sync Invert
3D Format
Auto
SBS
Top and Bottom
Frame Sequential
Aspect Ratio menu
4:3
16:9/21:9/32:9
LBX
Auto
Note:
Detailed informations about LBX mode:
± Some Letter-Box Format DVDs are not enhanced for 16x9 TVs. In this situation, the image
will not look right when displaying image in 16:9 mode. In this situation, please try to use the
4:3 mode to view the DVD. If the content is not 4:3, there will be black bars around the image
in 16:9 display. For this type of content, you can use LBX mode to ll the image on the 16:9
display.
± If you use an external anamorphic lens, this LBX mode also allows you to watch a 2.35:1
content (include Anamorphic DVD and HDTV lm source) that supports anamorphic wide is
enhanced for 16x9 Display in a wide 2.35:1 image. In this case, there are no black bars. Lamp
power and vertical resolution are fully utilized.
English
34
USING THE PROJECTOR
4K UHD scaling table
16 : 9 screen 480i/p 576i/p 720p 1080i/p 2160p
LBX
Auto mapping rule
Input resolution Auto/Scale
H-resolution V-resolution 3840 2160
SDTV
HDTV

English
35
USING THE PROJECTOR
Zoom menu
Image Shift menu
Note: The image size will reduce slightly when adjusting the horizontal and vertical keystone.
Geometric Correction menu
Four Corners:
Note: While adjusting the Four Corners, the Zoom, Aspect Ratio, and Image Shift menus are
disabled. To enable Zoom, Aspect Ratio, and Image Shift, reset the Four Corners settings to
the factory defaults.
H Keystone:
V Keystone:
3x3 Warp:
Note: When using the Enhanced Gaming mode, Four Corners, H Keystone, V Keystone, and 3x3 Warping will be
disabled as the settings impact input lag. If you plan to use the Enhanced Gaming mode for low input lag,
we strongly recommend setting up the projector without the use of Four Corners, H Keystone, V Keystone,
and 3x3 Warping.
Reset:
Audio menu
Internal Speaker
O:
On:
Mute
O:
On:
Note: “Mute” function aects both internal and external speaker volume.
Volume

English
36
USING THE PROJECTOR
Setup menu
Projection
Lamp Settings menu
Lamp Reminder
Lamp Reset
Filter Settings menu
Filter Usage Hours
Optional Filter Installed
Yes:
Note: “Filter Usage Hours / Filter Reminder / Filter Reset” will only appear when “Optional Filter
Installed” is “Yes”.
No:
Filter Reminder
Filter Reset
Power Settings menu
Direct Power On
Auto Power O (min.)
Sleep Timer (min.)
Sleep Timer (min.):
Note: The Sleep Timer is reset every time when the projector is powered o.
Always On:
English
37
USING THE PROJECTOR
Security menu
Security
O:
On:
Security Timer
Change Password
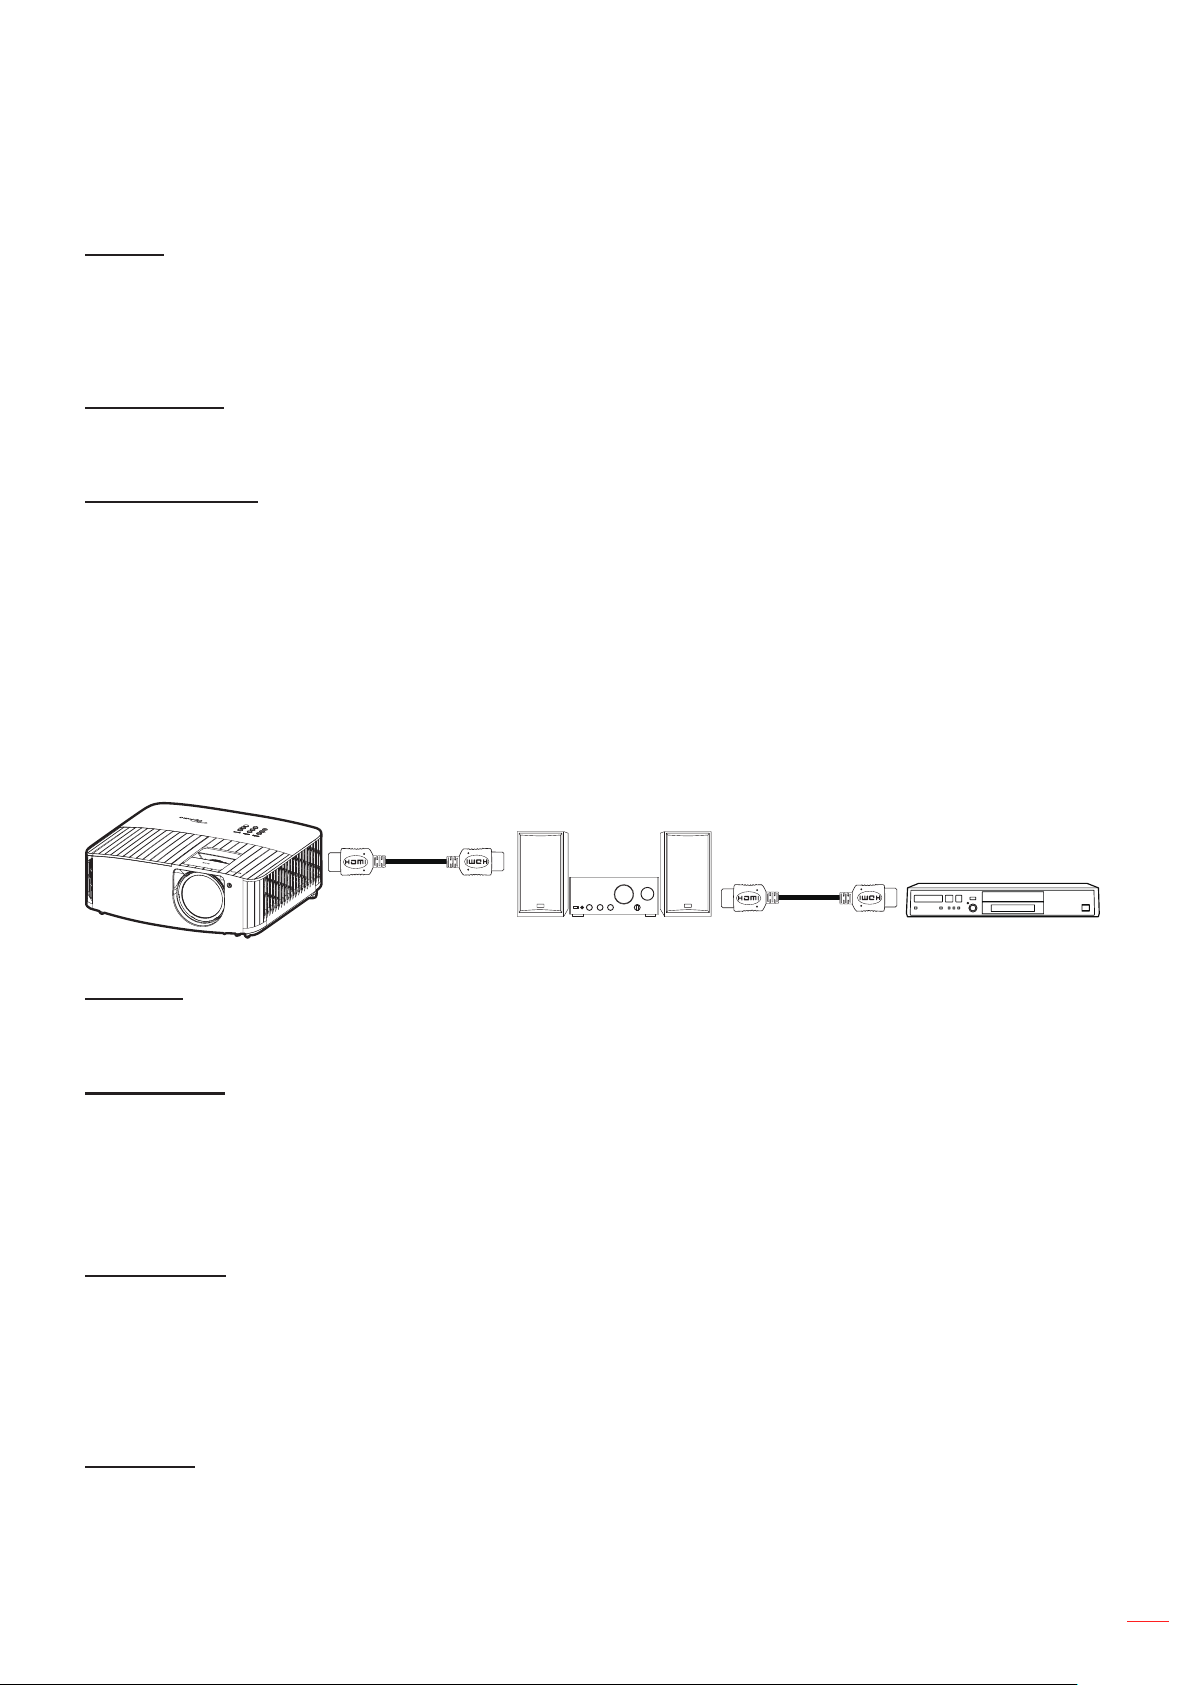
Setup HDMI link settings menu
Note:
When you connect HDMI CEC-compatible devices to the projector with HDMI cables, you can control
them on the same power on or power o status using the HDMI Link control feature in the projector’s
OSD. This lets one device or multiple devices in a group power on or power o via HDMI Link Feature
in a typical conguration, your DVD player may be connected to the projector through an amplier or
home theater system.
HDMI Link
Power On Link
Mutual:
PJ
Device:
Device
PJ:
Power O Link
Test Pattern menu
Remote Settings menu
IR Function
On:
O:
English
38
USING THE PROJECTOR
User1/ User2/ User3
Projector ID menu
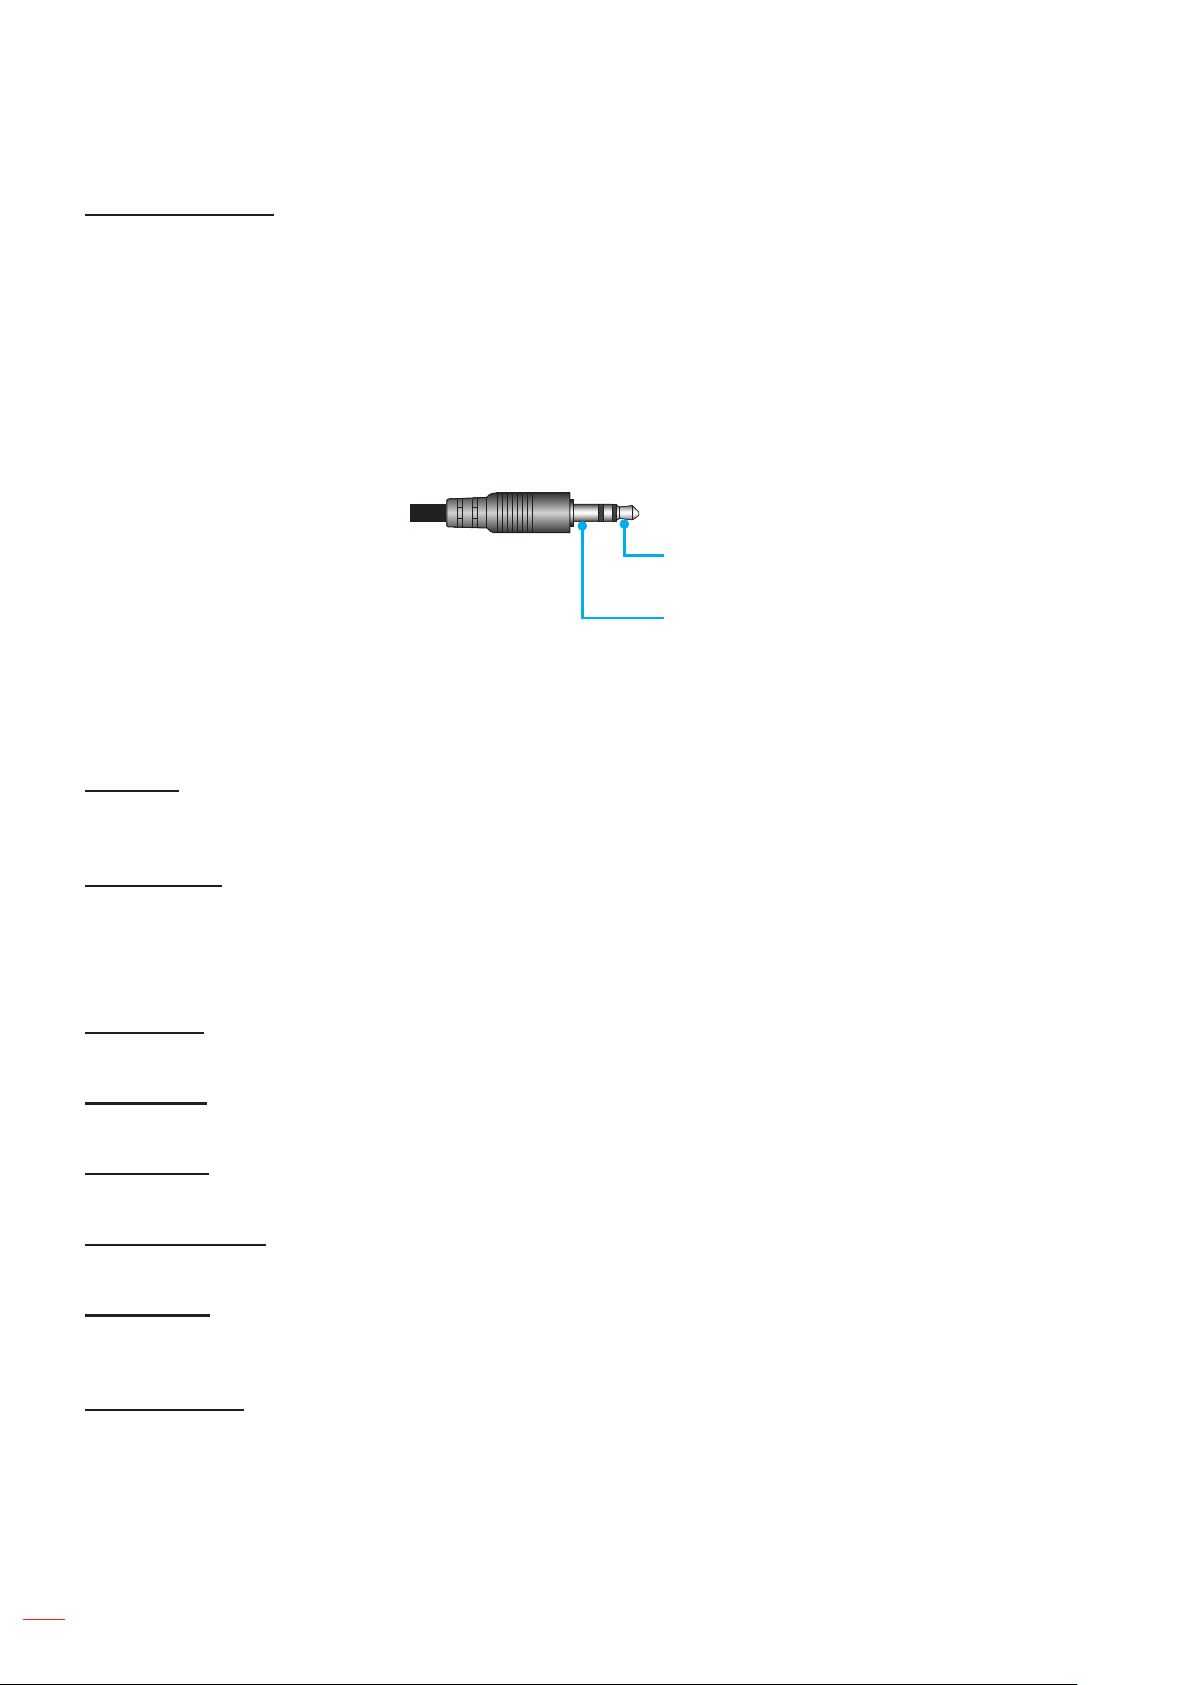
12V Trigger menu
Note: 3.5mm mini jack that outputs 12V 500mA (max.) for relay system control.
On
O
Options menu
Language
Menu Settings
Menu Location
Menu Timer
Auto Source
Input Source
High Altitude
Display Mode Lock
Keypad Lock
Information Hide
O:
On:

English
39
USING THE PROJECTOR
Logo
Default:
Neutral:
Background Color
Reset menu
Reset OSD
Reset to Default
Info menu
English
40
ADDITIONAL INFORMATION
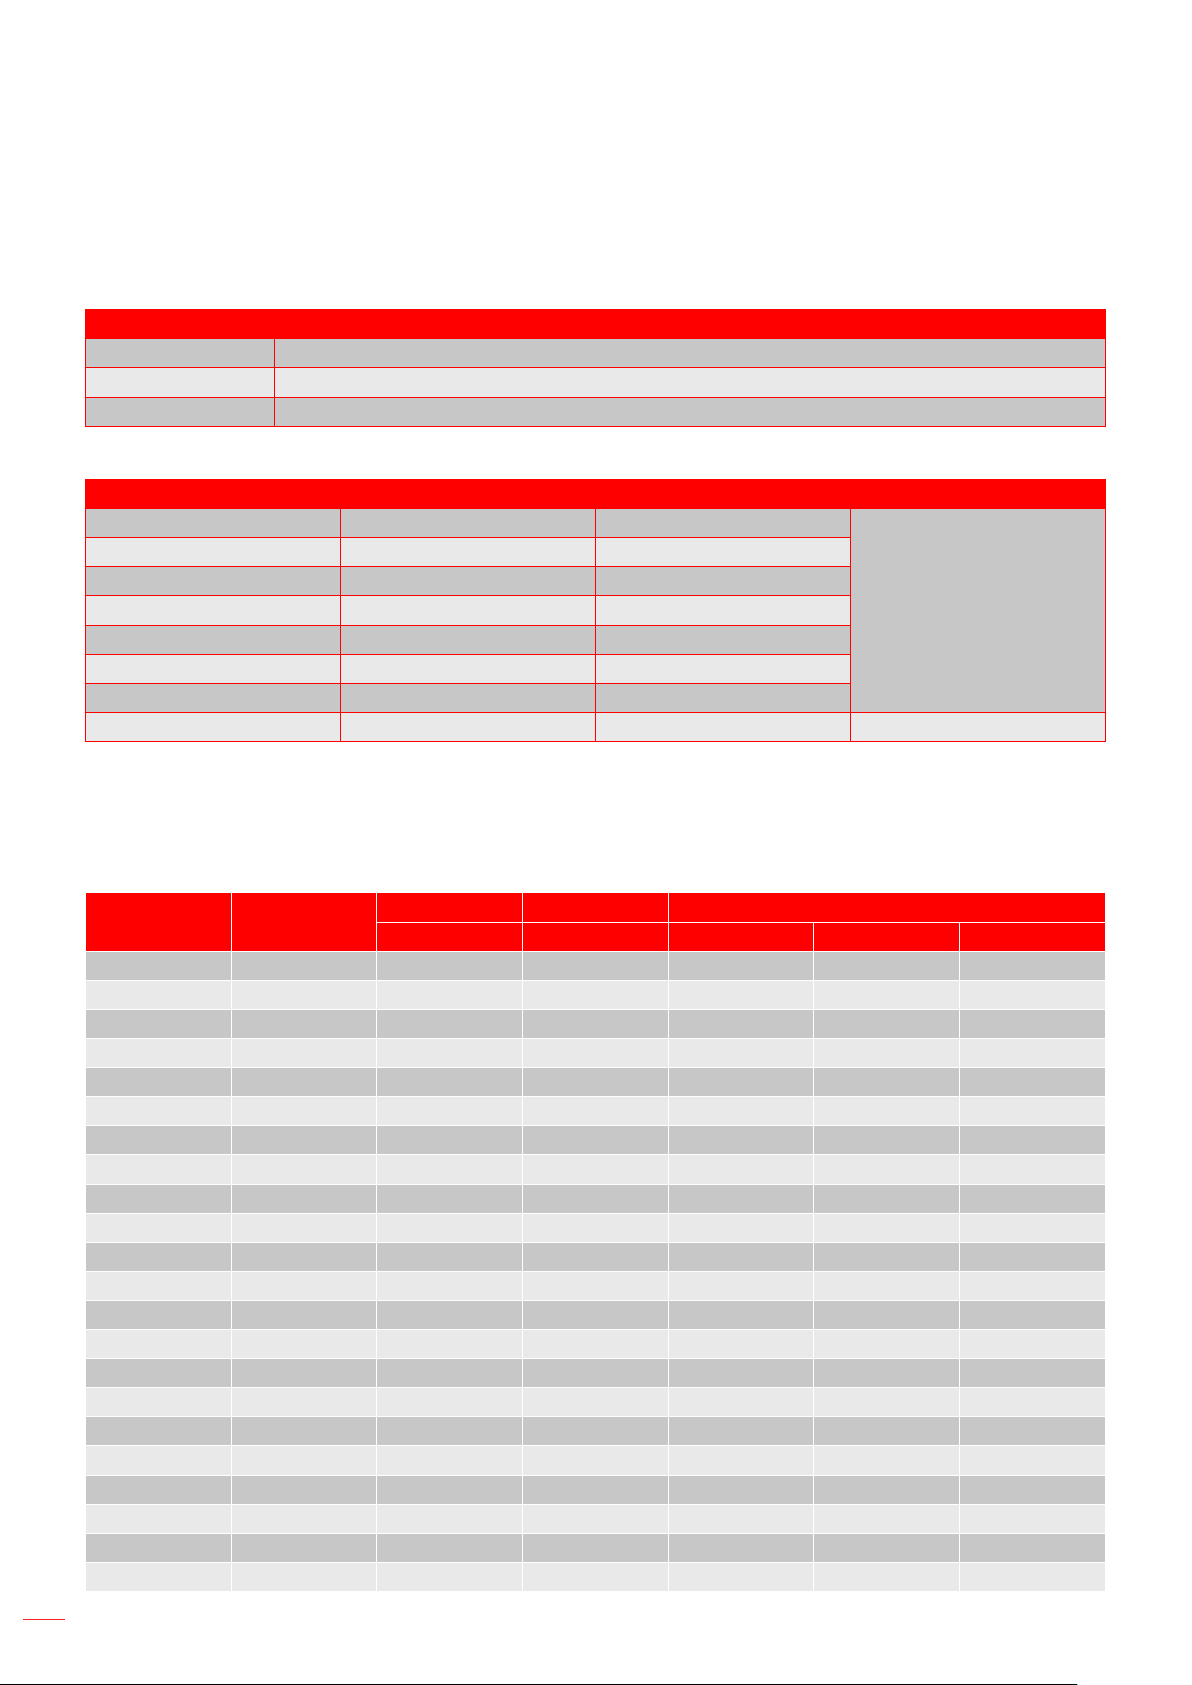
Compatible resolutions
Video compatibility
Signal Resolution
SDTV
HDTV
UHD
Signal Resolution Refresh Rate (Hz) Notes
Note: Searching time for each I/O port is less than 5 seconds, except for the HDMI port.
Computer compatibility
Signal Resolution
Frequency H Refresh Rate
(KHz) (Hz) Video Digital Note
English
41
ADDITIONAL INFORMATION
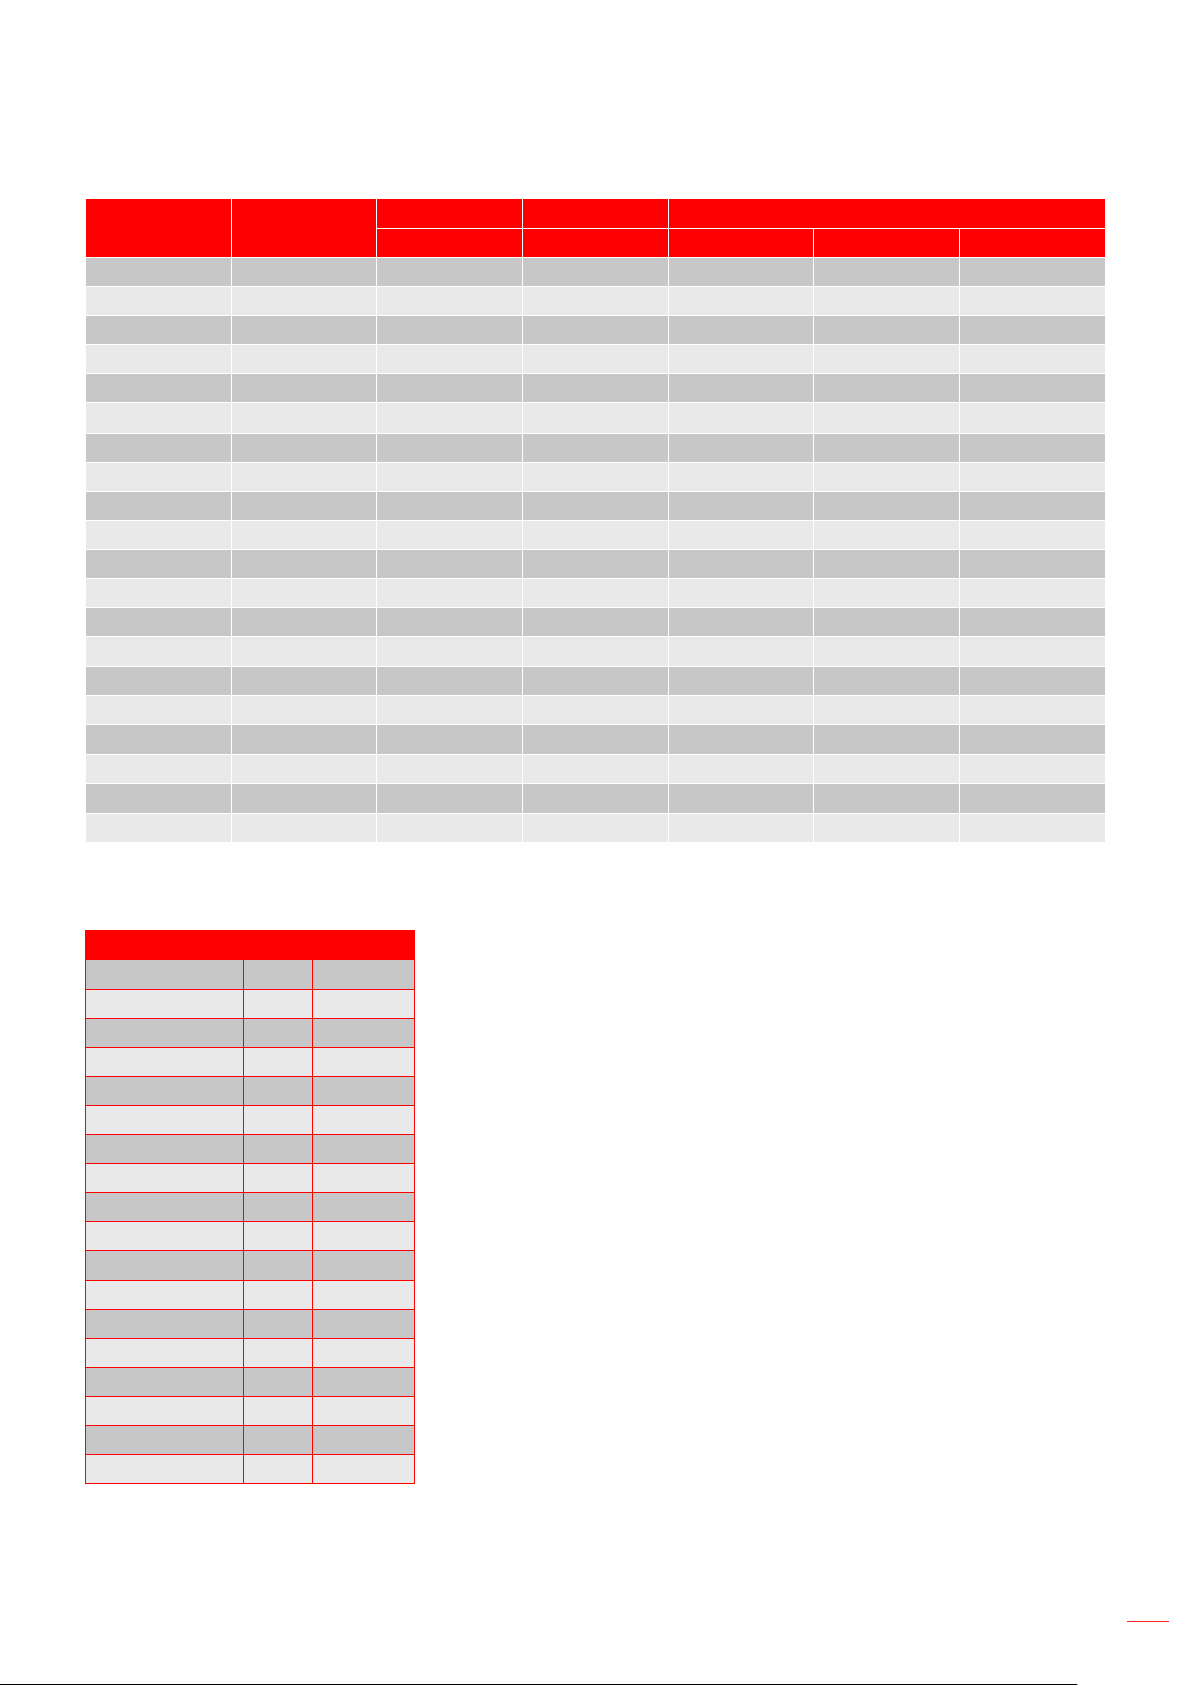
Signal Resolution
Frequency H Refresh Rate
(KHz) (Hz) Video Digital Note
HDTV
HDTV
HDTV
HDTV
HDTV
HDTV
HDTV
HDTV
SDTV
SDTV
SDTV
SDTV
SDTV
SDTV
Note: ““ means the resolution is supportred, “N/A” means the resolution is not supported.
Resolution Hz Analog
Note:
““ means the resolution is supportred, “N/A” means the resolution is not supported.
(*1) 1920 x 1200 @ 60Hz only support RB (reduced blanking).
English
42
ADDITIONAL INFORMATION
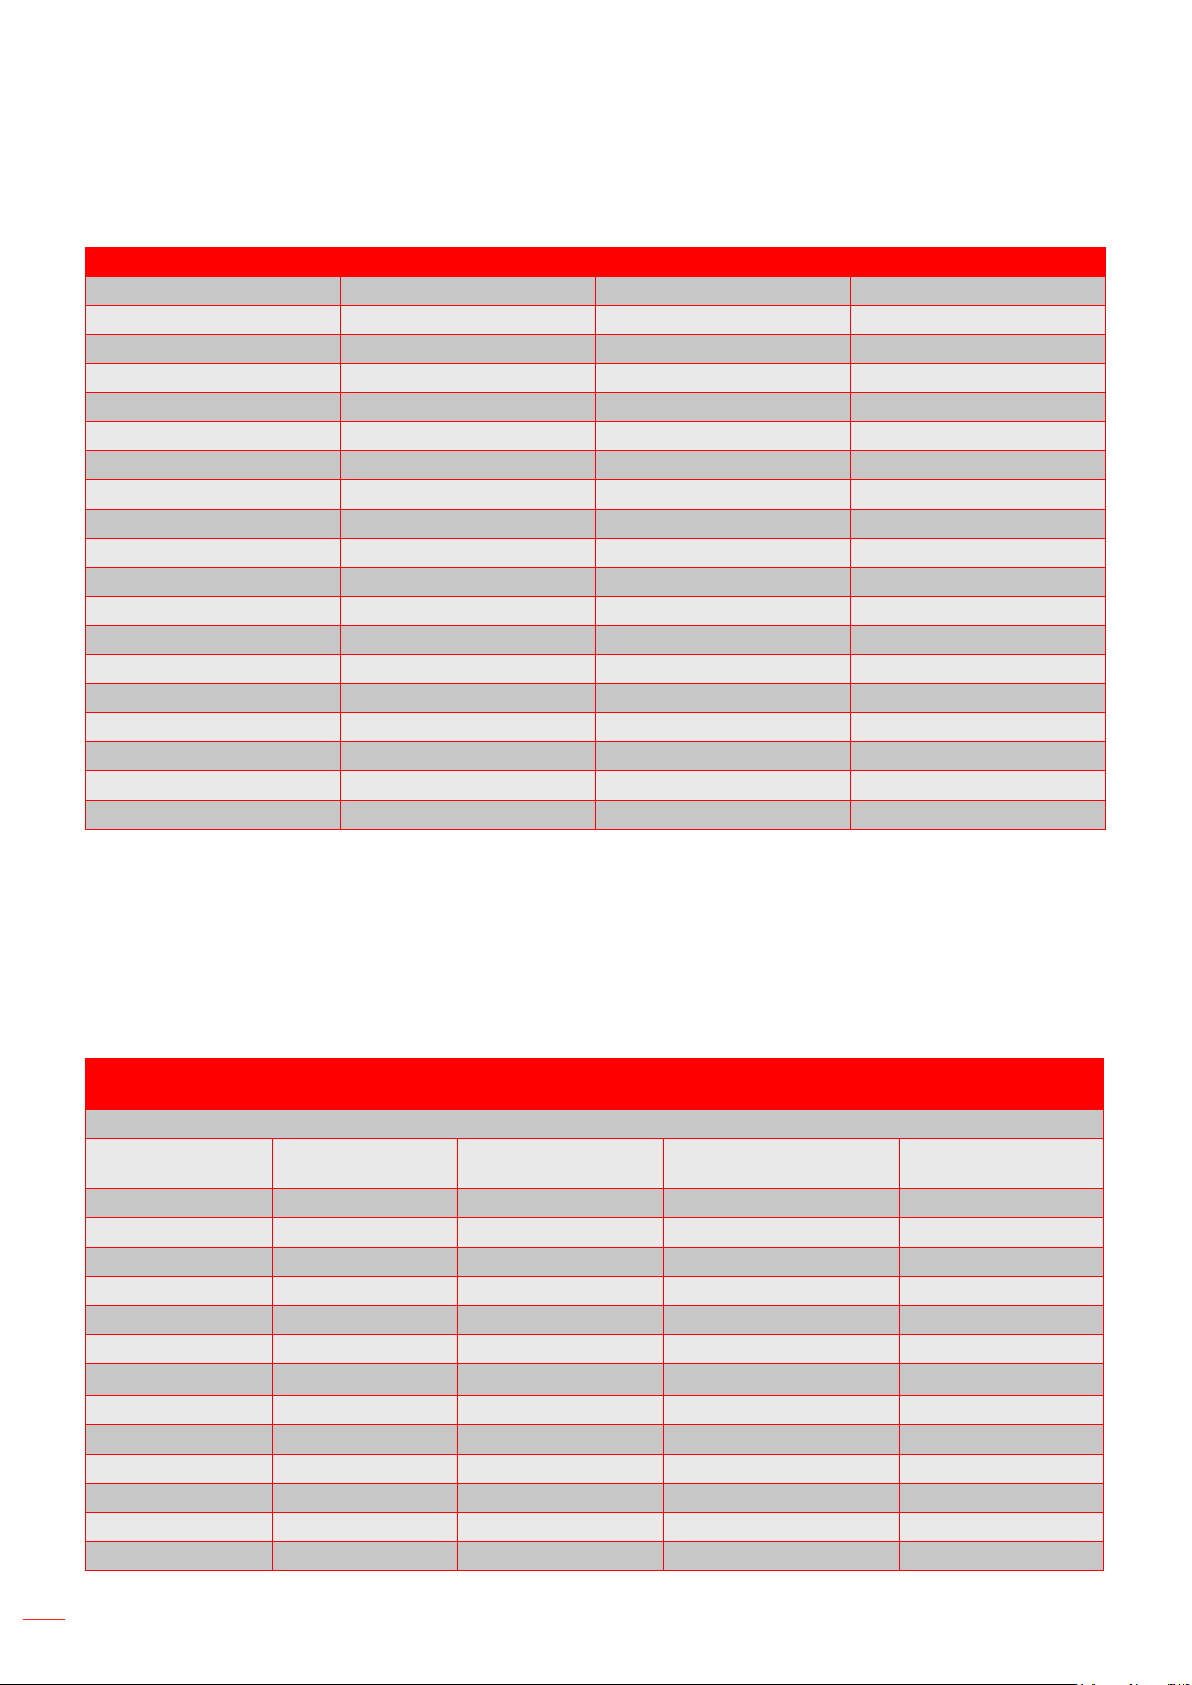
Input signal for HDMI
Signal Resolution Refresh Rate (Hz) Notes for Mac
Note:
““ means the resolution is supportred, “N/A” means the resolution is not supported.
(*1) 1920 x 1200 @ 60Hz only support RB (reduced blanking).
(*2) Windows 10 standard timing.
Extended Display Identication Data (EDID) tables
B0/Established
Timing
B0/Standard
Timing
B0/Standard Timing B1/Video Mode B1/Detail Timing

English
43
ADDITIONAL INFORMATION
B0/Established
Timing
B0/Standard
Timing
B0/Standard Timing B1/Video Mode B1/Detail Timing
True 3D video compatibility
Input
resolutions
English
44
ADDITIONAL INFORMATION
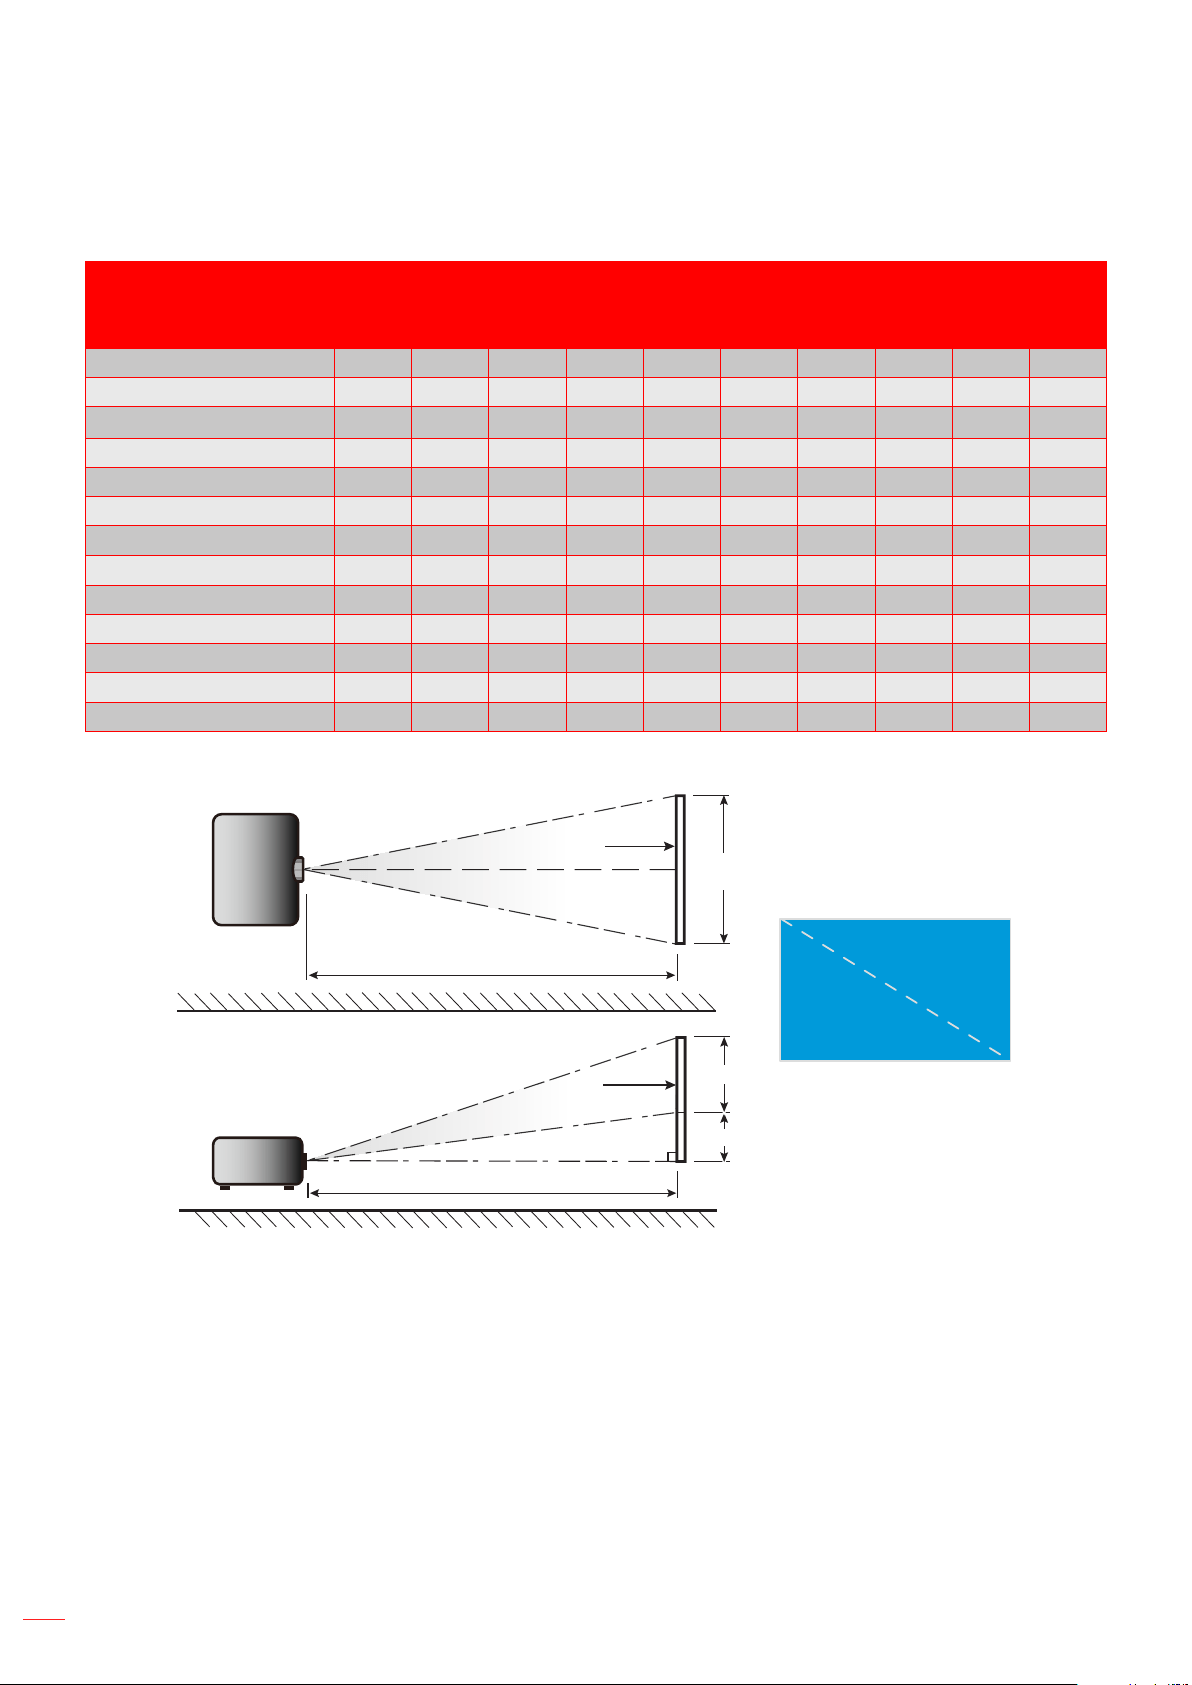
Image size and projection distance
Diagonal Length Size of
(16:9) Screen
Screen Size W x H Projection Distance (D)
Oset (HD)
(m) (inch) (m) (feet)
Width Height Width Height Wide Tele Wide Tele (m) (inch)
Width
Height
Diagonal
Top View
Side View
Projection Distance (D)
Projection Distance (D)
Screen
Screen
Screen (W)
Screen (H)
Offset (Hd)
English
45
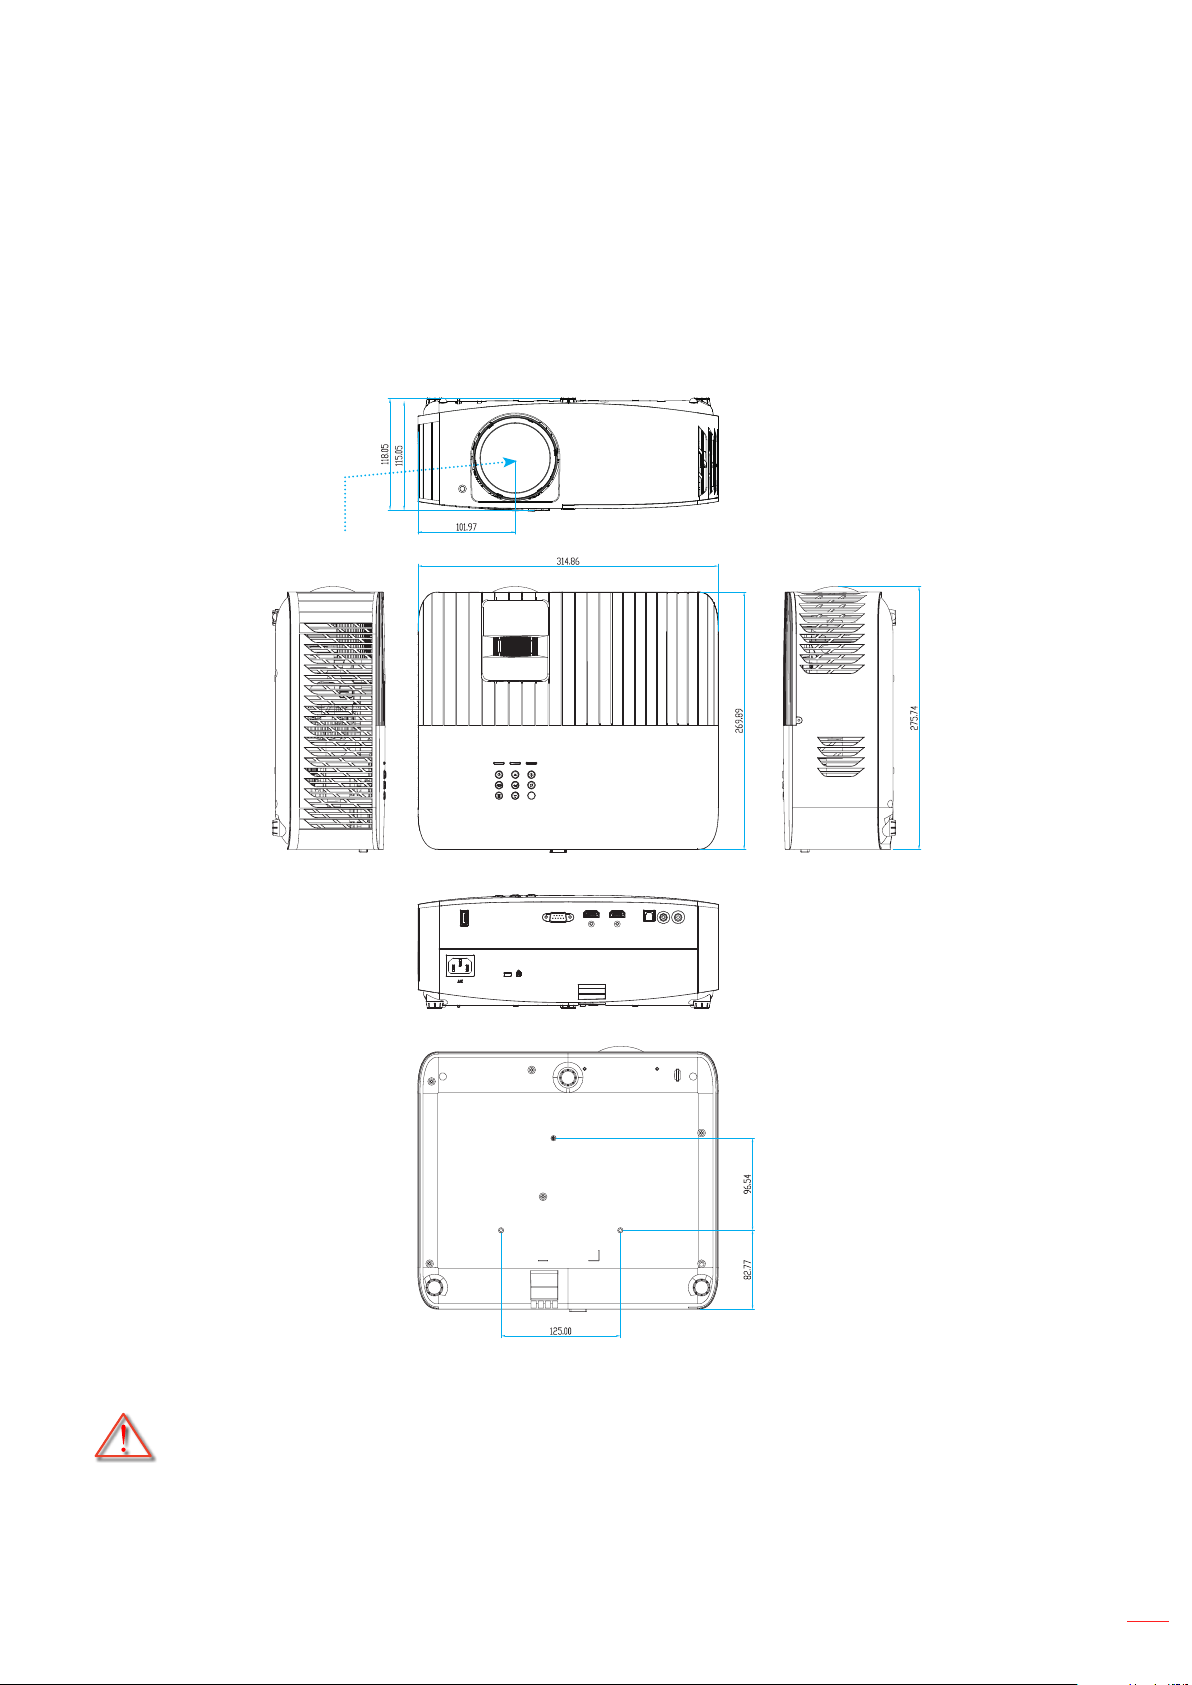
ADDITIONAL INFORMATION
Projector dimensions and ceiling mount installation
Note: Please note that damage resulting from incorrect installation will void the warranty.
English
46
ADDITIONAL INFORMATION
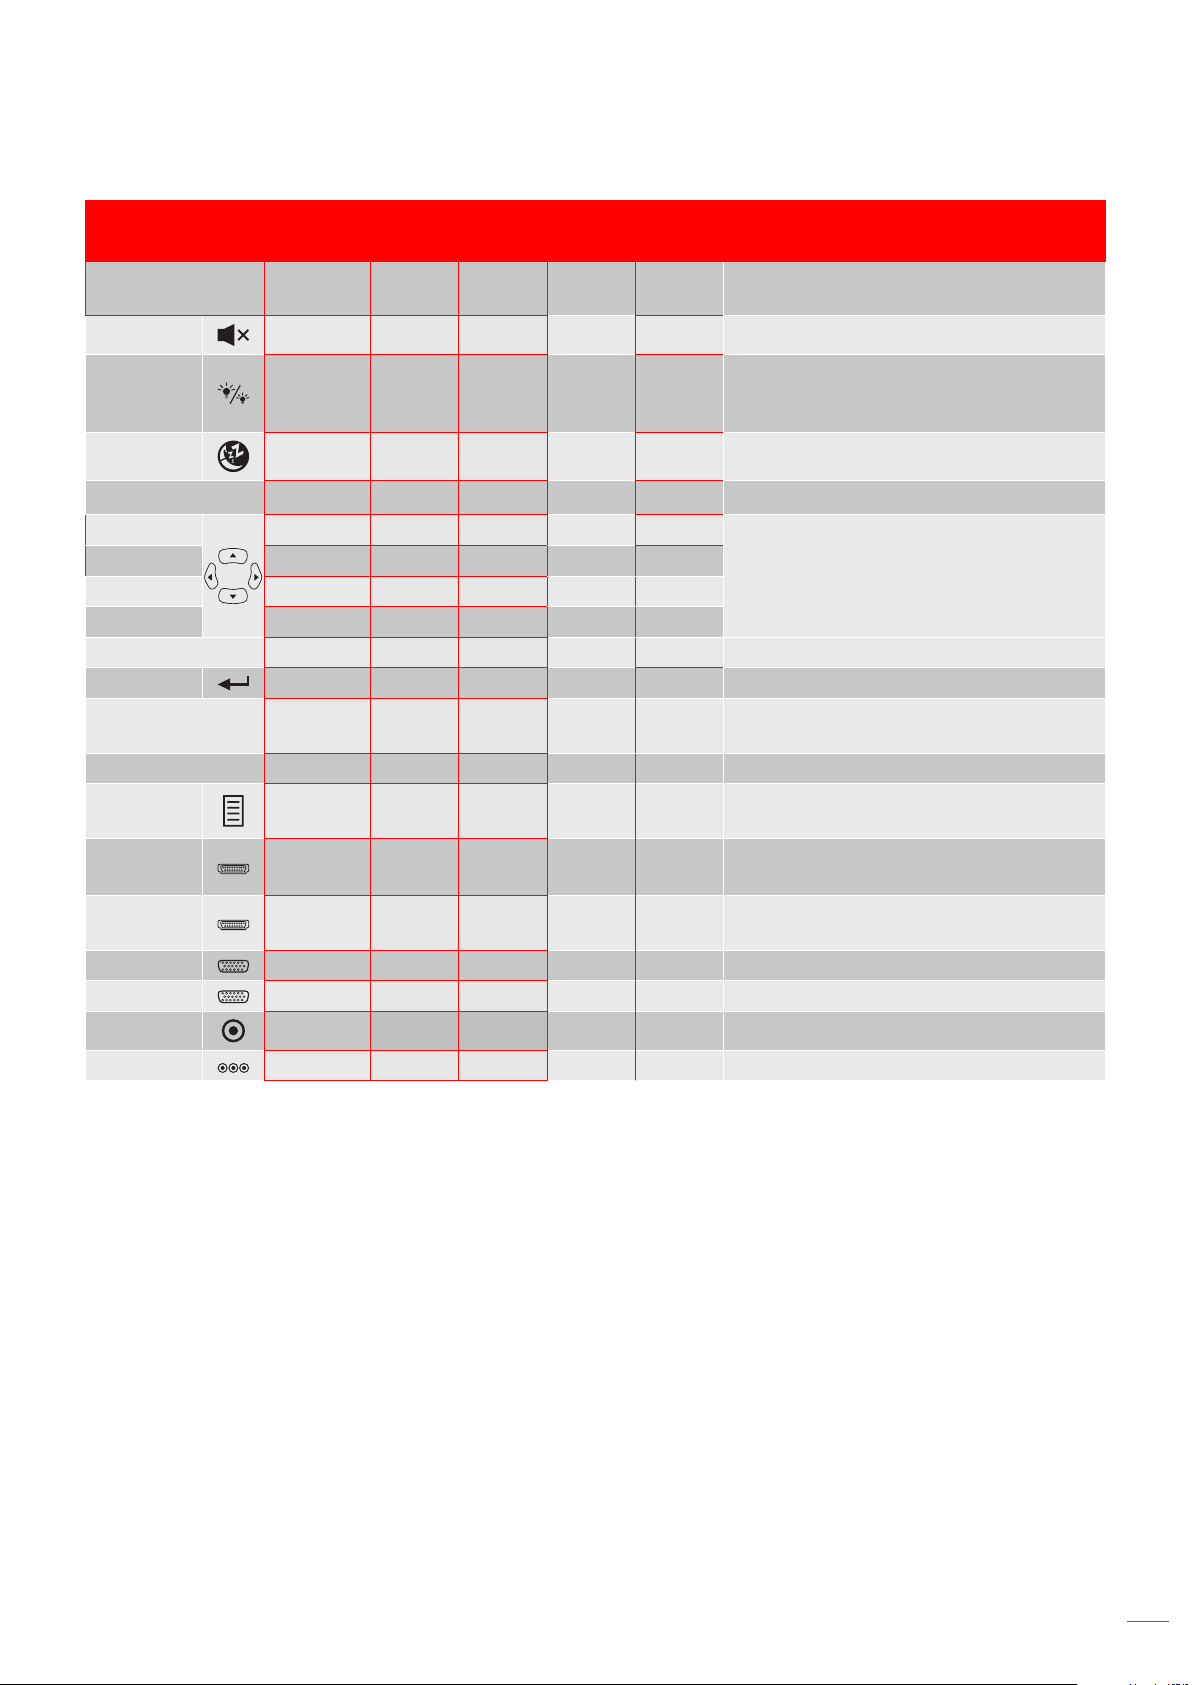
IR remote codes
ON
OFF
Menu
VGA1
HDMI1
User2
Contrast
Aspect ratio
DB
Volume
Source
Re-sync
User1
Brightness
Keystone
Mute
User3
Mode
3D
Sleep Timer
Volume
HDMI2
VGA2 Video YPbPr
Key
NEC
format
Customer code Key code
Description
Byte 1 Byte 2 Byte 3 Byte 4
BD
English
47
ADDITIONAL INFORMATION
Key
NEC
format
Customer code Key code
Description
Byte 1 Byte 2 Byte 3 Byte 4
AD
DB
BB

English
48
ADDITIONAL INFORMATION
Troubleshooting
Image problems
No image appears on-screen
Image is out of focus
16
44
The image is stretched when displaying 16:9 DVD title
Image is too small or too large
Image has slanted sides:
Image is reversed
Blurry double image

English
49
ADDITIONAL INFORMATION
Other problems
The projector stops responding to all controls
Remote control problems
If the remote control does not work
Warning indicators

English
50
ADDITIONAL INFORMATION
LED lightning messages
Message
On/Standby LED Temp LED Lamp LED
(Red) (Blue) (Red) (Red)

English
51
ADDITIONAL INFORMATION

English
52
ADDITIONAL INFORMATION
Specications
Optical Description
With
Weight
Note: All specications are subject to change without notice.
English
53
ADDITIONAL INFORMATION
Optoma global oces
USA
Canada
Latin America
Europe
Benelux BV
France
Spain
Deutschland
Scandinavia
Korea
Japan
https://www.optoma.com/jp/
Taiwan
China
Australia

www.optoma.com
