Owner Manual Projector
INTRODUCTION
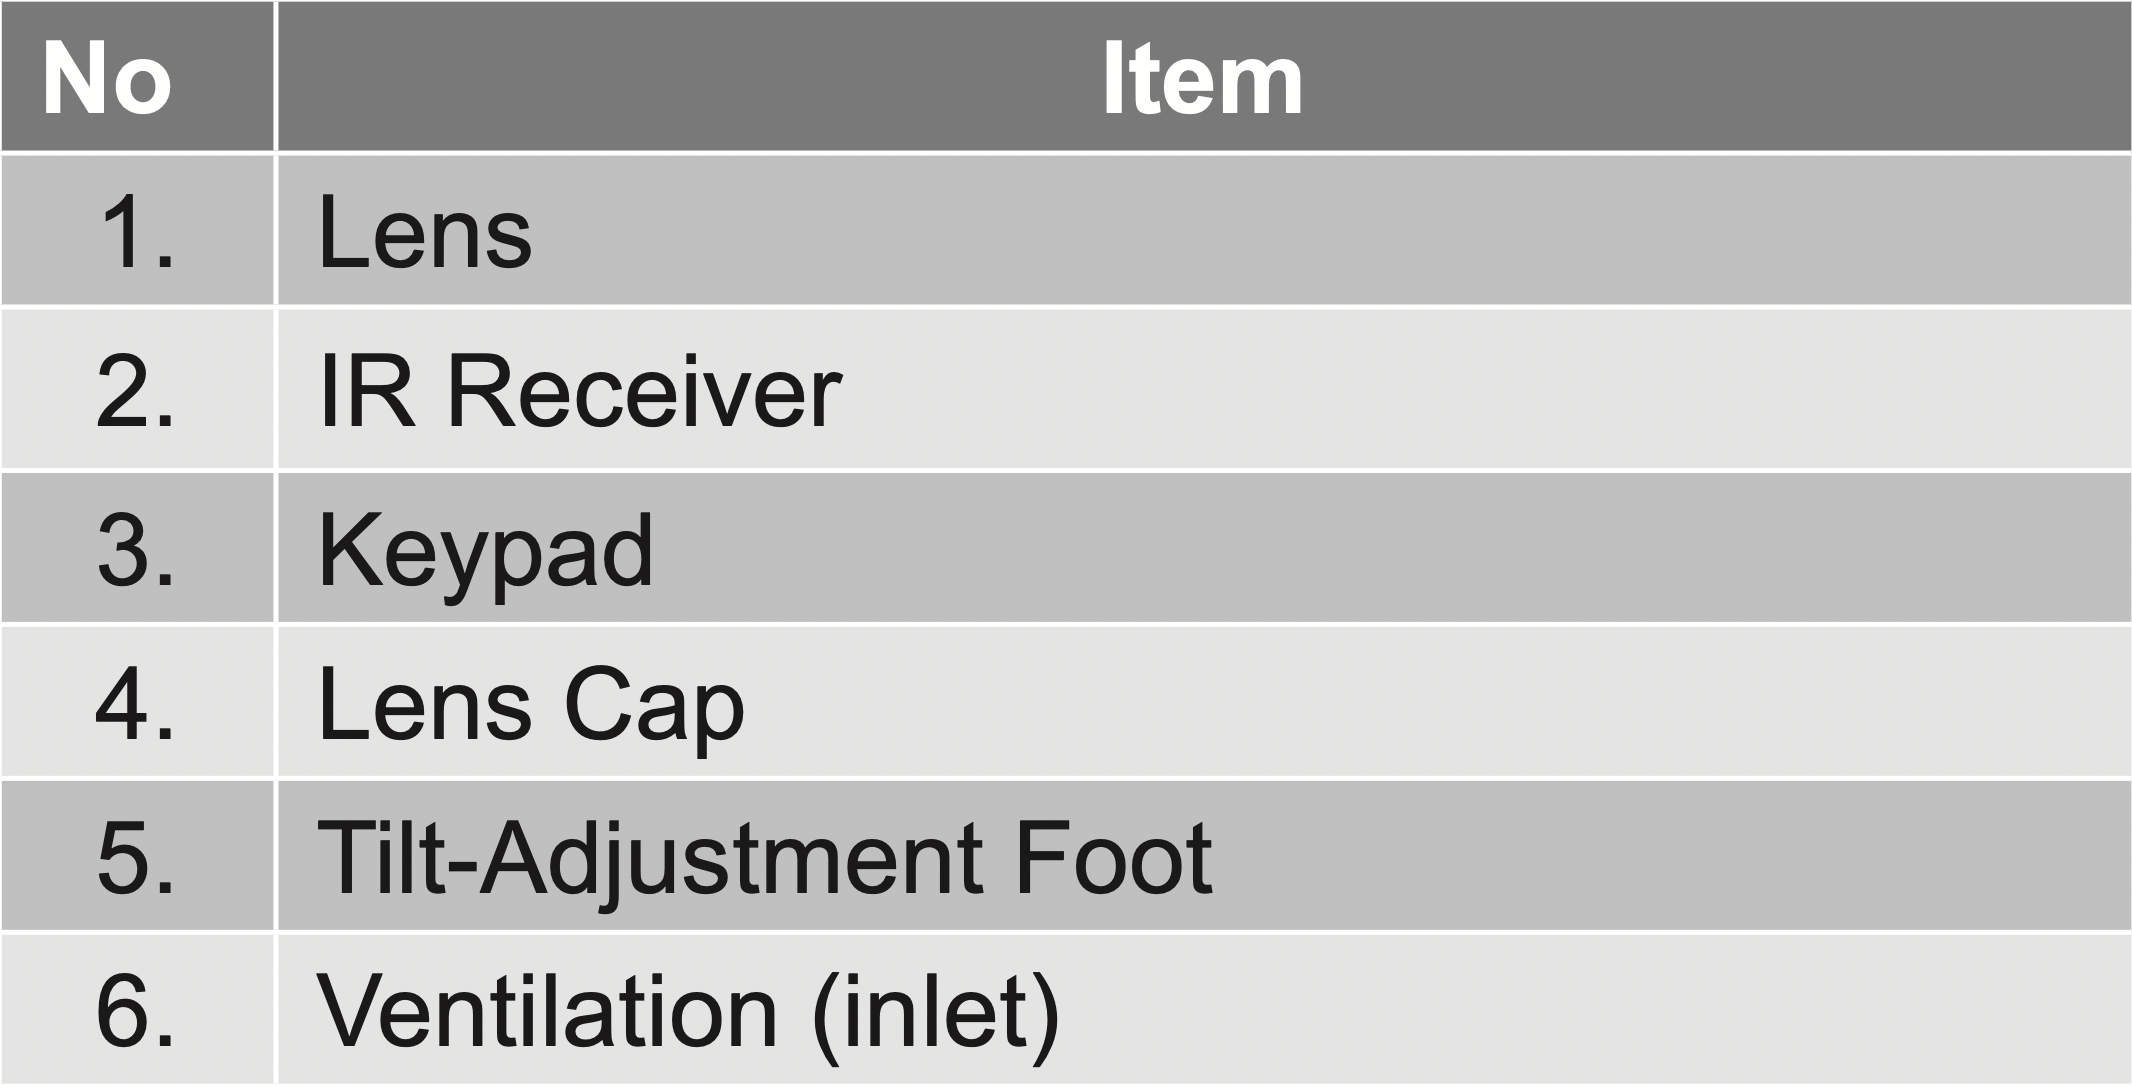
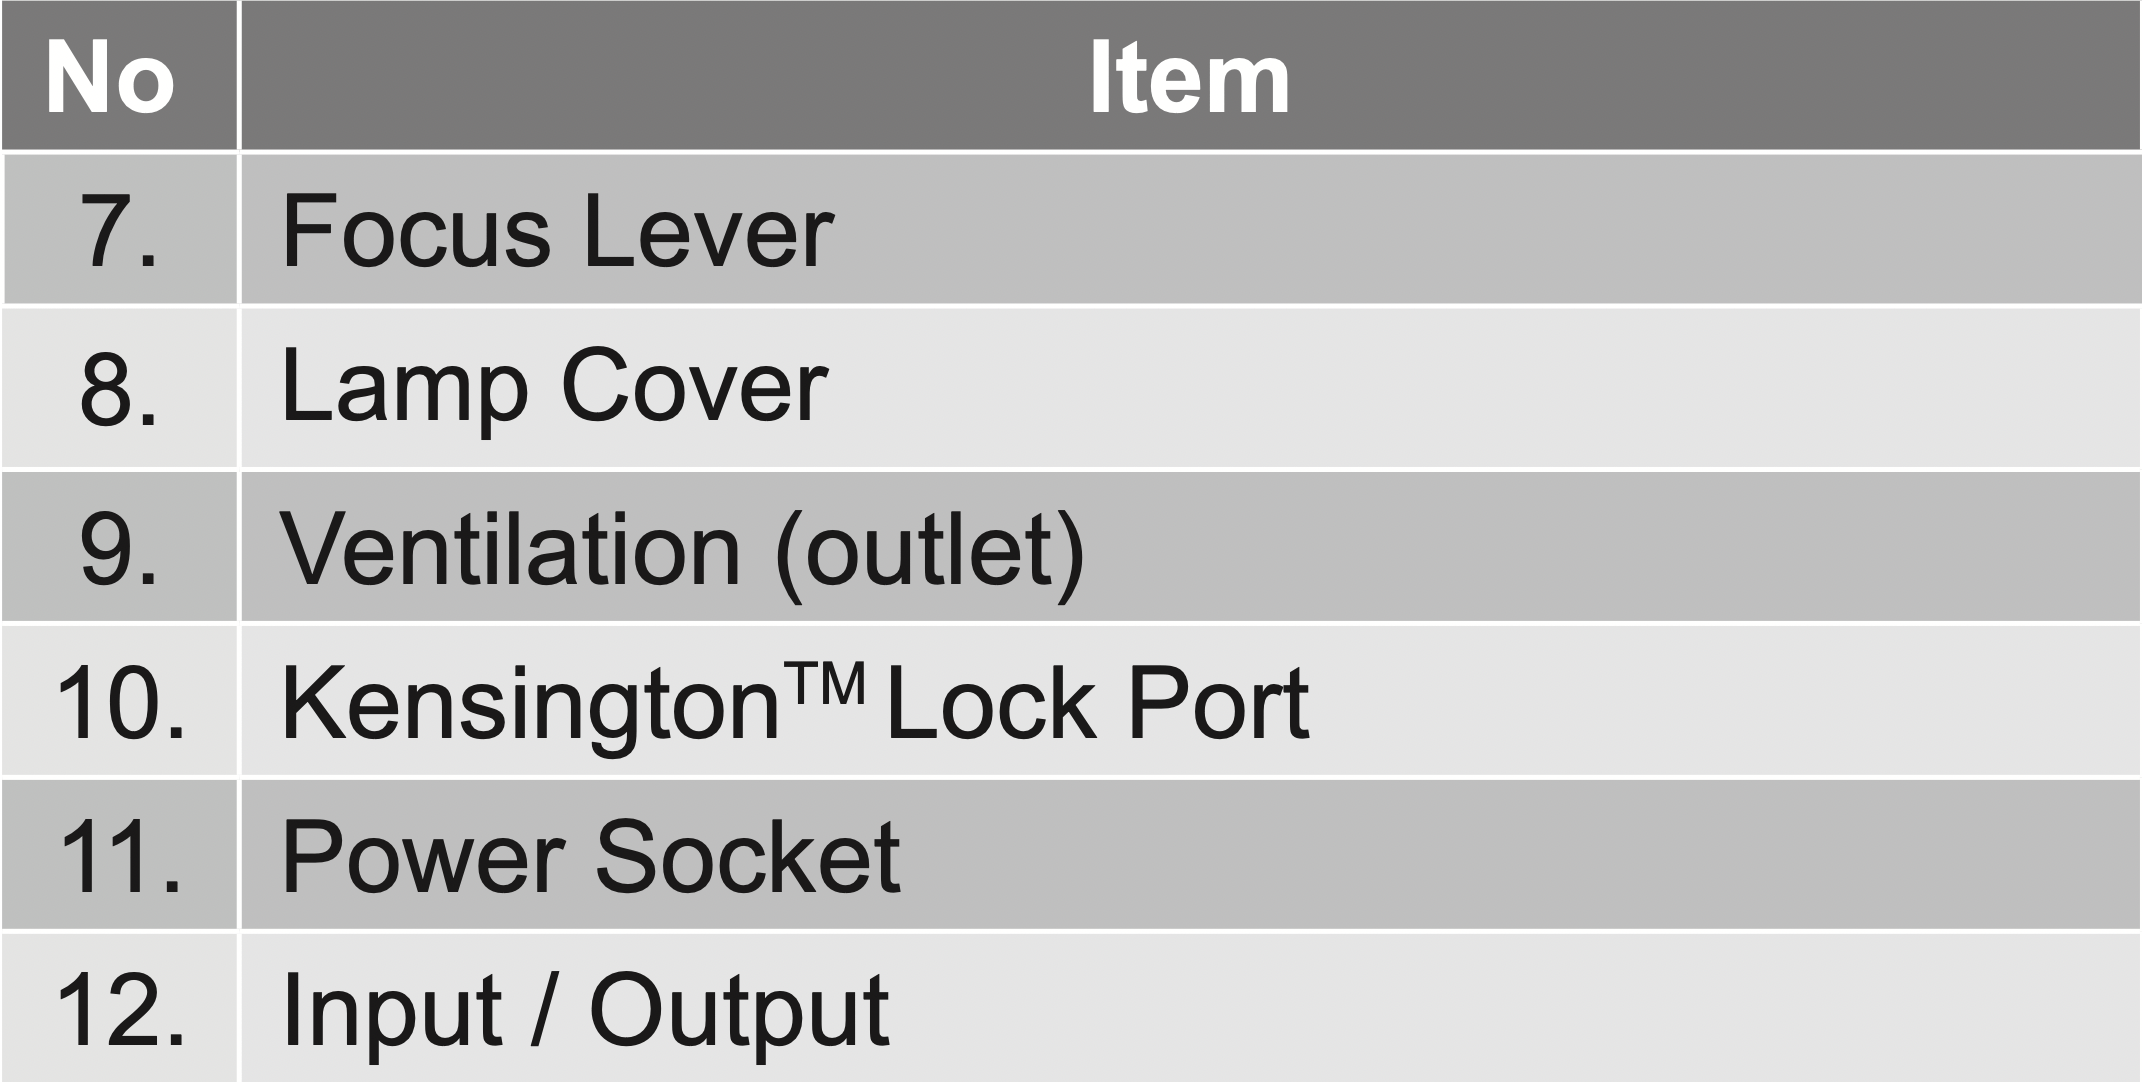
Product Overview
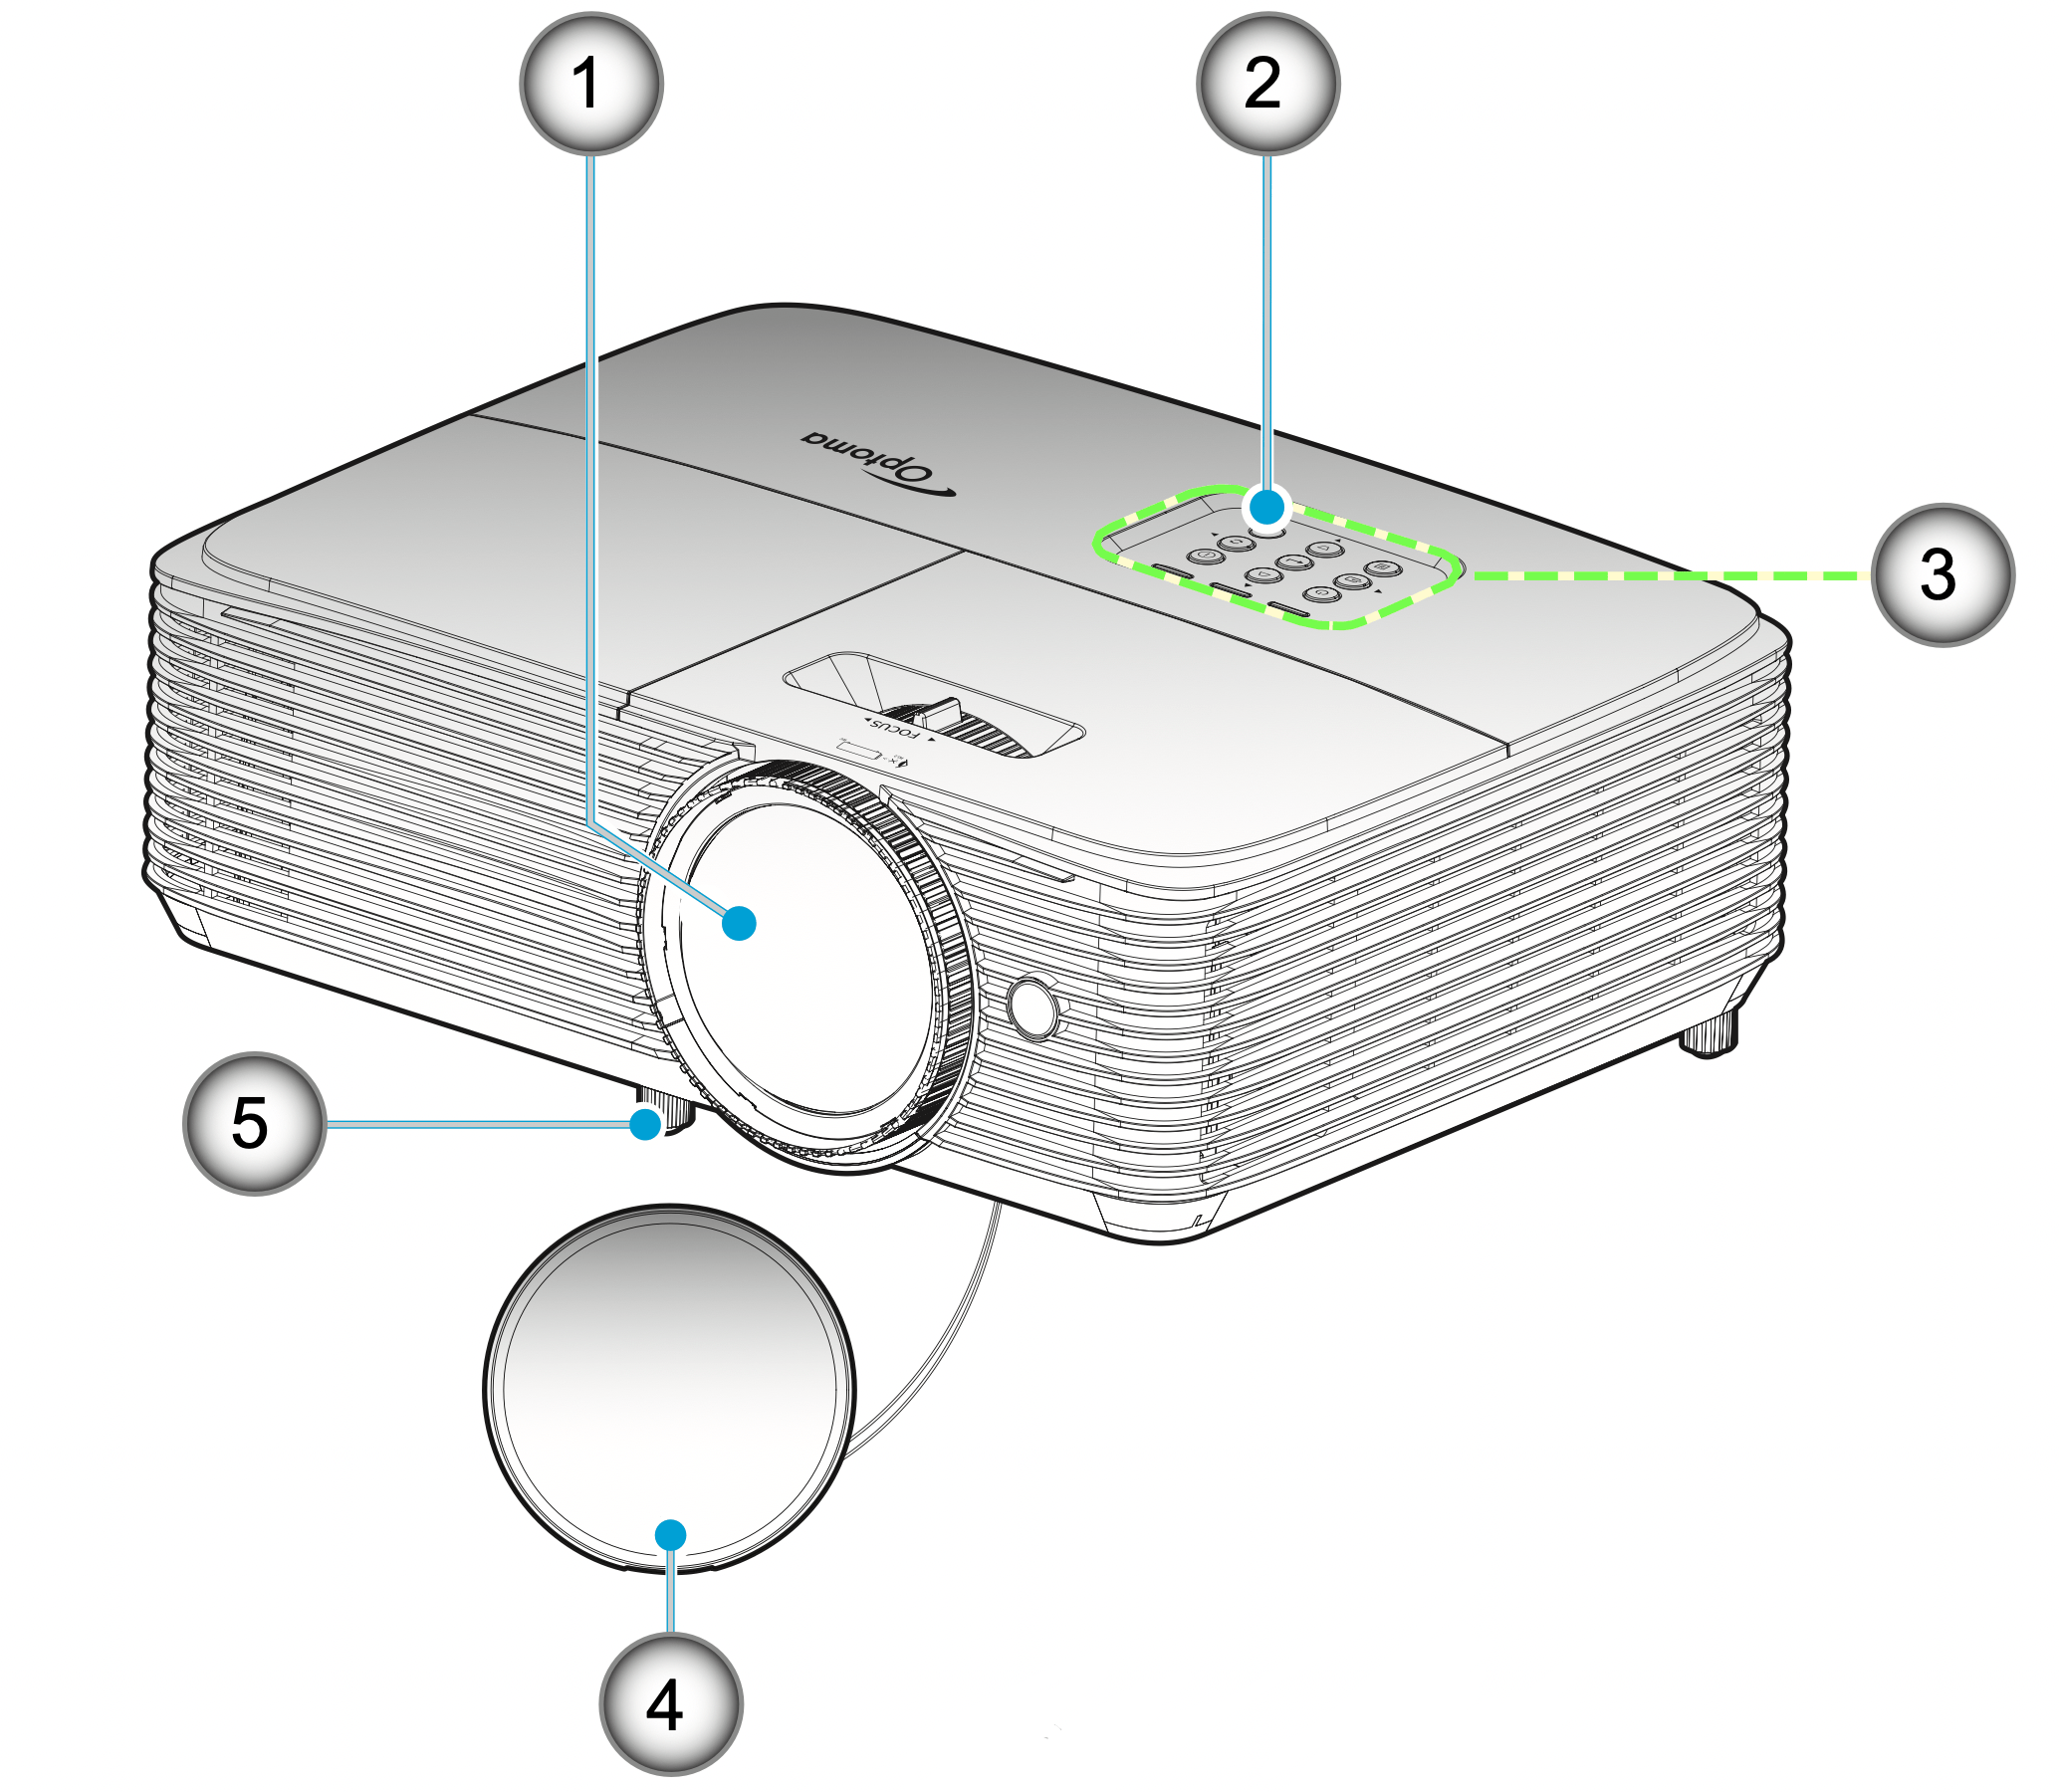
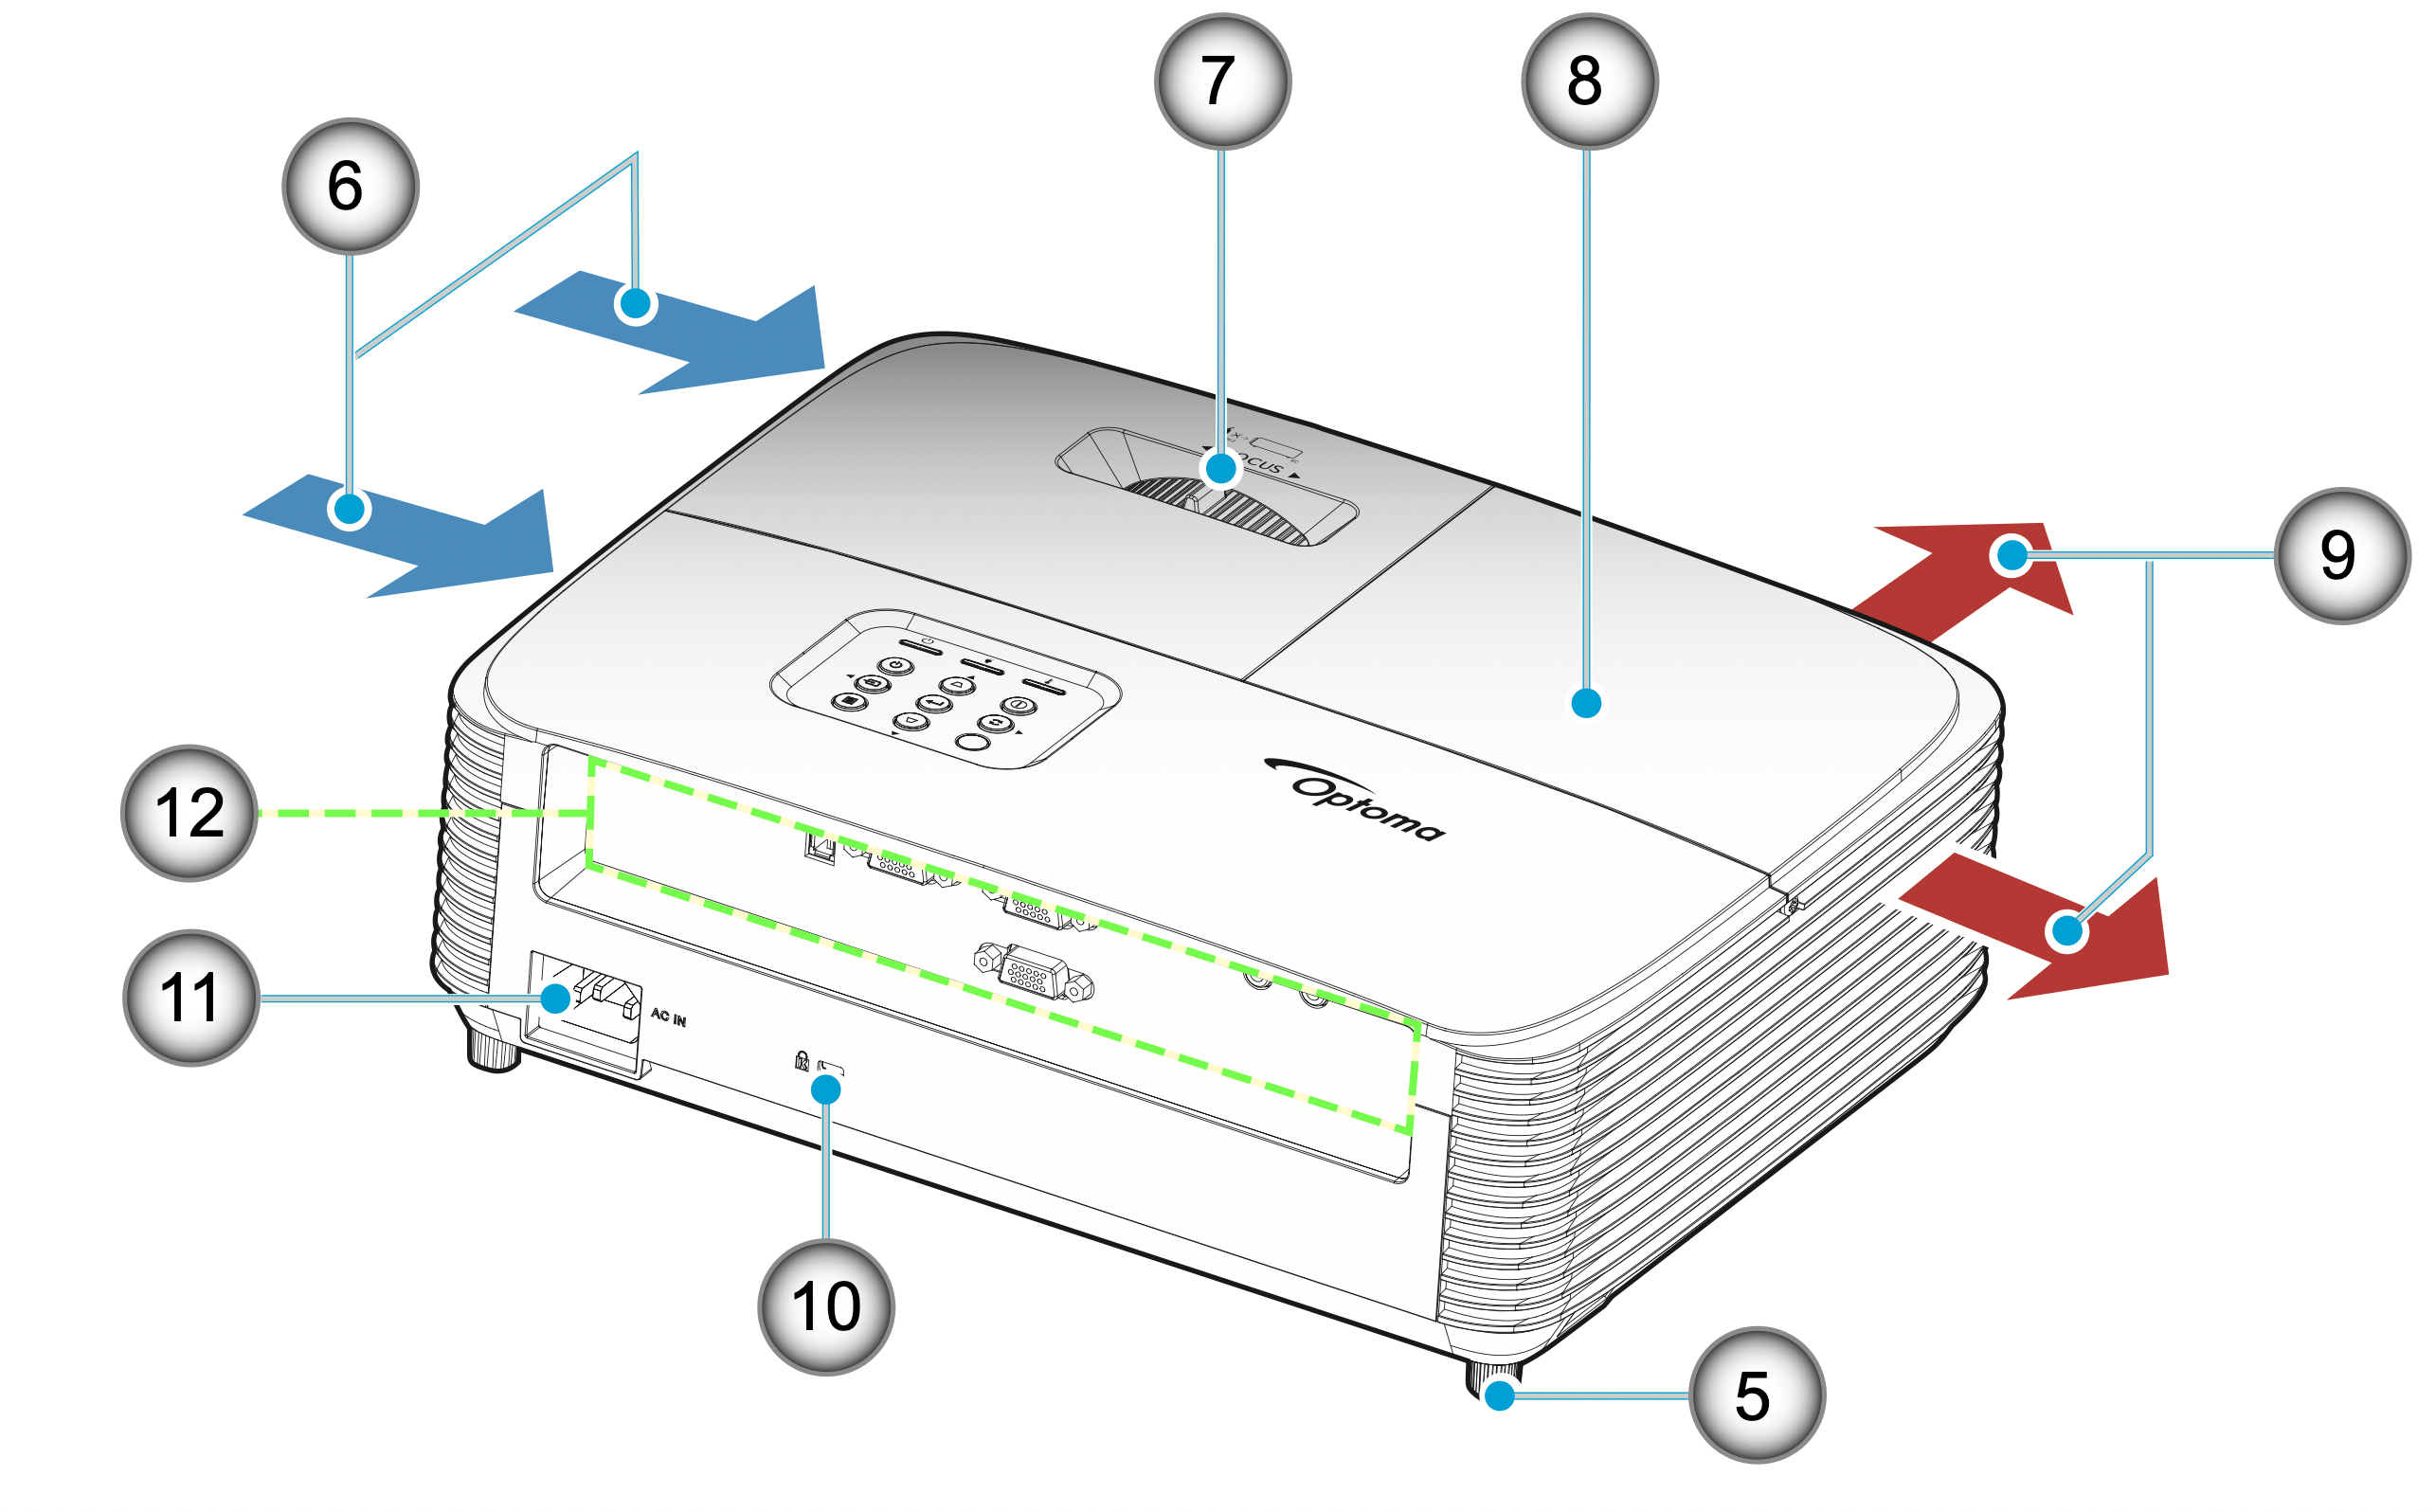
Note: Keep a minimum distance of 20 cm between the “inlet” and “outlet” labels.
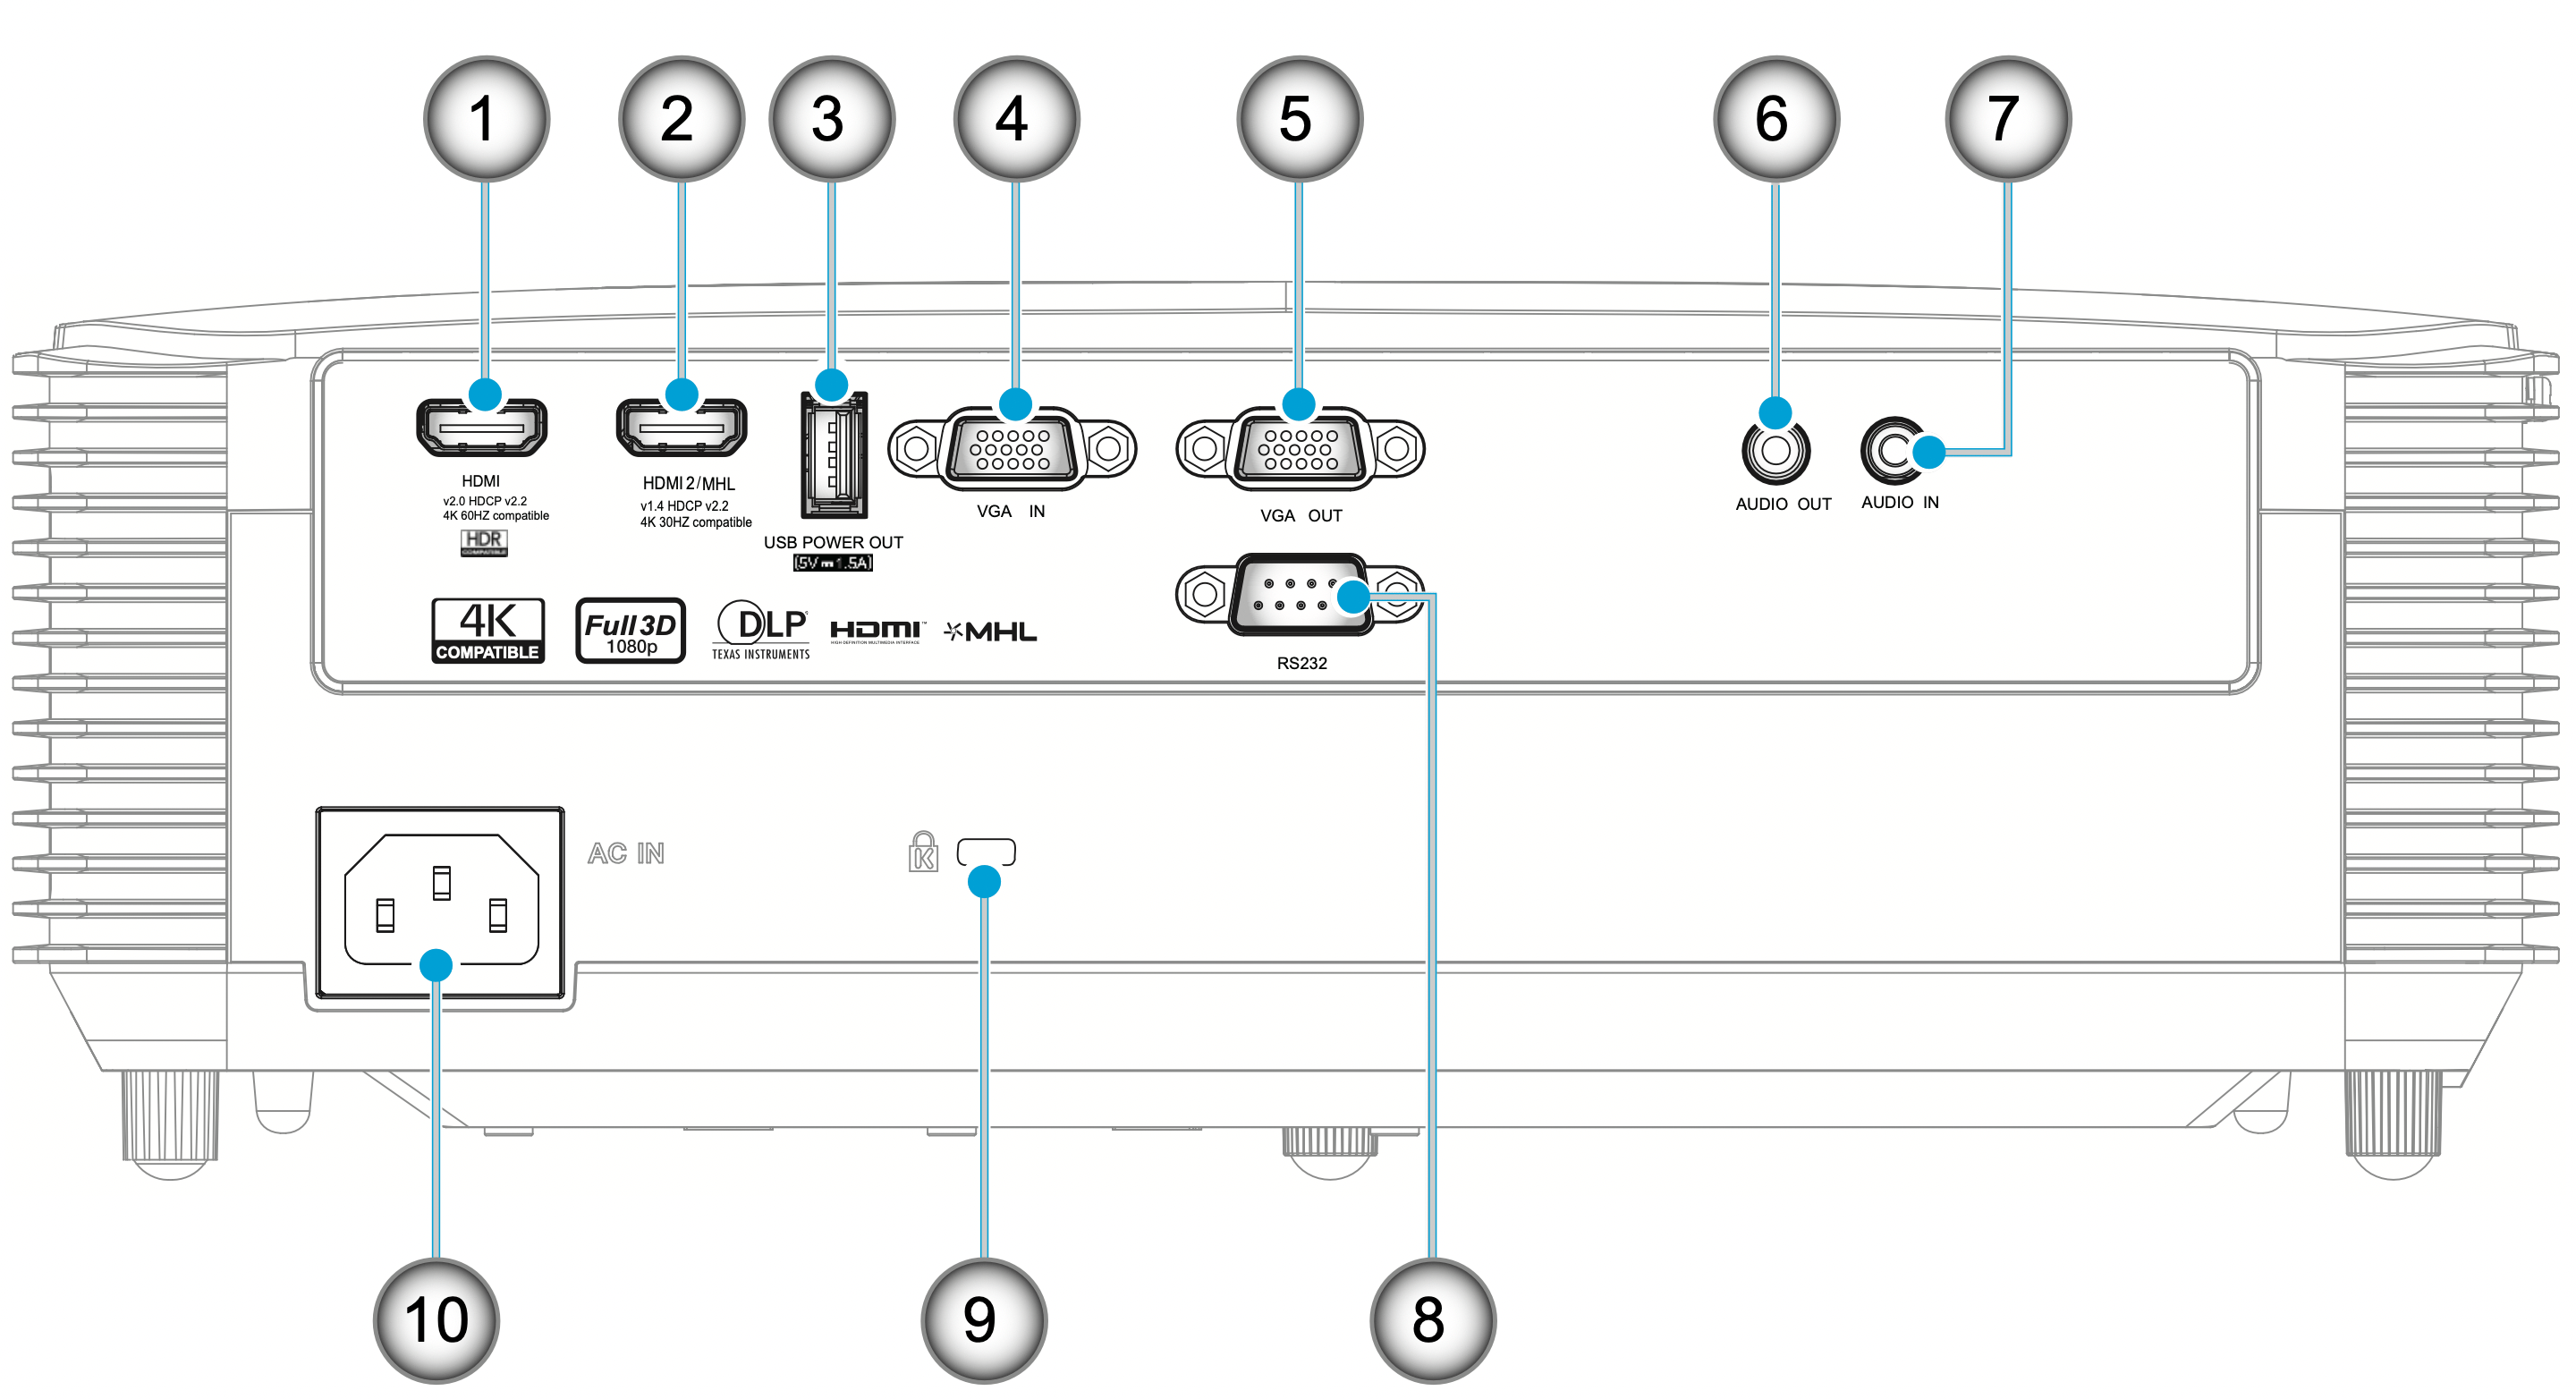
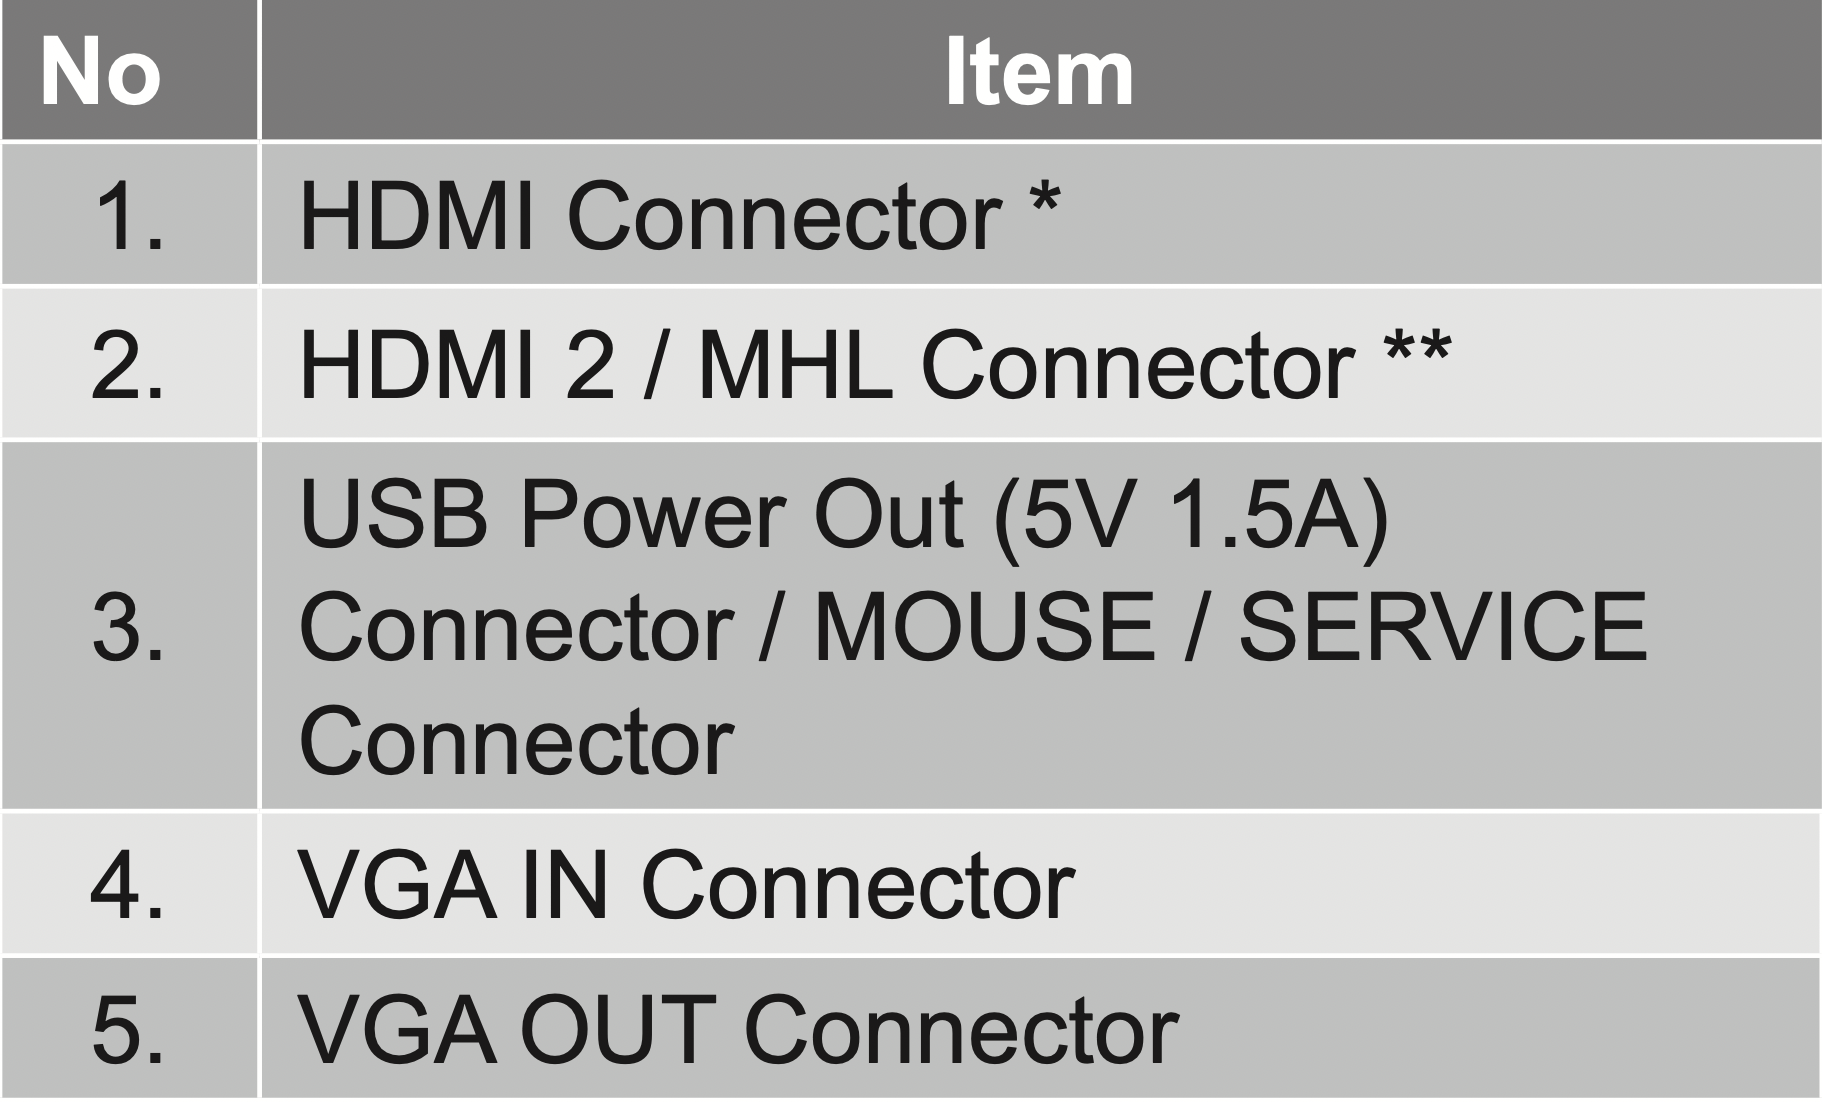
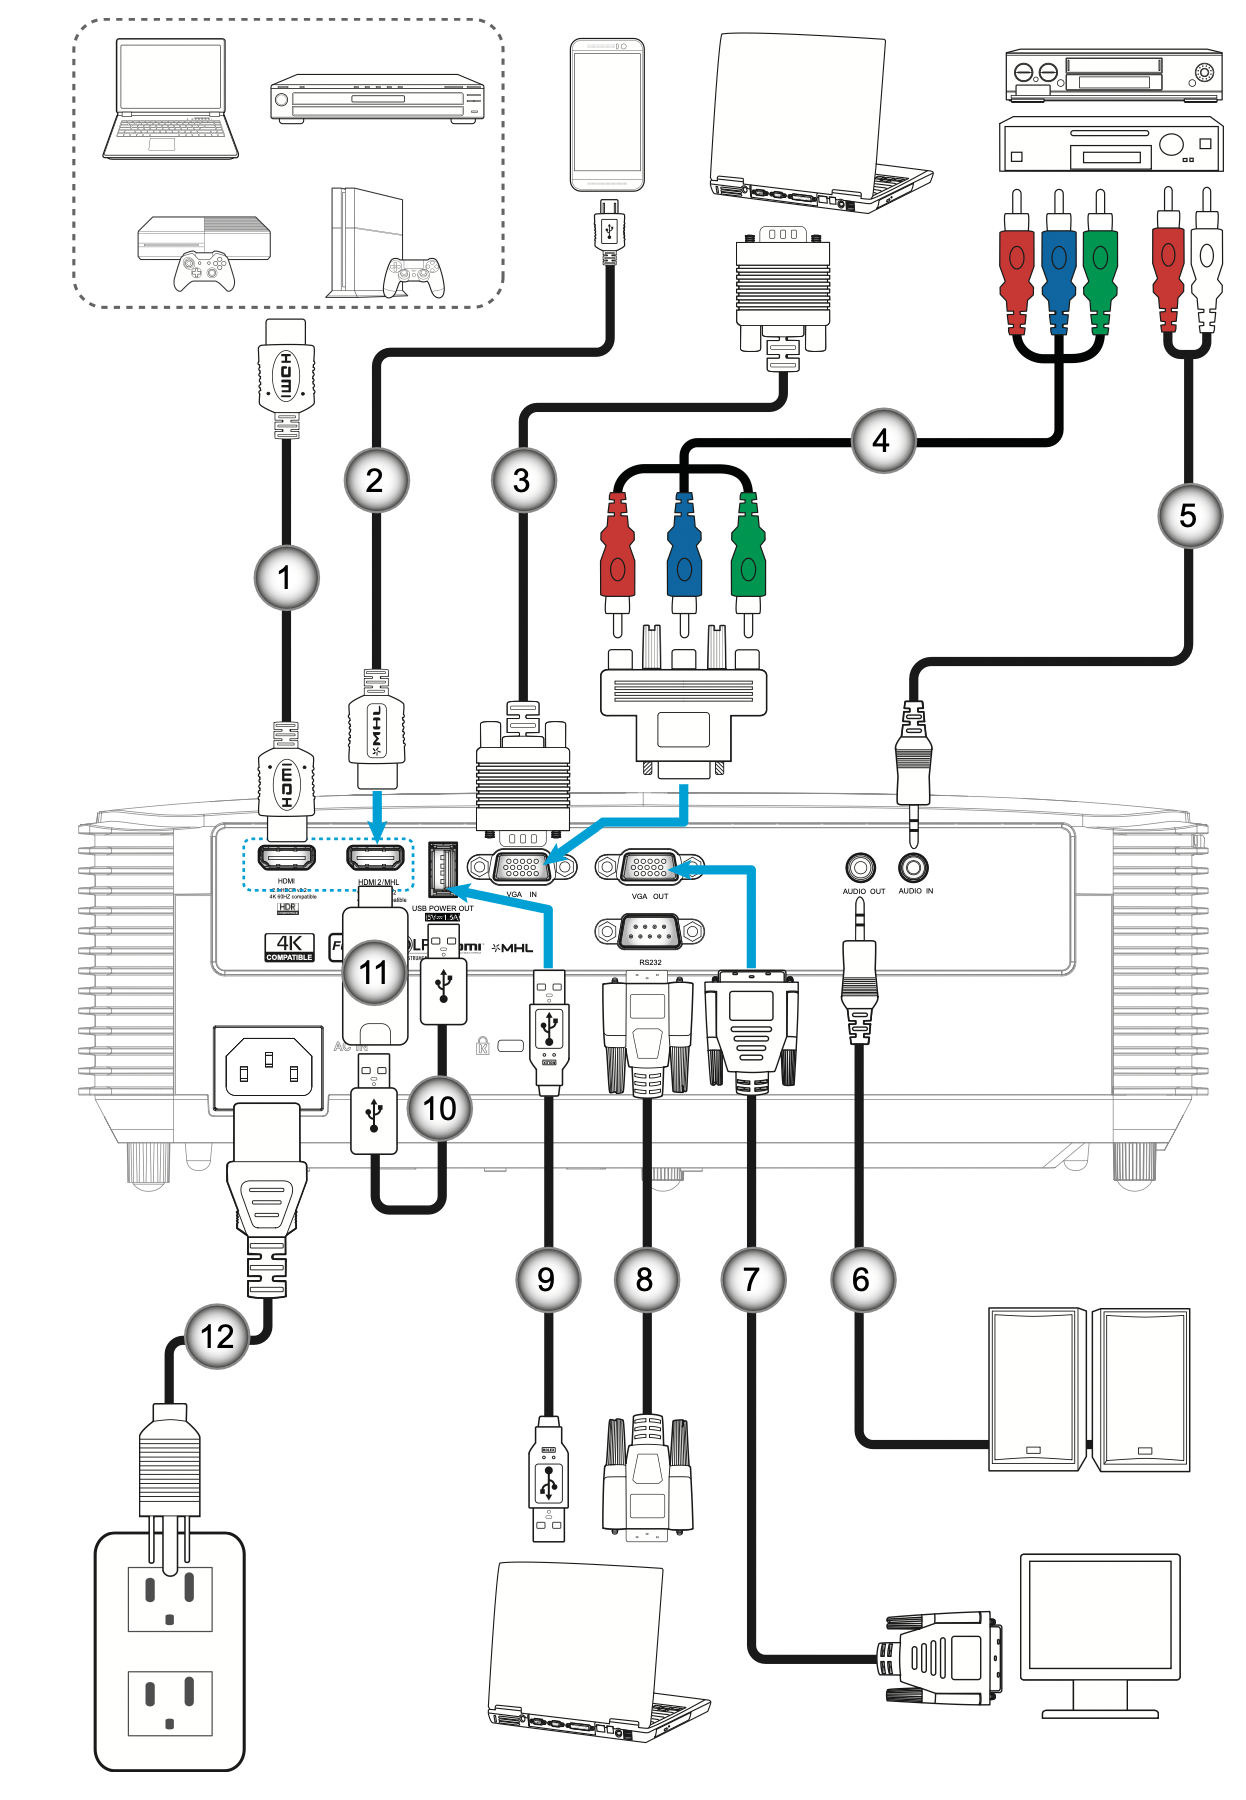
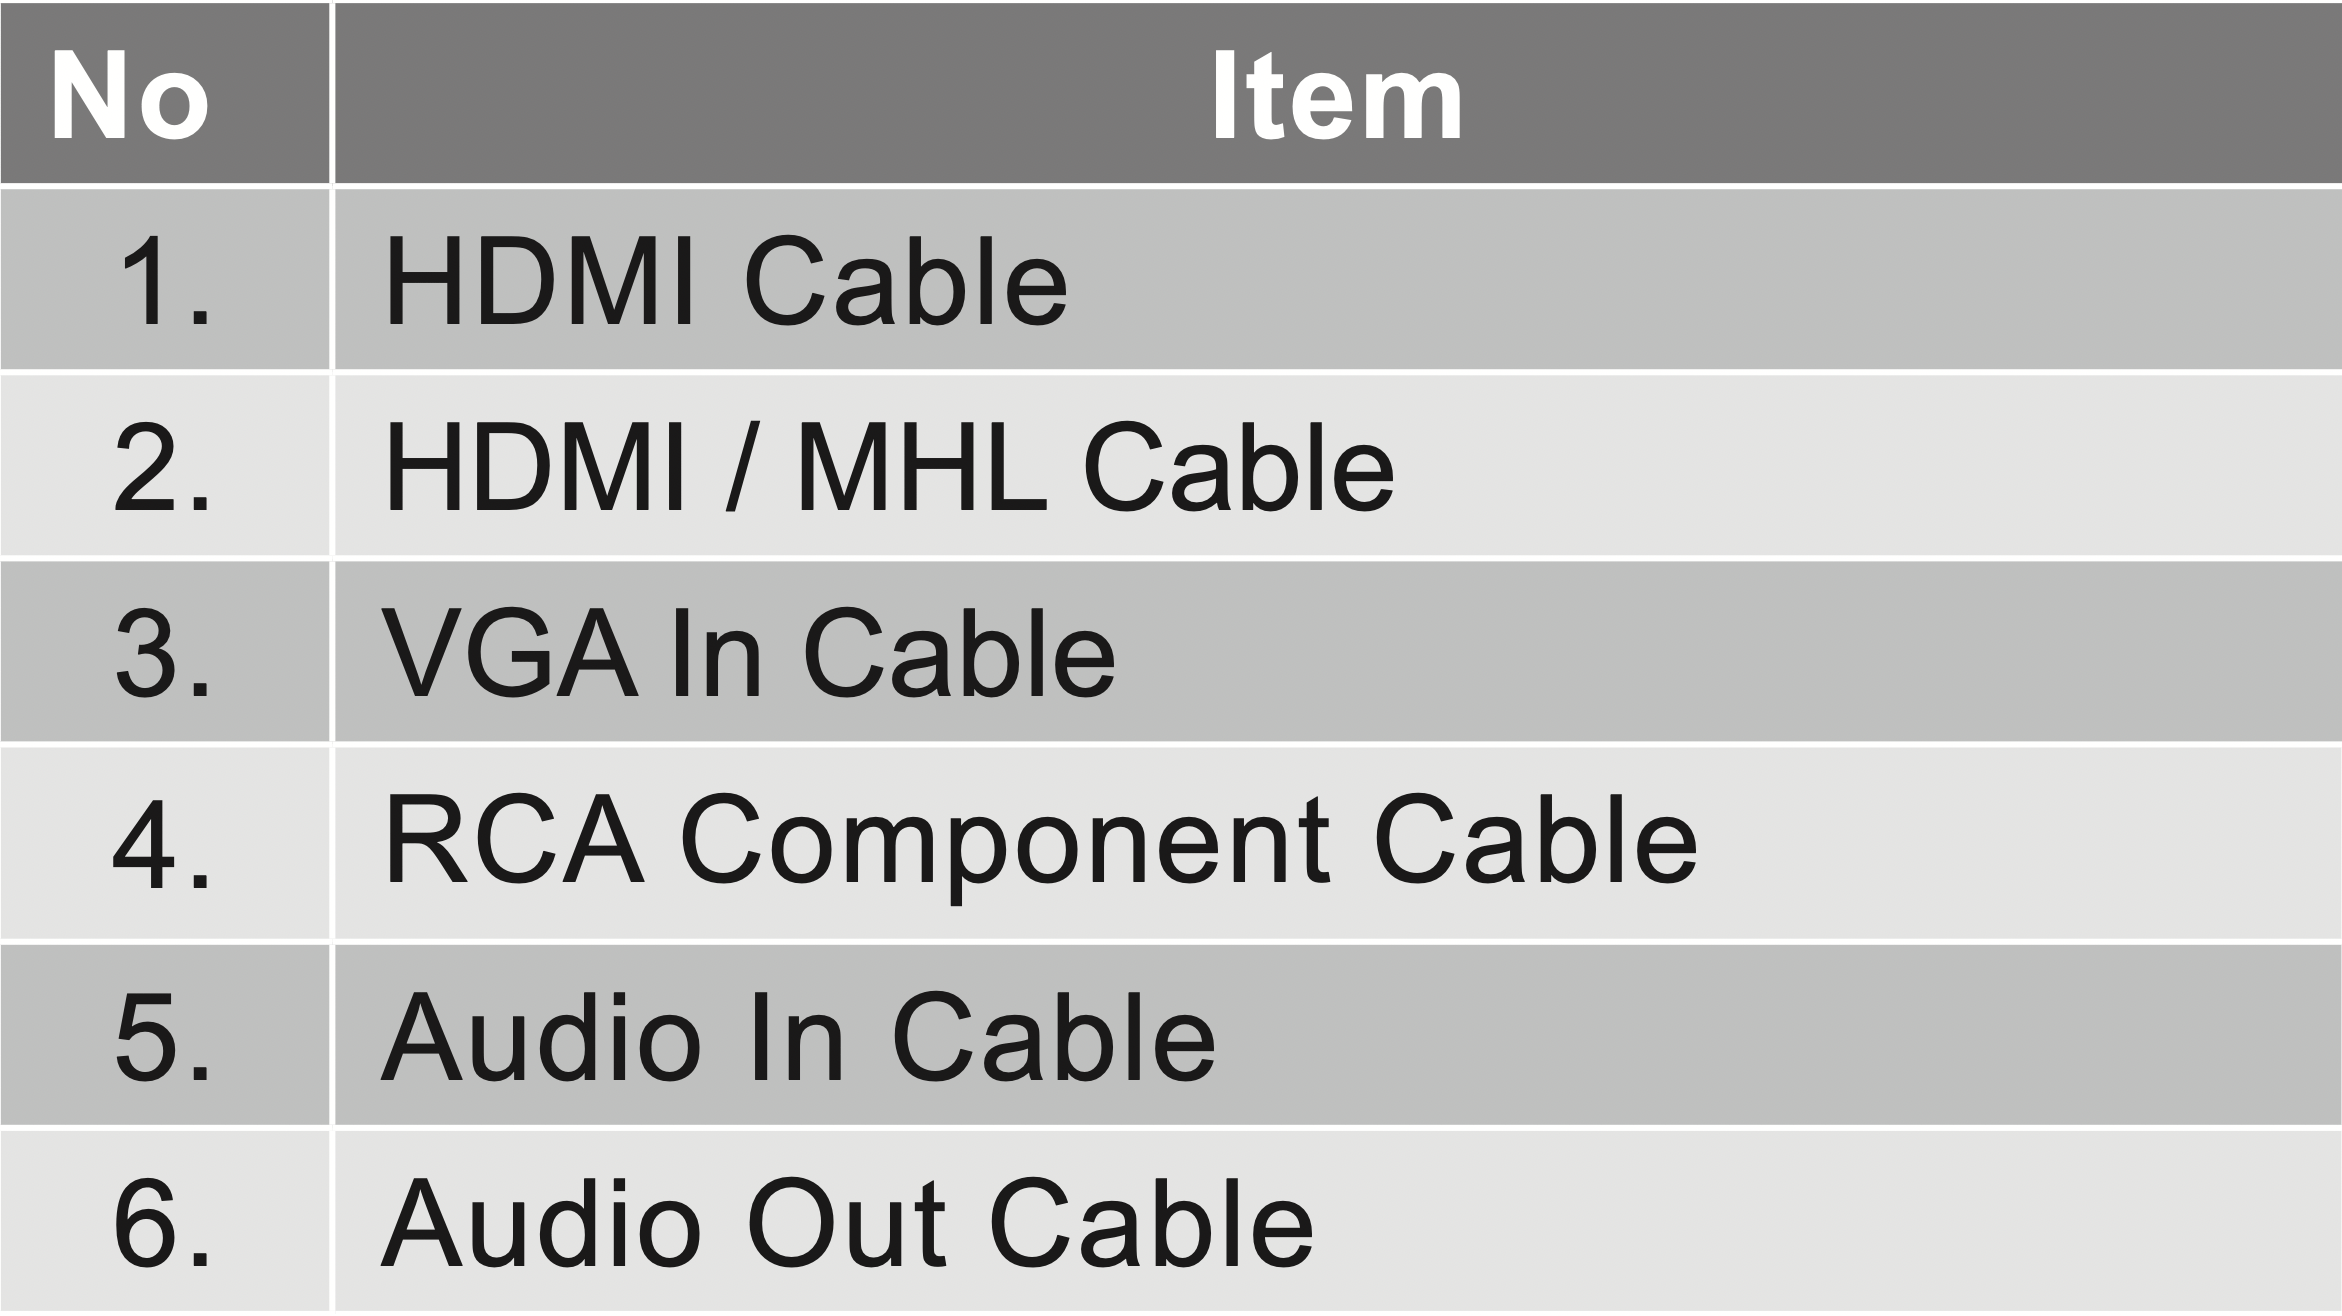
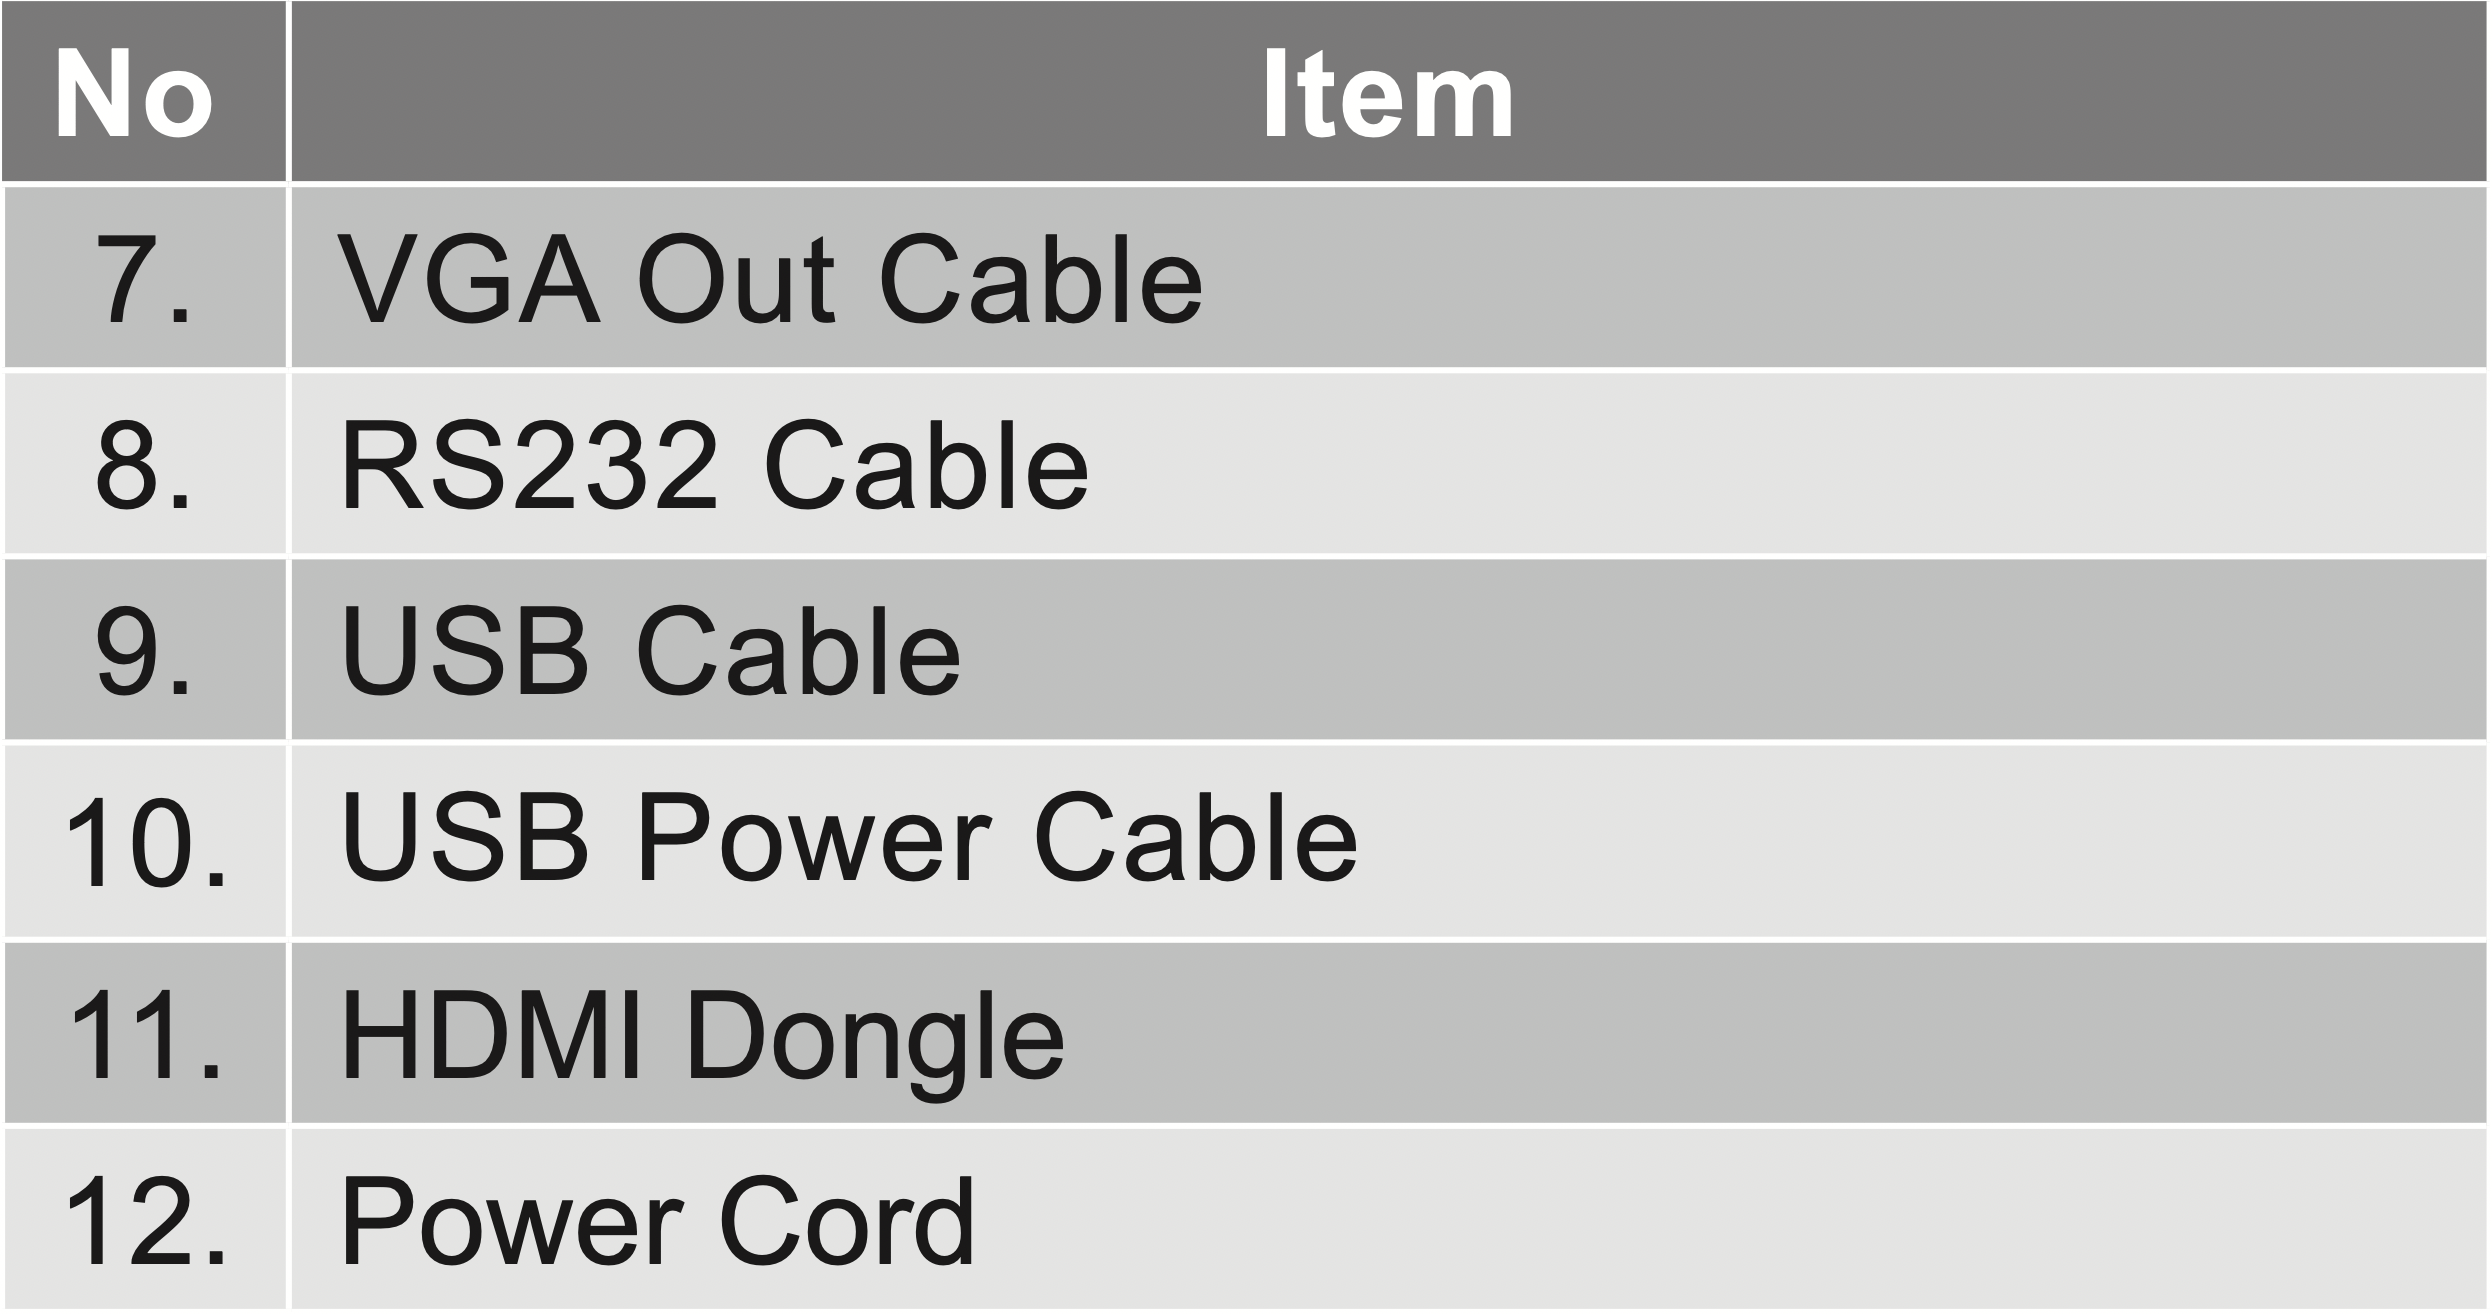
Connections
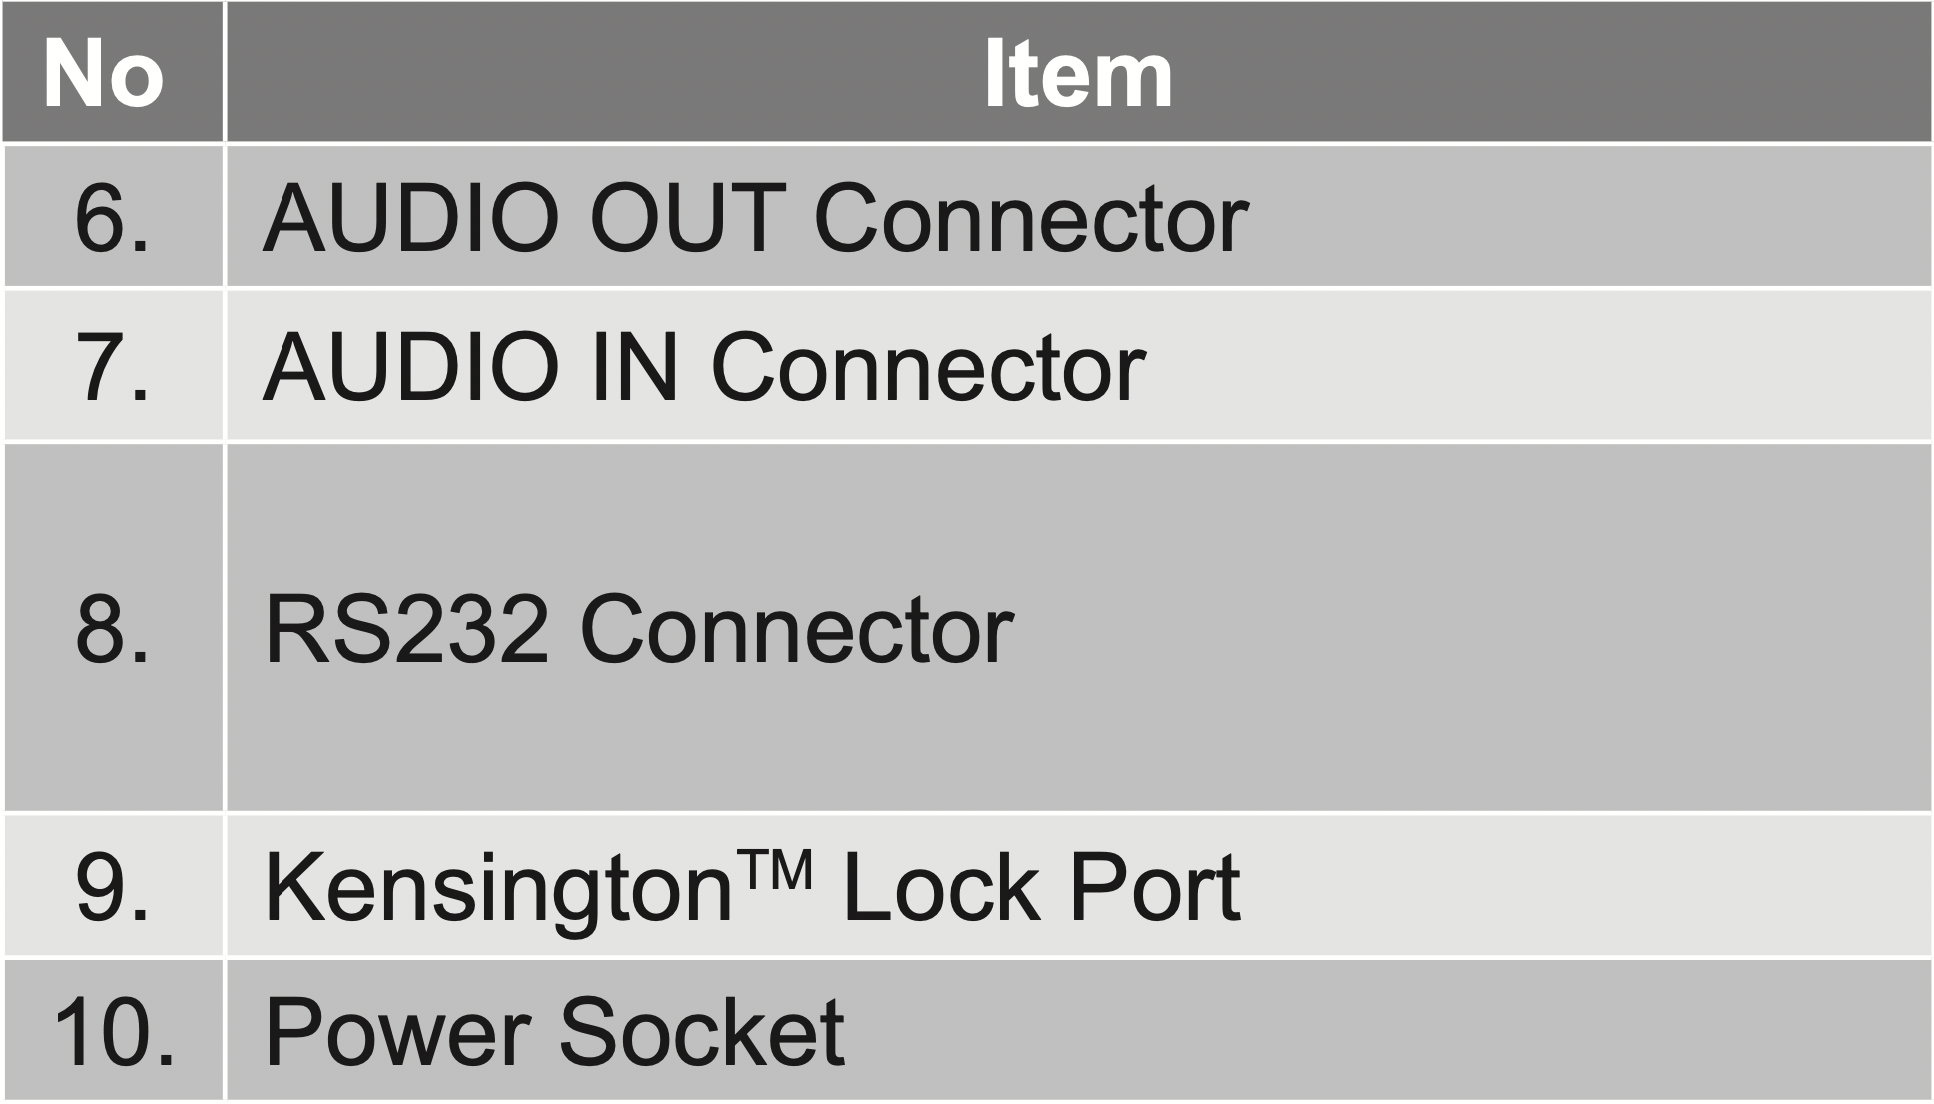
Note:
- To ensure the best image quality and avoid connection errors, we recommend the use of High Speed or Premium Certified HDMI cables up to 5 meters.
- Remote mouse requires special remote control.
- * HDMI 1 supports 4K 60HZ and HDR.
- ** HDMI 2 supports 4K 30HZ, not support HDR.
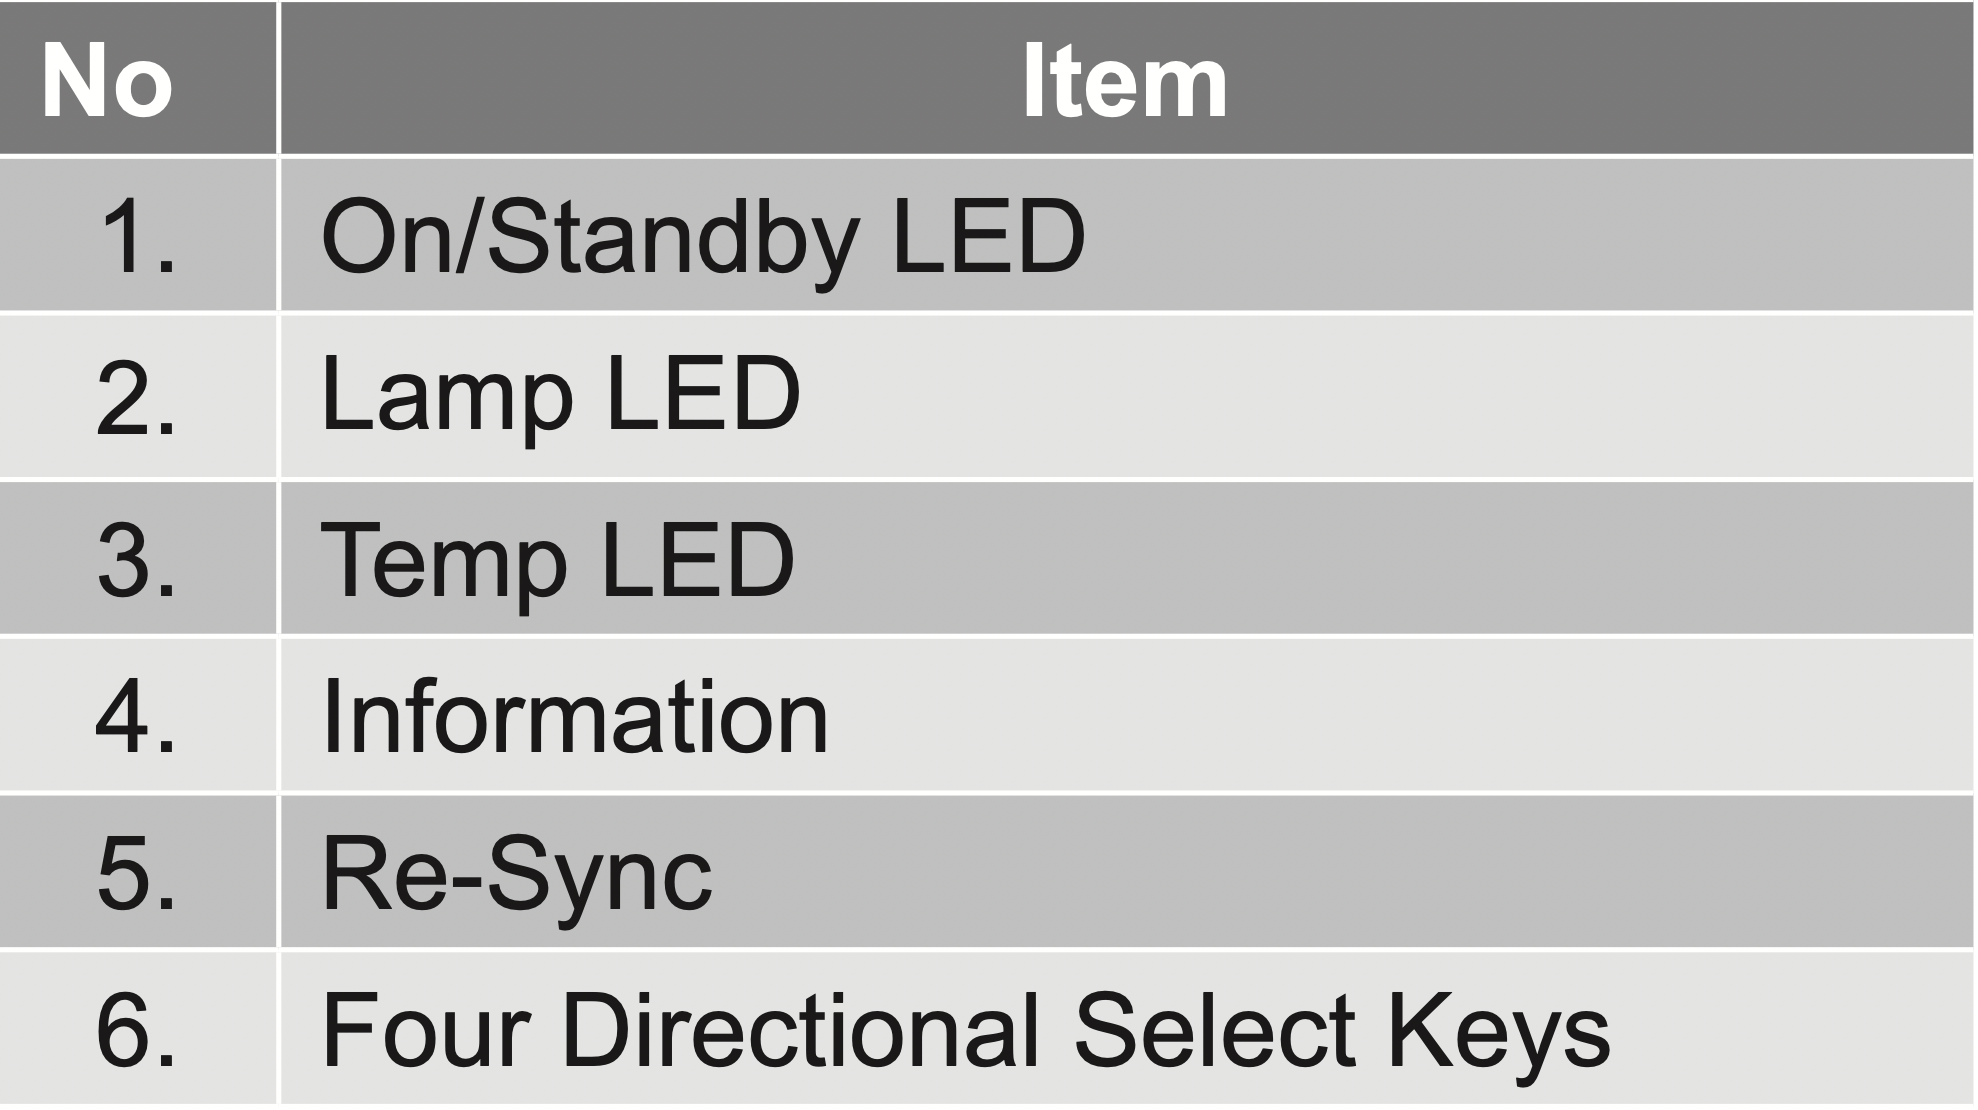
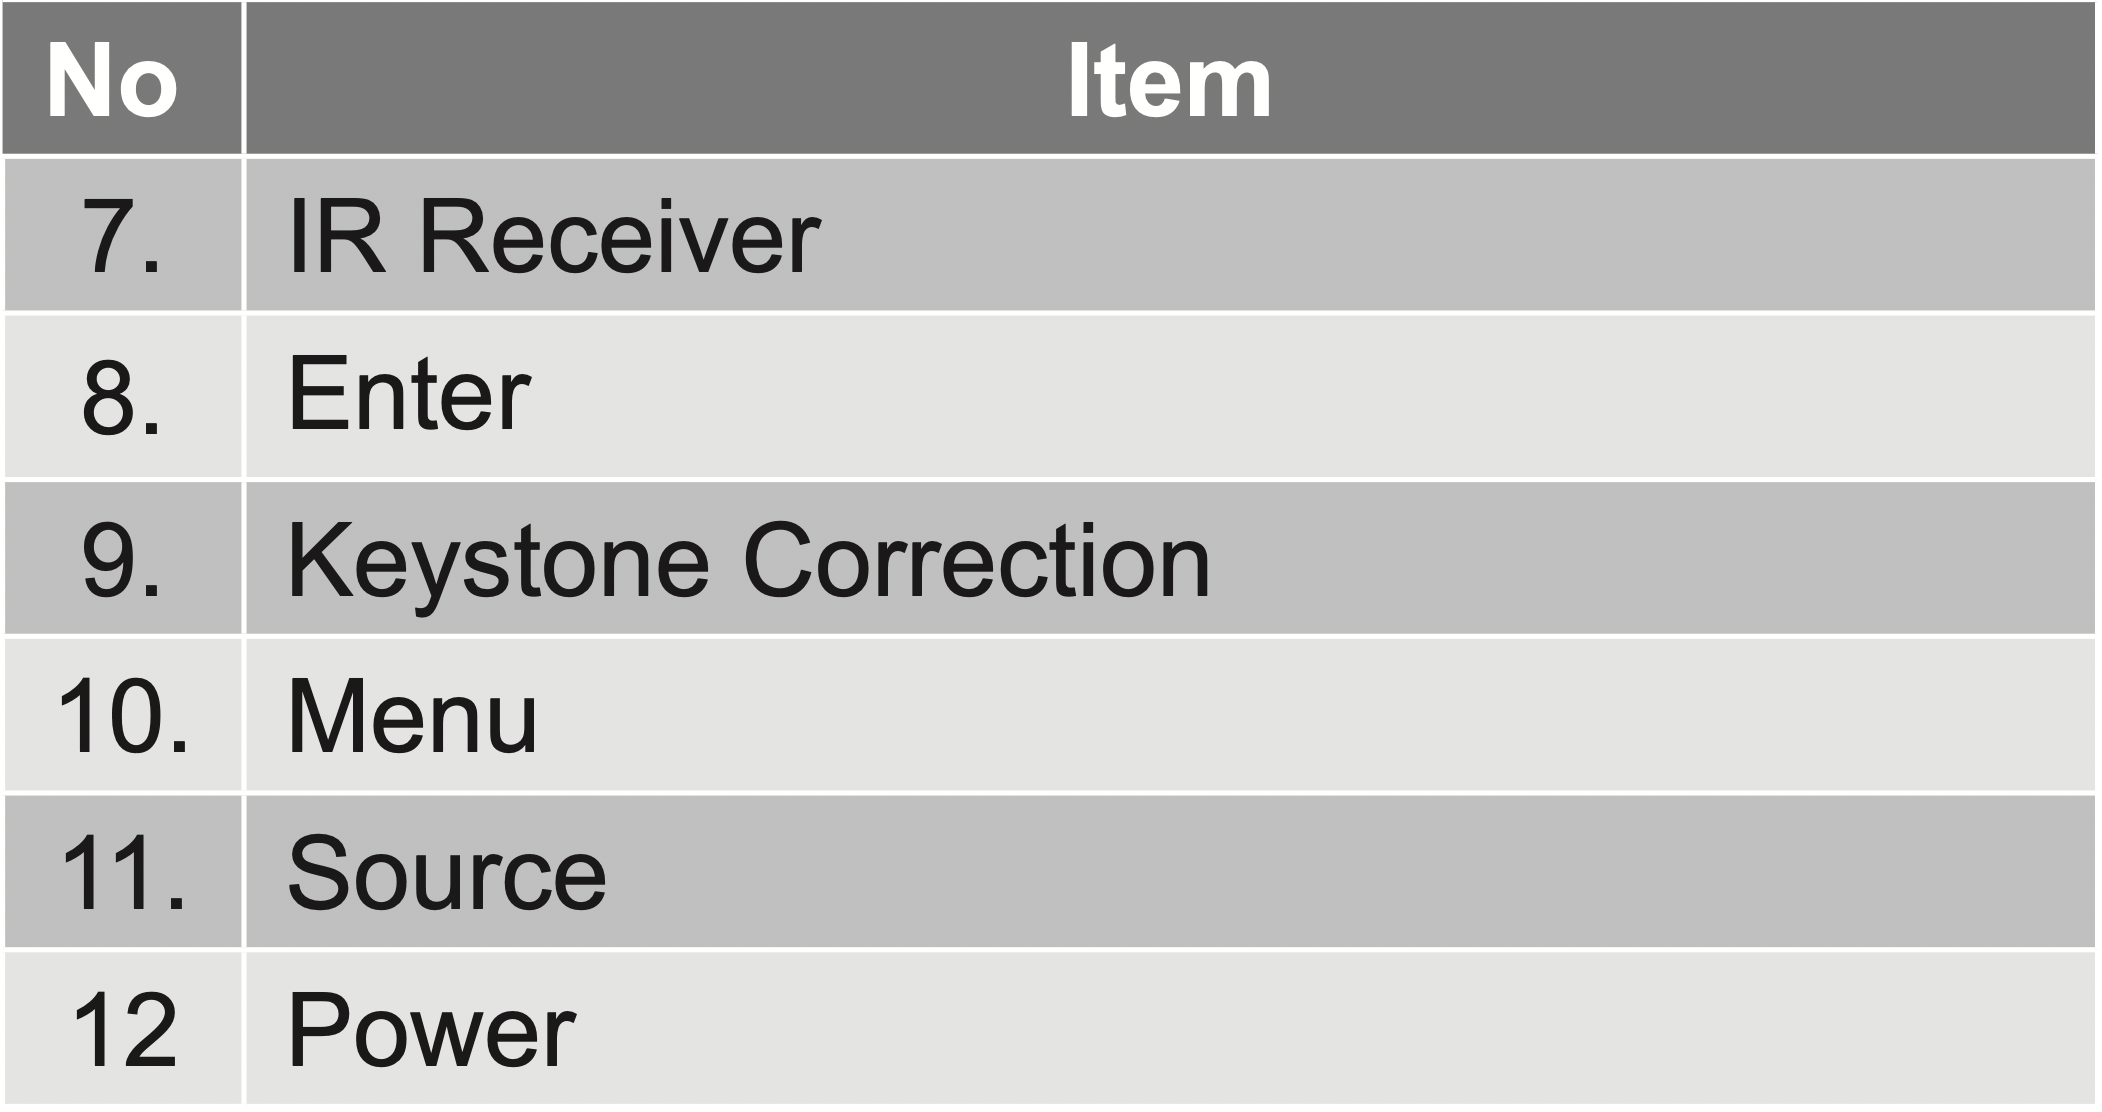
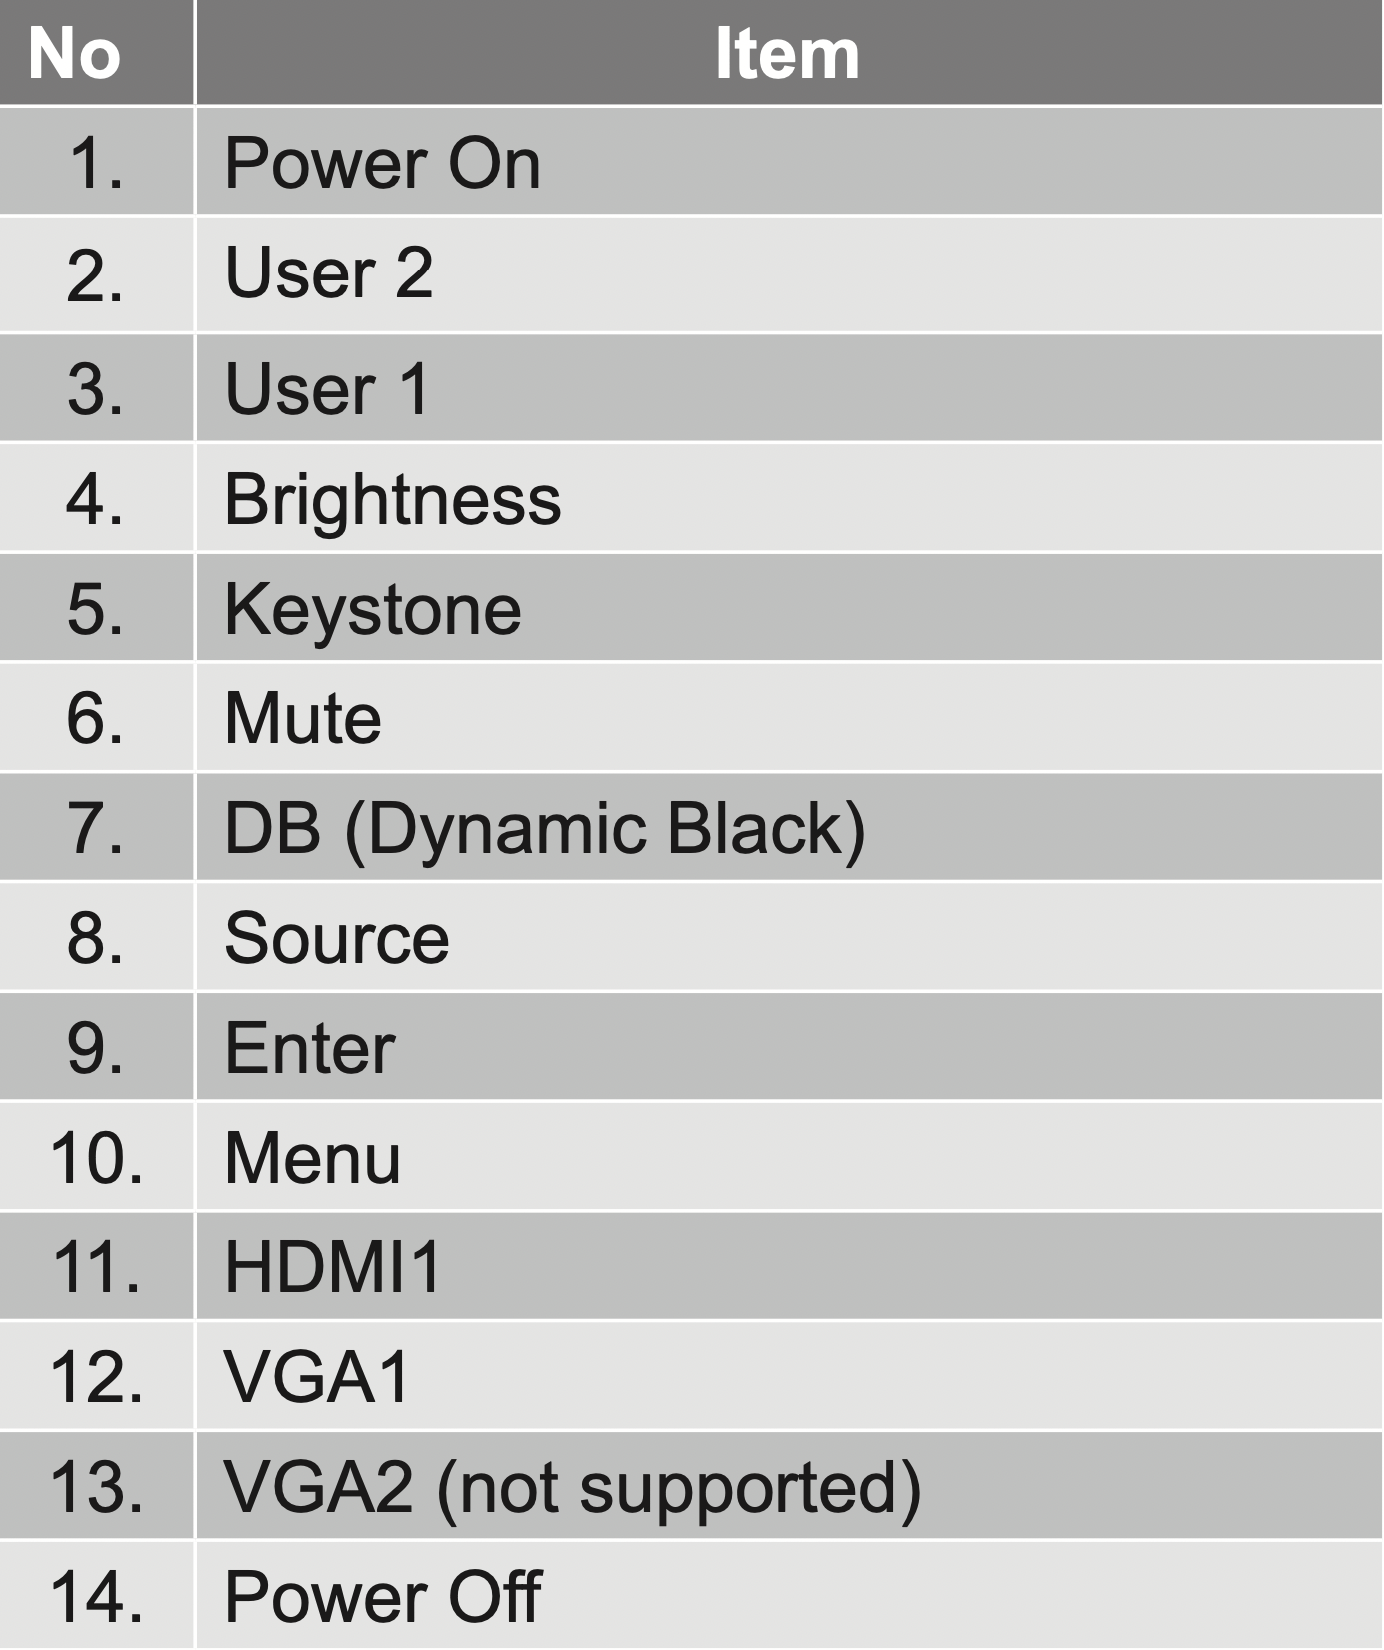
Keypad

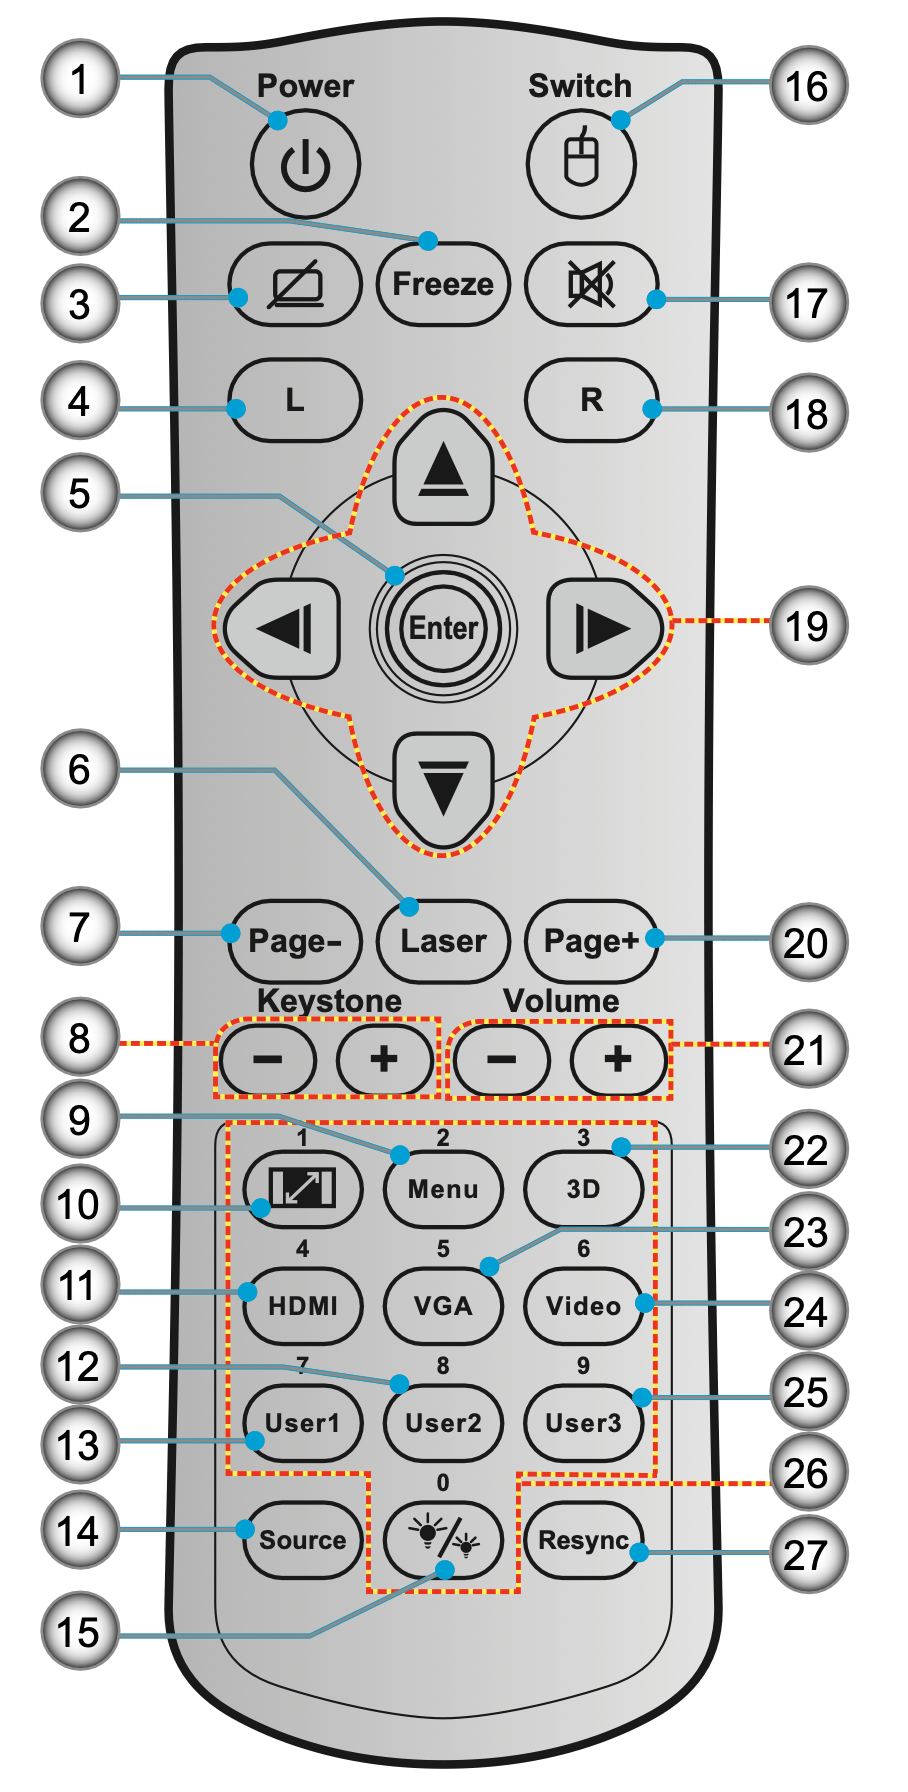
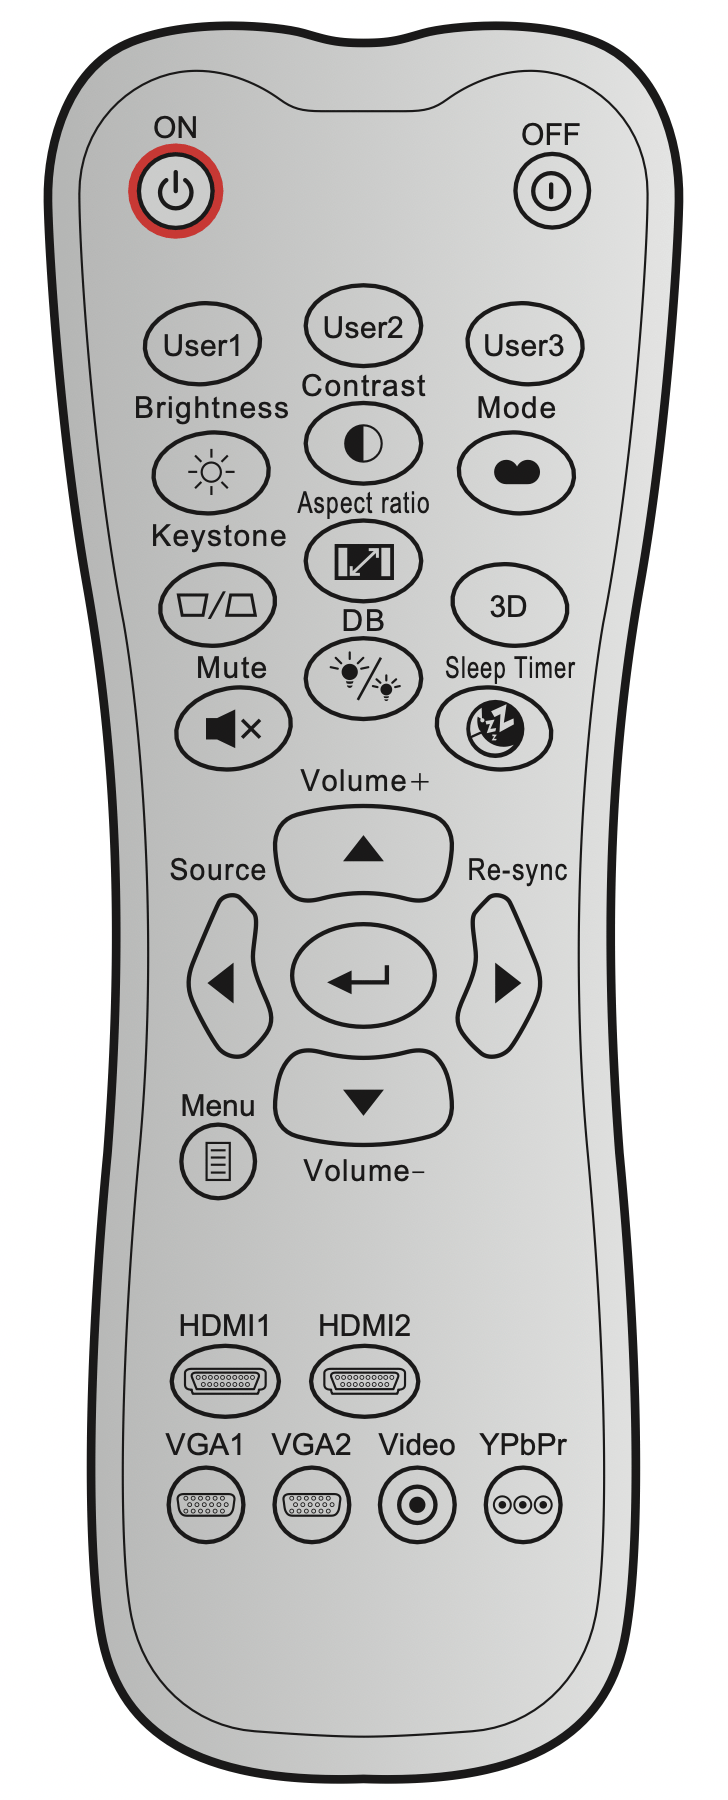
Remote control 1
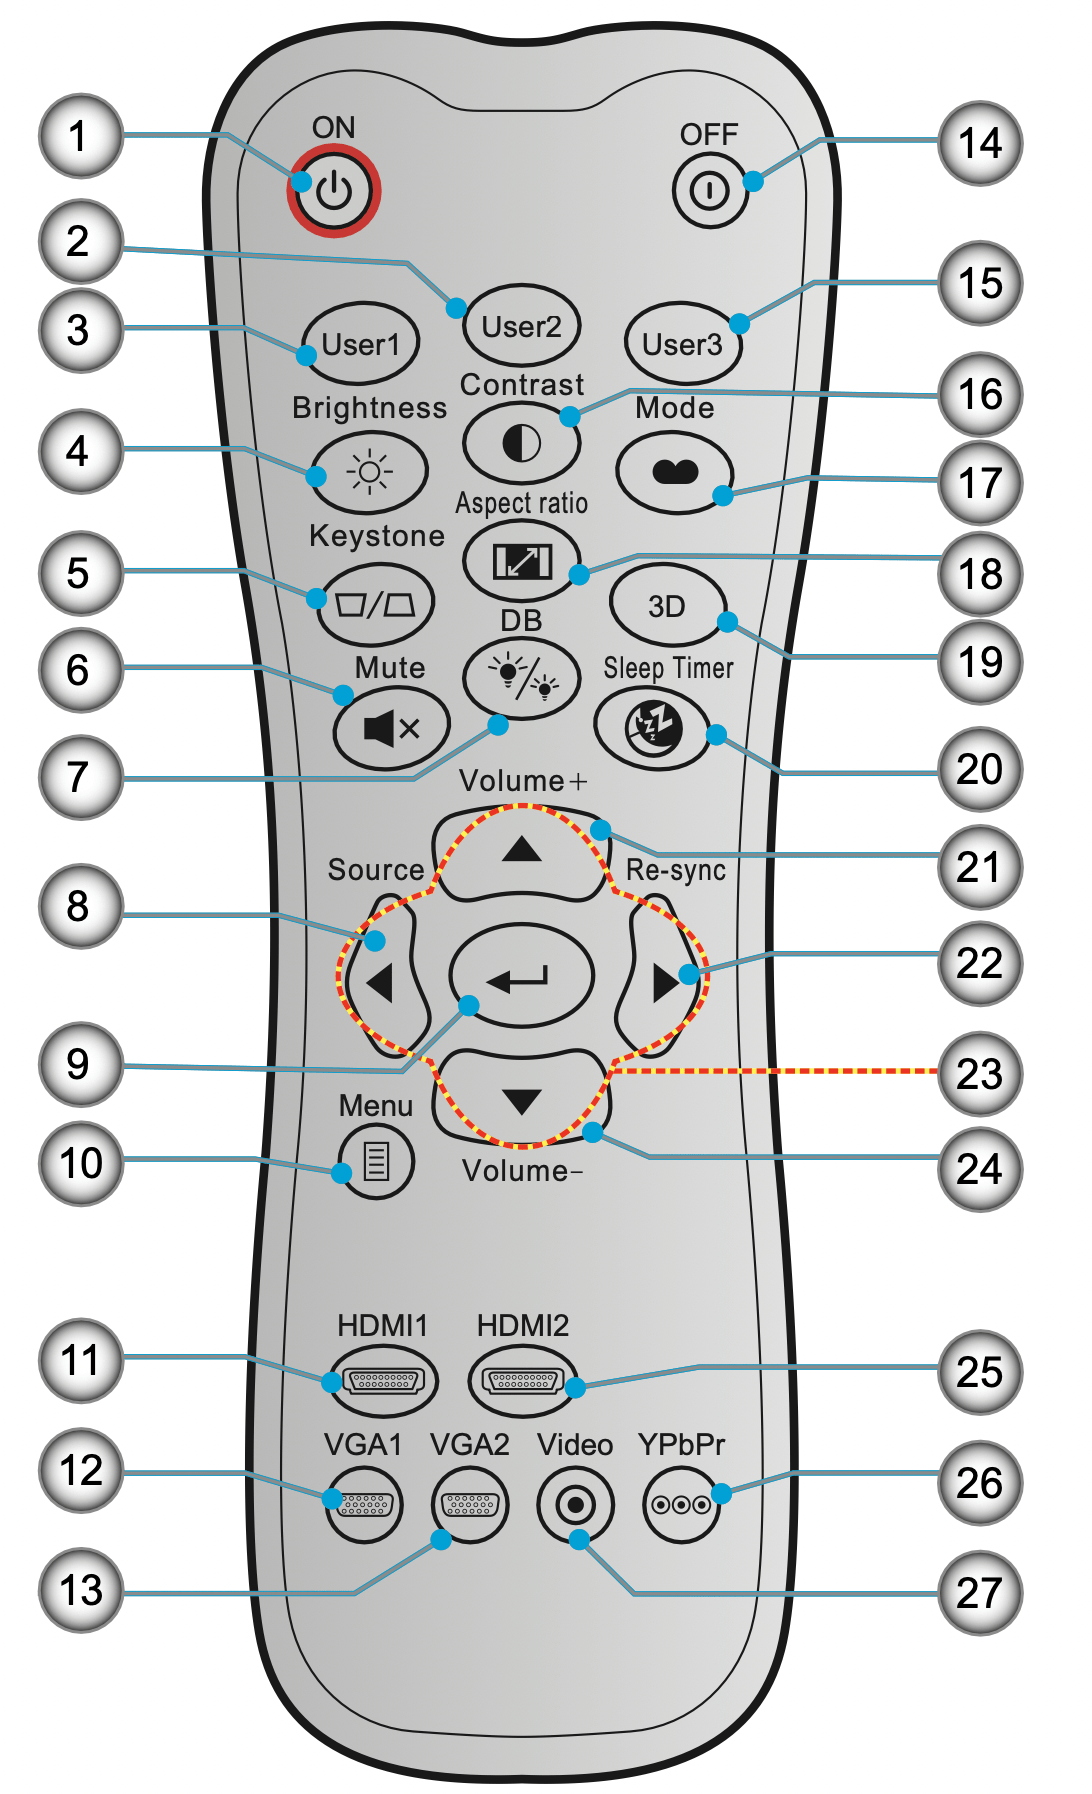

Note:
- The actual remote control may vary depending on the region.
- Some keys may have no function for models that do not support these features.
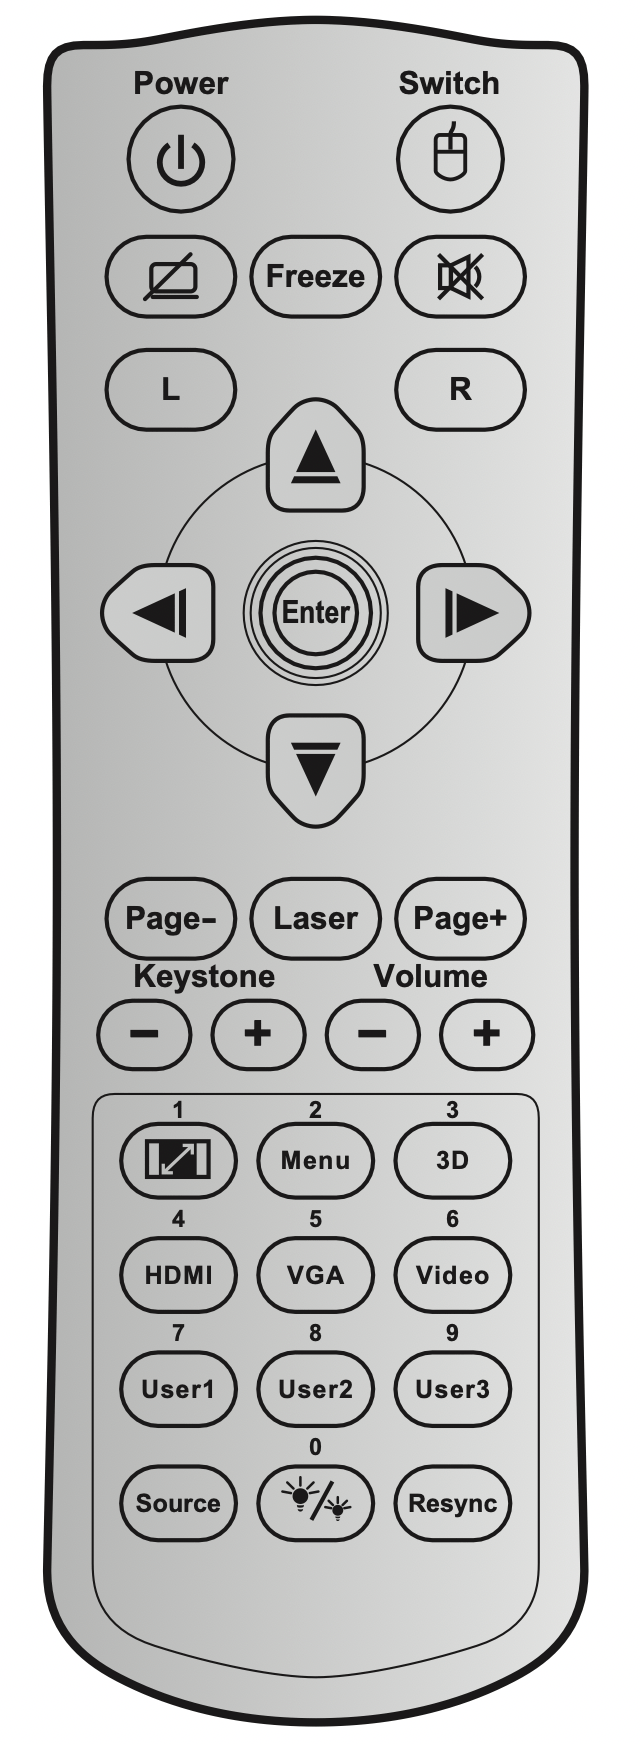
Remote control 2
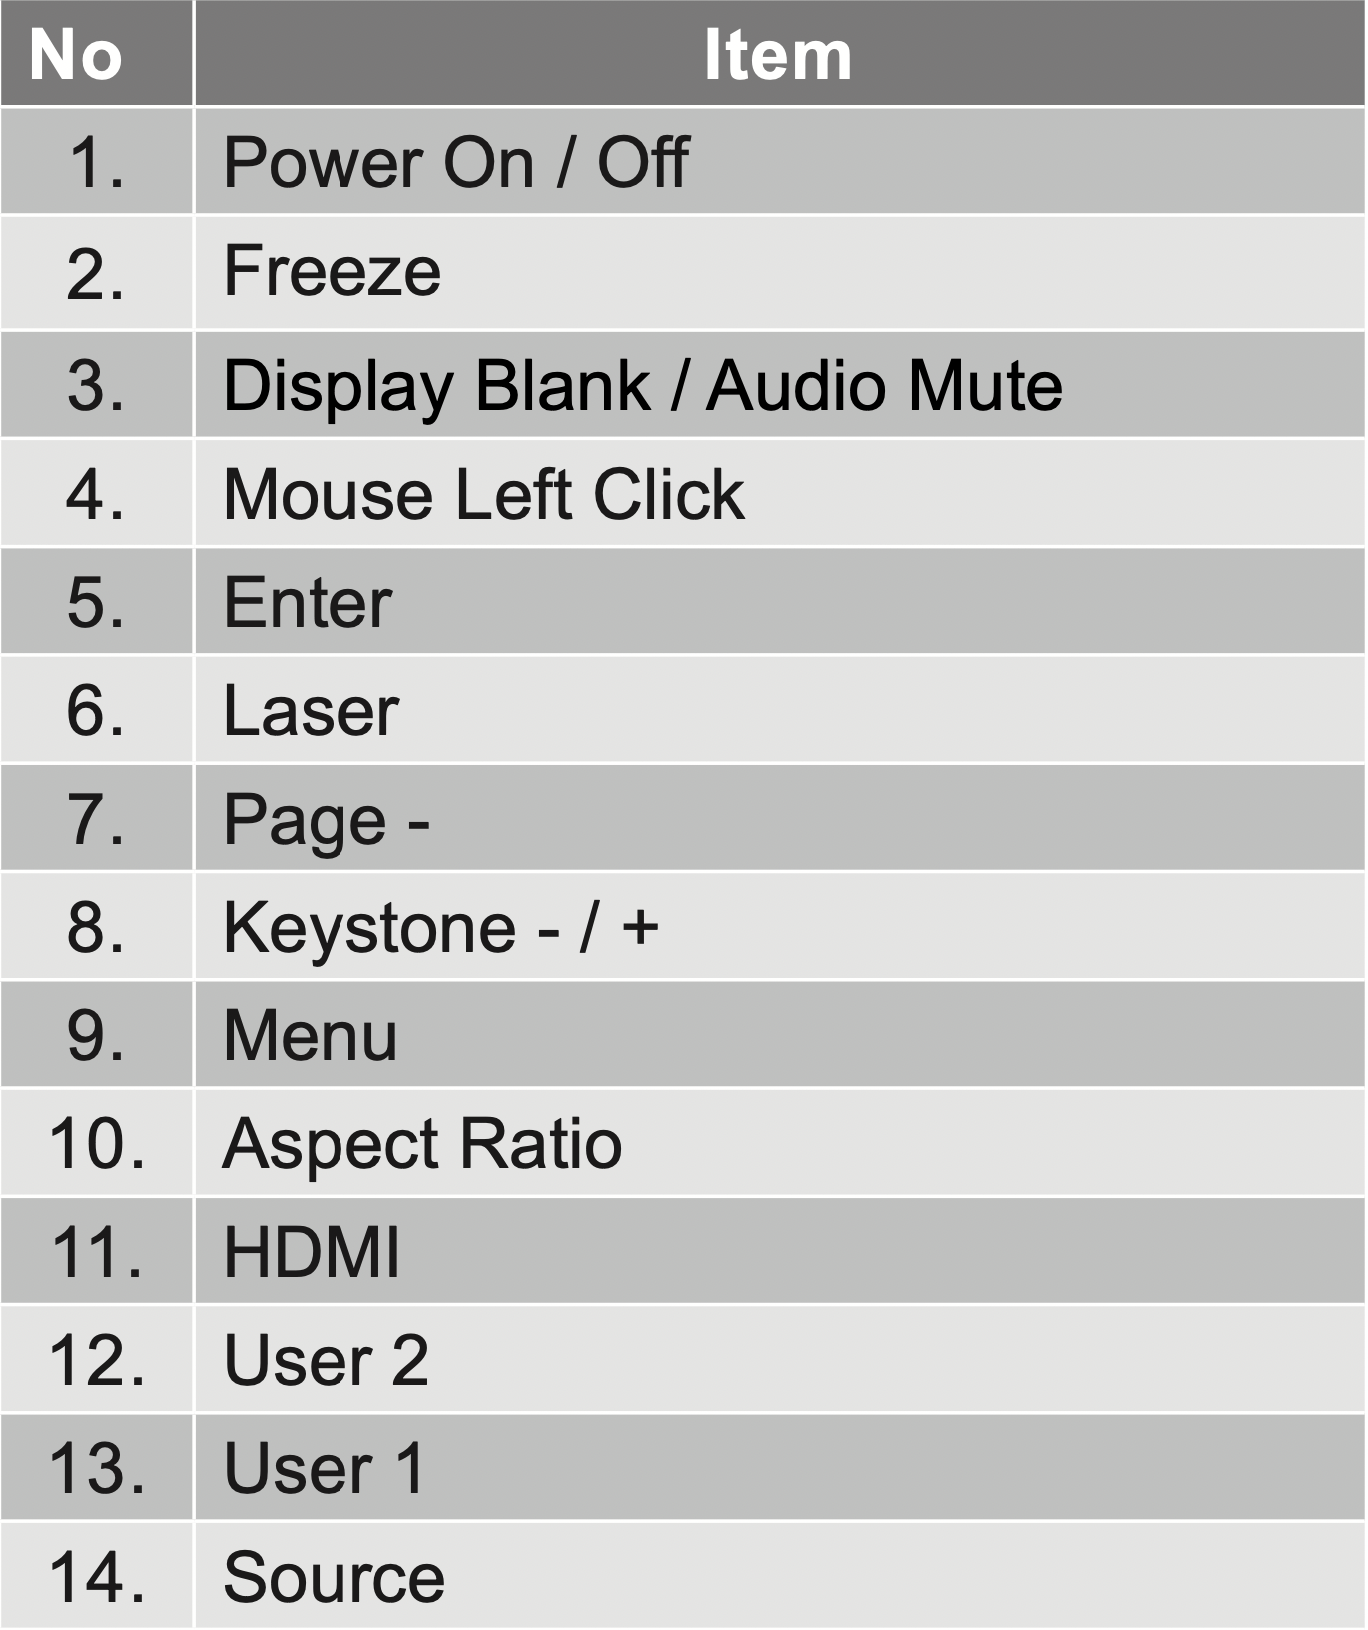

Note:
- The actual remote control may vary depending on the region.
- Some keys may have no function for models that do not support these features.
SETUP AND INSTALLATION
Connecting sources to the projector
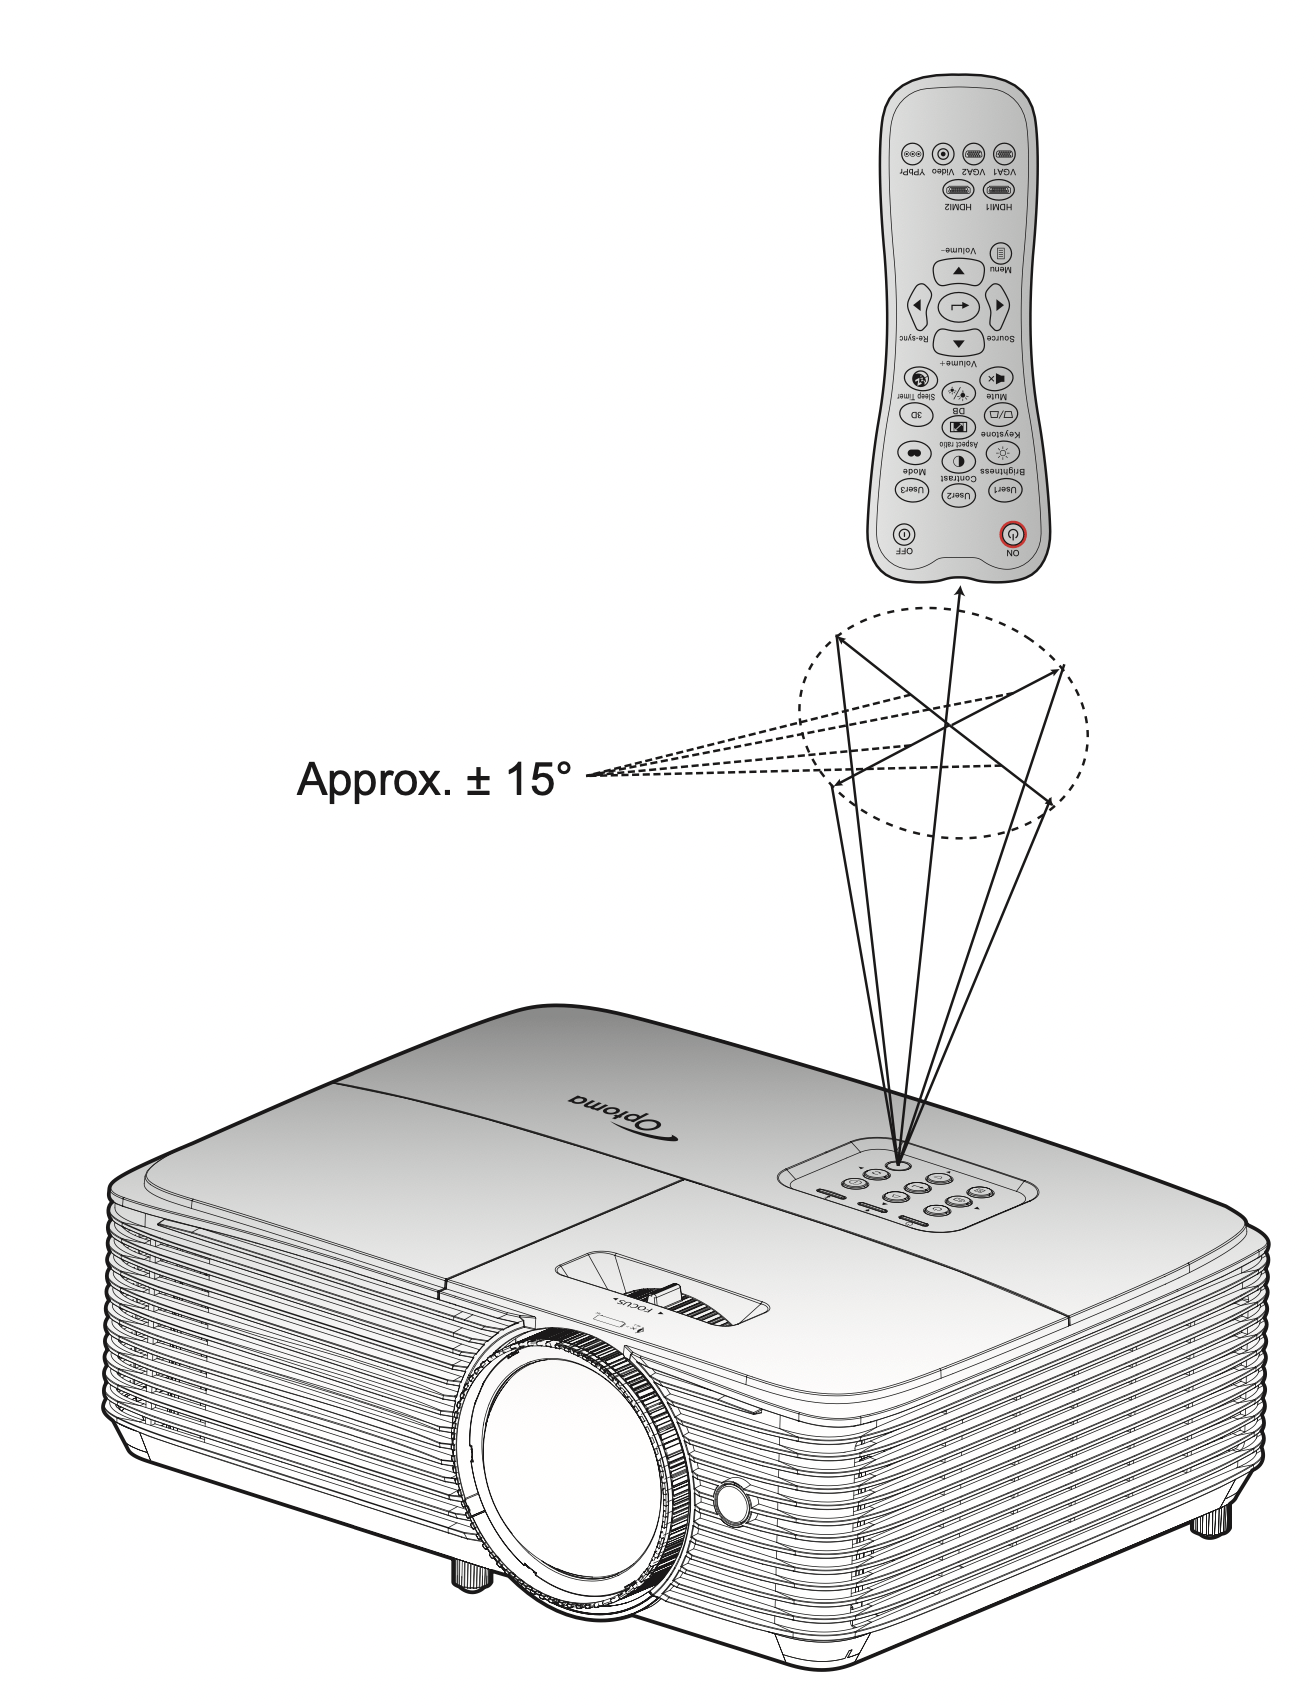
Effective range
Infra-Red (IR) remote control sensor is located on top of the projector. Ensure to hold the remote control at an angle within 30 degrees perpendicular to the projector’s top IR remote control sensor to function correctly. The distance between the remote control and the sensor should not be longer than 6 meters (~ 20 feet).
Note: When pointing the remote control directly (0 degrees angle) on the IR sensor, the distance between the remote control and the sensor should not be longer than 8 meters (~ 26 feet).
- Make sure that there are no obstacles between the remote control and the IR sensor on the projector that might obstruct the infra-red beam.
- Make sure the IR transmitter of the remote control is not being shined by sunlight or fluorescent lamps directly.
- Please keep the remote controller away from fluorescent lamps for over 2 meters or the remote controller might become malfunction.
- If the remote control is close to Inverter-Type fluorescent lamps, it might become ineffective from time to time.
- If the remote control and the projector are within a very short distance, the remote control might become ineffective.
- When you aim at the screen, the effective distance is less than 6 meters from the remote control to the screen and reflecting the IR beams back to the projector. However, the effective range might change according to screens.
USING THE PROJECTOR
Powering on / off the projector
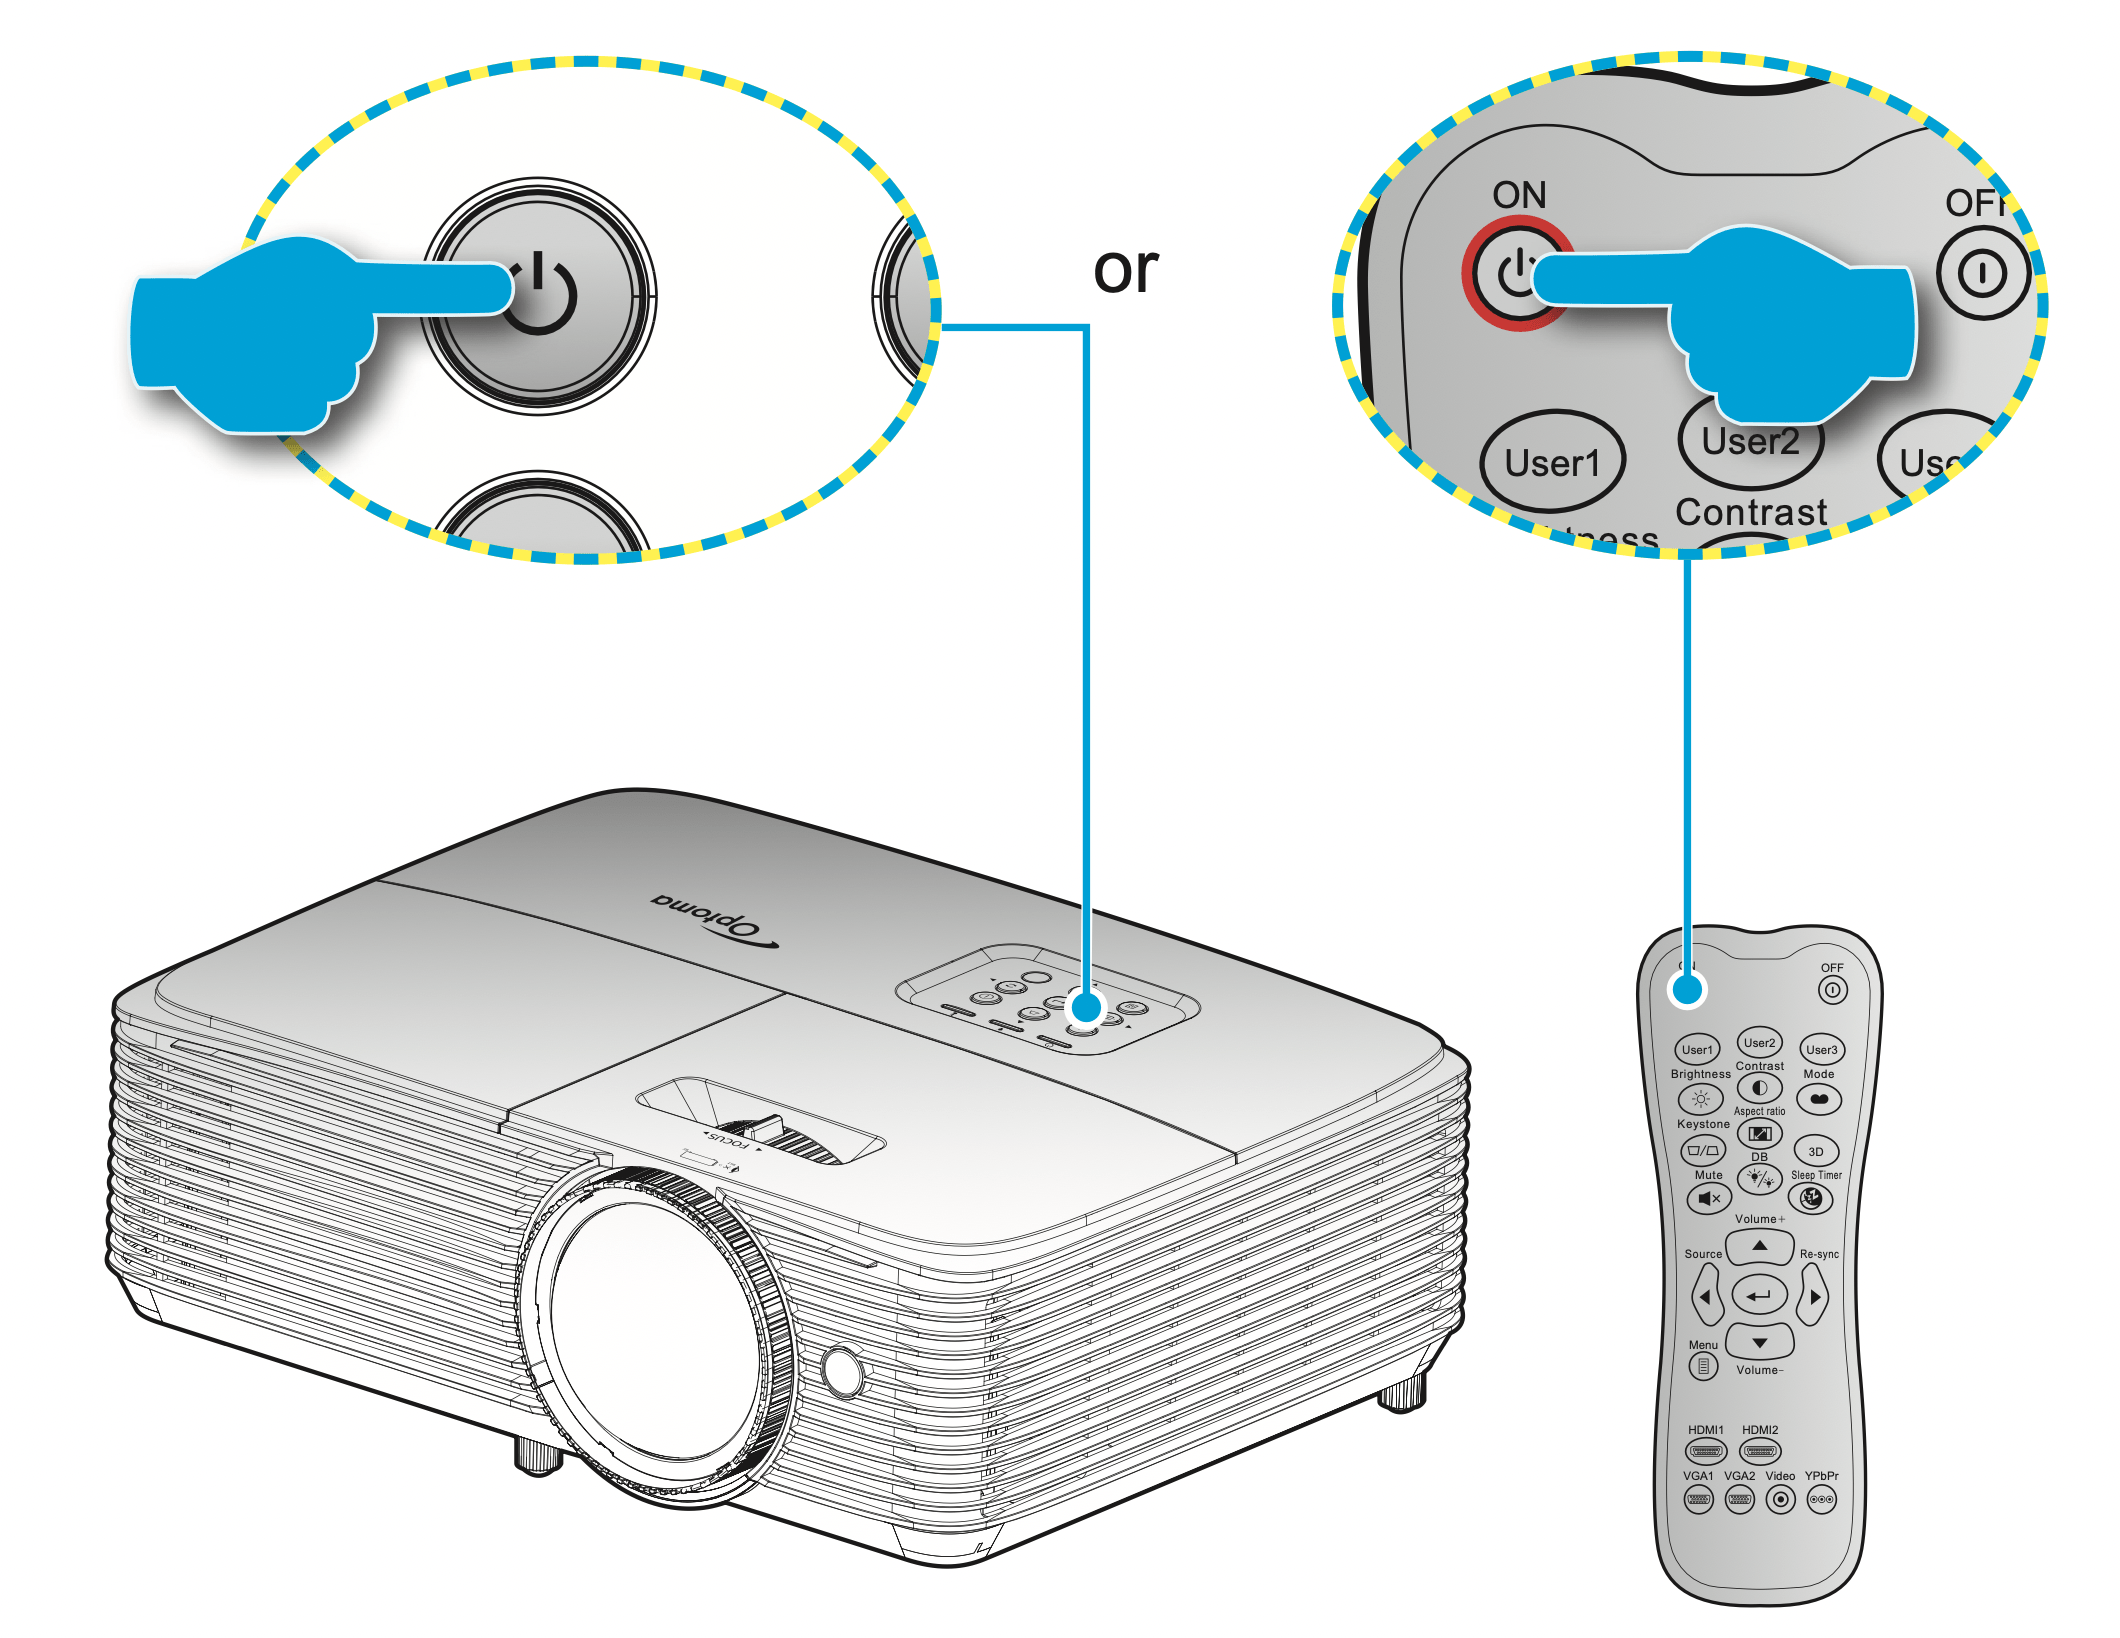
Powering on
- Securely connect the power lead and signal/source cable. When connected, the On/Standby LED will turn red.
- Turn on the projector by pressing the "
 " either on the projector keypad or the remote control.
- A start up screen will display in approximately 10 seconds and the On/Standby LED will be flashing green or flashing blue.
Note: The first time the projector is turned on, you will be prompted to select the preferred language, projection orientation, and other settings.
Powering off
- Turn off the projector by pressing the " " either on the projector keypad or the remote control.
- The following message will be displayed:
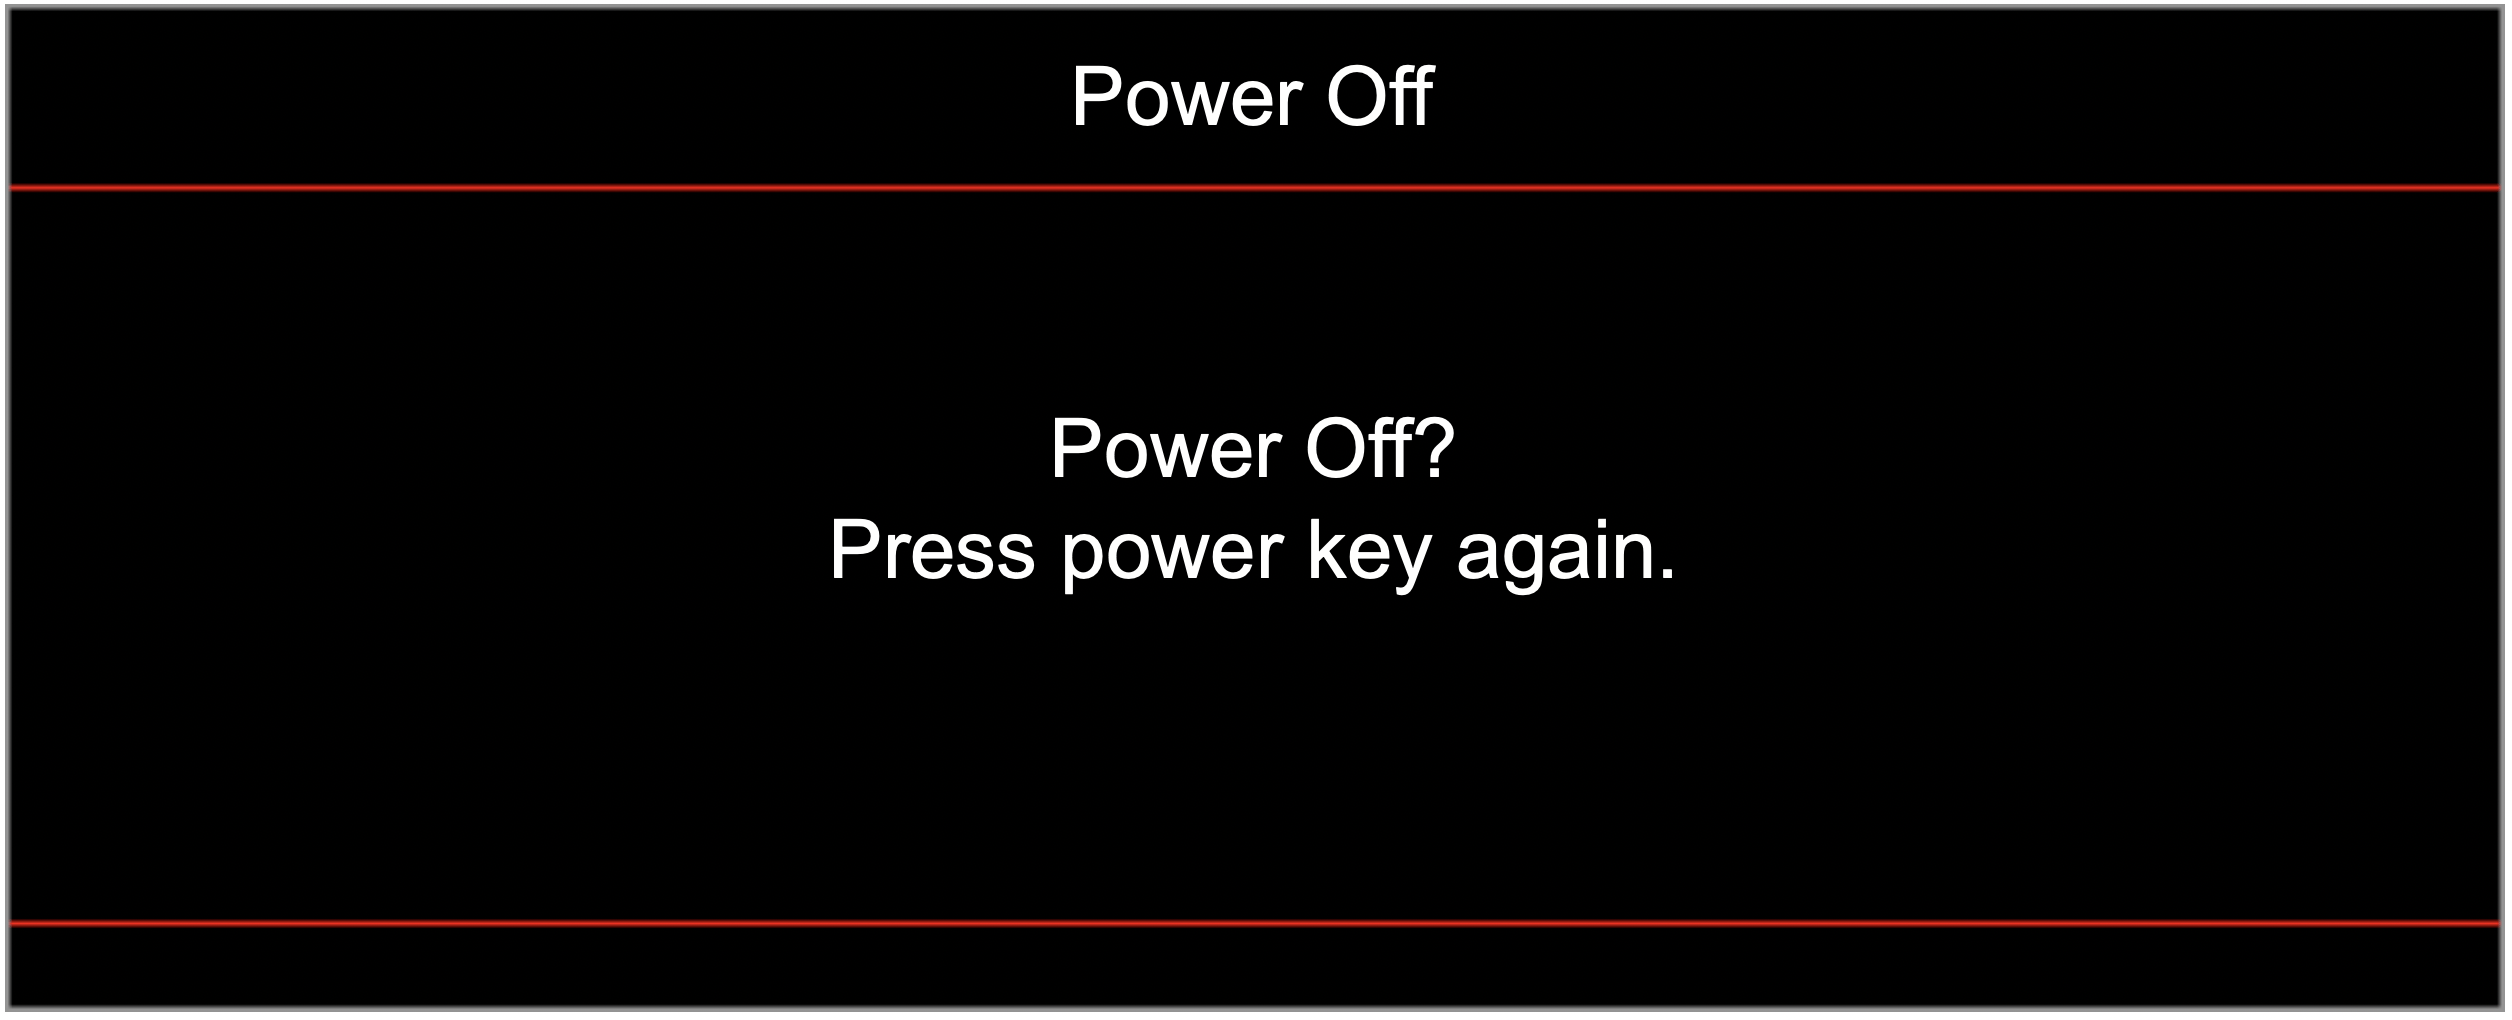
- Press the " " again to confirm, otherwise the message will disappear after 15 seconds. When you press the " " button for the second time, the projector will shut down.
- The cooling fans will continue to operate for about 10 seconds for the cooling cycle and the On/ Standby LED will flash green or flash blue. When the On/Standby LED turns solid red, this indicates the projector has entered standby mode. If you wish to turn the projector back on, you must wait until the cooling cycle has finished and the projector has entered standby mode. When the projector is in standby mode, simply press the " " button again to turn on the projector.
- Disconnect the power lead from the electrical outlet and the projector.
Note: It is not recommended that the projector is turned on immediately, right after a power off procedure.
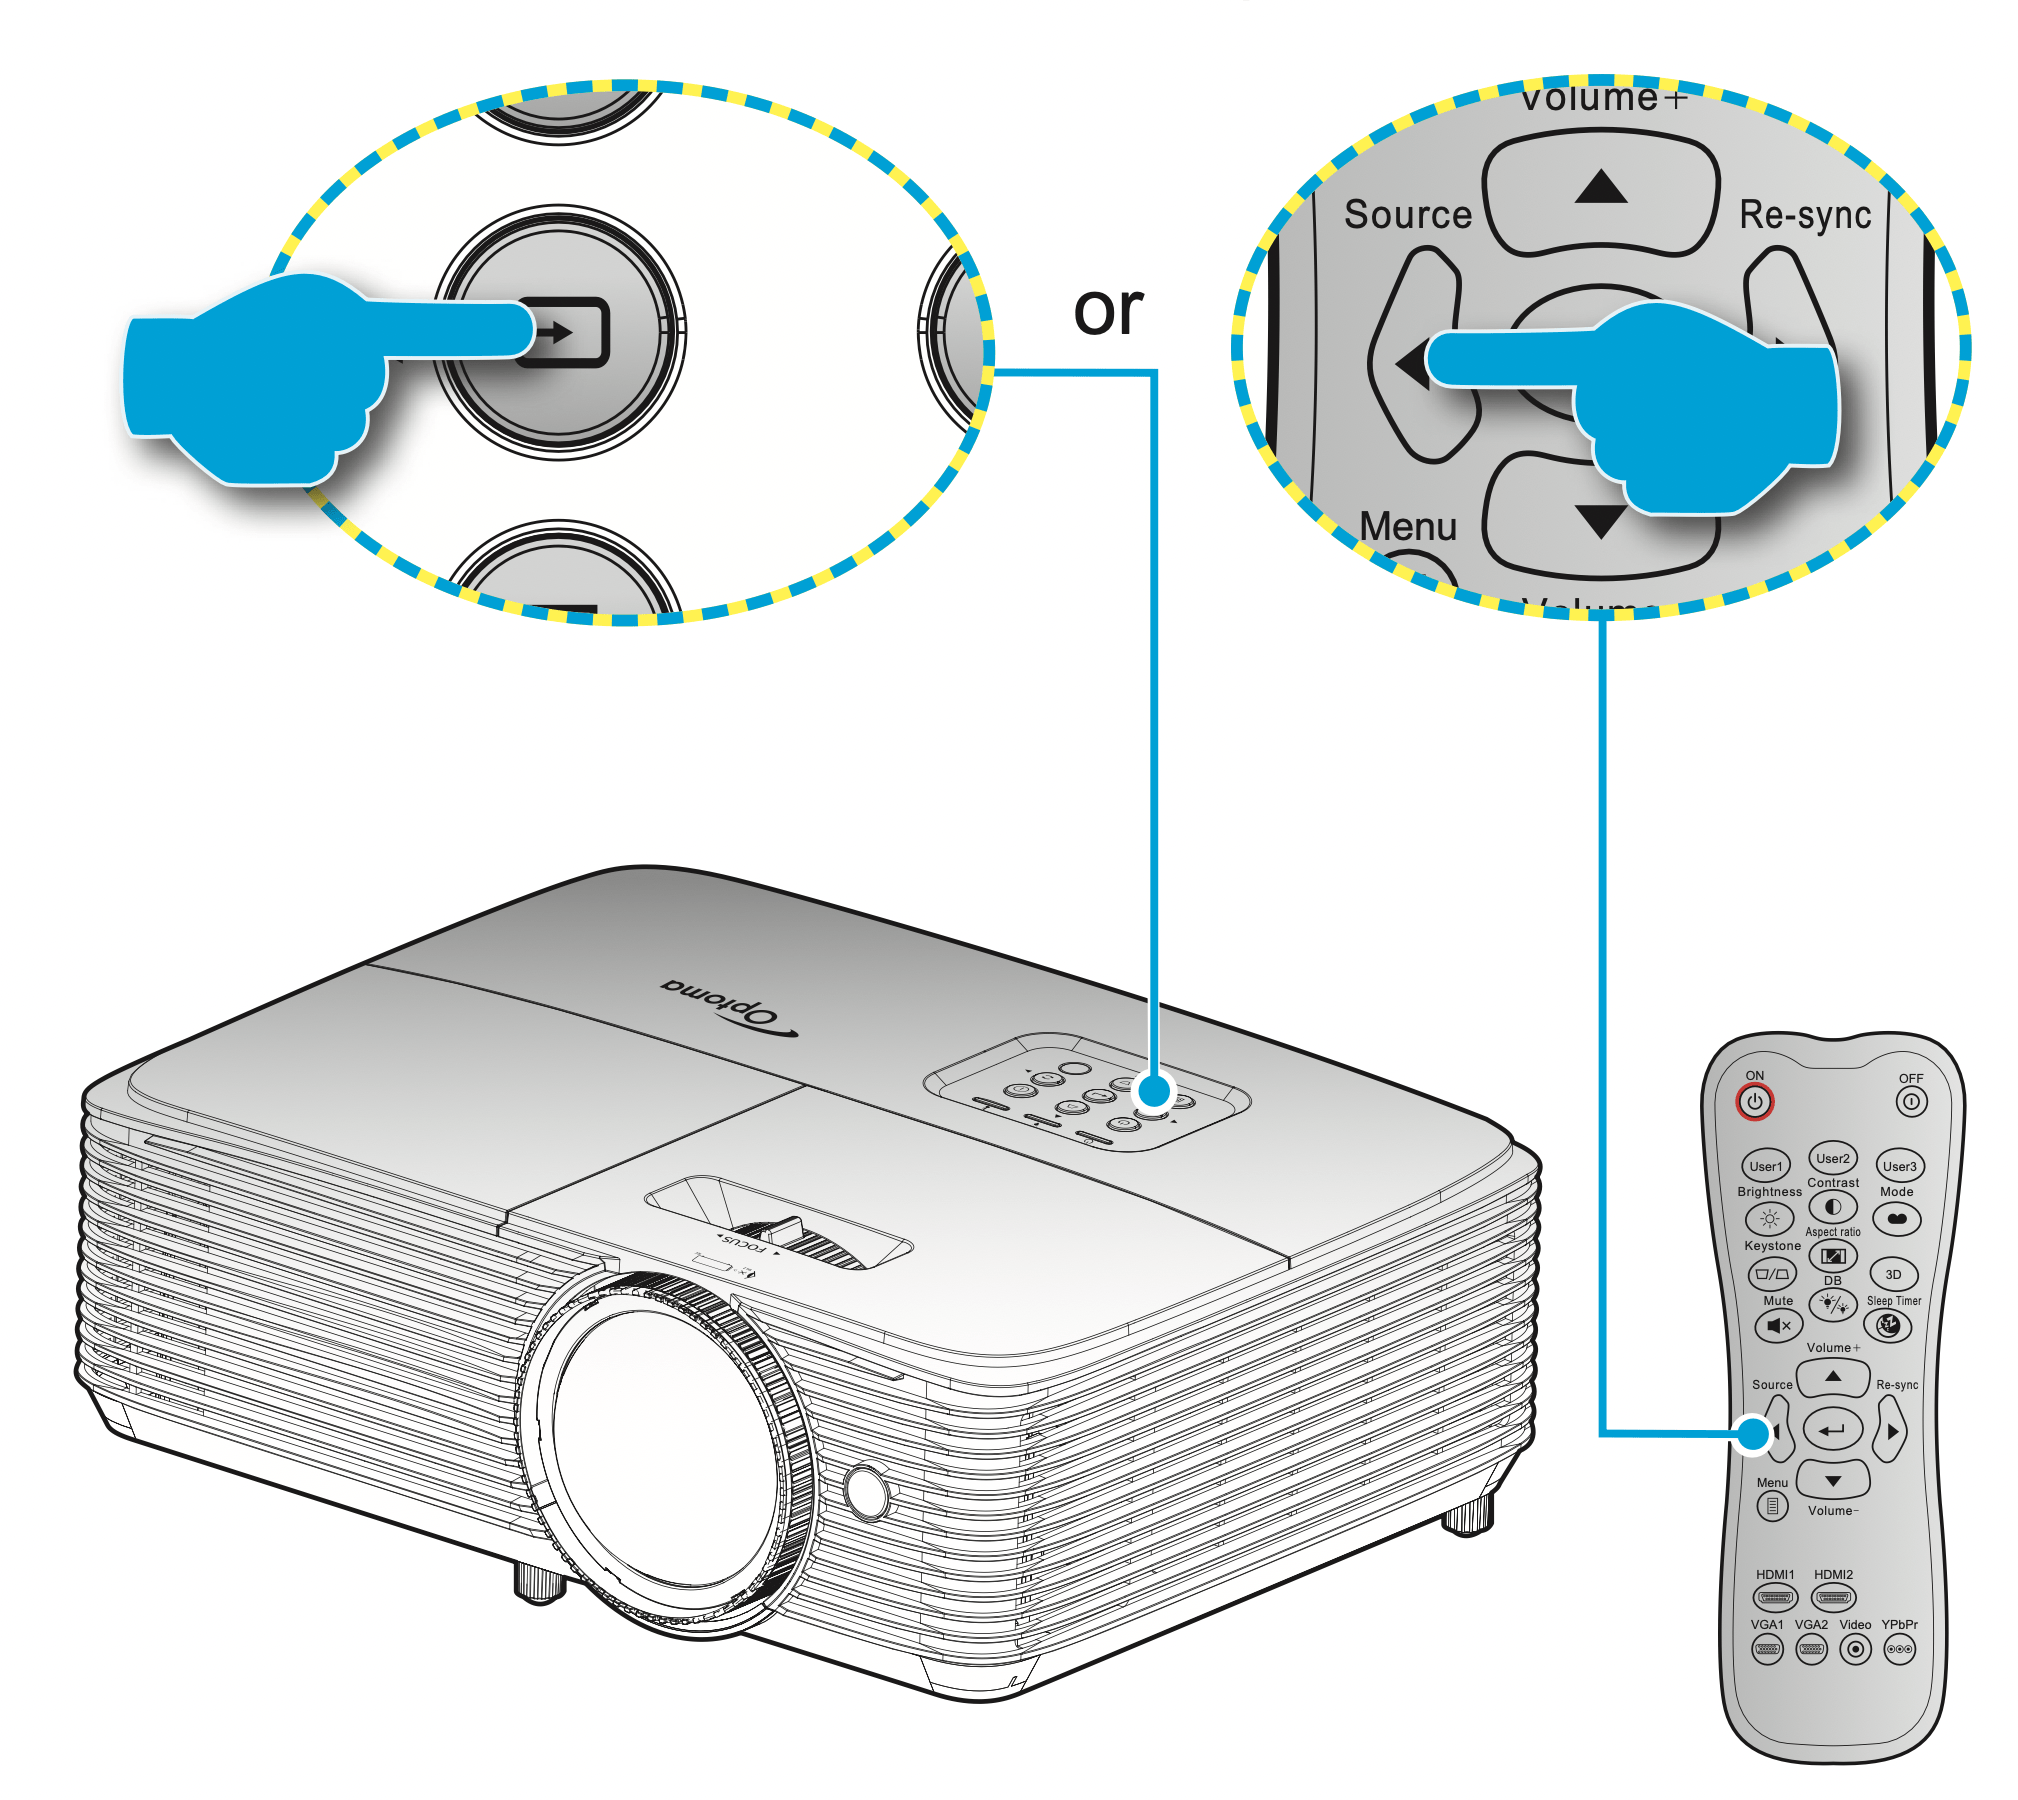
Selecting an input source
Turn on the connected source that you want to display on the screen, such as computer, notebook, video player, etc. The projector will automatically detect the source. If multiple sources are DB connected, 3D push the source button on the projector keypad or the remote control to select the desired input.
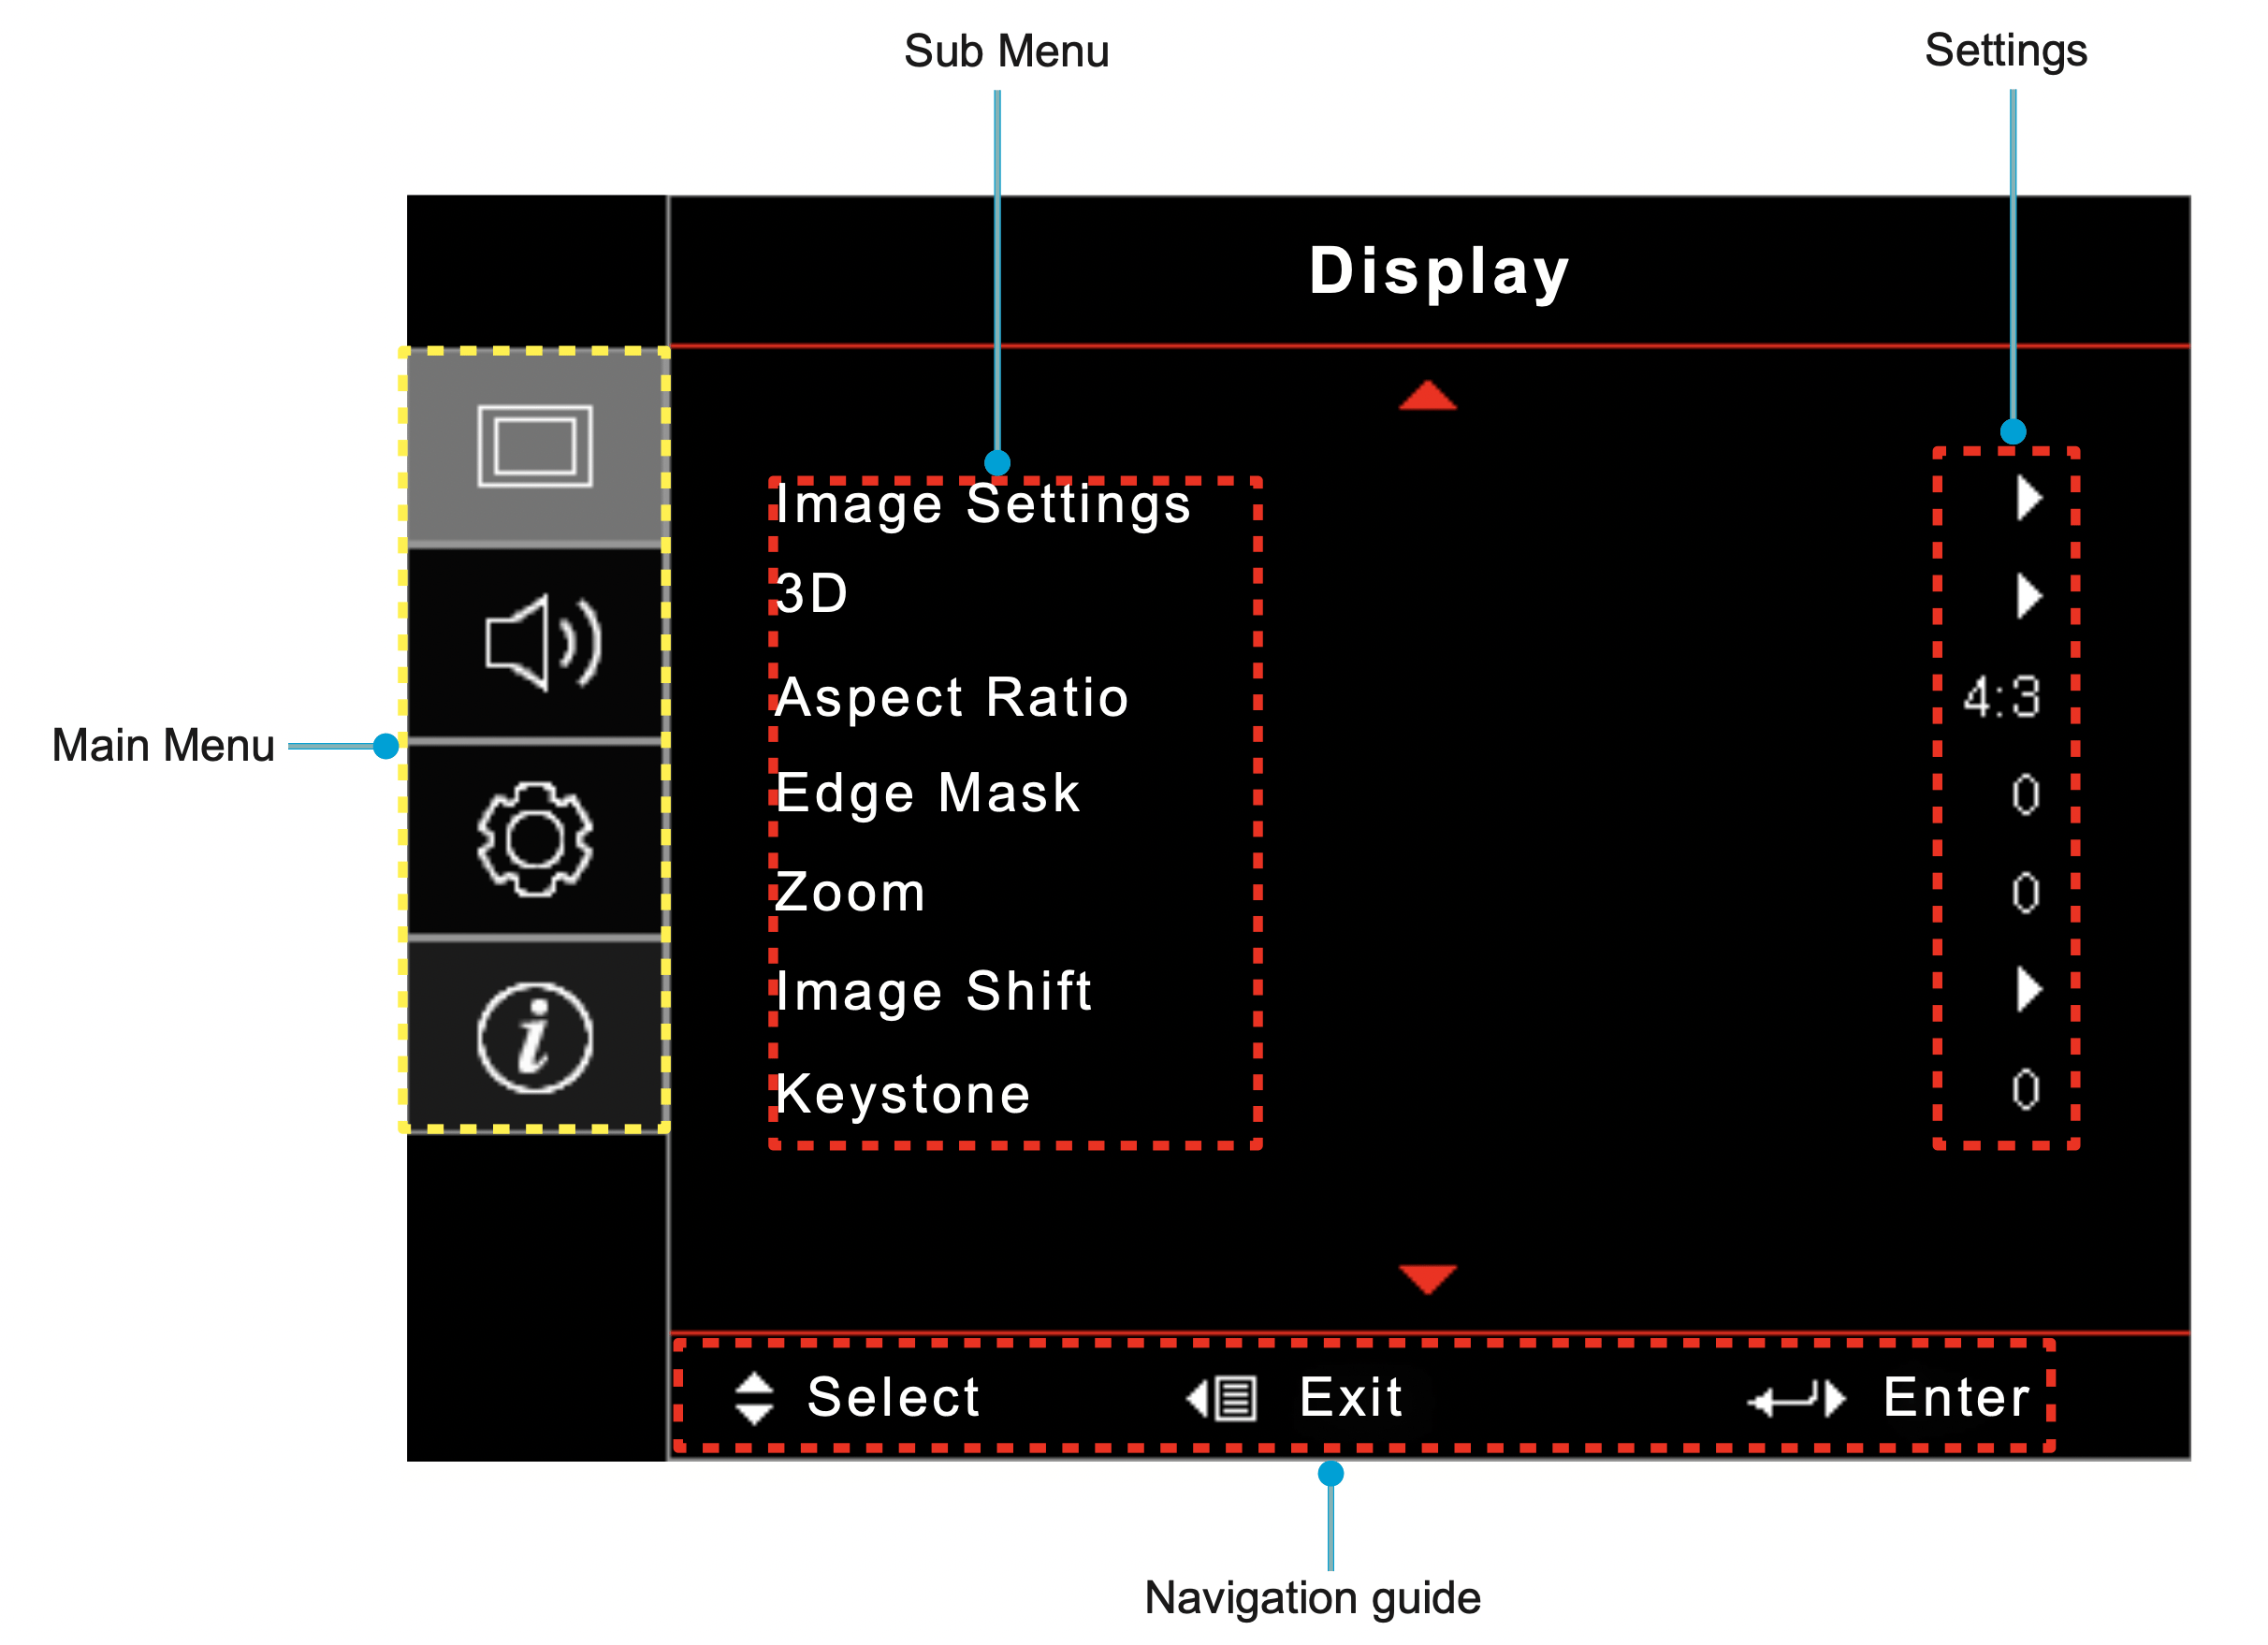
Menu navigation and features
The projector has multilingual on-screen display menus that allow you to make image adjustments and change a variety of settings. The projector will automatically detect the source.
- To open the OSD menu, press
 on the remote control or the projector keyboard.
- When OSD is displayed, use
 keys to select any item in the main menu. While making a selection on a particular page, press
  or
or  key to enter sub menu.
- Use
 keys to select the desired item in the sub menu and then press
  or
or  key to view further settings. Adjust the settings by using
  keys.
keys.
- Select the next item to be adjusted in the sub menu and adjust as described above.
- Press the
 or
or  to confirm, and the screen will return to the main menu.
- To exit, press the
 or
or  again. The OSD menu will close and the projector will automatically save the new settings.
OSD Menu tree
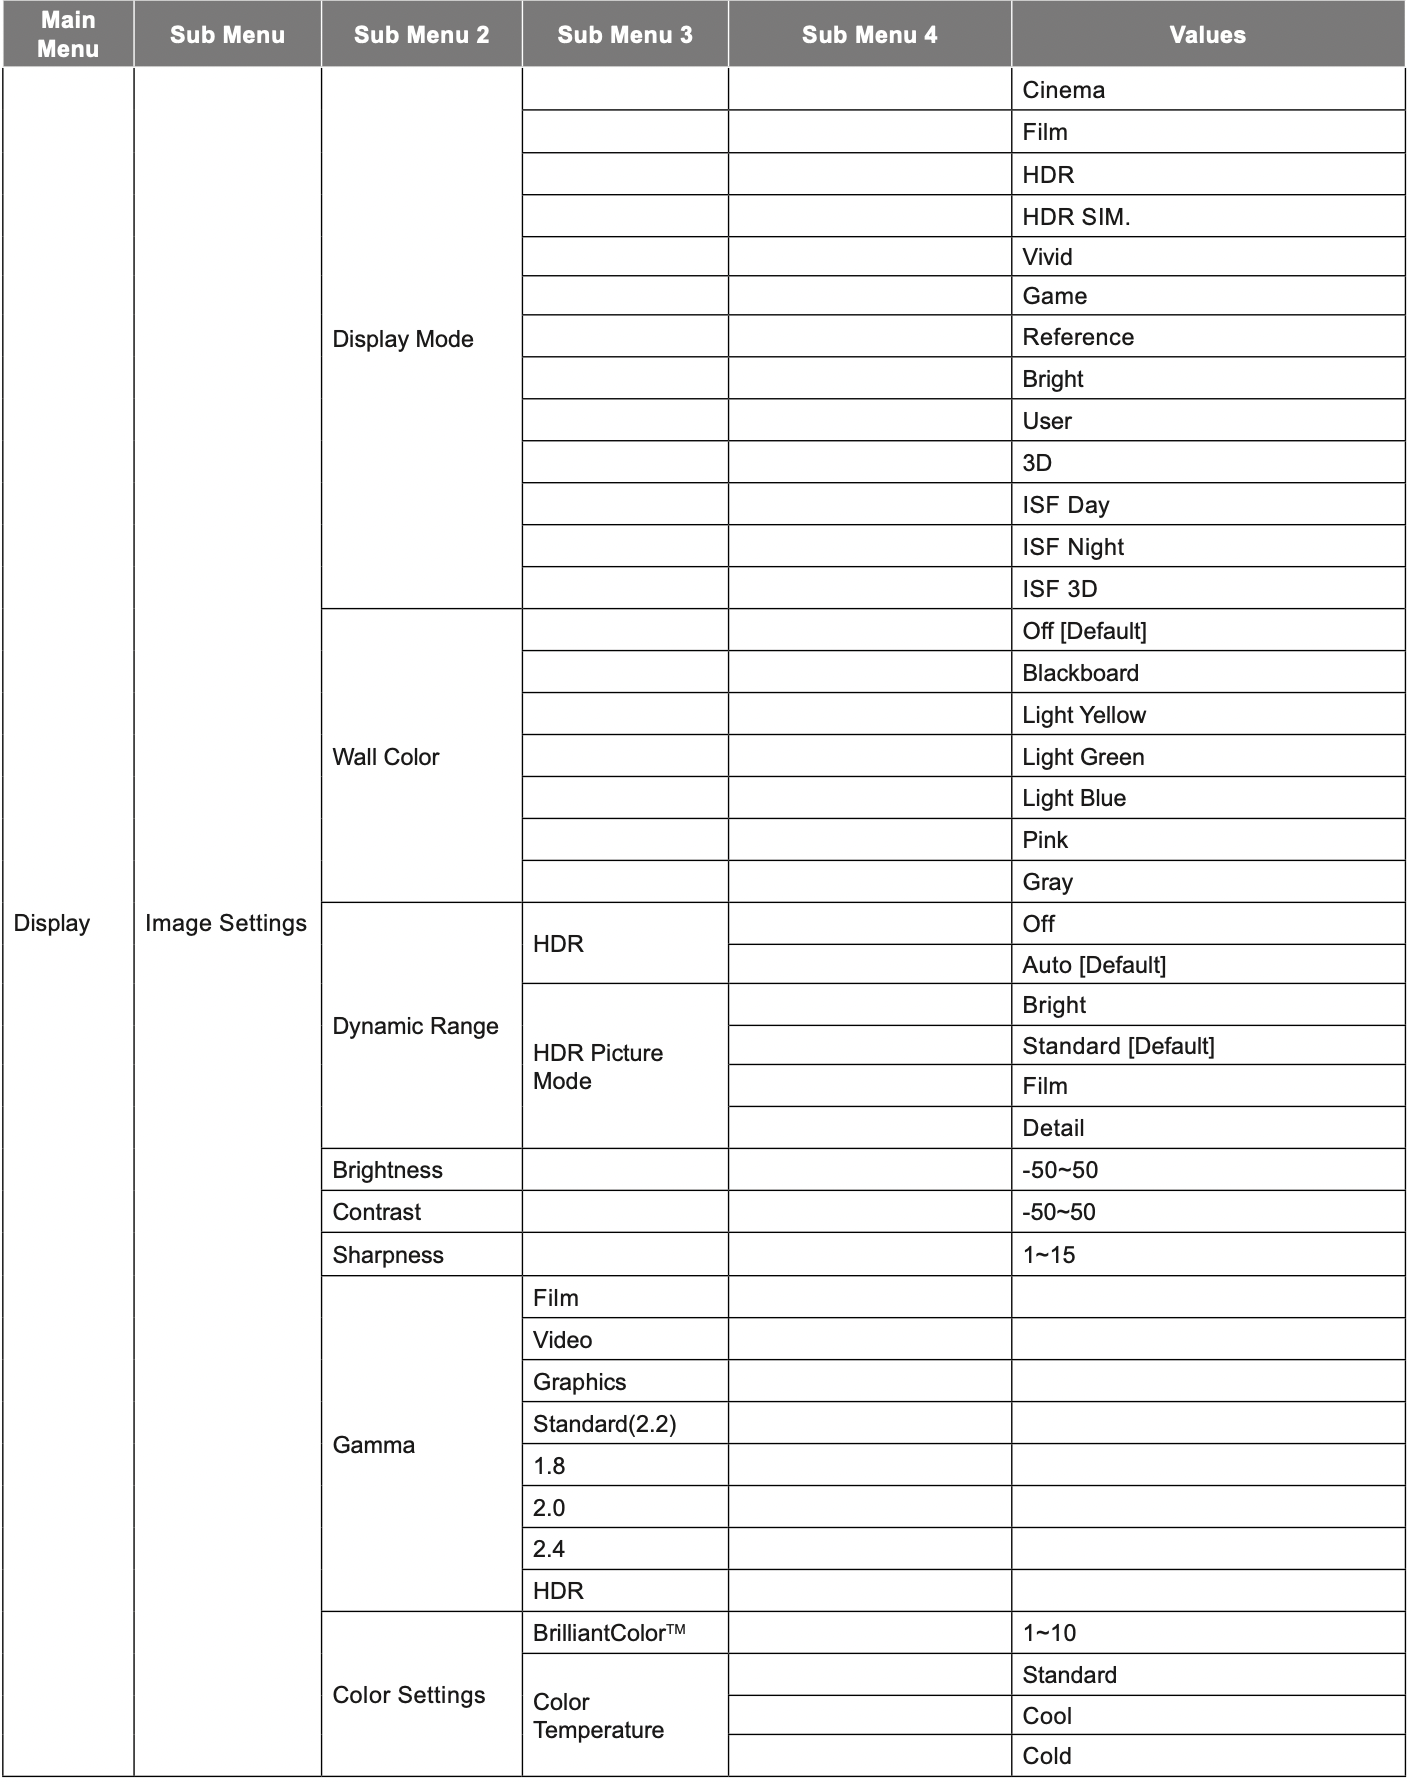
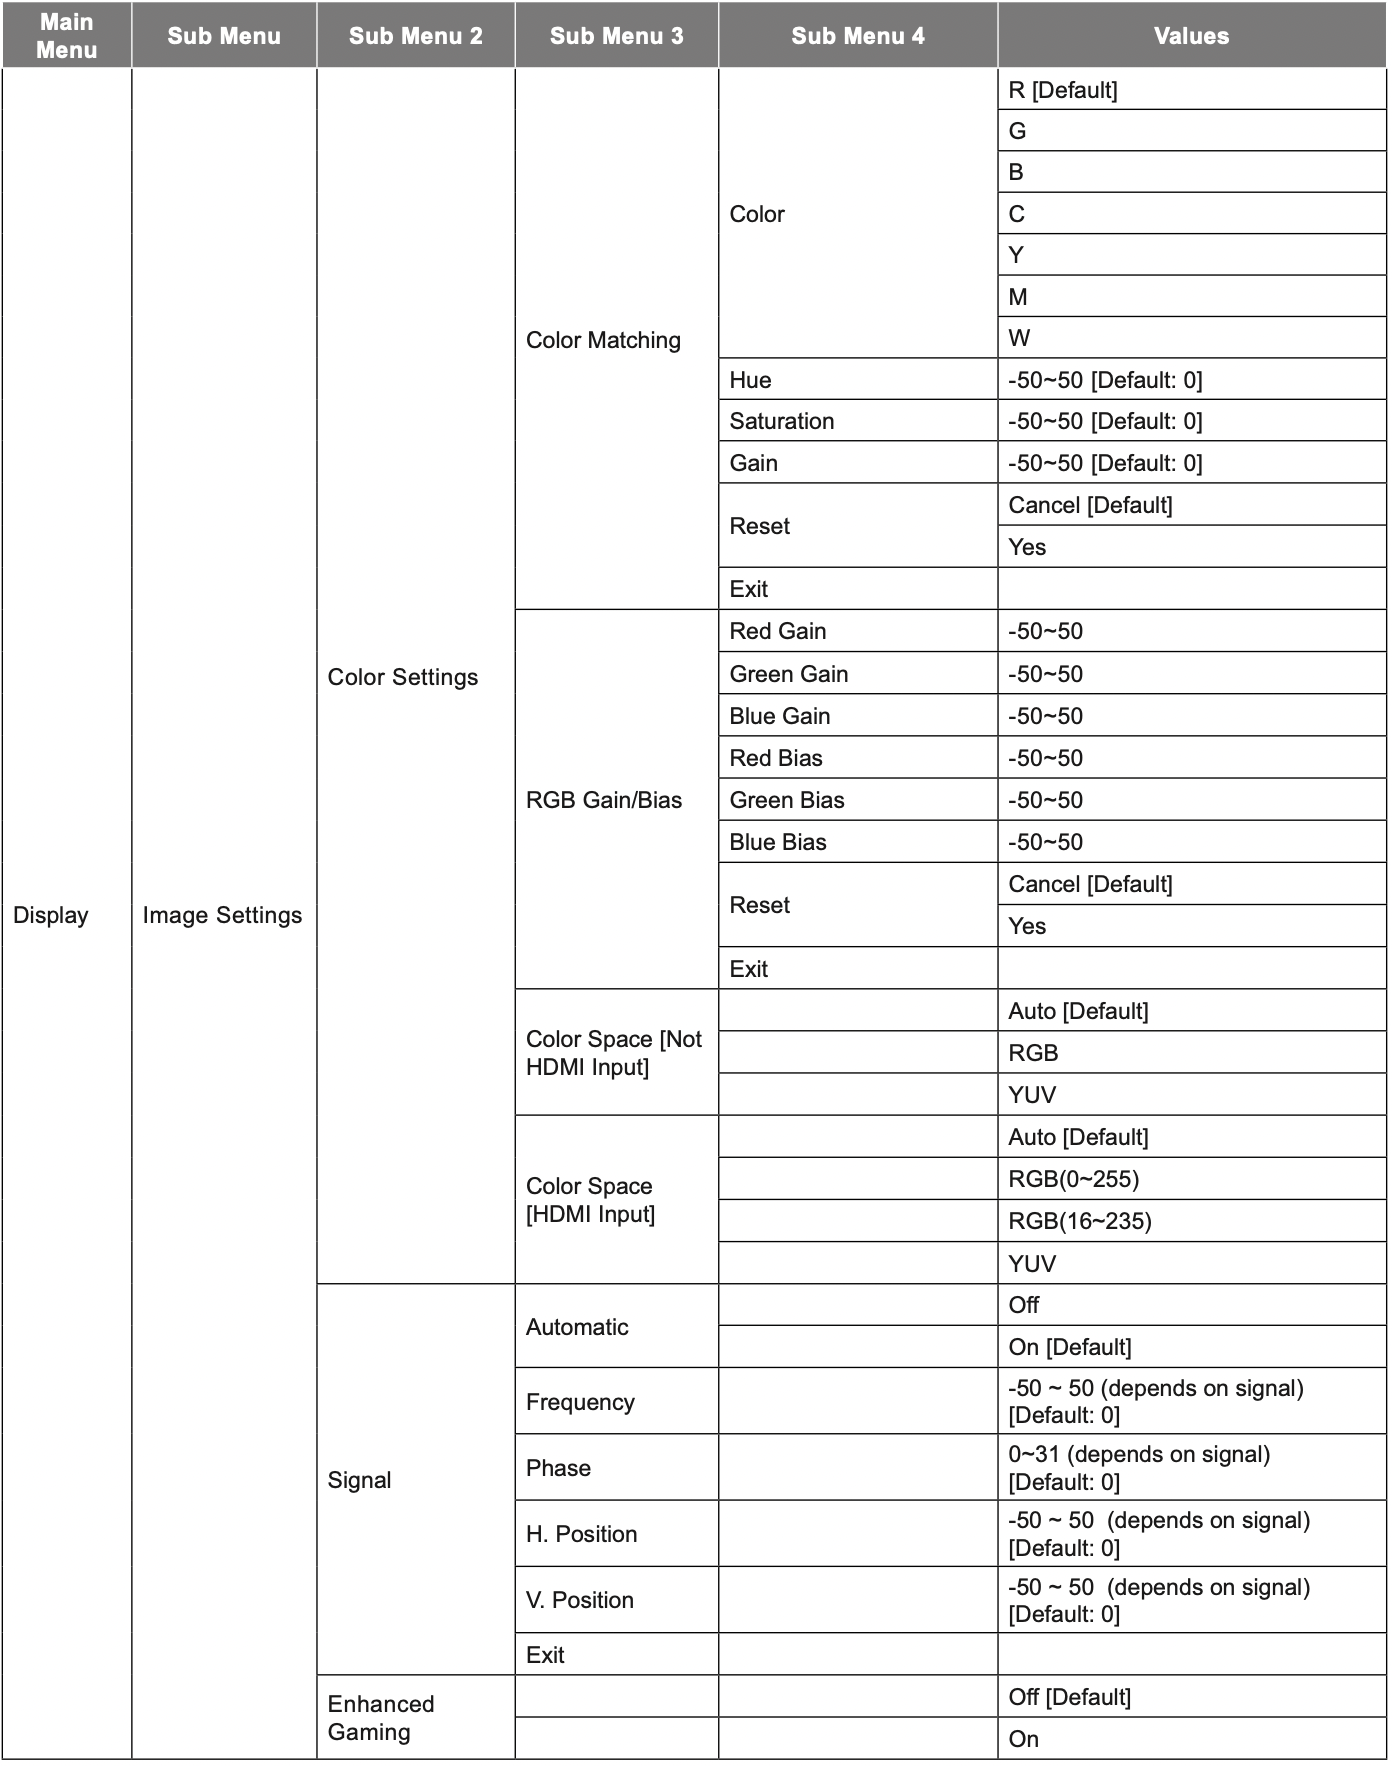

Display menu
Display image settings menu
Display Mode
There are many factory presets optimized for various types of images.
- Cinema: Provides the best colors for watching movies.
- Film: Select to display the purest color settings for home theatre.
- HDR: Decodes and displays High Dynamic Range (HDR) content for the deepest blacks, brightest whites, and vivid cinematic color using REC.2020 color gamut. This mode will be automatically enabled if HDR is set to ON (and HDR Content is sent to projector – 4K UHD Blu-ray, 1080p/4K UHD HDR Games, 4K UHD Streaming Video). While HDR mode is active, other display modes (Cinema, Reference, etc.) cannot be selected as HDR delivers color that is highly accurate, exceeding the color performance of the other display modes.
- HDR SIM.: Enhances non-HDR content with simulated High Dynamic Range (HDR). Choose this mode to enhance gamma, contrast, and color saturation for non-HDR content (720p and 1080p Broadcast/Cable TV, 1080p Blu-ray, non-HDR Games, etc). This mode can ONLY be used with nonHDR content.
- Vivid: In this mode, the color saturation and brightness are well-balanced. Choose this mode for playing games.
- Game: Select this mode to increase the brightness and response time level for enjoying video games.
- Reference: This mode is intended to reproduce as close as possible the image the way the movie director intended. Color, color temperature, brightness, contrast and gamma settings are all configured to standard reference levels. Select this mode to watch a video.
- Bright: Maximum brightness from PC input.
- User: Memorize user’s settings.
- 3D: To experience the 3D effect, you need to have 3D glasses. Make sure your PC/portable device has a 120 Hz signal output quad buffered graphics card and a 3D Player installed.
- ISF Day: Optimize the image with the ISF Day mode to be perfectly calibrated and high picture quality.
- ISF Night: Optimize the image with the ISF Night mode to be perfectly calibrated and high picture quality.
- ISF 3D: Optimize the image with the ISF 3D mode to be perfectly calibrated and high picture quality.
Note: For access and calibration of ISF daytime and night viewing modes, please contact your local dealer.
Wall Color
Use this function to obtain an optimized screen image according to the wall color. Select between off, blackboard, light yellow, light green, light blue, pink, and gray.
Dynamic Range
Configure the High Dynamic Range (HDR) setting and its effect when displaying video from 4K Blu-ray players and streaming devices.
Note: HDMI2 and VGA do not support Dynamic Range.
- HDR
- Off: Turn off HDR Processing. When set to Off, the projector will NOT decode HDR content.
- Auto: Auto detect HDR signal.
- HDR Picture Mode
- Bright: Choose this mode for brighter more saturated colors.
- Standard: Choose this mode for natural looking colors with a balance of warm and cool tones.
- Film: Choose this mode for improved detail and image sharpness.
- Detail: The signal comes from OETF conversion to achieve the best color matching.
Brightness
Adjust the brightness of the image.
Contrast
The contrast controls the degree of difference between the lightest and darkest parts of the picture.
Sharpness
Adjust the sharpness of the image.
Gamma
Set up gamma curve type. After the initial setup and fine tuning is completed, utilize the Gamma Adjustment steps to optimize your image output.
- Film: For home theater.
- Video: For video or TV source.
- Graphics: For PC / Photo source.
- Standard(2.2): For standardized setting.
- 1.8/ 2.0/ 2.4: For specific PC / Photo source.
Note: If the Display Mode setting is set to HDR, user can only select HDR for Gamma setting.
Color Settings
Configure the color settings.
- BrilliantColorTM : This adjustable item utilizes a new color-processing algorithm and enhancements to enable higher brightness while providing true, more vibrant colors in picture.
- Color Temperature: Select a color temperature from Standard, Cool, or Cold.
- Color Matching: Select the following options:
- Color: Adjust the red (R), green (G), black (B), cyan (C), yellow (Y), magenta (M), and white (W) level of the image.
- Hue: Adjust the color balance of red and green.
- Saturation: Adjust a video image from black and white to fully saturated color.
- Gain: Adjust the image brightness.
- Reset: Return the factory default settings for color matching.
- Exit: Exit the “Color Matching” menu.
- RGB Gain/Biase: This settings allows to configure the brightness (gain) and contrast (bias) of an image.
- Reset: Return the factory default settings for RGB gain/bias.
- Exit: Exit the “RGB Gain/Bias” menu.
- Color Space (non-HDMI input only): Select an appropriate color matrix type from the following: AUTO, RGB, or YUV.
- Color Space (HDMI input only): select an appropriate color matrix type from the following: Auto, RGB(0-255), RGB(16-235), and YUV.
Signal
Adjust the signal options.
- Automatic: Configure automatically the signal (the frequency and phase items are grayed out). If automatic is disabled, the frequency and phase items will appear for tuning and saving the settings.
- Frequency: Change the display data frequency to match the frequency of your computer’s graphic card. Use this function only if the image appears to flicker vertically.
- Phase: Synchronize the signal timing of the display with the graphic card. If the image appears to be unstable or flickers, use this function to correct it.
- H. Position: Adjust the horizontal positioning of the image.
- V. Position: Adjust the vertical positioning of the image.
- Exit: Exit the “Signal” menu.
Note: This menu is only available if the input source is RGB/Component.
Enhanced Gaming
Enable this feature to reduce response times (input latency) during gaming to 16ms and 8.4ms.
Note: 16ms for 1080p 60Hz; 8.4ms for 1080p 120Hz.
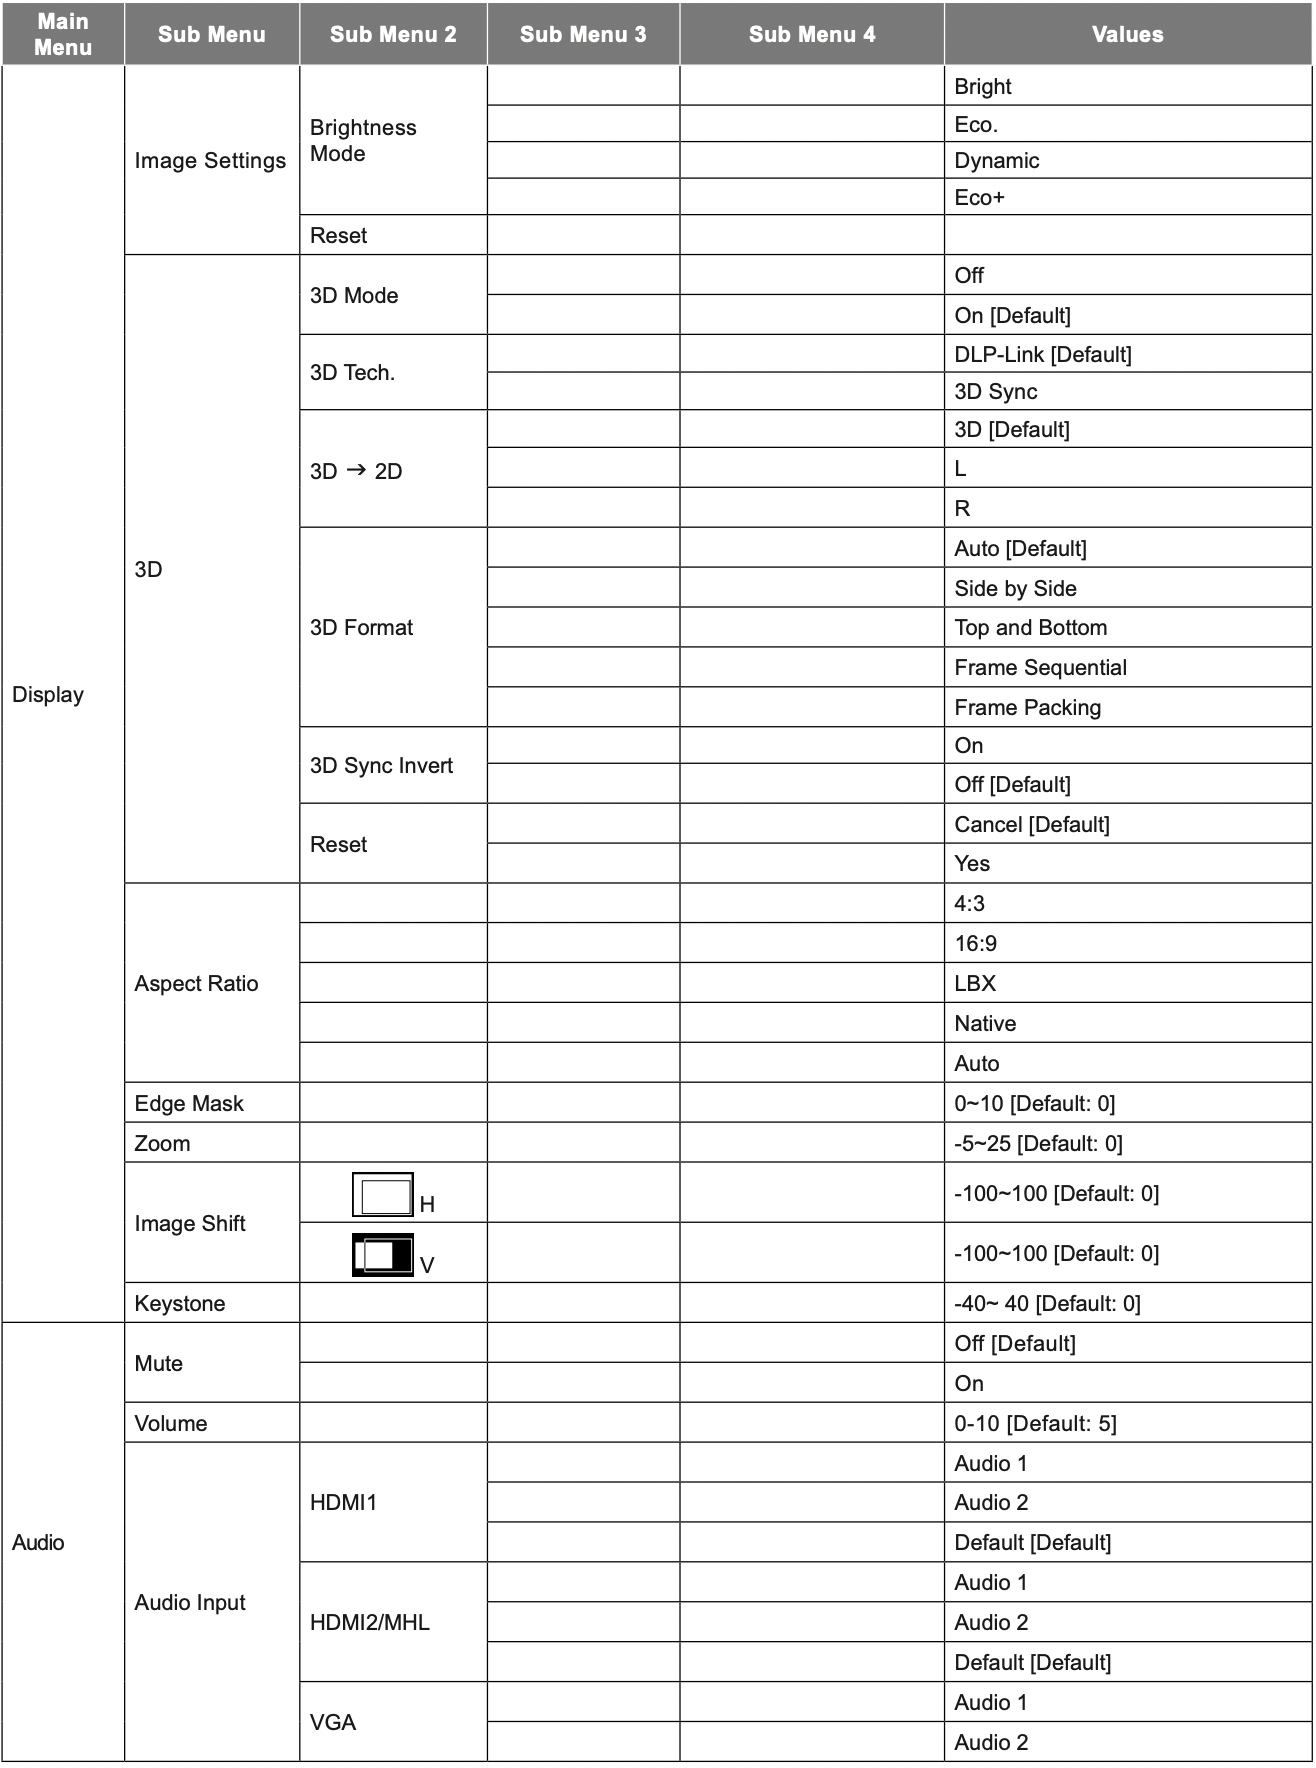
Brightness Mode
Adjust the brightness mode settings for lamp-based projectors.
- Bright: Choose “Bright” to increase the brightness.
- Eco.: Choose “Eco.” to dim the projector lamp which will lower power consumption and extend the lamp life.
- Dynamic: Choose “Dynamic” to dim the lamp power which will be based on brightness level of the content and adjust lamp power consumption between 100% and 30% dynamically. The lamp life will be extended.
- Eco+: When Eco+ mode is activated, the brightness level of the content is automatically detected to significantly reduced lamp power consumption (up to 70%) during periods of inactivity.
Reset
Return the factory default settings for color settings.
Display 3D menu
3D Mode
Use this option to disable or enable the 3D function.
- Off: Select “Off” to turn off 3D mode.
- On: Select “On” to turn on 3D mode.
3D Tech.
Use this option to select 3D technology.
- DLP-Link: Select to use optimized settings for DLP 3D Glasses.
- 3D Sync: Select to use optimized settings for IR, RF or polarized 3D Glasses.
3D → 2D
Use this option to specify how the 3D content should appear on the screen.
- 3D: Display 3D signal.
- L (Left): Display the left frame of 3D content.
- R (Right): Display the right frame of 3D content.
Note: When changing the input source from 3D to 2D, make sure the 3D Mode setting is set to Off. Otherwise, 2D input source will appear distorted (dual image).
3D Format
Use this option to select the appropriate 3D format content.
- Auto: When a 3D identification signal is detected, the 3D format is selected automatically.
- Side by Side: Display 3D signal in “Side-by-Side” format.
- Top and Bottom: Display 3D signal in “Top and Bottom” format.
- Frame Sequential: Display 3D signal in “Frame Sequential” format.
- Frame Packing: Display 3D signal in “Frame Packing” format.
3D Sync Invert
Use this option to enable/disable the 3D sync invert function.
Reset
Return the factory default setting for 3D settings.
- Cancel: Select to cancel Reset.
- Yes: Select to return the factory default settings for 3D.
Display aspect ratio menu
Aspect Ratio
Select the aspect ratio of the displayed image between the following options:
- 4:3: This format is for 4:3 input sources.
- 16:9: This format is for 16:9 input sources, like HDTV and DVD enhanced for Wide screen TV.
- LBX: This format is for non-16x9, letterbox source and if you use external 16x9 lens to display 2.35:1 aspect ratio in full resolution.
- Native: This format displays the original image without any scaling.
- Auto: Automatically selects the appropriate display format.
1080p scaling table

Display edge mask menu
Edge Mask
Use this function to remove the video encoding noise on the edge of video source.
Display zoom menu
Zoom
Use to reduce or magnify an image on the projection screen.
Display image shift menu
Image Shift
Adjust the projected image position horizontally (H) or vertically (V).
Display keystone menu
Keystone
Adjust the image distortion caused by tilting the projector.
Audio menu
Audio mute menu
Mute
Use this option to temporarily turn off the sound.
- Off: Choose “Off” to turn mute off.
- One: Choose “On” to turn mute on.
Note:
- “Mute” function affects both internal and external speaker volume.
- When an external speaker is connected, the internal speaker is automatically muted.
Audio volume menu
Volume
Adjust the audio volume level.
Audio audio input menu
Audio Input
Select the audio input port for the video sources as follows:
- HDMI1: Audio 1, Audio 2, or Default.
- HDMI2/MHL: Audio 1, Audio 2, or Default.
- VGA: Audio 1 and Audio 2.
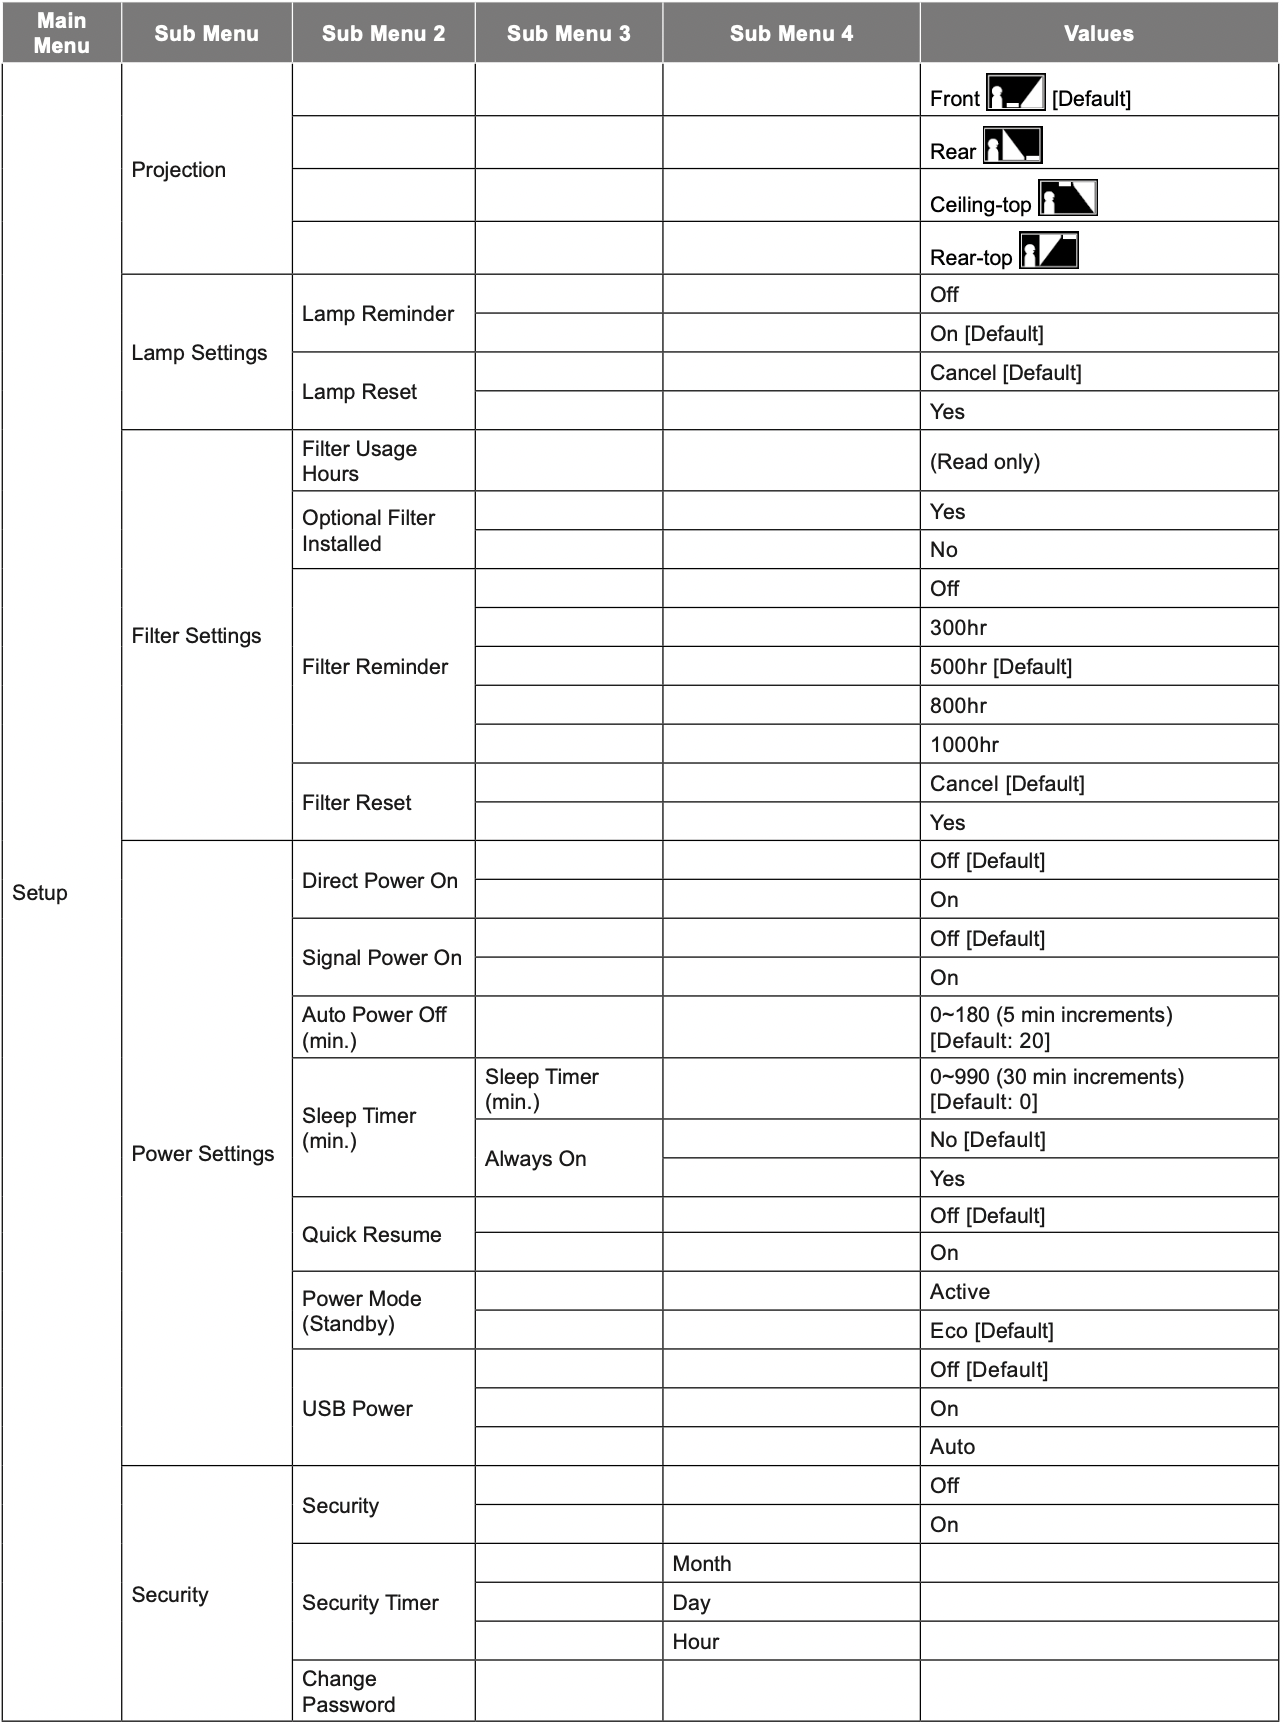
Setup menu
Setup projection menu
Projection
Select the preferred projection between front, rear, ceiling-top, and rear-top.
Setup lamp settings menu
Lamp Reminder
Choose this function to show or to hide the warning message when the changing lamp message is displayed. The message will appear 30 hours before suggested replacement of lamp.
Lamp Reset
Resets the lamp hour counter after replacing the lamp.
Setup filter settings menu
Filter Usage Hours
Display the filter time.
Optional Filter Installed
Set the warning message setting.
- Yes: Display warning message after 500 hours of use.
Note: “Filter Usage Hours / Filter Reminder / Filter Reset” will only appear when “Optional Filter Installed” is “Yes”.
- No: Turn off warning message.
Filter Reminder
Choose this function to show or hide the warning message when the changing filter message is displayed. The available options include Off, 300hr, 500hr, 800hr, and 1000hr.
Filter Reset
Reset the dust filter counter after replacing or cleaning the dust filter.
Setup power settings menu
Direct Power On
Choose “On” to activate Direct Power mode. The projector will automatically power on when AC power is supplied, without pressing the “Power” key on the projector keypad or on the remote control.
Signal Power On
Choose “On” to activate Signal Power mode. The projector will automatically power on when a signal is detected, without pressing the “Power” key on the projector Keypad or on the remote control.
Note: If the “Signal Power On” option is turned “On”, the power consumption of the projector in standby mode will be over 3W.
Auto Power Off (min.)
Sets the countdown timer interval. The countdown timer will start, when there is no signal being sent to the projector. The projector will automatically power off when the countdown has finished (in minutes).
Sleep Timer (min.)
Configure the sleep timer.
- Sleep Timer (min.): Sets the countdown timer interval. The countdown timer will start, with or without a signal being sent to the projector. The projector will automatically power off when the countdown has finished (in minutes).
Note: The Sleep Timer is reset every time when the projector is powered off.
- Always On: Check to set the sleep timer always on.
Quick Resume
Set the quick resume setting.
- Off: The fan will start cooling the system after 10 seconds when user turns off the projector.
- One: If the projector is accidentally turned off, this feature allows the projector to be instantly powered on again, if selected within a period of 100 seconds.
Power Mode (Standby)
Set the power mode setting.
- Active: Choose “Active” to return to normal standby.
- Eco: Choose “Eco.” to save power dissipation further < 0.5W. Notee: The fans will still run in active standby if “Signal Power On” is enabled.
USB Power
Set the USB power settings.
- Off: The USB Power function is off.
- On: The projector is always powered on by a USB power source.
- Auto: The projector is automatically powered on by a USB power source.
Setup security menu
Security Enable this function to prompt for a password before using the projector.
- Off: Choose “Off” to be able to switch on the projector without password verification.
- On: Choose “On” to use security verification when the turning on the projector.
Security Timer
Can be select the time (Month/Day/Hour) function to set the number of hours the projector can be used. Once this time has elapsed you will be requested to enter your password again.
Change Password
Use to set or modify the password that is prompted when turning the projector on.
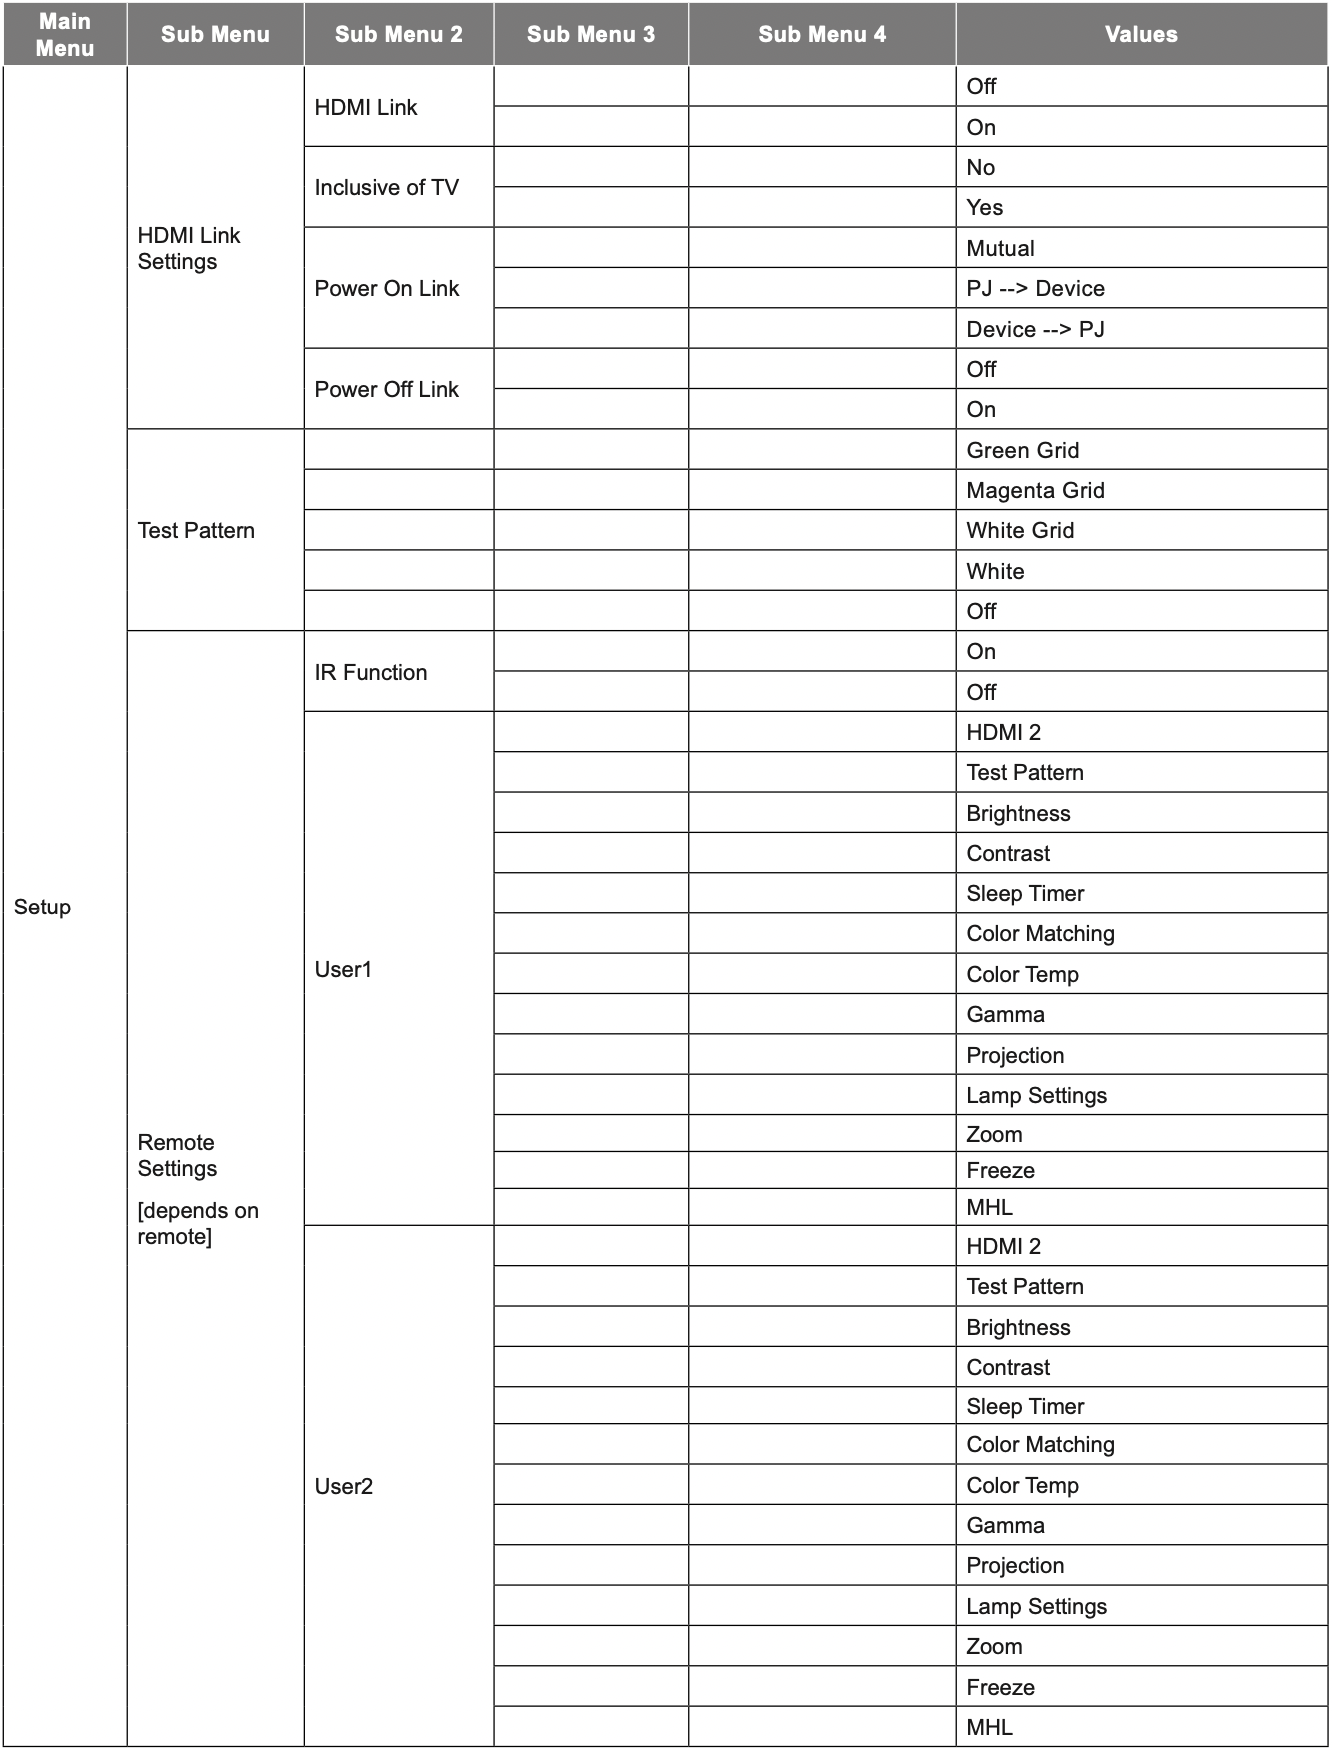
Setup HDMI link settings menu
Note: When you connect HDMI CEC-compatible devices to the projector with HDMI cables, you can control them on the same power on or power off status using the HDMI Link control feature in the projector’s OSD. This lets one device or multiple devices in a group power on or power off via HDMI Link Feature in a typical configuration, your DVD player may be connected to the projector through an amplifier or home theater system.

HDMI Link
Enable/disable the HDMI Link function. The inclusive TV, power on link, and power off link options will only available if the setting is set to “On”.
Inclusive of TV
Set to “Yes” if you prefer both TV and projector to be automatically turned off at the same time. To prevent both devices to be turned off at the same time, set the setting to “No”.
Power On Link
CEC power on command.
- Mutual: Both projector and CEC device will be turned on simultaneously.
- PJ → Device: The CEC device will be turned on only after the projector is switched on.
- Device → PJ: The projector will be switched on only after the CEC device is turned on.
Power Off Link
Enable this function to let both HDMI Link and projector to be automatically turned off at the same time.
Setup test pattern menu
Test Pattern
Select the test pattern from green grid, magenta grid, white grid, white or disable this function (off).
Setup remote settings menu
IR Function
Set the IR function setting.
- On: Choose “On”, the projector can be operated by the remote control from top IR receiver.
- Off: Choose “Off”, the projector can’t be operated by the remote control. By selecting “Off”, you will be able to use the Keypad keys.
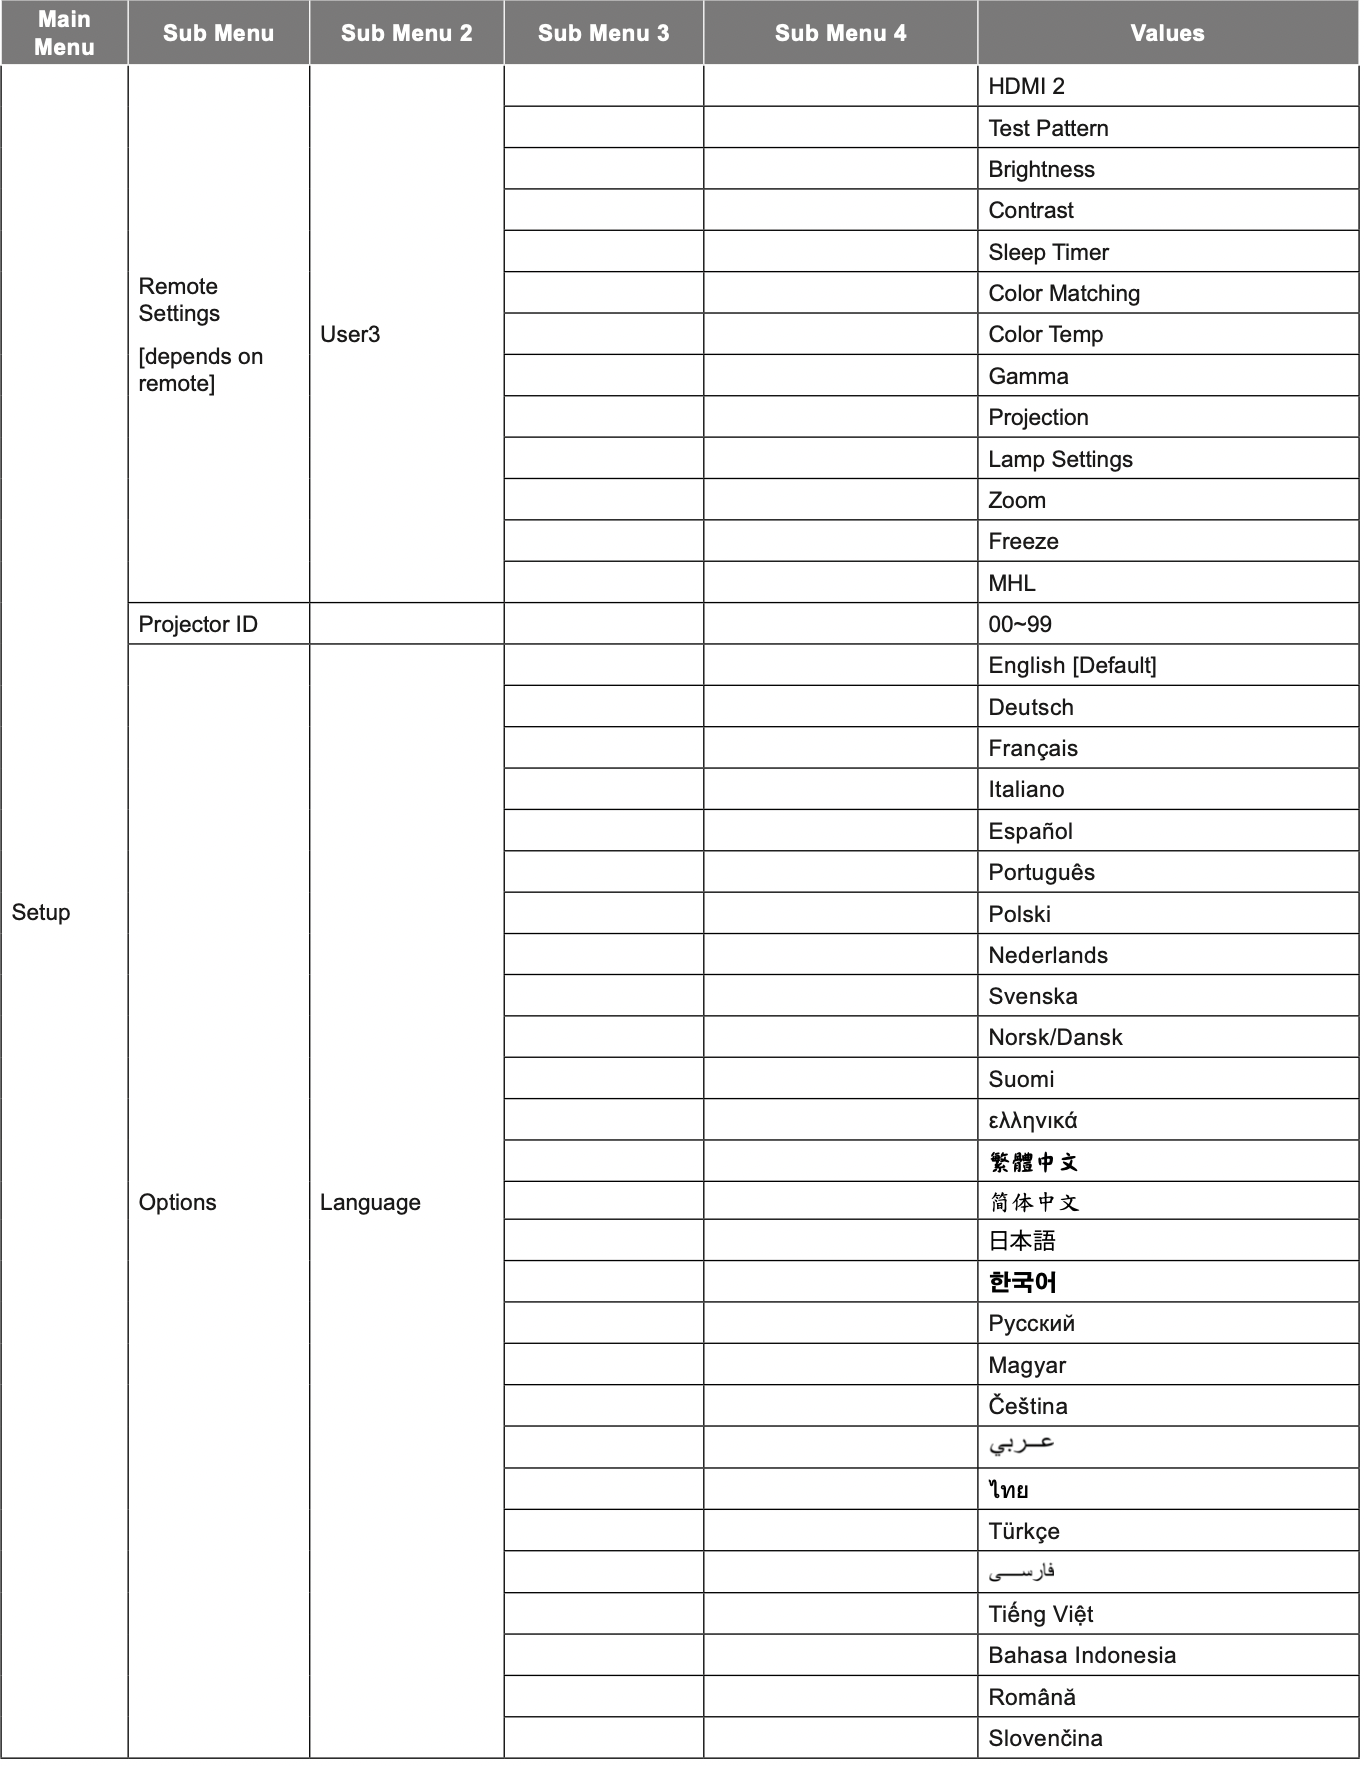
User1/ User2/ User3
Assign the default function for User1, User2, or User3 between HDMI 2, Test Pattern, Brightness, Contrast, Sleep Timer, Color Matching, Color Temp, Gamma, Projection, Lamp Settings, Zoom, Freeze, and MHL.
Setup projector ID menu
Projector ID
ID definition can be set up by menu (range 0-99), and allow user control an individual projector by using RS232 command.
Setup options menu
Language
Select the multilingual OSD menu between English, German, French, Italian, Spanish, Portuguese, Polish, Dutch, Swedish, Norwegian/Danish, Finnish, Greek, traditional Chinese, simplified Chinese, Japanese, Korean, Russian, Hungarian, Czechoslovak, Arabic, Thai, Turkish, Farsi, Vietnamese, Indonesian, Romanian, and Slovakian.
Menu Settings
Set the menu location on the screen and configure menu timer settings.
- Menu Location: Select the menu location on the display screen.
- Menu Timer: Set the duration where the OSD menu stays visible on the screen.
Auto Source
If you set this option “On” and press the  button on the projector keypad or Source button on the remote control then the next available input source is selected automatically. Set “Off” to disable auto source function.
Input Source
Select the input source between HDMI1, HDMI2/MHL, and VGA.
Input Name
Use to rename the input function for easier identification. The available options include HDMI1, HDMI2/MHL, and VGA.
High Altitude
When “On” is selected, the fans will spin faster. This feature is useful in high altitude areas where the air is thin.
Display Mode Lock
Choose “On” or “Off” to lock or unlock adjusting display mode settings.
Keypad Lock
When the keypad lock function is “On”, the Keypad will be locked. However, the projector can be operated by the remote control. By selecting “Off”, you will be able to reuse the Keypad.
Information Hide
Enable this function to hide the information message.
- Off: Choose “Off” to show the “searching” message.
- On: Choose “On” to hide the info message.
Logo
Use this function to set the desired startup screen. If changes are made, they will take effect the next time the projector is powered on.
- Default: The default startup screen.
- Neutral: Logo is not displayed on startup screen.
- User: Use the stored picture as the startup screen.
Background Color
Use this function to display a blue, red, green, gray color, none, or logo screen when no signal is available.
Note: If the background color is set to “None”, then the background color is black.
Setup reset menu
Reset OSD
Return the factory default settings for OSD menu settings.
Reset to Default
Return the factory default settings for Setup menu settings.
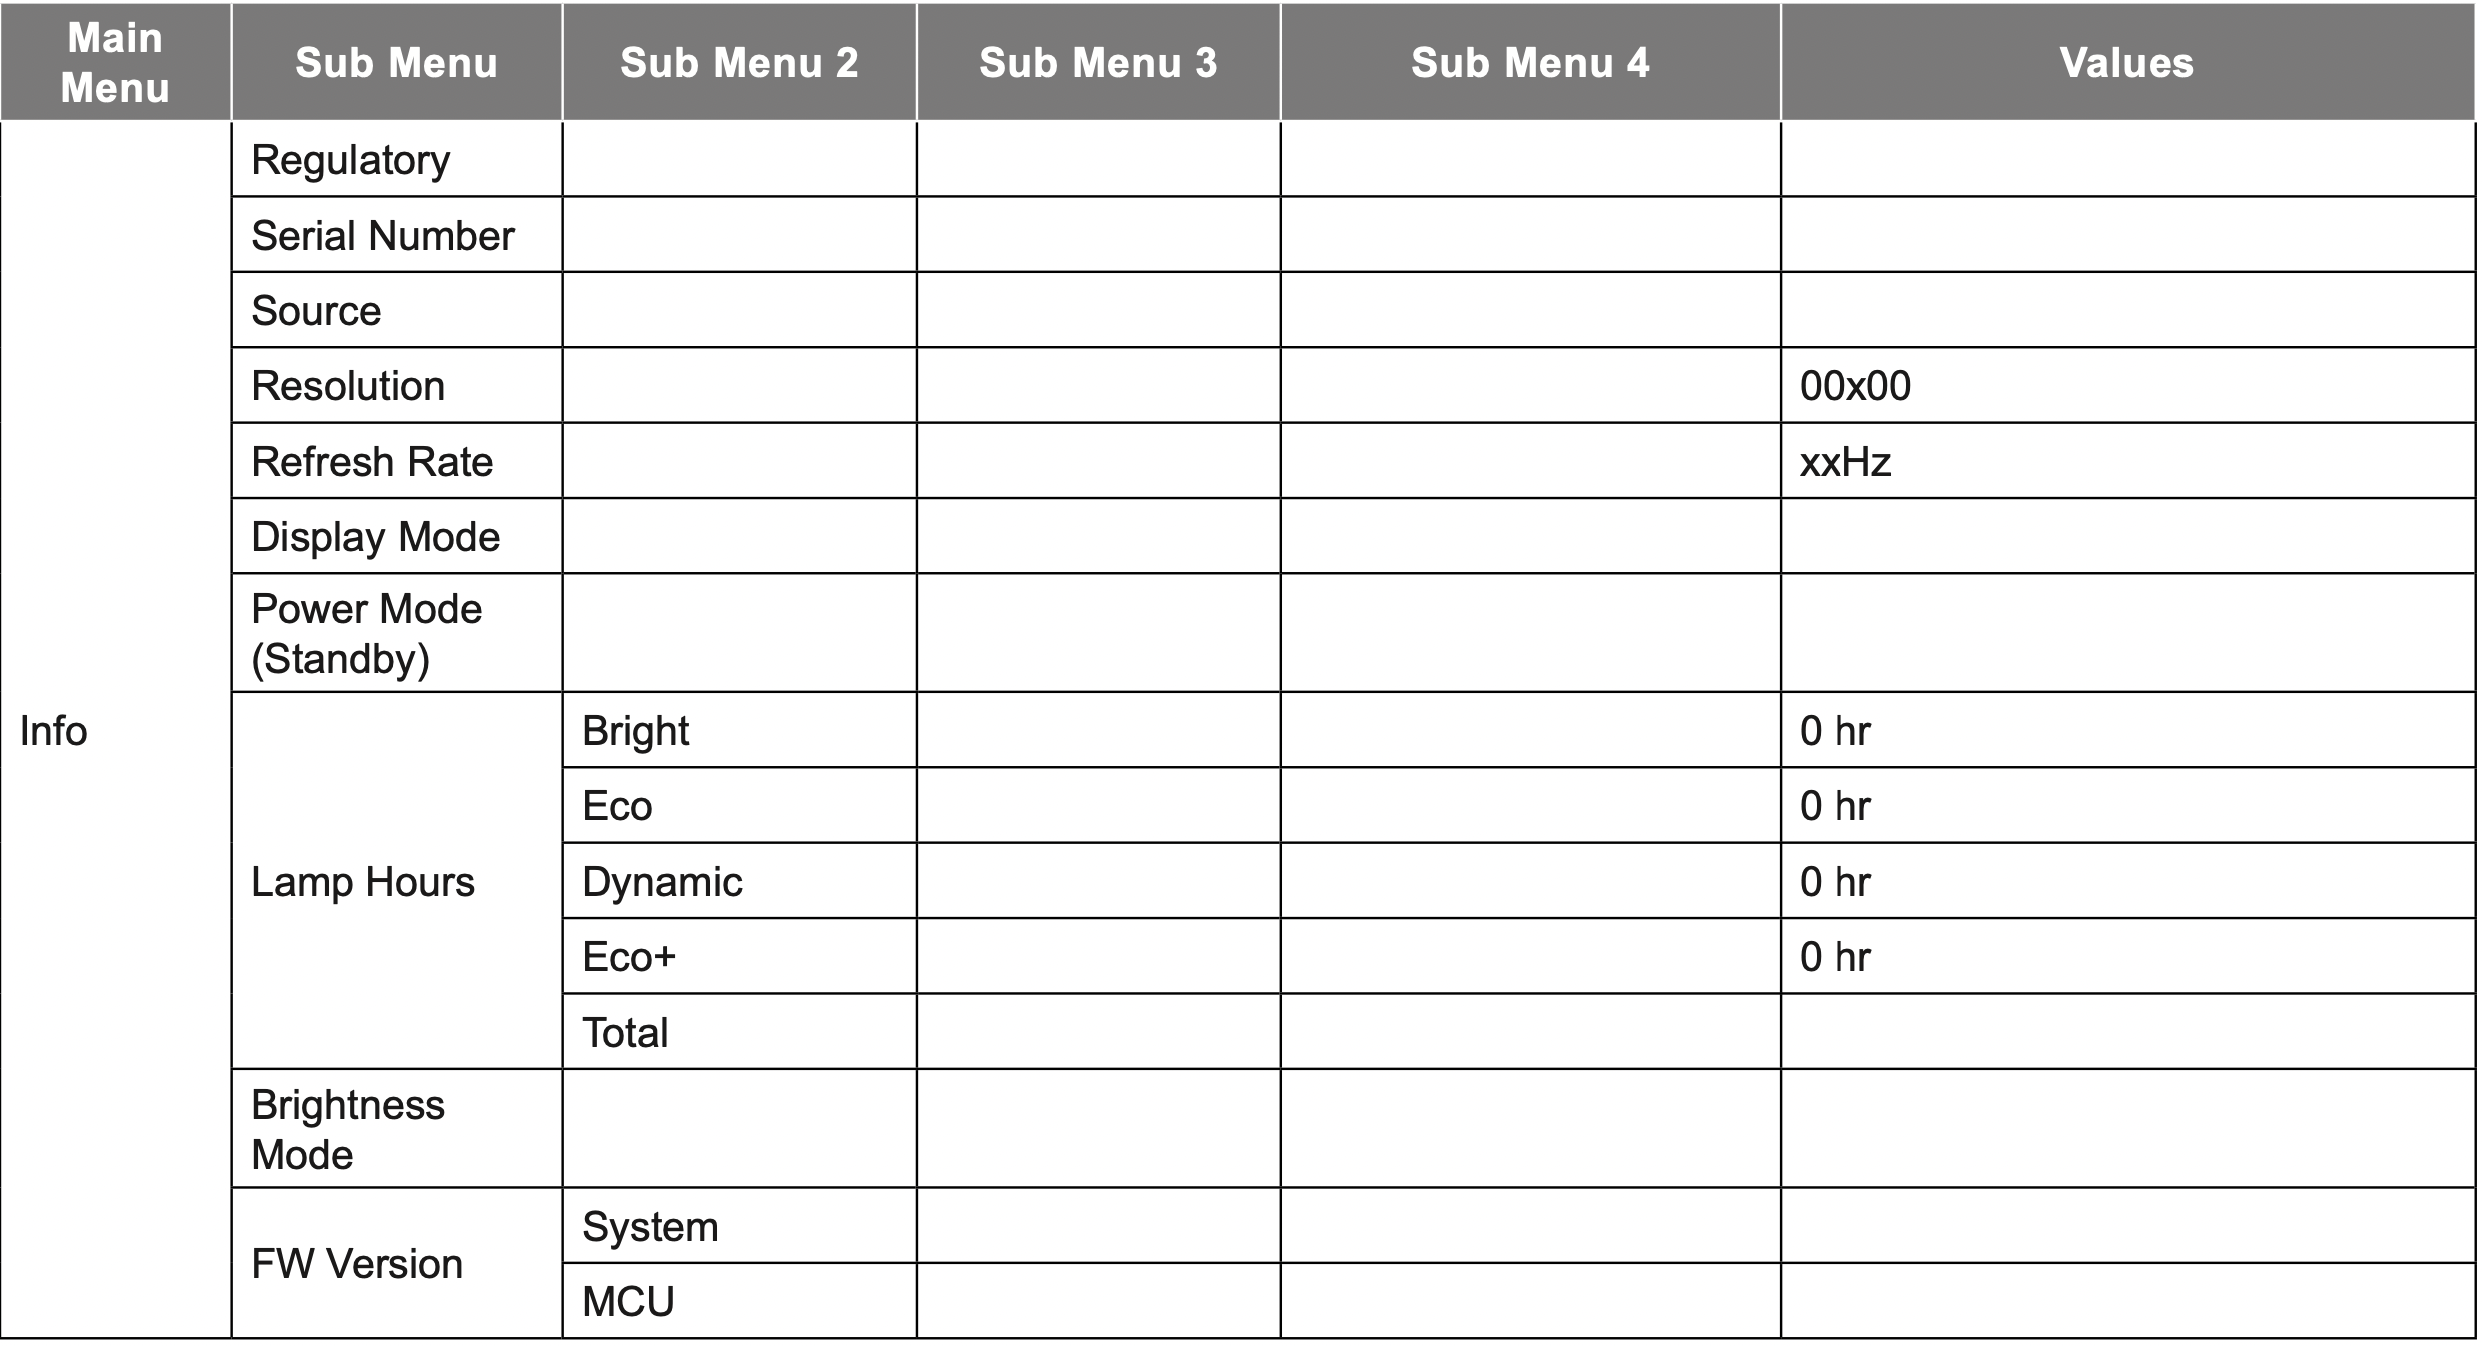
Info menu
View the projector information as listed below:
- Regulatory
- Serial Number
- Source
- Resolution
- Refresh Rate
- Display Mode
- Power Mode (Standby)
- Lamp Hours
- Brightness Mode
- FW Version
MAINTENANCE
Replacing the lamp
The projector automatically detects the lamp life. When the lamp life is nearing the end of use, a warning message will appear on the screen.
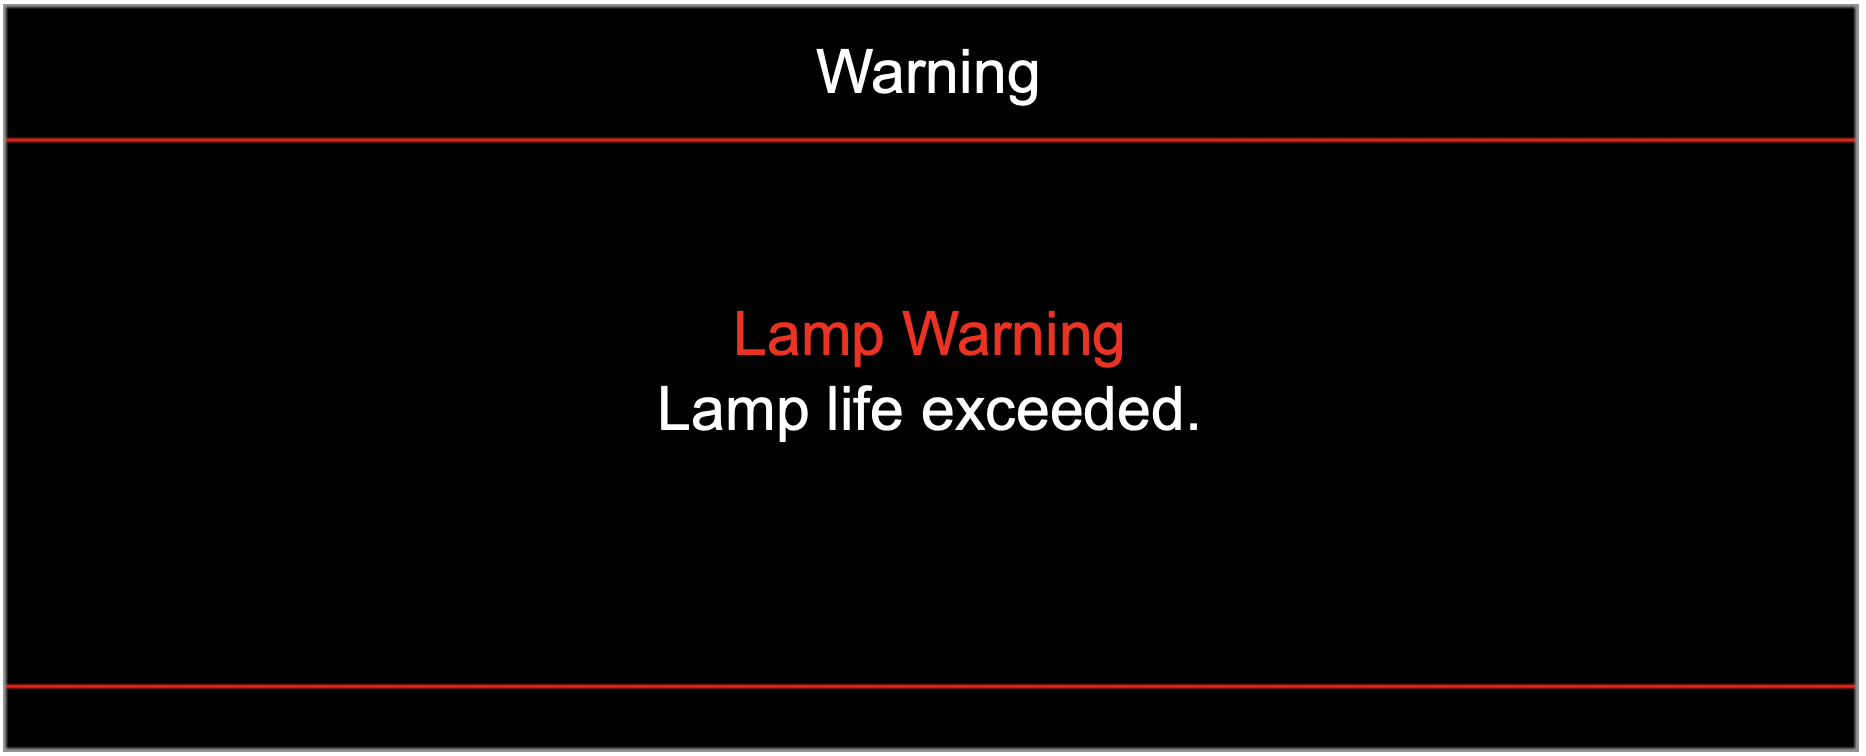
When you see this message, please contact your local reseller or service center to change the lamp as soon as possible. Make sure the projector has been cooled down for at least 30 minutes before changing the lamp.
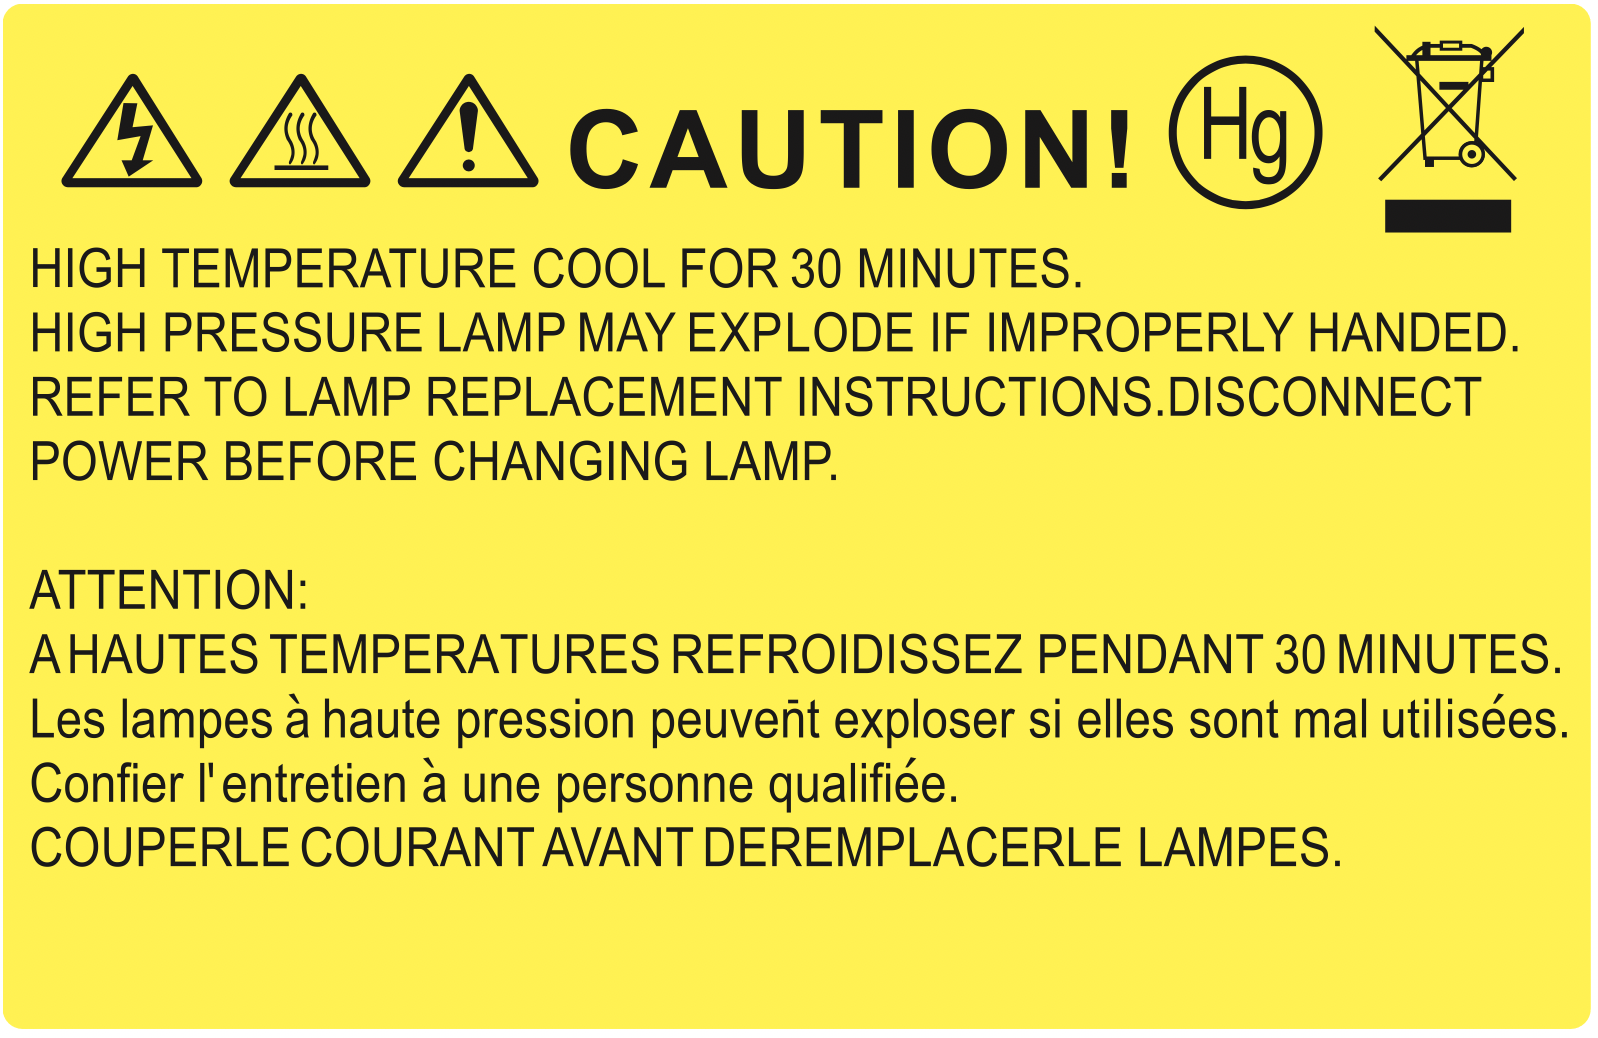
Warning: If ceiling mounted, please use caution when opening the lamp access panel. It is recommended to wear safety glasses if changing the bulb when ceiling mounted. Caution must be used to prevent any loose parts from falling out of projector.
Warning: Lamp compartment is hot! Allow it to cool down before changing lamp!
Warning: To reduce the risk of personal injury, do not drop the lamp module or touch the lamp bulb. The bulb may shatter and cause injury if it is dropped.
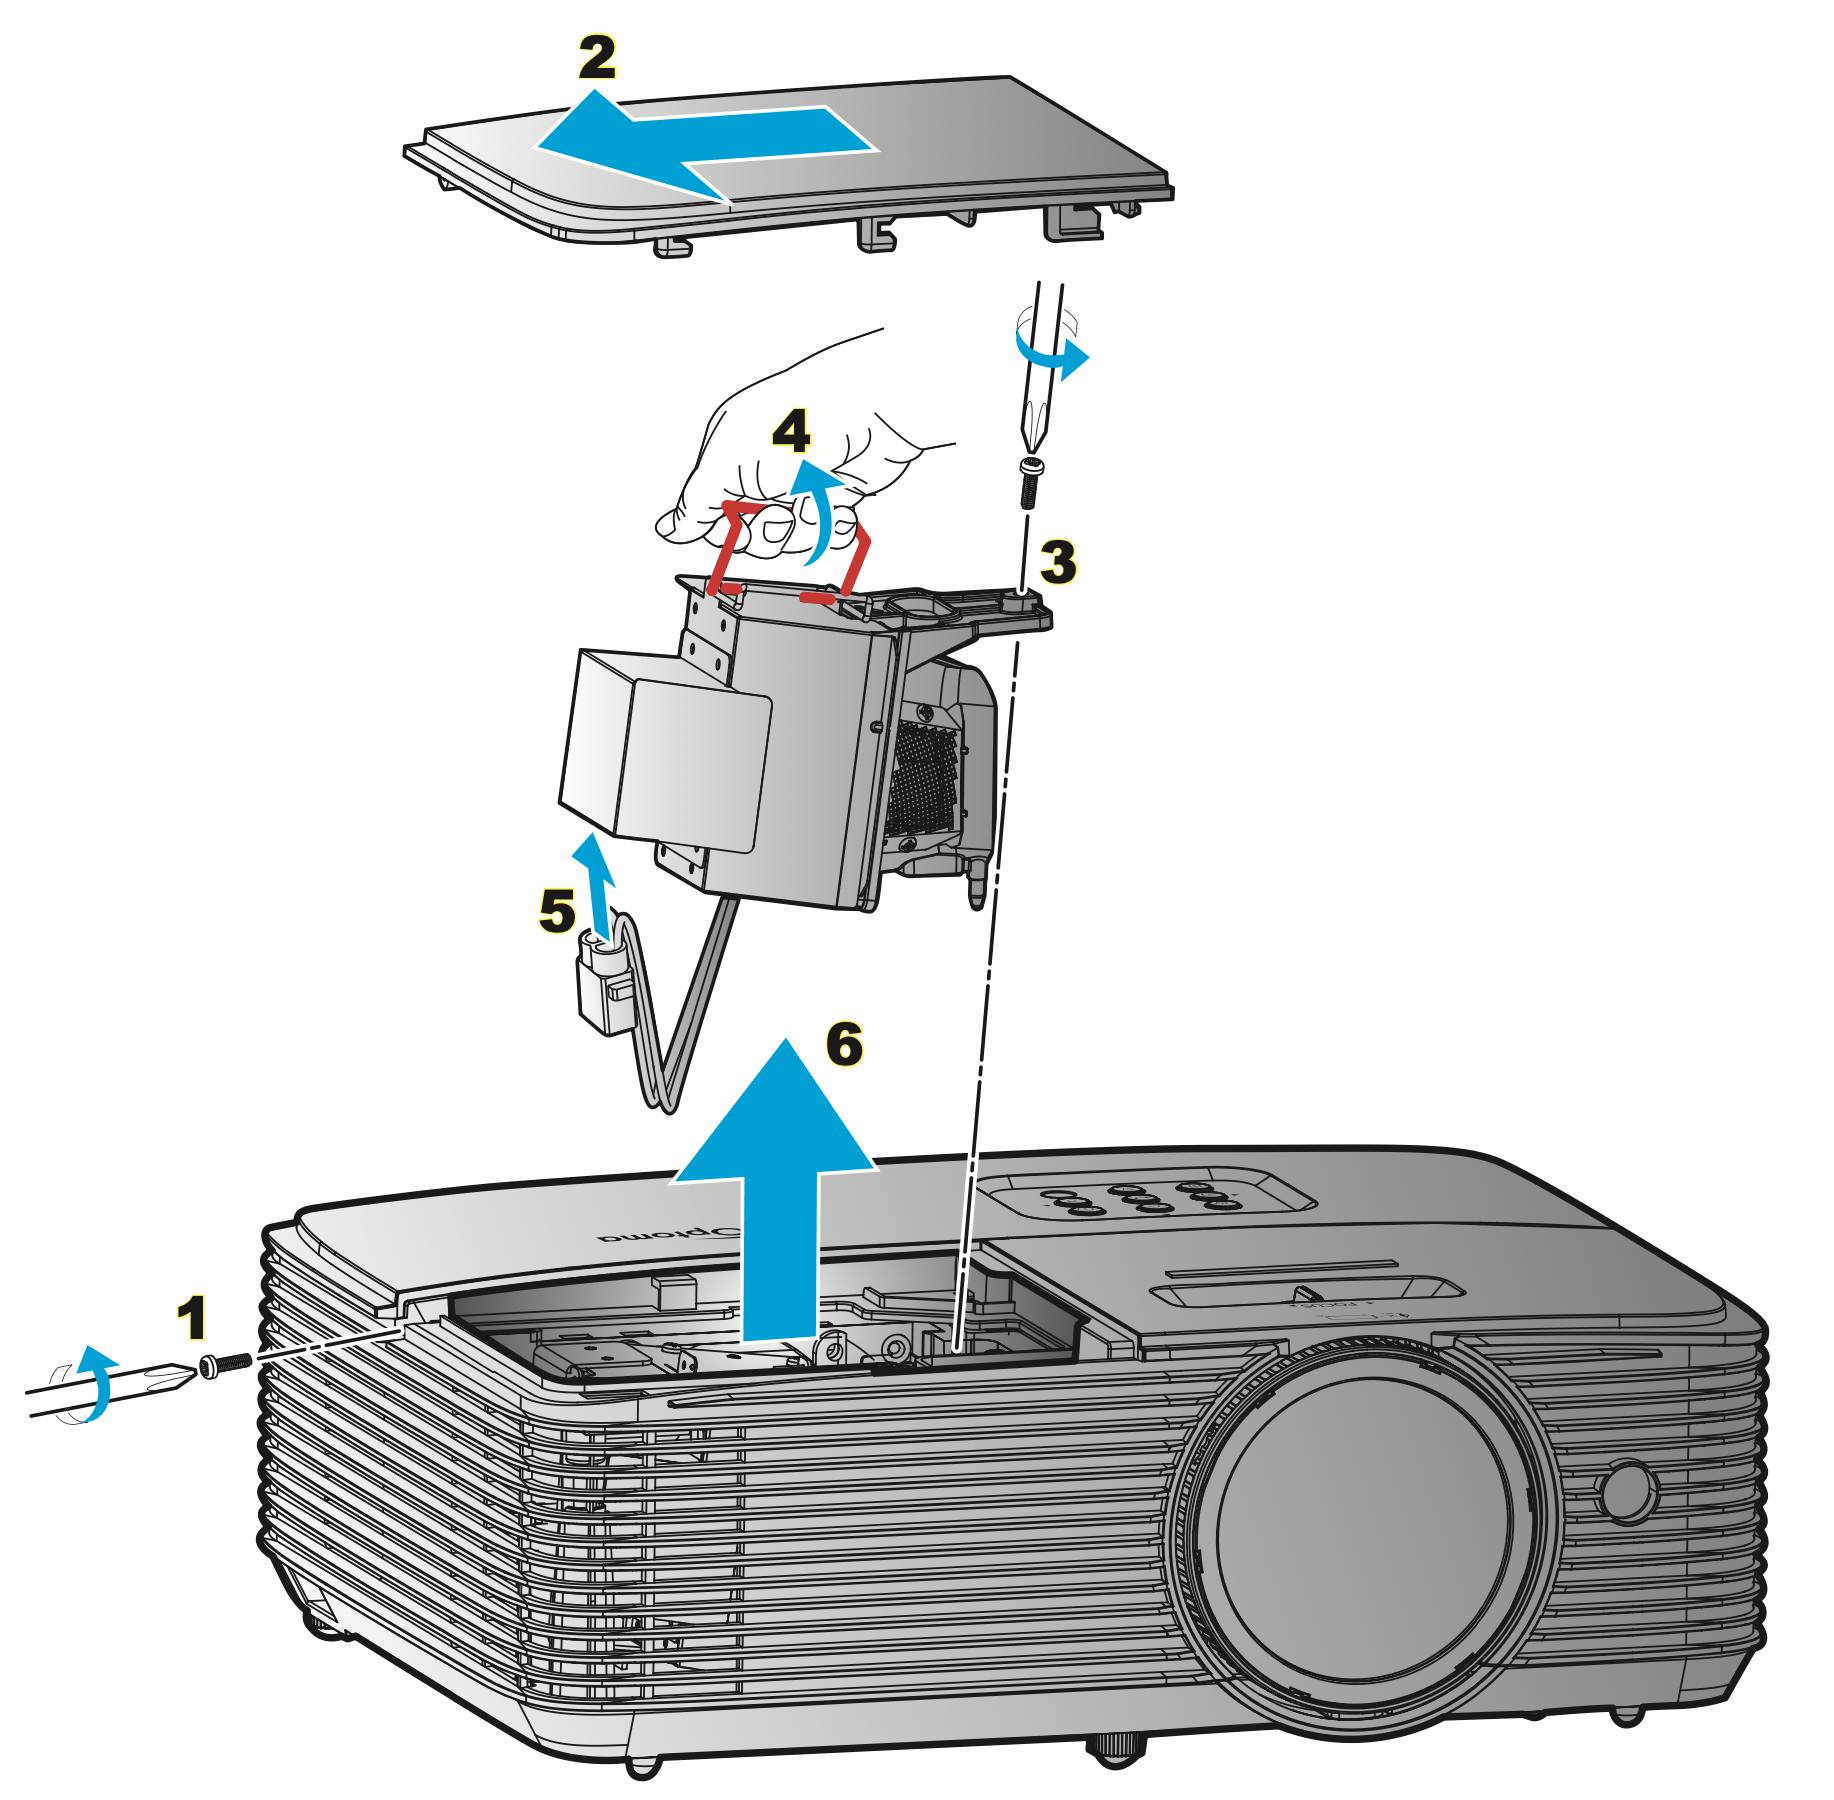
Procedure:
- Switch off the power to the projector by pressing the " " button on the remote control or the projector keypad.
- Allow the projector to cool down for at least 30 minutes.
- Disconnect the power cord.
- Unscrew the screw on the cover. 1
- Remove the cover. 2
- Unscrew the screw on the lamp module. 3
- Lift up the lamp handle. 4
- Remove the lamp cord. 5
- Remove the lamp module carefully. 6
- To replace the lamp module, reverse the previous steps.
- Turn on the projector and reset the lamp timer.
- Lamp Reset: (i) Press "Menu" → (ii) Select "Setup" → (iii) Select "Lamp Settings" → (iv) Select "Lamp Reset" → (v) Select "Yes".
Note:
- The screw on the lamp cover and the lamp cannot be removed.
- The projector cannot be turned on if the lamp cover has not been placed back on the projector.
- Do not touch the glass area of the lamp. Hand oil can cause the lamp shatter. Use a dry cloth to clean the lamp module if it was accidentally touched.
Installing and cleaning the dust filter
Installing the dust filter

Note: Dust filters are only required/supplied in the selected regions with excessive dust.
Cleaning the dust filter
We recommend you to clean the dust filter every three months. Clean it more often if the projector is used in a dusty environment.
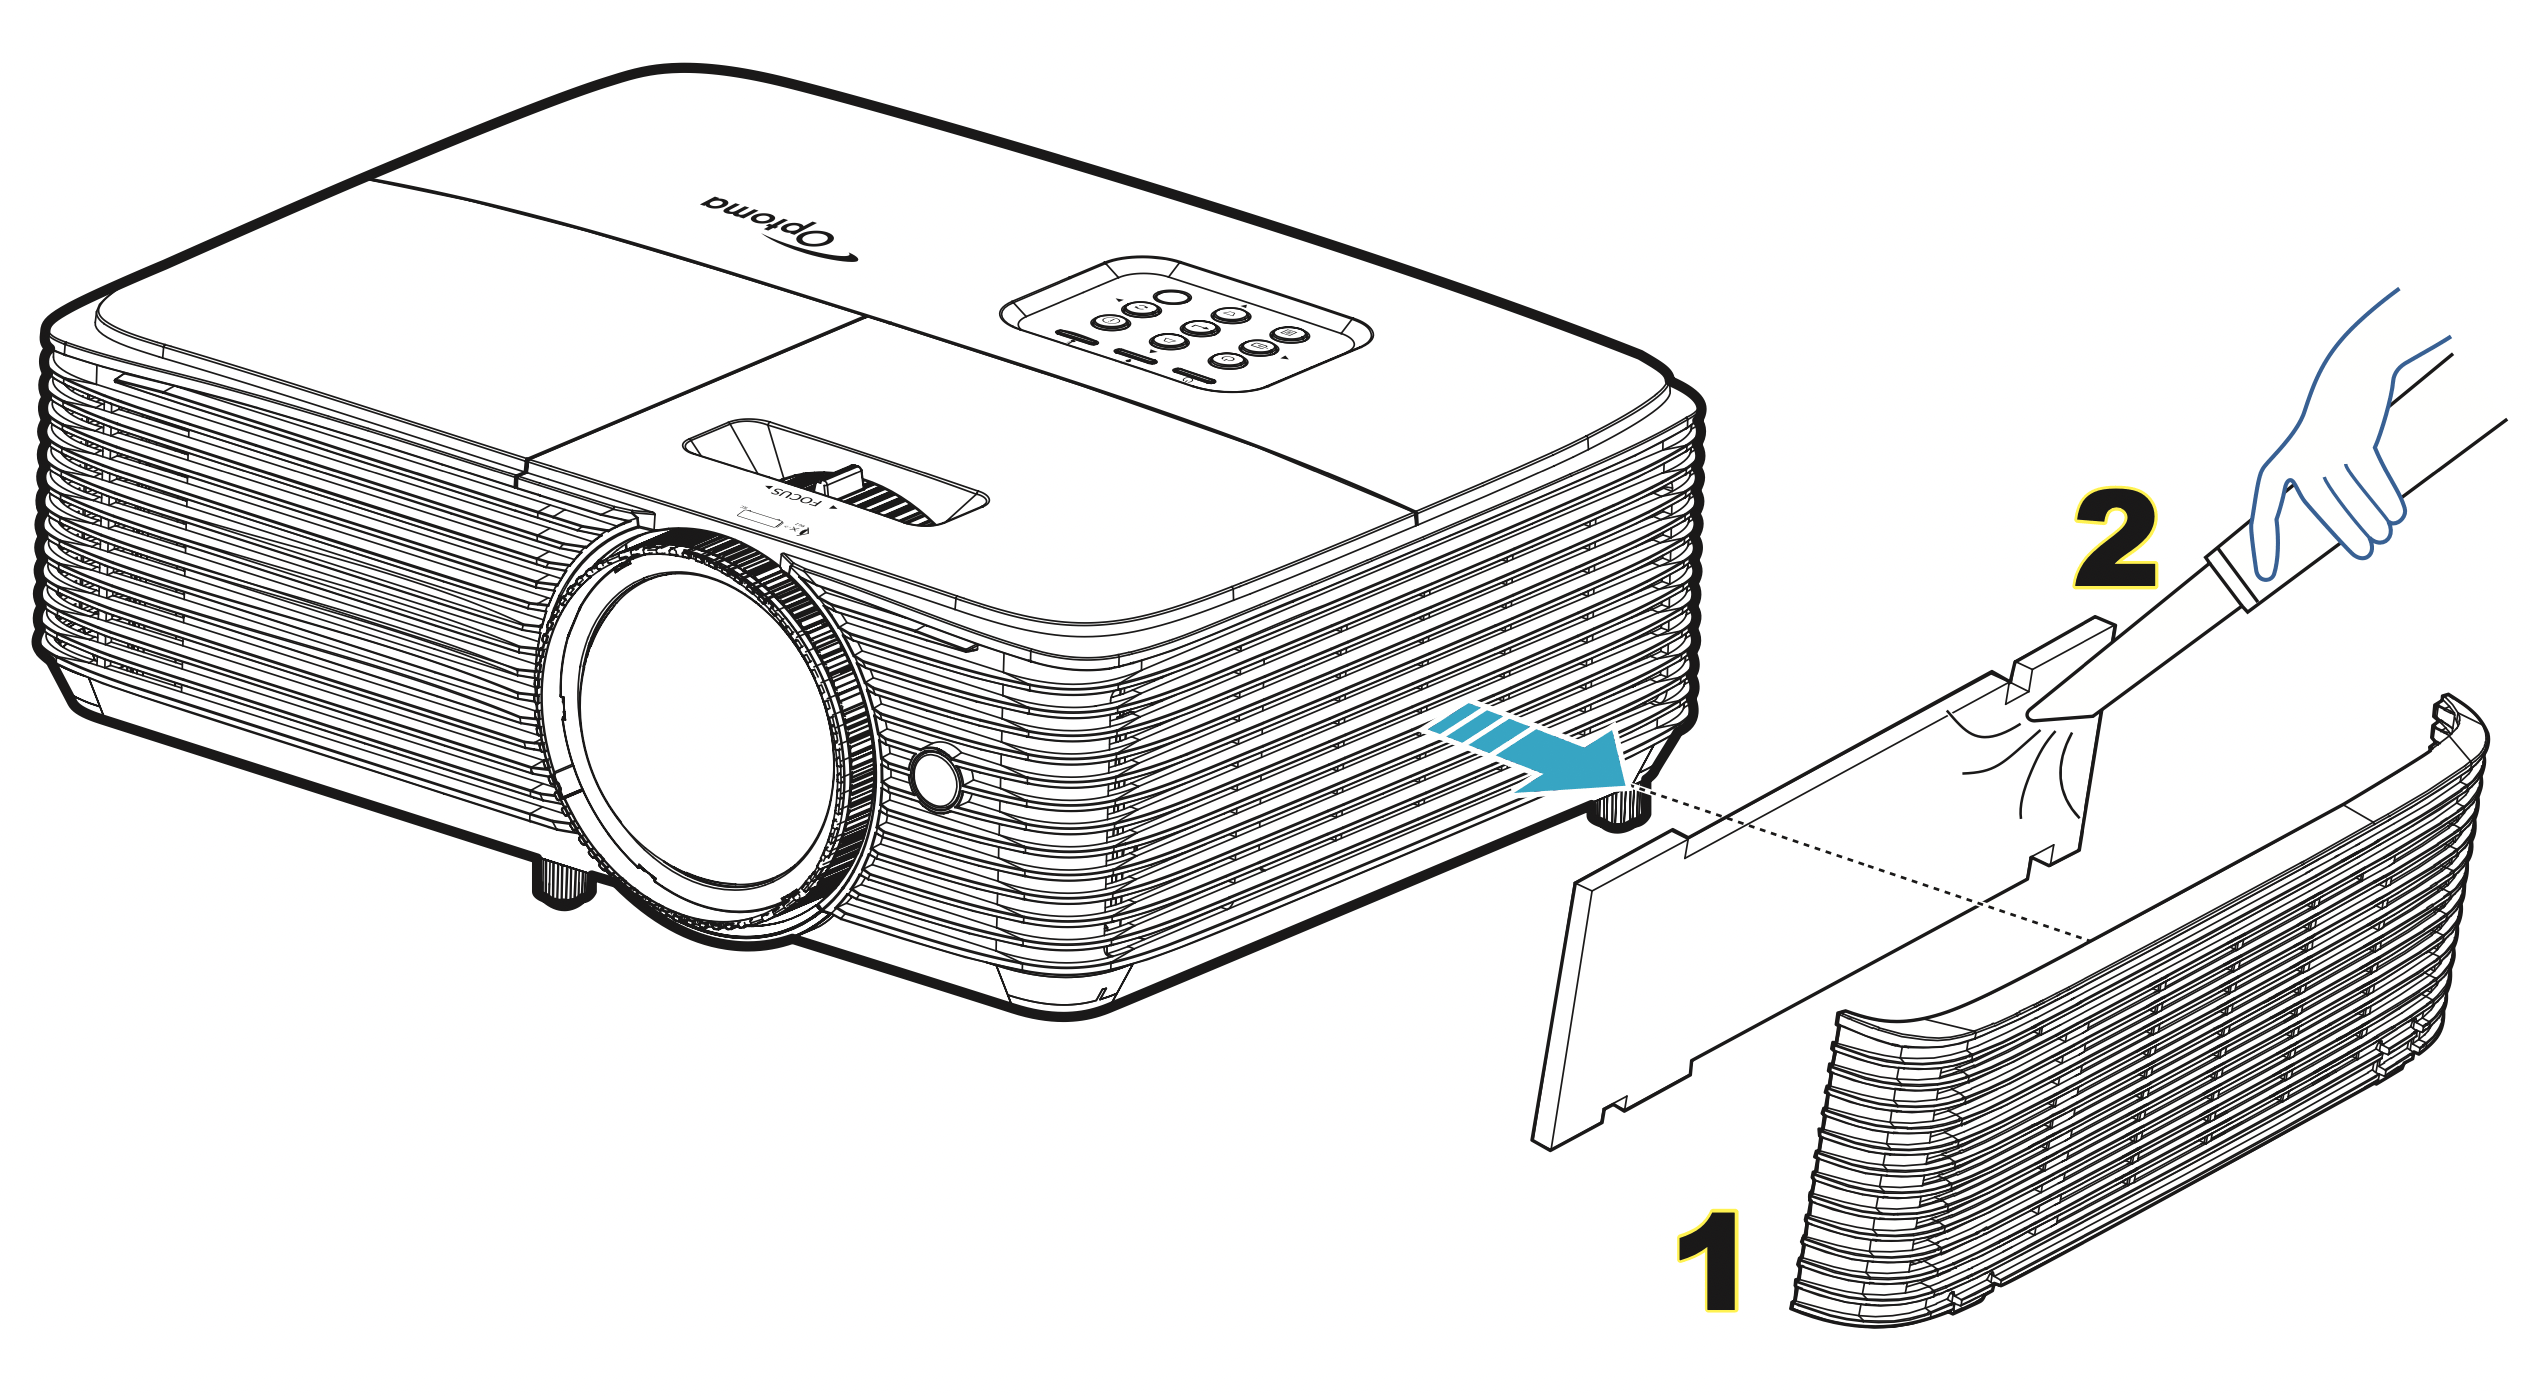
Procedure:
- Switch off the power to the projector by pressing the " " button on the remote control or the projector keypad.
- Disconnect the power cord.
- Remove the dust filter carefully. 1
- Clean or replace the dust filter. 2
- To install the dust filter, reverse the previous steps.
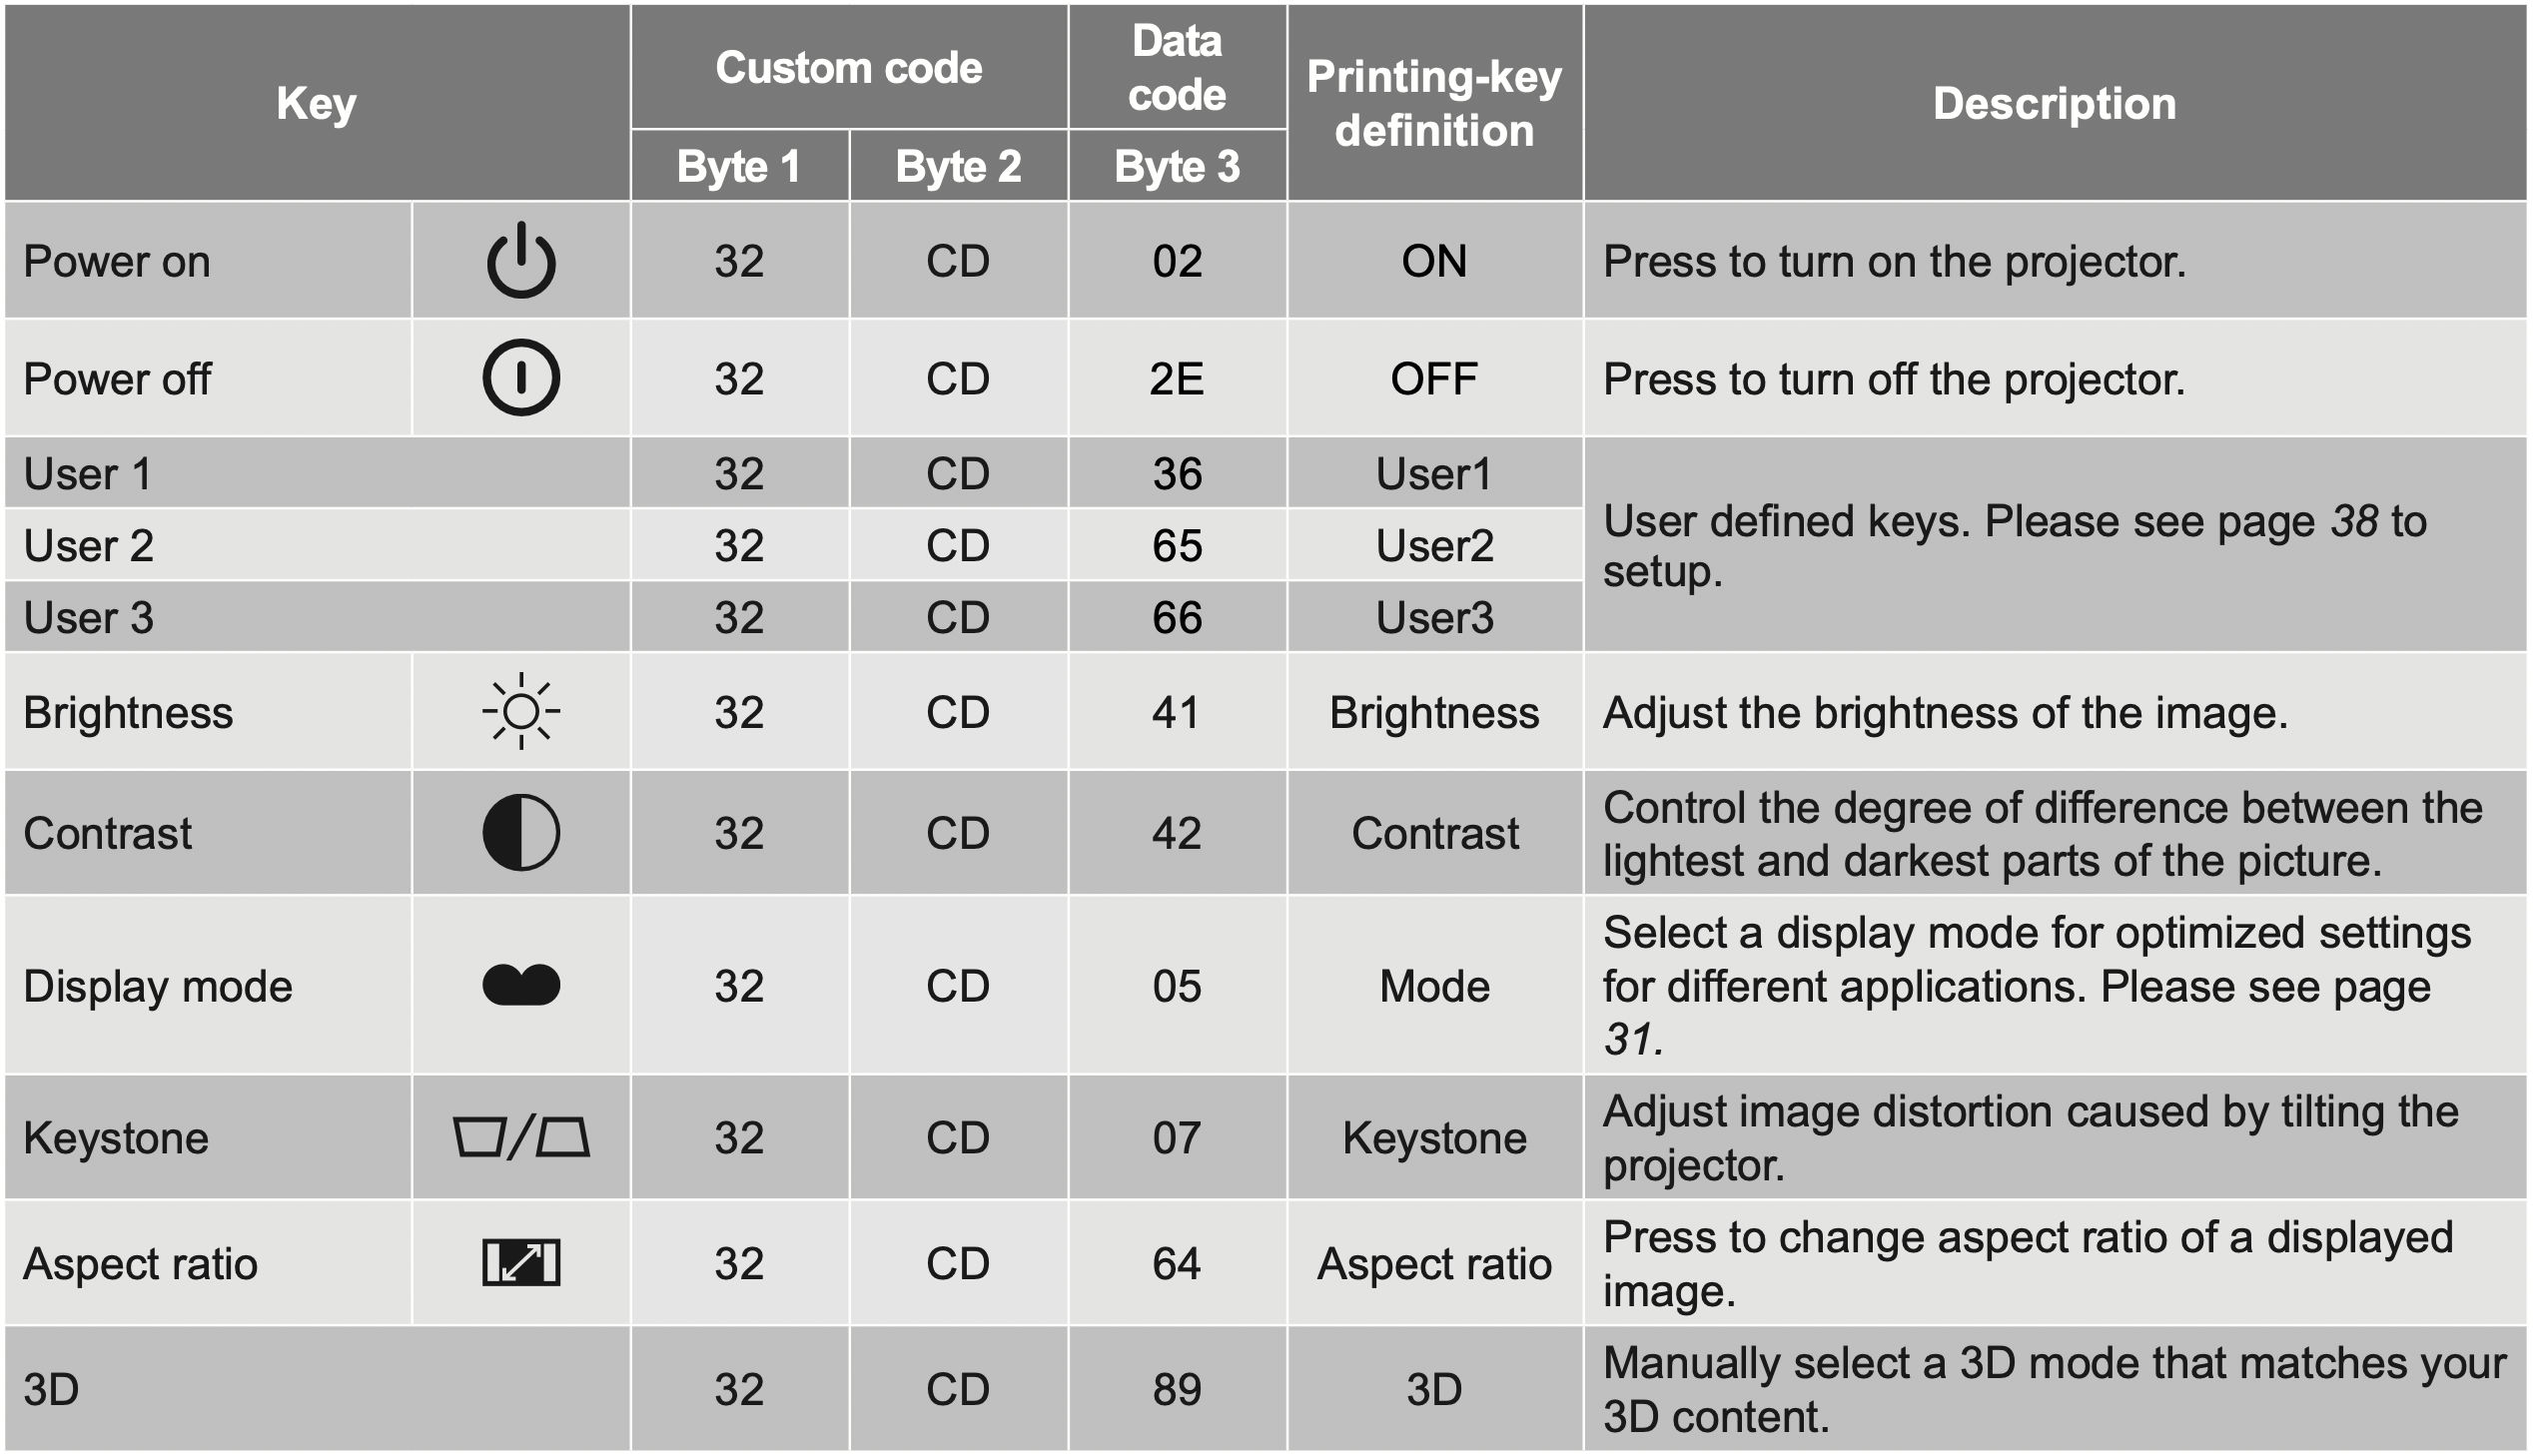
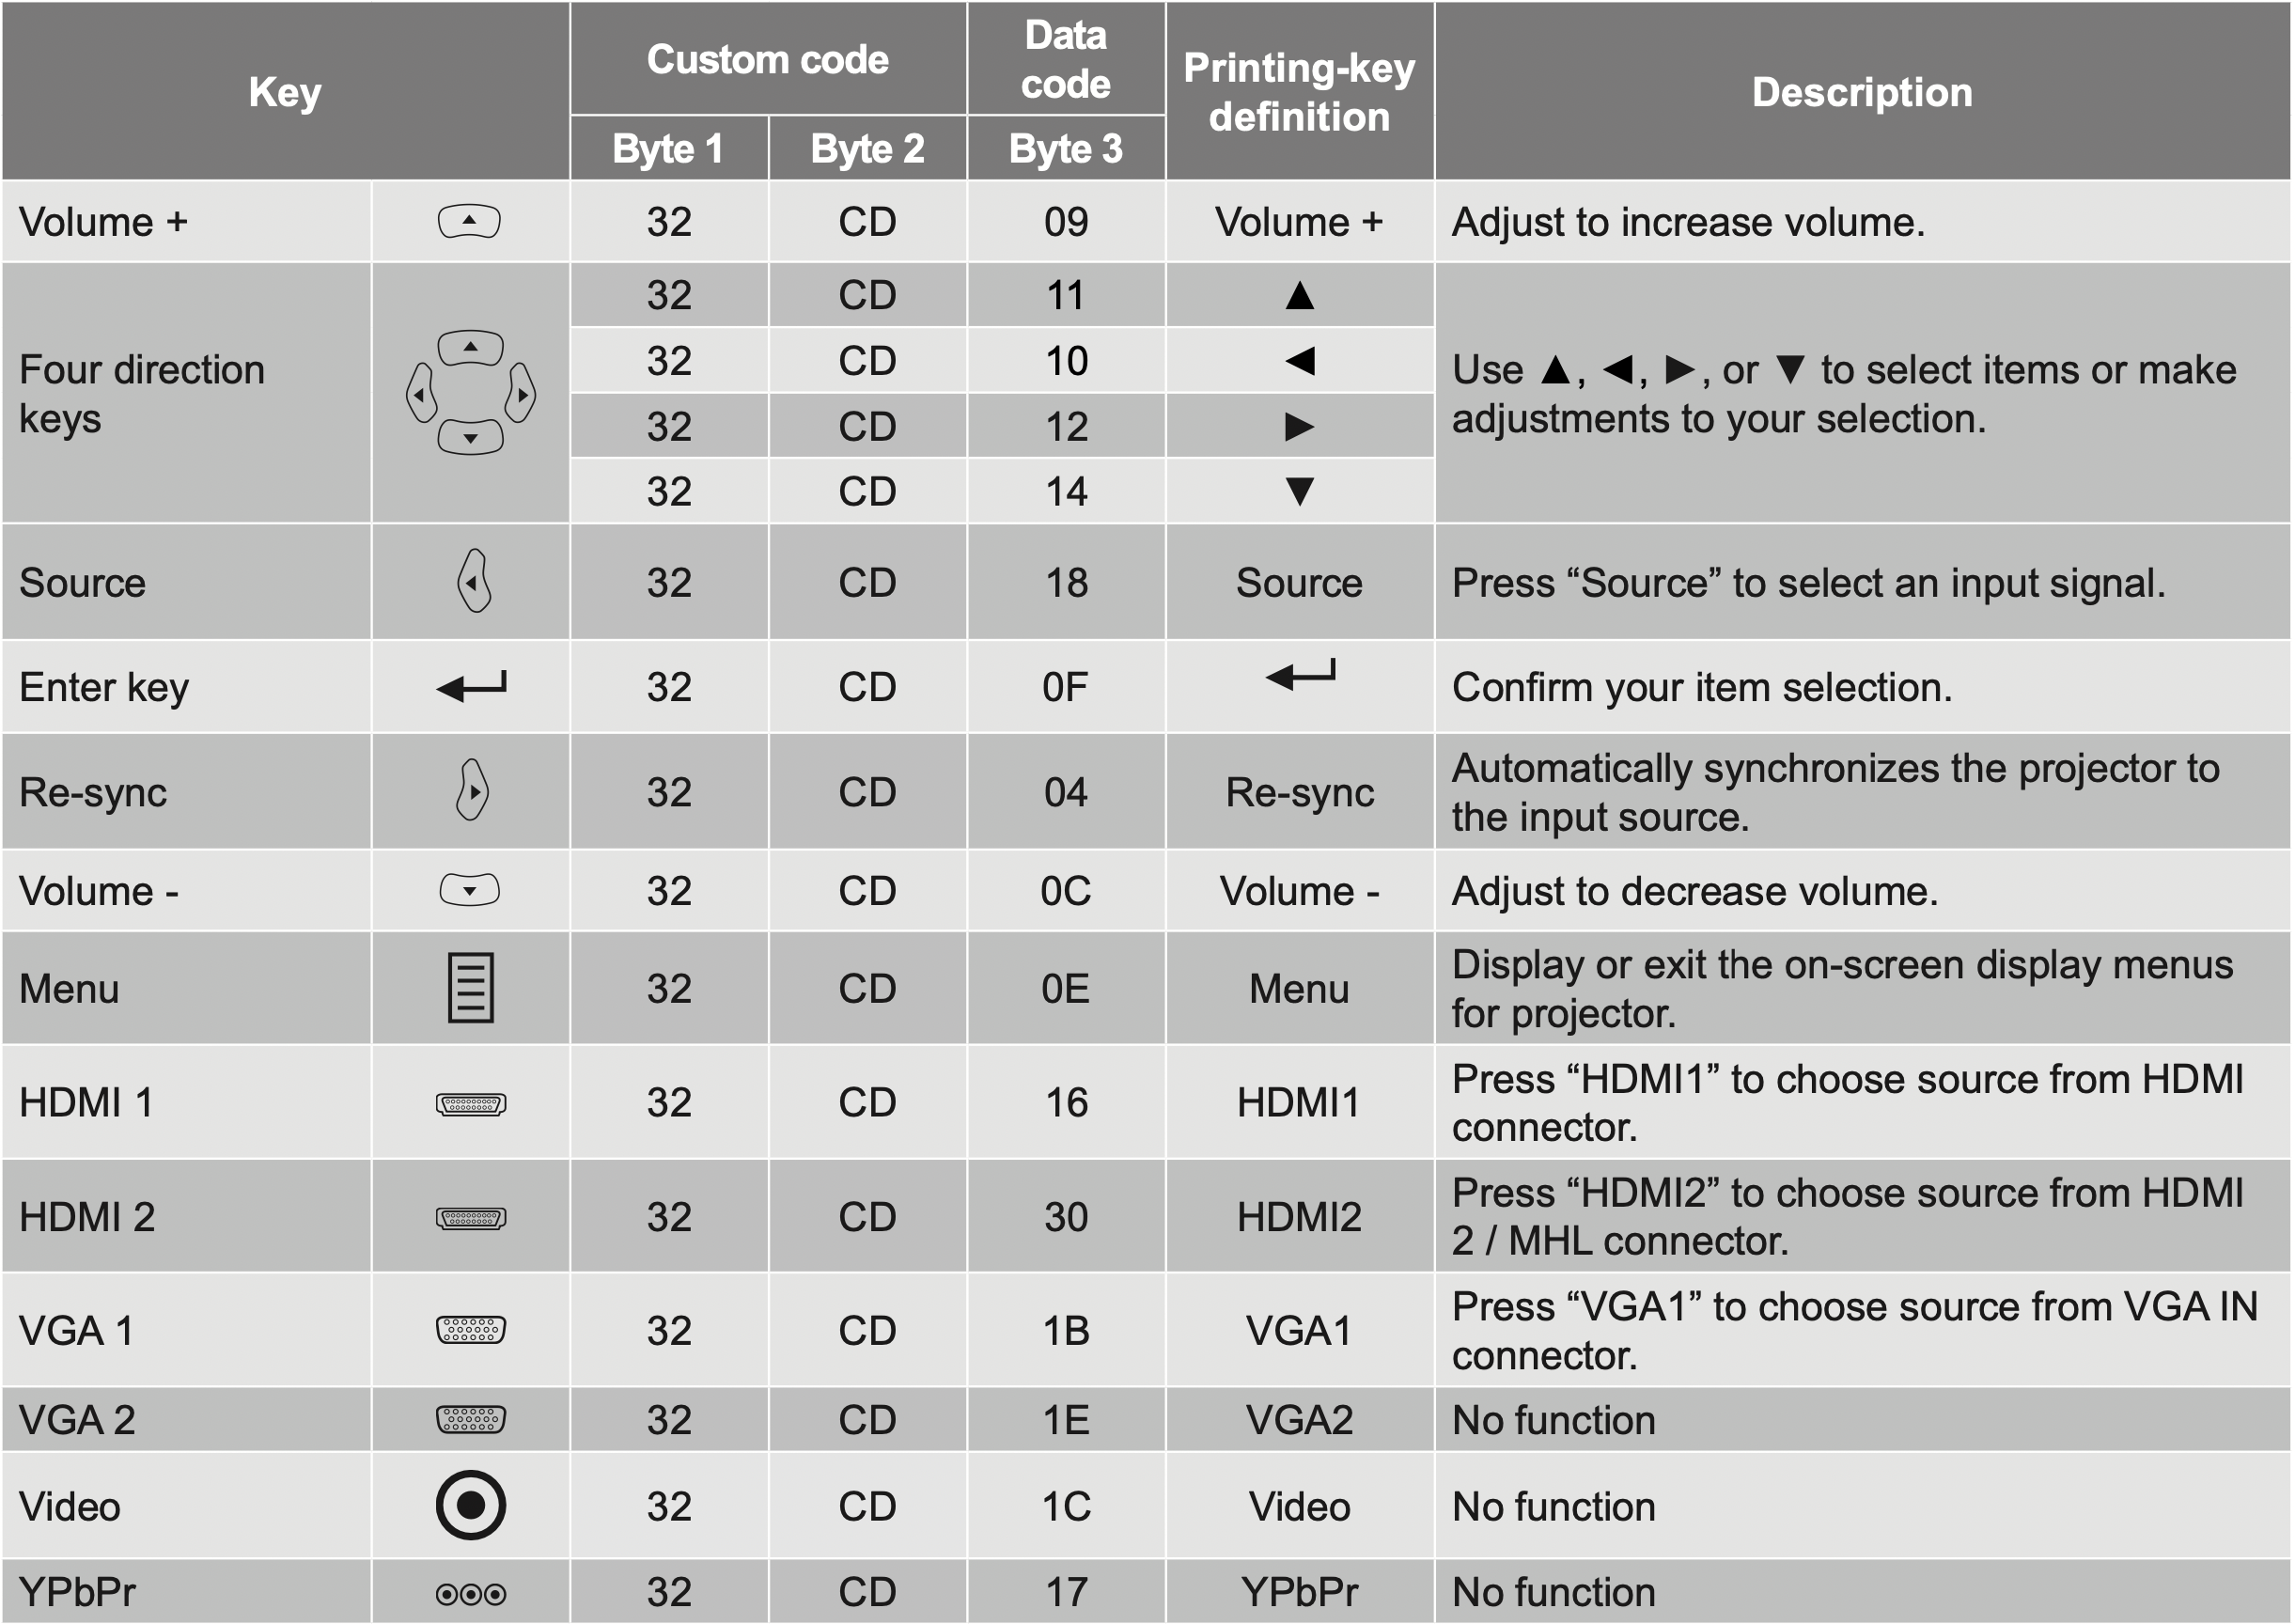
IR remote control 1 codes
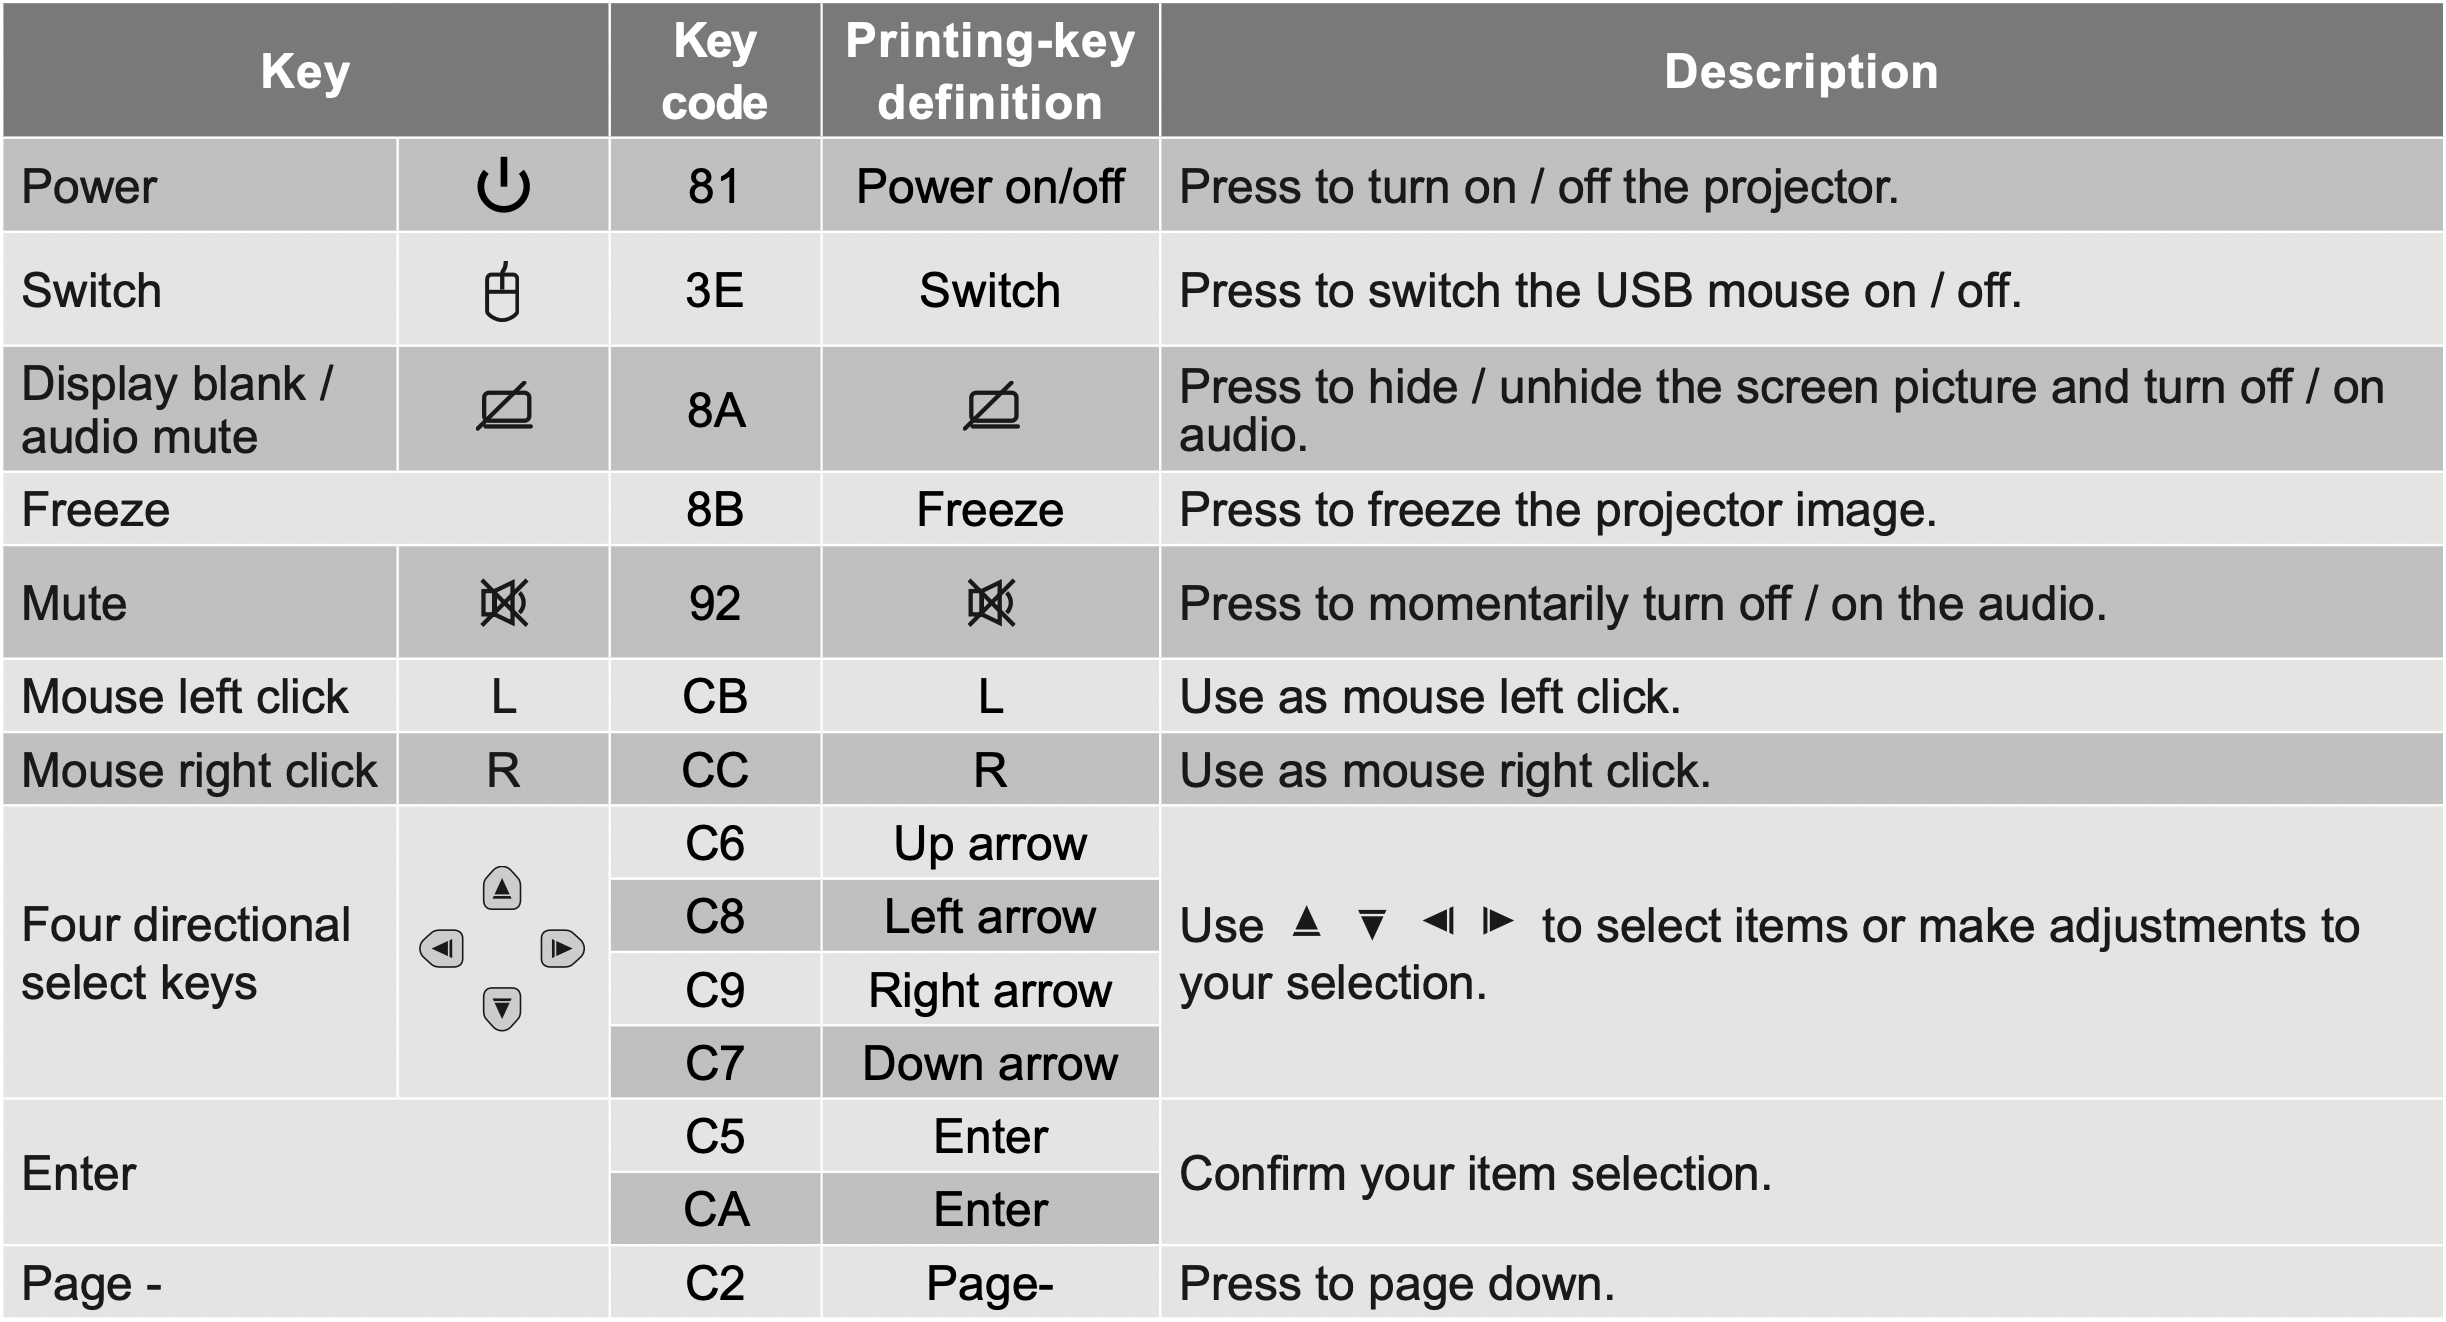
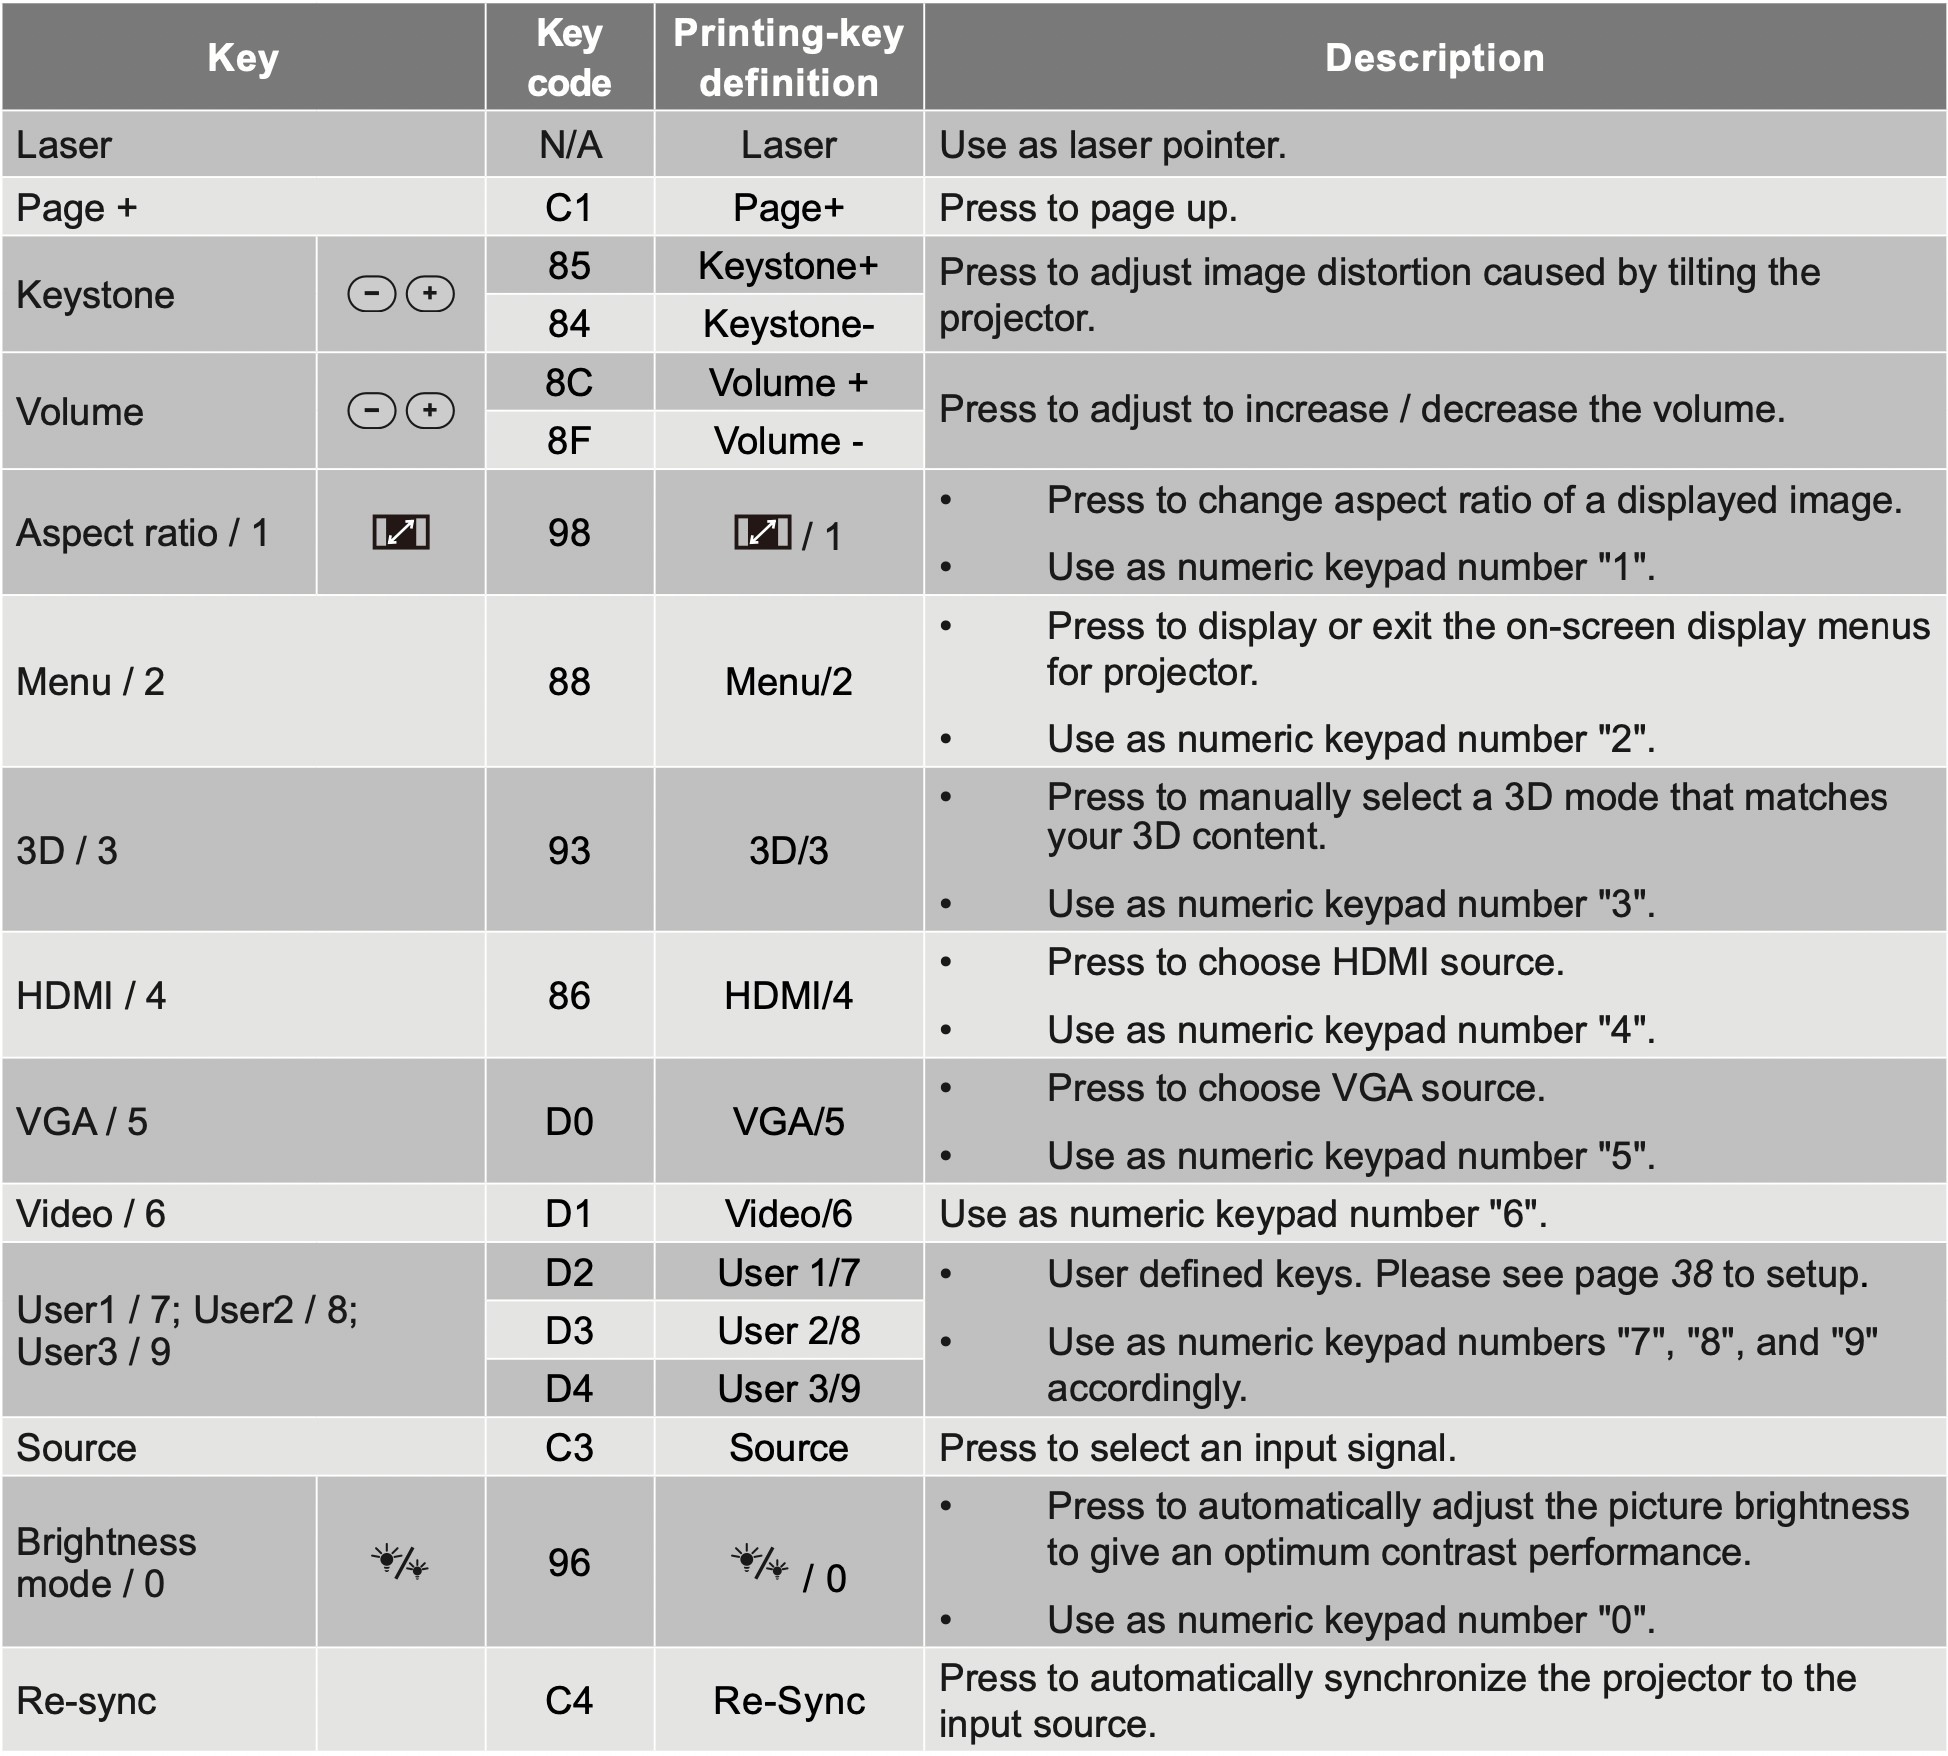
IR remote control 2 codes
TROUBLESHOOTING
If you experience a problem with your projector, please refer to the following information. If a problem persists, please contact your local reseller or service center.
Image problems
No image appears on-screen
- Ensure all the cables and power connections are correctly and securely connected as described in the "Installation" section.
- Ensure the pins of connectors are not crooked or broken.
- Check if the projection lamp has been securely installed. Please refer to the "Replacing the Lamp" section.
- Ensure that the "Mute" feature is not turned on.
Image is out of focus
- Adjust the focus by using the focus lever.
- Make sure the projection screen is between the required distance from the projector. (Please refer to page 46).
The image is stretched when displaying 16:9 DVD title
- When you play anamorphic DVD or 16:9 DVD, the projector will show the best image in 16: 9 format on projector side.
- If you play the LBX format DVD title, please change the format as LBX in projector OSD.
- If you play 4:3 format DVD title, please change the format as 4:3 in projector OSD.
- Please setup the display format as 16:9 (wide) aspect ratio type on your DVD player.
Image is too small or too large
- Adjust the image size by using the zoom lever (only for standard lens model).
- Move the projector closer to or further from the screen.
- Press "Menu" on the projector panel, go to "Display Aspect Ratio". Try the different settings.
Image has slanted sides:
- If possible, reposition the projector so that it is centered on the screen and below the bottom of the screen.
- Use "Display --> Keystone" from the OSD to make an adjustment.
Image is reversed
- Select "Setup --> Projection" from the OSD and adjust the projection direction.
Blurry double image
- Press "3D" button and switch to "Auto" to avoid normal 2D image is blurry double image.
Two images, side-by-side format
- Press "3D" button and switch to "Side by Side" for input signal is HDMI 1.3 2D 1080i side-by-side.
Image does not display in 3D
- Check if the battery of 3D glasses is drained.
- Check if the 3D glasses is turned on.
- When the input signal is HDMI 1.3 2D (1080i side-by-side half), press "3D" button and switch to "Side by Side".
Other problems
The projector stops responding to all controls
- If possible, turn off the projector, then unplug the power cord and wait at least 20 seconds before reconnecting power.
Lamp burns out or makes a popping sound
- When the lamp reaches its end of life, it will burn out and may make a loud popping sound. If this happens, the projector will not turn on until the lamp module has been replaced. To replace the lamp, follow the procedures in the "Replacing the Lamp" section on pages 41-42.
Remote control problems
If the remote control does not work
- Check the operating angle of the remote control is pointed within ±15° to the IR receiver on the projector.
- Make sure there are not any obstructions between the remote control and the projector. Move to within 6 m (20 ft) of the projector.
- Make sure batteries are inserted correctly.
- Replace batteries if they are exhausted.