Loading ...
Loading ...
Loading ...

parts & accessories
nuwavenow.com
12 13
ENGLISH
nuwavenow.com
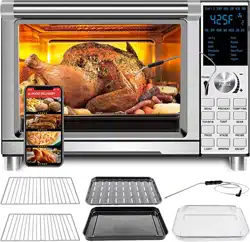
PARTS & ACCESSORIES
12 13
1
2 3
4a
4b
5
6
7
9
10
8
Base
Part #: 26815
Handle
Digital Display Menu
Probe Input (Jack)
Temperature Probe
Part #: 26808
Dial
Functions
1
2
3
4a
4b
5
6
Pull-Out Crumb Tray
Part #: 26801
2 Heavy-Duty
Cooking Racks
Part #: 26802
Enamel Baking Pan
and Enamel Broiler
Rack
Part #: 26804
Air Fry Basket
Part #: 26806
Light Bulb
Part#: 26807
Light Bulb Cover
Part#: 26809
7
8
9
10
11
12
1. Place the Bravo on a level,
even, and stable heat-
resistant surface.
2. Slide the Cooking Rack(s)
into Position 1, 2, 3, or 4 of
the Bravo.
3. Place Baking Pan with
Broiler Rack on Cooking
Rack in Position 1.
4. Place the Air Fry Basket
on top of Baking Pan. It is
recommended to use Air
Fry Basket with Baking
Pan to optimize cooking
results.
5. Place Crumb Tray into
position by sliding it into
slot at bottom of Oven. To
remove, push down slightly
and pull out.
6. Plug the appliance into a
standard wall socket. The
power plug is located in the
rear of the unit.
Parts
Position 1
Position 2
Position 3
Position 4
ASSEMBLY GUIDE
11
12
To order parts head over to Replaceable Parts section
or NuWaveNow.com.
Air Fry Basket
Cooking Rack
Baking Pan/
Broiler Rack
Note:
Do not cover or block the intake
air vents located in the back and
sides of the Bravo, as doing so
can prevent proper ventilation.
Loading ...
Loading ...
Loading ...